
This guide to Fallout 3: Point Lookout includes a complete walkthrough for all of the side- and main quests in this expansion pack to the Fallout 3 RPG. This guide also includes a description of how to obtain new achievements, of new maps necessary throughout the game, as well as various curiosities like, e.g. the whereabouts of hidden treasures.
This guide includes:
Fallout 3: Point Lookout is the fourth official DLC for a popular RPG game - Fallout 3. This time, the developers gave you the opportunity to take a sojourn into dangerous swamps, where you are going to experience an adventure divided into 10 missions. Throughout the game, you will have to fight your enemies, explore the unwelcoming swamps and many more.
Make sure that Point Lookout has been installed properly on your computer and you'll also have to activate it from the game's autostart. This fourth add-on is almost as equally challenging as Broken Steel, so as a result you should consider waiting until you have a high level hero with powerful equipment. It's important to have a lot of medical supplies ready for use, because you're going to need those to survive in the new environment. You should also know that you'll be going in alone, without being able to rely on your followers anymore.
![[#1] - Fallout 3: Point Lookout - Game Guide and Walkthrough](https://game.lhg100.com/Article/UploadFiles/201512/2015121518501274.jpg) [#1]
[#1]
Start the game and make sure to exit your current location to end up standing in Capitol Wasteland. Explore your surroundings a little until you receive an information on your screen. You'll find out that a riverboat has appeared nearby and that you can use it to travel to Point Lookout. Notice that a new location called Riverboat Landing has been added to your list [#1]. I would recommend fast travelling to Arlington Library and starting from there. Watch out for mercenaries and mutants near the library.
![[#2] - Prologue - Fallout 3: Point Lookout - Game Guide and Walkthrough](https://game.lhg100.com/Article/UploadFiles/201512/2015121518501209.jpg) [#2]
[#2]You shouldn't have any major problems finding a correct route leading to the Riverboat Landing, especially since it's located near the shore. Keep heading towards the ferry seen in the distance and you're going to be stopped by an older woman called Catherine along the way [#2]. You can offer your help in finding her daughter who's gone missing in Point Lookout. Catherine will give you a note to Nadine. End the conversation and get on board of the riverboat. Remember that this your last chance to interact with your followers, especially if they were carrying some useful items for you.
Received from: Tobar the Ferryman [Capitol Wasteland]
![[#3] - Main quests - QUEST 1: The Local Flavor - part 1 - Main quests - Fallout 3: Point Lookout - Game Guide and Walkthrough](https://game.lhg100.com/Article/UploadFiles/201512/2015121518501228.jpg)
[#3]
Walkthrough: Obviously you must start off by talking to Tobar the Ferryman. Ask him about Nadine (Catherine's daughter), about the cruise and about attractions waiting for all new visitors in Point Lookout. End the conversation by asking him to buy a ticket for the ferry [#3]. As I've mentioned before, you will be forced to leave your followers in Capitol Wasteland, because he's selling only one ticket. Wait for a trade window to appear on your screen and choose the riverboat ticket from the list. This object will cost about 400 bottlecaps. If you don't have enough money, consider selling some of your items to Tobar since he's a trader or you can also return here later on during the course of the game.
![[#4] - Main quests - QUEST 1: The Local Flavor - part 1 - Main quests - Fallout 3: Point Lookout - Game Guide and Walkthrough](https://game.lhg100.com/Article/UploadFiles/201512/2015121518501249.jpg)
[#4]
Once you've acquired the ticket go to the left cabin. Locate a small bed to your right [#4] and use it. You'll find out that during your stay in Point Lookout your followers will sent back elsewhere (probably to the Museum of History). You must now wait patiently for the game to load an entirely new area and you'll end up standing close to Point Lookout Pier. Talk to Tobar again. Ask him about interesting areas to visit, as well as about smoke coming out of Calvert Mansion seen in the distance.
![[#5] - Main quests - QUEST 1: The Local Flavor - part 1 - Main quests - Fallout 3: Point Lookout - Game Guide and Walkthrough](https://game.lhg100.com/Article/UploadFiles/201512/2015121518501337.jpg)
[#5]
As you've probably suspected, your top priority at the moment will be to reach Calvert Mansion. Thankfully it's nearby, so it won't be a long trip. Start off by heading east. Watch out, because you may be attacked by several tribals along the way. You shouldn't ignore them, because they're more powerful and more resistant that you might have thought. I would recommend using big guns to take them out. You won't have to loot their bodies, however you would come across ammunition, shotguns and rifles. Approach the mansion from the north [#5] and get to the main entrance. Confirm that you want to head inside.
![[#6] - Main quests - QUEST 1: The Local Flavor - part 1 - Main quests - Fallout 3: Point Lookout - Game Guide and Walkthrough](https://game.lhg100.com/Article/UploadFiles/201512/2015121518501324.jpg)
[#6]
Head forward upon your arrival in the mansion. DON"T attack the ghoul! The same goes with his attack dogs and with security turrets seen in the main area. Instead focus all of your efforts on eliminating a small group of tribals [#6]. Don't forget to aim for their heads, so it won't take too long for them to die. Having a perk that regenerates your AP's after each kill in V.A.T.S. may come in handy. Once you've won inspect the bodies and you'll find a Lever-Action rifle among other things, including much needed medical supplies.
![[#7] - Main quests - QUEST 1: The Local Flavor - part 1 - Main quests - Fallout 3: Point Lookout - Game Guide and Walkthrough](https://game.lhg100.com/Article/UploadFiles/201512/2015121518501368.jpg)
[#7]
You may approach Desmond, however you won't be allowed to talk to him right now. Instead enter a small room with a lot of security cameras showing all parts of the mansion. Follow Desmond to a new room which will be located to your left. Watch out, because a nearby wall is going to be destroyed and more tribals will show up [#7]. I would recommend using a rocket launcher or something similar to get rid of an entire group quickly. You should also know that they're primary objective will be to get closer to you and Desmond and that'll make killing them a lot harder.
![[#8] - Main quests - QUEST 1: The Local Flavor - part 1 - Main quests - Fallout 3: Point Lookout - Game Guide and Walkthrough](https://game.lhg100.com/Article/UploadFiles/201512/2015121518501331.jpg)
[#8]
Once you've won take your time examining the bodies and wait for Desmond to open a northern door for you. Enter the dining area carefully and get ready to eliminate new enemy units. One of the tribals will land on the table [#8] and the rest will use the left door to get to you. Make sure you're the only one standing and choose the passageway where the larger group has appeared for the first time. Find the stairs and proceed to the upper floor. Head on to the main corridor and approach the left door slowly.
![[#9] - Main quests - QUEST 1: The Local Flavor - part 1 - Main quests - Fallout 3: Point Lookout - Game Guide and Walkthrough](https://game.lhg100.com/Article/UploadFiles/201512/2015121518501338.jpg)
[#9]
Watch out, because a new enemy will destroy a nearby door. Kill him before he gets up and get ready to eliminate his colleague as well. You may proceed to the next room. Ignore wardrobes found along the way unless you're in desperate need of unique clothes. :-) Tribals will attack you near a long passageway [#9] and you'll have to defend yourself against two groups. The first group is hiding in a large room to your right and the rest will surprise you from the back. Use powerful guns here, so you won't allow any of the tribals to get closer. It's also important to prevent tribals from surrounding the main character.
![[#10] - Main quests - QUEST 1: The Local Flavor - part 1 - Main quests - Fallout 3: Point Lookout - Game Guide and Walkthrough](https://game.lhg100.com/Article/UploadFiles/201512/2015121518501320.jpg)
[#10]
Make sure that you've eliminated all hostiles and enter a large room where you encountered one of the groups. Take your time exploring the area to find medical supplies and ammunition. Approach a partially destroyed door and use the intercom to listen to what Desmond has to say. Follow his instructions by aiming at the red tank [#10]. Make sure to maintain safe distance, because a huge explosion will occur and one of the passageways will collapse. Return to the main corridor where you'll be greeted by Desmond. Follow him and don't forget to choose a powerful gun from your inventory along the way.
![[#11] - Main quests - QUEST 1: The Local Flavor - part 2 - Main quests - Fallout 3: Point Lookout - Game Guide and Walkthrough](https://game.lhg100.com/Article/UploadFiles/201512/2015121518501335.jpg)
[#11]
You have to be ready to defeat a new group of hostiles once you're still in the main area of the mansion. Kill them from a larger distance and go to the corridor they were hiding in. Don't forget not to injure Desmond nor any of his dogs, because your allies may appear in your line of fire. Explore a nearby room to find guns and ammunition [#11] and then proceed towards a new corridor. Ignore the fact that there's a large barricade in front of you, because the floor will collapse as soon as you're close enough to it. Eventually you'll end up standing inside a cellar. Wait for the main character to regain focus before moving on.
[#12]
The basement also contains a lot of useful supplies, including stimpaks and ammo boxes. You won't encounter any enemies right away. Get ready when you arrive in a larger room [#12]. The tribals will brake open the left door and sadly you won't have enough time to place landmines. Instead use a rocket launcher or a similar weapon to get rid of them as soon as they appear. Don't forget to heal your main character each time he or she suffers major injuries. Once you've won use the stairs to leave the basement area.
![[#13] - Main quests - QUEST 1: The Local Flavor - part 2 - Main quests - Fallout 3: Point Lookout - Game Guide and Walkthrough](https://game.lhg100.com/Article/UploadFiles/201512/2015121518501357.jpg)
[#13]
A new group of tribals is waiting for you in one of the nearby rooms, however killing them is going to be very easy. Don't forget to take a peek inside a smaller room found along the way in order to collect much needed supplies. Get ready to defeat more tribals once you're close enough to the kitchen area [#13]. You should be fine as long as you prevent them from moving closer. Take your time exploring a small storage space once they're gone, including the refrigerators (one of these objects contains food and the other one booze). Return to the kitchen and find the stairs leading to an upper floor.
![[#14] - Main quests - QUEST 1: The Local Flavor - part 2 - Main quests - Fallout 3: Point Lookout - Game Guide and Walkthrough](https://game.lhg100.com/Article/UploadFiles/201512/2015121518501343.jpg)
[#14]
Watch out, because a new group of hostiles will attack you when you get to a room with a pool table. Most of the tribals here will be equipped with firearms, so it'll become even more important to eliminate them as soon as possible. Proceed towards the only available passageway. Just as before, you must destroy a red tank from a safe distance [#14]. Wait for an explosion to occur and Desmond will open a nearby door for you. Listen to his warning about an upcoming assault.
![[#15] - Main quests - QUEST 1: The Local Flavor - part 2 - Main quests - Fallout 3: Point Lookout - Game Guide and Walkthrough](https://game.lhg100.com/Article/UploadFiles/201512/2015121518501460.jpg)
[#15]
You won't have much time to prepare for the final offensive. I would recommend that you explore the area around Desmond. Take a sniper rifle, as well as some ammunition. You should also check ammo boxes to find a couple of landmines. There are going to be four groups of enemy units for you to deal with. The first group will come through a right door located on this floor [#15]. Set up 4-5 mines around the door, move back and wait for them to arrive. Eliminate the survivors with your newly acquired sniper rifle or other weapons capable of inflicting injuries from a larger distance.
![[#16] - Main quests - QUEST 1: The Local Flavor - part 2 - Main quests - Fallout 3: Point Lookout - Game Guide and Walkthrough](https://game.lhg100.com/Article/UploadFiles/201512/2015121518501418.jpg)
[#16]
Once you've taken out all hostiles use the stairs quickly to get to a lower floor. The second group of tribals will use the right door on the lower floor [#16]. If you don't have enough time to get there set up the mines near the stairs. Just as before, watch out for Desmond's dogs during the battle, especially since they'll come in handy in getting rid of your enemies. Thankfully you won't have to worry about Desmond himself, because he should remain on the upper balcony no matter what happens around him.
![[#17] - Main quests - QUEST 1: The Local Flavor - part 2 - Main quests - Fallout 3: Point Lookout - Game Guide and Walkthrough](https://game.lhg100.com/Article/UploadFiles/201512/2015121518501447.jpg)
[#17]
The third group of tribals will also appear on the ground floor, however they will use the left door to get in. Set up a couple of landmines near the stairs and wait for them to show up. Once they're gone get ready to take on the final fourth group which will storm through the main door of the mansion. In this case it would be wise to use a rocket launcher or even fatman, especially since one of the tribals will be carrying a minigun [#17]. Otherwise you may end up getting surrounded and shot at from many directions at the same time. Don't forget to loot all the bodies after the battle, taking guns and ammunition.
![[#18] - Main quests - QUEST 1: The Local Flavor - part 2 - Main quests - Fallout 3: Point Lookout - Game Guide and Walkthrough](https://game.lhg100.com/Article/UploadFiles/201512/2015121518501450.jpg)
[#18]
You may return to Desmond once it's safe. He should be standing in the exact same spot where you first encountered him, so it won't be long before you find him [#18]. Ask him about his security system, about Nadine (Catherine's daughter) and about the tribals if you want to. Desmond will also reward you with Superior Defender perk, as well as grant you with a new assignment. End the conversation and leave the mansion through the main door.
]
Received from: Desmond [Calvert Mansion]
![[#19] - Main quests - QUEST 2: Walking With Spirits - Main quests - Fallout 3: Point Lookout - Game Guide and Walkthrough](https://game.lhg100.com/Article/UploadFiles/201512/2015121518501437.jpg)
[#19]
Walkthrough: Once you've left the mansion proceed to the north. You can see the cathedral mentioned to you by Desmond from here, because it's located on top of a large hill. Sadly, reaching the cathedral isn't going to be easy as it sounds, because there's a river separating you from it. I wouldn't recommend swimming unless you're carrying a lot of medical supplies. If you want to remain on the land you would have to travel north-west. Don't forget to be careful along the way, because you'll encounter intelligent enemies, as well as different types of mirelurks. Keep heading north-west until you find a small bridge [#19].
![[#20] - Main quests - QUEST 2: Walking With Spirits - Main quests - Fallout 3: Point Lookout - Game Guide and Walkthrough](https://game.lhg100.com/Article/UploadFiles/201512/2015121518501473.jpg)
[#20]
Naturally the area around the bridge is being patrolled by tribals. As a result you'll have to be careful and quick, however you can also use a Stealth Boy to get past them. I wouldn't recommend trying to outrun them if they see you, because they won't back down that easily. Approach the main gate of Ark & Dove Cathedral and use the intercom found to your right [#20]. You'll find out that in order to gain access you must take part in some mysterious ritual.
![[#21] - Main quests - QUEST 2: Walking With Spirits - Main quests - Fallout 3: Point Lookout - Game Guide and Walkthrough](https://game.lhg100.com/Article/UploadFiles/201512/2015121518501463.jpg)
[#21]
Your current destination is located near the western edge of the map, so you'll have to enter the swamps. Start off by going down the hill and then head east. You shouldn't be surprised to hear that you'll encounter tribals along the way, as well as smugglers and different types of mirelurks. Avoid larger groups, because fighting them may prove to be a challenge. You should also remember that the water is irradiated, so it's important to stay on dry land if possible. Eventually you'll get to an area marked as Sacred Bog Entrance [#21]. Use a small door to get in.
![[#22] - Main quests - QUEST 2: Walking With Spirits - Main quests - Fallout 3: Point Lookout - Game Guide and Walkthrough](https://game.lhg100.com/Article/UploadFiles/201512/2015121518501495.jpg)
[#22]
The first area you're going to have explore is going to be very small. Travel through the caves and it shouldn't take too long for you to reach a door leading to Sacred Bog. Once you've arrived in a new area you'll have to acknowledge the fact that you'll encounter a lot of mirelurks during your journey. Attack the monsters from a larger distance and heal after each combat. At first you'll be going north-west [#22]. Ignore the fact that this area appears to be large, because there's going to be only one path leading to your current destination. Don't forget to use RadAway from time to time, especially since you'll have to travel through several flooded areas. Use the jump button, so you won't be touching the water all the time.
![[#23] - Main quests - QUEST 2: Walking With Spirits - Main quests - Fallout 3: Point Lookout - Game Guide and Walkthrough](https://game.lhg100.com/Article/UploadFiles/201512/2015121518501458.jpg)
[#23]
You'll soon have to turn north after which you'll be heading north-east. I would recommend to be very careful here, because there are A LOT of bear traps in the area. Having a perk that allows you to ignore ground traps can prove to be very useful in this situation. Keep heading east and make a stop each time you've spotted a new group of monsters. Soon you'll be heading south-east. Make a stop once you're close to a large flooded area [#23], because powerful creatures are stationed nearby. Surprise them if you can and head south once it's safe.
![[#24] - Main quests - QUEST 2: Walking With Spirits - Main quests - Fallout 3: Point Lookout - Game Guide and Walkthrough](https://game.lhg100.com/Article/UploadFiles/201512/2015121518501488.jpg)
[#24]
Don't worry if you can't see dry land from where you're standing. Keep heading north and eventually you'll find a small path with several torches. Choose this path and it'll lead to you to an object called Punga Seed Pods [#24]. Interact with the plant and wait for the main character to regain consciousness after he's been knocked down.
![[#25] - Main quests - QUEST 2: Walking With Spirits - Main quests - Fallout 3: Point Lookout - Game Guide and Walkthrough](https://game.lhg100.com/Article/UploadFiles/201512/2015121518501517.jpg)
[#25]
From now on you'll be witnessing a lot of weird hallucinations. The most important thing for you to know about is that your life won't be in danger at any time, aside of course from receiving small portions of radiation while in contact with water. You'll start moving back using the same paths as before. Notice that you'll be finding large bobbleheads along the way. Collect them if you want to and each time a window will be displayed on your screen. The first bobblehead (intelligence) [#25] is surrounded by water and the next one (strength) is not far away.
![[#26] - Main quests - QUEST 2: Walking With Spirits - Main quests - Fallout 3: Point Lookout - Game Guide and Walkthrough](https://game.lhg100.com/Article/UploadFiles/201512/2015121518501542.jpg)
[#26]
The third bobblehead (endurance) is also going to be easy to find, because it's on the main path. Ignore exploring Nuka-Cola Quantum bottles and inspect the area to your right [#26] in order to find the fourth bobblehead (agility). Find a passageway with the torches and choose it to move on with the mission. The fifth bobblehead (perception) can be found in the area where everything is upside down. Proceed forward and inspect the altar with the body of main character's mother. Take the sixth bobblehead (charisma).
![[#27] - Main quests - QUEST 2: Walking With Spirits - Main quests - Fallout 3: Point Lookout - Game Guide and Walkthrough](https://game.lhg100.com/Article/UploadFiles/201512/2015121518501591.jpg)
[#27]
Proceed forward. Notice that several bodies are floating in the water and they're some of the people you've met during your quest, including Amata from Vault 101 and Moira from Megaton. You can touch the bodies to make them disappear, but it's all optional. Head south and find an island with a bomb similar to an object found in Megaton [#27]. Pick up the final seventh bobblehead (luck) and listen to what Mister Break has to say. You'll soon be returned to the swamps and you won't receive any other visions.
![[#28] - Main quests - QUEST 2: Walking With Spirits - Main quests - Fallout 3: Point Lookout - Game Guide and Walkthrough](https://game.lhg100.com/Article/UploadFiles/201512/2015121518501562.jpg)
[#28]
As you've probably noticed, a large scar has appeared on your head and as a result you won't be allowed to use any helmets. Thankfully this is only temporary and you'll soon have the scar removed. Return to Ark & Dove Cathedral on foot or via quick travel option. Use the intercom once again and this time you'll gain access without any other problems. Make a few steps forward and talk to Jimson [#28] who is one of the members of this weird society. Ask him about the leader of the tribe, about the ritual you've just finished and about the attack on Desmond's mansion. Notice that you've been rewarded with Punga Power! perk.
Received from: Jimson [Point Lookout]
![[#29] - Main quests - QUEST 3: Hearing Voices - Main quests - Fallout 3: Point Lookout - Game Guide and Walkthrough](https://game.lhg100.com/Article/UploadFiles/201512/2015121518501550.jpg)
[#29]
Walkthrough: I would recommend that you start off by exploring cathedral grounds. It would be wise to collect plants for one of the subquests and the only person you'll want to talk to is Croatoa. If you have Child at Heart perk you can choose a new dialogue option [#29], resulting in Croatoa giving you a unique shovel. Once you're ready open the main gate to get access to the cathedral itself. Ignore some of the tribals in the center of the cathedral. Instead inspect the altar to find stimpaks and talk to Woodrose which apparently is one of the few sane people in this area.
![[#30] - Main quests - QUEST 3: Hearing Voices - Main quests - Fallout 3: Point Lookout - Game Guide and Walkthrough](https://game.lhg100.com/Article/UploadFiles/201512/2015121518501563.jpg)
[#30]
The most important person inside the cathedral is Nadine [#30] (daughter of Catherine whom you've met while trying to use the ferry). Start off by asking Nadine about the new scar on your body and ways of getting rid of it. The results will be satisfactory, because she'll remove the scar, allowing you to use helmets and other hats once again. You can now ask her about the person responsible for cutting away a piece of your brain and about her mother (by giving her the note). Nadine will offer to meet you down by the pier. Before you end this conversation make sure to ask her about Jackson's whereabouts and you'll find out that he can be found in the caves located beneath the cathedral. The only way to reach the caves is via underground tunnel system and that'll be your next objective. Nadine should give you a key to the caves, so you can finally exit the cathedral and move on with your mission.
![[#31] - Main quests - QUEST 3: Hearing Voices - Main quests - Fallout 3: Point Lookout - Game Guide and Walkthrough](https://game.lhg100.com/Article/UploadFiles/201512/2015121518501549.jpg)
[#31]
The game will now require to report your findings to Desmond, so you should consider quick travelling to Calvert Mansion. Enter the house and talk to Desmond. He should order you to find Jackson, so you may exit the mansion right away. Return to Ark & Dove Cathedral and start moving north-east, towards Wrecked Seatub. I would recommend to be very careful along the way, because the resting grounds located near the cathedral are being occupied by a large group of powerful feral ghouls [#31]. You should be fine as long as you maintain safe distance and leave them alone.
![[#32] - Main quests - QUEST 3: Hearing Voices - Main quests - Fallout 3: Point Lookout - Game Guide and Walkthrough](https://game.lhg100.com/Article/UploadFiles/201512/2015121518501500.jpg)
[#32]
Turn north when you get to the cliff and continue heading in that direction. You'll soon have to head downwards. Slide down carefully until you end up standing next to the water. Proceed west where you'll find the ship [#32]. Getting on board shouldn't be a problem, so instead focus on finding a small hatch. Press the action key to travel to the Sea Cave. Make sure to choose a good weapon from your inventory before moving on!
![[#33] - Main quests - QUEST 3: Hearing Voices - Main quests - Fallout 3: Point Lookout - Game Guide and Walkthrough](https://game.lhg100.com/Article/UploadFiles/201512/2015121518501573.jpg)
[#33]
You'll have to be very patient while going through the caves, because you'll be dealing with a lot of mirelurks. Some of these beasts are going to be very resistant to your gunfire, so don't forget to use heavy artillery to take them out and to minimize the risk of receiving major injuries. Find a small boat when you get to the first large cave [#33], because you'll be allowed to pick up a relatively powerful double-barreled shotgun. Use the upper platforms to travel west and then turn north. Use your Pip-Boy to locate monsters, so you won't be surprised by anything.
![[#34] - Main quests - QUEST 3: Hearing Voices - Main quests - Fallout 3: Point Lookout - Game Guide and Walkthrough](https://game.lhg100.com/Article/UploadFiles/201512/2015121518501545.jpg)
[#34]
Eventually you'll have to get to a much larger cave where you'll notice Jackson talking to a weird looking machine. Go to your right and use the platform to approach the leader of the tribe. You can kill him right now or you can act peacefully and wait for the audience to come to an end. If you're patient enough you'll be allowed to talk to Jackson and surprisingly he'll allow you to meet his master. Approach the holographic projection and initiate a new conversation by talking to the brain [#34]. During the conversation you'll find out that the scientist wants someone to shut down Desmond's signal. He'll ask you to do it, but thankfully even if you agree you'll have a chance to choose your allegiance during the course of the next main quest.
Received from: The Brain [Sea Cave]
![[#35] - Main quests - QUEST 4: Thought Control - Main quests - Fallout 3: Point Lookout - Game Guide and Walkthrough](https://game.lhg100.com/Article/UploadFiles/201512/2015121518501652.jpg)
[#35]
Walkthrough: This quest starts inside the Sea Cave where you talked to the brain, but thankfully you won't have to walk through the caves again. Instead follow Jackson to a large ladder. Use the ladder to get back to the main area of Point Lookout [#35]. Be careful, because you'll end up standing near cemetery grounds, so it would be a good idea to escape to the cathedral before you're killed by the ghouls. You may now travel to the Calvert Mansion (either on foot or via your Pip-Boy).
![[#36] - Main quests - QUEST 4: Thought Control - Main quests - Fallout 3: Point Lookout - Game Guide and Walkthrough](https://game.lhg100.com/Article/UploadFiles/201512/2015121518501612.jpg)
[#36]
Obviously you must enter the mansion and talk to Desmond to give him your report on the situation. It would be wise to ask the ghoul about the identity of the scientist you had a chance to talk to in a computerized form and about your next step. Desmond will ask you to plant a jammer in the highest point of the island. Leave the mansion and proceed towards this new destination. It can be found easily using your personal map and by starting from the pier. Once you're there wait for the scientist to contact you [#36] and listen to his proposal. You must now make a choice whether you want to help Desmond or Calvert (the brain). Keep reading this guide if you want to find out how will your choice affect the rest of the game.
![[#37] - Main quests - QUEST 4: Thought Control - Main quests - Fallout 3: Point Lookout - Game Guide and Walkthrough](https://game.lhg100.com/Article/UploadFiles/201512/2015121518501695.jpg)
[#37]
Important! The decision you're about to make isn't going to be a final one. You will still be allowed to switch your alignment during the course of the final main quest!
SIDING WITH THE BRAIN (SCIENTIST FROM THE SEA CAVE): Listen to what the scientist wants you to do and head towards the lower marker on your personal map. Approach a large trash compactor and press the action key to use it [#37]. You must now choose the first option from the list to get rid of the jamming device given to you by Desmond. Listen to a new transmission from Calvert and head on to the Calvert Mansion. Make a few steps forward and witness a HUGE explosion destroying the house.
![[#38] - Main quests - QUEST 4: Thought Control - Main quests - Fallout 3: Point Lookout - Game Guide and Walkthrough](https://game.lhg100.com/Article/UploadFiles/201512/2015121518501618.jpg)
[#38]
SIDING WITH DESMOND (GHOUL FROM THE MANSION): In this case you must approach the large ferris wheel which is the upper marker on your personal map. Find a single carriage and press the action key to mount a jamming device on it [#38]. Additionally you must use a nearby switch to start the wheel. Turn around quickly and get ready to defend yourself against a large group of tribals sent by the brain to kill you. Use your most powerful guns, especially since you'll be in a corner with no place to go. Once you've won transport yourself to Calvert Mansion and witness a huge explosion. And don't worry - Desmond is still alive. :-)
Received from: The Brain [Point Lookout]
Important: This section of the guide explains in detail what happens after you decide to side with Calvert (the brain from the Sea Cave) at the end of the fourth main quest. You can still change your allegiance - look for bold font in the text to find out where.
![[#39] - Main quests - QUEST 5: A Meeting of the Minds - Ally: The Brain - Main quests - Fallout 3: Point Lookout - Game Guide and Walkthrough](https://game.lhg100.com/Article/UploadFiles/201512/2015121518501673.jpg)
[#39]
Walkthrough: Ignore the ruins of the mansion and proceed south, towards the lighthouse. Take your time while crossing the water, so you won't expose yourself to high doses of radiation. You should also watch out for the mirelurks in this area, because you may end being surrounded by the monsters. Approach the Point Lookout Lighthouse and open the door to head inside. Wait for a secret passageway to be uncovered [#39] and use the stairs to gain access to an Underground Lab.
![[#40] - Main quests - QUEST 5: A Meeting of the Minds - Ally: The Brain - Main quests - Fallout 3: Point Lookout - Game Guide and Walkthrough](https://game.lhg100.com/Article/UploadFiles/201512/2015121518501634.jpg)
[#40]
Use the stairs once again to get to a lower level. You'll soon encounter Desmond. There's going to be only a single dialogue option allowing you to resolve this situation in a peaceful manner by joining him (despite your previous betrayal). If you do decide to join Desmond make sure to follow the rest of the quest by reading a section of my guide titled QUEST 5: A Meeting of the Minds - Ally: Desmond. All other answers lead to a fight [#40]. Don't forget to inspect Desmond's body after the duel has ended. It's very important to pick up a lab access card, however you can also take a shotgun, a sniper rifle, ammunition and his glasses.
![[#41] - Main quests - QUEST 5: A Meeting of the Minds - Ally: The Brain - Main quests - Fallout 3: Point Lookout - Game Guide and Walkthrough](https://game.lhg100.com/Article/UploadFiles/201512/2015121518501643.jpg)
[#41]
I would recommend exploring a room where you first saw Desmond, because there are going to be a lot of useful items stored inside, including a Gatling laser, ammunition and medical supplies. This also applies to the rest of this underground complex. There's only going to be one path leading to the final area, so you should focus on securing rooms found along the way. Eventually you'll get to a larger room with a computer. Ignore the terminal, because it would explode. Instead use a card from Desmond's body to open a nearby door [#41].
![[#42] - Main quests - QUEST 5: A Meeting of the Minds - Ally: The Brain - Main quests - Fallout 3: Point Lookout - Game Guide and Walkthrough](https://game.lhg100.com/Article/UploadFiles/201512/2015121518501635.jpg)
[#42]
Don't forget NOT to attack any robots encountered along the way, because they're going to be allied with the brain. You should also know that you can ignore two new cards found in nearby rooms, because you'll be given free access to all the chambers of the underground facility. Keep exploring lower levels of the complex and eventually you'll get to a second storage area. You can collect a second Gatling laser from here, as well pulse mines and other valuable objects. You'll soon end up standing inside a large room [#42] and you can now either betray Calvert by shooting at the dome or initiate a new conversation with the scientist.
![[#43] - Main quests - QUEST 5: A Meeting of the Minds - Ally: The Brain - Main quests - Fallout 3: Point Lookout - Game Guide and Walkthrough](https://game.lhg100.com/Article/UploadFiles/201512/2015121518501640.jpg)
[#43]
Sadly, during the conversation you'll find out that the brain has no more use for you and therefore he plans on terminating the main character. As soon as the conversation has ended start firing at the large structure with a floating brain. Use a Gatling laser, a plasma rifle or something equally powerful. Destroying the cylinder [#43] not only will eliminate Calvert but will also shut down nearby robots. You may now proceed to the back of this room. Find a small storage area with a lot of cool items, including a unique microwave emitter. Exit the lab when you're done exploring either by heading towards the corridors again or by using a nearby ladder.
Received from: Desmond [Point Lookout]
Important: This section of the guide explains in detail what happens after you decide to side with Desmond (ghoul from the mansion) at the end of the fourth main quest. You can still change your allegiance - look for bold font in the text to find out where.
![[#44] - Main quests - QUEST 5: A Meeting of the Minds - Ally: Desmond - Main quests - Fallout 3: Point Lookout - Game Guide and Walkthrough](https://game.lhg100.com/Article/UploadFiles/201512/2015121518501606.jpg)
[#44]
Walkthrough: After you've witnessed the explosion take your time exploring what's left of the Calvert Mansion. Thankfully you won't be dealing with negative effects of radiation here, so you can remain in this area for as long as you want to. Your objective will be to find a small hatch leading to the Panic Room [#44]. Talk to Desmond and find out that he's located where the brain is hiding. You can now offer your help in getting rid of the brain, however you can also betray Desmond at any time by killing him without giving him a proper warning. If you do decide to betray him, make sure to follow the rest of the quest by reading a section of my guide titled QUEST 5: A Meeting of the Minds - Ally: The Brain (don't forget to take his card!). Once the conversation has ended follow Desmond by heading back outside.
[#45]
Keep following Desmond. You'll be heading towards Point Lookout Lighthouse, so it won't take too long for you to get there. The route itself should be safe. Once you're inside the lighthouse wait for a floor section to reveal a secret passageway [#45]. Obviously you must use the stairs here to gain access to an Underground Lab. Keep heading downwards and don't forget to explore a storage area along the way. This small room contains several useful items, including a Gatling laser, ammunition and medical supplies. Move on to the next section when you're done picking up new items.
![[#46] - Main quests - QUEST 5: A Meeting of the Minds - Ally: Desmond - Main quests - Fallout 3: Point Lookout - Game Guide and Walkthrough](https://game.lhg100.com/Article/UploadFiles/201512/2015121518501745.jpg)
[#46]
Remember that during your stay in the lab it would be wise to explore all rooms found along the way. Doing this will allow you to get your hands on some interesting treasures and most of these objects can be taken easily. Only some of the items will be hidden inside safes and lockers, but I assume that you've developed high Lockpicking skill by now. Eventually you'll get to a locked door [#46]. Use the switch to open it and get ready to destroy several security turrets at the same time. It shouldn't be a problem, even if you use less powerful weapons. Proceed to the lower floor and be ready to destroy a couple of robobrains on your way to the final area. Use EMP grenades/mines or energy weapons against them.
![[#47] - Main quests - QUEST 5: A Meeting of the Minds - Ally: Desmond - Main quests - Fallout 3: Point Lookout - Game Guide and Walkthrough](https://game.lhg100.com/Article/UploadFiles/201512/2015121518501712.jpg)
[#47]
Destroy the turrets when you get to a large oval area and take your time exploring your surroundings. Focus on finding an alpha security badge [#47]. You can use this card on a terminal to unlock a new passageway without having to hack into the system. Continue exploring lower levels of the compound and find the second badge (beta) to unlock a new door. It shouldn't be a big problem.
![[#48] - Main quests - QUEST 5: A Meeting of the Minds - Ally: Desmond - Main quests - Fallout 3: Point Lookout - Game Guide and Walkthrough](https://game.lhg100.com/Article/UploadFiles/201512/2015121518501707.jpg)
[#48]
Get rid of the last set of turrets before moving on any further and eventually you'll arrive in a large oval area with a cylinder. If you still want to cooperate with Desmond approach the cylinder and destroy it with a Gatling laser or something equally powerful [#48]. You can also talk to the brain and agree to betray Desmond at this point. Notice that he'll automatically become hostile, so you won't be allowed to surprise him anymore.
![[#49] - Main quests - QUEST 5: A Meeting of the Minds - Ally: Desmond - Main quests - Fallout 3: Point Lookout - Game Guide and Walkthrough](https://game.lhg100.com/Article/UploadFiles/201512/2015121518501726.jpg)
[#49]
Once you've destroyed the brain you should wait for Desmond to approach you and to initiate a new conversation. You won't receive too much gratitude, however you will be allowed to steal everything you see. Desmond will also give you a key to a nearby room. This storage space is located behind the cylinder [#49]. Explore it to find a large stash of weapons, ammunition and medical supplies. Microwave emitter is by far the best thing you can find here. Leave the lab using a small ladder or by going through the corridors again.
Received from: Marguerite [Marguerite's Shack]
[#50]
Walkthrough: Marguerite's Shack can be found in the eastern section of the swamps, so you shouldn't have any major problems reaching that location. Be on a look out for tribals and smugglers and try to avoid larger groups by using alternative paths or a Stealth Boy. Approach the shack and use the main door to head inside. Locate Marguerite [#50] and talk to her. You'll find out that she needs some ingredients to create a cure, however if you have a high Medicine skill you can catch her lying and find out that her true intention is to manufacture moonshine. Notice that you've been given a single bottle of this specific. Before you agree to take part in this quest make an offer to repair Marguerite's still. Assuming you have a high Speech skill you can ask her to pay you 200 bottlecaps. Fixing the still is very easy. Once you've repaired it return to Marguerite for the cash and ask her about your main assignment.
![[#51] - Side quests - QUEST 1: A Spoonful Of Whiskey - Side quests - Fallout 3: Point Lookout - Game Guide and Walkthrough](https://game.lhg100.com/Article/UploadFiles/201512/2015121518501702.jpg)
[#51]
There are going to be three different objects on the list of ingredients given to you by Marguerite. You will have to find three units of Yeast, six Fission Batteries and some Punga (20 Wild Punga or 10 Refined Punga Fruit). I would recommend that you start this quest as soon as you've arrived in Point Lookout, so you won't have to spend too much time searching for these items. The main reason is that most of the ingredients can be found while completing main quests. Don't forget that you'll have to make a lot of room in your inventory, however you will be allowed to deliver small parts of the shipment. As for yeast and batteries, the easiest way to find them would be to go to the Panic Room located beneath Calvert Mansion (after completing the last main quest) [#51]. Otherwise you might want to consider visiting one of the traders or going to the Blackhall Manor.
![[#52] - Side quests - QUEST 1: A Spoonful Of Whiskey - Side quests - Fallout 3: Point Lookout - Game Guide and Walkthrough](https://game.lhg100.com/Article/UploadFiles/201512/2015121518501776.jpg)
[#52]
As for the Punga fruits, you could try exploring the swamps and collecting items as you go, however I would recommend that you wait until you've completed the second main quest of the game. At the beginning of third main quest you'll gain access to Ark & Dove Cathedral and the tribals out there are going to be friendly. Explore the area around the cathedral to find refined Punga [#52]. Doing this will allow you to leave more room in your inventory for other items.
![[#53] - Side quests - QUEST 1: A Spoonful Of Whiskey - Side quests - Fallout 3: Point Lookout - Game Guide and Walkthrough](https://game.lhg100.com/Article/UploadFiles/201512/2015121518501768.jpg)
[#53]
Once you've collected all the ingredients report back to Marguerite and you'll find out that she needs a day to manufacture moonshine. Thankfully you won't have to wait that long, because there's a bed inside her shack and you'll be allowed to use it [#53]. Wake up 24 hours later and talk to Marguerite again. Aside from 300 bottlecaps you'll receive 6 bottles of moonshine. Additionally, you'll be allowed to ask her about a new shipment, however the still will have to remain idle for a days before you'll be allowed to use it again.
Received from: automatically during the exploration of Point Lookout [Point Lookout] or automatically after using a computer terminal [USS Ozymandias - Belowdecks]
![[#54] - Side quests - QUEST 2: An Antique Land - Side quests - Fallout 3: Point Lookout - Game Guide and Walkthrough](https://game.lhg100.com/Article/UploadFiles/201512/2015121518501711.jpg)
[#54]
Walkthrough: There are two ways for you to activate this quest, but it's highly unlikely that you'll want to start it while exploring the swamps. If you're persistent, you would have to find an Excavated Muck Hole on your own and explore it in search of a holotape. I would recommend that you begin this quest properly by heading towards a wrecked ship, called USS Ozymandias. Thankfully you won't have to spend too much time looking for it. Start off at Calvert Mansion and swim a few meters when you get to the water [#54]. Open a hatch to gain access to Belowdecks.
![[#55] - Side quests - QUEST 2: An Antique Land - Side quests - Fallout 3: Point Lookout - Game Guide and Walkthrough](https://game.lhg100.com/Article/UploadFiles/201512/2015121518501710.jpg)
[#55]
Once you're inside the ship proceed to your left and locate a computer terminal on one of the walls [#55]. Activate the terminal and choose the first option from the list - Mission Parameters. Ignore other functions and shut down the terminal. You may finally leave the ship. Open your Pip-Boy and you'll notice that three locations have been added to your personal map and they're all located in the swamps. It's up to you to figure out in which order you want to explore them.
![[#56] - Side quests - QUEST 2: An Antique Land - Side quests - Fallout 3: Point Lookout - Game Guide and Walkthrough](https://game.lhg100.com/Article/UploadFiles/201512/2015121518501818.jpg)
[#56]
Each time you're close to a designated area of the map you're going to be attacked by a small group of feral ghouls [#56]. It's important to be careful while trying to kill the monsters, especially while going after stronger versions of these creatures. Keep moving and use your powerful guns to end each fight quickly.
![[#57] - Side quests - QUEST 2: An Antique Land - Side quests - Fallout 3: Point Lookout - Game Guide and Walkthrough](https://game.lhg100.com/Article/UploadFiles/201512/2015121518501856.jpg)
[#57]
After you've defeated each group of ghouls you will have to locate an Excavated Muck Hole. Notice that you'll be dealing with small portions of radiation while exploring underground tunnels, so it'll be important to act quickly. Each time you'll have to find a holotape [#57], pick it up and head back outside. Once all three holodisks are in your possession you will be allowed to return to USS Ozymandias. Use the computer terminal again and choose the correct options from the main menu to input all three codes (you don't have to listen to what's on the tapes). Finish off by choosing the first option from the list (Access Expedition Supplies) and you'll gain access to a safe. Open the safe to find bio-gas canisters, radiation suits, stimpaks and other useful supplies.
Received from: Plik [Coastal Grotto]
![[#58] - Side quests - QUEST 3: Plik's Safari - Side quests - Fallout 3: Point Lookout - Game Guide and Walkthrough](https://game.lhg100.com/Article/UploadFiles/201512/2015121518501889.jpg)
[#58]
Walkthrough: The easiest way to reach Coastal Grotto is to begin your journey near Ark & Dove Cathedral. It's also important that you check your ammo supplies before proceeding with this assignment, because you'll need at least a dozen of typical clips to succeed. Once you've reached the cliff head down by making small jumps and sliding down. It shouldn't be a problem as long as you don't get distracted by any monsters. Find an entrance marked with a number of lights [#58]. Open the door quickly before mirelurks or other hostiles appear near your position.
![[#59] - Side quests - QUEST 3: Plik's Safari - Side quests - Fallout 3: Point Lookout - Game Guide and Walkthrough](https://game.lhg100.com/Article/UploadFiles/201512/2015121518501837.jpg)
[#59]
There's only one main passageway inside the cave, so you can't really get lost. Turn right after you notice a ghoul in the distance and enter a small room. Examine the table to find Plik's journal [#59]. Reading the contents of the journal will result in the main character receiving a new perk called Ghoul Ecology. There's also a mininuke on the table, as well as medical supplies. Return to the main corridor and talk to Plik. Ask him about the details of the safari and agree to his fee (sadly - you can't barter) of 1000 bottlecaps. Open a nearby gate to get to Plik's Safari.
![[#60] - Side quests - QUEST 3: Plik's Safari - Side quests - Fallout 3: Point Lookout - Game Guide and Walkthrough](https://game.lhg100.com/Article/UploadFiles/201512/2015121518501812.jpg)
[#60]
Take your time to familiarize yourself with the surroundings, because the ghouls won't appear unless you're ready. Notice that you'll receive help from two other hunters. It'll be a good idea to look after them once the safari has started, however you won't receive any penalties if they die. If you have some spare landmines in your inventory it would be a good idea to place them around the central platform. Make sure that all the mines are far away from each other, so one explosion won't trigger any other mines. Press a large button when you're ready to take on the ghouls [#60].
![[#61] - Side quests - QUEST 3: Plik's Safari - Side quests - Fallout 3: Point Lookout - Game Guide and Walkthrough](https://game.lhg100.com/Article/UploadFiles/201512/2015121518501861.jpg)
[#61]
You'll have to keep defending yourself against ghoul attacks for about three minutes. I would recommend that you start using a plasma rifle or something better, so in most cases it'll only take a single hit for a ghoul to die. Having a perk that regenerates your action points for each successful hit may also prove to be very helpful, because you'll be more efficient while using V.A.T.S. system. Each time you attack the ghouls focus on eliminating the strongest individuals [#61], because your colleagues will be to weak to do that. Don't forget to heal and to reload your gun after each wave of attacks. Explore the area once the battle has ended and don't forget to loot bodies of your fellow hunters if they won't make it.
![[#62] - Side quests - QUEST 3: Plik's Safari - Side quests - Fallout 3: Point Lookout - Game Guide and Walkthrough](https://game.lhg100.com/Article/UploadFiles/201512/2015121518501866.jpg)
[#62]
You may return to the main corridor via the same door. Talk to Plik [#62] and he'll reward you for surviving your first safari with a unique type of an axe. You can now ask the ghoul about taking part in a new safari, however he'll respond that it'll take him a few days to round up new feral ghouls. You can also murder Plik in cold blood and loot his body. Doing this would allow you to get your hands on 1800 bottlecaps (including 1000 which belonged to you), as well as on an interesting body armor.
Received from: Obadiah Blackhall [Blackhall Manor] or automatically after picking up Krivbeknih book [Ritual Site]
![[#63] - Side quests - QUEST 4: The Dark Heart Of Blackhall - part 1 - Side quests - Fallout 3: Point Lookout - Game Guide and Walkthrough](https://game.lhg100.com/Article/UploadFiles/201512/2015121518501860.jpg)
[#63]
Walkthrough: There are two ways of activating this subquest, however I would recommend that you start by taking a trip to the Blackhall Manor instead of visiting the Ritual Site. Otherwise you may have some problems understanding the concept of this quest and you'll miss out on several important scenes. The manor can be found near the western edge of the map, to the south of the swamps [#63]. As a result you'll have to take part in a few fights in order to get there safely. Thankfully the residence itself should be free of any hostile units.
![[#64] - Side quests - QUEST 4: The Dark Heart Of Blackhall - part 1 - Side quests - Fallout 3: Point Lookout - Game Guide and Walkthrough](https://game.lhg100.com/Article/UploadFiles/201512/2015121518501888.jpg)
[#64]
Once you're inside the manor head forward and inspect the first room to your right. Obadiah Blackhall will initiate a conversation while you're still far away from him, but thankfully even if you choose a rude response he won't be offended. You should also know that if you have high Charisma you may lie that you were only admiring the architecture of this place [#64]. Obadiah will ask you to retrieve a book for him stolen by the tribals. Agree to his proposal and exit the mansion via the same door you came in. If you've done everything correctly you're going to be stopped by Marcella just outside the mansion. She will tell you that the book is far too powerful to end up in the wrong hands and she'll ask you to destroy it. Don't worry - you'll have to make up your mind, because you'll choose what to do next when you have the book.
![[#65] - Side quests - QUEST 4: The Dark Heart Of Blackhall - part 1 - Side quests - Fallout 3: Point Lookout - Game Guide and Walkthrough](https://game.lhg100.com/Article/UploadFiles/201512/2015121518501825.jpg)
[#65]
You must now proceed to a place called Ritual Site which can be found to the east of the manor. Don't be fooled by what you see in front of you [#65], because you'll be going underground. Before you'll be allowed to get closer to the book you'll have to defeat a group of tribals. They will be guarding the ruins of the house, so make sure to kill all of them before moving on with the mission. Check the house once they're gone and locate a shack door leading to the Burned-Out Basement. Make sure to choose a good weapon from your inventory, capable of injuring enemy units from a small distance.
![[#66] - Side quests - QUEST 4: The Dark Heart Of Blackhall - part 1 - Side quests - Fallout 3: Point Lookout - Game Guide and Walkthrough](https://game.lhg100.com/Article/UploadFiles/201512/2015121518501920.jpg)
[#66]
You won't encounter any hostile units right away. Keep heading forward using a narrow corridor and turn left when you get to a small junction. Eventually you should be able to reach a larger section of the basement with an altar [#66]. I would recommend that you place traps in the passageway leading to this room. Don't forget to place landmines far away from each other, so they won't go out all at once. Once you're ready go back to the altar and examine your surroundings. Stimpaks can be taken on the altar. Once you have them turn around and interact with ceremonial lectern. Confirm that you want to pick up the book called the Krivbeknih.
![[#67] - Side quests - QUEST 4: The Dark Heart Of Blackhall - part 1 - Side quests - Fallout 3: Point Lookout - Game Guide and Walkthrough](https://game.lhg100.com/Article/UploadFiles/201512/2015121518501939.jpg)
[#67]
Wait for a new group of tribals to begin moving towards your current position. Once you've heard a series of explosions head on to the junction you've used before. Get ready to defeat at least a few hostiles [#67], because it's not possible to eliminate all of them with landmines. Consider using more powerful guns if you feel overwhelmed. You'll have to fight your way back to the ladder and exit the basement. This where you'll have to choose on how you want to end this particular subquest.
![[#68] - Side quests - QUEST 4: The Dark Heart Of Blackhall - part 1 - Side quests - Fallout 3: Point Lookout - Game Guide and Walkthrough](https://game.lhg100.com/Article/UploadFiles/201512/2015121518501960.jpg)
[#68]
SIDING WITH MARCELLA (DESTROYING THE BOOK): I won't lie to you that it'll all go down easily, because if you want to choose the "good ending" by siding with Marcella you'll have to visit a lot of dangerous locations and eliminate more enemy units. Your first objective will be to reach an area marked as the Disaster Relief Outpost. Once you arrive at the outpost [#68] get ready to defeat smugglers and monsters, because it's going to be far from safe here. I would also recommend that you explore each tent before moving on to the last one. Doing this will allow you to get your hands on a lot of medical supplies and on some of the ingredients needed to complete Marguerite's quest.
![[#69] - Side quests - QUEST 4: The Dark Heart Of Blackhall - part 2 - Side quests - Fallout 3: Point Lookout - Game Guide and Walkthrough](https://game.lhg100.com/Article/UploadFiles/201512/2015121518501981.jpg)
[#69]
Once you're ready to move on with the quest enter Marcella's Tent and it'll turn out that she's been already murdered. It's not mandatory to examine her body, however you would find some stimpaks, ammunition and a key to her safe. Notice that stealing items from her safe will be treeted as an act of thievery. The most important thing to do here is to pick up a new holotape from the table [#69]. Listen to the tape using your Pip-Boy and you'll find out that you'll have to travel to the Dunwich Building in Capitol Wasteland if you still want to destroy the book. Exit the tent and proceed to Point Lookout Pier. If you've already resolved the situation with Nadine and Catherine you will be allowed to leave Point Lookout for free. Otherwise you'll have to pay the fee for using the boat. It would be a good idea to eliminate Tobar prior to completing this quest, because otherwise you would only waste precious bottlecaps.
![[#70] - Side quests - QUEST 4: The Dark Heart Of Blackhall - part 2 - Side quests - Fallout 3: Point Lookout - Game Guide and Walkthrough](https://game.lhg100.com/Article/UploadFiles/201512/2015121518501992.jpg)
[#70]
When you return to Capitol Wasteland focus on planning the shortest route to the Dunwich Building. Don't forget that the area around the building is being patrolled by powerful creatures, so you'll have to be careful. Enter the building upon your arrival and start exploring nearby rooms, assuming of course that you haven't been here before. Watch out for Feral Ghoul Reavers [#70], because they're going to be very resistant to your attacks. Eventually you'll have to find a door leading to the Ruins of Dunwich Building.
[#71]
Continue exploring the ruins until you find a door leading to the Virulent Underchambers. It shouldn't be a problem, however don't forget that you don't have to be in a lot of hurry. Explore the underchambers and you'll soon find a passageway leading to the caves [#71]. Eliminate a couple of ghouls here, including the one named Jaime.
[#72]
Once you've secured this area explore the passageway that was being defended by the last group of ghouls. Concentrate your efforts on finding a large obelisk [#72]. Approach this structure, press the action key and choose the first option from the list to confirm that you want to destroy the book. Don't worry about the flames, because the damage received here is going to be minimal. You don't have to return to Point Lookout for any additional confirmation, because the quest will end with you getting rid of the book.
![[#73] - Side quests - QUEST 4: The Dark Heart Of Blackhall - part 2 - Side quests - Fallout 3: Point Lookout - Game Guide and Walkthrough](https://game.lhg100.com/Article/UploadFiles/201512/2015121518501908.jpg)
[#73]
SIDING WITH OBADIAH (HANDING OVER THE BOOK): In this case ending the quest is going to be much easier, especially since you won't have to leave Point Lookout even for a second. Once you've acquired the book head topside and fast travel to the Blackhall Manor. Enter the mansion and locate Obadiah again. You can give him the book right away in exchange for 1000 bottlecaps [#73] or you can ask him a few additional questions about Marcella and about the book itself.
![[#74] - Side quests - QUEST 4: The Dark Heart Of Blackhall - part 2 - Side quests - Fallout 3: Point Lookout - Game Guide and Walkthrough](https://game.lhg100.com/Article/UploadFiles/201512/2015121518501911.jpg)
[#74]
After you've formally ended the quest you can stay inside the manor a little while longer. Notice that if you follow the old man to the Basement you will witness a cruel ritual [#74]. You can now ask Obadiah about the body on the altar or you can murder him if you want to have the book back. Sadly it won't be of any use to you anymore.
Received from: automatically after using a computer terminal [Homestead Motel - Room 1D]
[#75]
Walkthrough: The Homestead Motel is located in the southern section of the island and the easiest way to get to it is to start from the pier. Obviously you must remain very careful, because the area around the motel may be patrolled by smugglers, tribals and mutated beings. Notice that the motel doesn't have a single entrance. Instead there are small rooms and the only one you'll be allowed to enter is Room 1D [#75]. Once you're inside interact with a computer terminal. After that pick up a Stealth Boy, turn around and open the luggage case. Take a key to a locker from the case and leave the motel.
![[#76] - Side quests - QUEST 5: The Velvet Curtain - part 1 - Side quests - Fallout 3: Point Lookout - Game Guide and Walkthrough](https://game.lhg100.com/Article/UploadFiles/201512/2015121518502095.jpg)
[#76]
Thankfully it'll be very easy to find the locker for a key you've just taken. Once again you should begin from the Point Lookout Pier. Head east and locate a locker [#76]. Open this object and pick up a new holotape (Box 1207 - Spy's Audio Password). Obviously you should listen to the recording using your Pip-Boy, because you'll find out that you'll have to gain access to a safety deposite box. Travel to People's Bank of Point Lookout which is going to be located at about a half way through between the pier and the motel.
![[#77] - Side quests - QUEST 5: The Velvet Curtain - part 1 - Side quests - Fallout 3: Point Lookout - Game Guide and Walkthrough](https://game.lhg100.com/Article/UploadFiles/201512/2015121518502088.jpg)
[#77]
Once you're inside the bank start off by eliminating all radroaches. Don't forget that they're very weak, so you should be using a melee weapon instead of wasting ammunition. Check the desk to your right and you'll find a new holotape (Box 1191 - Password Backup). You can also loot two safes located in the background (especially the left one with more valuable items). Doing this will allow you to add interesting items to your inventory, including a shotgun, pistols and ammunition. Head on to a small room with safety desposite boxes. Approach a security device [#77], BUT don't press the action key.
![[#78] - Side quests - QUEST 5: The Velvet Curtain - part 1 - Side quests - Fallout 3: Point Lookout - Game Guide and Walkthrough](https://game.lhg100.com/Article/UploadFiles/201512/2015121518502034.jpg)
[#78]
All you have to do is to activate the tape from your Pip-Boy menu, so you'll listen to it again. Stand still and the device will recognize the voice and the password, opening a nearby deposite box. Repeat this with the tape found inside the bank if you want to. The box you wanted to open will contain a new holotape [#78] (Espionage Debriefing). Listen to the contents of the tape and exit the bank through the main door.
![[#79] - Side quests - QUEST 5: The Velvet Curtain - part 1 - Side quests - Fallout 3: Point Lookout - Game Guide and Walkthrough](https://game.lhg100.com/Article/UploadFiles/201512/2015121518502097.jpg)
[#79]
I guess you may now have some problems figuring out the next step. Proceed south and find a poster of a missing person on one of the nearby walls [#79]. Examine the poster by pressing the action key. Once you've read the information head east. You must find a door leading to the Recruitment Station. There are more radroaches waiting for you here. Once it's safe locate DIA officer's computer terminal. Choose the first option from the list. Before you exit the station don't forget to collect objects from the environment, including a mininuke and medical supplies. You can also open a new safe if you have spare time.
![[#80] - Side quests - QUEST 5: The Velvet Curtain - part 1 - Side quests - Fallout 3: Point Lookout - Game Guide and Walkthrough](https://game.lhg100.com/Article/UploadFiles/201512/2015121518502080.jpg)
[#80]
Your next destination is a placed marked as the Turtledove Detention Camp. It's located near the northern edge of the map, to the north-east of the swamps. There are two ways for you to gain access to the camp. I wouldn't recommend trying the more obvious approach, because the camp is being defended by a lot of security systems. The easier way to reach the morgue would be to locate a sewer entrance leading into Septic Tunnels. Use my map [#80] to find this entrance. It's a small hatch located close to the water and to the north-east of the Trash Heap.
![[#81] - Side quests - QUEST 5: The Velvet Curtain - part 1 - Side quests - Fallout 3: Point Lookout - Game Guide and Walkthrough](https://game.lhg100.com/Article/UploadFiles/201512/2015121518502059.jpg)
[#81]
I would strongly recommend that you leave the tunnels as soon as possible, because you'll be dealing with radiation. Eventually you should be able to find a ladder which lead you to the Morgue. Once you've arrived at your destination take out nearby feral ghouls. Make sure it's safe and scout the area for medical supplies (stimpaks, Med-X's and more). In order to move on with this quest you must find a stash with items belonging to a man called Yang [#81]. Acquire the codes by choosing the second option from the list. You must now return to Point Lookout and it would be a good idea to use Septic Tunnels again.
![[#82] - Side quests - QUEST 5: The Velvet Curtain - part 2 - Side quests - Fallout 3: Point Lookout - Game Guide and Walkthrough](https://game.lhg100.com/Article/UploadFiles/201512/2015121518502074.jpg)
[#82]
You must now proceed to the area where the submarine is located and the easiest way to do that would be to fast travel to the Calvert Mansion. Proceed south from there and ignore a wrecked ship seen in the distance. The sub itself can be found under water, so you'll have to swim to it. Thankfully it won't be too deep, so you don't have to worry about running out of oxygen. Examine the upper section of the submarine and find a hatch leading to SSN-37-1A [#82].
![[#83] - Side quests - QUEST 5: The Velvet Curtain - part 2 - Side quests - Fallout 3: Point Lookout - Game Guide and Walkthrough](https://game.lhg100.com/Article/UploadFiles/201512/2015121518502087.jpg)
[#83]
You should make your stay inside the submarine as short as possible, because once again you'll expose yourself to radiation. Make sure to examine contents of a small footlocker before you focus on your assignment. Start off by going to your left. Pick up a Stealth Boy and use a nearby computer terminal. Choosing the second option from the list of commands will allow you to trigger self-destruct feature. In order to confirm that choice you must turn around, go to the other end of the sub and use the switch [#83]. Escape through the hatch quickly, swim back to a safe distance and enjoy the explosion.
![[#84] - Side quests - QUEST 5: The Velvet Curtain - part 2 - Side quests - Fallout 3: Point Lookout - Game Guide and Walkthrough](https://game.lhg100.com/Article/UploadFiles/201512/2015121518502024.jpg)
[#84]
Follow your current instructions by heading back to the Homestead Motel. Once you're inside the motel room use a computer terminal and choose the last option from the list (Extraction Details). Remember the combination 1323442 and head over to the bathroom. Stand on top of the bathtub and examine the toilet tank to find cryptochromatic spectacles [#84]. I would recommend that you put on your new glasses right away, because you won't be too exposed without a proper helmet. Leave the motel and fast travel to the Calvert Mansion.
![[#85] - Side quests - QUEST 5: The Velvet Curtain - part 2 - Side quests - Fallout 3: Point Lookout - Game Guide and Walkthrough](https://game.lhg100.com/Article/UploadFiles/201512/2015121518502079.jpg)
[#85]
You must head over to a large greenhouse located to the west of the mansion (or near its ruins). Make sure that you're using the spectacles found in the motel and examine each of four vases. Notice that each vase has rings, ranging from one to four. Your objective is to touch vases in the order corresponding to the message from the motel. Start with the vase with a single ring [#85] and then touch vases with three, two, three, four, four and two rings. Notice that a hatch has revealed itself near the last pedestal. Use this hatch to travel to the Chinese Intelligence Bunker.
![[#86] - Side quests - QUEST 5: The Velvet Curtain - part 2 - Side quests - Fallout 3: Point Lookout - Game Guide and Walkthrough](https://game.lhg100.com/Article/UploadFiles/201512/2015121518502135.jpg)
[#86]
Use the stairs to reach the lower level of the underground complex. There's a protectron in front of you, but you shouldn't destroy it. Instead talk to the machine and tell the password from the motel (first response from the list) [#86]. You don't have to follow the robot right away. Instead use your free time to explore your surroundings and collecting cool items, such as a mininuke, a chinese sword or a chinese rifle. The room where you've encountered the robot also contains A LOT of ammo boxes.
![[#87] - Side quests - QUEST 5: The Velvet Curtain - part 2 - Side quests - Fallout 3: Point Lookout - Game Guide and Walkthrough](https://game.lhg100.com/Article/UploadFiles/201512/2015121518502175.jpg)
[#87]
Once you feel you're ready use the next set of the stairs by heading to a lower level. Approach the robot and use the switch located next to it. You may now enter a small room located to your left. Take a Backwater rifle from the left shelf and use a nearby computer terminal [#87]. Sadly you'll find out that this was a trap and so you'll have to leave this room as soon as possible.
![[#88] - Side quests - QUEST 5: The Velvet Curtain - part 2 - Side quests - Fallout 3: Point Lookout - Game Guide and Walkthrough](https://game.lhg100.com/Article/UploadFiles/201512/2015121518502107.jpg)
[#88]
There are three ways for you to get out of this room, however two methods require you to have proper skills. You can interact with a switch located to the right of the closed door (high Science skill required), you can turn off the device located on the floor (high Repair skill required) or you can leave the room "manually". If you decide not to rely on your skills start using the jump key to get to the upper section of the room. You'll find a small hatch there [#88] and use it to escape. This quest will end once you're far away from the last computer terminal.
As you probably remember, Tobar told you that you would have to pay him ~400 bottlecaps each time you plan on using his ferry. Thankfully you can resolve this situation by performing a few simple tasks. Make sure that you've talked to Catherine even before you've used the boat for the first time (more on that in the Prologue section). Once you've arrived in Point Lookout you'll have to find Catherine's daughter named Nadine. She can be found easily while trying to complete the third main quest. All you have to do is to visit the Ark & Dove Cathedral and talk to her. Agree to meet Nadine near the Point Lookout Pier after talking to her about the person who has taken a part of your brain.
![[#89] - Appendix - Leaving the island - Appendix - Fallout 3: Point Lookout - Game Guide and Walkthrough](https://game.lhg100.com/Article/UploadFiles/201512/2015121518502181.jpg)
[#89]
You should be greeted by Nadine after you get to the pier [#89]. It would be wise to ask her a few questions during this conversation concerning the ritual from the swamps and the person who's taken a part of your brain. Nadine will tell you that Tobar is the one responsible and that she's been able to trap him in the Engine Room. You can now go and meet him by opening the left door.
![[#90] - Appendix - Leaving the island - Appendix - Fallout 3: Point Lookout - Game Guide and Walkthrough](https://game.lhg100.com/Article/UploadFiles/201512/2015121518502105.jpg)
[#90]
A new conversation will automatically begin when you get to the Engine Room. You can talk to Tobar and ask him why he's doing this to find out that he's collecting trophies or you can you choose a response that will trigger a fight. Perform a quick execution on Tobar and examine his body to collect a few useful items. The most precious find can be found on a table to your right [#90]. It's going to be the missing piece of your brain. :-)
![[#91] - Appendix - Leaving the island - Appendix - Fallout 3: Point Lookout - Game Guide and Walkthrough](https://game.lhg100.com/Article/UploadFiles/201512/2015121518502189.jpg)
[#91]
You can now travel between Point Lookout and Capitol Wasteland freely, because you won't be forced to buy tickets anymore. Each time you plan on leaving one area go to a small room and use the bed. When you return to Capitol Wasteland after dealing with Tobar don't forget to talk to Catherine. She should be standing somewhere close to the ferry [#91] assuming it's safe. The woman will reward you for finding Nadine with 300 bottlecaps and 10 Punga fruits.
![[#92] - Appendix - Additional activities - Appendix - Fallout 3: Point Lookout - Game Guide and Walkthrough](https://game.lhg100.com/Article/UploadFiles/201512/2015121518502113.jpg)
[#92]
BUOYS
The waters surrounding the island contain nine different rescue buoys. You can spot these objects from the dry land and they create specific sounds, so you shouldn't have any problems finding them. The buoys don't hold any treasures, but it'll be more important to swim under them. Each time you'll be allowed to collect a few things, but don't expect treasures of unbelievable value. The only buoy worth taking a closer look at is the one closest to the Coastal Grotto. If you swim under the buoy you'll come across a dinosaur skeleton [#92].
![[#93] - Appendix - Additional activities - Appendix - Fallout 3: Point Lookout - Game Guide and Walkthrough](https://game.lhg100.com/Article/UploadFiles/201512/2015121518502100.jpg)
[#93]
LIGHTHOUSE
The Point Lookout Lighthouse was a key object during one of the main quests and while you were completing it you've probably noticed that the building was inactive. You change that, but first you must find a bulb large enough to fit in the mechanism. Travel to a placed marked as the Truck Wreckage. Enter the truck and find an undamaged lighthouse bulb [#93].
![[#94] - Appendix - Additional activities - Appendix - Fallout 3: Point Lookout - Game Guide and Walkthrough](https://game.lhg100.com/Article/UploadFiles/201512/2015121518502114.jpg)
[#94]
Once you've taken the bulb you may proceed to the Point Lookout Lighthouse. If this is your first visit the structure shouldn't be protected by anyone, but if you were here before you'll come across a large group of smugglers. Most of your enemies will occupy the stairs [#94] and you should be happy to see them, because they've brought along a lot of useful items. Be careful while trying to get to the top of the lighthouse, because one of the smugglers will be carrying a rocket launcher. Eliminate him using one of your more powerful weapons.
[#95]
Make sure to look around when you get to the top of the staircase, because you'll have a chance to pick up another rocket launcher, as well as drugs, ammunition and medical supplies. Open a nearby door to return outside and focus on securing this entire balcony. Notice that there's a large stash of supplies and weapons nearby [#95]. Take whatever you can carry. You can now activate the lighthouse by placing the bulb in a correct slot and starting the mechanism. Sadly in order to exit the lighthouse you must use the stairs again, because if you jump you'll die instead of landing in the water safely.
![[#96] - Appendix - Additional activities - Appendix - Fallout 3: Point Lookout - Game Guide and Walkthrough](https://game.lhg100.com/Article/UploadFiles/201512/2015121518502240.jpg)
[#96]
SHOPPING
You'll probably be in desperate need of supplies more than once during your stay in Point Lookout. Thankfully you won't have to return to Capitol Wasteland to resupply, because there are a few friendly characters in Point Lookout. My recommendation is Haley's Hardware [#96]. The owner here can repair your equipment and he's selling A LOT of items. Notice that he's not hiding his stock, so you can try stealing items from him. You can also murder Haley and loot his body. It's not a wise decision, though, unless you're planning on leaving Point Lookout for good.
![[#97] - Appendix - Additional activities - Appendix - Fallout 3: Point Lookout - Game Guide and Walkthrough](https://game.lhg100.com/Article/UploadFiles/201512/2015121518502238.jpg)
[#97]
A second location worth of your interest is a House of Wares [#97]. In this case you can talk to a woman named Panada. Notice that her store is outside, so it is possible for her to die if you engage hostile units in direct combat. If you see that Panada has died you can loot her body and you can also inspect her stash. Notice that if you steal from her stash you will receive negative karma points, so you should think it through if you're playing as a good characters.
MAIN MAP OF THE FOUR SECTORS:

MAP OF THE FIRST SECTOR (NORTH-WEST):
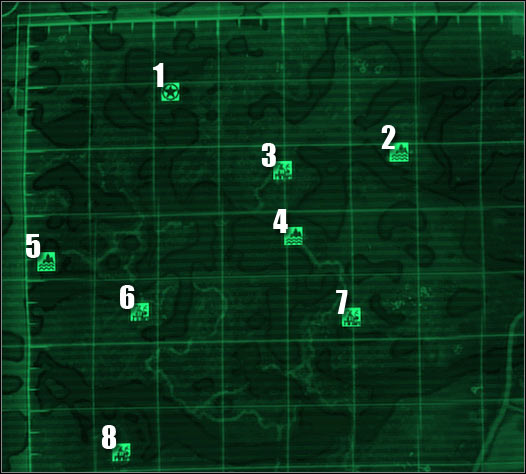
Map legend:
1 - Jet Crash Site
2 - Trash Heap
3 - Trapper's Shack
4 - Flooded Sinkhole
5 - Sacred Bog Entrance
6 - Grower's Shack
7 - Lil' Tyke Playhouse
8 - Blackhall Manor
MAP OF THE SECOND SECTOR (NORTH-EAST):
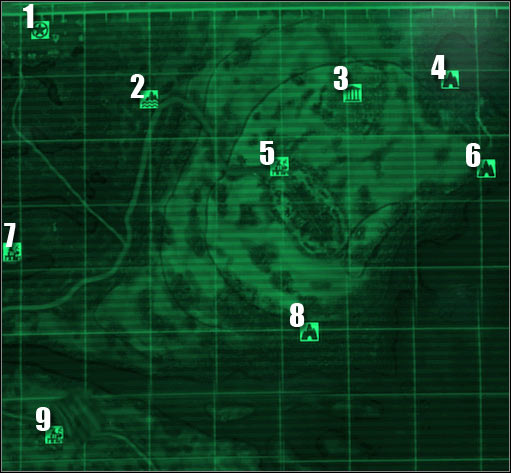
Map legend:
1 - Turtledove Detention Camp
2 - Truck Wreckage
3 - Ark & Dove Resting Grounds
4 - Wrecked Seatub
5 - The Ark & Dove Cathedral
6 - Coastal Grotto
7 - Marguerite's Shack
8 - Herzog Mine
9 - Haley's Hardware
MAP OF THE THIRD SECTOR (SOUTH-WEST):

Map legend:
1 - Ofie Clan Plot
2 - The Homestead Motel
3 - House of Wares
4 - Dove Delta
5 - Disaster Relief Outpost
6 - Pilgrim's Landing
7 - Point Lookout Pier
MAP OF THE FOURTH SECTOR (SOUTH-EAST):

Map legend:
1 - USS Ozymandias
2 - Ritual Site
3 - Beachview Campsite
4 - Calvert Mansion
5 - Sub Recovery Site
6 - Point Lookout Lighthouse
Important notice: Some of the locations in Fallout 3 had no real purpose, however in Point Lookout almost all of them are of high significance. As a result is you should visit all of them, especially since you'll find a lot of useful equipment. Notice that some of the locations will require you to spend more time searching for treasures (Herzog Mine is a great example) and some of them will be well guarded. I would strongly recommend avoiding Ark & Dove Resting Grounds and Turtledove Detention Camp unless you're well prepared.
There are four achievements in Point Lookout and they're all worth 100 points. The only achievement you may have problems finishing is the one that requires you to visit all locations, because the rest is tied to main quests of the game.
ACHIEVEMENT
REWARD
REQUIREMENTS
A Meeting of the Minds
20
Complete A Meeting of the Minds quest (fifth main).
Bog Walker
40
Discover AND visit all locations in Point Lookout. Go to the section of the guide titled Point Lookout maps to find out about these places. Notice that you only have to visit "official" locations that appear on your main map.
The Local Flavor
20
Complete The Local Flavor quest (first main).
Walking With Spirits
20
Complete Walking with Spirits quest (second main).


 Fable II: Knothole Island Game Guide & Walkthrough
 Fable III Game Guide & Walkthrough
 Fallout Shelter Game Guide & Walkthrough
 Far Cry 2 Game Guide & Walkthrough
 Fallout 3: Mothership Zeta Game Guide & Walkthrough