
This guide to Fallout 3: Mothership Zeta includes a complete walkthrough for all of the missions in this expansion pack to the RPG game - Fallout 3. It also includes the description of new achievements and whereabouts of the audio logs recorded by the people abducted by the aliens.
This guide includes:
Fallout 3: Mothership Zeta is the fifth DLC for a popular RPG game - Fallout 3. This DLC gives you the opportunity to visit an alien ship. During the game, you will be using new weapons and armor. Also, the game is not short of additional NPCs and additional achievements.
Make sure that Mothership Zeta has been installed properly on your computer and you'll also have to activate it from the game's autostart. This final fifth add-on is not suitable for players whose characters have just left Vault 101. The best moment in my opinion to begin this new journey is somewhere around 15th-20th level of experience. Thankfully you won't have to worry about taking good equipment for the new mission, because you'll find A LOT of useful guns on board of the mothership. The only real exception is the armor, so I would recommend visiting the Citadel prior to meeting the aliens and learning how to use power armors. Don't forget to collect any equipment you need from your followers, because they won't be abducted and they'll remain in Capitol Wasteland waiting for you to return to them.
![[#1] - Prologue - Fallout 3: Mothership Zeta - Game Guide and Walkthrough](https://game.lhg100.com/Article/UploadFiles/201512/2015121518494062.jpg)
[#1]
This DLC is being activated in a similar manner to previous add-ons, so you should choose your last saved game. Make sure that you're standing on an open field, not in a city nor a village. You'll have to wait for about one minute for a message to be displayed on your screen. Notice that a new radio station has been added in your Pip-Boy, called Recon Craft Theta Beacon [#1]. Choose it from the list and listen to some strange noises while waiting for the first main quest to be activated.
Received from: automatically during the exploration of Capitol Wasteland [Capitol Wasteland]
![[#2] - Main quests - QUEST 1: Not Of This World - part 1 - Main quests - Fallout 3: Mothership Zeta - Game Guide and Walkthrough](https://game.lhg100.com/Article/UploadFiles/201512/2015121518494047.jpg)
[#2]
Walkthrough: The area you'll have to reach should be familiar to you if you've been thorough while playing the main game for the first time. This is where one of the alien ships have crash landed and where you've collected an alien blaster. You can reach the crash site by starting your journey from one of four nearby locations - Greener Pastures Disposal Site, MDPL-13 Power Station, Reclining Groves Resort Homes or Clifftop Shacks. Upon your arrival in the target area you're going to be automatically captured by an alien beam [#2] and transported slowly to an alien ship. Afterwards you'll witness your character being tested by strange looking creatures.
![[#3] - Main quests - QUEST 1: Not Of This World - part 1 - Main quests - Fallout 3: Mothership Zeta - Game Guide and Walkthrough](https://game.lhg100.com/Article/UploadFiles/201512/2015121518494068.jpg)
[#3]
You'll eventually find yourself standing in an area of the ship called Holding Cells. Wait for the game to automatically initiate a conversation with Somah. It doesn't really matter how you'll respond to her comments, because you can't make her angry at you and you won't receive any profits for being polite. Ignore a short intermission, because the machine will take someone else [#3]. Talk to Somah again and this time focus on figuring out a way to escape the ship. You can agree to her plan of starting a fight right away or you can question it by saying it's a bad idea. Sadly you don't have any other alternatives, especially since there aren't any interactive objects in the area and also because you've lost your equipment (only temporarily).
![[#4] - Main quests - QUEST 1: Not Of This World - part 1 - Main quests - Fallout 3: Mothership Zeta - Game Guide and Walkthrough](https://game.lhg100.com/Article/UploadFiles/201512/2015121518494055.jpg)
[#4]
Once you've agreed to Somah's plans you'll start a melee fight [#4]. Don't worry, because you won't lose too much health here. Damage done to your character is going to be minimal, even if you allow her to punch you a few times. Wait for two aliens to appear near the force field. Both creatures will soon enter the cell to stop this fight. This is your chance to escape, so stop attacking Somah and focus on killing both aliens. Each time hit only one target. This is important, because the aliens will use shock batons to stun you. Once you've eliminated both creatures make sure to collect one of the batons and to choose it as your primary weapon. For the next few minutes this is going to be your only piece of equipment.
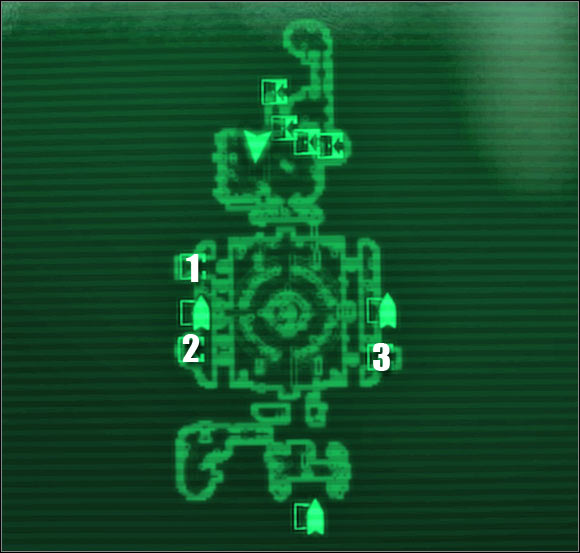
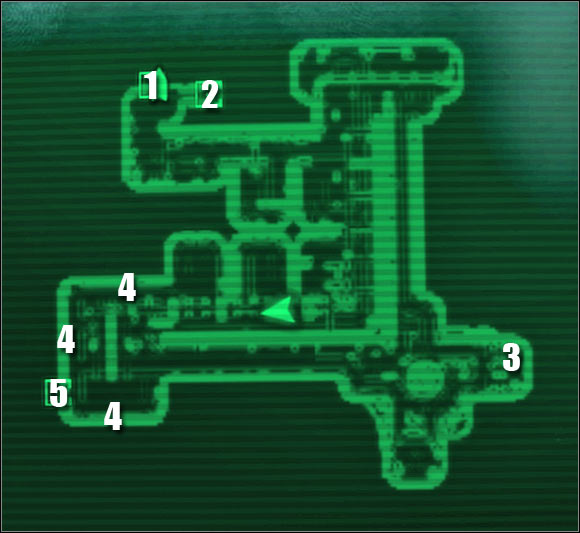
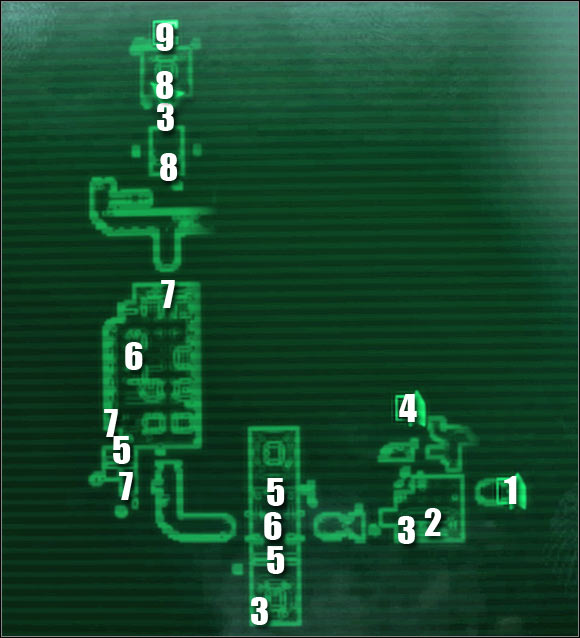
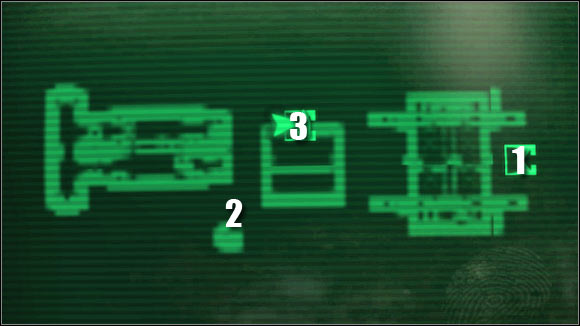
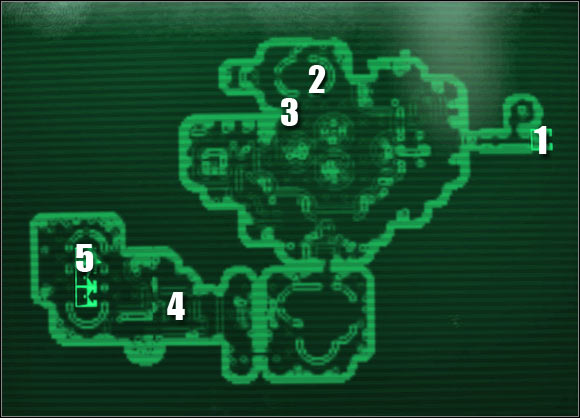
MAP OF THE HOLDING CELLS:
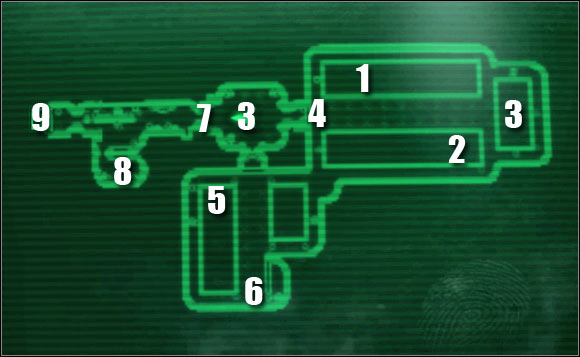
Map legend: 1 - holding cell where you start the game; 2 - imprisoned guard from Rivet City; 3 - control panel with the first recording; 4 - healing archway; 5 - Sally's cell; 6 - generator; 7 - blocked passageway; 8 - control station and your equipment; 9 - passageway to: Steamworks
![[#5] - Main quests - QUEST 1: Not Of This World - part 1 - Main quests - Fallout 3: Mothership Zeta - Game Guide and Walkthrough](https://game.lhg100.com/Article/UploadFiles/201512/2015121518494086.jpg)
[#5]
Get ready, because two other aliens will enter this cell in just a few seconds. Defeating the creatures should be slightly easier since you already have a melee weapon. Exit the cell once it's safe and choose the eastern corridor. There are a few release mechanisms on the nearby walls, however they're not too important. One of the cells imprisons a guard from Rivet City [#5], but you don't even have to talk to this person. Aside from that you'll find a dead Enclave soldier. Take his clothes if you don't feel comfortable running around half-naked.
![[#6] - Main quests - QUEST 1: Not Of This World - part 1 - Main quests - Fallout 3: Mothership Zeta - Game Guide and Walkthrough](https://game.lhg100.com/Article/UploadFiles/201512/2015121518494049.jpg)
[#6]
Continue heading eastwards. You'll soon enter a slightly larger room where you'll be allowed to interact with a glowing control panel [#6]. Doing this will allow you to get your hands on the first recording made by one of the captives. There 25 recordings "hidden" on the ship and adding all of them to your Pip-Boy's playlist is required if you're planning on fulfilling one of the achievements in Mothership Zeta. There are three panels in this room - #15, #22, #14. Return to the start area once you've found all of them and this time proceed west.
![[#7] - Main quests - QUEST 1: Not Of This World - part 1 - Main quests - Fallout 3: Mothership Zeta - Game Guide and Walkthrough](https://game.lhg100.com/Article/UploadFiles/201512/2015121518494010.jpg)
[#7]
You'll now have to go through something that looks like a stargate [#7]. This is a healing archway and it's purpose is to grant you with a small amount of health points. Thankfully you won't have to rely only on these devices, because you'll find tons of healing items (including food) while searching other decks of the ship. Explore a new large room to collect three new recordings - #3, #1, #12. Choose the southern corridor by opening a massive looking door.
![[#8] - Main quests - QUEST 1: Not Of This World - part 1 - Main quests - Fallout 3: Mothership Zeta - Game Guide and Walkthrough](https://game.lhg100.com/Article/UploadFiles/201512/2015121518494139.jpg)
[#8]
Approach the cell located to your right and you'll come across a young girl named Sally. She wants you to get her out, however there aren't any control panels in the vicinity of her cell. Proceed further down to the south and approach a single control panel. Using this device will result in a generator being raised from the floor. Your objective will be to approach and use three coolant switches [#8] located around the generator. Once you've disabled all three units move back to a safe distance. Wait for the generator to overheat and explode. You may return to Sally and obviously you should ask her to assist you in leaving this deck of the flying ship.
![[#9] - Main quests - QUEST 1: Not Of This World - part 1 - Main quests - Fallout 3: Mothership Zeta - Game Guide and Walkthrough](https://game.lhg100.com/Article/UploadFiles/201512/2015121518494154.jpg)
[#9]
Follow Sally to a large room where you've found the second set of recordings. Proceed towards the left door. Ignore Somah's comments and wait for the little girl to unlock this passageway for you. Once again you should agree to her offer, because her actions will make your progress slightly less painful. Head west and don't forget to kill one of the aliens [#9]. I would recommend that you start looting bodies of alien creatures from now on, because most of them will be carrying weapons, ammunition, medical supplies, food and other valuable items.
![[#10] - Main quests - QUEST 1: Not Of This World - part 1 - Main quests - Fallout 3: Mothership Zeta - Game Guide and Walkthrough](https://game.lhg100.com/Article/UploadFiles/201512/2015121518494197.jpg)
[#10]
It's crucial that you explore a small room where the alien was standing not long ago. Use a large switch to open a passageway leading to the next section of the ship, HOWEVER don't leave this area just yet. It's extremely important that you open all nearby containers [#10], because one of them will contain your equipment. Aside from that you'll also find plasma grenades and an Enclave helmet. Rearm yourself and once you're ready choose the passageway leading to the Steamworks.
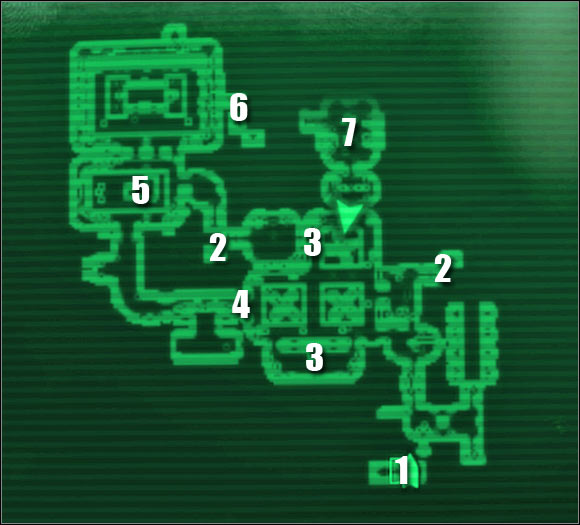
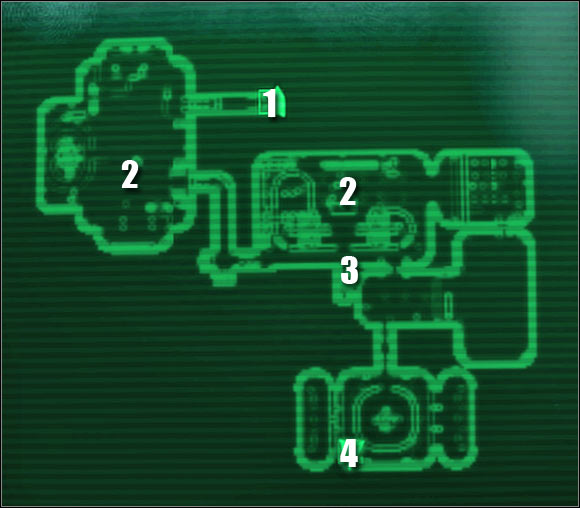
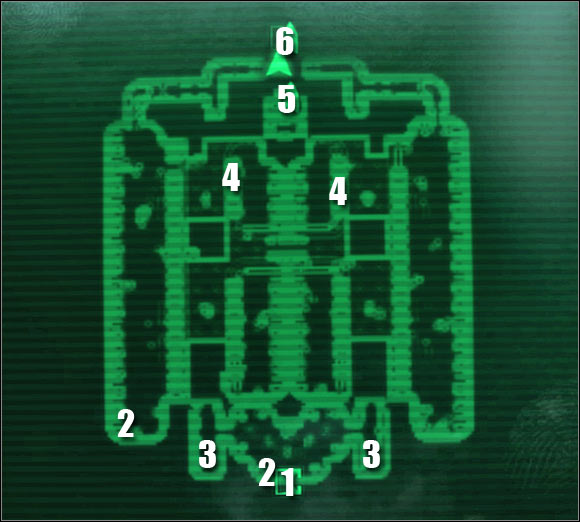
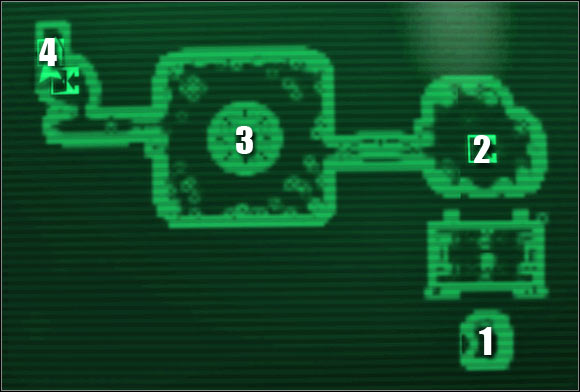
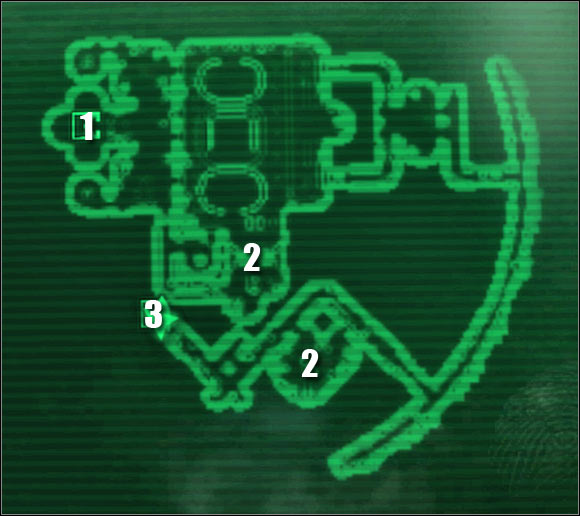
MAP OF THE STEAMWORKS:
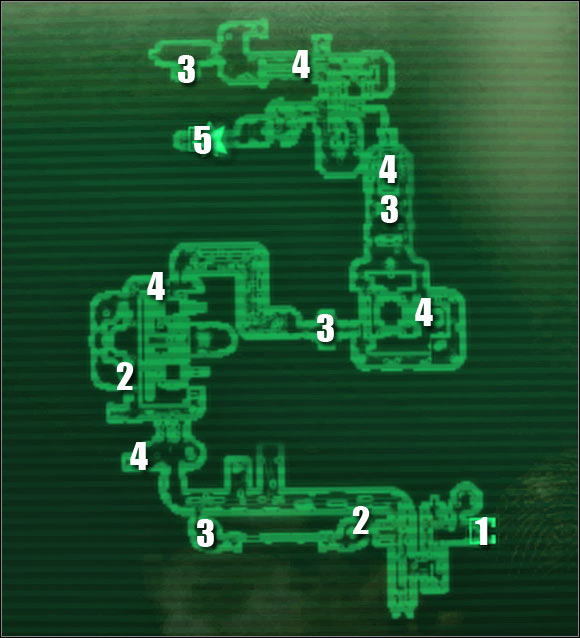
Map legend: 1 - passageway to: Holding Cells; 2 - passageways unlocked by Sally; 3 - healing archways; 4 - stairs; 5 - passageway to: Engineering Core
![[#11] - Main quests - QUEST 1: Not Of This World - part 2 - Main quests - Fallout 3: Mothership Zeta - Game Guide and Walkthrough](https://game.lhg100.com/Article/UploadFiles/201512/2015121518494161.jpg)
[#11]
After you find yourself in an entirely new area of the ship make a few steps forward and talk to Sally again, assuming that you've agreed to her offer of exploring the alien vessel together. Look to your left and when you zoom in the view you should be able to notice a group of three alien creatures. You can take them out yourself or you can ask the girl for help in this matter. Sally can take your grenades [#11]. If you don't have any explosives from your journeys in Capitol Wasteland you can always give her plasma grenades found in the Holding Cells. Wait for the girl to enter a nearby ventilation shaft. She'll soon get closer to the hostile creatures and blow them up. Loot their bodies to collect treasures.
![[#12] - Main quests - QUEST 1: Not Of This World - part 2 - Main quests - Fallout 3: Mothership Zeta - Game Guide and Walkthrough](https://game.lhg100.com/Article/UploadFiles/201512/2015121518494177.jpg)
[#12]
Proceed to the north and after that head west. There's a group of alien creatures in front of you. You can attack them right away or you can wait for the girl to unlock a passageway located to your left [#12]. Either way, you'll find containers with some very valuable equipment here. I would strongly recommend picking up an Alien Disintegrator, especially since this gun is equally powerful to a standard plasma rifle. You may have some problems aiming from larger distances, but thankfully most of the aliens will start running towards you instead of trying to stay away. The decision on whether you want to use it or not is up to you, however bear in mind that you'll find a lot of ammunition and you would be allowed to swap weapons often by picking up less damaged models. Ignore Alien Atomizers on the other hand, because they're crap.
![[#13] - Main quests - QUEST 1: Not Of This World - part 2 - Main quests - Fallout 3: Mothership Zeta - Game Guide and Walkthrough](https://game.lhg100.com/Article/UploadFiles/201512/2015121518494101.jpg)
[#13]
You must now make a decision on whether you want to continue following Sally's aids or maybe you want to explore the ship on your own and kill everything that will stand in your way. If you want to keep it quiet choose a smaller corridor where you'll encounter a single alien [#13]. Use a Stealth Boy for better effect, however even then you may attract other creatures to your position. If you don't have anything against open combat consider placing landmines before you attack any larger group of aliens and move back to a safe area each time you've suffered major injuries.
![[#14] - Main quests - QUEST 1: Not Of This World - part 2 - Main quests - Fallout 3: Mothership Zeta - Game Guide and Walkthrough](https://game.lhg100.com/Article/UploadFiles/201512/2015121518494106.jpg)
[#14]
Don't forget to reload your current weapon after each fight and use items found along the way or carried from the wasteland to regenerate your health. As you've probably noticed most of the aliens leave medical supplies behind, so you shouldn't run out of supplies. One of the side corridors hides a healing archway and it would be a good idea to use it while trying to reach your current destination. Eventually you'll have to get to a corridor leading to the northern section of this deck [#14].
![[#15] - Main quests - QUEST 1: Not Of This World - part 2 - Main quests - Fallout 3: Mothership Zeta - Game Guide and Walkthrough](https://game.lhg100.com/Article/UploadFiles/201512/2015121518494121.jpg)
[#15]
There are two ways for you to explore this area. If you've got nothing against open combat you may remain on the ground floor. Enter a large room and aside from the aliens you would also have to eliminate two drones. The biggest threat is going to be an alien surrounded by a force field [#15]. Killing this creature is not going to be easy and you'll also have to watch out for possible reinforcements appearing behind you.
![[#16] - Main quests - QUEST 1: Not Of This World - part 2 - Main quests - Fallout 3: Mothership Zeta - Game Guide and Walkthrough](https://game.lhg100.com/Article/UploadFiles/201512/2015121518494108.jpg)
[#16]
If you're a fan of a stealth approach you should stay away from the main warehouse and instead use the stairs to your left. Only one alien would stand in your way. Sally would drop a bomb on the rest upon your arrival in the balcony area [#16], allowing you to move more freely. Either way your top priority will be to reach a small exit located in the northern section of the room. Afterwards head east.
![[#17] - Main quests - QUEST 1: Not Of This World - part 2 - Main quests - Fallout 3: Mothership Zeta - Game Guide and Walkthrough](https://game.lhg100.com/Article/UploadFiles/201512/2015121518494239.jpg)
[#17]
Watch out, because you'll come across an alien defense turret just around the corner. Thankfully its structure is very similar to the turrets you've been finding so far. You won't have to worry about losing a lot of health and it'll only take a few hits to destroy the target. Aside from the turret you should also be prepared to eliminate new aliens along the way. Don't forget to use a healing archway. Once you've found your way to a new room use the stairs [#17] to reach an upper floor. Hide somewhere to your left, wait for aliens to show up and surprise them if you can.
![[#18] - Main quests - QUEST 1: Not Of This World - part 2 - Main quests - Fallout 3: Mothership Zeta - Game Guide and Walkthrough](https://game.lhg100.com/Article/UploadFiles/201512/2015121518494254.jpg)
[#18]
Don't forget that you should always search a new room and open all containers, especially if you don't have a lot of ammunition and medical supplies left in your backpack. This time choose the balcony leading to the north. Once you've arrived destroy a turret and then attack the aliens. All the creatures will be appearing near an archway [#18], so it should be easy to get rid of them. Heal yourself after you've won and use the stairs to head down. Watch out, because a large group of aliens is stationed in the corridor with a big pipe. Once they're gone approach the exit and locate a turret.
![[#19] - Main quests - QUEST 1: Not Of This World - part 2 - Main quests - Fallout 3: Mothership Zeta - Game Guide and Walkthrough](https://game.lhg100.com/Article/UploadFiles/201512/2015121518494274.jpg)
[#19]
Proceed to the north-west and eventually you'll find the stairs leading to an upper level. It shouldn't take too long before you meet up with Sally. Check the north-western corner of this deck. Aside from a new healing archway you'll also come across a lot of supplies, including alien blaster cells and a lot of crystals [#19]. Return to the area where Sally is standing and proceed towards an unexplored corridor. There's one more turret here for you to destroy. Once this is done choose the passageway leading to the Engineering Core.
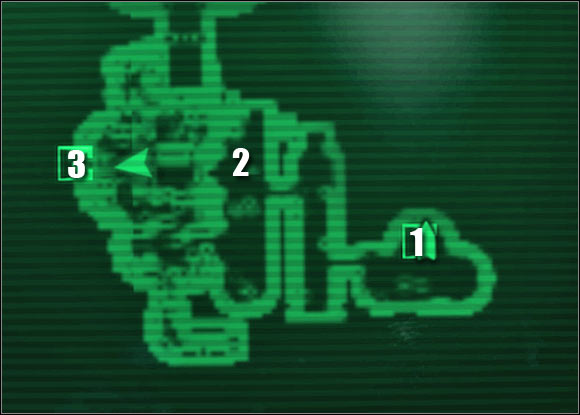
MAP OF THE ENGINEERING CORE:
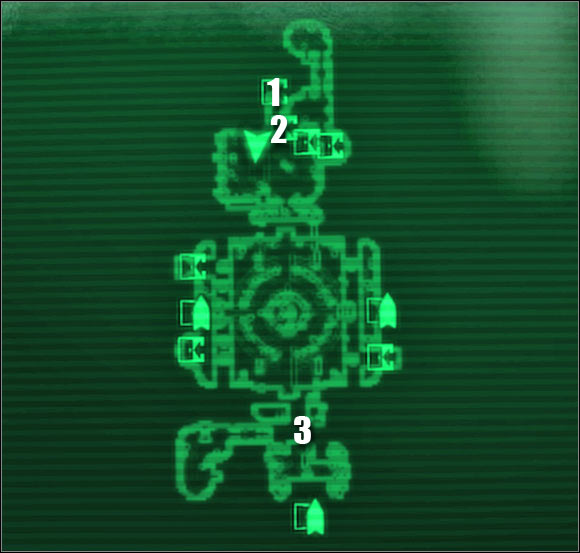
Map legend: 1 - passageway to: Steamworks; 2 - teleportation matrix being inspected by Sally; 3 - frozen people
![[#20] - Main quests - QUEST 1: Not Of This World - part 2 - Main quests - Fallout 3: Mothership Zeta - Game Guide and Walkthrough](https://game.lhg100.com/Article/UploadFiles/201512/2015121518494279.jpg)
[#20]
This is the main deck of the alien ship and it shouldn't come as a surprise that you'll be returning here many times in the future. The biggest news is that there aren't any hostiles here at the moment. You may as well ignore alien workers, because they're no threat to you and you would receive negative karma for killing them. You may take a while to explore the ship or you can use the stairs to follow Sally [#20]. Once you've reached the matrix listen to her comments about finding a different way to get off the ship.
![[#21] - Main quests - QUEST 1: Not Of This World - part 2 - Main quests - Fallout 3: Mothership Zeta - Game Guide and Walkthrough](https://game.lhg100.com/Article/UploadFiles/201512/2015121518494282.jpg)
[#21]
Keep following the young girl to the ship's main core. You'll then enter the southern room. Once you've arrived [#21] you'll automatically trigger a new conversation. Notice that there are some people here who were being frozen by the aliens. You'll now have a chance to wake them up. Wait for Somah to show up and soon after that you'll end the first main quest.
Received from: automatically upon completion of Not Of This World [Engineering Core]
MAP OF THE ENGINEERING CORE:
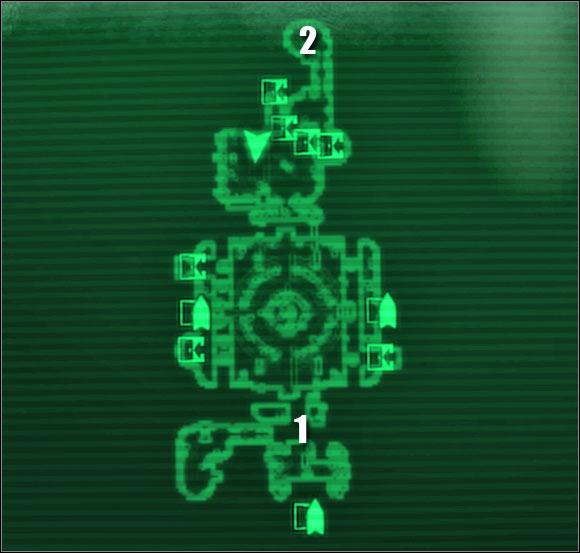
Map legend: 1 - capsules with frozen people and control panels with recordings; 2 - Sally's hideout
![[#22] - Main quests - QUEST 2: Among The Stars: Introduction - Main quests - Fallout 3: Mothership Zeta - Game Guide and Walkthrough](https://game.lhg100.com/Article/UploadFiles/201512/2015121518494228.jpg)
[#22]
Walkthrough: After you've officially started this quest you should take your time to look around. First of all, you'll find four control panels near your position. Interacting with the alien devices will allow you to get your hands on four recordings - #5, #6, #7, #8. Once you're ready to move on with the main quest approach the central control panel [#22] and use it to open all nearby capsules. You may now talk to Sally and you'll find out that you're next objective will be to destroy three generator scattered throughout the entire alien ship.
Important! If you wish to continue with the main task at hand skip to section QUEST 2: Among The Stars - Primary locations. If you've got nothing against visiting all areas of the ship read section QUEST 2: Among The Stars - Secondary locations.
[#23]
RESCUED PEOPLE:
You'll be allowed to talk to the rescued wastelanders and this isn't something you should ignore. The only exception is colonel Hartigan [#23], because he's the only one who didn't survive. Notice that he was an astronaut, so you should take his suit. You won't need it right away, but you won't have to return here after you've advanced with the main quest. As for the rest of the people, it would be a good idea to talk to them right away, because otherwise they'll leave this area and you'll only waste precious time trying to find them (they won't leave the core).
![[#24] - Main quests - QUEST 2: Among The Stars: Introduction - Main quests - Fallout 3: Mothership Zeta - Game Guide and Walkthrough](https://game.lhg100.com/Article/UploadFiles/201512/2015121518494286.jpg)
[#24]
Toshiro Kago is the only person you won't be able to communicate with, because he doesn't understand a word in English [#24]. As you've probably noticed he's a samurai and even if you do say something to him he'll respond in Japanese. If you decide to kill Kago you would be allowed to take his samurai sword, however I would recommend keeping him alive.
![[#25] - Main quests - QUEST 2: Among The Stars: Introduction - Main quests - Fallout 3: Mothership Zeta - Game Guide and Walkthrough](https://game.lhg100.com/Article/UploadFiles/201512/2015121518494329.jpg)
[#25]
Paulson on the other hand is a cowboy. Convincing him that you're not conspiring with the aliens shouldn't be a problem. Notice that you can ask him about his family during the initial conversation [#25]. This can be achieved either by using the Black Widow perk or by listening to one of the found recordings and passing a Speech challenge.
![[#26] - Main quests - QUEST 2: Among The Stars: Introduction - Main quests - Fallout 3: Mothership Zeta - Game Guide and Walkthrough](https://game.lhg100.com/Article/UploadFiles/201512/2015121518494387.jpg)
[#26]
The last person you've rescued is a soldier who goes by the name of Elliott Tercorien. He's a medic to be more exact and so he can help in getting your hands on valuable medical supplies [#26]. The idea here is that you can deliver alien biogel and in return you'll receive adapted biogel from Elliott. The new type of the gel can heal up to 150 health points, but sadly there are some serious side effects. As a result you should rely on stimpacks for as long as possible.
![[#27] - Main quests - QUEST 2: Among The Stars: Introduction - Main quests - Fallout 3: Mothership Zeta - Game Guide and Walkthrough](https://game.lhg100.com/Article/UploadFiles/201512/2015121518494378.jpg)
[#27]
OTHER CHARACTERS:
You can talk to Sally again after you've successfully rescued all the wastelanders. If you have Child at Heart perk you will be allowed to convince the girl to share a secret with you [#27]. Once the conversation has ended follow Sally to the northern section of the deck and wait for her to disable a nearby barrier. You can enter a small storage area where you'll find three containers filled with alien items. The other person you can talk to is Somah and she can repair some of the things from your inventory (for a price, of course).
Important! If you want to find out more about which person you can take as your ally go to section QUEST 2: Among The Stars - Primary locations.
![[#28] - Main quests - QUEST 2: Among The Stars: Introduction - Main quests - Fallout 3: Mothership Zeta - Game Guide and Walkthrough](https://game.lhg100.com/Article/UploadFiles/201512/2015121518494352.jpg)
[#28]
OTHER AREAS OF INTEREST:
There's a small storage space to the west of the capsules and you'll find interesting items there. After you've returned to the Engineering Core from your first mission you'll witness a scene showing an interrogation of one of the aliens [#28]. Don't interfere, especially since Paulson will execute the creature anyway. Later on during the course of the game the core will be attacked by several groups of aliens. In this case you should assist your allies in getting rid of the creatures, however they should also be fine on their own.
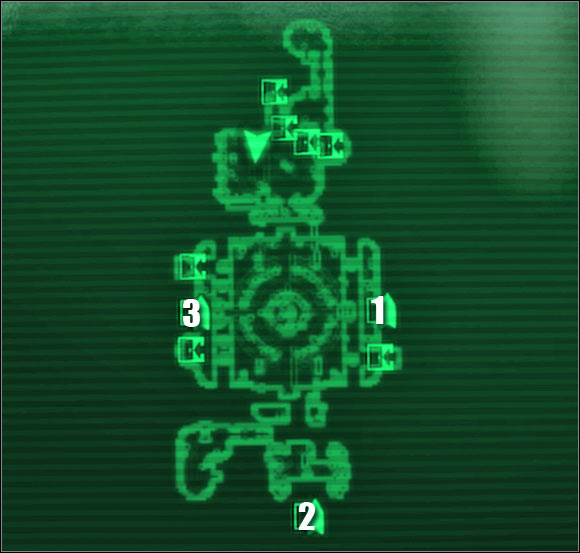
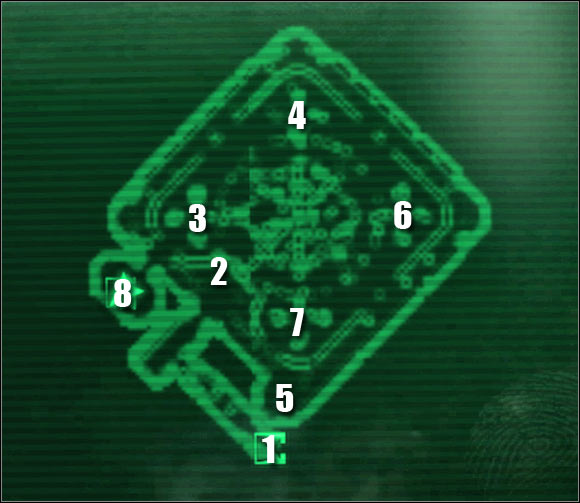
MAP OF THE ENGINEERING CORE:
Map legend: 1 - passageway to: Engine Room; 2 - teleportation matrix to: Maintenance Level; 3 - passageway to: Cargo Hold
Before you'll proceed with your main assignment it would be a good idea to visit three locations mentioned in this section of the guide - the Engine Room, the Maintenance Level and the Cargo Hold. Doing so will allow you to find new guns, new recording and ammunition. Keep reading to find out more about these places.
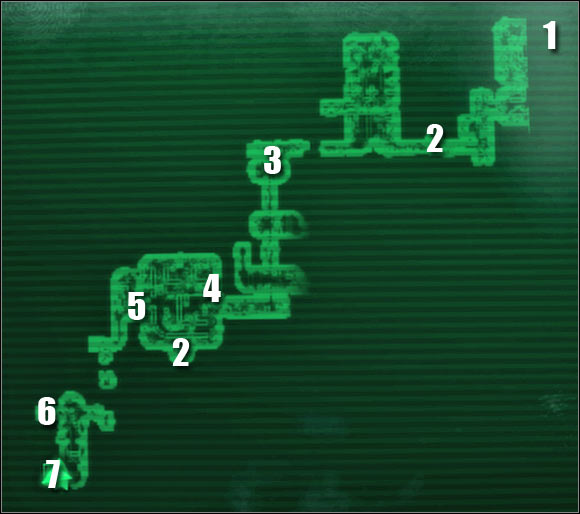
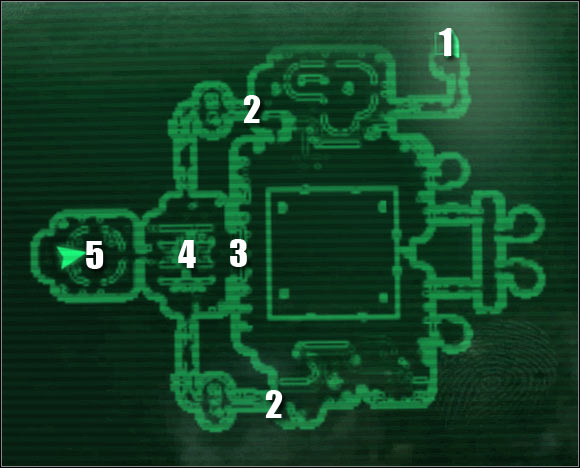
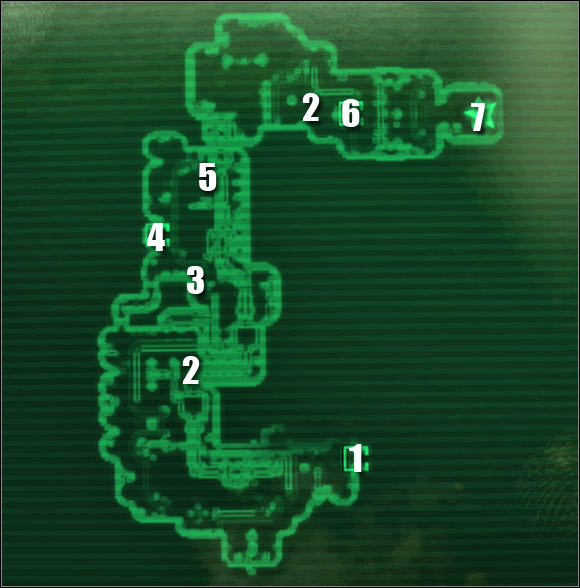
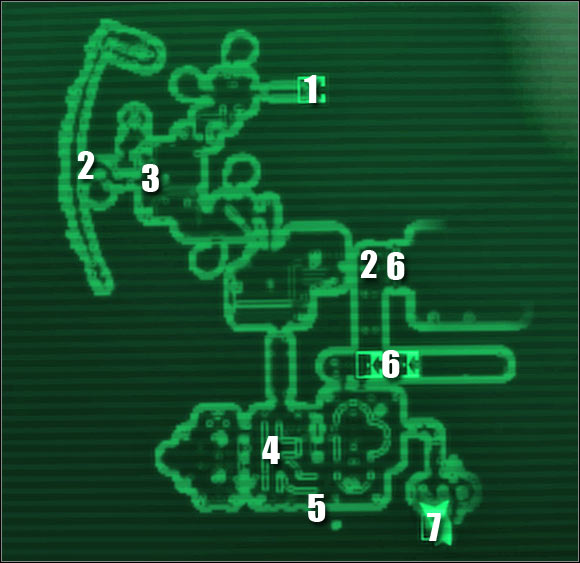
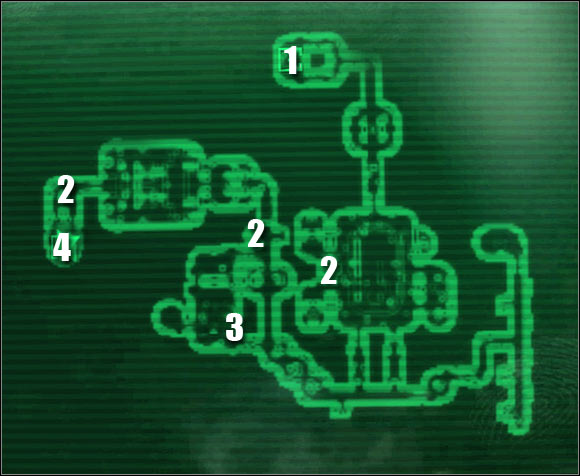
MAP OF THE ENGINE ROOM:
Map legend: 1 - passageway to: Engineering Core; 2 - healing archways; 3 - control panels; 4 - passageway to the western section of the engine room; 5 - stairs and a control pane; 6 - control panel and a healing archway; 7 - main storage space
![[#29] - Main quests - QUEST 2: Among The Stars: Secondary locations - part 1 - Main quests - Fallout 3: Mothership Zeta - Game Guide and Walkthrough](https://game.lhg100.com/Article/UploadFiles/201512/2015121518494389.jpg)
[#29]
Engine Room is a large area and you should consider visiting it only if you've developed a strong character. The main reason is that you'll encounter a lot of heavily equipped enemies and you're going to need big guns to kill them. Eliminating the aliens won't be that bad. It's the security bots you should be worried about [#29]. Keep destroying these machines from a larger distance, because they're deadly in short range combat. Don't forget to inspect the wrecks, because you'll find a powerful Drone Cannon. This weapons fires large spheres which can bounce off nearby walls. It's best to use this gun against slow targets, so don't forget to switch to something better each time you encounter aliens instead of bots.
![[#30] - Main quests - QUEST 2: Among The Stars: Secondary locations - part 1 - Main quests - Fallout 3: Mothership Zeta - Game Guide and Walkthrough](https://game.lhg100.com/Article/UploadFiles/201512/2015121518494366.jpg)
[#30]
Keep heading forward and make sure to secure each room before moving on to the next one. Don't forget to inspect all the bodies and wrecks, as well as keep opening containers. Once you've entered a larger room you'll be allowed to sabotage one of the nearby control panels [#30]. I would recommend overloading the system, so that a turret found in the next room will explode on its own. If you can't see this option on the list you'll have to increase your Science skill. A second panel found inside the southern room will open a passageway leading to the west section of this deck. Go there now.
![[#31] - Main quests - QUEST 2: Among The Stars: Secondary locations - part 1 - Main quests - Fallout 3: Mothership Zeta - Game Guide and Walkthrough](https://game.lhg100.com/Article/UploadFiles/201512/2015121518494314.jpg)
[#31]
Expect heavy resistance near one of the staircases [#31]. If you have some mines you can place them nearby and wait for enemies to show up. Don't forget to use your most powerful guns against the drones, however you'll also have to defeat a couple of aliens protected by force fields. The best way to get rid of them is to aim for their heads in hopes for a critical hit. Once it's safe head down and expect to find more enemies inside a narrow passageway.
![[#32] - Main quests - QUEST 2: Among The Stars: Secondary locations - part 1 - Main quests - Fallout 3: Mothership Zeta - Game Guide and Walkthrough](https://game.lhg100.com/Article/UploadFiles/201512/2015121518494397.jpg)
[#32]
A storage area with the most valuable treasures can be found in the northern section of this deck [#32]. You'll probably encounter additional aliens along the way, however you will also be allowed to hack into several security terminals. Check the last room to find ammunition among other interesting objects. Thankfully you won't have to go through all the rooms again, because you can open the southern door to get to the exit quickly.
MAP OF THE MAINTENANCE LEVEL:
Map legend: 1 - teleportation matrix to: Engineering Core; 2 - elevator; 3 - passageway to: Waste Disposal
![[#33] - Main quests - QUEST 2: Among The Stars: Secondary locations - part 1 - Main quests - Fallout 3: Mothership Zeta - Game Guide and Walkthrough](https://game.lhg100.com/Article/UploadFiles/201512/2015121518494493.jpg)
[#33]
Don't be fooled by how small this area looks on your personal map, because the Maintenance Level is merely an introduction to a much larger deck which you'll be allowed to travel to in the near future. After you've used the matrix to get here inspect nearby containers and proceed to the north-west. You'll soon reach an elevator with Sally standing inside [#33].
![[#34] - Main quests - QUEST 2: Among The Stars: Secondary locations - part 1 - Main quests - Fallout 3: Mothership Zeta - Game Guide and Walkthrough](https://game.lhg100.com/Article/UploadFiles/201512/2015121518494460.jpg)
[#34]
You can talk to Sally, however this conversation is not that important to what you're doing here. Instead focus on the fact that the elevator has begun falling. Each time you'll make a stop near a window and you'll have to be careful, because you'll see aliens on the other side twice. Ignore the first group, however attack the next one [#34]. Once it's safe Sally will leave the elevator. You'll be less lucky than her, because you'll end up on a lower level and next to a destroyed elevator. Wait until you can control the main character again and heal his injuries (legs) if necessary. Talk to Sally again and agree to split up for a few minutes. Once the conversation has ended choose a nearby passageway leading to the Waste Disposal.
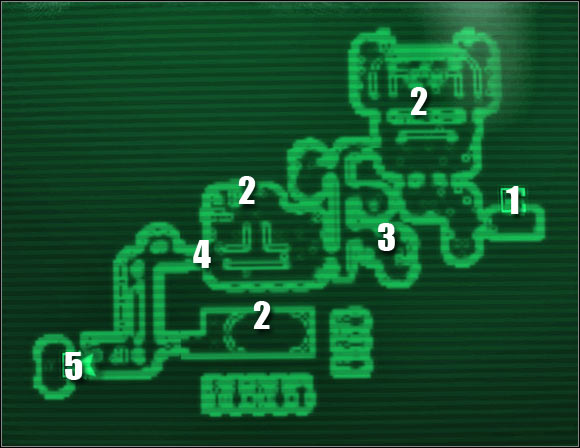
MAP OF THE WASTE DISPOSAL:
Map legend: 1 - passageway to: Maintenance Level; 2 - healing archways; 3 - series of force fields and control panels; 4 - recordings; 5 - ambush (alien units); 6 - storage space; 7 - teleportation matrix to: Engineering Core
![[#35] - Main quests - QUEST 2: Among The Stars: Secondary locations - part 1 - Main quests - Fallout 3: Mothership Zeta - Game Guide and Walkthrough](https://game.lhg100.com/Article/UploadFiles/201512/2015121518494431.jpg)
[#35]
Ignore the fact that there's a lot of machinery nearby, because you won't have to go under any one of these machines unless you really want to. The only exception will be when you'll plan on reaching locked safes located to the south of the entrance [#35]. Thankfully if you aren't careful enough you won't be crushed to death right away, but instead you'll only lose a few health points.
![[#36] - Main quests - QUEST 2: Among The Stars: Secondary locations - part 1 - Main quests - Fallout 3: Mothership Zeta - Game Guide and Walkthrough](https://game.lhg100.com/Article/UploadFiles/201512/2015121518494485.jpg)
[#36]
Keep using the narrow passageways. You'll be heading north-west and you should make a stop once you've reached a longer corridor. Attack enemy drones from a safe distance and once it's safe head forward, using a healing archway found along the way. Watch out, because there are aliens in the next room and they'll be using an upper balcony to surprise you [#36]. In addition to them a second group may also attack you from the back.
![[#37] - Main quests - QUEST 2: Among The Stars: Secondary locations - part 2 - Main quests - Fallout 3: Mothership Zeta - Game Guide and Walkthrough](https://game.lhg100.com/Article/UploadFiles/201512/2015121518494435.jpg)
[#37]
Sally will soon rejoin with the main character and don't worry about her, because she's not in any danger. You'll soon end up standing next to a long corridor with a lot of active force fields [#37]. Start using the control panels located next to each barrier and wait for each force field to be disabled. At first nothing else will happen, but later on after using control panels expect the aliens to show up.
![[#38] - Main quests - QUEST 2: Among The Stars: Secondary locations - part 2 - Main quests - Fallout 3: Mothership Zeta - Game Guide and Walkthrough](https://game.lhg100.com/Article/UploadFiles/201512/2015121518494488.jpg)
[#38]
Open a round door and you should end up standing inside a much larger room. Get ready, because it won't be long until the aliens arrive and attack the main character. Use your most powerful guns and prevent the aliens from hiding behind a barrier. Once you've won turn right and use a control panel to acquire recording #19 [#38]. Get ready for a second wave of the alien creatures to show up. This time your enemies will use the western door. Use a rocket launcher or even a fatman to defeat them and proceed towards the western corridor once you're the only one left standing.
![[#39] - Main quests - QUEST 2: Among The Stars: Secondary locations - part 2 - Main quests - Fallout 3: Mothership Zeta - Game Guide and Walkthrough](https://game.lhg100.com/Article/UploadFiles/201512/2015121518494409.jpg)
[#39]
Don't forget to step through a healing archway along the way. Keep heading south-west until you'll rejoin with the little girl for the second time. Don't follow Sally right away. Instead explore a nearby storage space [#39] which will hold the most valuable treasures of this particular deck, including A LOT of medical supplies and a samurai sword. Once you're ready to move on proceed to the north and use the teleportation matrix to return to the Engineering Core (if it's not working properly try reloading the game and try again).
MAP OF THE CARGO HOLD:
Map legend: 1 - passageway to: Engineering Core; 2 - teleportation matrix to: Research Lab (you must activate it during your stay in the lab); 3 - healing archway; 4 - supplies; 5 - passageway to: Research Lab
![[#40] - Main quests - QUEST 2: Among The Stars: Secondary locations - part 2 - Main quests - Fallout 3: Mothership Zeta - Game Guide and Walkthrough](https://game.lhg100.com/Article/UploadFiles/201512/2015121518494517.jpg)
[#40]
Cargo Hold is a reasonably large area and it's also well protected. I would strongly recommend that you secure the entire warehouse before you decide to have a look around. The best way to defeat all the aliens without risking too much is to remain on the upper balconies. Aside from the creatures you'll also come across a lot of security turrets [#40] and drones, so you should be very careful. Don't forget to use a healing archway located to the south-east.
![[#41] - Main quests - QUEST 2: Among The Stars: Secondary locations - part 2 - Main quests - Fallout 3: Mothership Zeta - Game Guide and Walkthrough](https://game.lhg100.com/Article/UploadFiles/201512/2015121518494592.jpg)
[#41]
Once you've secured the warehouse you may head down to the ground level and start searching the place for cool items. Most of the objects found here are going to useless, including toys and souvenirs. I would recommend exploring the conveyor belts, because that's where the best things are hidden [#41]. You'll find a couple of powerful guns and a lot of ammunition.
![[#42] - Main quests - QUEST 2: Among The Stars: Secondary locations - part 2 - Main quests - Fallout 3: Mothership Zeta - Game Guide and Walkthrough](https://game.lhg100.com/Article/UploadFiles/201512/2015121518494567.jpg)
[#42]
Finish off by exploring the south-western corner of the warehouse. Most of the valuable items can be found on the nearby walls. There are medical supplies and drugs on the southern wall, guns on the western wall [#42] and ammunition on the northern wall. Once you're ready to move on open a nearby door to travel to the Research Lab.
MAP OF THE RESEARCH LAB:
Map legend: 1 - passageway to: Cargo Hold; 2 - control panels with recordings; 3 - healing archway and a control panel which opens a door; 4 - teleportation matrix to: Cargo Hold
![[#43] - Main quests - QUEST 2: Among The Stars: Secondary locations - part 2 - Main quests - Fallout 3: Mothership Zeta - Game Guide and Walkthrough](https://game.lhg100.com/Article/UploadFiles/201512/2015121518494536.jpg)
[#43]
You'll have to watch out for enemy turrets even more during your stay in the Research Lab. There are going to be a lot of these objects and some of the turrets will be well hidden, so you won't notice them during your initial sweep of the area. Start off by securing a room located to the west of the entrance to the lab. Once you've killed the aliens and destroy the turrets find a control panel with a new recording - #13 [#43].
![[#44] - Main quests - QUEST 2: Among The Stars: Secondary locations - part 2 - Main quests - Fallout 3: Mothership Zeta - Game Guide and Walkthrough](https://game.lhg100.com/Article/UploadFiles/201512/2015121518494513.jpg)
[#44]
You can inspect a nearby space shuttle if you're interested, however this is optional. Eventually new aliens should arrive near your position. Kill all the opposition and proceed towards the eastern passageway. You'll soon end up standing in a new large room. Check the southern wall here to find a healing archway. You should also use a new console to add the next recording (#21) to your Pip-Boy [#44].
![[#45] - Main quests - QUEST 2: Among The Stars: Secondary locations - part 2 - Main quests - Fallout 3: Mothership Zeta - Game Guide and Walkthrough](https://game.lhg100.com/Article/UploadFiles/201512/2015121518494508.jpg)
[#45]
If you want to leave the lab right now you should proceed towards the southern room. Otherwise head east, however watch out for a new turret located next to the staircase. You can explore the eastern warehouse to find a small toy [#45]. Once you're ready to leave this area head south and find a teleportation matrix to return to Cargo Hold. From there it won't take long to go back to the Engineering Core.
MAP OF THE ENGINEERING CORE:
Map legend: 1 - passageway to: Hangar; 2 - passageway to: Cryo Lab; 3 - passageway to: Robot Assembly
![[#46] - Main quests - QUEST 2: Among The Stars: Primary locations - part 1 - Main quests - Fallout 3: Mothership Zeta - Game Guide and Walkthrough](https://game.lhg100.com/Article/UploadFiles/201512/2015121518494533.jpg)
[#46]
Walkthrough: There are three places you'll need to visit to complete the second main quest - Hangar, Cryo Lab and Robot Assembly. You'll be allowed to ask one follower to join you for each of these trips, but you won't choose this person on your own. Instead each follower will be tied to a certain location. You can ask someone to join you by choosing the correct dialogue option from the list [#46]. Don't forget to break up the team each time you've returned to the core. Here's the list of the people you can ask for help:
Elliott Tercorien - Cryo Lab
Paulson - Hangar
Somah - Robot Assembly
As for the order in which you should visit the locations, I would recommend going to the factory first, because you'll find a useful gadget there. Once you've been to the factory go to the lab and leave the hangar for later. Keep reading this section of my guide to find out more information on all three decks of the alien ship.
MAP OF THE HANGAR:
Map legend: 1 - passageway to: Engineering Core; 2 - staircases to an upper control room; 3 - control panel for the pylons; 4 - healing archways; 5 - generator and supplies
![[#47] - Main quests - QUEST 2: Among The Stars: Primary locations - part 1 - Main quests - Fallout 3: Mothership Zeta - Game Guide and Walkthrough](https://game.lhg100.com/Article/UploadFiles/201512/2015121518494656.jpg)
[#47]
Start off by opening a nearby container in order to collect valuable items. It shouldn't take too long until you enter the largest area of the hangar. Ignore a smaller space ship and head south. Be careful here, because some of the aliens may attack you from a larger distance and you should fire back. Watch out for Paulson - he's very weak and you'll have to protect him all the time if you want him to stay alive. Once you've secured the area choose the stairs to get to a nearby balcony and find a control panel [#47] which disables a nearby force field.
![[#48] - Main quests - QUEST 2: Among The Stars: Primary locations - part 1 - Main quests - Fallout 3: Mothership Zeta - Game Guide and Walkthrough](https://game.lhg100.com/Article/UploadFiles/201512/2015121518494605.jpg)
[#48]
Proceed to the second staircase. This time you'll want to reach a large control room located on an upper floor. It would be a good idea to place a few landmines near the stairs. The same goes with a new staircase found to the north. Also - if you possess a device from the Robot Assembly you may take control over one of the drones located inside the hangar. Once you're ready to defend yourself proceed to your left and try using a second control panel [#48] in order to gain access to the generator room. Instead of being let through you'll raise an alarm.
![[#49] - Main quests - QUEST 2: Among The Stars: Primary locations - part 1 - Main quests - Fallout 3: Mothership Zeta - Game Guide and Walkthrough](https://game.lhg100.com/Article/UploadFiles/201512/2015121518494610.jpg)
[#49]
Move back quickly (to the east) and make a stop near a large opening. There are several smaller control panels here which you've probably noticed before and they can be used to activate pylons seen below. Make sure that each time you've activated a pylon one of the aliens is standing nearby [#49], so the creature will die instantly. Aside from activating pylons you should also keep using your guns to defeat the aliens. Don't forget to choose weapons suitable for long range hits. Watch out for security bots and keep defending Paulson by standing in front of him whenever he's targeted by the aliens.
[#50]
You must acknowledge the fact that some of the aliens sooner or later will find a way to get up to the control room. Assuming you've decided to place landmines many of these creatures will die near the stairs, however being cautious is a good thing. Eliminate all the aliens you can see from the top and then return to the main section of the hangar to deal with the remaining creatures [#50]. Don't forget to heal the main character and watch out while going against stronger foes.
![[#51] - Main quests - QUEST 2: Among The Stars: Primary locations - part 1 - Main quests - Fallout 3: Mothership Zeta - Game Guide and Walkthrough](https://game.lhg100.com/Article/UploadFiles/201512/2015121518494667.jpg)
[#51]
Make sure it's safe and return to the upper control room. Notice that eliminating all the aliens has allowed you to enter the generator room. Take your time to explore nearby shelves for supplies and then use the control panel to raise the core. You'll now have to interact with three coolant switches [#51] just like you did when you were trying to rescue Sally. Move back and wait for the generator to overheat. After the explosion go back the same way you came here to return to the Engineering Core.
MAP OF THE CRYO LAB:
Map legend: 1 - passageway to: Engineering Core; 2 - force field mechanism and a healing archway (lower level); 3 - recordings; 4 - teleportation matrix to: Cryo Storage (you must activate it while exploring the storage); 5 - panels which control the capsules; 6 - healing archways; 7- supplies; 8 - control panels; 9 - passageway to: Cryo Storage
![[#52] - Main quests - QUEST 2: Among The Stars: Primary locations - part 1 - Main quests - Fallout 3: Mothership Zeta - Game Guide and Walkthrough](https://game.lhg100.com/Article/UploadFiles/201512/2015121518494663.jpg)
[#52]
Head on towards the first large area of the laboratory where you'll have to defeat a small number of aliens. Once they're gone focus on finding a large control panel [#52]. Using the panel will shut down a barrier seen below you. Head down there and explore a small storage area. Aside from a healing archway you'll come across supplies and you'll be allowed to use the control panel to acquire a recording (#4).
![[#53] - Main quests - QUEST 2: Among The Stars: Primary locations - part 1 - Main quests - Fallout 3: Mothership Zeta - Game Guide and Walkthrough](https://game.lhg100.com/Article/UploadFiles/201512/2015121518494681.jpg)
[#53]
You may return to the upper balconies. There's a teleportation device nearby, but you won't be allowed to use it at the moment. As a result you should proceed towards the western passageway right away. Deal with the aliens and the drones quickly [#53], especially since your ally may die during the course of this battle. Thankfully Elliott will heal himself once it's safe again, so it'll be slightly easier with him than with Paulson. Don't forget not to attack the workers yourself, allowing Elliott to handle them.
![[#54] - Main quests - QUEST 2: Among The Stars: Primary locations - part 1 - Main quests - Fallout 3: Mothership Zeta - Game Guide and Walkthrough](https://game.lhg100.com/Article/UploadFiles/201512/2015121518494650.jpg)
[#54]
Check the southern room to find a new recording (#2). You can also use control panels located near your current position [#54]. Each time you've done that you'll kidnap random people and ghouls from Capitol Wasteland. This is a good opportunity to score bonus experience points, assuming that you want to fight wastelanders instead of focusing on leaving the alien ship. Don't forget to heal yourself before heading west.
![[#55] - Main quests - QUEST 2: Among The Stars: Primary locations - part 1 - Main quests - Fallout 3: Mothership Zeta - Game Guide and Walkthrough](https://game.lhg100.com/Article/UploadFiles/201512/2015121518494791.jpg)
[#55]
Continue moving west, however you'll soon turn north. More aliens can be seen in front of you. Deal with the situation and then proceed towards a small room found to your left. You can unlock a nearby supply room by using a control panel [#55]. There's some equipment from the wasteland inside if you're interested. A second panel will allow you to kidnap more people from Capitol Wasteland. Join the fight or remain here and wait for everyone to kill each other. If you decide to play it safe don't forget about Elliott and help him if he's in critical condition.
![[#56] - Main quests - QUEST 2: Among The Stars: Primary locations - part 1 - Main quests - Fallout 3: Mothership Zeta - Game Guide and Walkthrough](https://game.lhg100.com/Article/UploadFiles/201512/2015121518494730.jpg)
[#56]
Once it's safe leave the control room and head north, using an archway found along the way. Before you decide to leave this area it would be a good idea to explore the southern and the northern section of the room. You should be able to find valuable supplies, including medicine needed to fight off radiation. Once you've arrived in a new section of the ship use a nearby control panel quickly [#56]. If you were successful you'll kill the aliens seen inside without having to actually attack them yourself.
![[#57] - Main quests - QUEST 2: Among The Stars: Primary locations - part 2 - Main quests - Fallout 3: Mothership Zeta - Game Guide and Walkthrough](https://game.lhg100.com/Article/UploadFiles/201512/2015121518494723.jpg)
[#57]
Wait here for the device to shut down, enter the room and inspect all the bodies. Notice that there are control panels here [#57] and you should use them to acquire two new recordings - #11, #17. Proceed towards the northern room where you should listen to Elliott's comment (assuming he's still alive).
![[#58] - Main quests - QUEST 2: Among The Stars: Primary locations - part 2 - Main quests - Fallout 3: Mothership Zeta - Game Guide and Walkthrough](https://game.lhg100.com/Article/UploadFiles/201512/2015121518494785.jpg)
[#58]
You'll now have to make an important decision on what to do with Elliott's frozen buddies. There are four solutions to this problem:
1) Awakening the soldiers without making any preparations. You would have to use the control panel located in front of the capsules. The soldiers would die and Elliott would be angry at you.
2) Convincing Elliott that he should leave his colleagues alone. You would have to pass a Speech challenge and then proceed the next area, leaving the soldiers behind.
3) Convincing Elliott that he should shut down life support for both capsules, so that the aliens wouldn't be able to experiment on his colleagues anymore.
4) Allowing Elliott to start the procedure and knowing that his colleagues will be alive for a few minutes. In this case you would have to approach the control panel [#58], BUT you would have to use it AFTER receiving confirmation from your follower. I would recommend choosing this outcome, even though the awakened soldiers won't last too long.
Once you're done making decisions allow Elliott to take a few samples and proceed towards a nearby door leading to the Cryo Storage.
MAP OF THE CRYO STORAGE:
Map legend: 1 - passageway to: Cryo Lab; 2 - recordings; 3 - healing archways; 4 - control panels releasing supermutants; 5 - generator; 6 - teleportation matrix to: Cryo Lab
![[#59] - Main quests - QUEST 2: Among The Stars: Primary locations - part 2 - Main quests - Fallout 3: Mothership Zeta - Game Guide and Walkthrough](https://game.lhg100.com/Article/UploadFiles/201512/2015121518494714.jpg)
[#59]
As soon as you've arrived turn left and use a nearby control panel [#59] to acquire a new recording (#25). You can now choose either of the passageways leading to the main warehouse, as well as use healing archways found along the way. Once you've entered the storage room start attacking the aliens.
![[#60] - Main quests - QUEST 2: Among The Stars: Primary locations - part 2 - Main quests - Fallout 3: Mothership Zeta - Game Guide and Walkthrough](https://game.lhg100.com/Article/UploadFiles/201512/2015121518494708.jpg)
[#60]
Make sure that you've listened to Elliott's advice and watch yourself while standing next to the staircases, because some of the aliens may decide to use them to surprise you. Be careful and prevent the creatures from inflicting serious injuries to you or Elliott. Don't worry about your new soldier friends, because they'll die sooner or later and you won't be able to prevent that from happening. After you've secured this floor head down and proceed to the south-west. A new control panel can be found in a corner and it contains a recording (#16) [#60].
[#61]
You don't have to explore any of the four lower corridors, however you would encounter capsules with supermutants. You may revive the mutants if you want to and this can be achieved using two control panels found on the upper balcony [#61]. The mutants are unarmed so may consider doing this if you want to earn experience points easily. The generator which is your primary target can be found easily. Just make to choose one of two passageways leading to the northern section of the deck.
![[#62] - Main quests - QUEST 2: Among The Stars: Primary locations - part 2 - Main quests - Fallout 3: Mothership Zeta - Game Guide and Walkthrough](https://game.lhg100.com/Article/UploadFiles/201512/2015121518494703.jpg)
[#62]
Thankfully you won't be presented with any other unpleasant surprises near the generator. Start off by using the central control panel to uncover its core and then interact with three remaining switches. Don't forget to move back before the explosion destroys everything in the room [#62]. There's a teleportation matrix nearby which you can now activate.
![[#63] - Main quests - QUEST 2: Among The Stars: Primary locations - part 2 - Main quests - Fallout 3: Mothership Zeta - Game Guide and Walkthrough](https://game.lhg100.com/Article/UploadFiles/201512/2015121518494788.jpg)
[#63]
Activate the teleportation matrix to return to the Cryo Lab and from there you can go back to the Engineering Core almost right away. Use this opportunity to talk to Elliott and ask him about the samples he's gathered in the lab [#63]. You'll find out that he'll have more info for you in an hour. When you return to him later on he'll give you three cryo grenades and three cryo mines. Elliott will also promise to deliver new shipments once every three hours.
MAP OF THE ROBOT ASSEMBLY:
Map legend: 1 - passageway to: Engineering Core; 2 - healing archways; 3 - control panel; 4 - teleportation matrix (to a different floor); 5 - control panel for the conveyor belt; 6 - teleportation matrix (to the southern section of the factory); 7 - generator
![[#64] - Main quests - QUEST 2: Among The Stars: Primary locations - part 2 - Main quests - Fallout 3: Mothership Zeta - Game Guide and Walkthrough](https://game.lhg100.com/Article/UploadFiles/201512/2015121518494890.jpg)
[#64]
Once you're inside the factory start following Somah's lead and listen to her comment on the inactive teleportation devices. Ignore the fact that she's disappeared, because nothing bad is going to happen to her and you'll meet up again soon enough. Don't forget not to attack alien workers encountered in this area. Instead wait until you come across security bots. The machines will appear on the lower floor [#64].
![[#65] - Main quests - QUEST 2: Among The Stars: Primary locations - part 2 - Main quests - Fallout 3: Mothership Zeta - Game Guide and Walkthrough](https://game.lhg100.com/Article/UploadFiles/201512/2015121518494868.jpg)
[#65]
Once you've taken care of the bots use the stairs to get down to a lower level. Head north-east and witness a short conversation with Somah along the way. You may ignore this scene, because nothing important will come out of it. This time you should be moving north, using an archway found along the way. Once you're close to enemy positions hack into a nearby security console [#65] and override the system to blow up a security turret (last option on the list).
![[#66] - Main quests - QUEST 2: Among The Stars: Primary locations - part 2 - Main quests - Fallout 3: Mothership Zeta - Game Guide and Walkthrough](https://game.lhg100.com/Article/UploadFiles/201512/2015121518494831.jpg)
[#66]
There are also security bots in the area. Destroy the machines and you'll soon team up with Somah. You should also inspect a small storage space found to the south-east of your current position. If you're interested only in completing your primary objective proceed to the north right away. Ignore a teleportation matrix found along the way and instead find an electronics access panel which controls the nearby conveyor belt [#66]. Choose the last option from the list and move back to a safe distance. A huge explosion will occur near the panel in just a few seconds.
![[#67] - Main quests - QUEST 2: Among The Stars: Primary locations - part 2 - Main quests - Fallout 3: Mothership Zeta - Game Guide and Walkthrough](https://game.lhg100.com/Article/UploadFiles/201512/2015121518494810.jpg)
[#67]
Head on to the area where the explosion has taken place and quickly walk through a large hole. Proceed to the north. Once you're inside a new warehouse eliminate alien beings AS SOON AS POSSIBLE [#67]. It's extremely important to prevent the creatures from reawakening nearby security bots, because it would only make killing them more difficult. Once you've killed the aliens (and destroyed the machines) check their bodies and pick up a Drone Control Device.
![[#68] - Main quests - QUEST 2: Among The Stars: Primary locations - part 2 - Main quests - Fallout 3: Mothership Zeta - Game Guide and Walkthrough](https://game.lhg100.com/Article/UploadFiles/201512/2015121518494821.jpg)
[#68]
You may test your new toy on one of the nearby drones. In order to do that you must approach one of the glowing pods [#68], press the action key and confirm that you want to begin controlling the robot. I would recommend that you take a security bot with you, because they're more powerful and because you can only have one mechanical follower. Head east and make sure to check the balcony along the way to find the second archway.
![[#69] - Main quests - QUEST 2: Among The Stars: Primary locations - part 2 - Main quests - Fallout 3: Mothership Zeta - Game Guide and Walkthrough](https://game.lhg100.com/Article/UploadFiles/201512/2015121518494889.jpg)
[#69]
Reaching the final generator room shouldn't take much of your precious time and you won't be interrupted by anyone else. Just as before you must raise the main generator core and then interact with three coolant switches. Wait for the generator to blow up. I guess you won't be surprised to hear that you won't have to return on foot, because there's an active teleportation matrix nearby [#69]. Use it and then travel to the Engineering Core.
MAP OF THE ENGINEERING CORE:
Map legend: 1 - passageway to: Decompression Chamber
![[#70] - Main quests - QUEST 2: Among The Stars: Conclusion - Main quests - Fallout 3: Mothership Zeta - Game Guide and Walkthrough](https://game.lhg100.com/Article/UploadFiles/201512/2015121518494824.jpg)
[#70]
Once you've successfully destroyed all three generators and returned to the core wait for Sally to approach you and initiate a new conversation. You'll find out that your next objective will be to take a walk outside the ship. Make sure that you have the astronaut's suit from one of the soldiers from the capsule. Head on to the northern section of the main deck and choose the airlock door leading to the Decompression Chamber [#70].
MAP OF THE DECOMPRESSION CHAMBER:
Map legend: 1 - passageway to: Engineering Core; 2 - storage space; 3 - passageway to: Space Walk
![[#71] - Main quests - QUEST 2: Among The Stars: Conclusion - Main quests - Fallout 3: Mothership Zeta - Game Guide and Walkthrough](https://game.lhg100.com/Article/UploadFiles/201512/2015121518494957.jpg)
[#71]
During your short time spent in the Decompression Chamber you won't encounter any aliens, so you'll have to plenty of time to look around. As soon as you've entered the room make sure to open your inventory and to wear the astronaut's suit collected earlier on. Once you're wearing the suit locate a switch [#71] and use it to unlock access to a new corridor.
![[#72] - Main quests - QUEST 2: Among The Stars: Conclusion - Main quests - Fallout 3: Mothership Zeta - Game Guide and Walkthrough](https://game.lhg100.com/Article/UploadFiles/201512/2015121518494955.jpg)
[#72]
Wait until the large hatch opens itself and proceed to the next corridor. You'll be moving upwards here and once you've arrived at the top interact with a nearby control panel [#72]. Choose the second option from the list, so you'll unlock a nearby storage space. Look around to find a lot of useful supplies, including alien biogel. Once you're ready to move on with the mission proceed towards a nearby hatch and eventually you'll end up standing outside the alien ship (Space Walk).
![[#73] - Main quests - QUEST 2: Among The Stars: Conclusion - Main quests - Fallout 3: Mothership Zeta - Game Guide and Walkthrough](https://game.lhg100.com/Article/UploadFiles/201512/2015121518494964.jpg)
[#73]
You don't have to use any maps here, because you won't find any real obstacles. Don't even think about dropping down to lower sections of the roof of the ship, because a cut-scene would inform you about your death. Your task will be to close a couple of exposed panels [#73]. It shouldn't take too long before you locate all the panels and you can ignore aliens seen running around the ship, because they can't get to you in any way. Once you've closed all the panels proceed to the center of the ship and allow a new capture beam to transport you to the Observation Deck. This is where you'll begin the final third quest of the game.
Received from: automatically upon completion of Among The Stars [Observation Deck]
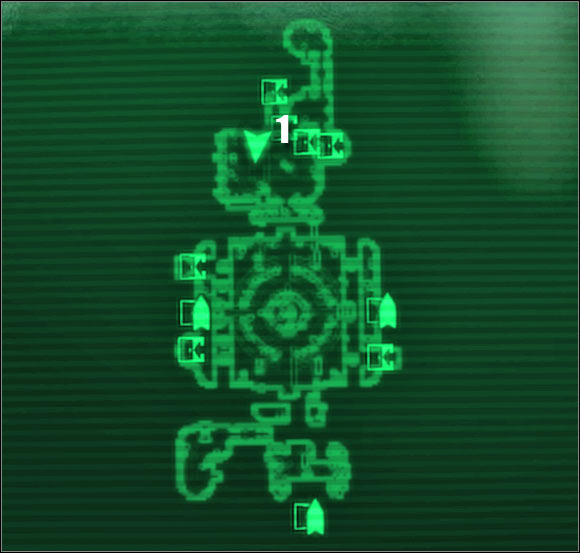
MAP OF THE OBSERVATION DECK:
Map legend: 1 - starting area; 2 - teleportation matrix to: Engineering Core; 3 - main section of the observation deck; 4 - passageway to: Weapons Lab
![[#74] - Main quests - QUEST 3: This Galaxy Aint Big Enough... - part 1 - Main quests - Fallout 3: Mothership Zeta - Game Guide and Walkthrough](https://game.lhg100.com/Article/UploadFiles/201512/2015121518494975.jpg)
[#74]
Don't forget to remove the astronaut's suit. You won't need it anymore, so you may as well drop it somewhere. Start off by using a nearby control unit in order to gain access to the northern room. Approach the second switch [#74]. Using this device will allow other survivors from the Engineering Core to use a teleportation matrix to get here. Wait for all of them to show up.
![[#75] - Main quests - QUEST 3: This Galaxy Aint Big Enough... - part 1 - Main quests - Fallout 3: Mothership Zeta - Game Guide and Walkthrough](https://game.lhg100.com/Article/UploadFiles/201512/2015121518494930.jpg)
[#75]
Talk to Somah and once the conversation has ended proceed towards the largest room of the Observation Deck. Notice glass windows and floors. Don't be frightened, because a huge hologram of an alien leader will soon appear and you'll have to listen to its speech. You can then talk to other survivors to share their opinion on what just happened. The most important thing to do here is to wait for Sally to unlock a new passageway for you [#75]. Head west and once you've reached an inactive teleportation matrix choose a nearby door leading to the Weapons Lab.
MAP OF THE WEAPONS LAB:
Map legend: 1 - passageway to: Observation Deck; 2 - healing archways; 3 - control panel; 4 - recording; 5 - supplies; 6 - shooting ranges; 7 - passageway to: Experimentation Lab
![[#76] - Main quests - QUEST 3: This Galaxy Aint Big Enough... - part 1 - Main quests - Fallout 3: Mothership Zeta - Game Guide and Walkthrough](https://game.lhg100.com/Article/UploadFiles/201512/2015121518494966.jpg)
[#76]
Soon after you've arrived in the lab you should locate a control panel on the left wall [#76]. Hack into the system and choose the last option from the list in order to overload a nearby security turret. You may now proceed to the next room and attack the remaining aliens. Don't forget to keep locating other turrets along the way. Some of the aliens will be using shields to protect themselves and killing them should be a top priority. You'll also have to acknowledge the fact that reinforcements may arrive here soon via nearby teleportation devices.
![[#77] - Main quests - QUEST 3: This Galaxy Aint Big Enough... - part 1 - Main quests - Fallout 3: Mothership Zeta - Game Guide and Walkthrough](https://game.lhg100.com/Article/UploadFiles/201512/2015121518494940.jpg)
[#77]
Make sure that you've successfully eliminated all the aliens before you continue exploring this deck of the ship. You'll now have to use a narrow passageway [#77], because you won't be allowed to proceed directly to the south. Once you've reached a junction proceed to your right and locate the stairs. Head on to the upper level and this time move south. You'll soon find a healing archway and obviously using it is something you shouldn't ignore.
![[#78] - Main quests - QUEST 3: This Galaxy Aint Big Enough... - part 1 - Main quests - Fallout 3: Mothership Zeta - Game Guide and Walkthrough](https://game.lhg100.com/Article/UploadFiles/201512/2015121518494970.jpg)
[#78]
It shouldn't take long until you find your way to a small control room and obviously you'll have to interact with a control panel here [#78]. This time you won't be choosing any actions from the list, so as soon as you've used the panel you may proceed south. Watch out for new aliens and security bots which may appear near your current position. I would recommend using the drone cannon against the machines. Don't forget to heal your character frequently. The next group of enemy units is stationed inside a large room located to the south-east. Secure the upper balconies first and once it's safe use the stairs.
![[#79] - Main quests - QUEST 3: This Galaxy Aint Big Enough... - part 1 - Main quests - Fallout 3: Mothership Zeta - Game Guide and Walkthrough](https://game.lhg100.com/Article/UploadFiles/201512/2015121518495025.jpg)
[#79]
Once you've made your way to the upper balconies focus on find a passageway leading south. The new room you're about to enter is some kind of an armory. Start off by inspecting the western wall. Notice that by interacting with a nearby control panel [#79] you may begin capturing brahmins and nearby security bots will immediately kill the creatures. This is all optional and won't bring you any closer to your current goal.
![[#80] - Main quests - QUEST 3: This Galaxy Aint Big Enough... - part 1 - Main quests - Fallout 3: Mothership Zeta - Game Guide and Walkthrough](https://game.lhg100.com/Article/UploadFiles/201512/2015121518495083.jpg)
[#80]
I would strongly recommend that you take your time to explore the armory. One of the nearby control panels contains a new recording (#24) [#80]. You should also check the southern wall, because that's where you'll find good armors and weapons. There are going to be a lot of these items and you'll probably want to take only the best toys. Don't forget that you can take control over a new drone using a device found in the factory.
![[#81] - Main quests - QUEST 3: This Galaxy Aint Big Enough... - part 1 - Main quests - Fallout 3: Mothership Zeta - Game Guide and Walkthrough](https://game.lhg100.com/Article/UploadFiles/201512/2015121518495042.jpg)
[#81]
I wouldn't recommend leaving this deck right away. Instead inspect the corridor located to the north-east and you'll find two shooting ranges. Notice that each range has a control panel and interacting with the device while standing on an upper balcony will summon various types of creatures from Capitol Wasteland. There's also a very powerful gun called a Destabilizer near the southern range [#81]. Make sure to pick it up.
![[#82] - Main quests - QUEST 3: This Galaxy Aint Big Enough... - part 1 - Main quests - Fallout 3: Mothership Zeta - Game Guide and Walkthrough](https://game.lhg100.com/Article/UploadFiles/201512/2015121518495056.jpg)
[#82]
Expect more action after choosing the northern shooting range [#82]. Each time you interact with a control panel you'll summon a lot of hostile beings, including deathclaws, raiders and security bots. It's likely that the wastelanders will attack each other, however you should also consider firing at them from an upper balcony. I guess you'll be interested to hear that you'll be rewarded with Xenotech Expert perk after a few successful kills. Return to the armory once you're bored with the shooting ranges and this time choose the eastern corridor. Eventually you'll find a passageway leading to the Experimentation Lab.
MAP OF THE EXPERIMENTATION LAB:
Map legend: 1 - passageway to: Weapons Lab; 2 - recordings; 3 - healing archway; 4 - force field; 5 - passageway to: Biological Research
![[#83] - Main quests - QUEST 3: This Galaxy Aint Big Enough... - part 1 - Main quests - Fallout 3: Mothership Zeta - Game Guide and Walkthrough](https://game.lhg100.com/Article/UploadFiles/201512/2015121518495098.jpg)
[#83]
Start off by opening the airlock door and enter a new room. There are new alien workers here and you should ignore them. Instead focus on eliminating hostile alien beings. Don't forget to target enemies with force fields in the first place, because they pose a serious threat. Head on towards the northern room after the battle and find a control panel to add a new recording (#20) to your Pip-Boy [#83]. Return to the main room and this time choose the corridor leading west.
![[#84] - Main quests - QUEST 3: This Galaxy Aint Big Enough... - part 2 - Main quests - Fallout 3: Mothership Zeta - Game Guide and Walkthrough](https://game.lhg100.com/Article/UploadFiles/201512/2015121518495093.jpg)
[#84]
You'll come across several smaller rooms along the way and it's really up to you whether you want to check them out or not. I would recommend visiting only one room - the last one to your left (with a control panel by the door). There's a healing archway inside this room, as well as a cool armor. Proceed towards the eastern passageway and notice two abominations on the other side of the active barrier [#84]. I would be a good idea to place several plasma or cryo mines near the force field. Aside from setting up traps look around to find a control panel with a new recording (#10).
![[#85] - Main quests - QUEST 3: This Galaxy Aint Big Enough... - part 2 - Main quests - Fallout 3: Mothership Zeta - Game Guide and Walkthrough](https://game.lhg100.com/Article/UploadFiles/201512/2015121518495034.jpg)
[#85]
The panel which controls the force field can be found in the center of the room [#85]. Don't count on the barrier to disappear right away, because you'll have to interact with the coolant switches to destroy the generator. Once this is done focus your full attention on attacking the abominations. The creatures very tough, however they should die sooner if you aim for their stomachs. Prevent the monsters from getting too close and you should be fine. Once the creatures have been killed proceed towards the western corridor.
![[#86] - Main quests - QUEST 3: This Galaxy Aint Big Enough... - part 2 - Main quests - Fallout 3: Mothership Zeta - Game Guide and Walkthrough](https://game.lhg100.com/Article/UploadFiles/201512/2015121518495078.jpg)
[#86]
Turn south and once you've reached a new junction explore the room found to your left (to the east). The most important object here is a new control panel. Interact with the device to collect a new recording (#9) [#86]. Aside from adding a recording you can also open some of the nearby containers to acquire supplies. Once you're ready to move on with the mission head west. Keep following in that direction until you find a door leading to the Biological Research.
MAP OF THE BIOLOGICAL RESEARCH:
Map legend: 1 - passageway to: Experimentation Lab; 2 - recording; 3 - healing archway; 4 - supplies; 5 - teleportation matrix to: Death Ray Hub
![[#87] - Main quests - QUEST 3: This Galaxy Aint Big Enough... - part 2 - Main quests - Fallout 3: Mothership Zeta - Game Guide and Walkthrough](https://game.lhg100.com/Article/UploadFiles/201512/2015121518495128.jpg)
[#87]
This is a relatively small area, so you won't spend too much time here. Start off by opening a door leading to a small storage space located to your right. Collect the supplies and then proceed towards the largest room of the laboratory. You'll have to be extremely careful here, because you're going to be attacked by abominations [#87]. Use your best guns to kill the monsters. In addition to that you can also activate a nearby security bot to help you out in getting rid of the creatures.
![[#88] - Main quests - QUEST 3: This Galaxy Aint Big Enough... - part 2 - Main quests - Fallout 3: Mothership Zeta - Game Guide and Walkthrough](https://game.lhg100.com/Article/UploadFiles/201512/2015121518495176.jpg)
[#88]
Make sure that you've secured the entire ground floor and then use the stairs to proceed to an upper balcony. Watch out, because new aliens will arrive from the south. You'll be dealing with standard creatures and not the abominations, so it should be slightly easier to succeed. Once you've secured this area look around to find a healing archway and a control panel with a new recording (#18) [#88]. Proceed towards the southern passageway when you're ready to move on with the mission.
![[#89] - Main quests - QUEST 3: This Galaxy Aint Big Enough... - part 2 - Main quests - Fallout 3: Mothership Zeta - Game Guide and Walkthrough](https://game.lhg100.com/Article/UploadFiles/201512/2015121518495103.jpg)
[#89]
Ignore alien workers encountered in the next section of the ship and instead proceed towards the force field. Thankfully all you have to do here is to use a nearby control panel to disable the electronic barrier. Before you leave this area it would be a good idea to use the stairs to get down to a lower level. There are a lot of supplies here [#89]. Once you've collected all the items you needed return to the upper floor and interact with a teleportation matrix to be transported to the Death Ray Hub.
MAP OF THE DEATH RAY HUB:
Map legend: 1 - teleportation matrix to: Biological Research; 2 - healing archways; 3 - passageway to: Death Ray Control
![[#90] - Main quests - QUEST 3: This Galaxy Aint Big Enough... - part 2 - Main quests - Fallout 3: Mothership Zeta - Game Guide and Walkthrough](https://game.lhg100.com/Article/UploadFiles/201512/2015121518495158.jpg)
[#90]
As soon as you've entered the new area of the ship you should consider exploring two small rooms located to the north and to the south of the teleportation matrix. In both cases you'll encounter drones and you'll be allowed to take control over them using the device carried from the factory. Once you're ready to move on head south. Take your time to explore a storage space found to your left [#90].
![[#91] - Main quests - QUEST 3: This Galaxy Aint Big Enough... - part 2 - Main quests - Fallout 3: Mothership Zeta - Game Guide and Walkthrough](https://game.lhg100.com/Article/UploadFiles/201512/2015121518495183.jpg)
[#91]
Once you're close enough to the largest room of the hub you'll be allowed to sabotage a control panel located to your left and you should also use a nearby archway. Proceed to the stairs once you're ready to move on [#91]. Be careful, because you'll be encountering aliens from now on and most of them will be hard to kill. Keep heading east and use a switch to disable a nearby force field. You may now move south and then turn west. Keep attacking the aliens encountered along the way and eventually you'll find your way to a door leading to the Death Ray Control.
MAP OF THE DEATH RAY CONTROL:
Map legend: 1 - passageway to: Death Ray Hub; 2 - main control panel; 3 - first generator; 4 - second generator; 5 - area where aliens show up; 6 - third generator; 7 - fourth generator; 8 - teleportation matrix to: Living Quarters
![[#92] - Main quests - QUEST 3: This Galaxy Aint Big Enough... - part 2 - Main quests - Fallout 3: Mothership Zeta - Game Guide and Walkthrough](https://game.lhg100.com/Article/UploadFiles/201512/2015121518495100.jpg)
[#92]
Proceed directly to the main area and deal with the enemy forces present in the room. It shouldn't take too long and once it's safe again approach the central console [#92]. Pressing the left switch will get you one stop closer to fulfilling your mission. Each time you've done that you'll uncover one of the generators. The other buttons are just for fun - you can change the angle of the death ray and you fire the cannon, admiring the effects through a glass floor.
![[#93] - Main quests - QUEST 3: This Galaxy Aint Big Enough... - part 2 - Main quests - Fallout 3: Mothership Zeta - Game Guide and Walkthrough](https://game.lhg100.com/Article/UploadFiles/201512/2015121518495214.jpg)
[#93]
Each time you've raised one of the generators [#93] you'll have to perform the same actions as before. It means you'll have to interact with three coolant switches and move back to a safe distance, waiting for the whole thing to explode. Be careful, because after you've destroyed the second generator (out of four) you're going to be attacked by a large group of aliens. The invaders will use a nearby teleportation matrix to get here and you should be ready for them.
![[#94] - Main quests - QUEST 3: This Galaxy Aint Big Enough... - part 3 - Main quests - Fallout 3: Mothership Zeta - Game Guide and Walkthrough](https://game.lhg100.com/Article/UploadFiles/201512/2015121518495232.jpg)
[#94]
Thankfully this was the only unpleasant surprise you had to deal with, because you won't be interrupted by the creatures again (at least not here). Destroy two of the remaining generators and the Death Ray will lose all of its power. You may now proceed towards a small room. Find a teleportation matrix there [#94] and use it to transport yourself to the Living Quarters.
MAP OF THE LIVING QUARTERS:
Map legend: 1 - teleportation matrix to: Death Ray Control; 2 - healing archways; 3 - recording; 4 - teleportation matrix to: Bridge
![[#95] - Main quests - QUEST 3: This Galaxy Aint Big Enough... - part 3 - Main quests - Fallout 3: Mothership Zeta - Game Guide and Walkthrough](https://game.lhg100.com/Article/UploadFiles/201512/2015121518495249.jpg)
[#95]
A new force field is located just around the corner [#95] and there are a few ways to get rid of it. You can throw a grenade to the other side, you can destroy a nearby turret in hopes that the explosion will shut it off or you can start firing at the barrier using your most powerful guns. Don't forget to maintain a safe distance if you're going for a more dangerous solution. Either way you'll have to be ready to defeat at least one abomination once the force field is down.
![[#96] - Main quests - QUEST 3: This Galaxy Aint Big Enough... - part 3 - Main quests - Fallout 3: Mothership Zeta - Game Guide and Walkthrough](https://game.lhg100.com/Article/UploadFiles/201512/2015121518495262.jpg)
[#96]
The next room is very large and it shouldn't come as a surprise that it's going to be well defended. Get ready to eliminate standard alien units, as well as to destroy several security turrets. Retreat to the previous corridor each time you've suffered major injuries. You may proceed to the lower level, however you wouldn't find anything of interest in the area. Once you've won choose one of two passageways leading south [#96].
![[#97] - Main quests - QUEST 3: This Galaxy Aint Big Enough... - part 3 - Main quests - Fallout 3: Mothership Zeta - Game Guide and Walkthrough](https://game.lhg100.com/Article/UploadFiles/201512/2015121518495222.jpg)
[#97]
Get ready, because you'll encounter more alien units while you're on your way to the ship's bridge. You'll soon reach a junction. If you decide to explore the eastern passageway you would have to destroy one additional force field and you would find Toshiro Kago [#97]. This is the same person you've rescued from one of the capsules and once again you should keep the samurai alive, because this isn't the last time you've crossed paths. If you want to proceed with the mission choose the western passageway.
[#98]
Sadly the western section of the Living Quarters is going to be heavily defended by alien forces and as a result you'll have to defeat a lot of creatures before you'll reach your destination. Don't forget to activate one of the drones found along the way, however you'll be mostly on your own. After you reach the corridor leading to the north consider securing a room located to your left in the first place. Watch out for aliens here and for the security turrets. Once the battle has ended check the wall to your right to find a recording (#23) [#98]. This should be your last collectible from this group, so if you don't have all 25 recordings use my guide to find the missing rest BEFORE heading to the bridge.
![[#99] - Main quests - QUEST 3: This Galaxy Aint Big Enough... - part 3 - Main quests - Fallout 3: Mothership Zeta - Game Guide and Walkthrough](https://game.lhg100.com/Article/UploadFiles/201512/2015121518495256.jpg)
[#99]
Notice that you can also hack into a security terminal, however it's a waste of time. Instead keep pushing to the north and then turn west. Be careful, because there are a lot of security turrets in the area and most of them are concealed. There's a group of abominations in the last room [#99] and you'll have to get rid of the monsters to get to the teleportation matrix safely. Use this device to transport yourself to the Bridge.
MAP OF THE BRIDGE:

Map legend: 1 - teleportation matrix to: Living Quarters; 2 - healing archway; 3 - main control panels; 4 - control panels for the generators
![[#100] - Main quests - QUEST 3: This Galaxy Aint Big Enough... - part 3 - Main quests - Fallout 3: Mothership Zeta - Game Guide and Walkthrough](https://game.lhg100.com/Article/UploadFiles/201512/2015121518495225.jpg)
[#100]
Make sure that you're armed and ready for the final battle with the alien troops. Head through the northern door and you'll end up standing inside a large room. You'll now have to defeat the alien captain [#100] as well as some of the alien guards. Thankfully once you've eliminated the captain the rest of the survivors from the Observation Deck will show up, helping you out during the rest of the battle. Once you've won approach the main control console of the ship. This is the exact same spot where you first saw the alien captain.
![[#101] - Main quests - QUEST 3: This Galaxy Aint Big Enough... - part 3 - Main quests - Fallout 3: Mothership Zeta - Game Guide and Walkthrough](https://game.lhg100.com/Article/UploadFiles/201512/2015121518495347.jpg)
[#101]
You'll now have to take part in a simple space ship battle with an alien vessel seen through the windows. Notice that there are two panels here and that the left panel has three buttons [#101]. Your task will be to use them properly. Pressing each button transfers power and you can choose between the shields and the alien cannon. You'll want to use only two buttons on both sides, because the middle one is for achieving a compromise and you won't be interested in that.
![[#102] - Main quests - QUEST 3: This Galaxy Aint Big Enough... - part 3 - Main quests - Fallout 3: Mothership Zeta - Game Guide and Walkthrough](https://game.lhg100.com/Article/UploadFiles/201512/2015121518495375.jpg)
[#102]
Keep repeating all the actions described below:
Step one - Transfer all power to the shields (left switch, left panel).
Step two - Wait for an alien ship to fire and then transfer all power to the cannon (right switch, left panel).
Step three - Fire at the alien ship using the main cannon (single large switch, right panel [#102]).
Step four - Transfer all power to the shields BEFORE alien vessel fires back (left switch, left panel).
![[#103] - Main quests - QUEST 3: This Galaxy Aint Big Enough... - part 3 - Main quests - Fallout 3: Mothership Zeta - Game Guide and Walkthrough](https://game.lhg100.com/Article/UploadFiles/201512/2015121518495364.jpg)
[#103]
Aside from attacking the alien vessel you'll also have to deal with two dangerous situations during the course of this battle. After the first round of attacks new aliens will arrive at the Bridge. Thankfully you won't have to defeat all of them on your own, because your allies will take care of that problem. You can make this even easier and place landmines before engaging the alien vessel in direct combat. The other problem will require you to interact with four control panels located on both sides of the room [#103] in order to regain power.
![[#104] - Main quests - QUEST 3: This Galaxy Aint Big Enough... - part 3 - Main quests - Fallout 3: Mothership Zeta - Game Guide and Walkthrough](https://game.lhg100.com/Article/UploadFiles/201512/2015121518495372.jpg)
[#104]
Assuming you won't make any major mistakes whole operating the ship you shouldn't have any problems blowing up the alien vessel [#104]. That's it. Congratulations!!
MAP OF THE BRIDGE:

Map legend: 1 - device used to construct unique items; 2 - teleportation matrix to: Engineering Core; 3 - teleportation matrix to: Capitol Wasteland
![[#105] - Epilogue - Leaving the alien vessel - Epilogue - Fallout 3: Mothership Zeta - Game Guide and Walkthrough](https://game.lhg100.com/Article/UploadFiles/201512/2015121518495339.jpg)
[#105]
Once you've destroyed the second alien vessel you can spend some time talking to other survivors on board your vessel, including Sally [#105]. Each conversation is going to be a little different, however the first person you'll talk to will inform you that you're allowed to return to Capitol Wasteland.
![[#106] - Epilogue - Leaving the alien vessel - Epilogue - Fallout 3: Mothership Zeta - Game Guide and Walkthrough](https://game.lhg100.com/Article/UploadFiles/201512/2015121518495359.jpg)
[#106]
It would be a good idea to visit captain's quarters and it's going to be a small room located in the southern section of the Bridge. There's a device here [#106] which will allow you to manufacture unique items without having to collect schematics. Bear in mind that you'll still have to deliver all the ingredients needed to create an item.
![[#107] - Epilogue - Leaving the alien vessel - Epilogue - Fallout 3: Mothership Zeta - Game Guide and Walkthrough](https://game.lhg100.com/Article/UploadFiles/201512/2015121518495345.jpg)
[#107]
There are two active teleportation devices in the area. One of the teleports can transport you back to the Engineering Core. Notice that you won't be allowed to revisit all the locations. Most of them have been destroyed during the battle with a second alien vessel and you couldn't prevent that from happening. The other device can be found inside captain's quarters [#107]. Using this matrix will allow you to return to Capitol Wasteland. You'll end up in the exact same spot where you were taken - near a crashed ship. Notice that a new location marked as the Alien Homing Beacon has been added to your Pip-Boy map. You can also return to the ship countless times by interacting with a beacon.
Here's a list of all 25 recordings you may find during your stay on board of an alien vessel. Make sure to read the main walkthrough section to find out more about each recording. This list should only be used if you haven't strictly followed my instructions and therefore didn't find some of the hidden collectibles.
RECORDING
LOCATION - quest number, name of the deck
Recording number 1
Quest 1, Holding Cells
Recording number 2
Quest 2, Cryo Lab
Recording number 3
Quest 1, Holding Cells
Recording number 4
Quest 2, Cryo Lab
Recording number 5
Quest 2, Engineering Core
Recording number 6
Quest 2, Engineering Core
Recording number 7
Quest 2, Engineering Core
Recording number 8
Quest 2, Engineering Core
Recording number 9
Quest 3, Experimentation Lab
Recording number 10
Quest 3, Experimentation Lab
Recording number 11
Quest 2, Cryo Lab
Recording number 12
Quest 1, Holding Cells
Recording number 13
Quest 2, Research Lab
Recording number 14
Quest 1, Holding Cells
Recording number 15
Quest 1, Holding Cells
Recording number 16
Quest 2, Cryo Storage
Recording number 17
Quest 2, Cryo Lab
Recording number 18
Quest 3, Biological Research
Recording number 19
Quest 2, Waste Disposal
Recording number 20
Quest 3, Experimentation Lab
Recording number 21
Quest 2, Research Lab
Recording number 22
Quest 1, Holding Cells
Recording number 23
Quest 3, Living Quarters
Recording number 24
Quest 3, Weapons Lab
Recording number 25
Quest 2, Cryo Storage
There are four achievements in Mothership Zeta and they're all worth 100 points. Three achievements are tied directly to completing main quests of the game and the final fourth achievement can be unlocked by finding all the recordings.
ACHIEVEMENT
POINTS
REQUIREMENTS
Alien Archivist
20
Find all 25 recordings of the people kidnapped by the aliens. Check the section titled as Finding the recordings for more info. You'll also find out where to search for the recordings in the main walkthrough section of the guide.
Among The Stars
20
Complete Among The Stars quest (gained automatically upon completion).
Not Of This World
20
Complete Not Of This World quest (gained automatically upon completion).
This Galaxy Ain't Big Enough...
40
Complete This Galaxy Ain't Big Enough... quest (gained automatically upon completion).


 Fallout 3: The Pitt Game Guide & Walkthrough
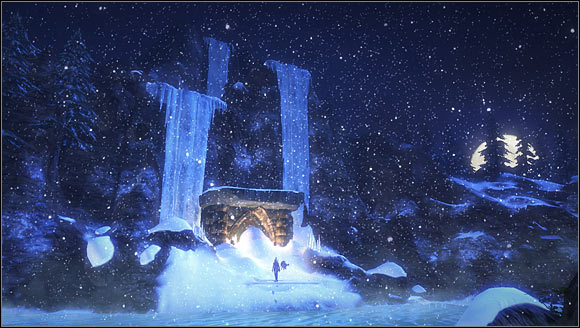 Fable II: Knothole Island Game Guide & WalkthroughF.3.A.R. Game Guide & Walkthrough
 Fallout 3: Operation Anchorage Game Guide & Walkthrough
 Fallout 4 Game Guide & Walkthrough