
This guide to Fallout 3: Broken Steel is a detailed walkthrough for all the missions available in this DLC. You will also find information necessary for the completion of side-quests. You will also find here tips concerning the gameplay, new perks and hints necessary to gain new achievements. All of this has been topped off with a sheer abundance of screenshots.
This guide includes:
Fallout 3: Broken Steel is the third expansion pack for the famous RPG game - Fallout 3. Just like the core game, this expansion pack has been developed by Bethesda Softworks. The storyline is about the Brotherhood of Steel at war with the Enclave. Developers made sure to add new missions and areas, and to increase the number of the available experience levels to 30.
Make sure that Broken Steel has been installed properly on your computer and you'll also have to activate it from the game's autostart. Two previous add-ons for Fallout 3 (Operation Anchorage and The Pitt) allowed the player to explore new content using a low-level character, however in this case I would STRONGLY recommend playing as a powerful hero on the 20th level of experience. Don't forget to gain access to powerful weapons, armor and additional equipment and to have at least one follower (my choice is Fawkes).
You should start playing the game somewhere near the end of the main campaign. To be more precise - somewhere near the end of Take it Back! quest. I would recommend choosing one of two areas. You can load the checkpoint from the first corridor of Jefferson Memorial building (after you've followed Liberty Prime and took out most of Enclave's troops) or you can skip forward a little and move directly to Jefferson Memorial - rotunda which is the last area of the game. I would recommend replaying as many battles with the Enclave as possible, because you'll start earning experience for the 21st level as soon as you've installed Broken Steel DLC.
Naturally you will have to get rid of colonel Autumn again [#1] (don't forget that you don't have to fight him - there's a peaceful solution). Once he's gone you'll have to approach the ramp and listen to final statements.
![[#1] - Fallout 3: Broken Steel - Game Guide and Walkthrough](https://game.lhg100.com/Article/UploadFiles/201512/2015121518492358.jpg)
[#1]
Make sure to read my main guide in order to find out about possible endings to Fallout 3. There are some differences resulting in the installation of Broken Steel. Here's what has changed:
- Entering the irradiated room and entering the correct code won't result in the main character dying, because he's going to be saved by the members of the Brotherhood of Steel. You'll soon find out how this has happened.
- Ordering Sara to enter the irradiated room will still result in her death, because she can't be saved by the brotherhood.
- In the main game you had to make a choice between you and Sara, because you couldn't ask any of your teammates for help. This has now changed. I would recommend asking Fawkes to start the purifier [#2], because he won't suffer negative effects of the radiation.
Remember that you can still upload the virus found in Raven Rock, however doing this won't change the outcome of the game drastically.
![[#2] - Fallout 3: Broken Steel - Game Guide and Walkthrough](https://game.lhg100.com/Article/UploadFiles/201512/2015121518492308.jpg)
[#2]
Either way you must wait for the purifier to start and then you'll be greeted with a set of familiar cut-scenes. Be patient and wait for those to end. You'll now find out that the new content starts two weeks later. You'll wake up in the Citadel [#3]. Notice that you're radiation-free even if you've decided to enter the irradiated room to start the device.
![[#3] - Fallout 3: Broken Steel - Game Guide and Walkthrough](https://game.lhg100.com/Article/UploadFiles/201512/2015121518492333.jpg)
[#3]
Received from: Elder Lyons [Citadel - B Ring]
Walkthrough: The game should automatically initiate a new conversation with Elder Lyons. This conversation may contain several additional dialogue lines depending on the choices you've made. Basically you can say you're sorry if Sara's dead or you can ask if she's okay if she didn't enter the chamber [#4]. You can ask Lyons about changes to the wasteland while you were in a coma. You'll soon be given an opportunity to help the Brotherhood of Steel once again. Lyons will nominate you to become one of the knights and he'll ask you to go and talk to Scribe Rothchild for new instructions.
![[#4] - Main quests - QUEST 1: Death from Above - part 1 - Main quests - Fallout 3: Broken Steel - Game Guide and Walkthrough](https://game.lhg100.com/Article/UploadFiles/201512/2015121518492347.jpg)
[#4]
Notice that during your conversation with Lyons you've been awarded experience points for completing the last main quest of Fallout 3 (more than 1500 points!!). You can also tell him about your encounters with supermutants in Vault 87 for additional experience points. Once this conversation has ended you can examine Sara's body (assuming she's still alive) [#5], interact with a medical computer, talk to a medical robot or ask your follower(s) to join you (they should be standing inside this room). Go to Citadel - laboratory.
![[#5] - Main quests - QUEST 1: Death from Above - part 1 - Main quests - Fallout 3: Broken Steel - Game Guide and Walkthrough](https://game.lhg100.com/Article/UploadFiles/201512/2015121518492477.jpg)
[#5]
You can find Scribe Rothchild easily by using your personal map - he's usually somewhere near the mess hall. Approach him and initiate a new conversation. Inform Rothchild that you want to assist the brotherhood in their problems. You must now follow Rothchild to a large screen located on the lab wall. Listen to a short briefing [#6] on what's happening in the Capitol Wasteland. Your next assignment will be to get in contact with paladin Tristan. I would recommend asking Rothchild a few additional questions about Liberty Prime's status or the purifier. Once you're done talking exit the Citadel.
![[#6] - Main quests - QUEST 1: Death from Above - part 1 - Main quests - Fallout 3: Broken Steel - Game Guide and Walkthrough](https://game.lhg100.com/Article/UploadFiles/201512/2015121518492438.jpg)
[#6]
The area where you must now go is located in the lower left corner of the map. Obviously it's a very isolated zone, so you'll have to be ready to take part in a long journey. I would recommend fast travelling to Dunwich Building and starting your trip from there. If you haven't unlocked this location yet, consider fast travelling to Warrington Trainyard unlocked during Tenpenny Tower subquest. You'll soon arrive at a Rockland Car Tunnel [#7]. Don't attack the brotherhood soldier! Instead approach him and use a nearby door to enter the building.
![[#7] - Main quests - QUEST 1: Death from Above - part 1 - Main quests - Fallout 3: Broken Steel - Game Guide and Walkthrough](https://game.lhg100.com/Article/UploadFiles/201512/2015121518492434.jpg)
[#7]
It would be a good idea to explore small stashes along the way, because most of the crates will contain ammunition for your weapons. Once you've arrived in a much bigger room go to your right and talk to paladin Tristan [#8]. Confirm that you want to assist the brotherhood in the operation against the Enclave. You can also ask Tristan a few additional questions concerning your rescue and what the Enclave has been up to recently. Once you're done talking to him follow brotherhood members to a door leading to Satellite Relay Station.
![[#8] - Main quests - QUEST 1: Death from Above - part 1 - Main quests - Fallout 3: Broken Steel - Game Guide and Walkthrough](https://game.lhg100.com/Article/UploadFiles/201512/2015121518492444.jpg)
[#8]
Make sure to choose a plasma rifle or an equally powerful weapon from your inventory, however you shouldn't be taking part in any fights here. Notice that Liberty Prime has arrived in the area and your only goal will be to follow the mech while maintaining a safe distance. Don't attack Enclave soldiers if you don't want to receive injuries. Don't worry - Liberty Prime and your allies will take care of the opposition. Try not to get hit too many times. These fights will take about a minute. Move back when you'll hear a warning about an upcoming bombardment. Take cover behind a small building [#9] and observe how Liberty Prime is being destroyed. Once the explosions have ocurred talk to Tristan again and listen to his new plan. He'll order you to gain access to the station in order to find out the details of the recent attack.
![[#9] - Main quests - QUEST 1: Death from Above - part 1 - Main quests - Fallout 3: Broken Steel - Game Guide and Walkthrough](https://game.lhg100.com/Article/UploadFiles/201512/2015121518492413.jpg)
[#9]
Notice that the explosions not only have destroyed Liberty Prime, but they've also resulted in all nearby soldiers being killed. This is why it was extremely important to move back, because otherwise you would be among them. It would be a good idea to spend some time looting their bodies for much needed supplies, especially when it comes to finding ammunition for a plasma rifle. Notice that all Enclave soldiers were using Tesla armors. Take one of the armors unless a similar object is already in your possession. Once you're ready to move on find a large hole in the wall [#10]. This is where Liberty Prime was standing prior to its destruction. Turn right and open the door leading to the Satellite Facility.
![[#10] - Main quests - QUEST 1: Death from Above - part 1 - Main quests - Fallout 3: Broken Steel - Game Guide and Walkthrough](https://game.lhg100.com/Article/UploadFiles/201512/2015121518492461.jpg)
[#10]
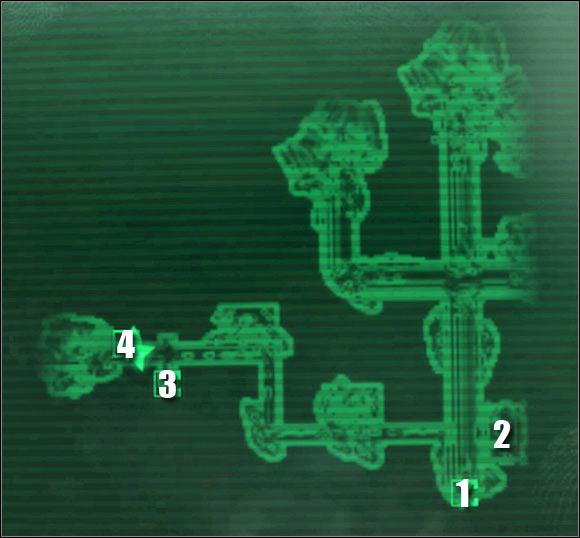
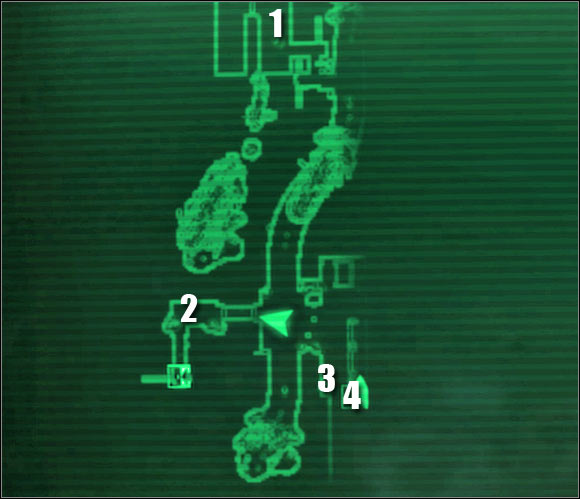
MAP OF THE SATTELITE FACILITY:
Mao legend: 1 - entrance; 2 - staircases; 3 - central computer; 4 - exit
Get ready to take part in A LOT of fights with Enclave soldiers. Your enemies will be moving in groups and they'll be heavily equipped. Thankfully you won't be exploring the facility alone, because you'll be surrounded by other members of the Brotherhood of Steel. This will make your life a lot easier. I would recommend that in this case you take an active part in all battles, because it'll be a good method to gain experience points, especially since you'll gain 65 points for every dead Enclave soldier. The first group of enemies will attack you very soon [#11]. Don't forget to activate V.A.T.S. whenever possible, especially if you've chosen a perk called Grim Reaper's Sprint. Using it will allow you to recharge action points easily, allowing you to enter turn-based combat more frequently.
![[#11] - Main quests - QUEST 1: Death from Above - part 2 - Main quests - Fallout 3: Broken Steel - Game Guide and Walkthrough](https://game.lhg100.com/Article/UploadFiles/201512/2015121518492405.jpg)
[#11]
It's rather important to loot bodies of fallen enemies after each battle. Doing this will allow you to find ammunition for some of the most powerful weapons in the game, including plasma rifles, laser rifles and Gatling lasers. You shouldn't be in a lot of hurry, because this may result in your character being surrounded by nearby Enclave units. There is going to be a small stash along the way. Explore it and proceed to a room with a staircase [#12]. Allow some of your allies to begin attacking Enclave troops and join them after a short while. Remain somewhere in the back in order to avoid too many hits.
![[#12] - Main quests - QUEST 1: Death from Above - part 2 - Main quests - Fallout 3: Broken Steel - Game Guide and Walkthrough](https://game.lhg100.com/Article/UploadFiles/201512/2015121518492481.jpg)
[#12]
You must get to the top using the staircase. Watch out for a new group of Enclave troops - they may appear in front of a small room. Proceed to the next section once they've all been eliminated. You'll soon get to a second staircase, however the biggest difference is that this time you'll want to reach a lower floor [#13]. Watch out for Enclave soldiers equipped with Gatling lasers, because their weapons may penetrate your armor, resulting in major injuries. A large group will also attack you when you get to a small tunnel. Don't forget to inspect each area for ammunition and other supplies. There's going to be one more staircase separating you from the exit. In this case you'll have to begin moving upwards.
![[#13] - Main quests - QUEST 1: Death from Above - part 2 - Main quests - Fallout 3: Broken Steel - Game Guide and Walkthrough](https://game.lhg100.com/Article/UploadFiles/201512/2015121518492555.jpg)
[#13]
Once you've reached a large corridor [#14] choose a rocket launcher or something equally powerful from your inventory, because you're going to be attacked by at least five Enclave soldiers. Plasma grenades will also do the trick, because they should be standing close to each other. Inspect a nearby room once they're gone. Keep heading towards the computer room. Thankfully this new area isn't going to be guarded by anyone.
![[#14] - Main quests - QUEST 1: Death from Above - part 2 - Main quests - Fallout 3: Broken Steel - Game Guide and Walkthrough](https://game.lhg100.com/Article/UploadFiles/201512/2015121518492583.jpg)
[#14]
Approach a computer terminal and press the action key. Wait for a new window to be displayed on your screen and choose the second option from the list - Request New Telemetry Data. This will allow you to upload needed information directly to your Pip-Boy. New enemies may appear to your left, so you'll have to be ready to get rid of them. Once they're gone use the new corridor [#15] to leave this area without having to go back using the same corridors as before. Get ready to destroy a few security turrets along the way. It shouldn't be a problem as long as you use a weapon powerful enough to destroy a turret with a single hit. Get to the exit leading back to Capitol Wasteland.
![[#15] - Main quests - QUEST 1: Death from Above - part 2 - Main quests - Fallout 3: Broken Steel - Game Guide and Walkthrough](https://game.lhg100.com/Article/UploadFiles/201512/2015121518492552.jpg)
[#15]
Obviously you must now return with the data obtained in the facility to the Citadel. Fast travel to that location. Go to Citadel - courtyard and from there get to Citadel - laboratory. Once again you must find Scribe Rothchild. Talk to him and give him the data [#16]. You can now talk to him about Liberty Prime's destruction or you can head back to Elder Lyons right away. Lyons can be found in his chambers in Citadel - B ring. Initiate a new conversation with the brotherhood leader and for the second time you'll be directed to talk to paladin Tristan. Notice that you've been awarded almost 1700 experience points for completing this first main quest of Broken Steel scenario.
![[#16] - Main quests - QUEST 1: Death from Above - part 2 - Main quests - Fallout 3: Broken Steel - Game Guide and Walkthrough](https://game.lhg100.com/Article/UploadFiles/201512/2015121518492594.jpg)
[#16]
Received from: Elder Lyons [Citadel - B ring]
Walkthrough: Paladin Tristan can be found in Citadel - A ring, near the stairs leading to the laboratory. Obviously you must agree to take part in a new mission for the brotherhood. Tristan will send you to Old Olney in order to steal a device called a Tesla coil. Doing this will allow the Brotherhood of Steel to regain power after the loss of Liberty Prime. I would strongly recommend that you ask Tristan for additional help [#17]. He will direct you to Scribe Vallincourt, because apparently she has invented an interesting device.
![[#17] - Main quests - QUEST 2: Shock Value - part 1 - Main quests - Fallout 3: Broken Steel - Game Guide and Walkthrough](https://game.lhg100.com/Article/UploadFiles/201512/2015121518492565.jpg)
[#17]
Scribe Vallincourt is one of the scientists working for the brotherhood, so naturally she can be found in Citadel - laboratory. Find her and ask her about the device [#18]. Vallincourt will give you a Deathclaw control scrambler which will enable to take control over some of these beasts. You don't have to ask her about the details, because you'll practice using this device soon enough. Leave the Citadel and notice that an area mentioned by Vallincourt is located to the south-east of Old Olney. As a result you should consider fast travelling to Chaste Acres Dairy Farm.
![[#18] - Main quests - QUEST 2: Shock Value - part 1 - Main quests - Fallout 3: Broken Steel - Game Guide and Walkthrough](https://game.lhg100.com/Article/UploadFiles/201512/2015121518492585.jpg)
[#18]
Keep heading towards the area mentioned to you by the scientist. Once you've arrived you're going to be attacked by Enclave soldiers. Ignore them and move closer to the containers. Doing this will allow you to take control over one of the deathclaws [#19]. Wait for the beast to deal with the opposition. Sadly you won't be allowed to continue using the beast to your advantage, because as soon as you move away from the broadcasting station a large device on a deatchlaw's head will explode. Take your time picking up items from a nearby table. You should be able to find valuable supplies there and you can also hack into the system using a computer in order to read interesting reports. Proceed towards Old Olney once you're done exploring and looting bodies of fallen Enclave soldiers.
![[#19] - Main quests - QUEST 2: Shock Value - part 1 - Main quests - Fallout 3: Broken Steel - Game Guide and Walkthrough](https://game.lhg100.com/Article/UploadFiles/201512/2015121518492516.jpg)
[#19]
Starting here you can only rely on yourself and your followers, because you won't be accompanied by any Brotherhood of Steel knights. Find a small entrance to Old Olney [#20]. Choosing this passageway will allow you to gain access to an isolated area of the map. Get ready to defend yourself against the first deathclaw, because in this case your scrambler won't work. Use some of the most powerful guns and aim for the head of the creature. It would also be a good idea to make sure that Fawkes is using a Gatling laser, because his attacks will be devastating. Locate a small hatch leading to Olney Sewers.
![[#20] - Main quests - QUEST 2: Shock Value - part 1 - Main quests - Fallout 3: Broken Steel - Game Guide and Walkthrough](https://game.lhg100.com/Article/UploadFiles/201512/2015121518492525.jpg)
[#20]
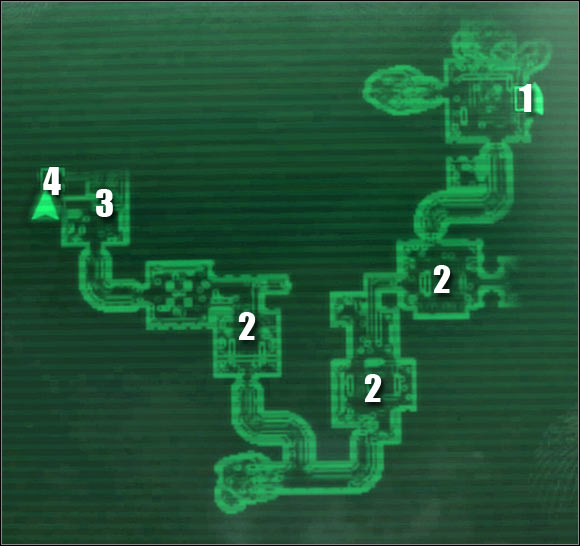
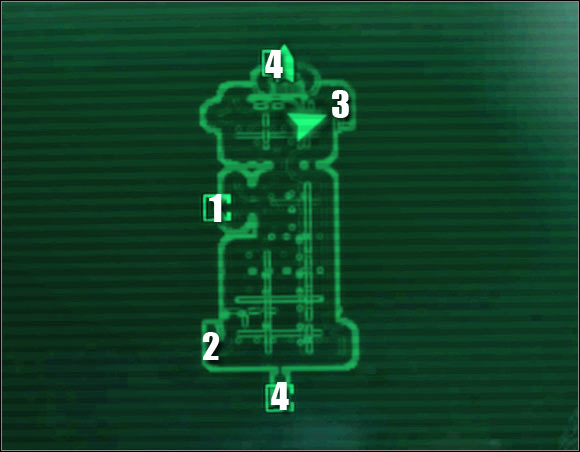
MAP OF THE SEWERS:
Map legend: 1 - entrance to the sewers; 2 - small stash with a couple of safes and powerful weapons; 3 - small stash with a closed door; 4 - exit to Old Olney; 5 - Exit to Old Olney Underground
If you want to leave the sewers as soon as possible you can begin by moving north, however I would recommend that you spend some time exploring the surrounding area. Doing this will not only allow you to gain possession of a few powerful items, but you'll also score a lot of experience points for killing new deathclaws (65 points to be exact for eliminating each creature). Choose a gate located to the south and get ready to kill the first beast. The room you're about to enter contains a scoped .44 magnum amongst other interesting items. Keep heading south until you stumble upon a few bodies. Inspect the bodies and you'll find a prototype armor [#21]. It would be a good idea to take it, even if you're not planning on using it right away.
[#21]
Turn around and proceed to the north-east. You should be able to get to a small room located directly to the east of the starting point [#22]. Notice a couple of safes on a nearby wall. I would recommend opening them as long as you're skilled enough. In addition to the safes you should look around the room to find a rocket launcher and a fatman. These weapons may come in handy while trying to get rid of the beasts or Enclave troops. Go back to the area where you've started exploring the sewers and proceed north. Get ready to defend yourself against two other deathclaws. You should move back, so you won't be fighting both monsters at the same time.
![[#22] - Main quests - QUEST 2: Shock Value - part 1 - Main quests - Fallout 3: Broken Steel - Game Guide and Walkthrough](https://game.lhg100.com/Article/UploadFiles/201512/2015121518492625.jpg)
[#22]
Get ready to defeat a new group of hostile creatures once you've reached a junction. Ignore the northern tunnel for the time being and instead head east. There are some new monsters for you to get rid of. Once they're gone take your time exploring this room. Notice that the northern passageway is closed. It would be a good idea to open the door if you're skilled enough, because there are a lot of cool items hidden inside [#23], including a mininuke. Go back to the junction mentioned before and this time choose a passageway leading north.
![[#23] - Main quests - QUEST 2: Shock Value - part 1 - Main quests - Fallout 3: Broken Steel - Game Guide and Walkthrough](https://game.lhg100.com/Article/UploadFiles/201512/2015121518492655.jpg)
[#23]
You'll soon get to a ladder leading to Old Olney Underground. You can decide to use it right away or you can spend some additional time exploring the area to the north. Aside from the new monsters you would also come across a capsule with a protectron inside [#24]. Notice that you can activate the robot using a nearby computer terminal. Once you're ready to move on go back to the ladder and confirm that you want to travel to a different location.
![[#24] - Main quests - QUEST 2: Shock Value - part 1 - Main quests - Fallout 3: Broken Steel - Game Guide and Walkthrough](https://game.lhg100.com/Article/UploadFiles/201512/2015121518492612.jpg)
[#24]
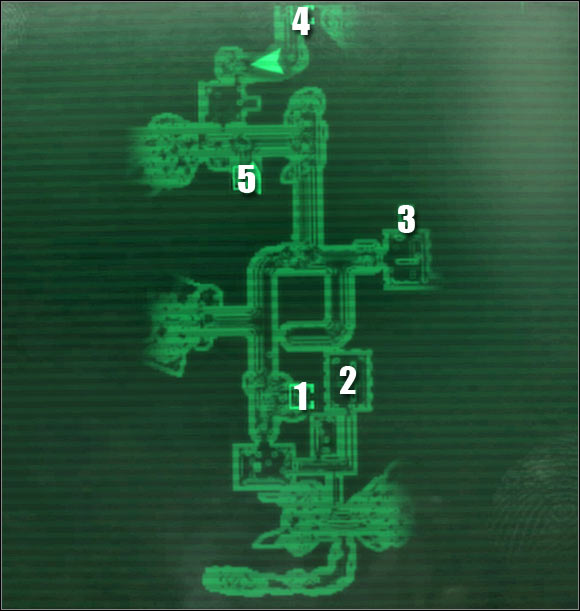
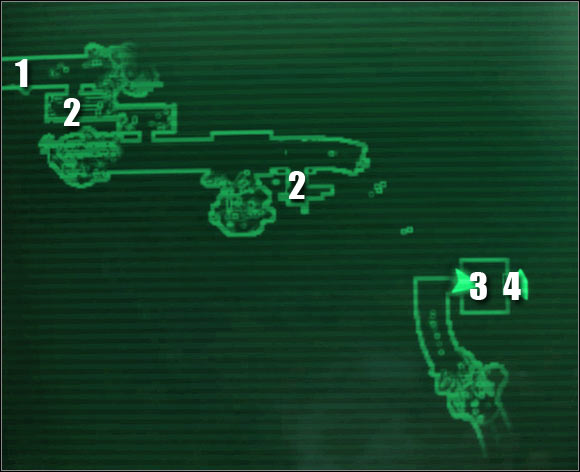
MAP OF THE UNDERGROUND:
Map legend: 1 - entrance to the underground; 2 - entrance to the area occupied by new deathclaws; 3 - passageway near a destroyed building; 4 - exit to S. Wilson Building
Upon your arrival in the underground you're going to be greeted by a friendly ghoul named Wint [#25]. You won't have to think too hard about your response, because you won't receive any items nor valuable intel from him. You could ask him to show you the way to Olney Powerworks, however you can get there yourself without anyone else helping you. Say goodbye to both ghouls and start exploring their hideout. Naturally you'll be safe here, so you should take your time to look around. Keep going forward until you find Dunbar's body. It would be a good idea to examine the body and to pick up a note.
![[#25] - Main quests - QUEST 2: Shock Value - part 2 - Main quests - Fallout 3: Broken Steel - Game Guide and Walkthrough](https://game.lhg100.com/Article/UploadFiles/201512/2015121518492679.jpg)
[#25]
You'll encounter your first deathclaw soon after you'll go through a large opening [#26]. Notice that you're standing inside a partially destroyed building. You could decide to check each floor, but aside from a sledgehammer don't count on the main character finding valuable items. Watch out for traps, including a baby carriage known from the main campaign. If you want to leave this area as soon possible use the large hole in the center of the room to get to the ground floor. Proceed west.
![[#26] - Main quests - QUEST 2: Shock Value - part 2 - Main quests - Fallout 3: Broken Steel - Game Guide and Walkthrough](https://game.lhg100.com/Article/UploadFiles/201512/2015121518492671.jpg)
[#26]
Eventually you should be able to get to a passageway with a bathtub [#27]. Make sure to take a look inside the bathtub, because you'll find a lot of interesting items, including a Chinese assault rifle. Keep heading west, however watch out for landmines along the way. Thankfully there's not going to be a lot of these objects. Get ready to defeat new deathclaws upon your arrival in a larger area. Keep heading north, but make sure to explore areas around you as you go.
![[#27] - Main quests - QUEST 2: Shock Value - part 2 - Main quests - Fallout 3: Broken Steel - Game Guide and Walkthrough](https://game.lhg100.com/Article/UploadFiles/201512/2015121518492613.jpg)
[#27]
You can explore smaller rooms along the way if you want to, especially since some of these areas will contain safes. Hacking into those will allow you to earn experience points and to collect better equipment. Don't count on finding huge treasures, though. Keep heading north-east and eventually you'll get to the stairs [#28]. Use the stairs and find a door leading to Old Olney S. Wilson Building.
![[#28] - Main quests - QUEST 2: Shock Value - part 2 - Main quests - Fallout 3: Broken Steel - Game Guide and Walkthrough](https://game.lhg100.com/Article/UploadFiles/201512/2015121518492662.jpg)
[#28]
This time it's not going to take you too long to get to the next area. The good news is that you won't be dealing with deathclaws anymore. The bad news is that the beasts are going to replaced by Enclave soldiers [#29]. Try attacking your enemies from a larger distance and prevent your character from having to defeat more of them at the same time. Watch out for Enclave units equipped with flamethrowers, because they're a serious threat. Thankfully if you have Fawkes in your team he'll provide much needed assistance in getting rid of hostile troops.
![[#29] - Main quests - QUEST 2: Shock Value - part 2 - Main quests - Fallout 3: Broken Steel - Game Guide and Walkthrough](https://game.lhg100.com/Article/UploadFiles/201512/2015121518492672.jpg)
[#29]
Notice that you can use nearby staircases. platforms and other large structure to move between floors of this building quite freely. This is all optional, because you won't find any real treasures inside the building, so the best items will be left by Enclave units. Get to a small passageway [#30] when you feel it's time to leave this area. Use the stairs and locate a door leading to Olney Powerworks.
![[#30] - Main quests - QUEST 2: Shock Value - part 2 - Main quests - Fallout 3: Broken Steel - Game Guide and Walkthrough](https://game.lhg100.com/Article/UploadFiles/201512/2015121518492738.jpg)
[#30]
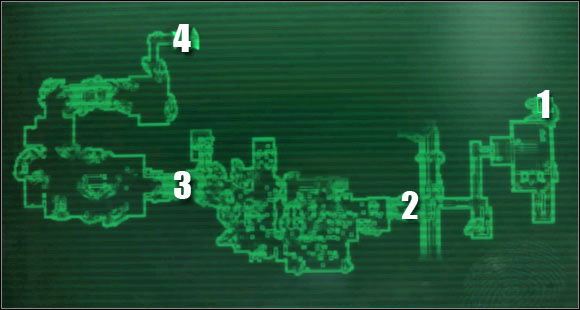
MAP OF THE FACTORY:
Map legend: 1 - entrance to the factory; 2 - passageways leading to the room with a Tesla coil; 3 - Tesla coil; 4 - computer terminal; 5 - exit to Old Olney
Use the stairs to get to the upper floor. You can finish this part of the quest in less than a minute, assuming you have a very high Science skill. If you do - hack into a very well protected computer terminal located to your right [#31] and unlock a nearby door. If you can't use the terminal, you'll have to go through the entire factory. It's going to be a long journey, but you'll also have a chance to earn a lot of experience points. Keep reading if you want to find out how to get to the room with the coil.
![[#31] - Main quests - QUEST 2: Shock Value - part 3 - Main quests - Fallout 3: Broken Steel - Game Guide and Walkthrough](https://game.lhg100.com/Article/UploadFiles/201512/2015121518492705.jpg)
[#31]
The entire warehouse is being patrolled by powerful sentry bots [#32], but thankfully you won't have to engage most of them in direct combat. Each time you'll get to an area with new sentry bots focus your efforts on finding a computer terminal. Hacking into the system will enable you to shut down the machines. Notice that you can destroy unactive bots and this will result in your main character earning valuable experience points without taking any risks. The same goes with every successful hacking attempt.
![[#32] - Main quests - QUEST 2: Shock Value - part 3 - Main quests - Fallout 3: Broken Steel - Game Guide and Walkthrough](https://game.lhg100.com/Article/UploadFiles/201512/2015121518492790.jpg)
[#32]
Proceed to the southern section of the factory, using stairs and balconies along the way. Once you found your way to a new balcony go to your right. Sadly you'll have to destroy one of the sentry bots in direct confrontation, so it would be a good idea to wait for Fawkes to join you. Once the machine has been destroyed use a computer terminal on the right wall [#33]. Hacking into the system not only will allow you to power down other bots, but you'll also disable radiation traps (first option from the list). This is a very important issue, because otherwise you would have to deal with large doses of radiation in the next corridor (20-40 rads per second!!).
![[#33] - Main quests - QUEST 2: Shock Value - part 3 - Main quests - Fallout 3: Broken Steel - Game Guide and Walkthrough](https://game.lhg100.com/Article/UploadFiles/201512/2015121518492742.jpg)
[#33]
Head forward. Once you're inside a new room use a computer terminal located on the left wall. You won't have to perform any particular tasks here, because all you want to do is to earn experience points for hacking into the system. Start moving west and unlock a new passageway [#34] using yet another computer terminal. You'll find a switch inside this dark corridor, as well as two unactive security turrets. Obviously you should destroy both turrets for more experience points.
![[#34] - Main quests - QUEST 2: Shock Value - part 3 - Main quests - Fallout 3: Broken Steel - Game Guide and Walkthrough](https://game.lhg100.com/Article/UploadFiles/201512/2015121518492754.jpg)
[#34]
Return to the previous room and approach a door on the northern wall. This will allow you to gain access to the room with a coil. There are two ways for you to collect the coil. A more dangerous solution will require you to use the upper balcony to jump inside the room with the electricity [#35]. You would then have to collect the object you were looking for, however you would receive MASSIVE injuries (or you could even die if you were playing as a weak character). As a result you should ignore this path and choose a better way to get your hands on the artifact.
![[#35] - Main quests - QUEST 2: Shock Value - part 3 - Main quests - Fallout 3: Broken Steel - Game Guide and Walkthrough](https://game.lhg100.com/Article/UploadFiles/201512/2015121518492739.jpg)
[#35]
Thankfully there's a much safer way for you to gain possession of the coil. Travel north and ignore the door leading out of the facility. Turn west and then south. Eventually you should be able to get to a small control room. Use a nearby computer terminal [#36]. Hacking into the system will allow you to disable the electricity. Proceed to the room with the coil and take it without any additional problems. Once this object is in your possession go back to the northern door leading back to Old Olney.
![[#36] - Main quests - QUEST 2: Shock Value - part 3 - Main quests - Fallout 3: Broken Steel - Game Guide and Walkthrough](https://game.lhg100.com/Article/UploadFiles/201512/2015121518492746.jpg)
[#36]
Sadly you won't be safe once you leave the facility, because you're going to be attacked by three deathclaws [#37] almost instantly. The beasts are very agile, so you wouldn't be able to outrun them. As a result choose a powerful weapon from your inventory and try to survive. Heal your character afterwards, open the world map and fast travel to the Citadel. Once you're there go to Citadel - A ring. Find Paladin Tristan and hand him over the coil. Listen to new orders from the brotherhood. You'll find out that you'll have to get to Adams Air Force Base using the Presidential Metro.
![[#37] - Main quests - QUEST 2: Shock Value - part 3 - Main quests - Fallout 3: Broken Steel - Game Guide and Walkthrough](https://game.lhg100.com/Article/UploadFiles/201512/2015121518492791.jpg)
[#37]
Received from: Paladin Tristan [Citadel - A ring]
Walkthrough: Once you've ended your conversation with Tristan you must leave the Citadel. Notice that a new location has been added to your personal map - White House Plaza. Obviously you can't fast travel to that area, however you can start the game in front of the ruins of the White House or somewhere else nearby. Thankfully the plaza is going to be guarded by the Brotherhood of Steel. Find a hatch [#38] leading to the Utility Tunnels.
![[#38] - Main quests - QUEST 3: Who Dares Wins - part 1 - Main quests - Fallout 3: Broken Steel - Game Guide and Walkthrough](https://game.lhg100.com/Article/UploadFiles/201512/2015121518492750.jpg)
[#38]
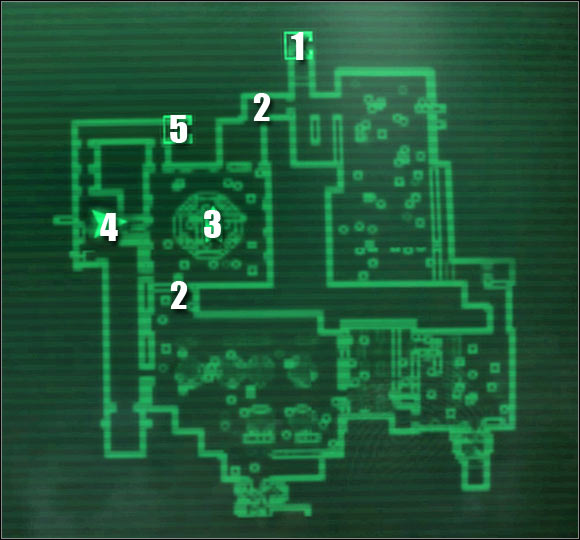
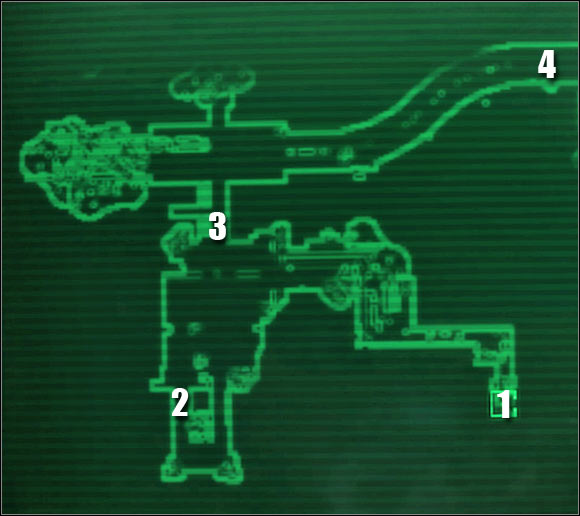
MAP OF THE TUNNELS:
Map legend: 1 - entrance to the tunnels; 2 - storage area; 3 - passageway to Pennsylvania Avenue; 4 - passageway to the Presidential Sub Level
You probably won't spend too much time in this first underground area. There aren't any enemies nearby, so you may take your time to look around. Sadly you won't find any cool treasures in these tunnels. The only exception is a small storage area found to the right of the entrance [#39]. If you look close enough you'll find a bottlecap mine (one of the objects you could manufacture using found schematics). Ignore the corridor located in front of you, because you would be dealing with dead ends and empty corridors. Instead travel through a blue door to your left. Eventually you'll get to a passageway leading to the Presidential Sub Level.
![[#39] - Main quests - QUEST 3: Who Dares Wins - part 1 - Main quests - Fallout 3: Broken Steel - Game Guide and Walkthrough](https://game.lhg100.com/Article/UploadFiles/201512/2015121518492882.jpg)
[#39]
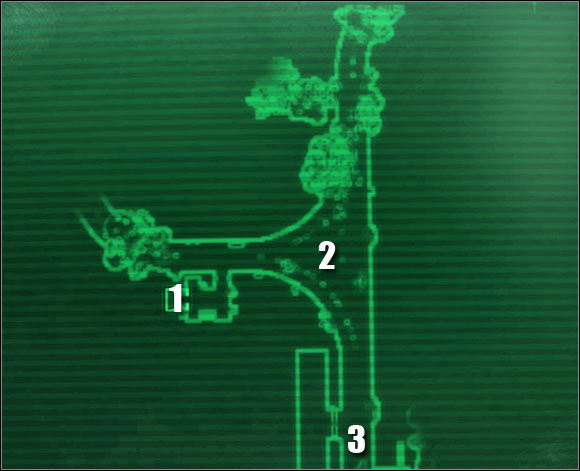
MAP OF THE PRESIDENTIAL SUB LEVEL - WESTERN PART:
Map legend: 1- entrance to the sub level; 2 - staircase; 3 - passageway to metro tunnels; 4 - passageway to the eastern part of the sub level
In this case you'll have to be ready to defend yourself against single enemy units. You'll start encountering enemies upon your arrival in the metro station [#40]. You won't be dealing with living hostiles, because instead you'll go against different types of machines, including sentry bots and security turrets. Don't forget to attack your enemies from a larger distance and avoid their most powerful attacks.
![[#40] - Main quests - QUEST 3: Who Dares Wins - part 1 - Main quests - Fallout 3: Broken Steel - Game Guide and Walkthrough](https://game.lhg100.com/Article/UploadFiles/201512/2015121518492897.jpg)
[#40]
Once you've secured the first room move forward and eventually you'll get to the stairs [#41]. Obviously you must use the stairs to get to the lower floor. Keep heading forward, eliminate anything that will stand in your way and be on a look out for ammunition crates. Ignore the first metro tunnel, because it has collapsed and you wouldn't be able to reach your destination from here. Instead proceed directly to the second larger tunnel and be on a look out for Capitol signs. Start moving east and get ready to get rid of a small group of sentry bots along the way.
![[#41] - Main quests - QUEST 3: Who Dares Wins - part 1 - Main quests - Fallout 3: Broken Steel - Game Guide and Walkthrough](https://game.lhg100.com/Article/UploadFiles/201512/2015121518492862.jpg)
[#41]
MAP OF THE PRESIDENTIAL SUB LEVEL - EASTERN PART:
Map legend: 1 - passageway to the western part of the sub level; 2 - storage areas; 3 - M.A.R.Go.T.; 4 - passageway to the Presidential Metro
Keep heading east. Once you've reached the final section of the tunnel turn south and locate a new door. There's a small storage area nearby. Look around to find a couple of pulse grenades amongst other interesting items. Afterwards use the stairs [#42] to get to a new section of the tunnels. Eventually you'll end up standing inside a new metro tunnel and you'll have to be ready to defend yourself against the robots. There's also going to be a second stash along the way. It contains a computer with some interesting logs.
![[#42] - Main quests - QUEST 3: Who Dares Wins - part 2 - Main quests - Fallout 3: Broken Steel - Game Guide and Walkthrough](https://game.lhg100.com/Article/UploadFiles/201512/2015121518492833.jpg)
[#42]
Keep heading south and choose a small passageway located on the left (eastern) wall of the tunnel. Make a few steps forward and notice a very large computer station in front of you [#43]. You could try ignoring this machine and lockpicking a nearby door, however I would recommend that you have a little chat with artificial intelligence. Here's what you can do:
1) You can rely on an aggressive approach by choosing hostile responses or by asking the machine to allow you to enter the inner complex. Doing this will make all other robots hostile towards your character, as well as will trigger nearby security turrets.
2) If you've invested a lot of points into Speech you can try to convince the machine that you're authorized to access the tunnels.
3) You can use your other skills (for example - Science) to fool the AI into thinking that you're an authorized user of the system.
Choosing a peaceful approach will allow you to find out that the system is dealing with intruders in the metro and it won't be able to return to its normal routine until the threat is dealt with. End the "conversation" and use the door located behind M.A.R.Go.T. This will allow you to get to the Presidential Metro.
![[#43] - Main quests - QUEST 3: Who Dares Wins - part 2 - Main quests - Fallout 3: Broken Steel - Game Guide and Walkthrough](https://game.lhg100.com/Article/UploadFiles/201512/2015121518492855.jpg)
[#43]
MAP OF THE PRESIDENTIAL METRO - NORTHERN PART:
Map legend: 1 - entrance to the Presidential Metro; 2 - area where ghouls appear; 3 - passageway to the southern section
DON'T attack any of the nearby robots unless you've decided to choose an aggressive approach during your conversation with M.A.R.Go.T. All the machines will be friendly towards your character and they're going to be helpful in getting rid of the intruders (ghouls - to be more specific). Head forward and notice fights taking place next to the train tracks [#44]. Ignore weaker beasts and focus on getting rid of new types of ghouls, called feral ghoul reavers. Use your must powerful guns to eliminate those creatures, however remember not to destroy friendly machines by mistake (you can't use a fatman nor a rocket launcher).
![[#44] - Main quests - QUEST 3: Who Dares Wins - part 2 - Main quests - Fallout 3: Broken Steel - Game Guide and Walkthrough](https://game.lhg100.com/Article/UploadFiles/201512/2015121518492925.jpg)
[#44]
You can look around the area if you want to once you take care of all hostile creatures. Consider exploring the tunnels to the north, however you won't find any rare treasures. Inspect bodies of some of the ghouls in order to collect ammunition and other useful supplies. You should also notice a lot of RadAway's in the area. Collect a few of those, especially since you'll enter irradiated areas very soon. Proceed to the south. Turn right and notice several ghouls on the other side of the fence [#45]. You can kill them yourself or you can wait for your followers to get rid of them.
![[#45] - Main quests - QUEST 3: Who Dares Wins - part 2 - Main quests - Fallout 3: Broken Steel - Game Guide and Walkthrough](https://game.lhg100.com/Article/UploadFiles/201512/2015121518492985.jpg)
[#45]
MAP OF THE PRESIDENTIAL METRO - SOUTHERN PART:
Map legend: 1 - passageway to the northern section; 2 - holodisc; 3 - power box; 4 - metro cart
You can check the rest of the tunnel leading south if you want to. You would have to deal with a small amount of radiation, but you would find a few interesting items, including a power fist and pulse grenades. Proceed towards the passageway located on the eastern wall. Once inside get rid of the final group of ghouls [#46] and you'll soon receive confirmation that all hostiles have been eliminated. I would recommend going back to the Presidential Sub Level and informing M.A.R.Go.T. about your success. In exchange you'll find out that the train can be used again.
![[#46] - Main quests - QUEST 3: Who Dares Wins - part 3 - Main quests - Fallout 3: Broken Steel - Game Guide and Walkthrough](https://game.lhg100.com/Article/UploadFiles/201512/2015121518492906.jpg)
[#46]
Return to Presidential Metro and continue moving south. Eventually you'll get to a large junction. Start off by exploring the western corridor, because you'll find a holodisc helpful in finishing a small subquest. In order to complete this quest you would have to travel to Georgetown - east after your return to Capitol Wasteland. You would then have to enter Le Maison Beauregard hotel, kill Lag-Bolt, take his key and open a nearby briefcase. This object would contain a unique outfit. :-) Once you've collected the holopad go back to the junction and this time choose the eastern corridor. Approach a nearby power box [#47] and wait for a friendly sentry bot to repair it for you by replacing a fuse. If the robots are hostiles towards your character you would have to destroy the bot, find a fuse on your own and install it in the power box. Enter the train and use the main lever to be transported to a new area.
![[#47] - Main quests - QUEST 3: Who Dares Wins - part 3 - Main quests - Fallout 3: Broken Steel - Game Guide and Walkthrough](https://game.lhg100.com/Article/UploadFiles/201512/2015121518492980.jpg)
[#47]
You'll find yourself standing in an area called Adams AFB Metro Exit. You won't spend too much time here, however I wouldn't recommend moving too quickly. Choose the corridor leading west. Upon your arrival in a new area you can decide to open a nearby door with a bobbypin and hack the terminal to activate a security turret. You would also find a stash here, containing microfussion cells and pulse grenades among other interesting objects. You can also ignore the side corridor completely and attack Enclave soldiers [#48]. Killing them shouldn't be a problem. Once they're all gone proceed north and find the door leading outside (to Adams Air Force Base).
![[#48] - Main quests - QUEST 3: Who Dares Wins - part 3 - Main quests - Fallout 3: Broken Steel - Game Guide and Walkthrough](https://game.lhg100.com/Article/UploadFiles/201512/2015121518492993.jpg)
[#48]
You've finally returned to the ground level. The base itself is quite large, however there is going to be only one main path leading to your current destination. I would recommend that you leave the main road from time to time in order to find new equipment and to hack into security terminals. Start off by using the stairs. There's a small building to your left [#49] and you should consider entering it. There are some supplies waiting for you inside, as well as the first terminal. I would strongly recommend that you start hacking into terminals, because this will allow you to shut down nearby (not all!) security turrets.
![[#49] - Main quests - QUEST 3: Who Dares Wins - part 3 - Main quests - Fallout 3: Broken Steel - Game Guide and Walkthrough](https://game.lhg100.com/Article/UploadFiles/201512/2015121518492900.jpg)
[#49]
Exit the building and check the area behind it. It's EXTREMELY important that you find a ressuply crate [#50]. Aside from the ammunition and a short note with new orders you'll also acquire a Tesla cannon (!!!). This is by far one of the most powerful weapons in the game and obviously you should start using it right away. If you've been spending a lot of time exploring stashes and looting bodies you should have plenty of ammunition for your new toy. Use the cannon to attack enemies from a large distance, because in close quarters combat you would risk taking injuries yourself.
![[#50] - Main quests - QUEST 3: Who Dares Wins - part 3 - Main quests - Fallout 3: Broken Steel - Game Guide and Walkthrough](https://game.lhg100.com/Article/UploadFiles/201512/2015121518492957.jpg)
[#50]
You can start off by destroying a couple of security turrets using a Tesla cannon [#51]. The turrets can be found on roofs of some of the nearby buildings. You can gain experience points easily that way and you won't have to worry about the turrets firing back. You should also know that in most cases a single hit will be more than enough to destroy the target.
[#51]
Keep heading north, however watch out for enemies equipped with flamethrowers. You may encounter them very soon and despite what you might think their weapons are also going to be effective from larger distances. The main reason is that they're using upgraded versions of flamethrowers that fire some kind of fireballs. As a result you'll have to focus on eliminating them as soon as possible, especially if your armor doesn't offer good protection against fire. You should also know that you'll be entering a sector with new turrets. Travel north-east [#52]. Locate a large container and enter it to find a computer terminal. You can use the terminal to disable a new set of turrets.
![[#52] - Main quests - QUEST 3: Who Dares Wins - part 3 - Main quests - Fallout 3: Broken Steel - Game Guide and Walkthrough](https://game.lhg100.com/Article/UploadFiles/201512/2015121518493011.jpg)
[#52]
Exit the container once you've disabled new base defences, turn left and use the stairs [#53] to get to a roof of a nearby building. Make sure to destroy a couple of turrets along the way to earn experience points easily. Be careful, because enemy soldiers may appear below your position. Enter a container as soon as possible and locate a computer terminal in order to disable a new set of turrets. A Vertibird may arrive to the north in the meantime. I would recommend that you destroy the flying machine before it deploys new troops and this can be done using the fatman.
![[#53] - Main quests - QUEST 3: Who Dares Wins - part 4 - Main quests - Fallout 3: Broken Steel - Game Guide and Walkthrough](https://game.lhg100.com/Article/UploadFiles/201512/2015121518493028.jpg)
[#53]
Proceed to the ground level. Ignore a landing pad located to the east of your current position and head north. Eventually you'll get to the stairs [#54]. Proceed to the upper level and you'll end up standing on a balcony. Make sure to kill all nearby enemy units. Afterwards proceed to the north quickly and find an area with a lot of supplies. Notice a switch near the crates and use it to trigger a bombardment. This will allow you to get rid of the vertibirds and nearby enemy troops without having to fight them on your own. Wait for your followers to get here and collect supplies in the meantime. Head east.
[#54]
As you've probably noticed by now, you're surrounded by buildings and force fields from almost all directions, so it won't be easy to get to your current destination. The only available passageway leads through a large warehouse [#55]. Get ready to kill a few scientists once inside. You can use your weapons to kill them or you can free one of the deathclaws. I wouldn't recommend doing that, because there's a chance you may end up being attacked by the beast. As a result the only true exception is if you're planning on earning additional experience points. Start moving north.
![[#55] - Main quests - QUEST 3: Who Dares Wins - part 4 - Main quests - Fallout 3: Broken Steel - Game Guide and Walkthrough](https://game.lhg100.com/Article/UploadFiles/201512/2015121518493075.jpg)
[#55]
Turn north-west when you exit the warehouse. This time you'll have to get to the stairs [#56]. I would recommend that you take out new Enclave troops as well as security turrets from a larger distance. It shouldn't be a big problem. You could try reaching the left container to disable or reprogram the turrets, however in this case it shouldn't be necessary. Proceed towards a small platform and locate a new switch. Pressing one of the buttons will result in yet another bombardment. Once you've successfully cleared out the area in front of you make sure no one else is standing behind you, because one of the soldiers may decide to perform a surprise attack. Don't forget to use the cannon with caution when you're killing enemies from a smaller distance.
![[#56] - Main quests - QUEST 3: Who Dares Wins - part 4 - Main quests - Fallout 3: Broken Steel - Game Guide and Walkthrough](https://game.lhg100.com/Article/UploadFiles/201512/2015121518493082.jpg)
[#56]
Keep moving north, however you will have to turn to north-east in a short while. Don't be surprised if you encounter a few other Enclave soldiers along the way, but thankfully eliminating them should be a piece of cake. Once you've reached the control tower quickly go to your left and find a computer terminal on one of the walls [#57]. Using the terminal will allow you to shut down all nearby turrets. Once this is done use the stairs to get to the upper platform of the control tower.
![[#57] - Main quests - QUEST 3: Who Dares Wins - part 4 - Main quests - Fallout 3: Broken Steel - Game Guide and Walkthrough](https://game.lhg100.com/Article/UploadFiles/201512/2015121518493060.jpg)
[#57]
Start moving towards the top of the tower. Obviously you'll have to eliminate other Enclave troops along the way, but there shouldn't be too many of them. Don't forget about the possibility of destroying security turrets for easy experience. Approach the top of the tower from the west and you should be able to locate a door [#58]. Open the door to get inside the Air Control Tower. Upon your arrival in a new area you may decide to scout the surrounding rooms for supplies (including a sniper rifle), however you would have to destroy a sentry bot in the process. I would recommend using the stairs to proceed directly to the top floor. Go through the door and approach a large console. Activate the console and choose the first option from the list - Open Mobile Platform Loading Ramp.
![[#58] - Main quests - QUEST 3: Who Dares Wins - part 4 - Main quests - Fallout 3: Broken Steel - Game Guide and Walkthrough](https://game.lhg100.com/Article/UploadFiles/201512/2015121518493037.jpg)
[#58]
You may exit the Air Control Tower. Proceed to the ground level and start moving south-east, heading towards a very large mobile platform. I guess you won't be surprised to hear that you'll be stopped by new Enclave soldiers. I wouldn't recommend fighting them, because fallen enemies are going to be replaced by new units. The only exception is if you want to earn a lot of experience points or collect valuable equipment. Make sure to explore a large container along the way, because you'll find a lot of medical supplies inside. Once you're ready head up the ramp [#59] and open the door leading to the Mobile Base Crawler.
![[#59] - Main quests - QUEST 3: Who Dares Wins - part 4 - Main quests - Fallout 3: Broken Steel - Game Guide and Walkthrough](https://game.lhg100.com/Article/UploadFiles/201512/2015121518493098.jpg)
[#59]
MAP OF THE CRAWLER:
Map legend: 1 - entrance to the mobile base; 2 - storage area; 3 - armory; 4 - passageways to the Launch Platform Base
Approach the force field [#60]. You can disable each obstacle using one of three available methods. The first method allows you to turn off the force field using high Science skill (80 points), the second method relies on Explosives skill (50 points) and the third method requires the main character to destroy a control panel using brute force. Don't ignore the third possibility, because you'll have about one second to move back before the explosion has ocurred. Once you've disabled the force field make a few steps forward to enter a big area.
![[#60] - Main quests - QUEST 3: Who Dares Wins - part 5 - Main quests - Fallout 3: Broken Steel - Game Guide and Walkthrough](https://game.lhg100.com/Article/UploadFiles/201512/2015121518493049.jpg)
[#60]
I would recommend that you start off by moving south. You can disable a second force field while you're there. Take your time to look around and you'll soon initiate a conversation with Stiggs. I would recommend asking him a few questions about the mobile base, especially about the layout of the upper level. Travel south-east and you should be able to find a small supply point. It gets even more interesting when you head south-west, because there's small storage area there [#61]. Turn off the field and look around to find a lot of medical supplies and other items of high value.
![[#61] - Main quests - QUEST 3: Who Dares Wins - part 5 - Main quests - Fallout 3: Broken Steel - Game Guide and Walkthrough](https://game.lhg100.com/Article/UploadFiles/201512/2015121518493185.jpg)
[#61]
You could leave this area right now, however I would recommend that you take your time and travel north. Notice that once you're close enough to a new force field you're going to be surprised by a group of elite Sigma soldiers [#62]. Use a Tesla cannon or an upgraded plasma rifle to get rid of them, especially since they're heavily equipped. You can also consider setting up a minefield in the area, but you would have to finish placing the mines prior to their arrival. Make sure to inspect all the bodies after the battle, because you'll be allowed to collect powerful armors, as well as an incinerator (upgraded version of the flamethrower). Explore the north-eastern corner and you'll come across a fairly large armory. Disabling the force field will grant you access to a Gatling laser and other guns. Once you're ready move on go back to the southern passageway leading to the Launch Platform Base, because going through there will give you more freedom of choice upon your arrival in the next zone.
![[#62] - Main quests - QUEST 3: Who Dares Wins - part 5 - Main quests - Fallout 3: Broken Steel - Game Guide and Walkthrough](https://game.lhg100.com/Article/UploadFiles/201512/2015121518493183.jpg)
[#62]
MAP OF THE LAUNCH PLATFORM BASE:
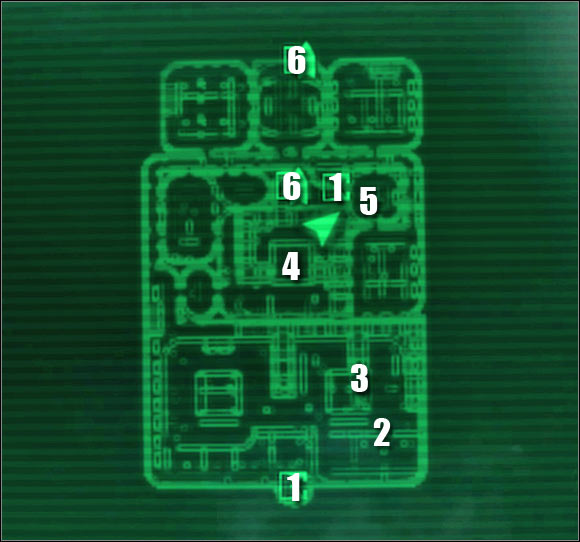
Map legend: 1 - passageways to the ground level; 2 - deathclaws; 3 - storage area with a unique type of a flamethrower; 4 - mainframe; 5 - armory; 6 - exits from the mobile base
You'll have more freedom of movement during the exploration of this new level and you'll be dealing with a lot of Enclave soldiers, officers and scientists along the way. Killing them shouldn't be a problem as long as you don't go against larger groups. I would strongly recommend that you gain access to the upper balconies as soon as possible, because this is where you'll find most of the treasures and high security areas. Start off by heading over to the balcony located directly above the southern entrance. You should be able to find a computer terminal there [#63]. Hacking into the system will allow the main character to disable a force field that was holding back one of the deathclaws. Wait for the beast to wreak havoc before moving on.
![[#63] - Main quests - QUEST 3: Who Dares Wins - part 6 - Main quests - Fallout 3: Broken Steel - Game Guide and Walkthrough](https://game.lhg100.com/Article/UploadFiles/201512/2015121518493112.jpg)
[#63]
One of the nearby balconies will lead you to a room called Sensitive Electronics [#64]. Make sure to look around and you'll find a unique flamethrower called Slo-Burn Flamer. I would recommend that you start using this weapon right now, especially since a Tesla cannon isn't the best choice for close quarters combat (there's a risk of sustaining injuries caused by electricity).
![[#64] - Main quests - QUEST 3: Who Dares Wins - part 6 - Main quests - Fallout 3: Broken Steel - Game Guide and Walkthrough](https://game.lhg100.com/Article/UploadFiles/201512/2015121518493151.jpg)
[#64]
I would strongly recommend that you now focus on finding an area called Mainframe. This means you'll have to remain on the upper balconies and proceed to the central section of this level. Find a passageway with a High Security Clearance sign [#65] and be ready to take out a single guard. Eventually you'll end up inside a room with two computer terminals. One of the terminals isn't protected by any safety measures and using it will allow you to open doors leading to other areas, including an armory. The other terminal will require you to find a password. Doing so will allow you to disable some of the security systems (if you haven't done that already).
![[#65] - Main quests - QUEST 3: Who Dares Wins - part 6 - Main quests - Fallout 3: Broken Steel - Game Guide and Walkthrough](https://game.lhg100.com/Article/UploadFiles/201512/2015121518493143.jpg)
[#65]
Since you've unlocked a door leading to the armory it would be a good idea to visit that area right away. There are some very powerful weapons hidden inside the armory, including a heavy incinerator, a Gatling laser and a minigun. Don't forget to collect medical supplies as well. Aside from stealing items from the main room you can also disable a nearby force field. Doing this will trigger a duel with armory master [#66]. I must warn you - not only he's well equipped but he's also using a precision Gatling laser. Kill him, take his primary weapon and hand it over to Fawkes.
![[#66] - Main quests - QUEST 3: Who Dares Wins - part 6 - Main quests - Fallout 3: Broken Steel - Game Guide and Walkthrough](https://game.lhg100.com/Article/UploadFiles/201512/2015121518493126.jpg)
[#66]
In order to leave this floor you can use one of two available passageways. It shouldn't take you too long to find them, especially if you'll follow Launch Pad signs [#67]. Choosing the passageway won't affect the outcome, however I would recommend going to the exit located closer to the armory. Notice that you'll end up standing on top of the mobile base. Choose a Tesla cannon from your inventory before moving on and get ready for a series of challenging fights.
![[#67] - Main quests - QUEST 3: Who Dares Wins - part 6 - Main quests - Fallout 3: Broken Steel - Game Guide and Walkthrough](https://game.lhg100.com/Article/UploadFiles/201512/2015121518493158.jpg)
[#67]
Get ready for some serious shooting once you're back outside. You'll be dealing with Enclave troops and more units will be arriving constantly. They will use mostly Vertibirds to get here, so you wouldn't be able to stop them from showing up. As a result it would be a good idea to focus mostly on completing your current objective, without making any unnecessary stops along the way. Defeat the first group and head west. Turn south when you have the chance and start heading towards a large tower [#68]. Make sure to eliminate new enemy units from a larger distance. Afterwards find an entrance leading to the Satellite Control Tower.
![[#68] - Main quests - QUEST 3: Who Dares Wins - part 6 - Main quests - Fallout 3: Broken Steel - Game Guide and Walkthrough](https://game.lhg100.com/Article/UploadFiles/201512/2015121518493180.jpg)
[#68]
The tower you've just entered isn't too big, however you will have to be ready to engage enemy units in difficult fights. Approach the first stairwell [#69] carefully and try to take out a few guards before you're seen by the rest. Keep shooting at the soldiers occupying upper balconies and retreat to the small room each time you suffer major injuries.
![[#69] - Main quests - QUEST 3: Who Dares Wins - part 6 - Main quests - Fallout 3: Broken Steel - Game Guide and Walkthrough](https://game.lhg100.com/Article/UploadFiles/201512/2015121518493297.jpg)
[#69]
Naturally your final objective will be to get to the top of the tower. This can be done using the staircase located in the middle of the tower or by opening doors to outer corridors of this structure. Notice that you will also find stairwells there. It would be a good idea to open all side doors using bobbypins, because you'll have to unlock them anyway soon enough. Once you're at the top take your time trying to find a central terminal [#70]. Approach the computer and decide how you want to end the game.
![[#70] - Main quests - QUEST 3: Who Dares Wins - part 6 - Main quests - Fallout 3: Broken Steel - Game Guide and Walkthrough](https://game.lhg100.com/Article/UploadFiles/201512/2015121518493273.jpg)
[#70]
Activate the terminal, check it status and load the cargo. Once this is done choose Fire Payload option from the list and you'll be given a list of five target locations [#71]. Only two of them are going to be viable and this choice will affect the ending:
- If you choose Preset Target 01: Citadel you'll automatically align yourself with the Enclave. Choosing this option will result in the Citadel being destroyed.
- If you choose Preset Target 05: Adams AFB Platform you'll automatically align yourself with the Brotherhood of Steel. Choosing this option will result in the Air Force Base being destroyed.
![[#71] - Main quests - Possible endings - Main quests - Fallout 3: Broken Steel - Game Guide and Walkthrough](https://game.lhg100.com/Article/UploadFiles/201512/2015121518493245.jpg)
[#71]
HELPING THE ENCLAVE:
Once you've chosen the first location from the list shut down this terminal and proceed to the exit through a door located to your right. It shouldn't take you too long to leave the tower. Wait for a Vertibird to show up [#72] and if you didn't choose Sara at the end of the main scenario you're going to be greeted by her as the pilot of this machine.
![[#72] - Main quests - Possible endings - Main quests - Fallout 3: Broken Steel - Game Guide and Walkthrough](https://game.lhg100.com/Article/UploadFiles/201512/2015121518493284.jpg)
[#72]
Approach the Vertibird and press the action key to take a seat inside the flying machine. On your way to the Citadel you'll hear a lot of complaints from the pilots that you aren't receiving any signal from the brotherhood base [#73]. All you can do here is to look around.
![[#73] - Main quests - Possible endings - Main quests - Fallout 3: Broken Steel - Game Guide and Walkthrough](https://game.lhg100.com/Article/UploadFiles/201512/2015121518493215.jpg)
[#73]
Once you've arrived at the Citadel you should notice that your former base of operations is in ruins. Wait for the game to automatically initiate a conversation with one of the paladins. You're going to be treated as a traitor and this means you'll have to kill all of your recent allies [#74]. Aside from knights and paladins you'll also have to deal with a couple of security turrets, however it shouldn't be anything you can't handle.
![[#74] - Main quests - Possible endings - Main quests - Fallout 3: Broken Steel - Game Guide and Walkthrough](https://game.lhg100.com/Article/UploadFiles/201512/2015121518493224.jpg)
[#74]
Keep heading towards the entrance to the Citadel and proceed to the courtyard. You'll probably have to kill a few Brotherhood of Steel knights along the way, but your followers will assist you in achieving victory. Upon your arrival in the courtyard you should notice that there's a huge crater in front of you [#75]. Thankfully you won't have to worry about radiation, so you may proceed directly to a lower level. Locate a small door leading to Citadel - armory. Start moving forward and eventually you'll get to a large storage area. Make sure to explore your surroundings, because you'll find A LOT of useful and valuable objects, including two (!!!) Tesla cannons, alien blaster cells, mininukes and Nuka-grenades. Good luck carrying it all out of the Citadel! :-)
![[#75] - Main quests - Possible endings - Main quests - Fallout 3: Broken Steel - Game Guide and Walkthrough](https://game.lhg100.com/Article/UploadFiles/201512/2015121518493293.jpg)
[#75]
HELPING THE BROTHERHOOD:
Choose the last location from the list. Notice that you'll have to confirm your choice several times which shouldn't come as a surprise since you're trying to destroy the base you're standing in. Once you've made up your mind quickly leave this area through a nearby door (it would be a good idea to unlock it before using the terminal). Wait for a Vertibird to show up and talk to Sara. It won't be a long conversation. Get on board of the Vertibird and wait for the flying machine to land far away from the mobile base. Enjoy the fireworks [#76]!
![[#76] - Main quests - Possible endings - Main quests - Fallout 3: Broken Steel - Game Guide and Walkthrough](https://game.lhg100.com/Article/UploadFiles/201512/2015121518493231.jpg)
[#76]
Take a seat inside the Vertibird once you're done watching the explosions. Wait for the flying machine to take you back to the Citadel. Obviously you're going to be greeted by Elder Lyons [#77]. He'll thank you for your help in getting rid of the Enclave's base. Notice that you've been awarded with positive karma for completing this quest, as well as with nearly 2000 experience points.
![[#77] - Main quests - Possible endings - Main quests - Fallout 3: Broken Steel - Game Guide and Walkthrough](https://game.lhg100.com/Article/UploadFiles/201512/2015121518493269.jpg)
[#77]
Destroying the mobile base will also allow you to take part in two minor subquests for the Brotherhood of Steel. Start off by talking to Scribe Rothchild. If you haven't waited too long you should be able to find him somewhere in the courtyard [#78]. Offer him help and Rothchild will ask you to start delivering him parts needed to rebuild Liberty Prime. For each successful run you'll be rewarded with bottlecaps and experience points.
![[#78] - Main quests - Possible endings - Main quests - Fallout 3: Broken Steel - Game Guide and Walkthrough](https://game.lhg100.com/Article/UploadFiles/201512/2015121518493234.jpg)
[#78]
You should also talk to paladin Tristan again. If you forgot - he can be found in Citadel - A ring. Offering your help will result in paladin Tristan upgrading your Pip-Boy with a new module [#79]. From now on you'll be allowed to take blood samples from defeated supermutants. Don't worry - you'll take the samples directly from their bodies. Tristan will reward you with bottlecaps and experience points for delivering these objects to him. Note that the module won't work on mutants killed prior to its installation.
![[#79] - Main quests - Possible endings - Main quests - Fallout 3: Broken Steel - Game Guide and Walkthrough](https://game.lhg100.com/Article/UploadFiles/201512/2015121518493391.jpg)
[#79]
Received from: Scribe Bigsley [Jefferson Memorial - Jefferson Museum and Gift Shop]
Walkthrough: During your conversation with Scribe Bigsley ask him about his problems with the caravans. He'll send you to officer Lepelletier. Exit Jefferson Memorial and fast travel to Rivet City. Once you're there ignore the large ramp leading to the aircraft carrier. Instead turn around and proceed to a lower level. It shouldn't take you too long to locate Lepelletier [#80]. Offer your help in dealing with the bandits. If you're playing as a typical mercenary you can also inform her that you'll want some kind of a reward when this is all over. Additionally - if you have a high Speech skill you can persuade her into giving you a plasma rifle with a couple of microfussion cells. Lepelletier will finally inform you that one of the caravans has just left Jefferson Memorial and you'll be sent in to protect it.
![[#80] - Side missions - QUEST 1: Protecting the Water Way - Side missions - Fallout 3: Broken Steel - Game Guide and Walkthrough](https://game.lhg100.com/Article/UploadFiles/201512/2015121518493370.jpg)
[#80]
Open the main map and notice that the caravan is already far away from Jefferson Memorial. As a result you should consider fast travelling to a different location. Irradiated Metro seems like a good idea. Head west and find an opening between large buildings. Turn north once you're close enough to the water. You can now take part in a battle between the guards and the bandits or you may notice that all fights have already ended [#81]. Notice that the water caravan driver has been killed. It would be a good idea to inspect his body, because he'll have a lot of bottlecaps and valuable items with him.
![[#81] - Side missions - QUEST 1: Protecting the Water Way - Side missions - Fallout 3: Broken Steel - Game Guide and Walkthrough](https://game.lhg100.com/Article/UploadFiles/201512/2015121518493359.jpg)
[#81]
Examine the body of one of the bandits that attacked the caravan. Aside from the standard equipment you'll also find a holotape. Play the tape using your Pip-Boy and you'll find out two things - other bandits will meet at Wilhelm's Wharf and the passcode is mirelurk stew. Proceed to the wharf [#82]. Upon your arrival you'll have to decide how you want to end this quest.
![[#82] - Side missions - QUEST 1: Protecting the Water Way - Side missions - Fallout 3: Broken Steel - Game Guide and Walkthrough](https://game.lhg100.com/Article/UploadFiles/201512/2015121518493317.jpg)
[#82]
Endings for a good character:
The most obvious solution to this problem would be to kill all the bandits [#83]. You can attack them by surprise or you can talk to their leader Split Jack and insult him during the initial conversation (for example, by making fun of his eyepatch). Defeating the raiders shouldn't be a big problem, however there's going to be a few of them so you should be using a plasma rifle or an equally powerful weapon.
[#83]
You can also resolve this situation peacefully. Start off by talking to the leader of the bandits, a man called Split Jack. Tell him the password (mirelurk stew), posing as one of the bad guys. Split Jack will order you to wear a metal helmet and a metal armor. Choose these objects from your inventory and when you look like other bandits talk to him again. This time you'll have to win a Speech challenge to convince him in stopping the attacks [#84]. I would recommend that you save your game before the second conversation in case the Speech challenge fails.
![[#84] - Side missions - QUEST 1: Protecting the Water Way - Side missions - Fallout 3: Broken Steel - Game Guide and Walkthrough](https://game.lhg100.com/Article/UploadFiles/201512/2015121518493341.jpg)
[#84]
It doesn't matter whether you've agreed to a peaceful or to a hostile approach. Return to Lepelletier in Rivet City. You'll find out that she won't be able to reward you with anything, but the brotherhood will surely have some kind of a reward. Proceed to Jefferson Memorial - Jefferson Museum and Gift Shop and share the mission report with Scribe Bigsley [#85]. As a reward for your efforts you'll receive a Gatling laser with ammunition, a plasma pistol with ammunition, Enclave's power armor and Enclave's power helmet.
![[#85] - Side missions - QUEST 1: Protecting the Water Way - Side missions - Fallout 3: Broken Steel - Game Guide and Walkthrough](https://game.lhg100.com/Article/UploadFiles/201512/2015121518493318.jpg)
[#85]
Ending for a bad character:
Start off peacefully by approaching the bandits and talking to their leader Split Jack. Prove to him that you're one of the bad guys by telling him the password (mirelurk stew). Split Jack will give you a metal helmet and a metal armor. Wear these objects AND before you initiate a second conversation leave this area. More far away from the wharf and order your followers to stay put [#86]. This is a very important thing, because otherwise you wouldn't be able to achieve the outcome you're going for.
![[#86] - Side missions - QUEST 1: Protecting the Water Way - Side missions - Fallout 3: Broken Steel - Game Guide and Walkthrough](https://game.lhg100.com/Article/UploadFiles/201512/2015121518493388.jpg)
[#86]
Return to the wharf and talk to Split Jack again. This time you'll want to choose the second option from the list [#87], challenging him to a duel for the leadership in his gang. Split Jack will agree to your proposal and he'll present you with a choice of melee weapons. A combat knife should do the trick.
![[#87] - Side missions - QUEST 1: Protecting the Water Way - Side missions - Fallout 3: Broken Steel - Game Guide and Walkthrough](https://game.lhg100.com/Article/UploadFiles/201512/2015121518493349.jpg)
[#87]
Notice that as soon as the conversation has ended you'll start the fight. Quickly open your inventory and choose the melee weapon you agreed to a few seconds earlier. Don't forget that you can't use any real guns, because you would have been attacked by Split Jack's friends. The same goes with using followers and that's why you had to move back. Keep attacking your opponent [#88] and make sure to activate V.A.T.S. from time to time to make this duel even easier.
![[#88] - Side missions - QUEST 1: Protecting the Water Way - Side missions - Fallout 3: Broken Steel - Game Guide and Walkthrough](https://game.lhg100.com/Article/UploadFiles/201512/2015121518493444.jpg)
[#88]
Once you've defeated Split Jack you'll initiate a short conversation with one of the members of his gang. You won't be nominated as a new leader of the gang, however you will be allowed to help your new colleagues in getting their hands on the ransom for the caravan. Return to Rivet City and talk to Lepelletier. You can persuade her into giving you 200 bottlecaps or you can try winning a Speech challenge [#89]. If the challenge succeeds she'll have to pay you 500 bottlecaps. Listen to her warning and don't talk to her again unless you want to start a fight. You should also know that you won't have to return to Scribe Bigsley.
![[#89] - Side missions - QUEST 1: Protecting the Water Way - Side missions - Fallout 3: Broken Steel - Game Guide and Walkthrough](https://game.lhg100.com/Article/UploadFiles/201512/2015121518493442.jpg)
[#89]
Received from: Scribe Bigsley [Jefferson Memorial - Jefferson Museum and Gift Shop] or Griffon [Museum of History] or automatically after reading files from Bigsley's computer [Jefferson Memorial - Jefferson Museum and Gift Shop]
Walkthrough: As you've probably noticed by now, there are three ways for you to activate this quest. The easiest way would be to talk to Griffon, however I doubt you'll want to travel to Museum of History on your own. As a result you should consider choosing one of two other paths and returning to the museum only if they both fail. As for Bigsley, I wouldn't recommend trying to hack into his computer, because you would have been caught. Instead initiate a conversation and talk to him about selling the water. If you have negative karma or a high Speech skill you'll be allowed to ask him for more details of his operation [#90]. Bigsley will then tell you and about his dealings with a ghoul named Griffon.
![[#90] - Side missions - QUEST 2: The Amazing Aqua Cura - Side missions - Fallout 3: Broken Steel - Game Guide and Walkthrough](https://game.lhg100.com/Article/UploadFiles/201512/2015121518493494.jpg)
[#90]
Exit Jefferson Memorial and proceed directly to the Museum of History. Upon your arrival in the large hall you should be able to notice a few ghouls. Approach the group and take your time listening to Griffon's speech. Talk to him when you're ready and you'll find out that he's selling Aqua Cura which apparently has some healing powers. You can purchase a bottle of Aqua Cura from him for 10 bottlecaps or you can win a Speech challenge [#91] and convince him into giving you a sample for free.
![[#91] - Side missions - QUEST 2: The Amazing Aqua Cura - Side missions - Fallout 3: Broken Steel - Game Guide and Walkthrough](https://game.lhg100.com/Article/UploadFiles/201512/2015121518493493.jpg)
[#91]
Open your Pip-Boy and check the bottle you've received for Griffon. It shouldn't take you too long before you'll notice that it's a standard irradiated water. Talk to Griffon again and this time share your concerns. Griffon will deny your accusations which shouldn't come as a surprise. If you win a Speech challenge or if you have negative karma you can convince him to tell you the truth [#92]. You would find out that he's switching the irradiated water with clean samples bought from the Brotherhood of Steel. Sadly he won't tell you where he's manufacturing Aqua Cura. Leave the museum and return to Jefferson Memorial - Jefferson Museum and Gift Shop.
![[#92] - Side missions - QUEST 2: The Amazing Aqua Cura - Side missions - Fallout 3: Broken Steel - Game Guide and Walkthrough](https://game.lhg100.com/Article/UploadFiles/201512/2015121518493490.jpg)
[#92]
Talk to Scribe Bigsley again and this time ask him about the details of his dealings with Griffon. You won't have to win any new Speech challenges, because you'll find out right away that he's trading water for bottlecaps in the Museum of Authority. Leave Jefferson Memorial and notice that a new marker has been added to your personal map. Your current destination should be surrounded by a lot of previously visited locations, so it won't take you too much time to get there. Keep heading towards a small building [#93]. There are some radroaches near the entrance and you should use a melee weapon to get rid of them. Enter the Museum of Authority through a nearby door.
![[#93] - Side missions - QUEST 2: The Amazing Aqua Cura - Side missions - Fallout 3: Broken Steel - Game Guide and Walkthrough](https://game.lhg100.com/Article/UploadFiles/201512/2015121518493498.jpg)
[#93]
MAP OF THE MUSEUM:
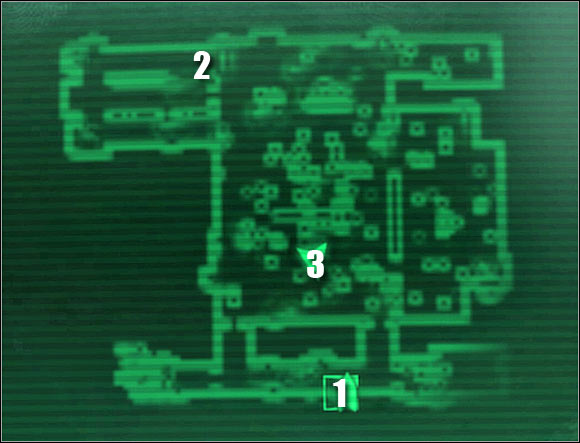
Map legend: 1 - entrance to the museum; 2 - staircase; 3 - holotape
The museum itself is being guarded by at least two ghoul guards, however you shouldn't have any major problems eliminating them. There are two ways for you to acquire a proof of Griffon's shady operations. You can examine the body of a ghoul killed near the staircase and you would find a note. Alternatively you can use the stairs to proceed to a lower level and you would find a holopad near the bathtubs [#94]. Make sure to read the note or to play the holotape before moving on. Return to the Museum of History and decide how you want to end this quest.
![[#94] - Side missions - QUEST 2: The Amazing Aqua Cura - Side missions - Fallout 3: Broken Steel - Game Guide and Walkthrough](https://game.lhg100.com/Article/UploadFiles/201512/2015121518493454.jpg)
[#94]
Before you'll make your final decision you must start a new conversation with Griffon and choose the first option from the list, informing him that you know his secret. You should also know that you may decide to visit Scribe Bigsley after leaving the Museum of Authority, however informing him about the hideout wouldn't do you any good.
Endings for a good character:
Choosing the second option from the list will result in the main character forcing Griffon to tell other ghouls about his scheme. This will result in the mob attacking Griffon [#95] after his short speech. You won't receive negative karma unless you attack Griffon or other ghouls. I would recommend that you remain in the back and observe what happens next. Griffon is going to end up getting killed. Loot his body if you want to and you'll find 200 bottlecaps.
![[#95] - Side missions - QUEST 2: The Amazing Aqua Cura - Side missions - Fallout 3: Broken Steel - Game Guide and Walkthrough](https://game.lhg100.com/Article/UploadFiles/201512/2015121518493430.jpg)
[#95]
Choosing the last dialogue option from the list will result in the main character convincing Griffon to seize his operations. Your friend will promise to comply [#96] and you'll end this quest right away. Notice that you don't have to win a Speech challenge. If you want to find out if he followed your instructions visit him again in a couple of days. :-)
![[#96] - Side missions - QUEST 2: The Amazing Aqua Cura - Side missions - Fallout 3: Broken Steel - Game Guide and Walkthrough](https://game.lhg100.com/Article/UploadFiles/201512/2015121518493426.jpg)
[#96]
Ending for a bad character:
Choosing the first option from the list will result in the main character trying to force Griffon into giving him a bribe in exchange for his silence [#97]. You can ask Griffon for a single payment of 300 bottlecaps, you can agree to his plan of splitting future income (20/80) or you can win a Speech challenge and present your plan (50/50). Don't forget to visit Griffon from time to time if you've agreed to become his business partner.
![[#97] - Side missions - QUEST 2: The Amazing Aqua Cura - Side missions - Fallout 3: Broken Steel - Game Guide and Walkthrough](https://game.lhg100.com/Article/UploadFiles/201512/2015121518493566.jpg)
[#97]
Received from: Scribe Bigsley [Jefferson Memorial - Jefferson Museum and Gift Shop] or automatically during the exploration of Capitol Wasteland [Capitol Wasteland] or while exploring Megaton [Megaton]
Walkthrough: I would recommend that you activate this side mission along with two other subquests, so you won't have to return to Scribe Bigsley too many items. If you don't want to participate in other subquests proceed directly to Megaton. You can activate this quest by witnessing a scene near the main gate [#98]. A woman named Rose will give a bottle of holy water to one of the beggars and he'll immediately die. Talk to her and you'll find out that she received this holy water from one of the monks living in a monastery located in Springvale. Notice that she gave you a pamphlet.
![[#98] - Side missions - QUEST 3: Holy Water - Side missions - Fallout 3: Broken Steel - Game Guide and Walkthrough](https://game.lhg100.com/Article/UploadFiles/201512/2015121518493575.jpg)
[#98]
If you don't want to talk to Rose or if you by any chance you haven't met her you should enter Megaton. You can now either proceed to your house and you would find the pamphlet stuck to the door [#99] or you can wait for an anonymous citizen of Megaton to approach you and to hand over this object. I would recommend that you take your time and read the note.
![[#99] - Side missions - QUEST 3: Holy Water - Side missions - Fallout 3: Broken Steel - Game Guide and Walkthrough](https://game.lhg100.com/Article/UploadFiles/201512/2015121518493594.jpg)
[#99]
You may leave Megaton. The monastery is located in Springvale, so you don't have to fast travel, because you can get there on foot. Once you've arrived at your destination approach the monastery building [#100] and you're going to be greeted by brother Gerard. He will give you a bottle of holy water, asking you to drink it. Here's where you'll have to decide how to get inside the monastery.
![[#100] - Side missions - QUEST 3: Holy Water - Side missions - Fallout 3: Broken Steel - Game Guide and Walkthrough](https://game.lhg100.com/Article/UploadFiles/201512/2015121518493572.jpg)
[#100]
Finding a way into the monastery:
You can choose an aggressive approach, ignoring brother Gerard's wish to drink the water. If you'd like to see him dead there's nothing standing in your way of killing him [#101]. You should know that other monks will know about his death, but you won't have to worry about them turning hostile towards your character. You could try stealing a monastery key from Gerard, however chances of success are slim at best. You can also ignore him and find a hatch leading to the Eternal Light Monastery. Opening the hatch would only be possible with very high Lockpicking skill.
![[#101] - Side missions - QUEST 3: Holy Water - Side missions - Fallout 3: Broken Steel - Game Guide and Walkthrough](https://game.lhg100.com/Article/UploadFiles/201512/2015121518493513.jpg)
[#101]
If you plan on talking to brother Gerard again you'll have to drink the holy water he gave you. I guess you won't be surprised to hear that you'll suffer from the effects of radiation. It won't be a lethal dose, so don't worry. Talk to him again and ask him about the monastery and about the holy water if you want to. Eventually you'll find out that you won't be allowed inside the monastery until you become one of the enlightened [#102]. This of course means exposing yourself to more radiation. Ready to become green? :-)
![[#102] - Side missions - QUEST 3: Holy Water - Side missions - Fallout 3: Broken Steel - Game Guide and Walkthrough](https://game.lhg100.com/Article/UploadFiles/201512/2015121518493587.jpg)
[#102]
Thankfully you won't have to leave this area in order to comply to Gerard's wish. Instead enter the building and go to your right. Press a switch [#103] and get closer to a bathtub. Notice that you've exposed yourself to a very large dose of radiation. You can return to Gerard in a few seconds and win a Speech challenge to convince him that you should gain access. If you fail you'll have to go back to the bathtub and receive even more radiation. Either way you'll end up getting a monastery key from Gerard. Don't forget to heal yourself after the final conversation. Use a hatch in the floor leading to the Eternal Light Monastery.
![[#103] - Side missions - QUEST 3: Holy Water - Side missions - Fallout 3: Broken Steel - Game Guide and Walkthrough](https://game.lhg100.com/Article/UploadFiles/201512/2015121518493569.jpg)
[#103]
Start moving forward until you get to a slightly larger room. You'll meet Mother Curie III here, as well as a couple of ghouls. There are three ways to complete this quest. Two methods will require you to persuade her to change her mind and the third method will require you to kill all the monks.
Peaceful solutions:
Approach Mother Curie III and initiate a new conversation during which ask her about the monastery. You can ask her an additional question if you have a Science skill and the main character will notice that she's turning people into ghouls. Finish the conversation by trying to convince her that her actions are wrong [#104]. This can only be done if you have high Charisma.
![[#104] - Side missions - QUEST 3: Holy Water - Side missions - Fallout 3: Broken Steel - Game Guide and Walkthrough](https://game.lhg100.com/Article/UploadFiles/201512/2015121518493563.jpg)
[#104]
If you can't persuade Mother Curie using the method mentioned above you can choose the last topic from the list and you'll find out that the only person capable of changing her mind is going to be the prophet of Atom. Proceed to the basement and locate a new switch. Press the switch and then remain inside the irradiated area [#105]. You'll have to wait until the main character receives 800 rads. Quickly retreat from the hazardous area, because you'll be in critical condition. Slowly head over to Mother Curie. Talk to her and pose as a prophet of Atom. This will result in her stopping the further distribution of holy water.
![[#105] - Side missions - QUEST 3: Holy Water - Side missions - Fallout 3: Broken Steel - Game Guide and Walkthrough](https://game.lhg100.com/Article/UploadFiles/201512/2015121518493511.jpg)
[#105]
Attacking the monks:
Obviously you'll have to kill all the monks if you're planning on choosing a hostile approach, including Mother Curie III. It's not going to be easy as it might seem, because there are two very powerful ghouls in the basement of the monastery and you would have to kill the beasts along with other hostile units [#106]. Don't forget to use your must powerful weapons and it would also be a good idea to set up a minefield near the stairs leading to the cellar.
![[#106] - Side missions - QUEST 3: Holy Water - Side missions - Fallout 3: Broken Steel - Game Guide and Walkthrough](https://game.lhg100.com/Article/UploadFiles/201512/2015121518493699.jpg)
[#106]
Claiming your reward:
It doesn't matter whether you've been able to convince Mother Curie or killed all the monks, because the only thing that counts is that you got the job done. Go back to Jefferson Memorial and talk to Scribe Bigsley to claim your reward [#107]. Don't count on unbelievable treasures, because you'll get only 300 bottlecaps without being able to ask for more money.
![[#107] - Side missions - QUEST 3: Holy Water - Side missions - Fallout 3: Broken Steel - Game Guide and Walkthrough](https://game.lhg100.com/Article/UploadFiles/201512/2015121518493698.jpg)
[#107]
Broken Steel expansion pack adds fourteen new perks to the game. You should also know that these talents are all connected to the increased level cap, so you'll be allowed to choose them whenever you advance to a higher experience level. The first group of perks will become available when you reach level 22 and some of the most powerful talents are reserved for level 30 characters.
I would like to inform you that you won't be able to get to 30th level of experience if you'll only rely on new quests. All six challenges (three main quests and three side missions) won't get you past levels 24-25 so as a result you'll have to look for other opportunities of earning experience points. I would recommend installing other DLC's, as well as fighting supermutants, deathclaws and other powerful creatures. Don't forget that in some areas in Broken Steel you'll be dealing with endless enemy reinforcements until you move on to other section. You'll be allowed to use this to your advantage in order to earn a lot of points easily.
Here's a list of new perks:

Deep Sleep - lvl22; ranks: 1
Effects: Sleeping (even if someone elses bed) results in a 10% experience points increase that lasts eight hours.
Additional info: Interesting perk, but only if you prefer to heal injuries using sleep instead of standard stimpacks and other medical supplies.

Puppies! - lvl22; ranks: 1
Effects: Each time Dogmeat dies you can get a new dog from the entrance to Vault 101.
Additional info: Useless perk. Choose it only if you want the dog at your side badly and if you've already lost Dogmeat once. Otherwise you should choose something more practical.

Quantum Chemist - lvl22; ranks: 1
Effects: You can manufacture Quantum Nuka-Cola using ten bottles of Nuka-Cola.
Additional info: Consider choosing this perk only if you haven't completed Nuka-Cola Challenge subquest and if you're too lazy to look for Quantum bottles on your own. Otherwise ignore this talent.

Devil's Highway - lvl24; ranks: 1
Effects: Your character's allignment is automatically set to very evil.
Additional info: Yet another useless perk. You can lower your karma without its help by attacking helpless wanderers, blowing up Megaton or destroying the Citadel.
Escalator to Heaven - lvl24; ranks: 1
Effects: Your character's allignment is automatically set to very good.
Additional info: Similar situation to the previous perk. It's more difficult to gain positive karma, however I assume that you've made up your mind at the beginning of the game whether you want to play as a good or as a bad character.

Karmic Rebalance - lvl24; ranks: 1
Effects: Your character's allignment is automatically set to neutral.
Additional info: Third karma-based perk. It's slightly more useful, because usually you have to spend more time trying to reach neutral status.

No Weakness - lvl24; ranks: 1
Effects: All main stats are being raised to 5 points.
Additional info: Guess what... another useful perk. You can raise your main stats easily and without having to choose a perk. I recommend taking part in some of the subquests and collecting Vault-Tec figurines. Spend your point on something useful.
Nerves of Steel - lvl26; req: Agility 7; ranks: 1
Effects: Faster regeneration of action points.
Additional info: Finally something that's interesting. Using this perk can make some of the toughest parts of the game easier, because you won't have to wait too long before you're allowed to use V.A.T.S. system again.

Rad Tolerance - lvl26; req: Endurance 7; ranks: 1
Effects: You won't receive penalties from minor radiation.
Additional info: Worthless perk, mostly because minor radiation won't result in any large penalties. Besides you can heal yourself easily and you should have armors that offer good protection against radiation.

Warmonger - lvl26; req: Intelligence 7; ranks: 1
Effects: You don't need the schematics anymore to construct unique weapons.
Additional info: This is an ideal perk for a lazy player. :-) You won't have to spend additional time anymore trying to get to the schematics. I wouldn't recommend taking this perk, especially since custom-made weapons aren't that good and it's not that difficult to manufacture them on your own.

Party Boy/Girl - lvl28; ranks: 1
Effects: Your character won't receive any penalties from drinking a lot of alcohol and being addicted to beverages.
Additional info: Wanna guess? Yes - it's a useless perk! Choose something that you can actually profit from.

Rad Absorption - lvl28; req: Endurance 7; ranks: 1
Effects: You begin losing radiation points over time.
Additional info: I would only recommend choosing this perk if other useful talents are already on your list. Still - you can achieve the exact same effect thanks to medical supplies (Med-X and RadAway).

Almost Perfect - lvl30; ranks: 1
Effects: Your main stats are all raised to 9 points.
Additional info: A very useful perk which will allow you to achieve total dominance while exploring the Capitol Wasteland. Nevertheless, you can achieve similar results if you've already collected all the figurines and completed all subquests with stat increases as rewards.

Nuclear Anomaly - lvl30; ranks: 1
Effects: The main character explodes each time he has less than 20 health points.
Additional info: This is by far the strangest perk you can get in the game and I would recommend choosing it for fun. Remember that the explosion will hurt everybody, including your allies, followers and innocent civilians.
This time you can unlock six achievements which are all worth 150 points. Three achievements are tied to main quests of Broken Steel and the remaining three to reaching the final level of experience. I would recommend that you save your game not long before you advance to level 29. When you do remember that you can change your alignment using new perks. That way you'll be able to get all achievements without having to replay large portions of the game.
ACHIEVEMENT
REWARD
REQUIREMENTS
Death from Above
30
Complete Death from Above quest (gained automatically upon completion).
Devil
20
Achieve 30th level of experience while playing as a bad character.
Messiah
20
Achieve 30th level of experience while playing as a good character.
Shock Value
30
Complete Shock Value quest (gained automatically upon completion).
True Mortal
20
Achieve 30th level of experience while playing as a neutral character.
Who Dares Wins
30
Complete Who Dares Wins quest (gained automatically upon completion).


 Fallout 3: Operation Anchorage Game Guide & Walkthrough
 FIFA 14 Game Guide & Walkthrough
 Final Fantasy XII Game Guide & Walkthrough
 Football Manager 2015 Game Guide & WalkthroughFar Cry 3: Blood Dragon Game Guide & Walkthrough