The Mystery of the Crystal Portal Walkthrough, Guide, & Tips
The Mystery of the Crystal Portal Walkthrough
Welcome to the The Mystery of the Crystal Portal Walkthrough!
Embark on a brain-bending adventure that’s full of unique hidden object fun! Help Nicole Rankwist find her missing father!
Whether you use this document as a reference when things get difficult or as a road map to get you from beginning to end, we’re pretty sure you’ll find what you’re looking for here.
This document begins with general game tips then launches into the complete The Mystery of the Crystal Portal game walkthrough featuring annotated screenshots from actual gameplay!
We hope you find this information useful as you play your way through the game. Use the walkthrough menu below to quickly jump to whatever stage of the game you need help with.
Remember to visit the Big Fish Games Forums if you find you need more help. Have fun!
This walkthrough was created by Chie.
WALKTHROUGH MENU
- General Tips
- Chapter 1 – Entrance
- Chapter 2 – Study Room
- Chapter 3 – Japan
- Chapter 4 – The Swiss Alps
- Chapter 5 – Guatemala
- Chapter 6 – Africa
- Chapter 7 – Russia
- Chapter 8 – America
General Tips

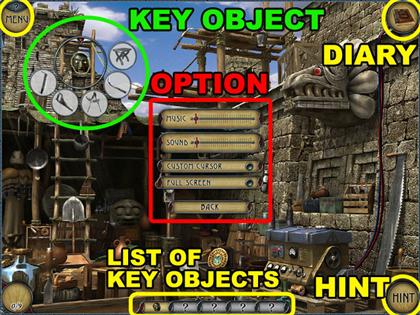
- From the main menu, you can adjust a variety of settings, like music and sound volume, screen mode and toggling the custom cursor from the option menu.
- In this game, there are many key objects in a scene. You will need to find hidden objects and drop them on the key objects to remove them from the scene.
- You can work on multiple key objects at the same time, but many will not be available until other objects have been cleared from in front of them.
- Sometimes you may have to start on the next key object in order to finish the one you are currently working on.
- Use the hints to find the next key object and an object to add to it.
- In every location you will also have to find a certain number of objects to unlock the last secret place and mini-game.
Chapter 1 – Entrance

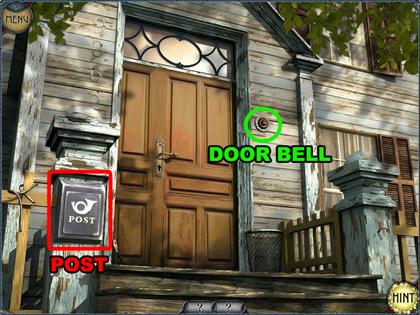

- You can see how many tasks you need to complete in this section by looking at the bottom of the screen.
- The number of boxes is the number of tasks to finish and after completing a task the box will be filled in by an icon.
- Click on the red door bell in the middle of the screen to try to open the door.
- Click on the post box in the bottom left corner. It is a KEY OBJECT and will need four other hidden objects to complete it.
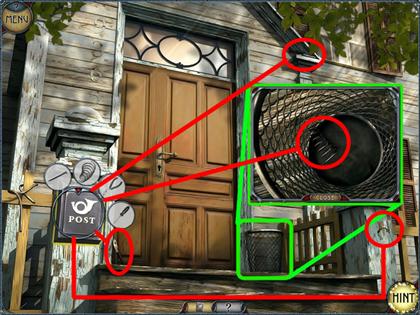
- First, click and drop the three hidden objects circled in red in the screenshot to the post box.
- Some containers hold objects and when you place your custom cursor on to a container, the cursor will become a magnifying glass. When you use the system cursor, the object will just be highlighted in white.
- Second, click the trash can beside the entrance door and find the spring inside the trash can. Click and drop the spring on the post box.

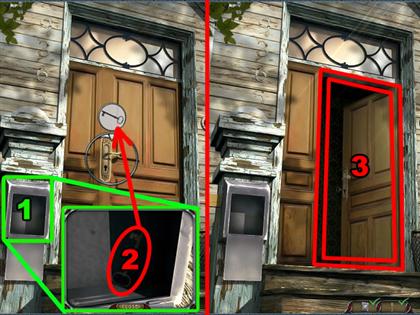
- Lastly, click the post to look inside and click the key. Use the key on the door and click it twice, once to open it and once to go inside.
- Refer to the images for the solution.
Chapter 2 – Study Room

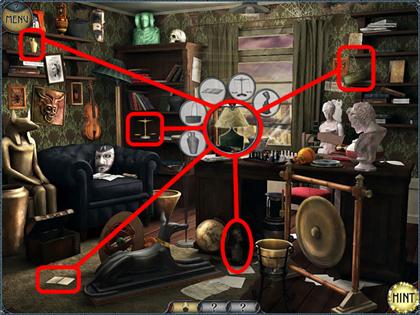
- Click on the lamp in the middle of the screen and a list of five hidden objects will then appear.
- Find five objects that are highlighted red in the image.

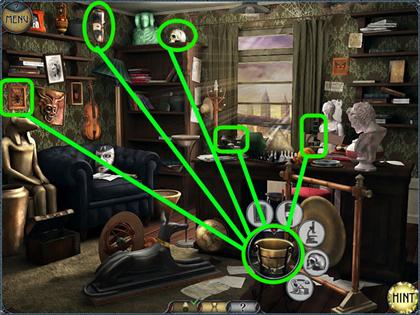
- Click on the vase in the bottom right corner of the screen and a list of five hidden objects will then appear.
- Find five objects that are highlighted red in the image.
- Refer to the images for the solution.

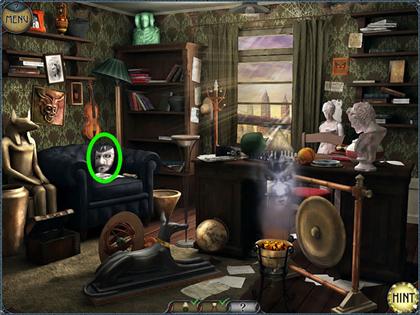
- The vase will then show the mask.
- Click on the mask in the left side of the screen.

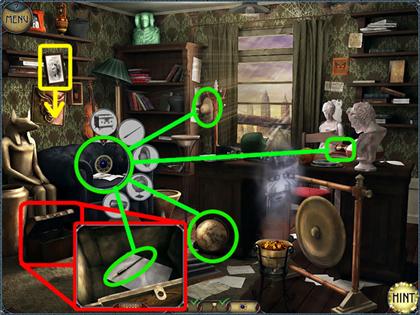

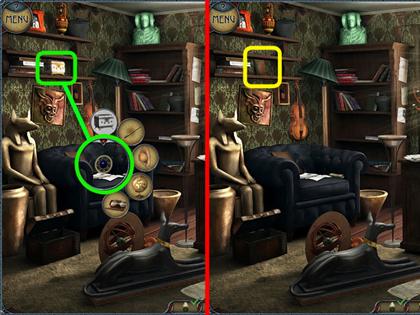
- After finding the mask, the blue crystal will then appear and click on it. This is the last key object and fills in the icon at the bottom of the screen.
- Find four hidden objects that are highlighted in green.
- To find one of the hidden objects, open the wooden box in the bottom left corner. You must open the wooden box last.
- After finding the four hidden objects, the frame in the upper left corner will fall down and the white box will then appear. Click on the white box and drop it on the key object, the blue crystal.
- After finding the five hidden objects, a diary will then appear behind the white box. Click on the diary to finish this chapter.
- Refer to the images for the solution.
Chapter 3 – Japan
Temple

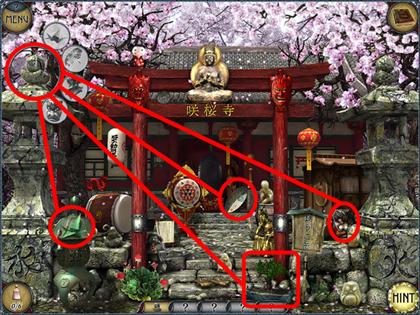
- At the beginning of this chapter, you will be shown a book with different locations noted in it. This walkthrough takes the most logical order, but you may be able to play in a different order.
- Click on the sculpture in the upper left corner. It is a key object.
- Find four objects that are highlighted red in the image.

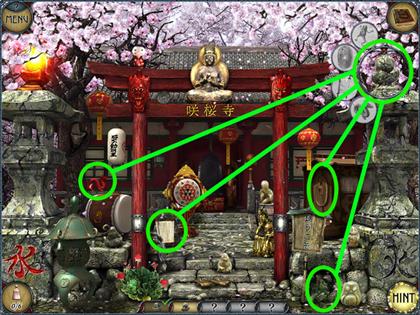
- Click on the sculpture key object in the upper right corner.
- Find four objects that are highlighted green in the image.

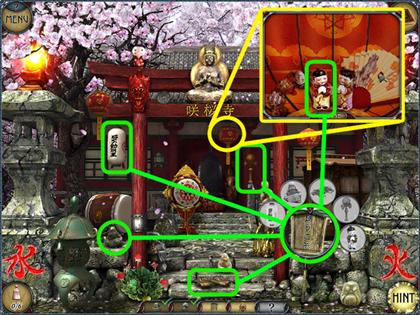
- Click on the wooden sign in the bottom right corner. It is a key object.
- Find four objects that are highlighted green in the image.
- After finding the four objects in green, click on the red lantern in the middle of the screen and find the doll. Drop it onto the key object.

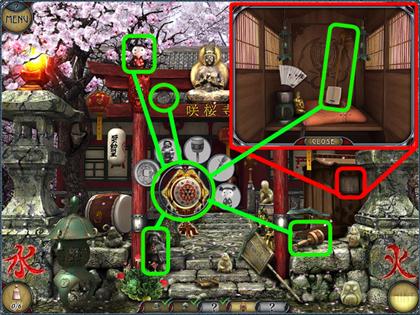
- Click on the drum in the middle of the screen.
- Find four objects that are highlighted green in the image.
- Click on the bamboo window that in the right side of the screen and find the Shamisen inside the window.
- Click on the red lantern in the middle of the screen and find the doll and drag to the key object.

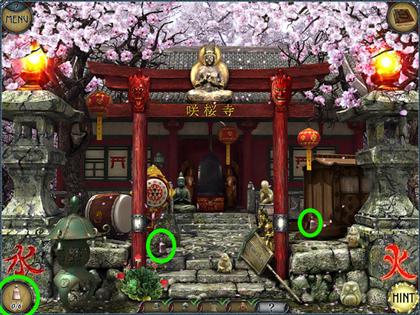
- Find two weights that are highlighted green in the image. You will need to collect 6 of these to enter the temple.

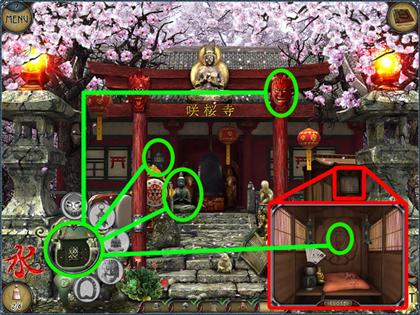
- Click on the lamp in the bottom left corner in the screen.
- Find four hidden objects that are highlighted in green in the image.
- To find one of hidden objects, click on the bamboo window on the right side.
- The fifth object will not be available now, so you will need to go check the other locations in this area.
- If you click on the birds nest on the left side of the screen you will find you need a ladder. This ladder can be found in the docks.
- Click on the diary icon in the upper right corner to change your location.
Dock

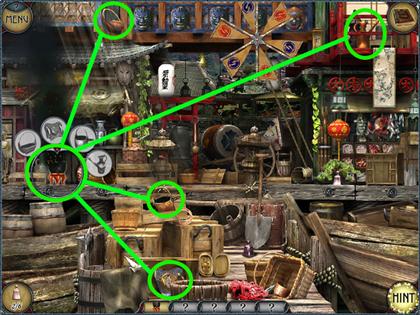
- Click on the black hibachi in the left side of the screen.
- Find four objects that are highlighted green in the image.

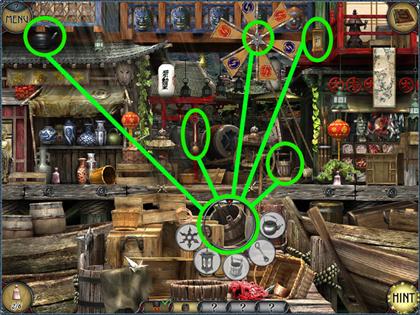
- Click on the barrel in the bottom middle of the screen.
- Find four objects that are highlighted green in the image.

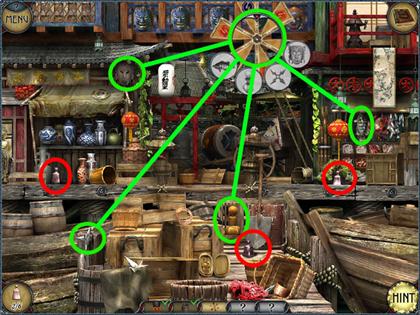
- Click on the fan in the upper middle of the screen.
- Find four objects that are highlighted green in the image.
- Find three weights that are circled red in the image.

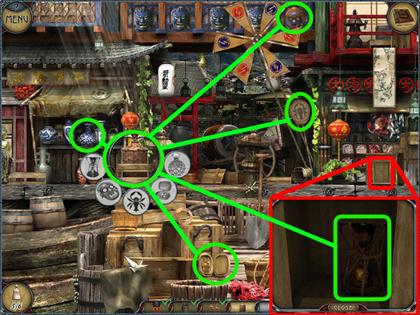
- Click on the barrel in the middle of the screen.
- Find five objects that are highlighted green in the image.
- To find the last hidden object, click on the wooden shelf in the right side.

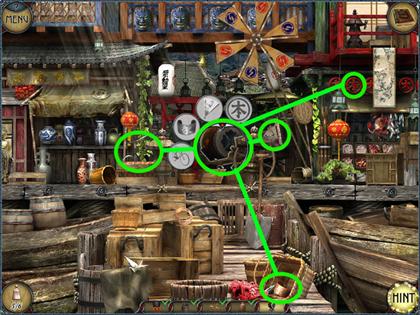
- Click on the big drum in middle of the screen.
- Find four objects that are highlighted green in the image.

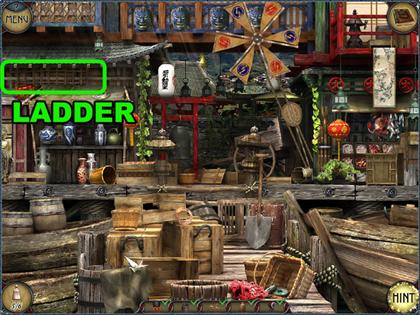
- Click on the ladder that is highlighted green in the upper left corner to collect it.
- Click on your diary and go back to the temple to use the ladder.
Temple

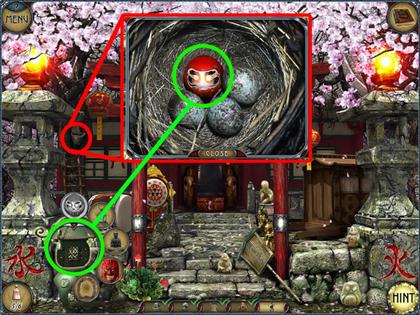
- Click on the green lantern in the bottom left corner.
- Click on the bird nest to find the red figure inside it and drag it to the green lantern.

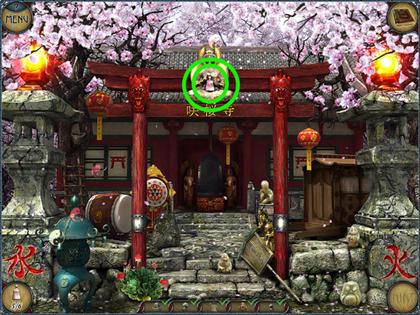
- The last weight will then appear inside the Buddha’s hands in the middle of the screen.
Secret Place

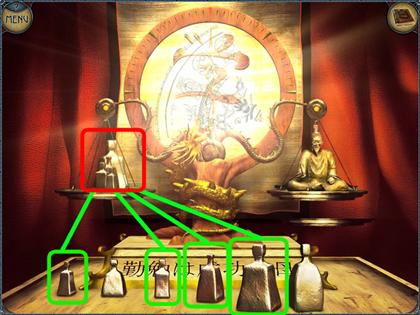
- Place weights on the scale until the weight is the same with the sculpture on the right side.
- The correct solution uses all the weights except for two: the weight on the right and the weight second to the left.
- Click weights that are highlighted green and drag to the scale.
Chapter 4 – The Swiss Alps
Tavern

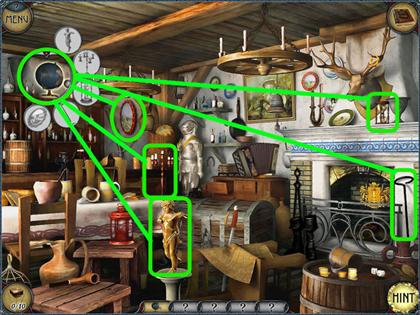
- From the diary, click on the Tavern to start this chapter.
- Click on the globe in the upper left corner. This is the first key object.
- Find five objects that are highlighted green in the image.

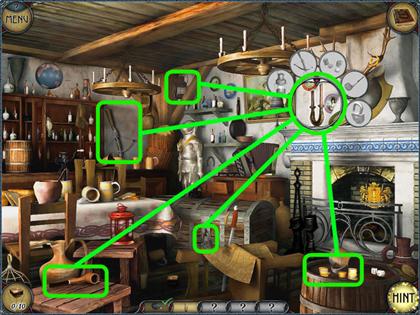
- Click on the candle holder key object in the upper right corner.
- Find five objects that are highlighted green in the image.

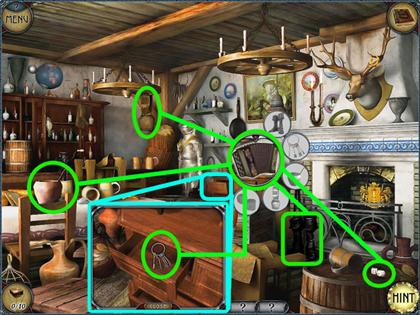
- Click on the accordion key object in the middle of the screen.
- Find five objects that are highlighted green in the image.
- To find one of the hidden objects, click on the wooden shelf in the middle of the screen.

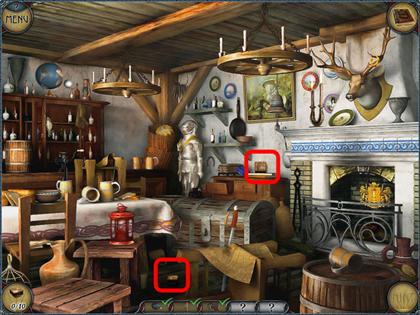
- Find two stones that is highlighted red in the image.

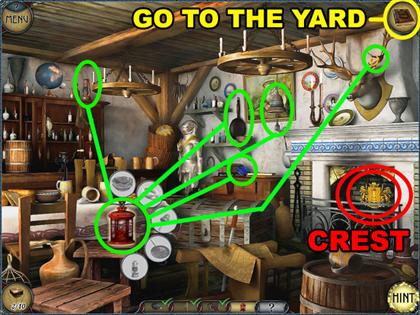
- Click on the lantern key object in the bottom left corner in the screen.
- Find five objects that are highlighted green in the image.
- Click on the crest in the fire place to get your next suggestion. Your character will tell that you need to find matches in the yard.
- Click on the diary icon to go to the Yard.
Yard

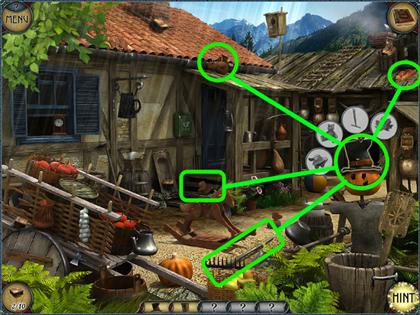
- Click on the hat on the Jack-o-lantern key object in the bottom right corner.
- Find four objects that are highlighted green in the image.

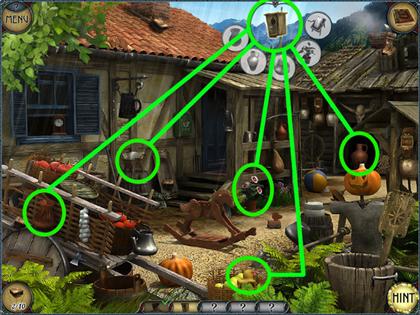
- Click on the hat on the bird house key object in the upper middle of the screen.
- Find five objects that are highlighted green in the image.

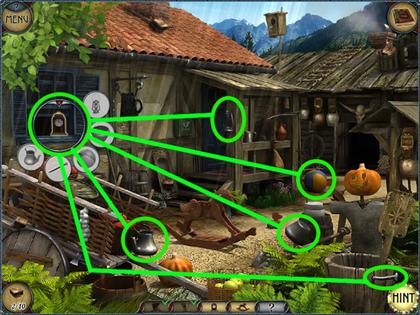
- Click on the clock key object on the left side.
- Find five objects that are highlighted green in the image.

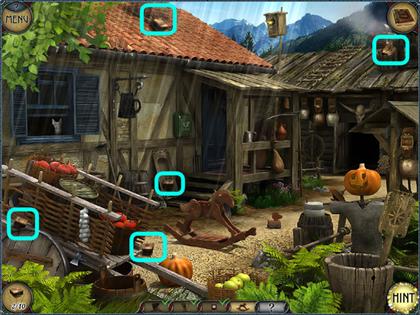
- Click on five stone boxes that are highlighted light blue in the image.

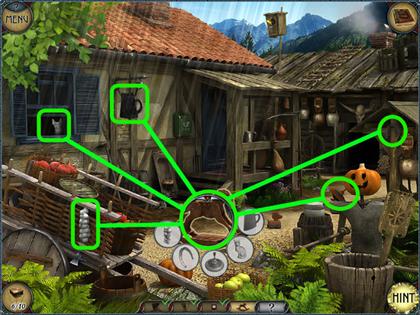
- Click on the rocking horse key object in the middle of the screen.
- Find five objects that are highlighted green in the image.

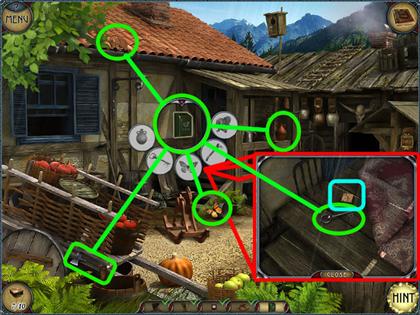
- Click on the green post key object in the middle of the screen.
- To find the last of the hidden objects, click on the doormat beside the green post. Also, there is another stone under the doormat.
- Find five objects that are highlighted green in the image.
- After finding all five hidden object, the match box will then appear inside the post. Click on the match box and go to the Tavern again.
Tavern

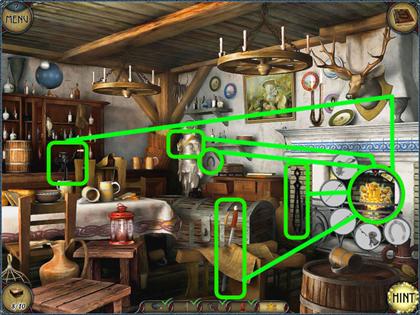
- Click on the crest key object in the fireplace.
- Find five objects that are highlighted green in the image.

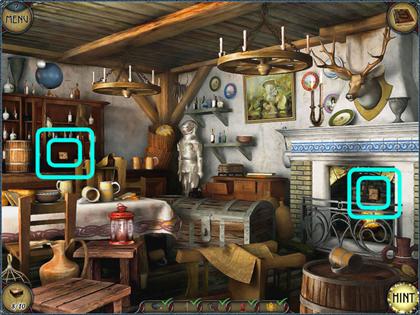
- After finding all five objects, another two stones that are highlighted light blue will then appear.
- Click on those stones to complete this level and open up another secret place in your diary.
Secret Place

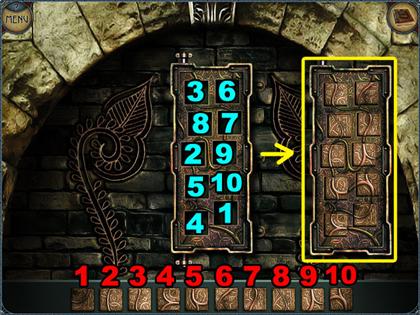
- Click and drag each stones to correct position to compete the puzzle.
- When all the stones are in the right position, the vines from the bottom will connect to the top.
- Once the stones are in the correct position they cannot be moved.
- Refer to the image for the solution.
Chapter 5 – Guatemala
Camp

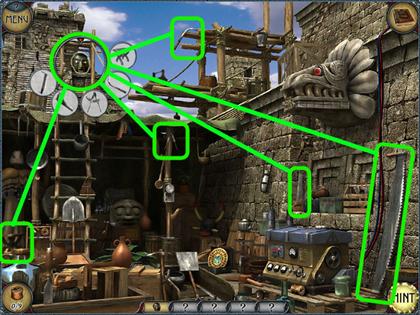
- When first starting the chapter, both the camp and the tomb will be available. This walkthrough goes to the camp first, but your play through may vary.
- Click on the mask key object in the upper left corner.
- Find five objects that are highlighted green in the image.

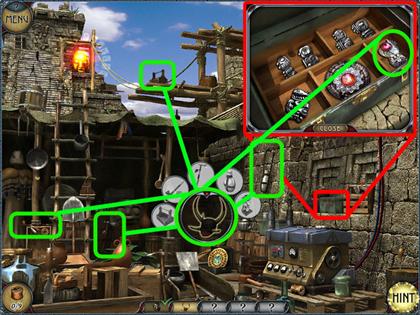
- Click on the mask key object in the middle of the screen.
- To find one of objects, click on the green tool box.
- Find five objects that are highlighted green in the image.

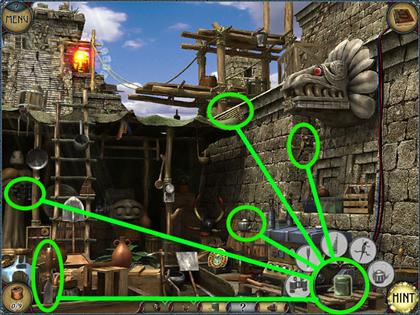
- Click on the mess kit key object in the bottom right corner.
- Find five objects that are highlighted green in the image.

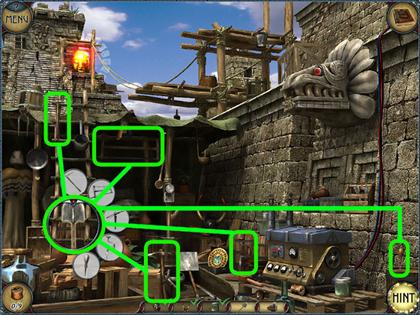
- Click on the shovel key object in the bottom left corner.
- Find five objects that are highlighted green in the image.

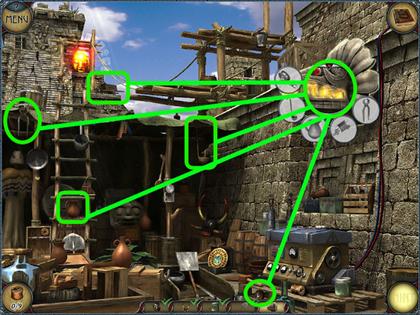
- Click on the sculpture key object in the upper right corner.
- Find five objects that are highlighted green in the image.

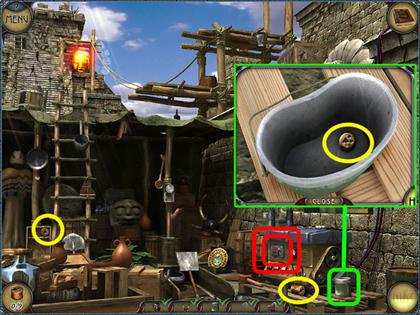
- Find three runes that are circled yellow in the image.
- To find one of the runes, click on the green mess kit in the bottom right corner of the screen. Once all 9 runes are collected you will be able enter the next secret place.
- Click on the button on the generator that is highlighted red to get the next suggestion. You will be told to go to the station to get gas for the generator.
- Click on the diary icon to go to the railway station.
Station

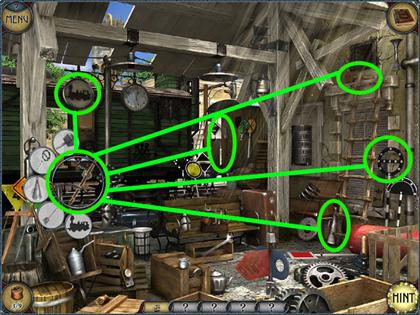
- Click on the tool key object in the left side of the screen.
- Find five objects that are highlighted green in the image.

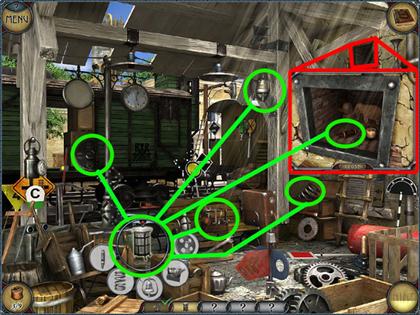
- Click on the pod key object in the left bottom left corner.
- To find the last object, click on the ventilation hole in the upper right corner.
- Find five objects that are highlighted green in the image.

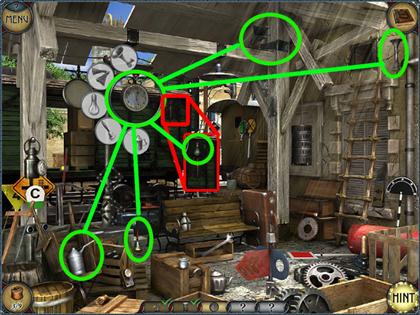
- Click on the wall clock key object in the upper left corner.
- To find the last object,, click on the door beside the wall clock and collect the light bulb.
- Find five objects that are highlighted green in the image.

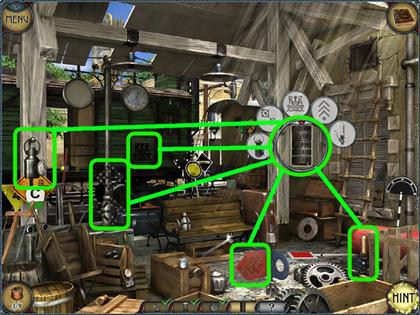
- Click on the weight key object in the upper right corner.
- Find five objects that are highlighted green in the image.

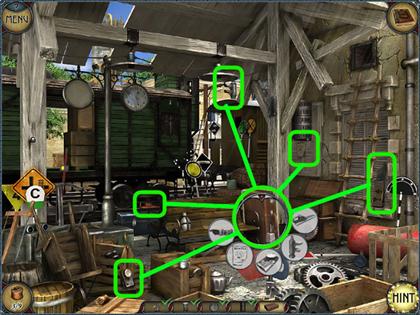
- Click on the luggage key object in the middle of the screen.
- Find five objects that are highlighted green in the image.

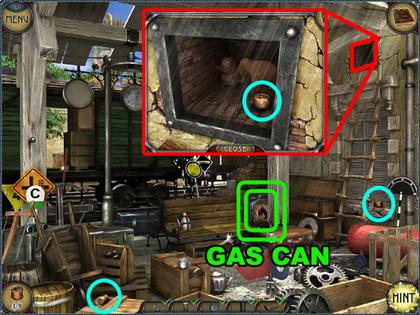
- Find three runes that are highlighted light blue. To find one of the runes, click again on the ventilation hole in the upper right corner.
- After the luggage has been removed, click on the gas can in the middle of the screen to complete this level.
- Return to the camp with the gas for the generator.
Camp

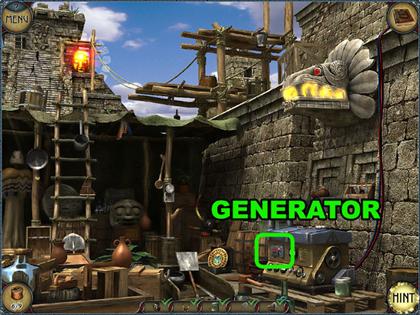
- Click on the generator in the bottom right corner to finish this level.
Tomb

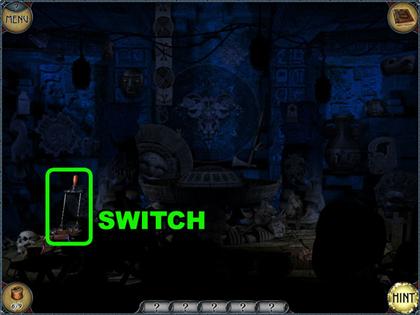

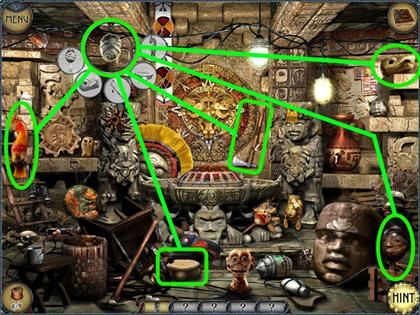
- Click on the switch to turn on the light.
- Click on the wasp nest key object in the upper left corner.
- Find five objects that are highlighted green in the image.

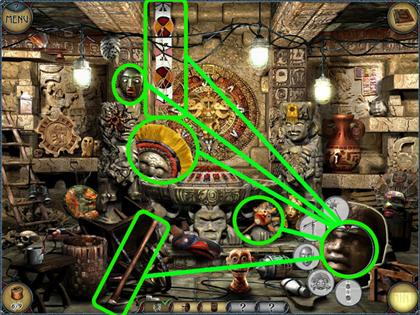
- Click on the stone head key object in the bottom right corner.
- Find five objects that are highlighted green in the image.

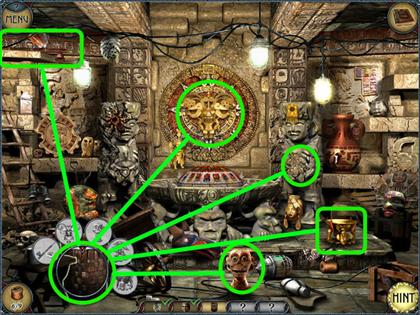
- Click on the basket key object in the bottom left corner.
- Find five objects that are highlighted green in the image.

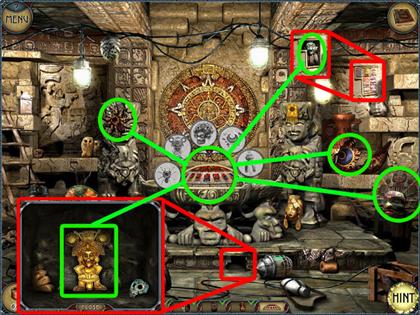
- Click on the pot key object in the right side of the screen.
- Find five objects that are highlighted green in the image.


- Click on the sculpture key object in the middle of the screen.
- Find one object inside the hole towards the bottom of the screen.
- Find another object behind the wall decoration in the upper right corner.
- Find five objects that are highlighted green in the image.

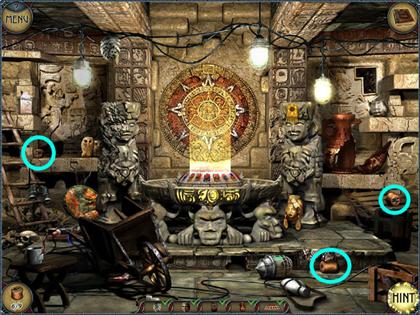
- Find the last three runes that are circled light blue in the image.
- Once these runes are collected you may enter the secret place for this chapter.
Secret Place

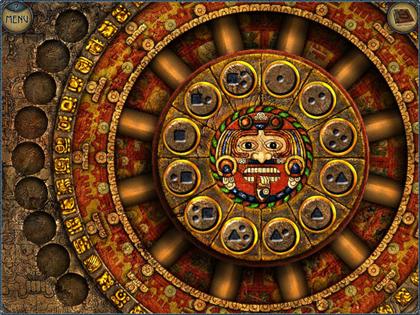
- Place the runes in their appropriate place in order around the face of the clock.
- The dots represent one, the triangles 5, and the square 10.
- The numbers add together like Roman numerals where IV = 4 and VI = 5.
- Arrange the numbers just like the numbers of a normal clock.
- Each correct answer will extend a cylinder from the center of the clock.
- Refer to the image for the solution.
Chapter 6 – Africa
Cave

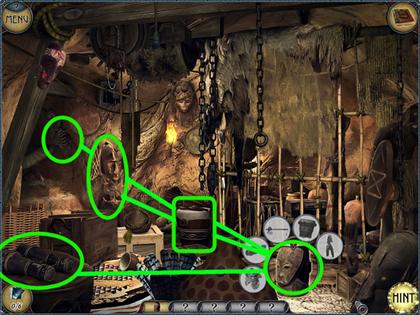
- After starting this chapter, visit the cave location first from the diary.
- Click on the wooden head key object in the bottom right corner.
- Find four objects that are highlighted green in the image.
- You will be unable to get the fifth object for now.

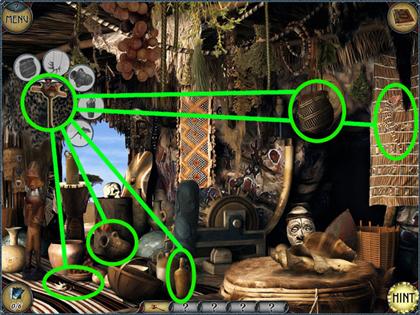
- Click on the wooden box key object in the bottom left corner.
- To find one of the hidden objects, click on the wooden box in the bottom right corner.
- Find six objects that are highlighted green in the image.
- You will be unable to get the seventh object for now.
- Click on the diary icon to move to the Shaman’s Hut.
Shaman’s Hut

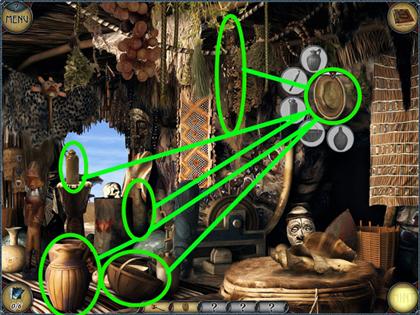


- These next two key objects must be completed at the same time.
- If something is in front of an object, you will not be able to get to it.
- First click the wooden sculpture key object in the upper left corner.
- Collect the bag in front of the plate key object on the right.
- Then click the brown plate key object in the upper right corner.
- Find five objects that are highlighted green in the image.
- Then you will be able to find the rest of the hidden objects for the wooden sculpture key object.
- Find four objects that are highlighted green in the image.

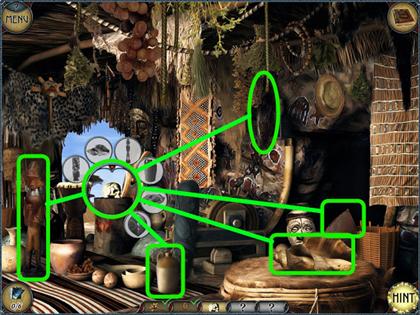
- Click on the skull key object in the left side of the screen.
- Find five objects that are highlighted green in the image.
- The sixth object is still hidden and cannot be collected.

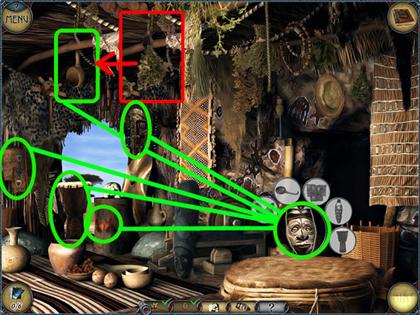
- Click on the mask key object in the bottom right corner.
- Find five objects that are highlighted green in the image.

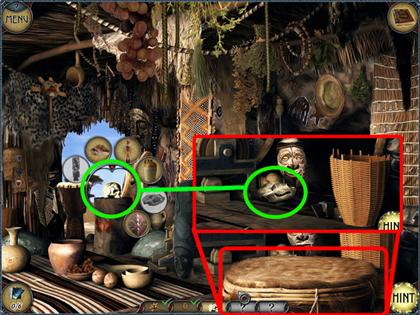
- Click on the skull key object in the left side of the screen again.
- Click on the drum in the bottom right corner and find the skull that is highlighted green in the image.

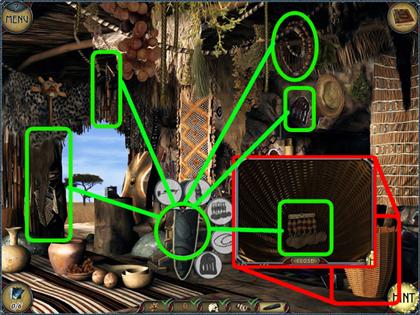
- Click on the stone sculpture key object in the middle of the screen.
- To find one of the objects, click on the basket in the bottom right corner.
- Find five objects that are highlighted green in the image.

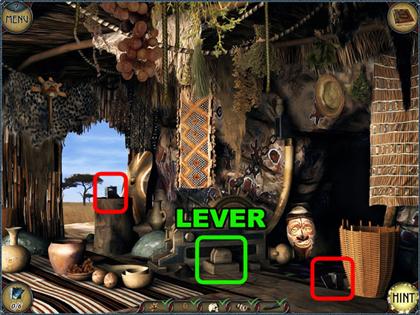
- Click on the wooden lever base that is highlighted green and in the bottom side of the screen. You will be told to find a lever at the airfield.
- Find two small prisms that are highlighted red in the image. Finding 6 prisms will unlock the secret place behind the cave.
- Click on the diary icon to move the airfield.
Airfield

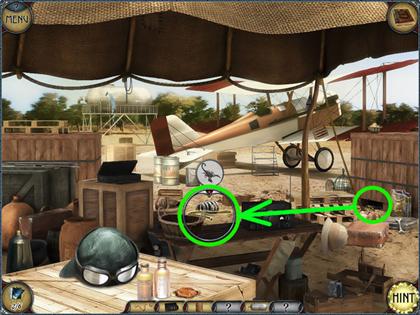
- Click on the brown spring key object in the middle of the screen.
- Find the scorpion that is highlighted green in the image.

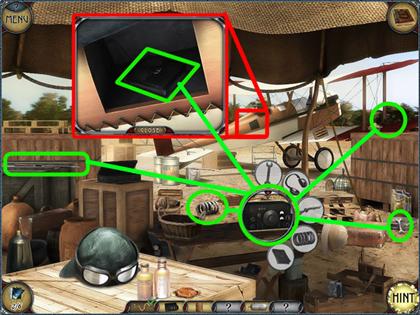
- Click on the radio key object in the middle of the screen.
- To find one of the objects, click on the hole on the plane in the middle of the screen.
- Find five objects that are highlighted green in the image.

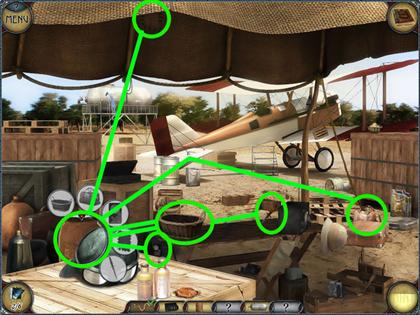
- Click on the brown vase key object in the bottom left corner.
- Find five objects that are highlighted green in the image.

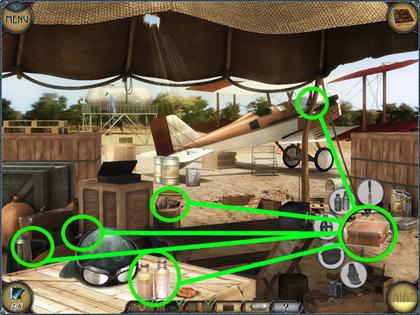
- Click on the luggage key object in the bottom right corner.
- Find five objects that are highlighted green in the image.

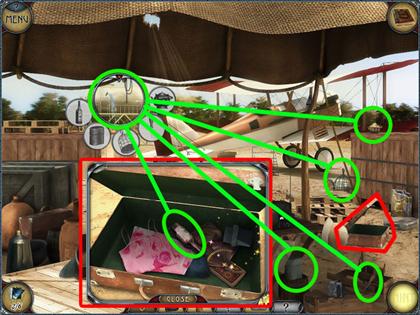
- Click on the white tank key object with the large leak in the left side of the screen.
- To find one of the objects, click on the luggage.
- Find five objects that are highlighted green in the image.

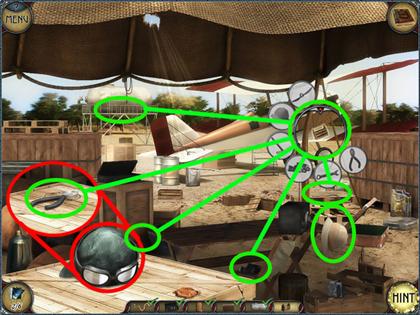
- Click on the wooden tool box key object in the right side of the screen.
- To find one of the objects, click on the hard hat.
- Find six objects that are highlighted green in the image.

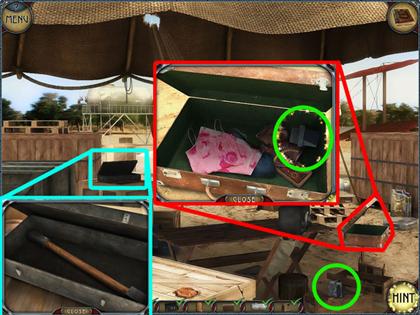
- Click on the luggage to find the small prism that is highlighted green in the image.
- There is another small prism in the bottom right corner on the screen.
- Click on the black case in the middle of the screen to find the lever.
- Go back to the Shaman’s hut.
Shaman’s Hut

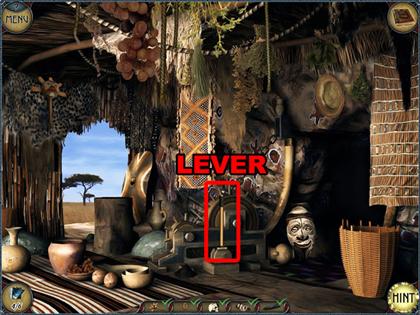
- Click on the lever to open the trellis and complete this level.
- After completing this level, go back to the cave again.
Cave

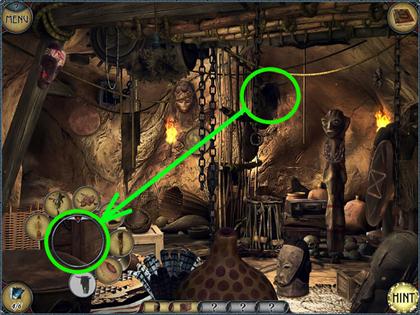
- Now that the trellis has been lifted you should be able to complete the rest of the key objects.
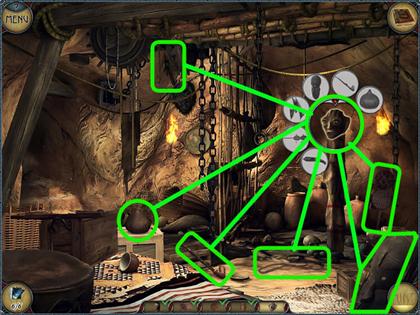
- Click on the wooden box key object in the bottom left corner.
- Find the stuffed animal that is highlighted green in the image.

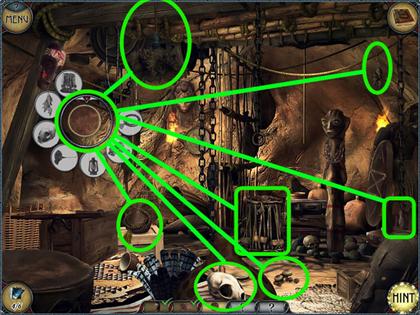
- Click on the wooden head key object in the bottom right corner.
- Click on the wooden box in the bottom left corner to find the ax.

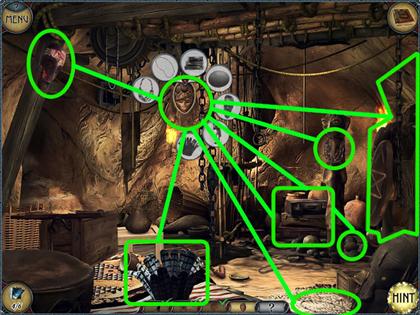
- Click on the bronze plate key object in the upper left corner.
- To find one of the hidden objects, click on the polka dotted pot.
- Find seven objects that are highlighted green in the image.

- Click on the mask key object in the middle of the screen.
- Find seven objects that are highlighted green in the image.

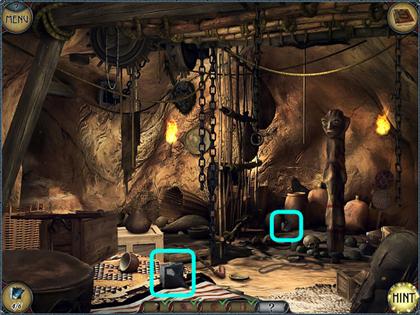
- Find the last two small prisms that are highlighted light blue in the image.


- Click on the wooden sculpture key object in the right side of the screen.
- Find six objects that are highlighted green in the image.
- This will finish the cave and open up the secret place for this chapter.
Secret Place

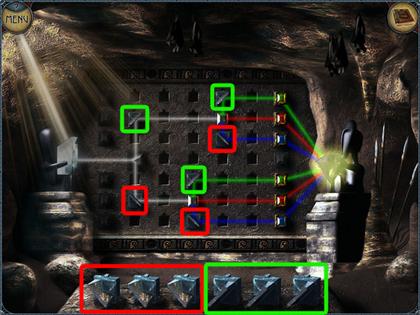
- Place the prisms in the squares to reflect the beams of light to the receptors at the right side of the screen.
- You have 6 prisms that will reflect the light at a right angle: three tilt to the right, three to the left.
- There are two prisms in the board that will split light into the three primary colors.
- Match the three colors with the correctly colored receptors to finish the puzzle.
- Follow the solution in the screenshots. The highlighted colors in the image tell you which direction of prism to use.
Chapter 7 – Russia
Yard

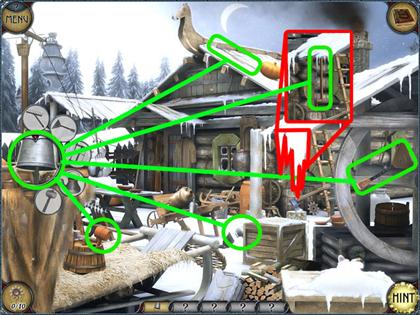
- Click on the yard from the diary to start the chapter.
- Click on the bucket key object in the left side of the screen.
- To find one of the hidden objects, click on the icicles in the right side of the screen.
- Find five objects that are highlighted green in the image.

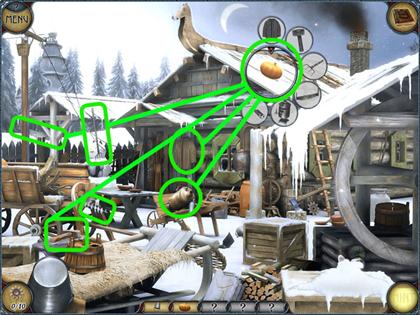
- Click on the pumpkin key object on the roof in the upper right corner.
- Find six objects that are highlighted green in the image.

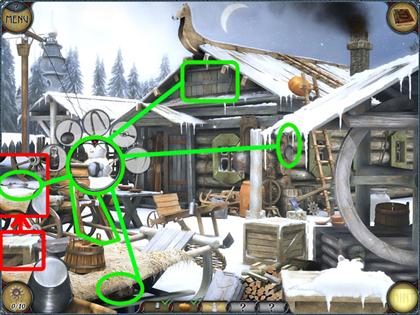
- Click on the snow man key object in the middle of the screen.
- To find one of the hidden objects, click on the snow on the wooden box in the bottom left corner.
- Find five objects that are highlighted green in the image.

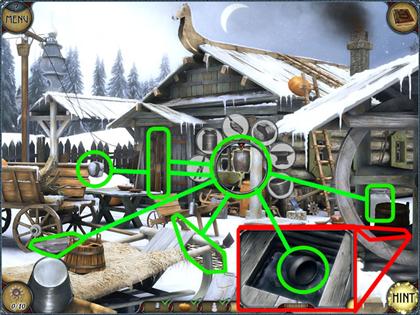
- Click on the pot key object in the middle of the screen.
- To find one of the hidden objects, click on the well in the right side of the screen.
- Find six objects that are highlighted green in the image.

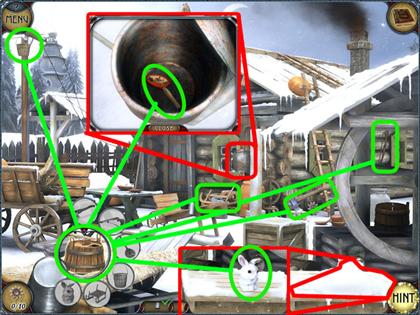
- Click on the barrel key object in the bottom left corner in the screen.
- To find one of the hidden objects, click on the pot in the middle of the screen.
- After finding the wooden spoon in the pot, click on the snow in the bottom right corner to find a rabbit.
- Find six objects that are highlighted green in the image.

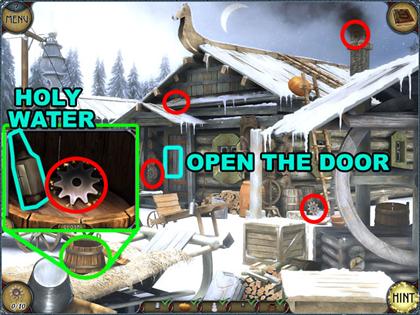
- Find five gears that are highlighted red in the image.
- To find one of the gears, click on the barrel.
- In the barrel, there is a gear and holy water, click both to take them.
- Click on the door in the middle house to complete this level.
- Once the door is open the peasant hut will become available from the diary menu.
Peasant Hut

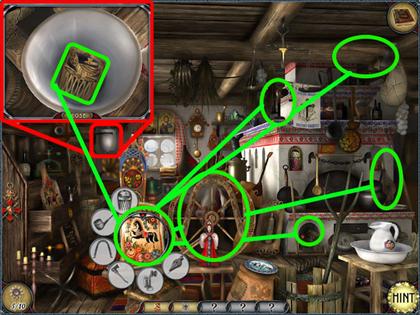
- Click on the horse decoration key object in the bottom left corner in the screen.
- To find one of the hidden objects, click on the white jar in the upper left corner.
- Find six objects that are highlighted green in the image.

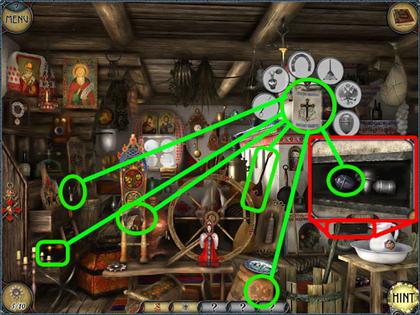
- Click on the cross key object in the upper right corner.
- To find one of the hidden objects, click on the shelf in the stove.
- Find six objects that are highlighted green in the image.

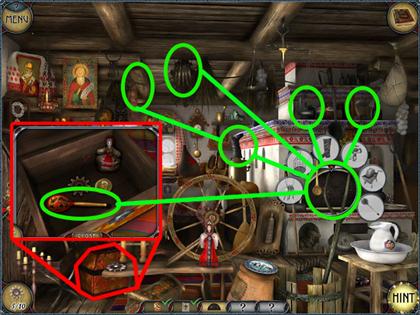
- Click on the oven key object in the right side of the screen.
- To find one of the hidden objects, click on the red box in the bottom left corner.
- Find six objects that are highlighted green in the image.

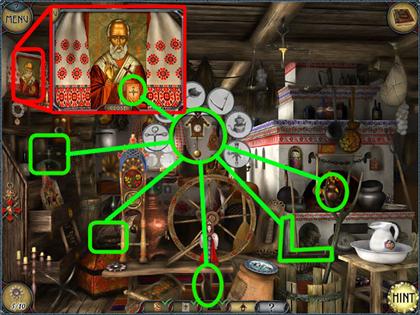
- Click on the wall clock key object in the upper side of the screen.
- To find one of the hidden objects, click on the picture on the wall in the upper left corner.
- Find six objects that are highlighted green in the image.

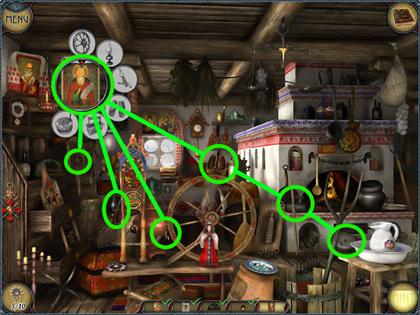
- Click on the picture key object in the upper left corner.
- Find six objects that are highlighted green in the image.

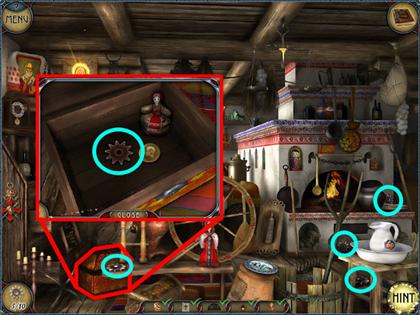
- Find five gears that are highlighted red in the image to complete this level and gain entrance to the secret place.
Secret Place

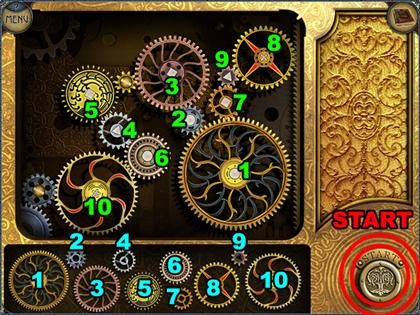
- All of the gears will fit only the spot that matches the hole in the middle of them.
- Multiple gears can fit in the same spot.
- Put all the gears in place and have them all touching to finish the puzzle.
- Press the start button once you are finished.
- Refer to the image for the solution.
Chapter 8 – America
Father’s Room

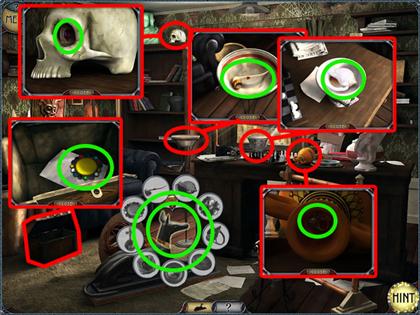


- Click on the head of the dog sculpture key object in the bottom side of the screen.
- To find all hidden objects, click on the objects that are highlighted red in the images.
- Find nine objects that are highlighted green in the image.

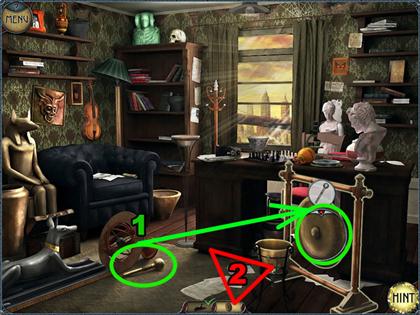
- Click on the drum key object in the bottom right corner.
- Find the stick that is circled green in the bottom side of the screen and drag to the drum.
- Click on the area in front of the desk and the carpet will peal back showing the outline of a secret door.

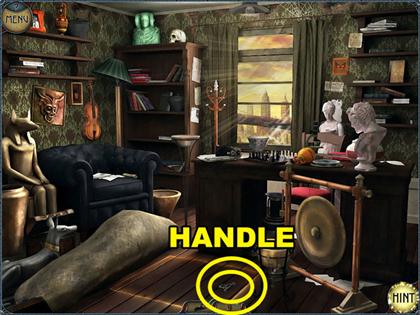
- Click on the handle that is highlighted yellow in the image to find the stairs to go to the underground.
- Go to the down stairs by clicking the stairs.
Father’s Room – Secret Room

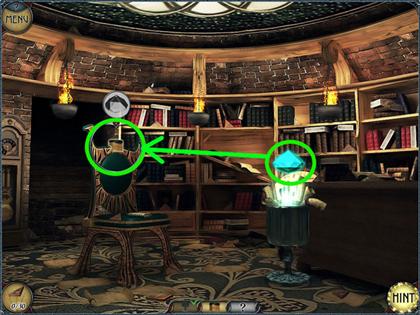
- Click on the vase key object in the bottom right corner.
- To find three of the hidden objects, click on the brick in the upper left corner, the triangle space in the upper side and the stacked books on the bottom side of the screen.
- Find nine scripts that are circled green in the image.


- Click on the square on the green chair key object in the middle of the screen.
- Find the crystal in the right side of the screen and drag to the square.

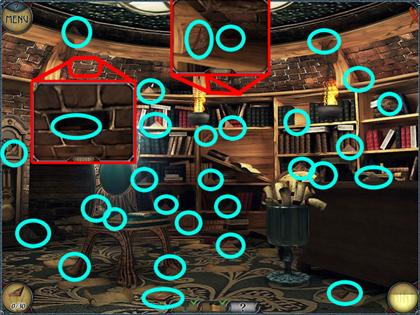
- Find 30 triangles that are highlighted light blue in the image.
- To find three of the triangles, click on the brick in the upper left corner and the spot in the upper side of the screen. They are highlighted red in the image.

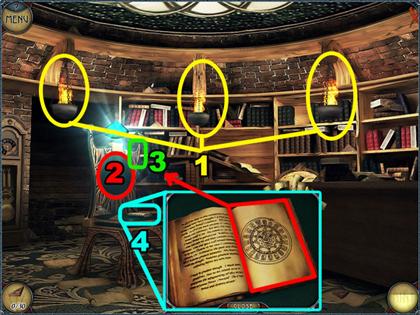
- After finding all 30 triangles, click on the three fire pots they are highlighted yellow in the image to put them out.
- Click on the back seat of the green chair and the symbol will then appear on the back seat. Click again on the symbol to look at it.
- Click on the right side of the back seat flame. This is the key object.
- Click on the diary on the green chair and rip off the right page and drag to the key object.
Crystal Portal Pieces

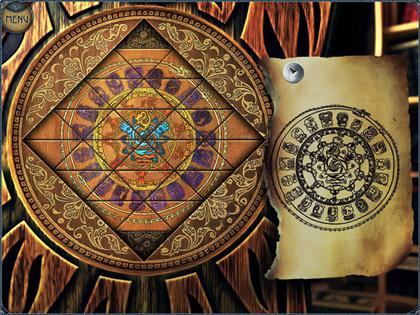
- Place all triangles to correct position by following the final image in the right side of the screen.
- Click on a piece to pick it up, and click another to switch their places.
- The pieces will only switch if it is correct. After the switch, both pieces will be correct.
- Use the inner and the outer ring as a guide.
- Refer to the image for the solution.
CONGRATULATIONS! You’ve Completed The Mystery of the Crystal Portal!





 Fatal Passion: Art Prison Walkthrough, Guide, & Tips
 Nightmare Adventures: The Witch's Prison Walkthrough, Guide, & Tips
 White Haven Mysteries Walkthrough, Guide, & Tips
 Diamon Jones: Amulet of the World Handbuch, Guide, & Tips
 Christmas Stories: A Christmas Carol Walkthrough, Guide, & Tips