Nightmare Adventures: The Witch's Prison Walkthrough, Guide, & Tips
Nightmare Adventures: The Witch’s Prison Walkthrough
Welcome to the Nightmare Adventures: The Witch’s Prison Walkthrough!
Help Kiera Vale discover her ancestor’s history as she explores Blackwater Asylum in Nightmare Adventures: The Witch’s Prison!
Whether you use this document as a reference when things get difficult or as a road map to get you from beginning to end, we’re pretty sure you’ll find what you’re looking for here.
This document contains a complete Nightmare Adventures: The Witch’s Prison game walkthrough featuring annotated screenshots from actual gameplay!
We hope you find this information useful as you play your way through the game. Use the walkthrough menu below to quickly jump to whatever stage of the game you need help with.
Remember to visit the Big Fish Games Forums if you find you need more help. Have fun!
This walkthrough was created by prpldva, and is protected under US Copyright laws. Any unauthorized use, including re-publication in whole or in part, without permission, is strictly prohibited.
General Tips & Information

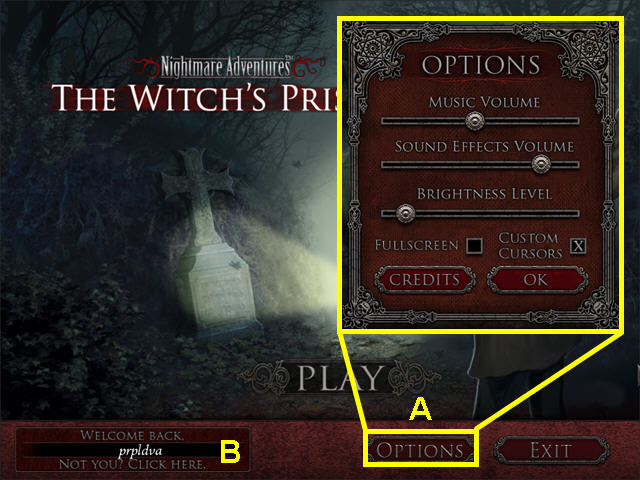
- The options menu allows for the adjustment of music and sound volume (A).
- The brightness can be adjusted.
- You may play this game in windowed or full screen mode.
- The custom cursor may be disabled.
- From the main screen you may manage player profiles (B).
- You have the choice of a brief tutorial once you start the game.

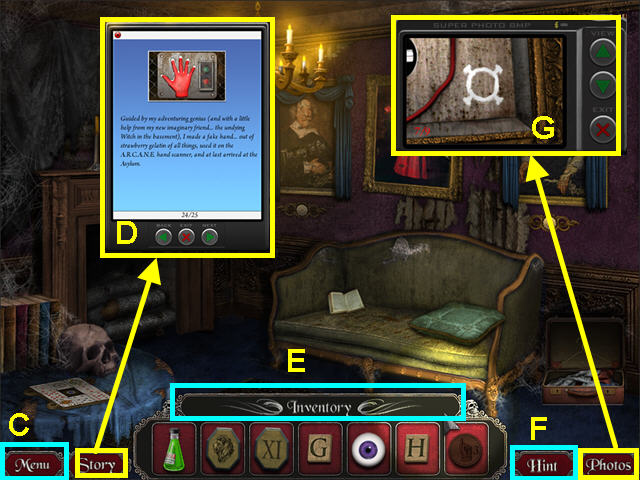
- The Menu button in the lower left corner will take you to the menu (C).
- The Story button will bring up your PDA which keeps a history of the information uncover (D).
- Click on “Inventory” to show/hide your inventory (E).
- Hints are unlimited, but you must wait for the button to refill (F).
- The Photos button in the lower right will bring up your camera (G).
- The camera will take photos of every clue you uncover.
- An eye cursor indicates that you can take a closer look.
- The hand cursor indicates that you can pick up an item.
- The footprints indicate that you can travel in the direction they point (move your cursor to the edge of the screen and click when you see the footprints).

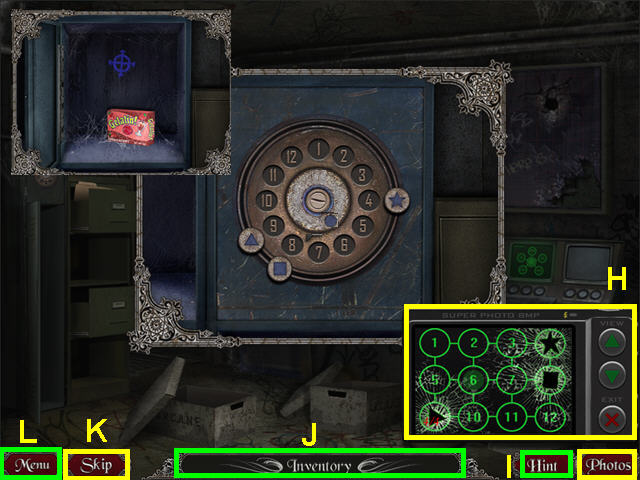
- Most mini-games will have a photo clue; make sure to check your camera if you are unsure of how to proceed (H).
- Hints are available during most mini-games (I).
- Your inventory is accessible during mini-games that may require the use of items (J).
- Once the skip button has filled up and is the same color as the menu button, you can skip the mini-game (K).
- The lower left button will take you to the menu (L).
The Front Gate

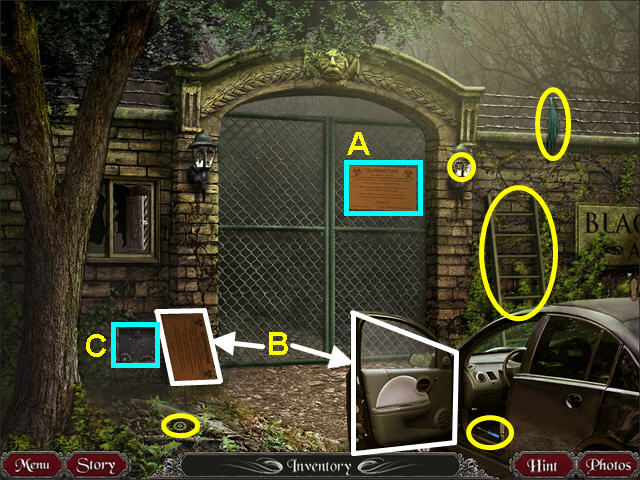
- Read the quarantine sign on the gate (A).
- Move the quarantine sign on the gear box and open the car door (B).
- Look at the gear box to learn you need to find the missing gears (C).
- Collect the SCREWDRIVER, 2 GEARS, CLOTH, and LADDER.
- Walk to the right.

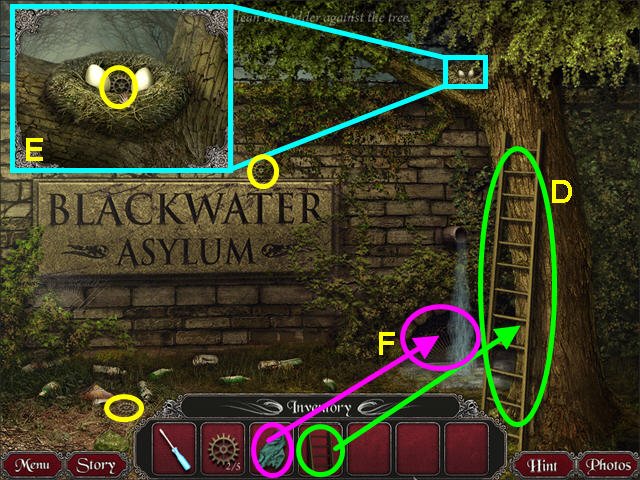
- Place the LADDER against the tree (D).
- Look in the bird’s nest and click on the right egg to move it aside (E).
- Take the GEAR from the nest.
- Take the other 2 GEARS from the scene.
- Use the CLOTH on the pool of water to get the WET CLOTH (F).
- Walk to the left.

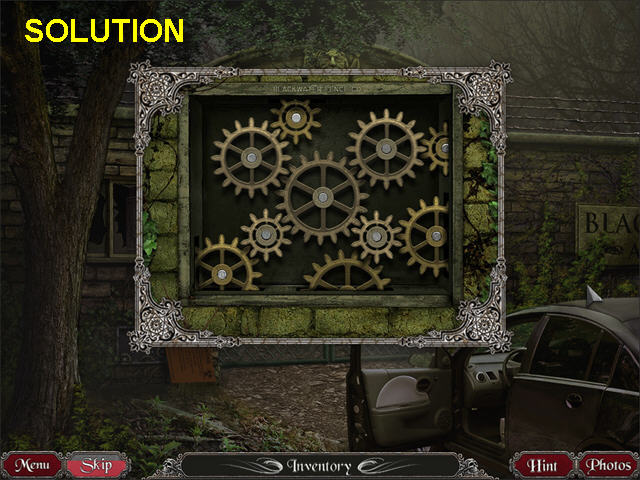
- Look at the gear box; use the GEARS on the array to trigger a mini-game.
- Click hold and drag to position the gears.

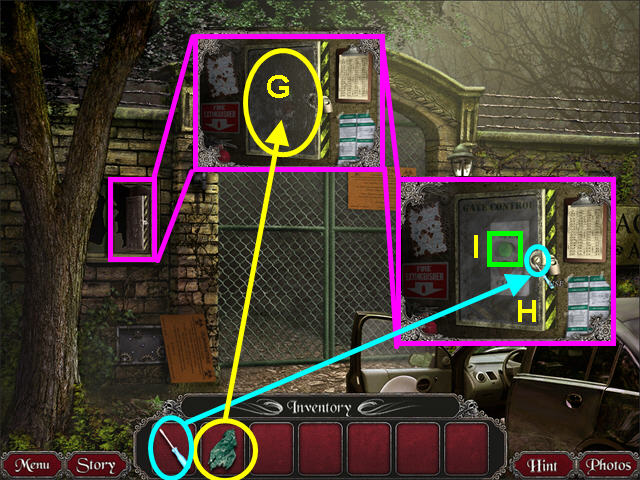
- Look at the control box and use the WET CLOTH to clean the door (G).
- Use the SCREWDRIVER on the screw for the lock latch (H).
- Push the green button to open the gate (I).
The Groundskeeper’s Cabin

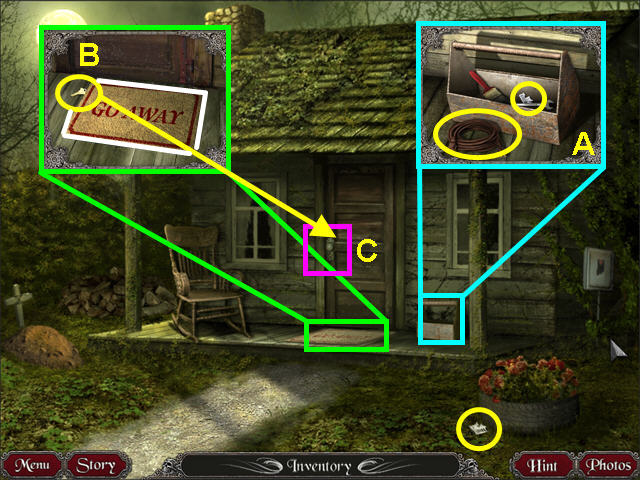
- Look at the toolbox and take the EXTENSION CORD and the LOTTERY TICKET PIECE (A).
- Take the LOTTERY TICKET PIECE by the tire planter.
- Look at the door mat and move it aside (B).
- Take the KEY from under the mat and use it on the front door (C).
- Enter the cabin.

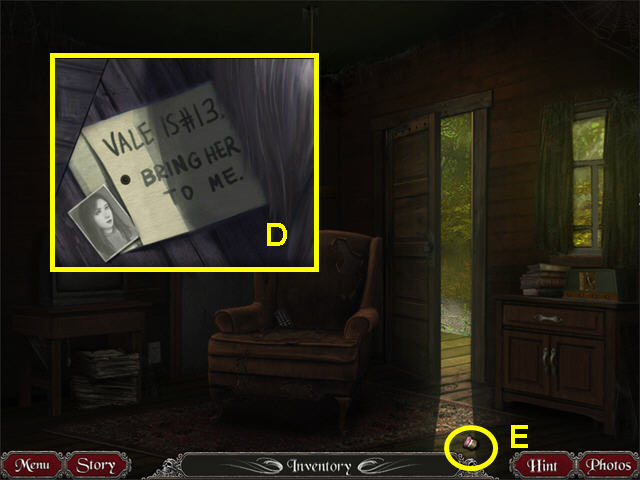
- Just inside, during the cut-scene, you find an envelope that makes you suspicious of the groundskeeper (D).
- Take the FUSE and go outside (E).

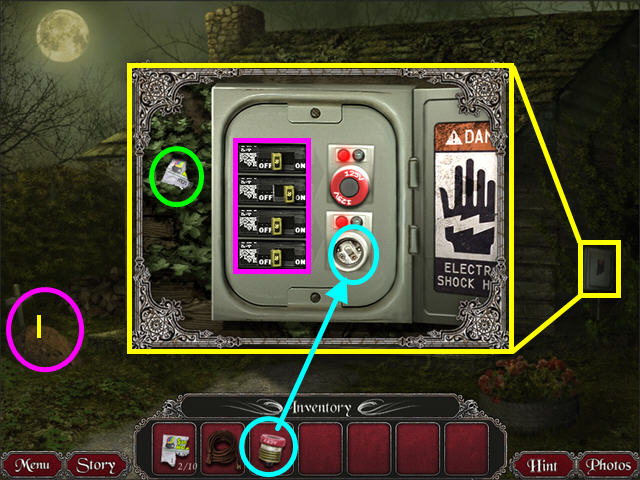
- Look at the close-up of the fusebox on the side of the house and replace the FUSE (F).
- Take the LOTTERY TICKET PIECE (G).
- Flip all the switches to ON (H).
- Note the fresh grave on the left side of the house (I).
- Enter the cabin.

- Open the drawer and take the LOTTERY TICKET PIECE and the POCKET KNIFE (J).
- Look at the close-up of the clock; click on the panel above the 6 and take the BATTERY (K).
- Take the EXTENSION CORD from your inventory and use it on the wall outlet (L).

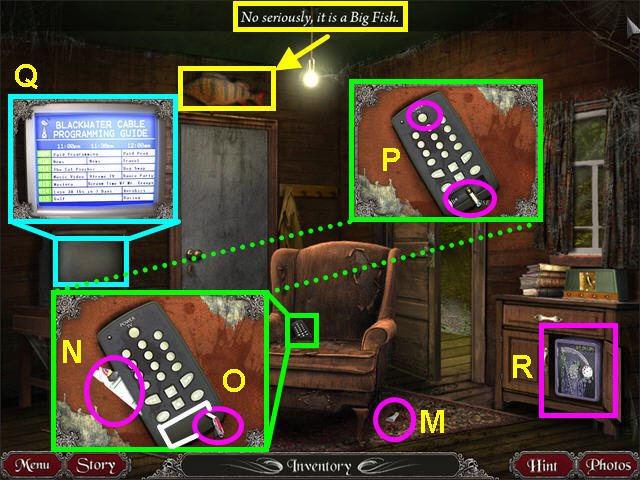
- Take the LOTTERY TICKET PIECE from the floor (M).
- Look at the close-up of the remote control; take the LOTTERY TICKET PIECE (N).
- Use the POCKETKNIFE to open the battery compartment (O).
- Place the BATTERY into the remote control and press the power button (P).
- Look at the close-up of the TV (your camera will automatically take a photo) (Q).
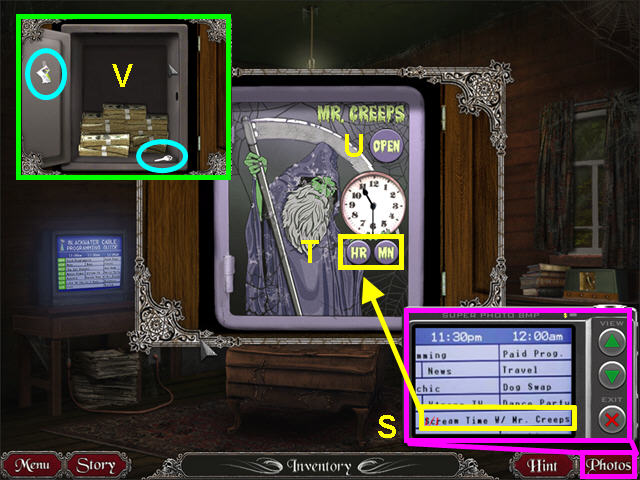
- Open the cupboard and look at the safe (R).


- Look at the TV schedule in your photos to see the show with Mr. Creeps starts at 11:30 (S).
- Use the HR (hour) and MN (minute) buttons to set the clock to 11:30 (T).
- Press the Open button (U).
- Take the KEY and the LOTTERY TICKET PIECE (V).
- Exit the close-up; use the KEY on the gray door and enter the room.

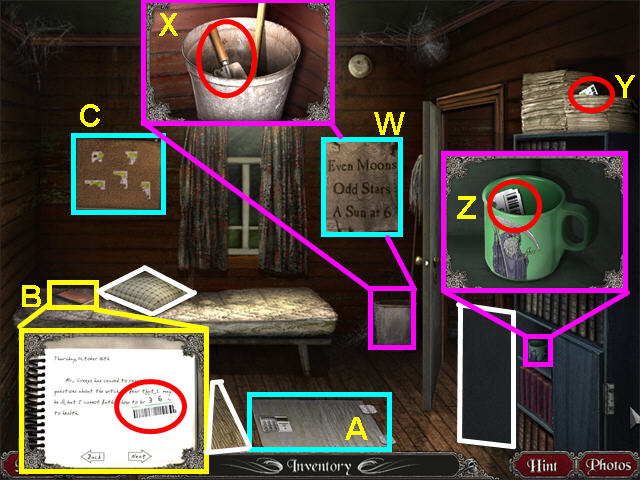
- Your camera will automatically take a photo of the wall poster (W).
- Look in the pail and take the SHOVEL (X).
- Take the LOTTERY TICKET PIECE from the top of the bookcase (Y).
- Open the cupboard, look in the cup and take the LOTTERY TICKET PIECE (Z).
- Move the rug on the floor and take note of the lock (A).
- Move the pillow on the bed and look at the journal (B).
- Turn the pages to read the journal; find the LOTTERY TICKET PIECE.
- Look at the bulletin board for a mini-game (C).

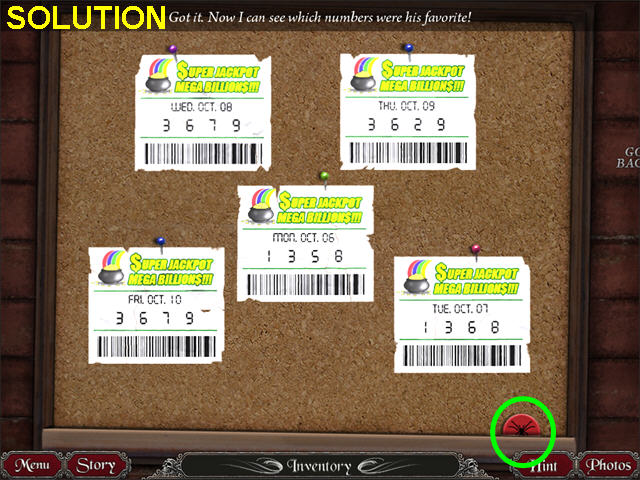
- Take the LOTTERY TICKET PIECES from your inventory and place them on the bulletin board.
- Repair the tickets in this jigsaw style game.
- Take the RED SPIDER TOKEN from the lower right corner.
- Exit the close-up and return to the front of the cabin.
- Use the SHOVEL on the fresh grave on the left.
- Click on the open grave for a mini-game.

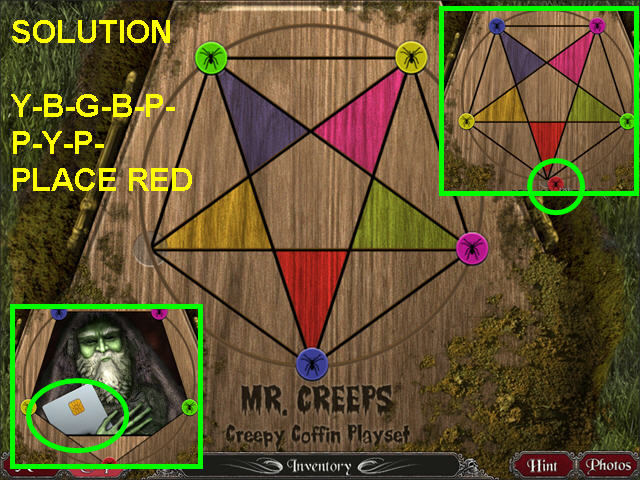
- The object of this mini-game is to get the tokens to the top of the same color star point.
- Click on the tokens in this order: yellow, blue, green, blue, pink, pink, yellow, pink.
- Now place the RED SPIDER TOKEN in the open spot (D).
- Take the KEY CARD (E).
- Exit and return to the bedroom.
- Look at the close-up of the lock.

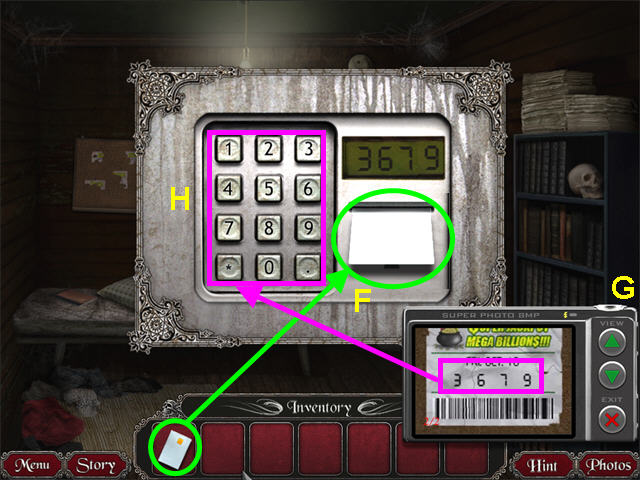
- Take the KEY CARD from your inventory and insert it into the reader (F).
- Look at the photos to see his favorite number (G).
- Enter 3679 into the keypad to open the lock (H).
- Click on the ladder to climb below.

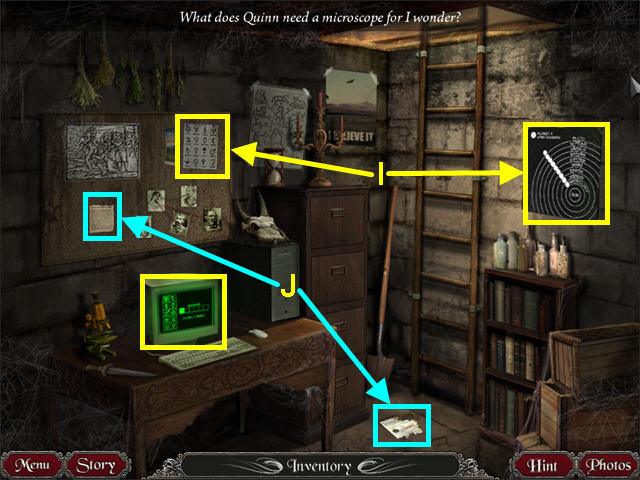
- Look at the poster on the wall and the diagram on the bulletin board (I).
- Your camera will take photos of these two items.
- Read the article on the bulletin board and the partial letter on the floor to add to your story (J).
- Look at the computer monitor for a mini-game.

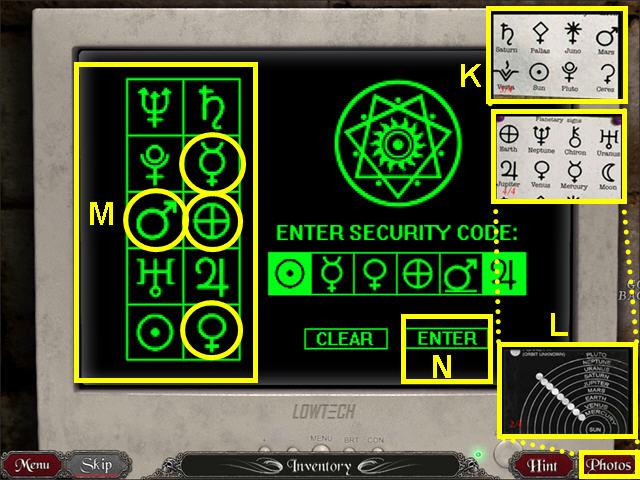
- Looking at your photos of the diagram on the bulletin board tells you the first symbol in the code is the Sun and the last is Jupiter (K).
- Looking at the photo of the solar system tells us that Mercury, Venus, Earth, and Mars are missing (L).
- Enter the symbols for Mercury, Venus, Earth, and Mars, using the buttons on the left (M).
- Click “ENTER” (N).

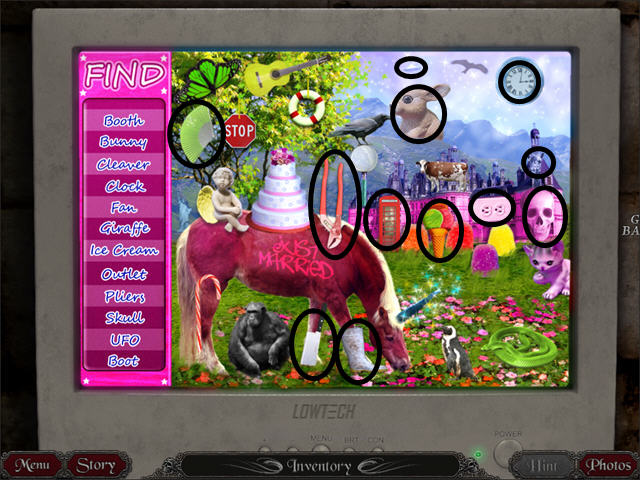
- Locate the hidden objects on the list.
- Before you can find all the objects, you will get a message that your trial has ended.

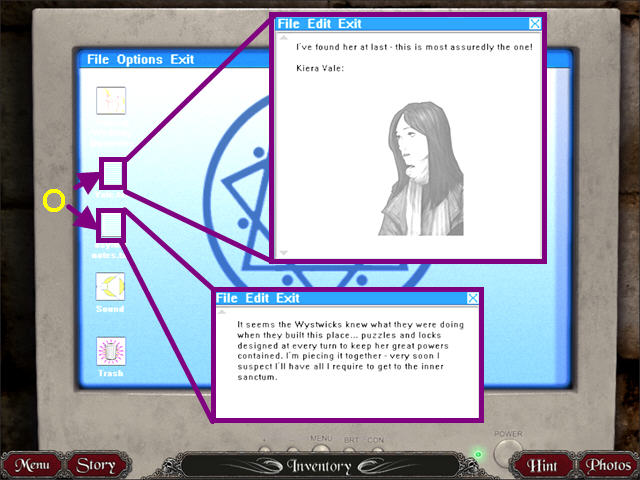
- Click to remove the message.
- Read the two documents (O).
The Graveyard

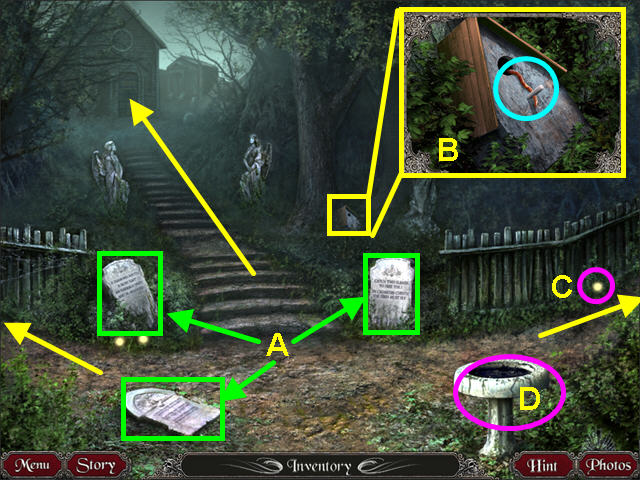
- Look at each of the three tombstones (your camera will take photos of each) (A).
- Look at the close-up of the birdhouse and take the worm (B).
- There are three paths: one leading to the chapel, one to the left, and one to the right.
- Note the fireflies (C).
- Note the birdbath (D).
- Take the left path.

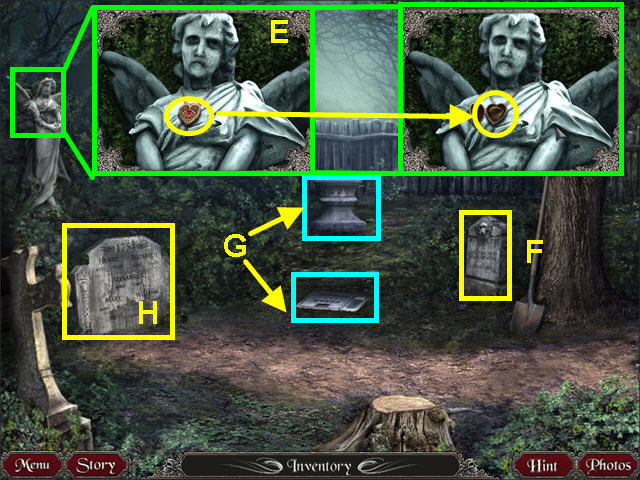
- Look at the statue on the left; then click on her locket (E).
- Take the LOCK of HAIR from the locket.
- Read the tombstone next to the shovel for a picture (F).
- Take note of the urn and the floor safe (G).
- Click on the large tombstone for a mini-game (H).

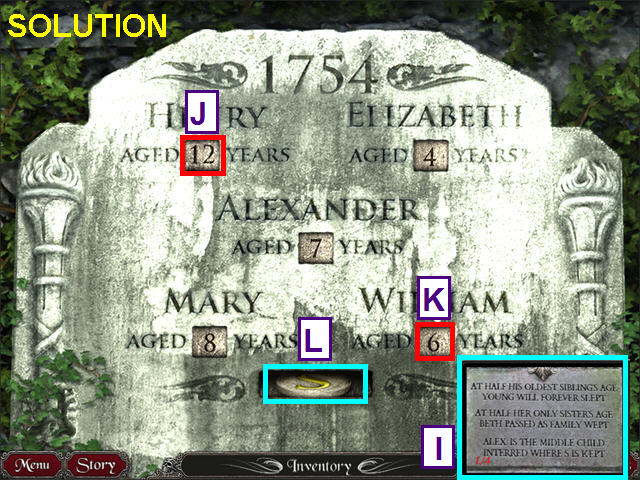
- Look at the photo of the tombstone for clues to the correct ages (I).
- Click on Henry’s years four times (J); then click William’s age twice to solve (K).
- Take the “S” COIN from the slot (L).
- Exit the close-up; look at the urn for another mini-game.

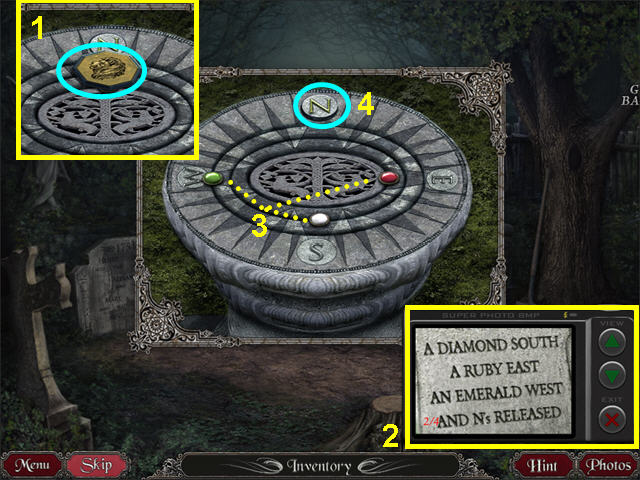
- Take the LION TILE (1).
- Look at your photo’ for the mini-game’s clue (2).
- Click on the gems to move them into position (3).
- Take the “N” COIN (4).
- Exit the close-up and walk right twice.

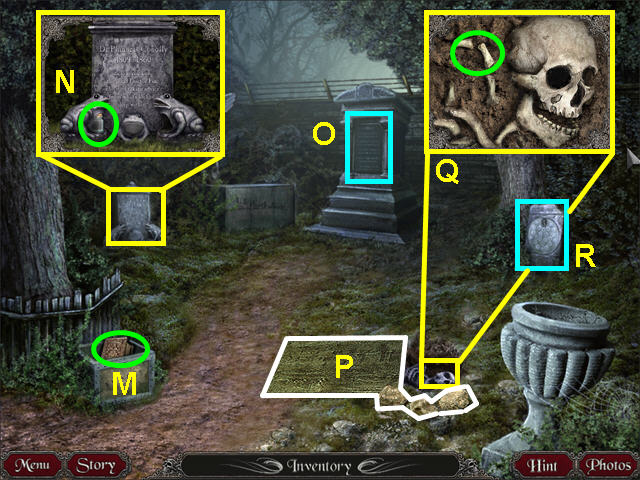
- Take the BOOK from the small crate on the left (M).
- Look at the close-up of the left tombstone; take the GLASS JAR (N).
- Read the large monument in the center (O).
- Move the three rocks and plywood to find an open grave (P).
- Look at the close-up of the grave; take the SMALL BONES (Q).
- Look at the right tombstone for a mini-game (R).

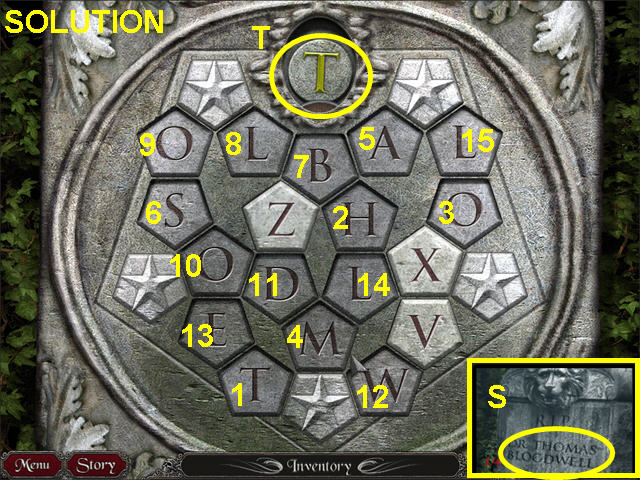
- Look at your photos to see Dr. Thomas Bloodwell’s tombstone (S).
- Push on the letters to spell out “Thomas Bloodwell” without duplicating any tiles.
- Take the “T” COIN from the niche (T).
- There are several solutions to this puzzle.
- Exit the close-up; walk right and up to the chapel.

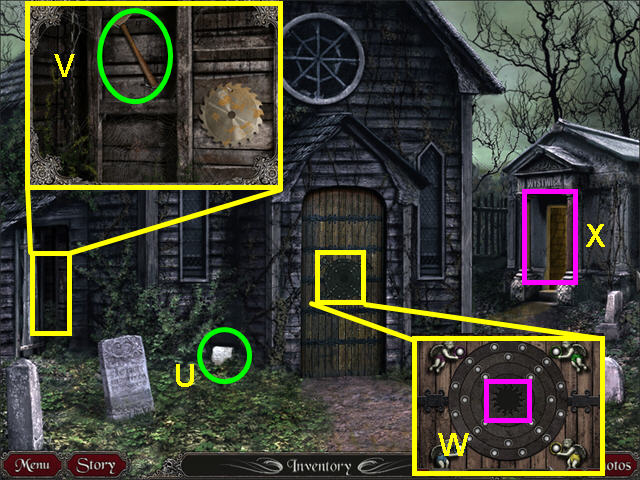
- Read the letter (U).
- Look in the side shed on the left; take the HAMMER (V).
- Make note of the mini-game on the front door: it is missing a sun shaped piece (W).
- Walk to the Wystwick mausoleum on the right (X).

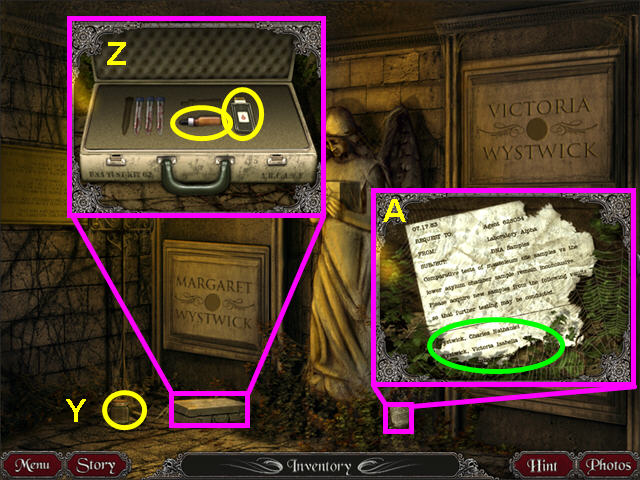
- Take the glass jar (Y).
- Look at the briefcase; take the DNA TESTER and the EYE DROPPER (Z).
- Look at the memo to learn the middle names of three of the Wystwicks (A).
- Exit the mausoleum and walk down from the chapel.

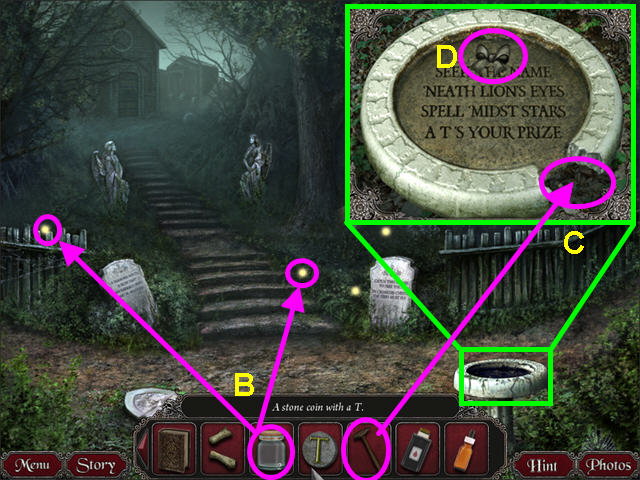
- Take a GLASS JAR from your inventory and click on a firefly; repeat this with the other GLASS JAR (B).
- Look at the close-up of the bird bath and use the HAMMER on the cracked piece (C).
- Your camera will take a photo.
- Take the ribbon (D).

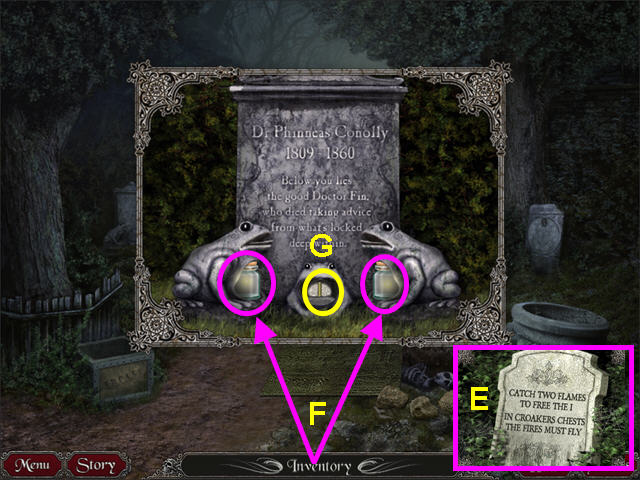
- Walk to the right and look at the left tombstone.
- Look at your photos for a clue (E).
- Place the JARS with FIREFLIES into the frogs’ mouths (F).
- Take the “I” COIN (G).
- Exit the close-up.
- Walk left and up; then enter the mausoleum.

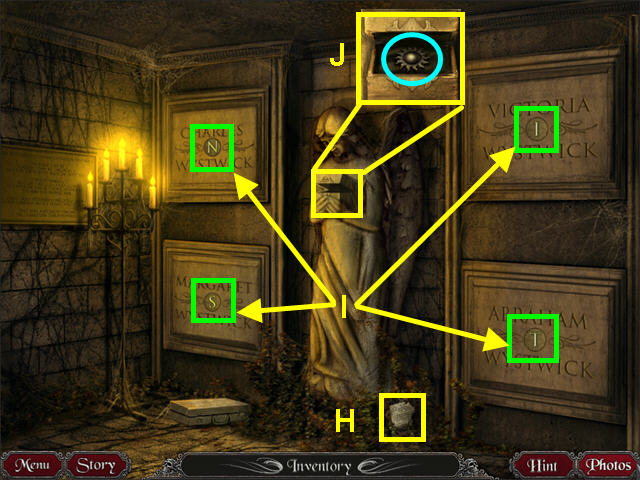
- From the memo, we know that the full names of three Wystwicks are: Charles Nathaniel, Victoria Isabella, and Abraham Theodore (H).
- Place the INITIAL COINS with the matching names; then use the “S” coin for Margaret (I).
- Look at the angel’s box and take the SUN DISC (J).
- Exit the mausoleum and look at the door to the chapel.

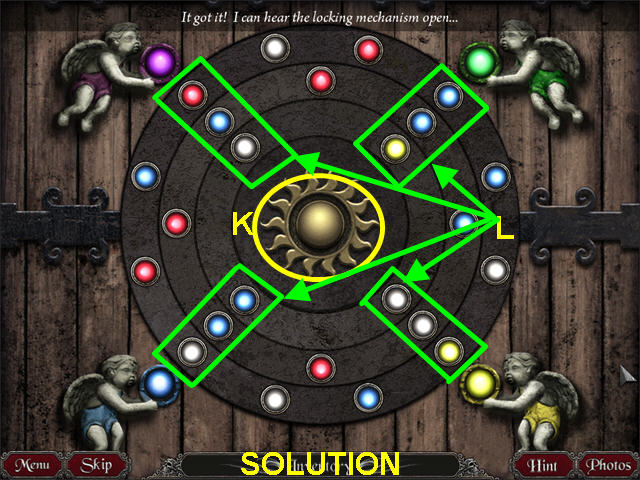
- Place the SUN DISC in the center to activate the mini-game (K).
- Rotate the rings so the three colors combined make the color of the angel (L).
- Click on a ring to rotate it into position.
- Red and blue make purple; blue and yellow make green.
- Enter the chapel.

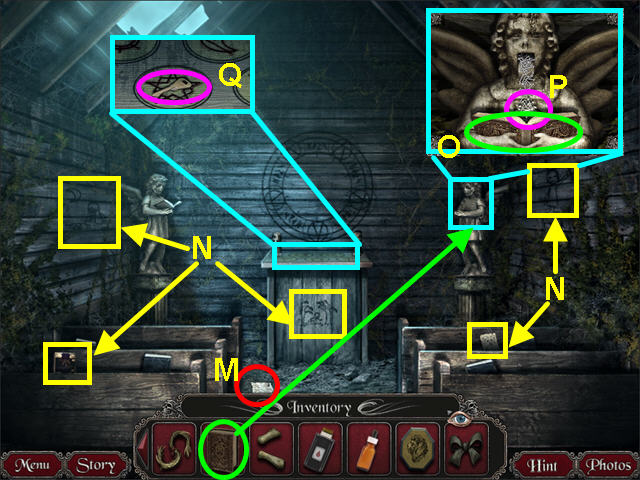
- Read the journal pages; click to read the second page (M).
- Look at the five drawings to take photos (N).
- Look at the right angel and place the BOOK into her hands (O).
- Take the PINS that fall from her mouth (P).
- Look at the altar and take the KEY (Q).

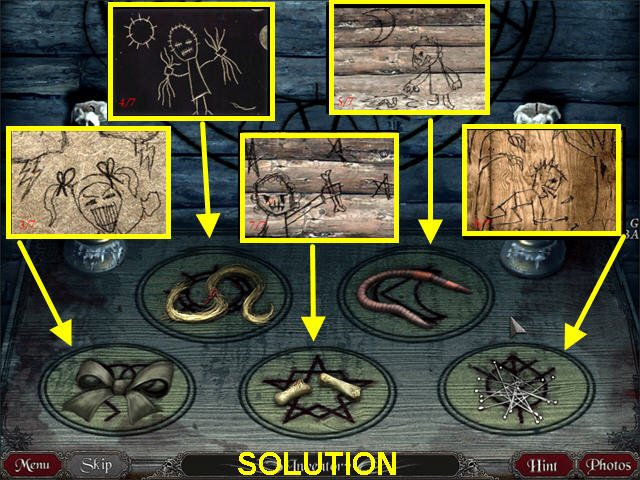
- Refer to the photos of the five drawings.
- From left to right, place the items on the symbols.
- Place the RIBBON on the lightning symbol.
- Place the LOCK of HAIR on the sun symbol.
- Place the SMALL BONES on the star.
- The WORM goes on the moon symbol.
- Place the PINS on the leaf.

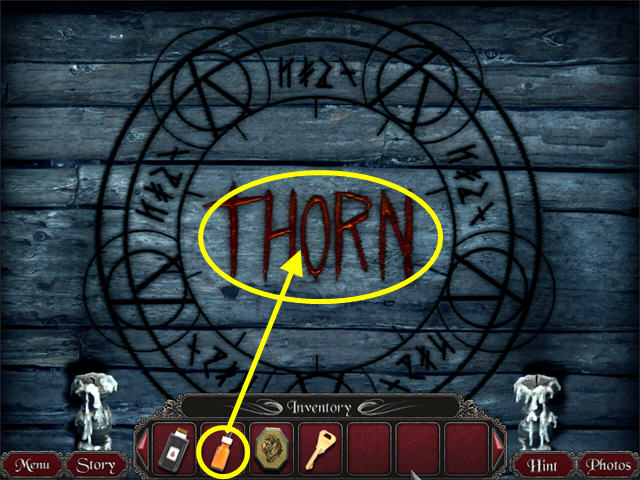
- The symbols on the wall glow and the name THORN appears oozing blood.
- Use the EYE DROPPER on THORN to get a DNA SAMPLE.
- Exit the chapel, walk down and to the left.
- Look at the floor safe.

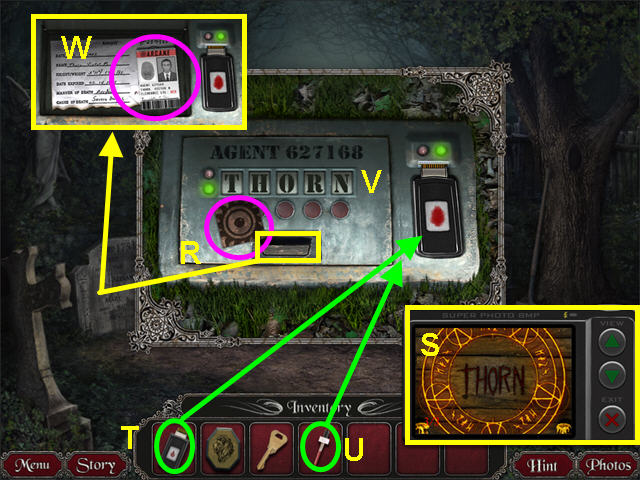
- Take the WOOD TILE (R).
- Look at the photo for a clue (S).
- Place the DNA TESTER into the slot (T).
- Use the DNA SAMPLE on the DNA tester (U).
- Use the buttons to spell THORN (V).
- Open the safe and take the ID BADGE (W).
The Asylum Gate

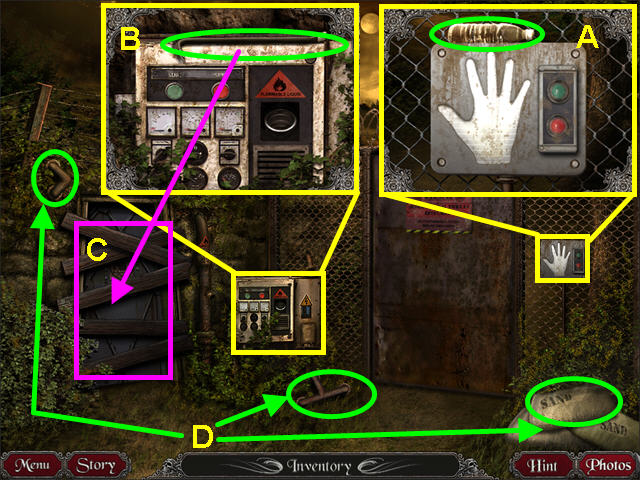
- Look at the close-up of the hand reader; take the WATER BOTTLE (A).
- Look at the close-up of the generator; take the CROWBAR (B).
- Use the CROWBAR to remove the boards covering the bunker door (C).
- Take the two pieces of PIPE and a SANDBAG (D).

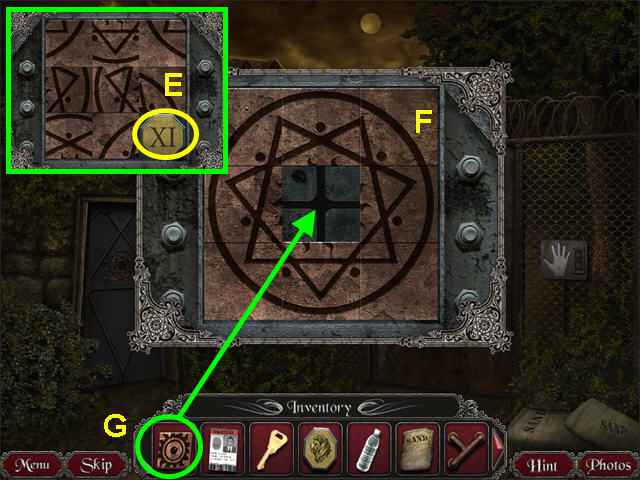
- Look at the mini-game on the bunker door.
- Take the XI TILE (E).
- Slide pieces to form a star in a circle (F).
- Place the WOOD TILE in the center (G).
- Check out our video solution!
- Enter the bunker.

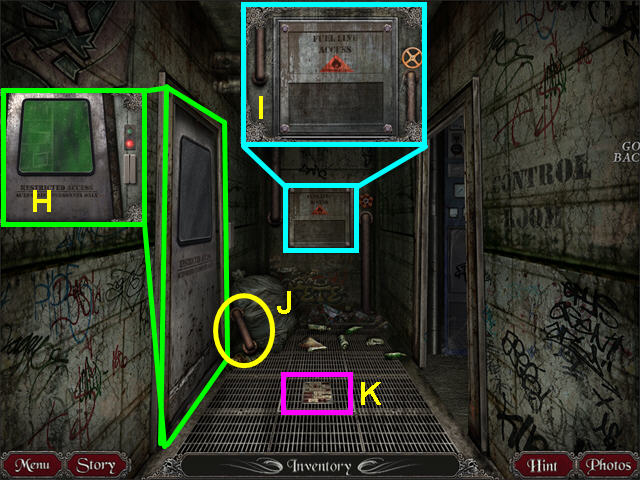
- Look at the left door and see the room is flooded with green gas (H).
- Look at the back panel to learn you need a tool to open it (I).
- Take the PIPE (J).
- Look at the floor panel for a mini-game (K).

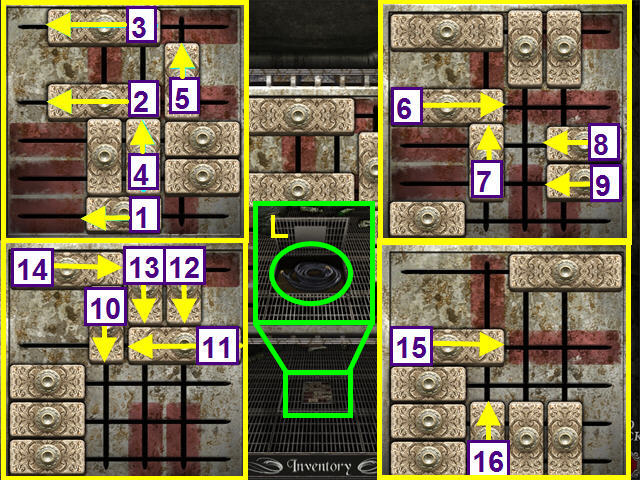
- The object of this slider puzzle is to move the bars onto the matching red areas.
- Slide the bars in the direction indicated, in numerical order.
- Once the grate opens, take the HOSE (L).
- Walk right, into the control room.

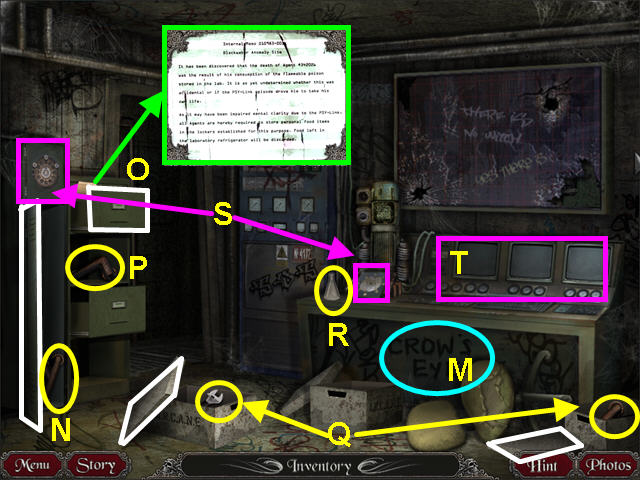
- Your camera will take a photo of the graffiti (M).
- Open the locker on the left and take the PIPE (N).
- Open the top filing cabinet drawer and read the note (O).
- Take the PIPE from the second drawer area (P).
- Remove the box lids and take the WRENCH and PIPE (Q).
- Take the FLASK (R).
- Make note of the two mini-games (S) and the computer bank (T).
- Exit left to the hall and look at the back wall panel.

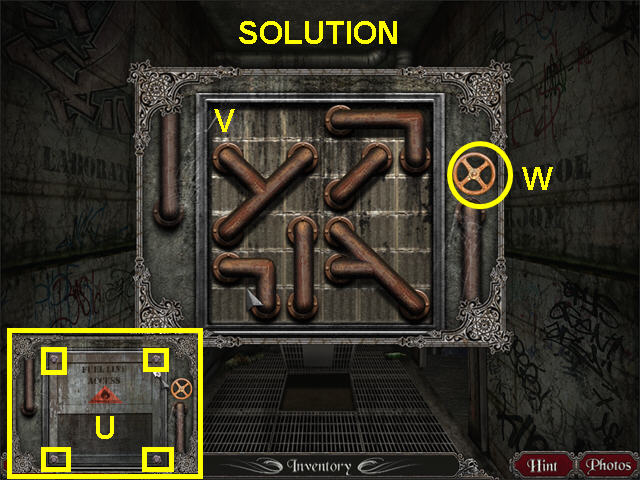
- Use the WRENCH from your inventory on each of the four bolts to remove the panel (U).
- Take the PIPE pieces from your inventory and fit them onto the holes (V).
- Turn the valve on the right to open the fuel line (W).
- Walk down to exit the bunker and look at the generator.

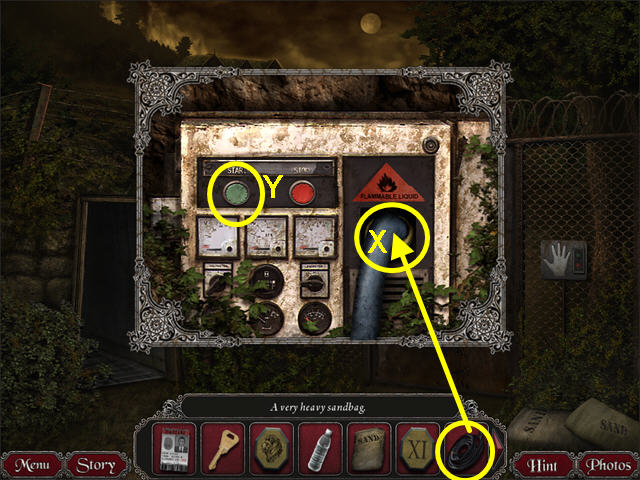
- Take the HOSE from your inventory and use it on the hole (X).
- Press the green button to start the generator (Y).
- Enter the bunker and walk right to the control room.

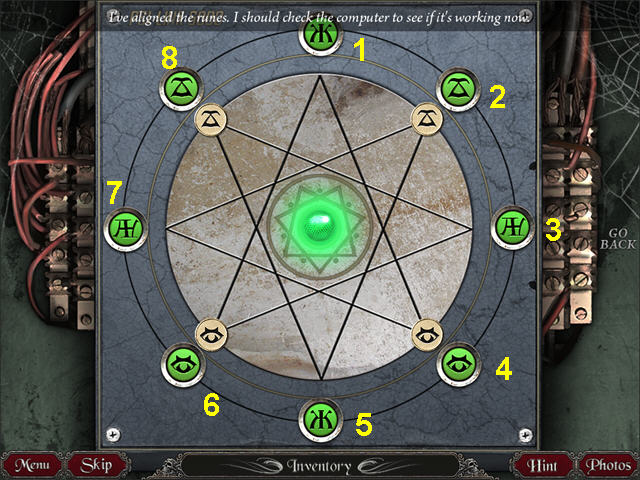
- Look at the mini-game on the end of the table.
- The object of this mini-game is to move the runes along the lines of the star using the outer buttons until they match.
- Starting at the top and going clockwise, number the buttons 1-8.
- Press these buttons: 2, 5, 8, 3, 6, 1, 4, 7, 1, 4, 5, 8, 3, 6, 6, 1, 8, 3, 3, 6, 7, 2, 2, 5, 5, 8, 3, 7, 7, 2, 1, and 4.

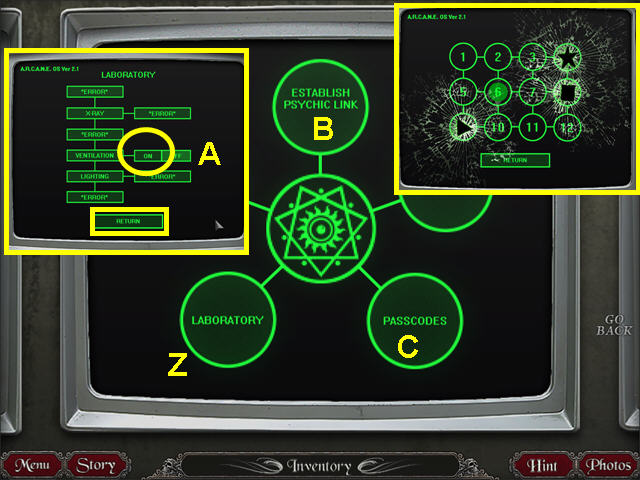
- Look at the lighted computer monitor.
- Select “LABORATORY” (Z).
- Click the ventilation “ON” (A).
- Select the “RETURN” button.
- Click on the “FILES” circle to read some memos from the past.
- Click on circle labeled “ESTABLISH PSYCHIC LINK” (B).
- You will see remote video of a coffin. Things go haywire and a strange message appears; then the screen breaks.
- Select the circle labeled “PASSCODES” (C).
- Your camera will take a picture.
- Exit; look at the mini-game at the top of the locker.

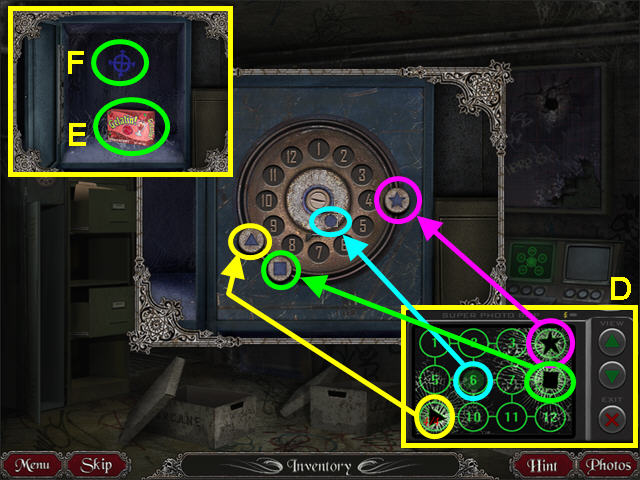
- Look at the photo for a clue on the code (D).
- Move the star, square, and triangle around the outer ring to the number indicated in the photo.
- Click on a symbol to move its position.
- Move the circle on the inner ring to the number in the photo.
- Look inside the safe; take the GELATIN (E).
- Your camera will take a photo of the blue symbol (F).

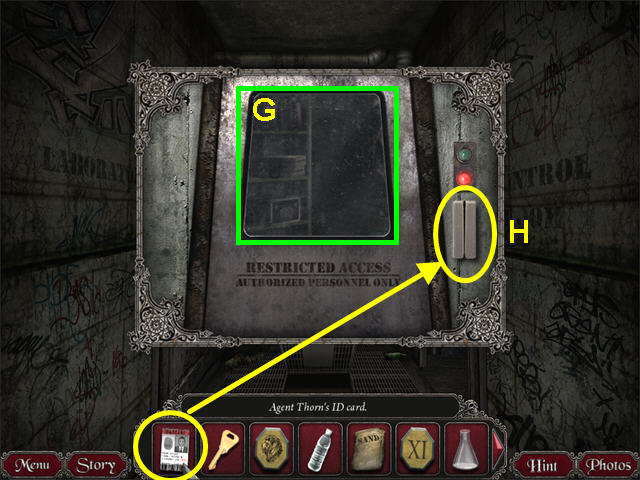
- Exit to the hall and look at the left door.
- The green poisonous gas should be gone, since the ventilation was turned on (G).
- Use Agent Thorn’s ID BADGE from your inventory on the key card swipe (H).
- Enter the laboratory.

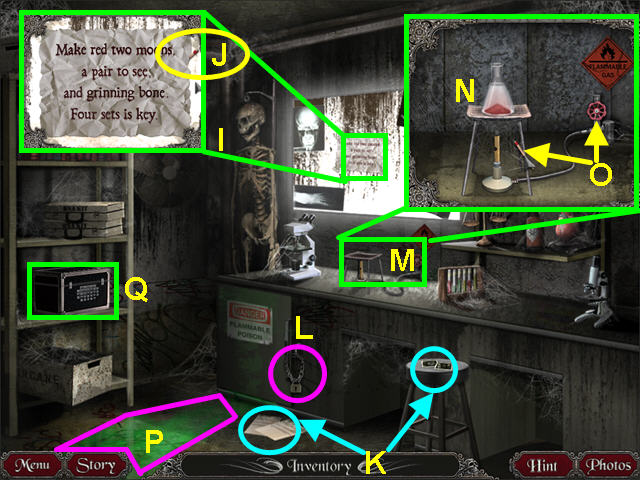
- Look at the note on the wall (your camera will automatically take a photo) (I).
- Take the MATCH stuck on the side of the note (J).
- Look at the photos on the stool and the memo on the floor (K).
- Use the KEY from your inventory to unlock the refrigerator (L).
- Look at the close-up of the Bunsen burner (M).
- From your inventory, place the FLASK on the stand (N).
- Use the WATER and the GELATIN on the flask.
- Turn on the gas then use the MATCH on the burner (O).
- Take the FLASK with GOO then turn off the gas.
- Exit the close-up.
- Use the SANDBAG on the green liquid spill (P).
- Look at the black box for a mini-game (Q).

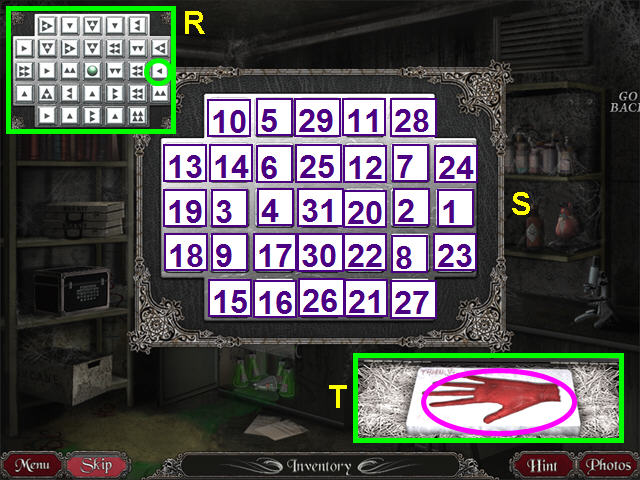
- The object of this mini-game is to press all the white buttons before pressing the green button (R).
- The button you press tells you the next button to press.
- For example, if you press a button with three arrows to the right, the next button you’ll push will be located three buttons to the right.
- Press the buttons in numerical order (S).
- Inside the box is a hand mold.
- Use the GELATIN GOO from your inventory on the mold (T).
- Take the GELATIN HAND IN PROGRESS.
- Exit the close-up and look at the refrigerator.

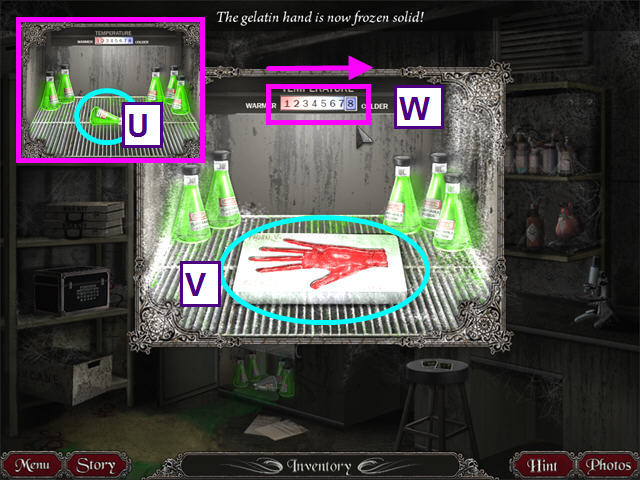
- Take the green bottle of POISON from the shelf (U).
- Place the GELATIN HAND IN PROGRESS on the shelf (V).
- Slide the freezer control all the way to the right (W).
- Take the GELATIN HAND from the mold.
- Exit the lab and return to the gate.

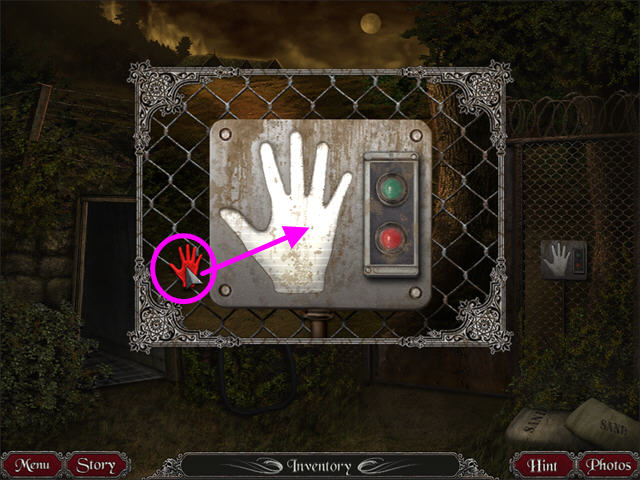
- Look at the close-up of the hand reader, right of the gate.
- Use the GELATIN HAND from your inventory on the hand.
- The gate will open.
The Asylum

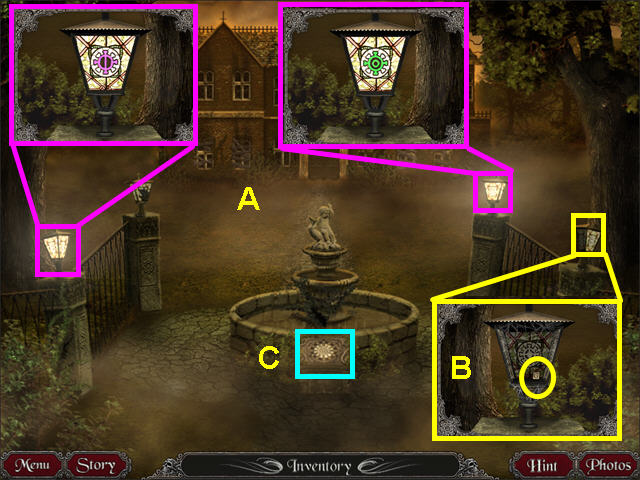
- Look at the two lighted lamps, so the camera can take photo clues (A).
- Look at the lower right lamp and take the “G” TILE (B).
- Look at the design on the fountain for a mini-game (C).

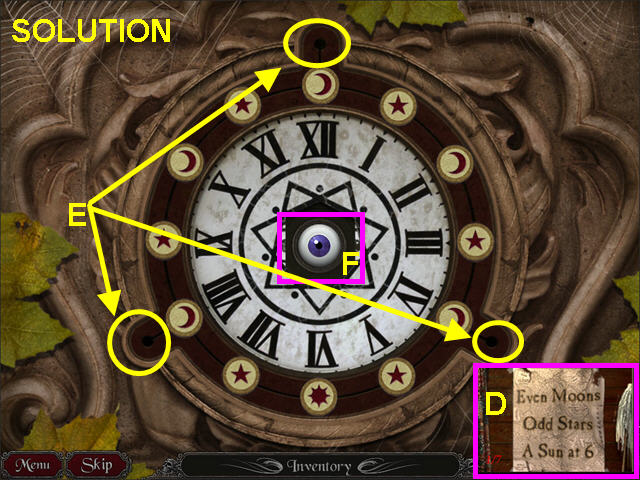
- Look at the photo for a clue (D).
- Slide the symbols around so that the sun is on the 6, the moons are on the even numbers, and the stars are on the odd numbers.
- There are three places outside of the circle to which you can move a symbol (E).
- Take the EYEBALL when the center opens (F).
- Walk up, to the front of the asylum.

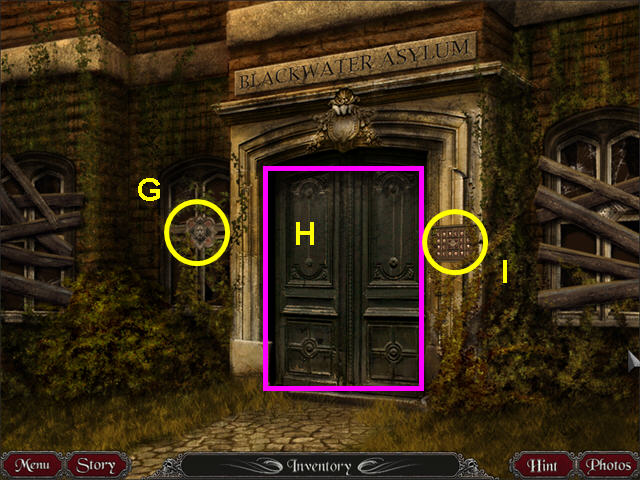
- Notice the mini-game on the left (G).
- The doors are locked (H).
- Select the right mini-game (I).

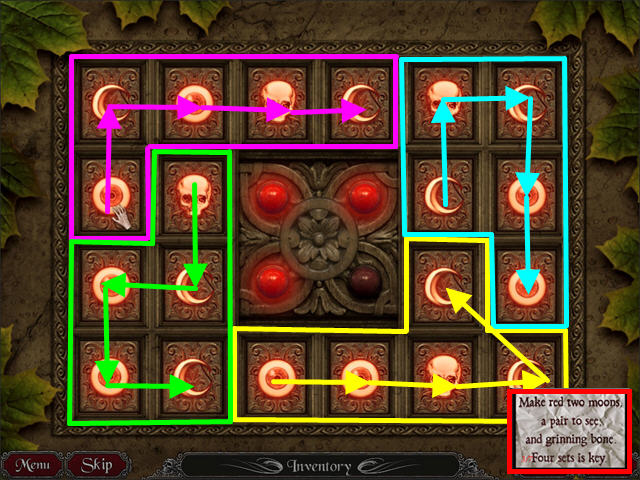
- Look at the photo clue.
- Turn on the four center lights.
- Press a tile, then adjoining lighted tiles, to make a chain that includes two eyes, two moons, and one skull.
- You need to make four sets.
- Enter the asylum through the front doors.

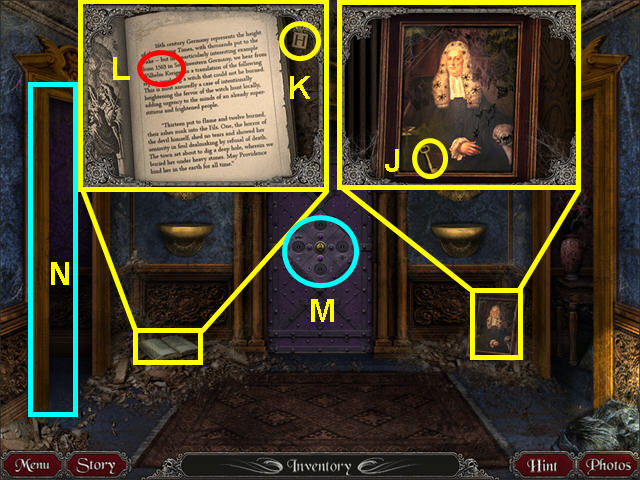
- Look at the painting on the floor and take the KEY (J).
- Your camera will take a photo.
- Look at the book on the floor; take the “H” TILE (K).
- Make note of the year in the text: 1563 (L).
- Note the mini-game on the purple door (M).
- Walk into the left room (N).

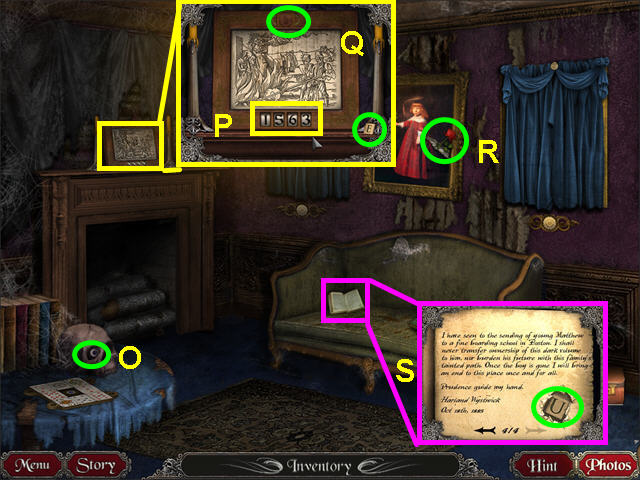
- Take the EYEBALL from the skull (O).
- Look at the engraving on the mantle and enter the date “1563” (P).
- Take the WOOD COIN and the “E” TILE (Q).
- Take the ROSE from the painting (R).
- Look at the journal on the couch and turn the pages to the end.
- Take the “U” TILE (S).
- Exit to the hall and enter the right doorway.

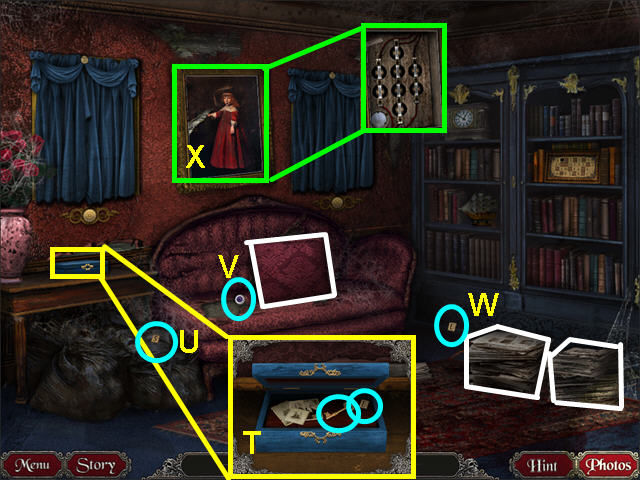
- Look at the blue box on the table; take the KEY and the “E” TILE. (T).
- Take the “S” TILE off the garbage bags (U).
- Move the pillow on the couch and take the EYEBALL (V).
- Move the two stacks of newspapers and take the “E” TILE (W).
- Take the ROSE from your inventory and use it on the painting to reveal a mini-game (X).
- Select the mini-game.

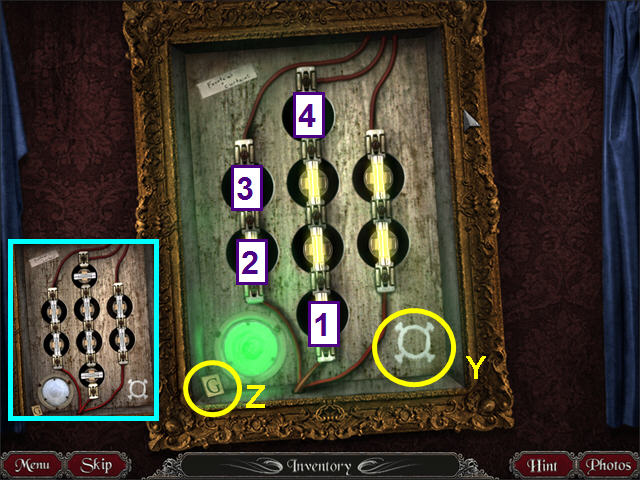
- Your camera will take a photo of the symbol (Y).
- Take the “G” TILE (Z).
- Turn all the fuses to the vertical position in this mini-game.
- Clicking on a fuse will turn that fuse, and any adjacent fuses.
- Click on the fuses in numerical order.
- Exit to the hall and back out to the front of the building.

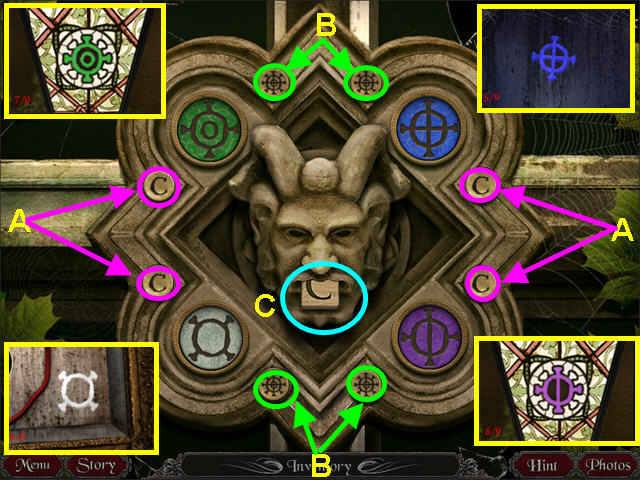
- Look at the mini-game to the left of the doors.
- Look at the photo clues of the symbols.
- The object of this mini-game is to change the symbols and colors to match the four photos.
- Note that some colors are only in one location.
- Push the “C” buttons to change colors (A) and the symbol button to change the symbol (B).
- Take the “C” TILE from the mouth of the lion (C).
- Go inside and walk to the left room.

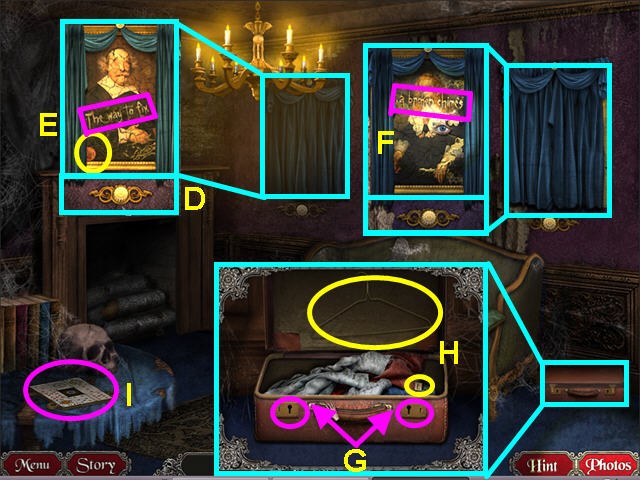
- Look at the left blue curtain and push the button beneath to reveal a painting (D).
- Take the WOOD COIN and note the phrase on the painting (E).
- Look at the right blue curtain and push the button beneath to reveal a painting (F).
- Note the phrase on the painting.
- Look at the suitcase and use the two KEYS from your inventory to unlock the lid (G).
- Take the HANGAR and the “E” TILE (H).
- Note the mini-game on the left table (I).

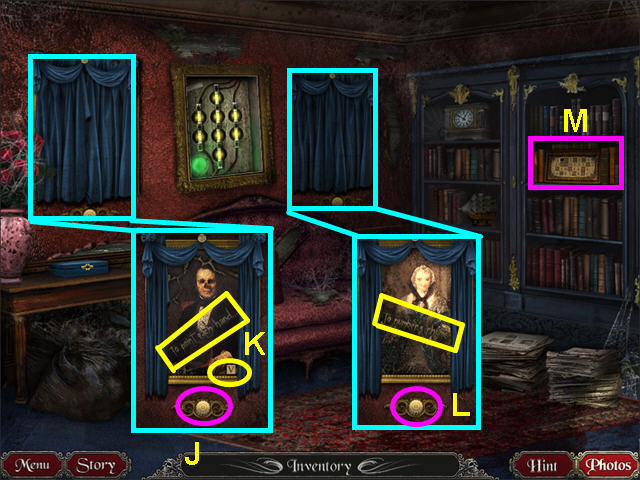
- Exit to the hall and walk right to the next room.
- Look at the left blue curtain and push the button beneath to reveal a painting (J).
- Take the “V” TILE and note the phrase on the painting (K).
- Look at the right blue curtain and push the button beneath to reveal a painting (L).
- Note the phrase on the painting.
- Look at the mini-game on the shelf (M).

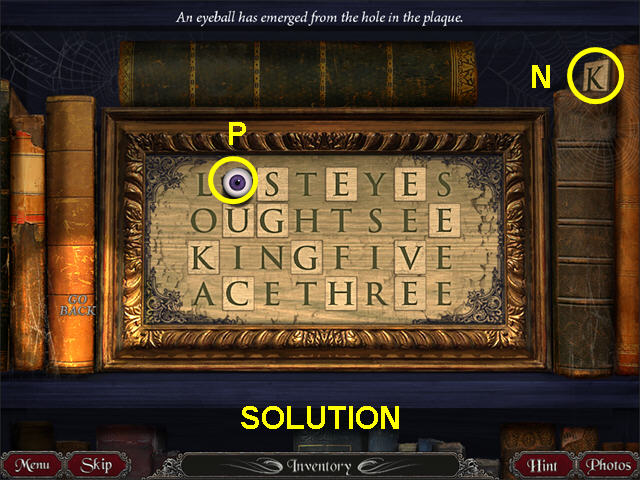
- Take the “K” TILE from the upper right (N).
- Place the TILES from your inventory to complete the phrase.
- Your camera will take a photo clue.
- Take the EYEBALL that appears (O).
- Exit to the hall and enter the left room.

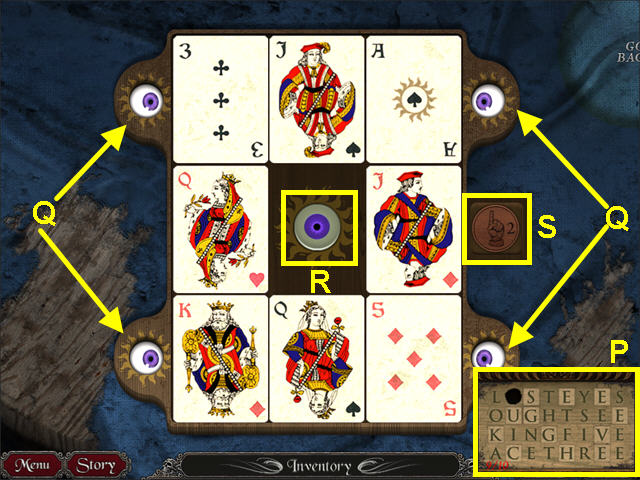
- Look at the mini-game.
- Look at the photo clue (P).
- Take the EYEBALLS from you inventory and place them in the four outer holes (Q).
- Slide the cards around so that the Ace, King, Three, and Five are next to an eye and the center is open.
- Press the center eyeball (R).
- Take the WOOD COIN from the right drawer (S).
- Exit to the hall.

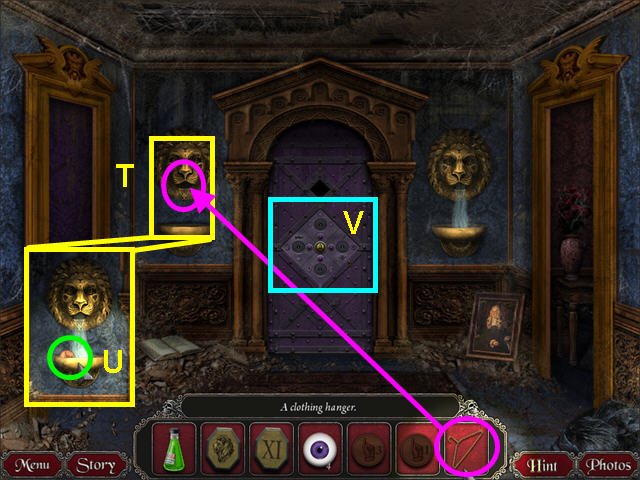
- Use the HANGAR from your inventory to unclog the left lion head (T).
- Take the WOOD COIN from the basin (U).
- Look at the mini-game on the purple door (V).

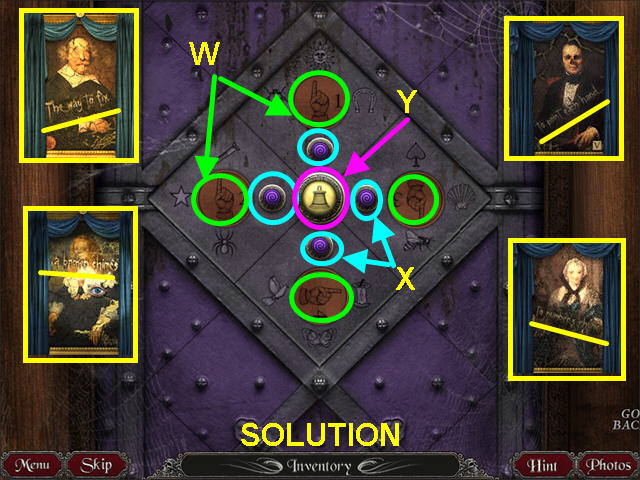
- Refer to the four paintings for the clue to this mini-game.
- “The way to fix … the broken chimes … to point each hand … to number’s rhyme.”
- Place the WOOD COINS from your inventory into the circles that have an item that the coin’s number rhymes with: [one-sun], [two-screw], [three-bee], and [four-core] (W).
- Use the purple buttons to rotate each coin so it points to the proper item (X).
- Press the center button to ring the bell (Y).
Captured

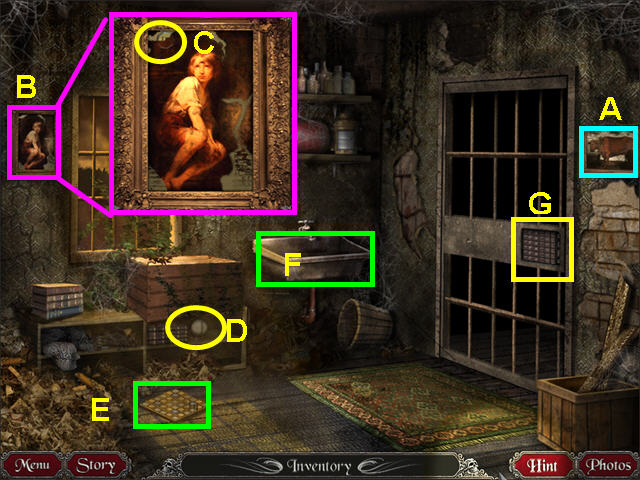
- Look at the right painting so your camera can take a photo clue (A).
- Look at the left painting so your camera can take a photo clue (B).
- Take the III TILE from the upper left corner of the painting (C).
- Take the BASEBALL (D).
- Note the mini-game on the floor (E).
- Note the sink (F).
- Look at the mini-game on the cell door (G).

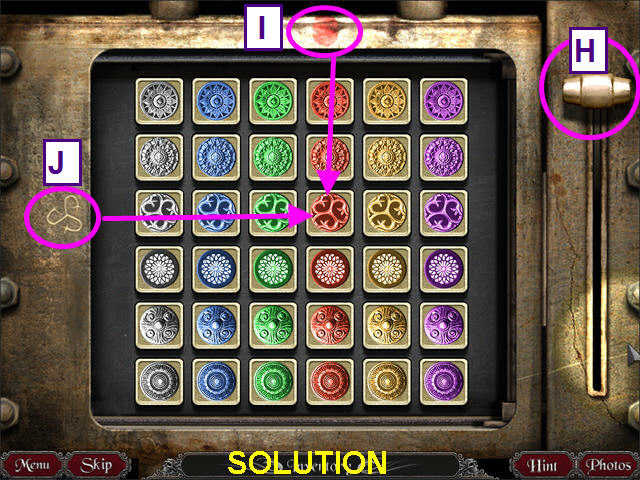
- Place the tiles in the correct positions in this mini-game.
- Click on two tiles to swap positions.
- Pull the lever on the right to check if you are correct (H).
- There are two clues to get you started: a red splotch over one column (I), and a symbol next to one row (J).
- Exit the cell.

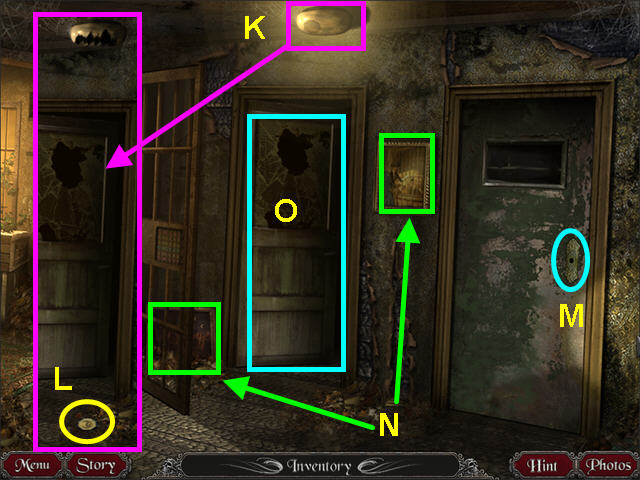
- Use the BASEBALL from your inventory on the light fixture (K).
- Take the MOON TILE that falls to the ground (L).
- Look at the right door to notice the missing door knob (M).
- Look at the two paintings so the camera can take photo clues (N).
- Enter the center door (O).

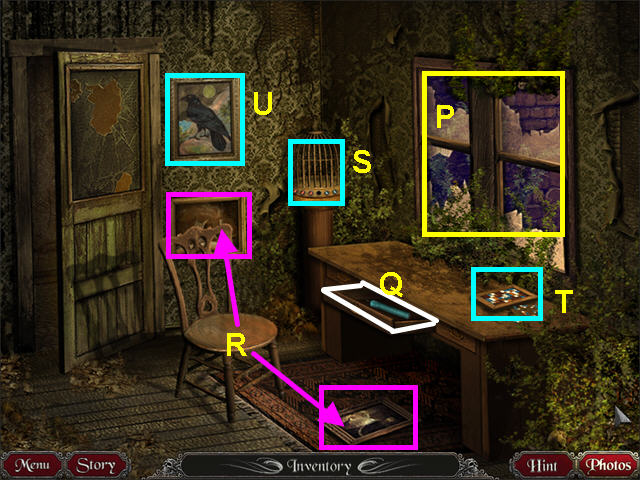
- Look out the window to see the A.R.C.A.N.E. Agents trying to reach you (P)!
- Open the drawer on the desk and take the BLUE CANDLE (Q).
- Look at the two paintings so the camera can take photo clues (R).
- Note the cage mini-game (S).
- Note the tile mini-game on the table (T).
- Look at the crow painting (U).

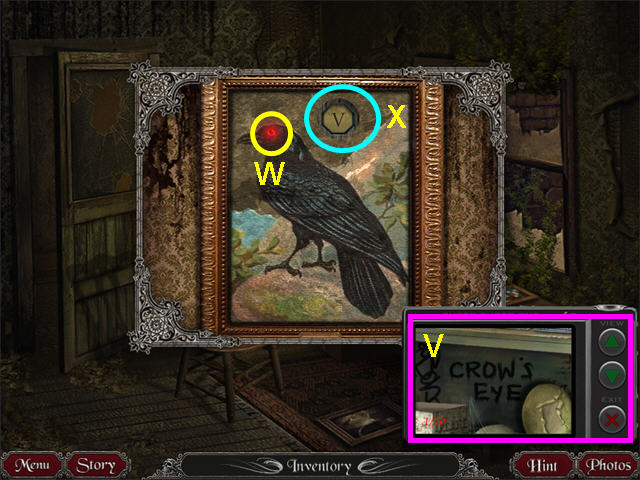
- Look at the photo for a clue (V).
- Click on the crow’s eye (W).
- Take the “V” TILE (X).

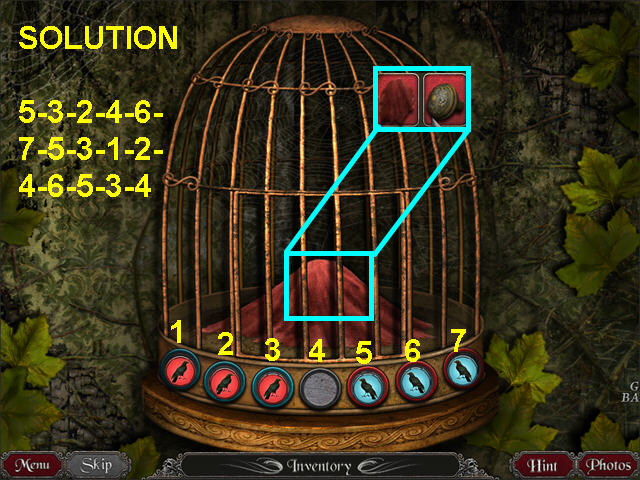
- Look at the cage mini-game.
- Swap the red crows with the blue crows.
- Pieces can only move forward one space or jump forward over an opposite color.
- Number the positions 1-7, from left to right.
- Click on the piece in these positions: 5, 3, 2, 4, 6, 7, 5, 3, 1, 2, 4, 6, 5, 3, and 4.
- After the cage door opens, take the RED CLOTH and the DOORKNOB.

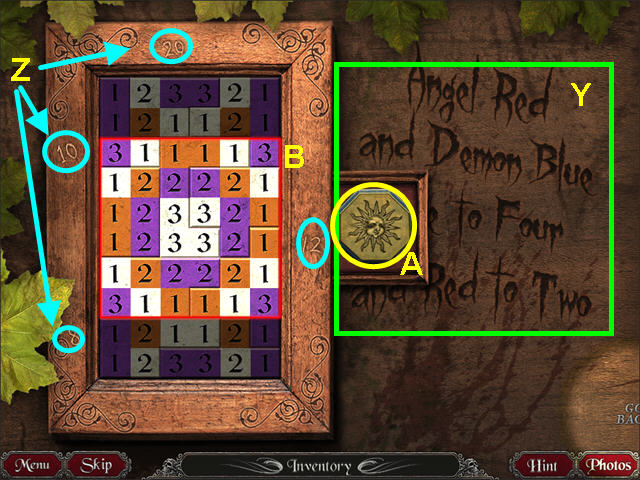
- Look at the mini-game on the desk.
- Your camera will take a photo clue of the rhyme (Y).
- Place all the pieces into the grid in this mini-game.
- There are clues to the row or column totals should be around the outside of the grid (Z).
- Take the SUN TILE from the hidden drawer (A).
- The solution to this mini-game is a clue to another mini-game (your camera will take a photo of it) (B).
- Exit to the hall and look at the close-up of the door on the right.
- Take the DOORKNOB from your inventory and use it on the door.
- Enter the right room.

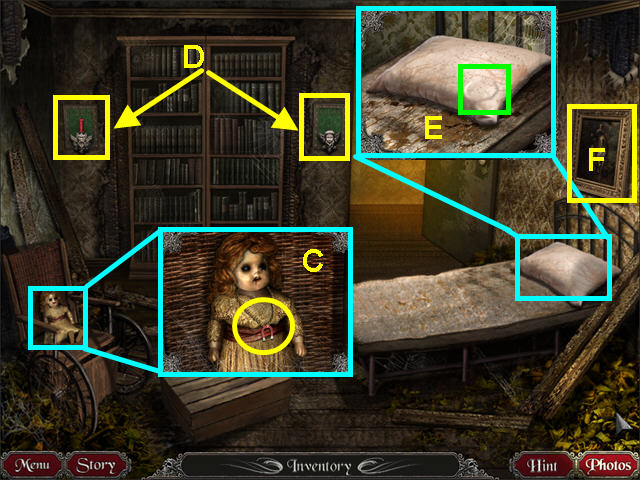
- Look at the doll on the chair and take the MAGNET (C).
- Take note off the two candle sconces (D).
- Look at the pillow and note there is something inside (E).
- Look at the painting on the right for a photo clue (F).
- Exit to the hall and walk left to the cell.

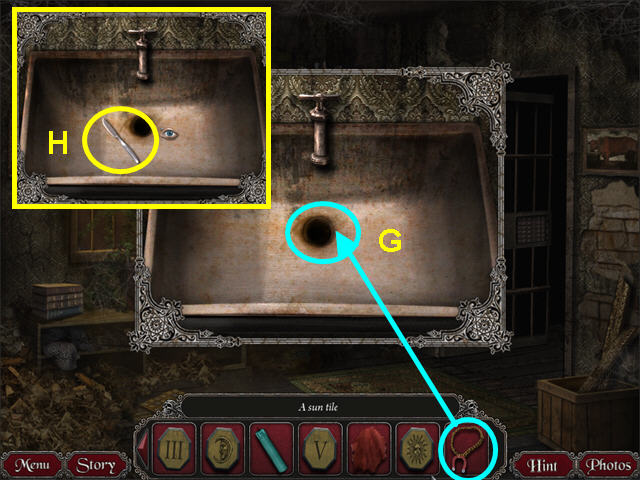
- Look at the close-up of the sink.
- Use the MAGNET from your inventory on the drain (G).
- Take the BUTTER KNIFE (H).
- Exit the close-up of the sink and look at the mini-game on the floor.

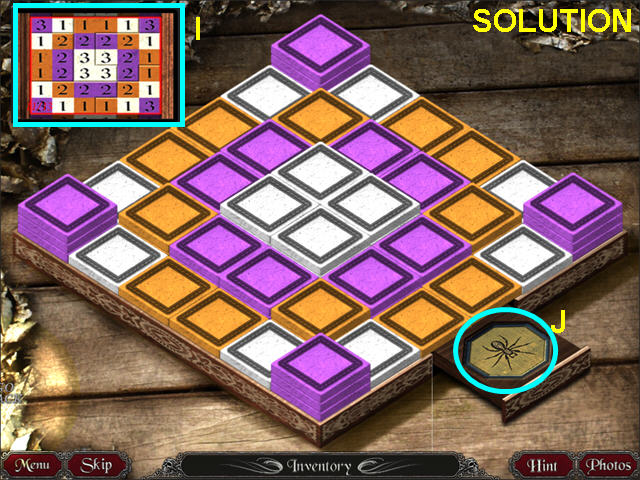
- Look at the photo clue from the other puzzle (I).
- The object is to stack the squares according to the picture.
- The numbers indicate the height of each stack.
- Click on a tile to select it; then click the location to which you want it moved.
- You cannot stack more than three high.
- Take the SPIDER TILE from the secret drawer (J).
- Exit to the hall and enter the right room.
- Look at the close-up of the pillow and use the BUTTER KNIFE on the lower right corner.
- Take the “IV” TILE.

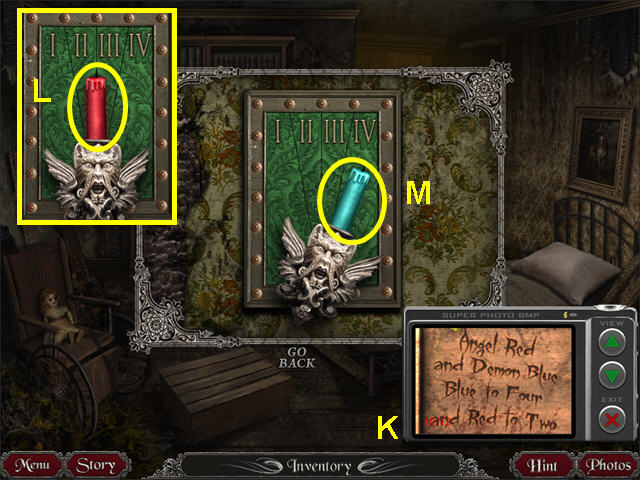
- Look at the close-up of the left candle sconce.
- Look at the photo clue (K).
- Take the RED CANDLE (L).
- Take the BLUE CANDLE from your inventory and place it in the sconce (M).
- Click on the demon sconce to move it to the IV position.

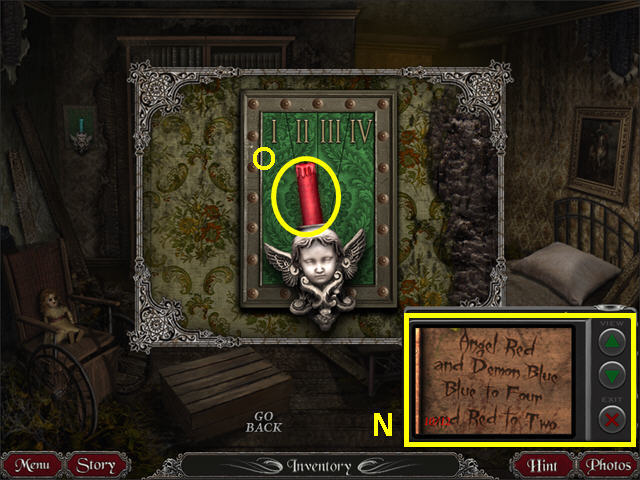
- Exit the close-up and look at the right candle sconce.
- Look at the photo clue (N).
- Take the BLUE CANDLE from your inventory and place it in the sconce (O).
- Click on the angel sconce to move it to the II position.
- Exit the close-up and look at the mini-game that was behind the bookshelves.

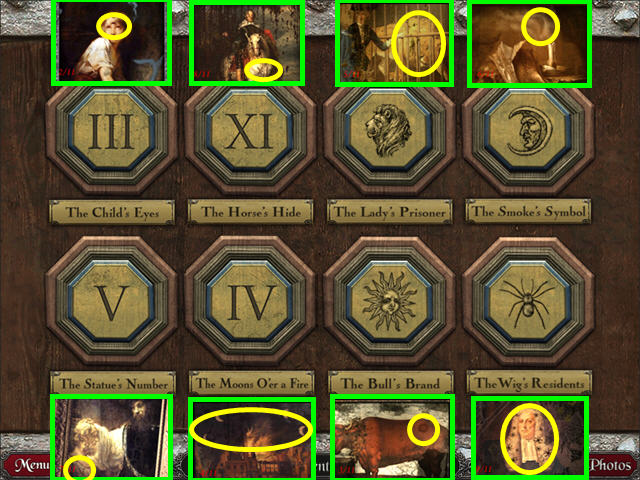
- Look at the eight photos of the paintings.
- Use the TILES from your inventory: match the numbers or symbols to the titles.
- Click to enter the passageway.
Beneath the Asylum

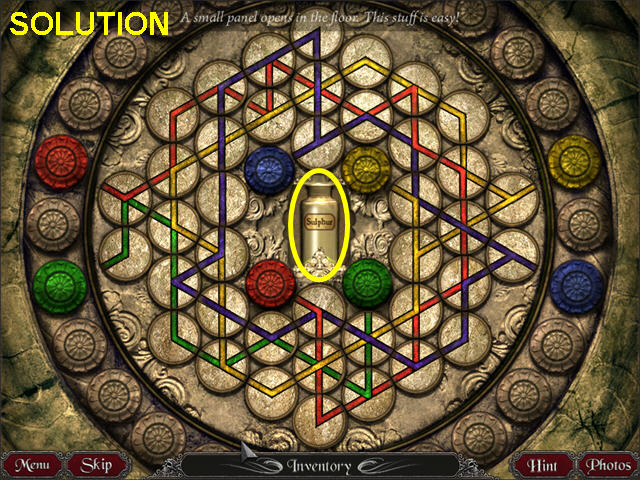
- Look at the mini-game on the center of the floor.
- The object is to connect the pairs of colored tokens with the pipes.
- Click on a circle to rotate it into position.
- Once solved, take the SULFUR from the hidden compartment.
- Exit the close-up.

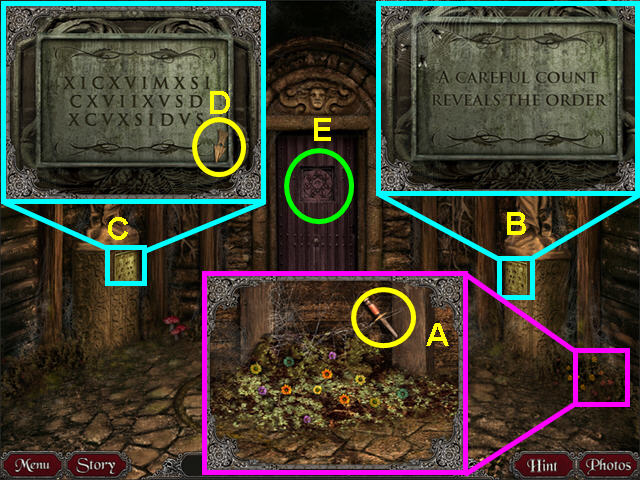
- Look at the flowers on the lower right and take the DAGGER (A).
- Read the plaque on the right statue (B).
- Read the plaque on the left statue (your camera will take a photo clue) (C).
- Take the WOODEN ARROW (D).
- Look at the mini-game on the door (E).

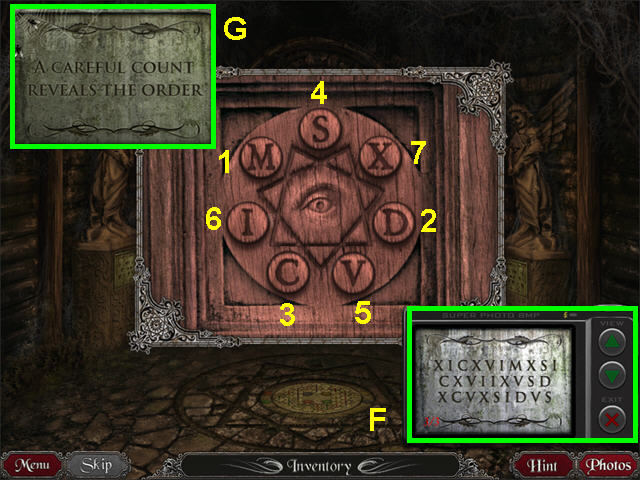
- Look at the photo clue (F).
- The clue is disguised as a Roman numeral.
- The plaque from the other statue tells you how to read the clue-count (G).
- Count how many of each letter, then press the letters from those that appear the least often to those that appear the most often.
- Press the letters M, D, C, S, V, I, and X.
- Enter the doorway and look at the mini-game on the right door.

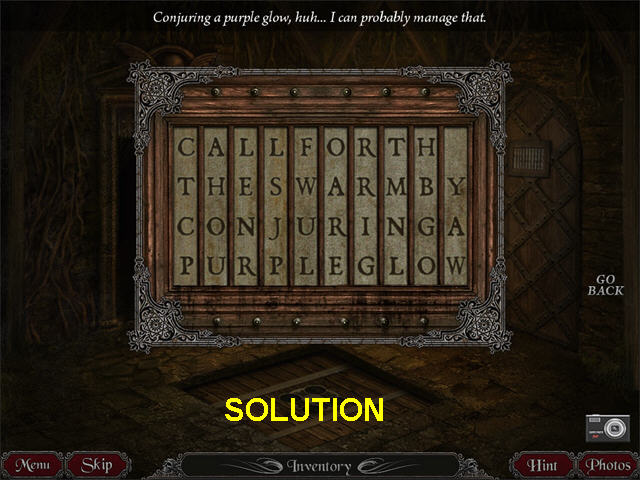
- Form a phrase in this mini-game.
- Click on each column to move the letters down.
- Once you have the phrase, the door will unlock.
- Your camera will take a photo of the solved puzzle.
- Enter the right door.

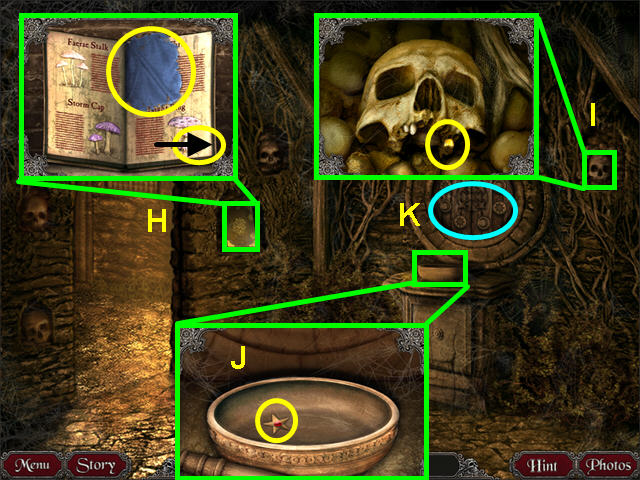
- Look at the book in the niche and take the BLUE CLOTH (H).
- Click on the arrow to turn the page and read the book.
- Look at the skull on the right and take the GOLD TOOTH (I).
- Look at the bowl and take the STAR (J).
- Make note of the mini-game over the bowl (K).
- Exit the room to the left.

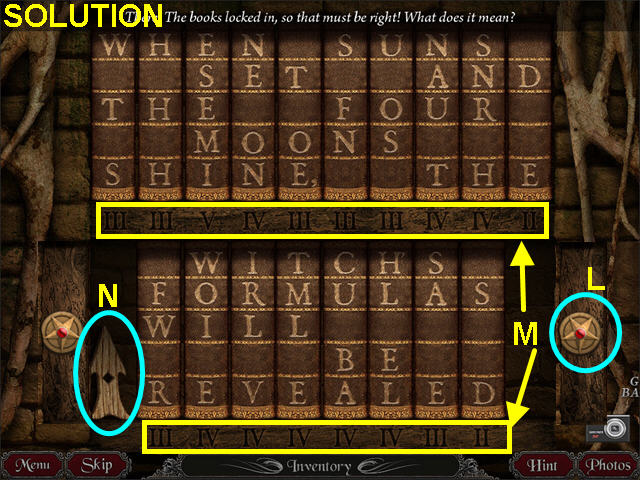
- Look at the bookcase on the left for a mini-game.
- Take the STAR from your inventory and place it in the star slot on the right (L).
- This will open an empty slot and allow you to move the books around.
- Move the books to form a phrase.
- The numbers on the bottom of the shelf indicate how many letters are on the book that belongs in that position (M).
- Click on a book to select it; then click on the empty spot to move positions.
- Your camera will take a photo of the solved puzzle.
- Take the WOODEN ARROW (N).
- Exit the close-up and enter the right room.
- Look at the mini-game over the bowl.

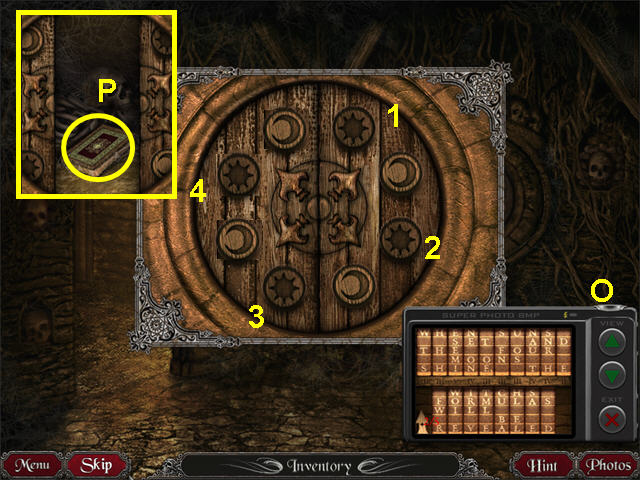
- Your camera will take a photo of the arrows in the center.
- Look at your photos for a clue (O).
- Press the suns down and the moons up in this puzzle.
- Each button you press affects the two on either side.
- Press the buttons in numerical order (1-4).
- Look at the book in the compartment; read all the pages to learn the recipes (P).
- Exit the close-up and walk left twice to return to the room with the two angel statues.

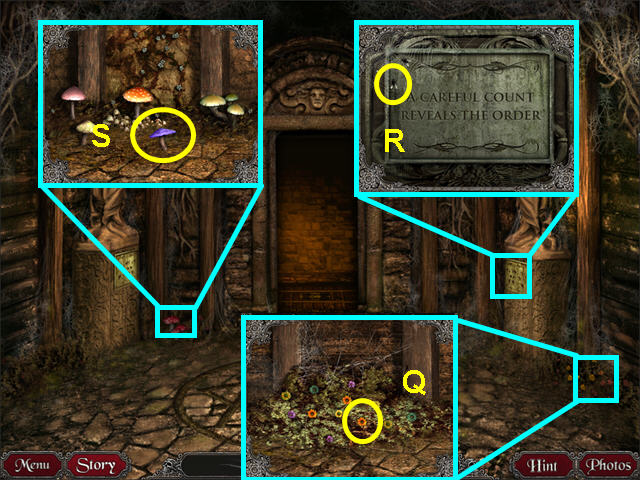
- Look at the flowers on the right and take a FLAME BLOSSOM (Q).
- Look at the right statue’s plaque and take a FLY (R).
- Look at the mushrooms on the left and take a STORM CAP MUSHROOM (S).
- Walk forward to the next room.

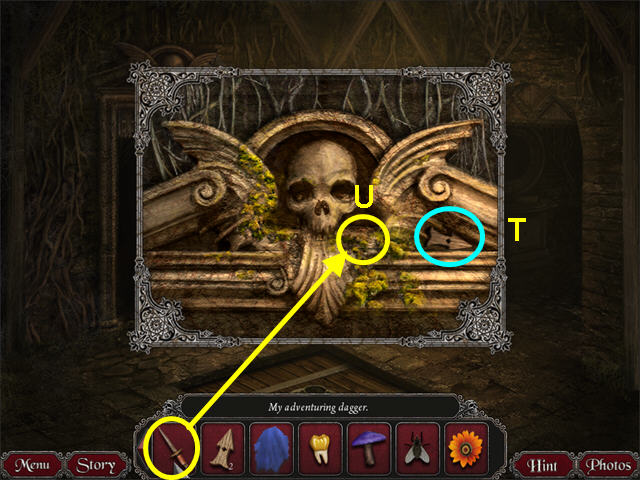
- Look at the skull over the left door.
- Take the WOODEN ARROW (T).
- Use the DAGGER from your inventory to take some MOSS (U).
- Exit the close-up and enter the right room.

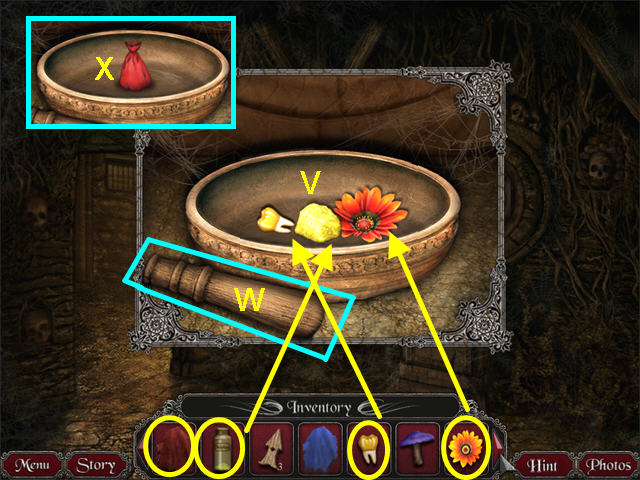
- Look at the bowl.
- Place the SULFUR, FLAME BLOSSOM, and GOLD TOOTH from your inventory into the bowl (V).
- Click on the mortar to pick it up; then click on the bowl’s ingredients to grind them to a powder (W).
- Use the RED CLOTH from your inventory to make the RED POTION (X).

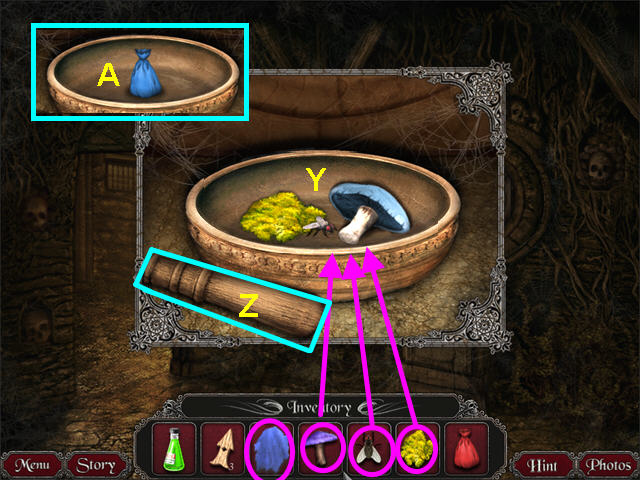
- Place the MOSS, STORM CAP MUSHROOM, and DEAD FLY from your inventory into the bowl (Y).
- Click on the mortar to pick it up; then click on the bowl’s ingredients to grind them to a powder (Z).
- Use the BLUE CLOTH from your inventory to make the BLUE POTION (A).
- Exit the close-up and walk to the left room.

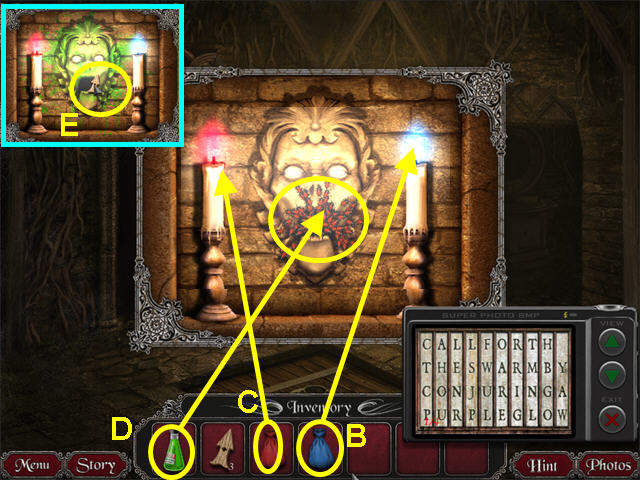
- Look at the close-up of the face sculpture on the wall.
- Look at the photo clue (B).
- Use the RED and the BLUE POTIONS on the two candles (it does not matter which candle) (C).
- When the swarm of bugs arrives, use the POISON to kill them (D).
- Reach in the mouth and take a WOODEN ARROW (E).

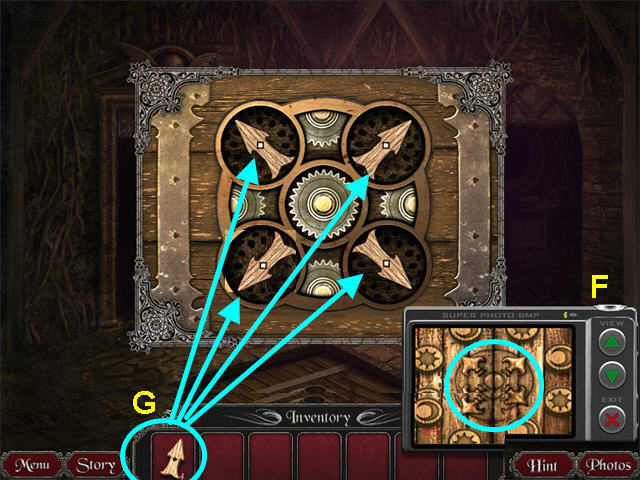
- Exit the close-up and look at the mini-game on the floor.
- Look at the photo for a clue (F).
- Place the four WOODEN ARROWS onto the spindles (G).
- Click on the arrows to match their positions in the photo.
- Exit the close-up and enter the trap door.

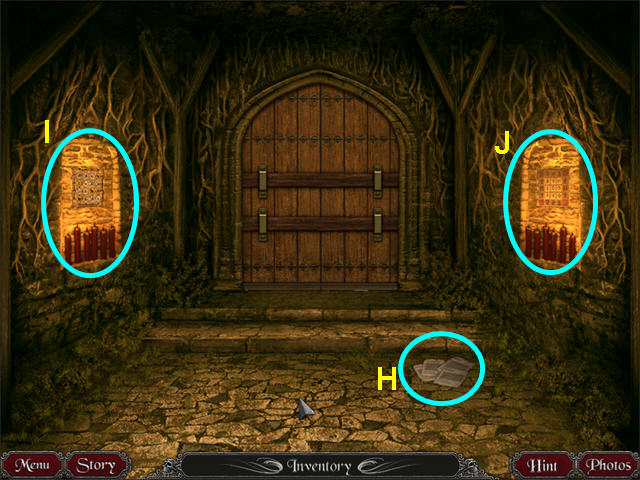
- Look at the papers on the floor so your camera can take a photo clue (H).
- Note the mini-game on the left wall (I).
- Look at the mini-game on the right wall (J).

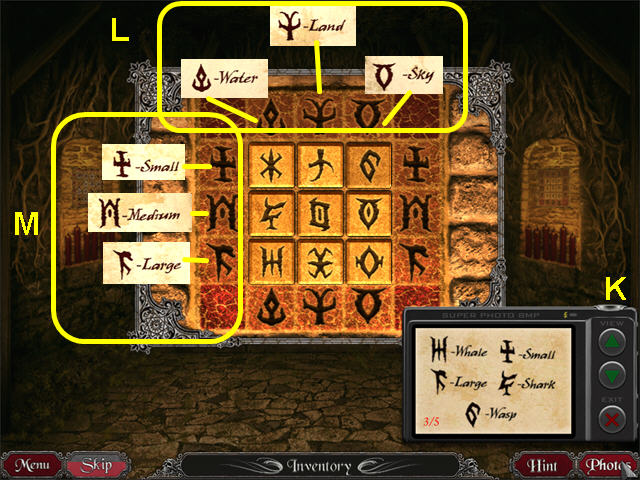
- Use the photos to decipher the symbols (K).
- The columns are Water, Air, and Sky (L).
- The rows are Small, Medium, and Large (M).
- Click on two tiles to swap their positions.
- Look at the mini-game on the left wall.

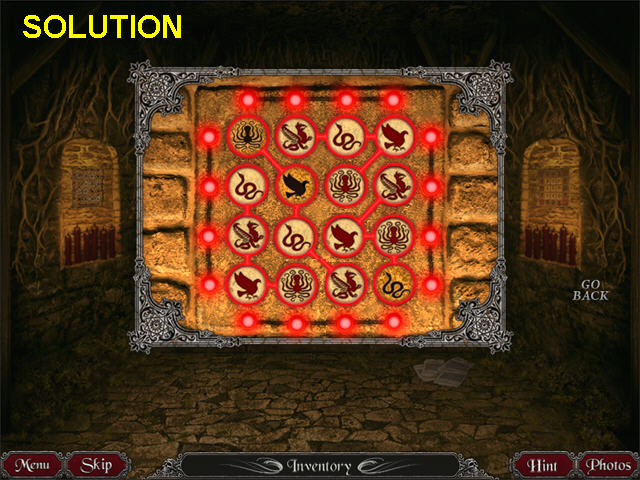
- Have one of each of the four animals in every column, row, and stringed set to complete this mini-game.
- Click on a disc to change the animal.
- Several are locked into place to get you started.
- Once the door is opened, look at the close-up of the coffin for a mini-game..

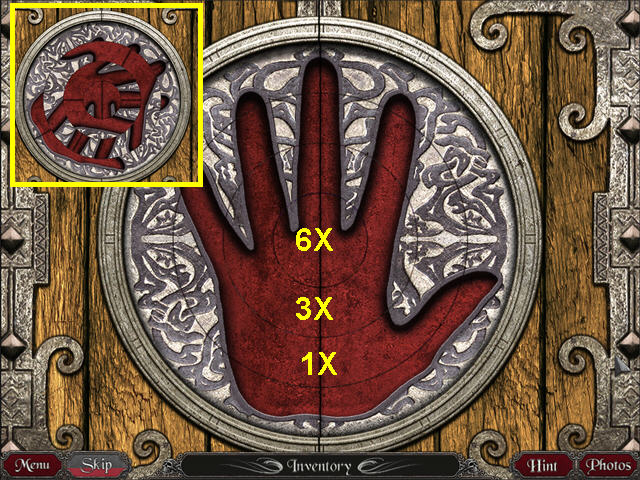
- The object of this mini-game is to reform the hand by rotating the rings.
- Click on a ring to rotate it; some rings will affect other rings.
- Click the center six times.
- Click the next ring three times and the third ring from the center once.
- The hand hid another mini-game.

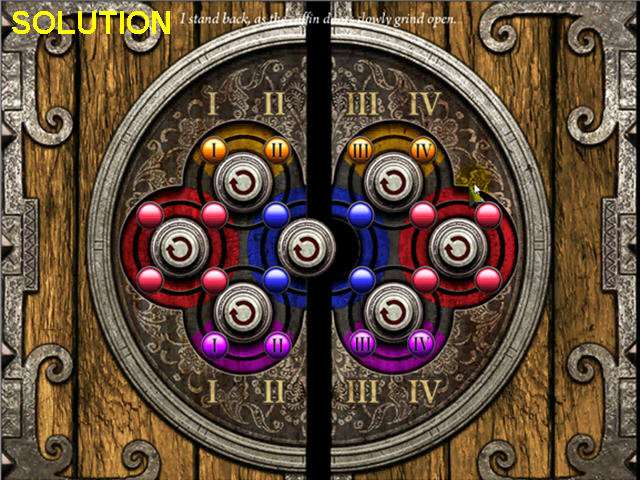
- Move the blank balls onto the matching colors, and the numbered balls adjacent to the matching numbers to complete this mini-game.
- Check out our video solution!
- Click on the rings to rotate the balls.
Congratulations! You’ve completed Nightmare Adventures: The Witch’s Prison!




 Fetch Walkthrough, Guide, & Tips
 Dream Chronicles: The Book of Air Walkthrough, Guide, & Tips
 Beyond the Unknown: A Matter of Time Walkthrough, Guide, & Tips
 Whispers: Revelation Walkthrough, Guide, & Tips
 Hidden Mysteries: Return to Titanic Walkthrough, Guide, & Tips