Dominic Crane 2: Dark Mystery Revealed Walkthrough, Guide, & Tips
Dominic Crane 2: Dark Mystery Revealed Walkthrough
Welcome to the Dominic Crane 2: Dark Mystery Revealed Walkthrough!
Uncover the sinister meaning behind Dominic’s dreams!
Whether you use this document as a reference when things get difficult or as a road map to get you from beginning to end, we’re pretty sure you’ll find what you’re looking for here.
This document contains a complete Dominic Crane 2: Dark Mystery Revealed game walkthrough featuring annotated screenshots from actual gameplay!
We hope you find this information useful as you play your way through the game. Use the walkthrough menu below to quickly jump to whatever stage of the game you need help with.
Remember to visit the Big Fish Games Forums if you find you need more help. Have fun!
This walkthrough was created by Margie B, and is protected under US Copyright laws. Any unauthorized use, including re-publication in whole or in part, without permission, is strictly prohibited.
General Tips
- This game is a Hidden Object Puzzle Adventure.
- When you need a hint you can click on Dominic’s icon in the lower left corner. His bubble has to be full before he will grant you a hint.
- The Hint can be used in a Hidden Object Scene as well as in regular scenes.
- All mini-games and jigsaw puzzles can be skipped once the SKIP button is filled.
- Inventory items can be found in Hidden Object Scenes as well as in Regular Scenes. They will be stored in the tray at the bottom of the scene.
- Some inventory items can be used more than once and may remain in your inventory even if you no longer need them.
- When you click on 3 incorrect items in a Hidden Object Scene your cursor will disappear for a few seconds.
- Areas of interest will sparkle when you pass your mouse over them.
- Click on the Red “X” Button in the upper right to exit out of certain scenes.
Chapter 1

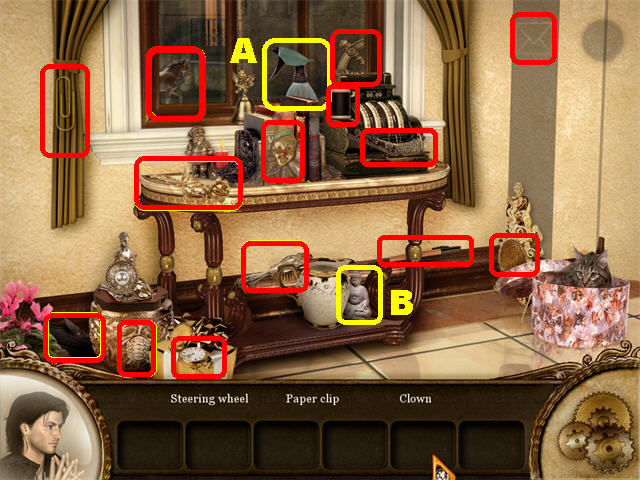
- Zoom into the window to play a Hidden Object Scene.
- The SPRAY BOTTLE (A) and the BUDDHA (B) will be added to inventory.
- Click on the red “X” in the upper right to exit this scene.

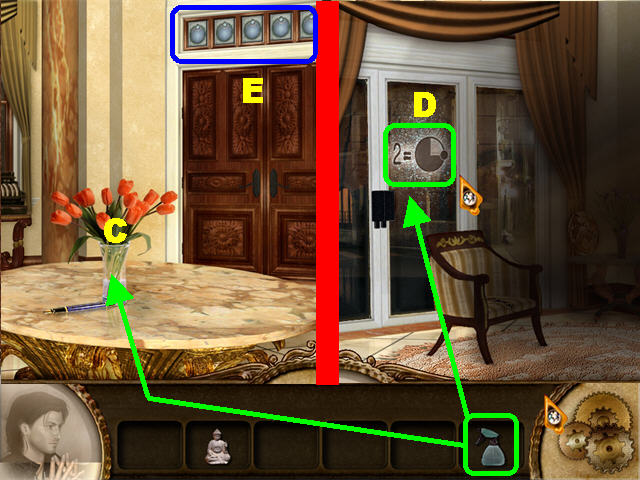
- Place the SPRAY BOTTLE on the flower vase (C) to fill it with water.
- Go left.
- Spray the glass door with the SPRAY BOTTLE to reveal a symbol (D) on the glass.
- Go right.
- Zoom into the symbols above the door (E) to trigger a puzzle.

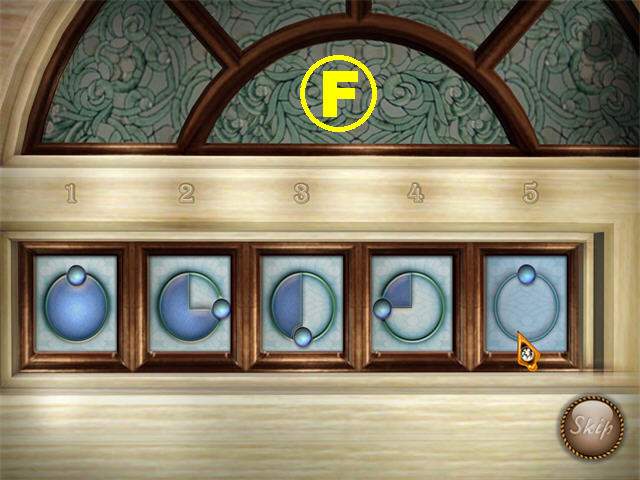
- Using the code on the glass door place the symbols in the correct order. The symbol on the door had a number 2 next to it; that symbol belongs in the second slot.
- The rest of the symbols should be placed according to the image in the second slot.
- Click on each symbol to change it.
- Please look at the screenshot for the solution (F).
- Go through the door.

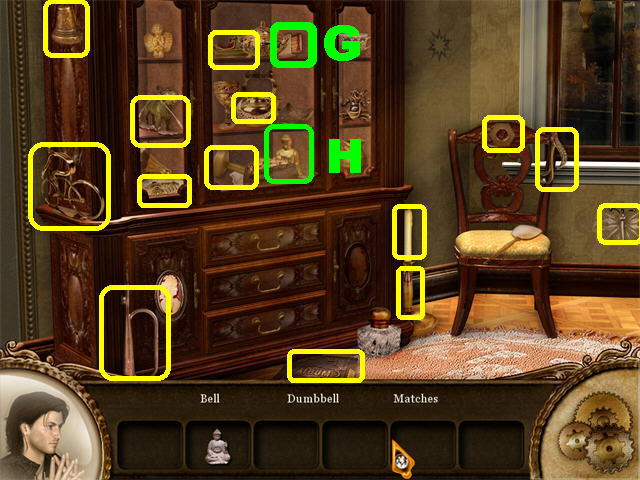
- Click on the cupboard to trigger a Hidden Object Scene.
- The MATCHES (G) and the BUDDHA (H) will be added to inventory.
- Click on the “X” in the upper right and head left twice.

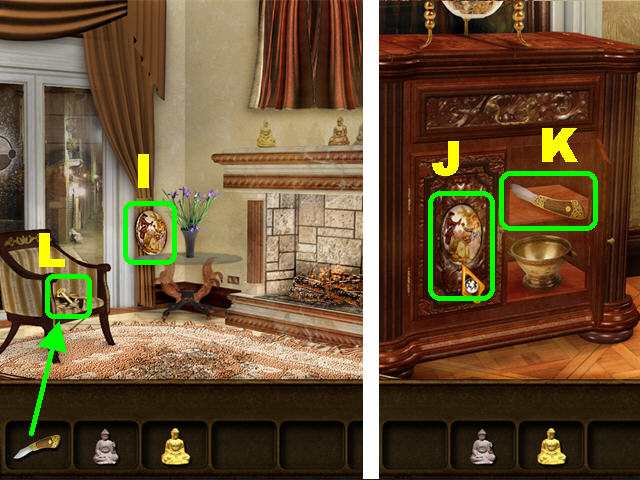
- Place the MATCHES in the fireplace.
- Grab the PLAQUE (I) on the small table.
- Go right and through the door.
- Zoom into the cabinet on right.
- Put the PLAQUE in the empty slot (J); grab the KNIFE (K).
- Return to the fireplace room.
- Cut the chair with the KNIFE; take the KEY (L).

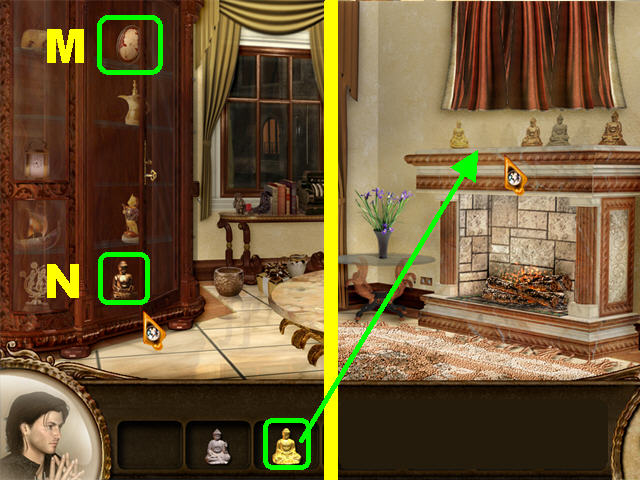
- Go right.
- Open the cabinet with the KEY; take the BUDDHA (M) and the CAMEO (N).
- Go left.
- Place a BUDDHA on the mantle above the fireplace to trigger a puzzle.

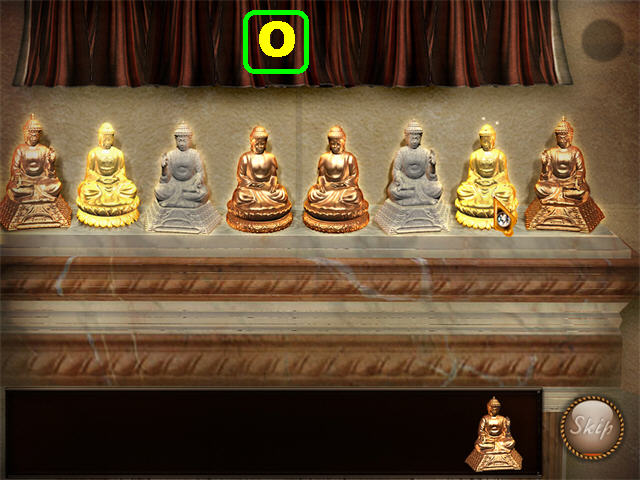
- Place the Buddhas in the correct order using the locked pieces as a guide.
- Click on any 2 Buddhas to swap their positions.
- One Buddha will not be used.
- Please look at the screenshot for the solution (O).
- A picture will appear above the fireplace after the puzzle has been solved.

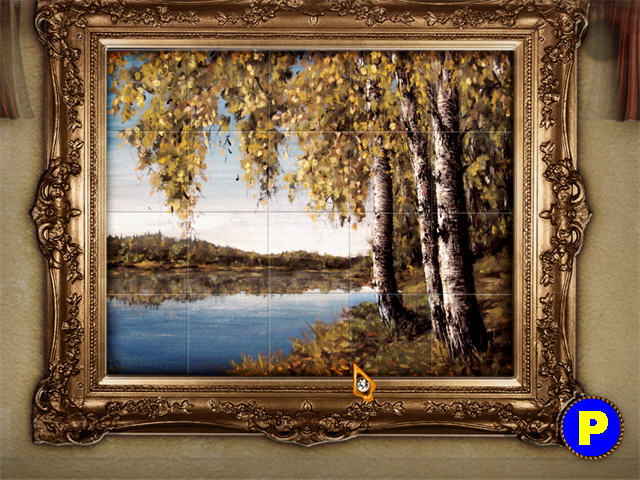
- Click on the picture to trigger a puzzle.
- Click on any 2 tiles to swap their positions.
- Please look at the screenshot for the solution (P).
- A Safe will appear behind the picture after the puzzle has been solved.

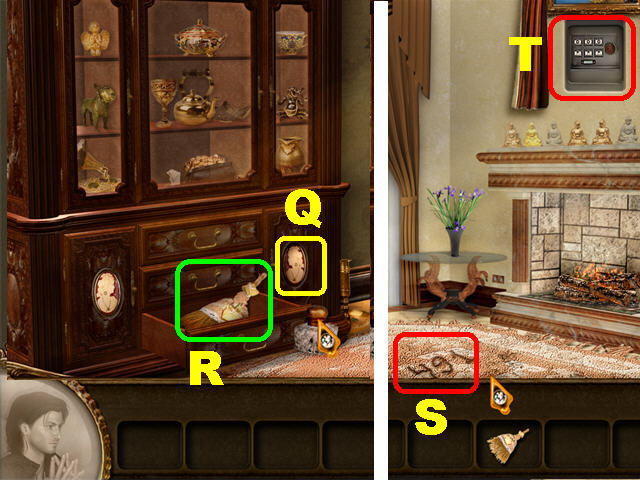
- Go right and through the door.
- Zoom into the cupboard.
- Place the CAMEO in the empty slot (Q); take the WHISK BROOM (R) in the drawer.
- Return to the fireplace.
- Clean the carpet with the WHISH BROOM; note the numbers 491 on the carpet (S).
- Click on the safe above the fireplace to trigger a new puzzle (T).

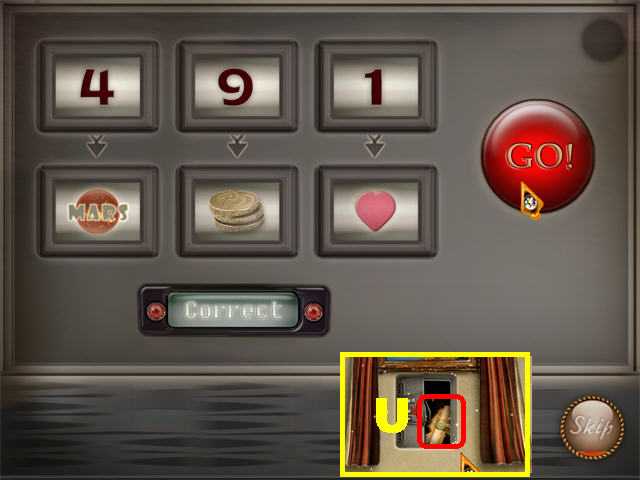
- Use the code “491” on the carpet to change the numbers on top from left to right to “491”.
- Now you have to find the items that have the same amount of items as the numbers above them.
- From left to right change the dials to: MARS, 3 CENT GOLD COINS STACK, and HEART.
- Click on the Red “Go” Button on right to enter your selections.
- Take the SCROLL (U) inside the safe to end this chapter.
Chapter 2

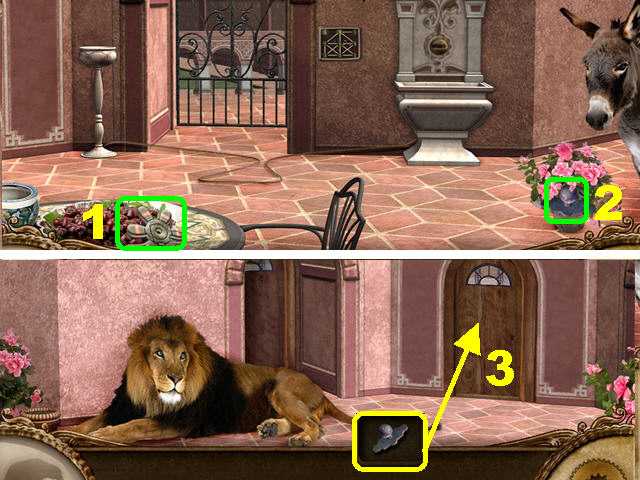
- Take the FAUCET HANDLE 1/3 (1) in lower left.
- Grab the DOORKNOB (2) inside the flower pot.
- Go left.
- Place the DOORKNOB on the door (3) to unlock it; go through door.
- Click on the right painting to trigger a puzzle.

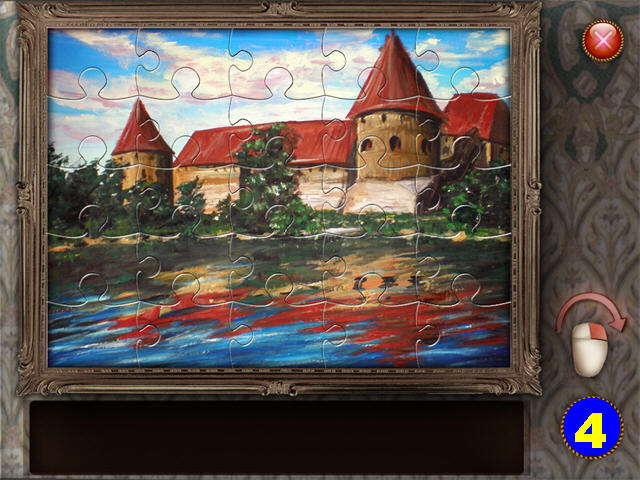
- Assemble the puzzle by placing the correct pieces of the painting in place.
- Pick up the puzzle piece and Right-click it to rotate it.
- Left-click on a piece to put it in place.
- Please look at the screenshot for the solution (4).

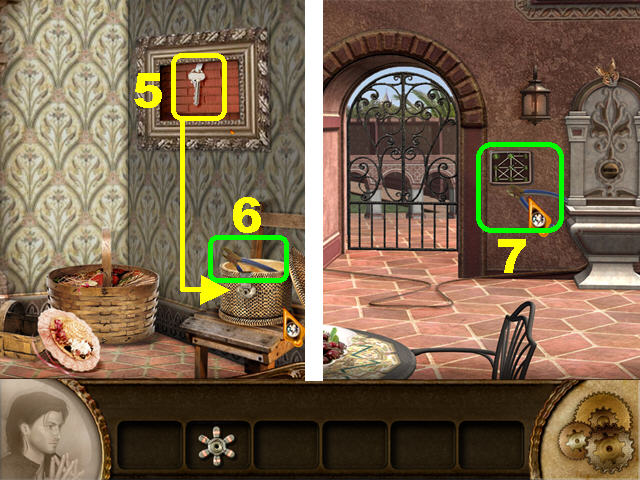
- Take the KEY (5) that appears after the puzzle has been solved.
- Open the basket on the chair with the KEY; take the WIRE CUTTERS (6).
- Exit and go right.
- Place the WIRE CUTTERS on the WIRES (7) next to door to trigger a puzzle.

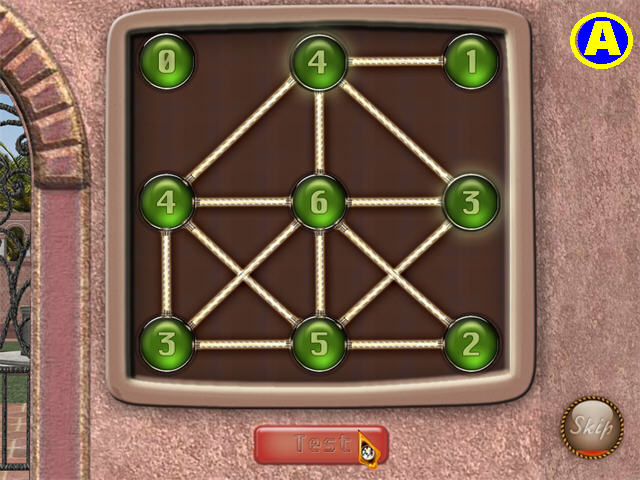
- The numbers on the board must coincide with the amount of wires connected to it.
- Click on 2 numbers to swap them.
- Click on “TEST” to enter your selection. If your answer is correct, all the numbers will light up. If it’s incorrect, try again.
- Please look at the screenshot for the solution (A).
- Go through the gate after the puzzle has been solved.

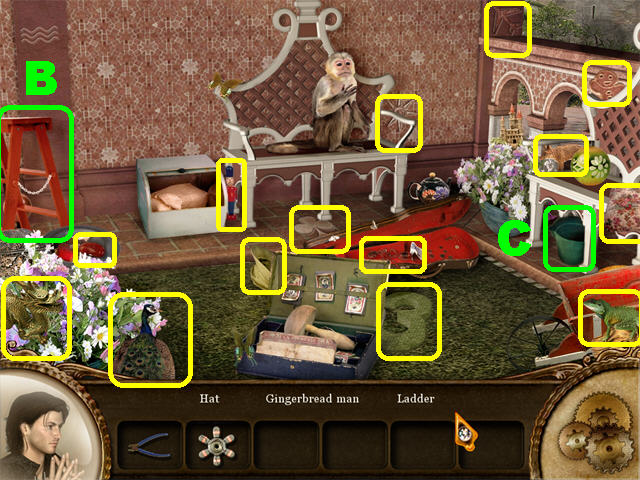
- Zoom into the benches in the back to trigger a Hidden Object Scene.
- The LADDER (B) and the BUCKET (C) will be added to inventory.
- Click on the red “X” in the upper right.

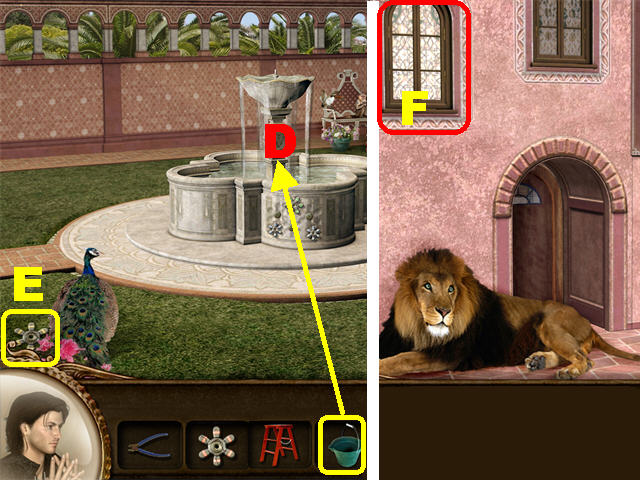
- Fill the BUCKET with water from the fountain (D).
- Pick up FAUCET HANDLE 2/3 (E) in the lower left (next to peacock).
- Go right and then left.
- Throw the BUCKET OF WATER on the lion to make it move out of the way.
- Place the LADDER below the window (F) and click on the window to trigger a Hidden Object Scene.

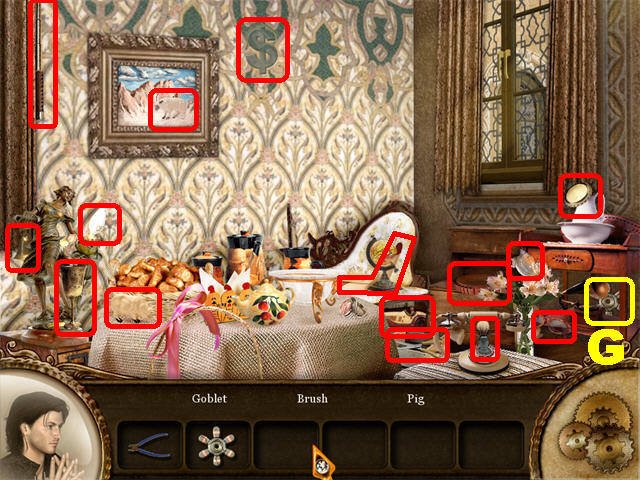
- The FAUCET HANDLE 3/3 (G) will be added to inventory.
- Exit through the window. Go right and through the iron door.

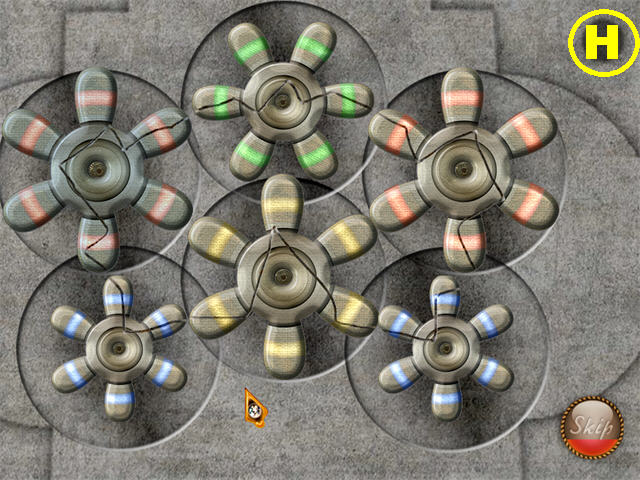
- Place the FAUCET HANDLES on the side of the fountain to trigger a puzzle.
- Click or drag the handles so the cracks on each handle line up with the cracks on the adjacent handles. Hold down the mouse to continuously rotate the handle.
- Please look at the screenshot for the solution (H).

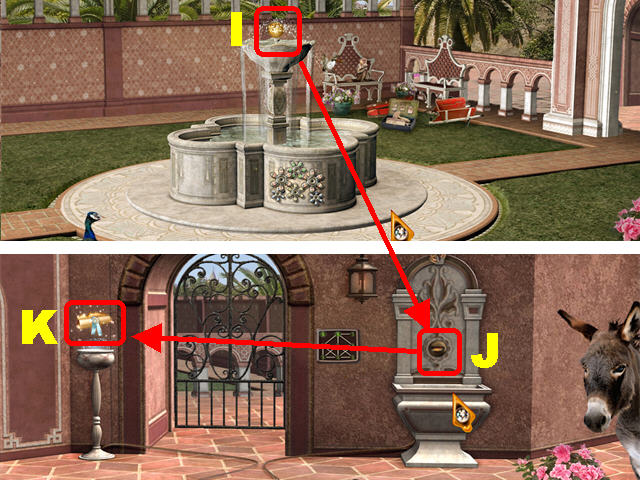
- Grab the COIN (I) that appears above the fountain after the puzzle has been solved.
- Go right.
- Place the COIN in the slot (J) of the small water fountain against the wall.
- Grab the SCROLL (K) that appears on left to end the chapter.
Chapter 3

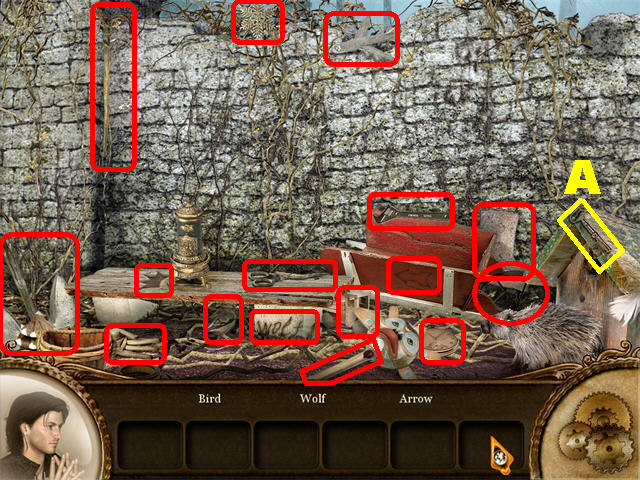
- Zoom into the bench to trigger a Hidden Object Scene.
- The KEY (A) will be added to inventory. Click on the “X” in the upper right.
- Click on the red “X” in the upper right.

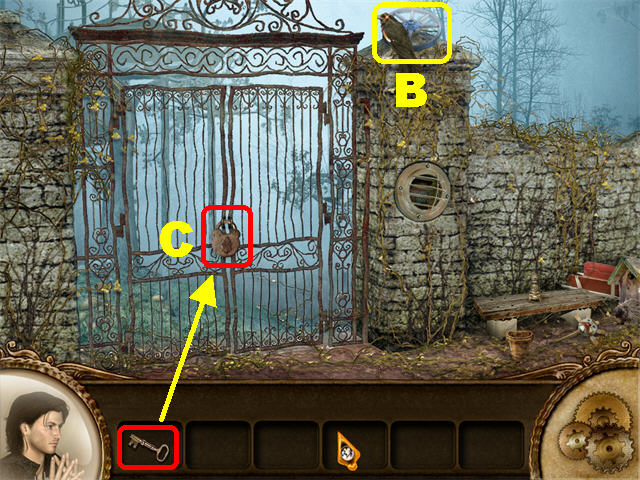
- Grab the BLUE WHEEL (B) in the upper right.
- Open the lock (C) on the gate with the KEY.

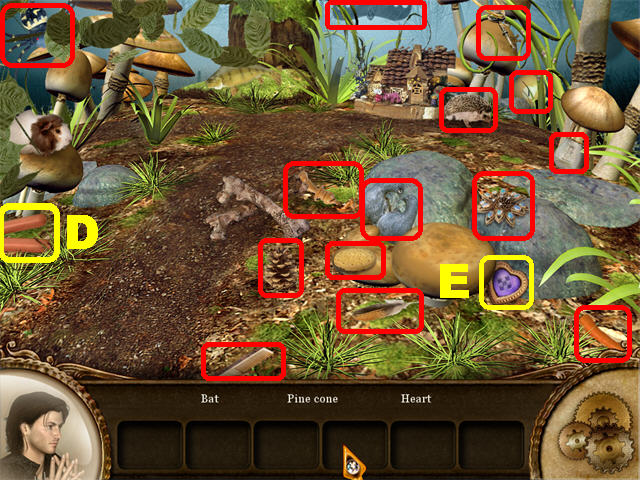
- Click on the area below the Treehouse to trigger a Hidden Object Scene.
- The SAUSAGES (D) and the HEART GEM (E) will be added to inventory.
- Click on the red “X” in the upper right.

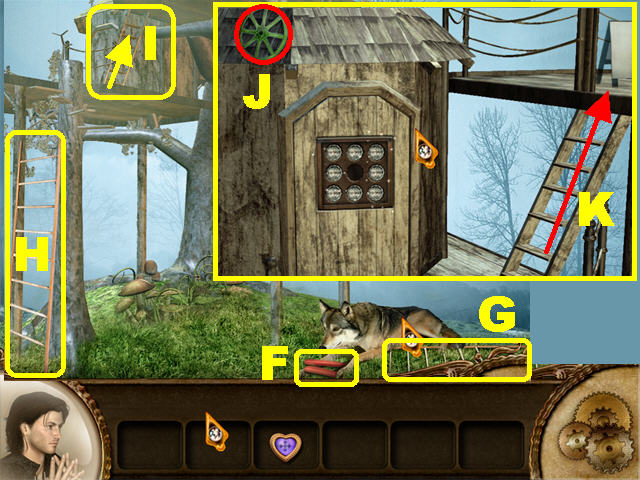
- Give the SAUSAGES to the wolf (F).
- Take the LADDER (G) after the wolf receives the sausage.
- Place the LADDER on the left as shown in the screenshot (H).
- Click on the small ladder (I) above the Treehouse to go up.
- Take the GREEN WHEEL (J).
- Click on the small ladder on right to go up (K).

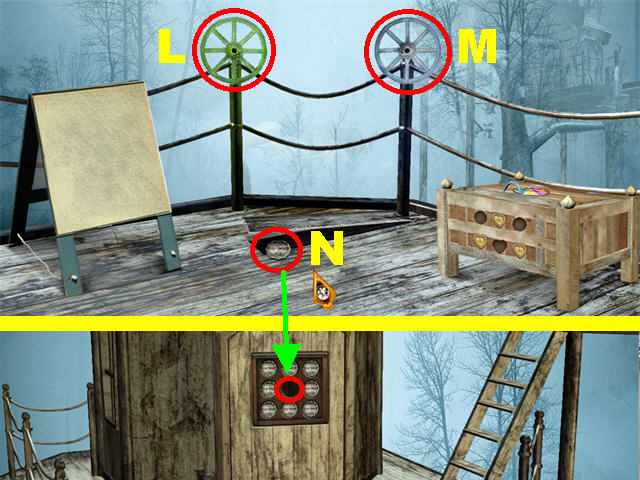
- Place the GREEN WHEEL (L) on the left post.
- Place the BLUE WHEEL (M) on the right post.
- Pick up the COIN (N) that appears below the boards.
- Click down.
- Place the COIN in the empty slot.
- Click on the puzzle to activate it.

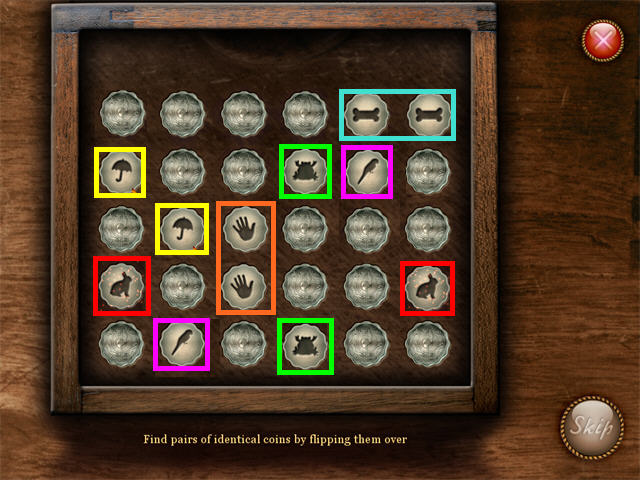
- Click on any 2 coins to flip them.
- Find matching pairs of symbols to eliminate them.
- The solution for this puzzle is random.
- Go through the door after the puzzle has been solved.

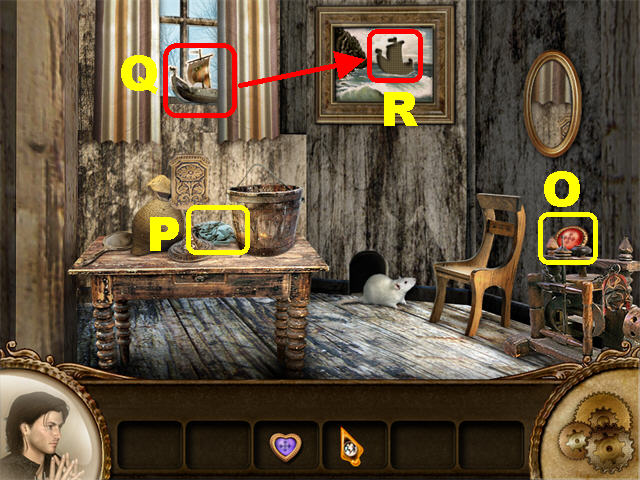
- Pick up the RED GEM (O) on right.
- Take the RAG (P) from the table.
- Open the curtains and take the SMALL SAILBOAT (Q).
- Place the SMALL SAILBOAT on the picture to trigger a puzzle (R).

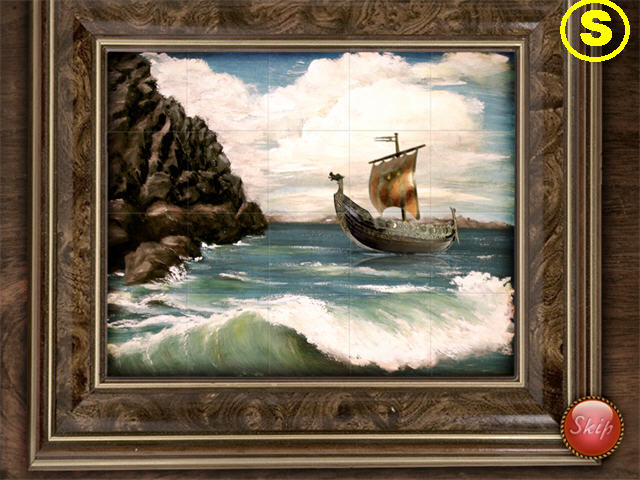
- Click on any 2 tiles to swap their positions.
- Please look at the screenshot for the solution (S).

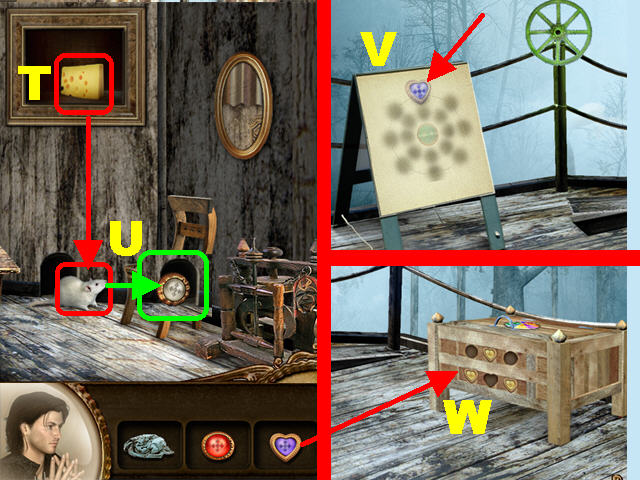
- Grab the CHEESE (T) that appears after the puzzle has been solved.
- Give the CHEESE to the mouse (U) and take the GEM in the mouse hole.
- Click down and go up the ladder.
- Wipe the canvas with the RAG (V).
- Note the drawing on the canvas has a blue heart on top.
- Place one of the GEMS (W) on the box to trigger a puzzle.

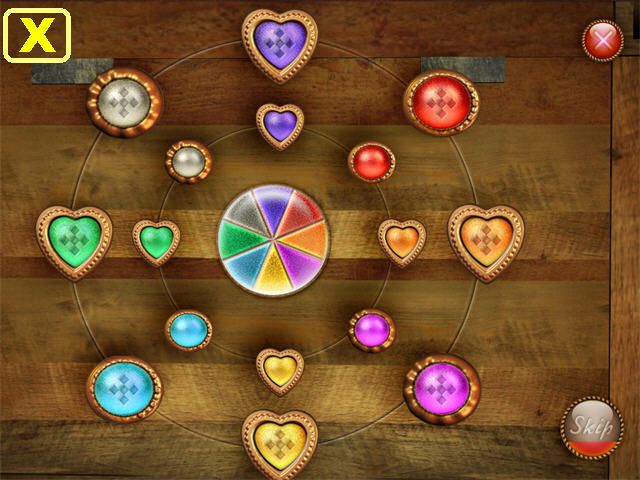
- Using the drawing on the canvas start by placing the blue heart on top.
- Move the center wheel so the blue piece is on top.
- Click on any 2 symbols to swap their positions.
- Move the rest of the symbols next to their matching colors on the wheel.
- The large symbols must be on the outside ring and the small symbols must be on the inside ring.
- Please look at the screenshot for the solution (X).

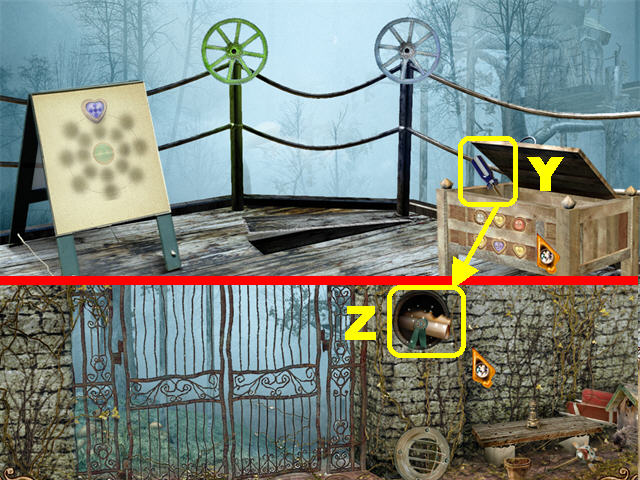
- Grab the SCREWDRIVER (Y) inside the box after the puzzle has been completed.
- Go all the way down and make a left.
- Place the SCREWDRIVER on the grate; take the SCROLL to end the chapter (Z).
Chapter 4

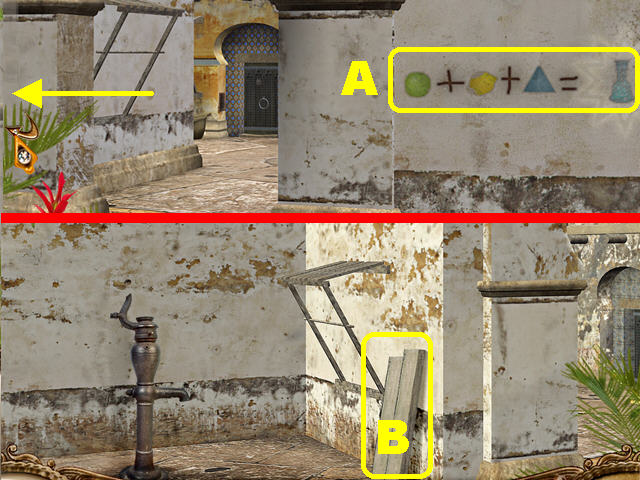
- Note the symbols (A) on the right side of the wall.
- Go left.
- Pick up the WOODEN PLANKS (B).
- Go right and head towards the door in the background.

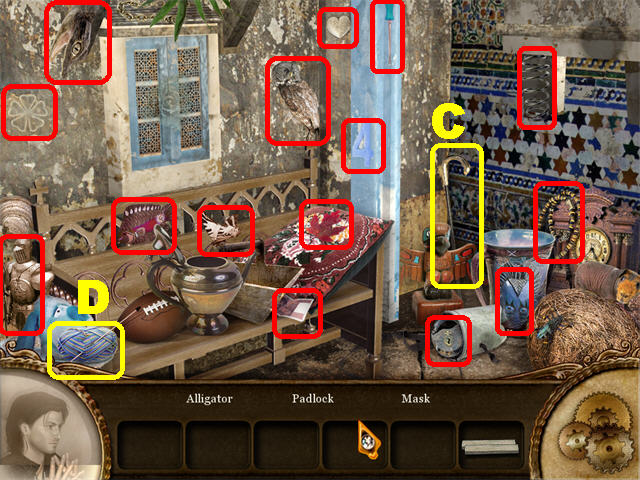
- Zoom into the bench to trigger a Hidden Object Scene.
- The CANE (C) and the YARN (D) will be added to inventory.
- Click on the “X” in the upper right.

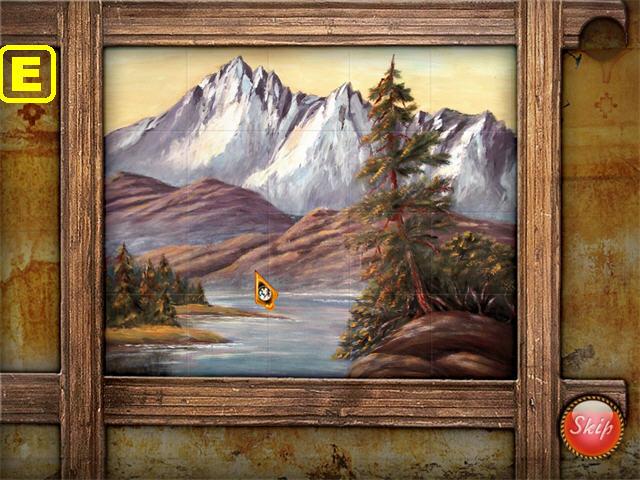
- Click on the picture on right to trigger a puzzle.
- Click on any 2 tiles to swap their positions.
- Please look at the screenshot for the solution (E).

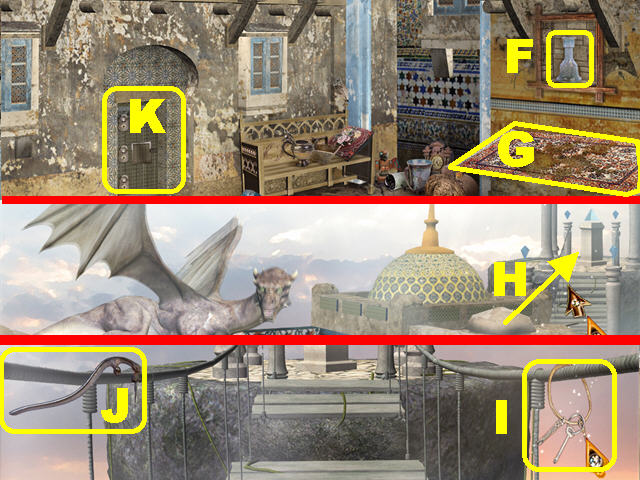
- Take the BOTTLE (F) that appears after the puzzle has been solved.
- Repair the magic carpet (G) with the YARN.
- Click on the magic carpet to go up towards the dragon.
- Go toward the steps on right (H).
- Grab the KEYS (I) on right.
- Take the PUMP HANDLE (J) on left.
- Click down twice.
- Place the KEYS on the door to trigger a puzzle (K).
- Slide the KEY out of the box by moving the bars out of the way.
- Click on bars to slide them. The bars can only slide in the direction they are facing.
- You have to beat 3 stages of this game.

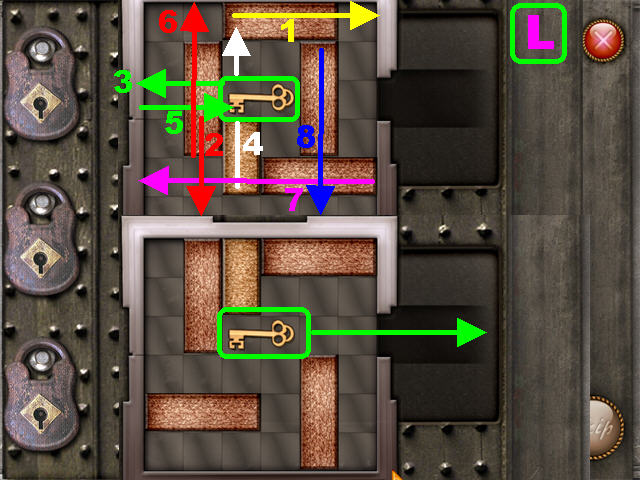
- Please look at screenshot (L) for the solution to the first puzzle.

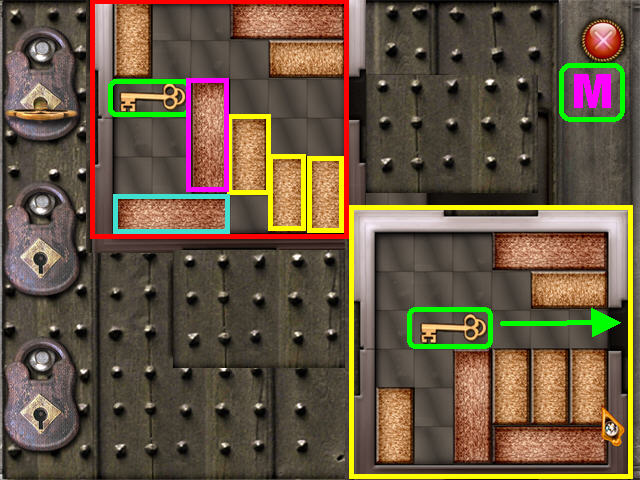
- Please look at screenshot (M) for the solution to the second puzzle.
- Move all the yellow pieces up.
- Slide the light blue piece all the way to the right.
- Slide the purple piece down.
- Move all the yellow pieces down.
- Slide the green key all the way out to the right.

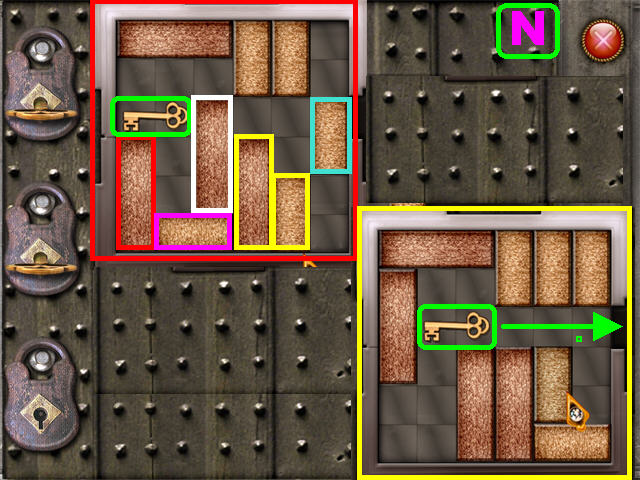
- Please look at screenshot (N) for the solution to the third puzzle.
- Move the light blue piece up.
- Move the yellow pieces up.
- Slide the purple piece all the way to the right.
- Move the white piece down.
- Move the green piece to the right.
- Slide the red piece up.
- Move the yellow pieces down.
- Slide the green key all the way out to the right.

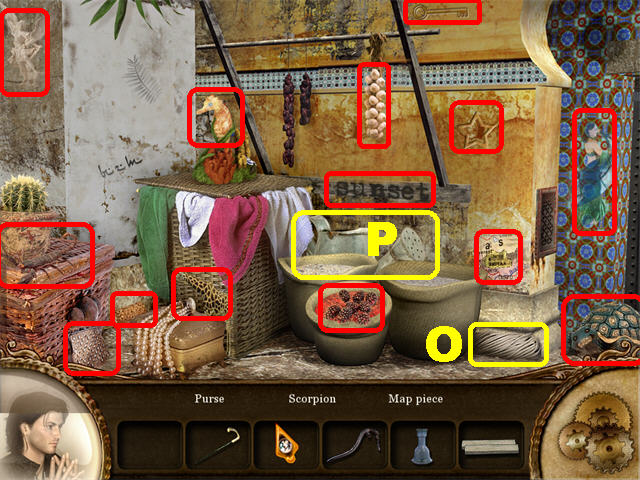
- Click on the basket on left to trigger a Hidden Object Scene.
- The ROPE (O) and the WATERING CAN (P) will be added to inventory.
- Click on the red “X” in the upper right.

- Knock the apples down with the CANE (Q).
- Pick up the GREEN APPLE from the ground (R).
- Leave this scene, take the magic carpet and return to the bridge.
- Place the ROPE on the broken bridge.
- Put the WOODEN PLANKS on the bridge (S).
- Go across the bridge.
- Take the PYRAMID (T).
- Take the magic carpet all the way back down. Click down and head left to access the water pump.

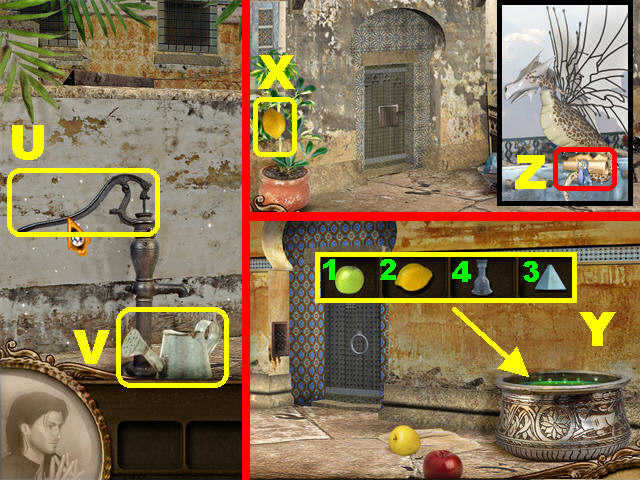
- Place the PUMP HANDLE on the water pump (U).
- Place the WATERING CAN below the water pump.
- Click on the pump handle to fill the watering can.
- Take the FULL WATERING CAN (V).
- Go right, and towards the door in the background.
- Place the FULL WATERING CAN on the potted plant on left to make the plant grow.
- Take the LEMON (X) from the plant.
- Go through the door.
- Place the GREEN APPLE, LEMON, PYRAMID, and BOTTLE in the pot on right to create the POTION (Y).
- Take the magic carpet back to the dragon.
- Give the POTION to the dragon and take the SCROLL (Z) to end the chapter.
Chapter 5

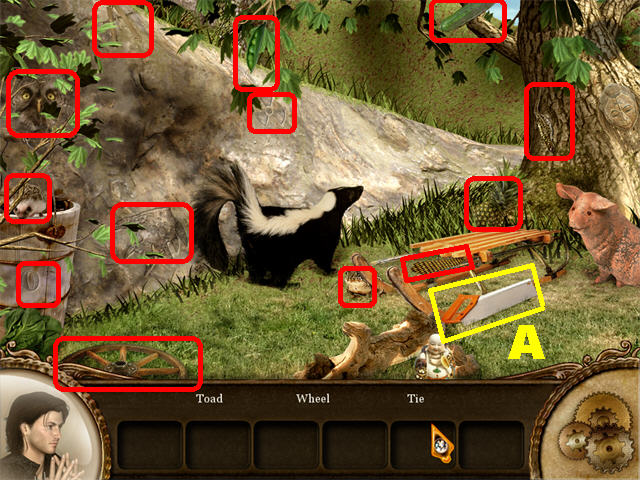
- Click on the tree to trigger a Hidden Object Scene.
- The SAW (A) will be added to inventory.
- Click on the red “X” in the upper right.

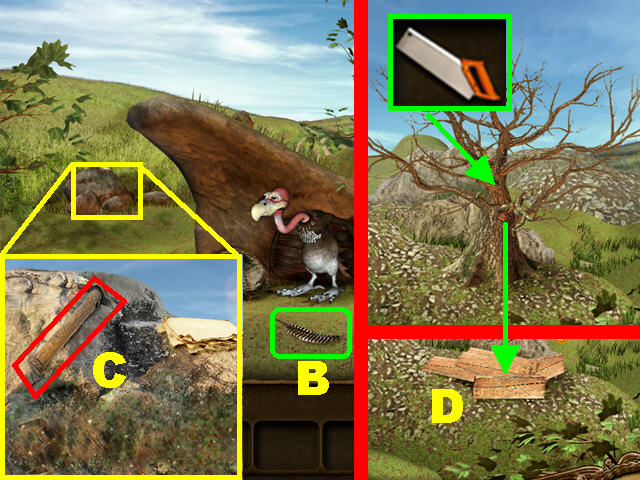
- Click on the bird and pick up the FEATHER (B) that falls on the ground.
- Zoom into the rocks on left.
- Grab the PICKAXE (C).
- Go right.
- Cut the tree with the AXE and pick up the WOODEN BOARDS (D).
- Go left twice.

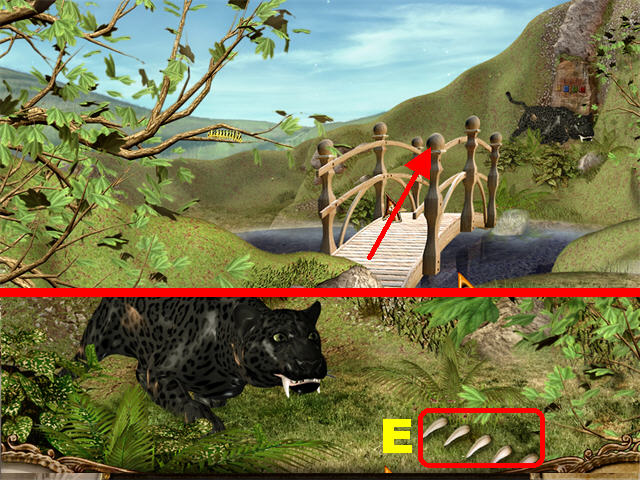
- Place the WOODEN BOARDS on the ground.
- Put the PICKAXE on the wooden boards to construct the bridge.
- Cross the bridge.
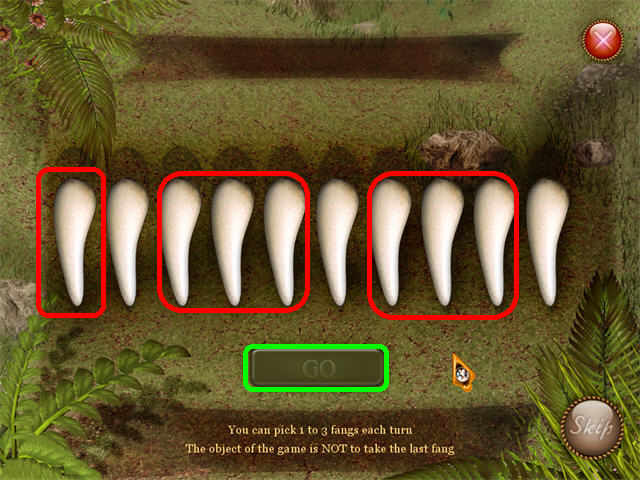
- Click on the FANGS (E) to trigger a mini-game.


- Your goal is to click on 1 to 3 fangs to eliminate them in such a manner that you do not take the last fang.
- Each time you make a move, the computer will do the same.
- To solve the puzzle click on the fangs in the following order: First round choose 1 fang, second round choose 3 fangs, and last round choose 3 fangs.
- Click on the green “GO” button to enter your selection.

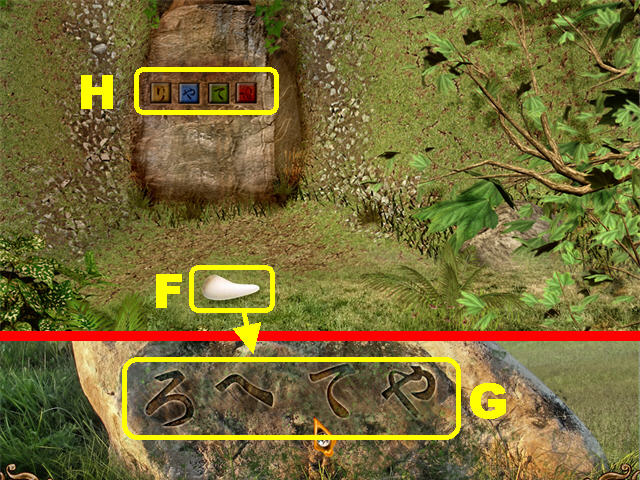
- Take the last FANG (F) on the ground.
- Go right twice; zoom into the rocks on left.
- Place the FANGS on the side of the rock to reveal some symbols (G).
- Click on the “X” in the upper right, go left and cross the bridge.
- Zoom into the symbols in the back of the scene (H).

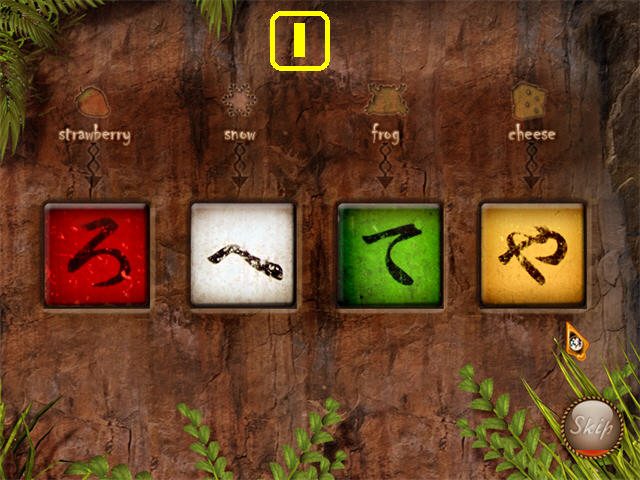
- Enter the symbols on the wall according to the symbols carved on the rock and the words written above each square.
- Please look at the screenshot for the solution (I).

- Go through the cave after the puzzle has been solved.
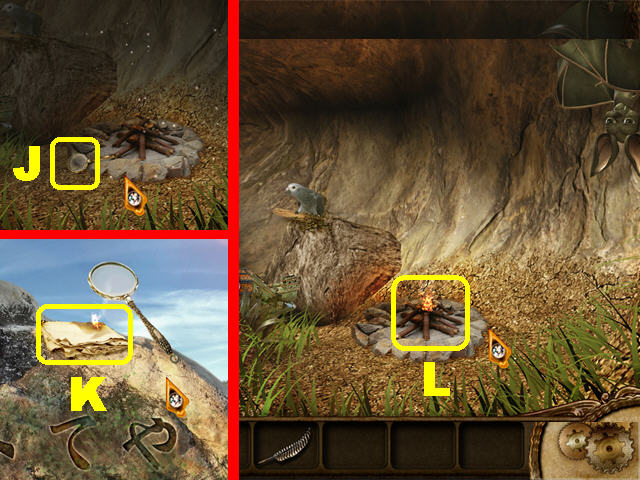
- Grab the MAGNIFYING GLASS (J) on the ground.
- Cross the bridge and go right.
- Zoom into the rocks on left; place the MAGNIFYING GLASS on the papers.
- Take the BURNING PAPERS (K).
- Return to the cave.
- Place the BURNING PAPERS on the sticks to start a fire (L).

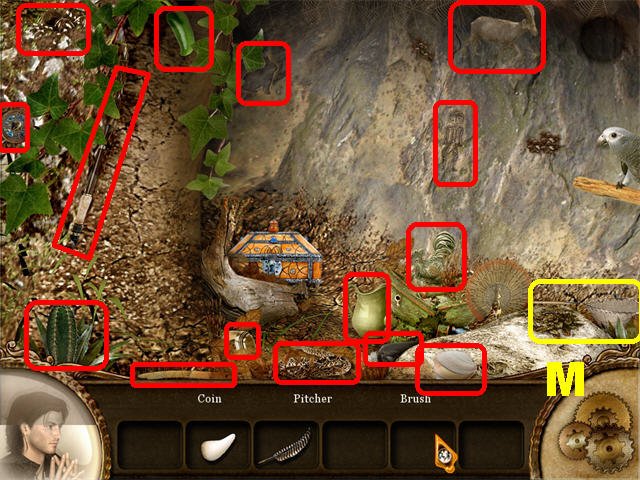
- Click by the bird to activate a Hidden Object Scene.
- The BUTTERFLY NET (M) will be added to inventory.

- Cross the bridge.
- Place the FEATHER on the caterpillar (N) and a butterfly will fall to the ground.
- Grab the BUTTERFLY (O) with the BUTTERFLY NET.
- Return to the cave.
- Give the BUTTERFLY to the bat in the upper right; take the KEYS (P).
- Zoom into the area with the bird.
- Open the box with the KEY and take the EGG (Q).
- Cross the bridge and go right.
- Place the EGG in the nest (R); grab the SCROLL (S) the bird’s holding to end this chapter.
Chapter 6

- Head right.
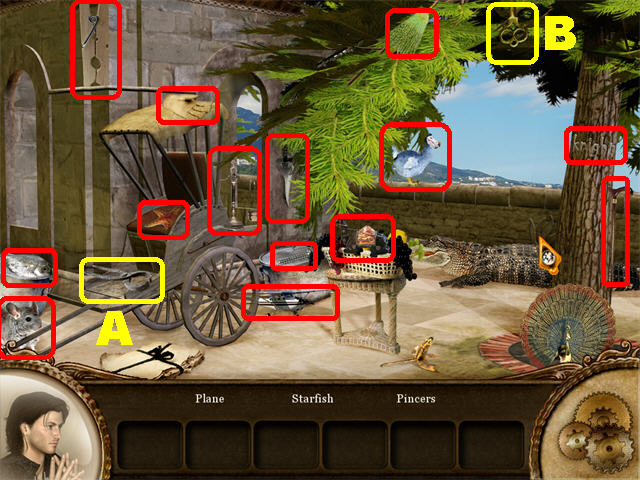
- Click on the rickshaw to trigger a Hidden Object Scene.
- The PINCERS (A) and the KEY (B) will be added to inventory.
- Click on the red “X” in the upper right.

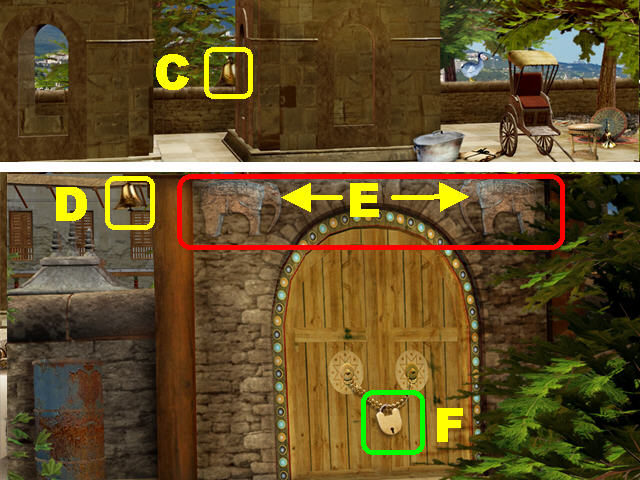
- Take BELL 1/4 on left (C).
- Go left.
- Take BELL 2/4 in upper left (D).
- Note the positions of the elephants above the door (E). You’ll need that solution for a puzzle.
- Open the lock with the KEY (F); go through the door.


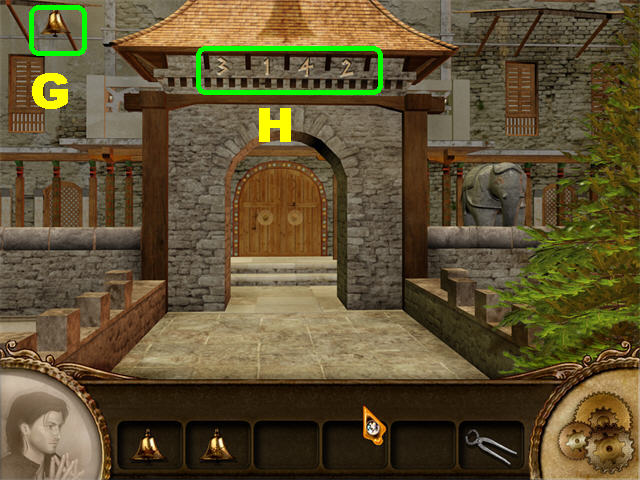
- Take BELL 3/4 (G) in the upper left.
- Note the numbers 3142 above the arch (H).

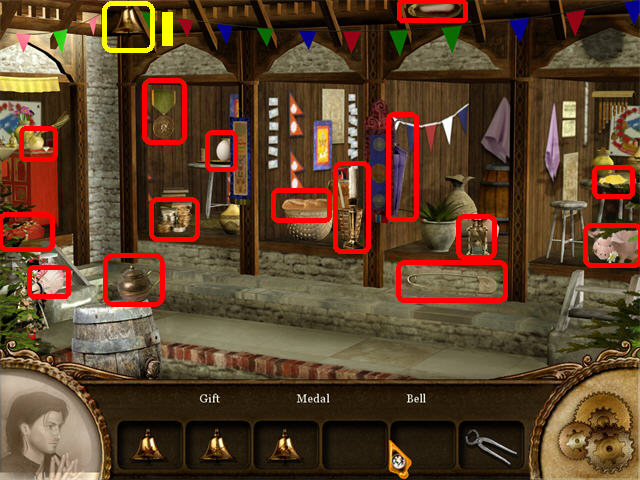
- Click on the right house to trigger a Hidden Object Scene.
- BELL 4/4 (I) will be added to inventory.
- Click on the red “X” in the upper right and head right.

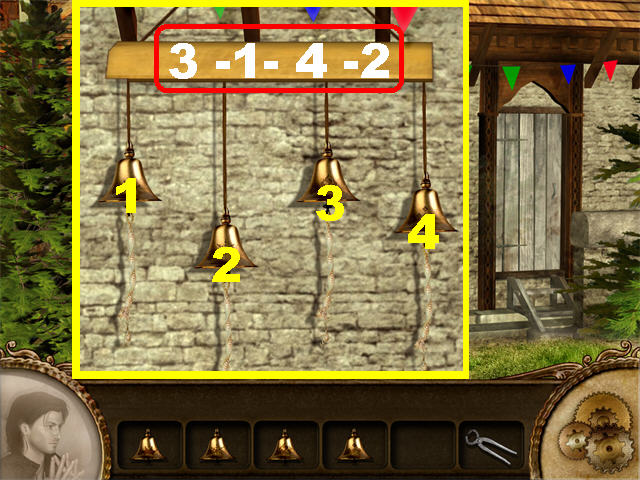
- Place the BELLS on the wall.
- Press on the bells in the order marked above the arch at the beginning of this chapter.
- To solve the puzzle click on the bells in this order:”3-1-4-2”.

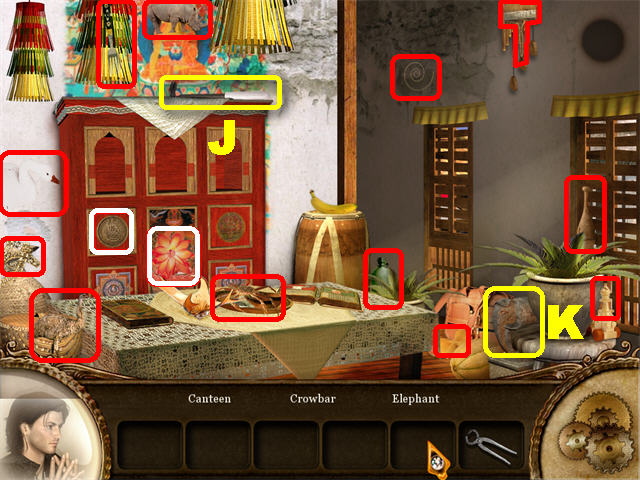
- Go through the door to trigger a Hidden Object Scene.
- The CROWBAR (J) and the ELEPHANT (K) will be added to inventory.

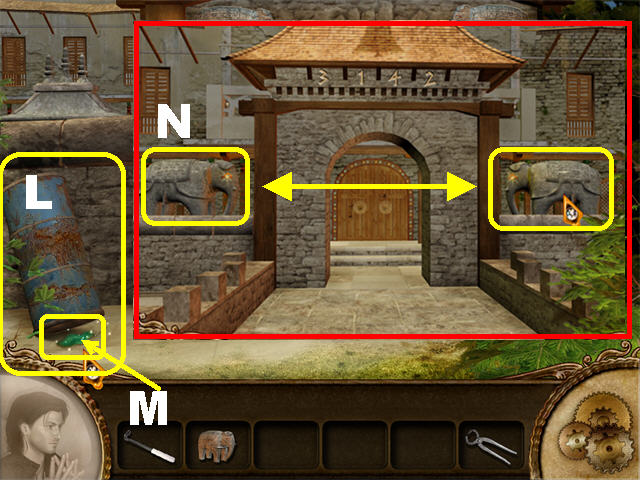
- Click on the “X” in the upper right, go left twice and click down.
- Move the drum (L) with the CROWBAR.
- Grab the DEFLATED BALLOON (M) below the drum.
- Go through the door.
- Place the ELEPHANT on the left (N).
- Click on each elephant until they face each other as they do outside the door.
- Go through the door after the elephants are in place.

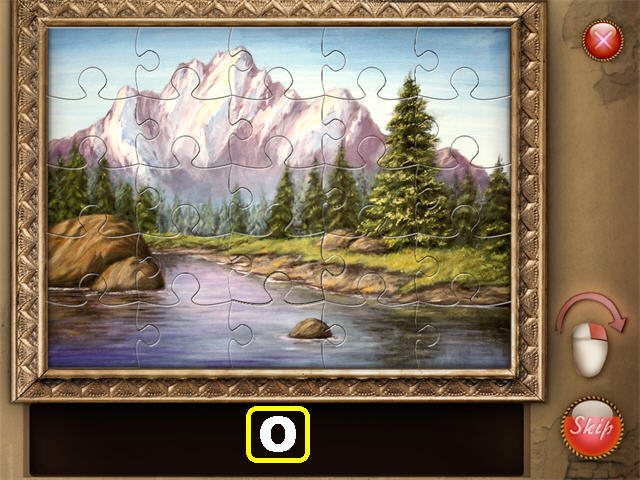
- Click on the painting to trigger a puzzle.
- Pick up the puzzle piece and Right-click it to rotate it.
- Left-click on a piece to snap it in place.
- Please look at the screenshot for the solution (O).

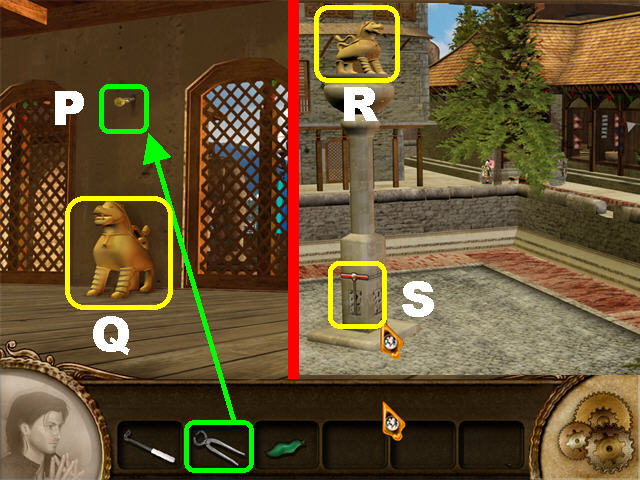
- Remove the SCREW (P) with the PINCERS after the puzzle has been solved.
- Take the LION STATUE (Q) on the floor.
- Click down and head right.
- Place the LION STATUE above the post (R); take the AIR PUMP HANDLE (S).
- Go left and go through the door.

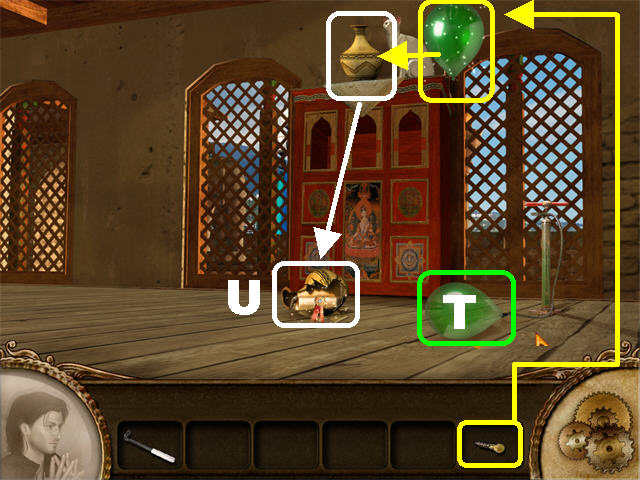
- Place the AIR PUMP HANDLE on the air pump.
- Place the DEFLATED BALLOON as shown in the screenshot (T).
- Click on the handle to inflate the balloon.
- Click on the balloon to make it rise next to the cat.
- Pop the balloon with the screw to make the vase fall to the ground.
- Take the SCROLL (U) from the broken case.
Chapter 7

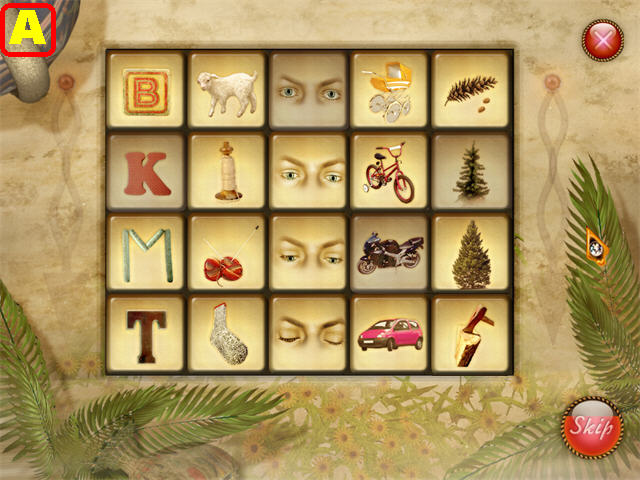
- Click on the puzzle on the floor to activate it.
- Arrange the symbols according to their stages using the locked pieces as a guide. For example, the letters need to be placed in alphabetical order. The eyes need to be arranged by the order in which the eyes are opened.
- Click on 2 tiles to swap their locations.
- Please look at the screenshot for the solution (A).

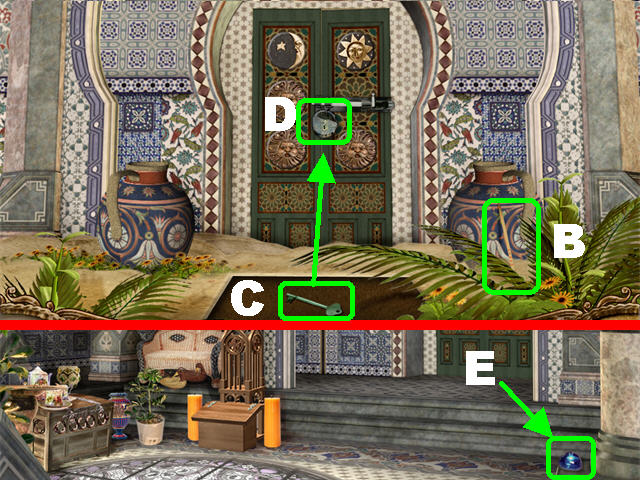
- Take the CANDLE (B) leaning against the right vase.
- Take the KEY (C) on the ground after the puzzle has been solved.
- Open the lock (D) with the KEY; go through the door to access the palace.
- Take the BLUE GEM (E) in the lower right.

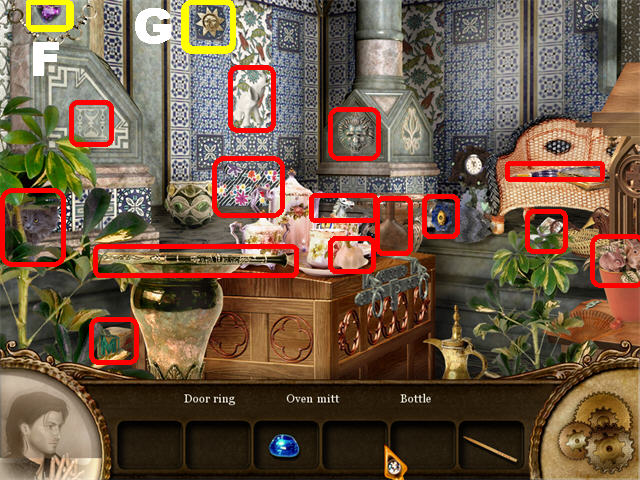
- Click on the furniture on left to trigger a Hidden Object Scene.
- The HEART GEM (F) and the SUN (G) will be added to inventory.
- Click on the red “X” in the upper right.

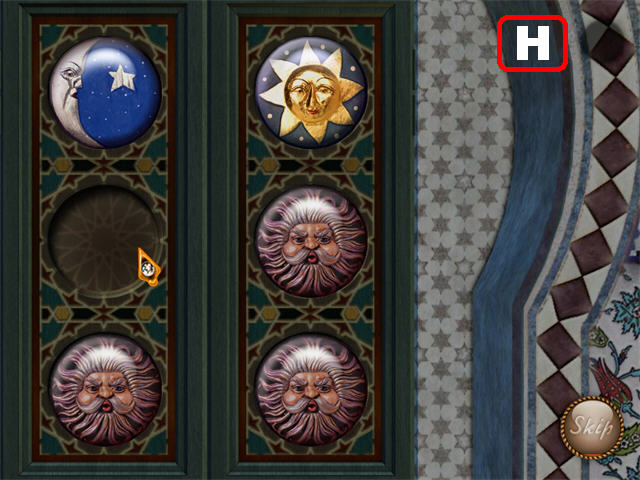
- Place the SUN on the door to trigger a puzzle.
- Your goal is to place the moon in the upper left slot and the sun in the upper right slot (according to the images behind them).
- Please look at the screenshot for the solution (H).

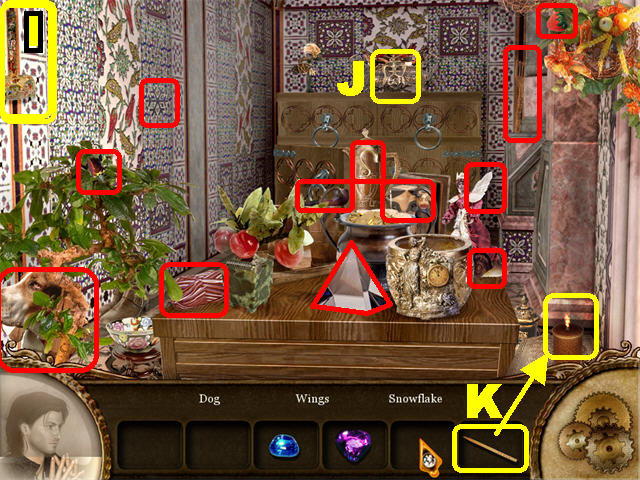
- Go through the door after the puzzle has been solved.
- Click on the right side to trigger a Hidden Object Scene.
- The MALLET (I) and the PENDANT (J) will be added to inventory.
- Light the UNLIT CANDLE in inventory with the candle in the lower right side of the scene (K).

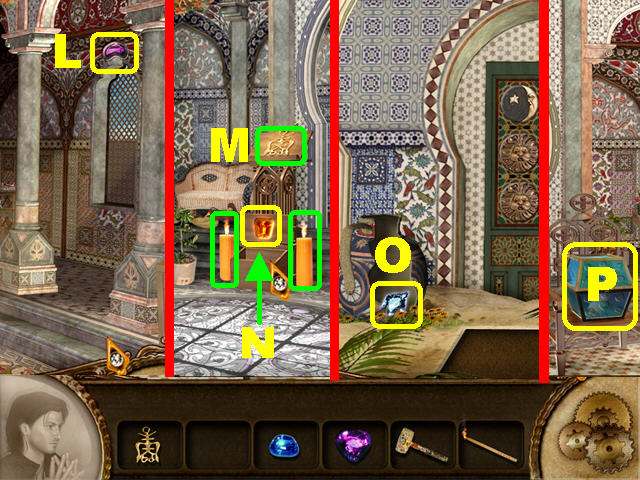
- Click on the red “X” in the upper right.
- Take the PURPLE GEM (L) in the upper right.
- Go through door.
- Light the two candles on the ground with your LIT CANDLE.
- Place the PENDANT on the podium (M).
- Take the AMBER GEM (N) that appears in the open box.
- Go outside.
- Break the left vase with the MALLET; take the BLUE GEM (O).
- Go through the next 2 doors.
- Place the GEMS on the box (P) to trigger a puzzle.

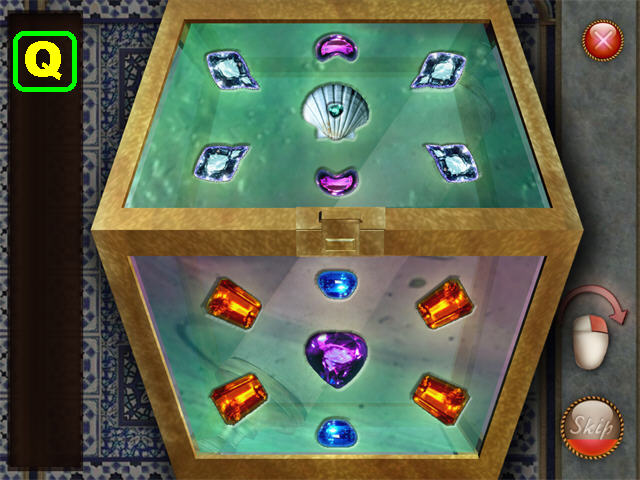
- Put all the gems in the correct slots.
- Right-click a piece to rotate it. Left-click on a piece to snap it in place.
- Please look at the screenshot for the solution (Q).

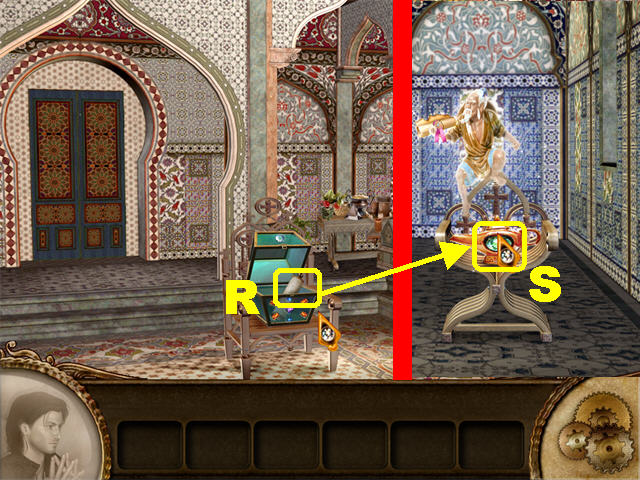
- Grab the TUBE (R) inside the box after the puzzle has been solved.
- Go through door and make a right.
- Place the TUBE on the altar; take the SCROLL (S) to end the chapter.
Chapter 8

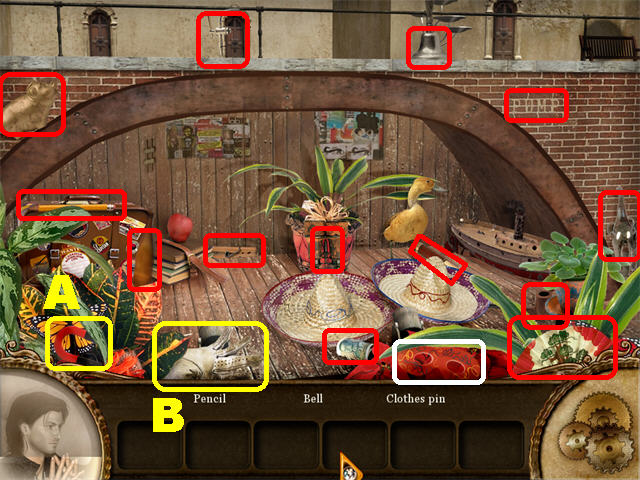
- Zoom into the lower left side of the scene to trigger a Hidden Object Scene.
- The MAGNET (A) and the GLOVE (B) will be added to inventory.
- Click on the red “X” in the upper right.

- Go forward.
- Take a closer look at the left building.
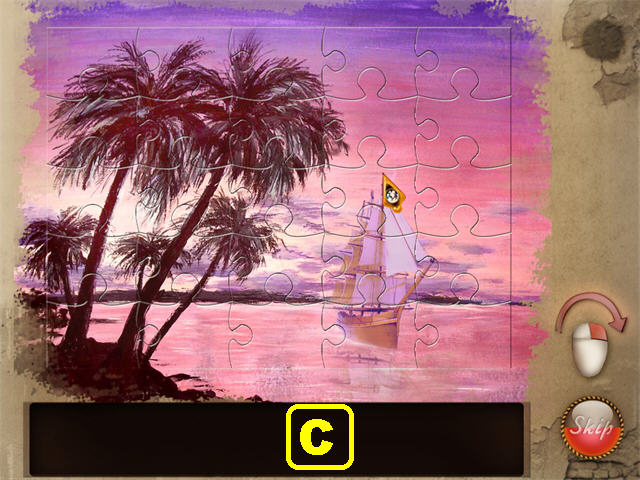
- Click on the painting to activate a puzzle.
- Assemble the puzzle by placing the correct pieces of the painting in place.
- Pick up the puzzle piece and Right-click it to rotate it.
- Left-click on a piece to put it in place.
- Please look at the screenshot for the solution (C).
- Click on the red “X” in the upper right.

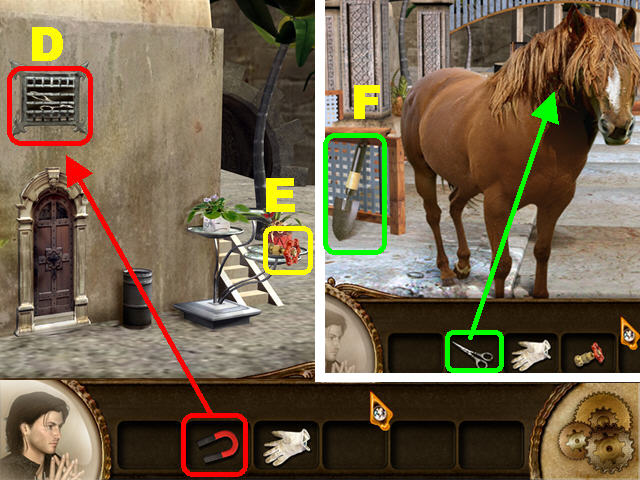
- Use the MAGNET to retrieve the SCISSORS (D) from the grid.
- Pick up the VALVE (E) on the right.
- Click on the “X” in the upper right, click down and go right twice.
- Cut the horse’s hair with the SCISSORS to make the horse move out of the way.
- Take the SHOVEL (F) on left.

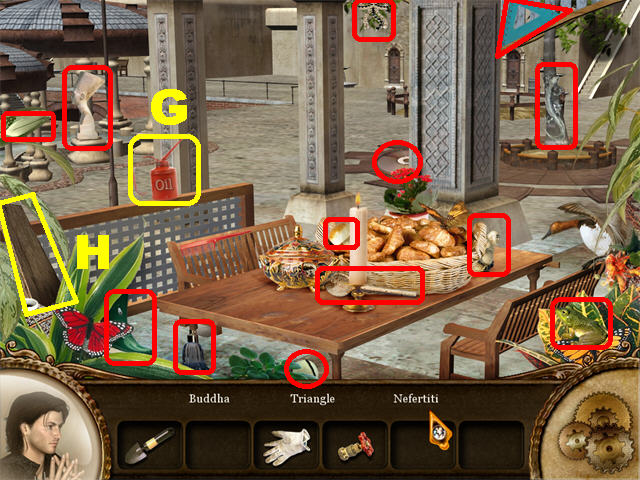
- Click on the left table to activate a Hidden Object Scene.
- The OIL CAN (G) and the WOOD PLANK (H) will be added to inventory.

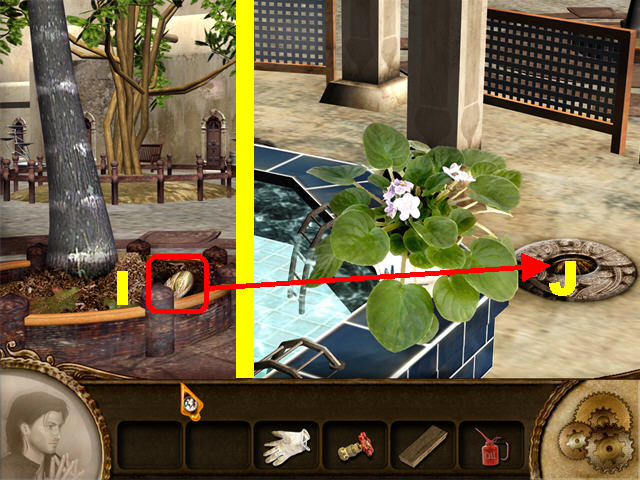
- Click on the “X” in the upper right. Go left twice and then forward.
- Put the SHOVEL on the patch of dirt at the base of the tree; take the DISC (I).
- Go right; take a closer look at the right corner of the pool.
- Place the DISC (J) on the ground to trigger a puzzle.

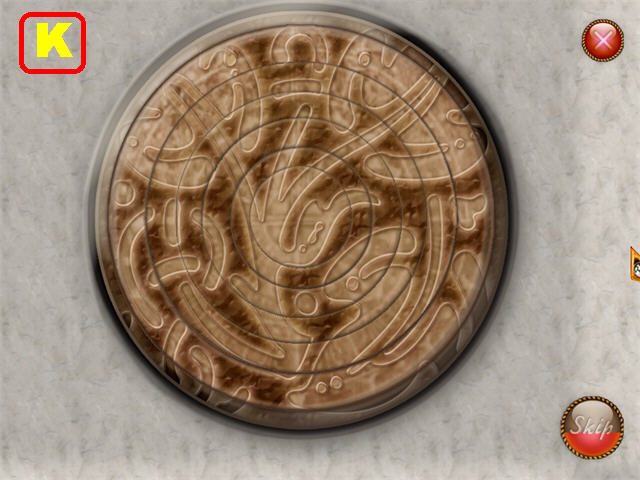
- Click and hold the rings to rotate them until they form the image shown in the screenshot (K).

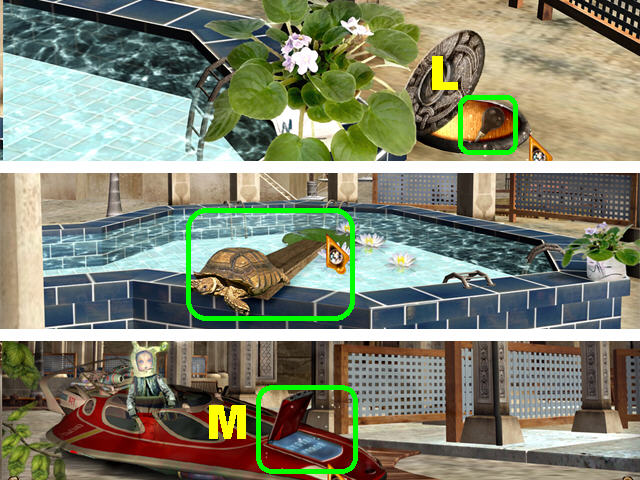
- Take the HORN (L) using the GLOVES.
- Click on the red “X” in the upper right.
- Place the WOOD PLANK on the side of the pool.
- Wake up the turtle with the HORN.
- Click the turtle to make it move and the WRENCH be automatically added to inventory.
- Go left, click down and head right.
- Place the OIL CAN (M) on the hood of the vehicle to lift it.
- Click inside the hood to trigger a puzzle.

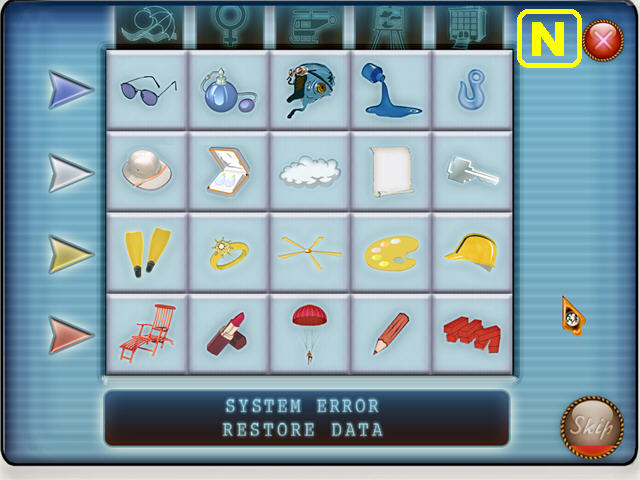
- Your goal is to put the correct images in place according to the pictures in the top row.
- Click on any 2 tiles to swap their positions.
- The colors of the arrows indicate the color of the item in that row.
- Please look at the screenshot for the solution (N).

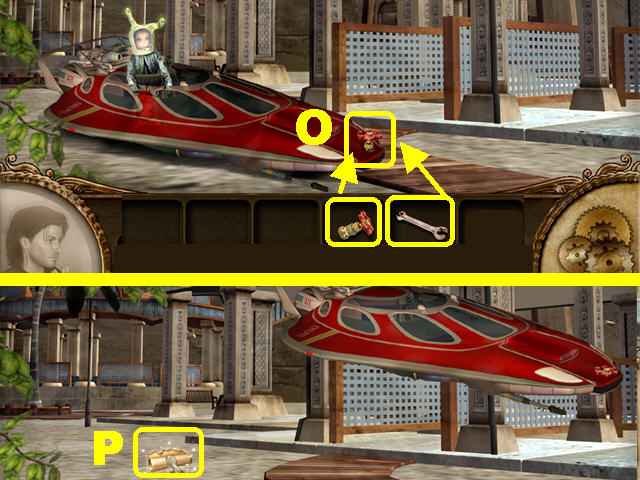
- Place the VALVE (O) in the front of the vehicle.
- Secure the VALVE with the WRENCH.
- Click on the SCROLL (P) that appears on the ground after the vehicle moves out of the way.

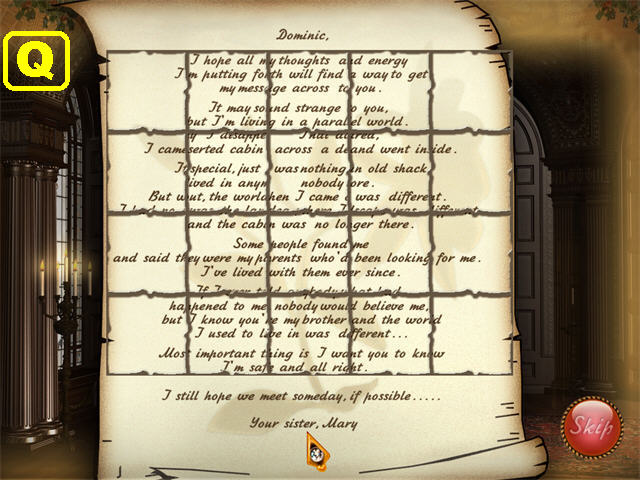
- Click on any 2 pieces of paper to swap their positions.
- Please look at the screenshot for the solution (Q).
- The End!


 Mystery of Unicorn Castle: The Beastmaster Walkthrough, Guide, & Tips
 3 Days: Amulet Secret Walkthrough, Guide, & Tips
 Joan Jade and The Gates of Xibalba Walkthrough, Guide, & Tips
 My Singing Monsters Tips and Tricks, Guide, & Tips
 Fairway Solitaire Blast Tips and Tricks, Guide, & Tips