Mystery of Unicorn Castle: The Beastmaster Walkthrough, Guide, & Tips
Mystery of Unicorn Castle: The Beastmaster Walkthrough
Welcome to the Mystery of Unicorn Castle: The Beastmaster Walkthrough
Explore the Mystery Unicorn Castle and save Sophie from the Beastmaster in this exciting HOPA game!
Whether you use this document as a reference when things get difficult or as a road map to get you from beginning to end, we’re pretty sure you’ll find what you’re looking for here.
This document contains a complete Mystery of Unicorn Castle: The Beastmaster game walkthrough featuring annotated screenshots from actual gameplay!
We hope you find this information useful as you play your way through the game. Use the walkthrough menu below to quickly jump to whatever stage of the game you need help with.
Remember to visit the Big Fish Games Forums if you find you need more help. Have fun!
This walkthrough was created by David Becker, and is protected under US Copyright laws. Any unauthorized use, including re-publication in whole or in part, without permission, is strictly prohibited.
General Tips
- This is the official guide for Mystery of Unicorn Castle: The Beastmaster.
- This guide will not mention each time you have to zoom into a location; the screenshots will show each zoom scene.
- We will use the acronym HOP for Hidden-object puzzles. Interactive items will be color-coded and some will be numbered; please follow the numbers in sequence.
- HOPs may be randomized.
- Use the map to travel to a location.
Chapter 1: The Graveyard

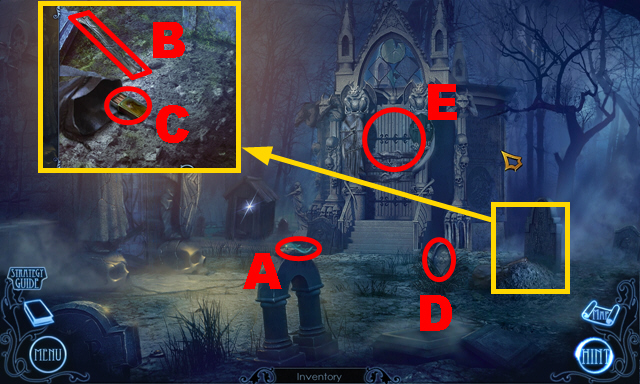
- Take the ribbon (A), BONE (B), BOX OF MATCHES (C), and MIRROR (D).
- Examine the crypt (E).

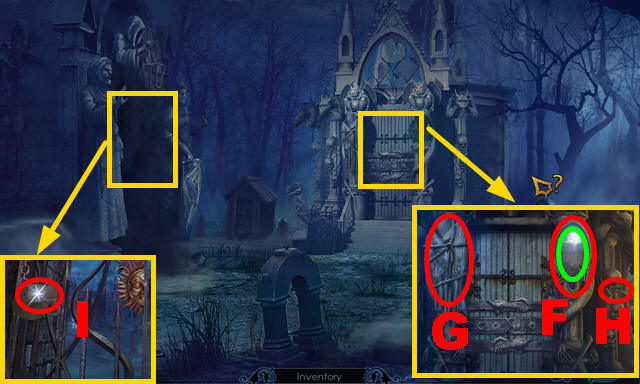
- Place the MIRROR (F); take the CLOTH (G) and HANDLE (H).
- Use the CLOTH (green).
- Place the HANDLE (I).

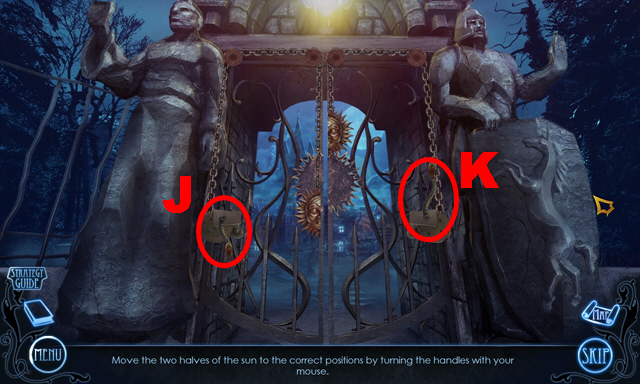
- Play the mini-game.
- Solution: Jx3, Kx2.
- Turn left twice.

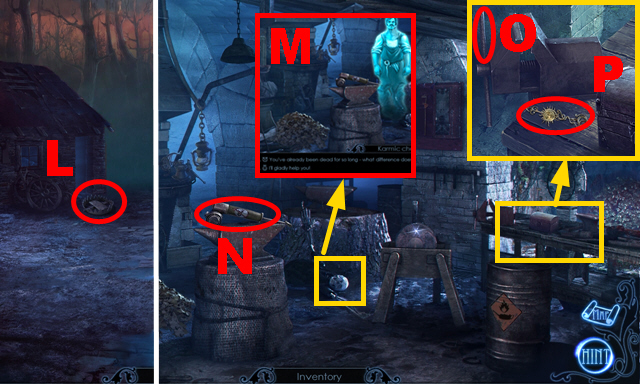
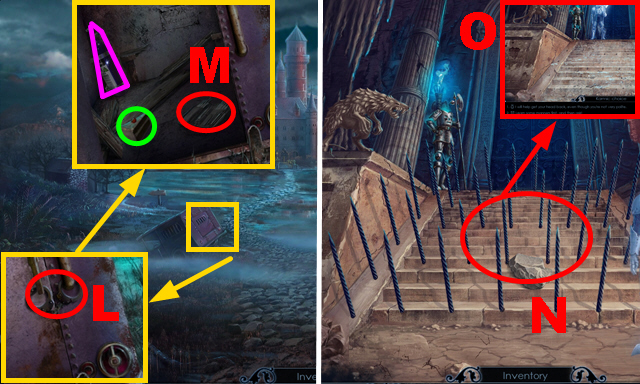
- Place the BONE (L).
- Turn left.
- Make a karmic choice (M).
- Take the INSECT REPELLENT (N).
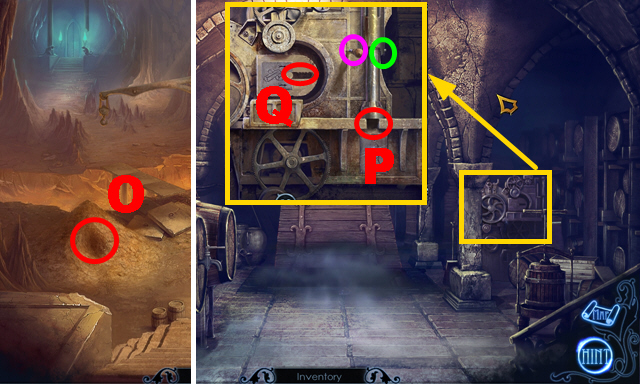
- Pull the vice (O); take the ARROW (P).
- Walk down twice, move forward.

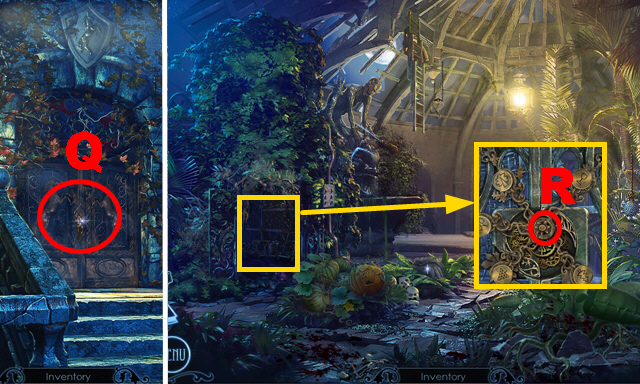
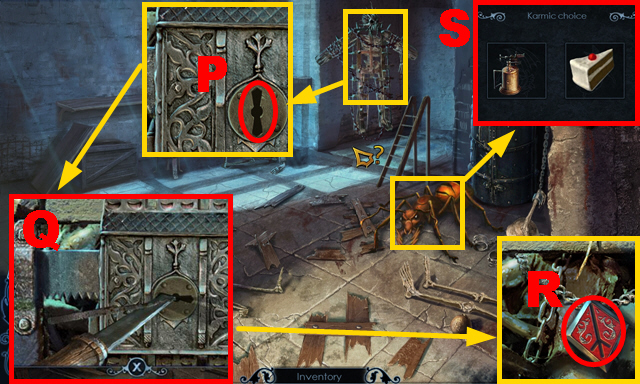
- Open the door (Q).
- Walk down, turn right.
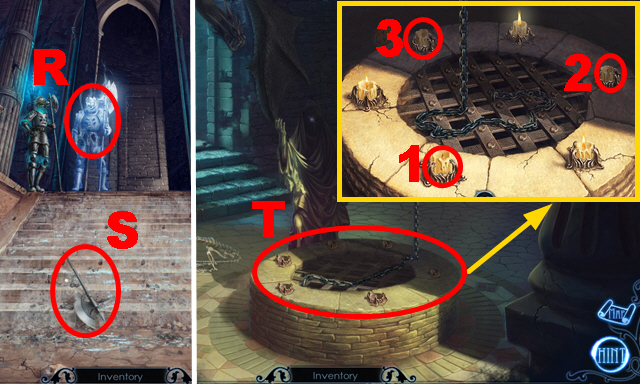
- Place the ARROW (R).

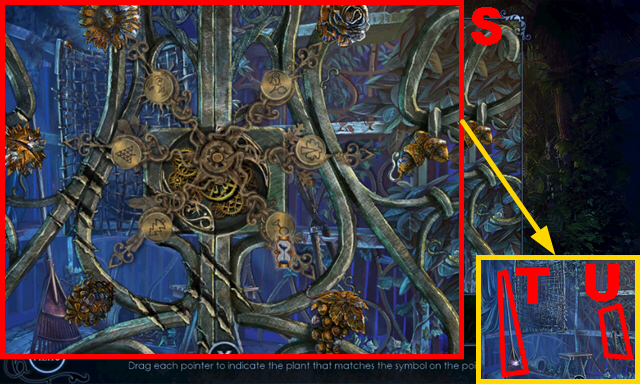
- Play the mini-game.
- Solution: (S).
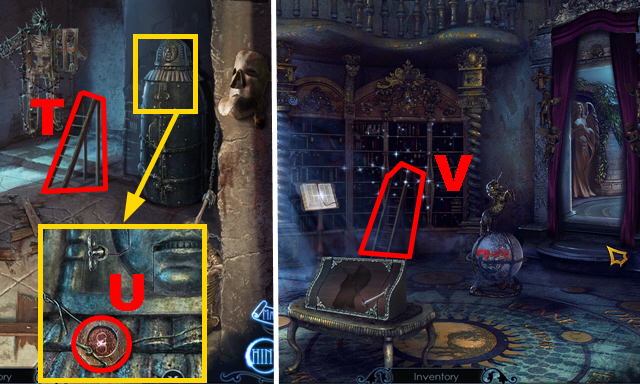
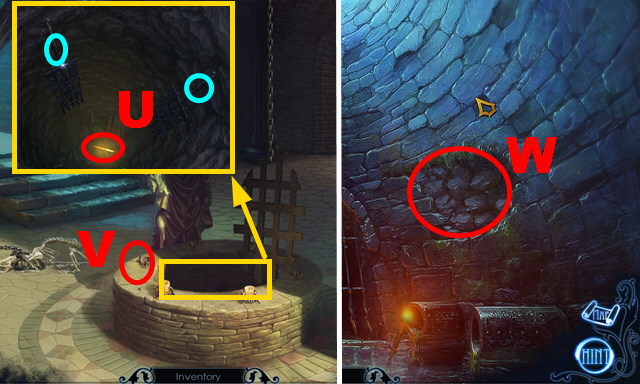
- Take the RAKE (T) and RUSTY GARDEN SHEARS (U).

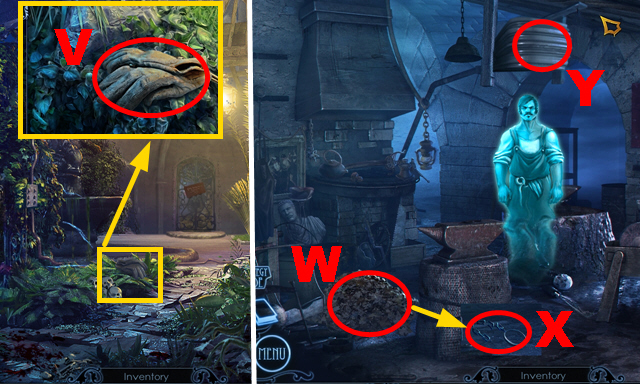
- Take the GLOVES (V).
- Go to the Smithy.
- Use the RAKE three times (W); take the BELLOWS CHAIN (X).
- Place the BELLOWS CHAIN (Y).

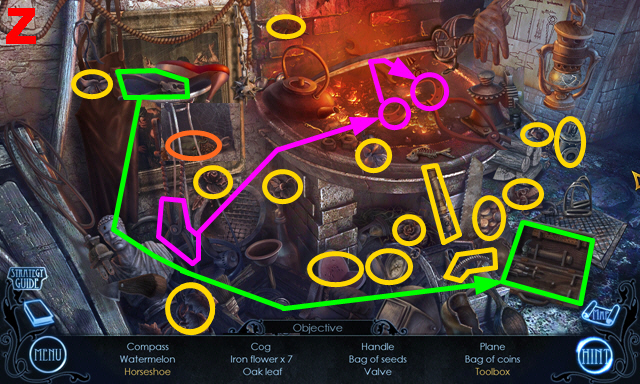
- Play the HOP.
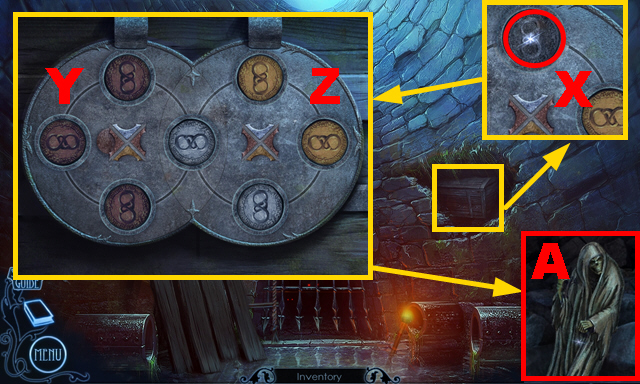
- You receive the GRINDSTONE HANDLE (Z).

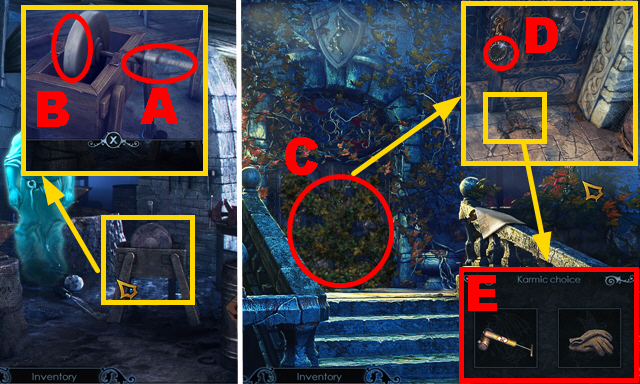
- Place the GRINDSTONE HANDLE (A); pull it.
- Put down the RUSTY GARDEN SHEARS (B) to acquire the SHARPENED GARDEN SHEARS.
- Go to the Castle Entrance.
- Use the SHARPENED GARDEN SHEARS (C).
- Pull the ring (D).
- Use either the INSECT REPELLENT or GLOVES (E).

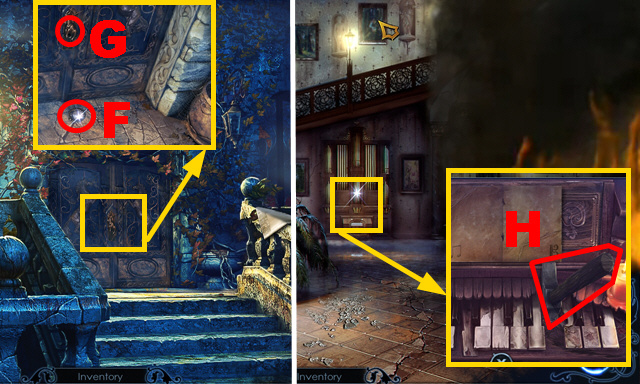
- Take the DOOR HANDLE (F); place the DOOR HANDLE (G).
- Move forward.
- Take the HAMMER (H).
- Go to the Smithy.

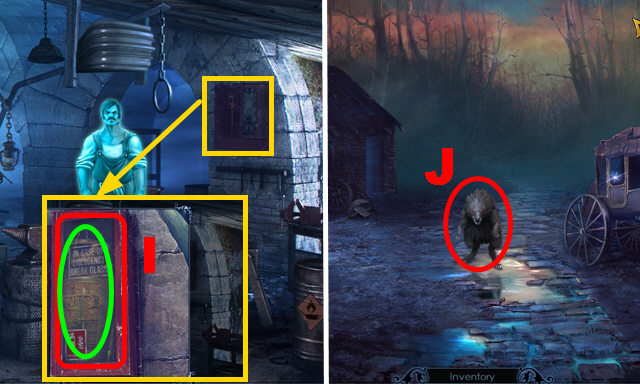
- Use the HAMMER three times (I); take the FIRE EXTINGUISHER (green).
- Walk down.
- Use the FIRE EXTINGUISHER (J).
- Go to the Castle Hall.

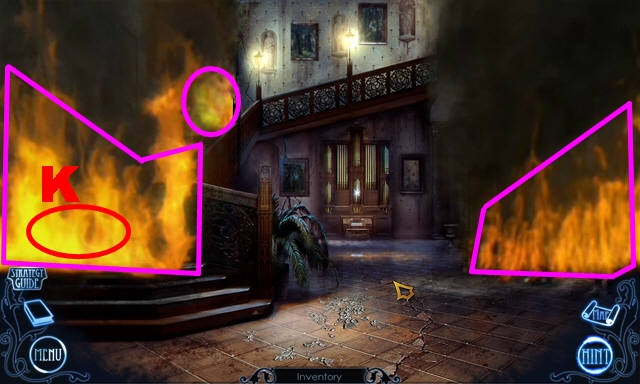
- Use the FIRE EXTINGUISHER (K).
- Play the mini-game.
- Extinguish all flames (purple).
- Go upstairs.

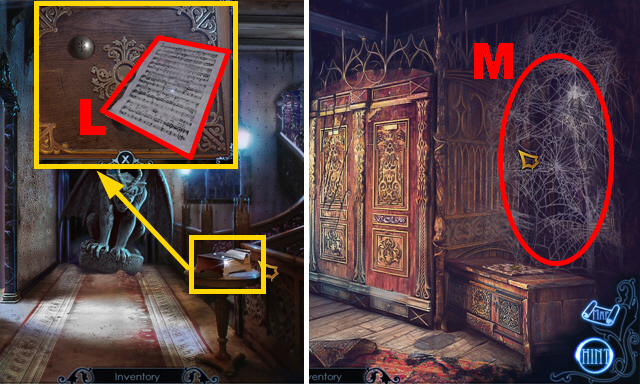
- Take the PAGE OF SHEET MUSIC (L).
- Turn left.
- Use the BOX OF MATCHES (M).

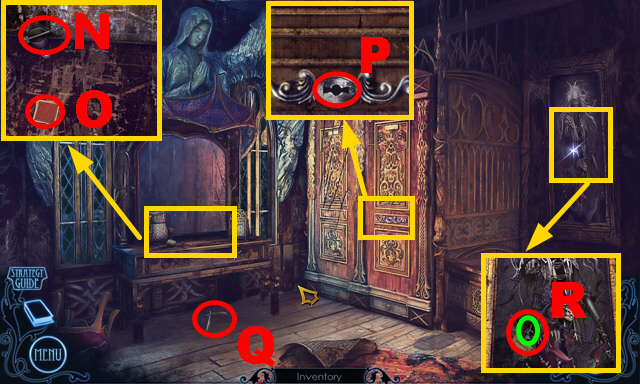
- Take the SILVER KEY (N); deal the cards (O).
- Use the SILVER KEY (P); turn it.
- Take the STRAIGHT RAZOR (Q).
- Use the STRAIGHT RAZOR (R); take the METAL UNICORN INSIGNIA (green).
- Walk down.

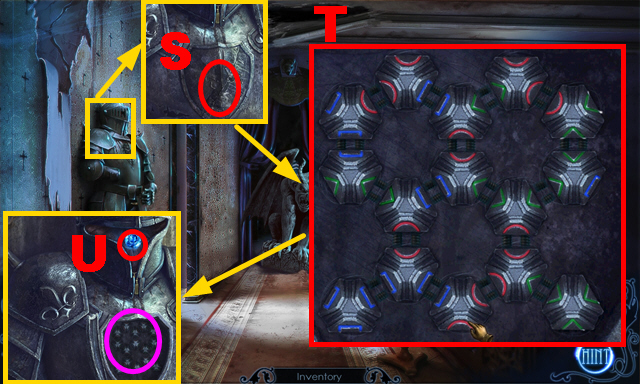
- Place the METAL UNICORN INSIGNIA (S).
- Play the mini-game (purple).
- Solution: (T).
- Take the SAPPHIRE (U).
- Turn right.

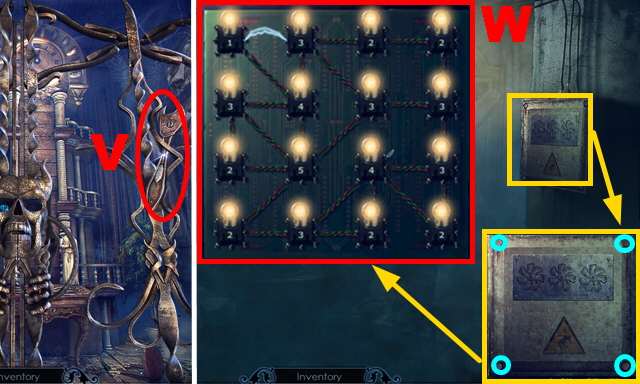
- Take the WRENCH (V).
- Walk down twice, turn right.
- Use the WRENCH (blue).
- Play the mini-game.
- Solution: (W).

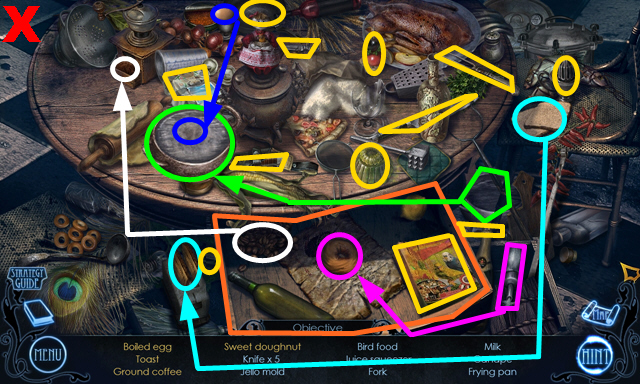
- Play the HOP.
- You receive the BIRDSEED (X).

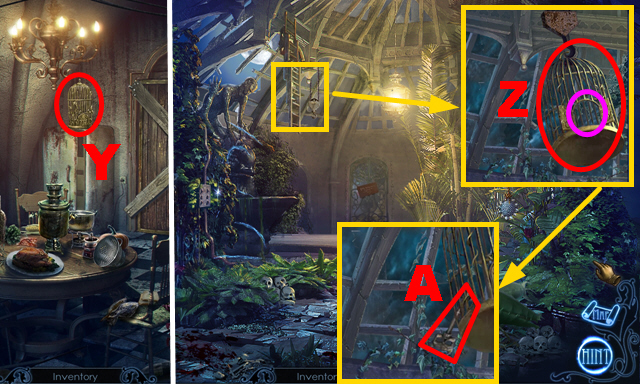
- Take the BIRDCAGE (Y).
- Go to the Greenhouse.
- Place the BIRDCAGE (Z) and BIRDSEED (purple).
- Take the DEMON KEY (A).
- Go to the Third Floor.

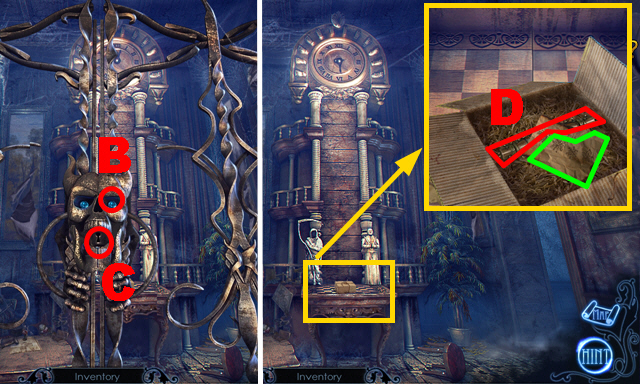
- Place the SAPPHIRE (B); use the DEMON KEY (C).
- Open the package; take the note (green) and STRANGE BATTERY (D).
- Turn right.

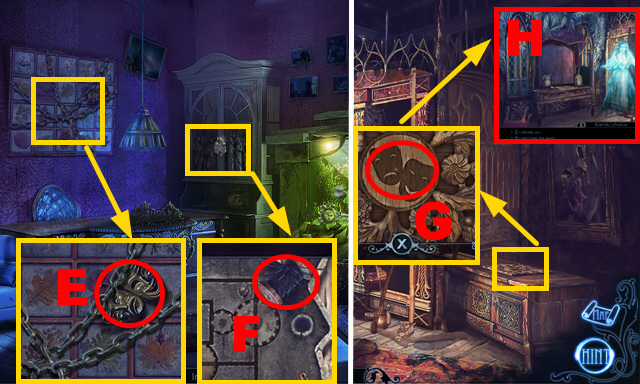
- Take the THEATER MASKS (E) and SPOOL OF STRING (F).
- Go to the Storage Room.
- Place the THEATER MASKS (G).
- Make a karmic decision (H).

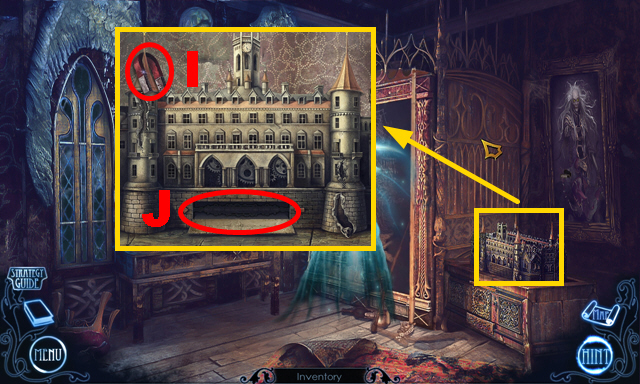
- Take the magnet (I) to acquire the MAGNET ON A STRING.
- Place the STRANGE BATTERY (J).

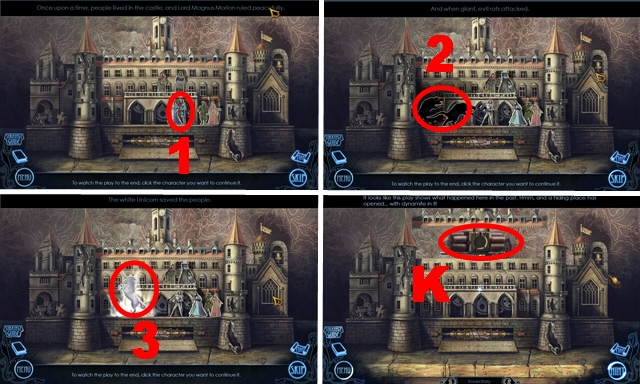
- Play the mini-game.
- Solution: 1-3.
- Take the DYNAMITE (K).
- Go to the Office.

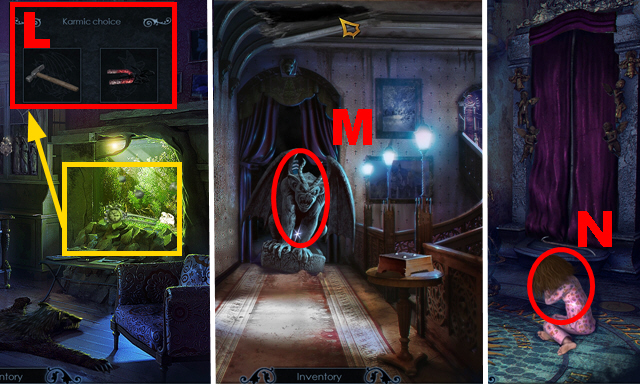
- Use either the MAGNET ON A STRING or HAMMER (L); you receive the BOMB.
- Walk down twice.
- Place the BOMB (M).
- Walk down, go upstairs, move forward.
- Talk to Sophie (N).
Chapter 2: The Library

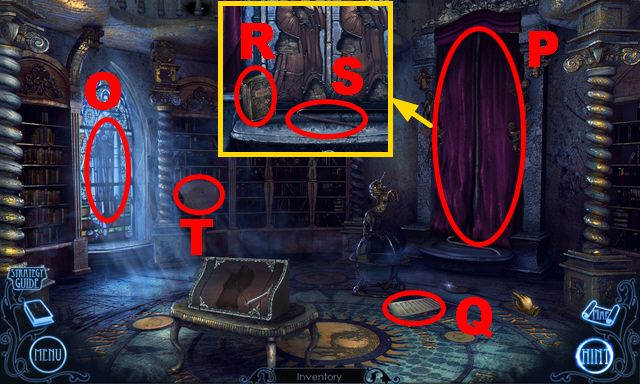
- Close the window (O).
- Open the curtain (P).
- Take the PAGE OF SHEET MUSIC (Q), ANCIENT TOME (R), and CROWBAR (S).
- Place the ANCIENT TOME (T).

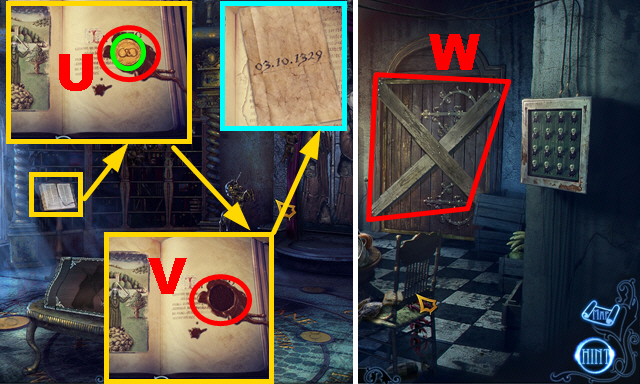
- Use the STRAIGHT RAZOR (U); take the GOLDEN COIN (green).
- Use the STRAIGHT RAZOR (V); turn two pages.
- Take the note (blue).
- Go to the Kitchen.
- Use the CROWBAR (W).
- Turn right.

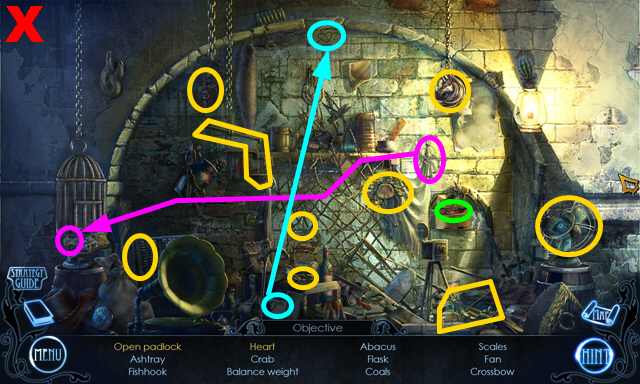
- Play the HOP.
- You receive the BALANCE WEIGHT (X).

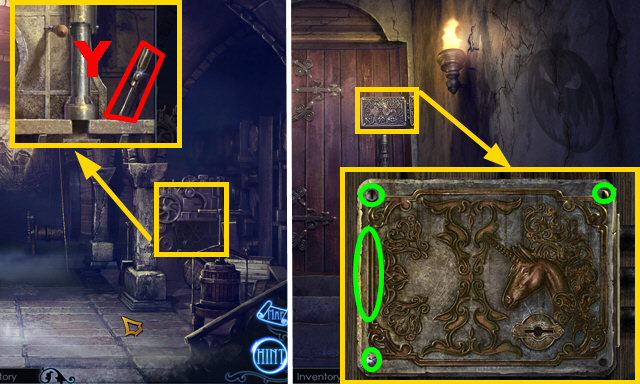
- Take the SCREWDRIVER (Y).
- Walk down.
- Use the SCREWDRIVER (green).
- You receive the SCREWS.

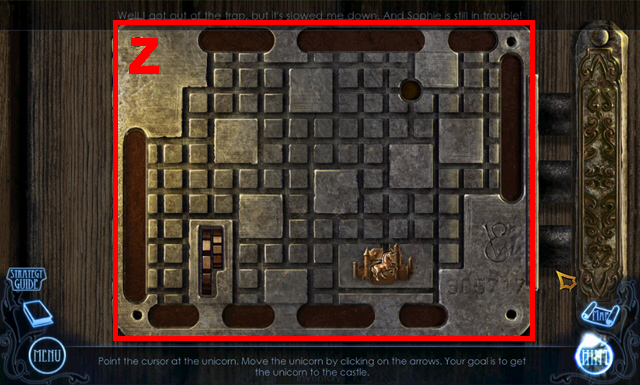
- Play the mini-game.
- Solution (Z): Down, right, up, left, up, right, down, left, up, right, down.
- Go to the Greenhouse.

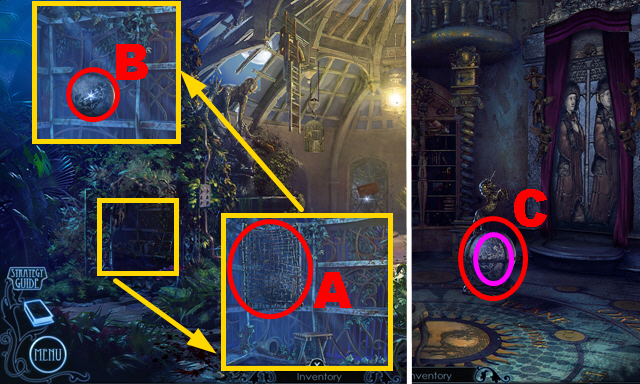
- Use the CROWBAR (A); take the GLOBE (B).
- Go to the Library.
- Place the GLOBE (C).
- Play the mini-game (purple).

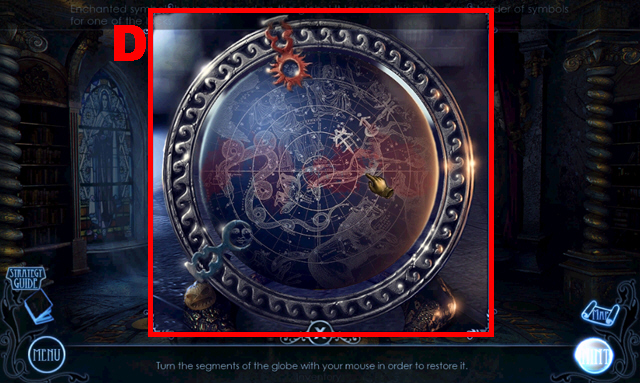
- Solution: (D).
- Go to the Castle Hall.

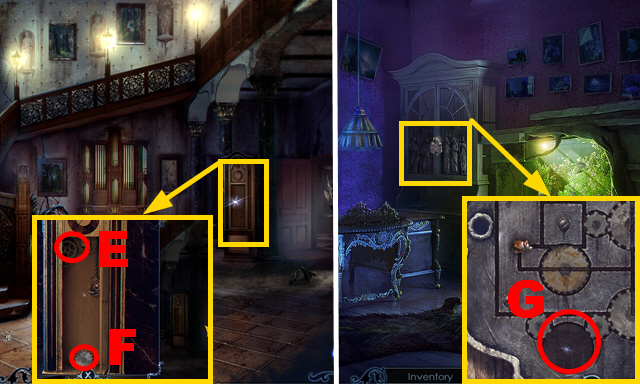
- Open the clock; place the BALANCE WEIGHT (E).
- Take the COG (F).
- Go to the Office.
- Place the COG (G).

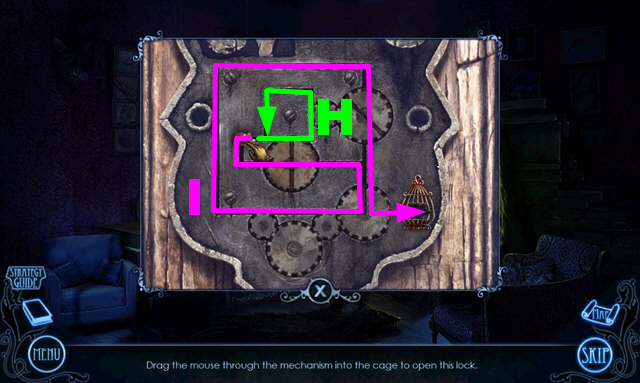
- Play the mini-game.
- Solution: Hx3, I.

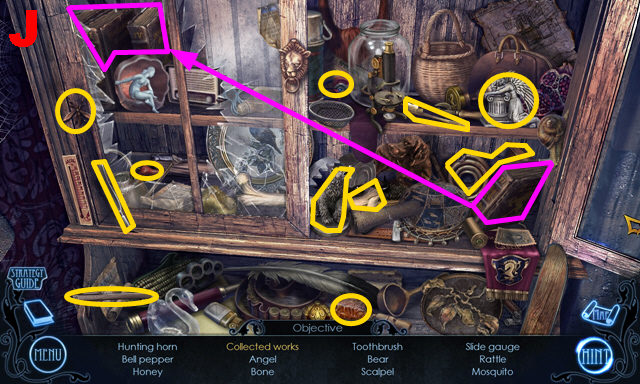
- Play the HOP.
- You receive the BLACKSMITH’S DEATH SENTENCE (J).
- Go to the Smithy.

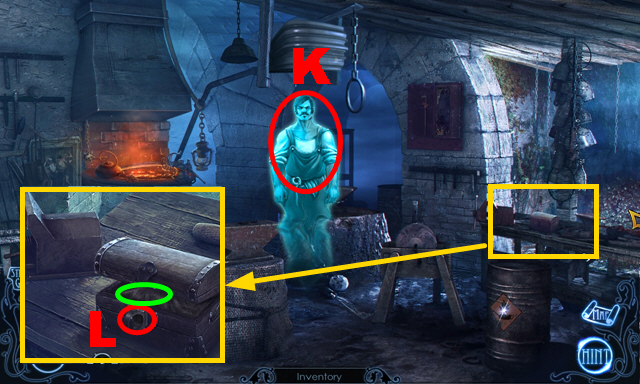
- Give the BLACKSMITH’S DEATH SENTENCE to the blacksmith (K).
- You receive the BLACKSMITH’S RING.
- Use the BLACKSMITH’S RING (L); turn it.
- Play the mini-game (green).

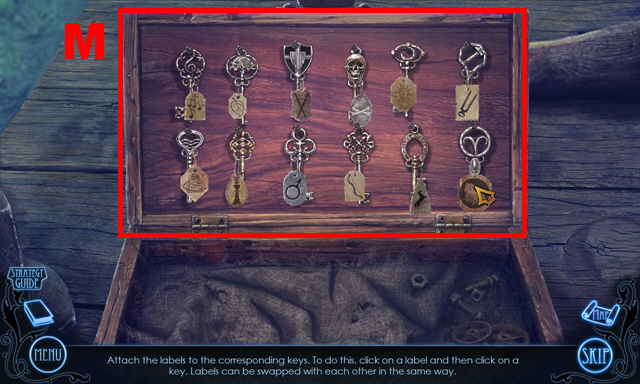
- Solution: (M).
- You receive the KEY WITH LEAF LABEL.
- Go to the Greenhouse.

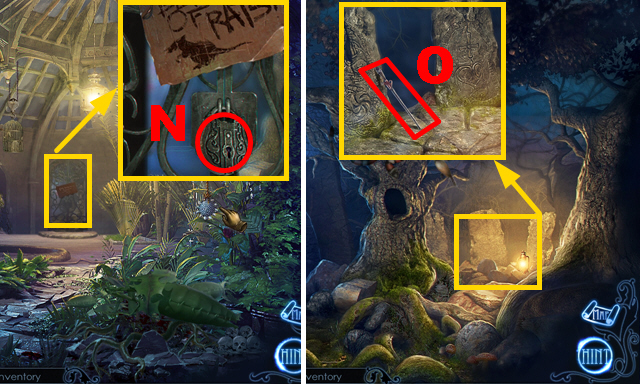
- Use the KEY WITH LEAF LABEL (N).
- Move forward.
- Take the BOLT CUTTER HALF (O).
- Go to the Smithy.

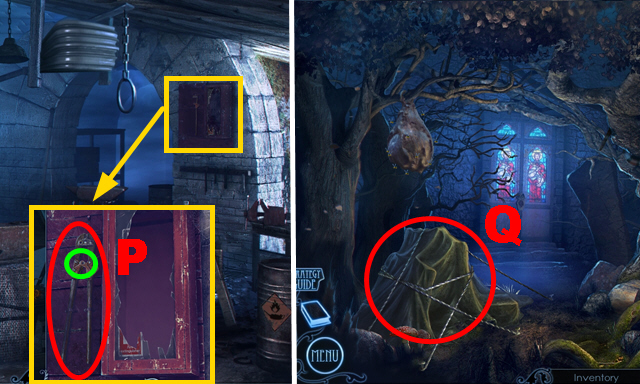
- Place the BOLT CUTTER HALF (P).
- Use the SCREWS and SCREWDRIVER (green).
- Take the BOLT CUTTERS.
- Go to the Stone Circle.
- Use the BOLT CUTTERS (Q).
- Remove the tarp.

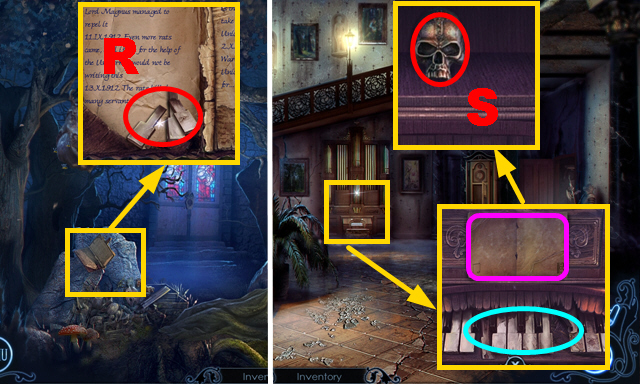
- Take the ORGAN KEYS (R).
- Go to the Castle Hall.
- Place the ORGAN KEYS (blue) and 2 PAGES OF SHEET MUSIC (purple).
- Take the METAL SKULL (S).
- Go to the Stone Circle.
Chapter 3: The Chapel

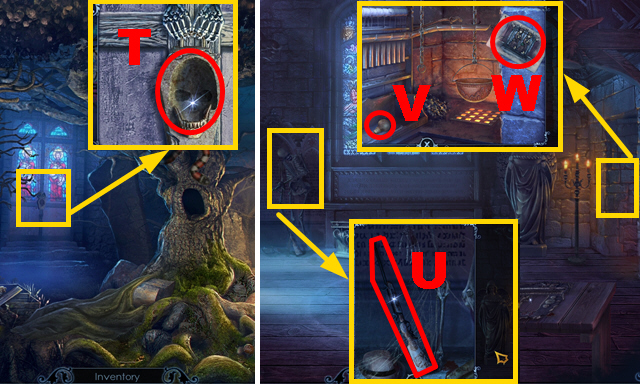
- Place the METAL SKULL (T).
- Move forward.
- Take the RIFLE WITHOUT A SIGHT (U), LIGHTBULB (V), and photo (W).
- Go to the Third Floor.

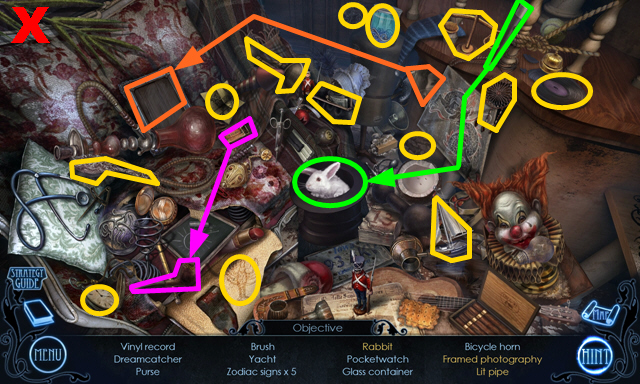
- Play the HOP.
- You receive the CONTAINER OF LUMINOUS SUBSTANCE (X).
- Turn right.

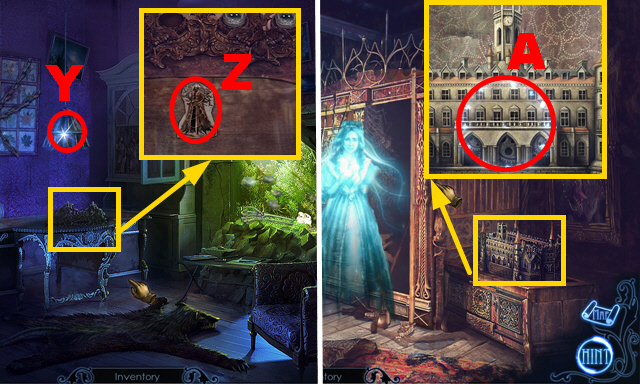
- Place the LIGHTBULB (Y); switch on the lamp.
- Take the THEATER FIGURINE (Z).
- Go to the Storage Room.
- Place the THEATER FIGURINE (A).

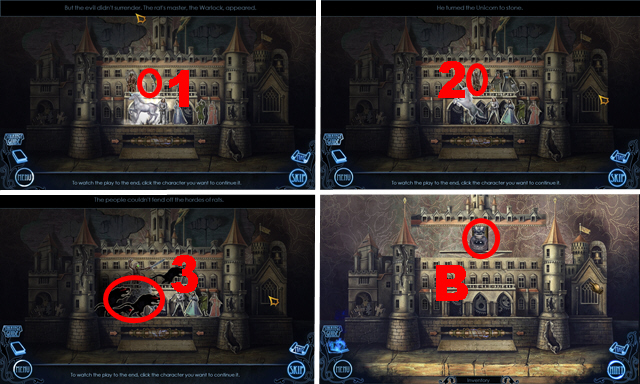
- Play the mini-game.
- Solution: 1-3.
- Take the INKPOT (B).
- Go to the Office.

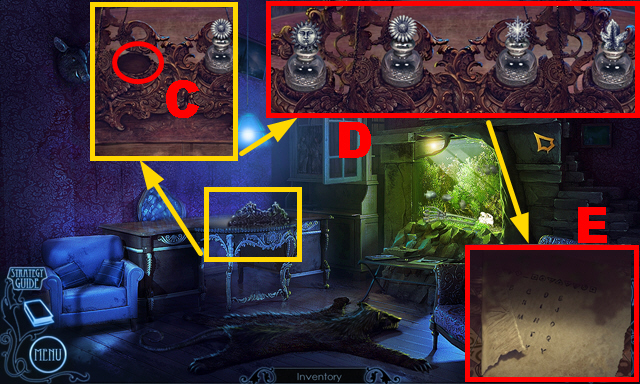
- Place the INKPOT (C).
- Play the mini-game.
- Solution: (D).
- Take the ENCODED SPELL (E).
- Go to the Chapel.

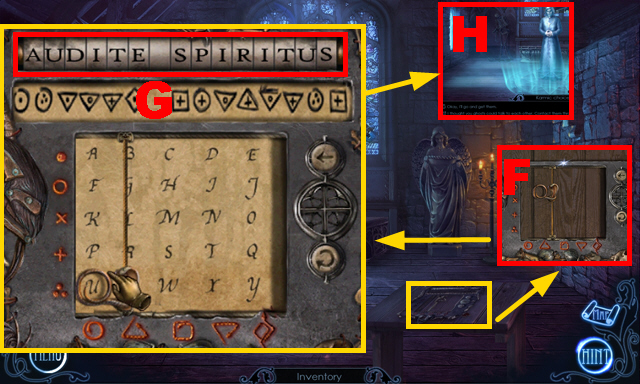
- Place the ENCODED SPELL (F).
- Play the mini-game.
- Solution: (G).
- Make a karmic decision (H).
- Walk down.

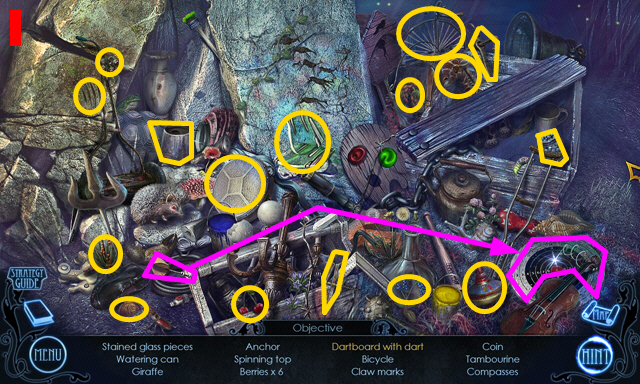
- Play the HOP.
- You receive the STAINED GLASS PIECES (I).
- Go to the Library.

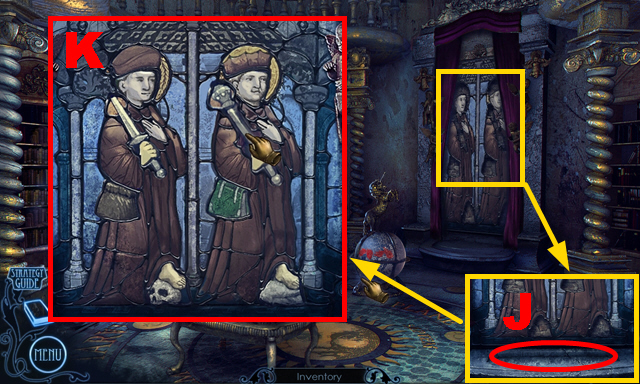
- Place the STAINED GLASS PIECES (J).
- Play the mini-game.
- Solution: (K).
- Turn right.

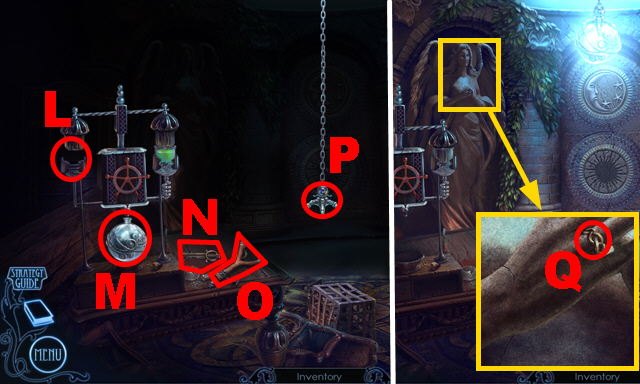
- Place the CONTAINER OF LUMINOUS SUBSTANCE (L).
- Take the LUMINOUS SPHERE (M), SWORD-SHAPED KEY (N), and SLINGSHOT (O).
- Place the LUMINOUS SPHERE (P).
- Take MARTHA’S RING (Q).
- Go to the Storage Room.

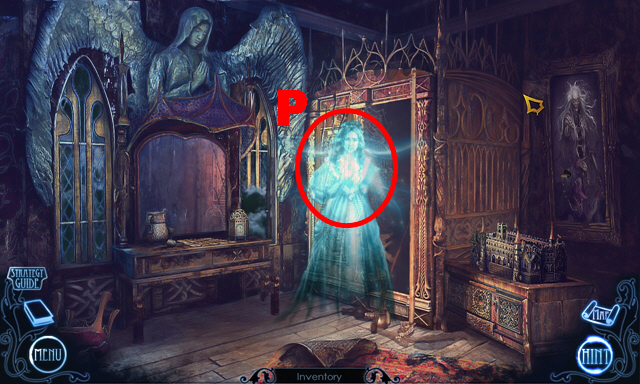
- Give MARTHA’S RING to Martha (P).
- Play the HOP.

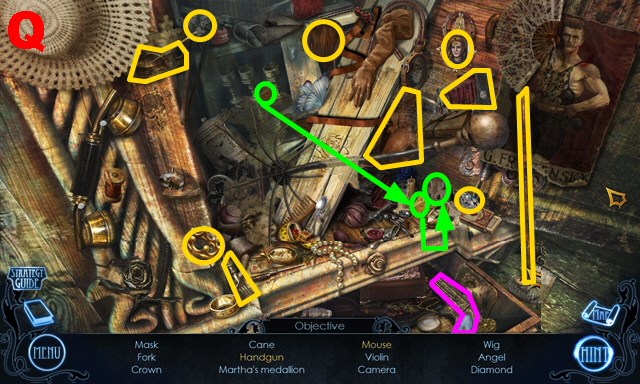
- You receive MARTHA’S MEDALLION (Q).
- Go to the Cellar.

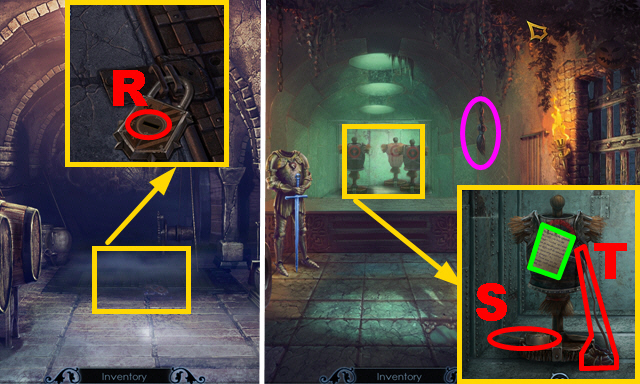
- Use the SWORD-SHAPED KEY (R).
- Enter the Armory.
- Pull the rope (purple).
- Take the EMPTY OIL CAN (S), note (green), and SNAKE CATCHER (T).
- Go to the Smithy.

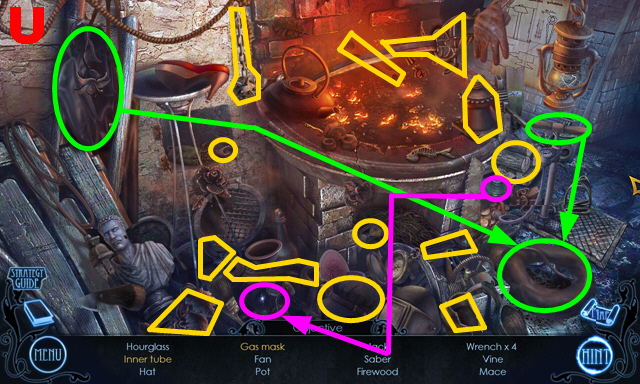
- Play the HOP.
- You receive the JACK (U).

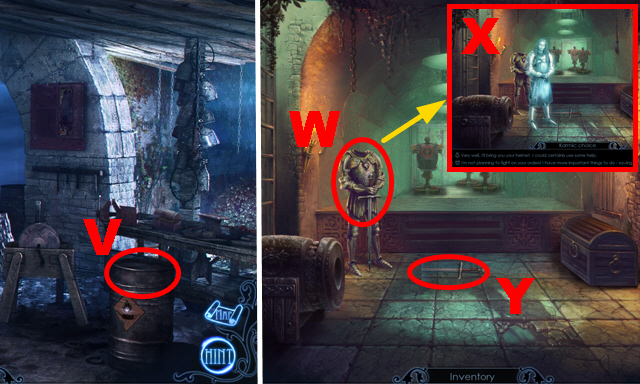
- Place the EMPTY OIL CAN (V) to acquire the CAN OF MACHINE OIL.
- Go to the Armory.
- Use the CAN OF MACHINE OIL (W).
- Make a karmic decision (X).
- Take the SWORD (Y).
- Go to the Secret Library.

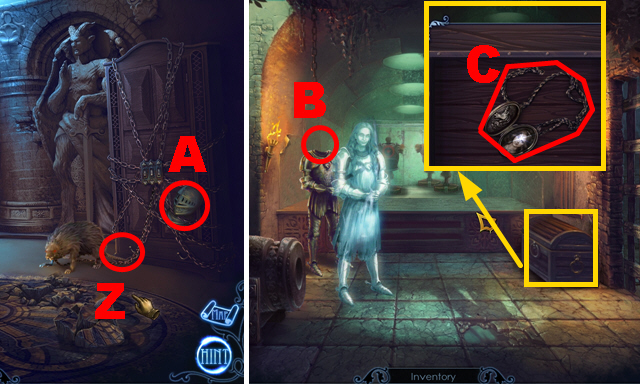
- Use the SWORD (Z).
- Take MAGNUS’ HELMET (A).
- Go to the Armory.
- Place MAGNUS’ HELMET (B).
- Take MAGNUS’ MEDALLION (C).
- Go to the Chapel.

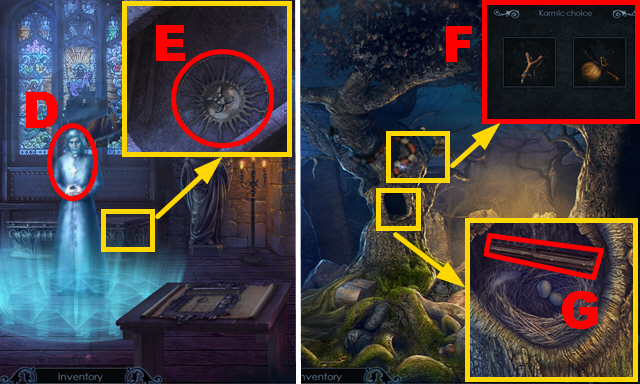
- Give MAGNUS’ MEDALLION and MARTHA’S MEDALLION to the priest (D).
- Take the SUN-SHAPED DISC (E).
- Walk down.
- Use either the SLINGSHOT or SNAKE CATCHER (F).
- Take the BROKEN TELESCOPIC SIGHT (G).
- Go to the Secret Library.

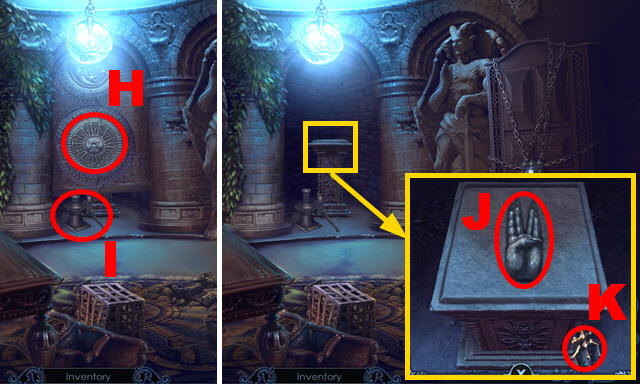
- Place the SUN-SHAPED DISC (H) and JACK (I).
- Activate the jack.
- Take the STONE HAND (J) and TRIDENT SYMBOL (K).
- Go to the Graveyard.

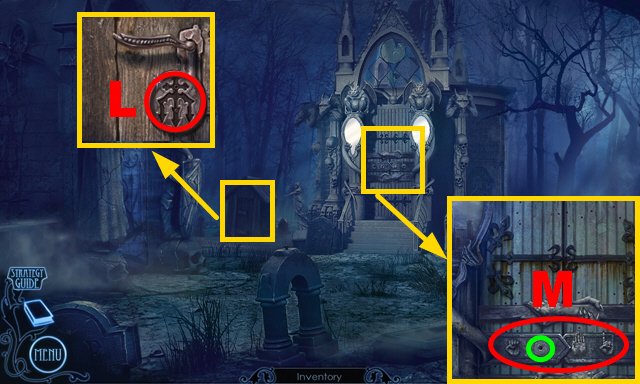
- Place the TRIDENT SYMBOL (L).
- Place the STONE HAND (green).
- Play the mini-game (M).

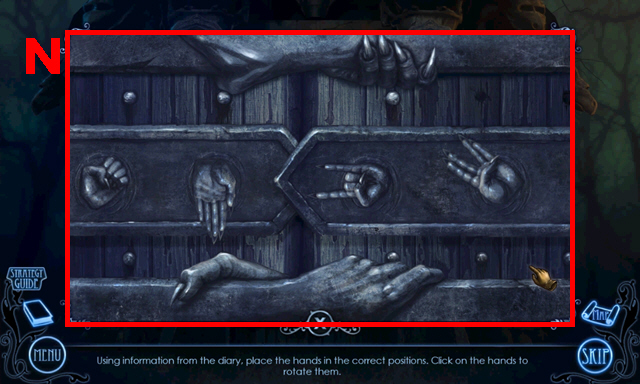
- Solution: (N).
- Play the HOP.

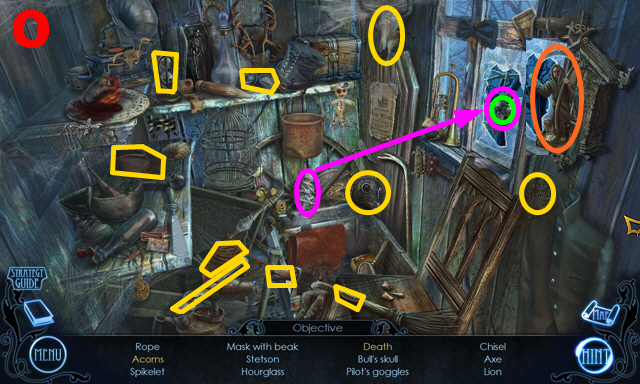
- You receive the CHISEL (O).
- Go straight.

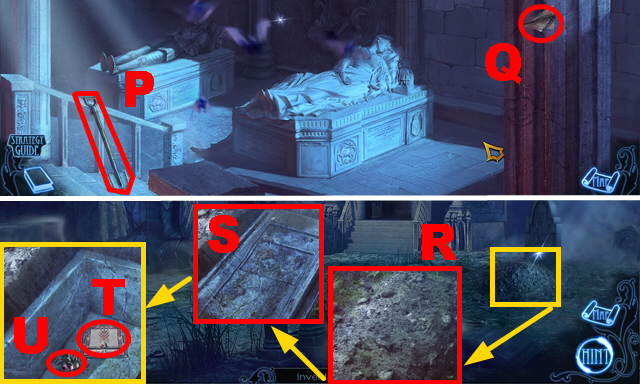
- Take the SHOVEL (P) and note (Q).
- Walk down.
- Use the SHOVEL (R) and CROWBAR (S).
- Take the TAROT CARD (T) and SPIDER KEY (U).
- Go to the Storage Room.

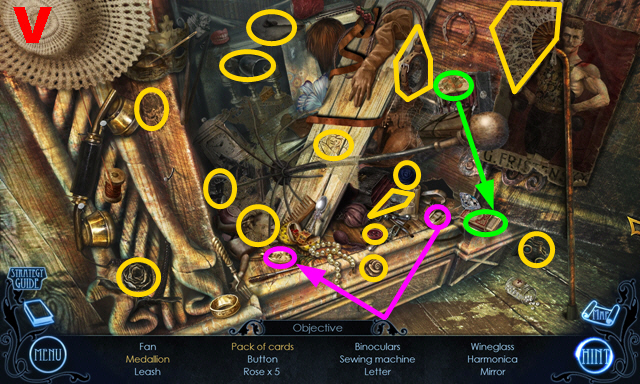
- Play the HOP.
- You receive the MIRROR (V).

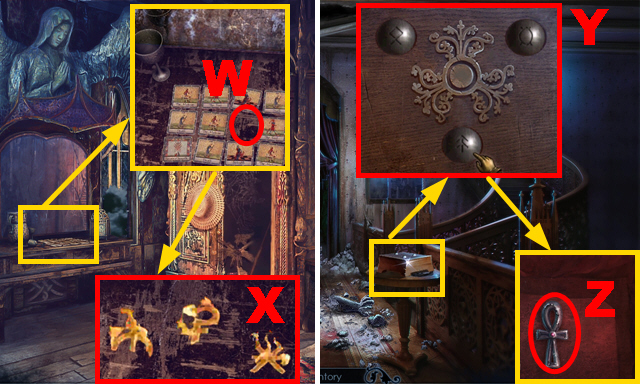
- Place the TAROT CARD (W); make note of the symbols (X).
- Walk down.
- Enter the correct symbols (Y).
- Take the ANKH (Z).
- Go to the Crypt.

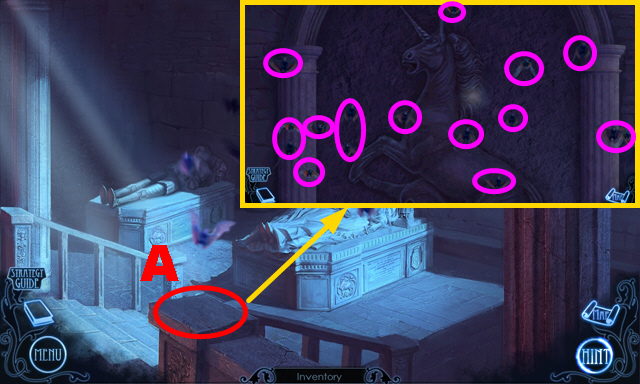
- Place the MIRROR (A).
- Play the mini-game.
- To solve this puzzle, drive away the bats (purple).

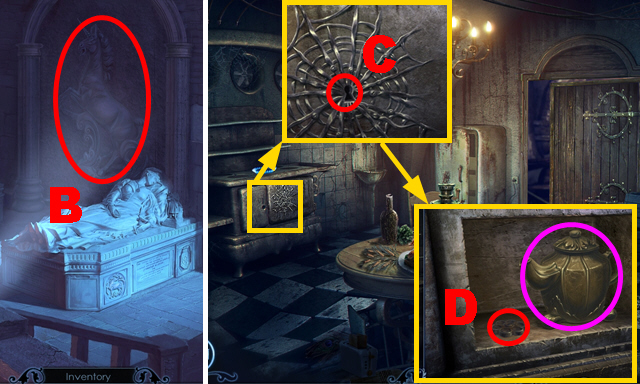
- Use the HAMMER AND CHISEL (B).
- Go to the Kitchen.
- Use the SPIDER KEY (C).
- Take the VALVE (D) and EMPTY KETTLE (purple).
- Turn right.

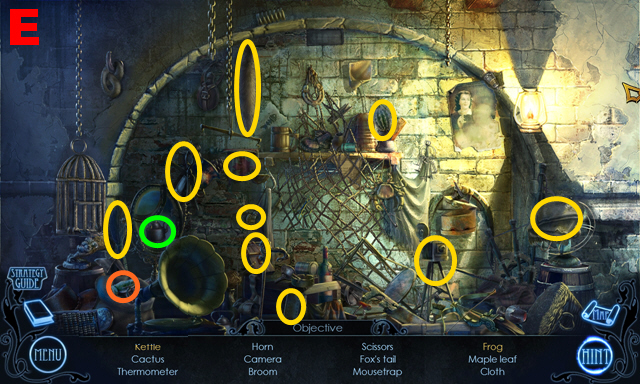
- Play the HOP.
- You receive the CLOTH (E).

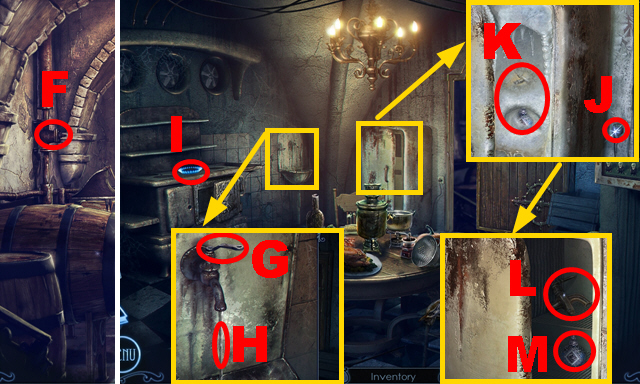
- Place the VALVE (F).
- Walk down.
- Turn the handle (G).
- Place the EMPTY KETTLE and CLOTH (H) to acquire the KETTLE OF COLD WATER and WET CLOTH.
- Place the KETTLE OF COLD WATER (I); take the KETTLE OF BOILING WATER.
- Pull the plug (J); use the KETTLE OF BOILING WATER (K).
- Take the WINE BARREL SPIGOT (L) and HOLY WATER (M).
- Go to the Storage Room.
Chapter 4: The Storage Room

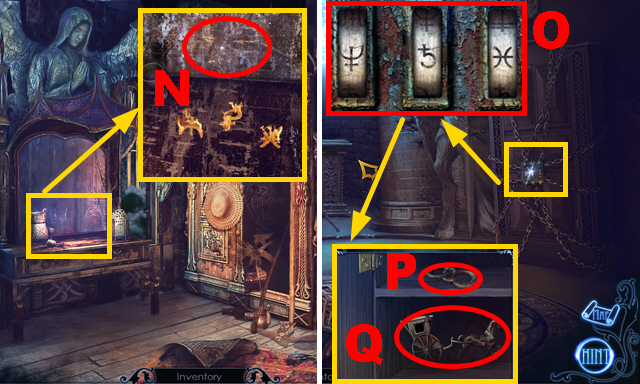
- Use the WET CLOTH (N).
- Go to the Secret Library.
- Enter the correct symbols (O).
- Take the WARLOCK’S SYMBOL (P) and COACH INSIGNIA (Q).
- Go to the Coach Yard.

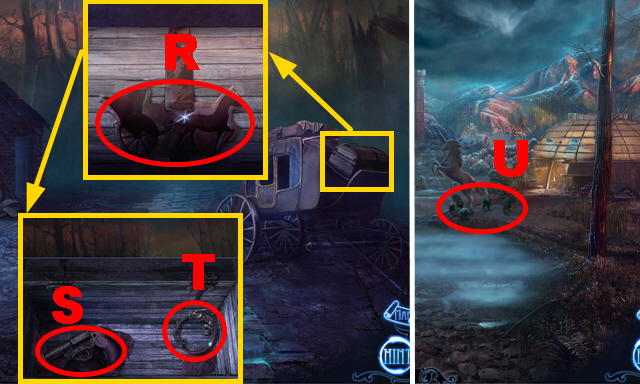
- Place the COACH INSIGNIA (R).
- Take the FLARE PISTOL (S) and DRAGON SYMBOL (T).
- Walk down.
- Use the FLARE PISTOL (U).
- Go to the Chapel.

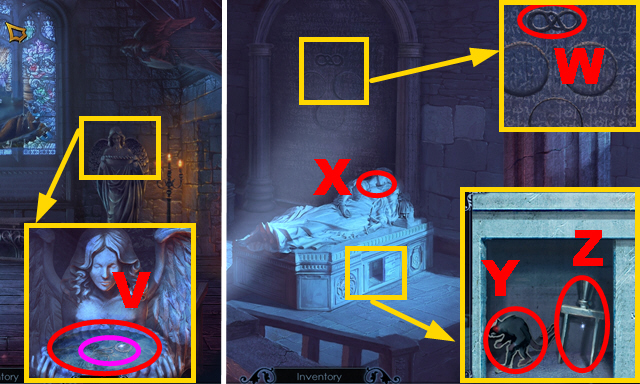
- Use the HOLY WATER (V); take MARTHA’S PENDANT (purple).
- Go to the Crypt.
- Place the WARLOCK’S SYMBOL (W) and MARTHA’S PENDANT (X).
- Take the THEATER FIGURINE (Y) and SWITCH LEVER (Z).
- Go to the Greenhouse.

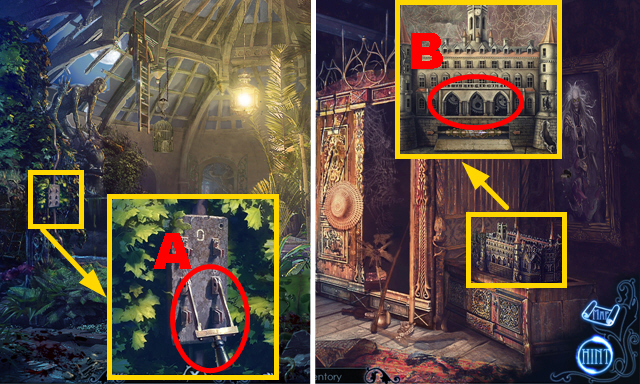
- Place the SWITCH LEVER (A); push it.
- Go to the Storage Room.
- Place the THEATER FIGURINE (B).

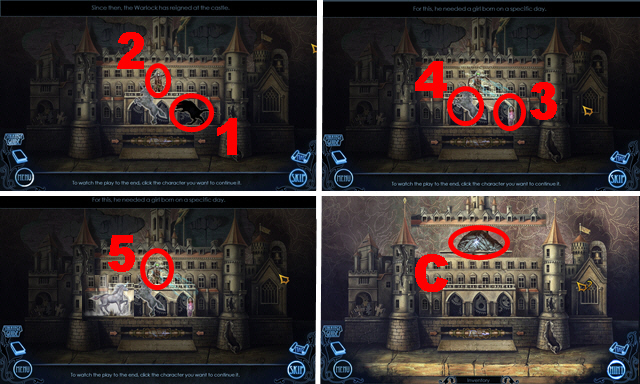
- Play the mini-game.
- Solution: 1-5.
- Take the RUNE STONE FRAGMENT (C).
- Go to the Greenhouse.

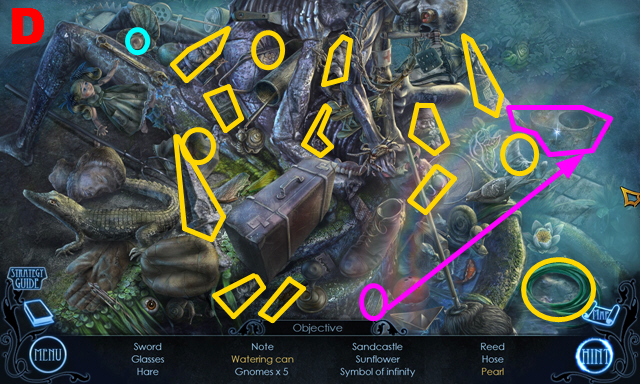
- Play the HOP.
- You receive MAGNUS’ SWORD (D).
- Go to the Crypt.

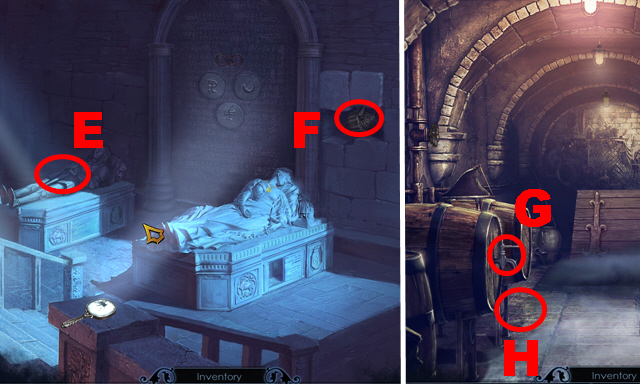
- Place MAGNUS’ SWORD (E).
- Take the EMPTY WINE BOTTLE (F).
- Go to the Cellar.
- Place the WINE BARREL SPIGOT (G).
- Put down the EMPTY WINE BOTTLE (H) to acquire the BOTTLE OF WINE.
- Go to the Stone Circle.

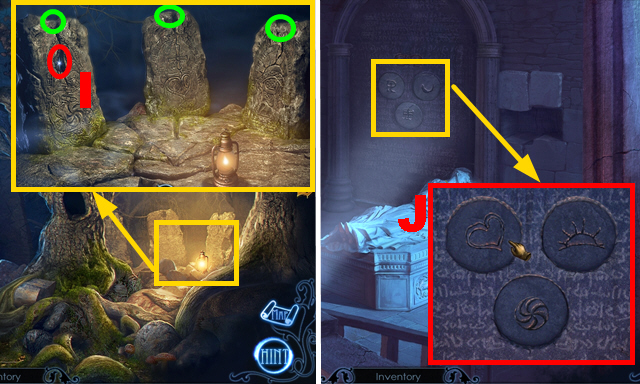
- Place the RUNE STONE FRAGMENT (I); use the BOTTLE OF WINE (green).
- Go to the Crypt.
- Enter the correct symbols (J).

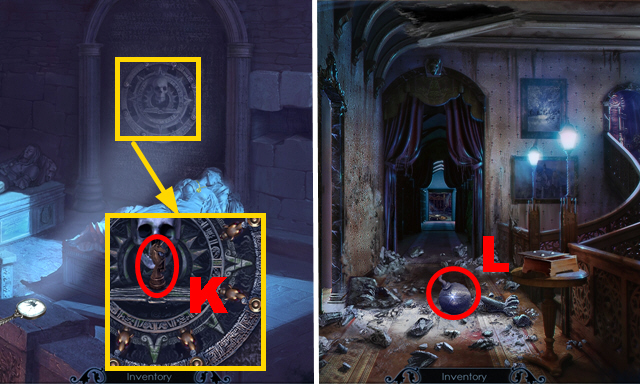
- Take the CHESS PIECE (K).
- Go to the Second Floor.
- Take the CANNONBALL (L).
- Turn right.

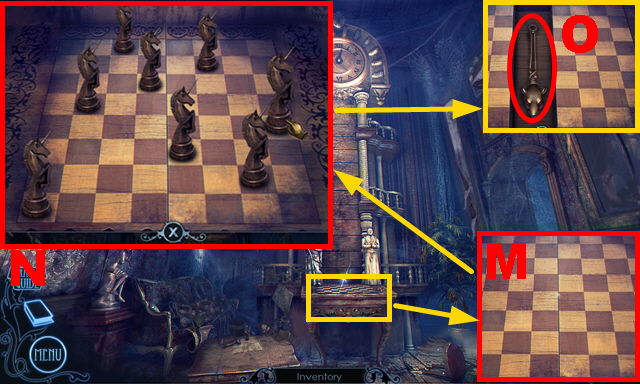
- Place the CHESS PIECE (M).
- Play the mini-game.
- Solution: (N).
- Take the RAT’S HEAD POINTER (O).
- Go to the Crypt.

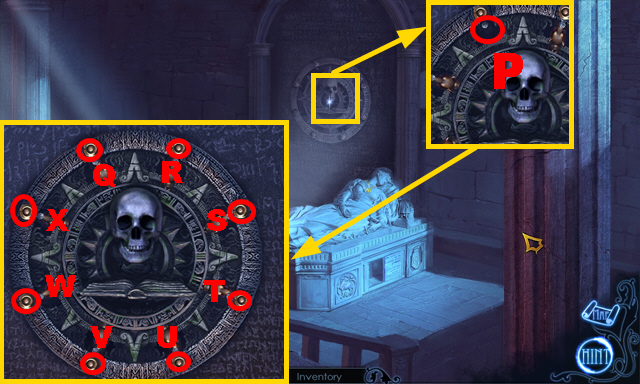
- Place the RAT’S HEAD POINTER (P).
- Play the mini-game.
- Solution: R, T, V, S, U, V, W, V, W, X, W, Q.
- Move right.

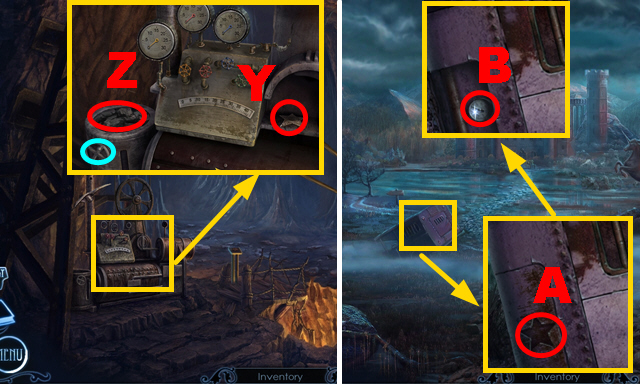
- Take the SHERIFF’S BADGE (Y).
- Rotate the valve (blue); use the BOX OF MATCHES (Z).
- Go to the Courtyard.
- Place the SHERIFF’S BADGE (A); take the PRESSURE GAUGE (B).
- Go to the Cableway.

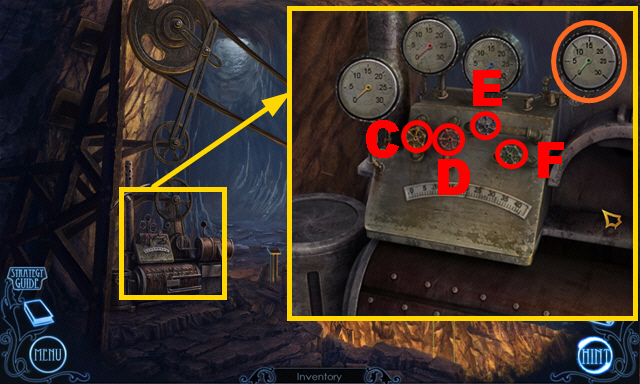
- Place the PRESSURE GAUGE (orange).
- Play the mini-game.
- Solution: Cx5, Dx5, Ex4, Fx8.

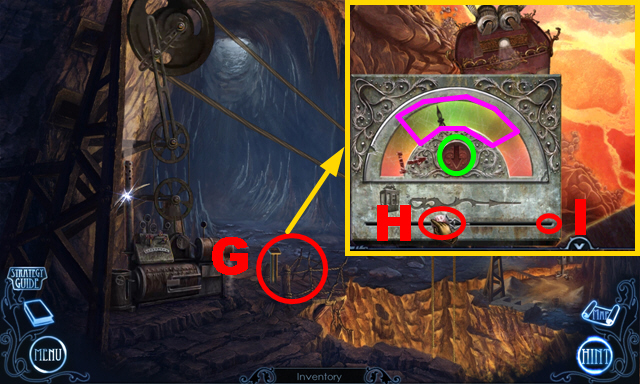
- Play the mini-game (G).
- Push the button (green).
- Pull the lever (H) to the edge (I).
- While pulling the lever, be careful to remain in the area (purple).

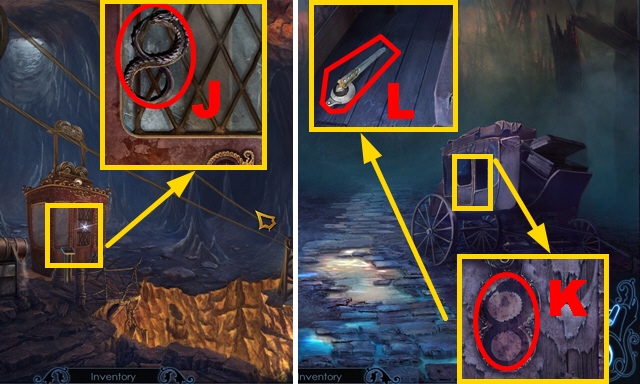
- Take the COMPLEX DRAGON SYMBOL (J).
- Go to the Coach Yard.
- Place the COMPLEX DRAGON SYMBOL (K).
- Take the CABLE CAR DOOR HANDLE (L).
- Go to the Cableway.

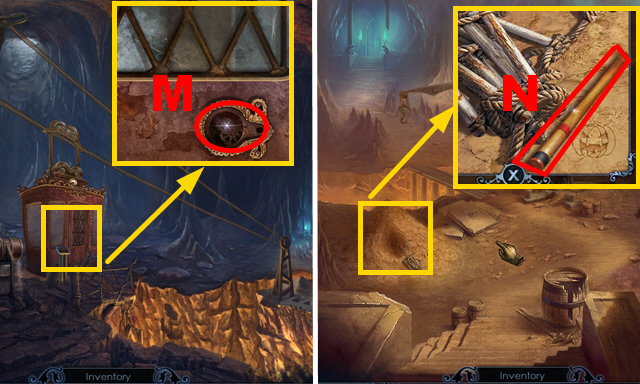
- Place the CABLE CAR DOOR HANDLE (M).
- Move right.
- Take the TORCH (N).
- Try to move left.

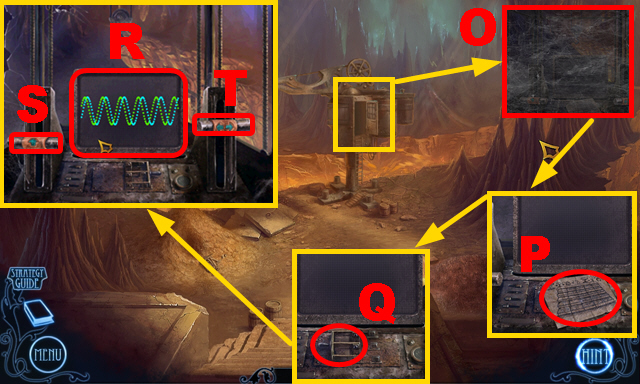
- Use the BOX OF MATCHES (O).
- Take the note (P); pull the lever (Q).
- Play the mini-game.
- To solve this puzzle (R), move lever (S) and (T) to the correct positions.
- Move left.
Chapter 5: The Gates

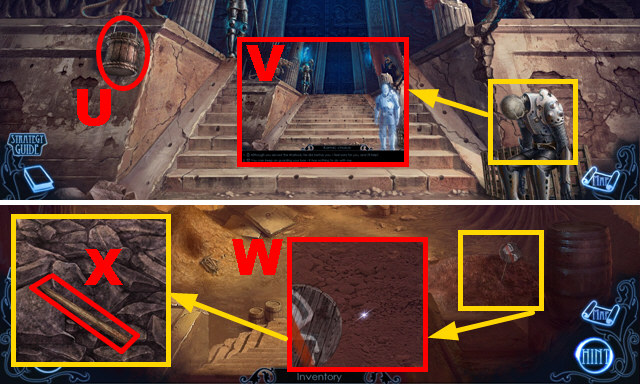
- Take the BUCKET OF WATER (U).
- Make a karmic decision (V).
- Walk down.
- Use the BUCKET OF WATER (W); take the PICKAX HANDLE (X).
- Walk down.

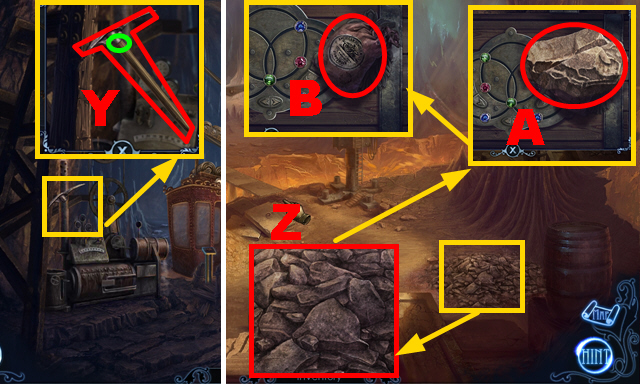
- Place the PICKAX HANDLE (green); take the PICKAX (Y).
- Move right.
- Use the PICKAX (Z); take the STONE (A) and GUNPOWDER (B).
- Go to the Armory.

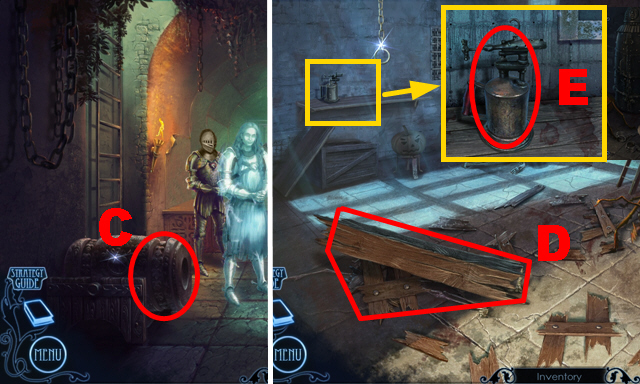
- Use the GUNPOWDER, CANNONBALL, and BOX OF MATCHES (C).
- Turn right.
- Use the CROWBAR (D).
- Take the BLOWTORCH (E).

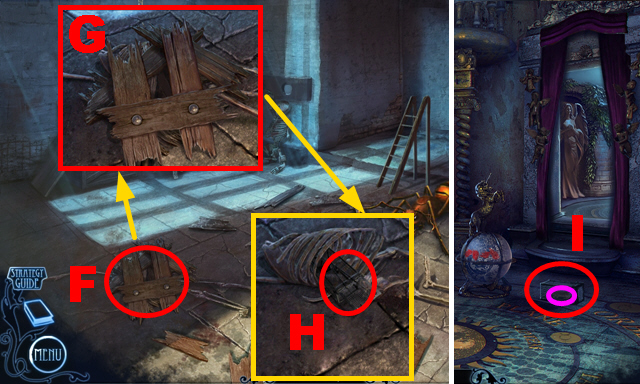
- Play the mini-game (F).
- Remove the layers from top to bottom (G).
- Take the MOUSETRAP (H).
- Go to the Library.
- Place the MOUSETRAP (I); take the MOUSE (purple).
- Go to the Dungeon.

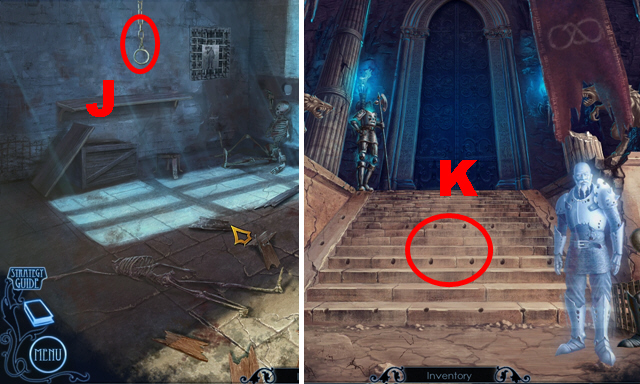
- Pull the chain (J).
- Go to the Gates.
- Throw the STONE (K).
- Go to the Courtyard.

- Use the BLOWTORCH (L).
- Take the LIQUID NITROGEN (purple), PIECE OF CAKE (green), and SET OF LOCK PICKS (M).
- Go to the Gates.
- Use the LIQUID NITROGEN and CROWBAR (N).
- Make a karmic decision (O).
- Go to the Dungeon.

- Place the SET OF LOCK PICKS (P).
- Play the mini-game.
- Solution: (Q).
- Take the RED RUNE STONE (R).
- Use either the BLOWTORCH or PIECE OF CAKE (S).

- Take the STEPLADDER (T) and MINTING DIE (U).
- Go to the Library.
- Place the STEPLADDER (V).

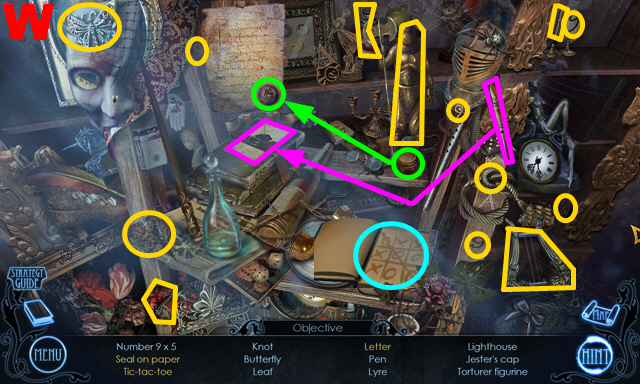
- Play the HOP.
- You receive the TORTURER FIGURINE (W).
- Go to the Dungeon.

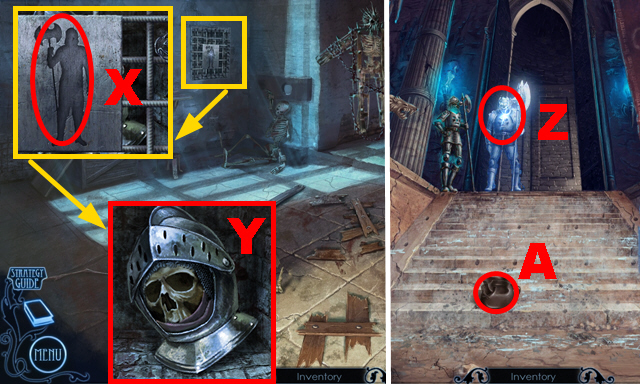
- Place the TORTURER FIGURINE (X); take the GUARD’S HEAD (Y).
- Go to the Gates.
- Give the GUARD’S HEAD to the guardian (Z).
- Take the EMPTY BAG (A).
- Move forward.

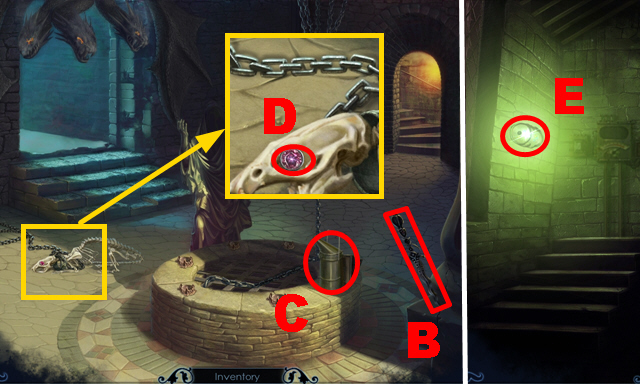
- Take the KNIFE (B), BEE SMOKER (C), and RED GEM (D).
- Turn right.
- Play the mini-game (E).

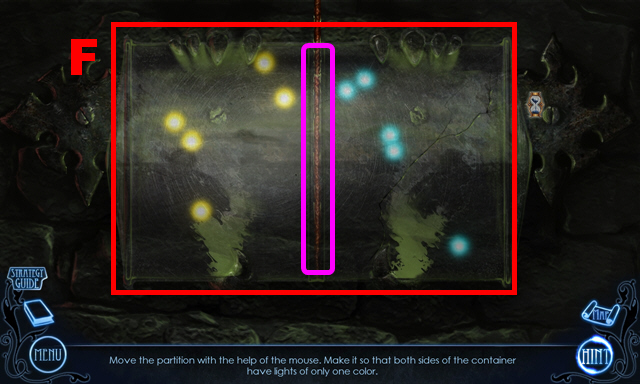
- Solution: (F).
- Move the partition (purple) until each side only contains lights of the same color.

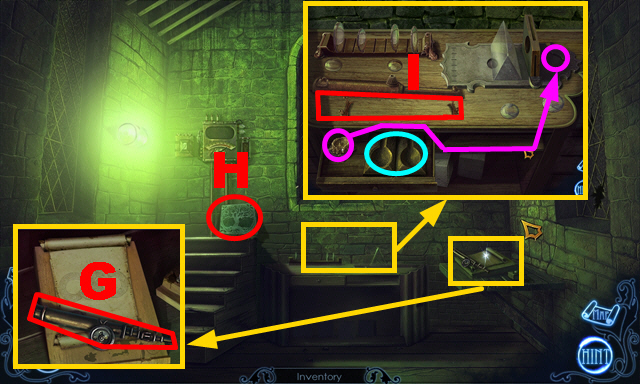
- Take the TELESCOPE(G) and STONE SLAB (H).
- Open the drawer; place the BROKEN TELESCOPIC SIGHT (I).
- Take the GLASS CASTING MOLD (blue).
- Place the candle (purple); light it with the BOX OF MATCHES.

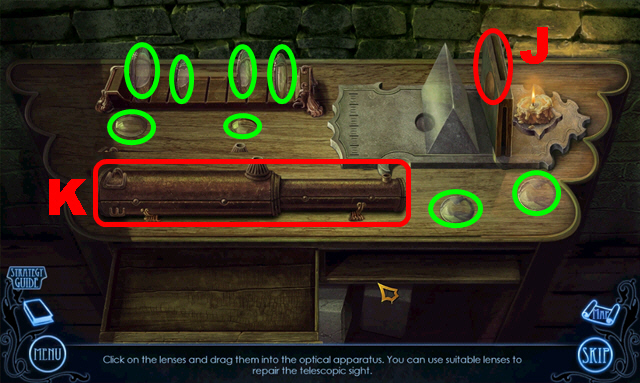
- Play the mini-game.
- Place 3 of the lenses (green) into the apparatus (J) to complete this puzzle.
- The correct lenses are randomized.
- Take the TELESCOPIC SIGHT (K) to acquire the RIFLE WITH SIGHT.
- Walk down.

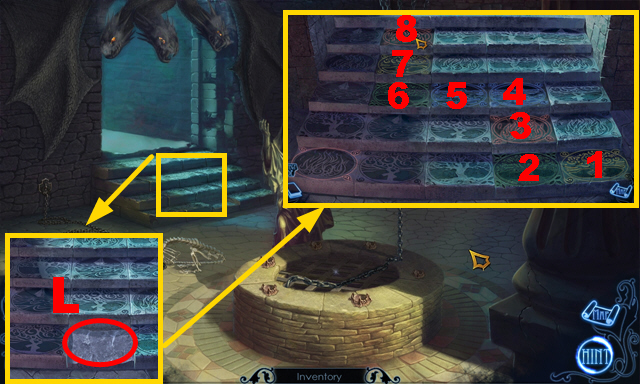
- Place the STONE SLAB (L).
- Play the mini-game.
- Solution: 1-8.
- Turn left.
Chapter 6: The Laboratory

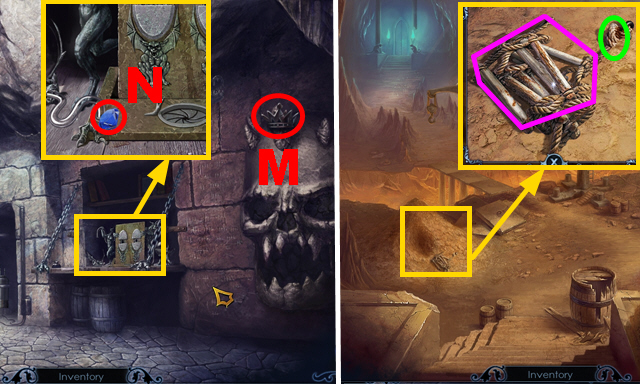
- Take the CROWN (M) and BLUE GEM (N).
- Walk down three times.
- Use the KNIFE (green); take the ROPE LADDER (purple).
- Go to the Greenhouse.

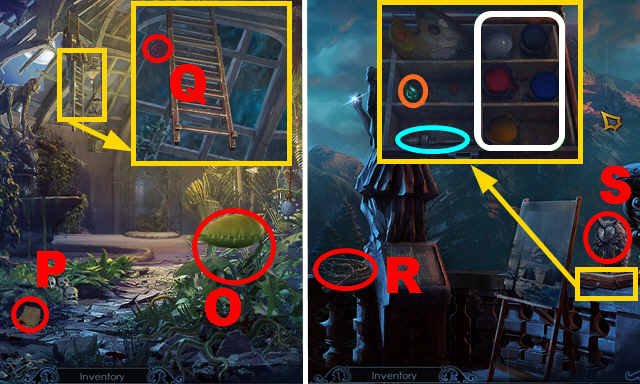
- Examine the plant (O).
- Take the note (P).
- Shoot the RIFLE WITH SIGHT (Q).
- Climb up to the Roof.
- Take the ROPE (R).
- Give the MOUSE to the owl (S).
- Open the suitcase.
- Take the GREEN GEM (orange), PAINTS (white), and BRUSH (blue).

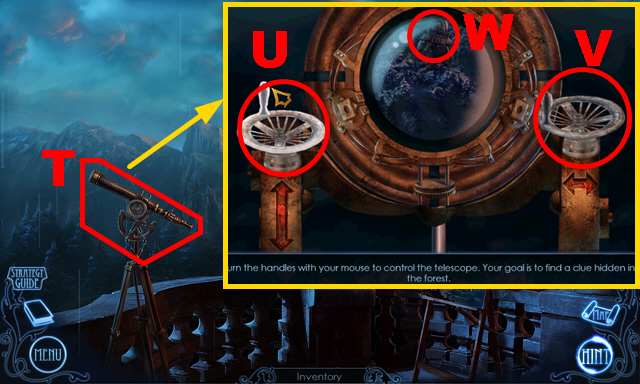
- Place the TELESCOPE (T).
- Play the mini-game.
- Rotate the handles (U) and (V) until you find a clue (W).
- Go to the Stone Circle.

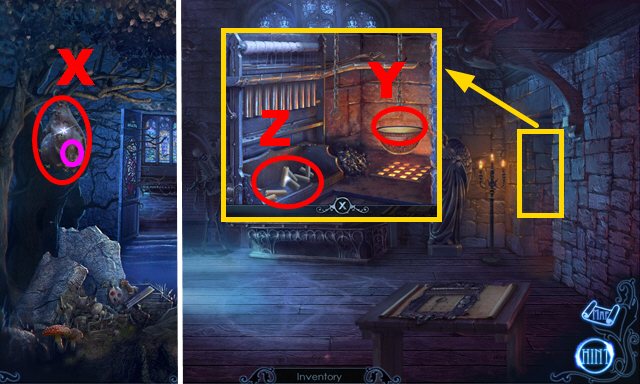
- Use the BEE SMOKER (X); take the BEESWAX (purple).
- Move forward.
- Place the BEESWAX (Y); take the CANDLES (Z).
- Go to the Dungeon.

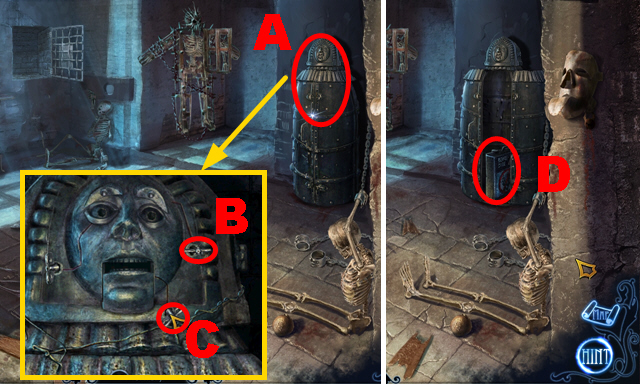
- Play the mini-game (A).
- Solution: Bx2, C.
- Take the HERBICIDE (D).
- Go to the Greenhouse.

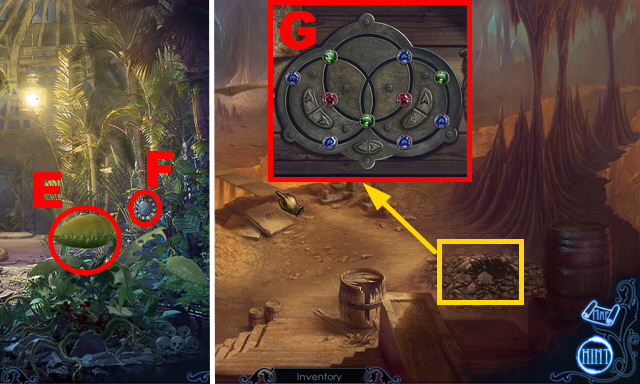
- Use the HERBICIDE (E); take the METAL FLOWER (F).
- Go to the Underground Area.
- Place the GREEN GEM, BLUE GEM, and RED GEM (G).

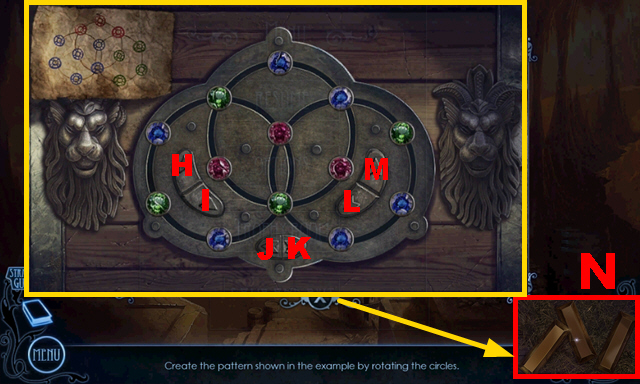
- Play the mini-game.
- Solution: M, Jx4, Lx3, Hx3, L, Hx4, L, J, Hx4.
- Take the GOLD BARS (N).
- Go to the Office.

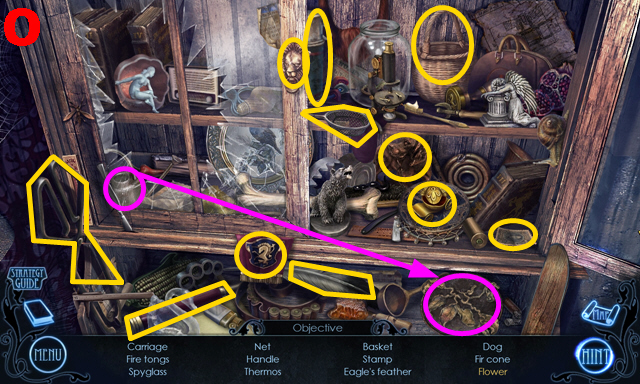
- Play the HOP.
- You receive the TONGS (O).

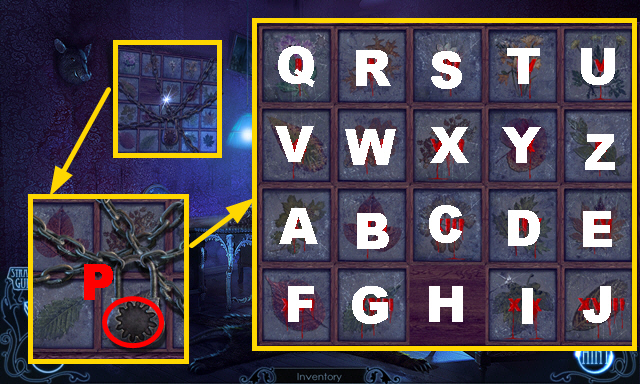
- Place the METAL FLOWER (P).
- Play the mini-game.
- Solution: B, C, X, S, T, Y, X, S, T, Y, X, C, H, G, B, C, H, G, B, W, X, C, D, E, J.

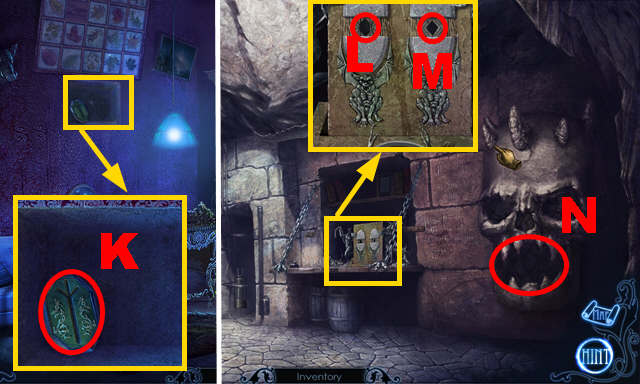
- Take the GREEN RUNE STONE (K).
- Go to the Laboratory.
- Place the GREEN RUNE STONE (L) and RED RUNE STONE (M).
- Activate the fireplace (N).
- Go to the Underground Area.

- Place the GLASS CASTING MOLD (O) to acquire the FULL CASTING MOLD.
- Go to the Cellar.
- Place the EMPTY BAG (P) and GOLD BARS (Q).
- Push the lever (purple); place the MINTING DIE (green).
- Take the BAG OF COINS.
- Go to the Gates.

- Give the BAG OF COINS to the guardian (R).
- Take the BATTLE-AXE (S).
- Move forward.
- Place the CANDLES (T).
- Play the mini-game.
- Solution: 1-3.

- Throw the TORCH (U).
- Use the BATTLE-AXE (blue).
- Place the ROPE LADDER (V).
- Climb down the ladder.
- Use the CROWBAR (W).

- Place the GOLDEN COIN (X).
- Play the mini-game.
- Solution: Yx2, Zx2, Y.
- Take the DEATH FIGURINE (A).

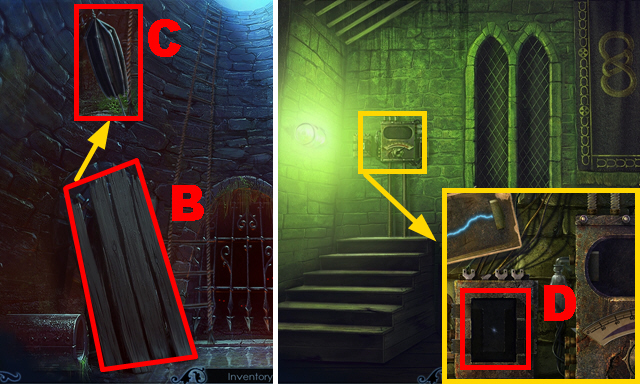
- Remove the boards (B); take the UMBRELLA (C).
- Go to the Tower.
- Place the FULL CASTING MOLD (D).

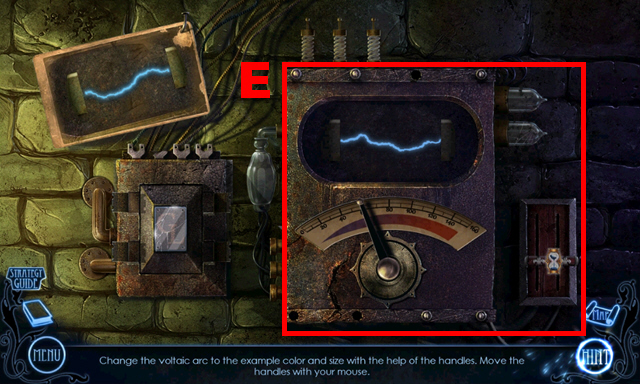
- Play the mini-game.
- Solution: (E).
- You receive the GLASS CONTAINER.
- Go to the Library.

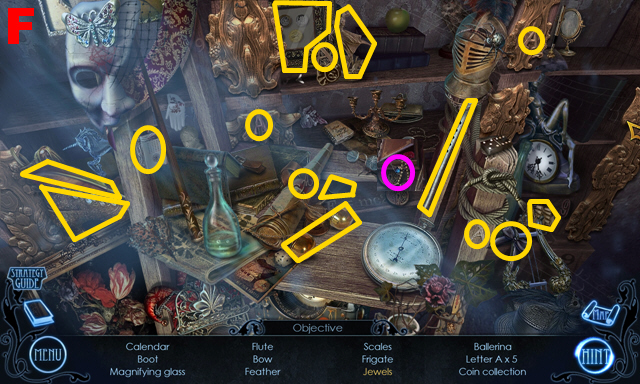
- Play the HOP.
- You receive the QUILL (F).

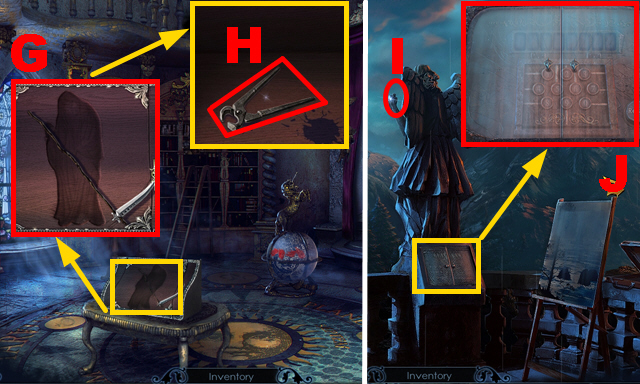
- Place the DEATH FIGURINE (G); take the PLIERS (H).
- Go to the Roof.
- Place the UMBRELLA (I).
- Open the apparatus (J).

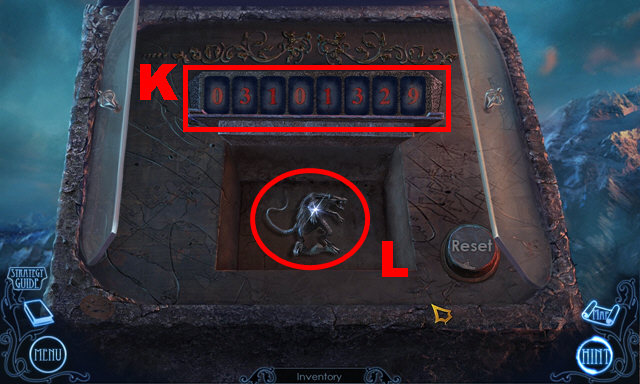
- Play the mini-game.
- Solution: (K).
- Take the RAT FIGURINE (L).
- Go to the Well.

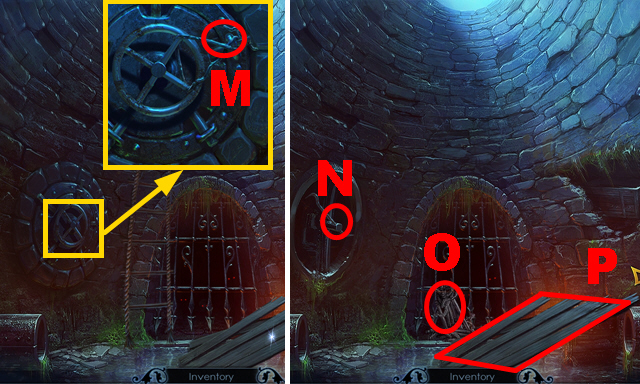
- Use the PLIERS (M) and CROWBAR (N).
- Connect the rope (O) to the boards (P).

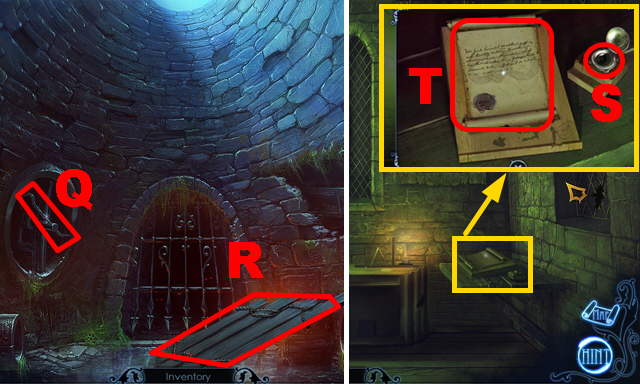
- Rotate the crowbar (Q); use the raft (R).
- Turn right.
- Place the QUILL (S); use it to write on the paper.
- Take the RELEASE ORDER (T).
- Walk down twice.

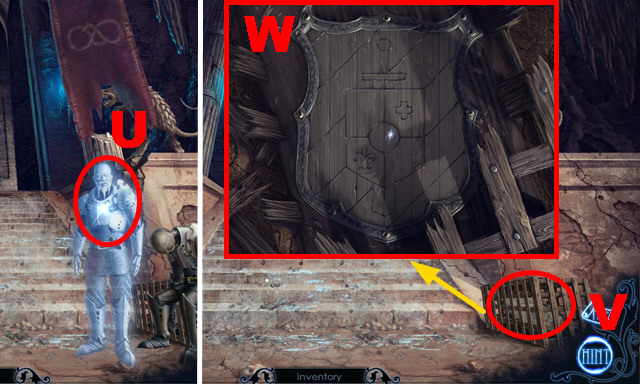
- Give the RELEASE ORDER to the guardian (U).
- Use the BATTLE-AXE (V).
- Place the PAINTS and BRUSH (W).

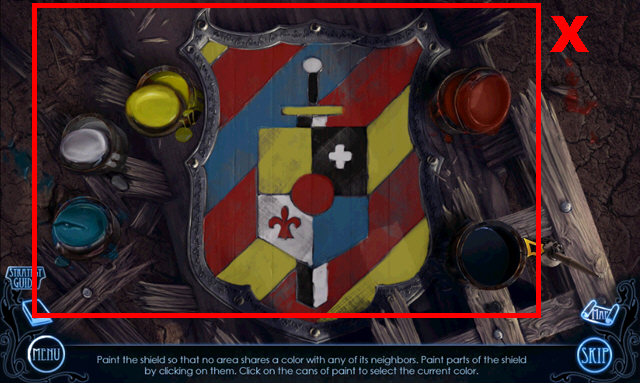
- Play the mini-game.
- Solution: (X).
- You receive MAGNUS’ SHIELD.
- Go to the Armory.

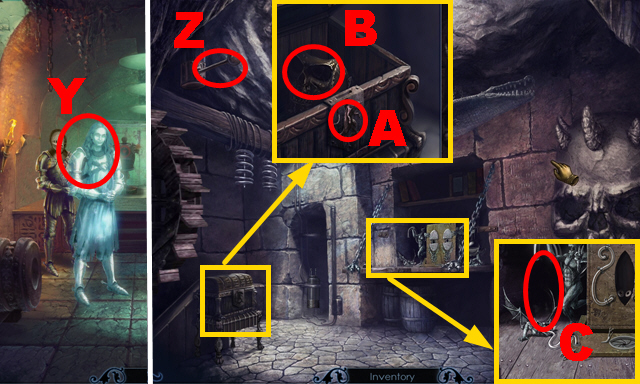
- Give MAGNUS’ SHIELD to Magnus (Y).
- Go to the Laboratory.
- Throw the ROPE (Z).
- Place the RAT FIGURINE (A).
- Take the SKULL-SHAPED MASK (B).
- Place the GLASS CONTAINER (C).
- Walk down.

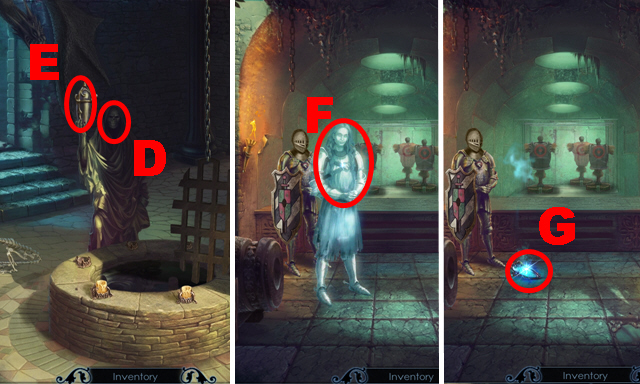
- Place the SKULL-SHAPED MASK (D).
- Take the CONTAINER FOR SPECTRAL ENERGY (E).
- Go to the Armory.
- Give the CONTAINER FOR SPECTRAL ENERGY to Magnus (F).
- Take the SPECTRAL ESSENCE (G).
- Go to the Graveyard.

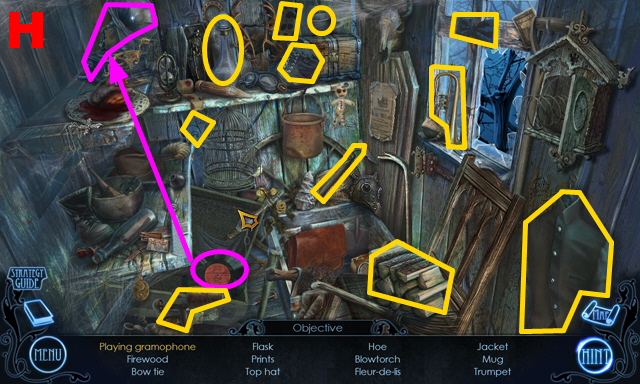
- Play the HOP.
- You receive the FIREWOOD (H).
- Go to the Laboratory.

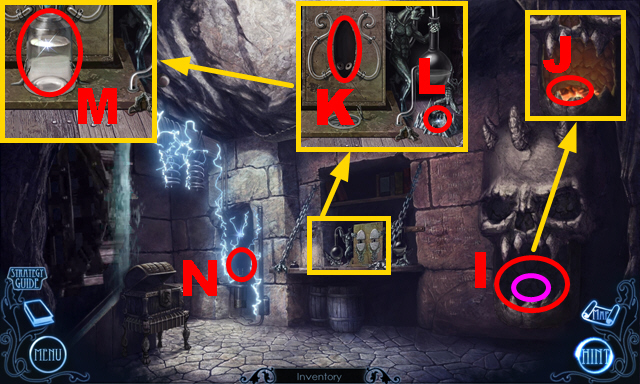
- Place the FIREWOOD (I); use the BOX OF MATCHES (purple).
- Use the TONGS (J) to acquire the BURNING CHARCOAL.
- Place the SPECTRAL ESSENCE (K) and BURNING CHARCOAL (L).
- Take the LIFE-GIVING POTION (M).
- Place the LIFE-GIVING POTION (N) to acquire the CHARGED FLASKS.
- Go to the Courtyard.

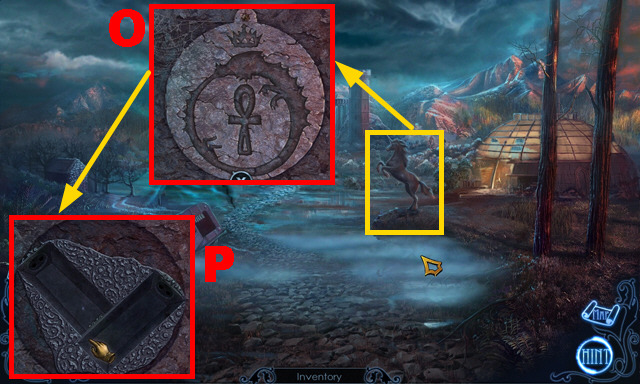
- Place the CROWN, DRAGON SYMBOL, and ANKH (O).
- Place the CHARGED FLASKS (P).
- Congratulations, you have completed Mystery of Unicorn Castle: The Beastmaster.




 Love Chronicles: The Spell Walkthrough, Guide, & Tips
 Dark Dimensions: Somber Song Walkthrough, Guide, & Tips
 Shadow Wolf Mysteries: Tracks of Terror Walkthrough, Guide, & Tips
 Iron Roses Walkthrough, Guide, & Tips
 RealMYST Walkthrough, Guide, & Tips