Hallowed Legends: Ship of Bones Walkthrough, Guide, & Tips
Hallowed Legends: Ship of Bones Walkthrough

Welcome to the Hallowed Legends: Ship of Bones Walkthrough
Follow the trail of the mysterious woman in white and discover the secret behind her terrible task!
Whether you use this document as a reference when things get difficult or as a road map to get you from beginning to end, we’re pretty sure you’ll find what you’re looking for here.
This document contains a complete Hallowed Legends: Ship of Bones game walkthrough featuring annotated screenshots from actual gameplay!
We hope you find this information useful as you play your way through the game. Use the walkthrough menu below to quickly jump to whatever stage of the game you need help with.
Remember to visit the Big Fish Games Forums if you find you need more help. Have fun!
This walkthrough was created by BrownEyedTigre, and is protected under US Copyright laws. Any unauthorized use, including re-publication in whole or in part, without permission, is strictly prohibited.
General Tips

- This is the official guide to Hallowed Legends: Ship of Bones.
- Select Options to adjust the Music, Effects, Environment, and Voice Volume. You can also adjust Full-Screen, Wide-Screen, Custom Cursor, Special Effects and Gamma.
- You may select between Casual, Advanced and Hardcore Mode. You may change the mode of play anytime in Options.
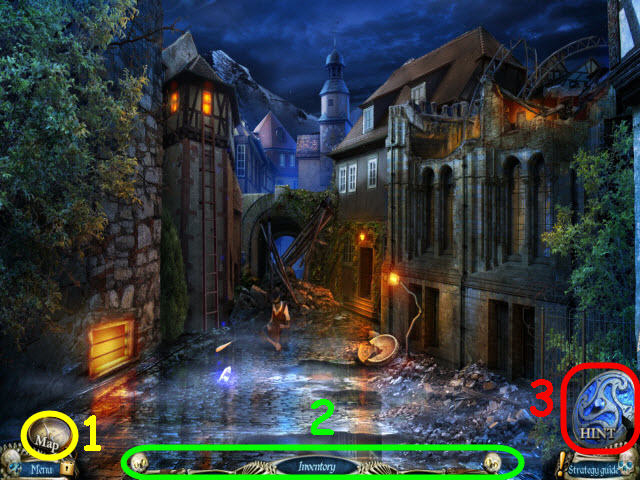
- You may access the Map (1) on the lower left to travel quickly to other areas and to see where you have unfinished quests.
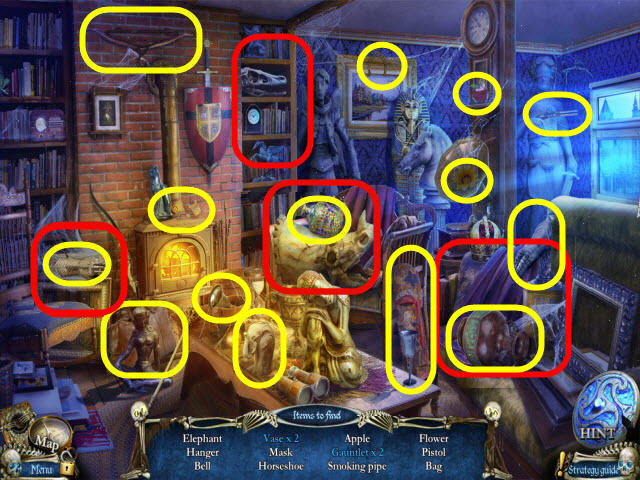
- Hidden-object scenes are referred to as HOS throughout the guide. Items in blue in the Find List require extra steps to acquire them.
- Puzzles may be skipped and reset.
- Select the Info Button on the right of the puzzles to access the game instructions.
- Move your cursor down to the bottom of the screen to raise the Inventory bar (2). Inventory items will be marked in all CAPS in the strategy guide.
- Select the Hint button (3) on the bottom right to get a hint in HOS and in the main quest.
Chapter 1 – The City
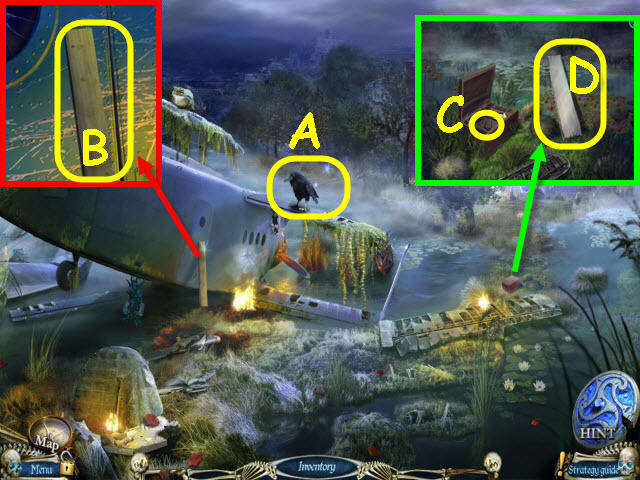
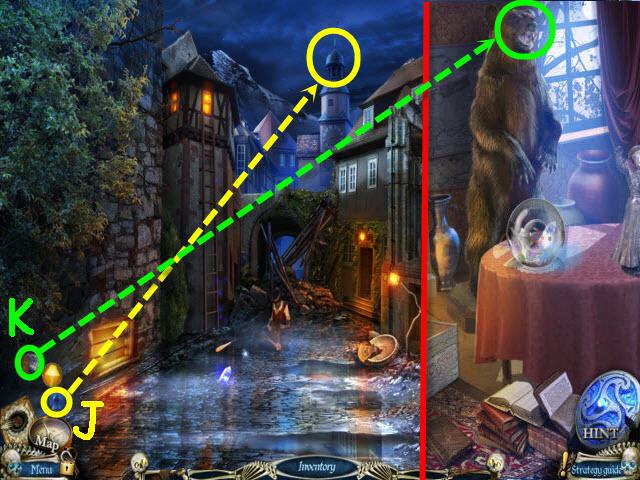
- Select anywhere in the scene and you will acquire a RAVEN (A).
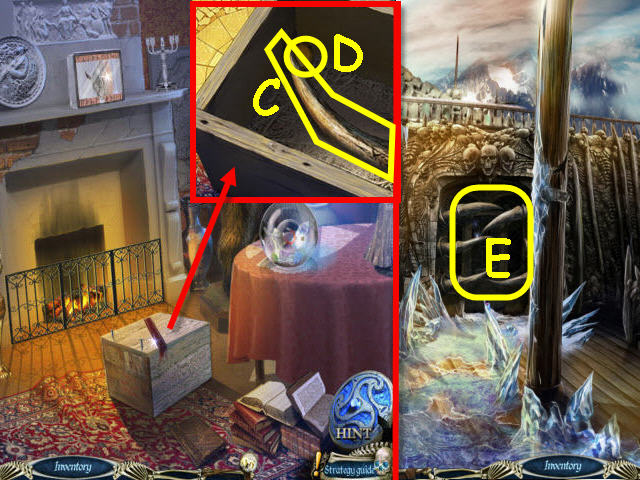
- Examine the plane door; take the board (B).
- Examine the box; open the lid and take the FISHHOOK (C).
- Place the BOARD across the water (D).
- Go forward on the right to the city gates.
- Select anywhere in the scene to speak to the pilot.
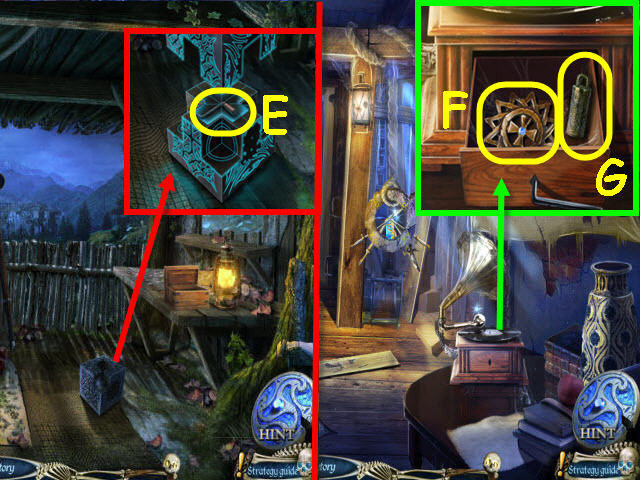
- Examine the pilot and take the KEY (E).
- Back out.
- Examine the bag and use the KEY on the lock; take the BANDAGE (F) and TORN PICTURE (G).
- Return to the City gates.
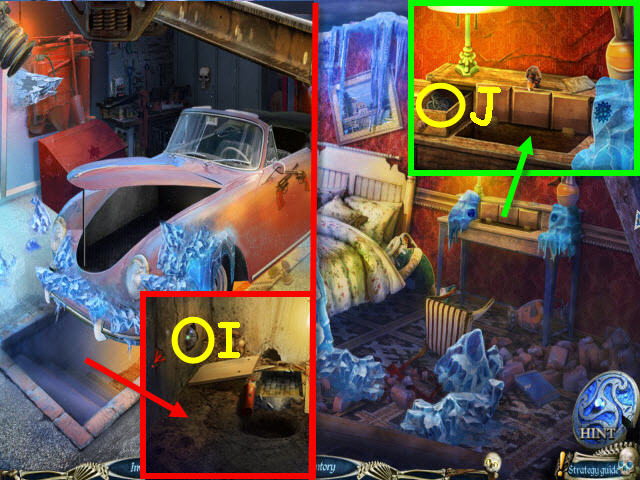
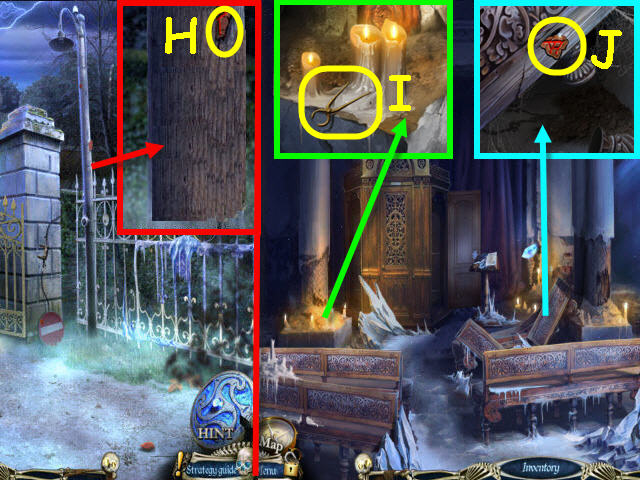
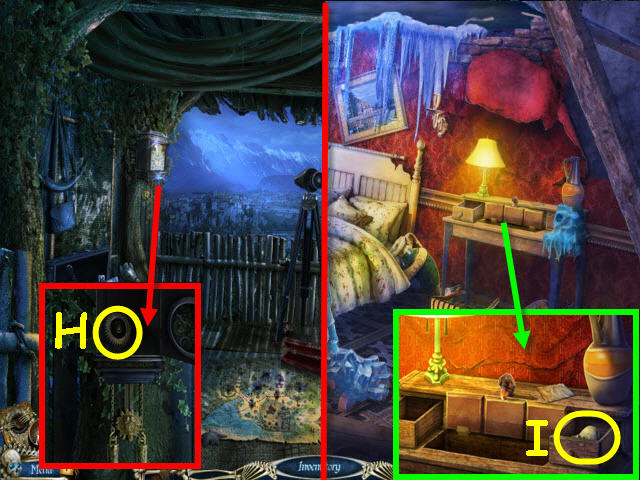
- Examine the pilot; use the BANDAGE on his hand (H).
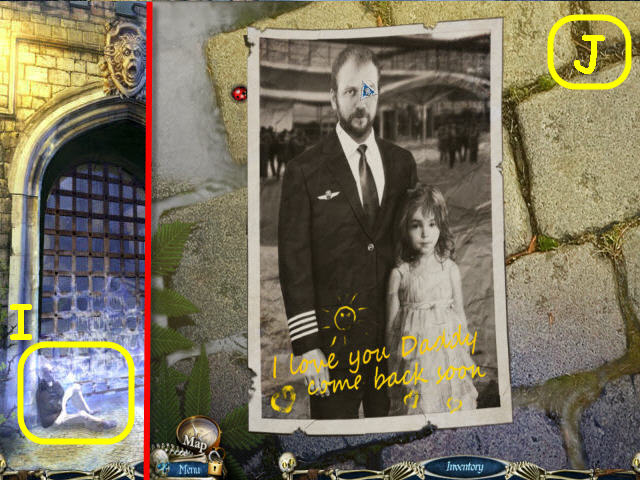
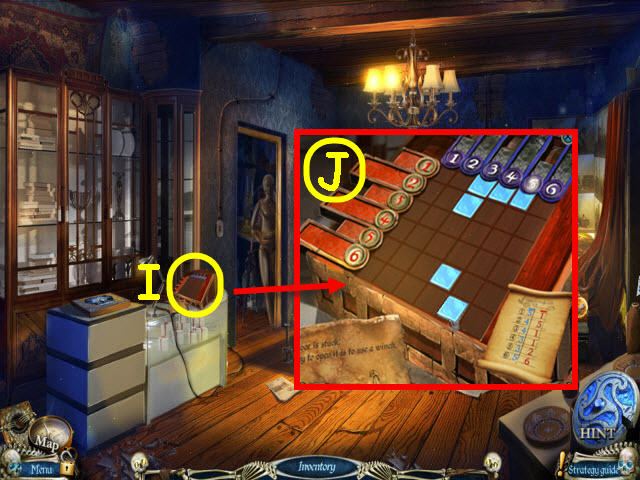
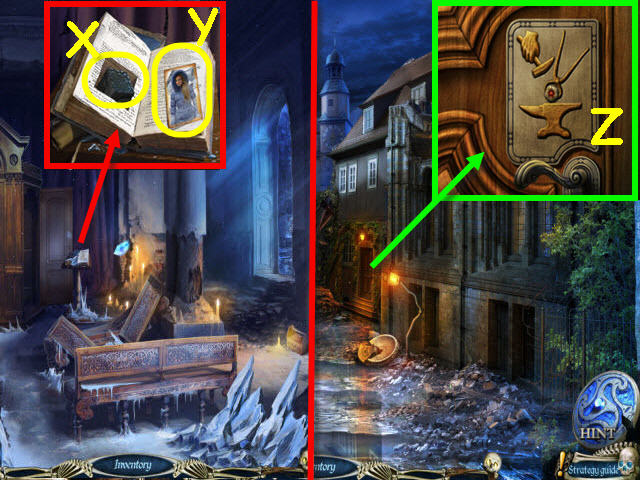
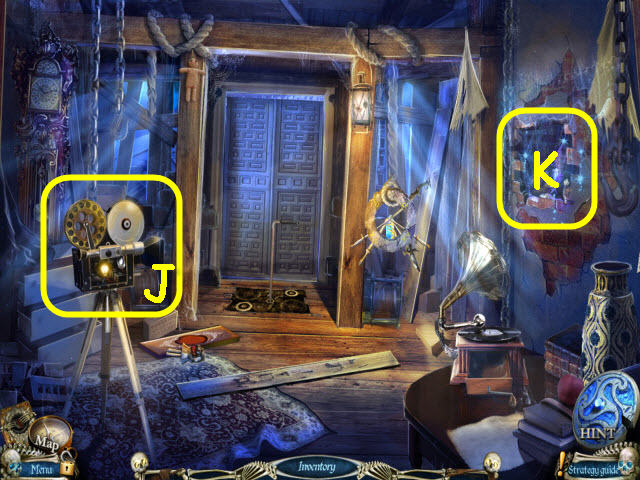
- Speak to the pilot’s skeleton; examine the ground by his feet and place the TORN PICTURE on the ground to trigger a puzzle (I).
- Assemble the pieces to complete the photo.
- See screenshot for solution (J).
- Take the HANDLE.
- Back out.
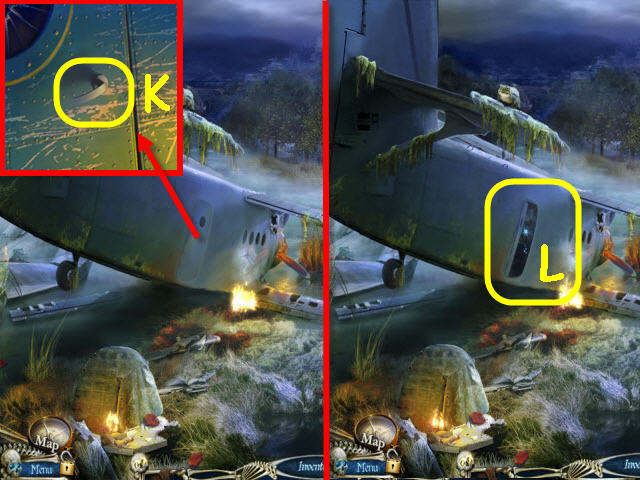
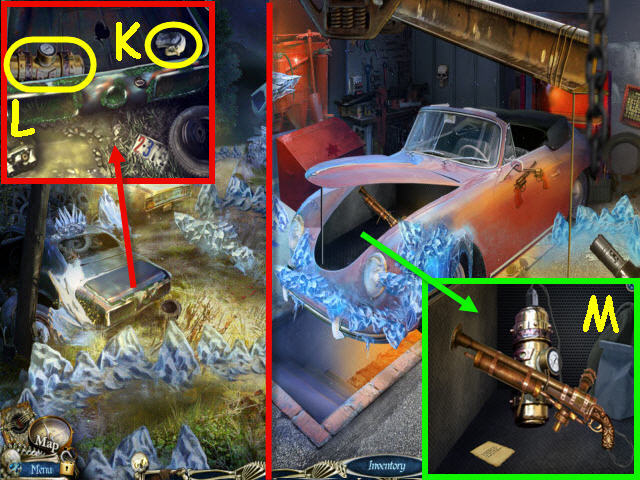
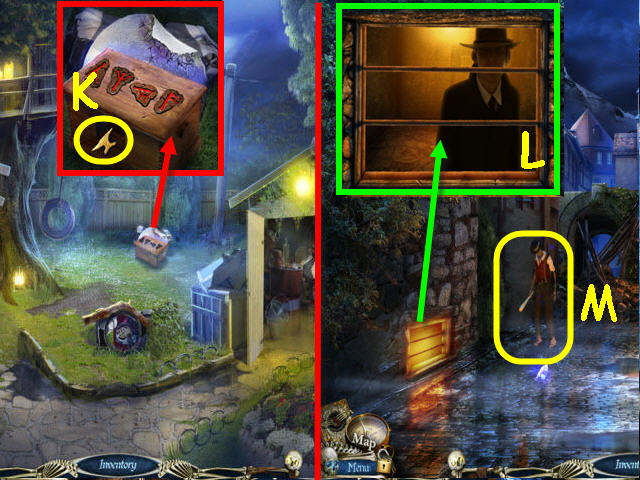
- Examine the plane door and place the HANDLE on it; turn the handle (K).
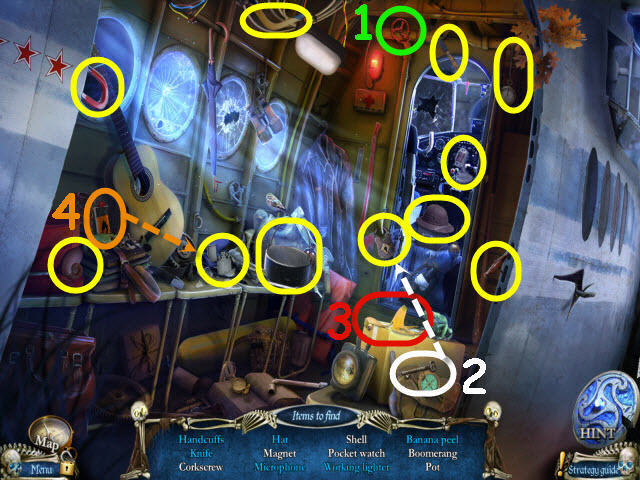
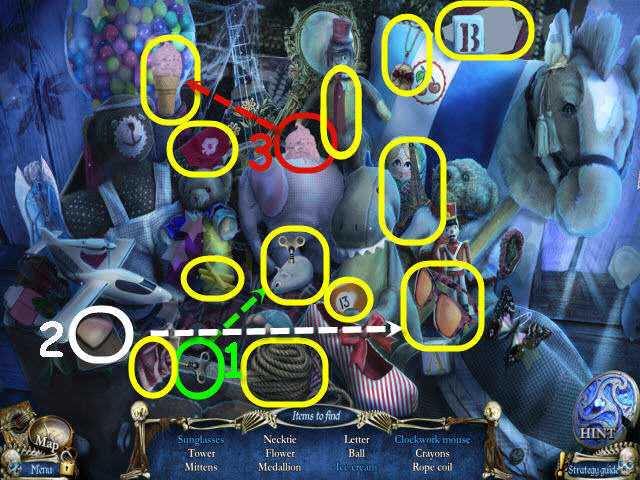
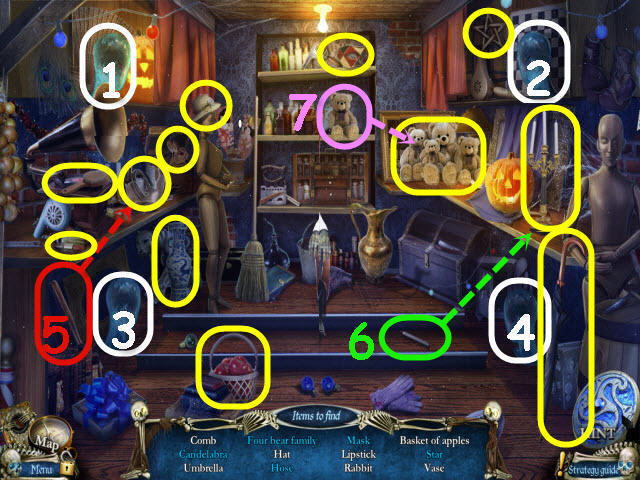
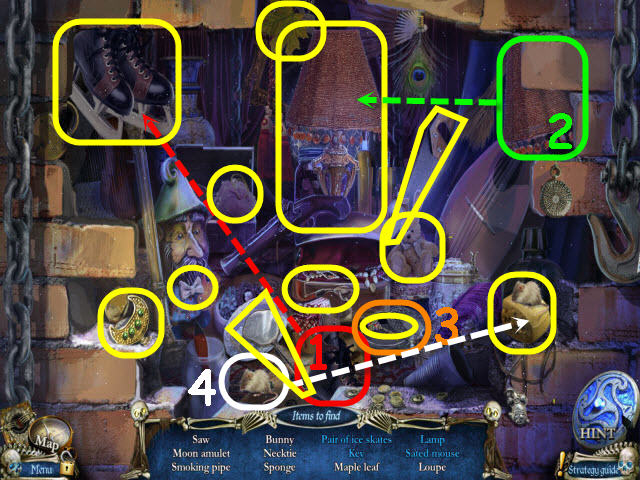
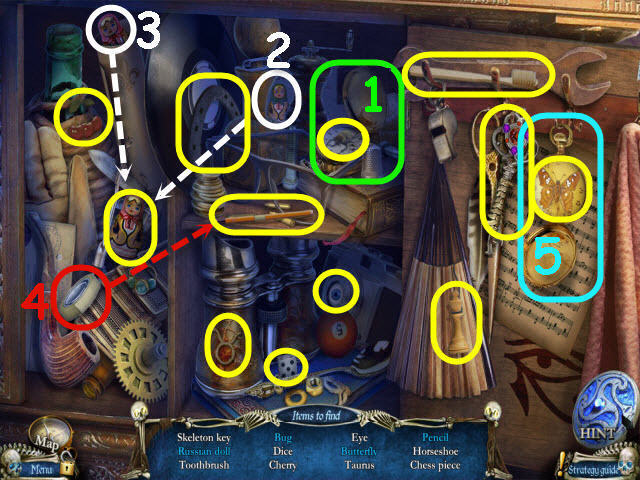
- Examine the opened plane door to access a HOS (L).
- Find the items listed.
- Turn the valve to shut off the steam to get the knife, microphone and hat (1).
- Use the key on the lock to get handcuffs (2).
- Peel the banana to get the banana peel (3).
- Use the gas on the lighter and light it to get a working lighter (4).
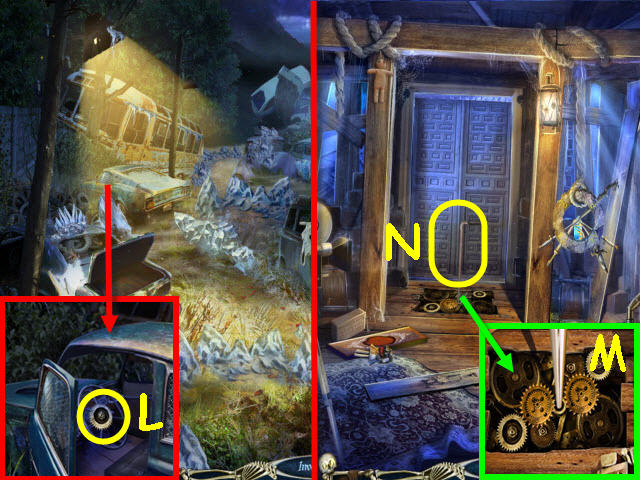
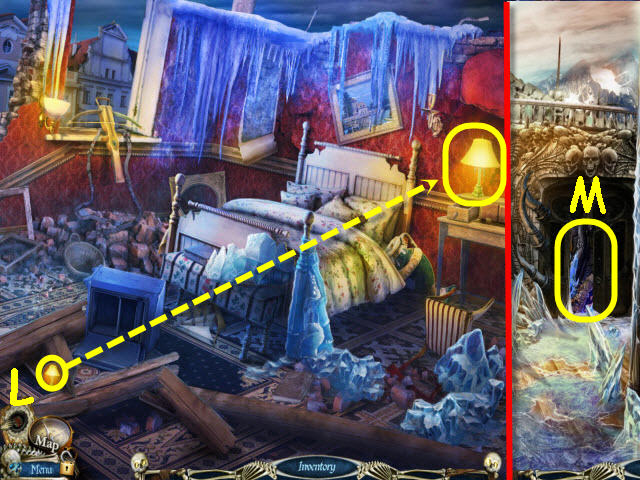
- You will earn a POT.
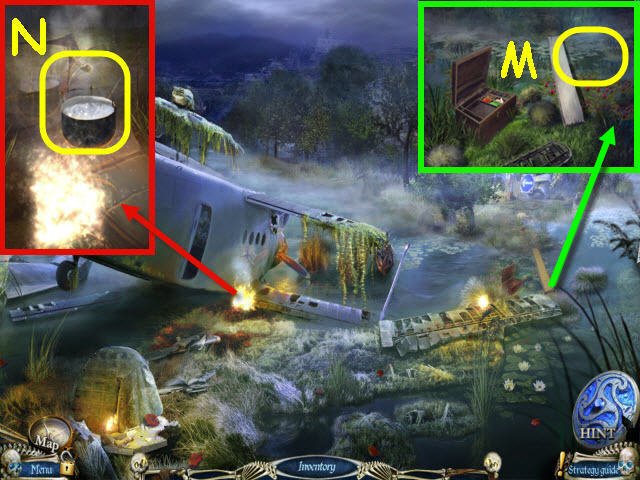
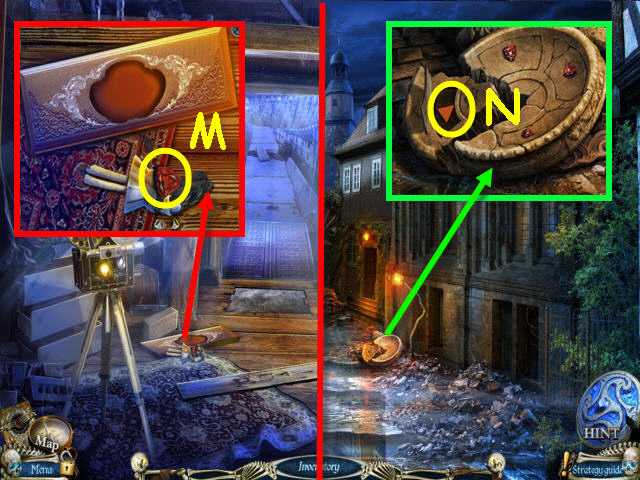
- Examine the board and use the POT on the water (M); get a POT WITH WATER.
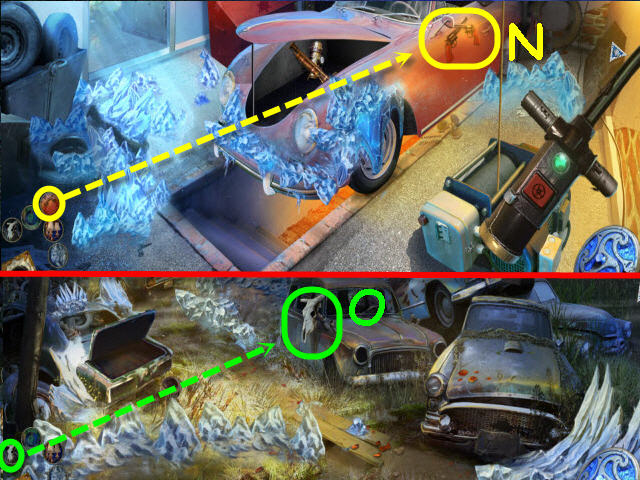
- Examine the fire and place the POT WITH WATER on it; take the BOILING WATER (N).
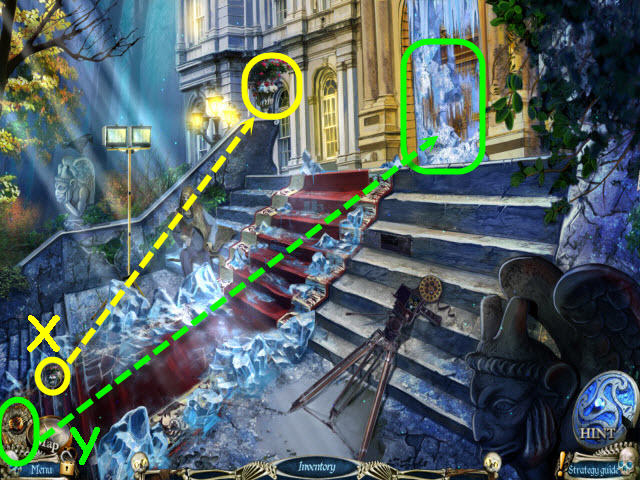
- Go forward to the City gates.
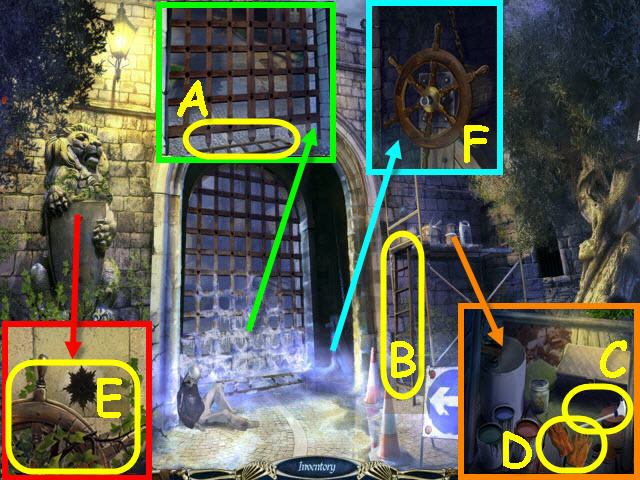
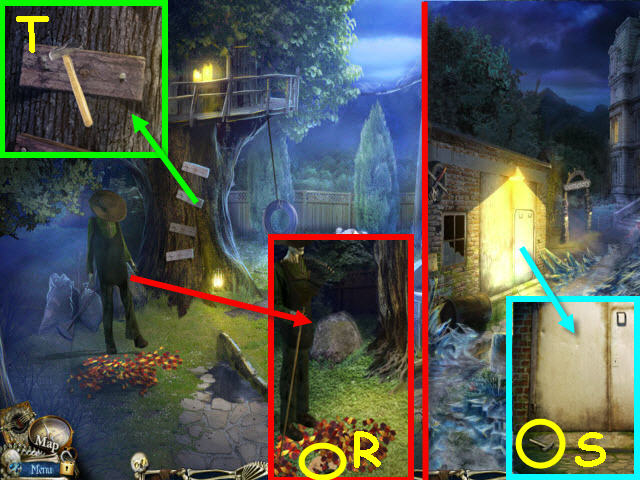
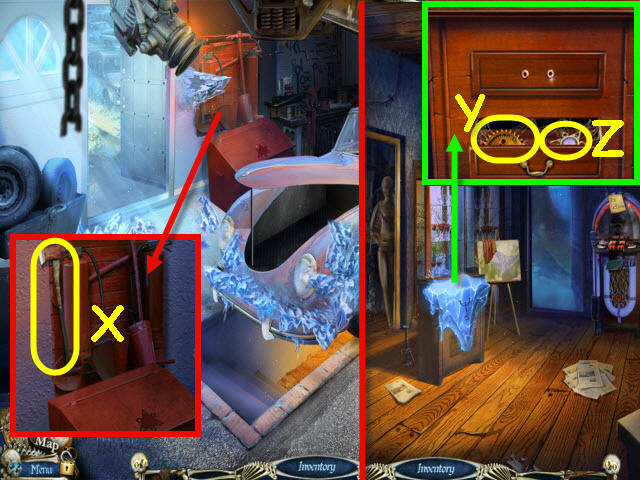
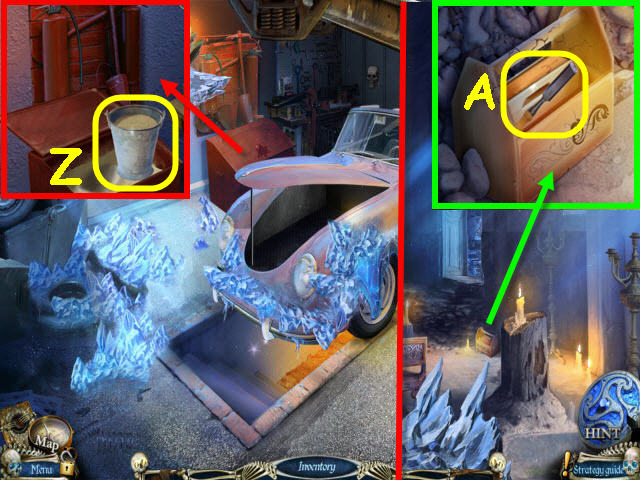
- Examine the frozen gates and use the BOILING WATER on the ice; take the LADDER (A).
- Place the LADDER against the scaffolding (B).
- Examine the scaffolding platform; take the SPRAY HEAD (C) and the GLOVES (D).
- Examine the statue shield and use the GLOVES on the thorns; take the SHIP’S WHEEL (E).
- Examine the mechanism and place the SHIP’S WHEEL on it; turn the SHIP’S WHEEL (F).
- Go forward twice to the Cemetery entrance.
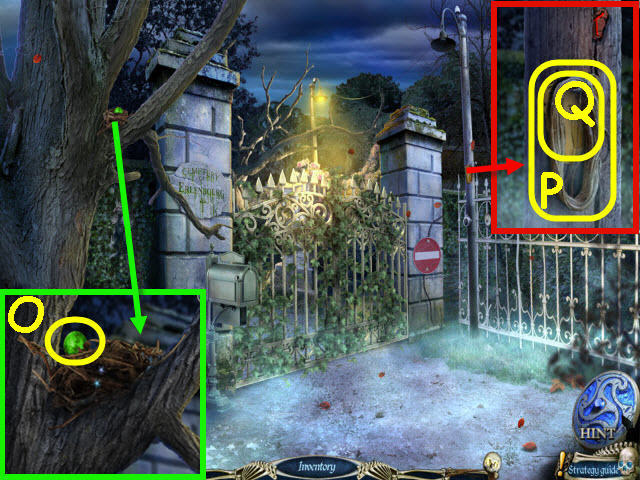
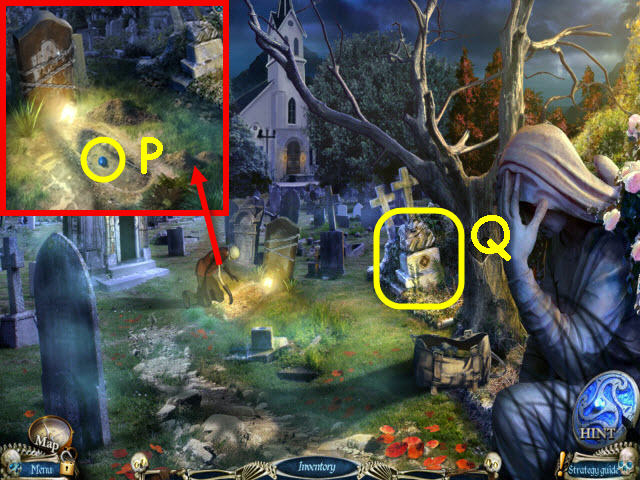
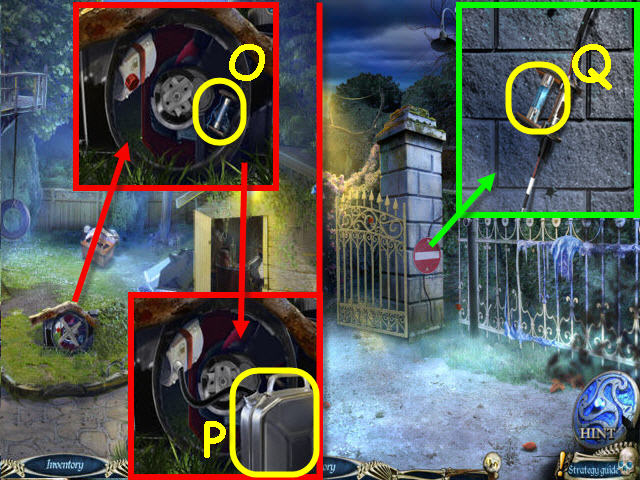
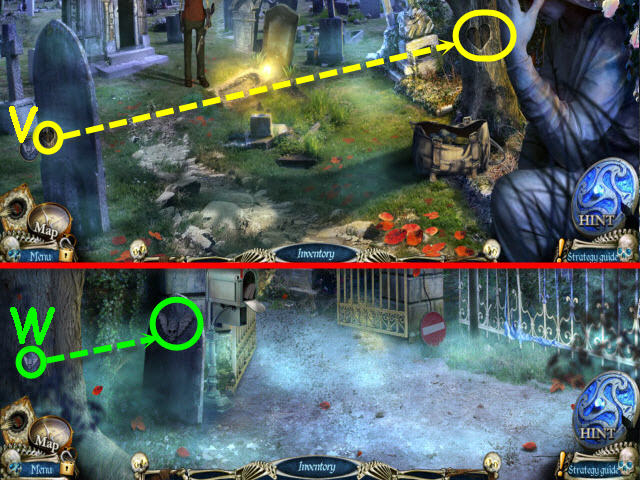
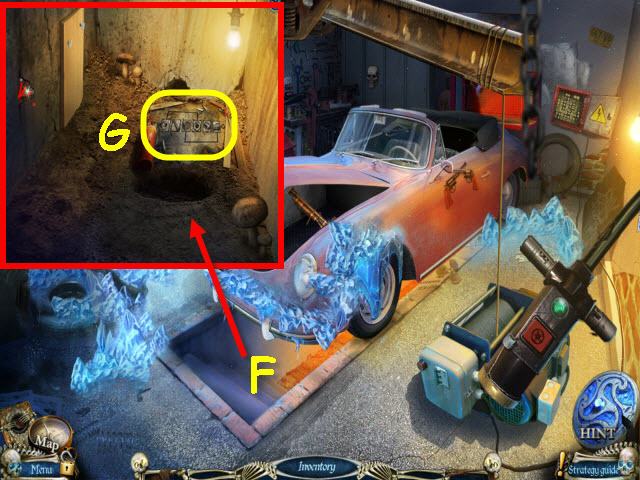
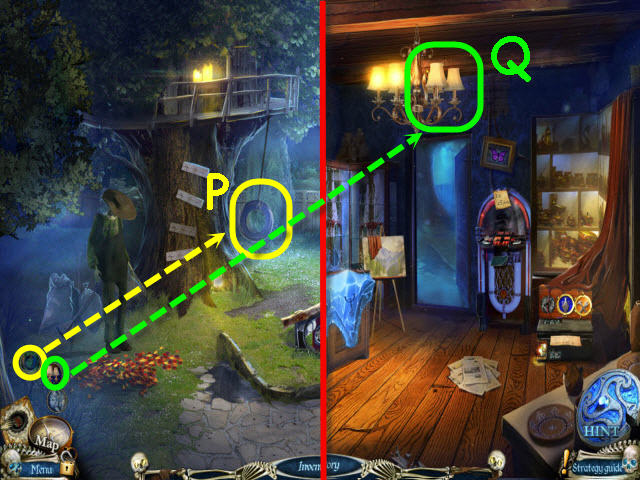
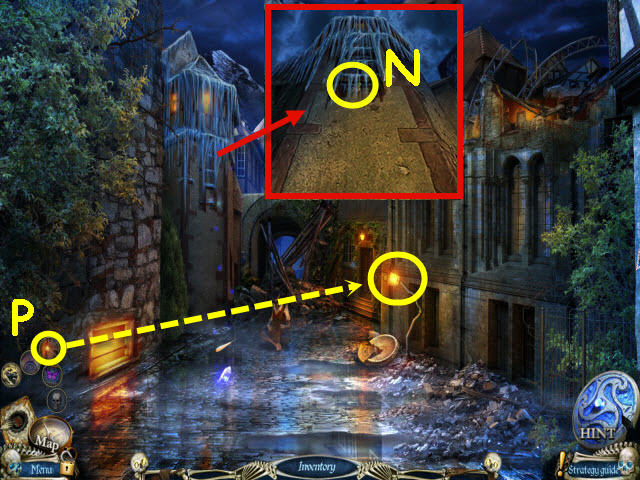
- Examine the nest; use the RAVEN to get the GREEN GEM (O).
- Examine the light pole; take the ROPE (P), which will automatically combine with the HOOK to create a ROPE AND HOOK.
- Take the WEED KILLER FORMULA (Q).
- Back out.
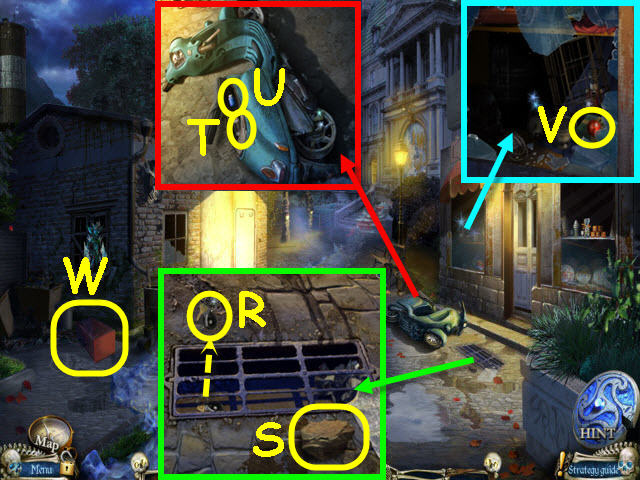
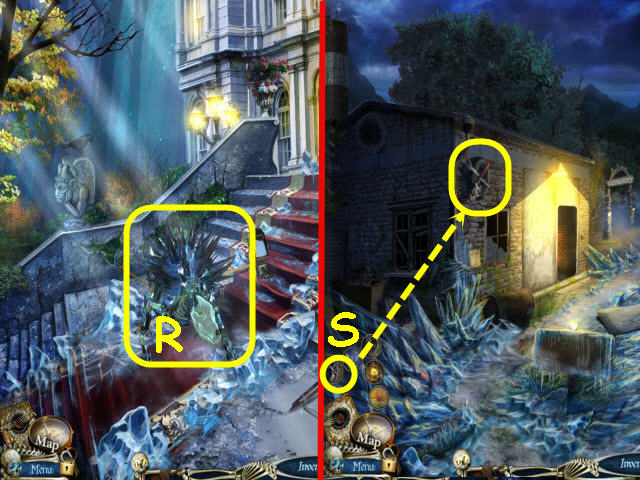
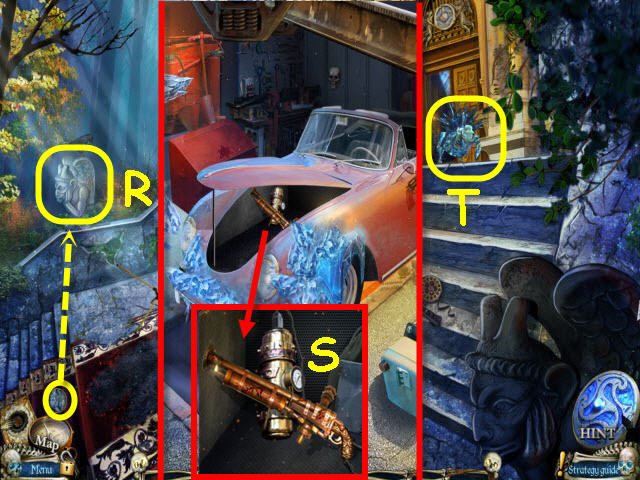
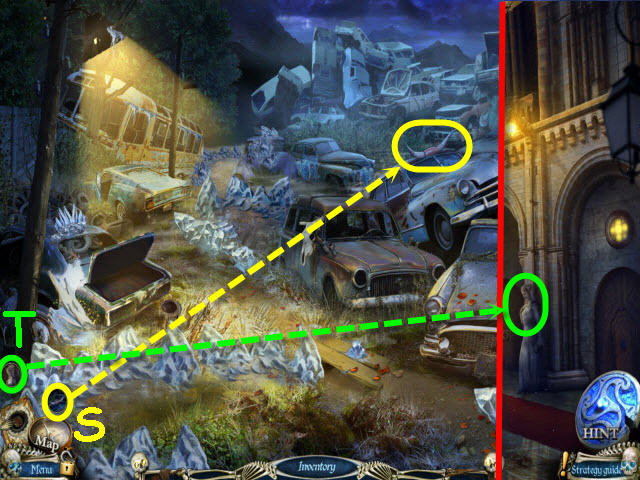
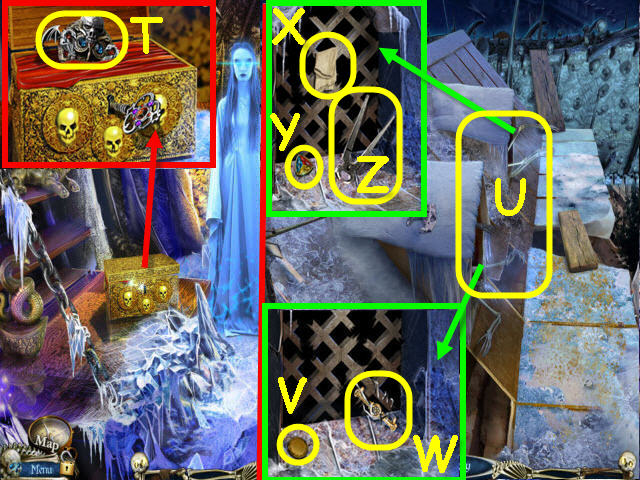
- Examine the drain and use the ROPE AND HOOK on the keys; take the MOTORBIKE KEY (R) and STONE (S).
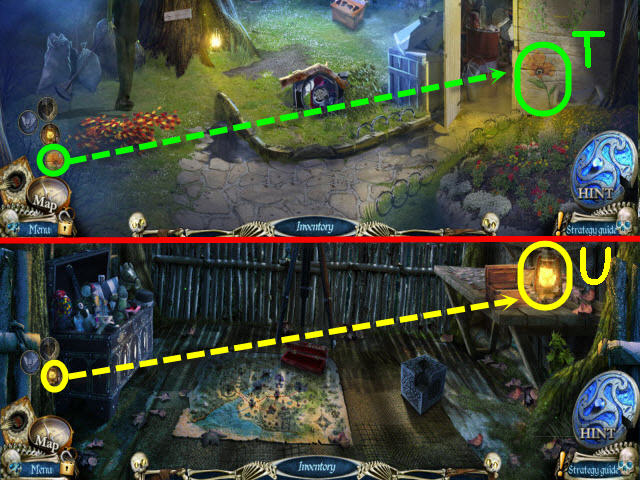
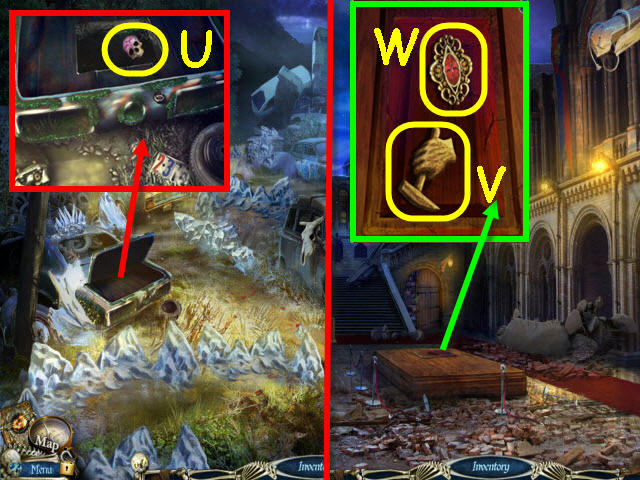
- Examine the motorbike and use the MOTORBIKE KEY on the compartment lock; take the HYDRO-BOOSTER (T) and PILLS (U).
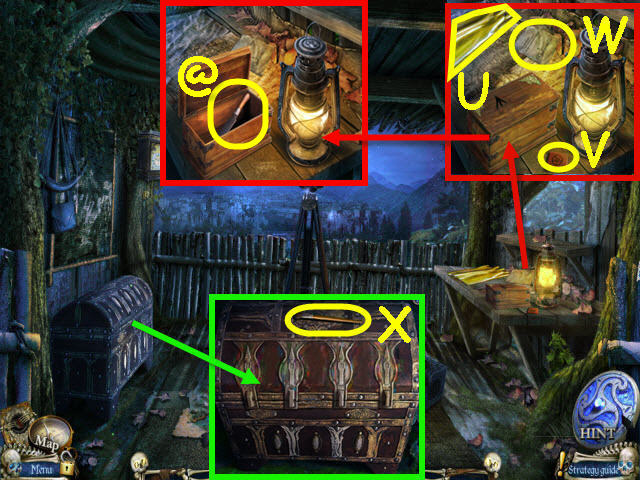
- Examine the window and use the STONE on it; take the RED GEM (V).
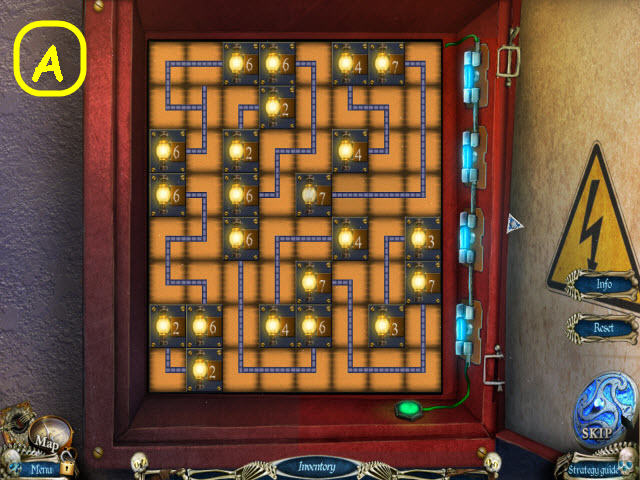
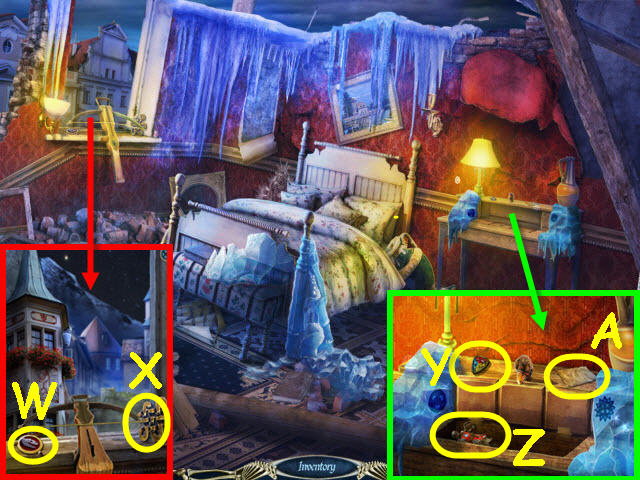
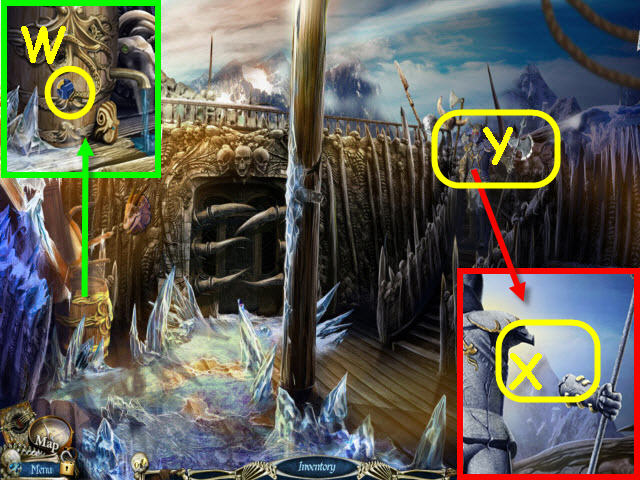
- Examine the box; move the cover and place the HYDRO-BOOSTER on it to trigger a puzzle (W).
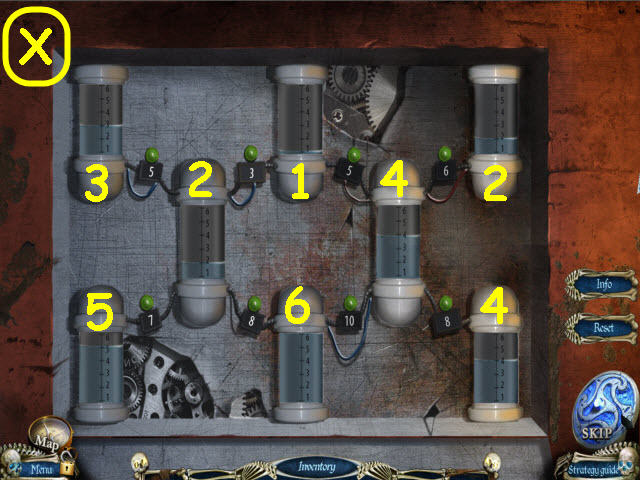
- Adjust the levels in the tubes to light all the lights green.
- To solve the puzzle, see the correct levels marked in the screenshot (X).
- Examine the opened box to access a HOS.
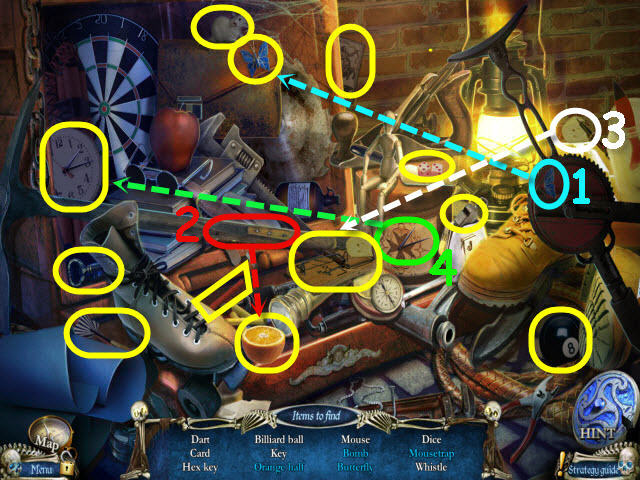
- Find the items listed.
- Place the butterfly half on the butterfly half to get a butterfly (1).
- Use the knife on the orange to get an orange half (2).
- Place the cheese on the trap to get a mousetrap (3).
- Place the clock hands on the clock to get a bomb (4).
- You will earn a HEX KEY.
- Go forward up the steps to the Museum entrance.
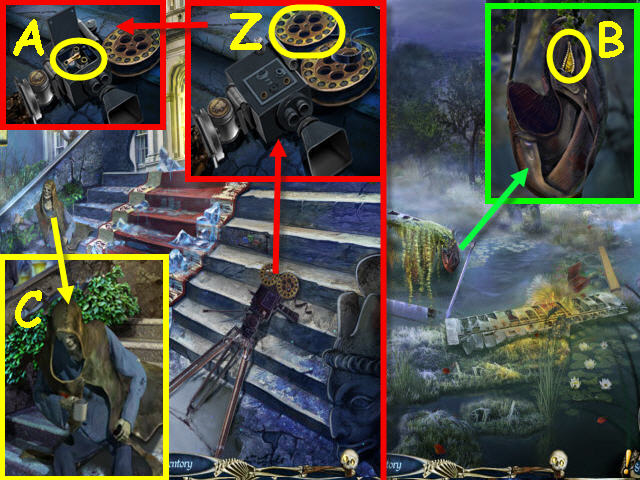
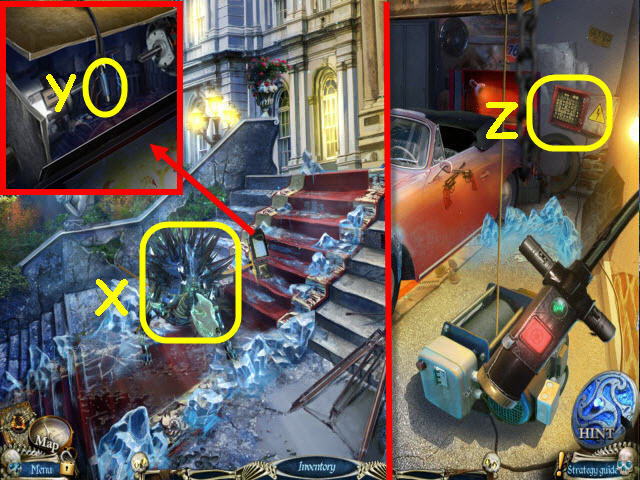
- Examine the camera; select the FILM REEL (Z) to take the reel and trigger a cut scene.
- Use the HEX KEY on the camera compartment; take the ZIPPER PULL (A).
- Back out three times to the Plane.
- Examine the bag and place the ZIPPER PULL on the zipper; take the COINS (B).
- Return to the Museum entrance.
- Examine the beggar; speak to him and give him the COINS to get a BOTTLE (C).
- Back out.

- Examine the barrel and place the WEED KILLER FORMULA on the wall and the PILLS, BOTTLE and SPRAY HEAD on the shelf (D).
- Place the PILLS in the barrel, then use the BOTTLE in the barrel; place the SPRAY HEAD on the bottle with formula. Take the WEED KILLER (E).
- Go forward to the Cemetery entrance.
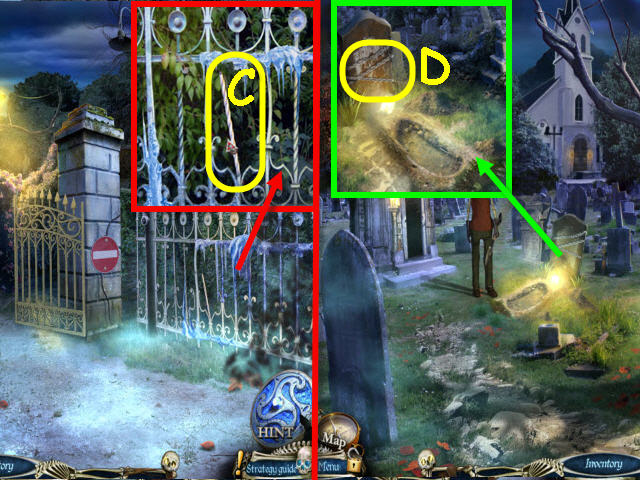
- Examine the gate and use the WEED KILLER on the vines (F).
- Go through the newly-opened gates to the Cemetery.
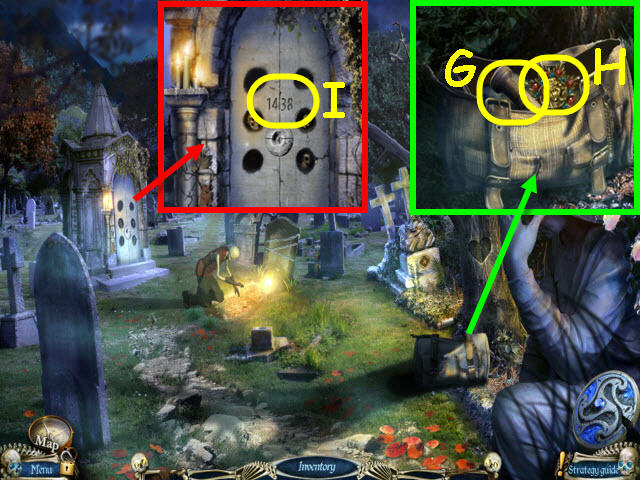
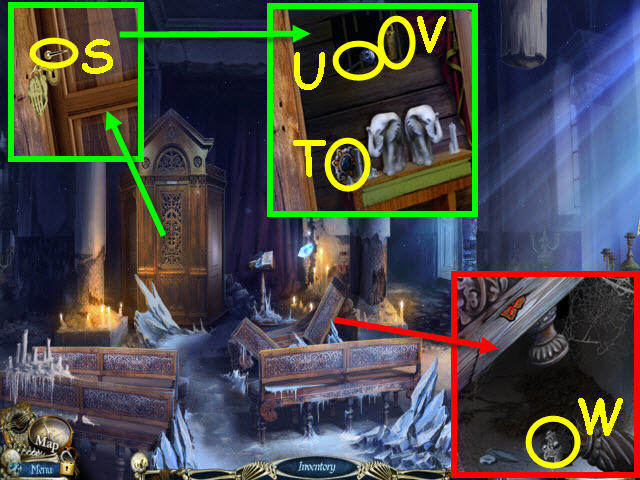
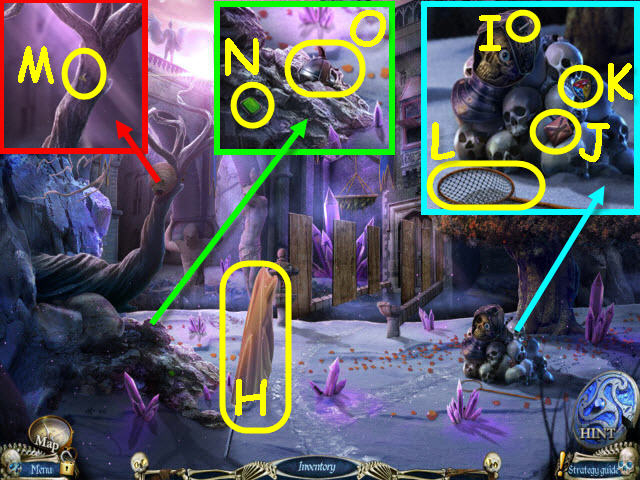
- Examine the duffle bag and open it; take the FLASHLIGHT (G) and the AMULET (H).
- Examine the crypt and note the numbers; 1-4-3-8 (I).
- Back out twice and go forward up the stairs.
Chapter 2 – The Cemetery
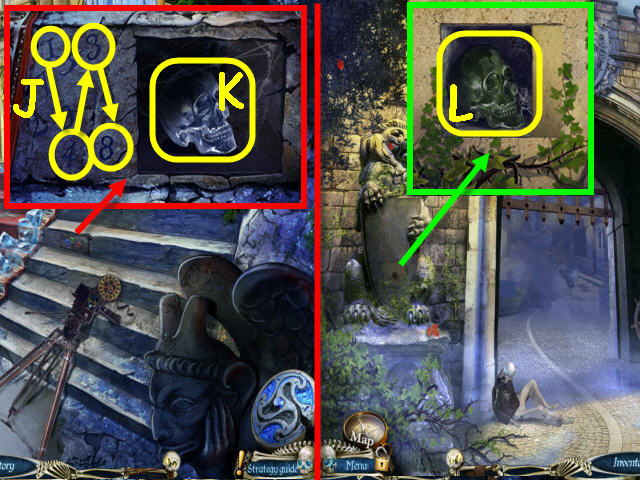
- Examine the stair riser and move the runner; press the numbers from the crypt 1-4-3-8 (J).
- Take the BLUE SKULL (K).
- Back out twice.
- Examine the statue shield and place the AMULET in the slot; take the GREEN SKULL (L).
- Go forward.
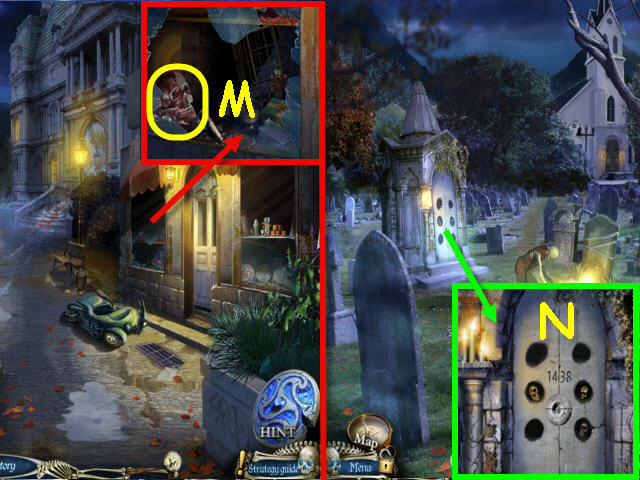
- Examine the broken window and use the FLASHLIGHT on it; take the RED SKULL (M).
- Go to the Cemetery.
- Examine the crypt and place the BLUE SKULL, GREEN SKULL, and RED SKULL in the slots (N).
- Examine the opened crypt to access a HOS.
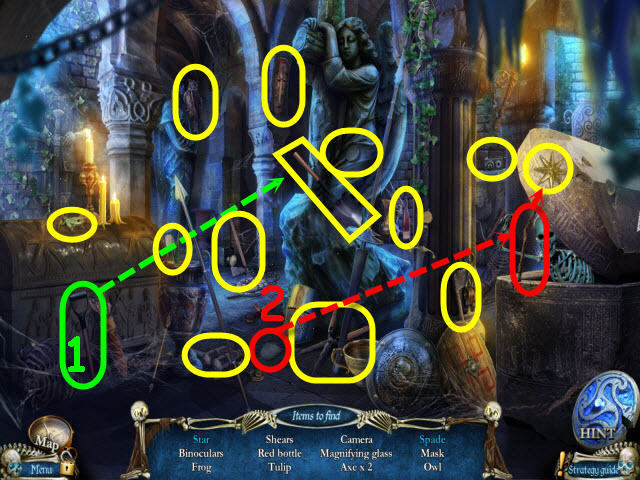
- Find the items listed.
- Place the handle on the spade head to get a spade (1).
- Use the rock on the stick to get the star (2).
- You will earn a SPADE.
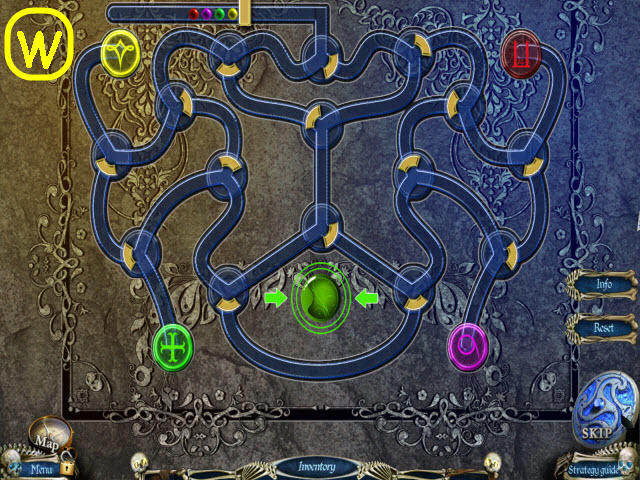
- Examine the man digging and speak to him; give him the SPADE and take the BLUE GEM (P).
- Examine the headstone and place the GREEN GEM, RED GEM and BLUE GEM on it to trigger a puzzle (Q).
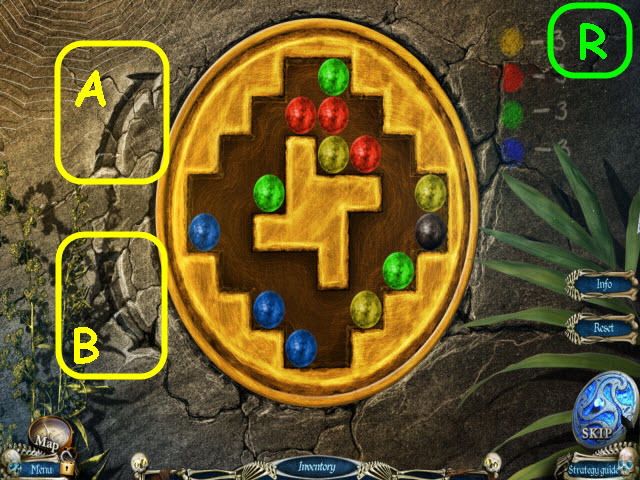
- Remove all the colored balls.
- To solve the puzzle, select the following arrows; Bx4-A-Bx2-A-B-A-B-Ax3-Bx3-Ax2-B-A-Bx2-A and B (R).
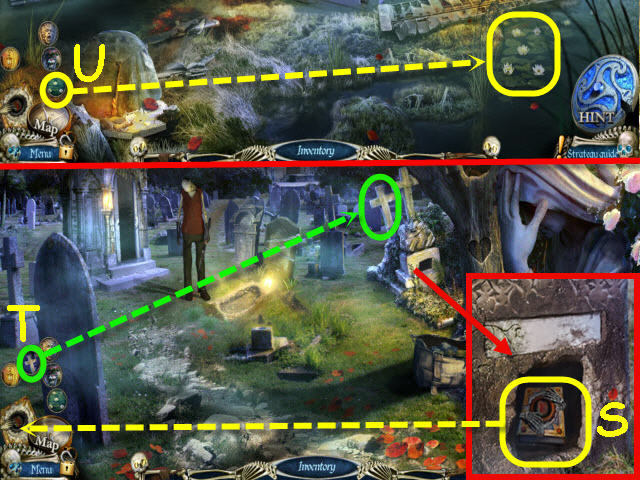
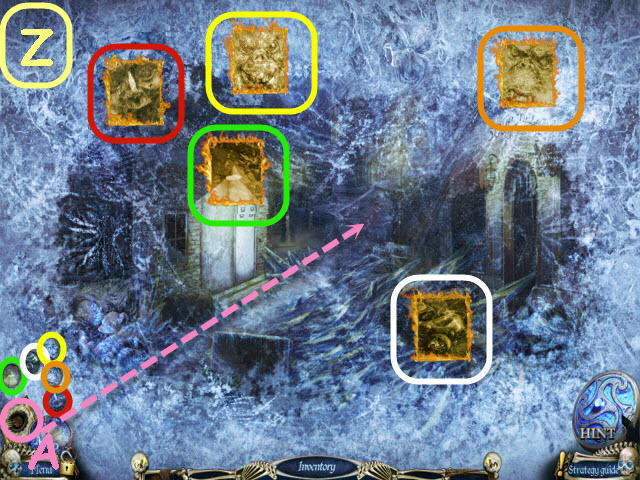
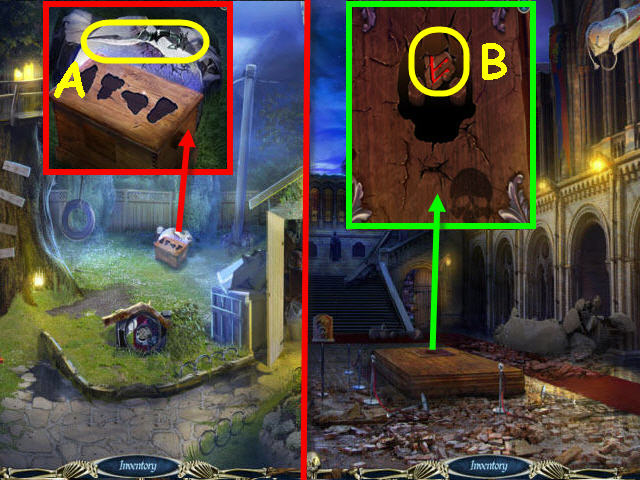
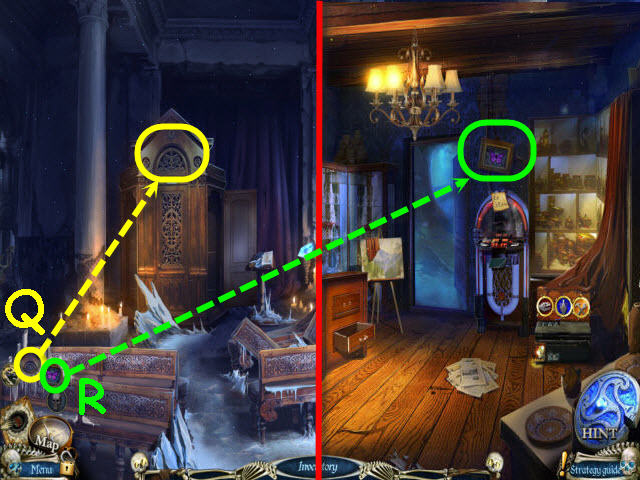
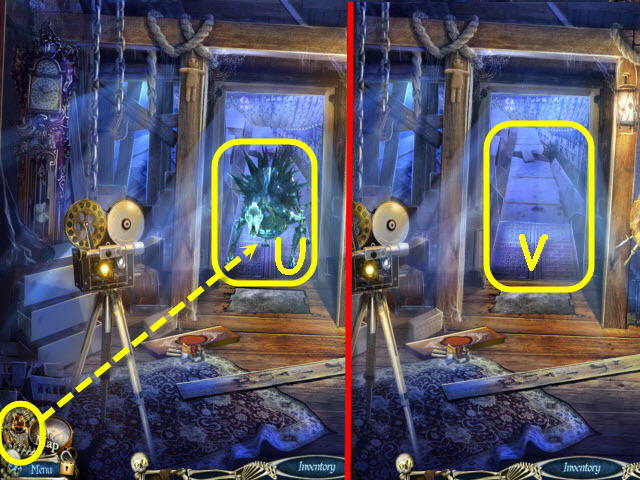
- Examine the grave; take the Book of Fire which will be added to your toolbar (S).
- Place the rune on its matching location (T).
- Go to the Plane.
- Place the rune on its matching location (U).
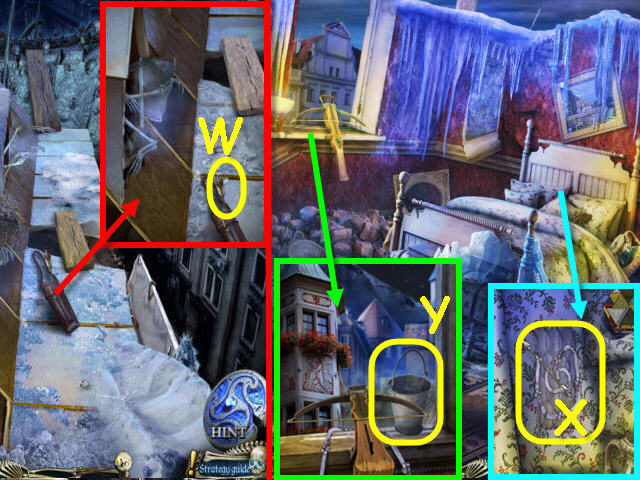
- Go forward.
- Place the rune on its matching location (V).
- Go forward.
- Place the rune on its matching location (W).
- Go forward up the stairs to the Museum entrance.
- Place the rune on its matching location (X).
- You should now have a lit Book of Fire.
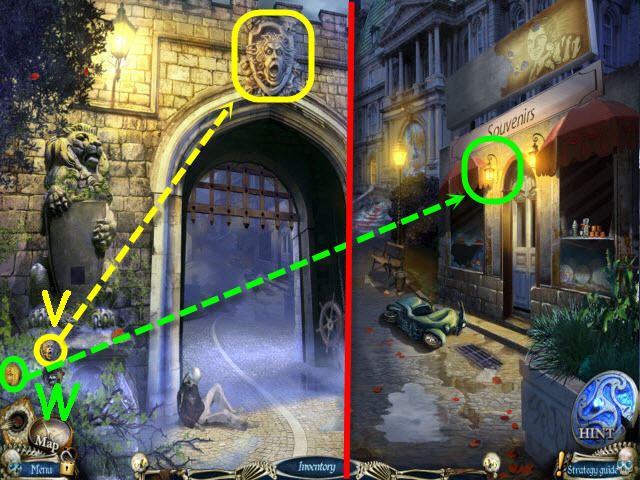
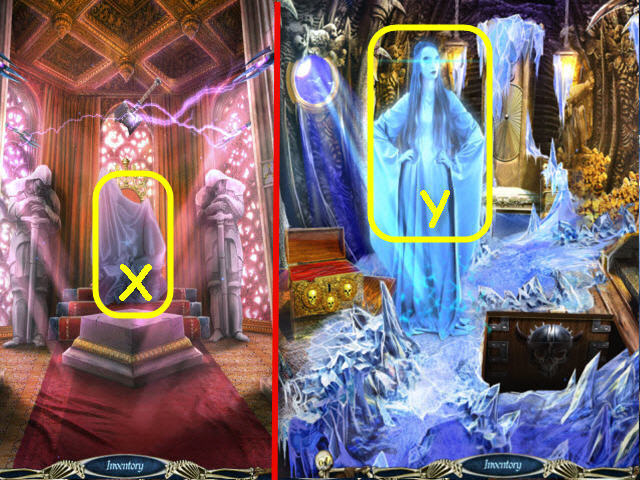
- Examine the icy door and use the Book of Fire on it (Y).
- Open the defrosted door and enter the Museum.
- Place the runes on their matching locations; runes and locations are color coded in the screenshot (Z).
- Select and drag the lit Book of Fire to the center of the screen to melt the ice (A).
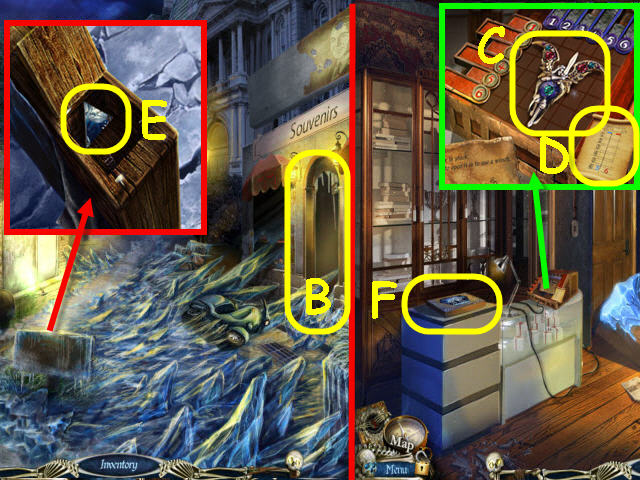
- Enter the Souvenir shop (B).
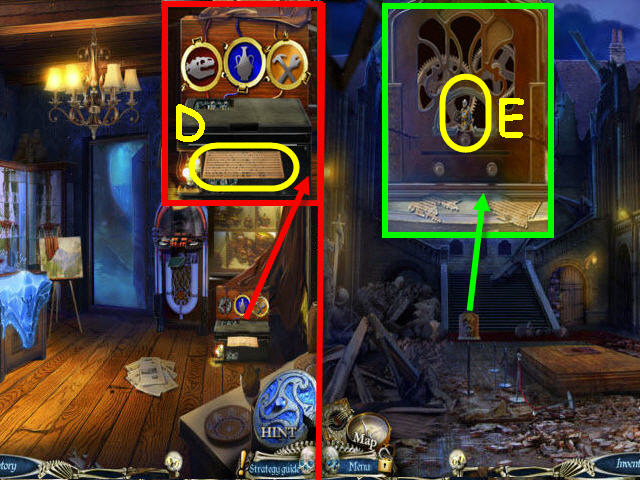
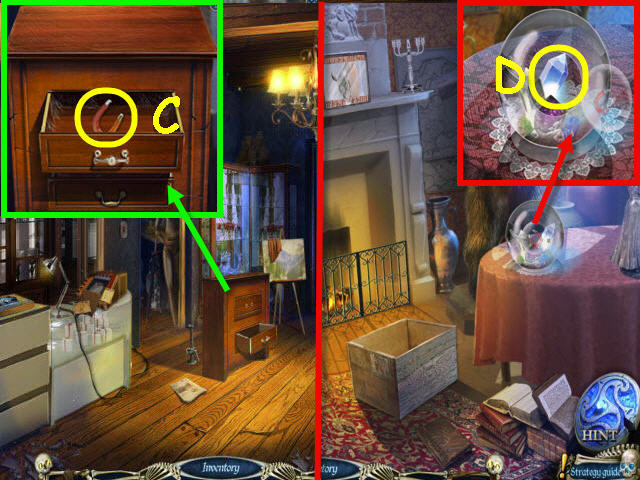
- Examine the cash register and read the diagram; take the KEY (C) and the BLANK PASSWORD NOTE (D).
- Back out.
- Examine the sign and place the KEY in the slot; take the TRIANGLE (E).
- Enter the Souvenir shop.
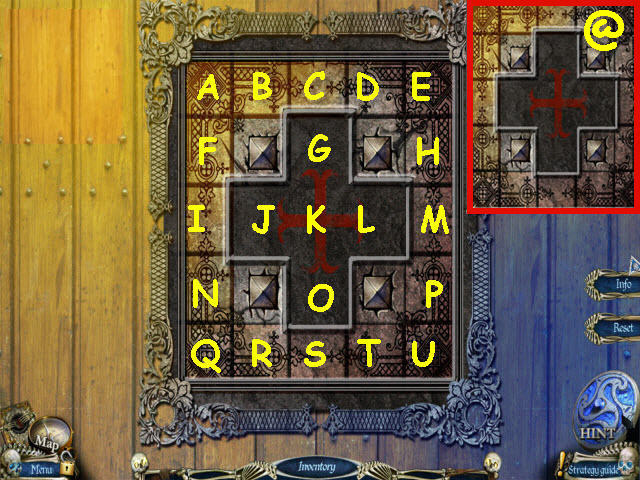
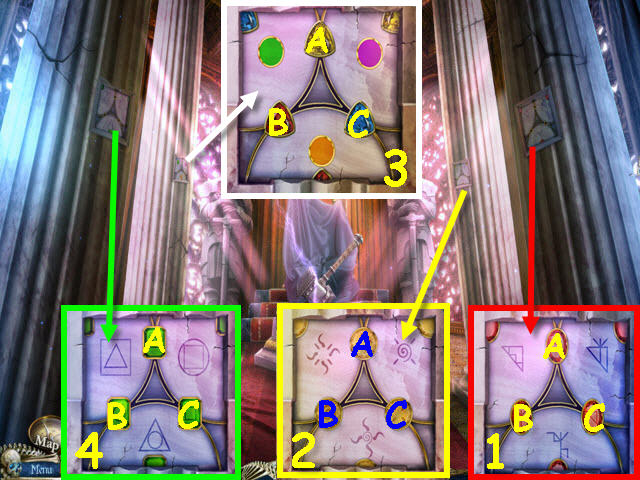
- Examine the board and place the TRIANGLE on it to trigger a puzzle (F).
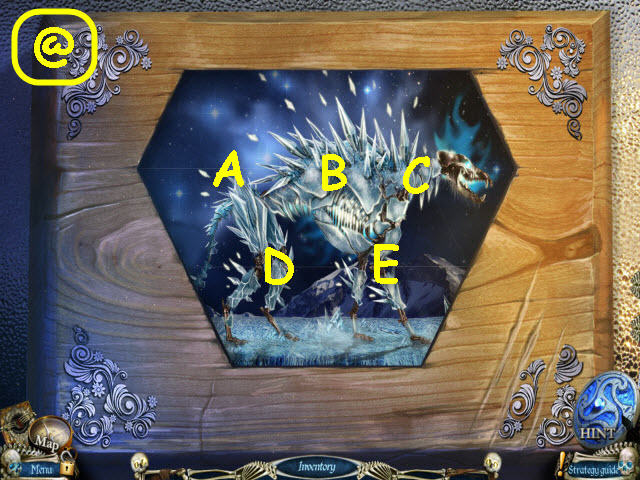
- Rotate the hexagons to complete the picture.
- To solve the puzzle, select the following hexagons: Ax2-Cx2-Dx2-Bx2-Ex2-Cx2 and Ax2 (@).
- Take the MAILBOX FLAG.
- Go to the Cemetery entrance.
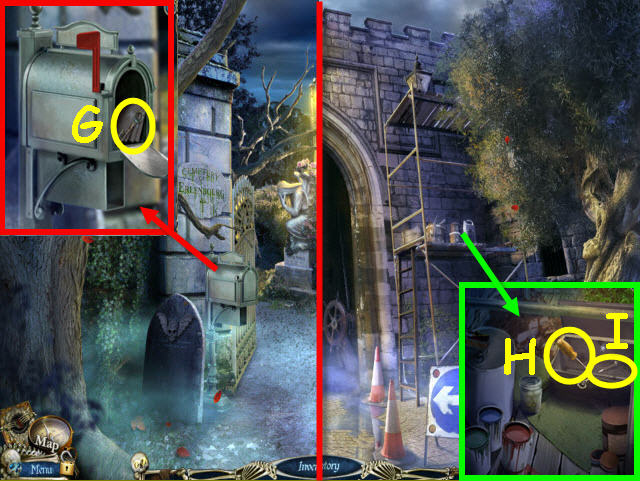
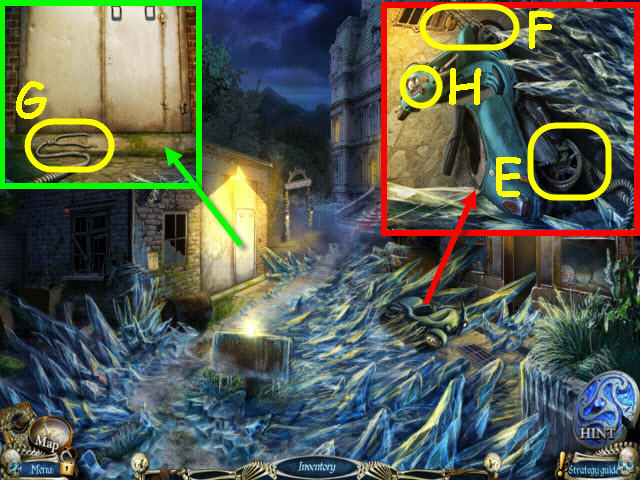
- Examine the mailbox and place the MAILBOX FLAG on it; take the TOOLBOX KEY (G).
- Go to the City gates.
- Examine the scaffolding platform and use the TOOLBOX KEY on the toolbox; take the SCREWDRIVER (H) and NAIL (I).
- Go to the Souvenir shop.
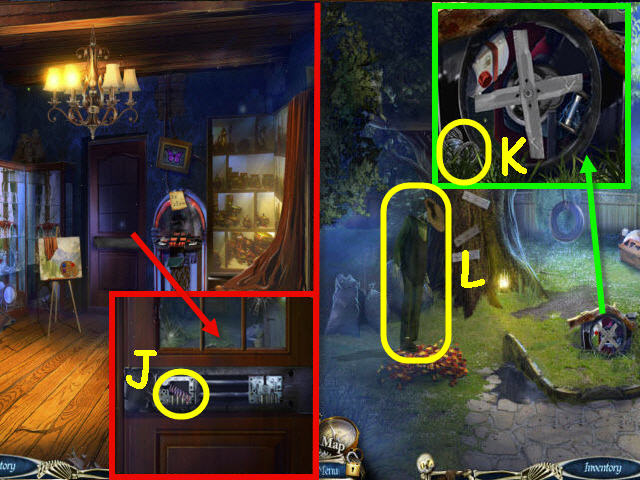
- Examine the boarded door and use the SCREWDRIVER on the board; move the spring (J).
- Go through the newly-opened door to the Backyard.
- Examine the lawnmower; take the CHAPEL KEY (K).
- Examine and speak to the gardener (L).
- Go to the Cemetery.
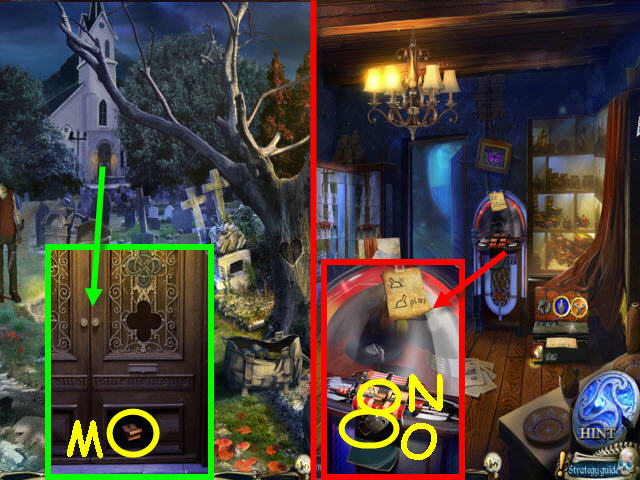
- Examine the chapel door and place the CHAPEL KEY on it; take the SWITCH (M).
- Go to the Souvenir shop.
- Examine the jukebox and open the panel; place the SWITCH on the top of the panel and flip it (N).
- Take the OIL CAN (O) after the cut scene.
- Go through the door to the Backyard.
Chapter 3 – The Backyard

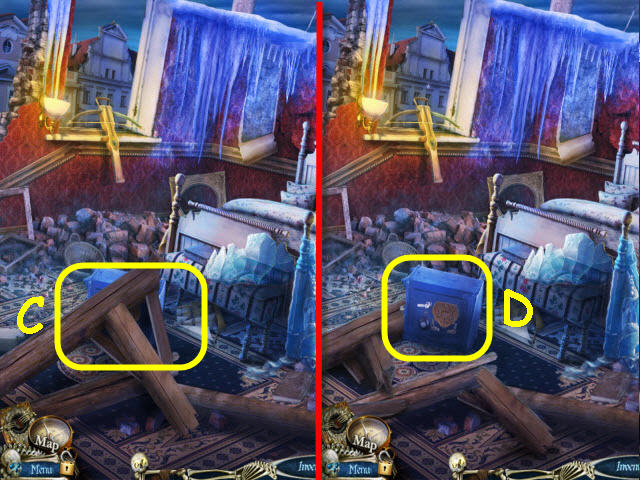
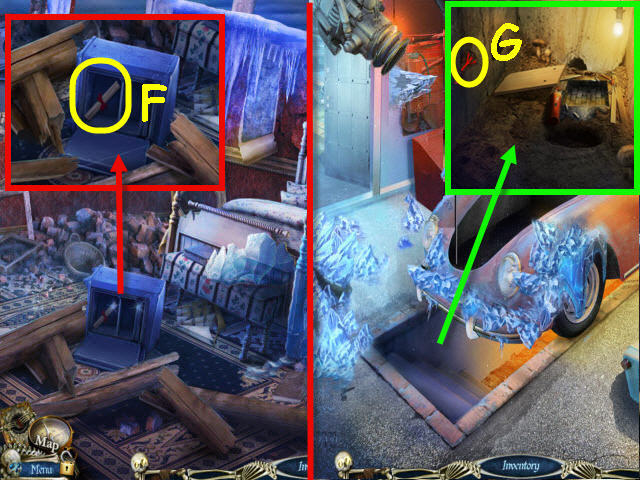
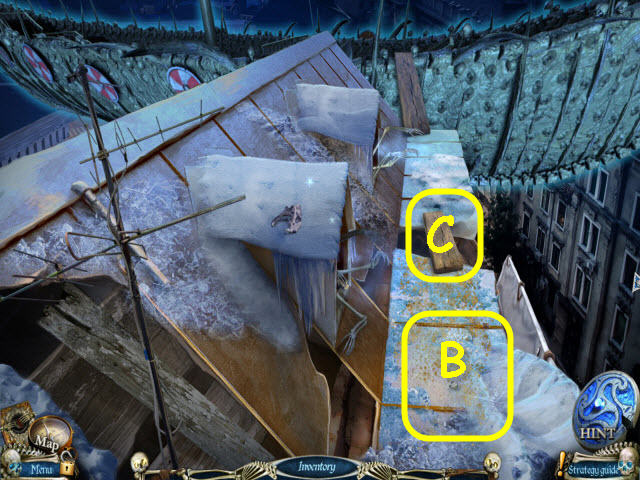
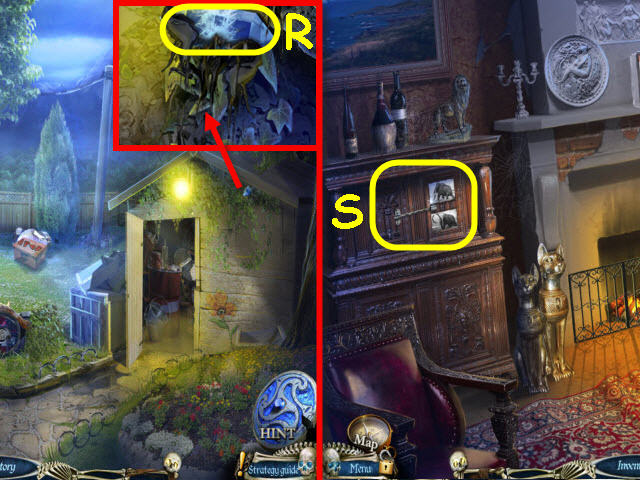
- Examine the shed and use the OIL CAN on the lock; turn the lock knob and take the LOCK (P).
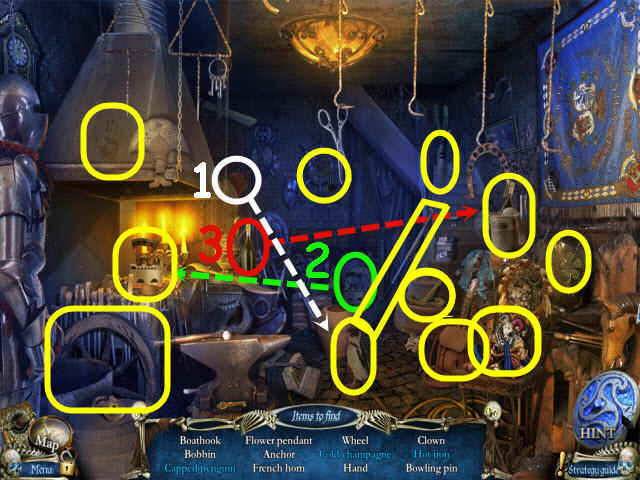
- Open the shed door and examine the shed to access a HOS (Q).
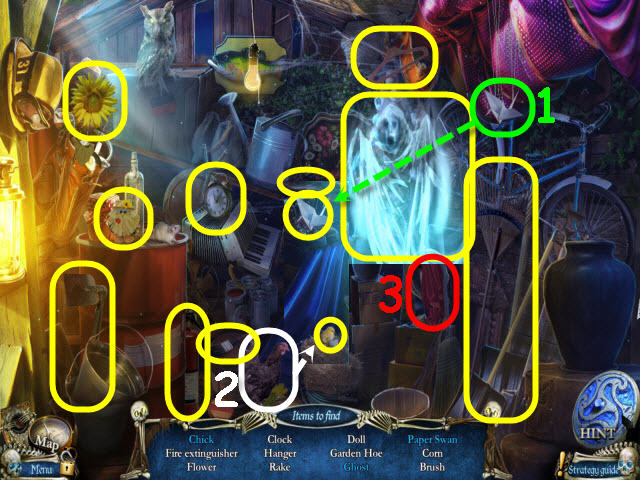
- Find the items listed.
- Sail the origami to get a paper swan (1).
- Place the hen on the nest to get a chick (2).
- Move the cloth to get a ghost (3).
- You will earn a RAKE.
- Examine the gardener and give him the RAKE; take the FAN (R).
- Back out twice.
- Examine the garage door and use the fan by the hammer; take the HAMMER (S).
- Return to the Backyard.
- Examine the Tree house steps and straighten the board; use the NAIL in the hole and HAMMER it (T).
- Go up into the Tree house.
- Examine the table; take the RUBBER GLOVES (U), RED BUTTON (V), and read the note (W).
- Use the RAVEN on the small box; take the FILE (@).
- Examine the chest; take the DRY BRUSH (X).
- Go to the City gates.
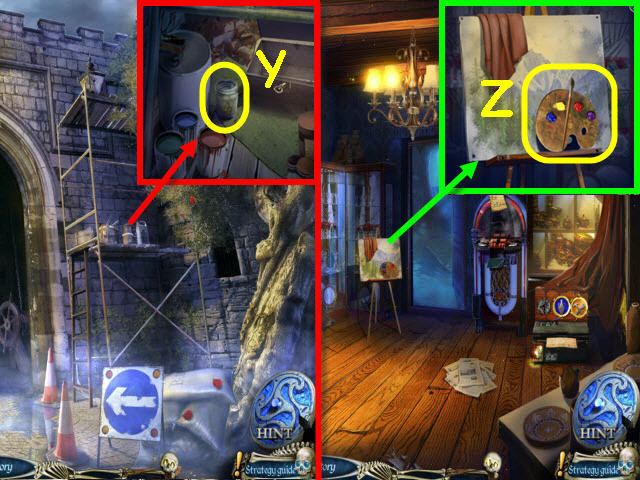
- Examine the scaffolding; use the DRY BRUSH in the solvent to get a CLEAN BRUSH (Y).
- Go to the Souvenir shop.
- Examine the easel and place the CLEAN BRUSH on the palette; take the PALETTE (Z).
- Go to the Tree house.
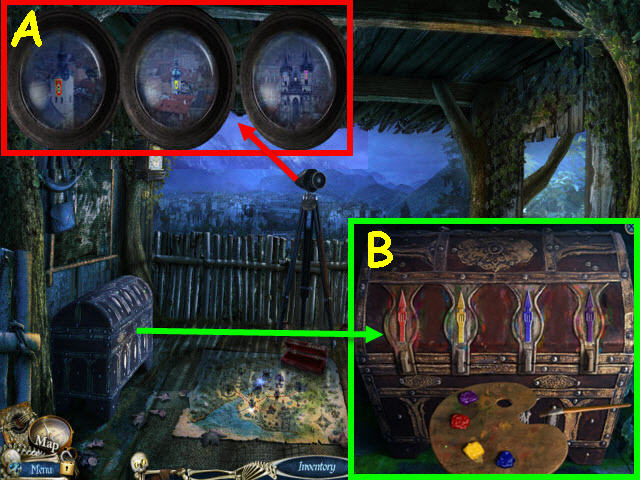
- Look through the telescope and move it from the upper left to the upper right and note the tower colors from left: red, yellow, blue and purple (A).
- Examine the chest and place the PALETTE on it. Select the color you wish the brush to go to and then select the tower until the towers are painted from left; red, yellow, blue and purple (B).
- Examine the opened chest to access a HOS.
- Find the items listed.
- Place the wind-up key on the mouse to get a clockwork mouse (1).
- Place the lens in the glasses to get sunglasses (2).
- Place the ice cream in the cone to get ice cream (3).
- You will earn a ROPE.
- Go to the Cemetery entrance.
- Examine the fence and use the FILE to get the FENCE PIECE (C).
- Go forward into the Cemetery.
- Examine the gravestone and use the FILE on the chain; take the CHAIN (D).
- Back out twice.
- Examine the motorbike and tie the ROPE on back wheel (E).
- Fasten the CHAIN to the front wheel and use the LOCK on the chain (F).
- Examine the door; select the rope to tie it (G).
- Examine the motorbike and place the MOTORBIKE KEYS in the ignition; turn the MOTORBIKE KEY (H).
- Go through the newly-opened door to the Garage.
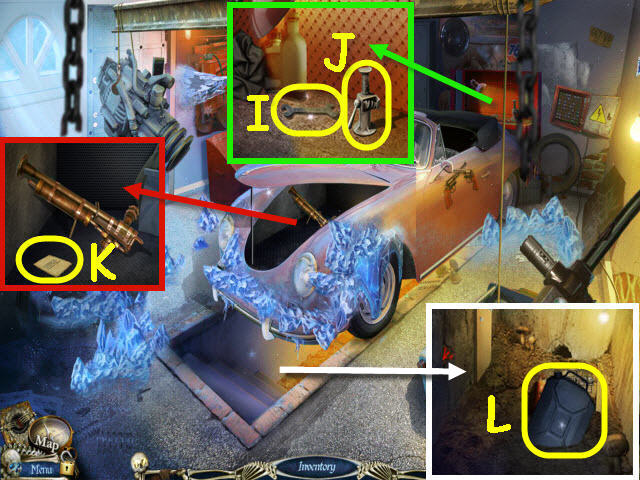
- Examine the workbench; take the WRENCH (I), and the HOISTING JACK (J).
- Open the hood and examine it; read the note (K).
- Examine the pit; take the GAS CAN (L).
- Go to the Souvenir shop.

- Examine the cabinet and place the HOISTING JACK underneath (M).
- Examine the storeroom to access a HOS (N).
- Find the items listed.
- Select the mannequin heads to move the shop keeper (not shown in screenshot) left and right to expose various hidden items (1-4).
- Use the baseball bat on the glass jar to get the hose (5).
- Place the candle on the candlestick to get a triple candlestick (6).
- Place the teddy bear by the three bears to get a four bear family (7).
- You will earn a HOSE.
- Go to the Backyard.
- Examine the lawnmower and use the FENCE PIECE on the blades; use the RUBBER GLOVES to take the FUSE 1/3 (O).
- Use the GAS CAN and HOSE on the fuel; take the FUEL (P).
- Go to the Cemetery entrance.
- Examine the sign and use the WRENCH on it; use the RUBBER GLOVES to get the FUSE 2/3 (Q).
- Go to the Museum entrance and attempt to enter the Museum.
- Use the FUEL on the ice monster (R).
- Back out.
- Place the rune on its matching location (S).
- Go to the Backyard.
- Place the rune on its matching location (T).
- Go up into the Tree house.
- Place the rune on its matching location (U).
- Go to the Cemetery.
- Place the rune on its matching location (V).
- Back out.
- Place the rune on its matching location (W).
- You should now have a lit Book of Fire.
- Go to the Museum entrance.
Chapter 4 – The Ice Monster
- Use the Book of Fire on the ice monster (X).
- Examine the device and use the RUBBER GLOVES to move the wires; take the FUSE 3/3 (Y).
- Go into the Garage.
- Examine the electrical panel and place the 3 FUSES on it to trigger a puzzle (Z).
- Connect the circuits.
- See screenshot for solution (A).

- Place the RED BUTTON on the controls and press it (B).
- Open the door and go through it to the Junkyard (C).
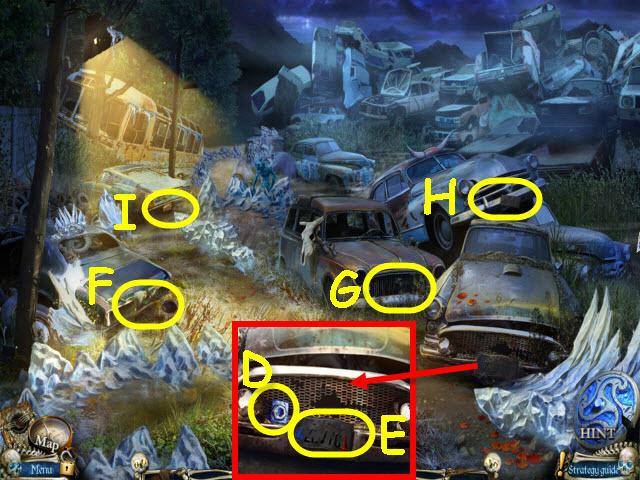
- Examine the bumper; take the BOLT (D).
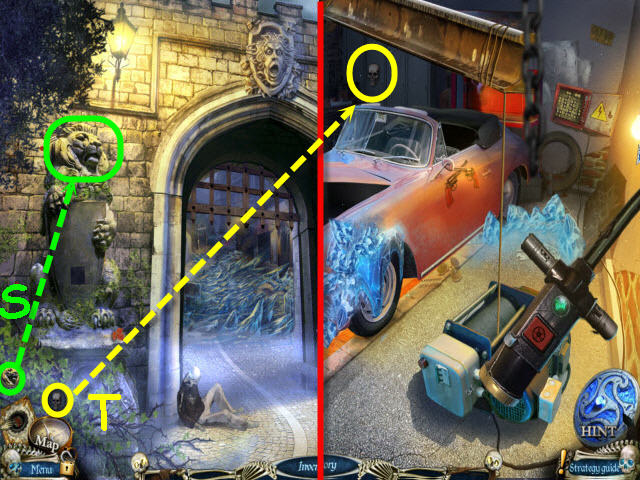
- Use the BLANK PASSWORD NOTE on the license plate (E).
- Examine the car bumpers and use the BLANK PASSWORD NOTE on the license plates (F-G-H-I) to get a NOTE WITH PASSWORD.
- Back out.
- Examine the pit and zoom into the floor panel (F).
- Place the BOLT on the panel to trigger a puzzle (G).

- Arrange the pieces per the color scheme painted on the board.
- To solve the puzzle, select the following pieces: A-A-B-A-D-D-C and C (H).
- Take the FLAMETHROWER HANDLE.
- Go to the Souvenir shop.
- Examine the cash register and place the NOTE WITH PASSWORD on it to trigger a puzzle (I).
- To solve the puzzle, press the numbers as depicted in the code (J).
- Take the TRUNK KEY.
- Go to the Junkyard.
- Examine the trunk and use the TRUNK KEY to unlock it; take the ELEPHANT FIGURINE (K), and CONTAINER (L) after triggering the cut scene.
- Back out.
- Examine the trunk; place the FLAMETHROWER HANDLE and CONTAINER on the flamethrower and use the FUEL on the container (M).
- Place the rune on its matching location (N).
- Go forward to the Junkyard.
- Place the rune on its matching location (O).
- Go to the Backyard.
- Place the rune on its matching location (P).
- Back out.
- Place the rune on its matching location (Q).
- Go to the Museum entrance.
- Place the rune on its matching location (R).
- The Book of Fire should now be lit.
- Go to the Garage.
- Examine the trunk and use the Book of Fire on the flamethrower; take the lit FLAMETHROWER (S).
- Go to the Museum entrance.
- Use the FLAMETHROWER on the ice monster (T).
- Enter the Museum.

- Examine the beam and use the RAVEN to get the SAFE PART (U).
- Go forward up the left side of the staircase to the Second floor room (V).
- Examine the windowsill; take the TOKEN (W) and the ARCHIVE AMULET (X).
- Examine the table and open the compartment; take the COLORED CRYSTAL 1/3 (Y), KNIGHT FIGURINE (Z), and read the note (A).
- Back out.
- Examine the door and place the ARCHIVE AMULET in the slot (B).
- Examine the opened door to access a HOS (C).
- Find the items listed.
- Move the cloths in the areas circled in red to unveil objects that may be hidden.
- You will earn a 2nd ELEPHANT FIGURINE.
- Go to the Souvenir shop.
Chapter 5 – The Chapel
- Examine the punch card machine and place the TOKEN over the wires; take the PUNCH CARD (D).
- Go to the Museum.
- Examine the audio guide and place the PUNCH CARD in the slot; take the 2nd KNIGHT FIGURINE (E) after the cut scene.
- Go to the Tree house.
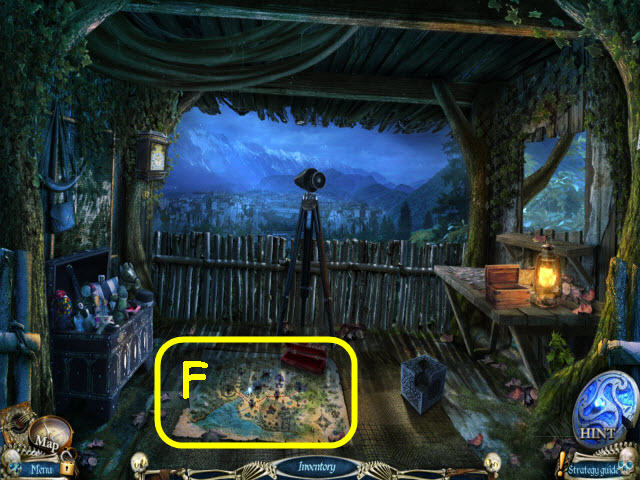
- Examine the map (F).
- Place the 2 KNIGHT FIGURINES on it to trigger a puzzle.
- Move the knights to their proper towns.
- To solve the puzzle, make the following moves: B-A, C-B, F-C, D-F, G-D, F-G, A-F, C-A, F-C, and E-F (@).
- Take the NAIL PULLER (H).
- Go to the Garage.
- Examine the pit and use the NAIL PULLER on the board; take the EMERALD AMULET (I).
- Go to the Second floor room in the Museum.
- Examine the table and use the EMERALD AMULET on the left ice; take the CHAPEL KEY (J).
- Go to the Cemetery.
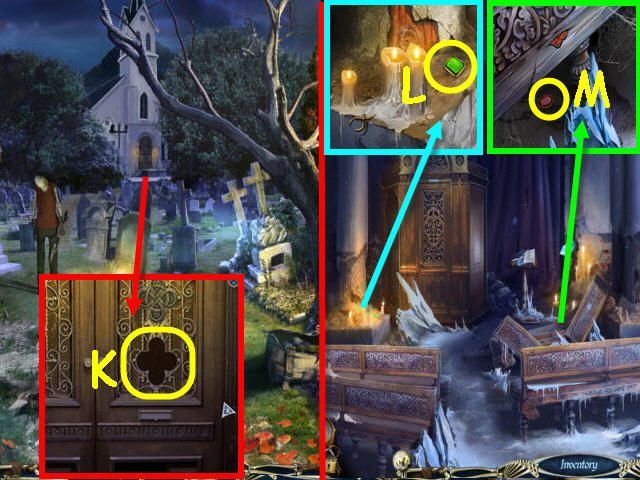
- Examine the chapel door and place the CHAPEL KEY in the slot (K).
- Go forward into the Chapel.
- Examine the pillar base; take the GREEN CRYSTAL 1/3 (L).
- Examine the broken pew; take the RED CRYSTAL 1/3 (M).
- Go through the doorway on the right to the Chapel yard.
- Examine the window; speak to the man (N) and take the CONFESSIONAL KEY (O).
- Examine and select the skeleton (P).
- Examine the disk; take the RUSTY KNIFE (Q), and the TRIDENT AMULET (R).
- Back out.
- Examine the confessional and use the CONFESSIONAL KEY in the lock and turn the handle (S).
- Place the 2 ELEPHANT FIGURINES in the recesses; take the BENCH AMULET (T), 2nd SAFE PART (U), and the CLOCK WEIGHT 1/2 (V).
- Examine the broken pew and use the BENCH AMULET on the ice; take the FIRE AMULET (W).
- Go to the Garage.
- Examine the tools and place the FIRE AMULET on the ice; take the AXE (X).
- Go to the Souvenir shop.
- Examine the chest of drawers and place the TRIDENT AMULET on the ice. Open the bottom drawer and take the COGWHEEL (Y), and the SANDCASTLE AMULET (Z).
- Go to the Backyard.
- Examine the grindstone and use the RUSTY KNIFE on it; take the KNIFE (A).
- Go to the Museum.
- Examine the platform and use the KNIFE to loosen the rune; take the RUNE (B).
- Go upstairs to the Second floor room.
- Examine the timber and use the AXE on it (C).
- Examine the safe and place the 2 SAFE PARTS on it to trigger a puzzle (D).
- Color all the lines blue and gold.
- To solve the puzzle, select the lines in numeric order indicated on the screeshot by following these colors: Yellow, green, red, white, cyan, and orange (E).
- Examine the safe; take the SECRET DOCUMENTS (F).
- Go to the Garage.
- Examine the pit and use the KNIFE to loosen the rune; take the 2nd RUNE (G).
- Go to the Cemetery entrance.
- Examine the pole; use the KNIFE to get the 3rd RUNE (H).
- Go to the Chapel.
- Examine the column base and use the KNIFE on the wax; take the PINCERS SYMBOL (I).
- Examine the broken pew and use the KNIFE to loosen the rune; take the 4th RUNE (J).
- Go to the Backyard.
- Examine the box and place the 4 RUNES on it; take the ANVIL SYMBOL (K).
- Go to the Chapel yard.
- Examine the window; give the SECRET DOCUMENTS to the man (L) and receive a BAG OF MONEY.
- Examine the skeleton and give him the BAG OF MONEY (M).
Chapter 6 – The Attic
- Examine the ladder and use the RAVEN to get the BUTTERFLY AMULET (N).
- Place the rune on its matching location (P).
- Back out.
- Place the rune on its matching location (Q).
- Go to the Souvenir shop.
- Place the rune on its matching location (R).
- Go to the City gates.
- Place the rune on its matching location (S).
- Go to the Garage.
- Place the rune on its matching location (T).
- The Book of Fire should now be lit.
- Go to the Junkyard.
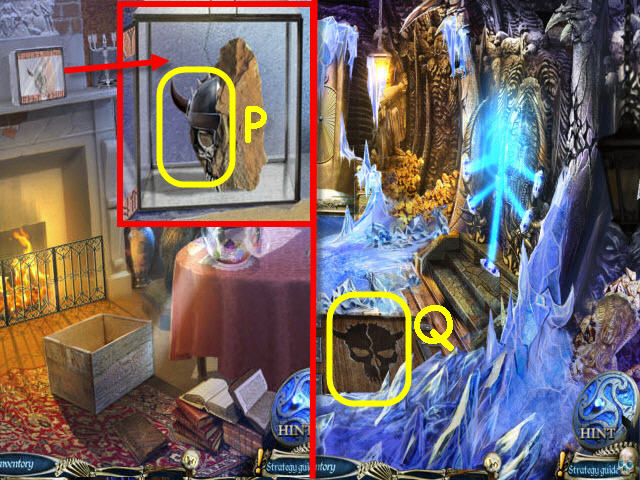
- Examine the opened trunk and place the BUTTERFLY AMULET in the slot; take the SKULL (U).
- Go to the Museum.
- Examine the platform and place the SKULL in the slot; take the ARM SYMBOL (V), and the BOOK AMULET (W).
- Go to the Chapel.
- Examine the lectern and place the BOOK AMULET on the icy book; take the PUZZLE PIECE (X) and examine the picture (Y).
- Go to the Chapel yard.
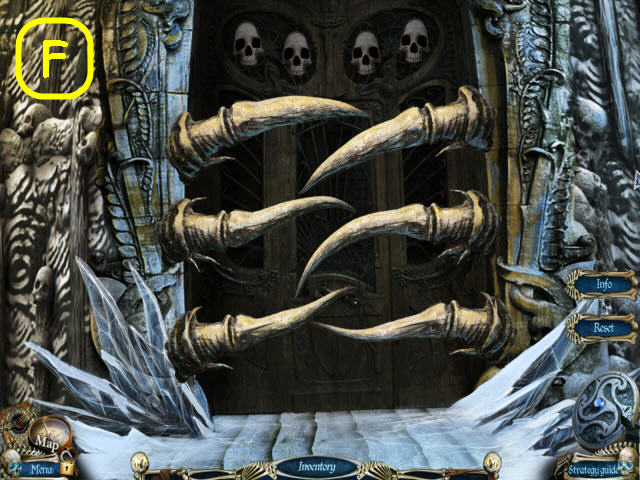
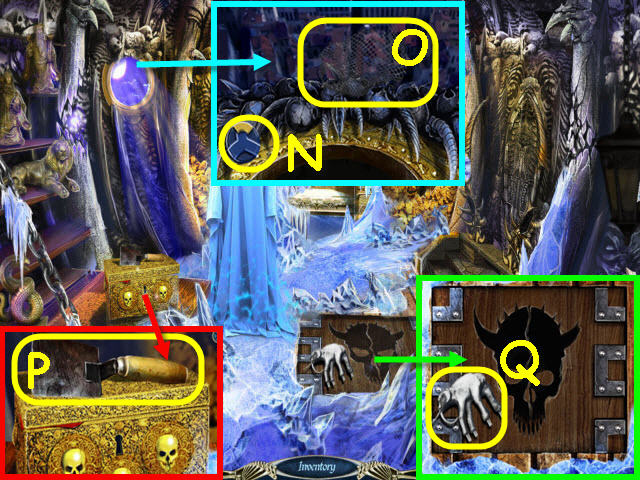
- Examine the door and place the PINCERS SYMBOL, ANVIL SYMBOL, and ARM SYMBOL on the lock; turn the handle (Z).
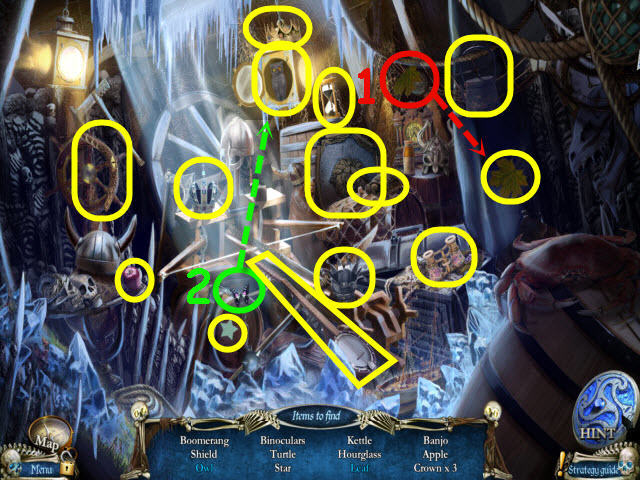
- Examine the newly-opened doorway to access a HOS.
- Find the items listed.
- Place the cap on the penguin to get a capped penguin (1).
- Place the iron in the furnace to get a hot iron (2).
- Place the champagne in the ice bucket to get cold champagne (3).
- You will earn a BOATHOOK.

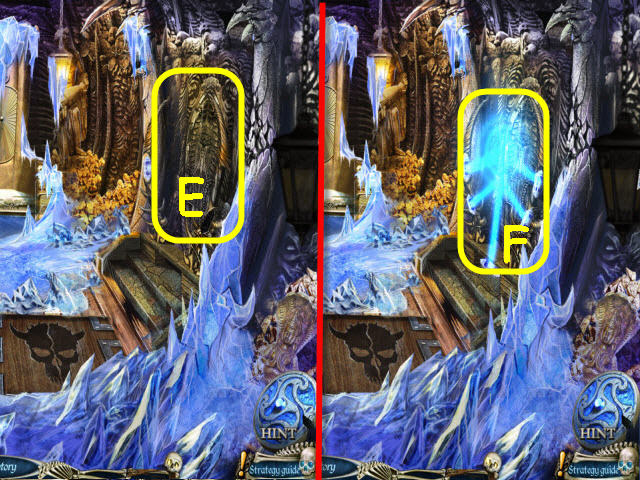
- Examine the frozen ladder and use the Book of Fire on it (X).
- Use the BOATHOOK on the ladder (Y).
- Go up the ladder to the Attic (Z).
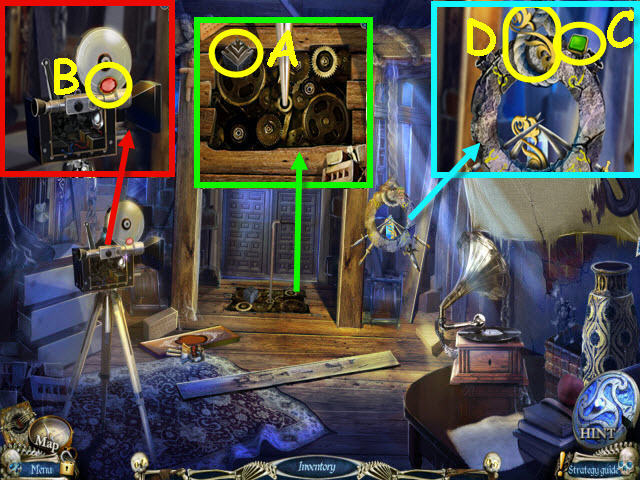
- Examine the mechanism; take the 2nd PUZZLE PIECE (A).
- Examine the projector; take the RED CRYSTAL 2/3 (B).
- Examine the ring; take the GREEN CRYSTAL 2/3 (C), and the WOODEN PART (D).
- Go to the Tree house.
- Examine the puzzle box and place the 2 PUZZLE PIECES on it; take the GRAMOPHONE HANDLE (E).
- Return to the Attic.
- Examine the gramophone; place the GRAMOPHONE HANDLE on it and crank it. Take the JAGGED AMULET (F), and the CLOCK WEIGHT 2/2 (G).
- Return to the Tree house.
- Examine the clock and hang the 2 CLOCK WEIGHTS on the hooks; take the 2nd COGWHEEL (H).
- Go to the Second floor room.
- Examine the table and place the JAGGED AMULET on the ice; take the BULB (I).
- Go to the Attic.
- Examine the projector and place the FILM REEL and BULB on it to trigger a cut scene (J).
- Examine the newly-exposed wall to access a HOS (K).
- Find the items listed.
- Place the ice skate by the ice the ice skate to get a pair of ice skates (1).
- Place the lamp shade on the lamp base to get a lamp (2).
- Open the trinket box to get a key (3).
- Place the mouse on the cheese to get a sated mouse (4).
- You will earn a MOON SYMBOL.
- Go to the Junkyard.
- Examine the car and use the MOON SYMBOL on the ice; open the car door and take the 3rd COGWHEEL (L).
- Go to the Attic.
- Examine the mechanism and place the 3 COGWHEELS on it (M).
- Select the lever to open the passage (N).

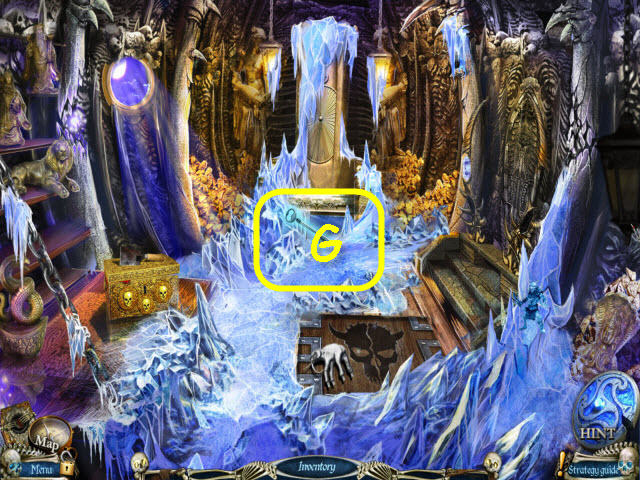
- Examine the ice monster (O).
- Place the rune on its matching location (P).
- Go to the Tree house.
- Place the rune on its matching location (Q).
- Go to the Second floor room.
- Place the rune on its matching location (R).
- Go to the Junkyard.
- Place the rune on its matching location (S).
- Go to the Museum.
- Place the rune on its matching location (T).
- You should now have a lit Book of Fire.
- Go to the Attic.
- Use the Book of Fire on the ice monster (U).
- Go forward to the Roof (V).
Chapter 7 – The Ship of Bones
- Examine the quiver and use the BOATHOOK to move it; take the ARROW (W).
- Go to the Second floor room.
- Examine the pillows and use the KNIFE on the sheets and knot the cloth. Place the ARROW on the knotted cloth; take the ARROW WITH ROPE (X).
- Examine the crossbow and place the ARROW WITH ROPE on it; fire the crossbow and take the BUCKET (Y).
- Go to the Garage.
- Examine the tools; place the SANDCASTLE AMULET on the box lid. Use the BUCKET on the sand; take the BUCKET WITH SAND (Z).
- Go to the Chapel.
- Examine the toolbox and place the WOODEN PART on it; take the CHISEL (A).
- Go to the Roof.
- Use the BUCKET WITH SAND on the icy walk (B).
- Examine the board to trigger a puzzle (C).
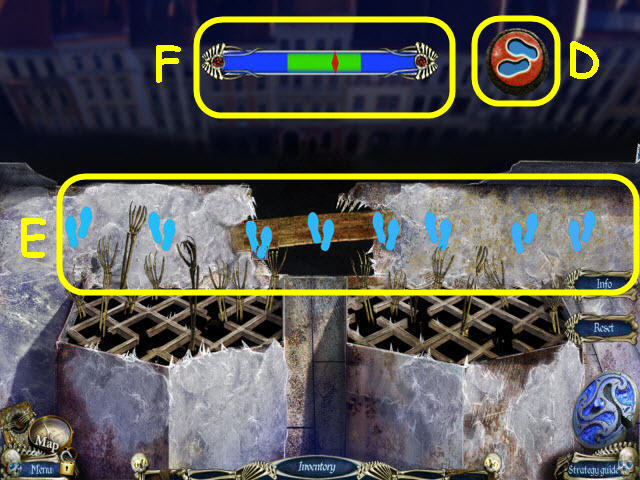
- Walk across the path while avoiding the skeleton hands.
- To solve the puzzle wait until the hands in front of you are down and select the button (D) to move.
- The safe zones are marked with footprints (E).
- When on the center plank you can only advance when the meter is on the green area (F).
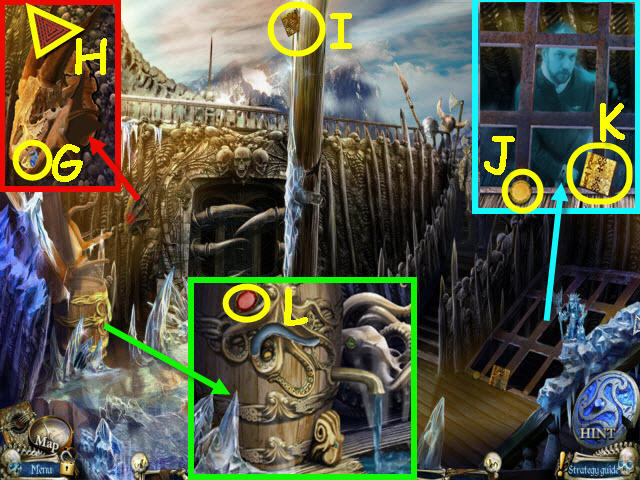
- Examine the mounted head and use the CHISEL on it; take the RING (G), and the TRIANGLE (1/2 (H).
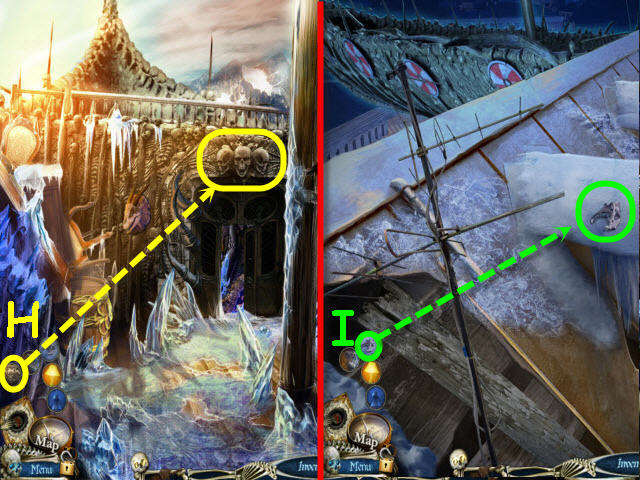
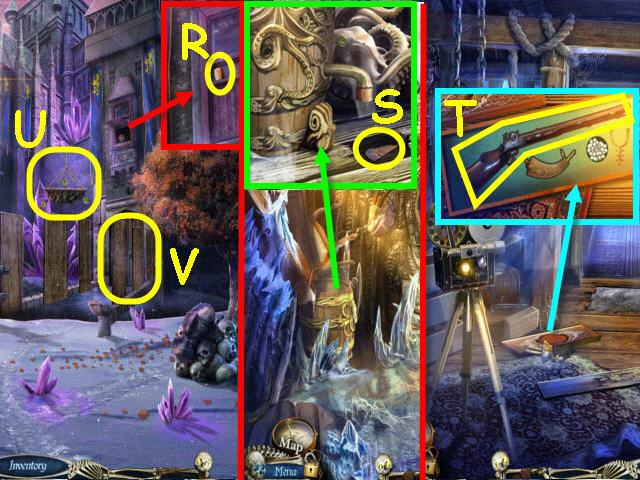
- Examine the top of the pole and use the RAVEN to get the OFFICE AMULET 1/3 (I).
- Examine the ships hold; take the YELLOW CRYSTAL 1/3 (J), and the OFFICE AMULET 2/3 (K).
- Examine the barrel; take the RED CRYSTAL 3/3 (L).
- Go to the Attic.
- Examine the gauntlet and place the RING on it; take the GEM (M).
- Back out.
- Examine the disk and place the GEM in the slot; take the TRIANGLE 2/2 (N).
- Go to the Second floor room.
- Examine the pillows and place the 2 TRIANGLES on the casket; take the OFFICE AMULET 3/3 (P).
- Go to the Museum.
- Examine the door and place the 3 OFFICE AMULETS on it to trigger a puzzle (Q).
- Slide the tiles to complete the pattern.
- To solve the puzzle select the following spaces: L-M, J-L, O-S, F-O, G-F, B-I, O-B, D-J, S-G, R-K, Q-O, N-S, I-Q, F-N, J-F, K-I, G-J, E-G, H-C, M-D, L-E, P-K, E-L, D-P, C-M, G-H, K-E, O-D, and S-C.
- L-G, M-K, T-O, U-S, P-T, H-U, K-P, E-M, O-L, S-K, T-O, D-E, C-D, G-C, K-G, O-R, L-T, M-S, J-O, I-H, O-M, F-O, N-L, Q-F, R-J, S-N, O-Q, J-S, L-I, S-J, T-L, Q-T, N-K, T-N, U-Q, and P-R.
- M-O, L-S, K-T, G-U, O-G, S-P, G-M, and J-S (@).
- Go through the newly-opened door to the Office.

- Examine the crate; take the GUARD’S ARM (S) and CUTTERS (T).
- Examine the globe; take the OCTOPUS TENTACLE (U).
- Examine the glass display; take the BAS-RELIEF 1/2 (V).
- Go to the Deck.
- Examine the barrel and place the OCTOPUS TENTACLE in the missing tentacle slot; take the CASTLE AMULET 1/2 (W).
- Examine the guard and place the GUARD’S ARM on him (X).
- Examine the stairs where the guard stood to access a HOS (Y).
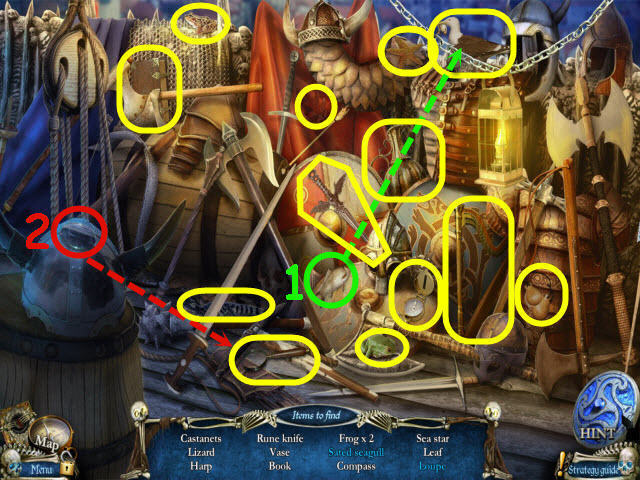
- Find the items listed.
- Give the fish to the seagull to get a sated seagull (1).
- Place the lens in the holder to get a loupe (2).
- You will earn a DAGGER.
- Go to the Attic.

- Examine the disk and place the KNIFE and DAGGER in the empty slots; take the WOODEN PART (Z), and the CRYSTAL 1/5 (A).
- Go to the Chapel.
- Examine the toolbox and place the WOODEN PART on it; take the CROWBAR (B).
- Go to the Office.
- Examine the crate and use the CROWBAR on the lid; take the TUSK (C), and the YELLOW CRYSTAL 2/3 (D).
- Go to the Deck.
- Examine the doorway and place the TUSK in the empty slot to trigger a puzzle (E).
- Repeat the sequences.
- The order of the tusks lighting up is random (F).
- Go forward into the Cabin.
Chapter 8 – The Portal
- Select anywhere in the room (G).
- You will trigger a rune search.
- Place the rune on its matching location (H).
- Back out.
- Place the rune on its matching location (I).
- Go to the Chapel yard.
- Place the rune on its matching location (J).
- Go to the Office.
- Place the rune on its matching location (K).
- Go to the Second floor room.
- Place the rune on its matching location (L).
- You will now have a lit Book of Fire.
- Go to the Deck.
- Use the Book of Fire on the doorway (M).
- Examine the porthole; take the CASTLE AMULET 2/2 (N), and use the BOATHOOK to get the NET (O).
- Examine the chest; take the SCRAPER (P).
- Examine the hatch; take the BOLT (Q).
- Go to the Backyard.
- Examine the eaves of the shed; use the SCRAPER to get the CRYSTAL 2/5 (R).
- Go to the Office.
- Examine the cabinet and place the BOLT on the latch (S).
- Examine the opened cabinet to access a HOS.
- Find the items listed.
- Open the pocket watch to get a bug (1).
- Place the doll in the bottom of the nesting doll (2) and place the top of the doll on it to get a Russian doll (3).
- Use the tape on the broken pencil to get a pencil (4).
- Open the pocket watch to get the butterfly (5).
- You will earn a BONE KEY.
- Go to the Cabin.
- Examine the chest and use the BONE KEY on it; take the MEDALLION OF THE UNDEAD (T).
- Back out twice.
- Use the MEDALLION OF THE UNDEAD on the windows (U).
- Examine the closest window and use the CUTTERS on the wire; take the YELLOW CRYSTAL 3/3 (V), and the DRAWER HANDLE (W).
- Examine the farthest window; take the RAG (X), COLORED CRYSTAL 2/3 (Y), and the PLIERS (Z).
- Go to the Chapel yard.
- Examine the crystal and use the PLIERS to move it; take the CRYSTAL 3/5 (A).
- Back out.
- Examine the crystal; use the PLIERS to get the CRYSTAL 4/5 (B).
- Go to the Souvenir shop.
- Examine the chest of drawers and place the DRAWER HANDLE on it; take the MAGNET (C).
- Go to the Office.
- Examine the globe and use the MAGNET on it; take the CRYSTAL 5/5 (D).
- Go to the Cabin.
- Examine the doorway and place the 5 CRYSTALS on it (E).
- Go through the portal to the Bridge (F).
- Select anywhere to pull up the bridge planks.
- Examine the eyeballs and cover them with the RAG (H).
- Examine the pile of skulls and use the PLIERS on the nail (I); take the MASK RUNE (J), and the COLORED CRYSTAL 3/3 (K).
- Place the NET on the handle; take the SCOOP NET (L).
- Examine the hive and use the SCOOP NET on it; use the SCOOP NET again to catch a BEE (M).
- Examine the rocks and use the BEE on the eye; take the GREEN CRYSTAL 3/3 (N), and the SKULL MASK PART (O).
- Go to the Office.
- Examine the display case and place the MASK RUNE on it; take the 2nd SKULL MASK PART (P).
- Go to the Cabin.
- Examine the hatch and place the 2 SKULL MASK PARTS on the lock (Q).
- Examine the opened hatch to access a HOS.
- Find the items listed.
- Place the leaf half on the leaf half to get a leaf (1).
- Place the butterfly on the lantern to get an owl (2).
- You will earn a BOOMERANG.
- Go through the portal to the Bridge.
- Examine the window and use the BOOMERANG on the stick; use RAVEN to retrieve the CORK (R).
- Back out twice to the Deck.
- Examine the barrel and use the CORK on the spigot; take the BAS-RELIEF 2/2 (S).
- Back out twice to the Attic.
- Examine the case and place the 2 BAS-RELIEF on the lid; take the MUSKET (T).
- Go to the Bridge.
- Examine the platform and use the MUSKET on the rope (U).
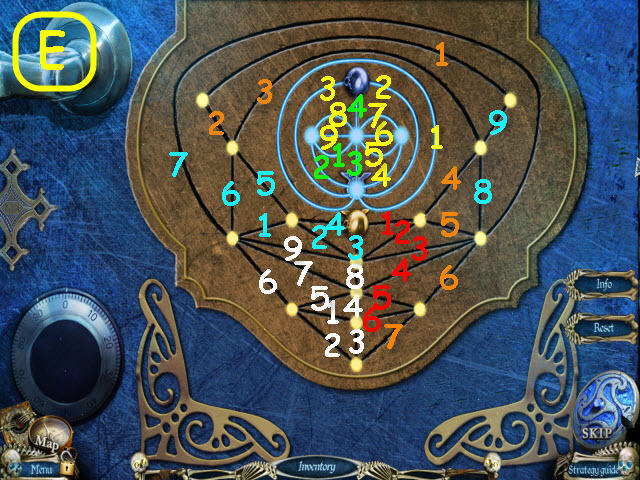
- Examine the castle door and place the 2 CASTLE AMULETS on the lock to trigger a puzzle (V).
- Guide the colored balls to their matching locations.
- You will need to reset the bumpers to match the screenshot after each turn.
- See screenshot for solution (W).
- Enter the newly-opened door to the Throne room.
- Examine the right column panel and place the 3 RED CRYSTALS on it.
- Select the following crystals: A-C, A-B, A-C, and A-B (1).
- Examine the second from right column panel and place the 3 YELLOW CRYSTALS on it.
- Select the following crystals: A-C, A-B, A-C, and A-B (2).
- Examine the second from left column panel and place the 3 COLORED CRYSTALS on it.
- Select the following crystals: A-C, A-B, A-C, and A-B (3).
- Examine the left column panel and place the 3 GREEN CRYSTALS on it.
- Select the following crystals: A-C, A-B, A-C, and A-B (4).
- Take the MAGICAL SAIL (X).
- Back out twice to the Cabin.
- Give the MAGICAL SAIL to Hel (Y).
- Congratulations, you have completed Hallowed Legends: Ship of Bones.


 Nevertales: The Beauty Within Walkthrough, Guide, & Tips
 Nearwood Walkthrough, Guide, & Tips
 Golden Trails 2: The Lost Legacy Walkthrough, Guide, & Tips
 White Haven Mysteries Walkthrough, Guide, & Tips
 Escape the Lost Kingdom Walkthrough, Guide, & Tips