Dreamscapes: The Sandman Walkthrough, Guide, & Tips
Dreamscapes: The Sandman Walkthrough

Welcome to the Dreamscapes: The Sandman Walkthrough
Be the one to save Laura from her nightmares!
Whether you use this document as a reference when things get difficult or as a road map to get you from beginning to end, we’re pretty sure you’ll find what you’re looking for here.
This document contains a complete Dreamscapes: The Sandman game walkthrough featuring annotated screenshots from actual gameplay!
We hope you find this information useful as you play your way through the game. Use the walkthrough menu below to quickly jump to whatever stage of the game you need help with.
Remember to visit the Big Fish Games Forums if you find you need more help. Have fun!
This walkthrough was created by Lucky Smile, and is protected under US Copyright laws. Any unauthorized use, including re-publication in whole or in part, without permission, is strictly prohibited.
General Tips

- This is the official guide for Dreamscapes: The Sandman.
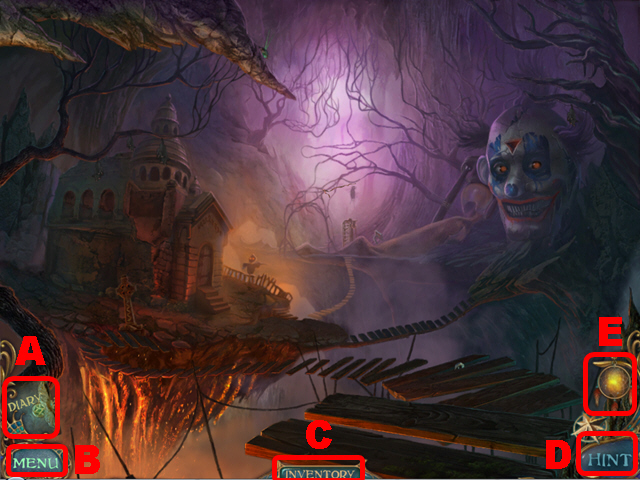
- Access the diary (A) to review the current state of your investigation.
- Select the menu (B) to leave the game and to adjust the volume and the display mode.
- Collected items will be stored in the inventory (C).
- Press the hint button (D) whenever you need help.
- Select the Dreamcatcher (E) to see how many pieces you have already collected and to restore the Dreamcatcher in the end.
- There are two grades of difficulty you can choose from in the beginning: Regular and Expert mode.
Chapter 1: Entering Laura’s Dreams
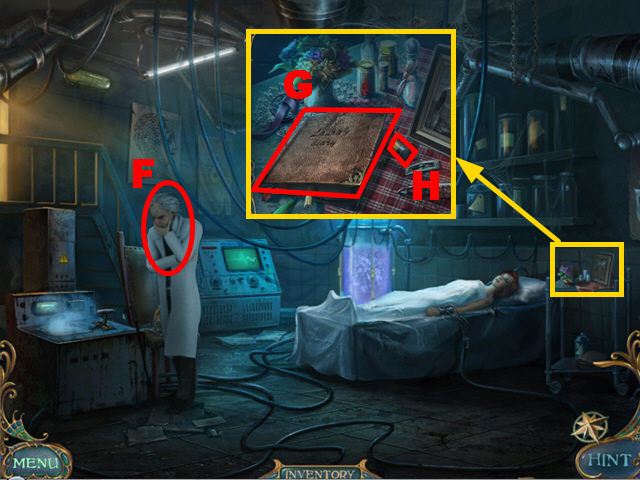
- Talk to the doctor (F).
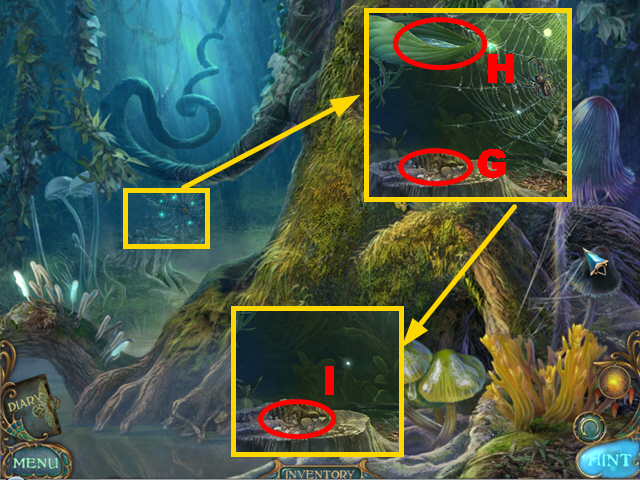
- Zoom into the table; take the diary (G) and the YELLOW FUSE (H).
- Turn left.
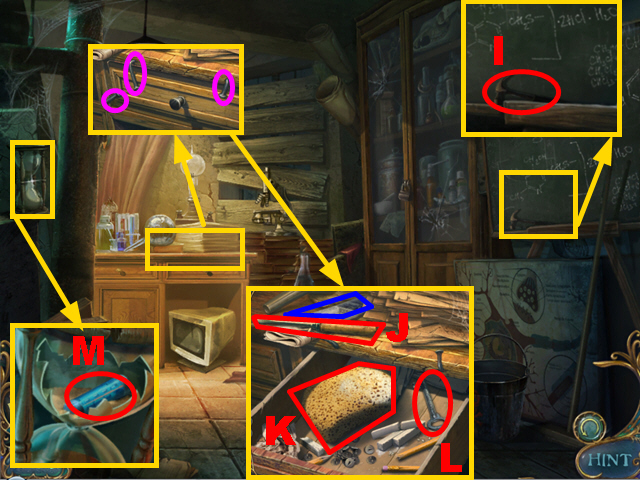
- Zoom into the blackboard; take HAMMER (I).
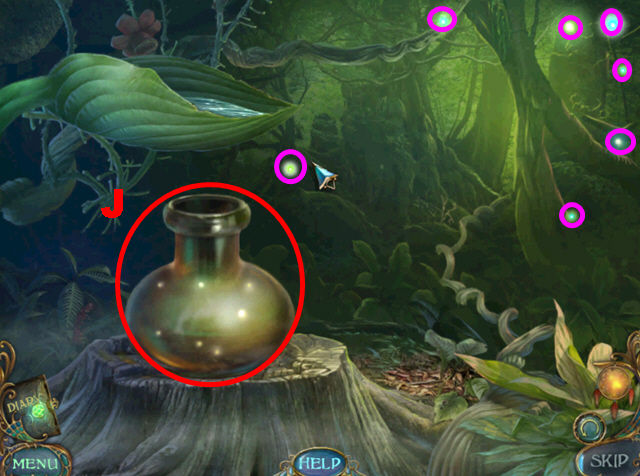
- Zoom into the desk, remove the nails (purple) with the HAMMER, and open the drawer; take the SCREWDRIVER (J), the SPONGE (K), the KEY (L), and read the newspaper (blue).
- Zoom into the hourglass and break it with the HAMMER; take the BLUE FUSE (M).
- Zoom into the blackboard and remove the drawings with the SPONGE; make note of the code (N).
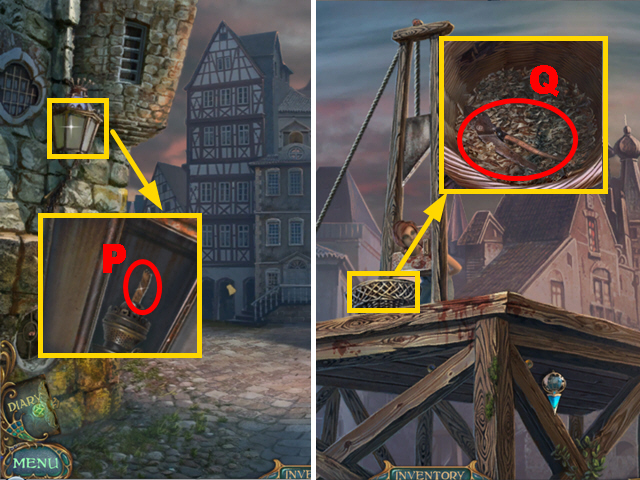
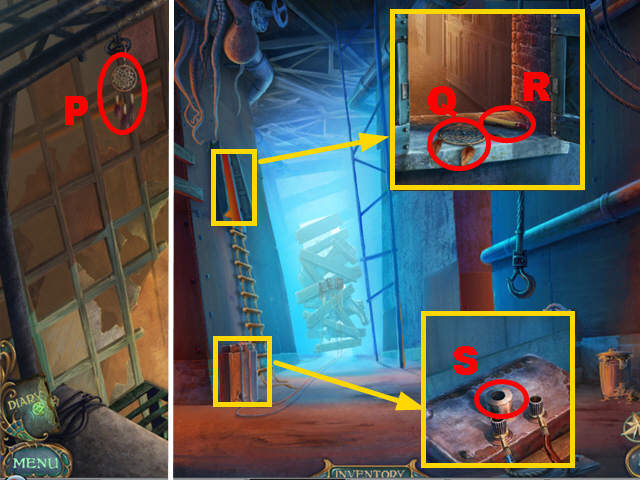
- Zoom into the cabinet and put the KEY into the lock (O); enter the correct symbols (P) to open the cabinet.
- Move aside the items in the middle compartment and take the RED FUSE (Q).
- Walk down.
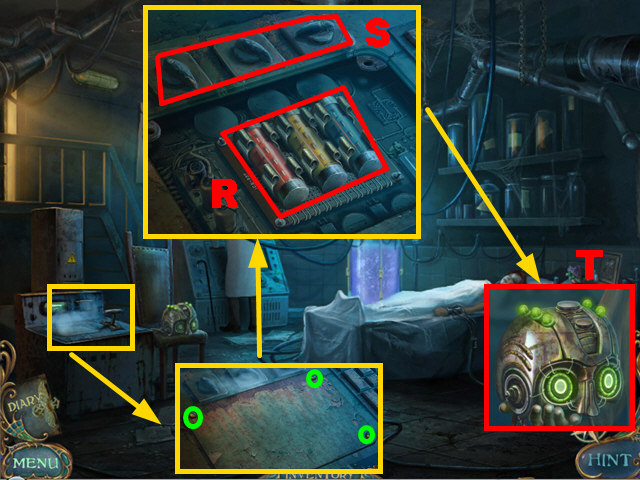
- Zoom into the device, remove the screws (green) with the SCREWDRIVER, and remove the cover; remove the old fuses and insert the RED, the YELLOW, and the BLUE FUSES into the empty slots (R).
- Turn the three knobs (S).
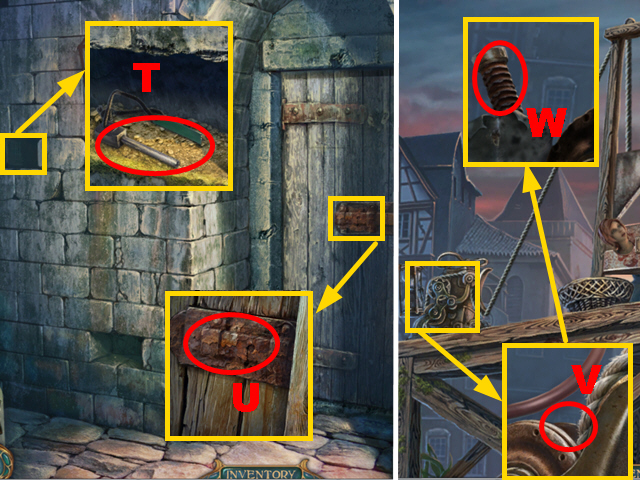
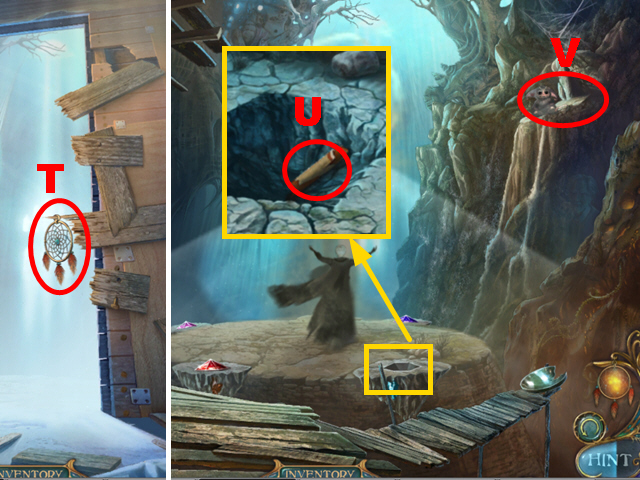
- Take the helmet (T).
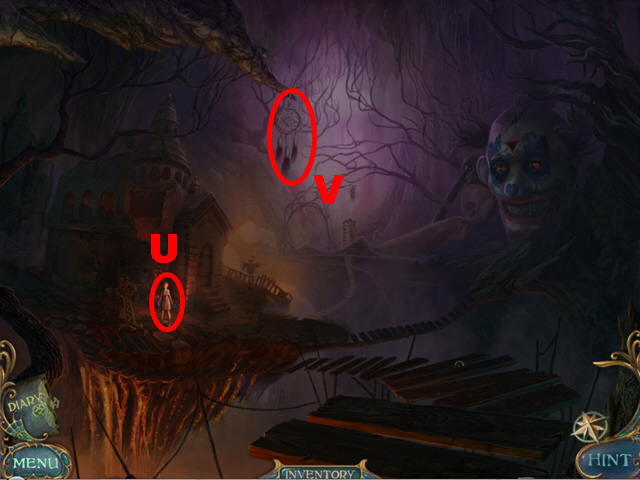
- Talk to Laura (U).
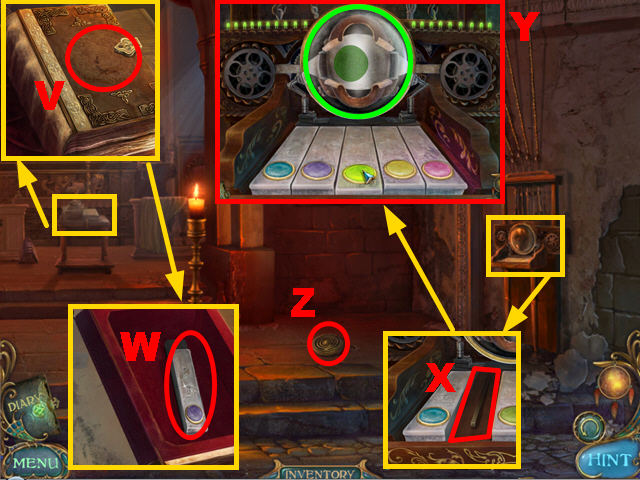
- Take the Dreamcatcher (V).
- Turn left.
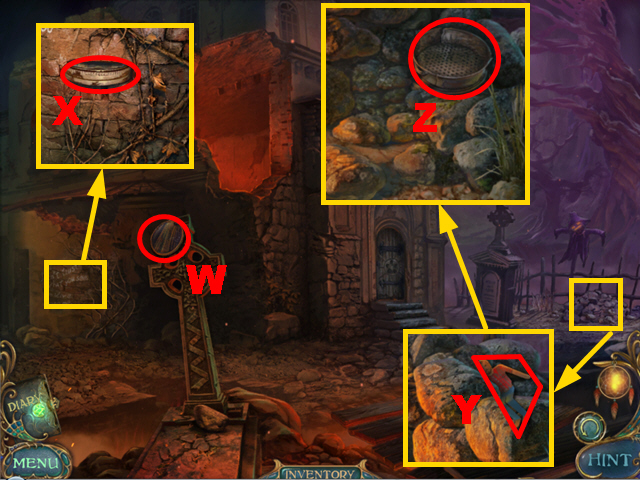
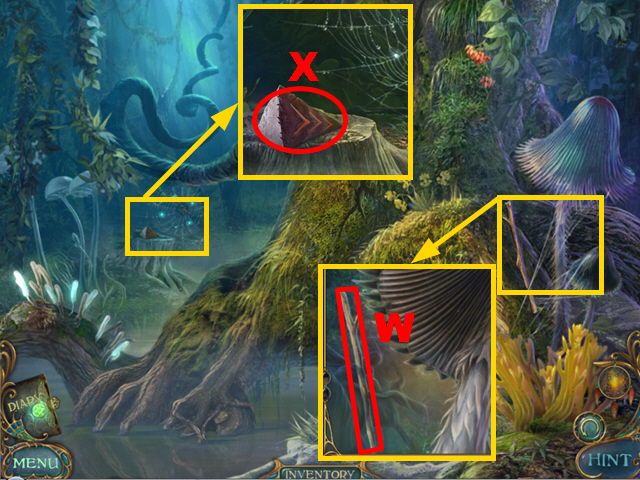
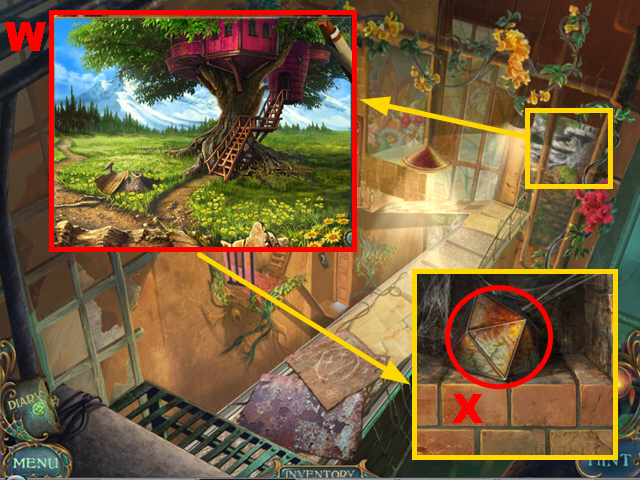
- Take the 1/4 MEDALLION (W).
- Zoom into the wall; take the 2/4 MEDALLION (X).
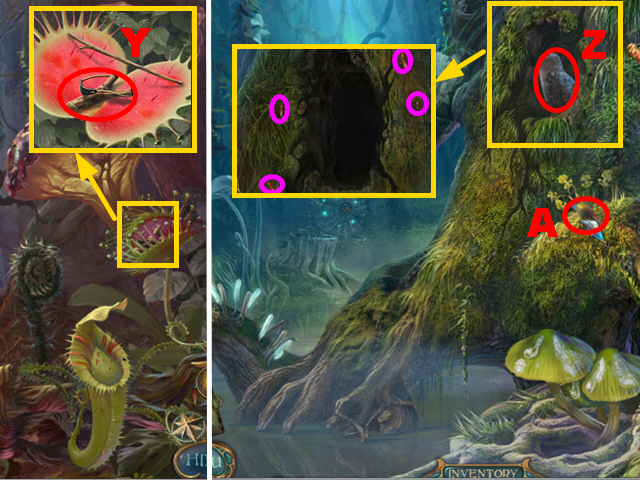
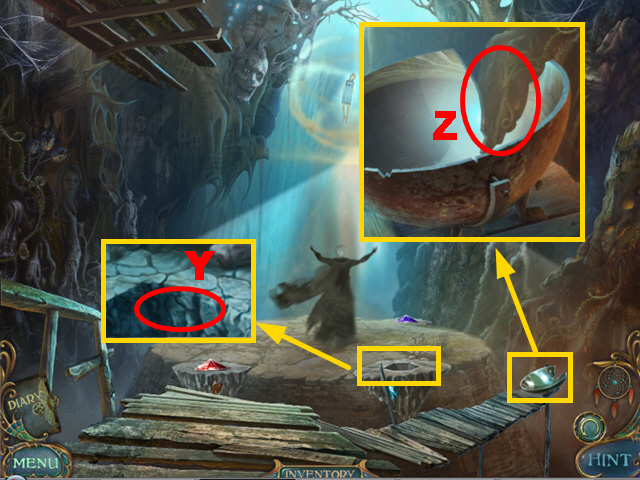
- Zoom into the stones; take the PAPER FATHER (Y).
- Remove three stones and take the SIEVE (Z).
- Walk down and turn right.
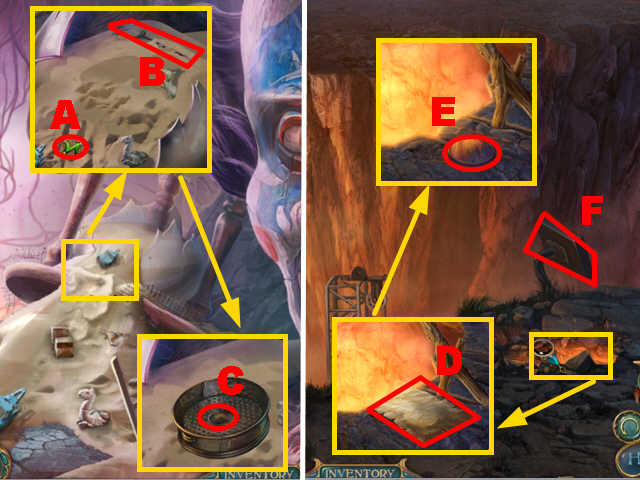
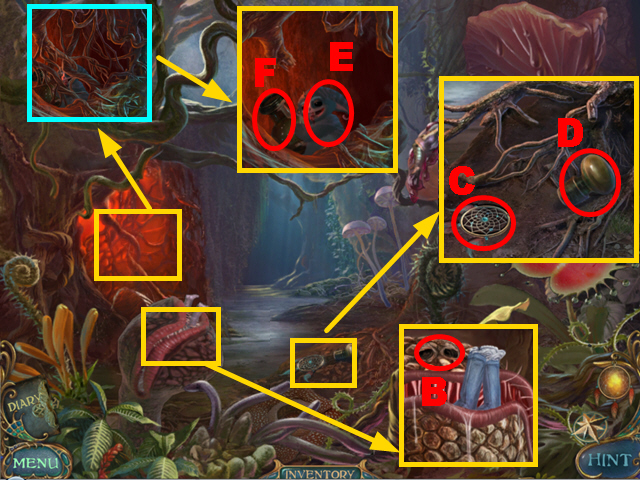
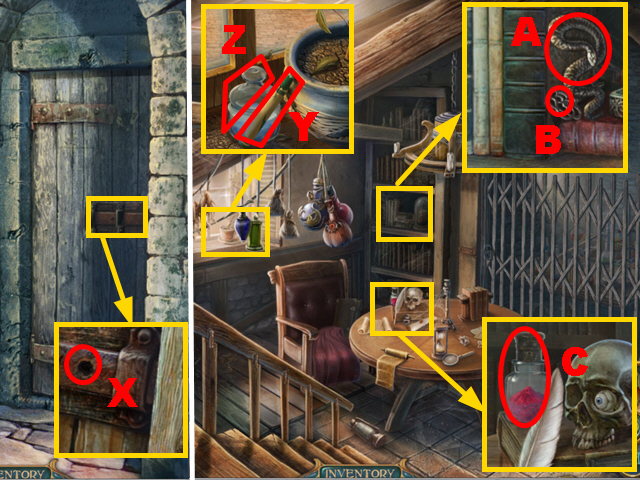
- Zoom into the sand and take the 1/3 CIRCUITRY (A) and the BUTTERFLY NET (B); put the SIEVE into the sand and take the 3/4 MEDALLION (C).
- Walk down and move forward.
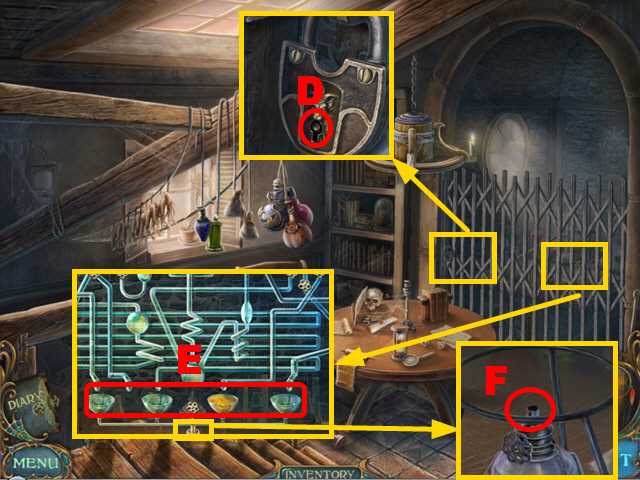
- Zoom into the pit; take the note (D) and the 4/4 MEDALLION (E).
- Turn around the control panel (F).
- Walk down and turn left.
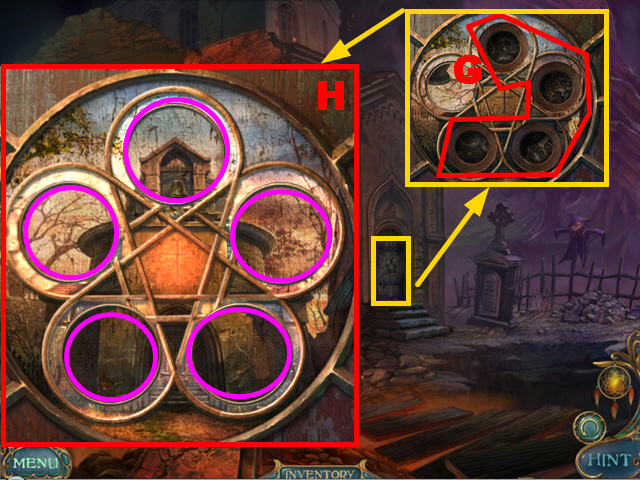
- Zoom into the door; put the 4 MEDALLIONS into the niches (G).
- Play the mini-game.
- To solve this puzzle (H), stop each medallion (purple) as soon as it is in its correct position.
- You can stop each medallion at any time and in any order.
- Enter the church.
Chapter 2: Buried Alive
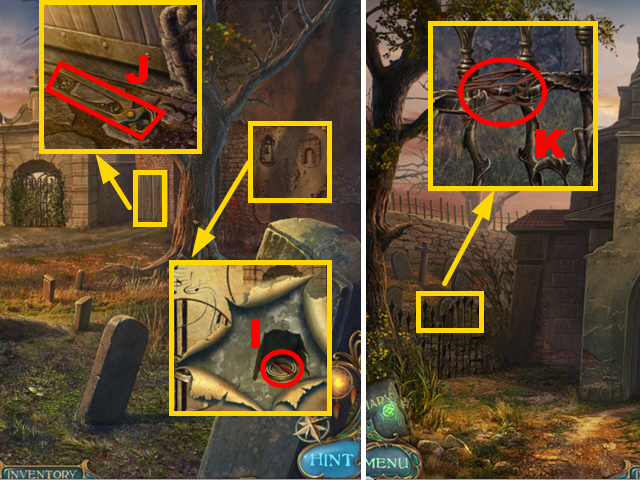
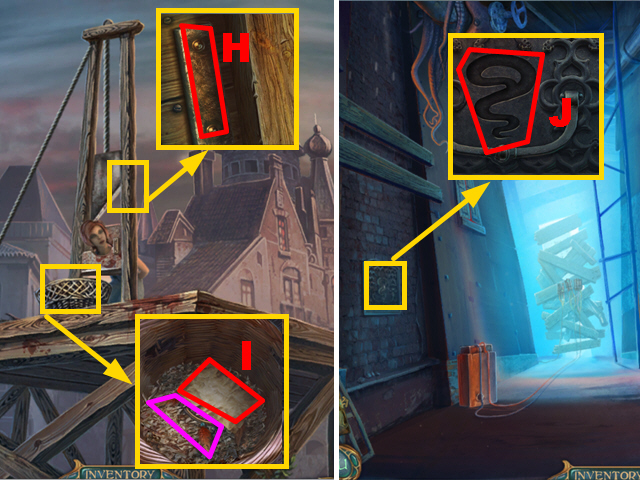
- Zoom into the poster and tear it apart three times; take the 1/2 RING (I).
- Zoom into the shed; take the CUTTERS (J).
- Turn left.
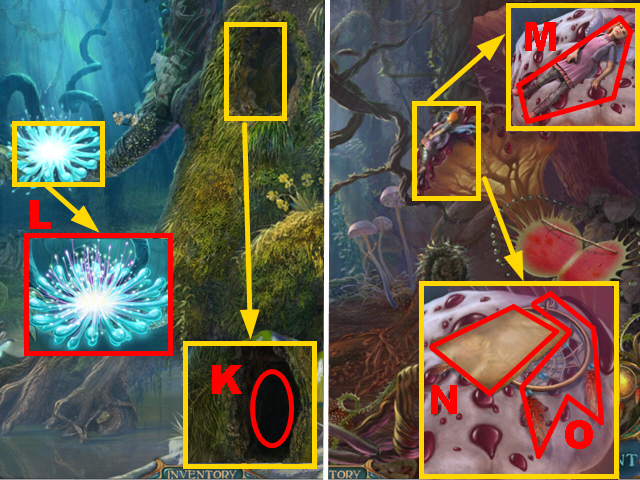
- Zoom into the gate; remove the wire with the CUTTERS (K).
- Turn left.
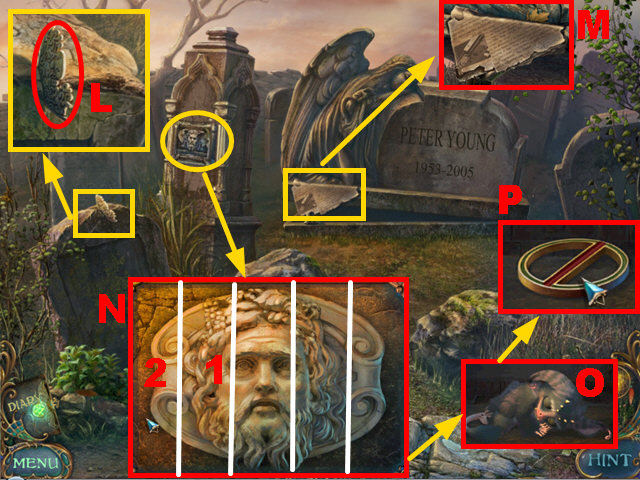
- Zoom into the left grave; take the 1/2 ORNAMENT (L).
- Zoom into the large grave; take the newspaper article (M).
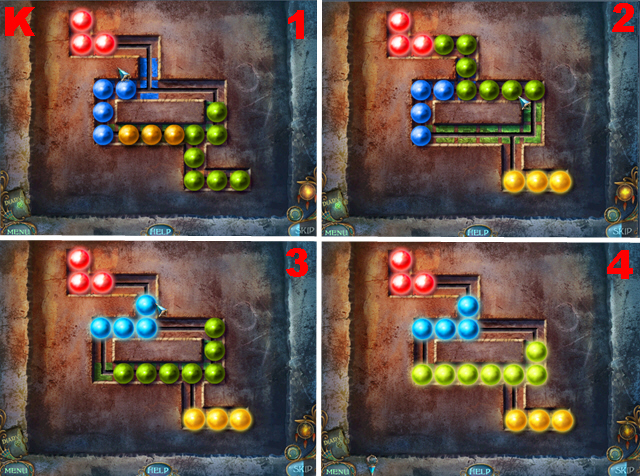
- Zoom into the column; play the mini-game.
- To solve this puzzle (N), press the tile (1) once and the tile (2) twice to recreate the correct picture.
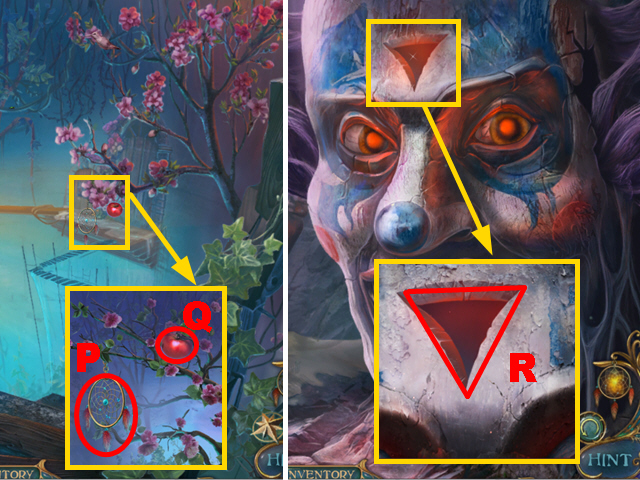
- Wake up Benny (O) and take the 2/2 RING (P).
- Walk down.
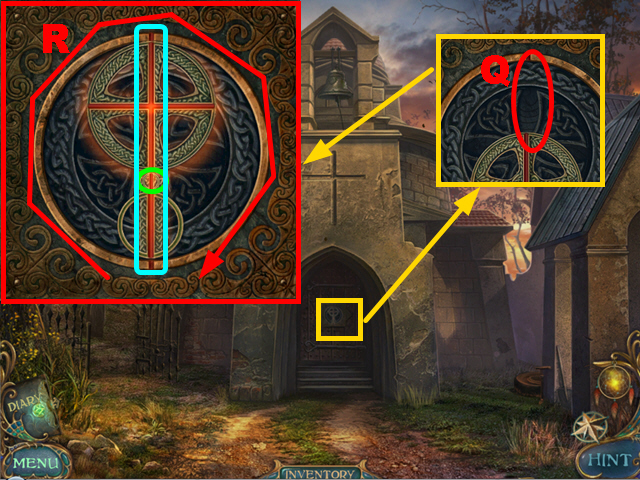
- Zoom into the door; connect the 2 RINGS to the third ring (Q).
- Play the mini-game.
- To solve this puzzle (R), rotate the small ring (green) clockwise until the red lines connect (light blue).
- Enter the church.
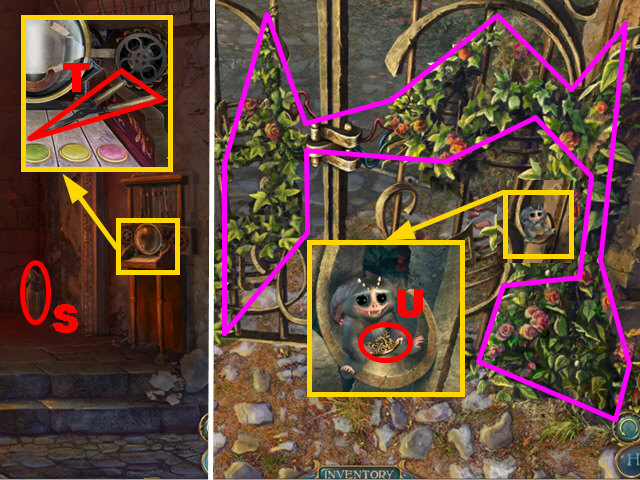
- Take the RUST REMOVER (S).
- Zoom into the device; take the GARDEN SHEARS (T).
- Walk down twice and move forward.
- Remove the vines with the GARDEN SHEARS (purple).
- Zoom into Benny; chase him away and take the 2/2 ORNAMENT (U).
- Walk down, turn left, and enter the church.
- Zoom into the shed and spray the RUST REMOVER on the lock (A); open the lock.
- Enter the shed.
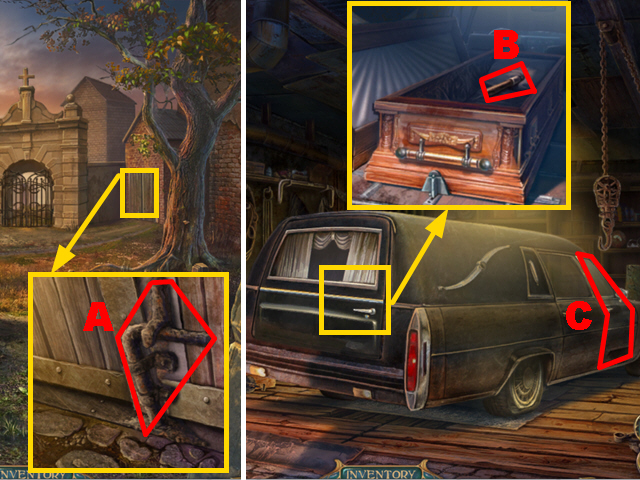
- Open the car’s trunk and zoom into it; open the coffin and take the JACK HANDLE (B).
- Open the front door (C).
- Enter the car.
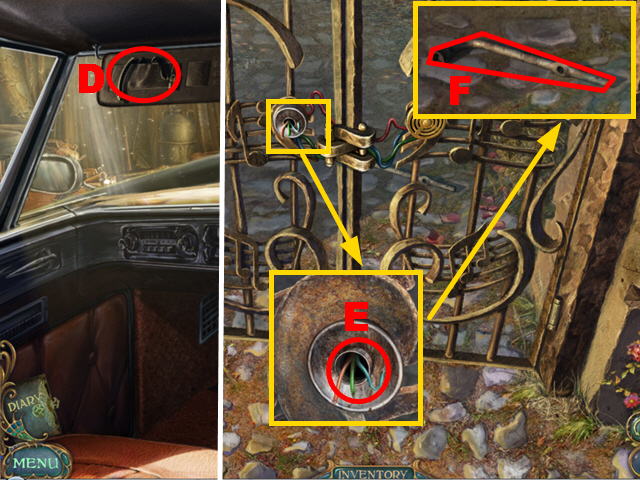
- Pull down the sun visor; take the PUMP HOSE (D).
- Walk down twice and move forward.
- Zoom into the broken microphone; connect the MICROPHONE to the wires (E).
- Take the WRENCH (F).
- Turn left.
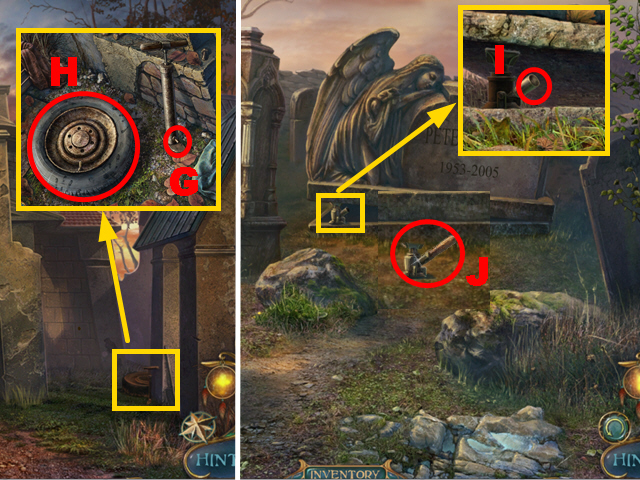
- Zoom into wheel; connect the PUMP HOSE to the pump (G).
- Press the pump and take the WHEEL (H).
- Turn left.
- Zoom into the large grave; connect the JACK HANDLE to the jack (I) and press the handle.
- Take the JACK (J).
- Walk down twice and turn right.
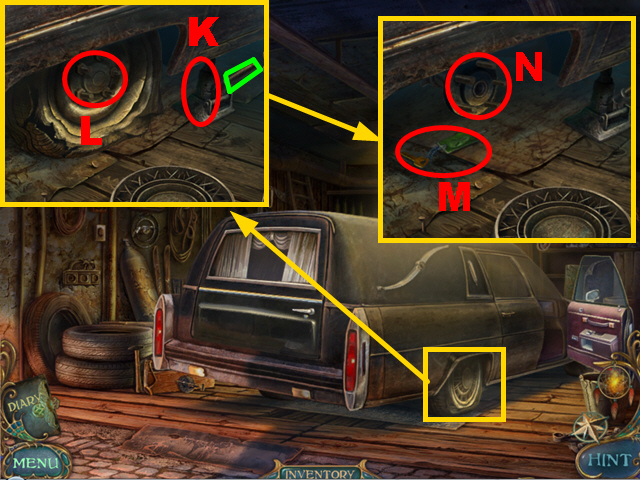
- Zoom into the flat wheel, put down the JACK (K), press the handle (green), and remove the wheel’s cover.
- Remove the bolts with the WRENCH (L).
- Remove the flat wheel, take the CAR KEY (M), and connect the WHEEL to the car (N).
- Remove the jack.
- Enter the car.
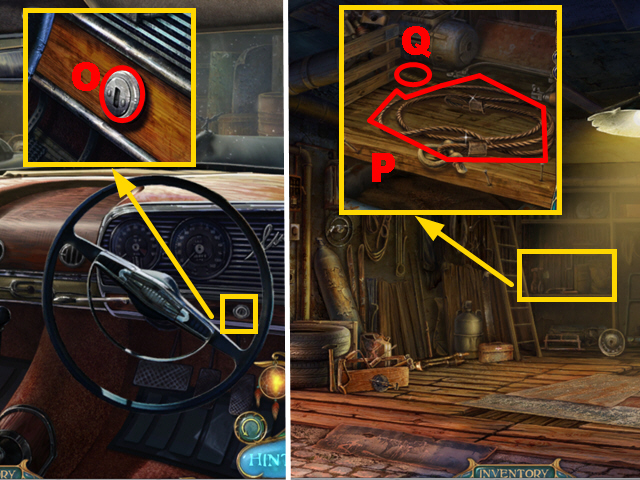
- Zoom into the ignition lock and put the CAR KEY into it (O); turn the key.
- Enter the shed.
- Zoom into the table; take the TOW CABLE (P) and the METAL ROD (Q).
- Walk down.
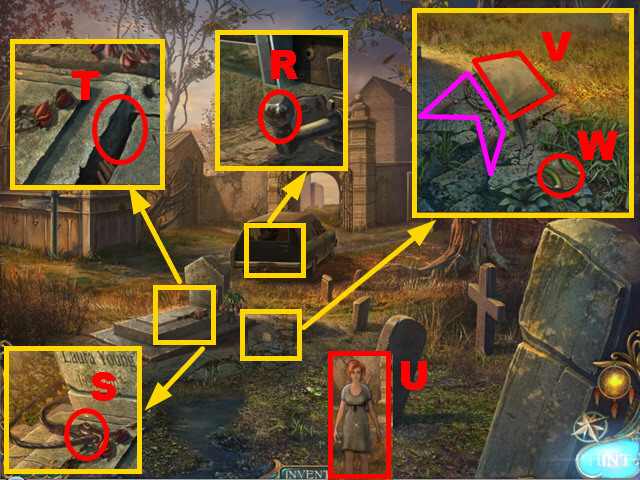
- Zoom into the car; connect the TOW CABLE to it (R).
- Zoom into the grave; fix the cable (S).
- Zoom into the grave; remove the cover with the METAL ROD (T).
- Talk to Laura (U).
- Zoom into the note; take the note (V), the Dreamcatcher piece (purple), and the 2/3 CIRCUITRY (W).
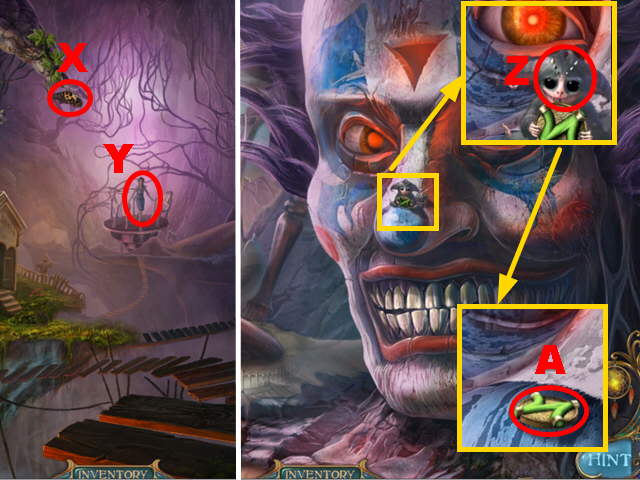
- Use the BUTTERFLY NET to acquire the BUTTERFLY (X).
- Talk to Laura (Y).
- Turn right.
- Zoom into Benny and give the BUTTERFLY to him (Z); take the 3/3 CIRCUITRY (A).
- Walk down and move forward.
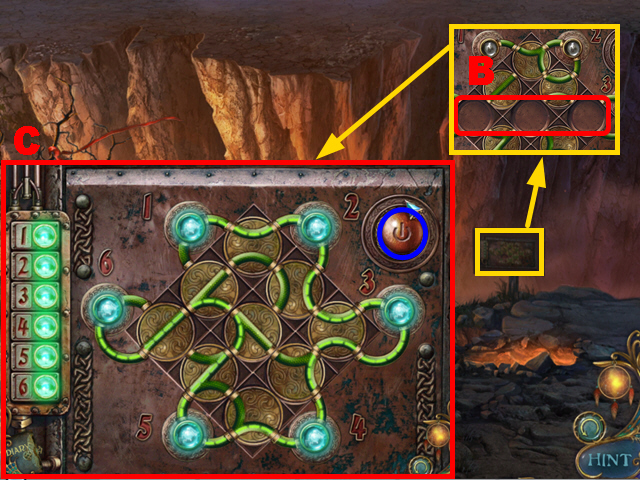
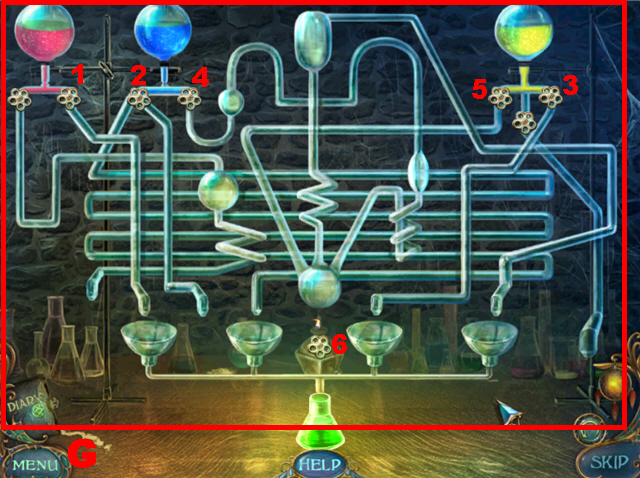
- Zoom into the control panel; insert the 3 CIRCUITRIES into the empty slots (B).
- Play the mini-game.
- To solve this puzzle (C), swap the circuitry parts so that the electricity flows from lamp 1-6.
- Press the power button (blue) to complete the puzzle.
- Move forward.
- Zoom into the pouch and open it; take the PAPER LAURA (D).
- Walk down.
- Take the RIBBON (E).
- Move forward twice.
- Zoom into the chisel and connect the RIBBON to it (F); pull the ribbon.
- Take the CHISEL (G).
- Walk down twice.
- Zoom into the pit; connect the CHISEL to the branch (H).
- Take the HOT CHISEL (I).
- Move forward twice.
Chapter 3: Breaking Through the Ice

- Use the HOT CHISEL to open the icy door (J).
- Open the door and go through it.
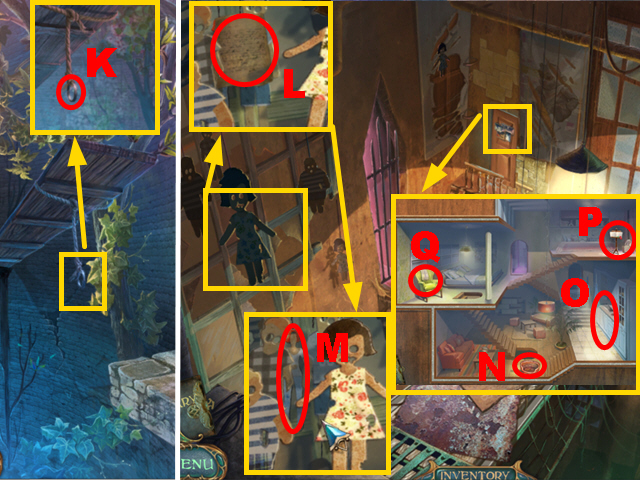
- Zoom into the bag and open it; take the note (K) and the PIN (green).
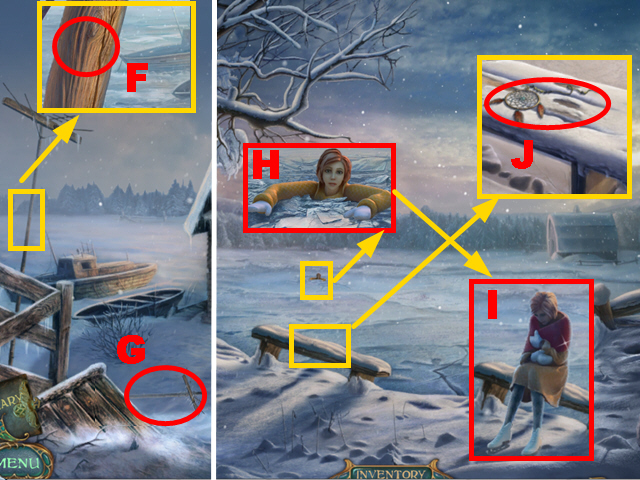
- Take the SCARF (L).
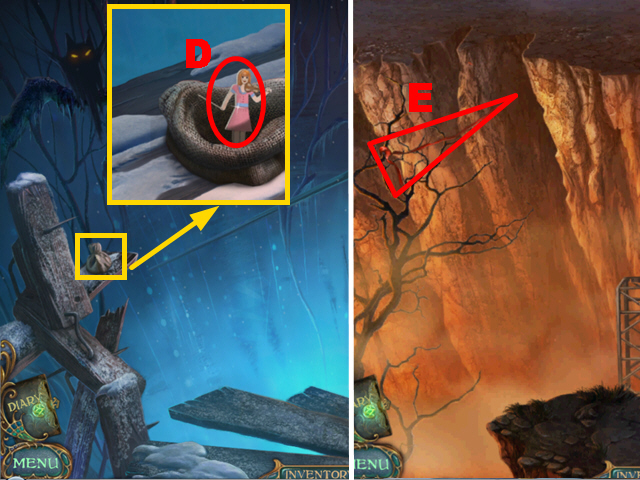
- Zoom into Benny; try to catch him (M).
- Zoom into Laura; try to help her (N).
- Move forward.
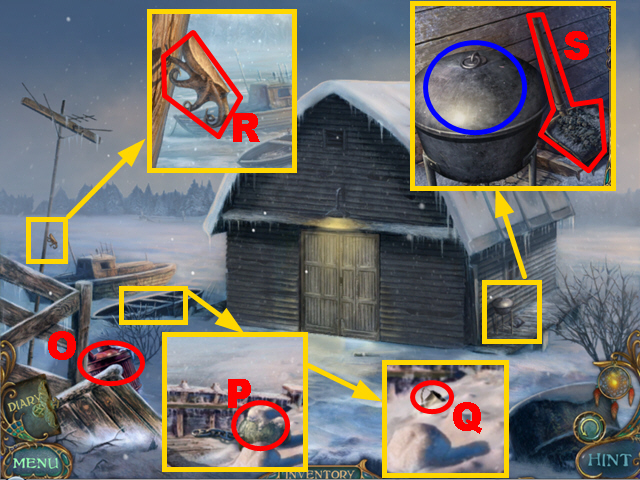
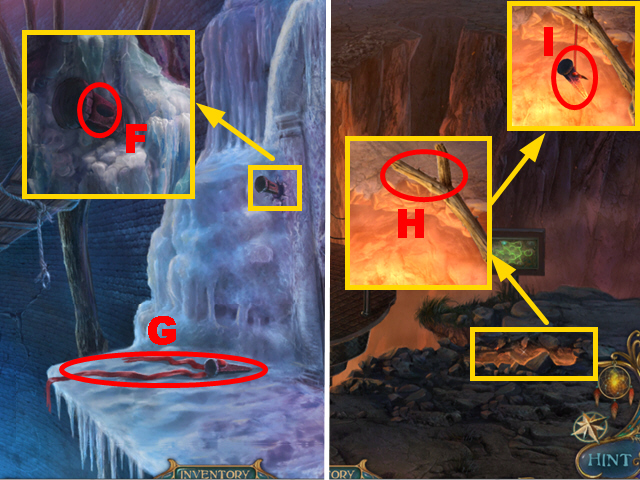
- Take the GASOLINE (O).
- Zoom into the boat; take the WEIGHT (P) and the MUG OF SNOW (Q).
- Zoom into the pole; take the 1/2 OCTOPUS (R).
- Zoom into the brazier; take the SCOOP (S) and remove the brazier’s cover (blue).
- Walk down.
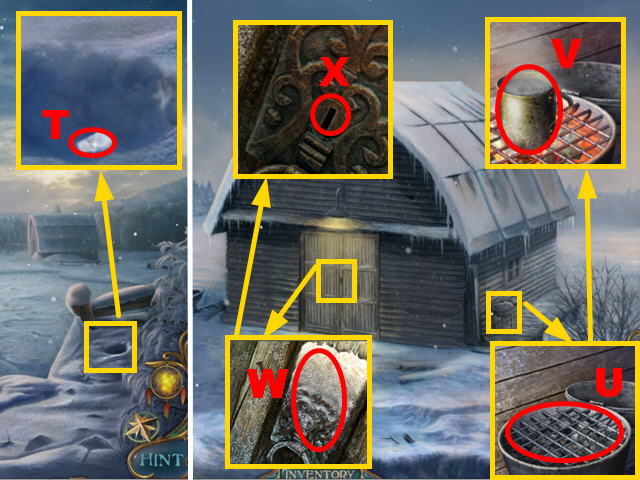
- Zoom into the snow and remove the snow with the SCOOP; take the LIGHTER (T).
- Move forward.
- Zoom into the brazier and pour the GASOLINE into it (U); light the brazier with the LIGHTER.
- Place the MUG OF SNOW on the brazier.
- Take the BOILING WATER with the SCARF (V).
- Zoom into the door and pour the BOILING WATER over the lock (W); insert the PIN into the lock (X) to open the door.
- Enter the Stable.
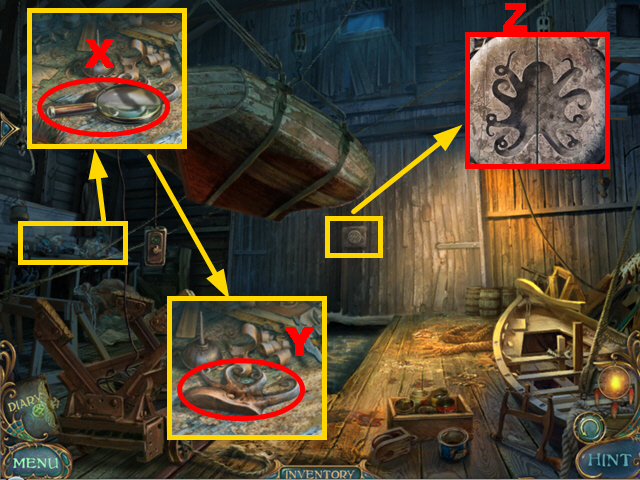
- Zoom into the desk; take the MAGNIFYING GLASS (X) and the 2/2 OCTOPUS (Y).
- Zoom into the door; put the 2 OCTOPUSES into the niche (Z).
- Play the mini-game.
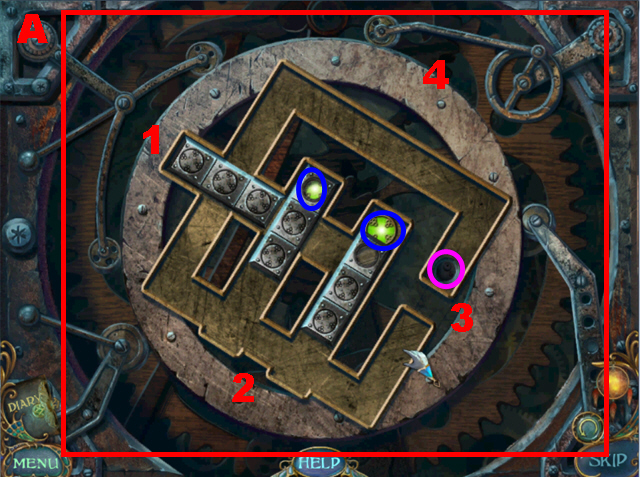
- To solve this puzzle (A), rotate the maze in the following directions: turn (1) to the bottom side counterclockwise (ccw).
- Turn (1) to the right side ccw.
- Turn (1) to the bottom side clockwise (cw), turn (1) to the left side cw.
- Turn (1) to the right side cw, turn (1) to the bottom side cw.
- Turn (1) to the right side ccw, and turn (1) to the left side ccw.
- The ball has to reach the hole (purple); the hole remains open while the two spots (blue) are green.
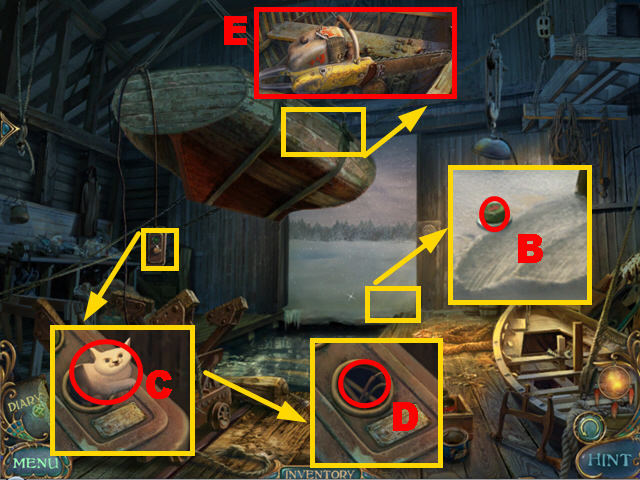
- Zoom into the open door; take the BUTTON (B).
- Zoom into the remote control and take the PAPER CAT (C); connect the BUTTON to the wires (D) and press it.
- Zoom into the boat; take the CHAINSAW (E).
- Walk down.
- Zoom into the mast; cut it with the CHAINSAW (F).
- Take the MAST (G).
- Walk down.
- Zoom into Laura; give her the MAST (H) to pull her out of the water.
- Talk to Laura (I).
- Zoom into the bench; take the piece of the Dreamcatcher (J).
- Move forward.
- Zoom into the board; connect the WEIGHT to the hook (K).
- Turn left.
- Zoom into the puppets; move around the puppets and take the note (L) and the PAPER MOTHER (M).
- Zoom into the door; put down the PAPER CAT (N), the PAPER MOTHER (O), the PAPER LAURA (P), and the PAPER FATHER (Q).
- Go through the door.
Chapter 4: Sharks
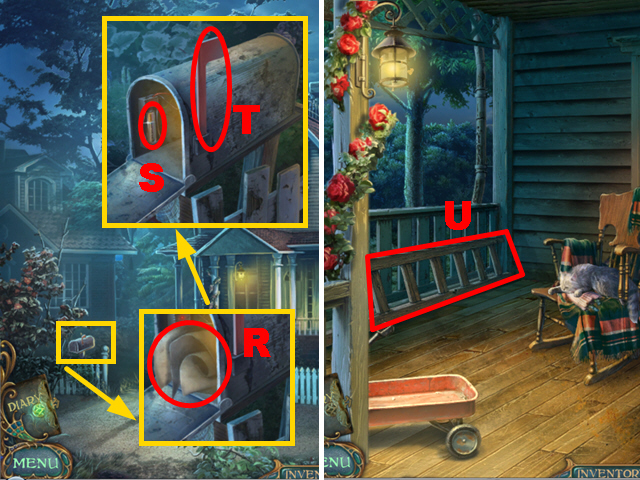
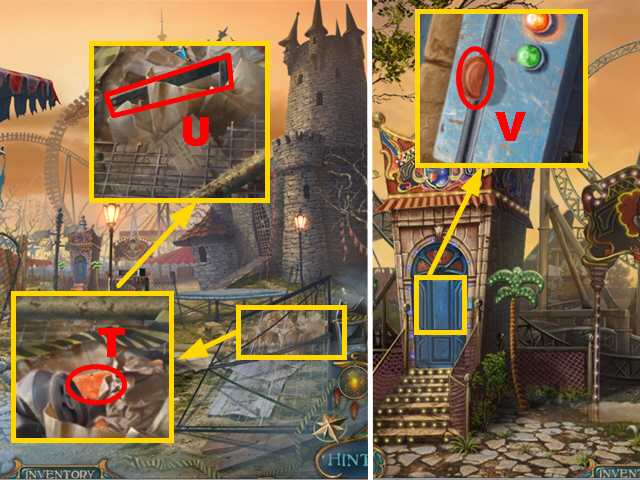
- Zoom into the mailbox and open it; take the note (R), the 1/4 BATTERY (S), and the MAILBOX FLAG (T).
- Move forward.
- Take the LADDER (U).
- Walk down and turn right.
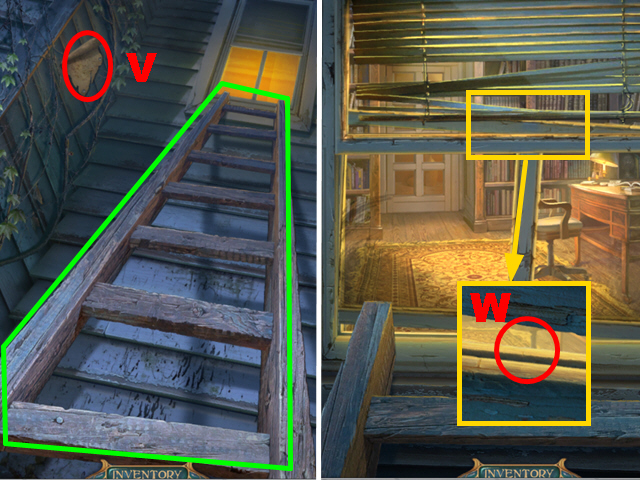
- Put down the LADDER (green).
- Take the note (V).
- Move forward.
- Zoom into the window; open it with the MAILBOX FLAG (W).
- Move forward.
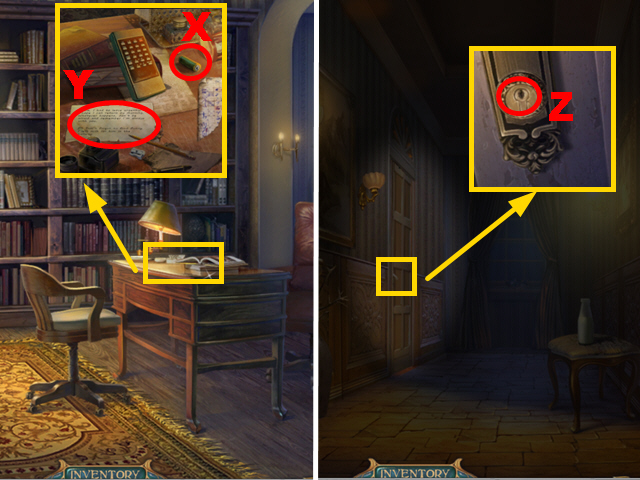
- Zoom into the desk; take the 2/4 BATTERY (X) and read the note (Y).
- Open the door and move forward.
- Zoom into the door; turn the handle (Z).
- Take the MILK (A).
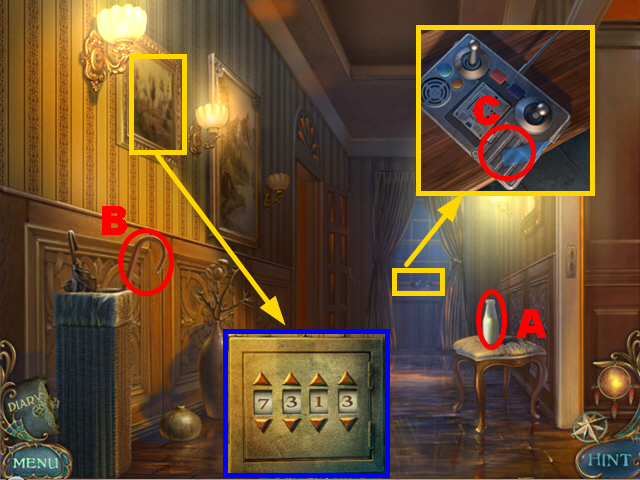
- Take the UMBRELLA HANDLE (B).
- Zoom into the painting; remove it to uncover the safe (blue).
- Zoom into the remote control; remove the cover (C).
- Turn left.
- Zoom into the newspaper; make note of the code I-IV-II-V-III (purple).
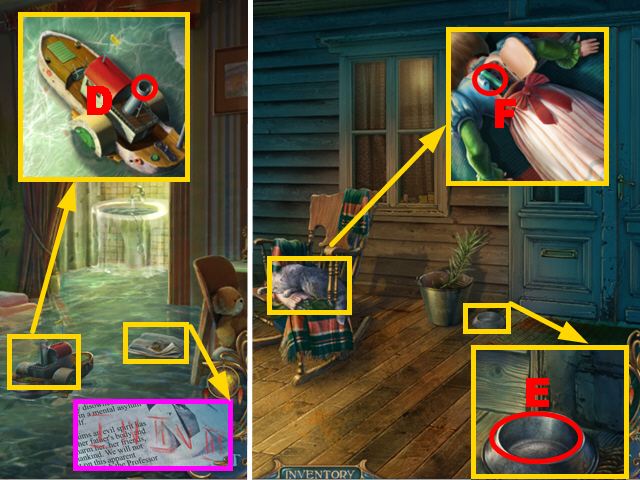
- Zoom into the toy ship; insert the UMBRELLA HANDLE into it (D).
- Walk down, turn right, walk down three times, and move forward.
- Zoom into the bowl; pour the MILK into it (E).
- Zoom into the rocking chair and open the doll twice; take the 3/4 BATTERY (F).
- Walk down, turn right, and move forward twice.
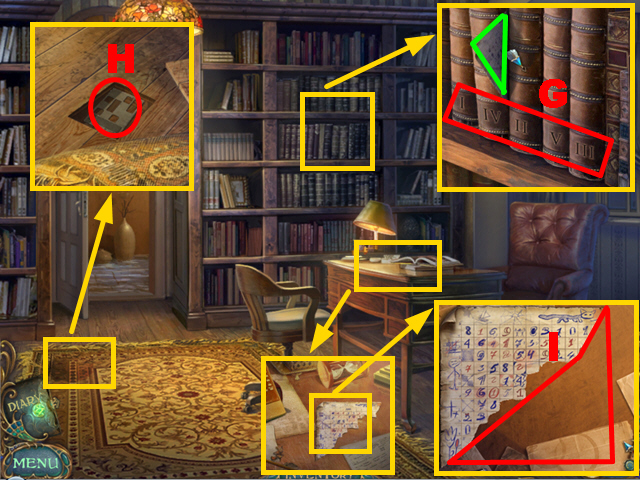
- Zoom into the bookshelf; swap the books so that they are sorted I-IV-II-V-III (G).
- Take the PIECE OF TABLE (green).
- Zoom into the rug, remove the rug, and open the compartment; take the TEMPLATE (H).
- Zoom into the table and then zoom into the paper piece; connect the PIECE OF TABLE to the paper piece (I) and put down the TEMPLATE.
- Play the mini-game.
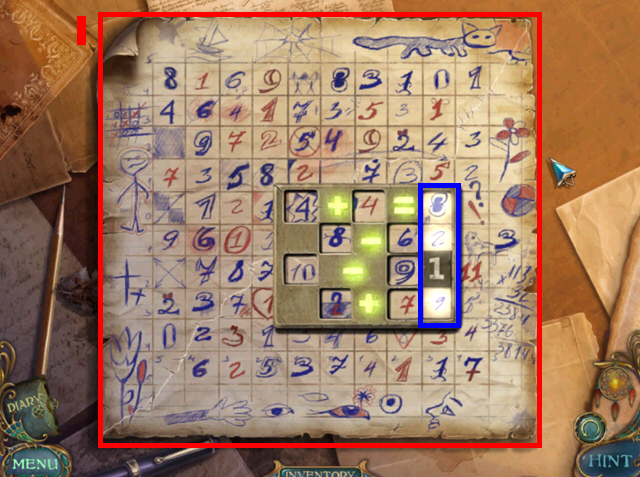
- To solve this puzzle (I), place the card so that the equation is correct for each row.
- Take note of the code 8-2-1-9 (blue).
- Move forward.
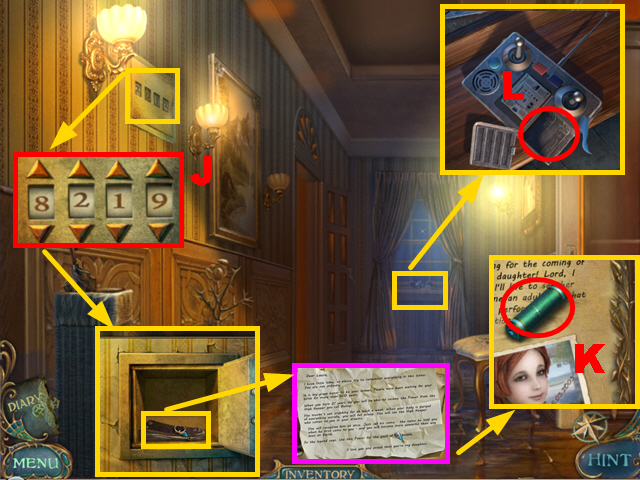
- Zoom into the safe; enter the code 8-2-1-9 (J) and zoom into the book.
- Turn the pages four times; take the note (purple) and the 4/4 BATTERY (K).
- Zoom into the remote control; insert the 4 BATTERIES into the slot (L) and put the cover on it.
- Take the REMOTE CONTROL.
- Turn left.

- Zoom into the toy ship; use the REMOTE CONTROL to direct the toy ship (M).
- Move to the left side of the room.
- Zoom into the box and open it; read the note (N).
- Zoom into the toy rabbit; take the BIG BUTTON (O).
- Move to the right side of the room.
- Turn on the light (blue).
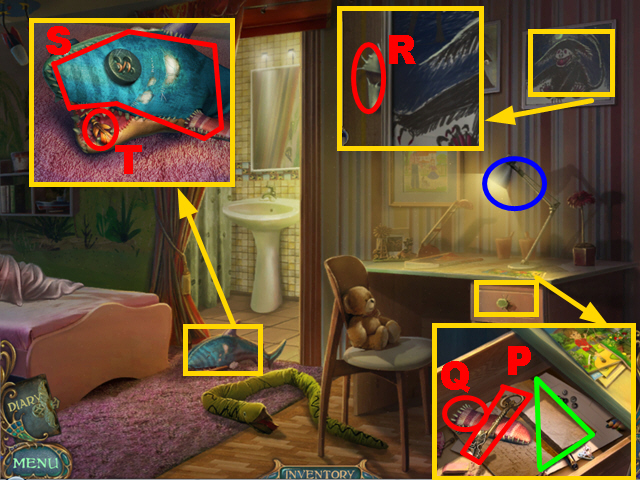
- Zoom into the desk and open the drawer; take the FAIRY KEY (P), the FIN (Q), and read the note (green).
- Zoom into the Benny painting; take the TEETH (R).
- Zoom into the toy shark; connect the TEETH, the BIG BUTTON and the FIN to it (S).
- Take the Dreamcatcher piece (T).
- Take the Dreamcatcher piece (U).
- Walk down and turn right.
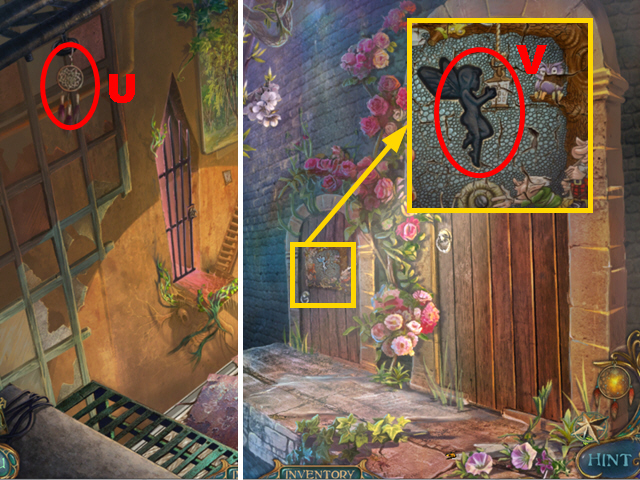
- Zoom into the small door; put the FAIRY KEY into the lock (V) and turn the key.
- Go through the door and move forward.
Chapter 5: Eternal Sleep
- Zoom into the mushroom; take the STICK (W).
- Zoom into the cobweb; take the CLOWN PART (X).
- Walk down.
- Zoom into the right plant; open it with the STICK and take the SLINGSHOT (Y).
- Move forward.
- Shoot the SLINGSHOT at the owl (Z).
- Take the FEATHER (A).
- Zoom into the tree; collect 10 TERMITES (purple) while they move across the trunk.
- Walk down.
- Zoom into the roots; use the 10 TERMITES to remove the roots (light blue).
- Zoom into the left plant; put the FEATHER into its nose (B).
- Zoom into the ground; take the Dreamcatcher piece (C) and the CORK (D).
- Zoom into the roots; take DRUNKEN BENNY (E), put the CORK into the bottle (F) to acquire the BOTTLE.
- Move forward.
- Zoom into the cobweb and put down DRUNKEN BENNY (G); tip the leave with water (H).
- Remove the cobweb and put down the BOTTLE (I).
- Play the mini-game.
- To solve this puzzle, guide the FIREFLIES (purple) into the bottle.
- The fireflies will always move away from your cursor.
- Take the FIREFLIES (J).
- Zoom into the tree; put the FIREFLIES into the hole (K) and remove the bottle’s cork.
- Zoom into the flower and take the FLOWER OF LIFE (L).
- Walk down.
- Zoom into Laura; give the FLOWER OF LIFE to her (M).
- Zoom into the glowing mushroom; take the note (N) and the Dreamcatcher piece (O).
- Zoom into the tree; take the Dreamcatcher piece (P) and the APPLE (Q).
- Walk down twice and turn right.
- Zoom into the clown’s head; insert the CLOWN PART into the niche (R).
- Go through the mouth (S).
- Zoom into the trash and remove 2 objects; take the BRICK (T) and the SWITCH (U).
- Move forward.
- Zoom into the blue door; take the COPPER COIN (V).
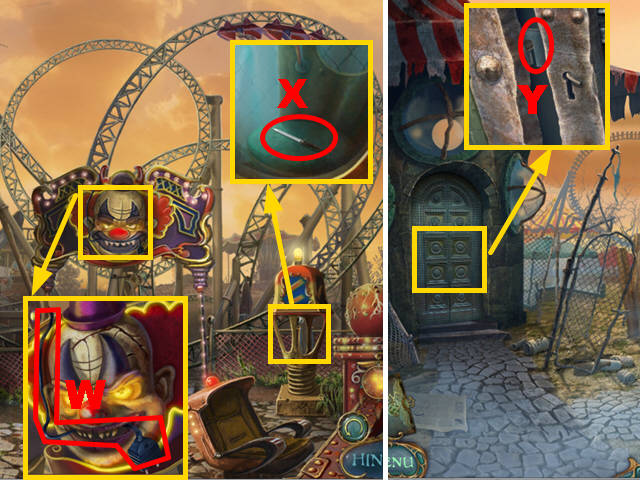
- Zoom into the clown; take the POWER CABLE (W).
- Zoom into the display; take the NAIL FILE (X).
- Walk down.
- Zoom into the door; open the lock with the NAIL FILE (Y).
- Turn left.
- Take the HOIST HANDLE (Z).
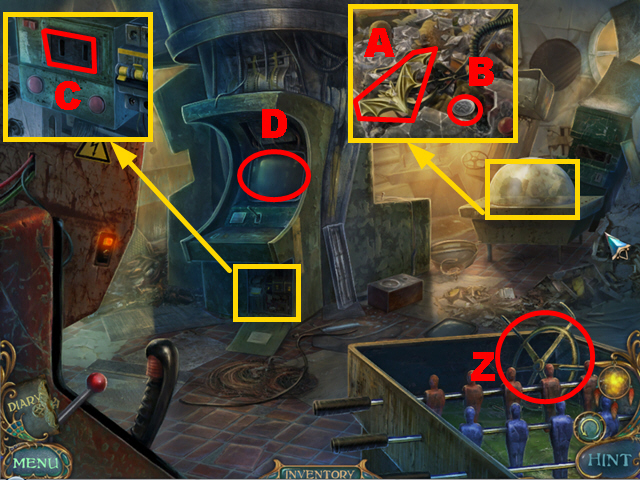
- Zoom into the glass display and break the glass with the BRICK; take the BAT TOY (A) and the SILVER COIN (B).
- Zoom into the machine; insert the POWER CABLE into the slot (C).
- Zoom into the display (D).
- Play the mini-game.
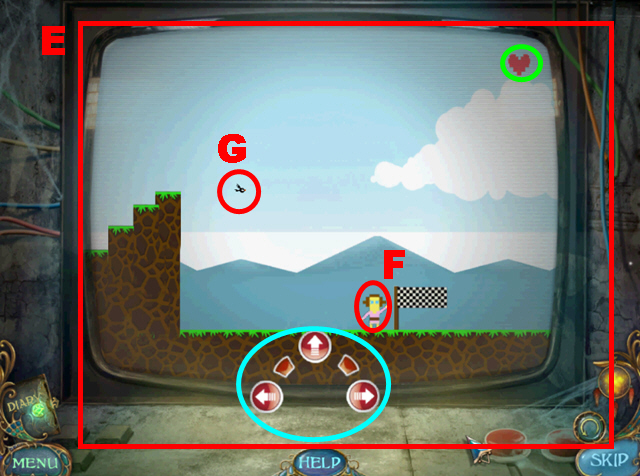
- To solve this puzzle (E), move the figure (F) by pressing the arrow buttons (light blue).
- Avoid gaps and enemies (G).
- Your remaining number of attempts is represented by the heart symbols (green).
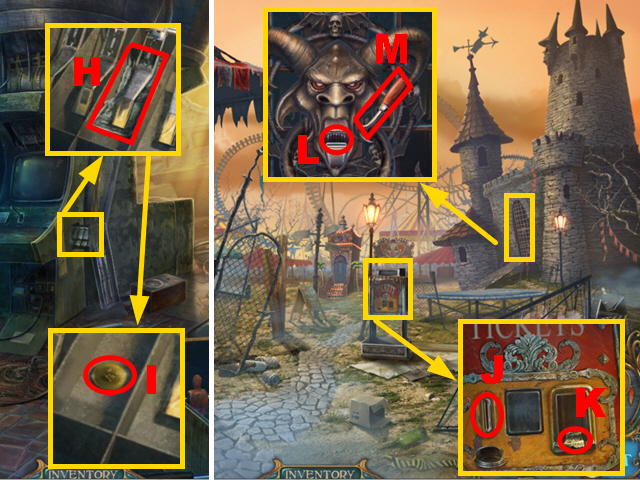
- Zoom into the drawer; take the DOLLAR (H) and the GOLD COIN (I).
- Walk down.
- Zoom into the tickets machine; insert the GOLD COIN, the SILVER COIN, and the COPPER COIN into the slot (J).
- Take the TICKET (K).
- Zoom into the gate and put the TICKET into the mouth (L); turn the handle (M).
- Enter the castle.
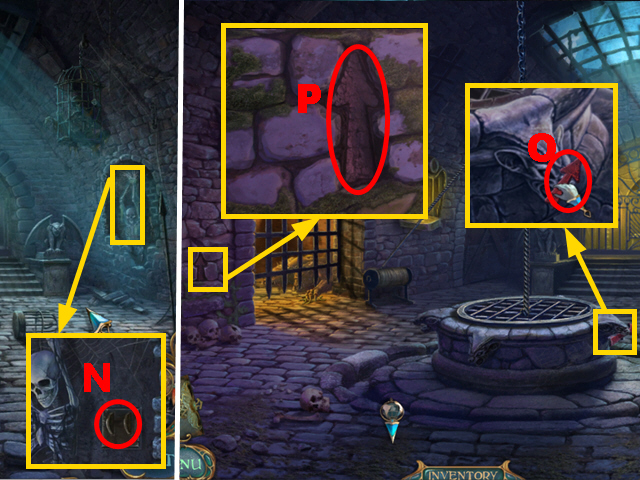
- Zoom into the skeleton; put the SWITCH into the slot (N) and pull it.
- Zoom into the well; take the ARROW (O).
- Zoom into the wall; insert the ARROW into the niche (P) and press it.
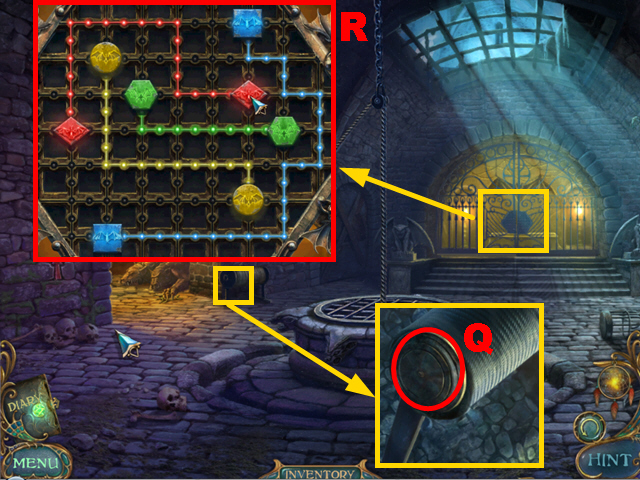
- Zoom into the hoist; connect the HOIST HANDLE to it (Q) and turn the handle.
- Zoom into the gate to play a mini-game.
- To solve this puzzle (R), connect each symbol of the same color.
- Colored paths are not allowed to cross each other.
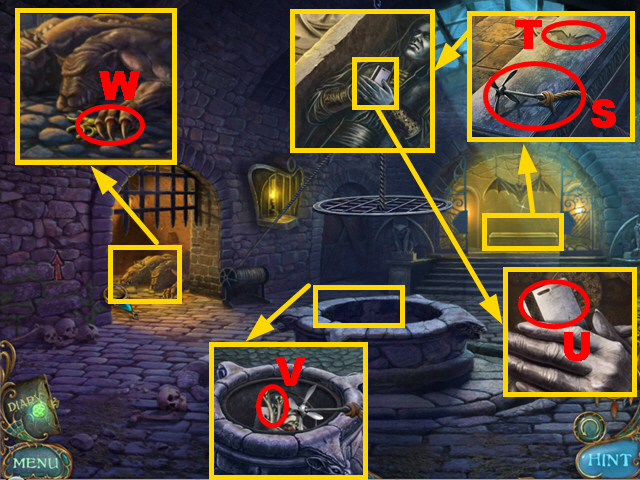
- Zoom into the sarcophagus and take the ROPE (S); insert the BAT TOY into the niche (T).
- Remove the cover and zoom into the hands; take the ACCESS CARD (U).
- Zoom into the well and throw the ROPE into it; take the BONE (V).
- Zoom into the left cell; put down the BONE (W) to acquire the CONNECTORS.
- Walk down and move forward.

- Zoom into the door; insert the ACCESS CARD into the slot (X).
- Zoom into the ticket office; put the CONNECTORS into the slots (Y).
- Play the mini-game.

- To solve this puzzle (Z), place the connectors in a way so that all the lamps are lit.
- Talk to Laura (A).
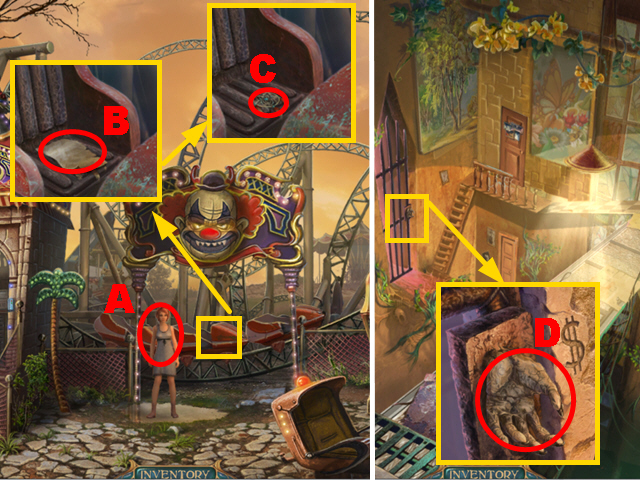
- Zoom into the chair; take the note (B) and the Dreamcatcher piece (C).
- Move forward twice and turn left.
- Zoom into the gate; put the DOLLAR into the hand (D).
- Go through the gate.
- Talk to Laura (E).
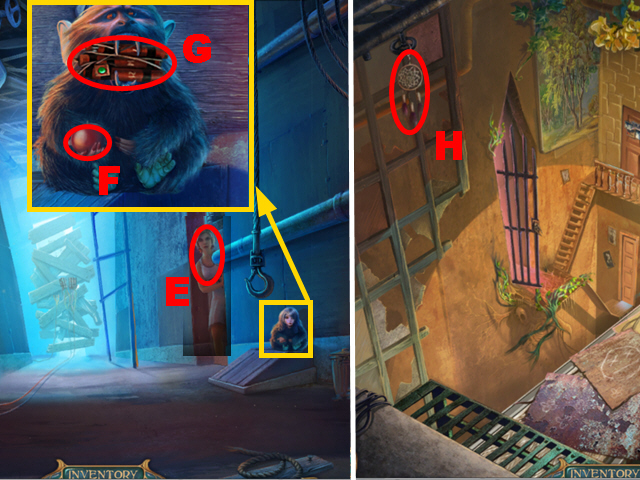
- Zoom into the creature; give the apple to the creature (F) and take the DYNAMITE (G).
- Walk down.
- Take the Dreamcatcher piece (H).
- Move forward twice.
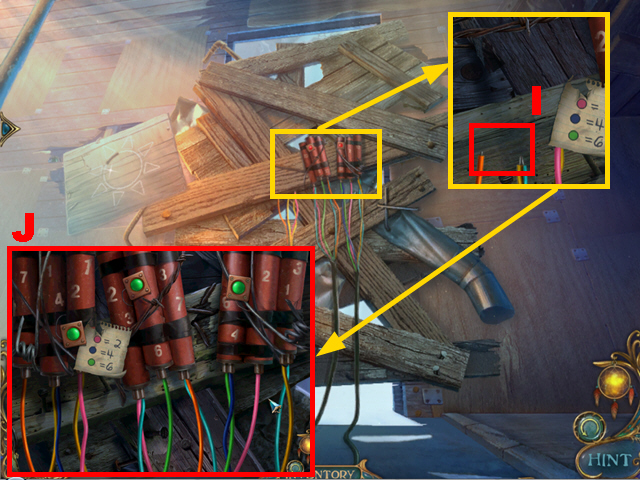
- Zoom into the dynamite; connect the DYNAMITE to the wires (I).
- Play the mini-game.
- To solve this puzzle (J), switch the wires so that they are connected to the correct numbers.
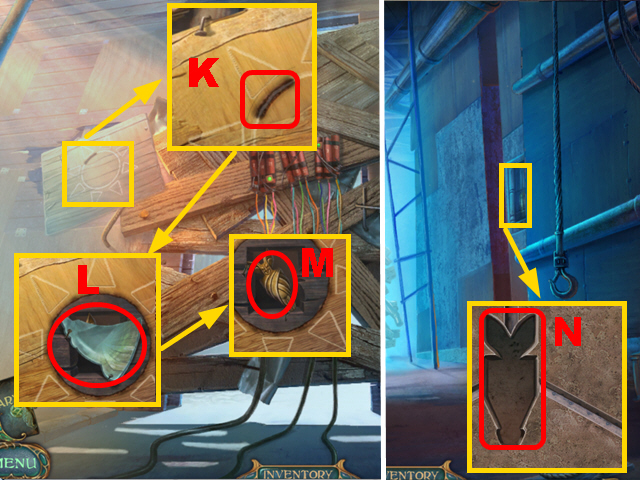
- Zoom into the sun; hold the MAGNIFYING GLASS next to it (K).
- Take the MIRROR SHARD (L) and the IDOL (M).
- Walk down.
- Zoom into the compartment; insert the IDOL into the niche (N).
- Play the mini-game.
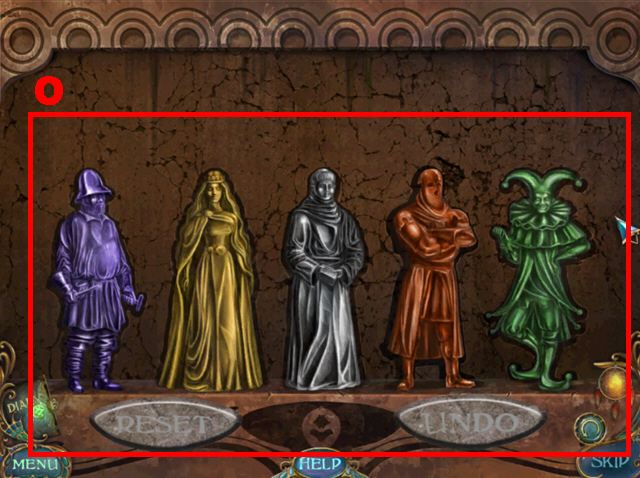
- To solve this puzzle (O), swap the parts of the idols until all the idols are recreated.
- Put each idol into its correct shape.
- The initial positioning of idol parts is randomized.
- Turn right.
Chapter 6: Public Execution
- Move to the left side of the street.
- Zoom into the lantern and open it; take the WICK (P).
- Move forward towards Laura.
- Zoom into the basket; take the PRUNING SHEARS (Q).
- Walk down.

- Zoom into the vines and remove the vines with the PRUNING SHEARS (purple) to acquire the POISON IVY; take the WEDGE (R).
- Go to the carriage.
- Zoom into the hay and remove the hay twice; take the OIL CAN (S).
- Walk down and move towards the door.
- Zoom into the gap; take the FLINT AND STEEL (T).
- Zoom into the lock; pour the OIL CAN over the rusted lock (U).
- Walk down and move towards Laura.
- Zoom into the device; put the WEDGE into it (V) to stop it.
- Zoom into the broken device; take the SCREW (W).
- Walk down and move towards the door.
- Zoom into the lock; insert the SCREW into the hole (X) and remove the lock.
- Move forward.
- Zoom into the window; take the GREEN CRAYON (Y) and the BLUE POWDER (Z).
- Zoom into the shelf; take the SERPENT (A) and the KEY (B).
- Zoom into the table; take the PINK POWDER (C).
- Zoom into the gate; insert the KEY into the lock (D).
- Zoom into the table; pour the BLUE POWDER, the PINK POWDER, and the POISON IVY into the machine (E).
- Zoom into the burner and put the WICK into it (F); light the wick with the FLINT AND STEEL.
- Play the mini-game.
- To solve this puzzle (G), turn the valves in the sequence 1-6.
- You will receive the ACID.
- Walk down twice and move towards Laura.
- Zoom into the mast; pour the ACID over the hinge (H).
- Zoom into the basket; take the note (I) and the Dreamcatcher piece (purple).
- Zoom into the wall; insert the SERPENT into the niche (J).
- Play the mini-game.
Chapter 7: Snakes
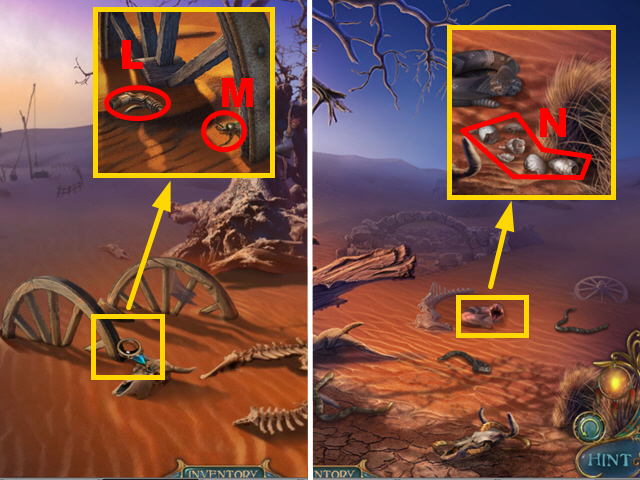
- Move to the left side of the desert.
- Zoom into the wheel; take the SPRAYER (L) and the 1/4 BEETLE (M).
- Move towards Laura.
- Zoom into the snake; take the EGGSHELLS (N).
- Walk down and turn to the left.
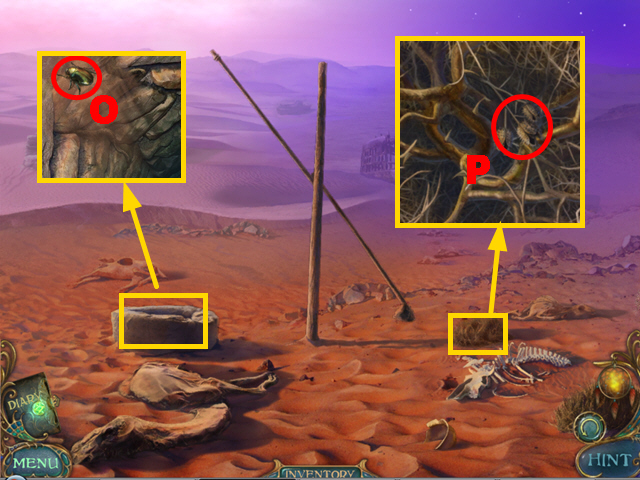
- Zoom into the well; take the 2/4 BEETLE (O).
- Zoom into the grass; take the SEEDS (P).
- Walk down, move to the right side of the desert, and go towards the house.
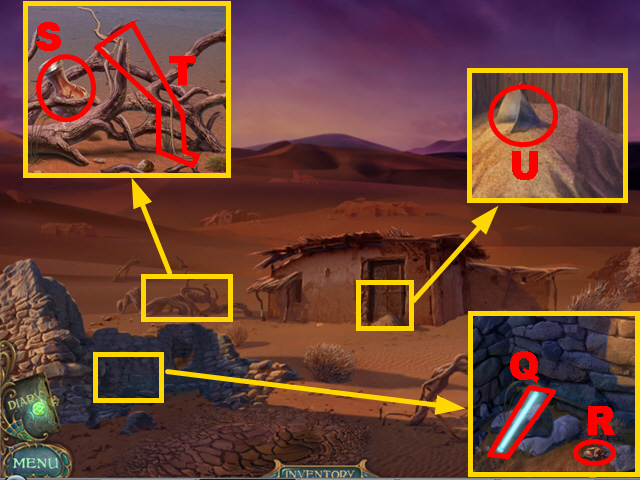
- Zoom into the broken wall; take the GLOW STICK (Q) and the 3/4 BEETLE (R).
- Zoom into the branches; take the FLASK (S) and the ROPE (T).
- Zoom into the door; take the FUNNEL (U).
- Walk down and turn left.
- Zoom into the well; throw down the GLOW STICK (green).
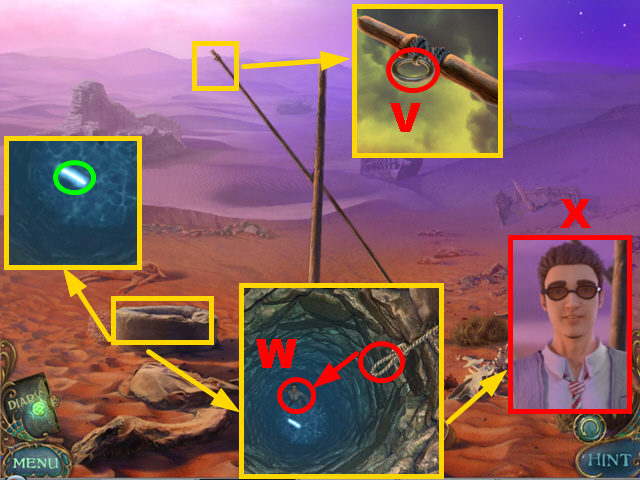
- Zoom into the mast; connect the ROPE to it (V).
- Zoom into the well; give the rope to the man (W).
- Talk to the man (X).
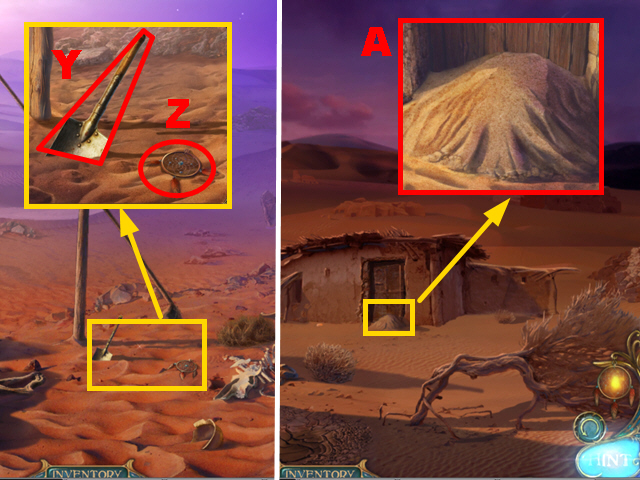
- Zoom into the sand; take the SHOVEL (Y) and the Dreamcatcher piece (Z).
- Walk down and move towards the house.
- Zoom into the door; remove the sand with the SHOVEL (A).
- Enter the house.
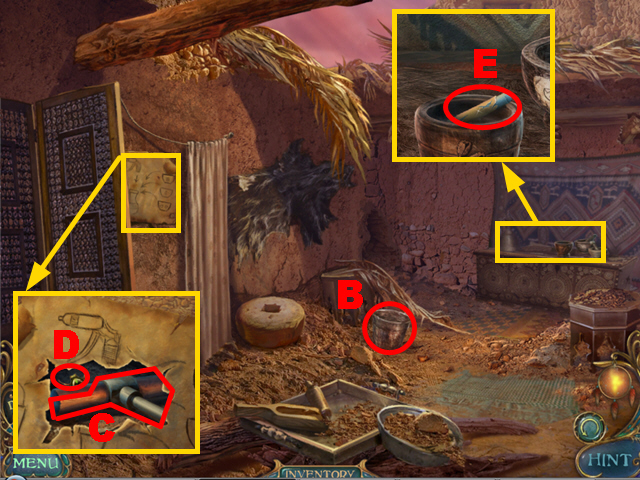
- Move aside the curtain.
- Take the EMPTY BUCKET (B).
- Zoom into the poster and rip it open twice; take the DETONATOR HANDLE (C) and the 4/4 BEETLE (D).
- Zoom into the table; take the BLUE CRAYON (E).
- Walk down twice and turn left.
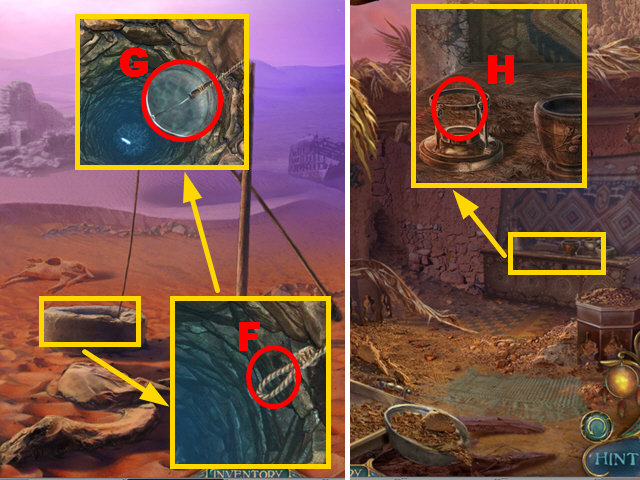
- Zoom into the well and connect the EMPTY BUCKET to the rope (F); lower the rope, pull it back up, and take the WATER (G).
- Walk down, turn right, and move forward.
- Zoom into the table; put down the FLASK (H) and place the FUNNEL into the flask.
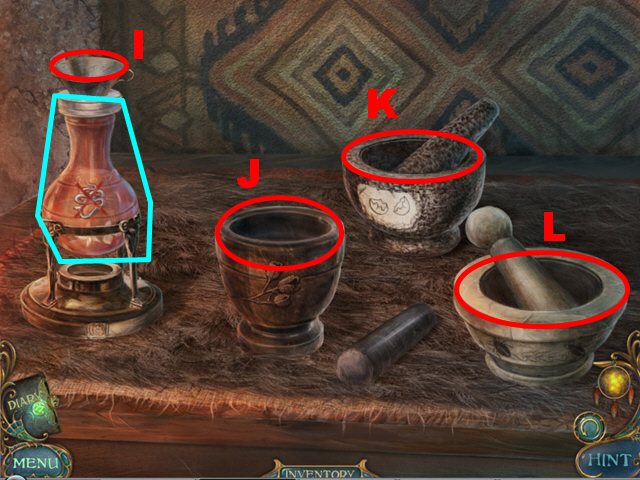
- Pour the WATER into the flask (I).
- Pour the SEEDS into the mortar (J), the EGGSHELLS into the mortar (K), and the 4 BEETLES into the mortar (L).
- Put the SPRAYER onto the flask and take the ANTI-SNAKE POTION (light blue).
- Walk down twice and move towards Laura.
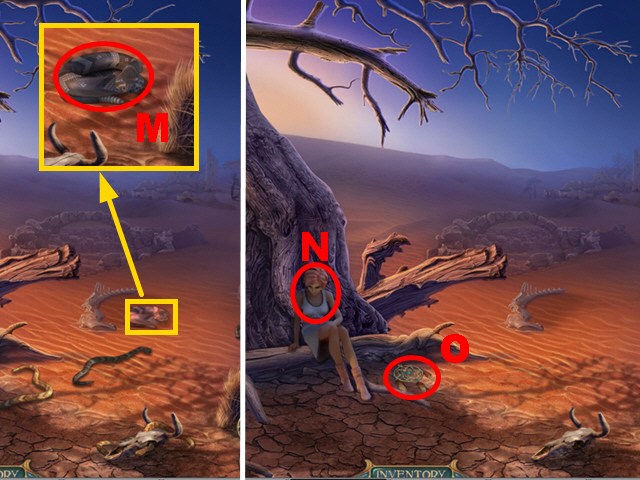
- Zoom into the snake; spray the ANTI-SNAKE POTION at it (M).
- Give the WATER to Laura (N).
- Take the Dreamcatcher piece (O).
- Walk down.
- Take the Dreamcatcher piece (P).
- Zoom into the window; take the Dreamcatcher piece (Q) and the RED CRAYON (R).
- Zoom into the detonator; connect the DETONATOR HANDLE to it (S) and press it.
- Move forward.
- Take the Dreamcatcher piece (T).
- Move forward.
- Lure out Benny (U).
- Zoom into the gap; take the BROWN CRAYON (V).
- Walk down three times.
- Zoom into the painting; complete the painting with the BLUE, the GREEN, the RED, and the BROWN CRAYON (W).
- Take the CRYSTAL (X).
- Turn left and move forward twice.
- Zoom into the gap; place the CRYSTAL inside the gap (Y).
- Zoom into the bowl; connect the MIRROR SHARD to it (Z).
- Play the mini-game.
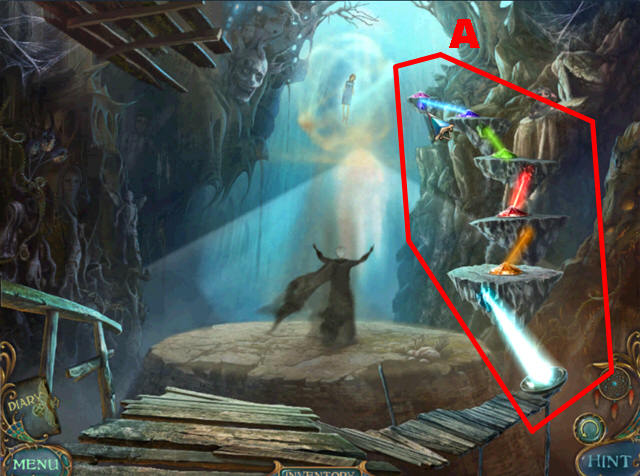
- To solve this puzzle (A), move the floating islands into the correct positions to create a stairway to Laura.
- The colors on the islands indicate which island has to be placed above which colored ray.
- Turn right.
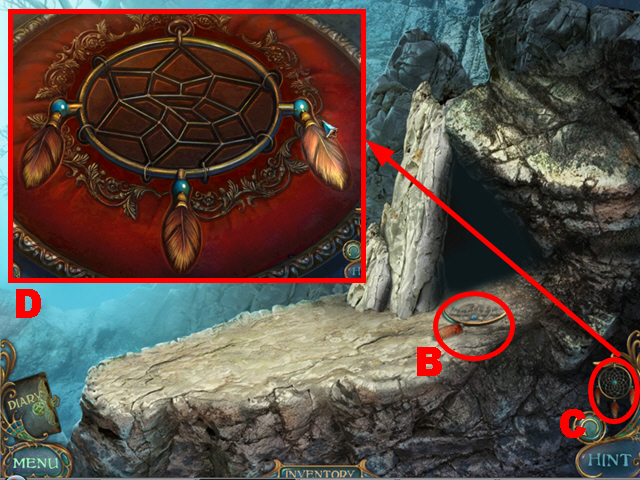
- Take the Dreamcatcher piece (B).
- Access the Dreamcatcher (C).
- Put the Dreamcatcher pieces into the correct positions to create the Dreamcatcher (D).
- You will receive the DREAMCATCHER.
- Move forward.
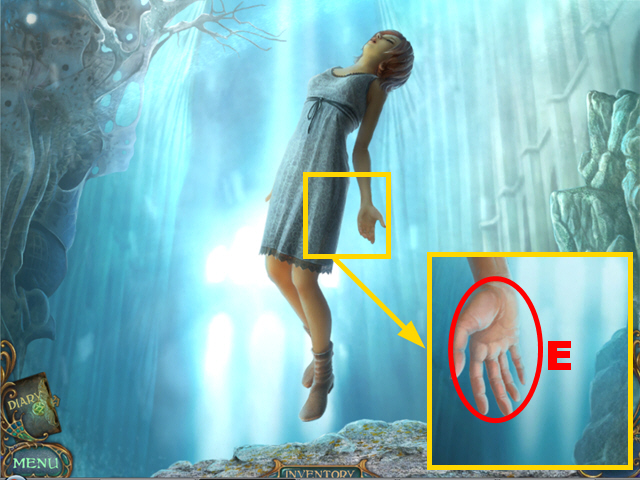
- Zoom into Laura; put the DREAMCATCHER into her hand (E).
- Congratulations, you have completed Dreamscapes: The Sandman.
Hidden Beholders
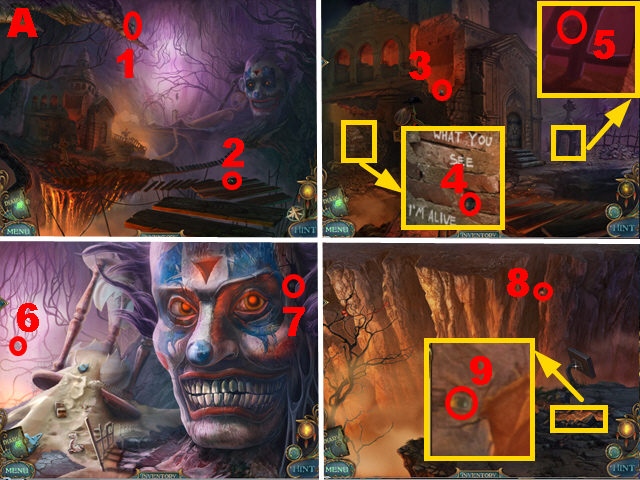
- There are 110 beholders hidden throughout the game; they are listed below.
- Screenshot A displays the location of hidden beholders 1-9.
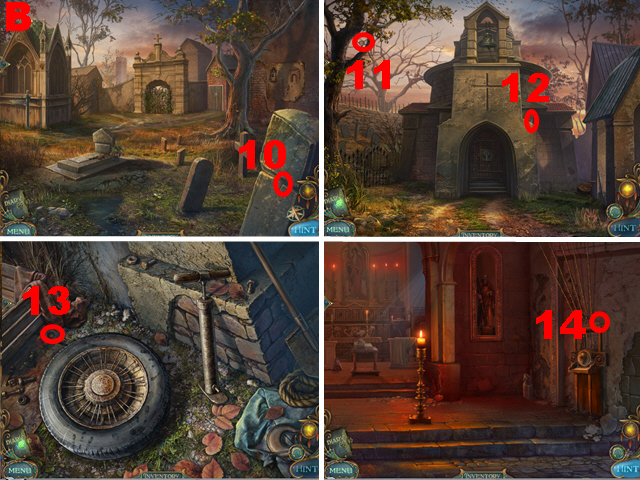
- Screenshot B displays the location of hidden beholders 10-14.
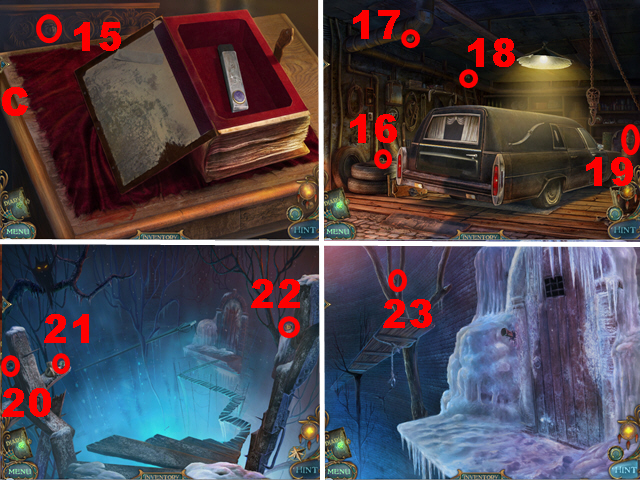
- Screenshot C displays the location of hidden beholders 15-23.
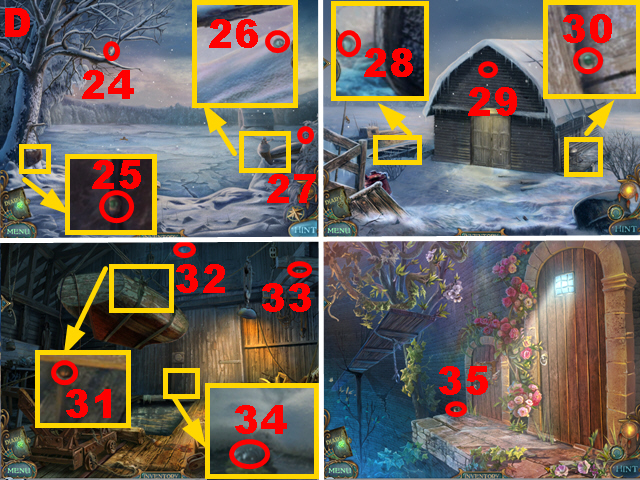
- Screenshot D displays the location of hidden beholders 24-35.
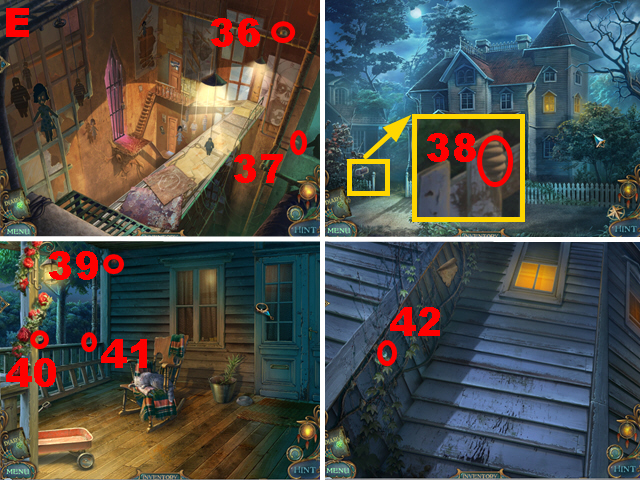
- Screenshot E displays the location of hidden beholders 36-42.
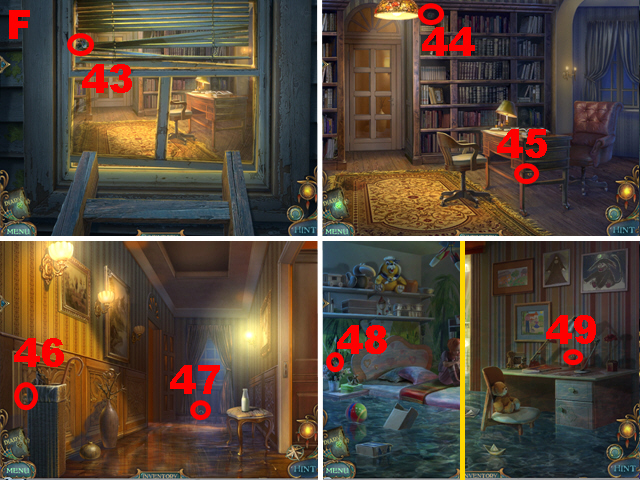
- Screenshot F displays the location of hidden beholders 43-49.
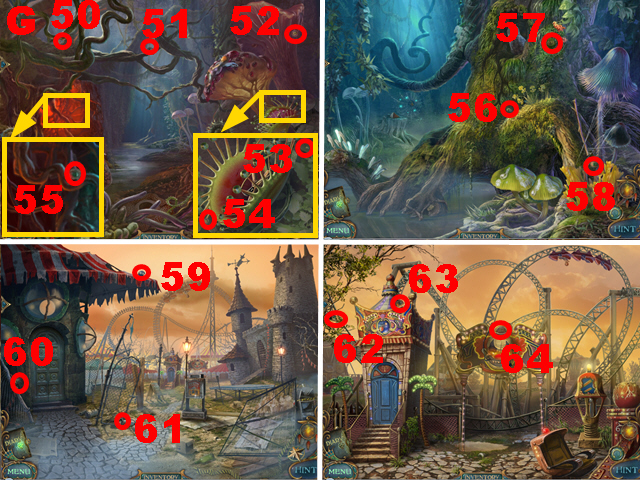
- Screenshot G displays the location of hidden beholders 50-64.
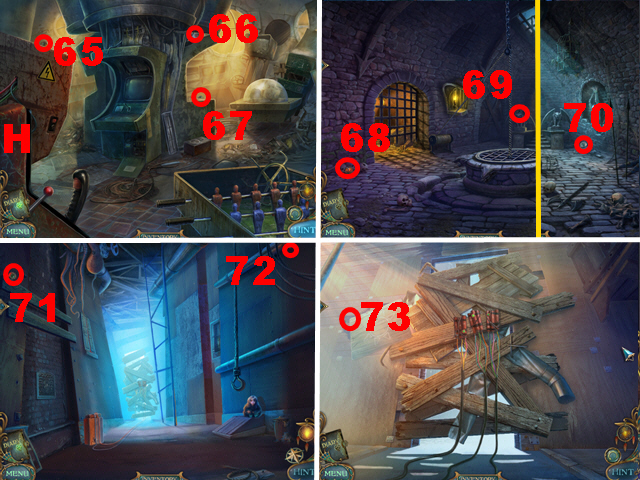
- Screenshot H displays the location of hidden beholders 65-73.
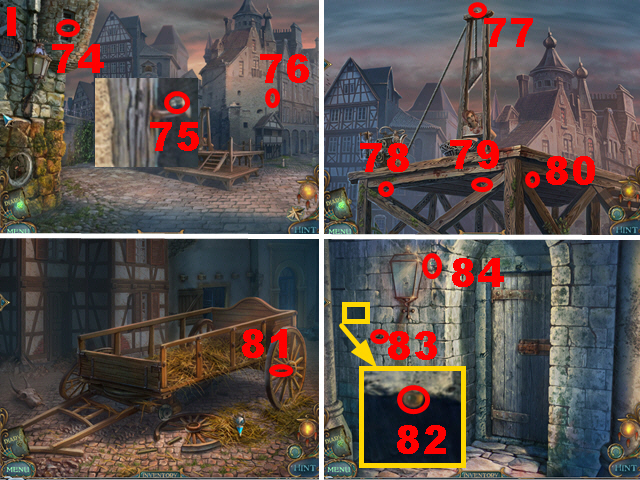
- Screenshot I displays the location of hidden beholders 74-84.
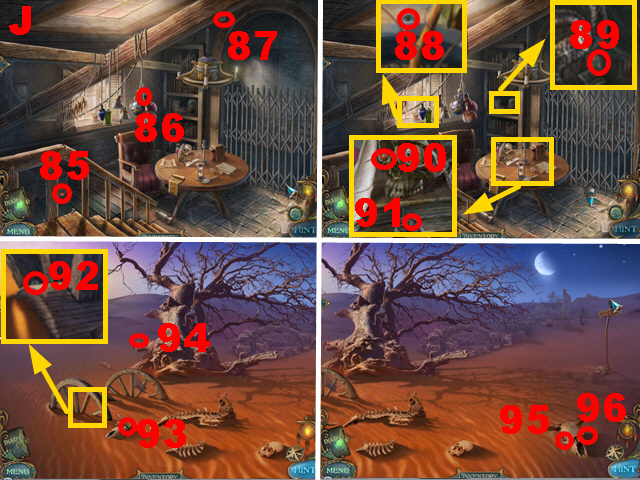
- Screenshot J displays the location of hidden beholders 85-96.
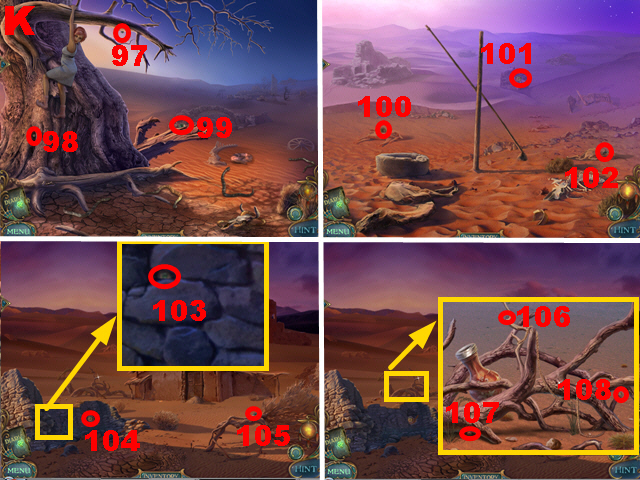
- Screenshot K displays the location of hidden beholders 97-108.
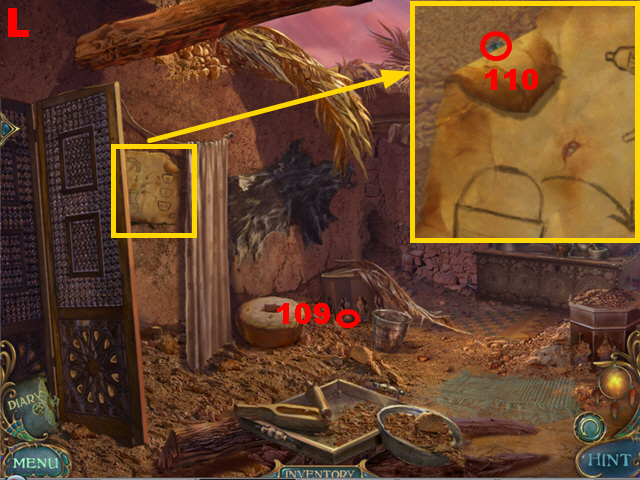
- Screenshot L displays the location of hidden beholders 109-110.


 Youda Legend: The Golden Bird of Paradise Walkthrough, Guide, & Tips
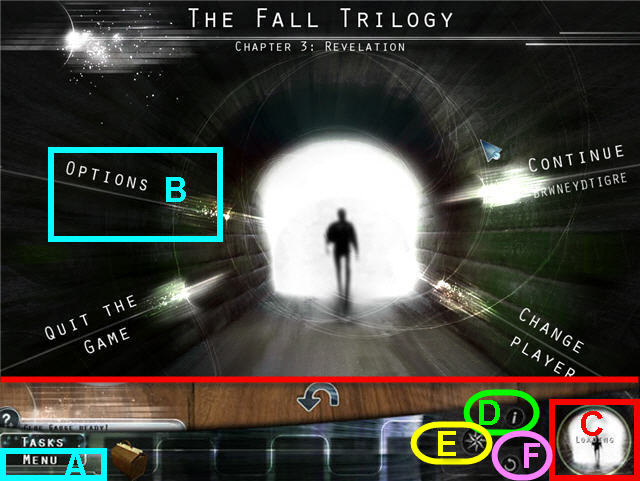 The Fall Trilogy - Chapter 3: Revelation Walkthrough, Guide, & Tips
 Final Cut: Death on the Silver Screen Walkthrough, Guide, & Tips
 Web of Deceit: Deadly Sands Walkthrough, Guide, & Tips
 Diamon Jones: Eye of the Dragon Handbuch, Guide, & Tips