Final Cut: Death on the Silver Screen Walkthrough, Guide, & Tips
Final Cut: Death on the Silver Screen Walkthrough

Welcome to the Final Cut: Death on the Silver Screen Walkthrough
Save your brother and try to solve the mystery behind the silver screen in Final Cut: Death on the Silver Screen, a thrilling game set in the 1950′s!
Whether you use this document as a reference when things get difficult or as a road map to get you from beginning to end, we’re pretty sure you’ll find what you’re looking for here.
This document contains a complete Final Cut: Death on the Silver Screen game walkthrough featuring annotated screenshots from actual gameplay!
We hope you find this information useful as you play your way through the game. Use the walkthrough menu below to quickly jump to whatever stage of the game you need help with.
Remember to visit the Big Fish Games Forums if you find you need more help. Have fun!
This walkthrough was created by BrownEyedTigre, and is protected under US Copyright laws. Any unauthorized use, including re-publication in whole or in part, without permission, is strictly prohibited.
General Tips

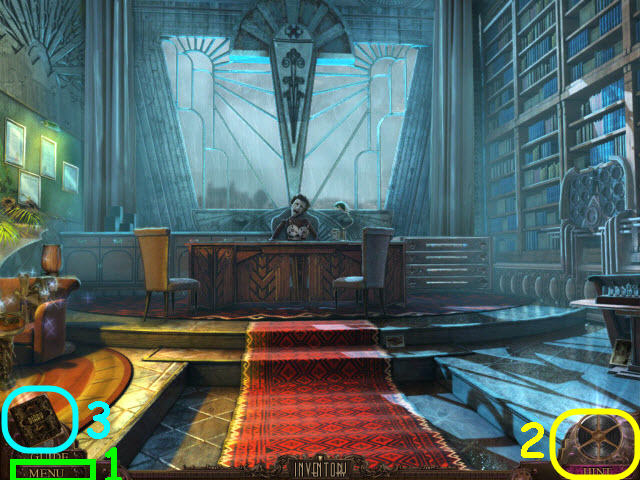
- Select Menu (1) to adjust the Music, SFX, Voice Volume, Full Screen and Custom Cursor.
- You can choose between Regular and Expert Mode.
- Throughout the guide, we will use the acronym ‘HOS’ for Hidden Object Scenes.
- Items written in orange in HOS require an extra step before they can be obtained. The items in HOS are random except for the items in orange.
- There is a short penalty for random clicking.
- In order to complete some of the puzzles you will need to collect the clues in your diary first. Puzzles may be skipped.
- Select the Question Mark on the top right of the puzzle screen to get directions for the puzzles.
- Select the movie reel (2) to get a hint in either the HOS or regular gameplay.
- Select the diary (3) to access the journal, map and objectives.
- This game is not linear and you may do things in a different order as the guide. If you cannot do an action when stated in the guide, please check the previous entries to see if you missed something.
Chapter 1 – Father’s Mansion

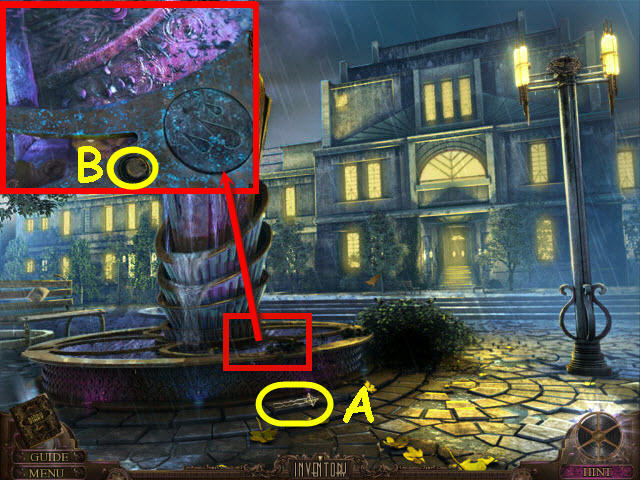
- Take the HAIRPIN (A).
- Examine the fountain; use the HAIRPIN to get the BUTTON (B).
- Examine the fountain to access a HOS.

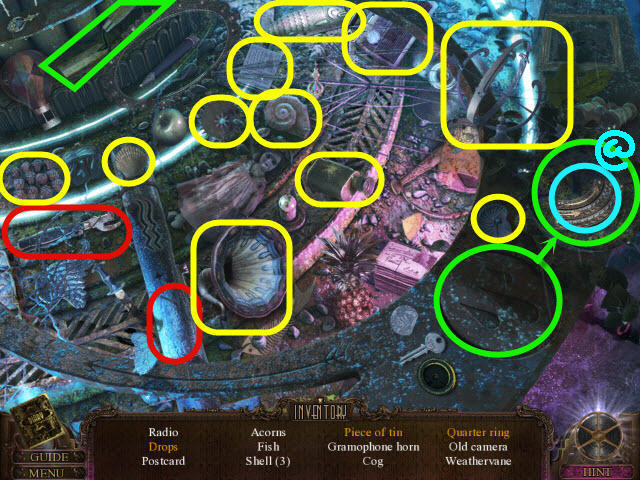
- Find the items listed.
- Marked in red: use the can opener on the pipe to get a piece of tin.
- Marked in green: use the trowel on the cover to get the drops and QUARTER RING (@).
- Go forward to the mansion.

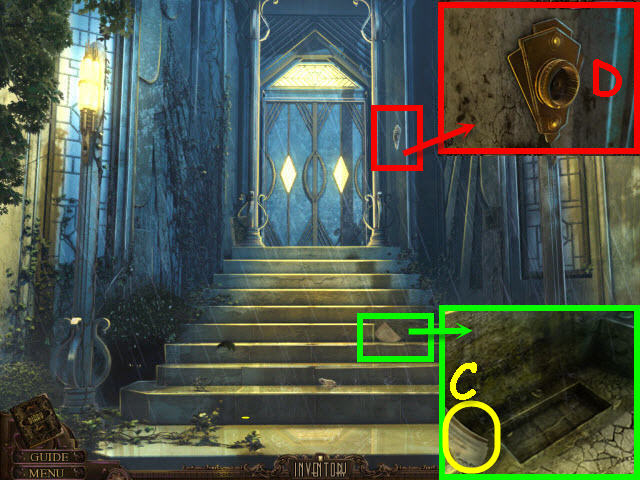
- Examine the steps; take the note (C).
- Examine and place the BUTTON on the doorbell (D); ring the doorbell.
- Enter into the foyer.

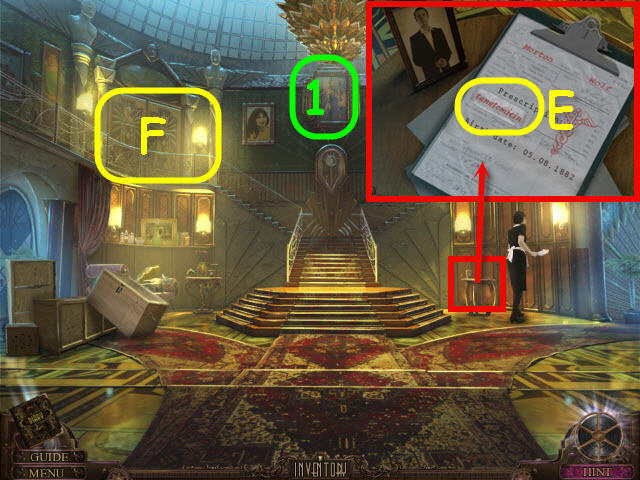
- Examine and select the poster (1) to get a clue.
- Examine the table; take the prescription name (E).
- Examine and place the QUARTER RING on the upper left door (F) to trigger a puzzle.

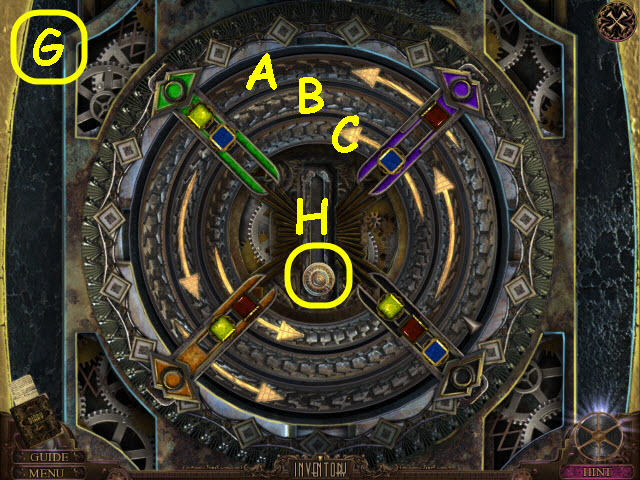
- Turn the rings to combine the colors so that the jewel holders match the inner colors.
- Solution: turn Ax2, B, and Cx3 (G).
- Slide the lever (H) to unlock the door.
- Enter father’s study.

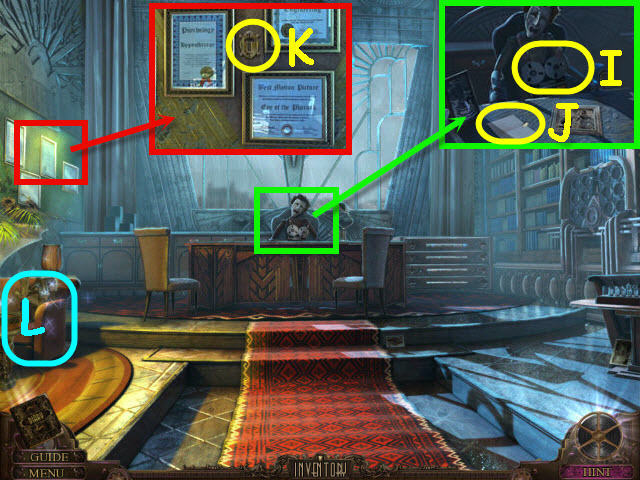
- Examine the desk; remove the cloth and select the audio tapes (I).
- Examine the desk; take the PAPER (J).
- Examine the frames; take the LETTER T (K).
- Examine the sofa (L) to access a HOS.

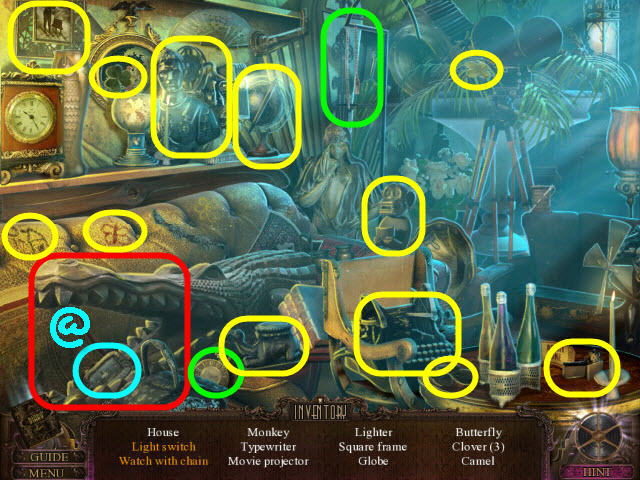
- Find the items listed.
- Marked in red: open the crocodile jaws to get the light switch.
- Marked in green: place the chain on the watch to get a watch with chain.
- You will earn a SWITCH (@).
- Back out and go right to the east hall.

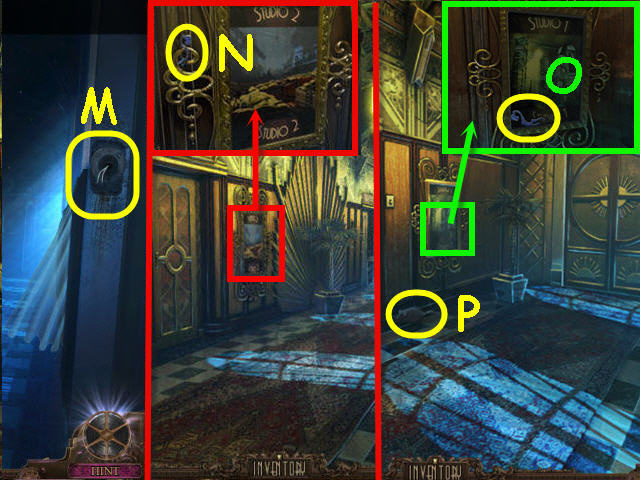
- Place the SWITCH on the wires (M); flip the SWITCH.
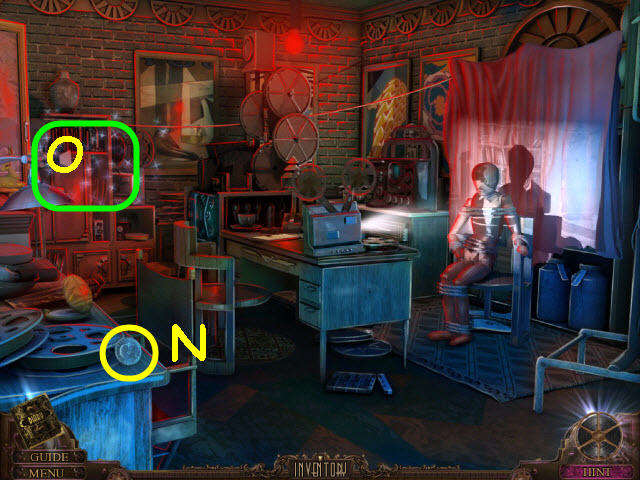
- Examine the poster; take the SMALL GARDEN LOCK 1/3 (N).
- Go forward to the east hall end.
- Examine the poster; take the SMALL GARDEN LOCK 2/3 (O).
- Take the MOUSE TOY (P).
- Back out and go left into the library.

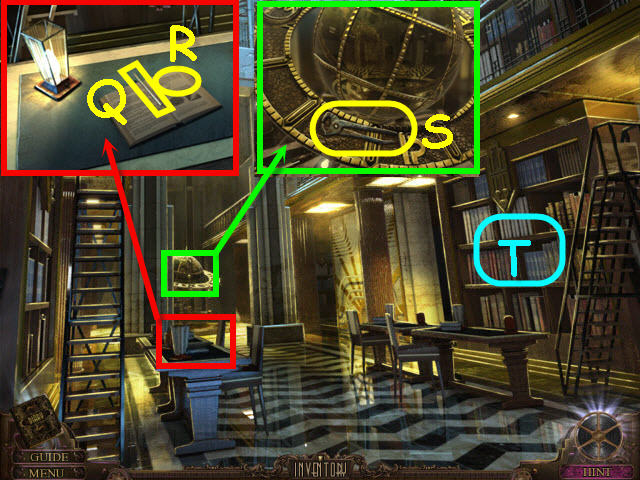
- Examine the table and open the book; take the BLUNT PENCIL (Q) and recipe (R).
- Examine the globe; take the PINCERS (S).
- Examine the bookcase (T); place the LETTER T on the top of the center book to trigger a puzzle.

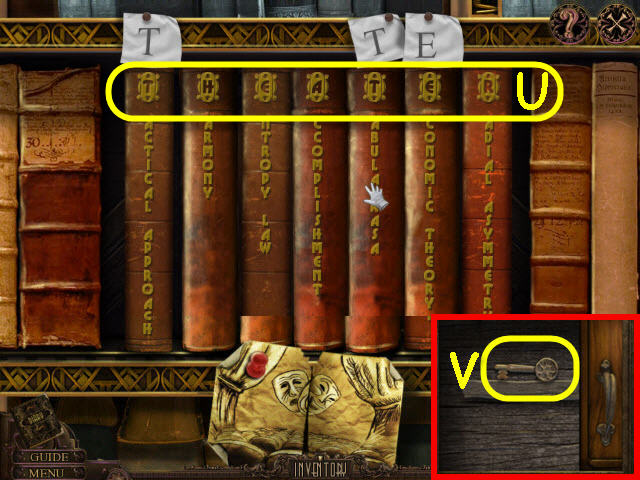
- Rearrange the books to spell a word with the top letters.
- Solution: T-H-E-A-T-E-R (U).
- Open the compartment; take the THEATER KEY (V).
- Back out.

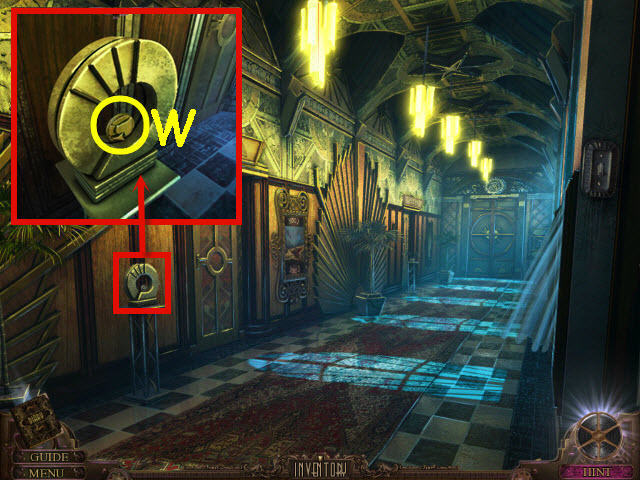
- Examine the sculpture; use the PINCERS to get the SPADE (W).
- Go to the father’s study.

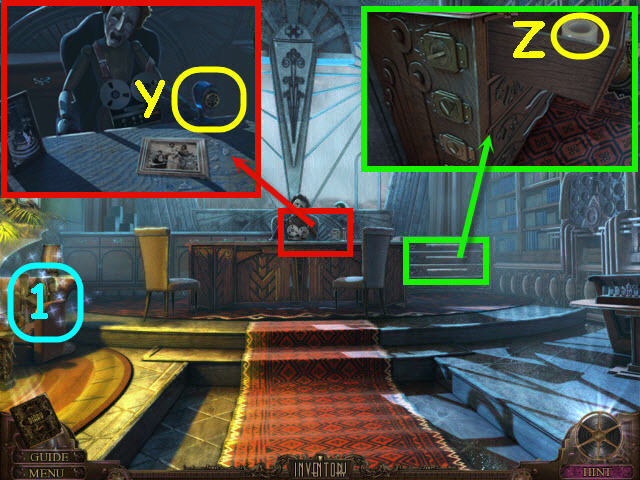
- Examine the desk; use the BLUNT PENCIL on the sharpener (Y); get a SHARP PENCIL.
- Examine and place the SPADE on the top cabinet lock; take the note and STICKY TAPE (Z).
- Examine the sofa (1) to access a HOS.

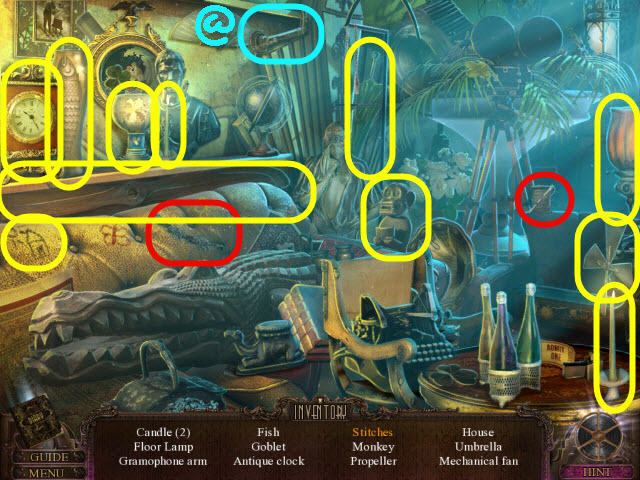
- Find the items listed.
- Marked in red: use the thread on the rip to get stitches.
- You will earn a GRAMOPHONE ARM (@).
- Go to the east hall end.

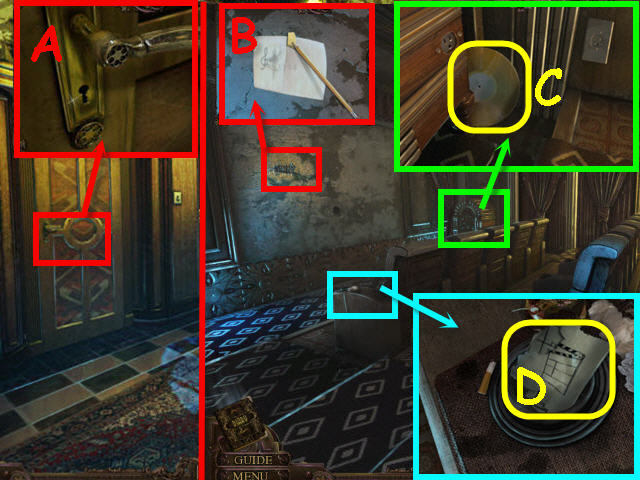
- Examine and use the THEATER KEY on the left door lock (A); turn the key.
- Enter the theater.
- Examine and use the PAPER and SHARP PENCIL on the wall scribbles; get a pass code (B) in your diary.
- Examine the jukebox; take the GOLD RECORD (C).
- Examine the arm rest; move the garbage and take the MAP PIECE 1/5 (D).
- Back out.

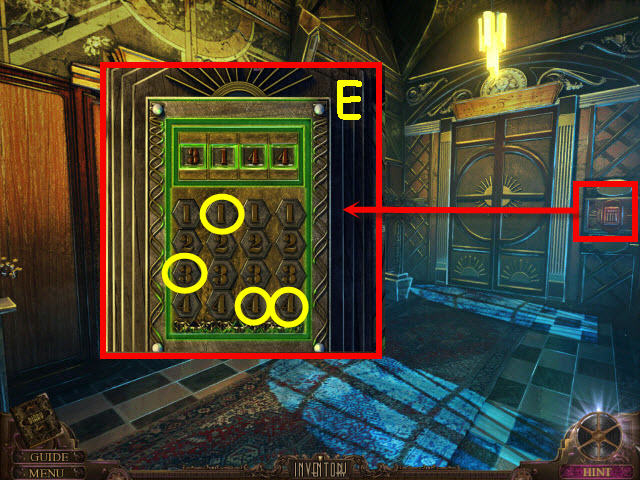
- Examine and enter the code from the ashtray in the panel.
- Solution: 3144 (E).
- Enter the music room.

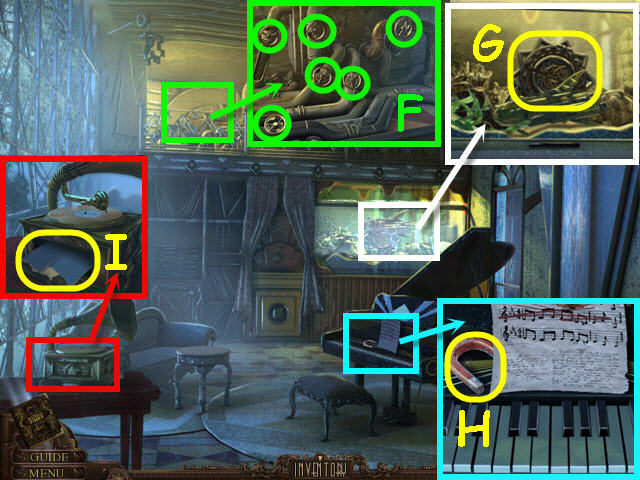
- Examine the upper balcony; turn all the valves (F).
- Examine the aquarium; open the glass and take the LARGE GARDEN LOCK (G).
- Examine the piano; take the MAGNET (H).
- Examine and place the GOLD RECORD and GRAMOPHONE ARM on the gramophone; take the note and PROJECTOR BLUEPRINT HALF (I).
- Go to the mansion entrance.

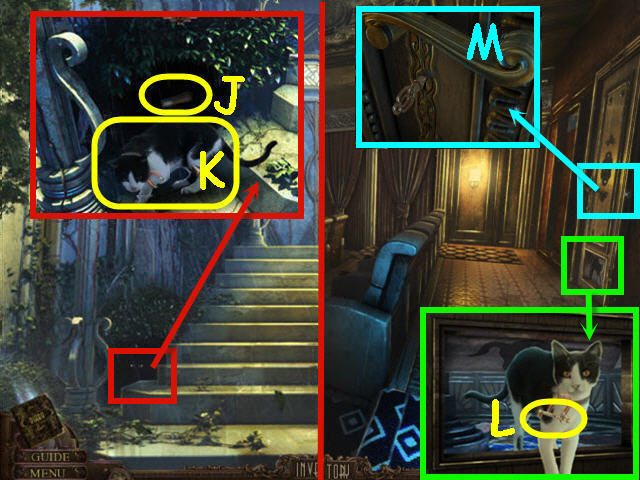
- Examine the left bushes; give the MOUSE TOY to the cat; take the WOODEN HANDLE (J).
- Use the MAGNET and the STICKY TAPE on the cat’s collar; take the CAT WITH MAGNET (K).
- Go to the theater.
- Examine and open the cat door; place the CAT WITH MAGNET in the door; take the PROJECTOR ROOM KEY (L).
- Examine and use the PROJECTOR ROOM KEY on the door lock (M); turn the key.
- Enter the projector room.

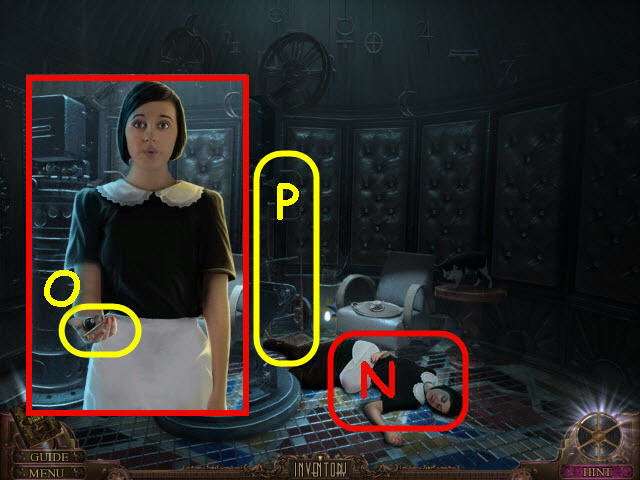
- Select the maid (N) to wake her.
- Take the REC ROOM KEY (O).
- Take the HAND CART (P).
- Go to the foyer.
Chapter 2 – The Gardener

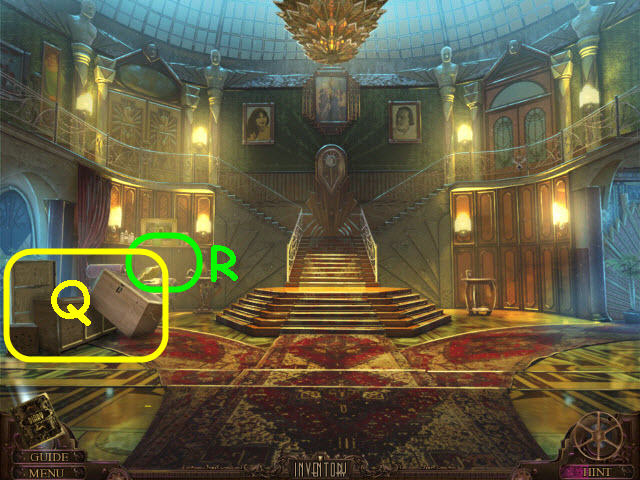
- Use the HAND CART on each of the four crates (Q).
- Examine the settee (R) to access a HOS.

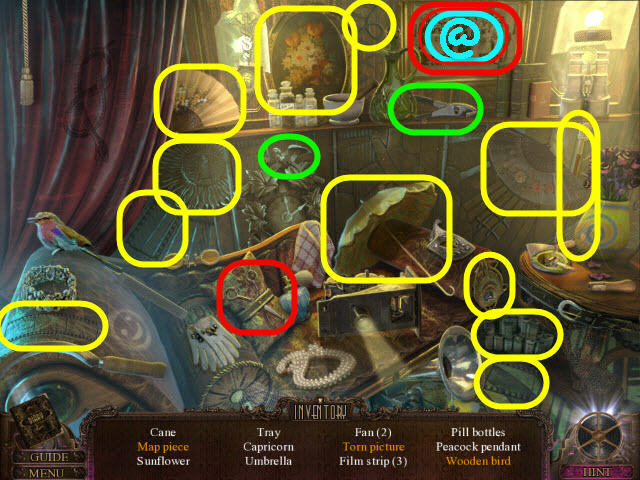
- Find the items listed.
- Marked in red: use the scissors on the picture to get a torn picture and a map piece.
- Marked in green: use the wrench on the bird to get a wooden bird.
- You will earn a MAP PIECE 2/5 (@).
- Go left into the west hall.

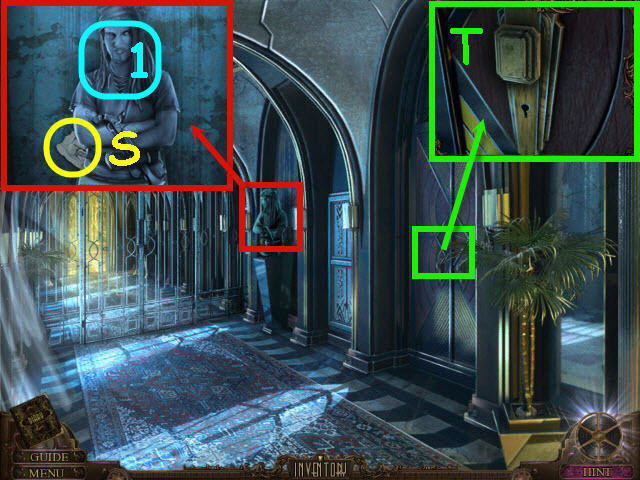
- Examine the bust; select the pirate (1) to get a clue and take the MAP PIECE 3/5 (S).
- Examine and use the REC ROOM KEY on the door lock (T); turn to open.
- Enter the rec room and go forward to the garden.

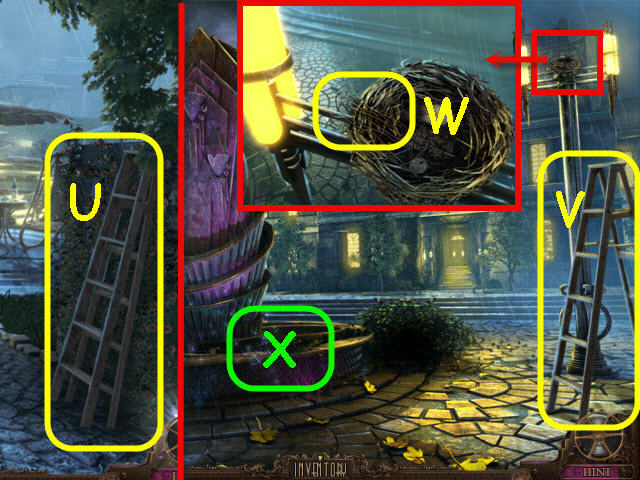
- Take the LADDER (U).
- Back out to the fountain.
- Place the LADDER by the pole (V).
- Examine the bird’s nest; take the WIRE (W).
- Examine the fountain (X) to access a HOS.

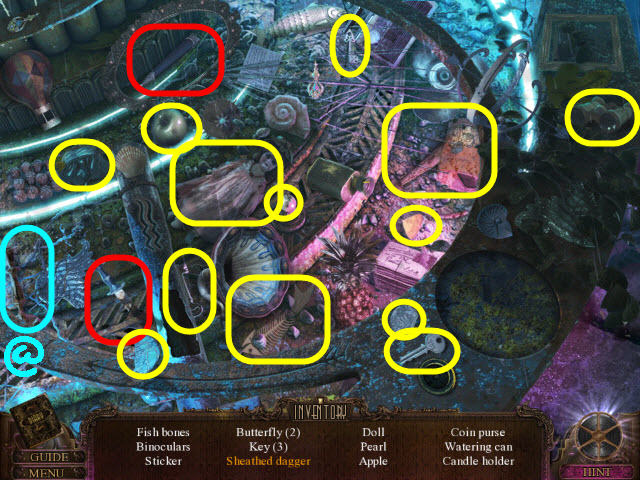
- Find the items listed.
- Marked in red: place the dagger in the sheath to get a sheathed dagger.
- You will earn a CANDLE HOLDER (@).
- Go to the rec room.

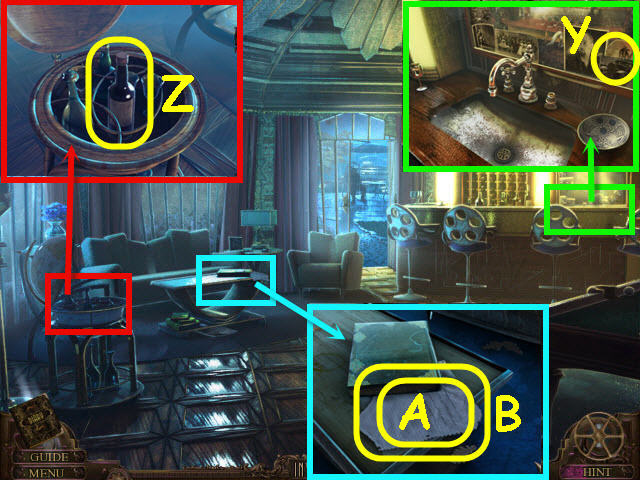
- Examine the sink; take the THAUMATROPE 1/5 (Y).
- Examine and open the globe; take the BOTTLE 1/3 (Z).
- Examine the table; take the note (A) and TRANSPARENT MAP (B).
- Back out.

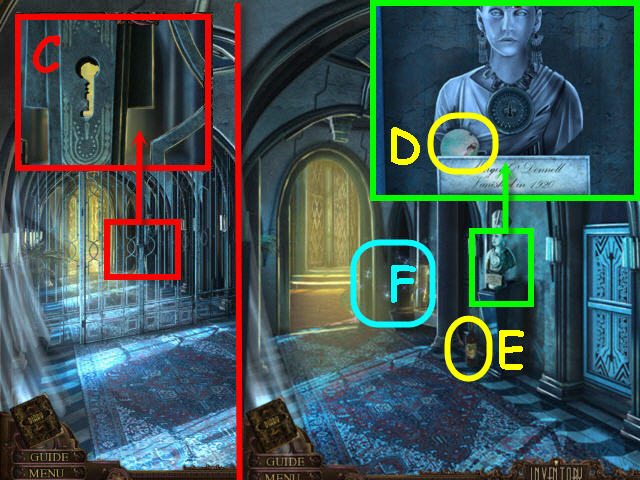
- Examine and use the WIRE on the gate lock (C).
- Go through the gates to the west hall end.
- Examine the bust; take the THAUMATROPE 2/5 (D).
- Take the BOTTLE 2/3 (E).
- Examine the corner (F) to access a HOS.

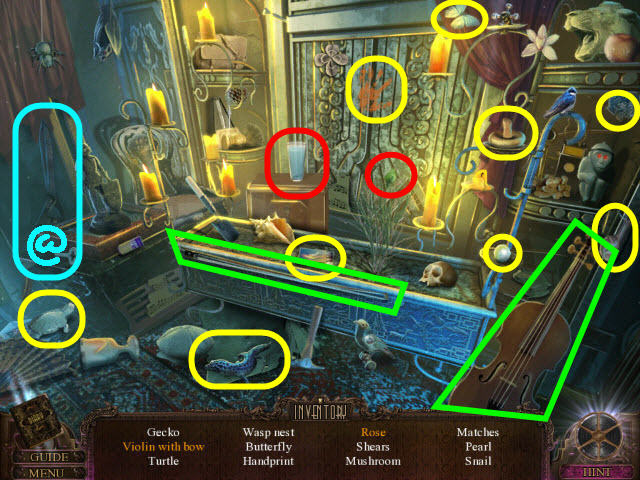
- Find the items listed.
- Marked in red: use the glass of water on the rosebud to get a rose.
- Marked in green: use the bow on the violin to get a violin with bow.
- You will earn SHEARS (@).
- Go forward into the elevator room.

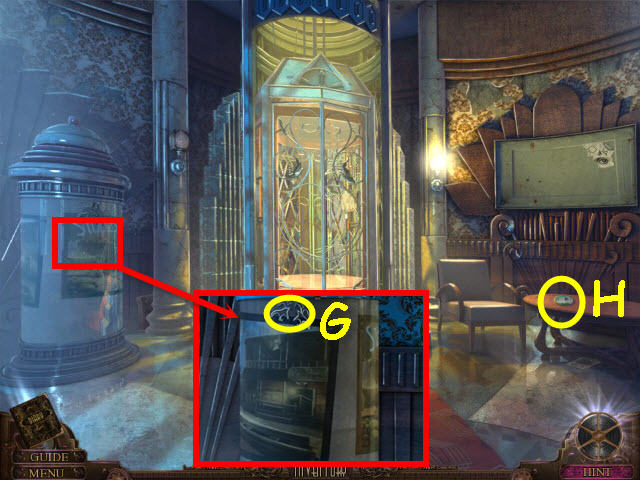
- Examine the glass case; take the SMALL GARDEN LOCK 3/3 (G).
- Take the THAUMATROPE 3/5 (H).
- Go to the garden.

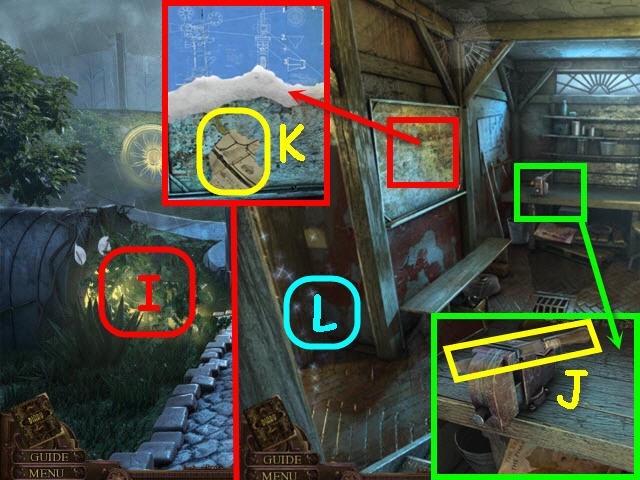
- Use the SHEARS on the tall grasses (I).
- Go left into the basement.
- Examine the workbench; place the WOODEN HANDLE on the file and take the FILE (J).
- Examine and place the PROJECTOR BLUEPRINT HALF on the board; unfold the print and take the MAP PIECE 4/5 (K).
- Examine the storeroom (L) to access a HOS.

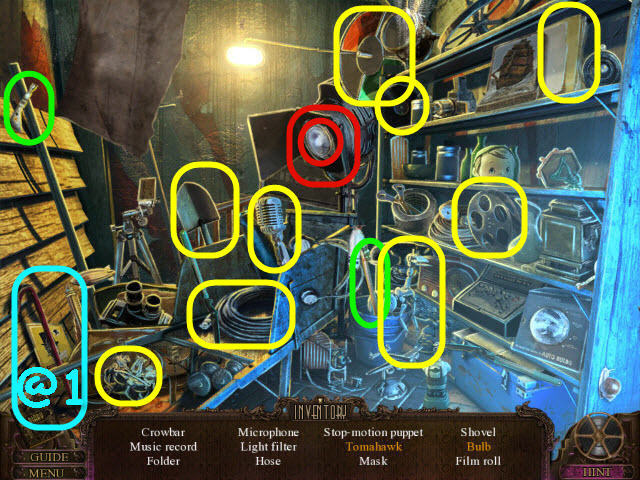
- Find the items listed.
- Marked in red: remove the spotlight cover to get the bulb.
- Marked in green: place the wooden stick on the blade to get a tomahawk.
- You will earn a CROWBAR (@1).
- Back out.

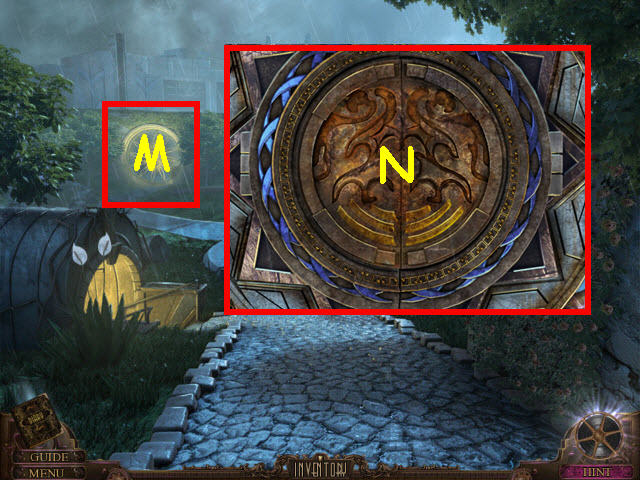
- Examine and place the LARGE GARDEN LOCK on the round gate (M).
- Use the FILE on the rust; place the SMALL GARDEN LOCKS 3/3 on the lock (N) to trigger a puzzle.

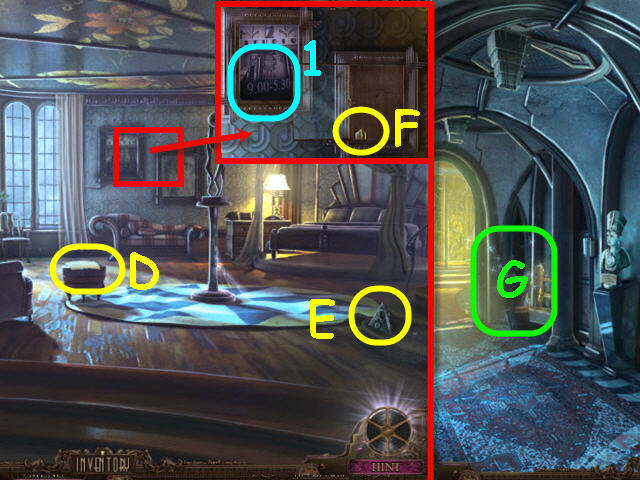
- Guide the butterfly through the maze in eleven moves using the buttons on the left.
- To solve the puzzle, select the following buttons: B, Ax2, B, C, B, Ax2, B, A, B, and E (O).
- Go through the gate to the studio entrance.

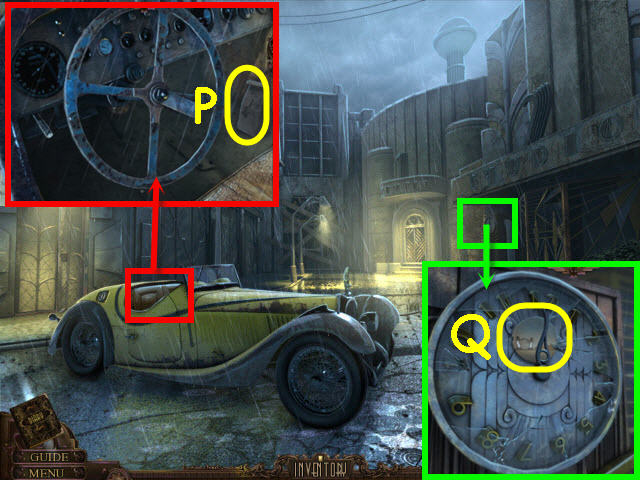
- Examine the roadster interior; take the BIRD FOOD (P).
- Examine and use the CANDLE HOLDER on the clock; take the THAUMATROPE 4/5 (Q).
- Back out.

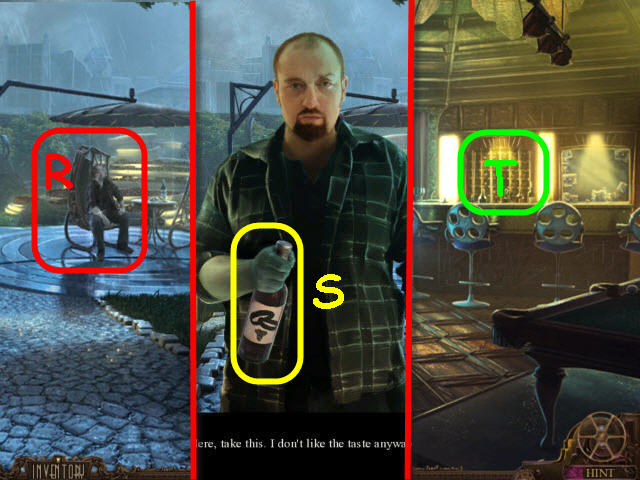
- Give the BIRD FOOD to the gardener (R).
- Take the BOTTLE 3/3 (S).
- Back out.
- Examine the bar (T); place the BOTTLE 3/3 on the wine rack to trigger a puzzle.

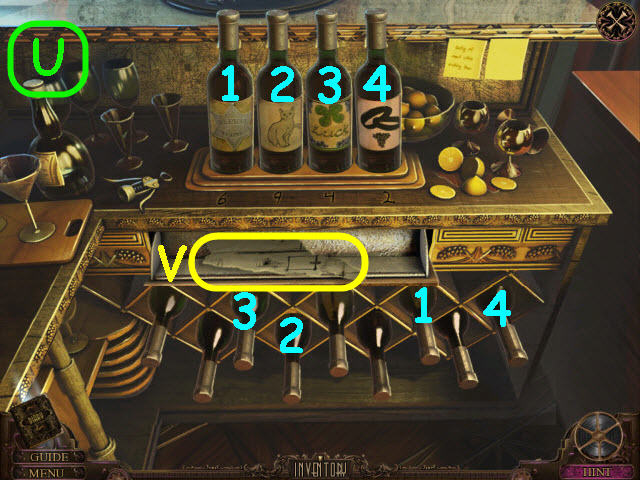
- Place the bottles with the labels matching the numbers on the holders.
- Solution: 6 = Deputy Badge/6 points on the star (1), 9= cat with 9 lives (2), 4= four leaf clover (3), and 2=wedding bands (4) (U).
- Take the MAP PIECE 5/5 (V).
- Go to the elevator room.

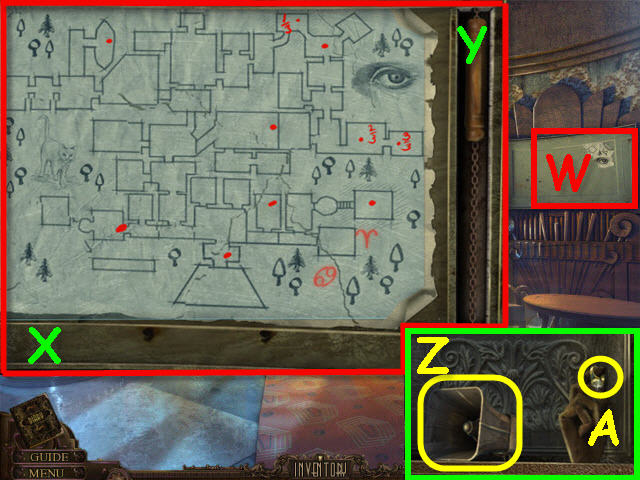
- Examine and place the MAP PIECE 5/5 in the frame (W) to trigger a puzzle. Then place the TRANSPARENT MAP (X) over the completed map.
- Pull the chain (Y); take the PROJECTOR SPEAKER (Z) and FATHER’S RING (A).

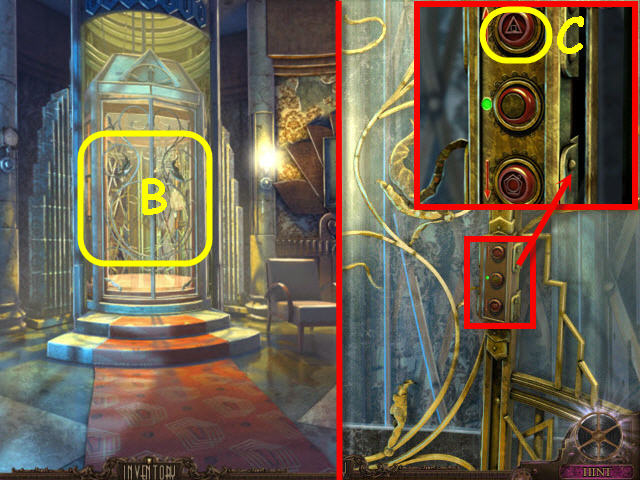
- Use the CROWBAR on the elevator doors (B).
- Enter the elevator.
- Read the note; examine and use FATHER’S RING on the top button and press the button (C).
Chapter 3 – Studio


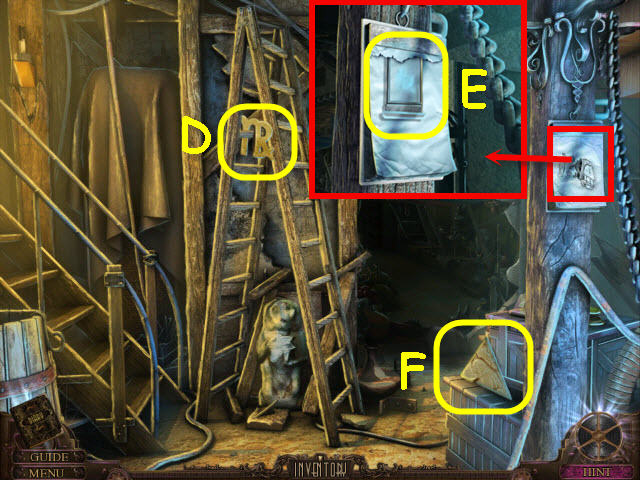
- Take the note (D) and EGYPTIAN SYMBOL (E).
- Examine the pictures; select the left picture (1) to get a clue.
- Open and take the right picture; take the DIAMOND (F).
- Go to the west hall end.
- Examine the corner (G) to access a HOS.

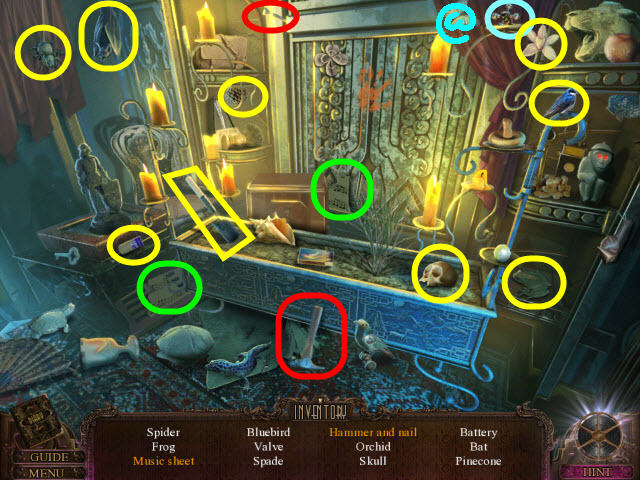
- Find the items listed.
- Marked in red: use the hammer on the nail to get a hammer and nail.
- Marked in green: combine the two halves of the music sheets together to get a music sheet.
- You will earn a VALVE (@).

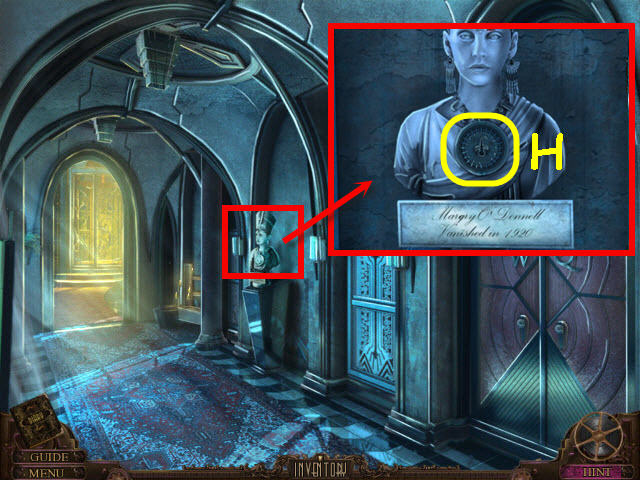
- Examine the bust.
- Place the EGYPTIAN SYMBOL on the pendant (H) and select to trigger a puzzle.

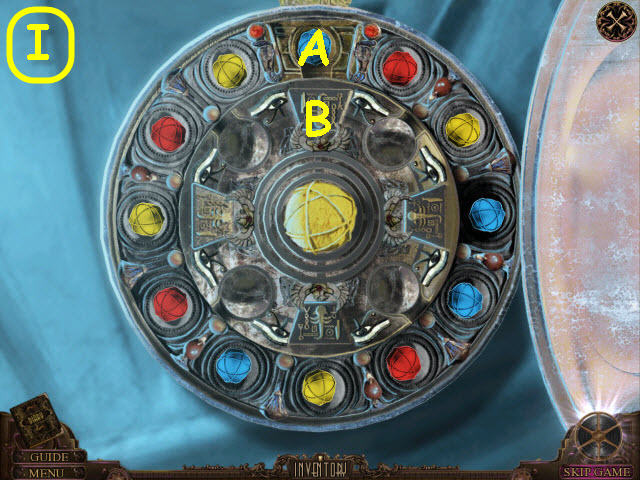
- Place all the same colored balls in the middle ring to match the color in the center ring till all rings are gone.
- To solve the puzzle rotate the rings in the following order: Ax3, Bx2, Ax3, Bx2, Ax4, Bx2, Ax4, Bx2, Ax2, Bx2, Ax3, Bx2, Ax2, Bx2, Ax3, Bx2, Ax5, and Bx2 (I).
- Take the JAR WITH THAUMATROPE.
- Return to the father’s study.

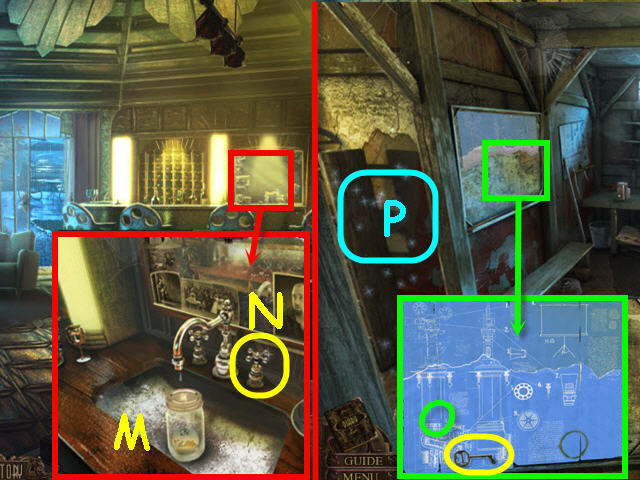
- Examine and place the DIAMOND into the third cabinet lock (J); take the note and the BLUEPRINT SECOND HALF (K).
- Return to the foyer.
- Examine the settee (L) to access a HOS.

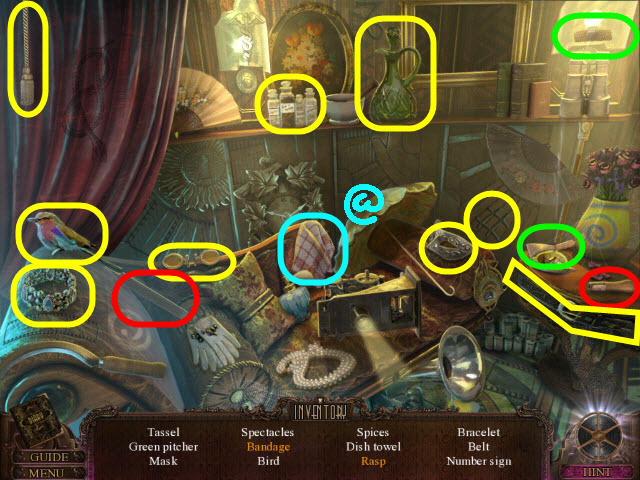
- Find the items listed.
- Marked in red: place the file on the handle to get a rasp.
- Marked in green: use the paint scraper on the bandage to get a bandage.
- You will earn a DISH TOWEL (@).
- Return to the rec room.


- Examine and place the JAR WITH THAUMATROPE in the sink (M).
- Place the VALVE on the tap (N) and turn; unscrew the lid of the jar to get a THAUMATROPE 5/5.
- Go to the basement.
- Examine and place the BLUEPRINT SECOND HALF on the board; open the print; take the STUDIO KEY (O).
- Examine the storeroom (P) to access a HOS.

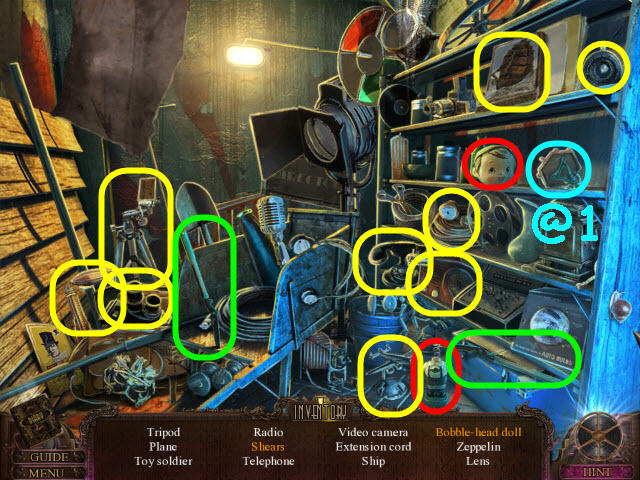
- Find the items listed.
- Marked in red: place the head on the body to get a bobble-head doll.
- Marked in green: combine the two shear halves to get shears.
- You will earn a TOY SOLDIER (@1).
- Go to father’s study.

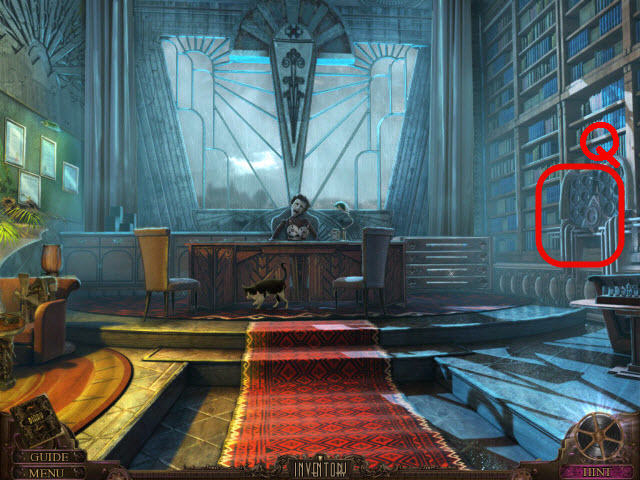
- Examine the thaumatrope player (Q).
- Place the THAUMATROPE 5/5 on an empty slot on the player to trigger a puzzle.

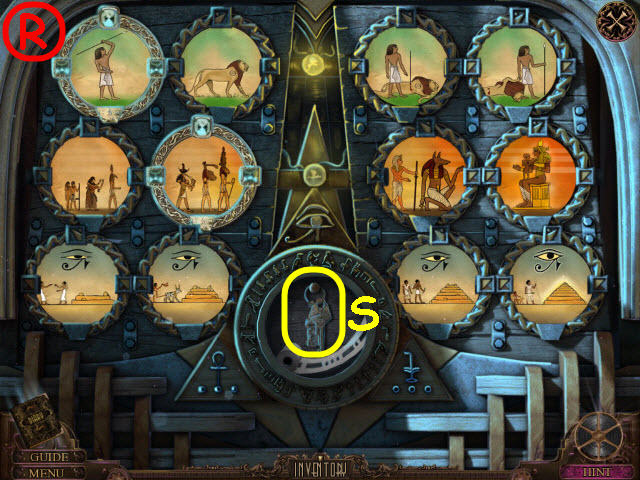
- Arrange the tiles to complete the scenes.
- See screenshot (R) for solution.
- Take the film and CAR KEY (S).
- Go to the studio entrance.

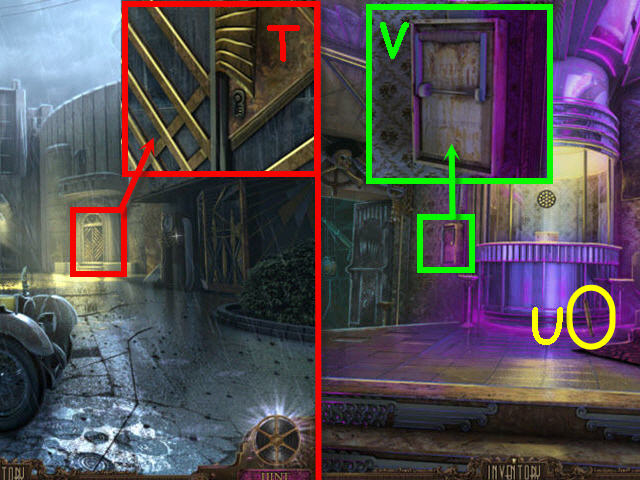
- Examine and use the STUDIO KEY on the studio door lock (T); turn to open.
- Enter the ticket hall.
- Take the WOOD PIECE 1/3 (U).
- Examine and pull the switch (V).
- Go to the pirate’s entrance.

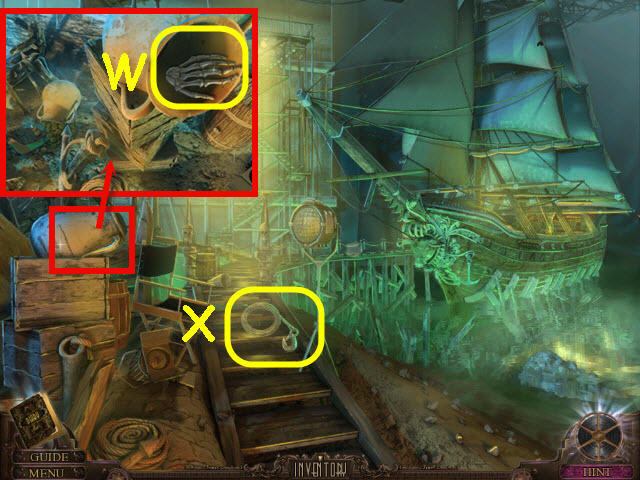
- Examine and take the SKELETON HAND (W) from the pot.
- Take the CABLE (X).
- Go forward to the pirate’s gangway.

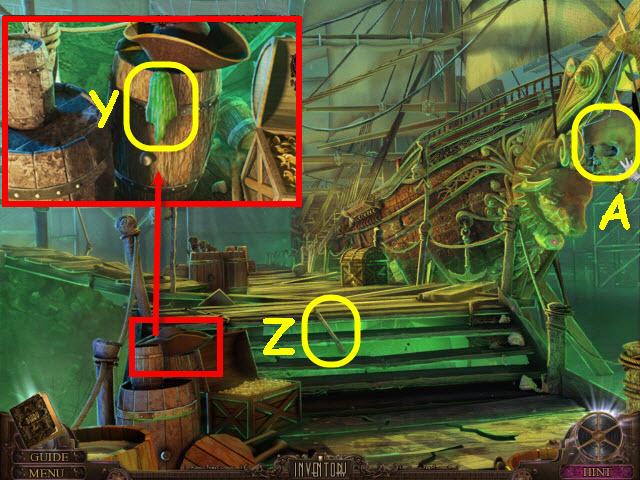
- Examine the pirate hat; take the BANDANA 1/3 (Y).
- Take the WOOD PIECE 2/3 (Z).
- Take the SKULL (A).
- Go left to the pirate’s tower base.

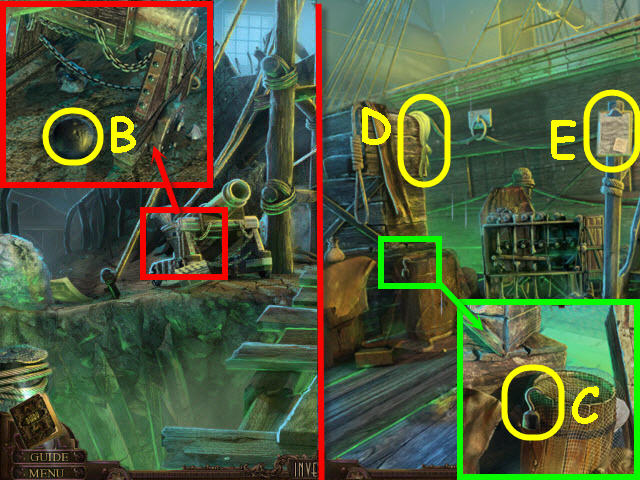
- Examine the cannon; take the CANNONBALL (B).
- Back out and go forward to the pirate’s ship side.
- Examine the barrel; take the HOOK (C).
- Take the BANDANA 2/3 (D).
- Examine and take the clipboard (E).
- Go up to the pirate’s ship deck.

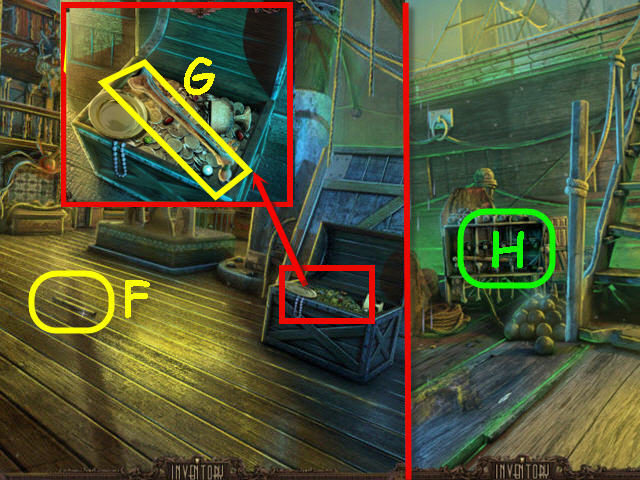
- Take the WOOD PIECE 3/3 (F).
- Examine the chest; take the BONE (G).
- Back out.
- Examine and place the BONE on the rack (H) to trigger a puzzle.

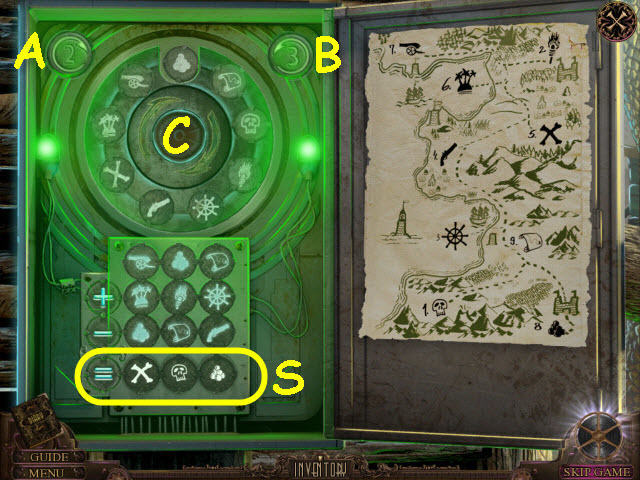
- Select the bones in the correct order to open the cage on the right.
- To solve the puzzle, select the bones in the following order: A, C, B, E, D, H, G, J, F, and I (1).
- Take the SWORD (2).
- Go to the pirate’s tower base.

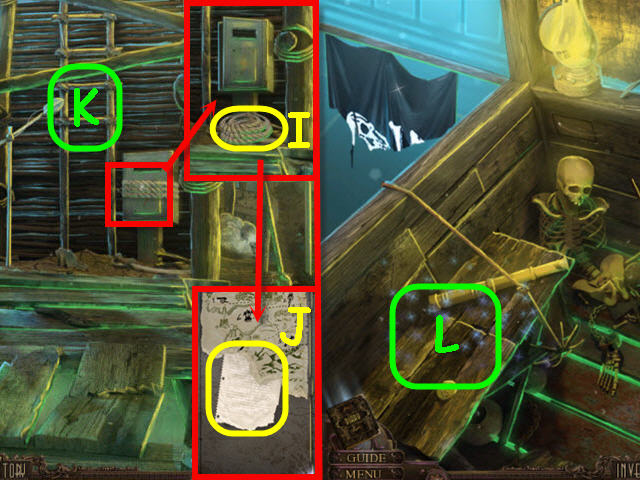
- Use the SWORD on the rope; take the PIECE OF ROPE (I).
- Examine and open the box; take the note (J).
- Use the WOOD PIECE 3/3 and PIECE OF ROPE on the broken ladder (K).
- Go up the ladder to the pirate’s tower.
- Examine the bench (L) to access a HOS.

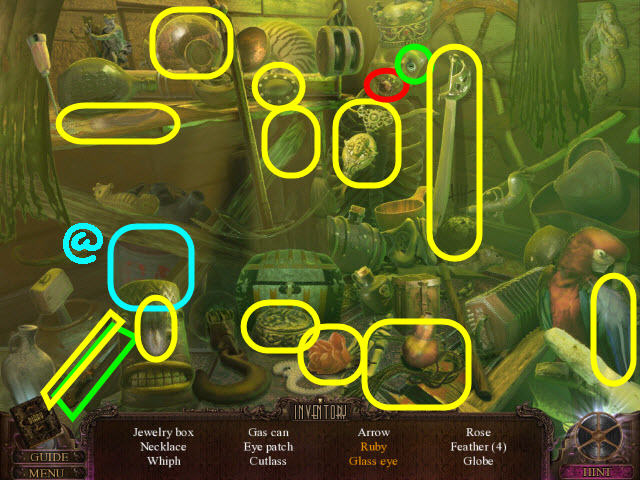
- Find the items listed.
- Marked in red: open the jaw to get the ruby.
- Marked in green: use the knife to pry out the glass eye.
- You will earn a GAS CAN (@).
- Go to the studio entrance.

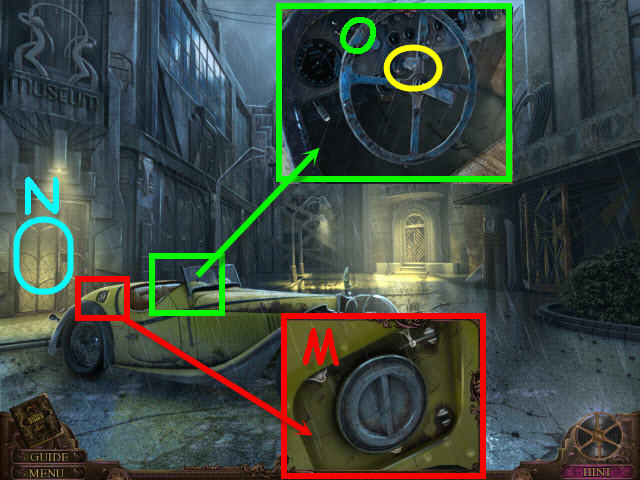
- Examine the roadster gas tank; use the DISH TOWEL on the gas cap (M).
- Fill the tank with the GAS CAN.
- Place the CABLE on the museum door (N).
- Examine the car interior; use the CAR KEY on the ignition; turn the key (O).
- Enter the museum.
Chapter 4 – Museum

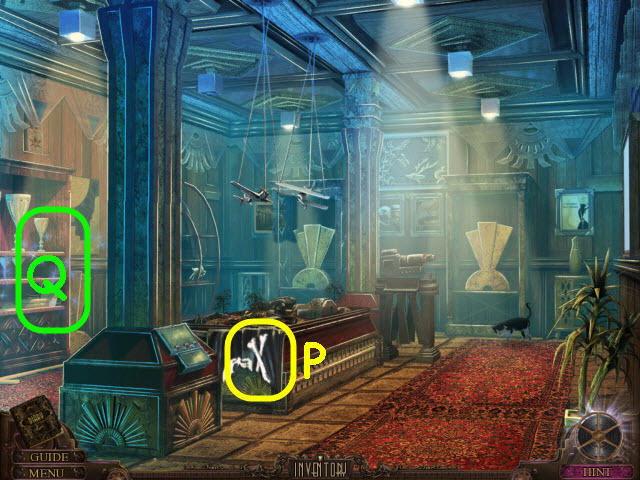
- Take the TORN JOLLY ROGER (P).
- Examine the left shelves (Q) to access a HOS.

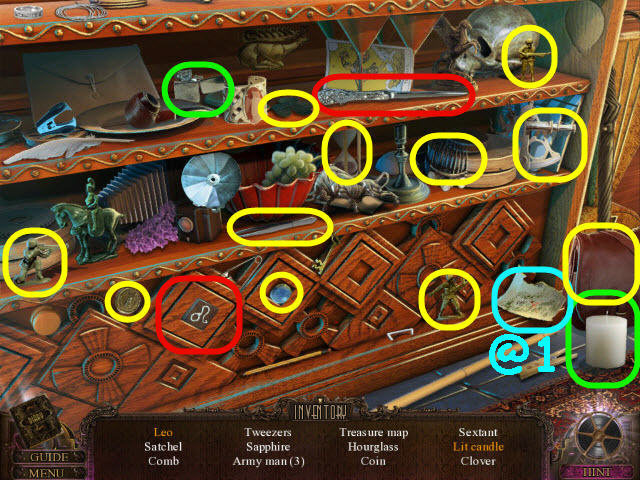
- Find the items listed.
- Marked in red: use the letter opener to get the Leo.
- Marked in green: use the lighter on the candle to get a lit candle.
- You will earn a PIRATE MAP (@1).
- Go to pirate’s tower base.

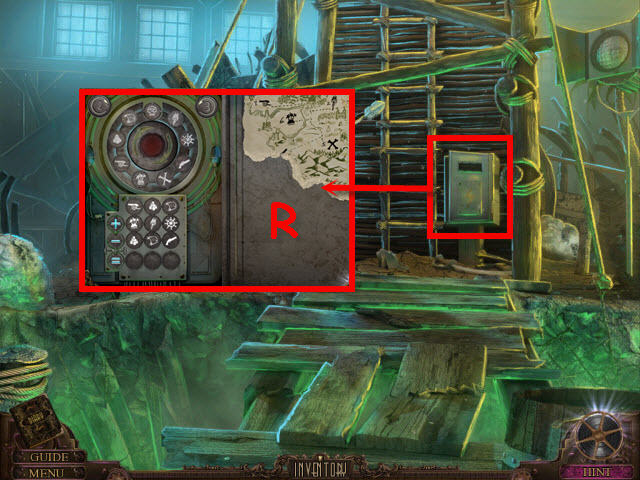
- Examine the control box.
- Place the PIRATE MAP in the box (R) to trigger a puzzle.


- Use the map as your guide to decipher the symbol values and solve the equation.
- To solve the puzzle, select the following buttons: B, A, B, C, A, A, C, A, and C (S).
- Go up the ladder to the pirate’s tower.

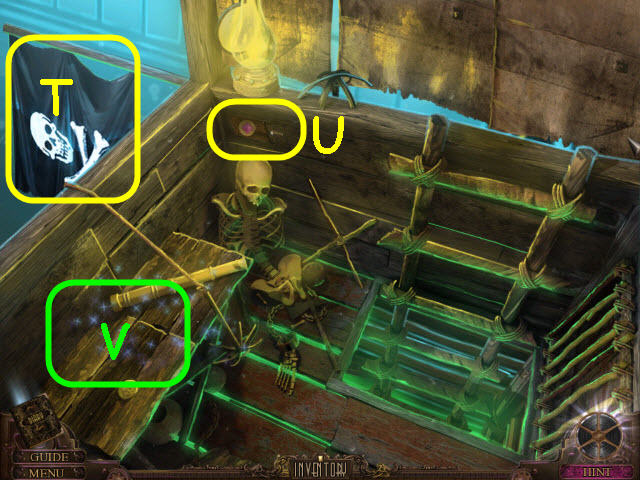
- Place the TORN JOLLY ROGER on the flag (T).
- Take the PINK CRYSTAL 1/2 (U).
- Examine the bench (V) to access a HOS.

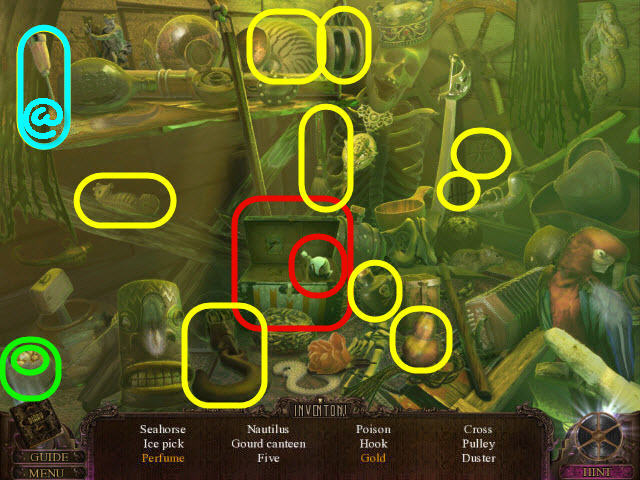
- Find the items listed.
- Marked in red: open the box to get the perfume.
- Marked in green: break the vase to get the gold.
- You will earn an ICE PICK (@).
- Go to pirate’s gangway.

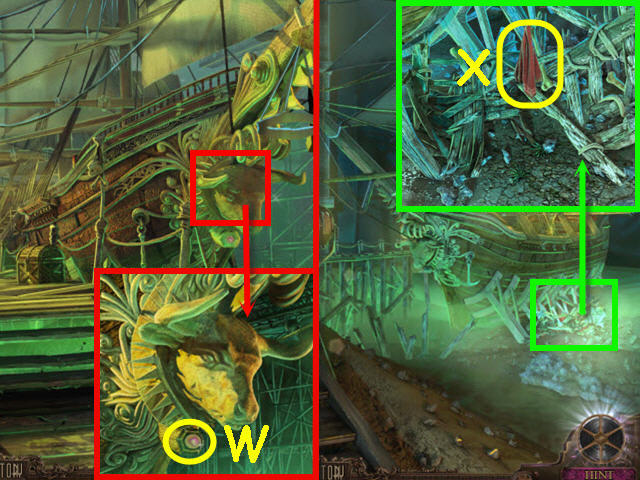
- Examine the figurehead; use the ICE PICK to get the PINK CRYSTAL 2/2 (W).
- Back out.
- Examine the ship’s bottom; take the BANDANA 3/3 (X).
- Go to the museum.

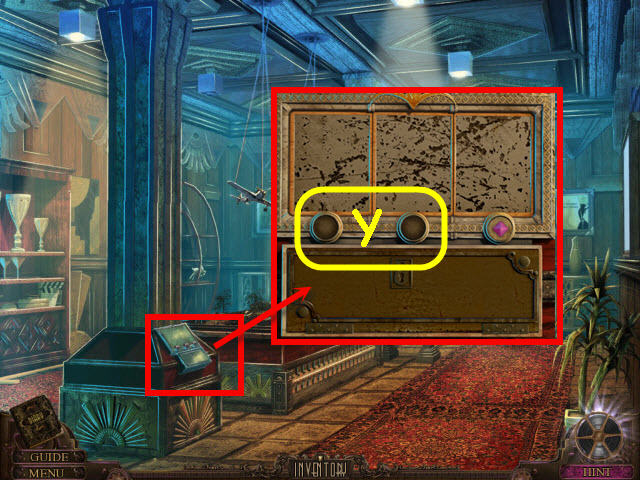
- Examine the pedestal of the pillar.
- Place the PINK CRYSTAL 2/2 in the slots (Y) to trigger a puzzle.

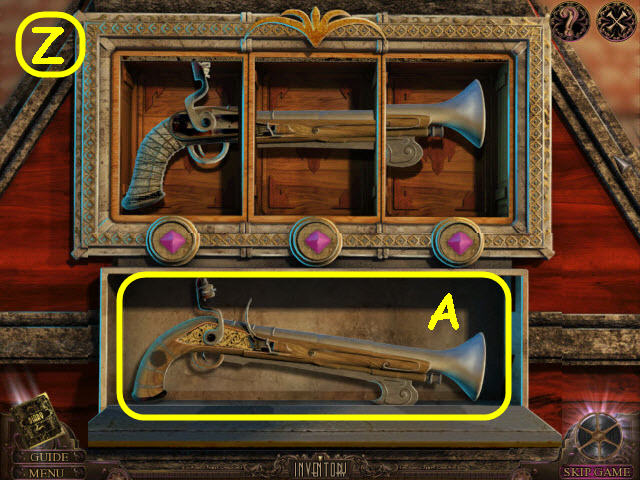
- Press the three buttons to complete the flintlock.
- The clue can be found in your diary from when you searched the pirate bust in the west end.
- See screenshot (Z) for solution.
- Take the FLINTLOCK (A).
- Go to the pirate’s ship deck.

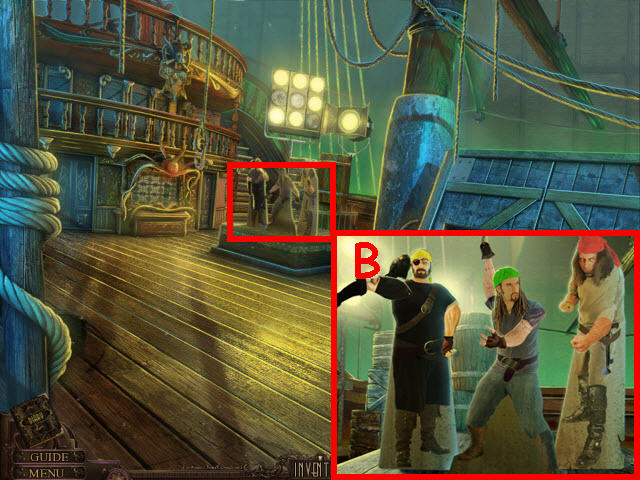
- Examine the pirates.
- Place the HOOK, BANDANA 3/3, and FLINTLOCK on the pirates (B) to trigger a puzzle.

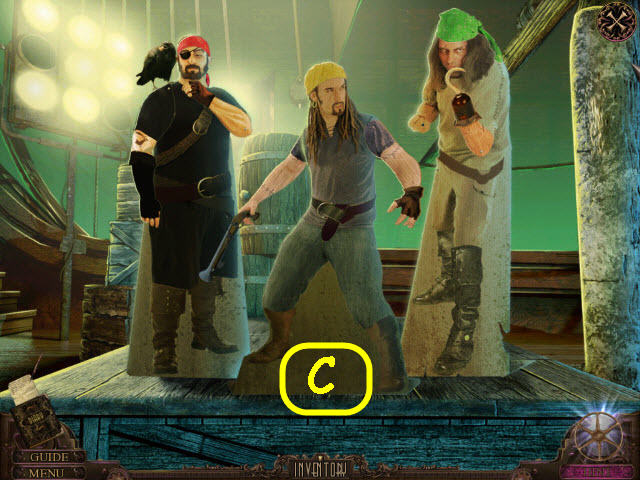
- Rearrange the positions of the arms, bandanas and accessories to match the movie poster in the foyer.
- See screenshot (C) for solution.

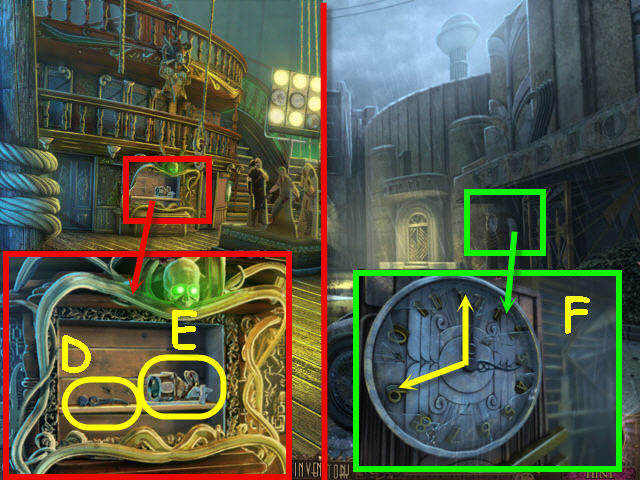
- Examine the compartment; read the note and take the CLOCK HAND (D) and PROJECTOR LAMP (E).
- Go to the studio entrance.
- Examine and place the CLOCK HAND on the clock; set the time to the opening time found in picture on father’s bedroom wall.
- Solution: 9:00 (F).
- Enter right into the WWI entrance.

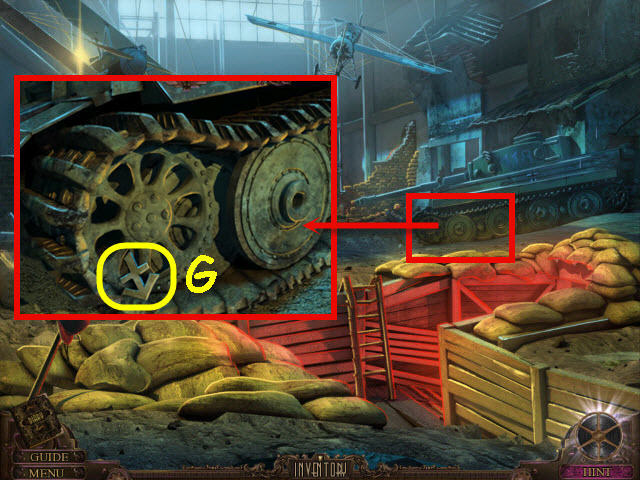
- Examine the tank tracks; take the ZODIAC 1/5 (G).
- Go forward to the WWI Exit.

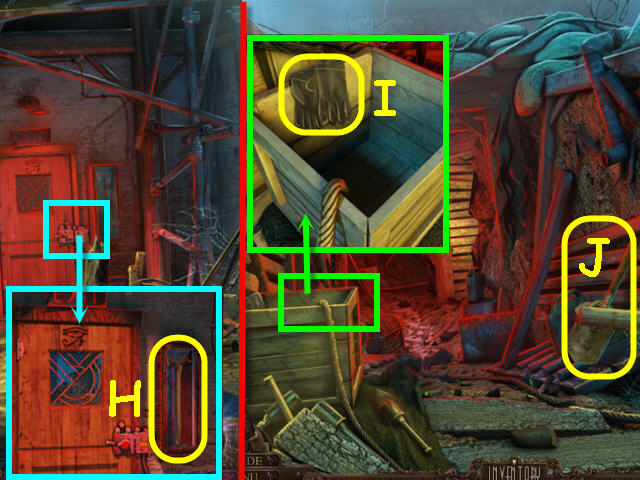
- Examine the door; use the CANNONBALL on the side glass and take the AXE (H).
- Back out and go into the WWI trench.
- Examine the crate; take the LEATHER GLOVES (I).
- Take the SHOVEL (J).
- Go forward to the WWI trench end.

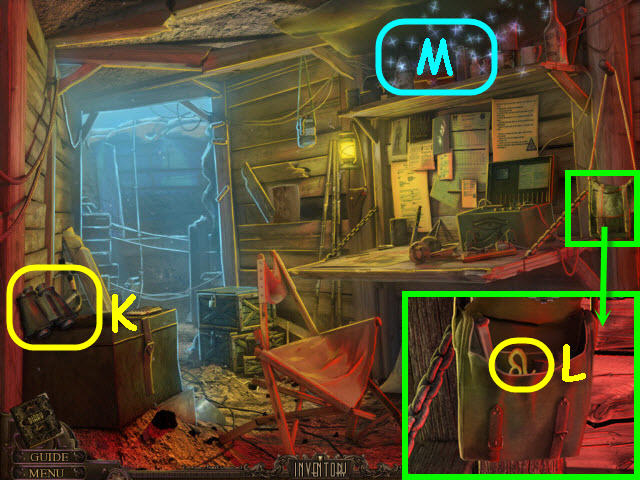
- Take the BINOCULARS (K).
- Examine and open the satchel; read the note and take the ZODIAC 2/5 (L).
- Examine the shelf (M) to access a HOS.

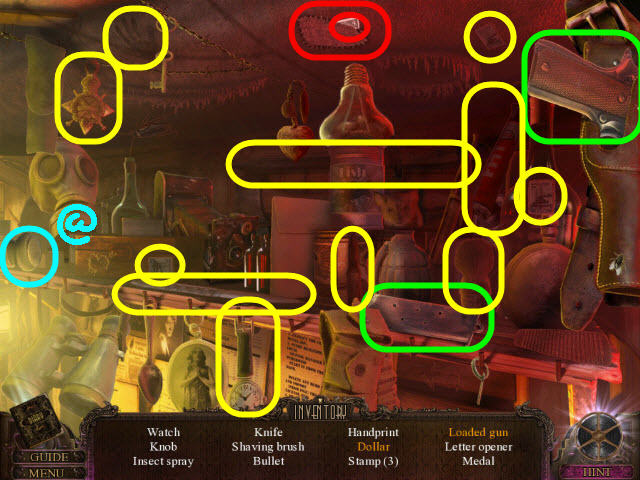
- Find the items listed.
- Marked in red: rip the patch to get the dollar.
- Marked in green: place the clip in the gun to get a loaded gun.
- You will earn a TRUNK LEVER (@).
- Go to the studio entrance.

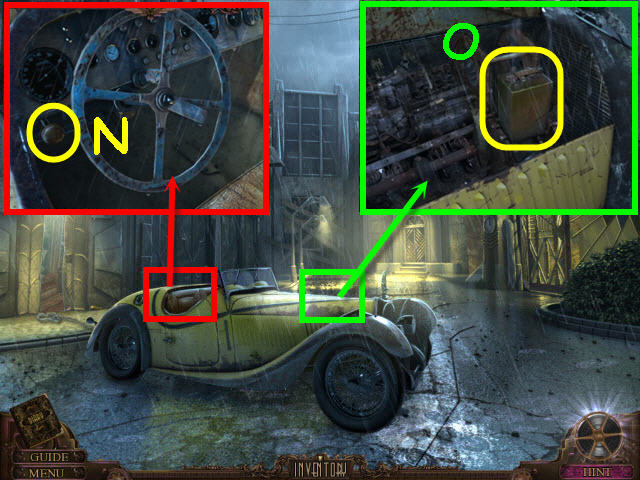
- Examine the roadster interior; place the TRUNK LEVER on the stem (N) and pull.
- Examine and open the hood; use the LEATHER GLOVES to get the BATTERY (O).
- Go to the WWI trench end.

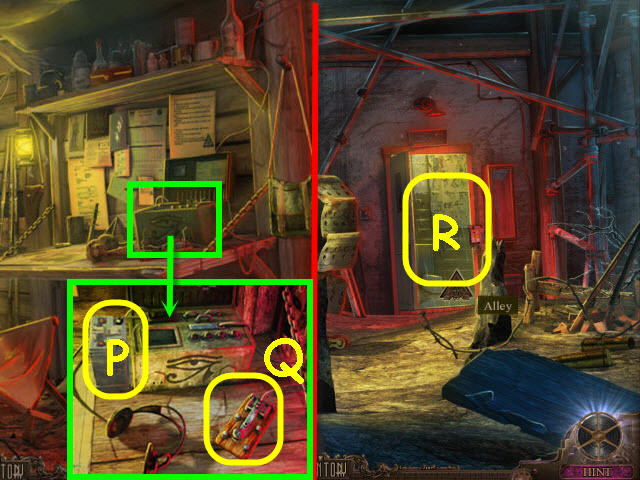
- Examine and place the BATTERY on the telegraph machine (P); tap the straight key (Q).
- Go to the WWI exit and go through the door (R) to the alley.
Chapter 5 – Egyptian Studio

- Examine the corner; take the TOY TANK (S).
- Examine and use the AXE on the door (T).
- Go to the museum.
- Examine and place the TOY SOLDIER and TOY TANK on the center display (U) to trigger a puzzle.

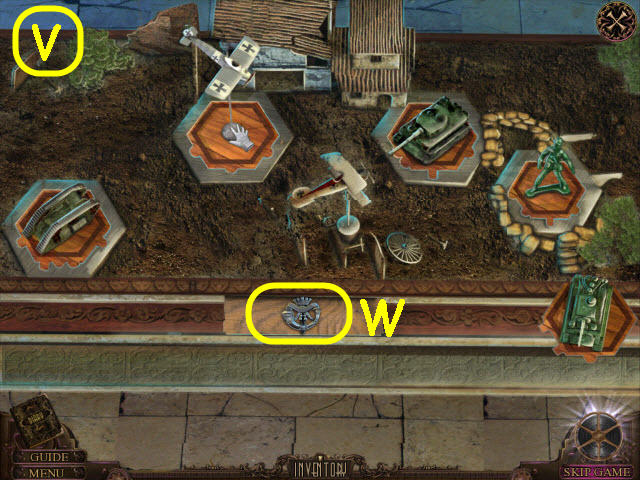
- Arrange the toys on the correct bases based on the patterns on the base of the toys.
- See screenshot (V) for solution.
- Take the BUCKLE (W).
- Go to the WWI trench end.

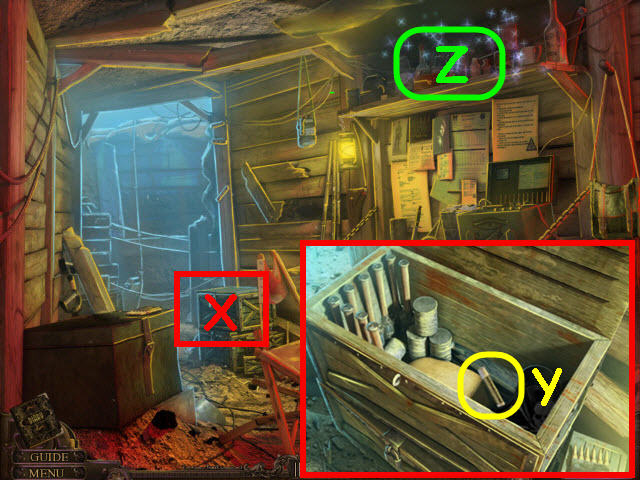
- Examine the chest (X); place the BUCKLE on the lock and open.
- Move the Jolly Roger flag and take the FUSE (Y).
- Examine the shelf (Z) to access a HOS.

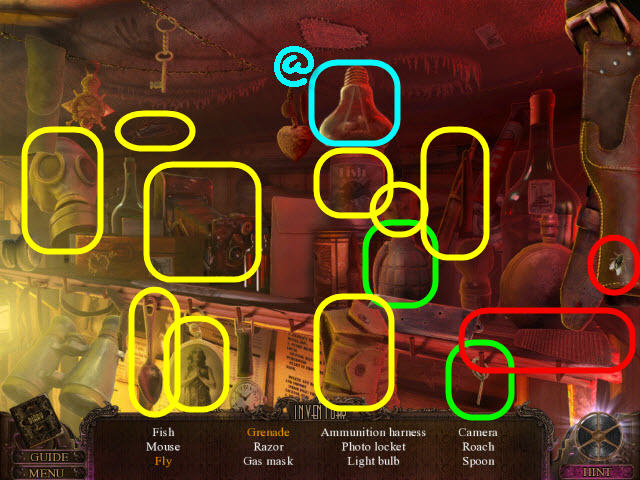
- Find the items listed.
- Marked in red: use the flyswatter to get the fly.
- Marked in green: place the pin in the grenade to get the grenade.
- You will earn a LIGHT BULB (@).
- Go to the alley.


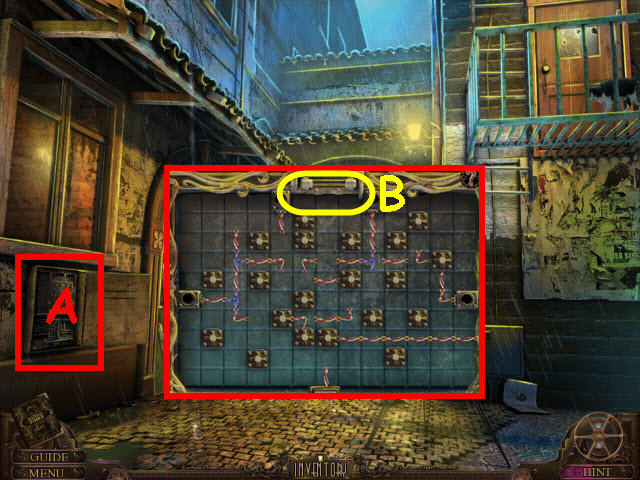
- Open and examine the fuse box (A).
- Place the FUSE on the top slot (B) to trigger a puzzle.

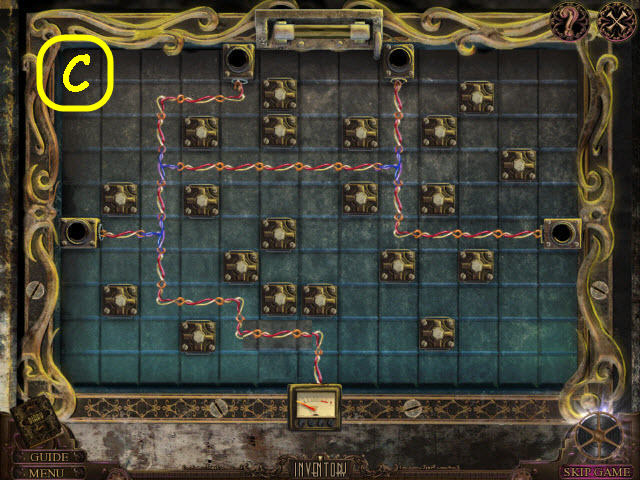
- Place the connectors on the grid to complete the circuit.
- See screenshot (C) for solution.
- Go left through the door to enter backstage down.

- Take the ZODIAC 3/5 (D).
- Examine the clipboard; take the sketch and LANTERNA MAGICA SLIDE (E).
- Take the SARCOPHAGUS PART (F).
- Go left to backstage up.

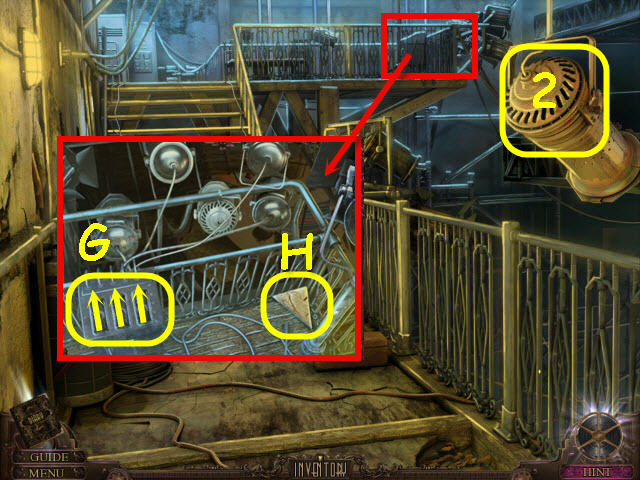
- Examine and place the LIGHT BULB in the lamp (2).
- Examine the control panel; push all switches up (G) and take the SARCOPHAGUS PART 2/3 (H).
- Back out and go forward to bazaar.

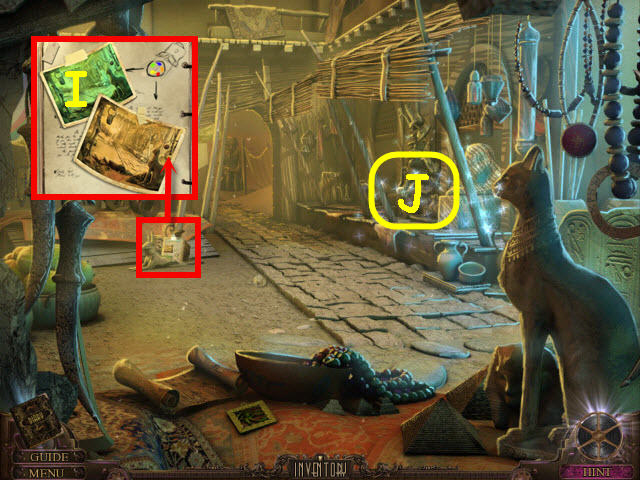
- Examine the clipboard (I) and select it to get a clue.
- Examine the market stall (J) to access a HOS.

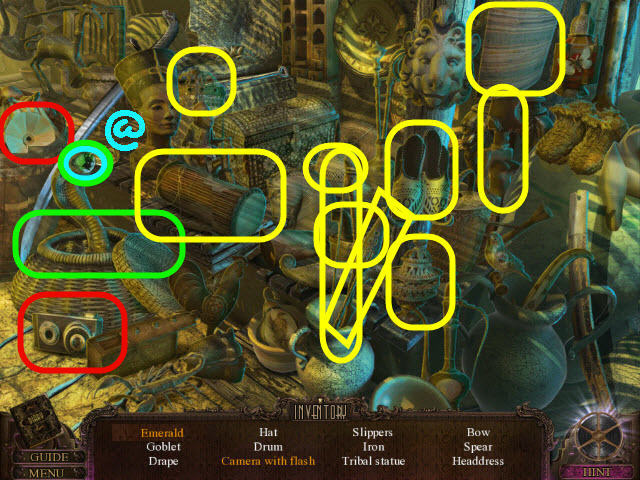
- Find the items listed.
- Marked in red: place the flash on the camera to get a camera with flash.
- Marked in green: remove the basket cover to get the color crystal.
- You will earn an EMERALD 1/4 (@).
- Go forward to the tent ext.

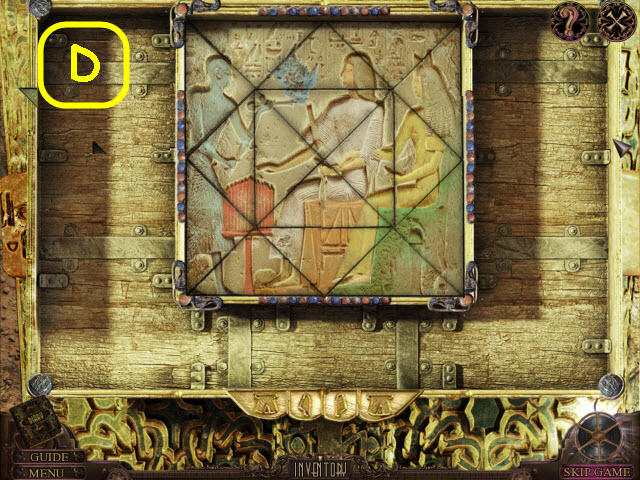
- Take the ZODIAC 4/5 (K).
- Go into the tent interior.
- Examine the left shelves; take the notes and the SALTPETER (L).
- Examine the box; hold and drag the air compressor nozzle (M) on the dust and take the BONES (N).
- Go to the museum.

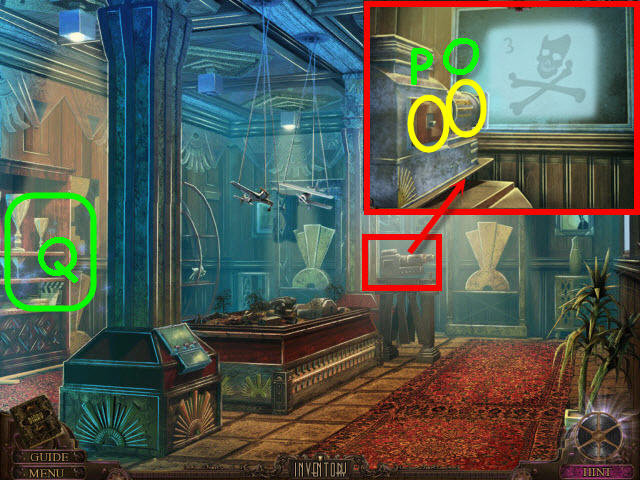
- Examine and place the LANTERNA MAGICA SLIDE on the projector (O).
- Flip the switch (P).
- Examine the shelves (Q) to access a HOS.

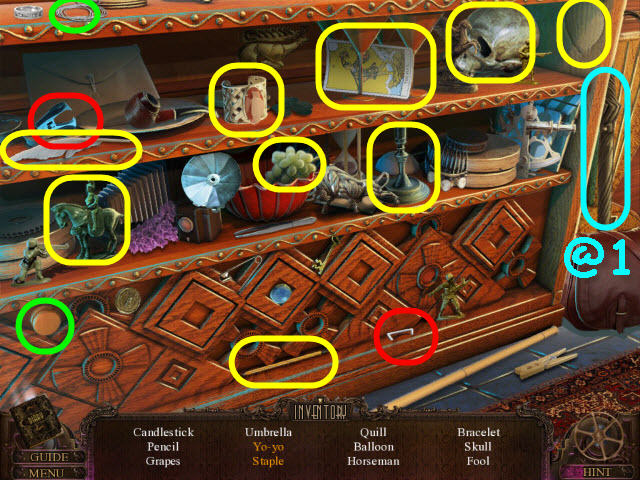
- Find the items listed.
- Marked in red: use the staple remover to get the staple.
- Marked in green: use the string on the yo-yo to get a yo-yo.
- You will earn an UMBRELLA (@1).
- Go to the alley.

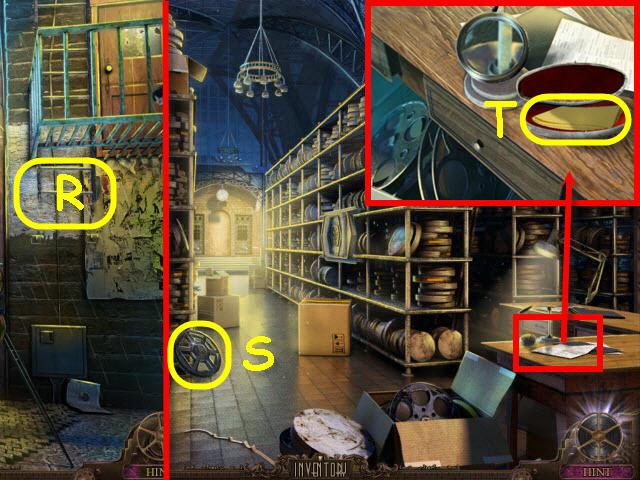
- Use the UMBRELLA on the fire escape ladder (R).
- Go up to the film archives.
- Take the EMPTY FILM ROLL (S).
- Examine the desk; open the case and take the SOFT CLOTH (T).
- Go straight to the props archive.

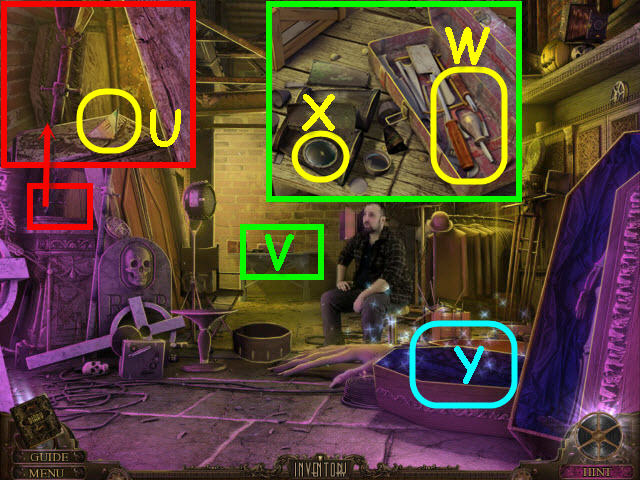
- Examine the top of the pedestal; take the SARCOPHAGUS PART 3/3 (U).
- Examine and place the BINOCULARS on the table (V).
- Open the toolbox and use the three screwdrivers (W) on the BINOCULARS; take it apart twice and take the LENS (X).
- Examine the coffin (Y) to trigger a HOS.

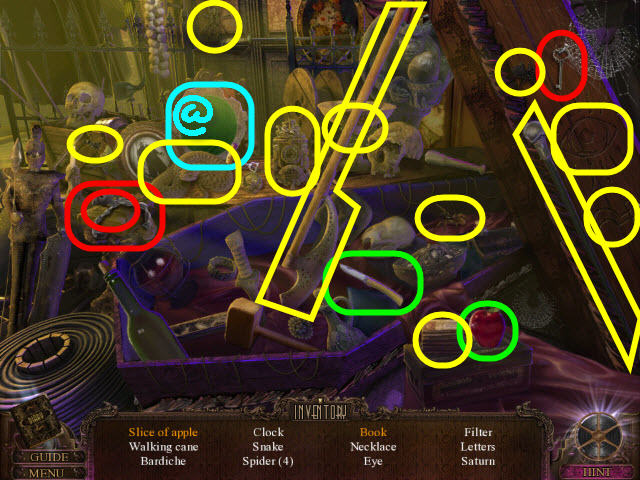
- Find the items listed.
- Marked in red: use the key on the lock to get a book.
- Marked in green: use the knife on the apple to get a slice of apple.
- You will earn a LIGHT FILTER (@).
- Go to the backstage up.

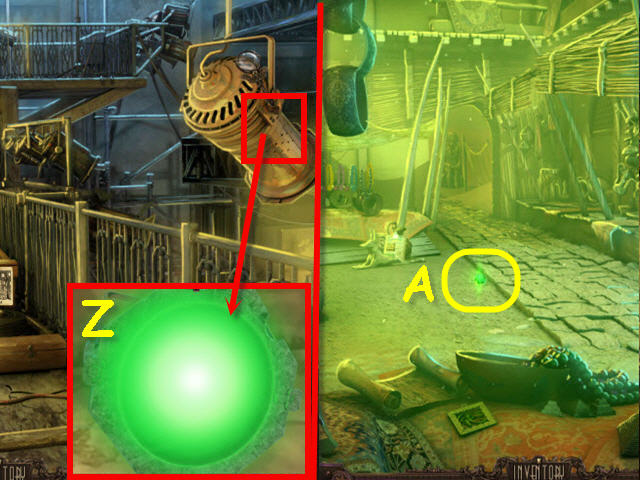
- Examine and place the LIGHT FILTER on the lamp (Z).
- Go to the bazaar.
- Take the EMERALD 2/4 (A).
- Go forward.

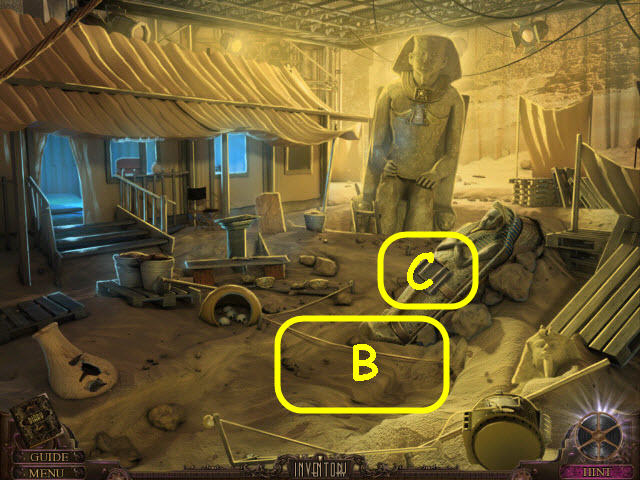
- Use the SHOVEL on the sand mound (B) twice.
- Examine and place the SARCOPHAGUS PART 3/3 on the sarcophagus (C) to trigger a puzzle.


- Place the tiles in the frame and complete the picture.
- See screenshot (D) for solution.
- Enter the sarcophagus to go into the maid’s lair.

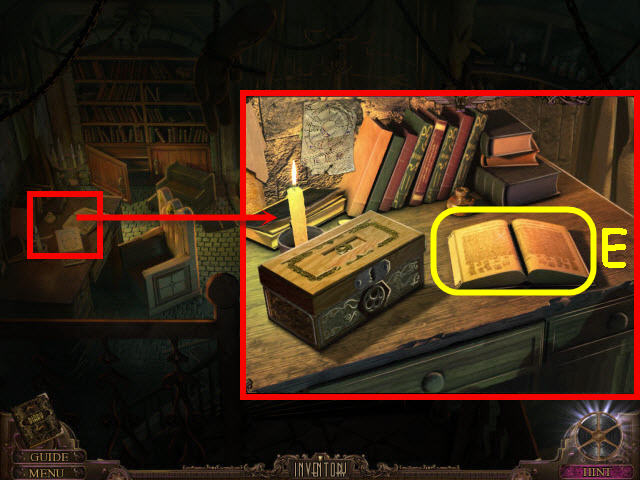
- Examine the desk.
- Select the book (E) to trigger a cutscene.
Chapter 6 – The Maid

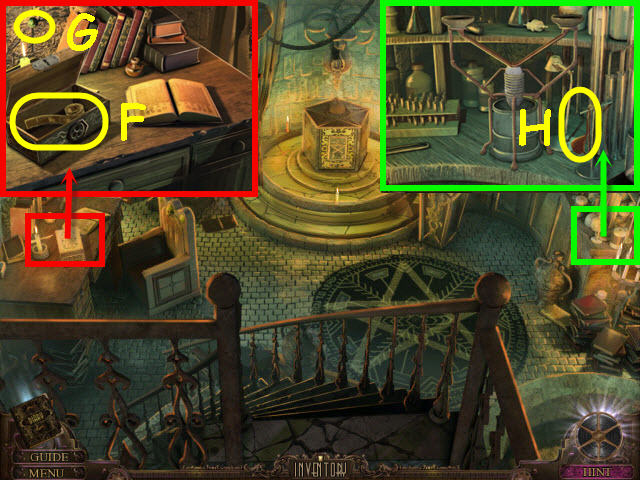
- Examine the desk; open the box and take the TAPE PART 1/3 (F).
- Read the note and take the EMERALD 3/4 (G).
- Examine the lab area; take the EYE PATCH (H).
- Go to the tent interior.

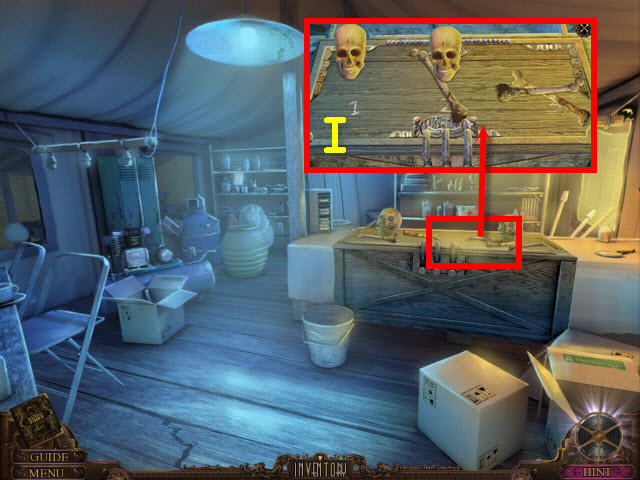
- Examine the chest.
- Place the EYE PATCH, BONES, and SKULL on the chest (I) to trigger a puzzle.

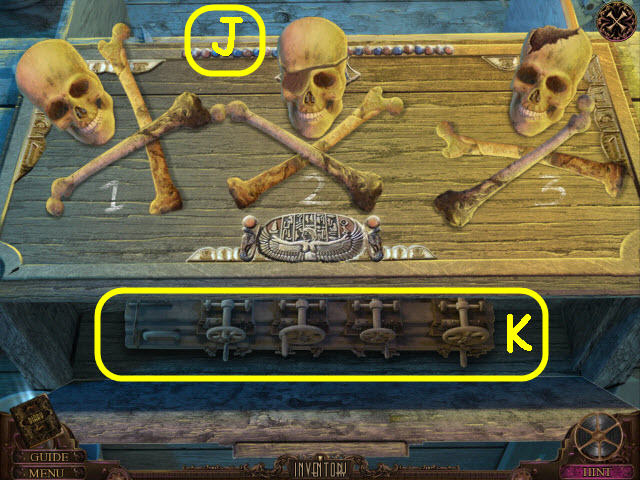
- Rotate the skulls, bones and patch to match the three Jolly Roger’s you have found.
- The clue can be found in your diary.
- See screenshot (J) for solution.
- Take the OPTICAL DEVICE (K).
- Back out.

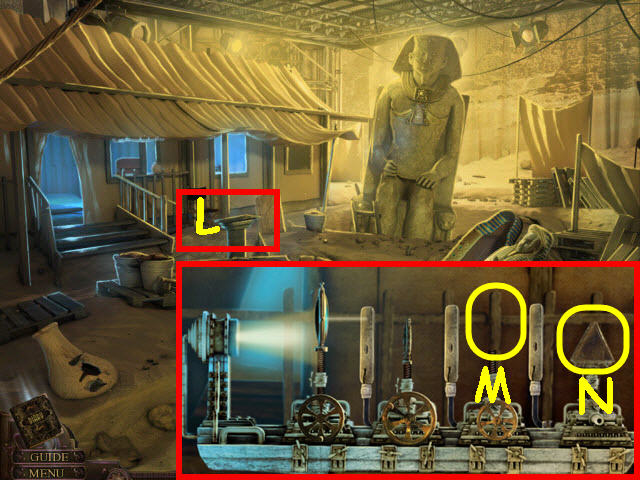
- Place the OPTICAL DEVICE on the pedestal (L).
- Examine and place the LENS on the empty spindle (M) of the OPTICAL BENCH.
- Use the SOFT CLOTH on the prism (N) to trigger a puzzle.

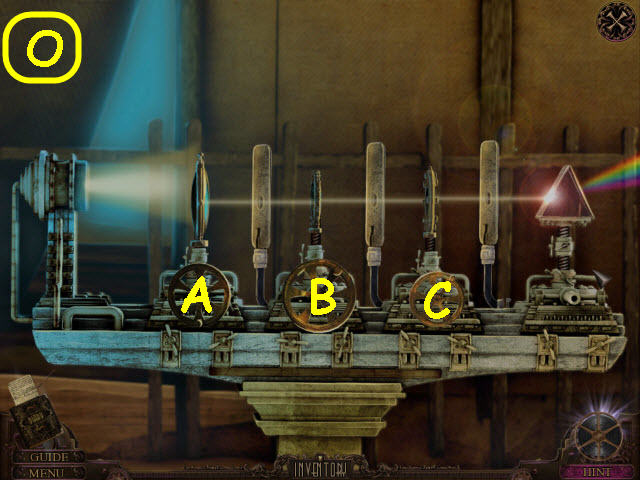
- Adjust the lenses so the ray of light travels through.
- To solve the puzzle, turn the following valves: Ax3, Bx5, and Cx4 (O).

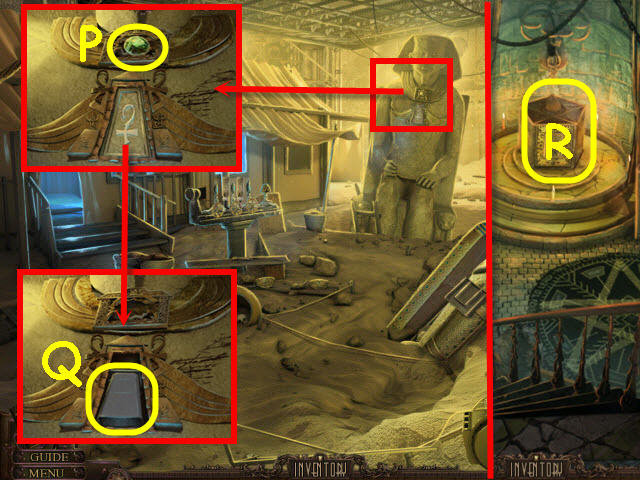
- Examine the statue; take the EMERALD 4/4 (P).
- Take the note and the PROJECTOR LENS (Q).
- Go into the maid’s lair.
- Open the curtain, examine, and place the EMERALD 4/4 on the upper slots on the device (R) to trigger a puzzle.

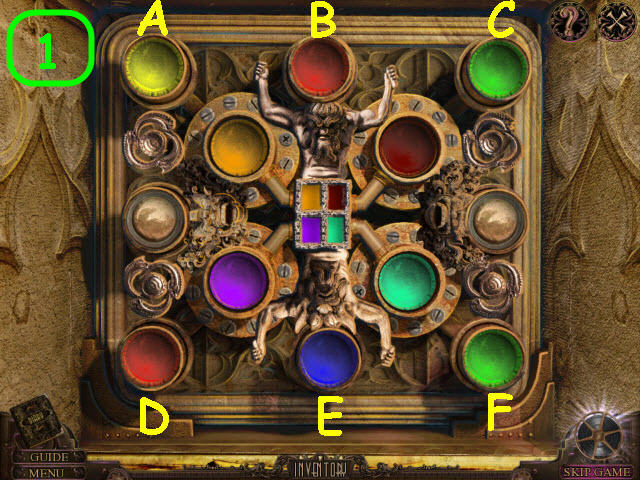

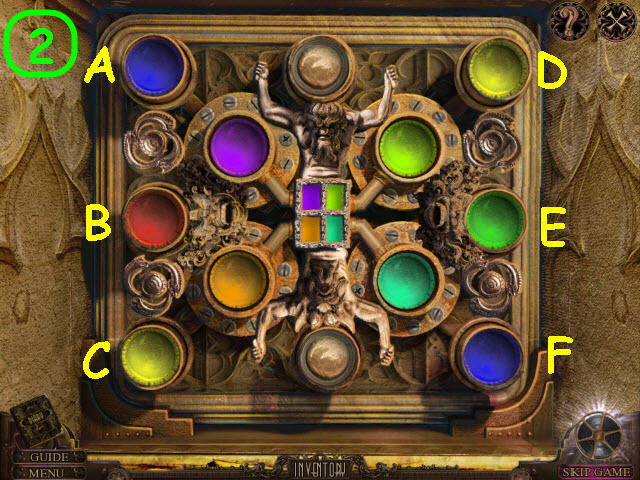

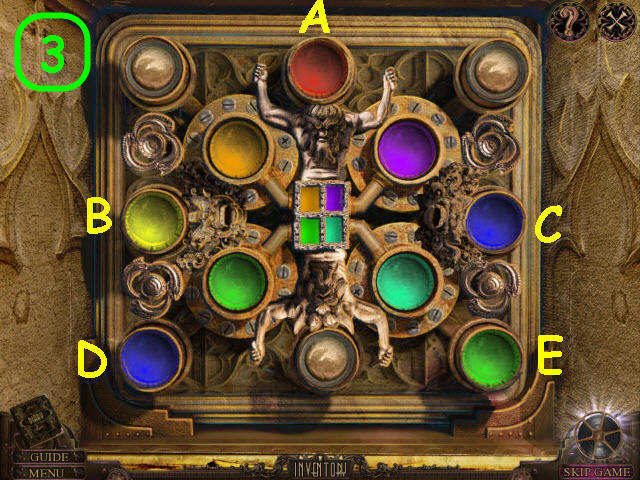
- Select the outer colors so that they combine to change the inner the colors to match the adjoining rectangular one. You must complete 3 rounds of this puzzle.
- To solve the first round, select the following buttons: Ax2, Bx2, C, D, Ex3, and F (1).
- To solve the second round, select the following buttons: Ax2, Bx2, C, Dx3, and F (2).
- To solve the third round, select the following buttons: B, Dx2, Ex3, and C (3).
- Take the PROJECTOR IRIS and ZOETROPE BOTTOM.
- Go to the props archive.

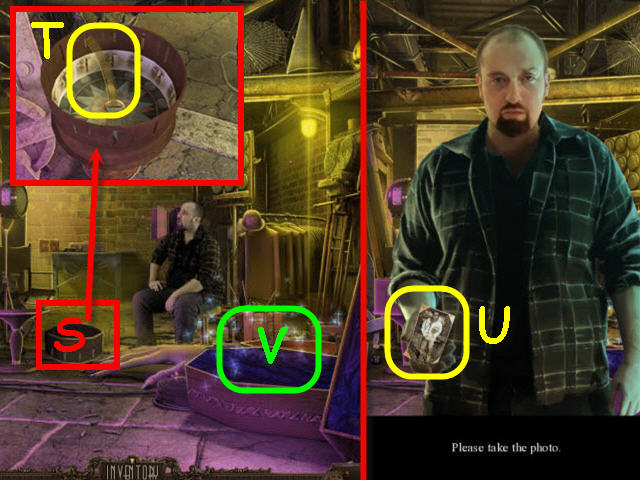
- Examine and place the ZOETROPE BOTTOM on the zoetrope (S).
- Select the zoetrope top to assemble and select again to spin.
- Take the TAPE PART 2/3 (T).
- Take the FATHERS PHOTO (U).
- Select the coffin (V) to access a HOS.

- Find the items listed.
- Marked in red: use the snuffer on the candle to get an unlit candle.
- Marked in green: use the corkscrew on the wine bottle to get a cork.
- You will earn a PESTLE (@).
- Back out.

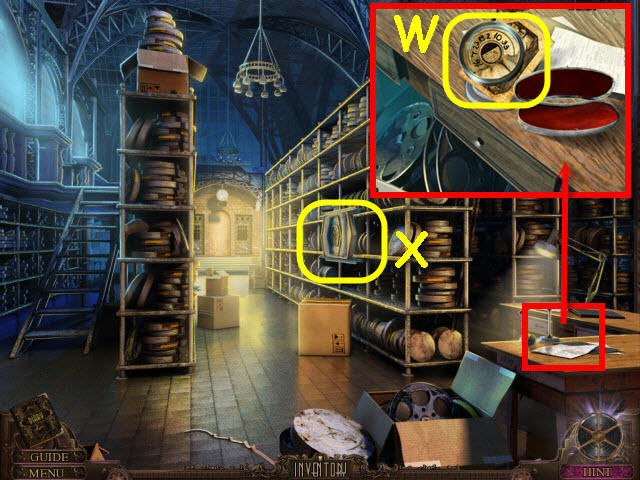
- Examine the desk; place the FATHERS PHOTO on the magnifying glass and select the code (W) to get a diary entry.
- Examine and open the panel (X) to trigger a puzzle.

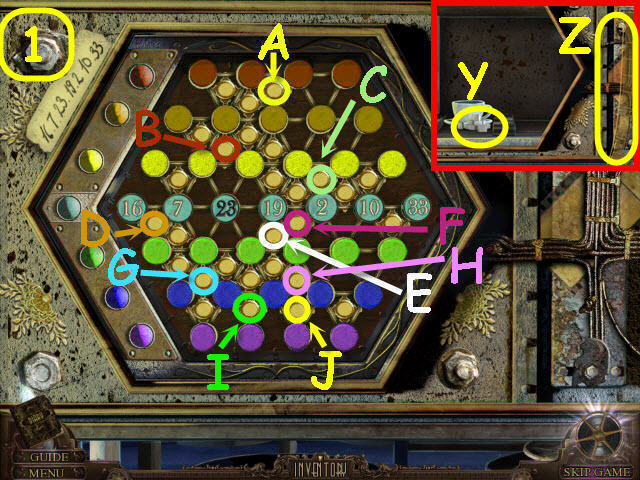
- Use the buttons to align the colored buttons to match the colors on the left and arrange the numbers to match the code in the upper left.
- To solve the puzzle, select the following buttons: A, Bx2, C, D, Ex2, F, G, Hx2, I, and J (1).
- Take the SUGAR (Y) and TAPE PART 3/3 (Z).
- Go to the maid’s lair.

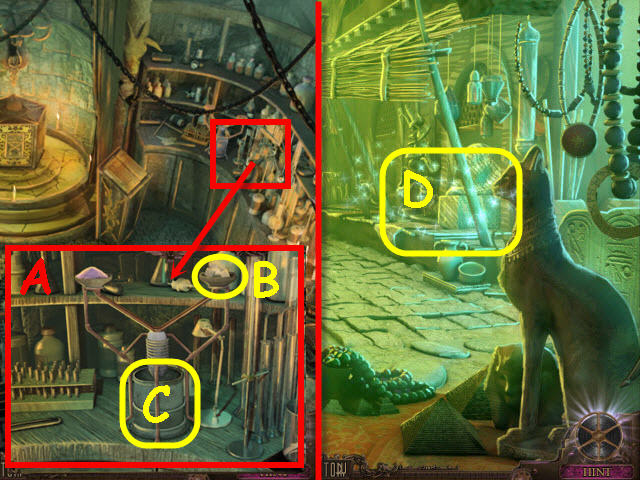
- Examine the lab area; place the SUGAR and SALTPETER on the device (A).
- Use the PESTLE on the SUGAR (B); take the SMOKE POWDER (C).
- Go to the bazaar.
- Examine the stall (D) to access a HOS.

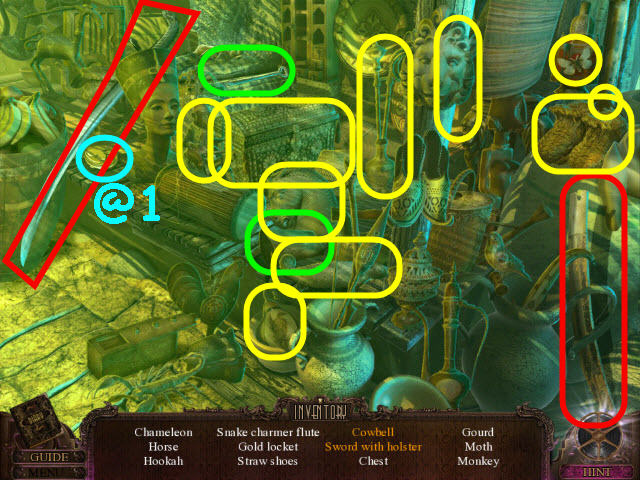
- Find the items listed.
- Marked in red: place the sword in the holster to get a sword with holster.
- Marked in green: put the clapper on the bell to get a cowbell.
- You will earn a HEART (@1).
- Go to the WW1 exit.


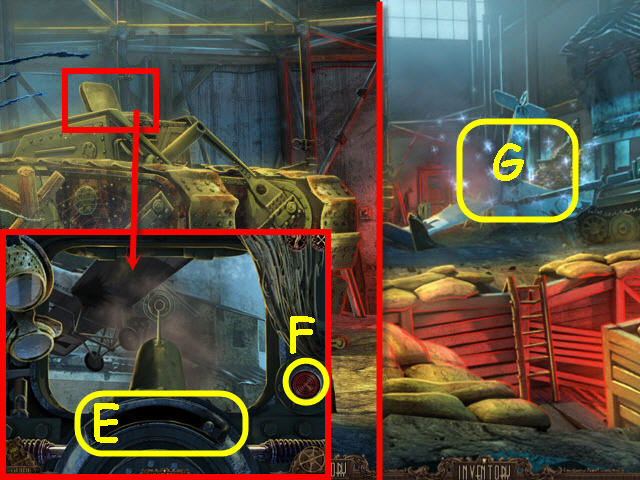
- Open and examine the tank turret hatch; open and place the SMOKE POWDER in the compartment (E) to trigger a puzzle.
- Wait for the plane to get in the crosshairs and push the button (F) to shoot. You will need to shoot the plane twice to down it.
- Back out.
- Examine the downed plane (G) to access a HOS.

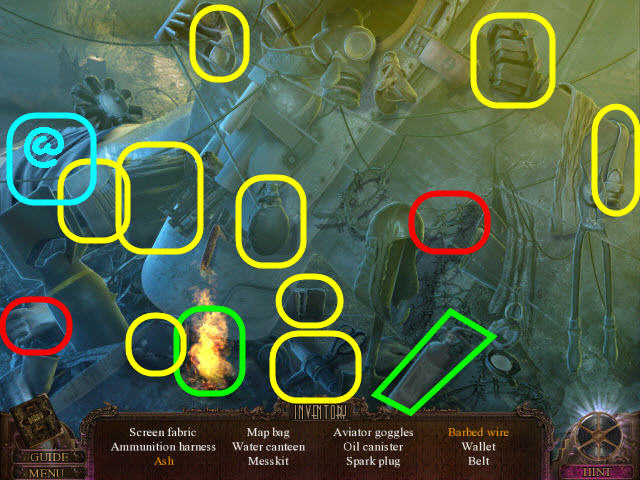
- Find the items listed.
- Marked in red: use the glove to get the barbed wire.
- Marked in green: use the fire extinguisher on the fire to get ash.
- You will earn a SCREEN FABRIC (@).
- Go to father’s study.

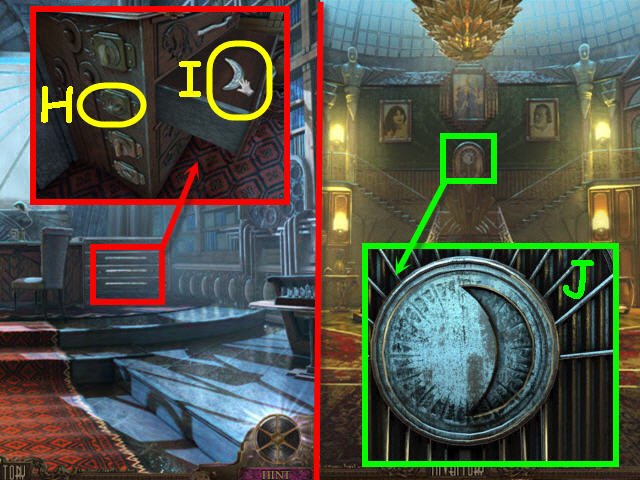
- Examine the cabinet; place the HEART on the second drawer lock (H); read the note and take the MOON SHAPE (I).
- Back out.
- Examine and place the MOON SHAPE on the zodiac clock (J) to trigger a puzzle.

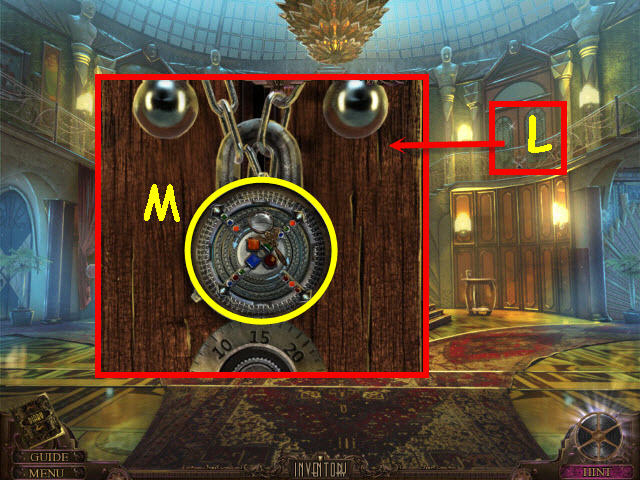
- Position the clock hands duplicating the three pairs of zodiac signs on the left.
- See screenshot (1-3) for solution.
- Take the PADLOCK DIAL (K).


- Examine the editing room door (L); place the PADLOCK DIAL on the lock.
- Turn the dial to open and examine the center (M) to trigger a puzzle.

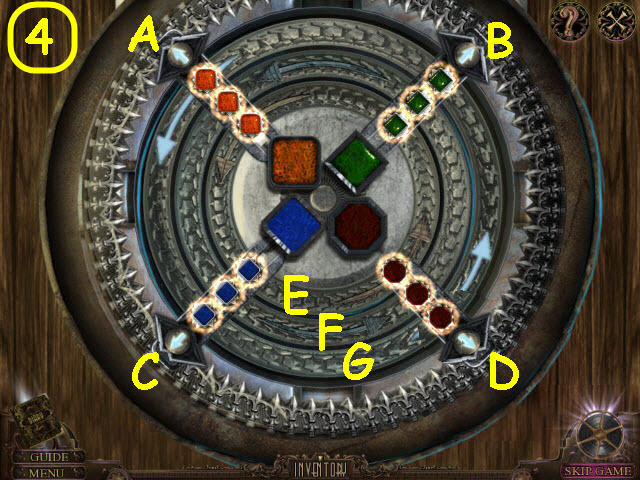
- Align the gems by using the arrows and rotating the dials.
- To solve the puzzle, select the following arrows and rings: A, D, Ex2, A, D, B, F, C, D, F, B, C, D, C, D, G, A, Gx2, A, C, and D (4).
- Enter the newly-opened door to the editing room.
Chapter 7 – Antidote

- Take the COIN 1/2 (N).
- Examine the shelves (O) to access a HOS.

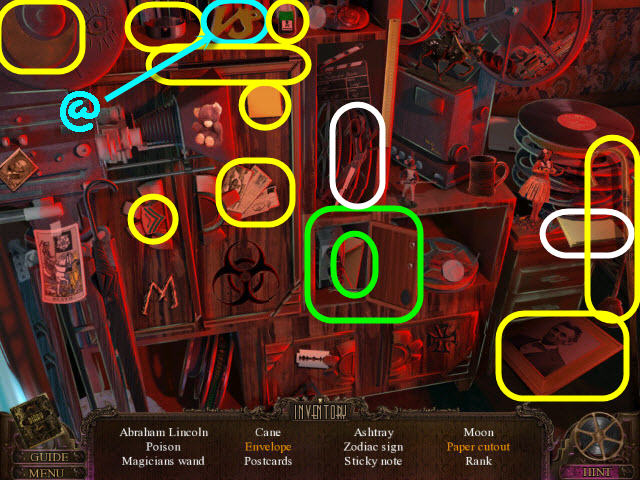
- Find the items listed.
- Marked in green: open the compartment to get the envelope.
- Marked in white: use the scissors on the paper to get a paper cutout.
- You will earn a ZODIAC 5/5 (@).
- Go to the library.

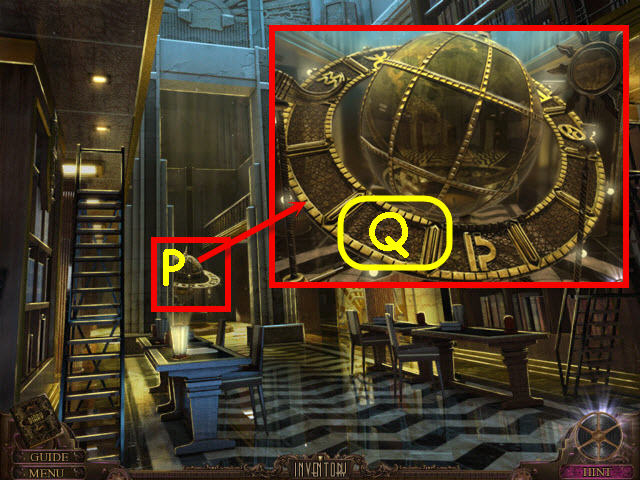
- Examine the globe (P).
- Place the ZODIAC 5/5 on the ring (Q) around the globe to trigger a puzzle.

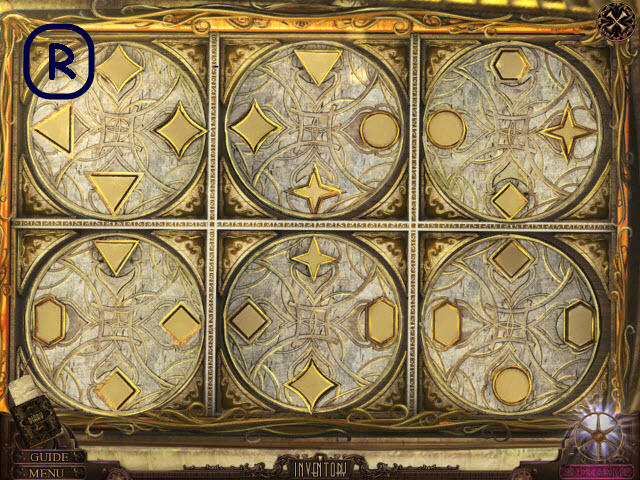
- Rotate the disks so that matching symbols are adjacent.
- See screenshot for solution (R).

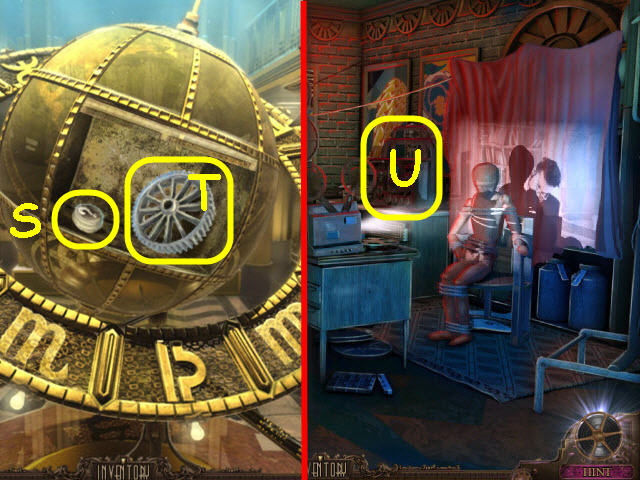
- Take the COLOR SHAPE (S) and PROJECTOR SPROCKET (T).
- Go to the editing room.
- Examine and place the COLOR SHAPE in the slot and RING WITHOUT SYMBOL on the left of the engraving machine (U) to trigger a puzzle.

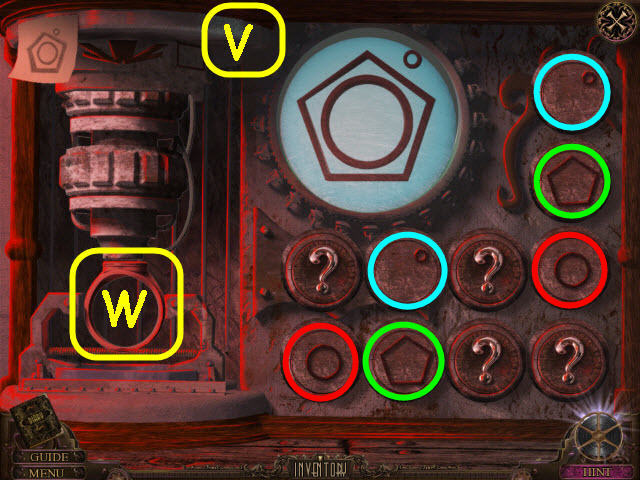
- Find the matching pairs of the three designs needed to match the template in the upper left.
- See screenshot for solution (V).
- Automatically get FATHER’S RING 2 (W).
- Go to the elevator.

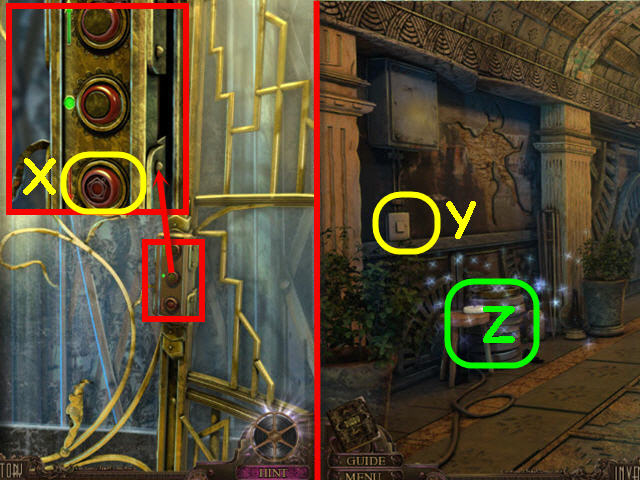
- Examine and use FATHER’S RING 2 on the bottom button of the panel; press the down button (X).
- Examine and press the switch (Y).
- Examine the stool (Z) to access a HOS.

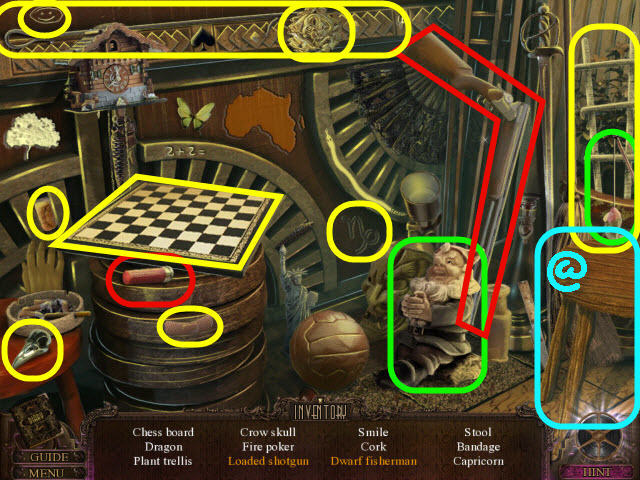
- Find the items listed.
- Marked in red: place the shotgun shell in the shotgun to get a loaded shotgun.
- Marked in green: place the fishing pole on the dwarf to get a dwarf fisherman.
- You will earn a STOOL (@).
- Go forward to the lower projector.

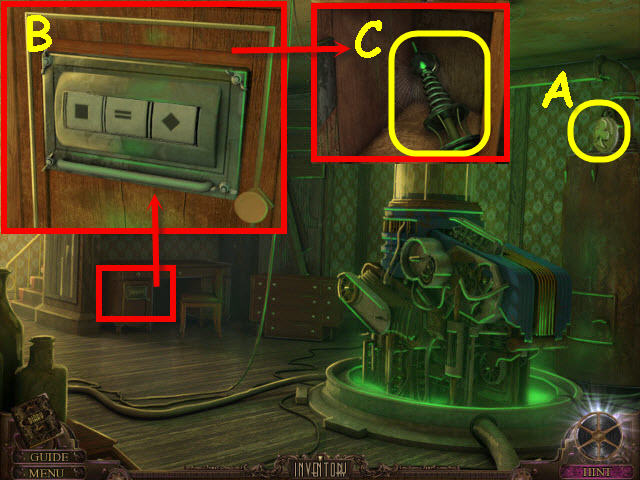
- Take the CLUB (A).
- Examine the locked desk; enter the code (B) in your diary from the zodiac clock.
- Take the PROJECTOR COIL (C).
- Go to the connecting door on the left.

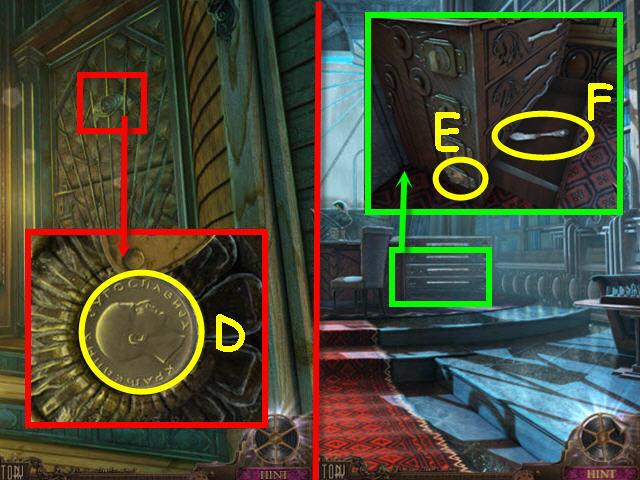
- Examine and open the peephole; take the COIN 2/2 (D).
- Go to father’s study.
- Examine the cabinet; place the CLUB on the bottom drawer lock (E); read the note and take the BUTTER KNIFE (F).
- Go to the editing room.

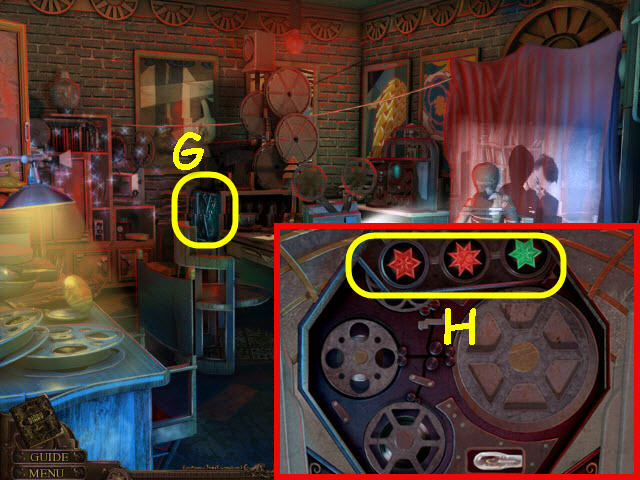
- Examine and place the TAPE PART 3/3 and the EMPTY FILM ROLL on the editing machine (G).
- Use the BUTTER KNIFE on the upper panel (H) to trigger a puzzle.

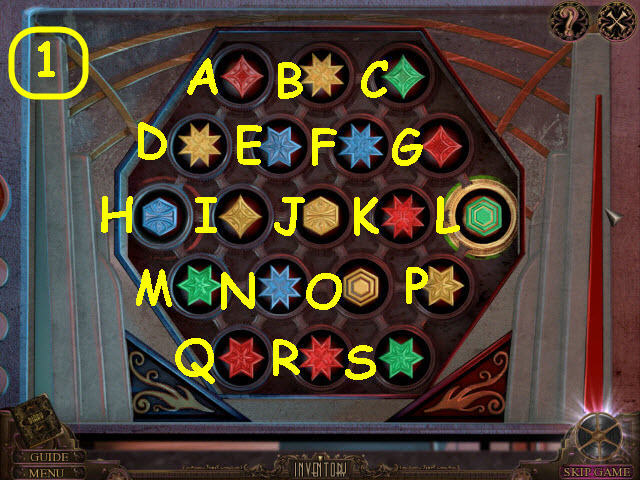
- Connect the symbols by color or shape to end up on the right green tile.
- To solve the puzzle, select the tiles in the following order: J, I, D, F, K, G, C, and L (1).

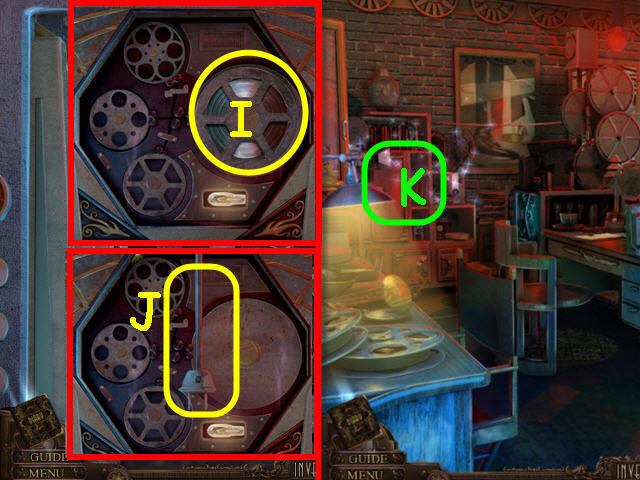
- Take the PROJECTOR TAPE (I).
- Take the ELECTRIC CABLE (J).
- Examine the shelves (K) to access a HOS.

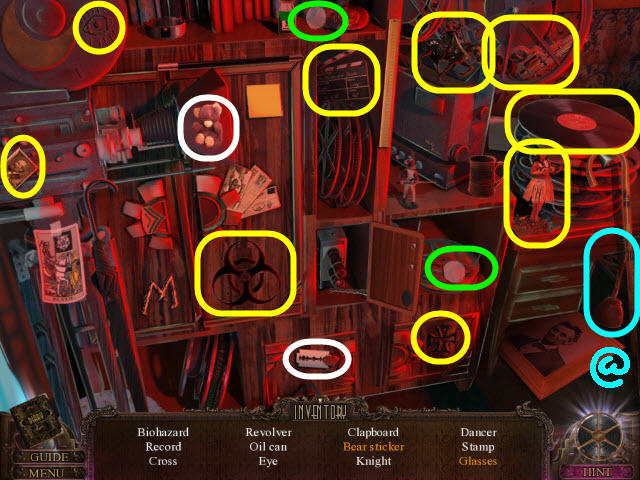
- Find the items listed.
- Marked in white: use the razor on the sticker to get a bear sticker.
- Marked in green: place the half of glasses with the half of glasses to get glasses.
- You will earn OIL (@).
- Go to the theater.

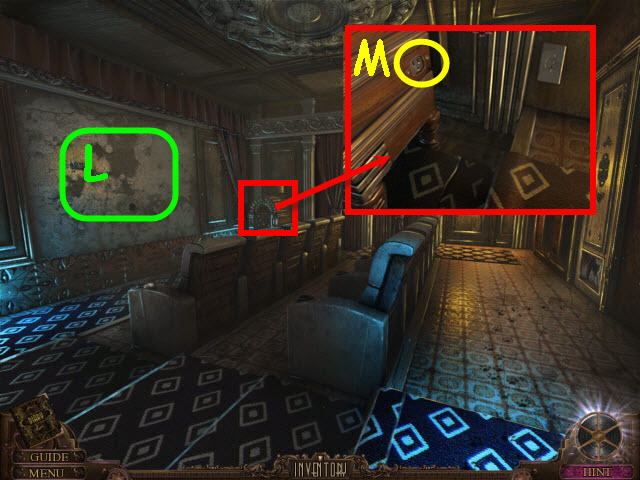
- Place the SCREEN FABRIC on the wall (L).
- Examine and place the ELECTRIC CABLE on the jukebox (M).
- Examine the jukebox to trigger a puzzle.

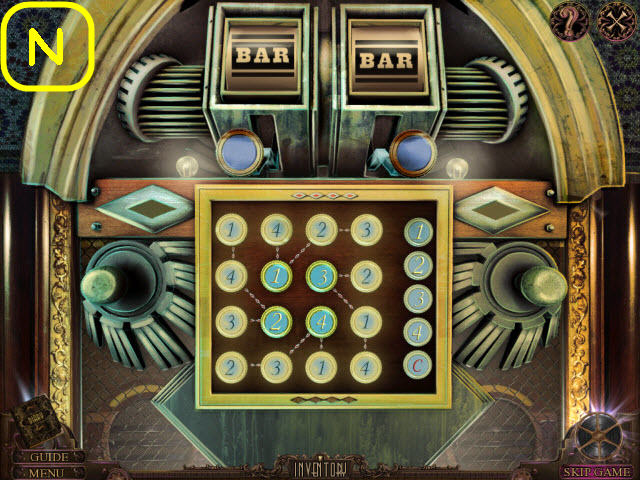
- Align the numbers so no duplicate are in any row, column or sequence.
- Select the button you want the number on and then the number on the right you wish to duplicate.
- See screenshot for solution (N).
- Go to the lower projector.

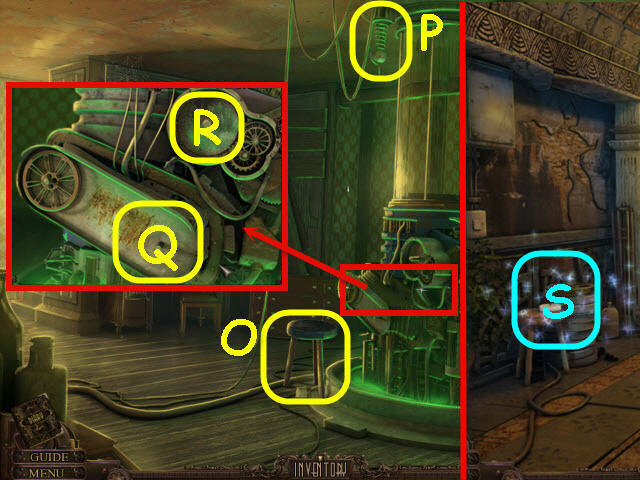
- Place the STOOL on the floor (O).
- Place the PROJECTOR COIL by the ceiling (P).
- Examine and place the PROJECTOR TAPE (Q) and PROJECTOR SPROCKET (R) on the machine.
- Back out.
- Examine the stool (S) to access a HOS.

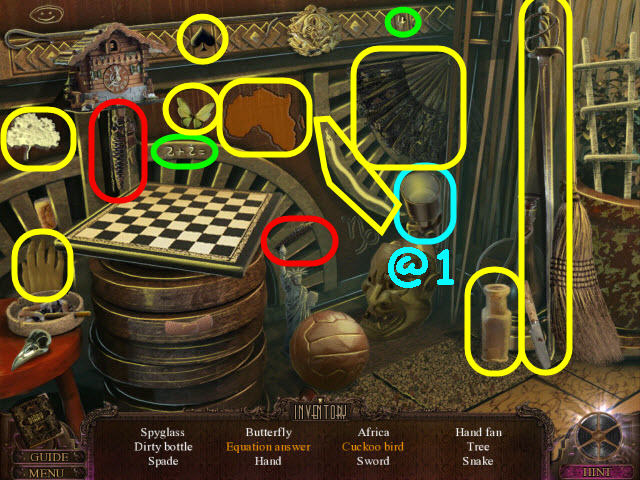
- Find the items listed.
- Marked in red: hang the weight on the clock to get a cuckoo.
- Marked in green: place the 4 on the equation to get an equation answer.
- You will earn a SPYGLASS (@1).
- Go to father’s bedroom.

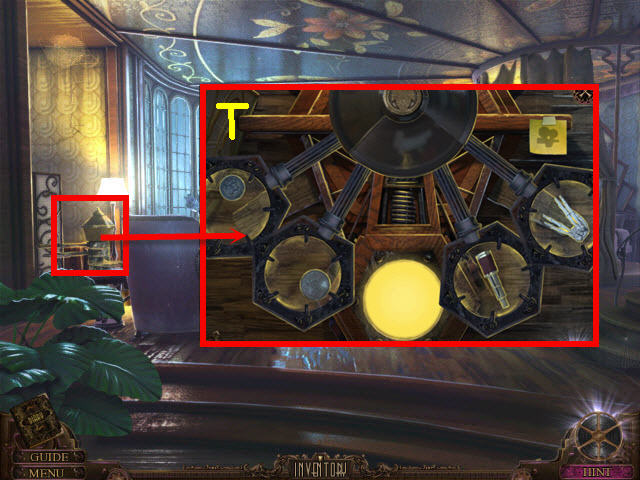
- Examine and place the COIN 2/2, SPYGLASS, and SKELETON HAND on the machine (T).
- Use the OIL on the center coil to trigger a puzzle.

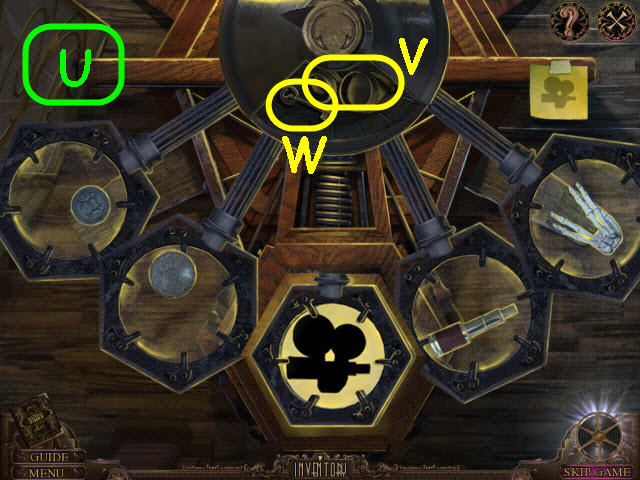
- Turn the pieces so that the shadows combine to form a projector.
- Press the top arrows when pieces are set.
- See screenshot for position of the pieces (U).
- Take the GOGGLES (V) and SECRET KEY (W).
- Go to the connecting door.

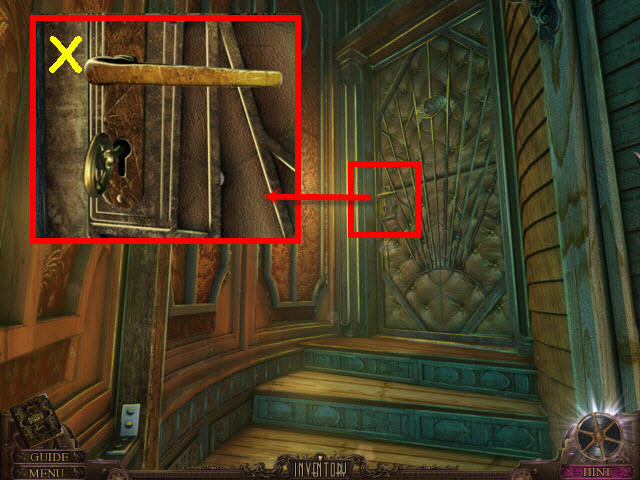
- Examine and use the SECRET KEY on the lock; turn the key and pull the handle (X).
- Go through the door to the projector room.

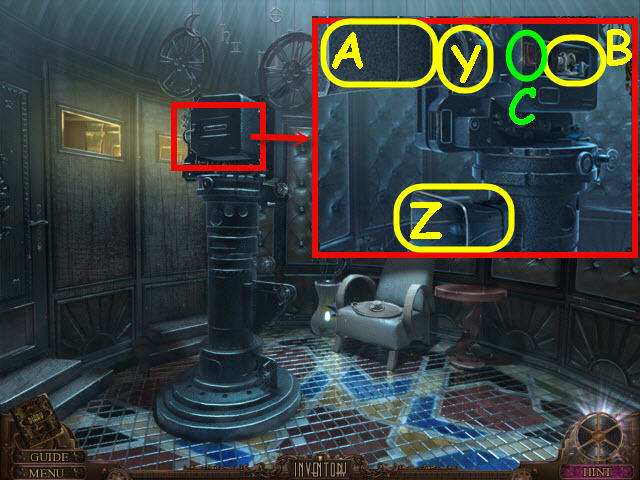
- Examine the place the PROJECTOR IRIS (Y), PROJECTOR SPEAKER (Z) and PROJECTOR LENS (A) on the projector.
- Open and place the PROJECTOR LAMP (B) in the side compartment.
- Flip the switch (C).
- Go left to the theater.

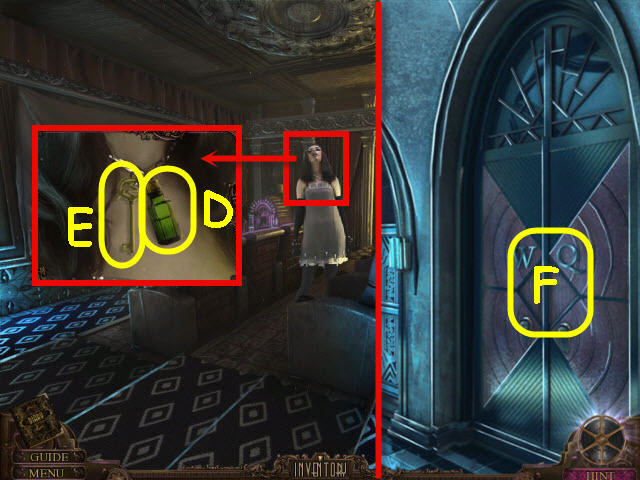
- Examine the maid; take the ANTIDOTE (D) and WORKER’S QUARTERS KEY (E).
- Go to west hall end.
- Examine and use the WORKER’S QUARTERS KEY on the door (F); turn the key.
- Go right into the workers quarters.

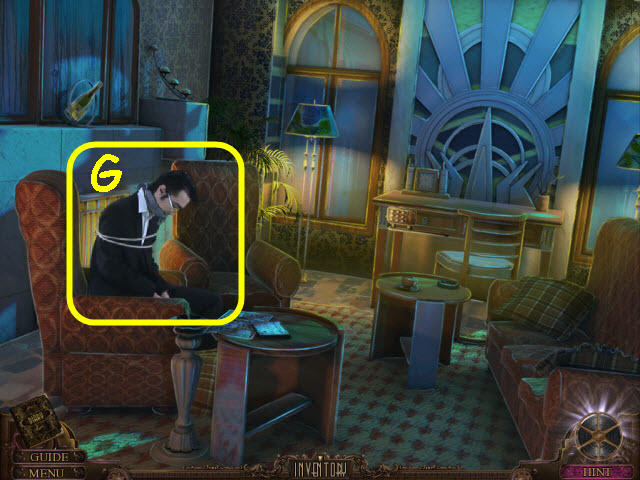
- Give the ANTIDOTE to the brother (G).
- Congratulations! You have successfully completed Final Cut: Death on the Silver Screen Standard Edition.
Hidden Estate Photo Achievement

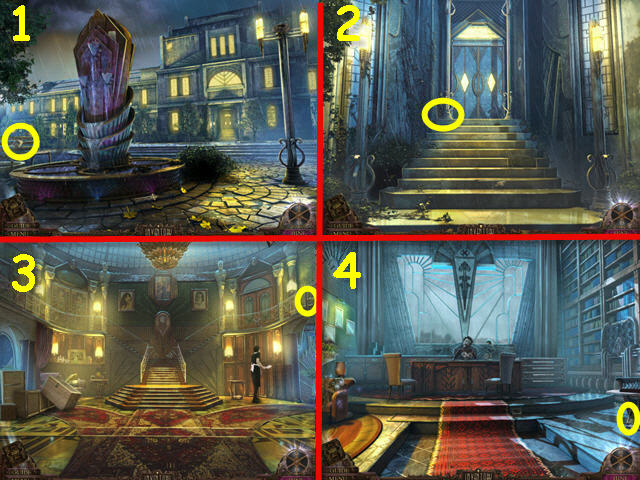
- There are 20 hidden estate photos throughout the game. They are all listed below.
- Bench by the fountain (1).
- Left of the front door to the mansion (2).
- Upper right in the foyer (3).
- Under the chessboard table on the right side of the father’s study (4).

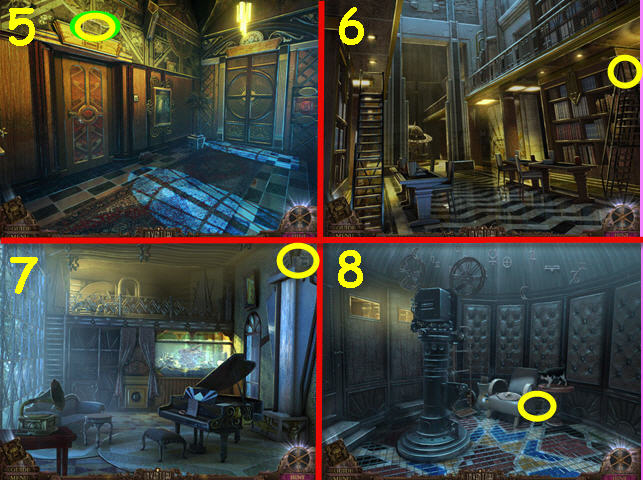
- Top of the left door in the east hall end (5).
- On top of the right rolling ladder in the library (6).
- Above the right water wall in the music room (7).
- Behind the chair in the projector room (8).

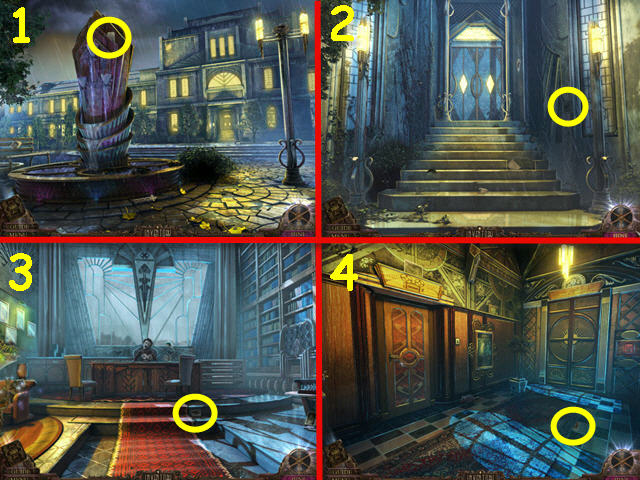
- Left of the path in the garden (9).
- Under the table in the rec room (10).
- Behind the pillar in the elevator room (11).
- On the left by the rock on the pirate’s tower base (12).

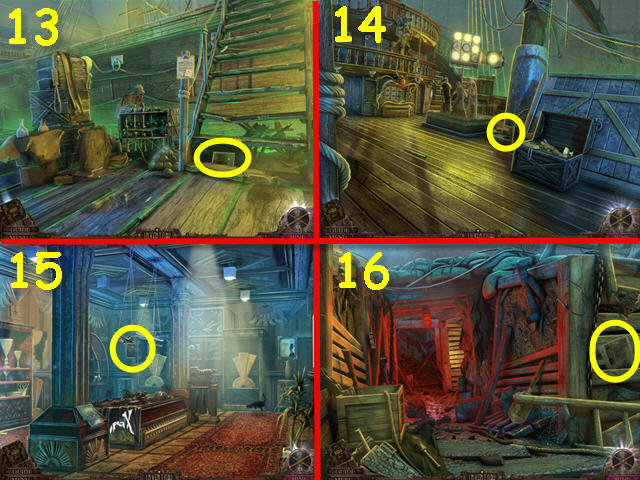
- Under the stairs at the pirate’s ship side (13).
- On the bottom of the mast on the pirate’s ship deck (14).
- On the back wall of the museum (15).
- On the right wall of the WWI trench (16).

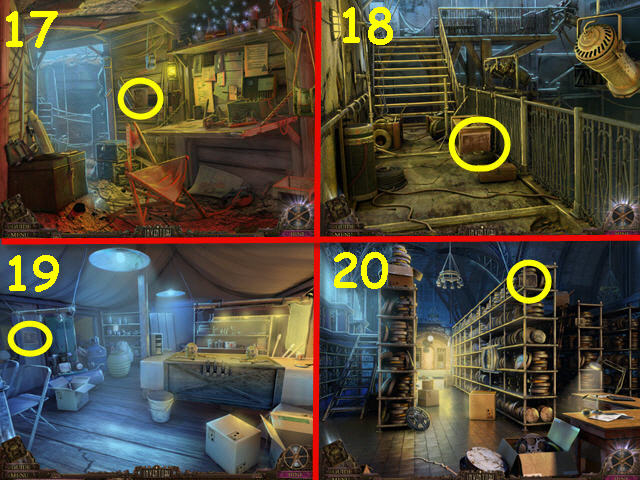
- On the wall in the WW1 trench end (17).
- On the side of the crate in backstage up (18).
- On the left wall in the tent interior (19).
- On the top rack of the 3rd from right film rack in the film archives (20).
Father’s Secret Card Achievement


- There are 10 father’s secrets cards hidden throughout the game.
- Top of fountain (1).
- Right wall of mansion entrance (2).
- To the right of the stair runner in father’s study (3).
- Tucked on the right of the carpet in the east hall end (4).

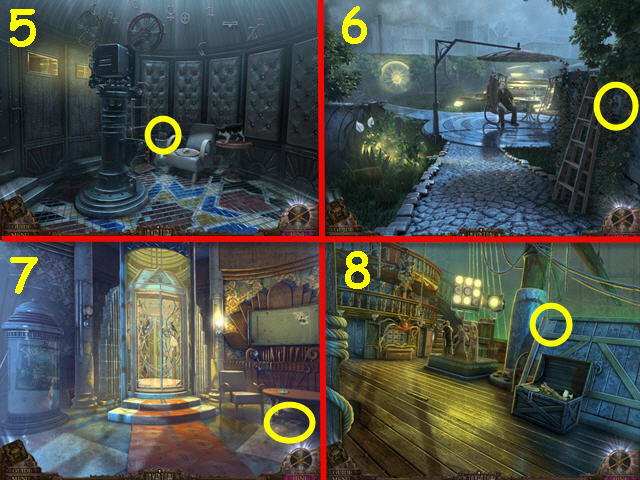
- In the vase in the projector room (5).
- Right of the ladder in the garden (6).
- Under the table in the elevator room (7).
- Above the chest in the pirate’s ship deck (8).

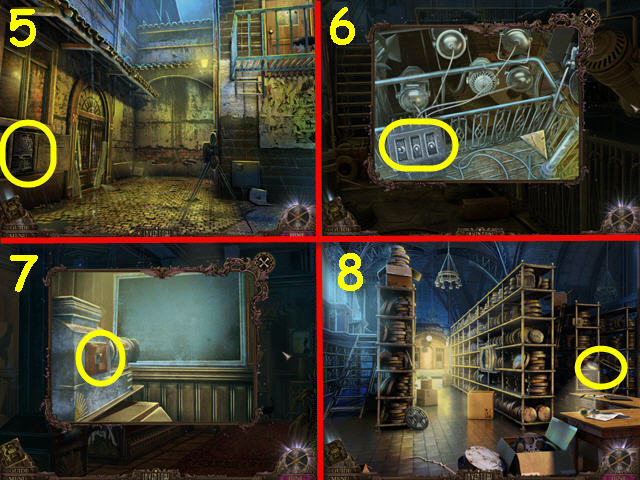
- Above the left shelves in the museum (9).
- On the top shelf of the middle film rack in the film archive (10).
Lighting Lamps Achievement

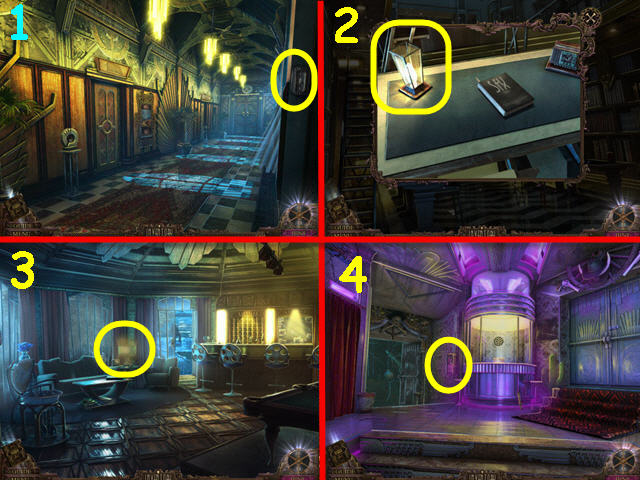
- There are ten lamps to be lit throughout the game.
- The switch in the east hall (1).
- In the zoom in on the table in the library (2).
- On the table in the rec room (3).
- Pull the switch in the ticket hall (4).


- Automatic when completing the puzzle in the alley (5).
- Turn on the lights while zoomed in on backstage up (6).
- Turn on Lanterna Magica in the museum (7).
- On the desk in the film archives (8).

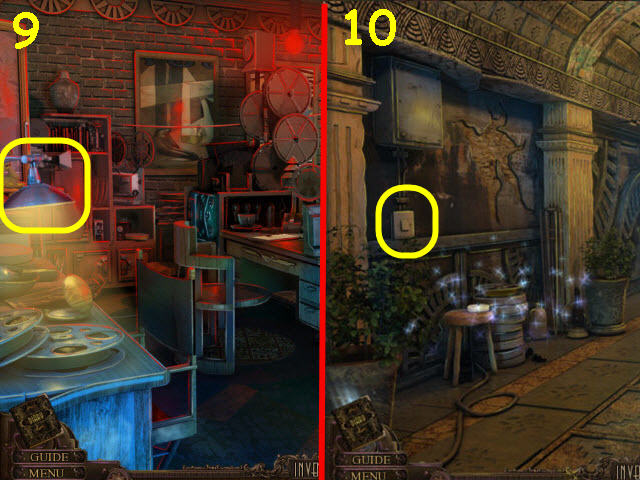
- Above the desk in the editing room (9).
- The wall switch in the secret passage (10).
Mystery Achievement

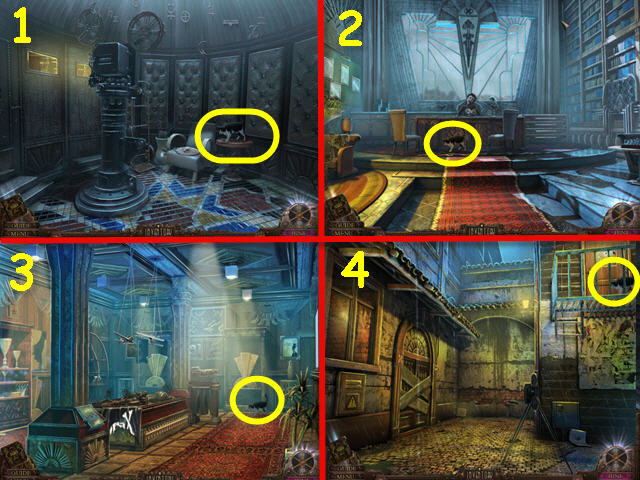
- There are 6 cats appearing in the game. They are listed here in order of appearance.
- Projector Room (1), Father’s Study (2), Museum (3), and Alley (4).

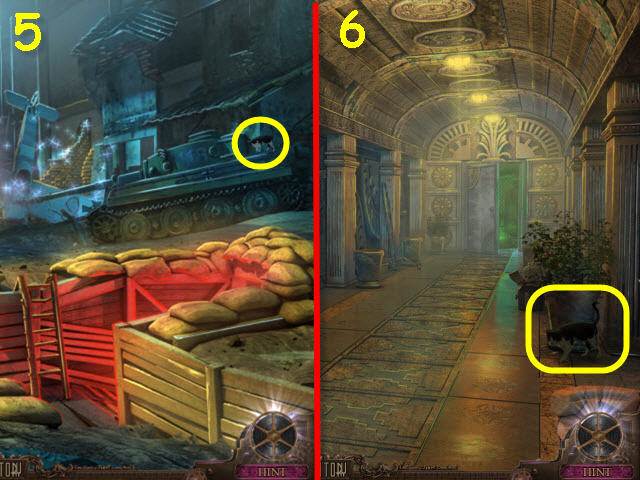
- WW1 Entrance (5) and Secret Passage (6).






 Sherlock Holmes and the Hound of the Baskervilles Walkthrough, Guide, & Tips
 Labyrinths of the World: Forbidden Muse Walkthrough, Guide, & Tips
 The Secret Order: New Horizon Walkthrough, Guide, & Tips
 Dark Dimensions Wax Beauty Walkthrough, Guide, & Tips
 Dark Dimensions: Shadow Pirouette Walkthrough, Guide, & Tips