Dark Dimensions: Shadow Pirouette Walkthrough, Guide, & Tips
Dark Dimensions: Shadow Pirouette Walkthrough
Welcome to the Dark Dimensions: Shadow Pirouette Walkthrough
The arts-loving town of Everton has been overrun by sentient shadows. Race to escape before you’re trapped in the darkness forever!
Whether you use this document as a reference when things get difficult or as a road map to get you from beginning to end, we’re pretty sure you’ll find what you’re looking for here.
This document contains a complete Dark Dimensions: Shadow Pirouette game walkthrough featuring annotated screenshots from actual gameplay!
We hope you find this information useful as you play your way through the game. Use the walkthrough menu below to quickly jump to whatever stage of the game you need help with.
Remember to visit the Big Fish Games Forums if you find you need more help. Have fun!
This walkthrough was created by Laurie Murphy, and is protected under US Copyright laws. Any unauthorized use, including re-publication in whole or in part, without permission, is strictly prohibited.
General Tips
- This is the official guide for Dark Dimensions: Shadow Pirouette!
- This guide does not mention each time you have to zoom into a location; the screenshots show each zoom scene.
- Hidden-object puzzles are referred to as HOPs. This guide does not show screenshots of the HOPs, however, it is mentioned when a HOP is available and the inventory item collected.
- This guide gives step-by-step solutions for all puzzles that are not random. Please read the instructions in the game for each puzzle.
Chapter 1: Entering the Theater

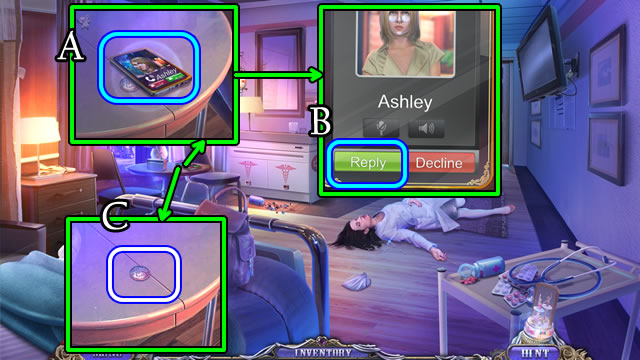
- Select the phone (A); touch Reply 3x (B).
- Take COIN 1/2 (C).

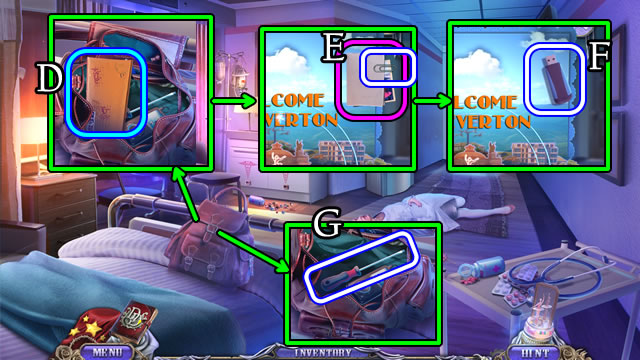
- Open, uncover and take the card (D). Take the note to receive a PAPER CLIP (E).
- Take the FLASH DRIVE (F).
- Take the SCREWDRIVER (G).

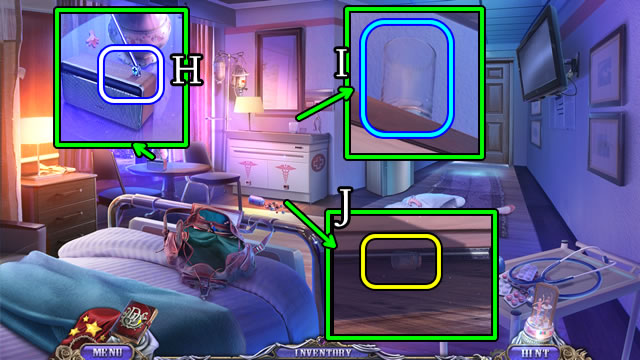
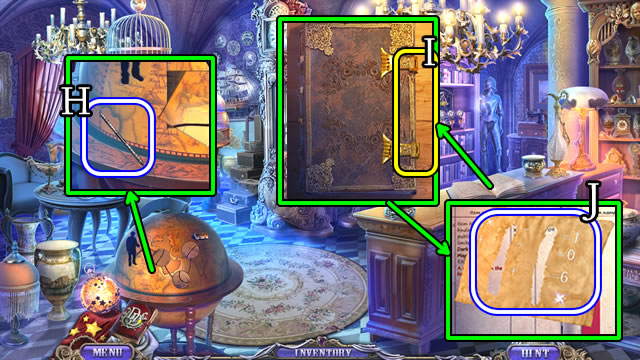
- Use the SCREWDRIVER (H); receive a SHORT ANTENNA.
- Select the SHORT ANTENNA 2x for a LONG ANTENNA (Inventory).
- Select the glass (I).
- Use the LONG ANTENNA (J) for a GLASS.

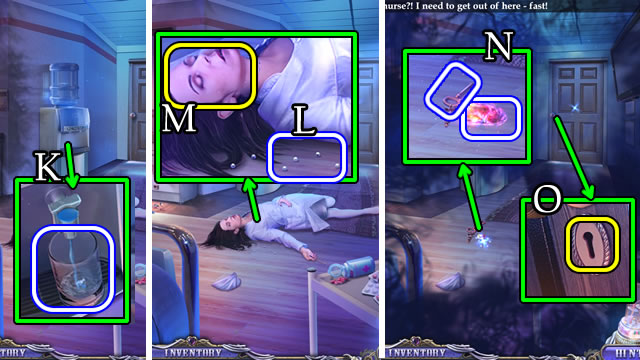
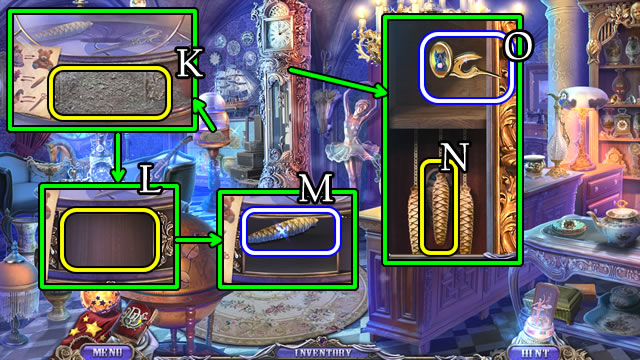
- Place the GLASS (K); receive WATER.
- Take the BEADS (L); use the WATER (M).
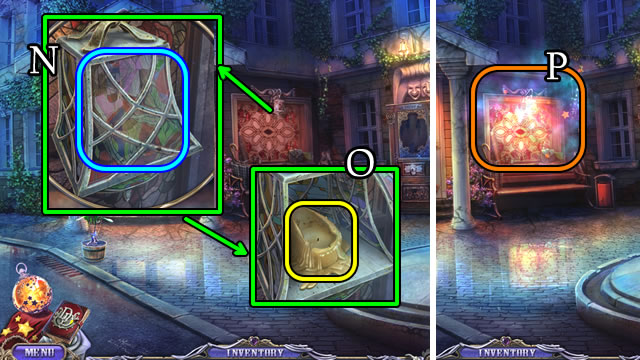
- Take the CRYSTAL and KEY (N).
- Use the KEY (O).
- Walk forward.

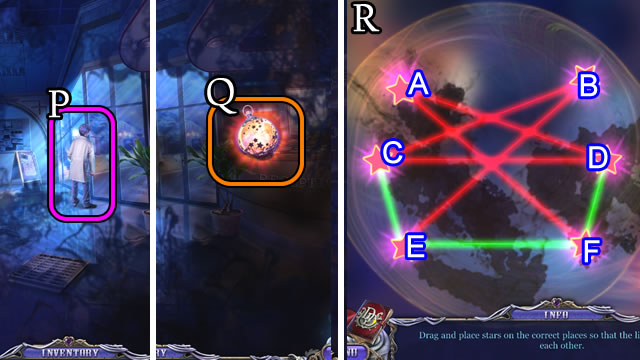
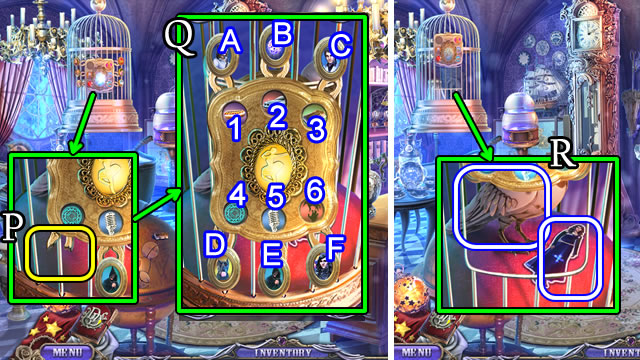
- Speak to the man (P) to receive a LANTERN.
- Combine the CRYSTAL and LANTERN for a Lantern (Inventory).
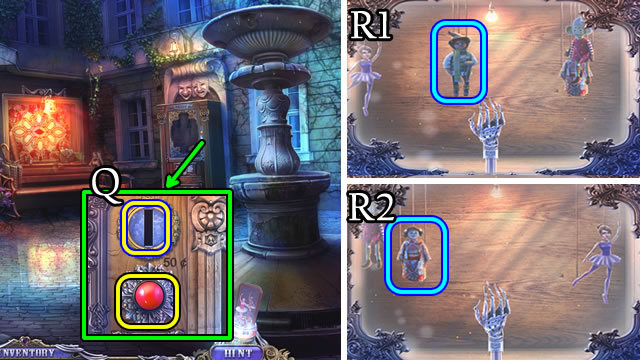
- Select and place the Lantern (Q).
- Solution (R). A-B-A-B-D-B-A-C-A.

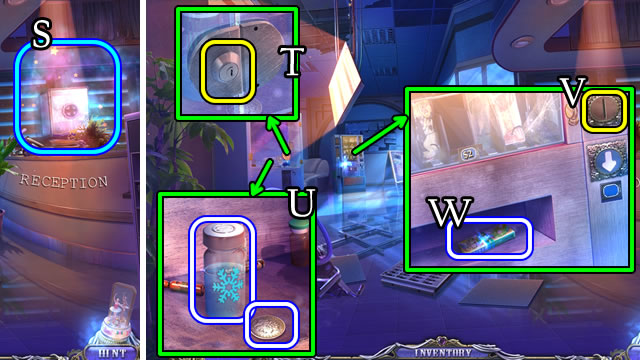
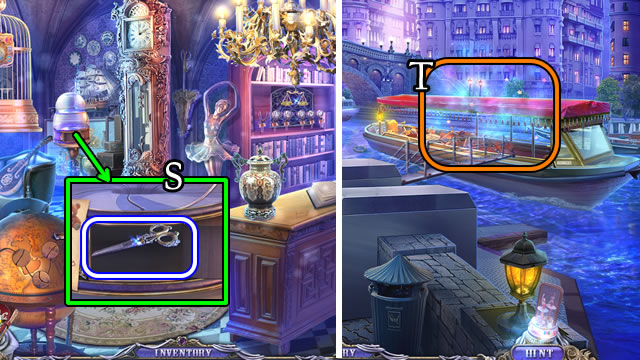
- Play the HOP (S) to receive a KEY CARD.
- Select the PAPER CLIP 2x; receive a BENT CLIP (Inventory).
- Use the BENT CLIP (T). Take COIN 2/2 and LIQUID NITROGEN (U).
- Use COINS 2/2 (V). Take the PACK OF GUM (W).

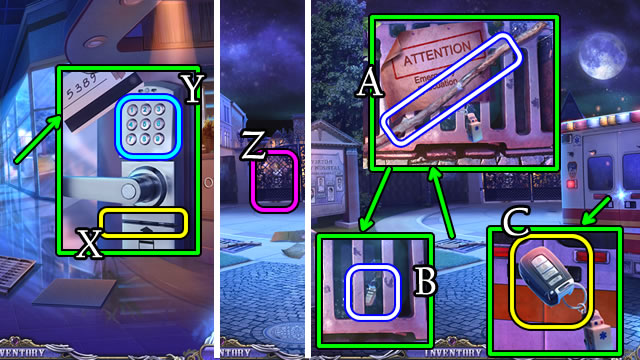
- Use the KEY CARD (X); touch 5-3-8-9 (Y).
- Walk forward.
- Speak to Ashley (Z); receive a LOCKPICK.
- Take the BRANCH (A).
- Open the PACK OF GUM; select a piece 3x for CHEWED GUM (Inventory).
- Combine the BRANCH and CHEWED GUM to receive a STICKY BRANCH (Inventory).
- Use the STICKY BRANCH to receive AMBULANCE KEYS (B).
- Use the AMBULANCE KEYS (C).

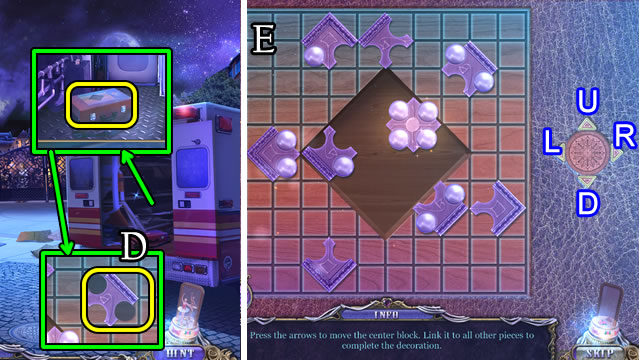
- Place the BEADS (D).
- Solution (E). U-R-U-L-Dx2-Lx2-D-L-Ux2-Dx3-Rx3-D-R-Lx2-U-Lx2-D.

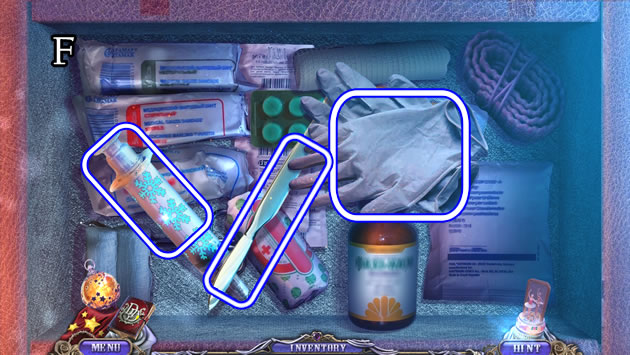
- Take the GLOVES, SCALPEL and EMPTY SYRINGE (F).

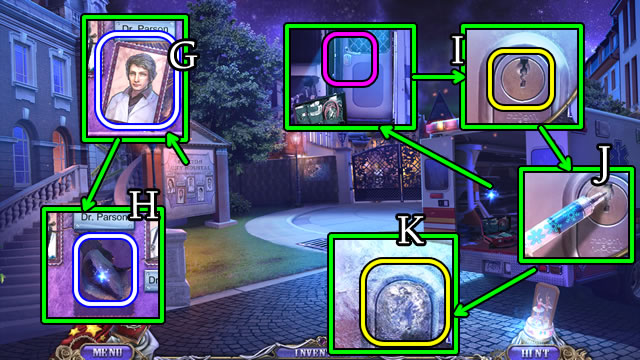
- Use the SCALPEL to receive DR. PARSON’S PHOTO (G). Take the STONE (H).
- Use the LOCKPICK (I).
- Combine the LIQUID NITROGEN and EMPTY SYRINGE for a FREEZING SYRINGE (Inventory).
- Use the FREEZING SYRINGE (J) and STONE (K). Touch the door.
- Touch the dashboard.

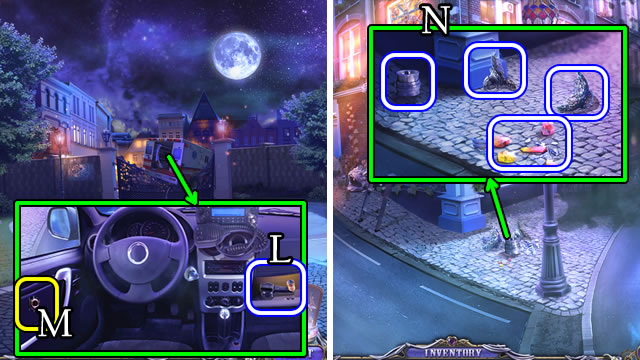
- Take (L), then place the CAR HANDLE (M).
- Walk left.
- Touch the shadows.
- Take BROKEN LANTERN 1/6, BROKEN LANTERN 2/6, BROKEN LANTERN 3/6 and the BROKEN CRYSTAL (N).

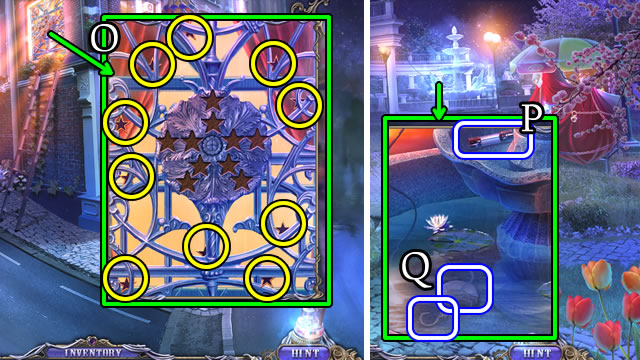
- Select (O). Receive BROKEN LANTERN 4/6.
- Scroll right.
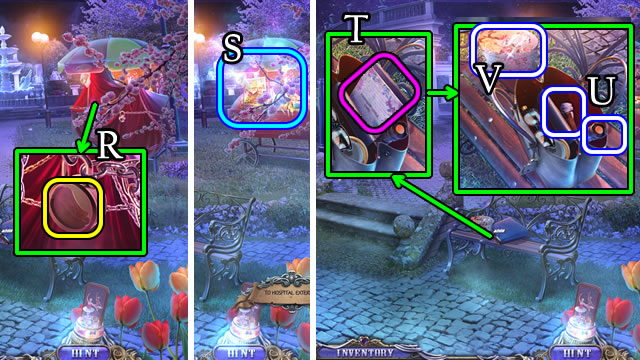
- Take the FUSE (P).
- Use the GLOVES to receive a HOOK and a PADLOCK KEY (Q).

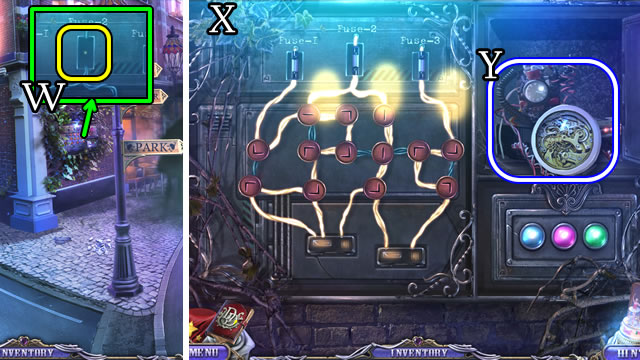
- Place the PADLOCK KEY (R) to play a HOP (S). Receive a HOTDOG.
- Open the purse; take the diary (T), FLASHLIGHT and SLEEPING PILLS (U).
- Take the MUSIC BOX (V).
- Scroll left.

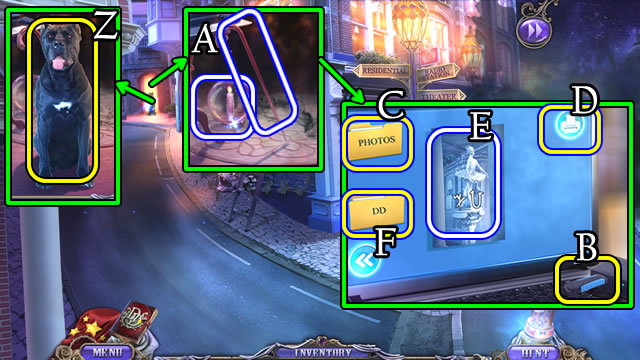
- Place the FUSE (W) and use the FLASHLIGHT.
- Solution (X). Take the INCOMPLETE BOMB (Y).
- Combine the HOTDOG and SLEEPING PILLS for a DRUGGED HOTDOG (Inventory).

- Give the DRUGGED HOTDOG (Z).
- Take the HOOK and BROKEN LANTERN 5/6 (A).
- Place the FLASH DRIVE (B).
- Select (C) and scroll right 3x. Touch (D). Take PHOTO WITH CODE 1/2 (E). Select (F) and scroll right 4x.

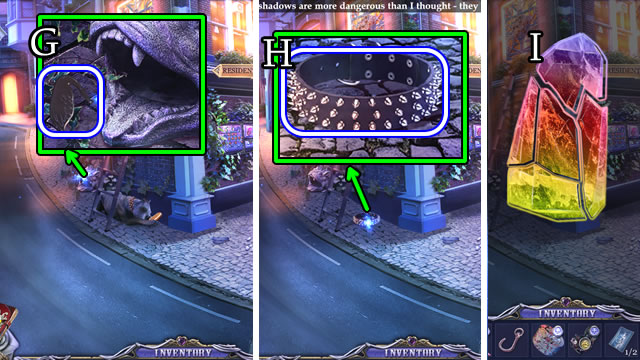
- Use the HOOK to take SWAN 1/2 (G).
- Take the COLLAR (H).
- Assemble the BROKEN CRYSTAL (I) for BROKEN LANTERN 6/6 (Inventory).

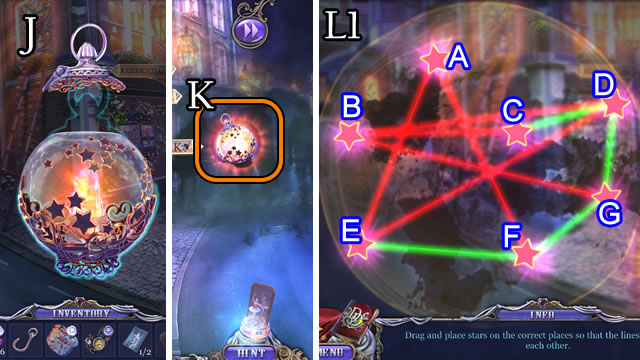

- Combine BROKEN LANTERN 6/6 pieces (J) for a Lantern (Inventory).
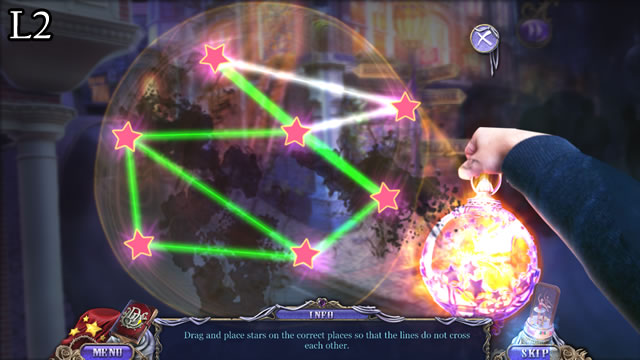
- Place the Lantern (K).
- Solution (L1-L2). A-B-A-B-E-B-C-D-C.
- Walk forward.

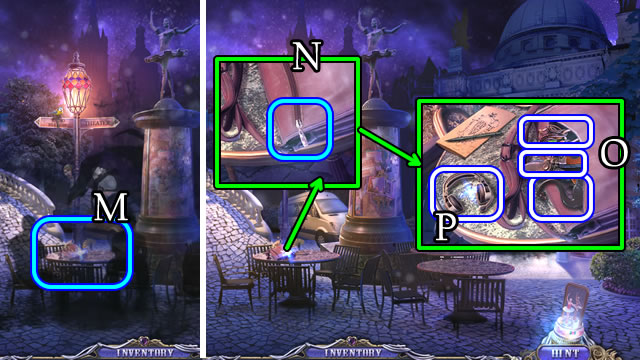
- Select (M).
- Attempt to open (N). Use the HOOK.
- Take the HAIRPIN, SWAN 2/2 and the SHEARS (O). Take the HEADPHONES (P).
- Walk forward.
- Place the Lantern.

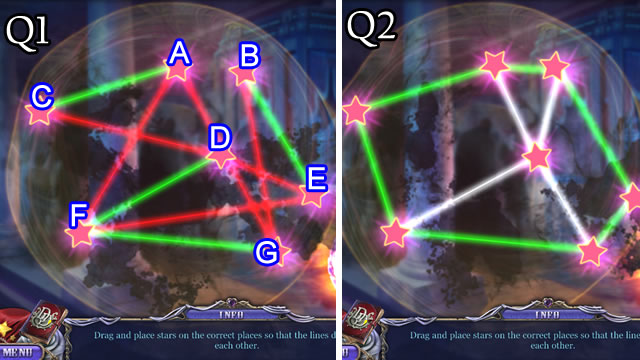
- Solution (Q1-Q2). B-E-B-A-F-A-D-A-D.

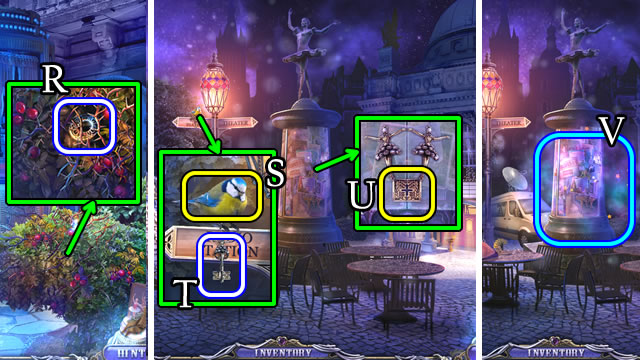
- Use the SHEARS for a BERRY. Take the CIRCLE ORNAMENT (R).
- Walk down.
- Give the BERRY (S); receive a CROSS KEY (T).
- Use the CROSS KEY (U) for a HOP (V). Receive PHOTO WITH CODE 2/2.
- Walk forward.

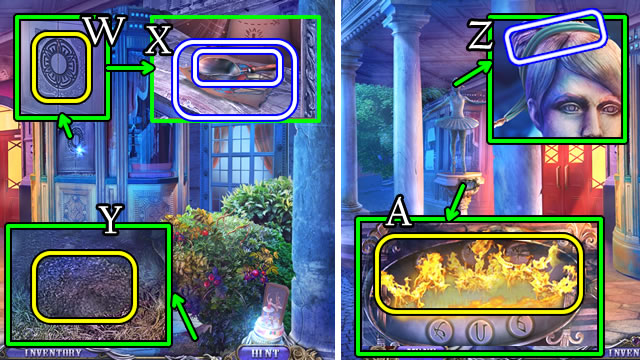
- Place the CIRCLE ORNAMENT (W); take the TROWEL and STREETLAMP INSTRUCTIONS (X).
- Use the TROWEL (Y).
- Use the HAIRPIN to receive WIRES 1/2 (Z).
- Select and use the TROWEL (A).
- Place the PHOTO WITH CODE 2/2.

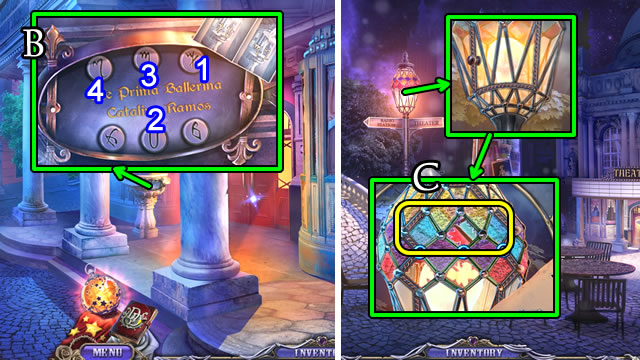
- Solution (B). 1-2-3-4.
- Receive COLORED GLASS 3/3.
- Walk down.
- Place COLORED GLASS 3/3 (C).

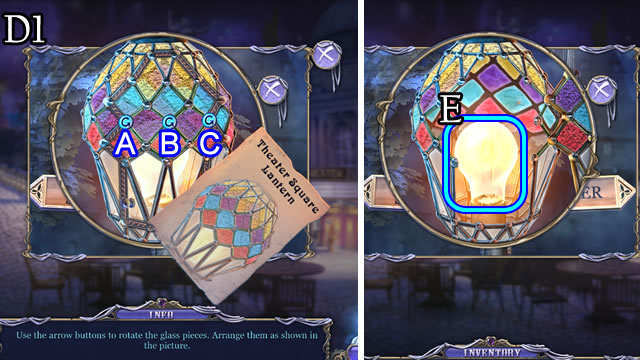
- Solution (D1). A-B-A-Bx2-Ax3-C-Bx2-Cx2-Bx2-Cx3-Bx2-C.
- Touch the lightbulb 2x (E) to receive a SMASHED BULB.
- Walk forward.

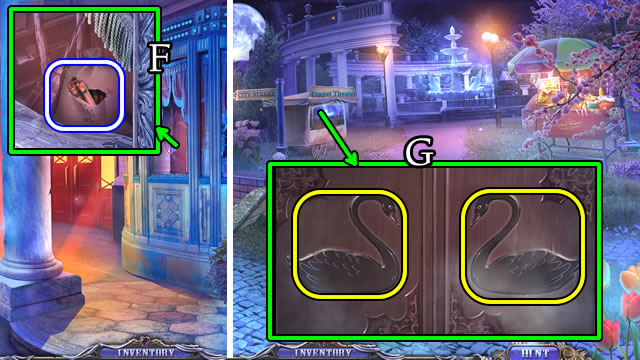
- Use the SMASHED BULB; take the DYNAMITE (F).
- Walk down 2x. Scroll right.
- Place SWANS 2/2 (G).

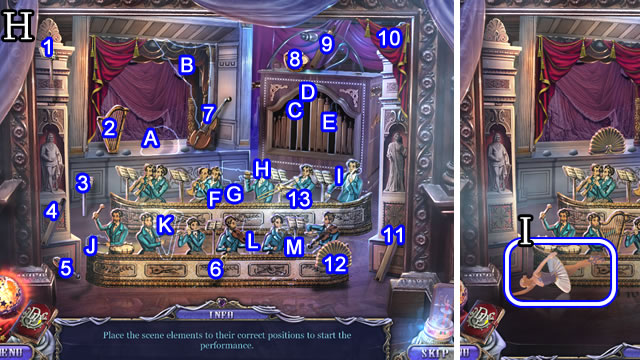
- Solution (H). A-12, B-10, C-4, D-11, E-9, F-6, G-1, H-13, I-7, J-8, K-2, L-3, M-5.
- Take the BALLERINA STATUETTE (I).

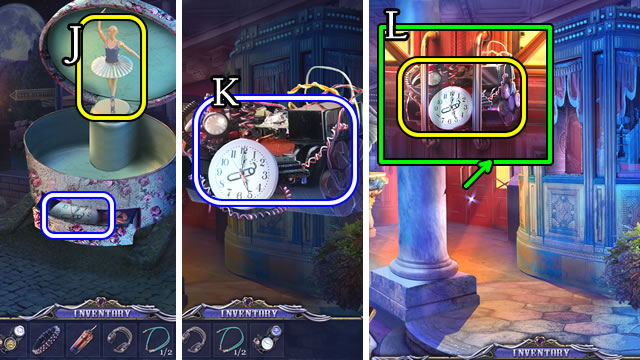
- Open the MUSIC BOX and take the photo. Place the BALLERINA STATUETTE (J). Take the CLOCKFACE (Inventory).
- Walk forward 2x.
- Combine the INCOMPLETE BOMB, DYNAMITE and CLOCKFACE for a BOMB (K) (Inventory).
- Place the BOMB (L).

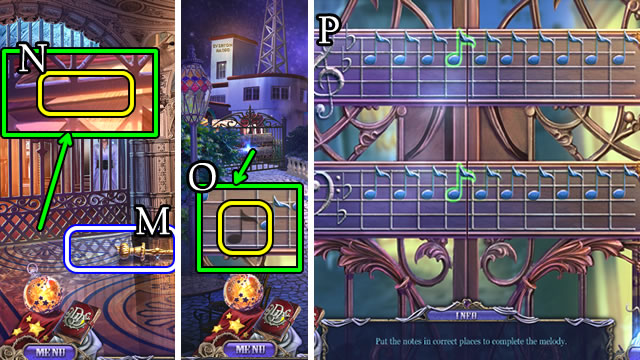
- Take (M), then place the CHANDELIER (N). Receive a NOTE.
- Walk down.
- Place the NOTE (O).
- Solution (P).
- Walk forward.
- Place the Lantern.

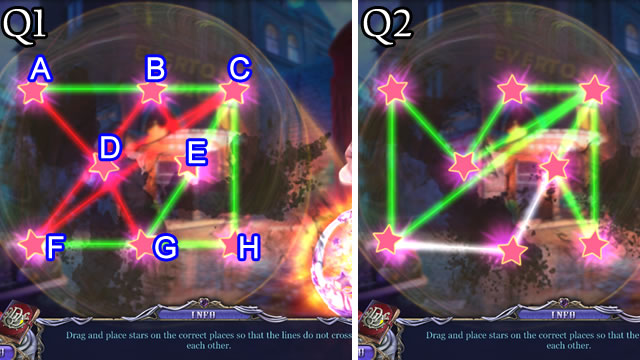
- Solution (Q1-Q2). C-B-E-G-F-C.
Chapter 2: Catalina’s House

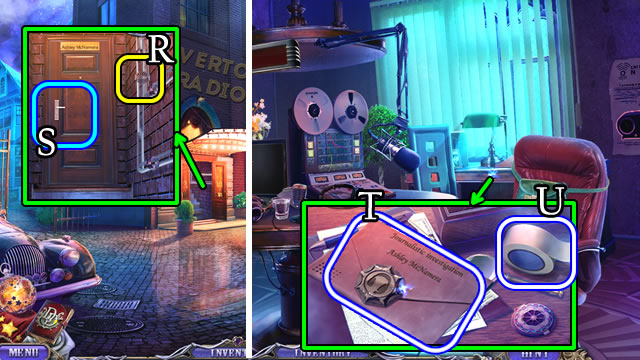
- Use the COLLAR (R); open (S) and enter.
- Touch the desk 2x.
- Take the FOLDER (T).
- Take the ADHESIVE TAPE (U).
- Select the FOLDER; place the HEADPHONES; take the notes and pictures. Take the LETTER OPENER (Inventory).

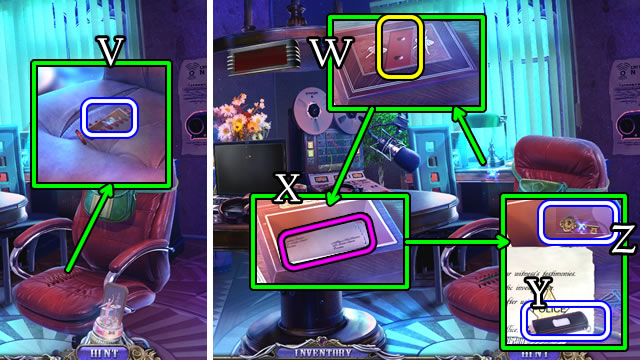
- Use the LETTER OPENER (V); receive a WOODEN TILE.
- Place the WOODEN TILE (W); take the letter (X) and POLICE FLASH DRIVE (Y). Take the LITTLE KEY (Z).
- Walk down.

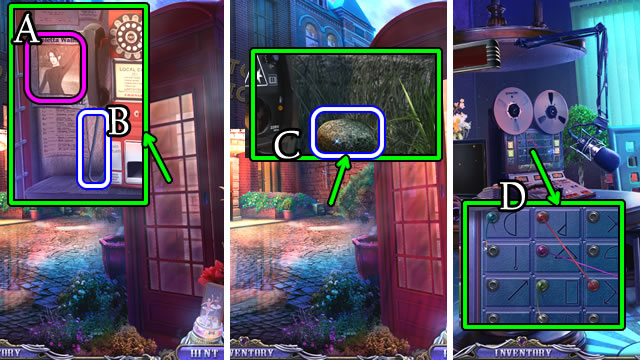
- Take the photo (A); use the LETTER OPENER for WIRES 2/2 (B).
- Take the STONE (C).
- Enter the building.
- Place WIRES 2/2 (D).

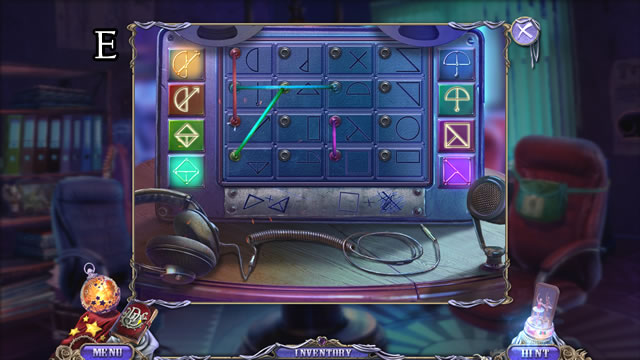

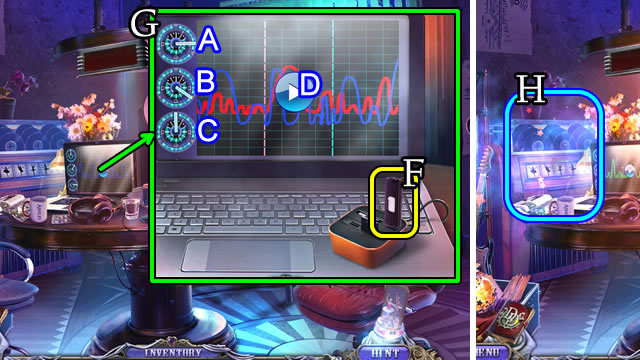
- Place the POLICE FLASH DRIVE (F).
- Solution (G). Ax3-Cx2-Bx2-D.
- Play the HOP (H); receive FLOWERS.
- Walk down, then to the Residential Area.

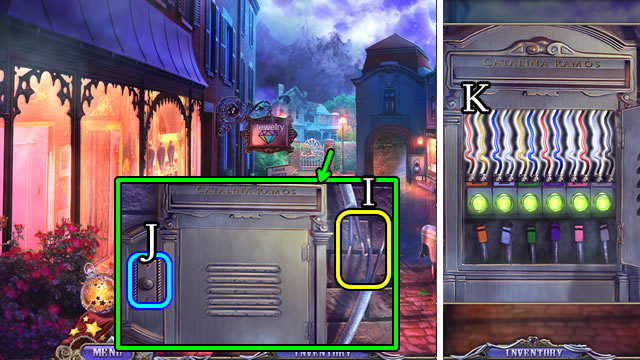
- Use the ADHESIVE TAPE (I); touch the button (J).
- Solution (K).
- Walk to the Catalina’s Yard.

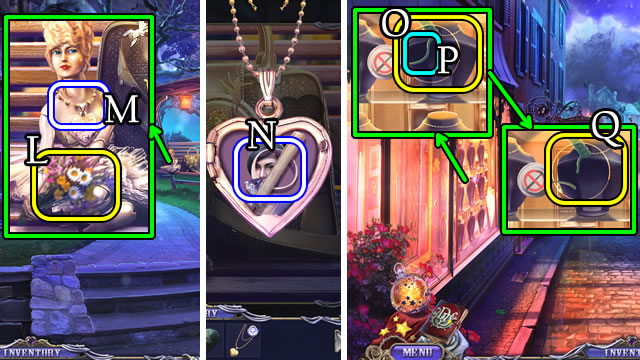
- Place the FLOWERS (L); receive a PENDANT (M).
- Combine the PENDANT and LITTLE KEY. Take the note and RING (N) (Inventory).
- Walk down.
- Use the RING (O); use the LETTER OPENER (P); use the STONE (Q).

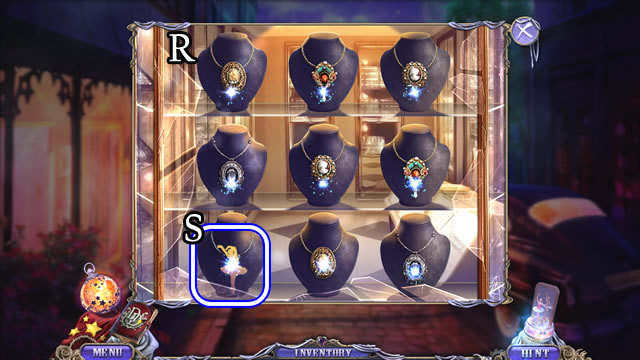
- Solution (R).
- Take the DANCER TOKEN (S).
- Walk to Catalina’s Yard.

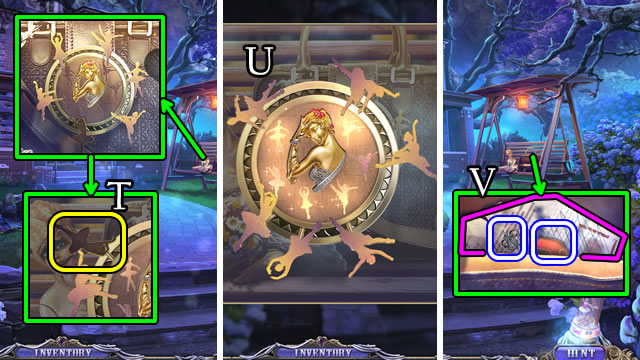
- Place the DANCER TOKEN (T).
- Solution (U).
- Take the KEY, EXTENDED MAGNET and note (V).
- Walk down 2x.

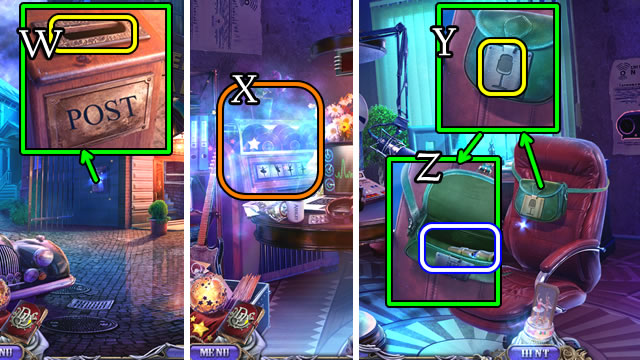
- Use the EXTENDED MAGNET (W) to receive a MICROPHONE.
- Enter the building.
- Play the HOP (X) for a WELDER BUTTON.
- Place the MICROPHONE (Y); take the WHISTLE (Z).
- Walk down.

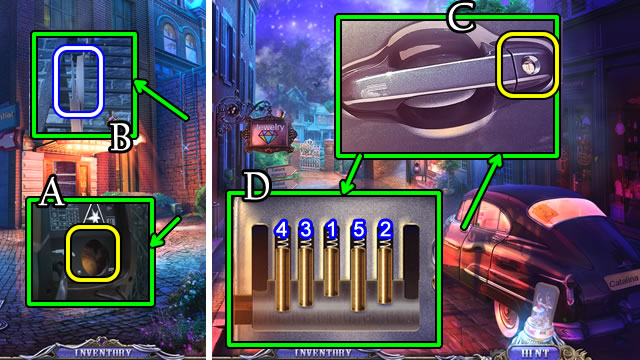
- Place the WELDER BUTTON (A); take the LOCKPICK (B).
- Walk to the Residential Area.
- Use the LOCKPICK (C).
- Solution (D). 1-2-3-4-5.

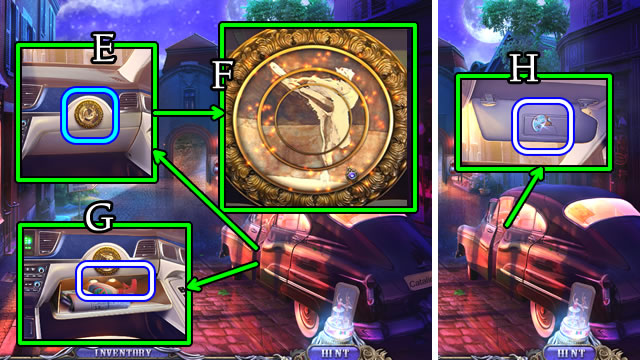
- Select (E).
- Solution (F).
- Take the newspaper and THINNER (G).
- Take LOCK TILE 1/4 (H).
- Walk forward.

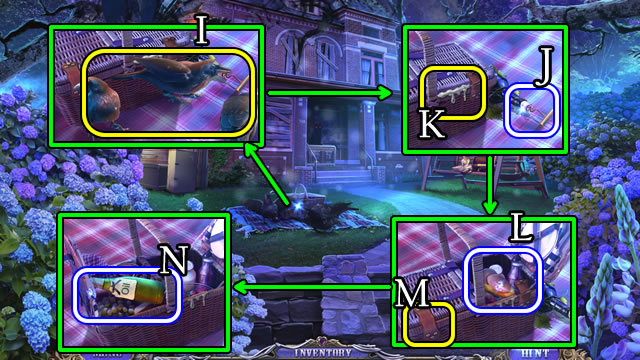
- Use the WHISTLE (I).
- Take the CORKSCREW (J). Use the THINNER (K).
- Take the SANDWICH (L). Use the LETTER OPENER (M).
- Take the OIL (N).

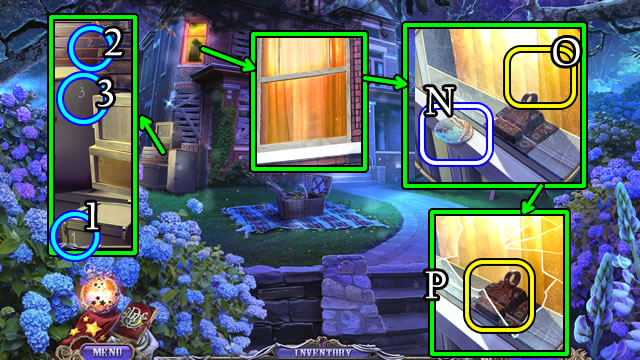
- Select the boxes 1-2-3.
- Take the LOCK TILE 2/4 (N). Use the STONE (O).
- Use the OIL (P).
- Walk forward.

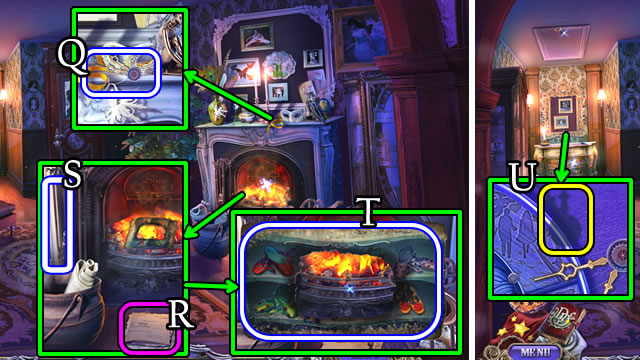
- Take the CLOCK HANDS (Q).
- Take the paper (R) and POKER (S).
- Use the POKER. Take the PARTS OF THE BURNED PICTURE (T).
- Place the CLOCK HANDS (U).

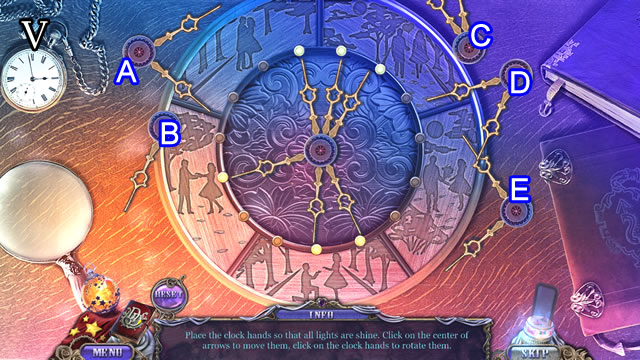

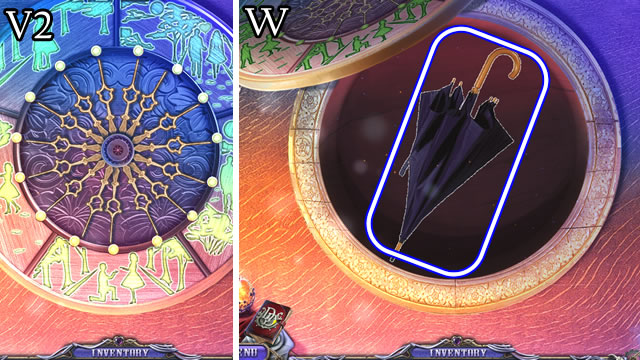
- Solution (V1-V2). Ax3-Bx10-Cx13-Dx9-E.
- Take the UMBRELLA (W).

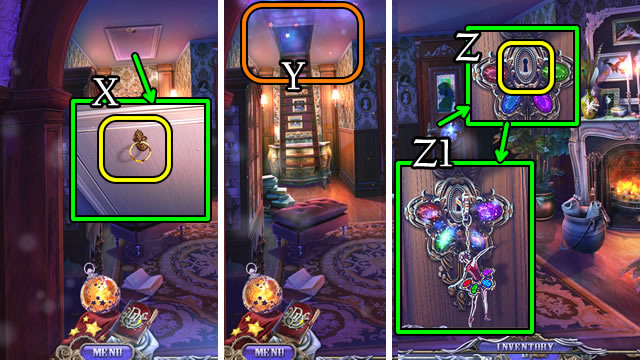
- Use the UMBRELLA (X).
- Place the Lantern to play the HOP (Y) for a DOLL PHOTO.
- Use the KEY (Z).
- Solution (Z1).
- Walk forward.
- Speak to the ghost.

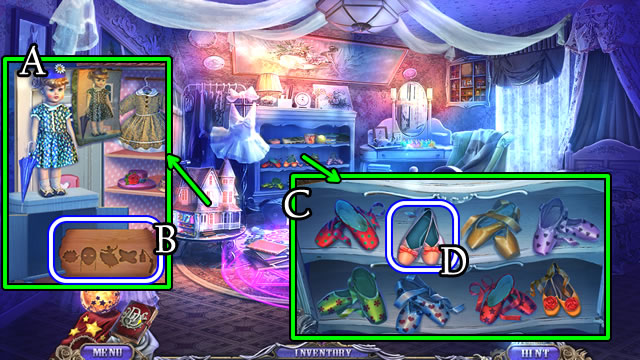
- Solution (A).
- Take the NOTCH (B).
- Solution (C).
- Take the POINTE SHOES (D).

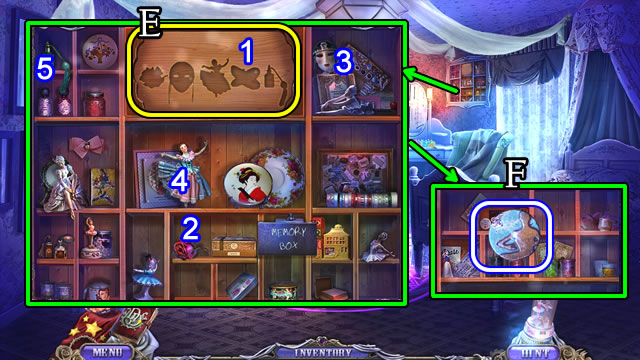
- Place the NOTCH (E).
- Place the POINTE SHOES (1). Select 2-3-4-5.
- Take the LOCK TILE 3/4 (F).

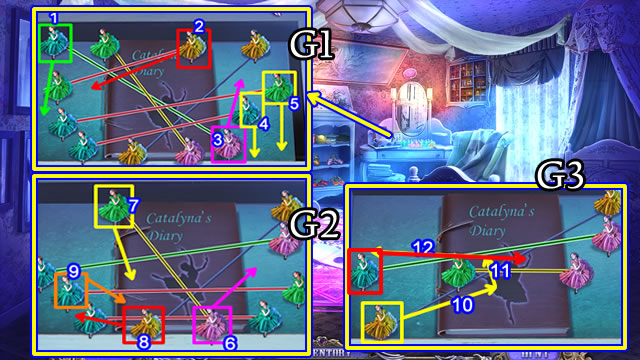
- Solution (G1-G2-G3).
- Take CATALINA’S DIARY.
- Select and open CATALINA’S DIARY (Inventory).

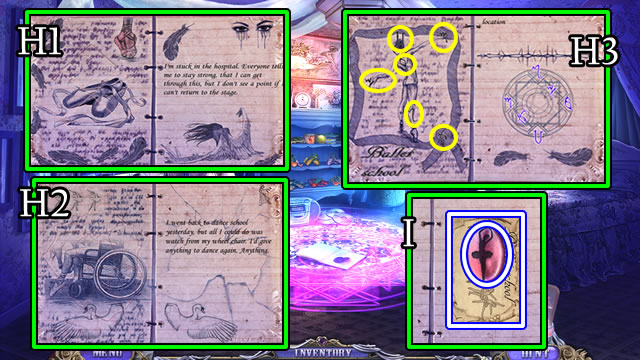
- Solution (H1-H2-H3).
- Take the BALLERINA BUTTON and HINT (I).
- Walk down.

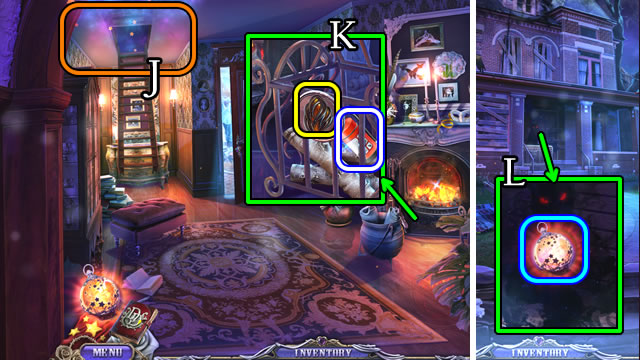
- Use the Lantern to play the HOP (J) for FIRE.
- Place the FIRE; take a FIRE EXTINGUISHER (K).
- Walk down.
- Use the Lantern (L).

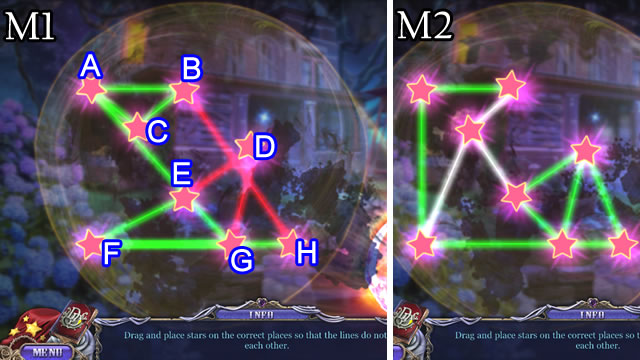
- Solution (M1-M2). A-E-A-B-D-B-C-G-C.

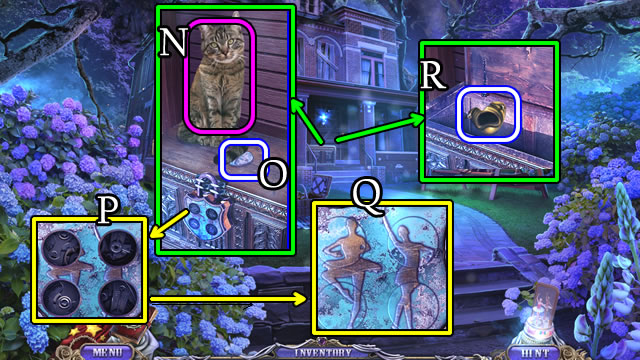
- Give the SANDWICH (N).
- Take LOCK TILE 4/4 (O).
- Place LOCK TILE 4/4 (P).
- Solution (Q).
- Take TRAGEDY MASK HALF (R).
- Walk down.

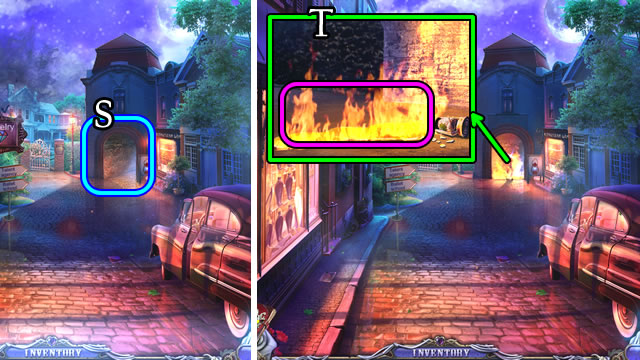
- Attempt to enter the archway (S).
- Use the FIRE EXTINGUISHER (T).
- Walk through the archway.
- Use the Lantern.
Chapter 3: The Ballet School

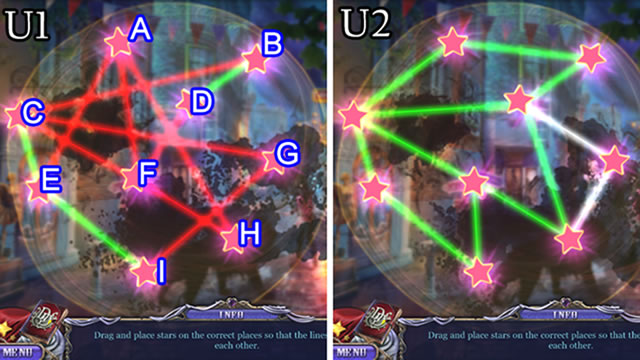
- Solution (U1-U2). F-G-F-E-F-E-A-B-A-B-D-B-D-G-D-G-H-G.

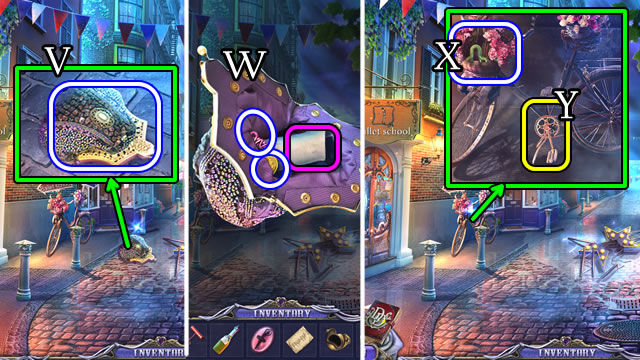
- Take the PURSE (V).
- Open the PURSE for REGISTER BUTTONS 2/3, POINTE SHOES 1/5. Select the photo 3x (W) (Inventory).
- Select the flowers; take the CATERPILLAR (X).
- Use the OIL (Y); receive a BICYCLE CHAIN.

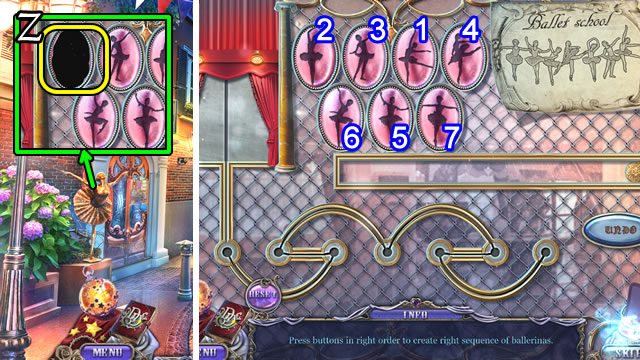
- Place the BALLERINA BUTTON (Z).
- Solution. 1-2-3-4-5-6-7.
- Walk left, then forward.
- Select the scene.

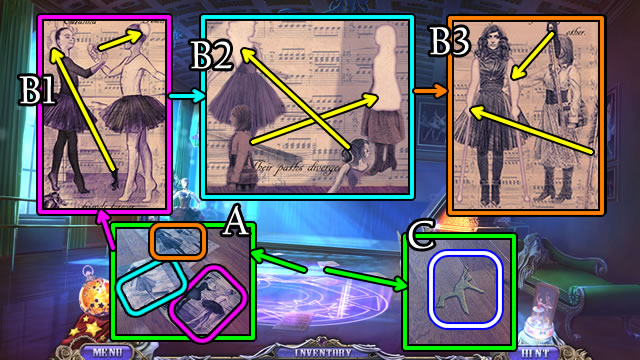
- Select (A).
- Solution (B1-B2-B3).
- Take the DANCING MAN (C).

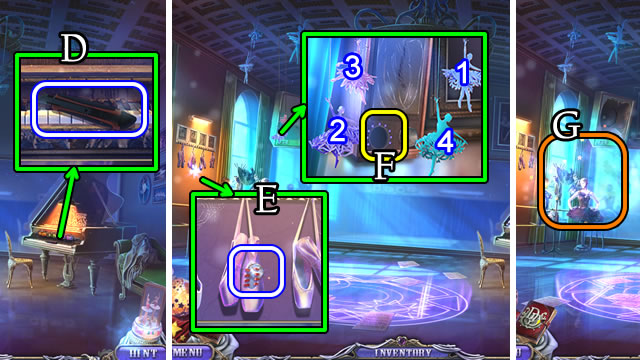
- Take the KNIFE (D).
- Use the KNIFE; take the KNOB (E).
- Place the KNOB (F). Select 1-2-3-4.
- Play the HOP (G) to receive a DANCING WOMAN.
- Walk down.

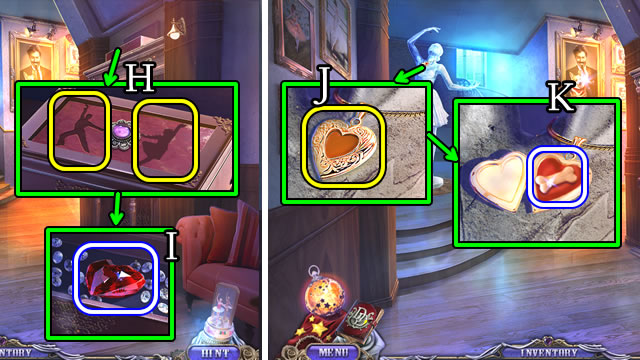
- Place the DANCING MAN and DANCING WOMAN (H); take the HEART (I).
- Place the HEART (J); take the BONE TILE (K).

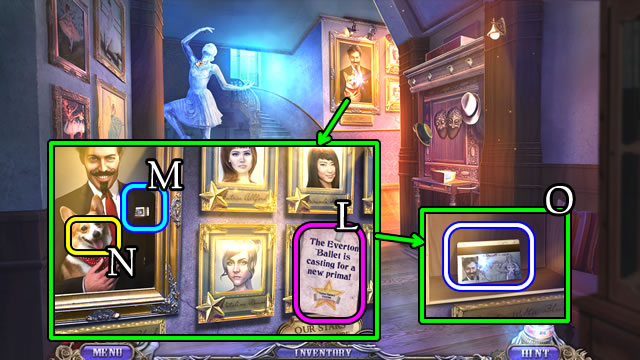
- Take the paper (L).
- Select the card (M); place the BONE TILE (N).
- Take the KEY (O).

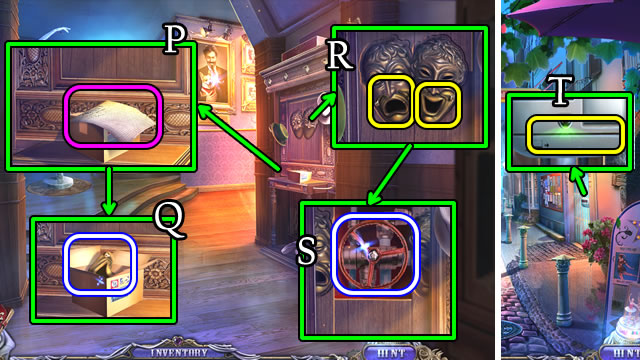
- Take the note (P); use the KNIFE; take the COMEDY MASK HALF (Q).
- Place the TRAGEDY MASK HALF and COMEDY MASK HALF (R).
- Take the VALVE HANDLE (S).
- Walk down.
- Use the KEY (T).
- Walk right.

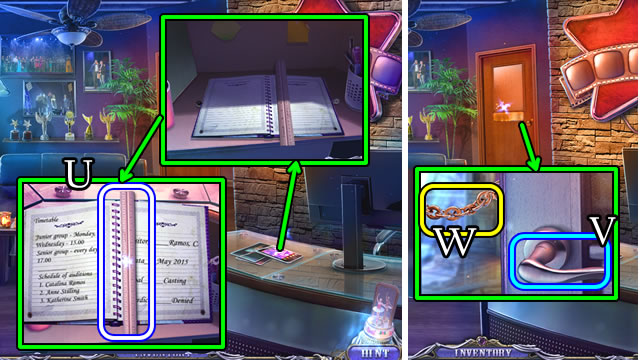
- Take the RULER (U); read the diary
- Select (V); use the RULER (W).
- Walk forward.

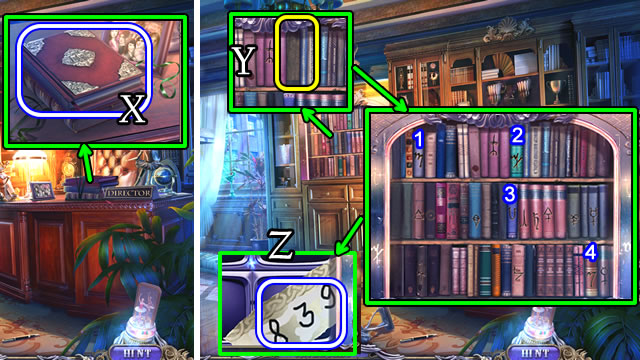
- Select, uncover and take the BOOK (X).
- Place the BOOK (Y).
- Select 1-2-3-4.
- Take the DESK CODE (Z).

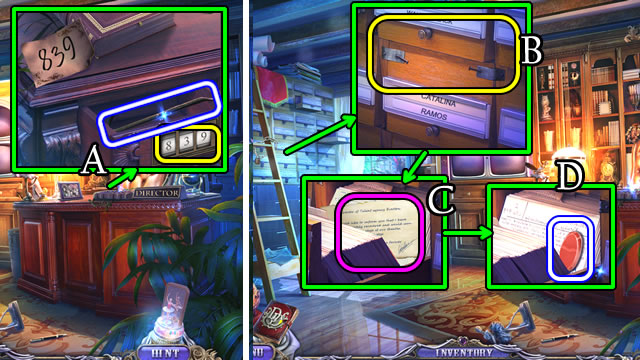
- Enter 8-3-9. Take the CROWBAR (A).
- Use the CROWBAR (B); take the notes (C). Uncover and take and BUTTON (D).
- Walk down.

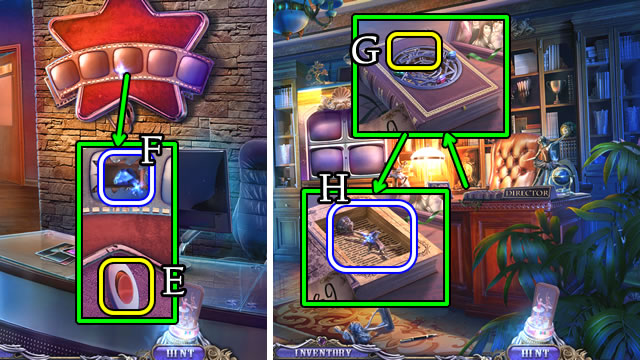
- Place and touch the BUTTON (E). Take the CRYSTAL (F).
- Walk forward.
- Place the CRYSTAL (G); take the CHESS FIGURE (H).
- Walk down.

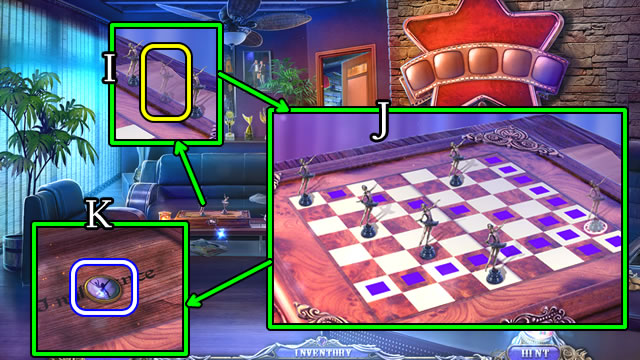
- Place the CHESS FIGURE (I).
- Solution (J).
- Take the BUTTON (K).
- Walk down, left and forward.

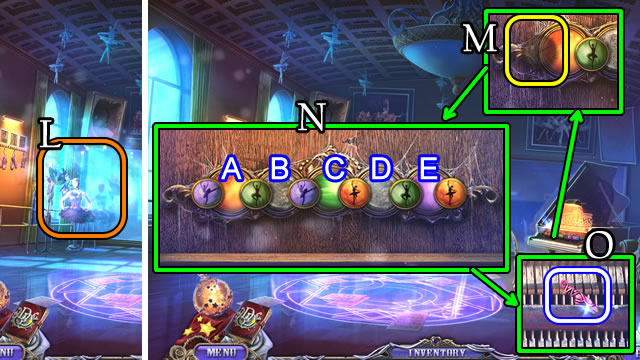
- Play the HOP (L) to receive a KEY.
- Place the BUTTON (M).
- Solution (N). C-D-E-A-B-C-D-C-A-B.
- Take POINTE SHOE 2/5 (O).
- Return to the Director’s Office.

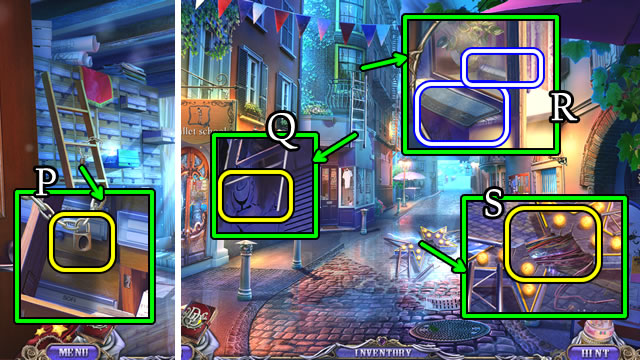
- Use the KEY (P); take the LADDER.
- Walk down 2x.
- Place the LADDER (Q).
- Take the RUBBER MAT and BOTTLE (R).
- Place the RUBBER MAT (S); walk forward.
Chapter 4: Following Dr. Parson

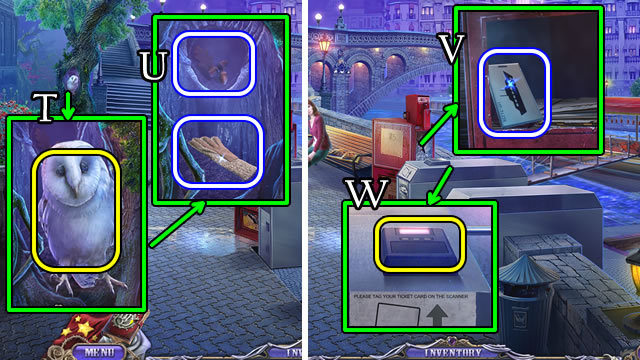
- Give the CATERPILLAR (T). Take the GLOVE and ACORNS (U).
- Use the GLOVE to take the TICKET (V).
- Use the TICKET (W).

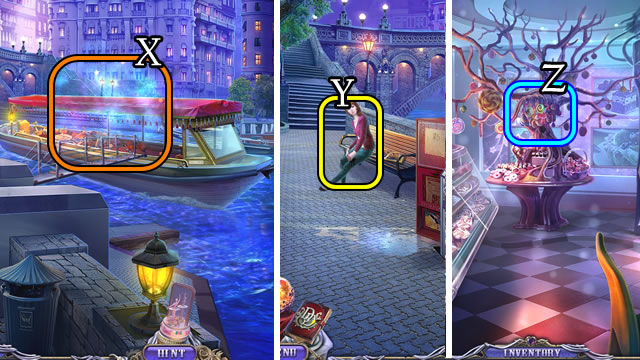
- Play the HOP (X); receive a BANDAGE.
- Place the BANDAGE (Y).
- Walk right, then left.
- Select (Z).

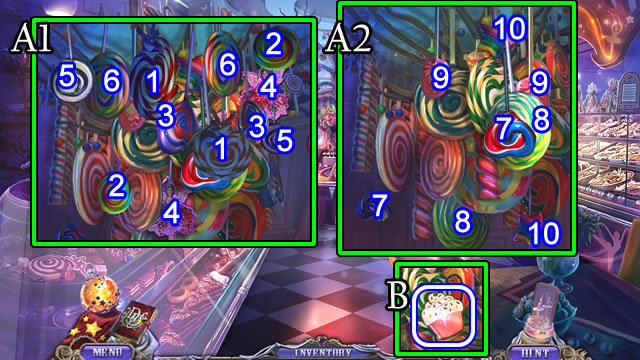
- Solution (A1-A2).
- Take the CAKE (B).

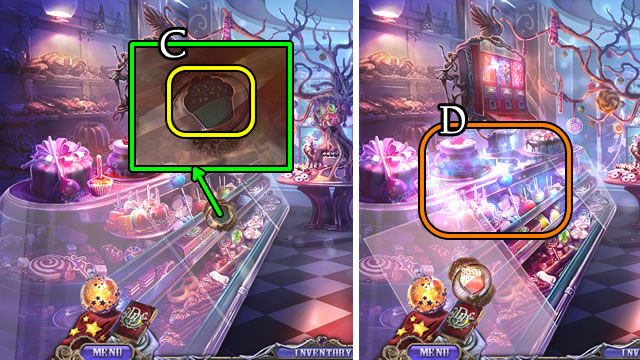
- Place the CAKE (C) for a HOP (D); receive a CARAMEL.
- Walk down.

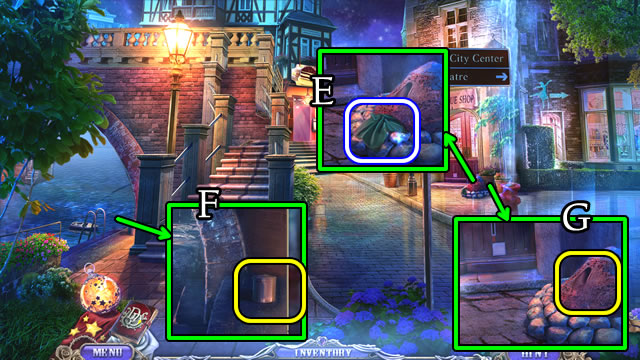
- Take the HANDKERCHIEF (E).
- Place the HANDKERCHIEF (F) get a WET CLOTH.
- Place the CARAMEL (G).
- Walk right.

- Take the DENTAL TOOL (H).
- Use the DENTAL TOOL (I).
- Open, take the PAPER WITH SYMBOLS (J).
- Select the book.

- Use the WET CLOTH (K).
- Place the ACORNS (L); take the WEIGHT (M).
- Place the WEIGHT (N); take the LEVER (O).

- Place the LEVER (P).
- Solution (Q) A-5, B-6, C-3, D-1, E-4, F-2.
- Take the METAL BIRD and PAPER DOLL (R).

- Place the METAL BIRD; take the SCISSORS (S).
- Walk down 2x.
- Play the HOP (T); receive a CONTROLLER.

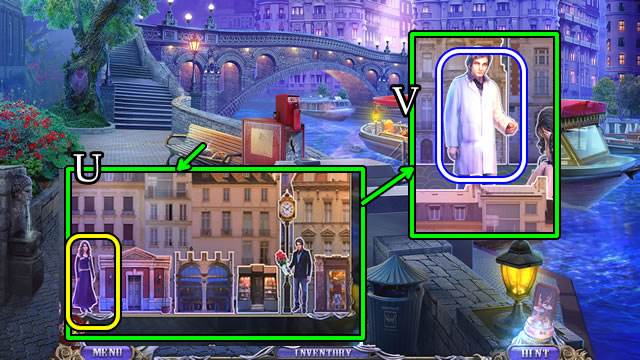
- Place the PAPER DOLL and buildings (U).
- Take the FIGURE OF DOCTOR (V).
- Walk right 2x.

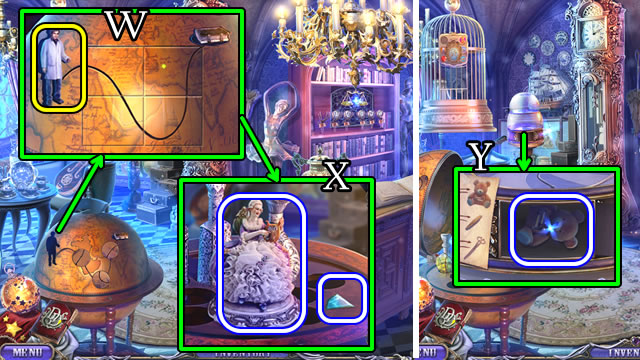
- Place the FIGURE OF DOCTOR and rotate the tiles (W).
- Take the STATUE and ARROWS 1/2 (X).
- Place the STATUE; take the TOY WITH BATTERY (Y).
- Walk down, then left.

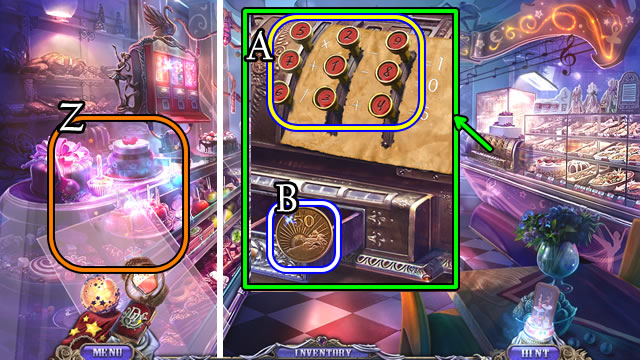
- Play the HOP (Z); receive a CUP OF COFFEE.
- Combine the BOTTLE and CORKSCREW to receive REGISTER BUTTONS 3/3.
- Place the REGISTER BUTTONS 3/3.
- Solution (A).
- Take COIN 2/2 (B).

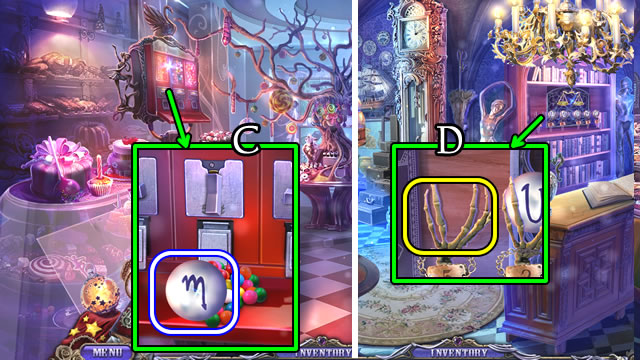
- Use COIN 1/2; take the BALL (C).
- Walk down and right.
- Place the BALL (D).

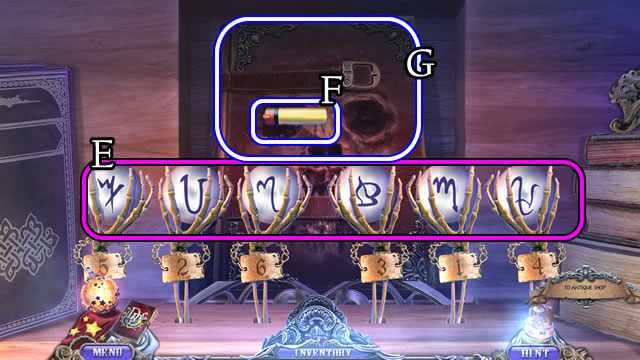
- Solution (E).
- Pull the lever to take BATTERY 1/2 (F) and DARK DIMENSION BOOK (G).
- Walk down.

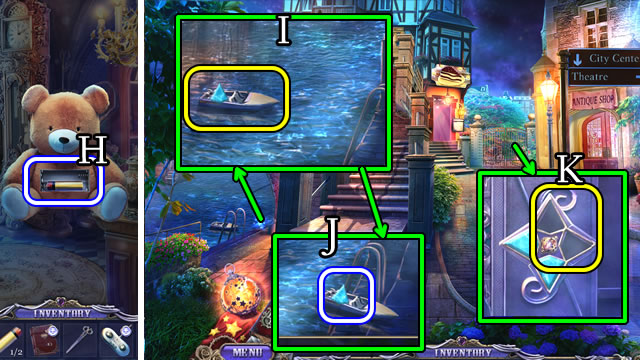
- Select the TOY WITH BATTERY; take BATTERY 2/2 (H) (Inventory).
- Select the CONTROLLER 2x; add BATTERY 2/2 for a CONTROLLER (Inventory).
- Use the CONTROLLER (I); take ARROWS 2/2 (J).
- Place the ARROWS 2/2 (K).

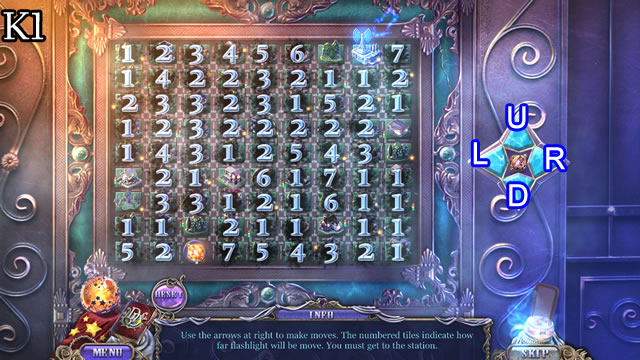
- Solution (K1). L-U-R-U-L-Ux2-Rx3-U.
- Walk forward.

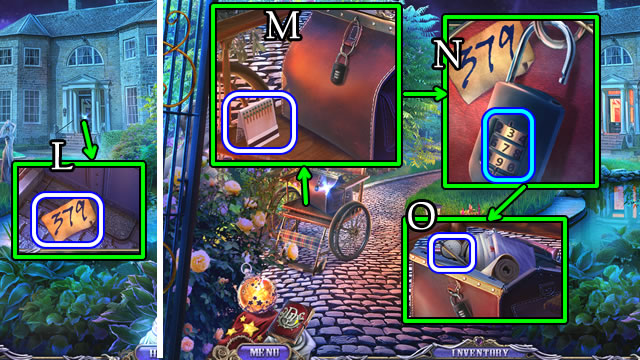
- Take SHEET WITH PASSWORD (L).
- Take the MATCHES (M).
- Enter 3-7-9 (N).
- Take the PENCIL (O).

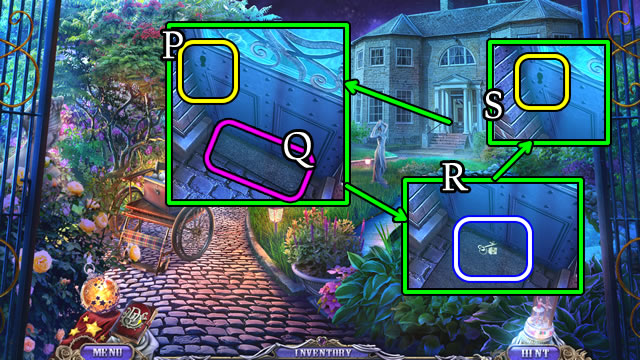
- Use the PENCIL (P); select (Q); take PARSON’S HOUSE KEY (R).
- Use PARSON’S HOUSE KEY (S).
- Walk forward.

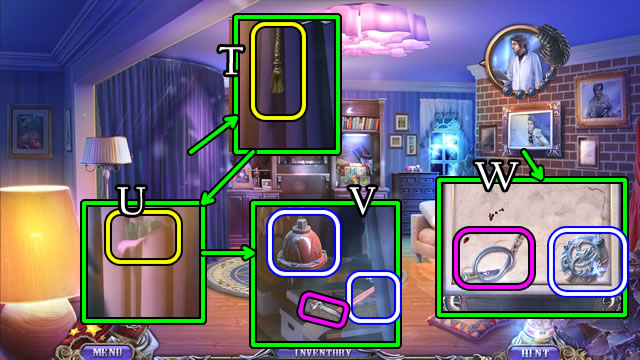
- Pull the cord (T); use the SCISSORS (U).
- Take the TOP OF HYDRANT, CLAW HAMMER and Wrench (V).
- Select the picture 3x. Take the SNAKE TOKEN and Brake Hose (W).

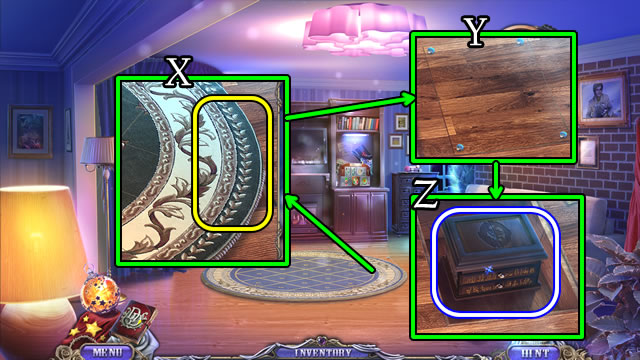
- Lift the rug (X); use the CLAW HAMMER (Y).
- Take the BOX (Z).

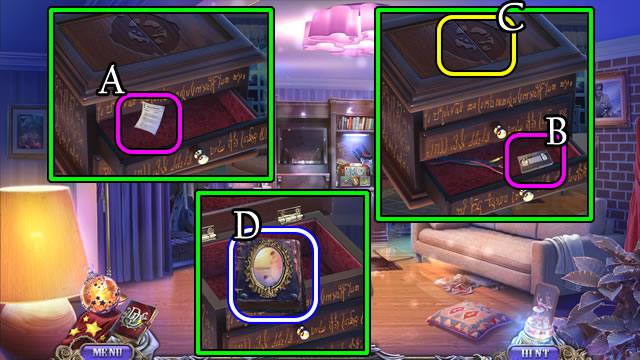
- Select the BOX; open (A), take a Police Report. Open (B) take the Cassette. Place the SNAKE TOKEN (C), take DR. PARSON’S DIARY (D) (Inventory).

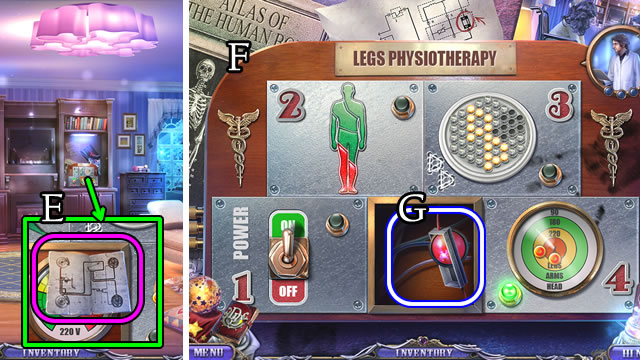
- Take the Blueprint (E).
- Solution (F).
- Take the BUTTON (G).

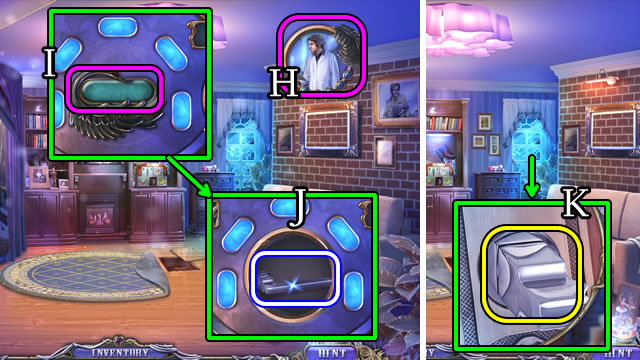
- Select (H), touch (I). Take the WINDOW HANDLE (J).
- Replace the WINDOW HANDLE (K).
- Open DR. PARSON’S DIARY (Inventory).

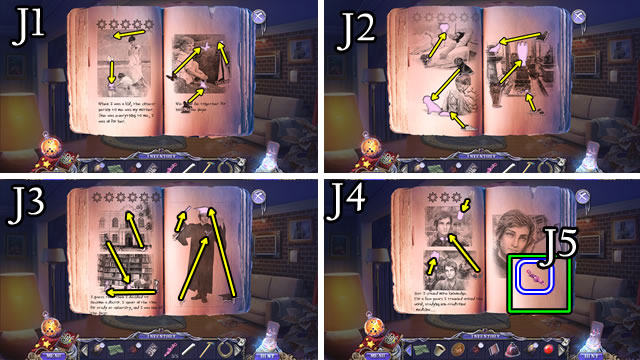
- Solution (J1-J2-J3-J4).
- Take POINTE SHOE 3/5 (J5).
- Walk forward, then down.

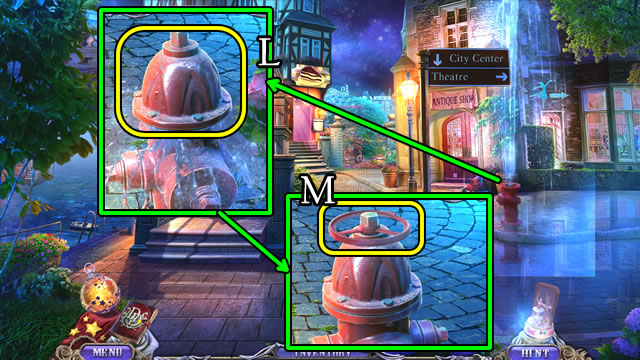
- Place the TOP OF HYDRANT (L); place the VALVE HANDLE (M).
- Walk right.
Chapter 5: The Theater Revisited

- Open (N), use the MATCHES (O).
- Play the HOP (P) for a BALLERINA.


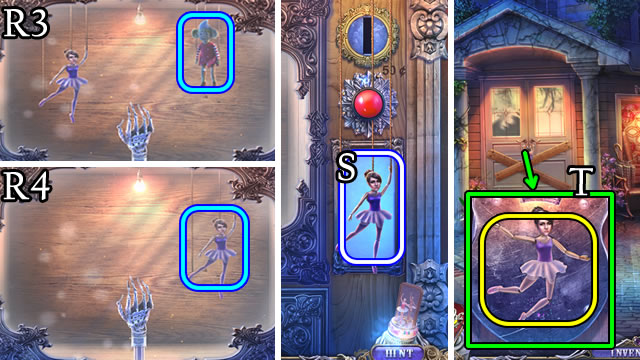
- Place the BUTTON; use the COIN (Q).
- Solution (R1-R2-R3-R4).
- Take FIGURE OF BALLERINA (S).
- Place the FIGURE OF BALLERINA and adjust (T).
- Walk forward.
- Use the Lantern.

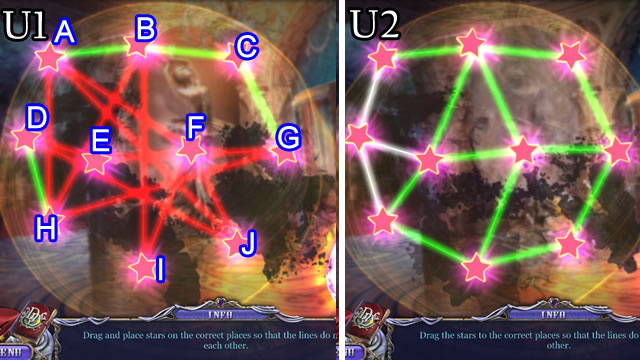
- Solution (U1-U2). F-H-F-D-J-D-E-J-E-I-E-I-A-E-A-D-H-D.
- Walk forward.

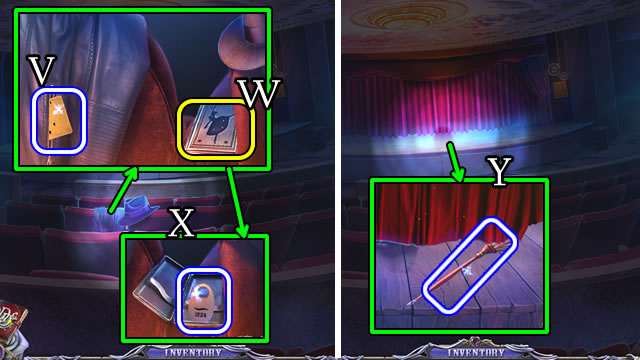
- Unzip; take the PUNCH CARD (V). Place the BALLERINA (W).
- Take the NUMBER (X).
- Take the BRUSH (Y).
- Walk down.

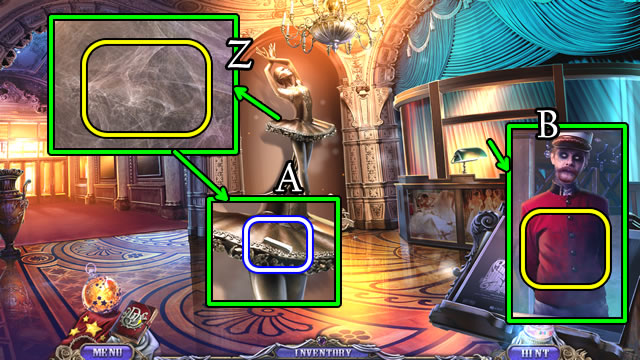
- Use the BRUSH (Z); take the CHALK (A).
- Give the NUMBER (B); receive a WALKING STICK.
- Walk forward.

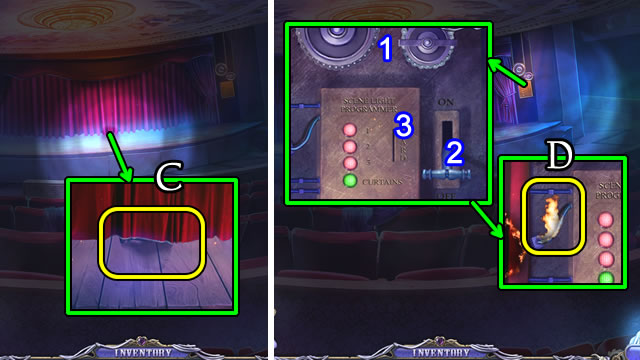
- Use the WALKING STICK (C) to receive a LEVER.
- Place the BICYCLE CHAIN (1), LEVER (2) and PUNCH CARD (3). Select the lever.
- Use the CUP OF COFFEE (D); select the lever.
- Walk forward.

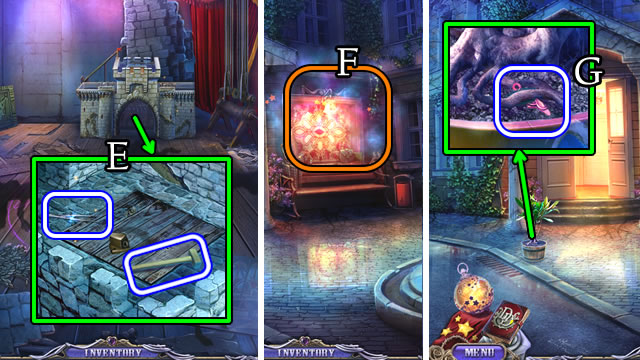
- Take the FORCEPS and SLEDGEHAMMER (E).
- Walk down 3x.
- Play the HOP (F) to receive a RING.
- Use the FORCEPS to receive POINTE SHOE 4/5 (G).
- Walk forward 3X.

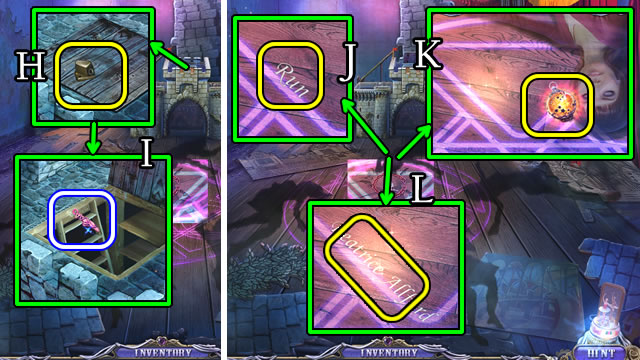
- Place the RING (H) and select to take POINTE SHOES 5/5 (I).
- Use the WET CLOTH (J), place the Lantern (K) and use the CHALK (L). Repeat the three steps for each shadow.

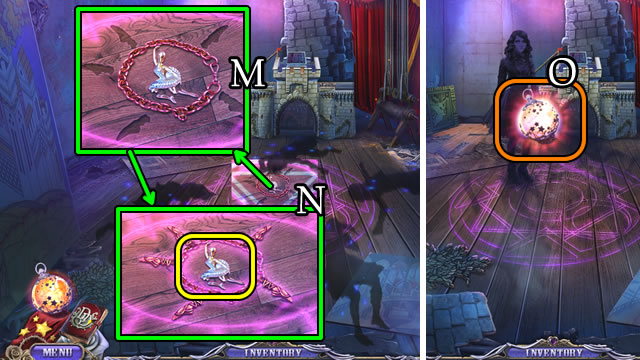
- Place the POINTE SHOES 5/5 (M).
- Use the SLEDGEHAMMER (N).
- Place the Lantern (O).
- Congratulations! You have completed playing Dark Dimensions: Shadow Pirouette.





 Azada: In Libro Walkthrough, Guide, & Tips
 Kate Arrow: Deserted Wood Walkthrough, Guide, & Tips
 Break the Curse: The Crimson Gems Walkthrough, Guide, & Tips
 Lamp of Aladdin Tips & Tricks, Guide, & Tips
 Echoes of the Past: Wolf Healer Walkthrough, Guide, & Tips