Amaranthine Voyage: The Orb of Purity Walkthrough, Guide, & Tips
Amaranthine Voyage: The Orb of Purity Walkthrough

Welcome to the Amaranthine Voyage: The Orb of Purity Walkthrough
A visitor arrives through Prof. Bennett’s portal, seeking help.
Whether you use this document as a reference when things get difficult or as a road map to get you from beginning to end, we’re pretty sure you’ll find what you’re looking for here.
This document contains a complete Amaranthine Voyage: The Orb of Purity game walkthrough featuring annotated screenshots from actual gameplay!
We hope you find this information useful as you play your way through the game. Use the walkthrough menu below to quickly jump to whatever stage of the game you need help with.
Remember to visit the Big Fish Games Forums if you find you need more help. Have fun!
This walkthrough was created by Margie B, and is protected under US Copyright laws. Any unauthorized use, including re-publication in whole or in part, without permission, is strictly prohibited.
General Tips
- This is the official guide for Amaranthine Voyage: The Orb of Purity.
- This guide will not tell you when you have to zoom into a location; the screenshots will show each zoom scene.
- Hidden-object puzzles are referred to as HOPs. This guide will not show screenshots of the HOPs, however, it will mention when an HOP is available and the inventory item you’ll collect from it.
- Use the Map to fast travel to a location.
Chapter 1: Laboratory

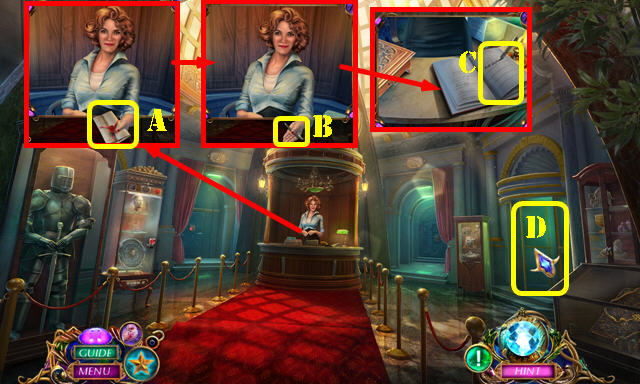
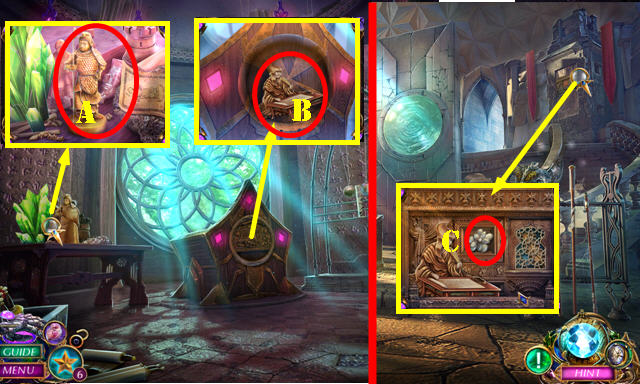
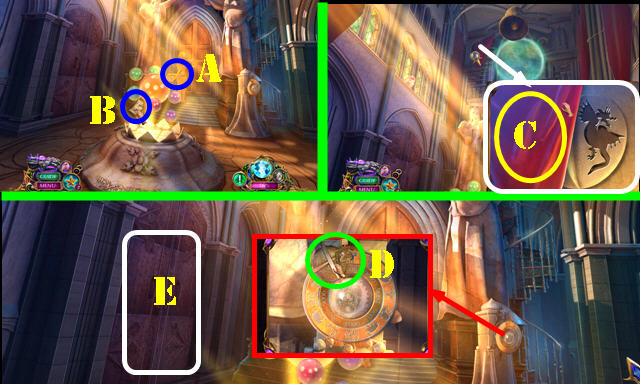
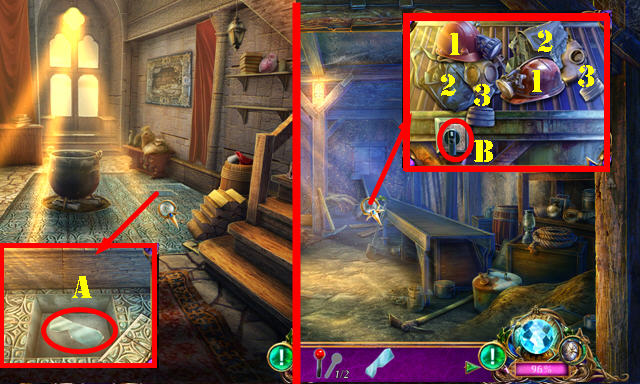
- Take the letter (A) and the PEN (B).
- Use the PEN (C).
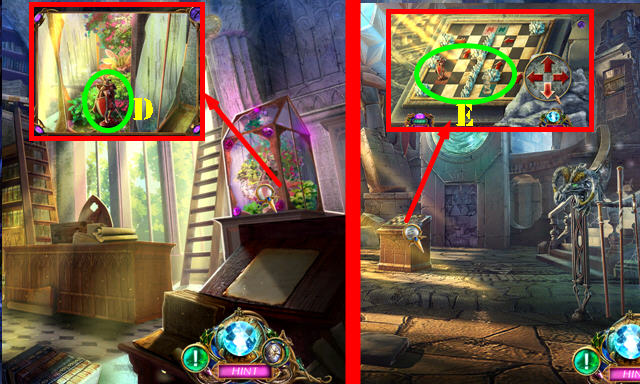
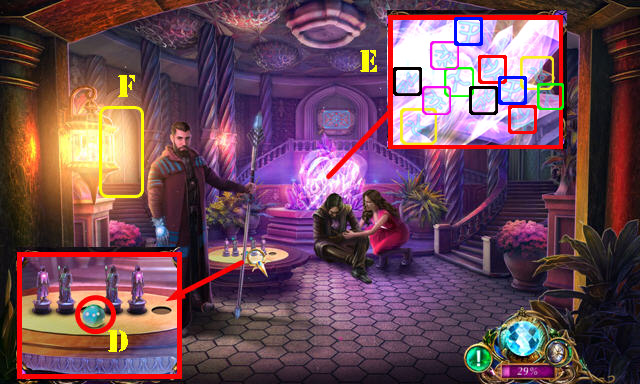
- Go to the Lounge (D).
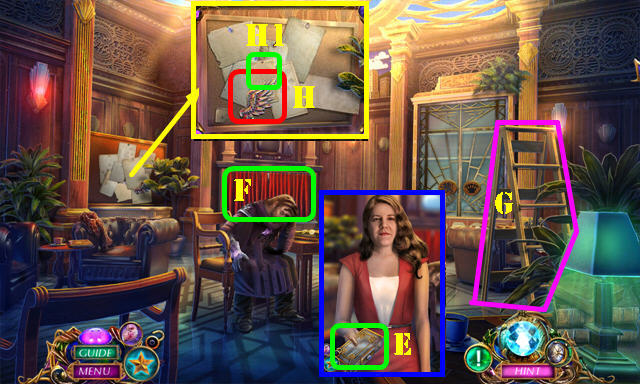
- Take the GLASS BOX (E).
- Push the button on the GLASS BOX; take the TEST TUBE EMBLEM and BLOOD SAMPLE (inventory).
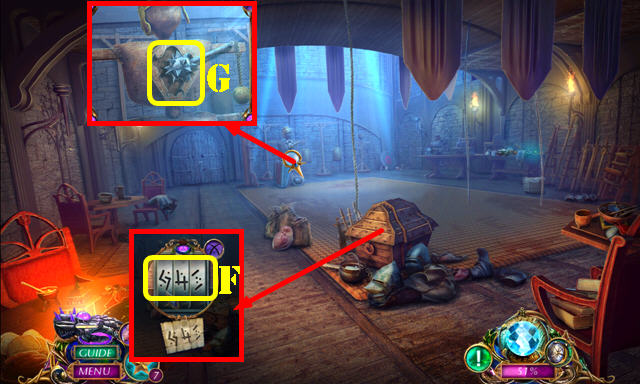
- Open the curtains for the HOP (F); play it to get the CCPP LOGO.
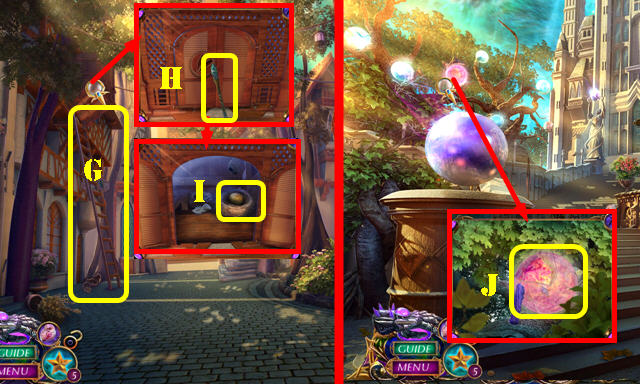
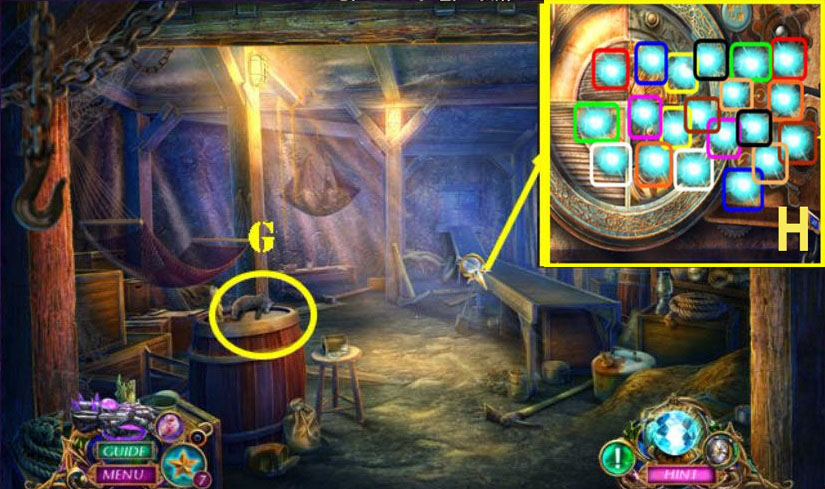
- Move the LADDER (G).
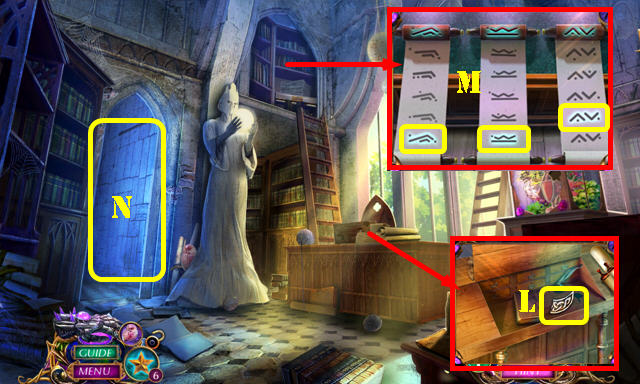
- Take the LEFT WING (H). Read the note (H1) and select the papers 3x.
- Walk down.
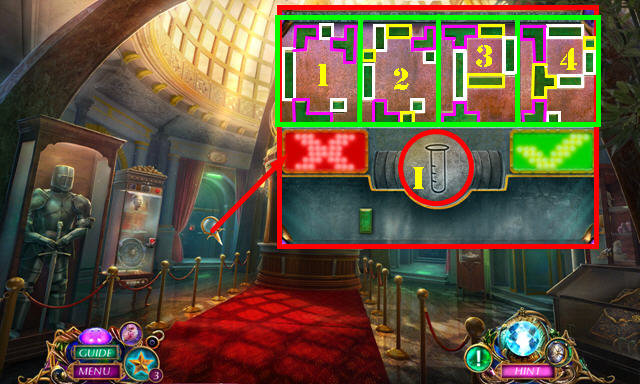
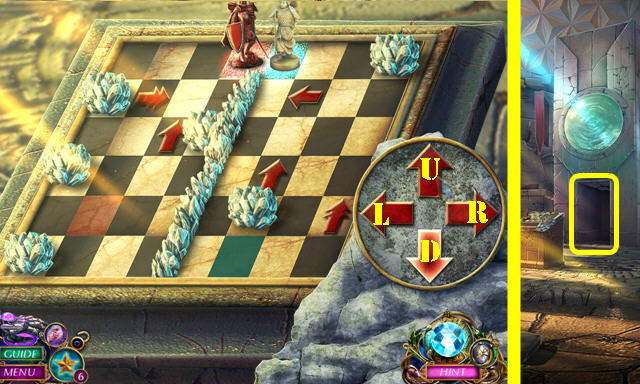
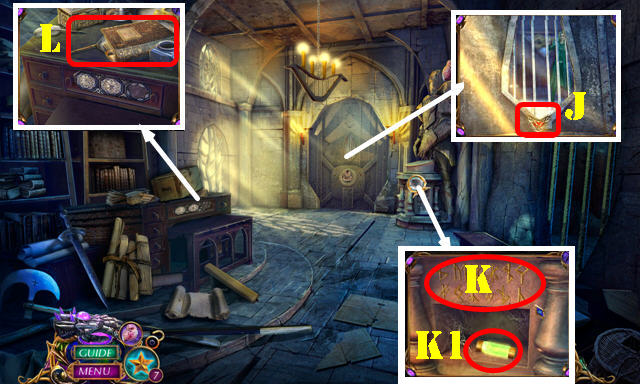
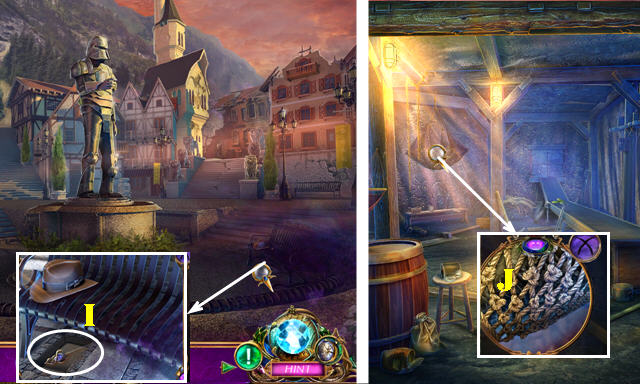
- Place the TEST TUBE EMBLEM for a puzzle (I).
- Solution (1-4).
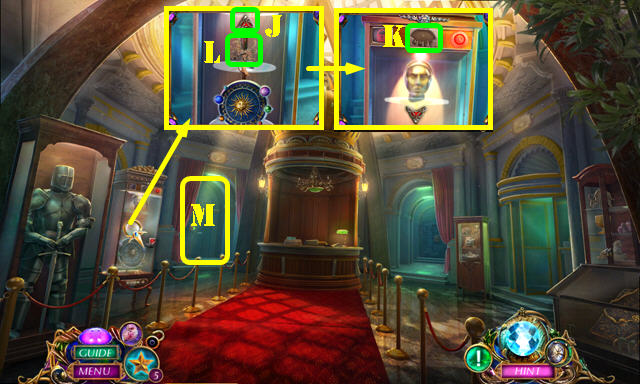
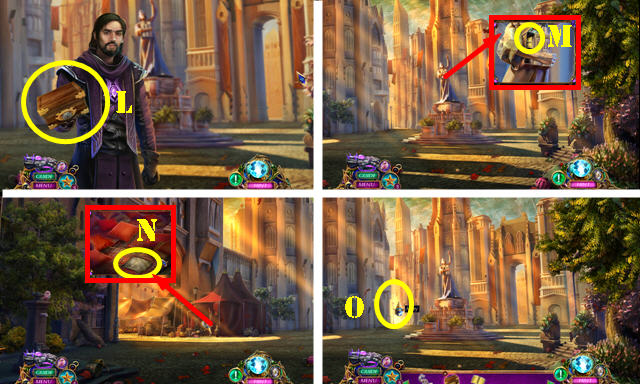
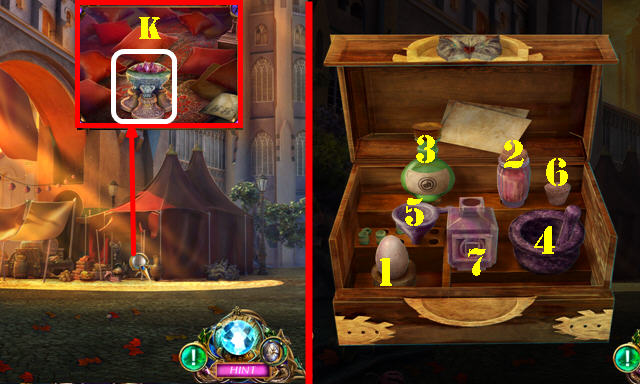
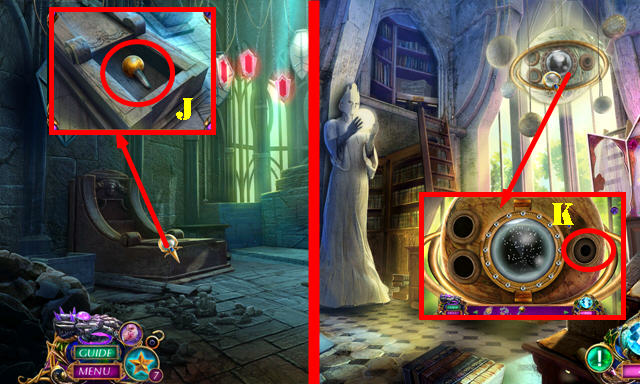
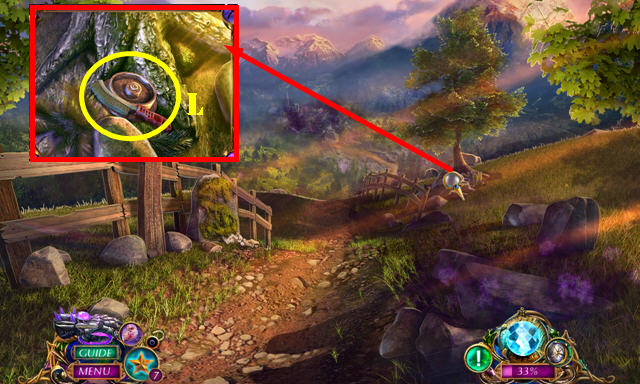
- Slide up (J). Place the CCPP LOGO (K); push the button; take the WINGLESS GRIFFIN (L).
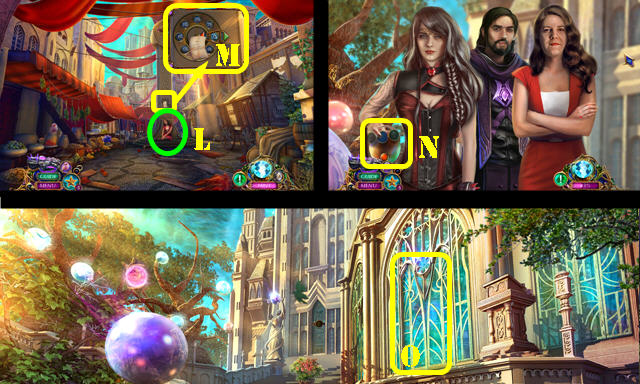
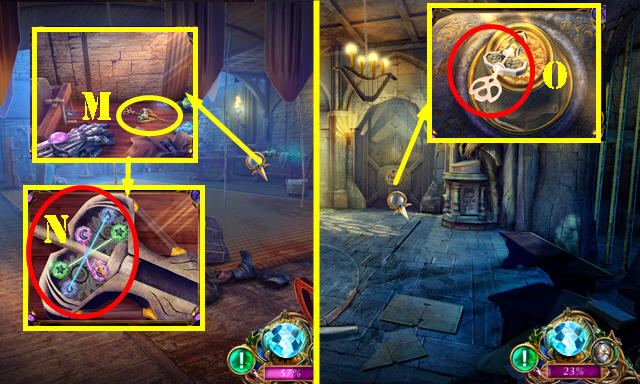
- Go to the Laboratory (M).
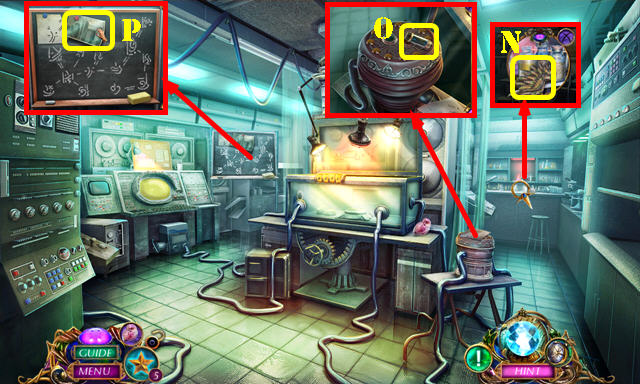
- Take the RIGHT WING (N).
- Look at the note; take the SPARE FUSES 1/3 (O).
- Take the CITY MAP (P).
- Go to the Lounge.
- Place the LEFT WING and RIGHT WING on the WINGLESS GRIFFIN to get the GRIFFIN EMBLEM (inventory).
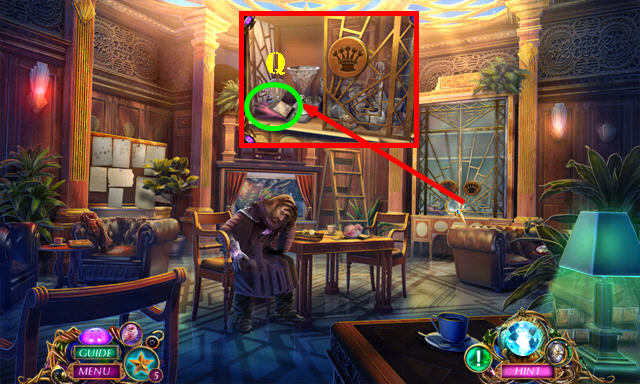
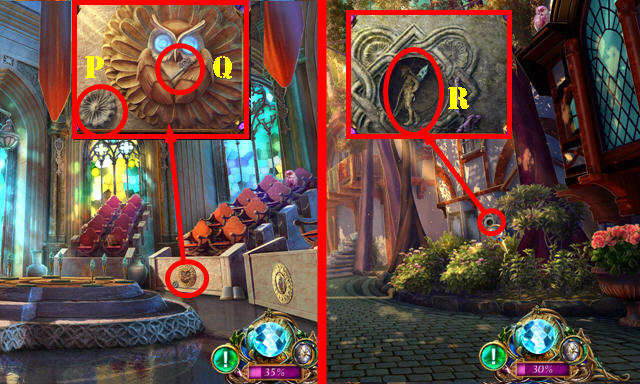
- Place the GRIFFIN EMBLEM; take the ID CARD and STERILE GLOVE (Q).
- Return to the Laboratory.
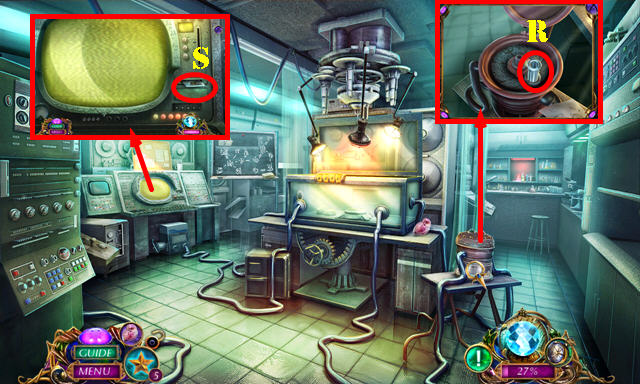
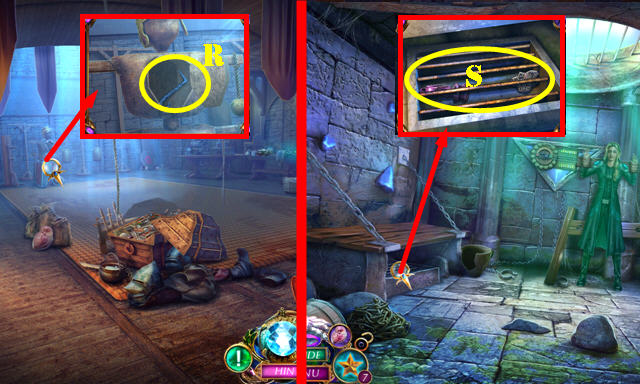
- Use the STERILE GLOVE and then the BLOOD SAMPLE (R); take the BLOOD SAMPLE.
- Place the BLOOD SAMPLE for a puzzle (S).
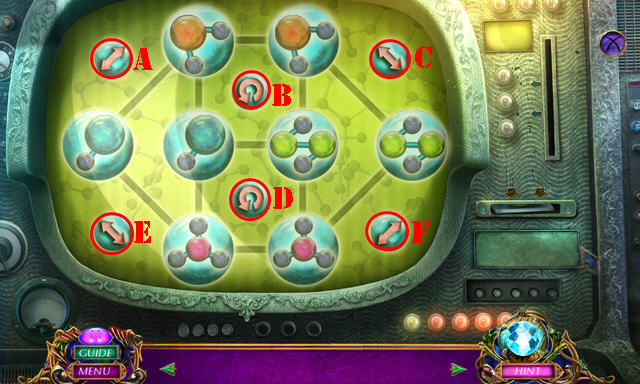
- Solution: B-A-Bx2-C-Bx2-D-F-C-Dx3-F.
- Take the MEDICAL PRESCRIPTION.
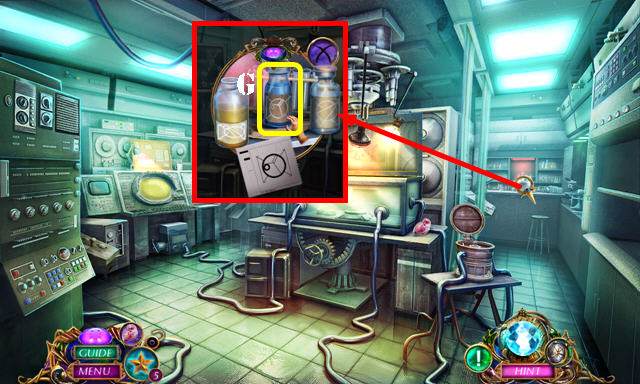
- Place the MEDICAL PRESCRIPTION; move the bottles and take the CURE (G).
- Return to the Lounge.
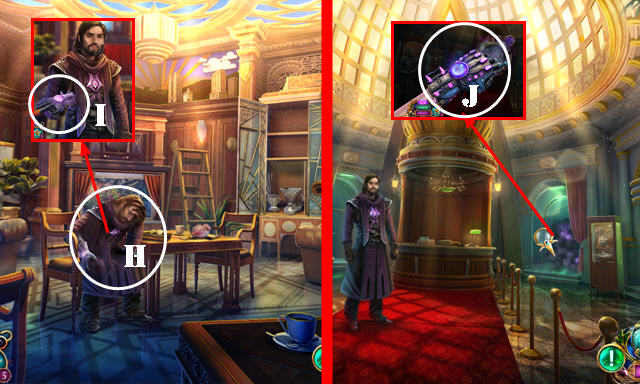
- Give the CURE (H).
- Take the gauntlet (I).
- Walk down.
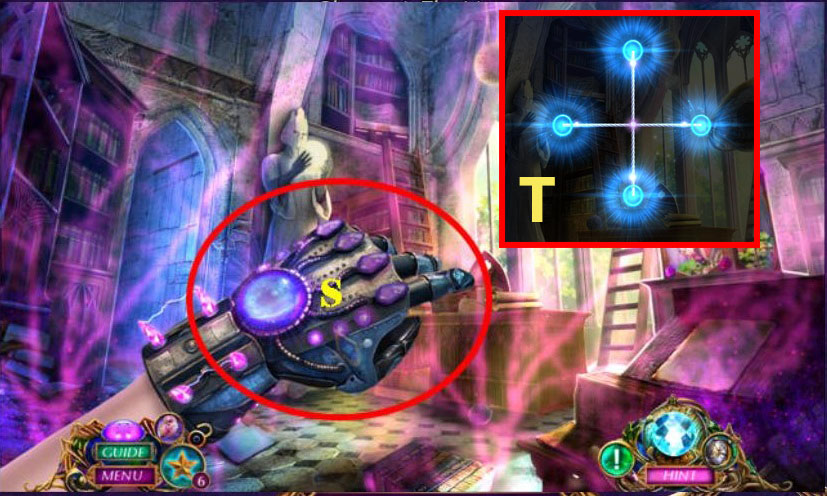
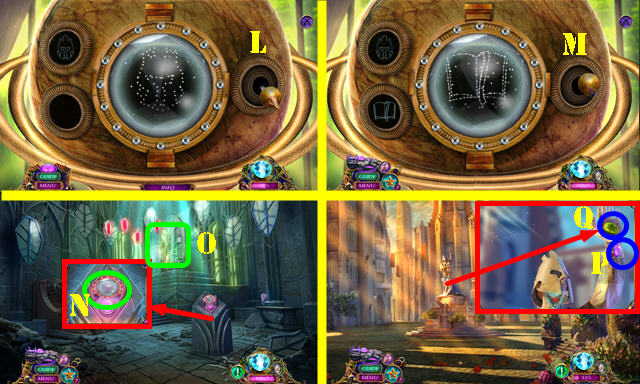
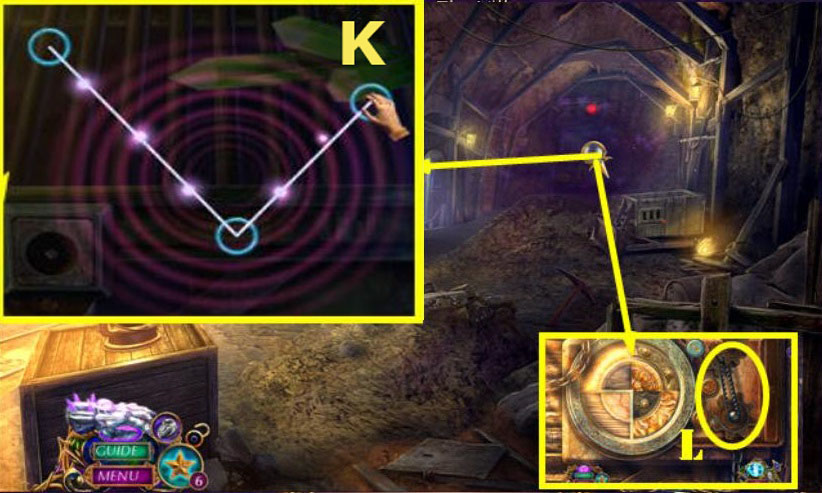
- Select the gauntlet for a puzzle (J).

- Solution (K).
- Use the ID CARD (L).
- Enter the Harmonium Chamber (M).
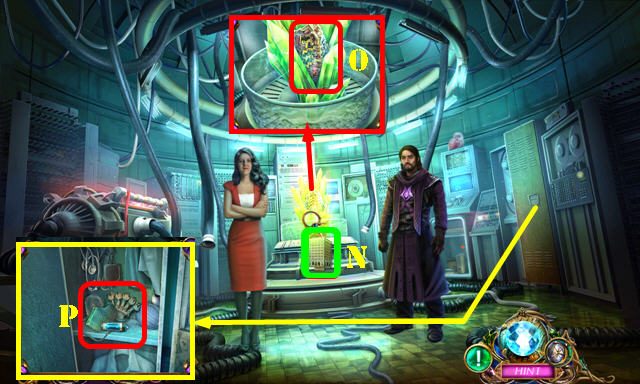
- Take the CARDBOARD BUILDING (N) and UNSTABLE CORE (O).
- Place the ID CARD; take the SPARE FUSES 2/3, EMERGENCY TOKEN and CROWN EMBLEM (P).
- Return to the Lounge.
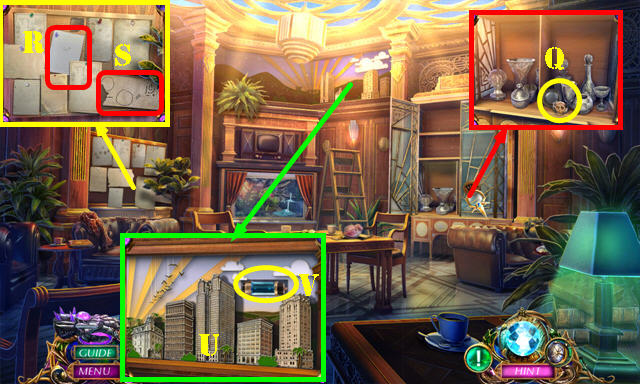
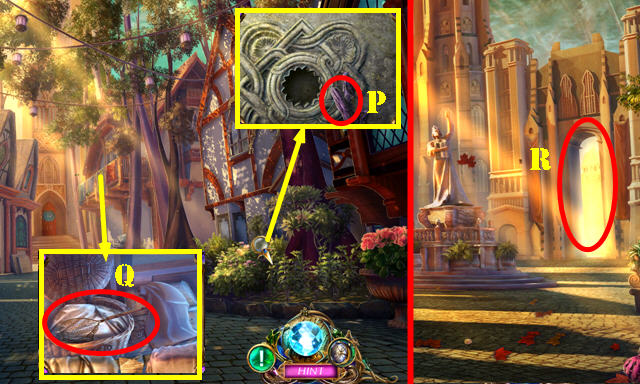
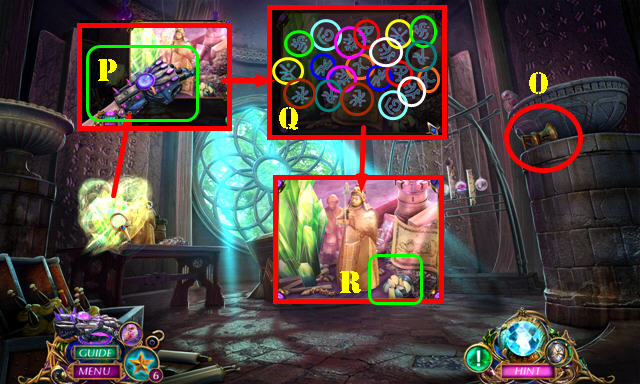
- Place the CROWN EMBLEM; take the SKULL RING and MAGNIFYING GLASS (Q).
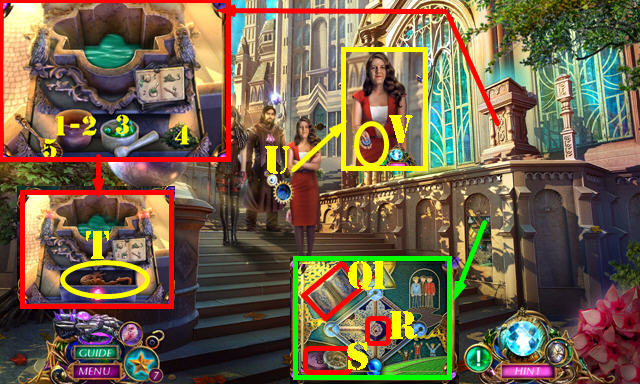
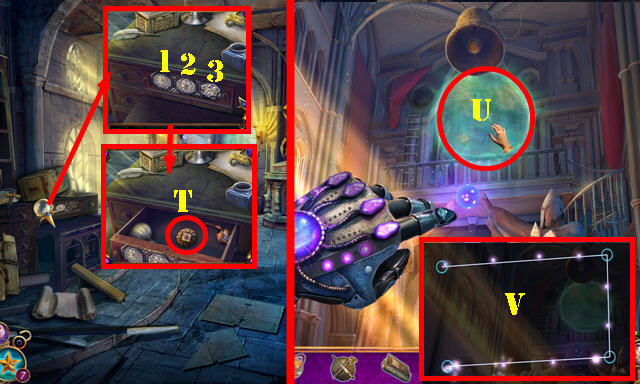
- Use the MAGNIFYING GLASS (R). Use the PEN and take the FORMULA PART (S).
- Place the CARDBOARD BUILDING and CITY MAP. Swap the buildings as shown (U). Take the SPARE FUSES 3/3 (V).
- Return to the Laboratory.
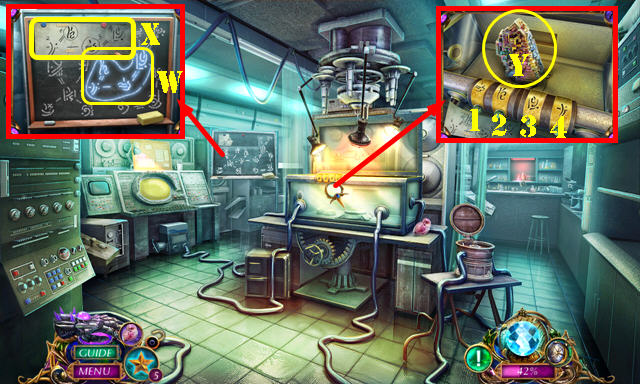
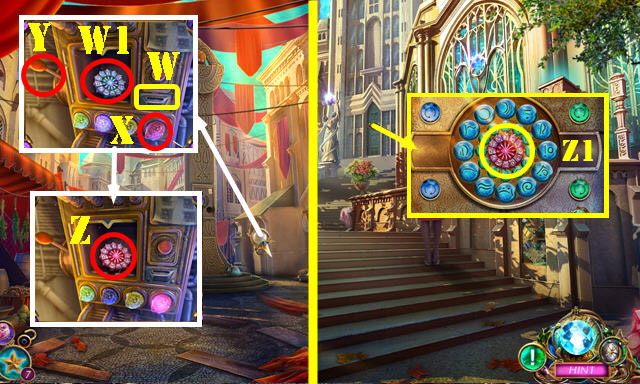
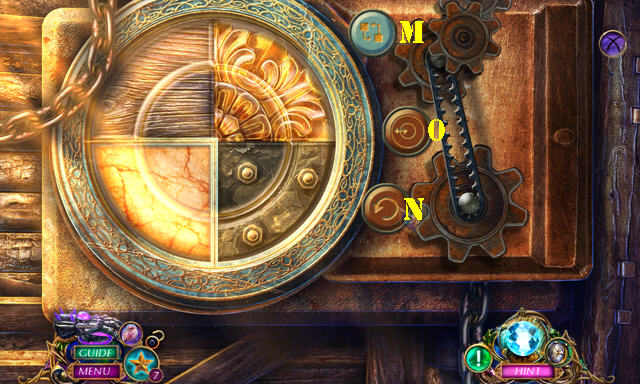
- Place the FORMULA PART. Select the solution (W).
- Use the PEN; take the HARMONIUM FORMULA (X).
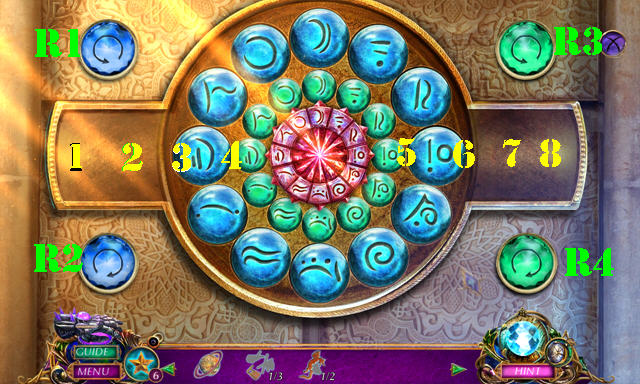
- Place the UNSTABLE CORE and the HARMONIUM FORMULA. Select 2-4-1-3. Take the HARMONIUM CORE (Y).
- Return to the Harmonium Chamber.
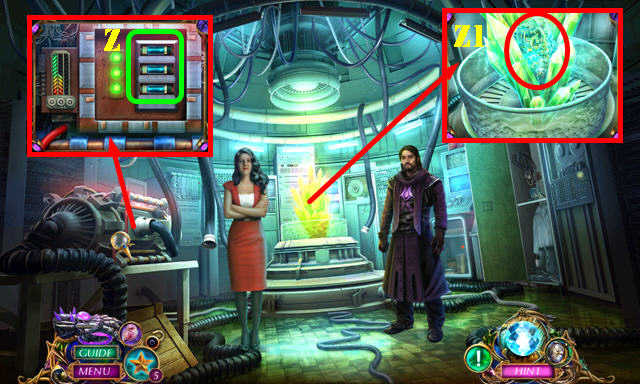
- Place the 3 SPARE FUSES (Z).
- Place the HARMONIUM CORE (Z1).
- Go through the portal.
Chapter 2: Field of Ruins
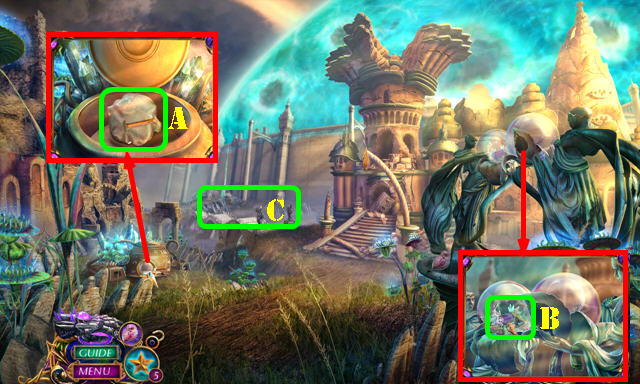
- Place the EMERGENCY TOKEN; take the ROMAN NUMERAL and the WRAPPED OBJECT (A).
- Take the COMMUNICATOR DEVICE (B).
- Go to the Barrier Wall (C).
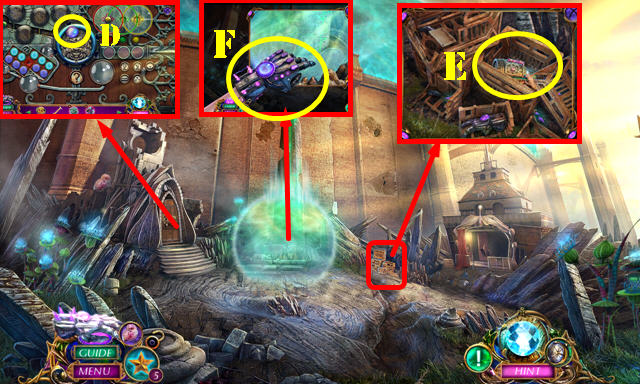
- Take the PURPLE GEM (D).
- Select the WRAPPED OBJECT and look at the note; place the PURPLE GEM; remove the ring and take the EXPANDING SPHERE (inventory).
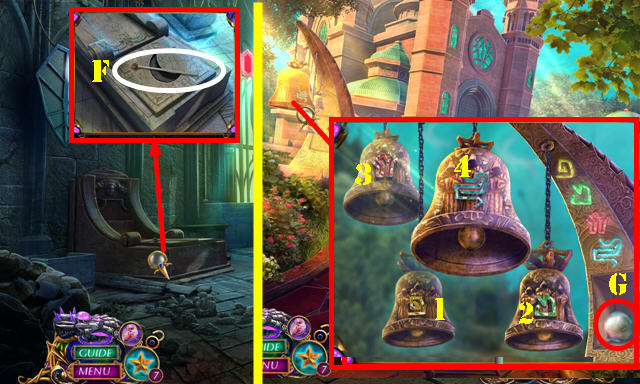
- Read the note; remove the cover and take the PORTABLE ENGINE (E).
- Push the button on the PORTABLE ENGINE; take the GOLDEN CRYSTAL (inventory).
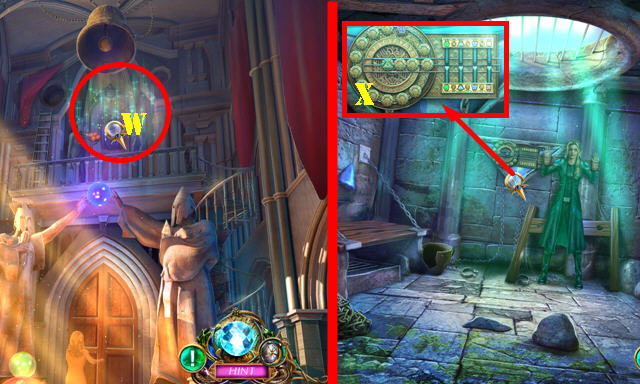
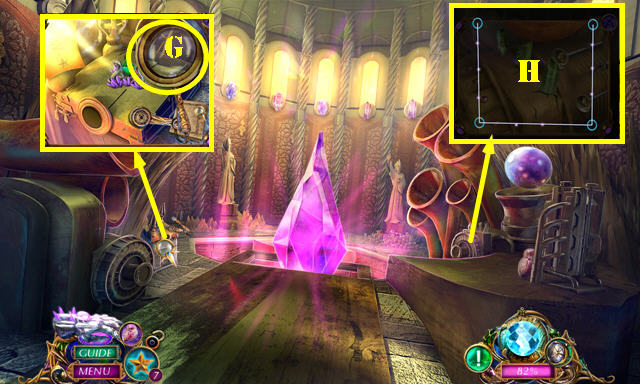
- Select the gauntlet for a puzzle (F).
- Solution (G).
- Take the WATCHER INSIGNIA (H).
- Go to the Guard Post (I).
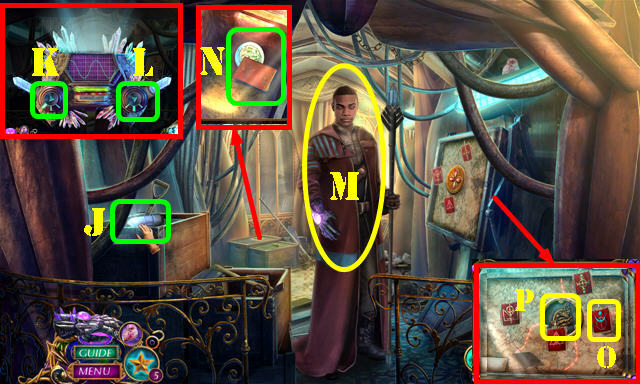
- Take the CRYSTAL BATTERY (J).
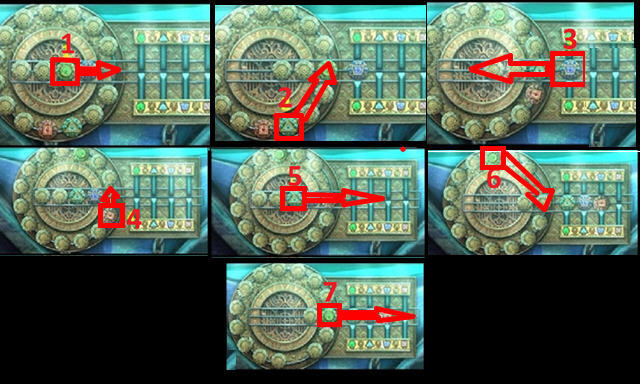
- Place the CRYSTAL BATTERY in the COMMUNICATOR DEVICE for a puzzle (inventory). Solution (K-Lx2-K-L). Take the DISTRESS MESSAGE.
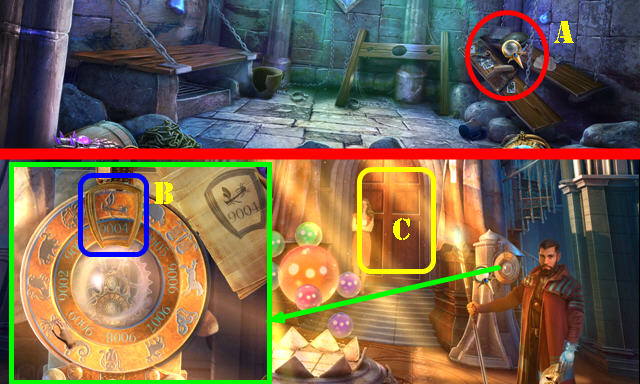
- Give the DISTRESS MESSAGE (M).
- Place the GOLDEN CRYSTAL; look at the book; take the ROUND CRYSTALS 1/3 (N).
- Read the note; place the WATCHER INSIGNIA (O). Take the STONE CROWN PART 1/2 (P).
- Return to the Field of Ruins.
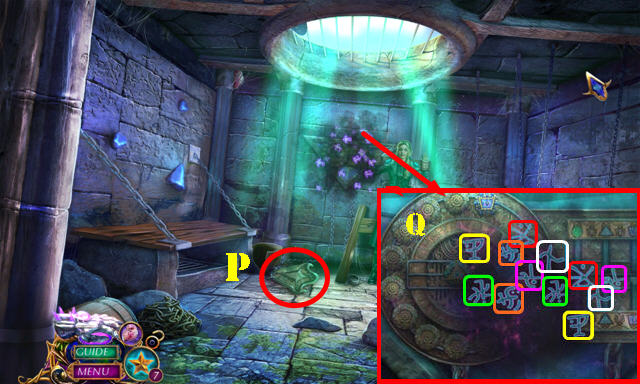
- Place the EXPANDING SPHERE (Q) for a HOP; play it to get the STONE CROWN PART 2/2.
- Go to the Barrier Wall.
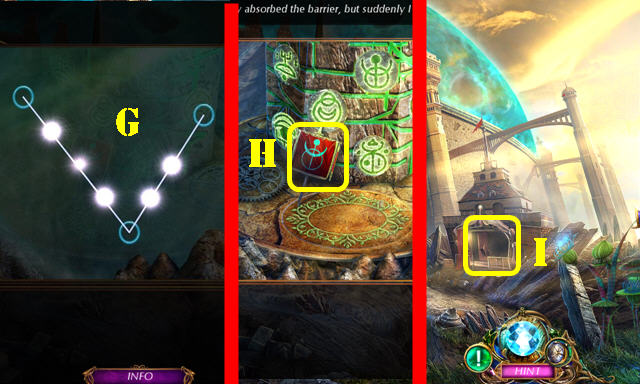
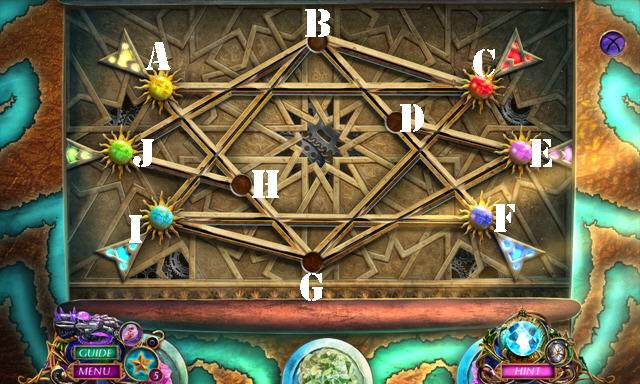
- Place the 2 STONE CROWN PARTS for a puzzle (R).
- Solution one: (D-B)-(A-C)-(D-C).
- Solution two: Gx4-F-G-Fx2.
- Solution three: (H-I-K)-(H-J-L)-(H-I-J-K).
- Solution four: Arrange as shown (M).
- Enter the Underground Tunnel (N).
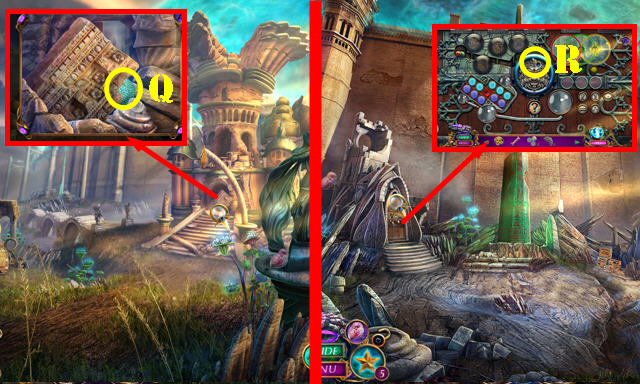
- Select the gauntlet for a puzzle (O). Solution (P).
- Play the HOP (Q) to get the LEAF AMULET.
- Go to the Mask Chamber (R).
- Take the SPEAR (S).
- Select the gauntlet for a puzzle (T).
- Solution (U).
- Walk down.
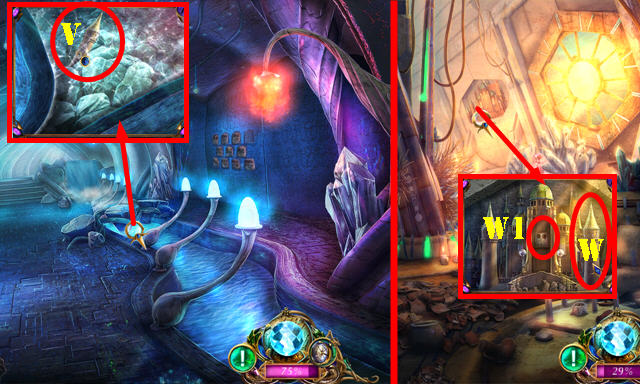
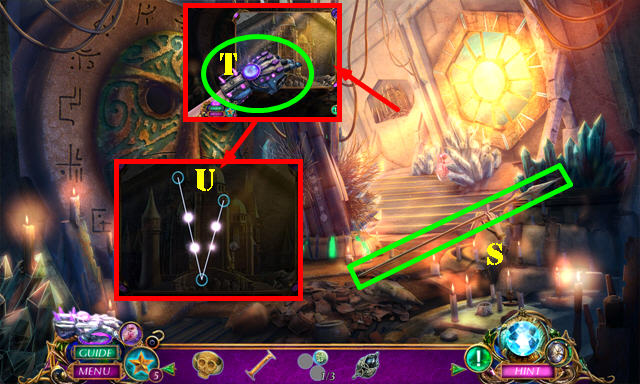
- Use the SPEAR to get the TOWER MODEL (V).
- Go forward.
- Place the TOWER MODEL (W); take the OWL STATUE (W1).
- Walk down.
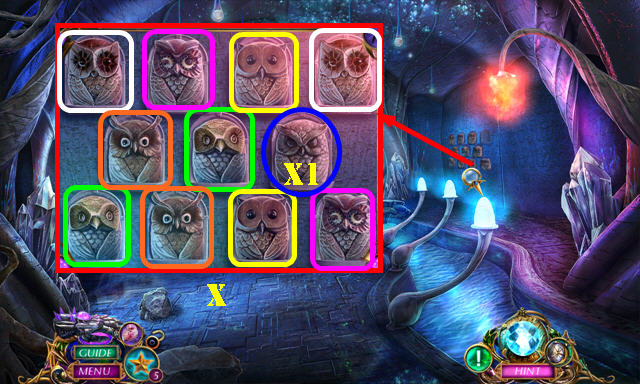
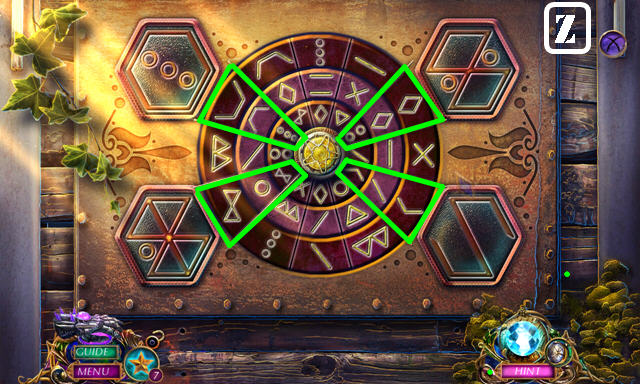
- Place the OWL STATUE for a puzzle. Solution (X).
- Select the last owl (X1); take the ROUND CRYSTALS 2/3.
- Return to the Field of Ruins.
- Place the LEAF AMULET; take the EMPTY ORB (Y).
- Return to the Underground Tunnel.
- Use the EMPTY ORB to get the FLAME ORB (Y1).
- Go forward.
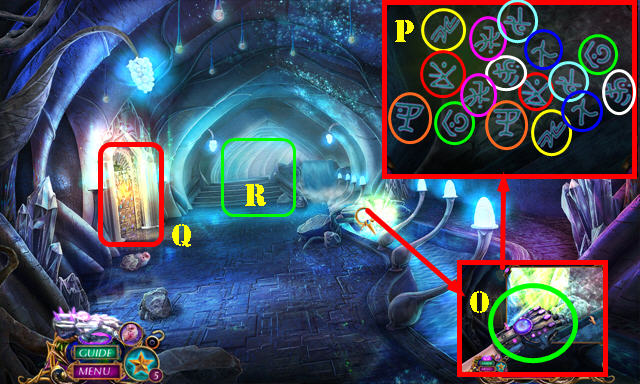
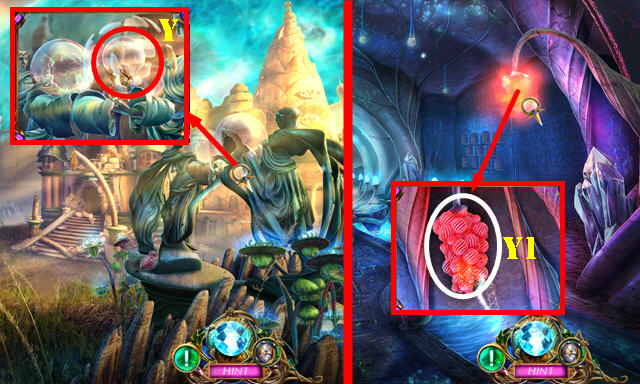
- Use the FLAME ORB; take the STONE DRAGON (Z).
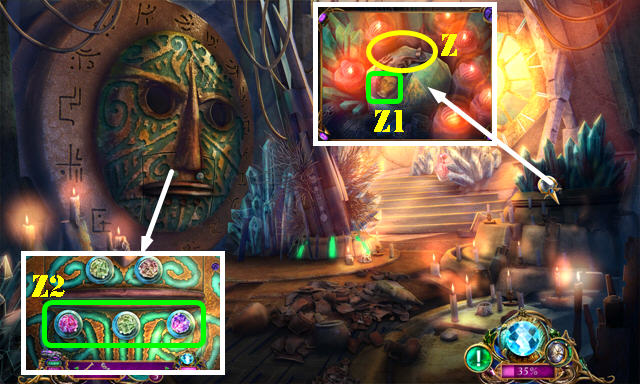
- Use the SKULL RING (Z1); take the ROUND CRYSTALS 3/3.
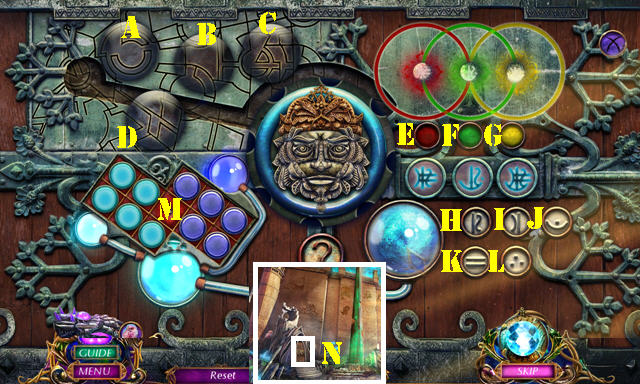
- Place the 3 ROUND CRYSTALS for a puzzle (Z2).
- Solution: (D-B)-(C-A)-(B-C)-(G-I)-(H-G)-(J-B)-(B-D)-(G-H)-(H-J)-(J-B)-(I-G)-(D-F).
- (F-I)-(B-D)-(D-F)-(G-H)-(H-J)-(I-B)-(A-H).
- (H-G)-(G-I)-(E-G)-(G-H)-(H-A)-(B-D)-(D-E).
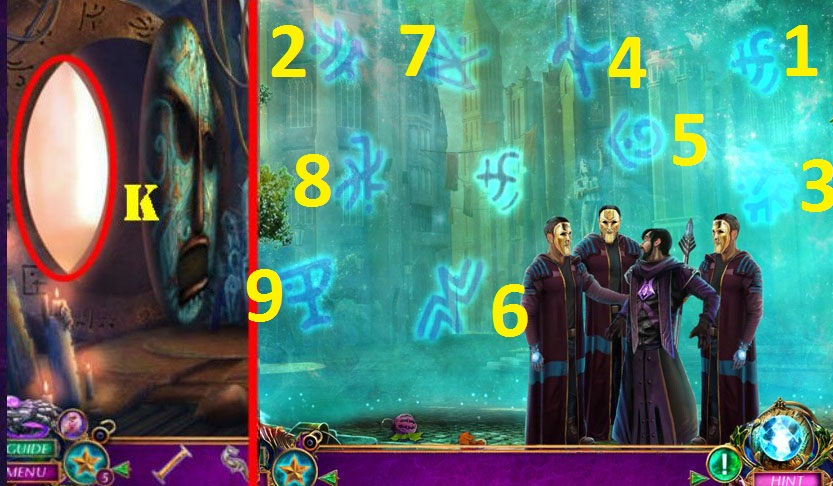
- Go to the City Entrance (K).
- Select 1-10 and then select the gauntlet.
Chapter 3: The City
- Take the REMEDY KIT (L); open it and look at the note (inventory).
- Look at the scroll and place the ROMAN NUMERAL; take the LIGHT BOOK (M).
- Slide left.
- Open the curtains; look at the note (N).
- Slide right and go to the Alley (O).
- Select the shrubs 3x; take the CANDLE (P).
- Move the sheet; take the NET (Q).
- Walk down and go to the Palace Front (R).
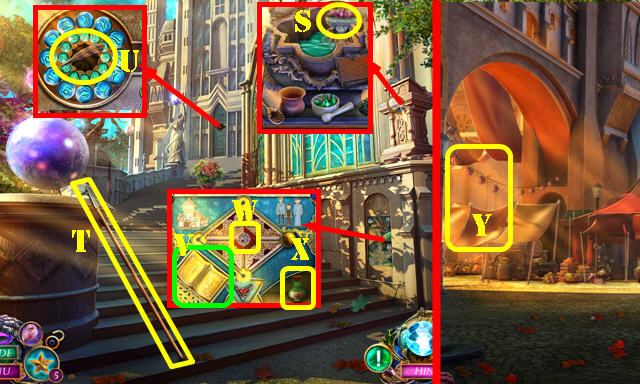
- Take the INCENSE CRYSTALS (S), HOOKED POLE (T) and FEATHER EMBLEM 1/2 (U).
- Place the LIGHT BOOK (V). Select the arrow (W) 3x; take the HEALING ESSENCE (X).
- Walk down, slide left and go to the Marketplace (Y).
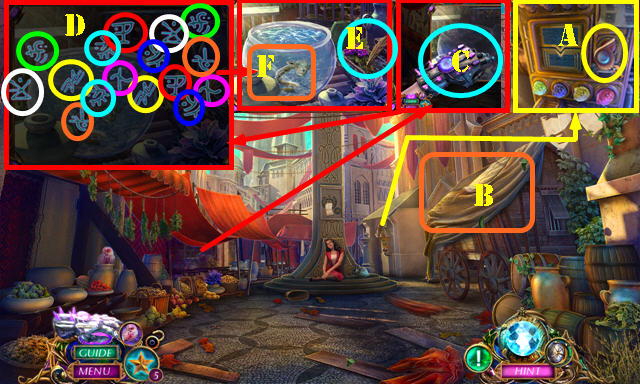
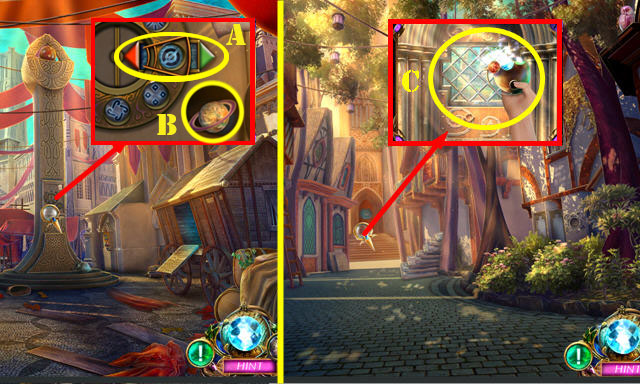
- Move the barrels. Look at the note and take the OWL EYE (A).
- Remove the cover (B).
- Select the gauntlet for a puzzle (C). Solution (D).
- Take the FEATHER EMBLEM 2/2 and PURPLE BERRIES (E).
- Use the NET to get the DAGGER (F).
- Go to the Alley.
- Use the HOOKED POLE (G); take the CRYSTAL BEACON 1/2 and place the 2 FEATHER EMBLEMS (H).
- Take the OWL EGG (I).
- Return to the Palace Front.
- Use the DAGGER and then the CANDLE to get the LIT CANDLE (J).
- Walk down and slide left.
- Place the INCENSE CRYSTALS (K) and use the LIT CANDLE for a HOP; play it to get the RED ASHES.
- Open the REMEDY KIT. Place the HEALING ESSENCE, OWL EGG and RED ASHES for a puzzle (inventory). Select 1-6; take the REMEDY (7).
- Go to the Marketplace.
- Use the REMEDY (L).
- Read the note (M).
- Return to the Palace Front.
- Take the CLOAKING DEVICE (N).
- Enter the Forum (O).
- Take the WREATH EMBLEM (P).
- Place the OWL EYE; take the CARAVAN KEY (Q).
- Return to the Alley.
- Place the WREATH EMBLEM; take the STONE SOLDIER and CRYSTAL BEACON 2/2 (R).
- Return to the Marketplace.

- Use the CARAVAN KEY (S) for a HOP; play it to get the GREEN GEM.
- Return to the Forum.
- Place the STONE DRAGON and STONE SOLDIER (T); take the SYMBOL CODE (U).
- Place the 2 CRYSTAL BEACONS (V) for a puzzle.
- Solution (W).
- Select the gauntlet for a puzzle (X). Solution (Y).
- Open the compartment; take the HORNS 1/2 and RED GEM (Z).
- Return to the Marketplace.
- Place the SYMBOL CODE; solution (A). Open the compartment; take the PLANET FIGURINE and BLUE GEM (B).
- Return to the Alley.
- Place the GREEN GEM, RED GEM and BLUE GEM in the CLOAKING DEVICE. Push the button to get the CLOAKING DEVICE (inventory).
- Use the CLOAKING DEVICE (C). Go through the door.
Chapter 4: The Monastery
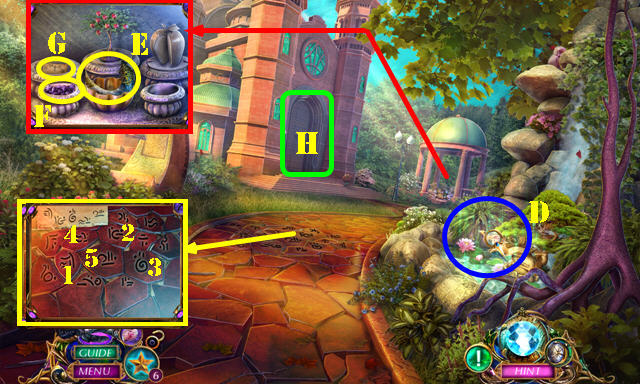
- Play the HOP (D) to get the STAR INSIGNIA.
- Take the HORNS 2/2 (E). Place the PURPLE BERRIES (F); take the HARMONIUM CODE (G).
- Place the HARMONIUM CODE; select 1-5.
- Enter the Monastery (H).

- Take the GOLDEN LETTERS 1/3 (I).
- Place the 2 HORNS; take the QUILL EMBLEM (J).
- Go to the Scriptorium (K).
- Place the QUILL EMBLEM. Select the scroll and then take the MOON EMBLEM 1/2 (L).
- Place the STAR INSIGNIA; select the three symbols (M).
- Enter the Shrine (N).
- Take the WEIGHT (O).
- Select the gauntlet (P) for a puzzle. Solution (Q).
- Look at the note; take the BLUE APPLES (R).
- Walk down.
- Select the gauntlet (S) for a puzzle. Solution (T).
- Walk down.

- Place the WEIGHT (U); take the MOTIF PART (V).
- Walk down.
- Place the BLUE APPLES (W); take the ORNAMENT CHISEL (X).
- Return to the Shrine.
- Use the ORNAMENT CHISEL; take the LIGHT WARRIOR (A).
- Place the MOTIF PART; take the MONK INSIGNIA (B).
- Walk down twice.
- Place the MONK INSIGNIA; take the FLOWER EMBLEM (C).
- Go to the Scriptorium.
- Place the FLOWER EMBLEM; take the DARK WARRIOR (D).
- Walk down.
- Place the LIGHT WARRIOR and DARK WARRIOR for a puzzle (E).
- Solution: Rx2-U-L-U-L-U.
- Enter the Basement.
- Take the SOFT MALLET (F).
- Return to Monastery Park.
- Use the SOFT MALLET; select 1-4 and take the ORNAMENT (G).
- Return to the Shrine.
- Place the ORNAMENT. Solution (H).
- Take the MOON EMBLEM 2/2 (I).
- Return to the Basement.
- Place the 2 MOON EMBLEMS; take the SPHERE LEVER (J).
- Return to the Scriptorium.
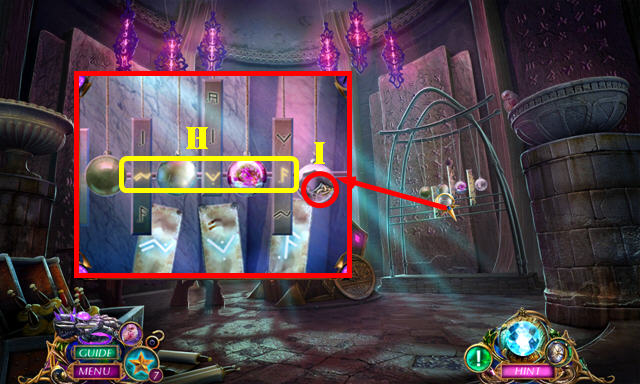
- Place the SPHERE LEVER and touch it for a puzzle (K).
- Solution one (L).
- Solution two (M). You receive the BEACON LENS.
- Return to the Basement.
- Place the BEACON LENS (N) for a HOP (O); play it to get the PURITY BOX.
- Look at the note on the PURITY BOX. Open the drawer; take the DARK BOOK, GAUNTLET GEM and RITUAL GUIDE (inventory).
- Return to the City Entrance.
- Look at the statue; slide up. Place the GAUNTLET GEM (P); take the GREEN SEAL (Q).
- Go to the Palace Front.
- Look at the niche; slide down. Place the DARK BOOK (Q1); select the arrow 3x (R); take the MACHINE TOKEN and PURPLE SEAL (S).
- Place the RITUAL GUIDE. Select 1-5. Take the DRAGON EMBLEM 1/2 and RED SEAL (T).
- Place the GREEN SEAL, PURPLE SEAL and RED SEAL on the PURITY BOX; take the ORB OF PURITY (inventory).
- Give the ORB OF PURITY (U). Take the BLUE CRYSTAL KEY (V).
- Return to the Marketplace.
- Use the MACHINE TOKEN (W) and BLUE CRYSTAL KEY (W1).
- Select red (X) and the handle (Y); take the RED CRYSTAL KEY (Z).
- Return to the Palace Front.
- Place the RED CRYSTAL KEY for a puzzle (Z1).
- Solution: R2;6;5;R2;3;4;R1x7;2;1;R1x4;R3x4;3;R4x5;4;
- R4x5;2;1;R2x2;R4x2;3;4;R1x6,R3x6,7,8,R1x2,6,R4x2;5;
- R4x3;7;8;R1x2;6;R2;8;R2;6;R1x2;8;R1x4;6;R3x2;5;
- R4x5;2;R3x5;7;1;R1;3;R1x5;1;R2;3;R2x6;8;
- R1x4;6;R1x4;8;R1x2;1;6;R1x2;3;R1x4;1;R2x3;3;
- R2;1;R2;3;R1x2;1;R1x4;8;R2x2;R4;
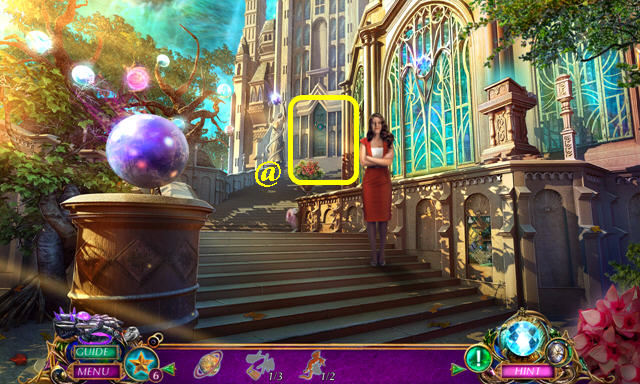
- Go to the Entrance Hall (@).
Chapter 5: Prison
- Take the GOLDEN LETTERS 2/3 (A) and CHEST CODE (B).
- Slide up.
- Open the curtain (C).
- Slide down.
- Take the ARMORY INSIGNIA (D).
- Go to the Unchained Quarters (E).
- Place the CHEST CODE; enter the code (F) for a HOP; play it to get the DRAGON EMBLEM 2/2.
- Remove the mace (G).
- Walk down and slide up.

- Place the 2 DRAGON EMBLEMS; take the RUNE HANDLE and GOLDEN LETTERS 3/3 (H).
- Slide down and return to the Unchained Quarters.
- Place the RUNE HANDLE and pull it (I). Go through the door.
- Look at the door and slide down (J).
- Place the 3 GOLDEN LETTERS (K); take the EXPLOSIVE CHARGE (K1).
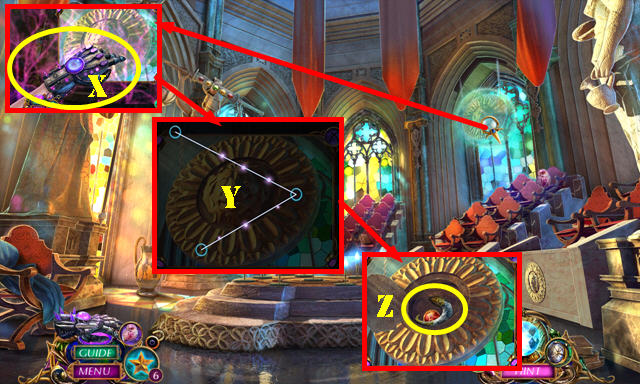
- Remove the scroll. Take the ANCIENT TOME and MAGNIFYING GLASS (L).
- Walk down.
- Use the MAGNIFYING GLASS (M); connect the pieces as shown (N). Take the BOLT MECHANISM.
- Place the EXPLOSIVE CHARGE on the BOLT MECHANISM to get the EXPLOSIVE BOLT (inventory).
- Return to the Prison.
- Use the EXPLOSIVE BOLT (O). Go through the door.
- Take the SHIELD EMBLEM (P).
- Select the gauntlet for a puzzle. Solution (Q).
- Return to the Unchained Quarters.
- Place the SHIELD EMBLEM; take the HOOKED STAFF (R).
- Return to the Prison Cell.
- Use the HOOKED STAFF; take the UNCHAINED FIGURINE and MOSAIC PART (S).
- Walk down.
- Place the MOSAIC PART; select 2-1-3; take the LOCK PART 1/2 (T).
- Return to Entrance Hall.
- Select the barrier (U) for a puzzle. Solution (V).
- Play the HOP (W) to get the LOCK PART 2/2.
- Return to the Prison Cell.
- Place the 2 LOCK PARTS for a puzzle (X).
- Solution (Y).
- Play the HOP (A) to get the CALENDAR CLUE.
- Return to Entrance Hall.
- Place the CALENDAR CLUE. Solution (B).
- Enter the Core Gallery (C).
- Take the LIGHT ORB 1/2 (D).
- Select the gauntlet for a puzzle. Solution (E).
- Go to Resonation Hall (F).
- Look at the two notes and select the magnifying glass (G).
- Select the gauntlet for a puzzle. Solution (H).
- Walk down and go to the Astral Map Chamber.
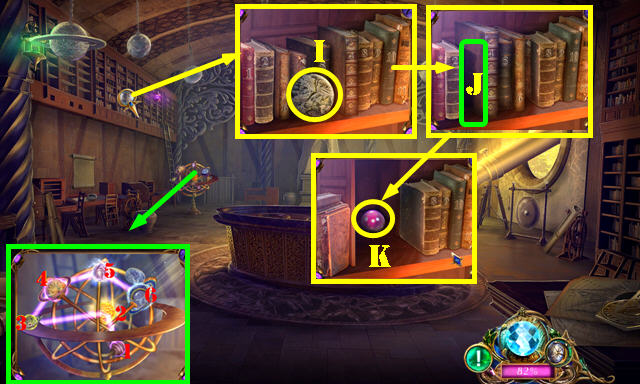
- Place the PLANET FIGURINE; select 1-5 and take the TELESCOPE LENS 1/2 (6).
- Take the MOSAIC PIECE (I). Arrange the books in numerical order and place the ANCIENT TOME (J). Take the LIGHT ORB 2/2 (K).
- Return to Entrance Hall.

- Place the 2 LIGHT ORBS for a puzzle (L).
- Solution (M).
- Take the WATCHER FIGURINE.
- Go forward.
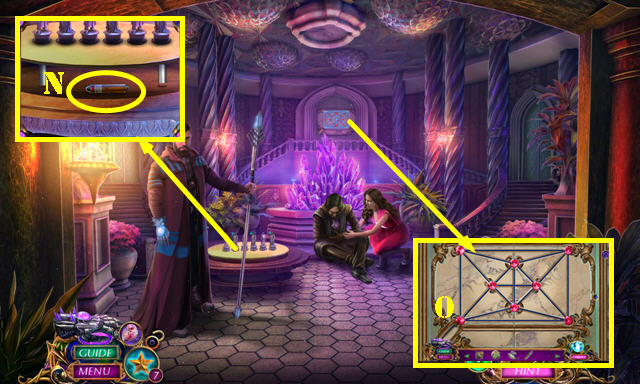
- Place the WATCHER FIGURINE and UNCHAINED FIGURINE. Take the LASER POINTER (N).
- Place the LASER POINTER for a puzzle (O).
- Solution one (P).
- Solution two (Q).
- Go forward to the Portal Area.

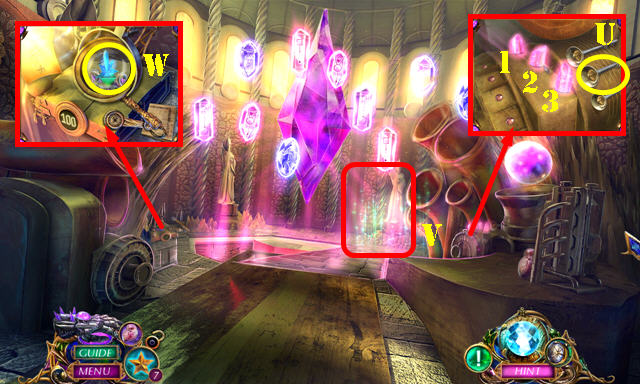
- Take the CRYSTAL CUTTER (R) and read the note.
- Take the HORN (S).
- Walk down.
- Use the CRYSTAL CUTTER to get the PURPLE CRYSTAL (T).
- Go to Resonation Hall.
- Place the HORN (U); select 1-3-2.
- Play the HOP (V) to get the STAR CRYSTAL.
- Place the PURPLE CRYSTAL and STAR CRYSTAL (W); take the CHARGED HARMONIUM CRYSTAL.
- Return to the Portal Area.
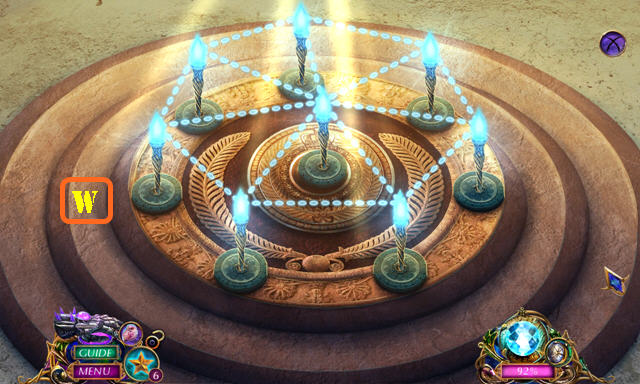
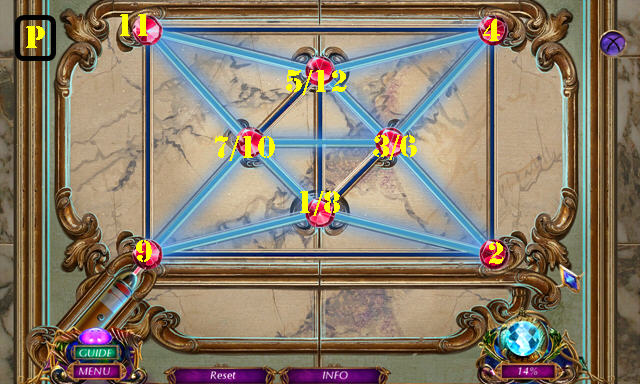
- Place the CHARGED HARMONIUM CRYSTAL for a puzzle (X).
- Solution one (Y).
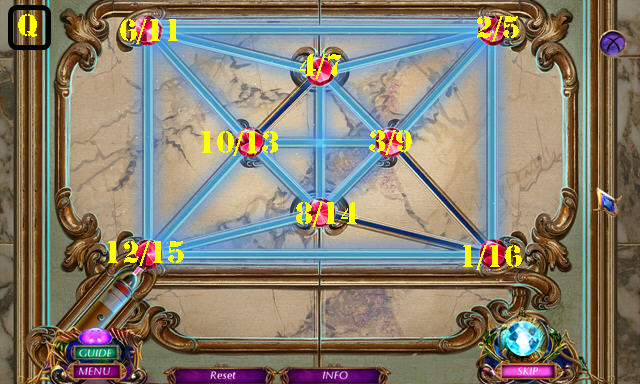
- Solution two (Z).
- Take the TELESCOPE LENS 2/2 (A).
- Go to the Astral Map Chamber.
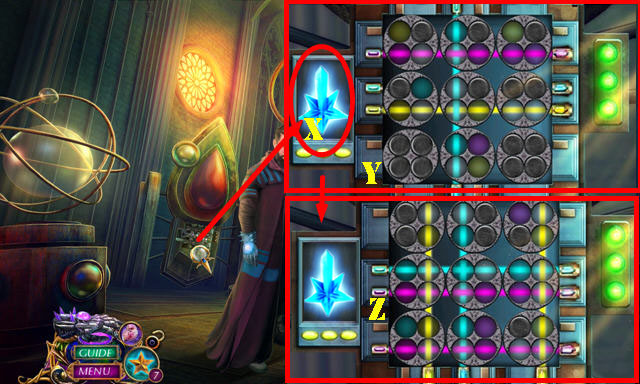
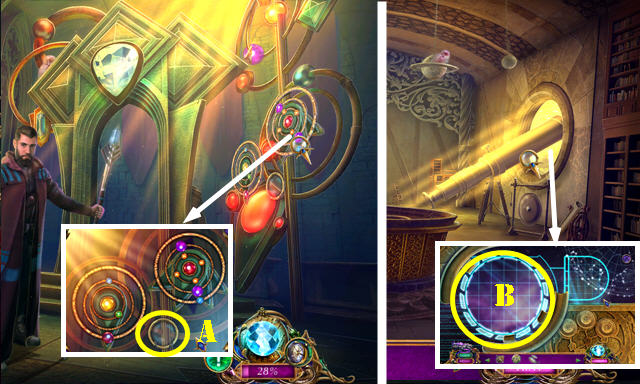
- Place the 2 TELESCOPE LENSES for a puzzle (B).
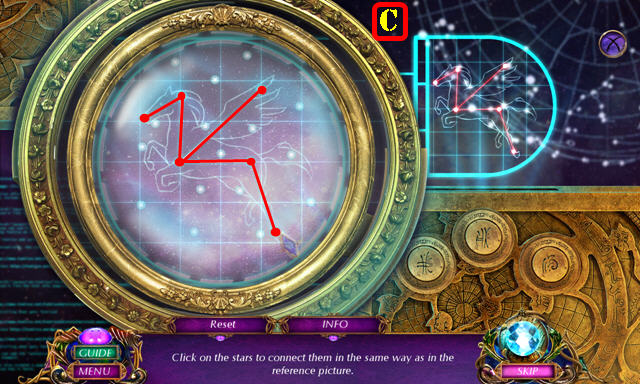
- Solution one (C).
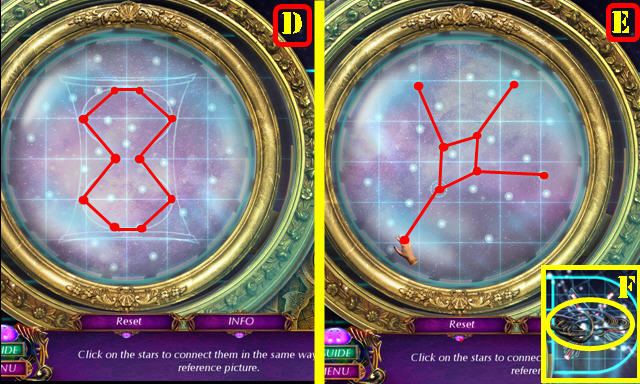
- Solution two (D).
- Solution three (E).
- Take the GALAXY INSIGNIA (F).
- Place the GALAXY INSIGNIA (G) for a HOP (H). Play it to get the TELEPORTATION COORDINATES.
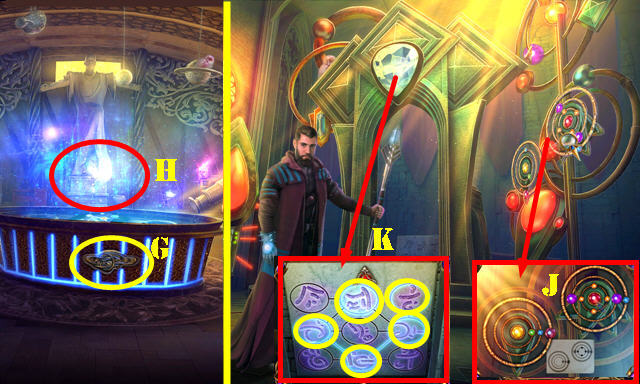
- Return to the Portal Area.
- Place the TELEPORTATION COORDINATES. Move the left rings 3x. Move the right rings 3x (J).
- Look at the crystal above the portal, slide down. Select the symbols (K).
- Go through the portal.
Chapter 6: The Village
- Remove two branches; take the RUST REMOVER and CARTWHEEL (L).
- Go forward.
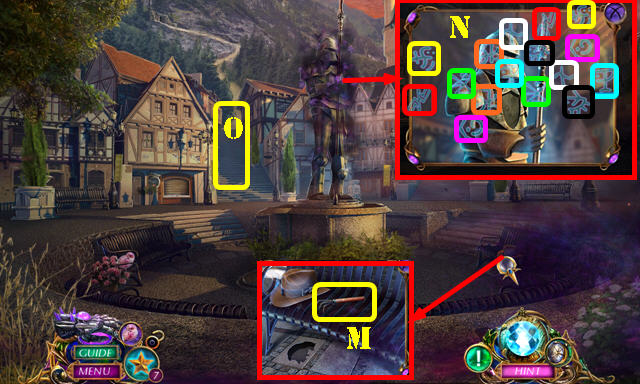
- Move the hat; take the SMALL RAKE (M).
- Select the gauntlet for a puzzle. Solution (N).
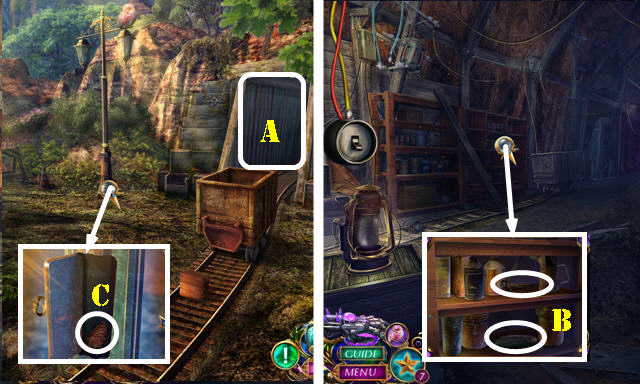
- Go to Outside the Mines (O).
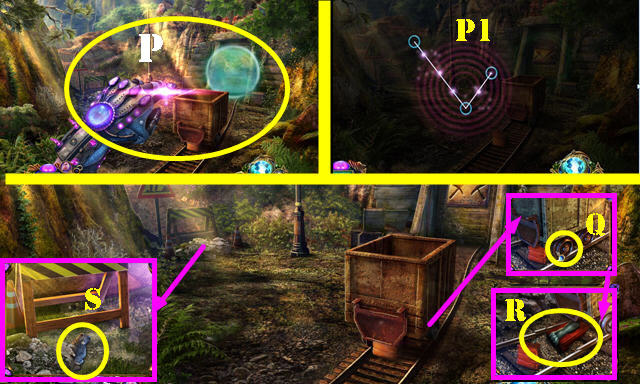
- Select the scene for a puzzle (P). Solution (P1).
- Place the CARTWHEEL and use the RUST REMOVER (Q). Push the cart; take the TOOLBOX and LION PAW (R).
- Remove the stones 3x; take the BEAR BADGE 1/2 (S).
- Walk down.
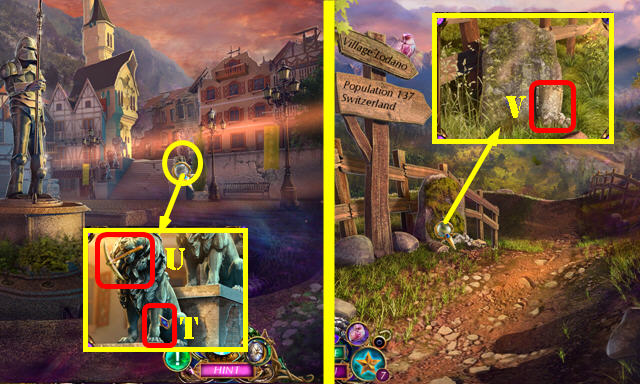
- Place the LION PAW (T); take the PICKAXE EMBLEM 1/2 (U).
- Walk down.
- Use the SMALL RAKE; take the VILLAGE CREST (V).
- Go forward.
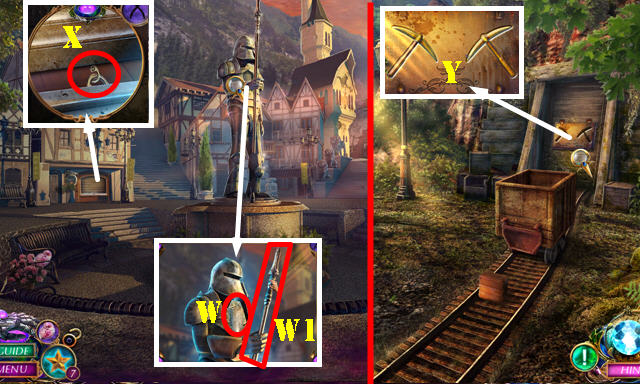
- Place the VILLAGE CREST (W); take the PIKE (W1).
- Use the PIKE (X) for a HOP; play it to get the PICKAXE EMBLEM 2/2.
- Go to Outside the Mines.
- Place the 2 PICKAXE EMBLEMS for a puzzle (Y).
- Solution (Z).
- Enter the Mines (A).
- Take the LAMP KEY and UTILITY KNIFE (B).
- Walk down.
- Use the LAMP KEY; take the METAL COG HALF (C).
- Place the METAL COG HALF on the TOOLBOX; take the CABLE CONNECTOR (inventory).
- Go to the Mines.
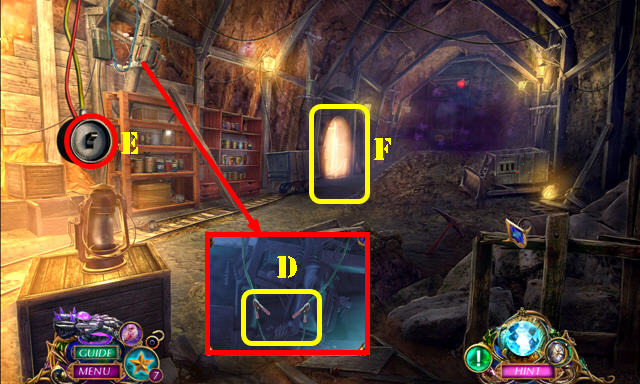
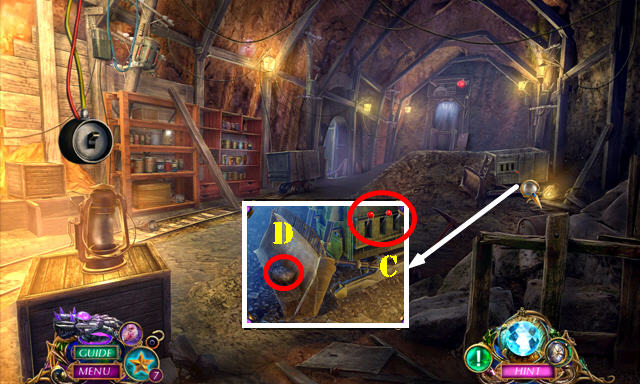
- Use the CABLE CONNECTOR (D) and flip the switch (E).
- Enter the Mine Bottom (F).
- Take the BEAR BADGE 2/2 (G).
- Select the gauntlet for a puzzle. Solution (H).
- Go to the Village Center.
- Place the 2 BEAR BADGES; take the ORNATE PIN (I).
- Use the ORNATE PIN on the UTILITY KNIFE (inventory).
- Go to the Mine Bottom.
- Use the UTILITY KNIFE (J) for a HOP; play it to get the COG BELT.
- Walk down.
- Select the gauntlet for a puzzle. Solution (K).
- Place the COG BELT for a puzzle (L).
- Solution; Nx3-M-Nx3-M-N-M-N-M-N-M-Nx3.
- Go through the door to access the Hill.
- Use the UTILITY KNIFE; take the FLOOR TILE 1/2 (P).
- Go to the Tower Interior (Q).
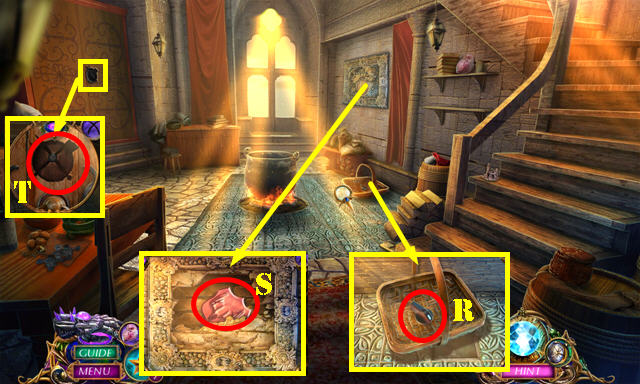
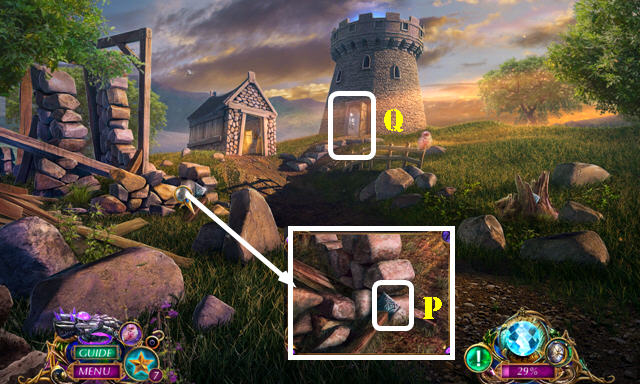
- Take the STARTER BUTTON (R); move the basket.
- Place the MOSAIC PIECE; take the DEER BADGE (S).
- Place the ARMORY INSIGNIA (T) for a HOP; play it to get the HELMET.
- Go up the steps and slide left.
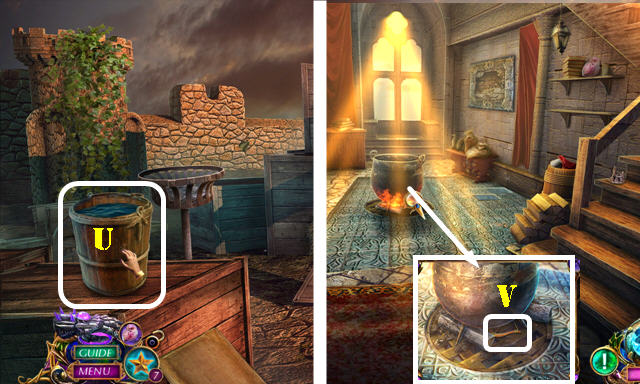
- Remove the two logs; take the WATER BUCKET (U).
- Walk down.
- Use the WATER BUCKET; take the HUNTER’S BADGE (V).
- Walk down.
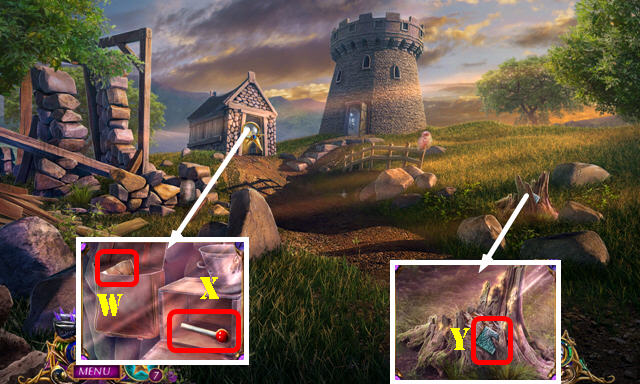
- Place the HUNTER’S BADGE; take the SMALL AXE (W).
- Place the DEER BADGE; take the HANDLES 1/2 (X).
- Use the SMALL AXE; take FLOOR TILE 2/2 (Y).
- Go to the Tower Interior.
- Place the 2 FLOOR TILES; take the GLASS PIECE (A).
- Go to the Mine Bottom.
- Place the STARTER BUTTON and turn it (B). Match the items 1-3; take the HANDLES 2/2.
- Walk down.
- Place the 2 HANDLES and pull all three up (C). Take the BLACK SOOT (D).
- Return to the Tower Top and slide right.
- Place the GLASS PIECE on the HELMET; rub the BLACK SOOT on the glass piece to get the PROTECTIVE HELMET (inventory).

- Use the PROTECTIVE HELMET on the scene for a puzzle.
- Solution (E).
- Congratulations, you’ve completed Amaranthine Voyage: The Orb of Purity!


 Living Legends: Ice Rose Walkthrough, Guide, & Tips
 Columbus: Ghost of the Mystery Stone Walkthrough, Guide, & Tips
 Detective Agency 2: Banker's Wife Walkthrough, Guide, & Tips
 Haunted Hotel: Eternity Walkthrough, Guide, & Tips
 Secrets of the Vatican: The Holy Lance Walkthrough, Guide, & Tips