Dark Canvas: A Murder Exposed Walkthrough, Guide, & Tips
Dark Canvas: A Murder Exposed Walkthrough

Welcome to the Dark Canvas: A Murder Exposed Walkthrough.
You’re called in to photograph a wedding, but what you really expose is murder.
Whether you use this document as a reference when things get difficult or as a road map to get you from beginning to end, we’re pretty sure you’ll find what you’re looking for here.
This document contains a complete Dark Canvas: A Murder Exposed game walkthrough featuring annotated screenshots from actual gameplay!
We hope you find this information useful as you play your way through the game. Use the walkthrough menu below to quickly jump to whatever stage of the game you need help with.
Remember to visit the Big Fish Games Forums if you find you need more help. Have fun!
This walkthrough was created by Amanda Barrera, and is protected under US Copyright laws. Any unauthorized use, including re-publication in whole or in part, without permission, is strictly prohibited.
General Tips
- This is the official guide for Dark Canvas: A Murder Exposed.
- This guide will not show when you have to zoom into a location; the screenshots will show each zoom scene.
- Hidden-object puzzles are referred to as HOPs. This guide will not show screenshots of the HOPs, however, it will mention when an HOP is available and the inventory item you’ll collect from it.
- Use the Map to fast travel to a location.
Chapter 1: Murder at Hollow Oak

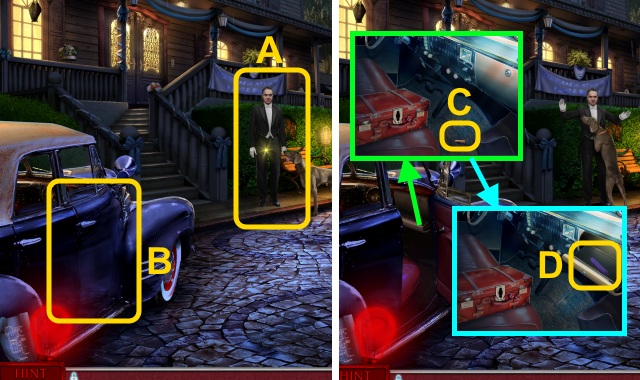
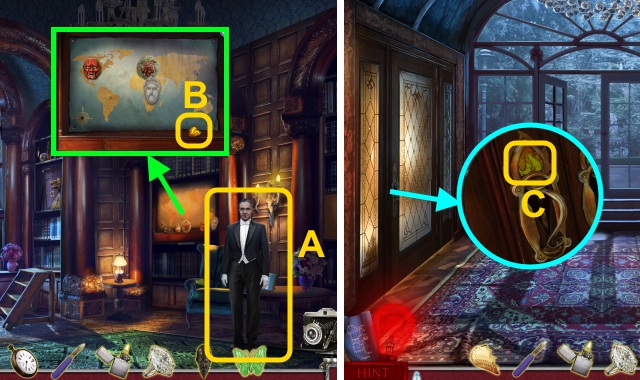
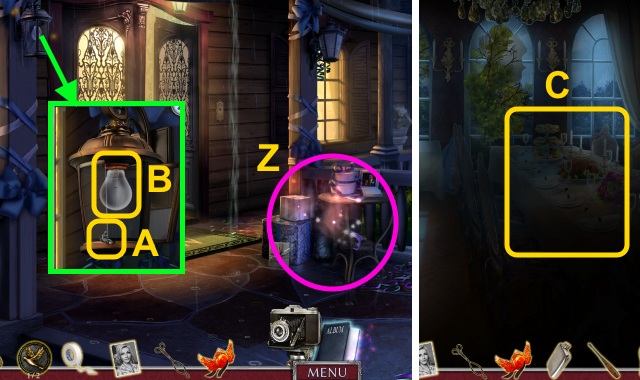
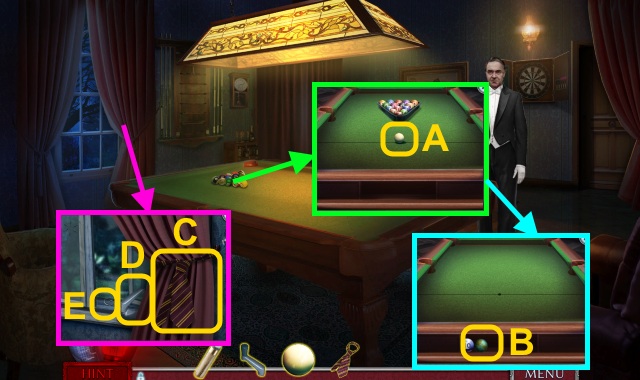
- Talk to Simon (A).
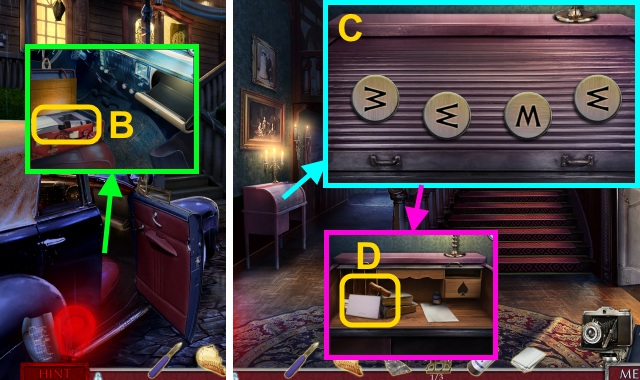
- Open the door (B).
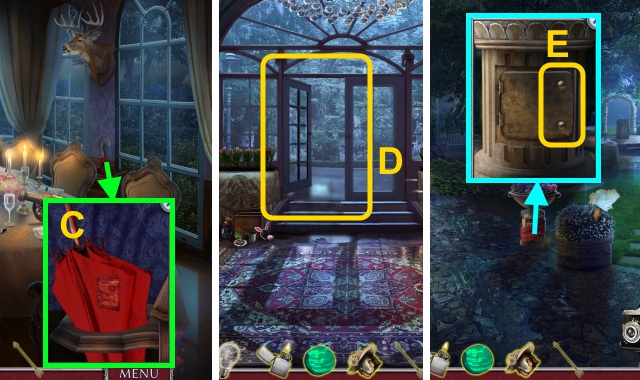
- Move the cover; take the GLOVE BOX KEY (C).
- Use the GLOVE BOX KEY; take the UTILITY KNIFE (D).
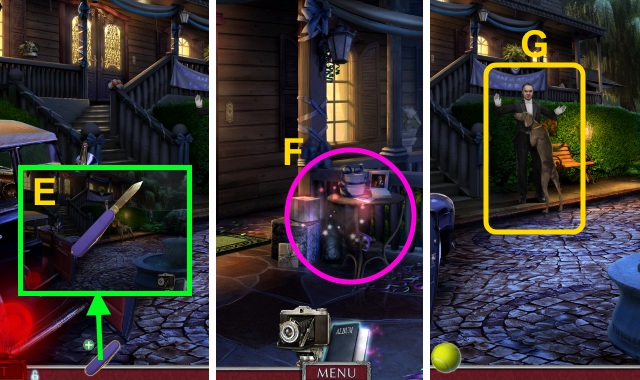
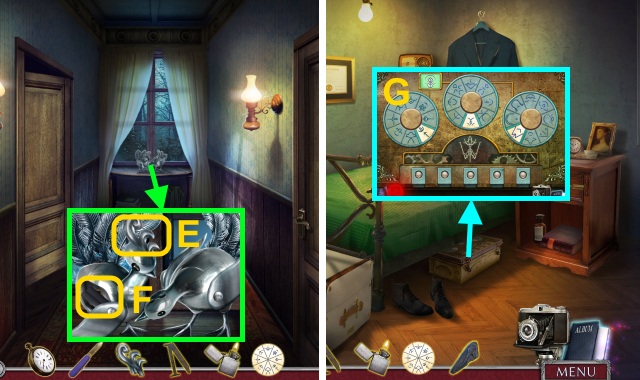
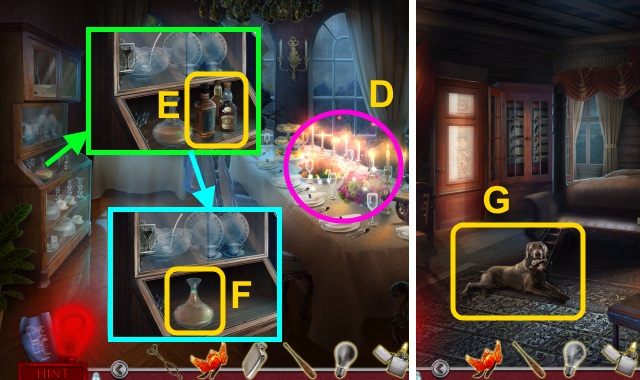
- Unfold the UTILITY KNIFE (E); take the POCKET KNIFE.
- Walk forward.
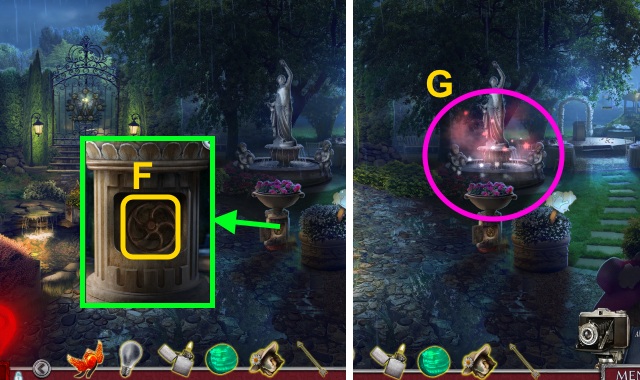
- Play the HOP to receive the TENNIS BALL (F).
- Walk down.
- Throw the TENNIS BALL (G).
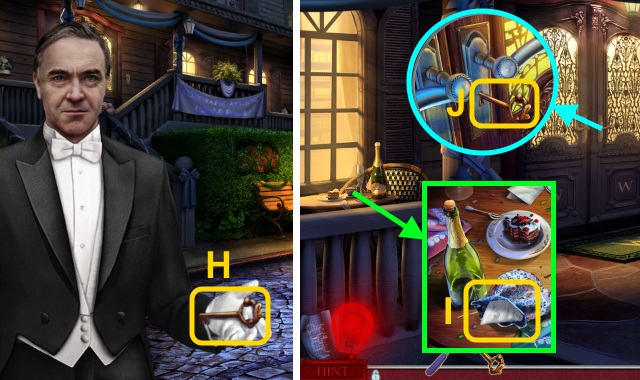
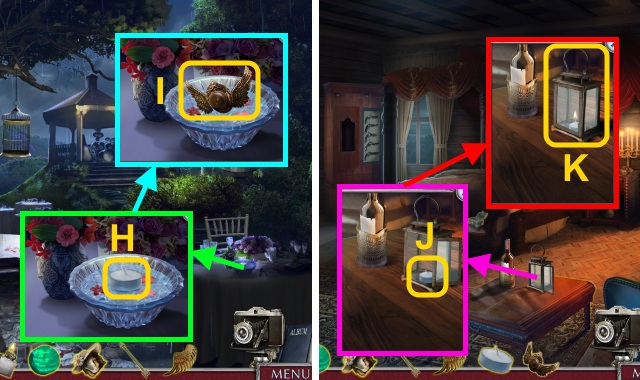
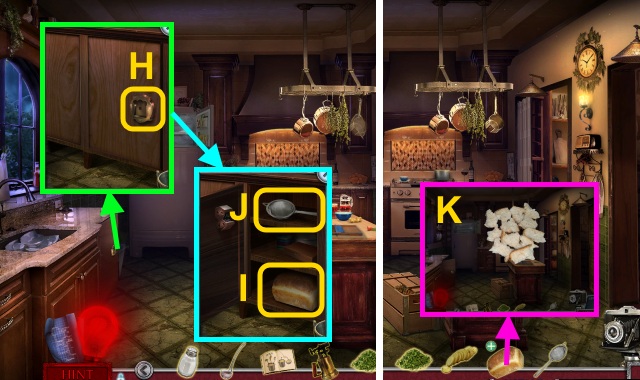
- Take the FRONT DOOR KEY (H).
- Walk forward.
- Use the POCKET KNIFE; take the HANDKERCHIEF (I).
- Use the FRONT DOOR KEY (J).
- Walk forward.
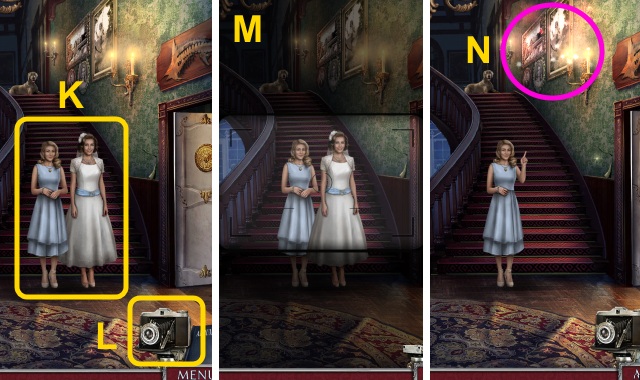
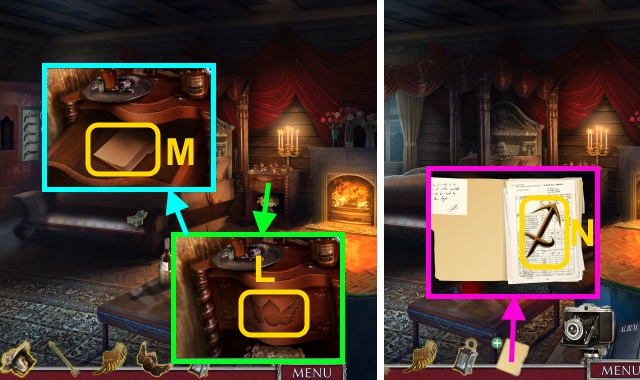
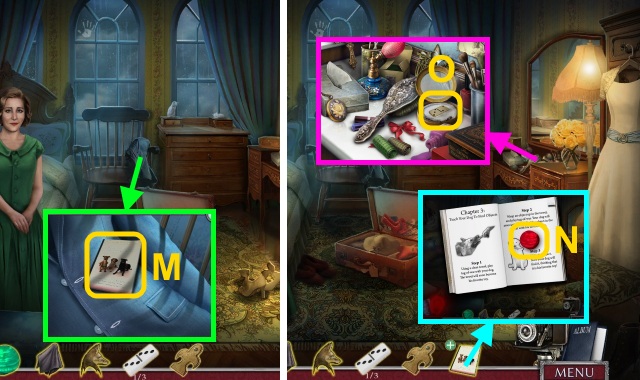
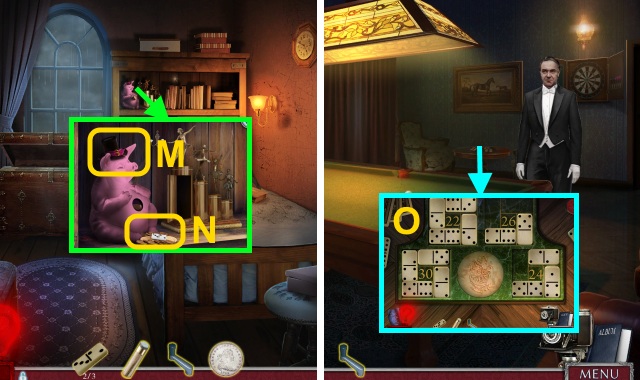
- Talk to Carol (K); use the Camera (L) to take a picture (M).
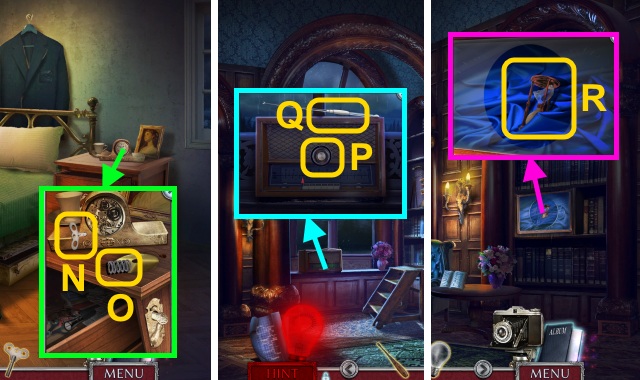
- Play the HOP to receive the BROKEN HEART (N).
- Walk right.
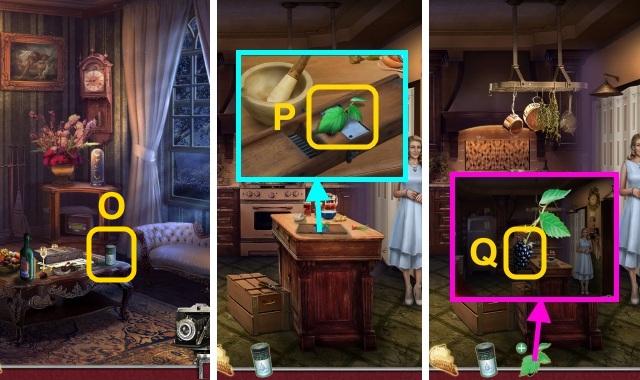
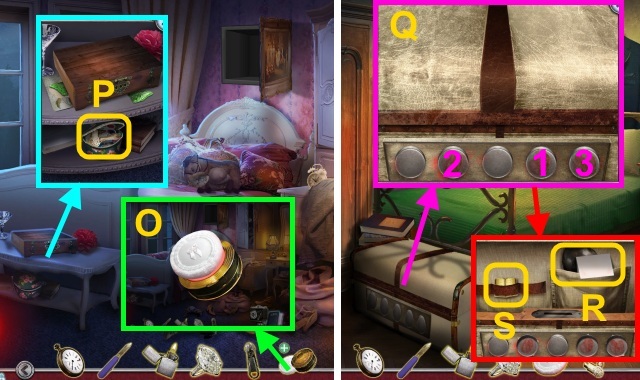
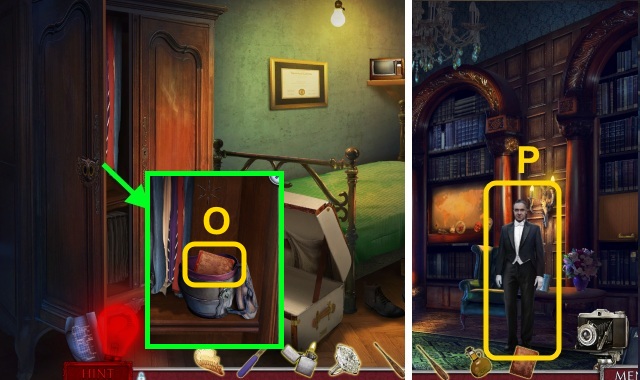
- Take the WATER CLEANSER (O).
- Walk down, forward, then right.
- Take the FRUIT VINE (P).
- Examine the FRUIT VINE; take the BLACKBERRY (Q).
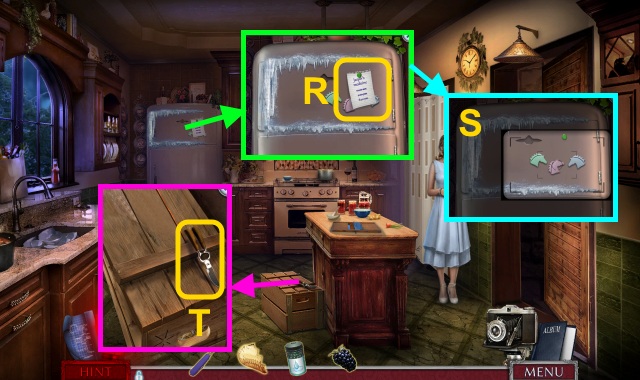
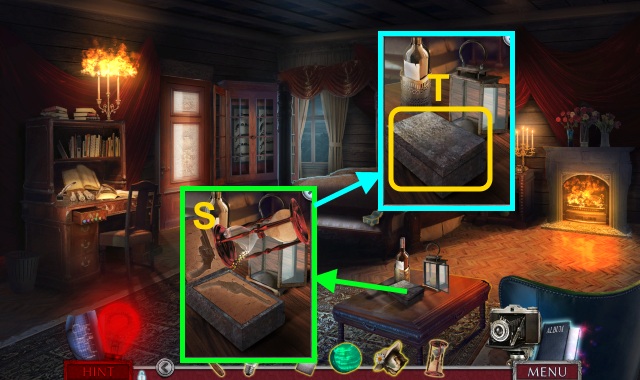
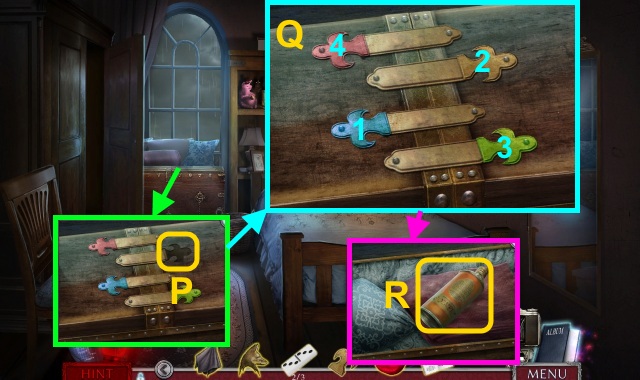
- Move the note (R); use the Camera (S).
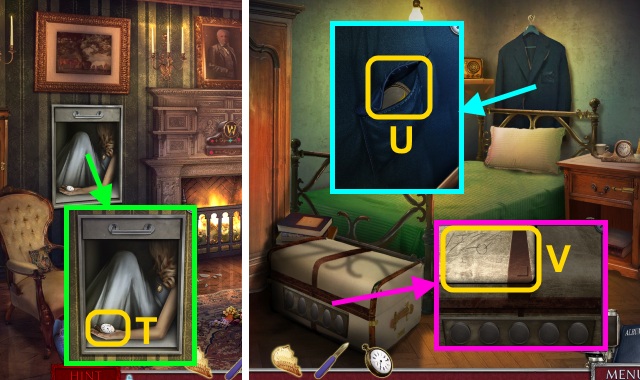
- Take the KITCHEN SHEARS (T).
- Walk right.
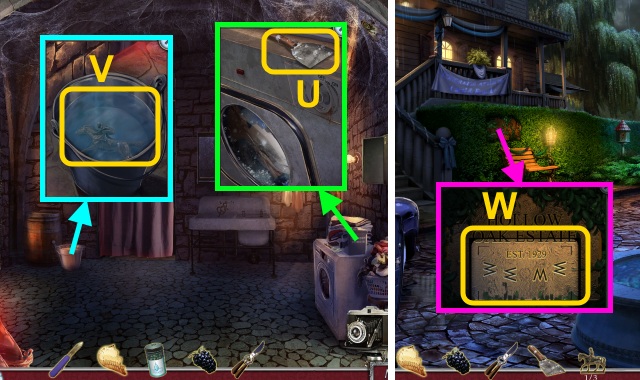
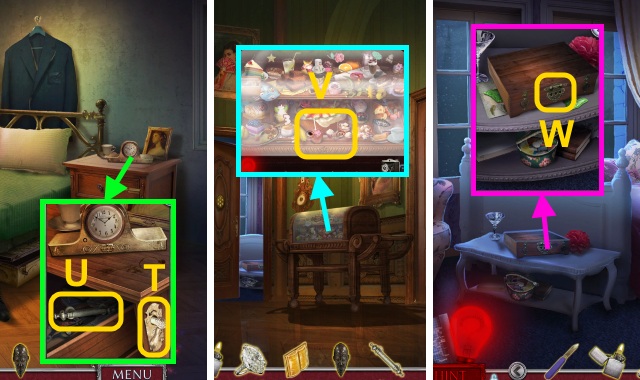
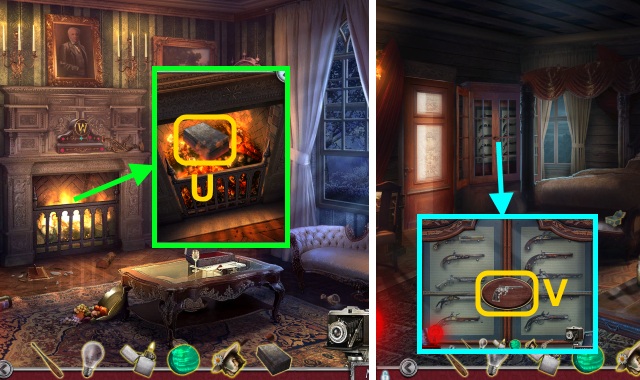
- Take the PUTTY KNIFE (U).
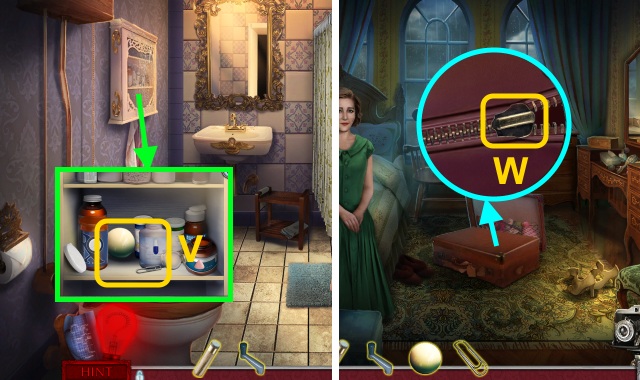
- Use the WATER CLEANSER; take the HORSE FIGURINE (1/3) (V).
- Go to the Front Yard.
- Use the KITCHEN SHEARS; use the Camera (W).
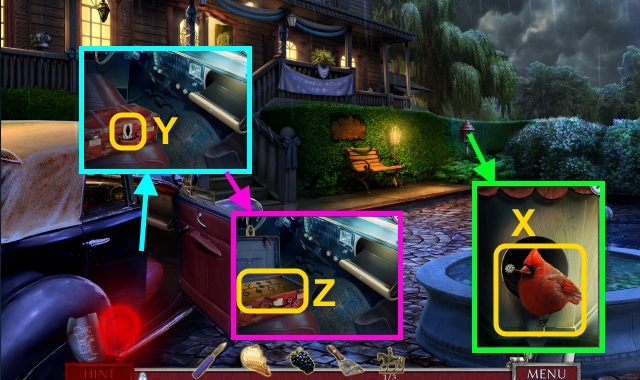
- Give the BLACKBERRY; take the HAIRPIN (X).
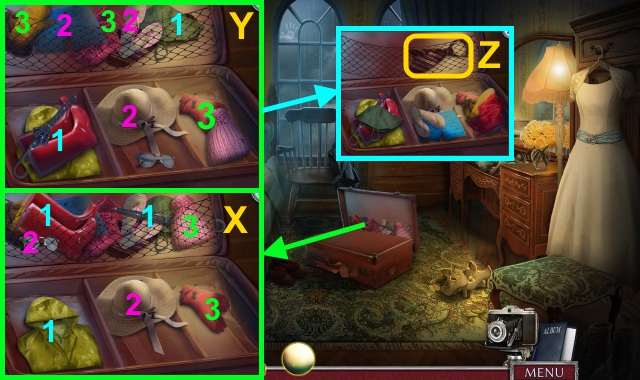
- Use the HAIRPIN (Y).
- Open the suitcase; examine it for a mini-game (Z).
- Solution (A): Kx2-C-Jx3-I-J-A-Kx4-I-Jx2-B-Jx2.
- I-J-E-Kx3-I-Kx3-H-Jx6-I-Kx3-B-Kx3-I.
- Take the DEVELOPING SOLUTION and PHOTO PAPER (B).
- Walk forward twice.
- Arrange the symbols (C); open the cover.
- Take the note and CORKSCREW (D).
- Walk down.
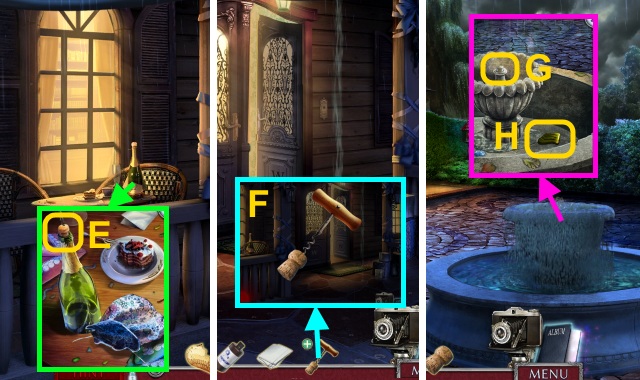
- Use the CORKSCREW (E); receive the CORKSCREW.
- Examine the CORKSCREW 3x (F); take the CORK.
- Walk down.
- Place the CORK (G); take the WATER EMBLEM (H).
- Go to the Cellar.
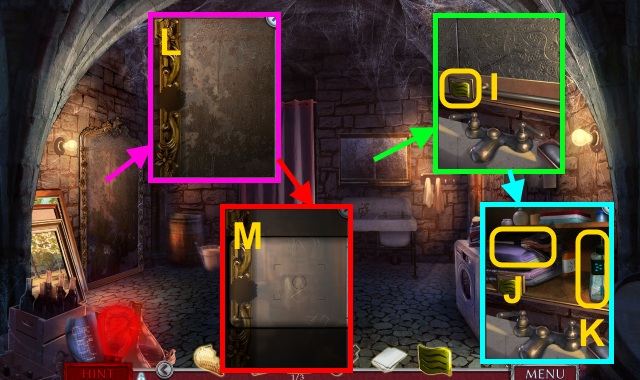
- Place the WATER EMBLEM (I); press it.
- Take the FEATHER DUSTER (J) and GLASS CLEANER (K).
- Use the GLASS CLEANER and HANDKERCHIEF (L); receive the GREASY CLOTH.
- Use the Camera (M).
- Walk down twice.
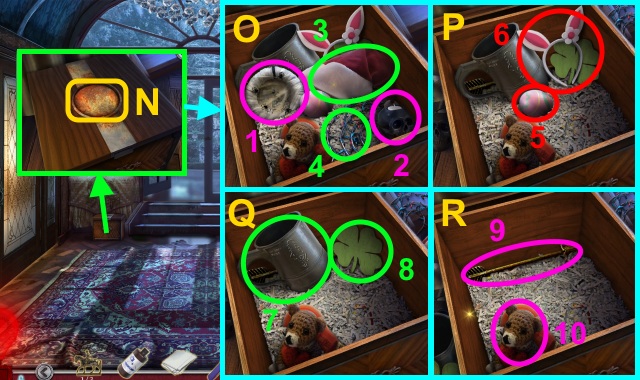
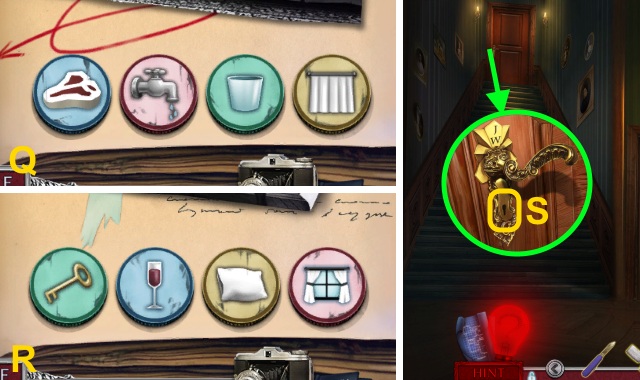
- Use the GREASY CLOTH for a mini-game (N).
- Solution (O-R).
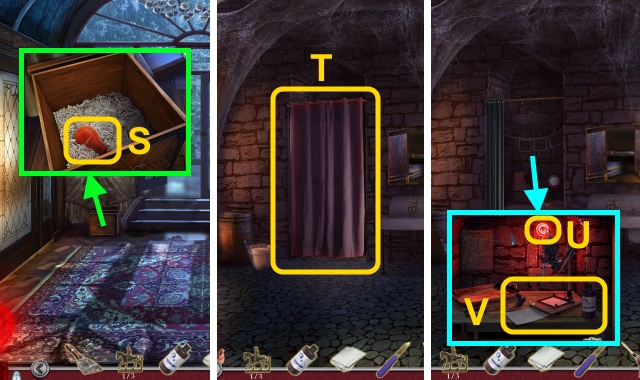
- Take the RED LIGHT BULB (S).
- Walk right twice.
- Open the curtain (T).
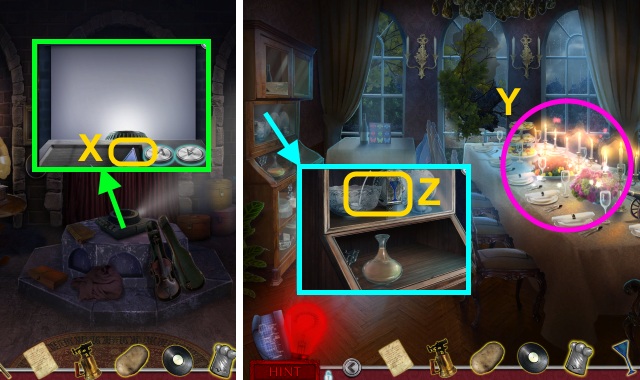
- Place the RED LIGHT BULB (U), PHOTO PAPER, and DEVELOPING SOLUTION (V).
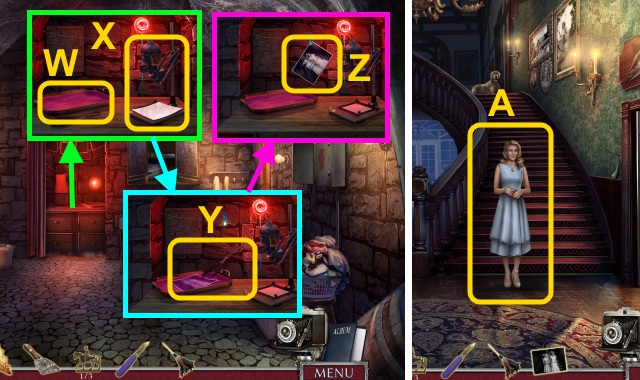
- Pour the solution (W); place the film and paper (X).
- Place the paper; use the tongs (Y).
- Hang the photo; take the STRANGE PHOTO (Z).
- Walk down three times.
- Give the STRANGE PHOTO (A).

- Take the DOOR KNOB (B).
- Walk forward, then right.
- Place the DOOR KNOB (C).
- Play the HOP to receive the SPADE (D).
- Walk down twice.
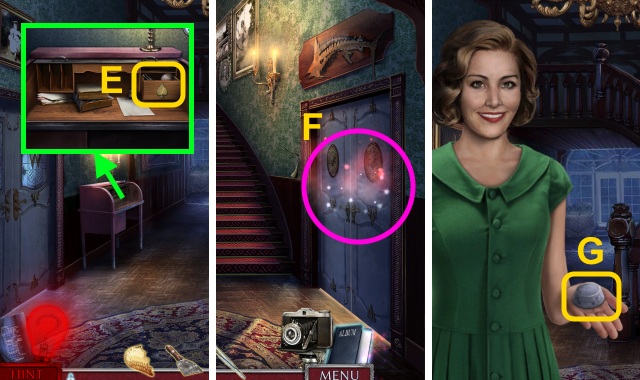
- Place the SPADE; take the TWEEZERS and ANNA EMBLEM (E).
- Play the HOP (F).
- Take the DIAL (G).
- Use the PUTTY KNIFE (H); use the TWEEZERS to take the HORSE FIGURINE (2/3) (I).
- Go to the Cellar.
- Place the DIAL (J); open the washer.
- Take the FISH KEY (K).
- Walk down three times.
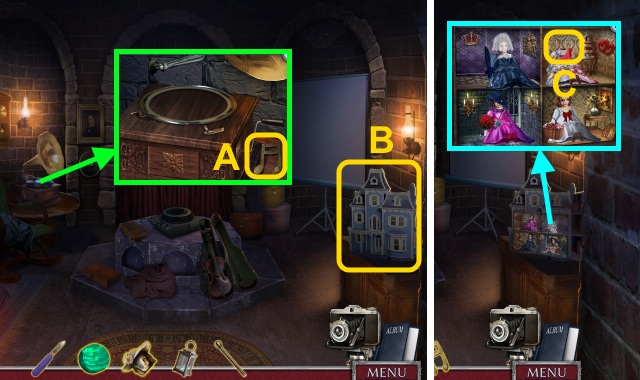
- Use the FISH KEY (L).
- Walk right.
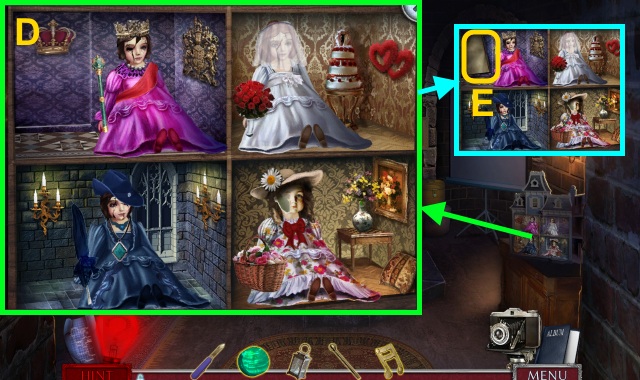
- Place ANNA EMBLEM for a mini-game (M).
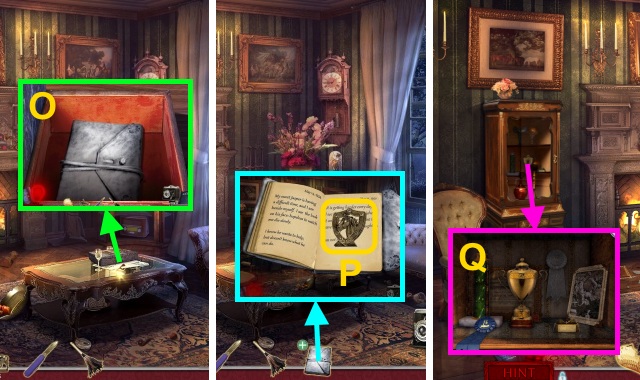
- Take ANNA’S JOURNAL (O).
- Read ANNA’S JOURNAL; take the HORSE FIGURINE (3/3) (P).
- Use the FEATHER DUSTER (Q); place the HORSE FIGURINE (3/3).
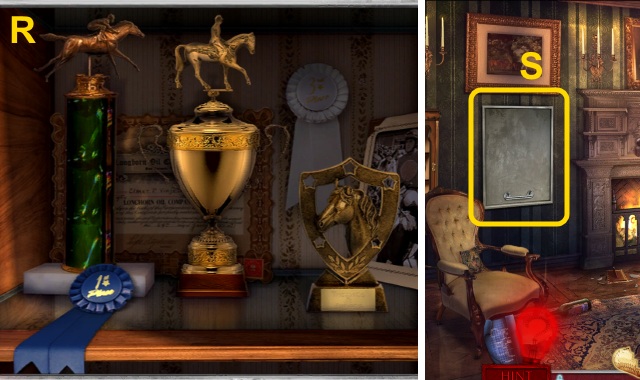
- Arrange the trophies (R).
- Examine the door (S).
Chapter 2: Simon
- Take the BUTLER’S POCKET WATCH (T).
- Walk down, upstairs, right, then left.
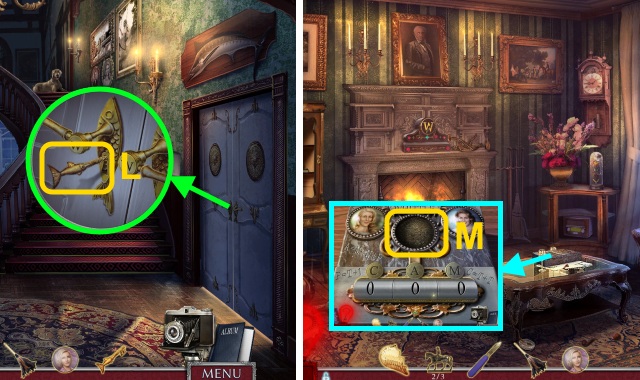
- Use the POCKET KNIFE; take the W EMBLEM (U).
- Use the Camera (V).
- Walk down twice, then left.
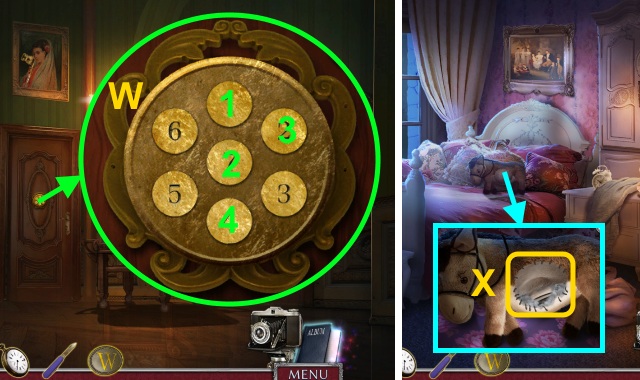
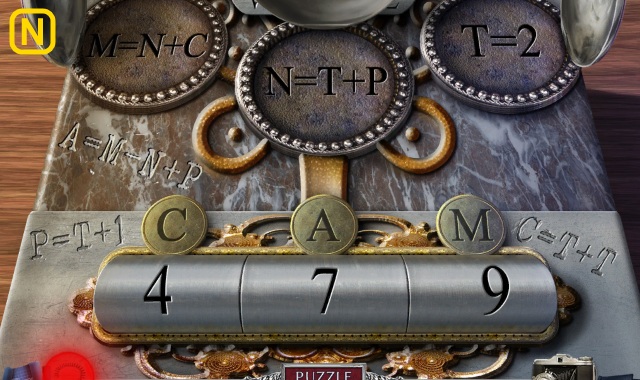
- Enter the code (W).
- Walk forward.
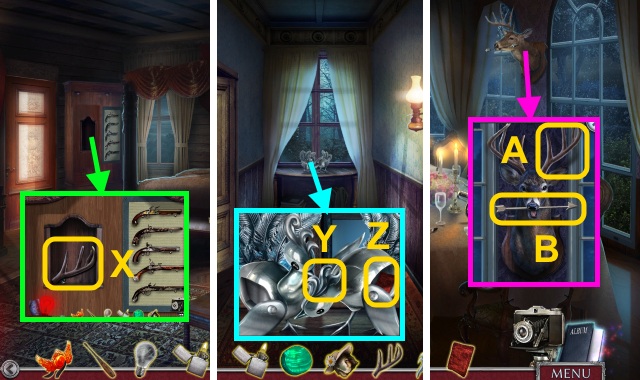
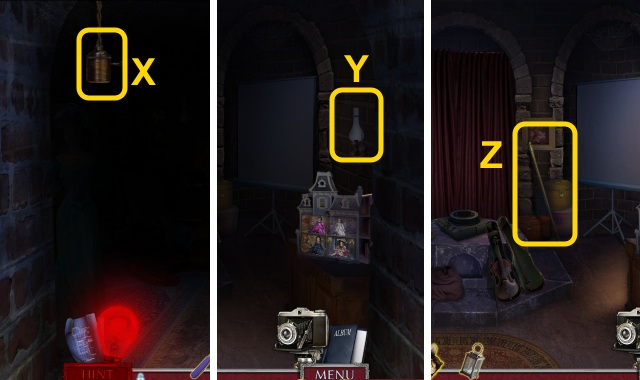
- Use the POCKET KNIFE; take the SECRET NOTE (X).
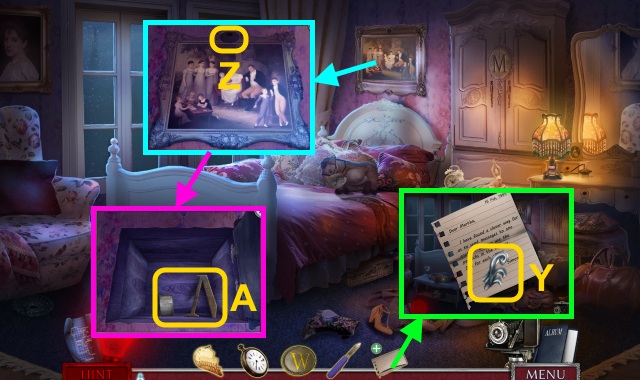
- Open the SECRET NOTE; take the PEACOCK PLUME (Y).
- Place the W EMBLEM (Z).
- Take the LIGHTER and LETTER PART (A).
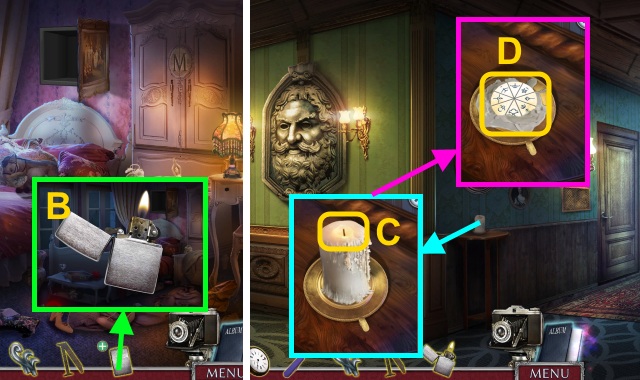
- Open the LIGHTER; light it (B).
- Walk down twice.
- Use the LIGHTER (C); take the SYMBOL DIAL (D).
- Walk right.
- Place the PEACOCK PLUME (E); take the note and STILETTO EMBLEM (F).
- Walk left.
- Place the SYMBOL DIAL for a mini-game (G).
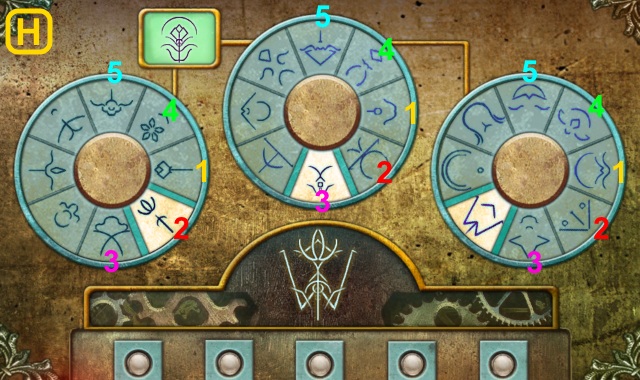
- Take the OWL BROOCH and DIAMOND RING (I).
- Place the OWL BROOCH (J).
- Take the ZIPPER PULL (K).
- Go to Martha’s Room.
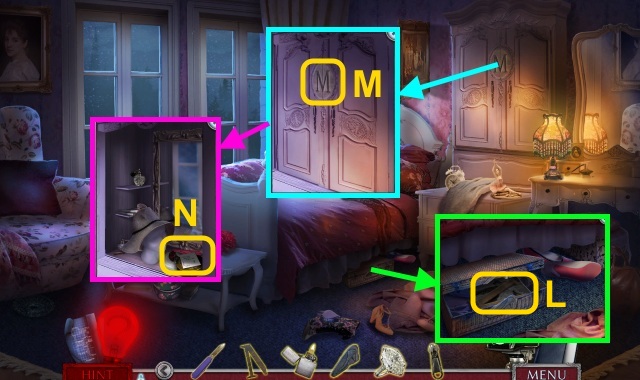
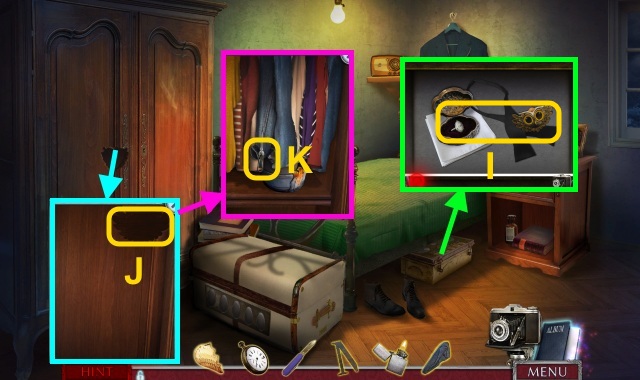
- Place the STILETTO EMBLEM (L); take the LETTER PART and photo.
- Place the LETTER PARTS (M).
- Take the note and MAKEUP COMPACT (N).
- Open the MAKEUP COMPACT; take the POWDER PUFF (O).
- Use the ZIPPER PULL; take the TINY HANDLE (P).
- Go to Simon’s Room.
- Use the POWDER PUFF; press the buttons (Q).
- Read the note (R); take the TRIBAL MASK and BOOK EMBLEM (S).
- Use the TINY HANDLE (T); take the SILVER HANDLE (U).
- Go to the Family Quarters.
- Place the SILVER HANDLE (V); place the HOP to receive the DESSERT FORK.
- Walk forward.
- Use the DESSERT FORK (W).
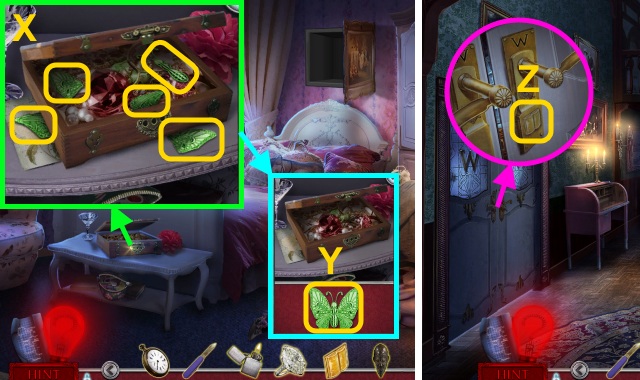
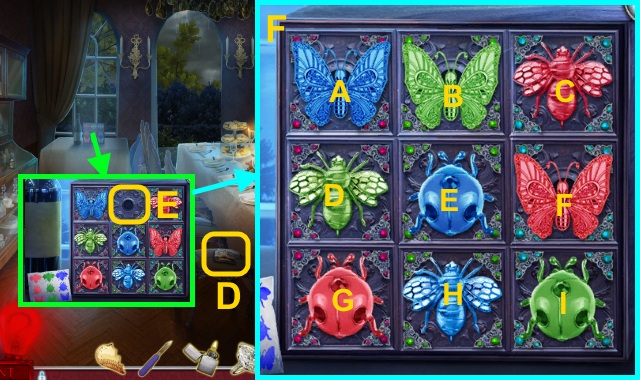
- Gather the pieces (X); take the EMERALD BUTTERFLY (Y).
- Walk down three times.
- Place the BOOK EMBLEM (Z).
- Walk left.
- Talk to Simon; give the BUTLER’S POCKET WATCH (A).
- Take the BRASS BUTTON (B).
- Walk down, then forward.
- Place the BRASS BUTTON (C); open the door.
- Walk left.
- Take the NATIVE MASK (D).
- Place the EMERALD BUTTERFLY for a mini-game (E).
- Solution (F): (A-B)(E-H)(H-I)(E-B)(D-A).
- (E-F)(E-D)(C-B)(B-A)(D-G)(E-H)(F-I).
- Take the HEX KEY (G).
- Walk down twice, then left.
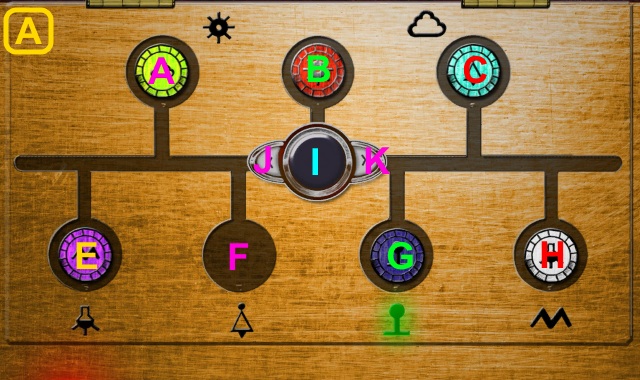
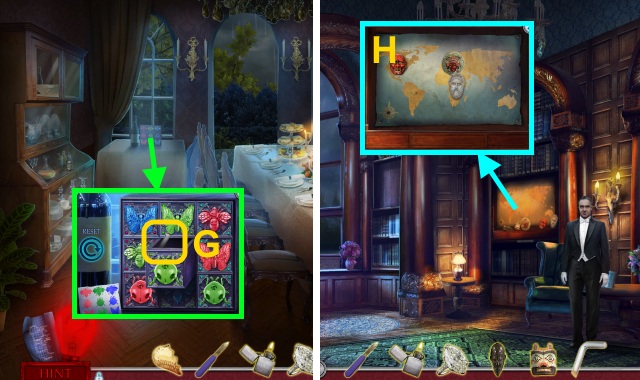
- Place the TRIBAL MASK and NATIVE MASK for a mini-game (H).
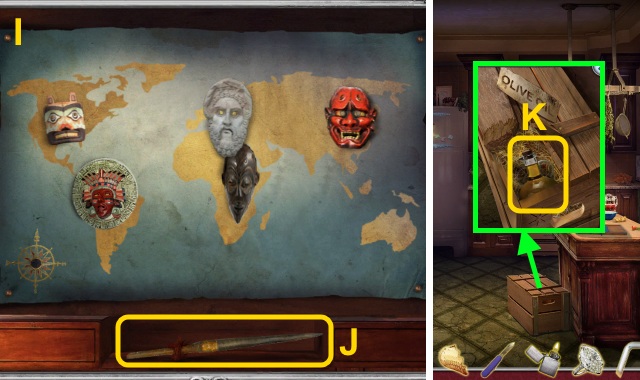
- Solution (I).
- Take the SPEAR (J).
- Go to the Kitchen.
- Use the SPEAR; take the OLIVE OIL (K).
- Walk right.
- Use the HEX KEY (L).
- Take the SCREWDRIVER (M).
- Go to Simon’s Room.
- Move the clothes; use the OLIVE OIL (N).
- Open the case; take the BUTLER’S SCRAPBOOK (O).
- Go to the Library.
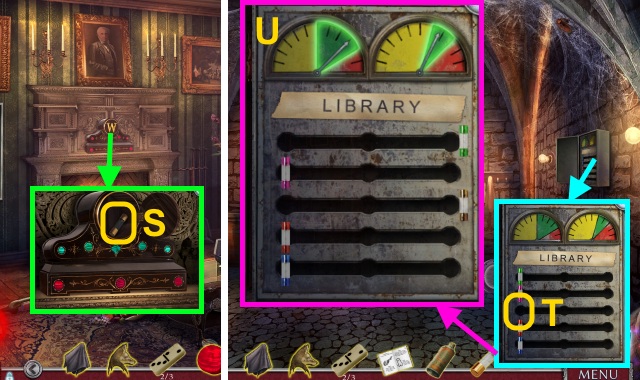
- Give the BUTLER’S SCRAPBOOK for a mini-game (P).
- Solution (Q-R); take JASPER’S KEY.
- Go to the Family Quarters.
- Use JASPER’S KEY (S).
- Walk left.
Chapter 3: Jasper
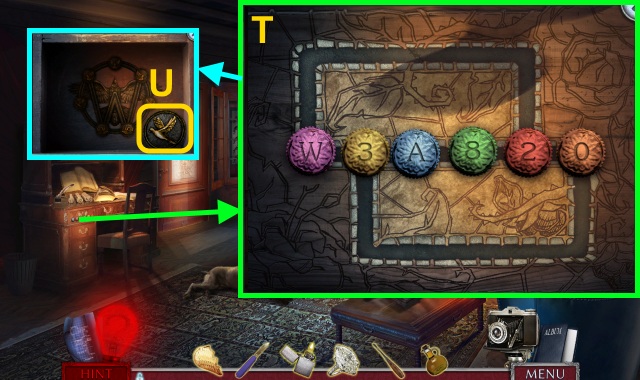
- Examine the drawer for a mini-game (T).
- Solution: W-0-W-8-2-8-3-A-2.
- Take the DOVE MEDALLION (1/2) (U).
- Take the MEDICAL TAPE (V).
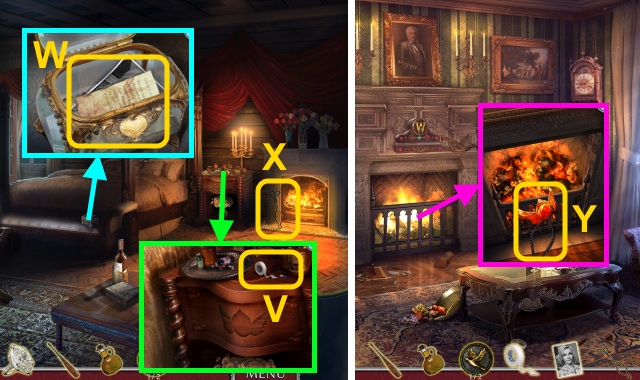
- Place the BROKEN HEART; take the letter and ANNA’S PORTRAIT (W).
- Take the TONGS (X).
- Go to the Lounge.
- Use the TONGS (Y); receive the BLAZING BROOCH.
- Walk down twice.
- Play the HOP to receive the BRANDY (Z).
- Use the SCREWDRIVER (A) and OIL (B); take the LIGHT BULB.
- Walk forward twice, then left.
- Use the LIGHTER (C).
- Play the HOP to receive the CHICKEN LEG (D).
- Pour the bottles and BRANDY (E); take the GREEN GEM (F).
- Go to Jasper’s Room.
- Give the CHICKEN LEG (G).
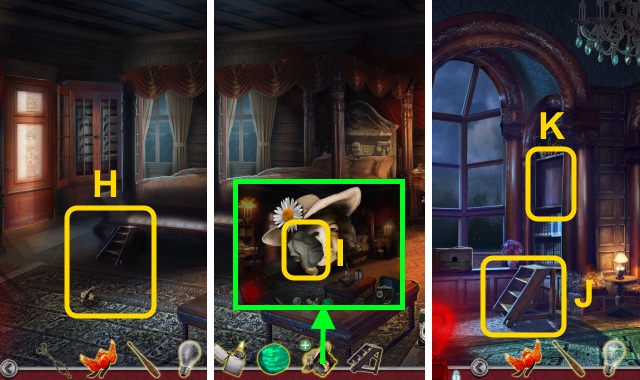
- Take the DOLL HEAD and STEPLADDER (H).
- Examine the DOLL HEAD; take the note and DOLL HEAD (I).
- Go to the Library.
- Place the STEPLADDER (J).
- Examine the shelf for a mini-game (K).
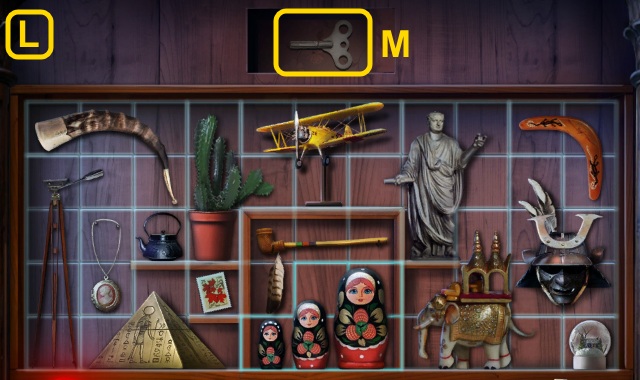
- Solution (L).
- Take the WIND-UP KEY (M).
- Go to Simon’s Room.
- Use the WIND-UP KEY (N); take the SPRING (O).
- Go to the Library.
- Place the SPRING (P) and MEDICAL TAPE (Q).
- Use the DIAMOND RING; take the BROKEN HOURGLASS (R).
- Go to Jasper’s Room.
- Use the BROKEN HOURGLASS (S); close the lid.
- Take the KEY MOLD (T).
- Go to the Lounge.
- Place the KEY MOLD (U); use the TONGS to receive the GLASS GUN.
- Go to Jasper’s Room.
- Place the GLASS GUN for a mini-game (V).

- Take the ANTLER and PEACOCK PLUME (X).
- Walk down twice, then right.
- Place the PEACOCK PLUME (Y); take the CANVAS PATCH (Z).
- Go to the Dining Room.
- Place the ANTLER (A); take the STONE ARROW (B).
- Place the CANVAS PATCH; take the UMBRELLA (C).
- Walk down.
- Examine the door (D); use the UMBRELLA.
- Walk forward.
- Move the cloth; use the SCREWDRIVER (E).
- Turn the valve (F).
- Play the HOP to receive the BRONZE WING (G).
- Walk right.
- Take the TEA LIGHT (H); place the BLAZING BROOCH.
- Take the BRONZE BROOCH (I).
- Go to Jasper’s Room.
- Place the TEA LIGHT (J); use the LIGHTER.
- Close the lantern; take the LANTERN (K).
- Place the BRONZE BROOCH (L).
- Take the FILE FOLDER and picture (M).
- Read through the FILE FOLDER; take the ARCHER STMBOL (N).
- Go to the Gazebo.
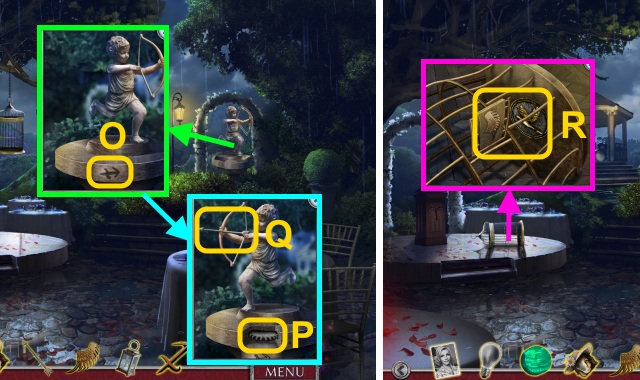
- Place the ARCHER SYMBOL (O).
- Turn the gear (P); give the STONE ARROW (Q).
- Place the BRONZE WING; open the cage (R).
- Take the DOVE MEDALLION (2/2).
- Walk down.
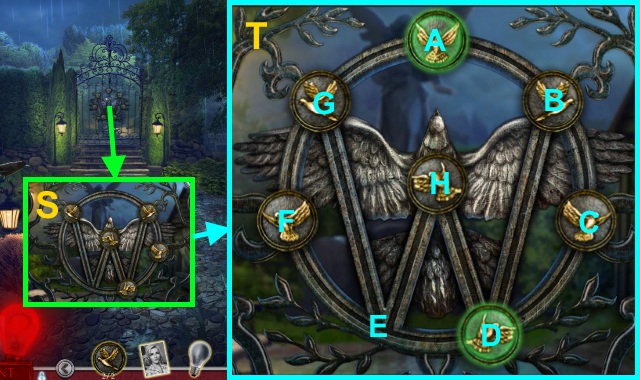
- Place the DOVE MEDALLION (2/2) for a mini-game (S).
- Solution (T): F-G-E-D-C-B-D-E-H.
- Walk left.
Chapter 4: Charmaine
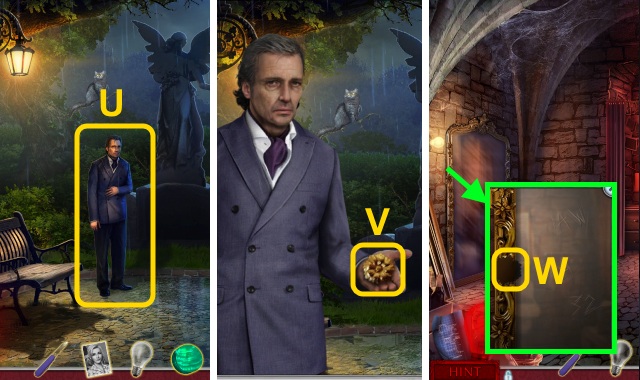
- Talk to Jasper; give ANNA’S PORTRAIT (U).
- Take the BRASS FLOWER (V).
- Go to the Cellar.
- Place the BRASS FLOWER (W).
- Walk left.
- Place the LIGHT BULB (X).
- Turn on the light (Y).
- Take the CURTAIN ROD (Z).
- Take the MUSIC NOTE EMBLEM (A).
- Open the dollhouse (B).
- Place the DOLL HEAD for a mini-game (C).
- Solution (D).
- Take the FOLDED LETTER (E).
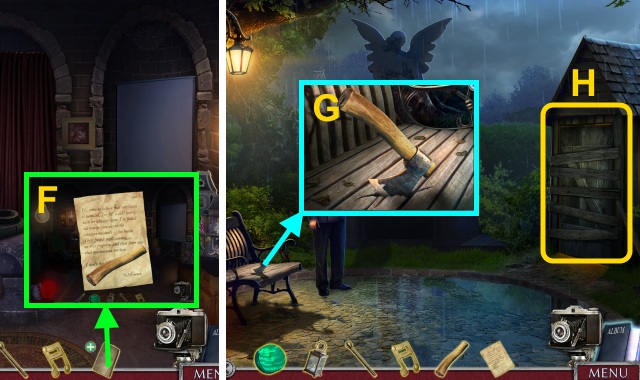
- Open the FOLDED LETTER; take the WOODEN HANDLE and ANNA’S LETTER (F).
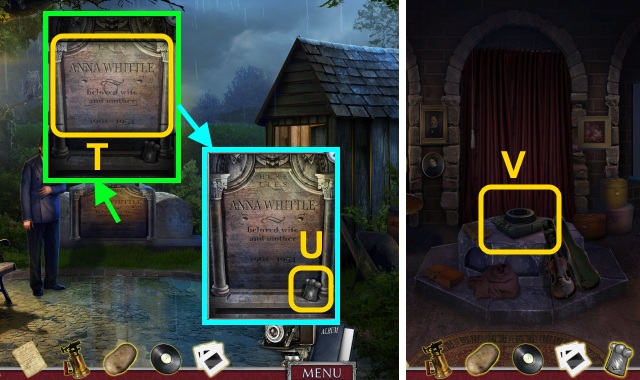
- Go to the Family Cemetery.
- Place the WOODEN HANDLE; take the HATCHET (G).
- Use the HATCHET (H).
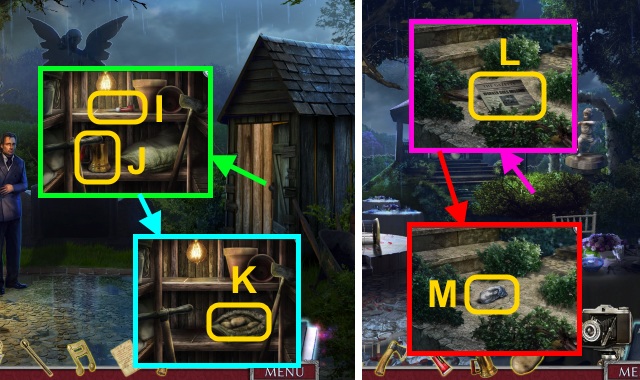
- Take the ADHESIVE (I) and BLOWTORCH (J).
- Use the POCKET KNIFE; take the POTATO (K).
- Walk down, then right.
- Use the HATCHET; read the newspaper (L).
- Take the STONE HAND (M).
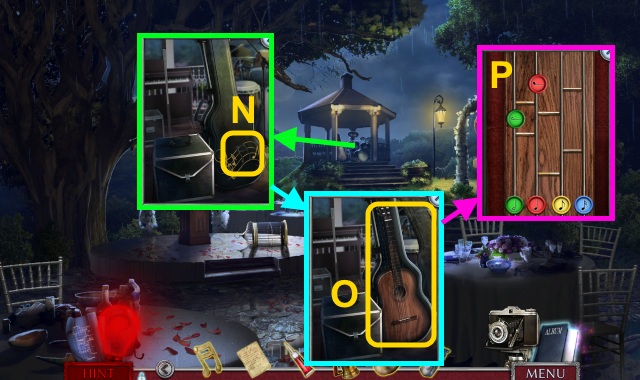
- Place the MUSIC NOTE EMBLEM (N).
- Examine the guitar for a mini-game (O).
- Match the notes (P).
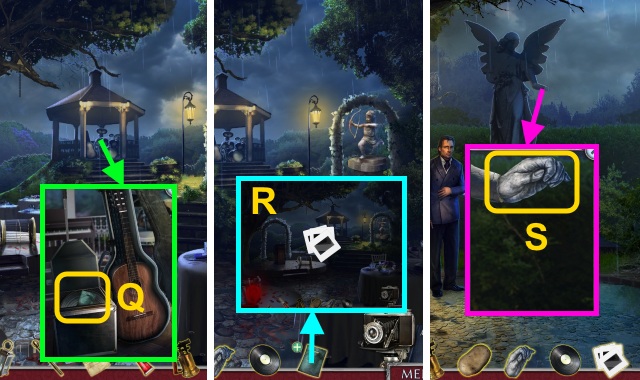
- Open the case; take the PLASTIC BAG and RECORD (Q).
- Examine the PLASTIC BAG; take the SLIDES (R).
- Walk down, then left.
- Use the ADHESIVE and STONE HAND (S); give the LANTERN.
- Use the Camera (T); take the CHEF EMBLEM (U).
- Go to the Secret Room.
- Place the SLIDES (V).
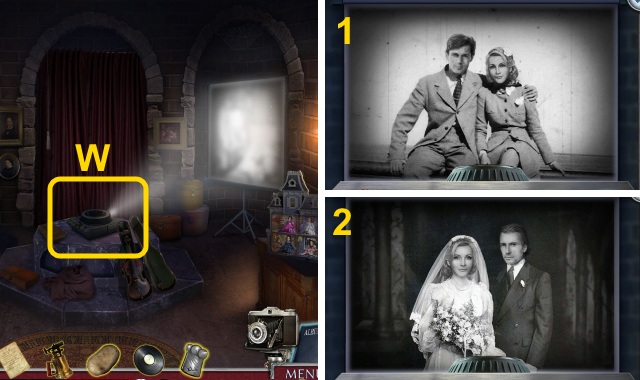
- Examine the projector for a mini-game (W).
- Solution (1-6).
- Take the MARTINI GLASS (X).
- Go to the Dining Room.
- Play the HOP to receive the SALT (Y).
- Place the MARTINI GLASS; take the LADLE (Z).
- Walk down, then right.
- Play the HOP to receive the COOKBOOK (A).
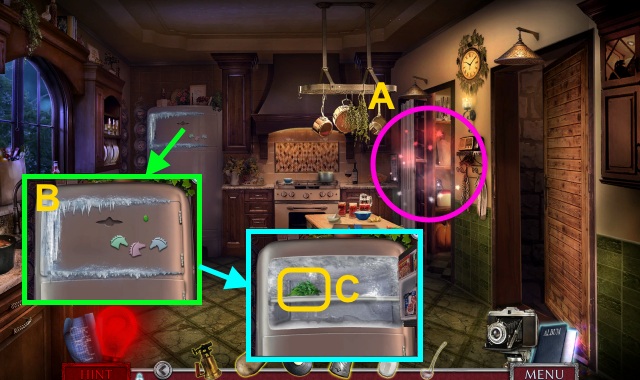
- Use the BLOWTORCH (B); open the freezer.
- Take the HERBS (C).
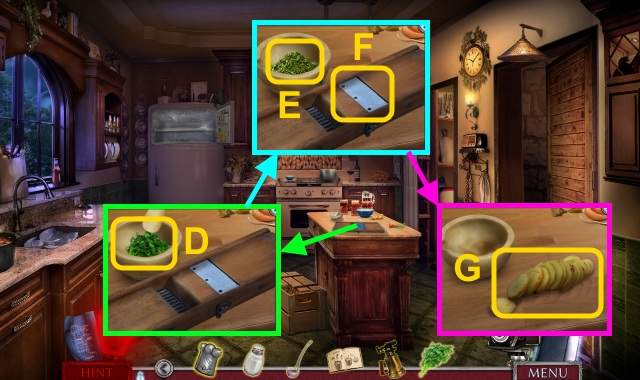
- Place the HERBS (D); use the pestle 3x.
- Take the GROUND HERBS (E); use the POTATO (F).
- Take the SLICED POTATOES (G).
- Place the CHEF EMBLEM (H).
- Take the BREAD (I) and STRAINER (J).
- Examine the BREAD; take the BREAD CRUMBS (K).
- Place the COOKBOOK (L).
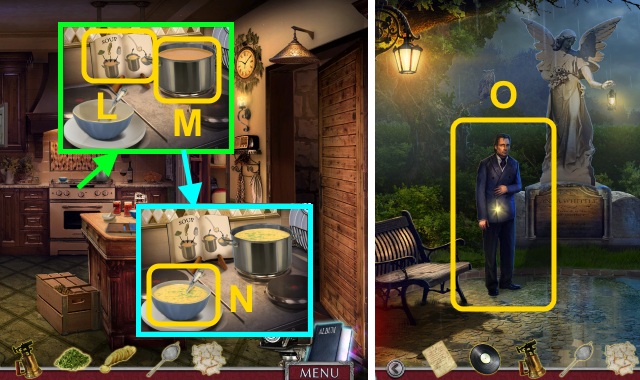
- Use the SLICED POTATOES, GROUND HERBS, and SALT (M); use the LADLE.
- Take the SOUP (N).
- Go to the Family Cemetery.
- Give the SOUP (O).
- Go to the Servant Quarters.
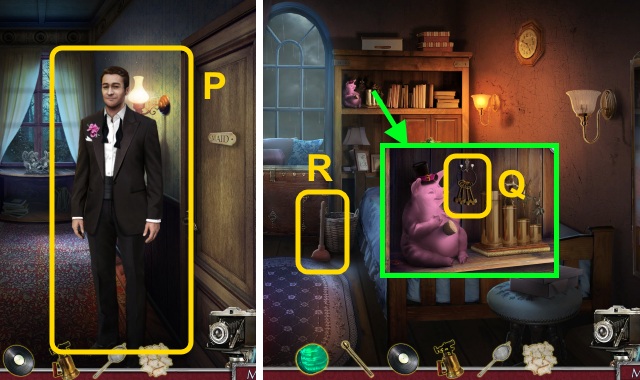
- Give ANNA’S LETTER (P).
- Walk right.
- Take the KEY RING (Q).
- Take the PLUNGER (R).
- Move the pillows; take the PHONOGRAPH NEEDLE (S).
- Go to Jasper’s Room.
- Use the KEY RING; select the arrow (T).
- Select the key (U).
- Walk left.
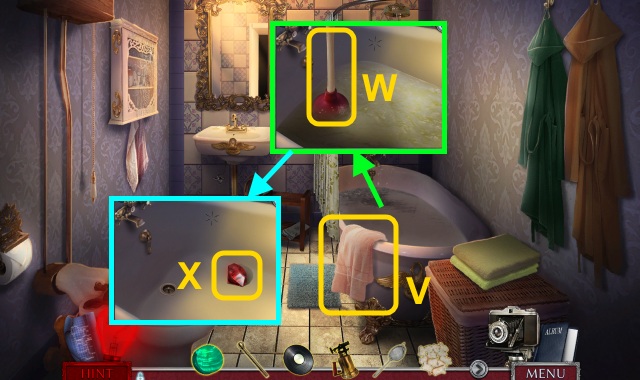
- Take the CLEAN TOWEL (V).
- Use the PLUNGER (W).
- Take the RUBY EYE (X).
- Go to the Secret Room.
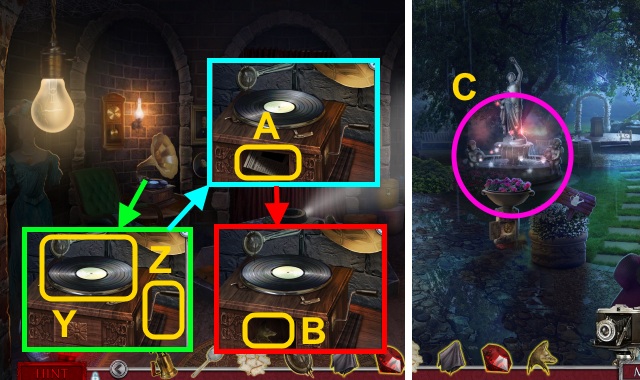
- Place the RECORD and PHONOGRAPH NEEDLE (Y); turn the handle (Z).
- Take the newspaper (A).
- Take the WOLF CAMEO (B).
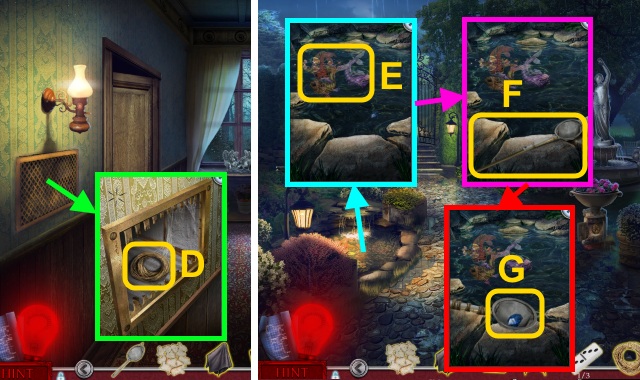
- Go to the Garden.
- Play the HOP to receive the DOMINO (1/3) (C).
- Go to the Servant Quarters.
- Use the BLOWTORCH; take the STRING (D).
- Go to the Garden.
- Give the BREAD CRUMBS (E).
- Place the STRAINER and CURTAIN ROD; use the STRING (F).
- Take the SAPPHIRE EYE (G).
- Go to the Second Floor Landing.
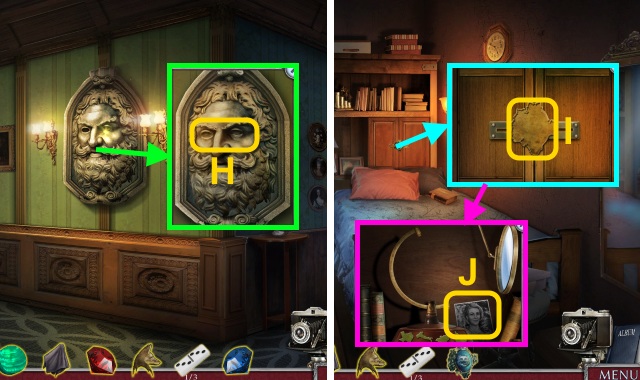
- Place the RUBY EYE and SAPPHIRE EYE (H); receive the KITTY CAMEO.
- Walk right twice.
- Place the KITTY CAMEO (I).
- Take the MARTHA PHOTO (J).
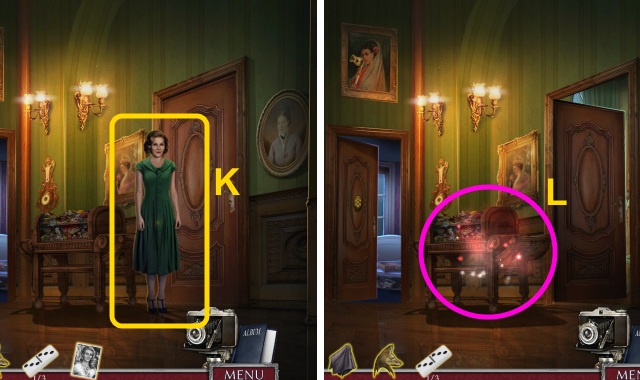
- Walk down twice, then left.
- Give the MARTHA PHOTO (K).
- Play the HOP to receive the WOODEN BUTTON (L).
- Walk right.
Chapter 5: Frank
- Take the DOG TRAINING BOOK (M).
- Open the DOG TRAINING BOOK; take the RED GEM (N) and DOG TRAINING BOOK.
- Take the DOMINO (2/3) (O).
- Go to Charmaine’s Room.
- Place the WOODEN BUTTON (P); press the locks in order (Q).
- Take the PAINT SOLVENT (R).
- Go to the Lounge.
- Place the GREEN GEM and RED GEM; take the FUSE (S).
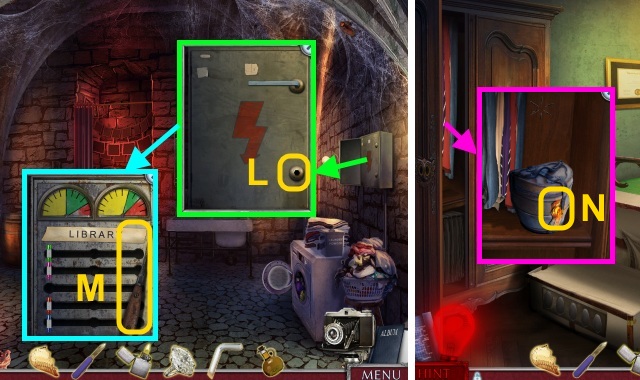
- Go to the Cellar.
- Place the FUSE for a mini-game (T).
- Solution (U).
- Walk left.
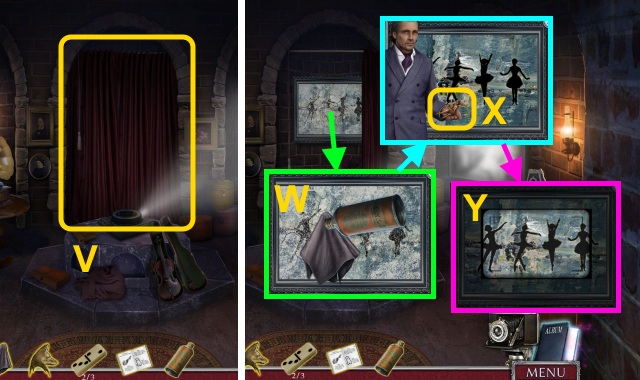
- Open the curtain (V); use the CLEAN TOWEL and PAINT SOLVENT (W).
- Take the BALLERINA FIGURINE (X).
- Use the Camera (Y).
- Go to Charmaine’s Room.
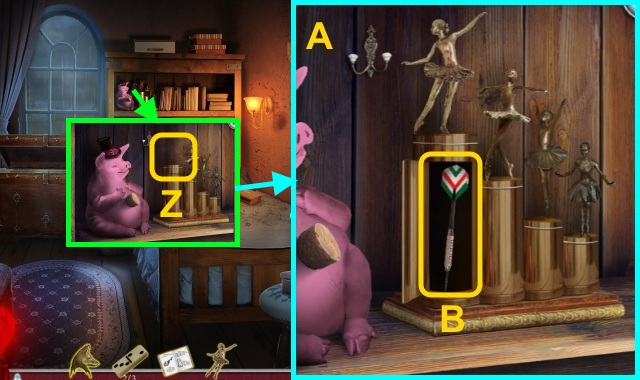
- Place the BALLERINA FIGURINE for a mini-game (Z).
- Solution (A); take the DART (B).
- Go to the Library; walk forward.
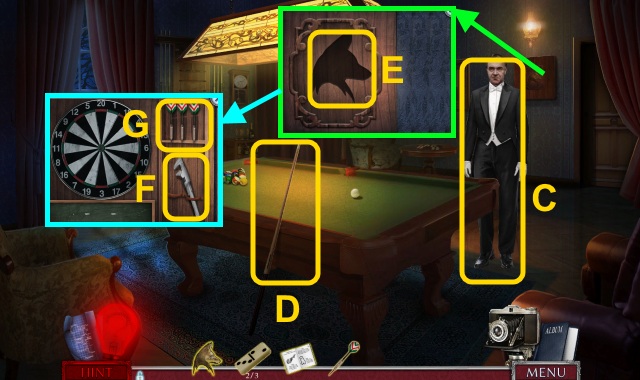
- Give the DOG TRAINING BOOK (C).
- Take the POOL CUE (D).
- Place the WOLF CAMEO (E).
- Take the WRENCH (F); place the DART for a mini-game (G).
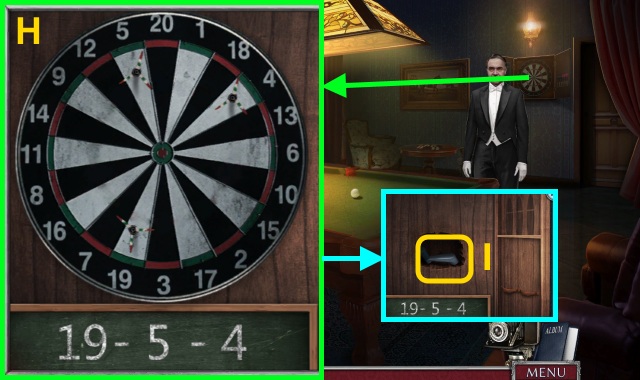
- Solution (H).
- Take the WINDOW HANDLE (I).
- Go to the Private Bathroom.
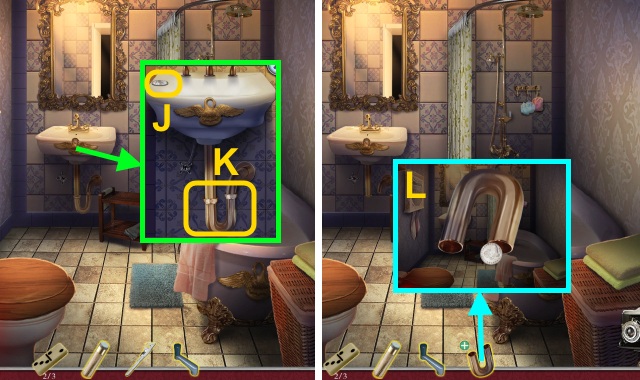
- Examine the coin (J); use the WRENCH (K).
- Receive the PIPE.
- Examine the PIPE; take the SILVER DOLLAR (L).
- Go to Charmaine’s Room.
- Place the SILVER DOLLAR (M); take the DOMINO (3/3) (N).
- Go to the Billiard Room.
- Place the DOMINO (3/3) for a mini-game (O).
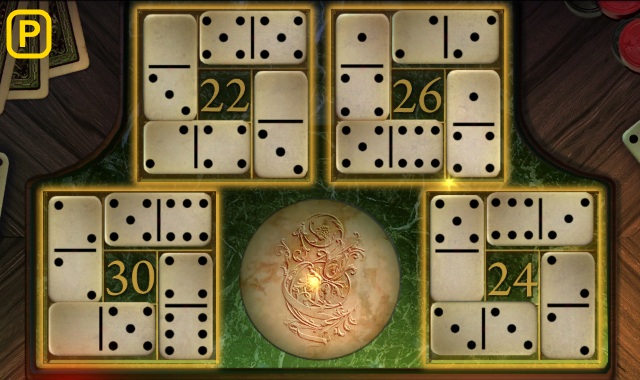
- Solution (P).
- Receive the VANITY PHOTO.
- Go to Carol’s Room.
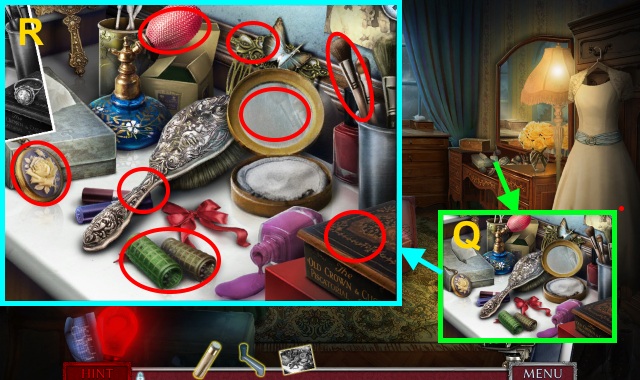
- Use the OLD PHOTO for a mini-game (Q).
- Solution (R).
- Receive the PERFUME.
- Go to the Private Bathroom.
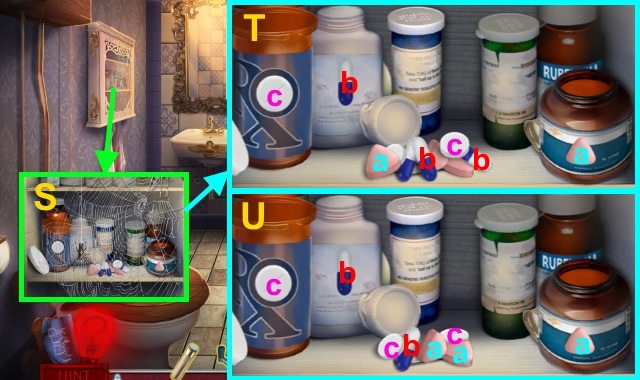
- Use the PERFUME for a mini-game (S).
- Solution (T-U).
- Take the CUE BALL and PAPER CLIP (V).
- Walk down twice, then right.
- Use the PAPER CLIP for a mini-game (W).
- Solution (X-Y).
- Take the NECKTIE (Z).
- Go to the Billiard Room.
- Place the CUE BALL (A); use the POOL CUE.
- Take the MINIATURE GLOBE (B).
- Use the NECKTIE (C) and WINDOW HANDLE (D); take the SILVER G (E).
- Go to Charmaine’s Room.
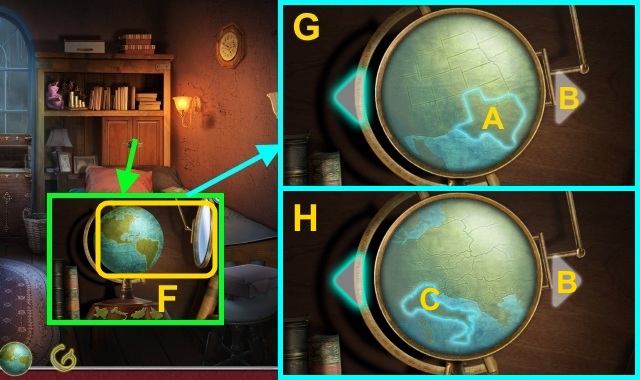
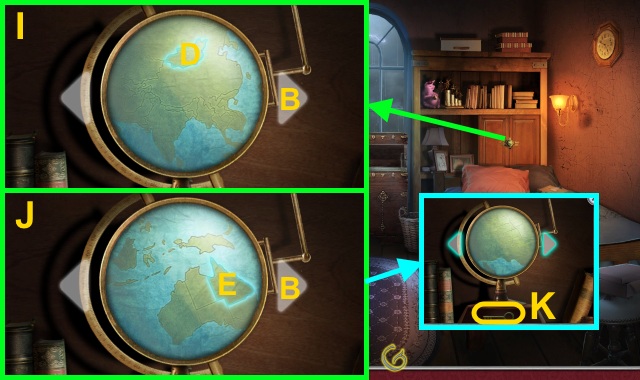
- Place the MINIATURE GLOBE; move the lens for a mini-game (F).
- Solution (G-J): A-Bx2-C-B-D-B-E.
- Take the MATCHING KEYS (1/2) (K).
- Walk down three times.
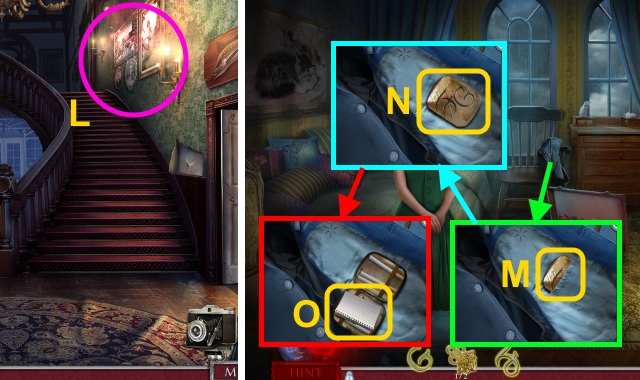
- Play the HOP to receive the SILVER F (L).
- Go to Carol’s Room.
- Open the coat; examine the pocket (M).
- Place the SILVER G and SILVER F (N).
- Take the note and MATCHING KEYS (2/2) (O).
- Go to Charmaine’s Room.
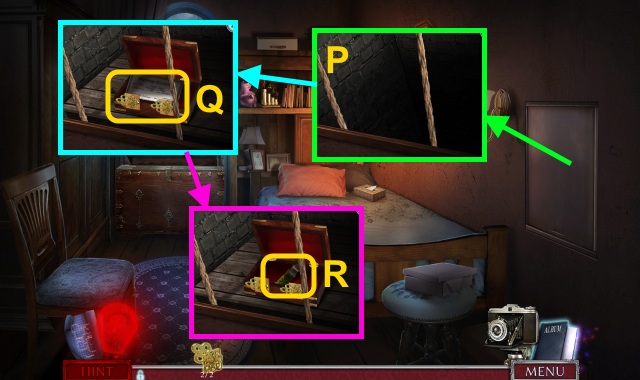
- Open the door; pull the rope (P).
- Use the MATCHING KEYS (2/2); take the MARRIAGE CERTIFICATE (Q).
- Take the ARSENIC (R).
- Go to Carol’s Room.
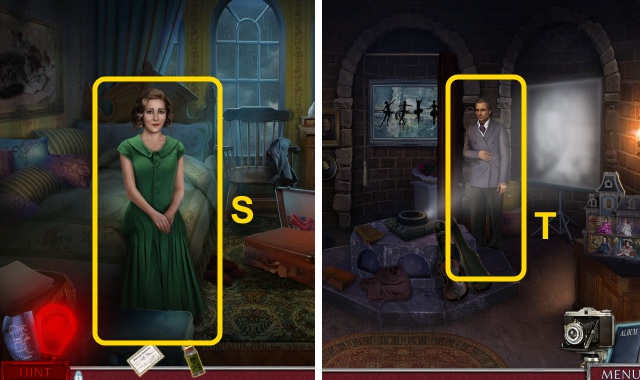
- Give the MARRAGE CERTIFICATE (S).
- Go to the Secret Room.
- Give the ARSENIC (T).
- Congratulations! you have completed Dark Canvas: A Murder Exposed.


 Secret Trails: Frozen Heart Walkthrough, Guide, & Tips
 Surface: Alone in the Mist Walkthrough, Guide, & Tips
 Hidden Mysteries: Vampire Secrets Walkthrough, Guide, & Tips
 Vampireville Walkthrough, Guide, & Tips
 Enlightenus II: The Timeless Tower Walkthrough, Guide, & Tips