Surface: Alone in the Mist Walkthrough, Guide, & Tips
Surface: Alone in the Mist Walkthrough
Welcome to the Surface: Alone in the Mist Walkthrough
All the adults have vanished. Is this a child’s dream, or nightmare?
Whether you use this document as a reference when things get difficult or as a road map to get you from beginning to end, we’re pretty sure you’ll find what you’re looking for here.
This document contains a complete Surface: Alone in the Mist game walkthrough featuring annotated screenshots from actual gameplay!
We hope you find this information useful as you play your way through the game. Use the walkthrough menu below to quickly jump to whatever stage of the game you need help with.
Remember to visit the Big Fish Games Forums if you find you need more help. Have fun!
This walkthrough was created by Chrysanne Westin, and is protected under US Copyright laws. Any unauthorized use, including re-publication in whole or in part, without permission, is strictly prohibited.
General Tips
- This is the official guide for Surface: Alone in the Mist.
- This guide will not mention each time you have to zoom into a location; the screenshots will show each zoom scene.
- Hidden-object puzzles are referred to as HOPs. This guide will not show HOP solutions. It will identify the location of the HOP and the inventory item acquired.
- This guide will show solutions for non-random puzzles. Please read the in-game instructions for each puzzle.
Chapter 1: My Birthday

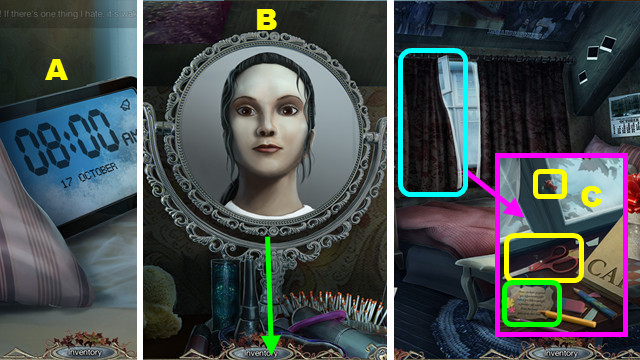
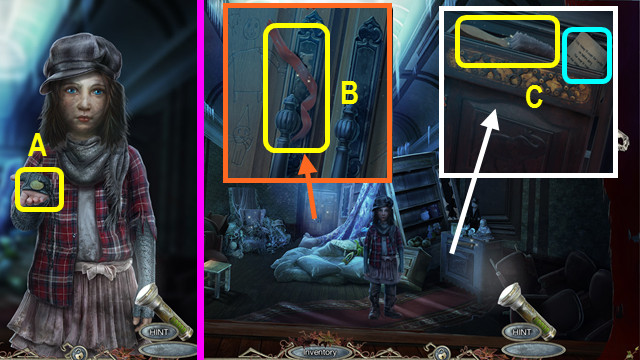
- Select the clock (A).
- Exit the mirror (B).
- Open the drapes and read the note; take the PUSH PIN and SCISSORS (C).

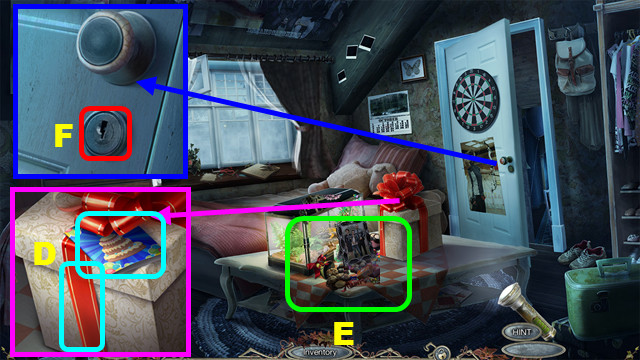
- Read the card; use the SCISSORS on the ribbon (D).
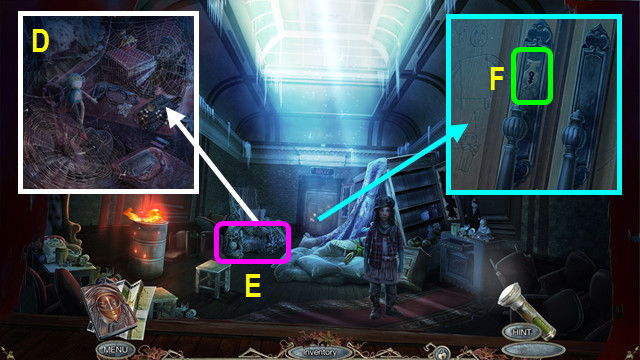
- Play the HOP; earn the TRUNK (E).
- Take the CLIP from the TRUNK (inventory).
- Use the CLIP (F); walk forward.

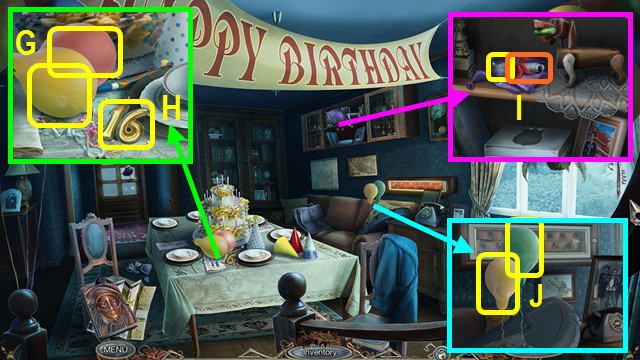
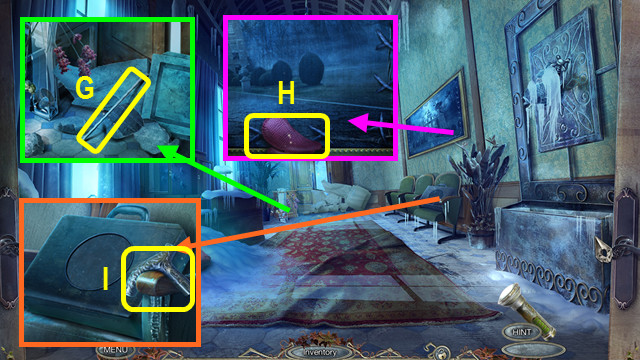
- Use the PUSH PIN 2x; earn the 1/5 and 2/5 LETTERS (G).
- Take the NUMBER 16 (H).
- Combine the TRUNK and NUMBER 16; take the CAMERA (inventory).
- Use the PUSH PIN; read the note and take the CODE REEL (I).
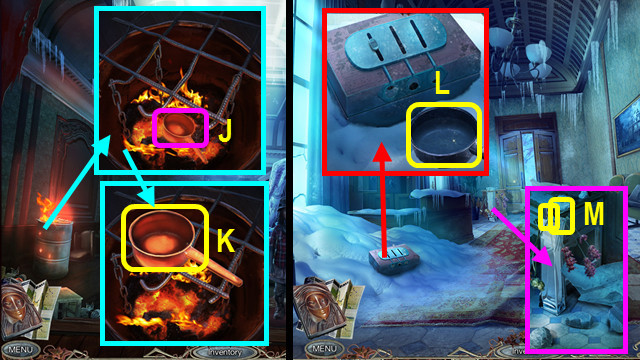
- Use the PUSH PIN 2x; earn the 3/5 and 4/5 LETTERS (J).

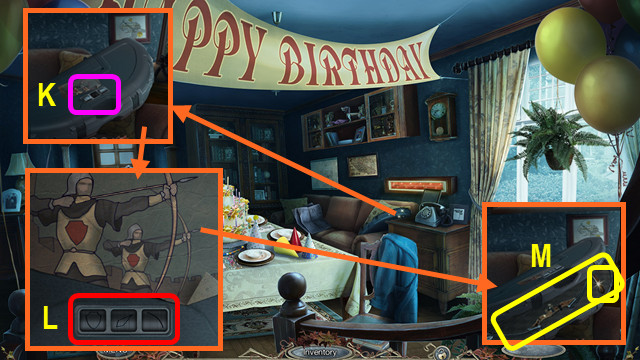
- Place the CODE REEL (K).
- Solution (L).
- Take the BOW and DOG TAIL (M).
- Talk to Mary.
- Walk forward.

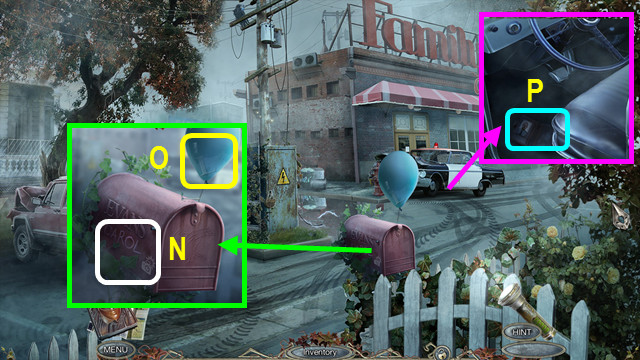
- Use the CAMERA (N); take the PHOTO.
- Use the PUSH PIN; earn the 5/5 LETTERS (O).
- Open the door; look at the wallet (P).
- Walk down 2x.

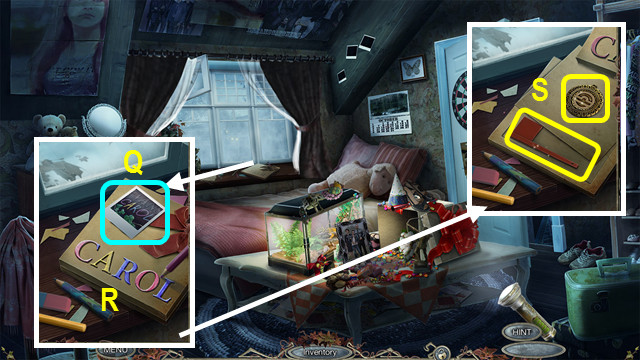
- Place the 5 LETTERS and PHOTO (Q).
- Solution (R).
- Take the GOLDEN PENDANT and FLAG (S).
- Walk forward.

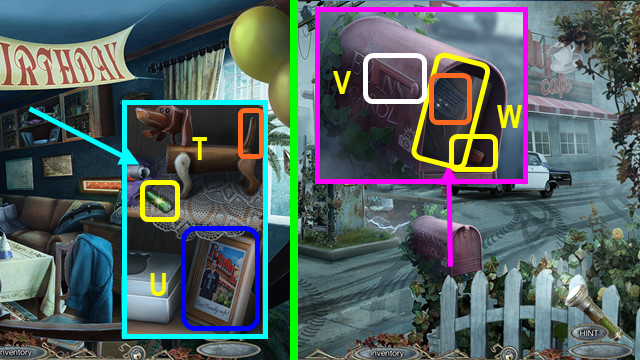
- Place the DOG TAIL; take the 1/2 BATTERY (T).
- Look at the photo (U).
- Walk forward.
- Place the FLAG; lower the flag (V).
- Read the note; take the PARCEL and SCREWDRIVER (W).
- Combine the PARCEL and SCISSORS; take the WALL PICTURE (inventory).
- Walk down.

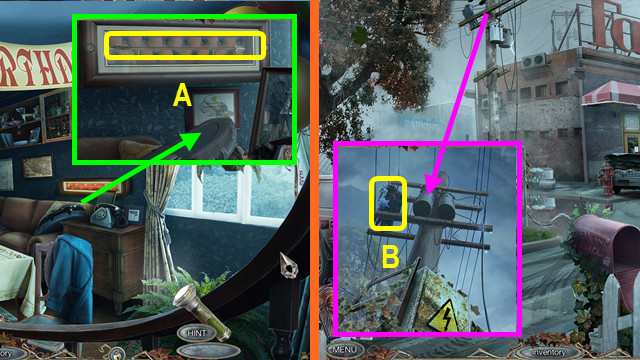
- Use the screwdriver; earn the ARROW (A).
- Combine the BOW and ARROW to make the BOWSTRING (inventory).
- Walk forward.
- Use the BOWSTRING; earn the POLICE KEYS (B).

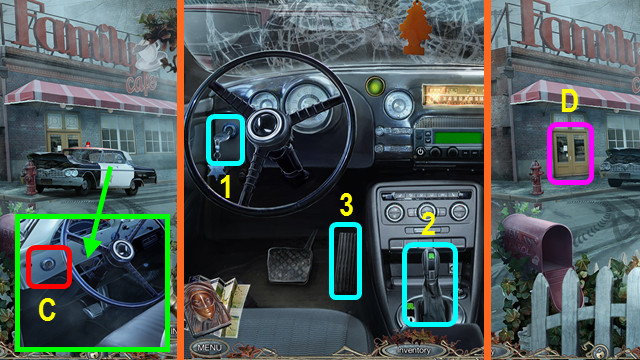
- Use the POLICE KEYS (C).
- Select 1-3.
- Open the doors; enter the Café (D).

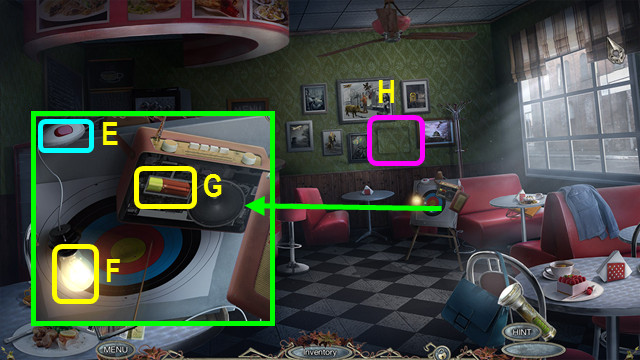
- Select (E); take the BULB (F).
- Use the SCREWDRIVER; take the 2/2 BATTERY (G).
- Place the WALL PICTURE (H).

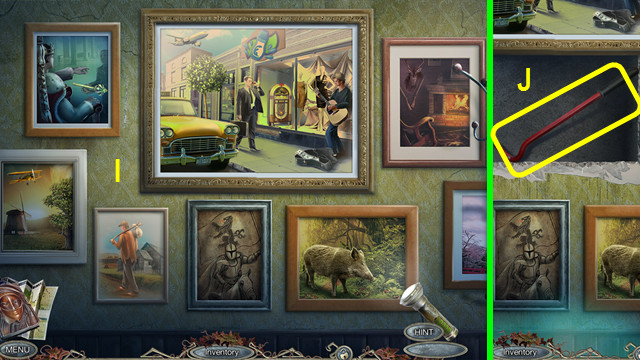
- Solution (I).
- Take the CROWBAR (J).
- Walk down.

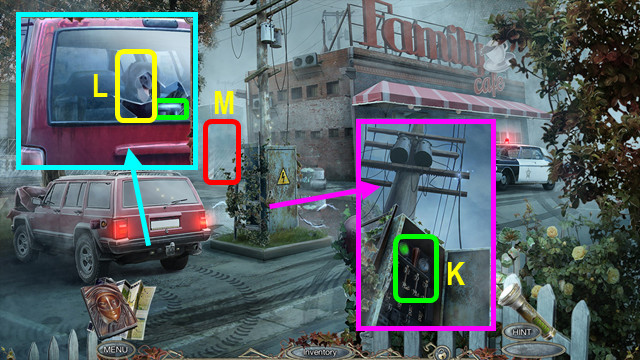
- Use the CROWBAR, open the door, and pull the switch (K).
- Use the CROWBAR and open the door; earn the DOG (L).
- Walk forward (M).

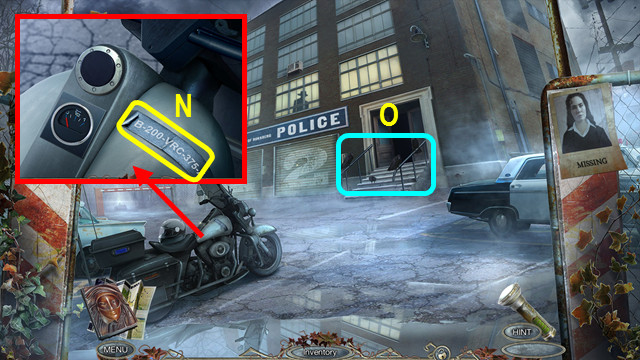
- Take the STICKER (N).
- Use the DOG (O).
- Walk forward.

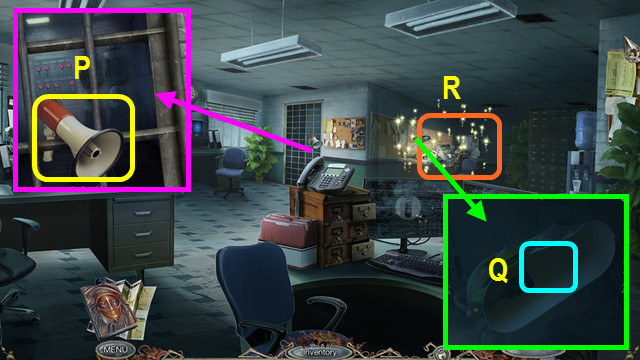
- Take the SPEAKER (P).
- Place the BULB (Q).
- Select the tape recorder and play the HOP; earn the POLICE BADGE (R).
- Walk down 3x.

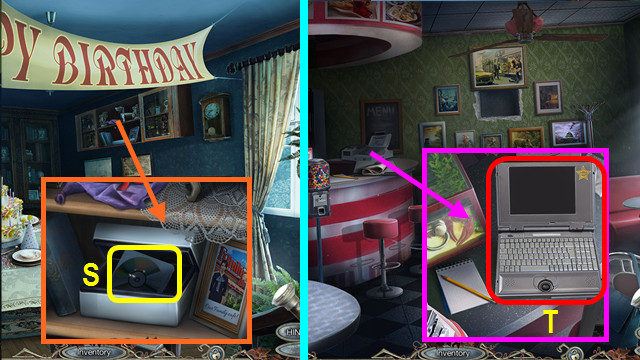
- Place the POLICE BADGE; take the CD (S).
- Go to the Café.
- Read the paper; open and turn on the laptop, and then enter the CD (T).

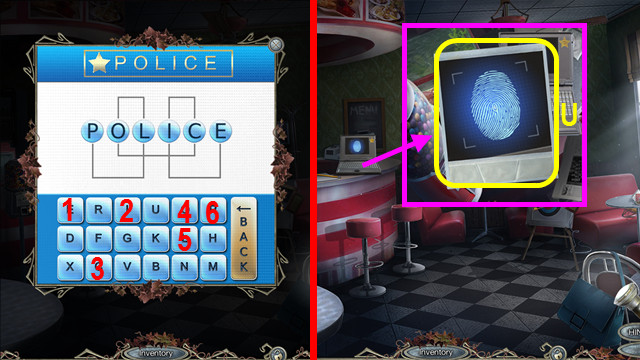
- Select 1-6.
- Use the CAMERA; take the SAFE CODE (U).
- Go to the Police Station.

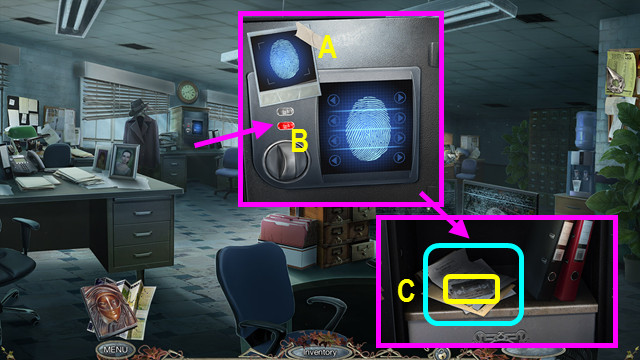
- Place the SAFE CODE (A).
- Solution (B).
- Take the BLADE; read the note (C).
- Walk down 2x.

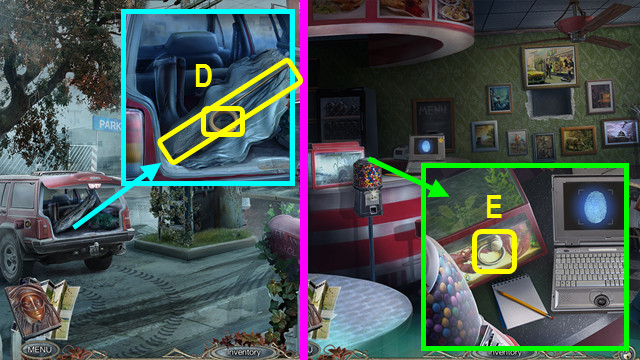
- Use the BLADE; take the FISHING LINE and NET (D).
- Enter the Café.
- Use the NET to take the DRAWER PULL (E).
- Go to the Police Station.

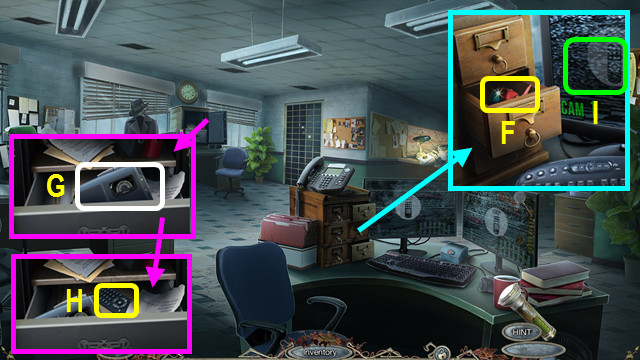
- Place the DRAWER PULL; take the TANGLE (F).
- Open the TANGLE to find the INSULATING TAPE, GREEN BUTTON, and COIN (inventory).
- Place the GREEN BUTTON; play the recorder (G).
- Read the address and take the REMOTE WITHOUT BATTERIES (H).
- Combine the REMOTE WITHOUT BATTERIES and the 2 BATTERIES to make the REMOTE CONTROL (inventory).
- Use the REMOTE CONTROL (I).

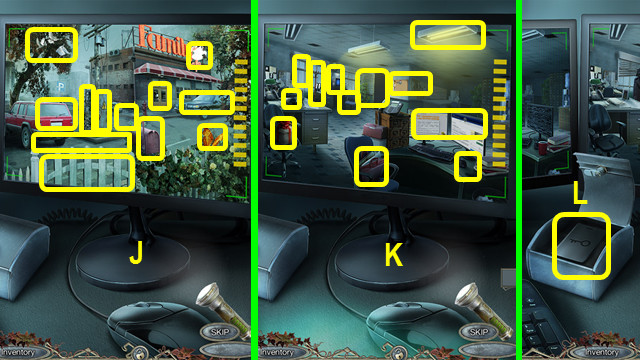
- Find the differences (J-K).
- Take the MAGNETIC KEY (L).
- Walk down.

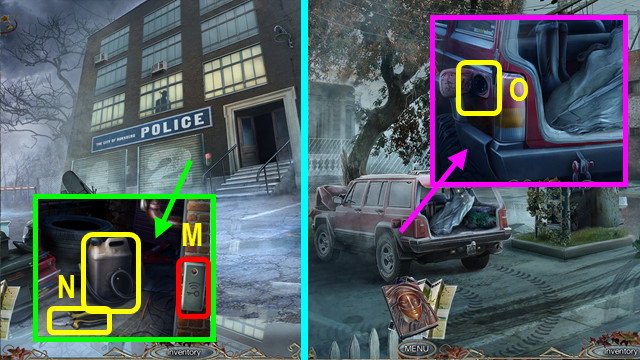
- Use the MAGNETIC KEY (M).
- Take the PLIERS and EMPTY CANISTER (N).
- Walk down.
- Open the cover and use the EMPTY CANISTER to get the GAS CANISTER (O).
- Enter the Café.

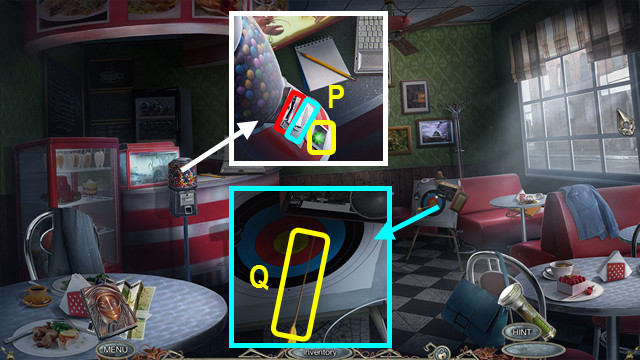
- Use the COIN, turn the knob, and take the BUBBLE GUM (P).
- Use the PLIERS to take the ARROW (Q).
- Combine the ARROW, BUBBLE GUM, and FISHING LINE to make the ARROW WITH FASTENER (inventory).
- Combine the BOW and ARROW WITH FASTENER to make the BOWSTRING (inventory).
- Return to the Police Station.

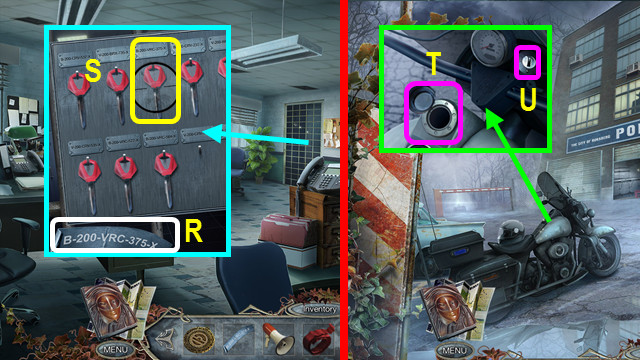
- Place the STICKER (R).
- Use the BOWSTRING to take the MOTORBIKE KEY (S).
- Walk down.
- Open the cap and use the GAS CANISTER (T).
- Use the MOTORBIKE KEY (U).
Chapter 2: The Orphanage

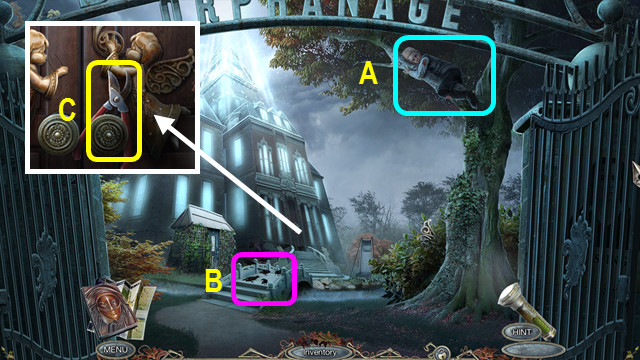
- Look at the Boy (A).
- Use the SPEAKER (B).
- Take the PRUNER (C).
- Walk down 2x.

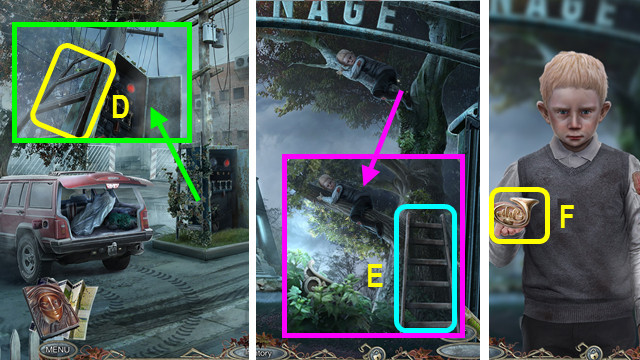
- Use the PRUNER; take the LADDER (D).
- Go to the Orphanage’s Park.
- Place the LADDER (E).
- Talk to the Boy; take the HORN (F).

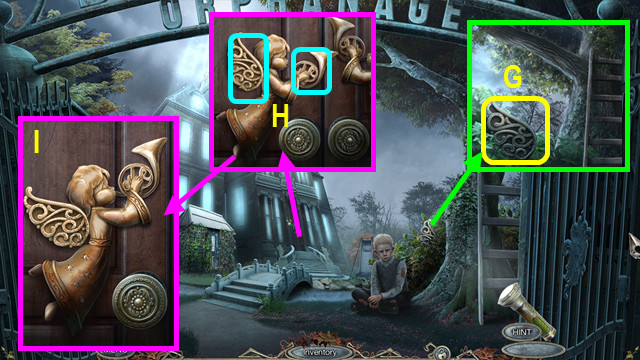
- Use the PRUNER; take the WINGS (G).
- Place the HORN and WINGS (H).
- Solution (I).
- Walk forward.

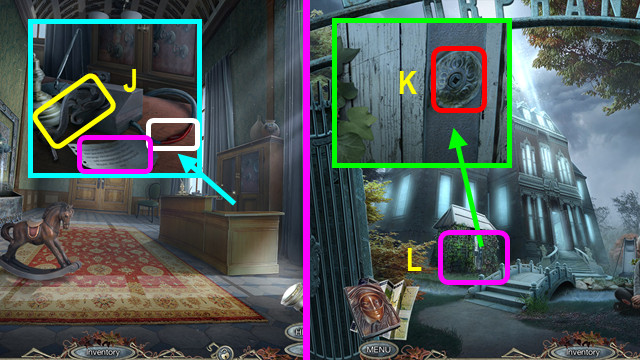
- Take the DOOR HANDLE, read the note, and use the INSULATING TAPE (J).
- Walk down.
- Use the DOOR HANDLE (K).
- Play the HOP; earn the WRENCH (L).
- Walk down.

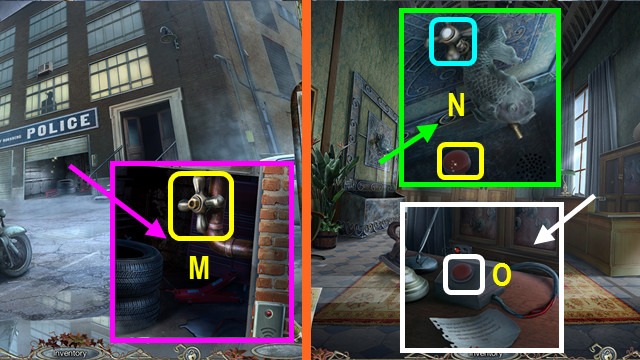
- Use the WRENCH; take the VALVE (M).
- Go to the Foyer.
- Place and turn the VALVE; take the RED BUTTON (N).
- Place and push the RED BUTTON (O).

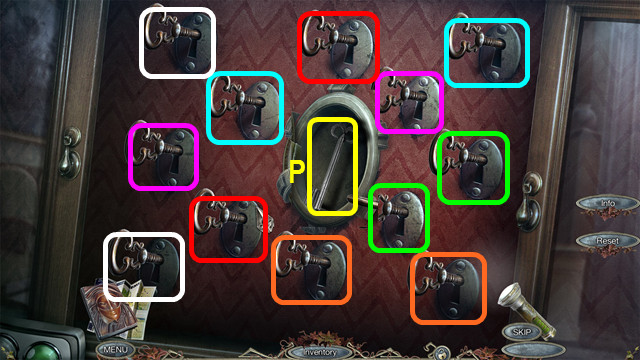
- Solution (color-coded).
- Take the IRON KEY (P).

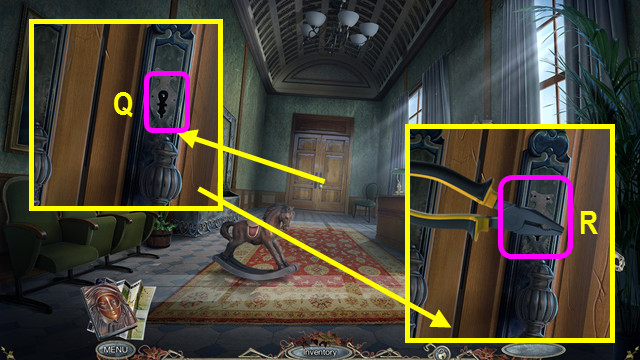
- Use the IRON KEY (Q).
- Use the PLIERS (R).
- Walk forward.

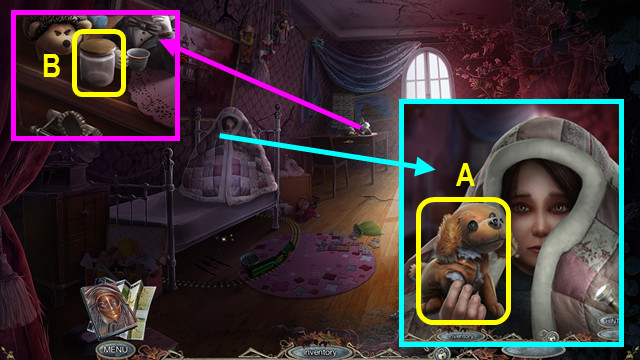
- Talk to Allie; take the TORN DOG (A).
- Take the JAR (B).

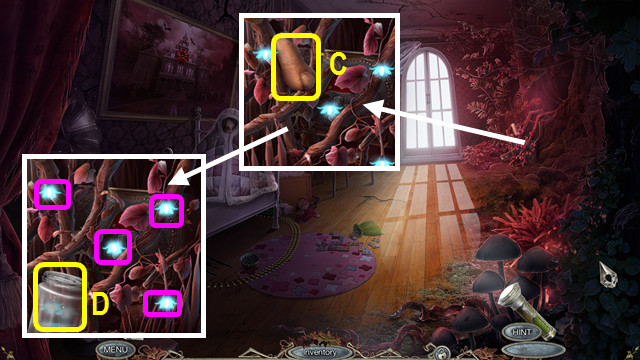
- Take the PLUSH PAW (C).
- Place the JAR, herd the fireflies (pink) into the jar, and take the GLOWING JAR (D).

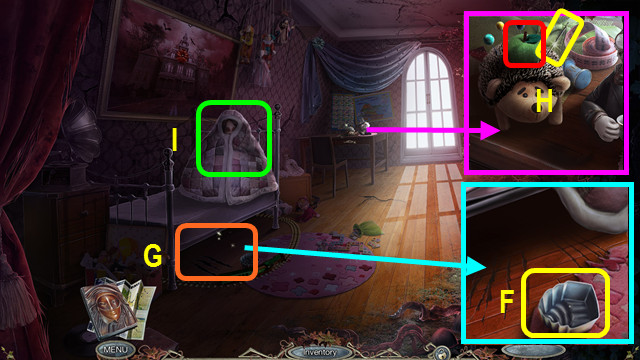
- Take the IRON MOLD; place the GLOWING JAR (F).
- Play the HOP; earn the TOY HORSE (G).
- Open the TOY HORSE; take the SPOOL OF THREAD and TOY APPLE (inventory).
- Place the TOY APPLE; take the NEEDLE (H).
- Combine the TORN DOG, PLUSH PAW, SPOOL OF THREAD, and NEEDLE to make ALLIE’S DOG (inventory).
- Give ALLIE’S DOG to Allie (I).
- Walk forward.

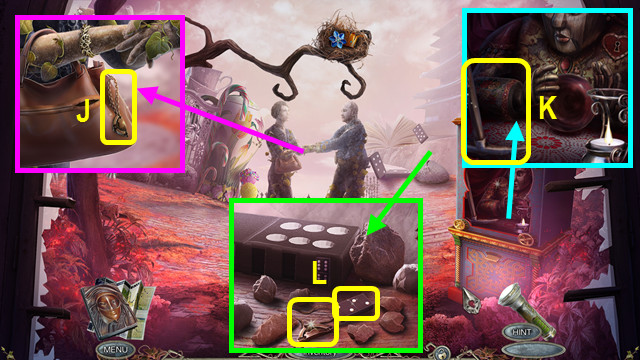
- Take the 1st ALLIE’S MEDALLION HALF (J).
- Take the PICKAXE (K).
- Use the PICKAXE; take the 2nd ALLIE’S MEDALLION HALF and 1/3 DOMINOES (L).
- Walk down.

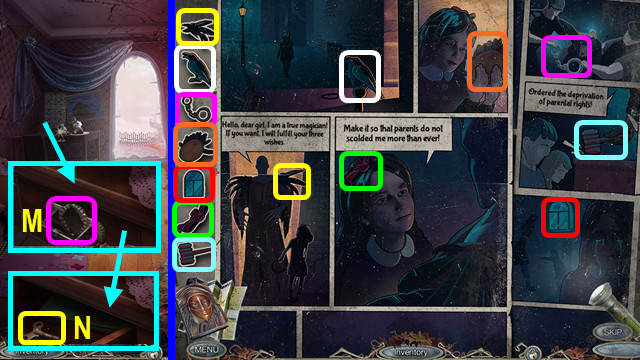
- Place the 2 ALLIE’S MEDALLION HALVES (M).
- Restore the items (color-coded).
- Take the WIND-UP KEY (N).
- Walk forward.

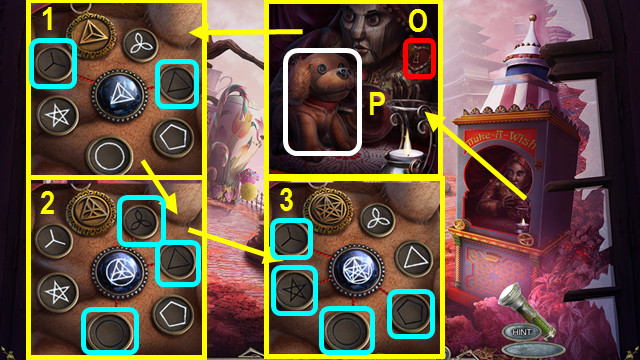
- Use the WIND-UP KEY (O).
- Place ALLIE’S DOG and the GOLD MEDALLION (P).
- Select the sets of symbols (1-3).

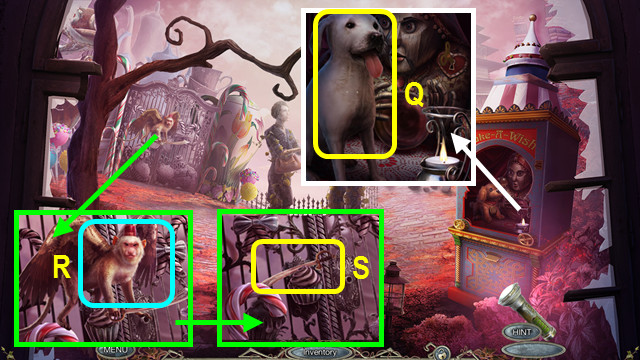
- Take the REVIVED DOG (Q).
- Use the REVIVED DOG (R).
- Take the SABER (S).
- Walk down.

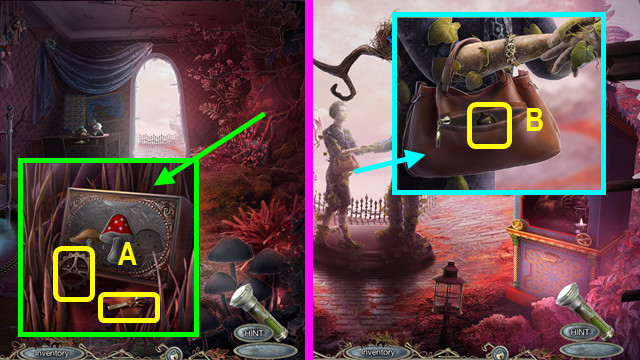
- Use the SABER: take the 1/3 GEARS and BAG CLASP (A).
- Walk forward.
- Use the BAG CLASP; take the COPPER BELL (B).

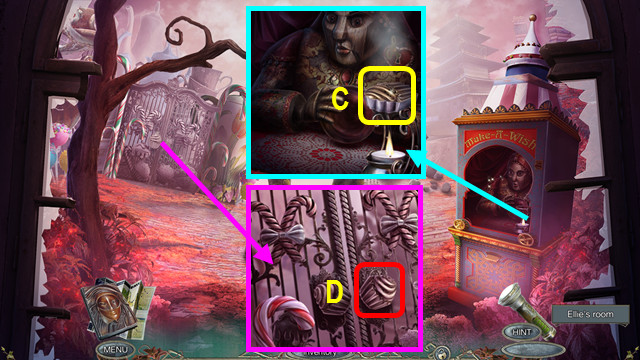
- Place the IRON MOLD and COPPER BELL; take the CAKE (C).
- Place the CAKE; walk left (D).
Chapter 3: Tea Party Lane

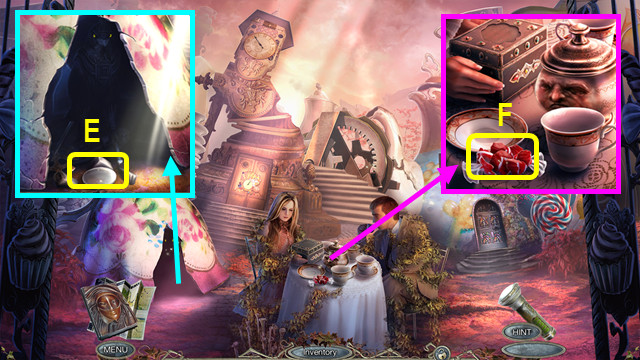
- Use the CAMERA; take the LENS (E).
- Take the SPLIT CANDY (F).
- Walk down 2x.

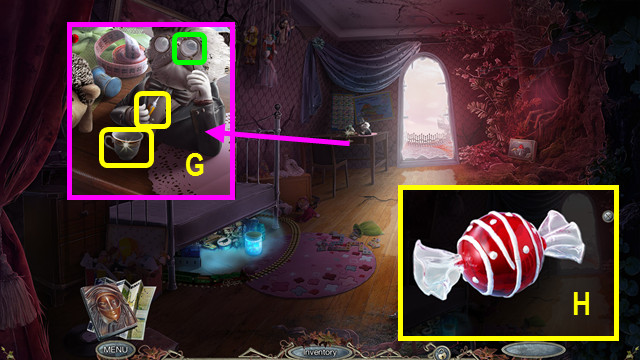
- Place the LENS; take the CUP FROM SET and GLUE (G).
- Combine the SPLIT CANDY and GLUE (inventory).
- Restore the pieces; take the GLASS CANDY (H).
- Return to Tea Party Lane.

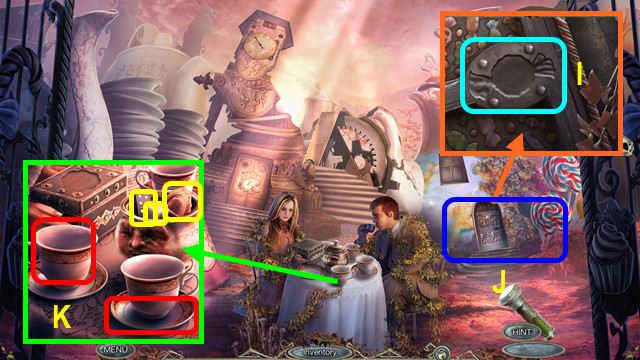
- Place the GLASS CANDY (I).
- Play the HOP; earn the PLATE FROM SET (J).
- Place the CUP FROM SET and the PLATE FROM SET; take the 2/3 DOMINOES, SUGAR, and MIRROR (K).

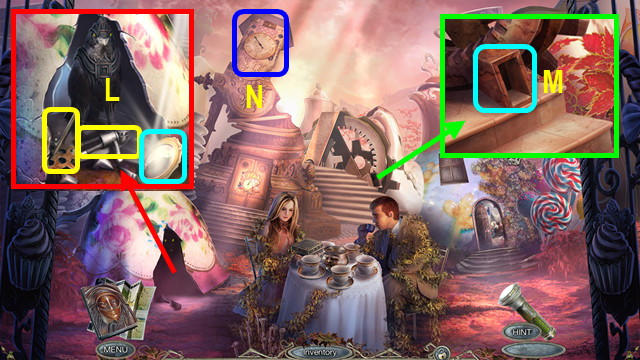
- Place the MIRROR; take the LEVER and 1st DOLL (L).
- Place the LEVER (M).
- Select (N).

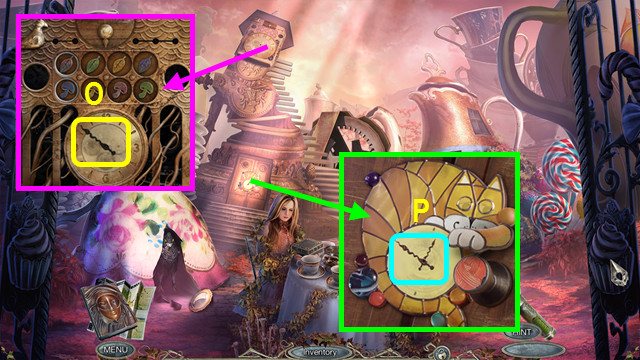
- Take the CLOCK HAND (O).
- Place the CLOCK HAND (P).
- Walk forward.

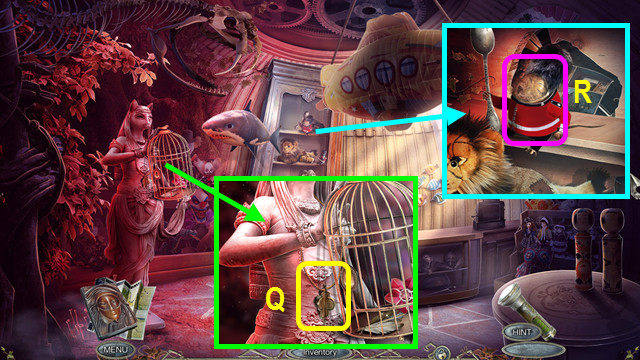
- Take the BROKEN KEY (Q).
- Use the SUGAR (R).

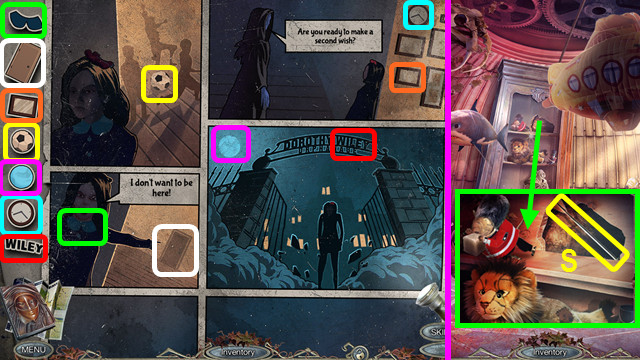
- Restore the items (color-coded).
- Take the HOOKED ARROW (S).
- Combine the BOW and HOOKED ARROW to make the LOADED BOW (inventory).
- Walk down 2x.

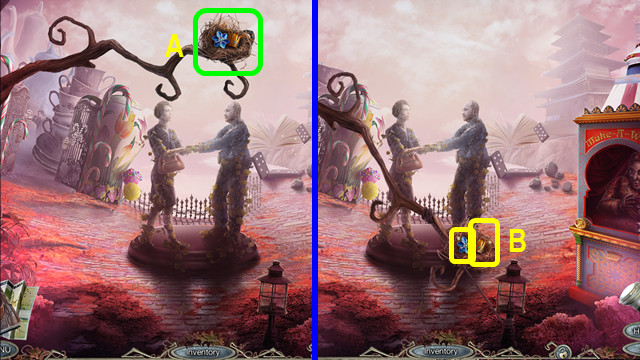
- Use the LOADED BOW (A).
- Take the 1st FLOWER and TOY CROWN (B).
- Go forward 2x.

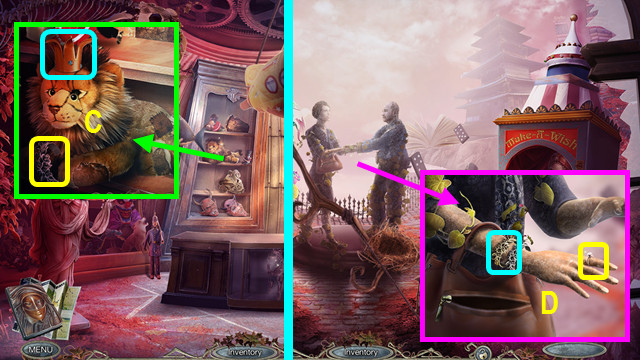
- Place the TOY CROWN; take the MYSTERIOUS AMULET (C).
- Walk down 2x.
- Place the MYSTERIOUS AMULET; take the DIAMOND RING (D).
- Go forward 2x.

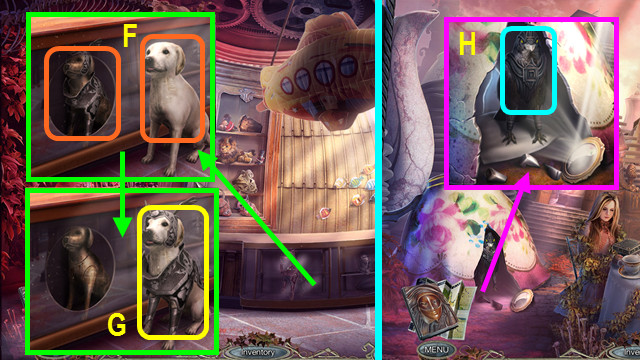
- Use the DIAMOND RING and place the REVIVED DOG (F).
- Move the 4 armor pieces to the dog; take the ARMORED DOG (G).
- Walk down.
- Use the ARMORED DOG (H).

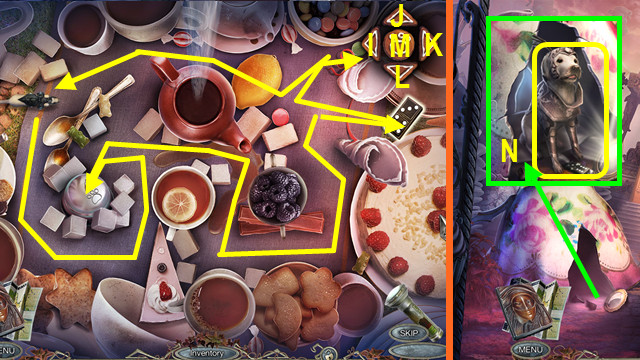
- Solution: L-K-J-I-M-K-K-L-K-J-K-M-I-J-M-L-I-I.
- Take the ARMORED DOG and 3/3 DOMINOES (N).
- Walk down.

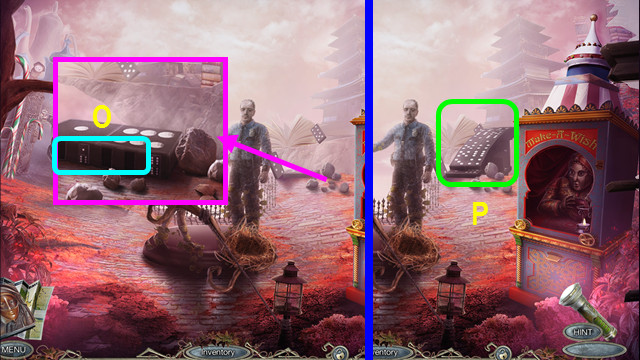
- Place the 3 DOMINOES (O).
- Walk right (P).

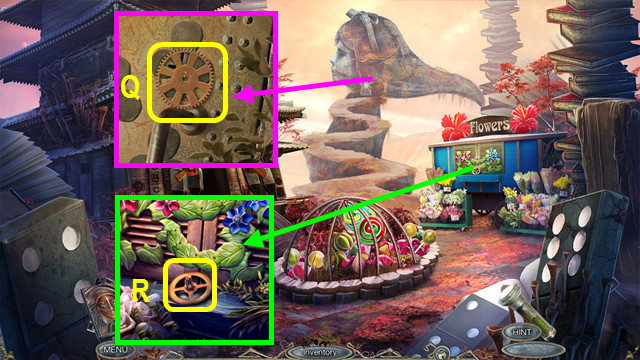
- Take the 2/3 GEAR (Q).
- Take the 3/3 GEAR (R).
- Go to Tea Party Lane.

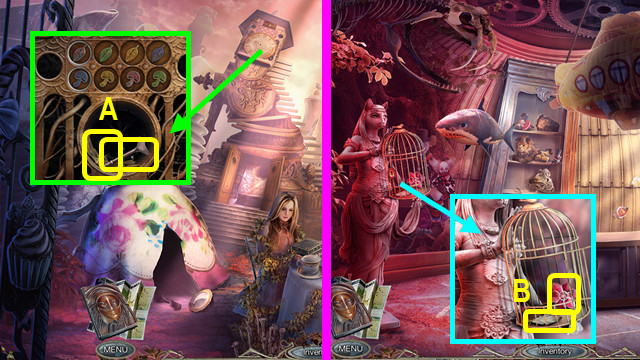
- Place the 3 GEARS; take the CAGE KEY and OILED CLOTH (A).
- Go forward.
- Use the CAGE KEY; take the FEATHERS and 2nd FLOWER (B).
- Return to Knowledge Street.

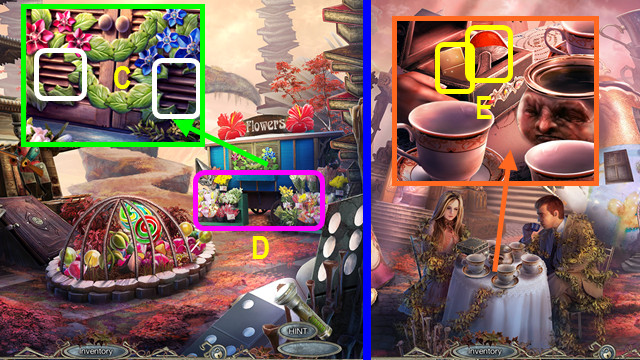
- Place the 2 FLOWERS (C).
- Play the HOP; earn the BOUQUET (D).
- Open the BOUQUET; take the FLOWER PIN and 1st KEY PART (inventory).
- Return to Tea Party Lane.
- Place the FLOWER PIN; take the MUSHROOM FIGURINE and LIGHTER (E).
- Walk down 2x.

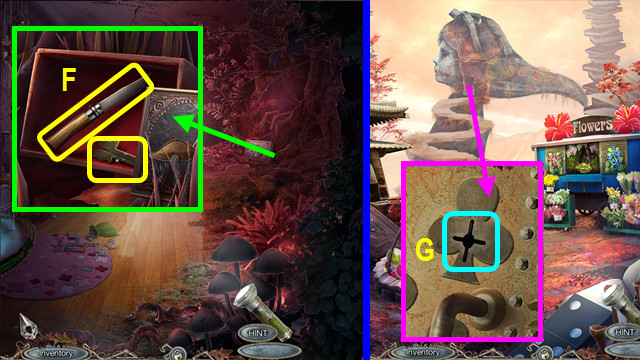
- Place the MUSHROOM FIGURINE; take the KNIFE and 2nd KEY PART (F).
- Combine the BROKEN KEY and 2 KEY PARTS to make the CLOVER KEY (inventory).
- Go to Knowledge Street.
- Use the CLOVER KEY; walk forward (G).

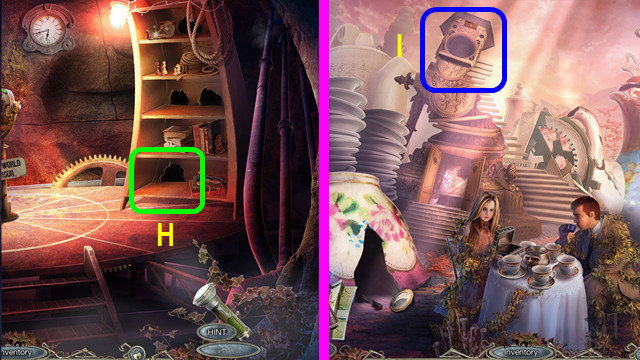
- Use the ARMORED DOG; earn the BINOCULARS SCHEME and CUCKOO FIGURINE (H).
- Go to Tea Party Lane.
- Select (I).

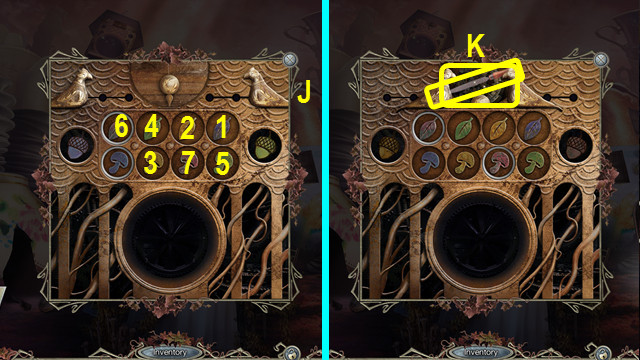
- Place the CUCKOO FIGURINE (J).
- Move the circle frames 1-7.
- Take the FILE and BINOCULARS PART (K).
- Go to Knowledge Street.

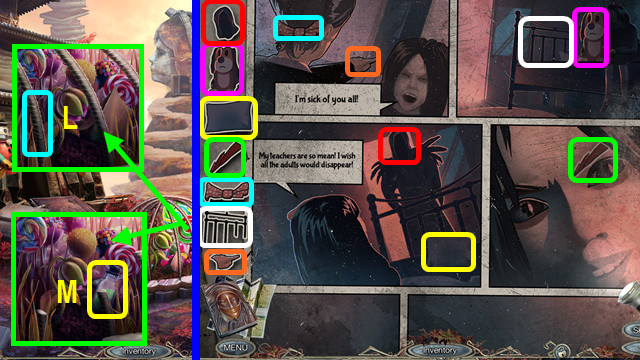
- Use the FILE (L).
- Restore the items (color-coded).
- Take the ACID (M).
- Walk forward.

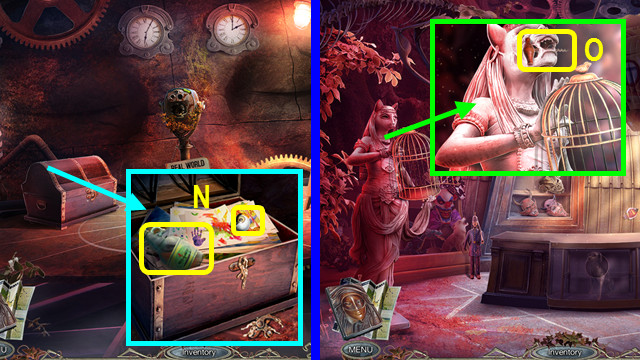
- Use the ACID; take the BOTTLED FERTILIZER and DUMMY’S EYE (N).
- Go to the Souvenir Shop.
- Place the DUMMY’S EYE; take the CORKSCREW (O).
- Combine the BOTTLED FERTILIZER and CORKSCREW to make the FERTILIZER (inventory).
- Go to Knowledge Street.

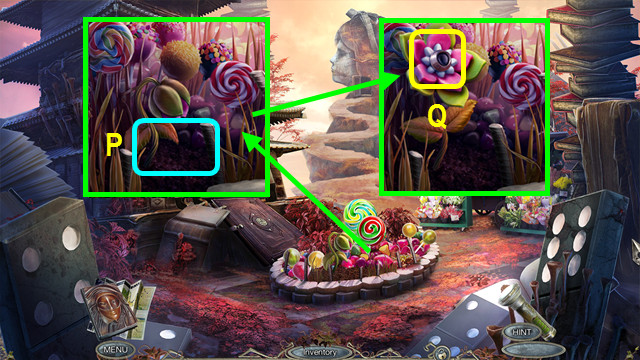
- Use the FERTILIZER (P).
- Use the KNIFE; take the 2nd BINOCULARS PART (Q).
- Walk forward.

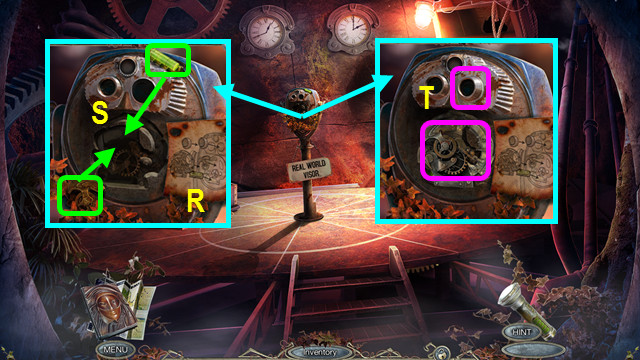
- Place the BINOCULARS SCHEME (R).
- Move the 2 pieces (S).
- Place the 2 BINOCULARS PARTS (T).
- Play the HOP; take the ARROW.
- Combine the ARROW, FEATHERS, OILED CLOTH, and LIGHTER to make the BURNING ARROW (inventory).
- Combine the BOW and BURNING ARROW to make the FIRE BOW (inventory).
- Walk down.

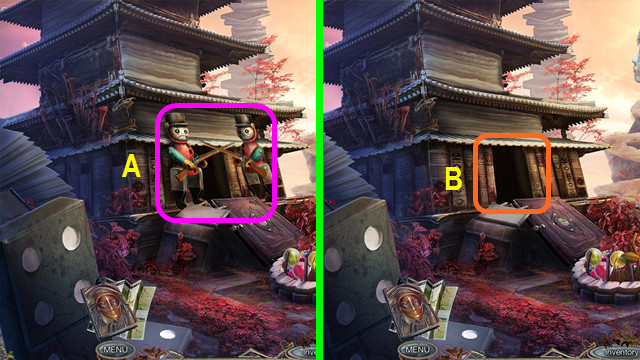
- Use the FIRE BOW (A).
- Enter the Library (B).

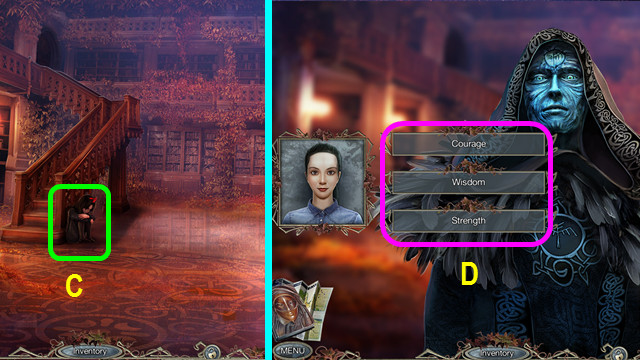
- Talk to Allie (C).
- Choose a quality (D).
Chapter 4: The Event Hall

- Talk to Ann; take the COIN (A).
- Take the ADHESIVE TAPE (B).
- Use the COIN; take the BRUSH and read the note (C).

- Use the BRUSH (D).
- Play the HOP; earn the HOLSTER (E).
- Open the HOLSTER; take the gun and load the bullet to make the GUN (inventory).
- Use the GUN (F).
- Walk forward.

- Take the IRON DOWEL (G).
- Take the MITTEN (H).
- Take the CANE PART (I).
- Combine the IRON DOWEL, CANE PART, and ADHESIVE TAPE to make the STICK WITH HOOK (inventory).
- Walk down.

- Use the STICK WITH HOOK (J).
- Use the MITTEN to take the FIERY LADLE (K).
- Walk forward.
- Use the FIERY LADLE; take the LADLE WITH WATER (L).
- Use the LADLE WITH WATER; take the 1st SLIDER and the BRACELET (M).
- Walk down.

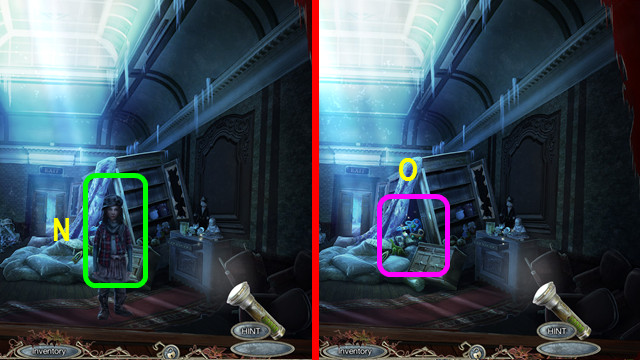
- Give the BRACELET (N).
- Select (O).

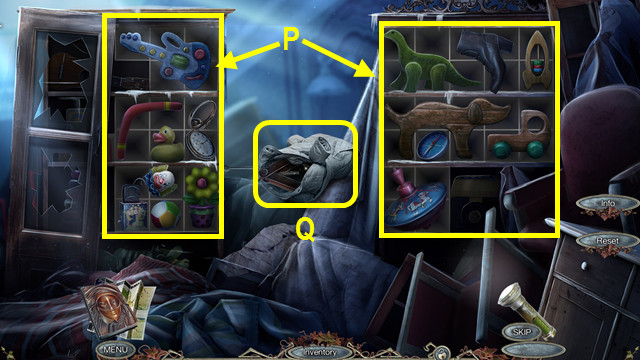
- Solution (P).
- Take the coat and RUSTY JACK (Q).
- Remove the 2nd SLIDER from the RUSTY JACK (inventory).
- Walk forward.

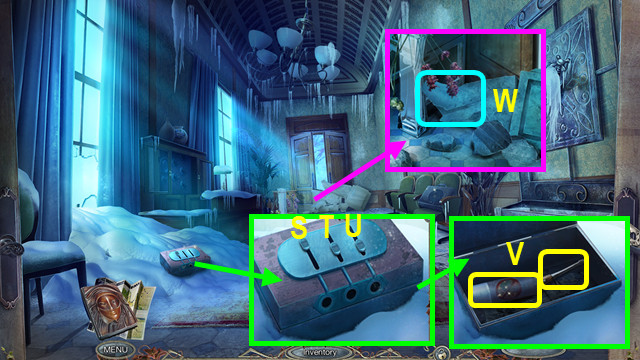
- Place the 2 SLIDERS; select Sx2-Ux4-Tx3.
- Take the RUST REMOVER and SCREWDRIVER (V).
- Combine the RUSTY JACK and RUST REMOVER to make the JACK (inventory).
- Use the JACK; walk forward (W).

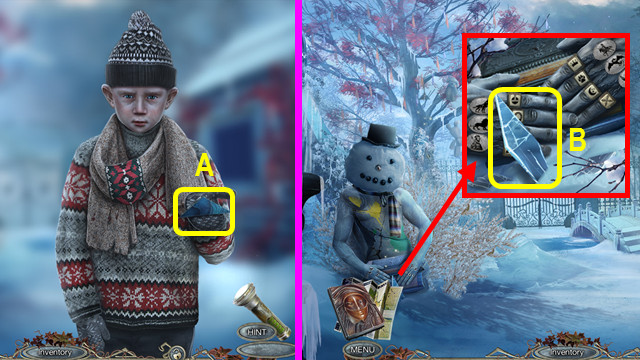
- Talk to Simon; take the 1/3 TRIANGULAR PARTS (A).
- Use the MITTEN to take the SHARP SHARD (B).

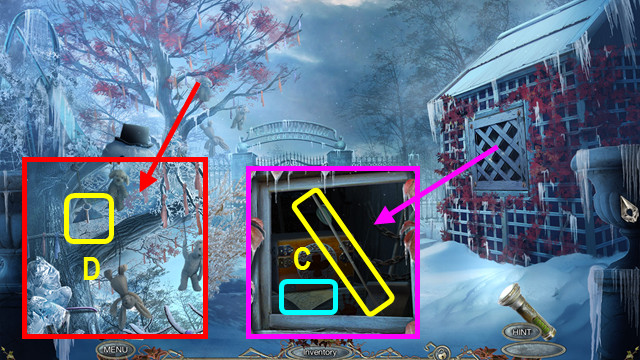
- Use the SCREWDRIVER; take the ARROW WITH BLUNT POINT and read the note (C).
- Combine the BOW and ARROW WITH BLUNT POINT to make the LOADED BOW (inventory).
- Use the LOADED BOW to take the STASH KEY and 2/3 TRIANGULAR PARTS (D).
- Walk down.

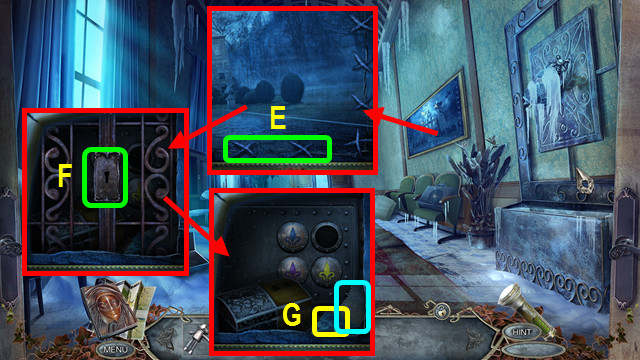
- Use the SHARP SHARD (E).
- Use the STASH KEY (F).
- Take the 3/3 TRIANGULAR PARTS and read the note (G).
- Walk forward.

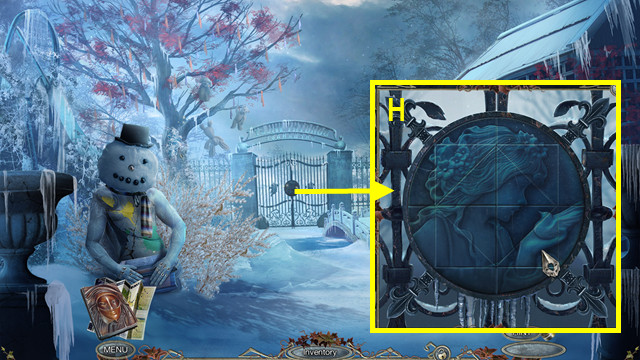
- Place the 3 TRIANGULAR PARTS; solution (H).
- Walk forward.

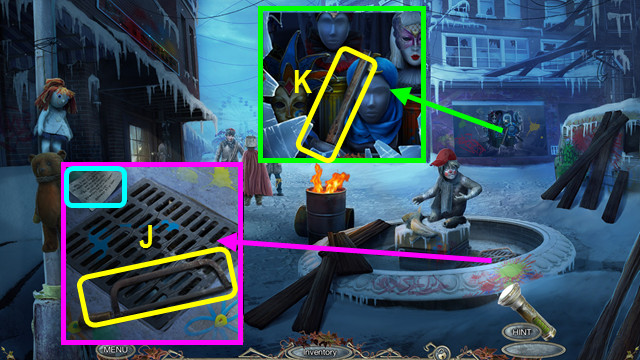
- Read the note; take the HACKSAW (J).
- Take the HAMMER (K).
- Walk down.

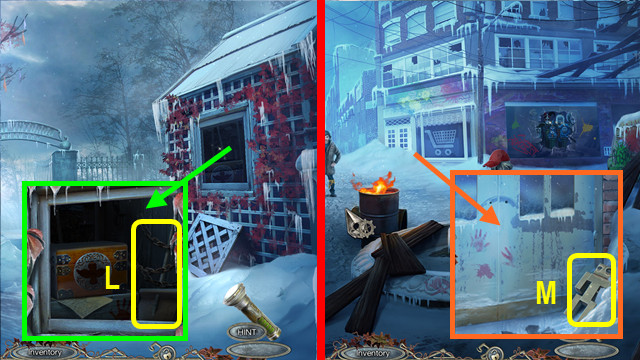
- Use the HACKSAW; take the BROKEN SHOVEL (L).
- Combine the BROKEN SHOVEL and HAMMER to make the SHOVEL (inventory).
- Walk forward.
- Use the SHOVEL; take the 2nd DOLL (M).
- Walk down 2x.

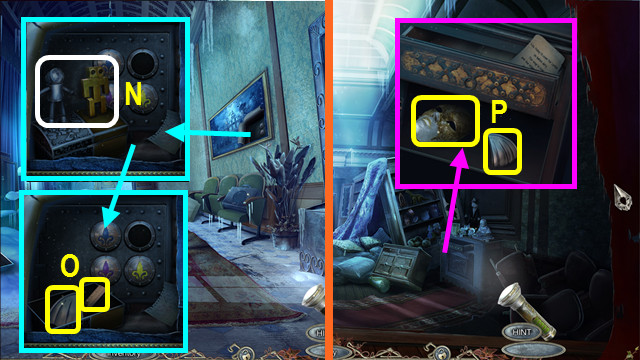
- Place the 2 DOLLS (N).
- Take the 1st SHELL HANDLE and RULER (O).
- Walk down.
- Use the RULER; take the 1st MASK and 2nd SHELL HANDLE (P).
- Walk forward 3x.

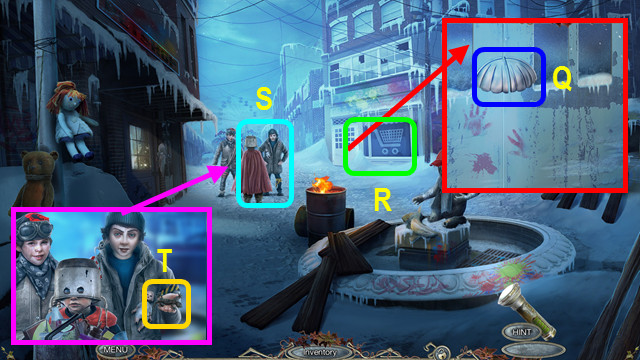
- Place the 2 SHELL HANDLES (Q).
- Play the HOP; earn the BASKET WITH FOOD (R).
- Give the BASKET WITH FOOD (S).
- Take the 1st LIZARD (T).
- Walk forward.
Chapter 5: The Amusement Park

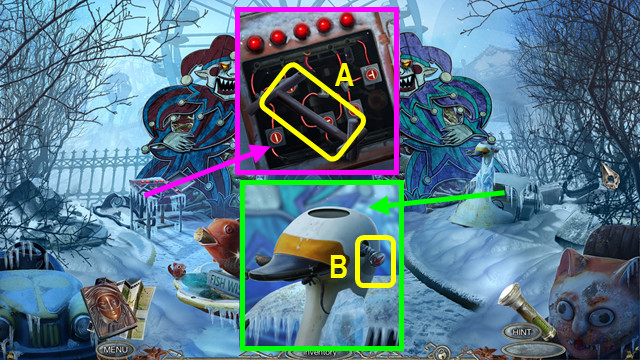
- Take the FOUNTAIN LEVER (A).
- Take the SAFE BUTTON (B).
- Walk down.

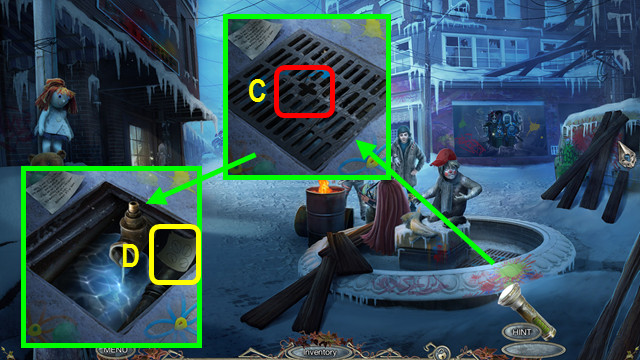
- Use the FOUNTAIN LEVER (C).
- Take the SHEET WITH CODE (D).
- Walk down 2x.

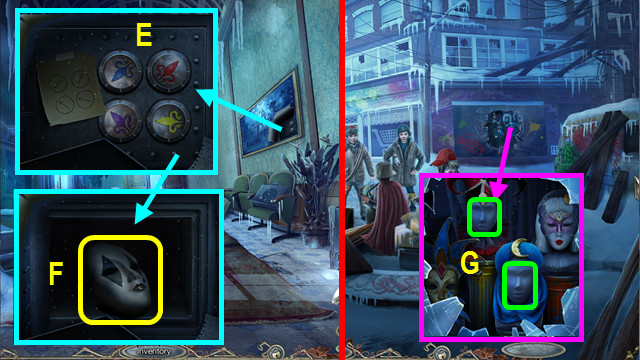
- Place the SAFE BUTTON and SHEET CODE; solution (E).
- Take the 2nd MASK (F).
- Walk forward 2x.
- Place the 2 MASKS (G).

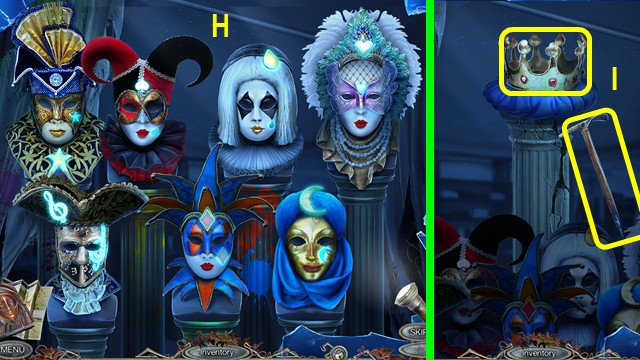
- Solution (H).
- Take the ICEBREAKER and SWAN CROWN (I).

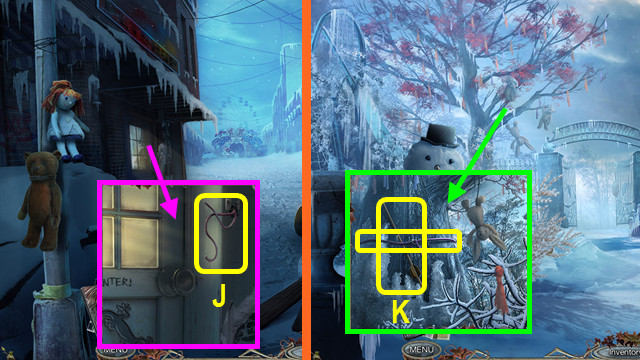
- Use the ICEBREAKER; take the 1/3 WIRE (J).
- Walk down.
- Use the ICEBREAKER; take the 2/3 WIRE and ARROW SHAFT (K).
- Walk forward 2x.

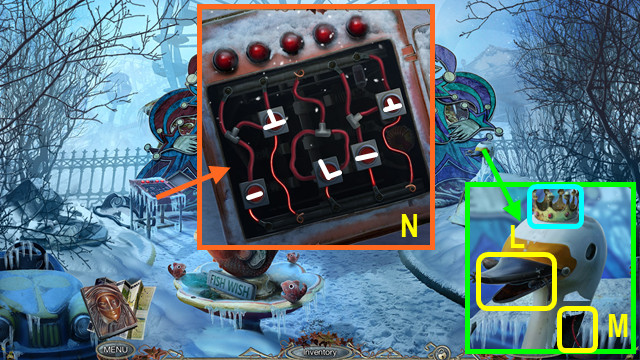
- Place the SWAN CROWN; take the 2nd LIZARD (L).
- Use the ICEBREAKER; take the 3/3 WIRE (M).
- Place the 3 WIRES; solution (N).
- Walk forward.

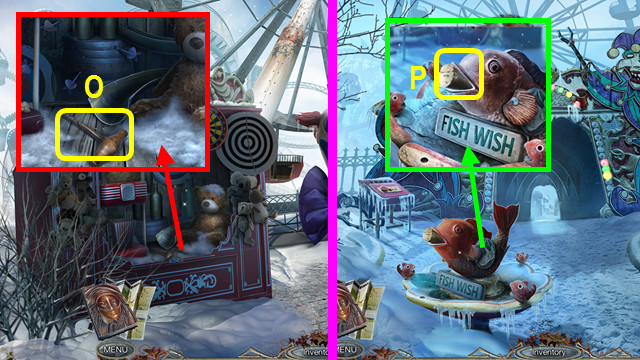
- Take the CORKSCREW (O).
- Walk down.
- Use the CORKSCREW to take the CORK (P).
- Combine the ARROW SHAFT and CORK to make the ARROW WITH CORK (inventory).
- Combine the BOW and ARROW WITH CORK to make the LOADED BOW (inventory).
- Walk forward.

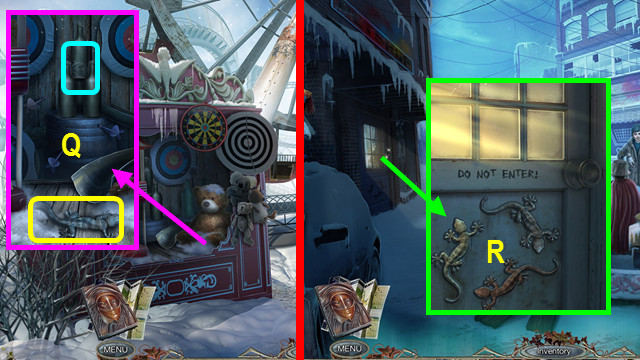
- Use the LOADED BOW; take the 3rd LIZARD (Q).
- Walk down 2x.
- Place the 3 LIZARDS (R).
- Play the HOP; earn the LUNCHBOX.
- Open the LUNCHBOX and eat the burger; take the 1/5 FLAGS and OWL (inventory).
- Walk down.

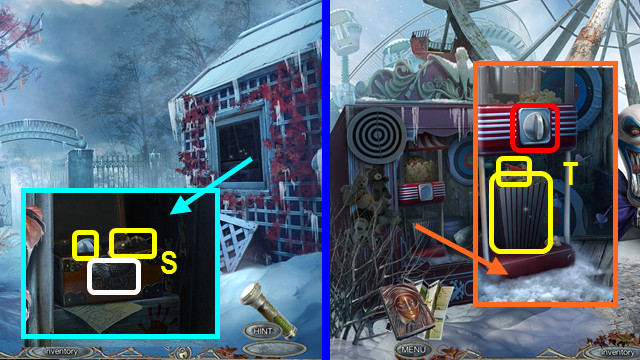
- Place the OWL; take the POPCORN MACHINE KEY and CURTAIN TIEBACK (S).
- Go forward 3x.
- Place and turn the POPCORN MACHINE KEY; take the 2/5 FLAGS and POPCORN (T).

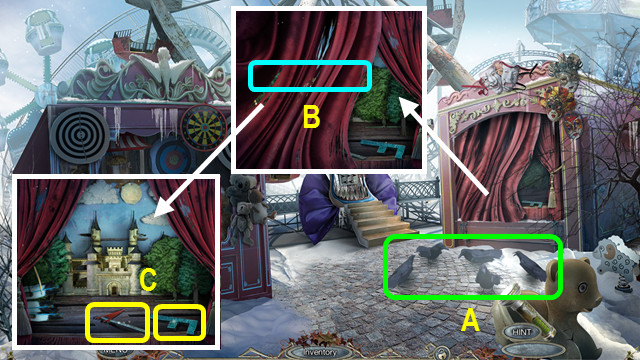
- Use the POPCORN (A).
- Use the CURTAIN TIEBACK (B).
- Take the 3/5 FLAGS and LETTER F (C).
- Walk down.

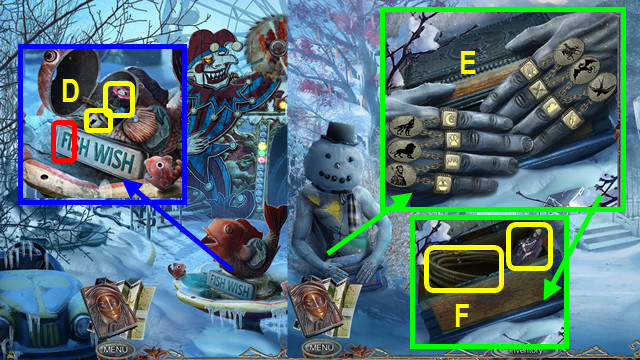
- Place the LETTER F; take the STATUE RING and FAUCET (D).
- Walk down 2x.
- Place the STATUE RING; solution (E).
- Take the SHERIFF FIGURINE and LASSO (F).
- Walk forward 2x.

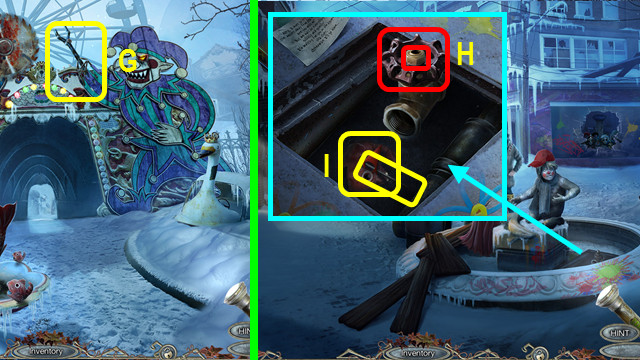
- Use the LASSO to take the MECHANICAL ARM and NUT (G).
- Walk down.
- Place the FAUCET and NUT; turn off the water (H).
- Take the 4/5 FLAGS and FISH (I).
- Walk forward.

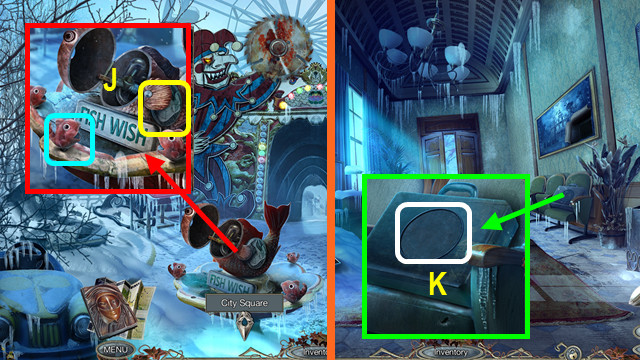
- Place the FISH; take the ROUND DISC (J).
- Walk down 3x.
- Place the ROUND DISC (K).

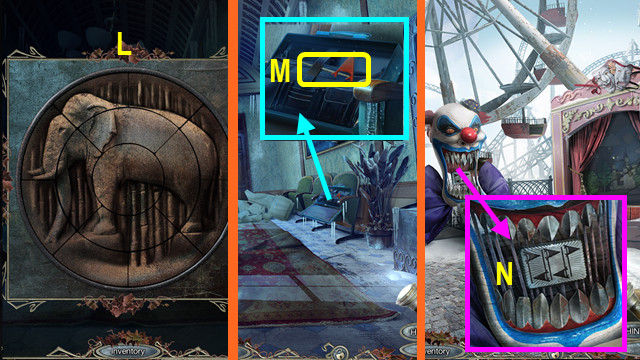
- Solution (L).
- Take the 5/5 FLAGS (M).
- Walk forward 4x.
- Place the MECHANICAL ARM and 5 FLAGS (N).

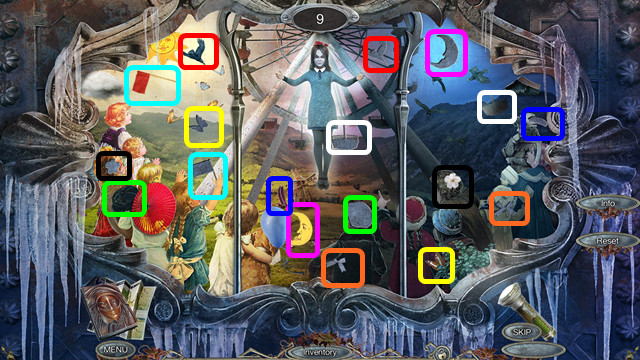
- Restore the items (color-coded).
- Go forward.

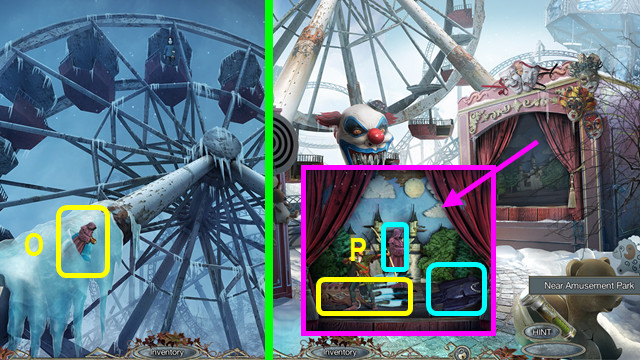
- Use the ICEBREAKER to take the MONK FIGURINE (O).
- Walk down.
- Place the MONK FIGURINE and SHERIFF FIGURINE; take the QUIVER (P).
- Combine the BOW and QUIVER to make the LOADED BOW (inventory).
- Go forward.

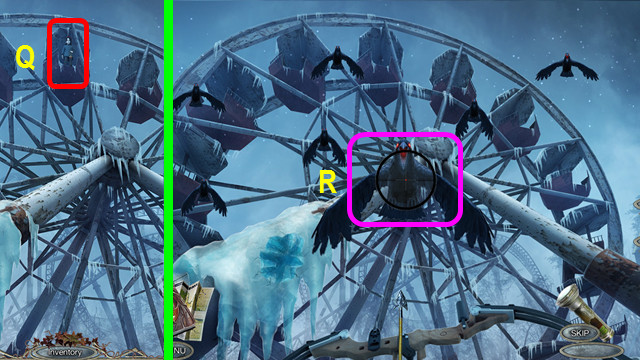
- Use the LOADED BOW (Q).
- Shoot the crows as they fly (R).

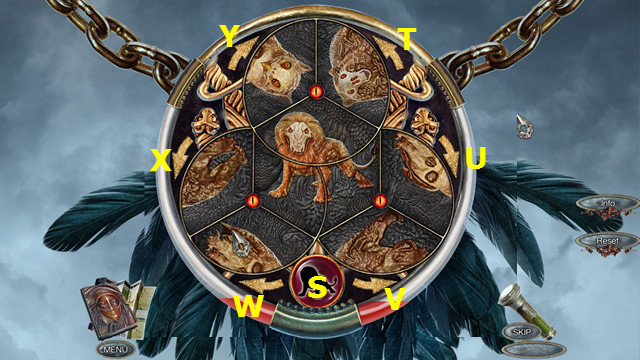
- Your solution depends on the animal shown (S).
- Select Wx2 for the manticore.
- Select T-U-X for the owl.
- Select V-X-Y for the bear.
- Congratulations! You have completed Surface: Alone in the Mist!



 Nancy Drew: Secret of Shadow Ranch Walkthrough, Guide, & Tips
 The Clockwork Man: The Hidden World Walkthrough, Guide, & Tips
 Witch Switch Tips and Tricks, Guide, & Tips
 Nat Geo Adventure: Ghost Fleet Walkthrough, Guide, & Tips
 Dracula: Love Kills Walkthrough, Guide, & Tips