New York Mysteries: High Voltage Walkthrough, Guide, & Tips
New York Mysteries: High Voltage Walkthrough

Welcome to the New York: Mysteries: High Voltage Walkthrough
A series of shocking – and otherworldly – murders has struck New York City, and you’re the only one who can solve them!
Whether you use this document as a reference when things get difficult or as a road map to get you from beginning to end, we’re pretty sure you’ll find what you’re looking for here.
This document contains a complete New York: Mysteries: High Voltage game walkthrough featuring annotated screenshots from actual gameplay!
We hope you find this information useful as you play your way through the game. Use the walkthrough menu below to quickly jump to whatever stage of the game you need help with.
Remember to visit the Big Fish Games Forums if you find you need more help. Have fun!
This walkthrough was created by Laurie Murphy, and is protected under US Copyright laws. Any unauthorized use, including re-publication in whole or in part, without permission, is strictly prohibited.
General Tips
- This is the official guide for New York Mysteries: High Voltage!
- This guide does not mention each time you have to zoom into a location; the screenshots show each zoom scene.
- Hidden-object puzzles are referred to as HOPs. This guide does not show screenshots of the HOPs, however, it is mentioned when a HOP is available and the inventory item collected.
- This guide gives step-by-step solutions for all puzzles that are not random. Please read the instructions in the game for each puzzle.
Chapter 1: The Case

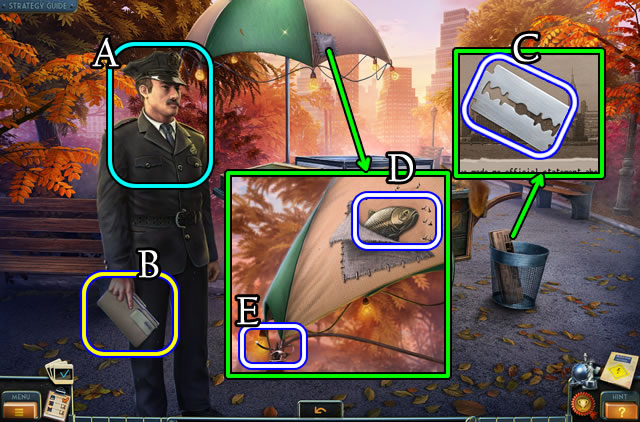
- Walk forward; speak to the officer (A); take the Journal (B).
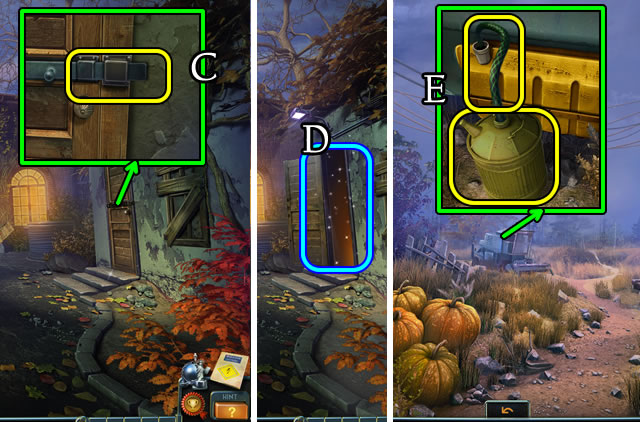
- Select the newspaper 2x; take the RAZOR BLADE (C).
- Use the RAZOR BLADE; uncover and take the FISH FIGURINE FRAGMENT (D).
- Unwrap (E) and take the WIRE.
- Select the WIRE 4x to get a LOCK PICK (Inventory).

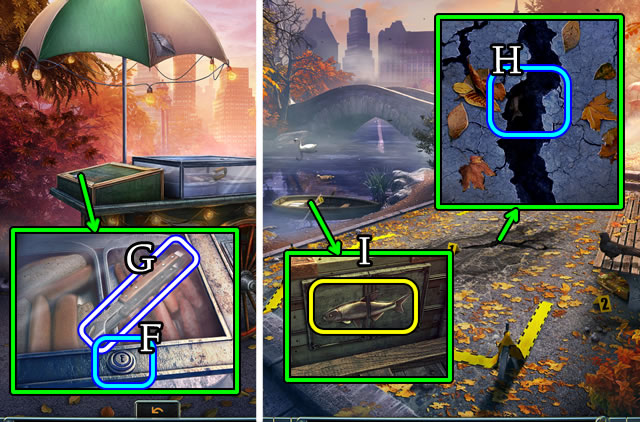
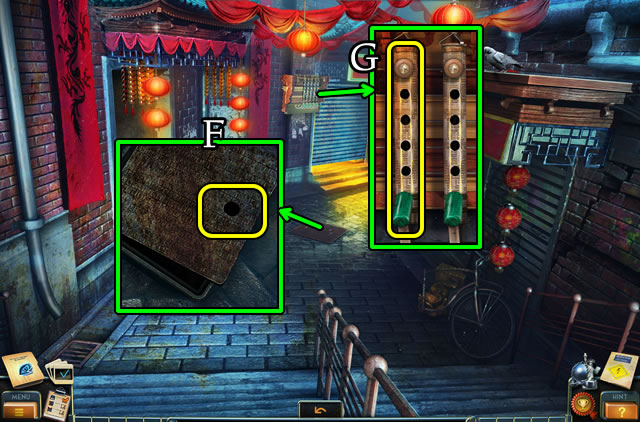
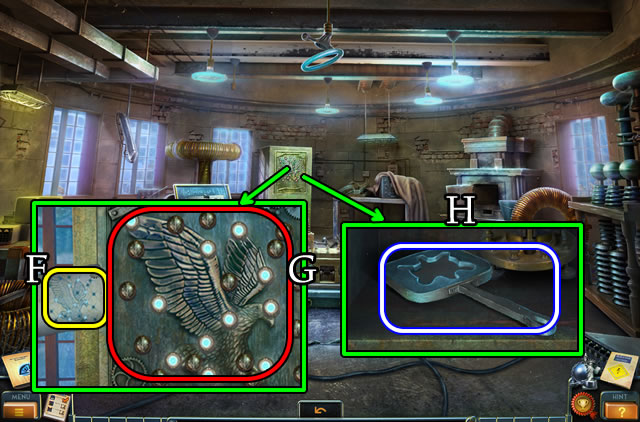
- Use the LOCK PICK (F); take the TONGS (G).
- Walk down.
- Use the TONGS to retrieve a FISH FIGURINE FRAGMENT (H).
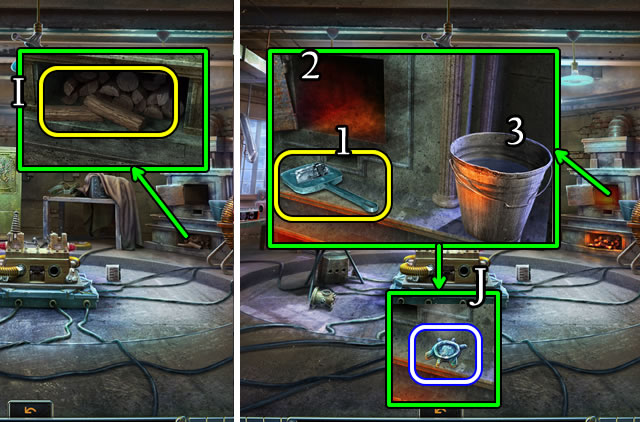
- Place both FISH FIGURINE FRAGMENTS (I).

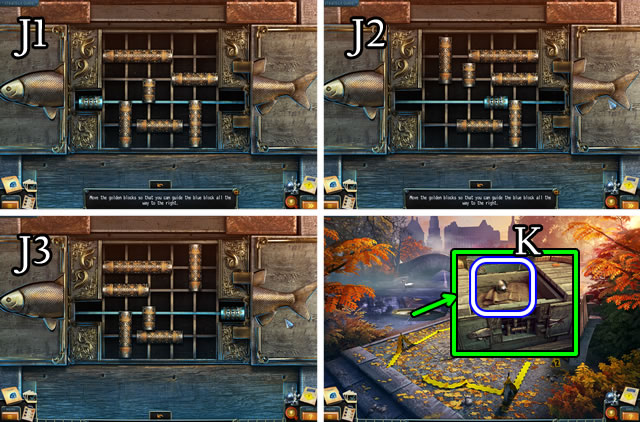
- Solution (J1-J2-J3).
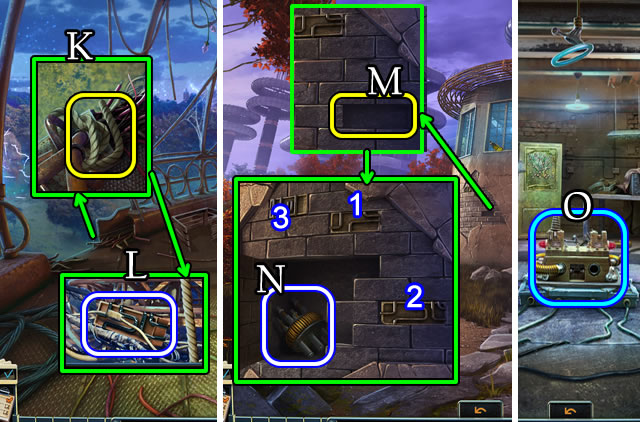
- Take the OILCAN (K).

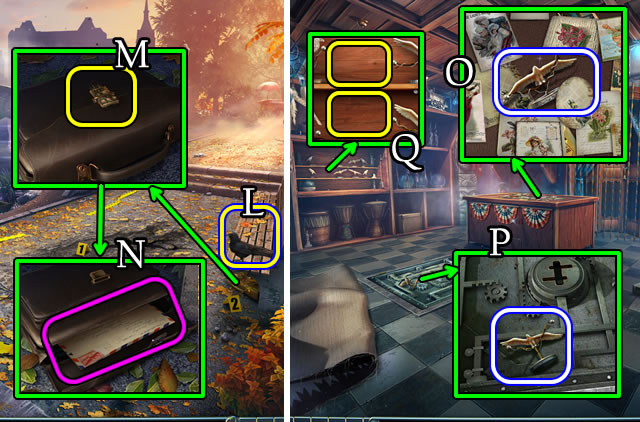
- Move the bird (L); move the leaves; use the OILCAN (M); open; take and open the envelope (N).
- Uncover the EAGLE FIGURINE (O).
- Lift the carpet; take the EAGLE FIGURINE (P).
- Place each EAGLE FIGURINE (Q).

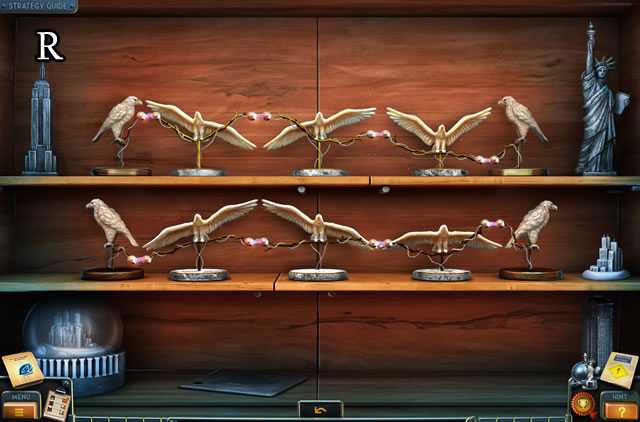

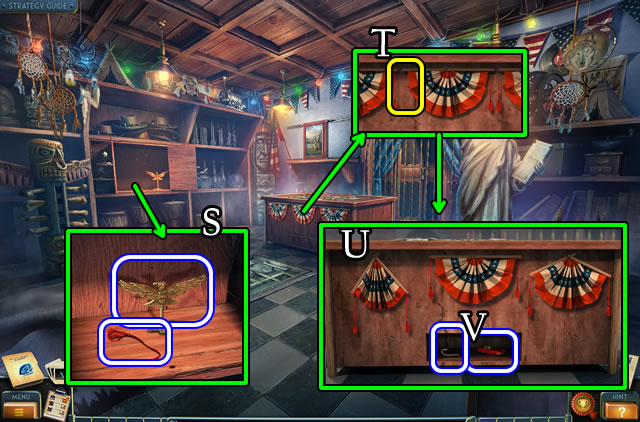
- Take the EAGLE KEY and STRING (S).
- Place the STRING (T).
- Solution (U).
- Take the TOY CAR and HOOK (V).

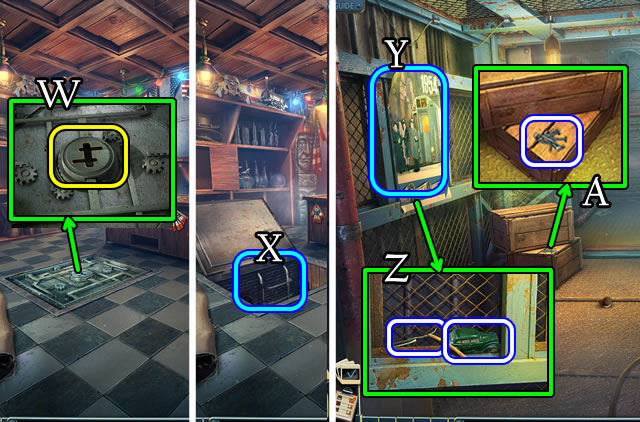
- Use the EAGLE KEY (W); walk down (X).
- Remove (Y); take the RAZOR and TOY CAR (Z).
- Take the NAILS (A).
- Walk up.

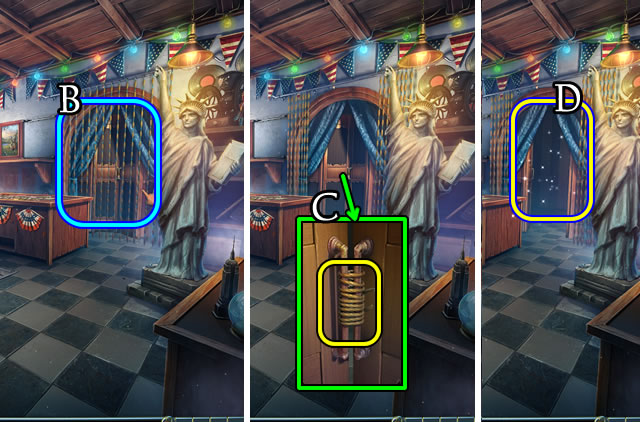
- Move (B); use the RAZOR (C) to play a HOP (D); receive a KEY CARD.
- Walk down.

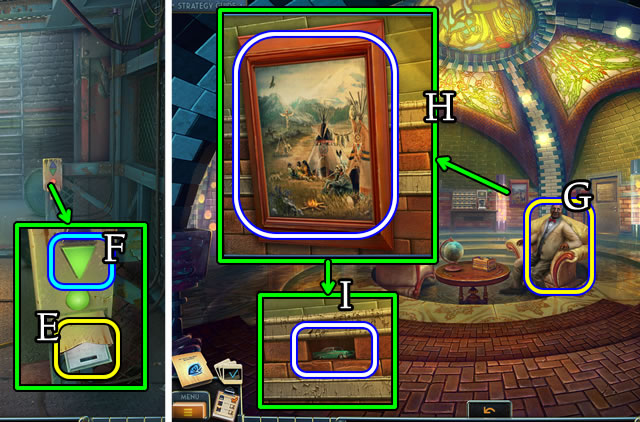
- Place the KEY CARD (E). Press (F).
- Walk forward.
- Speak to Dr. Bishop (G); receive a BUSINESS CARD HOLDER.
- Take the PICTURE (H) and TOY CAR (I).
- Walk down; press the control; walk forward.

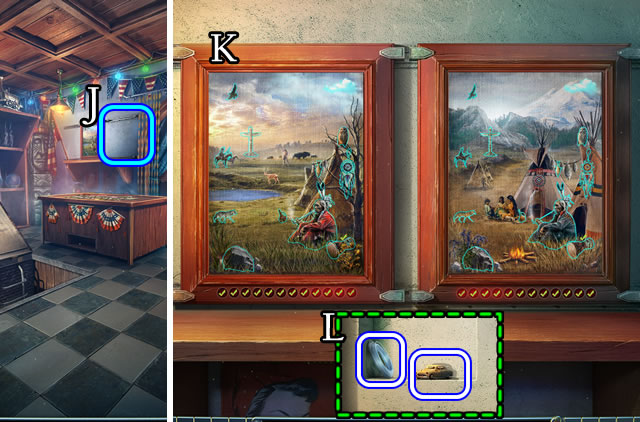
- Place the PICTURE (J).
- Solution (K).
- Take the FISHING LINE and TOY CAR (L).
- Return to the Hall.

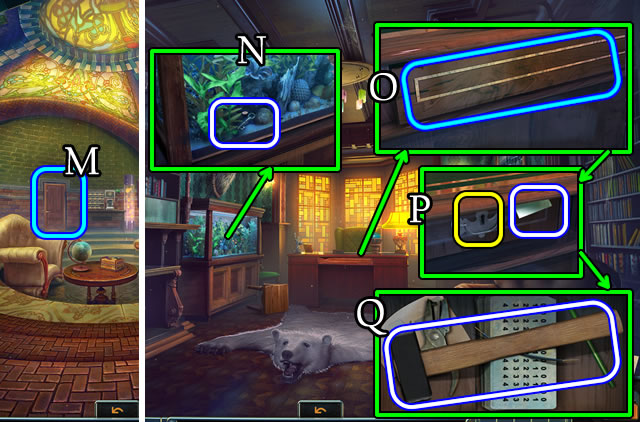
- Open (M); walk left.
- Combine the HOOK and FISHING LINE for a HOOK ON FISHING LINE (Inventory).
- Use the HOOK ON FISHING LINE to retrieve a KEY (N).
- Remove (0). Take the STENCIL; use the KEY (P).Take the HAMMER (Q).

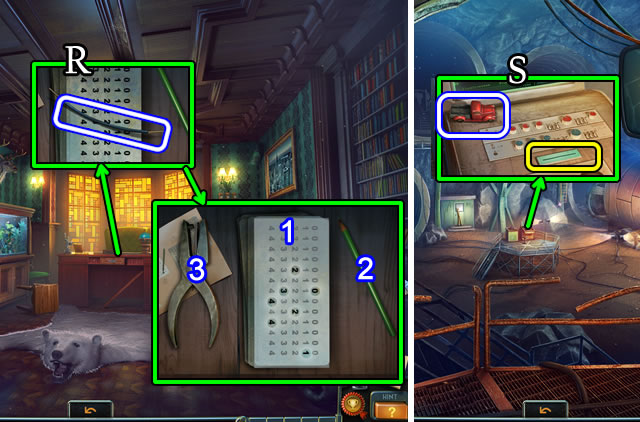
- Take the WIRE (R).
- Place the STENCIL (1); select (2), then (3); receive a PUNCH CARD.
- Walk down, then right.
- Take the TOY CAR; use the PUNCH CARD (S).

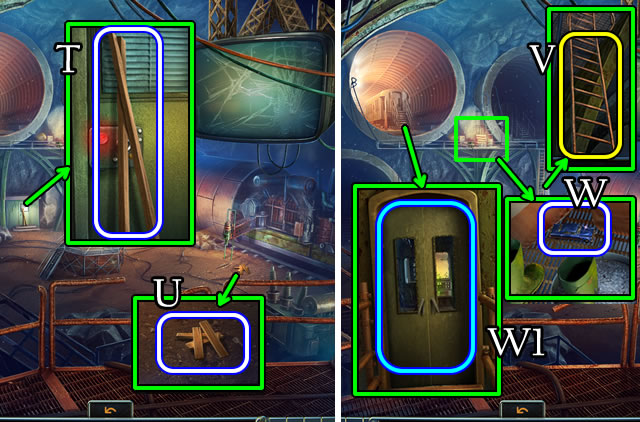
- Take the LONG PLANKS (T) and SHORT PLANKS (U).
- Combine the LONG PLANKS, SHORT PLANKS and NAILS. Use the HAMMER to receive a LADDER (Inventory).
- Place the LADDER (V).
- Grab the TOY CAR (W).
- Open (W1), select the controls.
Chapter 2: The Prison

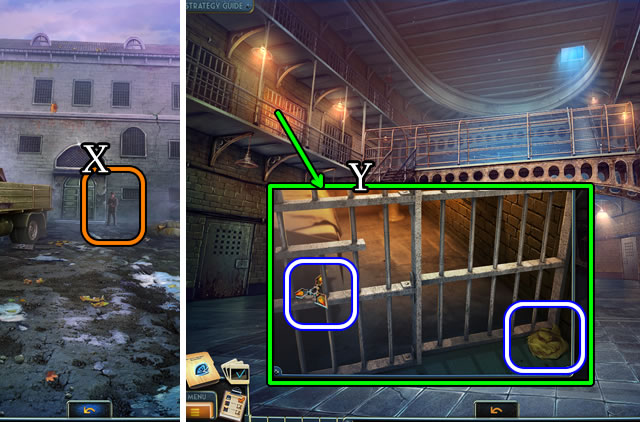
- Open the BUSINESS CARD HOLDER to find a PASS (Inventory).
- Give the PASS (X).
- Walk forward.
- Take STAR FRAGMENT 1/5 and the RAG (Y).
- Walk down.

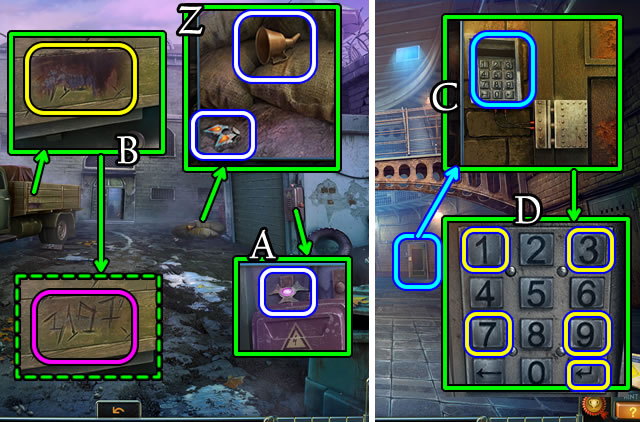
- Take the STAR FRAGMENT 2/5 and FUNNEL (Z).
- Take STAR FRAGMENT 3/5 (A).
- Use the RAG (B).
- Walk forward.
- Select (C). Press 3-1-9-7 and arrow key (D).
- Walk right.

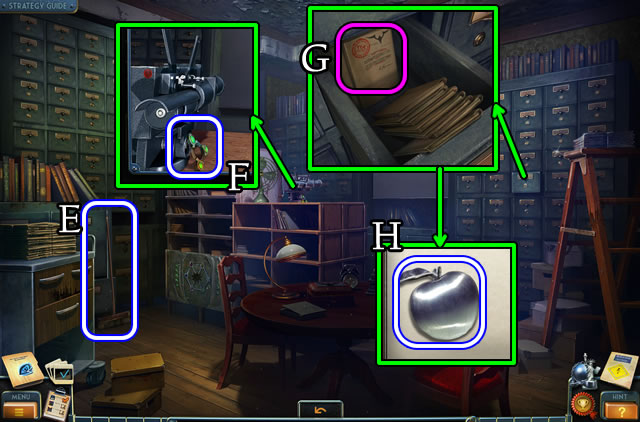
- Take the PUSH BROOM (E).
- Take STAR FRAGMENT 4/5 (F).
- Open and take the file (G) and IRON APPLE (H).
- Walk down 4x, then left.

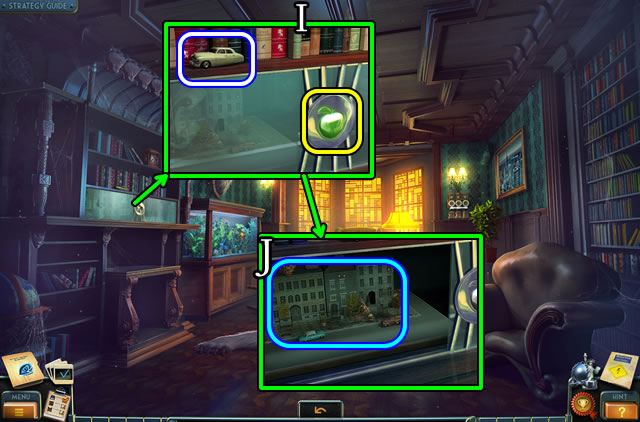
- Take the TOY CAR; place the IRON APPLE (I). Select (J).

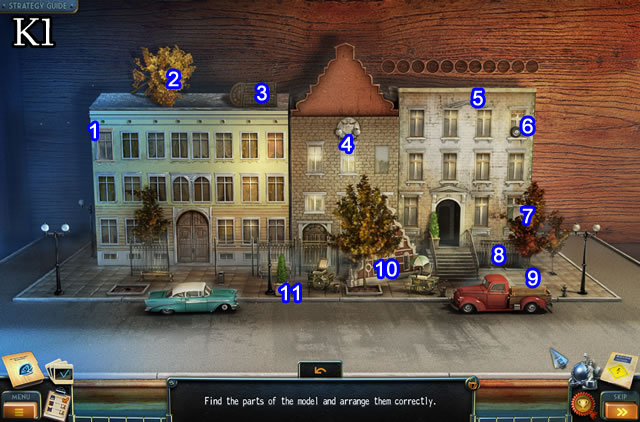

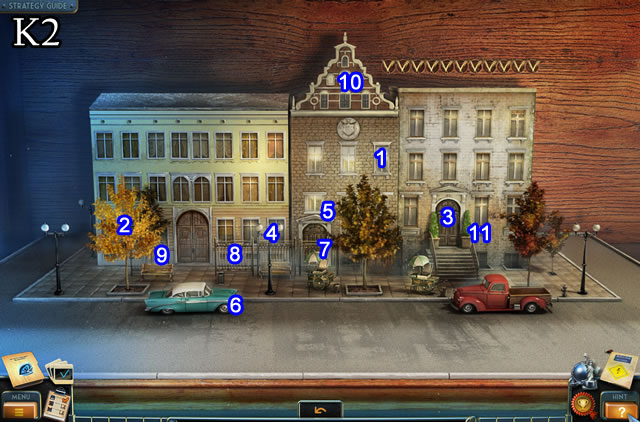
- Solution (K1-K2).
- Take the EMPTY FILM REEL and EAGLE FIGURINE.
- Return to the Archives.

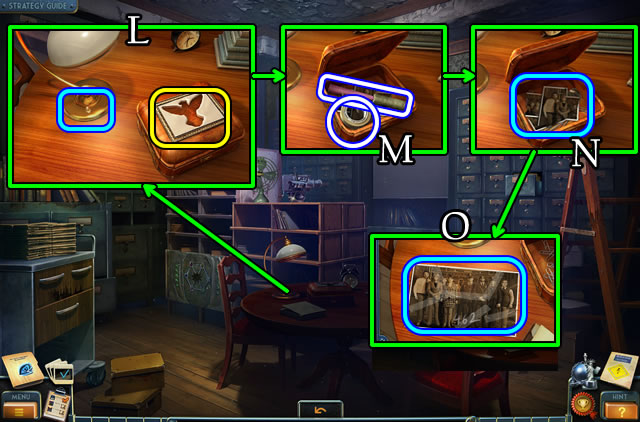
- Turn on the lamp; place the EAGLE FIGURINE (L).
- Take the LEVER HANDLE and TAPE (M).
- Select each picture fragment (N); use the TAPE.
- Select (O).
- Walk down 2x.

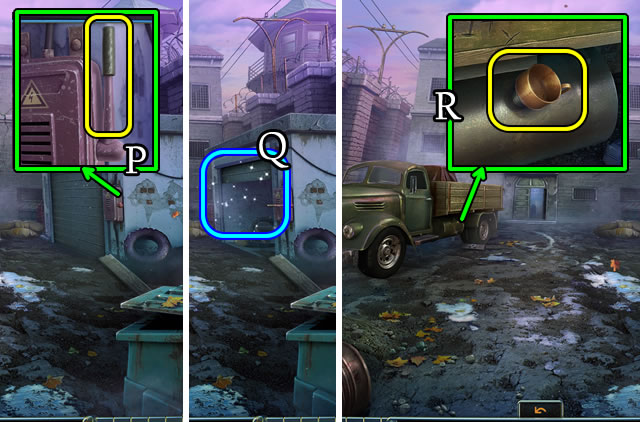
- Place (P) then select the LEVER HANDLE to play a HOP (Q). Receive a JERRY CAN.
- Remove the cap; place the FUNNEL (R); use the JERRY CAN.

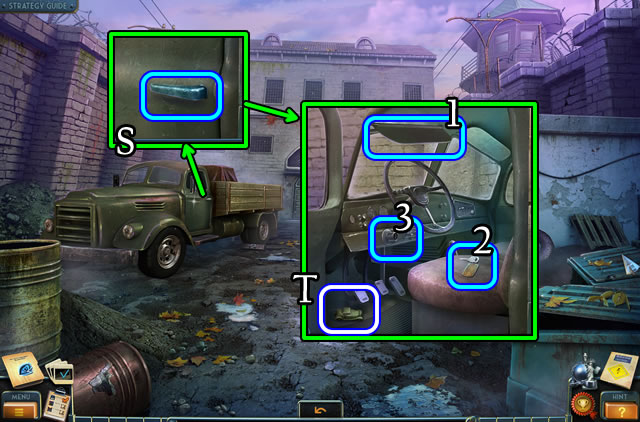
- Open (S).
- Take the TOY CAR (T). Lower (1); place (2) in (3) and select.

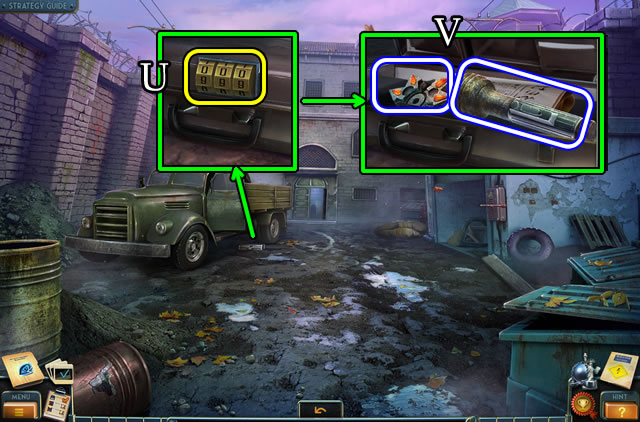
- Select (U). Enter 4-6-2.
- Take STAR FRAGMENTS 5/5 and the FLASHLIGHT (V).
- Walk forward, then right.

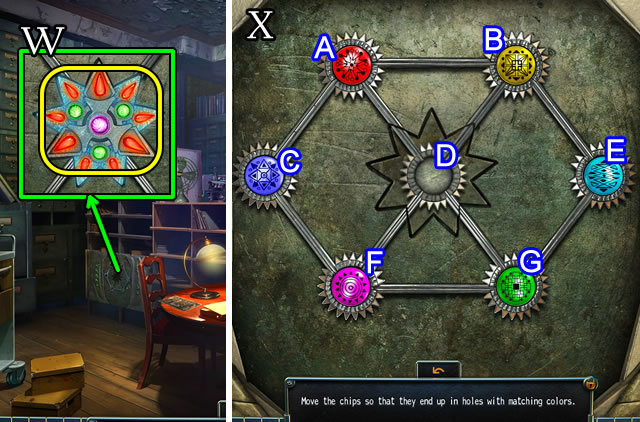
- Assemble the STAR FRAGMENTS 5/5 for a STAR (Inventory).
- Place the STAR (W).
- Solution (X). G-C-A-B-E-F-G-C-A-B-E-F-G-C-A-B-D.

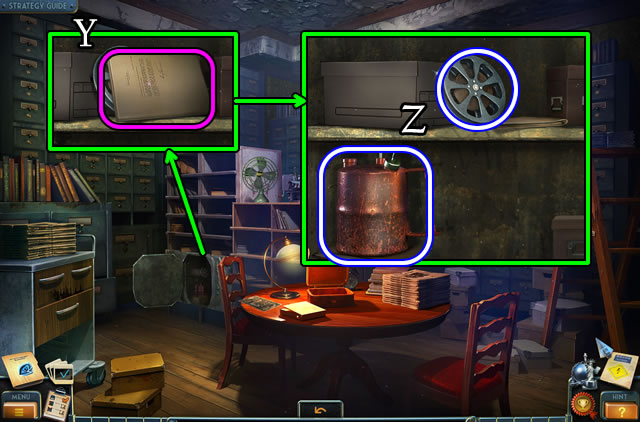
- Take the file (Y).
- Take the LOADED FILM REEL and BLOWTORCH PART (Z).

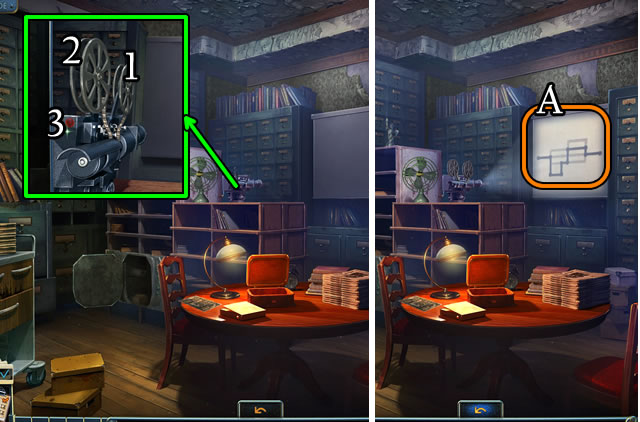
- Place the EMPTY FILM REEL (1) and LOADED FILM REEL (2). Select (3).
- Note (A).
- Walk down 2x.

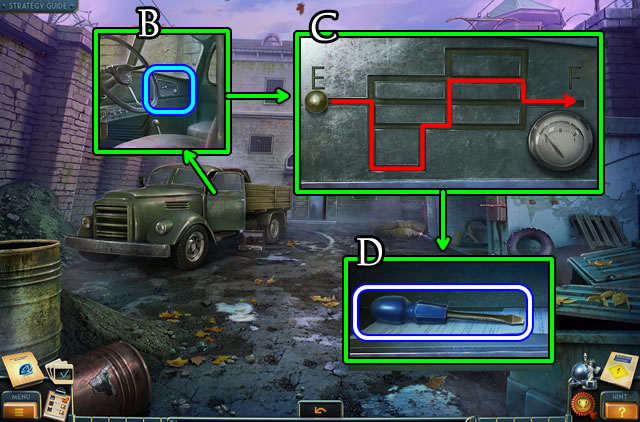
- Select (B).
- Solution (C).
- Take the SCREWDRIVER (D).
- Walk forward.

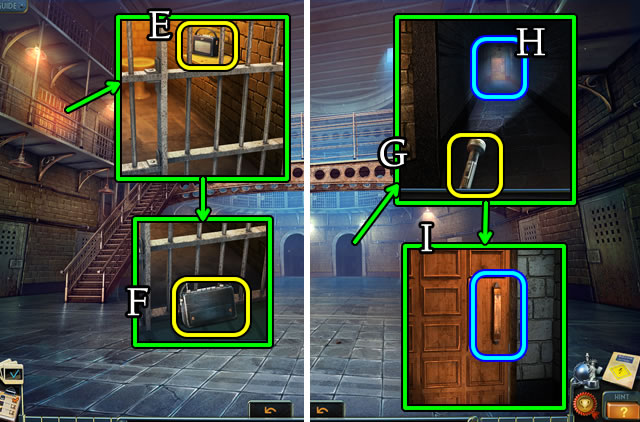
- Use the PUSH BROOM (E) and SCREWDRIVER (F). Open to take BATTERIES.
- Combine the BATTERIES and FLASHLIGHT for a working FLASHLIGHT (Inventory).
- Place the FLASHLIGHT (G); select (H); open (I) and walk forward.
- Select the scene to receive a MEDALLION.

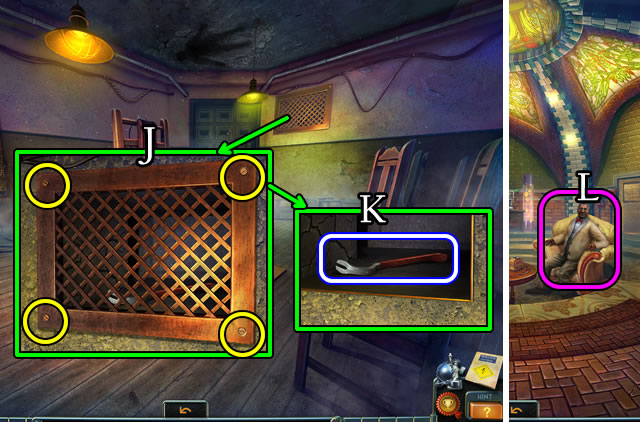
- Use the SCREWDRIVER 4x (J); remove; take the CROWBAR (K).
- Walk down 4x. Speak to Dr. Bishop (L).
- Walk down.

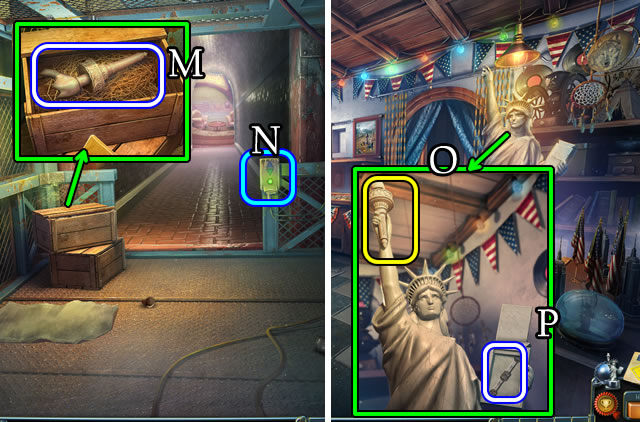
- Use the CROWBAR; take the TORCH (M).
- Select the control (N); walk forward.
- Place the TORCH (O); take the BAR (P).
- Return to the Study.

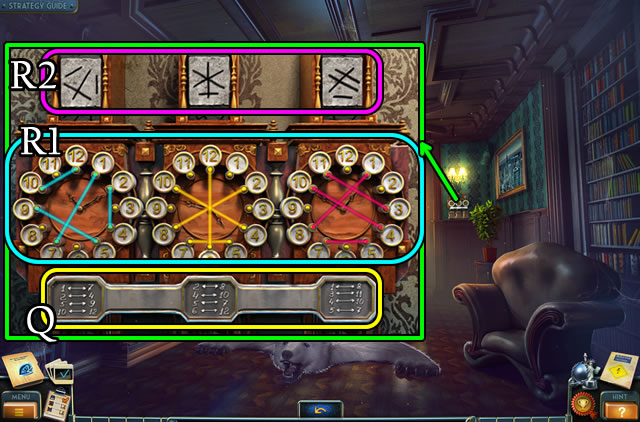
- Place the BAR (Q).
- Solution (R1-R2).
- Take the MAGNET and BLOWTORCH PART.
- Walk down, right, then forward 3x.

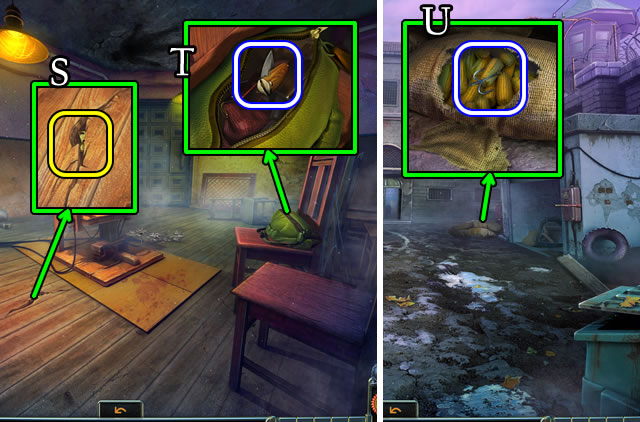
- Use the MAGNET (S) to get a ZIPPER PULL TAB.
- Place the ZIPPER PULL TAB; pull; take the JACKKNIFE (T).
- Walk down 2x.
- Use the JACKKNIFE; open; take the GRAPPLING HOOK (U).
- Walk forward.

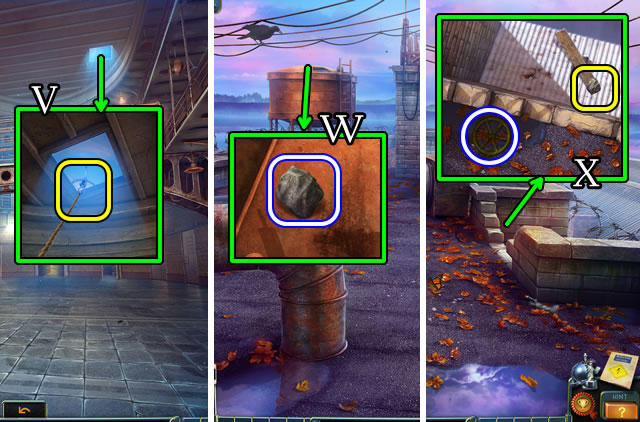
- Place the GRAPPLING HOOK (V); climb the rope.
- Take the STONE (W).
- Drop the STONE; take a HANDWHEEL (X).

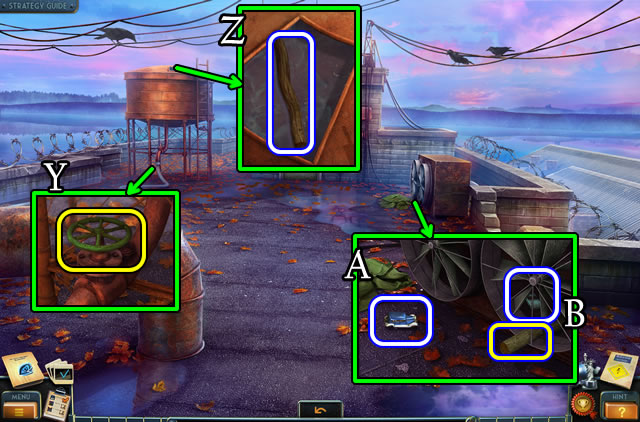
- Place and select the HANDWHEEL (Y); take the STICK (Z).
- Lift the coat; take the TOY CAR (A).
- Place the STICK; take the TOY CAR and STICK (B).
- Walk down 4x.

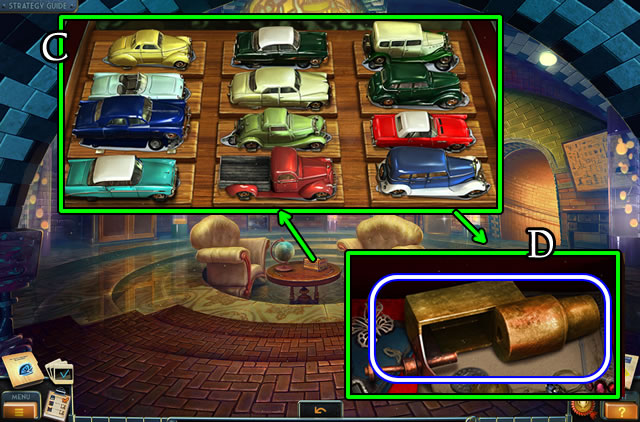
- Place 10 TOY CARS (C); take the BLOWTORCH PART (D).
- Return to the Roof.

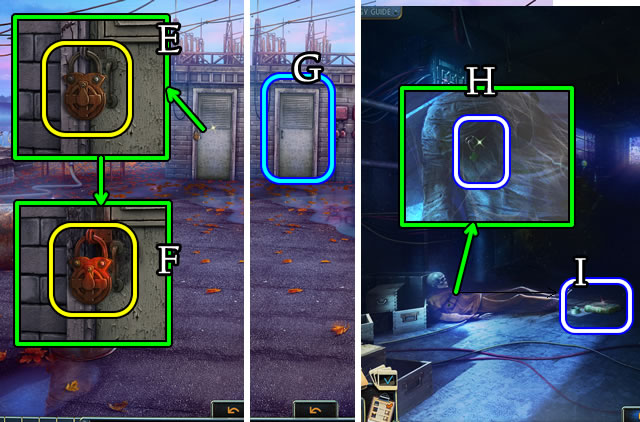
- Combine the BLOWTORCH PARTS for a BLOWTORCH (Inventory).
- Use the BLOWTORCH (E) and HAMMER (F); select (G).
- Take the MED STATION KEY (H) and PIPE (I).
- Walk down 2x.

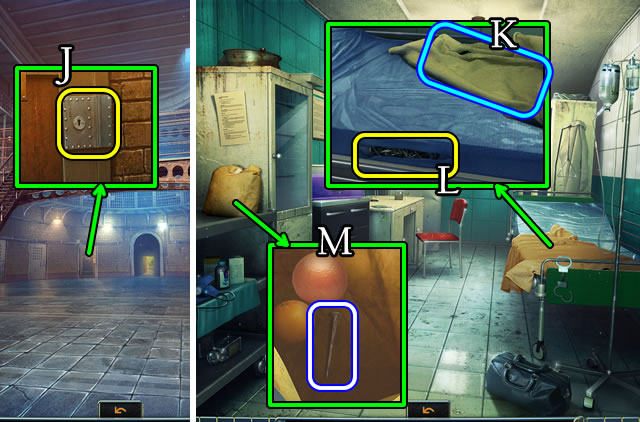
- Place and select the MED STATION KEY (J); walk left.
- Move (K); use the JACKKNIFE (L); take the WIRE.
- Open and uncover the NAIL (M).
- Walk down, climb up and walk forward.

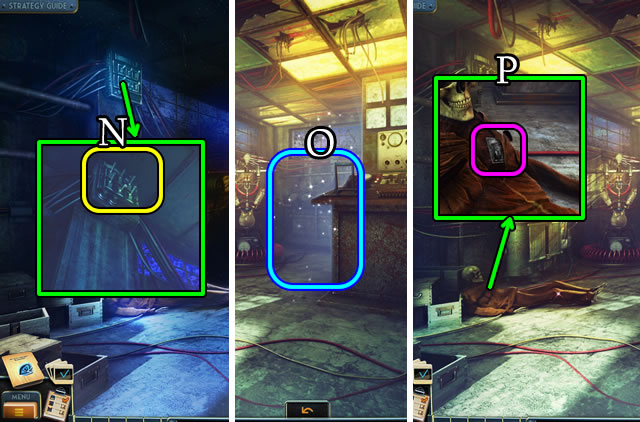
- Combine the PIPE, STICK and WIRE for a PIPE AND STICK (Inventory).
- Use the PIPE AND STICK (N); play the HOP (O) for a SWITCH.
- Select the photograph (P).

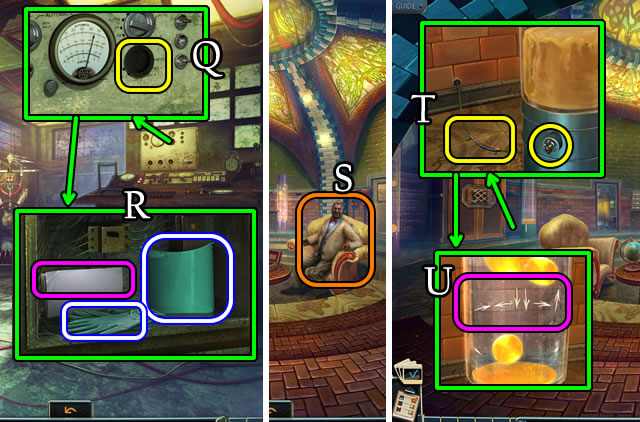
- Place the SWITCH (Q); take the CHANDLIER PART and RUBBER GLOVES; read the note (R).
- Walk down 5x; speak to Dr. Bishop (S); receive a PUNCH CARD.
- Place the WIRE; use the RUBBER GLOVES; turn the knob (T). Note (U).
- Walk left.
Chapter 3: Repairing the Pump

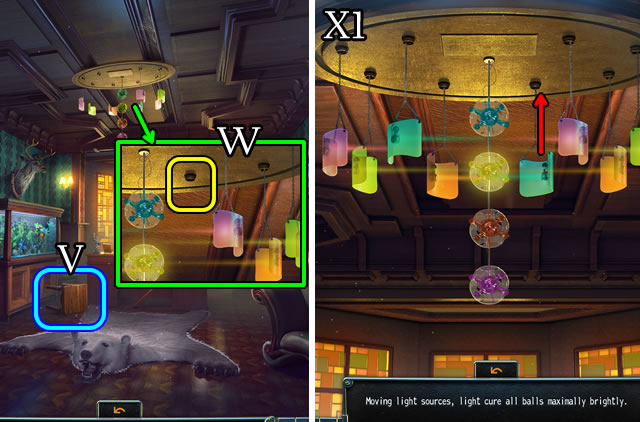

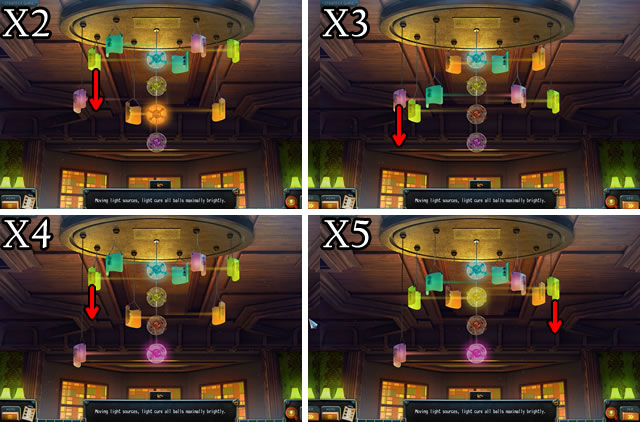


- Move (V); place the CHANDELIER PART (W).
- Solution, part one. (X1).
- Solution, part two. (X2-X3-X4-X5).
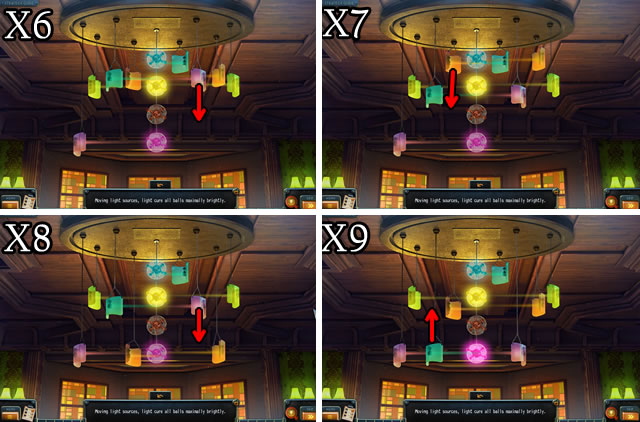
- Solution, part three. (X6-X7-X8-X9).
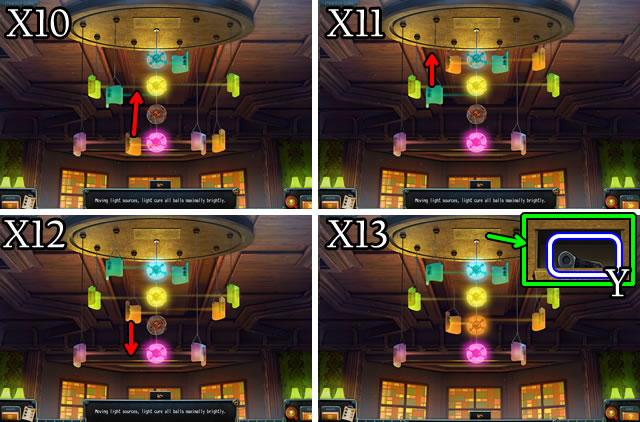
- Solution, part four (X10-X11-X12-X13).
- Take the MAGNETIC KEY (Y).
- Walk down, then right.

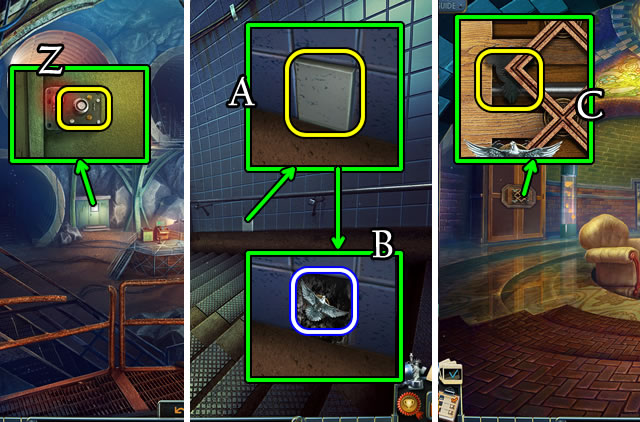
- Use the MAGNETIC KEY (Z); enter the Hallway.
- Use the NAIL and HAMMER (A); take the PIGEON FIGURINE (B).
- Walk down 2x.
- Place the PIGEON FIGURINE (C).

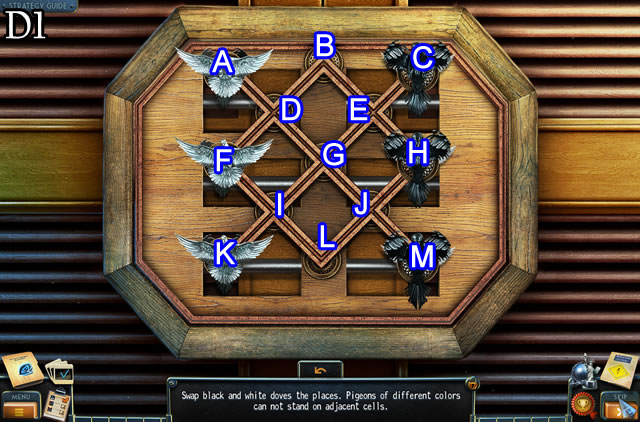
- Solution (D1). H-B, M-G, G-E, F-L, L-J, J-M, K-I, I-L, E-H.
- B-E, A-D, D-F, F-I, E-B, B-D, D-A, H-B, L-J, I-L, B-F, C-E.
- E-B, J-H, L-J, F-I, I-K, B-F, J-C.

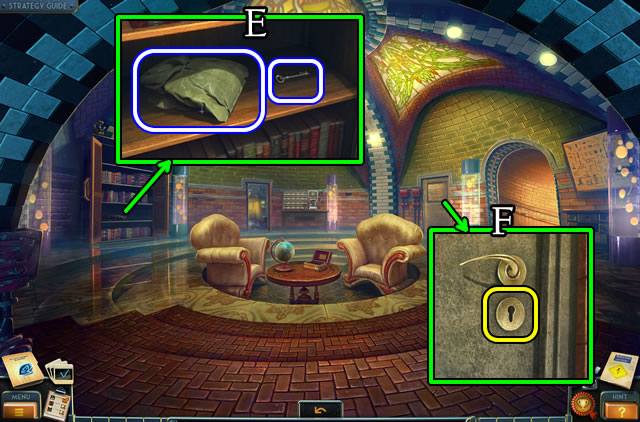
- Take the KEY and PROTECTIVE SUIT (E).
- Use the KEY (F), then enter.

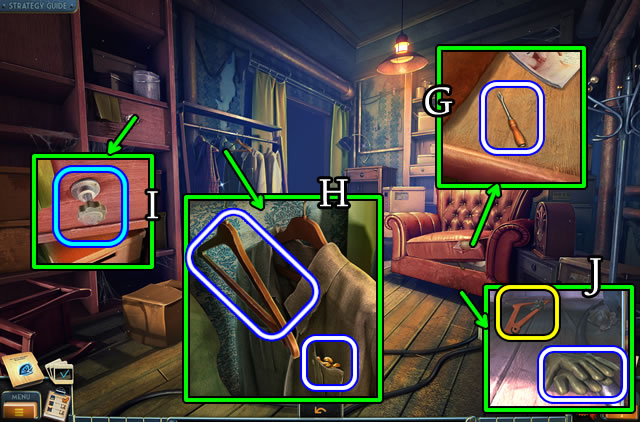
- Lift the cushion; take the NAIL PULLER (G).
- Take the YELLOW PEBBLES and HANGER (H).
- Select the knob (I).
- Take the GLOVES; use the HANGER to get the KNOB (J).

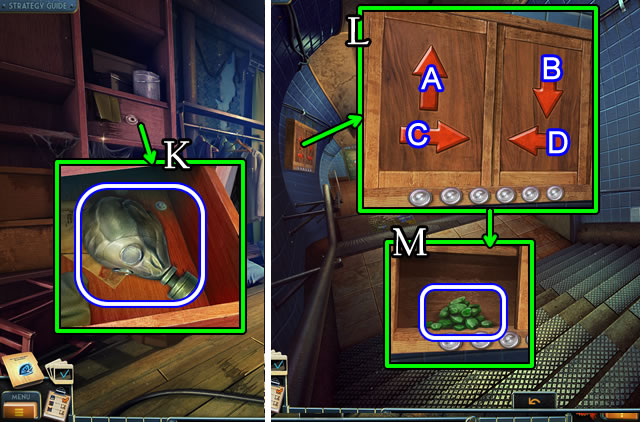
- Attach the KNOB; take the GAS MASK (K).
- Return to the Hallway.
- Select (L).
- Solution. C-D-B-B-C-A.
- Take the GREEN PEBBLES (M).

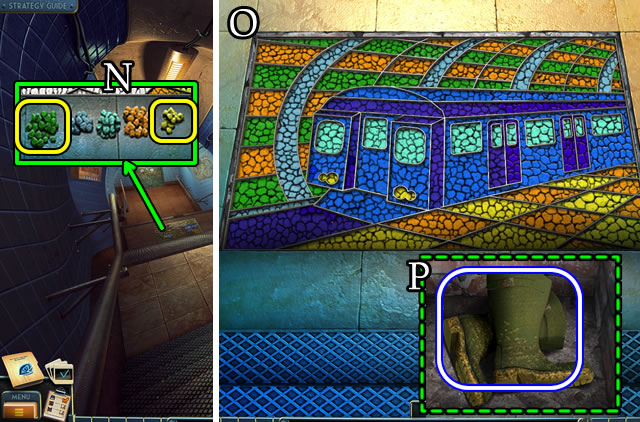
- Place the YELLOW PEBBLES and GREEN PEBBLES (N).
- Solution (O).
- Take the BOOTS (P).

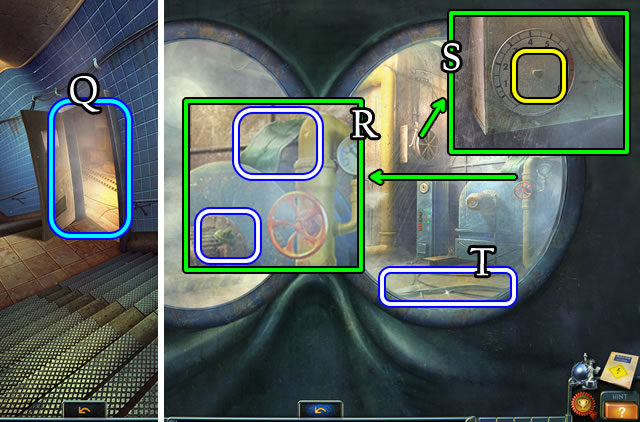
- Combine the PROTECTIVE SUIT, GLOVES, GAS MASK and BOOTS for a HAZMAT SUIT (Inventory).
- Open and place the HAZMAT SUIT (Q).
- Take the PIECE OF METAL and KNOB (R).
- Place, then select the KNOB (S).
- Grab the SHOVEL (T).
- Walk down.

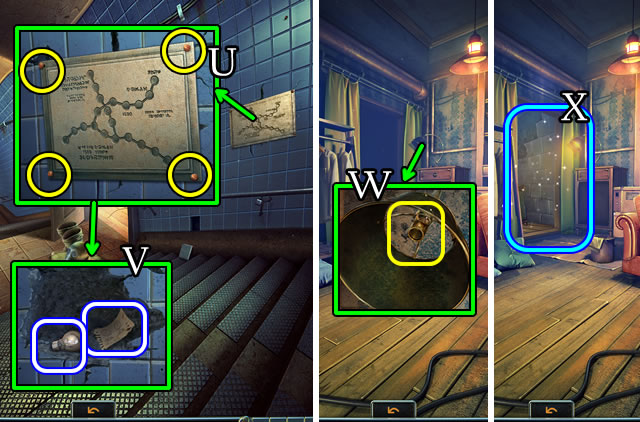
- Use the NAIL PULLER 4x (U); remove; take the LIGHTBULB and DIAGRAM (V).
- Walk down 2x and right.
- Place the LIGHTBULB (W) to play a HOP (X). Receive a DRILL BIT.
- Walk down and enter the tunnel.

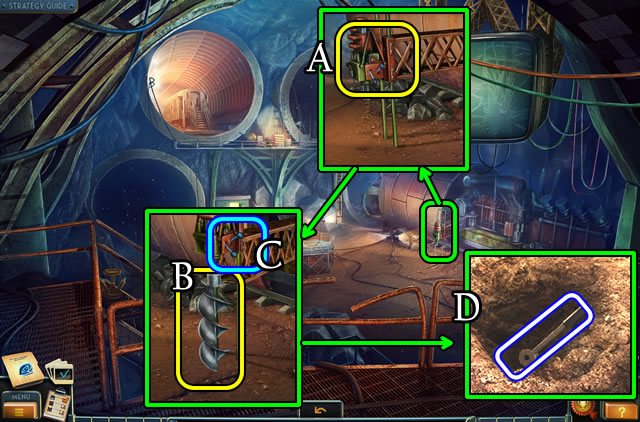
- Select (A), attach the DRILL BIT (B); flip (C); use the SHOVEL; take the MONKEY WRENCH (D).
- Return to the Pump Room.

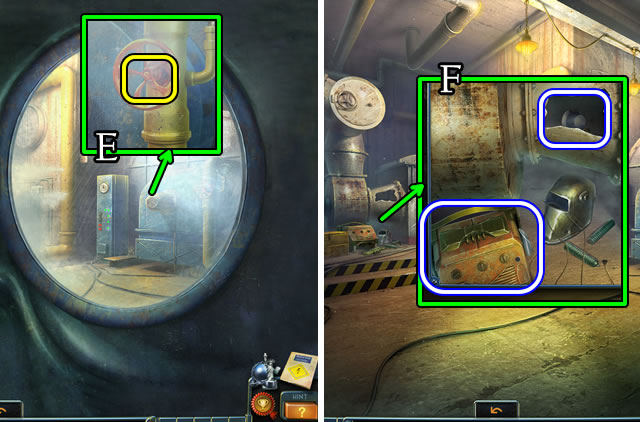
- Use the MONKEY WRENCH (E).
- Take the WELDING DEVICE PARTS and KNOB (F).
- Walk down.

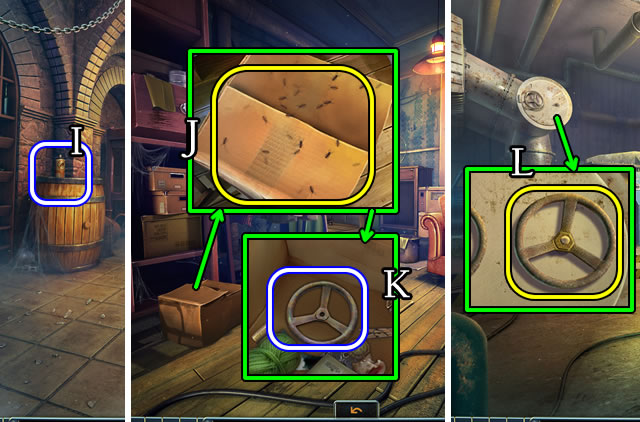
- Place the KNOB (G).
- Solution (H).
- Walk forward.


- Grab the INSECT REPELLANT (I).
- Walk down 3x, then right.
- Use the INSECT REPELLANT (J).
- Open and uncover the HANDWHEEL (K).
- Return to the Pump Room.
- Attach and turn the HANDWHEEL (L).

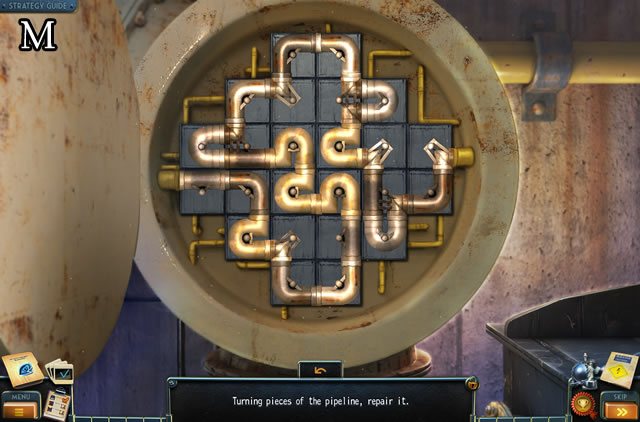

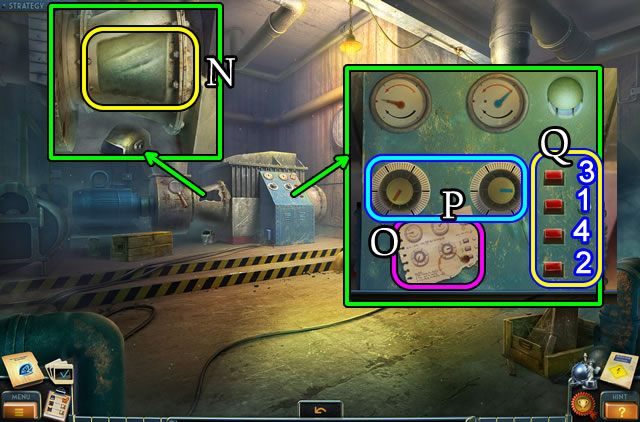
- Attach the WELDING DEVICE PARTS to get a WELDING DEVICE (Inventory).
- Place the PIECE OF METAL (N); use the WELDING DEVICE.
- Place the DIAGRAM (O); set (P); press (Q) 1-2-3-4.

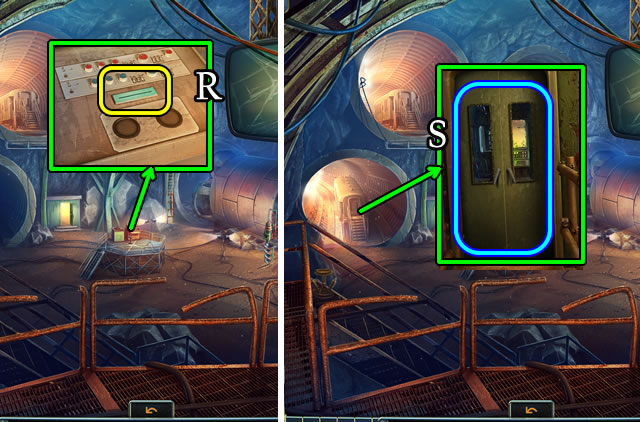
- Insert the PUNCH CARD (R).
- Open (S) and flip the control.
Chapter 4: Chinatown

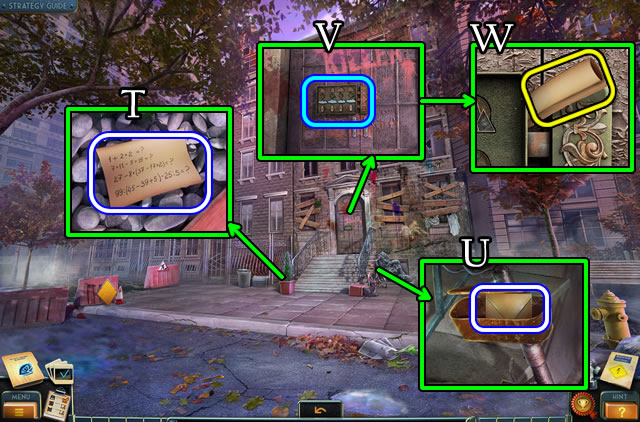
- Uncover and take the NOTE (T).
- Open and take ENVELOPE 1/5 (U).
- Select (V) and place the NOTE (W).

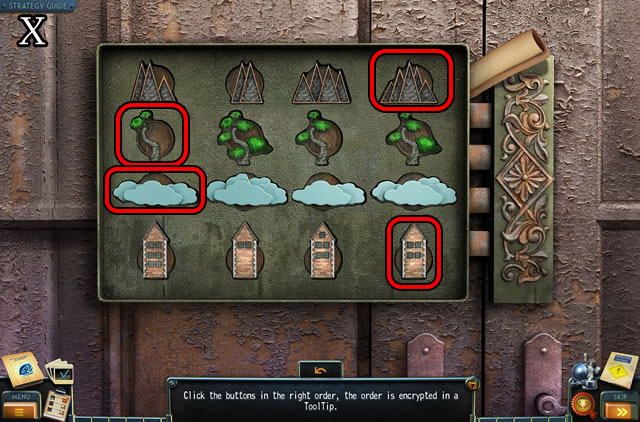
- Solution (X).
- Walk right.
- Climb the stairs; open the door; walk left.

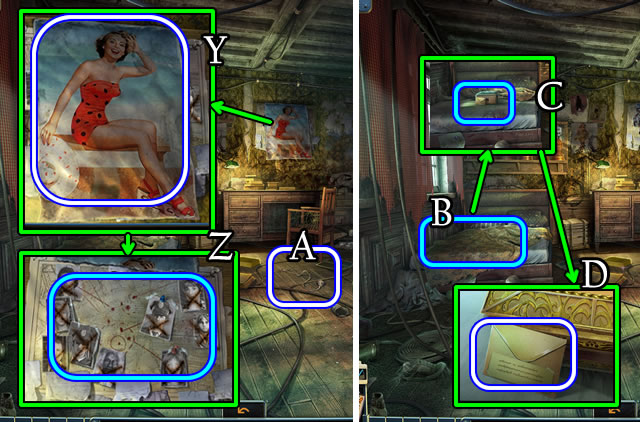
- Take the POSTER (Y).
- Select (Z).
- Grab the CORD (A).
- Move (B); Select (C) and take ENVELOPE 2/5 (D).
- Walk down.

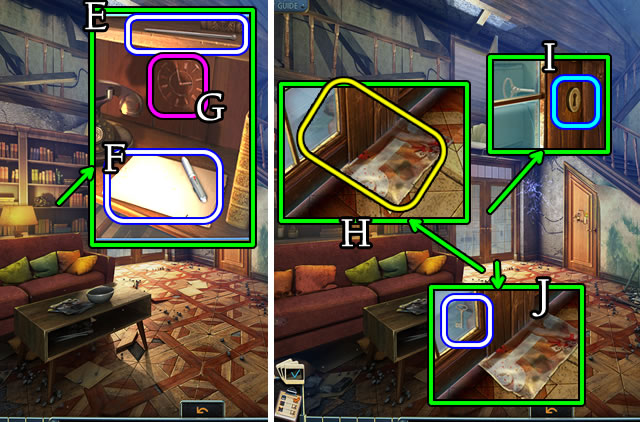
- Take the PIN (E) and PEN AND PAPER (F). Note (G).
- Place the POSTER (H).
- Use the PIN (I); select (J); take the KEY.
- Use the KEY; walk left.

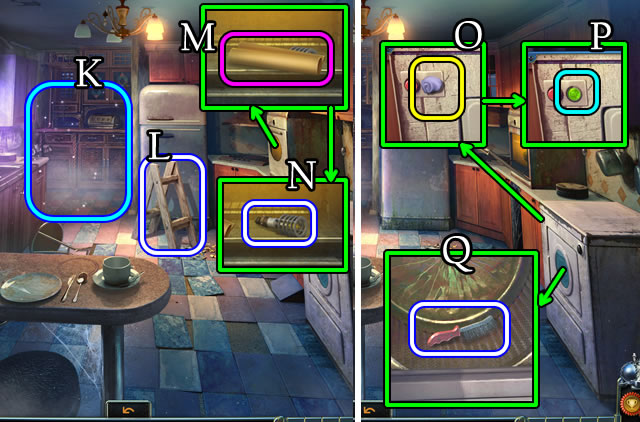
- Play the HOP (K) to receive a PITCHER.
- Grab the STEPLADDER (L).
- Open; take the note (M); take the BULB (N).
- Use the JACKKNIFE (O); press (P); take the METAL BRUSH (Q).

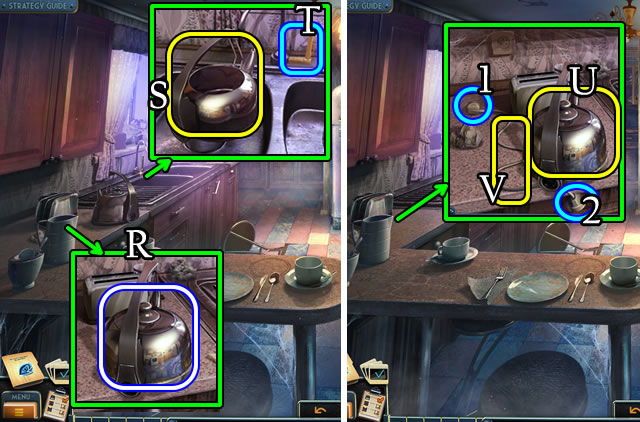
- Take the EMPTY KETTLE (R).
- Place the EMPTY KETTLE (S); pull (T); get a KETTLE OF WATER.
- Place the KETTLE OF WATER (U) and ELECTRIC CORD (V). Select (1-2); take the KETTLE OF HOT WATER.

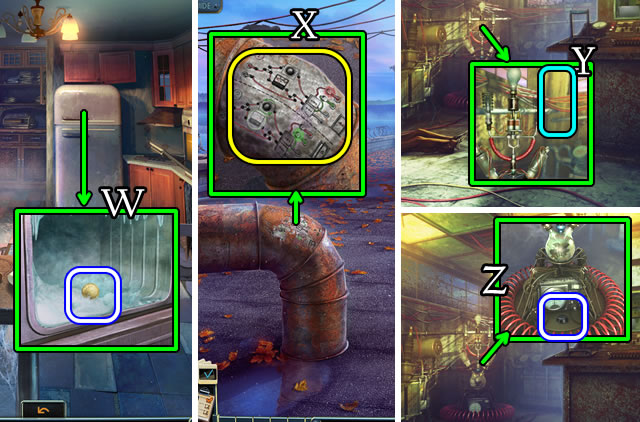
- Open; use the KETTLE OF HOT WATER; take the COIN (W).
- Return to the Rooftop.
- Use the METAL BRUSH (X). Place the PEN AND PAPER for a NOTE WITH DIAGRAM.
- Walk forward.
- Place the BULB (Y). Take the SWITCH (Z).

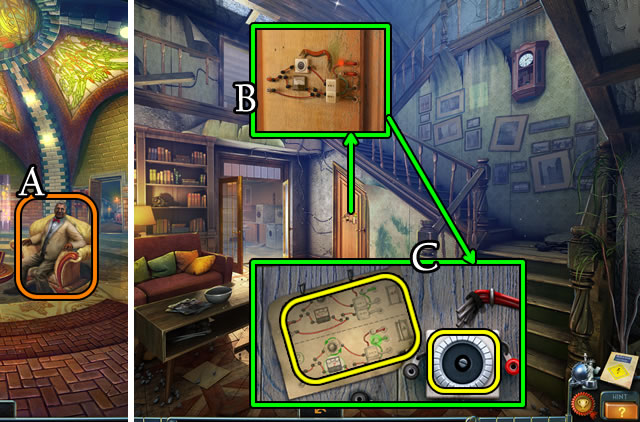
- Return to the Hall; speak with Dr. Bishop (A); receive ENVELOPE 3/5.
- Return to the house Hall.
- Select (B); place the NOTE WITH DIAGRAM and SWITCH (C).

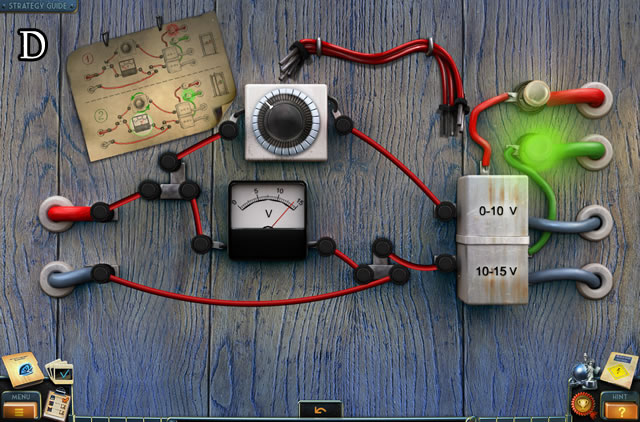
- Solution (D).
- Walk right.

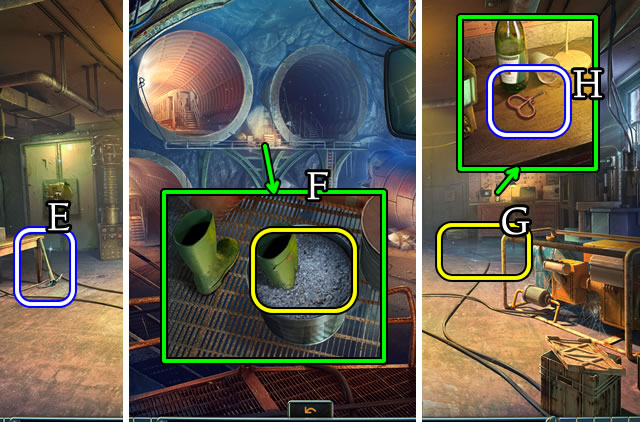
- Take the PICKAXE (E).
- Walk down 3x.
- Use the PICKAXE (F); take the RUBBER BOOTS.
- Return to the Cellar.
- Place the RUBBER BOOTS (G); take the CORKSCREW (H).
- Return to the Wine Cellar.

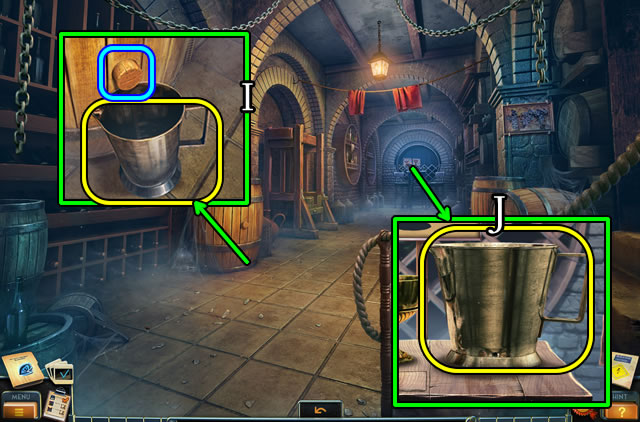
- Place the PITCHER; use the CORKSCREW (I). Take the PITCHER OF WINE.
- Place the PITCHER OF WINE (J).

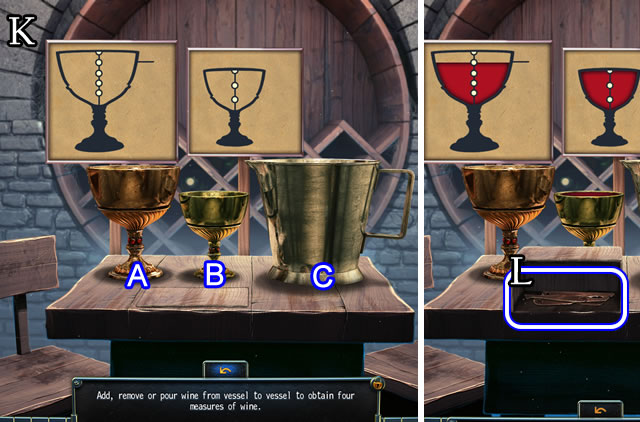
- Solution (K). C-A, A-B, B-C, A-B, C-A, A-B.
- Take the LOCKPICK SET (L).
- Return to Hugo’s Room.

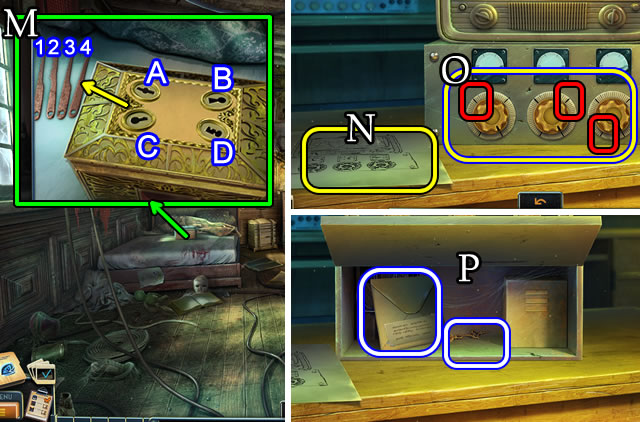
- Use the LOCKPICK SET (M).
- Solution. 1-C, 2-A, 3-D, 4-B.
- Take the NOTE.
- Walk down, then right.
- Place the NOTE (N).
- Solution (O).
- Take the ENVELOPE 4/5 and HAND OF A CLOCK (P).
- Walk down.

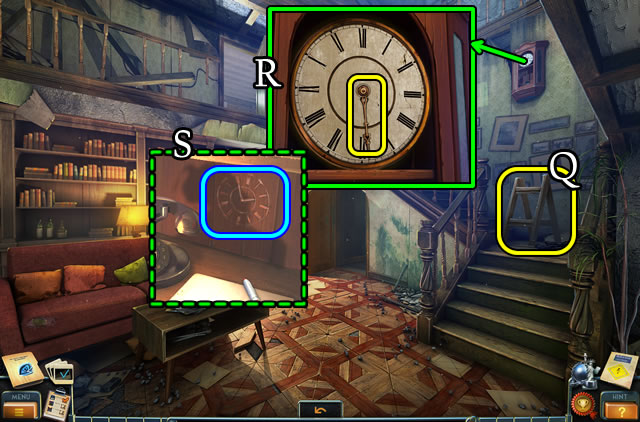
- Place the STEPLADDER (Q). Place the HAND OF A CLOCK (R).
- Solution (S).
- Take ENVELOPE 5/5.
- Walk up the stairs.

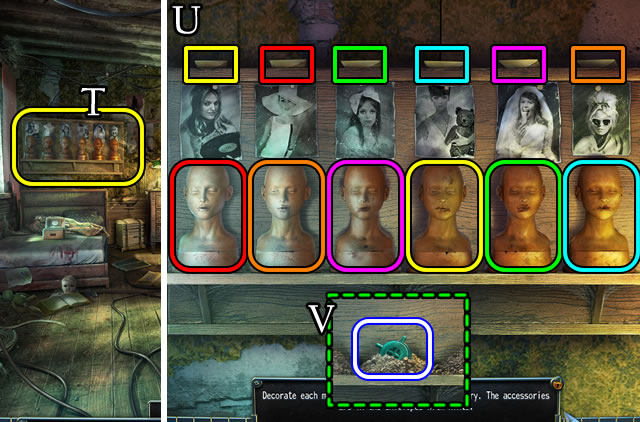
- Place ENVELOPE 5/5 (T).
- Solution (U).
- Take the TUNING MECHANISM (V).
- Walk down and right.

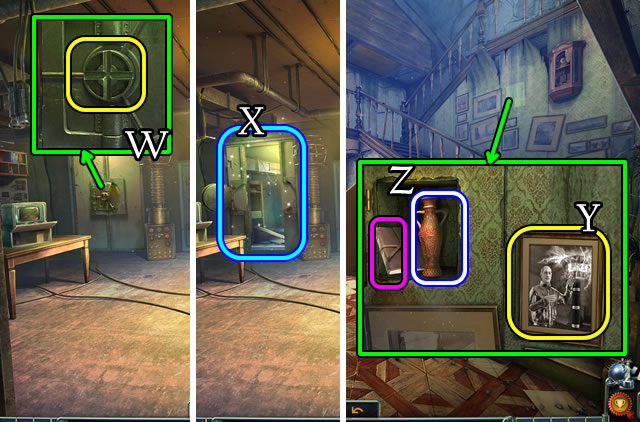
- Place the TUNING MECHANISM (W) to play a HOP (X). Receive SAMUEL’S PHOTO.
- Walk down.
- Place SAMUEL’S PHOTO (Y); take the BOTTLE and folder (Z).
- Return to the Wine Cellar.

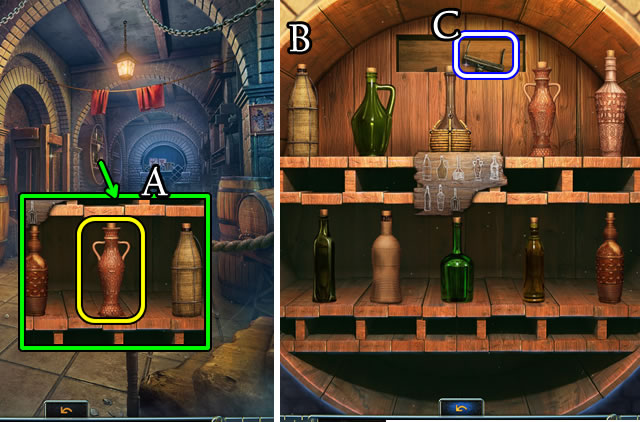
- Place the BOTTLE (A).
- Solution (B).
- Take the note and HAND SWITCH (C).

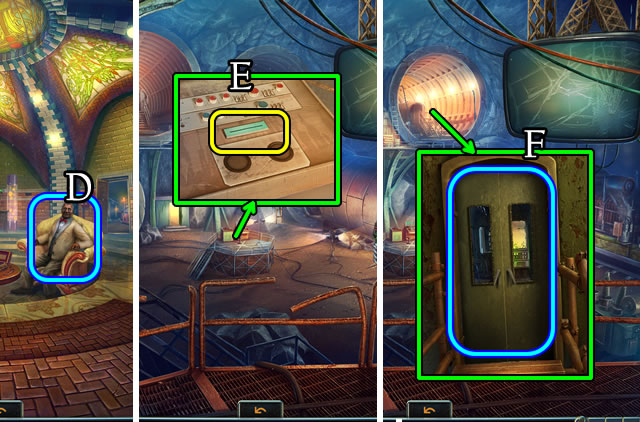
- Return to the Hall; speak with Dr. Bishop (D); receive a PUNCH CARD.
- Enter the Intersection.
- Use the PUNCH CARD (E).
- Open (F) and flip the controls.
Chapter 5: The Lab

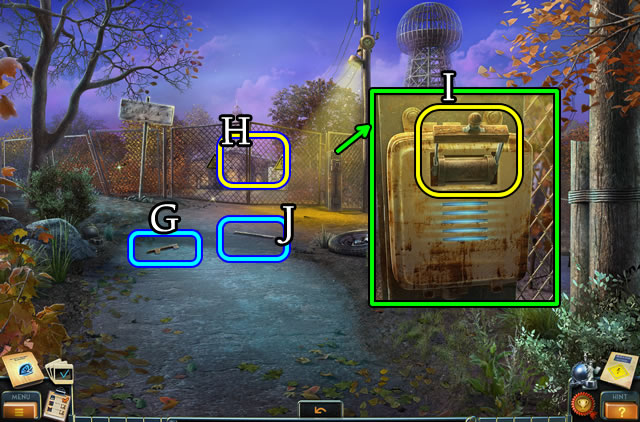
- Select (G) and place (H) the metal rod.
- Place, then select the HAND SWITCH (I).
- Select (J) and place (H) the metal rod.
- Open the gates and walk forward.

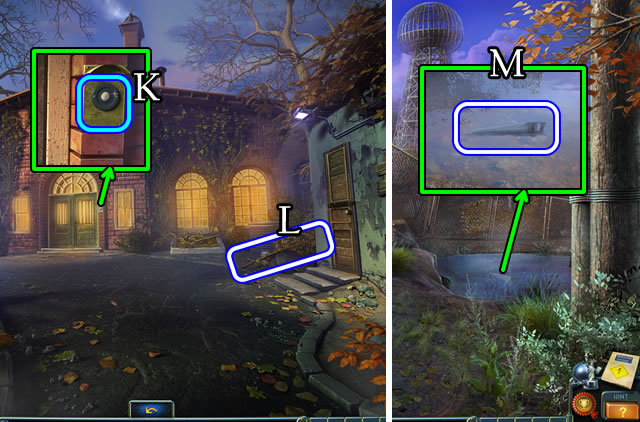
- Ring the doorbell (K); take the FISHING ROD (L).
- Walk down.
- Use the FISHING ROD to receive a SAW (M).
- Walk forward.

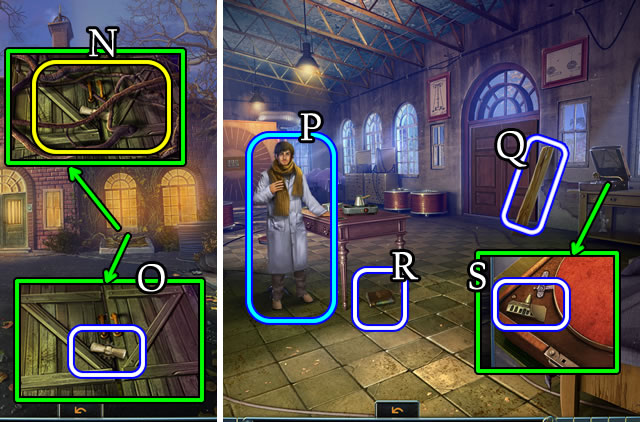
- Use the SAW (N); take the HANDLE (O); open the doors; speak with William (P).
- Take the LONG PLANK (Q), BOOK (R) and FIGURINE PART (S).
- Return to Hugo’s Room.

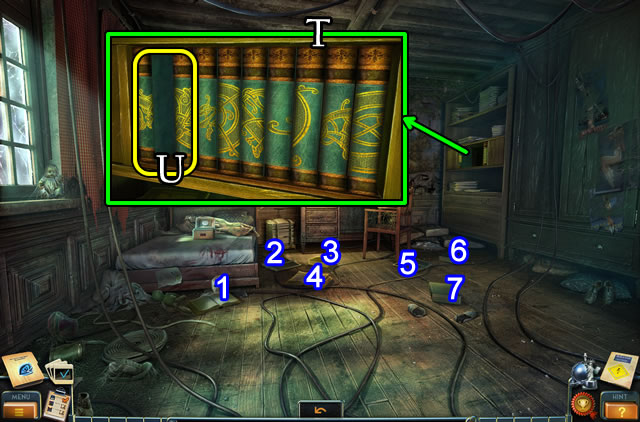
- Select (1-7) and place (T) the books. Add the BOOK (U).

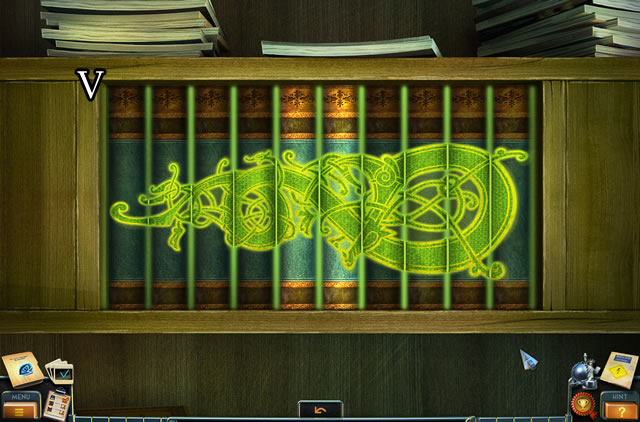

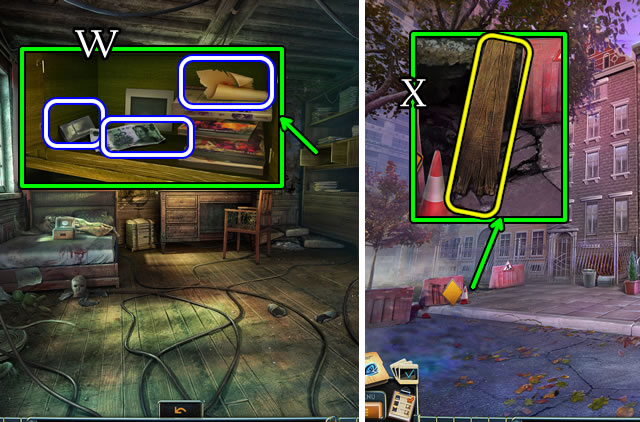
- Take the LIGHTER, BANKNOTES and NOTE (W).
- Walk down 2x, place the LONG PLANK (X).
- Walk left, then right.

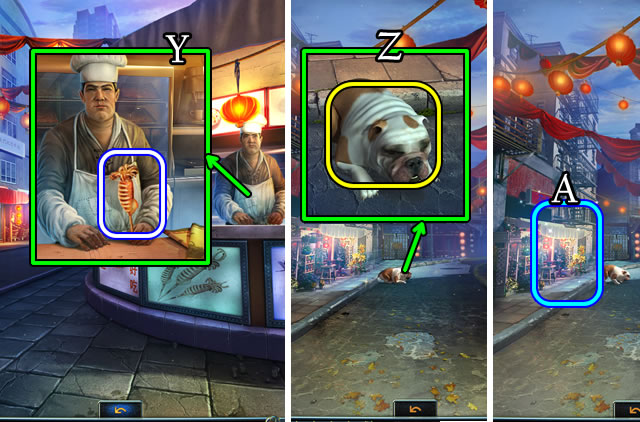
- Give the BANKNOTES; take the SQUID KEBAB (Y).
- Walk down.
- Give the SQUID KEBAB (Z) to play the HOP (A). Receive a FEVER PILL.
- Return to the Laboratory.

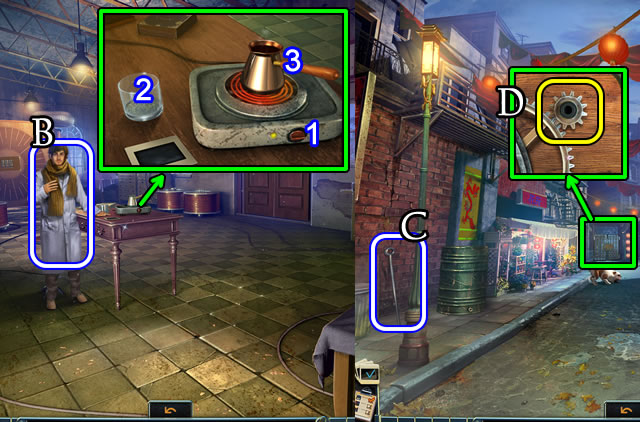
- Turn (1); place the FEVER PILL (2); select (3); take the FEVER MEDICINE.
- Give the FEVER MEDICINE (B); receive a BELL.
- Return to Chinatown.
- Grab the GAFFING HOOK (C).
- Place the HANDLE (D).

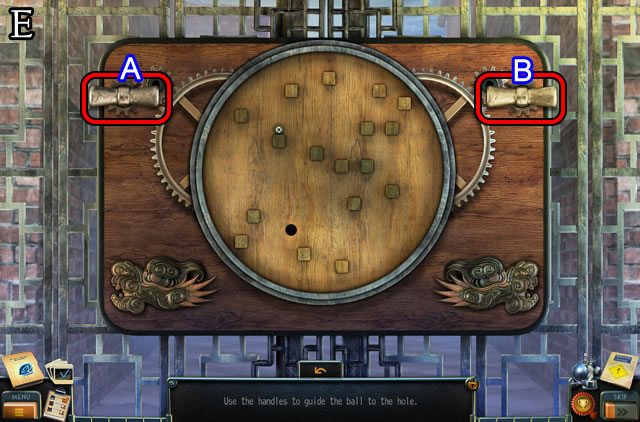
- Solution (E). A-B-Ax2-Bx3-Ax2-Bx4-Ax3-Bx3.
- Walk left; speak with the boy.

- Use the GAFFING HOOK (F); take the HOSE.
- Place the BELL (G).

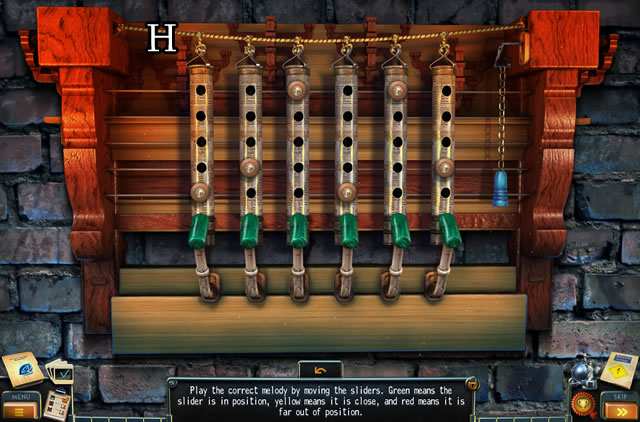
- Solution (H).
- Walk left; speak to the man.

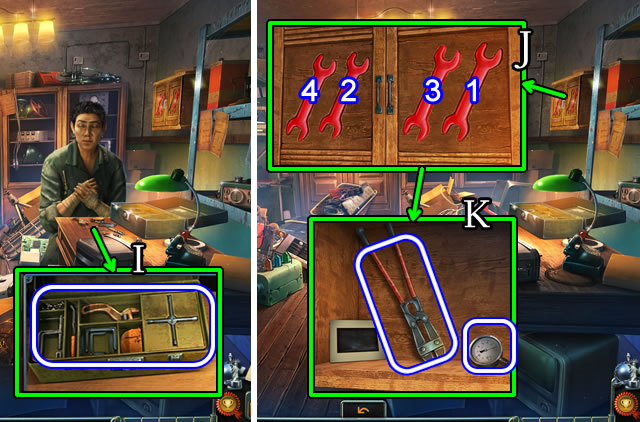
- Place the tools; receive a WRENCH; take the TOOL BOX (I).
- Place the WRENCH (J).
- Solution. 1-2-3-4.
- Take the REINFORCED CLIPPERS and DEVICE PART (K).
- Walk down 2x, then right.

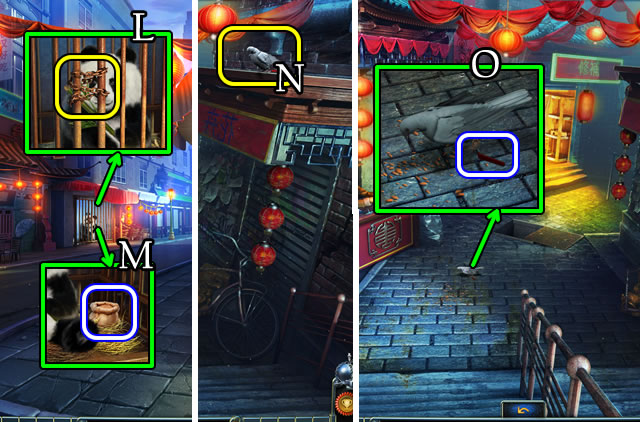
- Use the REINFORCED CLIPPERS (L); take the GRAIN (M).
- Walk down, then left.
- Place the GRAIN (N); take the FAUCET HANDLE (O).
- Walk down.

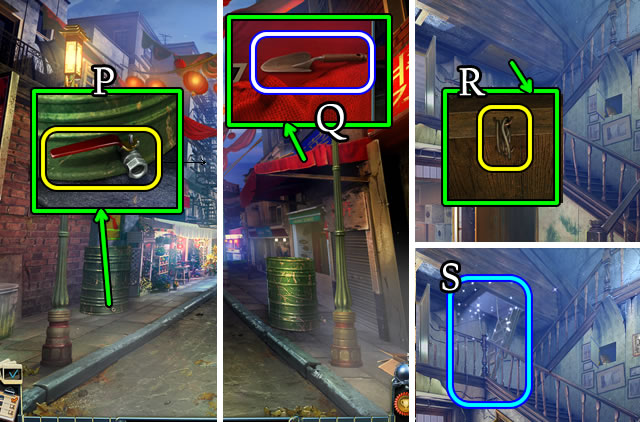
- Place then select the FAUCET HANDLE (P); select the barrel.
- Take the TROWEL (Q).
- Walk down, then right.
- Use the REINFORCED CLIPPERS (R); open to play a HOP (S); receive a WINE PRESS HANDLE.
- Return to the Wine Cellar.

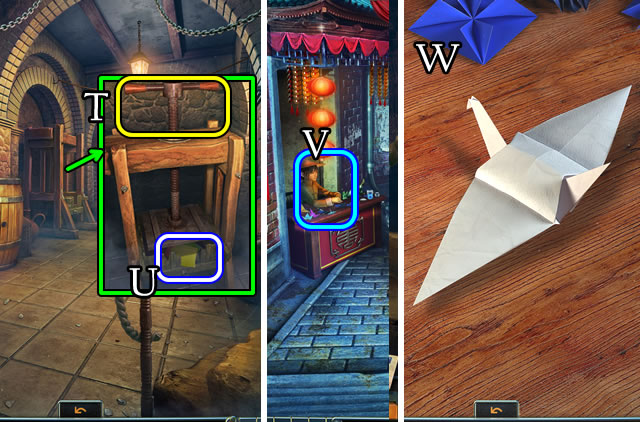
- Place and select the WINE PRESS HANDLE (T); take the COLORED PAPER (U).
- Return to Near the Workshop.
- Give the COLORED PAPER (V).
- Solution (W).
- Receive a WHEEL.
- Walk left.

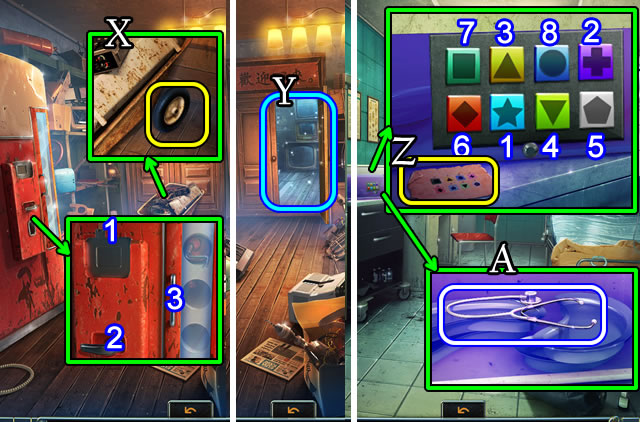
- Place the COIN (1), turn (2), open (3); take the GRAMOPHONE HANDLE.
- Place the WHEEL (X); select the wheelbarrow for a HOP (Y). Receive a FIGURINE PART.
- Return to the Med Station.
- Place the NOTE (Z).
- Solution. (1-8).
- Take the STETHOSCOPE (A).
- Return to the Cellar.

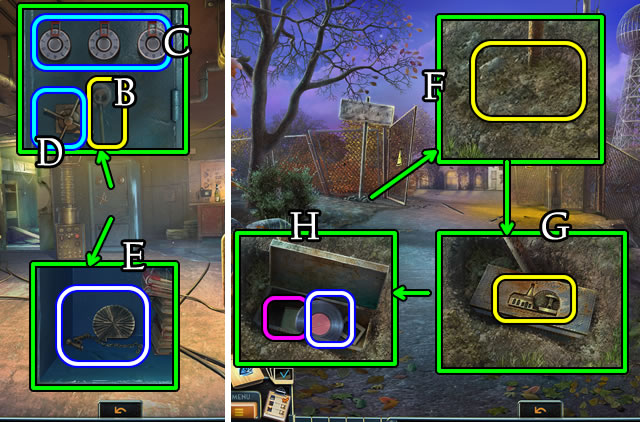
- Place the STETHOSCOPE (B).
- Solution (C). 9-5-3.
- Open (D); take FIGURINE PART (E).
- Return to the Road to the Lab.
- Combine the FIGURINE PARTS for a FIGURINE (Inventory).
- Use the TROWEL (F); place the FIGURINE (G); open; take the VINYL RECORD and note (H).
- Walk forward 2x.

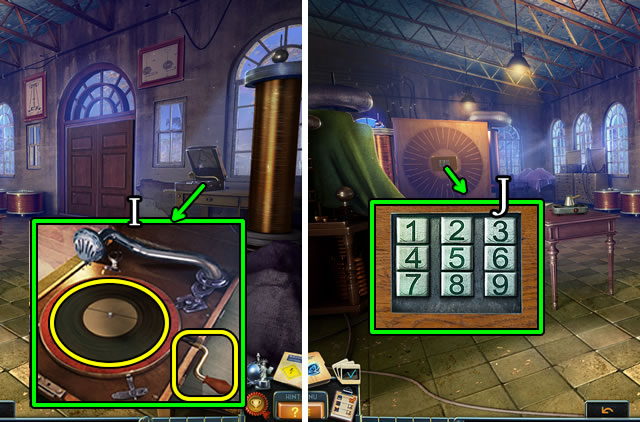
- Place the VINYL RECORD and GRAMOPHONE HANDLE (I). Select the handle and place the needle.
- Solution (J). 5-2-7-1-3.

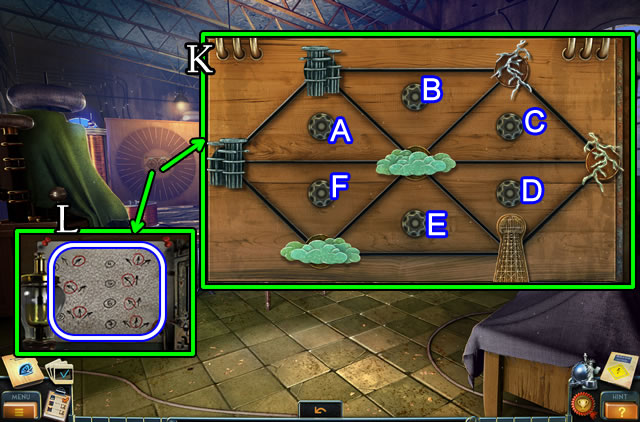
- Solution (K). A-Ex2-Cx2-F.
- Take the MAP (L). Speak to William.
- Walk down and left.

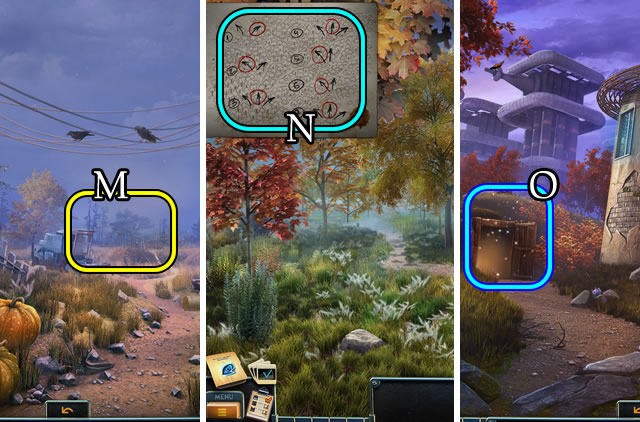
- Place the MAP (M).
- Solution (N). R-L-F-F-L-L-F.
- Play the HOP (O); receive a JERRY CAN.

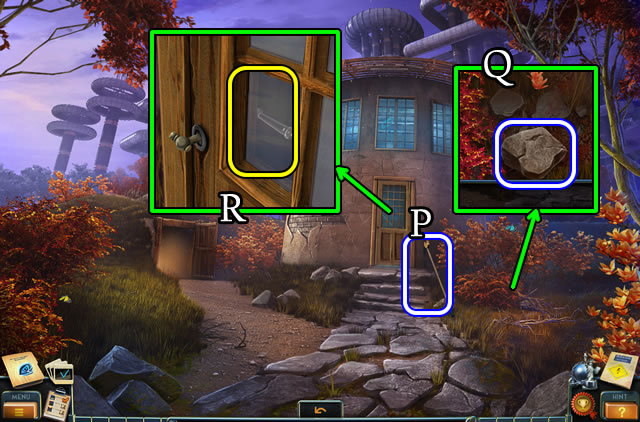
- Grab the FRUIT PICKER (P).
- Uncover and take the STONE (Q).
- Use the STONE (R). Select the lever and walk forward.

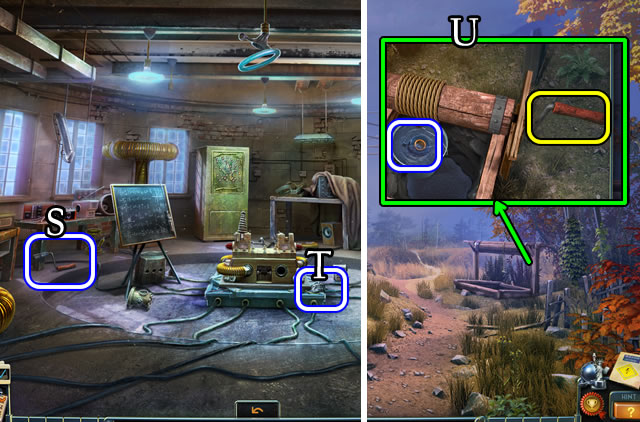
- Take the CRANK HANDLE (S) and METAL NUGGET (T).
- Walk down 2x.
- Place and select the CRANK HANDLE. Take the INSULATING TAPE (U).
- Walk down and forward. Open the doors and walk right.

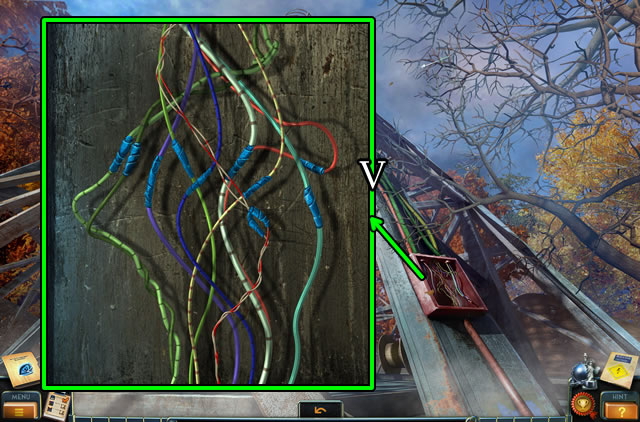
- Use the INSULATING TAPE.
- Solution (V).

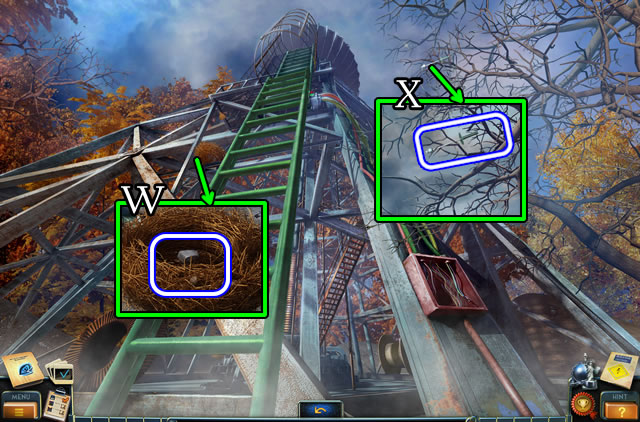
- Take the CHALK (W).
- Use the FRUIT PICKER to take the ELECTRODE (X).
- Climb the ladder.

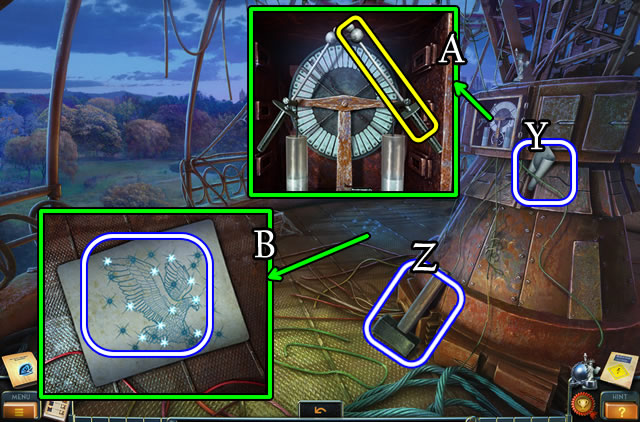
- Grab the TEMPLATE (Y) and SLEDGEHAMMER (Z).
- Place the ELECTRODE (A).
- Place the TEMPLATE and use the CHALK. Take the DIAGRAM (B).
- Walk down 3x.

- Use the SLEDGEHAMMER (C) to play the HOP (D). Receive a ROPE.
- Walk left.
- Remove the cap; place the JERRY CAN and HOSE (E). Receive a FULL JERRY CAN.
- Walk forward 2x and speak to William.

- Place the DIAGRAM (F).
- Solution (G).
- Take the MOLDING FORM (H).

- Use the FULL JERRY CAN and the LIGHTER (I).
- Place the MOLDING FORM and METAL NUGGET (1). Place in (2), then (3). Take the DEVICE PART (J).
- Return to the Tower.

- Place the ROPE (K); take the STONE WITH DRAWING (L).
- Return to the Abandoned Substation Yard.
- Place the STONE WITH DRAWING (M).
- Solution. 2-3-1.
- Take the DEVICE PART (N).
- Walk forward.
- Place the TOOL BOX (O).

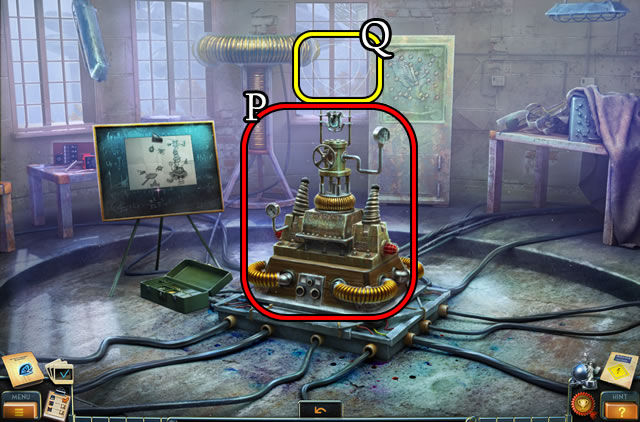
- Combine the pieces and the DEVICE PARTS according to the scheme (P).
- Place the MEDALLION (Q).
- Congratulations. You have completed New York Mysteries: High Voltage.



 Cleopatra: A Queen's Destiny Walkthrough, Guide, & Tips
 The Seawise Chronicles: Untamed Legacy Walkthrough, Guide, & Tips
 Season of Mystery: The Cherry Blossom Murders Walkthrough, Guide, & Tips
 Web of Deceit: Deadly Sands Walkthrough, Guide, & Tips
 Deadtime Stories Walkthrough, Guide, & Tips