Living Legends: Ice Rose Walkthrough, Guide, & Tips
Living Legends: Ice Rose Walkthrough

Welcome to the Living Legends: Ice Rose Walkthrough
Novelist Edward Grand has found evidence of a terrible tragedy in the city of Rosemount and sets off to investigate!
Whether you use this document as a reference when things get difficult or as a road map to get you from beginning to end, we’re pretty sure you’ll find what you’re looking for here.
This document contains a complete Living Legends: Ice Rose game walkthrough featuring annotated screenshots from actual gameplay!
We hope you find this information useful as you play your way through the game. Use the walkthrough menu below to quickly jump to whatever stage of the game you need help with.
Remember to visit the Big Fish Games Forums if you find you need more help. Have fun!
This walkthrough was created by Margie B, and is protected under US Copyright laws. Any unauthorized use, including re-publication in whole or in part, without permission, is strictly prohibited.
General Tips

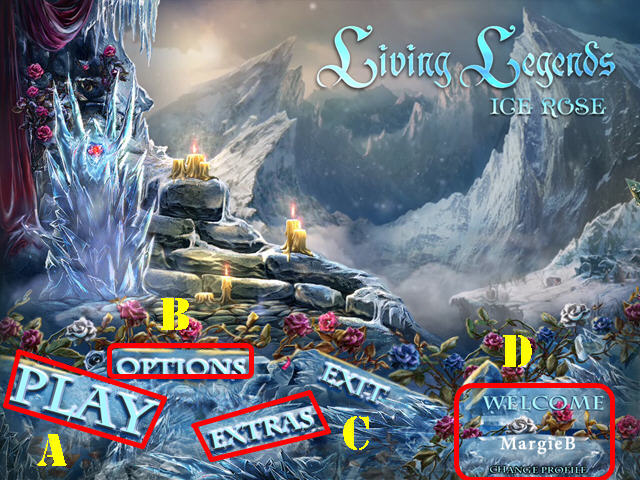
- This is the official guide for Living Legends: Ice Rose Standard Edition.
- Click on Play (A) to begin your adventure.
- The Options (B) Button allows you to adjust the screen size (widescreen and fullscreen), music, cursor, and sound.
- The Extras (C) Button is only accessible during the Collector’s Edition.
- The ‘Change Profile’ button (D) can be used to manage your profiles in the game.
- Hidden Object Scenes will be referred to as HOS in this walkthrough.
- HOS and mini-games are often randomized – your solution may vary. Items written in orange in HOS require an action to be performed before the item(s) can be visible.
- All mini-games can be skipped once the skip button has recharged. Most puzzles have a RESET button; use it if you want to follow the solutions shown in this guide.
- The Journal in the lower left will track your progress and note clues.
- Items will stay in inventory until they are no longer needed.
- The HINT button is accessible in both HOS and in quest scenes but you must wait for it to recharge in between uses.
Chapter 1: Rosemount

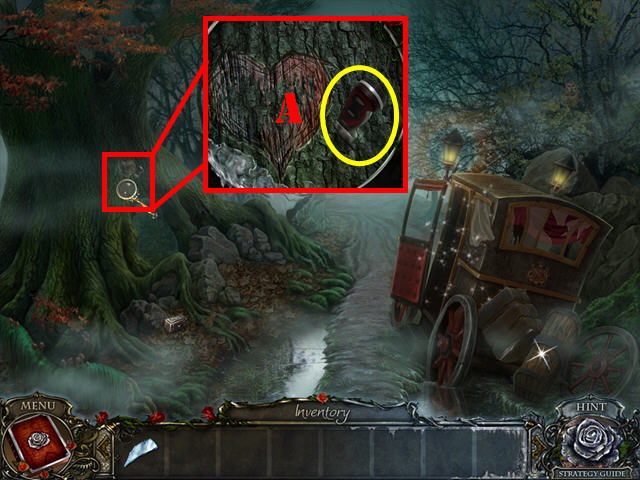
- The MIRROR SHARD automatically goes into your inventory.
- Examine the tree and take the KNIFE (A).

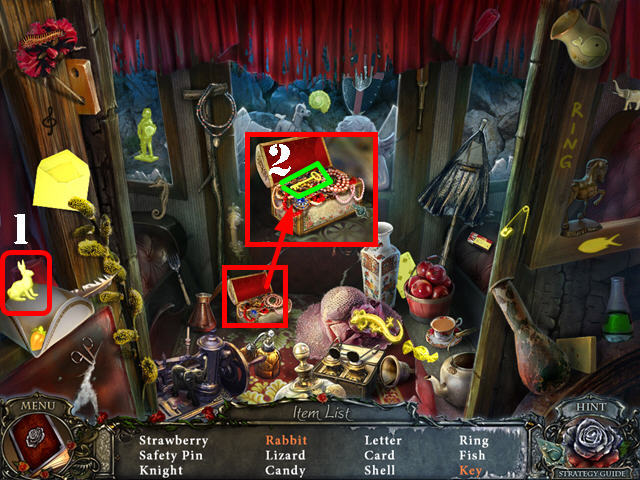
- Play the HOS.
- Touch the hat and take the rabbit (1).
- Zoom into the box; open it and take the key (2).
- The CHEST KEY will be added to inventory.

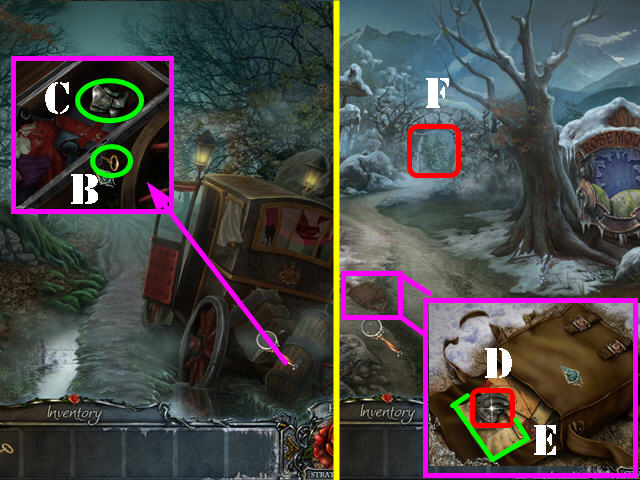
- Inspect the chest; put the CHEST KEY in the lock (B).
- Turn the key and take the first ROSE EMBLEM PIECE (C).
- Go forward.
- Examine the bag; cut the 2 straps with the KNIFE and take the second ROSE EMBLEM PIECE (D).
- Read the note (E).
- Try to go right (F) and the snow Queen will block the path to town. Go right after the animation stops.

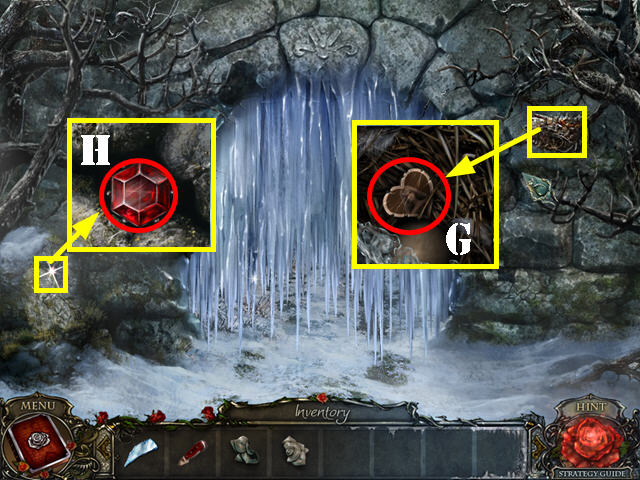
- Examine the nest; take the PHOTO (G).
- Look at the stone; take the RED GEM (H).
- Walk down and go left.

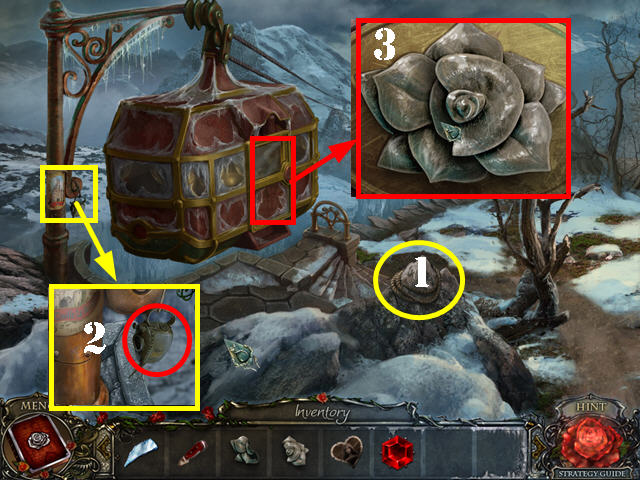
- Take the ROPE (1).
- Examine the pole; take the EMPTY OIL CAN (2).
- Zoom into the gondola door; put the 2 ROSE EMBLEM PIECES on the lock to activate a puzzle (3).

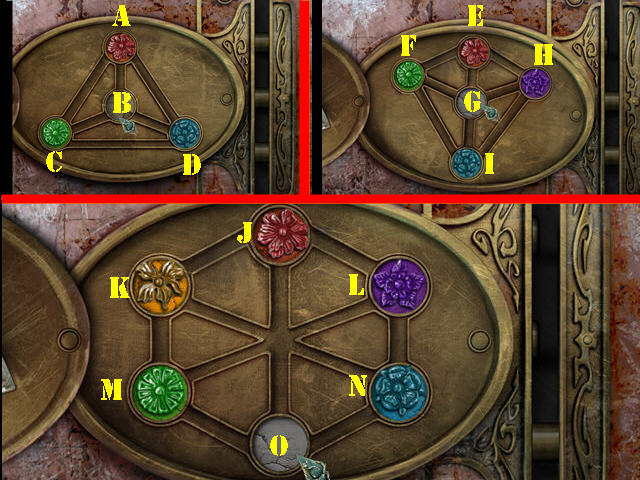
- Press on the flowers to move them to the matching spots.
- To solve stage 1, press on the spots in this order: D, A, C, D, A, and B.
- To solve stage 2, press on the spots in this order: I, H, E, F, I, H, E, and G.
- To solve stage 3, press on the spots in this order: N, L, J, K, M, O, N, L, J, and O.
- Enter the gondola.

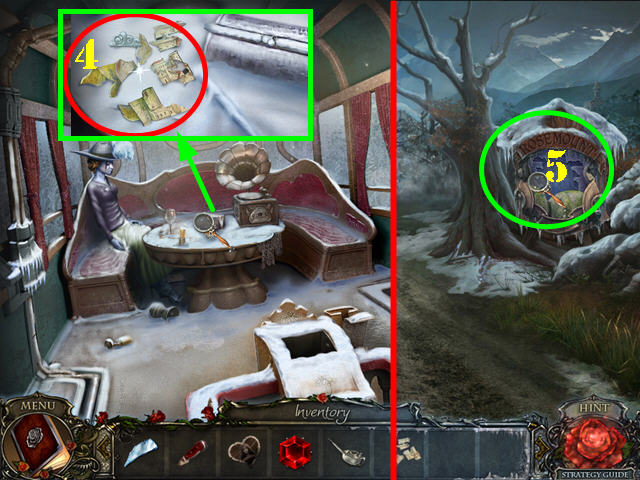
- Examine the table; take the ROSEMOUNT SIGN PIECES (4).
- Exit the gondola and walk down.
- Zoom into the sign and put the ROSEMOUNT SIGN PIECES on the board (5).

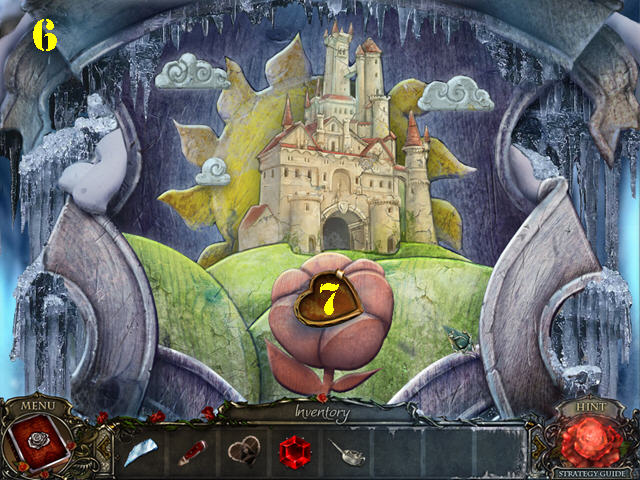
- Right-click on a piece to rotate it, and left-click on it to put it in place.
- Please look at the screenshot for the solution (6).
- Take the LOCKET PART (7).

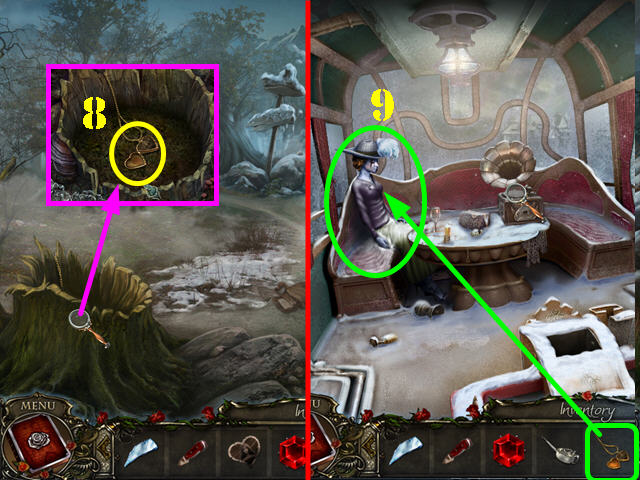
- Zoom into the tree stump; remove the leaves.
- Put the LOCKET PART and the PHOTO on the chain and take the LOCKET (8).
- Go back to the gondola.
- Give the LOCKET to Gerda to defrost the place (9).

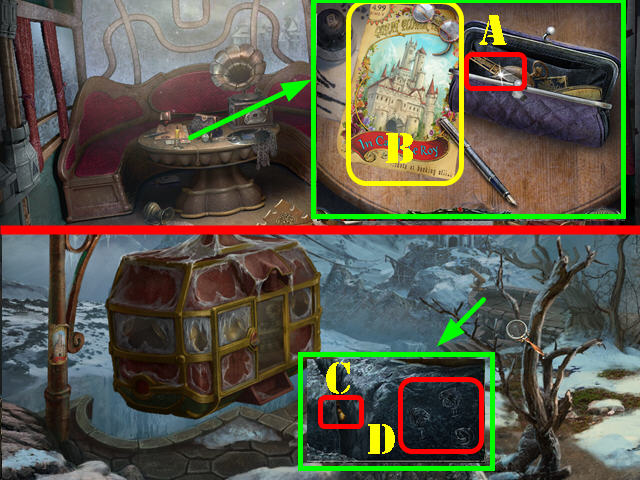
- Zoom into the table; open the purse and take the NAIL FILE (A).
- Look at and take the flyer (B).
- Exit the gondola.
- Zoom into the rocks and use the NAIL FILE to remove the LION SIGN (C).
- Note the signs etched on the rocks (D).
- Go back into the gondola.

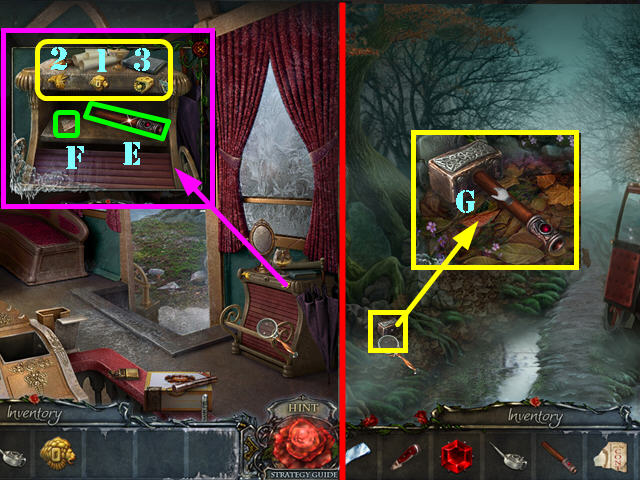
- Zoom into the desk on the right; put the LION SIGN in the slot.
- Press on the signs in the order shown in the screenshot (1-3).
- Take the HAMMER HANDLE (E) and the TICKET FRAGMENT (F).
- Exit the gondola and walk down twice.
- Zoom into the hammer head; put the HAMMER HANDLE on it and take the HAMMER (G).

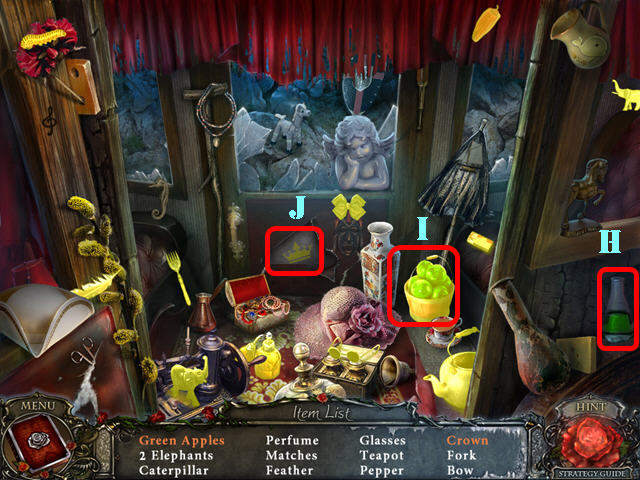
- Play the HOS.
- Drag the green paint (H) to the apples (I) and take the green apples.
- Tear the wallpaper and take the crown (J).
- The MATCHES will be added to inventory.
- Go forward and then go right.

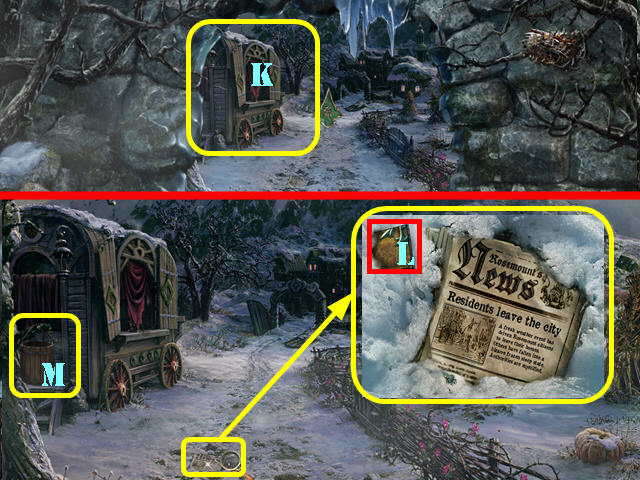
- Break the ice curtain with the HAMMER 3 times; go forward (K).
- Zoom into the newspaper; take the GOLD TILE (L).
- Take the BUCKET (M).
- Go forward.

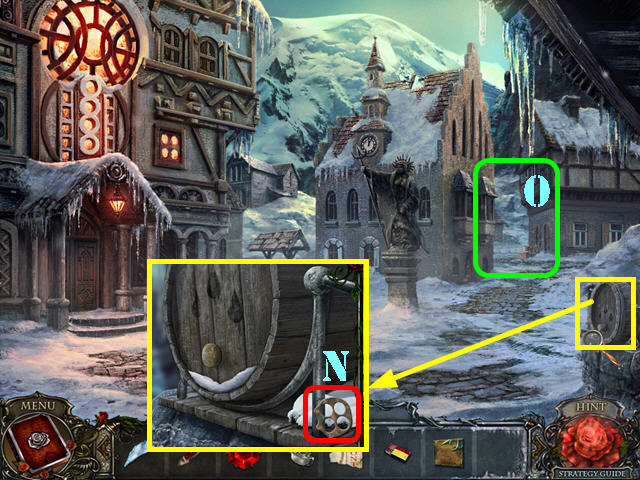
- Inspect the barrel; take the first CODE PLATE (N).
- Go in between the middle and last building to reach the alley (O).

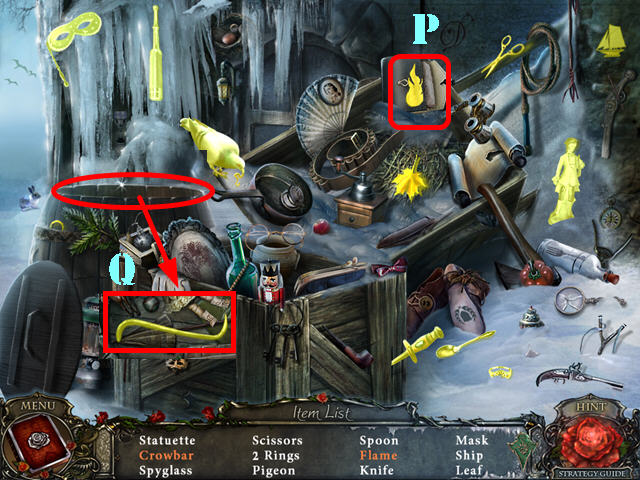
- Play the HOS.
- Open the purse; take the flame (P).
- Remove the lid on the barrel; zoom into it and take the crowbar (Q).
- The CROWBAR will be added to inventory.

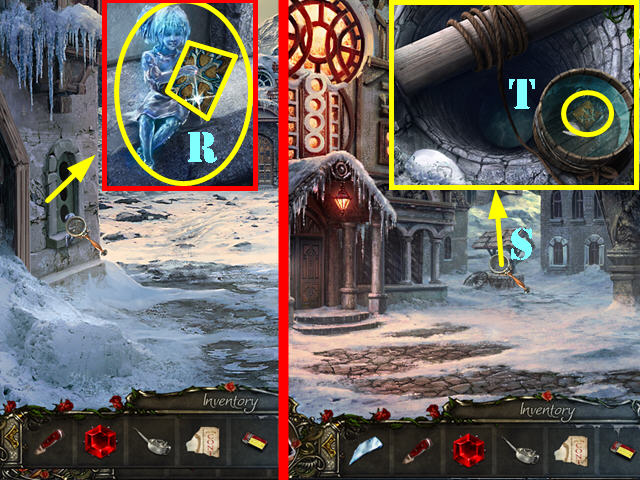
- Look at the window; take the second GOLD TILE and the first FIGURINE (R).
- Walk down.
- Inspect the well (S); use the CROWBAR on the boards 2 times.
- Put the ROPE on the handle and put the BUCKET on the side.
- Touch the bucket to lower it and take the third GOLD TILE once the bucket comes back up (T).

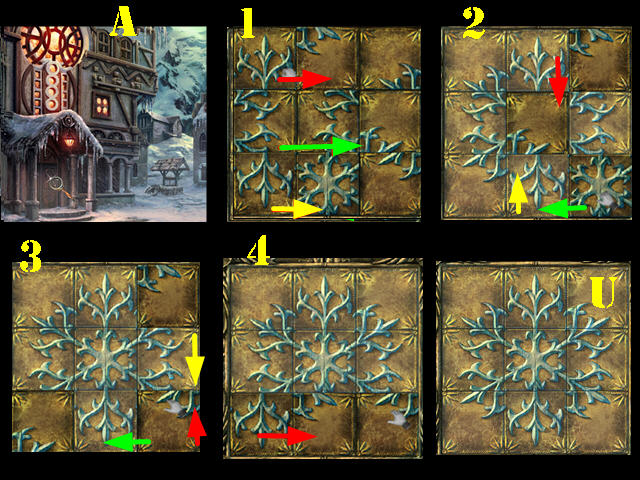
- Inspect the left door; add the 3 GOLD TILES to it activate a puzzle (A).
- Drag the tiles left, right, up, or down until you form the image of a snowflake.
- Please look at the screenshot for the solution. Drag the arrows in the direction they’re pointing to and in the following order: Red, Green, and Yellow (U).
- Enter the hotel and then go through the right door.
Chapter 2: The Hotel

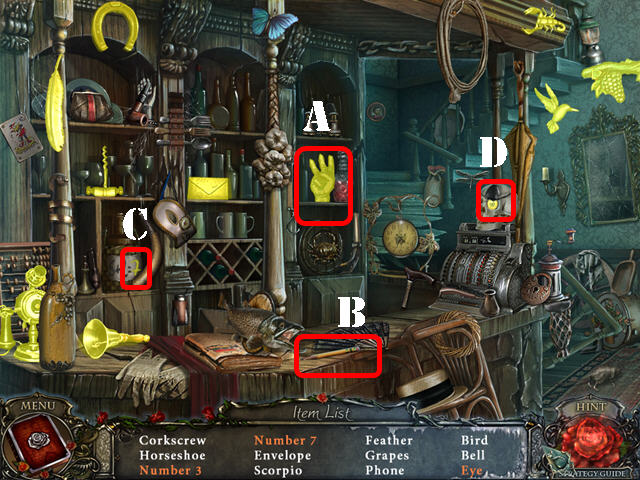
- Play the HOS in the restaurant.
- Touch the hand; take the number 3 (A).
- Drag the pencil (B) to the bottle (C); take the number 7.
- Touch the eye patch and take the eye (D).
- The CORKSCREW will be added to inventory.

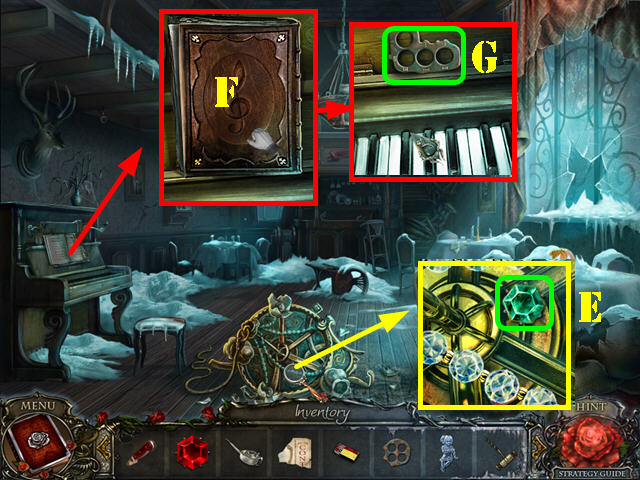
- Inspect the chandelier; take the GREEN GEM (E).
- Inspect the piano; turn the page and take the BOOK (F).
- Take the second CODE PLATE (G).
- Walk down twice.

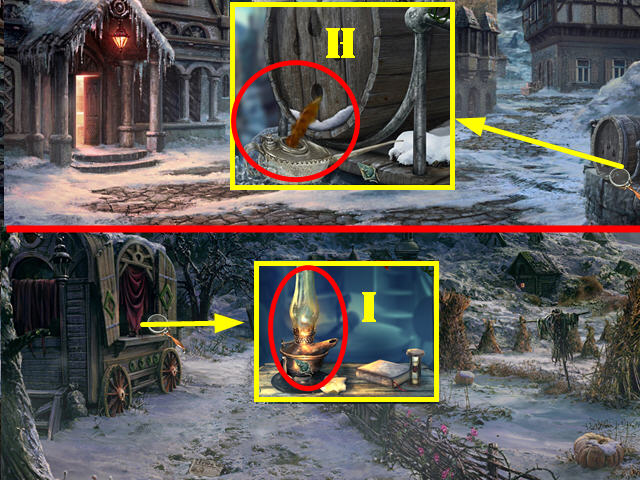
- Examine the barrel; put the CORKSCREW on the cork. Put the EMPTY OIL CAN on the cork to get the FULL OIL CAN (H).
- Walk down.
- Zoom into the wagon and remove the curtain (I).
- Put the FULL OIL CAN and the MATCHES on the lamp to activate a HOS.

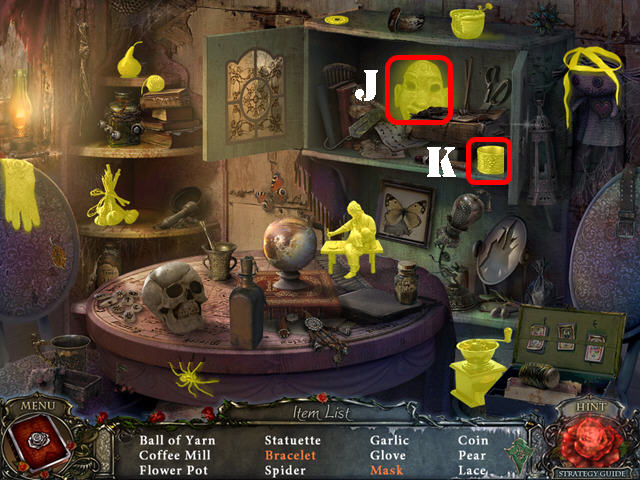
- Play the HOS.
- Open the cabinet; take the mask (J) and the bracelet (K) if it’s on your list.
- The LACE will be added to inventory.

- Go back to the hotel.
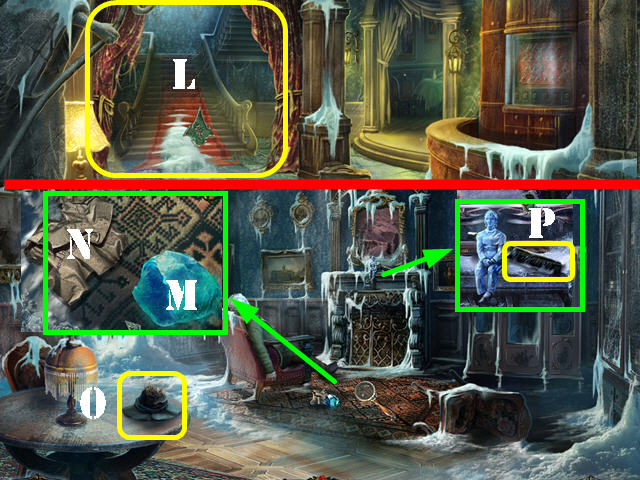
- Put the LACE on the curtains and go forward (L).
- Inspect the rug; take the STONE (M) and read the note (N).
- Take the HAT (O).
- Inspect the mantle; take the BRUSH (P).
- Walk down.

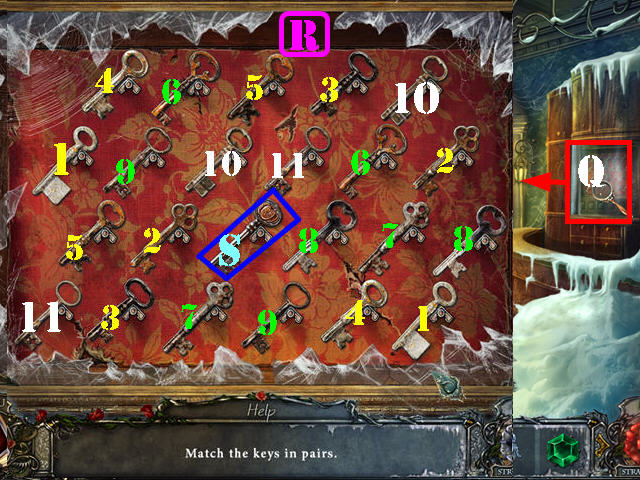
- Zoom into the cabinet on the right; break the glass with the STONE 3 times (Q).
- Select 2 matching keys to eliminate them from the board.
- Please look at the screenshot for the solution (R).
- Take the KEY WITH PUMPKIN (S).

- Walk down twice.
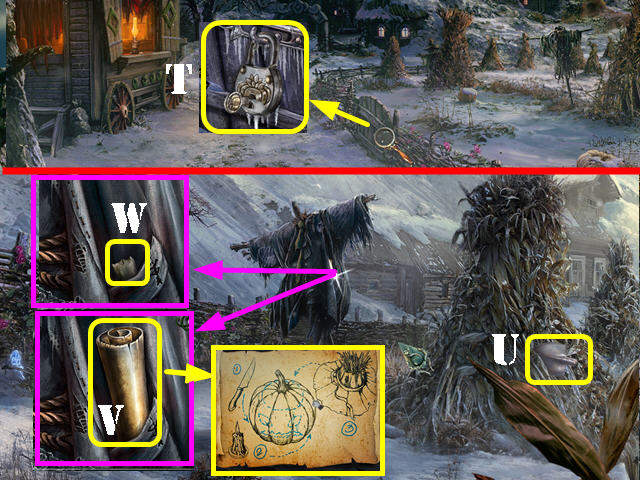
- Zoom into the fence; put the KEY WITH PUMPKIN in the lock (T). Turn the key and go through the gate.
- Take the SHOVEL PART (U).
- Look at the scarecrow’s pocket; take the note (V).
- Take the CANDLE from the scarecrow’s pocket (W).

- Go back to the restaurant.
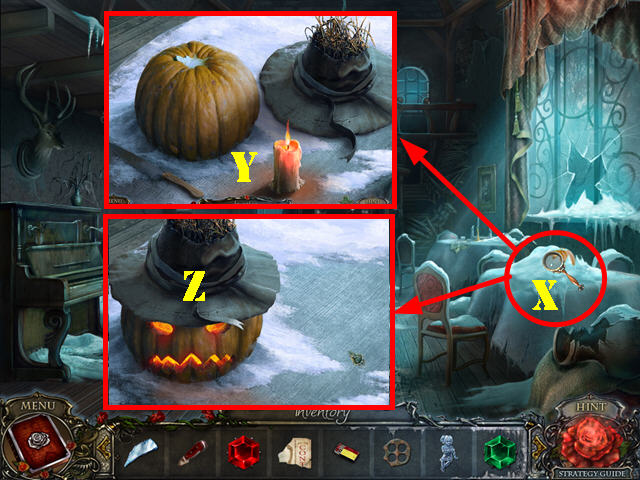
- Examine the table by the window (X). Remove the snow with the BRUSH.
- Put the HAT, KNIFE, and CANDLE on the table (Y).
- Drag the KNIFE to the pumpkin.
- Light the CANDLE with the MATCHES. Put the LIT CANDLE inside the pumpkin.
- Put the HAT on the pumpkin and take the JACK-O-LANTERN (Z).

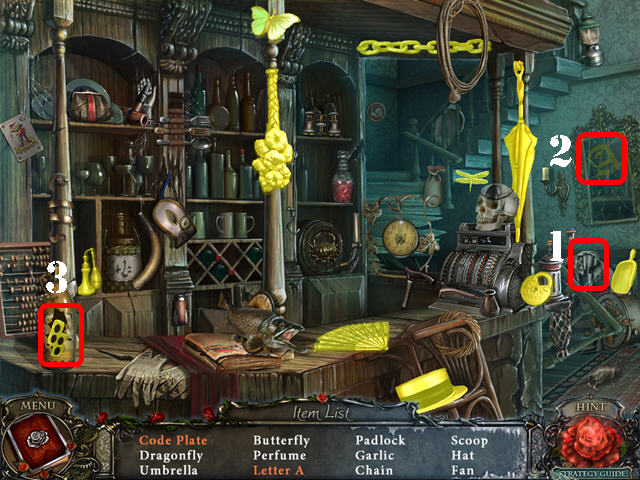
- Play the HOS.
- Use the rag (1) on the mirror (2) and take the letter A.
- Break the bottle and take the code plate (3).
- The third CODE PLATE will be added to inventory.
- Go back to the alley.

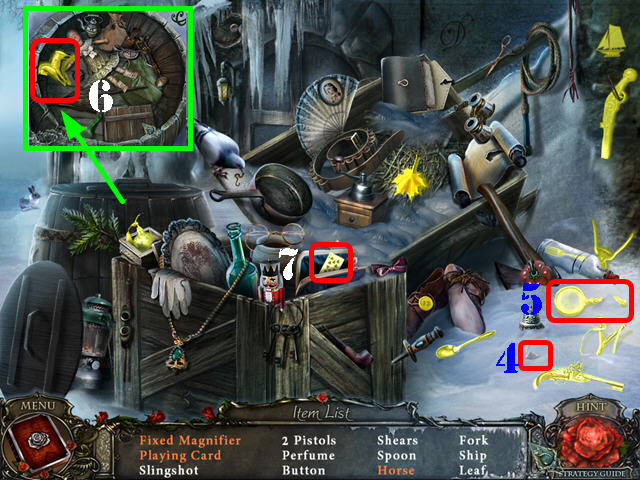
- Play the HOS.
- Put the shard (4) on the magnifier (5); take the fixed magnifier.
- Look inside the barrel and take the horse (6).
- Open the coin purse and take the playing card (7).
- The SHEARS will be added to inventory.

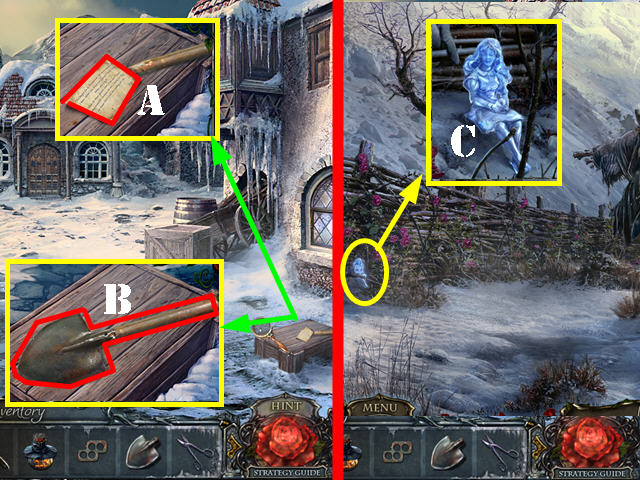
- Examine the crate; take the note (A).
- Put the SHOVEL PART on the handle and take the SHOVEL (B).
- Go back to the scarecrow.
- Examine the fence; cut the thorns with the SHEARS 3 times and take the FIGURINE (C).

- Go back to the hotel room.
- Examine the mantle and put the 2 FIGURINES on it (D).
- Zoom into the picture above the mantle; put the 3 CODE PLATE PARTS on the board to activate a puzzle.
- Right-click on a plate to rotate it. Left-click on a plate to put it in place.
- Put the Roman numerals etched on the sides of the plate next to the numbers on the board.
- Please look at the screenshot for the solution (E).
- Note the symbols on the paper (F).
- Exit the puzzle and walk down.

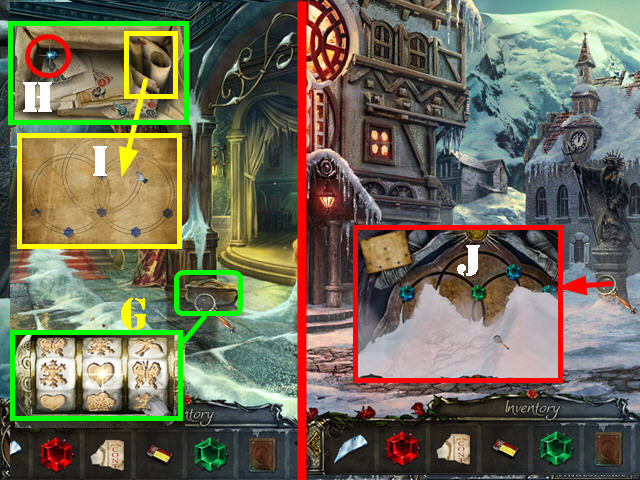
- Zoom into the bag; look at the lock and change the symbols to Snowflake, Heart, and Butterfly (G).
- Take the BLUE GEM (H); look at and take the note (I).
- Exit the hotel.
- Zoom into the base of the statue; remove the snow with the BRUSH (J).

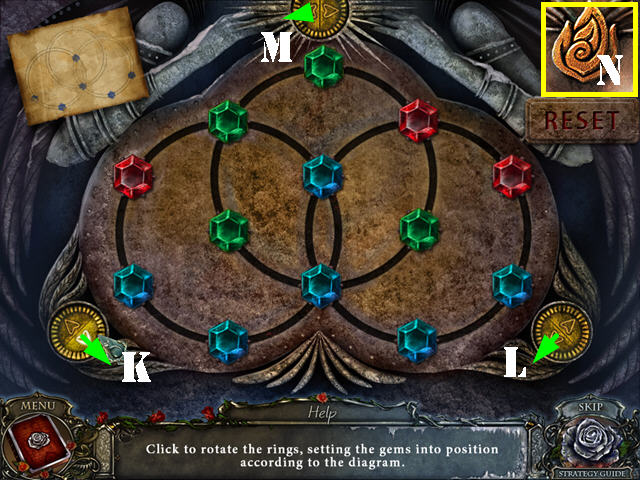
- Put the GREEN GEM, BLUE GEM and the RED GEM at the base of the statue to activate a puzzle.
- Press on the arrows to rotate the rings until the blue gems fall into the same spots shown on the clue ().
- To solve the puzzle, press on the arrows in this order: K, L x 4, K x 3, M, and K x 3.
- Zoom into the statue and take the BOX KEY (N).

- Go back to the scarecrow.
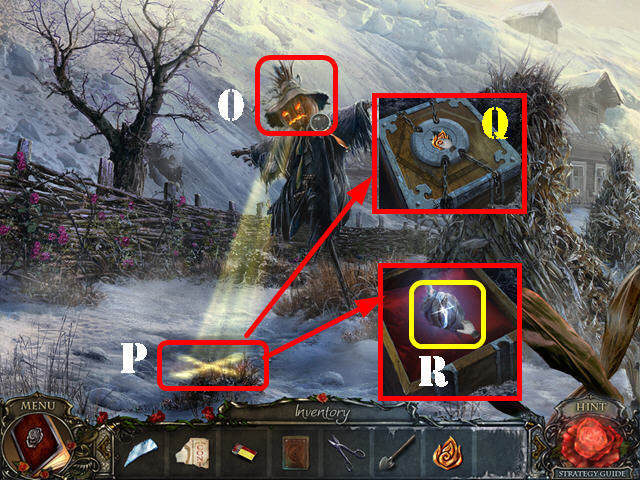
- Put the JACK-O-LANTERN on the scarecrow’s head (O).
- Dig in the spot the light is beaming on with the SHOVEL (P).
- Zoom into the ground; put the BOX KEY on the box (Q) and take the BUNDLED HEART (R).
- Walk down.

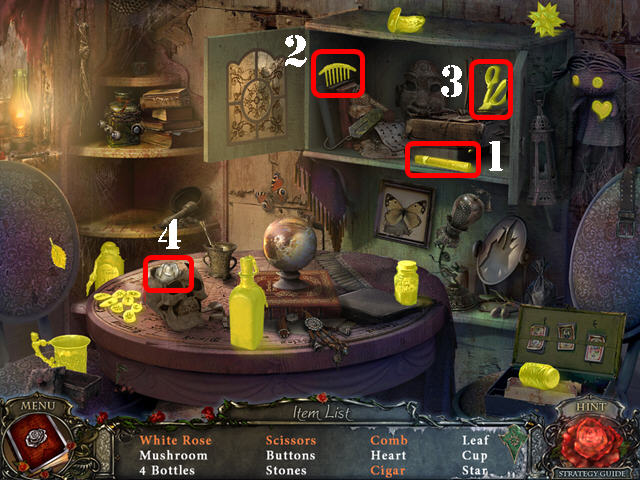
- Play the HOS.
- Open the cabinet; take the cigar (1), comb (2), and the scissors (3) if it’s on your list.
- Press on the skull and take the white rose (4).
- The WHITE ROSE will be added to inventory.

- Go back to the hotel room.
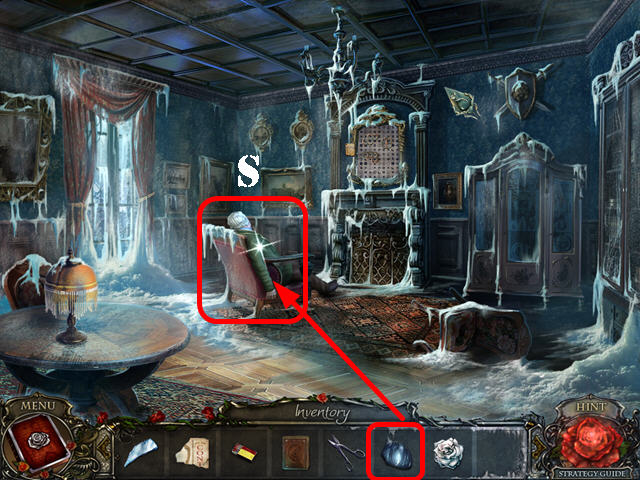
- Give the BUNDLED HEART to Kai (S).
- You will receive the ICY HEART and the hotel will defrost.


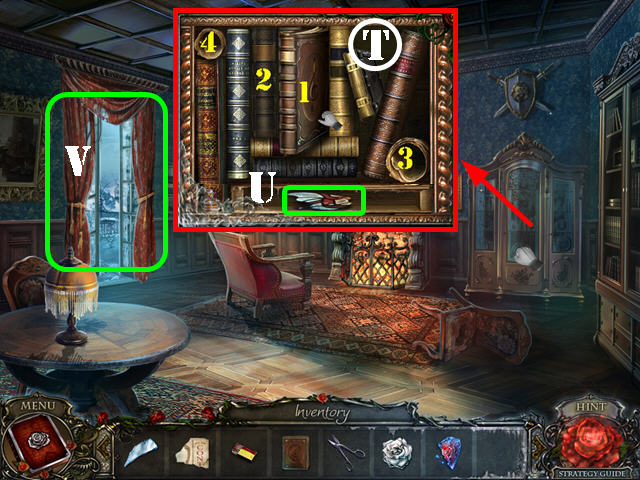
- Look at and open the bookcase; put the BOOK on the shelf.
- Press on the books and the scrolls in the order shown in the screenshot (T).
- Take the STAINED GLASS PIECE (U).
- Go out the balcony door (V).

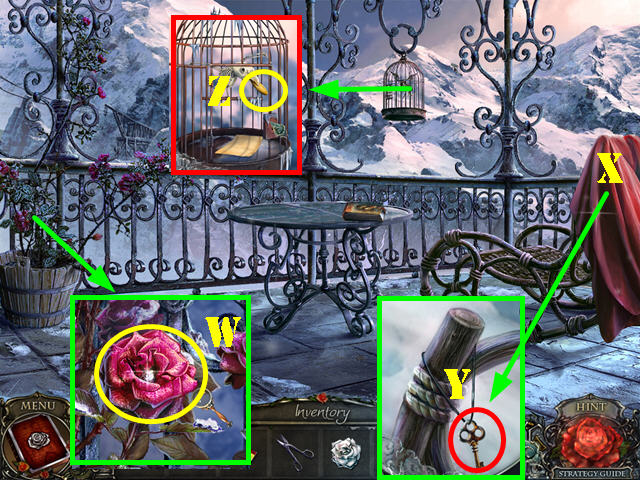
- Examine the potted plant; cut the RED ROSE with the SHEARS (W).
- Remove the sheet (X) and examine the top of the chair; take the KEY (Y).
- Examine the birdcage; put the KEY in the lock and turn it once.
- Take the COIN (Z).
- Walk down twice.

- Inspect the chair; move the pillow and take the TRAIN KEY PIECE (A).
- Inspect the bottom of the counter; remove the cover and take the PAIR OF TONGS (B).
- Go right.
- Examine the window; take the BLUE ROSE (C).
- Go back to the balcony.


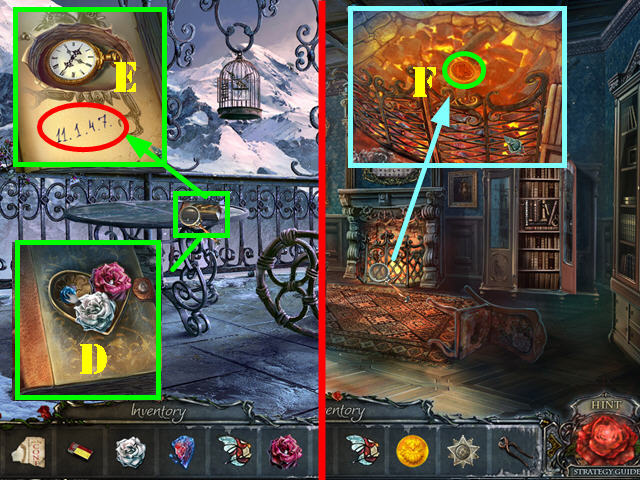
- Zoom into the table; put the RED ROSE, BLUE ROSE, and the WHITE ROSE on the book (D).
- Flip through 2 pages and note the numbers: 11.1.4.7 and the pocket watch with 4 pointers (E).
- Exit the book and walk down.
- Zoom into the fireplace; put the COIN in the fire (F).
- Remove the HEATED COIN with the PAIR OF TONGS.

- Go back to the alley.
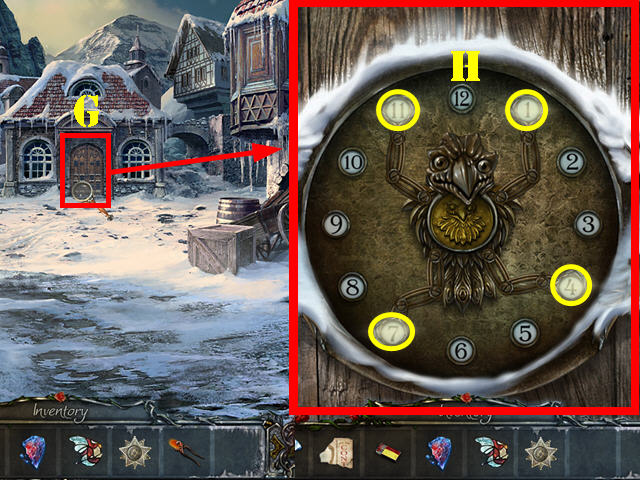
- Zoom into the back door (G); put the HEATED COIN in the center slot to activate a puzzle.
- Left-click on a limb to rotate it and right-click on a limb to rotate it in the opposite direction.
- Using the code found in the book on the balcony, move the limbs to 11.1.4.7.
- Please look at the screenshot for the solution (H).
- Go through the door to access the store.

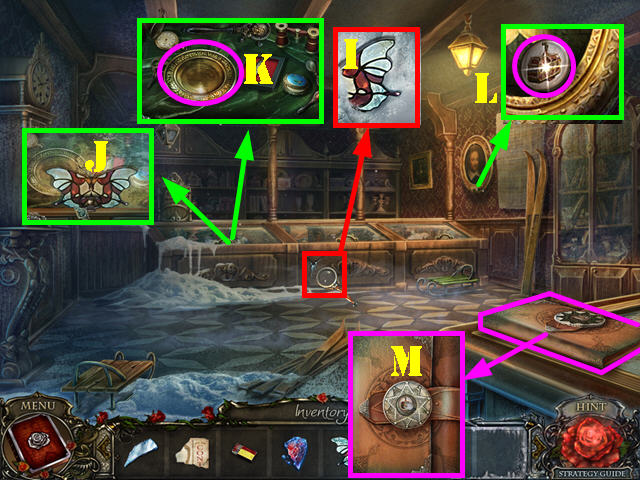
- Examine the bottom of the counter; take the second STAINED GLASS PIECE (I).
- Take a closer look at the display case; put the 2 STAINED GLASS PIECES on the case (J).
- Take the PLATE (K).
- Examine the picture; take the TRAIN KEY PIECE (L).
- Inspect the book in the lower right; put the 2 TRAIN KEY PIECES in the lock (M).

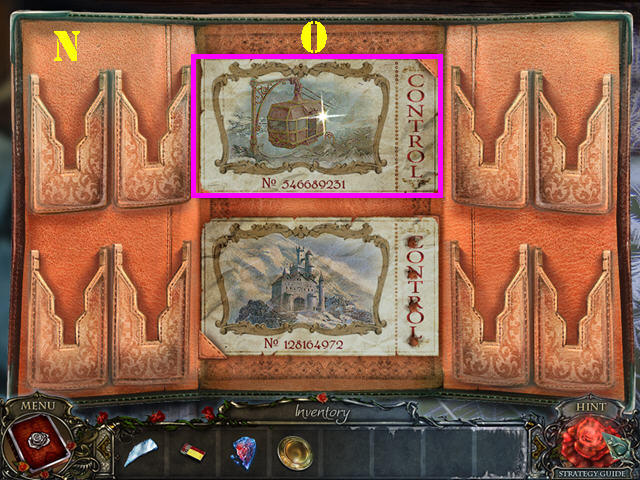
- Put the TRAIN FRAGMENT on the book to activate a puzzle.
- Drag the pieces together to form 2 ticket pieces.
- Right-click on a piece to rotate it, and left-click on it to put it in place.
- Please look at the screenshot for the solution (N).
- Take the TICKET (O).

- Go back to the restaurant.
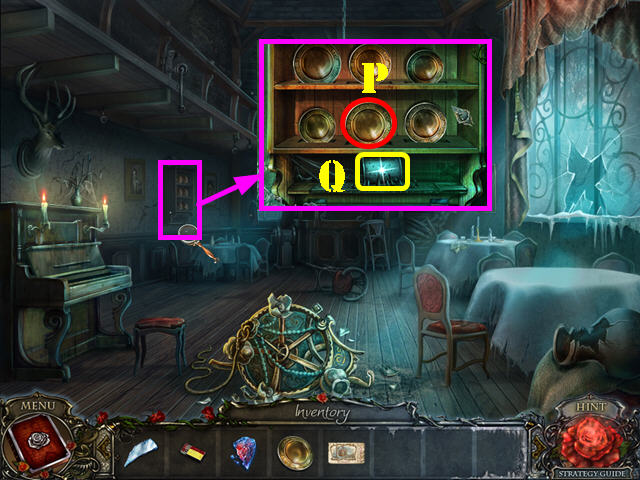
- Zoom into the shelf and put the PLATE on it (P).
- Take the MECHANISM PART (Q).

- Walk down until you reach the Rosemount sign and then make a left. Go back into the gondola.
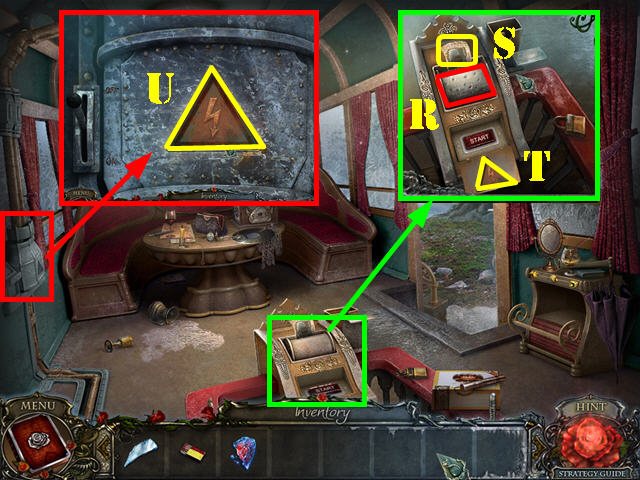
- Zoom into the carriage panel control; put the MECHANISM PART (R) and the TICKET (S) in their slots.
- Take the LIGHTNING SIGN (T).
- Examine the device on the left; put the LIGHTNING SIGN on it to activate a puzzle (U).

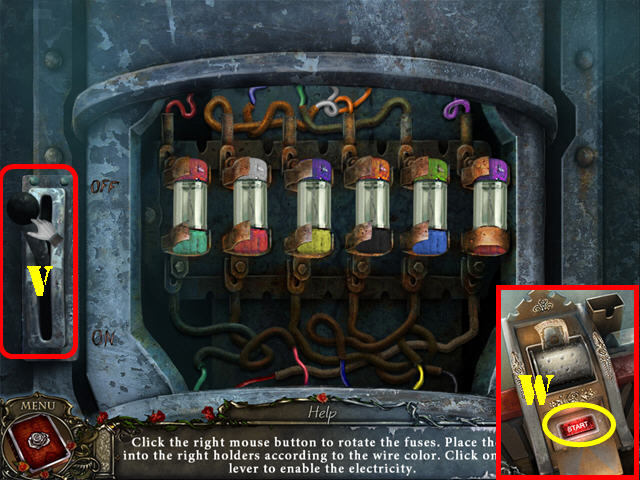
- Put the fuses into the correct areas.
- Right-click on a piece to rotate it, and left-click on it to place it. Put the fuses into the holders using the color of the wires they are connected to as a clue.
- Please look at the screenshot for the solution and then click on the lever (V).
- Zoom into the carriage panel control and press on the start button (W).
- The gondola will take you across.
Chapter 3: The Cave

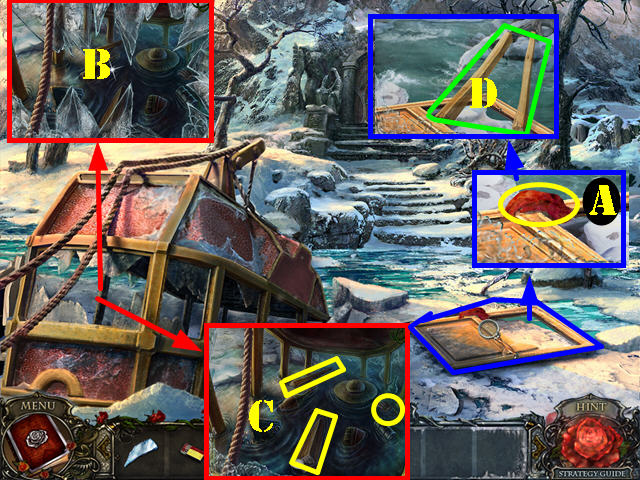
- Examine the broken door; take the RAG (A).
- Inspect the broken window; use the RAG 3 times on the glass to remove it (B).
- Take the 2 BOARDS and the GLOVE (C).
- Examine the broken door; put the 2 BOARDS down (D).
- Go to the front door.

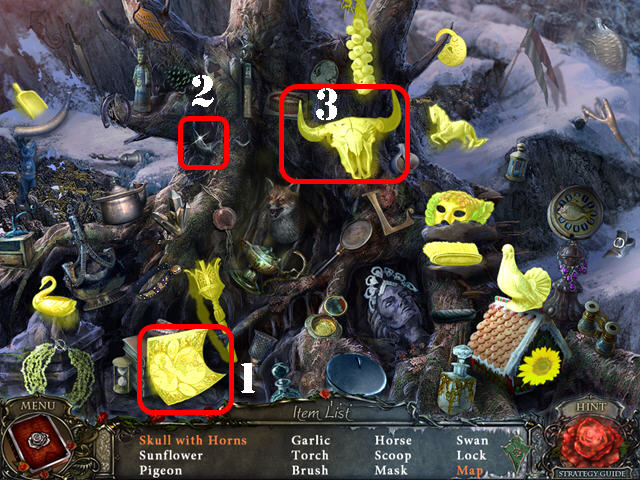
- Play the HOS.
- Open the scroll and take the map (1).
- Drag the horn (2) to the skull; take the skull with horns (3).
- The TORCH will be added to inventory.

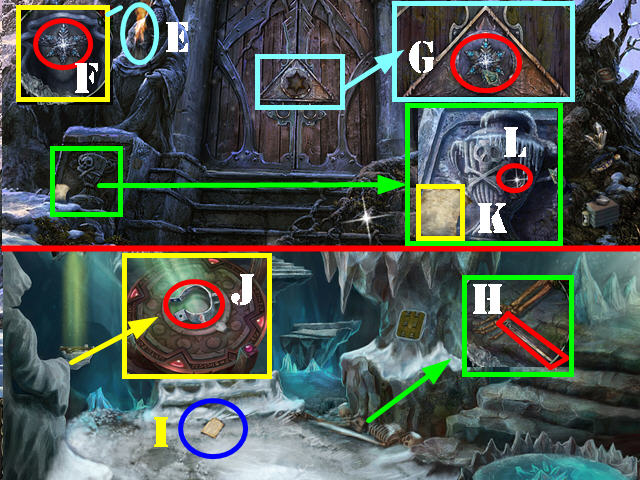
- Give the TORCH to the statue. Light the torch with the MATCHES (E).
- Inspect the statue’s face and take the SNOWFLAKE (F).
- Zoom into the door; put the SNOWFLAKE in the slot (G). Go through the door.
- Look at the skeleton and take the KNIFE (H).
- Look at and read the note (I).
- Examine the statue; cut the rope with the KNIFE and take the SHACKLE (J).
- Walk down.
- Look at the base of the statue; take the note (K).
- Use the knife on the crack 3 times and take the first FLOWER TOKEN (L).
- Go back in and go right.

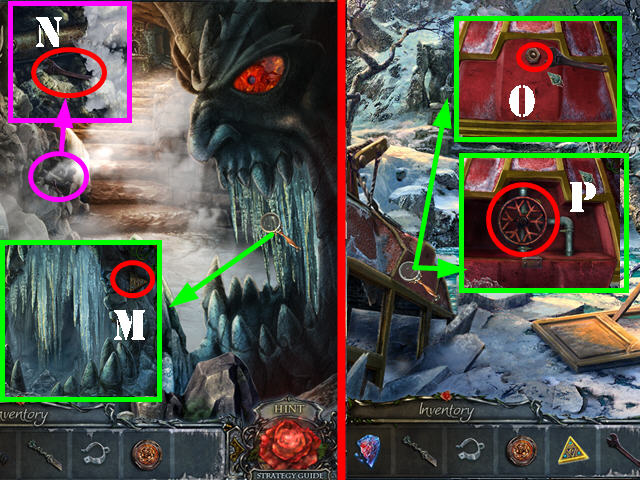
- Look at the right stone face; take the first TRIANGLE (M).
- Examine the pipe; remove the WRENCH with the GLOVES (N).
- Go back to the broken gondola outside.
- Zoom into the side of the gondola; use the WRENCH on the bolt (O).
- Remove the cover and take the VALVE (P).

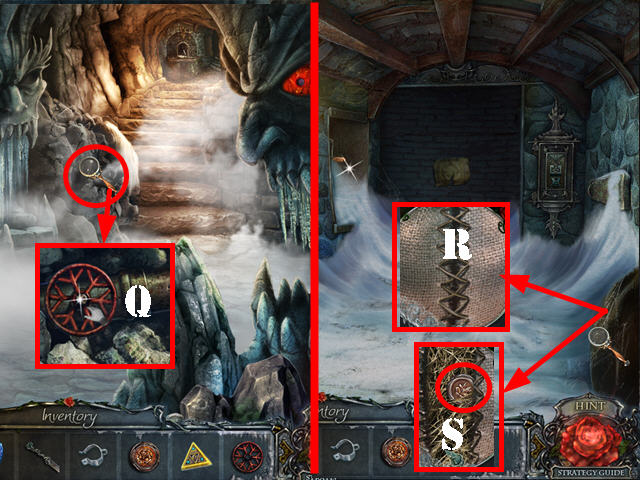
- Go back inside and turn right.
- Zoom into the pipe; put the VALVE on it. Turn the valve to stop the steam (Q).
- Go up the steps.
- Zoom into the sack; cut the rope with the KNIFE (R) and take the second FLOWER TOKEN (S).

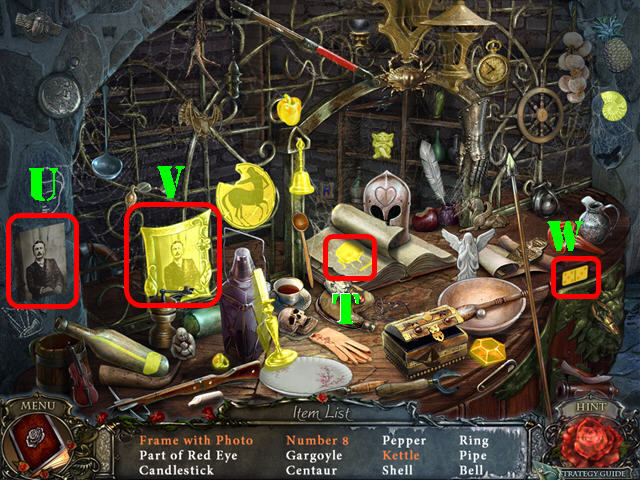
- Play the HOS.
- Flip the page and take the kettle (T).
- Drag the photo (U) to the frame; take the frame with photo (V).
- Press on the domino twice and take the number 8 (W).
- The RED EYE PIECE will be added to inventory.
- Walk down.

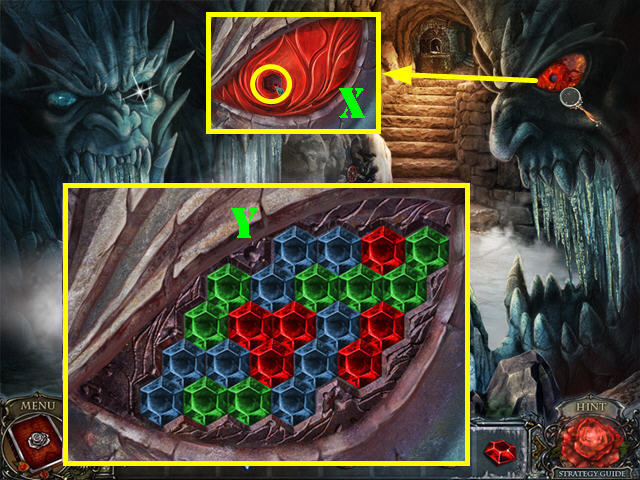
- Examine the eye of the right stone face; put the RED EYE PIECE in the eye to trigger a puzzle (X).
- Select two stones to switch their colors. Arrange the stones so that one group does not touch another of the same color.
- Please look at the screenshot for the solution (Y). Solving this puzzle makes the stone face breathe fire on the scene; which melts the ice.

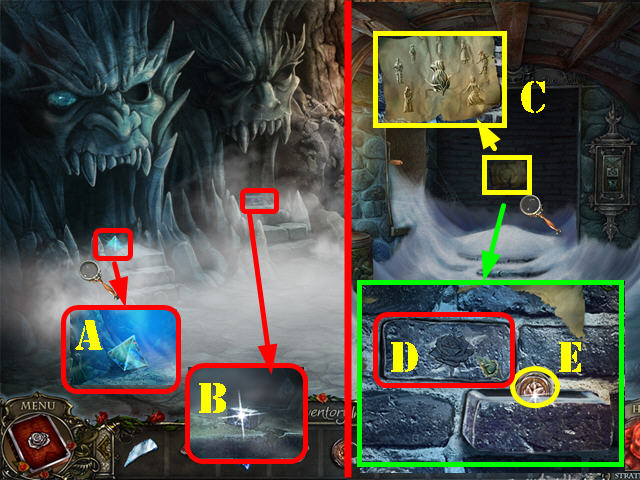
- Examine the mouth of the left stone face; take the PRISM (A).
- Examine the mouth of the far left stone face; take the BRICK (B).
- Go up the steps.
- Look at the back wall; take the note (C).
- Put the BRICK in the wall (D) and take the third FLOWER TOKEN (E).
- Walk down twice.

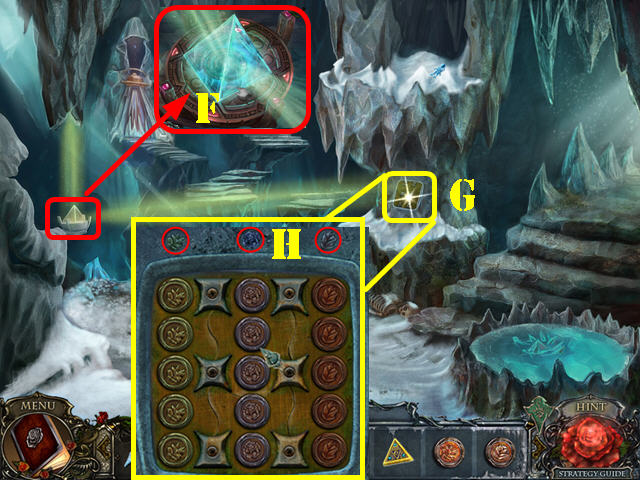
- Inspect the left statue; put the PRISM on the plate (F).
- Zoom into the puzzle the light is pointing to; put the 3 FLOWER TOKENS on it to activate a puzzle (G).
- Slide the tokens into the right spots. Arrange the tokens in columns according to the image etched on top of the puzzle.
- Please look at the screenshot for the solution (H). Solving this puzzle repairs the steps.
- Go up the left steps.

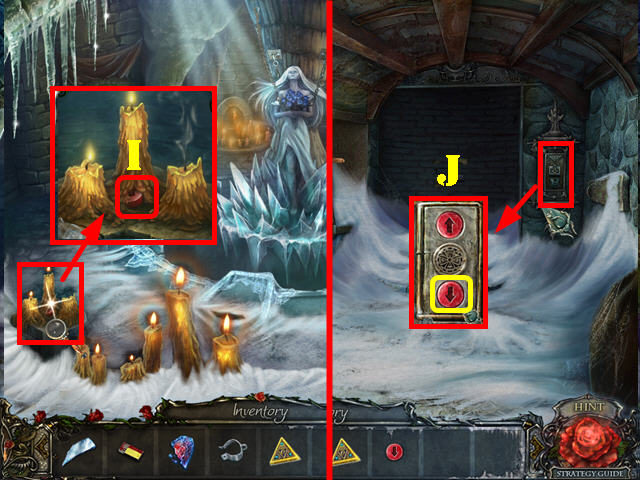
- Examine the left candles; take the BUTTON (I).
- Walk down; go right and up the steps.
- Examine the back panel; put the BUTTON on the panel and press the down button to open the elevator door (J). Enter the elevator.

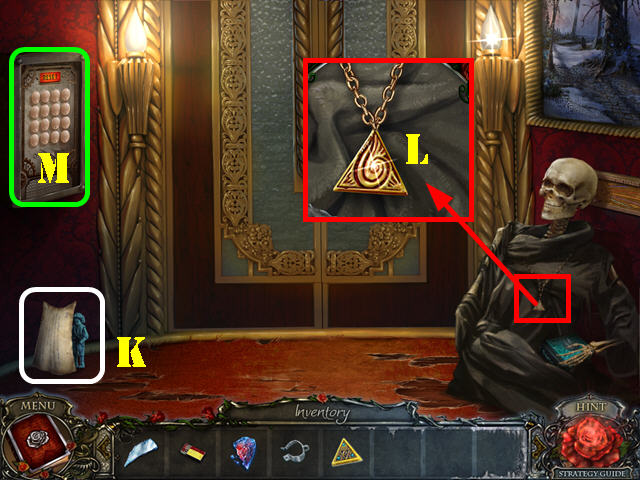
- Take the note and the 1st FIGURINE (K).
- Examine the skeleton’s chest and take the second TRIANGLE (L).
- Look at the elevator panel (M).

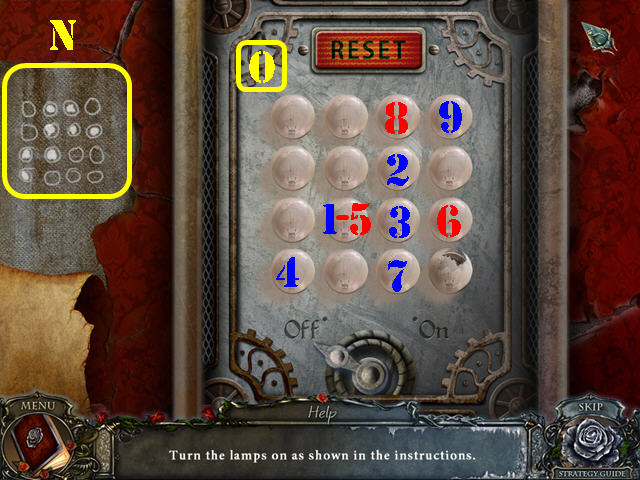
- Tear the wallpaper to reveal a code (N).
- Press on the buttons on the panel in the correct order to form the pattern shown on the code.
- Press on the buttons in the order shown in the screenshot to solve the puzzle (O).
- Press the panel to make the move; exit the elevator once the doors open.

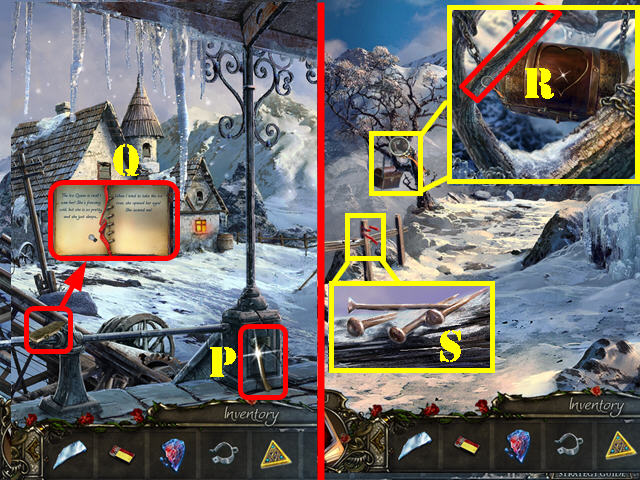
- Take the AXE (P).
- Zoom into the notebook and take it (Q).
- Go right.
- Look at the tree; cut the BRANCH with the AXE (R).
- Look at the railing; take the NAILS (S).
- Go forward.

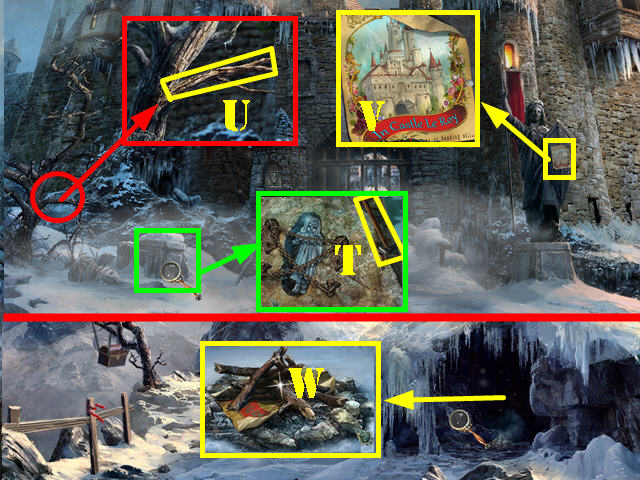
- Examine the stone; take the HAMMER (T).
- Look at the tree; cut the BRANCH with the AXE (U).
- Examine the shield on the statue; take the PIECE OF PAPER (V).
- Walk down.
- Inspect the cave; put the 2 BRANCHES and the PIECE OF PAPER on the log (W). Light the items with the MATCHES to activate a HOS.

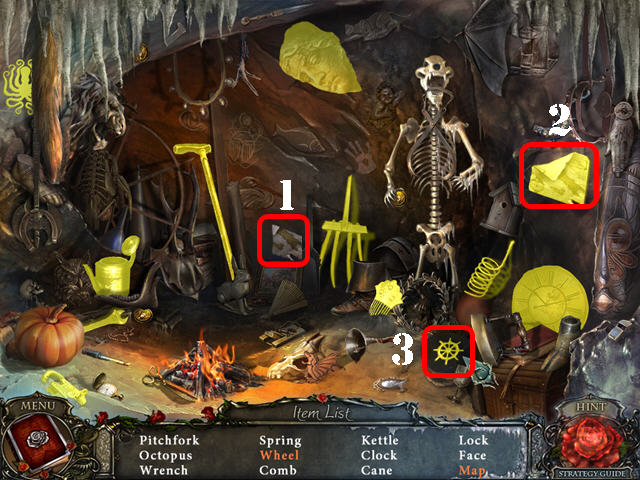
- Play the HOS.
- Drag the map fragment (1) to the torn map; take the map (2).
- Press on the hat; take the wheel (3).
- You will get the CANE.

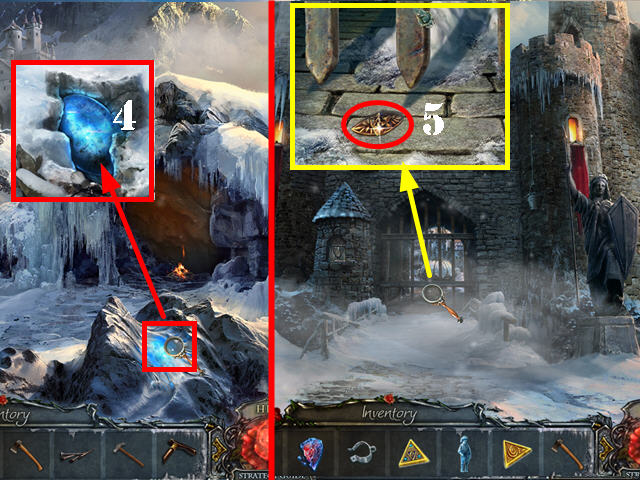
- Examine the stone; break the ice with the HAMMER 3 times and take the BLUE EYE (4).
- Go forward.
- Zoom into the gate; use the CANE on the handle. Take the HANDLE (5).
- Walk down 2 times.

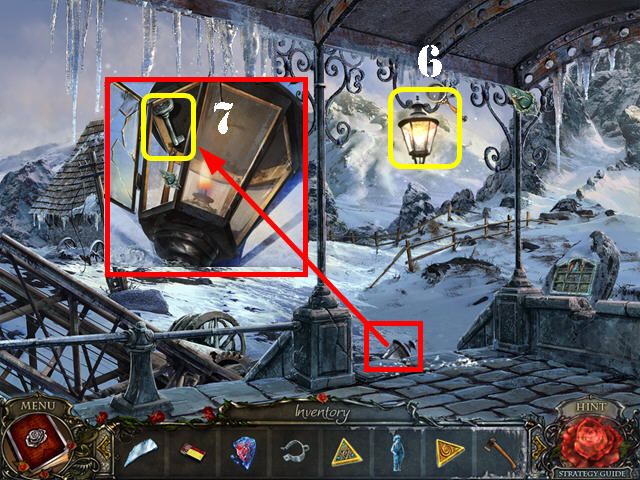
- Put the CANE on the lamp (6).
- Inspect the lamp; open the cover and take the KEY (7).
- Walk down.

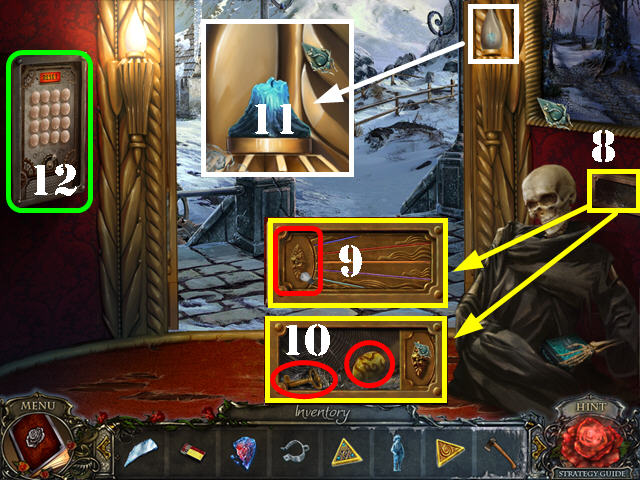
- Touch the skull and zoom into the panel behind it (8).
- Put the HANDLE on the panel (9).
- Take the SUN and the KEY (10).
- Inspect the lamp; break the glass with the HAMMER 2 times and take the BLUE CANDLE (11).
- Press on the elevator buttons to go back down. Exit the elevator (12).

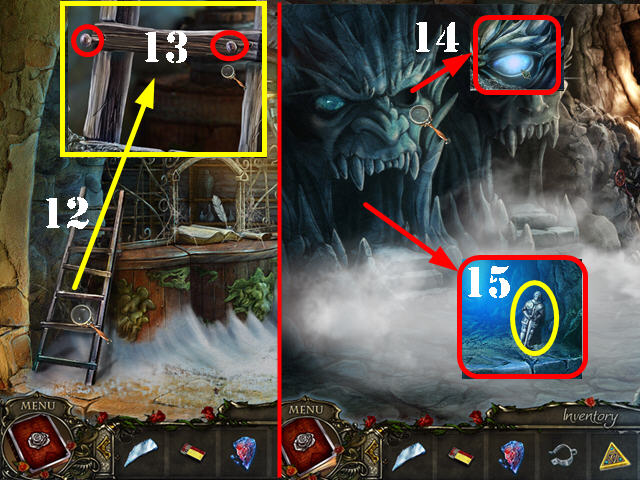
- Inspect the ladder and touch the rung (12).
- Put the 2 NAILS on the rung and hit the 2 nails with the HAMMER (13).
- Take the LADDER.
- Walk down.
- Zoom into the eye of the left stone face; put the BLUE EYE in the socket (14).
- Zoom into the mouth of the left stone face and take the 2nd FIGURINE (15).
- Walk down.

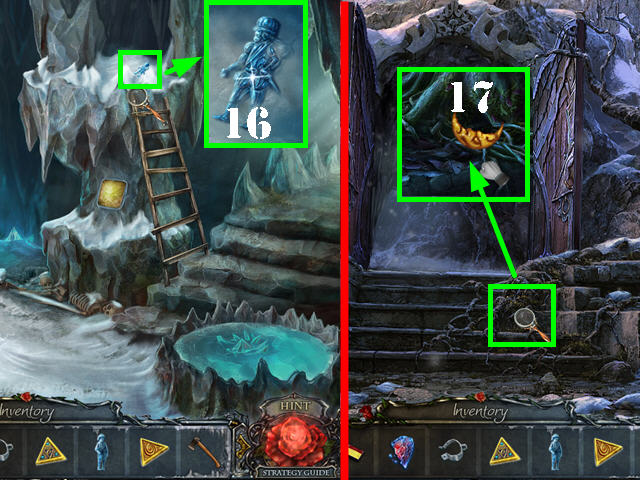
- Put the LADDER by the figurine stuck in the snow.
- Zoom into the 3rd FIGURINE and take it (16).
- Walk down.
- Examine the steps; chop the roots with the AXE and take the MOON (17).

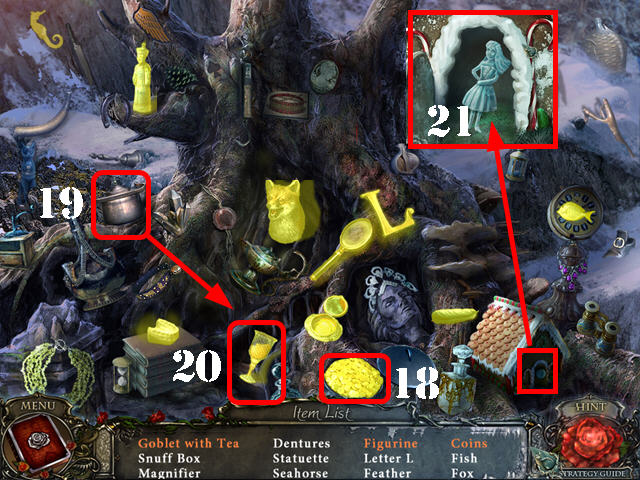
- Play the HOS.
- Remove the lid; take the coins (18).
- Drag the teapot (19) to the goblet; take the goblet with tea (20).
- Examine the gingerbread house; open the door and take the figurine (21).
- The 4th FIGURINE will be added to inventory.
Chapter 4: The Castle Gates

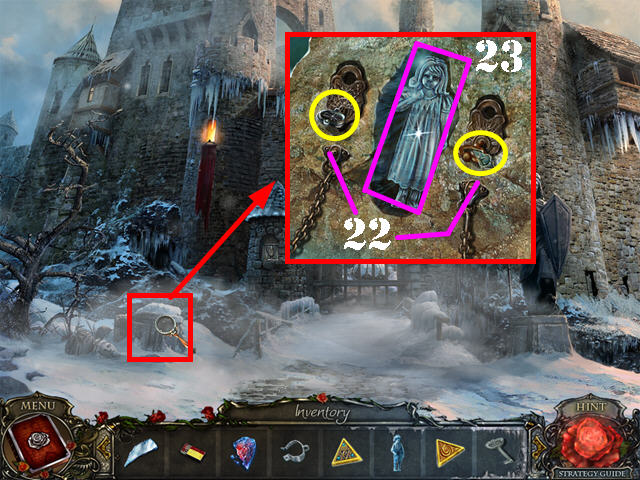
- Go back to the castle gates.
- Zoom into the stone; use both KEYS in the locks (22).
- Turn both keys and take the 5th FIGURINE (23).

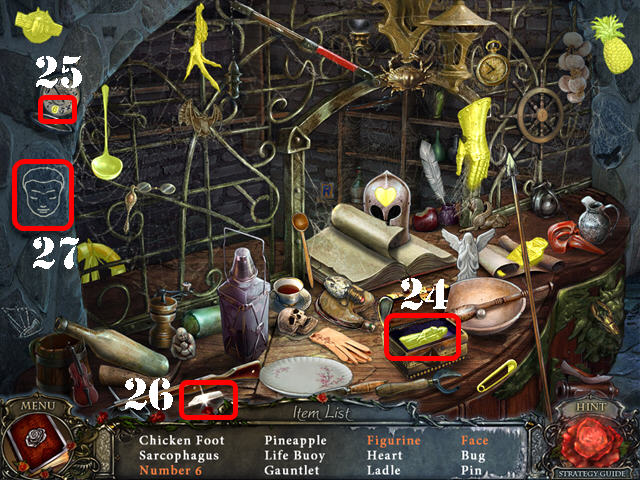
- Take the elevator back down and exit it.
- Play the HOS.
- Open the box and take the figurine (24).
- Open the pocket watch and take the number 6 (25).
- Drag the chalk (26) to the wall and take the face (27).
- The 6th FIGURINE will be added to inventory.

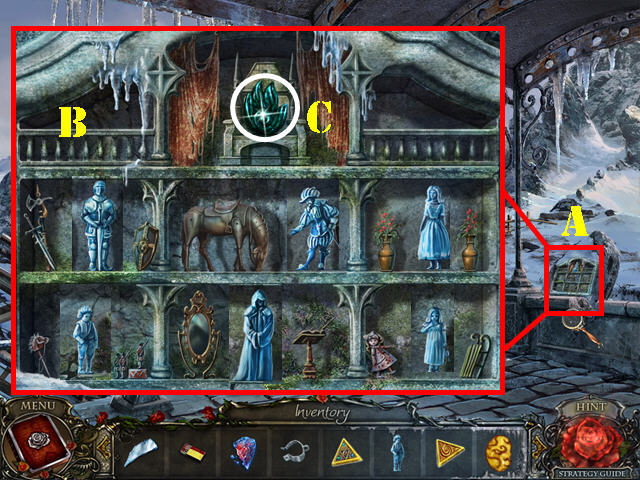
- Take the elevator back up and exit it.
- Zoom into the shadow box; put the 6 FIGURINES in it to activate a puzzle (A).
- Put the figurines into the spot that best matches what they are wearing.
- Drag one figurine over the other to swap their positions. Make sure that you move the tiny items that are in each cube as well.
- Each time you arrange a cube correctly, that figurine will disappear.
- Please look at the screenshot for the solution (B).
- Take the FIRE KEY (C).
- Walk down.

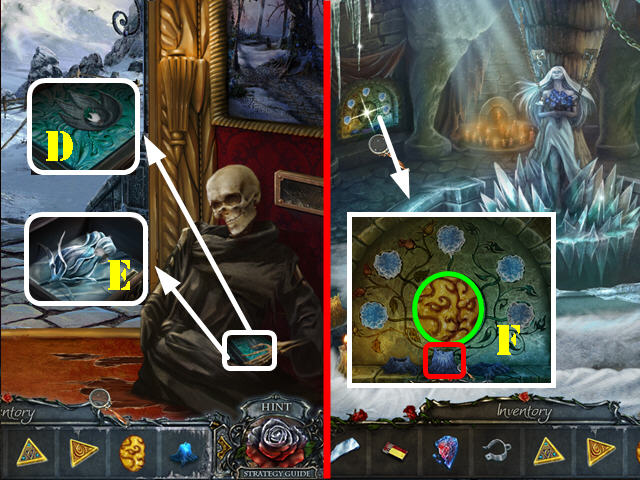
- Examine the skeleton’s hand; move it and put the FIRE KEY on the book (D).
- Take the ROSE (E).
- Take the elevator back down; exit it, walk down twice and then go up the left steps.
- Zoom into the altar in the back; put the MOON, SUN, and BLUE CANDLE in place (F).
- Light the candle with the MATCHES to activate a puzzle.

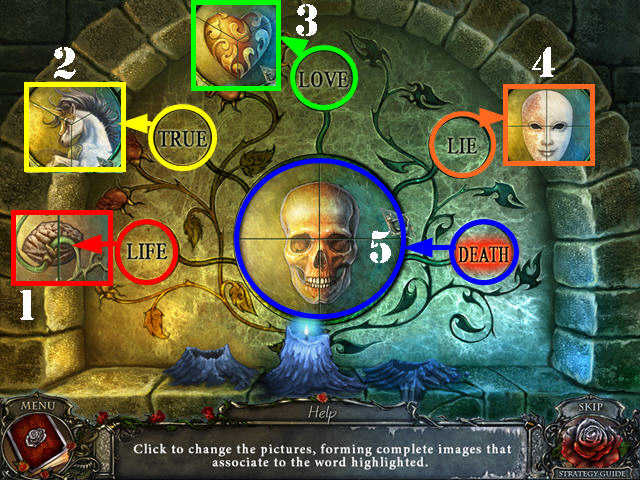
- Press on the center images to change the image. Match the picture in the center to the words on the stone.
- The Brain is for Life (1). The Unicorn symbolizes True (2). The heart symbolizes Love (3). The Mask symbolizes the Lie (4). The Skull symbolizes Death (5).
- Solving this puzzle, gives you access to the statue.

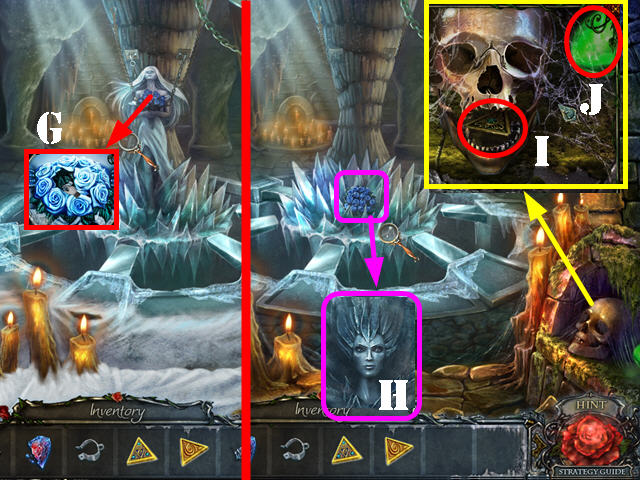
- Zoom into the statue; close in on her bouquet and put the ROSE in it (G). This action will defrost the area.
- Examine the bouquet; press on it and take the QUEEN’S FACE (H).
- Look at the skull; open its mouth and take the third TRIANGLE (I).
- Take the GREEN EYE next to the skull (J).
- Walk down.

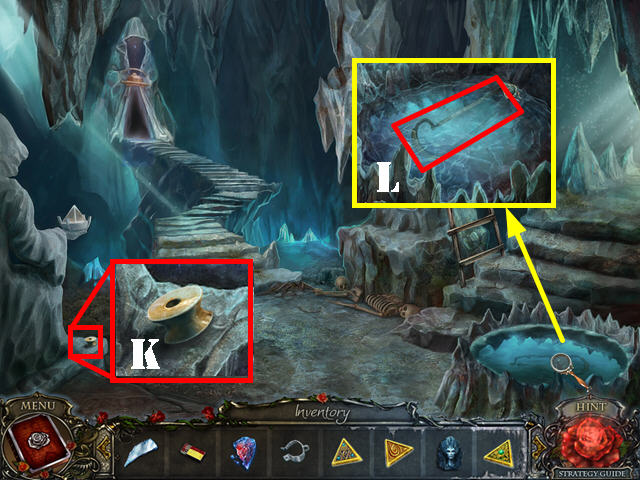
- Examine the base of the statue and take the SPINDLE (K).
- Examine the water; take the HACKSAW (L).
- Go right and then go up the steps.

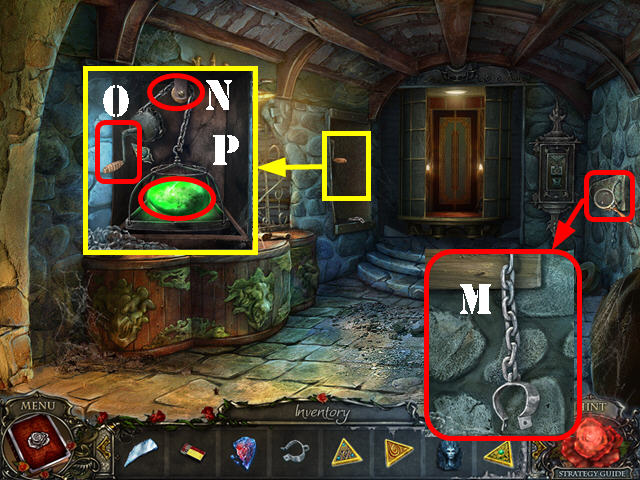
- Inspect the right wall; put the SHACKLE on the chain. Cut the chain with the HACKSAW to get the SHACKLES WITH A CHAIN (M).
- Look at the left panel; put the SPINDLE on it and attach the SHACKLES WITH A CHAIN to the spindle (N).
- Turn the handle (O) and take the GREEN EYE (P).
- Walk down.

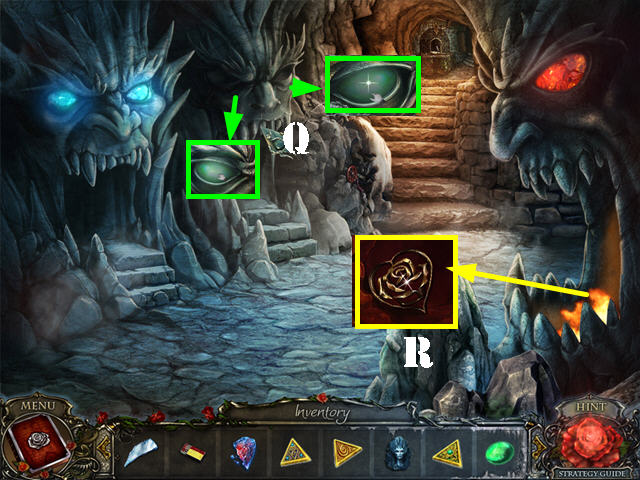
- Examine the 2 eyes on the stone face on the far left and put the 2 GREEN EYES in the sockets (Q).
- Zoom into the right statue’s mouth and take the HEART EMBLEM (R).
- Take the elevator back up; exit it and go right.

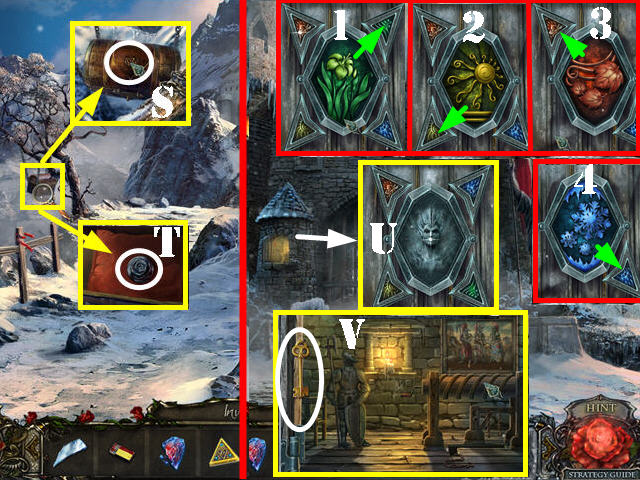
- Zoom into the chest; put the HEART EMBLEM in the recess (S).
- Take the BLUE ROSE TOKEN (T).
- Go forward.
- Zoom into the small tower; put the QUEEN’S FACE on the lock (U).
- Open the door and take the GOLD KEY (V).
- Exit this scene and walk down twice.

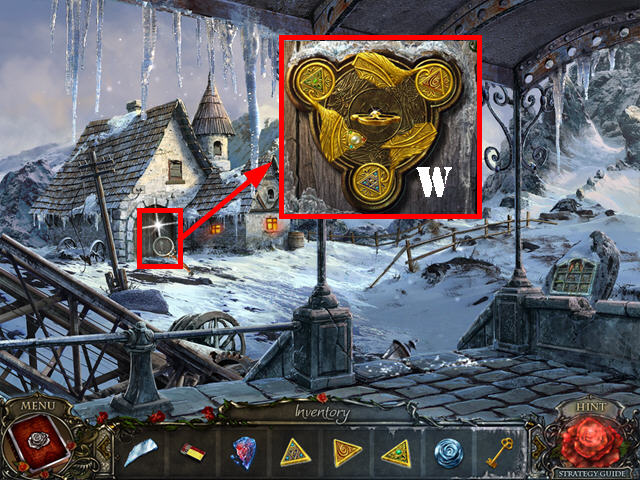
- Zoom into the left door; put the 3 TRIANGLES in the 3 locks.
- Insert the GOLD KEY in the center (W). Turn the key and go through the door.

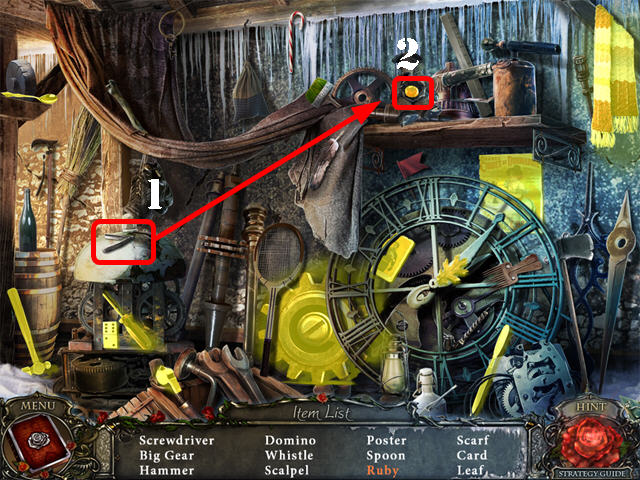
- Play the HOS.
- Cut the bear with the razor (1) and take the ruby (2).
- The GEAR will be added to inventory.

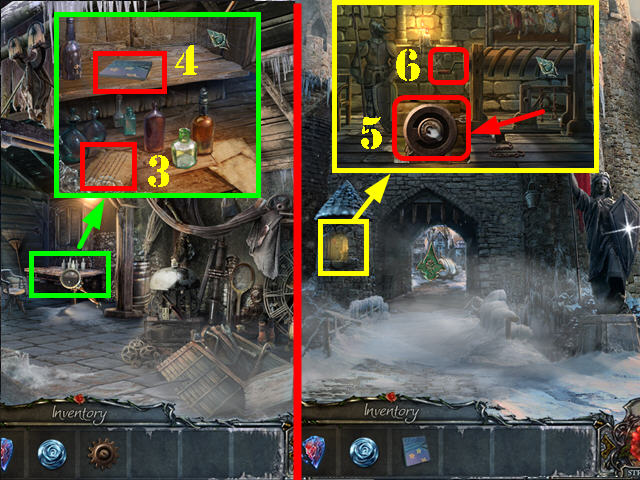
- Look at the desk; take the note (3).
- Open the cabinet doors; take the MURAL PIECE (4).
- Go back to the castle gates.
- Look at the small tower.
- Zoom in on the mechanism; put the GEAR on it (5) and turn the handle (6). The gates are open.
- Go through the gate.
Chapter 5: The Courtyard

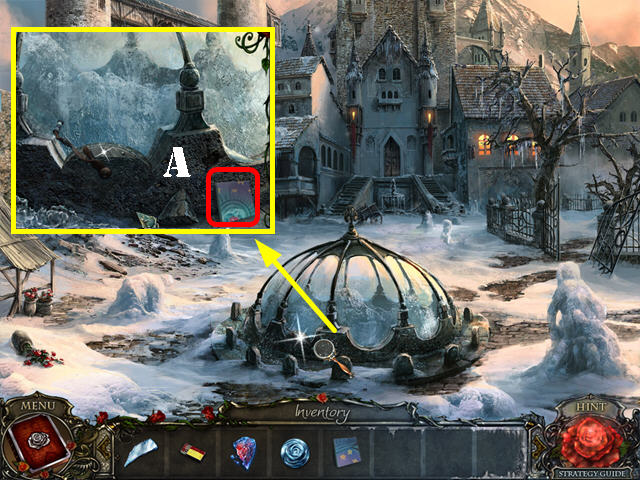
- Examine the dome’s mechanism; take the second MURAL PIECE (A).
- Go forward.

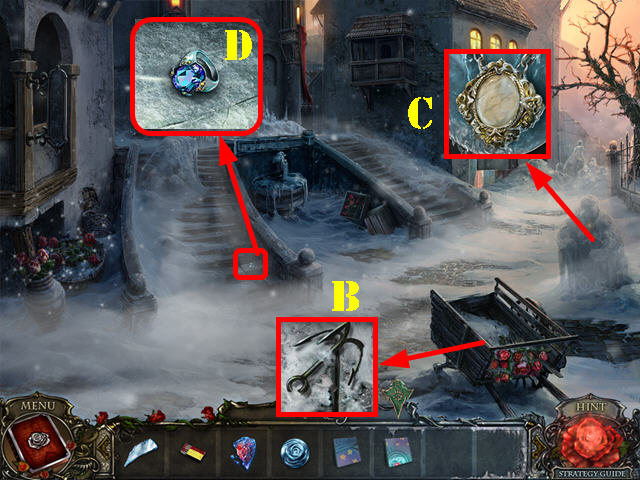
- Zoom into the cart; remove the flowers and take the HOOK (B).
- Examine the statue; take the GOLDEN PENDANT (C).
- Look at the steps; take the 1st RING (D).

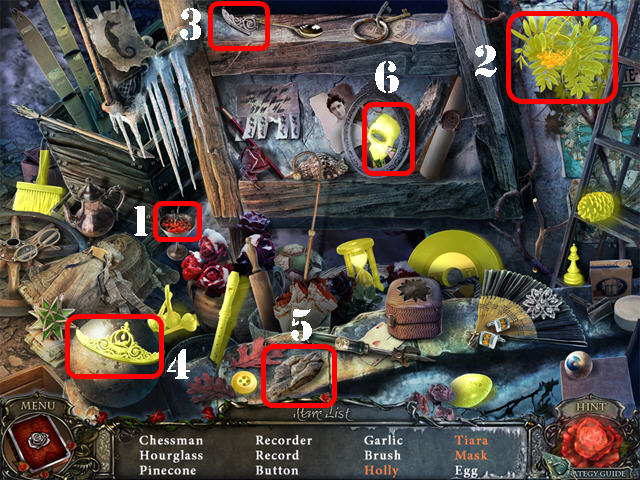
- Play the HOS.
- Drag the berries to the wreath (1); take the holly (2).
- Drag the tiara piece (3) to the broken tiara; take the tiara (4).
- Crack the mirror with the rock (5) and take the mask (6).
- The MASK will be added to inventory.
- Walk down and go right.

- Examine the post; put the HOOK on the rope and take the ROPE AND HOOK (7).
- Look at the right statue; put the MASK on its face (8) and take the third MURAL PIECE (9).
- Walk down.
- Zoom into the tower; put the ROPE AND HOOK on it and climb the tower (10).

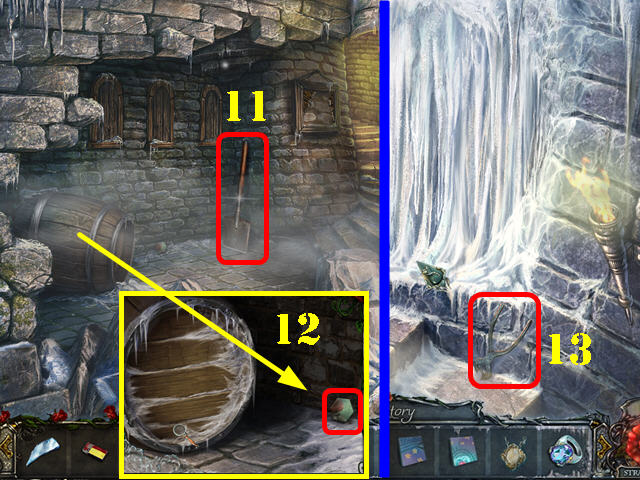
- Take the SHOVEL (11).
- Look at the barrel; take the FIRST PICTURE PART (12).
- Go up the steps; take the WIRE CUTTERS (13).
- Go left.

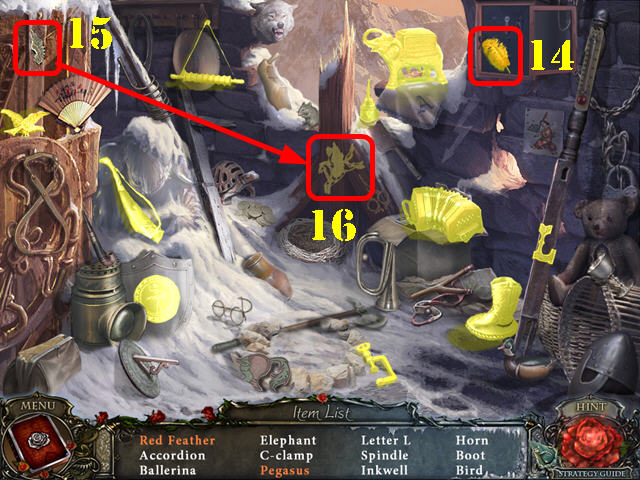
- Play the HOS.
- Open the door; take the red feather (14).
- Drag the wing (15) to the horse (16); take the Pegasus.
- The RED FEATHER will be added to inventory.

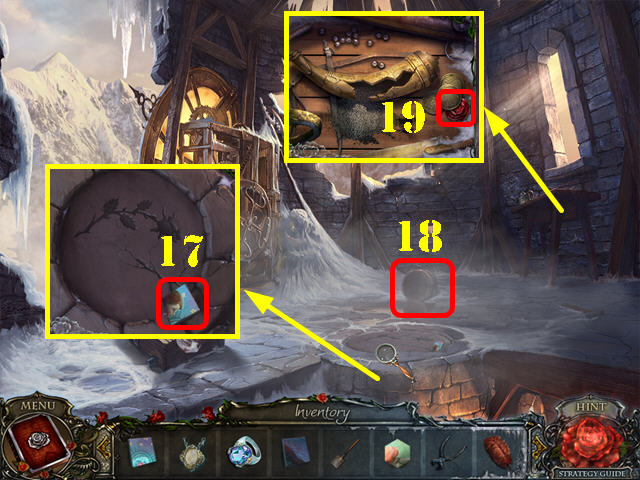
- Examine the ground; take the fourth MURAL PIECE (17).
- Take the BUCKET (18).
- Examine the table; take the RED ROSE TOKEN (19).
- Walk down twice.


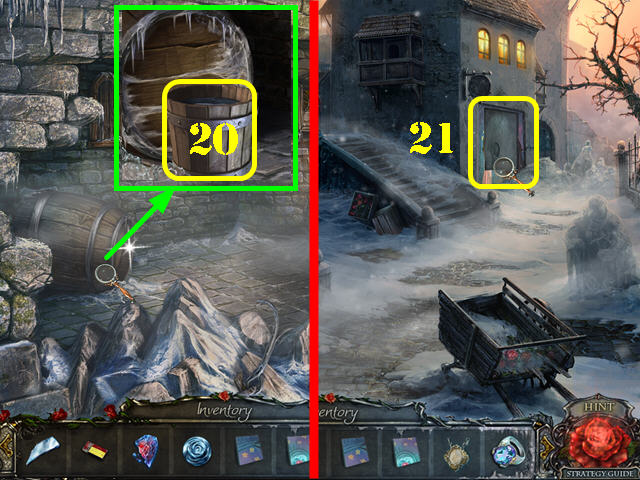
- Zoom into the barrel; put the BUCKET in front of it.
- Take the BUCKET WITH WATER (20).
- Walk down and go forward.
- Examine the wall (21); put the 4 MURAL PIECES on it to activate a puzzle.

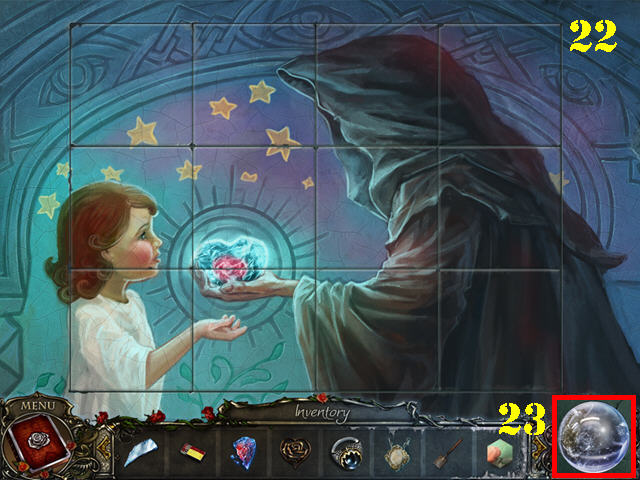
- Mouse over the tiles to swap their images. If you have only one piece left to arrange around the edges, just pass your cursor outside of the picture so you don’t alter a piece that is in the right spot.
- Please look at the screenshot for the solution (22).
- Take the CRYSTAL BALL (23).
- Walk down and go right.

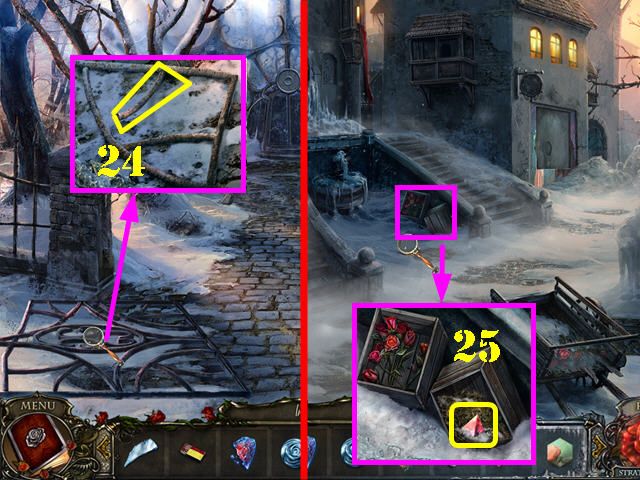
- Knock down the left gate. Zoom into the gate and use the WIRE CUTTERS on the bar.
- Take the CROWBAR (24).
- Go to the front of the castle.
- Zoom into the crates; break the crate with the CROWBAR and take the PRISM (25).

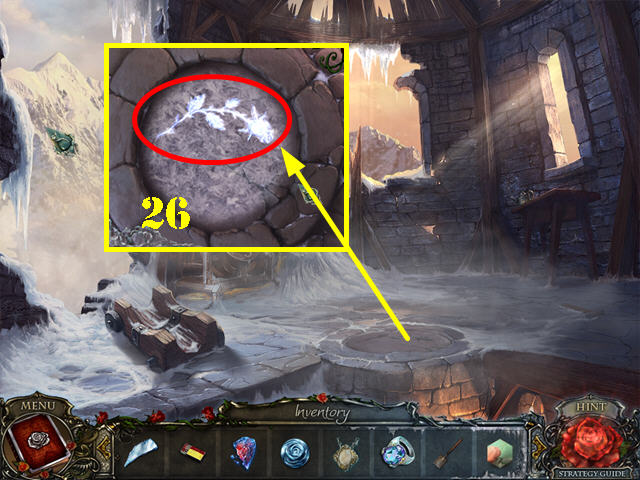
- Go all the way back to the top of the tower.
- Examine the ground; pour the BUCKET OF WATER in and take the ICE ROSE (26).

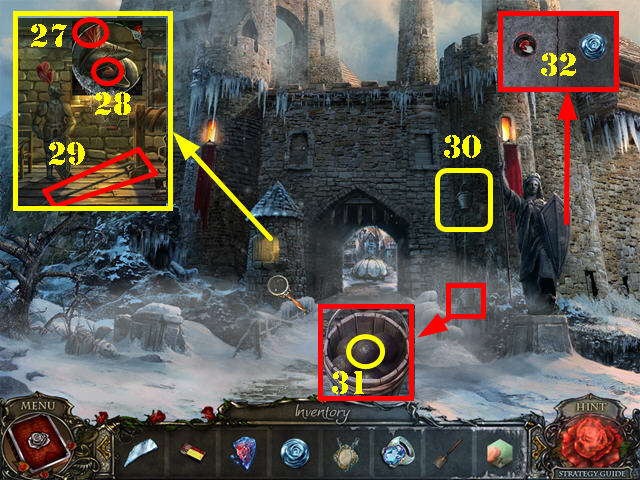
- Go back to the castle gates.
- Zoom into the small tower; examine the helmet and put the RED FEATHER on it (27).
- Take the EMPTY BAG (28).
- Touch the inside of the helmet again to knock down the halberd. Take the HALBERD (29).
- Exit the small tower.
- Lower the bucket with the HALBERD (30).
- Zoom into the bucket and take the CANNONBALL (31).
- Take a closer look at the shield; put the BLUE ROSE TOKEN and the RED ROSE TOKEN in the slots to activate a puzzle (32).

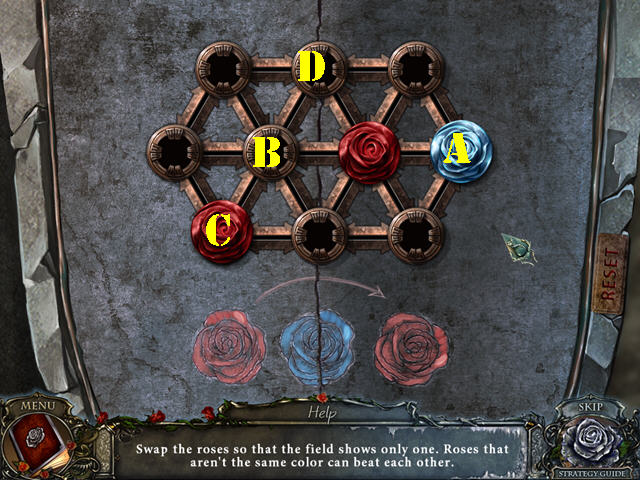

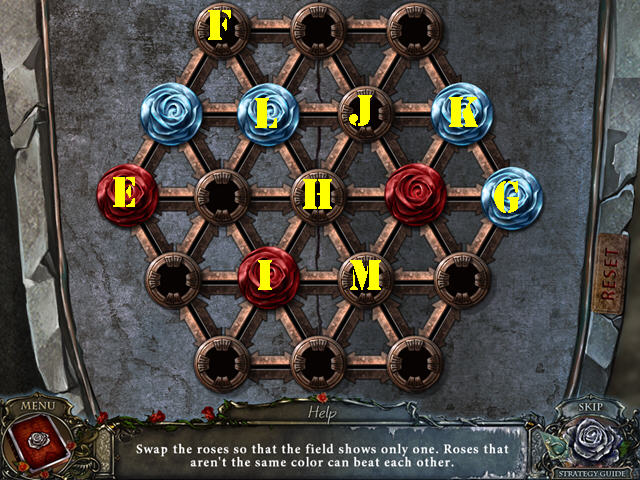

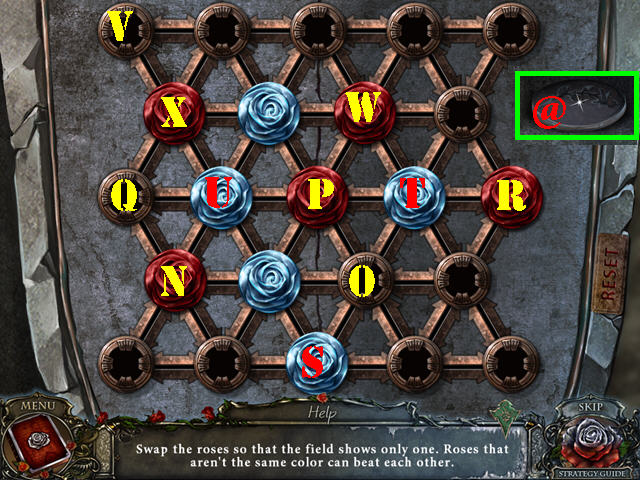
- Your goal is to eliminate all the roses but one. Roses can only pass over a rose of a different color. Press on a rose an all available moves will light up; choose which section you want to jump to.
- To solve the 1st puzzle, jump the roses in this order: A-B, and C-D.
- To solve the 2nd puzzle, jump the roses in this order: E-F, G-H, I-J, F-H, K-L, and L-M.
- To solve the 3rd puzzle, jump the roses in this order: N-O, P-Q, R-P, S-T, T-U, U-V, W-X, V-U, and Q-P.
- Take the SMELTING FORM after the puzzle has been solved (@).
- Walk down.

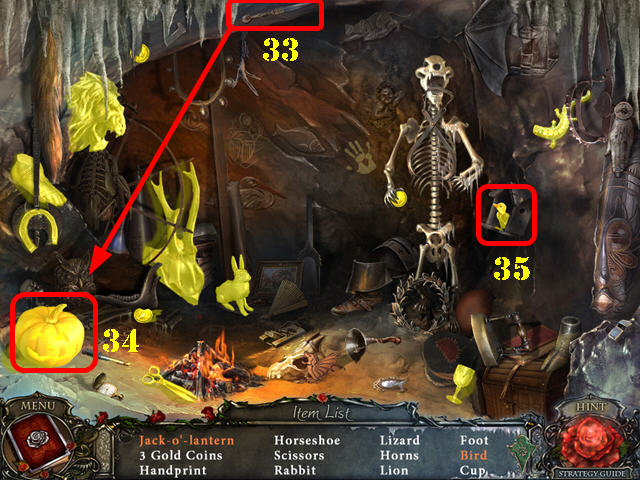
- Play the HOS.
- Drag the knife (33) to the pumpkin; take the jack-o-lantern (34).
- Touch the birdhouse; take the bird (35).
- You will get the GOLD COINS.
- Walk down and go through the door.

- Play the HOS.
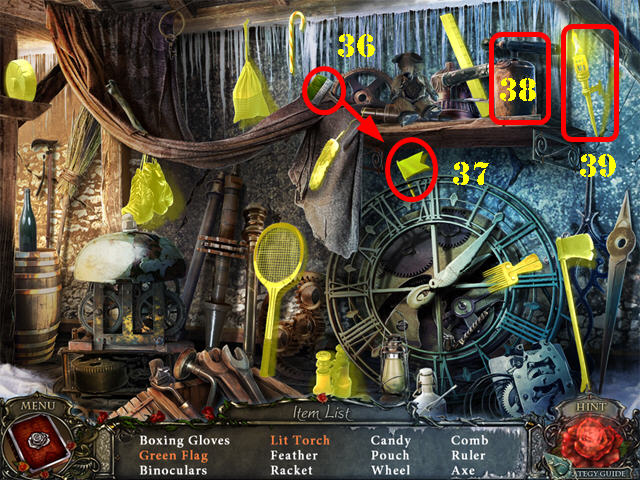
- Drag the brush (36) to the red flag; take the green flag (37).
- Press on the blowtorch (38); take the lit torch (39).
- The WHEEL will be added to inventory.

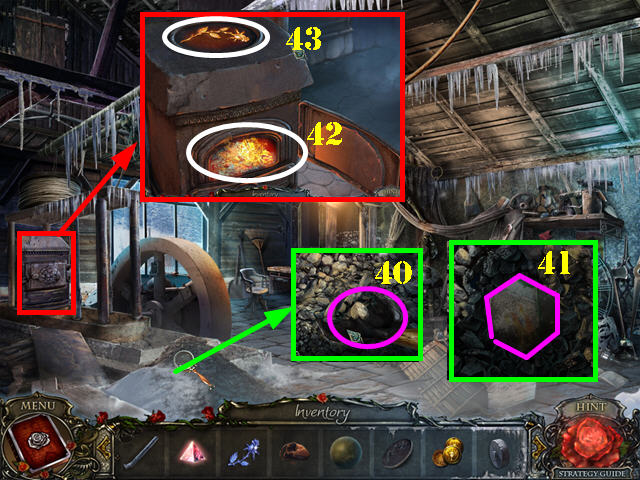
- Look at the pile of coal; put the shovel in it to get some COAL (40).
- Take the PICTURE PART (41).
- Zoom into the stove; open the door and put the COAL in it (42).
- Put the SMELTING FORM on top; put the GOLD COINS and the GOLDEN PENDANT in it.
- Take the GOLDEN ROSE (43).

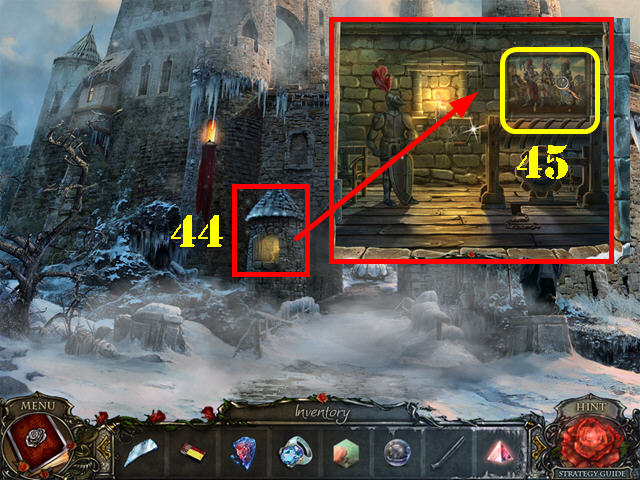

- Go back to the castle gates; zoom into the small tower (44).
- Examine the picture and put the 2 PICTURE PARTS in it to activate a puzzle (45).
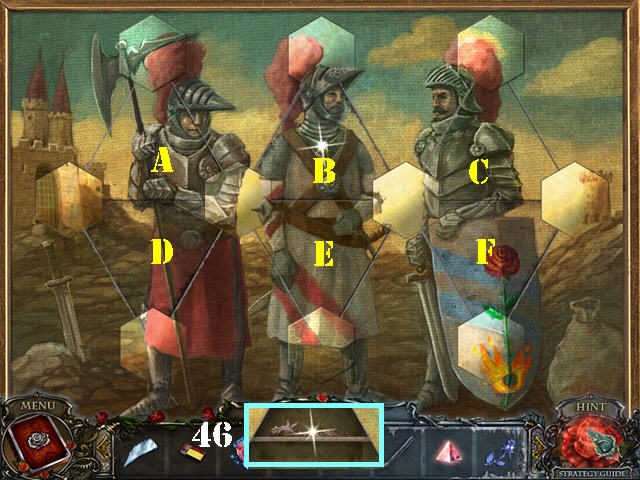
- Press on the triangles in the center to swap the positions of the picture parts until they are in the right place.
- To solve the puzzle, press on the triangles in this order: A, E, A, B, A, F, D x 2, E, F, B, F, C x 2, D, E, C, B x 2, E, B, D, E, D x 2, E x 2, and D x 2.
- Take the WAX ROSE (46).
Chapter 6: The Finale

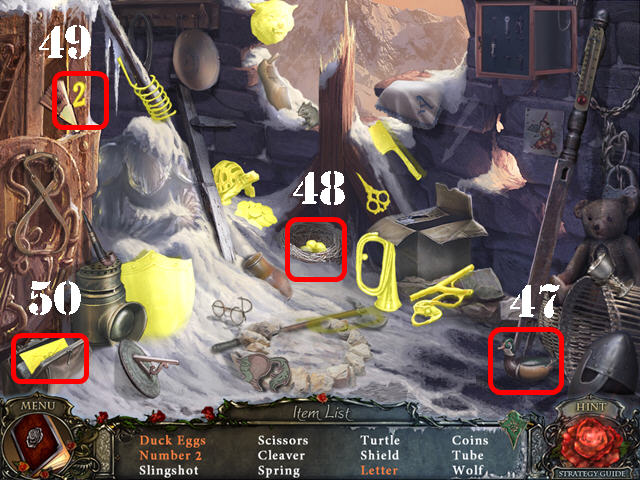
- Go all the way back to the top of the tower.
- Play the HOS.
- Put the duck (47) in the nest; take the duck eggs (48).
- Press on the fan; take the number 2 (49).
- Open the purse; take the letter (50).
- The WOODEN ROSE will be added to inventory.

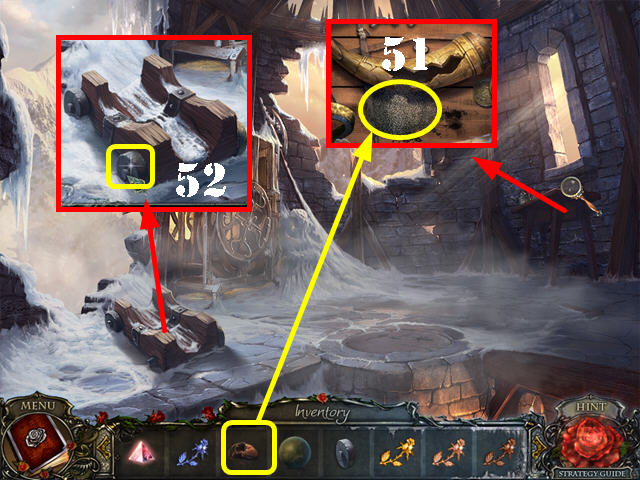
- Examine the table; collect the GUNPOWDER with the EMPTY BAG (51).
- Examine the cart; put the WHEEL on it (52) and then use the CROWBAR to push it down.
- Walk down.

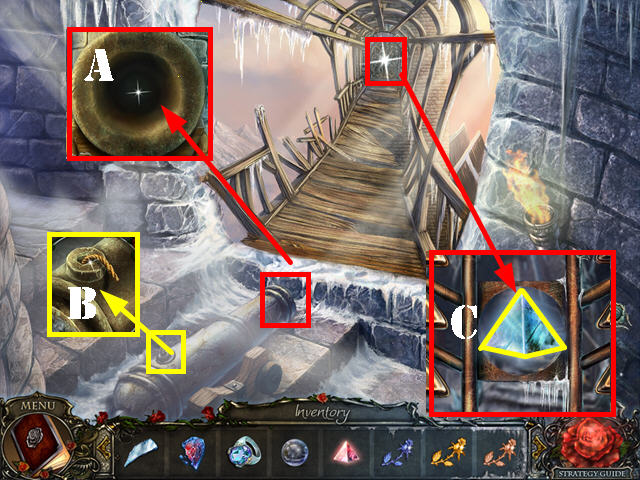
- Press on the cart.
- Press on the cannon and zoom into the barrel.
- Put the GUNPOWDER and then the CANNONBALL into the barrel. Push the cannonball in (A).
- Zoom into the fuse and light it with the MATCHES (B).
- The cannon will break through the ice curtain.
- Zoom into the back door.
- Take the PRISM (C).

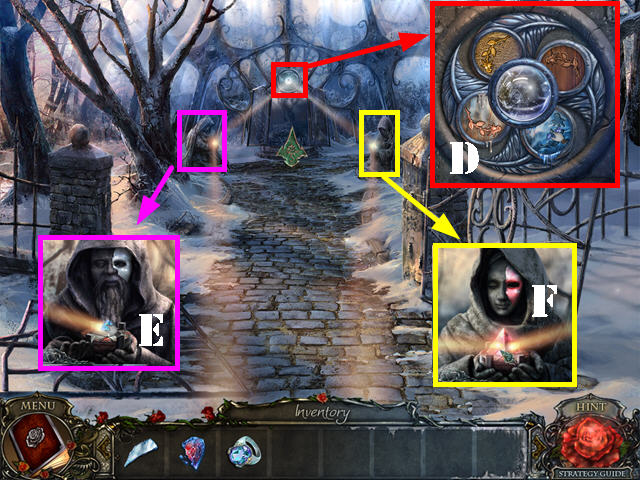
- Go all the way back down and go right.
- Zoom into the lock above the door; put the CRYSTAL BALL, ICE ROSE, GOLDEN ROSE, WAX ROSE, and the WOODEN ROSE into the slots (D).
- Zoom into the left statue; put the PRISM on the plate (E).
- Zoom into the right statue; put the PRISM on the plate (F).
- Go forward.

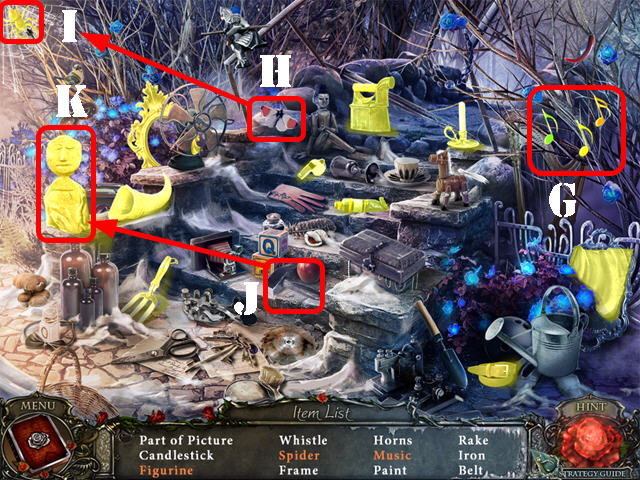
- Play the HOS.
- Press on the harp; take the music (G).
- Drag the butterfly (H) to the spider web (I) and take the spider.
- Use the chisel (J) on the stone; take the figure (K).
- The PICTURE PART will be added to inventory.

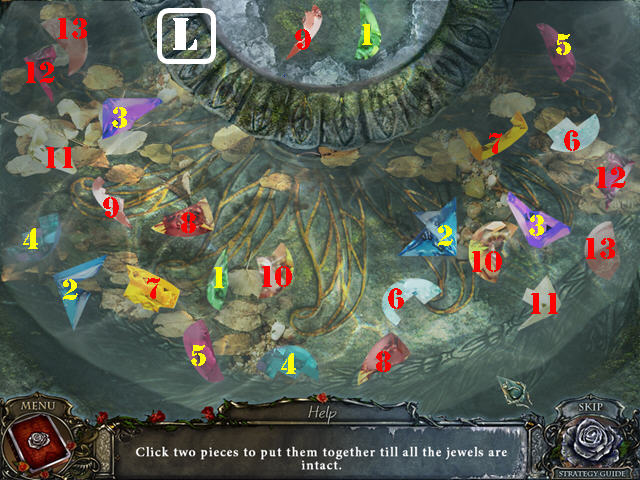
- Zoom into the frozen fountain to activate a puzzle.
- Select the 2 jewel fragments that belong together to eliminate them from the fountain.
- Please look at the screenshot for the solution (L).
- You will get a CRYSTAL.

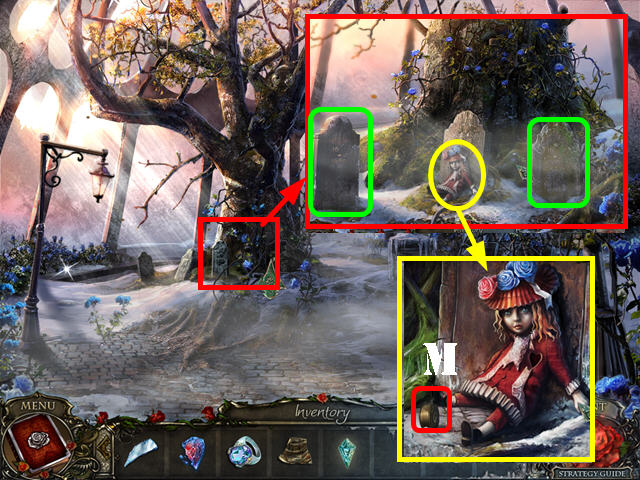
- Move up the tree.
- Examine the doll; take the CODE LOCK PIECE (M).
- Examine both gravestones; they are both missing numbers (green).
- Walk down three times.

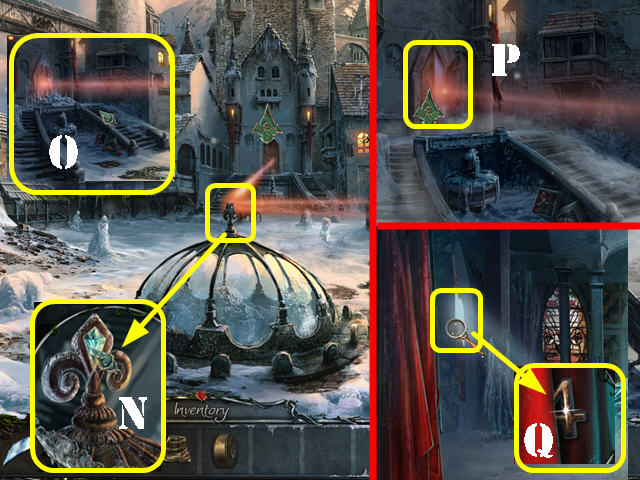
- Zoom into the ornament above the dome; put the CRYSTAL in it (N).
- Press on the crystal twice to focus the light on the door (O).
- Go forward.
- Open the door and go inside (P).
- Look at the curtain; take the GRAVESTONE NUMBER 4 (Q).
- Go forward.

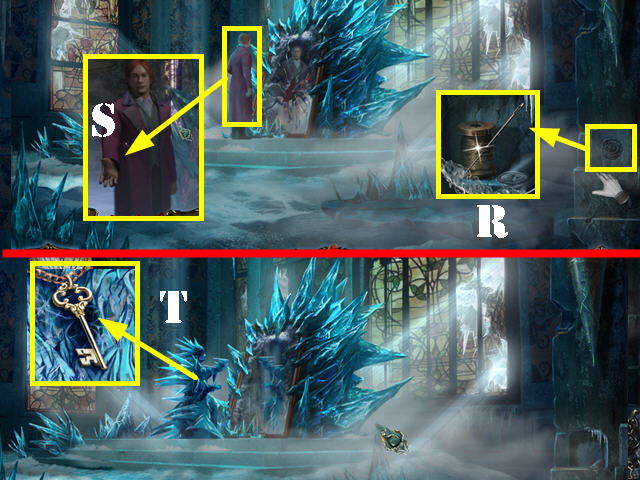
- Remove the brick and zoom into it; take the NEEDLE AND THREAD (R).
- Touch Edward and give him the MIRROR SHARD (S).
- Zoom into the frozen Edward and take the BOOK KEY (T).
- Walk down twice.

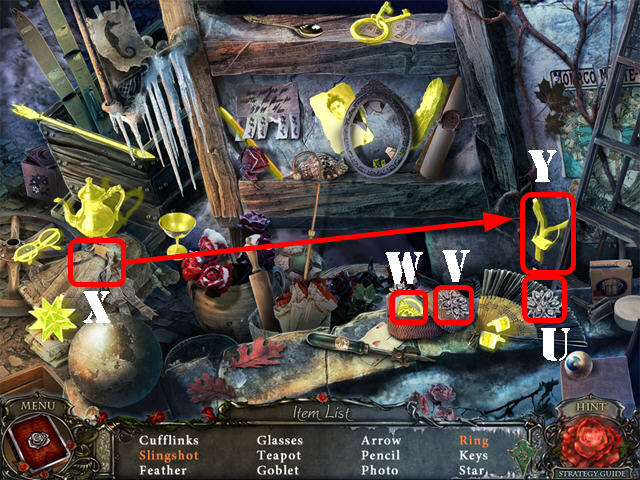
- Play the HOS.
- Put the flower (U) on top of the box (V) and take the ring (W).
- Put the rubber sling (X) on the wood stick; take the slingshot (Y).
- The 2nd RING will be added to inventory.

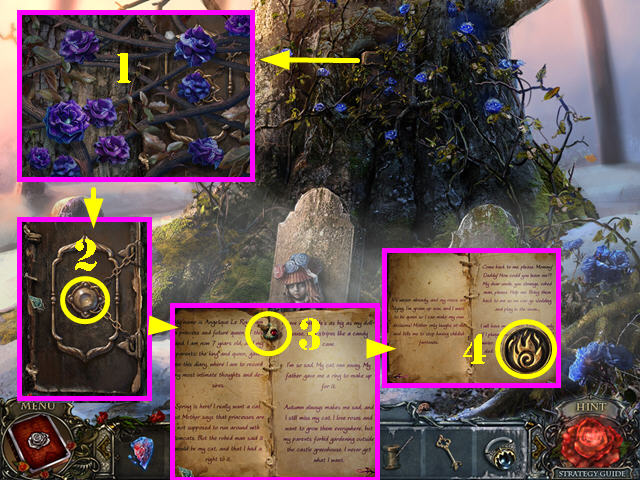
- Go back to the tree area.
- Zoom into the lock; press on the vines 3 times in order to remove them (1).
- Put the BOOK KEY in the lock and open the book (2).
- Flip the page; take the 3rd RING (3).
- Flip the page again and take the DOOR SIGN (4).


- Go back up to the first level in the tower.
- Zoom into the frame (A); put the PICTURE PART and the NEEDLE and THREAD on the torn cloth.
- Note the symbol on the cloth (B).
- Go up the steps.
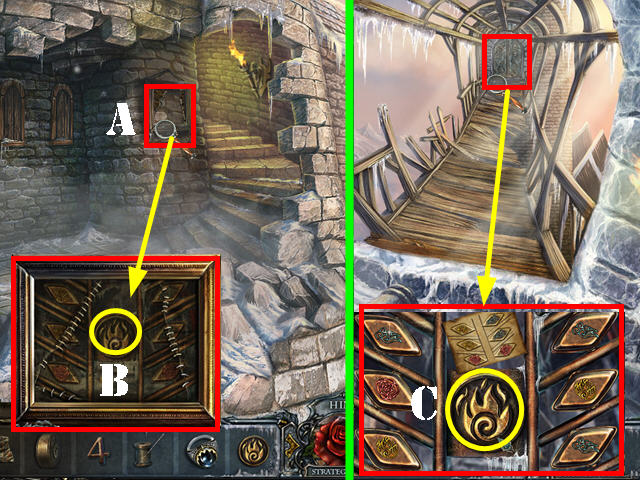
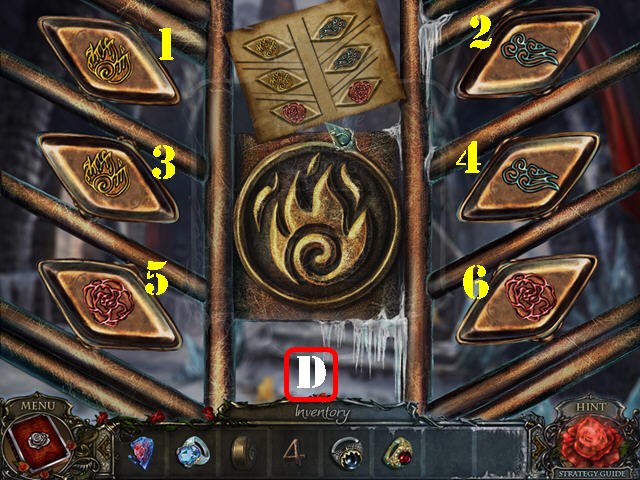
- Zoom into the back door; put the DOOR SIGN (C) in the center to activate a puzzle.
- Press on the buttons until the images resemble the clue on top.
- To solve the puzzle, press on the buttons in this order: 4, 4, 6, 6, 5, 4, and 4 (D).
- Go forward.

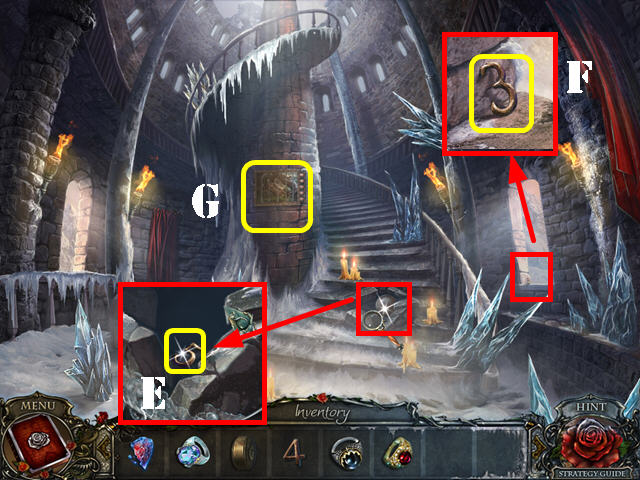
- Zoom into the cannonball; press on it and take the GRAVE STONE NUMBER 5 (E).
- Look at the window and take the GRAVE STONE NUMBER 3 (F).
- Zoom into the puzzle on the column (G).

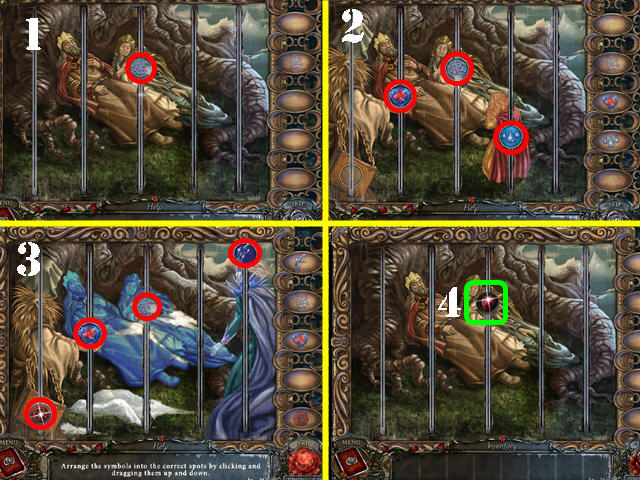
- Arrange the symbols into the right spots.
- Dragging a symbol up or down will affect other symbols. Drag the symbols into the correct spots; you will know a piece is in the right spot when that symbol appears on the right hand side.
- Solution 1: Drag the snowflake up to the position shown in the screenshot (1).
- Solution 2: Move the snowflake up 8 spaces, the raindrops down 3 spaces and slide the ice heart up 6 places (2).
- Solution 3: Slide the ice heart down 8 spaces, the rose up 2 spots, the snowflake down 3 spaces and the ice crown up 3 places. Slide the rose up 2 spots, the crown up 6 spaces, the snowflake down 3 spaces, and the ice heart up 2 spaces (3).
- Take the DOLL’S HEART (4).
- Go up the steps.

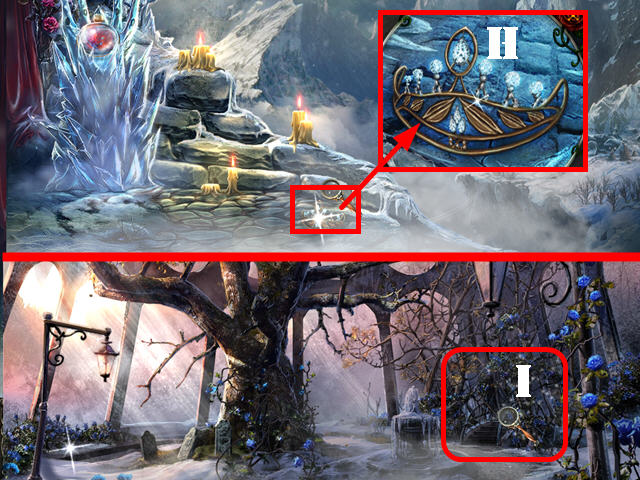
- Zoom into and take the CROWN (H).
- Go back to the tree.
- Play the HOS (I).

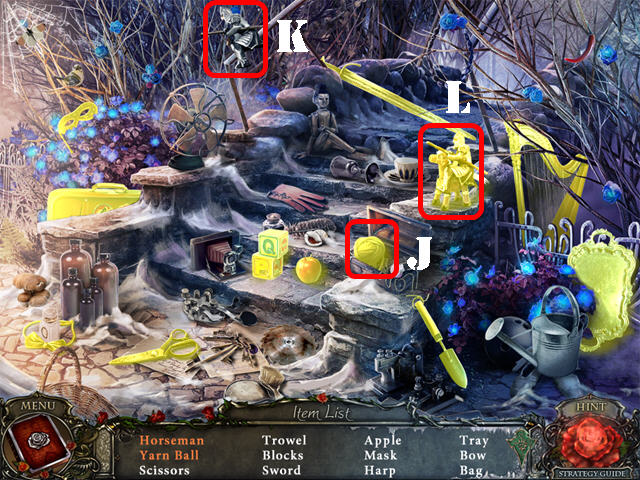
- Open the box; take the yarn ball (J).
- Drag the soldier (K); to the horse and take the horseman (L).
- You will earn the TROWEL.

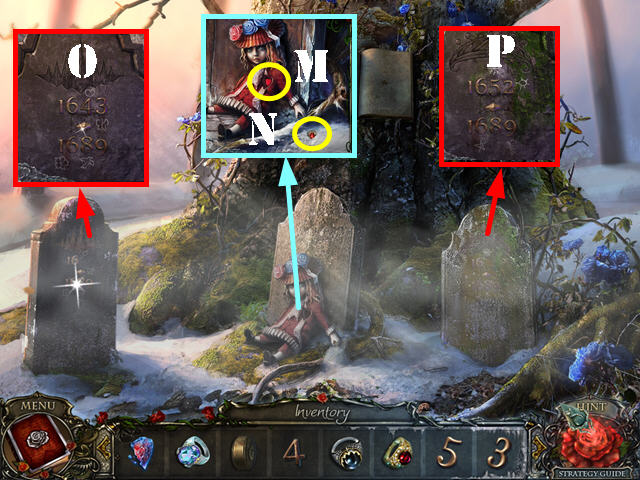
- Zoom into the tree.
- Examine the doll and put the DOLL’S HEART on the doll (M).
- Take the 4TH RING (N).
- Examine the left gravestone; add the GRAVE STONE NUMBER 4 and the GRAVE STONE NUMBER 3 to it. Note the symbols next to the numbers (O).
- Examine the right gravestone; remove the moss and add the GRAVE STONE NUMBER 5. Note the symbols next to the numbers (P).
- Walk down.

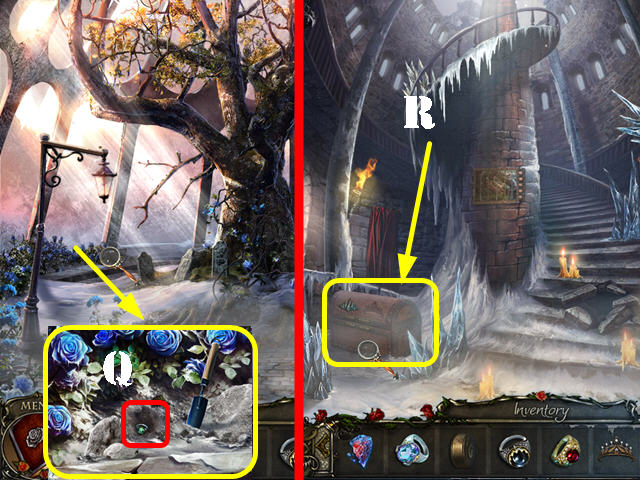

- Examine the flowerbed; use the TROWEL in the snow 3 times and take the 5th RING (Q).
- Go back to the second level in the tower and go through the door.
- Zoom into the chest (R).
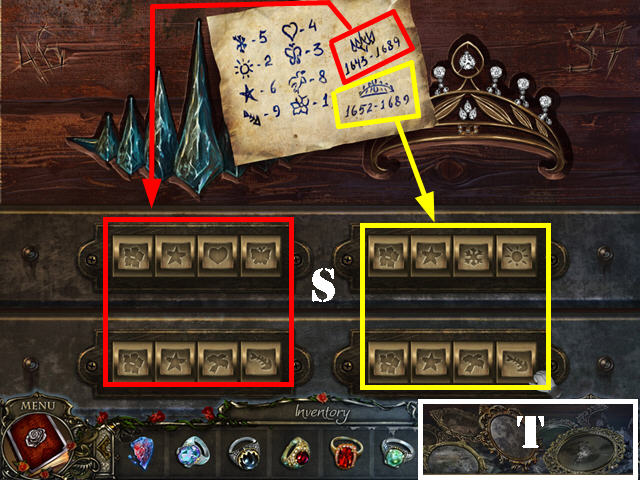
- Put the CROWN and the PART OF CODE LOCK on the chest to activate a puzzle (). This puzzle will not activate unless you solved the tree code first.
- Using the code shown on the paper next to the crowns, enter the dates on the buttons at the bottom. Press on each button to change the symbols.
- The dates marked in yellow should be placed on the right, and the dates marked in red, should be placed on the left.
- Please look at the screenshot for the solution (S).
- Take the 3 MIRRORS (T).

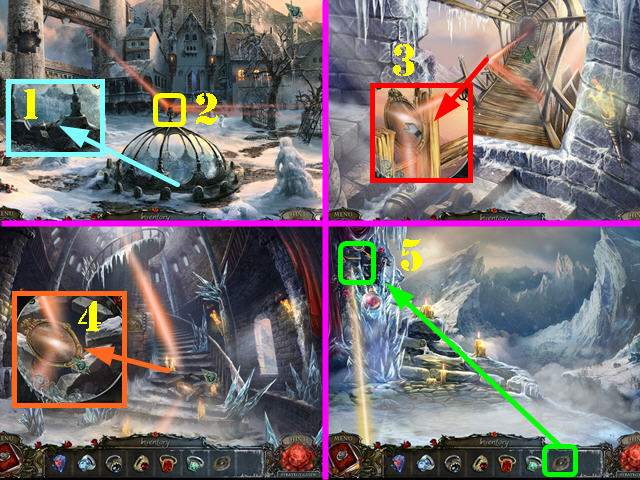
- Go back to the courtyard.
- Examine the dome’s mechanism and flip the switch (1). Turn the crystal (2) to focus the beam on the bridge. Now you need to direct it toward the queen’s tower.
- Go back to the tower bridge.
- Examine the railing; put the MIRROR on it (3).
- Go through the door.
- Examine the steps; put the MIRROR in the hole (4).
- Go up the steps.
- Put the MIRROR in the upper left corner (5).

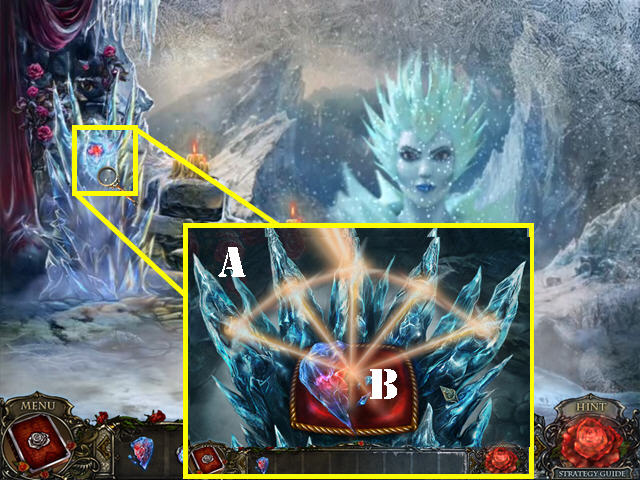
- Examine the globe; add the 5 RINGS to the icicles (A).
- Put the ICY HEART on the pillow (B).
- Congratulations, you have completed Living Legends: Ice Rose Standard Edition!





 Awakening: The Dreamless Castle Walkthrough, Guide, & Tips
 Fierce Tales: The Dog's Heart Walkthrough, Guide, & Tips
 Nevertales: Shattered Image Walkthrough, Guide, & Tips
 Strange Cases: The Secrets of Grey Mist Lake Walkthrough, Guide, & Tips
 Midnight Castle Tips and Tricks, Guide, & Tips