Strange Cases: The Secrets of Grey Mist Lake Walkthrough, Guide, & Tips
Strange Cases: The Secrets of Grey Mist Lake Walkthrough
Welcome to the Strange Cases: The Secrets of Grey Mist Lake Walkthrough!
Discover the Secrets of Grey Mist Lake! FBI Agent Claire Ellery has discovered another Strange Case and she needs your help!
Whether you use this document as a reference when things get difficult or as a road map to get you from beginning to end, we’re pretty sure you’ll find what you’re looking for here.
This document contains a complete Strange Cases: The Secrets of Grey Mist Lake game walkthrough featuring annotated screenshots from actual gameplay!
We hope you find this information useful as you play your way through the game. Use the walkthrough menu below to quickly jump to whatever stage of the game you need help with.
Remember to visit the Big Fish Games Forums if you find you need more help. Have fun!
This walkthrough was created by prpldva, and is protected under US Copyright laws. Any unauthorized use, including re-publication in whole or in part, without permission, is strictly prohibited.
General Tips

- This is the official guide for Strange Cases: The Secrets of Grey Mist Lake Standard Edition.
- Many mini-games and hidden object scenes are randomized; your solution may vary.
- For this walkthrough, Hidden Object Scenes will be referred to as HOS.
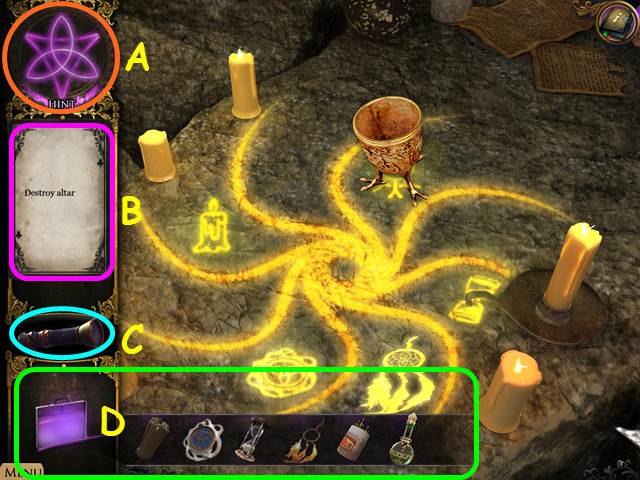
- Hints are unlimited, but you must wait for the Eye to refill (A).
- Click on the Eye for a hint in a Hidden Object Scene.
- You may skip mini-games once the meter fills.
- Your current task, Hidden Object list, or puzzle instructions will show on the card (B).
- You will have to find one CARD in the HOS which will provide you with the list of items to search for.
- Use the FLASHLIGHT in the creepy shadow areas to make RUNE STONES visible (C).
- Select the briefcase in the lower left to access your inventory (D).
- Right-click on an inventory item to drop it back into inventory.
- The magnifying glass cursor indicates that a close-up view is available.
- Puzzle pieces on the cursor means that you will need to solve a puzzle or use an inventory item.
- The talk bubble indicates that conversation is possible with a character.
Chapter 1: The Sheriff’s Letter

- Click on the card Claire is holding.
- You will have the option of some interactive help.
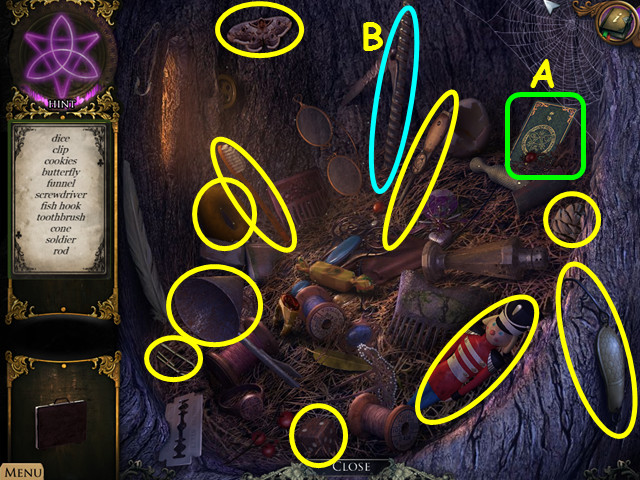
- Click on the hollow tree on the right to access a HOS.
- Click on the CARD in the upper right to acquire your list (A).
- Find all the items listed to acquire the ROD (B).

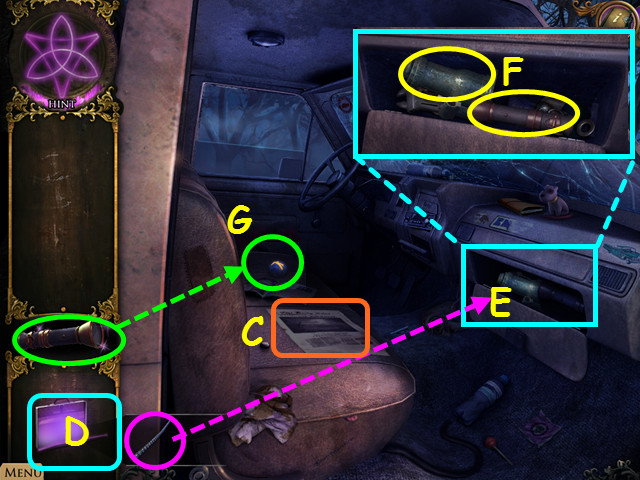
- Click on the door of the crashed car.
- Read the newspaper (C).
- Open the briefcase (D) to access your inventory items, then use the ROD on the glove compartment (E).
- Zoom into the glove compartment; take the FLASHLIGHT and the SCREW-JACK (F).
- Click on your FLASHLIGHT and aim it at the creepy shadow on the driver seat; take the RUNE STONE (G).
- Click down.

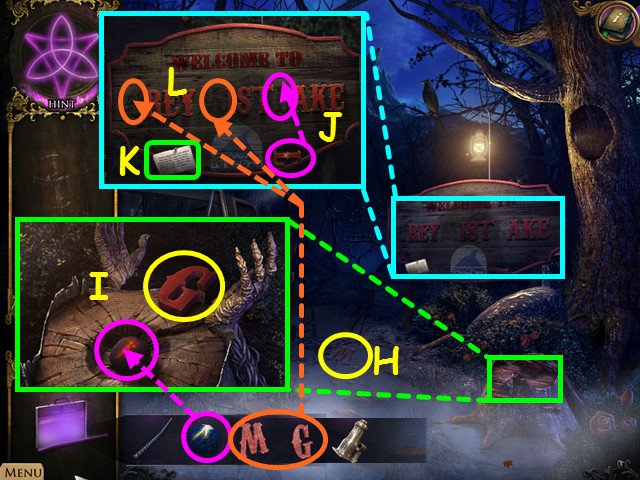
- Take the LETTER M (H).
- Zoom into the tree stump; use the RUNE STONE on it and take the LETTER G (I).
- The ghost will appear; talk to him.
- Examine the sign; take the LETTER L (J) and place it on the sign.
- Read the note on the sign for a clue (K).
- Put the LETTER G and the LETTER M on the sign (L).

- Go forward.
- There are 3 paths, you can take.
- Per the note on the sign, take the right path to town.
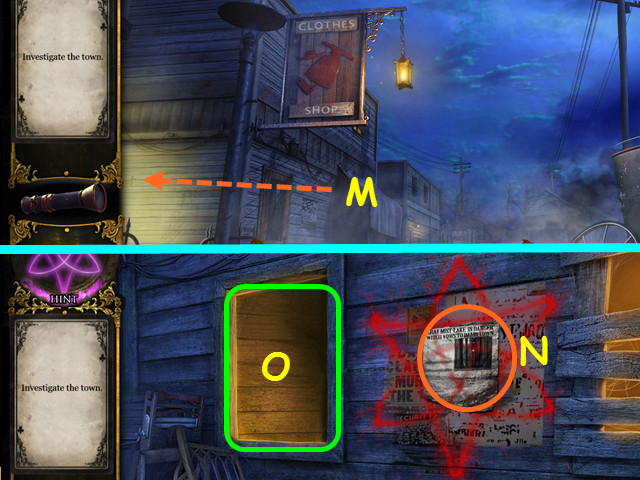
- Head left once you arrive at the clothes shop (M).
- Look at the newspaper (N).
- Enter the window (O).

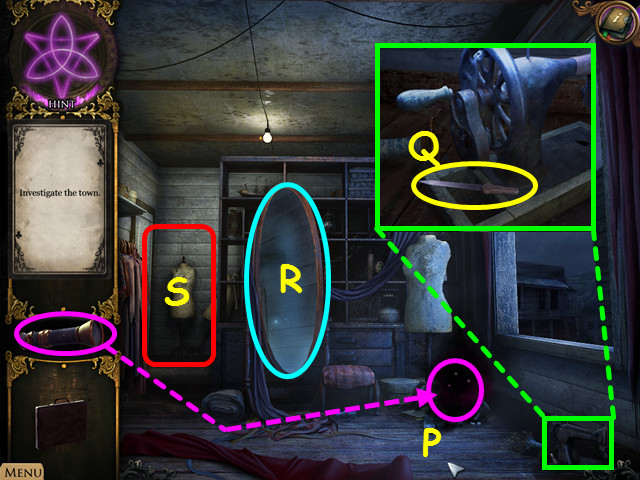
- Shine the FLASHLIGHT on the creepy shadow; take the RUNE STONE (P).
- Examine the sewing machine; take the FILE (Q).
- Look at the mirror (R).
- Walk forward (S).
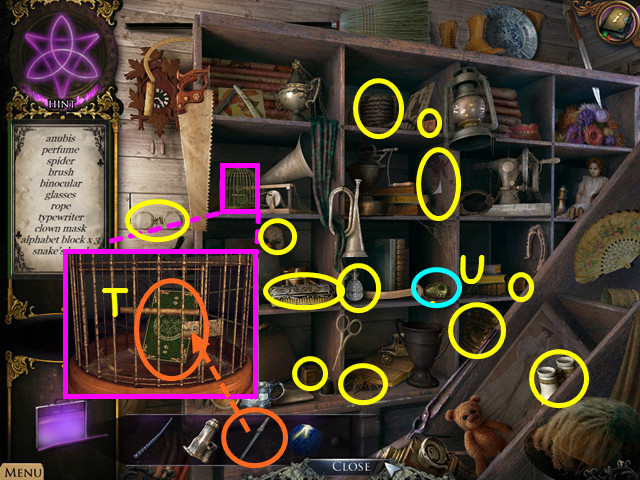
- Select the shelves on the right for a HOS.


- Examine the birdcage; use the FILE on the lock and take the CARD (T).
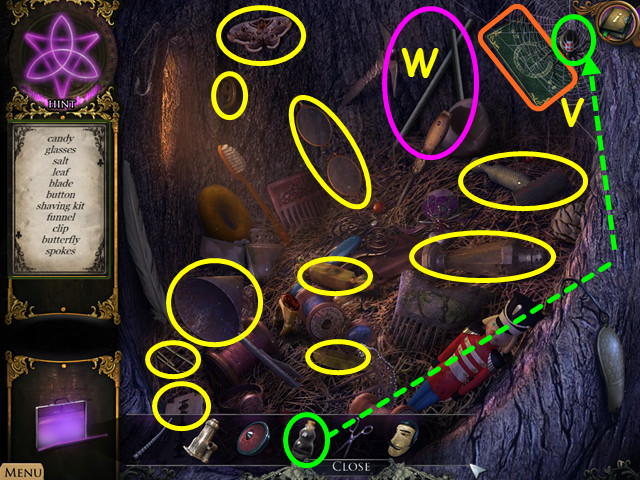
- Find all the items listed to acquire the SNAKE’S HEAD (U).

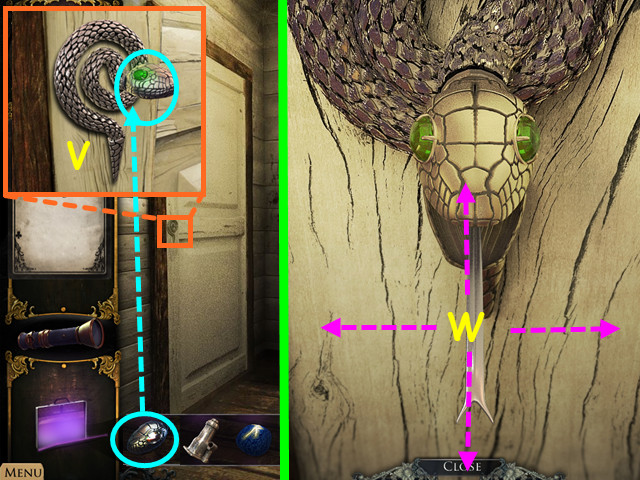
- Zoom into the left door; put the SNAKE’S HEAD on the lock (V).
- Zoom into the door to activate a puzzle.
- You must pull the snake’s tongue, up, down, left, or right (W).
- When you pull the tongue in the correct sequence, its eyes will light up. If you make the incorrect sequence, the puzzle will reset.
- To solve the puzzle, pull the tongue in this order: UP, UP, RIGHT, and LEFT.
- Go through the door.

- Examine the cabinet on the right to activate a puzzle.
- Take the 1/2 BUTTON (X).
- Assemble the puzzle by dragging the photo pieces into the frame.
- Pieces placed correctly will lock in place.
- Please look at the screenshot for the solution (Y).
- Take the BUTTERFLY (Z).

- Go up the staircase.
- Examine the table; read the newspaper.
- Go through the right door.
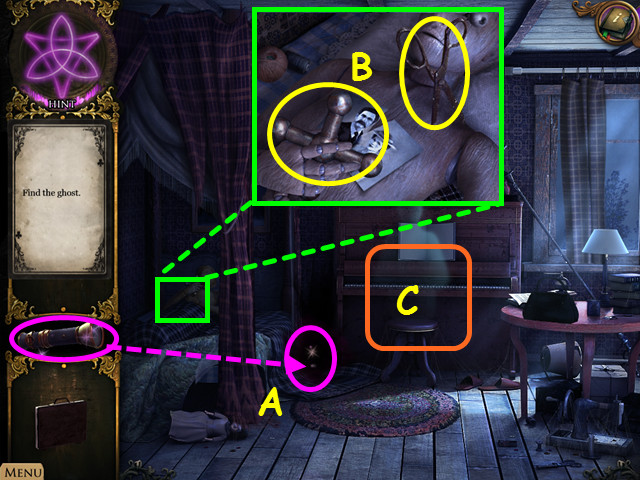
- Shine the FLASHLIGHT on the creepy shadow; take the RUNE STONE (A).
- Examine the bed; take the SCISSORS and the HANDLE (B).
- Click on the piano to access puzzle (C).

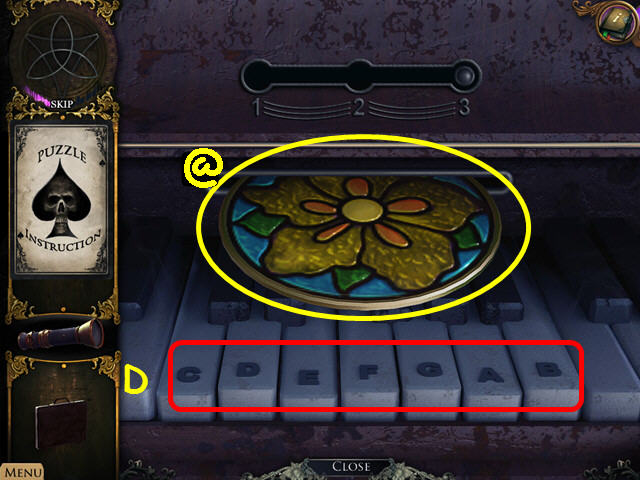
- Repeat the sequences shown on the piano (D).
- Sequence 1: B, G, and F.
- Sequence 2: B, G, F, A, and E.
- Sequence 3: B, G, F, A, E, D, and C.
- Take the 1/4 STAINED GLASS (@).
- Click on the window for a cut scene.
- Click down twice.

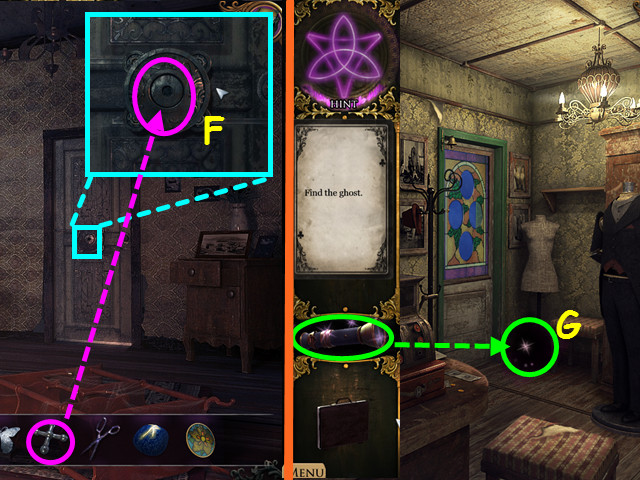
- Zoom into the door; put the HANDLE on it and go through the door (F).
- Shine the FLASHLIGHT on the creepy shadow; take the RUNE STONE (G).

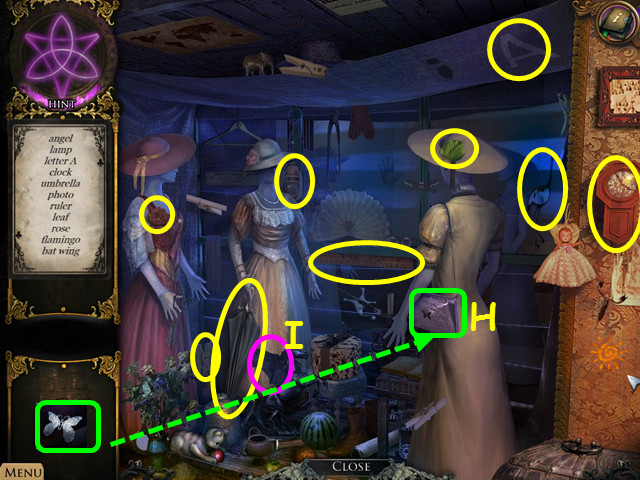
- Click on the HOS on the left.
- Zoom into the purse; put the BUTTERFLY on it and take the CARD (H).
- Find the listed items to acquire the BAT WING (I).
- Click down; go up the staircase and head forward.

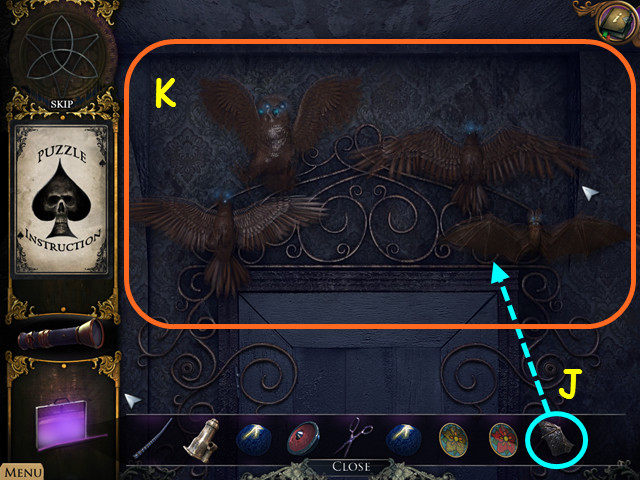
- Take the 2/4 STAINED GLASS on the chair.
- Examine the bird statues above the door; put the BAT WING on the empty slot to activate the puzzle (J).
- Put the correct wings on each bird.
- Click on any two wings to swap their positions.
- Please look at the screenshot for the solution (K).
- Go through the door.

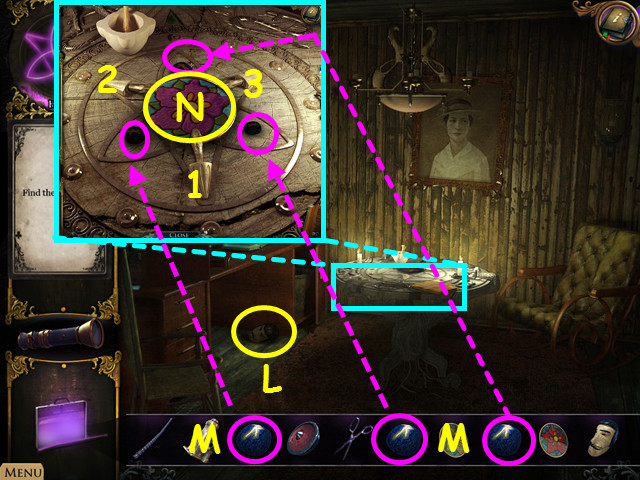
- Take the DUMMY’S HEAD (L).
- Examine the table; put the 3 RUNE STONES on the circles to activate a puzzle (M).
- Click on the snakes in numerical order (1-3).
- Take the 3/4 STAINED GLASS (N).
- Click down 3 times and go through the door.

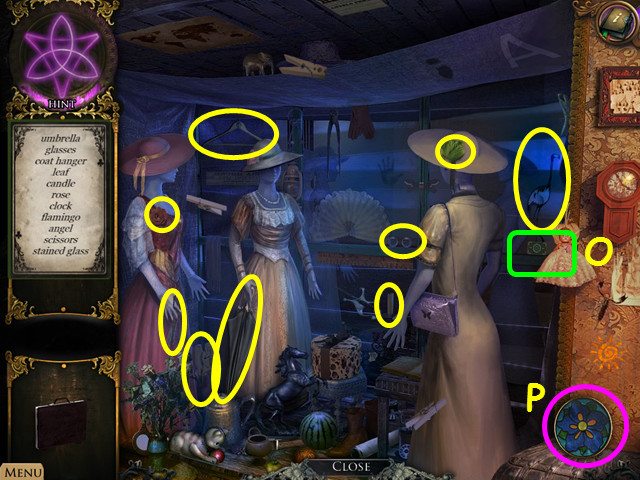
- Click on the HOS.
- Take the CARD on the right edge (O).
- Find the listed items to acquire the 4/4 STAINED GLASS (P).
- Examine the stained glass door; put the 4 STAINED GLASS pieces in their matching slots.
- Go through the door.

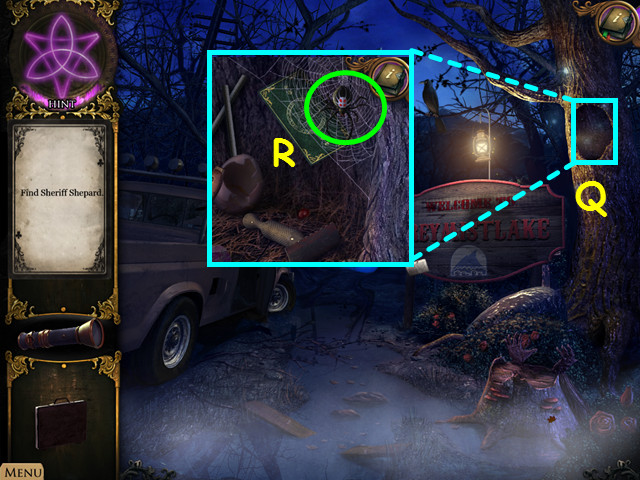
- Watch the cut scene then walk to the right.
- Look inside the hollow tree (Q).
- Click on the spider guarding the card to learn you need to feed it (R).
- Close the scene.

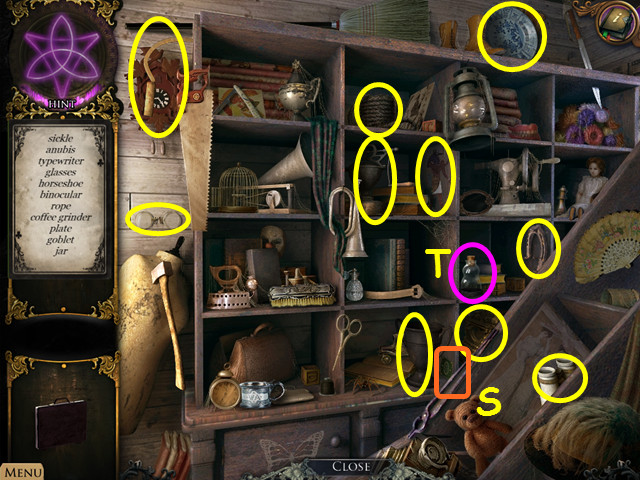
- Go forward and click down 3 times.
- Click on the HOS.
- Click on the CARD in the lower center, next to the goblet (S).
- Find the listed items to acquire the JAR (T).

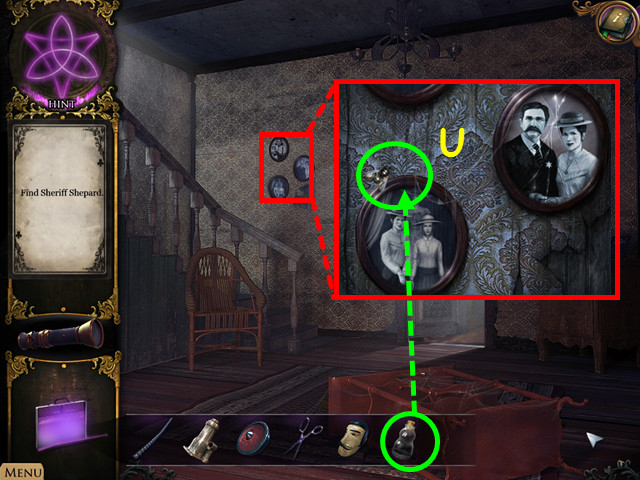
- Go through the left door.
- Zoom into the pictures; put the JAR over the FLY to create the JAR WITH FLY (U).
- Go back outside to the broken carriage area and head right.
- Zoom into the tree hollow for a HOS.


- Put the JAR WITH FLY on the spider and take the CARD (V).
- Find the listed items to acquire the SPOKES (W).
- Go forward.

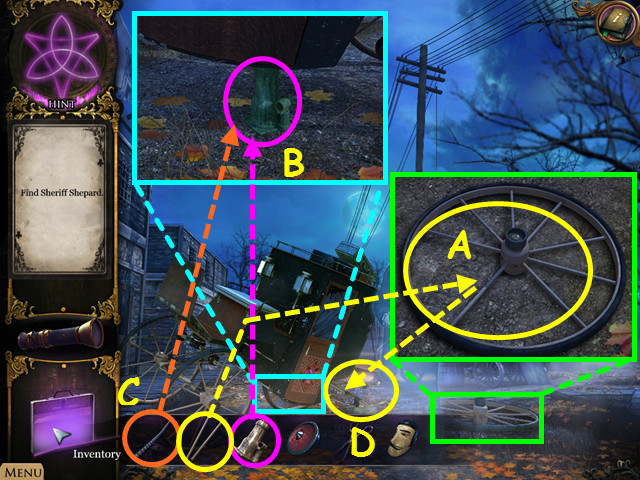
- Zoom into the wheel; put the SPOKES on it and take the WHEEL (A).
- Click on the carriage; place the SCREW-JACK on the ground (B).
- Put the ROD on the screw-jack (C).
- Put the WHEEL on the carriage (D).

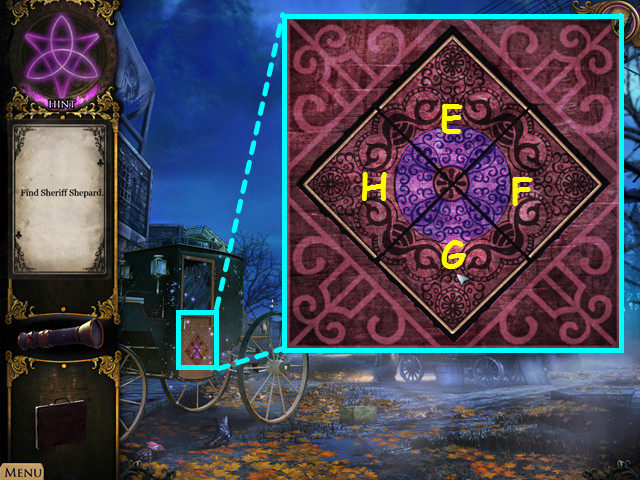
- Click on the carriage to access a puzzle.
- To solve the puzzle click on the pieces in this order: E, E, F, F, F, G, G (H will turn with G).

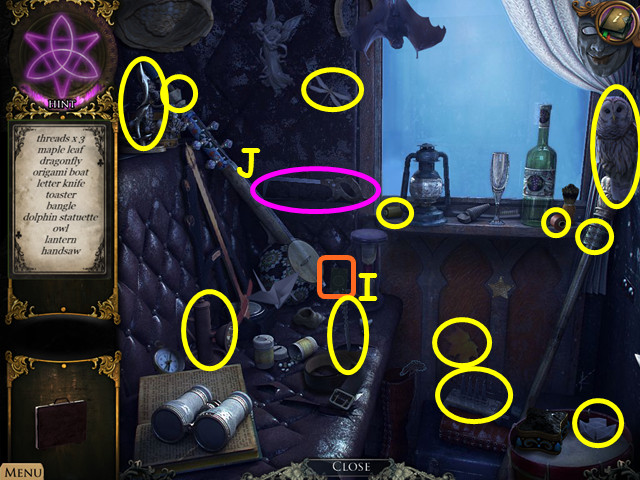
- Enter the carriage for a HOS.
- This mini-game is randomly generated, your solution may vary.
- E turns E and F, F turn F and G, while G turns G and H, and H turns only H.
- Our solution was to click on the pieces in this order: E, E, E, G, G, G, H, and H.

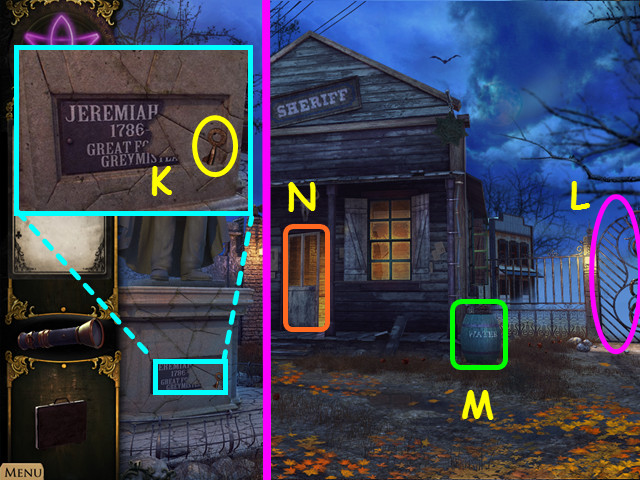
- Examine the base of the statue; take the CHEST KEY (K).
- Go towards the sheriff’s department.
- Look closely the gate (L) and the barrel (M).
- Enter into the sheriff’s department (N).

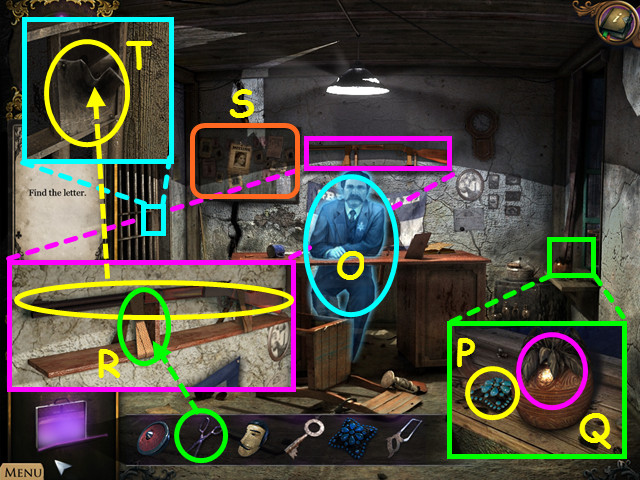
- Talk to the sheriff (O).
- Examine the window; take the JEWELRY BOX MEDALLION (P) and click on the flower vase (Q).
- Examine the rifle; cut the straps with the SCISSORS and take the RIFLE (R).
- Examine the board (S).
- Zoom into the cell door; use the RIFLE on the lock and go through the door (T).

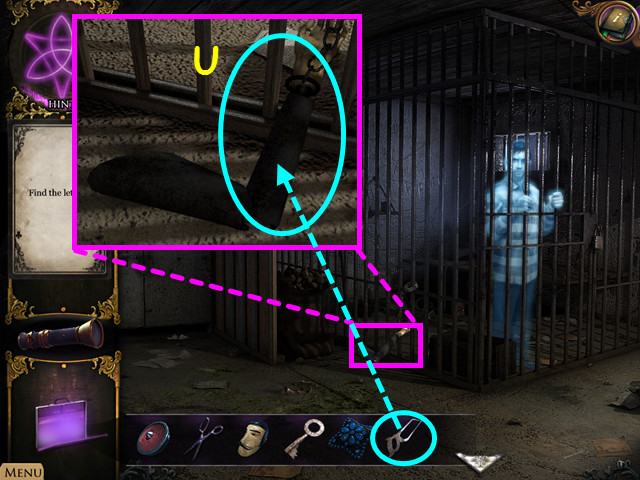
- Talk to the prisoner.
- Examine the dummy’s arm; use the HANDSAW on it and take the DUMMY’S ARM (U).
- Click down 5 times.

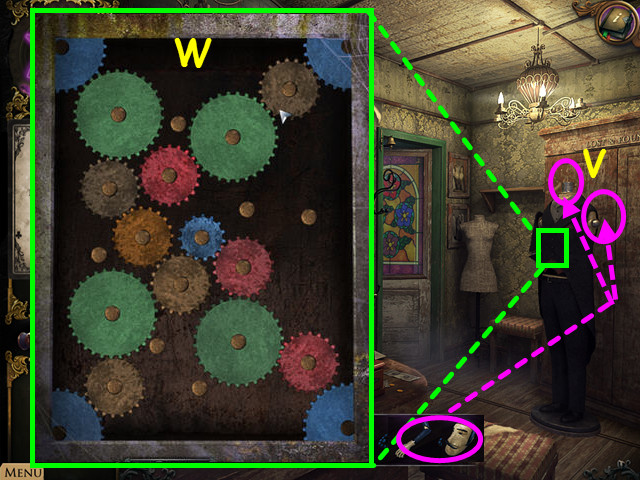
- Put the DUMMY’S HEAD and the DUMMY’S ARM on the dummy (V).
- Zoom into the dummy to activate a puzzle.
- Arrange the gears so they are all connected to the large blue pieces as shown in the screenshot (W).

- The dummy will open the closet once the puzzle has been solved; zoom into it.
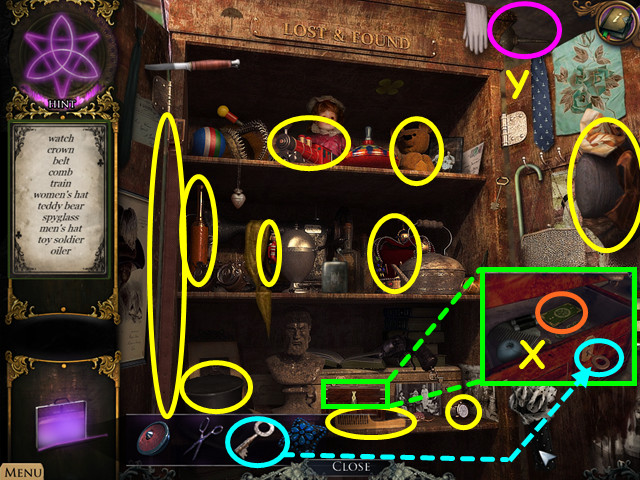
- Examine the box; use the CHEST KEY on the lock and take the CARD (X).
- Find the listed items to acquire the OIL CAN (Y).

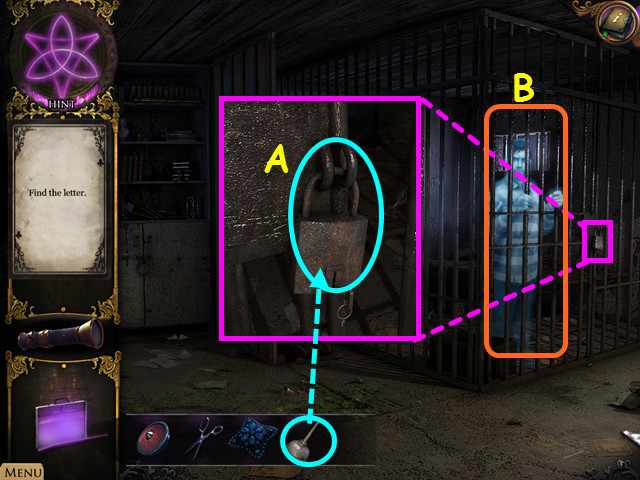
- Return to the jail cell.
- Zoom into the lock; use the OIL CAN on it and click on the key to unlock the cell (A).
- Click on the holding cell for a HOS (B).

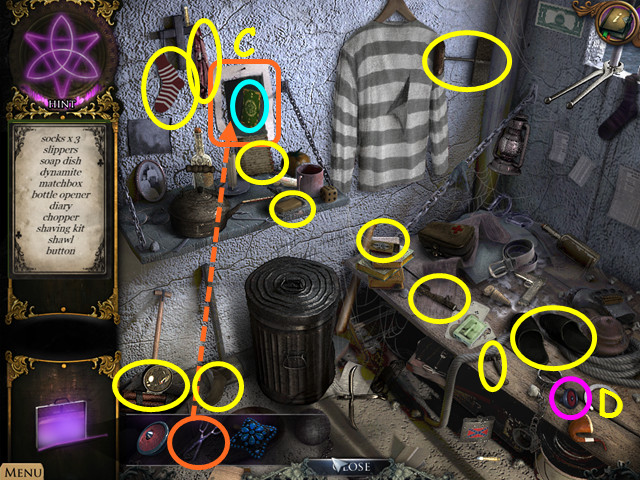
- Use the SCISSORS on the poster; take the CARD (C).
- Find the listed items to acquire the 2/2 BUTTON (D).

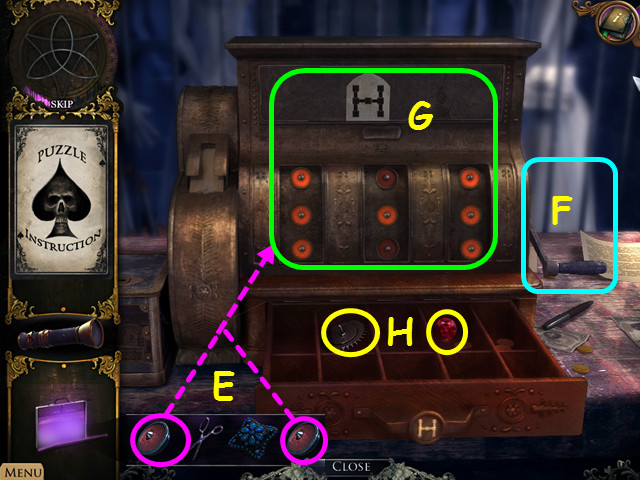
- Return to the dressmaker’s shop.
- Zoom into the cash register and put the 2 BUTTONS on it (E) to activate a puzzle.
- Click on the buttons to form an ‘H’ pattern on the card. Once you have the correct pattern, click on the handle (F) to open the cash register.
- Please look at the screenshot for the solution (G).
- Take the RUBY EYE and the GEAR (H).

- Zoom into the cabinet for a HOS.
- Click on the CARD (I) in the lower right.
- Find the listed items to acquire the 1/2 PUZZLE PIECE (J).

- Click down; go up the steps, and forward twice.
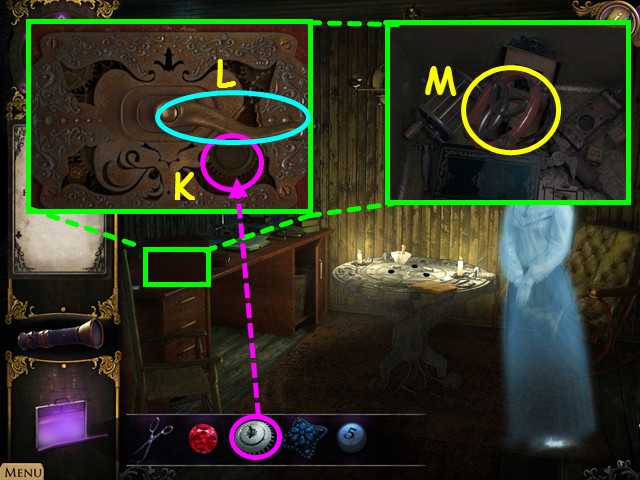
- Zoom into the box and put the GEAR on it (K).
- Click on the handle (L).
- Zoom into the box and take the STRANGE DEVICE (M).

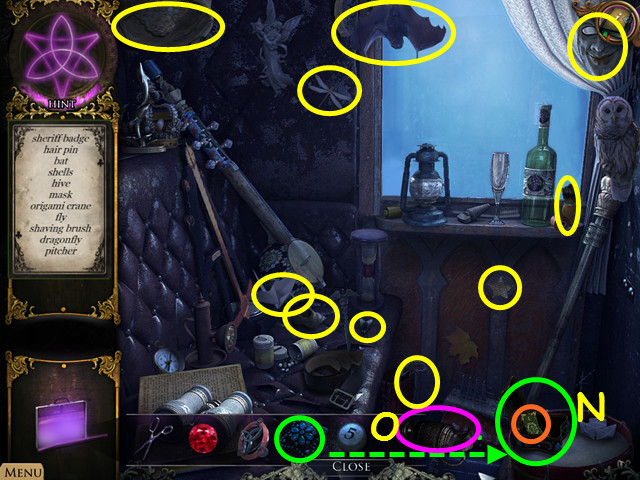
- Return to the carriage; click on it to access a HOS.
- Place the JEWELRY BOX MEDALLION on the jeweled box then take the CARD (N).
- Find the listed items to acquire the PITCHER (O).


- Go forward and head towards the sheriff’s dept.
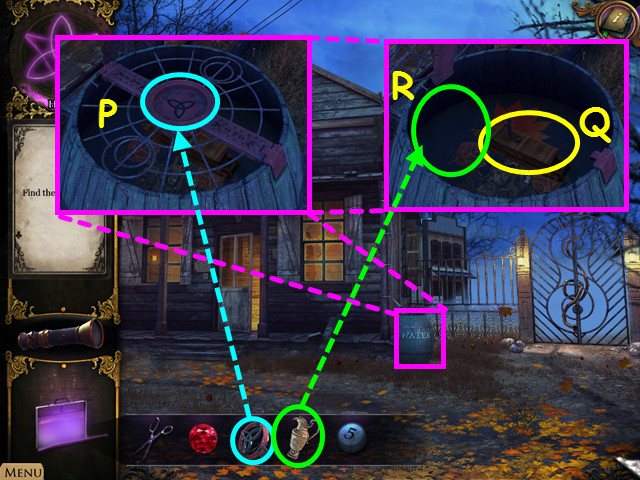
- Examine the barrel; put the STRANGE DEVICE on the lock (P) and take the TOY BOAT (Q).
- Put the PITCHER in the water to create the PITCHER WITH WATER (R).

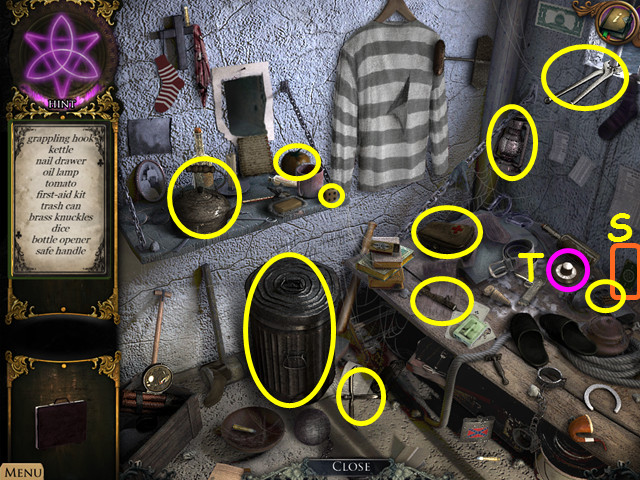
- Return to the holding cell for a HOS.
- Click on the CARD (S) on the bench.
- Find the listed items to acquire the SAFE HANDLE (T).
- Click down.

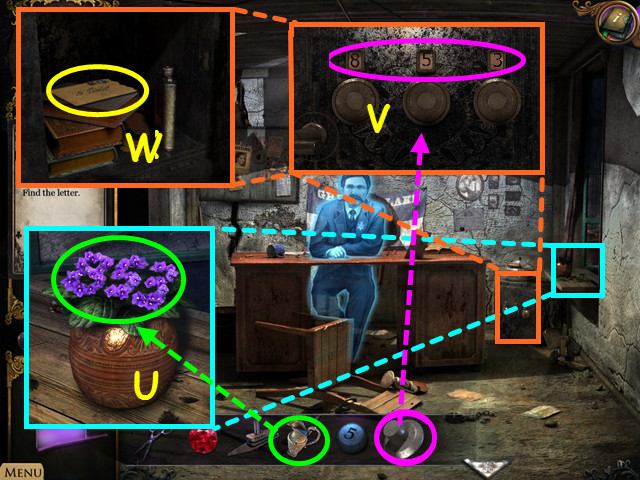
- Zoom into the window; water the plants with the PITCHER WITH WATER (U).
- The flowers form the number ’853′.
- Zoom into the safe; put the SAFE HANDLE on it (V).
- Change the numbers to 853.
- Examine the safe and take the SHERIFF’S LETTER (W).
- Click down 5 times; go up the steps and forward twice.

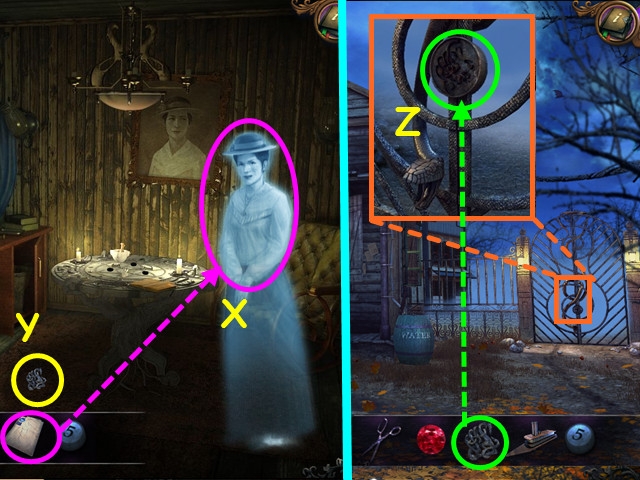
- Give the SHERIFF’S LETTER to the ghost (X).
- Take the SNAKE KEY on the ground (Y).
- Return to the outside of the sheriff’s dept.
- Head towards the right gate; examine the lock and use the SNAKE KEY on it (Z).
- Go through the gate.
Chapter 2: The Butcher’s Daughter

- Click on the man.
- Go forward.
- Click on the wheel to access a HOS.
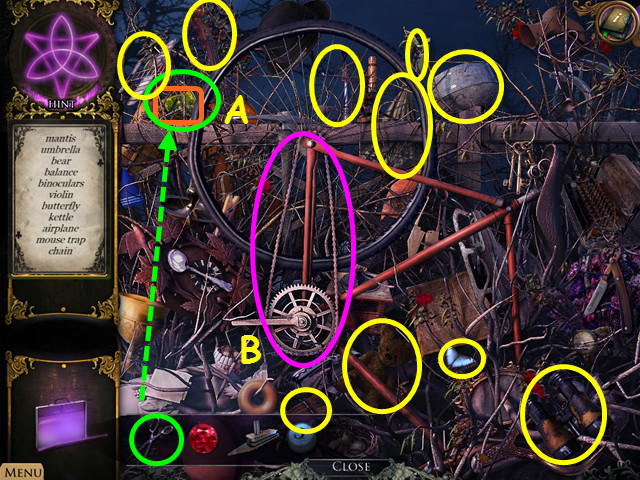
- Cut the bushes in the upper left with the SCISSORS and click on the CARD (A).
- Find the listed items to acquire the CHAIN (B).

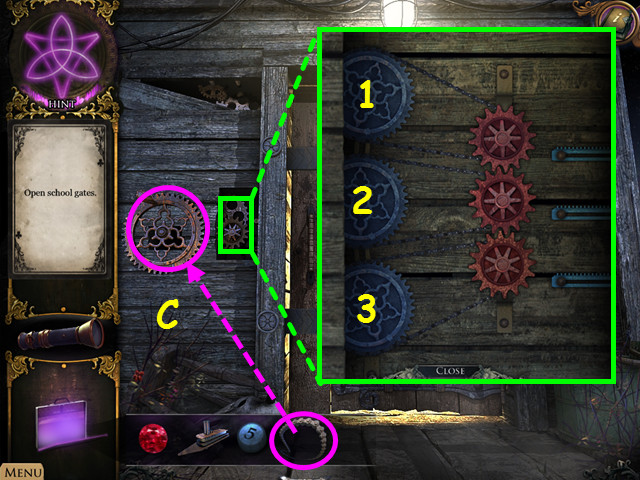
- Click down and go into the butcher’s door.
- Put the CHAIN on the mechanism on the left (C).
- Click on the mechanism to activate a puzzle.
- Click on the left gears in the correct order to unlock the door.
- To solve the puzzle, click on the gears in this order: 1, 2, 1, 3, and 2.
- Go through the door.

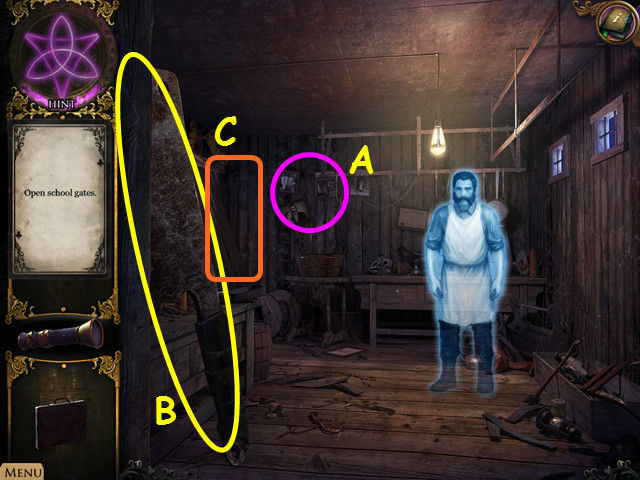
- Examine the photo (A).
- Take the CLEAVER (B).
- Head left into the finishing room (C).

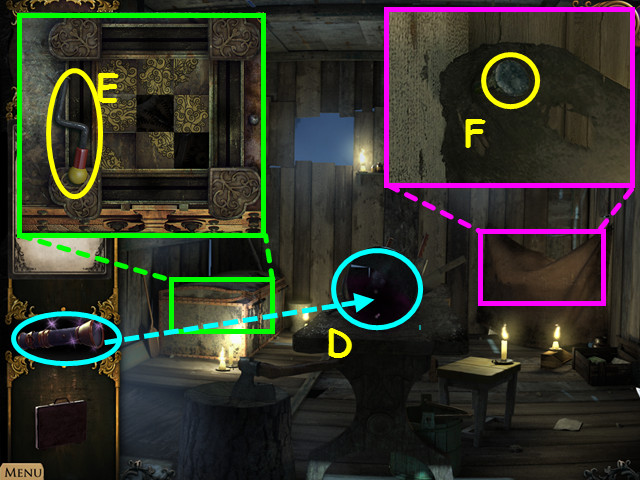
- Shine the FLASHLIGHT on the creepy shadow; take the RUNE STONE (D).
- Examine the freezer; take the HANDLE (E).
- Zoom into the cloth and take the STAKE (F).

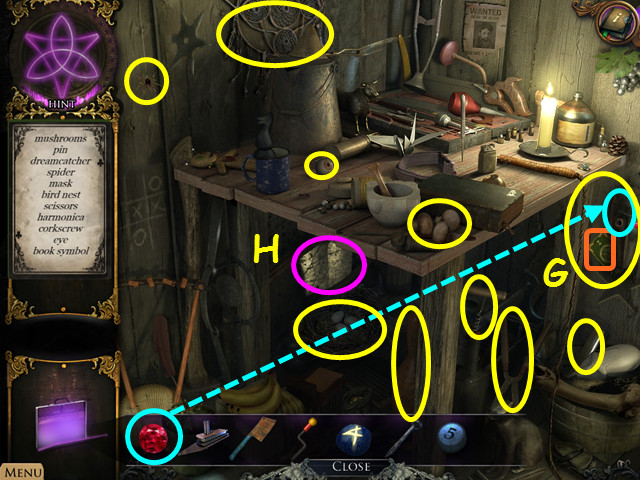
- Click on the butcher desktop HOS.
- Put the RUBY EYE on the mask to get the CARD (G).
- Find the listed items to acquire the STONE BOOK (H).

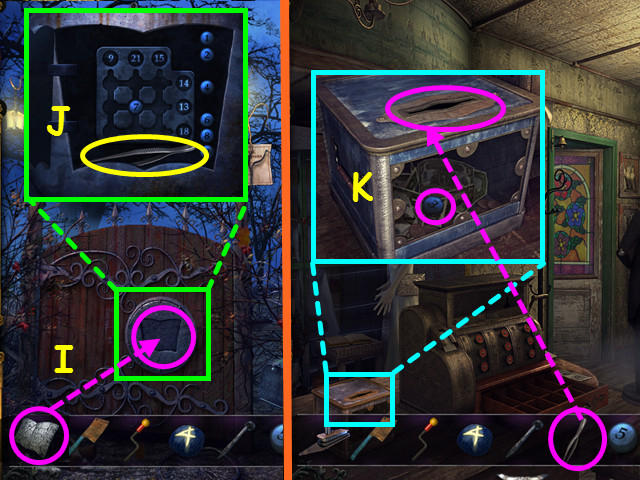
- Exit the butcher’s house and go forward.
- Put the STONE BOOK on the gate (I).
- Examine the gate; take the PINCERS (J).
- Click down until you enter the shop.
- Zoom into the box; use the PINCERS to retrieve the 2/2 PUZZLE PIECE (K).

- Return to the school gate.
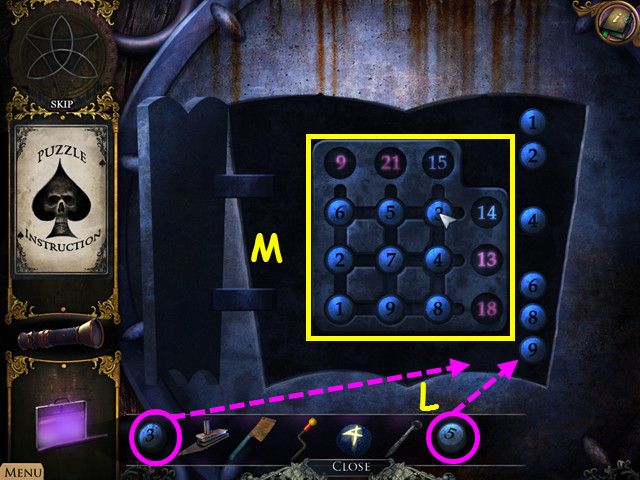
- Zoom into the gate and put the 2 PUZZLE PIECES on the board to activate a puzzle (L).
- Arrange the numbers so they match the amount on the edges.
- The number 7 is locked in; use that as your guide.
- Please look at the screenshot for the solution (M). First Row: 6, 5, 3 – Second Row: 2, 7, 4 – Third Row: 1, 9, 8.
- Go through the gates.

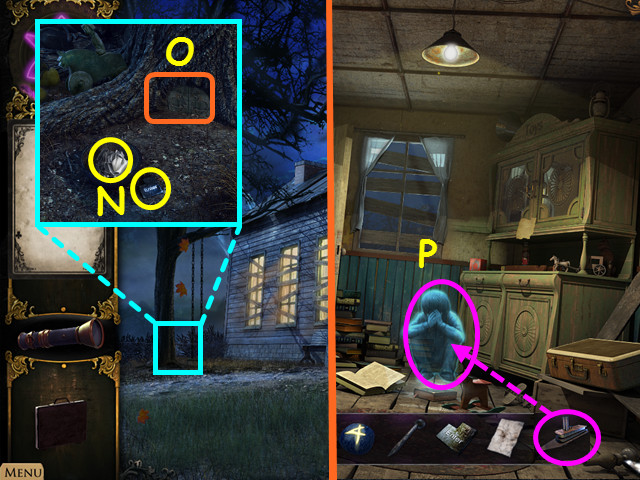
- Zoom into the big tree; take the PAPER and the ENTER BUTTON (N).
- Examine the bottom of the tree; 2 rabbits are needed (O).
- Click down and go inside the school.
- Give the TOY BOAT to the little boy (P).
- Examine the shelf HOS.

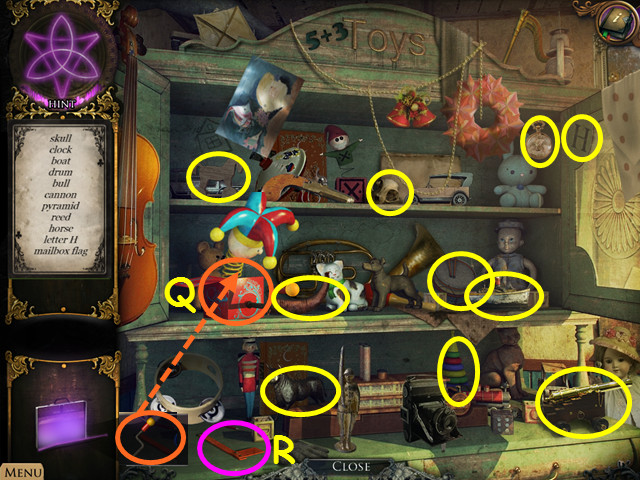
- Put the HANDLE on the jack-in-the box and take the CARD (Q).
- Find the items listed to acquire the MAILBOX FLAG (R).
- Click down.

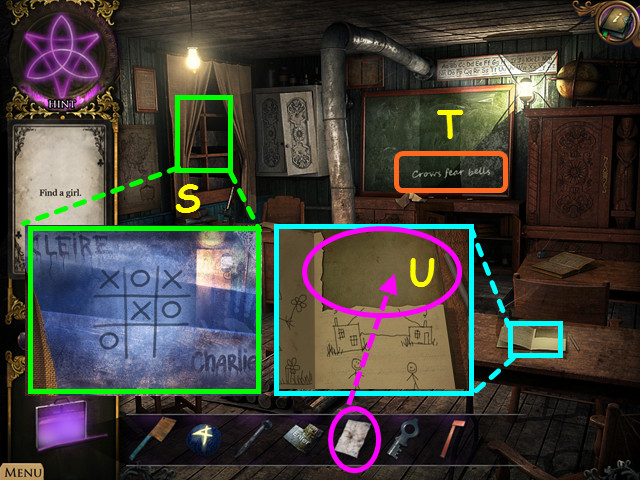
- Head left into the classroom.
- Click on the window to activate a tic-tac-toe game (S).
- Click on an empty spot to enter the ‘X’.
- Win 3 rounds to complete the game.
- You will earn the GARRET KEY.
- The message: ‘crows fear bells’ appears on the blackboard (T).
- Examine the copybook; put the PAPER on it (U).
- The word ‘CAT’ appears in the paper.
- Exit the schoolroom.

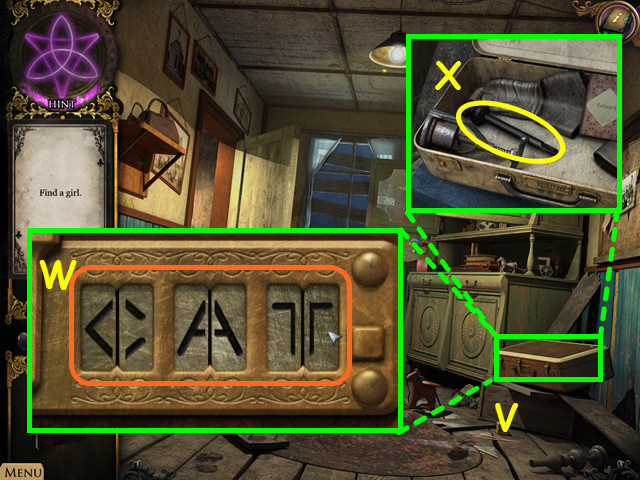
- Zoom into the suitcase to activate a puzzle (V).
- Using the clue in the copy book, spell out the word CAT with the symbols.
- Please look at the screenshot for the solution (W).
- Zoom into the opened suitcase; take the BELL CLAPPER (X).

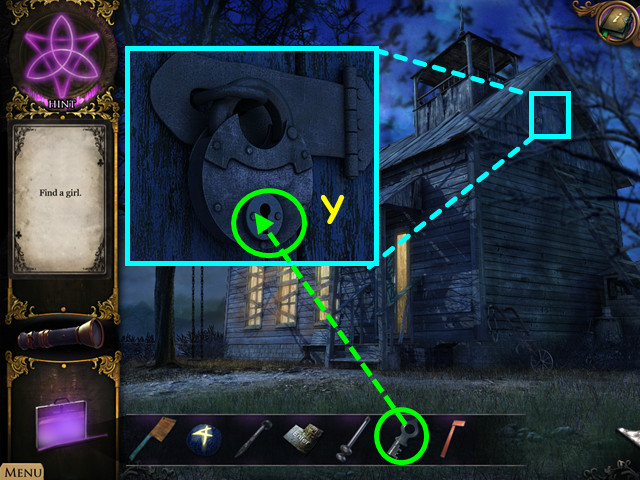
- Exit the school.
- Examine the garret in the upper right; use the GARRET KEY in the lock (Y).
- Go through the window.

- Click on the ghost.
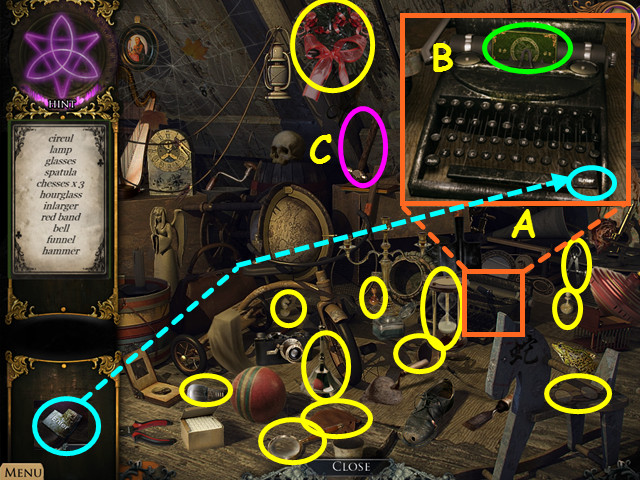
- Examine the mess HOS on the right.
- Zoom into the typewriter; put the ENTER BUTTON on the keyboard (A).
- Click on the button and take the CARD (B).
- Find the listed items to acquire the HAMMER (C).

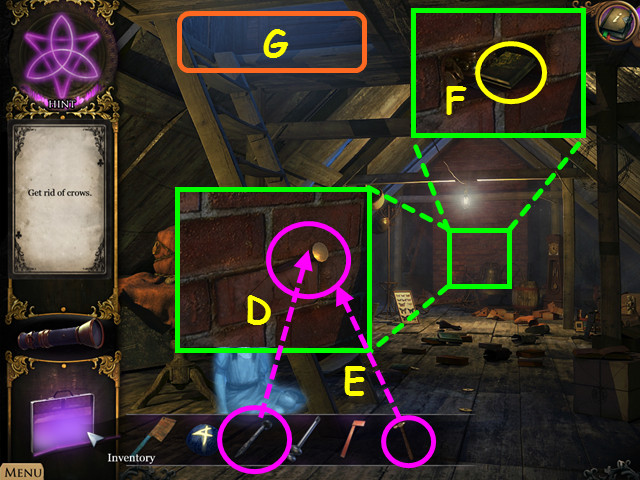
- Zoom into the brick wall; put the STAKE on the wall (D).
- Use the HAMMER on the stake (E) and take FREEZER PIECE 2 (F).
- Go up to the bell (G).

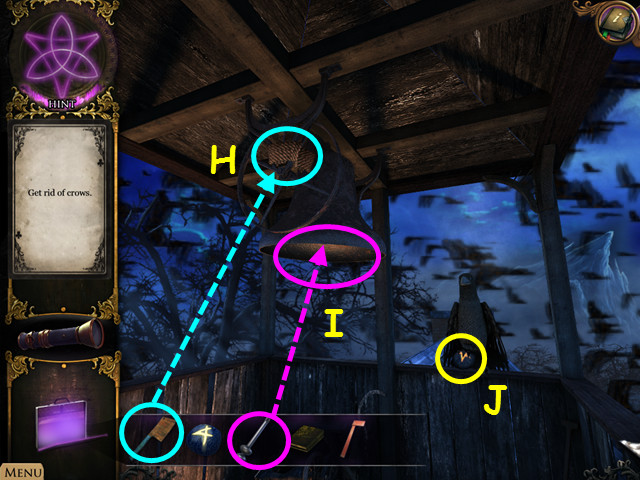
- Cut the ROPE with the CLEAVER (H).
- Put the BELL CLAPPER in the bell (I).
- Click on the bell to scare away the crow; take the RUNE STONE (J).

- Click down and talk to the ghost.
- Click down twice.
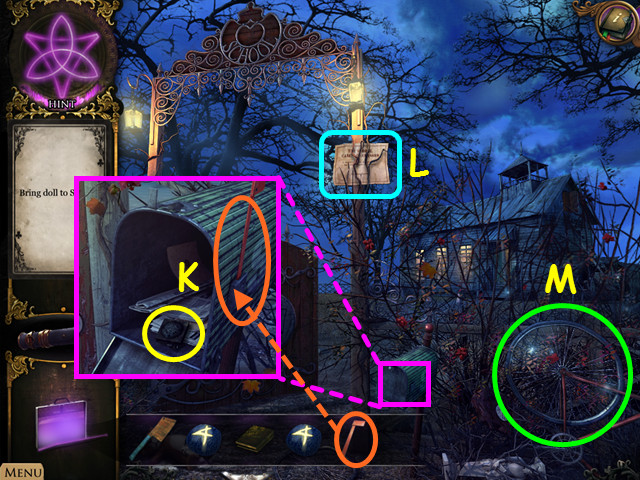
- Zoom into the mailbox; put the MAILBOX FLAG on it and take the FREEZER PIECE 1 (K).
- Read the notice (L).
- Select the bicycle for a HOS (M).

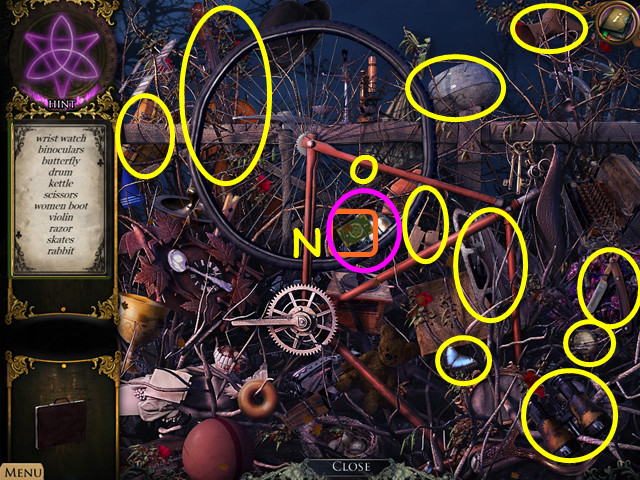
- Take the CARD (N) in the center.
- Find the listed items to acquire the 1/2 RABBIT (O).

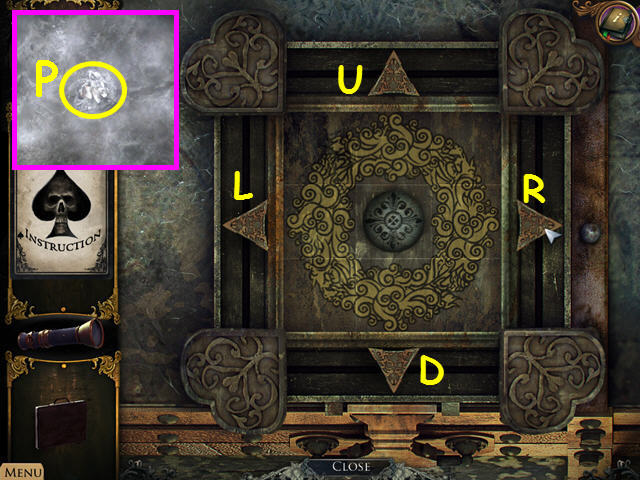
- Go into the Butcher’s finishing room.
- Examine the freezer on the left; put the 2 FREEZER BUTTONS on it to activate a puzzle.
- Assemble the puzzle by clicking on the arrows.
- This mini-game is randomly generated, your solution may vary.
- Our solution was: U, R, D, D, L, U, R, D, L, L, U, R, R, D, D, L, D, D, R, U, L, L, D, R, D, L, D, D, R, and U.
- Open the chest and take the FROZEN RABBIT (P).

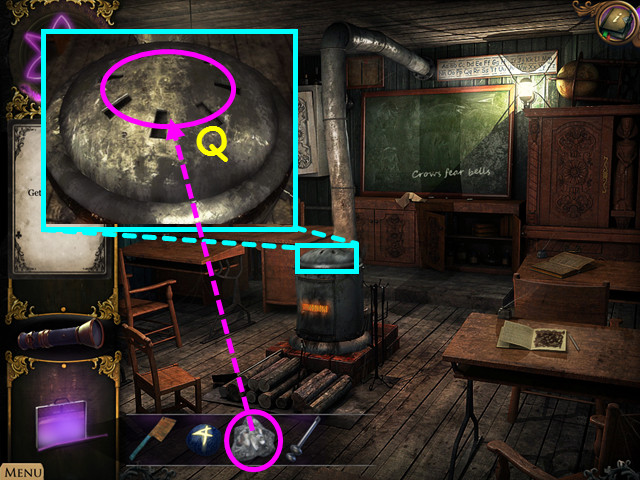
- Return the classroom.
- Zoom into the stove and put the FROZEN RABBIT on it to acquire the 2/2 RABBIT (Q).
- Click down.

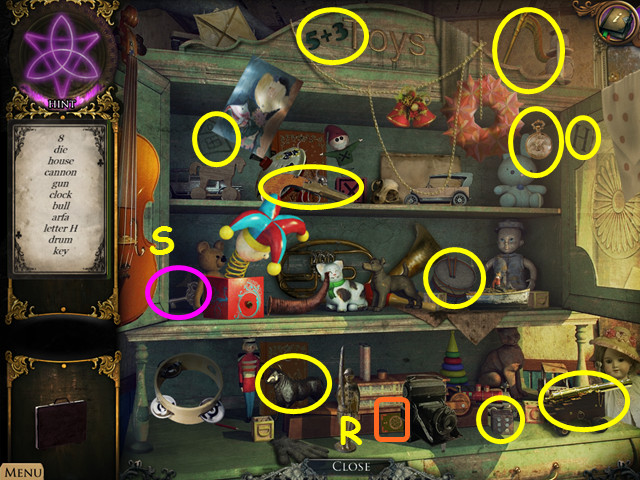
- Play the shelf HOS.
- Click on the CARD (R) in the lower center.
- Find the listed items to acquire the KEY (S).

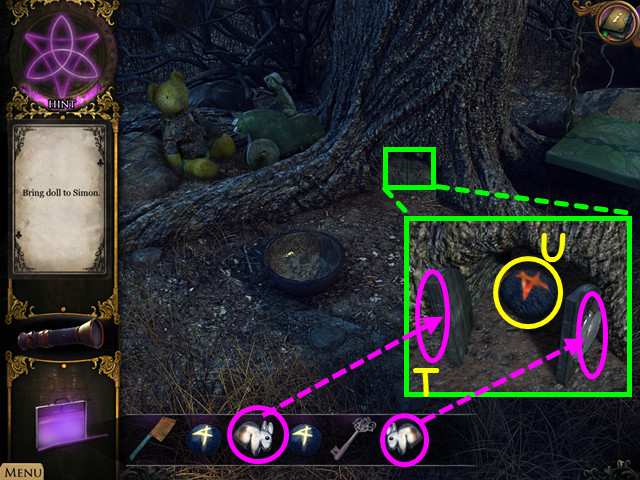
- Click down and zoom into the big tree.
- Zoom into the rabbit home; put the 2 RABBITS in the slots on the doors (T).
- Take the RUNE STONE (U).

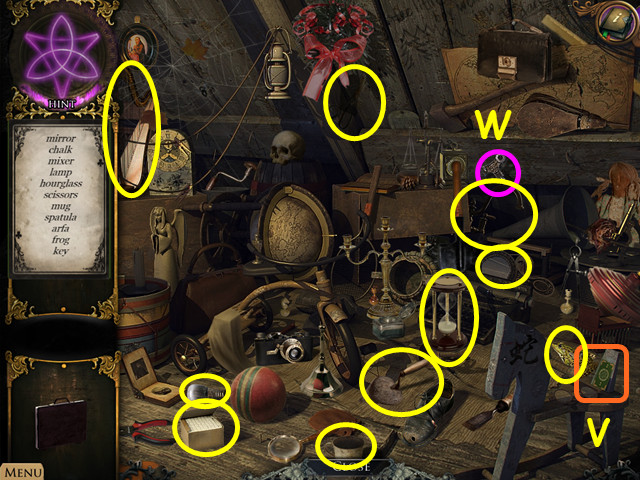
- Return to the garret.
- Play the mess HOS.
- Click on the CARD (V) in the lower right.
- Find the listed items to acquire the 2nd KEY (W).

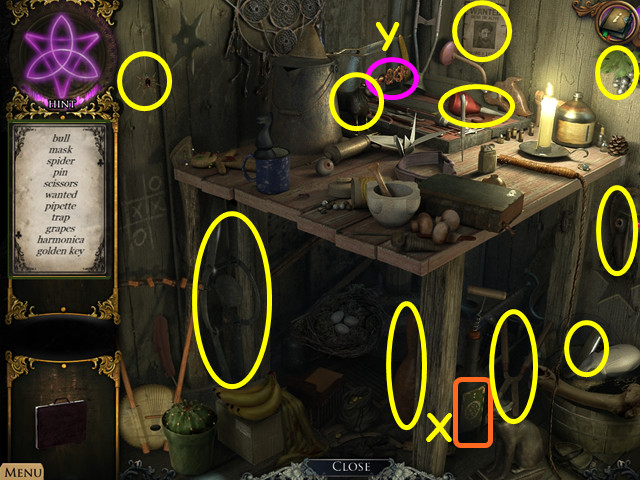
- Return to the Butcher’s finishing room.
- Play the butcher desktop HOS.
- Click on the CARD (X) in the lower center.
- Find the listed items to acquire the GOLDEN KEY (Y).

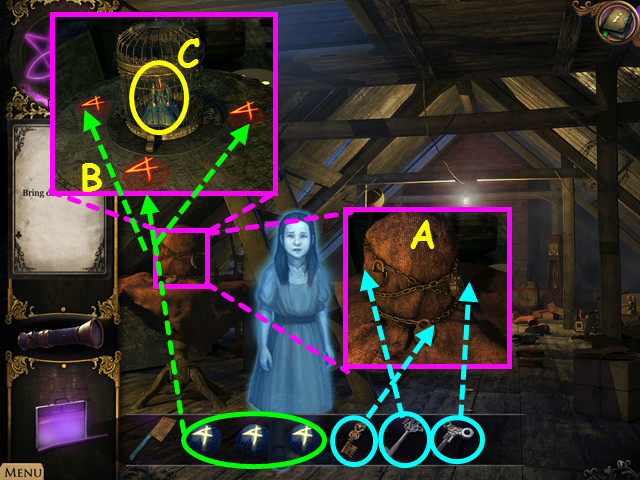
- Return to the garret.
- Zoom into the cage; use the GOLDEN KEY and the 2 KEYS on the 3 locks (A).
- Put the 3 RUNE STONES on the circles (B) and take the DOLL (C).

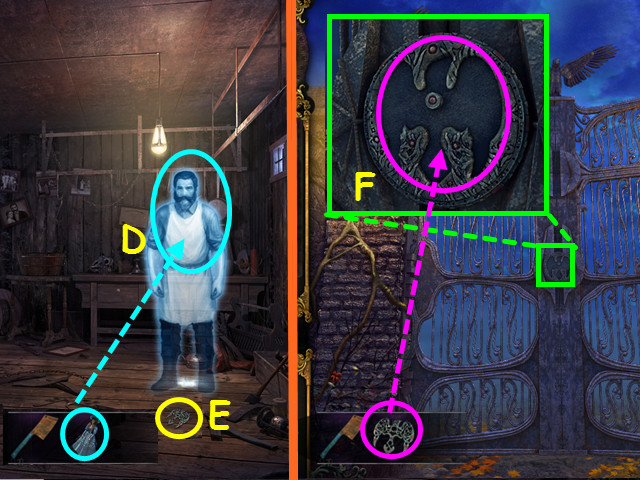
- Go back to the butcher’s house.
- Give the DOLL to the ghost (D).
- Take the RAVEN KEY on the ground (E).
- Click down 3 times and head towards the gate on the left.
- Examine the gate and put the RAVEN KEY in the keyhole (F).
- Go through the gates.
Chapter 3: The Undertaker

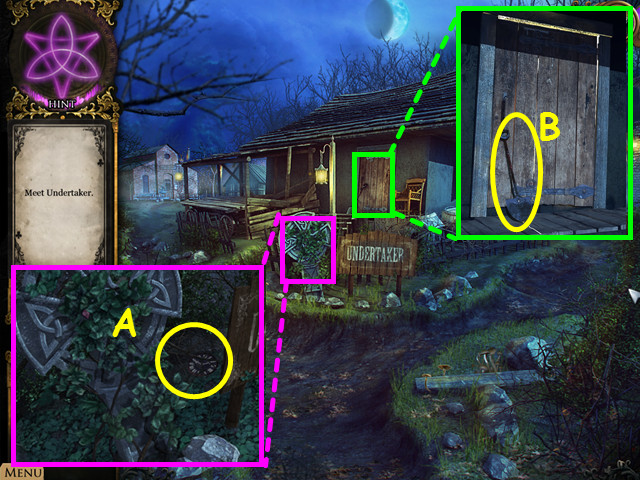
- Zoom into the tombstone; take the DIAL (A).
- Examine the door; take the SHOVEL (B).
- Go through the door.

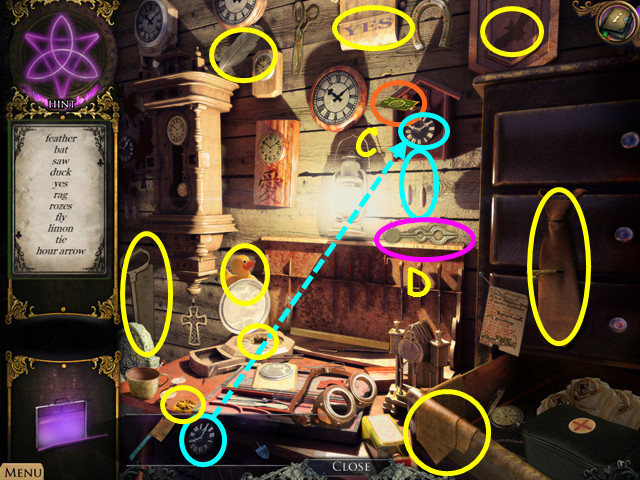
- Notice all the clocks are set to 10:10.
- Click on the desk HOS.
- Put the DIAL on the clock; pull the chain and take the CARD (C).
- Find the listed items to acquire the CLOCK HANDS (D).

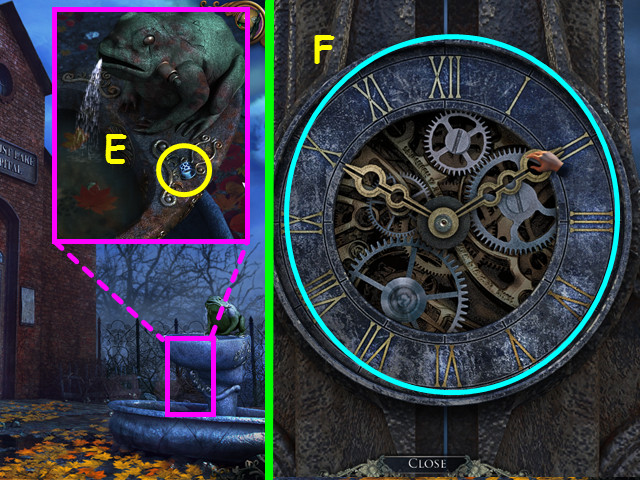
- Click down and head left.
- Examine the fountain; take the RING (E).
- Click down twice.
- Examine the gate and put the CLOCK HANDS on the clock face to activate a puzzle.
- Change the time to the same time all the clocks are set inside the house which is 10:10 (F).

- Go through the gates to access the cemetery.
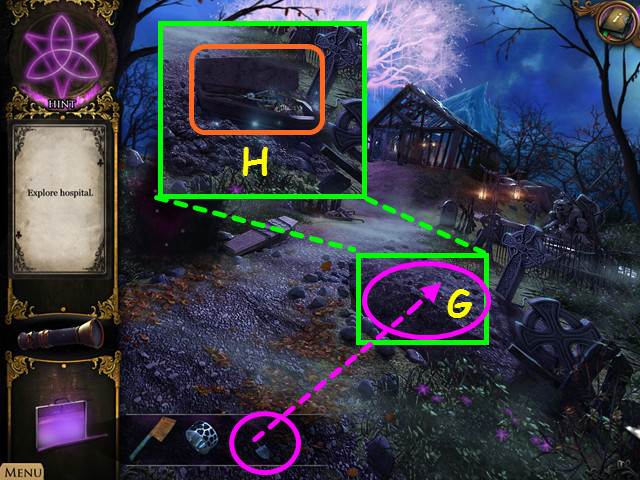
- Use the SHOVEL on the mound of dirt (G); open the casket to trigger a HOS (H).

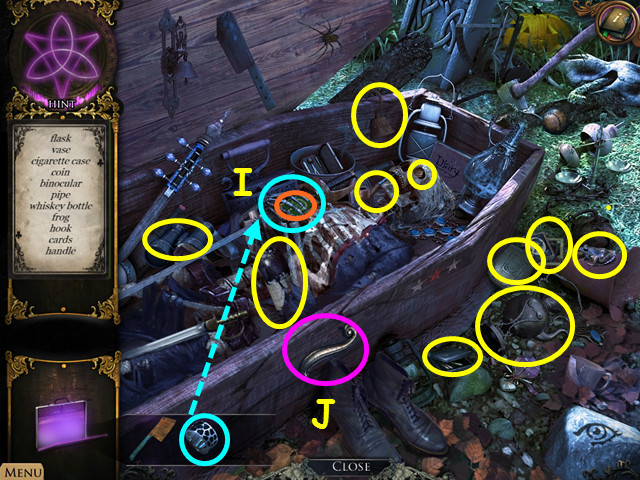
- Put the RING on the skeleton’s hand and take the CARD (I).
- Find the listed items to acquire the HANDLE (J).
- Click down and head left.

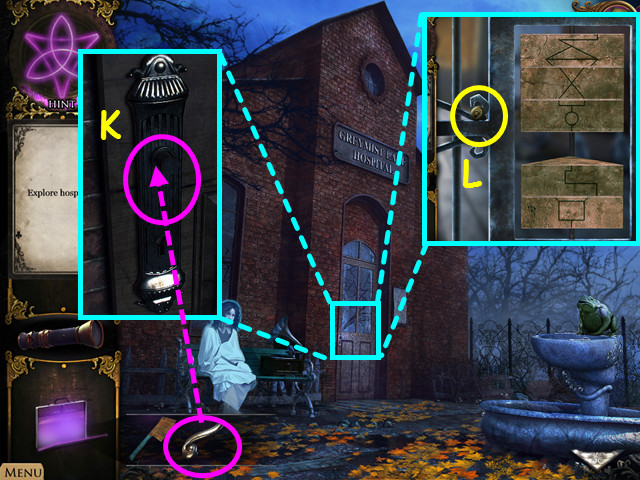
- Zoom into the hospital door; put the HANDLE on the door (K).
- Look at the door again and take the YELLOW PUZZLE PIECE (L).
- Click down, go right and head towards the building.

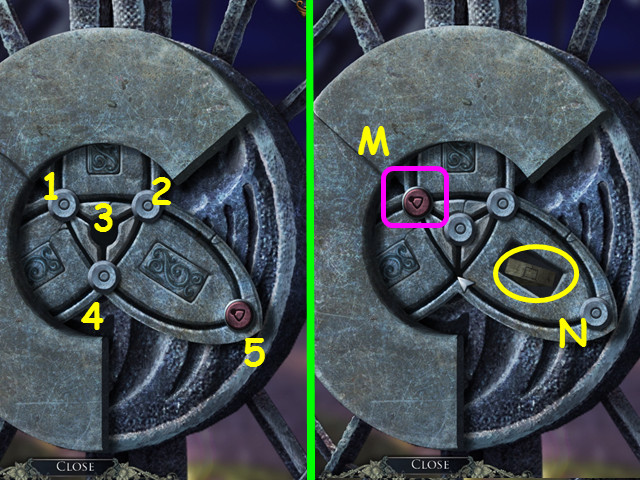
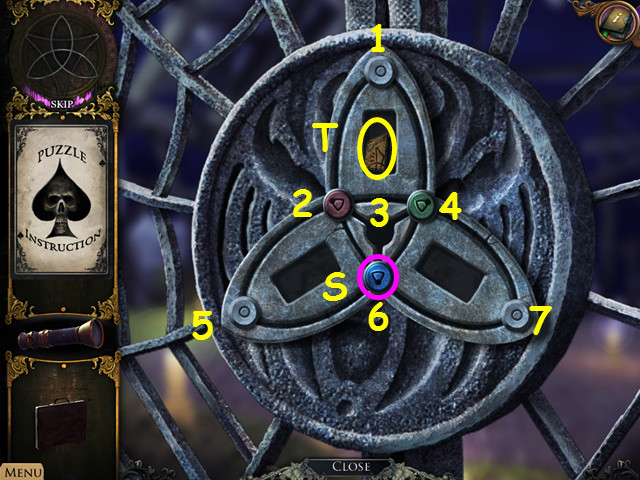
- Zoom into the lock; click on it to activate a puzzle.
- Put the YELLOW PUZZLE PIECE on the lock.
- Put the chips with symbols on them in the center in opposite ends of the lock (M).
- Click on the numbered locations in this order: 4-5-2-1-4.
- Take the PUZZLE PIECE (N).

- Return to the hospital area.
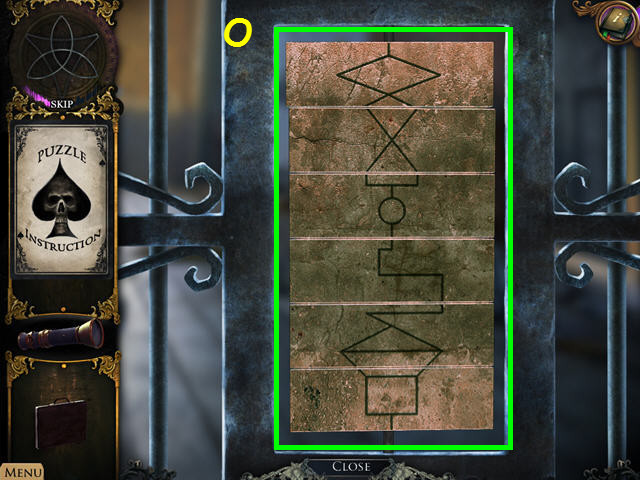
- Zoom into the door; put the PUZZLE PIECE on the door to activate the puzzle.
- Click on the pieces to rotate the images.
- Please look at the screenshot for the solution (O).
- Enter the hospital.

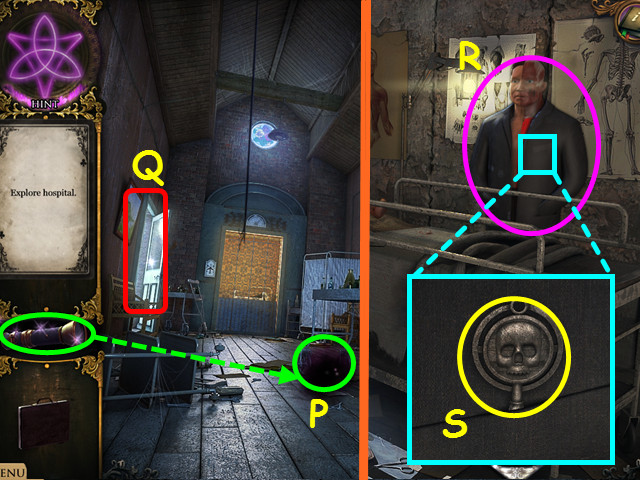
- Shine the FLASHLIGHT on the creepy shadow; take the RUNE STONE (P).
- Go through the left door to access the operating room (Q).
- Click on the dummy (R).
- Click on him again and take the DOCTOR’S ROOM KEY (S).

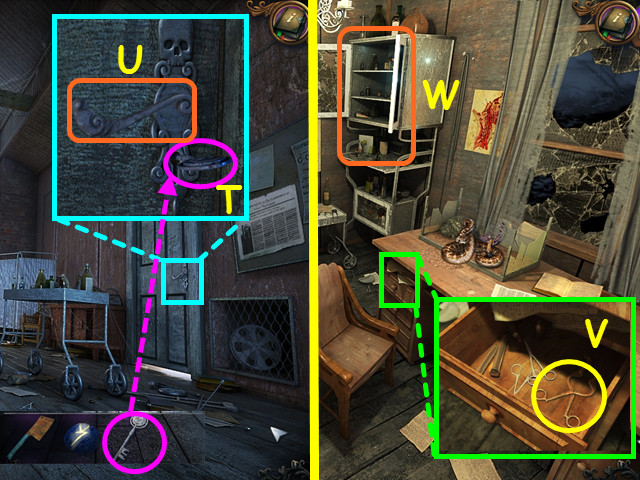
- Click down and zoom into the right door.
- Use the DOCTOR’S ROOM KEY in the lock (T).
- Click on the handle and go through the door (U).
- Zoom into the drawer; open it, zoom into it and take the DENTAL FORCEPS (V).
- Click on the shelf HOS (W).

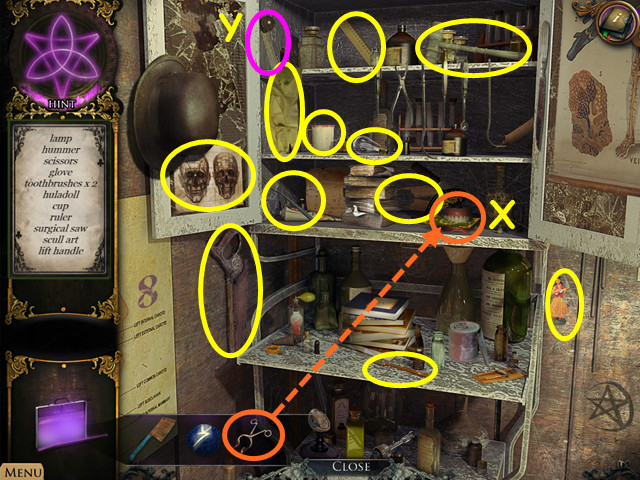
- Put the DENTAL FORCEPS on the dentures; take the CARD (X).
- Find the listed items to acquire the LIFT HANDLE (Y).

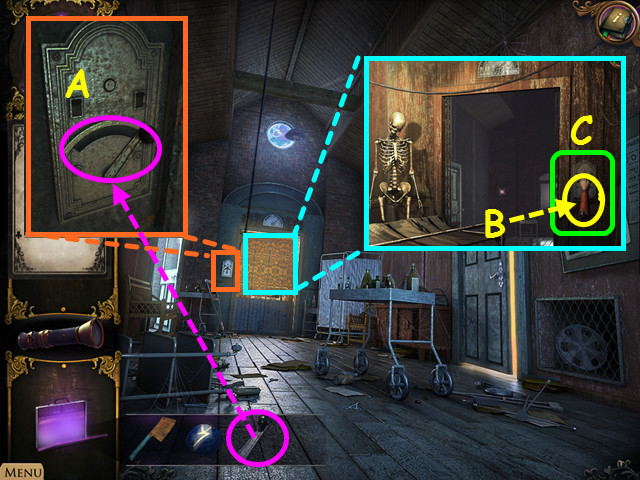
- Click down and click on the elevator.
- Put the LIFT HANDLE on the door (A).
- Click on the handle and enter the elevator.
- Take the HAND (B).
- Click on the handle and exit the elevator once it stops (C).

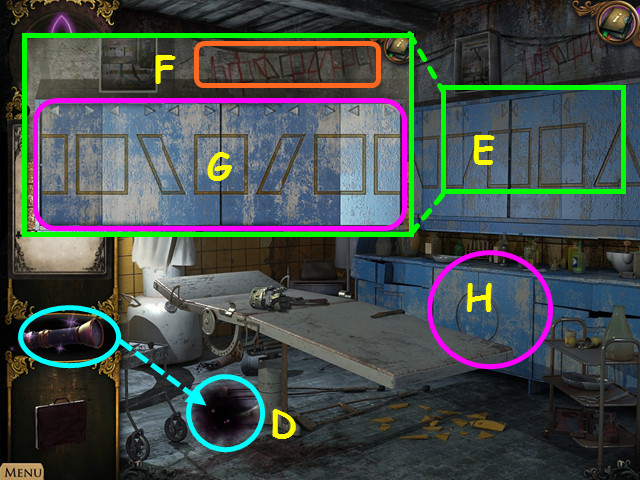
- Shine the FLASHLIGHT on the creepy shadow; take the RUNE STONE (D).
- Zoom into the cupboards in the back to activate a puzzle (E).
- Click on the arrows to move the panels.
- Place the panels in the correct order noted on the wall (F).
- Please look at the screenshot for the solution (G).
- Play the instrument shelf HOS (H).

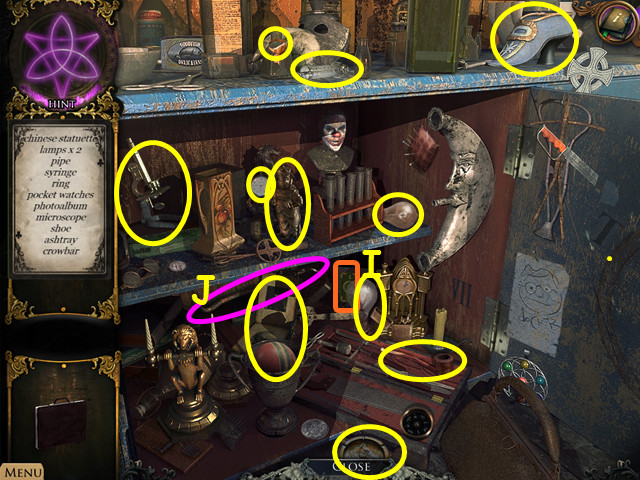
- Click on the CARD (I) in the lower center (behind the light bulb).
- Find the listed items to obtain the CROWBAR (J).

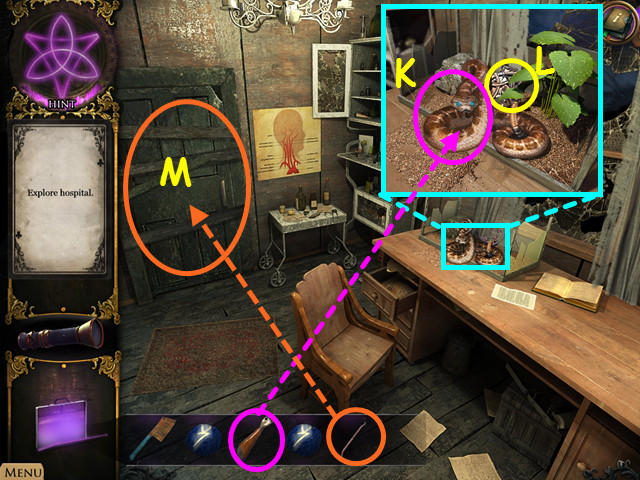
- Go back into the elevator and click on the handle.
- Exit the elevator and go into the right door.
- Examine the snake on the table; put the HAND on the snake (K).
- Take KEY 1 (L).
- Use the CROWBAR on the door; go into the second doctor’s room (M).
- Talk to the doctor.

- Return to the undertaker’s house.
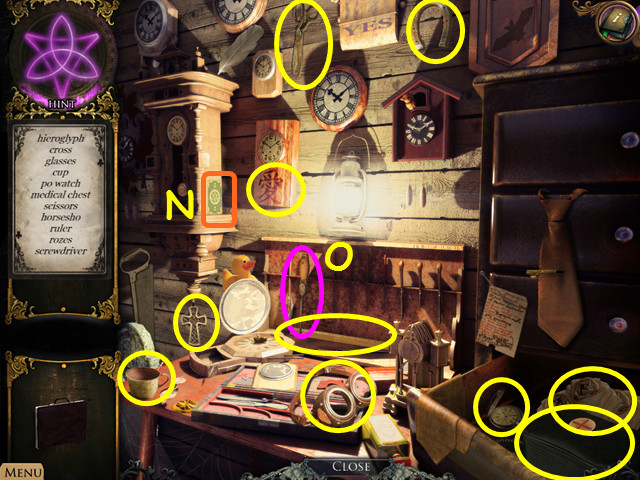
- Play the HOS on the desk.
- Click on the CARD (N) on the side of the large clock.
- Find the listed items to acquire the SCREWDRIVER (O).

- Return to the cemetery.
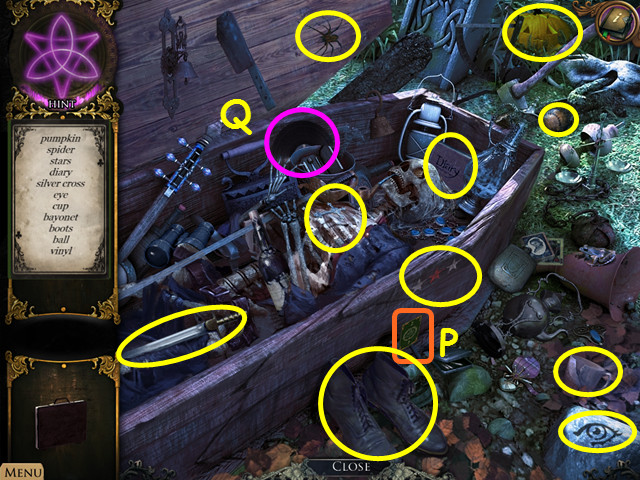
- Play the HOS in the coffin.
- Click on the CARD (P) in the lower center.
- Find the listed items to acquire the RECORD (Q).

- Return to the outside of the hospital.
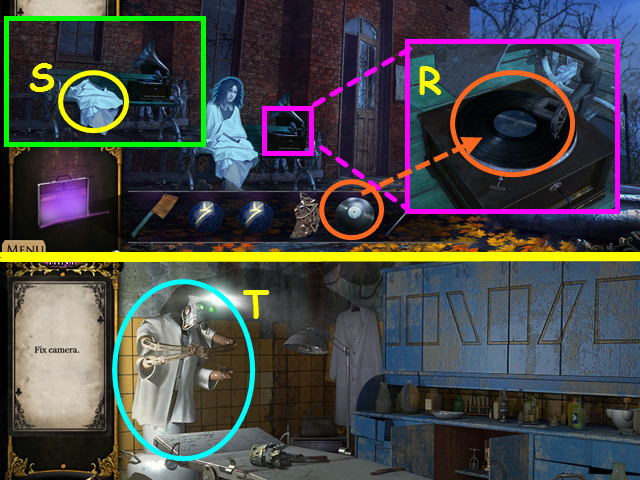
- Zoom into the gramophone; put the RECORD on it (R).
- Take the CLOTH after the ghost leaves (S).
- Enter the hospital and take the elevator back downstairs.
- Zoom into the mechanical skeleton (T).

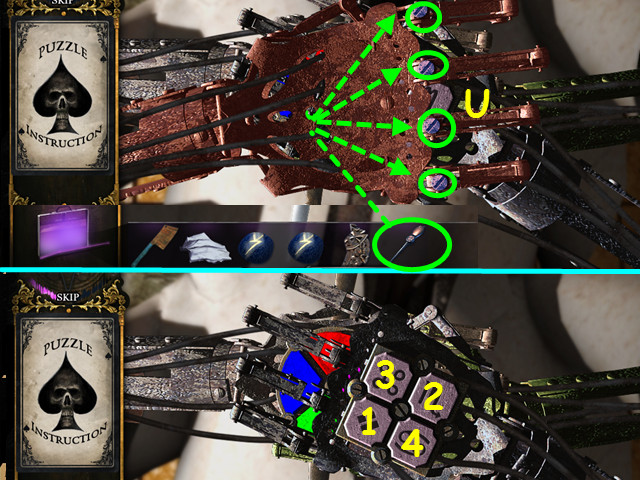
- Use the SCREWDRIVER to remove the 4 screws (U).
- Press the buttons in the correct order as shown in the screenshot (1-4).

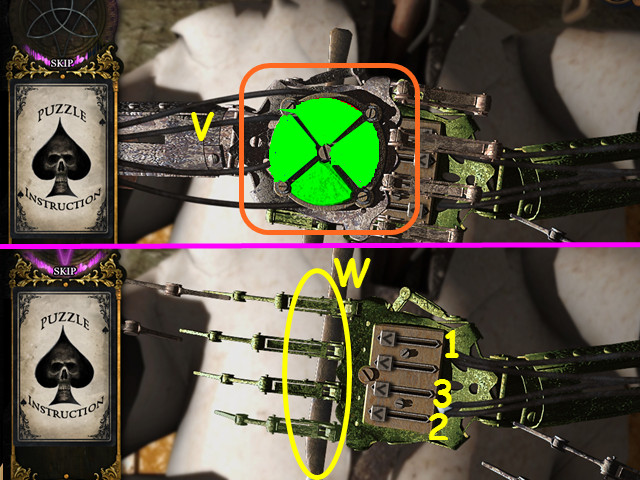
- Next, click on the sections until they are all green (V).
- Lastly, click on the arrows until they all end up on the left side.
- To solve the puzzle, click on the arrows in numerical order (1 through 3).
- Take the SCALPEL (W).

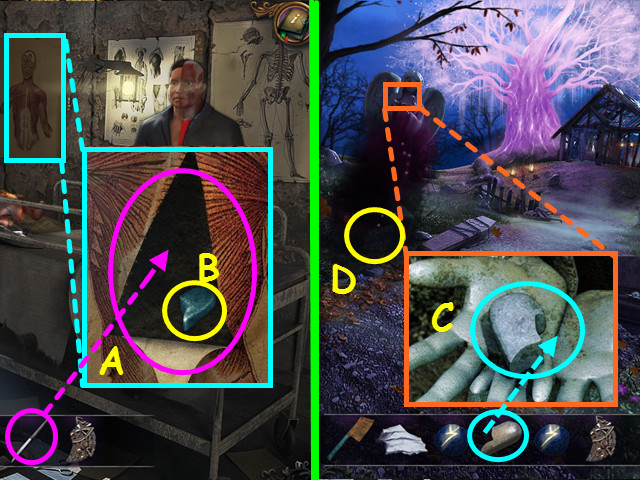
- Go back to the operating room upstairs.
- Zoom into the poster and cut it with the SCALPEL (A).
- Take the HALF A HEART (B).
- Return to the cemetery.
- Zoom into the statue; put the HALF A HEART in her hand (C).
- Take the PLATE (D) at the bottom of the statue.
- Click down twice.

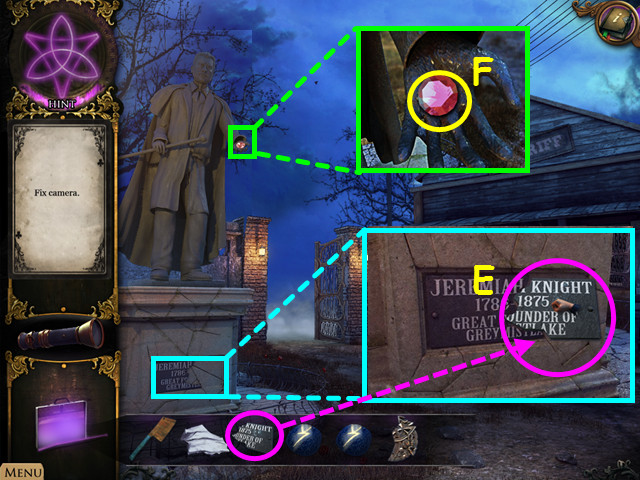
- Zoom into the statue base; put the PLATE on (E).
- Zoom into the statue’s hand and take the GEM (F).
- Go through the gate.

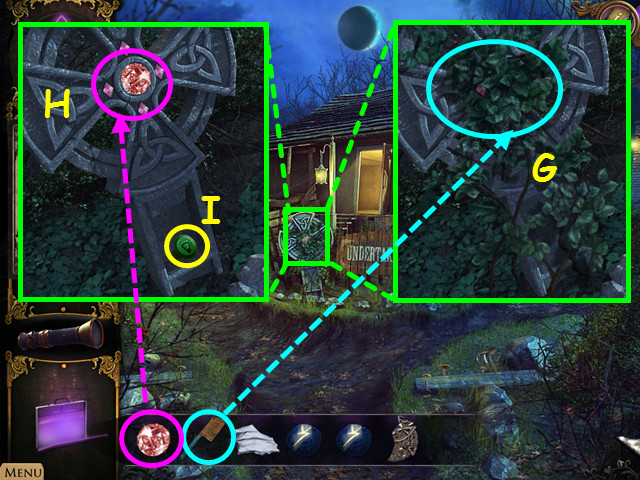
- Zoom into the tombstone.
- Use the CLEAVER on the bushes (G); put the GEM in the hole (H).
- Take the GREEN PUZZLE PIECE (I).
- Go right and head towards the building.

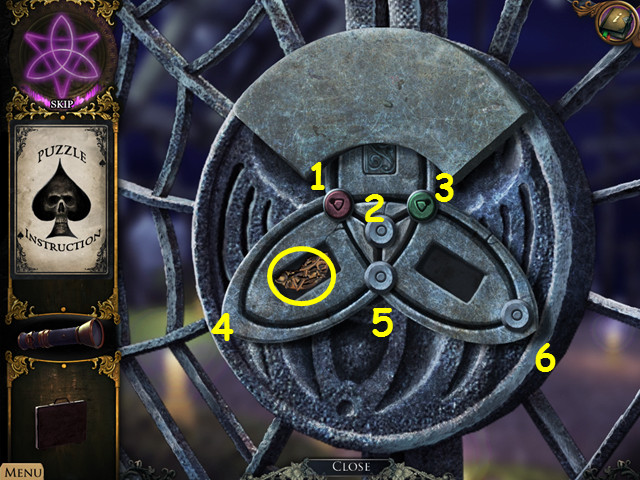
- Put the GREEN PUZZLE PIECE on the lock.
- Slide the green piece to the position shown in the screenshot.
- Click on the numbered locations: 4-1-2-5-3-2-1-4.
- Take the KEY 2 (J).

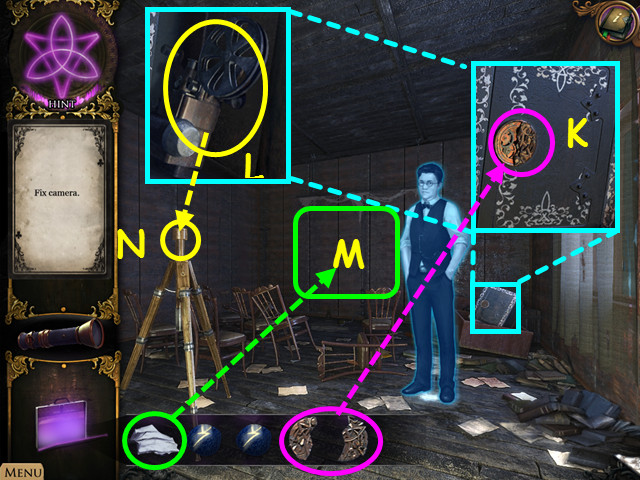
- Return to the second doctor room in the hospital.
- Examine the safe; put KEY 1 and KEY 2 on the lock (K).
- Take the PROJECTOR (L).
- Put the CLOTH on the back wall (M).
- Put the PROJECTOR on the tripod (N).
- Click down.

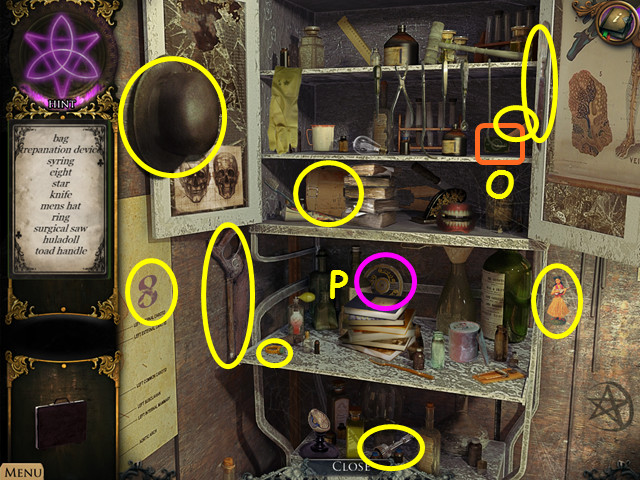
- Play the shelf HOS.
- Take the CARD (O) on the second shelf.
- Find the listed items to obtain the FAUCET HANDLE (P).

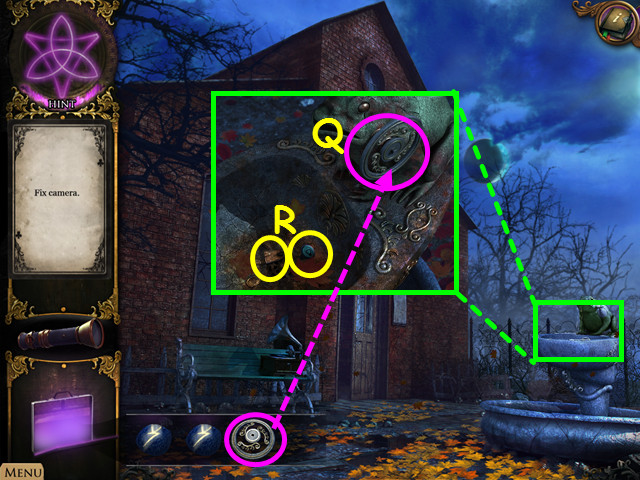
- Go outside.
- Zoom into the fountain; put the FAUCET HANDLE on the faucet (Q).
- Take the BLUE PUZZLE PIECE and the TOOTH (R).

- Return to the building in the cemetery; zoom into it.
- Put the BLUE PUZZLE PIECE on the gate.
- Position the blue piece as shown in the screenshot (S).
- Click on the numbered locations in this order: 2-3-4-1-2-5-6-4-3.
- Take the CLOCK PART (T).

- Take the elevator in the hospital back downstairs.
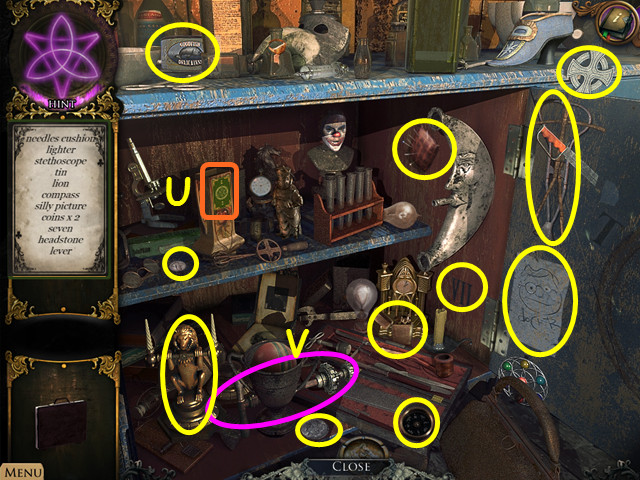
- Play the HOS.
- Click on the CARD (U) on the device.
- Find the listed items to acquire the LEVER (V).

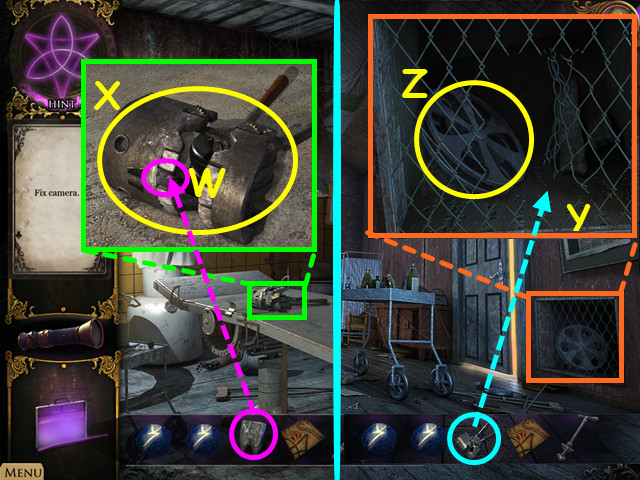
- Examine the head on the table; put the TOOTH in its mouth (W).
- Take the CLIPPERS (X).
- Take the elevator back up.
- Zoom into the grate in the lower right; cut the wires with the CLIPPERS (Y).
- Take the FILM REEL (Z).

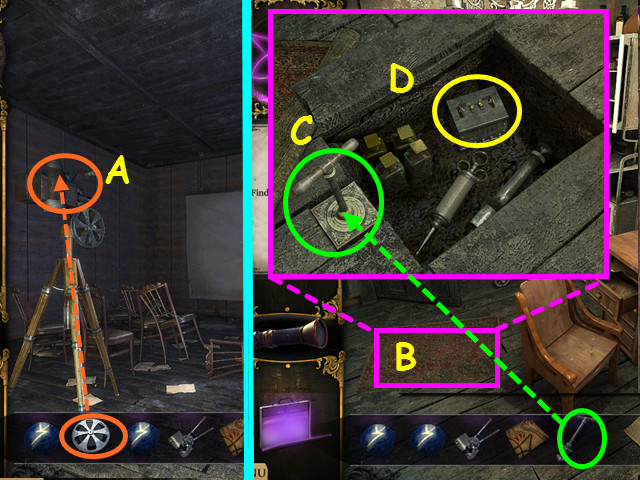
- Go through the right door and then go through the back one.
- Put the FILM REEL in the projector (A).
- Click down.
- Pull back the carpet and zoom into it (B).
- Put the LEVER in the slot (C).
- Click on the lever and take the ACCUMULATOR (D).

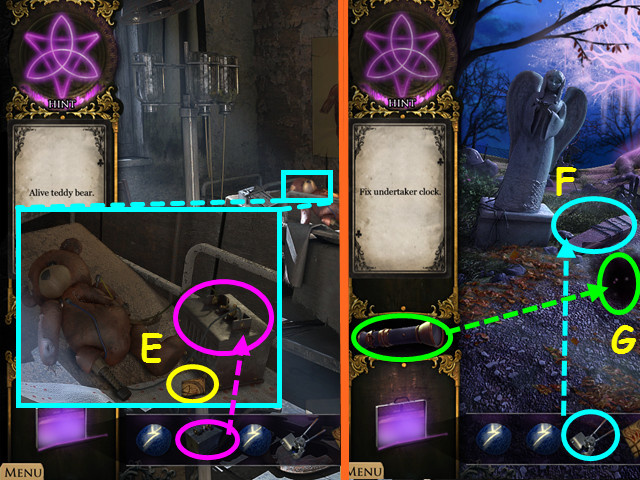
- Go back to the operating room.
- Zoom into the teddy bear; put the ACCUMULATOR on it and take the CLOCK DETAIL 2 (E).
- Go back to the cemetery.
- Break the chains on the coffin with the CLIPPER to make the last rune stone fall out (F).
- Shine the FLASHLIGHT on the creepy shadow; take the RUNE STONE (G).

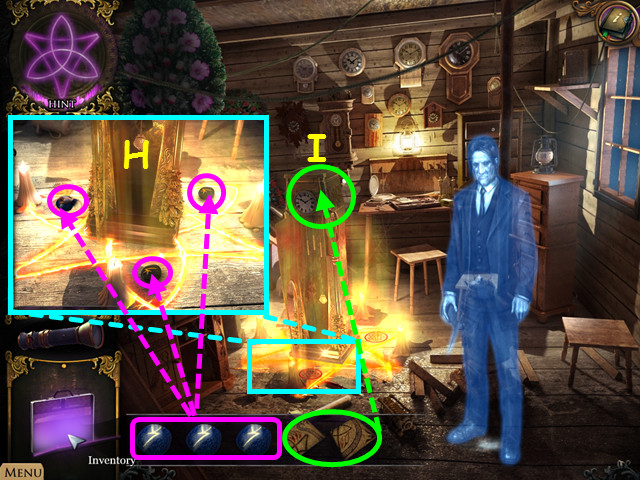
- Go back to the Undertaker’s house.
- Zoom into the bottom of the clock; place the 3 RUNE STONES in the slots (H).
- Examine the top part of the clock; insert the CLOCK DETAIL 2 and the CLOCK PART into it to activate the puzzle (I).

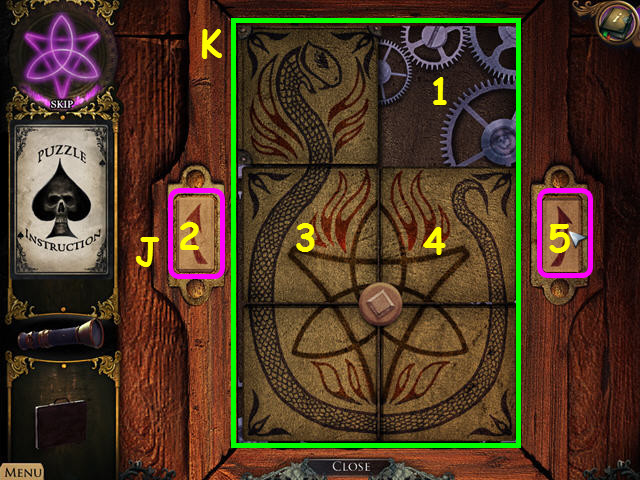
- The snake head cannot be moved.
- Use the arrows to rotate the puzzle (J).
- Click on the tiles to move them to an empty space.
- Click on the following locations to solve the puzzle: 5-4-3-2-1-5-4-3-2-1-5-4-3-2-1-5.
- Please look at the screenshot for the solution (K).

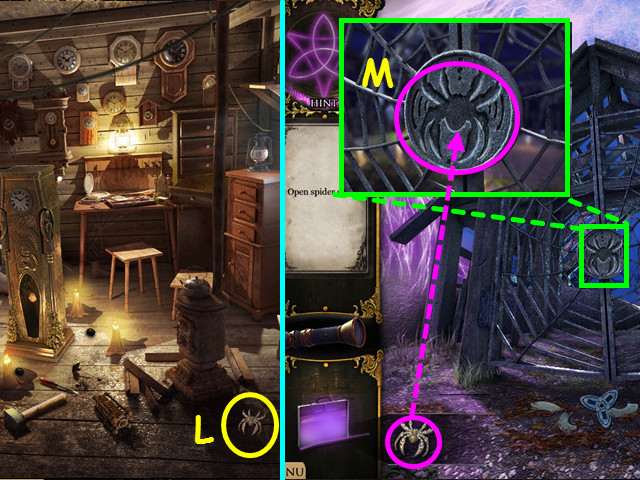
- Take the SPIDER KEY (L).
- Return to the building in the cemetery.
- Zoom into the gate and put the SPIDER KEY in the lock (M).
- Go forward.

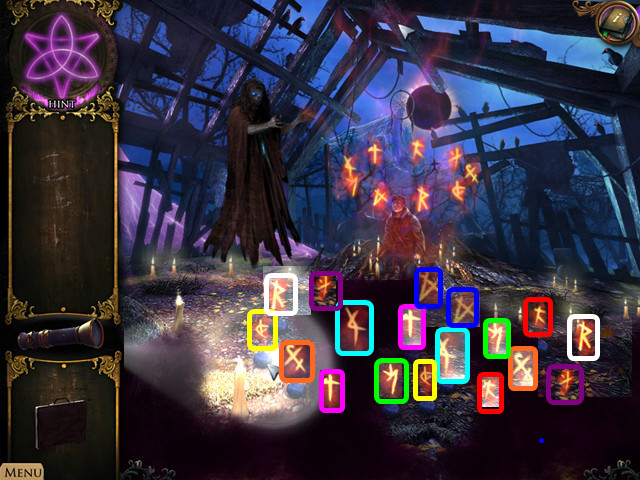
- Use the flashlight to see through the creepy shadow; click on ay two runes to reveal their symbols.
- Click on two matching symbols to eliminate them.
- Highlight a stone and then click on the hint to view its pair.
- Match all symbols to defeat the witch.
- Congratulations! You have completed Strange Cases: The Secrets of Grey Mist Lake Standard Edition!


 Cajun Cop: The French Quarter Caper Walkthrough, Guide, & Tips
 The Inquisitor Walkthrough, Guide, & Tips
 Dreamscapes: The Sandman Walkthrough, Guide, & Tips
 Nikopol: Secrets of the Immortals Walkthrough, Guide, & Tips
 The Dark Hills of Cherai: the Regal Scepter Walkthrough, Guide, & Tips