Cajun Cop: The French Quarter Caper Walkthrough, Guide, & Tips
Cajun Cop: The French Quarter Caper Walkthrough

Welcome to the Cajun Cop: The French Quarter Caper Walkthrough!
Join the famous Inspector Jacques Lamont as he pursues a gang of jewel thieves through the streets of the Big Easy!
Whether you use this document as a reference when things get difficult or as a road map to get you from beginning to end, we’re pretty sure you’ll find what you’re looking for here.
Please enjoy our comprehensive complete Cajun Cop: The French Quarter Caper game walkthrough with annotated screenshots from actual gameplay!
We hope you find this information useful as you play your way through the game. Use the walkthrough menu below to quickly jump to whatever stage of the game you need help with.
Remember to visit the Big Fish Games Forums if you find you need more help. Have fun!
- How to Play
- Using the Walkthrough
- Chapter 1: The Tip
- Chapter 2: The House on Dauphine Street
- Chapter 3: Fingerprint Investigation
- Chapter 4: The Shops on Bourbon Street
- Chapter 5: Jewel Investigation
- Chapter 6: The Trolley Barn
- Chapter 7: Receipt Investigation
- Chapter 8: The Hotel Picayune
- Chapter 9: Fiber Investigation
- Chapter 10: The Warehouse
- Pizza Party Minigame
- Electrical Circuit Puzzle
- Jewel Puzzle
- Trolley Barn Door Puzzle
- Streetcar Power Puzzle
- Slide Puzzle
- Player Piano Minigame
- Security Panel Puzzle
- Safecracking Puzzle
How To Play
Search Level Layout


- Item Board – This area lists the items that you must find in this level.
- Inventory Board – Some of the items you find might be placed in the
Inventory Board. You will need to use these items
in puzzles and mini-games. To use an inventory item,
first click on the item, and then on the location
where you wish to use it.
- Hint Button – If you get stuck and can’t find an item, click on this
button for a hint. Use the hints wisely–the Hint Button
takes 45 seconds to recharge after every use.
- Menu Button – Click this button to access game options, or to return
to the main menu.
Portals
- Portals allow you to go to other search venues in the same
chapter. They look like animated clouds of glowing particles.
Move the cursor over the portal to display the name of the
destination search venue.
Back Button
- Some dead-end search venues have a back button to let
you return to the previous area. Roll your cursor over
the back button to see the name of the destination.
Hotspots

- Some areas in the search levels require closer examination. These could
lead to puzzles, or to areas where additional items are hidden.
When your cursor passes over one of these ‘hotspots,’ it changes
to a magnifying glass, and the border of the hotspot pulses in
white.
- If you play the game in ‘Rookie Cop’ mode, these areas are highlighted
by sparkling particles to make them easier to find.
Movable Objects

- Some objects in the search levels are hidden behind other objects. These foreground
objects must be lifted or slid out of the way to reveal the
concealed object. When your cursor passes over one of these
movable objects, it changes to a grasping hand.
- If you play the game in ‘Rookie Cop’ mode, movable objects are highlighted
by sparkling particles to make them easier to find.
Using the Walkthrough
- Items circled in yellow – These are objects that you must
find every time you play the game; these objects may go into
your inventory or they enhance the game’s storyline. Most of
the objects listed in your ‘to find’ list are picked at random
every time you play the game; this makes for more interesting
replay.
- Items circled in green – These are objects you can move
by dragging them with the cursor. Sometimes objects on your
‘to find’ list are hidden behind these movable objects.
- Items and areas outlined in red – Some of these objects or areas are
involved in puzzles, and others need to be combined with items
from your inventory.
Chapter 1: The Tip
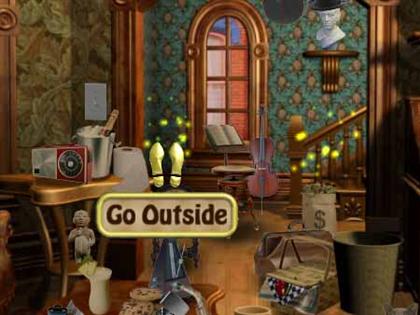
Jacques’ Office
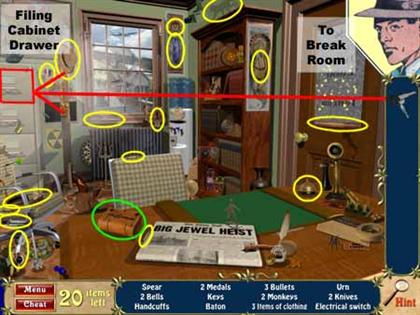
- The keys to the filing cabinet are hidden beneath the book on the
desk (circled in green). Slide the book to reveal the keys. When
you click on the keys, they will be placed in your inventory.
- To open the filing cabinet, first click on the keys (in your inventory),
and then click on the filing cabinet drawer.
Filing Cabinet Drawer
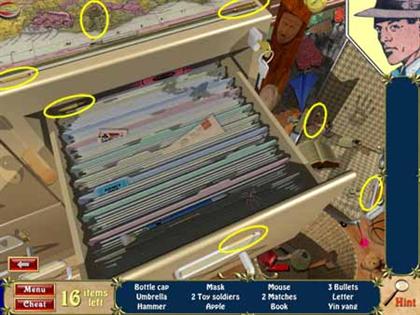
- Every time you play, you must find the matches, the bullets, and the
toy soldiers. The remaining items in the list are chosen at random,
and will be different when you replay the game.
Break Room

- One of the doughnuts is hidden behind the Buddha statuette.
Slide the statuette to reveal the doughnut.
Chapter 2: The House on Dauphine Street
Front Yard
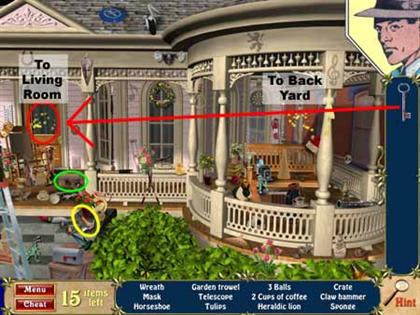
- The front door is locked. You will need to use the key to open it.
First click on the key, then click on the door to unlock it.
You can find the key in the barrel in the back yard.
- Be sure to pick up the claw hammer. You will need it to pry open
the barrel in the back yard.
- The sponge is hidden behind the chest on the front porch. Slide the
chest aside to reveal the sponge.
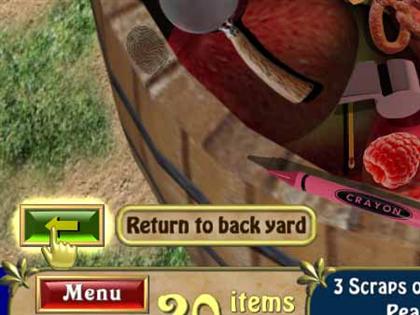
Back Yard
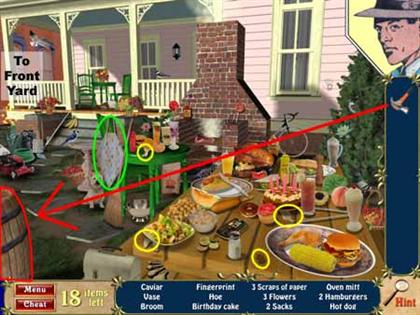
- Pry the barrel open with the claw hammer you picked up in the front yard.
First click on the hammer, then click on the barrel.
- The oven mitt is hidden behind the apron. Lift the apron stright up
to reveal the oven mitt.
- The scraps of paper and the fingerprint will be used in puzzles
later in the game.
Barrel
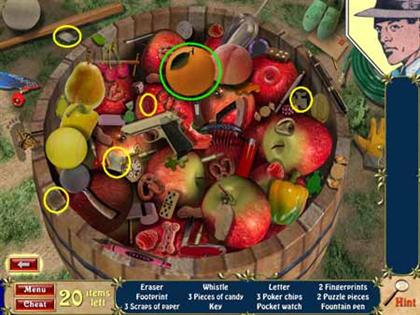
- The key to the front door is hidden beneath the orange. Slide the
orange aside to reveal the key.
- The scraps of paper and the fingerprints will be used in puzzles
later in the game.
Living Room
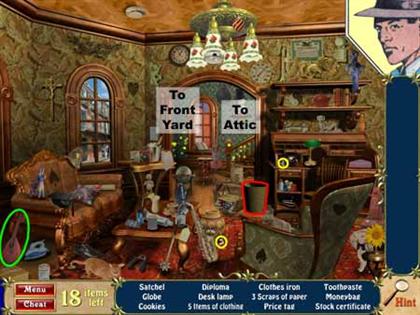
- One of the scraps of paper is hidden behind the mandolin. Slide
the mandolin aside to reveal the scrap of paper.
- Be sure to click on the wastebasket and examine its contents.
- The scraps of paper will be used in a puzzle
later in the game.
Wastebasket
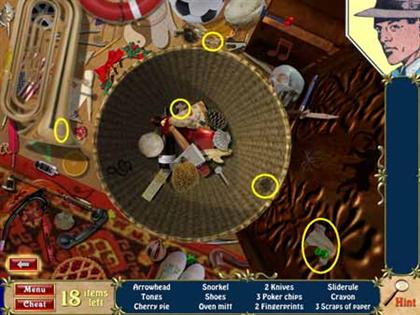
- As soon as you have collected all 12 scraps of paper, you will be
sent to the Camera Riddle Jigsaw.
- The fingerprints will be used in a puzzle later in the game.
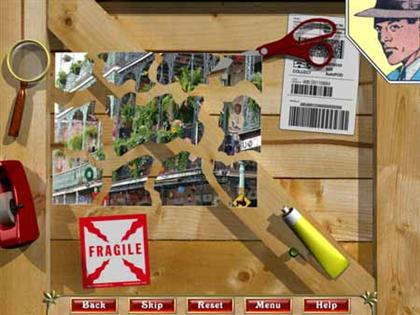
Camera Riddle Jigsaw
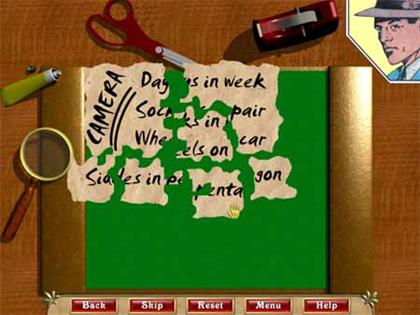
- As soon as you have collected all 12 scraps of paper, you will be
sent to the Camera Riddle Jigsaw.
- Match the edges of the puzzle pieces and use to mouse to drag them
into place.
- The assembled puzzle will be placed in your inventory. You will need
it later in the game.
- The ‘Skip’ button becomes active after 30 seconds.
Attic
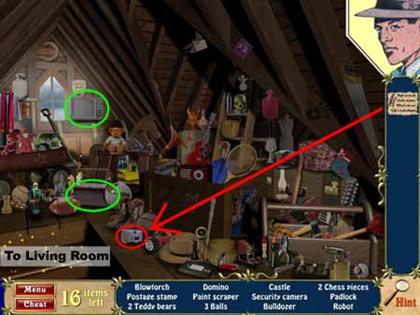
- Click on the camera riddle, then click on the camera to start the
camera PIN-code puzzle.
- The padlock is hidden behind the picnic basket. Slide the
basket aside to reveal the padlock.
- One of the stars is hidden behind the TV. Slide the TV aside
to reveal the star.
Camera PIN-code Puzzle
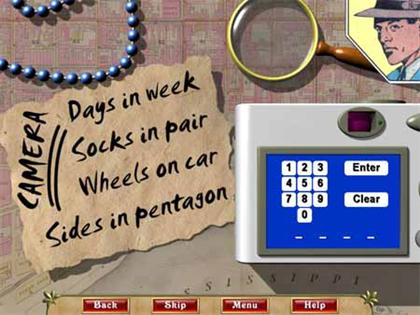
- Use the keypad located on the back of the camera to enter the code 7-2-4-5.
- Click the ‘Enter’ button, which is located on the back of the camera.
- The ‘Skip’ button becomes active after 30 seconds.
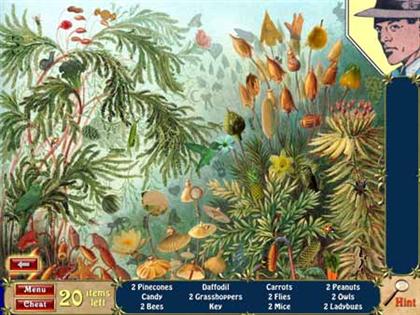
Photo
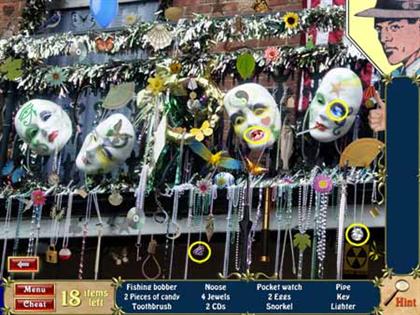
- You get to this level by solving the Camera PIN-code puzzle.
- The jewels will be placed in your inventory as you find them.
You will use them in a puzzle later in the game.
Living-Room Differences
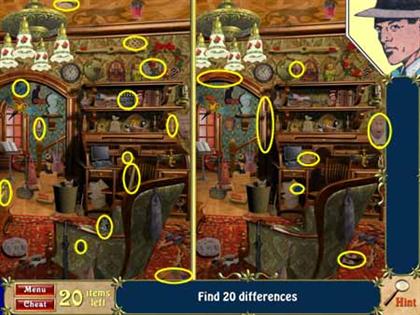
- This is the final level of the ‘House’ chapter.
- Click on 20 differences between the two images.
Chapter 3: Fingerprint Investigation
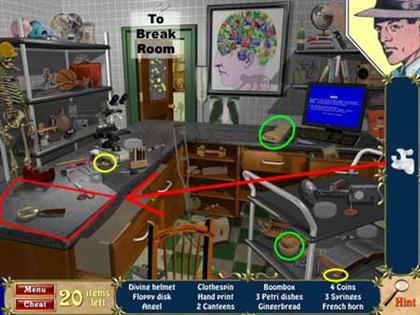
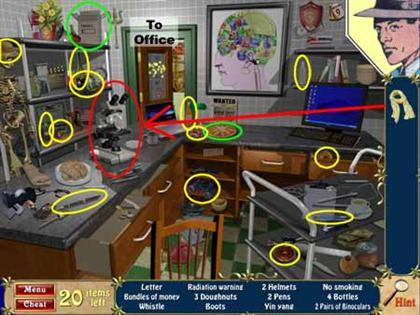
Crime Lab
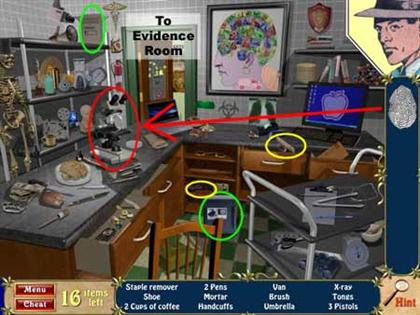
- To launch the Fingerprint Puzzle, first click on the fingerprints
in your inventory, then click on the microscope.
- The shoe is hidden behind the safe. Slide the safe aside
to reveal the shoe.
- One of the pistols is hidden behind the cardboard carton.
Slide the carton aside to reveal the pistol.
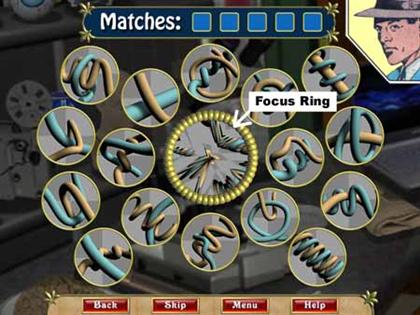
Fingerprint Puzzle
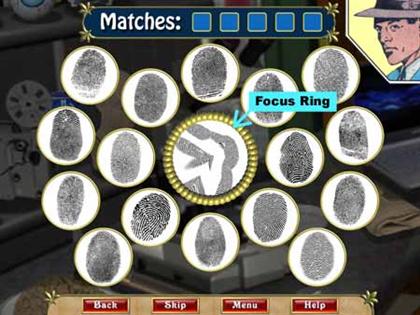
- Turn the focus ring to unscramble the central fingerprint image.
- Click on the matching fingerprint in one of the smaller images.
- Do this five times to complete the puzzle.
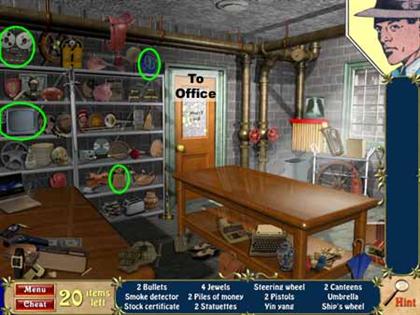
Evidence Room (Fingerprint Investigation)
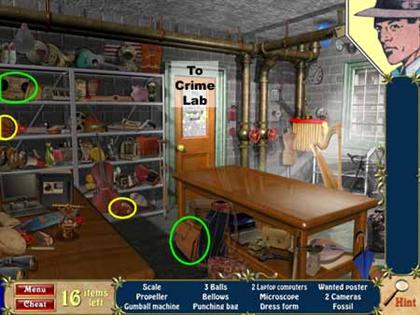
- The wanted poster is hidden behind the boombox. Slide the
boombox aside to reveal the wanted poster.
- One of the balls is hidden behind the briefcase on the floor.
Slide the briefcase aside to reveal the ball.
Chapter 4: The Shops on Bourbon Street
Street with Shops
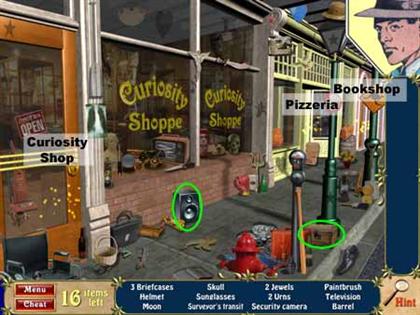
- One of the jewels is hidden behind the loudspeaker.
Slide the loudspeaker aside to reveal the jewel.
- The other jewel is hidden behind the chest.
Slide the chest aside to reveal the jewel.
Bookshop
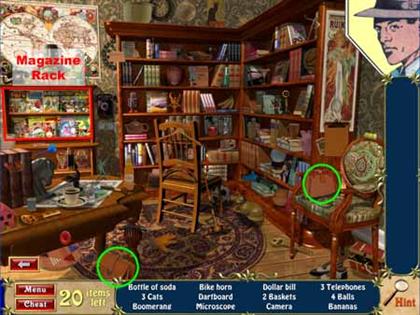
- One of the cats is hiding behind the briefcase.
Slide the briefcase aside to reveal the cat.
- One of the balls is hidden behind the handbag.
Lift the handbag straight up to reveal the ball.
- Click on the magazine rack to search for additional items.
Magazine Rack in Bookshop
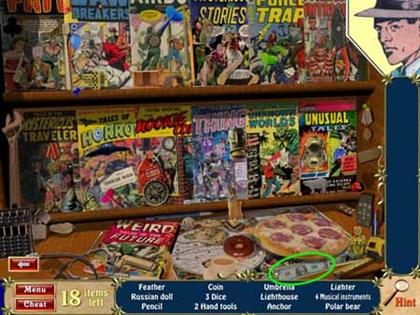
- The coin is hidden beneath the dollar bill.
Slide the dollar bill aside to reveal the coin.
- You will need the coin to play the ‘Pizza Party’
minigame in the pizzeria.
Pizzeria
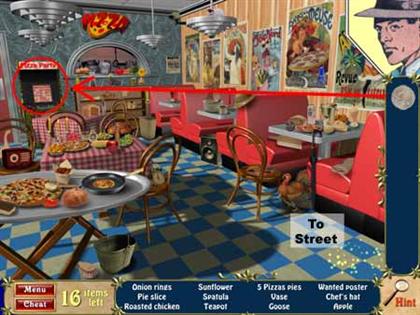
- Click on the coin in your inventory, then click on the
arcade machine to play the ‘Pizza Party’ minigame.
- The coin is hidden in the magazine rack in the bookshop.
Pizza Party Minigame (1 of 2)
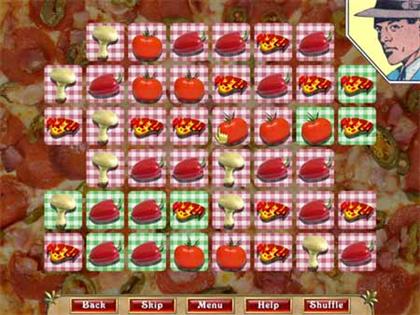
- Click on groups of two or more identical adjoining symbols.
- Red checkered table cloths behind the matching symbols turn
to green.
- Turn all of the tablecloths green to win the game.
- If you get stuck, click on the ‘Shuffle’ button. Use
this feature wisely, as it takes 30 seconds for the ‘Shuffle’
button to recharge.
Pizza Party Minigame (2 of 2)

- After winning the game, you can click on the screwdriver
and add it to your inventory.
- You can use the screwdriver later on to open up the electrical circuit
box in the Curiosity Shop.
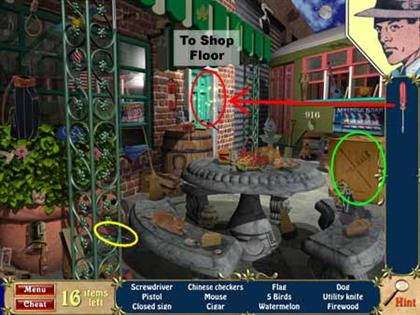
Curiosity Shop (Front Room)
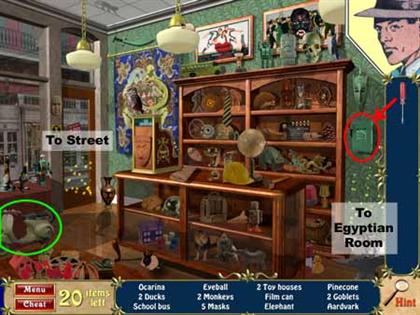
- You can’t go into the Egyptian Room until you have fixed
the wiring in the electrical circuit box.
- Access the electrical circuit box by clicking on the
screwdriver in your inventory, then clicking on the
electrical circuit box.
- If you don’t have the screwdriver yet, you must first
win it by beating the Pizza Party minigame located in
the pizzeria.
- One of the monkeys is hidden behind the motor scooter. Lift
the motor scooter straight up to reveal the monkey.
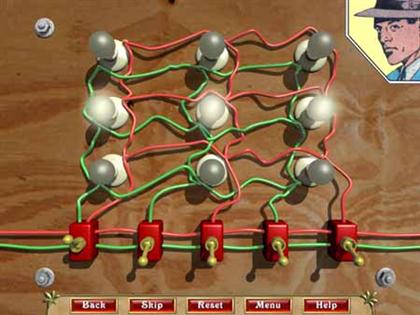
Electrical Circuit Puzzle
- Click on any of the wires to turn the wire by 90 degrees.
- Connect all of the wires to solve the puzzle (all of the wires will turn red).
- The ‘Skip’ button becomes active after 30 seconds.
Electrical Circuit Puzzle Solution

- Here is one solution to the puzzle.
- There are thousands of possible solutions, but it’s hard enough to find just one.
Curiosity Shop (Egyptian Room)
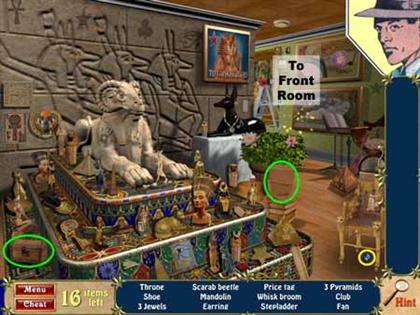
- You can’t enter this room until you have solved
the Electrical Circuit puzzle.
- One of the jewels is hidden behind the chest.
Slide the chest aside to reveal the jewel.
- Another jewel is hidden behind the stack of cardboard cartons.
Slide the cartons aside to reveal the jewel.
Bookshop Differences
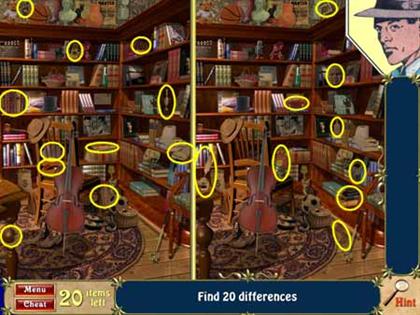
- This is the final level of the ‘shops’ chapter.
- Click on 20 differences between the two images.
Chapter 5: Jewel Investigation
Jacques’ Office (Jewel Investigation)
- You must have all 13 jewels in your inventory before you can start
the Jewel Puzzle. If you don’t have enough jewels,
you can find the rest in the evidence room.
- To start the Jewel Puzzle, first click on the jewels in
your inventory, then click on the desk blotter.
- One of the playing cards is hidden behind the chest
(circled in green). Slide the chest aside to reveal
the playing card.
Jewel Puzzle
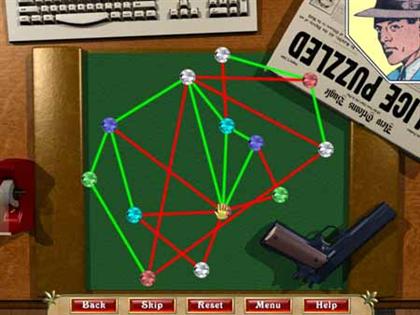
- The jewels are connected by a network of lines. Drag
the jewels with your mouse and arrange them so none
of the lines cross.
- Lines that cross turn red. Lines that don’t cross
are green.
- The ‘Skip’ button becomes active after 30 seconds.
Jewel Puzzle Solution
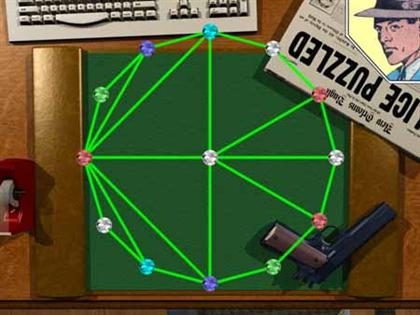
- Here is one possible solution to the jewel puzzle.
Evidence Room (Jewel Investigation)
- Each jewel is hidden behind a different item in the evidence room.
Slide the circled items aside to reveal the jewels.
- After you have collected the jewels, you must return to the
office to solve the Jewel Puzzle.
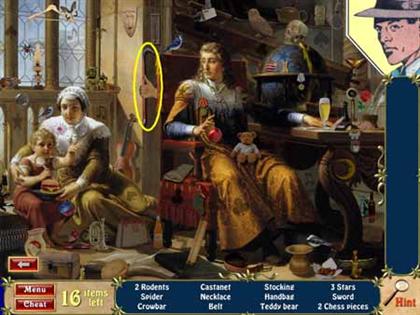
Chapter 6: The Trolley Barn
Trolley Barn Exterior
- You can’t get in the trolley barn until you unlock the door.
- First click on the screwdriver (circled in yellow) to place it
in your inventory.
- Click on the screwdriver (in your inventory) and then click on the
trolley barn door to start the Trolley Barn Door Puzzle.
- Some items could be hidden behind the crate (circled in green).
Slide the crate aside and look behind it.
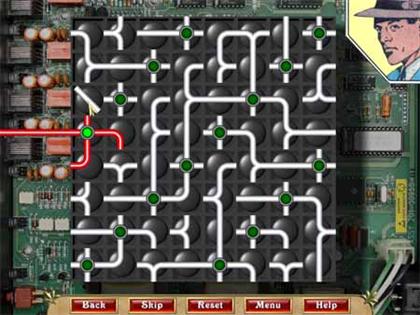
Trolley Barn Door Puzzle
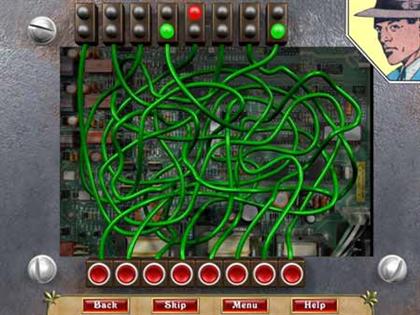
- Trace the wire from the blinking red light at the top of the
screen to one of the buttons at the bottom of the screen.
Click on the button.
- Do this correctly four times in a row to solve the puzzle.
If you miss, you have to start over.
- The ‘Skip’ button becomes active in 30 seconds.
Trolley Barn Door Puzzle Solution
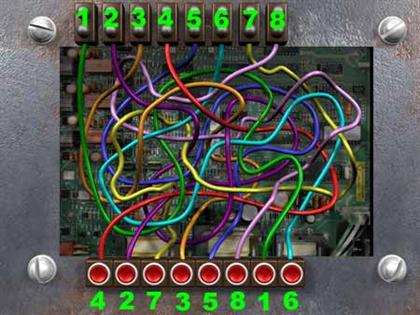
- Here is the puzzle with the wires colored differently
so they are easier to trace.
- The game will choose a different set of 4 wires every
time you play, so it is impossible to predict the
exact sequence of buttons you will need to press.
Trolley Barn Shop Floor
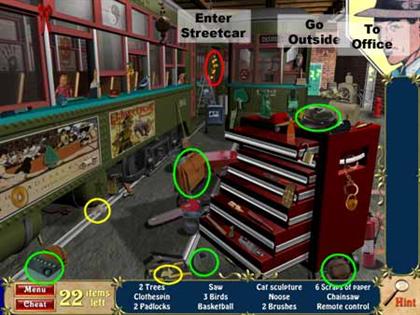
- Scraps of paper are hidden behind the battery, the
briefcase, the ball of string and the beneath the hat.
The hat lifts straight up, and the other objects slide
to the side.
- The clothespin is hidden behind the canteen. Slide the
canteen aside to reveal the clothespin.
- You can’t enter the streetcar until you have solved the
Streetcar Power Puzzle. This puzzle is located in the
office.
Trolley Barn Office
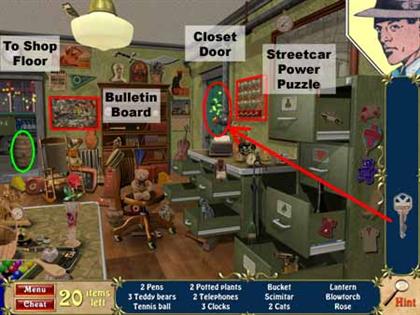
- The bucket is hidden behind the barrel. Slide the
barrel aside to reveal the bucket.
- To open the closet, you will need a key. This key
is hidden on the streetcar. Once you have obtained
the closet key, click on the key and then on the closet
door to open the closet.
- You must solve the Streetcar Power Puzzle before you
can go into the streeetcar.
- Additional items are hidden in the bulletin board.
Click on the bulletin board to search for these items.
Bulletin Board
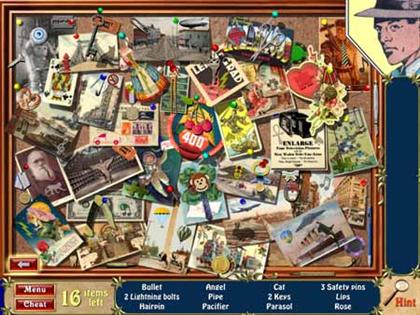
- There are no ‘must find’ items on the bulletin board.
Every time you play this level, the game will make up
a different list of items to find.
Streetcar Power Puzzle
- Click on the switches along the bottom of the screen
to turn the lights on and off.
- Once all of the lights are on, the puzzle is solved
and you can go into the streetcar.
- The solution to this puzzle will be different every
time you play it. The ‘Skip’ button becomes active
after 30 seconds.
Streetcar Interior
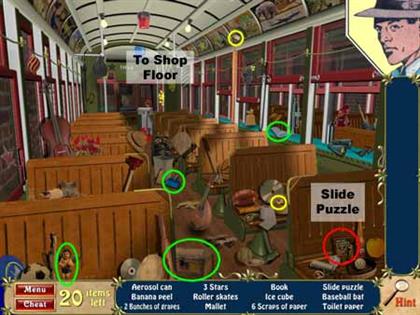
- Four of the scraps of paper are hidden behind other objects.
These objects are circled in green. Slide these objects
aside to reveal the scraps of paper.
- Click on the slide puzzle to start it. The key to the
closet is hidden in the slide puzzle.
Slide Puzzle
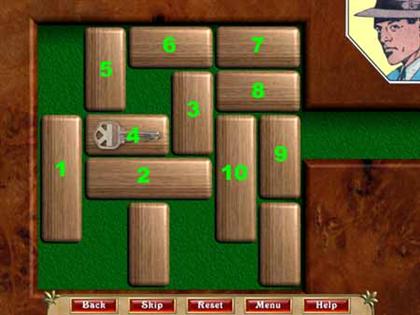
- To solve the puzzle, proceed as follows:
1 – Up
2 – Left
3 – Down
4 – Right
5 – Down
6 – Left
7 – Left
8 – Left
9 – Up
10 – Down
4 – Right
- When you have solved the puzzle, the closet key will
be placed in your inventory. You can then return to
to the office and unlock the closet.
Closet
- The wallet is hidden behind the radio. Slide the radio
aside to reveal the wallet.
- The heart is hidden behind the stack of bowls. Slide the
stack of bowls aside to reveal the heart.
Bulletin Board Differences
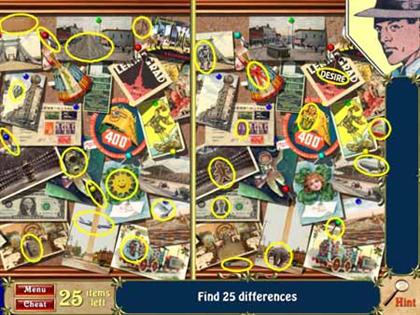
- Identify 25 differences between the two images.
- This is the final level of the Trolley Barn chapter.
Chapter 7: Receipt Investigation
Crime Lab
- Start the Receipt Jigsaw puzzle. First click on
the scraps of paper you collected at the trolley barn,
and then click on the end of the counter.
- Click on four gold coins. One of the coins is hidden
beneath the newspaper, and another is hidden beneath
the mortar and pestle.
Receipt Jigsaw
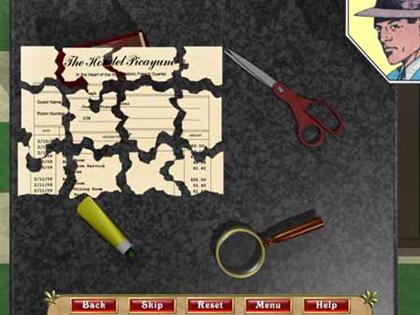
- Match the edges of the scraps of paper and use to mouse to drag them
into place.
- The assembled puzzle will be placed in your inventory. You will need
it later in the game.
- The ‘Skip’ button becomes active after 30 seconds.
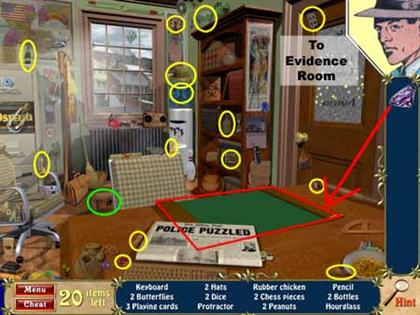
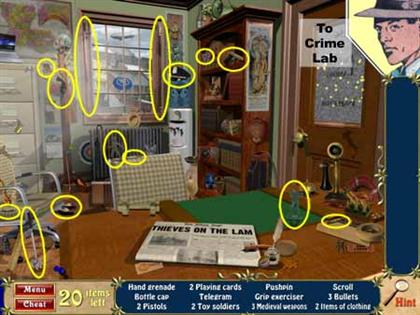
Break Room (Receipt Investigation)
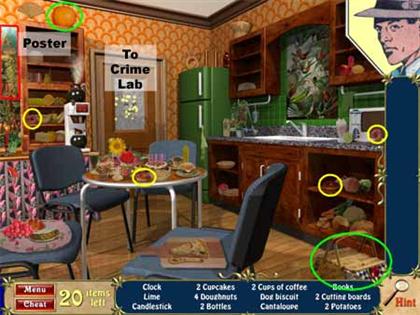
- Be sure to slide the pumpkin and the picnic basket aside
and check for hidden objects concealed behind them.
- There are additional items hidden in the poster at the left
edge of the scene.
Break Room Poster
- There are no ‘must-find’ items in the Break Room Poster.
The program compiles a list of items chosen at random
every time the game is played.
Chapter 8: The Hotel Picayune
Hotel Lobby
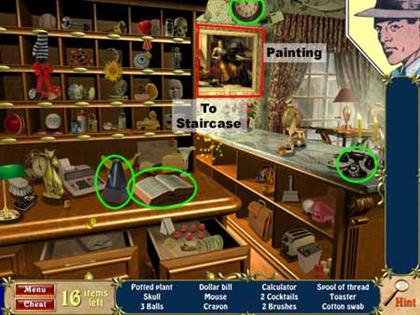
- The dollar bill is hidden beneath the open book (slide sideways).
- Some coins are hidden behind the metronome (slide sideways).
- A star is hidden beneath the telephone (lift up).
- The dartboard is hidden behind the clock (slide sideways).
- The painting contains additional hidden items.
Painting in Hotel Lobby
- This painting is entitled “Newton’s Discovery of the Refraction of Light.”
It was painted by Pelagio Palagi in 1827.
- When you click on the crowbar, it will be added to your inventory. You
will need it to pry open a drawer in the hotel room.
Hotel Staircase
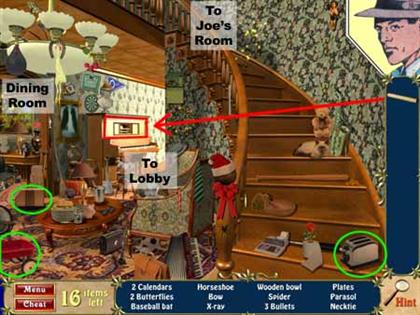
- You will need to have a piano roll to play the Player Piano Minigame.
Click on the piano roll, then click on the piano to start the game.
The piano roll is hidden in the Dining Room.
- The light bulb is hidden behind the red wagon.
- An urn is hidden behind the suitcase.
- A butterfly is hidden behind the toaster.
Player Piano Minigame (1 of 2)

- Follow the bouncing ball through the lyrics of the song.
When the ball enters a gold-tinted area, move your mouse
to the same gold-tinted area and hold down the left mouse
button. Keep holding the mouse button down as long as the
ball is in the gold-tinted area. Release the button when
the ball leaves the gold-tinted area.
- As you do this, the indicator on the right will gradually
fill with green liquid. When the indicator is full, you
have won the game.
- You can use the slider at the top of the screen to adjust
the music volume.
Player Piano Minigame (2 of 2)
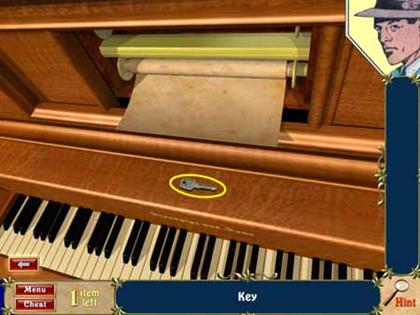
- After you have successfully completed the game, a key
will fall out of the piano roll. Click on the key to
add it to your inventory. This is the key to the cellar
door in the dining room.
Hotel Dining Room
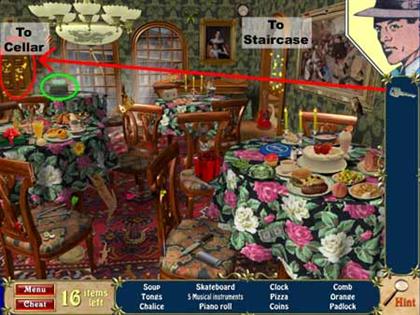
- The only item you must always find is the piano roll. It is
hidden behind the typewriter. Move the typewriter
aside to reveal the piano roll. The piano roll will
be added to your inventory; you will use it to start
the Player Piano Minigame.
- There will be additional items to find, but they will be
picked at random, and will be different every time you
play the game.
- The cellar door is locked. You will need to use a key
to open it. You get this key by successfully completing
the Player Piano Minigame. Click the key, and then the
door to enter the cellar.
Hotel Cellar — Security Center
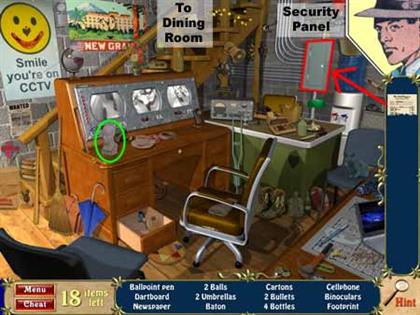
- The playing card is hidden beneath the bust.
Slide the bust to reveal the playing card.
- Click on the hotel receipt, and then on the security
panel to start the Security Panel Puzzle.
- Once you have solved the Security Panel Puzzle,
you can go upstairs to Joe’s room.
Security Panel Puzzle (1 of 2)
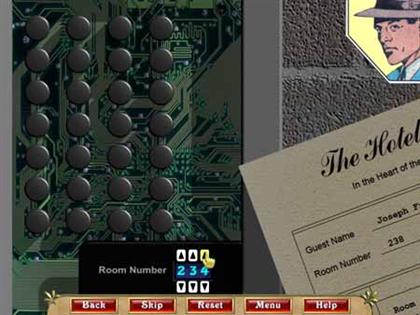
- Start by dialing in Joe’s room number (238).
The room number appears on the hotel receipt.
Security Panel Puzzle (2 of 2)
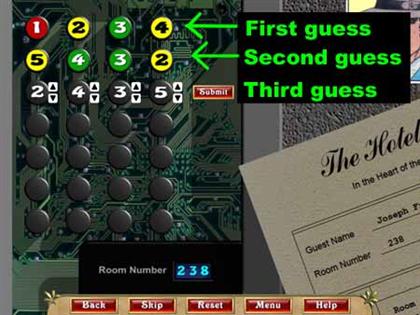
- The unlocking code is generated at random every time
this puzzle is played.
- Start by making an initial guess at the unlocking
code, and click the ‘Submit’ button.
- Base your subsequent guess on the color of the
numbers from the previous guess:
Red – This number does not appear in the unlocking code.
Yellow – This number is part of the unlocking code,
but it’s in the wrong column.
Green – This number is part of the unlocking code,
and it’s in the correct column.
- Keep repeating the previous step until you have guessed
the correct unlocking code.
- The ‘Skip’ button becomes active after 30 seconds.
Hotel Room
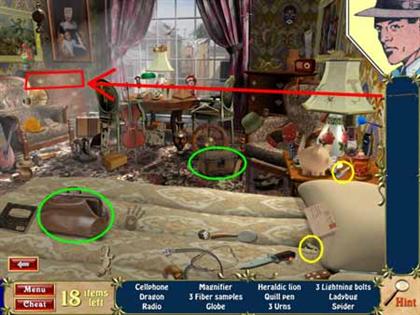
- Click on the three fiber samples. These will
be added to your inventory.
- One of the fiber samples is hidden behind the
satchel on the bed. Slide the satchel aside
to reveal the fiber sample.
- The lollipop is hidden behind the chest on the floor.
Slide the chest aside to reveal the lollipop.
- You will need to use the crowbar from your inventory to open the dresser
drawer. Click on the crowbar and then on the dresser
drawer.
Dresser Drawer in Hotel Room
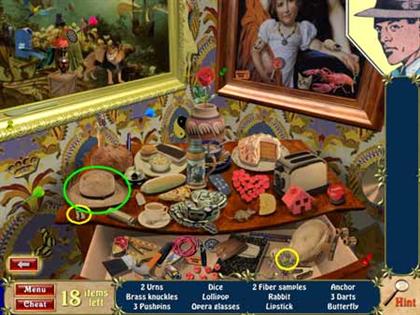
- Click on the two fiber samples. These will
be added to your inventory.
- The rabbit is hidden beneath the hat. Lift the
hat straight up to reveal the rabbit.
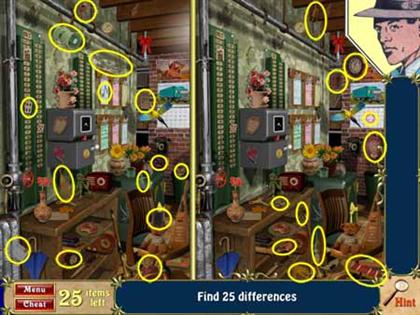
Dining Room Differences
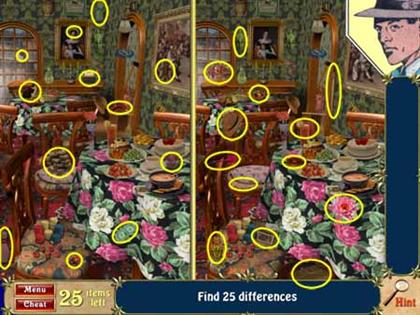
- Click on 25 differences between the two images.
- This is the final level of the ‘Hotel’ chapter.
Chapter 9: Fiber Investigation
Crime Lab
- Click on the fiber sample in your inventory, and then
click on the microscope to start the Fiber Puzzle.
- The radiation symbol is hidden behind the cardboard carton.
Slide the carton aside to reveal the radiation symbol.
- The yin-yang is hidden beneath the pizza.
Slide the pizza aside to reveal the yin-yang.
Fiber Puzzle
- Turn the focus ring to unscramble the central fiber image.
- Click on the matching fiber sample in one of the smaller images.
- Do this five times to complete the puzzle.
Jacques’ Office (Fiber Investigation)
- Click on all of the items in the list.
Chapter 10: The Warehouse
Warehouse Office
- Click on the stethoscope in your inventory, and then
click on the safe to start the safecracking puzzle.
If you don’t yet have the stethoscope, you can find
it in the ship’s engine room.
- One of the stars is hidden behind the umbrella.
Slide the umbrella aside to reveal the star.
- Another star is hidden behind the TV.
Slide the TV aside to reveal the star.
- The third star is hidden behind the balloon.
Slide the balloon aside to reveal the star.
Safecracking Puzzle
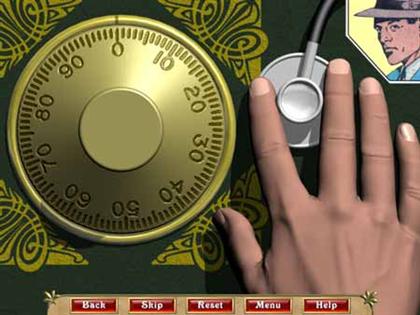
- Here is the safe combination:
Right (clockwise) to 68
Left (counterclockwise) to 30
Right to 57
Left to 15
Safe in Warehouse Office
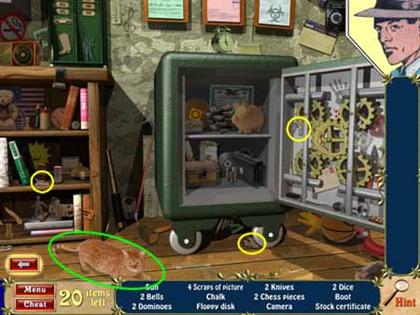
- The cat is lying on one of the scraps of the picture.
Slide the cat aside to reveal the scrap of the picture.
(The cat will consider this an indignity.)
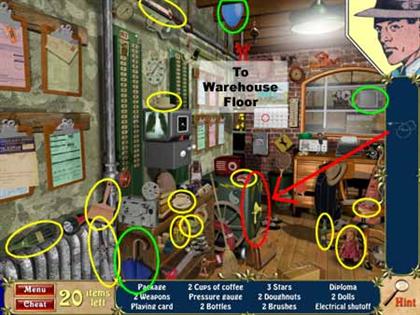
Warehouse Floor
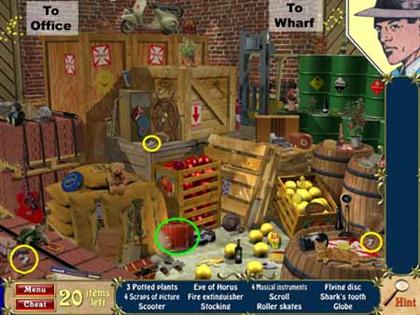
- One of the scraps of the picture is hidden behind
the briefcase. Slide the briefcase aside to reveal
the scrap of the picture.
Wharf
- The bow is hidden behind the garbage can.
Slide the garbage can aside to reveal the bow.
- The lobster is hidden behind the battery.
Slide the battery aside to reveal the lobster.
- The bottle is hidden behind the wastebasket.
Slide the wastebasket aside to reveal the bottle.
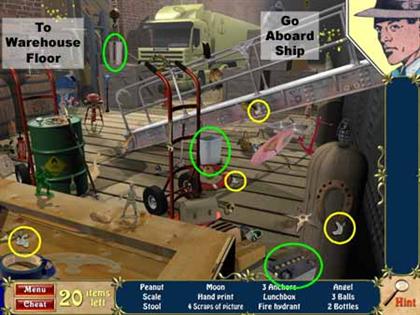
Ship’s Engine Room
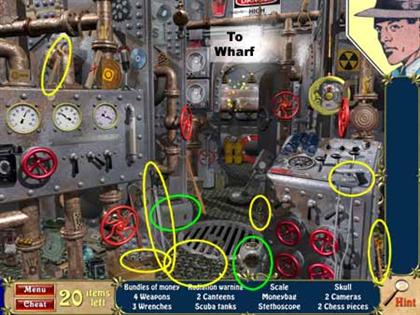
- One of the weapons is hidden behind the lunchbox.
Slide the lunchbox aside to reveal the weapon.
- The skull is hidden behind the diving helmet.
Slide the diving helmet aside to reveal the skull.
- When you click on the stethoscope, it will be added to
your inventory. Use the stethoscope to crack the safe
in the warehouse office.
Picture Jigsaw Puzzle
- Once you have collected all 12 scraps of the picture, you
will be taken to the picture jigsaw puzzle.
- Match the edges of the pieces and slide them together
to assemble the picture.
Assembled Picture
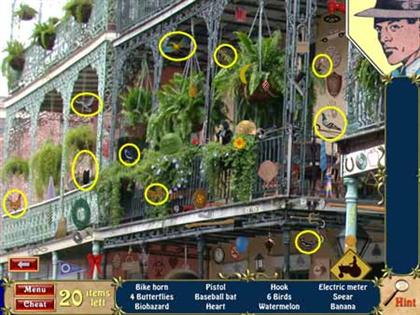
- After you have completed the Picture Jigsaw Puzzle, you
will be taken to this search level.
- You will always need to find the birds and the butterflies.
All other items are chosen at random, and will be different
every time you play the game.
Warehouse Office Differences
- Identify 25 differences between the two pictures.
- This is the final level of the ‘Warehouse’ chapter.


 Dead Reckoning: Brassfield Manor Walkthrough, Guide, & Tips
 Mystery Murders: The Sleeping Palace Walkthrough, Guide, & Tips
 Empress of the Deep: Legacy of the Phoenix Walkthrough, Guide, & Tips
 Brunhilda and the Dark Crystal Walkthrough, Guide, & Tips
 Ghosts of the Past: Bones of Meadows Town Walkthrough, Guide, & Tips