Mystery Murders: The Sleeping Palace Walkthrough, Guide, & Tips
Mystery Murders: The Sleeping Palace Walkthrough
Welcome to the Mystery Murders: The Sleeping Palace Walkthrough
Help Sophia uncover the secret behind the Curse of Laroche Palace and rescue the Royal Family from their magical slumber.
Whether you use this document as a reference when things get difficult or as a road map to get you from beginning to end, we’re pretty sure you’ll find what you’re looking for here.
This document contains a complete Mystery Murders: The Sleeping Palace game walkthrough featuring annotated screenshots from actual gameplay!
We hope you find this information useful as you play your way through the game. Use the walkthrough menu below to quickly jump to whatever stage of the game you need help with.
Remember to visit the Big Fish Games Forums if you find you need more help. Have fun!
This walkthrough was created by Microvalue, and is protected under US Copyright laws. Any unauthorized use, including re-publication in whole or in part, without permission, is strictly prohibited.
General Tips

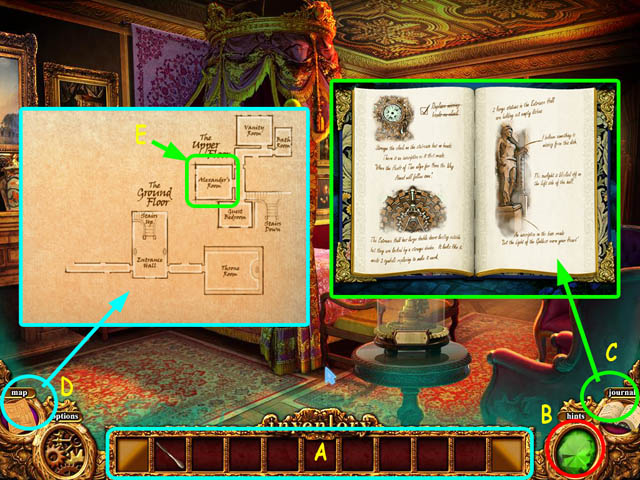
- This is the official guide for Mystery Murders: The Sleeping Palace.
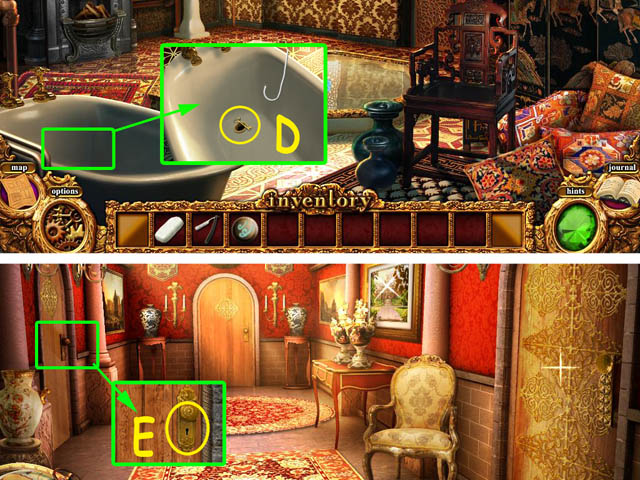
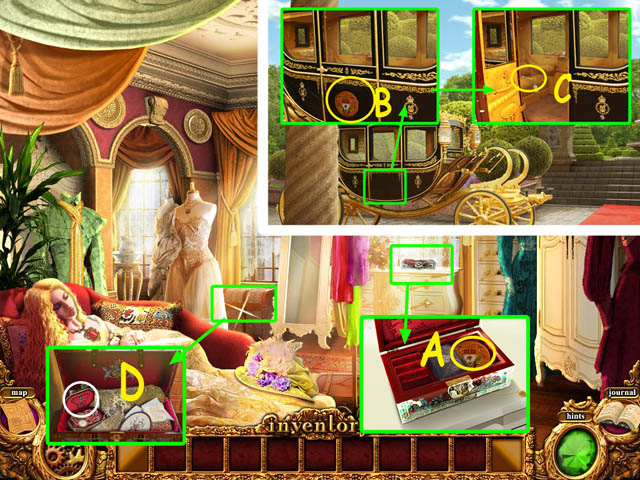
- Your inventory (A) is located in the lower panel; select an item to use it.
- Use the hint button (B) to get a hint for the current location. The hint is unlimited, but you must wait for it to recharge between uses.
- Open your Journal (C) to view notes on the game and clues about current tasks.
- Use the Map (D) to travel directly to a location that you have already visited.
- Select a location (E) on the map to revisit it.
- Hidden-object puzzles are referred to as HOP in this walkthrough.
- Hidden-object scenes and some puzzles are randomized so solutions may vary.
Chapter 1: The Awakening
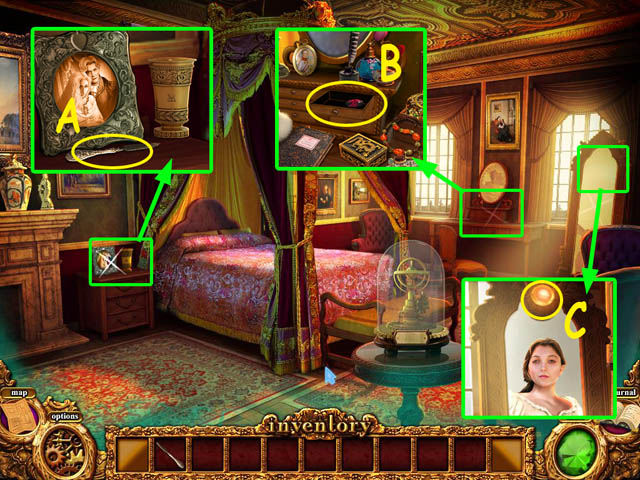
- Zoom into the bedside table and take the NAIL FILE (A).
- Zoom into the dressing table; use NAIL FILE to open drawer and collect the RUBY (B) from the drawer.
- Zoom into mirror and Insert RUBY into empty setting (C).
- Back out of Guest Bedroom onto Landing then go down the Stairs to the right.
- Play the HOP under the staircase and receive the WINDOW HANDLE.
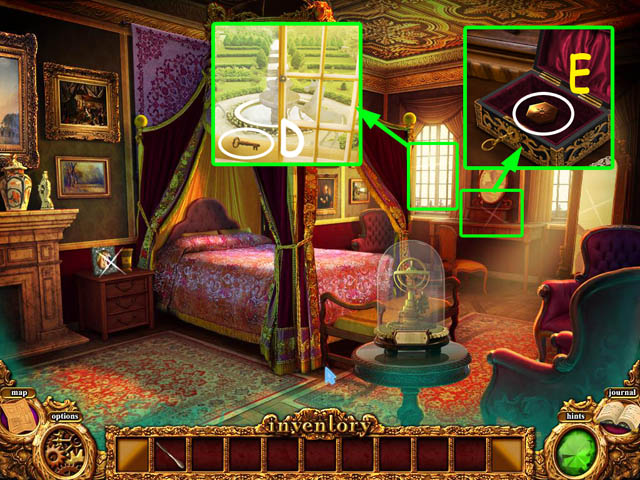
- Return to the Guest Bedroom.
- Zoom into the left hand window; use the WINDOW HANDLE on the window and collect the SMALL GOLD KEY (D).
- Zoom into the jewellery box on the dressing table; use the SMALL GOLD KEY on the jewellery box and collect the DEVICE KEY (E) from inside.
- Back out of Guest Bedroom onto Landing.
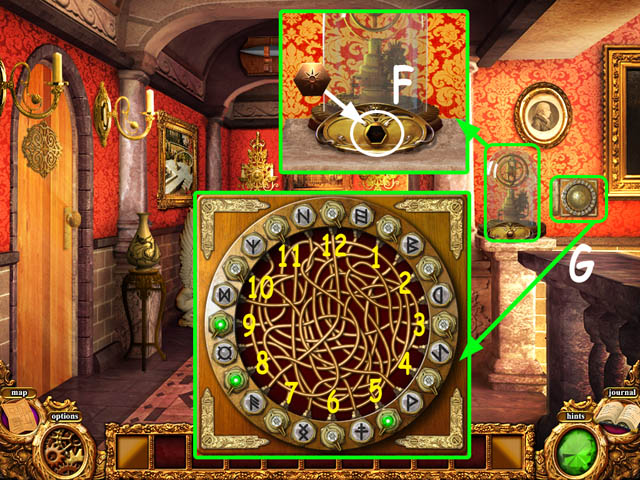
- Zoom into the glass domed device and use the DEVICE KEY in the pedestal (F).
- Zoom in on the wall panel and activate the circuit puzzle (G).
- Turn on the lights around the ring in the correct order. Working like the numbers on a clock turn switch, 9,8,5,12,4,3,2,11,10,7,1,6.
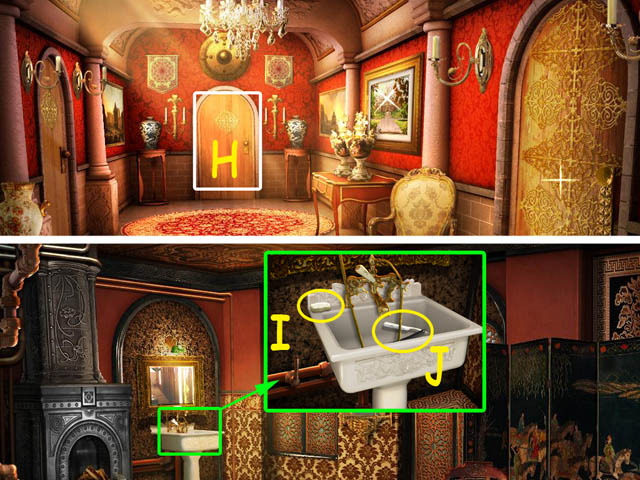
- Go forward into Hallway 1, then open the door at the end of the hallway (H) and go forward into the Bathroom.
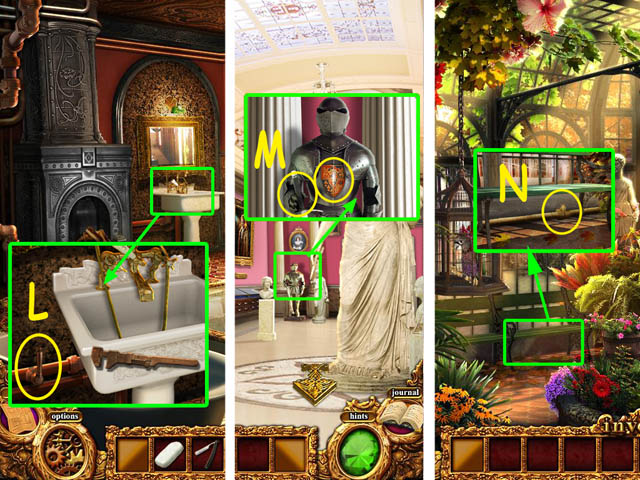
- Zoom into the sink and collect the BAR OF SOAP (I) and the RAZOR (J).
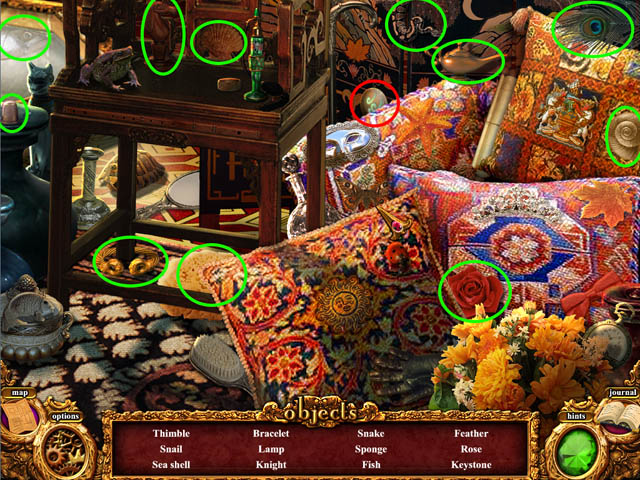
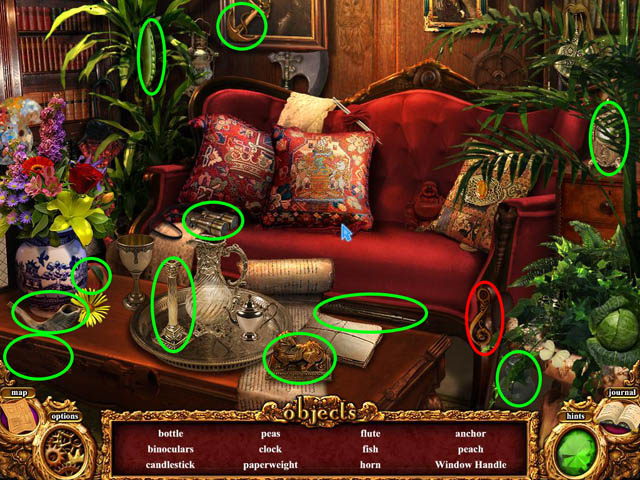
- Play the HOP in the pile of cushions and receive the KEYSTONE.
- Return to Landing.
- Open door on the left and go left to Alexander’s Room.
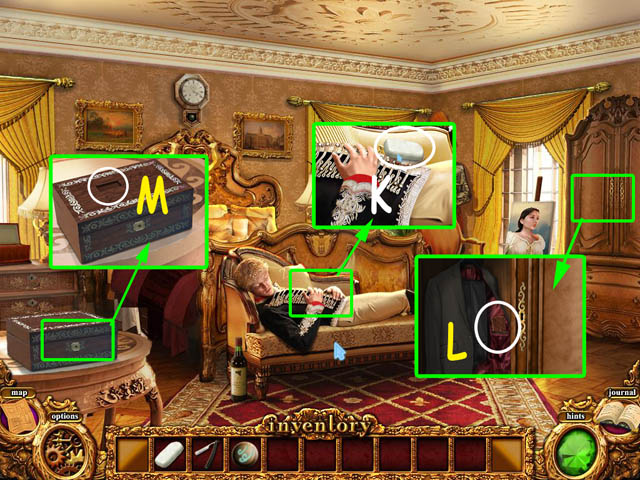
- Zoom into the sleeping prince; use the BAR OF SOAP on his hand to collect the WARDROBE KEY (K).
- Zoom into the wardrobe; use the WARDROBE KEY on the door and collect the WOODEN PUZZLE (L) piece from inside the jacket.
- Zoom into the table and insert the WOODEN PUZZLE piece in the box lid (M) then tap the lid to start the box puzzle.
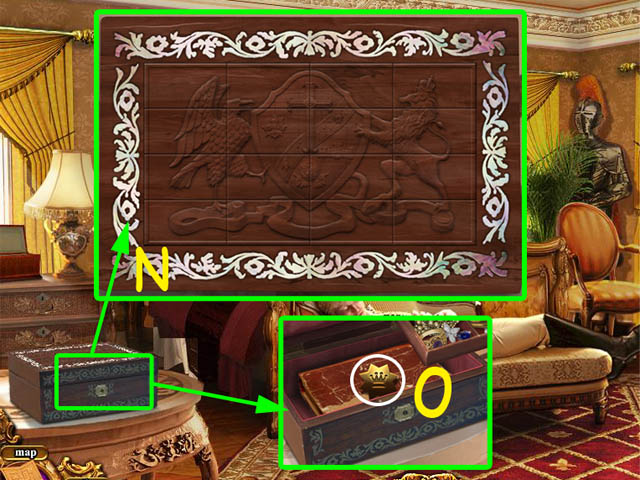
- Complete the puzzle (N) by left-clicking two tiles in a row to swap their positions until all the tiles are in the correct position.
- Zoom into table; remove the tray of jewels and collect the DEVICE KEY (O).
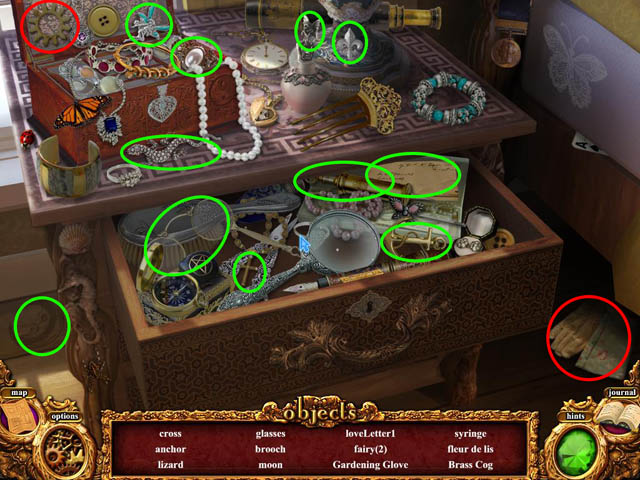
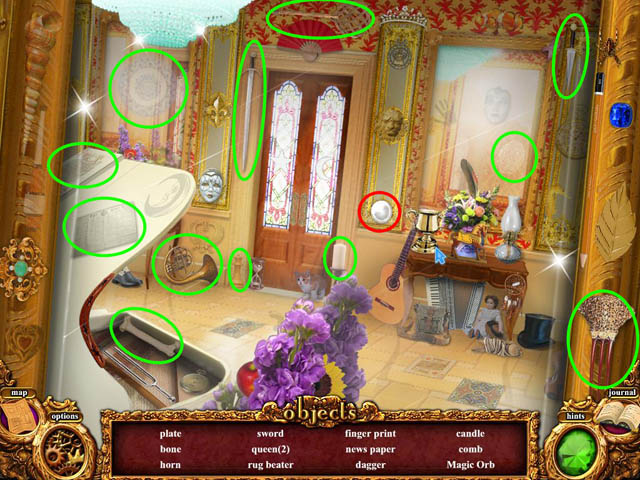
- Play the HOP next to bed to receive the GARDENING GLOVE and the BRASS COG.
- Return to the Stairs.
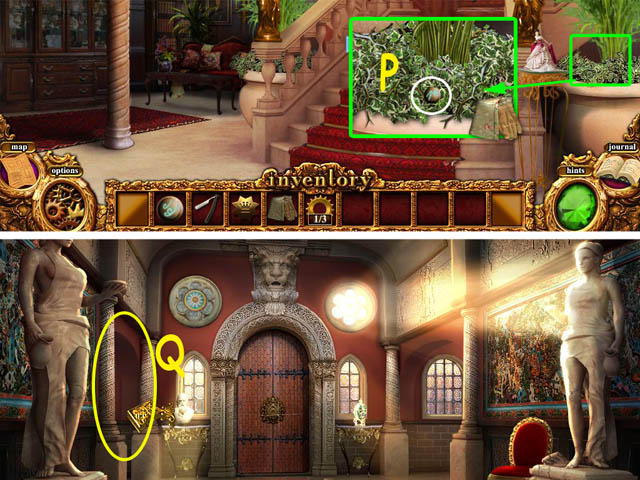
- Zoom into the planter and use the GARDENING GLOVE to collect the KEYSTONE (P).
- Back out of Stairs into the Entrance Hall, and then exit via the left hand archway (Q) into Hallway 2.
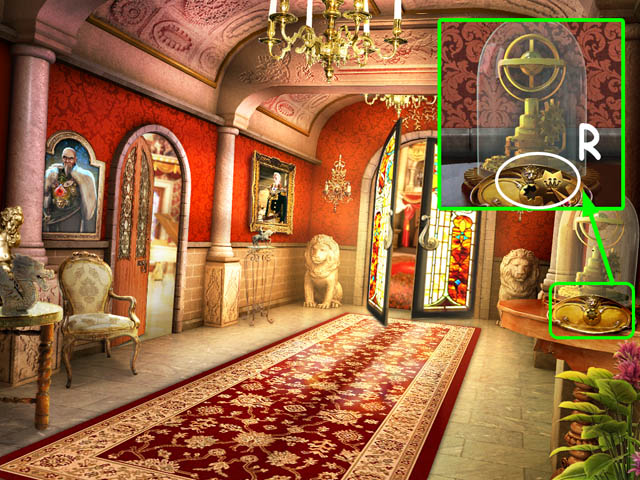
- Zoom into the domed device and insert the DEVICE KEY (R) to activate it.
- Open the ornate doors at the end of the hallway and go forwards into the Throne Room.
Chapter 2: A Royal Affair

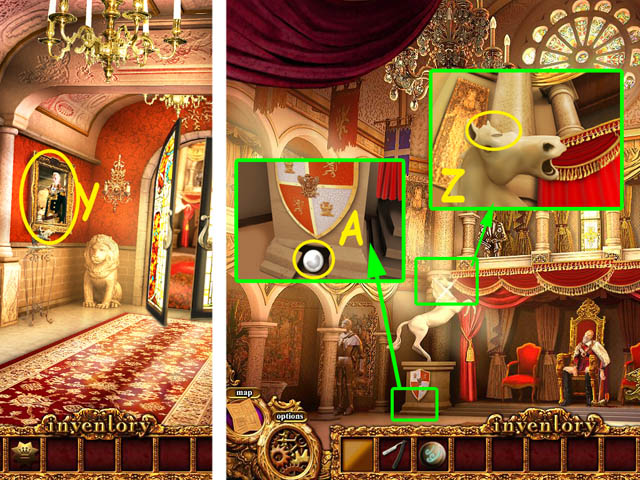
- Zoom into the base of the unicorn statue and collect the REDMOND CREST (S).
- Go forward to the King on his throne and collect the KING’S KEYS (T) from the side of his throne.
- Back out to the Throne Room.
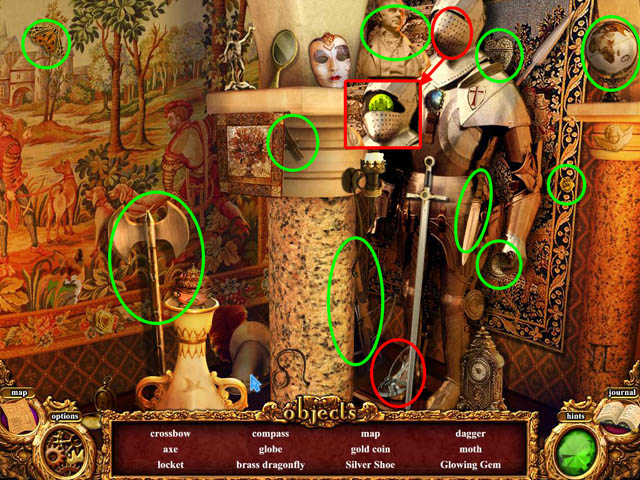
- Play the HOP under the archways to receive the SILVER SHOE and the GLOWING GEM.
- Return up the stairs and along to Hallway 1.
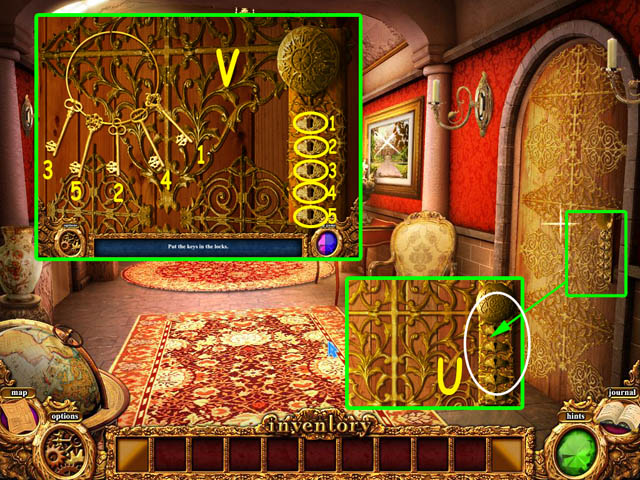
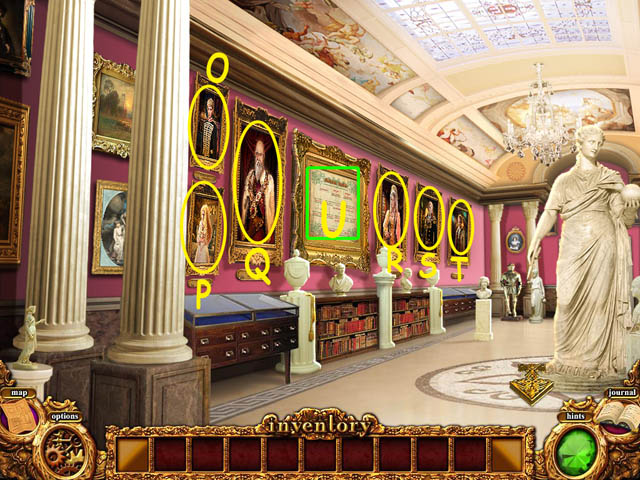
- Zoom into the ornate door and use the KING’S KEYS on the lock (U) to activate the Keys Puzzle.
- Complete the keys puzzle by inserting the keys into the locks in the correct order (V).
- Go right into the Royal Bedchamber.
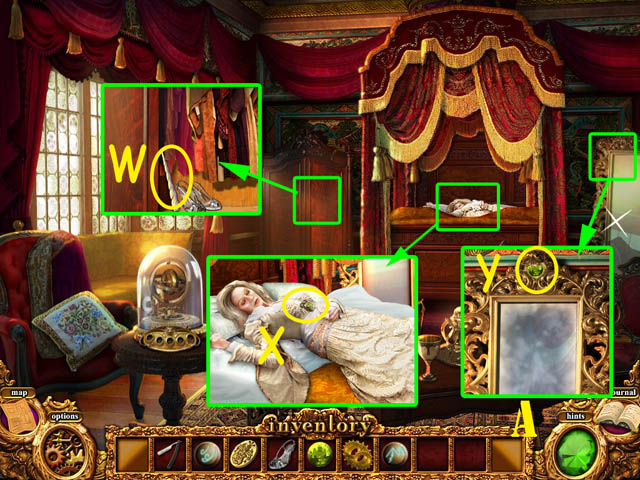
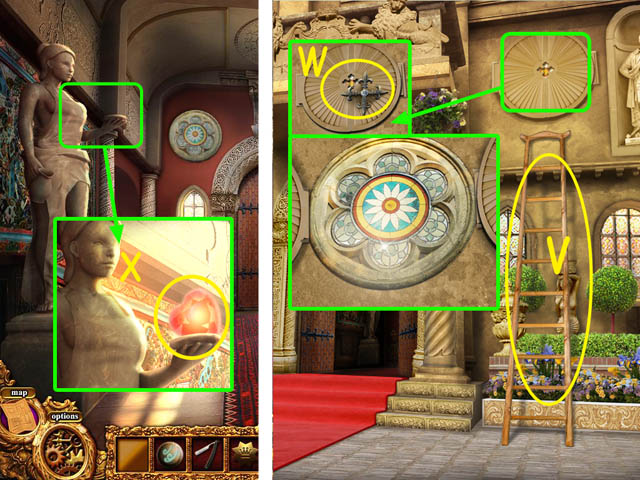
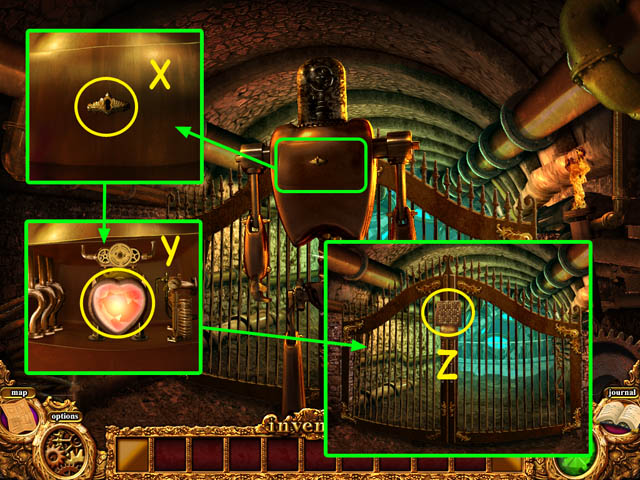
- Zoom into the wardrobe; open the door, place the SILVER SHOE next in the wardrobe and collect the UNICORN HORN (W).
- Zoom into the Queen on the bed and collect the GOLDEN SCARAB (X).
- Zoom into the mirror and insert the GLOWING GEM into the setting (Y).
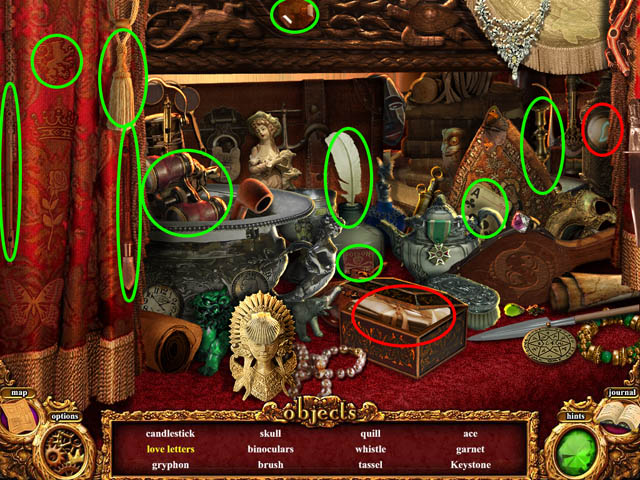
- Play the HOP that now appears below the bed to receive a KEYSTONE.
- Return to the Entrance Hall.
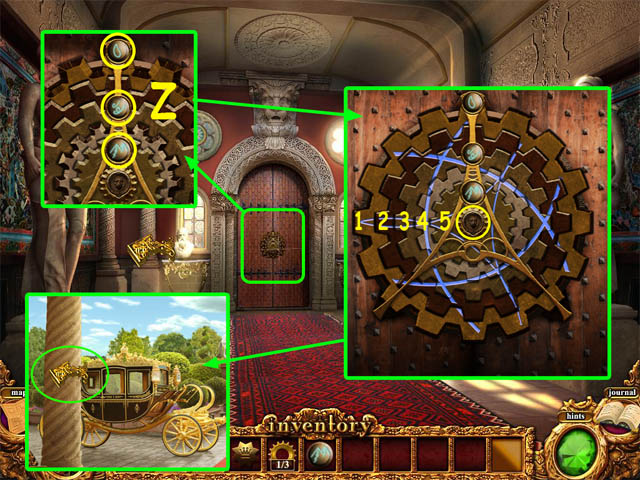
- Zoom in on the doorway and insert the 3 KEYSTONES into the correct slots (Z) to active the Door Puzzle.
- Rotate the disks on the door lock until they all align correctly. Rotate the centre piece into position first then ring 1, ring 2, ring 3, ring 4, ring 5.
- Go forward through the open doorway to the Courtyard, then head left to the Stables and Coach House.
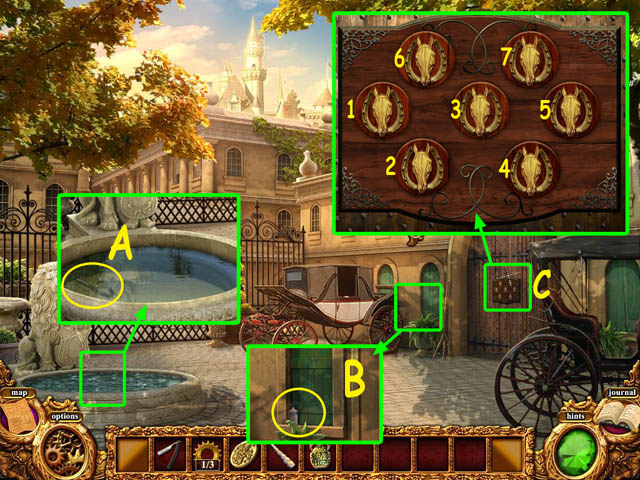
- Zoom into the pool and collect the WIRE HOOK (A).
- Zoom into the window next to the coach and collect the CAN OF OIL (B).
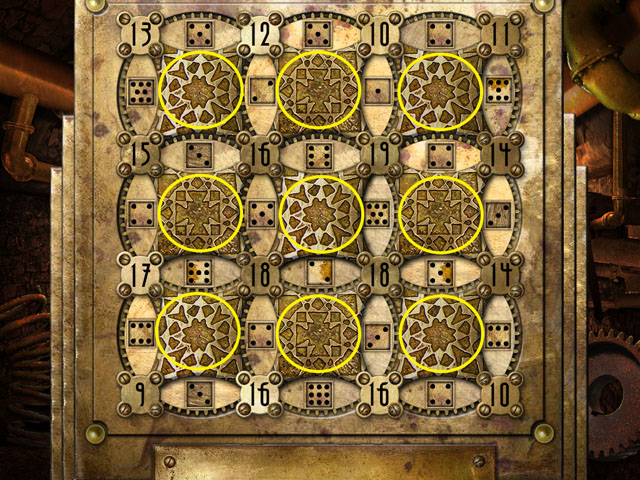
- Zoom into the Stable door (C) to active the Stable Puzzle. Rotate each horses head in turn 1,2,3,4,5,6,7 to align them.
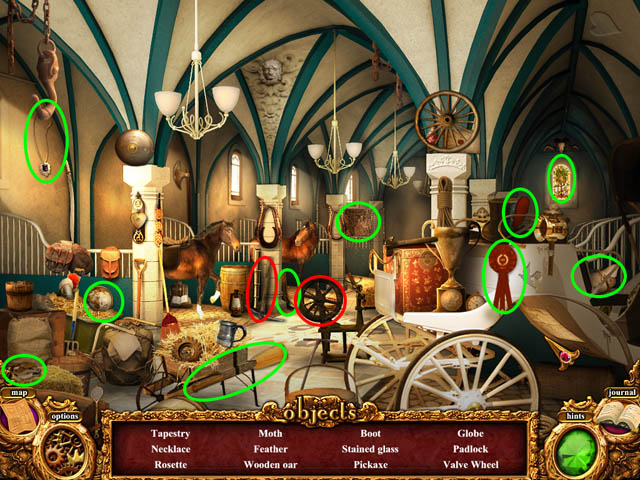
- Play the HOP behind the stable door to collect the PICKAXE and the VALVE WHEEL.
- Return to the Bathroom.
- Zoom into the bath and use the WIRE HOOK to retrieve the DOOR KEY (D) from the plughole.
- Back out of the Bathroom.
- Zoom into the door on the left of the Hallway; use the DOOR KEY (E) to open it.
- Go left through the open door and enter the Vanity Room.
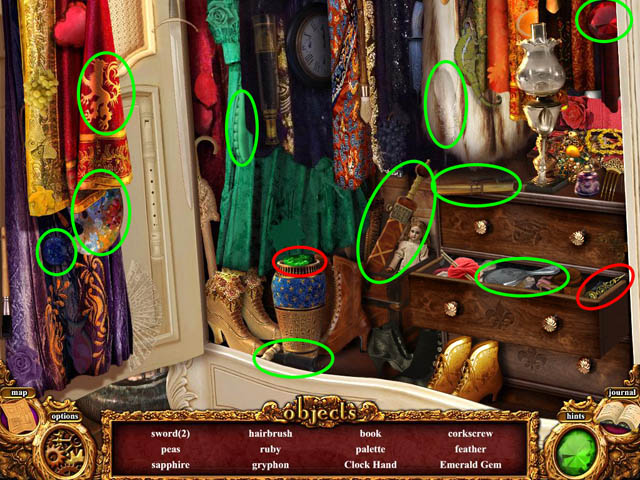
- Play the HOP in the open wardrobe to receive the CLOCK HAND and the EMERALD GEM.
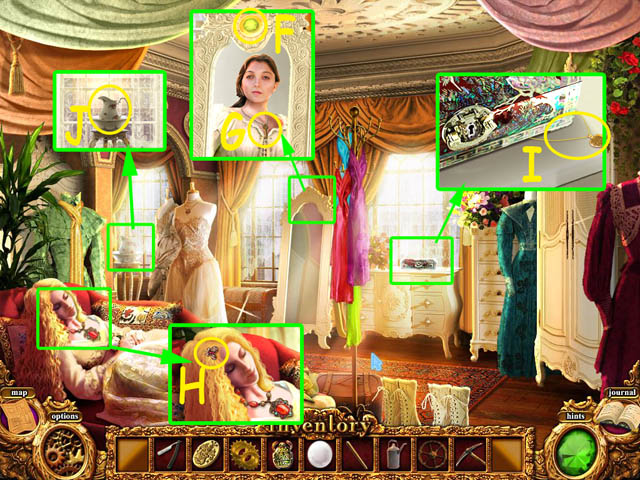
- Zoom into the mirror; insert the EMERALD GEM (F) into the empty setting and collect the SMALL BRASS KEY (G) after dialogue completes.
- Zoom into the princess and collect the HAIRPIN (H).
- Zoom into the dresser and collect the GOLD HEART (I).
- Zoom into the window and collect the EMPTY PITCHER (J).
- Return to the Bathroom.
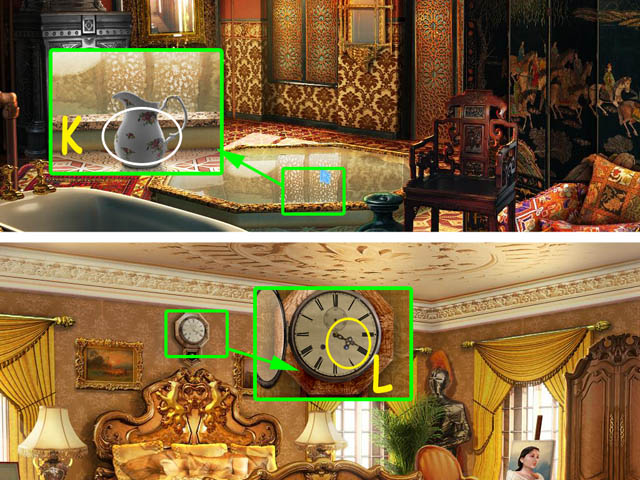
- Zoom into the sunken bath; use the EMPTY PITCHER on the water and collect the PITCHER OF WATER (K).
- Return to Alexander’s Room.
- Zoom into the clock; use the HAIRPIN to open the clock face and collect the CLOCK HAND (L).
- Return to the Stairs.
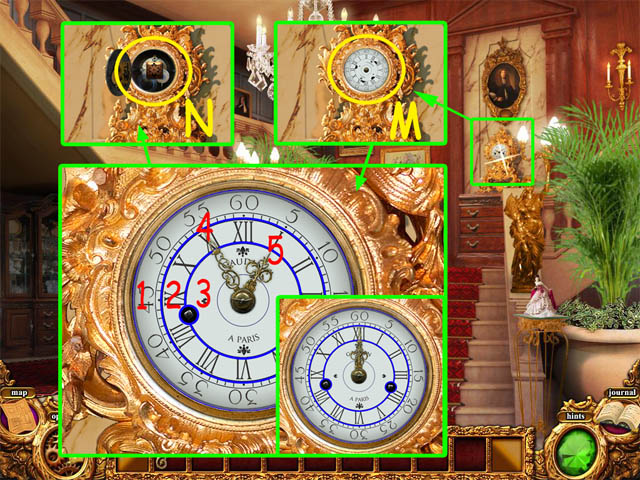
- Zoom into the gold clock and use the CLOCK HANDS (M) to activate the Clock Puzzle.
- Rotate face segments until they align and the hands are pointing to noon. Rotate rings into position from outside in followed by the minute hand then the hour hand.
- Zoom into the clock and collect the KEYSTONE (N).
- Back out of the Stairs into the Entrance Hall.
- Take the right archway to Hallway 3.
Chapter 3: A Broken Heart
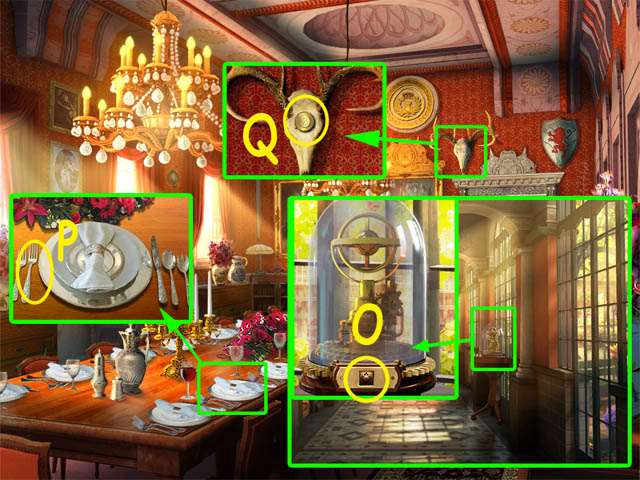
- Zoom into the domed device and insert the square DEVICE KEY (O) into the pedestal.
- Go left and enter the Dining Room.
- Zoom into the table and collect the SILVER FORK (P).
- Zoom into the stags head; use the SILVER FORK to collect the SMALL BRASS DISK (Q).
- Go through the door into the Drawing Room.
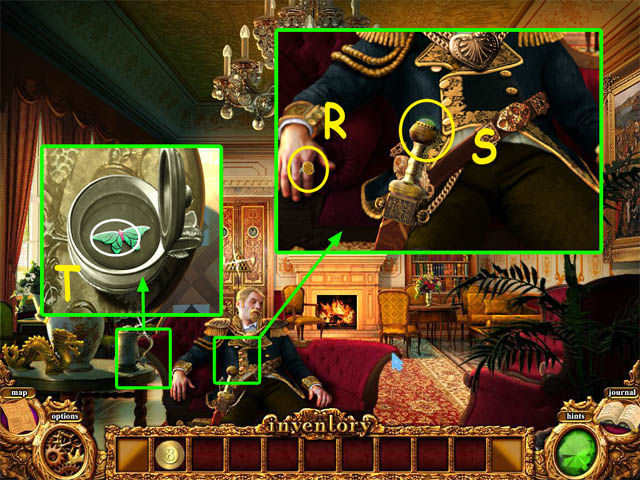
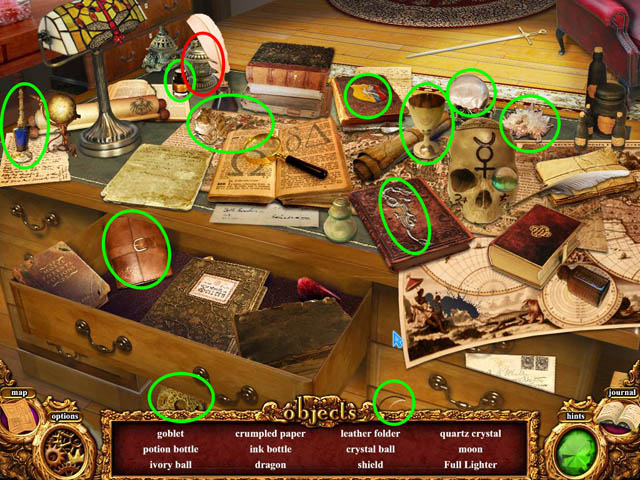
- Zoom into sleeping prince; insert REDMOND CREST (R) into his ring and collect MAGIC ORB (S) from sword pommel.
- Zoom into table, open tankard and collect GLASS BUTTERFLY (T).
- Go forward towards fire place.
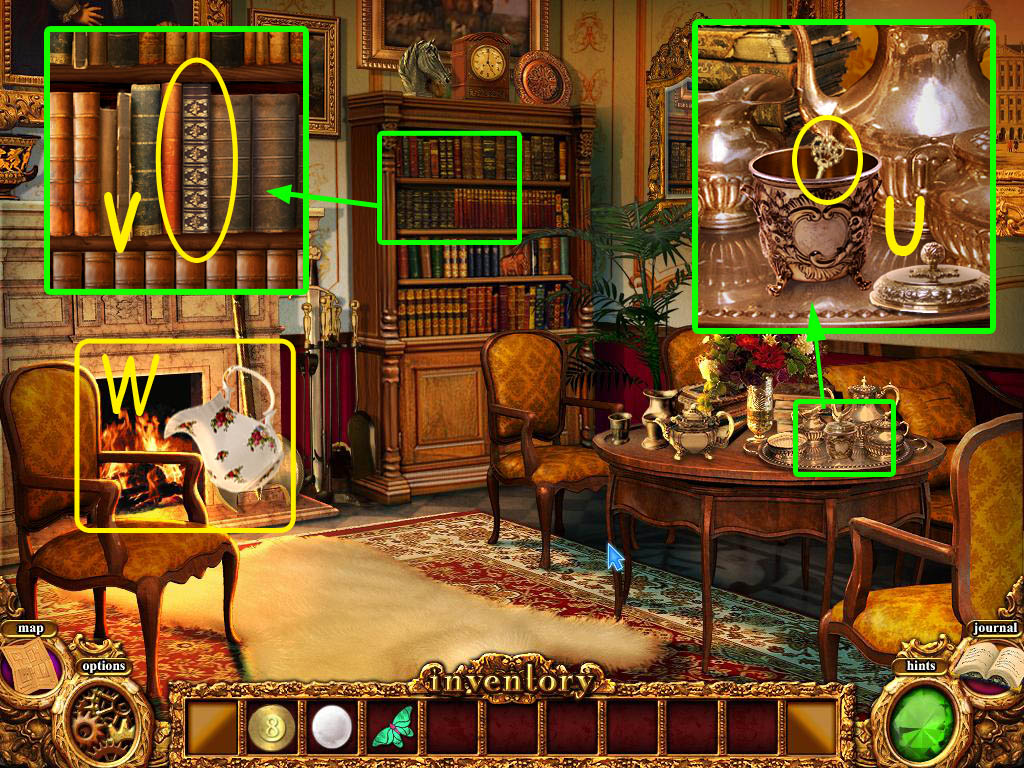
- Zoom into silverware on table and collect ORNATE KEY (U).
- Zoom into bookcase and collect MUSIC BOOK (V).
- Use PITCHER OF WATER to put out fire (W).
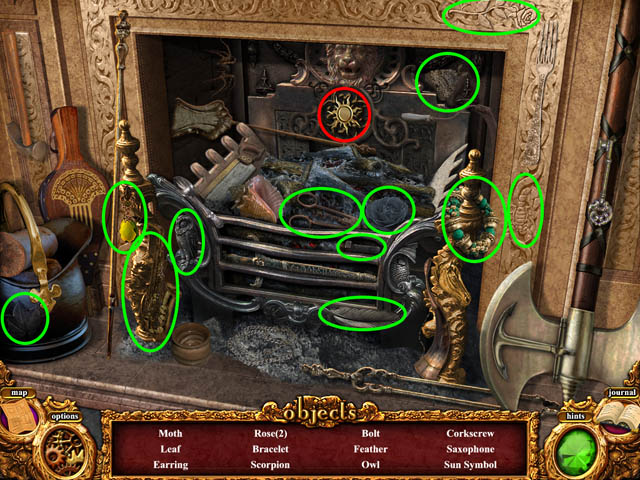
- Play the HOP in the fireplace to receive SUN SYMBOL.
- Go back 3 times to return to Hallway 3.
- Go forward to Hallway 4.
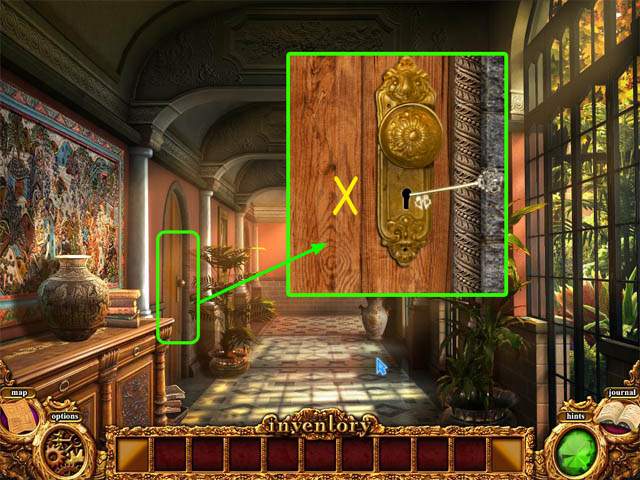
- Zoom into door and use ORNATE KEY (X) to open it.
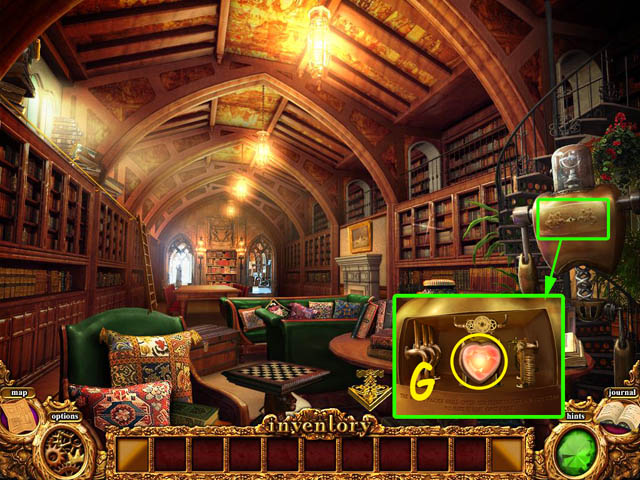
- Go left into Library.
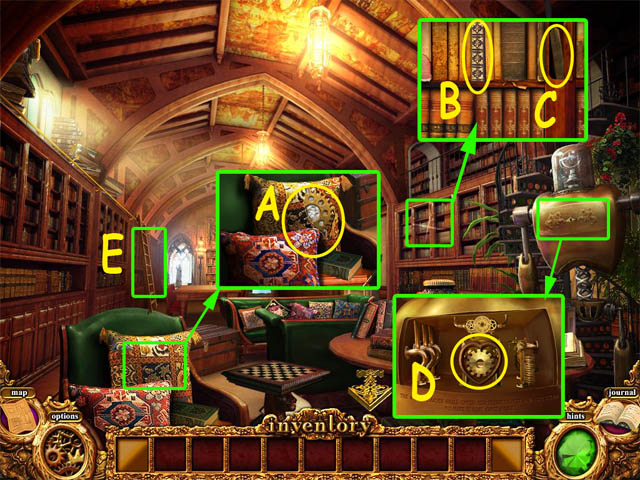
- Zoom into cushions; use RAZOR to cut cushion and collect COG (A).
- Zoom into bookcase on the right, insert MUSIC BOOK in gap (B) and collect SHEET MUSIC (C).
- Zoom into Brass Man; use SMALL BRASS KEY to open his chest and collect COG (D).
- Use CAN OF OIL on ladders (E) to activate HOP.
- Play HOP on top of bookcase to receive CLOCKWORK KEY and GLASS BUTTERFLY.
- Back out of Library.
- Go forwards to Hallway 5.
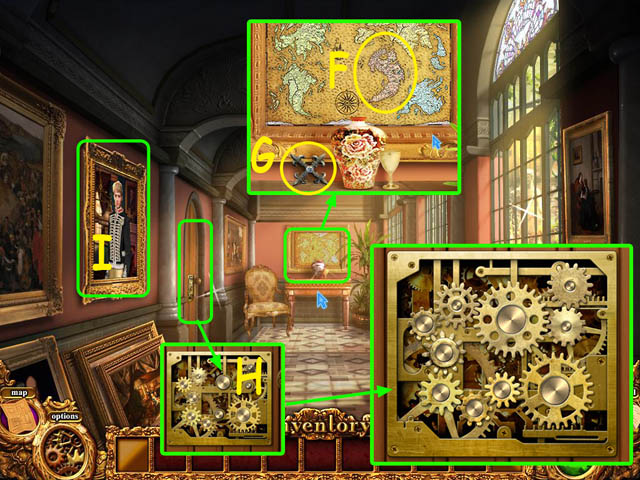
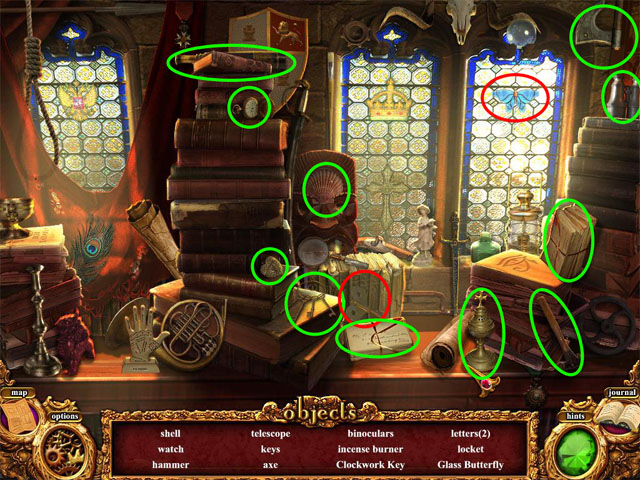
- Zoom into painting at the end of hallway and collect CONTINENT (F) and IRON CROSS (G).
- Zoom into door on left wall and use COGS on lock (H).
- Zoom into door again to active Cog Puzzle.
- Place cogs in the correct position to complete puzzle.
- Collect painting of PRINCE ALEXANDER (I) from the wall.
- Enter left door into Gallery.
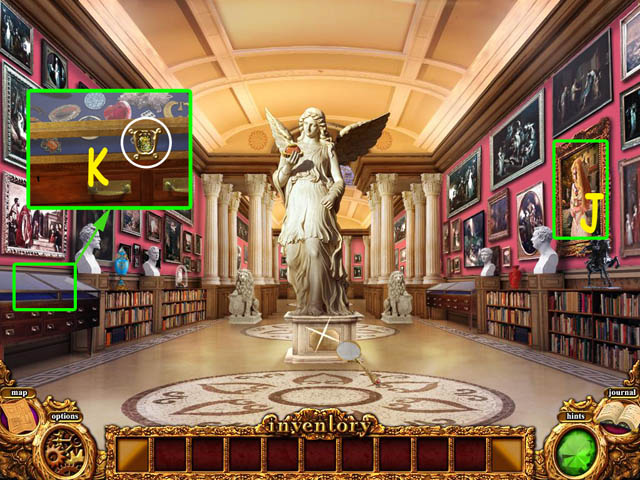
- Collect painting of PRINCESS ELISABETH (J) from wall.
- Zoom into cabinet on the left and use GOLDEN SCARAB (K) to open it.
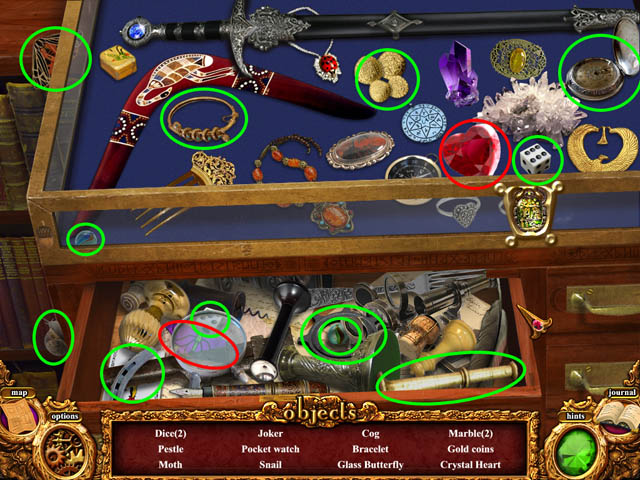
- Play HOP in display case to receive a GLASS BUTTERFLY and a CRYSTAL HEART.
- Return to the Drawing Room.
- Zoom into doorway and use SMALL BRASS DISK (L).
- Zoom back into doorway to activate puzzle (M). Click on the balls to turn them over and reveal the matching pairs. See screenshot for solution.
- Enter door into Games Room.
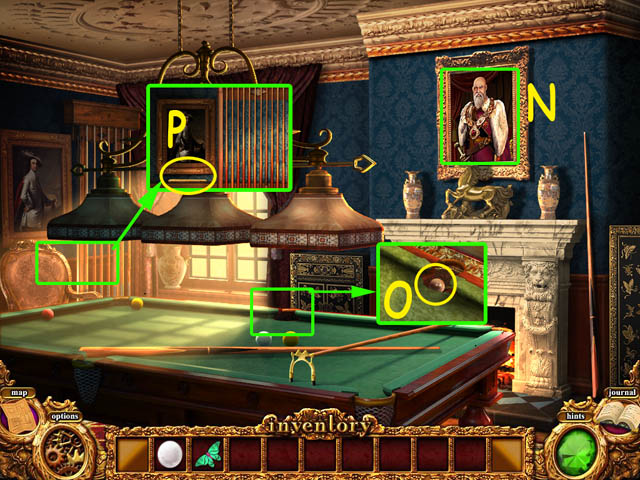
- Collect painting of King EDWARD (N) from wall.
- Zoom into pocket and collect HOLLOW SPHERE (O).
- Zoom Into cue rack and collect LADDER RUNG (P).
- Return to Entrance Hall.
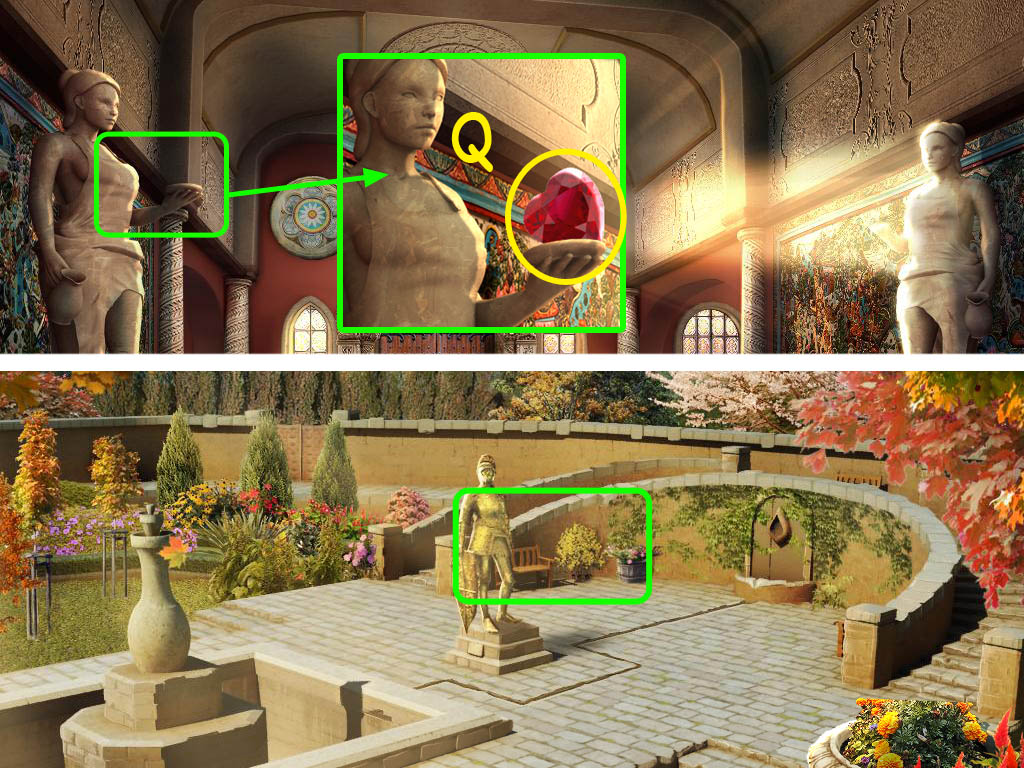
- Zoom into statue on the left and place CRYSTAL HEART (Q) into empty dish.
- Go forwards into the Courtyard, then forwards again to the Garden.
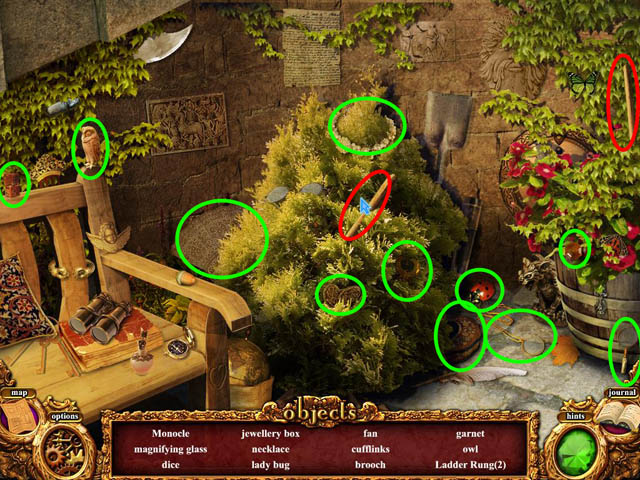
- Play the HOP next to the bench to receive 2 LADDER RUNGS.
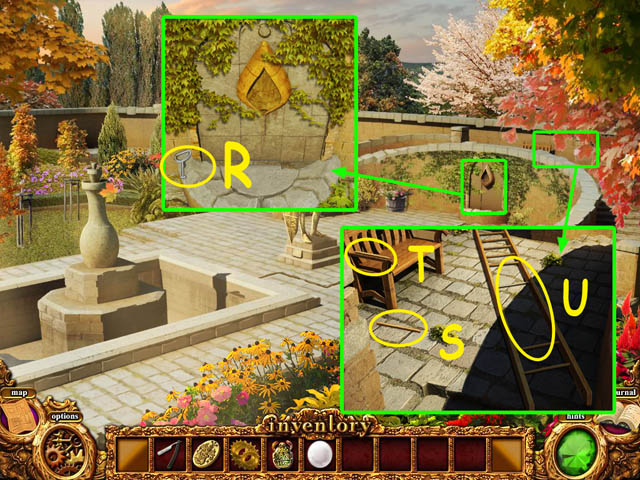
- Zoom into small fountain and collect MANHOLE KEY (R).
- Zoom into top of steps; collect LADDER RUNG from ground (S) and bench (T). Use all 5 LADDER RUNGS to repair ladder then collect LADDER (U).
- Back out of Garden.
- Back out of the Courtyard to the Entrance Door.
- Use the LADDER on the right hand window (V).
- Zoom into the window and use the IRON CROSS on shutters (W).
- Go forward to the Entrance Hall.
- Zoom into left hand statue and collect the GLOWING HEART (X).
- Take the left exit from the Entrance Hall into Hallway 2.
Chapter 4: The Family Tree
- Collect painting of PRINCE LUCAS (Y).
- Go forward to the Throne Room.
- Zoom into the unicorns head and fit UNICORN HORN (Z) to it.
- Zoom into base of unicorn statue and collect MAGIC ORB (A).
- Back out of the Throne Room.
- Go left through door into the Ballroom.
- Collect painting of QUEEN MARIA (B).
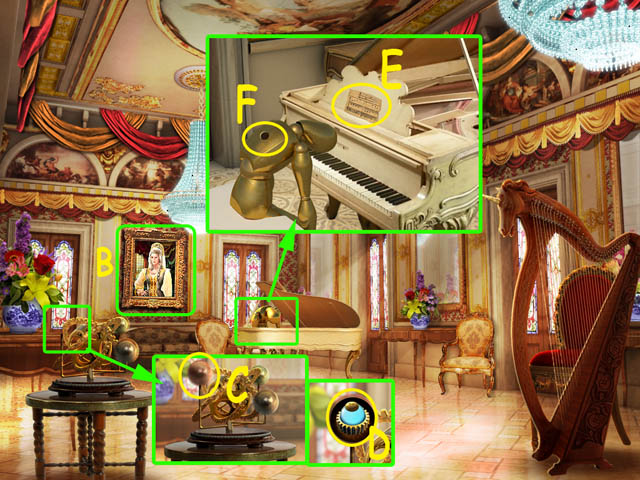
- Zoom into brass device and place HOLLOW SPHERE (C) onto the device. Open the sphere and collect AIR ELEMENTAL (D) from inside.
- Zoom into the piano; place the SHEET MUSIC (E) on the piano then CLOCKWORK KEY (F) into the brass mannequin. Select the sheet music to start the Piano Puzzle.
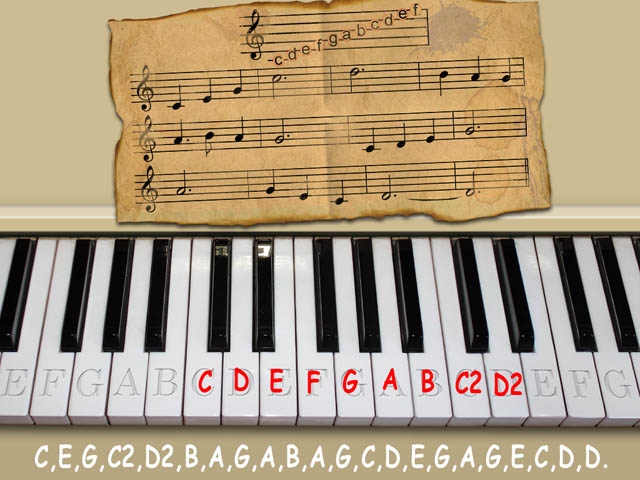
- Complete the piano puzzle by playing the keys in the correct order as listed on the sheet music. C,E,G,C2,D2,B,A,G,A,B,A,G,C,D,E,G,A,G,E,C,D,and D.
- Play the HOP in the mirror to receive the MAGIC ORB.
- Return to the Library.
- Zoom into the Brass Man and place the GLOWING HEART (G) into its chest.
- Go up spiral stair to the Study.
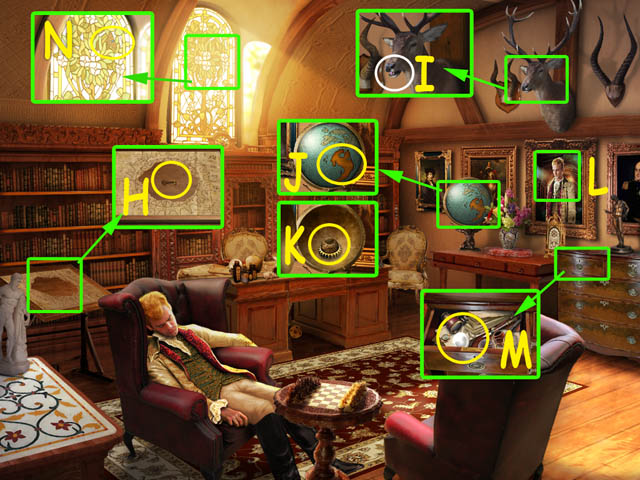
- Zoom into drawing board and collect the SMALL BRASS KEY (H).
- Zoom into deer head; open its mouth then collect SILVER KEY (I).
- Zoom into globe, insert CONTINENT (J) into map to open globe and collect EARTH ELEMENTAL (K).
- Collect painting of PRINCE RUPERT (L) from wall.
- Zoom into drawers; use SILVER KEY to open drawer and collect MAGIC ORB (M).
- Zoom in to stained glass window and collect GLASS BUTTERFLY (N).
- Play the HOP on the desk to receive the LIGHTER.
- Return to the Gallery.
- Hang all 5 PAINTINGS in the correct places on the wall. Prince Alexander (O), Princess Elisabeth (P), King Eduard (Q), Queen Maria (R), Prince Lucas (S), Prince Rupert (T).
- Zoom into the Family Tree (U) to play puzzle.
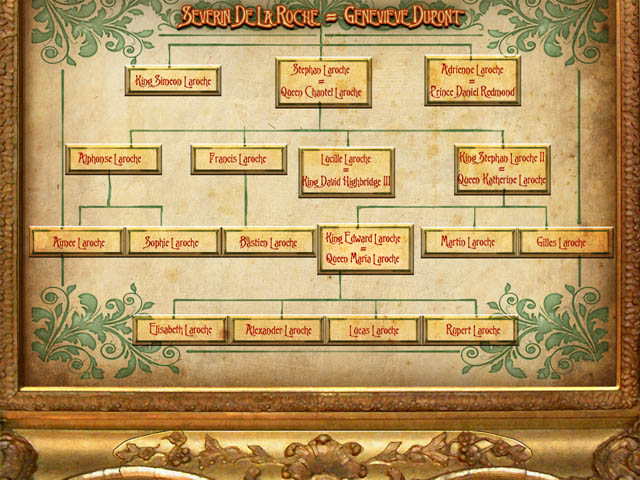
- Place all members of the family into the correct slots of the family tree to complete the puzzle and return to Gallery.
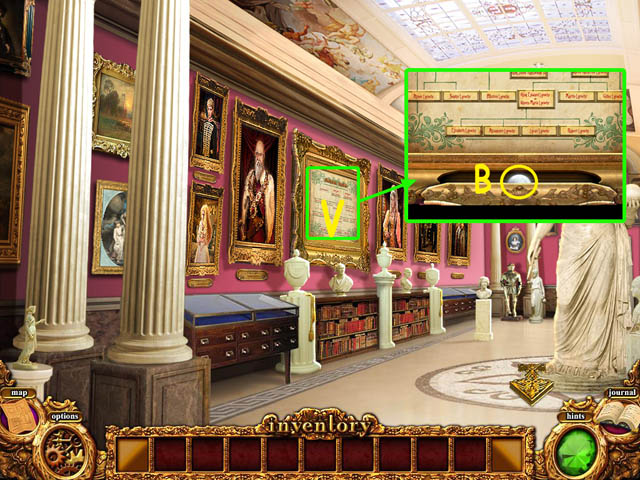
- Zoom back into family tree (V) and collect the MAGIC ORB (W).
- Return to Royal Bedchambers.
Chapter 5: The Laroche Curse
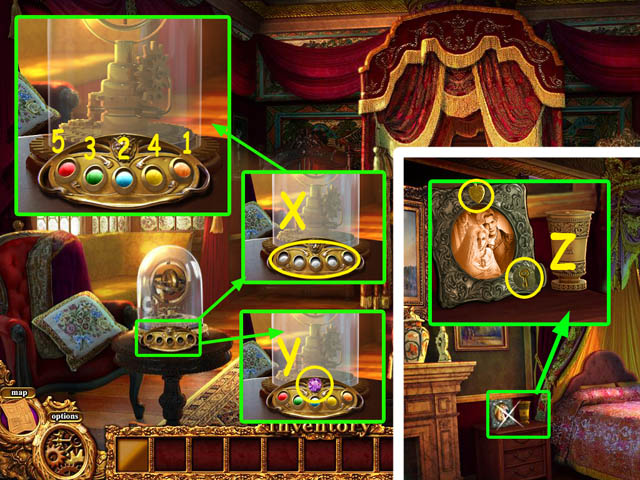
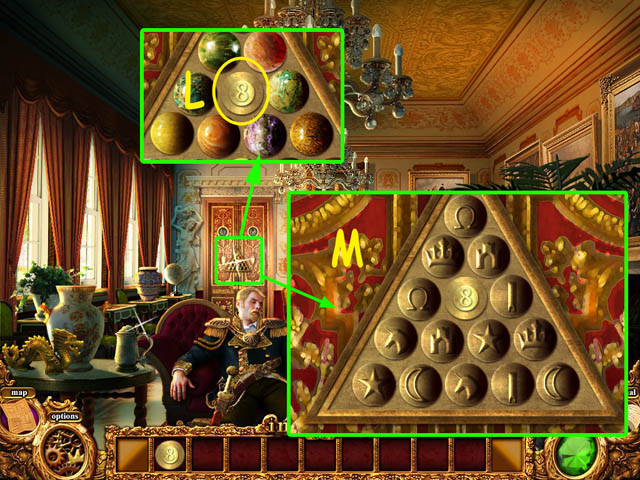
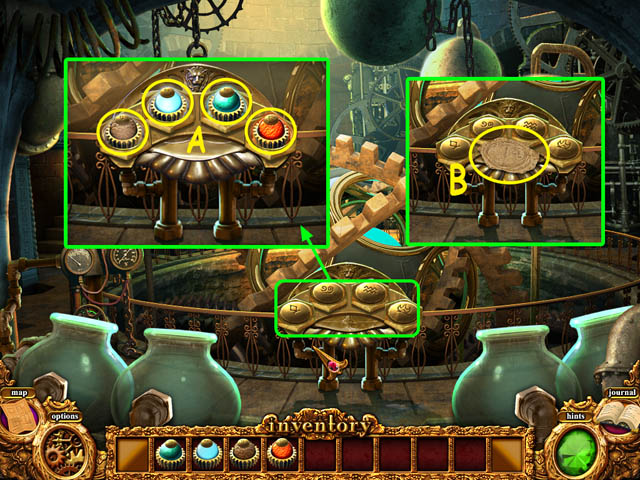
- Zoom into domed device; insert the 5 MAGIC ORBS (X) into the device pedestal then click to active Device Puzzle.
- Light the orbs in the correct order 1,2,3,4,5 to complete the puzzle.
- Zoom back into the domed device and collect the AMETHYST GEM (Y).
- Return to Guest Bedroom.
- Zoom into the bedside table; insert the GOLDEN HEART into the picture frame and collect the TINY KEY (Z) from the frame.
- Return to the Vanity Room.
- Zoom into the dresser; use the TINY KEY on the jewellery box and collect ROYAL SEAL (A).
- Return to the Courtyard.
- Zoom into the carriage; use ROYAL SEAL (B) to open the door and collect TRUNK KEY (C) from inside carriage.
- Return to the Vanity Room.
- Zoom into trunk; use TRUNK KEY to open and collect GLASS BUTTERFLY (D) from inside jewellery box.
- Return to Hallway 5.
- Zoom into glass door and insert the 5 GLASS BUTTERFLIES (E) into the stained glass window.
- Go right into Conservatory.
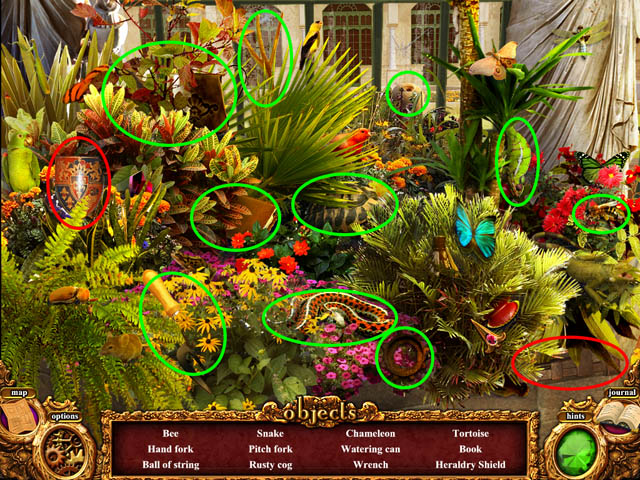
- Play HOP in the plants to receive HERALDRY SHIELD and WRENCH.
- Go forward through Conservatory door into Inner Garden.
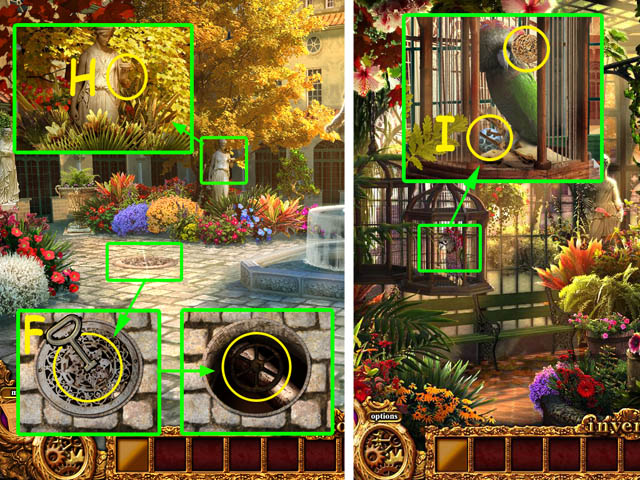
- Zoom into grate; use MANHOLE KEY (F) to open grate then use VALVE WHEEL (G) on pipe to turn off fountain water.
- Zoom into statue and collect the BALL OF BIRDSEED (H).
- Go back to the Conservatory.
- Zoom into the birdcage; open the cage, use the BALL OF BIRDSEED to calm the bird and collect the WATER SYMBOL (I).
- Return to Outer Garden.
- Zoom into small fountain and place WATER SYMBOL (J) into the recess above the fountain.
- Zoom into the pond and collect the WATER ELEMENTAL (K).
- Return to the Bathroom.
- Zoom into the sink and use the WRENCH on the lever to collect the VALVE LEVER (L).
- Return to rear of the Gallery.
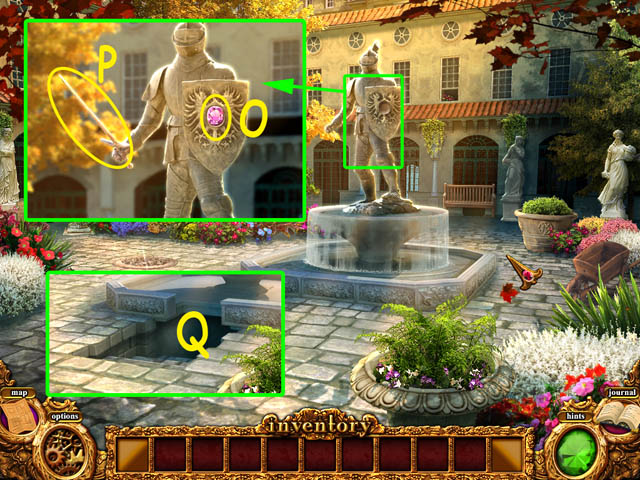
- Zoom into the suit of armor and use the HERALDRY SHIELD on its breastplate to open the knight’s hand and collect the KINGHTS SWORD (M).
- Return to the Conservatory.
- Zoom into bench and use VALVE LEVER (N) on the pipe.
- Go forward to the Inner Garden.
- Zoom into the fountain; place the AMETHYST GEM (O) and the KIGHTS SWORD (P) onto the statue.
- Head down the passage (Q) into Catacombs.
Chapter 6: The Heart of the Palace
- Use LIGHTER (R) to light torch on the right hand wall.
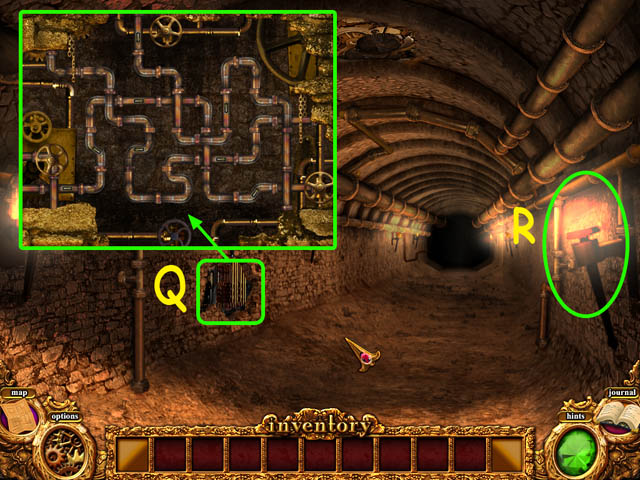
- Zoom into the hole in the left wall to activate Pipe Puzzle. Rotate all the pipes until they are all aligned correctly to flow gas to the torches.
- Move forward to Junction then go right to Dead End.
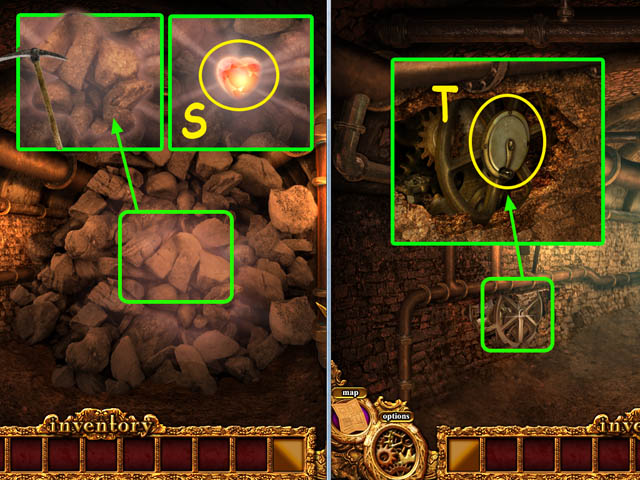
- Zoom into rock pile and use PICKAXE to retrieve GLOWING HEART (S).
- Back out of dead end into Junction then go left.
- Zoom into the gap in the wall and collect the WINCH HANDLE (T).
- Return to the Gallery.
- Zoom into the base of the statue and insert the SUN SYMBOL (U) in the plaque. Open the plaque and use the WINCH HANDLE (V) on the cogs.
- Collect the charged FIRE ELEMENTAL (W) from the angels’ hand.
- Return to the Catacombs.
- Head forwards, left and forwards until you come to the Gate.
- Zoom into Brass Man; use SMALL BRASS KEY (X) to open chest plate then use GLOWING HEART (Y) to activate Brass Man.
- Click on Gate (Z) to activate Gate Puzzle.
- Left-click the centre of each of the dials to rotate them until your screen matches the image.
- Go forward through gates and enter the Heart of the Palace.
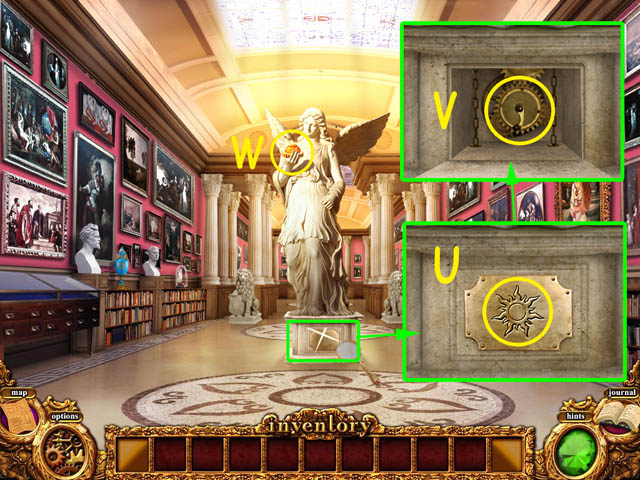
- Zoom into the pedestal and insert the 4 ELEMENTS (A) into the correct slots.
- Collect SECTION OF HEART PLANS (B).
- Return to the Study.
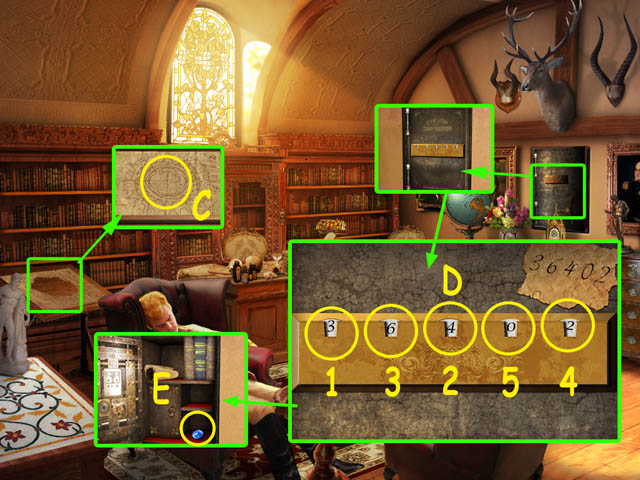
- Zoom into the drawing board and use the SECTION OF HEART PLANS (C) to reveal code for safe.
- Zoom into safe then activate Safe Puzzle.
- Solve the puzzle (D) to open the safe. Rotate each dial into position in the following order, 1,2,3,4,5.
- Zoom into safe and collect the GLOWING BLUE STONE (E).
- Return to the Throne Room.

- Zoom into the close up of the King and use GLOWING BLUE STONE (F) on the amulet.
- Speak to the King then watch as the power of the Blue Stone destroys the Heart and awakens the Royal family.
- Congratulations, you have completed Mystery Murders: The Sleeping Palace.


 Ranch Rush 2 Collector's Edition Walkthrough, Guide, & Tips
 Secrets of the Dragon Wheel Walkthrough, Guide, & Tips
 The Clumsys 2: The Butterfly Effect Walkthrough, Guide, & Tips
 The Secret Legacy: A Kate Brooks Adventure Walkthrough, Guide, & Tips
 Grim Tales: The Wishes Walkthrough, Guide, & Tips