Tearstone Walkthrough, Guide, & Tips
Tearstone Walkthrough

Welcome to the Tearstone Walkthrough!
Set off on an adventure and help your professor with a mysterious discovery in Tearstone, a fun Hidden Object game!
Whether you use this document as a reference when things get difficult or as a road map to get you from beginning to end, we’re pretty sure you’ll find what you’re looking for here.
This document contains a complete Tearstone game walkthrough featuring annotated screenshots from actual gameplay!
We hope you find this information useful as you play your way through the game. Use the walkthrough menu below to quickly jump to whatever stage of the game you need help with.
Remember to visit the Big Fish Games Forums if you find you need more help. Have fun!
This walkthrough was created by Chie, and is protected under US Copyright laws. Any unauthorized use, including re-publication in whole or in part, without permission, is strictly prohibited.
General Tips

- From the main menu you can change the player, adjust options like sound volume and full screen, watch the credits or play the game.
- This game has many cursors.
- The gears cursor means you have to use and object in this location (1).
- The red exclamation point means that a person has more information for you.
- The talking cursor means you can talk to a person in the environment (2).
- The hand cursors means you can take an item (3).
- The gears with the movement cursor means an area is locked and needs and item to the cursor.
- The puzzle piece cursor means there is a puzzle you can do in this area.
- The movement cursors without the gears means you can move freely to a new scene.
- At the bottom of the screen your have your inventory.
- To the left of the inventory you can get a hint or access the main and options menu.
- To the right of the inventory is the Magic Mixer. You can put two objects in this device and press the mix button to make new objects. The new objects always have a small ‘m’ in the corner of the icon in the inventory.
- When you start a chapter all of the items that you can find in the chapter will be grayed out in your inventory.
- As you find items they will become full color icons.
- As you finish using the items they will be removed from your inventory.
- Some items will be sets, and the number that you need compared to the number that you have will be written beside them.
- Many times things will be in the environment that you can use without even needing to add them to the inventory. These items usually happen in a chain where one unlocks another by using them.
Chapter 1


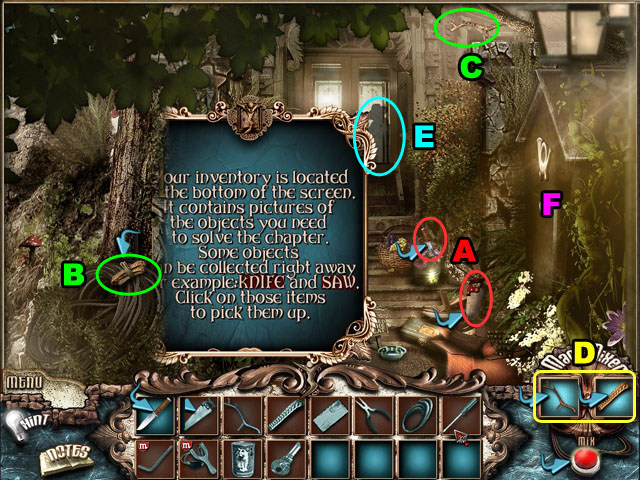
- Follow the tutorial messages.
- Pick up the KNIFE and the SAW (A).
- Use the KNIFE at the left and collect the RUBBER BAND. Use the SAW on the branch at the top and collect the BRANCH (C).
- Put the BRANCH and the RUBBER BAND in the Magic Mixer in the bottom right corner. Click the Mix button to get the SLINGSHOT (D).
- Use the SLIGNSHOT on the man through the door (E).
- Go to the next scene through the door (F).

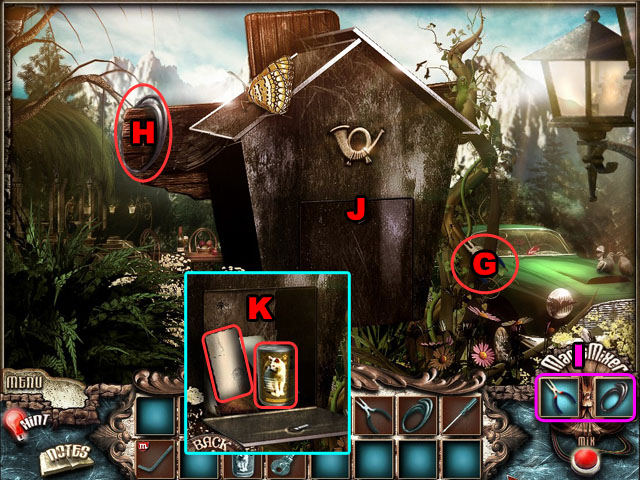
- You cannot get into the car without a key.
- Collect the PLIERS (G) and the WIRE (H) and use them in the Magic Mixer.
- You will receive the LOCK PICK.
- Use the LOCK PICK on the door (J).
- Collect the CAT FOOD and read the letter to the left (K).
- Click the back button to go back to the last scene.

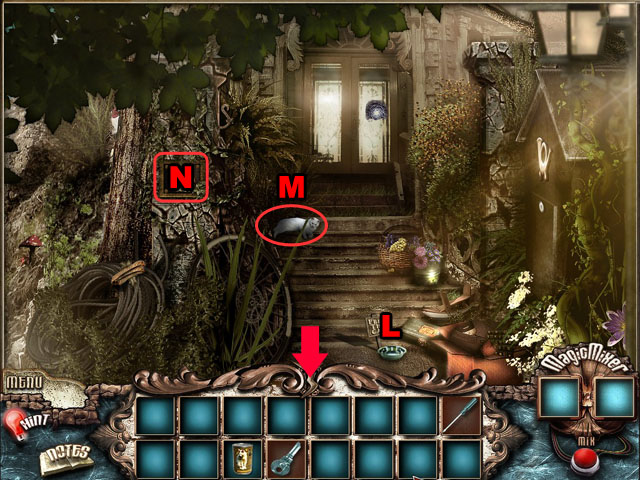
- Use the CAT FOOD on the cat’s dish (L).
- From behind the cat, collect the SCREWDRIVER (M).
- Use the SCREWDRIVER on the door and take the KEY from behind it (N).
- Return to the scene with the car.

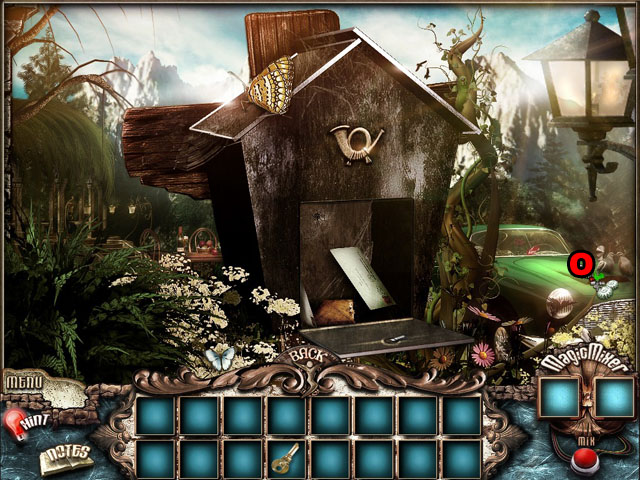
- Use the KEY on the car to finish the chapter.
Chapter 2

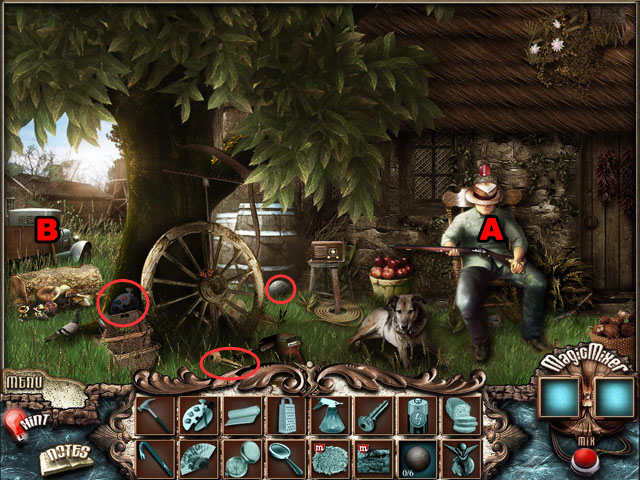
- Click on the man sitting in the chair (A).
- Collect the items on the ground, the KEY, the STONE BALL and then the PALETTE circled in red.
- Go to the next scene behind the house (B).

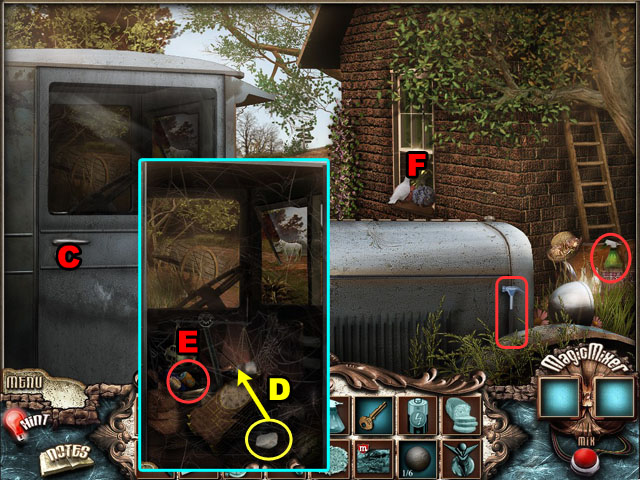
- Collect BUG SPRAY and the HAMMER.
- Open the door to the truck (C).
- Use the rock (D) on the right side of the scale to life up the left side.
- Collect the BATTERY from under the scale.
- Enter the house through the window (F).

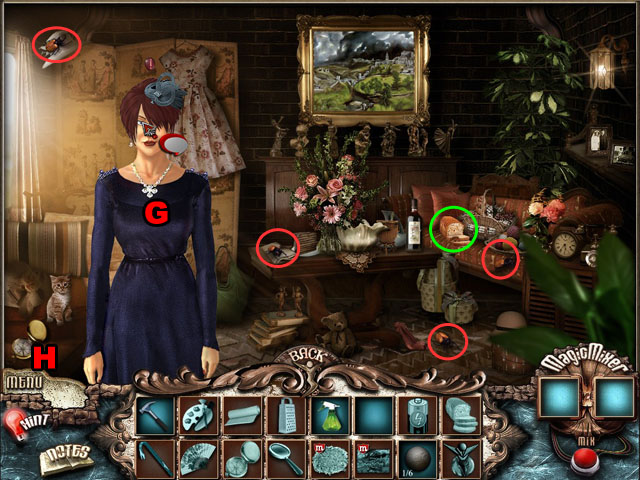
- Talk the to the woman standing in the room (G).
- Collect the BREAD circled in green.
- Use the BUG SPRAY on the bugs circled in red.
- Talk to the woman again and she will give you a compass.
- Collect the COMPASS (H).
- Talk to the woman one more time before you leave the scene.
- Click to go back.

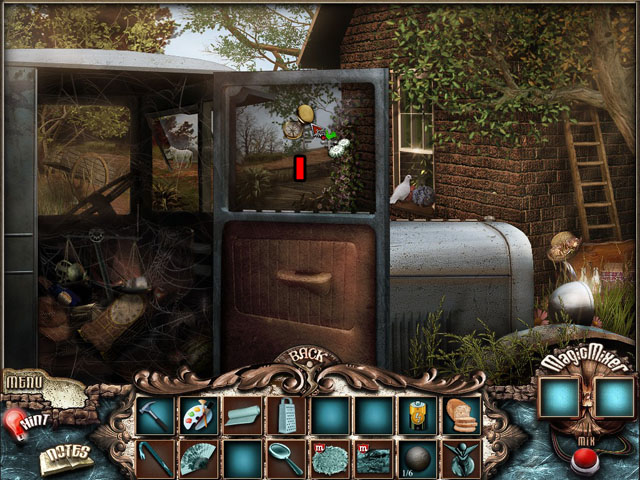
- Use the COMPASS on the path to the woods to travel to the next scene.

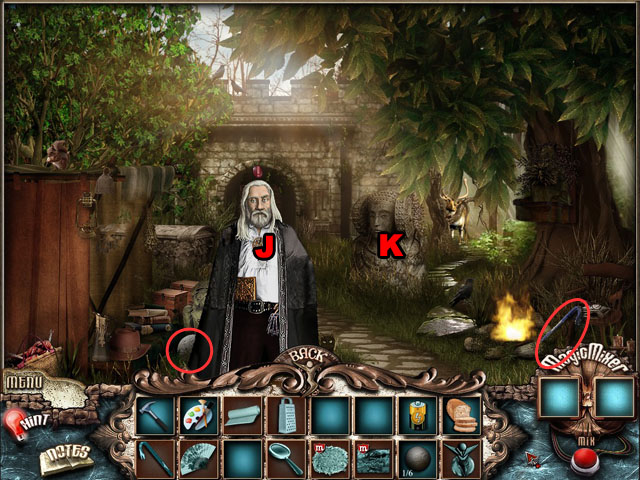
- Collect the STONE BALL and the CROWBAR.
- Talk to the man standing in front of you (J).
- Click on the statue head in the background (K).

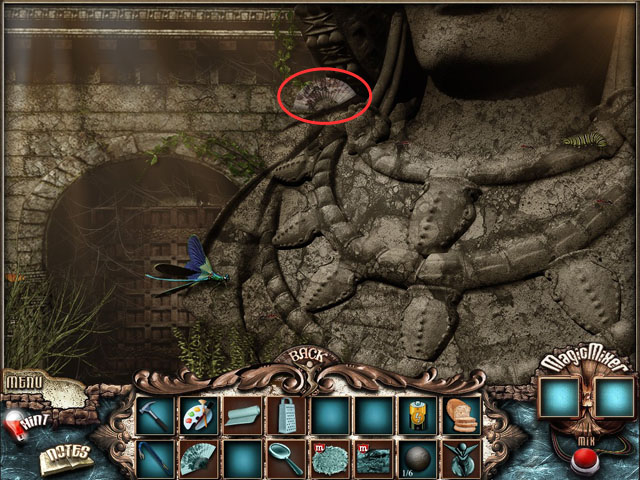
- Collect the FAN.
- Return to the woman inside the window.

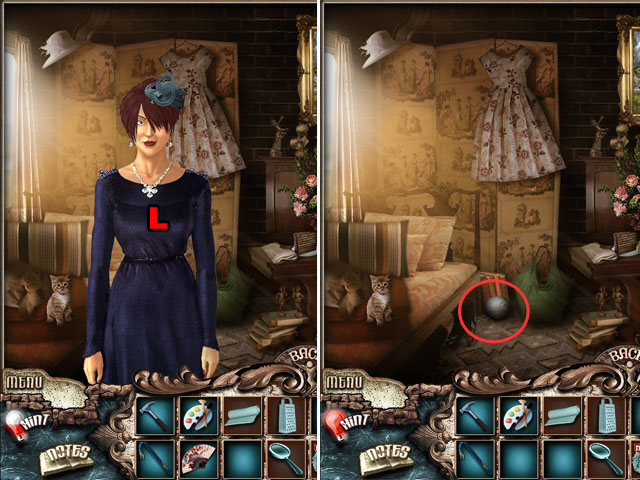
- Give the FAN to the woman (L) and retrieve the IRON BALL from behind where she was standing.

- Return to the first scene.
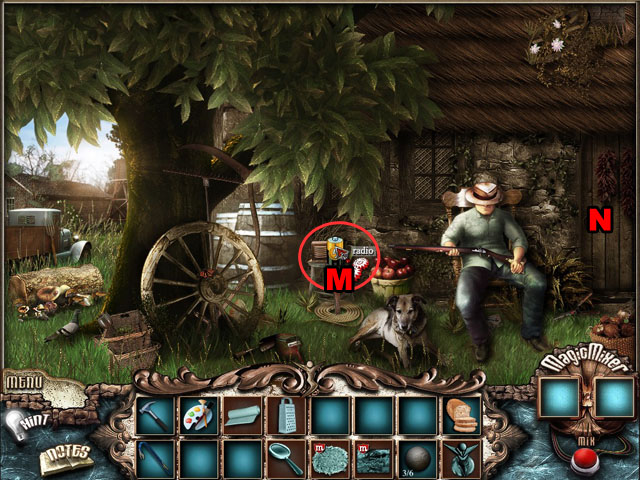
- Use the BATTERY on the radio (M).
- You can now enter the house to the right (N).

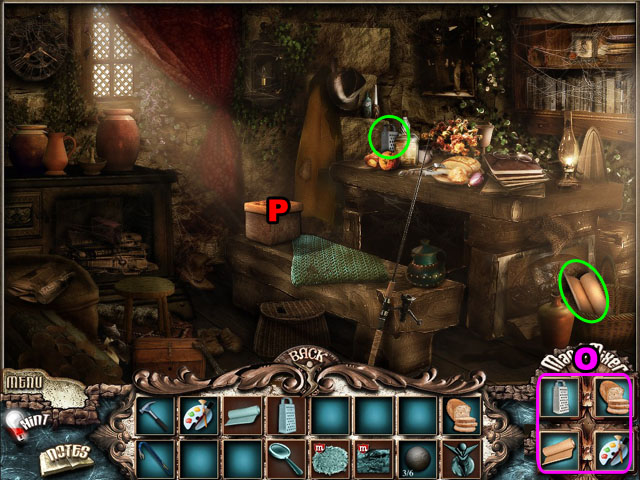
- Inside the house, collect the CHEESE GRATER and the CANVAS circled in green.
- Click on the basket to start the first mini-game (P).
- Use the BREAD and the GRATER in the Magic Mixer to make CRUMBS.
- Use the CANVAS and the PALETTE in the Magic Mixer to create the FORGERY (O).

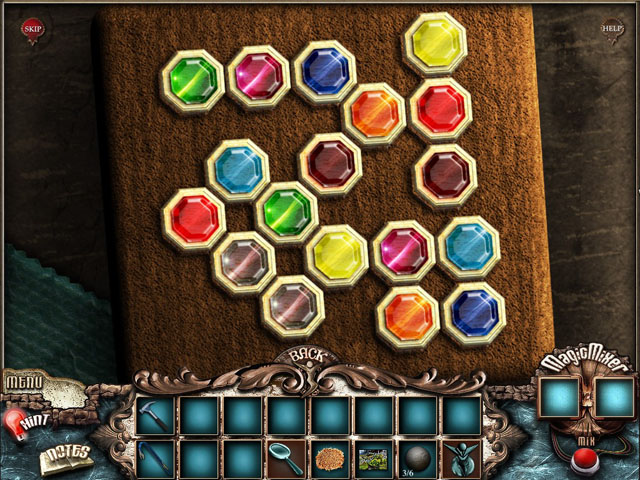
- Click on any one of the gems to reveal it’s color and then another to try and find it’s match.
- When the two gems match, their colors will stay lit.
- If you pick two gems that do not match, they will darken again.
- Light up all of the gems to finish the puzzle.
- The solution to the puzzle is not randomized. See the screenshot for correct locations of all the colors.

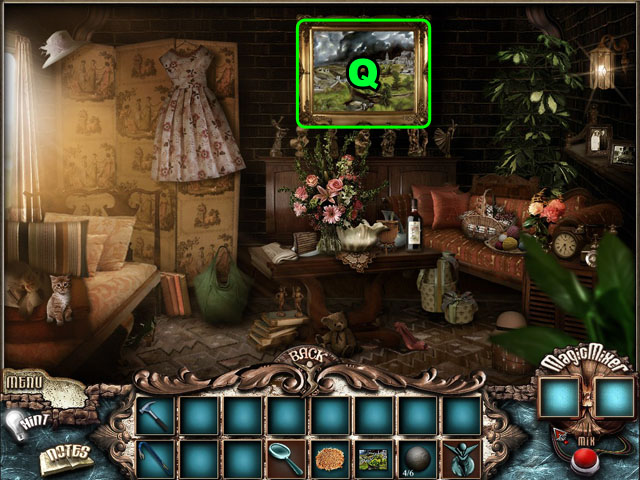
- Return to the woman’s house and use the FORGERY on the painting (Q).
- This will start up the next mini-game.

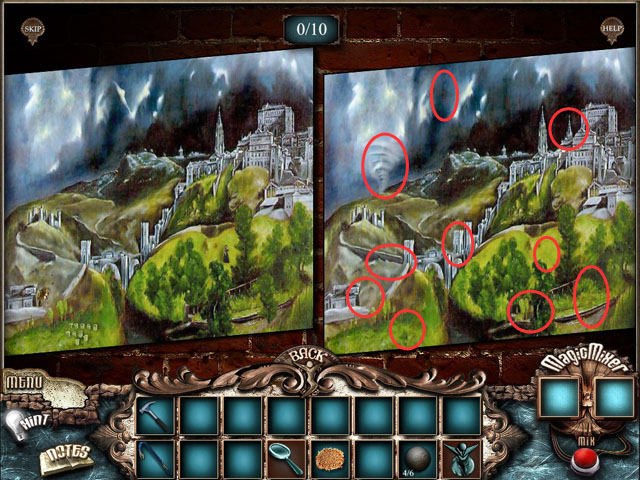
- Find the 10 differences between the two paintings.
- There will be things missing or added in either side of the painting. Click on the painting on the right and the difference will disappear.
- See the screenshot for the solution.

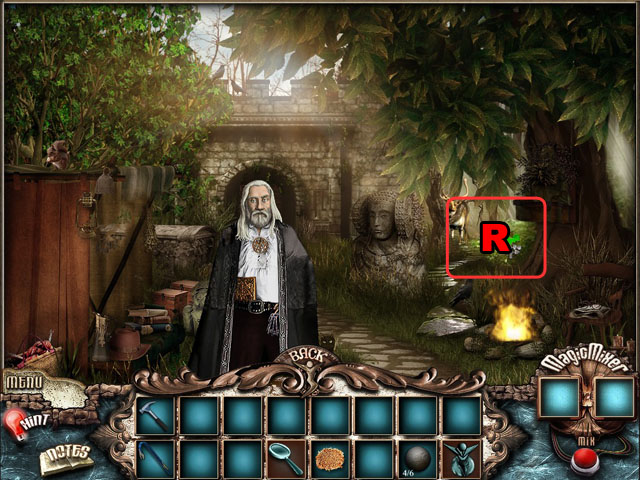
- Return to the man in the woods path.
- Click on the area to the right (R).

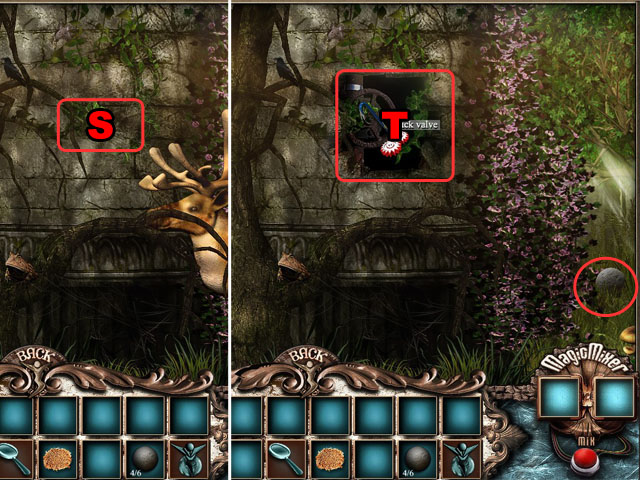
- Use the hammer on the wall to break it (S).
- The deer will leave the scene and you can take the IRON BALL in the corner.
- Use the CROWBAR on the stuck value to turn it (T).
- Exit this area to the previous scene.

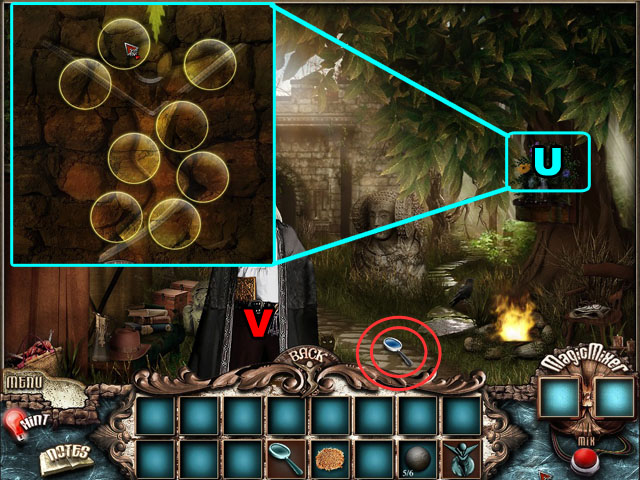
- Click on the flower basket on the tree to start another mini-game (U).
- Arrange all of the circles into the correct positions.
- Click on the circles and drag it to an empty spot. You can tell which one is the correct position by the lines on the circle.
- See the screenshot for the correct answer.
- After putting the pieces together talk to the man again (V).
- Collect the MAGNIFYING GLASS on the road.

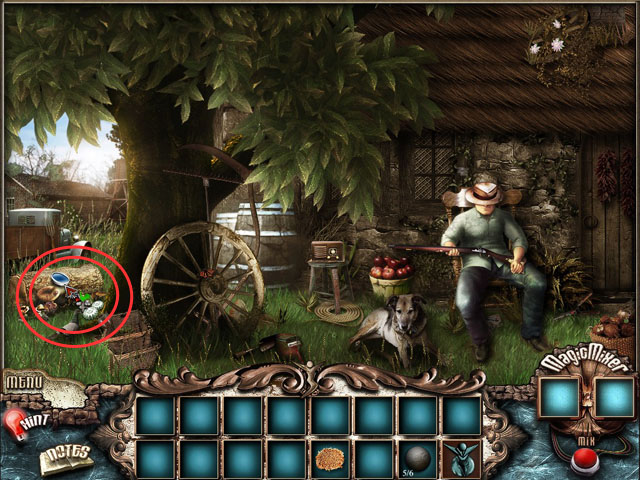
- Return to the first scene and use the MAGNIFYING GLASS on the log in the background.

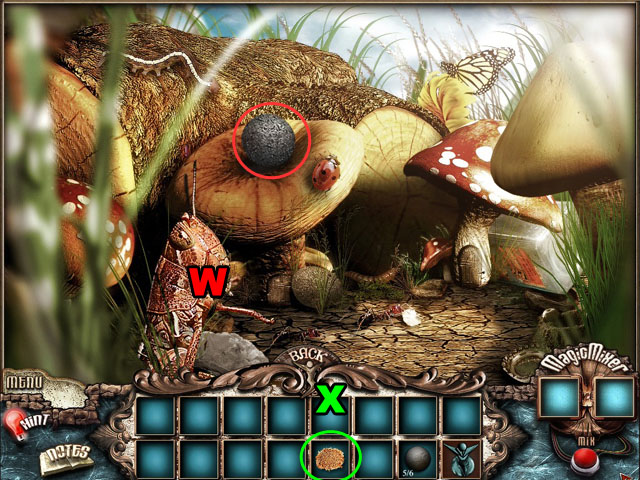
- Take the IRON BALL and use the BREAD CRUMBS on the grasshopper.
- The grasshopper will give you a MAGIC BOTTLE.

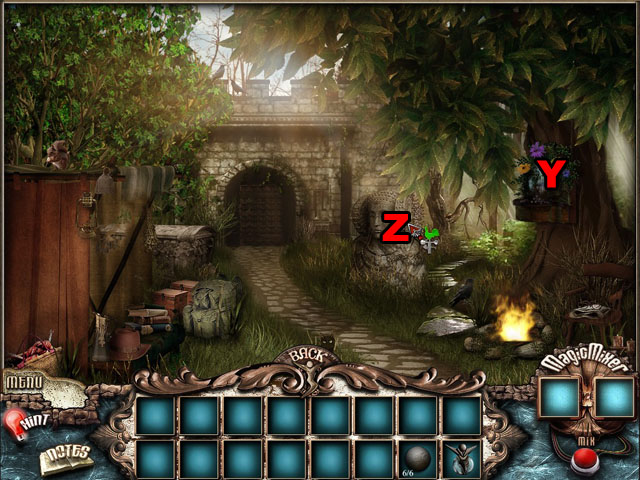
- Return to the woods path again and fill up the MAGIC BOTTLE with water from the flower basket (Y).
- Click on the stone head statue to zoom in (Z).

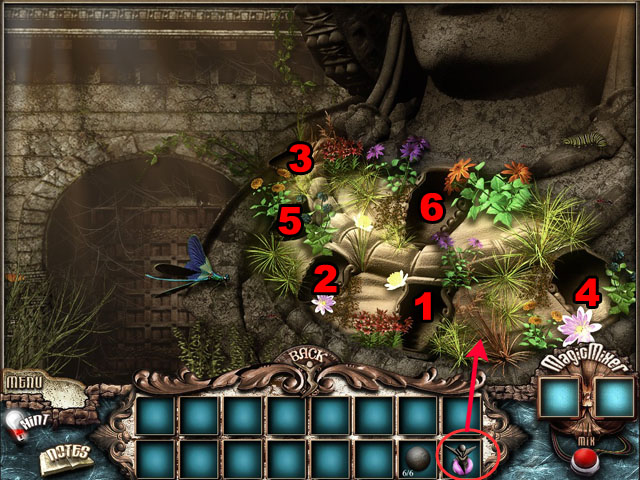
- Use the MAGIC BOTTLE of water on the statue.
- The place the IRON BALLS from your inventory in the holes in the correct order.
- You wil get a small shower of sparkles when you get the correct space.
- Use the process of elemination to find the correct holes. Once you get one right you do not have to start over, even when you get another wrong.
- See the screenshot for the correct order.
Chapter 3

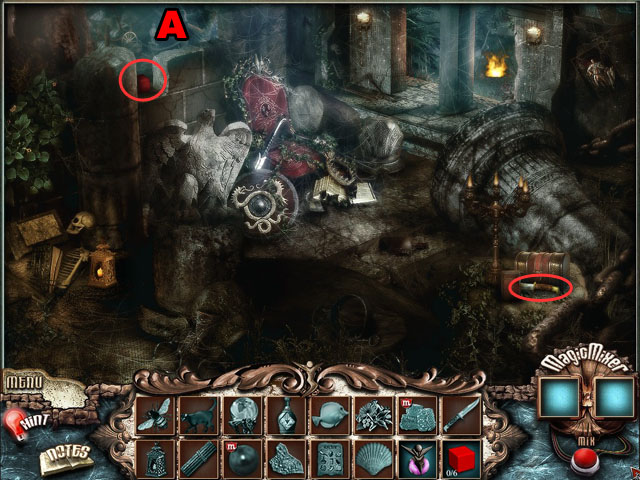
- Take the KNIFE and the RED CUBE highlighted in red.
- Travel over the wall (A).

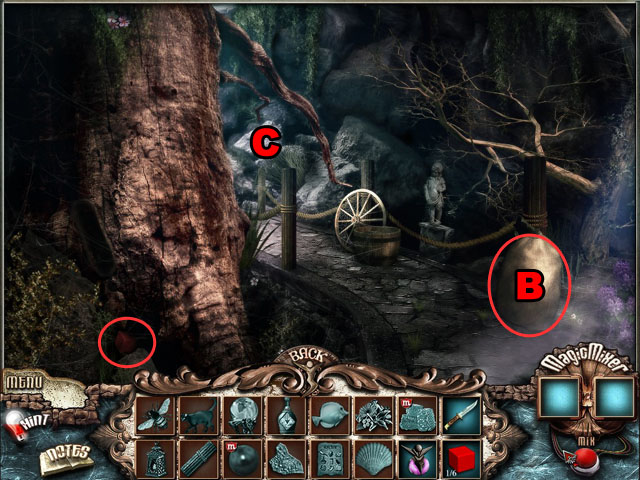
- Collect the RED CUBE near the base of the tree.
- Use the KNIFE on the SACK and get the CRYSTAL BALL (B).
- Travel on the path past the tree to the pool (C).

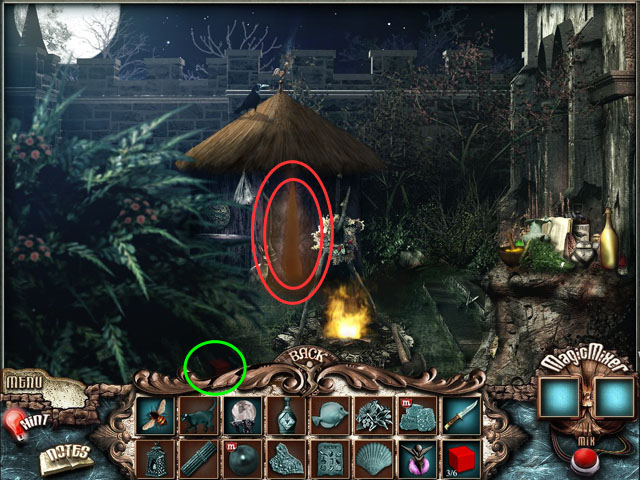
- Collect the BEE and another RED CUBE and then go back to the first scene.

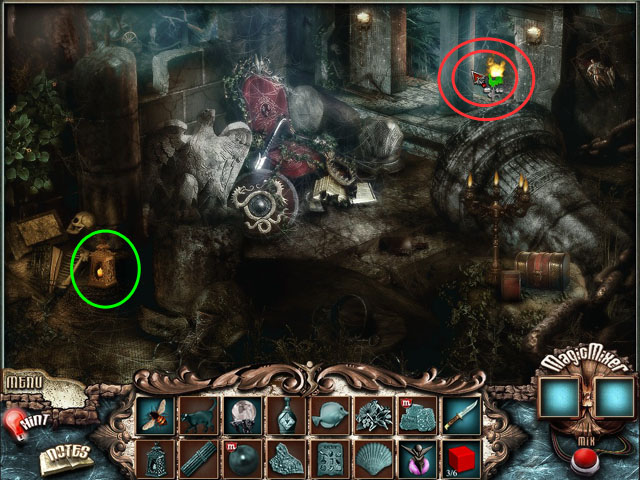
- Take the LANTERN off at the left of the screen.
- Click on the column to the right to travel to outside the fortune teller’s hut, circled in red.


- Collect the RED CUBE at the bottom of the screen.
- Enter the fortune teller’s hut.

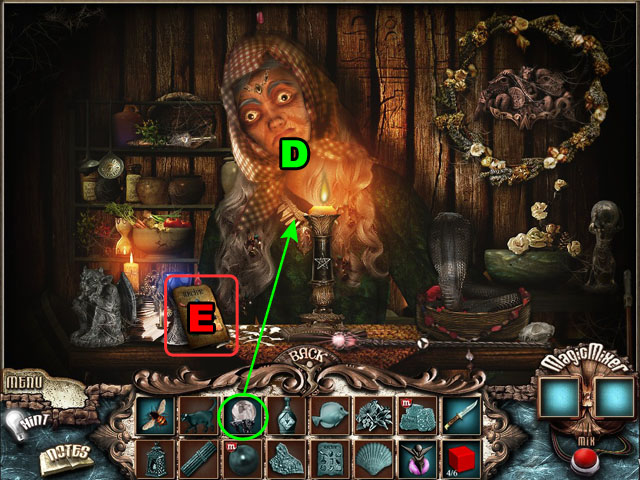
- Talk to the fortune teller and give her the CRYSTAL BALL (D).
- Take the RECIPE from her table (E).
- Talk to her again to find out she is looking for her cat.
- Exit the hut.

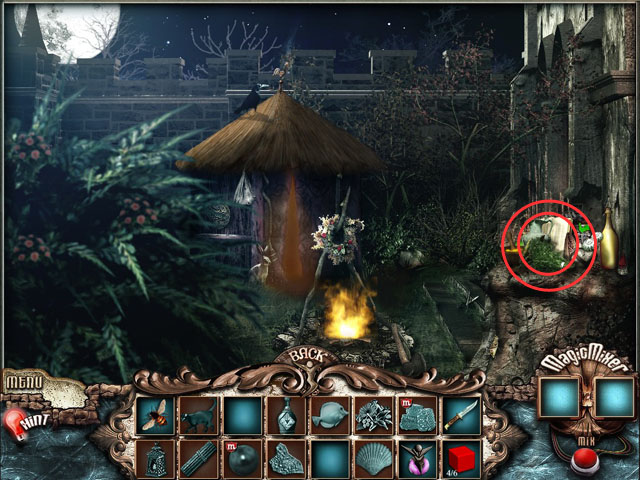
- Click on the area circled in red to enter the ingredient mixing station.

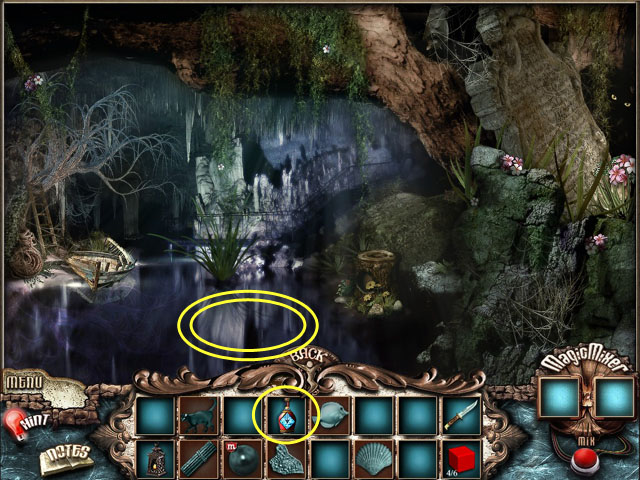
- Find all of the items in the recipe around the area, circled in red.
- There will be one item missing. Leave the area to find it.

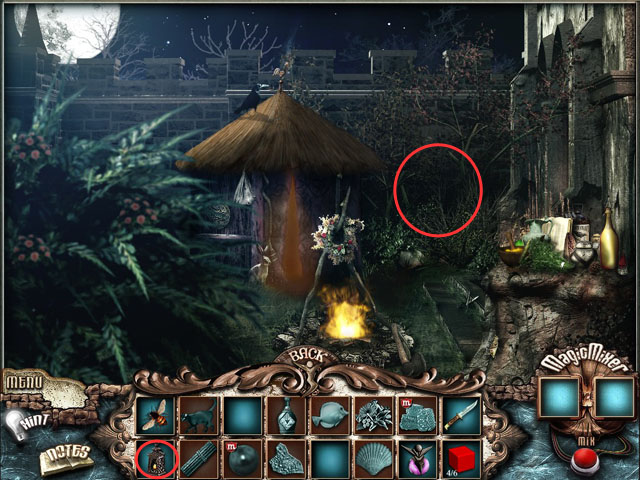
- Use the LANTERN on the woods to the right of the hut to enter a new area.

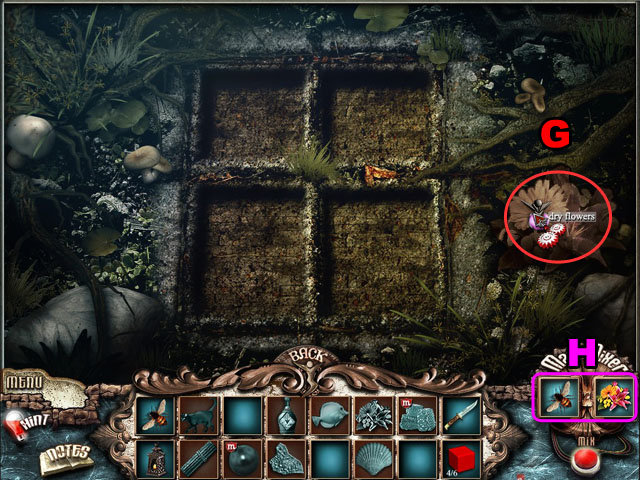
- There are four indents in the area that you cannot do anything with yet.
- Use the MAGIC BOTTLE on the dry flowers to the right (G).
- Take the FLOWERS.
- Use the BEE and the FLOWERS in the Magic Mixer to receive the HONEY CUBES (H).

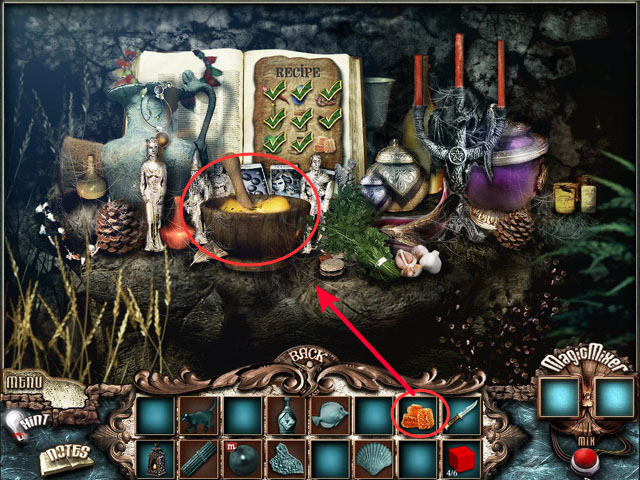
- Return to the ingredient mixing station and use the HONEY CUBES on the bowl in the middle of the screen.
- Collect the MAGIC ELIXIR.


- Travel to the pool past the tree.
- Use the MAGIC ELIXIR on the pool to enter it.

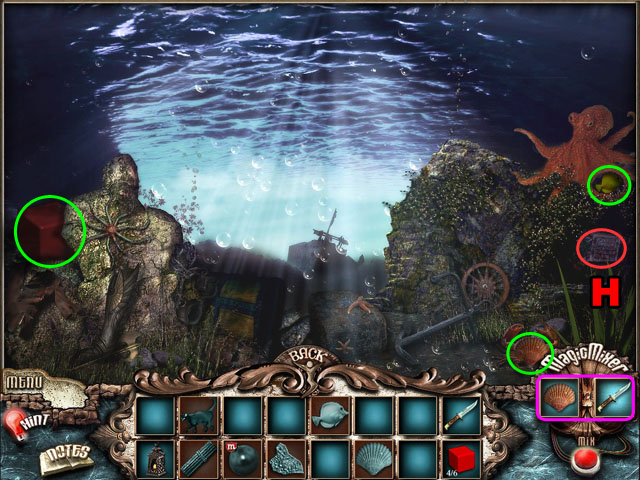
- Collect the SHELL, the FISH and the RED CUBE.
- Use the SHELL and the KNIFE in the Magic Mixer to get the PEARL.
- Click on the area highlighted in red (H).

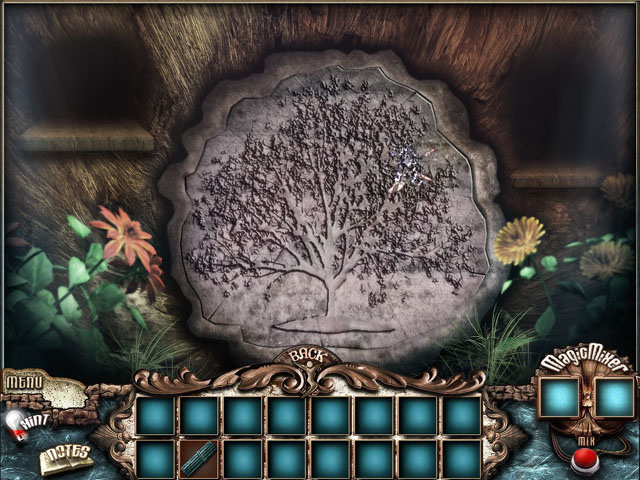
- Click on one puzzle piece and then another to switch their places.
- Use the edges of the red squares and the circle to help you complete the puzzle.
- There is also a thicker border around the edge of the puzzle that you can use to line things up.
- The pieces do not rotate.
- See the screenshot for the final solution of the puzzle.

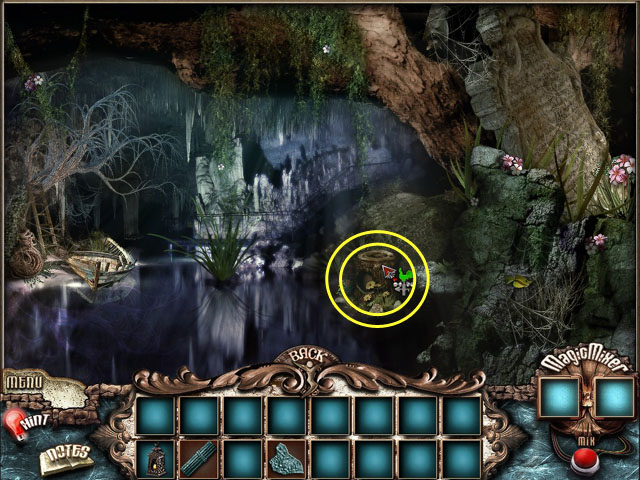
- Return to the top of the pool and use the FISH on the bushes to the right.
- Collect the BLACK CAT.

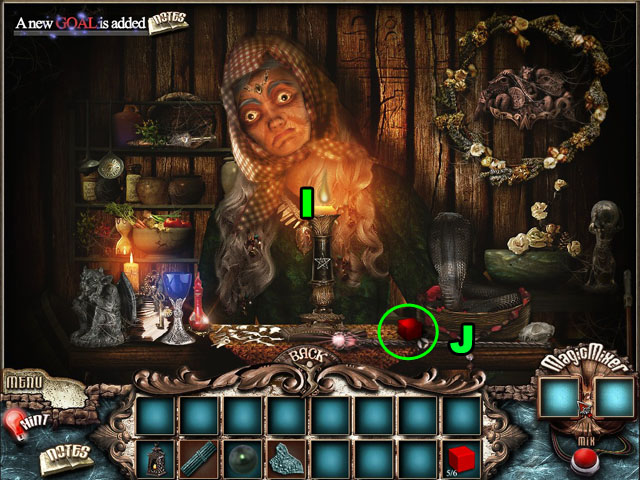
- Travel to the fortune teller and give her the BLACK CAT (I).
- She will give you the last RED CUBE (J).
- Collect it and go to the puzzle in the area to the right of the hut.

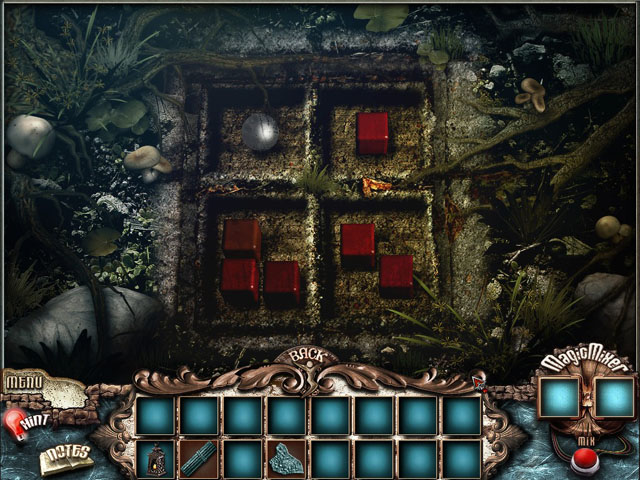
- Place the PEARL and the RED CUBES in the correct places.
- The PEARL goes in the top right corner and the cubes go in the same pattern as the puzzle you just solved: 1 in the top right, 3 in the bottom left, and 2 in the bottom right.
- You do not have to place the cubes in the exact right position, just in the same box.

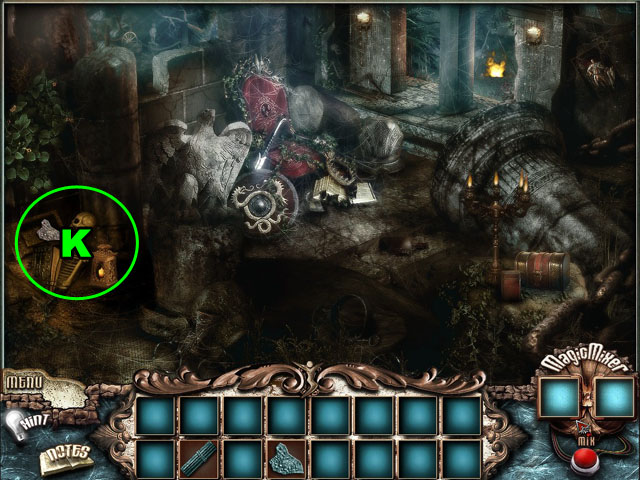
- Return to the first scene and use the LANTERN on the skeleton where you found it (K).
- Collect the PUZZLE PIECE.


- Travel past the tree to the pool one last time.
- Click on the log circled in green.


- Click and drag the puzzle pieces from the right and the left of the log to the correct position.
- If you drop them in the wrong position they will snap back to the shelf.
- When you have placed all of the pieces from the shelf use the PUZZLE PIECE to finish the puzzle.
- See the screenshot for the correct solution.

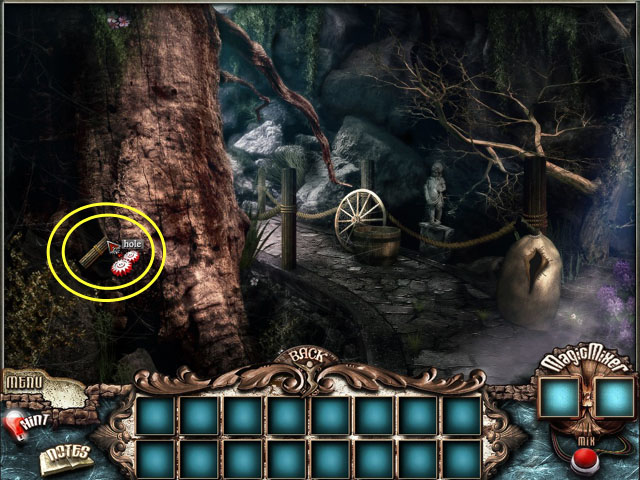
- Take the LEVER from the puzzle and return to the tree scene.
- Use the LEVER on the side of the tree and pull it to finish the chapter.
Chapter 4

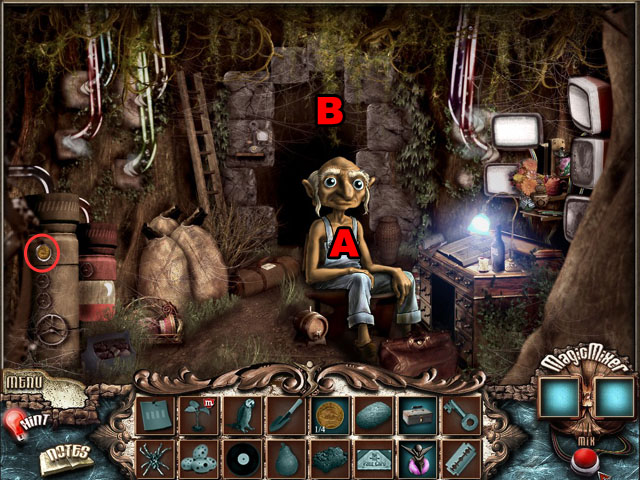
- Talk to the gnome at the desk (A).
- Pick up the COIN to the left.
- Exit the room to the back (B).

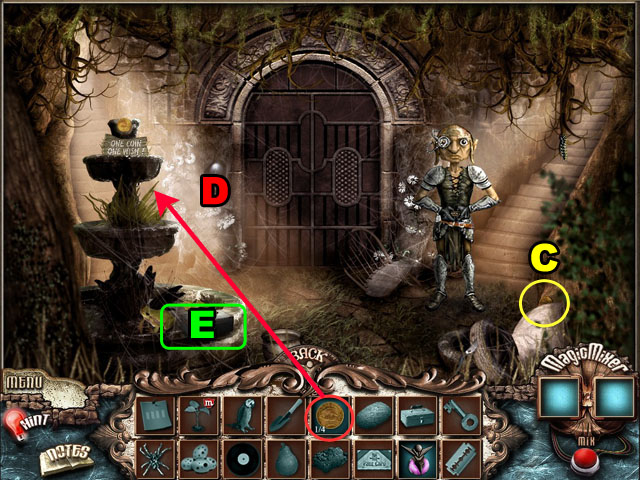
- Collect the COIN on the right (C).
- Use the COIN on the fountain (D).
- Collect the TOOLBOX from the fountain (E).
- Return to the first room.

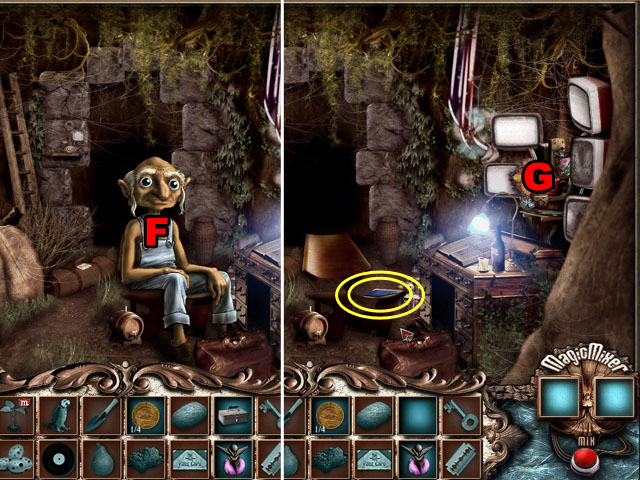
- Give the TOOLBOX to the gnome at the control panel (F).
- Grab the BLUEPRINT from his seat after he leaves.
- Click on the monitors (G).

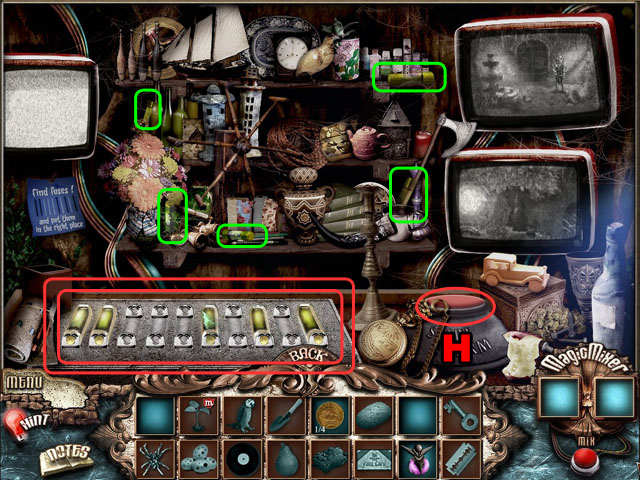
- Drag and drop the fuses circled in green to the fuse board at the bottom of the screen.
- You are trying to get the video screens and the red button to light up.
- The video screen on the left side will show static at the end.
- Look at the screenshot for the correct solution.
- Click the large red button to move the position of the guard (H).

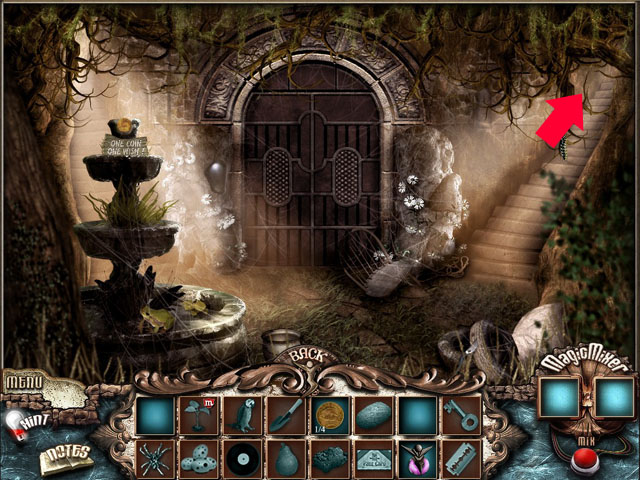
- Travel to the fountain scene and go up the stairs to the right.

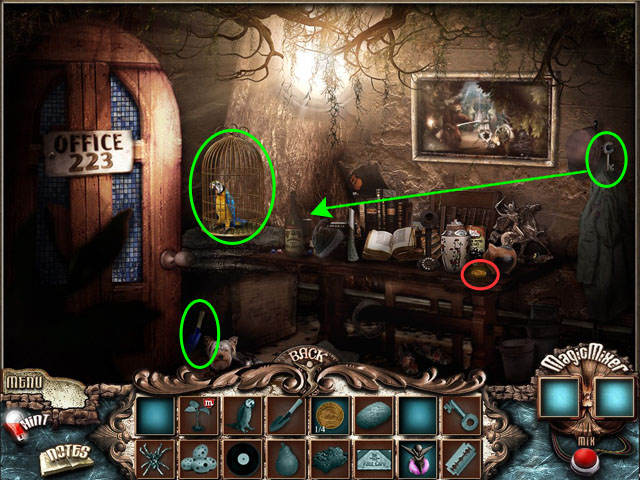
- Notice the office number: 223.
- Take the KEY from the right and use it on the bird cage.
- Collect the PARROT, the SHOVEL, and the COIN.
- Return to the previous scene.

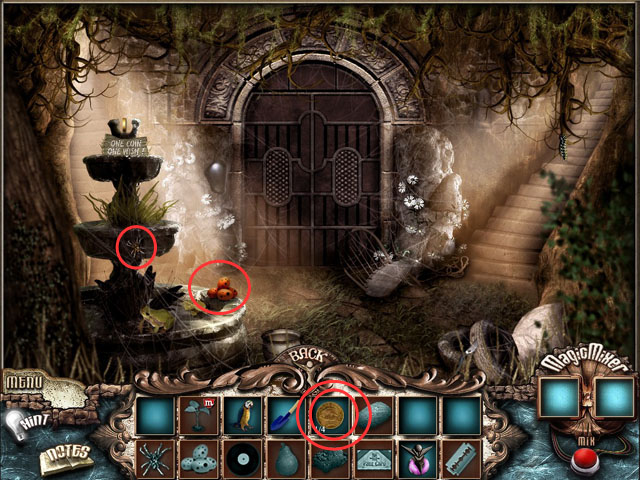
- Use the COINS you have on the fountain.
- Collect the SPIDER and the EGGS that appear.
- Go back one more scene.

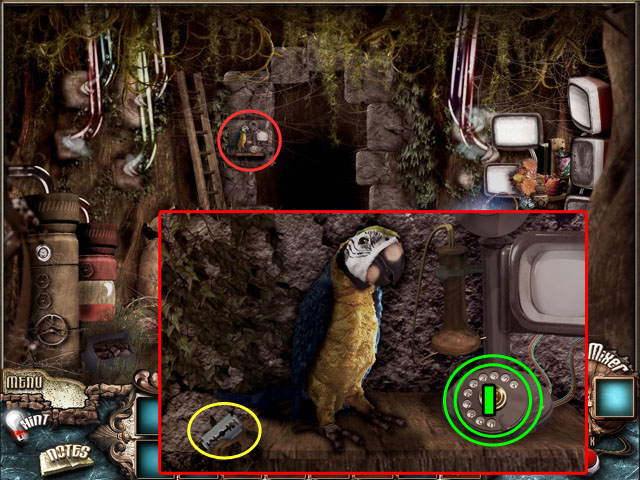
- Use the PARROT on the phone beside the door.
- Collect the RAZOR BLADE to the left of the parrot.
- Click on the speaker to pick up the phone and type in the numbers 223 (I).

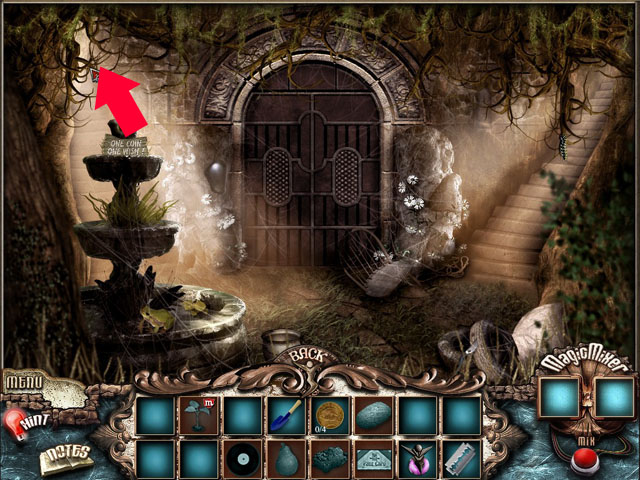
- Return to the fountain scene and go up the stairs to the left.

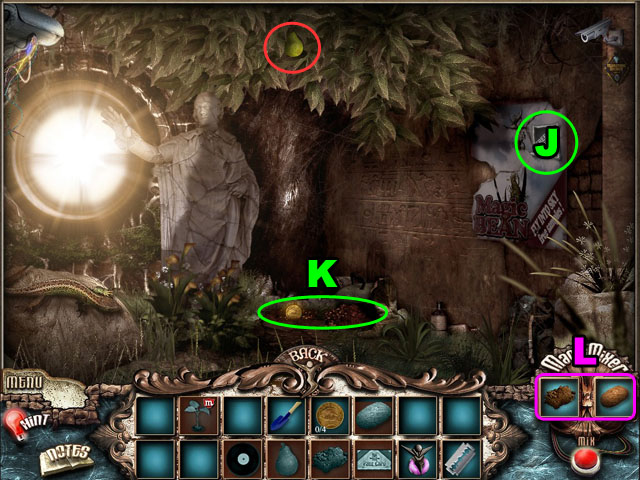
- Collect the pair.
- Use the RAZOR BLADE on the poster and collect the SEED (J).
- Use the SHOVEL on the patch of dirt at the bottom (K) and collect COIN and the DIRT.
- Combine the DIRT and the SEED in the Magic Mixer to make a PLANT (L).

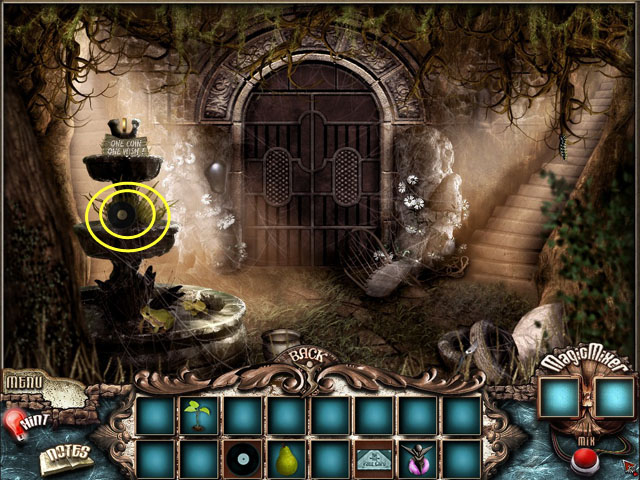
- Return to the fountain and use your last COIN to get a RECORD.
- Go back to the first scene, and click the desk with the monitors.
- Click the alarm button again to move the guard.

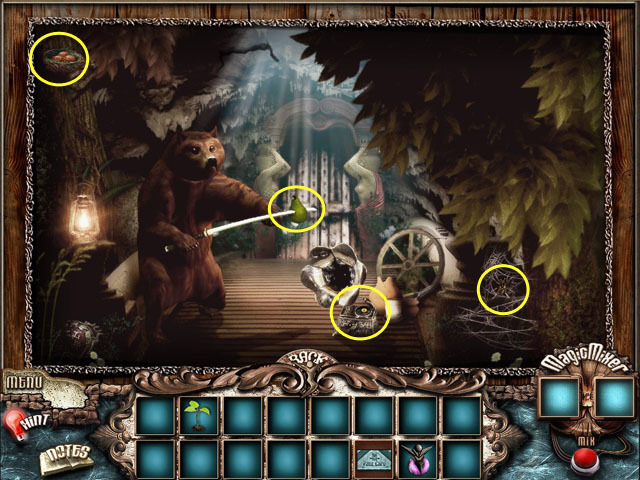
- Travel again to office 223, to the right of the fountain room.
- Click on the painting on the wall.
- Add the PEAR, EGGS, RECORD and SPIDER to the correct locations on the image.
- You will receive a PASS CARD.

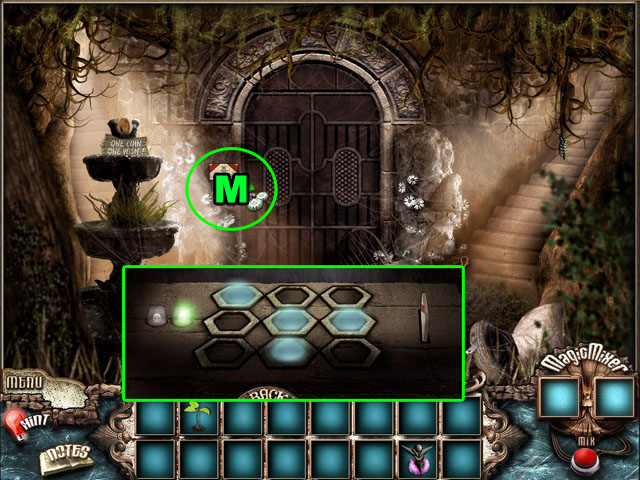
- Return to the fountain and use the PASS CARD on the slot next to the door (M).
- Click all of the lights to match the pattern on the pass card until the light turns green.
- Exit the lock and go through the door.

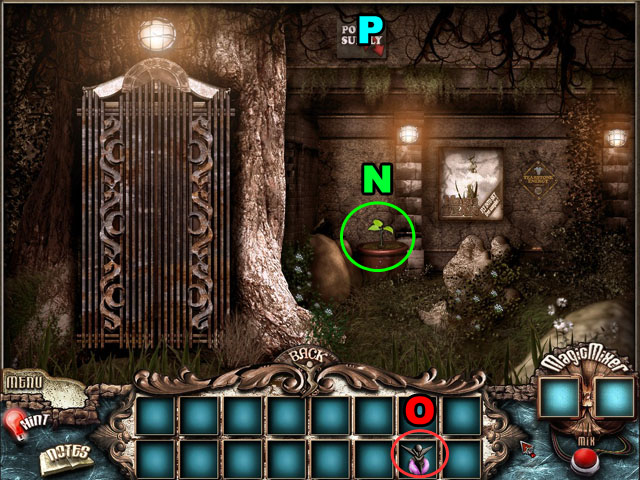
- Use the PLANT in the pot of dirt (N) and use the MAGIC BOTTLE on the potted plant (O).
- Click on the power supply at the top of the bean stock (P).

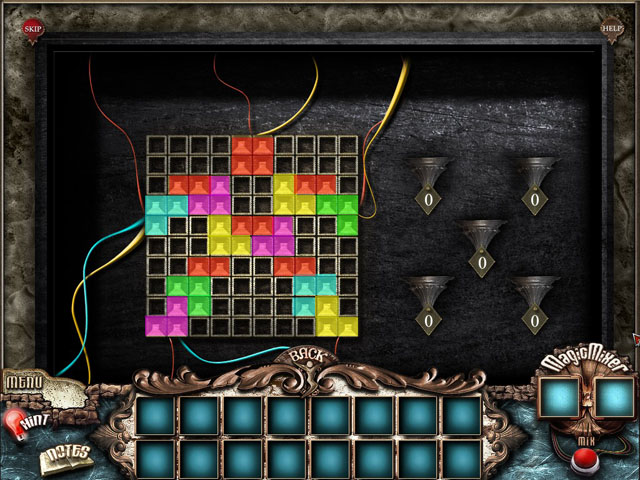
- The object of this minigame is to fill in all of the selected spaces with only the pieces available.
- There is a number beside each type of piece that tells you how many of that type you have left.
- As there are no pieces over 3 or under 2, you can first add two straight pieces to the square of 4 at the top of the puzzle.
- The ‘arms’ on the left and right can only be filled by one piece as well. Use these spaces as starting places to finish the rest of the puzzle.
- See the screenshot for the complete solution.
- Go back to the previous scene and enter the elevator.
Chapter 5

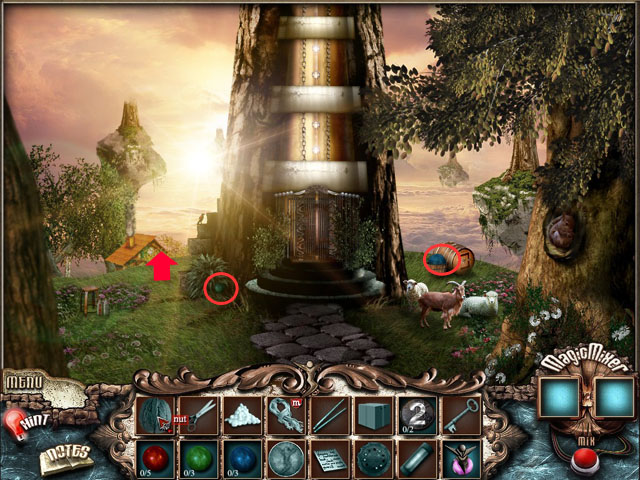
- Collect the GREEN BALL and the BLUE BALL.
- Go towards the cottage.

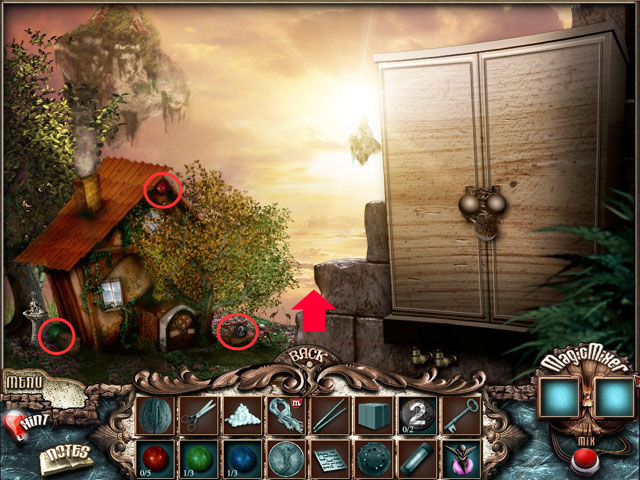
- Collect the different COLORED BALLS and 2 COIN.
- Travel forward again.

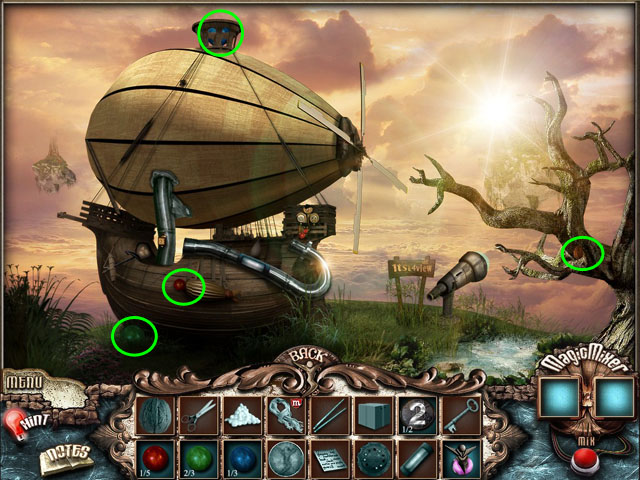
- Collect the different COLORED BALLS around the airship.
- Collect the WALNUT on the branch to the right.
- Return to the first scene.

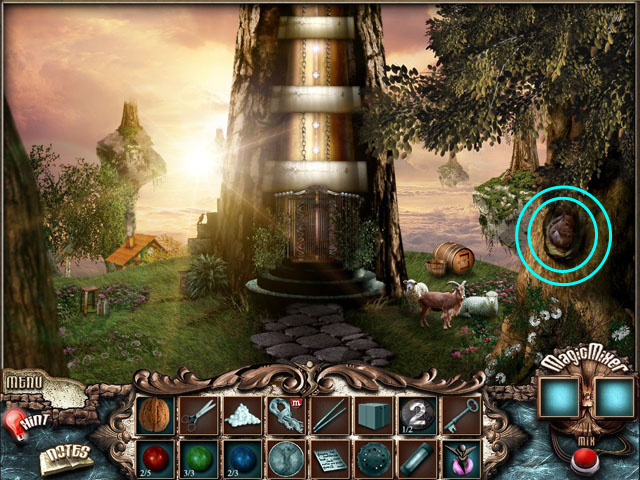
- Place the WALNUT to the right of the squirrel in the tree.
- Enter the hollow in the tree.

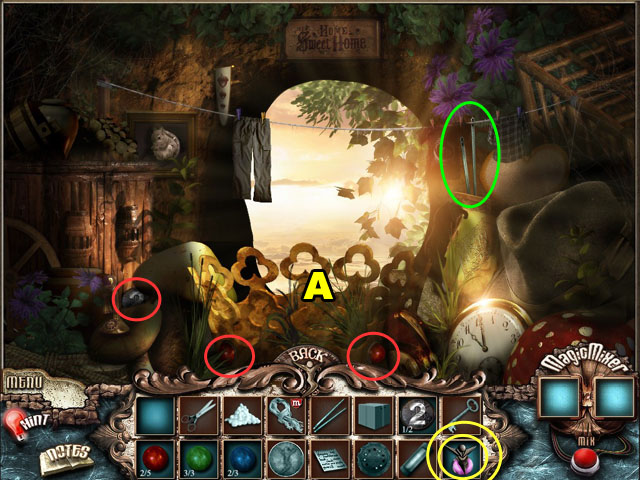
- Use the MAGIC BOTTLE on the crown in the middle (A).
- Collect the TWO RED BALLS in the crown and the 2 COIN at the left.
- Take the NEEDLES on the line.
- Travel to the cottage.

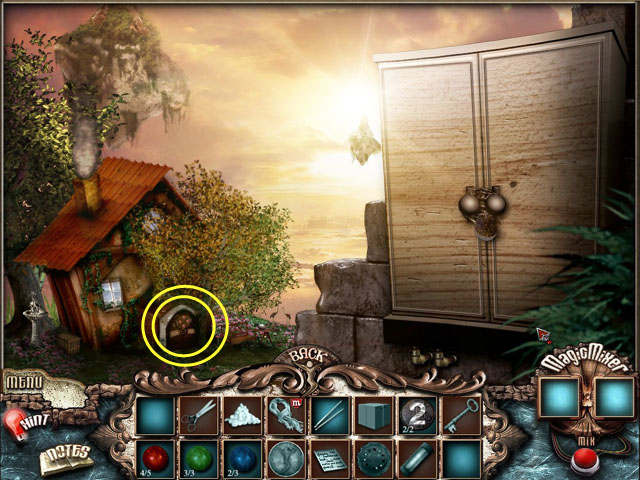
- Click on the door to the cottage.

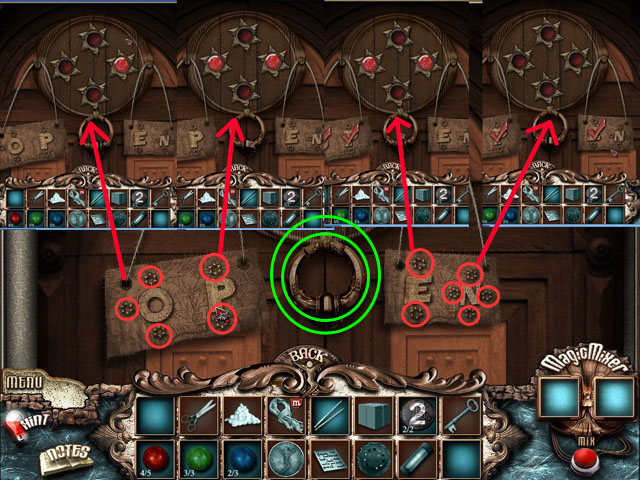
- Solve this mini-game by inputting the correct combination on the door.
- Each letter has a pattern of buttons around it.
- Push the buttons that correspond with the letter ‘O’ and the click on the knocker in the middle of the door.
- Do this three more times with ‘P’, ‘E’ and ‘N’ and the door will open.
- See the screenshot for the correct combinations.
- Enter the cottage.

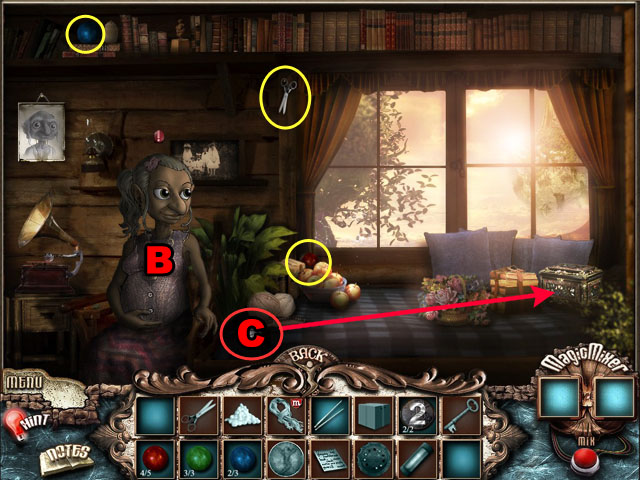
- Talk to the pregnant woman (B).
- Collect the RED BALL, the BLUE BALL and the SCISSORS.
- Use the LIST (C) on the box in the corner of the bed.
- Click on the jewelry box.

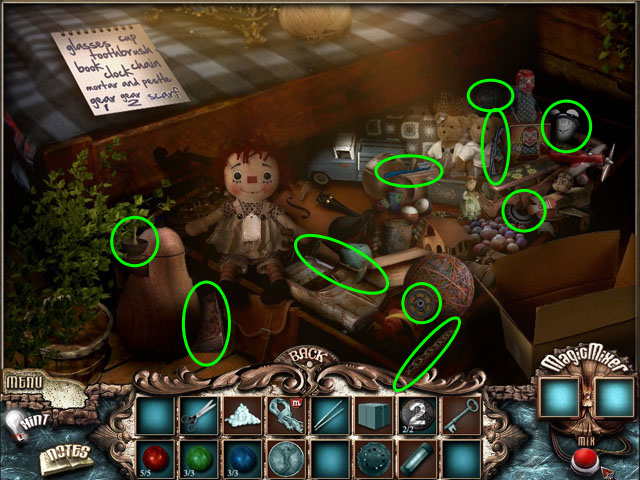
- Collect all of the objects from the list that are in this scene, circled in green.
- You will receive a MACHINE PART in your inventory.
- You will not be able to collect the scarf yet.
- Leave the scene and go to the first location.

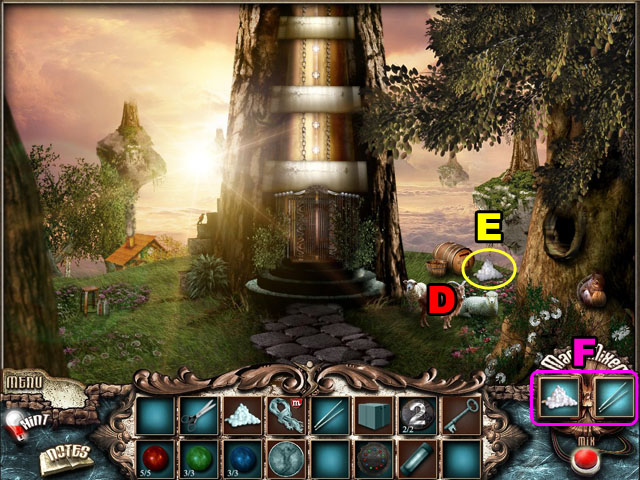
- Use the SCISSORS on the sheep (D) and collect the WOOL (E).
- Combine the WOOL and the NEEDLE in the Magic Mixer to get a SCARF (F).
- Return to the jewelry box.

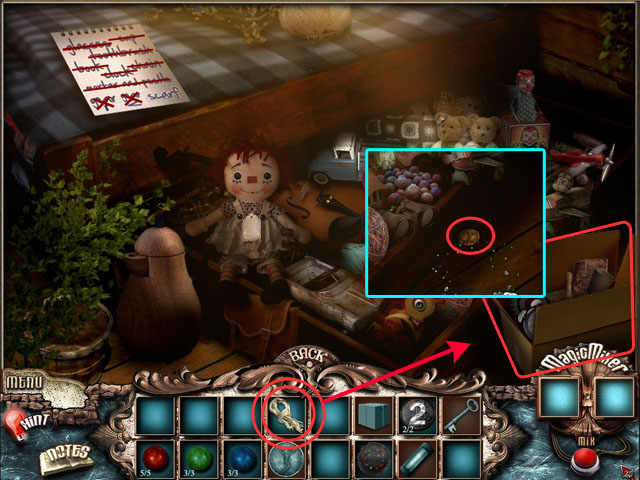
- Use the rope on the CARTON and collect it.
- Collect the TOKEN underneath the CARTON.

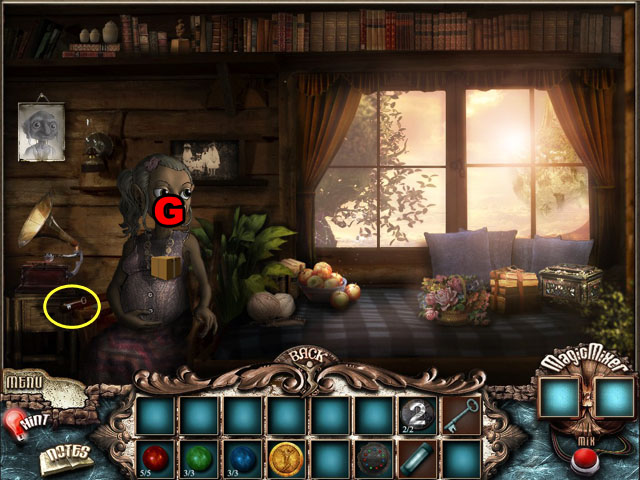
- Give the CARTON to pregnant woman and collect the KEY from her (G).

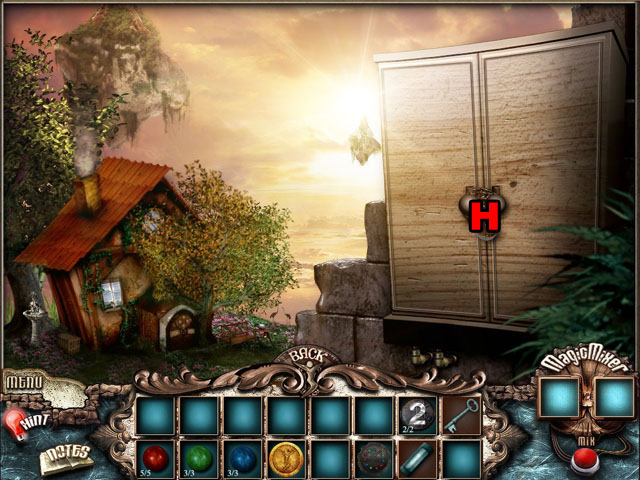
- Exit the cottage and use the KEY on the cabinet (H).
- Click on the cabinet to inspect it.

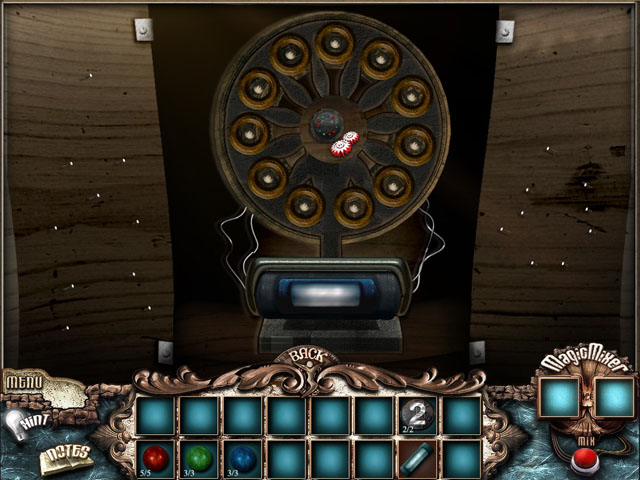
- Click and drag the machine pieces from the right and the left to the correct position.
- If you drop them in the wrong position they will snap back to the wall where they are hanging.
- When you have placed all of the pieces use the MACHINE PART to finish the machine.
- See the screenshot for the correct solution.

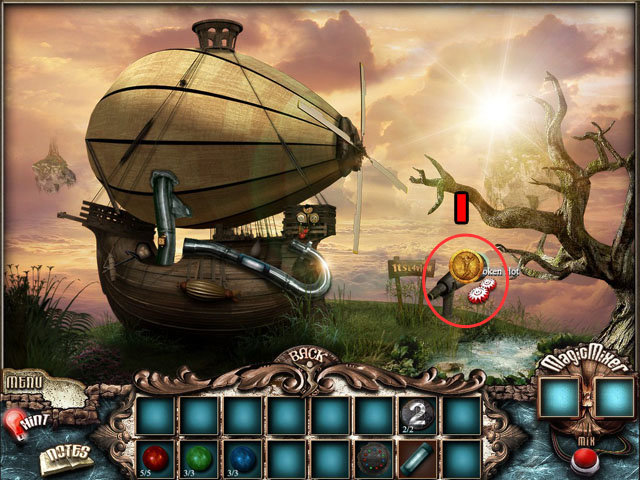
- Exit the cabinet and go to the airship scene.
- Use the TOKEN on the telescope and look through it (I).

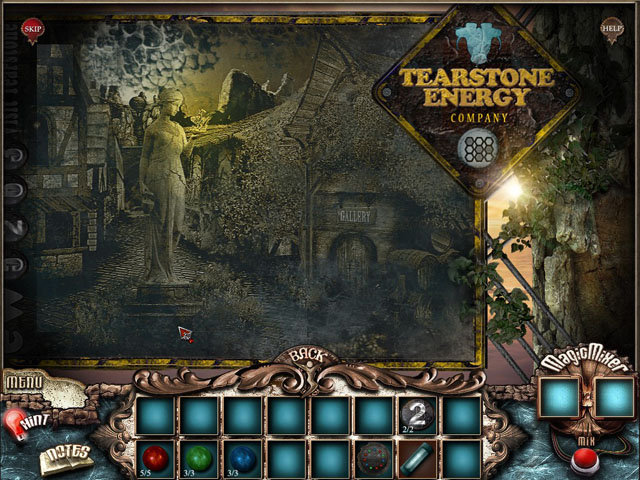
- Click one section and then another to switch their places until you have completed the puzzle.
- There are small sections between each piece that are locked in place to help you figure out which piece goes where.
- Use the sign on the very right side to start and work your way towards the left.
- See the screenshot for the completed puzzle.
- You will receive the passcode EW 5263.

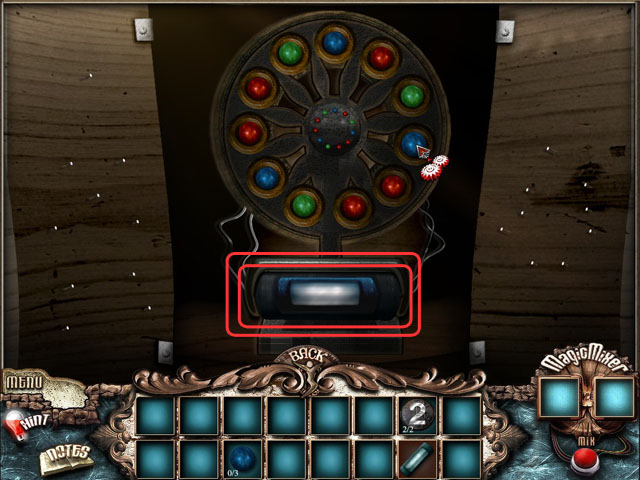
- Return to the cabinet puzzle and place all of the COLORED BALLS from your inventory in the matching slots.
- The slots will have a smaller ball of the same color in the middle on the machine part.
- See the screenshot for the correct locations.
- Take the BIOFUEL canister from the completed puzzle.

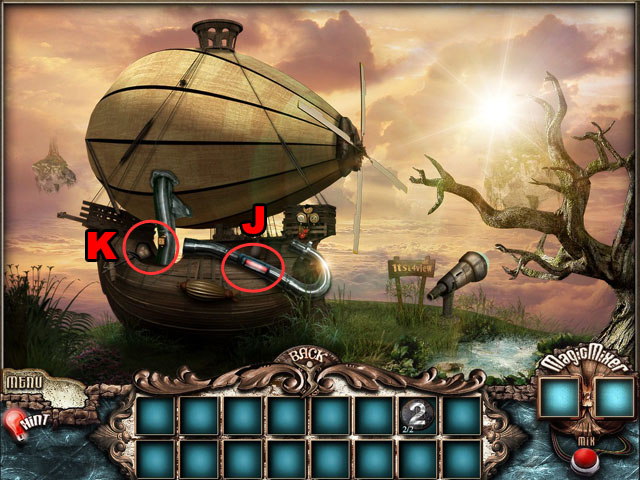
- Travel to the airship and use the BIOFUEL on the pipe on the side of the ship (J).
- Inspect the puzzle at the top of the ship (K).

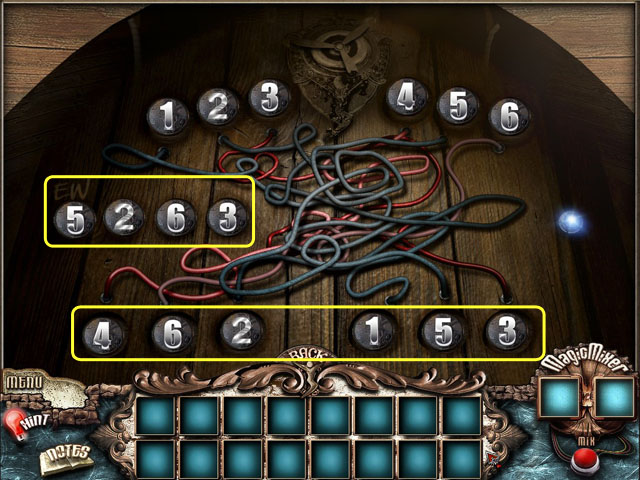
- This puzzle has two parts where you need to fill in the correct numbers to solve it.
- There is no 2 button, so you will need to use the 2 COINS from your inventory in the correct slots.
- The correct code for the middle left 4 slots is from the telescope 5263.
- The correct code for the bottom numbers can be found by following the wires from the top to the bottom of the screen and seeing which connect to each other.
- See the screenshot for the solution.
Chapter 6

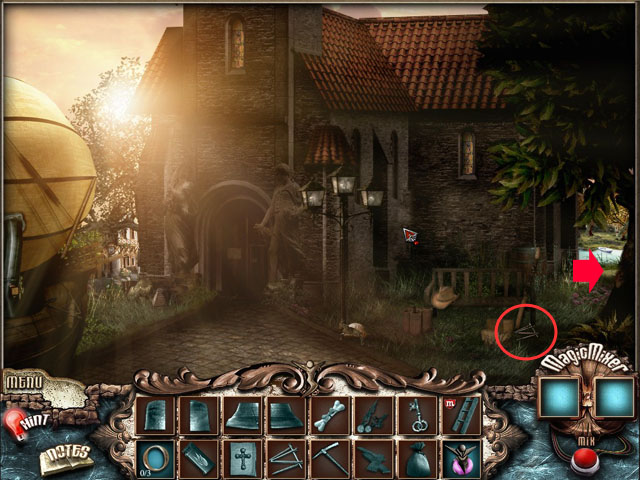
- Pick up the NAILS and exit the scene to the right.

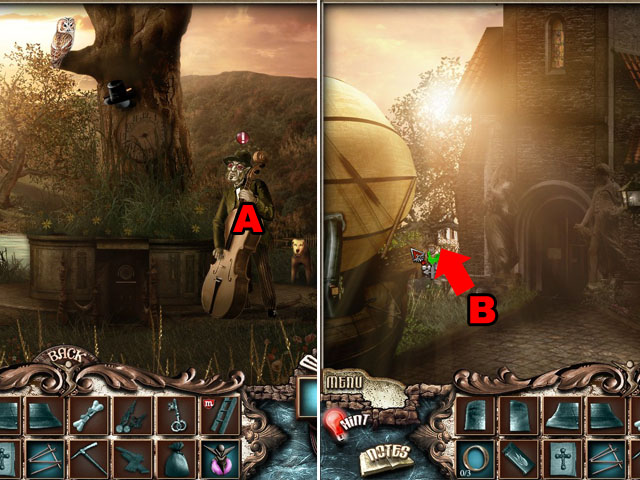
- Talk to the Cello player and then return to the first scene (A).
- Go the left, past the airship (B).

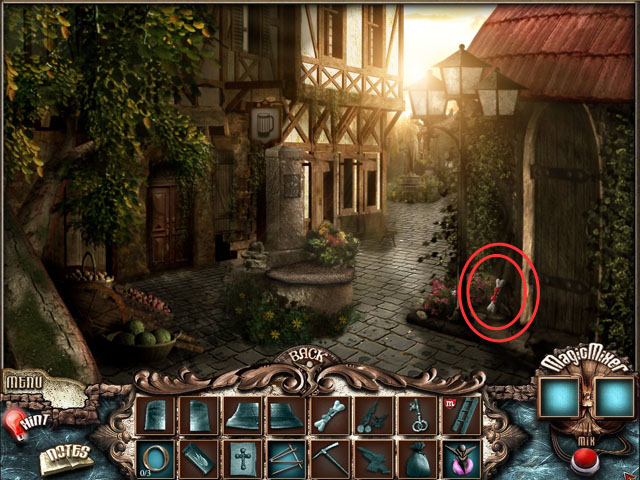
- Collect the DOG TOY in the area next to the well.

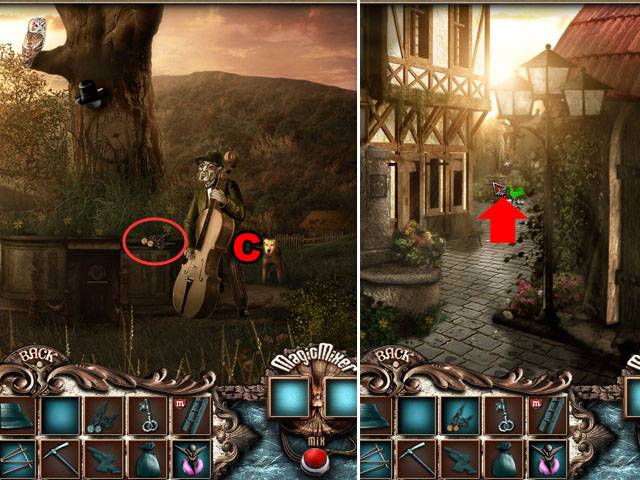
- Return to the cello player and give him the DOG TOY (C).
- Collect the CLOCK HANDS that he gives you.
- Return to the scene to the left with the well and continue forward.

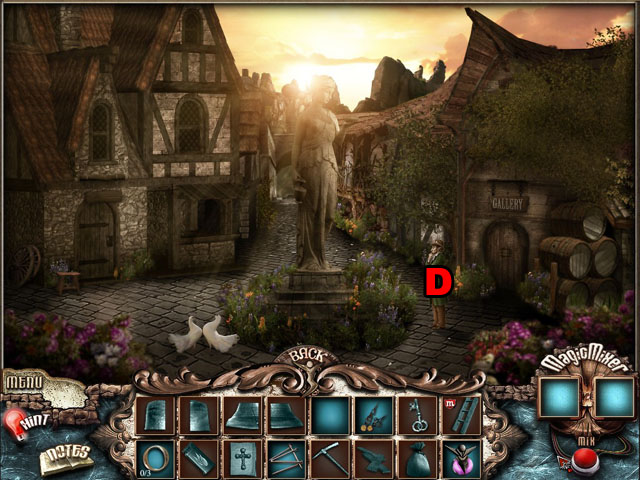
- Talk to the man in front of the statue (D). He will ask you to repair her crown.

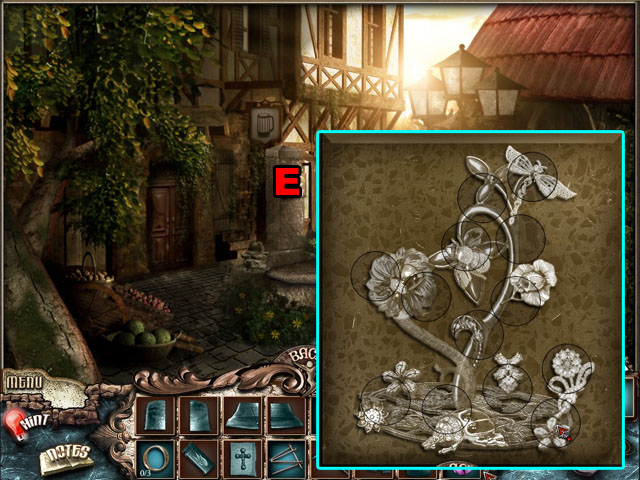
- Return the the previous scene and click on the box that comes out of the wall (E).
- Drag the circles from outside the puzzle to the inside of the puzzle, matching them with the background picture.
- The circles do not rotate and only fit one way. Use the large flower shapes to help you match them.
- See the screenshot for the solution.

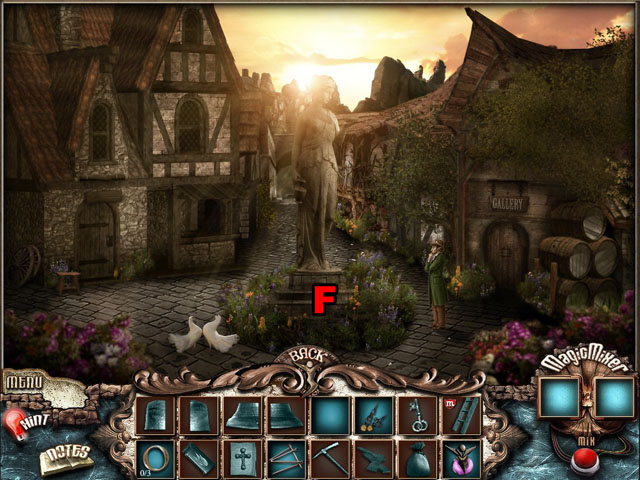
- Return to the statue scene and inspect the base of the statue (F).

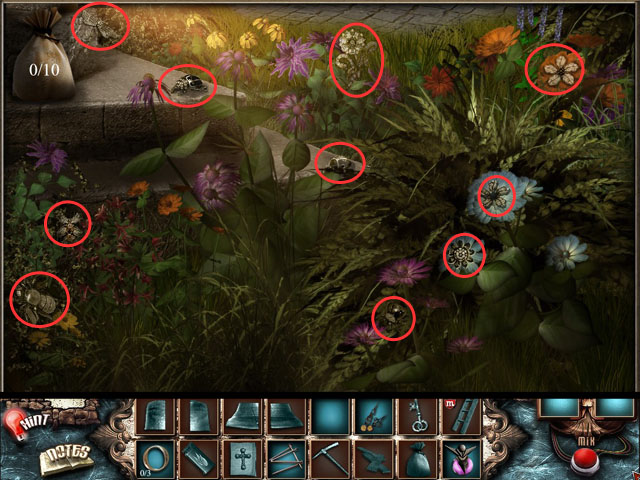
- Find all of the statue pieces circled in red, there are 10 in all.
- You will receive a SACK of the pieces when you are finished.

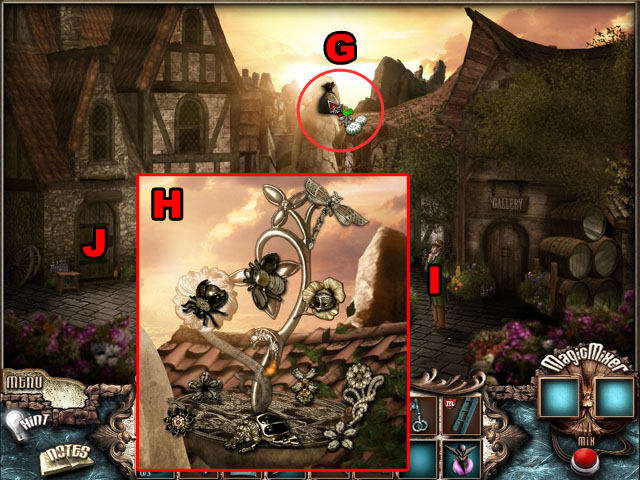
- Click at the top of the statue (G) and place all of the pieces from the SACK in the correct places, just like in the puzzle you finished before.
- See the screenshot for the placement of the bugs and flowers. Each one can only be on one peg in the sculpture (H).
- Talk to the man again briefly (I) and enter the door on the left (J).

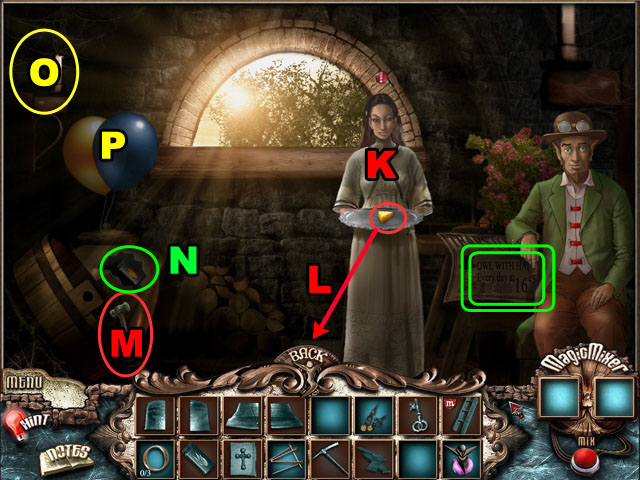
- Talk to the woman inside the house (K) and drag the cheese to the mouse hole at the bottom (L).
- Get the HAMMER not that the mouse is out of hiding (M).
- Use the HAMMER on the cask to get the LIGHTER (N).
- Use the LIGHTER on the CANDLE (O) and then pop the balloon with the NEEDLE that you can see beside the placed candle (P).
- You will receive a KEY.
- There is a newspaper with some story information circled in green here.

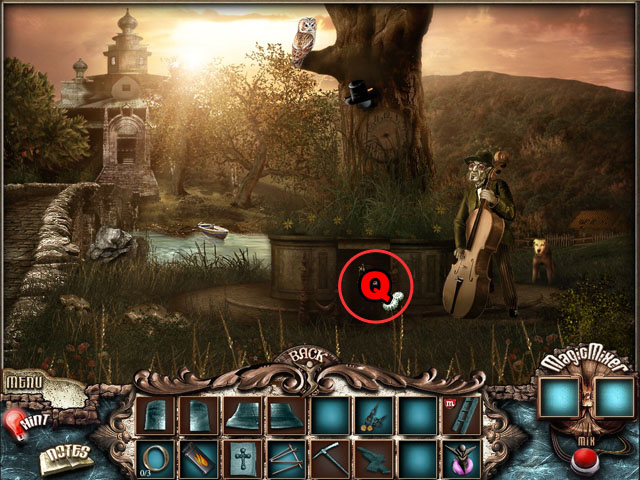
- Take the KEY to the locked door beside the cello player and use it (Q).
- You will enter a dark underground room.

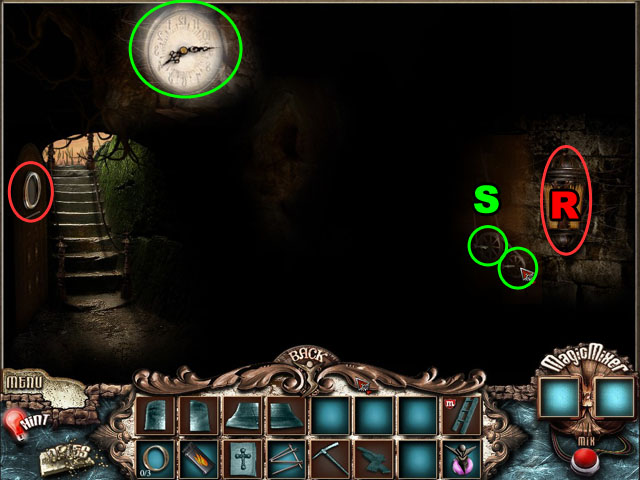
- Collect the O on the left side.
- Use the LIGHTER on the lantern (R).
- Turn the two wheels until the clock reads 4:45 like it said on the poster (S).
- The clock’s face is backwards, so it will actually look like 7:15.
- One of the wheels turns the hours hand and one turns the minute can.
- See the screenshot for the solution.

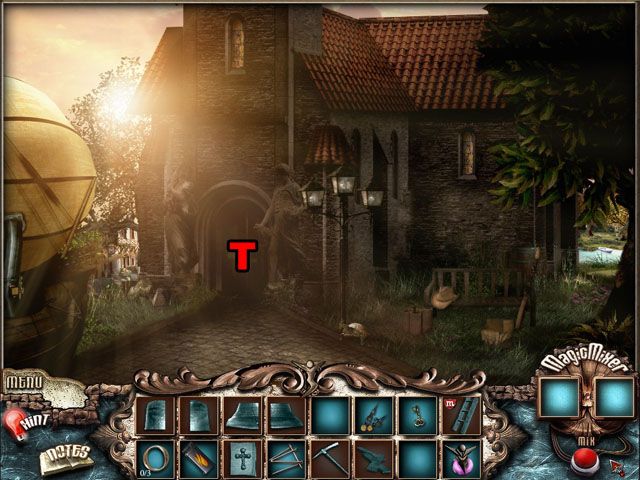
- Exit this scene and return to the first location.
- Go inside the church (T).

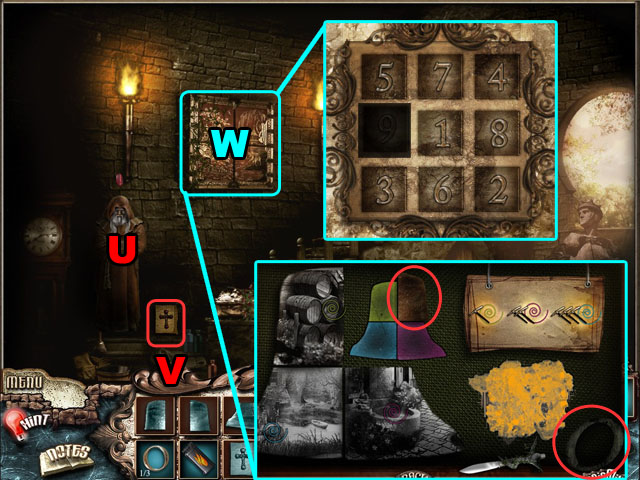
- Talk to the monk (U) and you will receive the MONK’S LIST. Make sure to pick it up (V).
- Click on the old cabinet on the wall (W).
- Click the buttons in the correct order to open the cabinet. Each square has a number on it that corresponds to what order it should be pushed in.
- If you click wrong you will have to start over from the beginning, but the numbers are not randomized.
- See the screenshot for the correct solution.
- After finishing the puzzle collect the O and the piece of the bell from inside the desk.

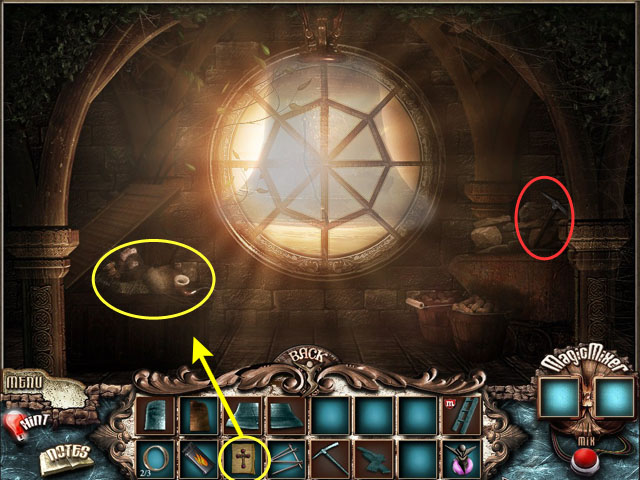
- Travel up the stairs and to the attic.
- Collect the PICK AXE.
- Use the MONK’S LIST on the pile of junk in the left corner.

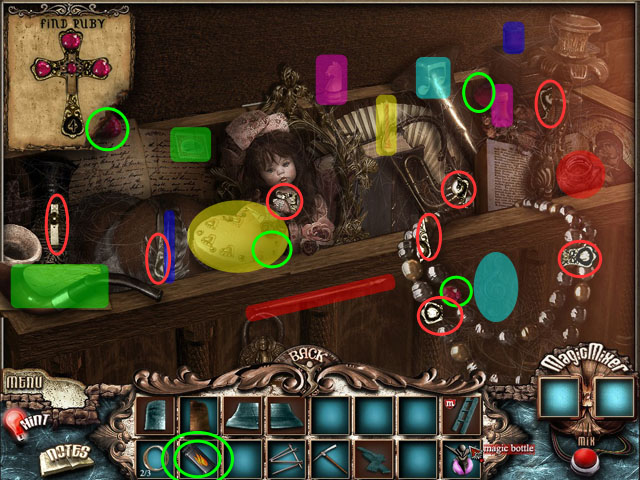
- The first part of this mini-game is the collect all of the objects that match each other, like for example a letter and a stamp.
- The pairs of objects are filled in with matching solid colors.
- After you find these objects, find all of the silver pieces that make the crucifix circled in red.
- After you find all of the silver pieces, find all of the red gems circled in green.
- Use the LIGHTER on the corner of the paper at the top to reveal the last germ.

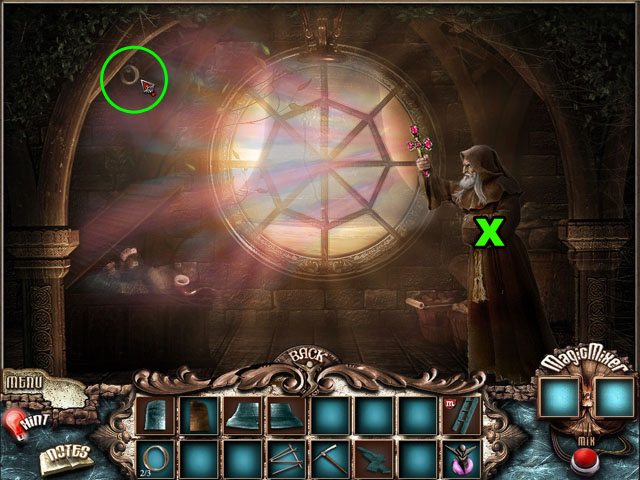
- Talk to the monk to give him the crucifix (X).
- Collect the LETTER O in the top left.

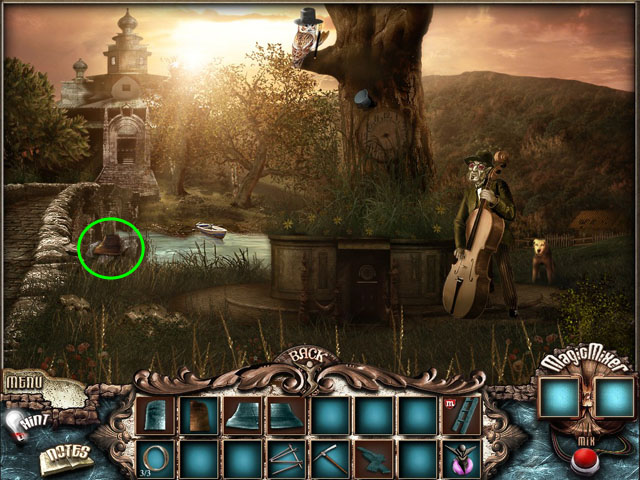
- Return to the cello player’s scene and use the pickaxe 3 times on the rock highlighted in green.
- Collect the BELL PIECE.

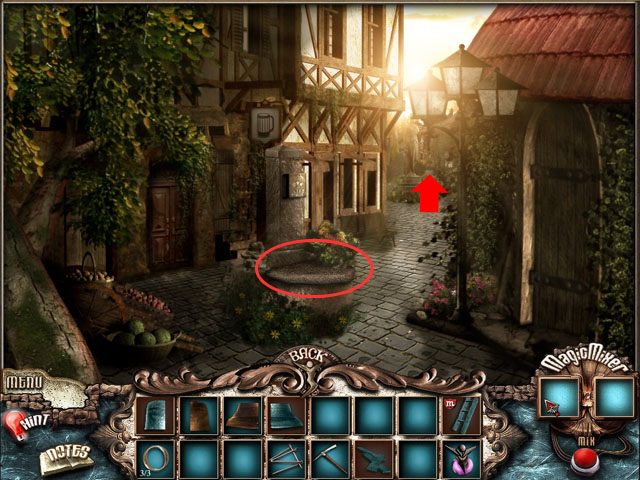
- Travel to the well scene and use the PICK AXE on the stone covering the well.
- Go forward again.

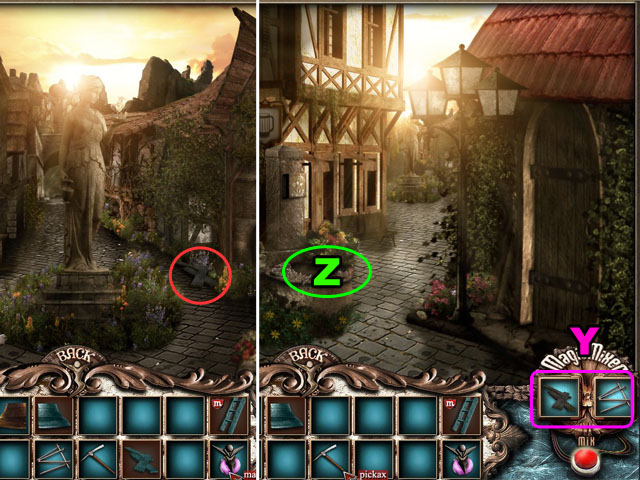
- Collect the BOARDS circled in red on the ground.
- Combine the BOARDS and the NAILS to make the LADDER (Y).
- Use the LADDER on the well top that you just opened up (Z).

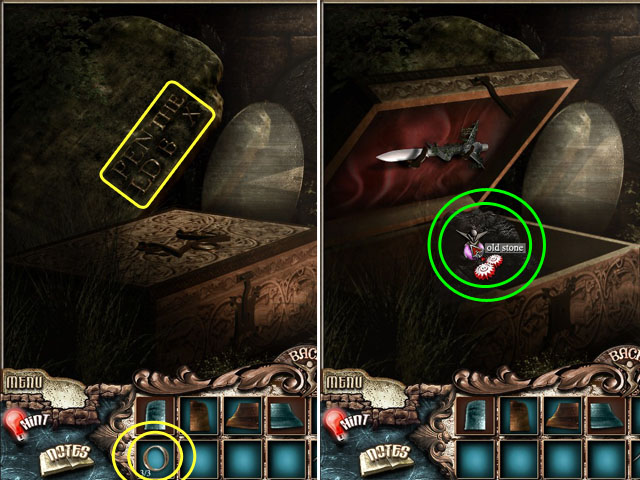
- Replace all of the O’s in the phrase ‘OPEN THE BOX’.
- Use the MAGIC BOTTLE on the old stone inside the box.
- Collect the BELL PIECE.

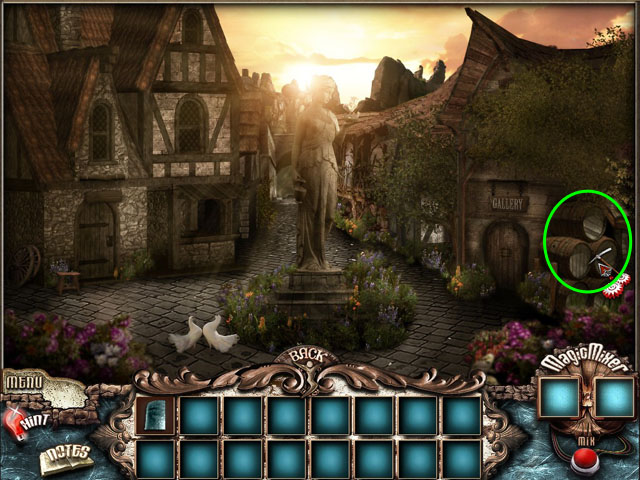
- Return to the surface and go forward on last time to the statue.
- Use the PICK AXE on the barrels in the corner.
- Collect the last BELL PIECE.

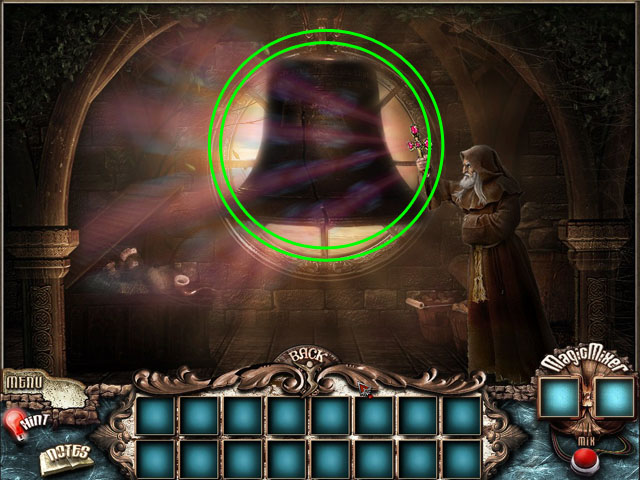
- Travel to the top of the church.
- Place the BELL PIECES in the correct places in the window to remake the bell and finish the chapter.
Chapter 7

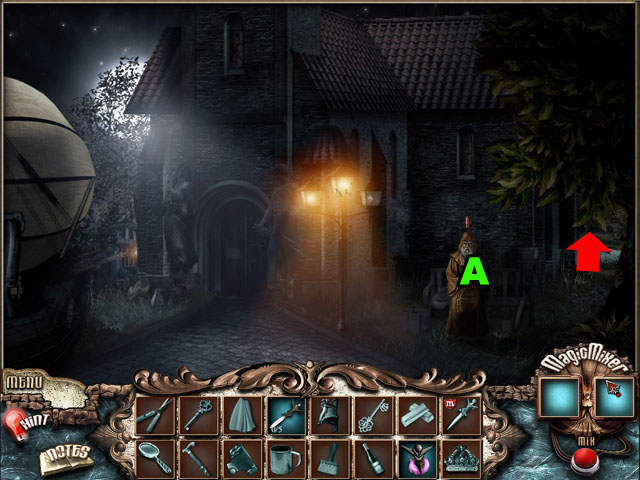
- Talk to the monk and then go to the right (A).

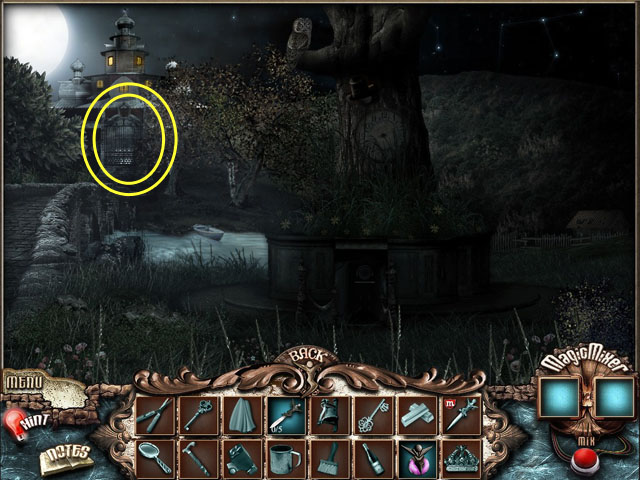
- Travel to the castle in the background.

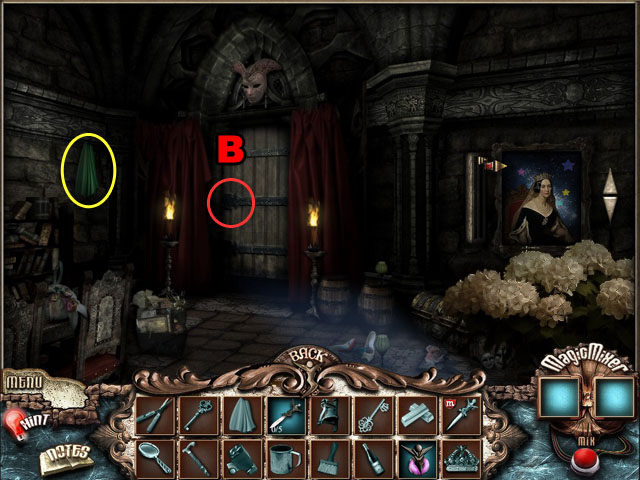
- Take the green CLOTH and go through the door (B).

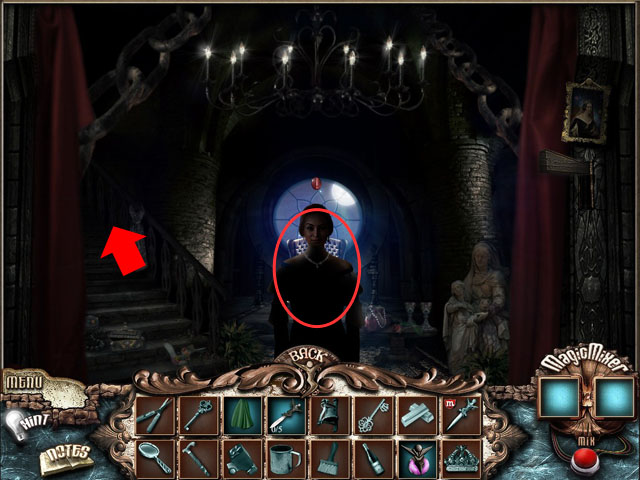
- Talk to the queen and go up the stairs to the left.

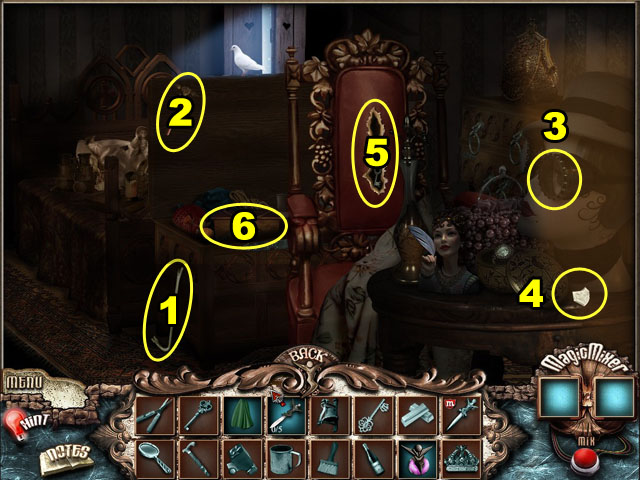
- Click to pick up the crowbar and use it on the door to the large chest (1).
- Use the hammer (2) pinned to the underside of the lid on the goggles to the right (3).
- Use the glass shard (4) on the chair back (5).
- Use the key on the locked box in the chest (6).
- Take the CROWN from inside the box.

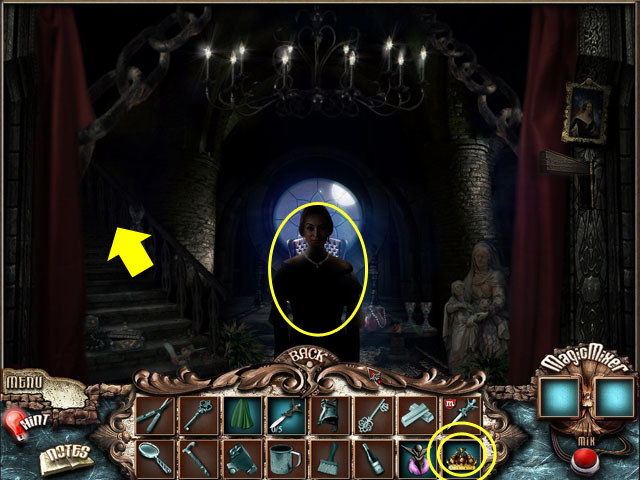
- Give the CROWN to the queen, and she will ask you to find the missing jewels.
- Go back up the stairs.

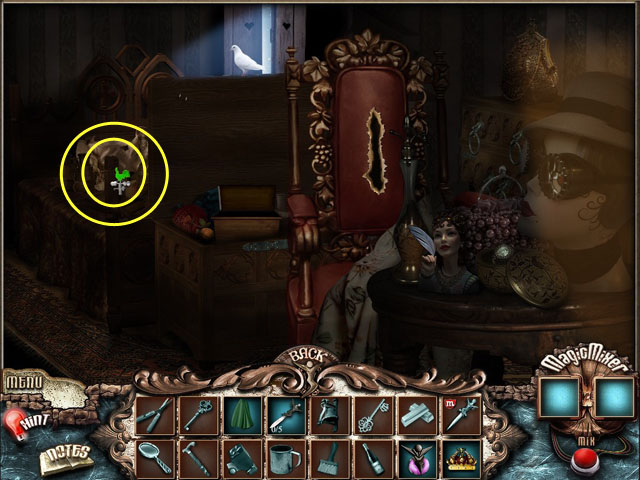
- Click on the bed Hidden Object Scene.

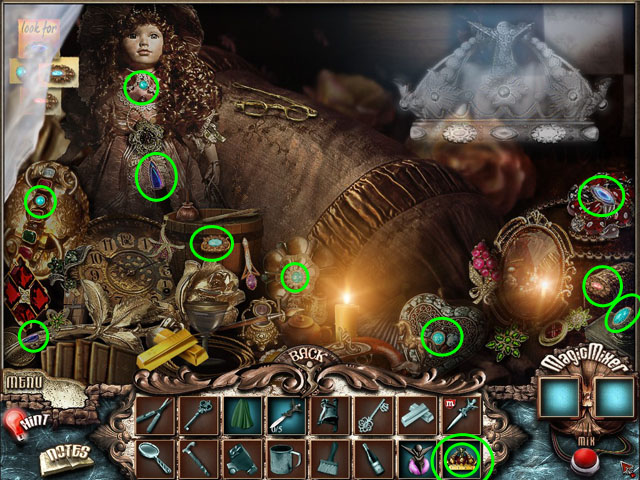
- Find all of the missing jewels circled in green.
- Use the CROWN on the jewels in the top right corner to add them together.
- Return to the queen and give her the crown. She will give you some more information.

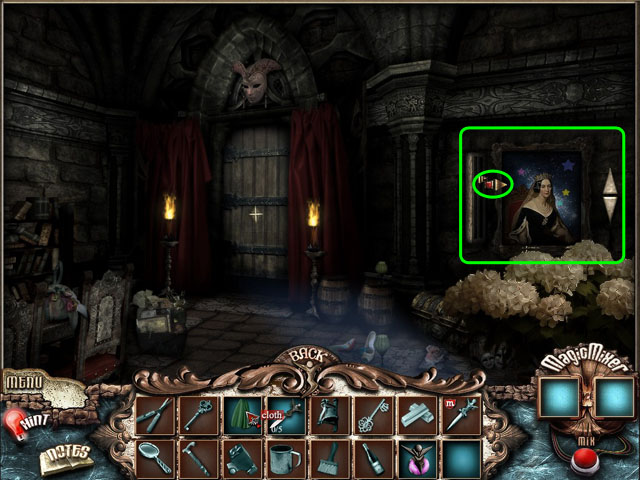
- Press the back button to go the previous scene.
- Click on the down arrow to the right of the painting until the arrow is between the crown and the yellow star in the painting.

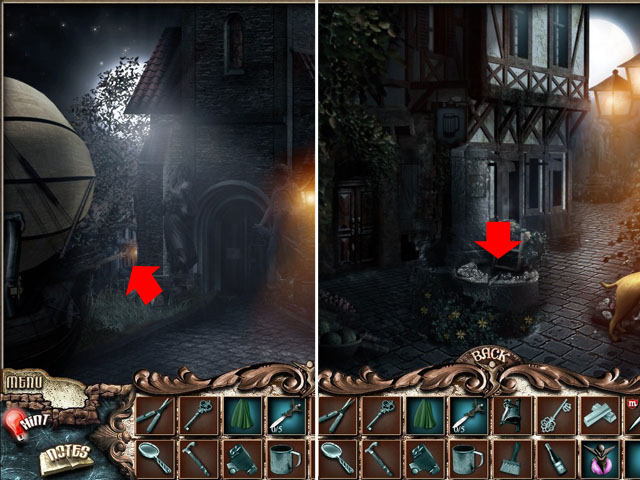
- Return to the first scene and go to the left to the well scene.
- Go down the well.

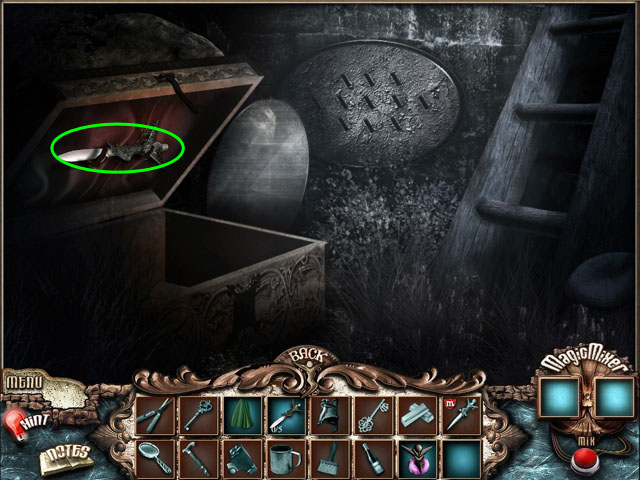
- Take the KNIFE from the chest door.

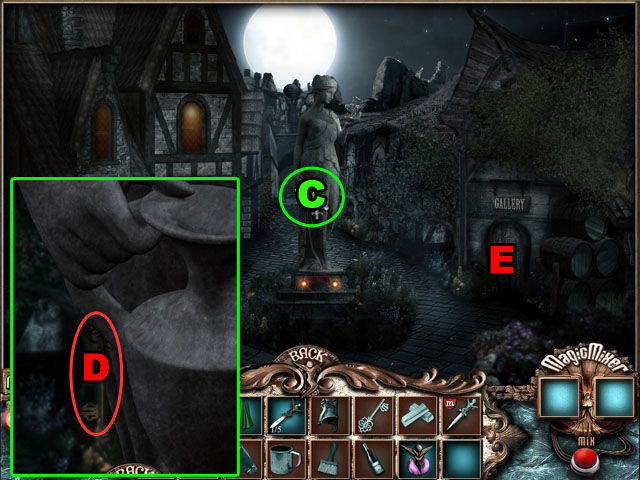
- Return to the previous scene and go forward to the statue.
- Click on the statue to zoom in (C).
- Take the GALLERY KEY (D) and use it on the door to the right (E).
- Enter the gallery.

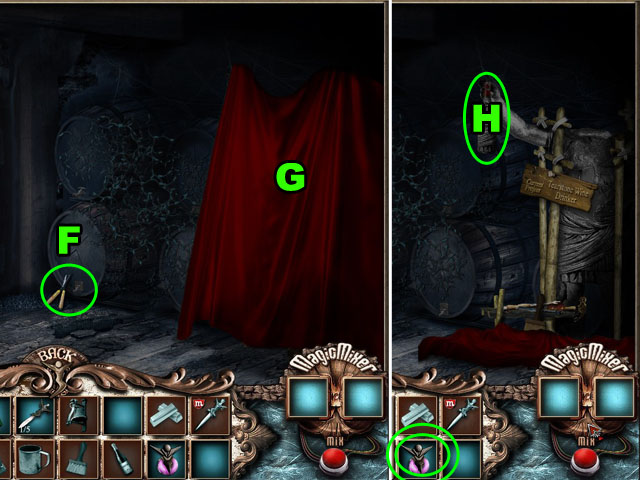
- Collect the SHEARS (F).
- Click the red curtain to remove it (G).
- Use the MAGIC BOTTLE on the WINE BOTTLE and then collect it (H).

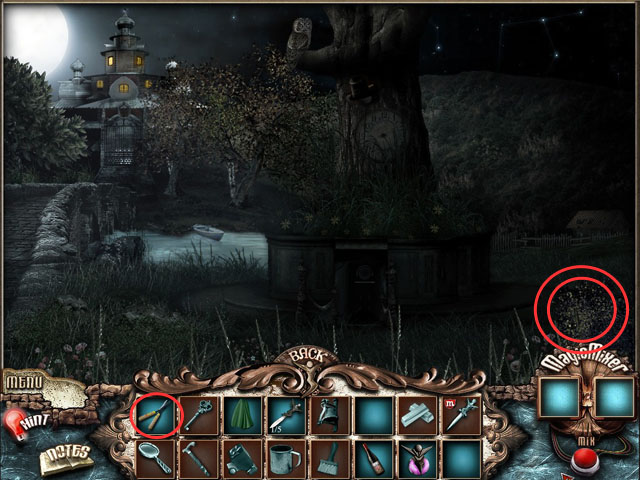
- Return to the first scene and go to the right.
- Use the SHEARS on the bushes circled in red and collect the MUG.

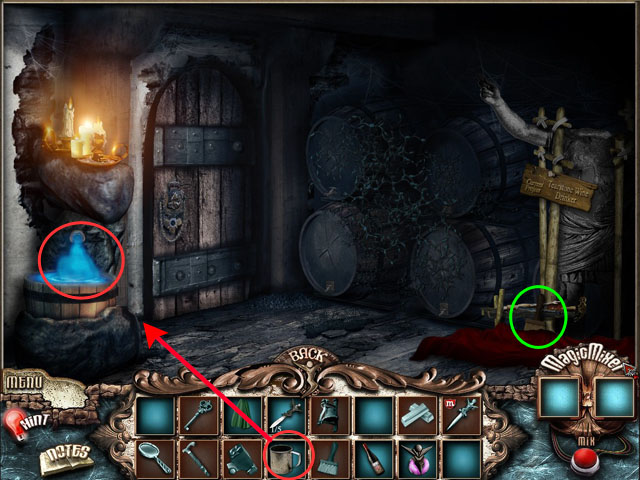
- Return to the gallery and use the MUG on the water to get a MUG FULL of water.
- Collect the BRUSH.

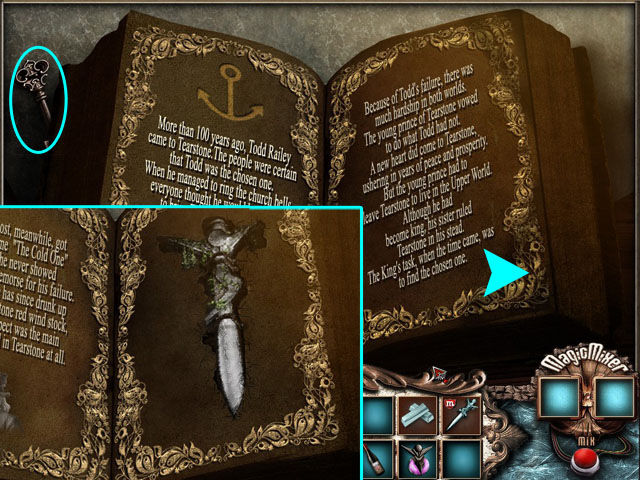
- Travel to the castle and go to the room with the queen.
- Pull the lever on the right (I).
- Go back to the previous room and the painting will open.
- Take the BELL (J).

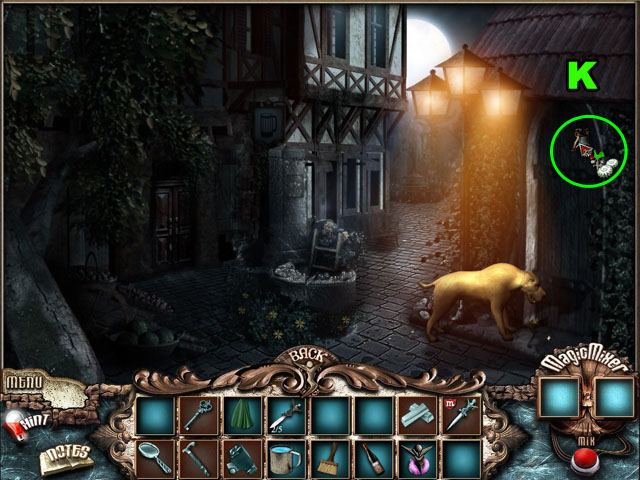
- Travel to the well scene with the dog and use the BELL on the door (K).
- Enter the room.

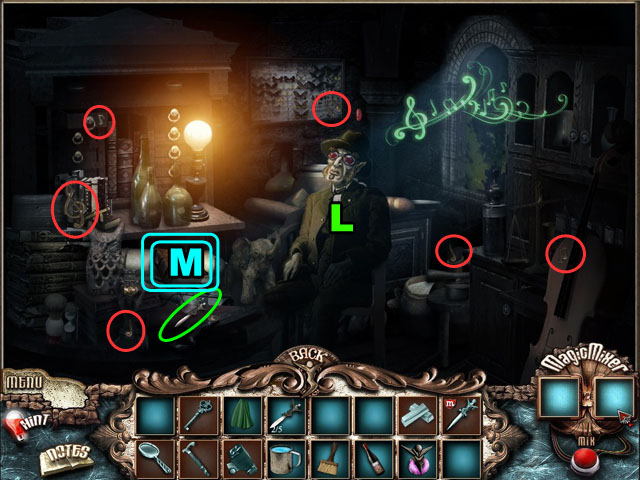
- Talk to the musician and then collect all the notes in the scene (L).
- After collecting all of the notes, inspect the book on the table (M).


- Flip to a new page on the right side and take the DAGGER.
- Take the BASEMENT KEY on the left.

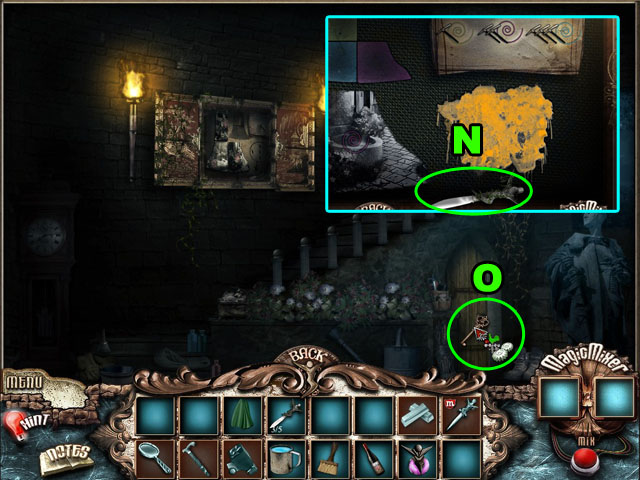
- Enter the church from the first scene.
- Click on the cabinet in the wall and collect the DAGGER (N).
- Use the BASEMENT KEY on the door (O) and enter the basement.

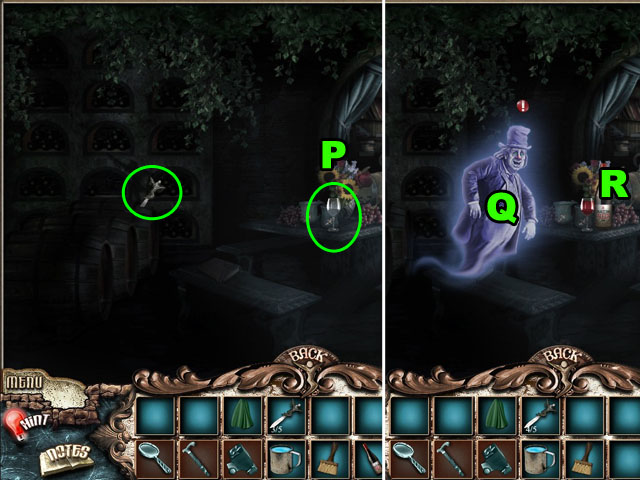
- Take the DAGGER from the wall.
- Use the WINE BOTTLE on the wine glass (P).
- Talk to the ghost (Q).
- Click on the area on the table to start the next mini-game (R).

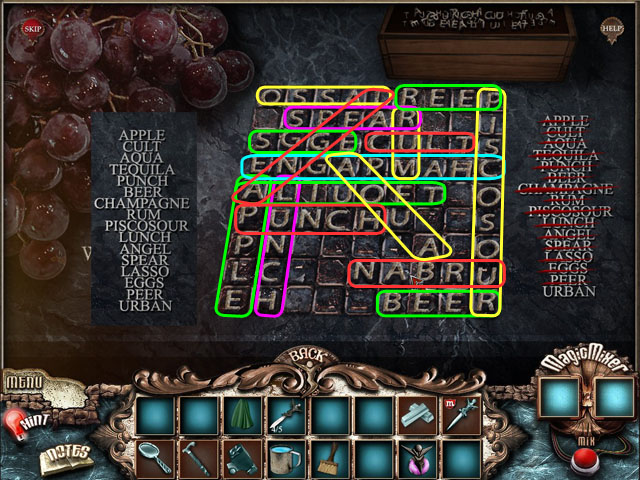
- Click on the box of words at the top and try to place those letters on the grid to make the words on the right.
- The letters must attach to other letters already on the board.
- The letters can’t be rotated by the word can be created backwards or forwards.
- You must go in order from the top to the bottom.
- The final output looks like a normal word search.
- See the screenshot for the solution.

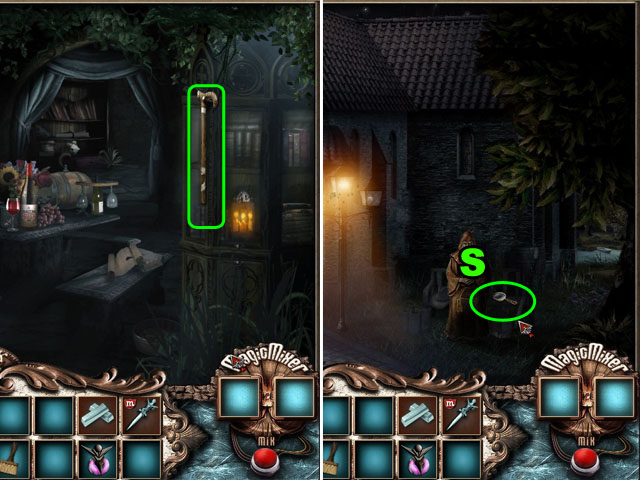
- Talk to the ghost and take the CANE.
- Give the CANE to the monk outside and he will give you the MAGNIFYING GLASS (S).
- Go to the left.

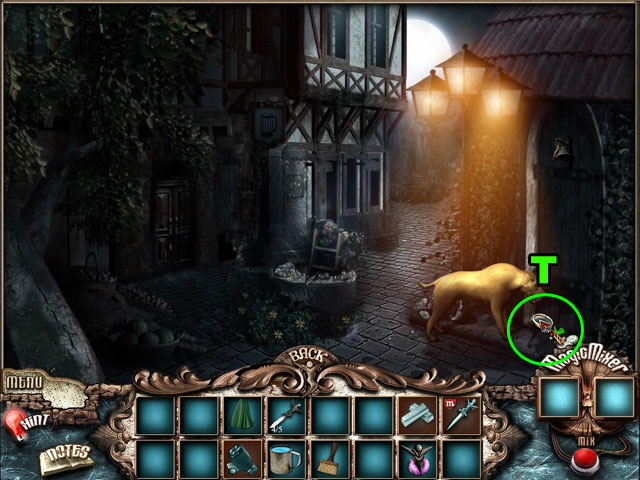
- Use the MAGNIFYING GLASS on area the dog is looking at (T).

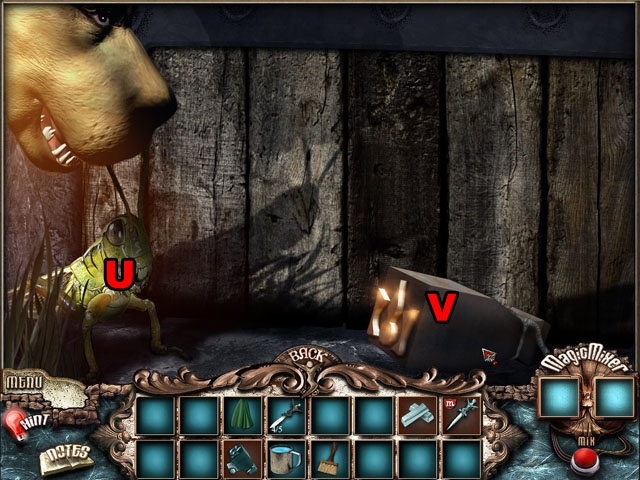
- Use the MAGIC BOTTLE on the grasshopper (U).
- Take the MONUMENT KEY (V).

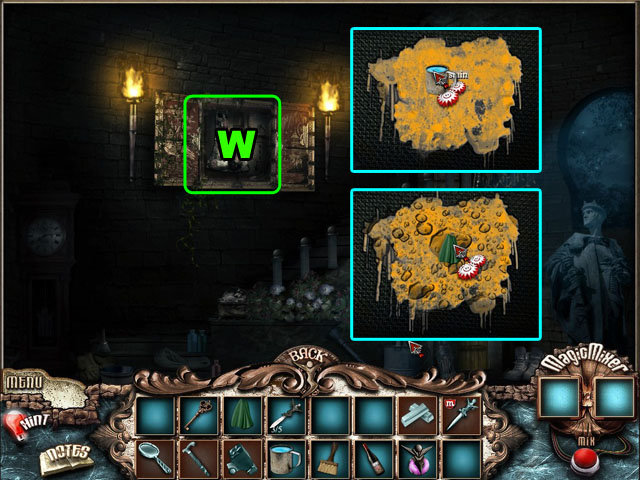
- Travel back to the inside of the church and look at the cabinet again (W).
- Use the MUG FILLED with water and CLOTH to clean off the yellow stain.
- This is the answer to the next puzzle.

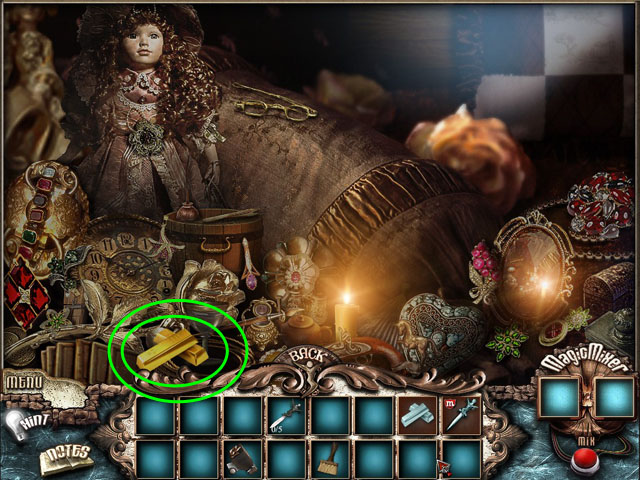
- Return to the castle bedroom and click on the bed Hidden Object Scene.
- Collect the GOLD BAR.

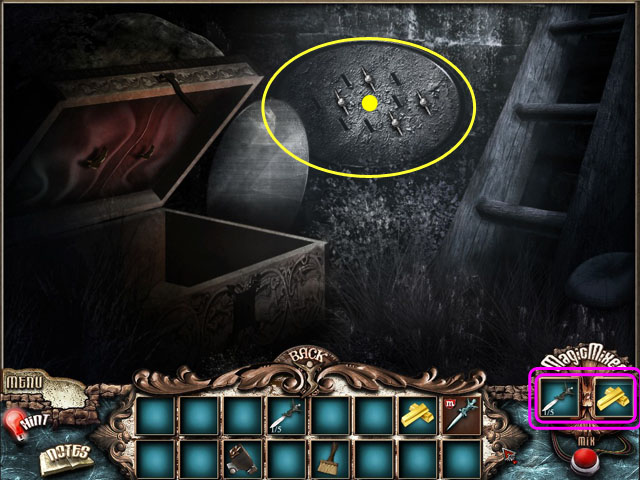
- Return to the well and go inside.
- Combine one KNIFE from your inventory with the GOLD BAR to make the GOLD KNIFE.
- Put the KNIVES into the holes to make the same pattern as we saw before in the church.

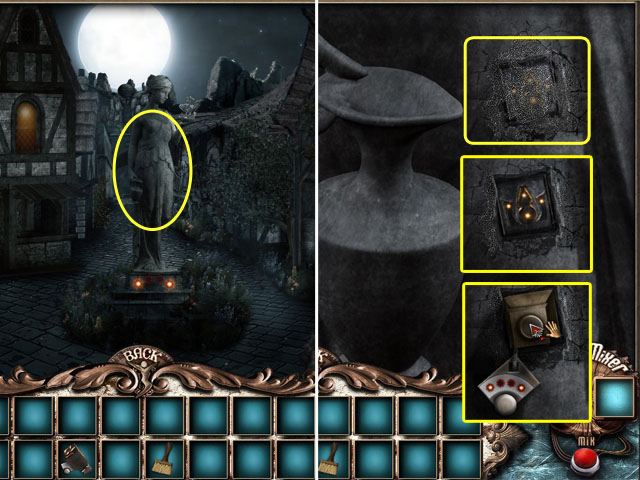
- Click the back button and go forward to the statue.
- Click on the statue’s hand.
- Use the BRUSH to clean off the key hole.
- Use the MONUMENT KEY on the hole.
- Click on the button with the lights above it until it looks like the screenshot: lights on, off, off on.
- Click the button in the middle to finish the chapter.
Chapter 8

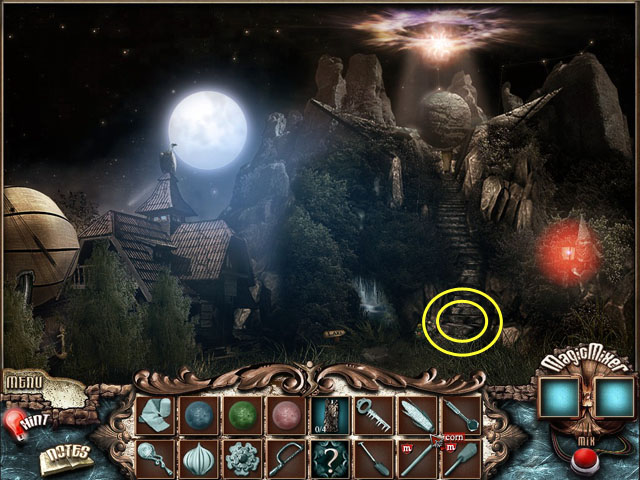

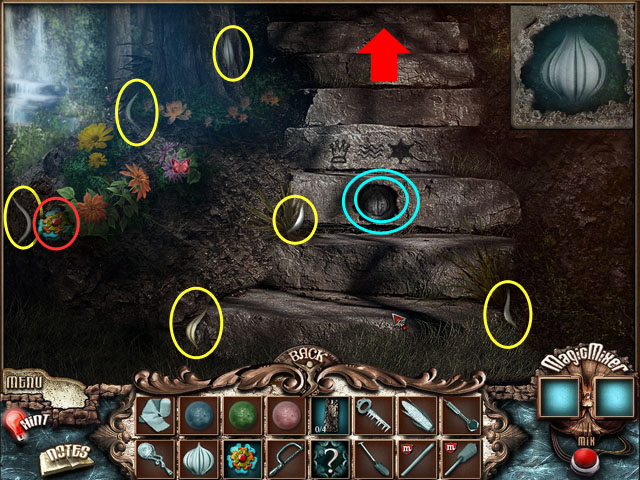
- Click on the onion symbol circled in blue.
- Collect all of the pieces of the onion circled in yellow and then click the ONION to collect it.
- Collect the RADIO PLUG highlighted in red.
- Continue up the stairs.

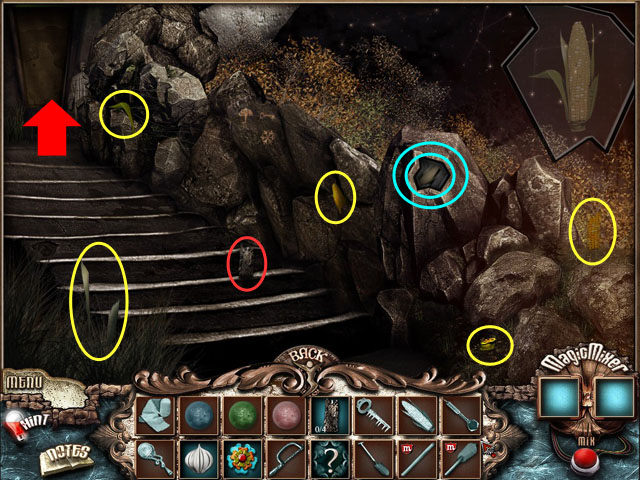
- Click on the icon in blue to search for pieces of the corn cob.
- Collect all of the pieces of the corn cob circled in yellow and then click the CORN to collect it.
- Pick up the CANDLE.
- Continue up the stairs.

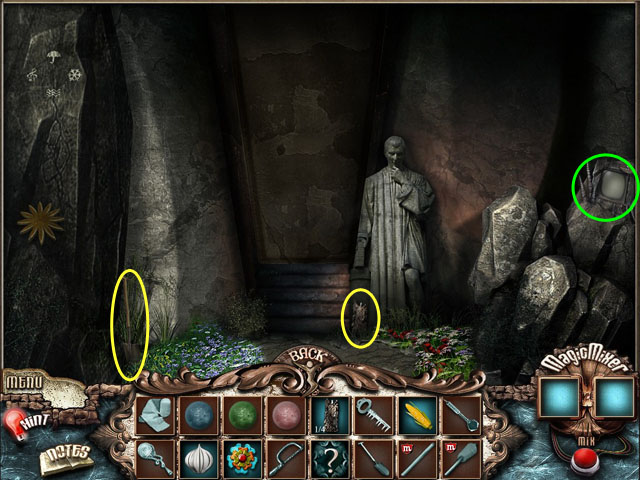
- Pick up the CANDLE in the middle of the screen.
- Collect the SHOVEL on the left.
- Click on the television to the right.

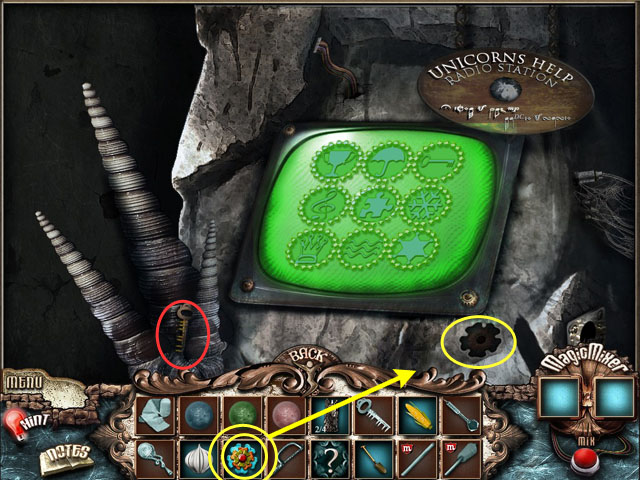
- Collect the CHEST KEY and place the RADIO PLUG in the indent.
- Set the icons in the screen to the correct positions.
- Hints are hidden all around the world, showing three or four at a time out of the whole pattern.
- Use the screenshot to see the complete pattern.

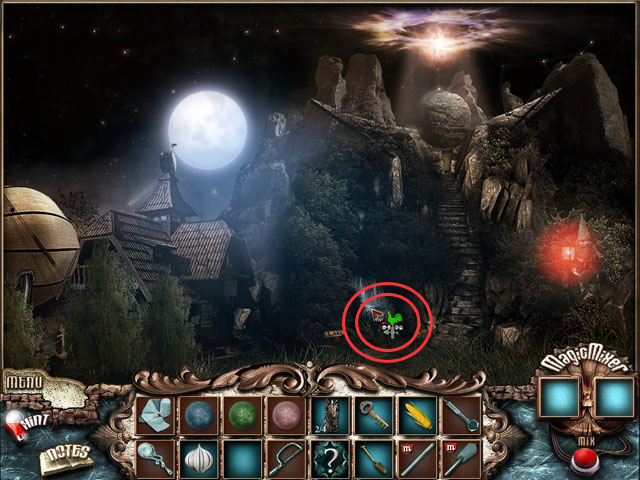
- Return to the first scene at the bottom of the stairs.
- Go to the lake.

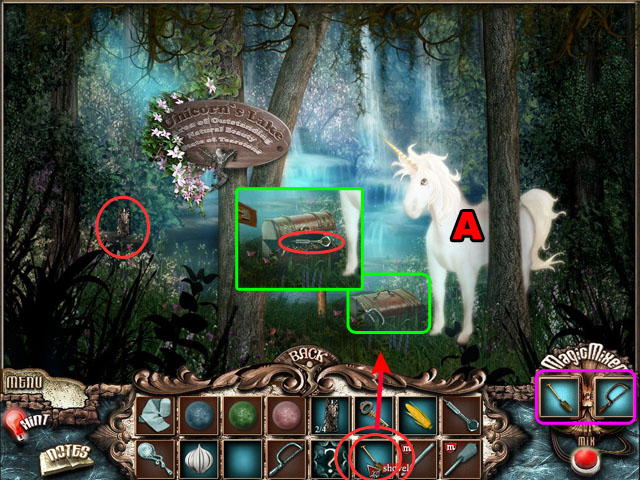
- Use the SHOVEL to uncover the edge of the water 3 times.
- Take the HACKSAW.
- Use the CHEST KEY to open the chest.
- Take the DART from inside the chest.
- Pick up the CANDLE to the left.
- Talk to the Unicorn that appears (A). If the unicorn does not appear yet, leave and come back.
- Combine the SHOVEL and the HACKSAW to make a STICK.

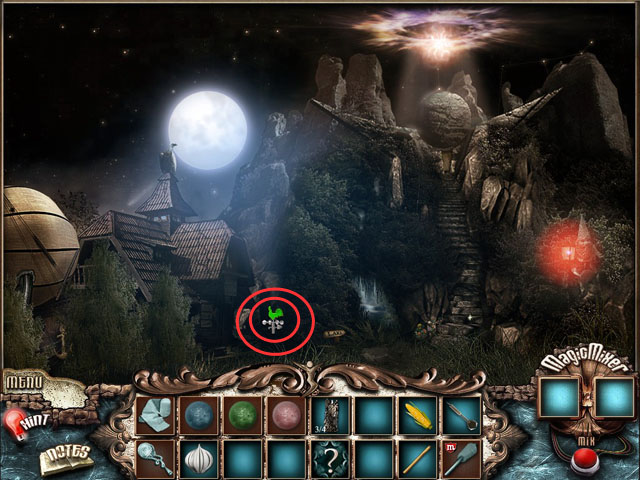
- Return to the previous scene and go towards the house.

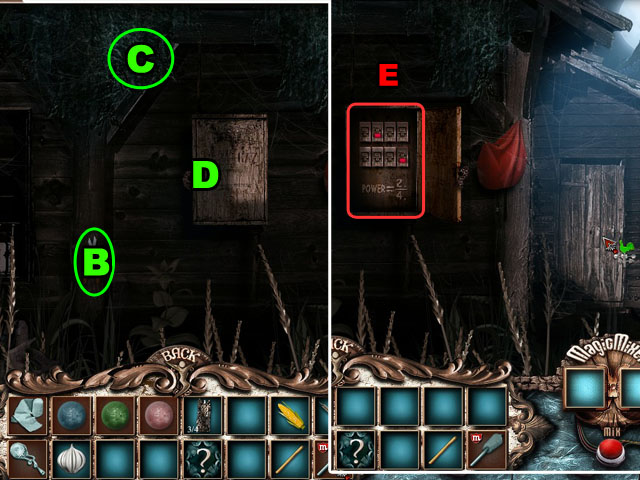
- Use the shears (B) on the bushes at the top of the screen (C).
- Use the key to open the power box (D).
- Select the 2nd fuse on the top and the 4th fuse on the bottom to turn on the power (E).
- Go through the door to the right.

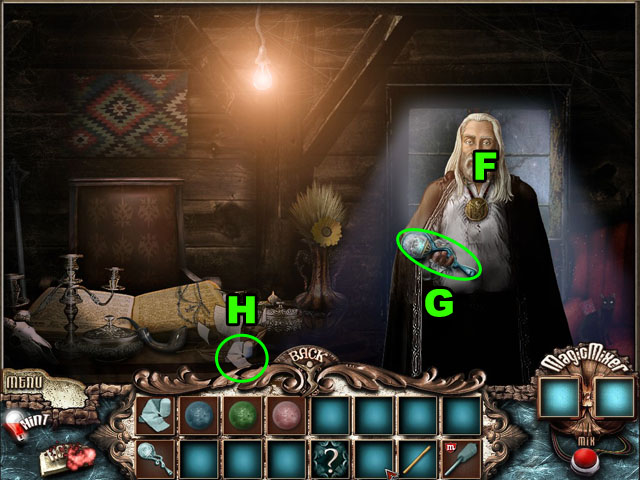
- Talk to the man inside the house (F).
- Take the LIGHT COLLECTOR from him (G).
- Collect the BANDAGE from the table (H).

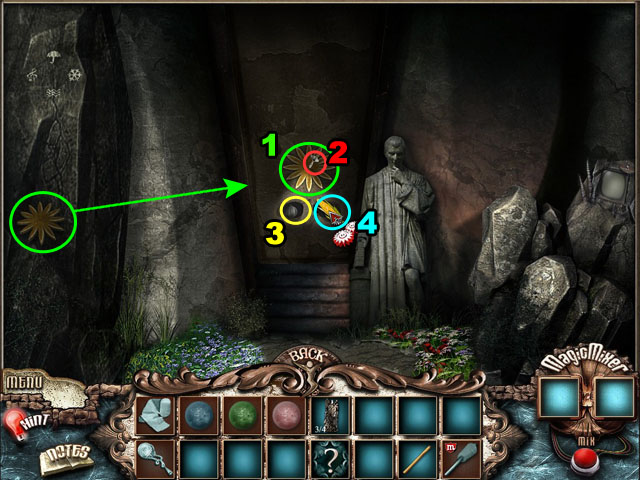
- Travel to the very top of the stairs.
- Use the sun from the left of the screen on the door (1).
- Use the DART on the sun door (2).
- Use the ONION (3) and the CORN (4) on the two holes in the door.
- Go through the open door.

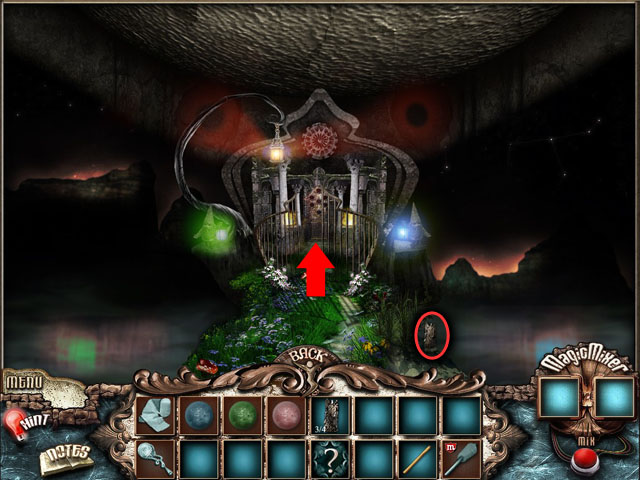
- Take the CANDLE and go towards the gate.

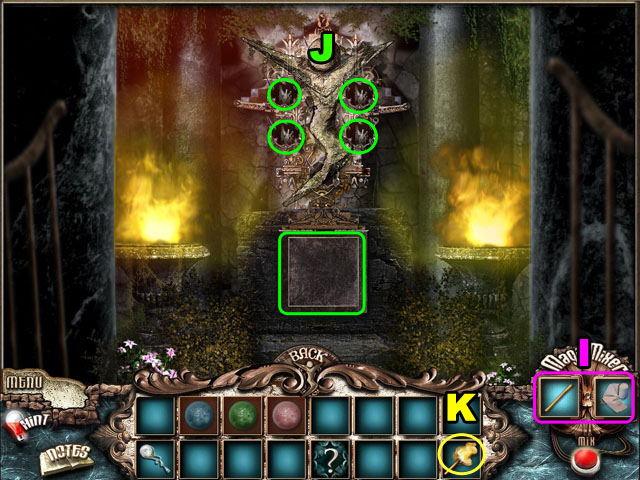
- Click on the large square at the bottom and add the statue to the top of the dias (J).
- Use the CANDLES on the open holes.
- Combine the STICK and the BANDAGES to make a TORCH (I).
- Use the TORCH on the left fire to light it (K).

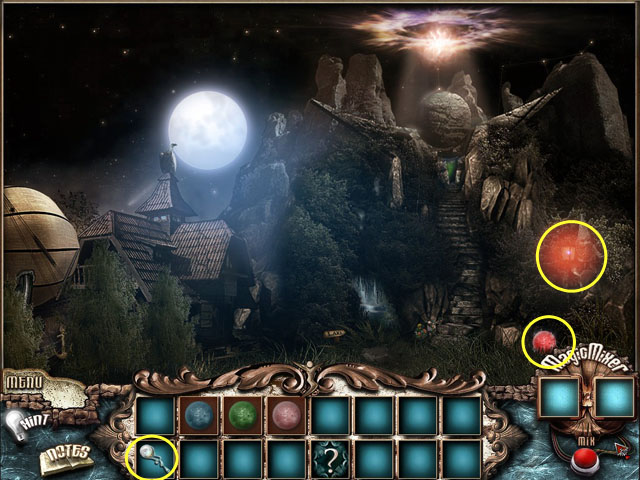
- Travel to the first scene again.
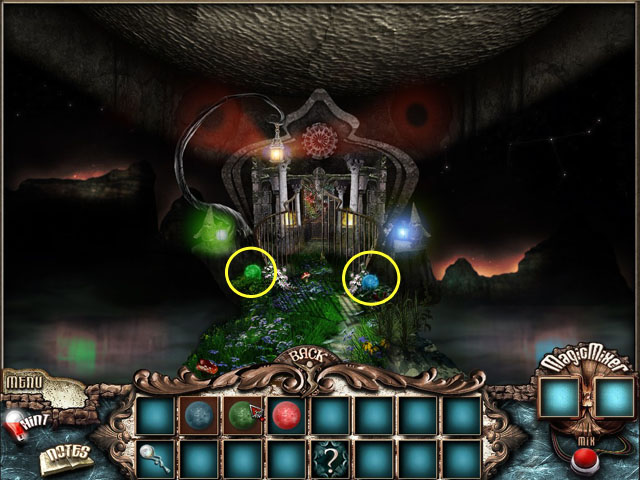
- Use the LIGHT COLLECTOR on the red lantern and then collect RED LIGHT from the ground.

- Travel to the gate past the sun door.
- Use the LIGHT COLLECTOR two more times to collect the GREEN LIGHT and the BLUE LIGHT.
- Go through the gate.

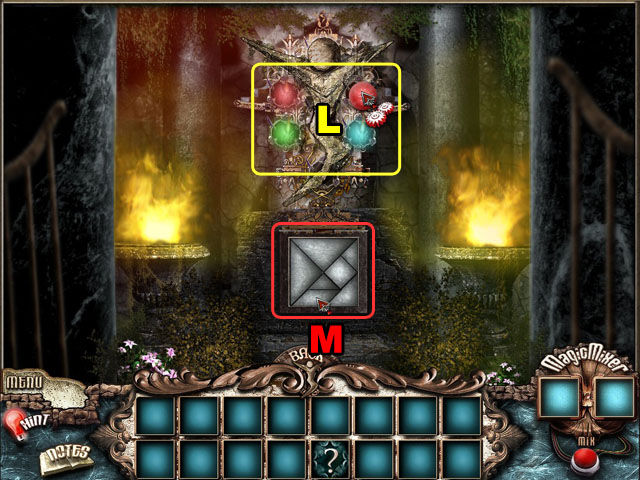
- Use the LIT TORCH on all the candles.
- Use the RED LIGHT on the top two candles, the GREEN LIGHT on the bottom left and the BLUE LIGHT on the bottom right candle (L).
- Small metal shapes will appear in all of the holes in the statue.
- Drag and drop the metal shapes onto the square at the bottom.
- If you drop them in the wrong place they will go back to their original position, but once you get them right they will be locked in place.
- Use the screenshot for the correct solution of the puzzle.
- Click on the complete puzzle when you are done (M).

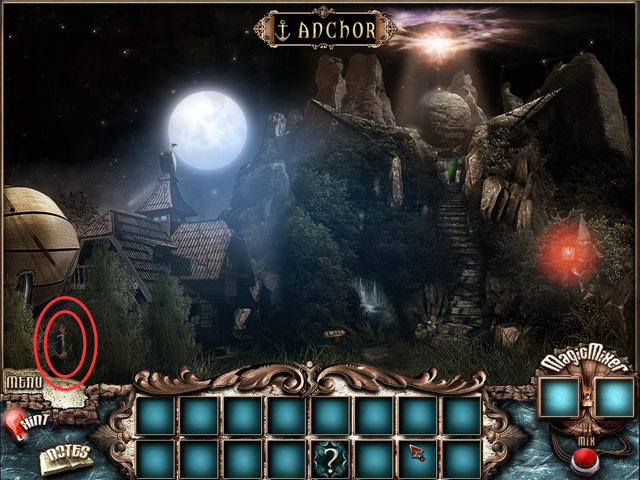
- You then will be given a riddle to find a secret item.
- The answer to the riddle is an ‘anchor’, and this answer will slowly reveal itself as you play.
- Find the anchor in the first scene circled in red and put it in the square below the candles, in the last scene of the game.
- Congratulations! You’ve just completed Tearstone!


