Lost Chronicles: Fall of Caesar Walkthrough, Guide, & Tips
Lost Chronicles: Fall of Caesar Walkthrough
Welcome to the Lost Chronicles: Fall of Caesar Walkthrough!
Experience the Fall of Caesar firsthand in this Hidden Object Puzzle Adventure game! Discover why Brutus betrayed his mentor!
Whether you use this document as a reference when things get difficult or as a road map to get you from beginning to end, we’re pretty sure you’ll find what you’re looking for here.
This document contains a complete Lost Chronicles: Fall of Caesar game walkthrough featuring annotated screenshots from actual gameplay!
We hope you find this information useful as you play your way through the game. Use the walkthrough menu below to quickly jump to whatever stage of the game you need help with.
Remember to visit the Big Fish Games Forums if you find you need more help. Have fun!
This walkthrough was created by Chie, and is protected under US Copyright laws. Any unauthorized use, including re-publication in whole or in part, without permission, is strictly prohibited.
General Tips

- From the main menu you can adjust options like volume, full screen, or custom cursor.
- You can also play the credits, manage your profiles or read more about this game.
- When you first start the game you will be asked if you want to play with the tutorial or not. The tutorial will show you how to do the first few scenes of the game and explain the UI.
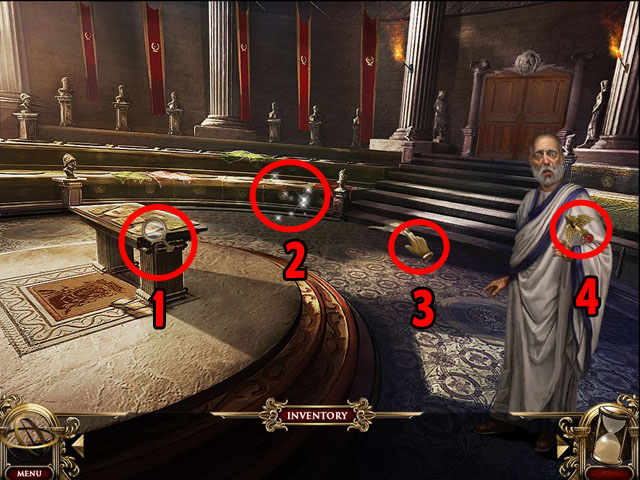
- There are 3 different cursors in the game: the magnifying glass for when you can look at something closer (1), the finger cursor for when you can take something (3), and the winged cursor for when you can talk or interact with something (4).
- When you talk to a character they will have blue topics and red topics for you to choose from. Blue topics are just part of the story; red topics are objectives that you need to finish the game.
- To solve the objectives you will need to give the characters some object from your inventory.
- Sometimes will see sparkles in an area. These are Hidden Object Scenes (2) that will ask you to find 12 objects from a list in order to get an inventory item.
- The Hidden Object Scenes and all of the puzzles are not randomized, so you can follow the walkthrough exactly to finish them.
- In the bottom left corner is your map. It tells you where there are objectives you still need to finish with red flags. Click on the red flags to see a black circle where you need to go to finish these objectives.
- There is a hint button in the bottom right corner of the screen that will slowly recharge; you can only use it when you are in a Hidden Object Scene to help you find an object.
- The inventory panel does not automatically scroll so use the two arrows on either side if you feel like you are missing some items that you have already found.
Chapter 1: The Senate

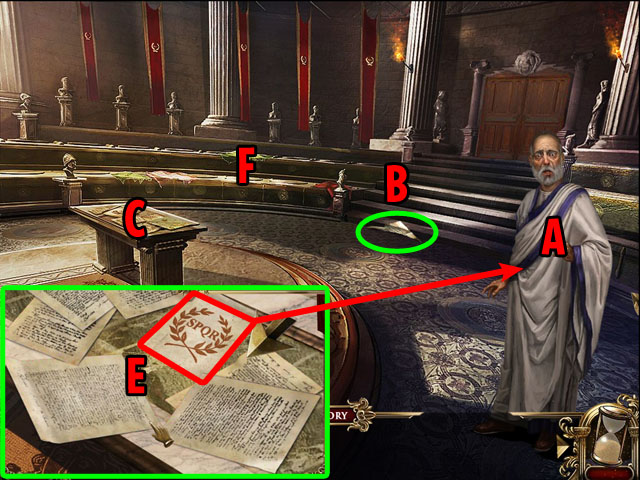
- Click on Senator Ovidius (A).
- Click on the red question at the bottom of the screen to get a new task.
- You can click on the blue questions to learn more about the story.
- Collect the SCRAP OF PAPER (B).
- Click on the table (C).
- Move the documents out of the way by clicking on them.
- Collect the SENATE DOCUMENT with the letters SPQR on it (E).
- Use the SENATE DOCUMENT on the Senator.
- Click on the area with sparkles (F).

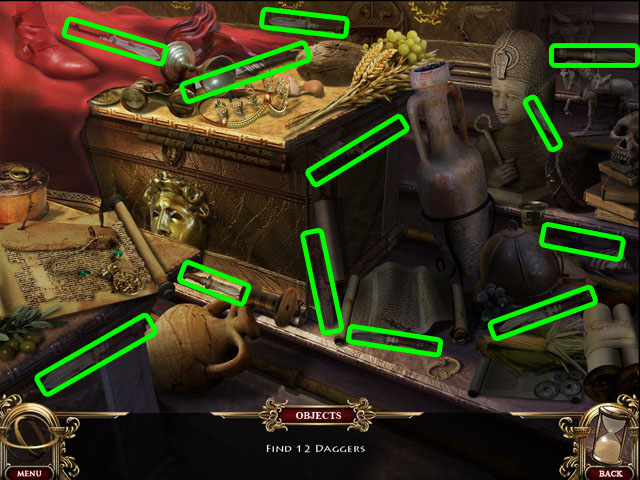

- Find the two daggers circled in green with the same icon on the handle.
- Click the daggers and click them again on the scabbards to select them.
- You will receive the ASSASSIN’S DAGGERS.
- Click on the doorway at the top right to exit to the senate halls.

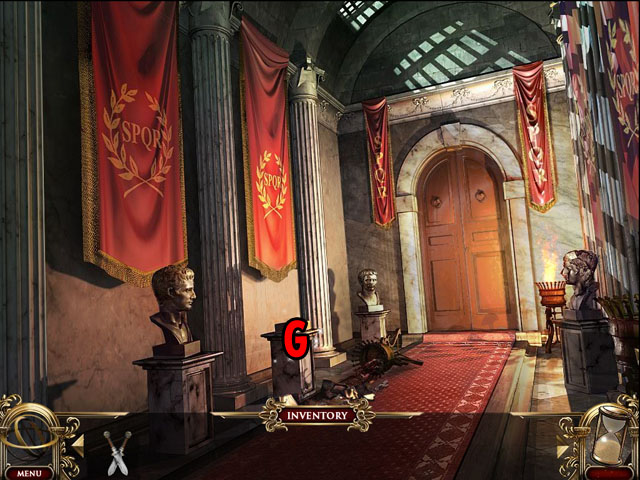
- Click on the broken statue (G).

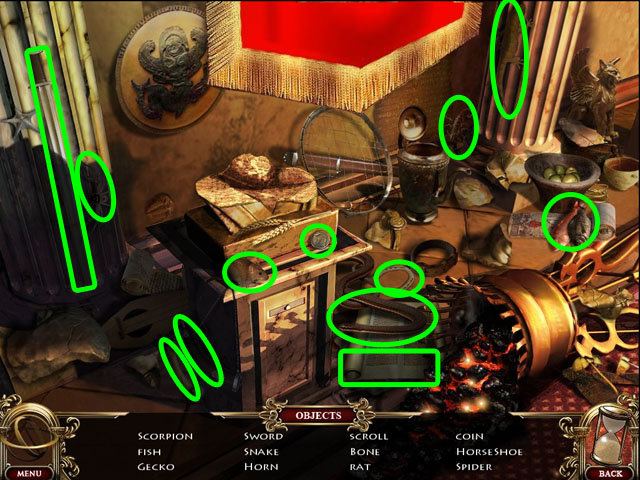
- Find all 12 items circled in green.
- You will receive a SILVER COIN.

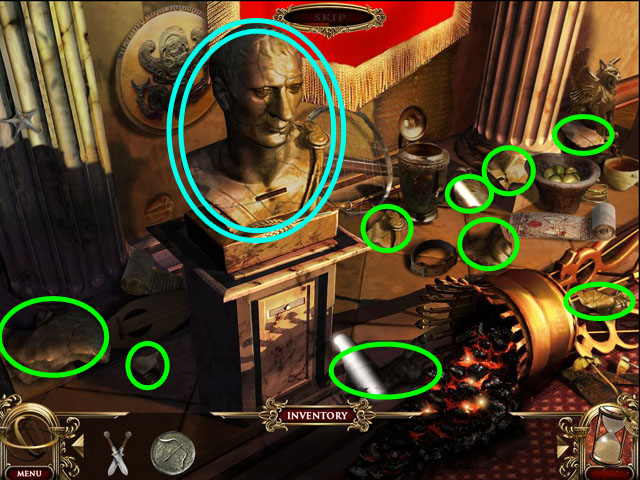
- Find the 9 pieces of the broken statue.
- Click the pieces and then click again on the statue.
- The pieces will be shining in the light.


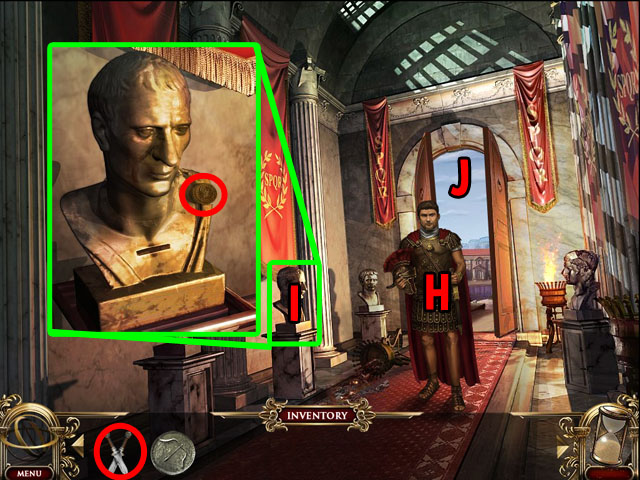
- When you are finished a guard will enter the room (H).
- Talk to him and click on the red text to get the next objective.
- Give him the ASSASSIN’S DAGGERS.
- Click on the statue and collect the IRON COIN (I).
- Exit to the outer senate (J).

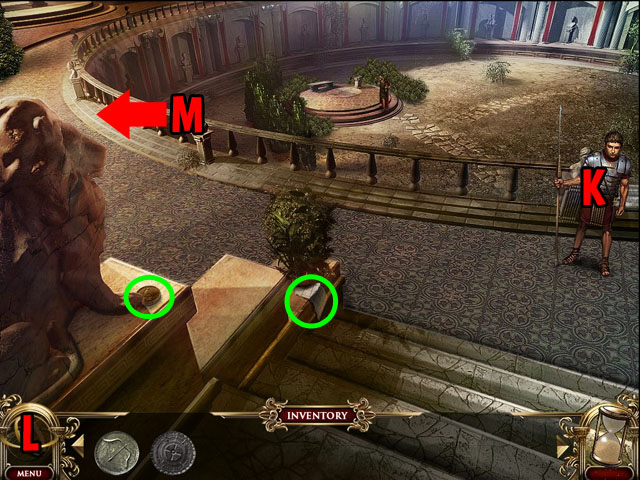
- Talk to the guard and get another objective by clicking on the red text (K).
- Collect the SCRAP OF PAPER and the COPPER COIN circled in green.
- If this is the tutorial, click on the left side of the UI to see your objective map (L).
- Tasks are marked with red flags and objectives are black circles.
- Exit to the guard station (M).

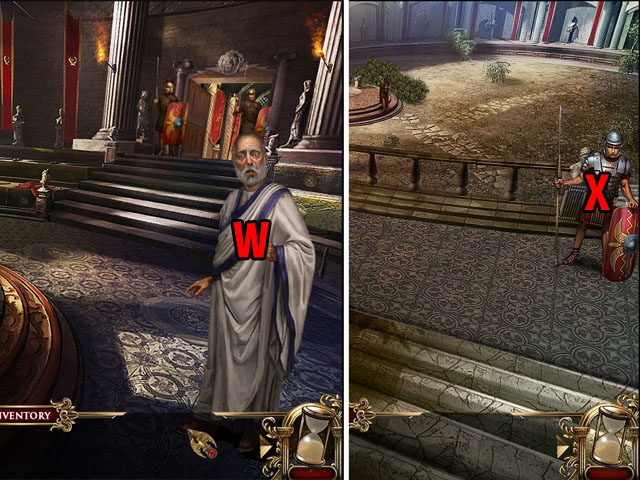
- Open the drawers and take the SHIELD (N).
- Collect the SCRAP OF PAPER circled in green.
- Talk to the guard (O) and accept his objective.
- Exit to the market (P).

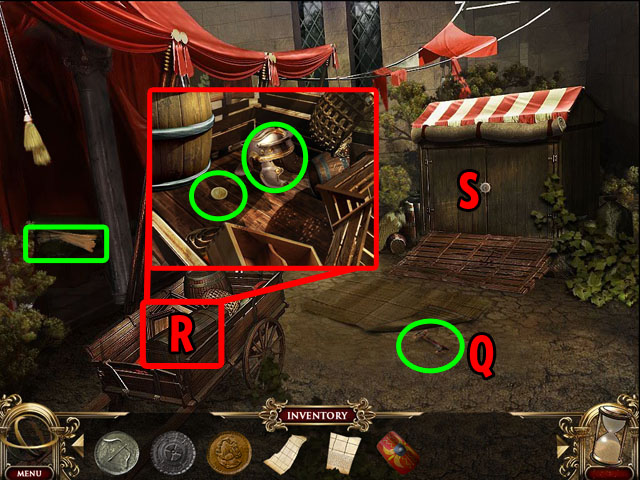
- Click on the rug and take the COPPER KEY (Q).
- Collect the SCRAP OF PAPER highlighted in green.
- Click on the cart and click on the junk to clear it away (R).
- Collect the HELMET and the GOLD COIN.
- Click on the doors (S) to look at the lock.
- Move all of the pieces out of the way by clicking on them and then use the COPPER KEY on the lock.
- Click on the sparkles.

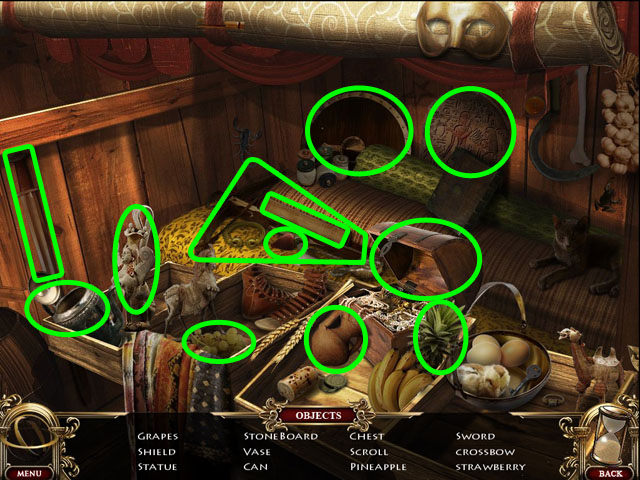
- Find all 12 items.
- You will receive some GRAPES.

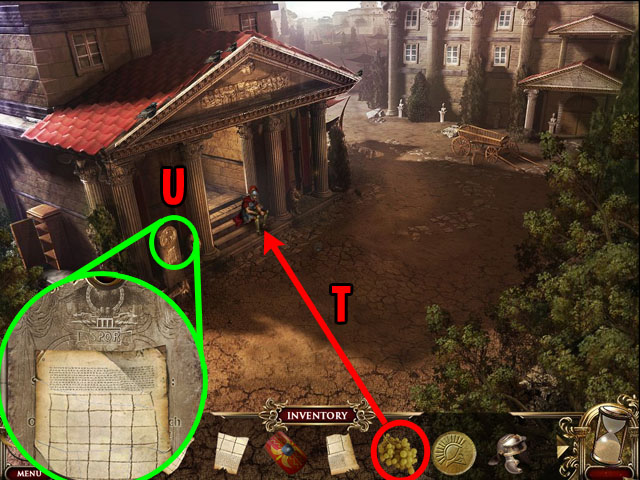
- Give the GRAPES to the soldier in the previous scene (T).
- Talk to him again and get the next objective.
- You will receive a SCRAP OF PAPER.
- Click on the paper next to him (U).
- Use all of the SCRAPS OF PAPER from your inventory on the paper and then collect the BATTLE FORMATIONS.
- Give the BATTLE FORMATIONS to the soldier.
- You cannot solve this puzzle without all 5 coins.

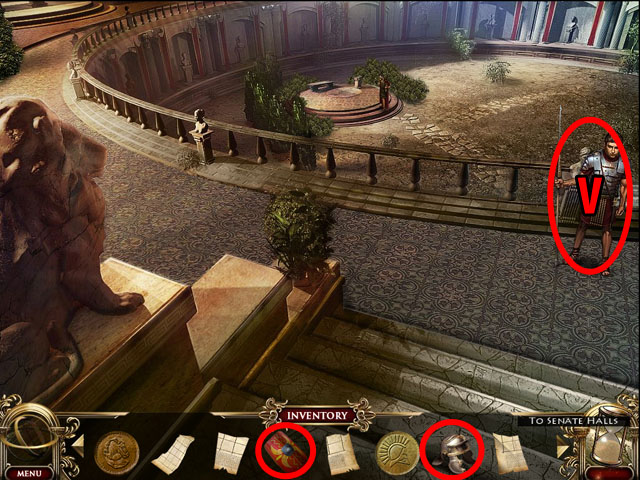
- Return to the outer senate.
- Give the guard there the HELMET and the SHIELD.
- You will receive a COPPER COIN.

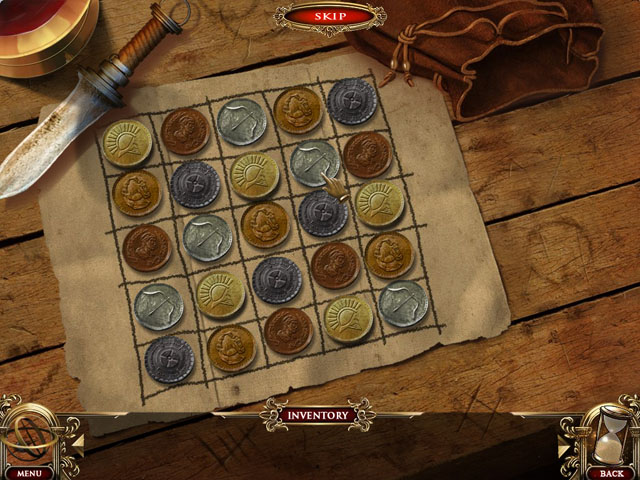
- Return to the coin puzzle by talking to the other soldier.
- Use all 5 COINS from your inventory on the puzzle.
- Arrange the coins in a way that every row and column only has one of each coin without any repeats.
- The coins already on the paper cannot be moved.
- Click the coins to the right and then click again to place them. You can also drag and drop them.
- See the screenshot for one possible solution. There may be others.
- You will receive MARCHING ORDERS.


- You will receive MARCHING ORDERS.
- Return to the first scene and use the MARCHING ORDERS on the senator (W).
- You will receive the SIGNED MARCHING ORDERS.
- Give the SIGNED MARCHING ORDERS to the soldier in the outer senate (X).
- Enter the assembly.

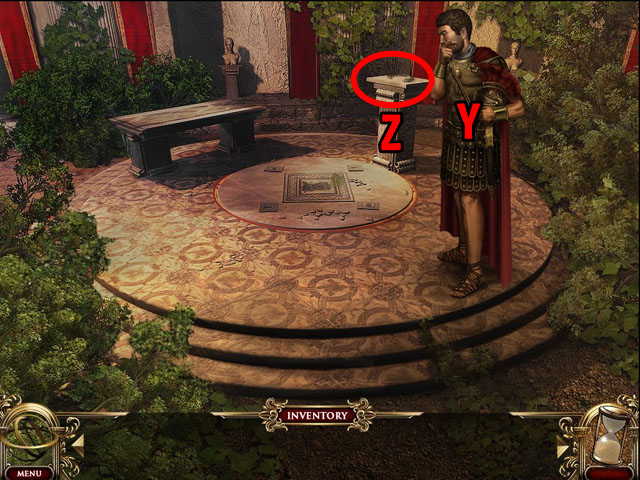
- Talk to Marc Anthony (Y) and get your next objective.
- Click on the pedestal and take the CROWN (Z).

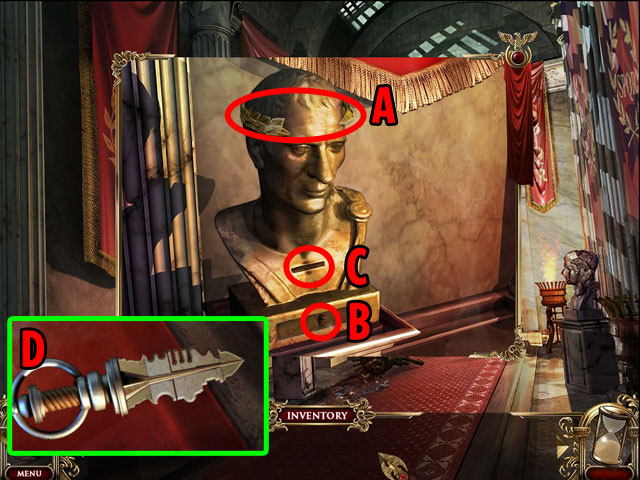
- Use the CROWN on the top of the statue in the senate halls (A).
- Open the small drawer that appears (B) and take the DAGGER KEY (C).
- Arrange the pieces of the DAGGER KEY so that it will fit in the lock in the statues.
- Click on any two pieces of the dagger’s teeth to change their places.
- Match the different pieces with their inverses on the walls of the statue.
- Click on the dagger handle to try your solution.
- See the screenshot for the solution (D).
- Take CAESAR’S WILL and give it to Marc Anthony in the assembly.
Chapter 2: The University

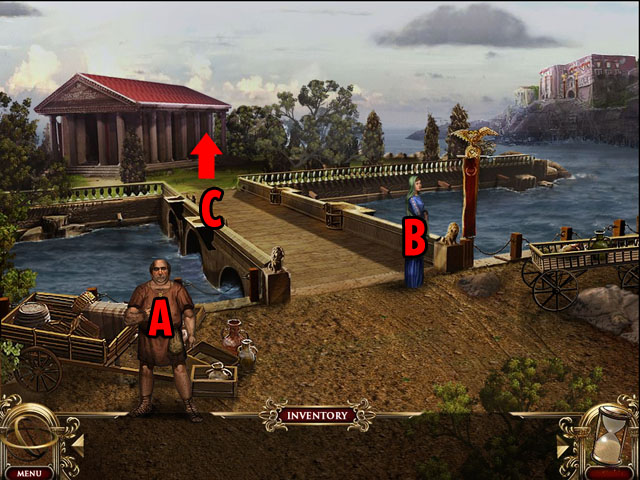
- Talk to the merchant and get his objective (A).
- Talk to the lady by the bridge and get her objective (B).
- Enter the University across the bridge (C).

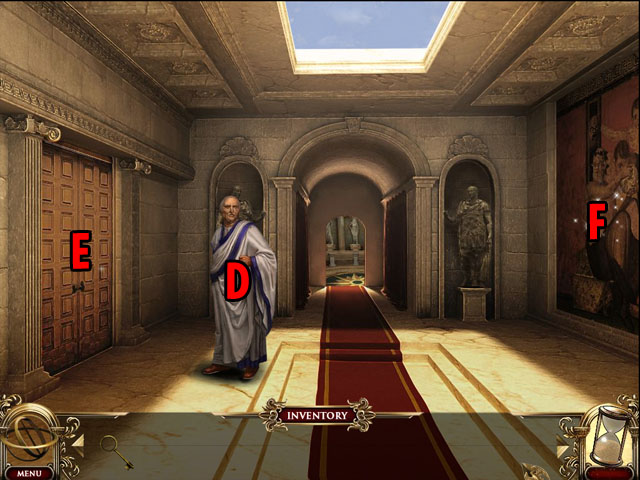
- Talk to Cicero and receive another objective (D).
- You will also receive a LIBRARY KEY.
- Use the KEY on the door to the left to open it (E).
- Click the mural on the right (F).

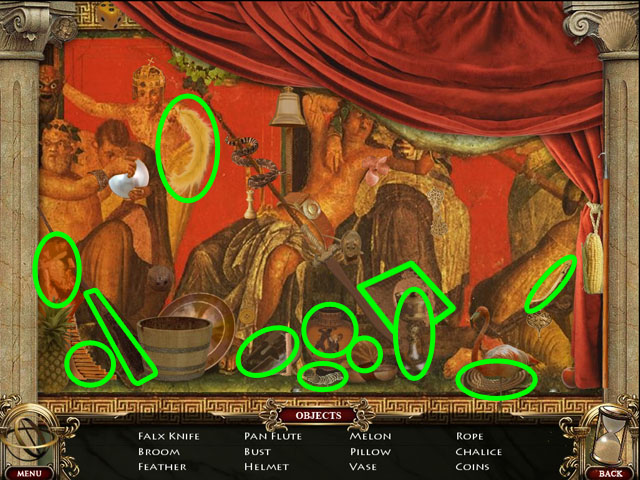
- Find all 12 items.
- You will receive the FALX KNIFE.
- Enter the library on the left (E).

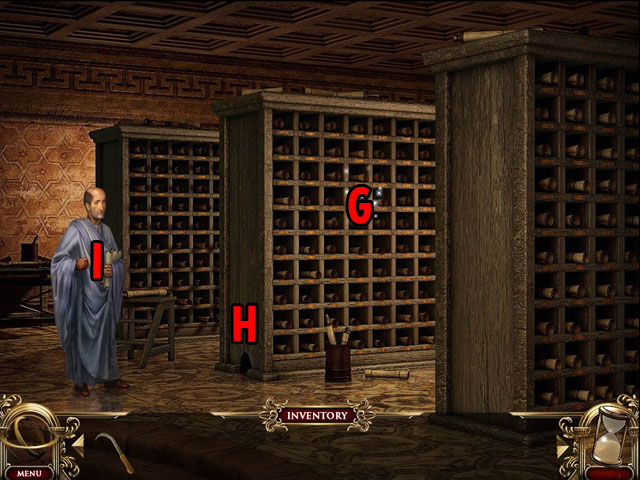
- There is a Hidden Object Scene in the shelves (G).
- There is a mouse hole that you can inspect here, but you need cheese to use (H).
- Talk to the librarian and get his objective (I).
- He will show you a piece a map of the seasons.

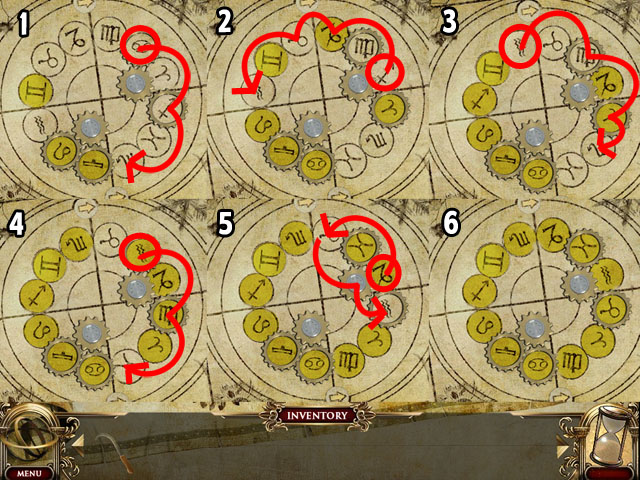
- Line up the different zodiac signs with the seasons in the corners of the map to finish this puzzle.
- The zodiac icons can be in any order, but the correct 3 months need to be in the quarter of the diagram with the correct season.
- You can see which zodiac sign goes with each month on the sides of the paper.
- There are two spots with gears; clicking these areas will swap the places of the icons inside the gears.
- Clicking on the arrow at the top or the bottom will rotate the entire disk.
- Use the gears that are 2 spaces apart to make big movements, moving one zodiac sign from one side to the other.
- Use the gears that are right next to each other to switch the places of signs that are almost in the correct place.
- See the screenshot for one possible solution.
- The jumps are written on the screenshot with red arrows, use the right gears to jump 2 spaces and the left gears to jump 1 space. Use the arrows at the bottom and top of the screen to line the discs up afterwards.
- You will receive 2 PIECES OF SILVER.

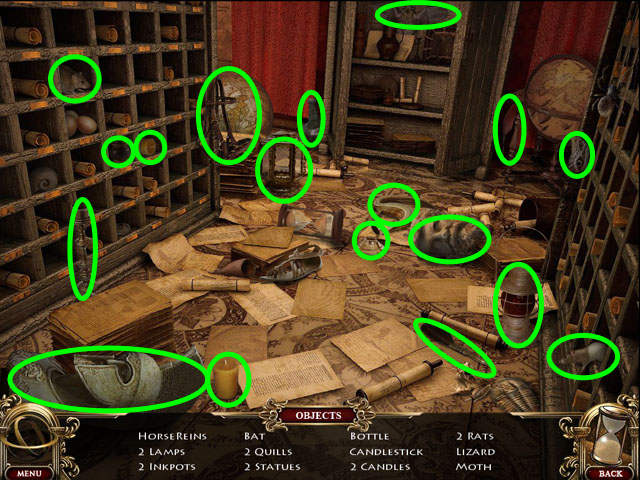
- Next go to the Hidden Object Scene in the same room.
- Find all 12 objects.
- You will receive HORSE REINS.

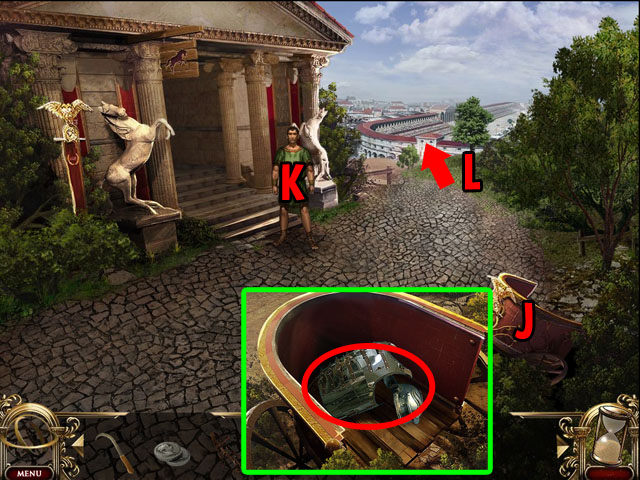
- Exit this room and then exit the library.
- Go to the right to the palatine hill.
- Click on the chariot (J).
- Click the boards to move them out of the way.
- Collect the RACING GEAR.
- Talk to the man and receive a new objective (K).
- Exit to the circus maximus (L).

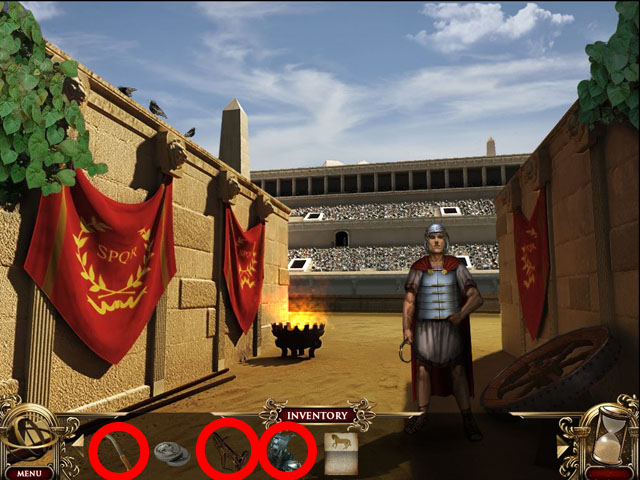
- Talk to the racer and receive a new objective (M).
- He will give you a RACE REGISTRATION.
- Use the HORSE REINS, FALX KNIFE and RACE GEAR on the racer.

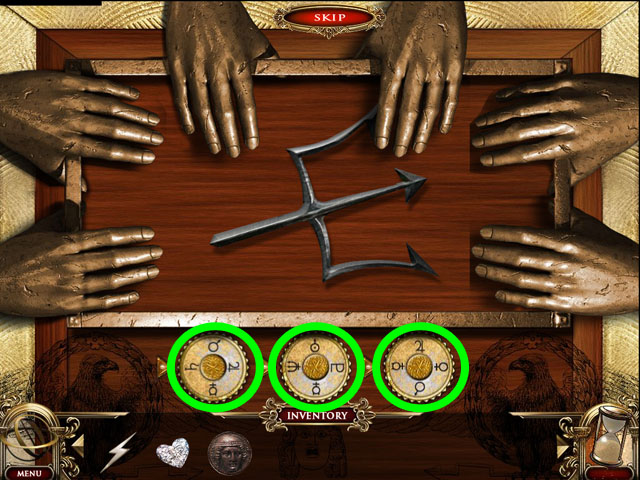
- The object of this mini-game is to open all of the hands surrounding the top of the box.
- The left dial moves the left and middle dials when clicked. The left moves clockwise and the middle moves counter-clockwise.
- The middle dial moves all three dials. The left and the right dials move counter-clockwise and the middle dial moves clockwise.
- The right dial moves the right and middle dials when clicked. The right moves clockwise and the middle moves counter-clockwise.
- Turning the left and the right dials the same number of times will spin the right dial once counter-clockwise without effecting the other dials.
- Clicking the right and the middle will turn the middle dial.
- To solve the puzzle, first click the middle dial once.
- Then click the left and middle dials twice each.
- Then click the right and middle dials three times each.
- Take the TRIDENT in the open box.

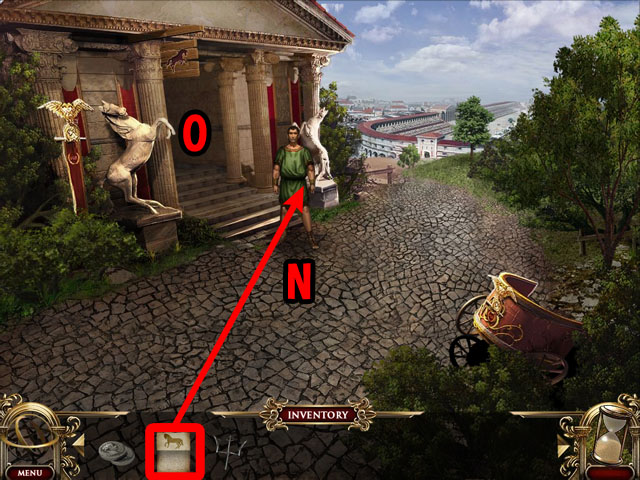
- Return to the previous screen.
- Use the REGISTRATION PAPER on the man (N).
- Enter the stable (O).

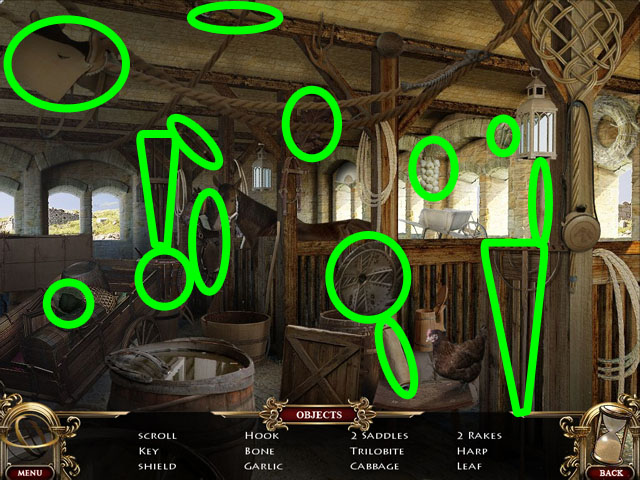
- Find the 12 hidden objects.
- You will receive a TEXT ON ROMAN LAW.
- Return to the first scene with the bridge.

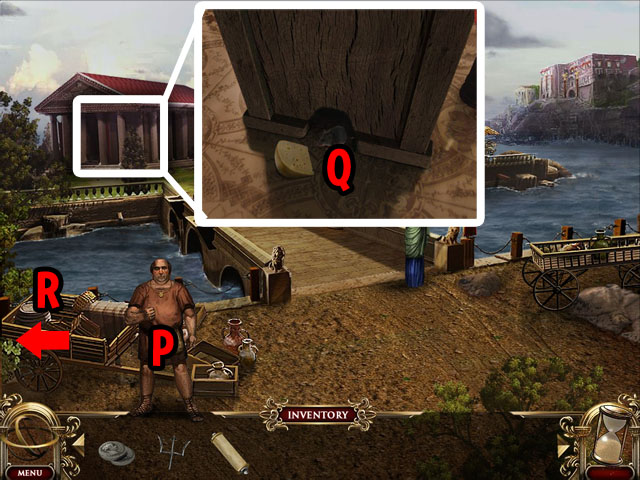
- Give the merchant the TWO PIECES OF SILVER (P).
- You will receive CHEESE.
- Use the CHEESE on the mouse hole inside the library (Q).
- Take the MOUSE.
- Return to the bridge scene and go to the left to the garden (R).

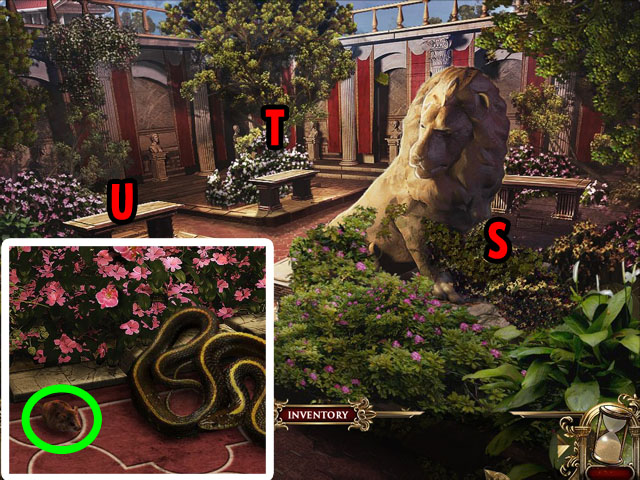
- Click on the bushes to clear them away (S).
- Take the BASKET.
- Use the BASKET on the bench and click the OLIVES to pick them (T).
- Click on the other bench and use the MOUSE on the snake (U).
- Take the FLOWERS.

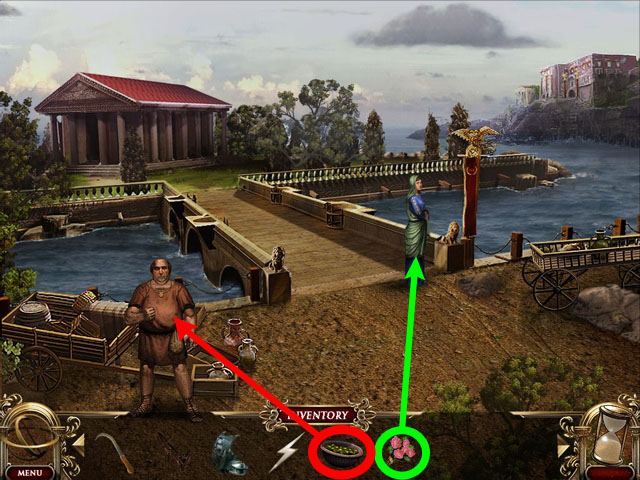
- Give FLOWERS to the woman in the previous scene and receive the CRYSTAL HEART.
- Give the BASKET OF OLIVES to the man and receive the HERMES COIN.

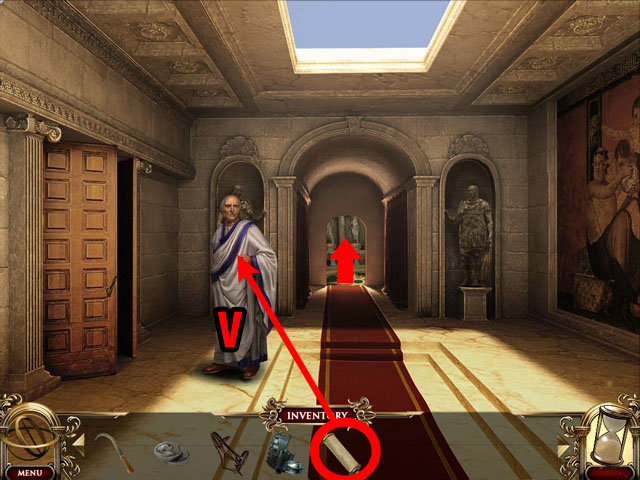
- Give the TEXT to the professor inside the university (V).
- You will receive a LIGHTNING BOLT.
- Enter the chamber of the gods to the back.

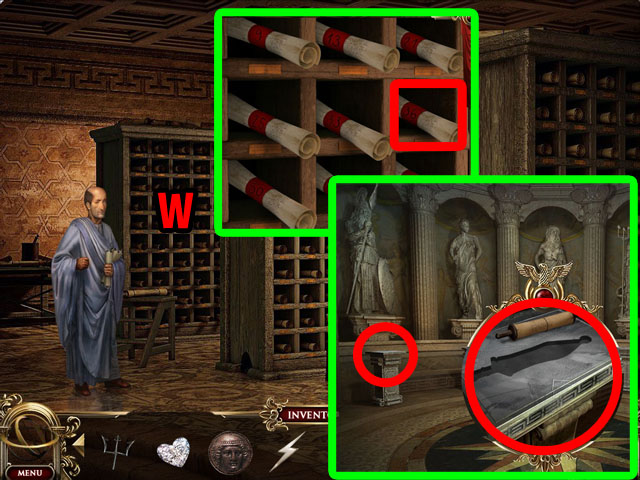
- Look at the pedestal circled in red.
- Click on the scroll and the empty opening.
- Go back and then to the left to the library.
- Look at the scroll shelf (W).
- Click the scroll circled in red, and then click it again.

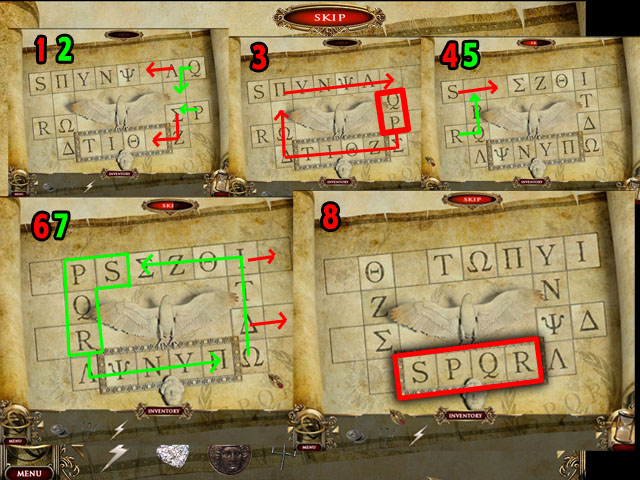
- Move the letters SPQR into the 4 slots at the very bottom to finish this mini-game.
- You can click on any letter and move it into any empty space beside it.
- Use the spaces on the side to hold blocks so that you have spaces to rotate all of the blocks in a circle one at a time.
- Follow the instructions in the screenshot for one possible way to solve this puzzle.
- Once finished take the ORNIMENTAL SWORD.

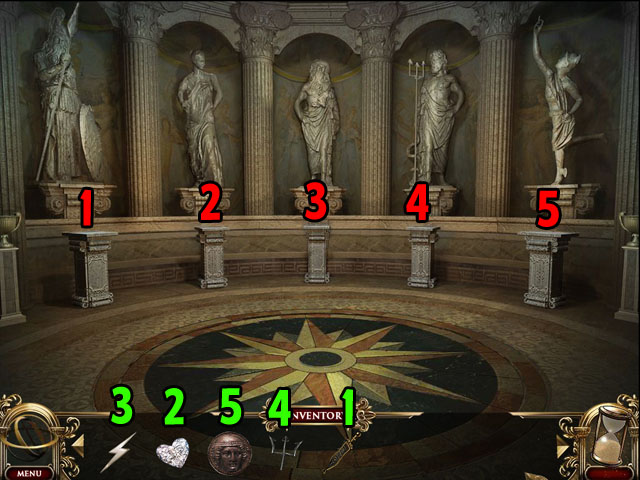
- Return to the chamber of the gods.
- Place the 5 relics: the LIGHTNING BOLT, CRYSTAL HEART, HERMES COIN, TRIDENT and ORNIMENTAL SWORD on the correct pedestals.
- These are numbered in the screenshot.
- Click on the sun in the middle of the floor afterwards.

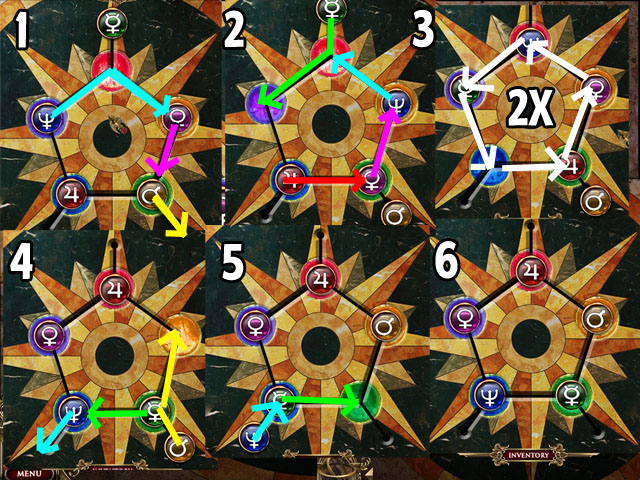
- Place each symbol on the circle of the same color to finish this mini-game.
- You can click on any circle and move it to an empty space.
- Use the spaces on the outside of the middle ring to help you switch the order of the circles.
- If they are in the correct order but the wrong places, you will not be able to rotate them around.
- Follow the screenshot for one possible solution.
- After finishing the puzzle, go down the stairs.
Chapter 3: The Village

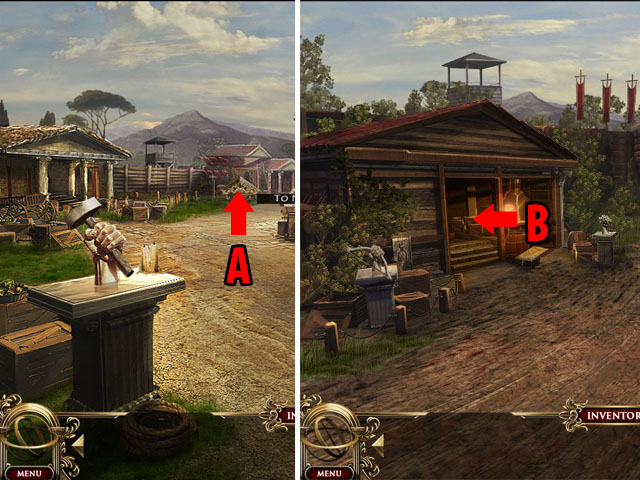
- Click forward to go to the north end (A).
- Enter the blacksmith’s forge (B).

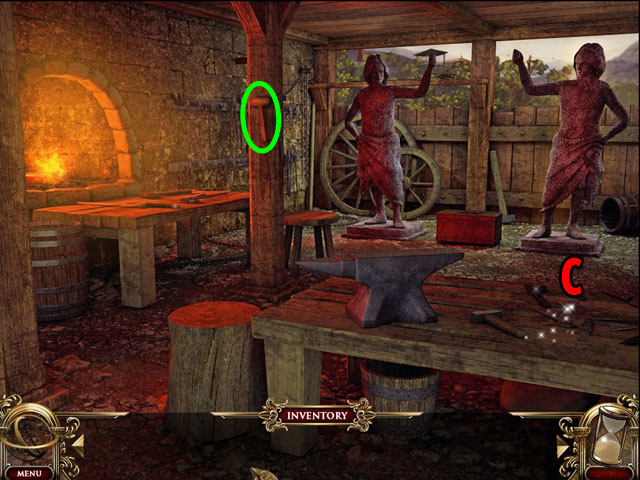
- Take the WOODEN MALLET circled in yellow.
- Click on the sparkles on the table (C).

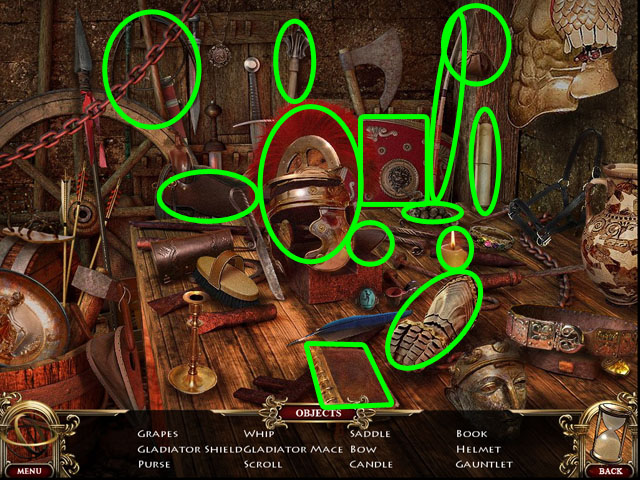
- Find all 12 objects in the scene.
- You will receive the BACCHUS GRAPES.
- Exit to the north end and enter the hunting lodge to the right.

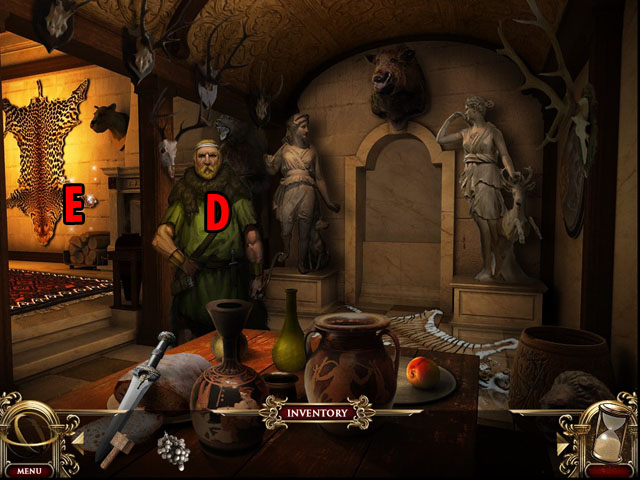
- Talk to the hunter and get his objective (D).
- You will receive a BROKEN SWORD.
- Click on the area with sparkles (E).

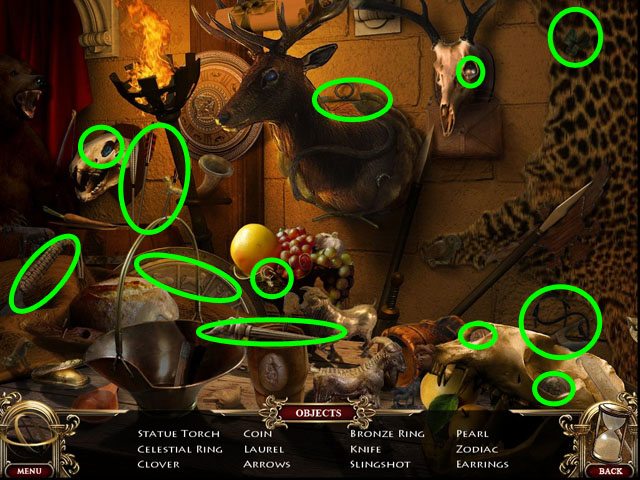
- Find all 12 objects in the scene.
- You will receive the DEMETER TORCH.

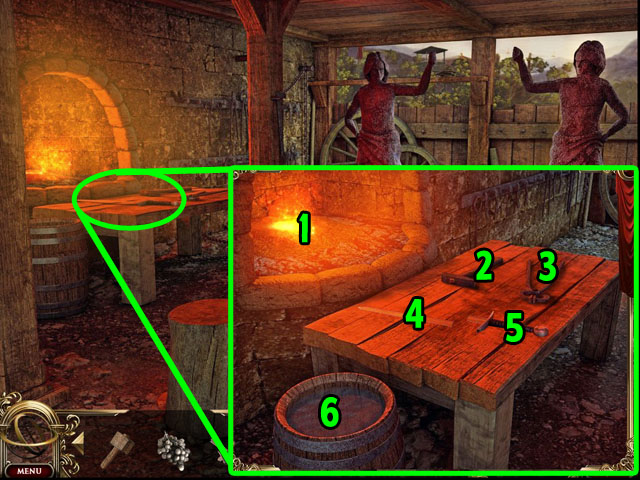
- Return to the blacksmith’s forge and click on the bench highlighted in green.
- Use the broken sword on the bench and there will be two pieces show (4, 5).
- Click on the tongs twice and put both pieces in the fire (3).
- Use the tongs again to remove the pieces from the fire (1).
- Use the hammer (2) on the sword to put it back together.
- Use the tongs again to dose the sword in water and cool it off (6).
- Take the REPAIRED SWORD.
- Give the REPAIRED SWORD to the hunter.
- You will receive the WINERY KEY.

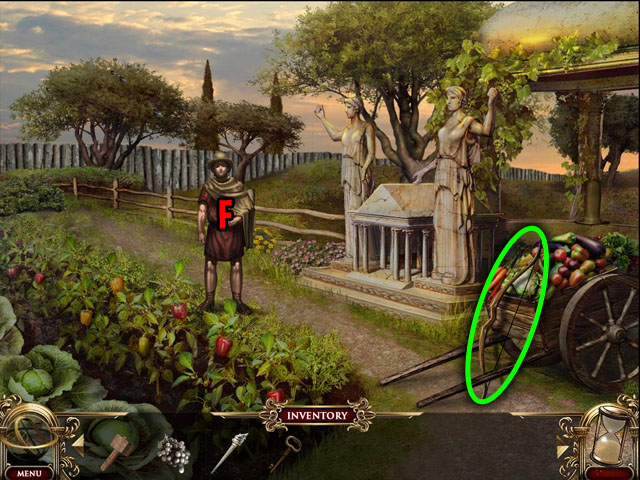
- Return to the south end, the first scene.
- Go to the farm to the left.
- Talk to the farmer and get his objective (F).
- Take the ARTIEMIS BOW circled in green.
- Return to the south end and click on the building to the right.
- Use the WINERY KEY on the key hole and enter the winery.

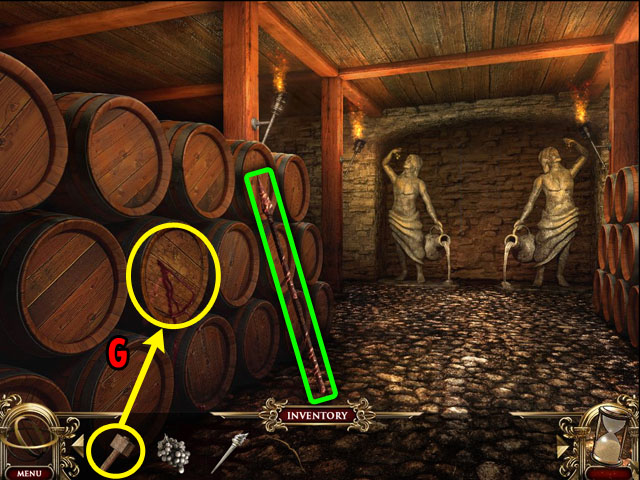
- Use the WOODEN MALLET on the wine barrel (G).
- Take the CERES TORCH.

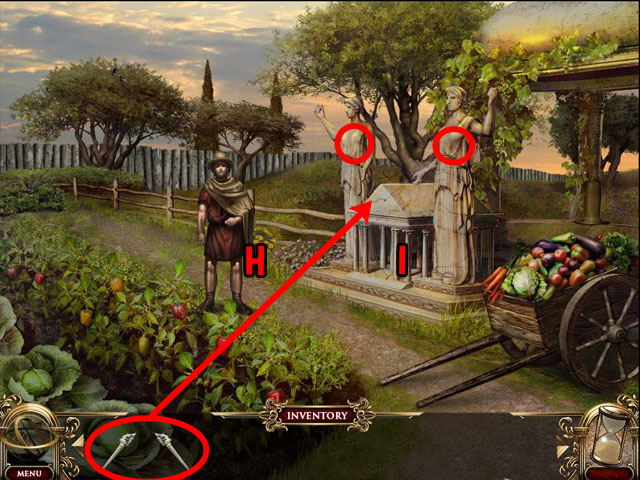
- Return to the farm and use the two TORCHES on the statues there (H).
- Make sure to use the torch which points to the left on the left statue and the one which points to the right on the right statue.
- Place the torches on the middle of the statues, not in the hands.
- Click on the small building in the middle of the statues (I).

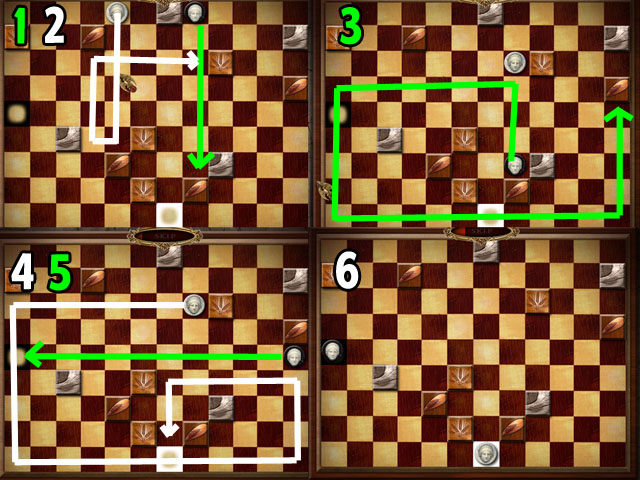
- Move the black coin to the black square and the white coin to the white square to complete this mini-game.
- The pieces will travel until they hit a block or another piece. They will not stop at the goal squares.
- Use the other piece to help you stop a piece in the right spot, so that you can reach the goals.
- See the screenshot for one possible solution.
- After finishing the puzzle you will receive the ARES SPEAR.

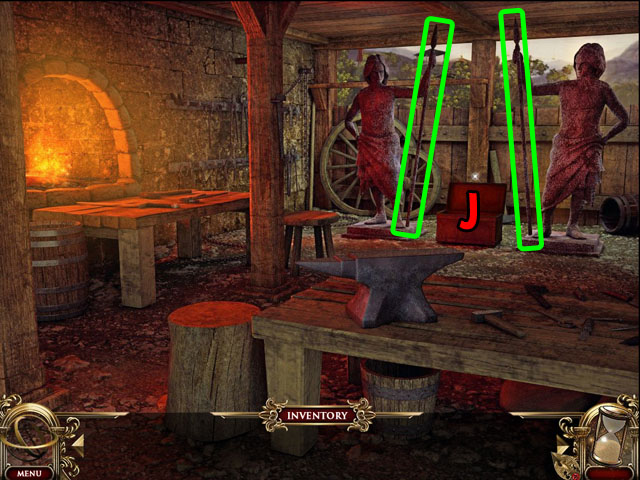
- Return to the blacksmith’s forge and use the two SPEARS on the statues in the back circled in green.
- The spears will only fit in one statue. Make sure to place the spear on the statues’ chests and not the hands.
- Click the treasure chest (J) to look inside.

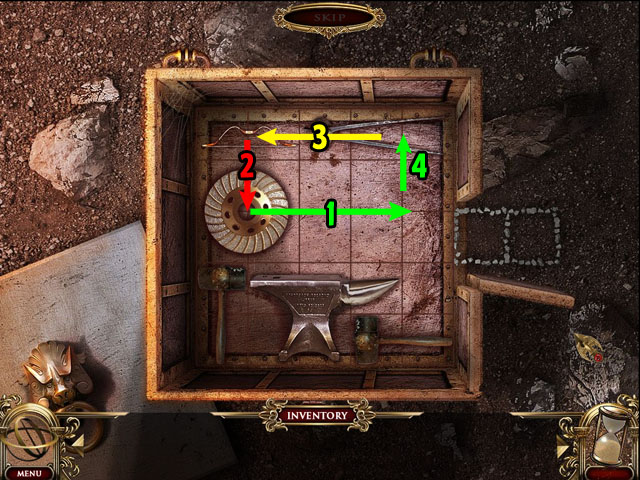
- You must slide the bow out of the chest to finish this mini-game.
- The pieces can only slide around if there is nothing in their way.
- The bow has to be entirely out of the box to win.
- Follow the instruction in the screenshot for one possible solution.
- You will receive the DIANA BOW in your inventory.

- Return to the hunting lodge and use the two BOWS on the statues here.
- Each bow only works on one statue and should be placed on the statue itself, not in its hands.
- Click on the DYNOSUS GRAPES to take them (K).

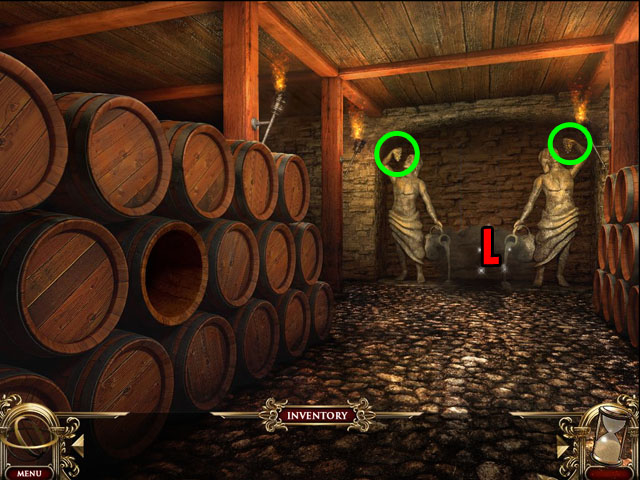
- Return to the wine cellar and use the two GRAPES on the statues here.
- Each bunch of grapes only works on one statue and should be placed on the statue itself, not in its hands.
- Click on the sparkles that appear afterword (L).


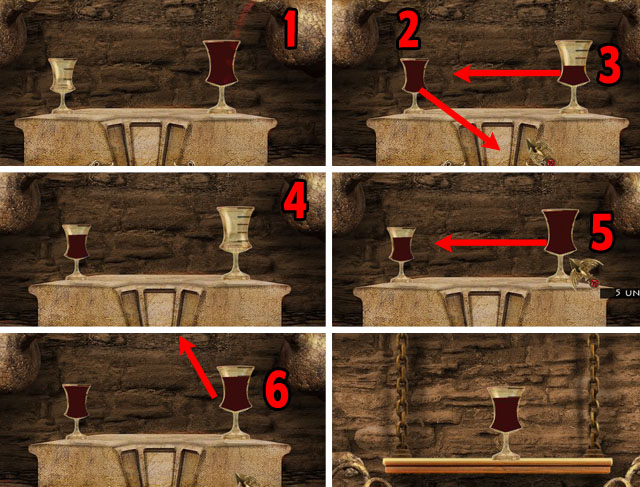
- The object of this mini-game is to put one cup on the platform (M) that is full of 4 units of wine.
- The right cup can hold 3 units and the left cup 5 units.
- Click on the wine jugs circled in green to fill the wine glasses.
- Use one wine glass on the other to transfer wine. Any wine that cannot fit in the other glass will stay in the first glass.
- Use the area circled in red to dump you your wine.
- Follow the steps in the screenshot for one possible way to finish the puzzle.
- Fill up the right glass and put that wine in the smaller glass.
- Empty the smaller glass.
- Put the left over wine from the larger glass in the smaller glass.
- Put some more wine in the larger glass.
- Fill up the smaller glass with the larger glass. This will leave only 4 units in the larger glass.
- Put the larger glass on the platform and collect the GREEK HISTORY SCROLLS that appear.

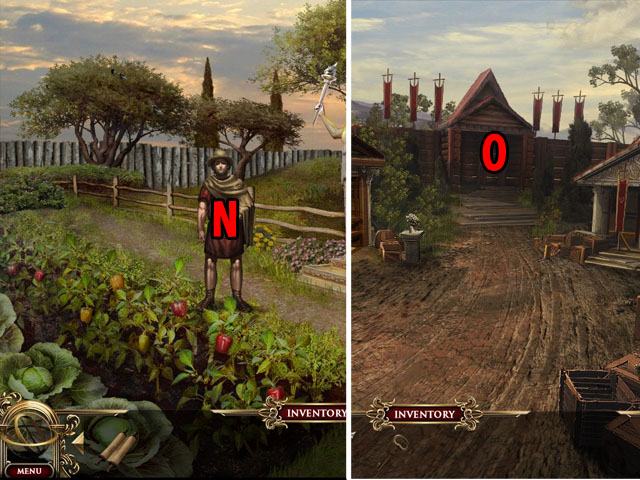
- Return to the garden and give the GREEK HISTORY SCROLL to the man here (N).
- He will give you the FORT KEY.
- Go the fort at the north end of the village (O) and use the KEY on the door.
- Enter the fort.
Chapter 4: The Fort

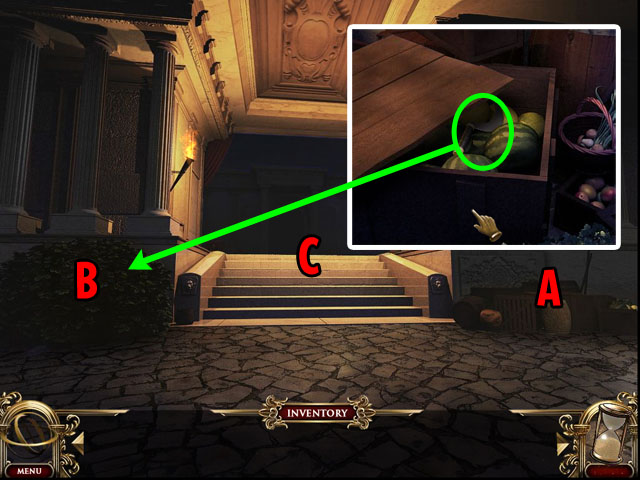
- Click on the pile of junk (A).
- Open the crate and take the SICKLE.
- Use the SICKLE on the bush (B) to the left of the stairs.
- Take the SPARTAN SPEAR from the bush.
- Enter the monument grounds (C).

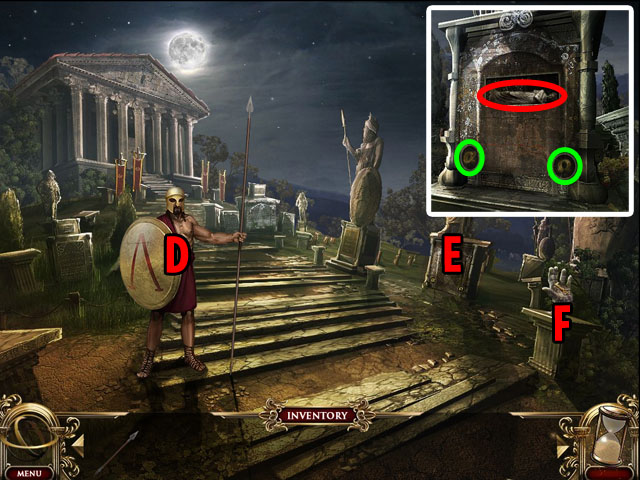
- Talk to the soldier. He has no objectives.
- Look at the monument to the left (E).
- Click on the alpha and omega symbol and take the MUSE from the monument base.
- Click on the monument to the right of the first (F).
- Take the SMALL KEY from the hand.
- Exit towards the acropolis up the stairs.

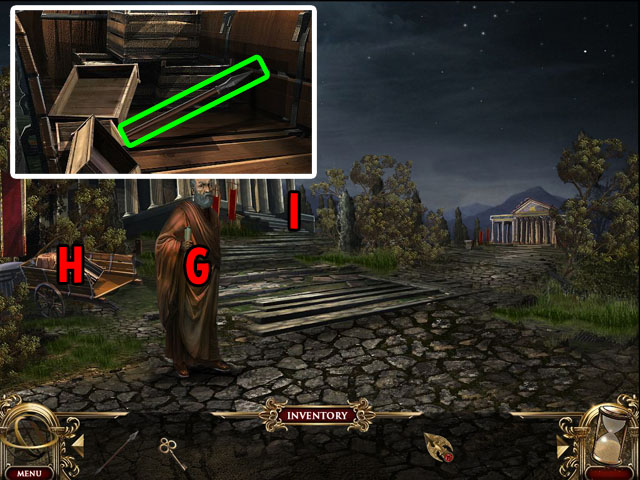
- Talk to the man in the acropolis. He also has no objectives.
- Look at the cart and move all of the stuff out of the way by clicking on it.
- Take the SPARTAN SPEAR.
- Exit towards the Parthenon up the stairs.

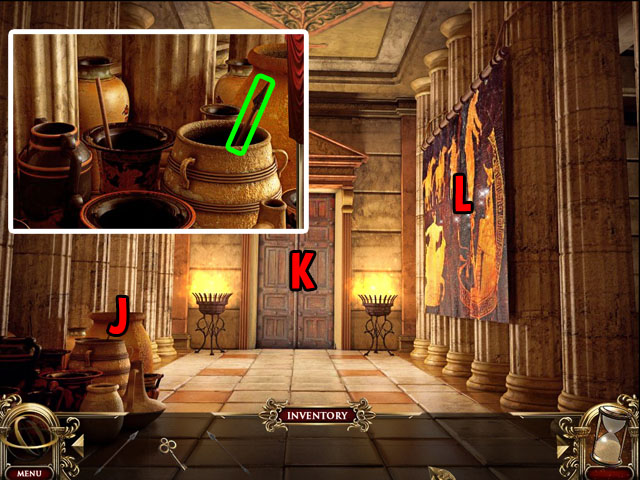
- Look in the pots to the left and collect another SPARTAN SPEAR (J) circled in green.
- The door ahead is locked (K).
- Click on the tapestry to the right.

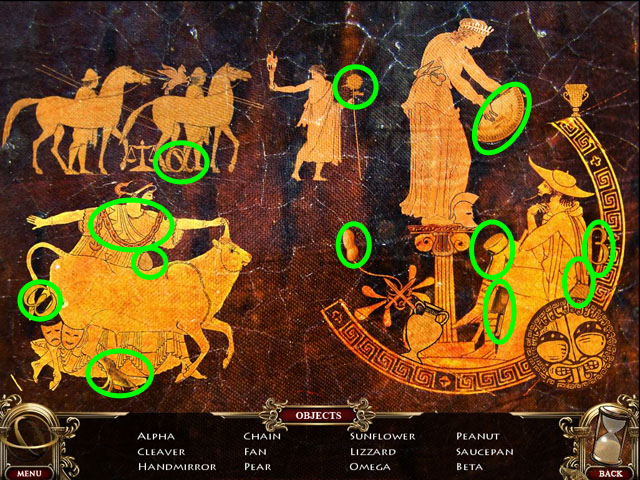
- Find all 12 objects in the scene.
- You will receive an ALPHA EMBLEM.
- Exit the Parthenon and go to the right, to the Zeus monument.

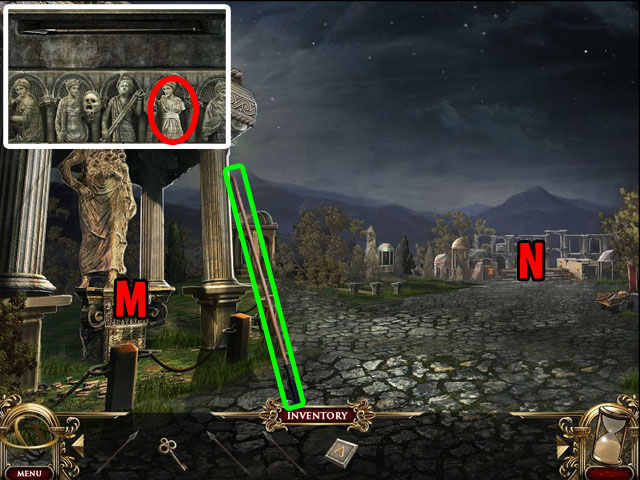
- Take the SPARTAN SPEAR circled in green.
- Click on the base of the monument (M).
- Use the MUSE on the empty space circled in red.
- Collect another SPARTAN SPEAR from above the figures.
- Exit to the theatre (N).

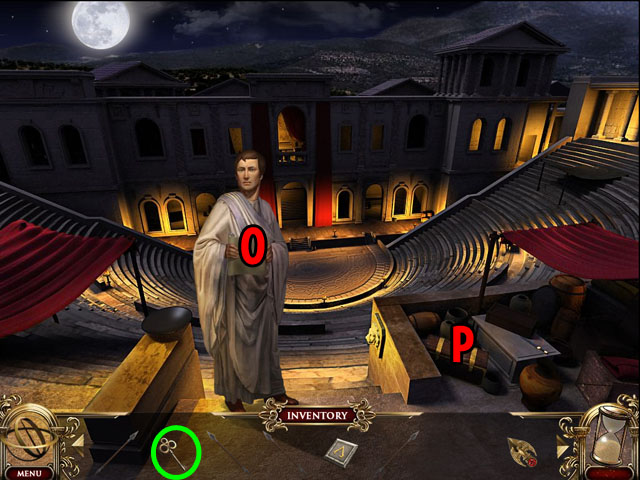
- Talk to the playwright and get his objective (O).
- He will give you a blank parchment.
- Use the SMALL KEY on the chest to his right (P).
- Take the SPARTAN SPEAR from inside.

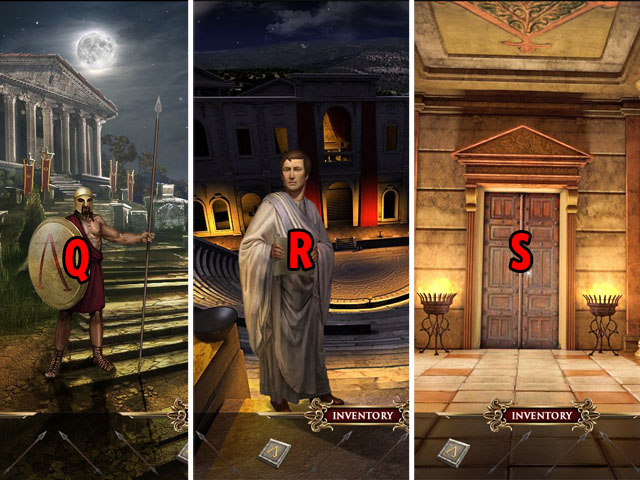
- Return to the soldier in the monument grounds and use the BLANK PARCHMENT on him (Q).
- He will give you the BATTLE OF THERMOPYLAE SCROLL.
- Give this scroll to the playwright (R).
- You will receive the PARTHENON KEY.
- Go to the Parthenon and use the key on the locked door (S).
- Enter the inner Parthenon.

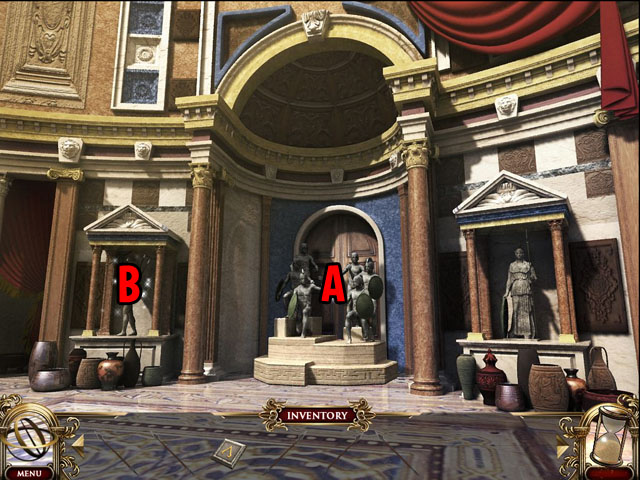
- Use all 6 of the SPARTAN SPEARS on the statue of six Spartans (A).
- Click on the other statue to the left (B).

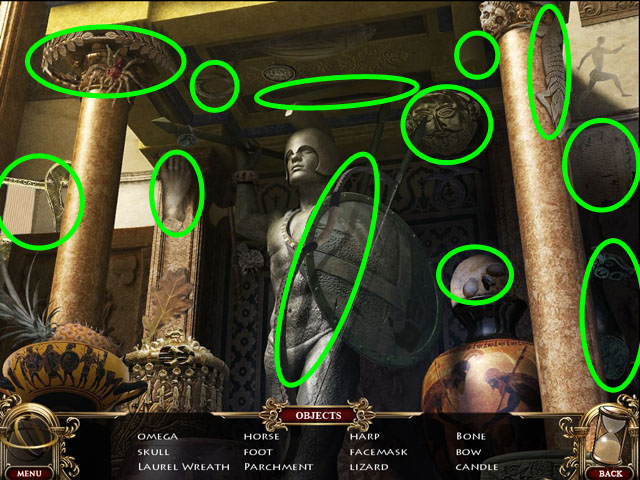
- Find all 12 objects in the scene.
- You will receive the OMEGA EMBLEM.
- Click on the door behind the statue of six Spartans.

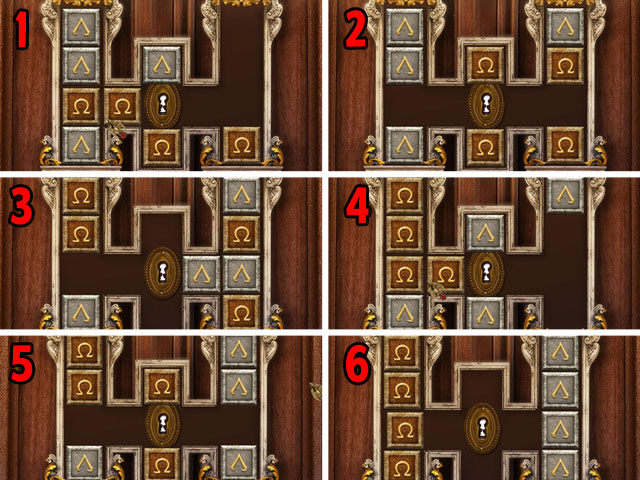
- First use the ALPHA EMBLEM on top of the stack on the left and the OMEGA EMBLEM on top of the stack to the right. This will start the mini-game.
- The object of this mini-game is to transfer all of the emblems on the left stack to the right stack and the right stack to the left.
- Use the top and bottom of the middle area to store pieces while you switch their places.
- Work on getting the correct pieces in the tops of the stacks first and then work one stack and then the other until all the pieces are in the correct stack.
- Follow the directions of the screenshot to finish the puzzle.
- After finishing the puzzle you can enter the next room through the door, to Athena’s chamber.

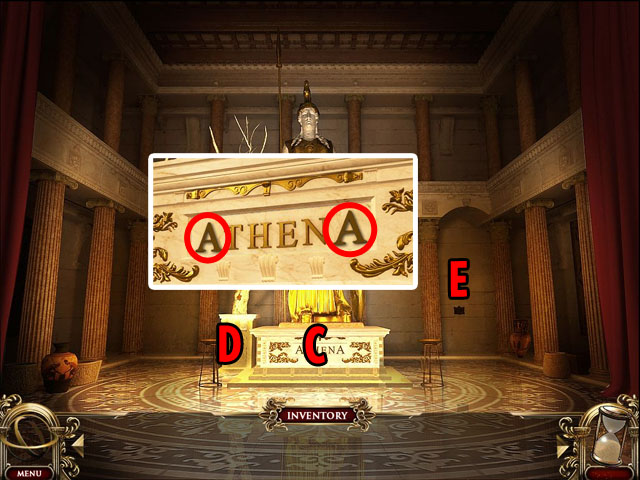
- Click on the nameplate under the Athena monument (C).
- Click on the two A’s in her name to get ATHENA’S KEY.
- Use ATHENA’S KEY on the base of the tree to the left (D).
- Collect the OWL EMBLEM.
- Use the OWL EMBLEM on the impression in the wall to the right (E).
- Click on the puzzle that opens up.

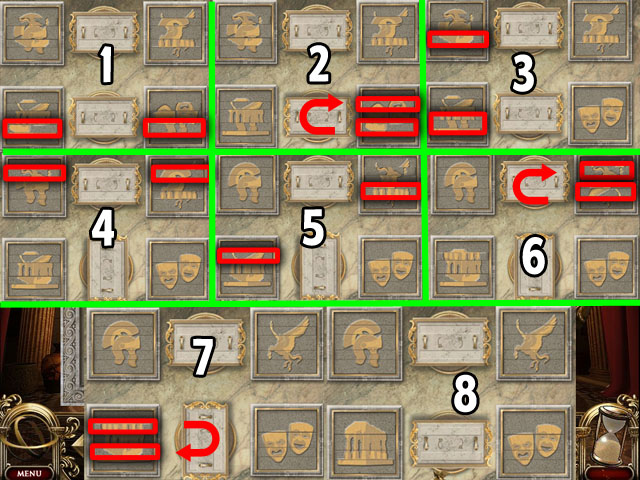
- The object of this puzzle is to get all 4 pictures in the correct order and orientation.
- You can use the boxes in the middle to rotate and switch pieces from one image to another.
- The boxes are themselves linked so that you can transfer pieces from the top to the bottom if they are facing the correct way.
- A piece will only enter or leave the box if it can slide without obstruction from one place to another. If the box in the middle is turned 90 degrees it will not be able to move pieces from the images to the left and right.
- Work on one image at a time. Some of the pieces belong in another image, and some of the pieces are upside-down.
- You can only switch two pieces at a time, because a piece cannot fit in the middle square if there is already a piece there.
- Follow the directions in the screenshot for one possible solution.
- It will tell you in which order to switch the pieces. Rotate them until they look like the pieces in the screenshot.
- When you are finished with the puzzle, go through the door behind it.
Chapter 5: The Camp

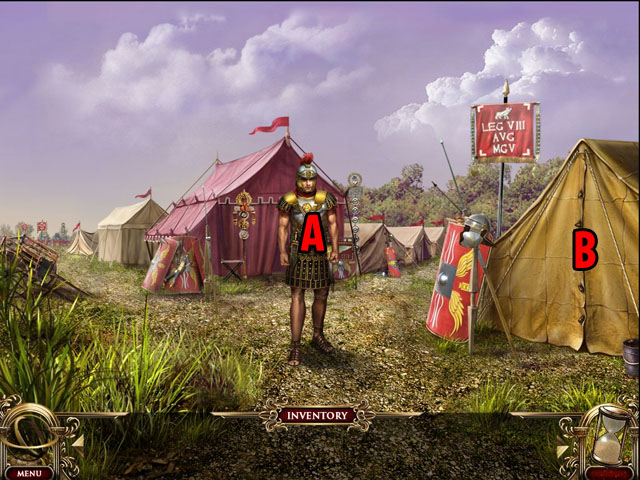
- Click on the Brutus and get his objective (A).
- Look at the tent entrance to the right (B).
- Click on all of the fasteners to open the tent’s door.
- Enter the tent.

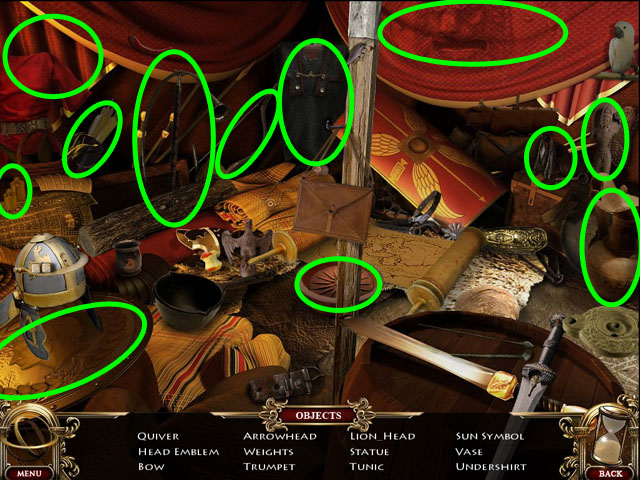
- Find all 12 hidden objects.
- You will receive some ARCHER’S ARROWS.
- Exit the tent and click to the left to go to the FRONT LINES.

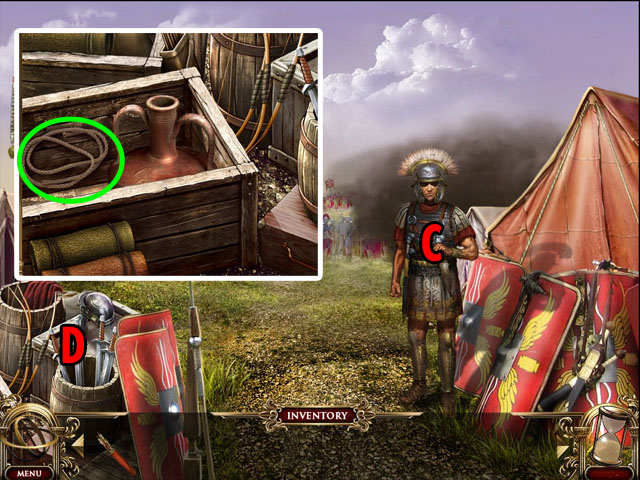
- Talk to the general and get his objective (C).
- Look in the barrel to the left (D) and remove items until you can collect the ROPE.
- Return to the previous scene and go to the right to the forest.

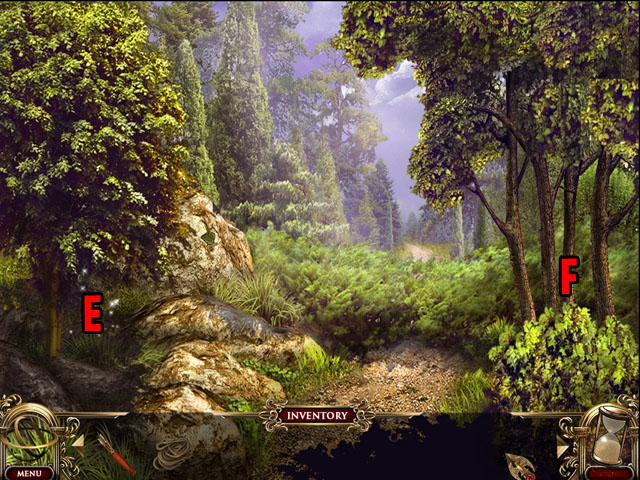
- There are some trees here that you could cut down if you had an axe (F).
- Enter the Hidden Object Scene to the left (E) first.

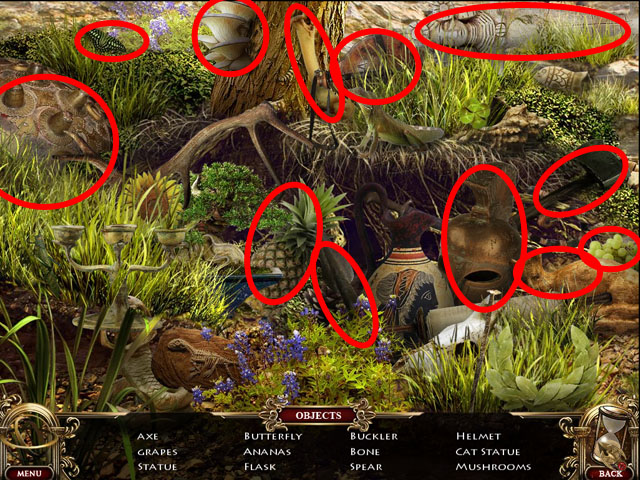
- Find all 12 hidden objects.
- You will receive an AXE.
- Use the AXE to cut down the trees to the right.
- You will need to click 4 times.
- Collect the LUMBER that appears.

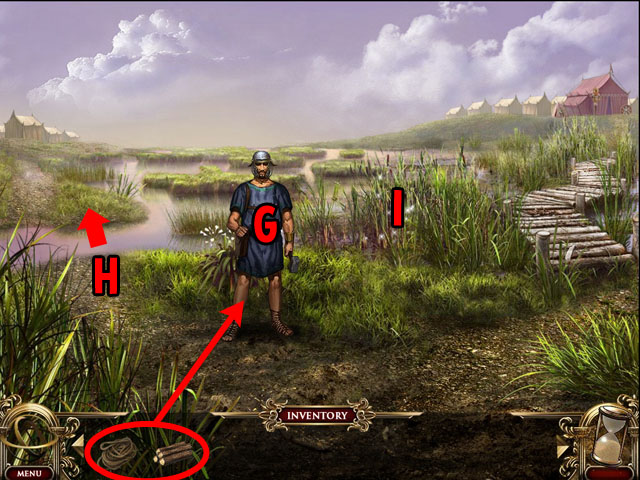
- Return to the camp and go down to the marshlands.
- Talk to the builder here and get his objective.
- Give him the LUMBER and the ROPE and he will give you a FOOTBRIDGE.
- Use the FOOTBRIDGE on the water to the left of him (H).
- Click on the Hidden Object Scene to his right first (I).

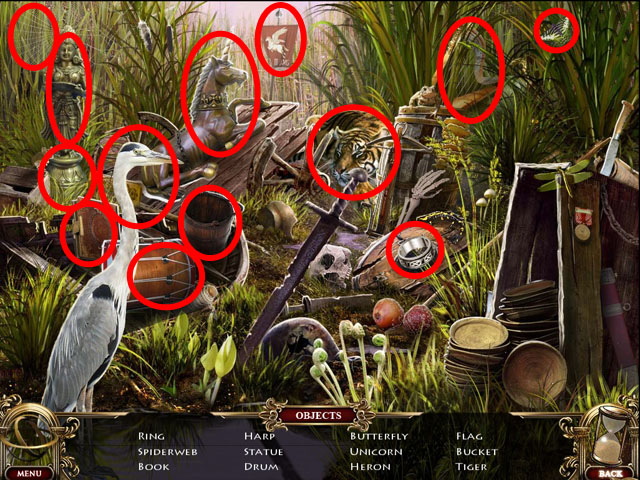
- Find all 12 hidden objects.
- You will receive CASSIUS’S RING.

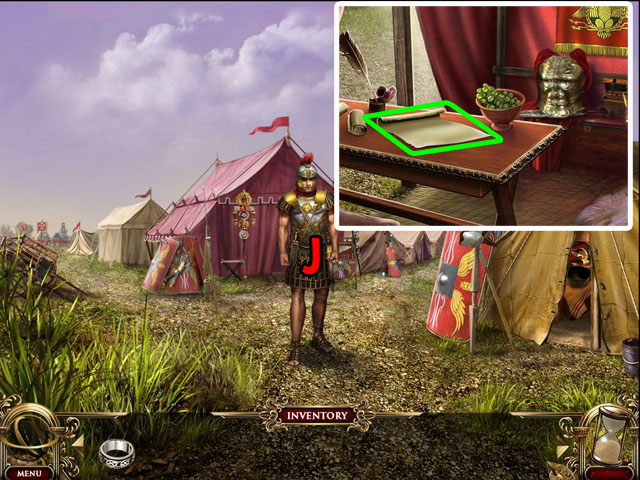
- Return to Brutus by clicking towards the right.
- Give him CASSIUS’S RING and he will leave (J).
- Go in his tent behind him and take the STRATEGIC PLAN from his table.
- Go to the marshlands and over the footbridge you placed and click forward again to enter Cassius’s camp.

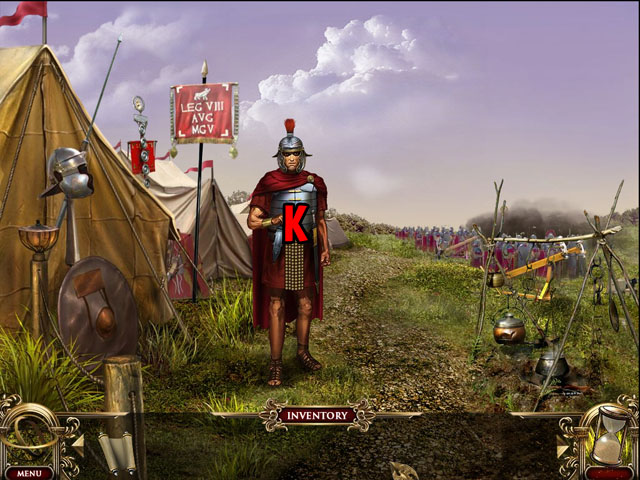
- Give Cassius the STRATEGIC PLAN.

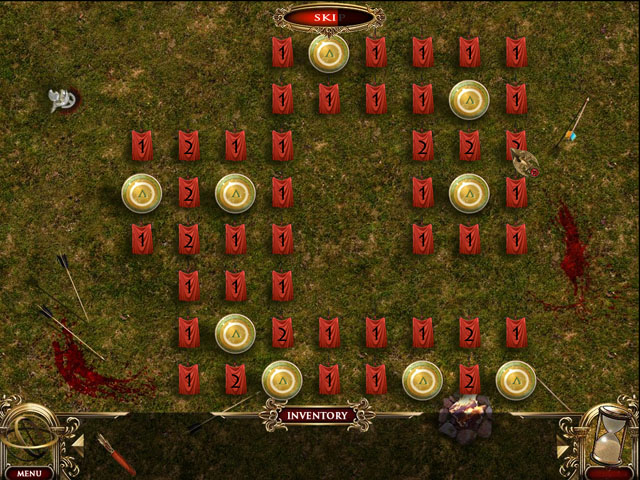
- The object of this mini-game is to find all of the save positions and not click on an enemy unit.
- When you click on a safe shield it will show a flag with a number on it.
- This number is the number of unsafe shields that are next to this space.
- The unsafe shields can be up, down, left right or any diagonal.
- If a flag has a 1 on it, that means there is only 1 unsafe spot beside it. Once you find that unsafe spot you can safely click on all the other spaces surrounding the 1 flag.
- If you click an unsafe spot you will have to start over from the beginning, but the spaces do not change.
- Click on all of the red flags and empty areas in the screenshot to complete this puzzle.

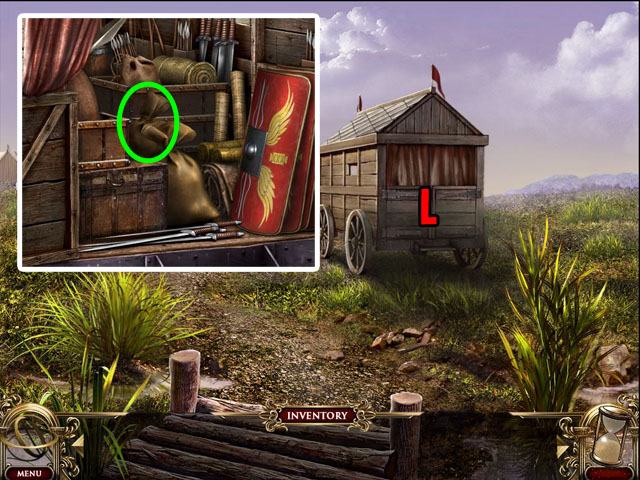
- Travel to the previous scene by going down.
- Click on the cart that appears on the screen (L).
- Collect the RATIONS in the back of the cart, behind another bag.

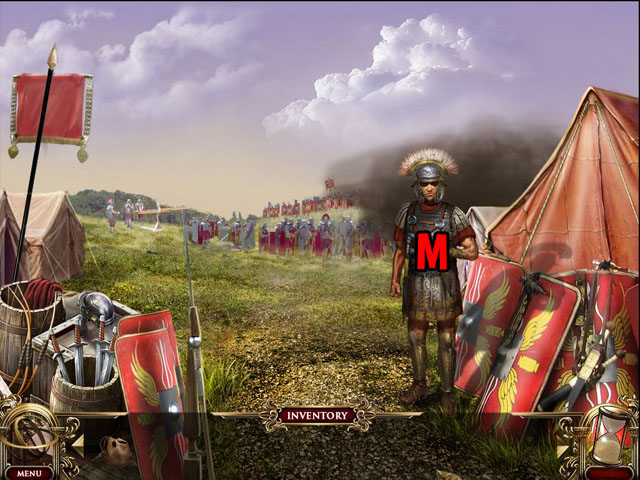
- Return to the general on the front lines of Brutus’s camp (M).
- Give him the RATIONS and the ARCHER’S ARROWS.

- This mini-game is the exact same as the previous battle mini-game.
- See the screenshot for the solution.
- Click on all of the red flags and empty areas to solve the puzzle.

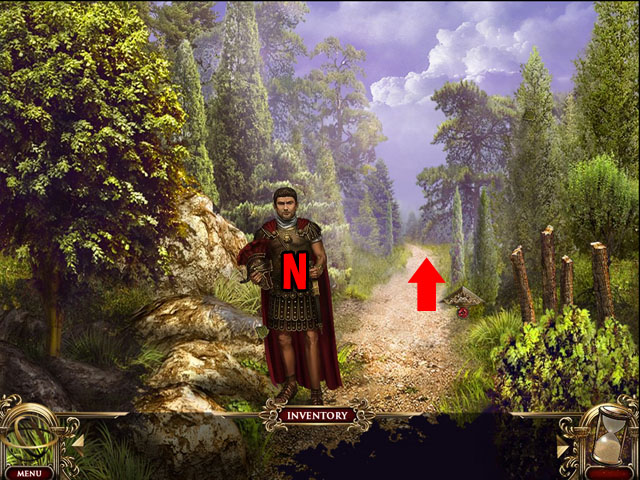
- Return to the main camp and go to the forest to the right.
- Talk to Cassius (N) and exit the forest.
Chapter 6: Brutus


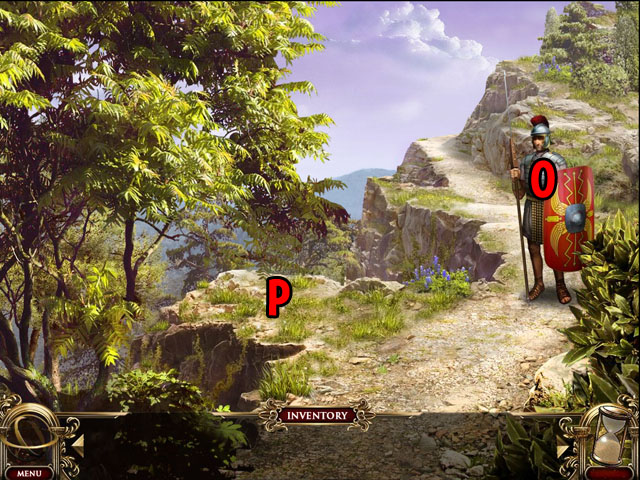
- Talk to the soldier. He will not let you pass (O).
- Enter the Hidden Object Scene on the left (P).

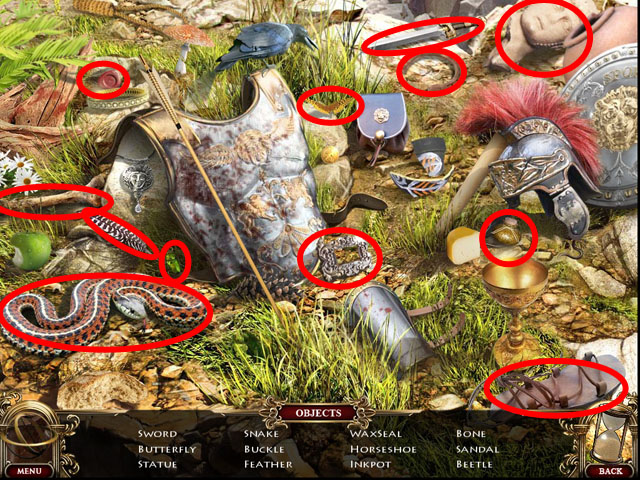
- Find all 12 objects in the scene.
- You will receive the ACHILLES SWORD.
- Use the SWORD on the soldier.
- Travel up the cliff twice and talk to Brutus.
- Congratulations! You have just finished Lost Chronicles: Fall of Caesar!




 Save Our Spirit Walkthrough, Guide, & Tips
 Crime and Punishment: Who Framed Raskolnikov? Walkthrough, Guide, & Tips
 Botanica: Into the Unknown Walkthrough, Guide, & Tips
 Delaware St. John Volume 3: The Seacliff Tragedy Walkthrough, Guide, & Tips
 Secrets of the Dark: Eclipse Mountain Walkthrough, Guide, & Tips