Spirits of Mystery: Amber Maiden Walkthrough, Guide, & Tips
Spirits of Mystery: Amber Maiden Walkthrough

Welcome to the Spirits of Mystery: Amber Maiden Walkthrough!
After learning about your royal heritage, you’re off on a fantastic adventure to undo the amber curse and save the King and Queen!
Whether you use this document as a reference when things get difficult or as a road map to get you from beginning to end, we’re pretty sure you’ll find what you’re looking for here.
This document contains a complete Spirits of Mystery: Amber Maiden game walkthrough featuring annotated screenshots from actual gameplay!
We hope you find this information useful as you play your way through the game. Use the walkthrough menu below to quickly jump to whatever stage of the game you need help with.
Remember to visit the Big Fish Games Forums if you find you need more help. Have fun!
This walkthrough was created by MargieB, and is protected under US Copyright laws. Any unauthorized use, including re-publication in whole or in part, without permission, is strictly prohibited.
General Tips

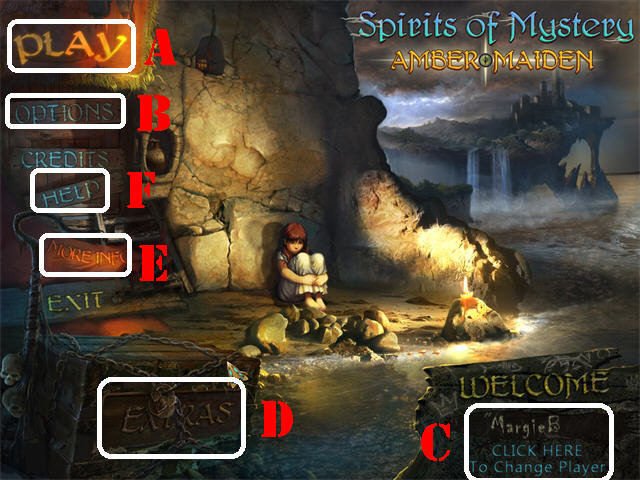
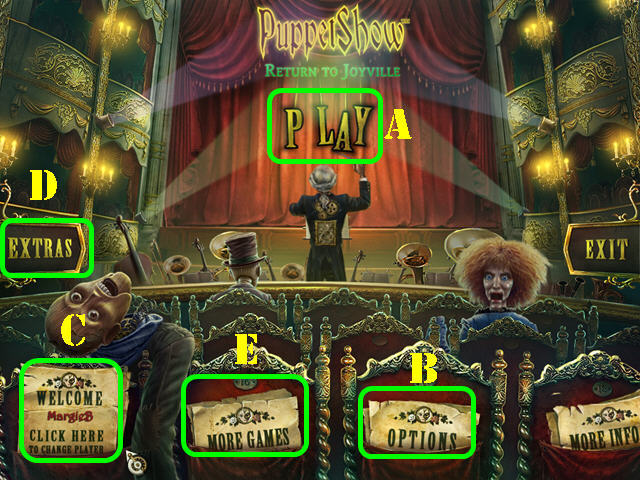
- Click on ‘PLAY’ (A) to access the main chapters in the game.
- The ‘OPTIONS’ (B) button allows you to adjust the screen, music, cursor, and sound.
- The ‘CLICK HERE To Change Player’ button (C) can be used to add or delete a new player.
- The ‘EXTRAS’ (D) button grants you access to the Bonus Content only if you are playing the Collector’s Edition.
- Click on the ‘MORE INFO’ (E) button to access the purchase link for the Strategy Guide and the Big Fish Games forum for this game.
- Click on the ‘HELP’ (F) button to view general tips for playing the game.
- Click on the Magnifying Glass Icon, when it appears, to take a closer look at a section, or to read information regarding the game.
- You can skip a puzzle once the ‘SKIP’ button fills. The ‘SKIP’ button only appears in puzzle sections; it is located in the lower right corner.
- The built-in guide can be accessed by clicking on the words ‘Strategy Guide’ below the HINT only if you are playing the Collector’s Edition.

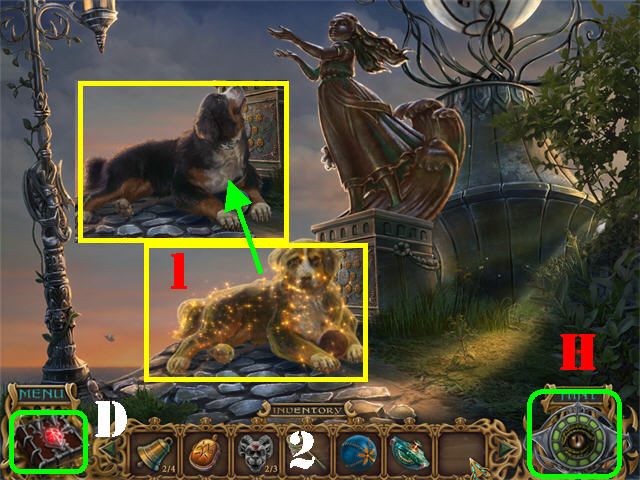
- You will find many cursed characters (1) throughout the game; the curses must be removed in order to progress in the game. You can remove these curses by giving them the right objects.
- The Hint (H) button is in the lower right corner of each scene.
- You have unlimited Hints in the Hidden Object Scenes and in Quest Scenes, but you must wait for them to recharge between uses.
- A cluster of sparkles indicates a Hidden Object Scene which will grant an inventory item upon completion.
- Items written in yellow in Hidden Object Scenes are hidden; you must open or click on something to make the hidden items appear.
- Pass your mouse over the bottom of the scene to access your Inventory Tray (2).
- Inventory items will appear at the bottom of the scene. Use the arrows in your inventory tray to scroll through all the items you’ve collected.
- The Diary (D) is in the lower left; read it to find clues and read part of the story.
- To use an inventory item, select it and drag it to the desired location; click it into the spot in which you want it used.
Chapter 1: Grandma’s House

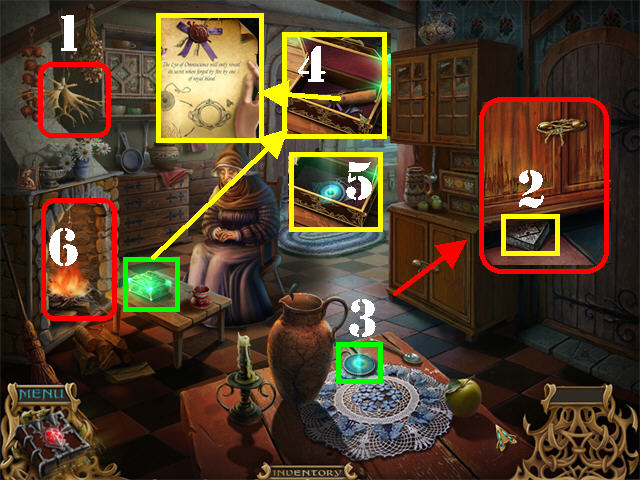
- Grab the ELK ROOT (1) in the upper left.
- Zoom into the cabinet on right; take STONE PUZZLE PIECE 1/6 (2).
- Grab the PENDANT (3) on the ground.
- Zoom into the box on the table; open it and read the scroll (4).
- Place the PENDANT on the frame inside the box and take the AMULET (5).
- Place the AMULET into the fireplace to activate a puzzle (6).

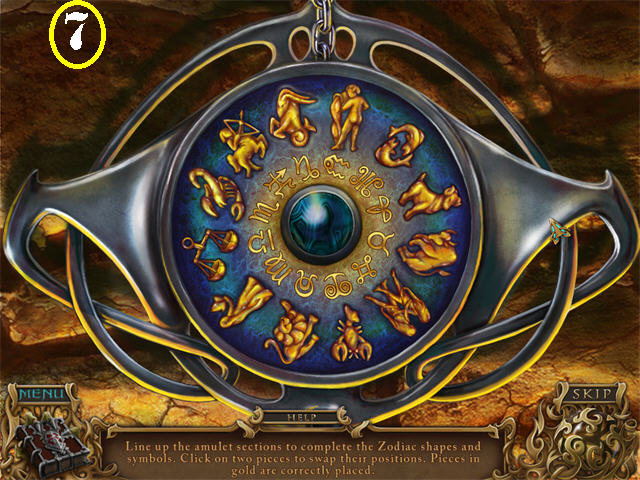
- Click on two pieces within the same circle to swap their positions.
- A bottom piece placed correctly will lock in place. Both correct pieces will light up gold.
- Please look at the screenshot for the solution (7).

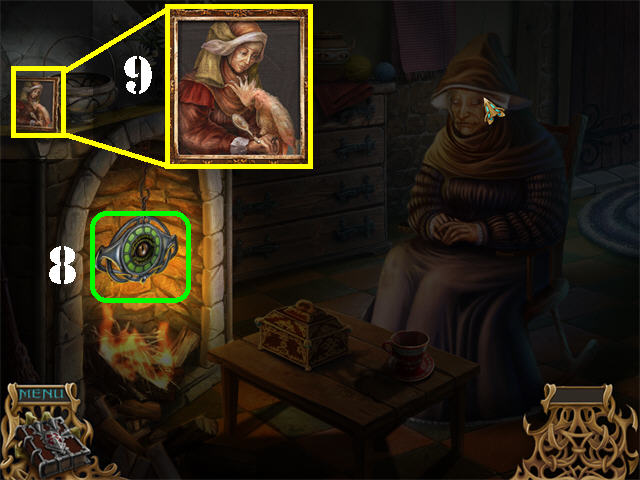
- Grab the EYE OF OMNISCIENCE from the fireplace (8).
- Click on the PICTURE (9) above the fireplace. An entry will be added to the Diary.

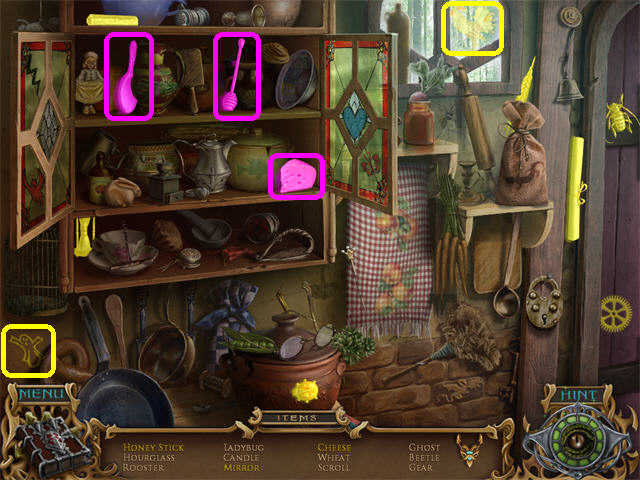
- Play the Hidden Object Scene in the upper left.
- Open the cabinets and take the items listed in yellow.
- The MIRROR will be added to inventory.

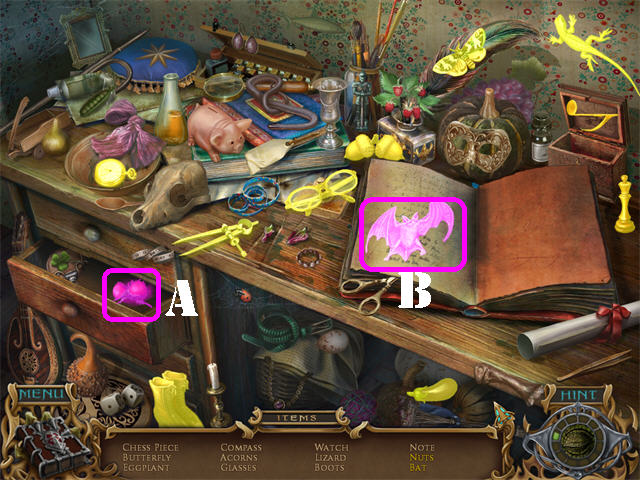
- Go through the right door.
- The room will remain dark until the OWL in the window flies away.
- Play the Hidden Object Scene.
- Open the left drawer; take the NUTS (A).
- Click on the left page of the book; take the BAT (B).
- The NUTS will be added to inventory.

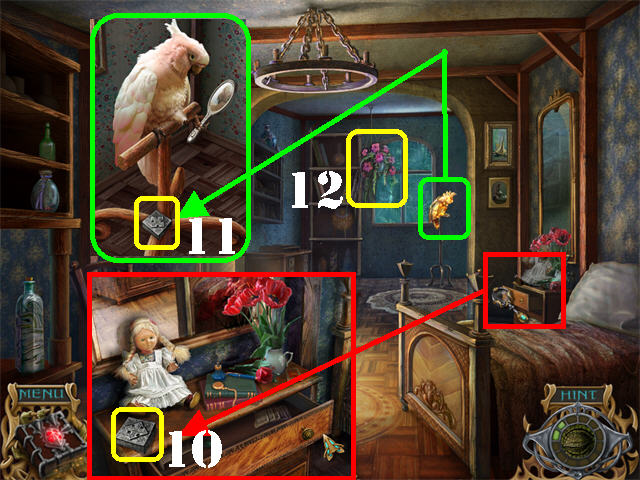
- Zoom into the drawer on right; take STONE PUZZLE PIECE 2/6 (10).
- Take a closer look at the cursed parrot; give it the MIRROR and take STONE PUZZLE PIECE 3/6 (11).
- Take the FLOWERS (12) in the upper center.

- Click down and go through the front door.
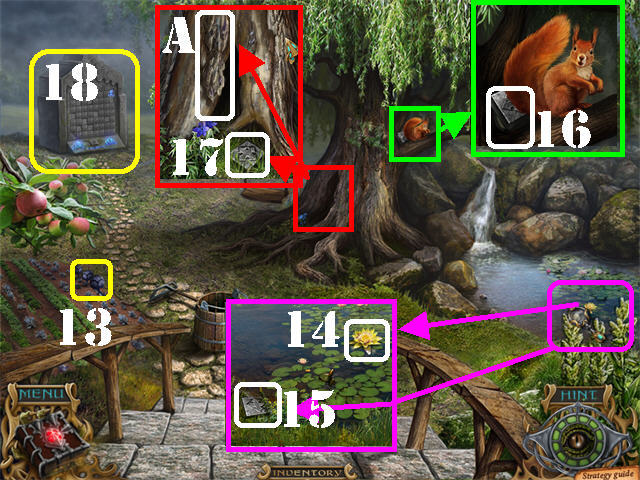
- Grab the BLUE CABBAGE (13) in the lower left.
- Zoom into the edge of the water; take the GOLDEN LILY (14) and STONE PUZZLE PIECE 4/6 (15).
- Zoom into the squirrel; give it the NUTS and take STONE PUZZLE PIECE 5/6 (16).
- Zoom into the tree hollow.
- Take the BARK OF WEEPING WILLOW (A) and STONE PUZZLE PIECE 6/6 (17).
- Zoom into the stone Portal in the back to access a puzzle (18).

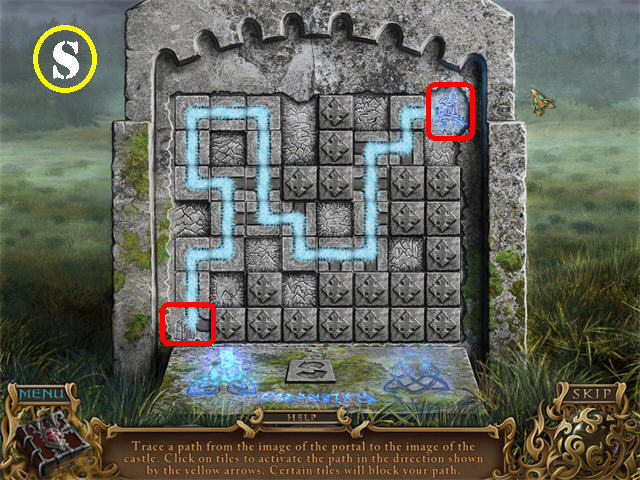
- Place the 6 STONE PUZZLE PIECES on the stone to activate a puzzle.
- Click on a stone for arrows to appear. Click on the arrow in the direction you want to go to.
- Trace the path from the portal to the castle as shown in the screenshot (S).
- Go through the Portal after the puzzle has been completed.
Chapter 2: The Portal

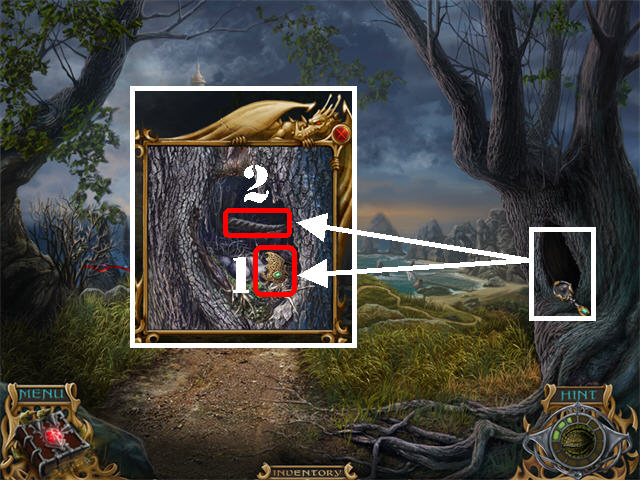
- Zoom into the tree hollow.
- Take the METAL BAT EMBLEM (1) and the DRAGON’S HORN 1/3 (2).
- Head right.

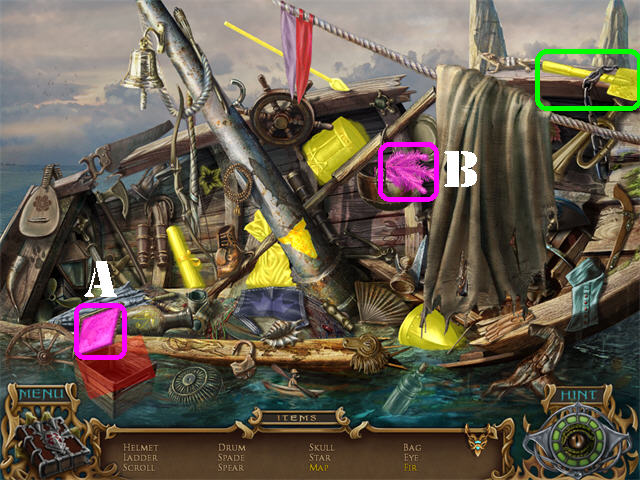
- Play the Hidden Object Scene by the boat.
- Open the box in the lower left; take the MAP (A).
- Move the curtain; take the FIR (B) if it’s on your list or any item listed in yellow.
- The SPADE will be added to inventory.

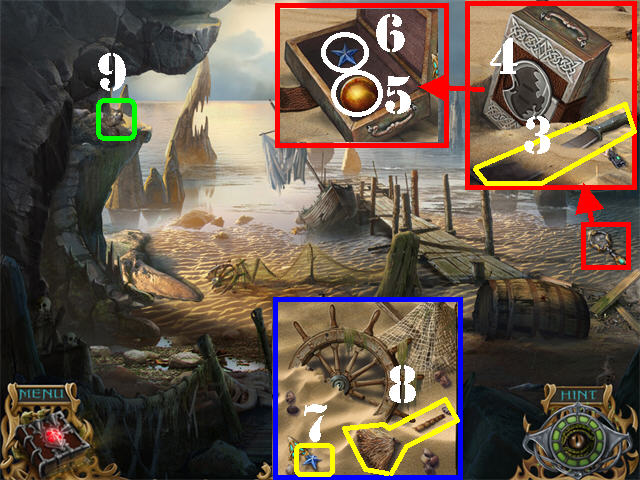
- Zoom into the right side of the sand; take the MACHETE (3).
- Use the SPADE on the box in the sand.
- Click on the box; place the METAL BAT EMBLEM on the box (4).
- Open the box and take the AMBER SPHERE (5) and the STAR 1/5 (6).
- Zoom into the buried wheel on left; take STAR 2/5 (7) and the BRUSH (8).
- Click on the OWL (9) in the upper left and it will fly away.
- Zoom into the boulder in the upper left; note that it is cracked.

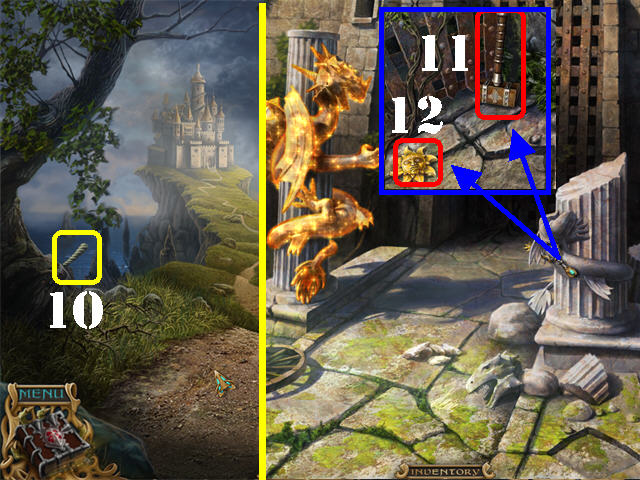
- Click down.
- Cut the thorny bush in the lower left with the MACHETE; take the DRAGON’S HORN 2/3 (10).
- Head towards the Castle.
- Zoom into the broken pedestal; take the HAMMER (11) and the GOLDEN SUN (12).

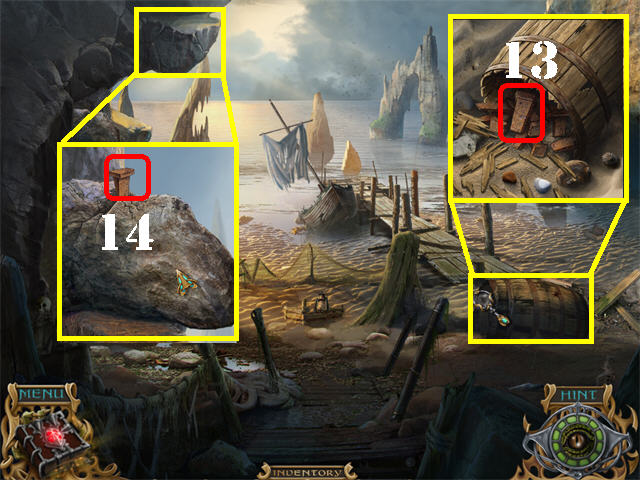
- Return to the beach.
- Zoom into the barrel; crack it open with the HAMMER and take the WEDGE (13).
- Zoom into the boulder in the upper left.
- Place the WEDGE on the boulder (14).
- Place the HAMMER on the WEDGE to crack the boulder.
- Head in the upper left direction.

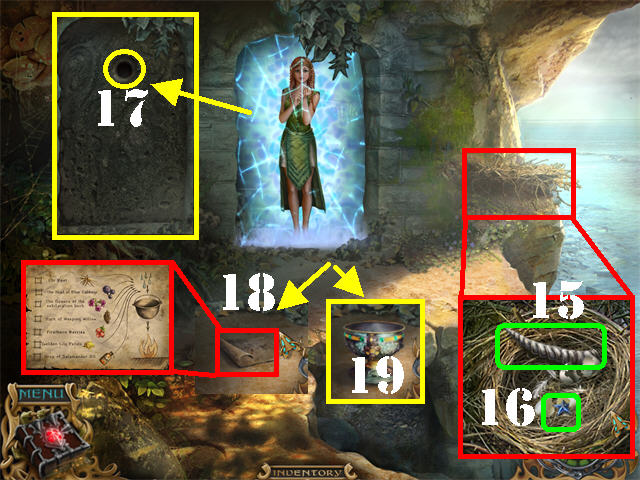
- Zoom into the nest; take the DRAGON’S HORN 3/3 (15).
- Click on the EGG in the nest; take STAR 3/5 (16).
- Place the MACHETE on the vines on the back wall.
- Place the AMBER SPHERE in the hole on the stone door for the girl to appear (17).
- Grab the POTION RECIPE (18) on the ground after she stops talking.
- Take the MAGIC CHALICE (19) on the ground after she stops talking a second time.

- Click down.
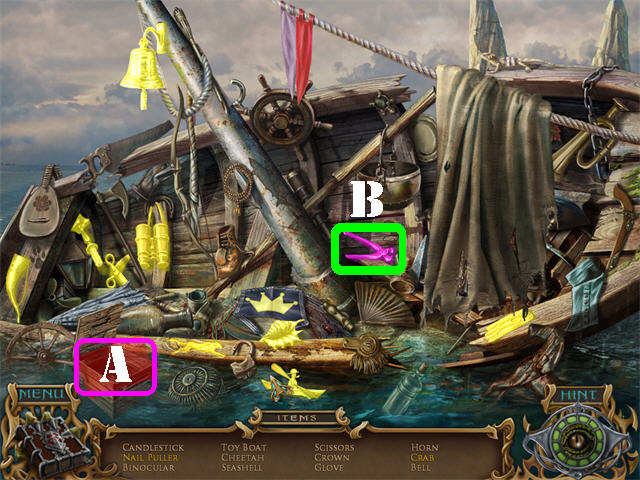
- Play the Hidden Object Scene by the boat.
- Open the box in the lower left; take the CRAB (A).
- Pull the curtain; take the NAIL PULLER (B).
- The NAIL PULLER will be added to inventory.

- Return to grandma’s house.
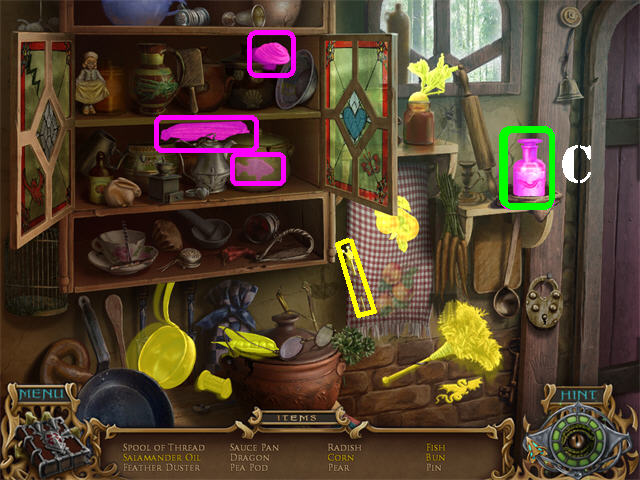
- Play the Hidden Object Scene on left.
- Click on the bag; take the SALAMANDER OIL (C).
- Open the cabinets; take the items listed in yellow.
- The SALAMANDER OIL will be added to inventory.

- Go into the bedroom.
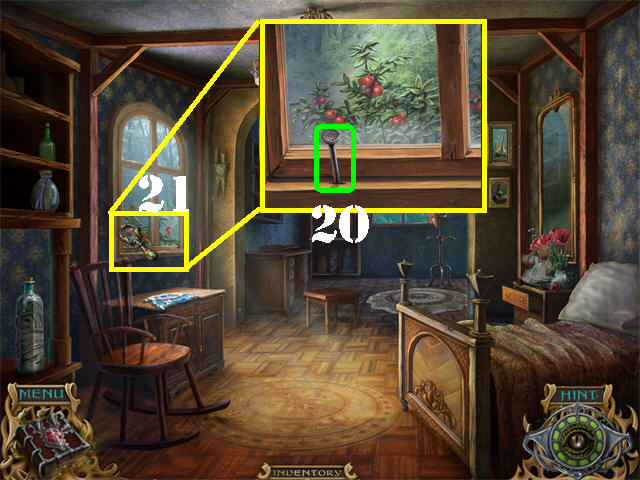
- Zoom into the window; pull the NAIL using the NAIL PULLER (20) to open the window.
- Take the FIRETHORN BERRIES (21) from the open window.

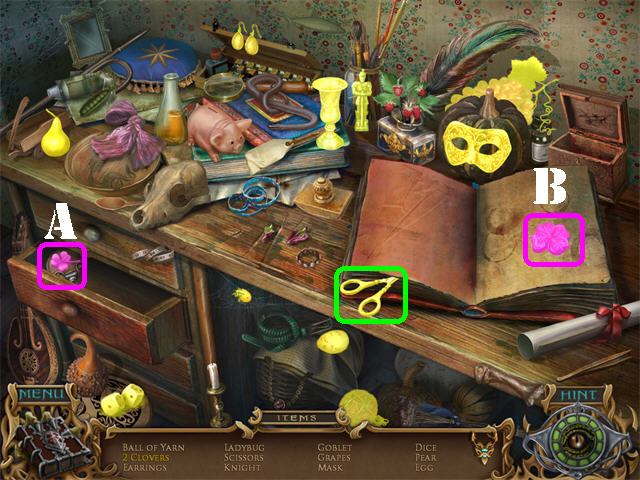
- Play the Hidden Object Scene by the desk.
- Open the lower left drawer; take the CLOVER (A).
- Click on the right page of the book; take the other CLOVER (B).
- The SCISSORS will be added to inventory.

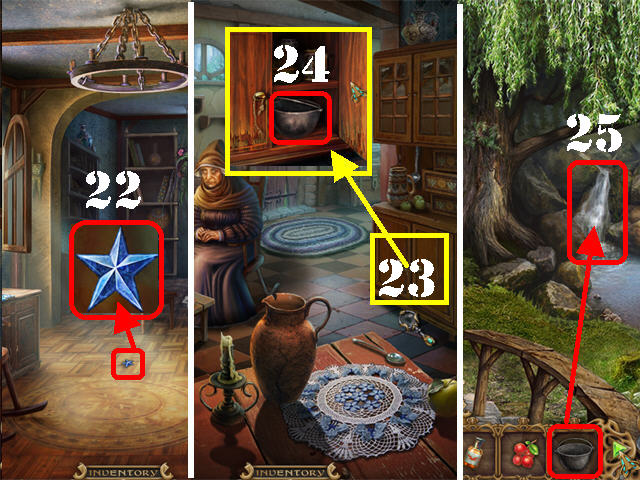
- Click on the OWL by the window; take STAR 4/5 (22) that falls on the ground.
- Click down.
- Zoom into the cabinet door by the back door (23).
- Cut the strings with the SCISSORS.
- Take the EMPTY CAULDRON from inside the cabinet (24).
- Go outside.
- Place the EMPTY CAULDRON in the water stream (25).
- The CAULDRON WITH WATER will be added to inventory.

- Go back inside grandma’s house.
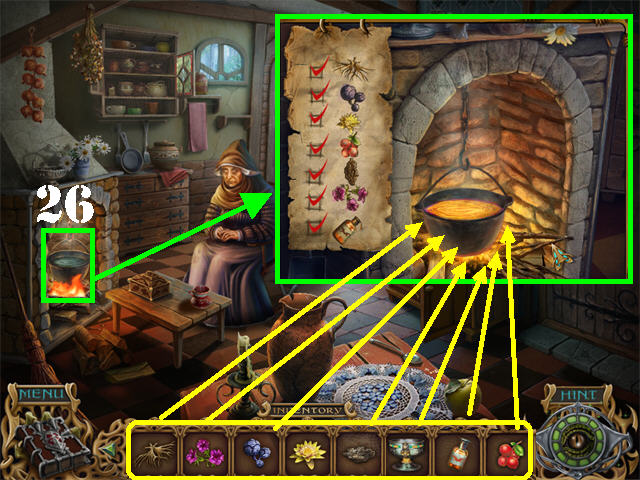
- Place the CAULDRON WITH WATER into the fireplace (26).
- Zoom into the cauldron and place the following items inside of it; FLOWERS, ELK ROOT, BARK OF WEEPING WILLOW, GOLDEN LILY, BLUE CABBAGE, SALAMANDER OIL, and the FIRETHORN BERRIES.
- Place the MAGIC CHALICE in the cauldron to automatically receive the MAGIC CHALICE WITH POTION.

- Return to the area with the girl.
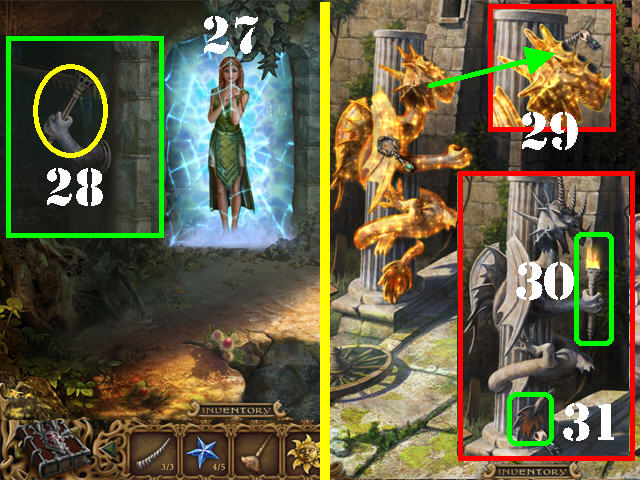
- Give the girl the MAGIC CHALICE WITH POTION (27).
- Take the TORCH (28) in the cave.
- Click down twice and head towards the castle.
- Zoom into the cursed dragon.
- Place the 3 DRAGON’S HORNS on the head (29).
- Place the TORCH in the dragon’s hand (30).
- Click on the DRAGON’S TAIL (31) to ignite the torch.
- Take the BURNING TORCH.
- Return to the cave entrance.
- Place the BURNING TORCH in the holder to illuminate the cave (28).
- Go into the cave.

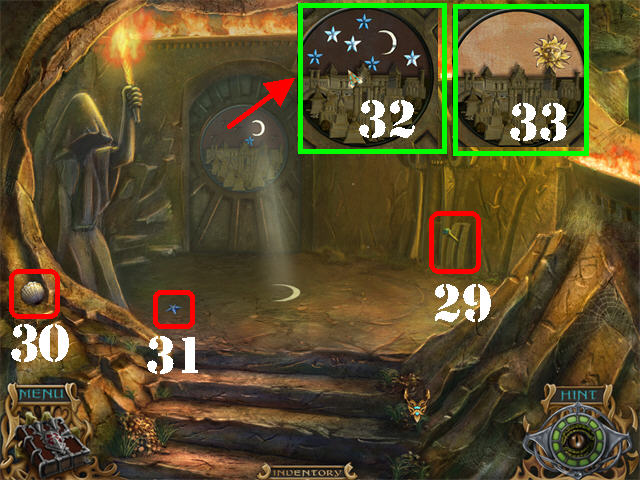
- Clean the cobweb on the right with the BRUSH to reveal a lever (29).
- Click on the lever to lift the torch and light up the rest of the cave.
- Take SHELL 1/6 (30) in the lower left.
- Take STAR 5/5 (31) on the ground.
- Zoom into the moon on the back wall.
- Place the 5 STARS on the back wall; the image will change (32).
- Place the GOLDEN SUN over the sun silhouette (33).
- Go through the back door.
Chapter 3: Getting into the Castle

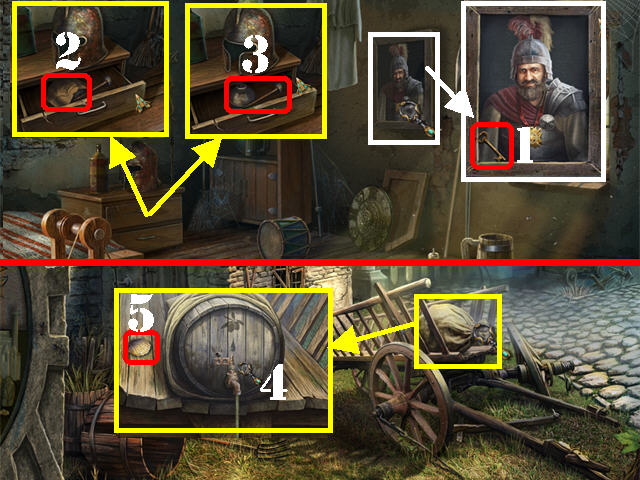
- Click on the OWL in the lower left.
- Enter the cabin.
- Zoom into the painting; take the KEY (1).
- Zoom into the drawer; open it and look at the shield sketch (2).
- Take the EMPTY OILER from inside the drawer (3).
- Click down.
- Zoom into the sack on the cart; click on the sack to untie it.
- Click on the barrel’s tap; place the EMPTY OILER on the dripping oil (4).
- The OILER WITH OIL will be added to inventory.
- Take SHELL 2/6 (5).

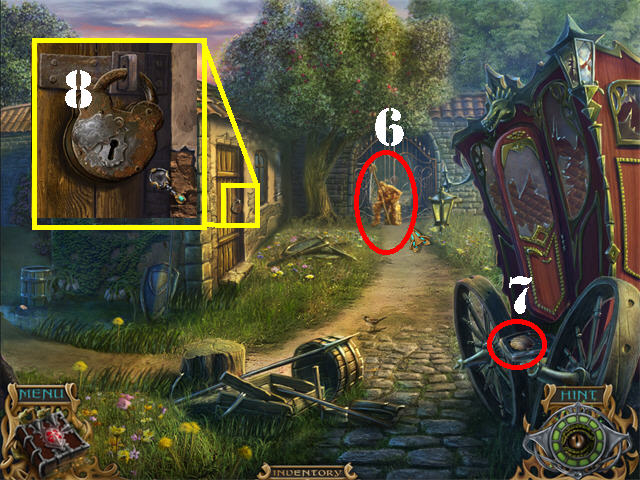
- Head towards the right.
- Note the cursed soldier in the back (6).
- Take SHELL 3/6 (7) in the lower right.
- Zoom into the left door; place the OILER WITH OIL on the lock (8).
- Click on the metal cover on the lock.
- Place the KEY in the lock; turn the key to activate a Hidden Object Scene; play it.

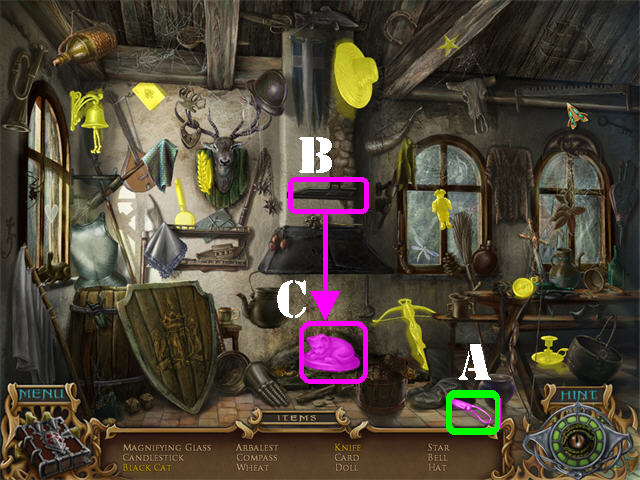
- Click on the BOOTS in the lower right; take the KNIFE (A).
- Click on the TRAY (B) in the center; take the BLACK CAT (C) below.
- The KNIFE will be added to inventory.

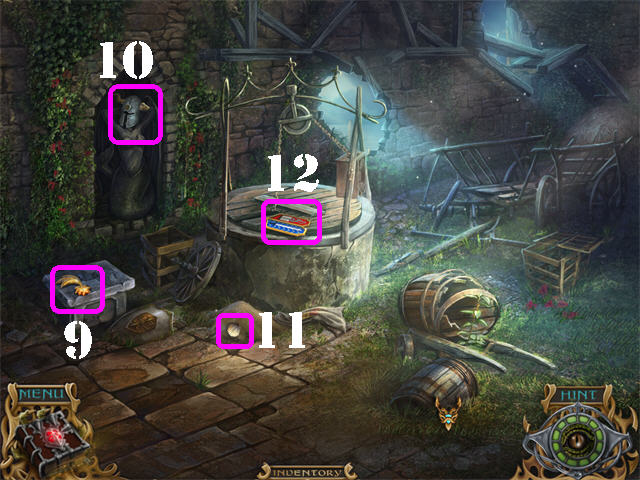
- Head left.
- Take the AMBER COMET (9) in the lower left.
- Grab the HELMET (10) on the left.
- Cut the BAG on top of the well with the KNIFE.
- Grab SHELL 4/6 (11) in the sand on the ground.
- Click on the bag to make it fall on the ground; take the COAT OF ARMS (12).

- Click down twice and enter the cabin.
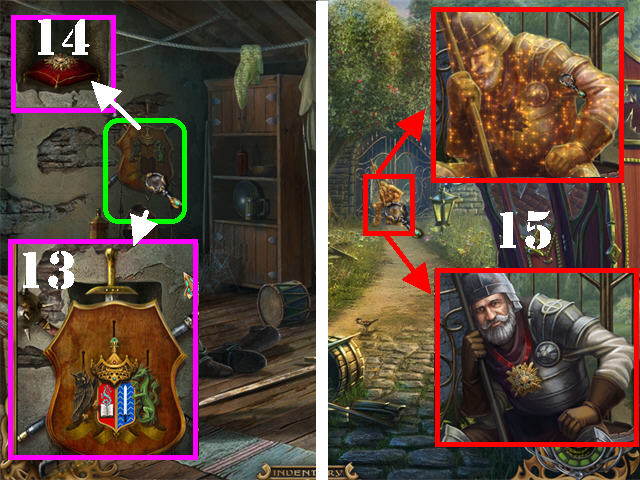
- Zoom into the shield on the wall; place the COAT OF ARMS in the center of the shield (13).
- Click on the 3 weapons on the shield to reveal a niche in the wall.
- Take the MEDAL (14) from the niche.
- Click down and head right.
- Zoom into the cursed soldier in the back; give him the MEDAL (15).
- Open the gate and go through it.

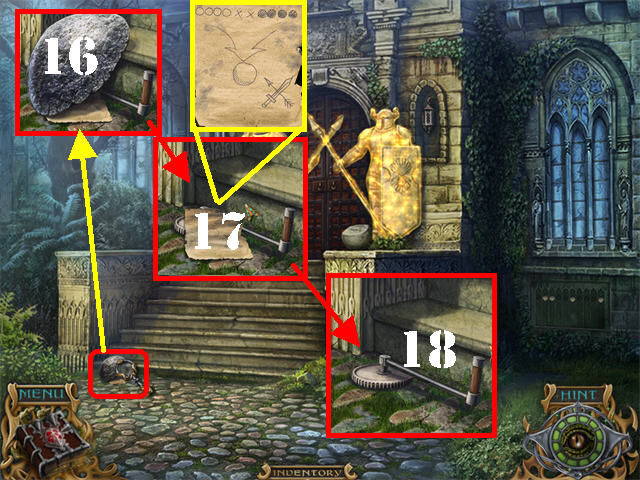
- Zoom into the rock in the lower left; remove the rock (16).
- Look at the sketch that was below the rock; it is a puzzle solution (17).
- Take the HANDLE (18) below the sketch.

- Click down.
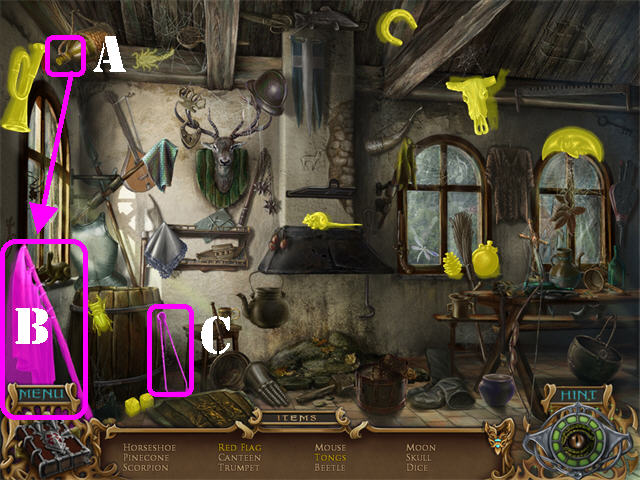
- Play the Hidden Object Scene.
- Click on the cork of the red wine bottle (A) in the upper left; take the RED FLAG (B) in the lower left.
- Click on the SHIELD; take the TONGS (C).
- The TONGS will be added to inventory.

- Head left.
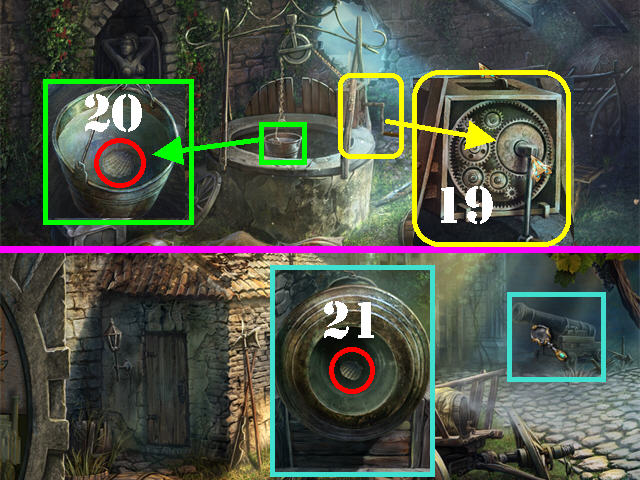
- Remove the well cover.
- Zoom into the mechanism on the right side of the well; place the HANDLE on it (19).
- Click on the HANDLE; take SHELL 5/6 (20) in the bucket of water.
- Click down twice.
- Zoom into the cannon in the upper right.
- Remove SHELL 6/6 (21) with the TONGS.

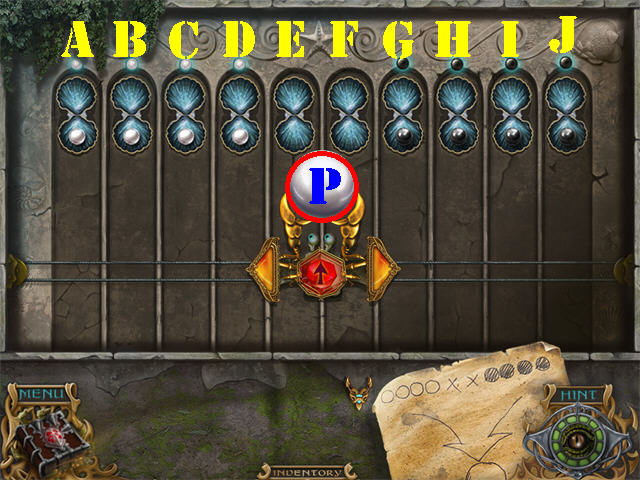
- Head right and then forward.
- Zoom into the puzzle below the right window.
- Place the 6 SHELLS on the board to activate the puzzle.
- Use the orange arrows to move the crab left and right.
- Use the red arrow to reach up and grab the pearls or to release them into spots.
- To solve the puzzle place the white pearls on the left and the black ones on the right.
- Follow these steps to solve the puzzle:
- Grab F and G and place them in spots A and B.
- Grab B and C and place them in spots F and G.
- Grab H and I and place them in spots B and C.
- Grab C and D and place them in spots H and I.
- Grab I and J and place them in spots C and D.
- Grab E and F and place them in spots I and J.
- Grab the PEARL (P) after the puzzle has been solved.

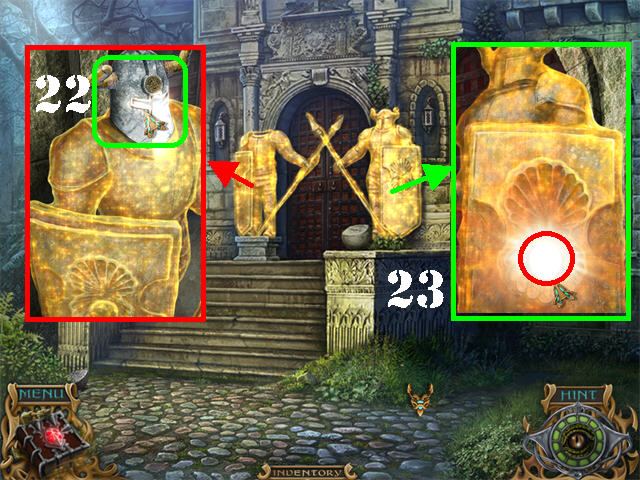
- Zoom into the left statue; place the HELMET on the armor (22).
- Zoom into the right statue; place the PEARL on the shield (23).
- Go through the gate after the Dark Queen disappears to enter the Castle.
Chapter 4: Inside the Castle

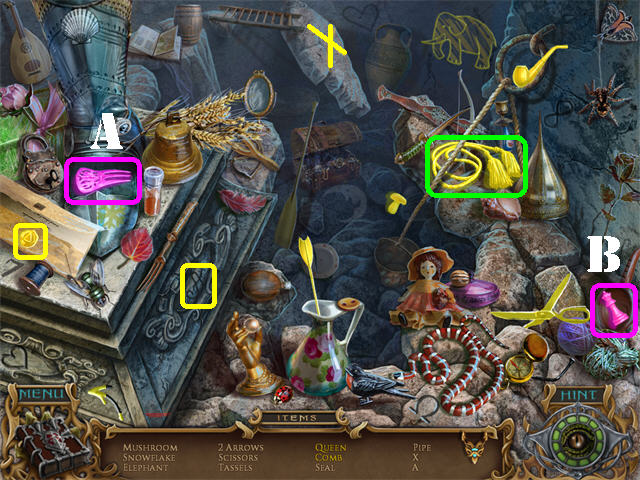
- Play the Hidden Object Scene in the far right.
- Click on the armor boots; take the COMB (A).
- Click on the pan on right; take the QUEEN (B).
- The TASSELS will be added to inventory.

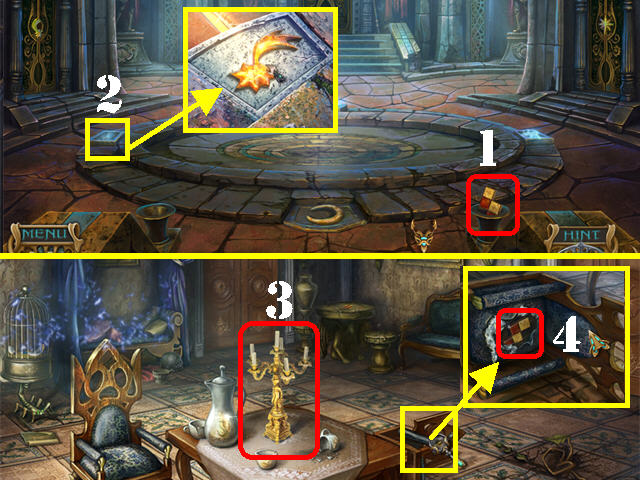
- Grab CHESSBOARD PIECE 1/9 (1) in the lower right.
- Zoom into the plaque on the left side of the ground; place the AMBER COMET in the recess to unlock the left door (2).
- Go through the left door to access the Living Room.
- Take the CANDELABRA on the table (3).
- Zoom into the fallen chair; tear the seat cushion and take CHESSBOARD PIECE 2/9 (4).

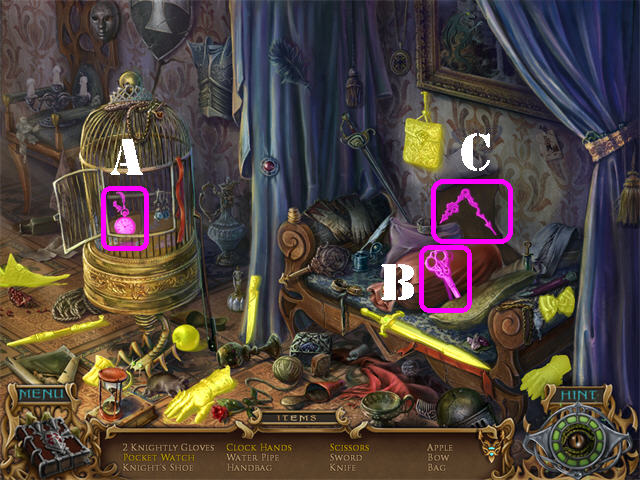
- Play the Hidden Object Scene on the left.
- Open the cage; take the POCKET WATCH (A).
- Click on the yellow pillow on the couch; take the SCISSORS (B).
- Tear the wallpaper on the back wall; take the CLOCK HANDS (C).
- The CLOCK HANDS will be added to inventory.

- Go through the left door.
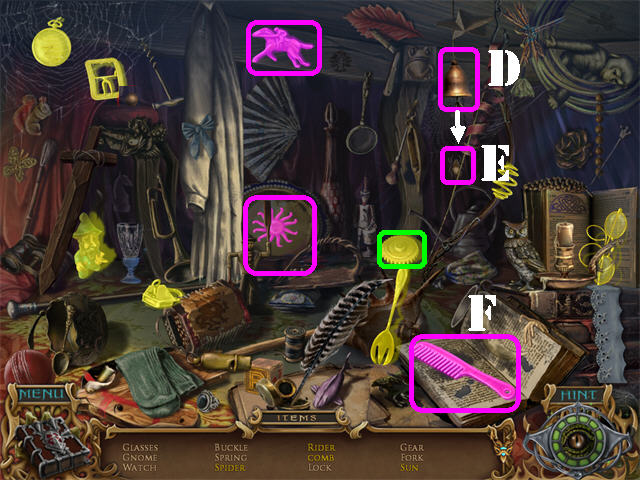
- Play the Hidden Object Scene below the table.
- Click on the curtain; take the items listed in yellow.
- Ring the bell in the upper right (D); take the SPIDER (E) that falls below the bell.
- Open the book in the lower right; take the COMB (F).
- The GEAR will be added to inventory.

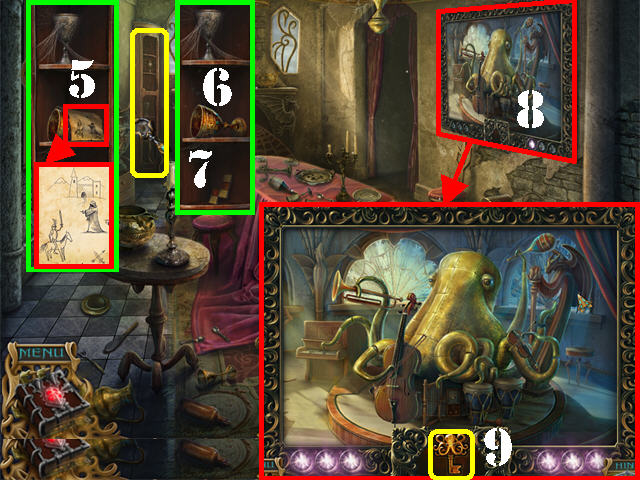
- Zoom into the shelf on left.
- Look at the scroll; click on it again to add it to the Diary (5).
- Grab the GOBLET (6) and CHESSBOARD PIECE 3/9 (7) on the shelf.
- Examine the picture on the right to activate a puzzle (8).
- Duplicate the 6 musical sequences demonstrated by the octopus by clicking on the instruments in the same order.
- The solution to this puzzle is random.
- Take the CLOCKWORK KEY (9) after the puzzle has been solved.

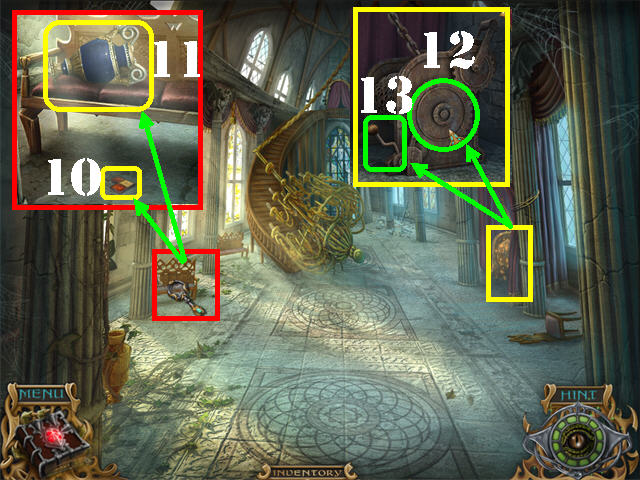
- Click down and go through the right door.
- Click on the OWL above the chandelier.
- Zoom into the left bench; take CHESSBOARD PIECE 4/9 (10) and the VASE (11).
- Place the TASSELS on the curtain on right to keep them open.
- Zoom into the lift mechanism behind the curtains; place the GEAR on it (12).
- Click on the LEVER (13) to lift the chandelier.

- Go up the steps.
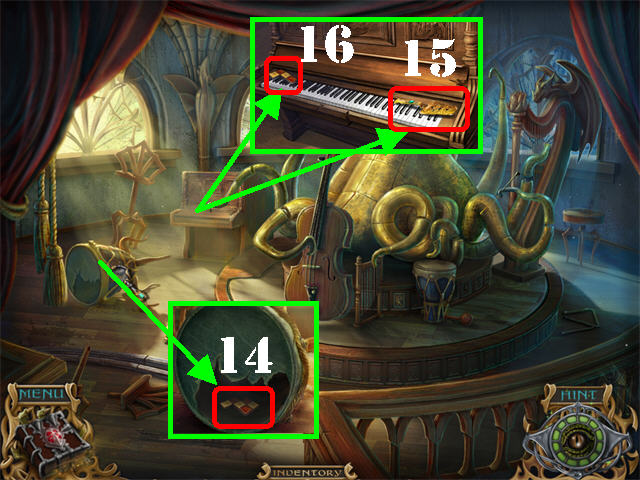
- Zoom into the drum on left; take CHESSBOARD PIECE 5/9 (14).
- Zoom into the piano; lift the cover.
- Take the CAKE KNIFE (15) and CHESSBOARD PIECE 6/9 (16) on the keyboard.

- Return to the dining room and head into the far right entryway.
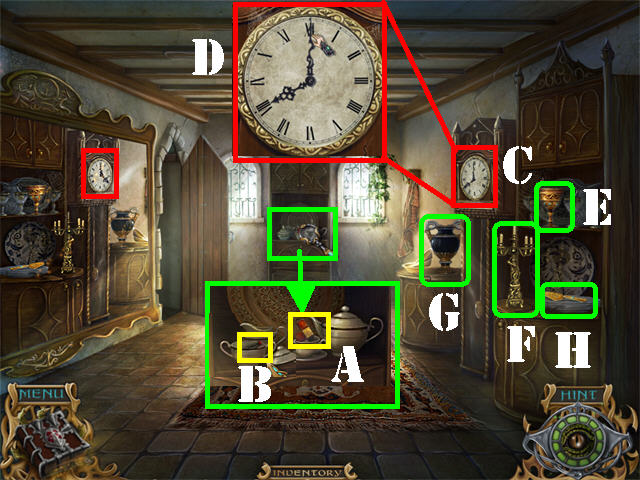
- Zoom into the back cupboard; take CHESSBOARD PIECE 7/9 (A).
- Click on the creamer’s lid; take the PIN (B) inside the creamer.
- The following actions will remove the curse from the left side of the wall.
- Zoom into the clock on right (C).
- Place the CLOCK HANDS on the clock.
- Change the clock hands to reflect the mirror image time displayed on the left clock; change it to 8:00 (D).
- Place the GOBLET (E), CANDELABRA (F), VASE (G), and CAKE KNIFE (H) as shown in the screenshot to take off the rest of the curse.
- Go through the left door to access the kitchen.

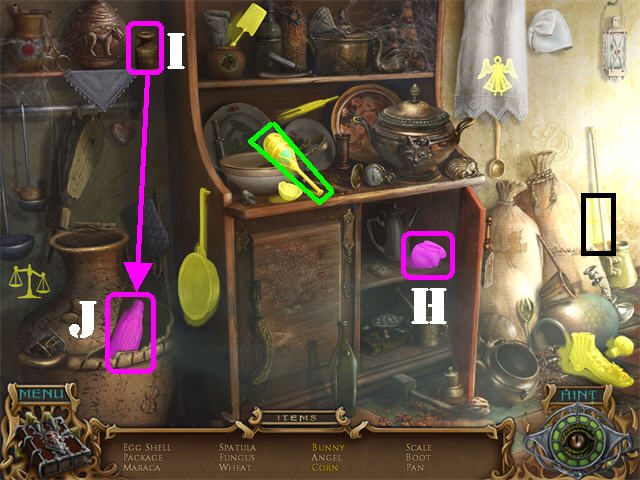
- Play the Hidden Object Scene in the back of the kitchen.
- Open the bottom right cabinet; take the BUNNY (H).
- Click on the WEIGHT (I) in the upper left; it will fall and break the vase below it.
- Grab the CORN (J) from inside the broken vase.
- The MARACA will be added to inventory.

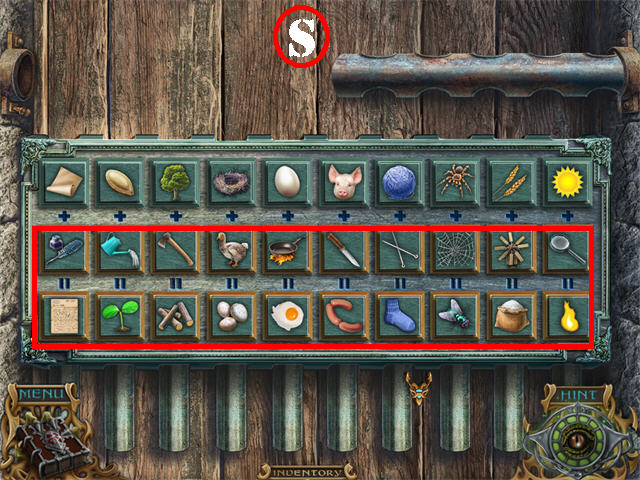
- Zoom into the back door to activate a puzzle.
- Click on any 2 tiles in the 2 lowest rows to swap their positions.
- The top row is stationary.
- Place the correct items in the middle or bottom rows that will result in the bottom image.
- For example: The blank paper combined with the quill and ink will result in a written letter. An egg placed in a frying pan will result in a fried egg. The sun and a magnifying glass will result in fire.
- A correct combination will remove the bar above it.
- Please look at the screenshot for the solution (S).

- Go through the door after the puzzle has been completed to access the cellar.
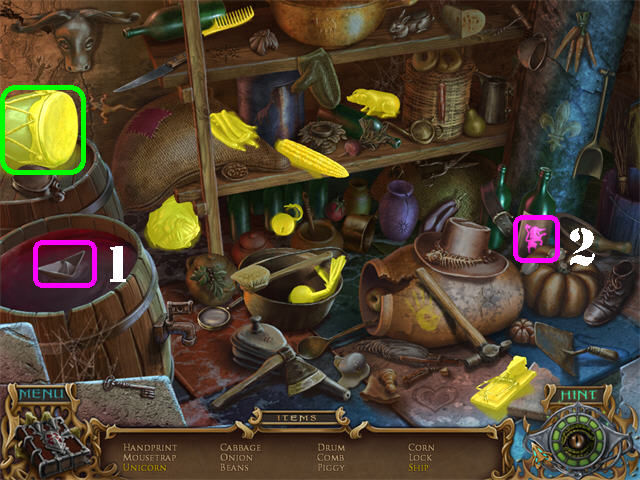
- Play the Hidden Object Scene on left.
- Open the barrel lid; take the SHIP (1).
- Click on the wine bottle; take the UNICORN (2).
- The DRUM will be added to inventory.

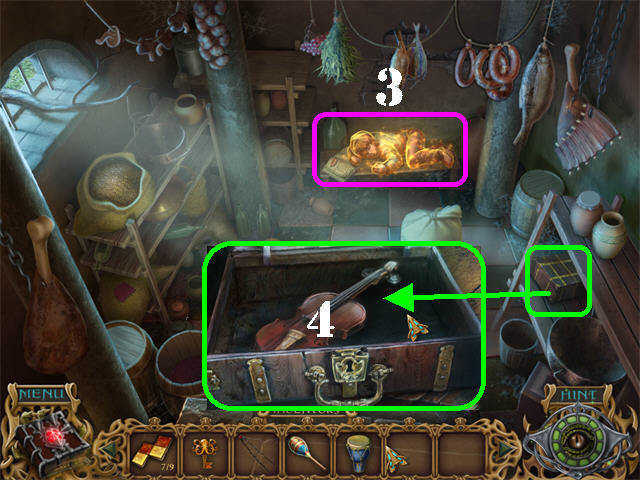
- Zoom into the cursed boy; note the pie image in the book. Zoom out of that view (3).
- Examine the box on the right; place the PIN in the keyhole.
- Open the box and take the VIOLIN (4).

- Return to the dining room.
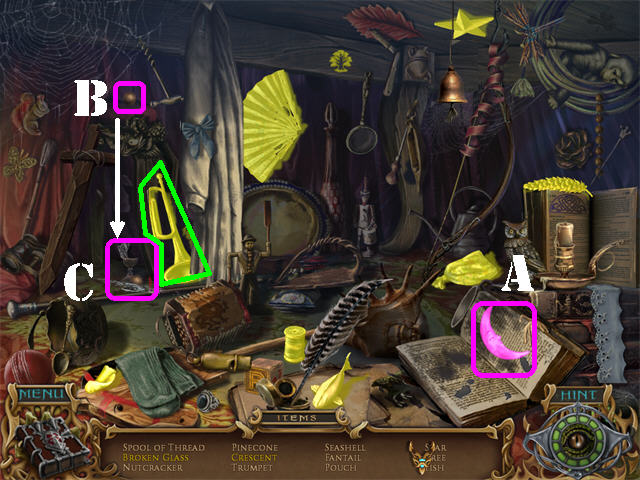
- Play the Hidden Object Scene.
- Open the book in the lower right; take the CRESCENT (A).
- Click on the metal ball (B) in the upper left; take the BROKEN GLASS (C) below it.
- The TRUMPET will be added to inventory.

- Click down to return to the living room.
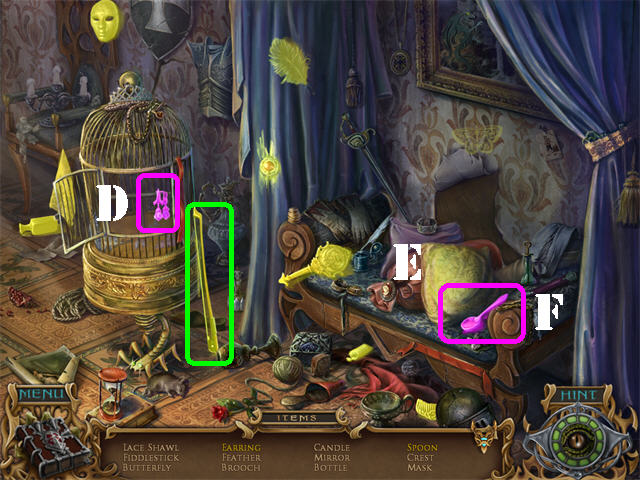
- Play the Hidden Object Scene on left.
- Open the cage; take the EARRING (D).
- Click on the yellow pillow (E) on the bench; take the SPOON (F).
- The BOW will be added to inventory.

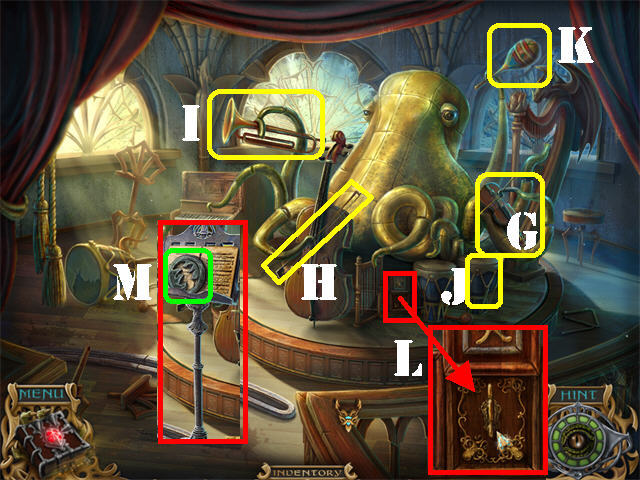
- Go through the right door and then up the stairs.
- Place the VIOLIN (G), BOW (H), TRUMPET (I), DRUM (J), and MARACA (K) into the spots shown in the screenshot.
- Place the CLOCKWORK KEY in the keyhole next to the drums (L).
- Turn the key once for the octopus to play and the music stand to appear.
- Take the CAST IRON DISC (M) on the music stand.

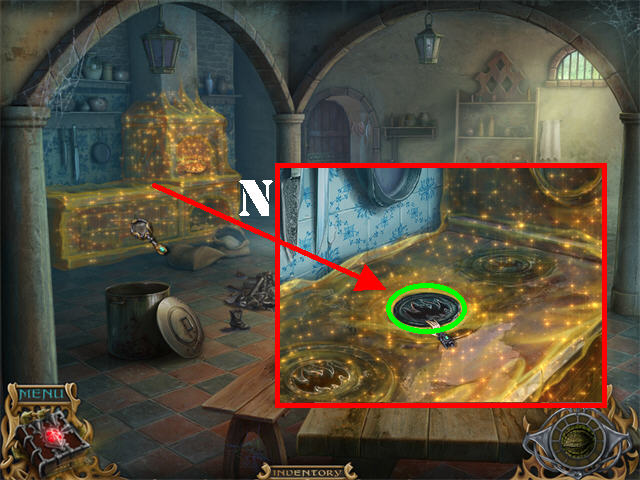
- Return to the kitchen.
- Zoom into the stove; place the CAST IRON DISC on the stove to remove the curse (N).
- This action activates a Hidden Object Scene in the kitchen; play it.

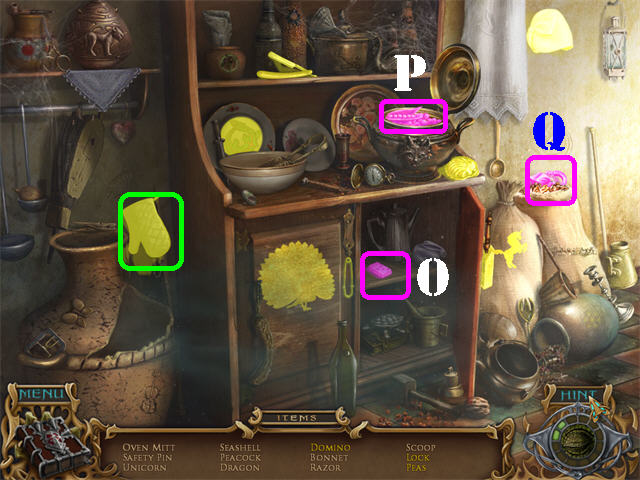
- Open the bottom right door; take the DOMINO (O) or any item listed in yellow.
- Open the lid; take the PEAS (P).
- Untie the sack on the right; take the LOCK (Q).
- The OVEN MITT will be added to inventory.

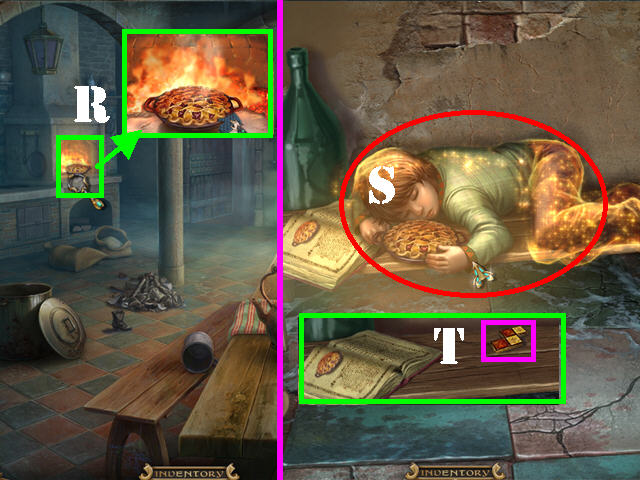
- Zoom into the oven.
- Remove the PIE with the OVEN MITT (R).
- Go into the back door.
- Zoom into the boy; give him the PIE (S).
- Take CHESSBOARD PIECE 8/9 (T) on the bench after the boy leaves.

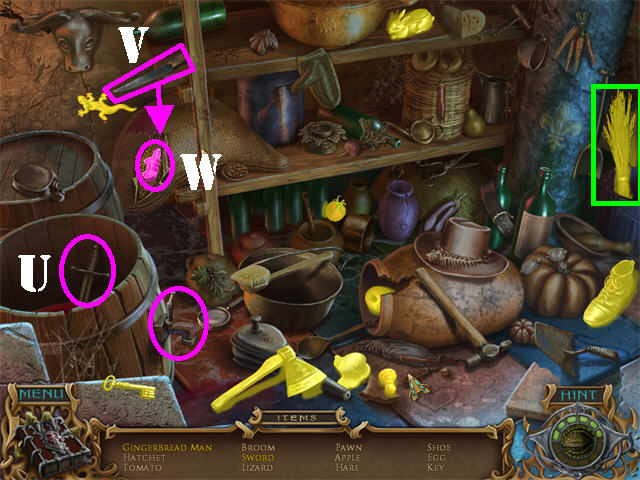
- Play the Hidden Object Scene that was just triggered in the cellar.
- Click on the spigot attached to the barrel; take the SWORD (U) in the barrel.
- Click on the KNIFE (V) and it will cut the bag below it; take the GINGERBREAD MAN in the sack (W).
- The BROOM will be added to inventory.

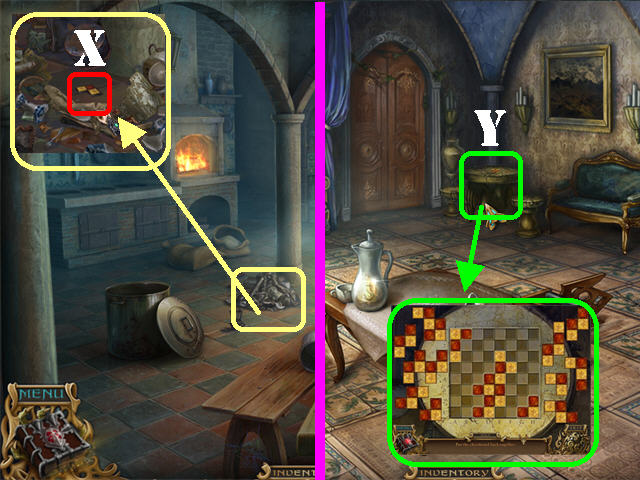
- Click down.
- Zoom into the pile of garbage on the ground.
- Remove the garbage with the BROOM; take CHESSBOARD PIECE 9/9 (X).
- Return to the living room.
- Zoom into the chessboard (Y).

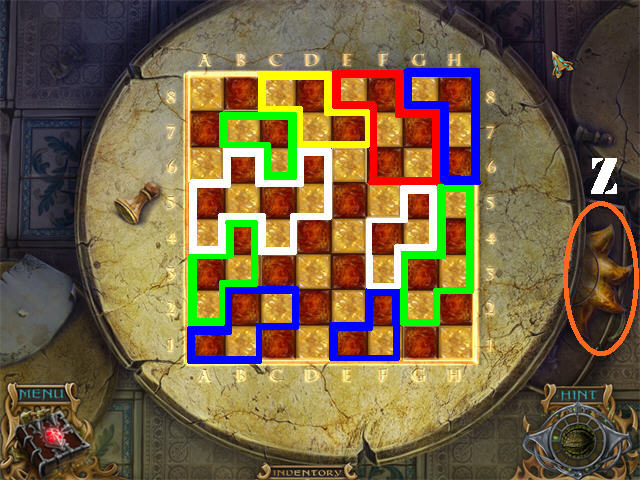
- Place the 9 CHESSBOARD PIECES on the board to activate the puzzle.
- Drag the CHESSBOARD PIECES onto the board so that all the pieces fit without overlapping.
- Please look at the screenshot for the solution.
- Take the AMBER SUN (Z) after the puzzle has been completed.
- Click down.

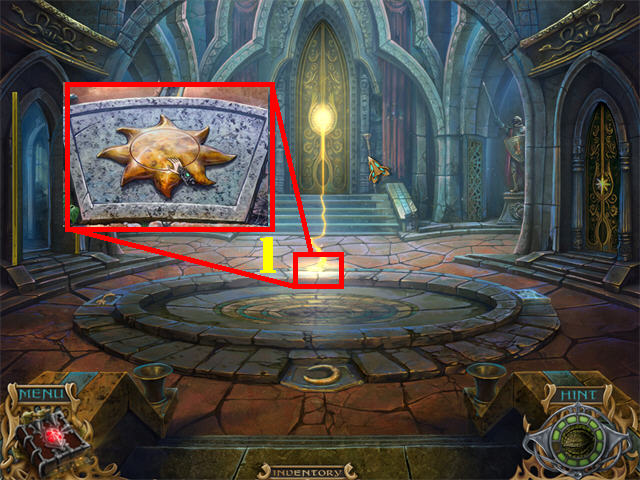
- Zoom into the recess on the ground facing the back door.
- Place the AMBER SUN in the recess to unlock the back door (1).
- Go through the back door.
Chapter 5: The Royal Quarters

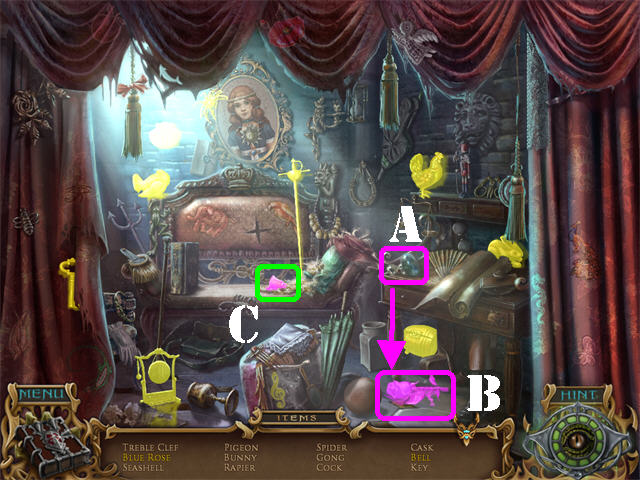
- Play the Hidden Object Scene on left.
- Click on the bottle of ink on the desk and it will spill (A); take the BLUE ROSE (B) below it.
- Click on the feathers on the couch; take the BELL (C).
- BELL 1/4 will be added to inventory.

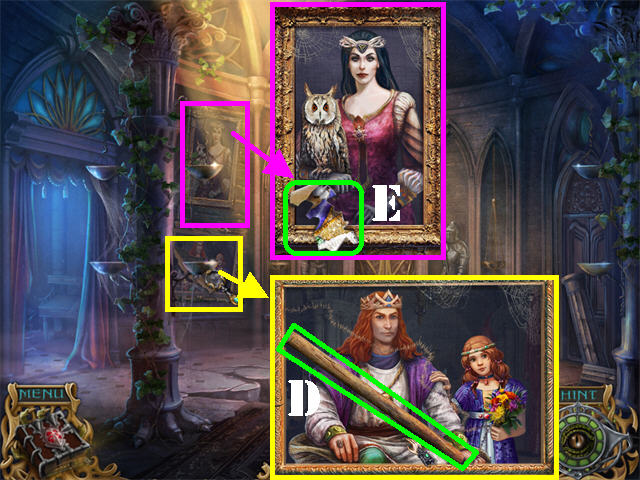
- Zoom into the lower left portrait; click on the painting and take the CUDGEL (D).
- Zoom into the upper left portrait; take PAINTING FRAGMENT 1/9 (E).
- Go through the back door to encounter the Dark Queen.

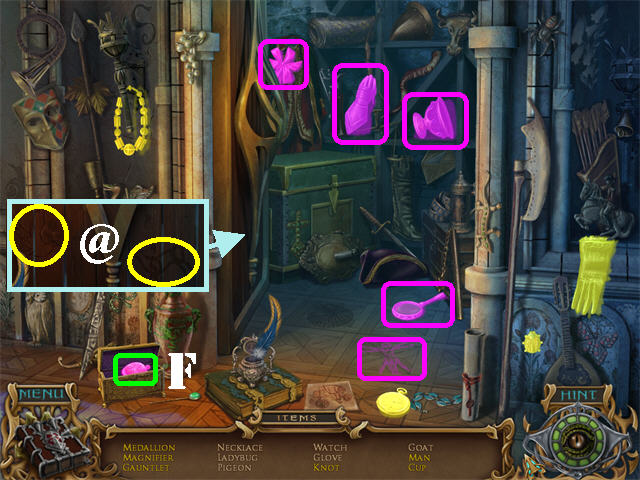
- Play the Hidden Object Scene on the right.
- Take the items on your list from the closed door (@).
- Open the door; take all the items listed in yellow.
- Open the box in the lower left; take the MEDALLION (F).
- The MEDALLION will be added to inventory.

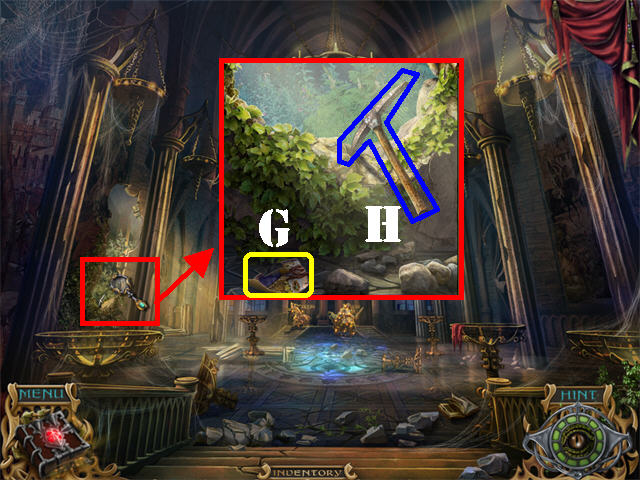
- Click on the OWL in the lower left.
- Zoom into the vines in the lower left; take PAINTING FRAGMENT 2/9 (G).
- Place the CUDGEL on the PICK HEAD; take the PICK (H).

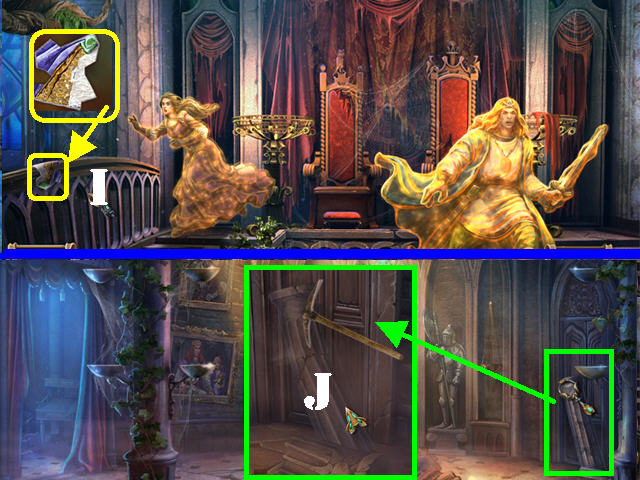
- Go forward.
- Take PAINTING FRAGMENT 3/9 (I) on the left railing.
- Note the cursed King and Queen.
- Click down twice.
- Zoom into the column on the right; break it with the PICK (J).
- Go through the door.

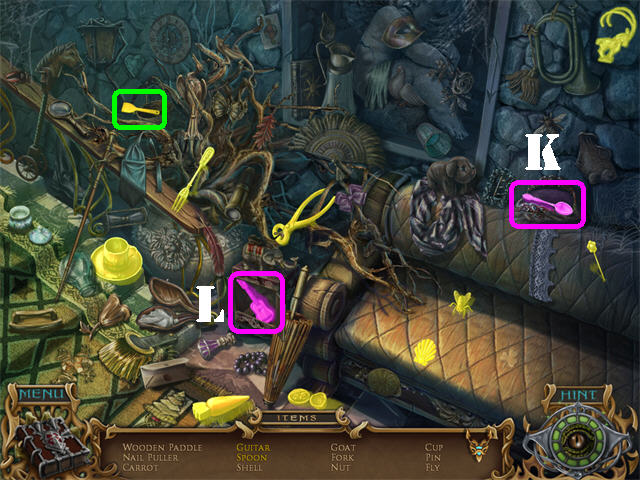
- Play the Hidden Object Scene on the right.
- Open the purse; take the SPOON (K).
- Open the box; take the GUITAR (L).
- The WOODEN PADDLE will be added to inventory.

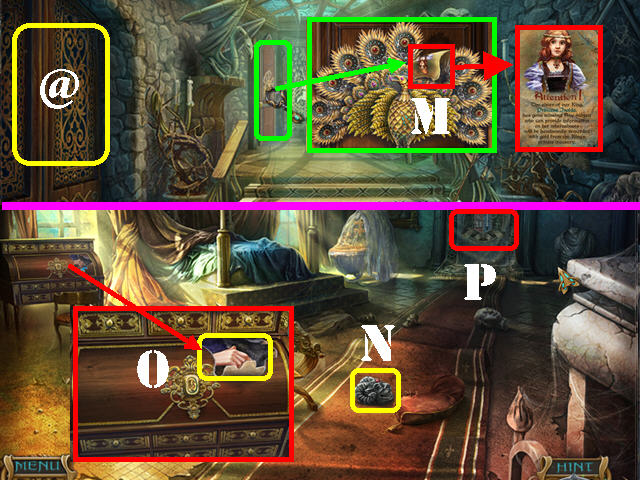
- Zoom into the far left door; read the scroll attached to the peacock (M).
- Go into the left door (@).
- Click on the red pillow on the carpet; take MASK 1/3 (N).
- Zoom into the secretary; take PAINTING FRAGMENT 4/9 (O).
- Remove the tapestry on the back wall (P); click on the back door to reveal a puzzle.

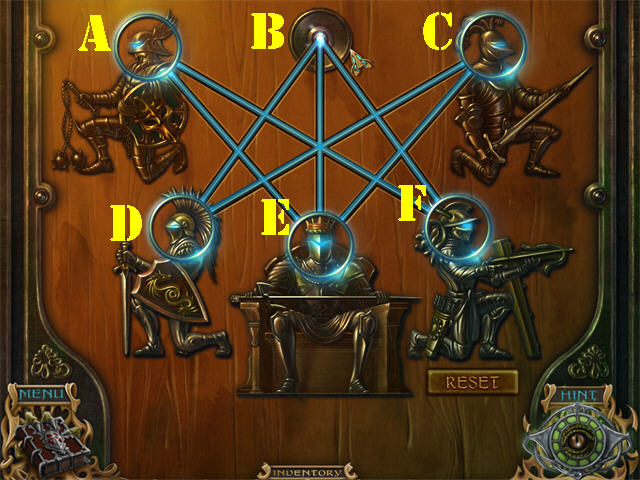
- Click on a helmet so it can move to an empty spot.
- Correct pieces will light up with a small blue light.
- Click on the helmets in this order to solve the puzzle: E- C – D – B – E – A – F and B.
- Go through the door after the puzzle has been solved.

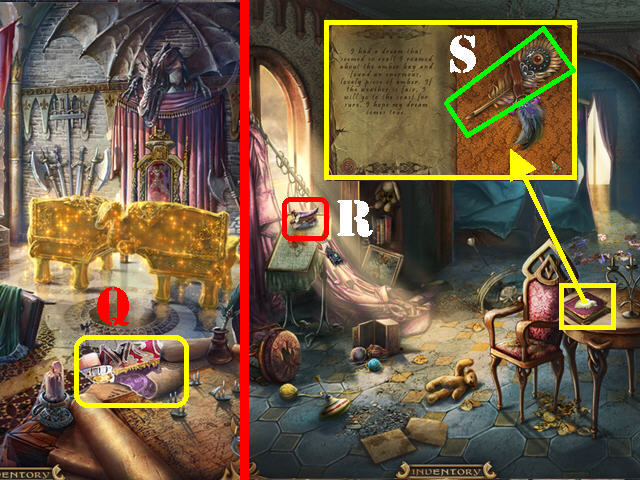
- Take PAINTING FRAGMENT 5/9 (Q) on the ground.
- Click down twice and head into the right door.
- Take PAINTING FRAGMENT 6/9 (R) by the fallen curtain.
- Zoom into the book on the table.
- Flip the pages twice and take the FEATHER (S).
- Close the pop-up view.

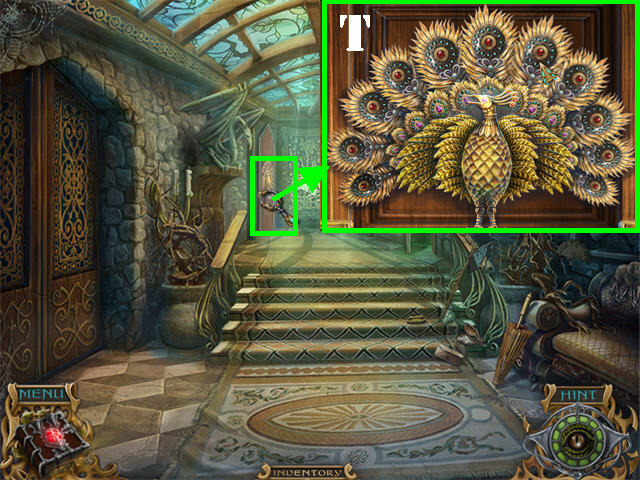
- Click down to return to the hallway.
- Zoom into the far left door.
- Place the FEATHER on the peacock to unlock the door (T).
- Go through the door to access the garden.
Chapter 6: The Garden

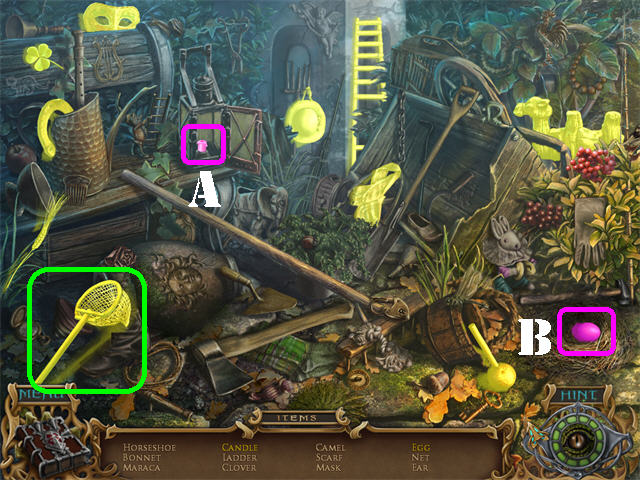
- Play the Hidden Object Scene on left.
- Open the lantern; take the CANDLE (A).
- Click on the duck in the lower right; take the EGG (B).
- The NET will be added to inventory.

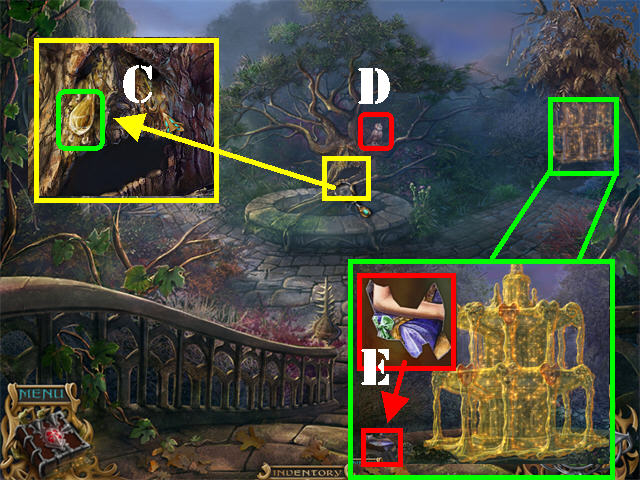
- Zoom into the tree hollow; scrape the RESIN with the WOODEN PADDLE (C).
- Click on the owl in the tree; follow it (D).
- Zoom into the fountain on the right.
- Take PAINTING FRAGMENT 7/9 (E) in the lower left.

- Exit the fountain.
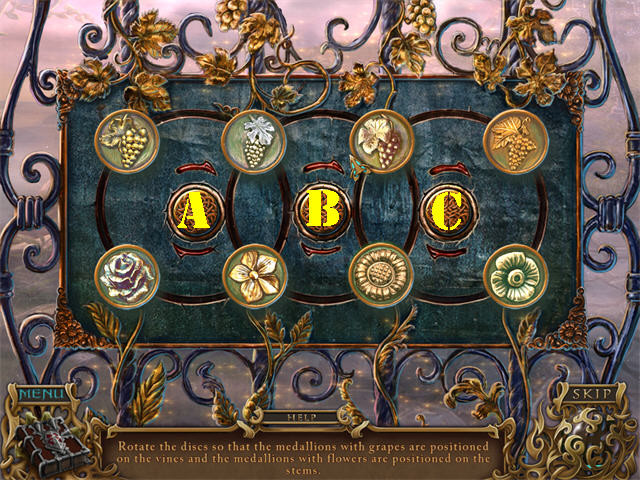
- Zoom into the gate on left to activate a puzzle.
- Arrange the tokens so the grapes are on top and the flowers are at the bottom using the buttons in the middle to rotate the tokens.
- Follow these steps to solve the puzzle: A-A-B-C-B-C-B-B-C.
- Go through the gate after the puzzle has been solved.

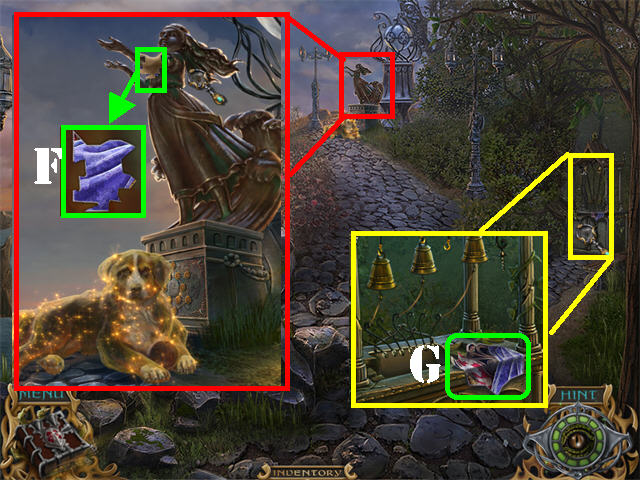
- Zoom into the stand on the right.
- Take PAINTING FRAGMENT 8/9 (F).
- Head forward.
- Take PAINTING FRAGMENT 9/9 from the statue’s arm (G).

- Click down 3 times; head into the right door.
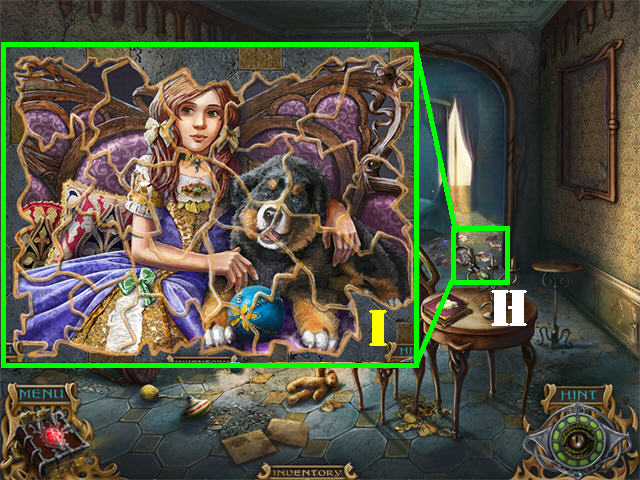
- Zoom into the painting fragments on the ground (H).
- Place the 9 PAINTING FRAGMENTS on the board to activate the puzzle.
- Left-click on a piece to place it on the board and right-click it to rotate it.
- Correct pieces will lock in place when placed into the right spots on the board.
- Please look at the screenshot for the solution.
- Place the RESIN on the completed picture.
- Take the PICTURE (I).

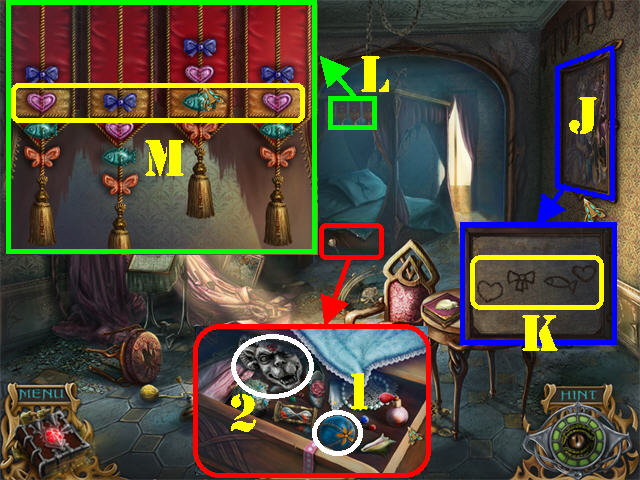
- Place the PICTURE in the frame on the right side of the wall (J).
- Click on the framed picture to see the back of it; note the symbols on the back of the picture (K).
- Zoom into the tassels hanging above the bed (L).
- Using the images on the back of the picture place the symbols in the same order on the yellow strip. Pull on each tassel to move the symbols.
- Please look at the screenshot for the solution (M).
- View the drawer below the bed; take the BALL (1) and MASK 2/3 (2).

- Return to the hallway.
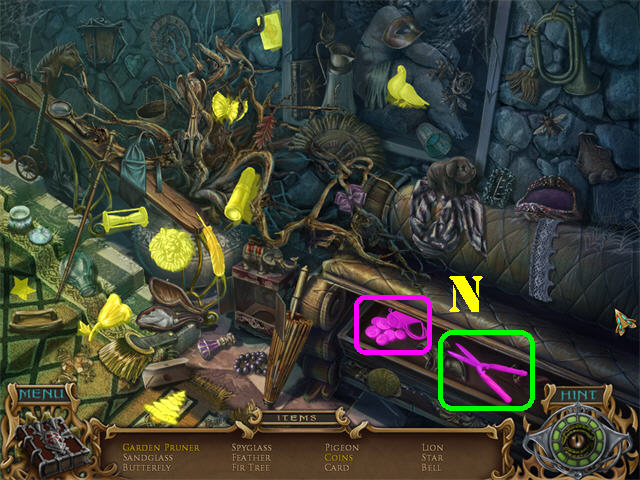
- Play the Hidden Object Scene on right.
- Open the bench (N); take the items listed in yellow.
- The GARDEN PRUNER will be added to inventory.

- Return to the garden.
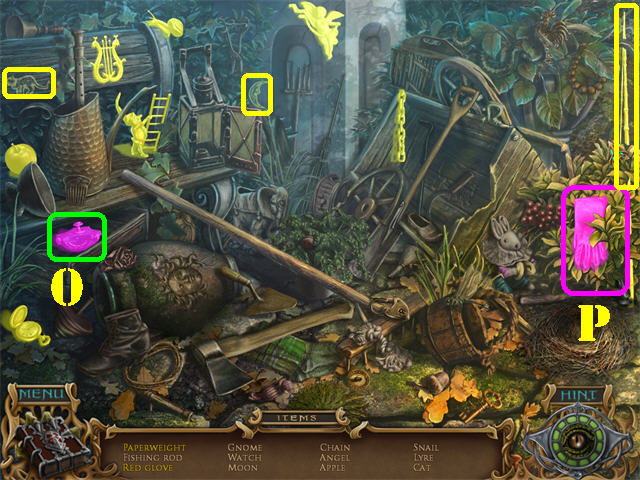
- Play the Hidden Object Scene on left.
- Open the drawer; take the PAPERWEIGHT (O).
- Click on the red berries in the upper right; take the RED GLOVE (P).
- The PAPERWEIGHT will be added to inventory.

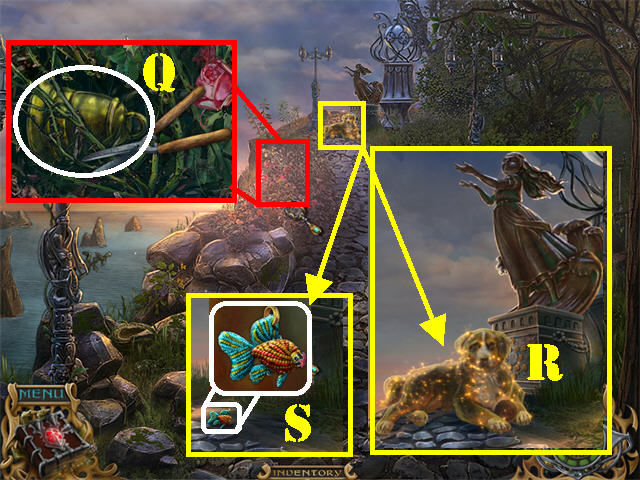
- Go through the left gate.
- Zoom into the bushes on left; cut them with the GARDEN PRUNER and take BELL 2/4 (Q).
- Head forward.
- Give the BALL to the dog (R).
- Take TOY FISH 1/3 (S) on the ground after the dog leaves.

- Zoom into the base of the statue.
- Click on any 2 medallions to view what is underneath. Match 2 identical pieces and they will remain face up.
- Each time you click on two incorrect medallions they will rotate on the board.
- Match all the medallions to win the game. The solutions are random.
- Take the SEA HORSE after the puzzle has been solved (T).

- Return to the hallway; go into the left door and then through the back door.
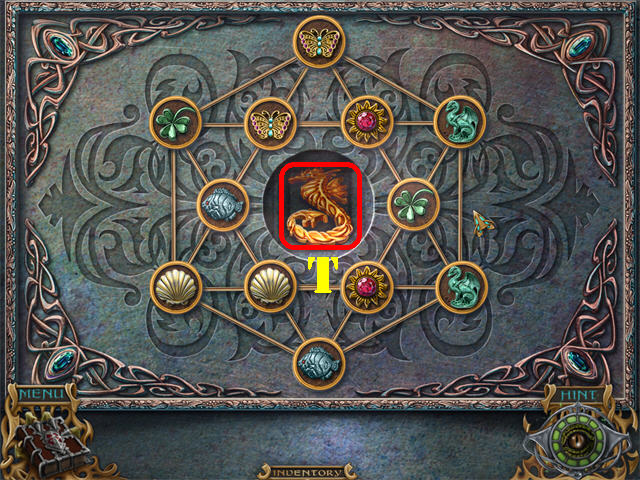
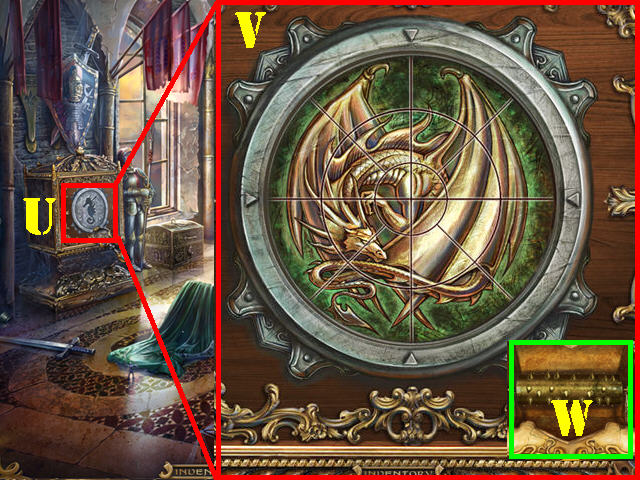
- Zoom into the cabinet on the left (U).
- Place the SEA HORSE in the center of the cabinet to activate a puzzle.
- Click on any 2 pieces within the same ring to swap their positions.
- Once all rings are complete you can rotate them to the right angle. The rings will lock in place when done correctly.
- Please look at the screenshot for the solution (V).
- Take the ROLLER from inside the cabinet (W) after the puzzle has been completed.

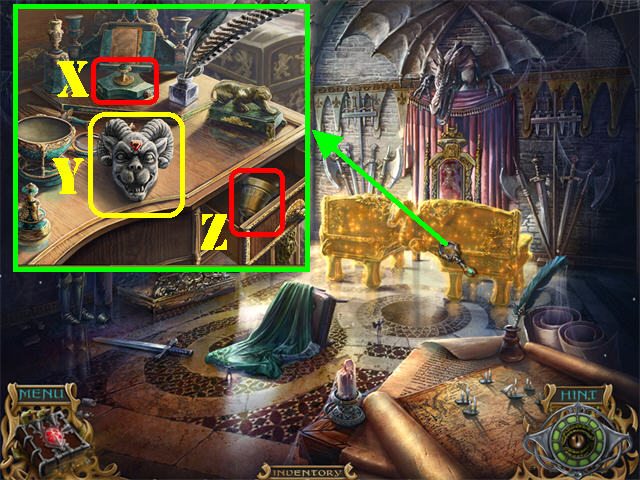
- Zoom into the cursed table.
- Place the PAPERWEIGHT in the hole to remove the curse (X).
- Take MASK 3/3 on the table (Y).
- Open the drawer; take BELL 3/4 (Z).

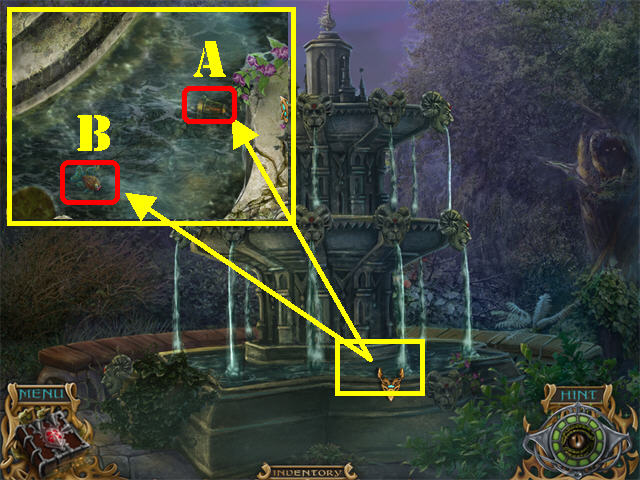
- Return to the fountain outside.
- Place the 3 MASKS on the fountain to remove the curse.
- Zoom into the water.
- Remove BELL 4/4 (A) and TOY FISH 2/3 (B) with the NET.

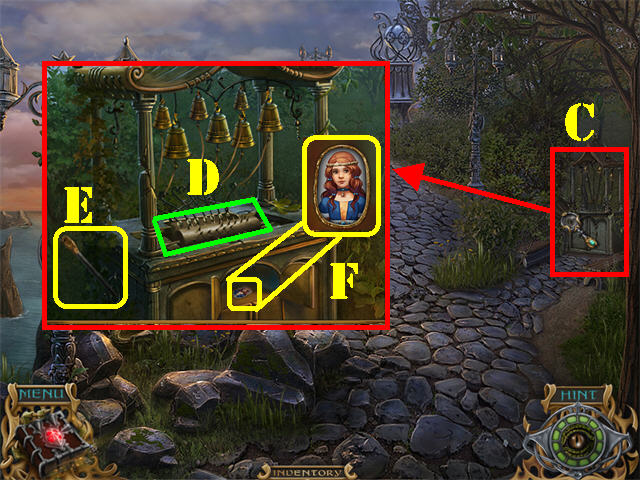
- Click down and go through the gate.
- Zoom into the stand on the right (C).
- Place the 4 BELLS on the stand.
- Place the ROLLER in the center (D).
- Click on the LEVER to activate the bells (E).
- Take the PORTRAIT at the bottom of the machine (F).

- Return to the hallway; click down, and go forward.
- Play the Hidden Object Scene on the right.
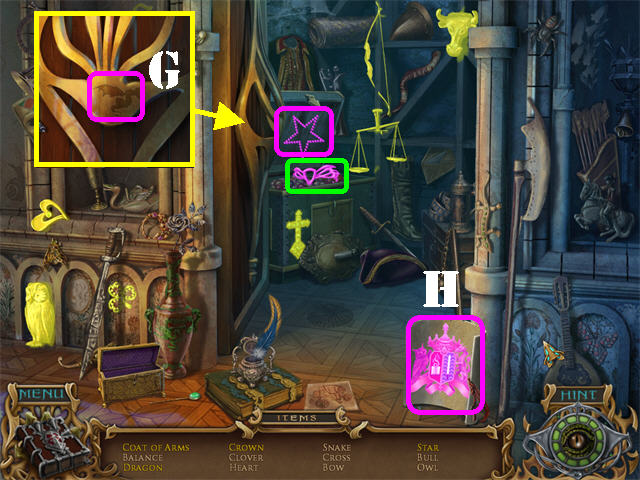
- Take the DRAGON on the front of the door (G).
- Open the door (if needed), and then open the chest; take the items listed in yellow.
- Click on the scroll in the lower right; take the COAT OF ARMS (H).
- The QUEEN’S CROWN will be added to inventory.

- Head forward.
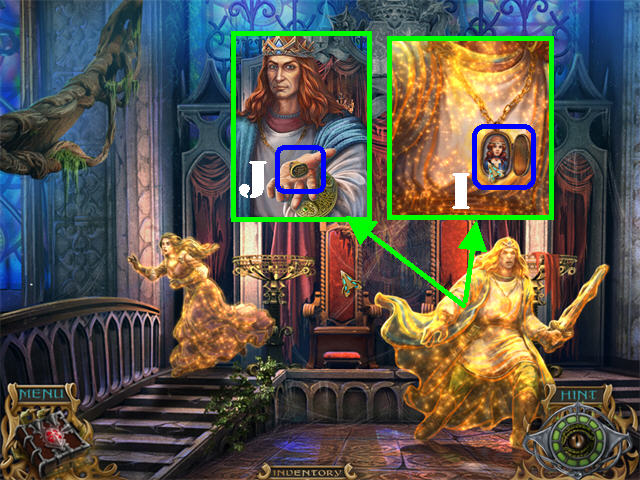
- Zoom into the King; Place the MEDALLION on his chain.
- Place the PORTRAIT in the medallion (I).
- Take the DRAGON RING (J) the King hands you.

- Click down twice.
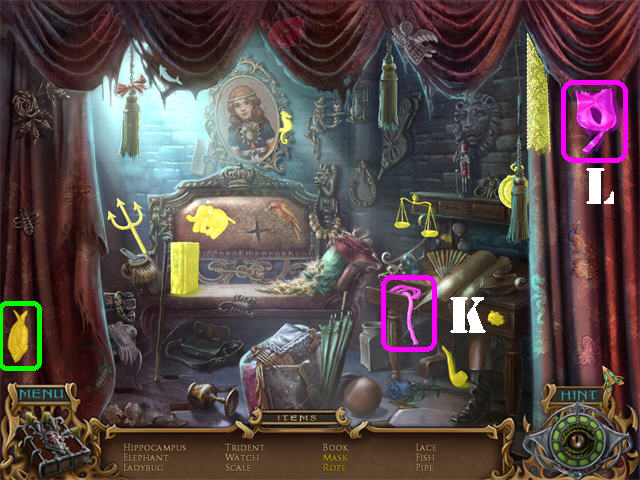
- Play the Hidden Object Scene on the left.
- Open the drawer; take the ROPE (K).
- Click on the upper right side of the curtain; take the MASK (L).
- TOY FISH 3/3 (M) will be added to inventory.

- Go Through the right door and then through the left door.
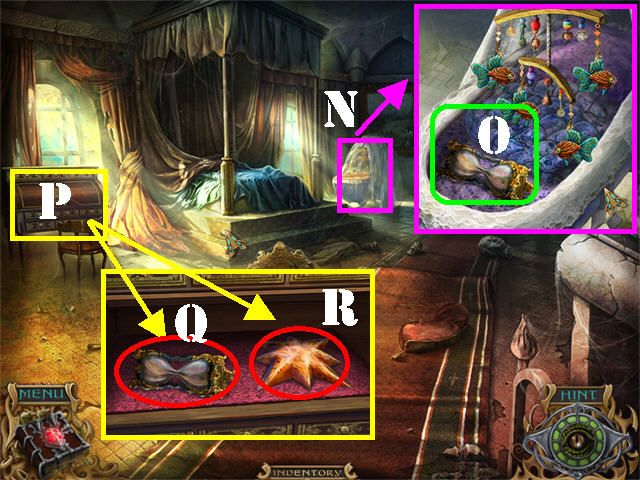
- Zoom into the cradle; place the 3 TOY FISH on the mobile (N).
- Click on the covers; take HOURGLASS 1/3 (O).
- Zoom into the secretary on left (P); place the DRAGON RING on the lock.
- Take HOURGLASS 2/3 (Q) and the AMBER STAR (R).
- Click down 3 times.

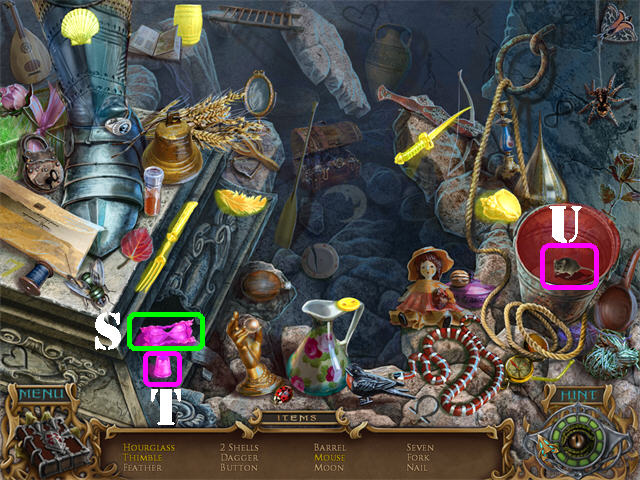
- Play the Hidden Object Scene on the far right.
- Click on the left drawer; take the HOURGLASS (S) and the THIMBLE (T).
- Click on the bucket in the lower right; take the MOUSE (U).
- HOURGLASS 3/3 will be added to inventory.

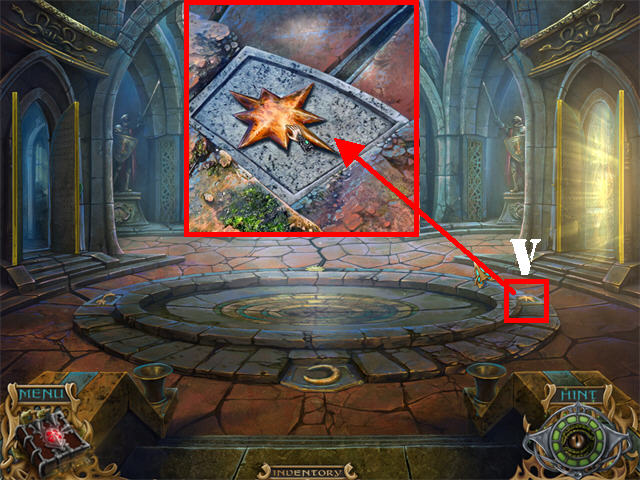
- Zoom into the recess facing the right door (V).
- Place the AMBER STAR in the recess to unlock the right door; go through it.
Chapter 7: The Finale

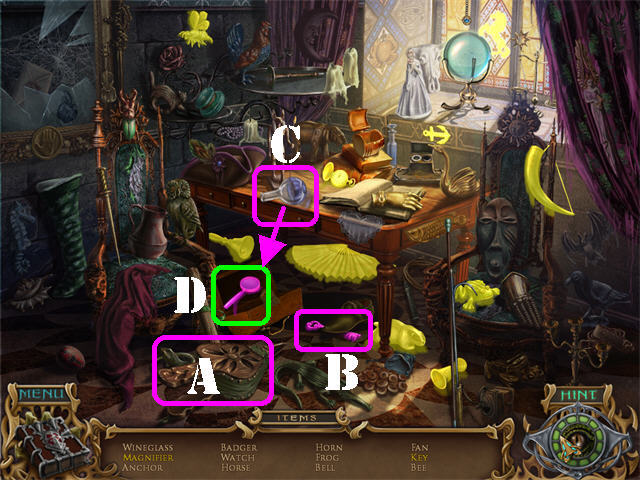
- Play the Hidden Object Scene on the right.
- Click on the bellows (A); take the KEY below the shoe (B).
- Click on the beaker (C); take the MAGNIFIER (D) inside the case.
- The MAGNIFIER will be added to inventory.

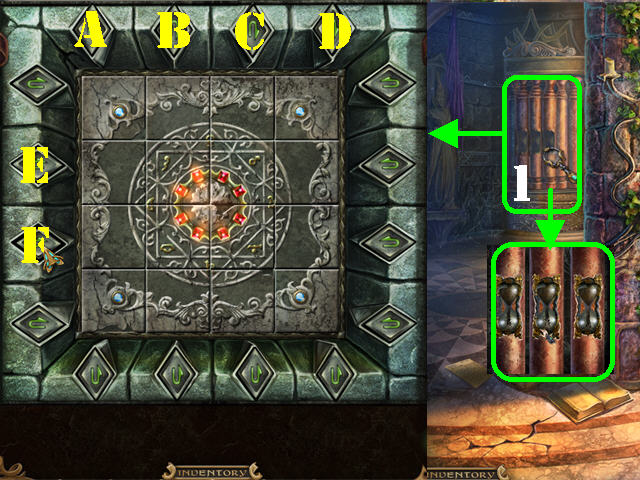
- Zoom into the column in the back; place the 3 HOURGLASSES on the column (1).
- Zoom into the column to activate a puzzle.
- Recreate the picture by clicking on the arrows in order to rotate the squares.
- You can reset the puzzle by clicking on the double arrows on the right.
- Follow these steps to solve the puzzle: A-D-B-B-C-C-E-E-E-F.

- Go through the door after the puzzle has been solved.
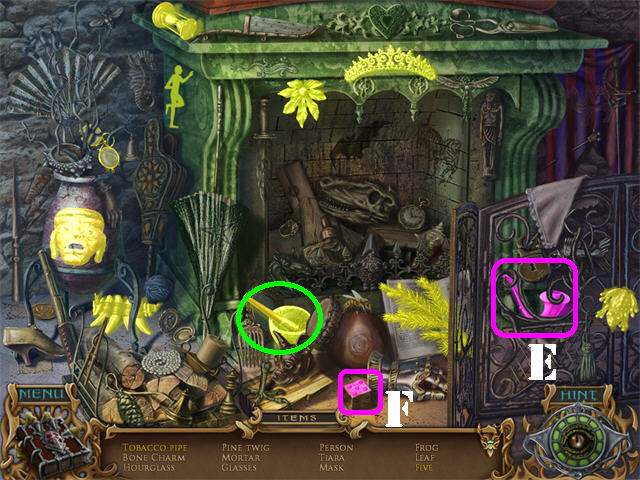
- Play the Hidden Object Scene by the fireplace.
- Click on the right gate; take the TOBACCO PIPE (E).
- Click on the dice; take the FIVE (F).
- The MORTAR will be added to inventory.

- Go through the door.
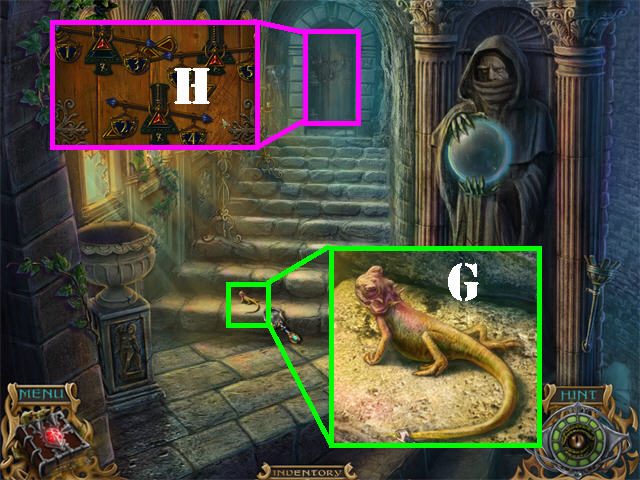
- Zoom into the steps.
- Click on the lizard; take the TAIL (G).
- Examine the back door to activate a puzzle (H).

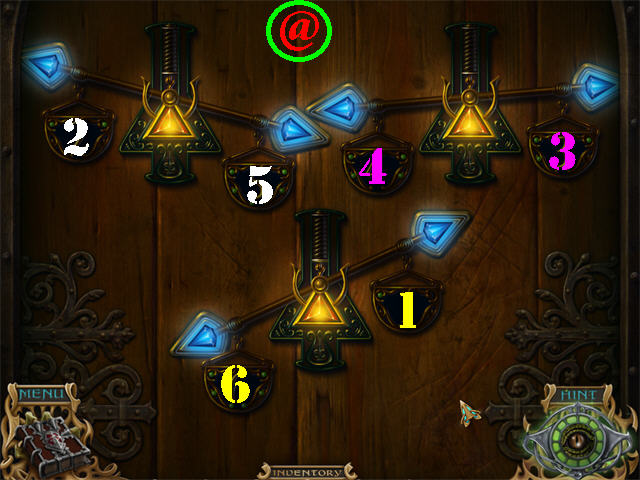
- Click on any 2 weights to swap their positions in order to balance the crystals to line up inside the frames.
- The sum of both weights must add up to 7.
- Please look at the screenshot for the solution (@).

- Go through the back door after the puzzle has been completed.
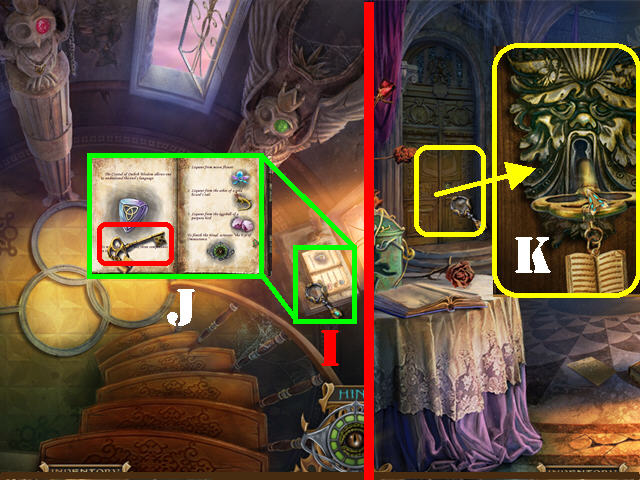
- Zoom into the book on the right (I); take the KEY (J).
- Note the ingredients needed to mix the crystal; exit the book close-up.
- Click down 3 times.
- Zoom into the left door; place the KEY in the lock (K).
- Go through the door.

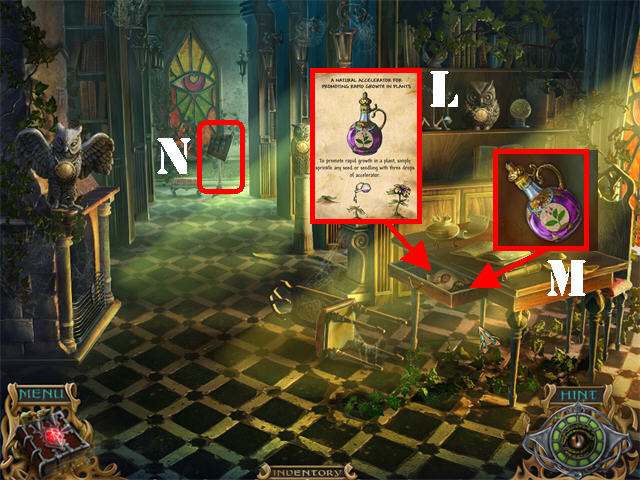
- Open the desk drawer; read the recipe (L).
- Take the ACCELERATOR (M) from inside the drawer.
- Zoom into the pedestal in the back to activate a puzzle (N).

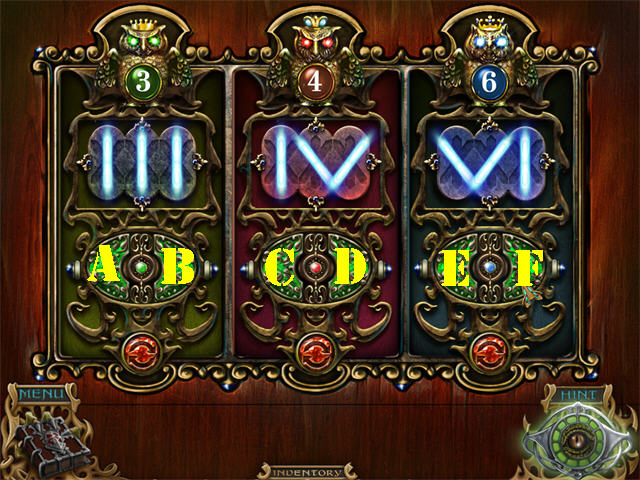
- Use the left and right side of the green buttons to change the symbols above them. Recreate the shapes so the correct roman numerals are formed.
- Follow these steps to solve the Roman numeral 3puzzle: B-B-A-A.
- Follow these steps to solve the Roman numeral 4puzzle: D-C-D.
- Follow these steps to solve the Roman numeral 6puzzle: E-E-F.

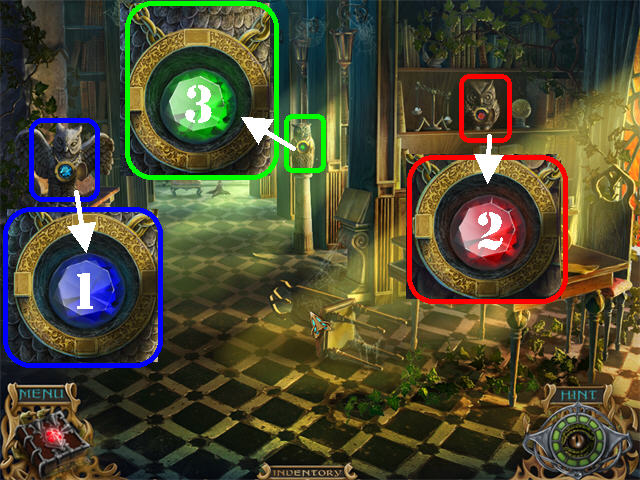
- Solving the puzzle activates the gems on the owls.
- Zoom into the 3 owls and take the BLUE JEWEL (1), RED JEWEL (2), and GREEN JEWEL (3).

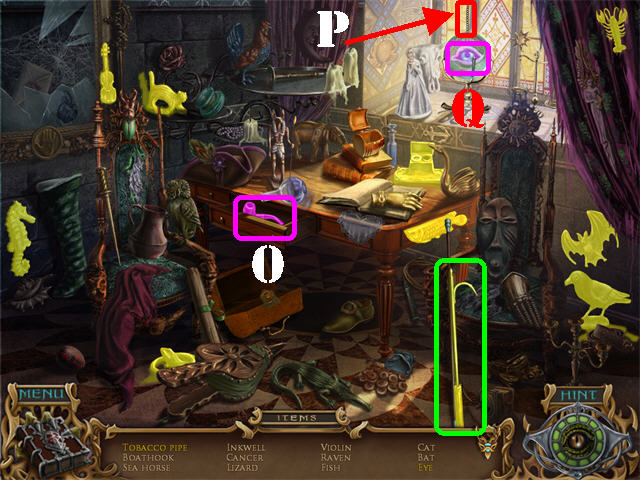
- Click down.
- Play the Hidden Object Scene on right.
- Open the drawer; take the TOBACCO PIPE (O).
- Pull the string (P) by the window; take the EYE (Q).
- The BOAT HOOK will be added to inventory.

- Go through the back door and head forward.
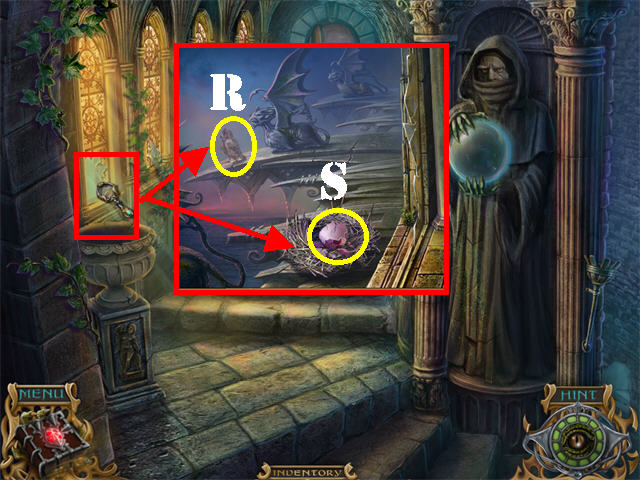
- Zoom into the left window; click on the owl (R).
- Use the BOAT HOOK to pull the nest closer; take the EGGSHELL (S).

- Click down.
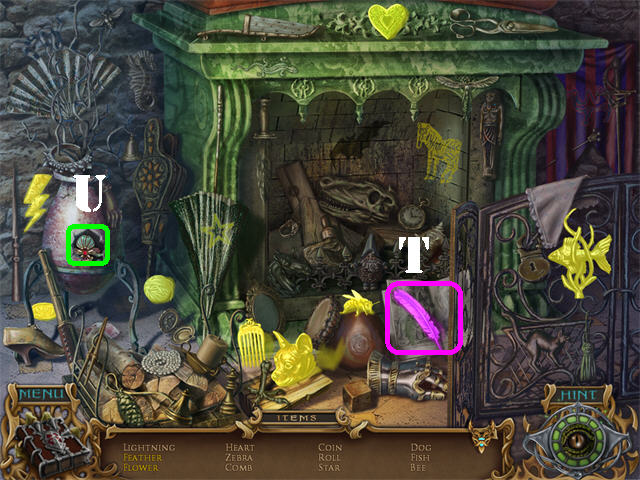
- Play the Hidden Object Scene by the fireplace.
- Turn the page; take the FEATHER (T).
- Click on the vase; take the FLOWER (U).
- The FLOWER will be added to inventory.

- Click down.
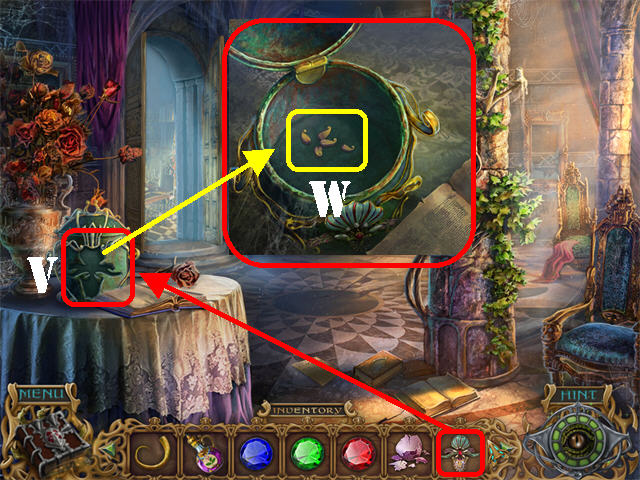
- Place the FLOWER on the vase in the lower left (V).
- Zoom into the vase; take the SEEDS (W).

- Go forward.
- Zoom into the left table.
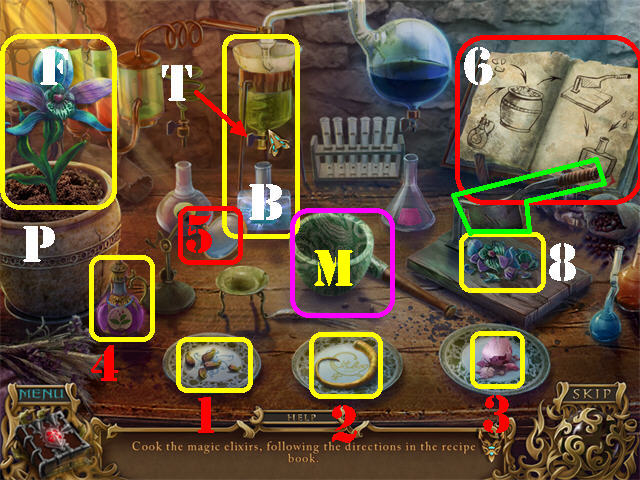
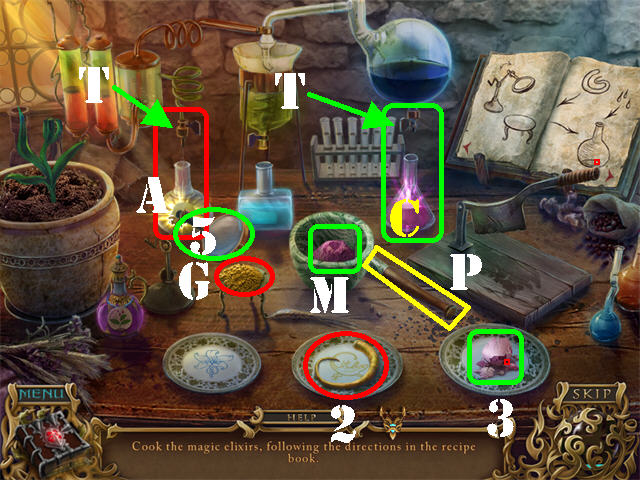
- Place the SEEDS (1), TAIL (2), EGGSHELL (3), ACCELERATOR (4), MAGNIFIER (5) and MORTAR (M) as shown in the screenshot to activate a puzzle.
- Follow the instructions shown in the book; click on the pages to flip through them (6).
- Drag the SEEDS (1) into the POT (P).
- Drag the ACCELERATOR (4) to the POT (P) for a flower to grow.
- Take the FLOWER (F) that grew in the pot and drag it to the CUTTING BOARD (8).
- Click on the KNIFE attached to the board to chop the FLOWER.
- Place the CHOPPED FLOWER into BEAKER B (B); click on the TAP (T) above BEAKER B to add the liquid.

- Turn the page.
- Drag the TAIL (2) to the GOLD PLATE (G).
- Click on the MAGNIFIER (5) to pulverize the tail.
- Place the PULVERIZED TAIL into BEAKER A (A); click on the TAP (T) above BEAKER A to add liquid.
- Turn the page.
- Place the EGGSHELL (3) in the MORTAR (M).
- Drag the PESTLE (P) to the MORTAR (M) to crush the EGGSHELL.
- Place the CRUSHED EGGSHELL into BEAKER C (C); click on the TAP (T) above BEAKER C to add the liquid.
- The THREE ELIXIRS will be added to inventory.

- Go forward twice.
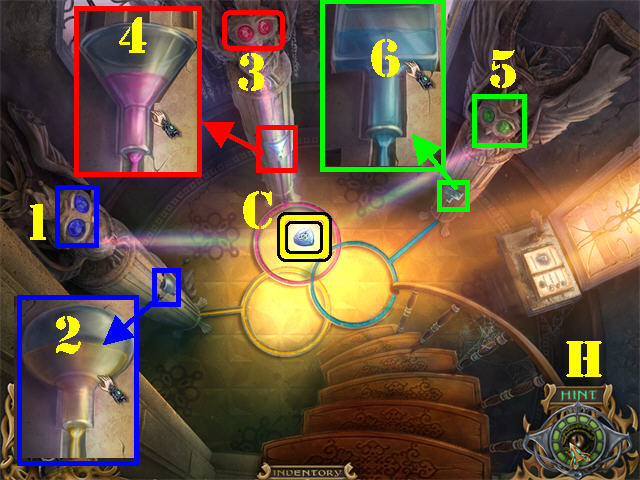
- Place the BLUE JEWEL on the left owl’s empty eye socket (1); zoom into the base; place the matching elixir on the base (2).
- Place the RED JEWEL on the center owl’s empty eye socket (3); zoom into the base; place the matching elixir on the base (4).
- Place the GREEN JEWEL on the right owl’s empty eye socket (5); zoom into the base; place the matching elixir on the base (6).
- Click on the EYE OF OMNISCIENCE (Hint Button) to complete the ritual (H).
- Take the CRYSTAL OF OWLISH WISDOM (C).

- Click down 4 times and go forward 3 times.
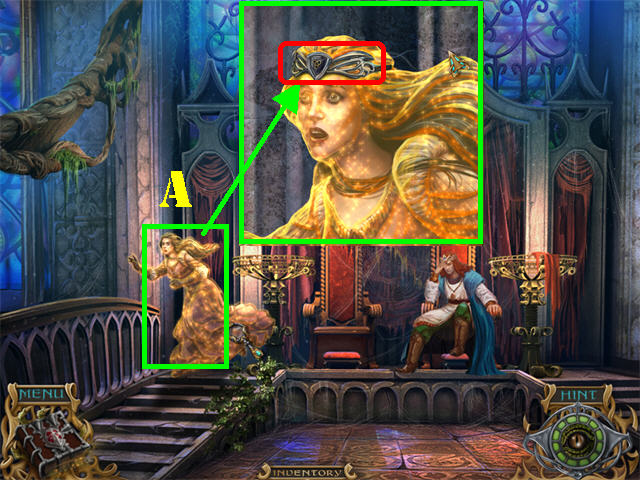
- Zoom into the Queen (A).
- Place the QUEEN’S CROWN on her head.
- Put the CRYSTAL OF OWLISH WISDOM in the crown.
- Congratulations! You have completed Spirits of Mystery: Amber Maiden!






 PuppetShow: Return to Joyville Walkthrough, Guide, & Tips
 Serpent of Isis: Your Journey Continues Walkthrough, Guide, & Tips
 Cajun Cop: The French Quarter Caper Walkthrough, Guide, & Tips
 Queen's Tales: The Beast and the Nightingale Walkthrough, Guide, & Tips
 Crime and Punishment: Who Framed Raskolnikov? Walkthrough, Guide, & Tips