PuppetShow: Return to Joyville Walkthrough, Guide, & Tips
PuppetShow: Return to Joyville Walkthrough
Welcome to the PuppetShow: Return to Joyville Walkthrough
Travel back in time to help stop a terrible fire that started Felicia down her evil path in PuppetShow: Return to Joyville!
Whether you use this document as a reference when things get difficult or as a road map to get you from beginning to end, we’re pretty sure you’ll find what you’re looking for here.
This document contains a complete PuppetShow: Return to Joyville game walkthrough featuring annotated screenshots from actual gameplay!
We hope you find this information useful as you play your way through the game. Use the walkthrough menu below to quickly jump to whatever stage of the game you need help with.
Remember to visit the Big Fish Games Forums if you find you need more help. Have fun!
This walkthrough was created by MargieB, and is protected under US Copyright laws. Any unauthorized use, including re-publication in whole or in part, without permission, is strictly prohibited.
General Tips


- This is the Official Guide for PuppetShow: Return to Joyville Standard Edition.
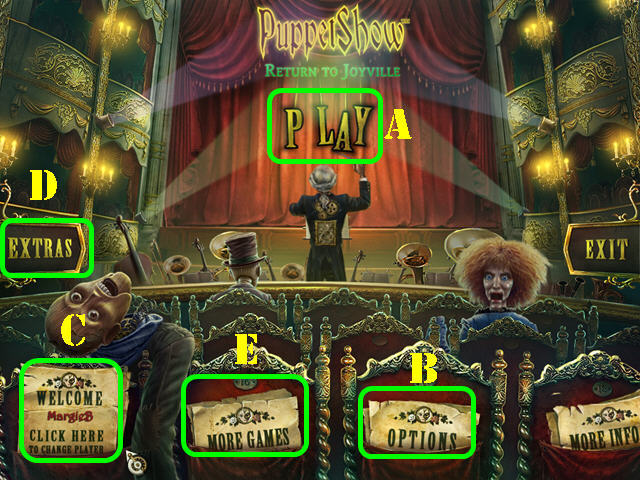
- Select ‘Play’ (A) to begin the main quest.
- The ‘Options’ (B) button allows you to adjust the screen, music, cursor, and sound.
- The ‘Click here to change player’ (C) can be used to manage your profiles in the game.
- The ‘Extras’ (D) button is only accessible in the Collector’s Edition.
- Select ‘More Games’ (E) to view other titles from this developer.
- This guide will refer to Hidden Object Scenes as ‘HOS’. Items listed in a red outline in HOS require an extra step of interaction to find. Some of the find lists may be random; our lists may vary from yours.
- When the cursor turns into a magnifying glass you can zoom into an area in the scene.
- When your cursor changes into a hand icon you can pick up inventory items or interact with objects.
- You can skip a mini-game once the Skip button is fully charged.
- Inventory items will go into the Tools tab in the lower left corner. If it’s full, use the arrows on each end of the Tools section to scroll through your items.
- Select the Tools button to open it and then select an inventory item. Drag the selected item to the appropriate area and click on it.
Chapter 1: The Puppeteer’s House

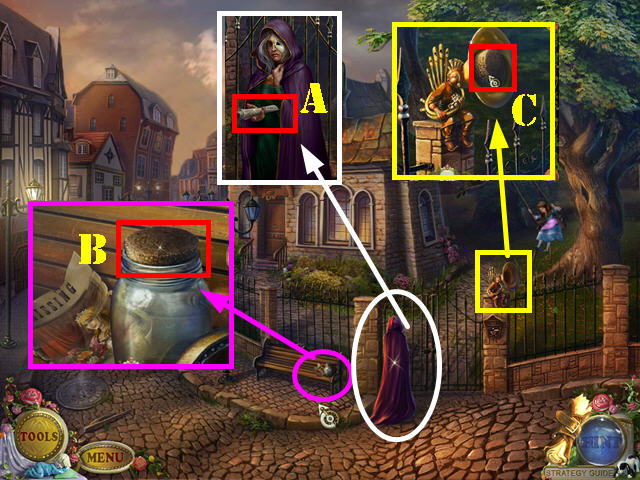
- Touch the caped lady in the scene; take the NEWSPAPER from her hand (A).
- Zoom into the bench; take the CORK (B).
- Examine the horn player; plug the horn with the CORK (C).
- Go through the gate.

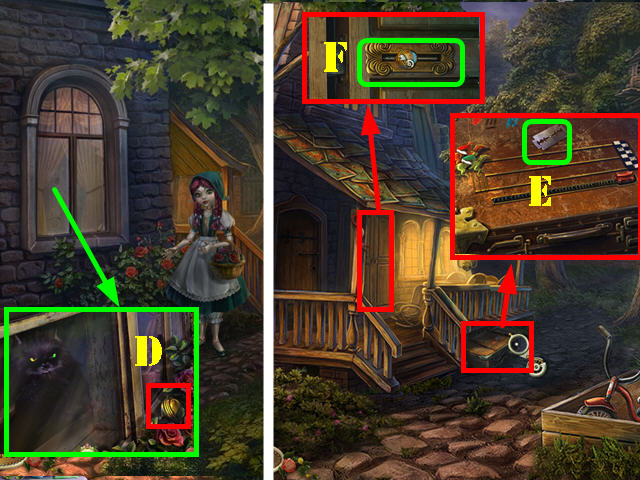
- Examine the window; take the LATCH KNOB (D).
- Go right.
- Examine the suitcase and take the RAZOR (E).
- Look at the door; put the LATCH KNOB on the latch (F) and slide it to the right to activate a HOS; play it.

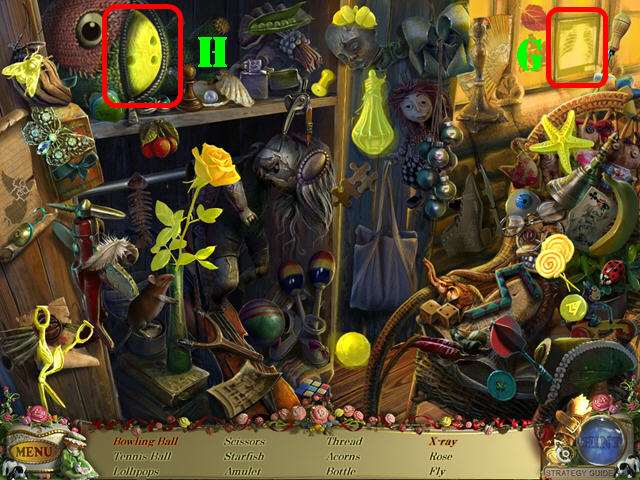
- Touch the paper; take the X-ray (G).
- Open the zipper and take the bowling ball (H).
- The BALL will be added to inventory.
- Go through the door.

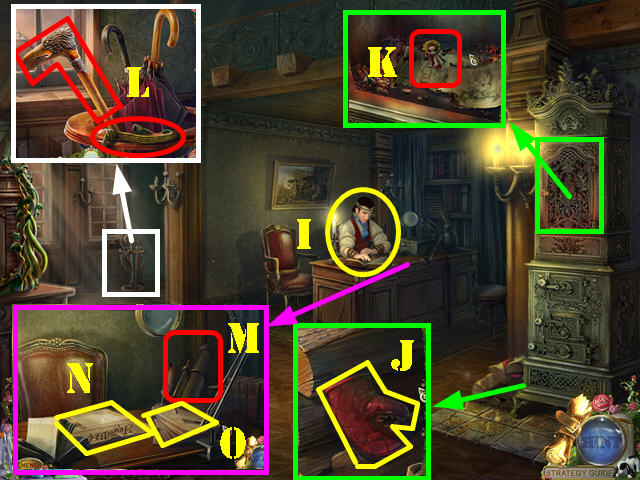
- Talk to the Puppeteer; give him the NEWSPAPER (I).
- Examine the logs; push one aside and take the GLOVE (J).
- Open the stove with the GLOVE; zoom into it, push the paper aside and take the first DOLL (K).
- Look at the stand; take the CANE and the ELASTIC BAND (L).
- Examine the desk; take the TELESCOPE (M).
- Read the paper (N) and the letter (O).

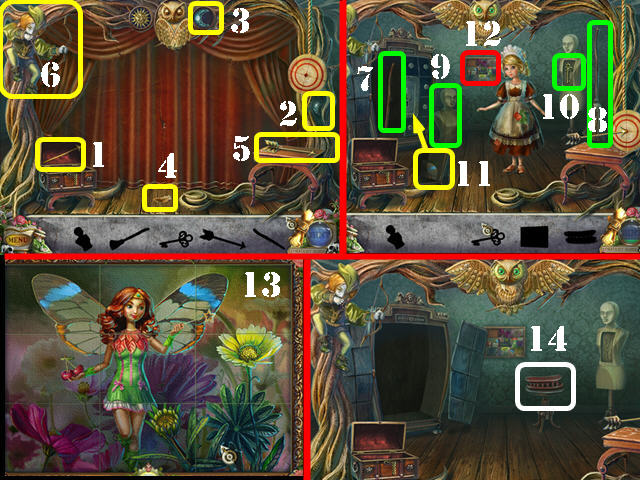
- Play the Hidden Object Puzzle.
- Open the chest and take the stick (1).
- Take the moon (2); put the moon in the slot (3).
- Take the feather (4).
- Put the stick and the feather on the table; take the arrow (5).
- Give the arrow to the archer (6) so he can hit the target and open the curtains.
- Open the closet door; take the broom handle (7) and put it on the broom (8).
- Take the broom; use it on the spider web and take the bust (9).
- Put the bust on the mannequin and take the key (10).
- Use the key in the lock on the closet and take the puzzle piece (11).
- Zoom into the frame and add the puzzle piece to it (12).
- Swap the pieces around until you form the image in the screenshot (13).
- Take the FADER (14).
- Exit the house.

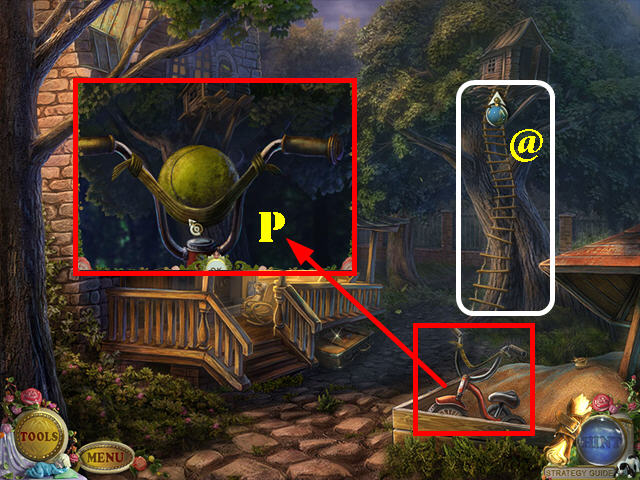
- Zoom into the tricycle; put the ELASTIC BAND on the handle (P).
- Put the BALL on the elastic band and throw the ball to knock down the rope ladder.
- Climb into the tree house (@).

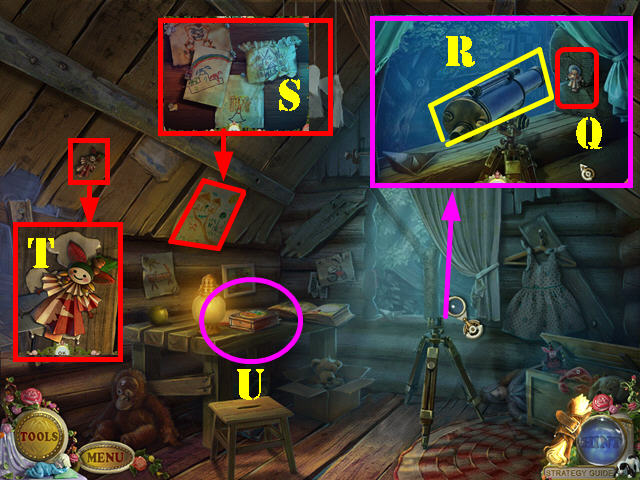
- Examine the window; take the DOLL (Q).
- Put the TELESCOPE on the tripod to view a brief cutscene (R).
- Look at the drawings on the wall (S).
- Zoom into the left side of the wall; cut out the doll with the RAZOR and take the DOLL (T).
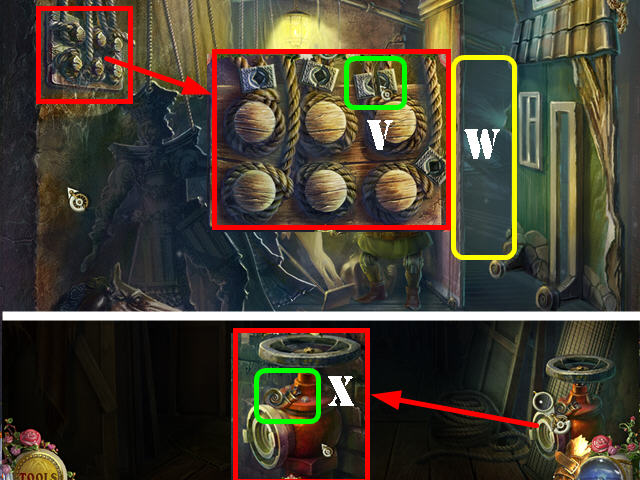
- Zoom into the table; put the 3 DOLLS on the board to activate a puzzle (U).

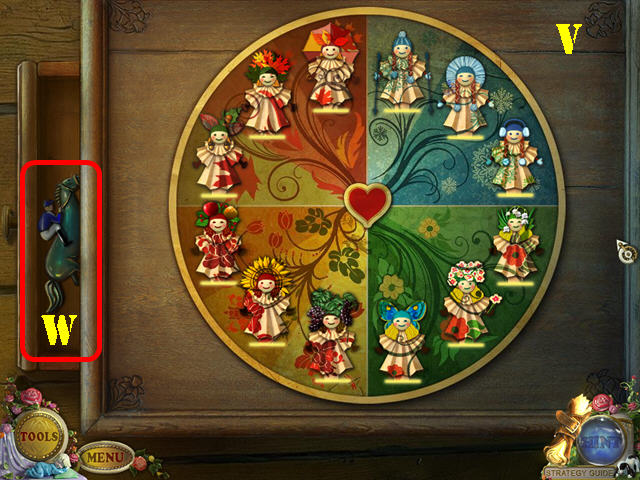
- Put all the dolls into their place by using the seasons in the background as a clue.
- Please look at the screenshot for the solution (V).
- Take the RIDER (W).
- Exit the tree house.

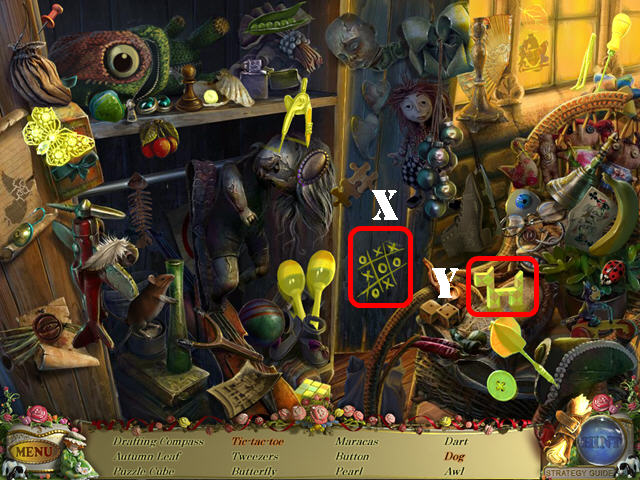
- Play the HOS.
- Touch the bag and take the Tic-tac-toe (X).
- Press on the links 3 times and take the dog (Y).
- The TWEEZERS will be added to inventory.

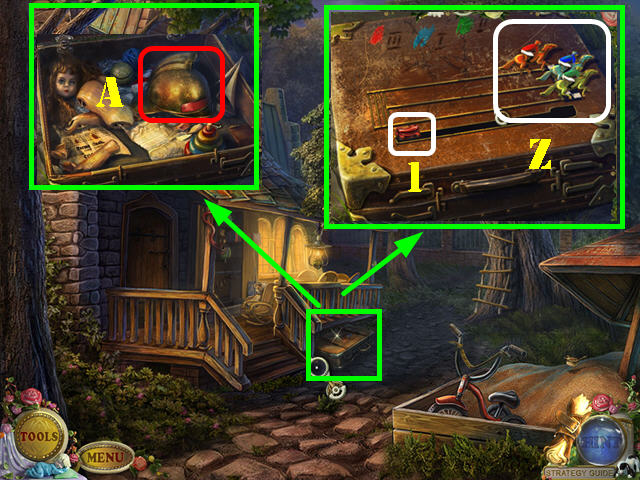
- Examine the suitcase; put the RIDER on it.
- Put the FADER on the zipper (1).
- Place the jockeys in the right order so that each rider finishes in the order etched on the suitcase.
- Press on two riders to switch their positions; press on the fader to make them run.
- Please look at the screenshot for the solution (Z).
- Take the HELMET (A).
- Walk down.

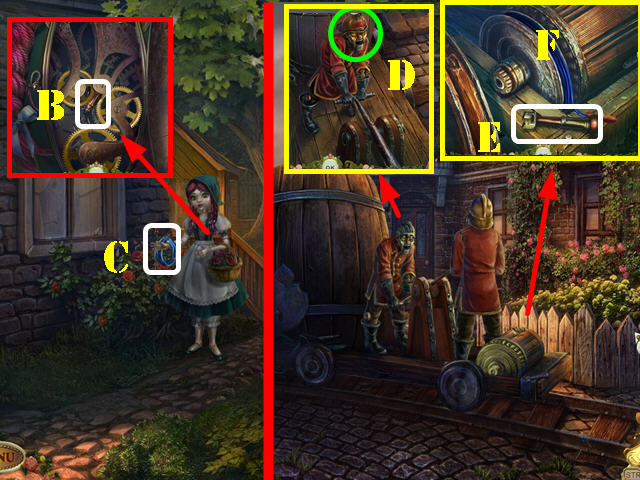
- Zoom into the doll; open her chest and use the TWEEZERS to remove the beetle (B).
- Take the JUMP ROPE from her hand (C).
- Walk down and go left.
- Zoom into the kneeled puppet; put the HELMET on his head (D).
- Zoom into the motor; take the LEVER (E).
- Put the JUMP ROPE on the motor and pull on the rope to start the motor (F).
- Go through the front door to access the tailor’s.
Chapter 2: The Tailor’s

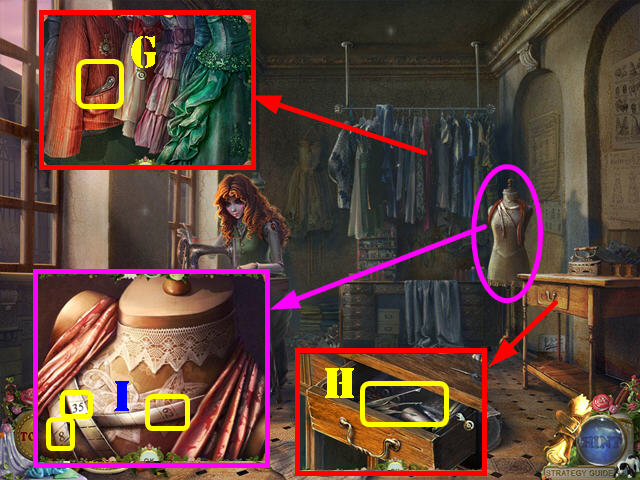
- Look at the clothes; move them aside and take the HANDLE (G).
- Examine the drawer; open it and take the PICKLOCK (H).
- Examine the mannequin; note the numbers 8, 35, and 62 (I).
- Walk down and go left.

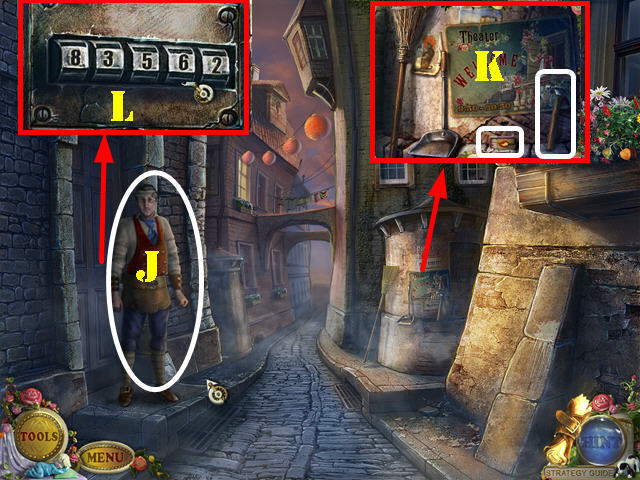
- Talk to the Puppeteer (J).
- Examine the billboard; take the HAMMER and the MATCHES (K).
- Examine the left door; enter the code found in the tailor’s 83562 (L).
- Go through the door.

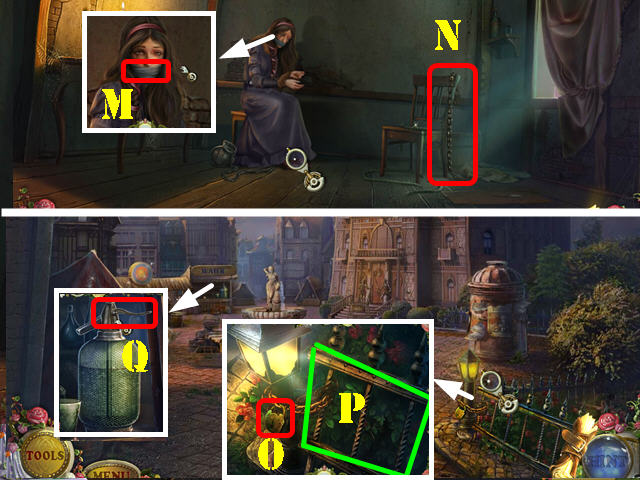
- Zoom into the lady and remove the tape from her face (M).
- Take the CHAIN (N).
- Walk down and go forward.
- Examine the lamppost in the lower right; use the PICKLOCK on the lock (O) and take the LADDER (P).
- Examine the water stand; put the HANDLE (Q) on the syphon and take the SODA SYPHON.

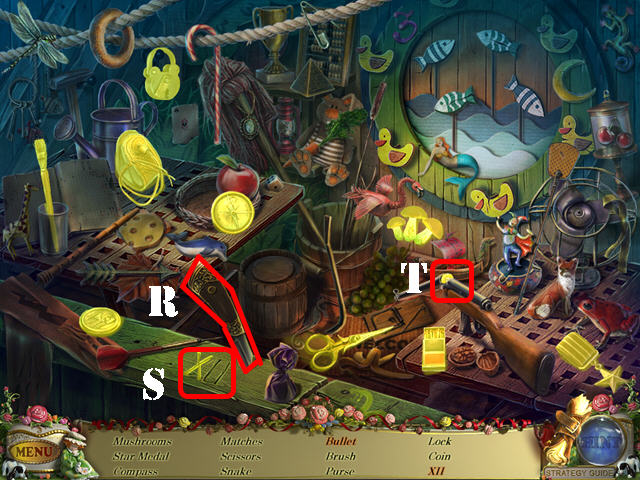
- Play the HOS.
- Press on the knife (R) and take XII (S).
- Open the gun and take the bullet (T).
- The SCISSORS will be added to inventory.

- Go forward; watch Felicia run into the theater.
- Get closer to the doors.
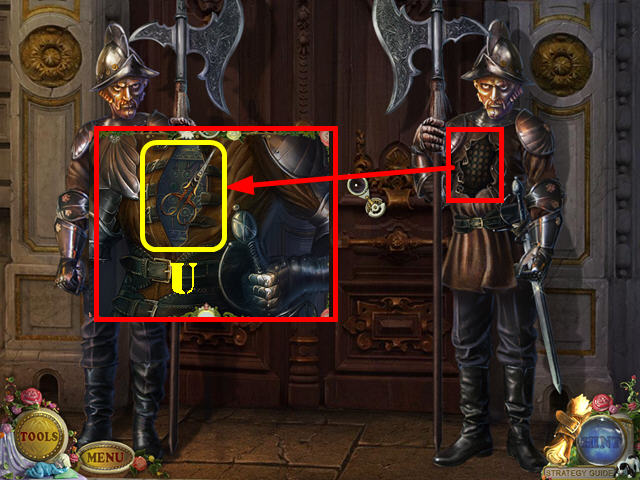
- Examine the right guard’s chest; cut the straps with the SCISSORS and zoom into his chest to activate a puzzle (U).

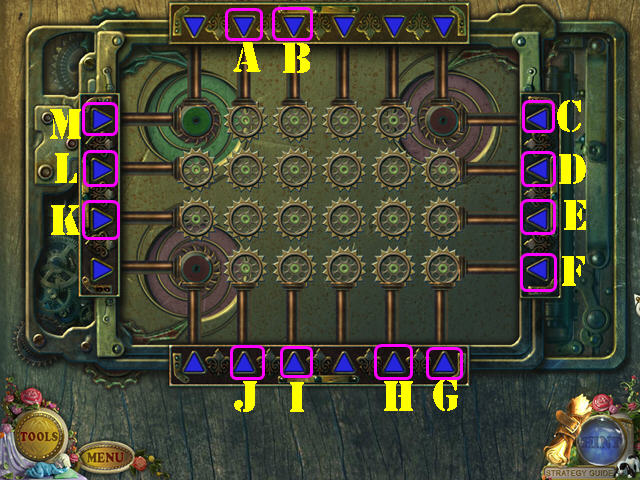
- Use the arrows to push the pieces into the matching springs.
- To solve the puzzle, press on the arrows in this order: D, B, E, J, I, M, J, C, K, A, F, H, L, and G.

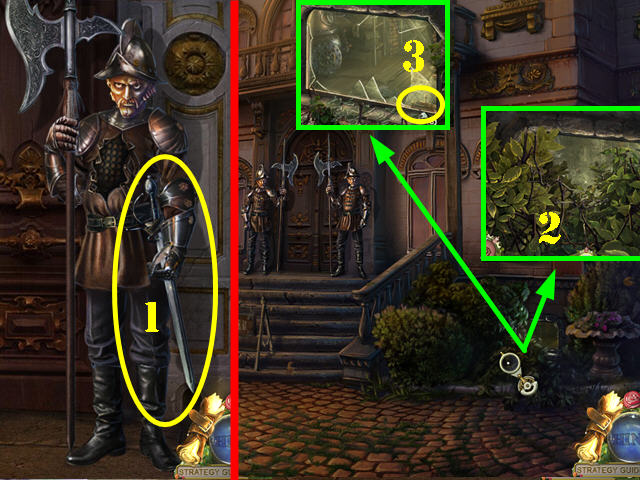
- Take the SWORD (1).
- Walk Down.
- Zoom into the bushes and cut them with the SWORD (2).
- Break the window with the HAMMER 3 times; touch the latch (3) and go through the window to access the basement.

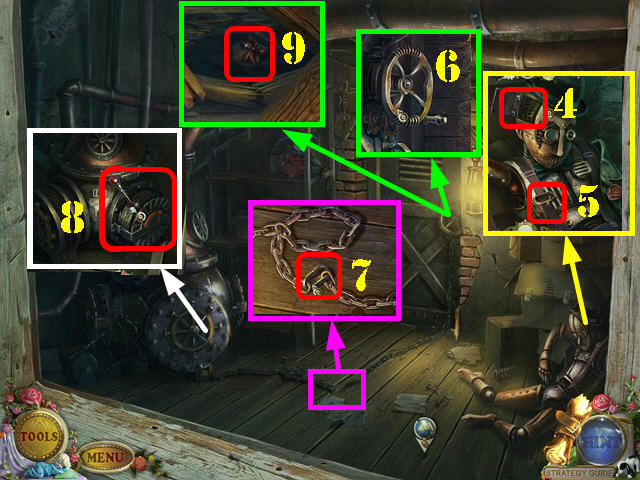
- Zoom into the puppet; open the door in its head (4) and take the CARABINER (5).
- Zoom into the door; attach the CHAIN to it (6).
- Examine the chain on the ground; attach the CARABINER to it (7).
- Zoom into the mechanism; put the LEVER on it and pull the lever (8).
- Examine the door; use the CANE to get the bag (9). Open the bag and take the FINGERS.

- Go back to the center of town.
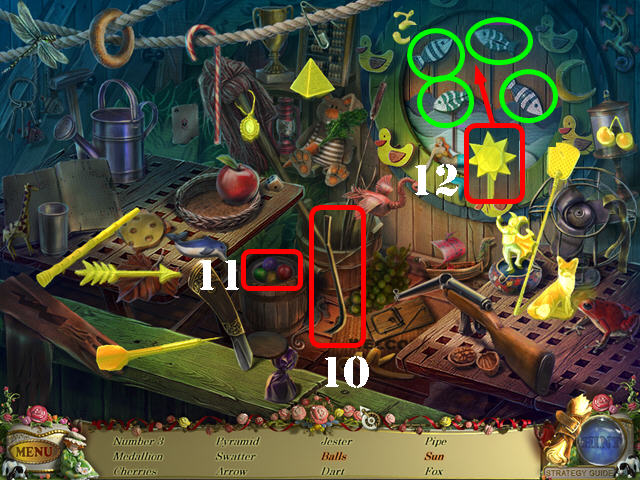
- Play the HOS.
- Touch the crowbar (10) and take the balls (11).
- Press on the 4 fish circled in green and take the sun (12).
- The JESTER will be added to inventory.
- Walk down.

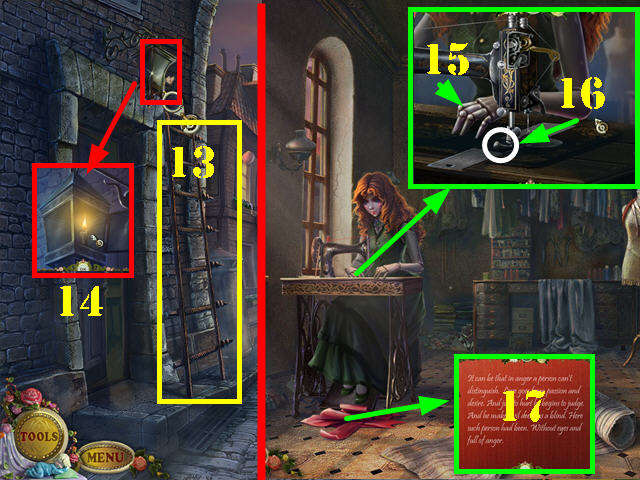
- Put the LADDER on the lamp (13); zoom into it, open the cover, and light the candle with the MATCHES (14).
- Take the LAMP.
- Go back to the tailor’s shop.
- Zoom into the sewing machine; put the FINGERS on the puppet (15).
- Zoom into the machine again; open the cover and take the DOWEL (16).
- Zoom into and read the note on the ground (17).
- Exit the shop; go left and enter the left door.

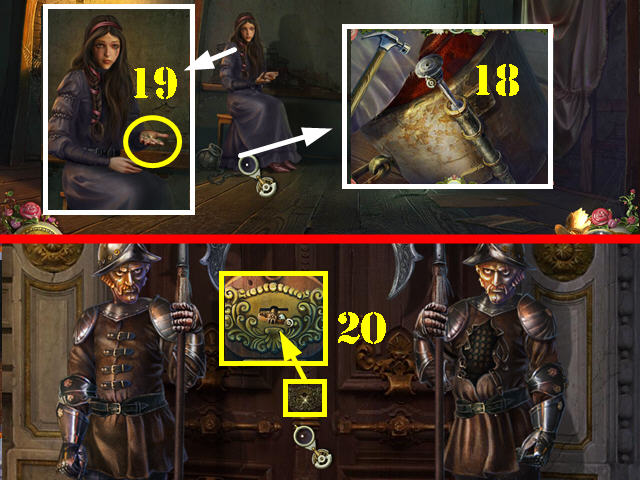
- Zoom into the bottom of the left chair; use the DOWEL on the pin (18).
- Hit the dowel with the HAMMER.
- Take the MASTER KEY (19).
- Go back to the front of the theater.
- Zoom into the lock on the door; insert the MASTER KEY in it (20). Turn the key 3 times and enter the theater.
Chapter 3: The Theater

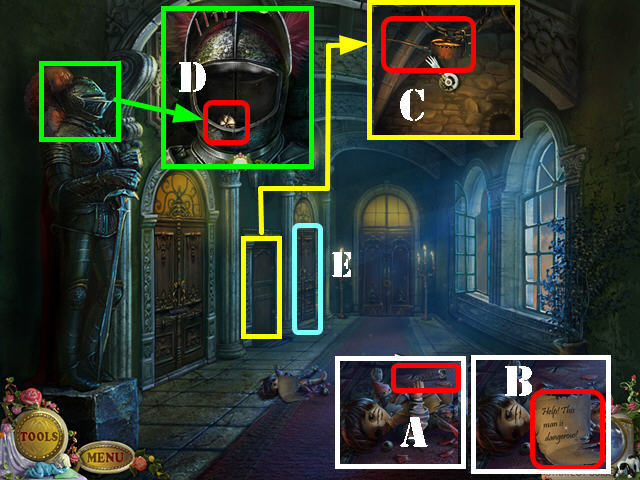
- Examine the puppet on the floor; take the SPRING PIN (A) and open the note (B).
- Go through the center left door; put the LAMP in the scene. Take the OIL CAN in the upper center of the room (C).
- Walk down.
- Examine the helmet; use the OIL CAN on the helmet. Open the helmet and take the CLASP (D).
- Go through the far left door to access the dressing room (E).

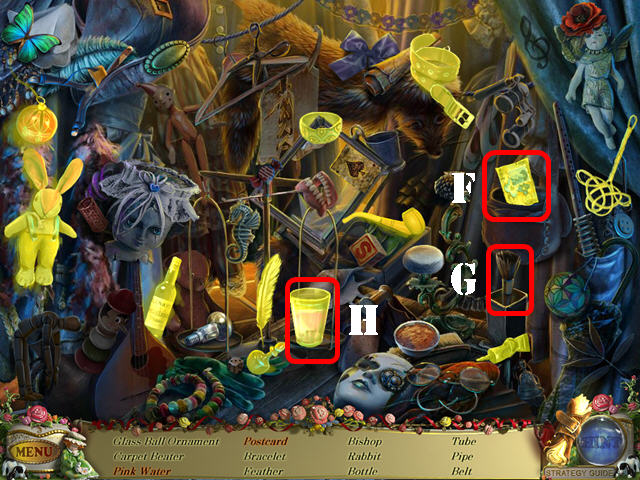
- Remove the partition to access a HOS; play it.
- Open the purse; take the postcard (F).
- Touch the brush (G) and take the pink water (H).
- The CARPET BEATER will be added to inventory.
- Walk down.

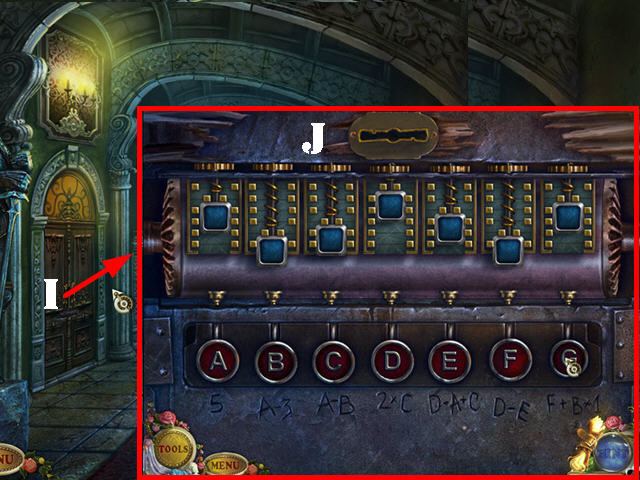
- Zoom into the left door; put the SPRING PIN on the lock to activate a puzzle (I).
- Place the latches in the correct spots.
- Press on the keys to move the latches up.
- Use the etchings at the bottom as a clue.
- Please look at the screenshot for the solution (J).
- Go through the door.

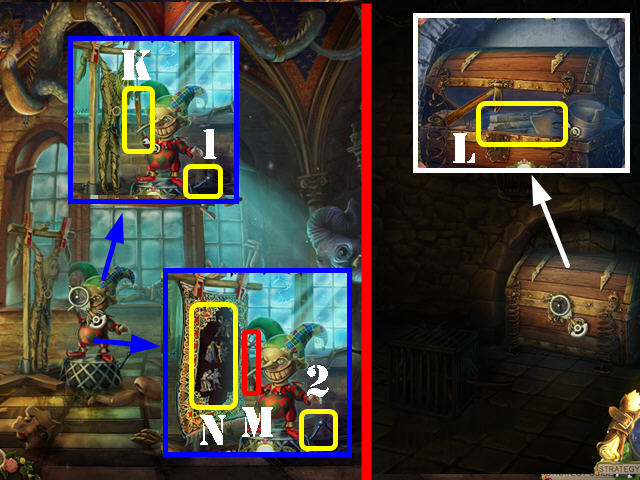
- Examine the jester; pull the lever (1) and take the CLUB (K).
- Go back to the darkened room and zoom into the chest.
- Put the CLUB on the chest and take the TAPESTRY (L).
- Go back to the room with the jester.
- Zoom into the jester; remove the hanging puppet.
- Put the CARPET BEATER in the jester’s hand (M).
- Hang the TAPESTRY on the clothes hangers; pull the lever (2) and look at the puzzle solution (N).
- Go back to the dressing room.

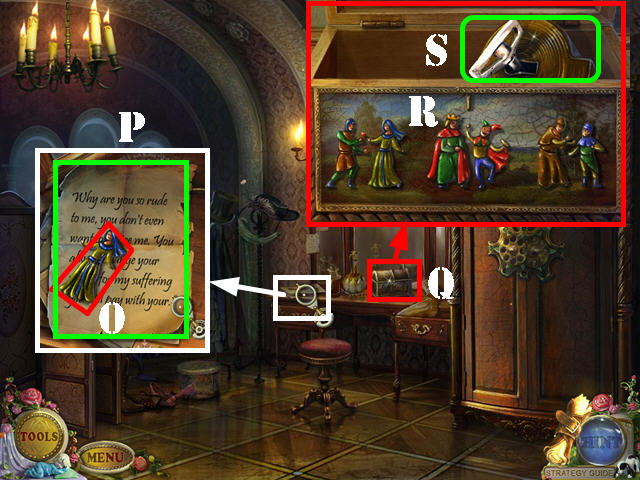
- Zoom into the desk; open the paper and take the LADY (O) and then read the note (P).
- Examine the box on the right side of the desk; put the LADY and the JESTER on it (Q).
- Using the clue on the tapestry, arrange the figures as shown in the screenshot (R).
- Take the PUZZLE CORE (S) from inside the box.

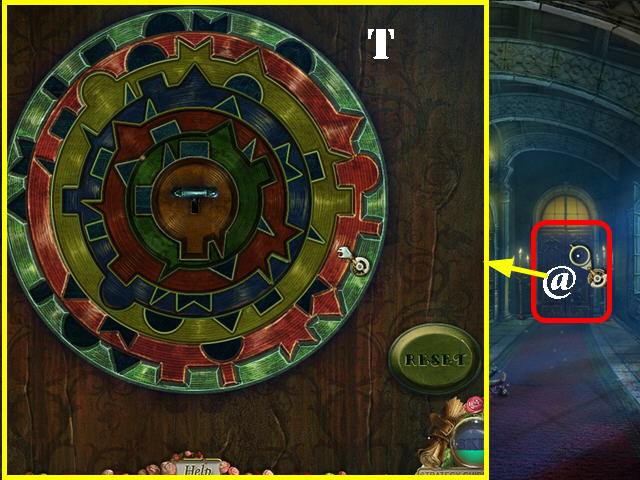
- Walk down and zoom into the back door (@).
- Put the PUZZLE CORE in the center of the door to activate the puzzle.
- Drag the rings around until the pieces lock into the holes.
- Please look at the screenshot for the solution (T).
- Go through the door to access the second corridor.

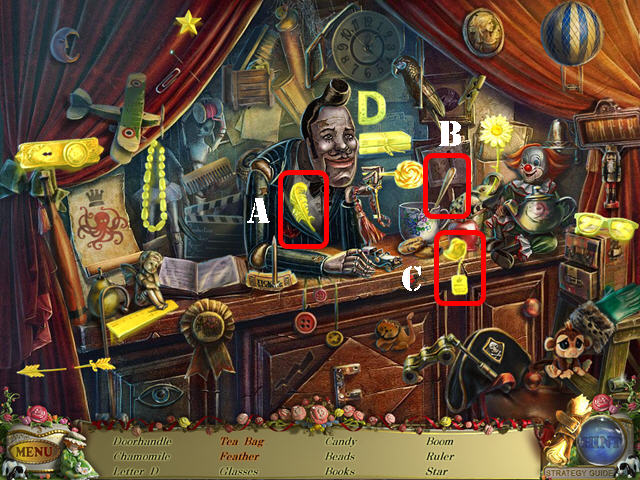
- Douse the fire on the floor with the SODA SYPHON.
- Play the HOS.
- Press on the lapel and take the feather (A).
- Touch the spoon (B) and take the tea bag (C).
- The RULER will be added to inventory.
- Go into the right door to access the restaurant.

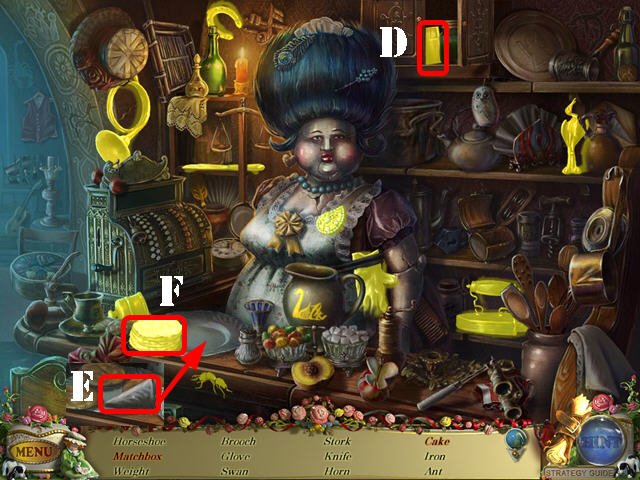
- Play the HOS.
- Open the cabinet; take the matchbox (D).
- Press on the pastry bag (E) and then on the 3 cake slices; take the cake (F).
- The KNIFE will be added to inventory.

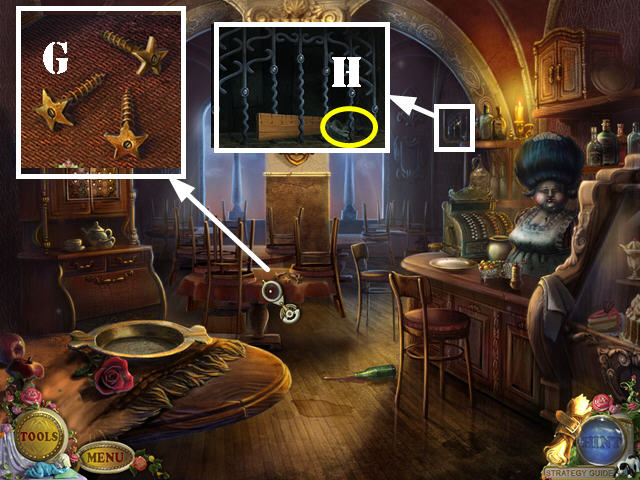
- Examine the table; take the BOLTS (G).
- Examine the vent; use the RULER to get the BEANS (H).
- Walk down.

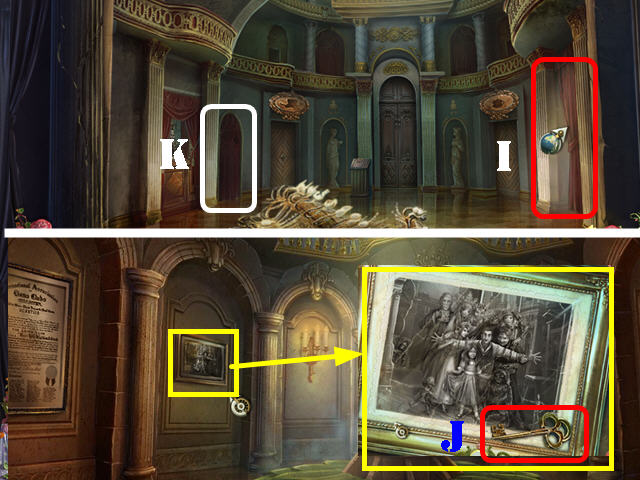
- Go through the curtains on the right (I).
- Examine the painting and take the KEY (J).
- Walk down and go through the left door to access the ticket booth (K).

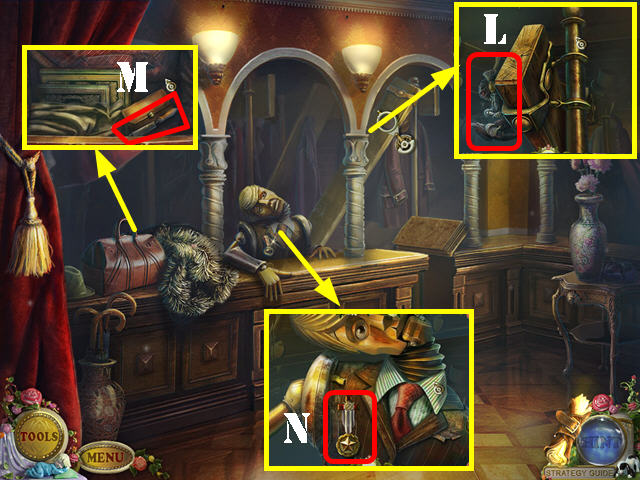
- Examine the plank and take the MAHOUT (L).
- Zoom into the bag; put the CLASP on the right latch. Open the bag and take the BICYCLE KEY (M).
- Examine the puppet; remove the screw around the BADGE with the KNIFE (N).

- Go back to the jester’s room.
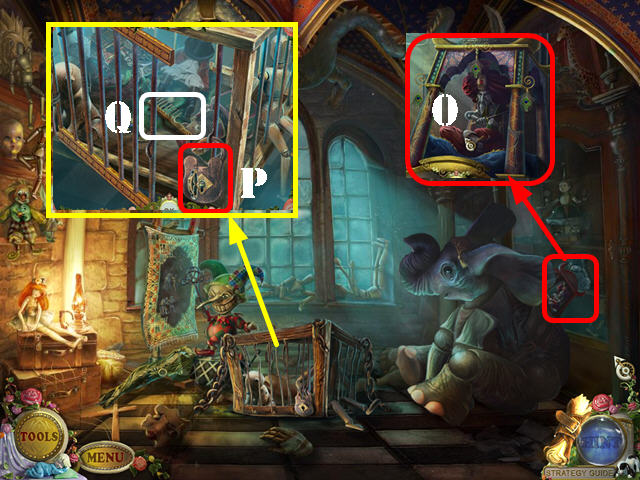
- Zoom into the elephant’s back; put the MAHOUT in the display (O).
- Examine the cage; use the KEY in the lock (P).
- Turn the key 3 times and take COMB (Q).
- Go back to the second corridor and go through the curtains on the right.

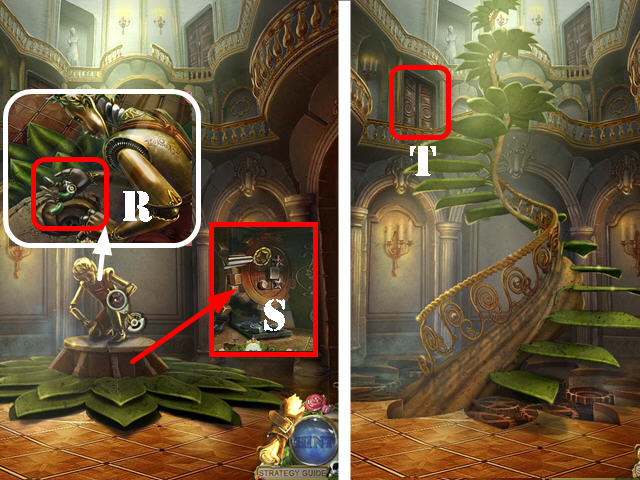
- Examine the puppet; put the BEANS in his hand (R).
- Zoom into the base of the statue; put the BOLTS on the mechanism. Fasten the bolts with the BADGE (S).
- A giant beanstalk stairway appears; go into the upper left door (T).
Chapter 4: The Giant Beanstalk

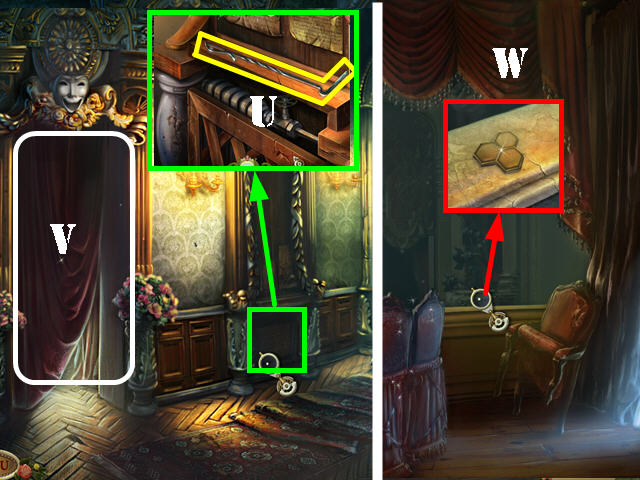
- Examine the device; take the POKER (U).
- Open the curtains and go through them (V).
- Examine the balcony; take the POLYGON (W).

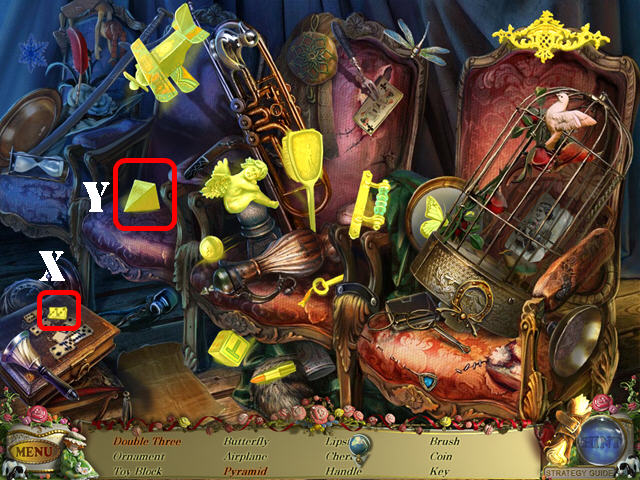
- Play the HOS.
- Touch the dominos and take the double three (X).
- Press on the cushion and take the pyramid (Y).
- The COIN will be added to inventory.
- Exit this room.

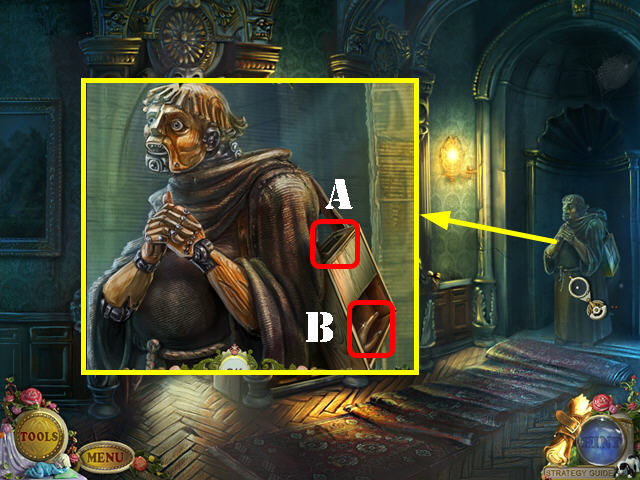
- Examine the monk puppet; insert the COIN into the slot (A).
- Take the HAND (B).
- Go back to the second corridor.

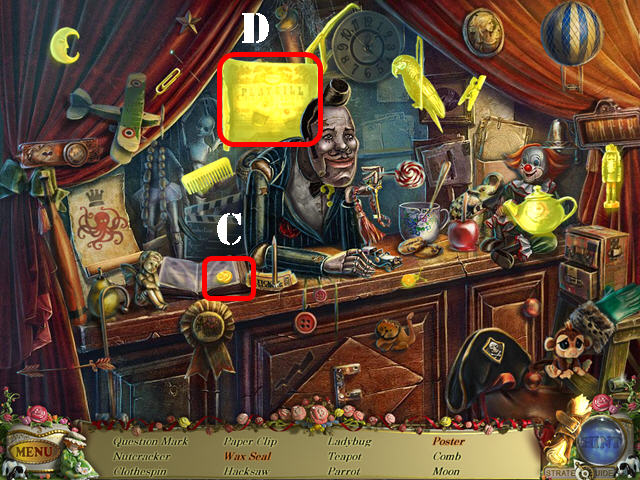
- Play the HOS.
- Flip the pages and take the wax seal (C).
- Press on the scroll and take the poster (D).
- The HACKSAW will be added to inventory.
- Go into the left door.

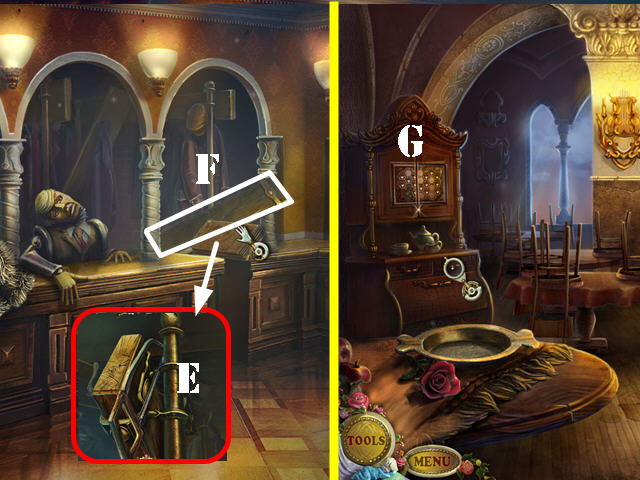
- Examine the plank and saw off the fastenings with the HACKSAW (E).
- Take the BOARD (F).
- Go back to the restaurant.
- Examine the hutch; add the POLYGON to it to activate a puzzle (G).

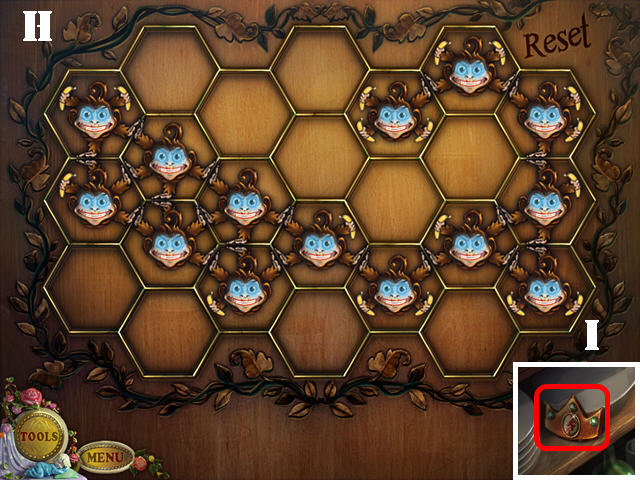
- Arrange the monkey legs so that none of them are free. When all the legs on a monkey are linked to another, its eyes will light up.
- Please look at the screenshot for the solution (H).
- Examine the bottom of the hutch and take the CROWN (I).

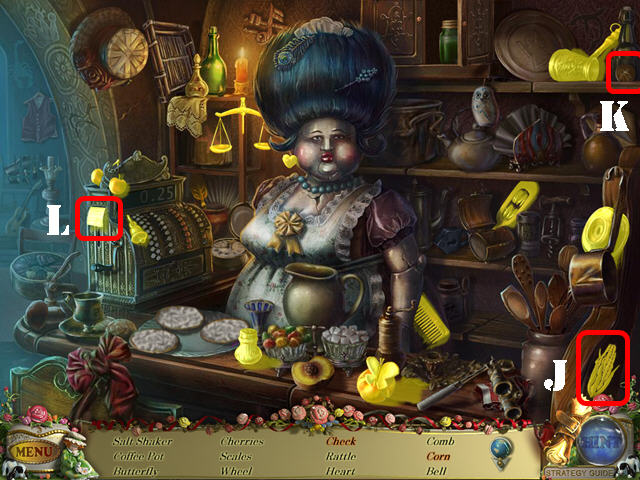
- Play the HOS.
- Remove the handkerchief and take the corn (J).
- Put the coin (K) into the slot on the side of the cash register; take the check (L).
- The WHEEL will be added to inventory.

- Go back to the dressing room.
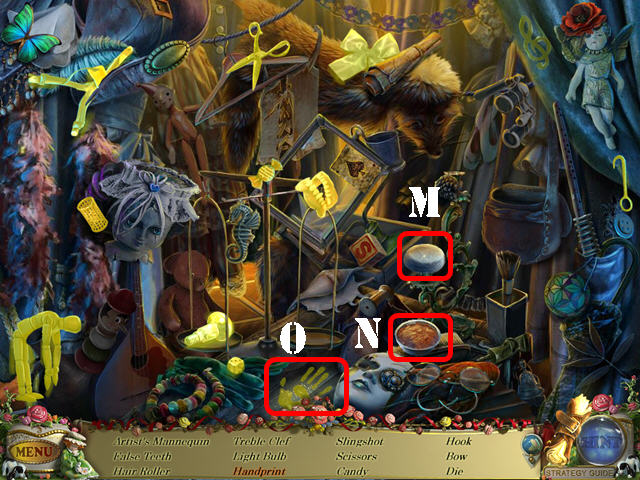
- Play the HOS.
- Drag the powder puff (M) to the powder (N) and take the handprint (O).
- The LIGHT BULB will be added to inventory.

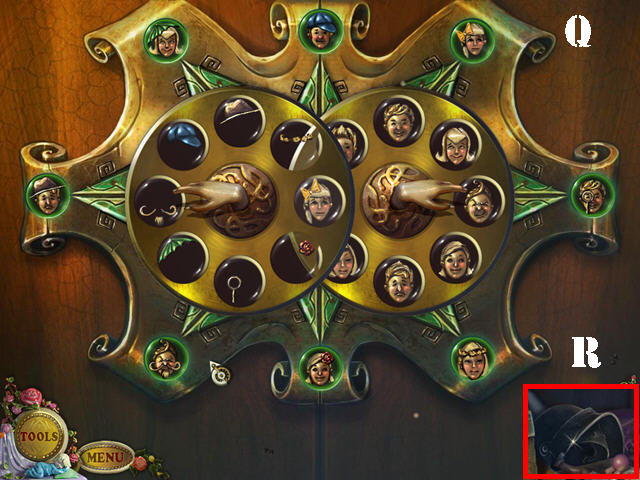
- Examine the closet door; put the HAND on it to activate a puzzle.
- Your goal is to look for the image that is opposite one of the question mark side.
- Select the question mark for the arrows to appear; move the left arrow to show the different accessories: hats, mustaches, bows etc. Move the right arrow to change the faces.
- Rotate the center dials to choose view which accessory and faces belong together.
- Please look at the screenshot for the solution (Q).
- Examine the closet and take the HELMET (R).

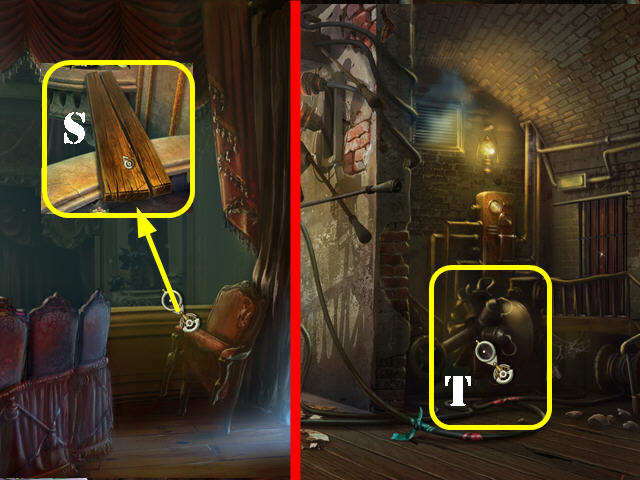
- Go back to the giant beanstalk; go through the left door and then through the curtains.
- Examine the balcony; put the BOARD down (S) and go across.
- Zoom into the mechanism to activate a puzzle (T).

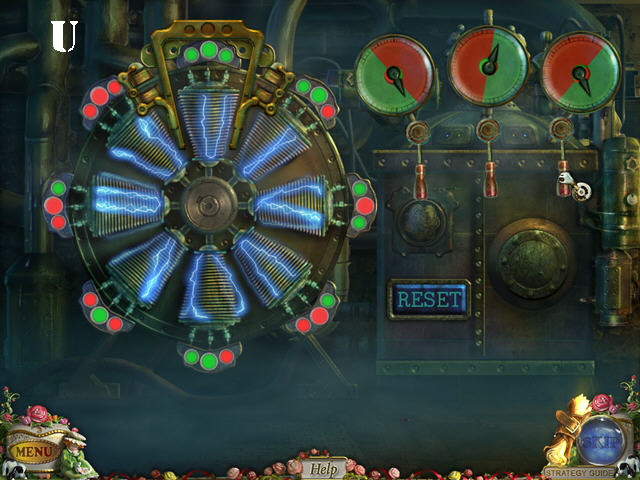
- Press on the levers to stop the meter in either the red or green section. Guess all the possible color combinations. For example, press on Green, Red, and Red for it to appear on the wheel. Keep making guesses until the board has filled up.
- Please look at the screenshot for the solution (U).

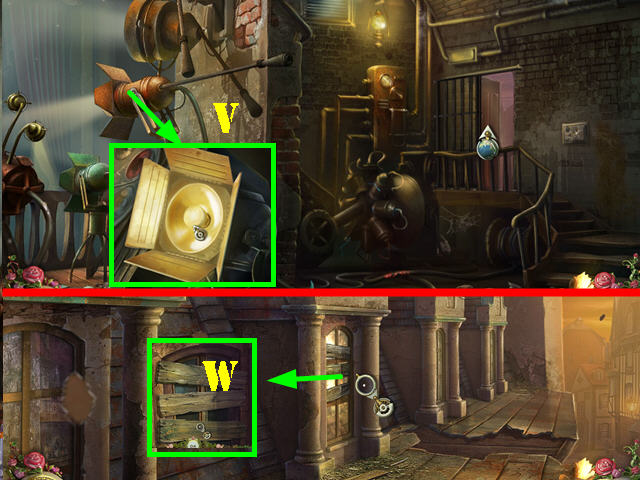
- Examine the projector; open the lid and put the LIGHT BULB in (V). You will see a brief cutscene of the stage.
- Go through the newly-opened door on the right.
- Examine the window; remove the 3 boards with the POKER (W).

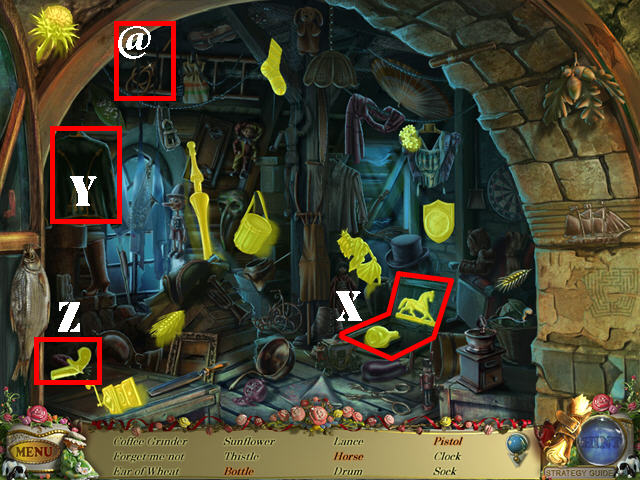
- Open the window to activate a HOS; play it.
- Open the trapdoor; take the horse and the bottle (X).
- Put the carpet beater (@) on the jacket (Y) and take the pistol (Z).
- The LANCE will be added to inventory.
- Walk down twice.

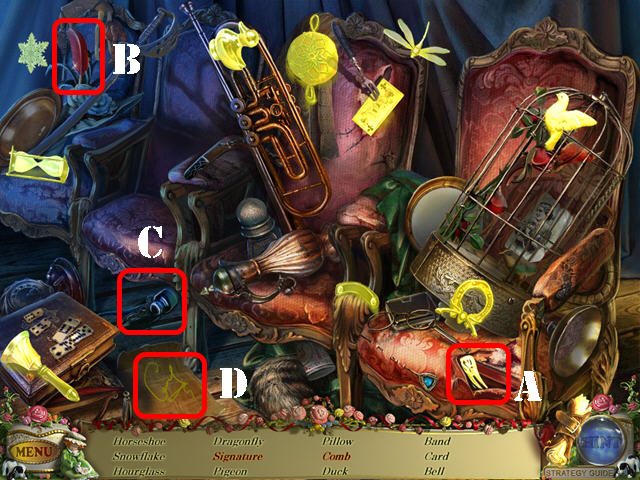
- Play the HOS.
- Press on the tear and take the comb (A).
- Drag the quill (B) to the inkpot (C) and take the signature (D).
- The BAND will be added to inventory.
- Go forward.

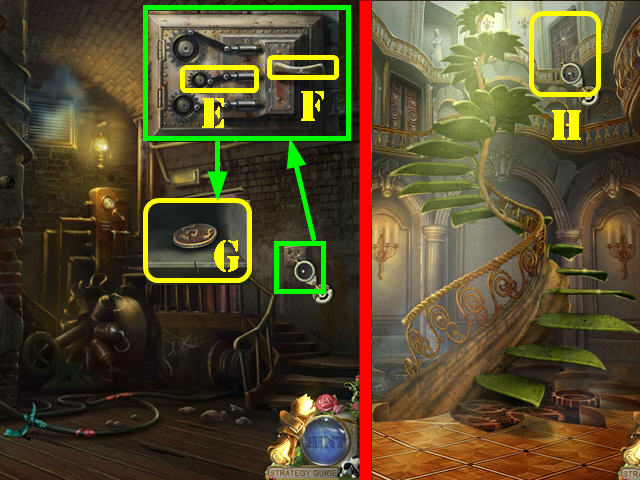
- Zoom into the panel; add the BAND to it (E) and press on the handle (F).
- Take the PUZZLE KEY (G).
- Go back to the beanstalk.
- Look at the top door (H).
Chapter 5: Tower

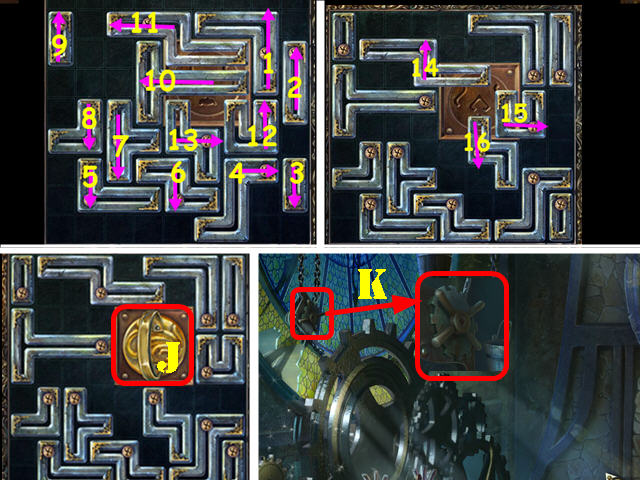
- Slide all the pieces out of the way to reveal the lock.
- The pieces cannot slide beyond the screws.
- Please follow steps 1 through 16 on the screenshot to solve the puzzle.
- Put the PUZZLE KEY in the lock (J) and go through the door.
- Examine the dragon head; watch the cat.
- Zoom into the mechanism; take the VALVE (K).

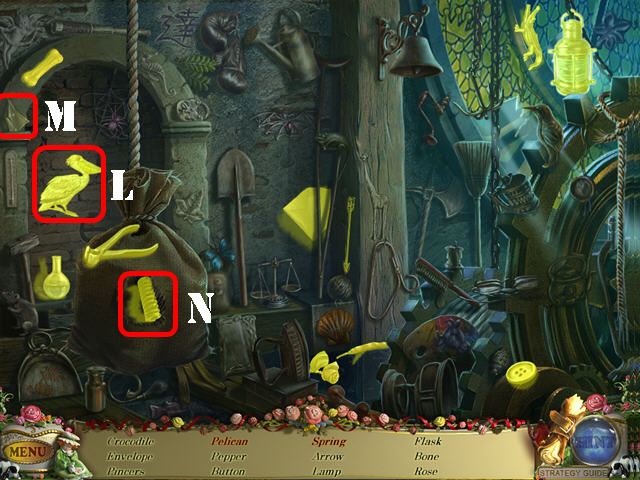
- Play the HOS.
- Pull on the rope on the right; take the pelican (L).
- Cut the bag with the shard (M) and take the spring (N).
- The PINCERS will be added to inventory.

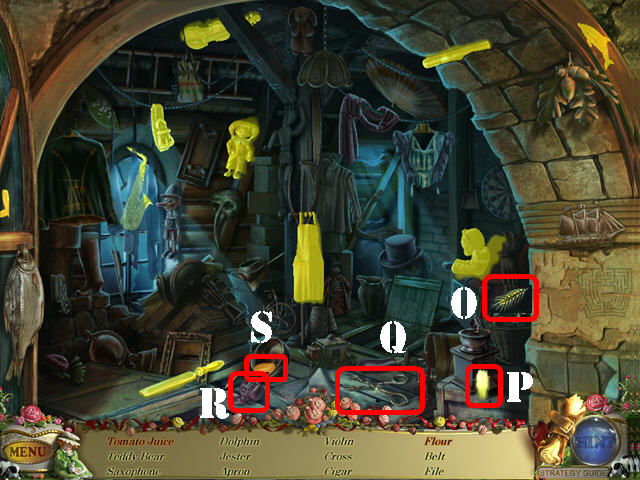
- Go back to the roof.
- Play the HOS.
- Drag the wheat (O) to the mill and take the flour (P).
- Put the tongs (Q) on the tomato (R); take the tomato juice (S).
- The FILE will be added to inventory.

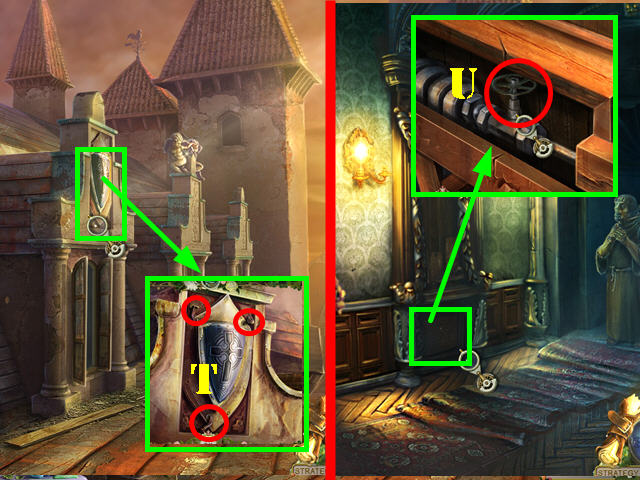
- Examine the shield; remove the nails with the PINCERS (T).
- Take the SHIELD.
- Walk down twice and go right.
- Zoom into the mechanism; use the FILE on the valve and take the VALVE (U).

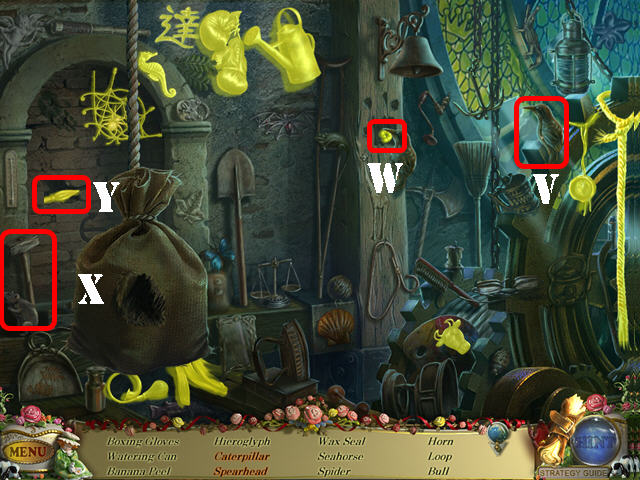
- Go back to the dragon’s room.
- Play the HOS.
- Touch the woodpecker (V) and take the caterpillar (W).
- Use the sledgehammer (X) on the wall and take the spearhead (Y).
- The ROPE will be added to inventory.

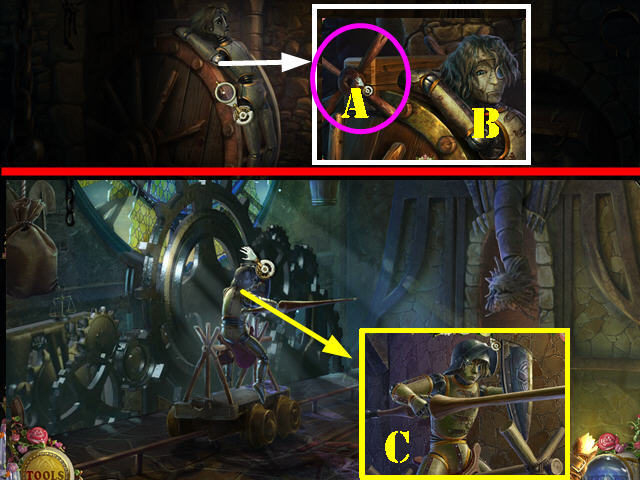
- Go back to the darkened room in the first corridor.
- Examine the puppet on the wheel; put the VALVE on the device and press on it twice (A).
- Take the PRINCE (B).
- Go back to the dragon’s room.
- Zoom into the trolley; put the PRINCE on the trolley. Give the HELMET, LANCE, and SHIELD to the Prince (C).
- Push the trolley and go forward.

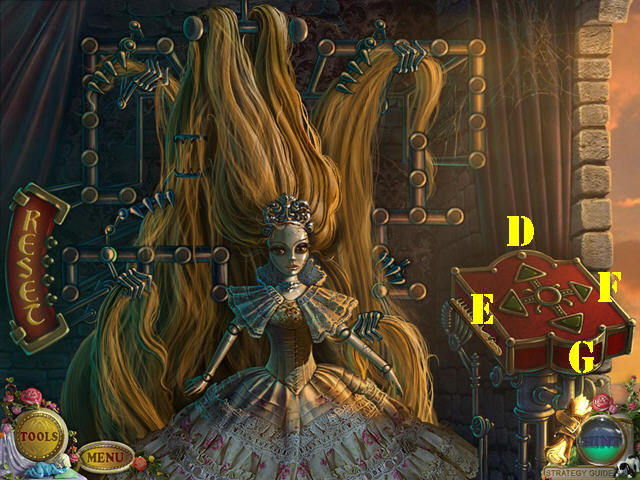
- Talk to the little girl in the corner.
- Zoom into the standing puppet; put the COMB in the slot on the side of the red device to activate a puzzle.
- Use the arrows on the device to arrange the hands holding the pieces of hair into the green slots.
- To solve the puzzle, press on the arrows in this order: E x 2, G x 2, F, D, E x 4, D x 4, E x 4, G x 2, F, D x 2, E, F x 2, and E.

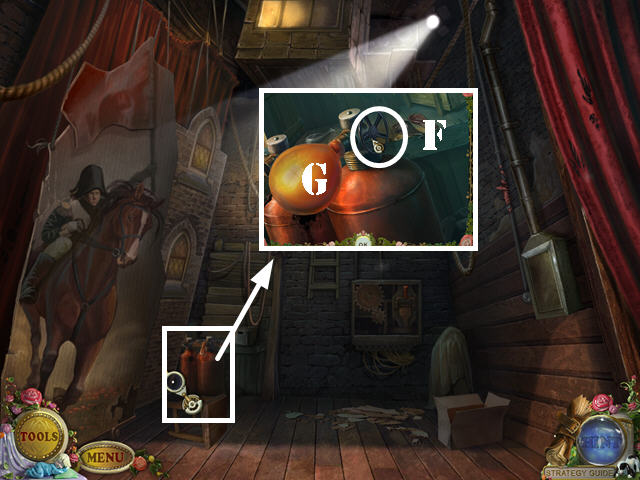
- Press on the end of the doll’s hair and go out to the roof (H).
- Zoom into the cherubs; attach the ROPE to the hand. Tug on the rope and take the HEART (I).
- Go back to the second corridor; zoom into the machine in the back (J).

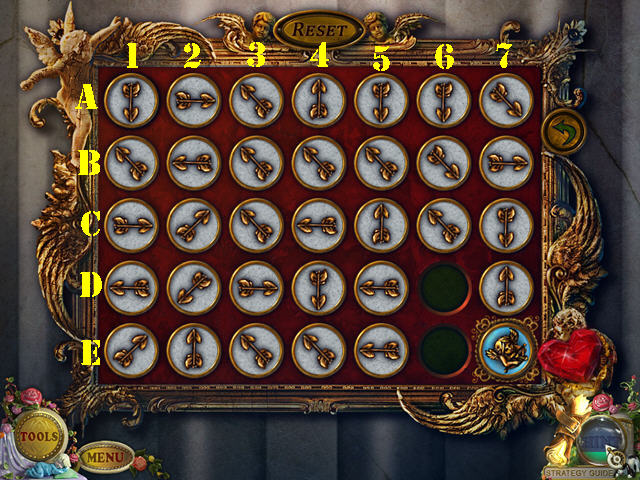
- Give the HEART to the bottom cherub to activate a puzzle.
- Move the cherub on the blue chip next to the cherub with the red heart.
- The arrows can only move in the direction they are pointing to. Select the cherub and all available spaces will light up; select the spot you want to go to.
- To solve the puzzle, please follow these steps: B1-Right, C2, D1, D2, C3, B2-Right, B3-Down, B4, B3, C3-Up, D4, C4, B3-Right, D5, C4, B4-Down, C5, C4-Right, C5-Down, C6, C5, D5-Up, C5-Right, E5, D5, D6, E6, C6-Down, D6-Down, D7, E7, and D6-Right.
- Go through the door to reach the auditorium.
Chapter 6: The Stage

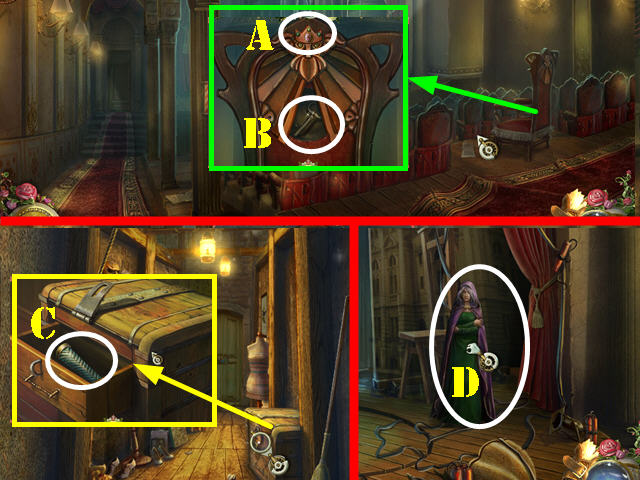
- Examine the chair; put the CROWN on the head (A).
- Take the CHEST KEY (B).
- Take the door on the left.
- Examine the chest; use the CHEST KEY on the lock; remove the lock and open the latch.
- Open the drawer and take the BEARD (C).
- Walk down and go towards the stage.
- Talk to Felicia (D).

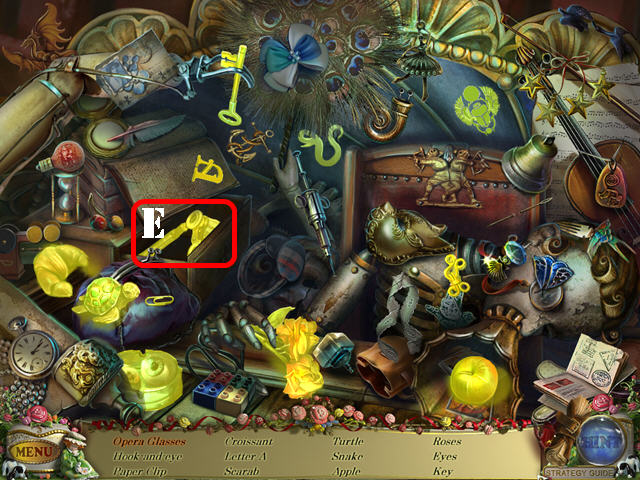
- Play the HOS.
- Open the drawer; take the opera glasses (E).
- The EYES will be added to inventory.


- Go to the right side of the stage.
- Zoom into the tank; put the TANK VALVE on it (F).
- Take the BALLOONS (G).
- Walk down.

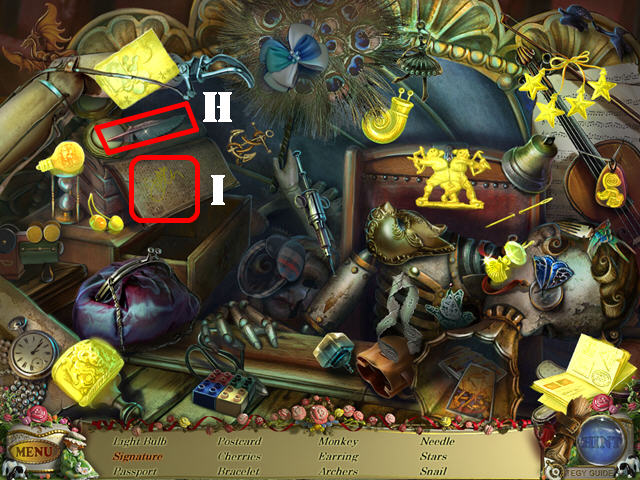
- Play the HOS.
- Touch the quill (H) and take the signature (I).
- The SNAIL will be added to inventory.

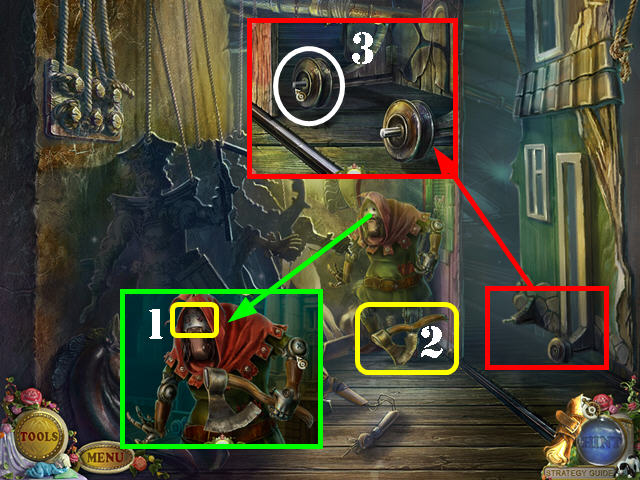
- Go to the left side of the stage.
- Examine the axe man; put the EYES on his face (1).
- Pick up the AXE (2) on the floor.
- Examine the bottom of the set decoration; put the WHEEL on it (3).
- Walk down twice and take the door on the left.

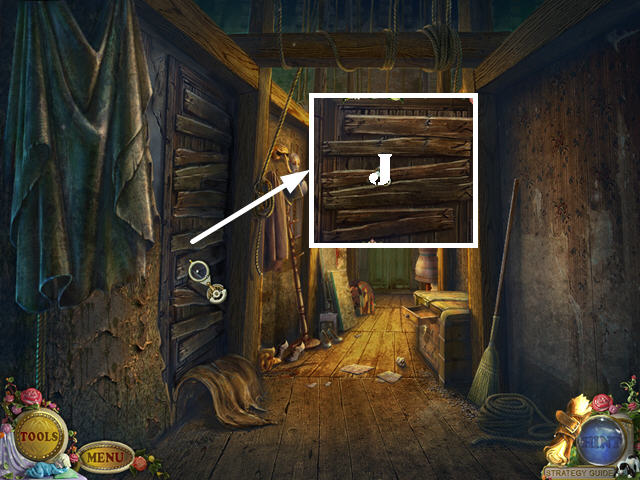
- Tear the wallpaper; zoom into it and remove the rest of the wallpaper.
- Use the AXE on the boards 3 times (J) to activate a HOS; play it.

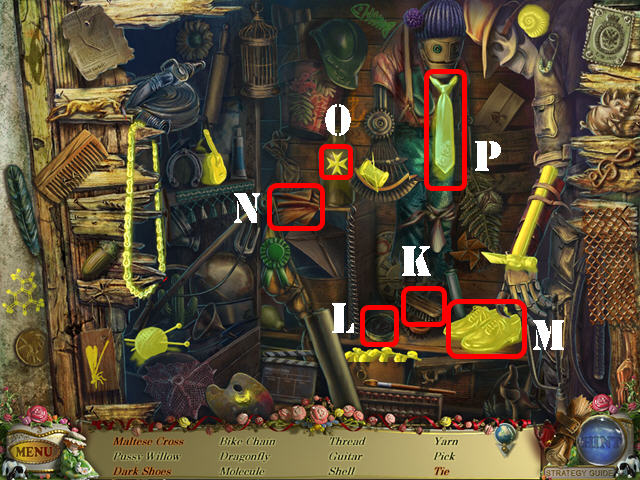
- Dip the brush (K) into the shoe polish (L); take the dark shoes (M).
- Wipe the bottle with the cloth (N); take the Maltese cross (O).
- Touch the untied tie; take the tie (P).
- The CHAIN will be added to inventory.

- Go to the right side of the stage.
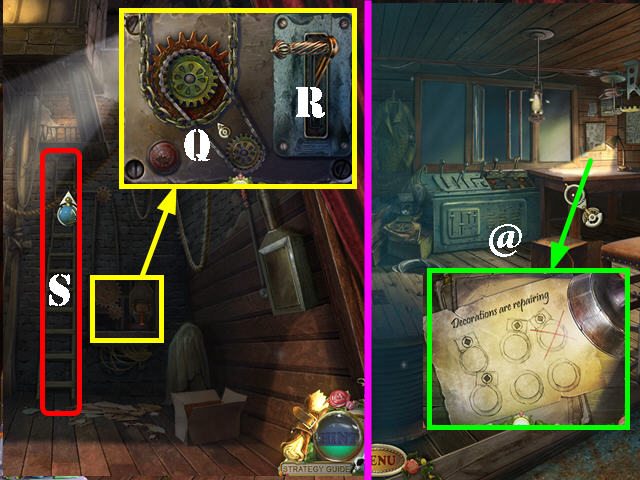
- Examine the mechanism; add the CHAIN to it (Q).
- Pull the handle (R).
- Go up the ladder (S) to reach the control room.
- Zoom into the desk; look at the diagram (@).

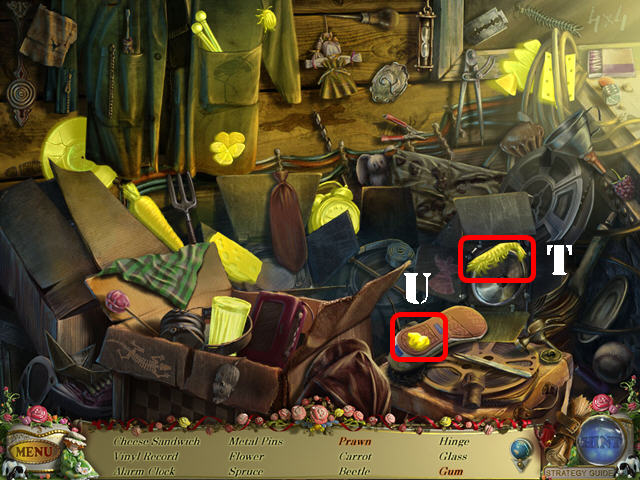
- Play the HOS.
- Open the box; take the prawn (T).
- Touch the tennis shoe and take the gum (U).
- The PINS will be added to inventory.

- Go back to the left side of the stage.
- Zoom into the board; put the BICYCLE KEY in the lock (V) that was shown on the book in the control room.
- Push the set decoration aside and go right (W). Note: You cannot pass this point unless you added the wheel to the set decoration and uncovered the diagram in the control room first.
- Put the LAMP in the scene.
- Examine the fire hydrant; take the SNAIL (X).

- Go down to the auditorium and head left.
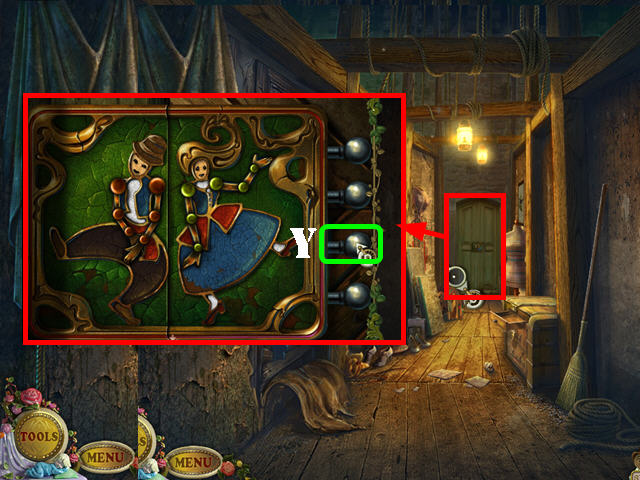
- Zoom into the back door; put the PINS on the lock to activate a puzzle.
- Arrange the limbs into the right positions by pulling on the latches on the right.
- To solve the puzzle, press on latch ‘Y’ 2 times.
- Go through the door.
Chapter 7: The Storage Room

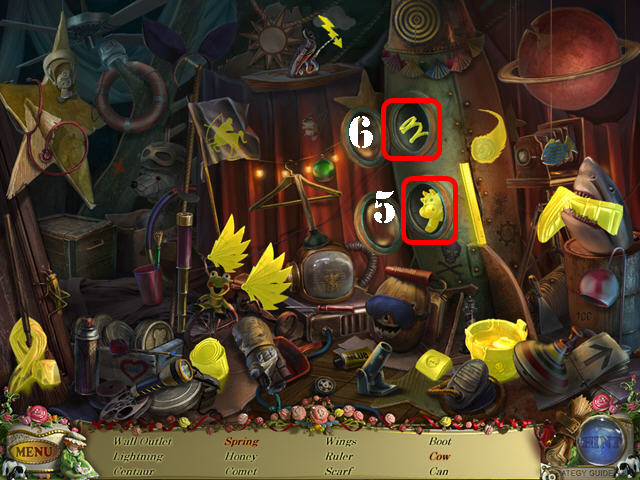
- Play the HOS.
- Open the lid and take the cow (5).
- Open the lid and take the spring (6).
- The HONEY will be added to inventory.

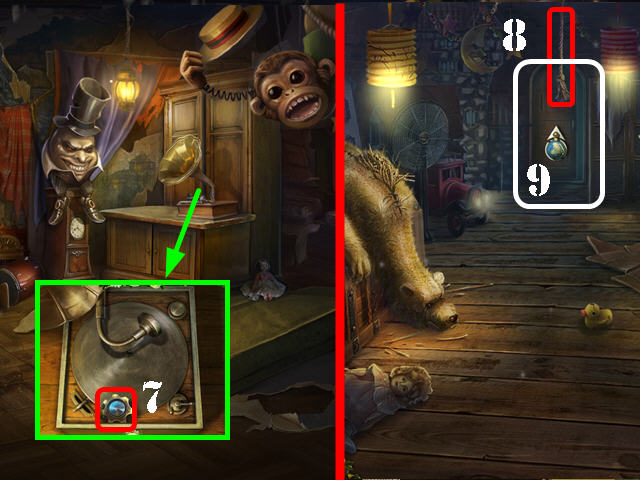
- Examine the phonograph; take the MECHANISM BUTTON (7).
- Go through the left door.
- Pull on the rope (8); open the back door go through it (9).

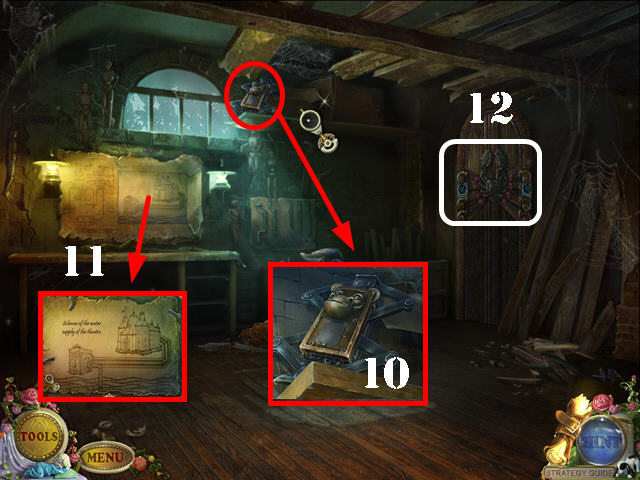
- Examine the shelf; take the MONKEY JACK (10).
- Look at the diagram on the wall (11).
- Examine the right door; put the 2 SNAILS on the door to activate a puzzle (12).

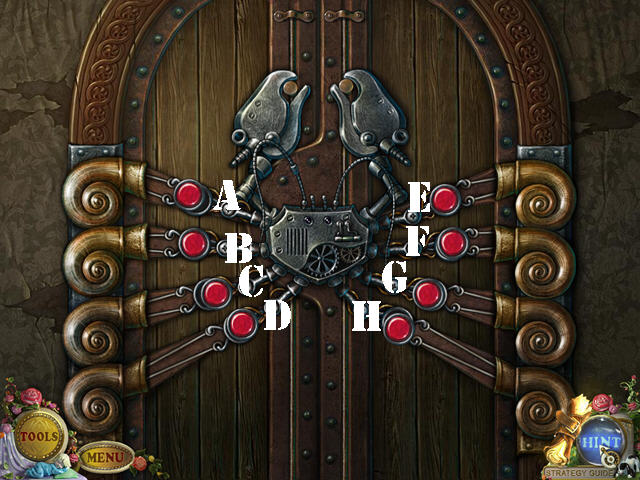
- Set all the crab legs so they hook into the snail-shell holders. Some of the crabs are connected to each other.
- Press on the red buttons to manipulate the legs.
- To solve the puzzle, press on the red buttons in this order: F, H x 3, E x 2, A x 2, B, C, E, C, D x 2, G, H x 2, C, A x 2, and E x 2.

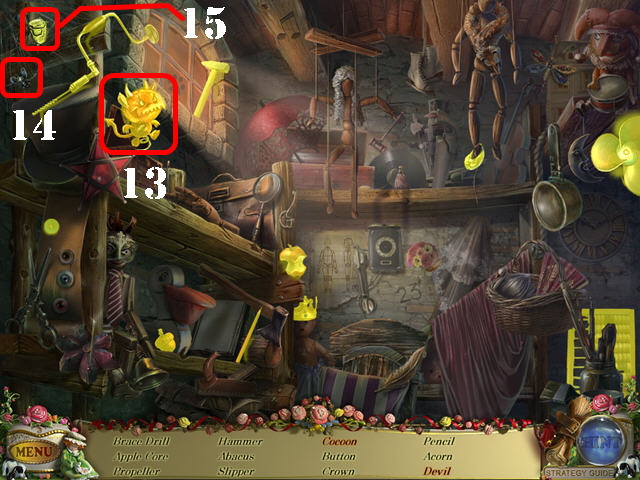
- Play the HOS.
- Open the box and take the devil (13).
- Press on the moth (14) and take the cocoon (15).
- The PROPELLER will be added to inventory.
- Walk down.

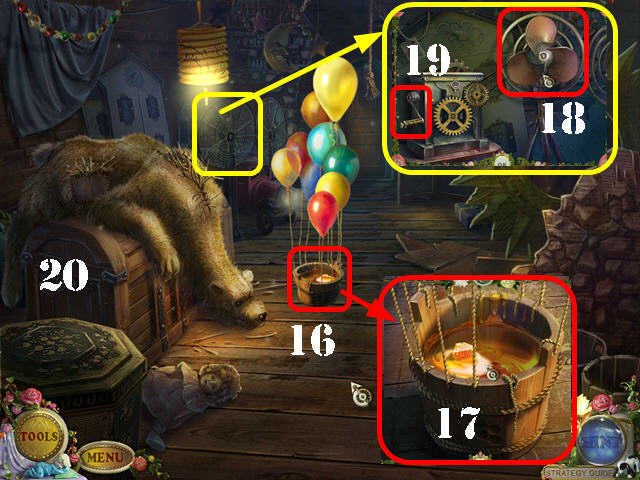
- Put the HONEY on the bear and it will land on the floor (16).
- Zoom into the honey and put the BALLOONS on the bucket (17).
- Examine the fan; open the cover and put the PROPELLER in it (18).
- Turn the handle to start the fan (19). The bear will get up and chase after the honey.
- Examine the chest to activate a puzzle (20).

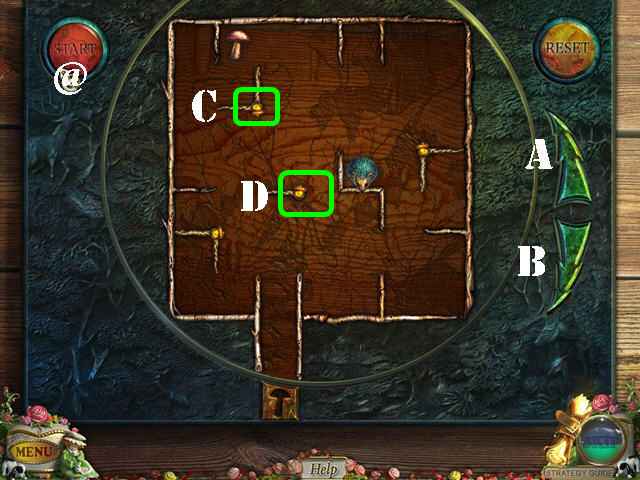
- Your goal is to grab the mushroom with the hedgehog and then drop the mushroom into the niche at the bottom of the screen.
- Use the arrows on the right to rotate the board. Press on the little acorns on the board to rotate the pieces attached to it.
- To solve the puzzle, press on the start button (@) first and then press on the items in this order: B x 2, A x 2, C x 3, A x 2, B x 1 (to get mushroom), C, B, A, B, D, B, and A.
- Go down into the chest to reach the basement under the stage.

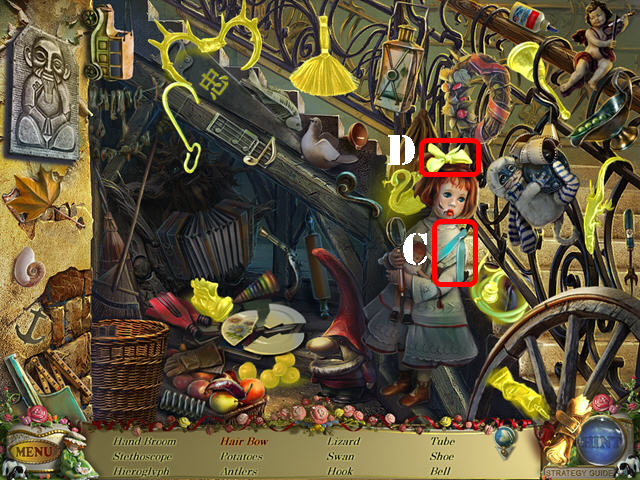
- Play the HOS.
- Drag the piece of fabric (C) to the doll’s hair and take the hair bow (D).
- The HOOK will be added to inventory.
- Go through the right door.
- Look at the book on the table (not pictured).

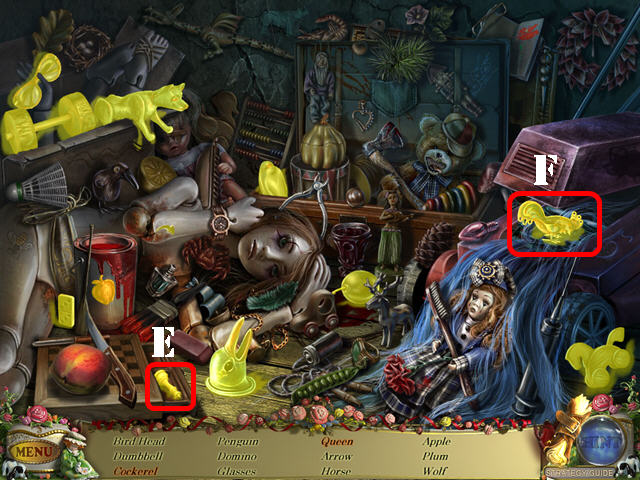
- Play the HOS.
- Open the chessboard; take the queen (E).
- Move the cover; take the cockerel (F).
- The PENGUIN HEAD will be added to inventory.
- Walk down twice and go through the back door.

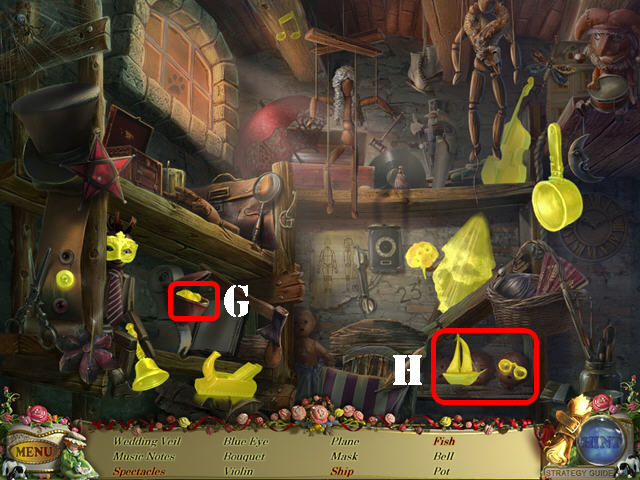
- Play the HOS.
- Open the pelican’s beak and take the fish (G).
- Remove the cloth; take the spectacles and the ship (H).
- The POT will be added to inventory.

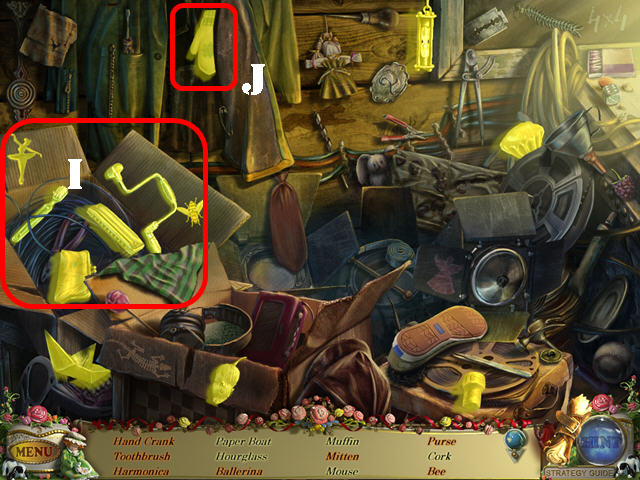
- Walk down 4 times and go forward; go to the right stage and up the ladder to reach the control room.
- Play the HOS.
- Open the box and take all the items on your list (I).
- Open the jacket and take the mitten (J).
- The HAND CRANK will be added to inventory.

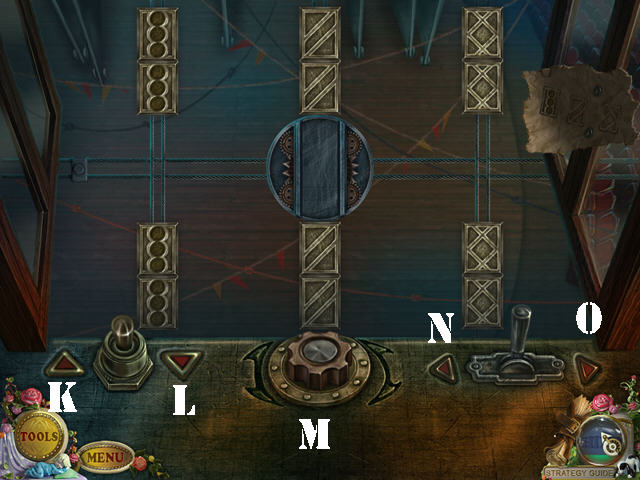
- Examine the controls; put the MECHANISM BUTTON on the device to activate a puzzle.
- Use the arrows to move the elements and the button to rotate them until they are in the same position as shown on the piece of paper on the right.
- To solve the puzzle, press on the controls in this order: K x 2, M, L, O, K, M, L, N, L x 3, M, K, N, L, M, K, O, L, M, K, O, L, N, K, O, L, M, K, N x 2, K, M, O x 2, K, N, L, M, K, N, K, and L x 2.

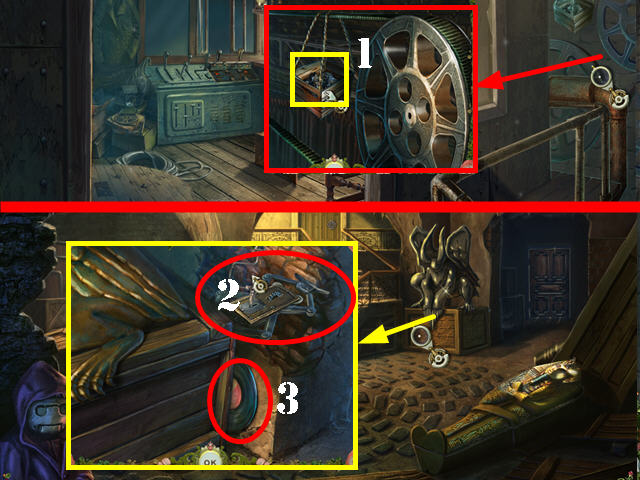
- Examine the wheel on the right and take the RESIN (1).
- Go back down to the basement under the theater.
- Zoom into the statue; put the MONKEY JACK on the base (2) and then put the HAND CRANK on the jack.
- Turn the crank and take the RECORD (3).
- Walk down twice.
Chapter 8: The Finale

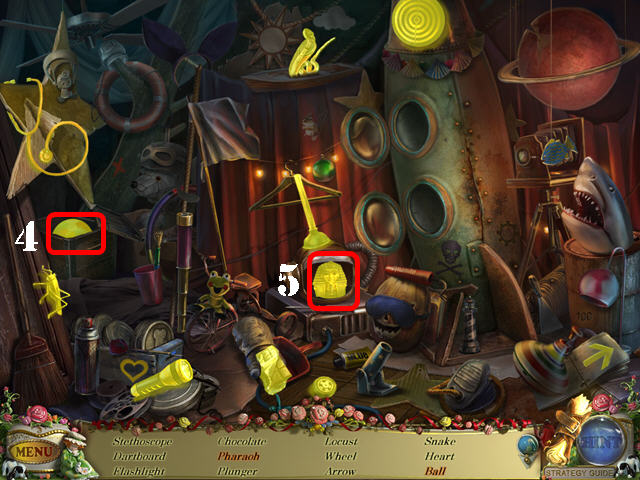
- Play the HOS.
- Touch the helmet and take the pharaoh (4).
- Open the box and take the ball (5).
- The SNAKE will be added to inventory.

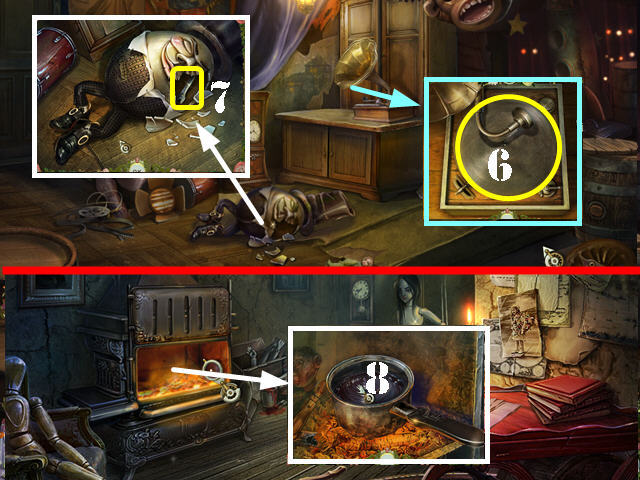
- Zoom into the phonograph; put the RECORD on the turntable (6).
- Examine the broken egg; take the WRENCH (7).
- Go back down to the basement below the theater and go into the right door.
- Open and examine the furnace; put the POT on the coals and then put the RESIN in the pot (8).
- Take the LIQUID RESIN.

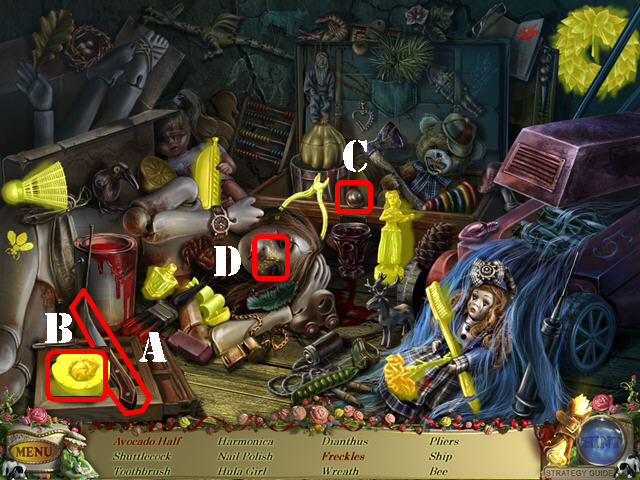
- Play the HOS.
- Touch the knife (A) and take the avocado half (B).
- Touch the ball (C) and take the freckles (D).
- The CUTTING PLIERS will be added to inventory.
- Walk down.

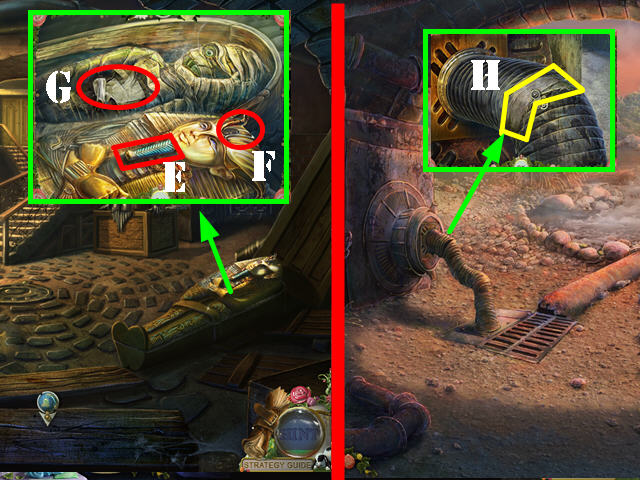
- Zoom into the sarcophagus; put the BEARD on the chin (E) and the SNAKE on the head (F).
- Take the BANDAGE (G).
- Go left.
- Examine the pipe; put the BANDAGE on it, followed by the LIQUID RESIN (H).
- Walk down.

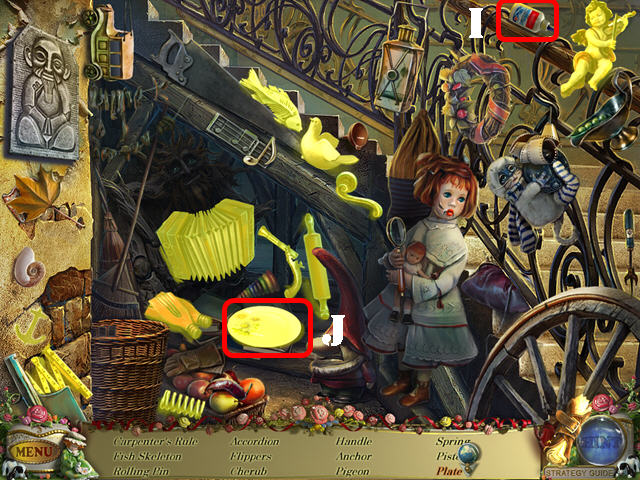
- Play the HOS.
- Drag the glue bottle (I) to the broken plate; take the plate (J).
- The PENGUIN FLIPPERS will be added to inventory.
- Walk down and go through the back door.

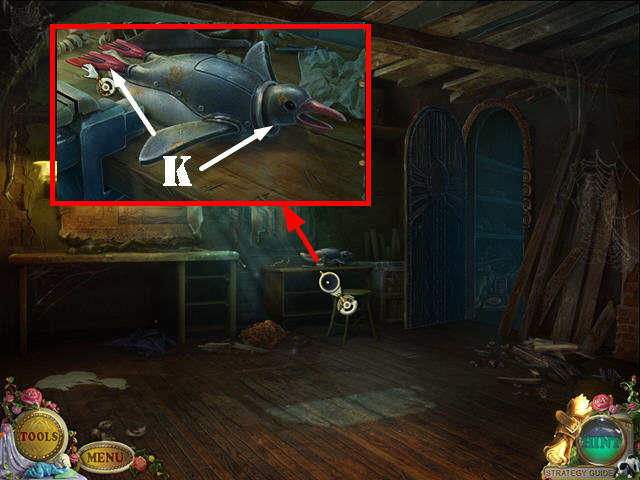
- Zoom into the table.
- Put the PENGUIN HEAD and the PENGUIN FLIPPERS on the mechanical penguin (K).
- Take the PENGUIN.
- Exit this room. Go into the chest to reach the basement and then head left.

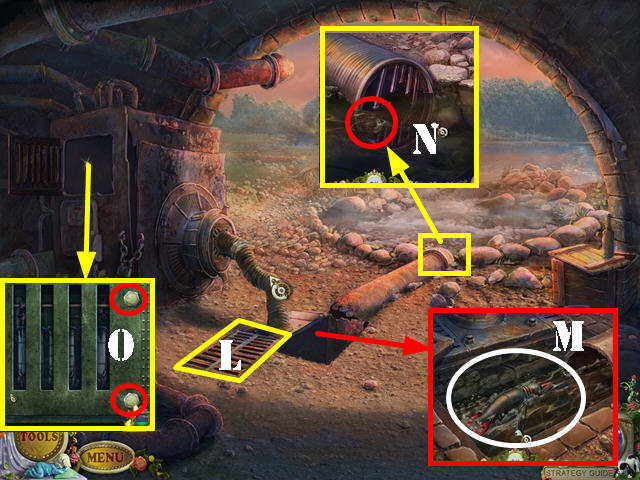
- Put the HOOK on the grate (L); zoom into the hole and put the PENGUIN in the water (M).
- Look at the other end of the hole and take the LOCK GEAR (N).
- Examine the side of the generator; remove the 2 bolts with the WRENCH (O).
- Open the cover to activate a puzzle.

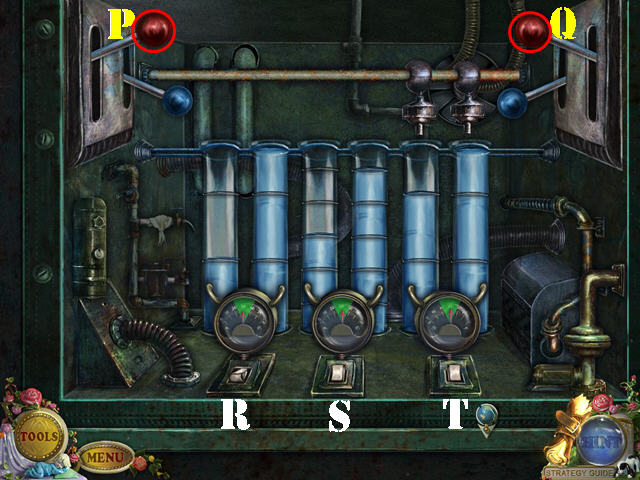
- Use the levers to normalize the pressure in the pipes until the red arrow lands in the green section of the gauges at the bottom of the scene.
- Use the white buttons to move the nozzles.
- The red and blue levers fill up or take away liquid from the tubes respectively. The red levers add liquid to the left or right tubes. The blue levers take away liquid from the left or right tubes.
- To solve the puzzle, press on the levers in this order: P, Q x 3, S, P x 3, Q x 5, T, P x 2 and Q x 3.
- Walk down.

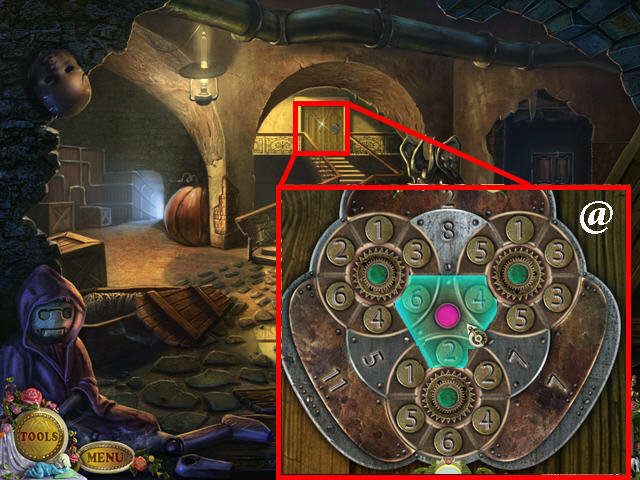
- Zoom into the back door; put the LOCK GEAR on it to activate a puzzle.
- Your goal is to place the dials so the numbers facing each other add up to the sum on the plate. Use the center dial with the red button to move the numbers from the wheels.
- Please look at the screenshot for the solution (@).
- Go through the door.

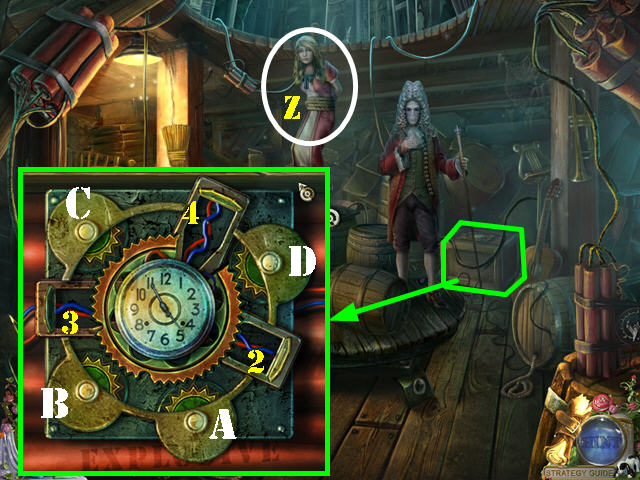
- Talk to Ornella on top of the barrels (Z).
- Zoom into the crate to access a puzzle.
- You must move the gears in a particular order to unlock the wires.
- To solve the puzzle, press on the gears in this order: A, B x 3, C x 3, and D x 4.
- Cut the 3 wires with the CUTTING PLIERS (2, 3, and 4).
- Walk down 4 times.

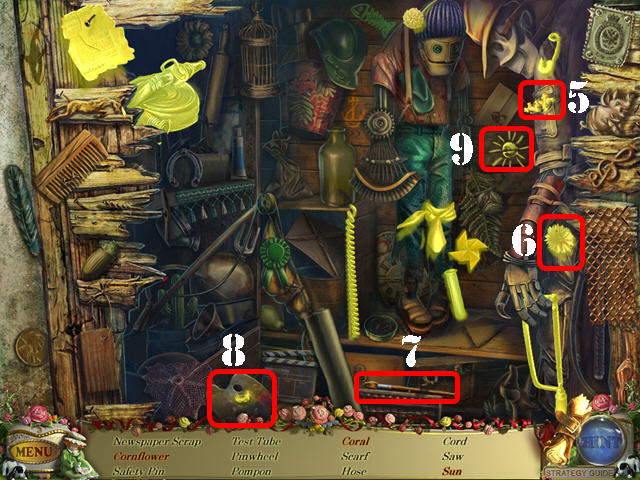
- Play the HOS.
- Open the pocket; take the coral (5).
- Open the other pocket; take the cornflower (6).
- Drag the brush (7) to the palette (8) and take the sun (9).
- The HOSE will be added to inventory.
- Walk down and go towards the stage.

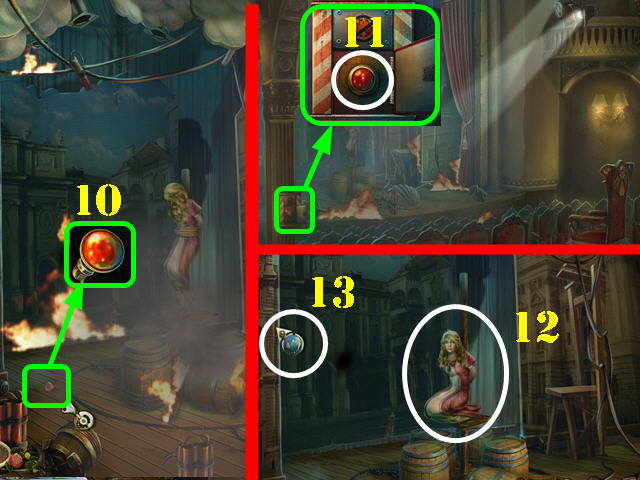
- Take the BUTTON (10) on the ground.
- Walk down.
- Zoom into the fire alarm box; open the cover and put the BUTTON in it (11).
- Press on the button to set off the sprinklers.
- Go back on stage and untie Ornella (12).
- Go to the left part of the stage (13) and then go right (past the set decoration).

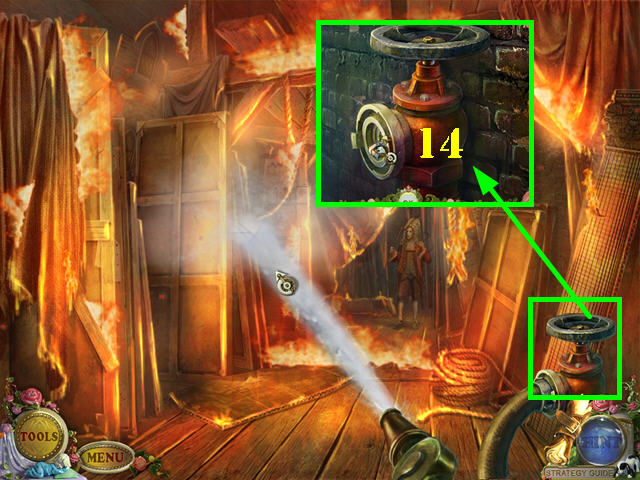
- Examine the fire hydrant and attach the HOSE to it (14).
- Extinguish the fire with the hose.
- Congratulations, you have completed PuppetShow: Return to Joyville Standard Edition!


 Dream Day Wedding: Viva Las Vegas Walkthrough, Guide, & Tips
 Tiger Eye: The Sacrifice Walkthrough, Guide, & Tips
 Break the Curse: The Crimson Gems Walkthrough, Guide, & Tips
 Chronicles of Mystery: The Legend of the Sacred Treasure Walkthrough , Guide, & Tips
 Lamp of Aladdin Tips & Tricks, Guide, & Tips