


Welcome to the Tiger Eye: The Sacrifice Walkthrough
In this adventurous romance, outwit powerful villains and break an evil curse inflicted upon your love, Hari, while saving your best friend’s life!
Whether you use this document as a reference when things get difficult or as a road map to get you from beginning to end, we’re pretty sure you’ll find what you’re looking for here.
This document contains a complete Tiger Eye: The Sacrifice game walkthrough featuring annotated screenshots from actual gameplay!
We hope you find this information useful as you play your way through the game. Use the walkthrough menu below to quickly jump to whatever stage of the game you need help with.
Remember to visit the Big Fish Games Forums if you find you need more help. Have fun!
This walkthrough was created by BrownEyedTigre, and is protected under US Copyright laws. Any unauthorized use, including re-publication in whole or in part, without permission, is strictly prohibited.

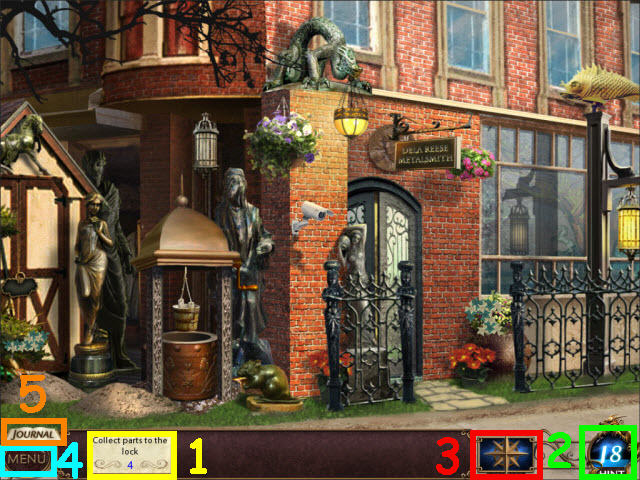
• Select Options to adjust the Music, Voice and Sound Effects. You may also adjust Windowed Mode, Widescreen, Tutorial and Custom Cursor.
• You can choose between Casual, Advanced or Expert mode.
• Puzzles may be skipped.
• There are lots of items to collect throughout the game.These collections with be circled in the screen in the same color as the collection box (1) on the toolbar.
• Select the Instruction button on each puzzle to get directions for the puzzles.
• Select the Hint Button (2) in the lower right to get a hint.
• Select the Compass button (3) to see the paths you can take.
• Select Menu (4) to exit or access options.
• Select the Journal (5) to access help, a To-do list and story updates.

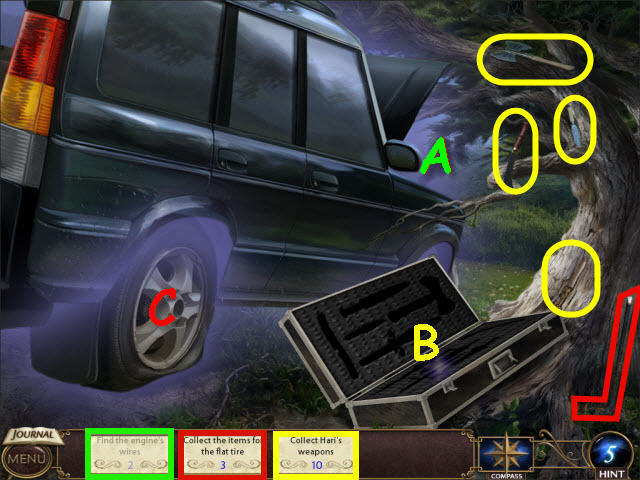
• Examine the engine (A), and weapons case (B) flat tire (C) to get your tasks.
• Collect HARI’S WEAPONS 1-4/10.
• Collect the ITEMS FOR A FLAT TIRE 1/3.
• Go left.

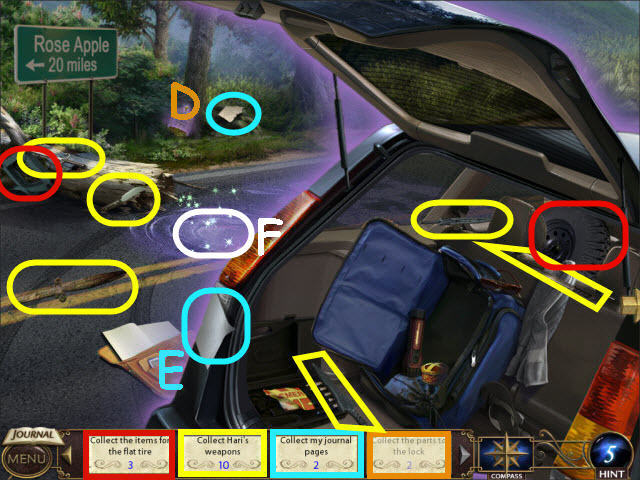
• Examine the cage (D) and journal (E) to get your tasks.
• Collect HARI’S WEAPONS 5-10/10.
• Collect the ITEMS FOR A FLAT TIRE 2-3/3.
• Collect the 2 JOURNAL PAGES.
• Place the 2 JOURNAL PAGES on the journal (E).
• Examine the image (F) to trigger a puzzle.

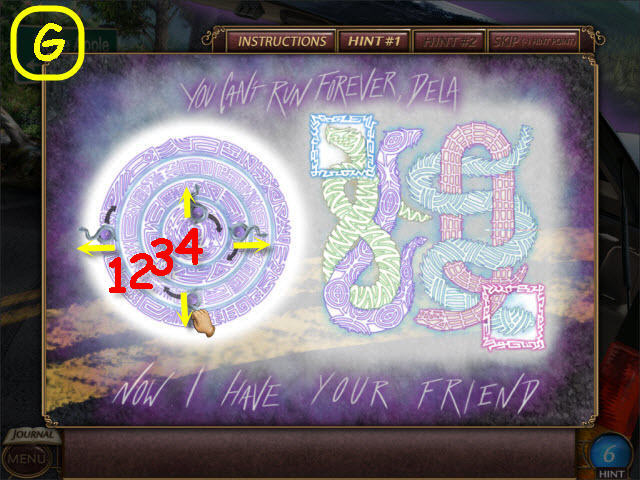
• Rotate the rings to complete the image on the right.
• To solve the puzzle, label the rings from the outside 1-4 and rotate them as follows: Ring 1 faces west, ring 2- south, ring 3 – east, ring 4 – north (G).

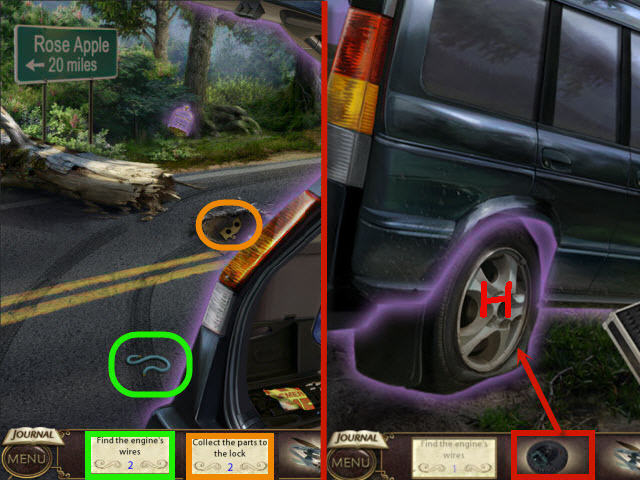
• Collect the PARTS TO THE LOCK 1/2 and the ENGINE WIRE.
• Go right.
• Examine and place the ITEMS FOR A FLAT TIRE on the tire (H).

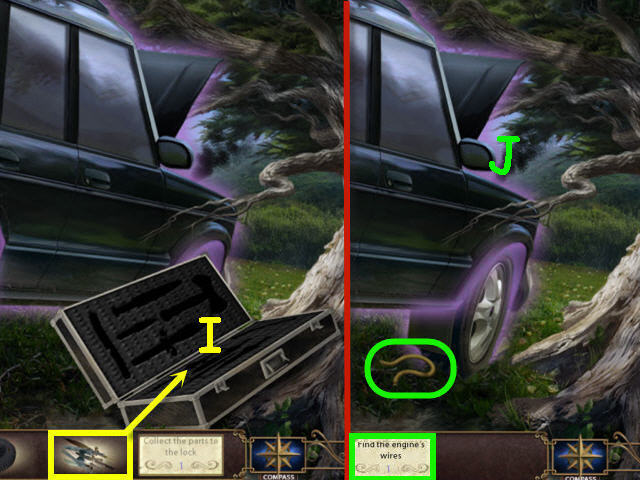
• Examine and place HARI’S WEAPONS in the case (I).
• Take the 2nd ENGINE WIRE.
• Examine and place the ENGINE WIRE on the engine (J) to trigger a puzzle.

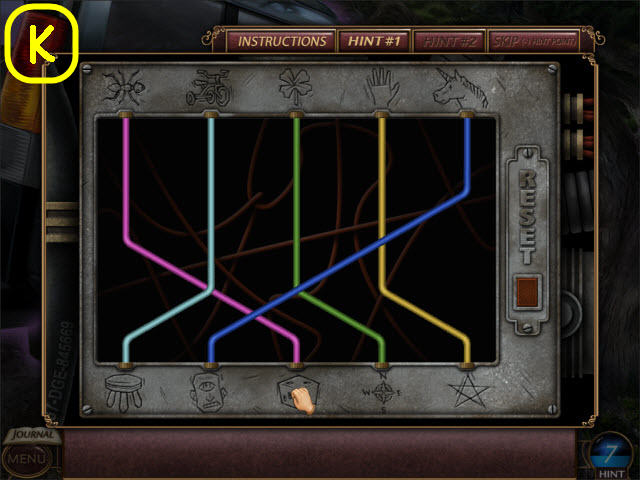
• Connect the wires from the top to the matching counterpart below.
• See screenshot (K) for solution.

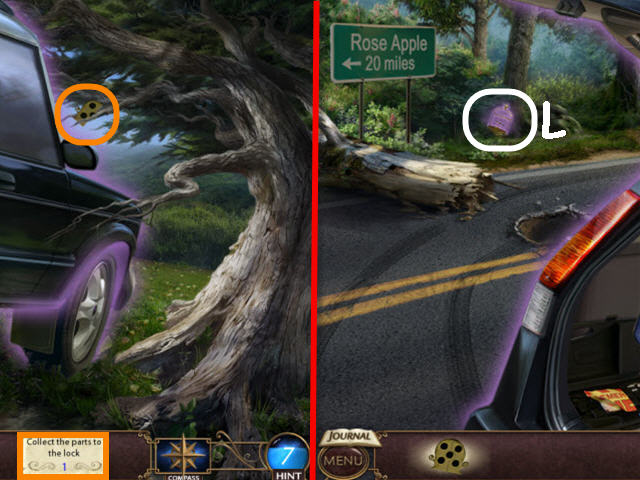
• Collect the 2nd PARTS TO THE LOCK to get SOME KIND OF LOCK.
• Go left.
• Examine and place the SOME KIND OF LOCK on the cage (L) to trigger a puzzle.

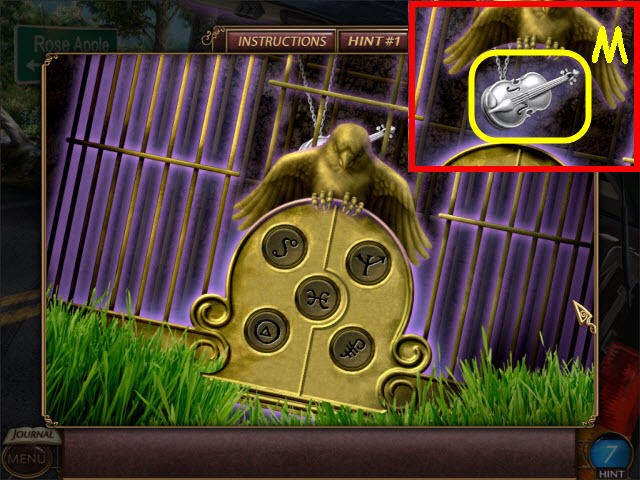
• Press the buttons in the correct order so they all stay pressed.This puzzle is random.
• Take Kit’s necklace (M) to trigger a puzzle.

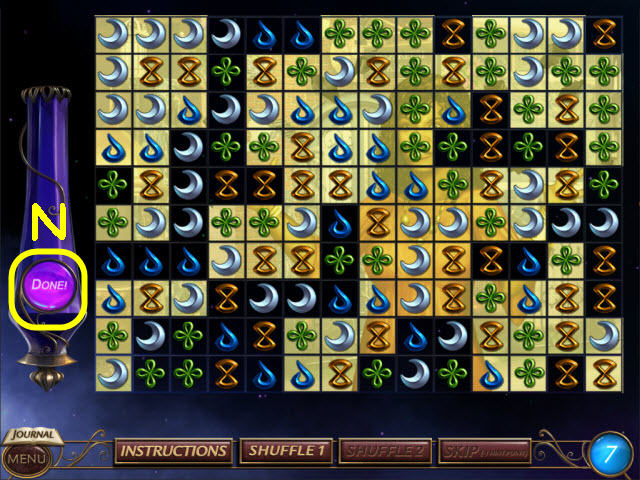
• Make combinations of 3 or more to fill the jar.
• Select the Done Button (N) when complete.

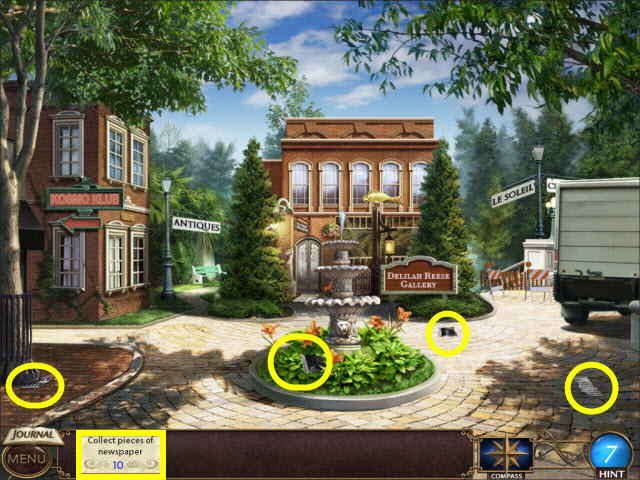
• Collect the PIECES OF NEWSPAPER 1-4/10.
• Go left.

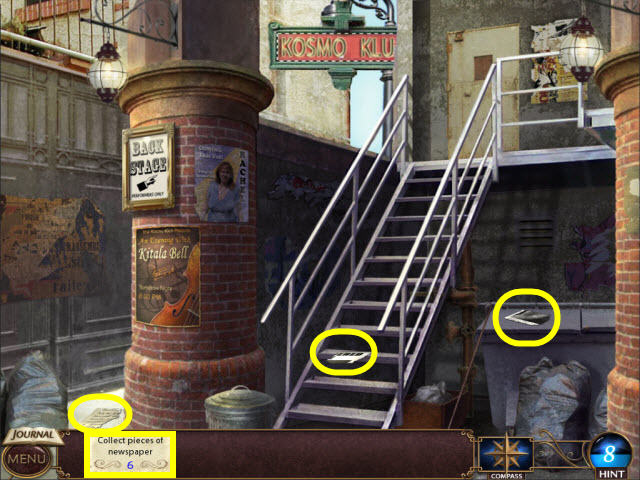
• Collect the PIECES OF NEWSPAPER 5-7/10.
• Back out and go forward.

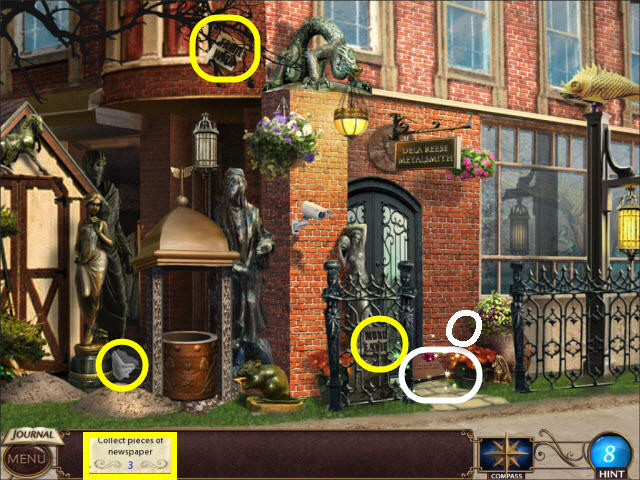
• Collect the PIECES OF NEWSPAPER 8-10/10.
• Examine the package on the doorstep (O) and remove the note to trigger a puzzle.

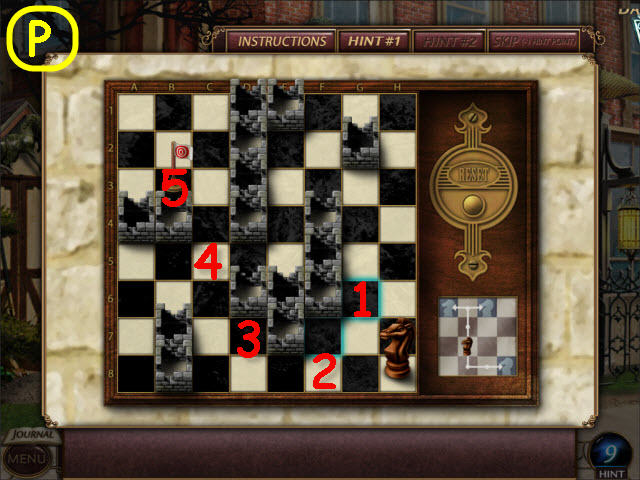
• Move the knight to the flag.
• To solve the puzzle, move the knight to the following tiles: G6, F8, D7, C5, and B3 (P).
• Take the photo.
• Go straight into Dela’s house.

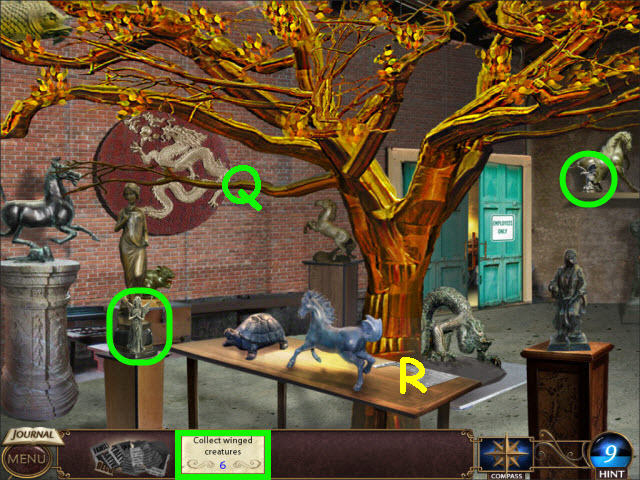
• Examine the tree branch (Q) to get a task.
• Collect the WINGED CREATURES 1-2/6.
• Examine and place the PIECES OF NEWSPAPER on the paper (R) to trigger a puzzle.

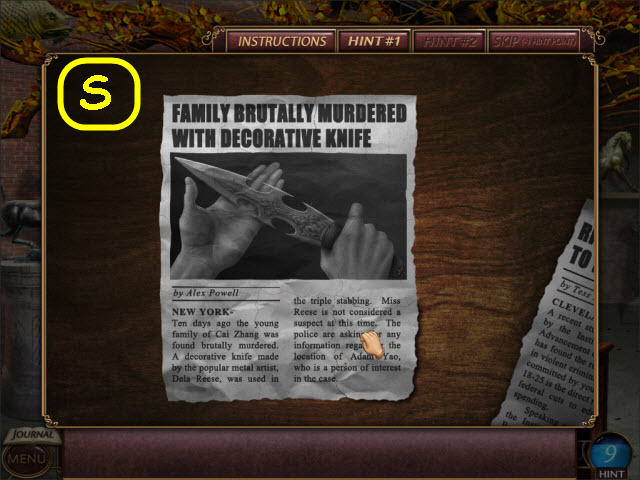
• Assemble the pieces to complete the picture.
• See screenshot (S) for solution.
• Take the newspaper clipping.
• Back out.

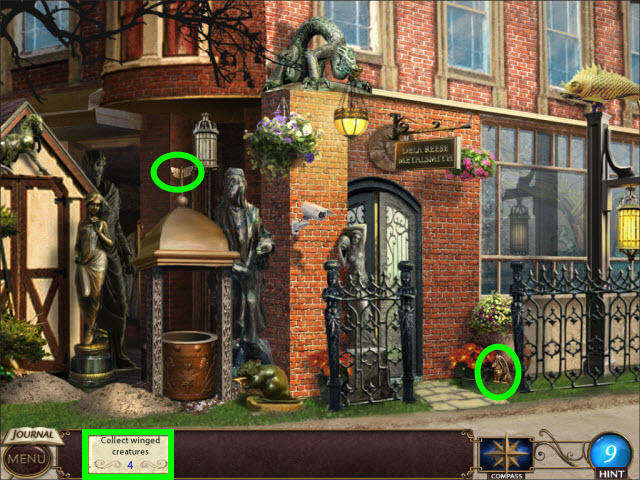
• Collect the WINGED CREATURES 3-4/6.
• Go forward twice to the workroom.

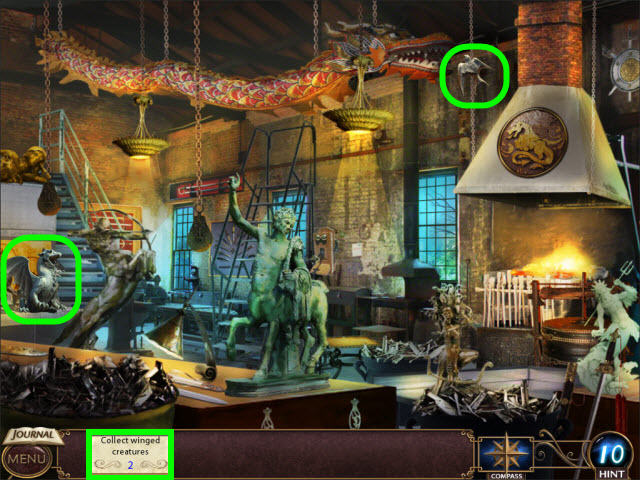
• Collect the WINGED CREATURES 5-6/6.
• Back out.

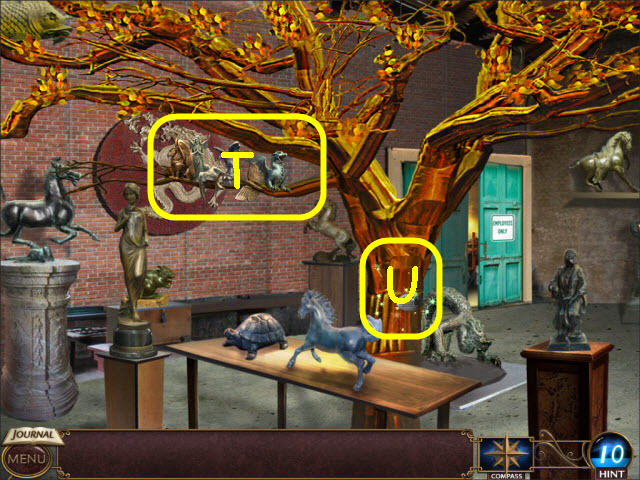
• Examine and place the WINGED CREATURES on the branch (T).
• Examine the tree trunk (U) to trigger a puzzle.

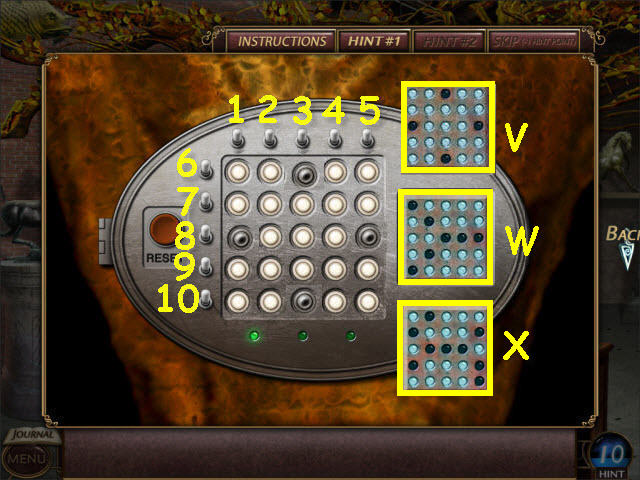
• Flip the correct switches to light the board to match the pattern on the right.
• Solution 1: Flip the 1, 3, 5, 7 and 9 switches (V).
• Solution 2: Flip the 1, 4, 6, and 9 switches (W).
• Solution 3: Flip the 1, 3, 6, 8 and 10 switches (X).
• Select the poster twice to trigger a cutscene.

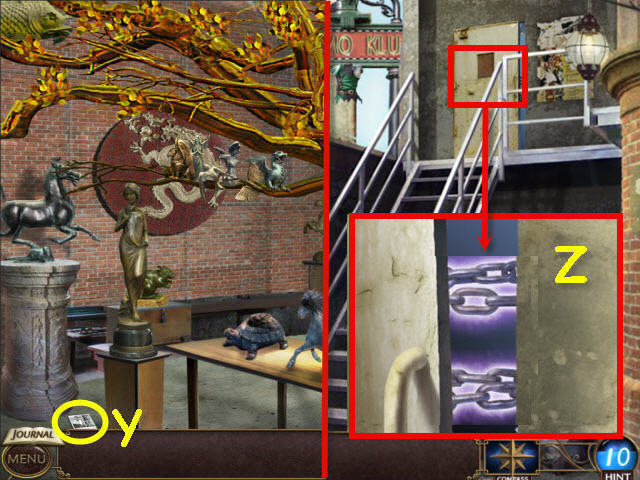
• Take the photo (Y).
• Back out twice and go left.
• Examine the door; move the chains (Z) to trigger a puzzle.

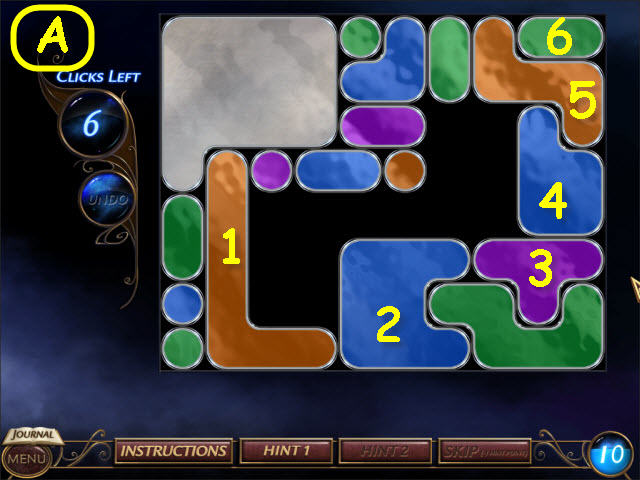
• Turn the entire board silver in 6 selections or under.
• To solve the puzzle, select the colors in this order: orange, blue, purple, blue, orange, and green (A).
• Go up the stairs into the Kosmo Klub.

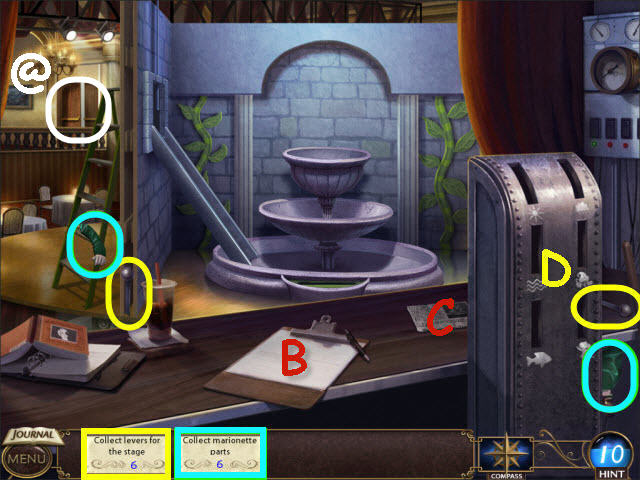
• Examine the clipboard (B) and newspaper clipping (C).
• Examine the control panel (D) to get a task.
• Collect the MARIONETTE PART 1-2/6 and LEVER 1-2/6.
• Go backstage via the upper left door (@).

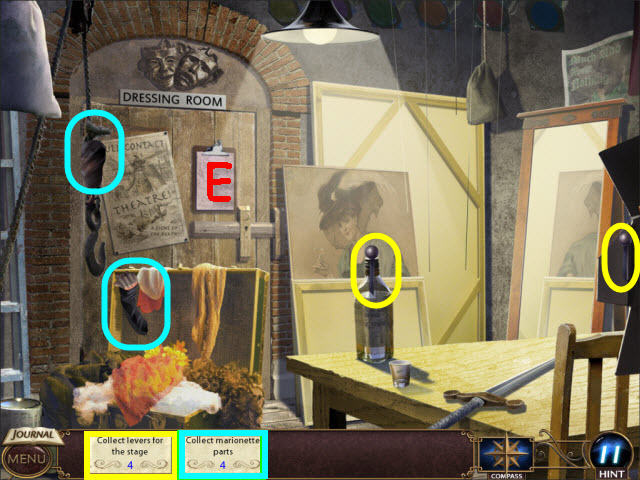
• Collect the MARIONETTE PART 3-4/6 and the LEVERS FOR THE STAGE 3-4/6.
• Examine the clipboard (E) to get a task.
• Back out twice.

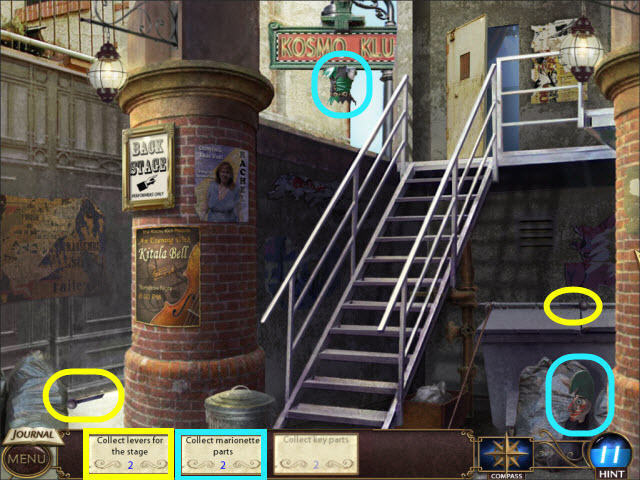
• Collect the MARIONETTE PART 5-6/6 and the LEVERS FOR THE STAGE 5-6/6.
• Enter the Kosmo Klub.

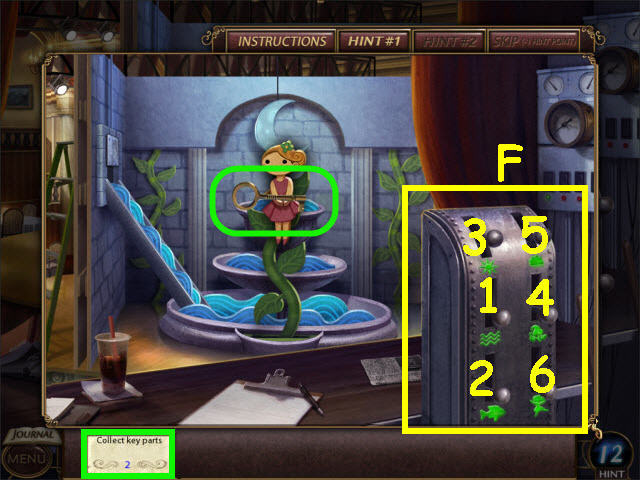
• Examine and place the LEVERS FOR THE STAGE on the control panel (F) to trigger a puzzle.
• Pull the levers so that the fairy gets the key from the fish.
• To solve the puzzle, pull the levers in the following order: water, fish, sun, leaves, cloud, and fairy.
• Take the KEY PART 1/2.
• Go backstage.

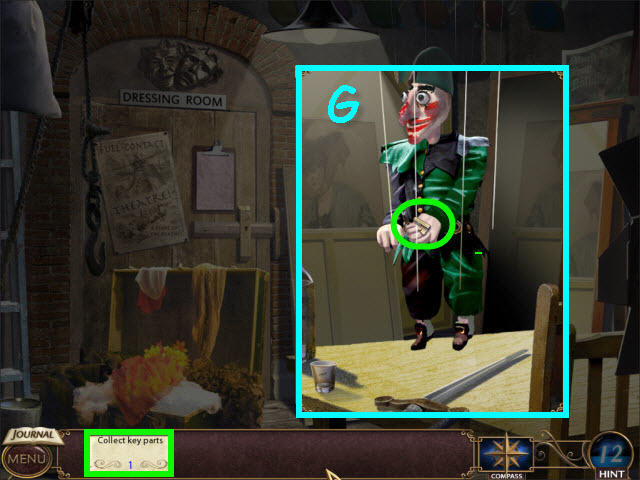
• Examine and place the MARIONETTE PARTS on the strings (G).
• Take the KEY PART 2/2; get BROKEN KEY.
• Go to Dela’s workshop.

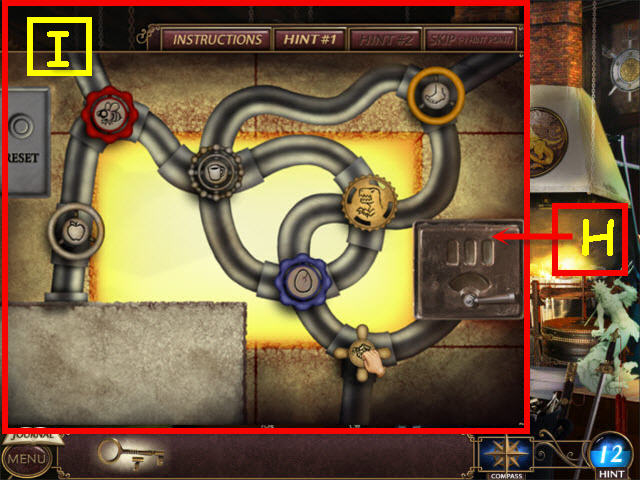
• Examine the forge (H) to trigger a puzzle.
• Place the valves on the pipe in the correct order.
• To solve the puzzle, place the valves in alphabetical order as follows: apple, bee, cup, dinosaur, egg, foot and grapes (I).

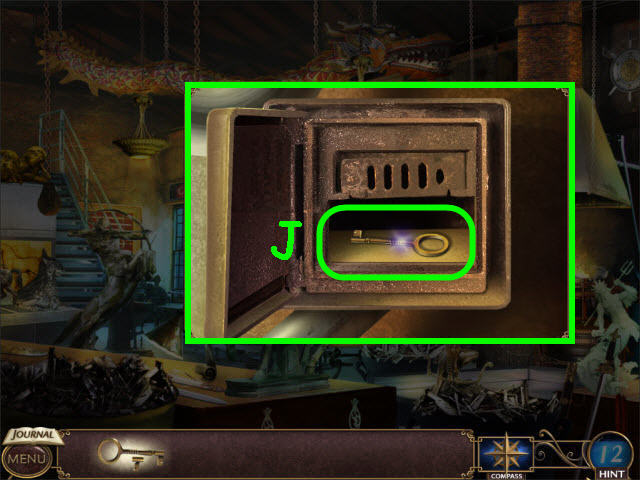
• Place the BROKEN KEY in the forge; take the FIXED KEY (J).
• Go to the backstage of the Kosmo Klub.

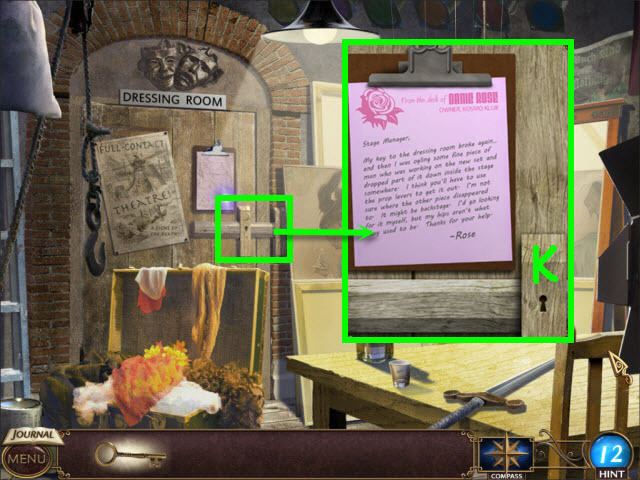
• Examine and use the FIXED KEY on the dressing room door lock (K).
• Enter the dressing room.

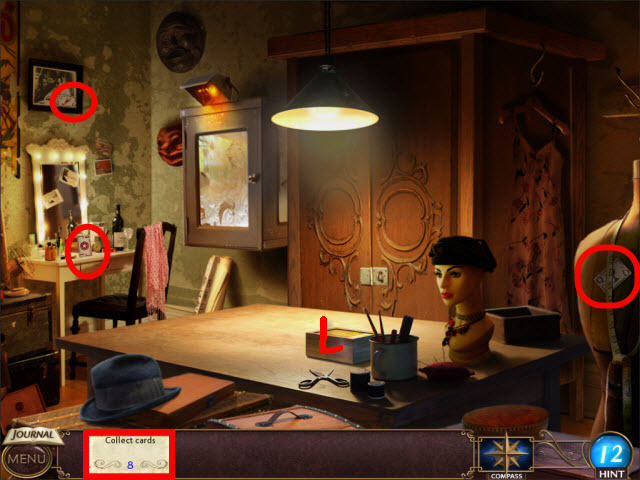
• Examine the wooden box (L) to get a task.
• Collect the CARDS 1-3/8.
• Back out.

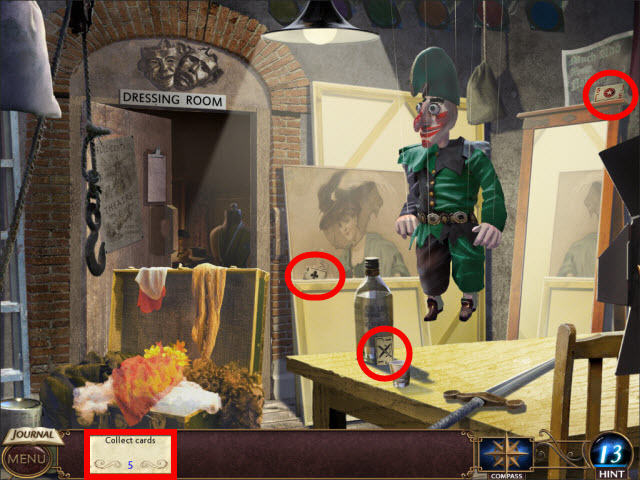
• Collect the CARDS 4-6/8.
• Back out.

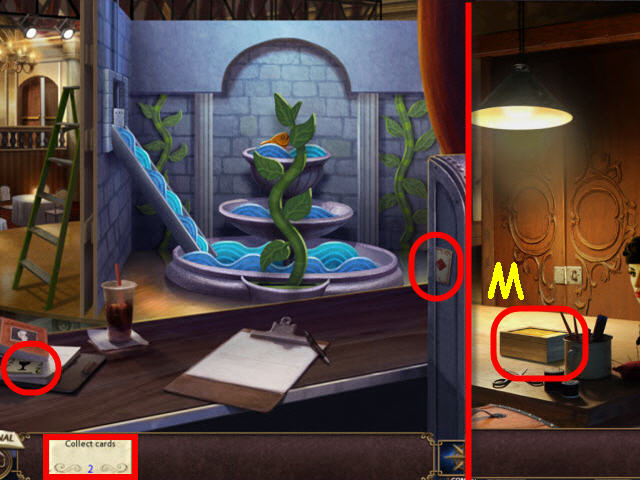
• Collect the CARDS 7-8/8.
• Go into the dressing room.
• Examine and place the CARDS on the box (M) to trigger a puzzle.

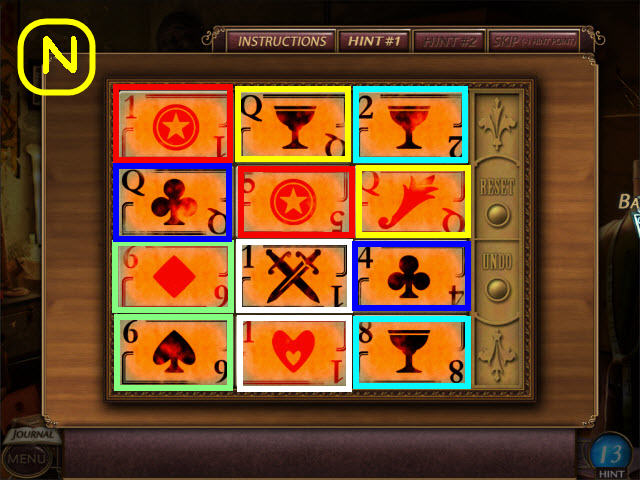
• Match the cards to turn them all over.
• See screenshot (N) for solution.
• Select the key twice to get the MORGUE KEY.
• Go to Dela’s house.

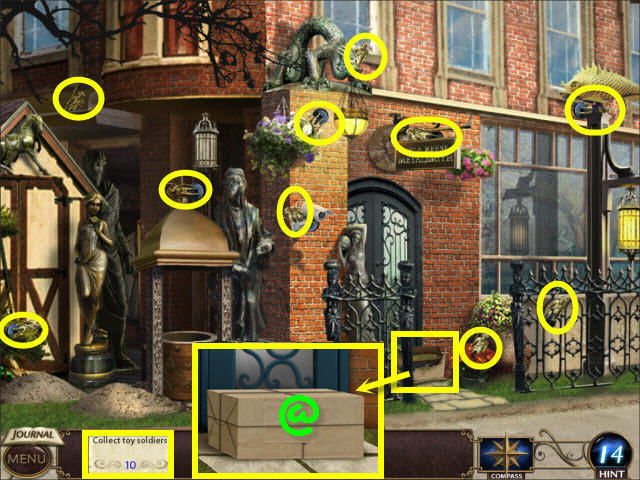
• Examine and open the package (@) to get a task.
• Collect the 10 TOY SOLDIERS.
• Examine and place the TOY SOLDIERS on the opened package to trigger a puzzle.

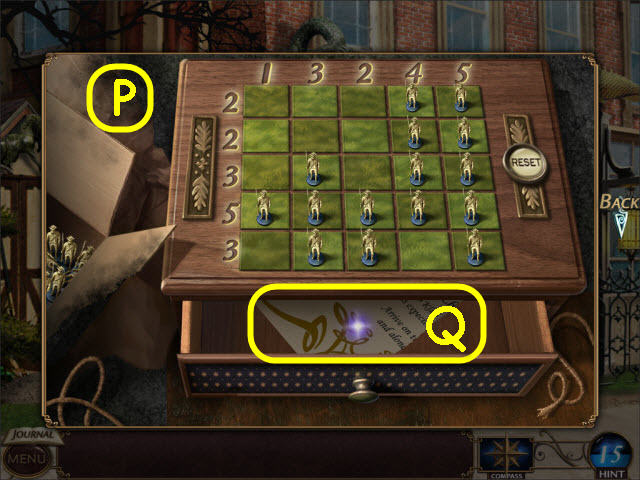
• Select the squares to place the SOLDIERS so that the number of soldiers in each row equals the numbers above and to the left.
• See screenshot (P) for solution.
• Take the half of invitation (Q).
• Back out and go right to the morgue.

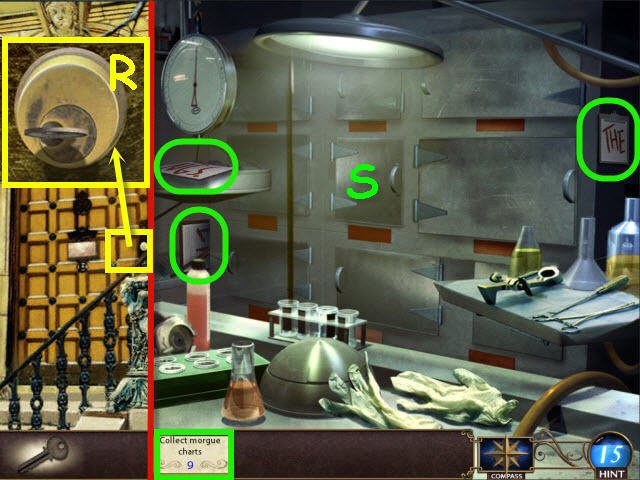
• Examine and use the MORGUE KEY on the door lock (R).
• Enter the morgue.
• Examine the drawers (S) to get a task.
• Collect the MORGUE CHARTS 1-3/9.
• Go into the lab on the left.

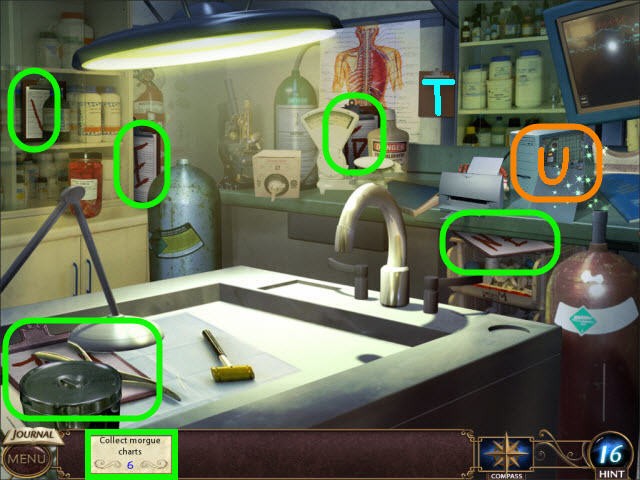
• Collect the MORGUE CHARTS 4-8/9.
• Examine the clipboard (T) to get a task.
• Examine the computer (U) to trigger a puzzle.

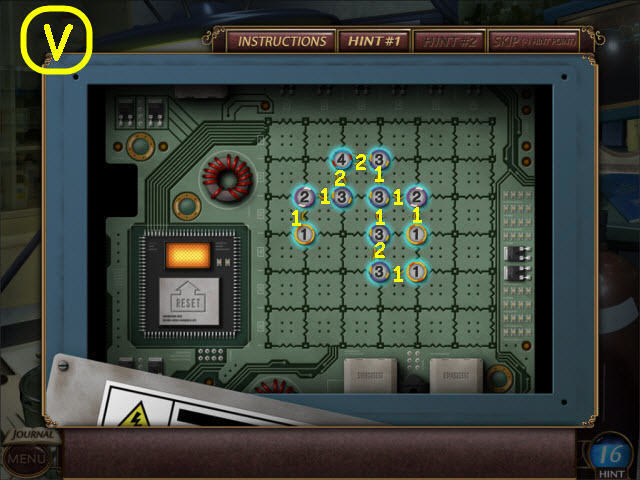
• Connect the circuits by placing the number of connectors to each peg equal to the number on the peg.
• See screenshot (V) for solution.

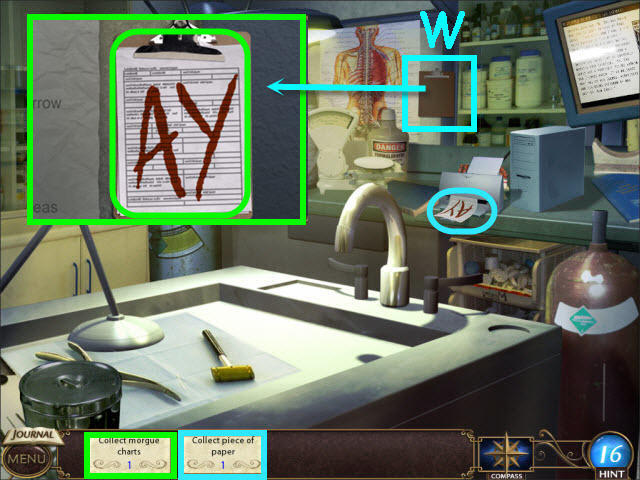
• Collect the PIECE OF PAPER to get a CHART FOR CLIPBOARD.
• Examine and place the CHART FOR CLIPBOARD on the clipboard (W).
• Collect the MORGUE CHARTS 9/9.
• Back out.
• Examine and place the MORGUE CHARTS on the drawer doors to trigger a puzzle.

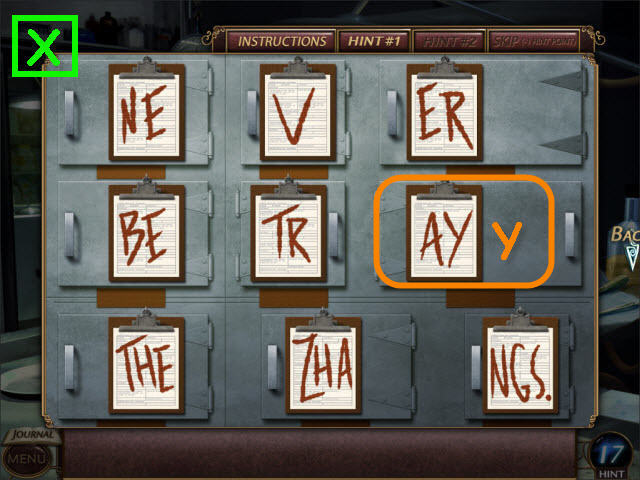
• Arrange the charts to complete the message.
• See screenshot (X) for solution.
• Select the drawer with the initials AY – Adam Yao (Y).
• Examine the opened drawer to trigger a puzzle.

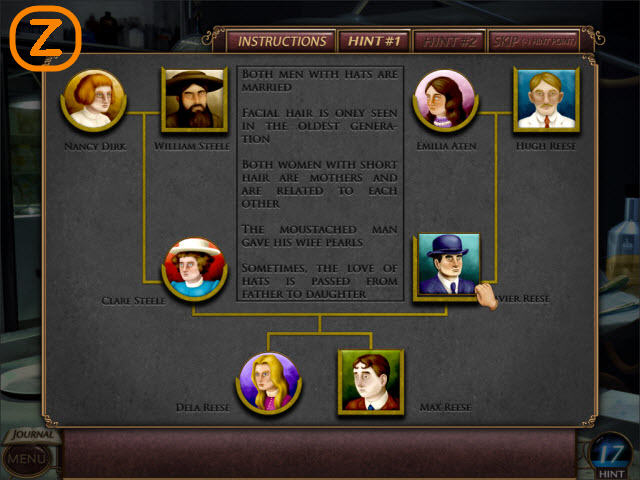
• Complete the family tree based on the clues given.
• See screenshot (Z) for solution.
• Take the half of a note; press on the completed note to trigger a puzzle.

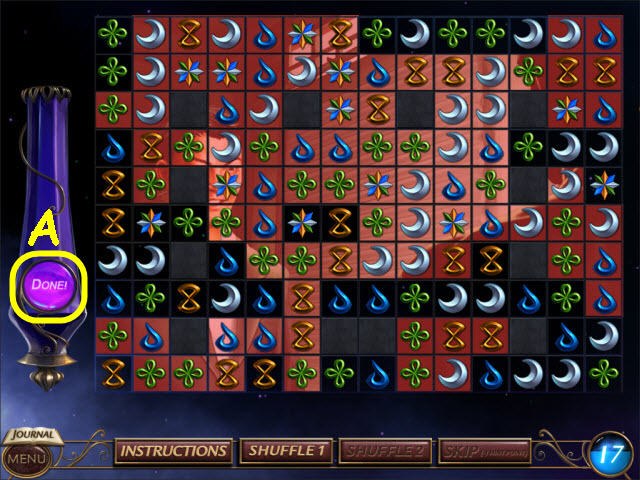
• Make combinations of 3 or more to fill the jar.
• Select the Done Button when complete (A).

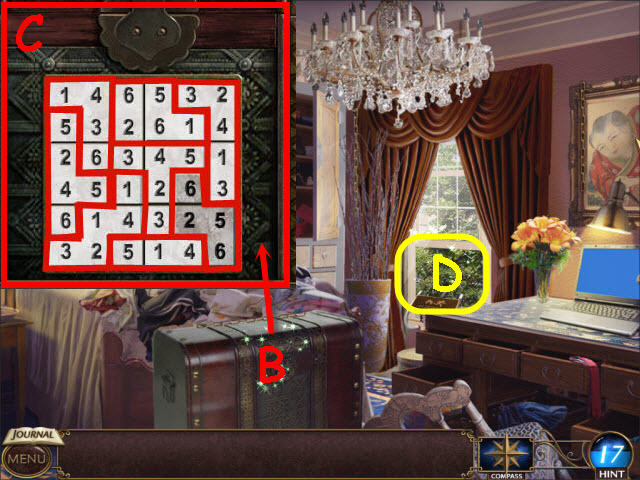
• Examine the trunk (B) to trigger a puzzle.
• Place the pieces so that there are no duplicate numbers in each 3×2 grid.
• See screenshot (C) for solution.
• Take the MECHANICAL LUBRICANT.
• Examine the window (D) and remove the cover to trigger a puzzle.

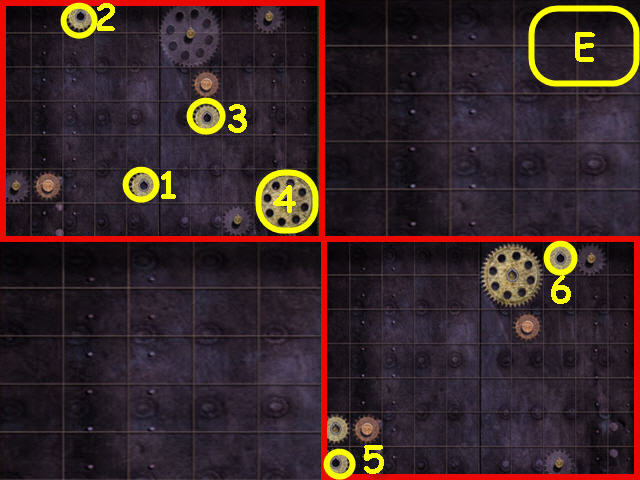
• Slide the gears to their correct position.
• To solve the puzzle, select the gears and move them in the following order: Gear 1 down and left, gear 2 left and down, gear 3 down, right and up, gear 4 left, up and right, gear 5 right, up and left, and gear 6 down (E).

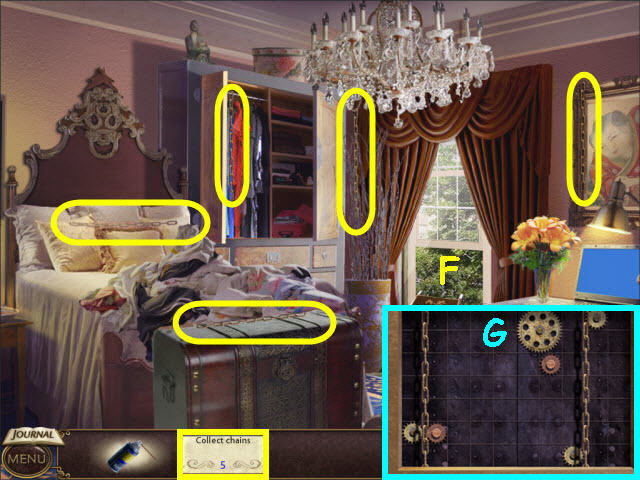
• Examine the window (F) to get a task.
• Collect the 5 CHAINS.
• Examine the window; place the CHAINS on the gears; use the MECHANICAL LUBRICANT on the gears (G).
• Exit out the window.

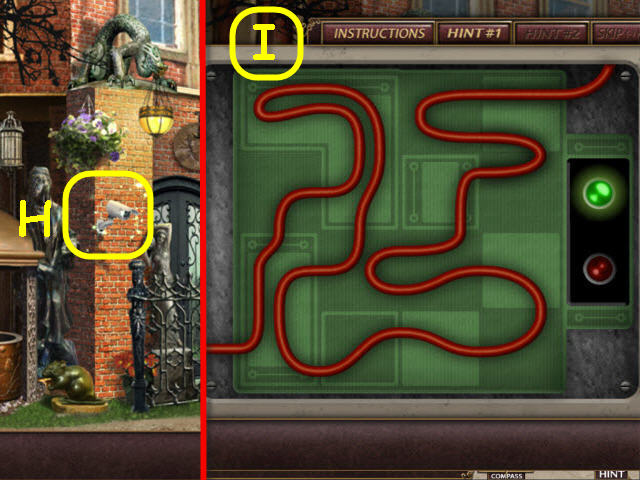
• Examine the security camera (H) and remove the wing nut to trigger a puzzle.
• Rearrange the wires to complete the circuit.
• See screenshot (I) for solution.
• Go to the Kosmo Klub.

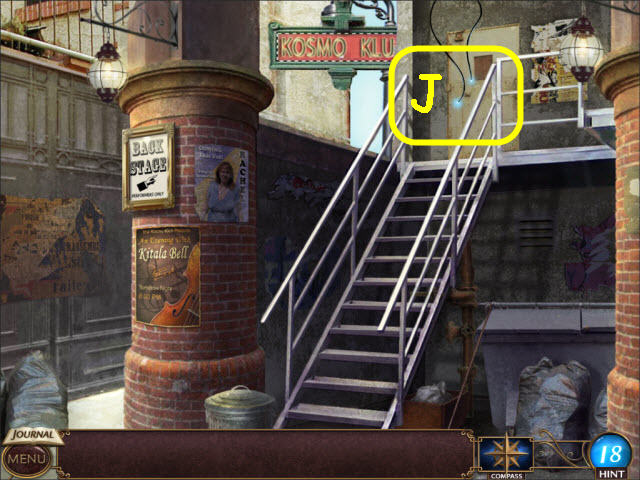
• Examine and touch the wires (J) to trigger a puzzle.

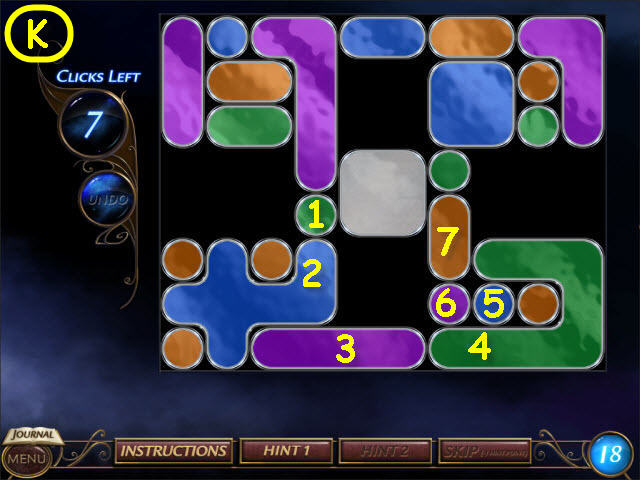
• Turn the entire board silver in 7 selections or under.
• To solve the puzzle, select the colors in this order; green, blue, purple, green, blue, purple, and orange (K).
• Enter the Kosmo Klub and go backstage.
• Go into the dressing room after the meeting.

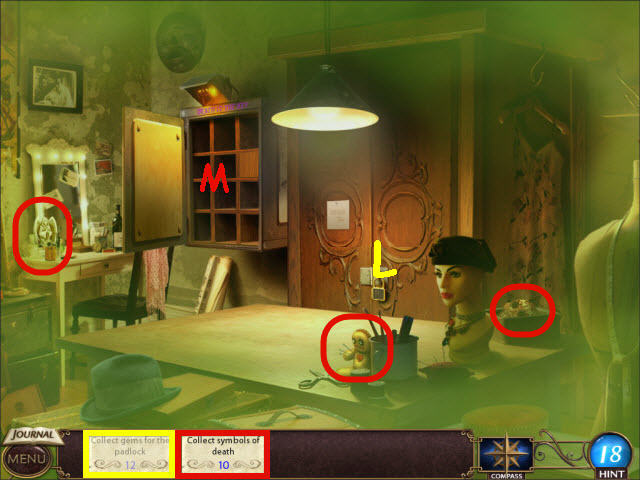
• Examine the wardrobe (L) and the curio cabinets (M) to get your tasks.
• Collect the SYMBOLS OF DEATH 1-3/10.
• Back out.

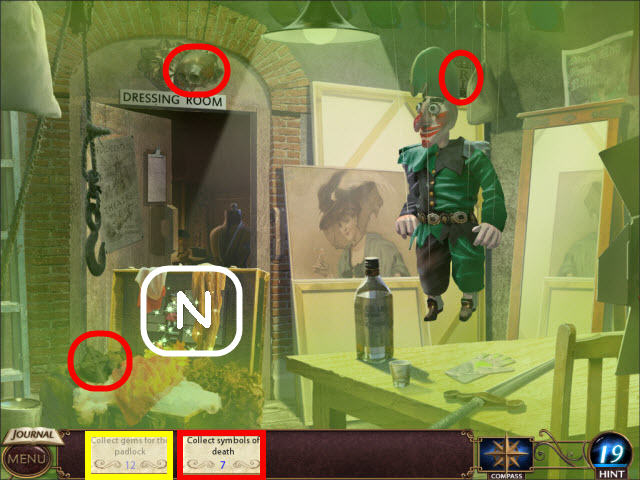
• Collect the SYMBOLS OF DEATH 4-6/10.
• Examine the trunk (N) and take the note to trigger a puzzle.

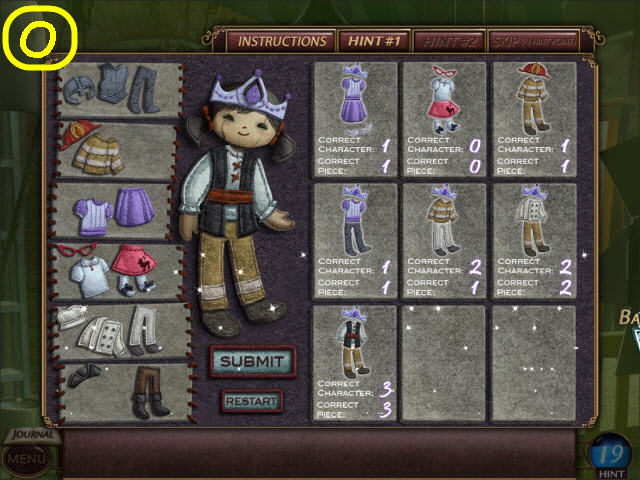
• Choose the correct outfit for the girl.
• See puzzle is random; see screenshot (O) for my solution.
• Take the 4 GEMS FOR THE PADLOCK.
• Back out.

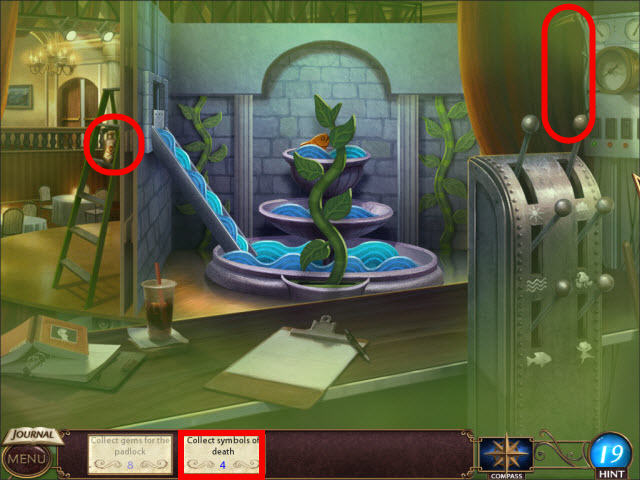
• Collect the SYMBOLS OF DEATH 7-8/10.
• Back out.

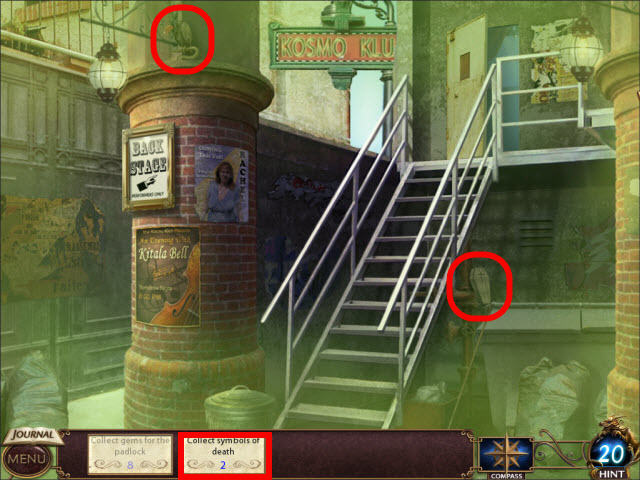
• Collect the SYMBOLS OF DEATH 9-10/10 to get the FIGURINES OF DEATH.
• Back out and go forward.

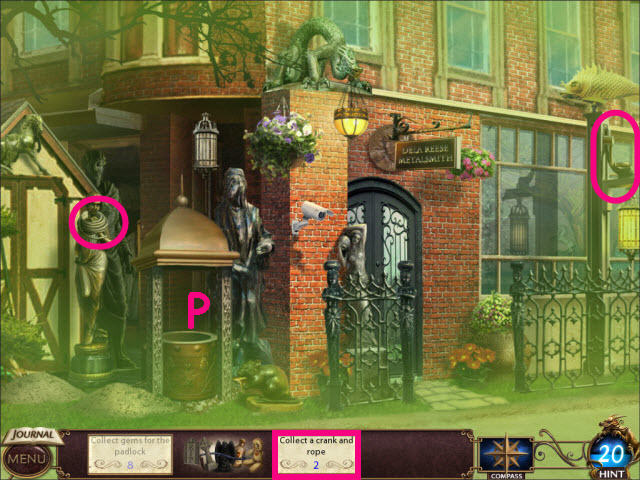
• Examine the well (P) to get a task.
• Collect the CRANK AND ROPE 2/2.
• Examine and place the CRANK AND ROPE on the well.
• Examine the well to trigger a puzzle.

• Move the figurine so that all tiles are turned red.
• To solve the puzzle, move the figurine to the following tiles: BB, Z, AA, Z, Y, Z, Y, S, T, U, V, W, X, U, T, U, T, S, Y, S, R, O, N, M, N, O, P, Q, P, O, N, O, P, O, L, F, E, D, C, A, B, D, E, D, E, F, G, H, I, J, K, H, G, H, G, and F (@).
• Take the 2nd set of 4 GEMS FOR THE PADLOCK.
• Go to the dressing room of the Kosmo Klub.

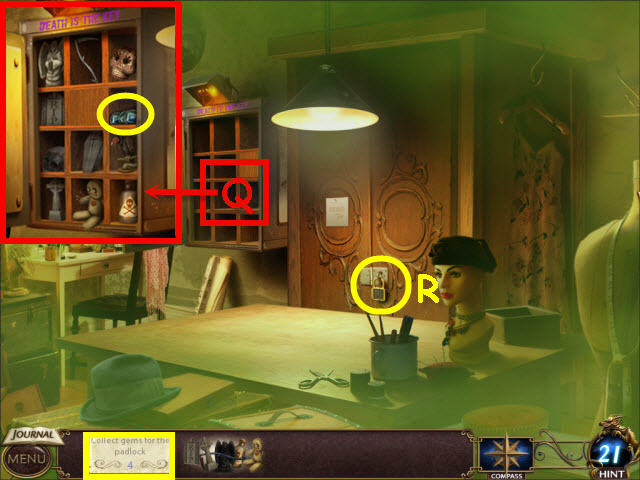
• Examine and place the FIGURINES OF DEATH in the curio cabinet (Q).
• Take the last set of 4 GEMS FOR PADLOCK to get GEMS.
• Examine and place the GEMS on the wardrobe lock (R) to trigger a puzzle.


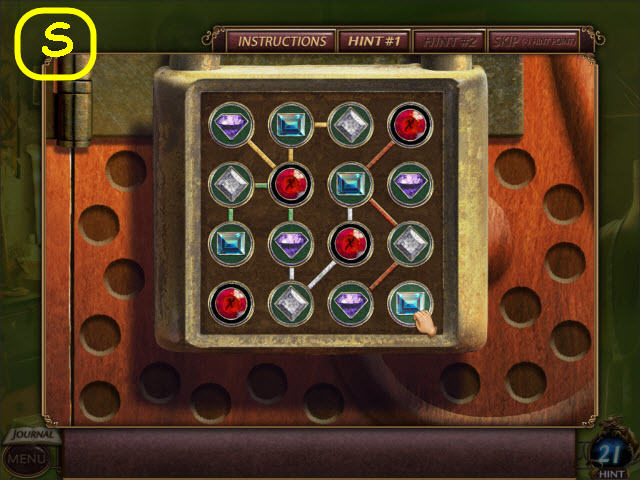
• Place the GEMS in the slots so no two of the same gems are in any row, column or connector set of slots.
• See screenshot (S) for solution.
• Take the antidote and automatically use it.
• Go to the fountain square and up the path to the Le Soleil.

• Enter the Le Soleil restaurant.
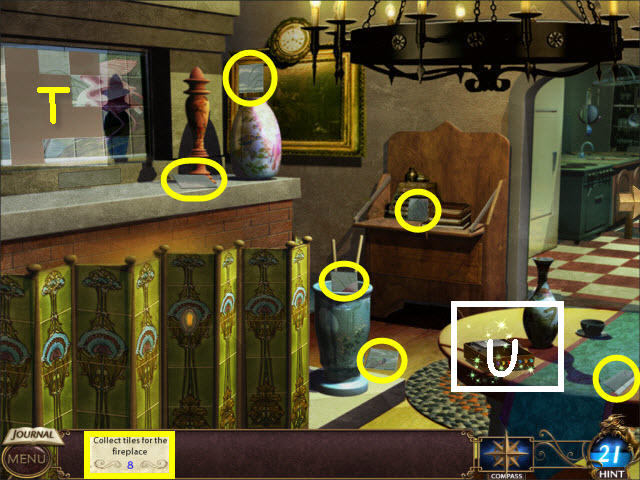
• Examine the mosaic tiles (T) to get a task.
• Collect the TILES FOR THE FIREPLACE 1-6/8.
• Examine the music box (U) to trigger a puzzle.

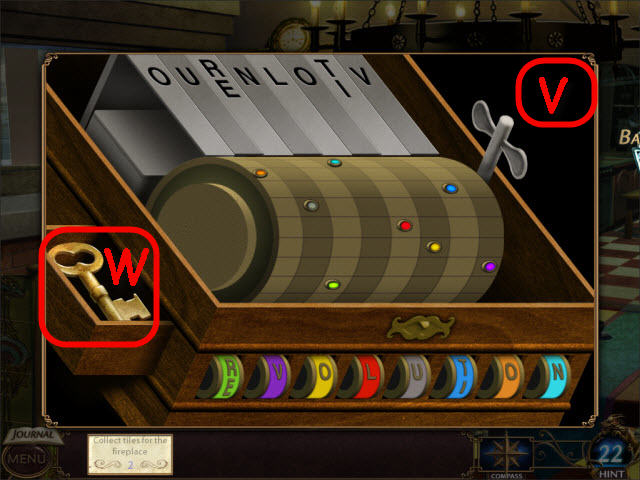
• Slide the colored pins on the music roll to descramble the letters.
• Turn the key on the right after the pins are set to activate.
• See screenshot (V) for solution.
• Take the KEY (W).
• Go right into the kitchen.

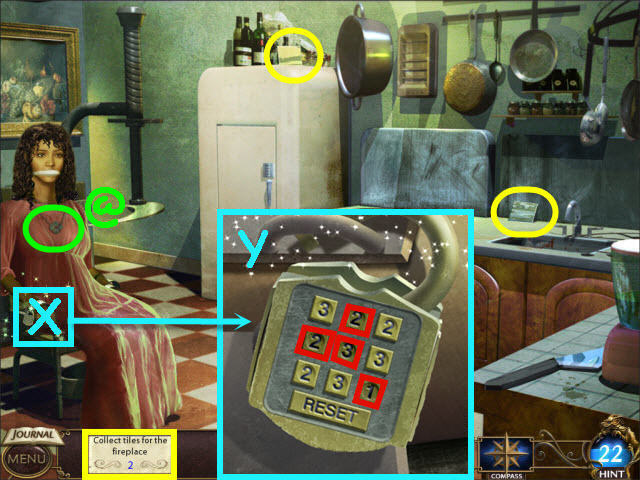
• Collect the TILES FOR THE FIREPLACE 7-8/8 and get the TILES.
• Examine the shackle lock (X) to trigger a puzzle.
• Press down the correct buttons to unlock the lock.
• See screenshot (Y) for solution.
• Examine the amulet (@) to get a task.
• Go left of the freezer to exit the room.

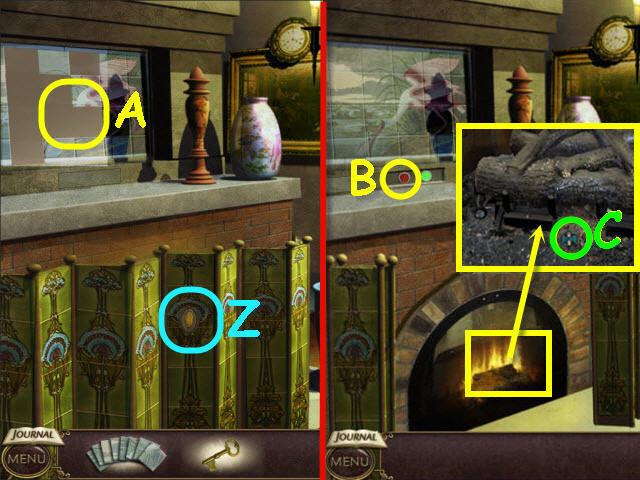
• Examine and use the KEY on the fireplace screen lock (Z).
• Examine and place the TILES on the mosaic (A).
• Push the red button (B).
• Examine the fireplace; take the HOURGLASS 1/2(C).
• Go to the fountain square.

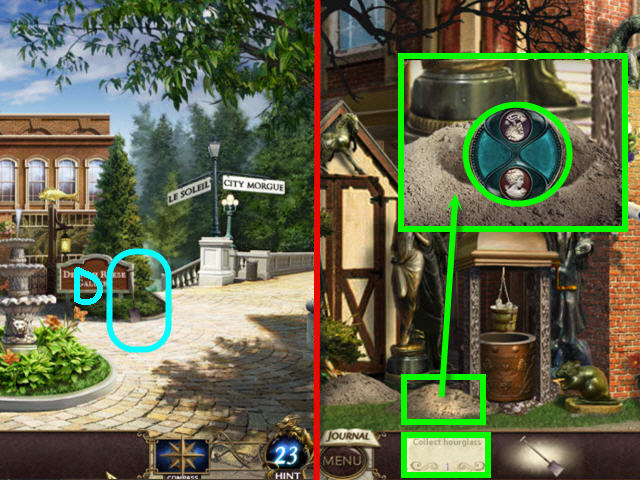
• Take the SHOVEL (D).
• Go straight to Dela’s house.
• Examine and use the SHOVEL on the dirt pile; take the HOURGLASS 2/2.
• Go to the kitchen of the Le Soleil.

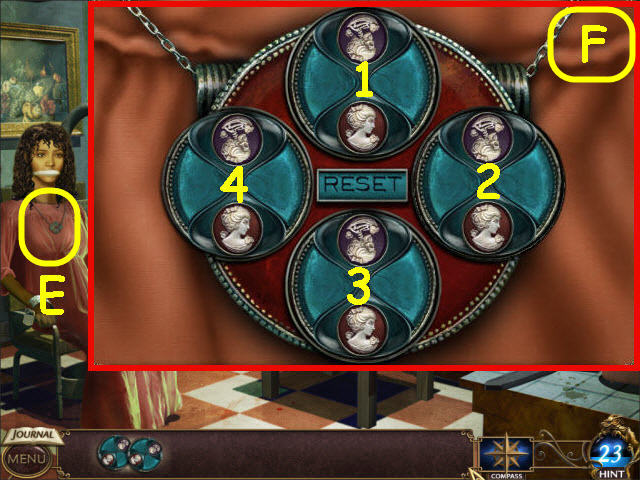
• Examine and place the HOURGLASS on the amulet (E) to trigger a puzzle.
• Turn the hourglasses so the skeletons are all upside down.
• To solve the puzzle, select the following hourglasses: 1, 2, 3 – 2, 3, 4 – 3, 4, 1, and 4, 1, and 2 (F).
• Talk to Kit; take the ANTIQUE RING.
• Play the Psychic Vision game.
• Go to the fountain square and straight up the left path to the antique store.

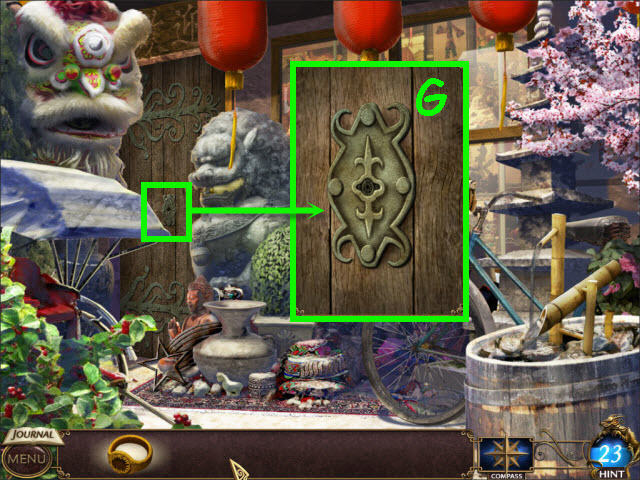
• Examine and use the ANTIQUE RING on the door lock (G).
• Enter the shop and talk to Long Nu to get three tasks.

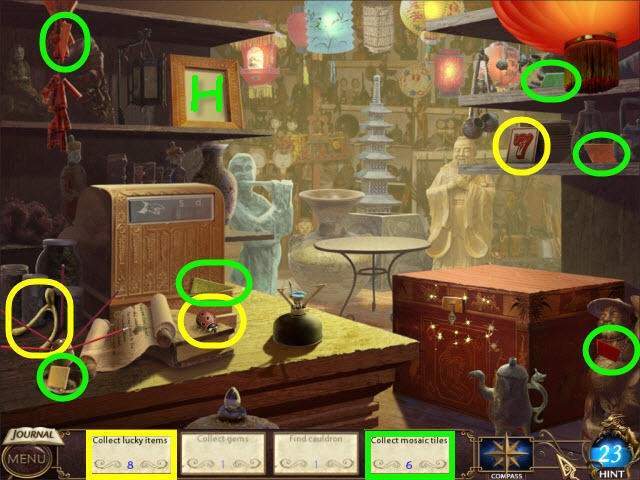
• Examine the frame (H) to get a task.
• Collect the LUCKY ITEMS 1-3/8.
• Collect the 6/6 MOSAIC TILES.
• Examine and place the MOSAIC TILES in the frame (H) to trigger a puzzle.

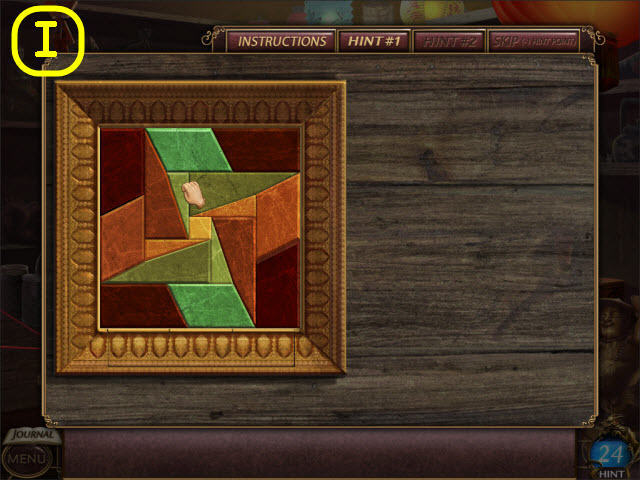
• Place the tiles in the frame to complete the mosaic.
• See screenshot (I) for solution.
• Take the GEMS.
• Examine the trunk and press on the lion to trigger a puzzle.

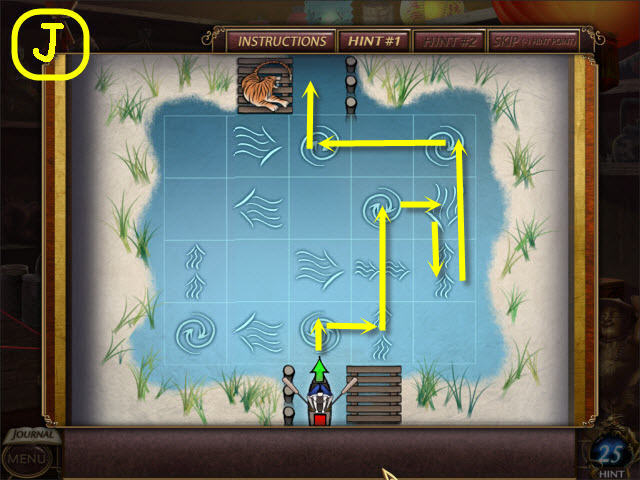
• Get the boat to the tiger by riding the currents.
• To solve the puzzle, select the green arrow or the red square in the following order: Green, red 2x, green, green, red 3x, green, green, and green (J).
• Sometimes the current will turn you without pushing the red square so these directions work best if you do not hesitate.

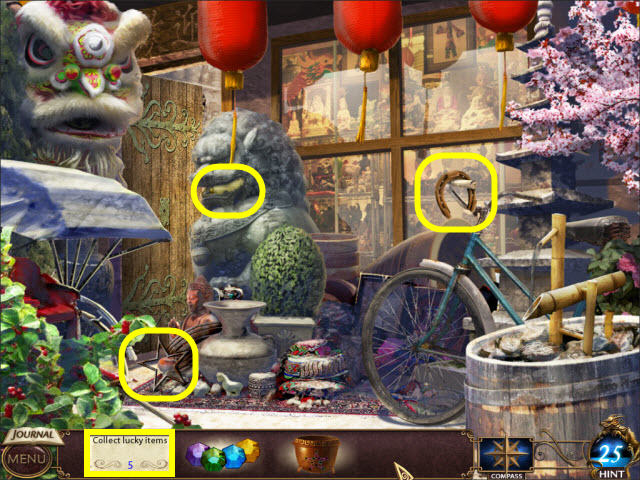
• Find the CAULDRON to get an ANTIQUE CAULDRON.
• Back out.


• Find the LUCKY ITEMS 4-6/8.
• Back out.

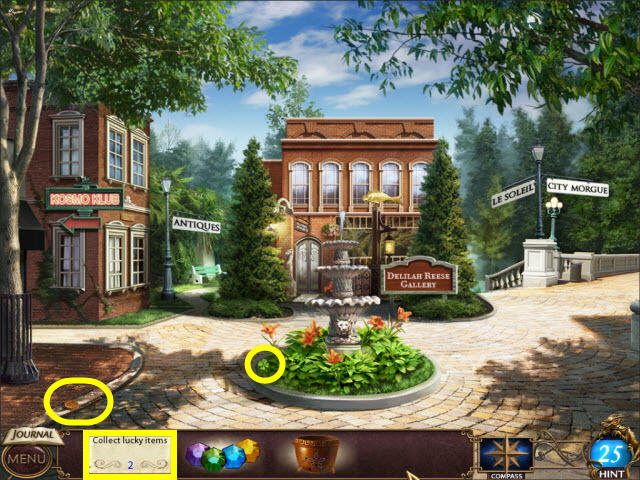
• Find the LUCKY ITEMS 7-8/8 to get the SPELL INGREDIENTS.
• Go back into the antique shop.

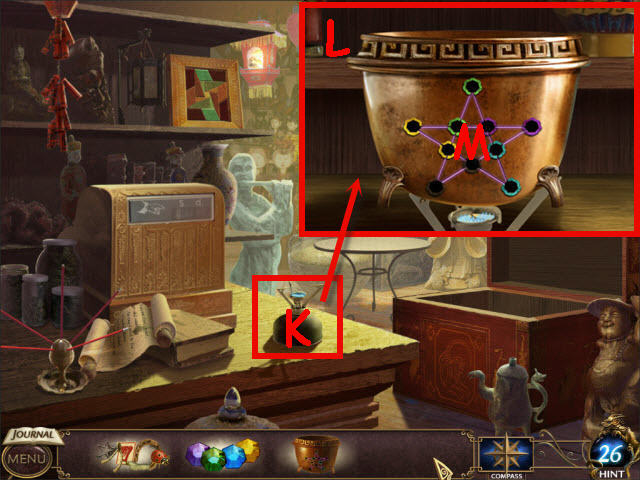
• Examine and place the ANTIQUE CAULDRON on the burner (K).
• Place the SPELL INGREDIENTS in the ANTIQUE CAULDRON (L).
• Place the GEMS on the star (M).
• Examine the ANTIQUE CAULDRON to trigger a puzzle.

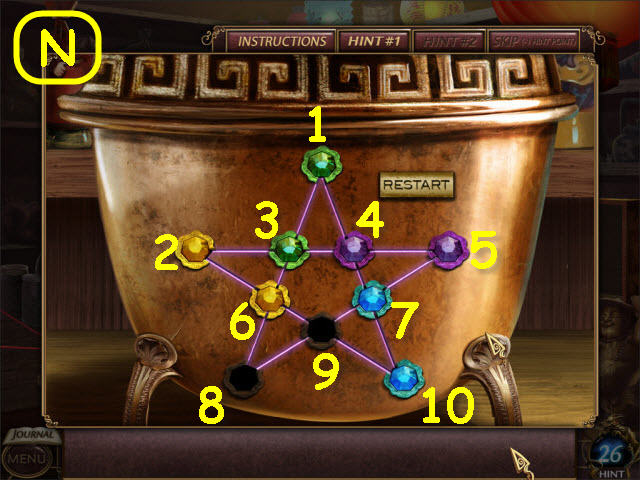
• Move each gem to the same colored slot.
• To solve the puzzle, move the following gems: 4-1, 5-4, 7-5, 9-7, 4-3, 7-4, 6-9, 9-7, 2-6, 3-2, 6-3, and 8-6 (N).

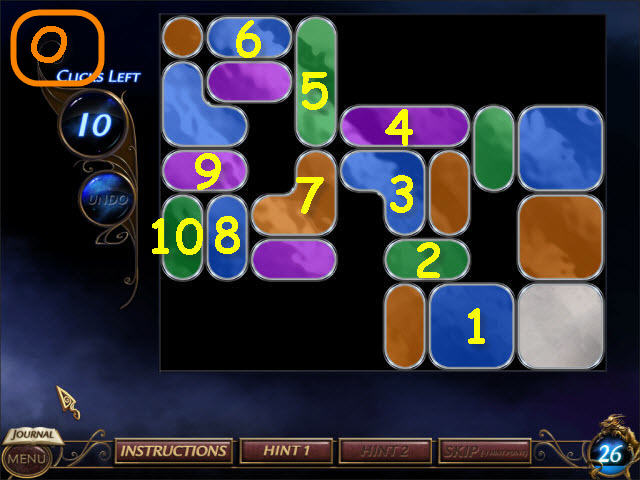
• Turn the entire board silver in 10 selections or under.
• To solve the puzzle, select the colors in this order: Blue, green, blue, purple, green, blue, orange, blue, purple, and green (O).

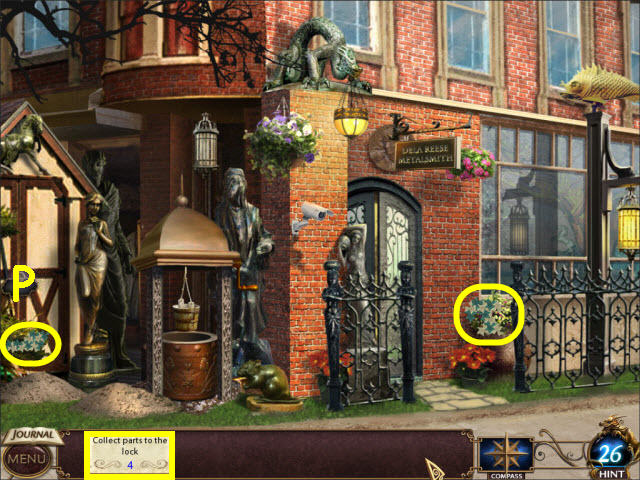
• Exit the house.
• Examine the shed (P) to get a task.
• Collect the PARTS TO THE LOCK 1-2/4.
• Enter Dela’s house.

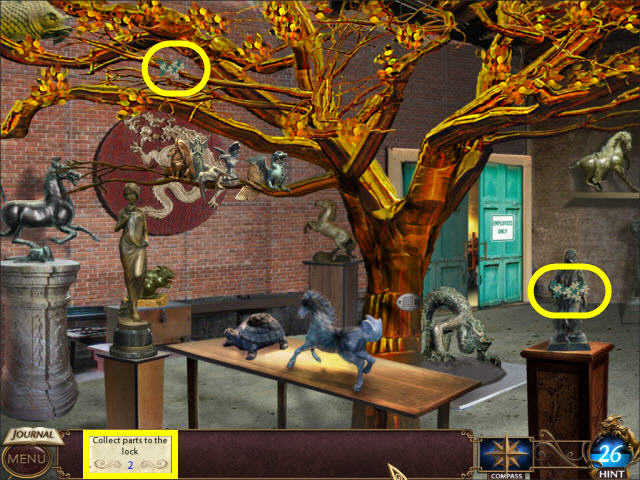
• Collect the PARTS TO THE LOCK 3-4/4 to get the LOCK PARTS.
• Back out.
• Examine and place the LOCK PARTS on the shed lock to trigger a puzzle.

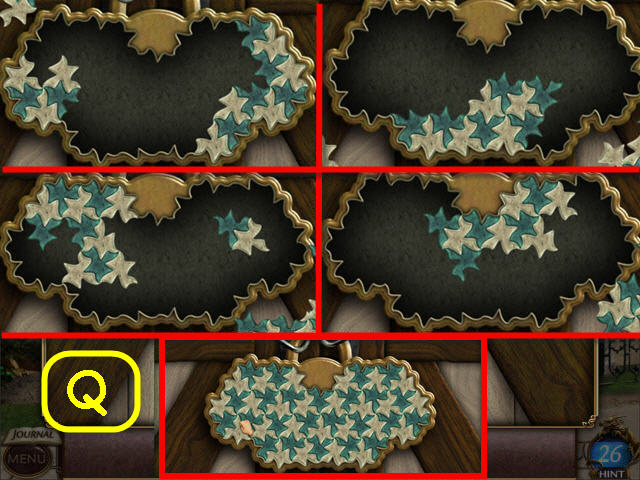
• Rotate and place the LOCK PARTS to complete the pattern.
• See screenshot (Q) for solution.

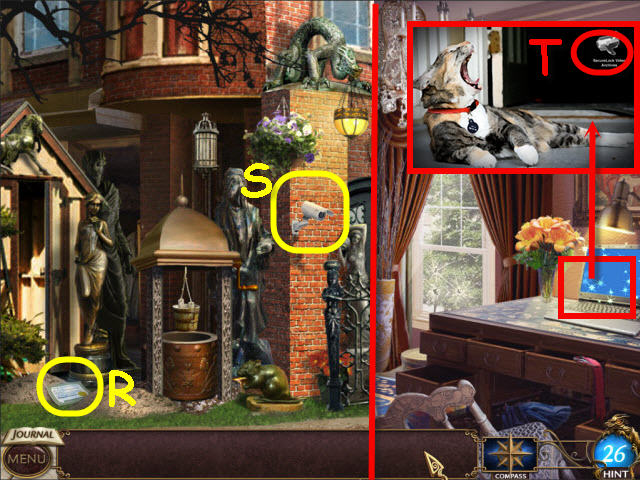
• Examine the death certificate (R).
• Select the security camera (S).
• Go to Dela’s bedroom via the stairs on the left in the workshop.
• Examine the laptop; select the SecureLock Video Archives (T) to trigger a puzzle.

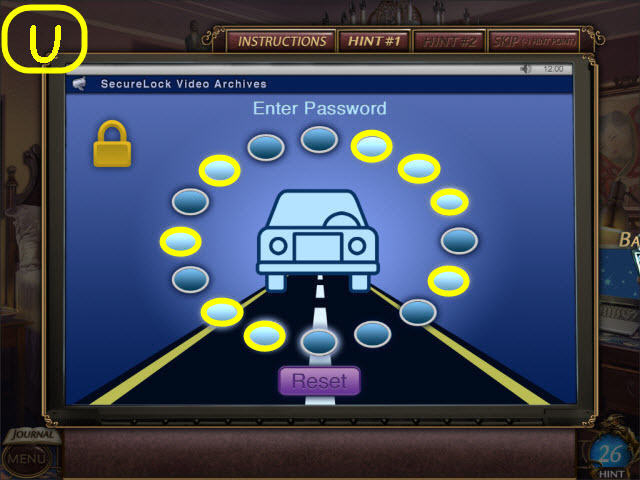
• Select the correct buttons to complete the picture.
• See screenshot (U) for solution.
• Back out.

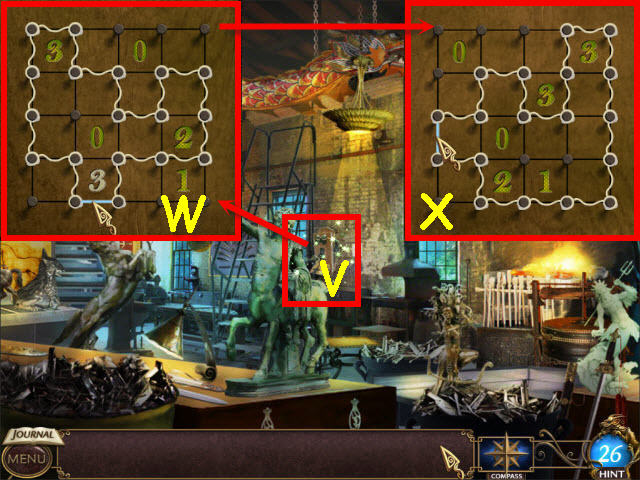
• Examine the phone (V) to trigger a puzzle.
• Connect the posts so that the number of wires surrounding a square equals the number on the panel.
• See screenshot (W-X) for solutions.
• Go to the morgue.

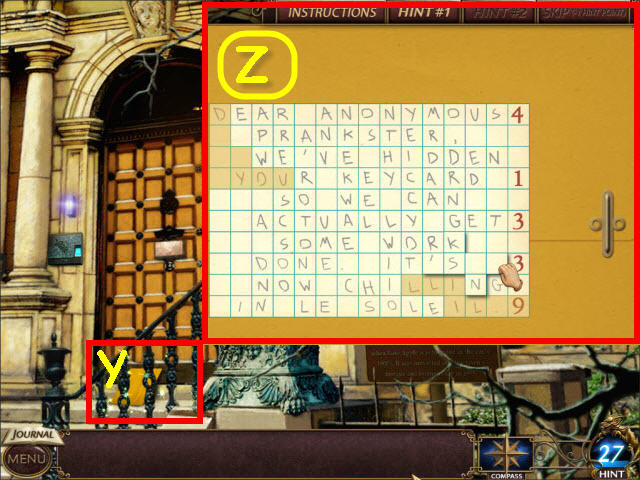
• Examine the envelope (Y) to trigger a puzzle.
• Place the note pieces in the grid to complete the message.
• See screenshot (Z) for solution.
• Get a NUMBER COMBINATION.
• Go into the kitchen of the Le Soliel.

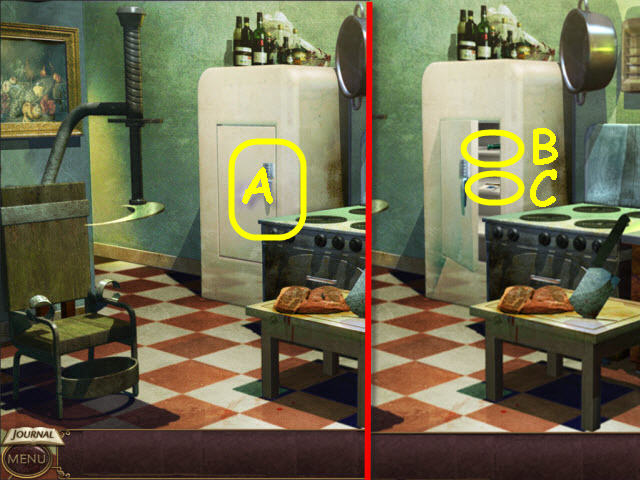
• Examine and use the NUMBER COMBINATION on the freezer door (A).
• Take the SCREWDRIVER (B) and KEYCARD (C).
• Go back to the morgue.

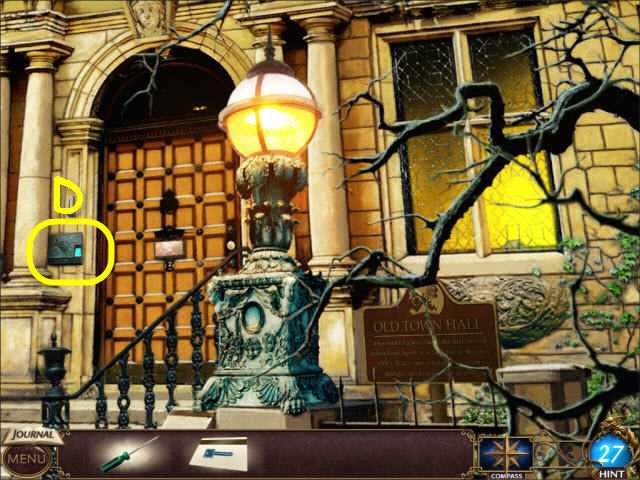
• Examine the print reader (D).
• Use the SCREWDRIVER on the cover plate to trigger a puzzle.

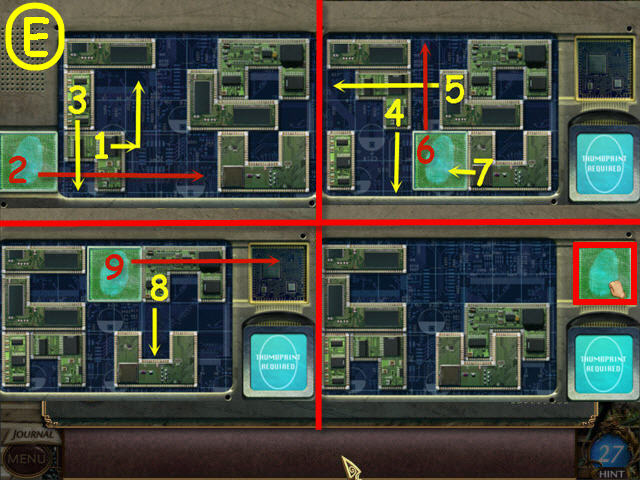
• Move the thumbprint to the panel above the reader.
• See screenshot (E) for solution.

• Examine and use the KEYCARD on the card reader (F).
• Enter the morgue.
• Examine the locked refrigerated compartment (G) to get a task.
• Collect the VALVES 1-2/5.
• Go into the lab on the upper left.

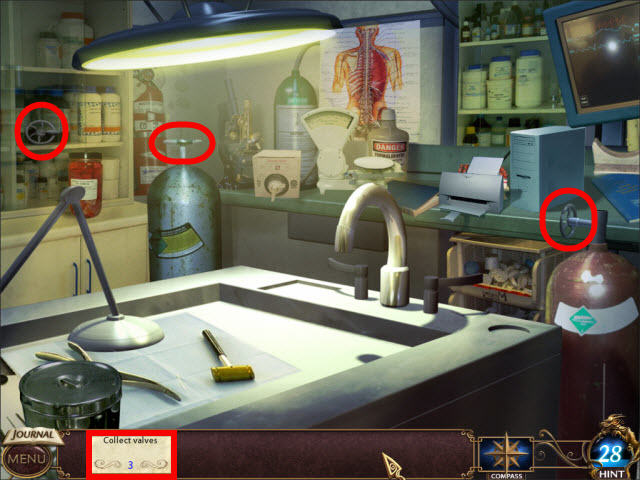
• Collect the VALVES 3-5/5.
• Back out.
• Examine and place the VALVES on the locked refrigerated compartment to trigger a puzzle.

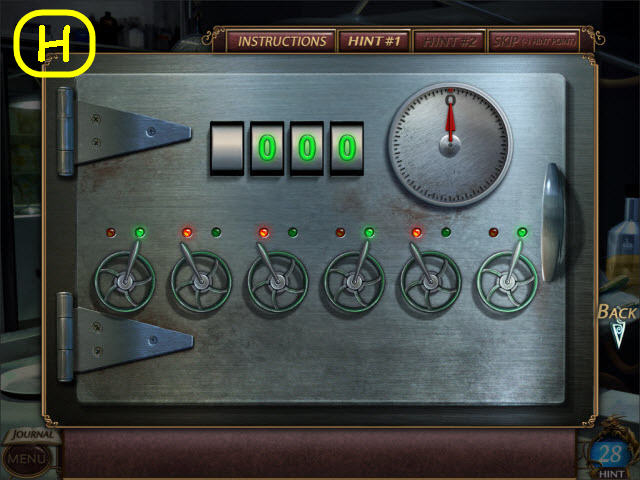
• Adjust the VALVES so that the gauge needle points to zero.
• To solve the puzzle, select the following levers from left: Turn the 1st, 4th, and the 6th lever to the right (H).
• Touch the corpse to trigger a Psychic Vision puzzle.
• Play the puzzle.
• Back out.

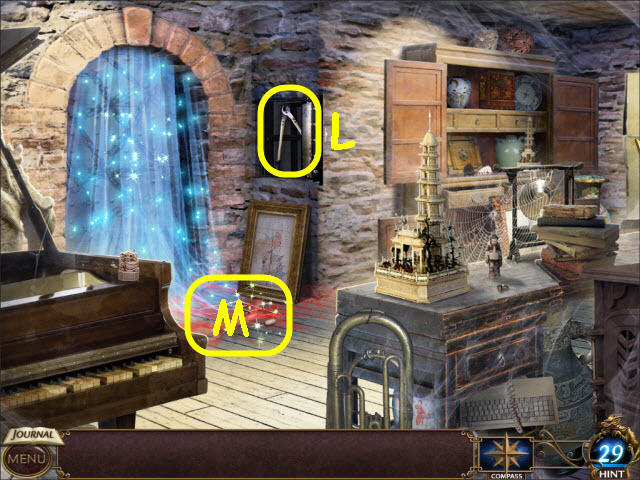
• Take the CROWBAR (I).
• Examine and use the CROWBAR on the picture (J).
• Examine the safe behind the picture to trigger a puzzle.

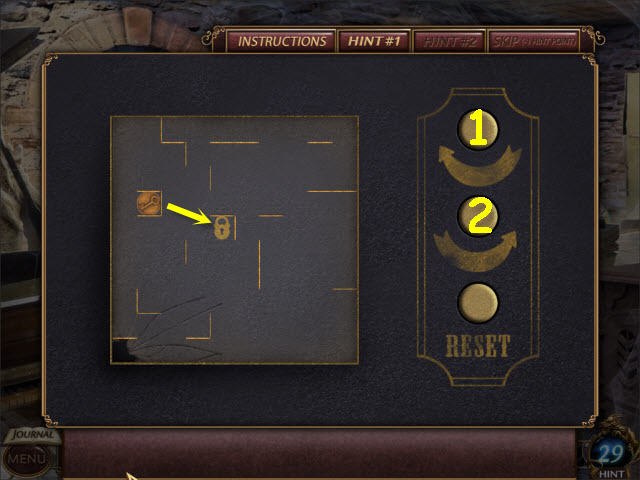
• Use the buttons on the right to move the key to the lock.
• To solve the puzzle, press the buttons in the following order: 2, 1×3, 2×3, 1×2, 2×2, 1×4, and 2×2 (K).


• Take the BOLT CUTTERS (L).
• Examine the red alarm on the floor (M) to trigger a puzzle.


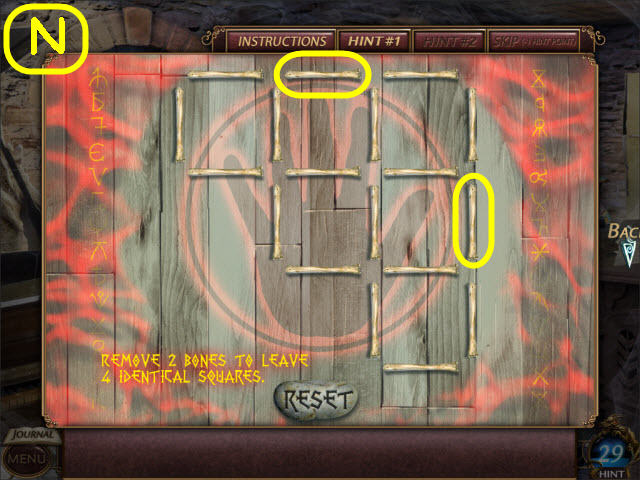
• Remove two bones to leave 4 identical squares.
• See screenshot (N) for bones to remove.

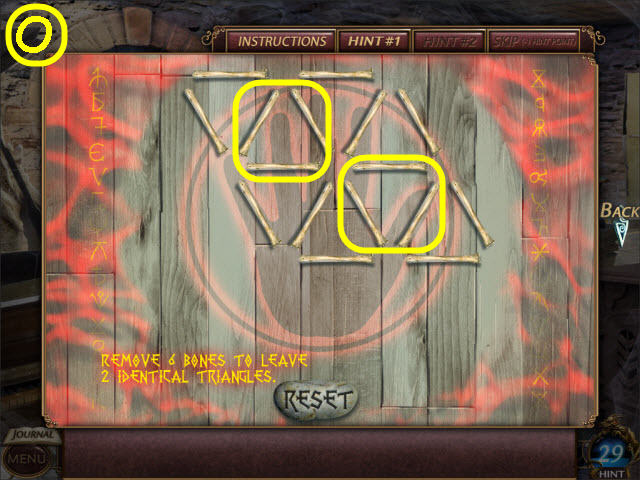
• Remove six bones to leave 2 identical triangles.
• See screenshot (O) for bones to remove.
• Examine the doorway to trigger a puzzle.

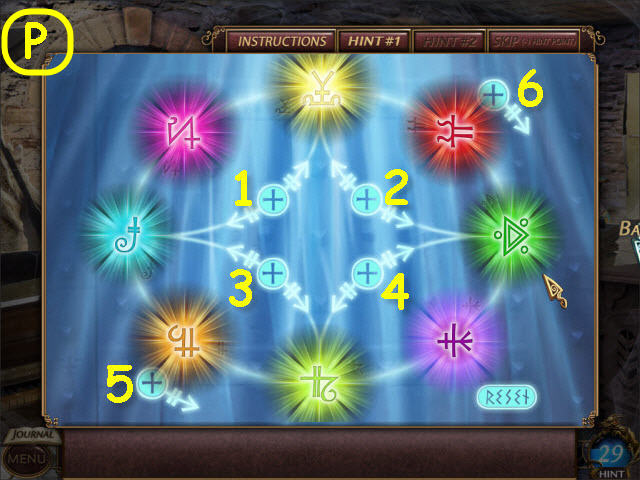
• Place the large symbols next to their matching symbols using the buttons.
• To solve the puzzle, press the following buttons: 2, 1, 4, 6, 4, 2, and 4 (P).

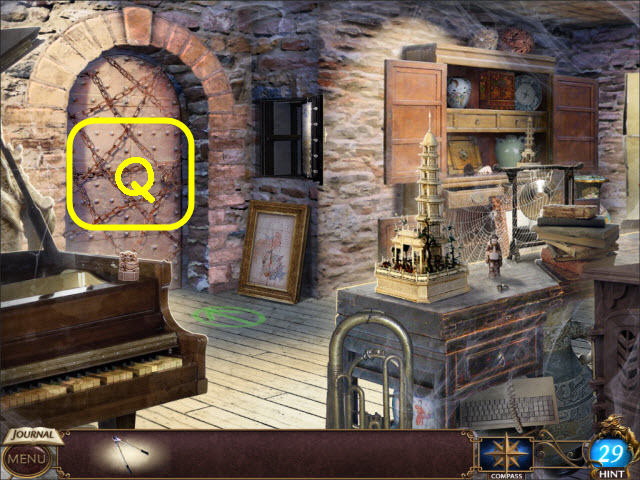
• Examine and use the BOLT CUTTERS on the chains on the door (Q).
• Go through the newly-opened door.

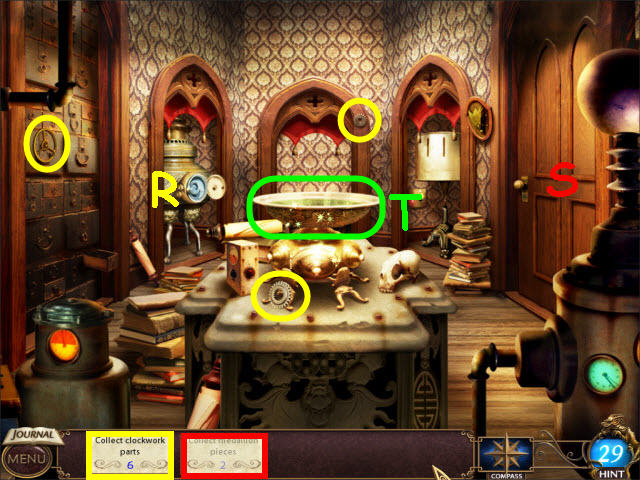
• Examine the urn (R) and door (S) to get tasks.
• Collect the CLOCKWORK PARTS 1-3/6.
• Examine the fountain (T) to trigger a puzzle.

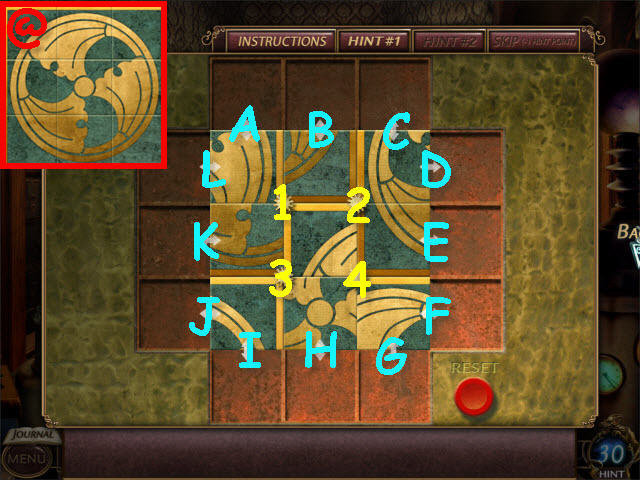
• Unscramble the tiles to complete the image.
• To solve the puzzle, select the following arrows or buttons: 1×2, A, 4×2, 3, I, 3, 2×2, C, 4×2, H, 4, E, F, 3×2, K, 2, B, 2×2, A, B, C, E, F, H, I, and K (@).

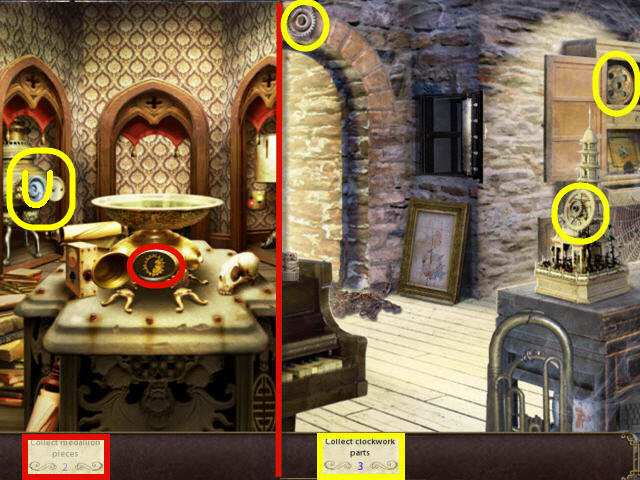
• Collect the MEDALLION PIECE 1/2.
• Back out.
• Collect the CLOCKWORK PARTS 4-6/6.
• Go straight through the doorway.
• Examine and place the CLOCKWORK PARTS on the urn (U) to trigger a puzzle.

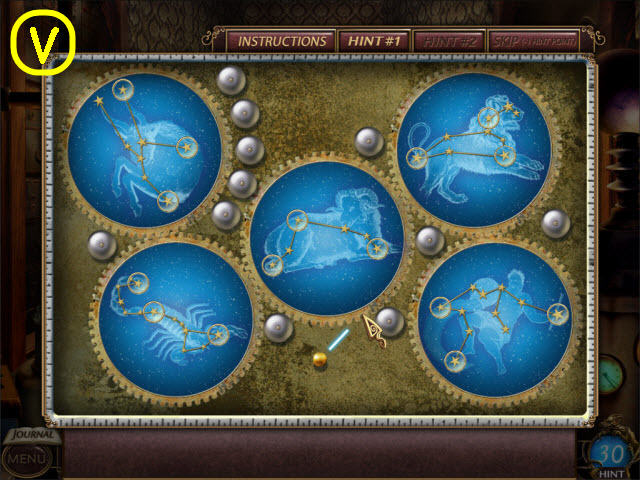
• Shoot the stars into the holes by bouncing them off the walls.
• See screenshot (V) for solution.
• Take the MEDALLION PIECE 2/3 to get MEDALLION PIECES.
• Examine and place the MEDALLION PIECES on the door.
• Go through the newly opened door.

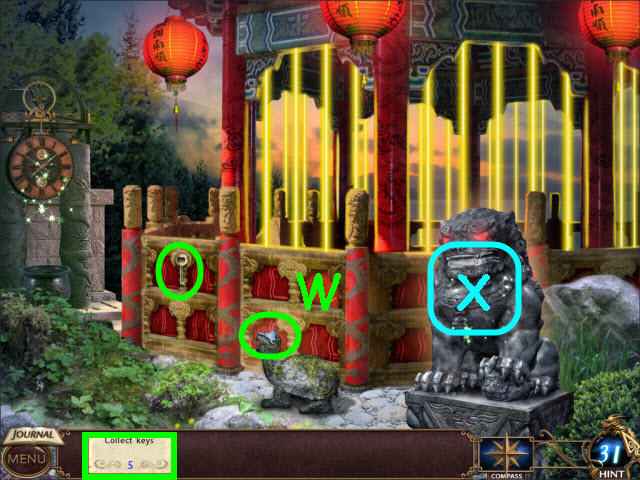
• Examine the recess (W) in the gazebo wall to get a task.
• Collect the KEYS 1-2/5.
• Examine the statue (X) and press the center panel to trigger a puzzle.

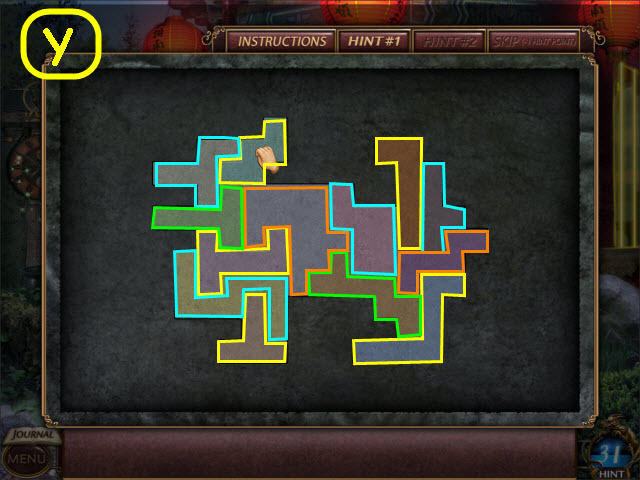
• Assemble and rotate the pieces to complete the jigsaw.
• See screenshot (Y) for solution.

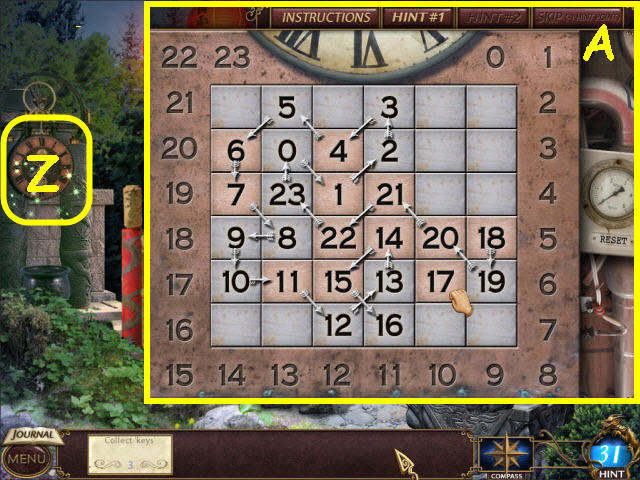
• Examine the clock (Z) to trigger a puzzle.
• Place the numbers on the grid so that the numbers from 0-23 are all adjacent in numerical order.
• See screenshot (A) for solution.
• Back out twice.

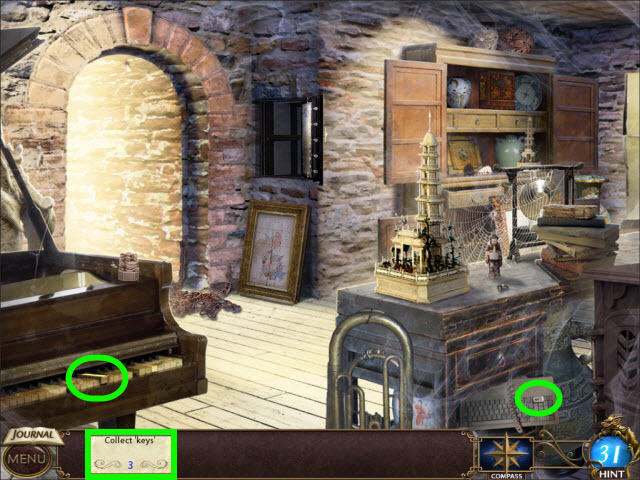
• Collect the 3-4/5 KEYS.
• Go straight through the door.

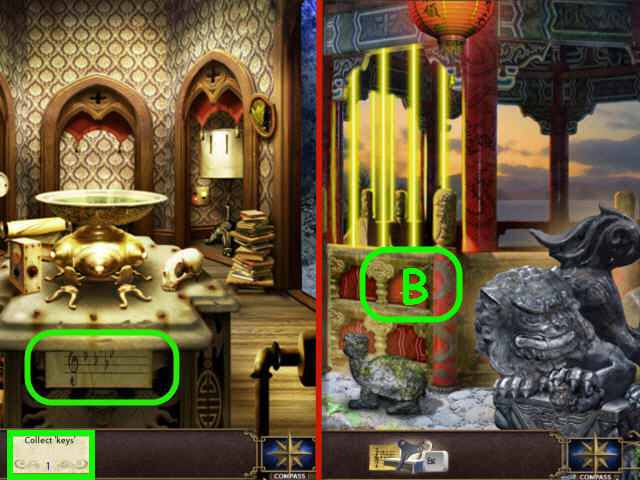
• Collect the 5/5 KEYS; get the VARIOUS KEYS.
• Go through the door on the right.
• Examine and place the VARIOUS KEYS on the recessed panel (B) to trigger a puzzle.

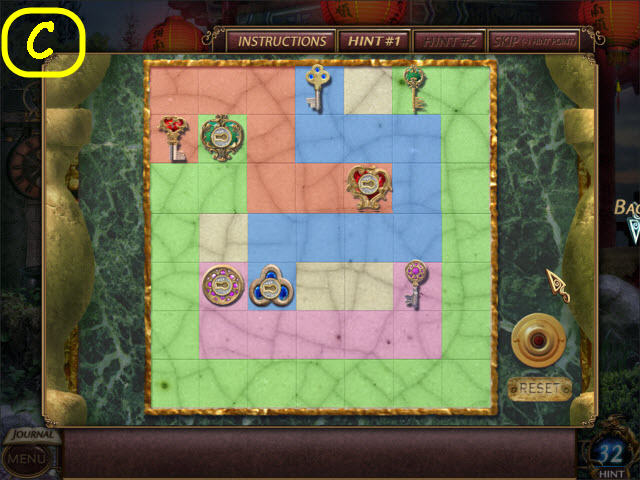
• Draw a path from each key to their matching keyhole.
• See screenshot (C) for solution.

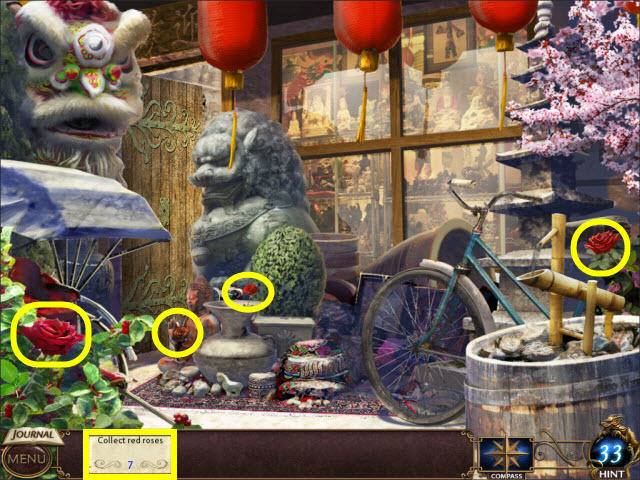
• Turn the entire board silver in 8 selections or under.
• To solve the puzzle, select the colors in this order: green, purple, orange, blue, green, orange, blue, and purple (D).

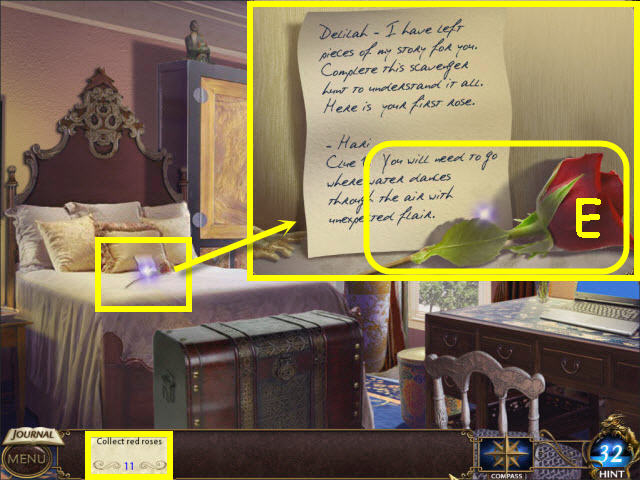
• Examine and take the RED ROSE 1/12 (E) and get a task.
• Back out three times.

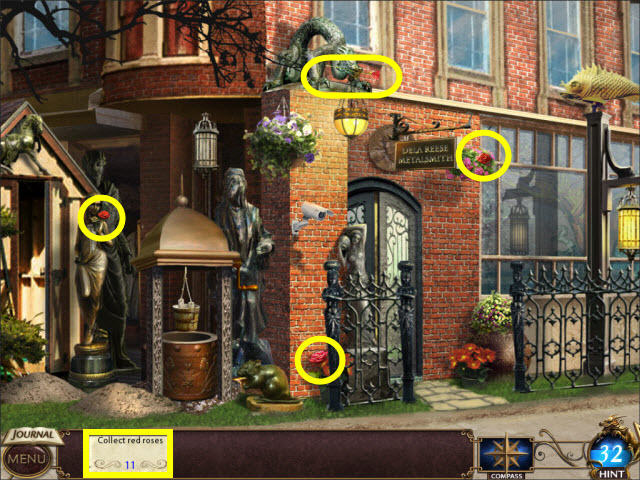
• Collect the RED ROSE 2-5/12.
• Back out and go forward to the antique shop.


• Collect the RED ROSE 6-9/12.
• Back out.

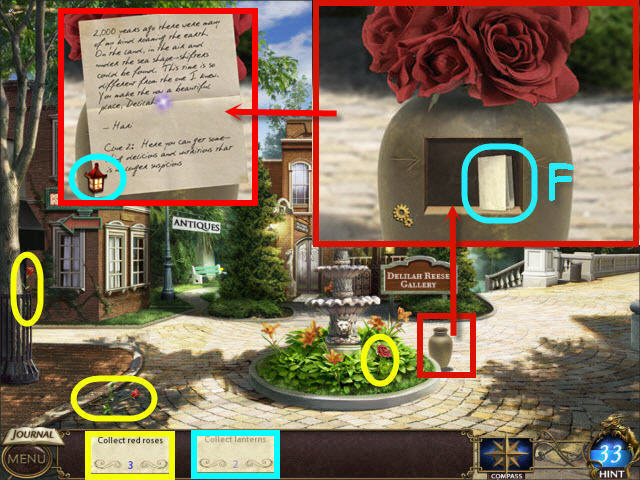
• Collect the RED ROSE 10-12/12; get the ROSES.
• Examine and place the ROSES in the vase; take and read the note (F) to get a task.
• Take the LANTERN 1/3.
• Go to the Le Soleil Restaurant.

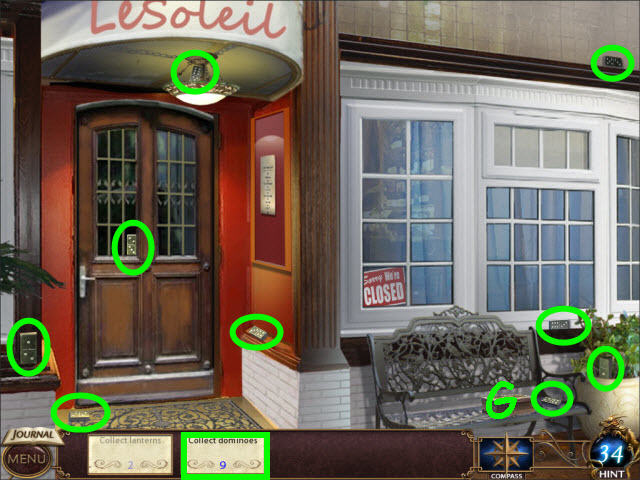
• Examine the box (G) to get a task.
• Collect 9 DOMINOES.
• Examine and place the DOMINOES on the box to trigger a puzzle.

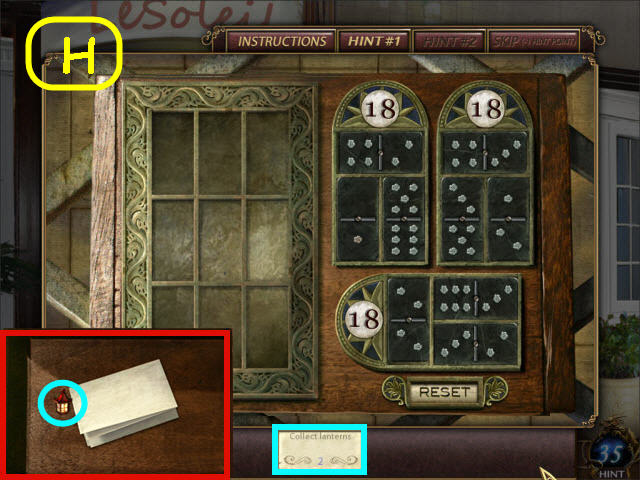
• Place the DOMINOES in the boxes on the right so that each box adds up to the same number.
• See screenshot (H) for solution.
• Take the note.
• Collect the LANTERNS 2/3.
• Go into the antique shop.

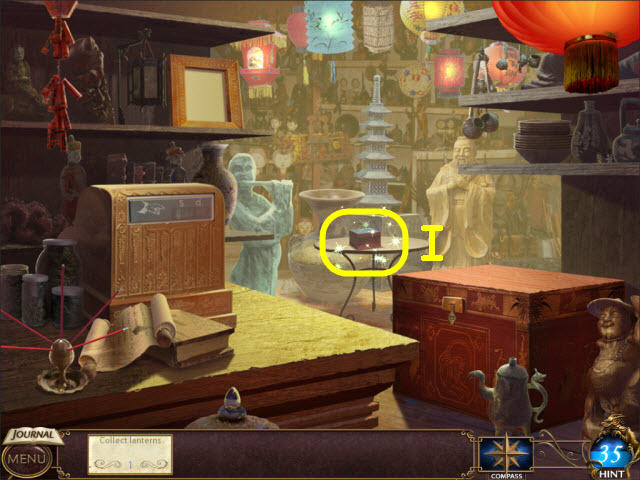
• Examine the box (I) to trigger a puzzle.

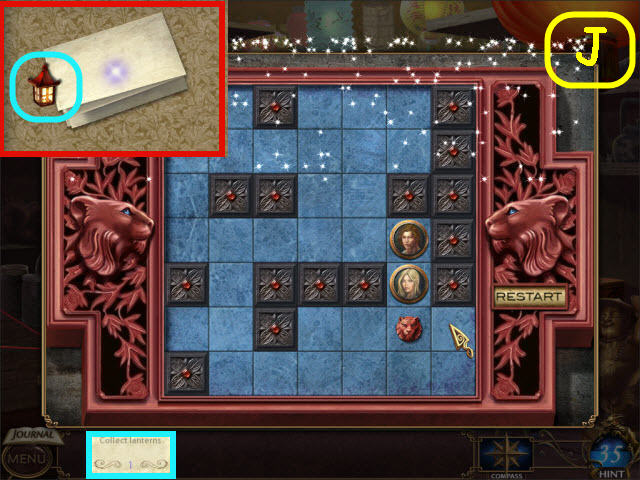
• Use the lion to move Hari and Deli together in adjacent squares.
• To solve the puzzle, select the lion and press on the following arrows: Right 5x, Up, Left, Down, Left 4x, Up 2x, Down 2x, Right 4x, Up 3x, Left 2x, Up 2x, Left 3x, Down 2x, Right 4x, Left 3x, Down 3x, Right 2x, Up, Right, Down, Right, and Up (J).
• Read the note.
• Take the LANTERNS 3/3.
• Go to Dela’s bedroom.

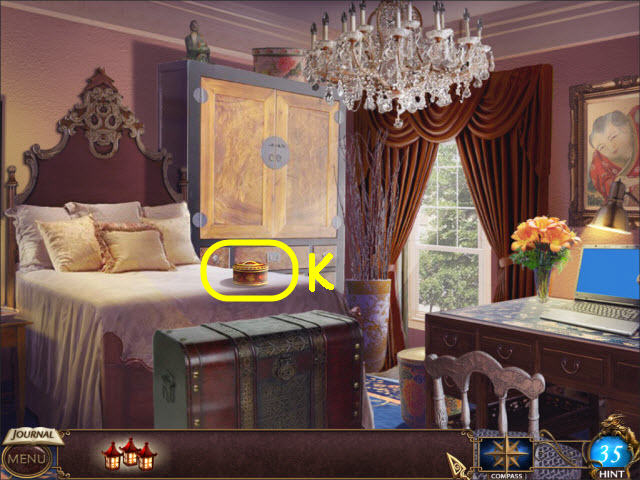
• Examine and place the LANTERNS on the box (K) to trigger a puzzle.

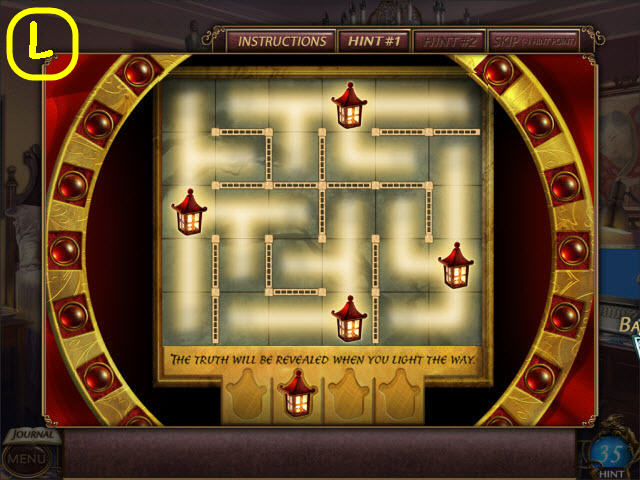
• Place the LANTERNS on board to light up all the spaces.
• See screenshot (L) for solution.
• Congratulations! You have successfully completed Tiger Eye: The Sacrifice.



 Eternity Walkthrough, Guide, & Tips
 Lost Realms: The Curse of Babylon Walkthrough, Guide, & Tips
 Twisted Lands: Insomniac Walkthrough, Guide, & Tips
 Mystery Tales: Alaskan Wild Walkthrough, Guide, & Tips
 The Surprising Adventures of Munchausen Walkthrough, Guide, & Tips