Spirits of Mystery: Song of the Phoenix Walkthrough, Guide, & Tips
Spirits of Mystery: Song of the Phoenix Walkthrough

Welcome to the Spirits of Mystery: Song of the Phoenix Walkthrough
Reunite the Dragon and Pheonix Kingdoms to stop the evil witch!
Whether you use this document as a reference when things get difficult or as a road map to get you from beginning to end, we’re pretty sure you’ll find what you’re looking for here.
This document contains a complete Spirits of Mystery: Song of the Phoenix game walkthrough featuring annotated screenshots from actual gameplay!
We hope you find this information useful as you play your way through the game. Use the walkthrough menu below to quickly jump to whatever stage of the game you need help with.
Remember to visit the Big Fish Games Forums if you find you need more help. Have fun!
This walkthrough was created by MargieB, and is protected under US Copyright laws. Any unauthorized use, including re-publication in whole or in part, without permission, is strictly prohibited.
General Tips

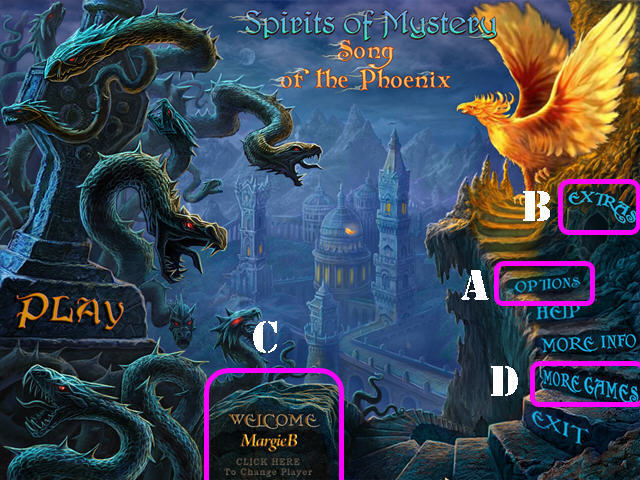
- This is the Official Guide for Spirits of Mystery: Song of the Phoenix Standard Edition.
- The Options (A) Button allows you to change Play Mode, adjust the screen, music, cursor, and sound.
- The Extras (B) Button is only accessible in the Collector’s Edition.
- The ‘Click here to change player’ button (C) can be used to manage your profiles in the game.
- Select ‘More Games’ (D) to view other titles from the developer.
- The HINT button is accessible in both HOS and in quest scenes but you must wait for it to recharge in between uses.
- This guide will refer to Hidden Object Scenes as ‘HOS’ and Hidden Object Puzzles as ‘HOP’.
- In the HOP you must find the items that appear in silhouette at the bottom of the screen on the scene. Only a few pieces will be available at a time. Use the pieces as you find to uncover other items in the scene.
- Listed items in HOS may be random; our lists may vary from yours. Items written in yellow in HOS require an action to be performed before the item(s) can be visible.
- When poisoned plants appear on the scene, use the Golden Phoenix Amulet in the lower left corner to find the light magic symbols in the scene. The number on the amulet symbolizes the amount of symbols left to find in that scene.
- Items will stay in inventory until they are no longer needed.
Chapter 1: The Arrival

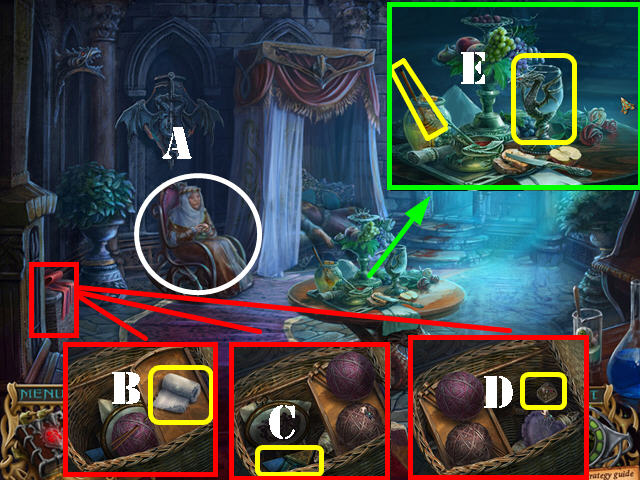
- Talk to Kim (A).
- Open the box; look into it and take the BANDAGE (B).
- Move the cover aside and then push the items on the right aside. Press on the left cover; push the left items aside and take the PUZZLE PIECE 1/4 (C).
- Push the right items aside and take the OWL BROOCH (D).
- Examine the table; take the EMPTY GLASS and the HONEY STICK (E).

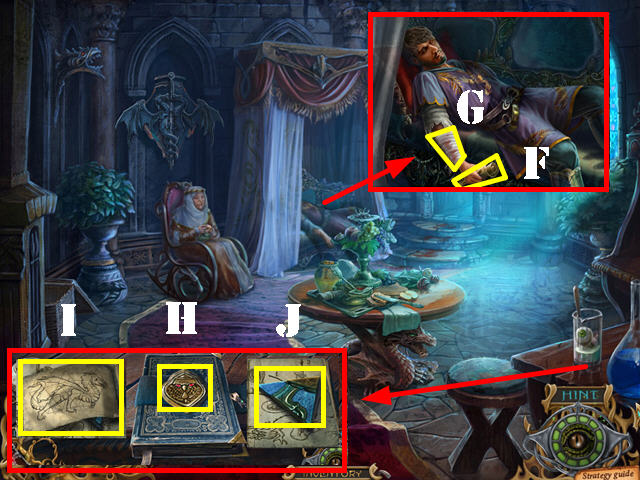
- Zoom into the man; take the letter (F) and touch his arm.
- Put the BANDAGE on his arm and he will ask for some water (G).
- Look at the table; put the OWL BROOCH on the book (H).
- Open the book; take the diagram (I) and the PUZZLE PIECE 2/4 (J).
- Go through the door.

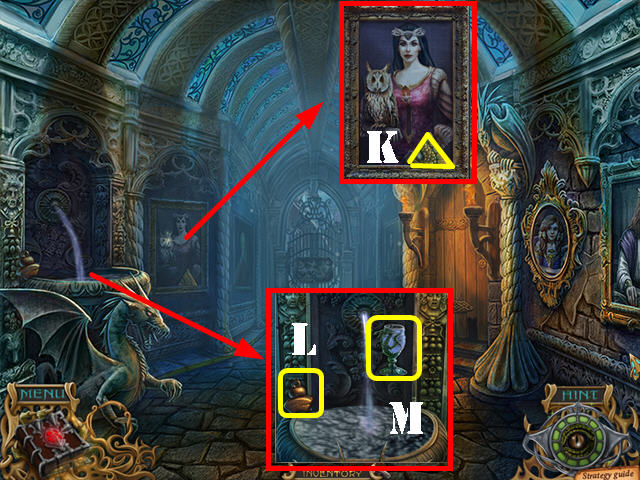
- Examine the portrait; take the PUZZLE PIECE 3/4 (K).
- Examine the fountain; take the first WEIGHT (L).
- Put the EMPTY GLASS in the water to get the GLASS OF WATER (M).
- Walk down.

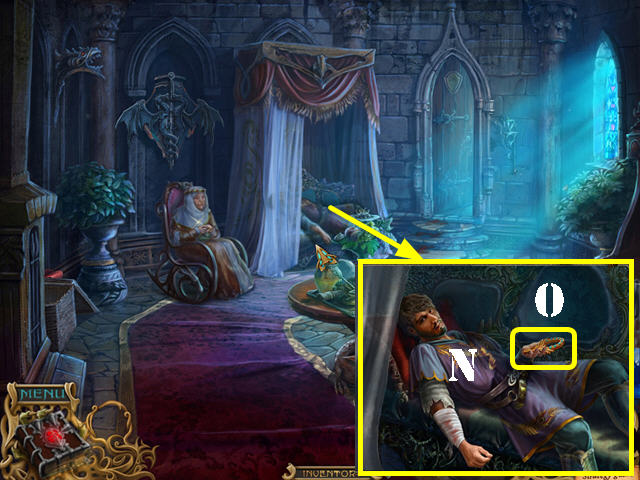
- Examine the man; give him the GLASS OF WATER (N).
- Take the amulet from his hand (O).
- Go through the door.

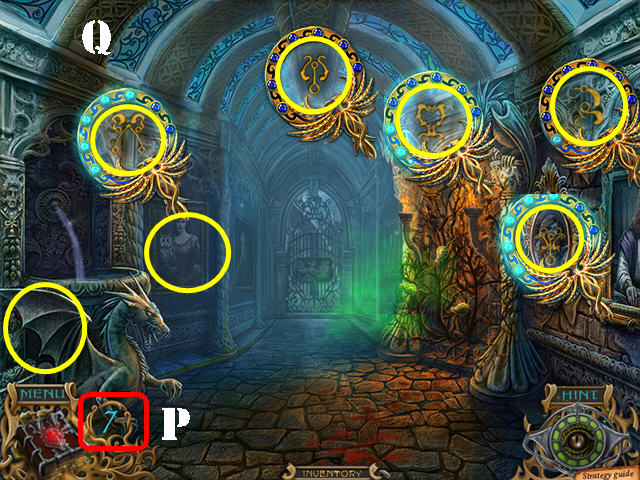
- Poison plants appear on the door; use the Golden Phoenix Amulet (P) to search for magic symbols in the scene.
- The areas marked in yellow represent the approximate areas of all the 7 symbols (Q).

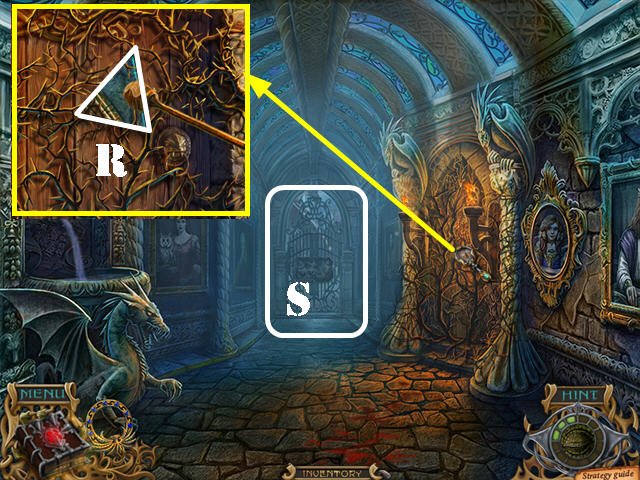
- Zoom into the door; use the HONEY STICK to get the PUZZLE PIECE 4/4 (R).
- Examine the back gate (S).

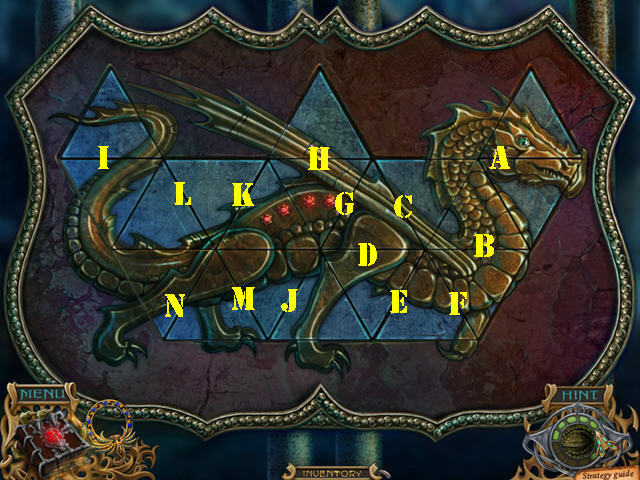
- Put the 4 PUZZLE PIECES on the lock to activate a puzzle.
- Complete the image by swapping the tiles.
- To solve the puzzle, swap the pieces in this order: A, B, C, D, E, F, D, E, C, G, H, I, C, D, C, J, K, L, M, J, M, and N.
- Go through the gate.

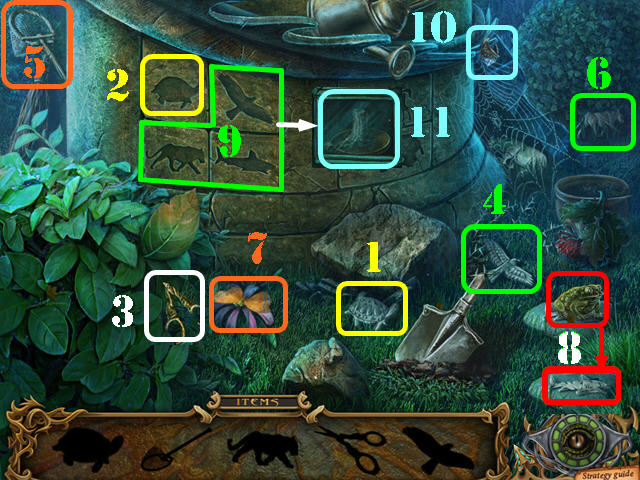
- Play the HOP.
- Take the turtle (1); put the turtle in its matching slot (2).
- Move the leaf; take the scissors (3).
- Cut the thorns with the scissors; take the eagle (4).
- Take the net (5) and the cat (6).
- Use the net on the butterfly while it’s in the resting position; take the butterfly (7).
- Give the butterfly to the frog; take the shark (8).
- Put the shark, eagle, and cat in their matching slots on the left (9).
- Take the diamond ring (10).
- Cut the glass with the diamond ring; take the CANDLESTICK to add it to inventory (11).

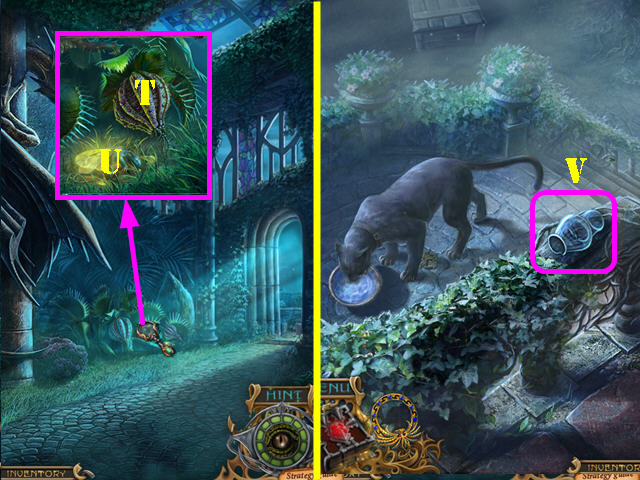
- Examine the plant; take the DREAM BERRY (T) and the SLEEPING FAIRY MOUSE (U).
- Go through the door.
- Take the POTION VESSEL (V).
- Walk down 3 times.

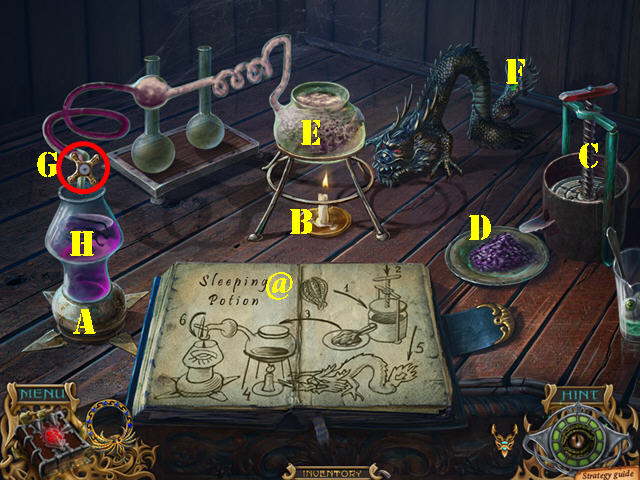
- Zoom into the corner table; read the instructions for the sleeping potion (@).
- Put the POTION VESSEL on the stand (A).
- Place the CANDLESTICK below the glass container (B).
- Put the DREAM BERRY in the press (C) and press on it.
- Drag the berry juice (D) into the glass container (E).
- Press on the dragon’s tail to make it breathe fire (F).
- Turn the valve (G) and take the SLEEPING POTION (H).

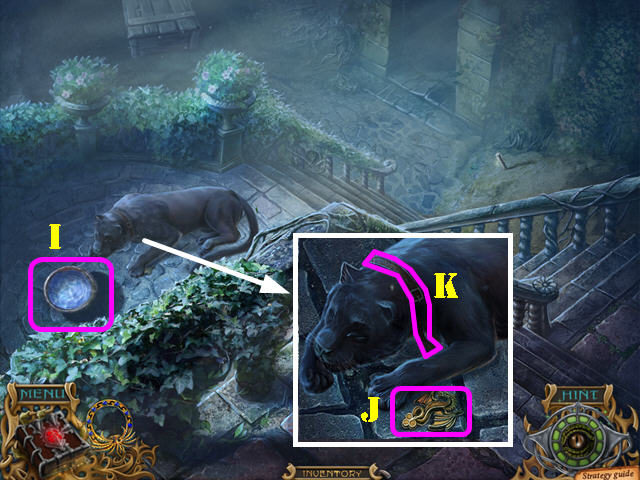
- Go back to the panther.
- Put the SLEEPING POTION in the bowl (I).
- Zoom into the panther; lift its paw and take the DRAGON CREST 1/3 (J).
- Unleash the COLLAR and take it (K).
- Go through the doorway.
Chapter 2: The Guard’s Tower

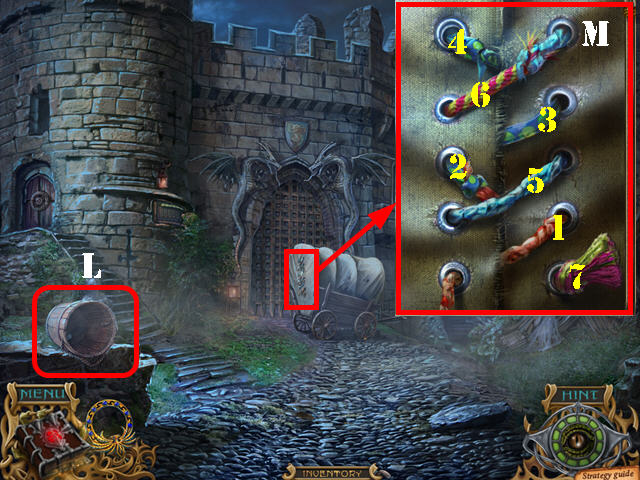
- Take the EMPTY BUCKET (L).
- Examine the wagon cover.
- Remove the ropes one by one in the order shown in the screenshot to activate a HOP (M).

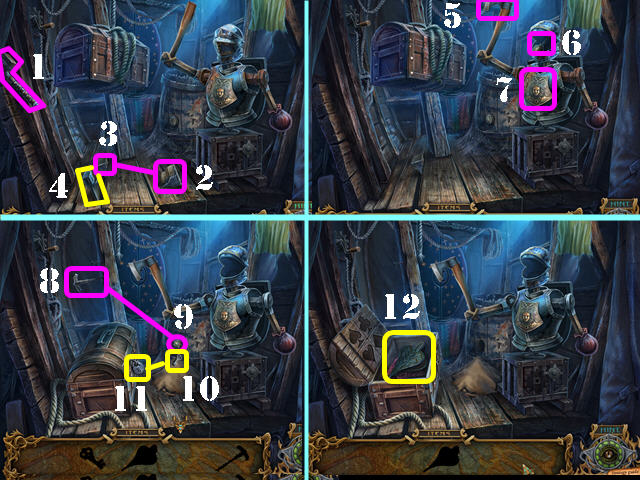
- Play the HOP.
- Take the hammer (1) and the wedge (2).
- Put the wedge next to the axe head (3); use the hammer on the wedge and take the axe head (4).
- Put the axe head on the handle (5).
- Open the helmet and take the oiler (6). Use the oiler on the breastplate and then press on the axe (7).
- Take the corkscrew (8) and use it on the cork (9).
- Take the key (10). Put the key in the lock (11).
- Open the chest and take the BELLOWS to add it to inventory (12).
- Walk down thrice.

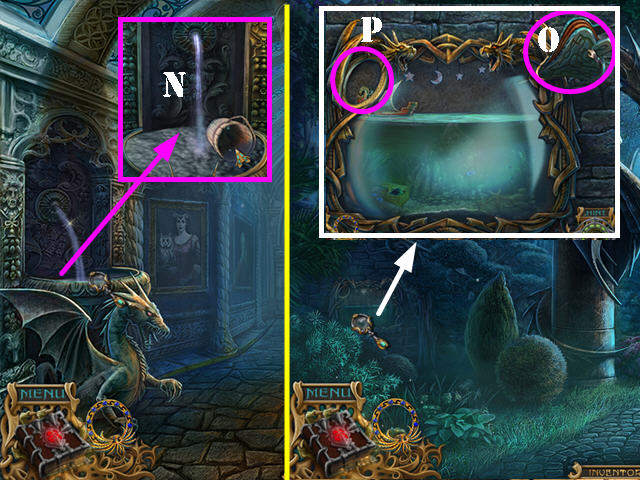
- Zoom into the fountain; put the EMPTY BUCKET in the water to get the BUCKET OF WATER (N).
- Go forward.
- Zoom into the fish tank; put the BELLOWS in the right hole (O) and pour the BUCKET OF WATER into the left hole (P).
- Press on the bellows twice to make the boat reach the hole on the left.
- Take the DRAGON CREST 2/3 (P).

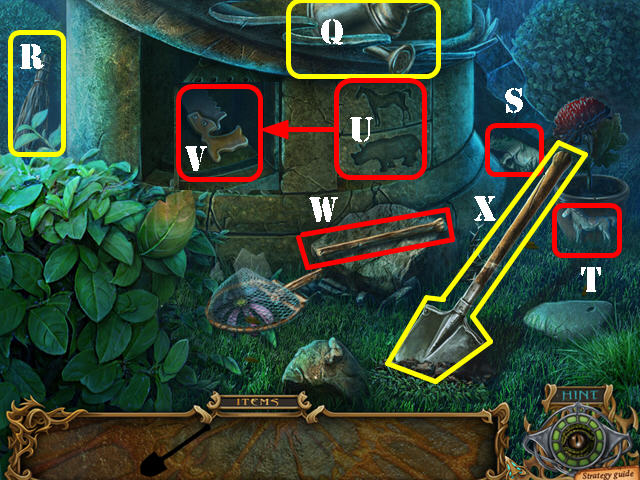
- Play the HOP.
- Take the watering can (Q) and the broom (R).
- Use the broom on the cobweb and take the rhino (S).
- Use the watering can in the pot and take the horse (T).
- Put the horse and the rhino in the slots (U) and take the saw (V).
- Cut the handle (W) with the saw; take the handle and put the handle on the shovel head (X).
- Take the SHOVEL to add it to inventory.

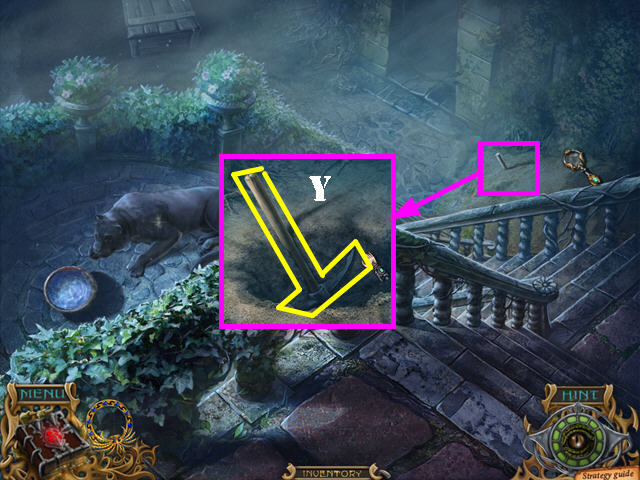
- Go out the door.
- Zoom into the sand; use the SHOVEL in the sand and take the PICKAXE (Y).
- Go through the doorway.

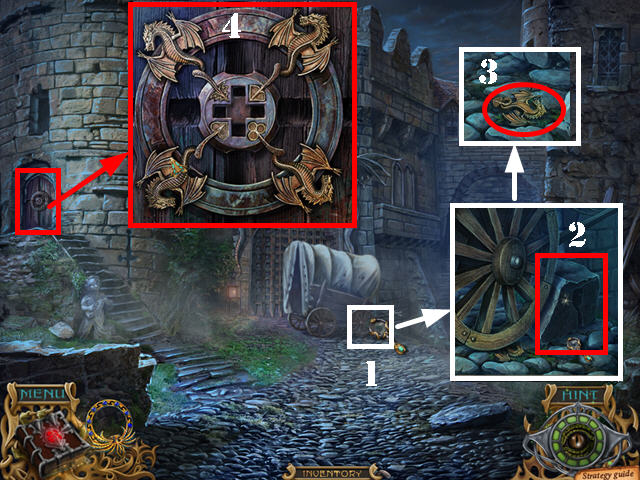
- Look at the wheel on the wagon (1).
- Use the PICKAXE on the rock; the wagon will move out of the way (2).
- Take the DRAGON CREST 3/3 (3).
- Zoom into the door; put the 3 DRAGON CRESTS in the lock to activate a puzzle.
- Rotate the locks until each symbol is next to the matching silhouette (4).
- Go into the guard’s tower.

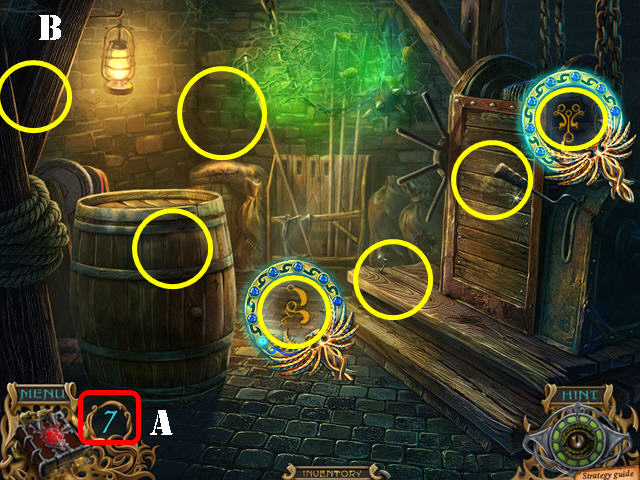
- Use the Golden Phoenix Amulet (A) to search for magic symbols in the scene.
- The areas marked in yellow represent the approximate areas of all the 7 symbols (B).

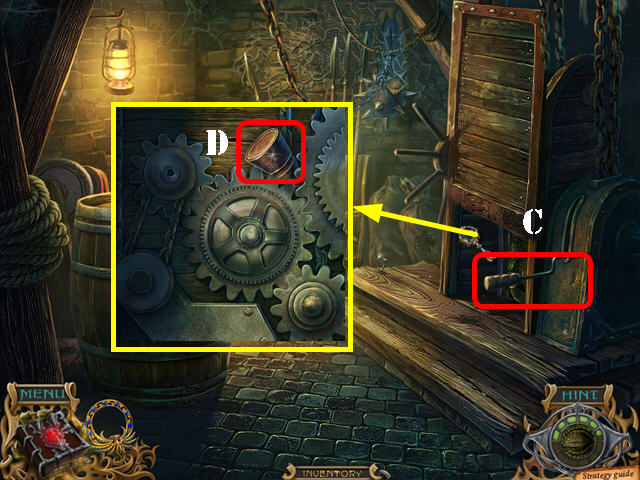
- Pull the handle (C).
- Zoom into the door and take the second WEIGHT (D).
- Walk down.

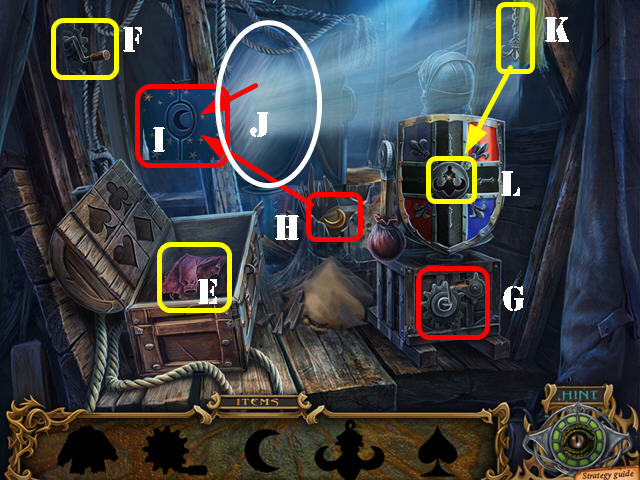

- Play the wagon HOP.
- Take the shirt (E) and the crank (F).
- Put the crank on the side of the crate (G); press on the crank and take the moon (H).
- Put the moon in the slot (I).
- Wipe the mirror with the shirt (J); lift the cloth and take the decoration (K).
- Put the decoration in the slot on the shield (L).
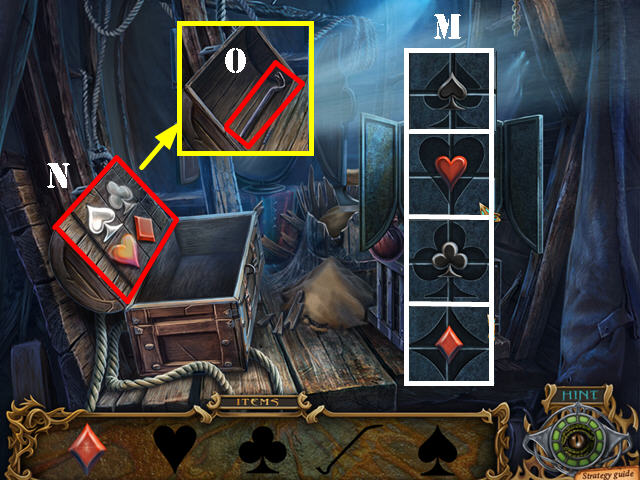
- Press on the squares until you form the images of the club, heart, diamond, and spade. Take the club, heart, diamond, and spade in the center of the square (M).
- Put the club, heart, diamond, and spade into the slots on the chest (N).
- Take the CROWBAR to add it to inventory (O).
- Walk down.

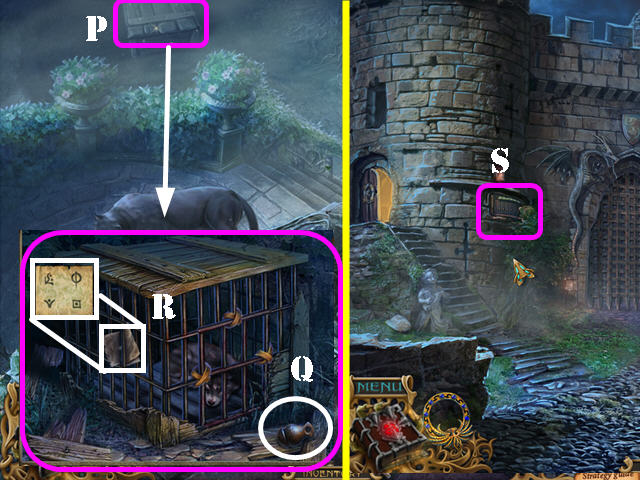
- Zoom into the crate; break it with the CROWBAR (P).
- Take the third WEIGHT (Q) and the note (R).
- Go through the door.
- Zoom into the mechanism next to the gate (S).

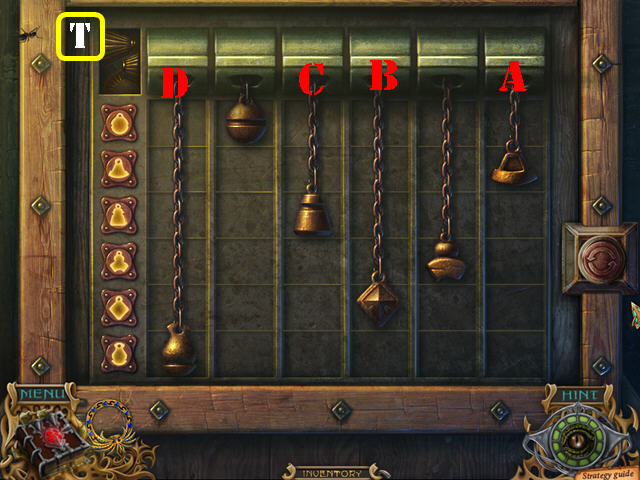
- Put the 3 WEIGHTS on it to activate a puzzle.
- Drag the weights up or down until you light up the symbols on the left.
- To solve the puzzle, drag the pieces down in this order: move A up 2 spots, move B down 2 spots, move C down 1 spot, and move D down 2 spots.
- Go through the gate.
Chapter 3: The Magical Forest

- Talk to Isas.
- Look at the sign; take the TASSELS (U).
- Look inside the carriage; read the note and take the WHIP (V).
- Go right; take the BRANCH (W).
- Zoom into the trunk; put the BRANCH on it (X).
- Push on the branch and take the CHIPPED KNIFE (Y).
- Open the cloth and take the MECHANISM PIECE (Z).

- Walk down and go back into the guard’s tower.
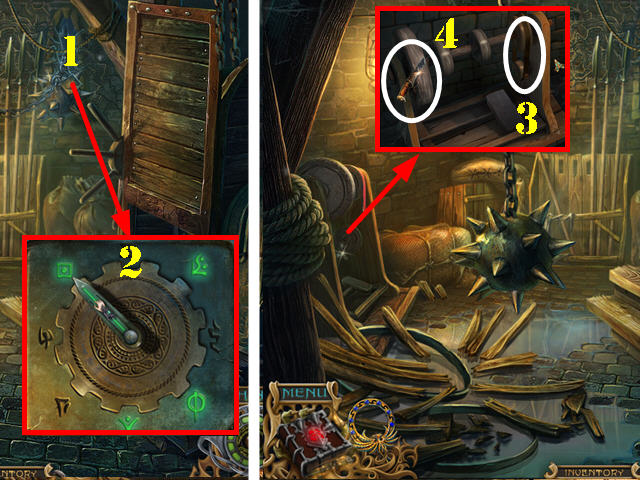
- Examine the mechanism; add the MECHANISM PIECE to it (1).
- Move the dial to each of the 4 symbols and stop on them to illuminate them. Please look at the screenshot for the solution (2).
- Take a closer look at the sharpening stone machine; put the COLLAR on it (3).
- Put the CHIPPED KNIFE on the stones to get the KNIFE (4).
- Walk down twice.

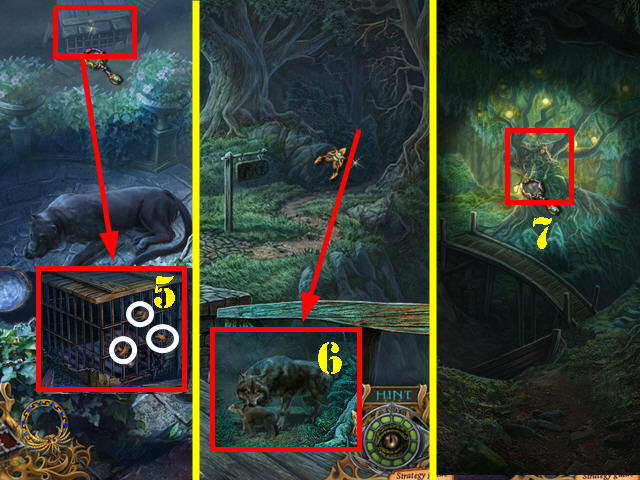
- Zoom into the cage; cut the 3 straps with the KNIFE (5).
- Take the WOLF PUP from inside the cage.
- Return to the forest and go right.
- Give the WOLF PUP to the wolf (6) and go forward.
- Zoom into the tree and listen to what the Forest Nymph has to say (7).

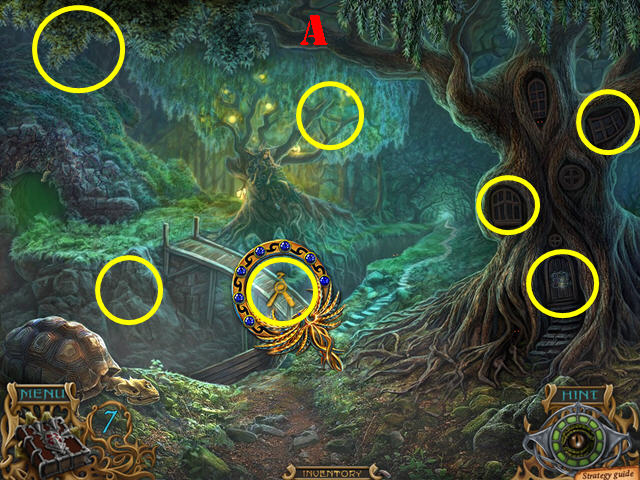
- Use the Golden Phoenix Amulet to search for magic symbols in the scene.
- The areas marked in yellow represent the approximate areas of all the 7 symbols (A).


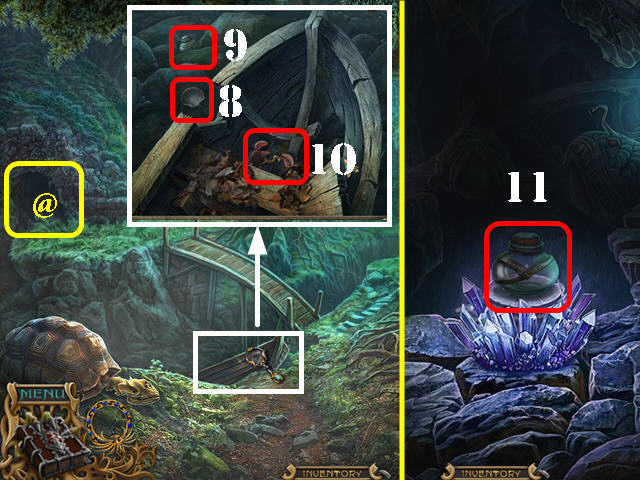
- Zoom into the boat; move the piece of wood and take the SHARP SHELL (8).
- Take the EMPTY JAR 1/3 (9).
- Move the items out of the way to expose the crab (10).
- Go into the cave (@); take the EMPTY JAR 2/3 (11).
- Exit the cave and go right.

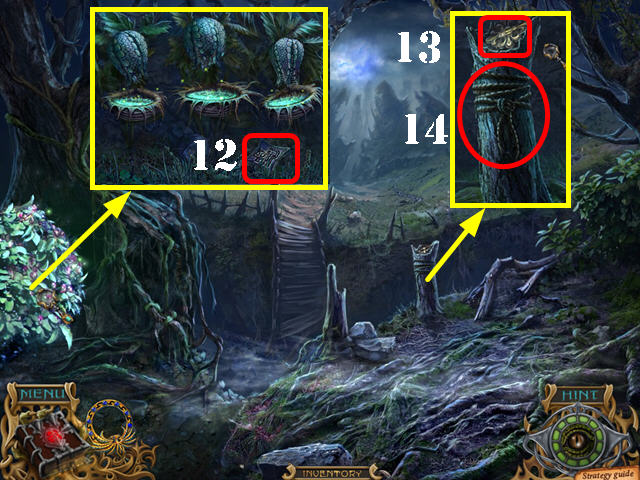
- Talk to Isa and he will destroy the bridge afterwards.
- Look at the bush; take the PUZZLE PIECE (12).
- Look at the stump; take the GOLDEN COAT OF ARMS (13).
- Cut the rope with the SHARP SHELL and take the ROPE (14).
- Walk down.

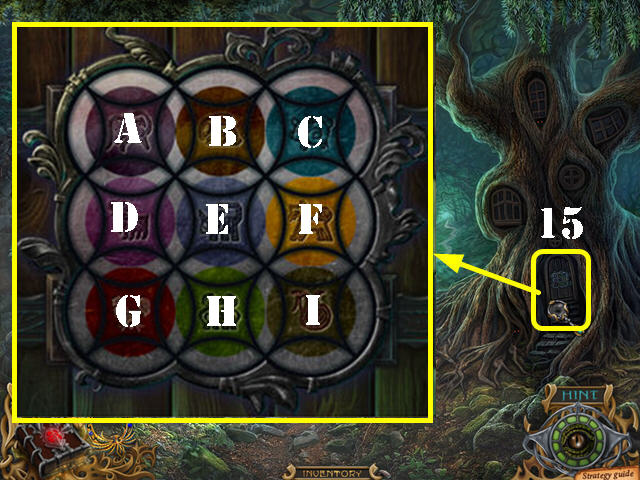
- Zoom into the door (15); put the PUZZLE PIECE on the lock to activate a puzzle.
- Rotate the discs so all the same colors are together.
- To solve the puzzle, press in the center of the circles in this order: F x 3, I x 2, H x 1, I x 3, H x 2, F x 2, E x 1, F x 2, H x 3, D x 1, E x 3, D x 3, H x 3, G x 3, D x 2, B x 3, E x 3, D x 2, E x 2, F x 2, E x 2, B x 1, C x 2, B x3 , F x 2, C x 2, and F x 2.
- Enter the tree house.

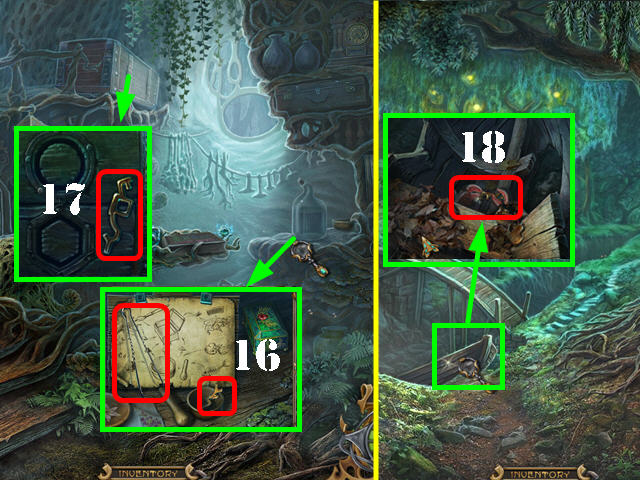
- Examine the table; take the TONGS and the GOLDEN KEY 1/3 (16).
- Examine the chest; grab the GOLDEN KEY 2/3 (17).
- Walk down.
- Zoom into the boat; use the TONGS to retrieve the GOLDEN KEY 3/3 from the crab (18).
- Go back into the tree house.

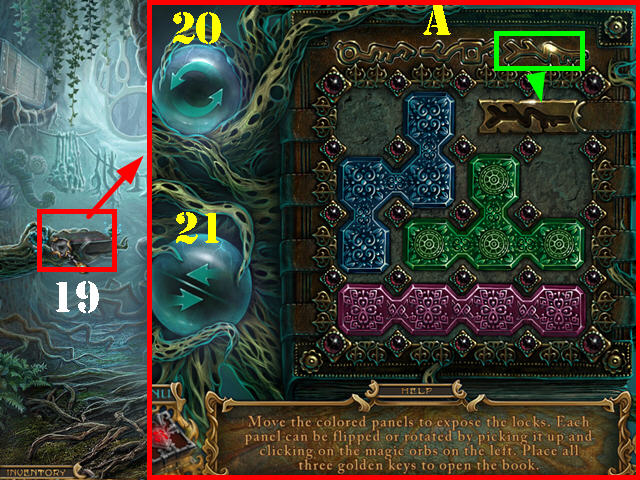

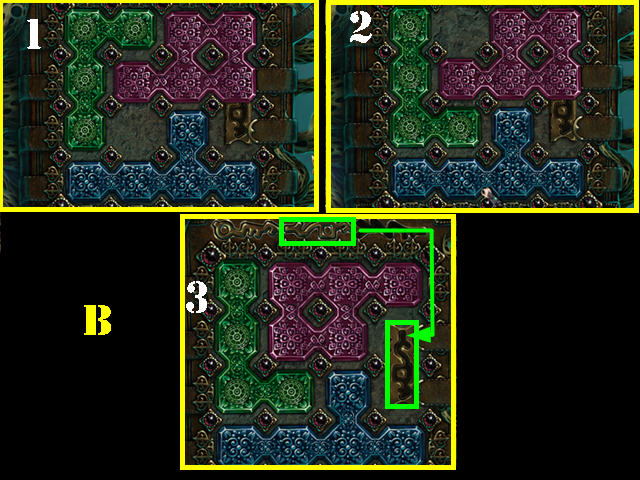

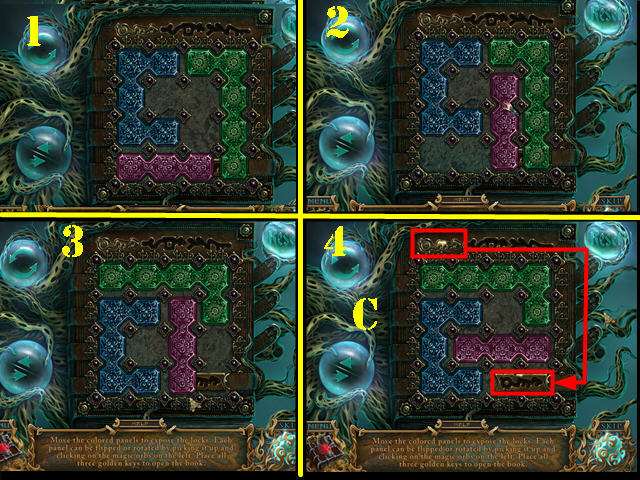
- Examine the book; put the 3 GOLDEN KEYS on it to activate a puzzle (19).
- Pick up a panel and place it on one of the magic orbs to rotate it (20) or flip it (21).
- Put the pieces into the right spots to expose the locks.
- Once the lock is exposed, put one of the keys located on top into the exposed lock.
- Screenshot (A) shows the first solution.
- Screenshot (B) shows the second solution.
- Screenshot (C) shows the third solution.

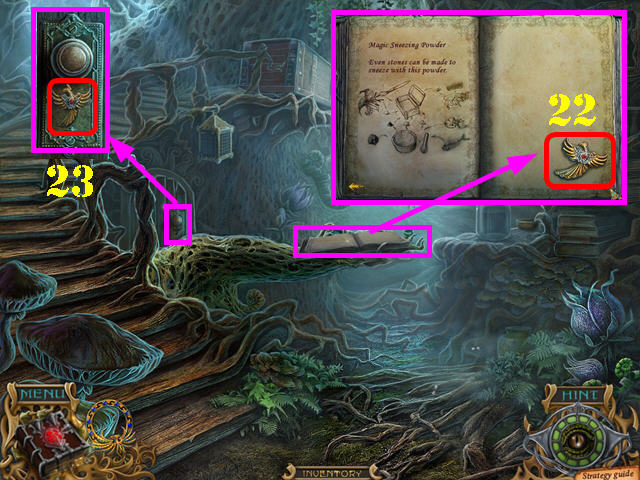
- Zoom into the book. Flip the pages of the book until you get to the last page; take the PHOENIX (22).
- Look at the door; put the PHOENIX in the lock to activate a HOS (23).

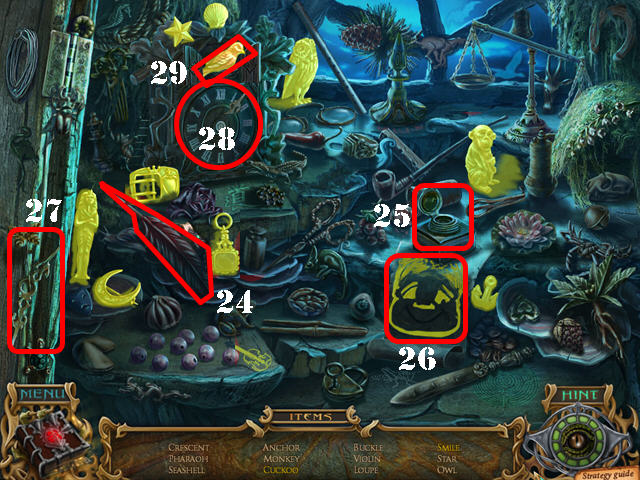
- Play the HOS.
- Drag the quill (24) to the inkwell (25); take the smile (26).
- Drag the clock hands (27) to the clock (28); take the cuckoo (29).
- The BIRD will be added to inventory.
- Walk down.

- Touch the fox (30).
- Walk down.
- Zoom into the carriage; move the rug out of the way and zoom into the panel (31).

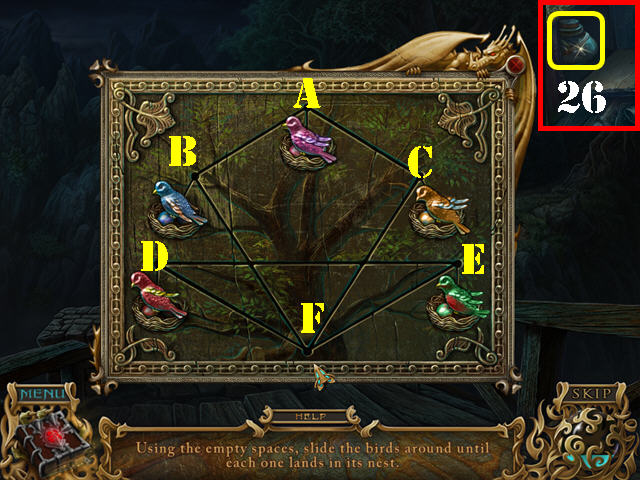
- Put the BIRD on the panel to activate a puzzle.
- Slide the birds around until each one is above the matching nest egg.
- To solve the puzzle, press on the birds in this order: D, E, F, B, A, C, and F.
- Take the 3/3 EMPTY JAR (26).
- Go right twice.

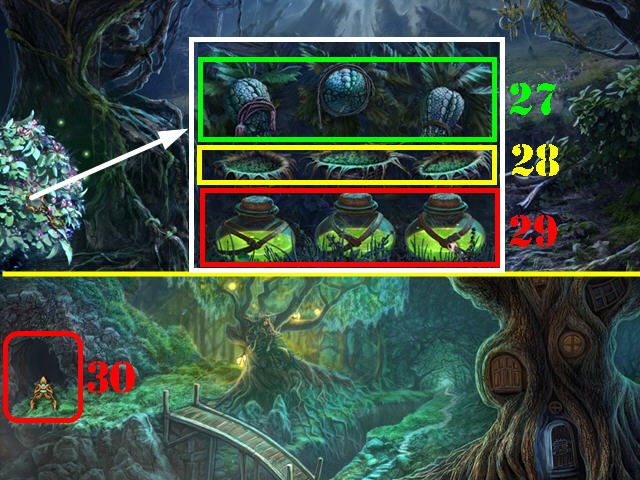
- Look at the plants; put the TASSELS, WHIP, and ROPE on them (27).
- Put the 3 EMPTY JARS down.
- Tilt each of the 3 bowls (28).
- Close the lids on all 3 of the jars.
- Take the 3 LUMINOUS NECTARS (29).
- Walk down and go into the cave on the left (30).

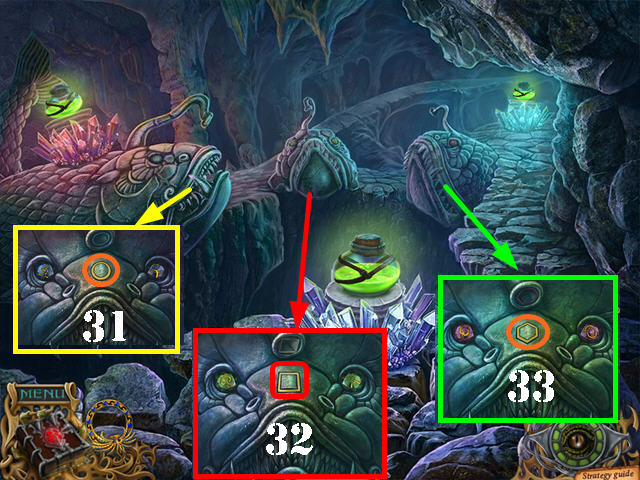
- Put down the 3 LUMINOUS NECTARS on the 3 stands.
- Inspect the left fish head; take the GOLDEN CIRCLE (31). Note the symbols on each eye.
- Inspect the center fish head; take the GOLDEN SQUARE (32).Note the symbols on each eye.
- Inspect the right fish head; take the GOLDEN POLYHEDRON (33).Note the symbols on each eye.
Chapter 4: The Tree House

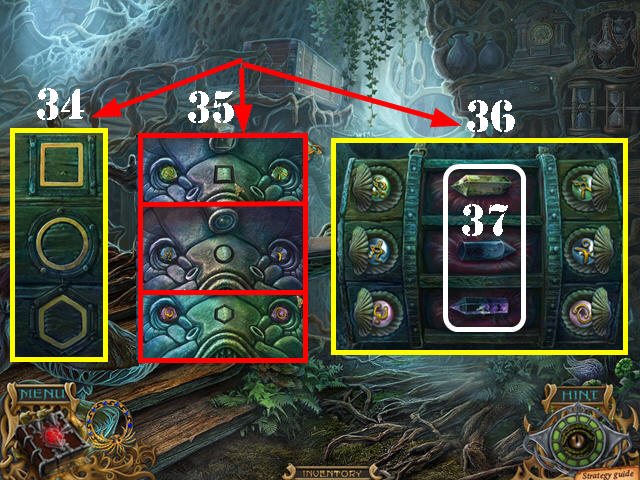
- Go back into the tree house.
- Zoom into the chest; put the GOLDEN CIRCLE, GOLDEN SQUARE, and the GOLDEN POLYHEDRON into the slots (34).
- Select 2 symbols to swap their positions. Arrange them in the order shown on the fish statues in the cave (35).
- Please look at the screenshot for the solution (36).
- Take the YELLOW CRYSTAL, the BLUE CRYSTAL, and the VIOLET CRYSTAL (37).


- Go back into the cave.
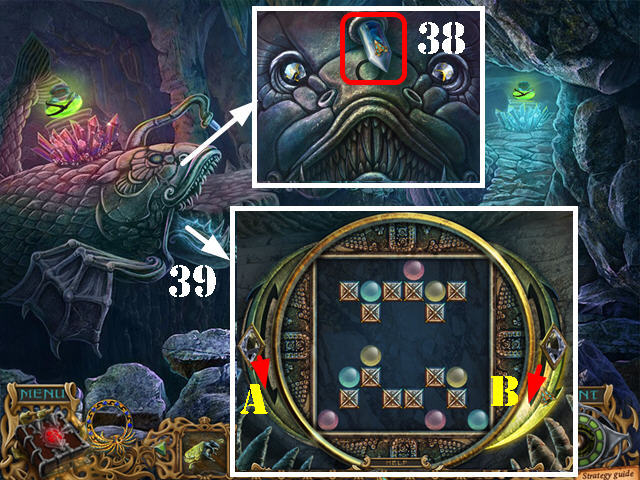
- Examine the left fish head; put the BLUE CRYSTAL in the slot (38).
- Zoom into its mouth to activate a puzzle (39).
- Use the arrows to rotate each circle; place the 3 matching balls next to each other to eliminate them.
- To solve this puzzle, press on the arrows in this order: B x 4 to eliminate the green balls. B x 2 to eliminate the yellow balls. B x 3, A, and B to eliminate the red balls.

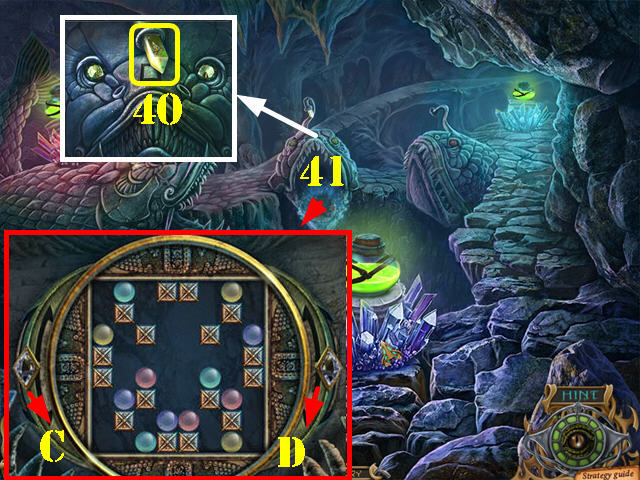
- Examine the center fish; put the YELLOW CRYSTAL in the slot (40).
- Zoom into its mouth to activate a puzzle (41).
- Use the arrows to rotate each circle; place the 3 matching balls next to each other to eliminate them.
- To solve this puzzle, press on the arrows in this order: C x 2, D x 3, C, D, C x 4, D x 2, C x 2, D, and C to make the red balls disappear. D x 2, C x 2, D, and C to make the violet balls disappear. C, D, C x 2, D, C, D, and C to make the green balls disappear. C, D x 2, C x 3, D x 2, and C to make the yellow balls disappear.

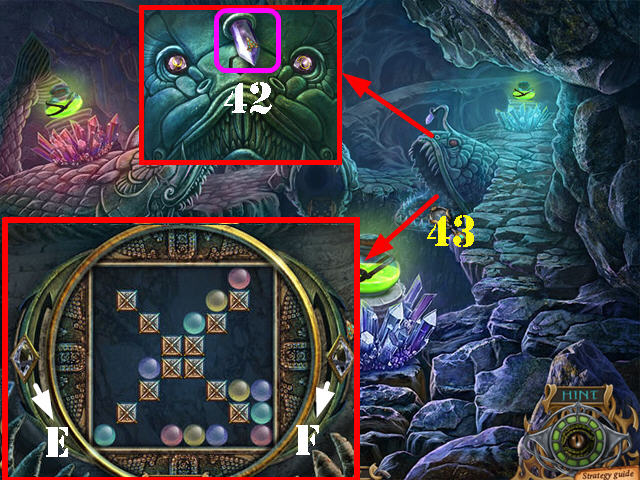
- Examine the right fish; put the VIOLET CRYSTAL in the slot (42).
- Zoom into its mouth to activate a puzzle (43).
- Use the arrows to rotate each circle; place the 3 matching balls next to each other to eliminate them.
- To solve this puzzle, press on the arrows in this order: E x 3, F x 5, E, F, E x 2, F x 3, E x 2, and F to eliminate the red balls. E x 2, F, and E x 2 to eliminate the violet balls. E x 2 to eliminate the green balls. E x 2, F, and E to eliminate the yellow balls.
- The magic water will begin to flow as soon as all three puzzles are solved.

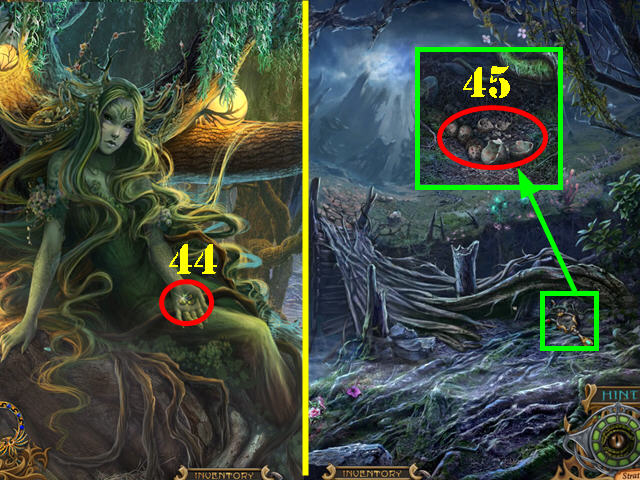
- Take the MAGIC BEANS (44).
- Go right.
- Examine the ground; take the EGGSHELL (45).
- Go forward.

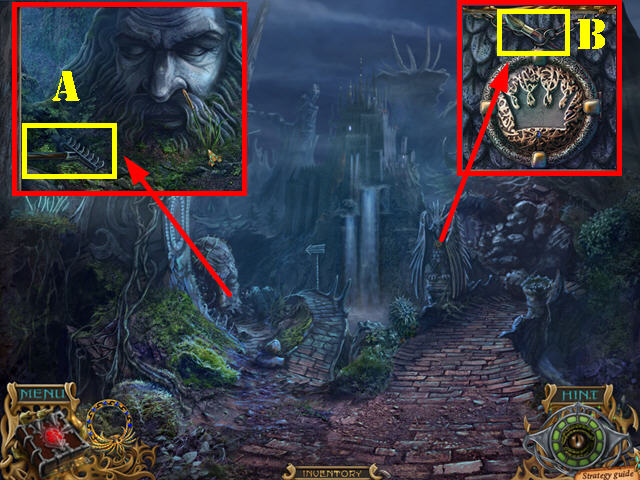
- Touch the fox.
- Examine the stone head; take the RAKE (A).
- Look at the statue’s medallion and take the BRUSH (B).
- Take the left path.

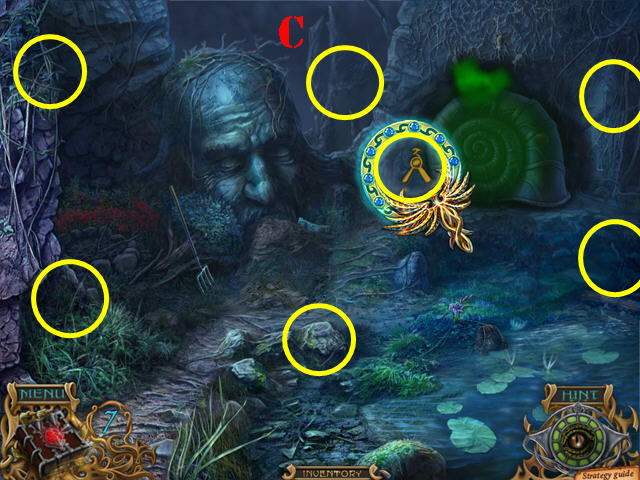
- Use the Golden Phoenix Amulet to search for magic symbols in the scene.
- The areas marked in yellow represent the approximate areas of all the 7 symbols (C).

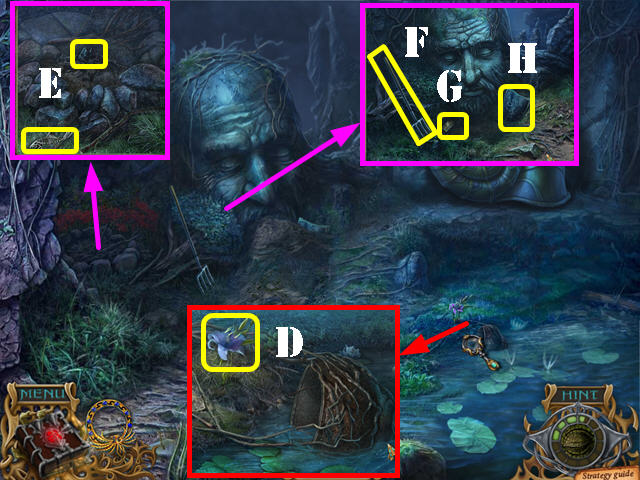
- Examine the pot in the water; take the LILY (D).
- Examine the fire pit; take the COAL and the FISH BONES (E).
- Look at the stone face; take the PITCHFORK (F).
- Use the SHOVEL on the ground; take the COMB (G) and the SHIELD (H).
- Go back to the tree house.

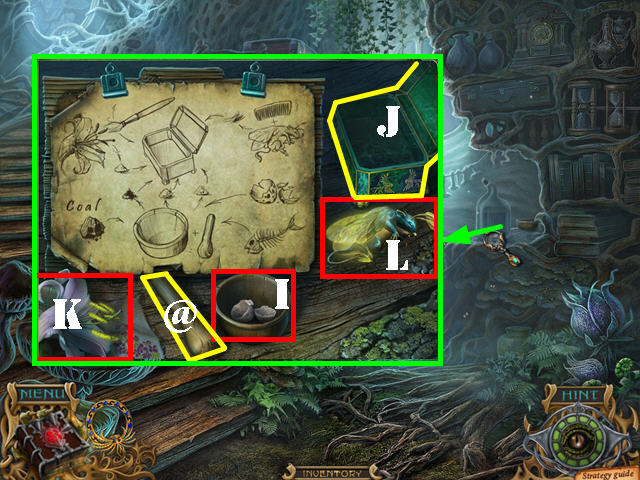
- Zoom into the table; put the SLEEPING FAIRY MOUSE and the LILY on the table.
- Put the EGGSHELL in the bowl (I); crush it with the pestle (@).
- Open the box; put the ground eggshells in the box (J).
- Use the BRUSH on the lily to sweep the pollen (K). Put the pollen in the box.
- Put the COAL in the bowl; crush it with the pestle. Put the ground coal in the box.
- Use the COMB on the sleeping fairy mouse (L); take the fur from the comb and put it in the box.
- Put the FISH BONES in the bowl; crush it with the pestle. Put the ground fish bones in the box.
- Take the PTARMIC POWDER.

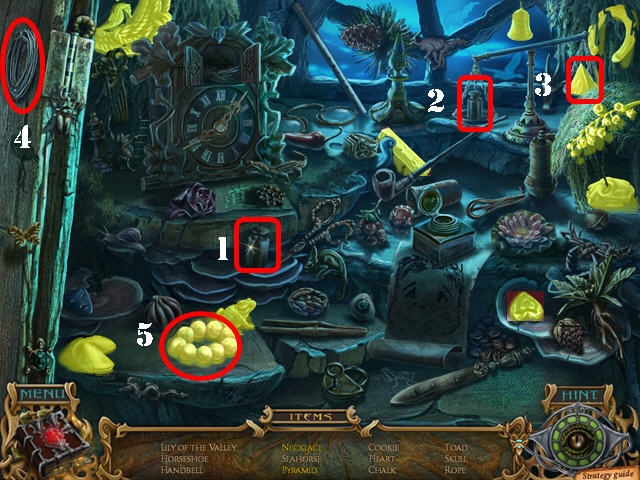
- Play the HOS.
- Drag the weight (1) to the scale (2); take the pyramid (3).
- Drag the string (4) to the beads; take the necklace (5).
- The ROPE will be added to inventory.

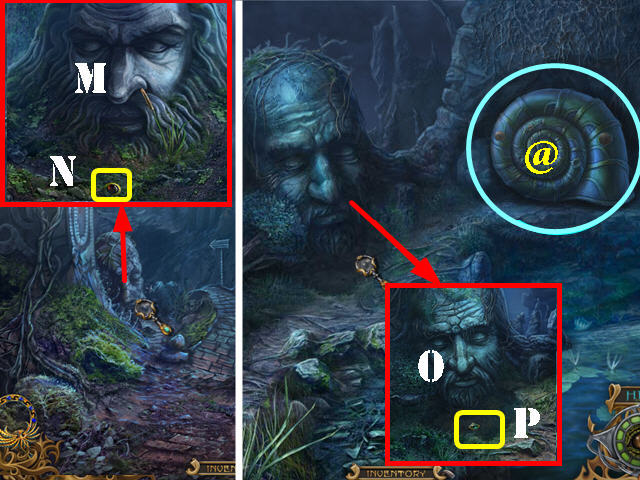
- Walk down; go right and cross the bridge.
- Examine the stone face; put the PTARMIC POWDER under its nose (M).
- Take the JEWEL (N).
- Take the left path.
- Examine the stone face; put the PTARMIC POWDER under its nose (O).
- Take the JEWEL (P).
- Examine the snail (@); put the 2 JEWELS on it to activate a puzzle.

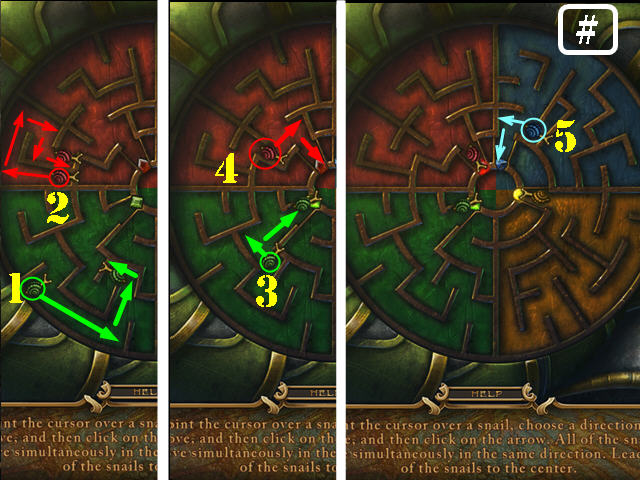
- Place your cursor over a snail for arrows to appear; press on an arrow to make that snail move in that direction along with all the other snails at the same time.
- Lead them to their matching color in the center.
- To solve the puzzle, move the snails in the order shown in the screenshot (#).
- Enter the cave after the snail moves out of the way.
Chapter 5: The Courtyard

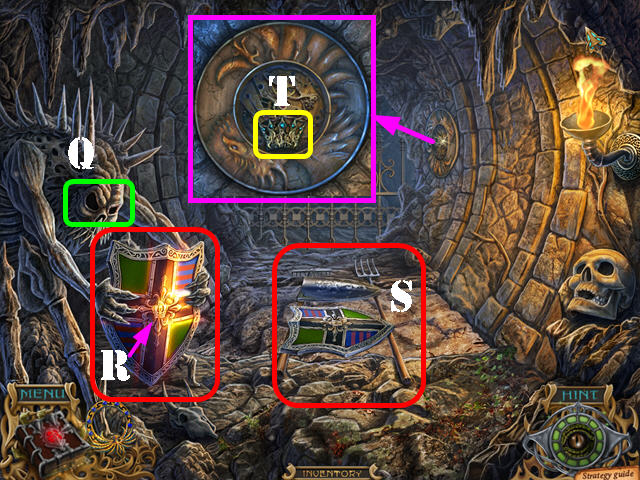
- Press on the eyes (Q) to light the torch.
- Zoom into the shield; put the GOLDEN COAT OR ARMS in the center (R).
- Take the SHIELD.
- Put the RAKE, PITCHFORK, and the 2 SHIELDS on the ground (S).
- Examine the mechanism; take the CROWN (T).
- Walk down twice.

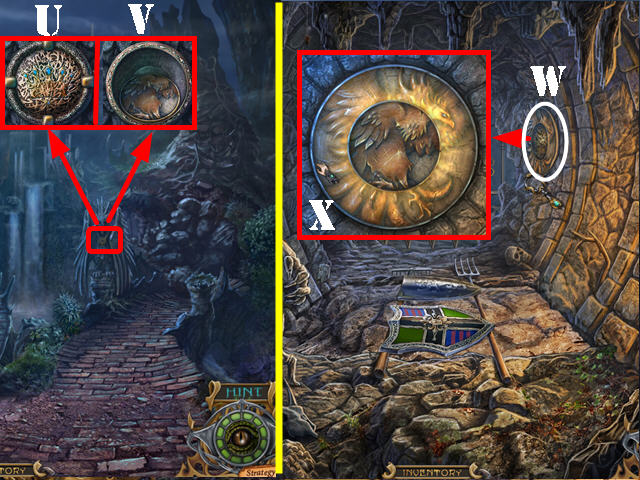
- Zoom into the statue’s medallion; put the CROWN in the recess (U) and take the DISK (V).
- Take the left path and enter the cave.
- Zoom into the mechanism and put the DISK in it (W).
- Rotate the outer ring into position (X).
- Go through the gate.

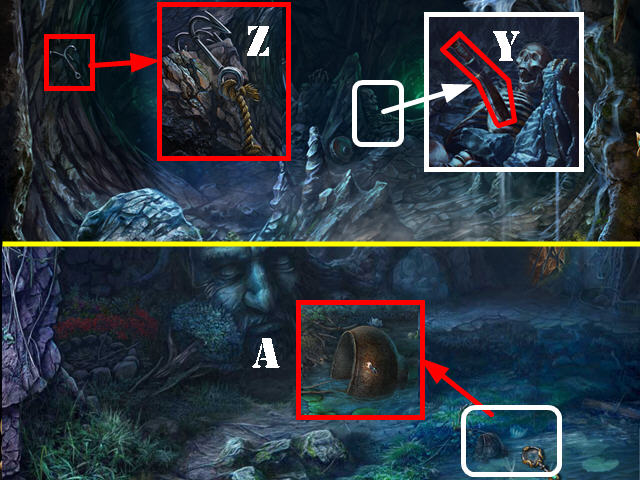
- Examine the skeleton; move the stone and take the MACHETE (Y).
- Look at the hook; put the ROPE on it and take the ROPE WITH HOOK (Z).
- Walk down twice.
- Zoom into the water; cut the roots with the MACHETE and take the POT (A).
- Walk down.

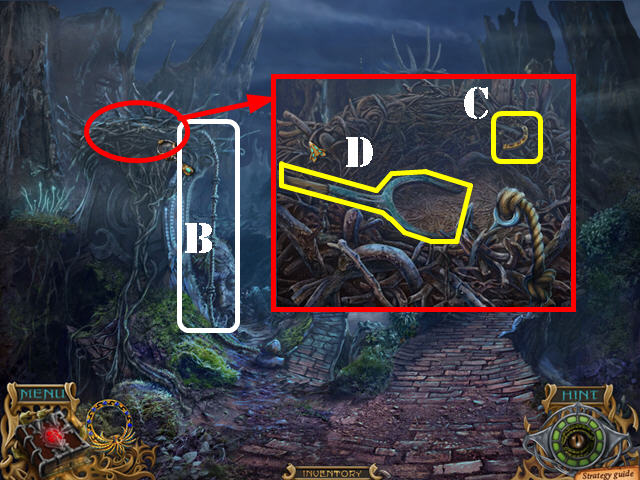
- Put the ROPE WITH HOOK on the nest (B).
- Zoom into the nest; take the GOLDEN HORSESHOE (C) and the OVEN FORK (D).
- Take the left path; enter the cave and go forward.

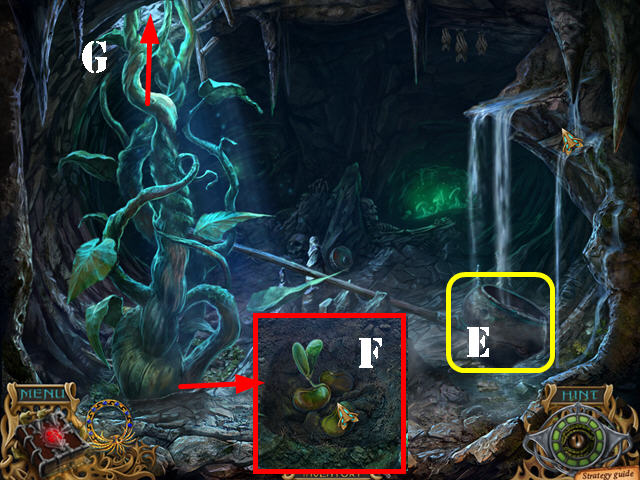
- Put the OVEN FORK on the stone in the lower left; put the POT at the end of the oven fork (E).
- Examine the soil; dig a hole with the SHOVEL and put the MAGIC BEANS in the ground (F).
- Go up the giant beanstalk (G).

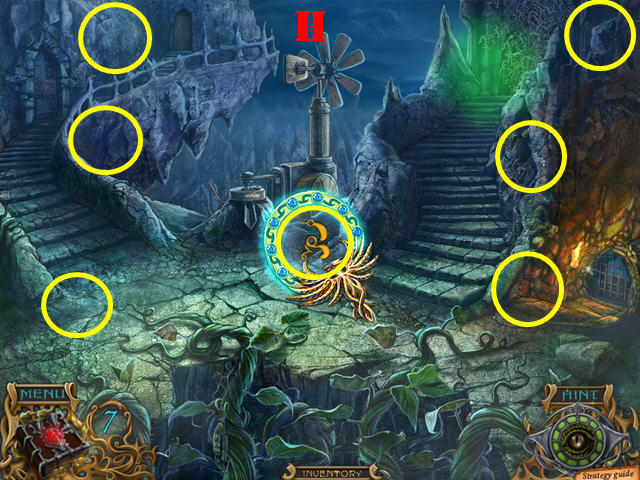
- Use the Golden Phoenix Amulet to search for magic symbols in the scene.
- The areas marked in yellow represent the approximate areas of all the 7 symbols (H).

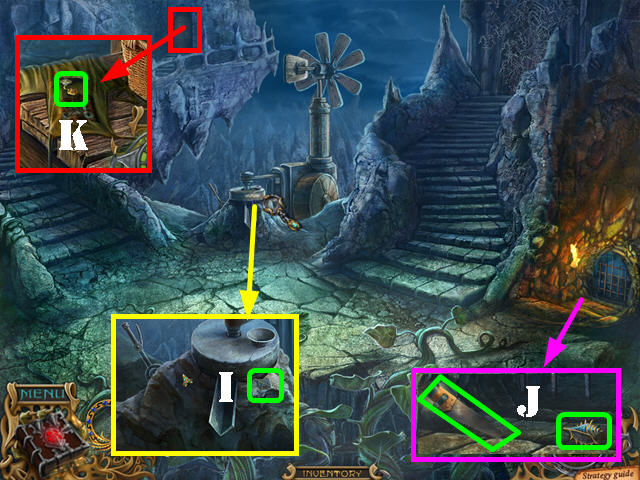
- Look at the gristmill; take the PUZZLE CHIP 1/4 (I).
- Examine the gate; take the SAW and the BLUE SHELL (J).
- Go through the upper left door; take the KEY (K).
- Walk down.

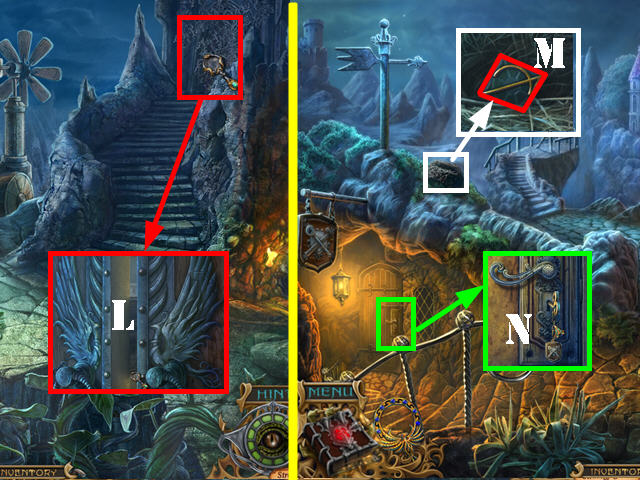
- Look at the upper right door; cut the thorns with the MACHETE and cut the wooden latch with the SAW (L).
- Go through the door.
- Touch the crow.
- Look at the nest; take the PUZZLE CHIP 2/4 (M).
- Look at the door; use the KEY in the lock; turn the key and go through the door to access the workshop (N).

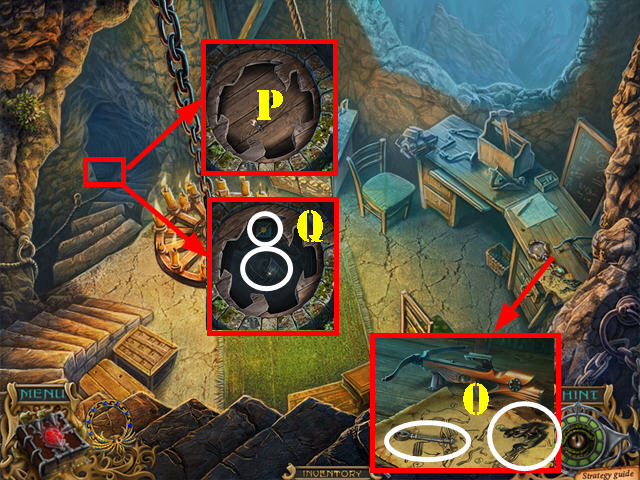
- Examine the table; take the STRIP OF LEATHER and the WRENCH (O).
- Look at the well lid; rotate the lid into position (P).
- Take the BUCKET and the PUZZLE CHIP 3/4 (Q).
- Walk down.

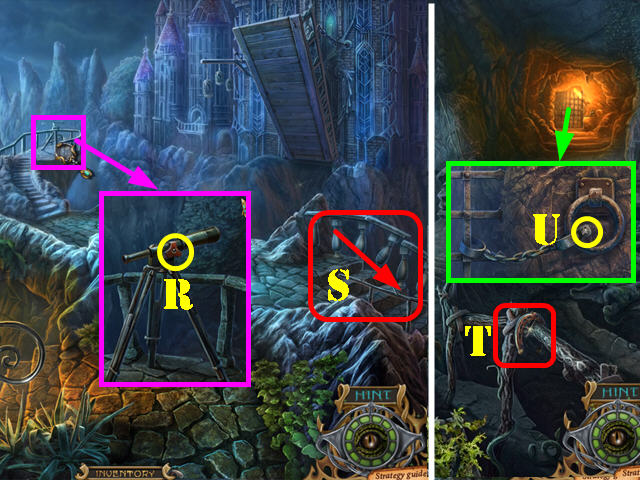
- Zoom into the spyglass; loosen the bolt with the WRENCH (R) to get the SPYGLASS.
- Go down the steps (S).
- Take the COPPER HORSESHOE (T).
- Examine the gate; remove the bolt with the WRENCH to activate a HOS (U).

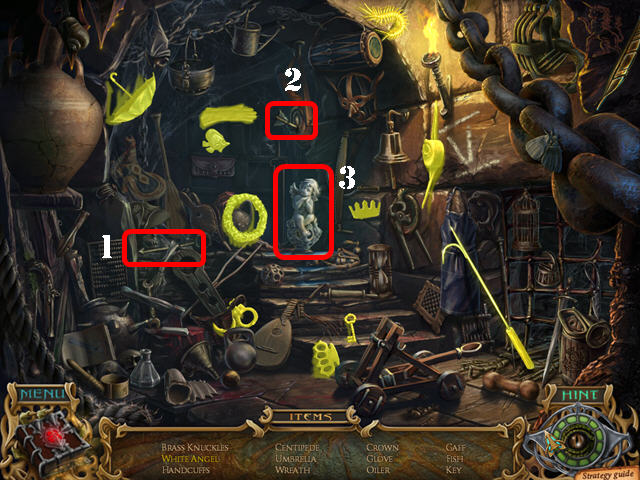
- Play the HOS.
- Drag the candle to the fuse on the right so you can light up the scene.
- Put the arrow (1) through the bag (2); take the white angel (3).
- The GAFF will be added to inventory.

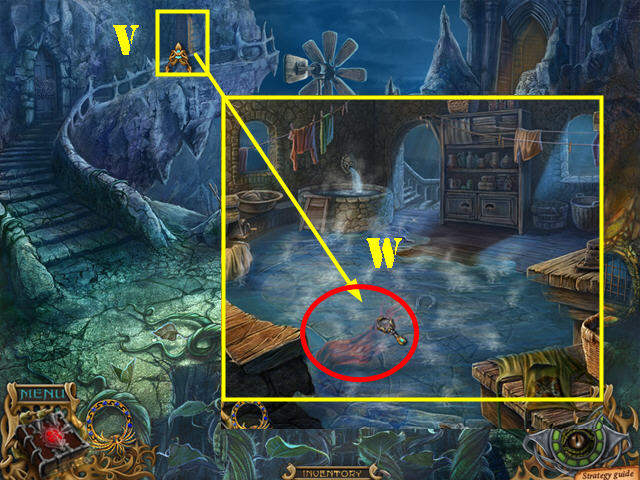
- Walk down twice and go into the upper left door (V).
- Use the GAFF to remove the rag blocking the drain (W).

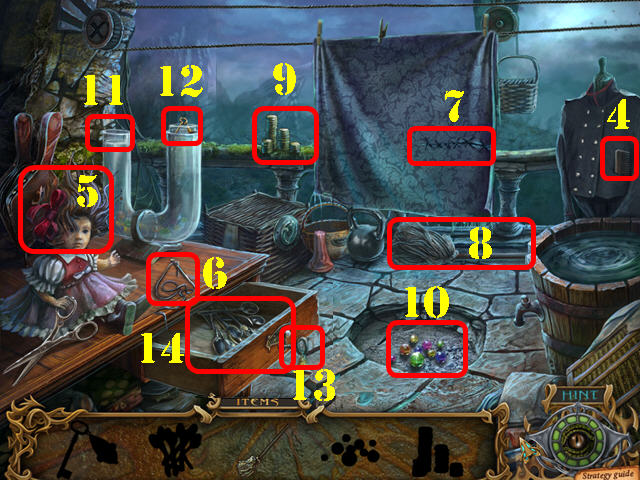
- Play the HOP.
- Take the COMB (4); put it on the doll’s hair (5).
- Take the needle (6); put it on the torn sheet (7) and take the mop (8).
- Remove the small sheet and take the coins (9).
- Use the mop in the puddle of water and take the glass balls (10).
- Put the coins and the glass balls in the tube (11); take the key (12).
- Unlock the drawer with the key (13); take the TINWARE (14).
- The TINWARE will be added to inventory.

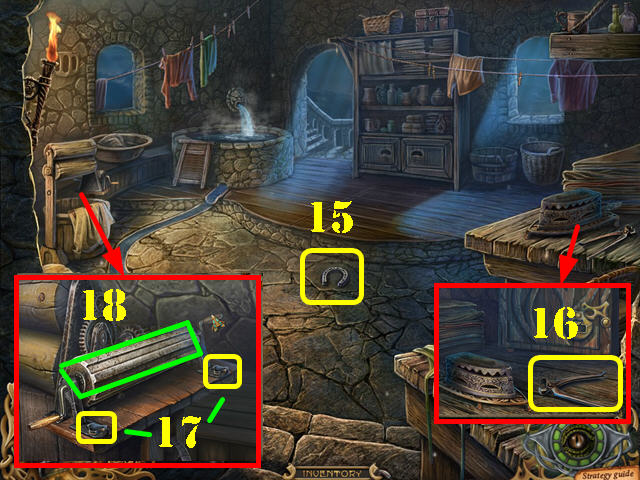
- Take the SILVER HORSESHOE (15).
- Examine the table; take the PLIERS (16).
- Zoom into the washing bucket; remove the bolts with the WRENCH (17).
- Take the MECHANISM (18).
- Walk down.

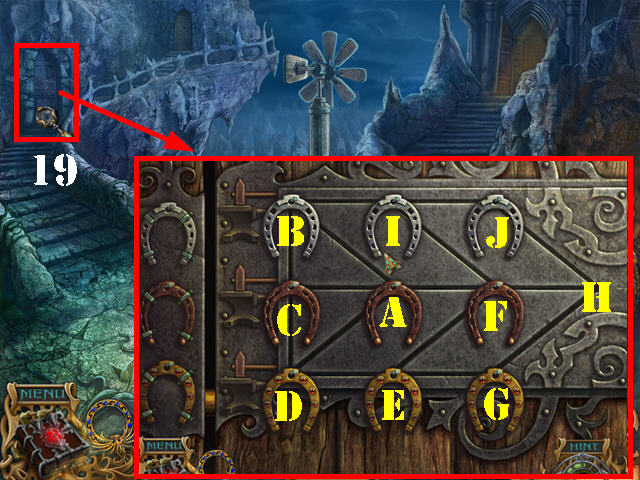
- Zoom into the lower left door (19); put the GOLDEN HORSESHOE, COPPER HORSESHOE and SILVER HORSESHOE on the door to activate a puzzle.
- Arrange the horseshoes in the correct order using the hanging horseshoes on the left as a clue.
- Slide the horseshoes into the empty spots.
- To solve the puzzle, press on the horseshoes in this order: A, B, C, D, E, F, A, D, E, G, H, F, I, J, H, F, E, G, and H.
- Go through the door to access the blacksmith’s.
Chapter 6: The Road to the Castle

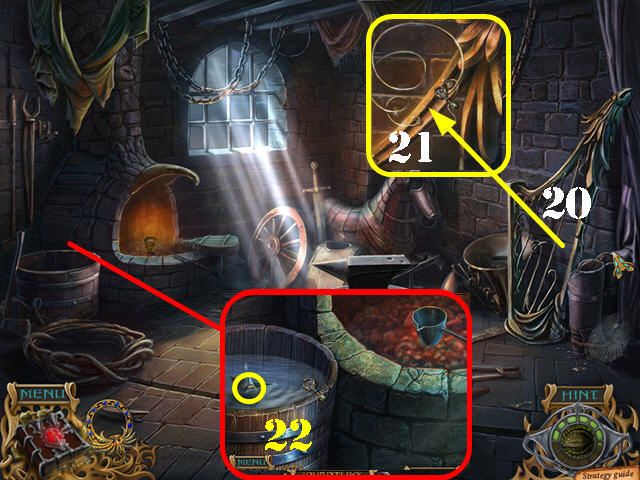
- Press on the harp strings and they will break (20).
- Zoom into the harp and cut the HARP STRING with the PLIERS (21).
- Examine the hearth; put the BUCKET into the bucket of water and take the CHIP (22).

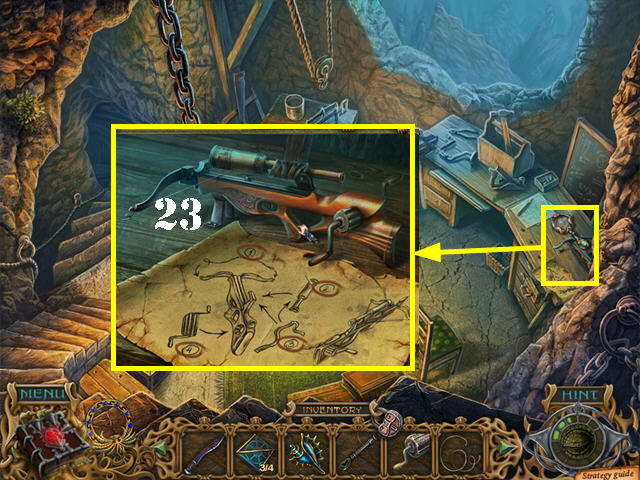
- Exit the blacksmith’s; go through the upper right door and then go into the lower left door to return to the workshop.
- Zoom into the table; put the SPYGLASS, STRIP OF LEATHER, HARP STRING, and the MECHANISM on the incomplete crossbow (23).
- Take the CROSSBOW.

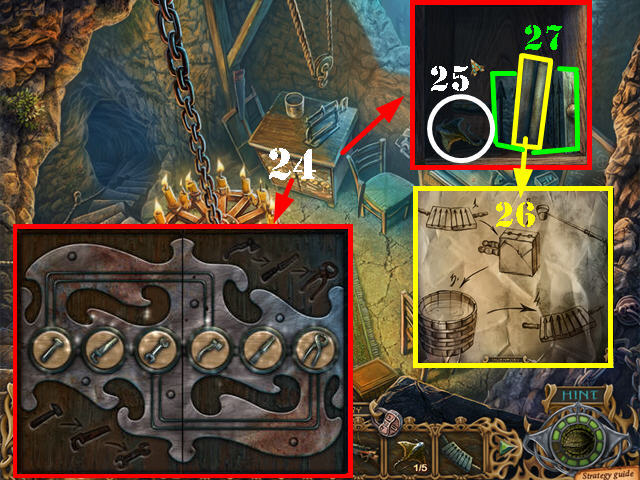
- Take a closer look at the small cabinet; put the CHIP in it to activate a puzzle (24).
- Move the chips along the grooves until they are in the rights spots; use the etched tool images as a clue.
- To solve the puzzle, press on the chips in this order: Chisel, Axe, Chisel, Wrench, and Pincers.
- Zoom into the cabinet; take the RAY 1/5 (25).
- Look at and take the instructions (26).
- Take the FORM FOR CROSSBOW BOLTS (27).
- Return to the blacksmith’s.

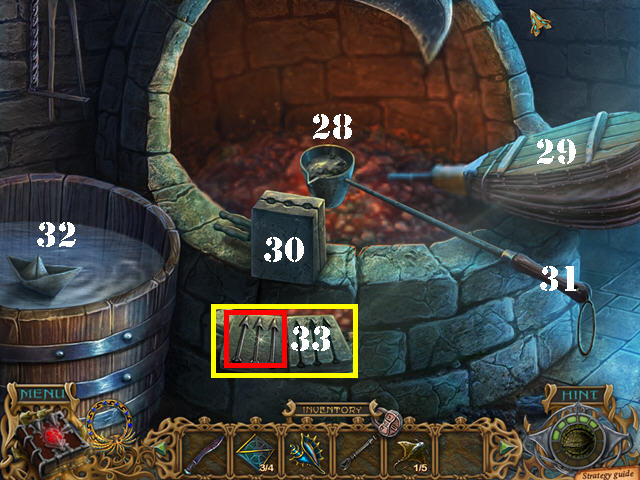
- Zoom into the hearth.
- Put the TINWARE into the ladle (28); press on the bellows (29).
- Place the FORM FOR CROSSBOW BOLTS below the ladle and close it (30).
- Tap the handle of the ladle (31) to pour the hot metal into the form.
- Drag the mold to the water (32); open the mold and take the CROSSBOW BOLTS (33).
- Exit the blacksmith’s and go through the upper right door.

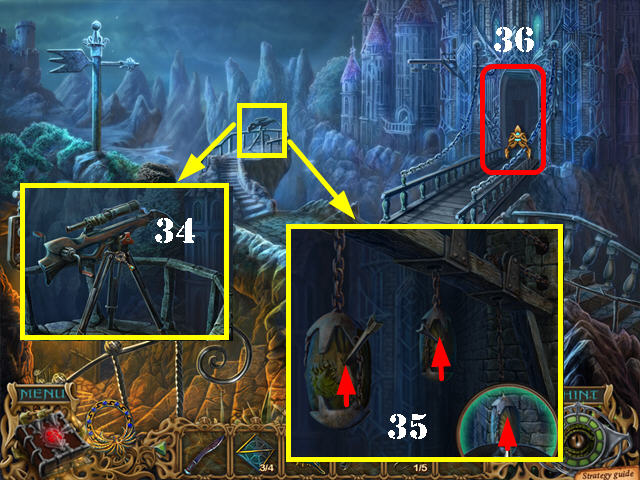
- Zoom into the tripod; put the CROSSBOW on it (34).
- Put the CROSSBOW BOLTS in the crossbow and press on it to make 3 sandbags appear.
- Shoot the 3 bags with the arrows (35).
- The bridge is now down; take it (36).

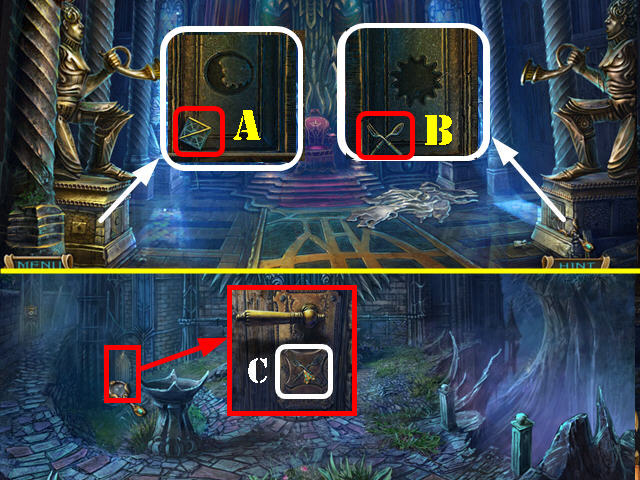
- Touch the fox.
- Enter the throne room and talk to Isa who is sitting on the throne.
- Examine the base of the left statue; take PUZZLE CHIP 4/4 (A).
- Examine the base of the right statue; take the SPOON AND FORK (B).
- Walk down.
- Examine the small side door; put the SPOON AND FORK in the slot (C).
- Go through the door to access the kitchen.

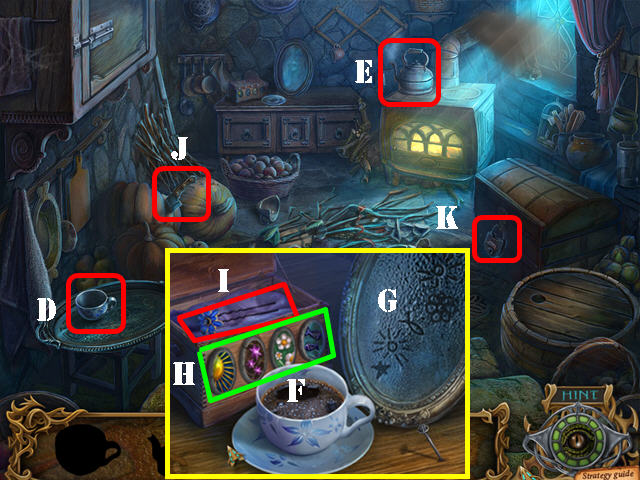

- Open the trapdoor to activate a HOP; play it.
- Take the coffee cup (D) and the kettle (E).
- Zoom into the cabinet; put the coffee cup on the saucer. Pour the coffee from the kettle into the coffee cup (F); note the symbols that appear on the mirror (G).
- Press the symbols on the box in the order they appear on the mirror: stars, sun, fish, flowers, and sun (H).
- Take the hairpin from inside the box (I).
- Take the knife (J).
- Use the hairpin on the lock (K).
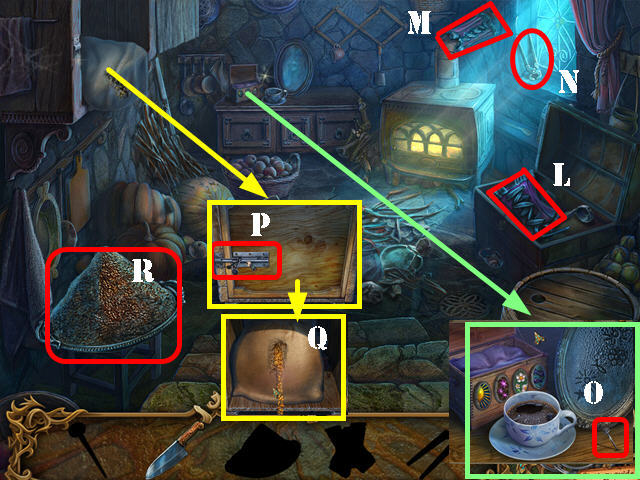
- Open the chest and take the corset (L).
- Put the corset over the pipe (M) and take the pliers (N).
- Zoom into the cabinet; use the pliers to remove the nail (O).
- Examine the door latch; use the nail on it and slide the latch to the right (P).
- Cut the sack with the knife (Q); take the WHEAT to add it to inventory (R).

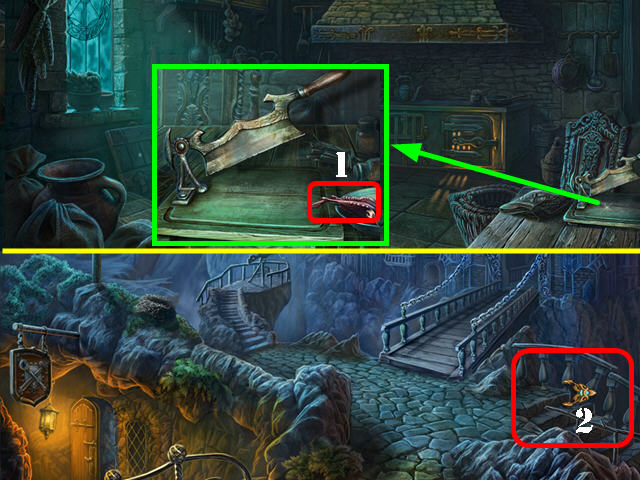
- Examine the table; take the RAY 2/5 (1).
- Walk twice and go down the steps (2).

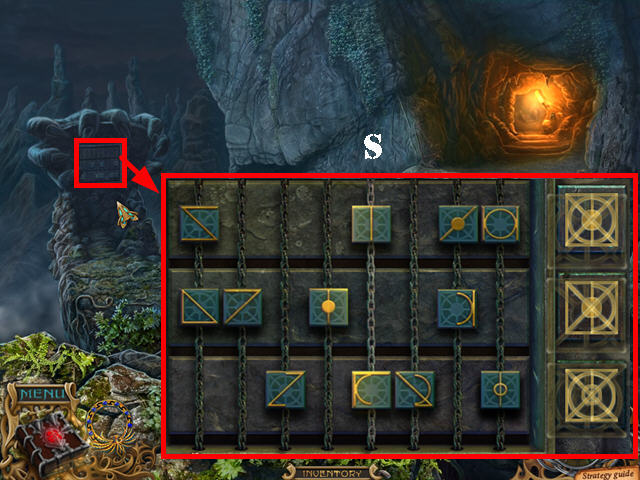
- Examine the puzzle on the left and add the 4 PUZZLE CHIPS to it to activate a puzzle.
- Position the tiles in a row so the sum of the symbols adds up to the image on the stones at the end of that row.
- Red lines on the stones on the right indicate extra or repeated lines.
- Please look at the screenshot for the solution (S).

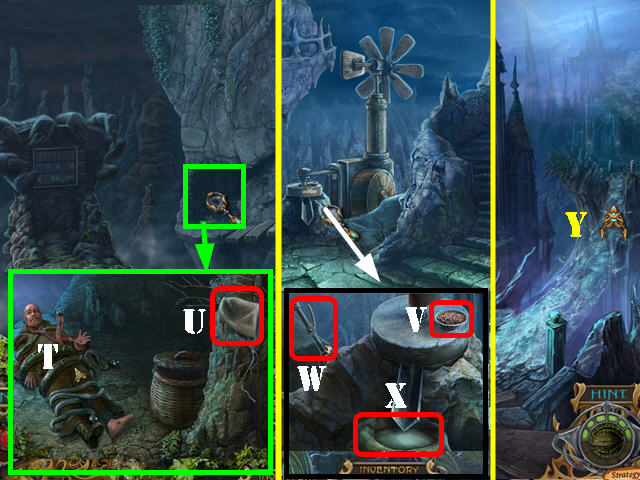
- Look in the cave to find a man being strangled by snakes (T).
- Take the SACK (U).
- Walk down 3 times.
- Examine the gristmill; put the WHEAT into the funnel (V).
- Put the SACK at the end of the slide.
- Press on the handle (W) and take the BAG OF FLOUR (X).
- Go through the upper right door and go through the bridge door.
- Pour the BAG OF FLOUR on the invisible bridge (Y); take the bridge.
Chapter 7: Isa’s House

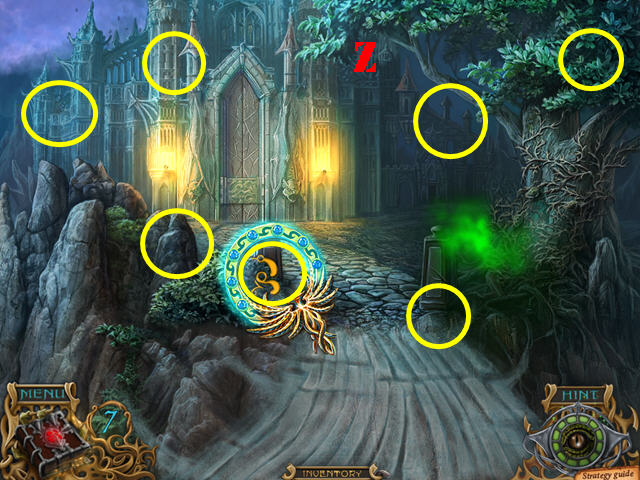
- Use the Golden Phoenix Amulet to search for magic symbols in the scene.
- The areas marked in yellow represent the approximate areas of all the 7 symbols (Z).

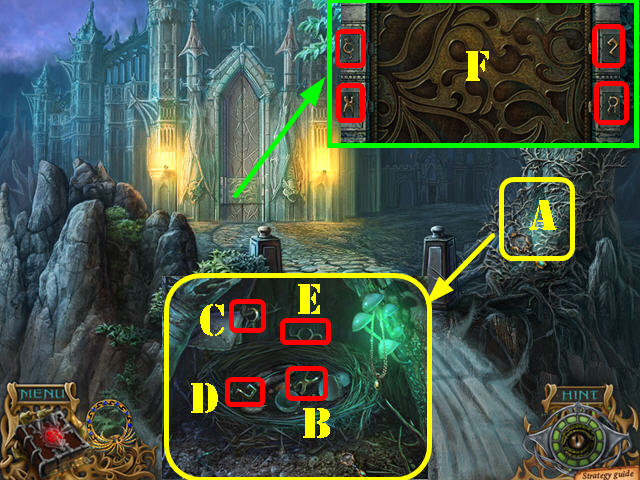
- Cut the thorns covering the tree hole with the MACHETE (A); zoom into the tree hole.
- Press on the eggs and take the first SYMBOL (B).
- Move the handkerchief and take the second SYMBOL (C).
- Move the feathers and take the third SYMBOL (D).
- Take the fourth SYMBOL (E).
- Zoom into the door and put the 4 SYMBOLS in their matching slots (F).

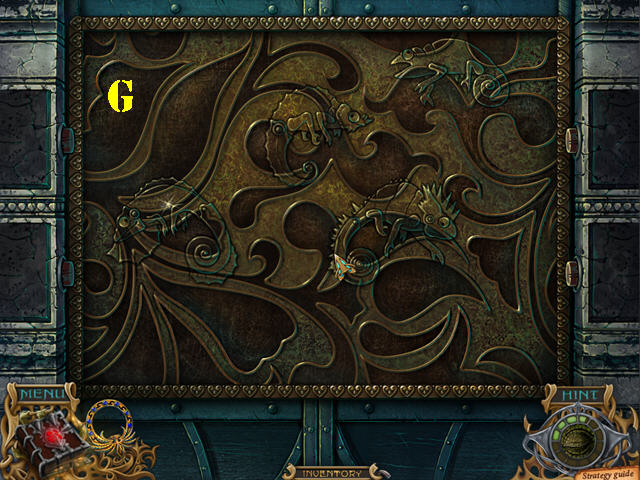
- Put the chameleons into the slots; then turn their heads and tails into the right positions so they can blend in with the background.
- Please look at the screenshot for the solution (G).
- Go through the door to access Isa’s house.

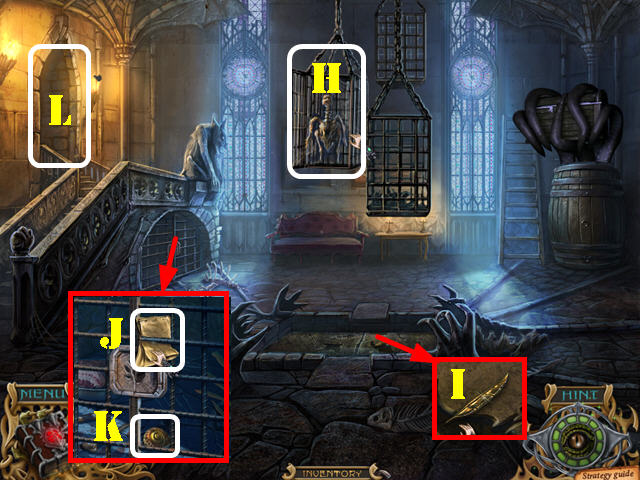
- Press on the skeleton inside the cage and it will fall apart (H).
- Examine the ground; take the FEATHER 1/5 (I).
- Inspect the gate; take the note (J).
- Grab the RED SHELL (K).
- Go through the left door (L).

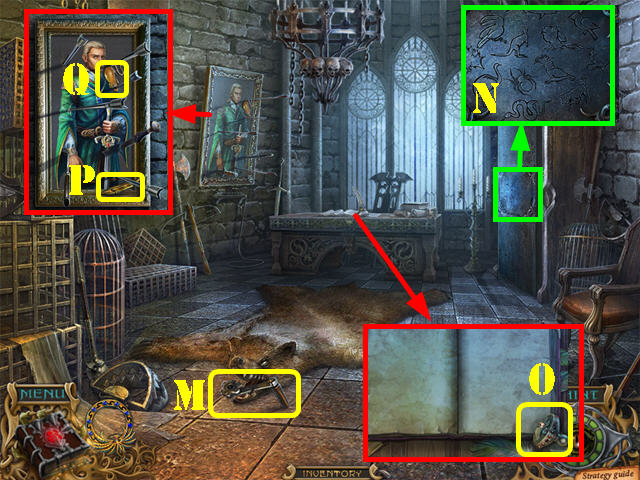
- Open the bear’s mouth and take the HANDLE (M).
- Examine the closet and press on the symbols; you need to find the right combination (N).
- Zoom into the desk; the mouse will spill the inkpot on the book pages as it leaves; the ink disappears. Take the PAW KEY (O).
- Examine the painting; take the FEATHER 2/5 (P) and the MOUSE (Q).
- Walk down.

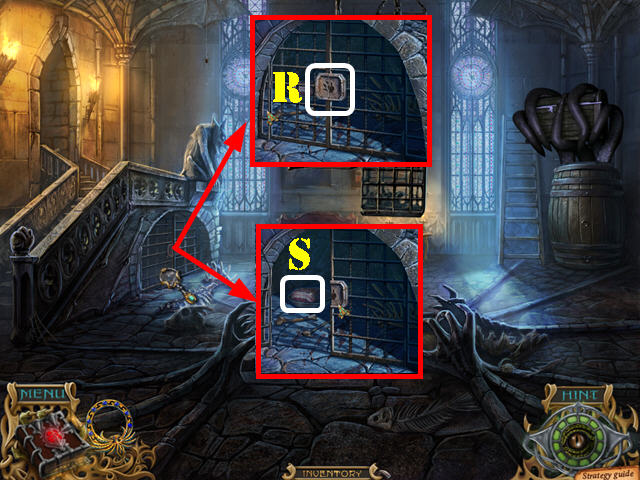
- Zoom into the gate; put the PAW KEY in the lock (R).
- Take the BACON (S).
- Go back to the kitchen.

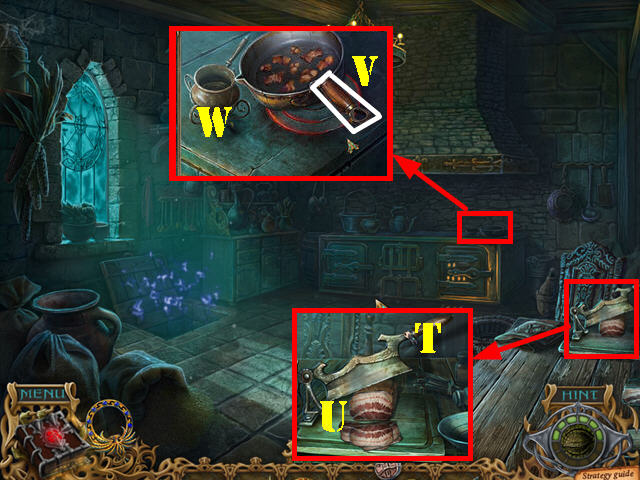
- Zoom into the table; put the BACON on the cutting board.
- Press the handle (T) and take the cut BACON (U).
- Examine the stove; put the cut BACON into the pan. Touch the pan handle (V) and take the BACON GREASE (W).

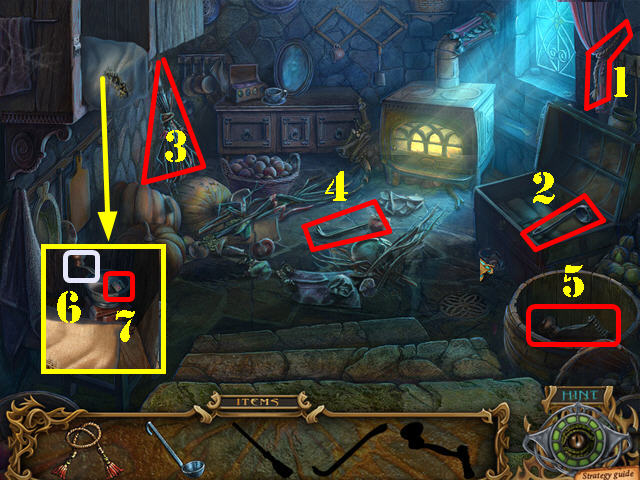
- Play the HOP.
- Take the cord (1) and the ladle (2).
- Tie the cord around the twigs and take the broom (3).
- Use the broom on the debris and take the crowbar (4).
- Remove the barrel lid with the crowbar; dip the ladle into the wine barrel and take the handle (5).
- Zoom into the cupboard; put the handle on the coffee mill (6).
- Press the handle and take the IRON ICON (7).
- Go back to the laundry room.

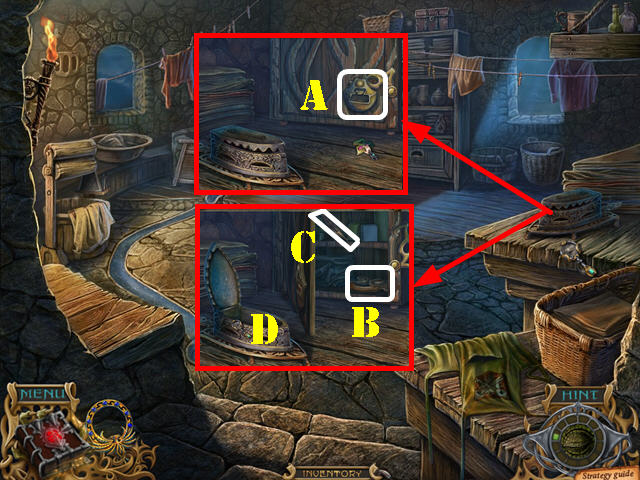
- Zoom into the table; put the IRON ICON on the lock (A).
- Take the IRON HANDLE (B) and the FEATHER (C).
- Put the IRON HANDLE on the iron (D).

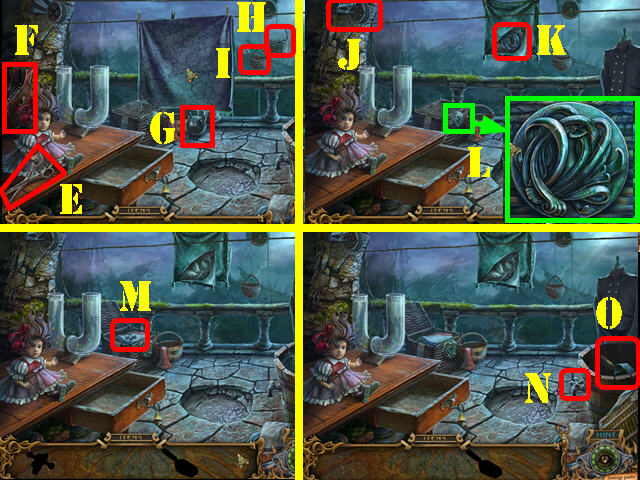
- Play the HOP.
- Take the scissors (E), bellows (F), and the weight (G).
- Put the weight in the basket (H) and take the handle (I).
- Put the handle on the pulley (J) and turn the handle.
- Cut the pillow with the scissors; use the bellows on the feathers inside the pillow and take the disk (K).
- Zoom into the basket; put the disk on the lock. Rotate the disk until you form the image on the screenshot (L).
- Take the tap from inside the basket (M).
- Put the tap on the spigot (N); turn the tap and take the scoop (O).
- The SCOOP will be added to inventory.

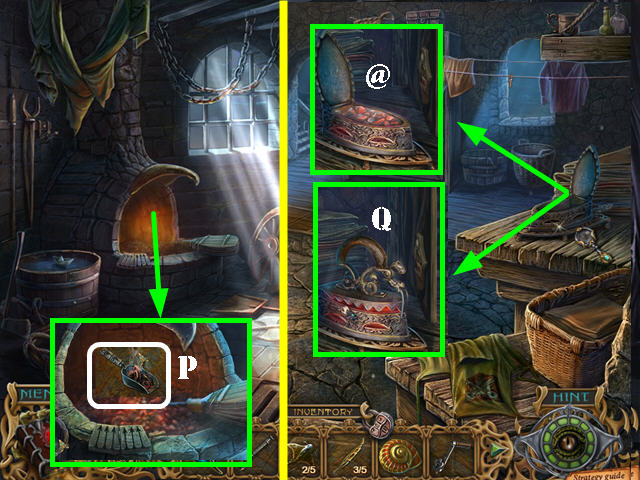
- Walk down and go through the lower left door to access the blacksmith’s.
- Zoom into the hearth; dip the SCOOP in it to get the HOT COALS (P).
- Go back to the laundry room.
- Zoom into the table; put the HANDLE on the iron (if you haven’t done so already).
- Put the HOT COALS in the iron (@); close the lid and take the HOT IRON (Q).
Chapter 8: Free Zakh

- Go back to Isa’s house and go into the office.
- Zoom into the table; put the HOT IRON on the pages to make the images appear (R).
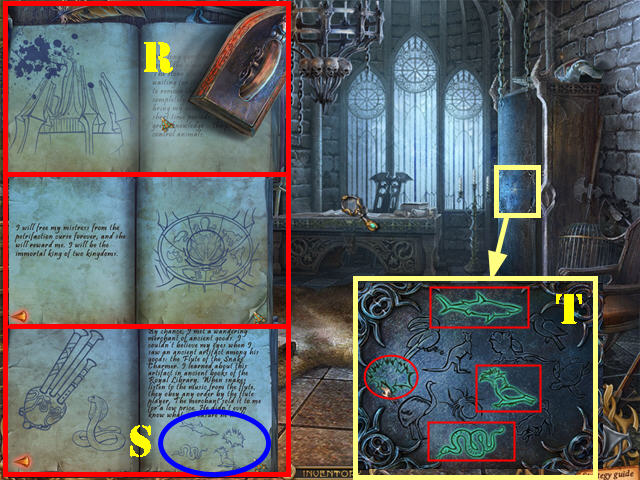
- Flip the pages and look at the clue (S).
- Examine the closet; press on the symbols you found in the book. Please look at the screenshot for the solution (T).

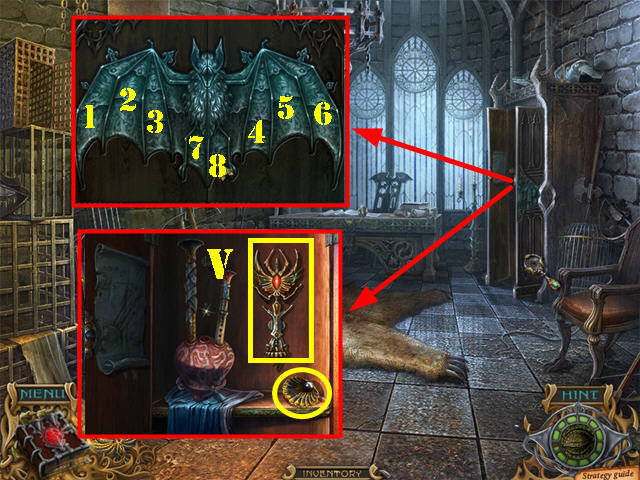
- Zoom into the closet again; press on the bat wings until they are all unfolded.
- To solve the puzzle, press on the wings in this order: 1, 2, 3, 4, 5, 6, 8, 7, 2, and 8 (U).
- Zoom into the closet again; take the GRAY SHELL and the SCEPTER (V).
- Walk down.

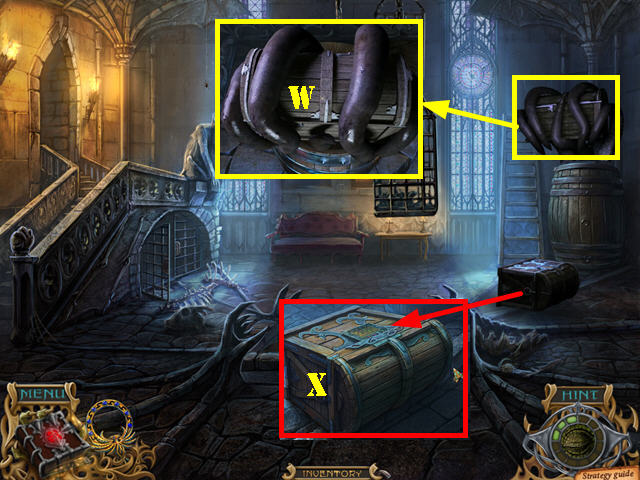
- Zoom into the tentacles; pour the BACON GREASE on the tentacles so it can drop the chest (W).
- Examine the chest; put the RED SHELL, BLUE SHELL, and the GRAY SHELL on the chest to activate a puzzle (X).

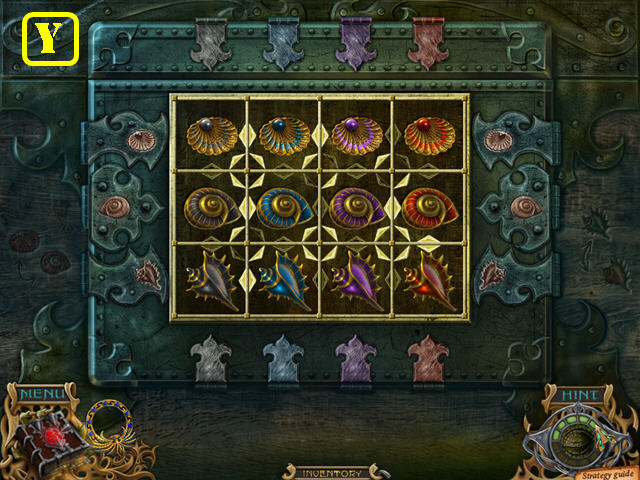
- Select 2 neighboring shells to swap position provided the shells are of the same shape or color.
- Arrange the shells in rows according to their shape; place the shells in columns according the color on the locks.
- Please look at the screenshot for the solution (Y).

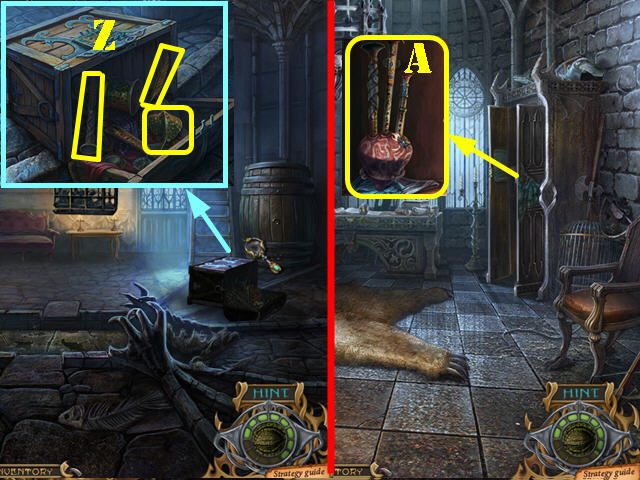
- Take the REED PIPE, RAY 3/5, and the FEATHER 4/5 (Z).
- Go through the left door.
- Zoom into the closet; put the REED PIPE on the unit and take the FLUTE (A).
- Walk down 4 times and go down the steps.

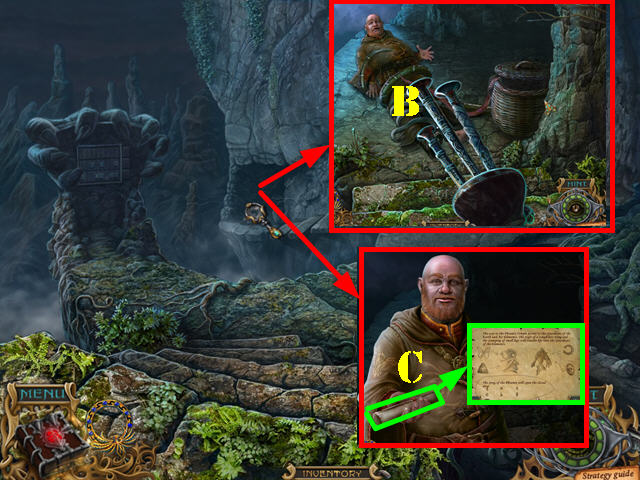
- Zoom into the cave.
- Put the FLUTE on the snakes covering Zakh (B).
- Take the scroll from Zakh’s hand (C).

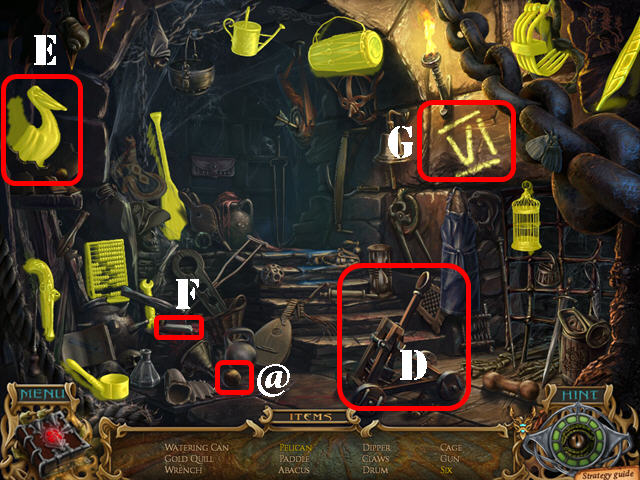
- Play the HOS.
- Drag the ball (@) to the ballista (D) and take the pelican (E).
- Put the chalk (F) on the wall; take the six (G).
- The FEATHER 5/5 will be added to inventory.
- Walk down and go through the top door.

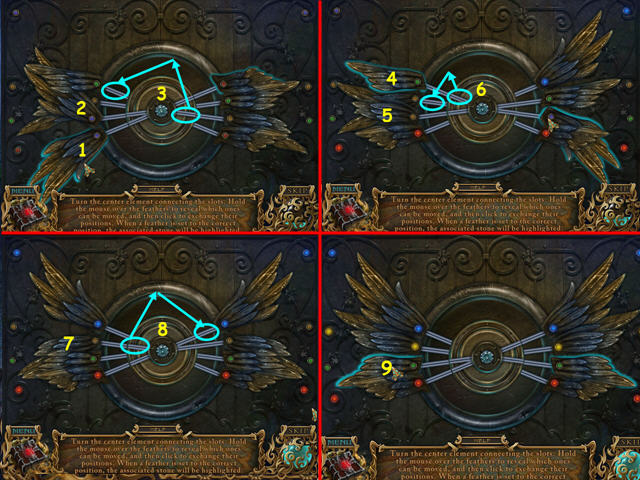
- Zoom into the gate on the left; put the 5 FEATHERS on the lock to activate a puzzle.
- Position the wheel in the middle so you can slide the feathers to the opposite side.
- Mouse over a feather to see if a move can be made; if it can, press on the feather to swap it with the one on the opposite side.
- Once a feather is in the right place, the stone on the outside will light up.
- Please look at the screenshot for the solution (H). Press on the feathers in the order shown and then switch the center wheel to the position shown in the screenshot.
- Go through the gate.
Chapter 9: The Garden

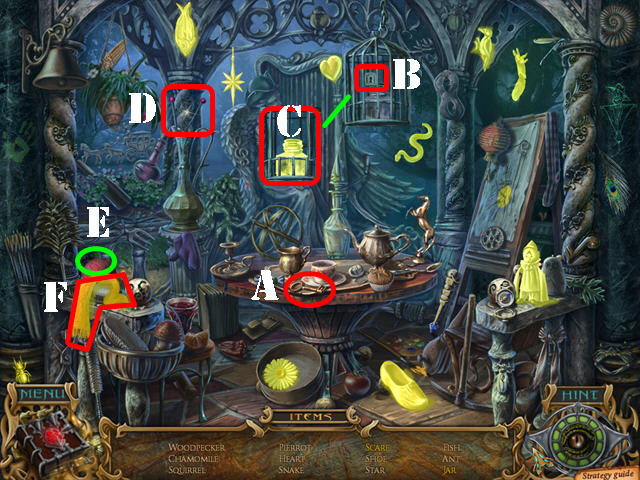
- Play the HOS.
- Drag the key (A) to the lock on the birdcage (B); take the empty jar (C).
- Put the knitting needles (D) on the ball of yarn (E) and take the scarf (F).
- The EMPTY JAR (G) will be added to inventory.

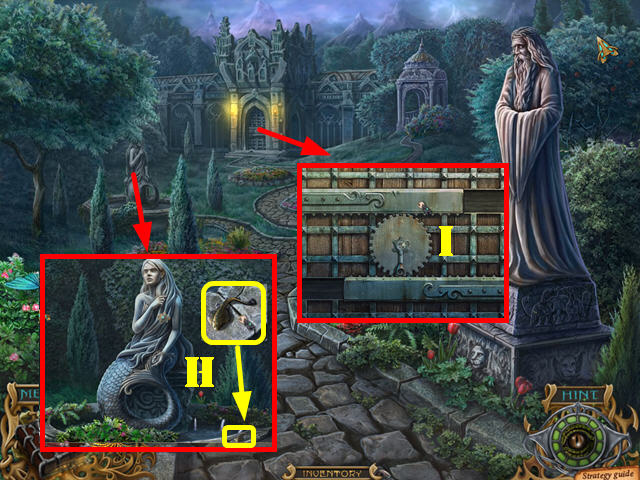
- Examine the fountain; zoom into the edge of the fountain and take RAY 4/5 (H).
- Zoom into the gate; put the HANDLE on the mechanism (I).
- Turn the handle and go through the gate.

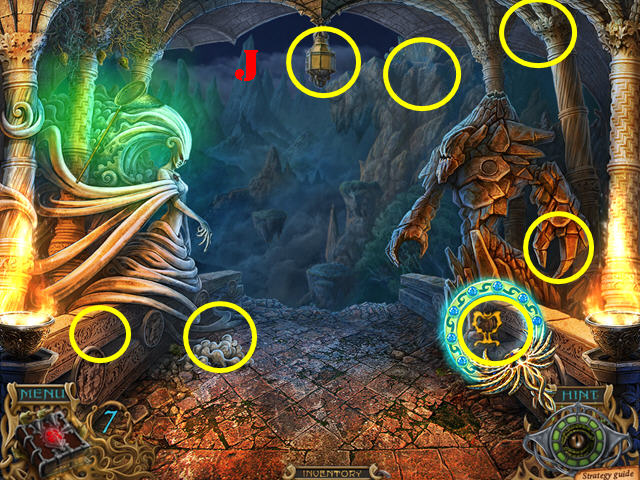
- Use the Golden Phoenix Amulet to search for magic symbols in the scene.
- The areas marked in yellow represent the approximate areas of all the 7 symbols (J).

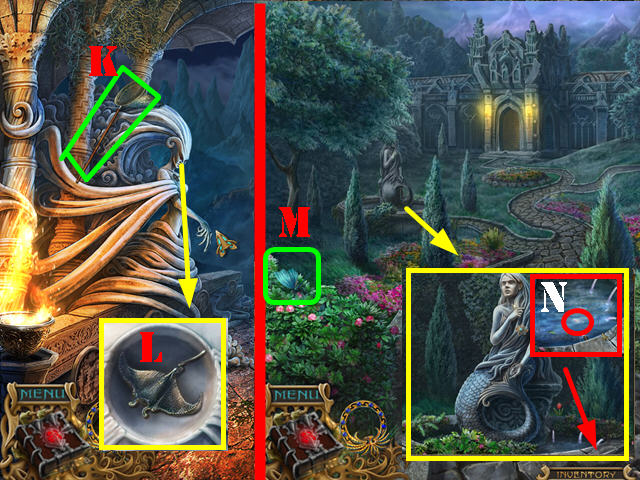
- Take the SCOOP NET (K).
- Examine the left statue’s face; take the RAY 5/5 (L).
- Walk down.
- Use the SCOOP NET to get the BUTTERFLY (M).
- Examine the fountain; zoom into the water and retrieve the SYMBOL OF EARTH with the SCOOP NET (N).
- Walk down and go over the bridge.

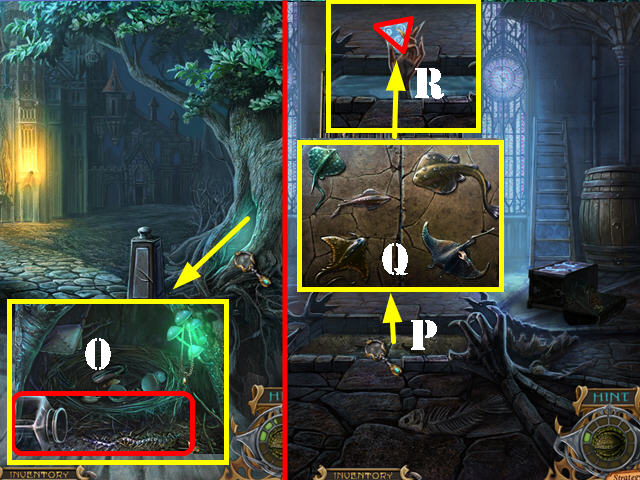
- Zoom into the tree hole; put the EMPTY JAR on the ground to obtain the MILLIPEDE (O).
- Go into Isa’s house.
- Zoom into the floor (P); put the 5 RAYS on the ground. Drag the RAYS into their matching slots (Q).
- Take the SYMBOL OF AIR (R).
- Return to the garden and go through the door.

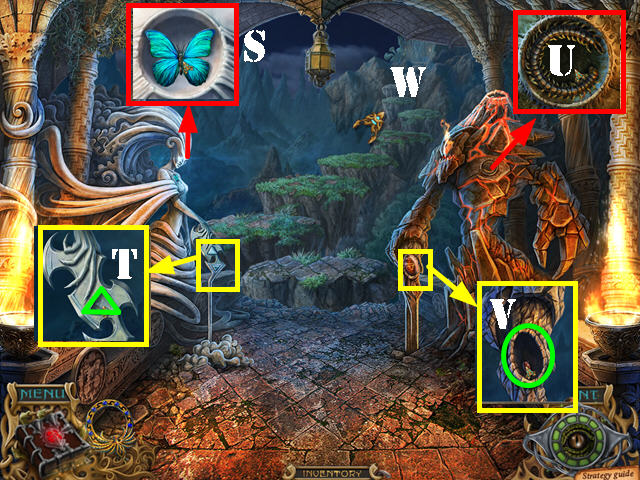
- Zoom into the left statue’s face; put the BUTTERFLY in the slot (S).
- Examine the staff that appears in the left statue’s hand; put the SYMBOL OF AIR in the slot (T).
- Examine the stone statue on the right; put the MILLIPEDE in the slot (U).
- Examine the staff that appears in the right statue’s hand; put the SYMBOL OF EARTH in the slot (V).
- A bridge of levitating stones appears; take the bridge to reach the temple door (W).

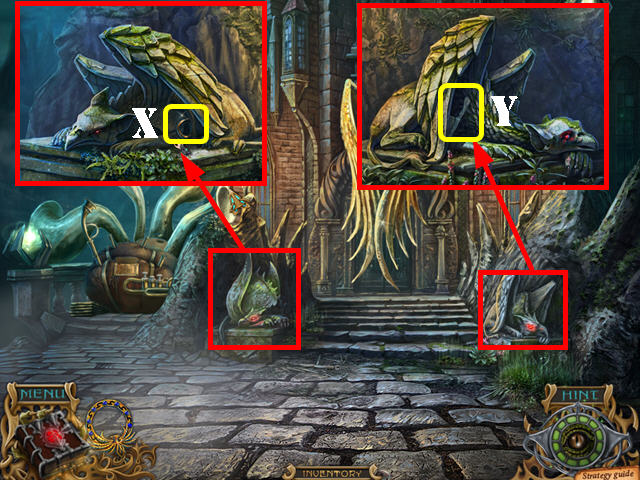
- Touch the crow.
- Examine the small left statue; take the HORN 1/3 (X).
- Examine the small right statue; take the COMB (Y).
- Walk down twice.

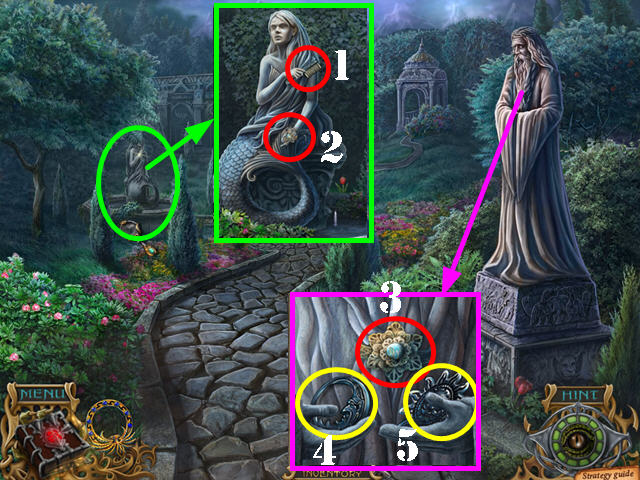
- Zoom into the fountain; put the COMB in the statue’s hand (1) and take the BARRETTE (2).
- Examine the right statue’s beard; put the BARRETTE on the beard (3).
- Take the MOON (4) and the SUN (5).
- Walk down and go into the throne room.

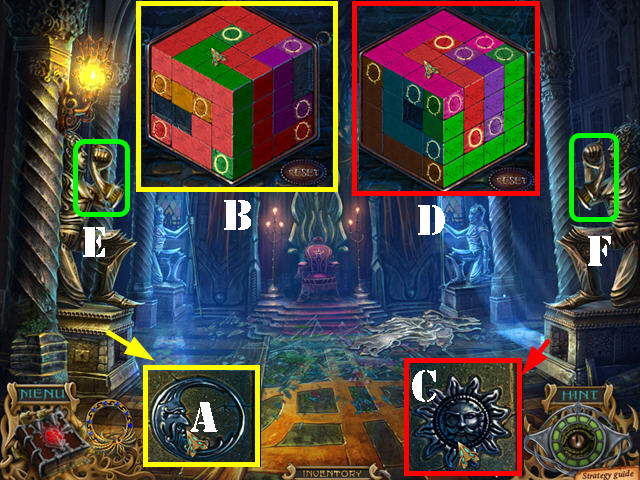
- Zoom into the base of the left statue; insert the MOON into the slot to activate a puzzle (A).
- Press on a colored ring to activate that color, then form a solid path between the same colored rings without crossing any lines.
- Please look at the screenshot for the solution (B).
- Zoom into the base of the right statue; insert the SUN into the slot to activate a puzzle (C).
- Press on a colored ring to activate that color, then form a path solid between the same colored rings without crossing any lines.
- Please look at the screenshot for the solution (D).
- Take HORN 2/3 (E) and HORN 3/3 (F).

- Go back to the garden.
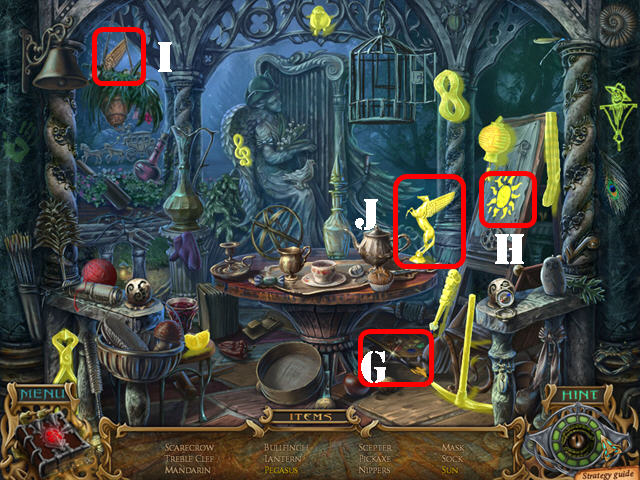
- Play the HOS.
- Drag the brush (G) to the easel; take the sun (H).
- Drag the wing (I) to the horse; take the Pegasus (J).
- The DIAMOND SCEPTER will be added to inventory.


- Return to the temple door.
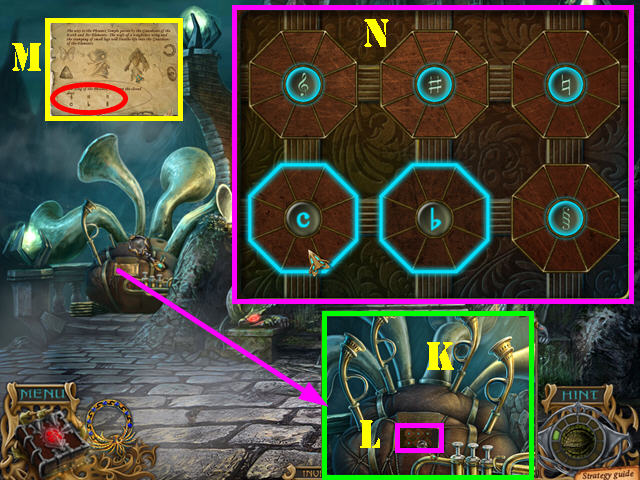
- Zoom into the instrument on the left; put the 3 HORNS on it (K).
- Press on the panel to activate a puzzle (L).
- Put the symbols in the correct spots according to the images in your journal (M).
- Select two symbols to swap their positions. Once symbols are in the right spots, the circle will light up.
- Please see screenshot for the solution (N). Another puzzle will appear as soon as you solve this one.
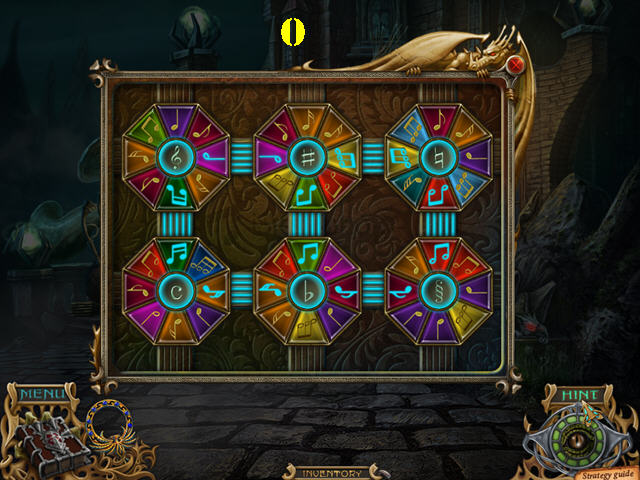
- Press on the center symbols to move the position of the musical symbols.
- Place the polygons so the same symbols are facing each other.
- Please look at the screenshot for the solution (O).
- Go through the door to access the temple.

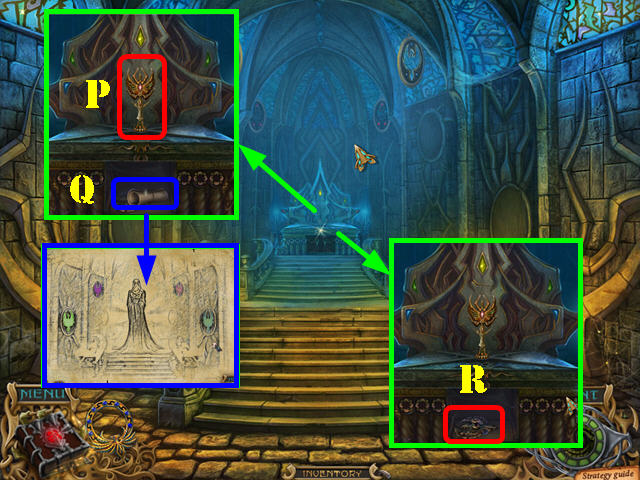
- Take a closer look at the altar; put the SCEPTER in the slot (P).
- Take the diagram (Q) and the PATTERN (R).
- Walk down 4 times and go into the throne room.

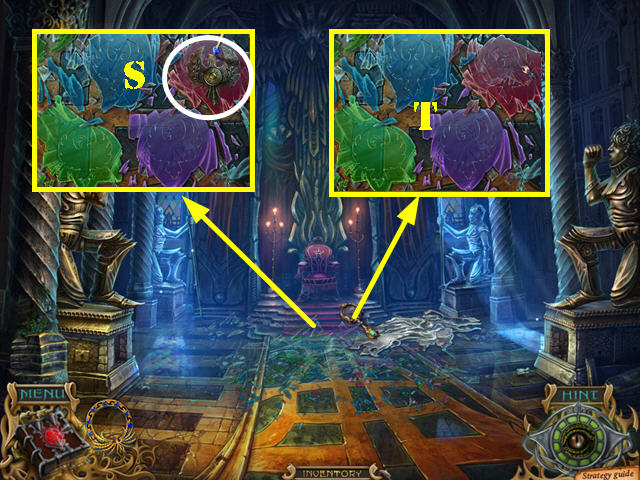
- Zoom into the ground; put the PATTERN on the glass (S).
- Use the DIAMOND SCEPTER on the pattern to cut out the shape.
- Place the pattern and the diamond scepter on the rest of the glass pieces to cut out the shapes.
- Take the RED GLASS, VIOLET GLASS, GREEN GLASS, and BLUE GLASS (T).

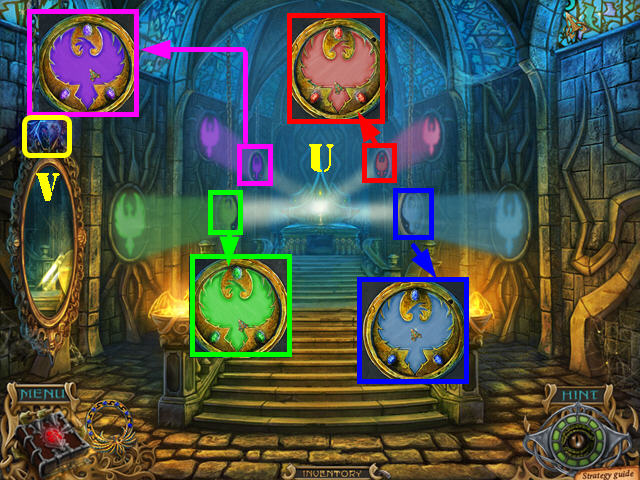
- Go back to the temple.
- Zoom into the mirrors and insert the RED GLASS, VIOLET GLASS, GREEN GLASS, and BLUE GLASS as shown in the screenshot (U).
- Talk to the Witch.
- Select the piece above the mirror to activate a puzzle (V).

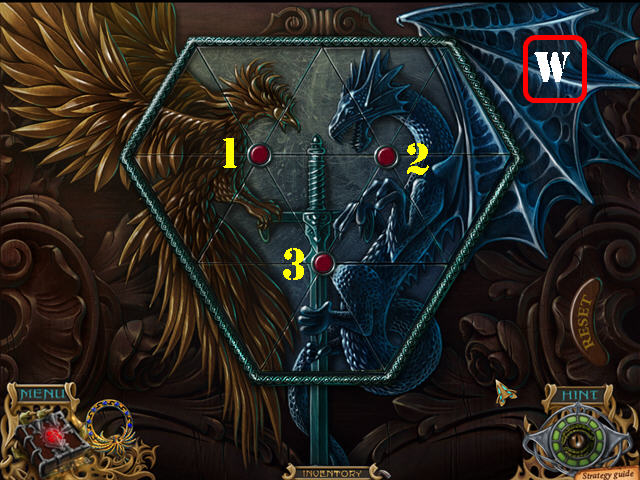
- Arrange the picture so the dragon and the phoenix are in the right spots.
- Press on the red buttons to move the 6 pieces attached to it. Press on the individual triangles to rotate each one.
- To solve the puzzle, press on the red buttons in this order: 3,3,3,2,2,1,1,and 1 (W).
- Go through the left mirror.
Chapter 10: The Finale

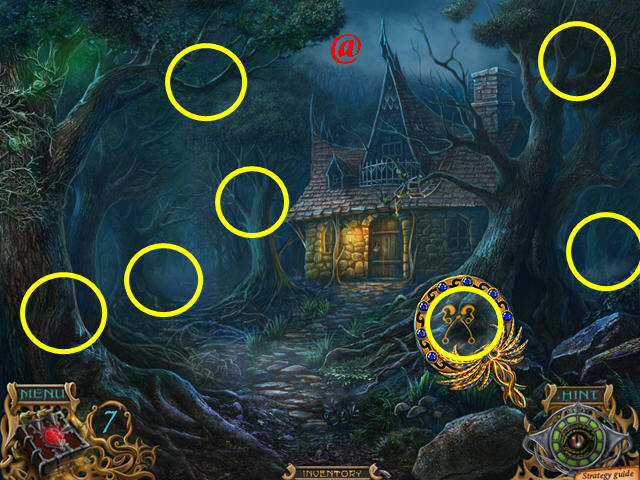
- Use the Golden Phoenix Amulet to search for magic symbols in the scene.
- The areas marked in yellow represent the approximate areas of all the 7 symbols (@).
- Go left.

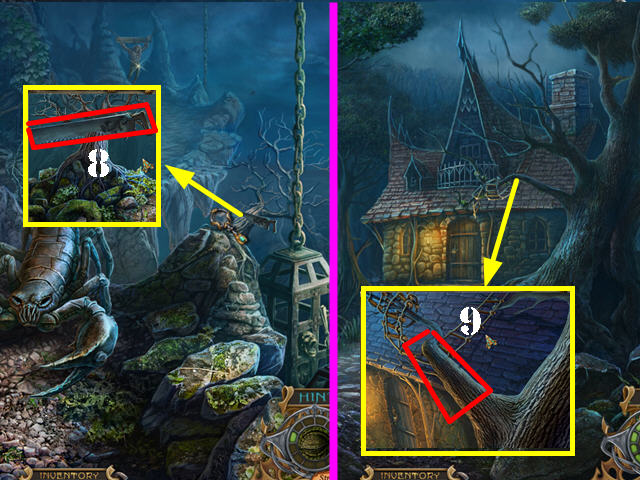
- Examine the base of the back statue; take the BRUSH (1).
- Go forward.
- Examine the giant scorpion; take the PRUNING SHEARS (2).
- Examine the tree; take the FOX (3).
- Walk down.

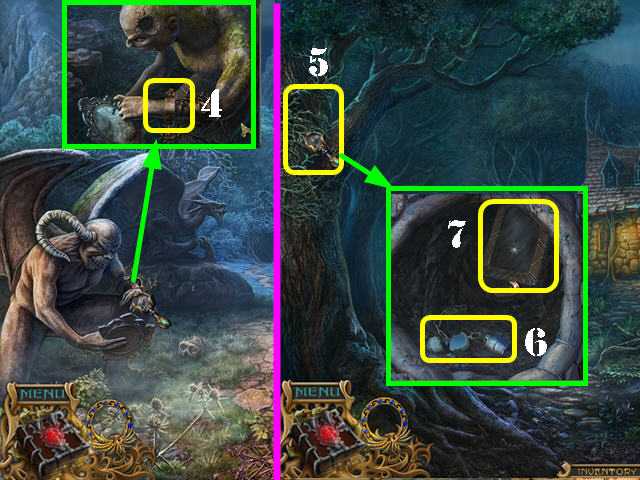
- Examine the left statue; remove the thorns with the PRUNING SHEARS and then remove the BOLT with the WRENCH (4).
- Walk down.
- Cut the thorns on the left tree with the PRUNING SHEARS (5).
- Examine the tree hollow and take the WEIGHT (6).
- Use the BRUSH to remove the cobweb; take the MIRROR 1/3 (7).
- Go back to the stone scorpion area.


- Zoom into the tree; put the BOLT on the saw and take the SAW (8).
- Walk down twice.
- Examine the roof; cut the branch with the SAW to activate a HOP (9).

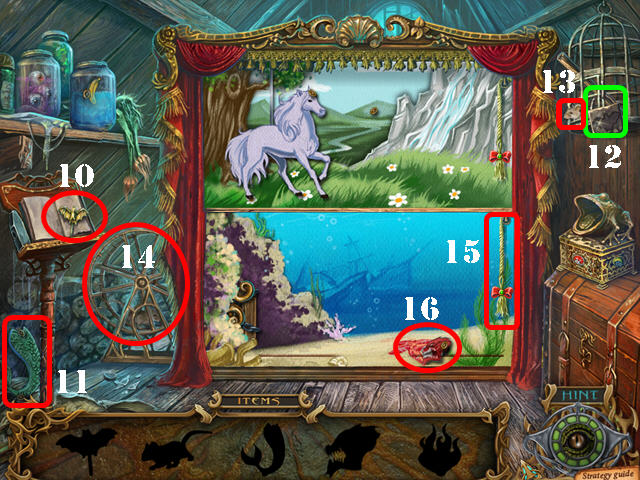

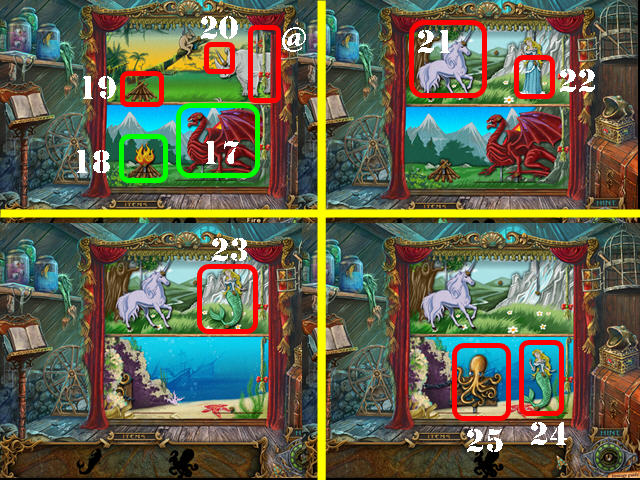
- Play the HOP.
- Open the book and take the bat (10).
- Grab the tail (11).
- Put the bat on the lock (12); open the cage and take the mouse (13).
- Put the mouse in the wheel (14) to open the curtains.
- Pull the lower tassel to change the scenery (15); take the dragon head (16).
- Pull the lower tassel again and put the dragon head on the dragon body (17).
- Take the fire (18).
- Pull the top tassel (@); put the fire on the sticks (19) and take the horn (20).
- Pull the top tassel again; put the horn on the unicorn (21).
- Remove the dress (22) and put the tail on the mermaid (23).
- Take the mermaid.
- Pull the lower tassel; put the mermaid on the beach (24).
- Take the octopus; the OCTOPUS will be added to inventory (25).

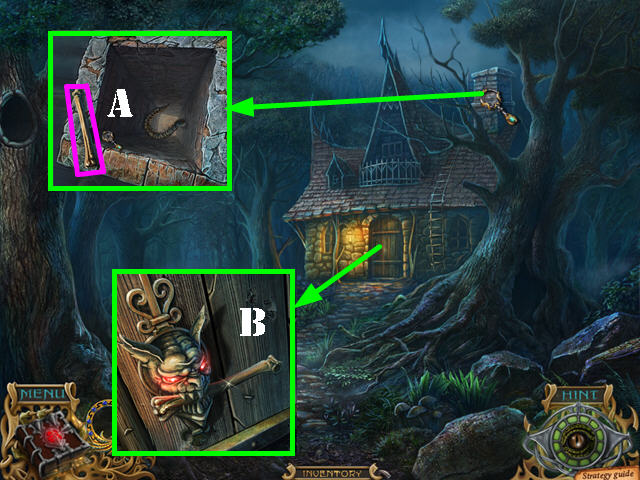
- Examine the chimney; take the BONE (A).
- Zoom into the door; give the BONE to the doorknocker (B) and turn the doorknocker.
- Go through the door.

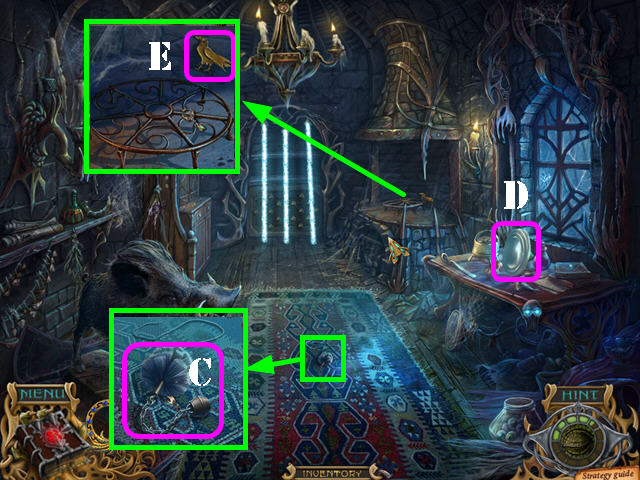
- Examine the carpet; put the WEIGHT on the brush and take the SWEEP TOOL (C).
- Take MIRROR 2/2 on the table (D).
- Examine the fireplace; take the CROW (E).
- Walk down.

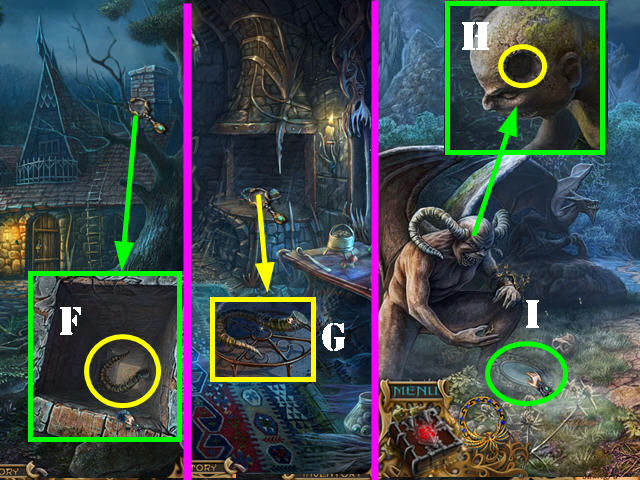
- Zoom into the chimney; use the SWEEP TOOL in the chimney (F).
- Go back into the cabin.
- Examine the fireplace and take the HORN (G).
- Walk down and go left.
- Examine the left statue; put the HORN (H) on its head and take the MIRROR 3/3 (I).
- Walk down.

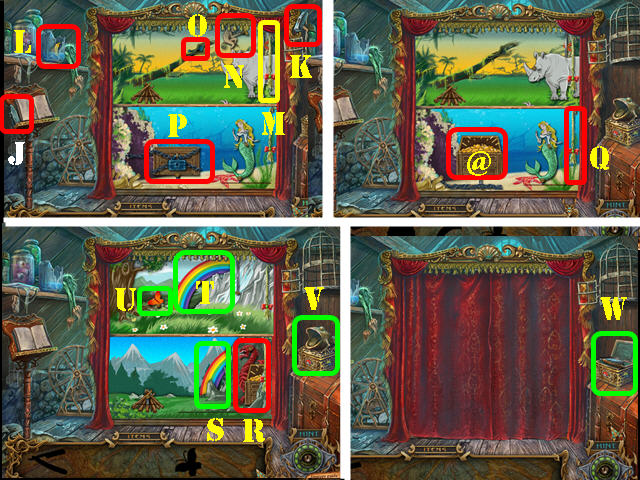
- Play the HOP.
- Take the hammerhead (J); put it on the handle and take the hammer (K).
- Break the jar with the hammer and take the banana (L).
- Pull the top tassel (M); give the banana to the monkey (N) and take the key (O).
- Unlock the chest with the key (P); take the chest (@).
- Pull the lower tassel (Q); put the chest on the dragon (R) and take the rainbow (S).
- Pull the top tassel and put the rainbow in the sky (T); take the butterfly (U).
- Give the butterfly to the frog (V) and take the razor (W).
- The RAZOR will be added to inventory.
- Go into the house.

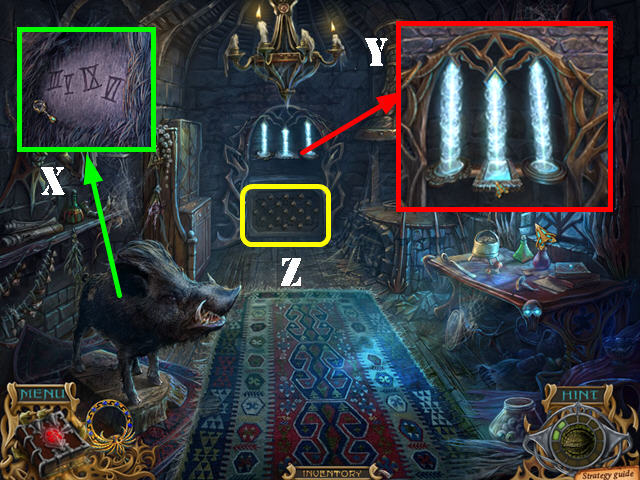
- Zoom into the boar; cut its fur with the RAZOR. Note the Roman numerals: III, V, IX, and VI (X).
- Zoom into the light beams; put the 3 MIRRORS on them (Y).
- Zoom into the area below the lights to activate a puzzle (Z).

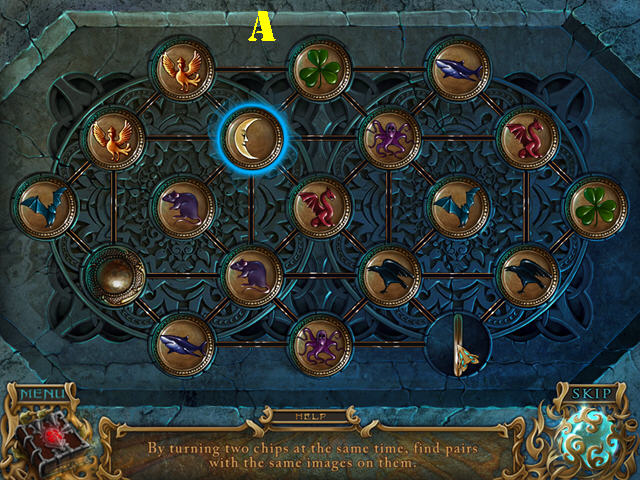
- Select two chips at a time to see what is behind them. Find matching pairs to eliminate them from the board.
- Each time a selection is made, the board will shift.
- The solution to this puzzle is random (A).

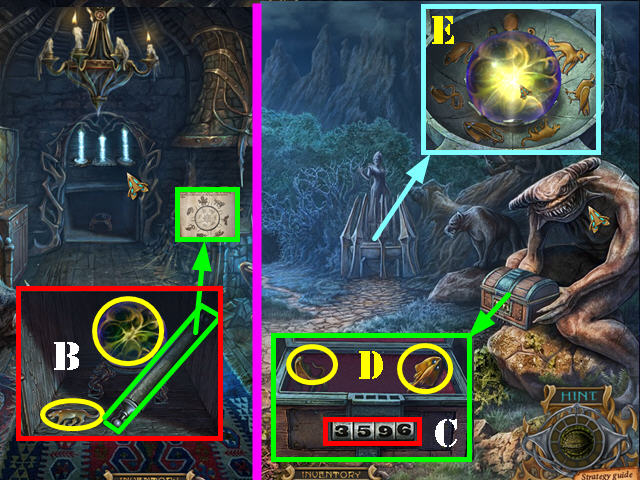
- Zoom into the niche; take the PANTHER, the scroll, and the SPHERE (B).
- Walk down and go left.
- Examine the right statue’s chest; enter the numbers 3, 5, 9, and 6 (C).
- Take the RAY and the SNAKE (D).
- Zoom into the base of the back statue; put the MOUSE, FOX, OCTOPUS, CROW, PANTHER, RAY, and the SNAKE into the slots. Put the SPHERE in the center (E).

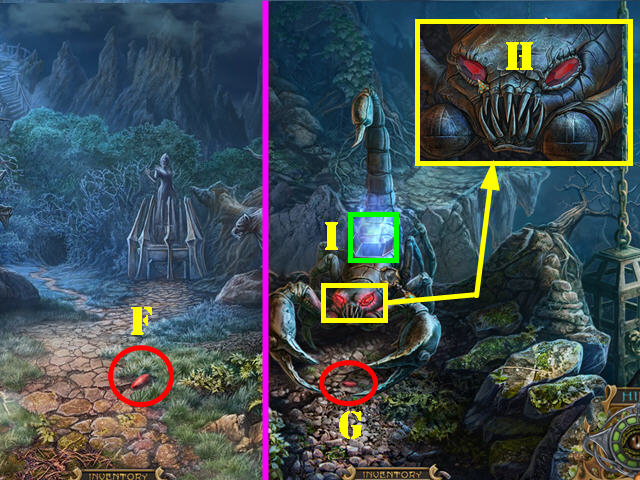
- Take the RUBY 1/2 on the ground (F).
- Go left.
- Take the RUBY 2/2 (G).
- Zoom into the scorpion’s head; put the 2 RUBIES into the eye sockets (H).
- Examine the secret compartment on the scorpion’s back to activate a puzzle (I).

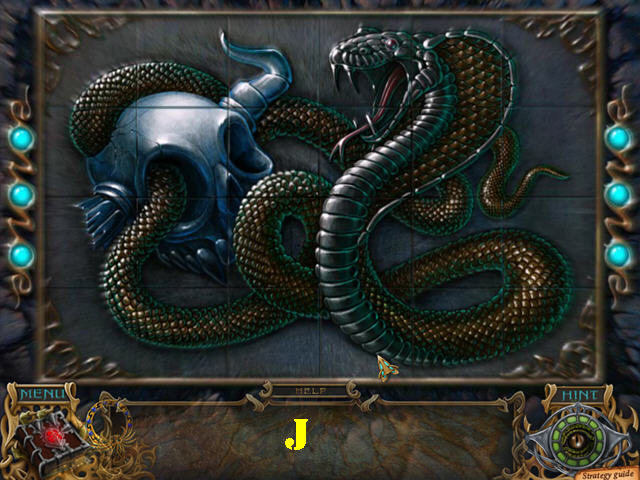

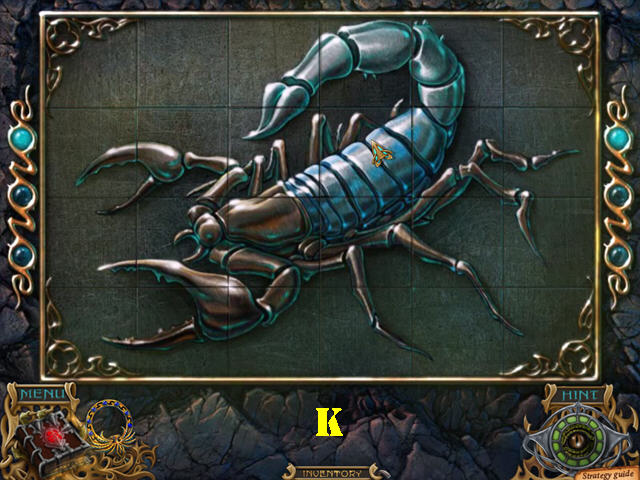
- Select two tiles to swap their positions. After 3 swaps, the tiles will flip over to reveal the second image; put those tiles into place in the same manner.
- Tiles that have been placed correctly will lock in place.
- You have to form the correct image for both side of the picture.
- Please see the screenshots for the solution (J and K).

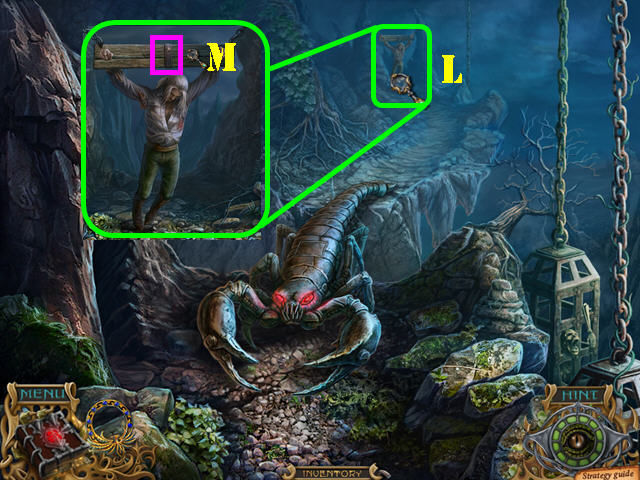
- Go to Thyrian (L).
- Use the wrench to loosen the bolts on the board (M).
- Congratulations, you have completed Spirits of Mystery: Song of the Phoenix Standard Edition!




 Golden Trails 2: The Lost Legacy Walkthrough, Guide, & Tips
 Chronicles of Albian 2: The Wizbury School of Magic Walkthrough, Guide, & Tips
 Dungeon Boss Tips and Tricks, Guide, & Tips
 The Secret Order: Ancient Times Walkthrough, Guide, & Tips
 Christmas Eve: Midnight's Call Walkthrough, Guide, & Tips