The Secret Order: Ancient Times Walkthrough, Guide, & Tips
The Secret Order: Ancient Times Walkthrough
Welcome to the The Secret Order: Ancient Times Walkthrough
Destroy artifacts in the past to preserve the world’s future!
Whether you use this document as a reference when things get difficult or as a road map to get you from beginning to end, we’re pretty sure you’ll find what you’re looking for here.
This document contains a complete The Secret Order: Ancient Times game walkthrough featuring annotated screenshots from actual gameplay!
We hope you find this information useful as you play your way through the game. Use the walkthrough menu below to quickly jump to whatever stage of the game you need help with.
Remember to visit the Big Fish Games Forums if you find you need more help. Have fun!
This walkthrough was created by BrownEyedTigre, and is protected under US Copyright laws. Any unauthorized use, including re-publication in whole or in part, without permission, is strictly prohibited.
General Tips

- This is the official guide for The Secret Order: Ancient Times.
- This guide will not mention each time you have to zoom into a location; the screenshots will show each zoom scene.
- We will use the acronym HOP for Hidden-object puzzles. Interactive items will be color-coded and some will be numbered; please follow the numbers in sequence.
- The HOP lists may be random; our lists may vary from yours.
- You may choose to play a Mah-jongg game instead of a HOP.
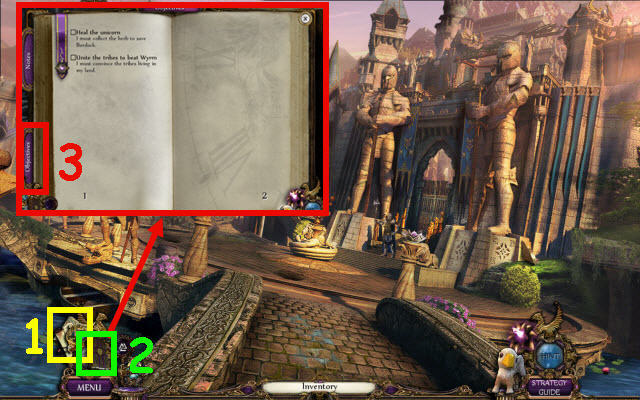
- Use the map (1) to fast travel to previously unlocked locations.
- Select the diary (2) for story updates and objectives (3).
Chapter 1: Time Stone
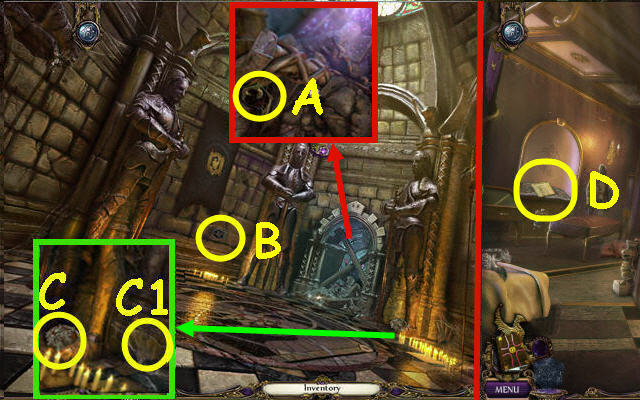
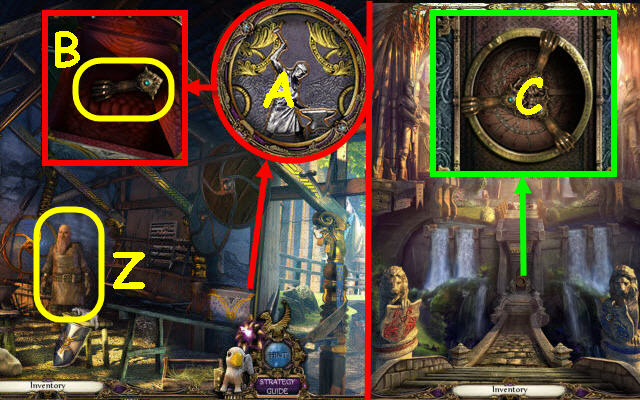
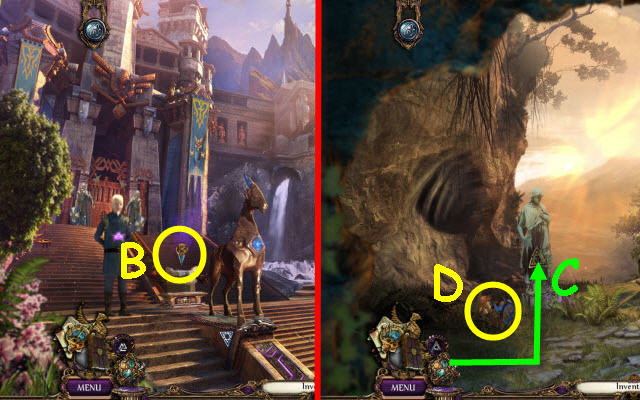
- Speak to the gentlemen; take the GRIFFIN SYMBOL (A).
- Place the GRIFFIN SYMBOL on the brick; push it (B).
- Take the SHELL PIECE (C1) and ROYAL TOKENS 1/4 (C).
- Go down.
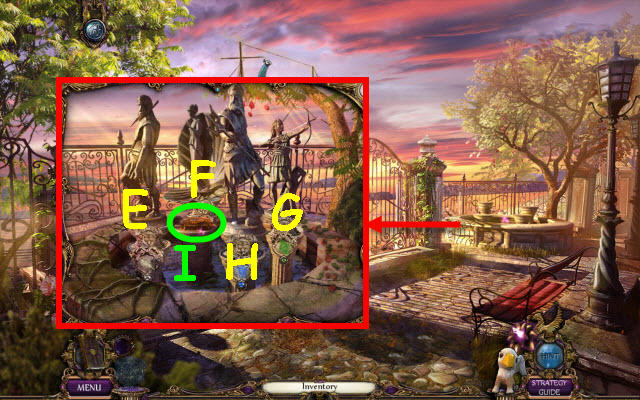
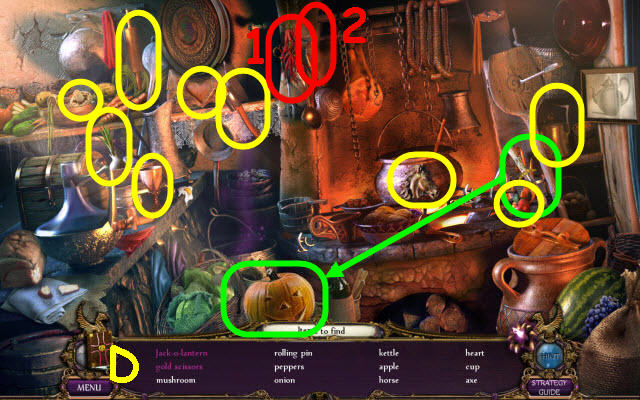
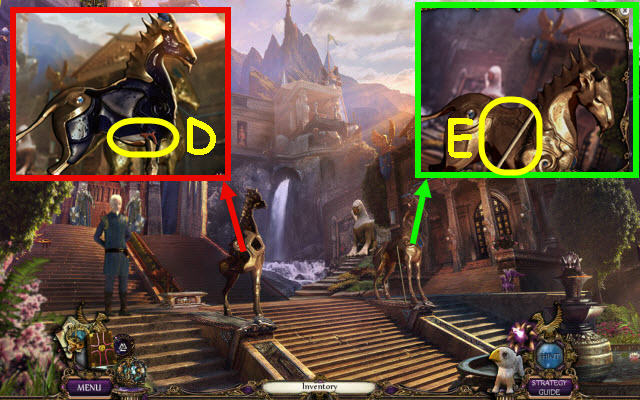
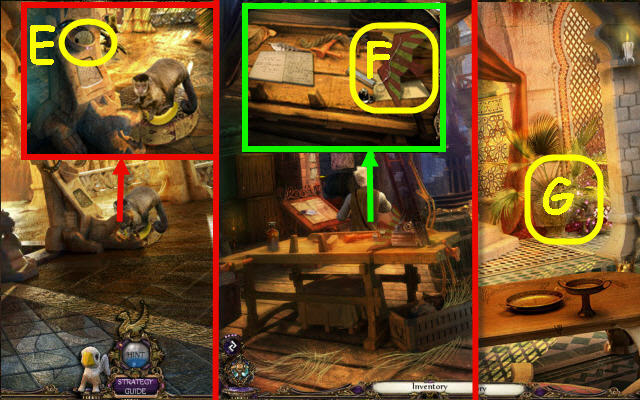
- Read the note to trigger a puzzle (D).
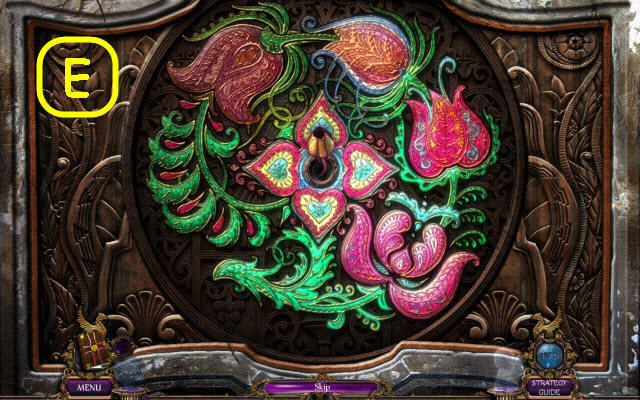
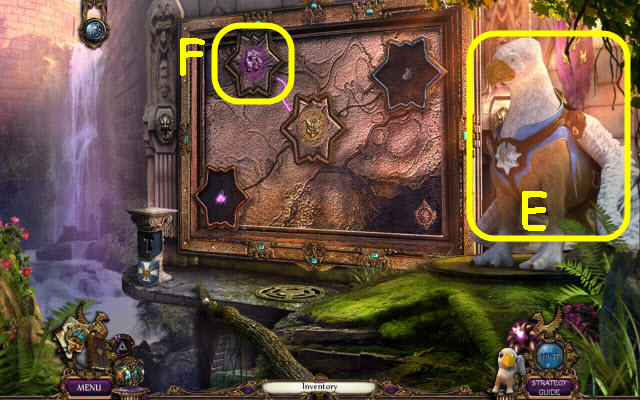
- Assemble the image.
- See screenshot for solution (E).
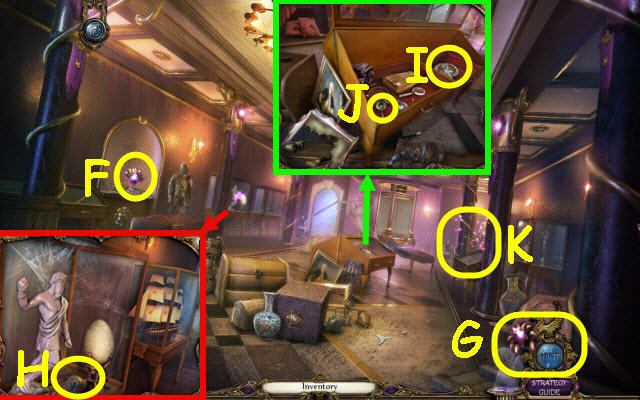
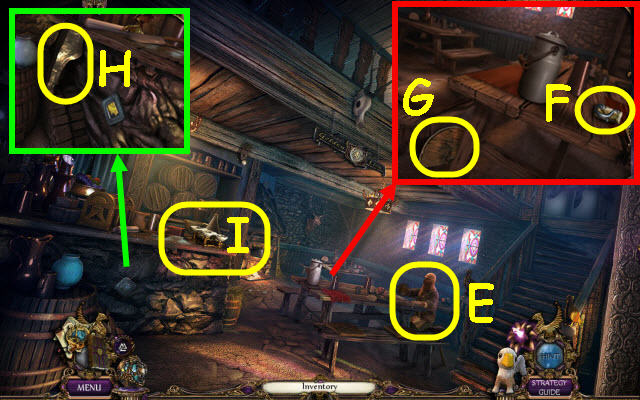
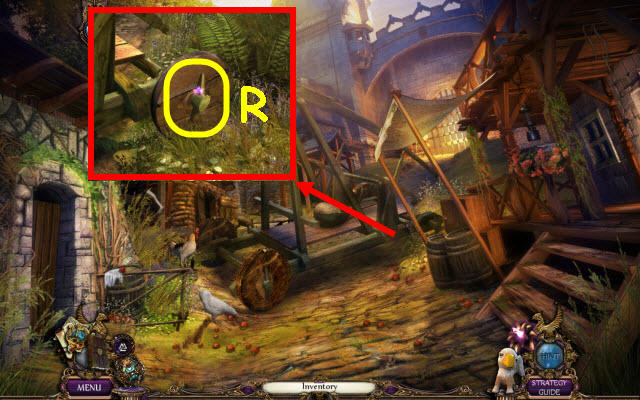
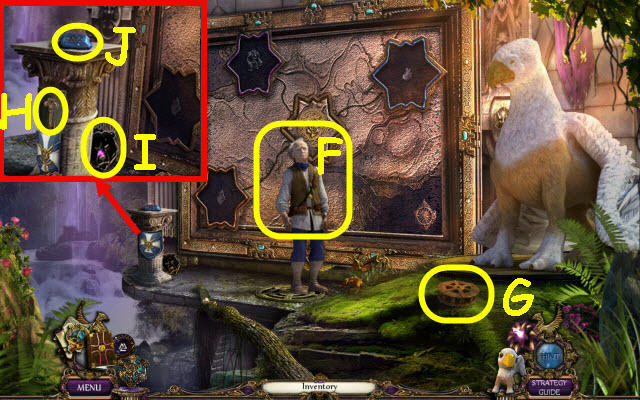
- Take the flower (F) which will be added to your toolbar as a hint button (G).
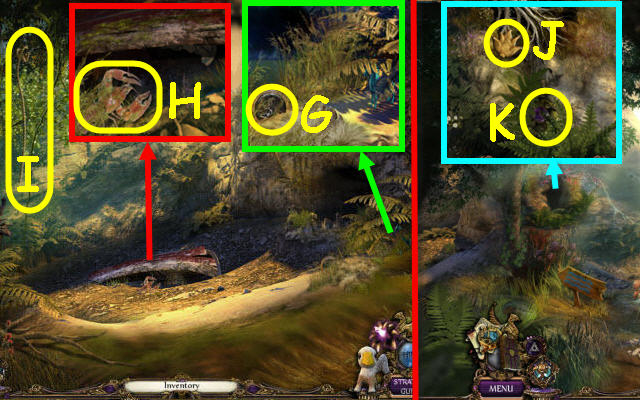
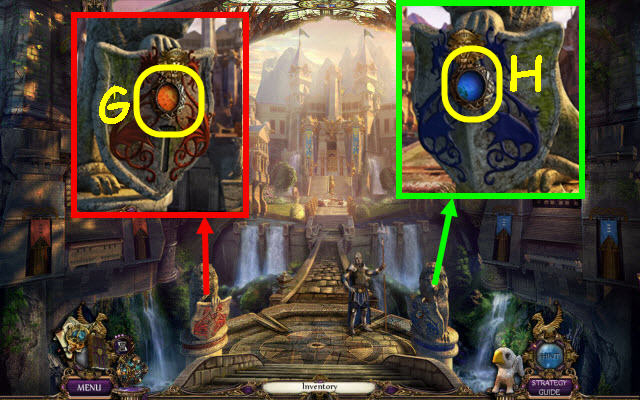
- Open the case; take the CANNON HANDLE (H).
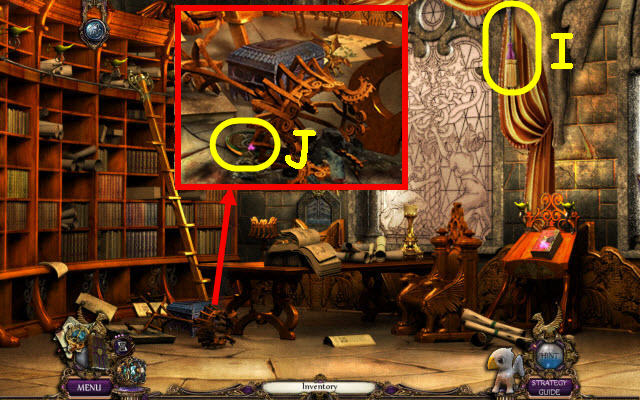
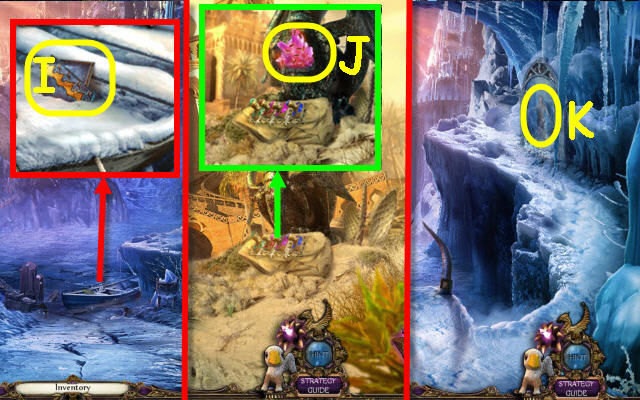
- Open the case and read the note. Take the ROYAL TOKENS 2/4 (I) and EMERALD (J).
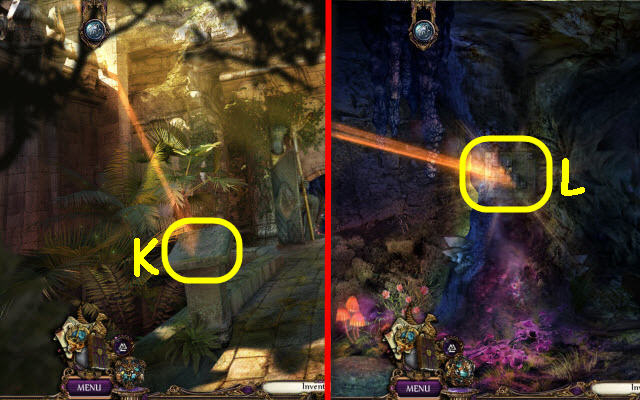
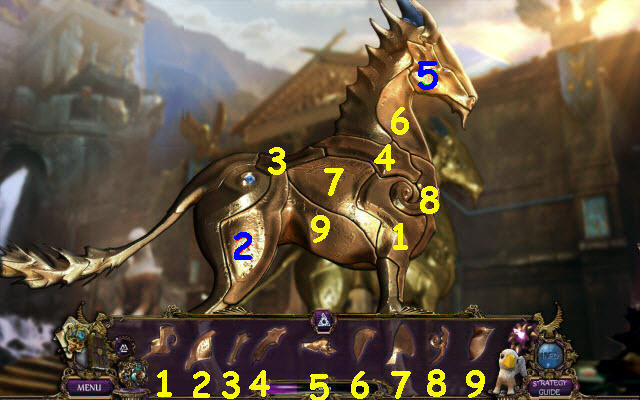
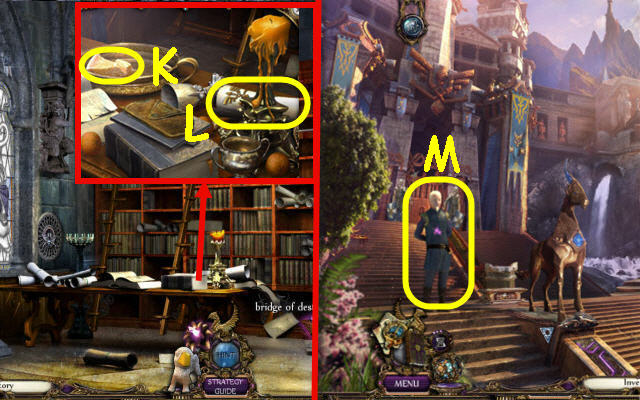
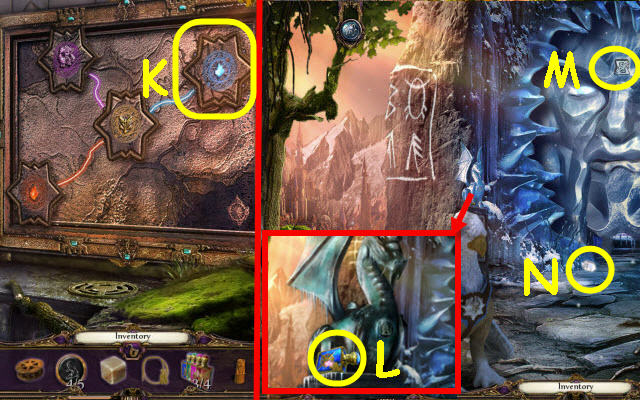
- Examine the display to access a HOP (K).
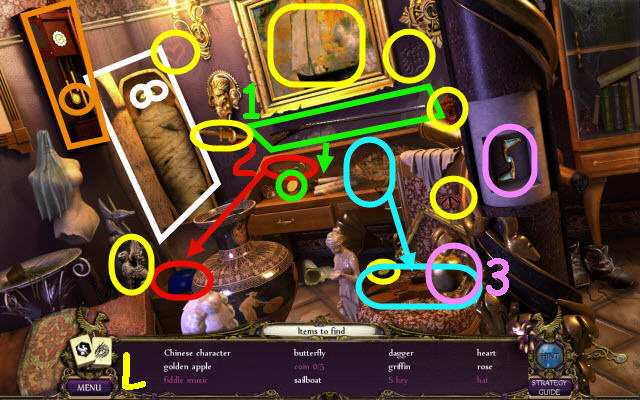
- Play the HOP.
- You receive an S-SHAPED KEY (L).
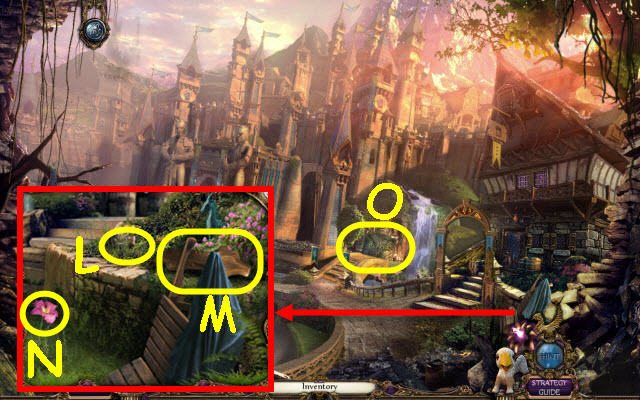
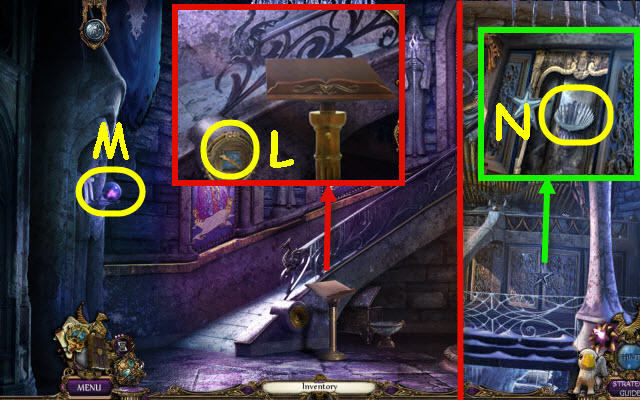
- Go forward to the hall; open the curtain.
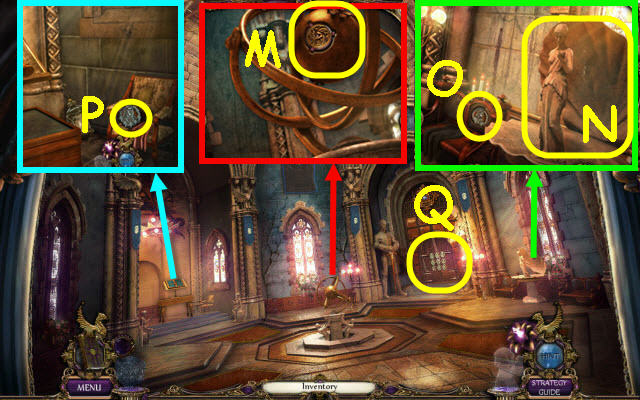
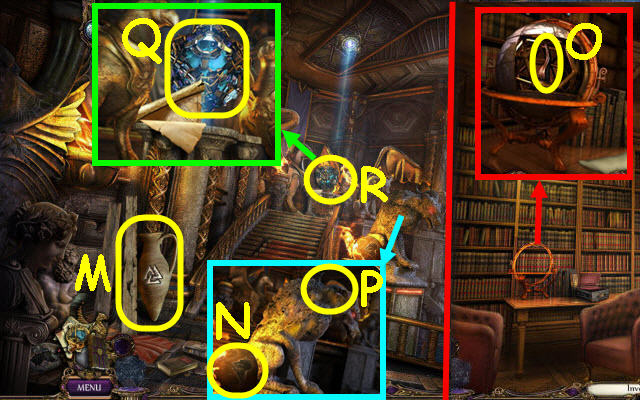
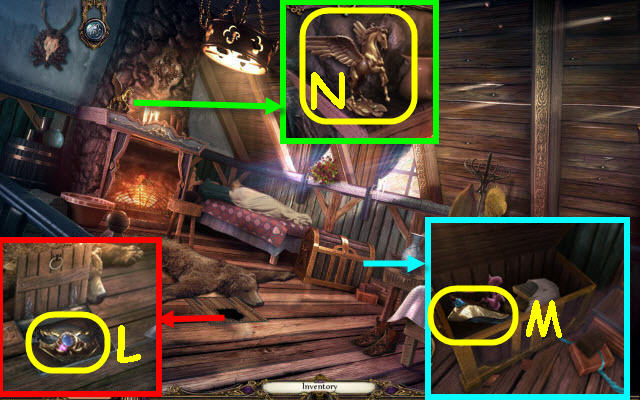
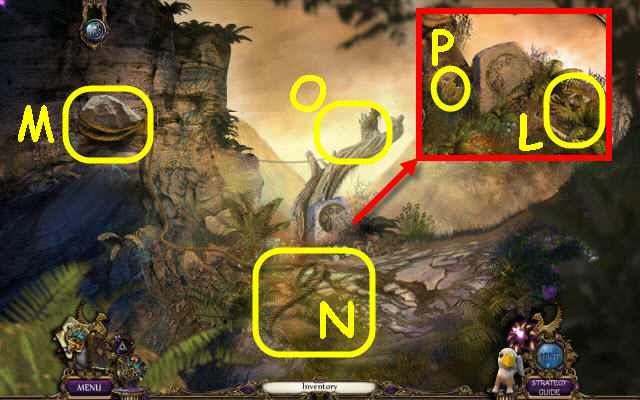
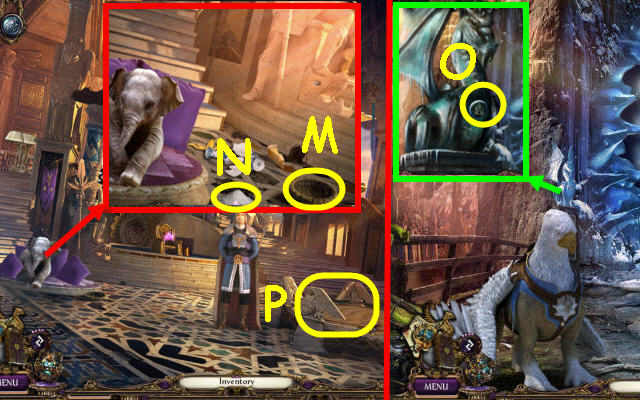
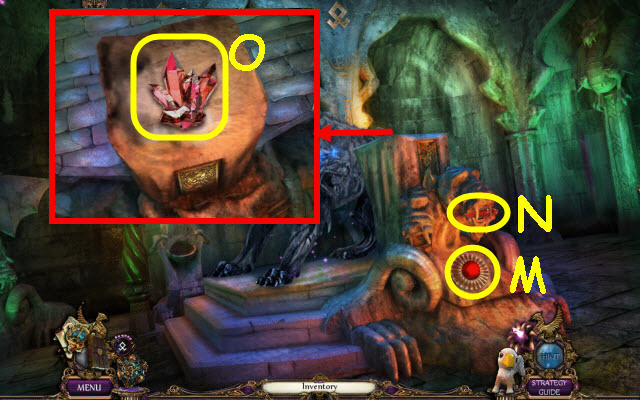
- Take the BROOCH (M).
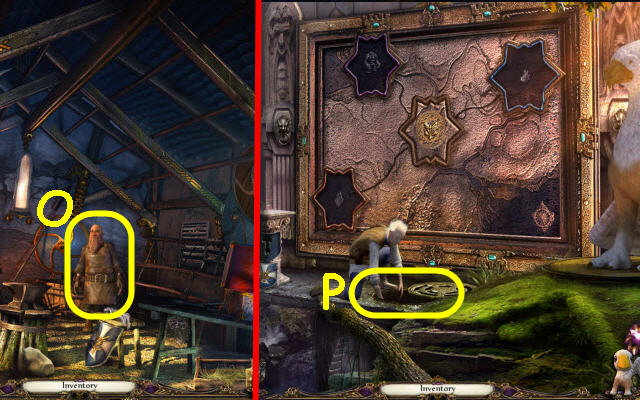
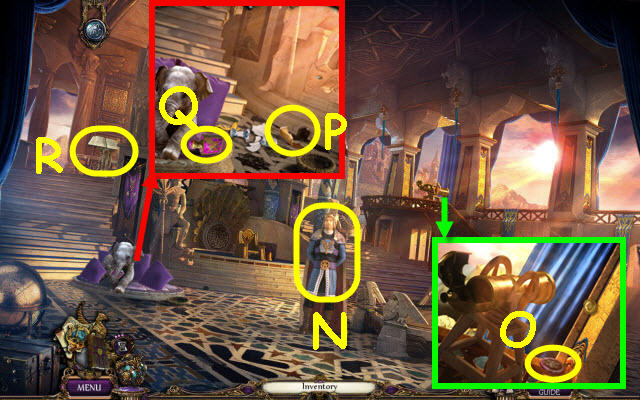
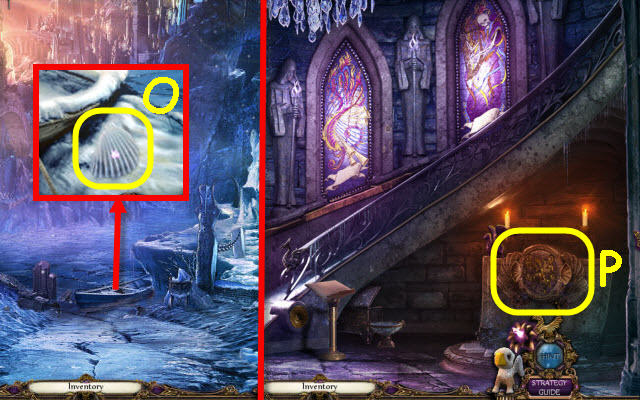
- Place the SHELL PIECE on the shell; take the APHRODITE STATUE (N) and ROYAL TOKENS 3/4 (O).
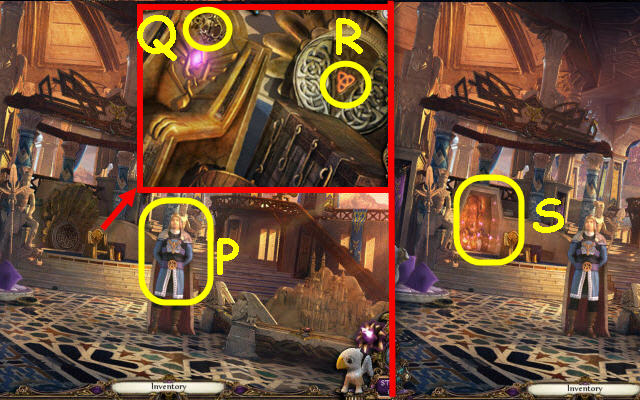
- Take the ROYAL TOKENS 4/4 (P).
- Back out.
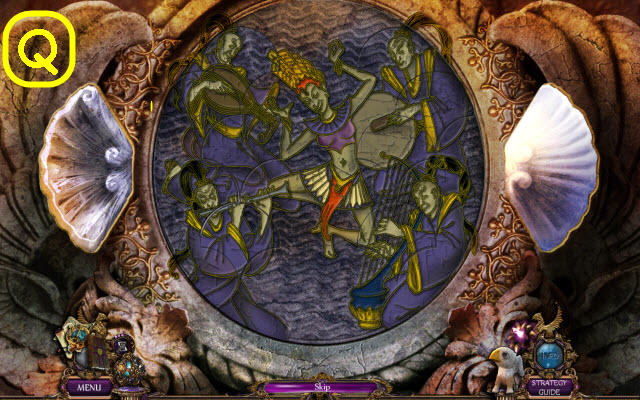
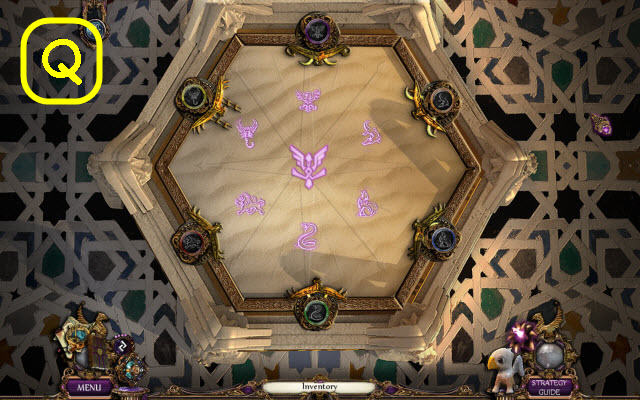
- Place the 4 ROYAL TOKENS on the lock to trigger a puzzle (Q).
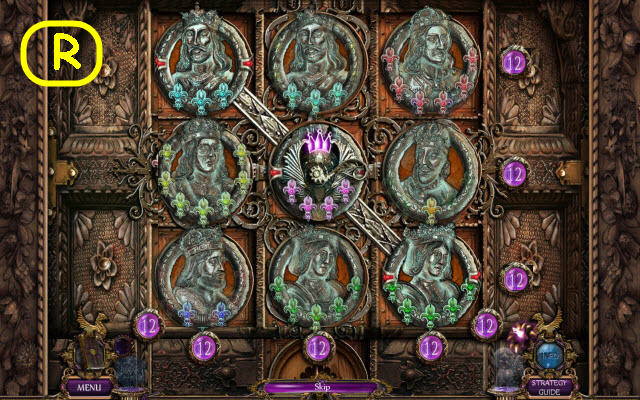
- Arrange the tokens.
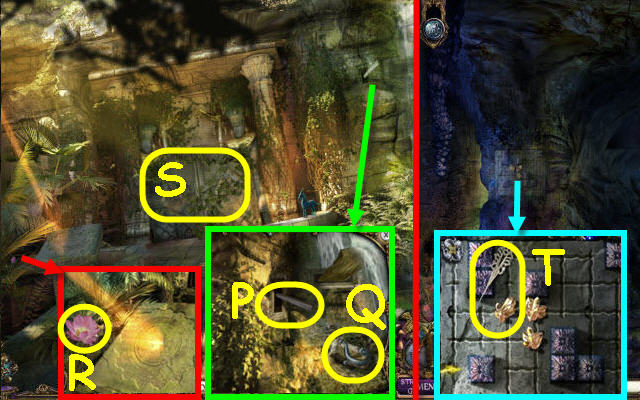
- Solution (R).
- Go forward.
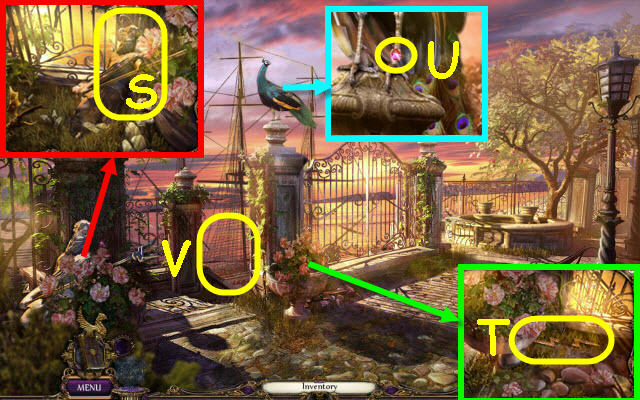
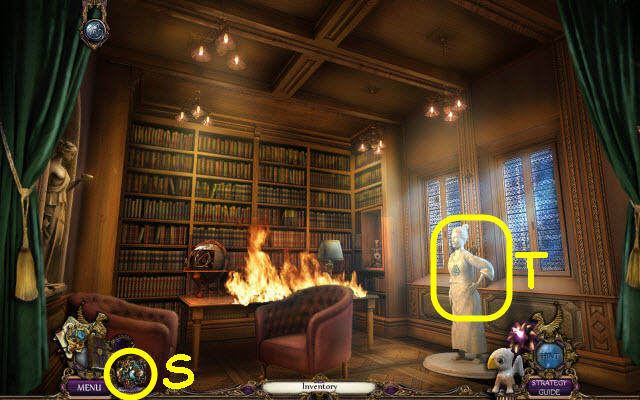
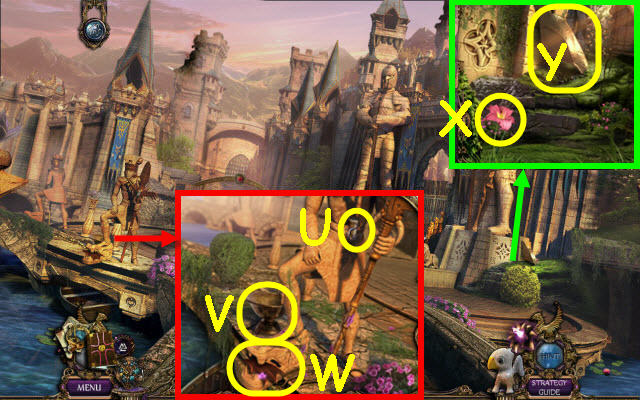
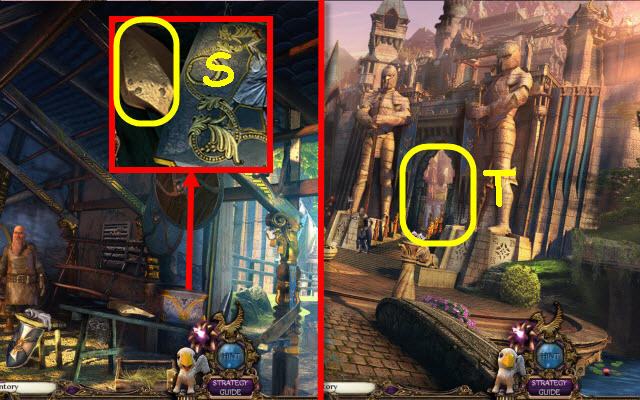
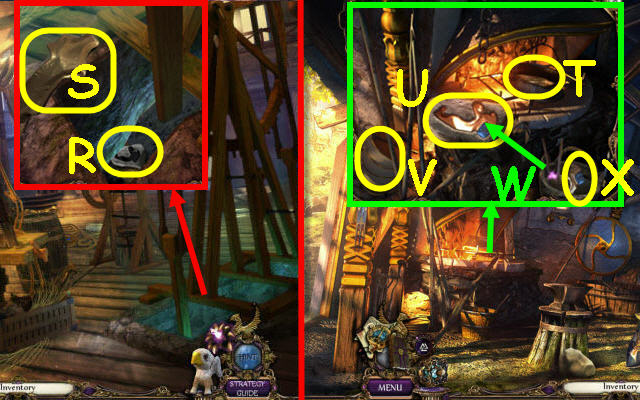
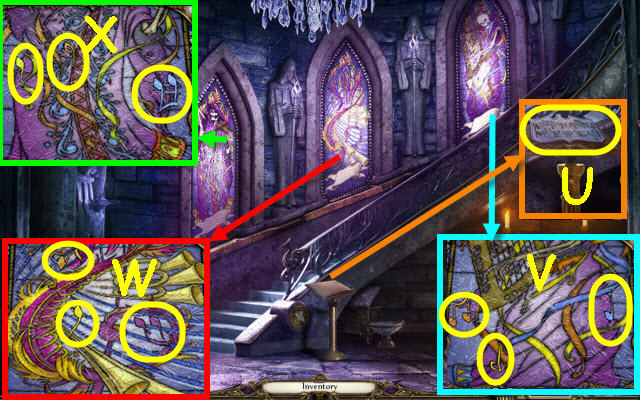
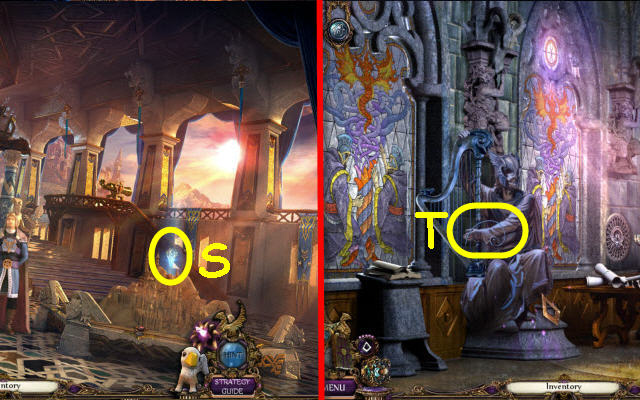
- Take the POSEIDON STATUE (S).
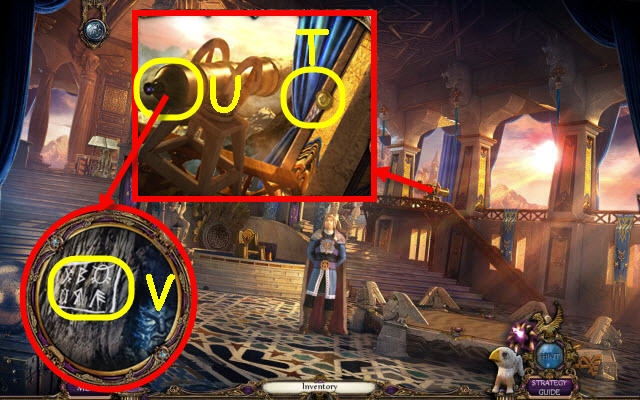
- Take ZEUS’ LIGHTNING BOLT (T).
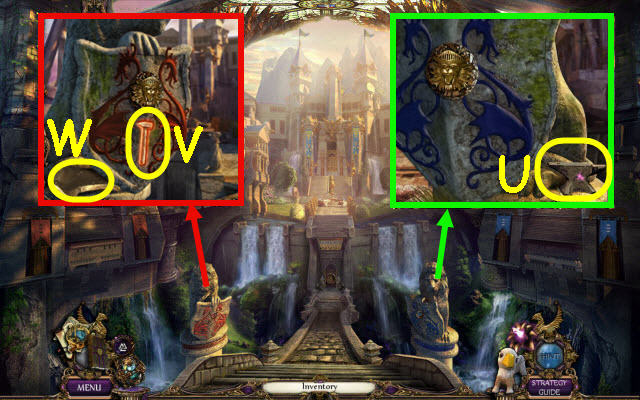
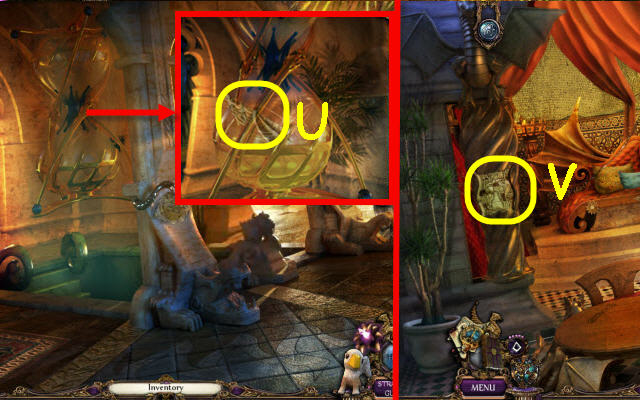
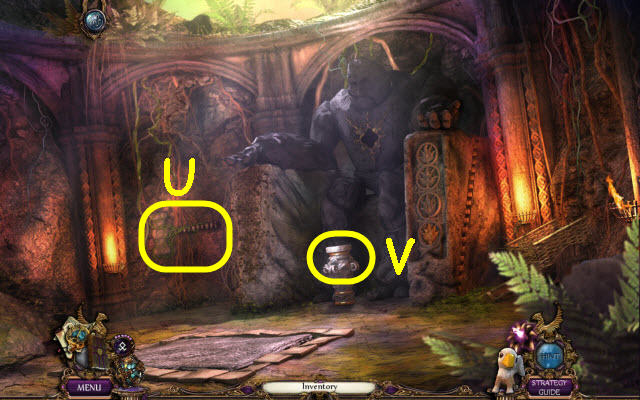
- Take the RUBY (U).
- Go down the stairs (V).
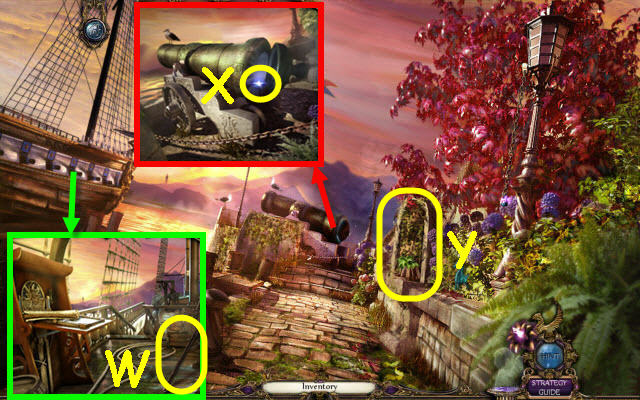
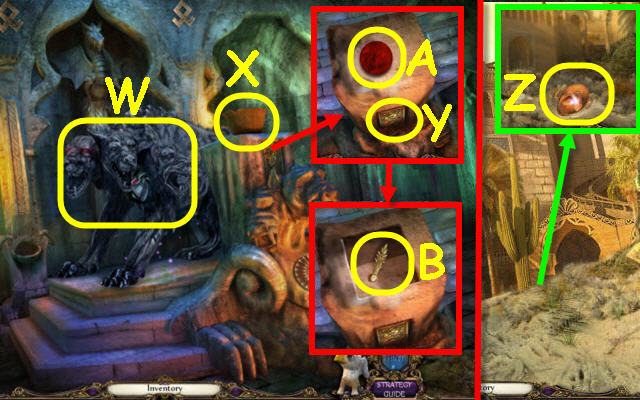
- Read the scroll; take the CROWBAR (W).
- Place the CANNON HANDLE on the cannon and open it; take the SAPPHIRE (X).
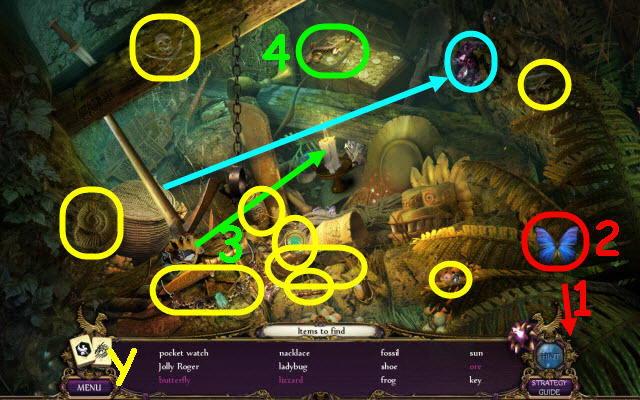
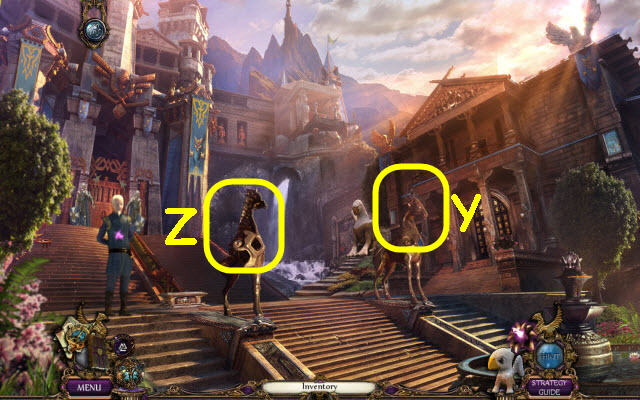
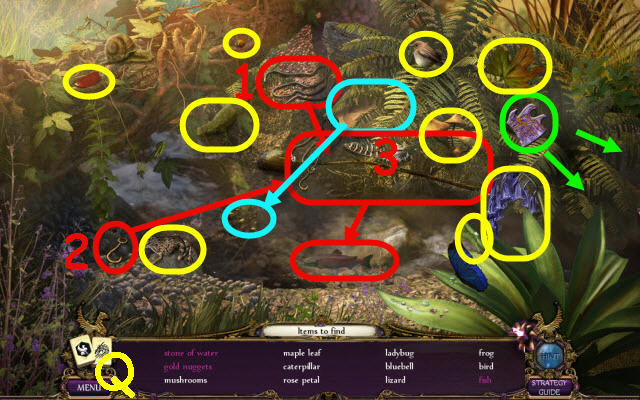
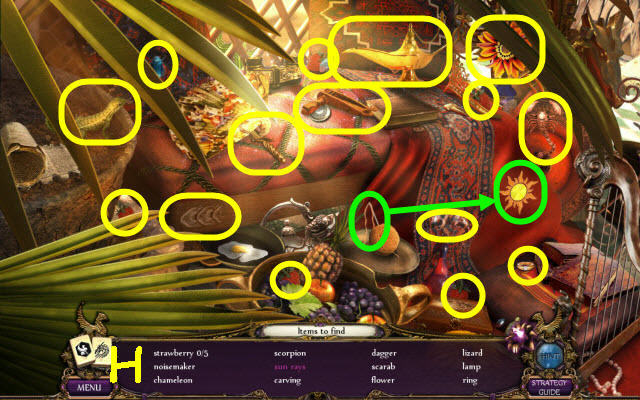
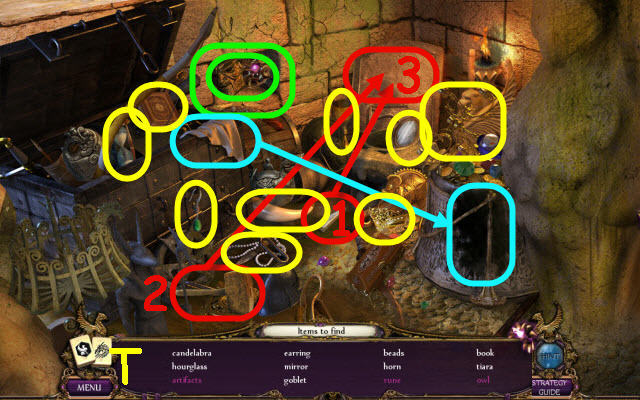
- Move the branch to start a HOP (Y).
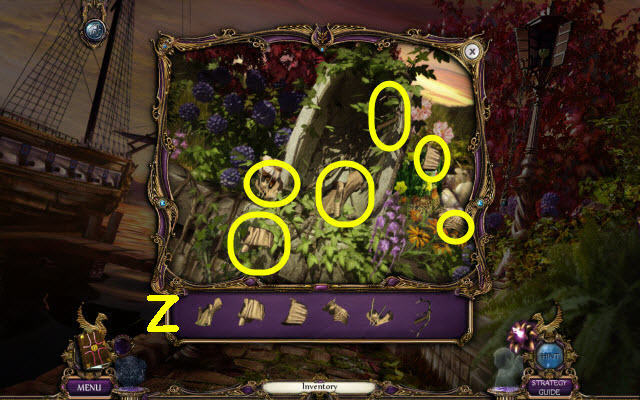
- Move the leaves to find the items.
- You receive an ARTEMIS STATUE (Z).
- Go to the ceremony hall.
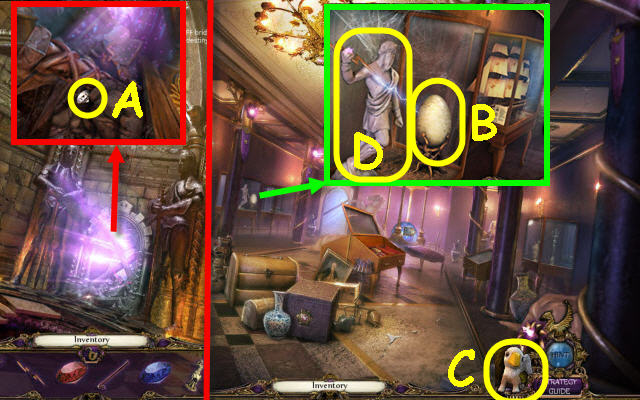
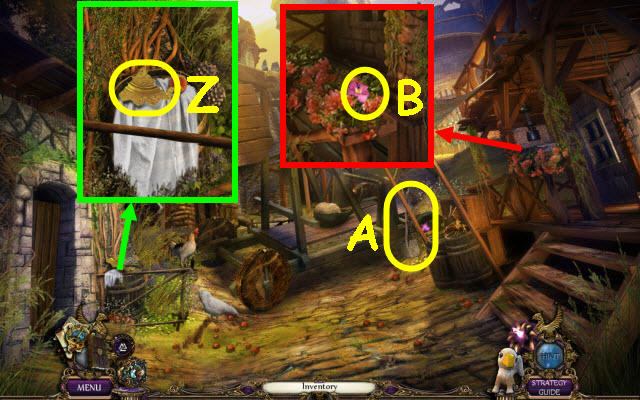
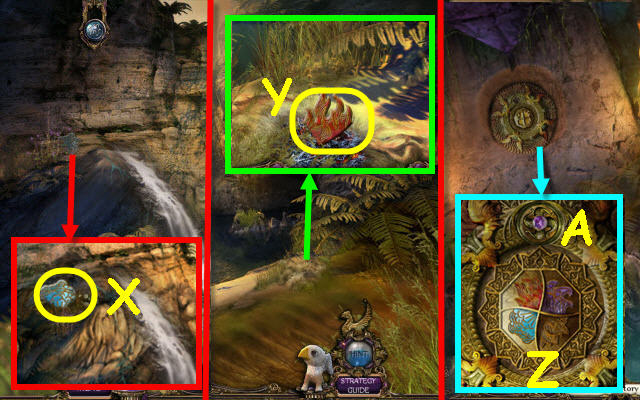
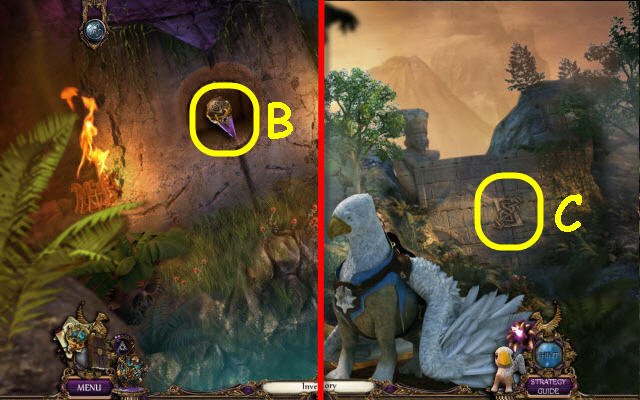
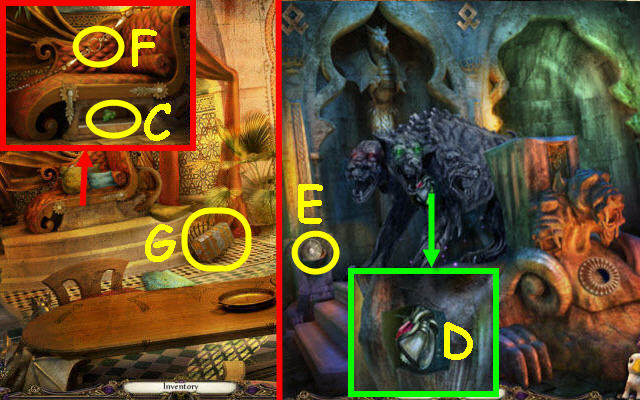
- Use the CROWBAR on the DIAMOND (A); take it.
- Go down.
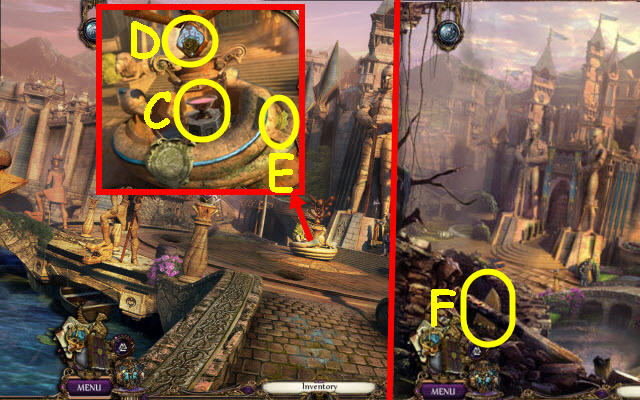
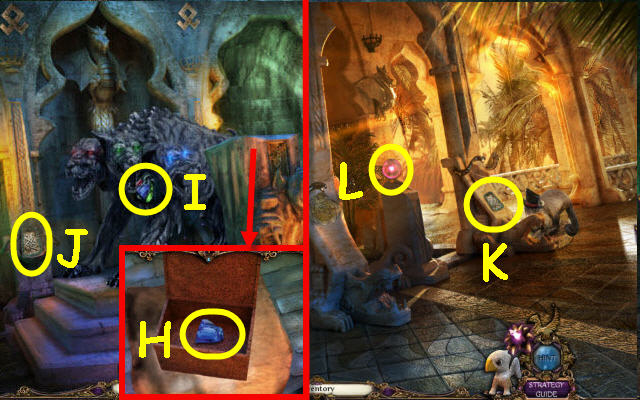
- Place ZEUS’ LIGHTNING BOLT on the statue; select the egg (B) and get a griffin added to your toolbar (C). Take the ZEUS STATUE (D).
- Go to the garden.
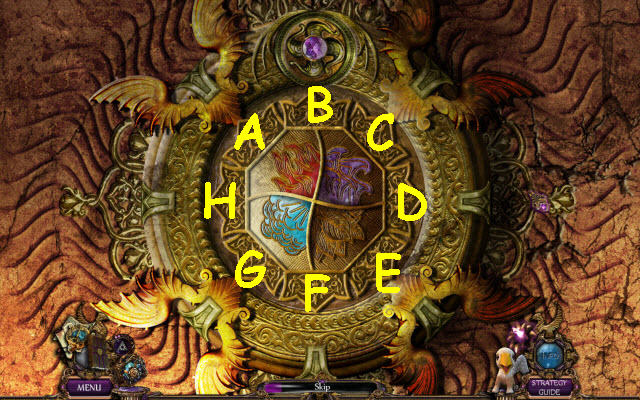
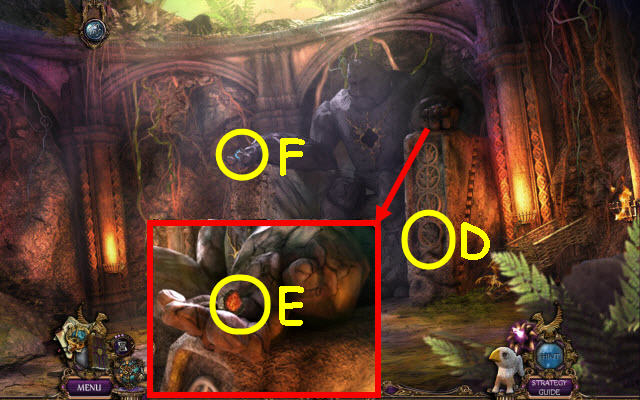
- Place the 4 statues on top of the pedestals and the gems on the side as follows: ZEUS STATUE and DIAMOND (E), APHRODITE STATUE and RUBY (F), ARTEMIS STATUE and EMERALD (G), POSEIDON STATUE and SAPPHIRE (H).
- Take the CHARGING DISK (I).
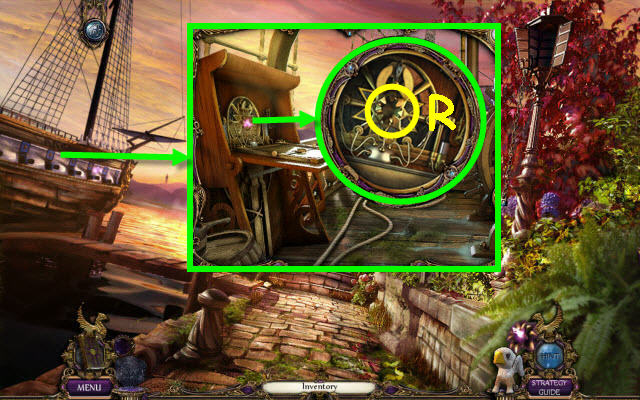
- Go to the pier.

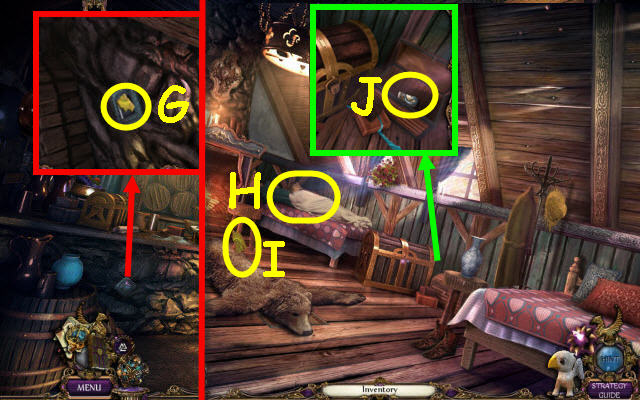
- Open the lantern; use the griffin to get the WINDER (J).
- Go to the codex.
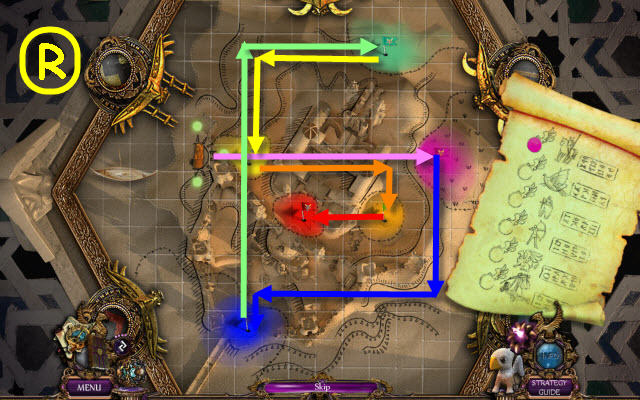
- Place the S-SHAPED KEY on the lock (K) and the WINDER in the slot (L); turn it to trigger a puzzle.
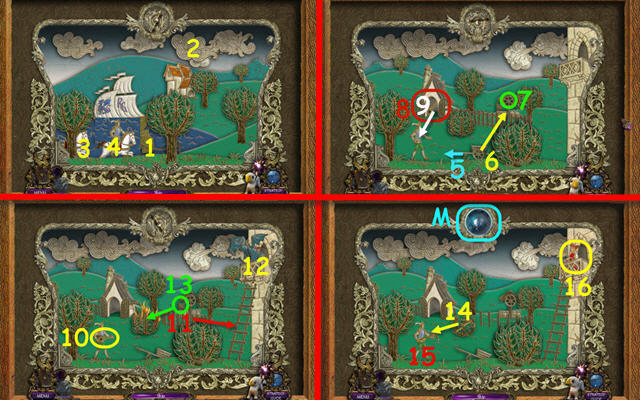
- Complete the actions in order.
- Solution (1-16).
- Take the TIME STONE (M).
- Go to the secret treasury.
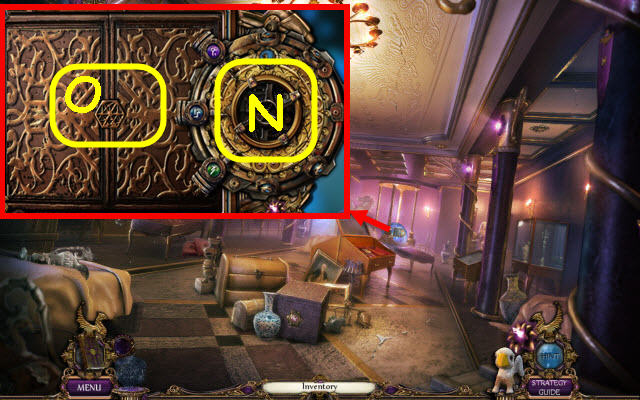
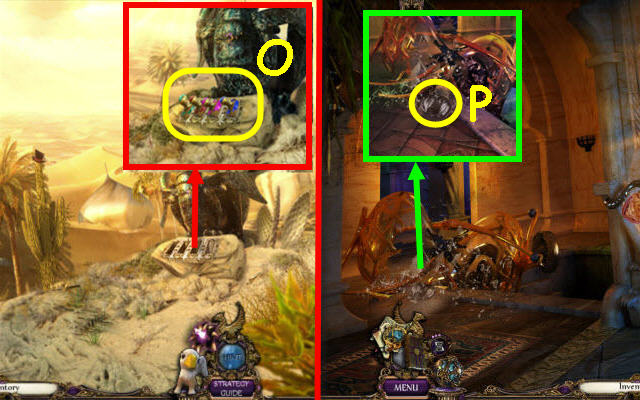
- Place the CHARGING DISK and TIME STONE on the device (N).
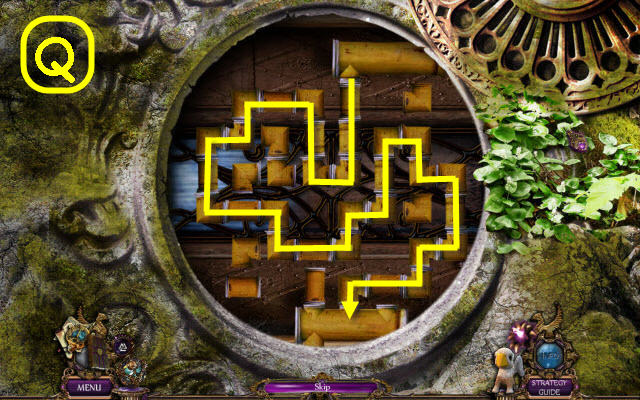
- Open the panel to trigger a puzzle (O).
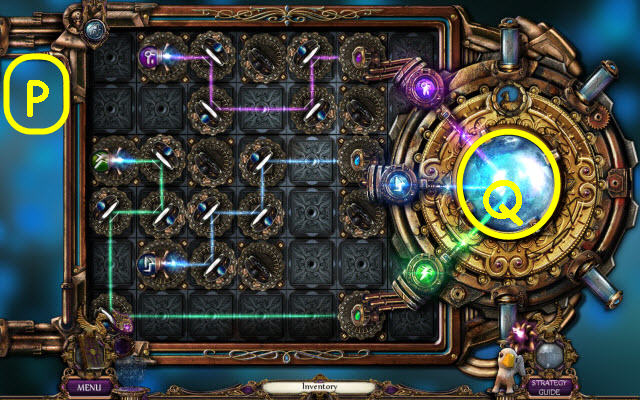
- Complete the beams.
- Solution (P).
- Take the CHARGED TIME STONE (Q).
- Go to the pier.
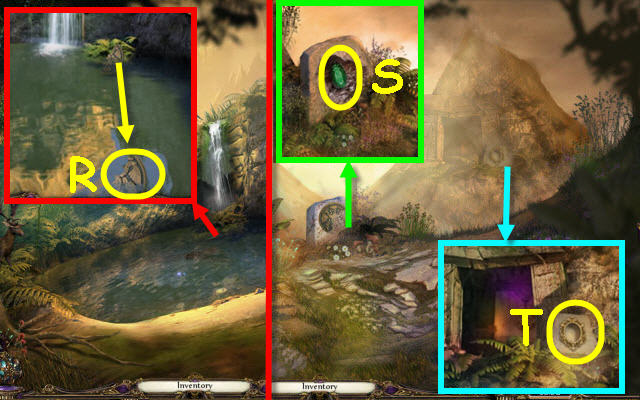
- Place the CHARGED TIME STONE on the device (R).
Chapter 2: London
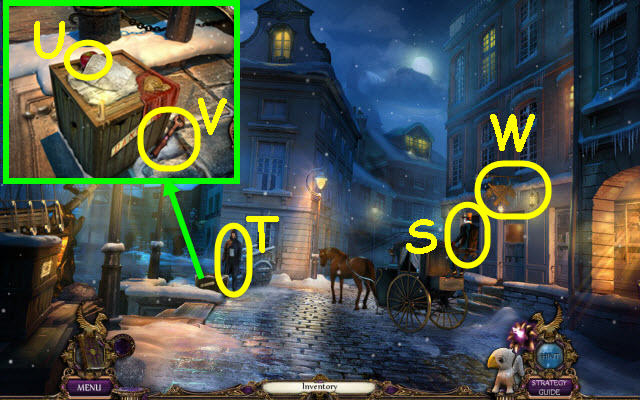
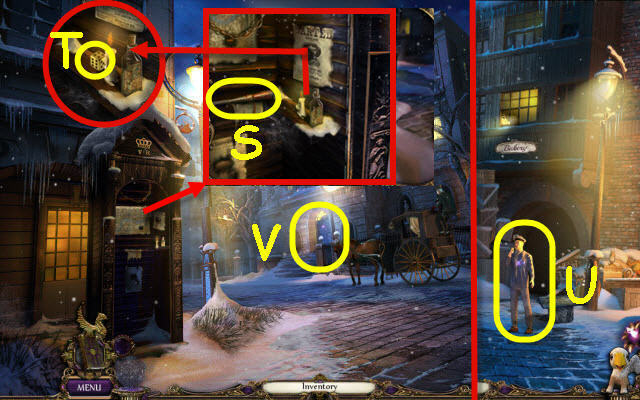
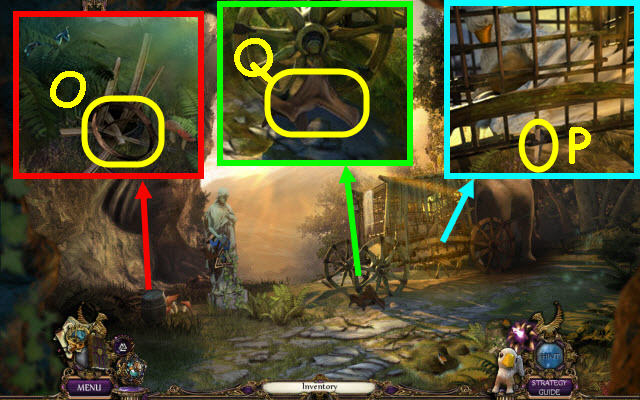
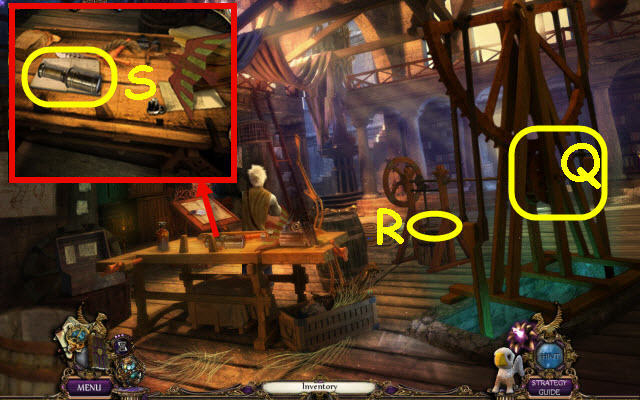
- Speak to the driver (S) and the gentleman (T).
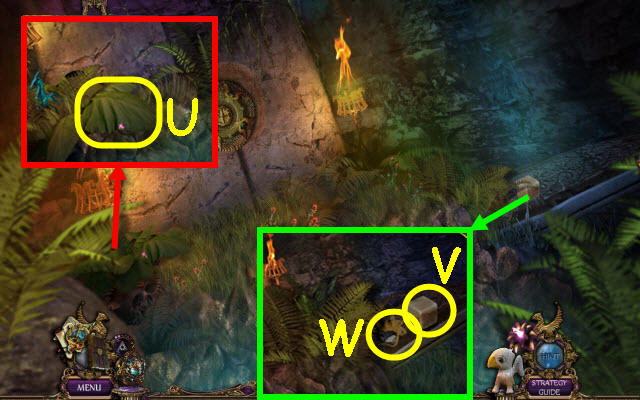
- Read the note; take the APPLE (U) and WINCH LEVER (V).
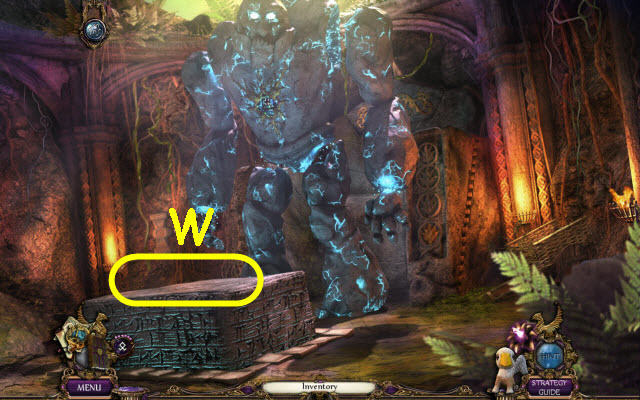
- Use the griffin on the sign (W); receive a PLANET 1/5.
- Go forward on the left.

- Use the griffin on the sign; receive a PLANETS 2/5 (X).
- Place the WINCH LEVER and the wheel on the winch; turn it (Y).
- Read the note; take the CAPTAIN’S LOG (Z).
- Give the CAPTAIN’S LOG to the captain (A).
- Select the Captain to trigger a puzzle.
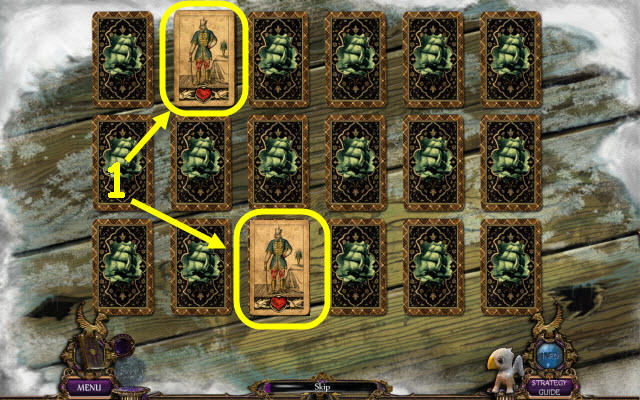
- Find the matches (1).
- Starting layout is random.
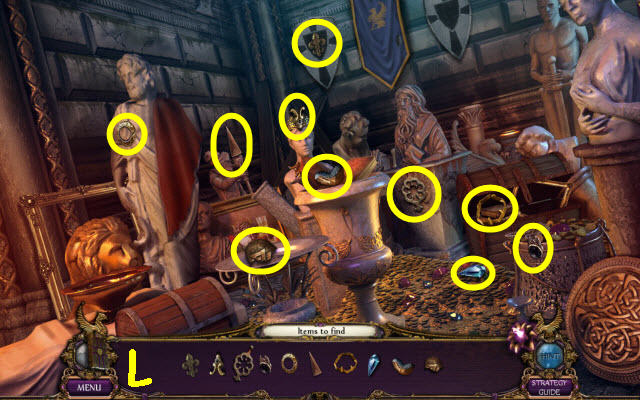
- Examine the crates on the right to trigger a HOP.
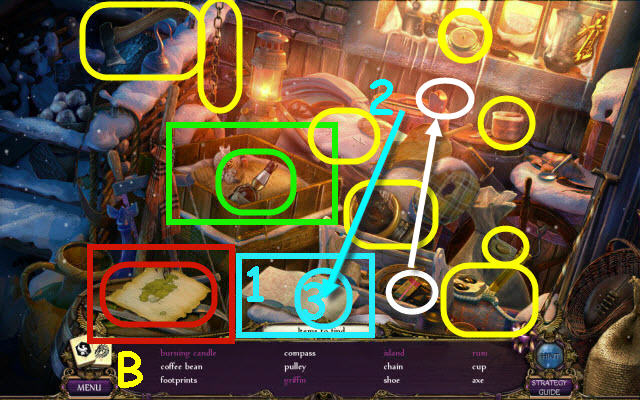
- Play the HOP.
- You receive a RUM (B).
- Back out.
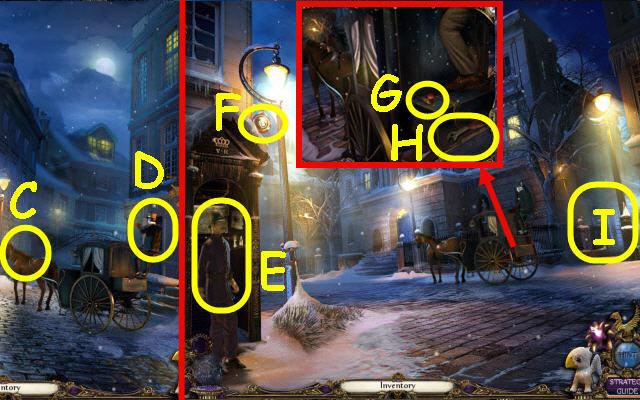
- Give the APPLE to the horse (C) and the RUM to the driver (D).
- Go forward on the right.
- Speak to the officer (E).
- Use the griffin to retrieve the PLANETS 3/5 (F).
- Read the note; take the PIPE (G) and WRENCH (H).
- Go up the path (I).
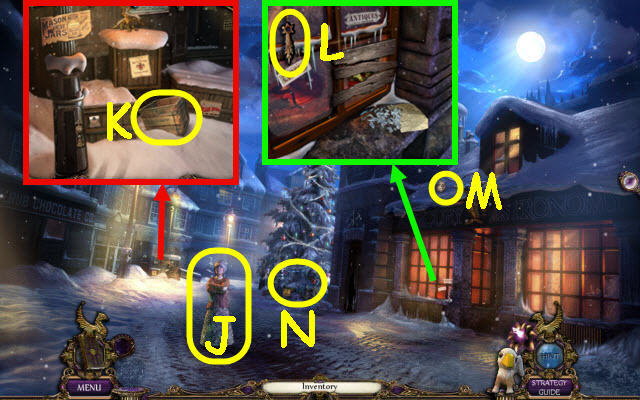
- Speak to the girl (J).
- Take the WOODEN BOX (K).
- Take the COMET (L).
- Use the griffin on the planet (M).
- Examine the tree to access a HOP (N).
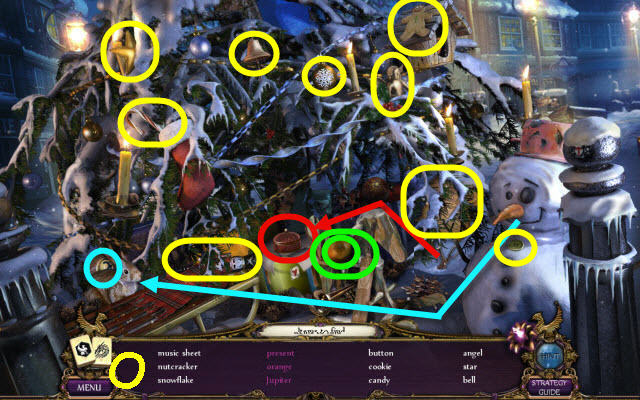
- Play the HOP.
- You receive a PLANETS 4/5 (O).
- Go to the London docks.
- Place the WOODEN BOX on the crates (P).
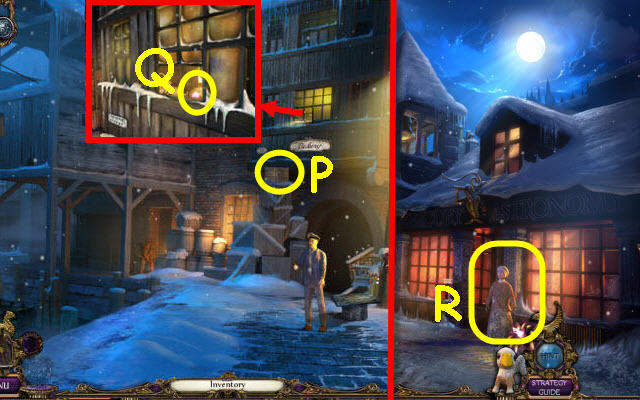
- Open the window; take the BREAD (Q).
- Go to the London bell tower.
- Give the BREAD to the girl (R).
- Back out.
- Take the CHISEL (S) and GOLDEN DIE (T).
- Go to the London docks.
- Give the GOLDEN DIE to the Captain (U); receive a LOCKPICK.
- Go to the London Museum.
- Use the LOCKPICK on the lock to trigger a puzzle (V).
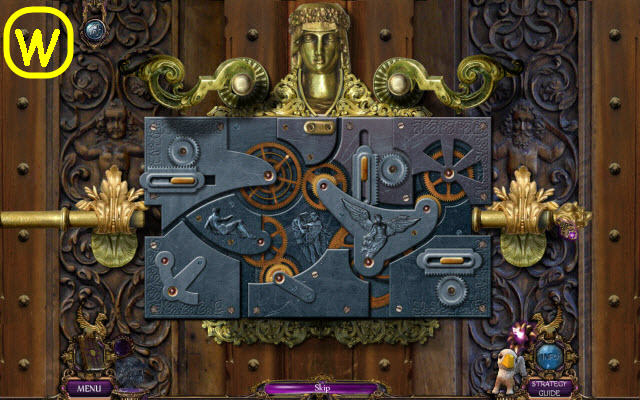
- Place the lock parts on the lock.
- Solution (W).
- Enter the treasure hall.
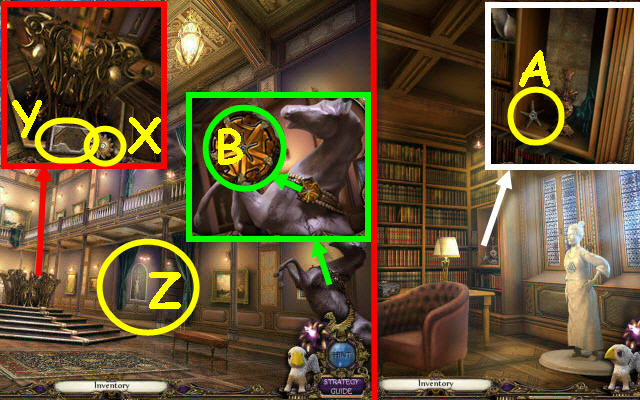
- Take the SUN (X) and OCTAGON HALF (Y).
- Go forward (Z).
- Take the STAR KEY (A).
- Back out.
- Place the STAR KEY in the key; take the UPGRADED STAR KEY (B).
- Return to the study corner.
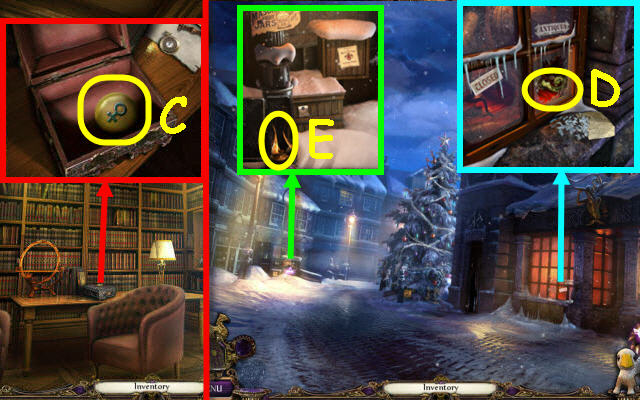
- Place the UPGRADED STAR KEY on the lid and open it; take the PLANETS 5/5 (C).
- Go to the London bell tower.
- Use the CHISEL on the boards 3x; take the DOOR HANDLE (D).
- Place the DOOR HANDLE on the door; turn it and open it. Take the TORCH HEAD (E).
- Go to the treasure hall.
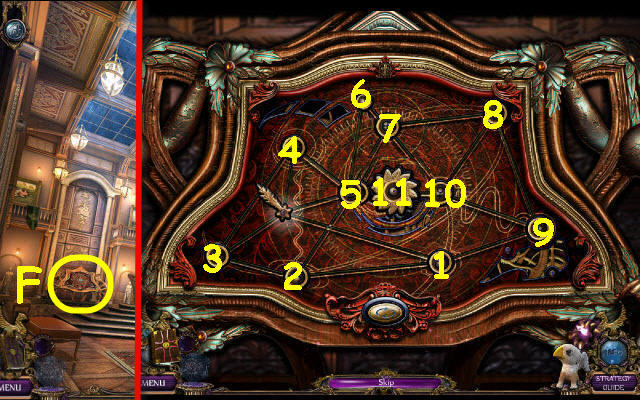
- Place the OCTAGON HALF, 5 PLANETS, SUN and COMET on the device to trigger a puzzle (F).
- Guide the comet through the planets.
- Solution (1-11).
- Enter the secret storage (G).
- Use the WRENCH on the nut (H); remove the panel to trigger a puzzle.
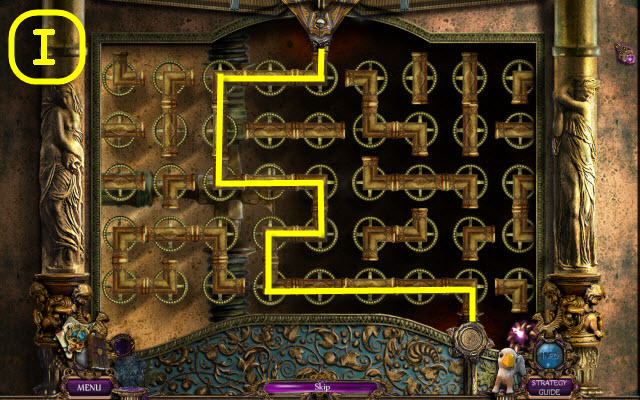
- Connect the pipes.
- Solution (I).

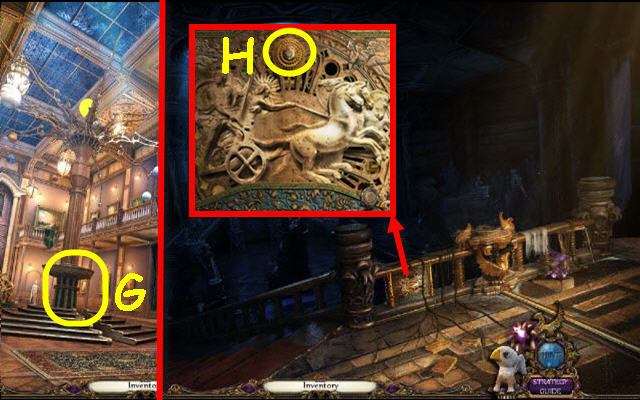
- Place the TORCH HEAD on the holder; light it with the PIPE (J).
- Examine the corner to access a HOP (K).
- Play the HOP.
- You receive an ODIN RUNE (L).
- Go forward to the altar.
- Take the AMPHORA (M).
- Take the GLOBE (N).
- Go to the study corner.
- Place the GLOBE in the stands; take the MYSTIC HORN (O).
- Return to the altar.
- Place the MYSTIC HORN on the creature (P).
- Read the scroll; place the ODIN RUNE on the heart (Q).
- Take the Golem’s heart which is added to you toolbar (R).
- Go to the study corner.
- Use the Golem heart (S) and AMPHORA on the statue (T).
- Back out.
Chapter 3: Aeronheart
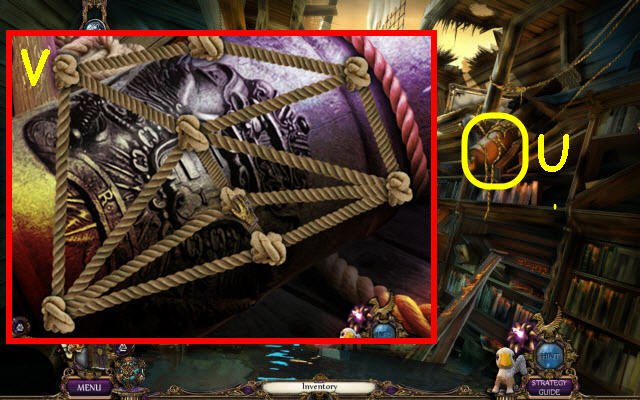
- Examine the rope (U).
- Detangle it (V).

- Take the CANDLESTICK (W).
- Take the RAG (X).
- Use the CANDLESTICK on the mirror; place the RAG on the MIRROR SHARD (Y) and take it.
- Use the MIRROR SHARD on the rope (Z).
- Exit through the hole.
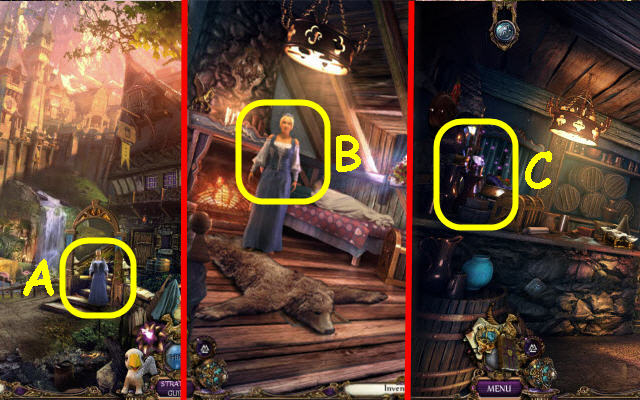
- Speak to the innkeeper (A); follow her to the tavern gallery.
- Speak to the innkeeper (B); receive a BLOSSOMING-POTION RECIPE.
- Back out.
- Examine the bar to access a HOP (C).
- Play the HOP.
- You receive a GOLD SCISSORS (D).
- Speak to the gentleman (E); receive a HAMMER.
- Take the SEQUENCE PART 1/5 (F) and PART OF WHEEL SET 1/4 (G).
- Take the STATUE PART 1/7 (H).
- Place the BLOSSOMING-POTION RECIPE on the bar to trigger a puzzle (I).

- Change the symbols per the clues.
- Solution (J).
- Take the BLOSSOMING POTION (K).
- Back out.
- Take the SEQUENCE PARTS 2/5 (L) and STATUE PARTS 2/7 (M).
- Use the BLOSSOMING POTION on the bud; take the FLOWER 1/4 (N).
- Go forward (O).
- Use the griffin on the lever (P); take the SEQUENCE PARTS 3/5 (Q).
- Use the BLOSSOMING POTION on the bud; take the FLOWERS 2/4 (R).
- Use the GOLD SCISSORS on the vines (S) and the Golem heart on the door; go forward.
- Take the ANTIQUE HAIRPIN (T).
- Back out twice; go forward to the main square.
- Take the SEQUENCE PARTS 4/5 (U), EMPTY BOWL (V) and WING (W).
- Use the BLOSSOMING POTION on the bud; take the FLOWERS 3/4 (X) and STATUE PARTS 3/7 (Y).
- Go forward.
- Take the MOSAIC PIECE 1/4 (Z).
- Take the SPADE (A).
- Use the BLOSSOMING POTION on the bud; take the FLOWERS 4/4 (B).
- Back out.
- Place the EMPTY BOWL in the center, the 4 FLOWERS in the bowl (C) and the BROOCH in the slot (D). Take the ESSENCE OF LIFE POTION (C).
- Use the ANTIQUE HAIRPIN on the MOSAIC PIECES 2/4 (E); take it.
- Back out.
- Use the SPADE on the WHEEL SET 2/4 (F); take it.
- Enter the tavern.
- Use the ANTIQUE HAIRPIN on the MOSAIC PIECES 3/4 (G); take it.
- Go up.
- Use the ESSENCE OF LIFE POTION on the Champion (H); receive an AMULET.
- Take the MOSAIC PIECES 4/4 (I).
- Open the box; take the SEQUENCE PARTS 5/5 (J).
- Go to the catacomb entrance.
- Place the 4 MOSAIC PIECES on the pedestal (K).
- Go forward.
- Play the puzzle (L).
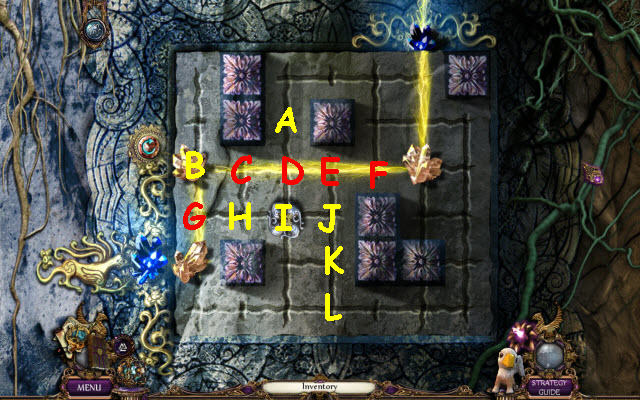
- Move the crystals.
- Select the following: A, D, E, F, E, J, I, H, B, G, L, K, J, F, E, D and C.
- Pull out the UNIQUE KEY (M); take it.
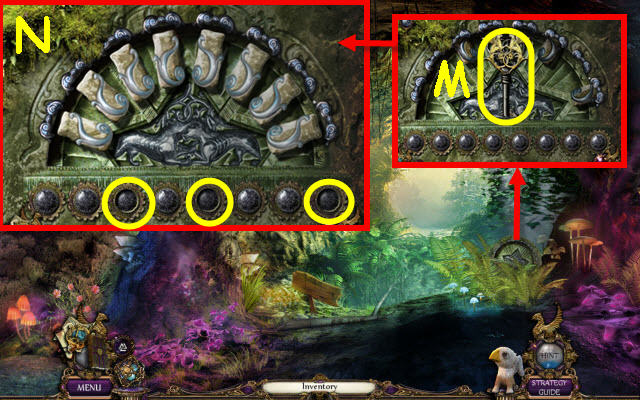
- Place the 5 SEQUENCE PARTS on the carving to trigger a puzzle.
- Select the correct buttons.
- Solution (N).
- Go forward.
- Use the HAMMER on the barrel; take the WHEEL SET 3/4 (O).
- Use the UNIQUE KEY on the padlock; take the WHEEL SET 4/4 (P).
- Take the GRIFFIN HARNESS KIT 1/3 (Q).
- Go to the apple street.
- Place the 4 WHEEL SET on the axle; use the HAMMER on it (R).
- Go forward.
- Receive a PICKAXE.
- Take the STATUE PARTS 4/7 (S).
- Back out twice; enter the Bridge of Destiny (T).
Chapter 4: Inner City
- Take the STONE ANVIL (U).
- Place the WING in the slot; take the STONE HAMMER (V) and STATUE PARTS 5/7 (W).
- Go to the catacombs.

- Use the PICKAXE on the stone (X).
- Reexamine the area to access a HOP.
- Play the HOP.
- You receive a SPECIAL ORE (Y).
- Go to the smithy.
- Give the SPECIAL ORE to the smithy (Z).
- Place the STONE ANVIL and STONE HAMMER in the recesses (A); open the lid.
- Read the scroll; take the LION PAW (B).
- Go to the Bridge of Destiny.
- Place the LION PAW on the device; select it (C).
- Go forward.
- Receive an ANCIENT GODS’ FIELD MAP PIECE.
- Take the HANDSAW (D).
- Take the ROD WITH HOOK (E).
- Go forward.
- Speak to the man; receive a BROKEN TUBE (F).
- Take the WOODEN GEAR (G).
- Open the panel; take the PADLOCK KEY (H), BEAR FIGURE (I) and TURQUOISE GEM (J).
- Go to the tavern gallery.
- Move the bear; place the BEAR FIGURE on the hatch. Open it; take the GRIFFIN HARNESS KIT 2/3 (L).
- Use the PADLOCK KEY on the padlock; turn it and open the lid. Take the UNICORN HORN (M).
- Use the HANDSAW on the base; take the BRONZE STATUE (N).
- Go to the smithy.
- Give the BROKEN TUBE to the smithy; receive a FIXED TUBE (O).
- Go to the griffin nest.
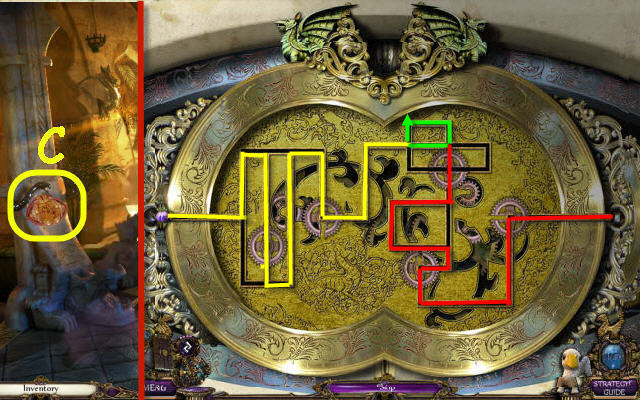
- Place the FIXED TUBE on the pipes to trigger a puzzle (P).
- Connect the pipes.
- Solution (Q).
- Back out; go right into polymath’s workshop.
- Use the ROD WITH HOOK on the mold; take the MOLD (R) and STATUE PARTS 6/7 (S).
- Go to the smithy.
- Place the BRONZE STATUE in the kettle (T) and place the MOLD next to it (U): push the bellows (V).
- Pour the kettle into the mold and place the TURQUOISE GEM into it; use the tongs (W) twice on the mold and place in the bucket. Take the STATUE PARTS 7/7 (X).
- Go to the palace court.
- Place the UNICORN HORN on the unicorn (Y).
- Place the 7 STATUE PARTS on the statue to trigger a puzzle (Z).
- Assemble the statue.
- Solution (1-9).
- Take the Heimdal rune (B) which is added to your Golem heart.
- Go to the griffin cage.
- Use the Golem heart on the statue (C); take the GRIFFIN HARNESS KIT 3/3 (D).
- Go to the griffin nest.
- Place the GRIFFIN HARNESS KIT 3/3 and AMULET on the griffin (E).
- Place the ANCIENT GODS’ FIELD MAP PIECE on the map; select it (F).
Chapter 5: Ancient’s Gods’ Field
- Go left.
- Take the STANDARD SYMBOL 1/5 (G).
- Take the CRAYFISH (H).
- Use the CRAYFISH on the ROPE 1/2 (I); take it.
- Back out.
- Use the CRAYFISH on the roots; take the ORNAMENT PIECE (J) and CENTER CRYSTAL (K).
- Go forward.
- Take the ROPE 2/2 (L).
- Use the ROPES 2/2 on the boulder (M); pull the rope (N).
- Use the griffin on the tree (O).
- Take the EARTH STONE (P).
- Back out.
- Examine the waterfall base to access a HOP.
- Play the HOP.
- You receive a WATER STONE (Q).
- Go left.
- Use the ROD WITH HOOK on the symbol; take the BIRD SYMBOL (R).
- Go to the bridge.
- Place the BIRD SYMBOL on the relief; select it and take the EGG SYMBOL (S).
- Place the EGG SYMBOL in the recess (T).
- Go forward.
- Take the BURDOCK LEAF (U).
- Take the BLOCK OF SALT (V) and FLINT (W).
- Back out.
- Use the BURDOCK LEAF on the symbol; take the AIR STONE (X).
- Go to the lake bed.
- Use the FLINT on the grass; take the FIRE STONE (Y).
- Go to the stone of elements.
- Place the EARTH STONE, WATER STONE, AIR STONE and FIRE STONE in their matching slots (Z).
- Place the CENTER CRYSTAL in the top to trigger a puzzle (A).
- Duplicate the sequences.
- Solution: B-D-F-H, B-D-F-H-C-E and B-D-F-H-C-E-G-A.
- Open the panel; take the Loki rune (B) which will be added to your Golem heart.
- Go to the stone guardians.
- Use the Golem heart on the symbol (C); go through the opening.
- Place the ORNAMENT PIECE on the pillar (D).
- Select the key 3x; receive a FIRE KEY (E).
- Use the griffin to retrieve the ICICLE KEY (F).
- Go to the Bridge of Destiny.
- Select the lion head; place the FIRE KEY on the left shield (G).
- Select the lion head; place the ICICLE KEY on the right shield (H).
- Go left.
- Use the griffin to retrieve the CURTAIN BINDER (I).
- Take the STANDARD SYMBOLS 2/5 (J).
- Back out; go right.
- Take the CHEESE (K) and DEFENSE STRATEGY PLAN (L).
- Go to the palace court.
- Give the DEFENSE STRATEGY PLAN to the Counselor (M).
- Go up the left stairs.
- Speak to the man; receive ZERINA’S SEAL (N).
- Take the STANDARD SYMBOL 3/5 (O).
- Place the CHEESE by the hole (P); take the WIND PHIAL 1/4 (Q).
- Examine the book to trigger a puzzle (R).
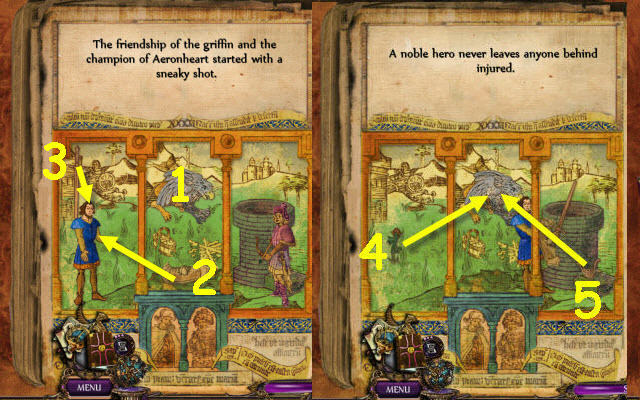
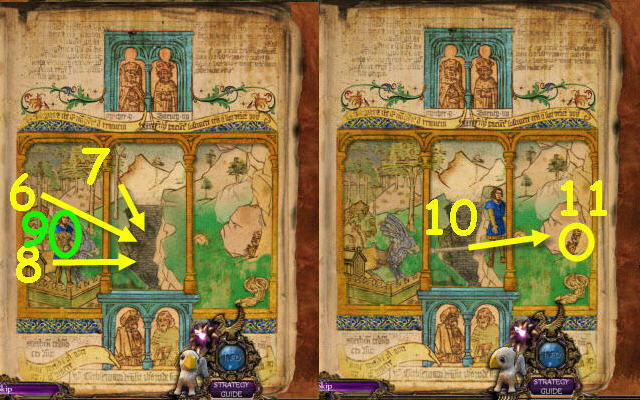
- Act out the story.
- Solution (1-11).
- Take the KING FIGURE.
- Go to Zerina’s library.

- Use ZERINA’S SEAL on the seal; open the book and turn the page. Take the ZERINA MAP PIECE (S).
- Go to the griffin nest.
- Place the ZERINA MAP PIECE in the slot; select it (T).
Chapter 6: Zerina
- Use the griffin on the ring (U); take the RING (V), STANDARD SYMBOLS 4/5 (W) and CYRUS’ SEAL (X).
- Go to Zerina’s library.
- Place the RING in the slot (Y).
- Examine the window to trigger a puzzle (Z).
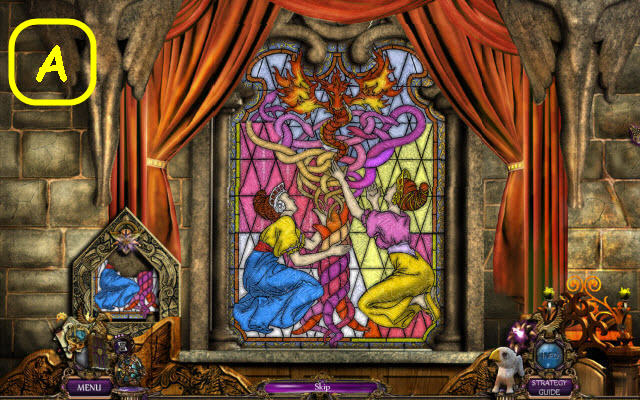
- Complete the image.
- Solution (A).
- Receive an UPGRADED RING.
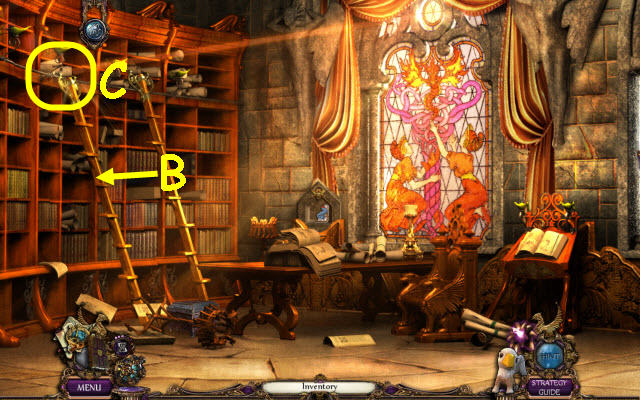
- Move the ladder (B).
- Examine the shelf to trigger a puzzle (C).
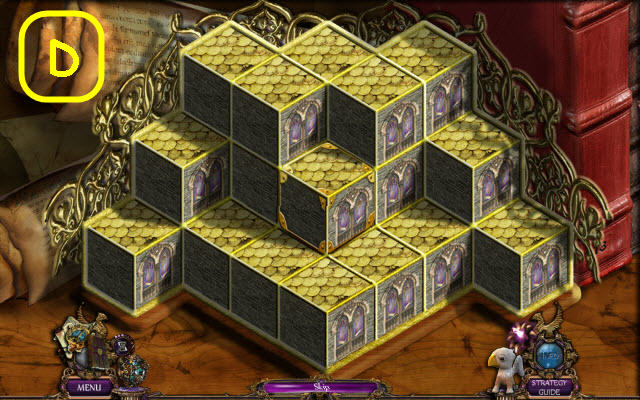
- Swap the pieces to complete the image.
- Solution (D).
- Take the WIND PHIALS 2/4.
- Go to Cyrus’s library.
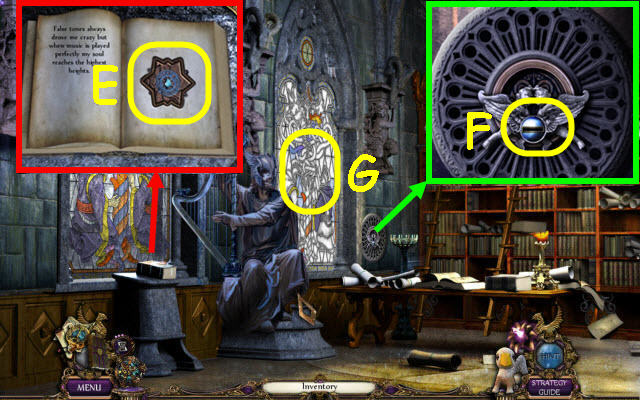
- Use CYRUS’ SEAL on the seal; open the book and turn the page. Take the CYRUS MAP PIECE (E).
- Place the UPGRADED RING in the slot (F).
- Examine the window to trigger a puzzle (G).
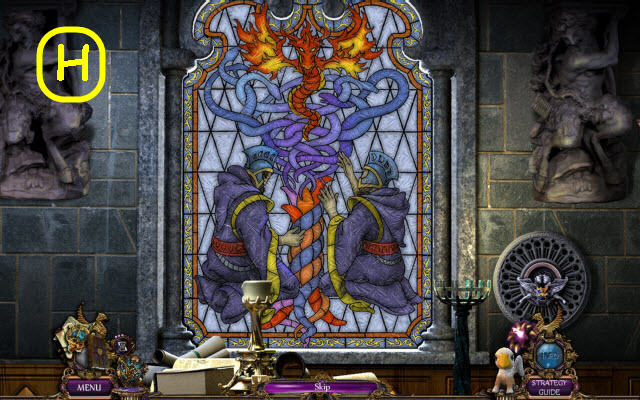
- Complete the image.
- Solution (H).

- Examine the shelf to trigger a puzzle (I).
- Arrange the books.
- Solution (J).
- Take the WIND PHIALS 3/4.
- Go to the griffin nest.
- Place the CYRUS MAP PIECE in the slot; select it (K).
- Take the WIND PHIALS 4/4 (L).
- Use the Golem heart on the symbol (M); take the MOUNTAIN CRYSTAL (N).
- Go to the dune.
- Place the 4 WIND PHIALS in the slots (O).
- Go forward.
- Take the LENS 1/2 (P).
- Go to the polymath’s workshop.
- Place the WOODEN GEAR on the mechanism (Q).
- Place the MOUNTAIN CRYSTAL on the polisher (R); receive a LENS 2/2.
- Place the 2 LENSES on the scope; take the SPYGLASS (S).
- Go to the throne room.
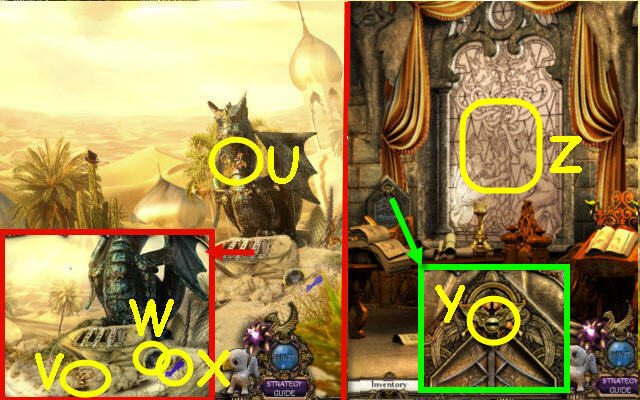
- Use the CURTAIN BINDER on the curtain (T) and the SPYGLASS in the telescope (U).
- Select the scope; take the LINE OF CODES (V).
- Go to the ice face.
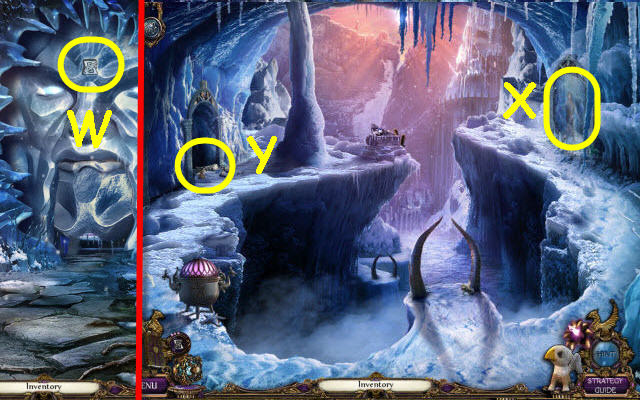
- Use the LINE OF CODES on the symbol (W).
- Go forward.
- Speak to the girl (X).
- Examine the doorway to access a HOP (Y).
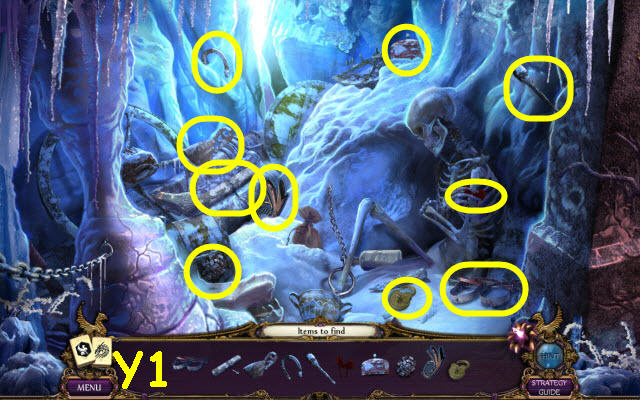
- Play the HOP.
- You receive an ICE-HORN MEDALLION (Y1).
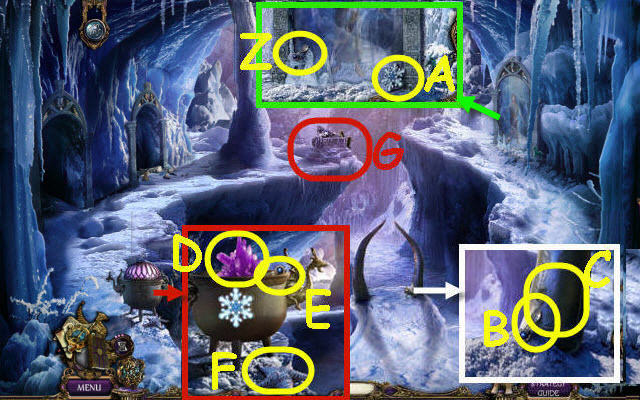
- Take the HORN KEYS 1/3 (Z) and ICY BREEZE (A).
- Take the HORN KEYS 2/3 (B).
- Open the compartment (C); place the ICE-HORN MEDALLION inside.
- Place the ICY BREEZE in the slot; take the GLOWING CRYSTAL (D), HORN KEYS 3/3 (E) and ICE STARFISH (F).
- Place the 3 HORN KEYS on the horn to trigger a puzzle (G).
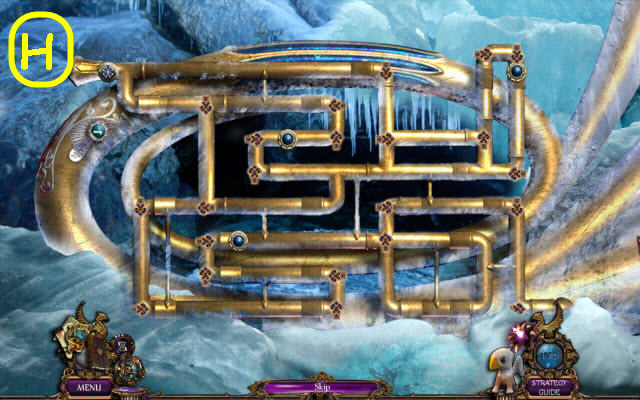
- Place the arrows.
- Solution (H).
- Go forward.
- Take the STAIRS SYMBOL (I).
- Go to the dune.
- Use the GLOWING CRYSTAL on the bugs; take the FIRE BUGS (J).
- Go to the prison.
- Use the FIRE BUGS on the symbols on the ice (K).
- Go forward.
- Go up the left stairs.
Chapter 7: Ice Kingdom
- Place the STAIRS SYMBOL in the slot (L).
- Take the UNCHARGED BLUE ORB (M).
- Go up the stairs.
- Place the ICE STARFISH on the panel; take the SHELL FORM (N).
- Back out twice.
- Use the SHELL FORM on the snow; take the SNOW SHELL (O).
- Go upstairs.
- Place the SHELL FORM and SNOW SHELL in the matching slots to trigger a puzzle (P).
- Complete the image.
- Solution (Q).
- Take the Freya rune.
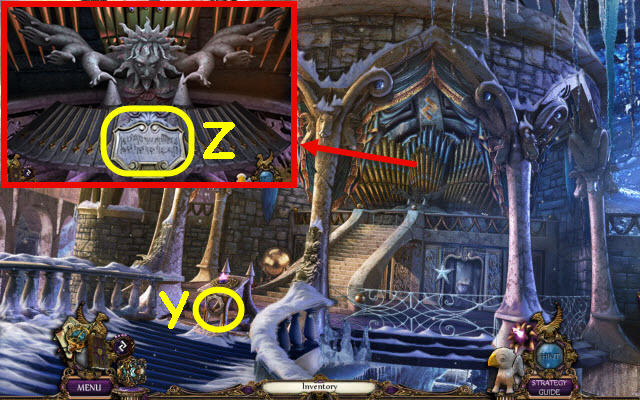
- Go to the concert hall.

- Use the Golem heart on the pipes; receive a TABLET (R).
- Take the OMEGA SYMBOL (S).
- Go to the ice face.
- Place the OMEGA SYMBOL on the stone and place the UNCHARGED BLUE ORB in the claws; take the CHARGED BLUE ORB (T).
- Go to the icicle stairs.
- Place the TABLET on the stand (U).
- Take the NOTES 1-3/9 (V), NOTES 4-6/9 (W) and NOTES 7-9/9 (X).
- Place the 9 NOTES on the tablet; take the FULL TABLET (U).
- Go up.
- Place the CHARGED BLUE ORB in the slot (Y).
- Place the FULL TABLET in the holder to trigger a puzzle (Z).
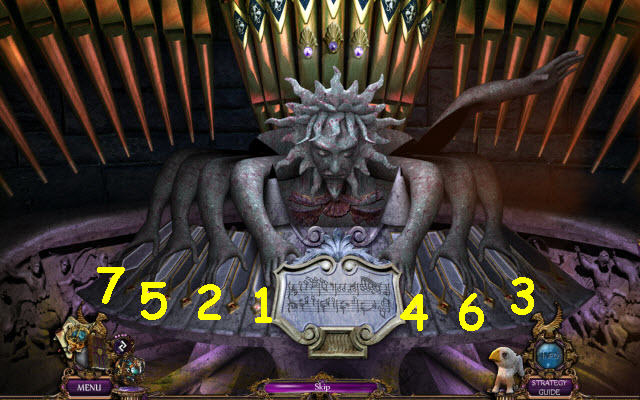
- Repeat the notes.
- Solution: 1-2-3-4, 1-2-3-4-5 and 1-2-3-4-5-6-7.

- Take the BROKEN CRYSTAL PIECES 1/2 (A).
- Speak to the man; take the ICE STAFF (B).
- Back out; go to the hourglass.
- Use the ICE STAFF on the symbol(C); examine it to trigger a puzzle.
- Guide the gem through the gears.
- Solution yellow, green x3 and red.
- Take the STRING (E).
- Go to the polymath’s workshop.
- Tie the STRING on the bird; take the EAGLE SHADOW MAKER (F).
- Return to the hourglass; go through the archway on the left.
- Examine the plant to access a HOP (G).
- Play the HOP.
- You receive a DAGGER (H).
- Dip the DAGGER in the basin; receive a BLOODY DAGGER (I).
- Go to the dune.
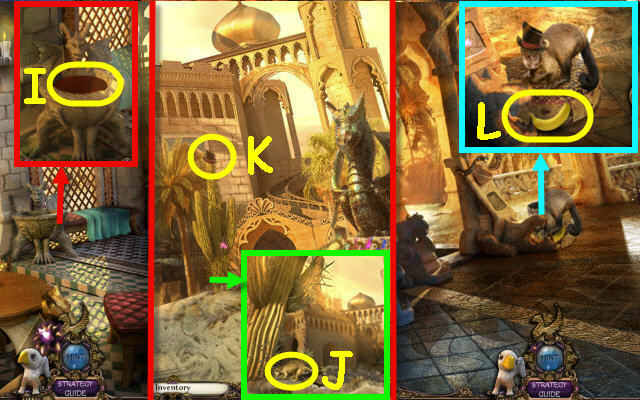
- Use the EAGLE SHADOW MAKER on the meerkat (J).
- Use the griffin to retrieve the HAT (K).
- Go forward.
- Put the HAT on the monkey; take the BANANA (L).
- Go to the throne room.
- Place the BLOCK OF SALT on the ground and the BANANA in the basket (M); take the SALT (N).
- Go to the ice face.
- Use the SALT on the symbol; take the STANDARD SYMBOLS 5/5 (O).
- Return to the throne room.
- Place the 5 STANDARD SYMBOLS on the platform to trigger a puzzle (P).
- Place the disks by their matching symbols.
- Solution (Q).
- Place the KING FIGURE on the sand castle to trigger a puzzle.
- Move the king to the kingdoms.
- Solution (R).
- Take the Aegir rune (S) which is added to your Golem heart.
- Go to Cyrus’ library.
- Use the Golem heart on the statue; take the SPIRAL (T).
- Go to the hourglass.
Chapter 8: The Crystal
- Use the SPIRAL in the bulb; take the PILLAR PIECE (U).
- Go to the dragon hall.
- Place the PILLAR PIECE on the pillar to trigger a puzzle (V).
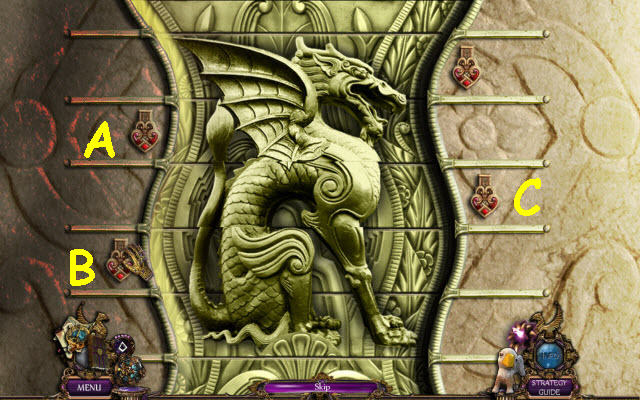
- Complete the image.
- Use the arrows until the row is correct as follows: B, C and A.
- Take the Thor rune, which will be added to your Golem heart.
- Back out; go down to the Cerberus.
- Use the Golem heart on the Cerberus (W).
- Take the POT (X) and examine the diagram (Y).
- Go to the dune.
- Place the POT by the sand; take the POT OF SAND (Z).
- Return to the Cerberus.
- Place the POT OF SAND on the pedestal; use the BLOODY DAGGER on it. Take the UNCHARGED RED ORB (A) and THRONE RELIEF (B).
- Go to the dragon hall.
- Place the THRONE RELIEF on the throne; select it and take the GREEN HEART PIECE (C).
- Return to the Cerberus.
- Place the GREEN HEART PIECE on the heart (D); take the DIAL (E).
- Return to the dragon hall.
- Place the DIAL on the chain (F); take the CHAINED CHEST (G).
- Return to the Cerberus.
- Place the CHAINED CHEST on the pedestal; take the BLUE HEART PIECE (H).
- Place the BLUE HEART PIECE on the heart (I); take the ENDLESS SYMBOL (J).
- Back out.
- Place the ENDLESS SYMBOL in the recess (K).
- Set the UNCHARGED RED ORB on the pedestal; take the CHARGED RED ORB (L).
- Return to the Cerberus.
- Place the CHARGED RED ORB in the slot (M); take the RED CRYSTAL (N).
- Place the RED CRYSTAL on the pedestal; take the BROKEN CRYSTAL PIECES 2/2 (O).
- Back out; go to the throne room.
- Give the 2 BROKEN CRYSTAL PIECES to the King (P); receive the KING’S KEY.
- Place the KING’S KEY in the keyhole (Q); take the THOR SYMBOL (R).
- Examine the alcove to access a HOP (S).
- Play the HOP.
- You receive the ROYAL ARTIFACTS (T).
- Go to the golem’s cave.
- Use the THOR SYMBOL on the hammer (U).
- Place the Golem heart in the center of the pedestal to trigger a puzzle (V).
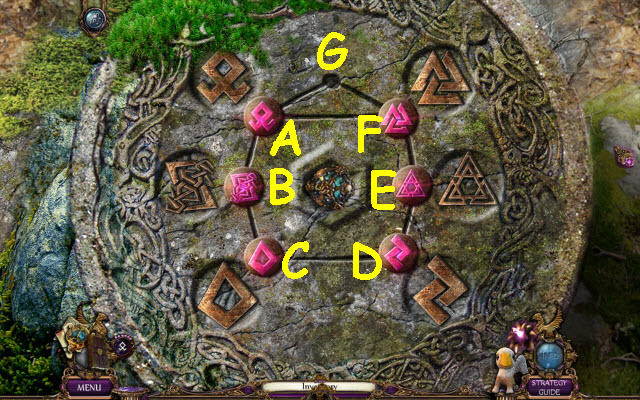
- Move the runes to their matching locations.
- Select the following: A, F, G, A, B, C, D, E, F, G, A, F, E, D, C, B, A, G, F, E, D, C, B, A, F, E, D, C, B, A, F and G.
- Place the ROYAL ARTIFACTS on the platform (W).
- Congratulations! You have successfully completed The Secret Order: Ancient Times.


 Insider Tales: Vanished in Rome Walkthrough, Guide, & Tips
 PuppetShow: Lightning Strikes Walkthrough, Guide, & Tips
 Hidden Mysteries: Vampire Secrets Walkthrough, Guide, & Tips
 Allora and the Broken Portal Walkthrough, Guide, & Tips
 Best in Show Solitaire Walkthrough, Guide, & Tips