Chronicles of Albian 2: The Wizbury School of Magic Walkthrough, Guide, & Tips
Chronicles of Albian 2: The Wizbury School of Magic Walkthrough

Welcome to the Chronicles of Albian 2: The Wizbury School of Magic Walkthrough
Search the Wizbury School of Magic for the stolen gold, and rebuild the school!
Whether you use this document as a reference when things get difficult or as a road map to get you from beginning to end, we’re pretty sure you’ll find what you’re looking for here.
This document contains a complete Chronicles of Albian 2: The Wizbury School of Magic game walkthrough featuring annotated screenshots from actual gameplay!
We hope you find this information useful as you play your way through the game. Use the walkthrough menu below to quickly jump to whatever stage of the game you need help with.
Remember to visit the Big Fish Games Forums if you find you need more help. Have fun!
This walkthrough was created by Rebekah, and is protected under US Copyright laws. Any unauthorized use, including re-publication in whole or in part, without permission, is strictly prohibited.
General Tips

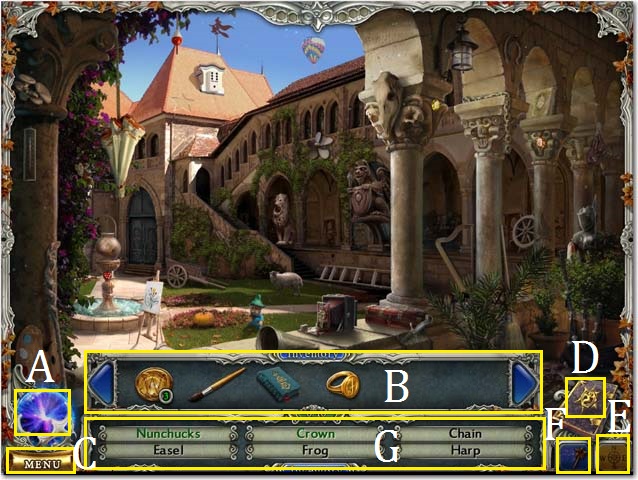
- This is the official guide for Chronicles of Albian 2: The Wizbury School of Magic.
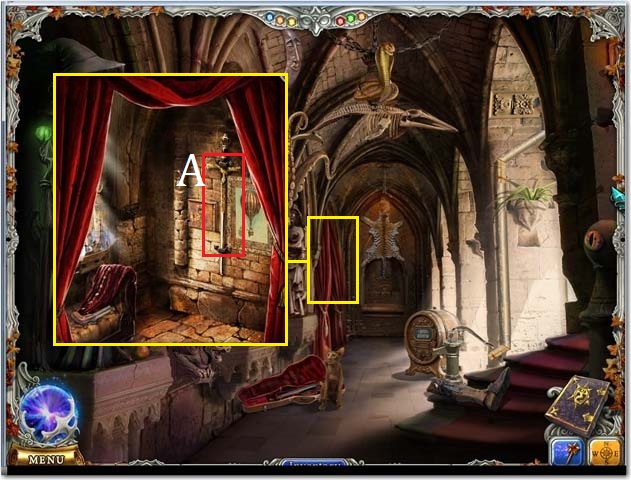
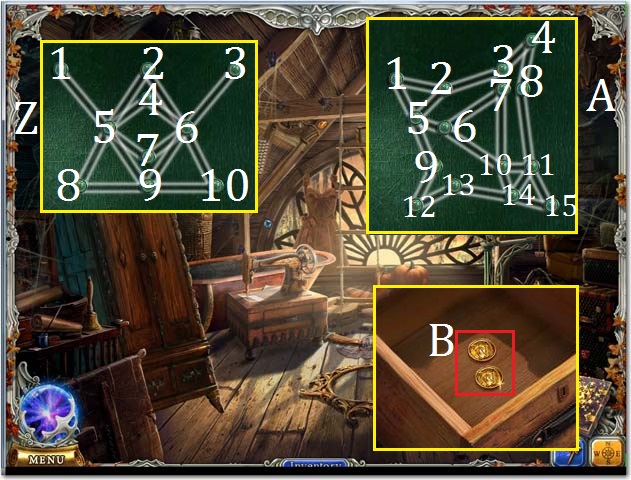
- Use the Hint Button (A) if you need additional help.
- Your Inventory Bar (B) will hold items until they are needed.
- Select the Menu Button (C) to adjust your options (sound, music, and screen size).
- Use your Spell book (D) for additional help.
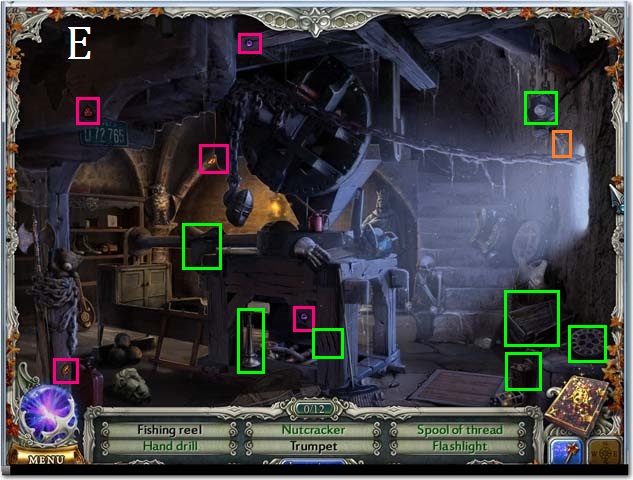
- You may use your Map (E) to switch from scene to scene.
- Once you collect the magic wand (F) it will be stored next to your map. When directed to do so, use the wand to cast spells.
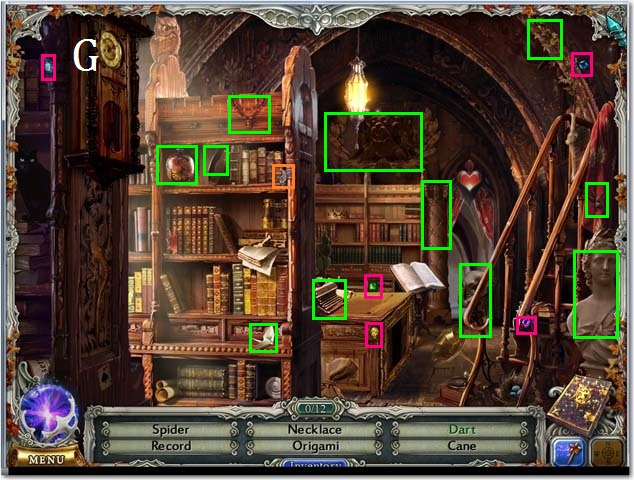
- Every scene has six hidden Gems. All of the Gems are all marked in pink in this guide unless otherwise noted.
- Find the ten to twelve Hidden Objects on the list (G). As you collect items new items will be listed until you have viewed all twelve. You cannot collect an item until it is visible on the list.
- All Hidden Objects are marked in green in this guide unless otherwise noted.
- The Hidden Objects and the Gems positions are random. This guide marks the items during the current game play.
- Every scene has a fairy that will locate one of the Hidden Objects in each scene. All of the fairies are marked in orange in this guide unless otherwise noted.
- Collect items fast to receive bonus gold! You may view all available trophies by going into the options menu from the main menu.
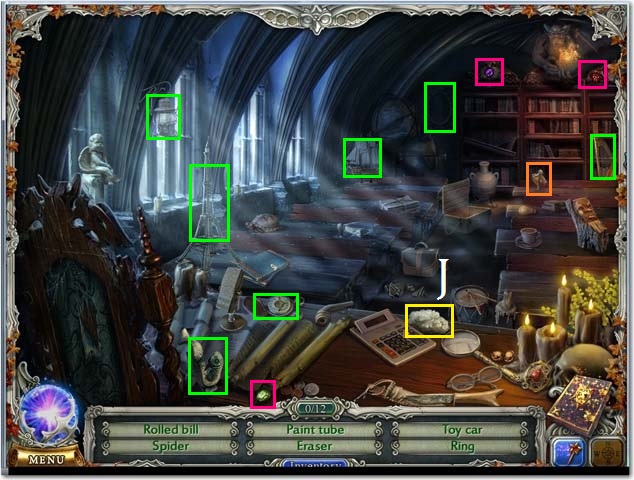
Chapter 1: The Courtyard
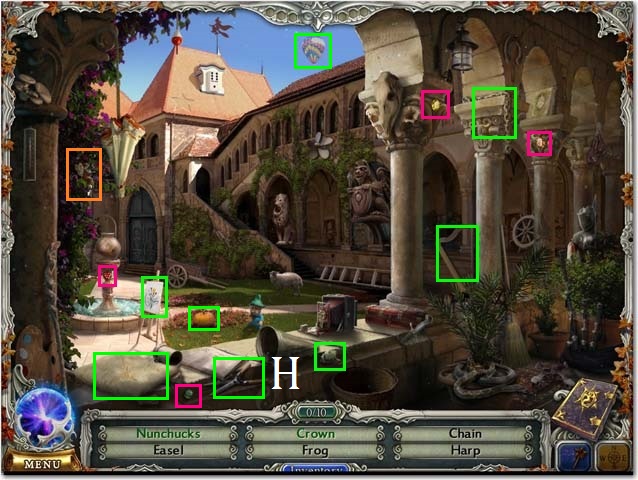
- Collect all of the visible Gems marked in pink.
- Collect all of the items, on the Hidden Object list, that are available. If an item is not visible on the list you will not be able to collect it yet.
- If you are having difficulty finding an item you may collect the Fairy (orange) and she will locate an item for you.
- You will receive an additional trophy for collecting ten Fairies.
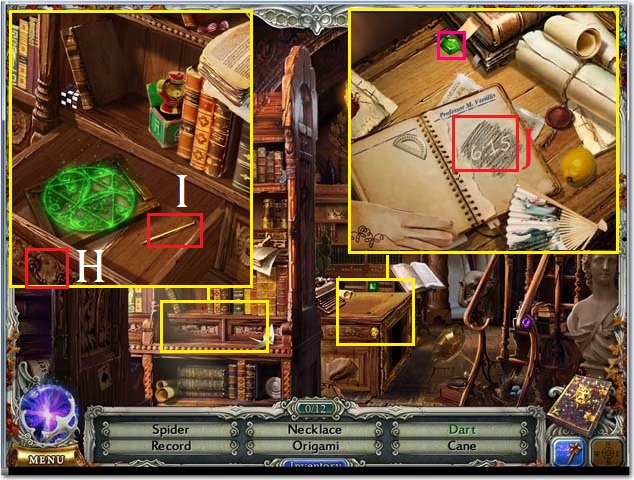
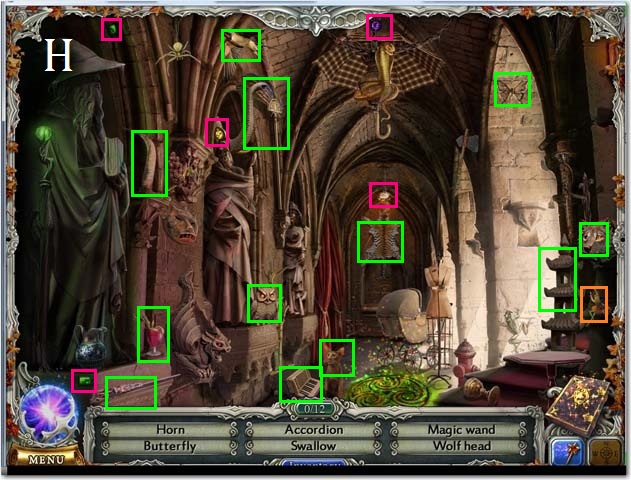
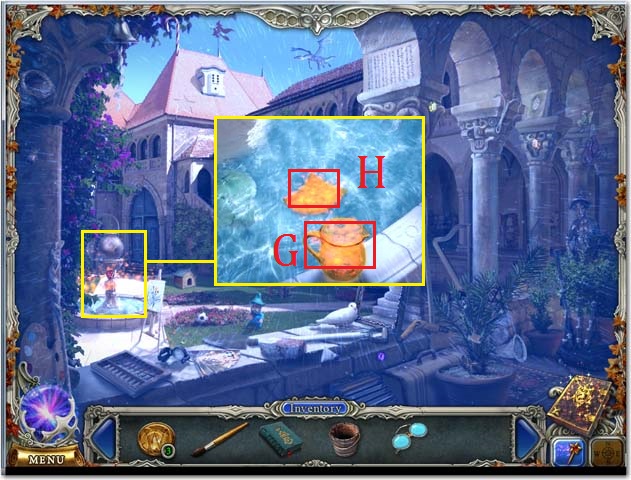
- The CLIPPERS (H) will be added to your inventory once collected.
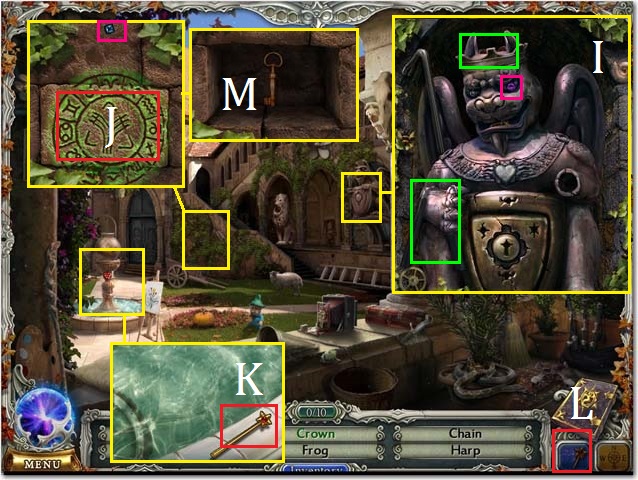
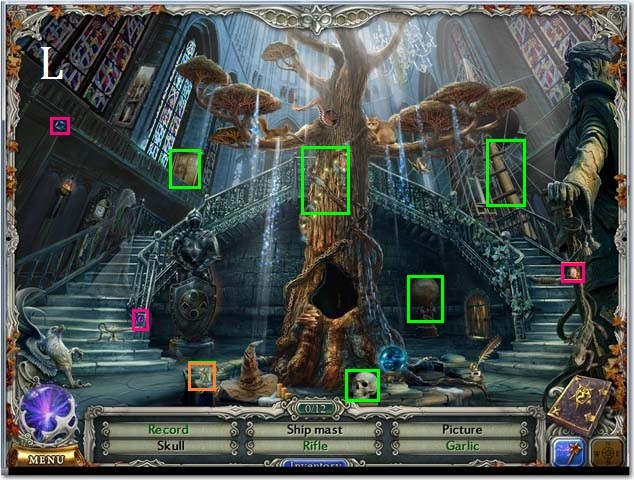
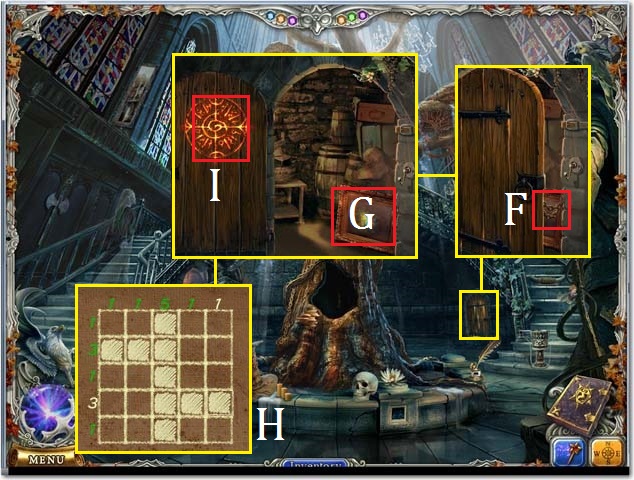
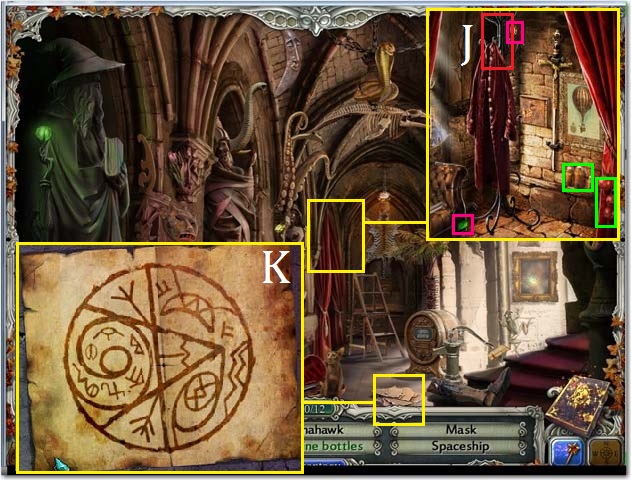
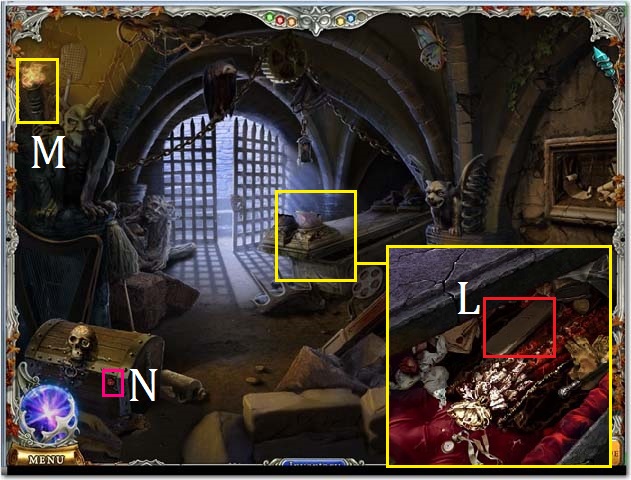
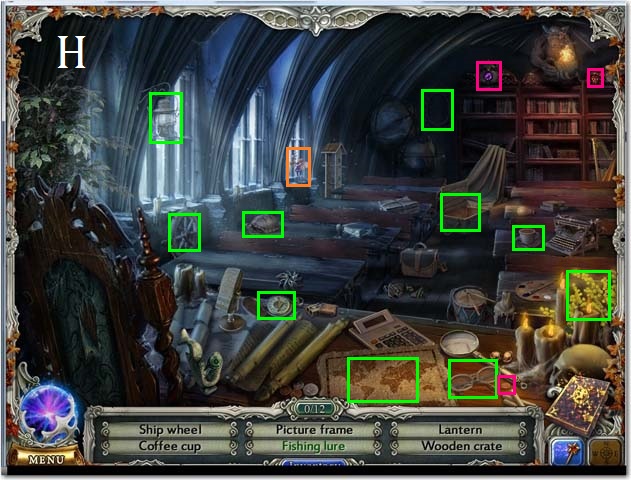
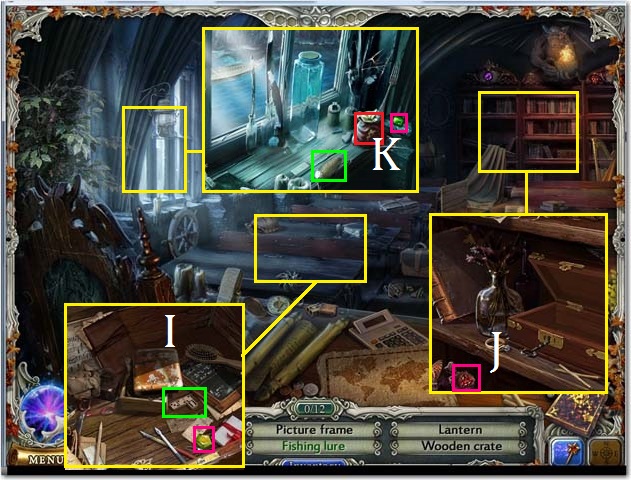
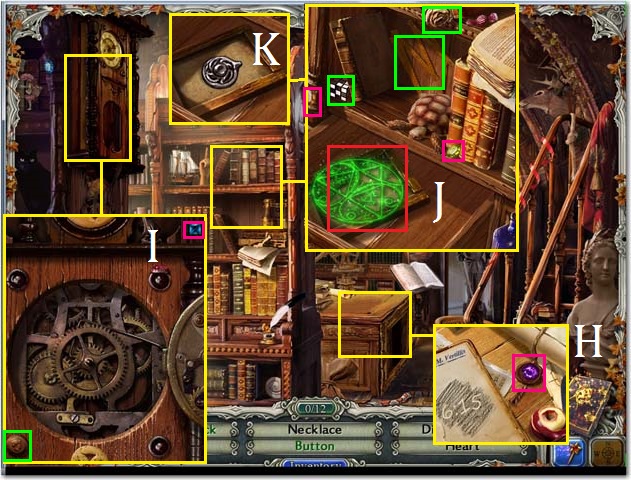
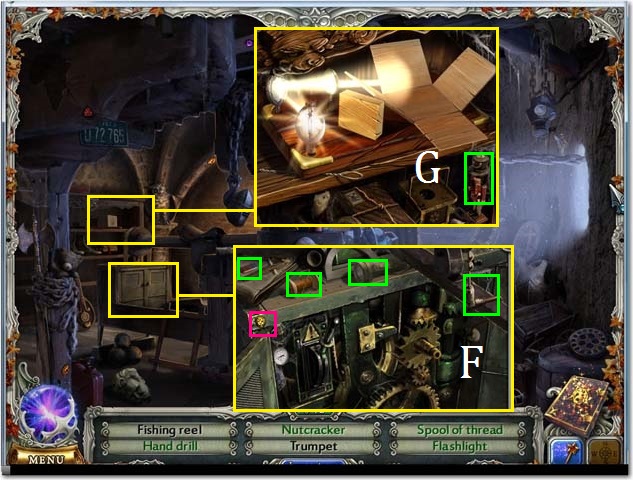
- Zoom into the gargoyle statue; collect the Gem and the two items (I).
- Zoom into the wall; use the CLIPPERS to cut the vines and then examine the stone (J).
- Collect the last GEM and then close the pop-up window.
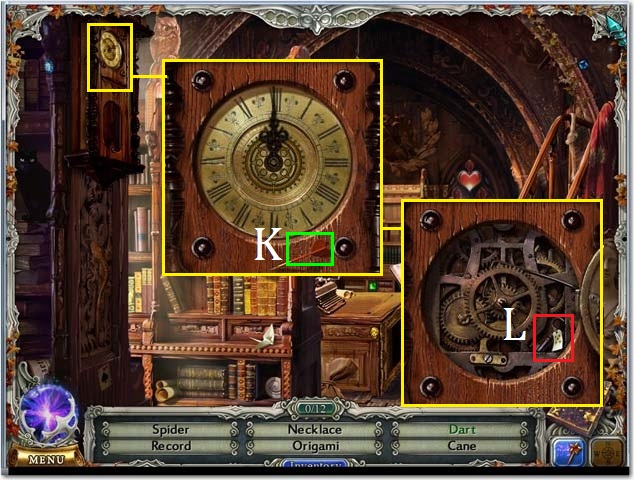
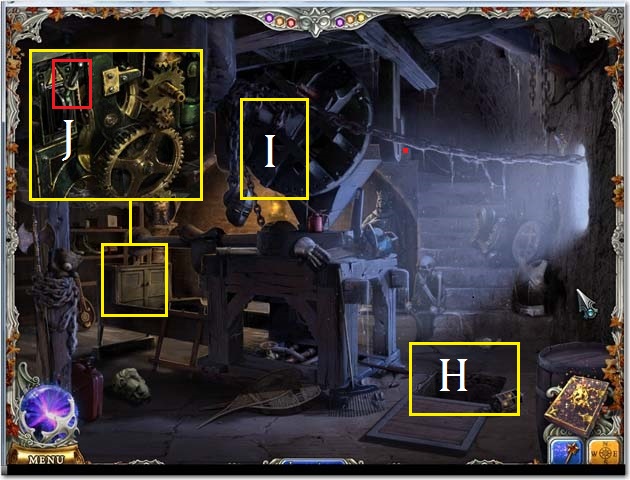
- After the dialog zoom into the fountain; collect the WAND (K).
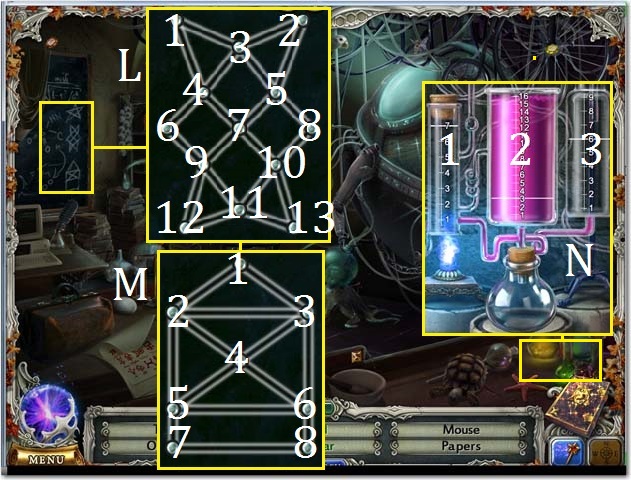
- Zoom back into the wall; draw a counterclockwise circle, starting with the 12 position with the WAND (L) over the stone. Remember, speed is not a factor just accuracy is needed.
- The STONE will be added to your inventory.
- Collect the COURTYARD KEY (M).
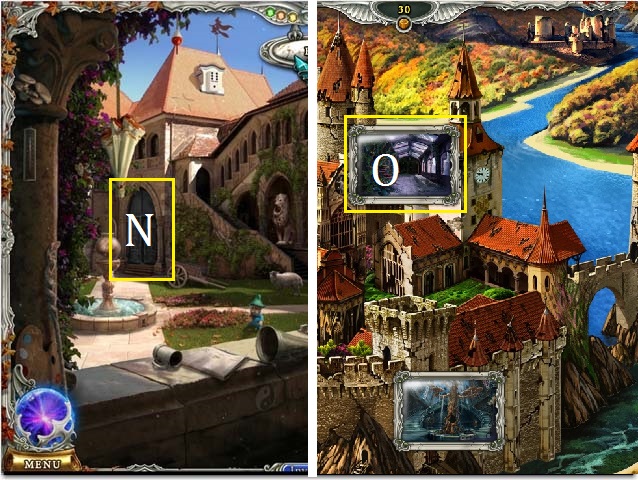
- Use the COURTYARD KEY to open the door (N).
- Note: when using an inventory item on another item in the game, always position it so that the gears appear before releasing the item.
- Exit the scene.
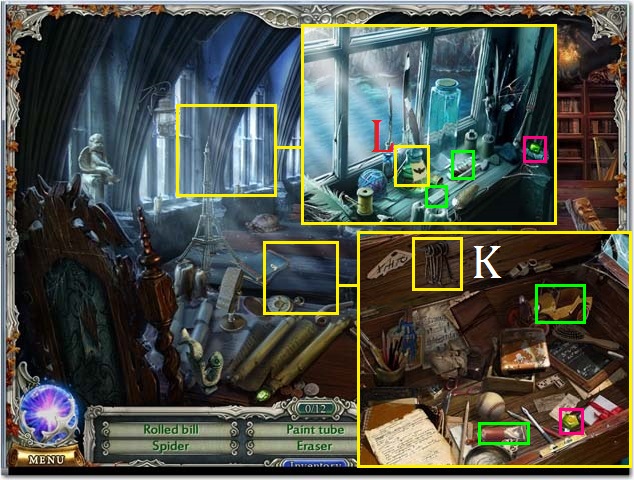
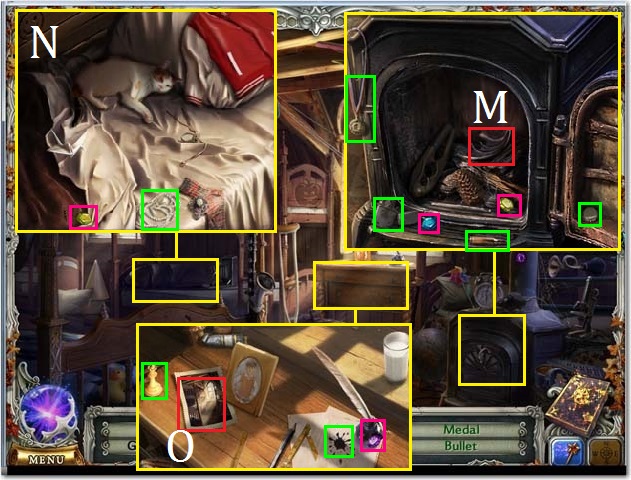
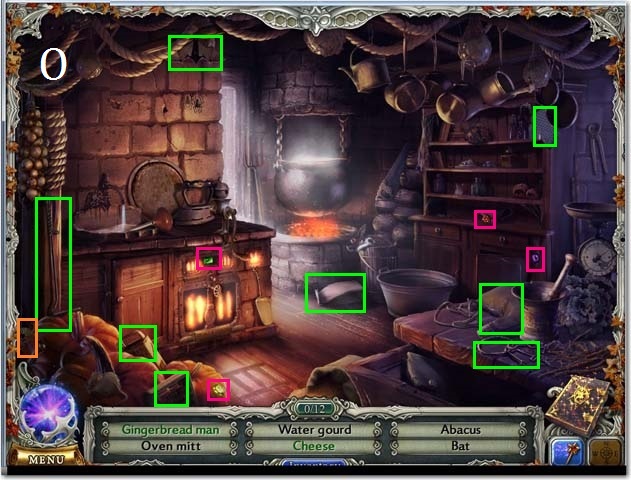
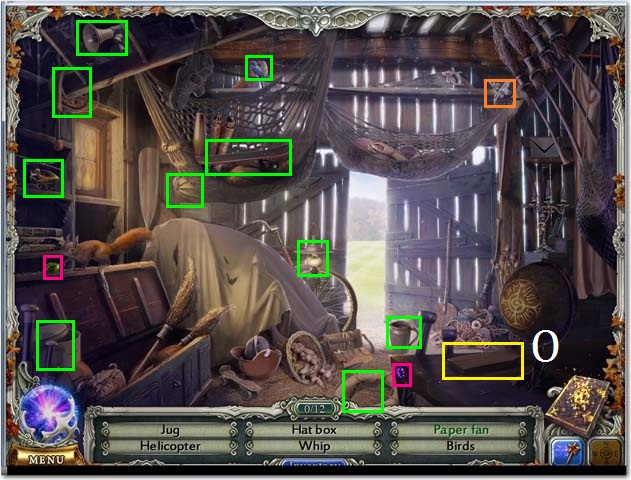
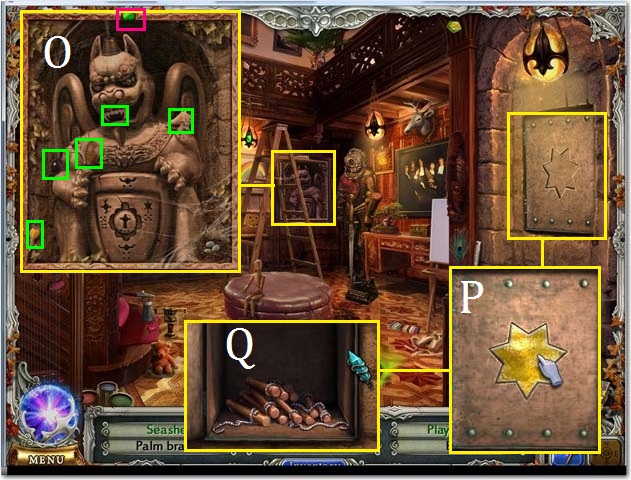
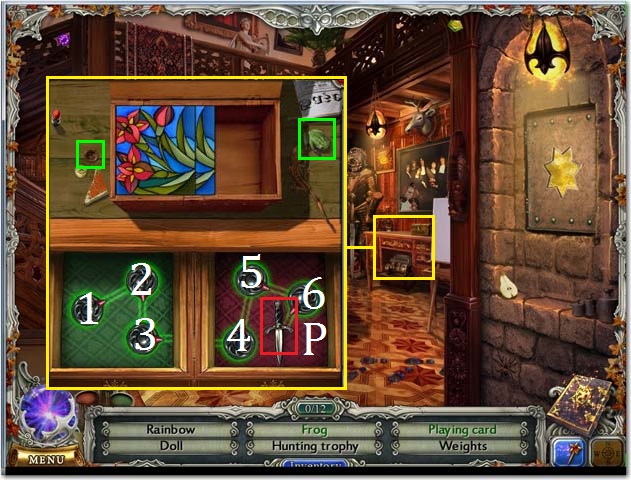
- Travel to the Greenhouse (O).
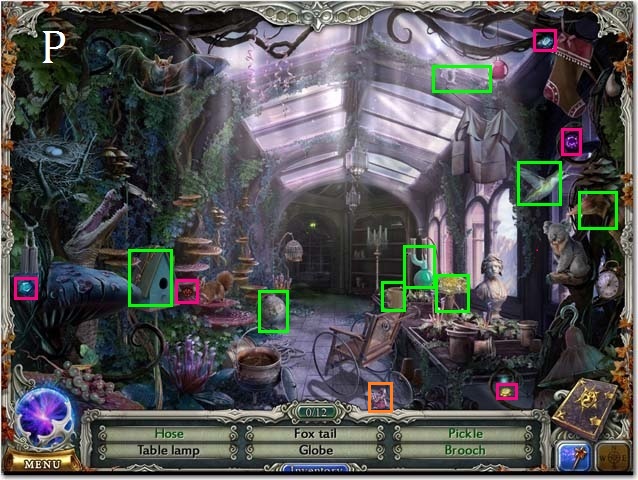
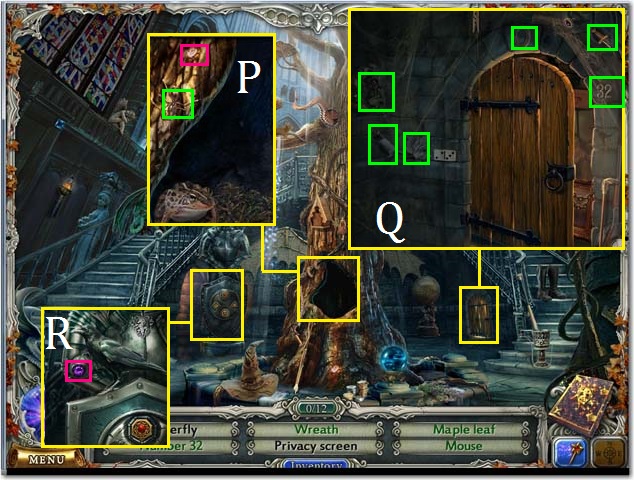
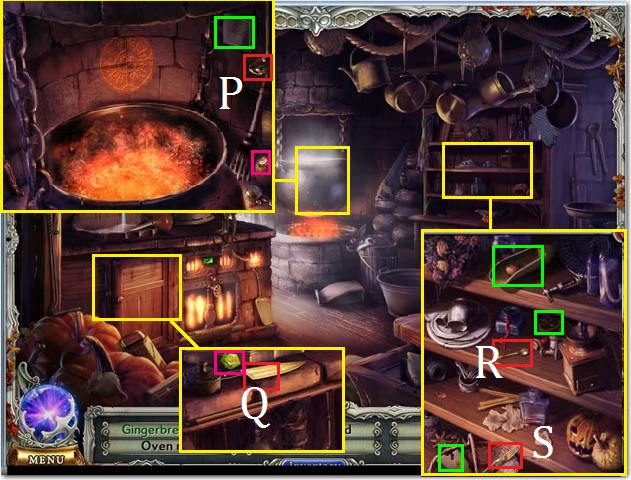
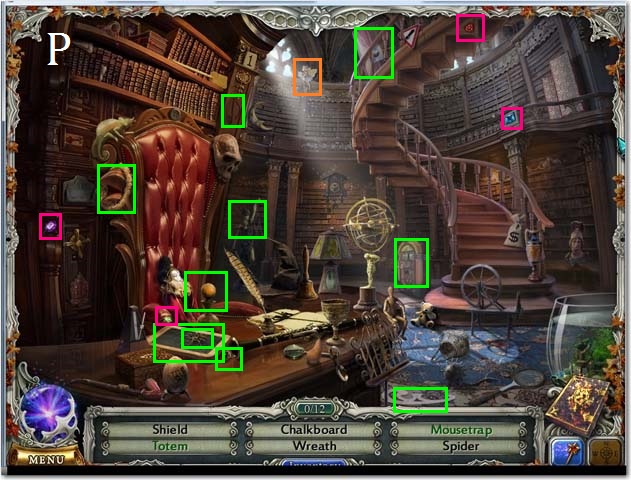
- Collect all of the visible Gems and all of the visible Hidden Objects (P).
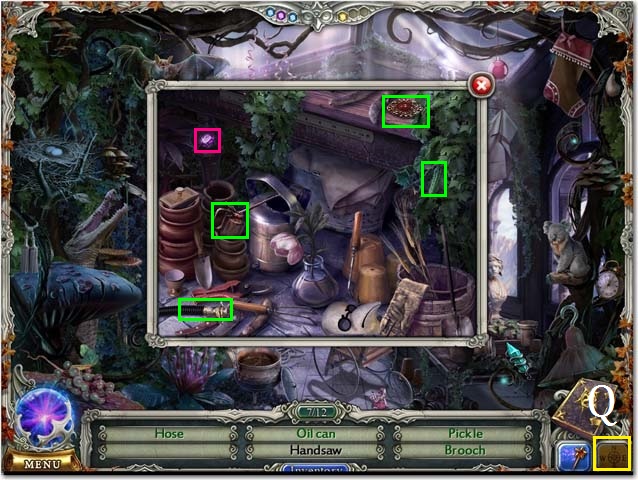
- Zoom into the table; collect the Gems and the Hidden Objects.
- The OIL CAN will be added to your inventory.
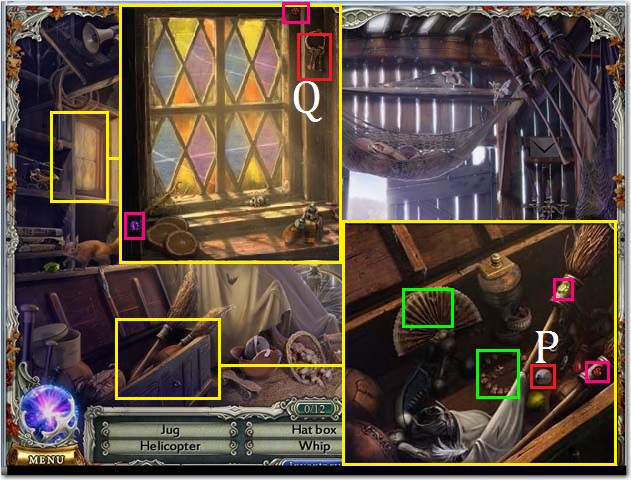
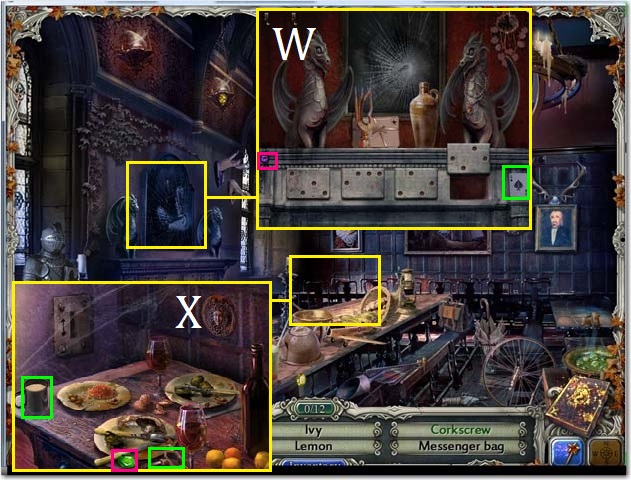
- Return to your Map (Q) and then travel to the School Foyer.
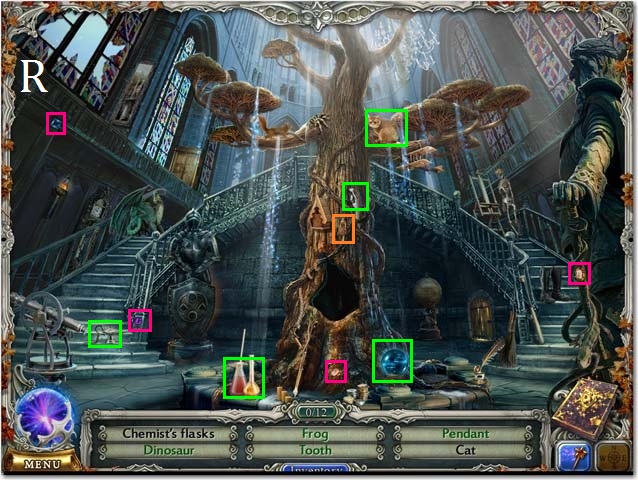
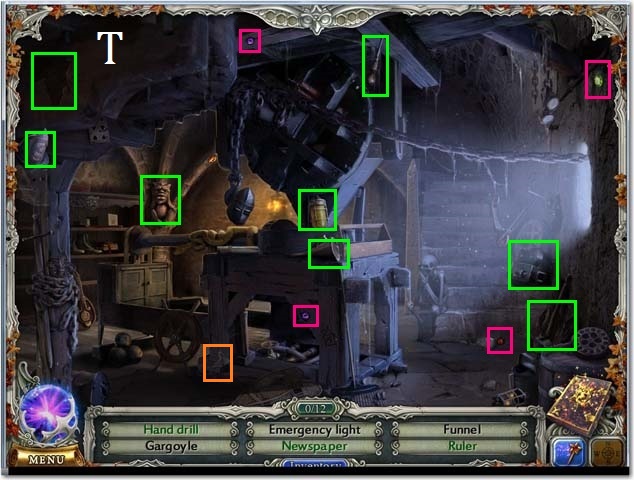
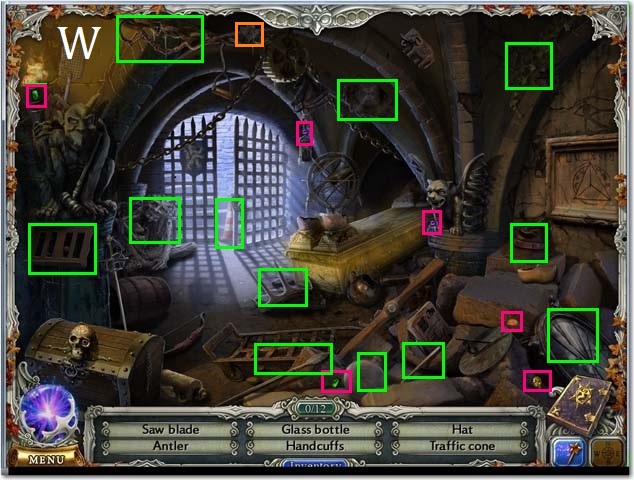
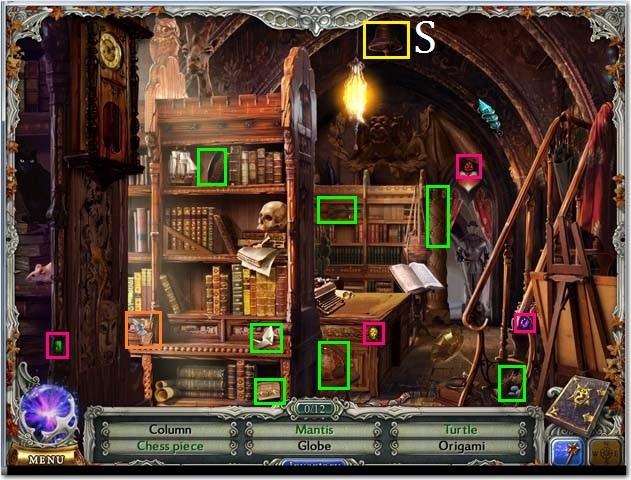
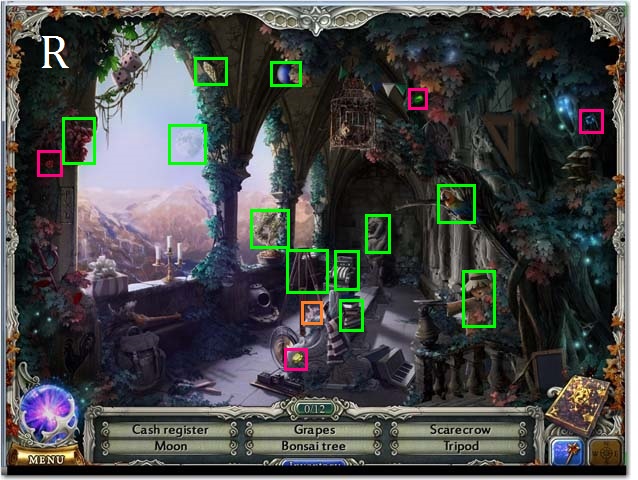
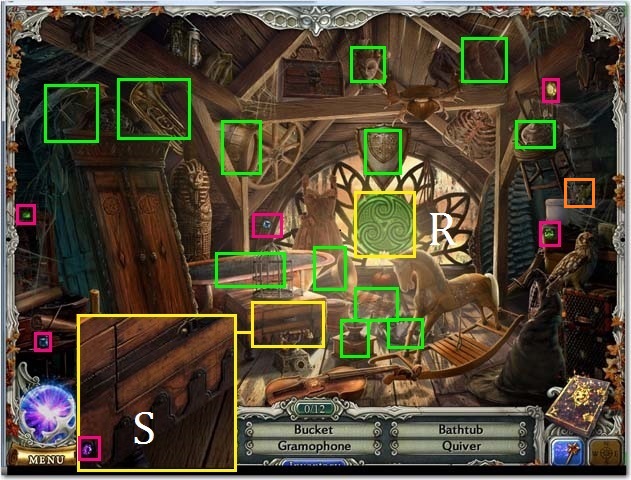
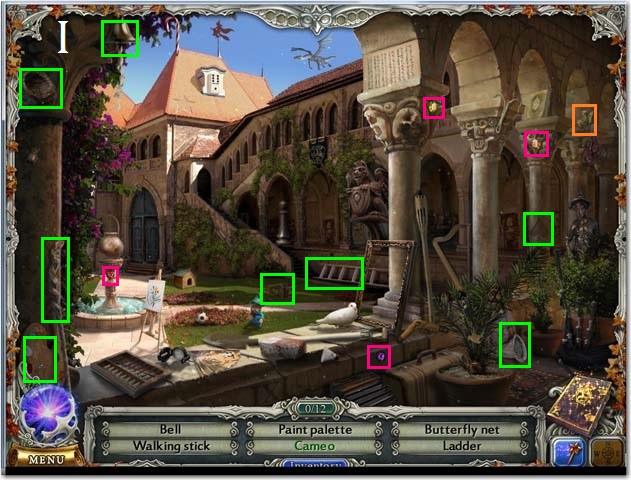
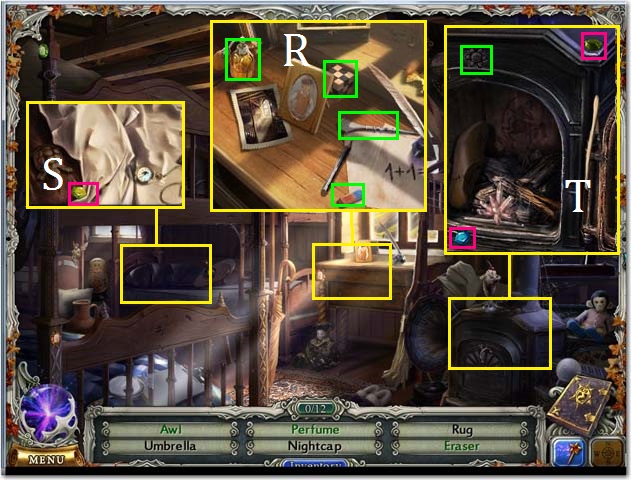
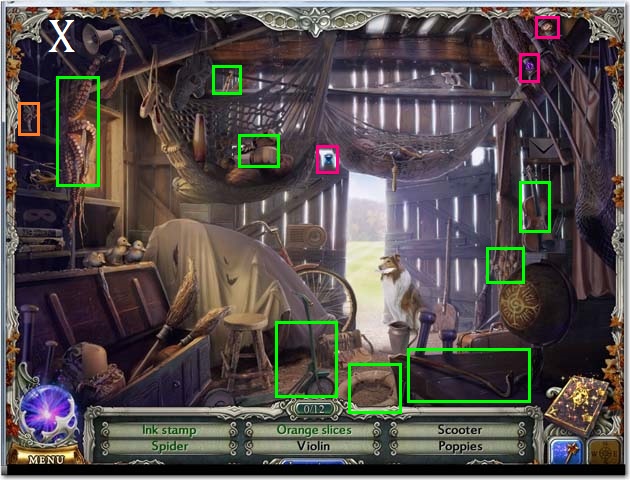
- Collect all of the visible Gems and all of the visible Hidden Objects (R).
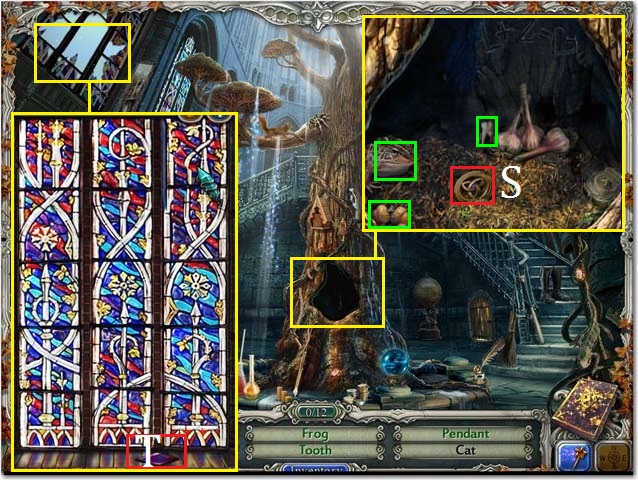
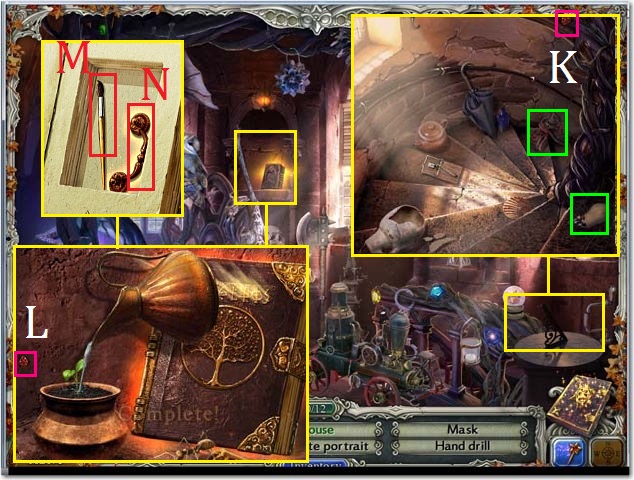
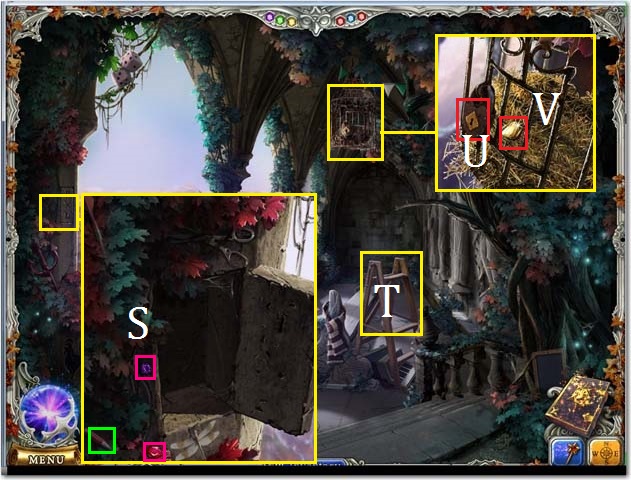
- Zoom into the tree; collect the Hidden Objects and the first AMULET (S).
- The TOOTH will be added to your inventory.
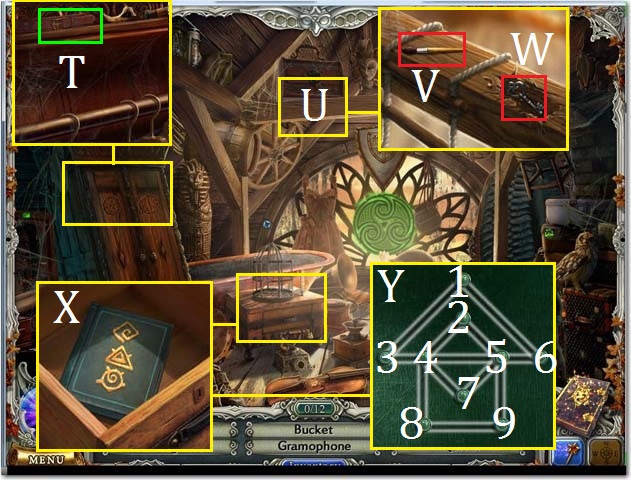
- Zoom into the broken window to trigger a puzzle; assemble the window as it is shown in the screenshot.
- Collect the remaining piece of STAINED GLASS (T).
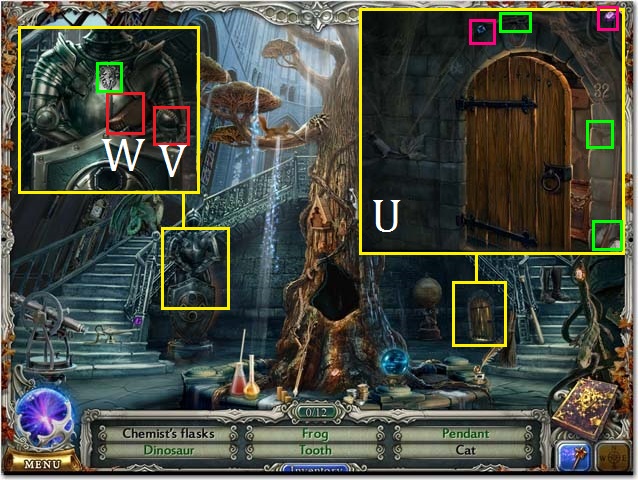
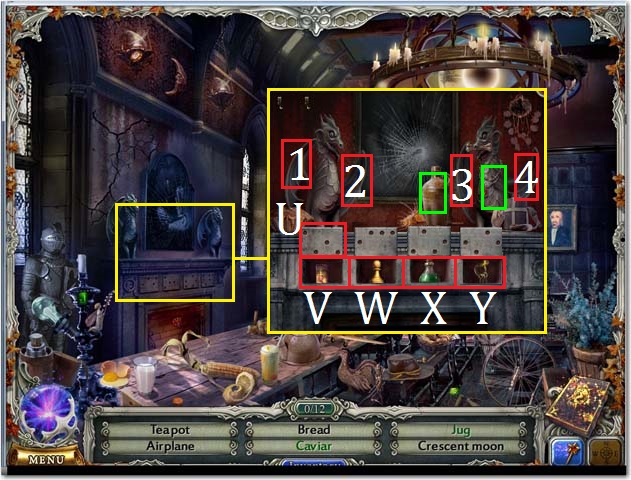
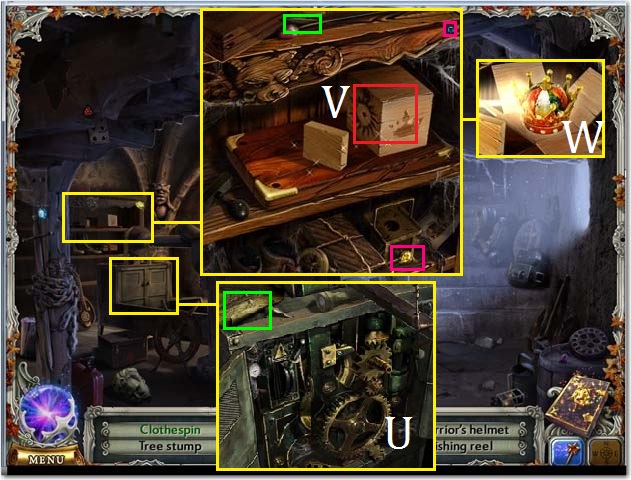
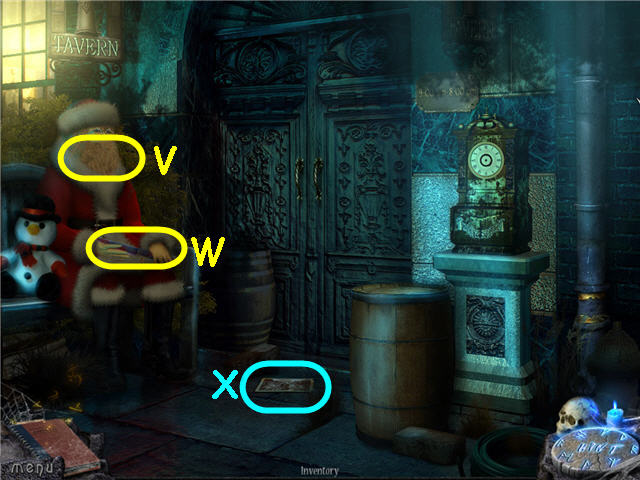
- Zoom into the door; collect all of the visible Hidden Objects (U).
- Zoom into the armor; collect the Hidden Object. Use the OIL CAN on the arm (V) and then collect the WIZARD’S LINEAGE VOL 8 (W).
- After you receive your gold from Fitz exit the scene.
- You may choose to begin making upgrades to Wizbury by following the onscreen prompts, or you may wait. One available trophy is for having $5,000 in the bank at once.
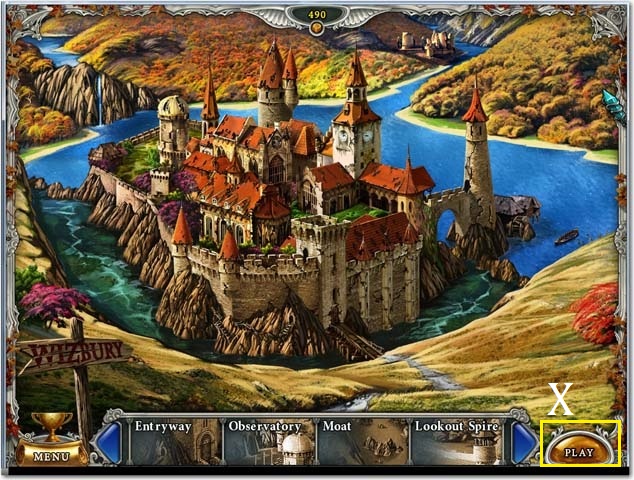
- When ready, press the play button (X) to return to your map.
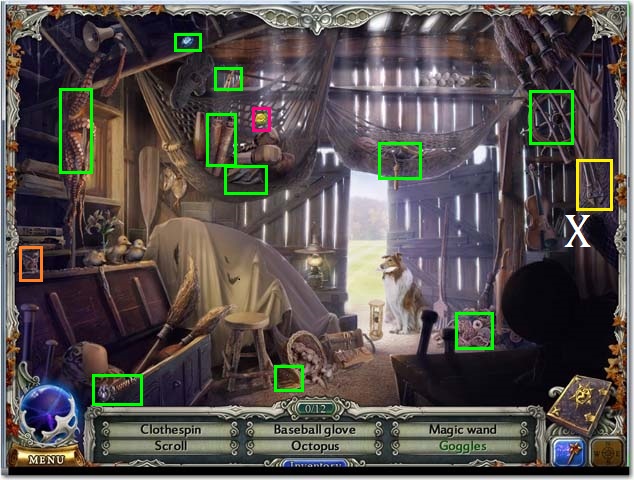
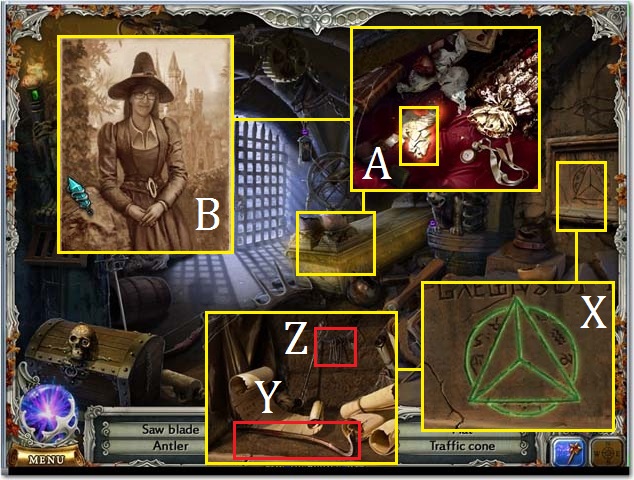
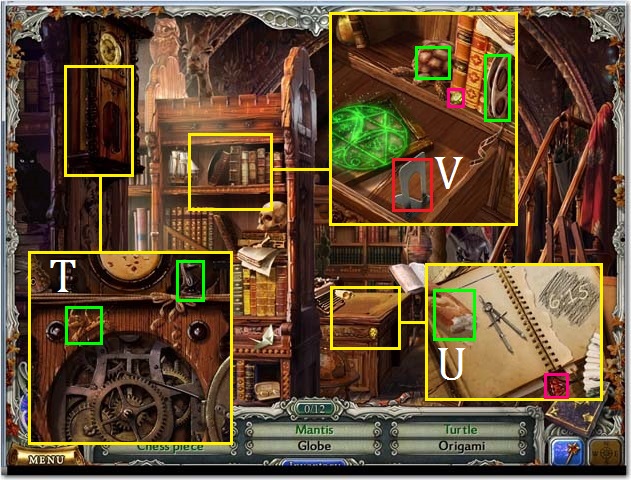
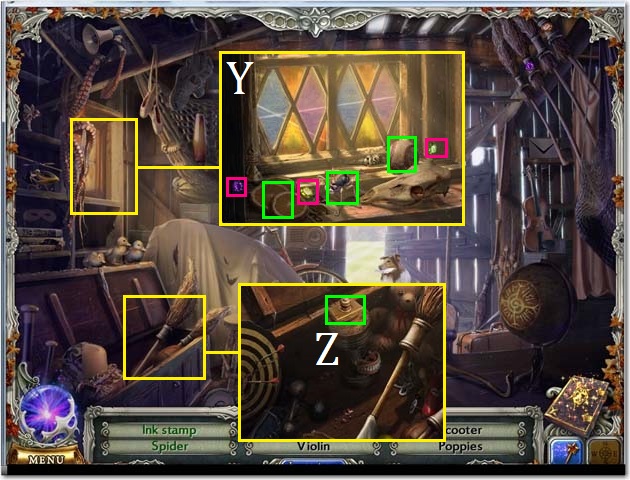
- Travel to the Magic Classroom.
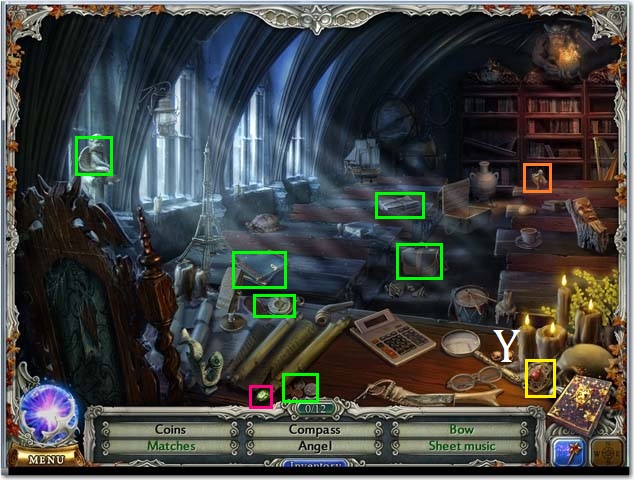
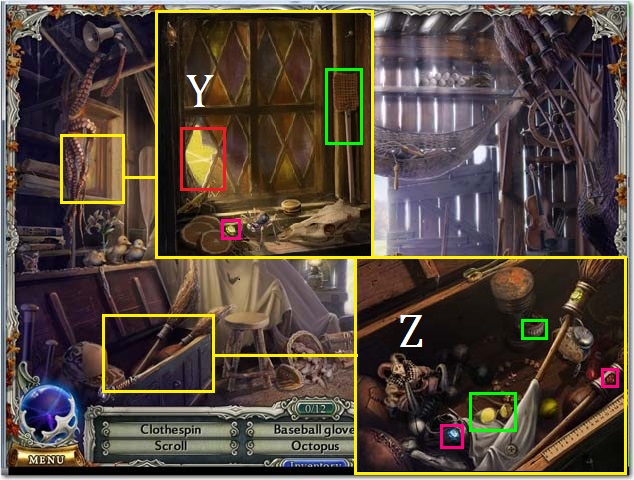
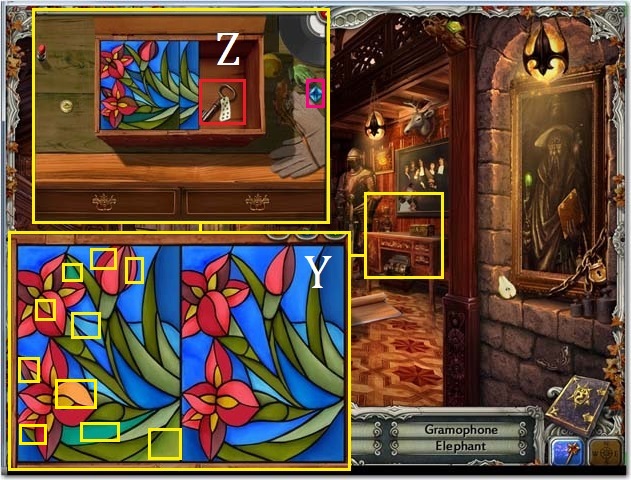
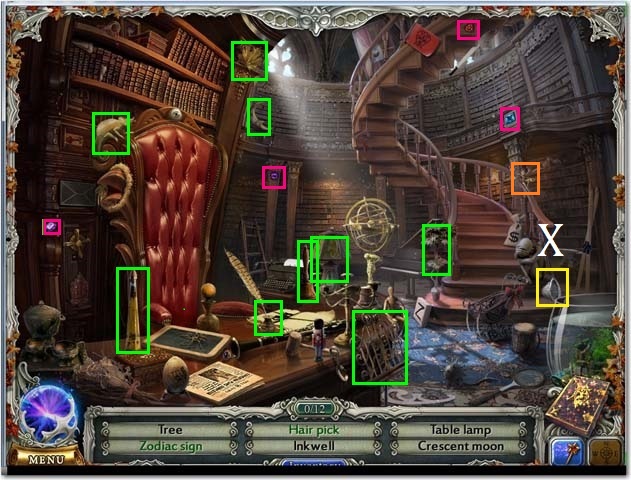
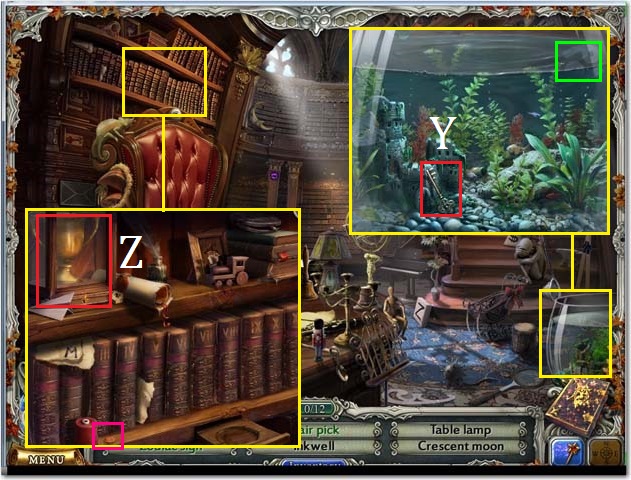
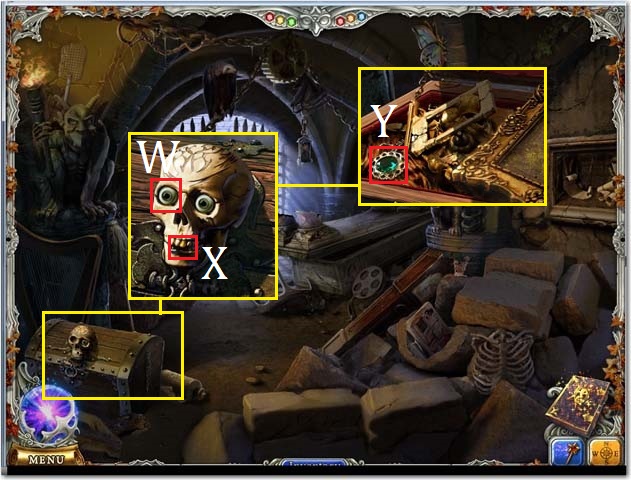
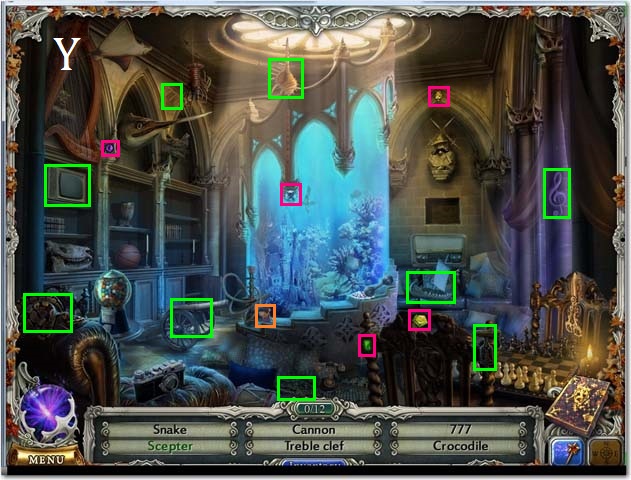
- Collect the second AMULET (Y).
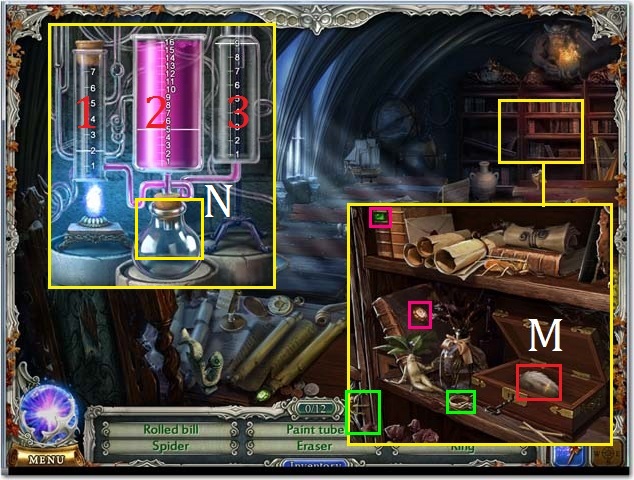
- Collect all of the visible Gems and all of the visible Hidden Objects.
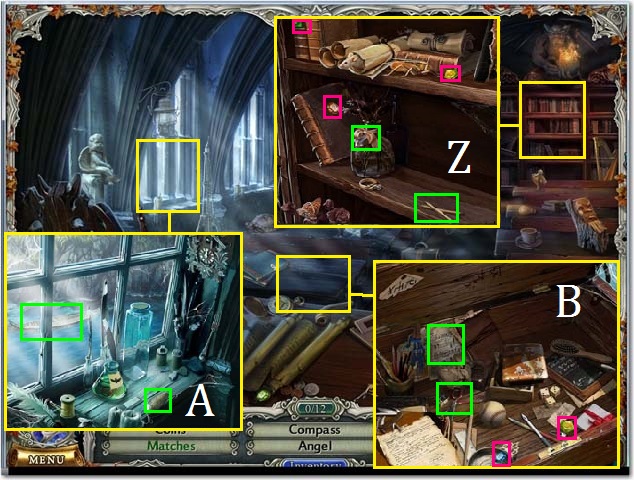
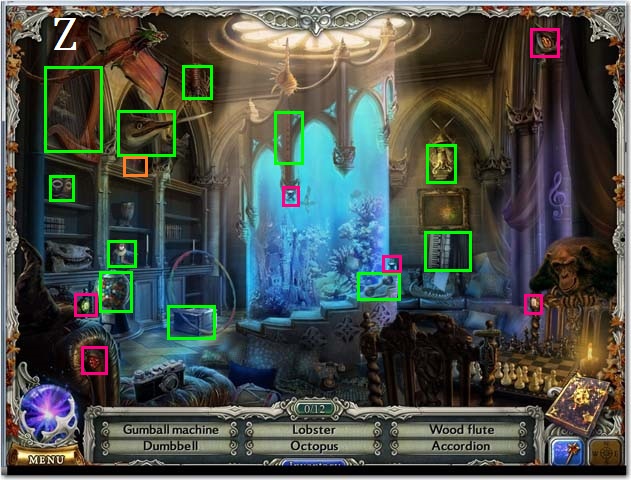
- Zoom into the shelf; collect the Gems and the Hidden Objects (Z).
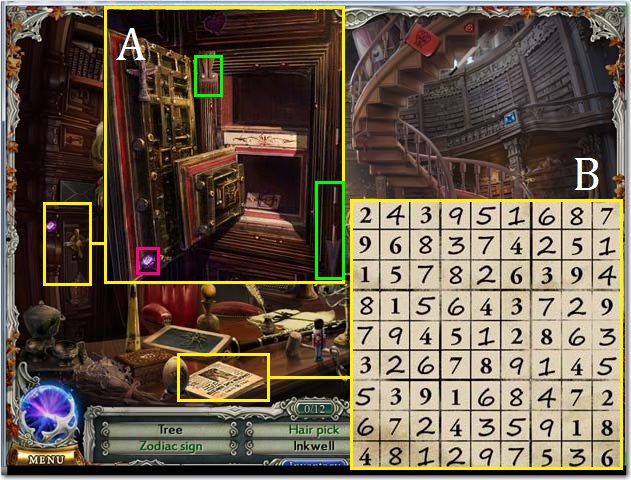
- Zoom into the window; collect the Hidden Objects (A).
- Zoom into the desk; collect the Gems and the Hidden Objects (B).
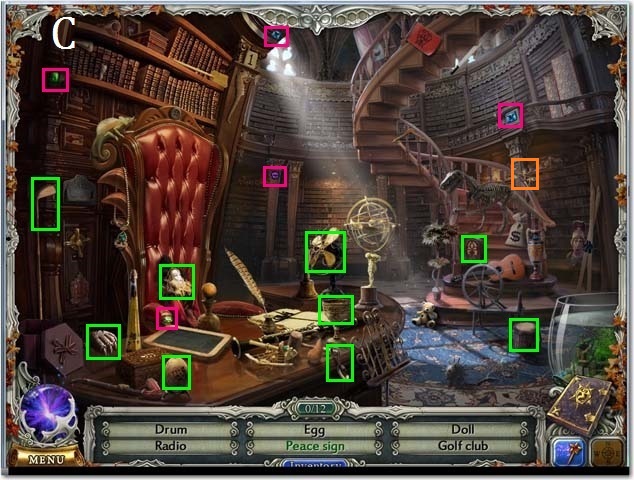
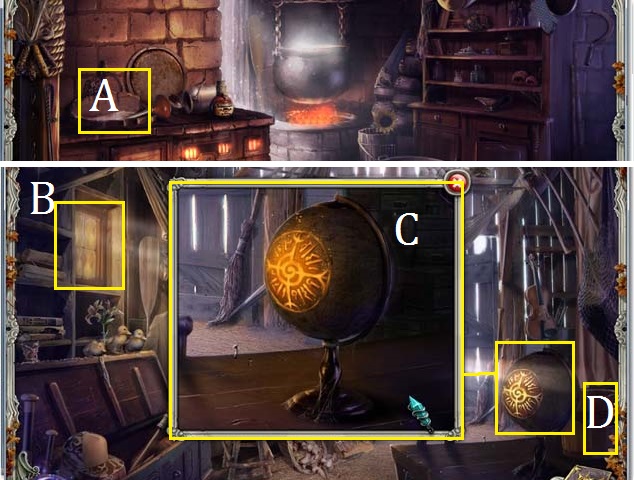
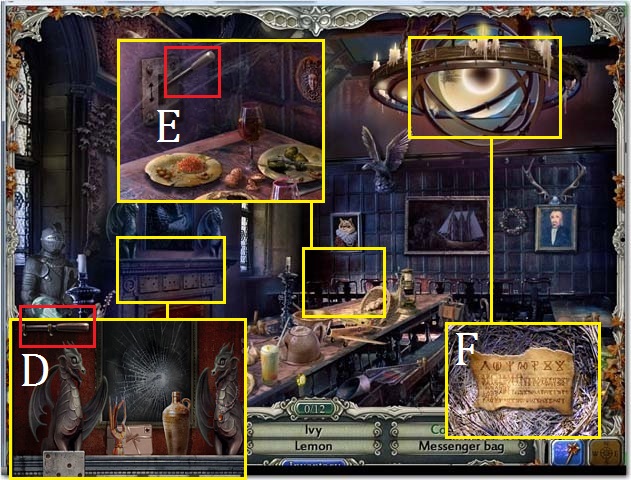
- Travel to Wynnstaff’s Office.
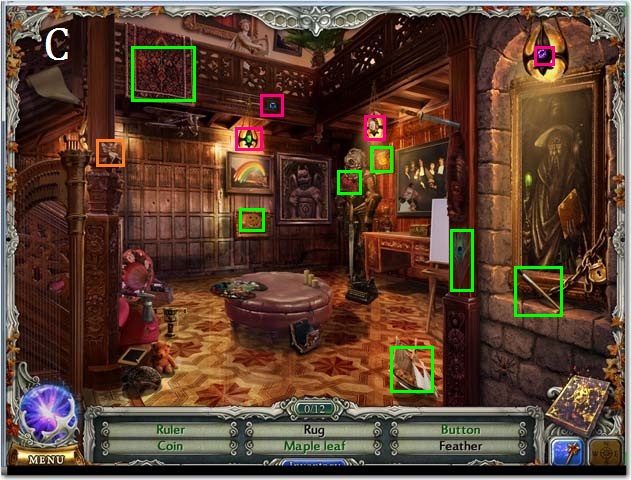
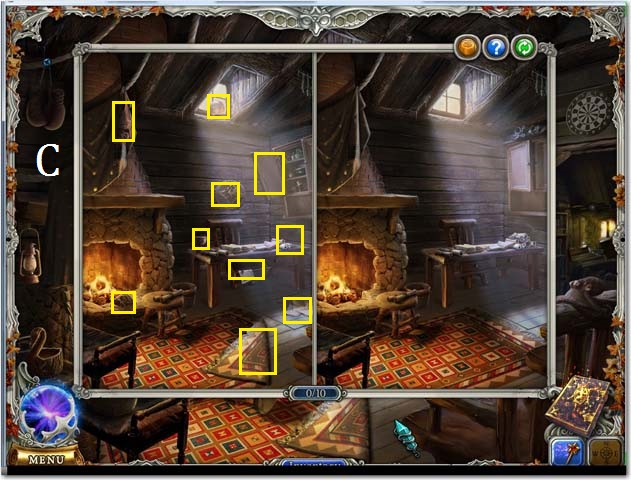
- Collect all of the visible Gems and all of the visible Hidden Objects (C).
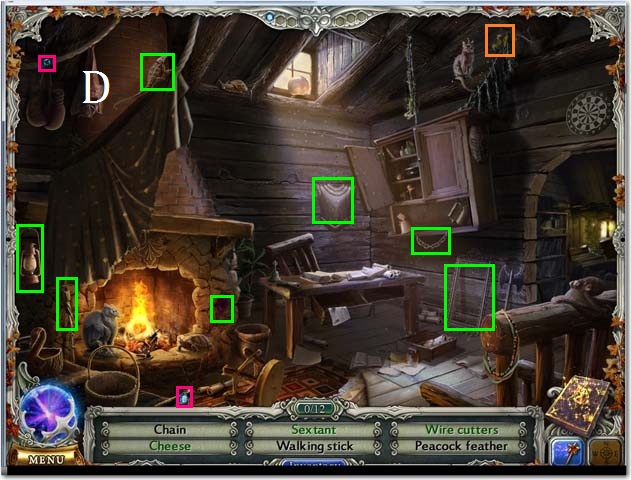
- The STONE HAND will be added to your inventory.
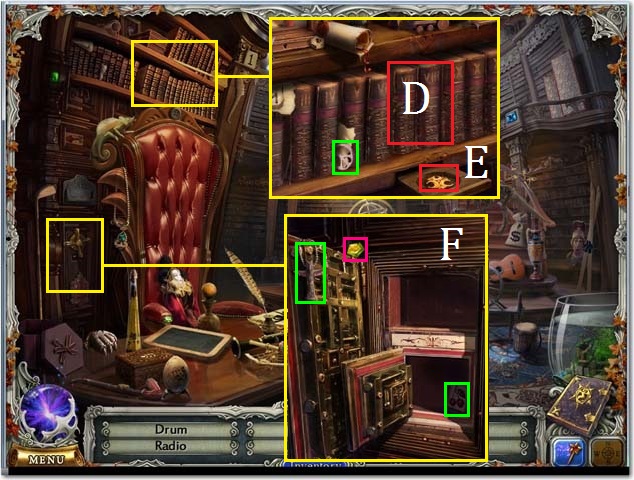
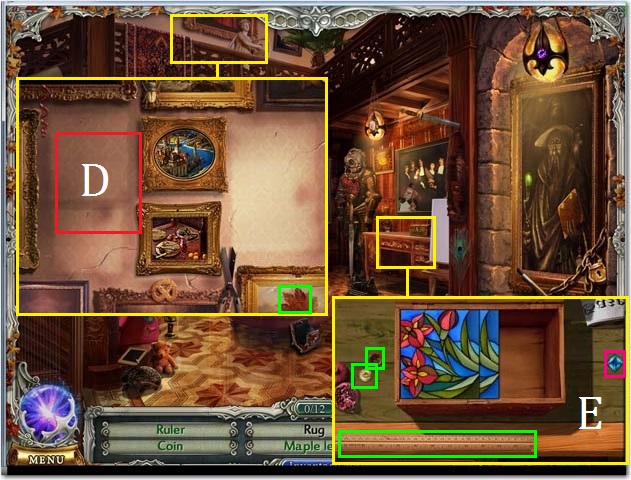
- Zoom into the shelf; place the WIZARD’S LINEAGE VOL 8 on the shelf (D).
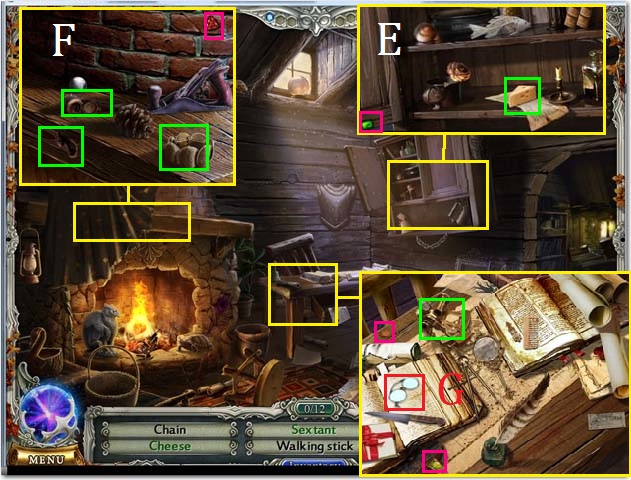
- Collect the third AMULET (E) and the Hidden Object.
- Zoom into the safe; collect the Gem and the Hidden Objects (F).
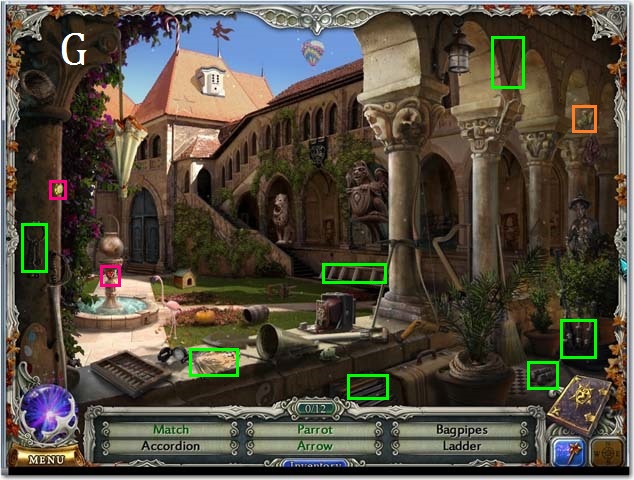
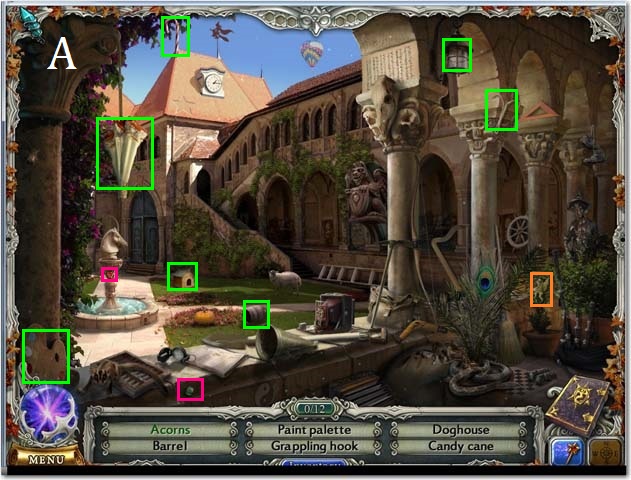
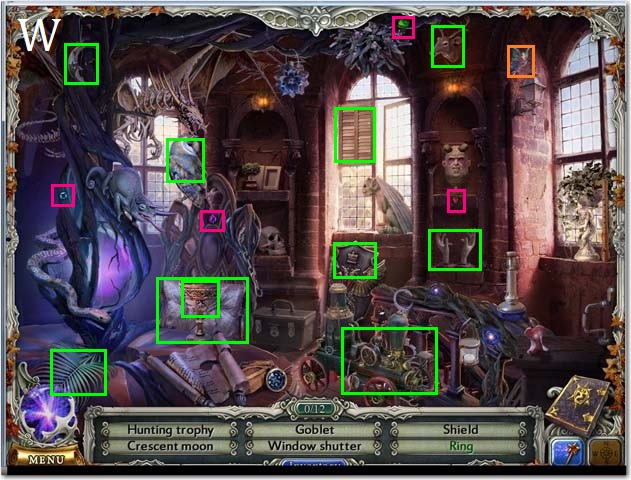
- Travel to the Courtyard.
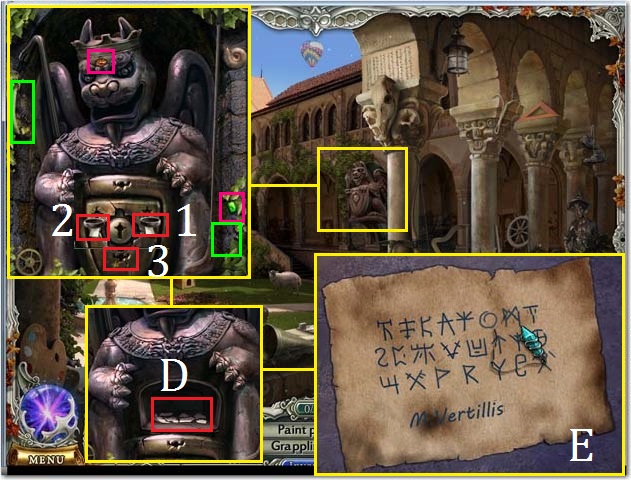
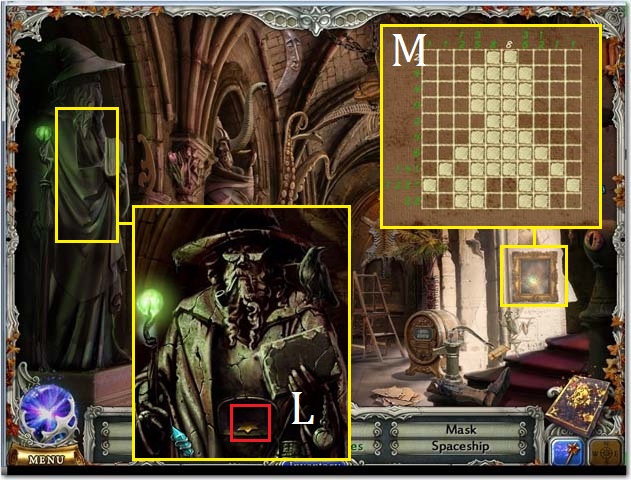
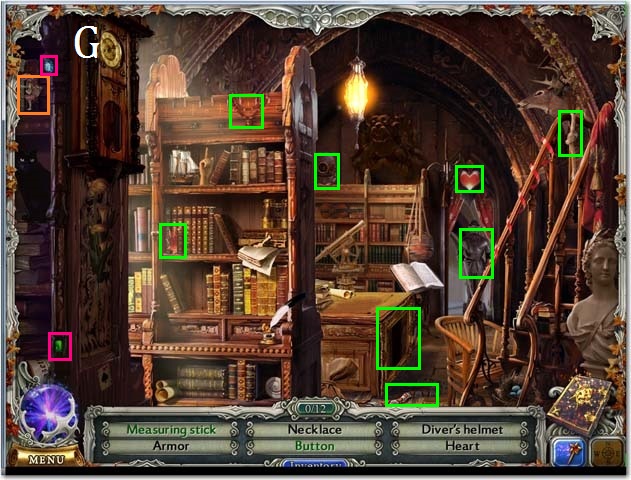
- Collect all of the visible Gems and all of the visible Hidden Objects (G).
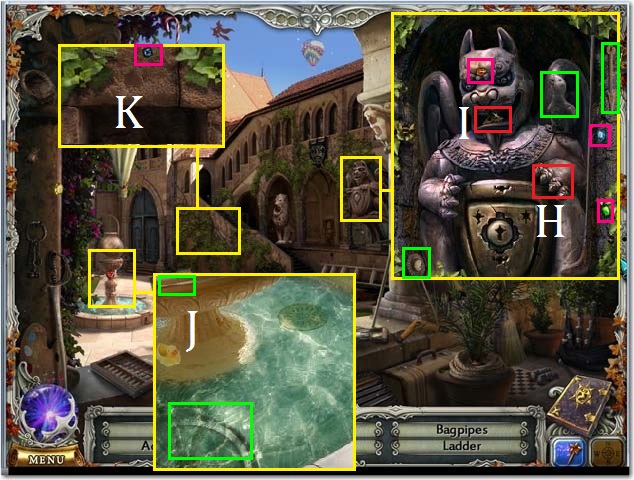
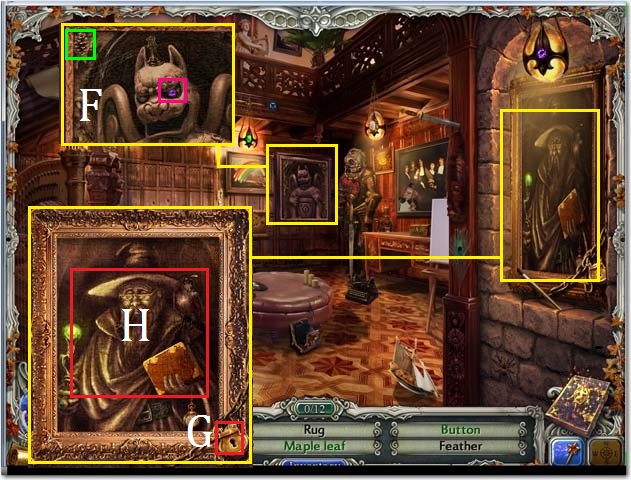
- Zoom into the gargoyle; collect the Gems and the Hidden Objects.
- Place the STONE HAND on the gargoyle (H) and then collect the fourth AMULET (I).
- Zoom into the fountain; collect the Hidden Objects (J).
- Zoom into the wall; collect the Gem (K).
- The LOCK PICK will be added to your inventory.
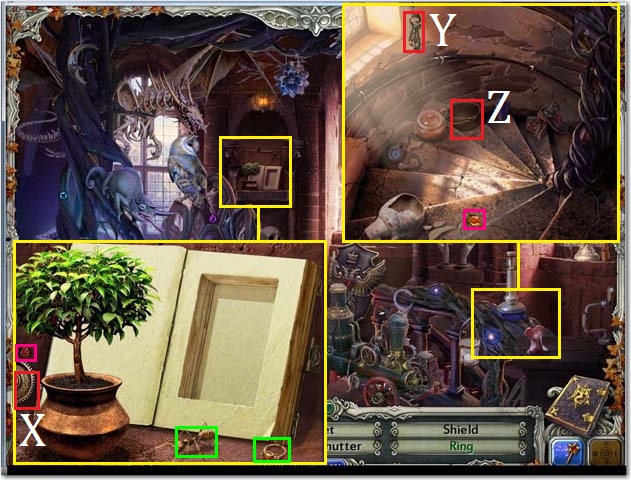
- Travel to the School Foyer.
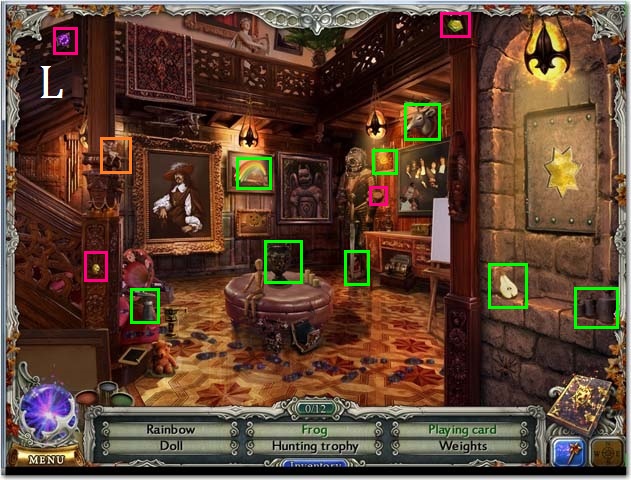
- Collect all of the visible Gems and all of the visible Hidden Objects (L).
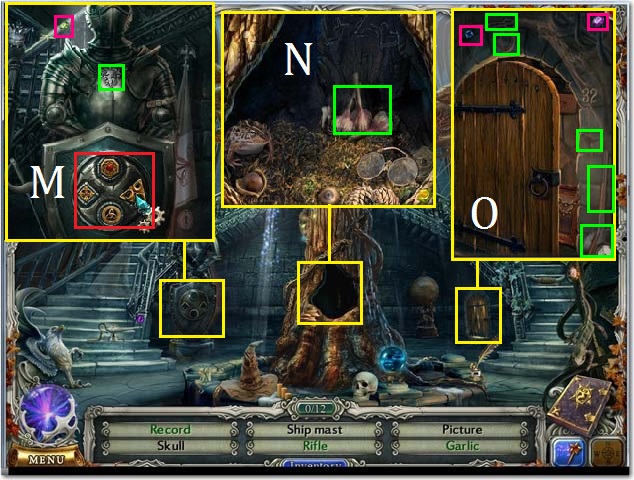
- Zoom into the armor; collect the Gem and the Hidden Object.
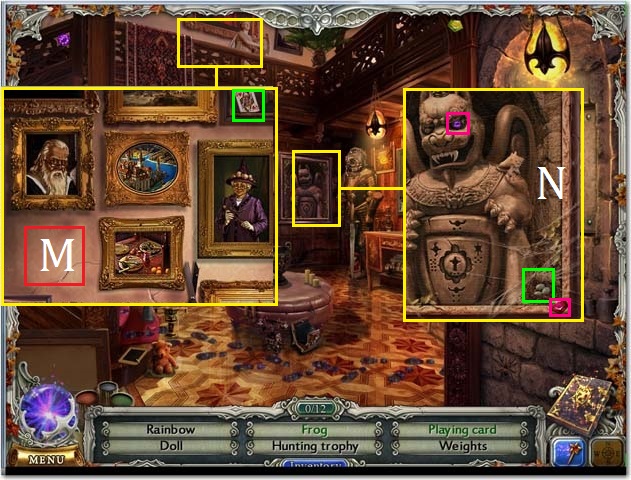
- Place the four AMULETS in the armor’s shield as they are shown in the screenshot (M).
- Zoom into the tree; collect the Hidden Object (N).
- Zoom into the door; collect the Gems and the Hidden Objects (O).
Chapter 2: The Kitchen
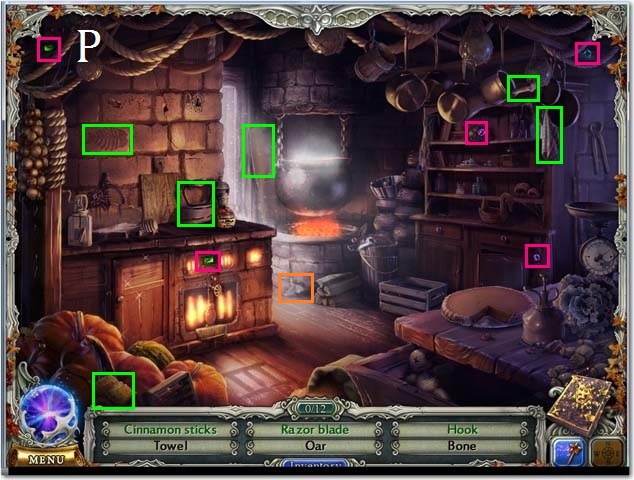
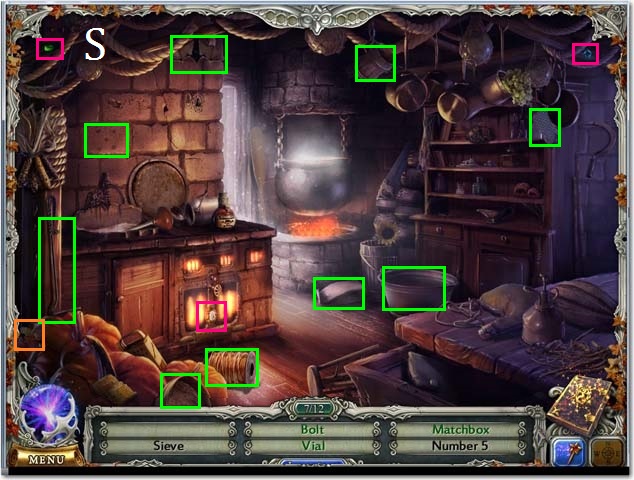
- Travel to the Kitchen.
- Collect all of the visible Gems and all of the visible Hidden Objects (P).
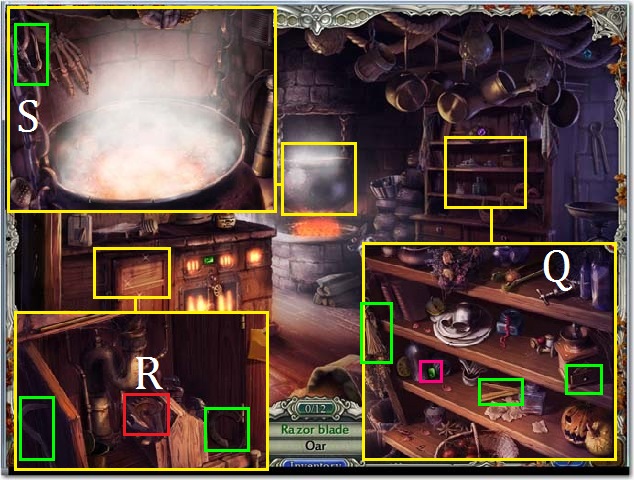
- Zoom into the shelf; collect the Gem and the Hidden Objects (Q).
- Zoom under the sink; collect the Hidden Object.
- Collect the COG (R).
- Zoom into the cauldron; collect the Hidden Object (S).
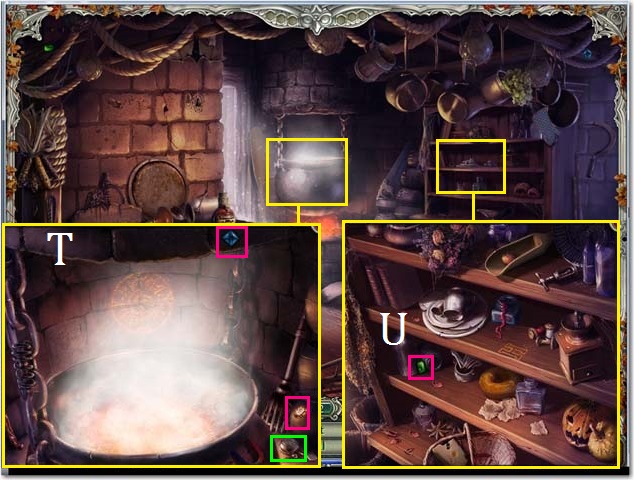
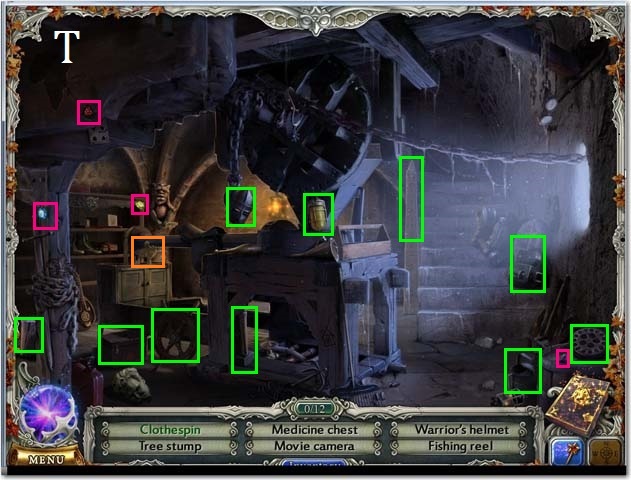
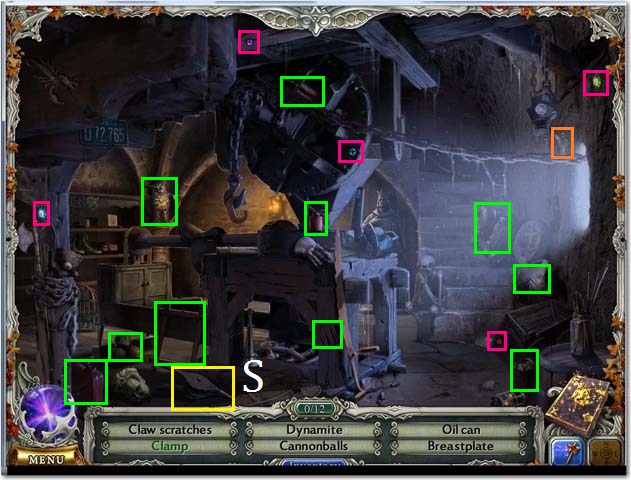
- Travel to the Basement.
- Collect all of the visible Gems and all of the visible Hidden Objects (T).
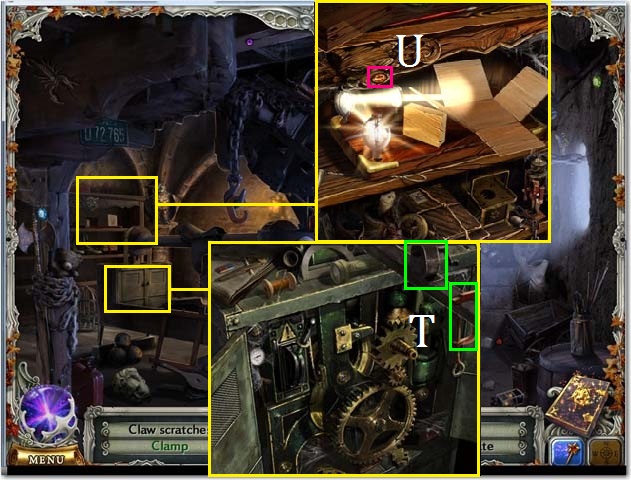
- Zoom into the shelf; collect the Gem and the Hidden Object (U).
- Zoom into the cabinet; collect all of the Hidden Objects.
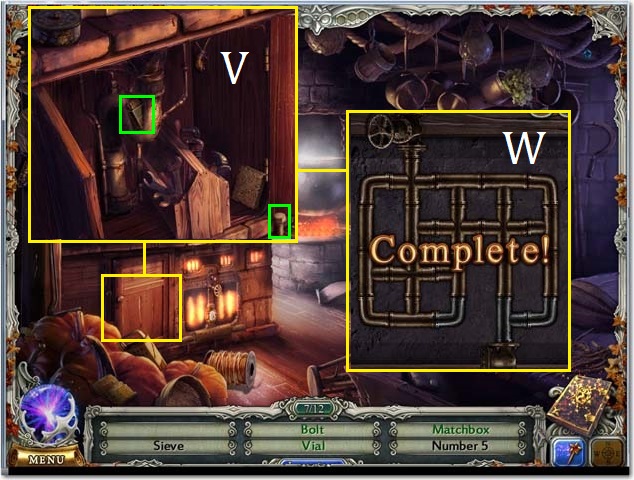
- Use the LOCK PICK on the padlock (V).
- Solve this puzzle by connecting two of the same colored cogs above the matching color (W) in the locking mechanism. To begin from the arrangement shown in the screenshot, first move the brown cog (X) in the third row to the second row (Y) to remove the brown lock part. Continue until you have removed all of the lock parts.
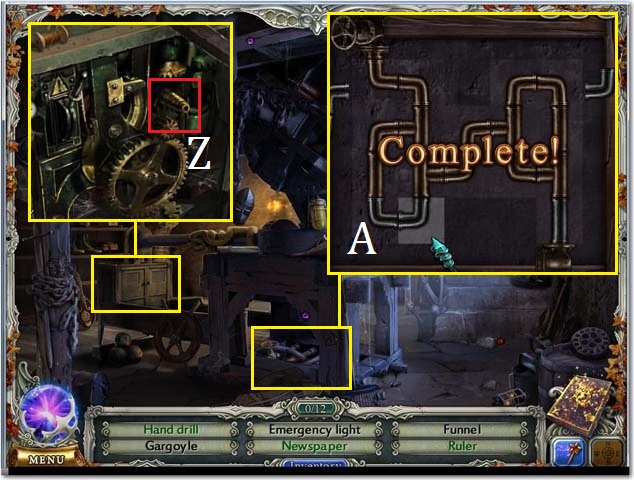
- Place the COG on the spindle (Z).
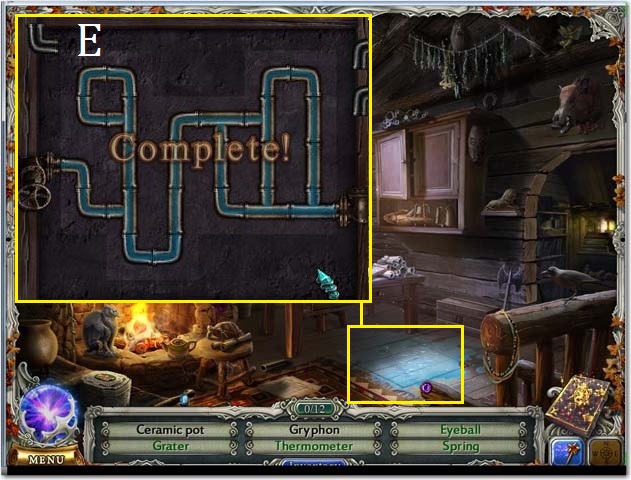
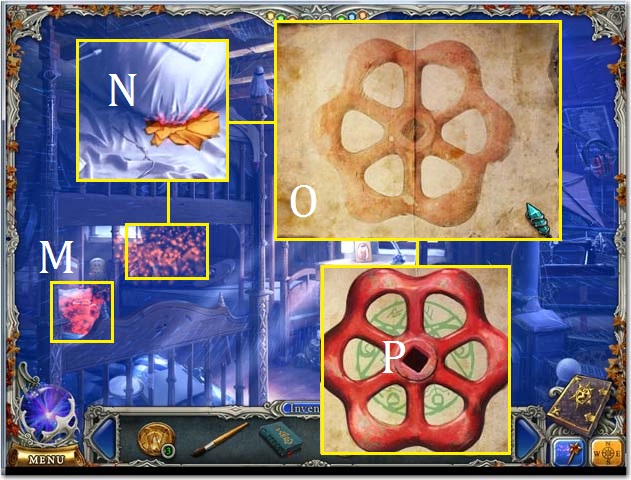
- Zoom into the panel under the machine; arrange the pipes as they are shown in the screenshot (A).
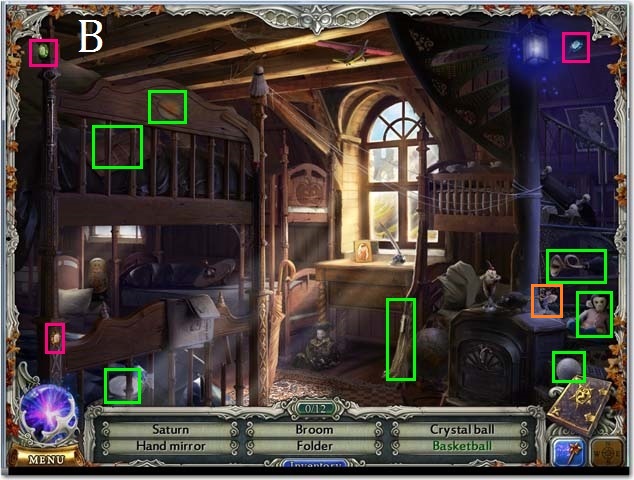
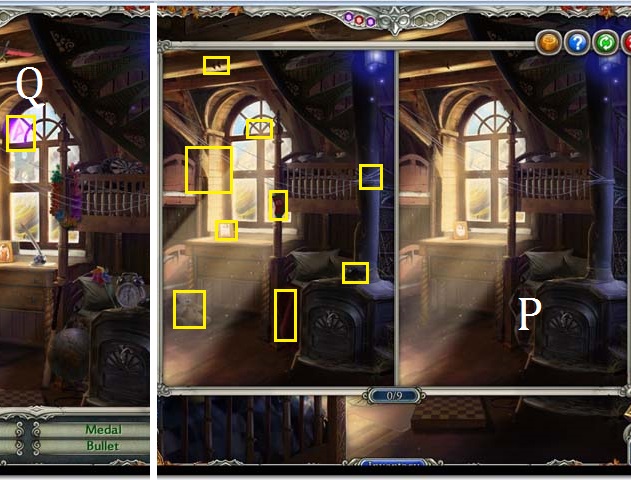
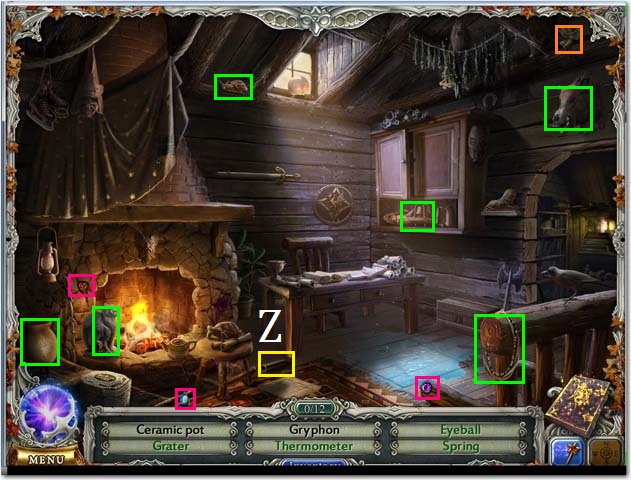
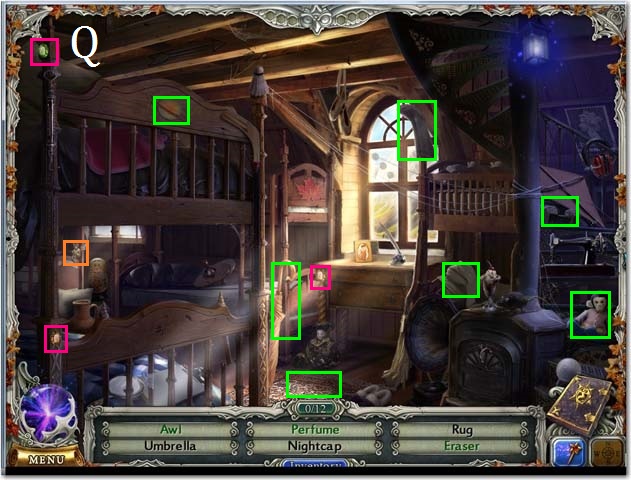
- Travel to the Sleeping Quarters.
- Collect all of the visible Gems and all of the visible Hidden Objects (B).
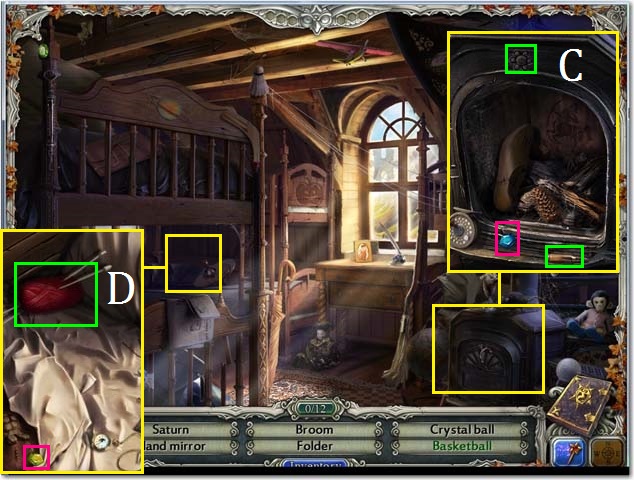
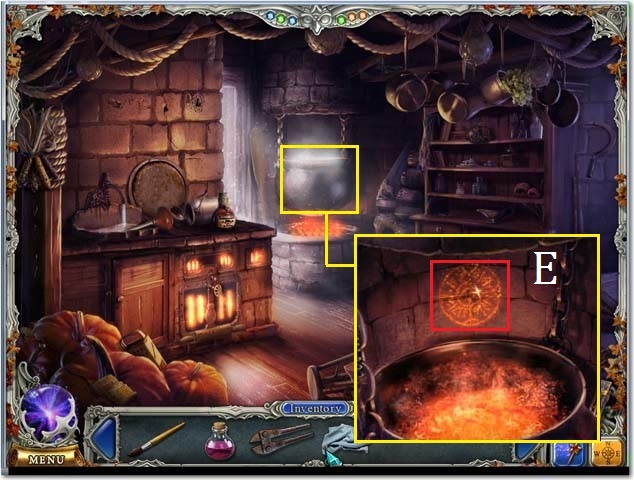
- Zoom into the stove; collect the Gem and the Hidden Objects (C).
- Zoom into the bed; collect the Gem and the Hidden Object (D).
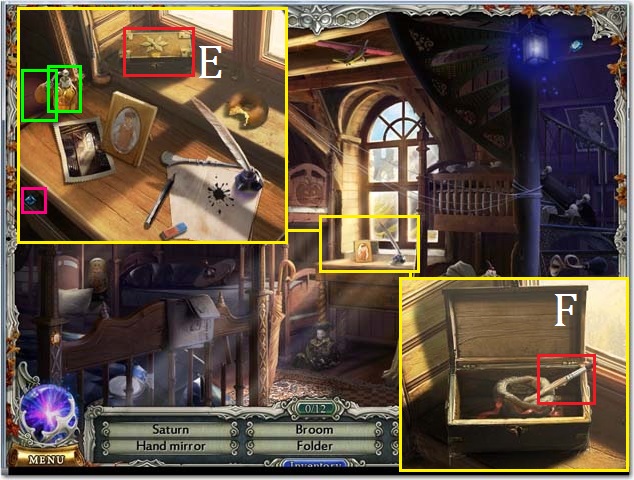
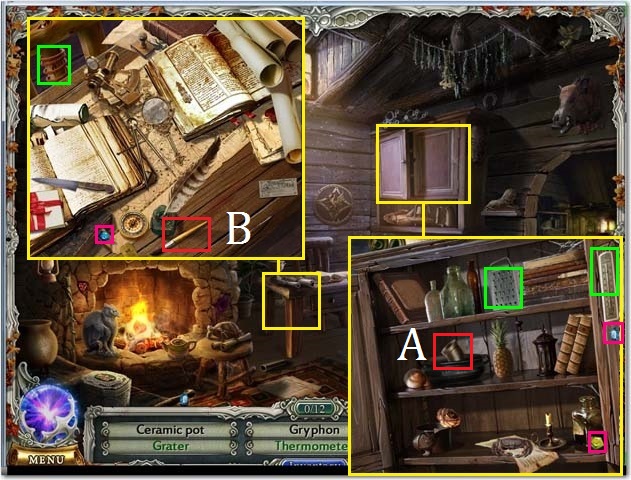
- Zoom into the desk; collect the Gem and the Hidden Objects.
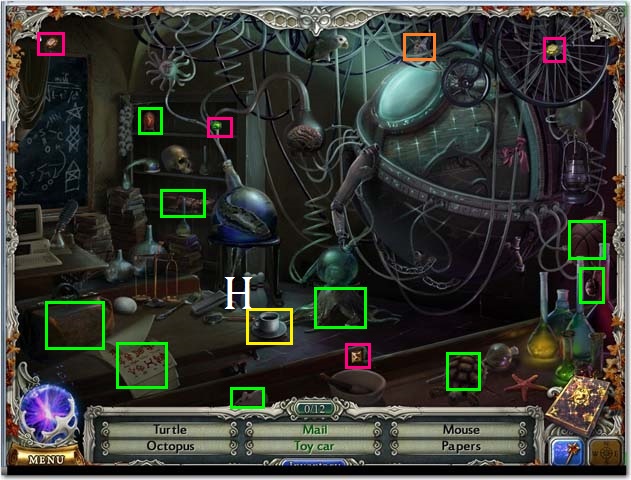
- Zoom into the conjuring box (E); type ‘key’ and press enter to open the box.
- Type ‘knife’ to open the bag and then ‘lighter’ to light the candle.
- Collect the PAINTBRUSH (F).
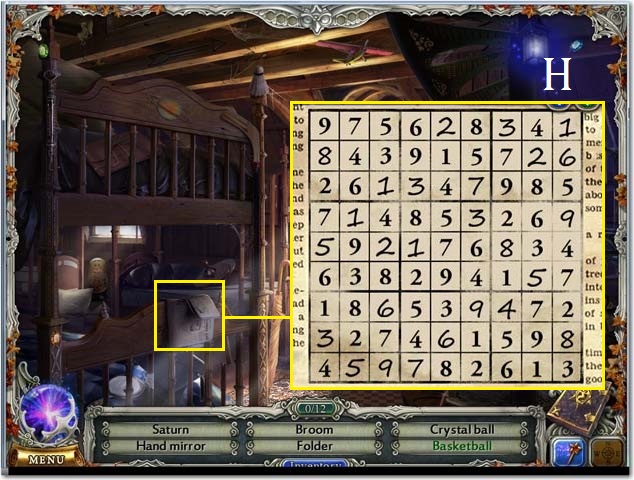
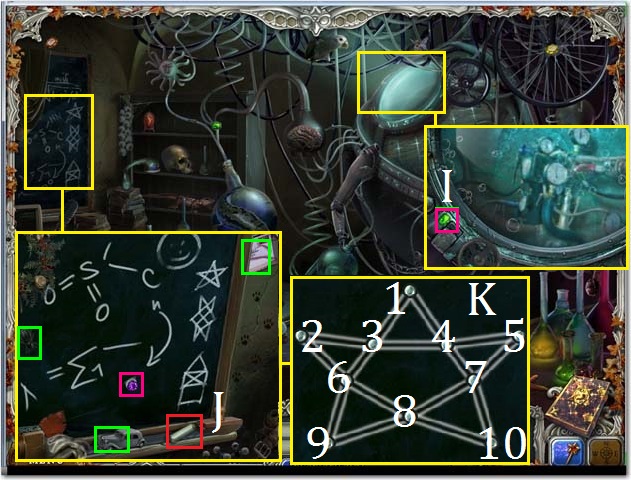
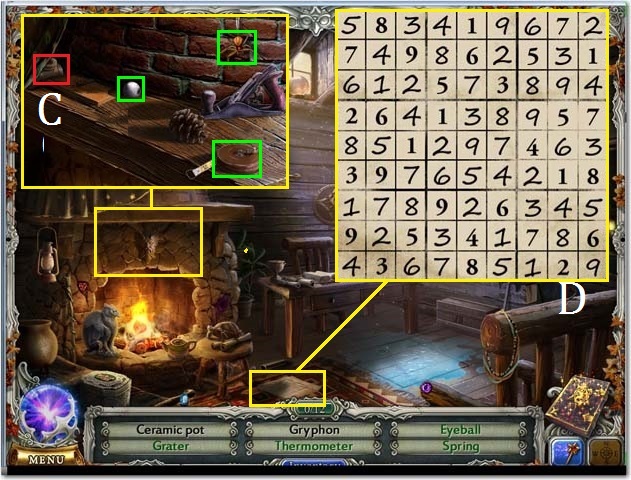
- Zoom into the newspaper; complete this Sudoku puzzle by filling in the missing numbers without repeating any number in the same row, column, or 3×3 square. You can use the screenshot as a key (H).
- Travel to the Magic Classroom.
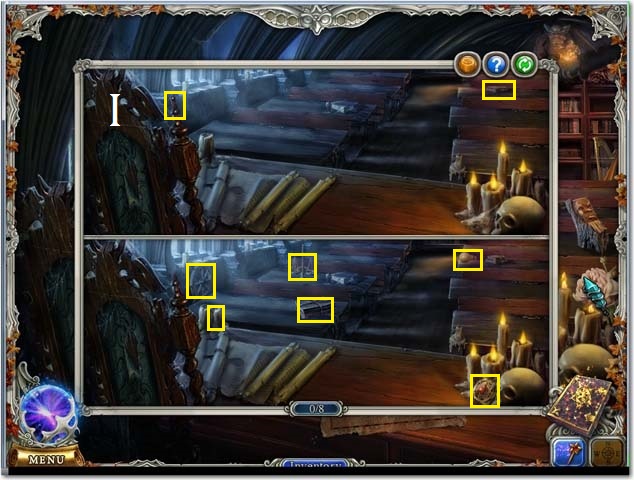
- Find the eight differences. You may use the screenshot as a key (I).
- Collect all of the visible Gems and all of the visible Hidden Objects.
- Use the STONE to crush the salt (J) and then collect the GROUND SALT.
- Zoom into the desk; collect the Gem, the Hidden Objects and the LOCK PICK (K).
- Zoom into the window; collect the Gem, the Hidden Objects and the BAT EYES (L).
- Zoom into the shelf; collect the Gems and the Hidden Objects.
- Use the LOCK PICK to open the box.
- Solve the puzzle as you did before and then collect the RABBIT’S FOOT (M).
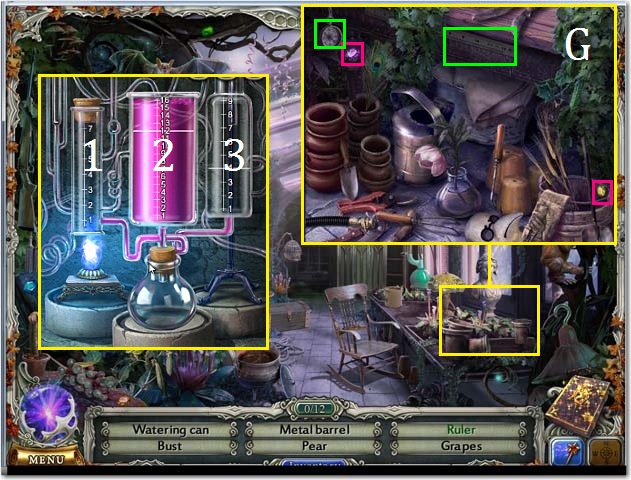
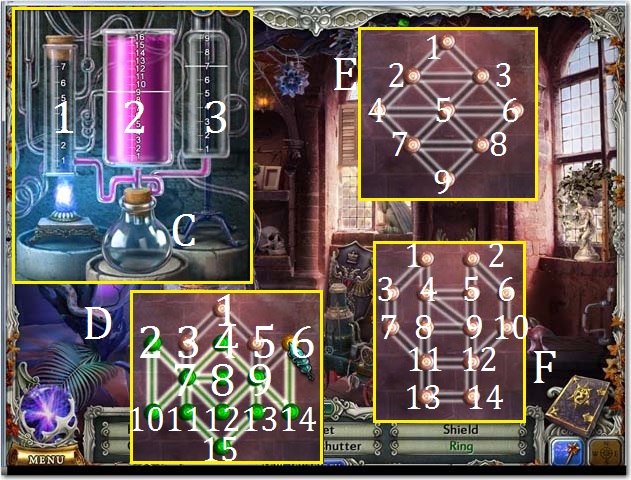
- To solve this puzzle first tap the middle beaker (2) and then the right beaker (3). Now place the liquid from the right beaker into the far left beaker (1).
- Continue moving the liquid from the left beaker into the middle beaker. Next, transfer the remaining liquid from the right beaker into the left beaker.
- Finish by filling the right beaker with the liquid from the middle.
- Collect the POTION (N).
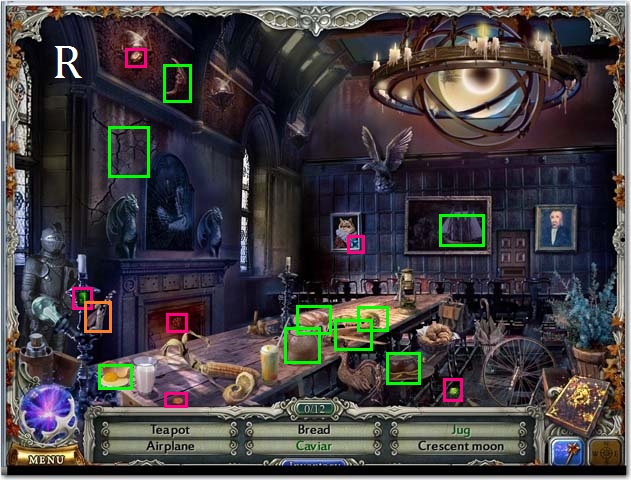
- Travel to the School Foyer.
- Collect all of the visible Gems and all of the visible Hidden Objects (O).
- Zoom into the tree; collect the Gem and the Hidden Object (P).
- Zoom into the door; collect the Hidden Objects (Q).
- Zoom into the armor; collect the Gem (R).
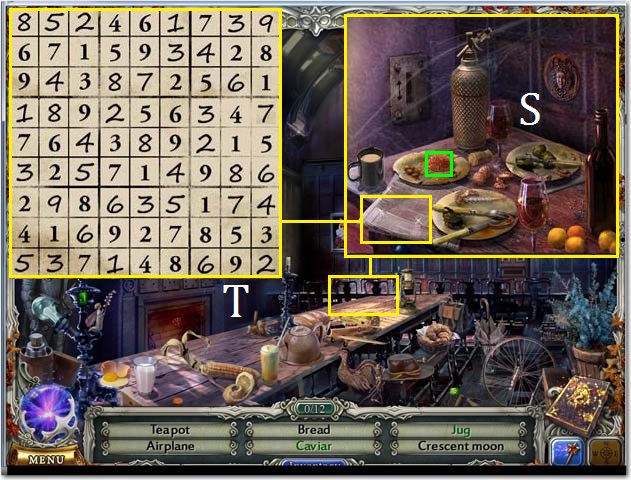
- Travel to the Kitchen.
- Collect all of the visible Gems and all of the visible Hidden Objects (S).
- Zoom into the cauldron; collect the Gems and the Hidden Object (T).
- Zoom into the shelf; collect the Gem (U).
- Zoom in under the sink; collect the Hidden Objects (V).
- Zoom into the pipes to solve the puzzle. See the screenshot (W) for a solution.
- Travel to the Storage Shed.
- Collect all of the visible Gems and all of the visible Hidden Objects.
- Collect the BOLT CUTTERS (X).
- The RAG will be placed in your inventory.
- Zoom into the window; collect the Gem and the Hidden Object.
- Replace the broken piece of STAINED GLASS (Y).
- Zoom into the chest; collect the Gems and the Hidden Objects (Z).
- Travel back to the Kitchen.
- Place the RAG under the faucet and then turn it on (A) to receive the WET RAG.
- Travel back to the Storage Shed.
- Zoom into the window (B) and then clean it with the WET RAG.
- Zoom into the globe; pour the POTION on the globe (C) and then draw your WAND in a ‘Z’ motion starting from the bottom right and then drawing left and up.
- Collect and the BUCKET (D).
- Return to the Kitchen.
- Fill the BUCKET with water from the faucet to receive the BUCKET OF WATER.
- Zoom into the cauldron; pour the BUCKET OF WATER into the cauldron.
- Pour the POTION over the symbol (E) on the wall.
- Draw your WAND in a ‘Z’ motion starting from the bottom right and then drawing left and up.
- Travel back to the School Foyer.
- Zoom into the door; use the BOLT CUTTERS on the chain (F) and then open the door.
- Drag the PAINTBRUSH over the frame (G).
- Use your PAINTBRUSH to fill in the correct boxes corresponding to the numbers on the edges. See the screenshot for the key (H).
- Collect the first MAGICAL PAINTING.
- Pour the POTION over the symbol on the door (I) and then cast the ‘Z’ spell.

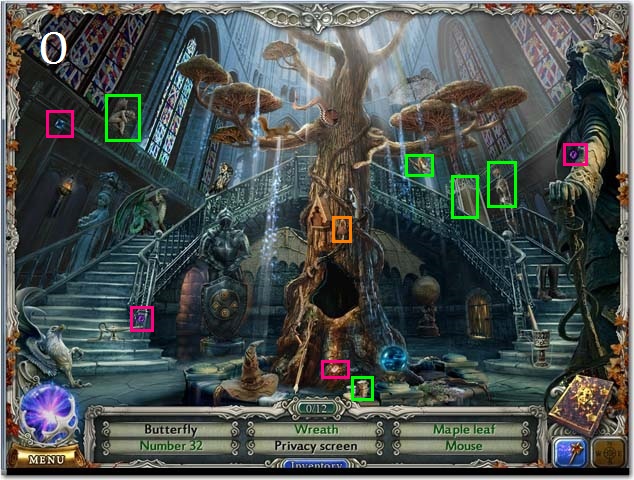
- Travel to the Tower.
- Collect all of the visible Gems and all of the visible Hidden Objects (J).
- Zoom into the stairwell; collect the Gem and the Hidden Objects (K).
- Zoom into the shelf; Collect the Gem (L).
- Zoom into the book and then type ‘pot’ followed by ‘soil’ into the puzzle.
- Next, type ‘seed’ and then ‘water’ to grow a tree and open the book.
- Collect the PAINTBRUSH (M) and the HANDLE (N).
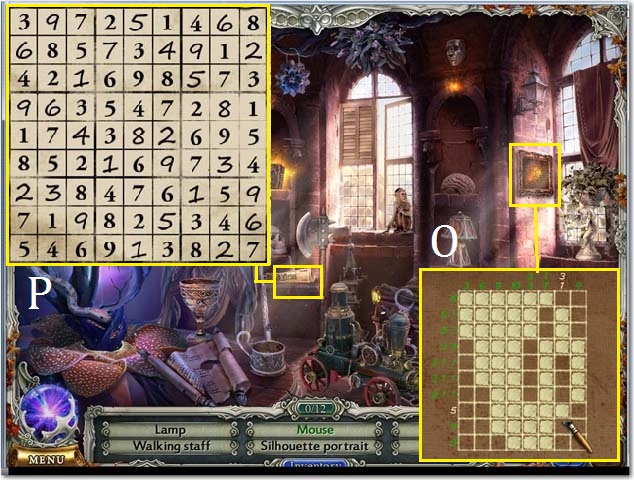
- Drag the PAINTBRUSH over the frame and then solve the puzzle. See the screenshot (O) for a solution.
- Collect the second MAGICAL PAINTING.
- Zoom into the newspaper to play a Sudoku puzzle. See the screenshot (P) for a solution.
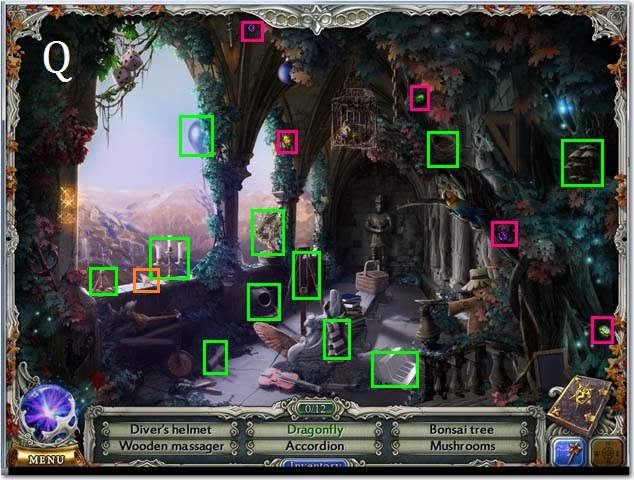
- Travel to the Upper Balcony.
- Collect all of the visible Gems and all of the visible Hidden Objects (Q).
- Once you collect the scroll a new spell will be added to your Spell Book.

- Zoom into the pillar; collect the Gem and the Hidden Object (R).
- Zoom into the panel to play a puzzle.
- Connect the dots in the following order to trace all of the lines; 5, 3, 2, 1, 3, 4, 6 and 3 (S).
- Connect the dots in the following order; 5, 6, 4, 2, 6, 3, 2, 1, 5, 3 and 1 (T).
- Connect the dots in the following order; 1, 4, 3, 6, 4, 7, 6, 5, 2, 1, 3, 2 and 6 (U).
- Open the panel and then collect the NECKLACE (V).
Chapter 3: The Catacombs
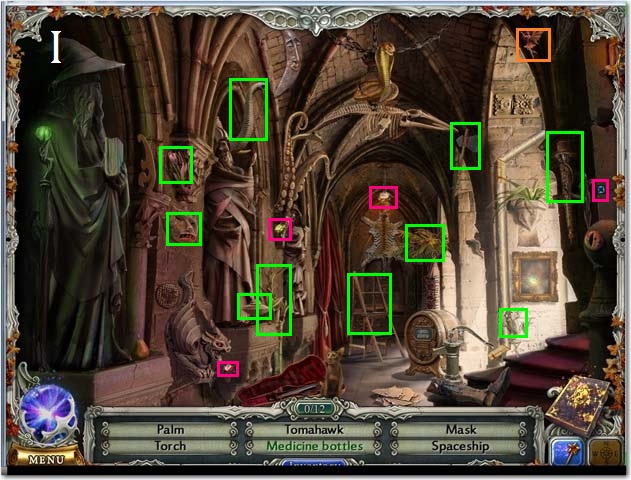
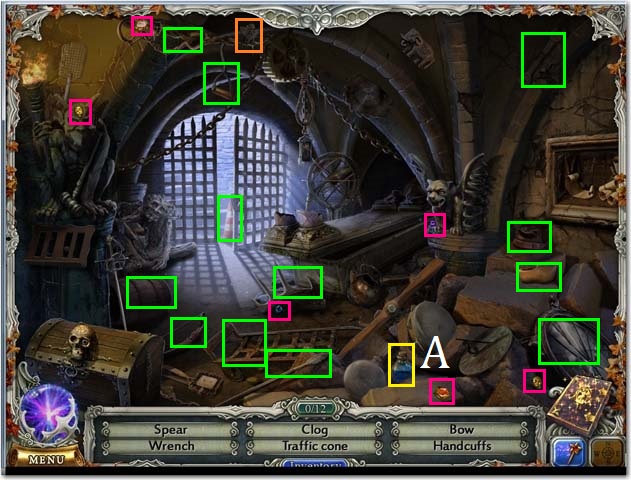
- Travel to the Catacombs.
- Collect all of the visible Gems and all of the visible Hidden Objects (W).
- Zoom into the wall; draw a counterclockwise triangle, over the symbol (X), with your WAND starting from the top point.
- Collect the CROWBAR (Y) and the LOCK PICK (Z).
- Use the CROWBAR to open the casket.
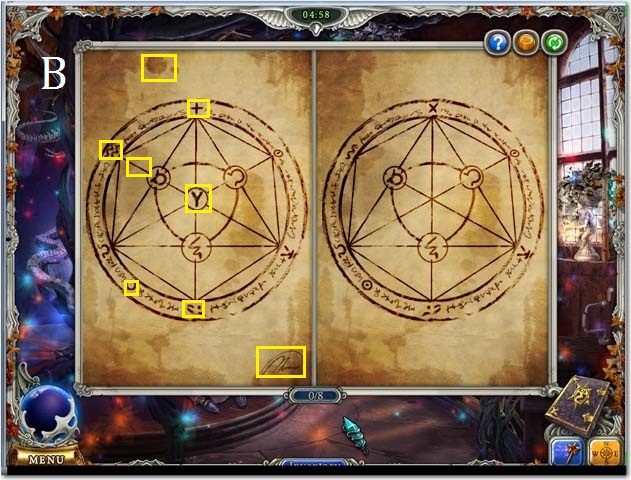
- Zoom into the casket and then into the torn photo (A); arrange the photo as it is shown in the screenshot (B).
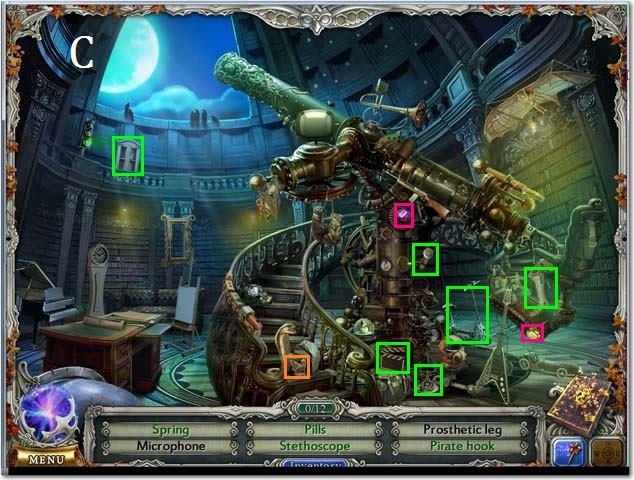
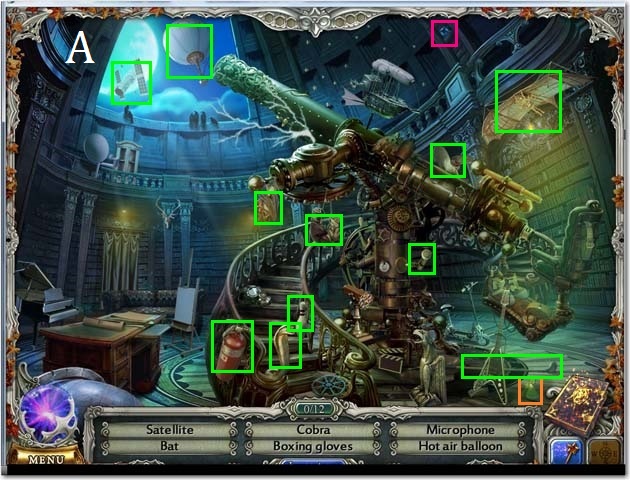
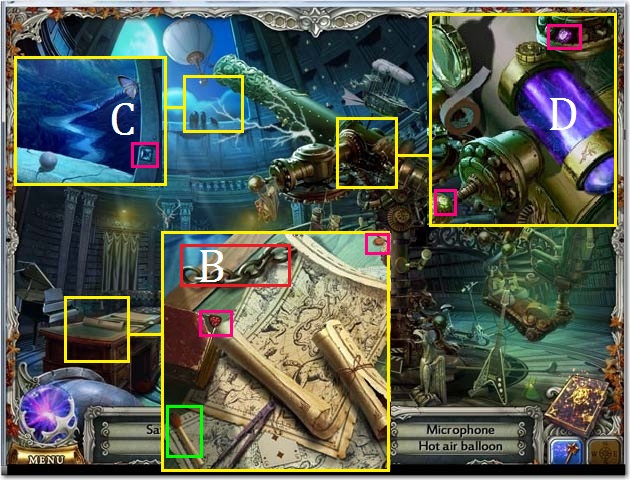
- Travel to the Observatory.
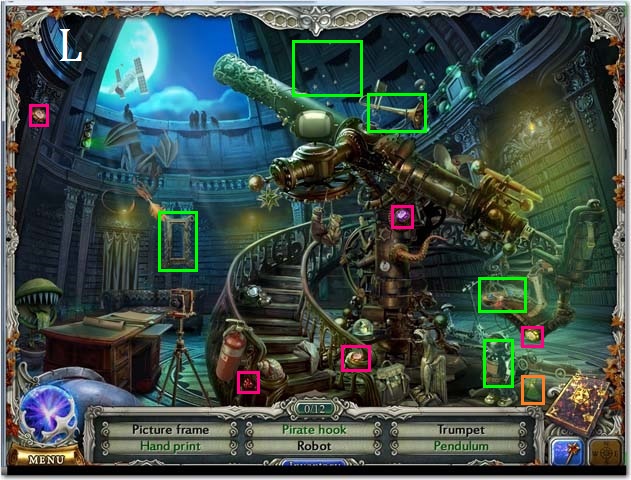
- Collect all of the visible Gems and all of the visible Hidden Objects (C).
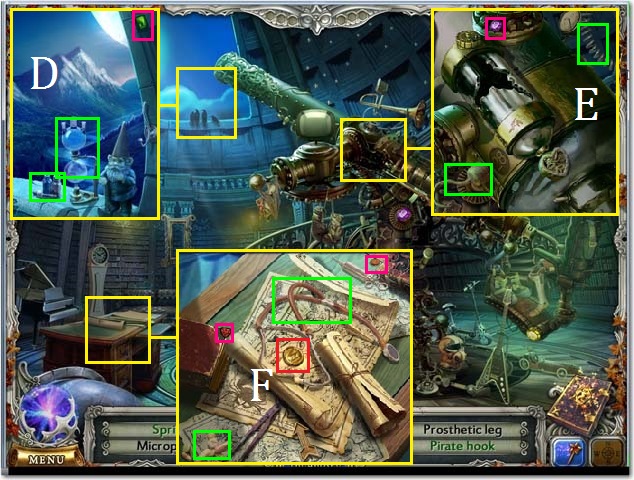
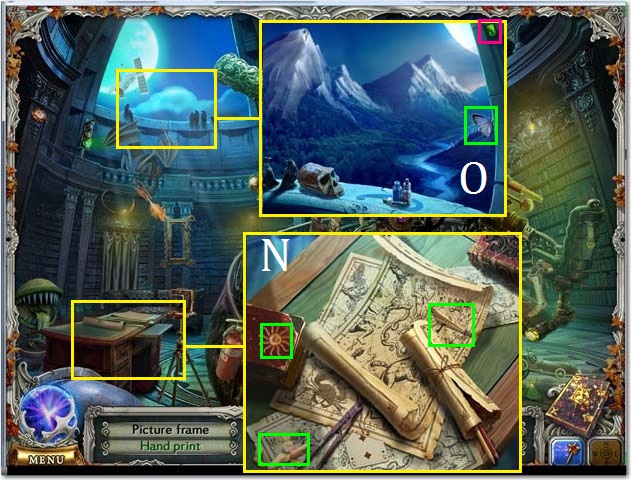
- Zoom into the window; collect the Gem and the Hidden Objects (D).
- Zoom into the telescope; collect the Gem and the Hidden Objects (E).
- Zoom into the desk; collect the Gems, the Hidden Objects and the GOLD PIECE (F).
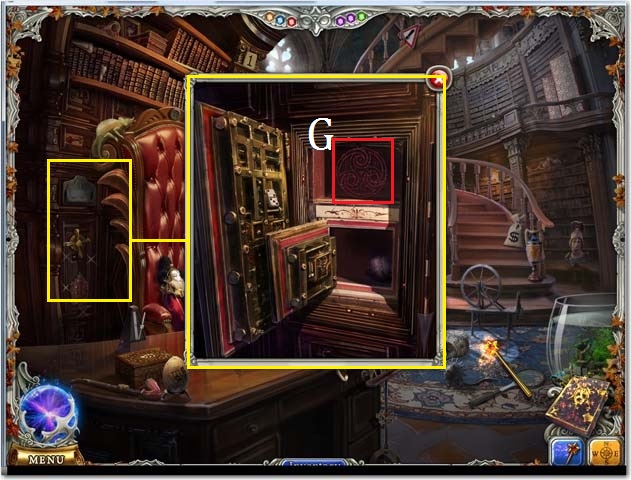
- Travel to the Library.
- Collect all of the visible Gems and all of the visible Hidden Objects (G).
- Zoom into the shelf; place the HANDLE on the drawer (H) and then open it.
- Collect the PENCIL (I).
- Zoom into the desk; collect the Gem.
- Use the PENCIL on the paper (J) to reveal the time of 6:15.
- Zoom into the clock; collect the Hidden Object (K).
- Set the hands to 6:15 and then collect the KEY 1 (L).
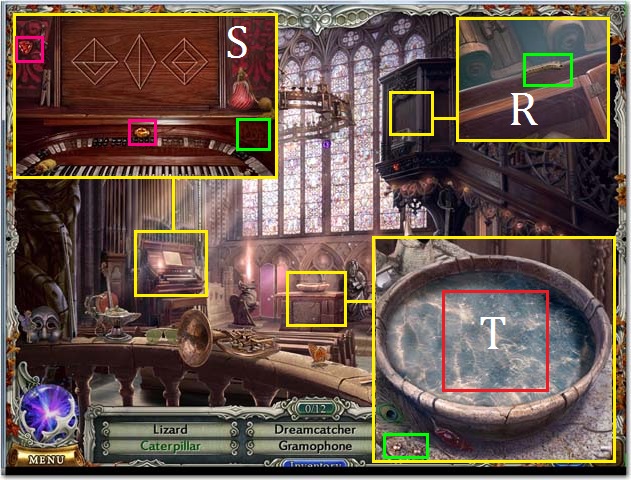
- Travel to the Cathedral.
- Collect all of the visible Gems and all of the visible Hidden Objects (M).
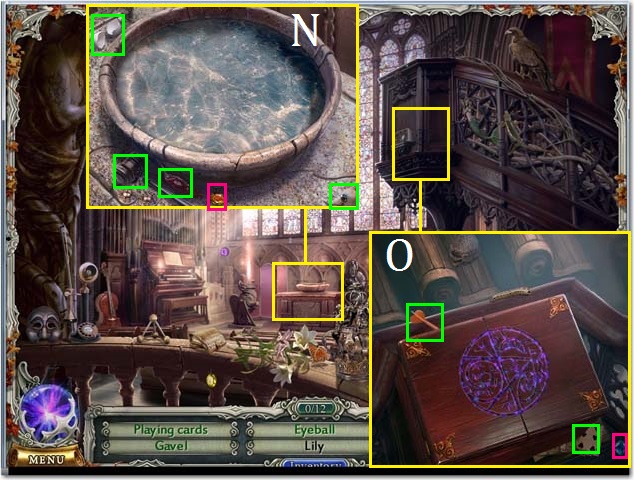
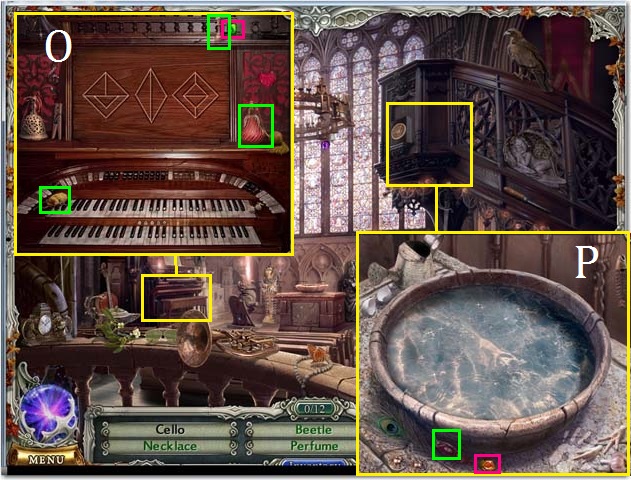
- Zoom into the holy water; collect the Gem and the Hidden Objects (N).
- Zoom into the balcony; collect the Gem and the Hidden Objects (O).
- Zoom into the organ; collect the Gem and the Hidden Object.
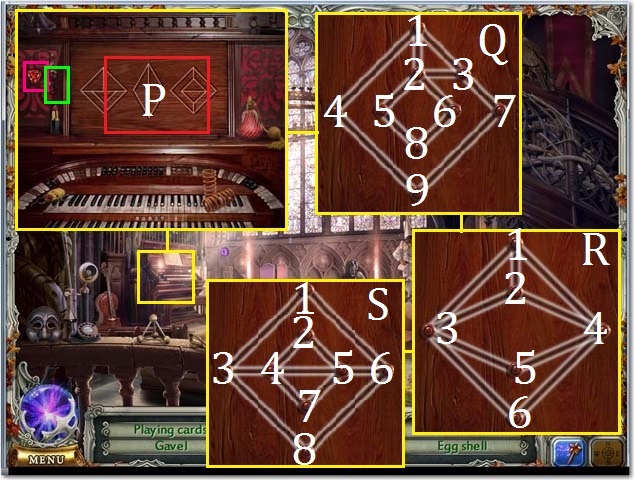
- Zoom into the panel (P) to play a puzzle.
- Connect the dots in the following order to trace all of the lines; 3, 2, 5, 8, 6, 2, 1, 3, 7, 9, 4 and 1 (Q).
- Connect the dots in the following order; 2, 1, 4, 5, 3, 6, 4, 2, 3 and 1 (R).
- Connect the dots in the following order; 6, 5, 2, 4, 5, 7, 4, 3, 1, 6, 8, and 3 (S).
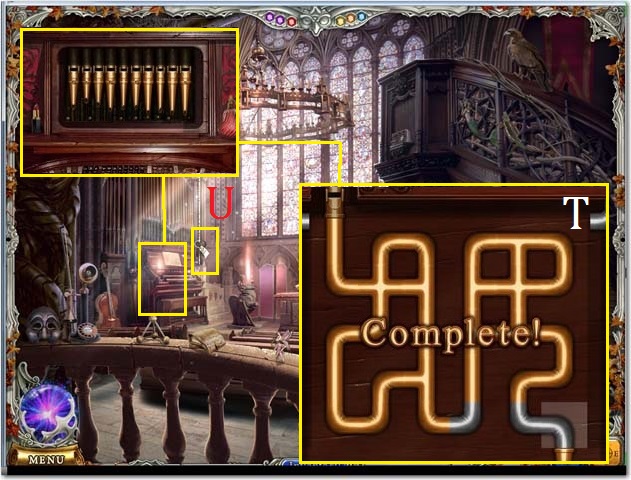
- Zoom into the pipes; use the screenshot (T) for a solution to this puzzle.
- Collect the KEY 3 (U).
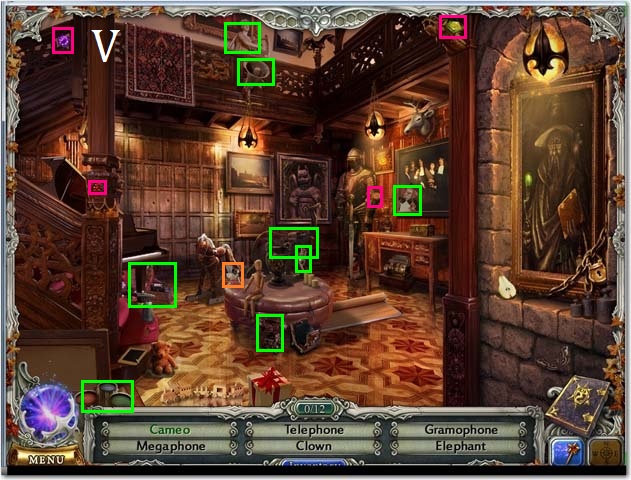
- Travel to the Art Hall.
- Collect all of the visible Gems and all of the visible Hidden Objects (V).

- Zoom into the upstairs wall; collect the Hidden Objects.
- Hang the two MAGICAL PAINTINGS on the wall (W).
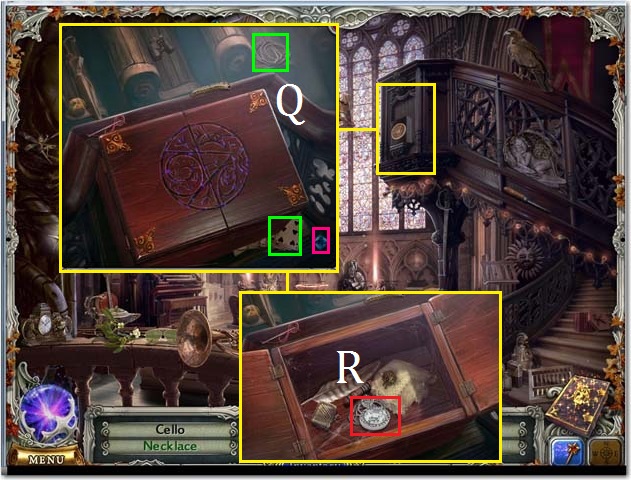
- Zoom into the gargoyle painting; collect the Gem and the Hidden Object. Pay attention to the keyholes (X).
- Zoom into the desk; collect the Gem.
- Use the LOCK PICK on the box. Solve the puzzle as you did before.
- Zoom back into the box; find the ten differences. Use the screenshot (Y) as a key.
- Collect the KEY 2 (Z).
- Travel to the Courtyard.
- Collect all of the visible Gems and all of the visible Hidden Objects (A).
- Zoom into the fountain; collect the Gems and the Hidden Objects (B).
- Zoom into the wall; collect the Hidden Object (C).
- Zoom into the gargoyle; collect the Gems and the Hidden Objects.
- Place the KEY 2 in the (2) keyhole, the KEY 1 in the (1) keyhole and the KEY 3 in the (3) keyhole.
- Zoom into the torn up paper (D); assemble the note as it is shown in the screenshot (E).
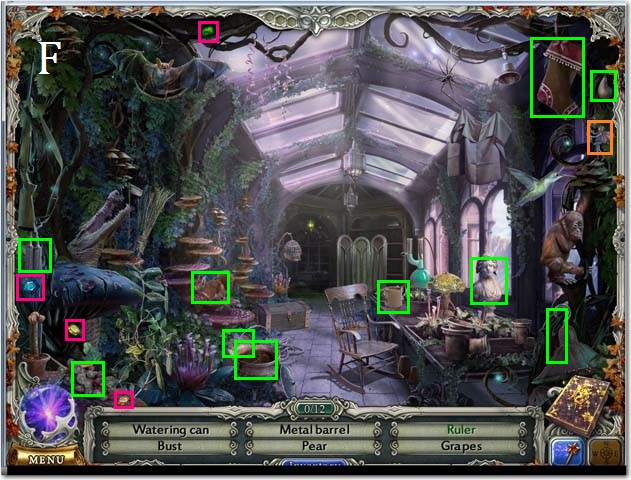
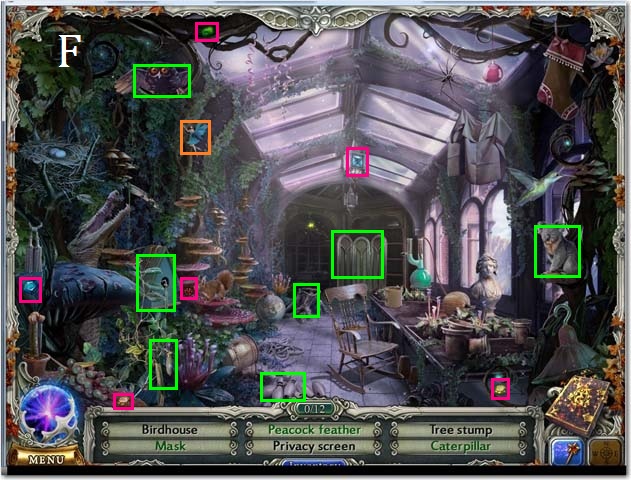
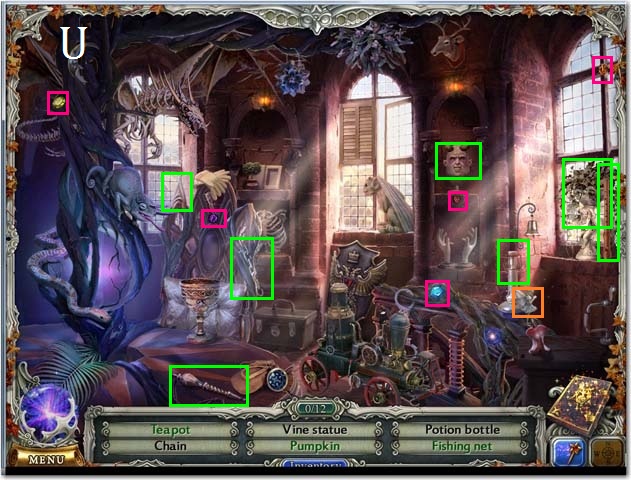
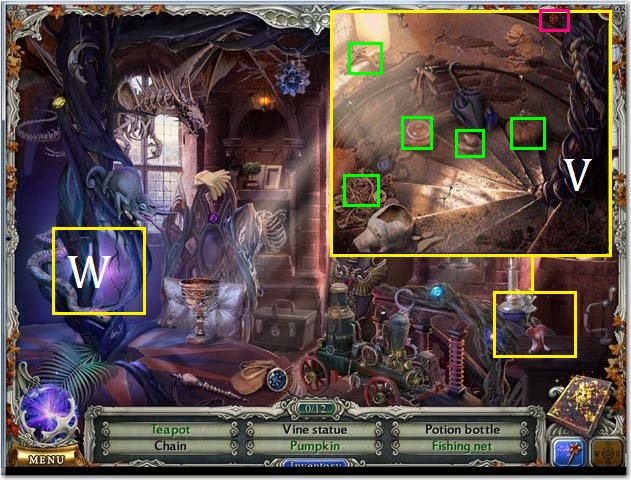
- Travel to the Greenhouse.
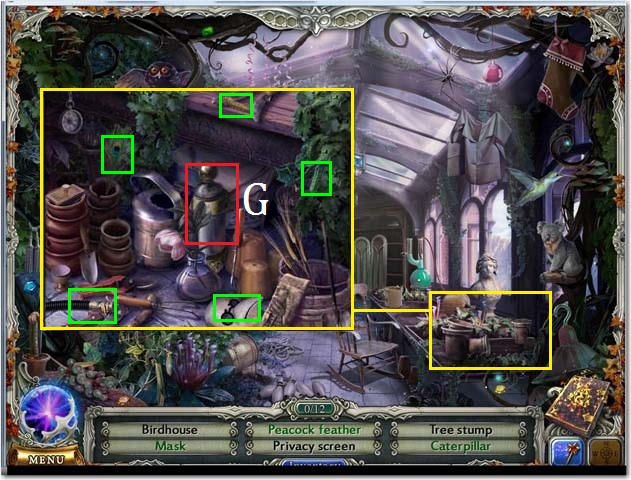
- Collect all of the visible Gems and all of the visible Hidden Objects (F).
- Zoom into the table; collect the Gems and the Hidden Objects (G).
- To solve this puzzle move the liquid from vial to vial in the following sequence; 2 to 3, 3 to 1, 1 to 2, 3 to 1, 2 to 3, 3 to 1 and 1 to 2.
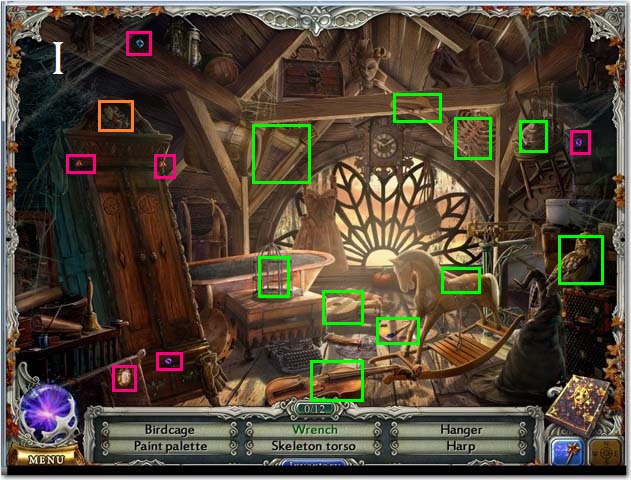
- Travel to the Attic.
- Collect all of the visible Gems and all of the visible Hidden Objects (I).
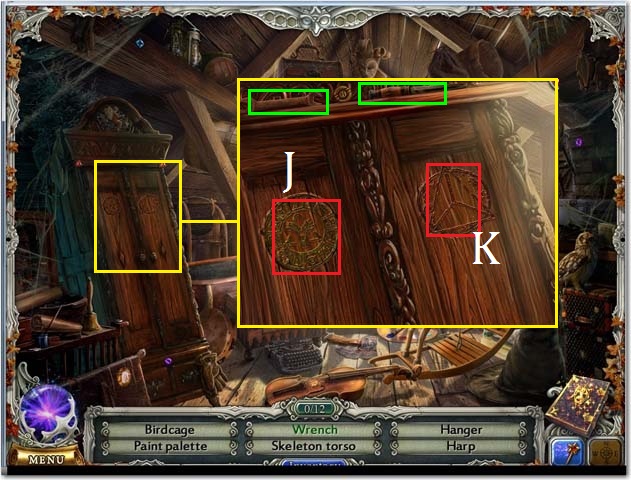
- Zoom into the wardrobe; collect Hidden Objects.
- Draw the counterclockwise circle spell on the left symbol (J) and a counterclockwise triangle spell on the right symbol (K) with your WAND.
- Open the wardrobe.
Chapter 4: The Sleeping Quarters
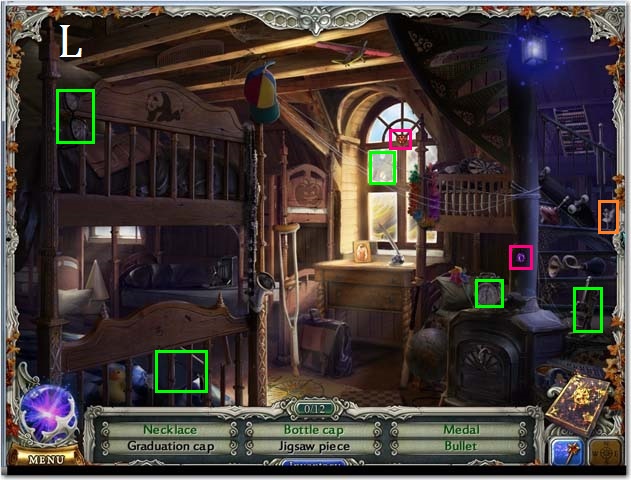
- Travel to the Sleeping Quarters.
- Collect all of the visible Gems and all of the visible Hidden Objects (L).
- Zoom into the stove; collect the Gems, the Hidden Objects and the DRAGON WING (M).
- Zoom into the bed; collect the Gem and the Hidden Object (N).
- Zoom into the desk; collect the Gem and the Hidden Objects.
- The QUEEN will be added to your inventory.
- Zoom into the photo (O).
- Find the nine differences. Use the screenshot (P) as a key.
- Collect the INVISIBILITY RUNE (Q).
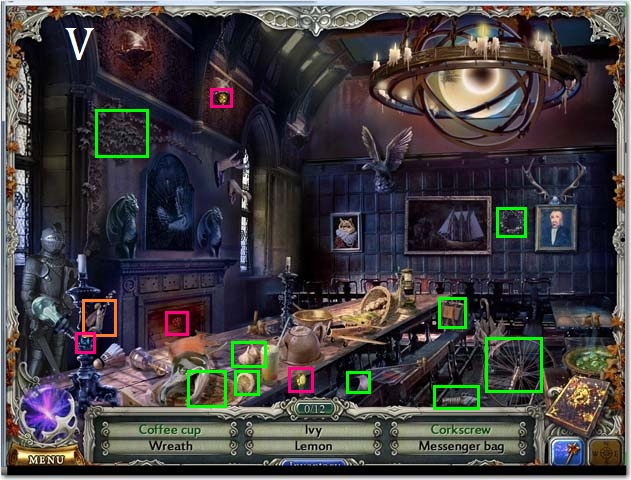
- Travel to the Dining Hall.
- Collect all of the visible Gems and all of the visible Hidden Objects (R).
- Zoom into the table; collect the Hidden Object (S).
- Zoom into the newspaper to play a puzzle; use the screenshot (T) to solve this Sudoku puzzle.
- Zoom into the fireplace; collect the Hidden Objects.
- Place the DRAGON WING on the dragon (2).
- To open the panels, position the dragon wings in the top middle or bottom positions as indicated by the dots on the panels (U).
- For the first panel, place wing (1) all the way up, wing (2) all the way down, wing (3) in the middle and wing (4) all the way down as they are shown in the screenshot.
- Collect the BOX OF MATCHES (V) from the first panel.
- Continue to open all four panels to collect the PAWN (W), MANA ELIXIR (X) and the LOCK PICK (Y).
- Travel to the Student’s Lounge.
- Collect all of the visible Gems and all of the visible Hidden Objects (Z).

- Zoom into the fish tank; collect the Hidden Object (A).
- Drag the PAINTBRUSH over the frame; use the screenshot (B) as a key.
- Collect the third MAGICAL PAINTING and then the KNIGHT (C).
- Zoom into the chess board; place the KNIGHT (D), QUEEN (E) and the PAWN (F) on the board to open the panel.
- Use the LOCK PICK on the lock and then solve the lock puzzle.
- Collect DOLT’S GOLD (G).
- Travel to the Alchemy Lab.
- Collect all of the visible Gems and all of the visible Hidden Objects.
- Collect the COFFEE CUP (H).
- Zoom into the tank; collect the Gem (I).
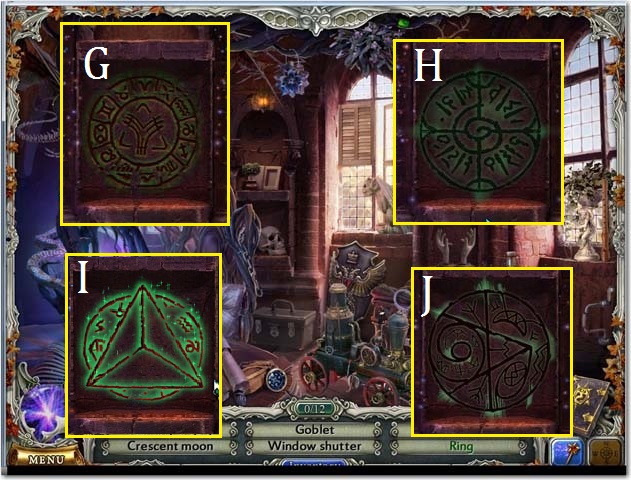
- Zoom into the chalkboard; collect the Gems, the Hidden Objects and the CHALK (J).
- Zoom into the drawings; connect the dots in the following order to trace all of the lines; 7, 8, 10, 7, 5, 4, 1, 3, 2, 6, 9, 8, 6, 3, 4 and 7 (K).
- Connect the dots in the following order; 5, 3, 2, 5, 8, 10, 13, 11, 12, 9, 6, 4, 1, 3, 4, 7, 10, 11, 9, 7 and 5 (L).
- Connect the dots in the following order; 4, 3, 2, 1, 3, 6, 4, 5, 6, 8, 7, 5, 2 and 4 (M).
- Zoom into the beakers; to solve this puzzle move the liquid from vial to vial in the following sequence; 2 to 3, 3 to 1, 1 to 2, 3 to 1, 2 to 3, 3 to 1, 1 to 2, 3 to 1, 2 to 3 and 3 to 1 (N).
- Travel to the Kitchen.
- Collect all of the visible Gems and all of the visible Hidden Objects (O).
- Zoom into the cauldron; collect the Gem, the Hidden Object and the first set of GOLD CUTLERY (P).
- Zoom in under the sink; collect the Gems, the Hidden Objects and the second set of GOLD CUTLERY (Q).
- Zoom into the shelf; collect the Gems, the Hidden Objects and the third and fourth sets of GOLD CUTLERY (R) (S).
- The LOCK PICK will be added to your inventory.
- Travel to the Basement.
- Collect all of the visible Gems and all of the visible Hidden Objects (T).
- Zoom into the cabinet; collect the Hidden Object (U).
- Zoom into the shelf; collect the Gems and the Hidden Object.
- Zoom into the wooden box (V) to play a puzzle.
- Type ‘light’ followed by ‘mirror’ and then ‘magnifying glass’ to solve this puzzle.
- Collect the GOLD CROWN (W).
- Travel to Wynnstaff’s Office.
- Collect all of the visible Gems, all of the visible Hidden Objects and the FISH NET (X).
- Zoom into the fish tank; collect the Hidden Object and then use the FISH NET to collect the KEY (Y).
- Zoom into the shelf; collect the Gem.
- Use the KEY to open the case and then collect the GOLD TROPHY (Z).
- Zoom into the safe; collect the Gem and the Hidden Objects (A).
- Zoom into the newspaper to play a Sudoku puzzle. See the screenshot (B) for a solution.
- Travel to the Art Hall.
- Collect all of the visible Gems and all of the visible Hidden Objects (C).
- Zoom into the upper wall; collect the Hidden Object and then hang the MAGICAL PAINTING on the wall (D).
- Zoom into the desk; collect the Gem and the Hidden Objects (E).
- Zoom into the gargoyle painting; collect the Gem and the Hidden Object (F).
- The PAINTBRUSH will be added to your inventory.
- Zoom into the painting; use the LOCK PICK to open the padlock (G).
- Solve the lock puzzle as you did before.
- Collect the GOLD FRAME and then the STATUE PAINTING (H).
Chapter 5: The Outer Hallway
- Travel to the Outer Hallway.
- Collect all of the visible Gems and all of the visible Hidden Objects (I).
- Zoom into the curtain; collect the Gem, the Hidden Objects and the METAL COAT RACK (J).
- Zoom into the pile of torn up paper; assemble the paper as it is shown in the screenshot (K) to receive a new spell.
- Zoom into the statue and then zoom in again to trigger a puzzle; type the following words in any order: Book, Watch, Glasses, Belt, Ring, Bird and Pipe.
- Collect the STAR SHAPED KEY (L).
- Drag the PAINTBRUSH over the frame and then solve the puzzle. See the screenshot (M) for a solution.
- Collect the fourth MAGICAL PAINTING.
- Travel to the Cathedral.
- Collect all of the visible Gems and all of the visible Hidden Objects (N).
- Zoom into the organ; collect the Gem and the Hidden Objects (O).
- Zoom into the holy water; collect the Gem and the Hidden Object (P).
- Zoom into the balcony; collect the Gem and the Hidden Objects (Q).
- Draw a counter clockwise square, beginning with the top left corner, over the box with your WAND.
- Open the box and then collect the SILVER NECKLACE (R).
- The SCREWDRIVER will be added to your inventory.
- Travel to the Library.
- Collect all of the visible Gems and all of the visible Hidden Objects.
- Collect the METAL BELL (S).
- Zoom into the clock; collect the Hidden Objects (T).
- Zoom into the desk; collect the Gem and the Hidden Object (U).
- Zoom into the shelf; collect the Gem, the Hidden Objects and the METAL BOOKEND (V).
- Travel to the Tower.
- Collect all of the visible Gems and all of the visible Hidden Objects (W).
- Zoom into the shelf; collect the Gems, the Hidden Objects and the MACHINE COG (X).
- Zoom into the stairwell; collect the Gems, the Hidden Objects, the KEYCHAIN (Y) and the CAULDRON (Z).
- Travel back to the Outer Hallway.
- Zoom into the curtain; use the SCREWDRIVER to remove the brackets from the SWORD and then collect the SWORD (A).
- Travel back to the Tower.
- Locate all eight differences. You can use the screenshot (B) as a key.
- To solve this puzzle move the liquid from vial to vial in the following sequence; 2 to 1 and 1 to 3 (C).
- Connect the dots in the following order to trace all of the lines; 8, 7, 2, 10, 7, 11, 15, 13, 9, 12, 7, 4, 9, 14, 6, 9, 5, 1, 3, 7, 4, 9, 12 and 7 (D).
- Connect the dots in the following order; 6, 8, 7, 5, 8, 9, 7, 4, 2, 1, 3, 6, 5, 3, 2, 5 and 4 (E).
- Connect the dots in the following order; 5, 9, 12, 10, 6, 2, 5, 4, 9, 8, 11, 12, 14, 13, 11, 7, 3, 1, 4 and 8 (F).
- Using your WAND to draw a counterclockwise circle over the first symbol (G).
- Draw a Z starting in the lower right corner over the second symbol (H).
- Draw a counterclockwise triangle over the third symbol (I).
- Draw a counterclockwise square over the fourth symbol (J).

- Travel to the Catacombs.
- Collect all of the visible Gems and all of the visible Hidden Objects.
- Collect the LADDER (K).
- Zoom into the casket; collect the LADDER STEP (L).
- Light the torch (N) with the BOX OF MATCHES.
- Collect the last Gem (N).
- Travel to the Storage Shed.
- Collect all of the visible Gems and all of the visible Hidden Objects.
- Collect the LADDER STEP (0).
- Zoom into the chest; collect the Gems, the Hidden Objects and the GLASS EYEBALL (P).
- Zoom into the window; collect all of the Gems and the LOCK PICK (Q).
- Travel to the Upper Balcony.
- Collect all of the visible Gems and all of the visible Hidden Objects (R).
- Zoom into the column; collect the Gems and the Hidden Object (S).
- Place the LADDER under the bird cage (T) and then place the two LADDER STEPS on the LADDER.
- Zoom into the birdcage; open the lock with the LOCK PICK (U) and then solve the puzzle as you did before.
- Collect the GOLD TOOTH (V).
- Travel back to the Catacombs.
- Zoom into the chest; place the GLASS EYEBALL (W) and the GOLD TOOTH (X) in the skull.
- Open the chest and then collect the BROOCH (Y).
Chapter 6: Radavante’s Cottage
- Travel to Radavante’s Cottage.
- Collect all of the visible Gems and all of the visible Hidden Objects.
- Collect the first PIPE PIECE (Z).
- Zoom into the cabinet; collect the Gems, the Hidden Objects and the second PIPE PIECE (A).
- Zoom into the desk; collect the Gem, the Hidden Object and the PAINTBRUSH (B).
- Zoom into the mantel; collect the Hidden Objects and the third PIPE PIECE (C).
- Zoom into the newspaper to play a Sudoku puzzle. See the screenshot (D) for a solution.
- Zoom into the hatch to solve this pipe puzzle. See the screenshot (E) for a solution.
- Travel to the Greenhouse.
- Collect all of the visible Gems and all of the visible Hidden Objects (F).
- Zoom into the table; collect the Hidden Objects and the MAGIC TUBE (G).
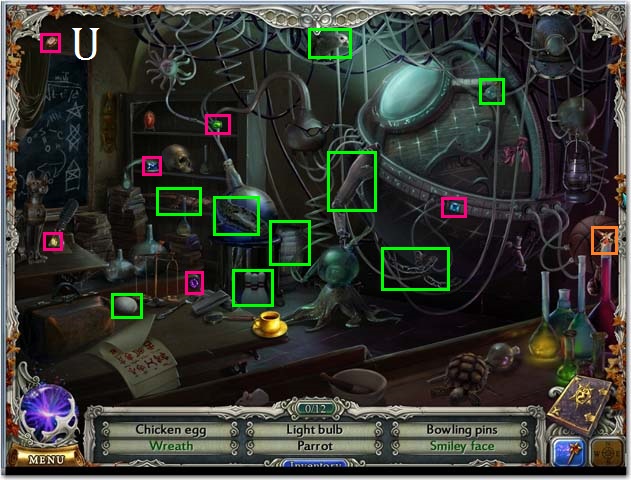
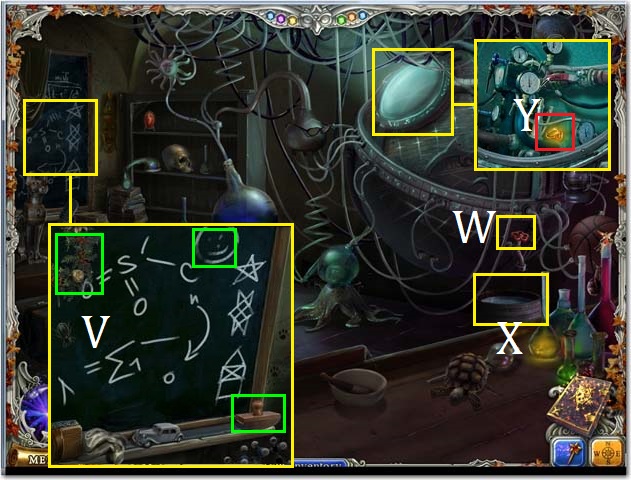
- Travel to the Magic Classroom.
- Collect all of the visible Gems and all of the visible Hidden Objects (H).
- Zoom into the desk; collect the Gem and the Hidden Object (I).
- Zoom into the shelf; collect the Gem (J).
- Zoom into the window; collect the Gem, the Hidden Object and the FAIRY DUST (K).
- Travel to the Observatory.
- Collect all of the visible Gems and all of the visible Hidden Objects (L).

- Zoom into the telescope; collect the Hidden Objects.
- Replace the MAGIC TUBE (M) and then fill it with the FAIRY DUST.
- Zoom into the desk; collect all of the Hidden Objects (N).
- Zoom into the window; collect the Gem and the Hidden Object (O).
- Travel to Wynnstaff’s Office.
- Receive the HALF SPELL PAGE.
- Collect all of the visible Gems and all of the visible Hidden Objects (P).

- Zoom into the safe; collect the Gem and the Hidden Objects (Q).
- Zoom into the shelf; collect the Gem (R).
- Travel to the Basement.
- Collect all of the visible Gems and all of the visible Hidden Objects.
- Collect the BELLOWS (S).
- Zoom into the cabinet; collect the Hidden Objects (T).
- Zoom into the shelf; collect the Gem (U).
- Travel to the Dining Hall.
- Collect all of the visible Gems and all of the visible Hidden Objects (V).
- Zoom into the mantel; collect the Gem, the Hidden Object (W).
- Zoom into the table; collect the Gem and the Hidden Objects (X).
- Travel to the Student’s Lounge.
- Collect all of the visible Gems and all of the visible Hidden Objects (Y).

- Zoom into the fish tank; collect the Gem and the Hidden Object.
- Insert the BELLOWS into the water hole (Z). Pump the BELLOWS until the frame floats all the way to the top of the tank and lands next to it.
- Drag the PAINTBRUSH over the frame (A) and then solve the puzzle. See the screenshot (B) for a solution.
- Collect the fifth TRIPSPIFF PAINTING.
- Zoom into the chess board; collect the Hidden Objects (C).
- Travel back to the Dining Room.
- Zoom into the mantel; collect the LEVER (D).
- Zoom into the table; place the LEVER in the slot (E) and then pull it down.
- Zoom into the chandelier; collect the HALF SPELL PAGE (F).
- Travel back to Wynnstaff’s Office to receive a new spell.
- Zoom into the safe; draw a symbol resembling a blocky backwards G in a counterclockwise motion, starting in the middle and moving left over the symbol (G) with your WAND.
- Travel to the Outer Hallway.
- Collect all of the visible Gems and all of the visible Hidden Objects (H).

- Zoom into the curtain; collect the Gem (I).
- Draw the same symbol you just used in Wynnstaff’s office over the symbol (J) on the ground.

- Travel to the Art Hall.
- Collect all of the visible Gems and all of the visible Hidden Objects.
- Hang the TRIPSPIFF PAINTING on the wall (K).
- Draw the same symbol that you just used over the symbol on the floor (L).

- Zoom into the upper wall; collect the Gem and the Hidden Objects.
- Hang the MAGICAL PAINTING on the wall (M).
- Zoom into the desk; collect the Gem (N).
- Zoom into the gargoyle painting; collect the Gem and the Hidden Objects (O).
- The CHISEL will be added to your inventory.
- Zoom into the safe; place the STAR KEY in the lock (P).
- Open the safe and then collect the ROPE LADDER (Q).
- Travel to the Attic.
- Collect all of the visible Gems and all of the visible Hidden Objects.
- Draw the same symbol that you just used over the symbol on the window (R).
- Zoom into the dresser; collect the Gem (S).
- Zoom into the wardrobe; collect the Hidden Object (T).
- Hang the ROPE LADDER from the rafter (U).
- Zoom into the rafter; collect the PAINTBRUSH (V).
- Use the CHISEL to dislodge the DRESSER KEY (W) and then collect the DRESSER KEY.
- Zoom into the dresser; use the DRESSER KEY to open the drawer and then zoom into the book (X) to play a puzzle.
- Connect the dots in the following order to trace all of the lines; 4, 7, 5, 9, 8, 4, 2, 5, 4, 3, 1, 6 and 5 (Y).
- Connect the dots in the following order; 3, 6, 4, 5, 2, 6, 10, 9, 6, 7, 5, 9, 8, 5 and1 (Z).
- Connect the dots in the following order; 2, 5, 9, 12, 13, 14, 15, 11, 14, 10, 11, 8, 4, 3, 2, 1, 5, 6, 10, 7 and 6 (A).
- Collect the FAIRY DUST GUIDE, and then the two GOLD PIECES (B).
- Travel to Radavante’s Cottage.
- Locate all ten differences. You may use the screenshot as a key (C).
- Collect all of the visible Gems and all of the visible Hidden Objects (D).
- The BUCKET will be added to your inventory.
- Zoom into the cabinet; collect the Gem and the Hidden Object (E).
- Zoom into the mantel; collect the Gem and the Hidden Objects (F).
- Zoom into the desk; collect the Gems, the Hidden Object and the SPECTACLES OF SORTILEGE (F).
- Travel to the Courtyard.
- Put on the SPECTACLES OF SORTILEGE.
- Zoom into the fountain; collect the JUG (G) and the paper (H).
- The JUG will be added to your inventory.
- Take of the SPECTACLES OF SORTILEGE.
- Collect all of the visible Gems and all of the visible hidden objects (I).

- Zoom into the gargoyle; collect the Gem and the hidden object (J).
- Zoom into the fountain; collect the Gem (K).
- Zoom into the wall; collect the hidden objects (L).
- Travel to the Sleeping Quarters.
- Put on the SPECTACLES OF SORTILEGE.
- Collect the PITCHER (M).
- Zoom into the bed; zoom into the paper (N).
- Assemble the paper as it is shown in the screenshot (O).
- Using your WAND draw a ‘W’ over the symbol (P), starting with the upper right corner and drawing it backwards.
- Receive the VALVE.
- Collect all of the visible Gems and all of the visible hidden objects (Q).
- Zoom into the desk; collect the hidden objects (R).
- Zoom into the bed; collect the Gem (S).
- Zoom into the stove; collect the Gems and the hidden object (T).
Chapter 7: The Alchemy Lab
- Travel to the Alchemy Lab.
- Collect all of the visible Gems and all of the visible hidden objects (U).
- Zoom into the chalk board; collect the hidden objects (V).
- The BARREL will be added to your inventory.
- Place the VALVE on the spigot (W).
- Place the BARREL under the spigot (X) and then turn the valve.
- Collect the BARREL once it is full.
- Continue filling the JUG, PITCHER and BUCKET.
- Zoom into the tank; open the glass and then collect FITZON’S RING (Y).
- Travel to the Catacombs.
- Collect all of the visible Gems and all of the visible hidden objects.
- Collect the blue POTION (A).
- Zoom into the wall; collect the red POTION (B).
- Zoom into the chest; collect the yellow POTION (C).
- To solve this puzzle move the liquid from vial to vial in the following sequence; 2 to 3, 3 to 1, 1 to 2, 3 to 1. 2 to 3, 3 to 1, 1 to 2, 3 to 1. 2 to 3 and 3 to 1.
- Collect the POTION (D).
- Give the POTION to Longfranks (E).
- Zoom back into the chest; drag the PAINTBRUSH over the frame and then solve the puzzle. See the screenshot (F) for a solution.
- Collect the fifth MAGICAL PAINTING.
- Travel to the Library.
- Collect all of the visible Gems and all of the visible hidden objects (G).
- Zoom into the desk; collect the Gem (H).
- Zoom into the clock; collect the Gem and the hidden object (I).
- Zoom into the shelf; collect the Gem and the hidden objects.
- Draw the backwards W using your WAND over the symbol (J).
- Collect the MYSTERIOUS SYMBOL (K).
- Travel to the Art Hall.
- Collect all of the visible Gems and all of the visible hidden objects (L).
- Zoom into the upper wall; collect the hidden object and hang the last MAGICAL PAINTING (M).
- Zoom into the gargoyle painting; collect the Gems and the hidden object (N).
- Zoom into the desk; collect the hidden objects.
- Open the right desk drawer and then place the MYSTERIOUS SYMBOL in the slot (6).
- Open the left desk drawer.
- Turn the dials as they are shown in the screenshot beginning with dial 1, 2 and then 3.
- Open the right drawer.
- Continue to turn the dials in order of 4, 5 and 6.
- Collect the DAGGER (P).

- Travel to the Cathedral.
- Collect all of the visible Gems and all of the visible hidden objects (Q).
- Zoom into the balcony; collect the hidden object (R).
- Zoom into the organ; collect the Gems and the hidden object (S).
- Zoom into the holy water; collect the hidden object.
- Dip the DAGGER into the holy water (T) to receive the HOLY DAGGER.
- Travel to the Tower.
- Collect all of the visible Gems and all of the visible Hidden Objects (U).
- Zoom into the stairwell; collect the Gem and the Hidden Objects (V).
- Stab the orb (W) with the HOLY DAGGER.
- Travel to the Storage Shed.
- Collect all of the visible Gems and all of the visible Hidden Objects (X).
- Zoom into the window; collect the Gems and the Hidden Objects (Y).
- Zoom into the chest; collect the Hidden Object (Z).
- The CROWBAR will be added to your inventory.
- Travel to the Observatory.
- Collect all of the visible Gems and all of the visible Hidden Objects (A).
- Zoom into the desk; collect the Gem, the Hidden Object and the CHAIN (B).
- Zoom into the window; collect the Gem (C).
- Zoom into the telescope; collect the Gems (D).
- Travel to the Basement.
- Collect all of the visible Gems and all of the visible Hidden Objects (E).
- Zoom into the cabinet; collect the Gem and the Hidden Objects (F).
- Zoom into the shelf; collect the Hidden Object (G).
- Wedge the CROWBAR under the trap door (H).
- Place the CHAIN on the machine (I).
- Zoom into the cabinet; pull the lever (J).
- Zoom into the open trap door.
- Congratulations! You have completed Chronicles of Albian 2: The Wizbury School of Magic!
- You will have these items left over at the end of your game: the FAIRY DUST GUIDE, 3 GOLD PIECES and FITZON’S RING. The items left in inventory were just part of your investigation and they never get used anywhere. You can always go back to the Art Hall and talk to Tripspiff (because he has like 70+ lines that he’ll say).
- Check out the Search and Seek mode from the main screen. Locate all of the hidden items in the game as fast as you can. There are over 2,000 of them!


 Redemption Cemetery: Children's Plight Walkthrough, Guide, & Tips
 Save Our Spirit Walkthrough, Guide, & Tips
 Hide and Secret: The Lost World Walkthrough, Guide, & Tips
 Beyond: Light Advent Walkthrough, Guide, & Tips
 The Surprising Adventures of Munchausen Walkthrough, Guide, & Tips