Beyond: Light Advent Walkthrough, Guide, & Tips
Beyond: Light Advent Walkthrough

Welcome to the Beyond: Light Advent Walkthrough
Beyond the sky lies a thrilling adventure… and a deadly threat!
Whether you use this document as a reference when things get difficult or as a road map to get you from beginning to end, we’re pretty sure you’ll find what you’re looking for here.
This document contains a complete Beyond: Light Advent game walkthrough featuring annotated screenshots from actual gameplay!
We hope you find this information useful as you play your way through the game. Use the walkthrough menu below to quickly jump to whatever stage of the game you need help with.
Remember to visit the Big Fish Games Forums if you find you need more help. Have fun!
This walkthrough was created by Amanda Barrera, and is protected under US Copyright laws. Any unauthorized use, including re-publication in whole or in part, without permission, is strictly prohibited.
General Tips
- This is the official guide for Beyond: Light Advent.
- This guide will not show when you have to zoom into a location; the screenshots will show each zoom scene.
- Hidden-object puzzles are referred to as HOPs. This guide will not show screenshots of the HOPs, however, it will mention when an HOP is available and the inventory item you’ll collect from it.
- Use the Map to fast travel to a location.
Chapter 1: The Meteor

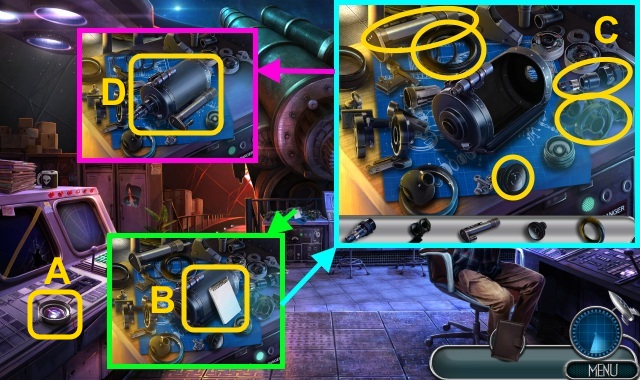
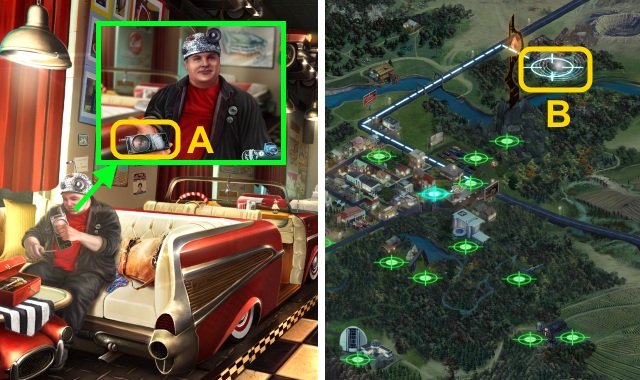
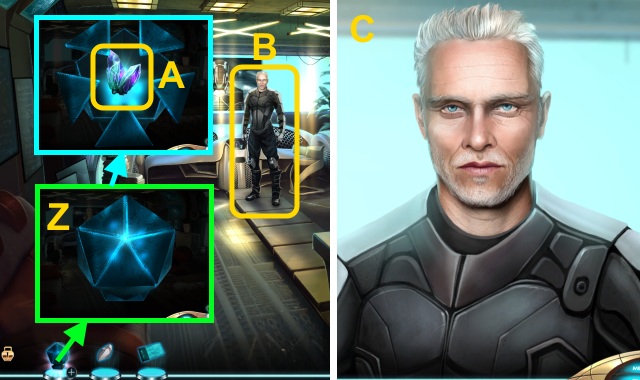
- Take the LENS (A).
- Take the PEN AND NOTEPAD (B); open the cover.
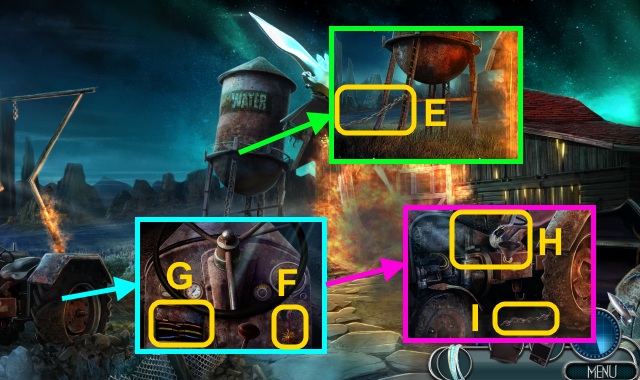
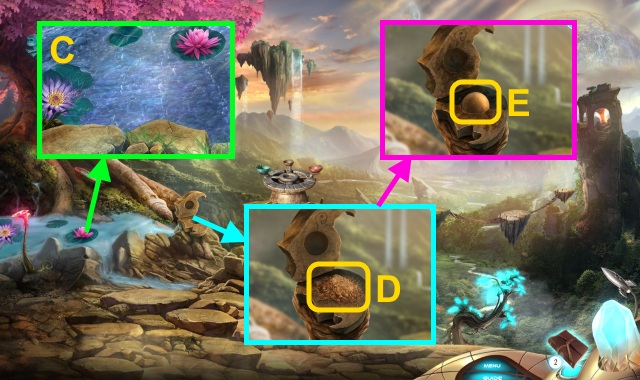
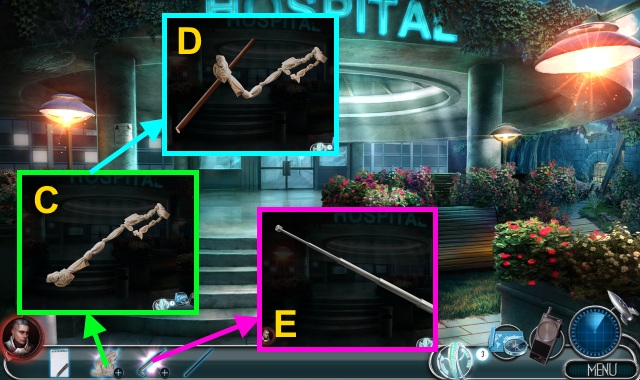
- Gather the parts (C); take the LENS FRAME (D).
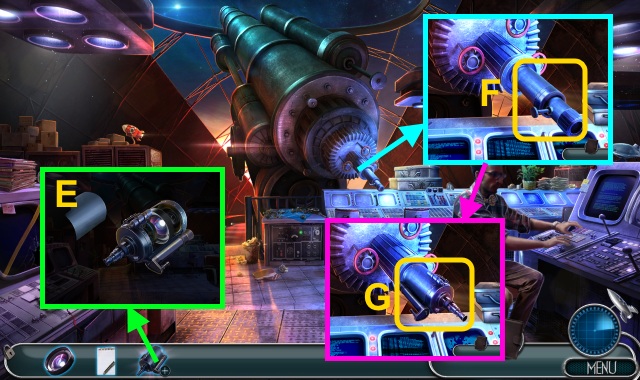
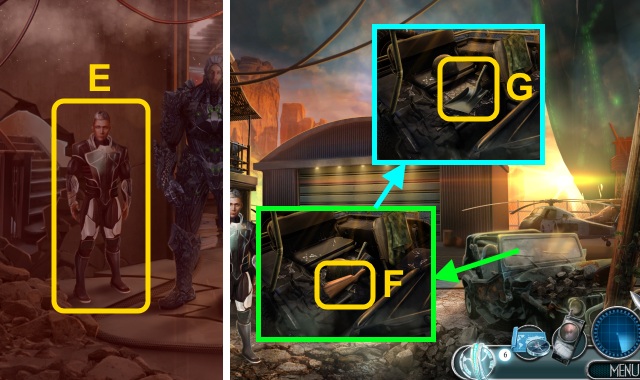
- Combine the LENS FRAME and LENS to make the TELECOPE LENS (E).
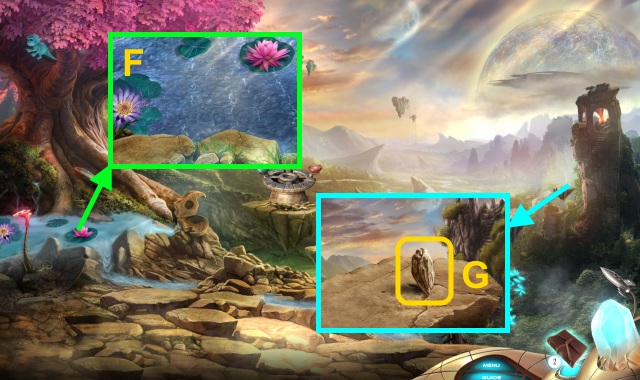
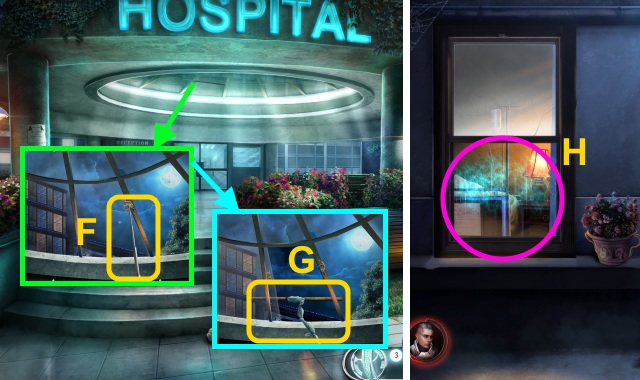
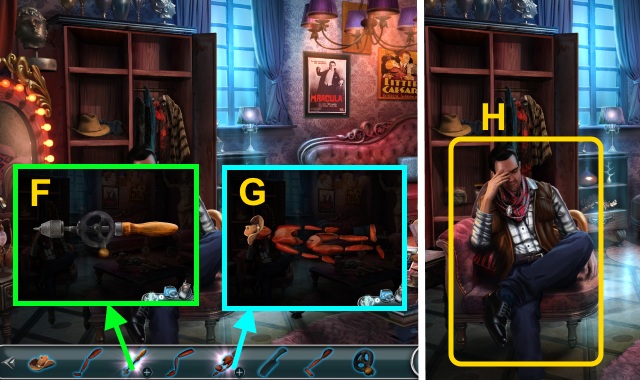
- Remove the lens (F); place the TELESCOPE LENS.
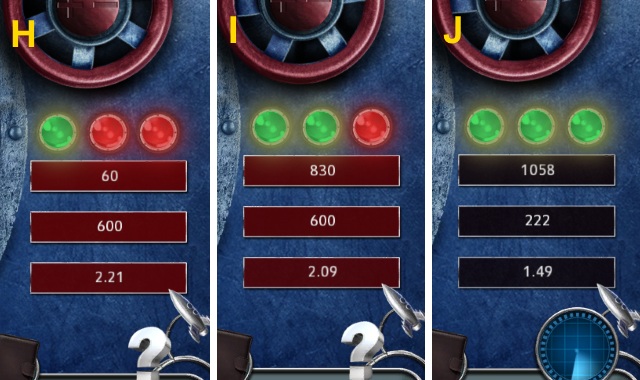
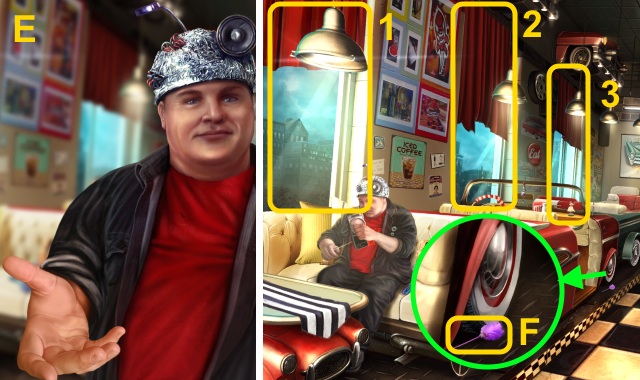
- Examine the telescope for a mini-game (G).

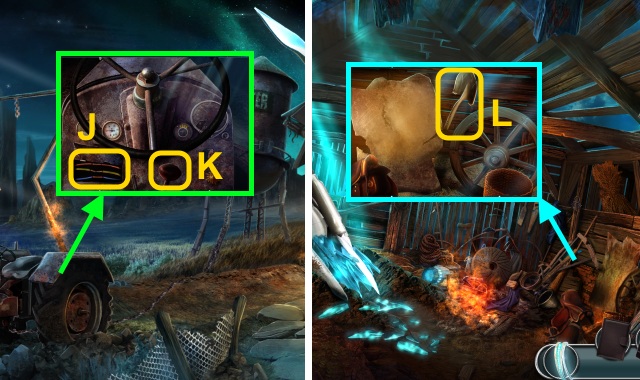
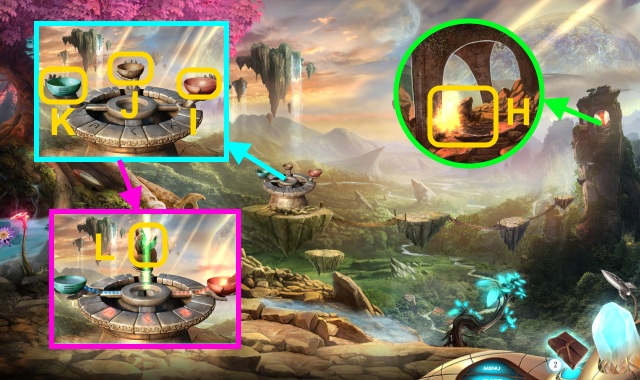
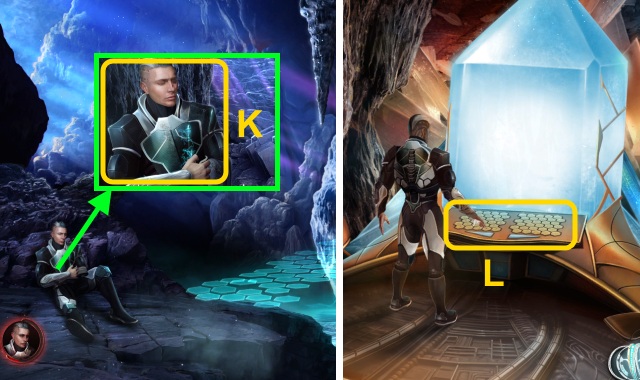
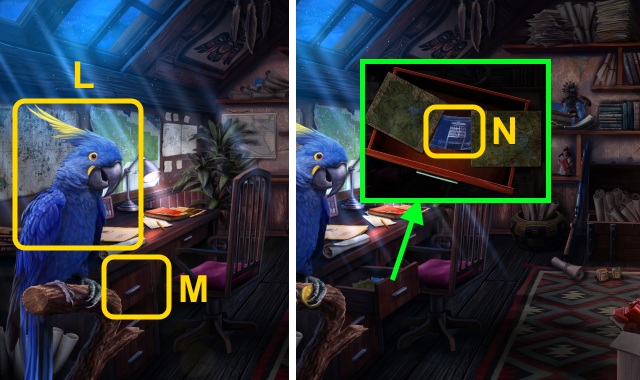
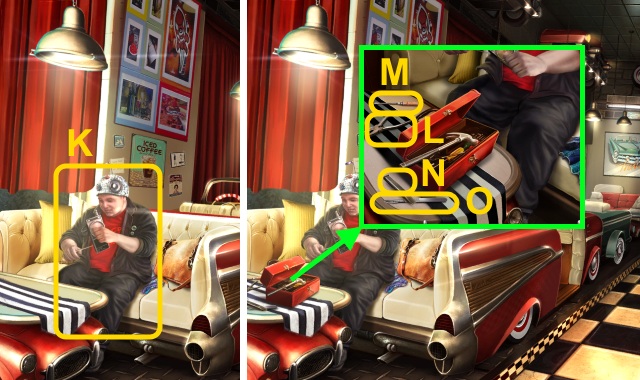
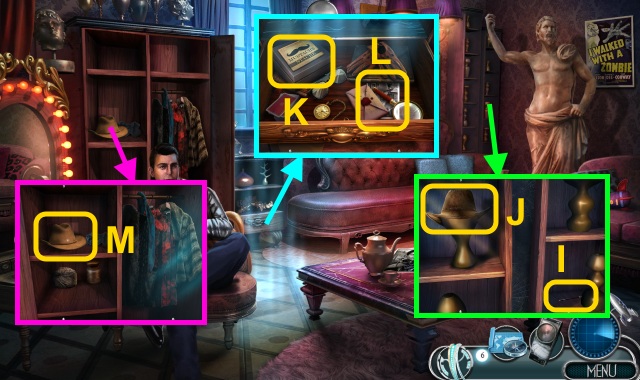
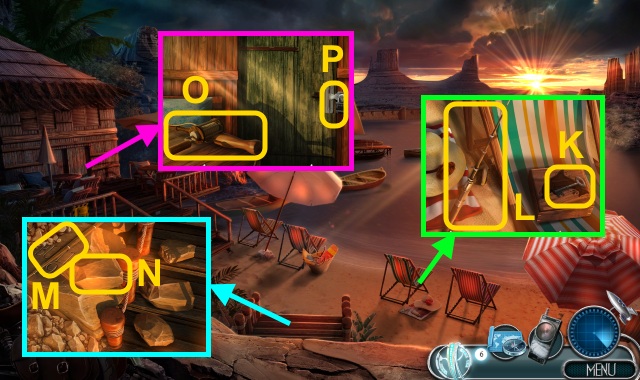
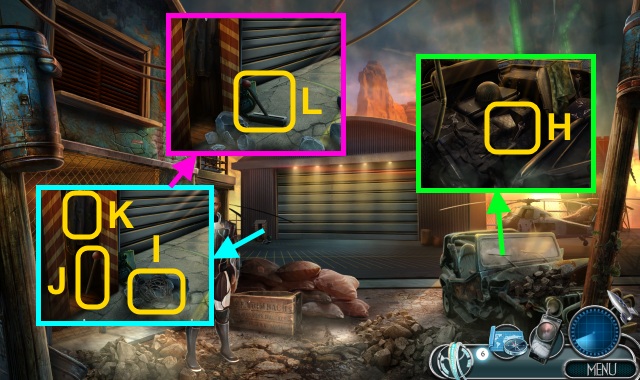
- Take the notebook (K).
- Examine the notebook (L).
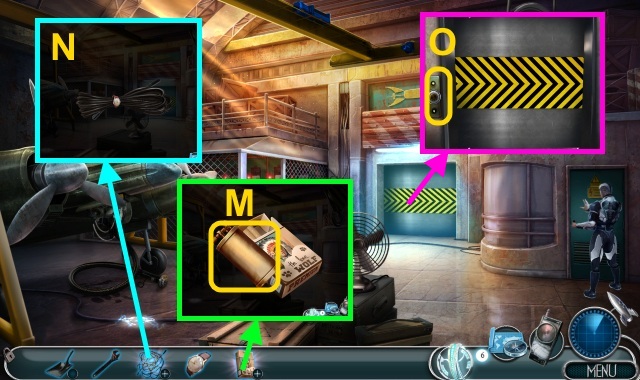
- Open the lockers; move the trophy and alien (M).
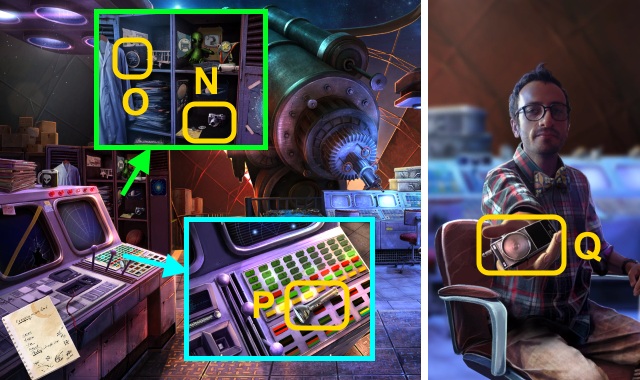
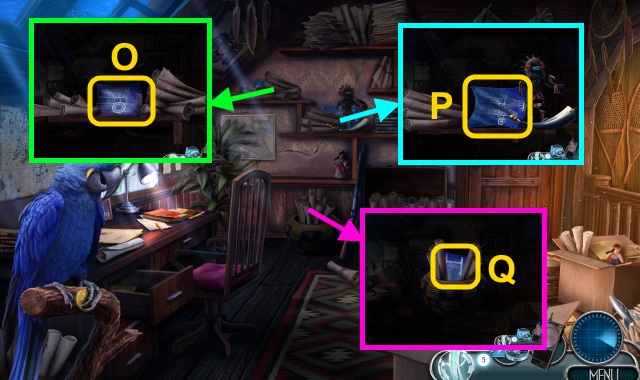
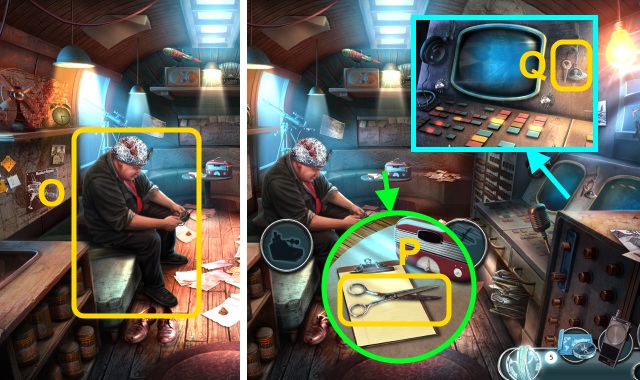
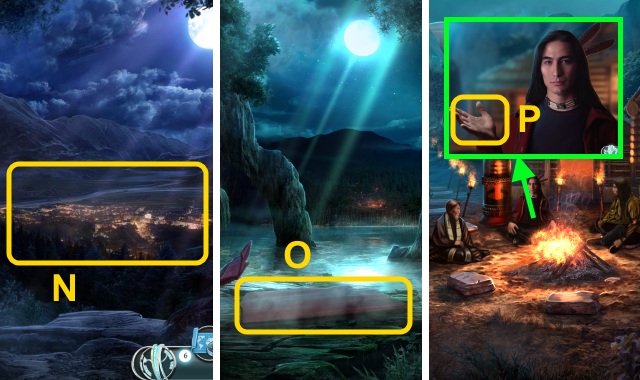
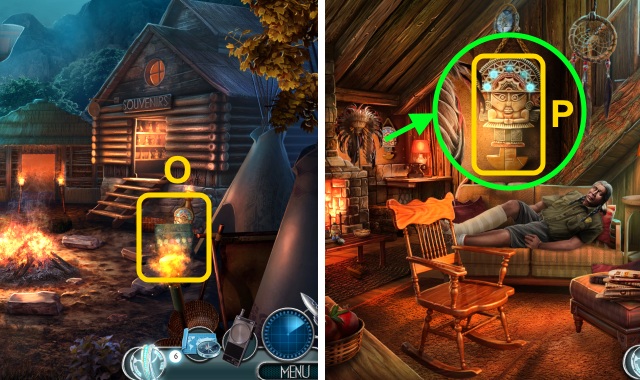
- Take the CAMERA, MOTORCYCLE KEY (N), and COMPASS (O).
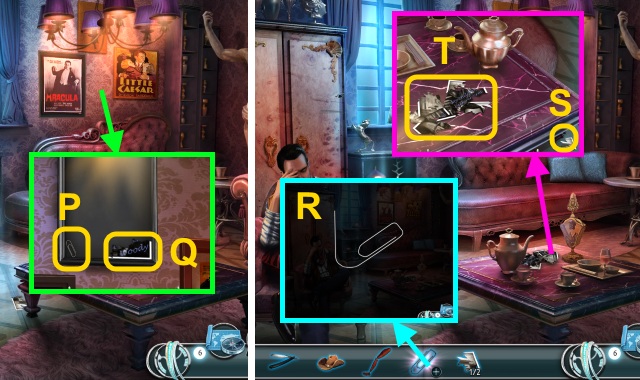
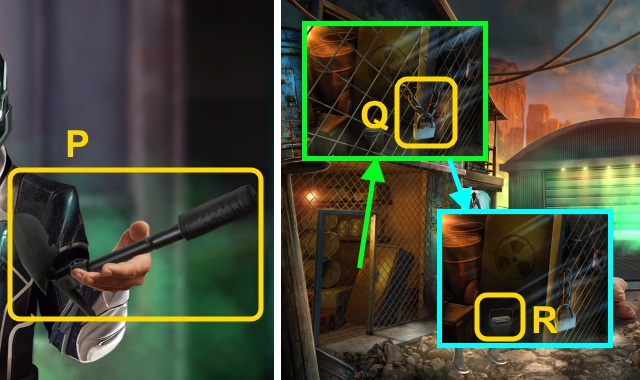
- Take the FLASHLIGHT (P).
- Take the Walkie-Talkie (Q).
- Walk forward.
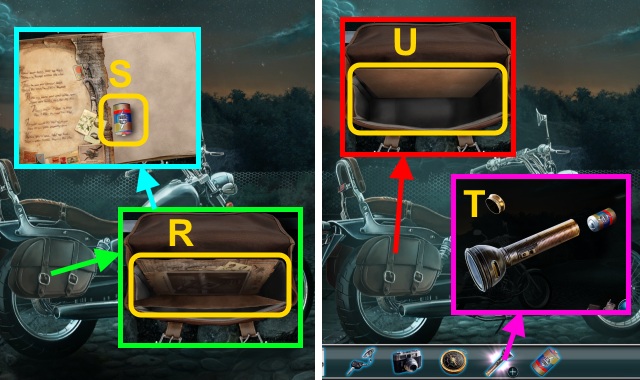
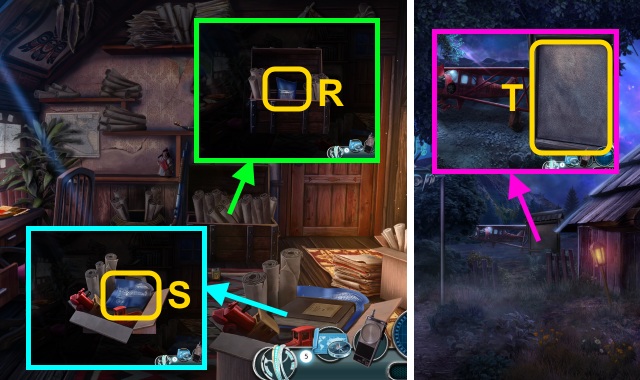
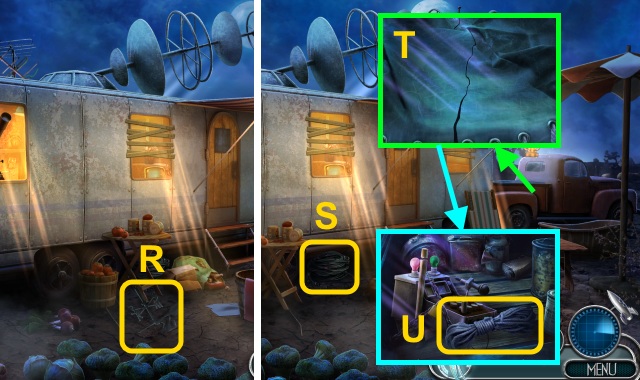
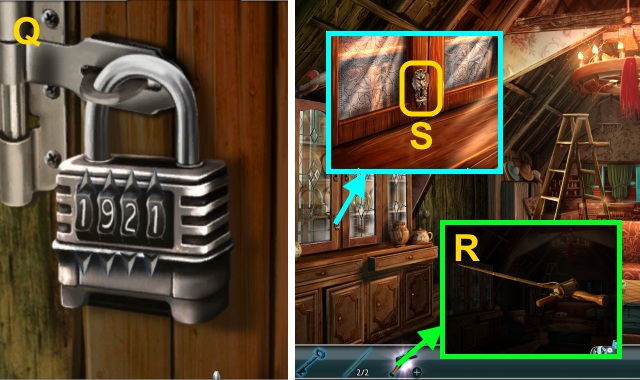
- Open the file (R).
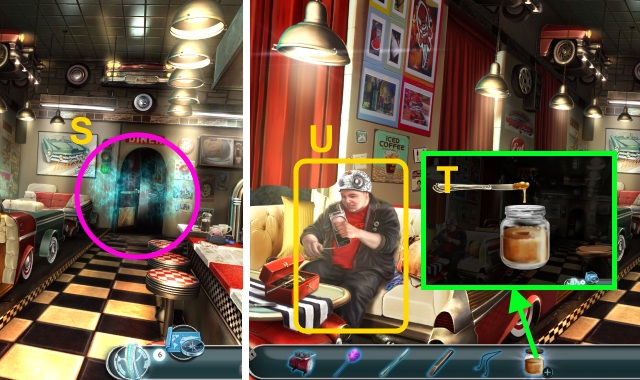
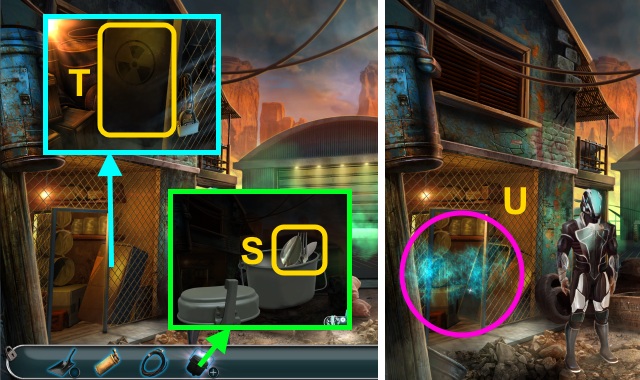
- Flip through the papers; take the BATTERY (S).
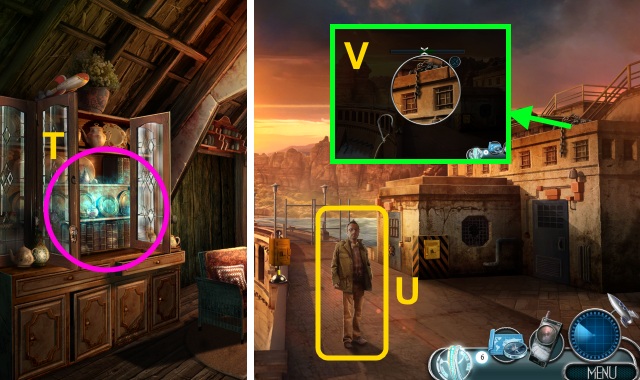
- Place the BATTERY inside the FLASHLIGHT (T).
- Place the COMPASS, CAMERA, and FLASHLIGHT (U).
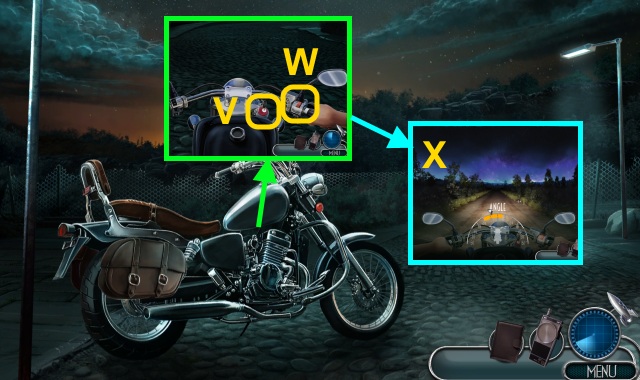
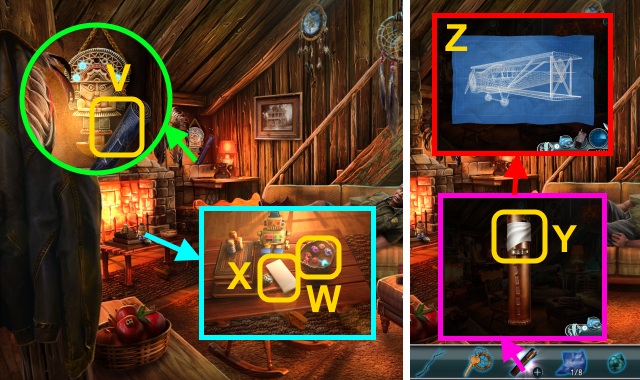
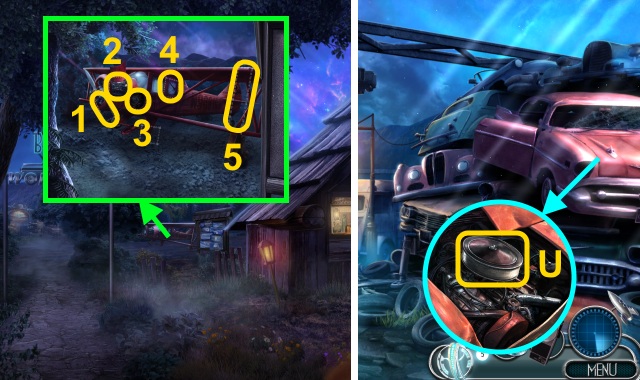
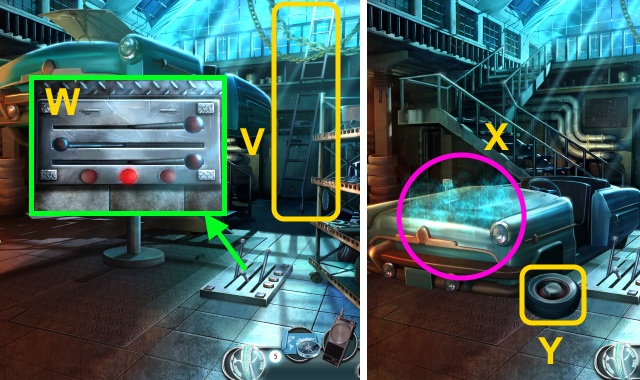
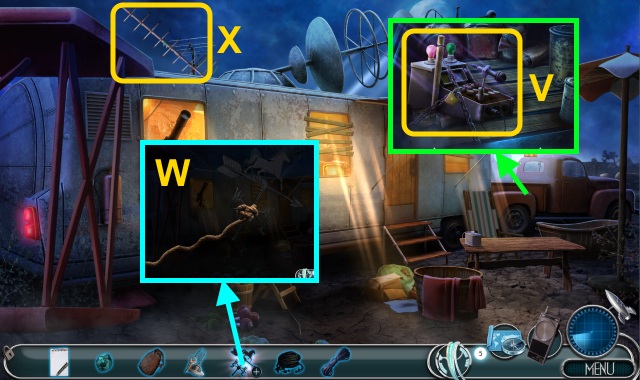
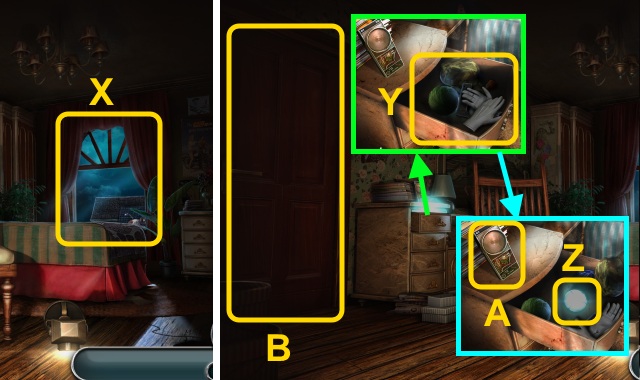
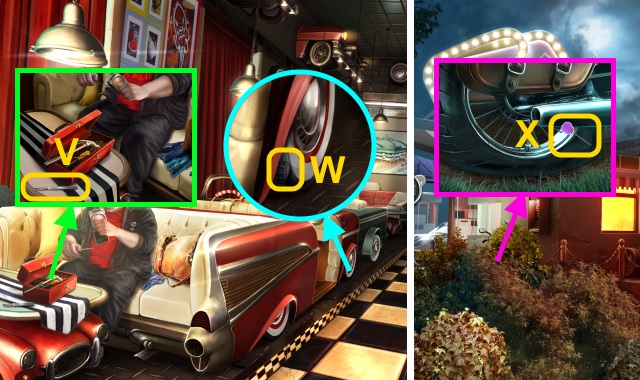
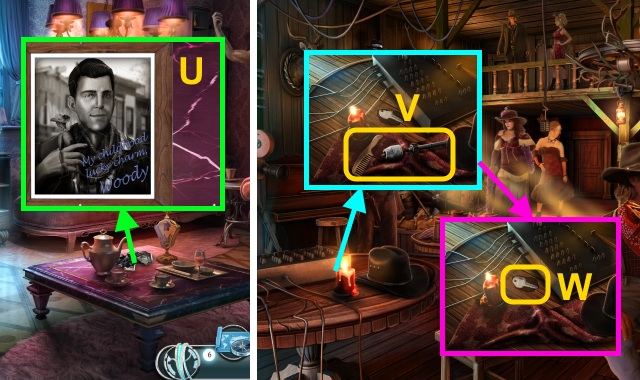
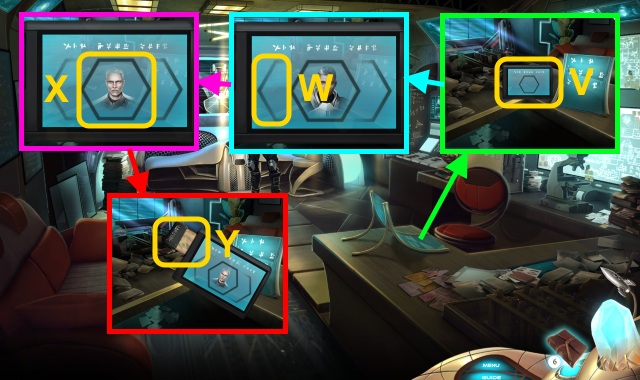
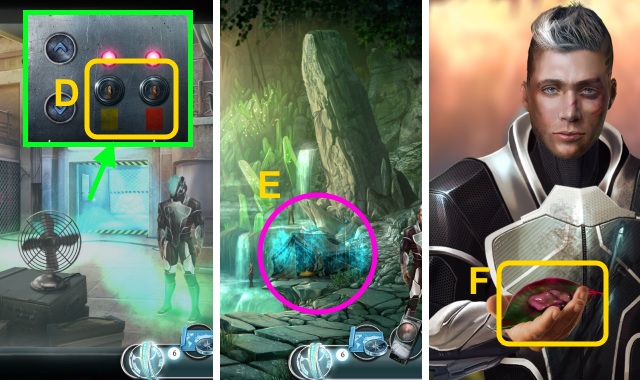
- Use the MOTORCYCLE KEY (V); flip the switch for a mini-game (W).
- Stop the indicator inside the yellow section 2x (X).
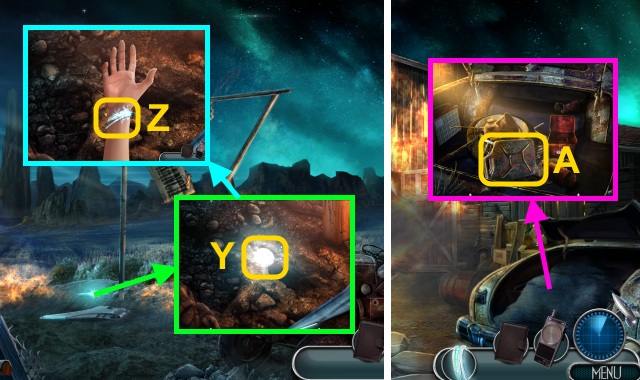
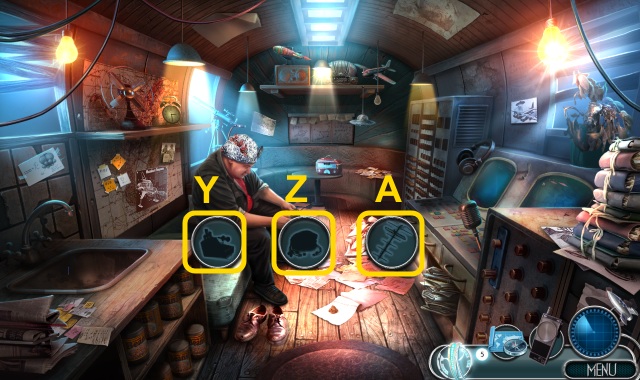
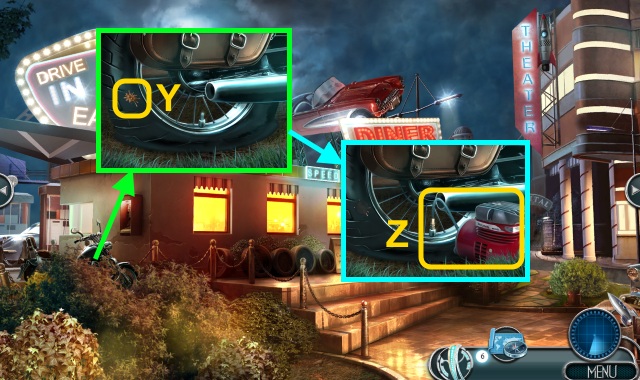
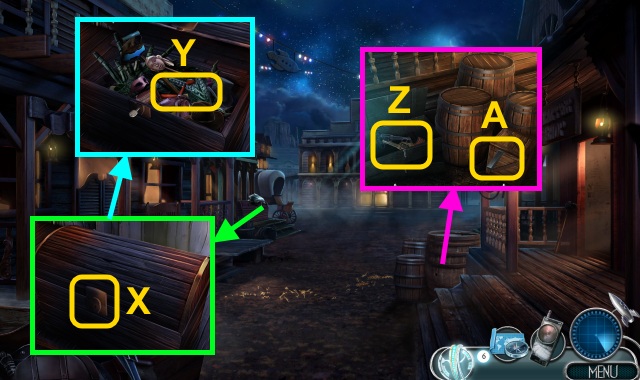
- Take the Alien Bracelet (Y); examine it (Z).
- Move the tarp; take the EMTPY GAS CAN (A).
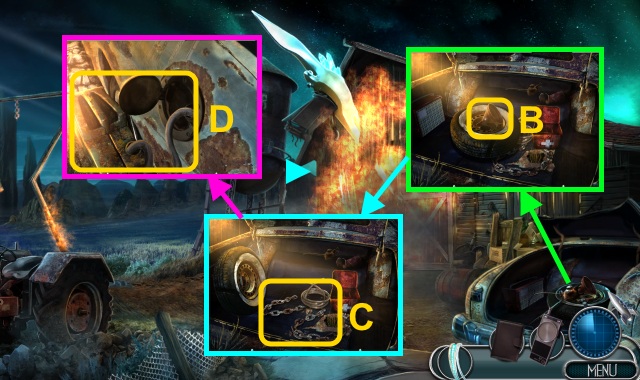
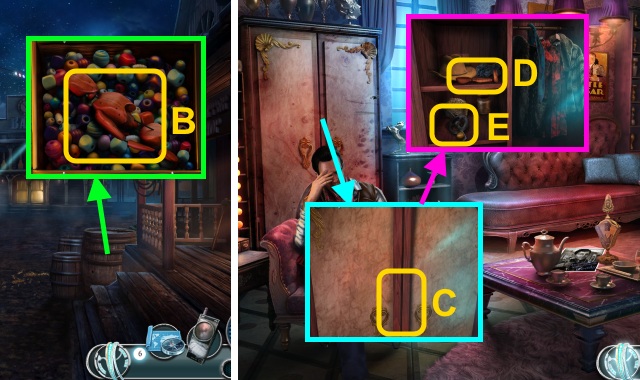
- Move the junk; take the FUNNEL (B).
- Move the tire; take the HOSE and CHAIN (C).
- Open the door; place the HOSE and EMPTY GAS CAN (D).
- Take the FULL GAS CAN.
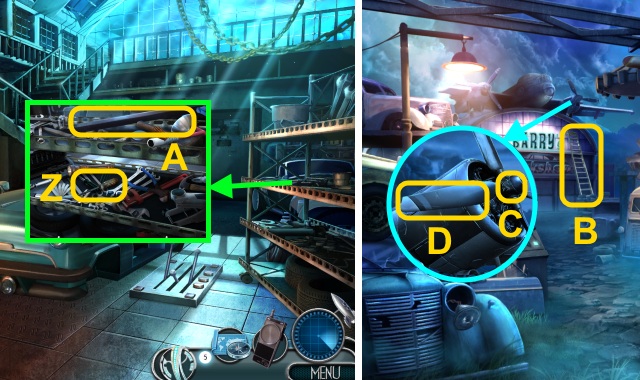
- Place the CHAIN (E).
- Turn the key (F).
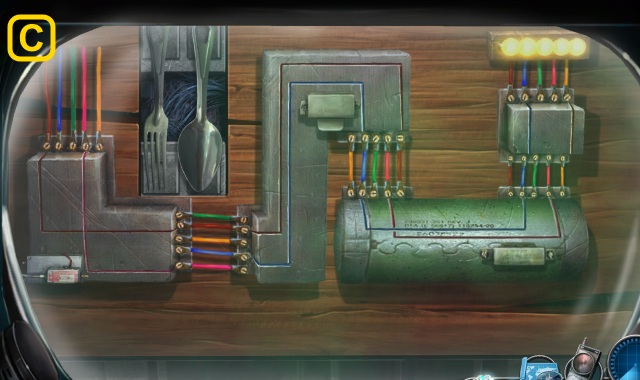
- Open the cover; examine the wires (G).
- Place the FUNNEL; pour the FULL GAS CAN (H).
- Place the chain (I).
- Scroll up.
- Examine the wire (J); pull the lever (K).
- Walk forward.
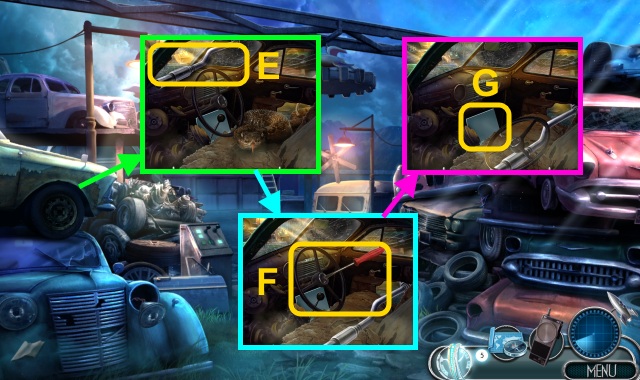
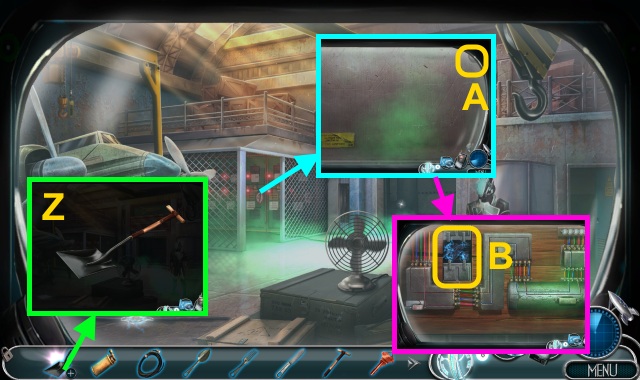
- Move the items; take the SHOVEL (L).
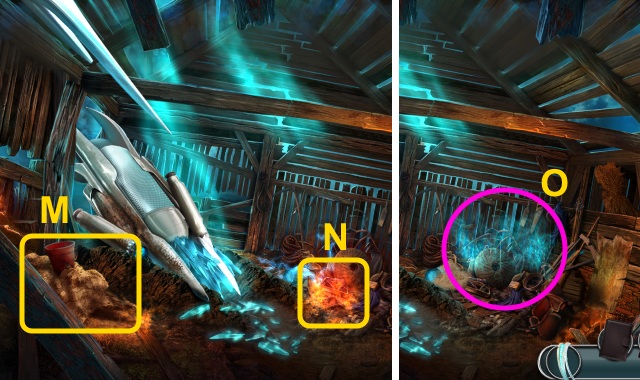
- Use the SHOVEL to receive the SHOVEL WITH SAND (M).
- Use the SHOVEL WITH SAND (N).
- Play the HOP to receive the CROWBAR (O).
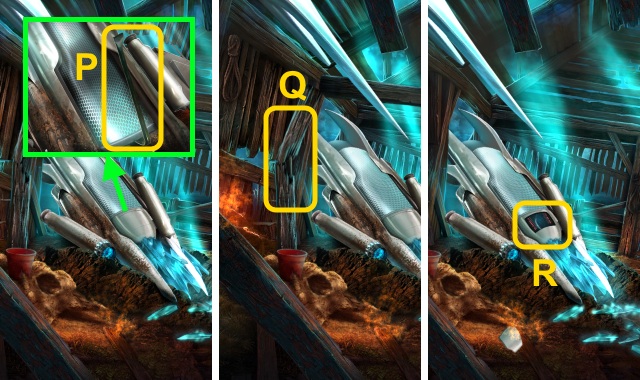
- Use the CROWBAR (P).
- Use the CROWBAR (Q).
- Examine the spaceship for a mini-game (R).
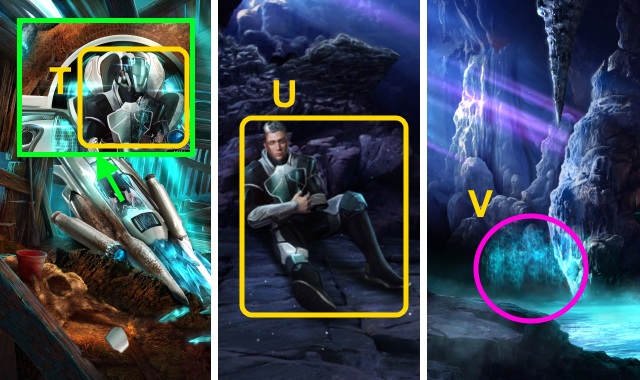
- Examine the pilot (T).
- Talk to Nix (U).
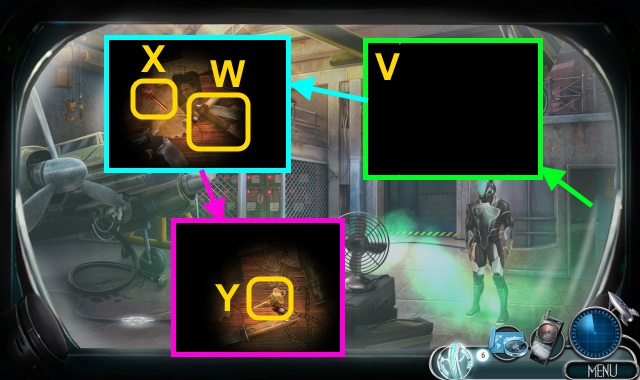
- Play the HOP to receive the Memory Crystal (V).
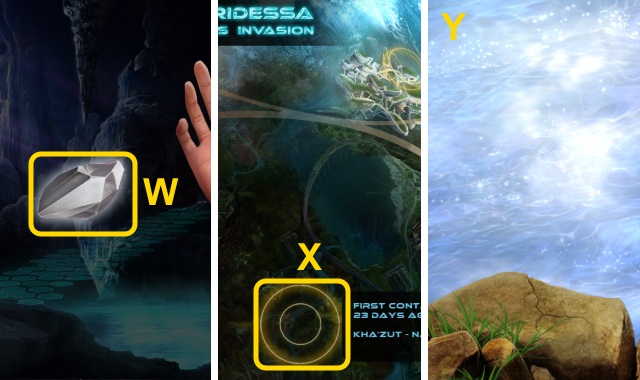
- Examine the crystal (W).
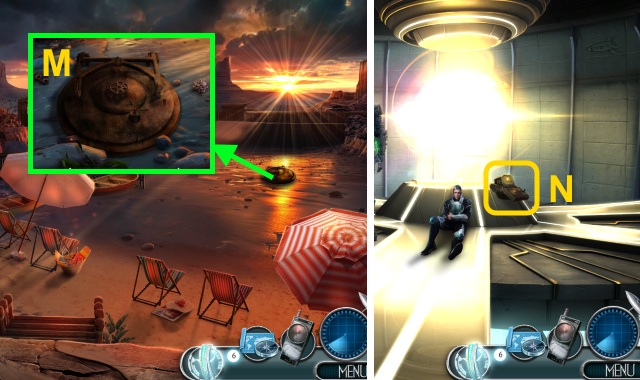
- Select the map marker (X).
- Examine the water (Y).
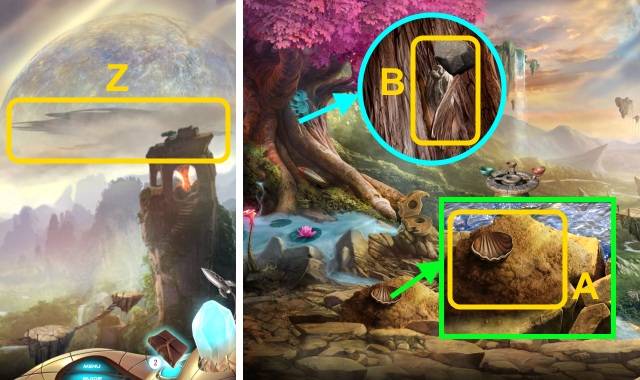
- Examine the spaceship (Z).
- Take the SEASHELL, HANDFUL OF DIRT (1/3), BLUNT STONE, HANDFUL OF DIRT (2/3), SHARP STONE, and HANDFUL OF DIRT (3/3) (A).
- Use the SHARP STONE and BLUNT STONE (B); take the TREE BARK.
- Use the SEASHELL to receive the WATER-FILLED SEASHELL (C).
- Place the DIRT; pour the WATER-FILLED SEASHELL (D).
- Close then open the press; take the MUD PLANET (E).
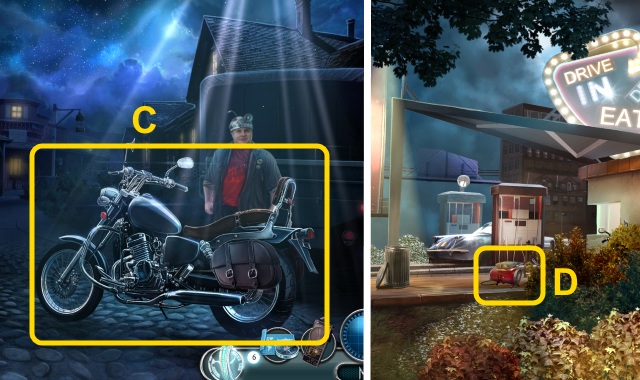
- Use the SEASHELL to receive the WATER-FILLED SEASHELL (F).
- Use the BLUNT STONE (G).
- Use the TREE BARK to receive the FLAMING TREE BARK (H).
- Place the FLAMING TREE BARK (I), MUD PLANET (J), and WATER-FILLED SEASHELL (K); examine the crystal (L).
- Go right, then forward.

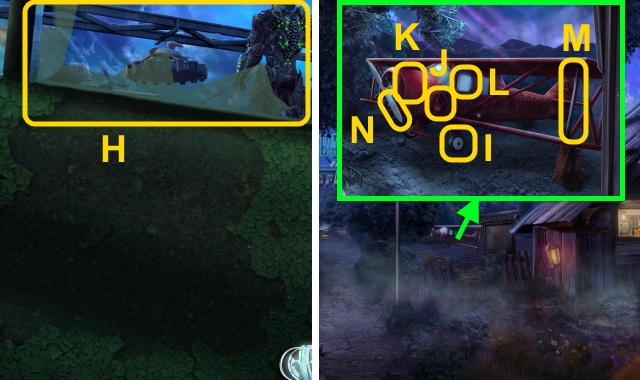
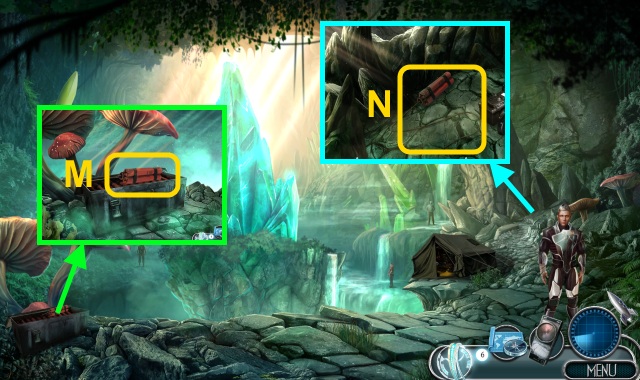
- Move the bushes (M).
- Talk to Gary (N).
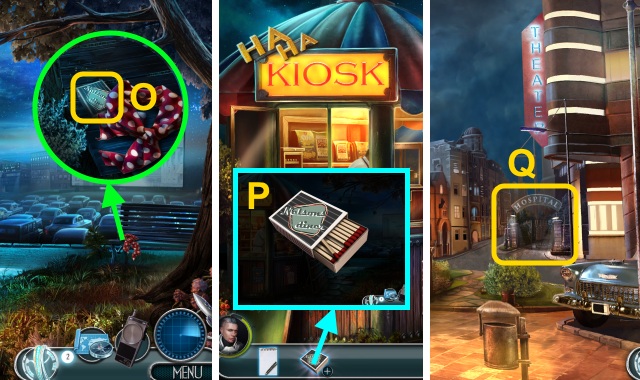
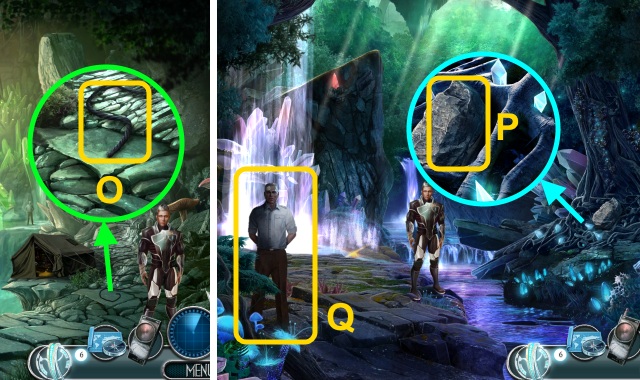
- Move the scarf; take the MATCHES (O).
- Open the MATCHES (P); take a match.
- Take the MATCHES.
- Walk forward.
- Try to walk forward (Q).
- Walk forward.
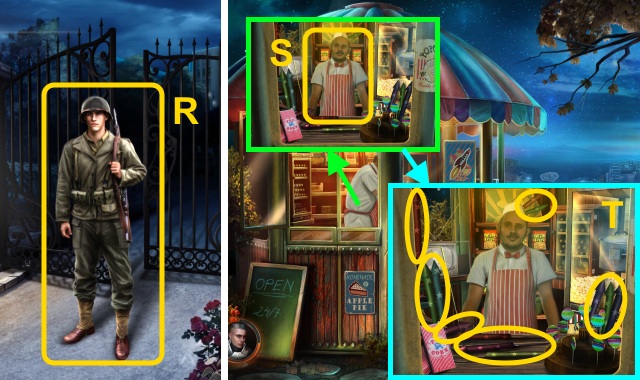
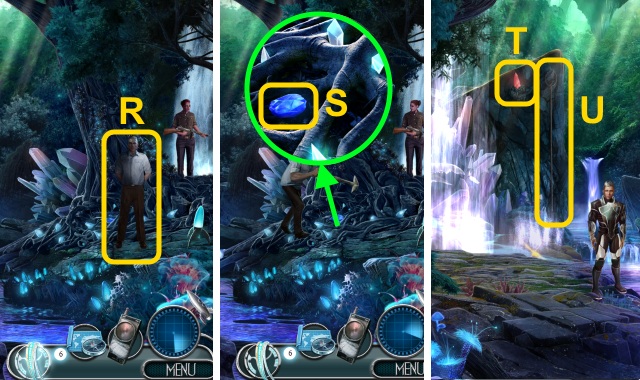
- Talk to the soldier (R).
- Walk down twice.
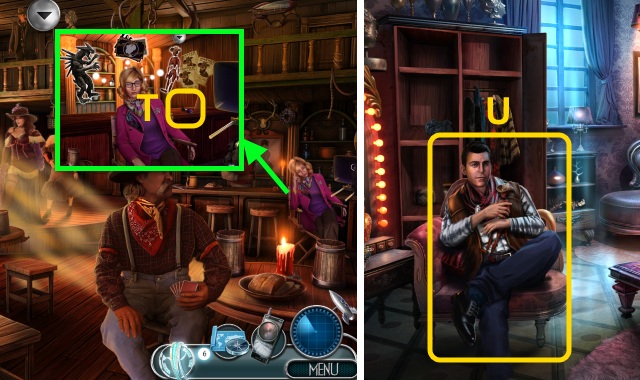
- Talk to Gary (S); play the HOP to receive the FIREWORKS (T).
- Walk forward.
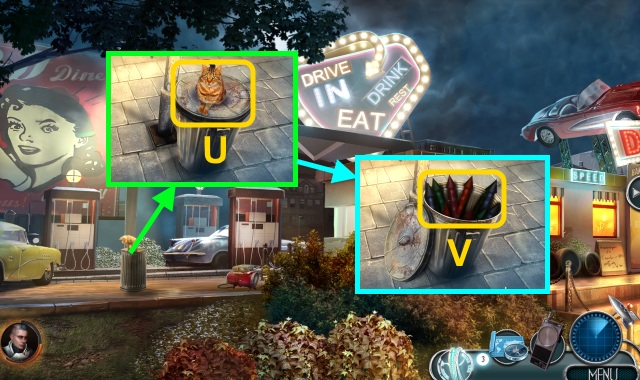
- Move the cat and lid (U).
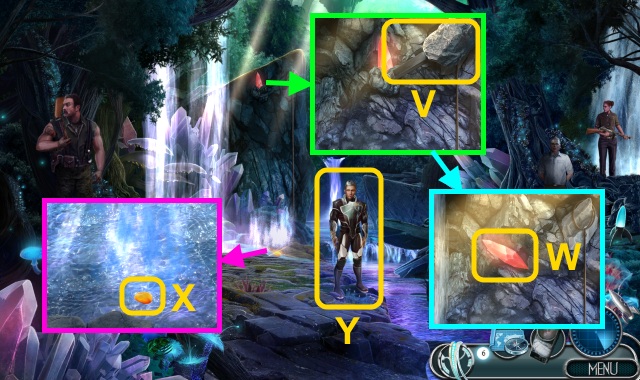
- Place the FIREWORKS; use the MATCHES (V).
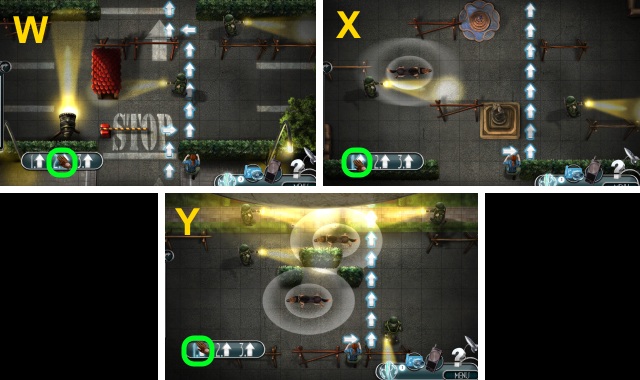
- Walk right, then forward for a mini-game.
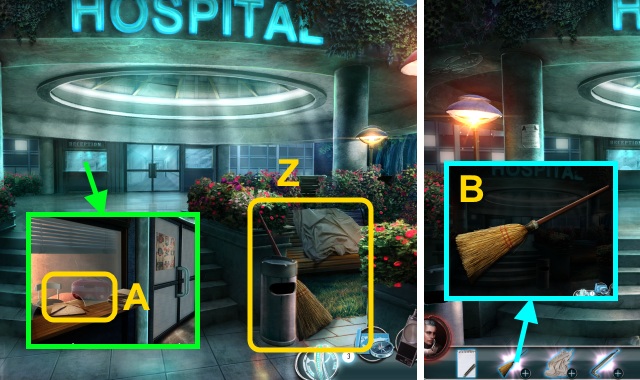
- Move the trash can; take the BROOM and OLD SHEET (Z).
- Move the paper; take the ANTENNA (A).
- Examine the BROOM; take the BROOMSTICK (B).
- Tie the OLD SHEET 4x (C).
- Combine the OLD SHEET with the BROOMSTICK to make the IMPROVISED CLIMBING ROPE (D).
- Extend the ANTENNA 4x to make the EXTENDED ANTENNA (E).
- Use the EXTENDED ANTENNA (F).
- Use the IMPROVISED CLIMBING ROPE 3x (G); climb up.
- Examine the windows; play the HOP to receive the MEDICAL BAG (H).
- Go down, then right.
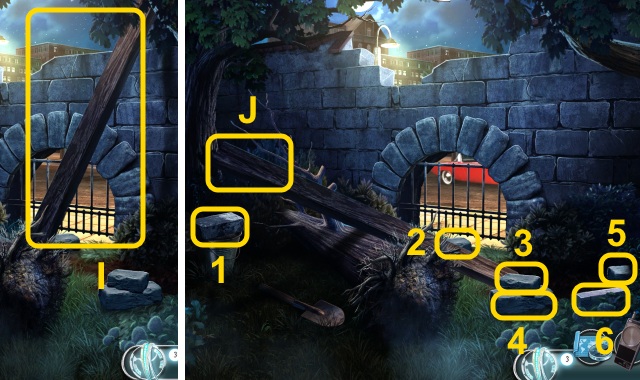
- Move the board (I).
- Place the bricks (1-6); on the end of the board (J).
- Go forward; then down twice.
- Use the MEDICAL BAG (K).
- Walk left.
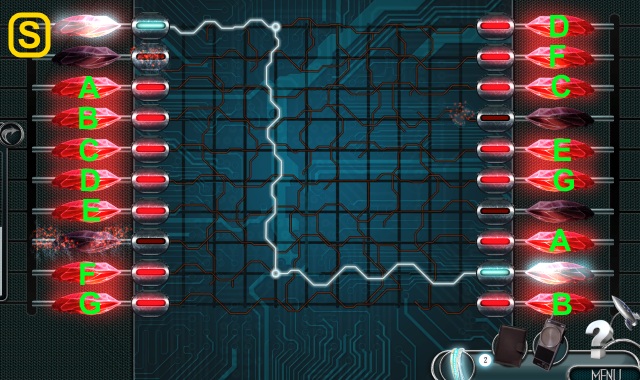
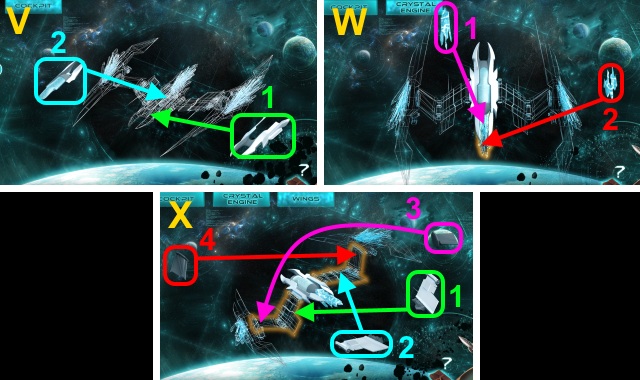
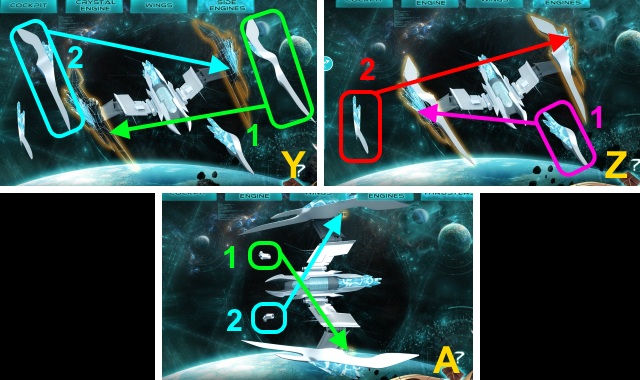
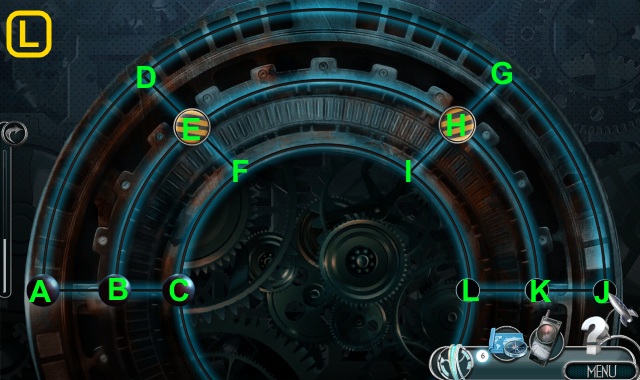
- Examine the console for a mini-game (L).
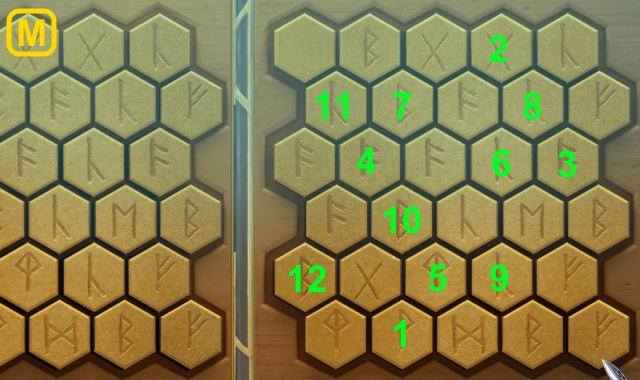
- Solution (M): 1-3, 4-7, 8-12.
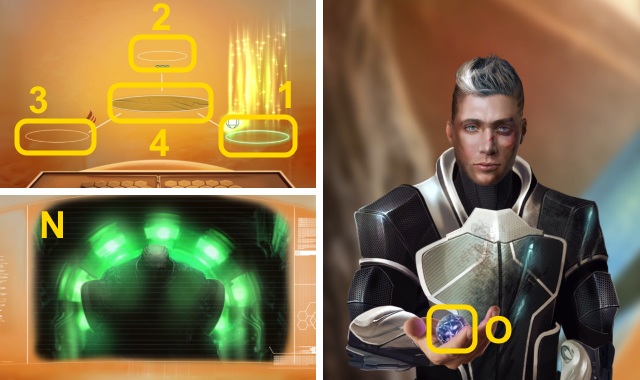
- Examine the diagrams (1-4); examine the screen (N).
- Take the crystal (O).
Chapter 2: Arrowhead National Park
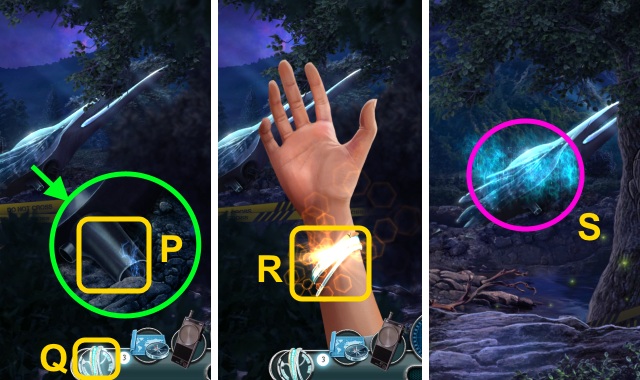
- Examine the thrusters (P); use the Memory Bracelet (Q).
- Examine the Memory Bracelet (R).
- Play the HOP to receive the Memory Crystal (S).
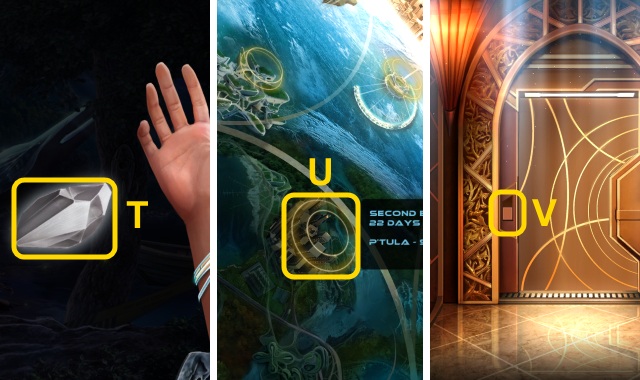
- Use the Memory Crystal (T).
- Select the map marker (U).
- Press the switch (V).
- Walk forward.
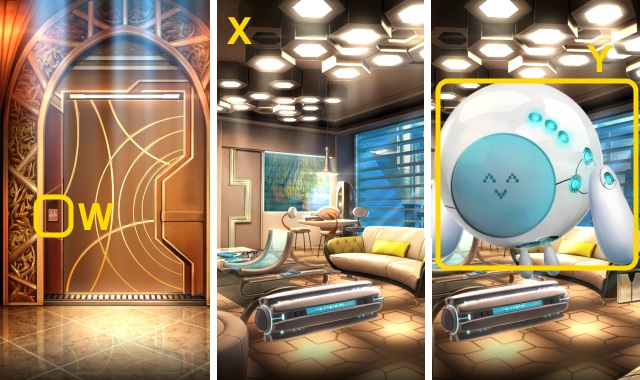
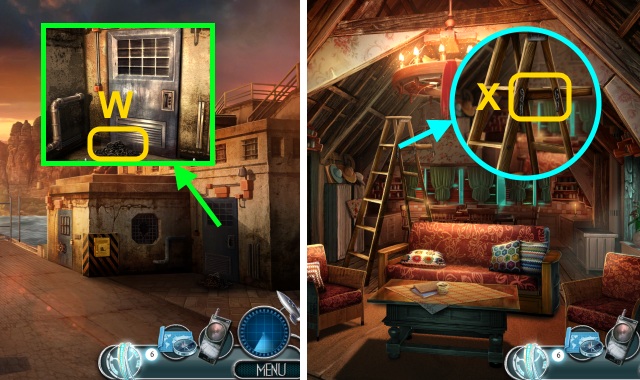
- Use the KEY CARD (W).
- Walk forward.
- Examine the room (X).
- Talk to the robot (Y).
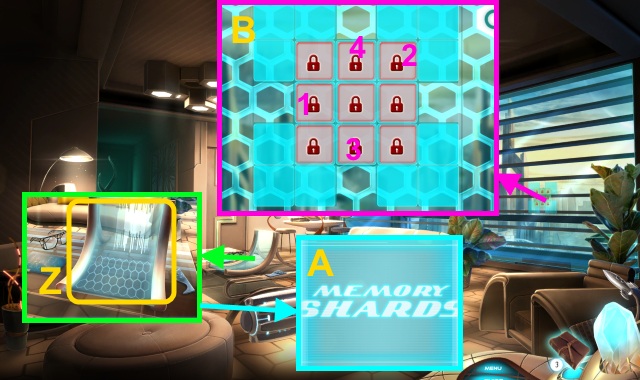
- Examine the computer (Z); examine the screen 5x (A).
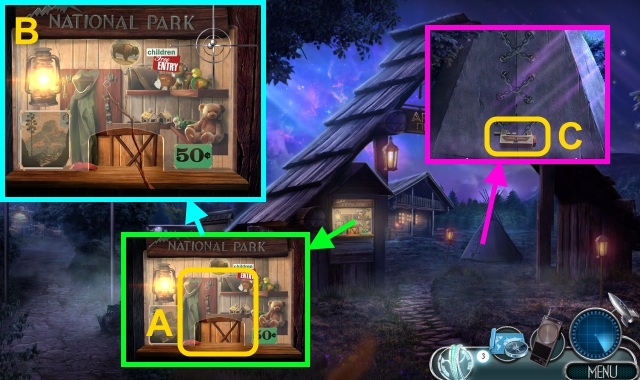
- Examine the door for a mini-game; solution (B).
- Walk right.
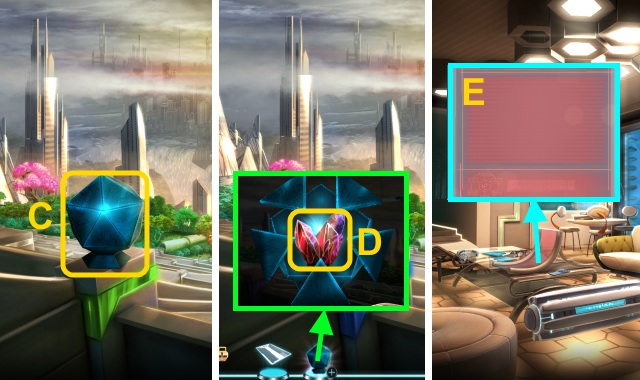
- Take the PROFESSOR’S PACKAGE (C).
- Open the PROFESSOR’S PACKAGE (D); take the FIRE CRYSTAL.
- Walk down.
- Examine the screen 2x (E).
- Walk right, then forward.
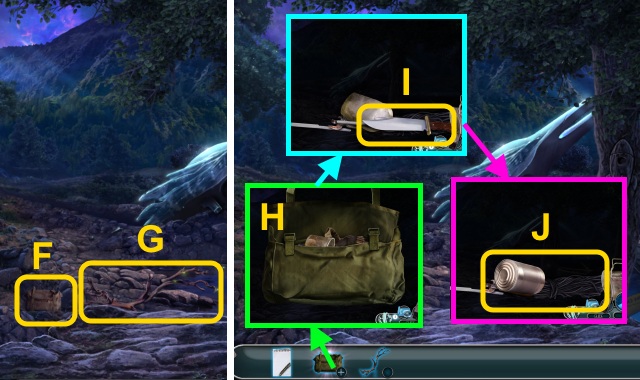
- Take the ARMY BAG (F) and BRANCH (G).
- Open the ARMY BAG (H); dump the bag.
- Move the gas mask; take the BOWIE KNIFE (I).
- Move the utensils; take the CANNED FOOD, CAN OPENER, and ROPE (J).
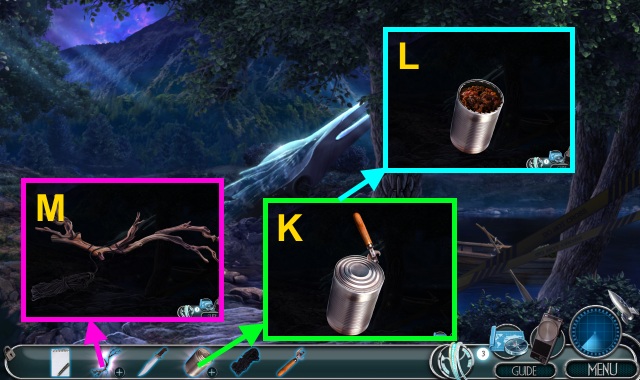
- Use the CAN OPENER on the CANNED FOOD (K).
- Remove the lid; take the OPENED CANNED FOOD (L).
- Combine the BRANCH and ROPE; tie the rope 3x (M).
- Take the IMPROVISED ANCHOR.
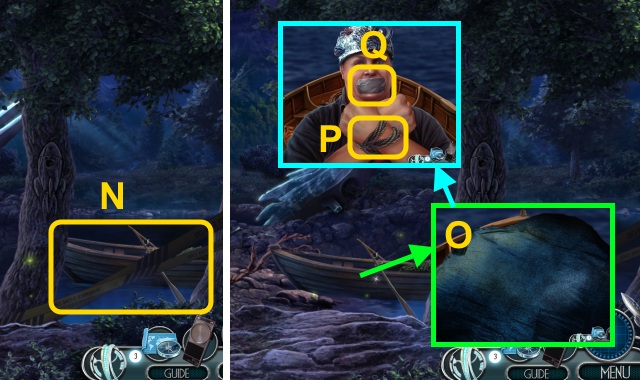
- Use the IMPROVISED ANCHOR (N).
- Move the tarp (O).
- Use the BOWIE KNIFE (P); remove the tape (Q).
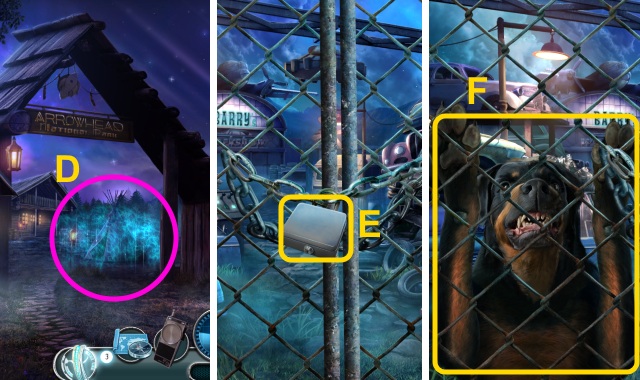
- Walk right for a mini-game.
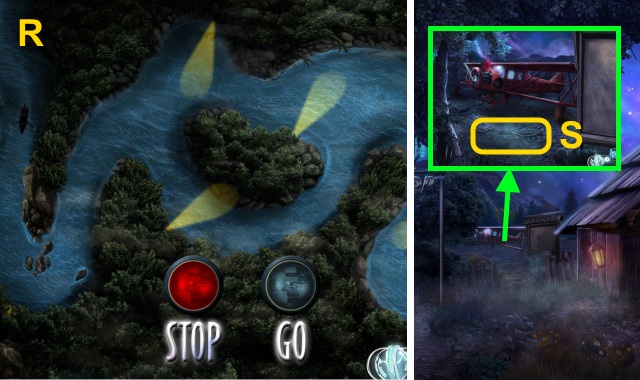
- Solution (R): cross the river while avoiding the searchlights.
- Take the BRANCH (S).
- Walk right.
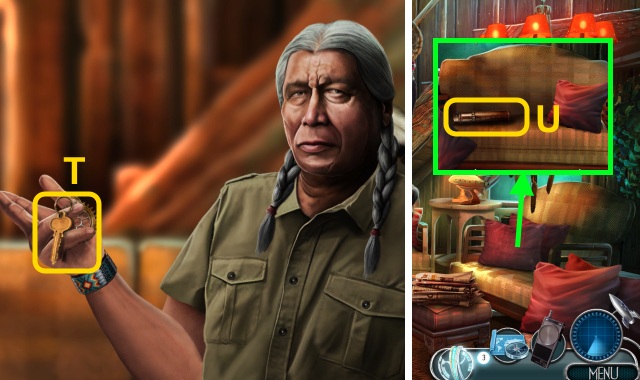
- Take the SCRAPYARD KEY (T).
- Move the pillows; take the SCROLL CASE (U).
- Take the AIRPLANE BLUEPRINTS (1/8) (V).
- Move the gems; take the TOPAZ (W).
- Take the NAPKIN (X).
- Use the NAPKIN on the SCROLLCASE (Y); remove the paper.
- Unroll the paper; take the AIRPLANE BLUEPRINTS (2/8) (Z).
- Walk down.
- Use the BRANCH for a mini-game (A).
- Stop the balls inside the target (B).
- You receive the WIGWAM KEY.
- Use the WIGWAM KEY (C).
- Play the HOP to receive the MEDICINE POUCH (D).
- Walk left.
- Try to use the SCRAPYARD KEY (E).
- Give the OPENED CANNED FOOD (F).
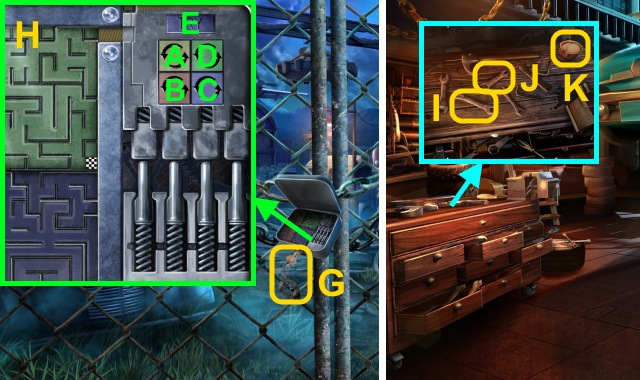
- Use the SCRAPYARD KEY (G); examine the lock for a mini-game.
- Solution (H): Ax2-Bx3-Cx2-D-E.
- Walk forward.
- Take the WRENCH (I), COMBINATION WRENCH (J), and CRACKERS (K).
- Walk down twice, right, then up.
- Give the CRACKERS (L).
- Open the drawers (M).
- Move the maps; take the AIRPLANE BLUEPRINTS (3/8) (N).
- Move the papers; take the AIRPLANE BLUEPRINTS (4/8) (O).
- Move the items; take the AIRPLANE BLUEPRINTS (5/8) (P).
- Move the papers; take the AIRPLANE BLUEPRINTS (6/8) (Q).
- Move the papers; take the AIRPLANE BLUEPRINTS (7/8) (R).
- Move the book; take the AIRPLANE BLUEPRINTS (8/8) (S).
- Walk down twice.
- Place the AIRPLANE BLUEPRINTS (8/8) (T).
- Examine the plane (1-5).
- Walk left.
- Open the hood; take the AIR FILTER (U).
- Walk forward.
- Take the METAL LADDER (V).
- Pull the levers (W).
- Play the HOP to receive the OIL FILTER (X).
- Take the WHEEL (Y).
- Move the tools; take the SCREWDRIVER (Z) and ROD (A).
- Walk down.
- Place the METAL LADDER (B).
- Use the COMBINATION WRENCH (C); take the PROPELLER (D).
- Open the door; use the pipe (E).
- Use the SCREWDRIVER (F); move the steering wheel.
- Move the handle; take the SHEET OF GLASS (G).
- Examine the window 3x (H).
- Go forward, then down.
- Place the WHEEL (I), AIR FILTER (J), OIL FILTER (K), SHEET OF GLASS (L), ROD (M), and PROPELLER (N); use the WRENCH.
- Examine the plane.
- Walk forward.
- Talk to Melvin (O).
- Move the office supplies; take the SCISSORS (P).
- Take MELVIN’S KEY (Q).
- Walk down.
- Take the WEATHER VANE (R).
- Move the barrel, boxes, and table; take the SCANNER CABLE (S).
- Use the SCISSORS (T); move the tarp.
- Move the can; take the HEMP ROPE (U).
- Use MELVIN’S KEY; take the SCANNER PART (V).
- Combine the WEATHER VANE and HEMP ROPE (W); take the IMPROVISED HOOK.
- Use the IMPROVISED HOOK to take the SCANNER ANTENNA (X).
- Walk forward.
- Give the SCANNER PART (Y), SCANNER CABLE (Z), and SCANNER ANTENNA (A).
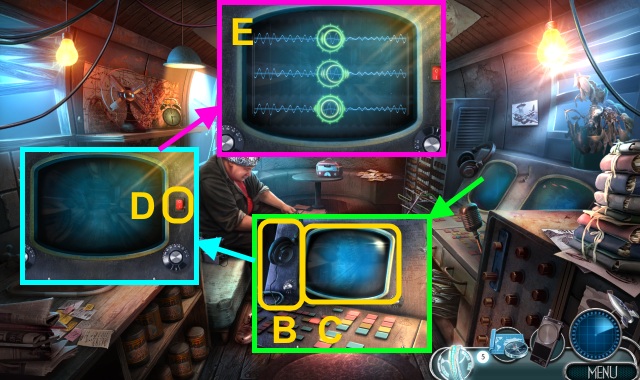
- Take the headset (B); examine the screen (C).
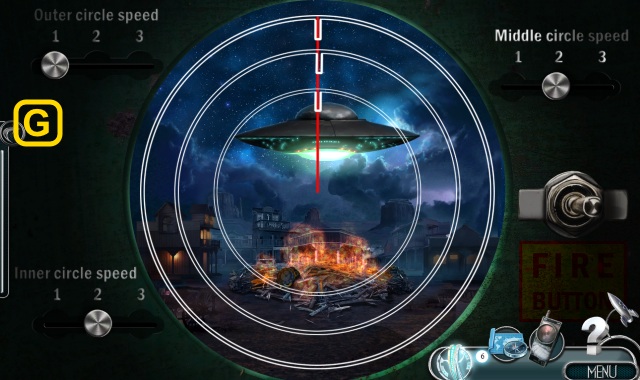
- Flip the switch for a mini-game (D); align all three circles (E).
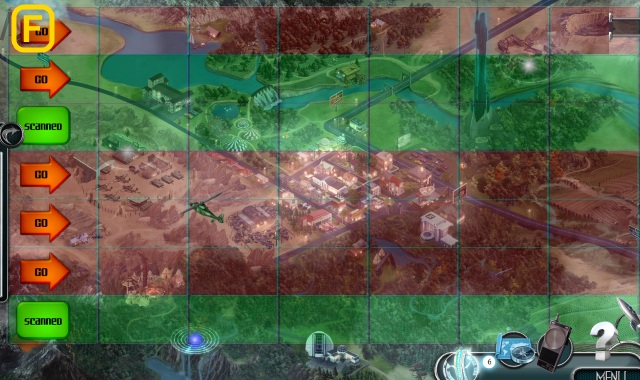
- Walk down twice for a mini-game.
Chapter 3: Wolf Mountain
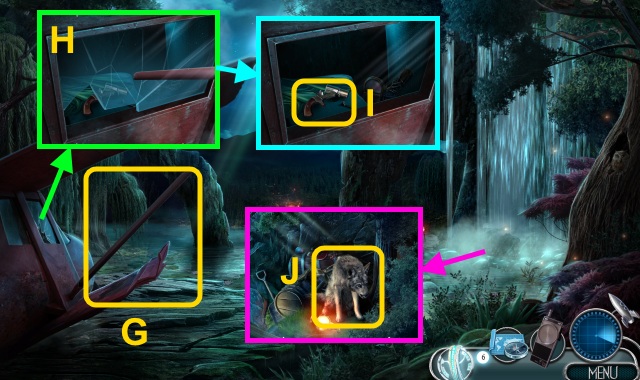
- Take the WING POLE (G).
- Use the WING POLE (H); take the FLARE GUN (I).
- Use the FLARE GUN (J).
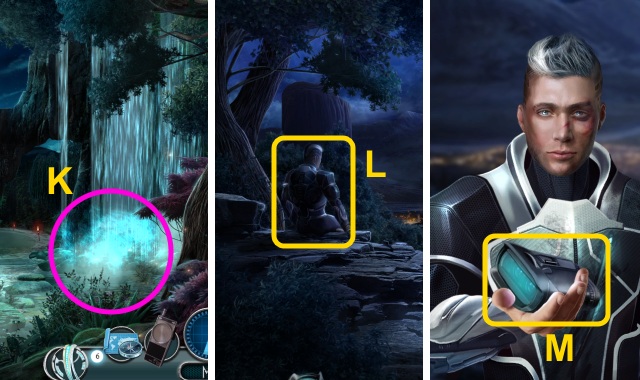
- Play the HOP to receive the BROKEN BLINK CHARGE (K).
- Give the BROKEN BLINK CHARGE (L).
- Take the BINOCULARS (M).
- Use the BINOCULARS (N).
- Move the scrap metal (O).
- Walk forward.
- Talk to the man; give the MEDICINE POUCH (P).
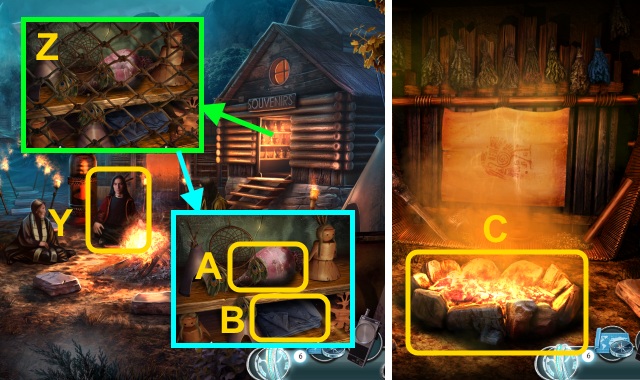
- Enter the Sweat Lodge.
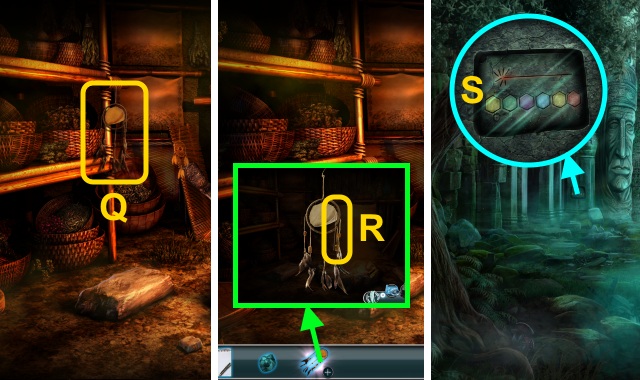
- Take the BROKEN DREAM CATCHER (Q).
- Examine the BROKEN DREAM CATCHER; take the STRING (R).
- Walk down, then left.
- Take the COLORED PLATE (S).
- Play the HOP to receive the WEIGHT (T).
- Place the WEIGHT for a mini-game (U).
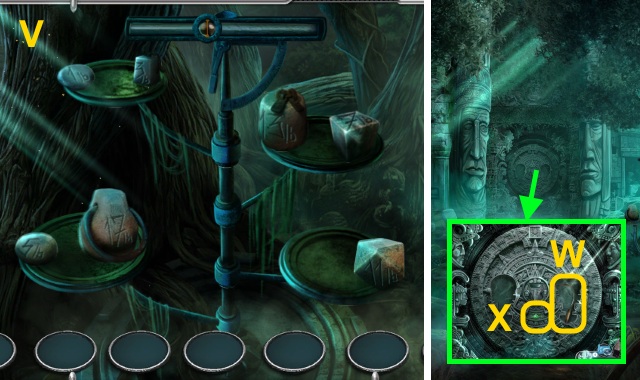
- Solution (V).
- Take the SICKLE (W) and EMERALD (X).
- Walk down.
- Talk to the man (Y).
- Use the SICKLE (Z); move the net.
- Take the RED ROOT (A) and BLANKET (B).
- Enter the Sweat Lodge.
- Use the BLANKET (C).
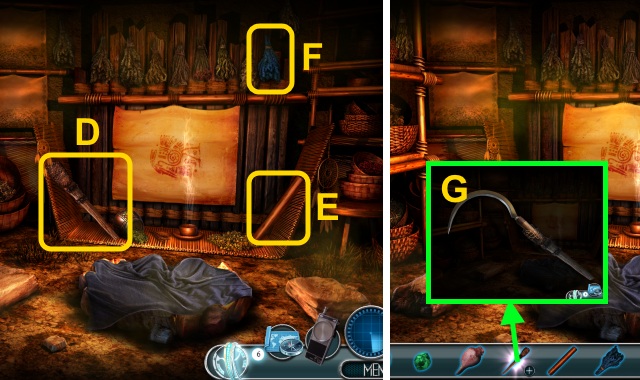
- Take the TORCH HANDLE (D), ROLLING PIN (E), and BLUE LEAVES (F).
- Place the SICKLE on the TORCH HANDLE; use the STRING (G).
- Take the EXTENDED SICKLE.
- Walk down, then forward.
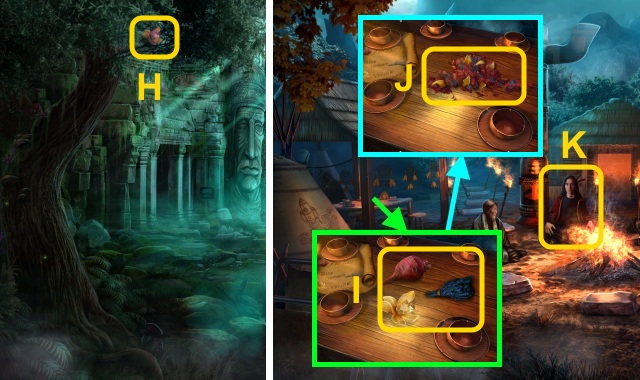
- Use the EXTENDED SICKLE (H); take the YELLOW FLOWER.
- Walk down.
- Place the RED ROOT, BLUE LEAVES, and YELLOW FLOWER (I); use the ROLLING PIN.
- Take the CRUSHED INGREDIENTS (J).
- Show the CRUSHED INGREDIENTS (K).
- Enter the Sweat Lodge.
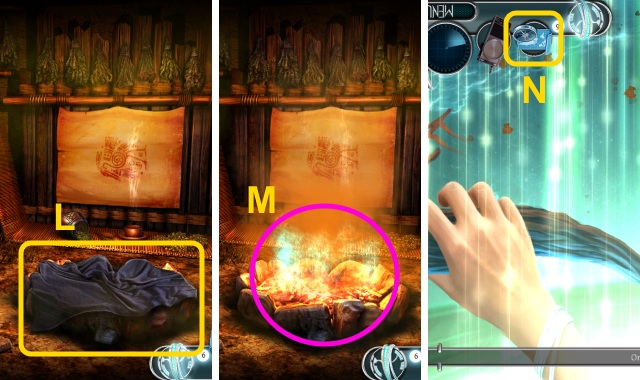
- Move the blanket (L); place the CRUSHED INGREDIENTS.
- Play the HOP to receive the IDOL (M).
- Use the Map to travel to any location (N).
- Return to the Native American Village.
- Take the COLORED PLATE and IDOL (O).
- Go to the Ranger’s Cabin.
- Place the TOPAZ and EMERALD; take the IDOL (P).
- Go to Wolf Mountain.
- Place the IDOLS (Q); open the door.
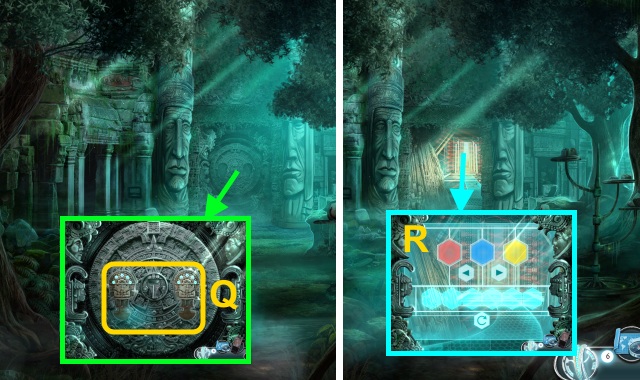
- Use the COLORED PLATE for a mini-game (R).
- Solution (S): C-D-C-B-D-A-B-D-B-D-C-D-A.
- Walk forward.
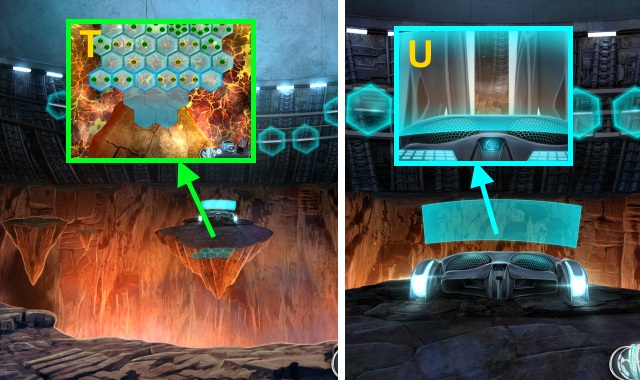
- Examine the floating isle for a mini-game; solution is random (T).
- Walk forward.
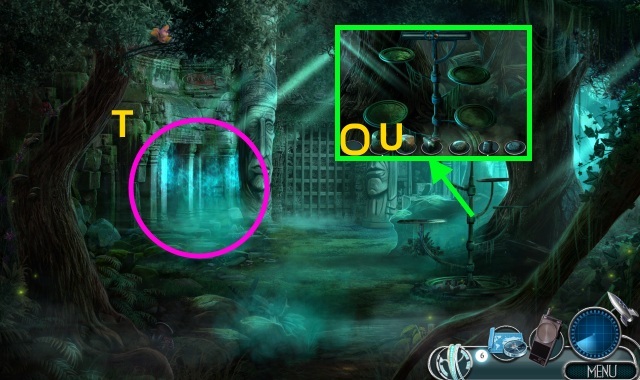
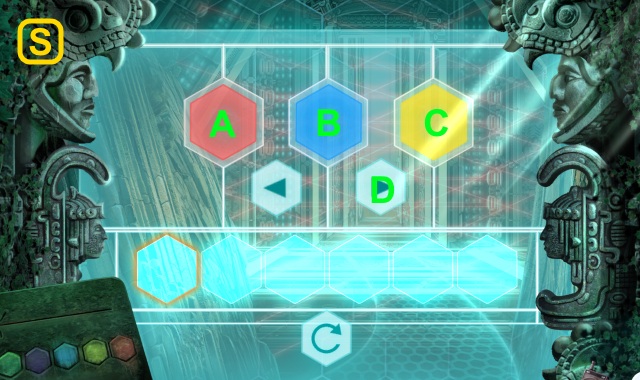
- Examine the console for a mini-game (U).

- Solution (V).
- Move forward.
- Press the console (W).
- Examine the window (X).
- Open the drawer; move the junk (Y).
- Take the Memory Bracelet (Z) and Broken Walkie-Talkie (A).
- Examine the door (B).
- Go forward.
- Examine the motorcycle (C).
- Scroll left.
- Take the AIR COMPRESSOR (D).
- Scroll right; walk forward.
- Give the Broken Walkie-Talkie (E).
- Close the curtains (1-3).
- Take the FEATHERED PEN (F).

- Talk to Melvin (G).
- Talk to Gary; take the STORAGE KEY (H).
- Move the notebook; take the BUTTER KNIFE (I).
- Talk to Gary; take the TOOLBOX (J).
- Give the TOOLBOX (K).
- Take the PLIERS (L), WOODEN SCREWDRIVER (M), and CHISEL (N); try to take the SCALPEL (O).

- Use the WOODEN SCREWDRIVER (P).
- Use the WOODEN SCREWDRIVER; use the PLIERS to take the WIRES (Q).
- Use the STORAGE KEY (R).
- Play the HOP to receive the JAR OF GLUE (S).
- Open the JAR OF GLUE; use the BUTTER KNIFE (T).
- Take the KNIFE WITH GLUE.
- Give the WIRES (U).
- Take the SCALPEL (V).
- Use the SCALPEL; take the RUBBER PATCH (W).
- Walk down.
- Move the bush; use the FEATHERED PEN (X).
- Use the KNIFE WITH GLUE and RUBBER PATCH (Y).
- Place the AIR COMPRESSOR; attach it (Z).
- Use the air compressor.
- Walk forward.
- Talk to Melvin; take the Walkie-Talkie (A).
- Walk down, then left.
- Select the map marker (B).
Chapter 4: The Wild West
- Examine the Saloon door (C).
- Take the COWBOY HAT and RAZOR (D).
- Walk left.
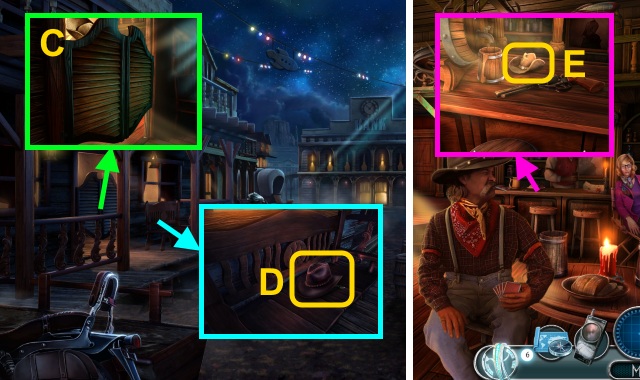
- Take the DOLL’S HAT (E).
- Talk to the director; take the SHERIFF’S BADGE and FLOOR PLAN (F).
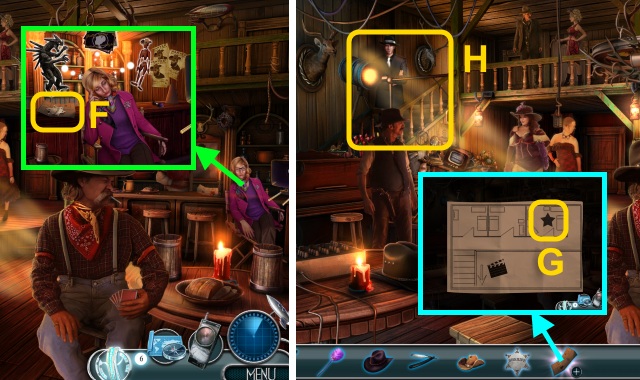
- Examine the FLOOR PLAN; examine the star (G).
- Try to go upstairs (H).
- Play the HOP to receive the GUEST LIST (I).
- Walk down.
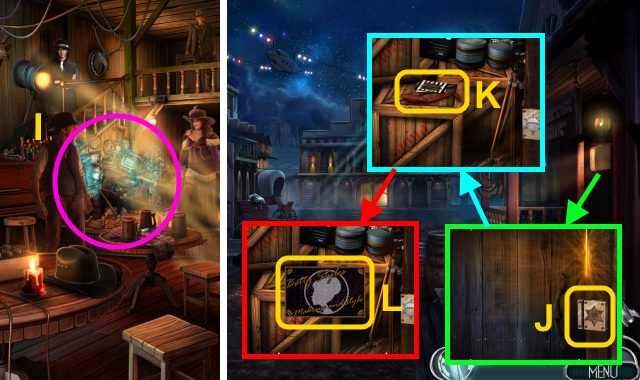
- Place the SHERIFF’S BADGE (J); open the door and curtain.
- Take the DOLL’S RIGHT LEG (K); sort through the cards.
- Take the BUSINESS CARD (L).
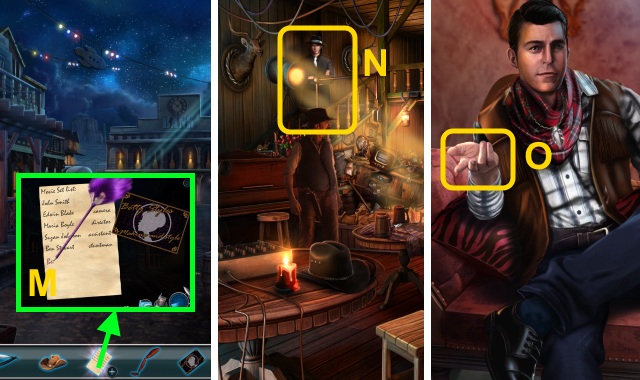
- Use the FEATHERED PEN and BUSINESS CARD on the GUEST LIST (M).
- Take the GUEST LIST.
- Walk left.
- Give the GUEST LIST (N).
- Give the BUSINESS CARD (O).
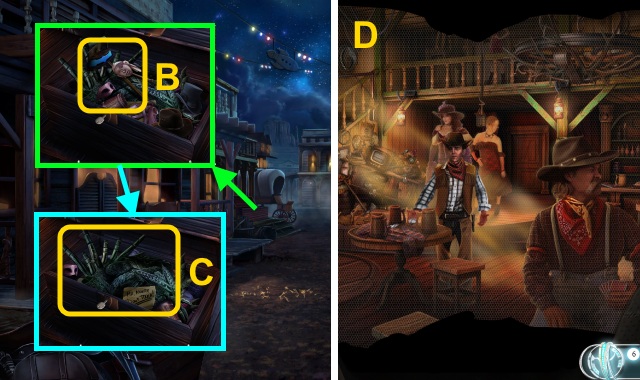
- Examine the frame; take the PAPER CLIP (P) and PHOTO SCRAPS (1/2) (Q).
- Bend the PAPER CLIP (R); take the IMPROVISED HOOK.
- Take the PHOTO SCRAPS (2/2) (S); place the PHOTO SCRAPS (2/2) (T).
- Arrange the scraps (U); examine the photo 2x.
- Walk down.
- Move the hat; take the HAND DRILL and COMB (V).
- Use the IMPROVISED HOOK; take the KEY (W).
- Walk down.
- Move the headdress; use the KEY (X).
- Take the DOLL’S LEFT ARM (Y).
- Take the FAKE REVOLVER (Z).
- Place the CHISEL (A); use the FAKE REVOLVER.
- Move the beads; take the WOODEN DOLL (B).
- Walk left, then upstairs.
- Use the COMB (C); take the DOLL’S LEFT LEG (D) and DRILL BIT (E).
- Combine the HAND DRILL and DRILL BIT; take the HAND DRILL (F).
- Place the DOLL’S HAT, DOLL’S LEFT LEG, DOLL’S LEFT ARM, and DOLL’S RIGHT LEG on the WOODEN DOLL (G); use the HAND DRILL.
- Take WOODY.
- Give WOODY (H).
- Move the trinket; take the makeup (I) and hat (J).
- Take the box (K) and photo (L).
- Take the hat (M).

- Open the drawers; take the brushes and makeup (N-R).
- Walk down.
- Take the hat (S).
- Try to take the eyeshadow; take the eyeshadow (T).
- Talk to Jack for a mini-game (U).
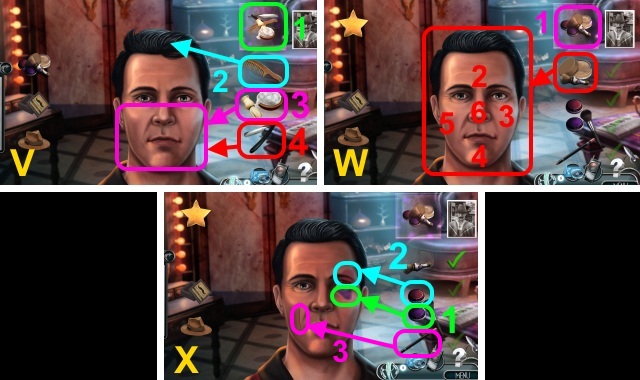
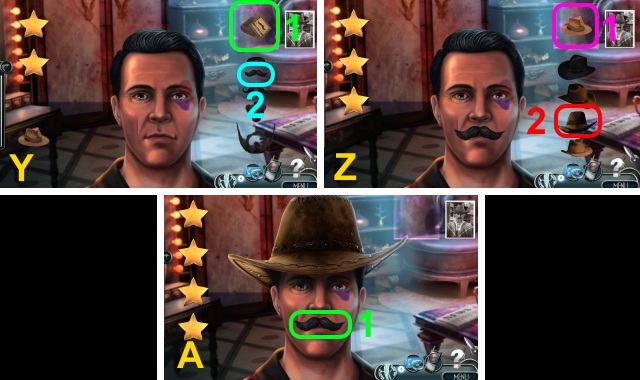
- Solution (V-A).
- Walk down.
- Take the COLLAPSIBLE SHOVEL (B); move the props.
- Take the costume (C).
- Walk left.
- Examine the room for a mini-game (D).
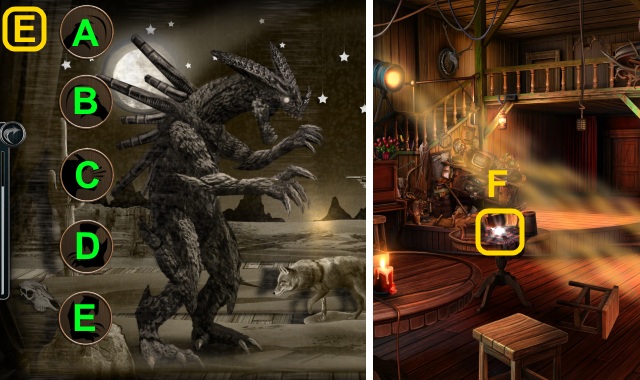
- Solution (E): D-C-C-E-A-D-A-B-C.
- Examine the Memory Crystal (F).
- Examine the map marker (G).
- Examine the reflection (H).
- Go forward for a mini-game.
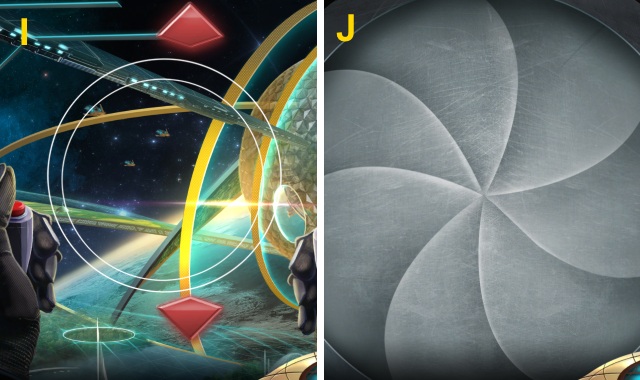
- Solution (I): Keep the small circle inside the large circle.
- Go forward.
- Open the hatch (J).
- Go forward.
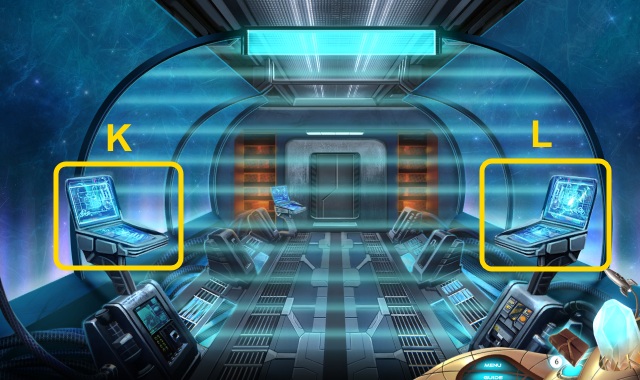
- Examine the computers (K-L).
- Walk forward for a mini-game.
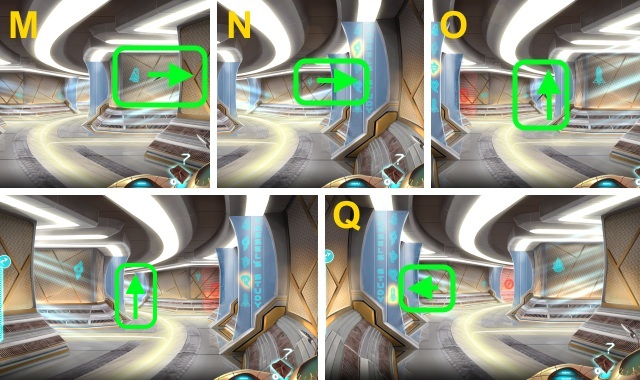
- Solution (M-Q).
- Walk forward.
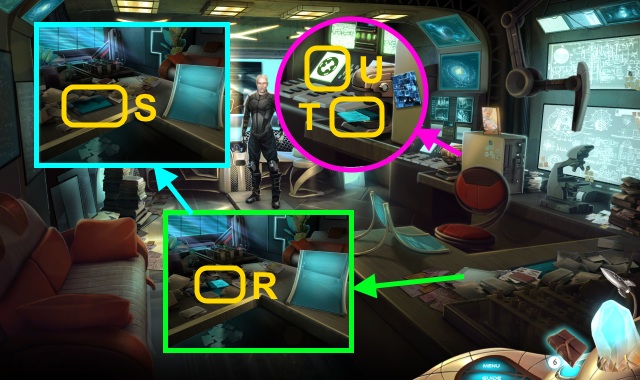
- Move the papers; take the BLANK ID CARD (R).
- Move the papers; take the TABLET (S).
- Place the BLANK ID CARD (T); press the button (U).
- Take the ENGRAVED ID CARD.
- Place the TABLET; use the ENGRAVED ID CARD (V).
- Press the arrow (W); select the picture (X).
- Take the ID CARD (Y).
- Examine TASSEL’S PACKAGE (Z); use the ID CARD.
- Take the PURPLE CRYSTAL (A).
- Give the PURPLE CRYSTAL (B).
- Give the PERSONAL MEMORY CRYSTAL (C).
- Walk left, then down.

- Examine the soldier 3x (D).
- Try to walk forward.
- Open the latches (E); open the hatch.
- Enter the tank for a mini-game (F).
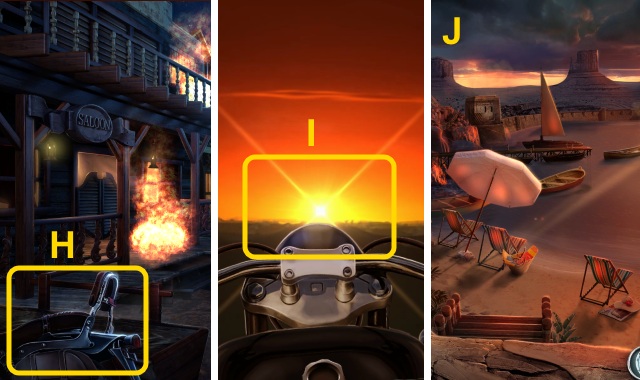
- Examine the motorcycle (H).
- Examine the horizon 2x (I).
- Examine the scene (J).
- Take the SMALL KEY (K) and FISHING-ROD PART (1/2) (L).
- Take the FISHING-ROD PART (2/2) (M); use the COLLAPSIBLE SHOVEL (N).
- Take the FISHING-ROD BASE (O); examine the lock for a mini-game (P).
- Solution (Q).
- Place the FISHING-ROD PART (2/2) on the FISHING ROD BASE (R); take the FISHING ROD.
- Use the SMALL KEY (S).
- Play the HOP to receive the DAM CONTROL MANUAL (T).
- Walk down, then forward.
- Talk to Carl (U).
- Use the FISHING ROD for a mini-game (V); stop the indicator inside the green mark.
- Take the SHORT CHAIN (W).
- Walk down, then left.
- Remove the chain (X); place the SHORT CHAIN.
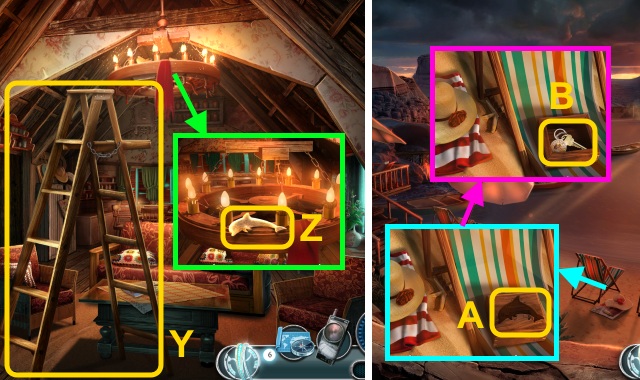
- Place the ladder (Y); take the WOODEN DOLPHIN (Z).
- Walk down.
- Place the WOODEN DOLPHIN (A); take the GOLD KEY (B).
- Walk forward.
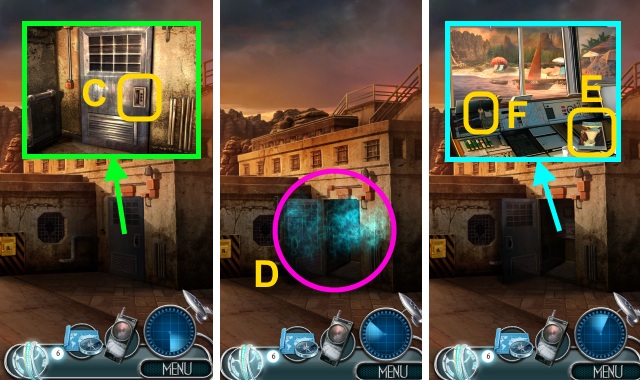
- Use the GOLD KEY (C).
- Play the HOP to receive the POWER SWITCH (D).
- Use the DAM CONTROL MANUAL (E).
- Open the cover; take the KEY ON HEXAGON CHAIN (F).
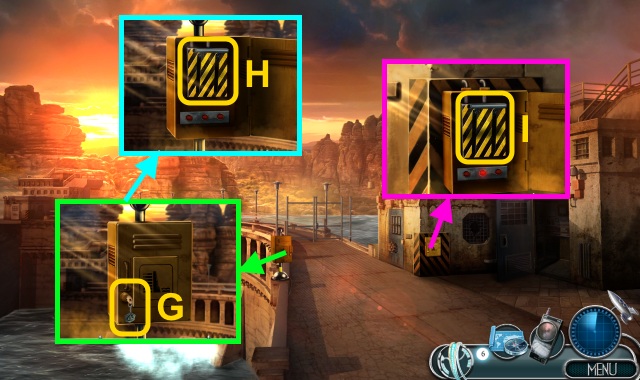
- Use the KEY ON HEXAGON CHAIN (G); open the cover.
- Flip the switch (H).
- Use the KEY ON HEXAGON CHAIN; open the cover. Flip the switch (I).
- Walk down.
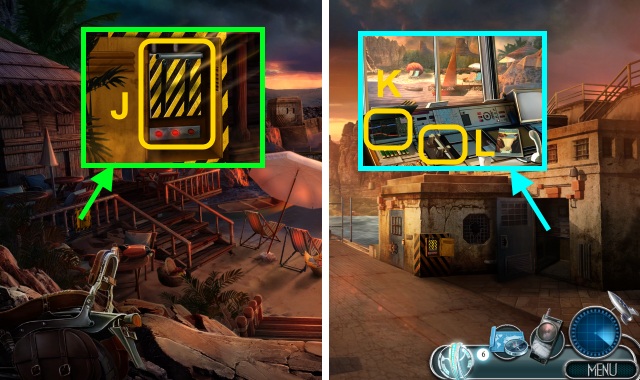
- Use the KEY ON HEXAGON CHAIN; open the cover. Flip the switch (J).
- Go forward.
- Connect the wires (K).
- Place the KEY ON HEXAGON CHAIN; press it (L).
- Remove the debris; open the hatch (M).
- Climb down.
- Examine the console (N).
Chapter 5: The Invasion
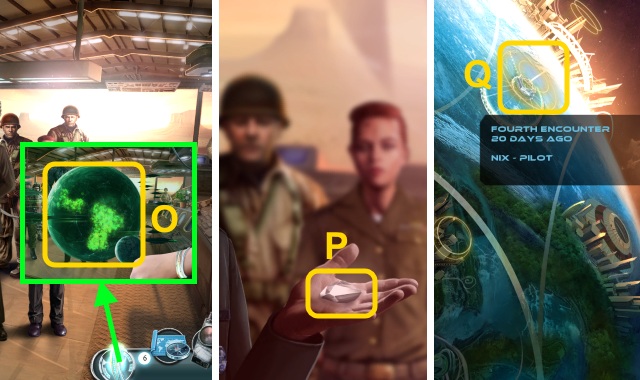
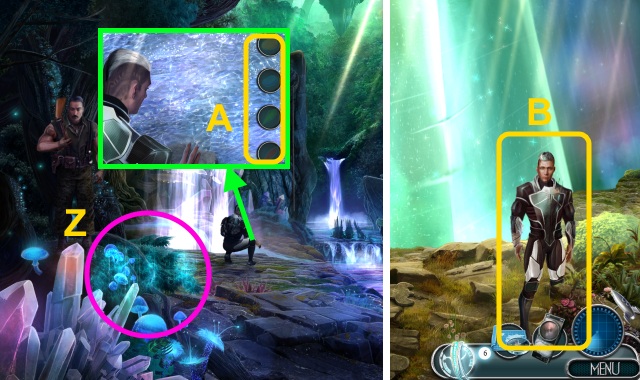
- Use the Memory Bracelet; examine the planet (O).
- Take the Memory Crystal (P).
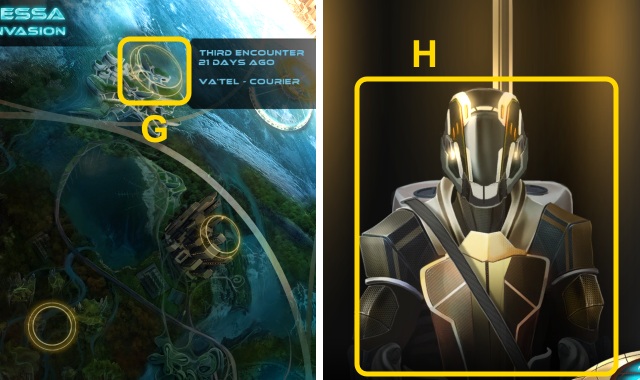
- Examine the map marker (Q).
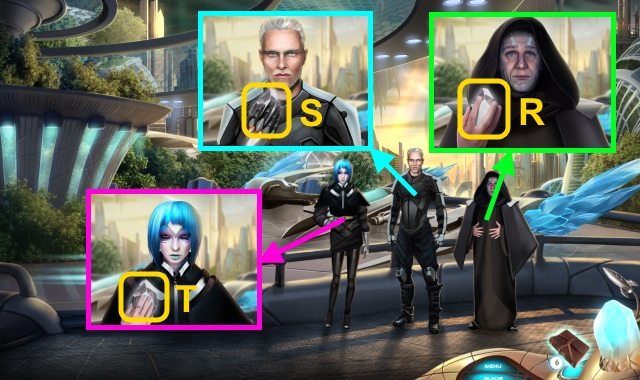
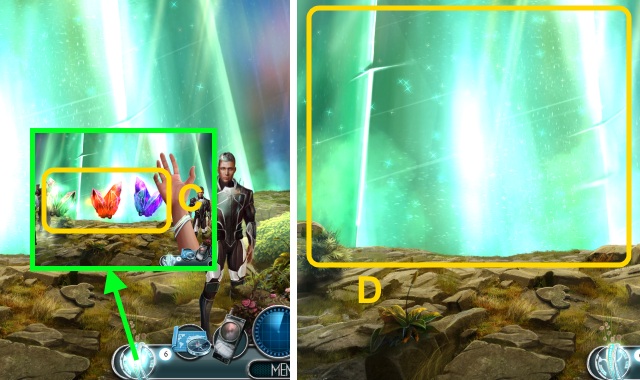
- Talk to Kha’zut; take KHAZUT’S CRYSTAL (R).
- Talk to Tassel; take TASSEL’S CRYSTAL (S).
- Talk to P’tula; take P’TULA’S CRYSTAL (T).
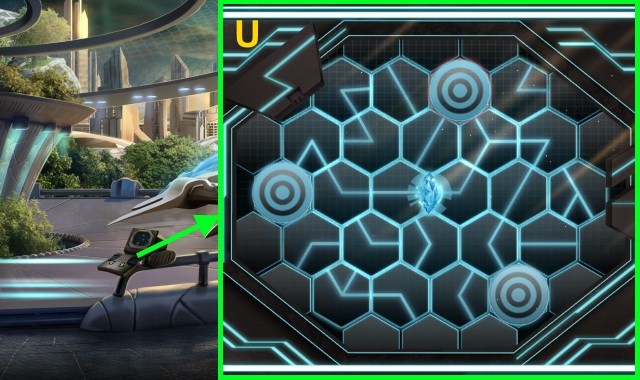
- Examine the console for a mini-game; solution (U).
- Go forward for a mini-game.
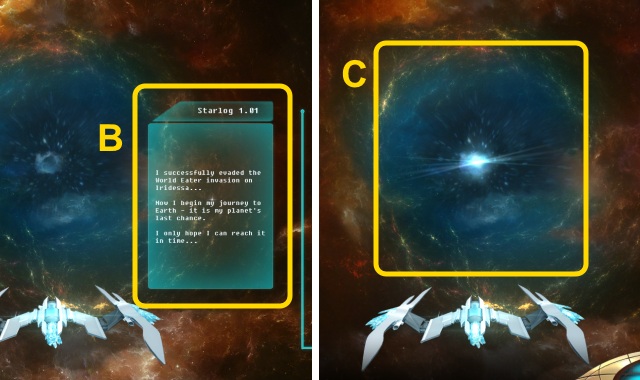
- Examine the log (B).
- Go forward.
- Play the HOP to receive the STARMAP.
- Use the STARMAP for a mini-game (C).
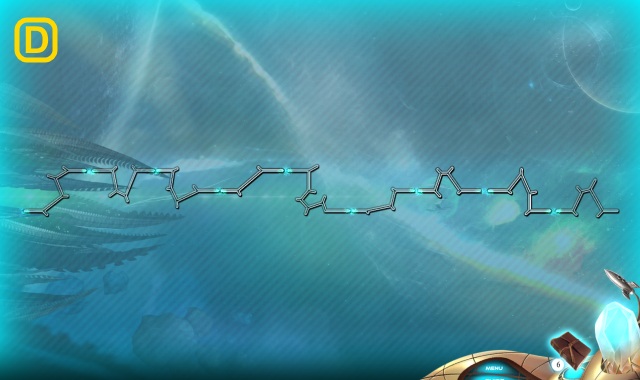
- Solution (D).
- Go forward.
- Talk to Nix (E).
- Try to walk left.
- Walk left.
- Take the RIFLE STOCK (F); move the helmet and boot.
- Take the SHOVEL BLADE (G).
- Use the RIFLE STOCK; take the RUSTY WRENCH (H).
- Take the TANGLED POWER CABLE (I), LEVER (J), WRISTWATCH, and CIGARETTE PACK (K).
- Move the stones.
- Place the LEVER (L); pull it.
- Walk forward.
- Open the CIGARETTE PACK; take the LIGHTER (M).
- Untangle the TANGLED POWER CABLE; place the WRISTWATCH (N).
- Take the POWER CABLE.
- Use the RUSTY WRENCH (O); press the button.
- Take the ENTRENCHING SHOVEL (P).
- Use the ENTRENCHING SHOVEL (Q); open the gate.
- Take the MESS KIT (R).
- Open the MESS KIT; take the SPOON, FORK, and KNIFE (S).
- Use the KNIFE (T).
- Play the HOP to receive the HAZMAT SUIT (U).
- Walk forward.
- Use the LIGHTER (V).
- Move the binoculars; take the SHOVEL HANDLE (W).
- Move the items; take the RED ELEVATOR KEY (X).
- Move the knife; take the YELLOW ELEVATOR KEY (Y).
- Combine the SHOVEL HANDLE and SHOVEL BLADE; take the SHOVEL (Z).
- Use the KNIFE (A); place the SPOON and FORK for a mini-game (B).
- Place the RED ELEVATOR KEY and YELLOW ELEVATOR KEY (D); turn them.
- Walk forward.
- Open the tent; play the HOP to receive the BOX PART (E).
- Take the ACID (F).
- Take the SNAPPED CHISEL (G); move the radio.
- Take the FUSE (H).
- Pour the ACID (I).
- Open the lid (J).
- Place the BOX PART for a mini-game (K).
- Solution (L): (A-D-G-J)(B-A)(J-K-J)(C-F-I-L)(J-K-J-K)(A-D-G-J).
- Take the DYNAMITE (M).
- Place the DYNAMITE and FUSE (N).
- Use the LIGHTER (O).
- Walk forward.
- Take the STONE (P).
- Talk to General Flint (Q).
- Give the SHOVEL (R).
- Take the BLUE CRYSTAL (S).
- Examine the crystal (T); place the POWER CABLE (U).
- Use the SNAPPED CHISEL and STONE 2x (V); take the RED CRYSTAL (W).
- Take the YELLOW CRYSTAL (X).
- Give the YELLOW CRYSTAL (Y).
- Play the HOP to receive the GREEN CRYSTAL (Z).
- Place the BLUE CRYSTAL, RED CRYSTAL, YELLOW CRYSTAL, and GREEN CRYSTAL (A).
- Go forward.
- Talk to Nix (B).
- Use the Memory Bracelet; take the EARTH CRYSTAL, FIRE CRYSTAL, and WATER CRYSTAL (C).
- Use the EARTH CRYSTAL, FIRE CRYSTAL, and WATER CRYSTAL (D).
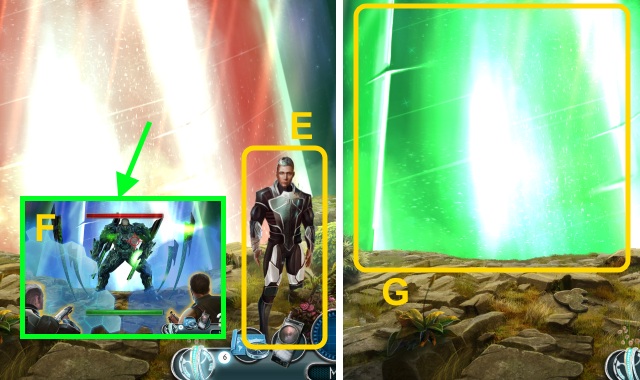
- Talk to Nix (E).
- Examine the crystal for a mini-game (F); shield your friends and defeat Nor.
- Examine the crystal (G).
- Congratulations! You have completed Beyond: Light Advent.


 Haunted Hotel: Phoenix Walkthrough, Guide, & Tips
 Lost in the City: Post Scriptum Walkthrough, Guide, & Tips
 Danse Macabre: Crimson Cabaret Walkthrough, Guide, & Tips
 Abandoned: Chestnut Lodge Asylum Walkthrough, Guide, & Tips
 Diamon Jones: Amulet of the World Handbuch, Guide, & Tips