Dead Reckoning: The Crescent Case Walkthrough, Guide, & Tips
Dead Reckoning: The Crescent Case Walkthrough

Welcome to the Dead Reckoning: The Crescent Case Walkthrough.
A carnival is no laughing matter when a murderer strikes.
Whether you use this document as a reference when things get difficult or as a road map to get you from beginning to end, we’re pretty sure you’ll find what you’re looking for here.
This document contains a complete Dead Reckoning: The Crescent Case game walkthrough featuring annotated screenshots from actual gameplay!
We hope you find this information useful as you play your way through the game. Use the walkthrough menu below to quickly jump to whatever stage of the game you need help with.
Remember to visit the Big Fish Games Forums if you find you need more help. Have fun!
This walkthrough was created by MargieB, and is protected under US Copyright laws. Any unauthorized use, including re-publication in whole or in part, without permission, is strictly prohibited.
General Tips
- This is the official guide for Dead Reckoning: The Crescent Case.
- This guide will not tell you when you have to zoom into a location; the screenshots will show each zoom scene.
- Hidden-object puzzles are referred to as HOPs. This guide will not show screenshots of the HOPs, however, it will mention when an HOP is available and the inventory item you’ll collect from it.
- Use the Map to fast travel to a location.
Chapter 1: Carnival Avenue

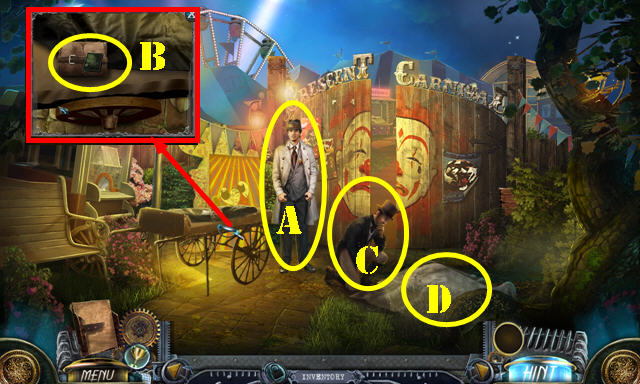
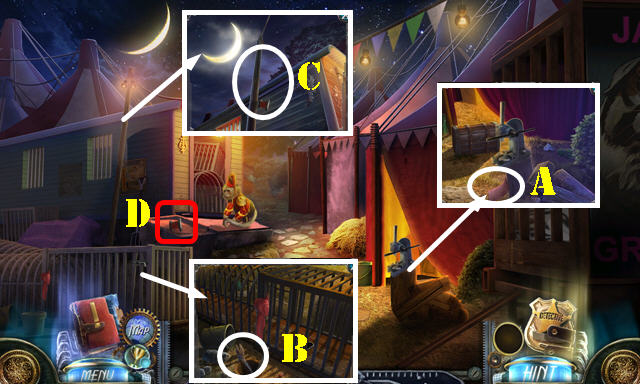
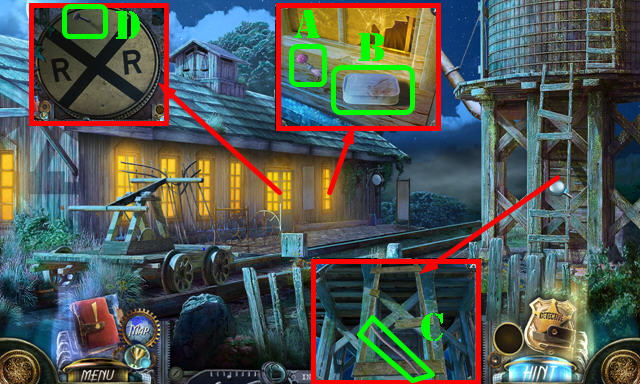
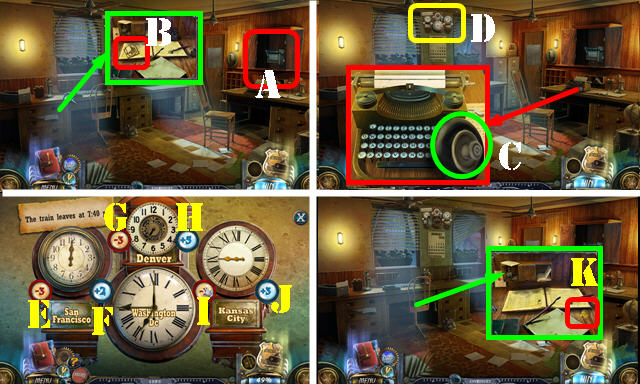
- Talk to the detective (A).
- Take the BADGE WALLET (B).
- Take the BADGE from the BADGE WALLET; you receive the FORENSICS KIT (inventory).
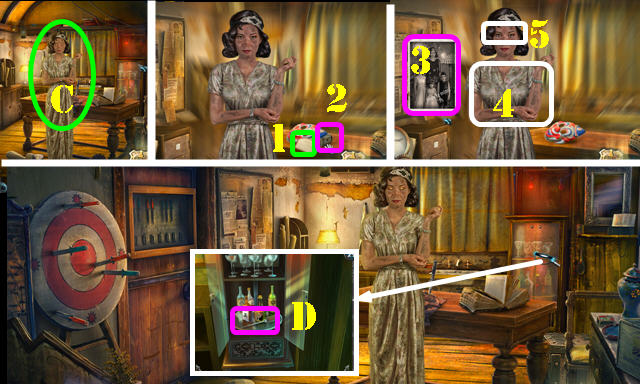
- Show the BADGE (C).
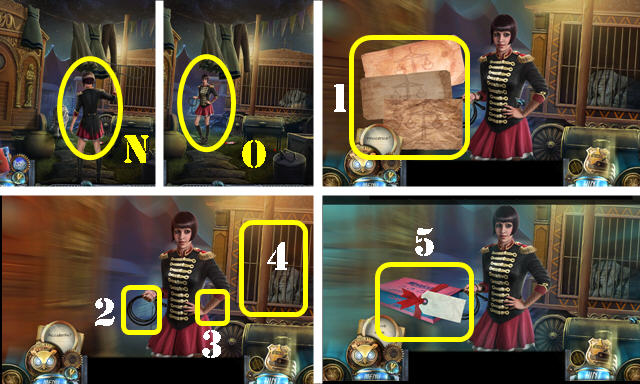
- Remove the sheet (D).
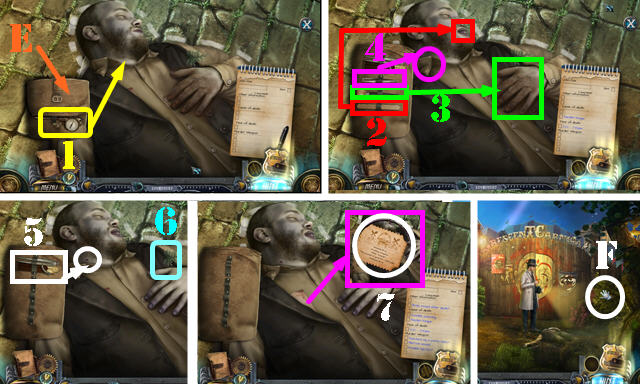
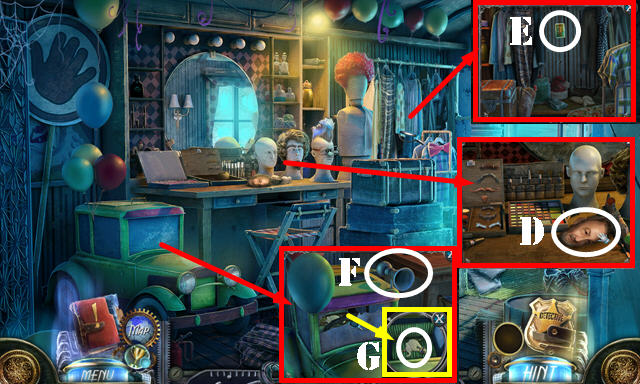
- Place the FORENSICS KIT (E).
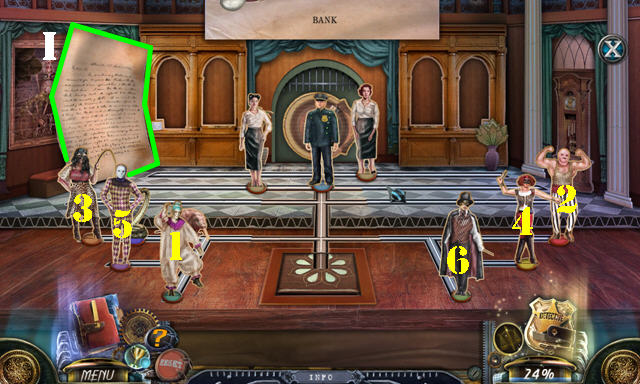
- Use the items (1-5). Take the branches (6).
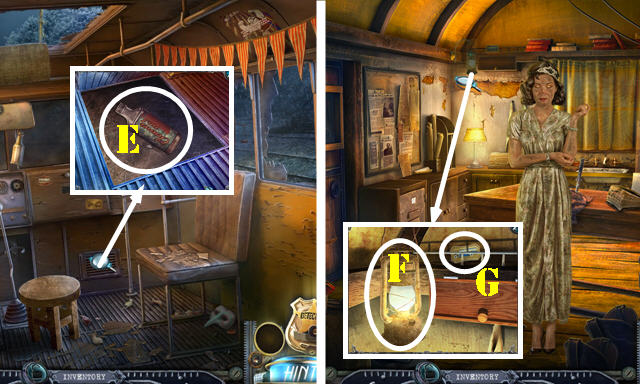
- Open the jacket and open the telegram; take the RINGS 1/3 (7); take the other note.
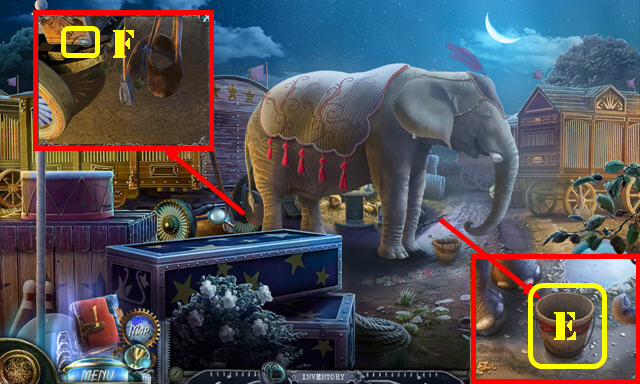
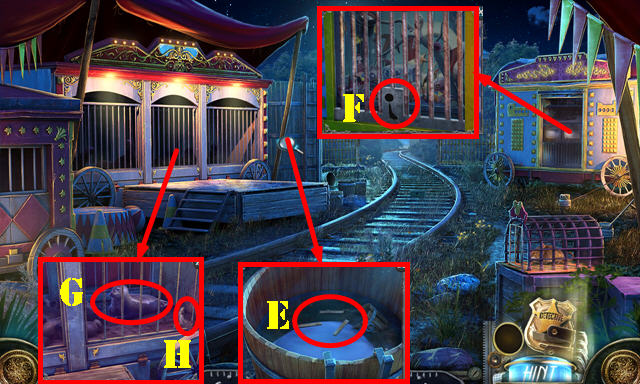
- Move the leaves (F) and go right.
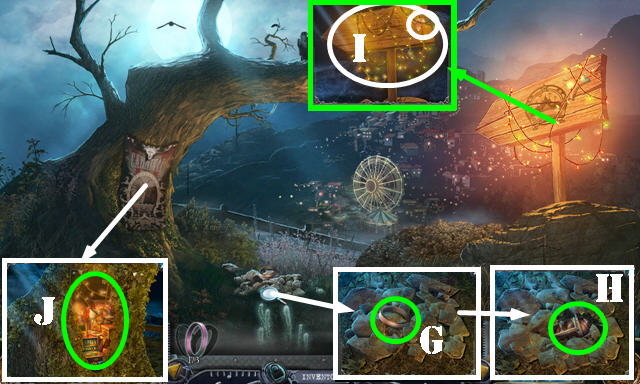
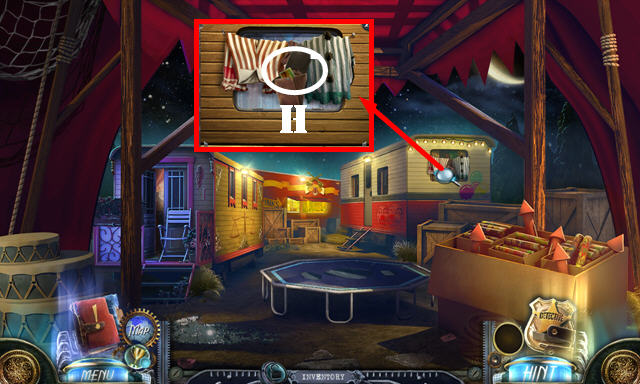
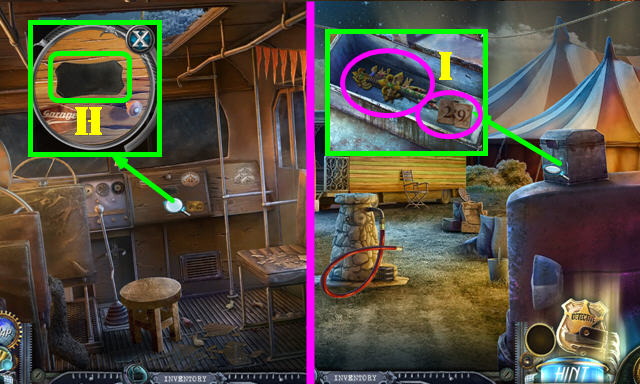
- Take the RINGS 2/3 (G). Select the rocks twice; take the MECHANICAL BOX (H).
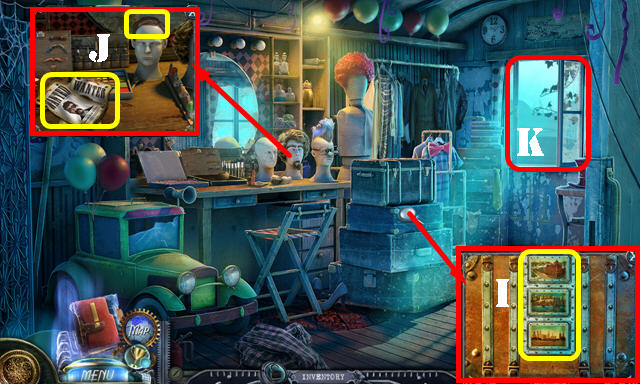
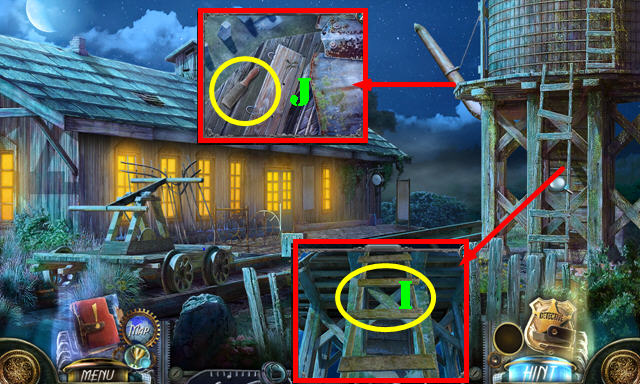
- Take the MERMAID-TAIL CUTOUT and LIGHTS (I).
- Move the poster; place the LIGHTS (J) to trigger an HOP; play it to get the PACKAGE.
- Open the PACKAGE; take the BLOW DART (inventory).
- Walk down.
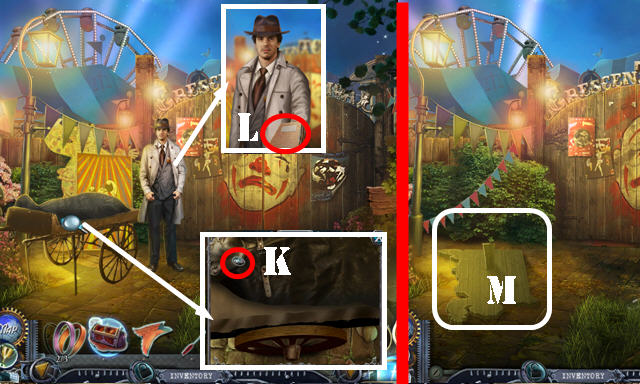
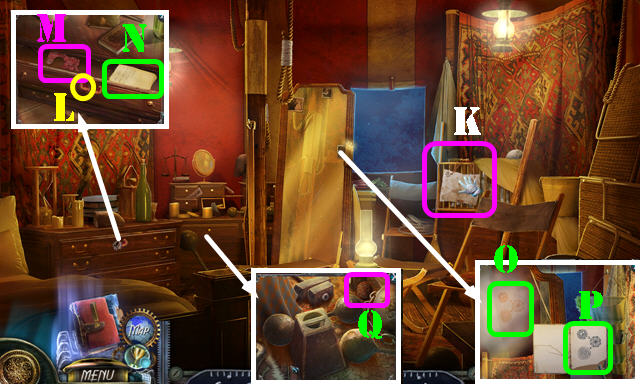
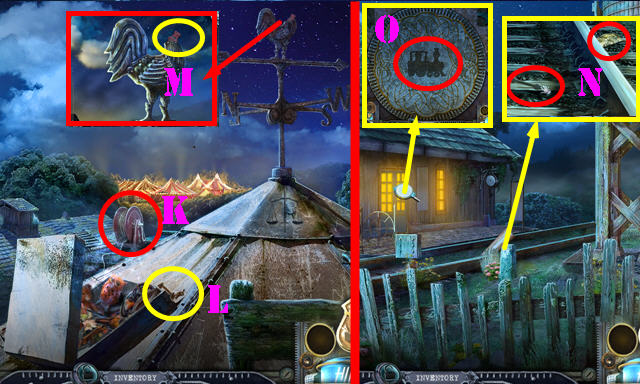
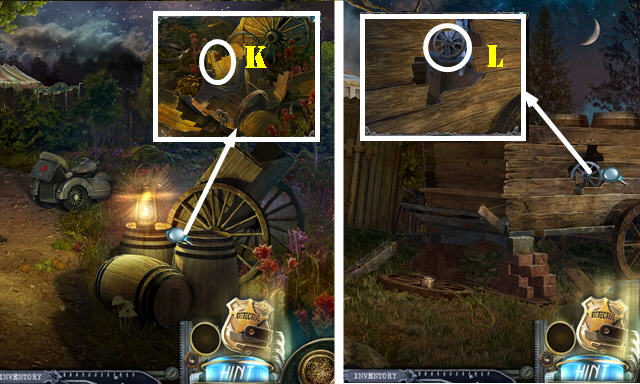
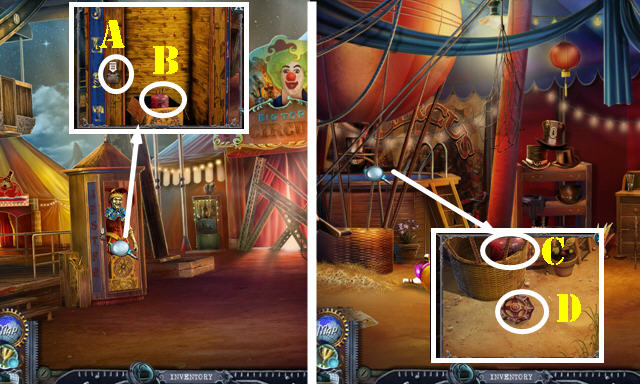
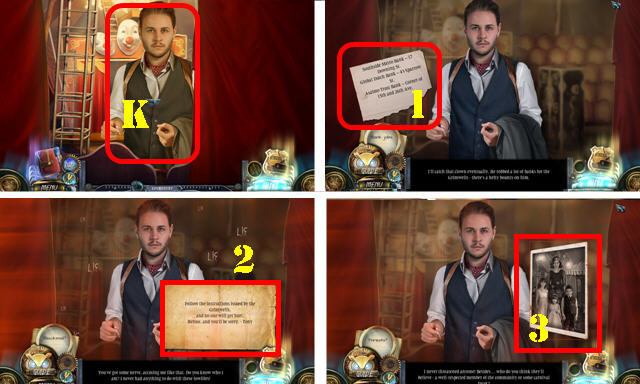
- Open the bag; use the BLOW DART (K) to get the POLICE REPORT.
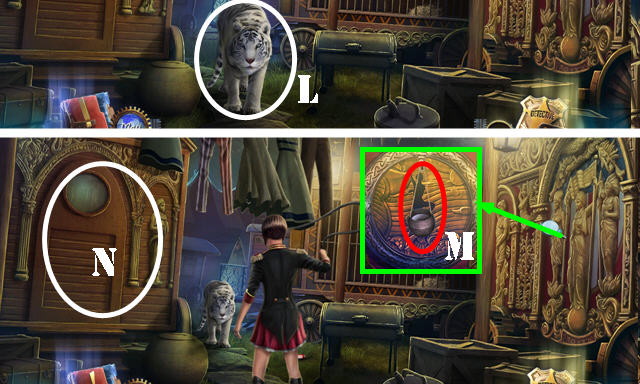
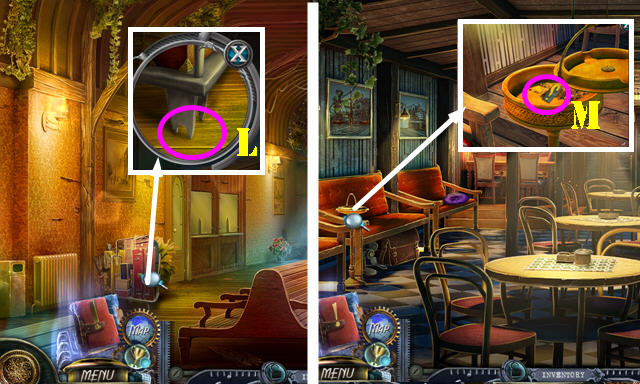
- Talk to the detective; take the evidence (L).
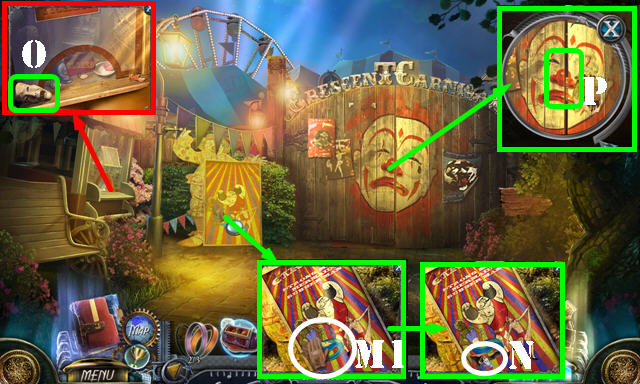
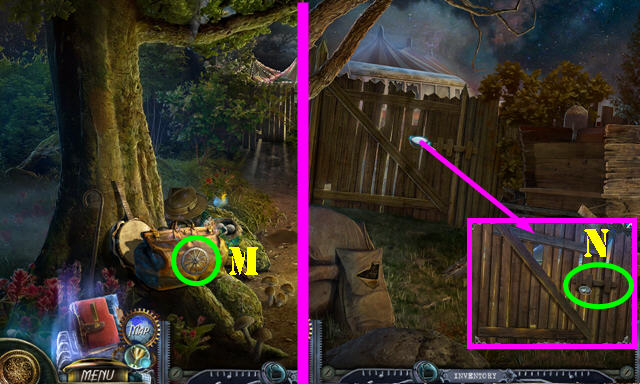
- Move the board (M); take the GLOVES (M1).
- Place the MERMAID-TAIL CUTOUT; take the THEATER MASKS 1/2 (N).
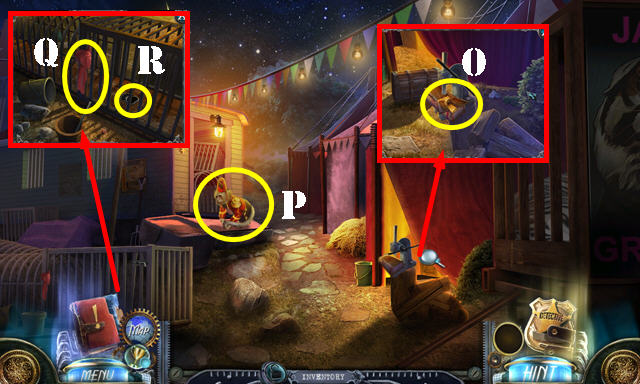
- Take the THEATER MASKS 2/2 (O).
- Place the 2 THEATER MASKS in the MECHANICAL BOX; take the BATON (inventory).
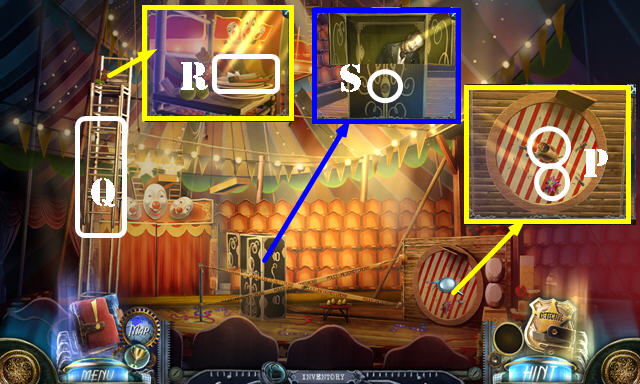
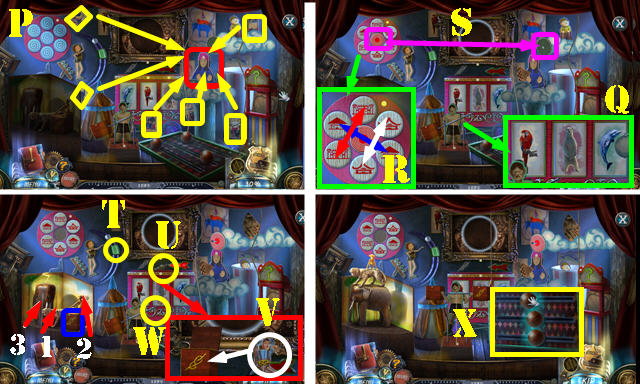
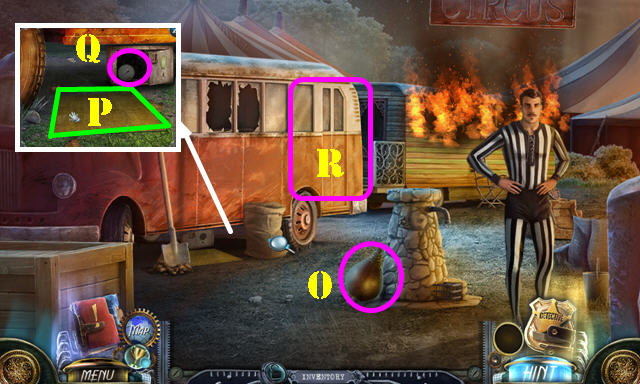
- Use the BATON (P); go forward.
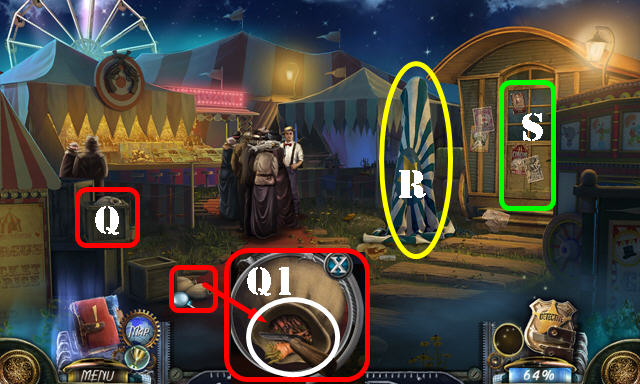
- Drop the box (Q); take the SCRAPER and CARROT (Q1).
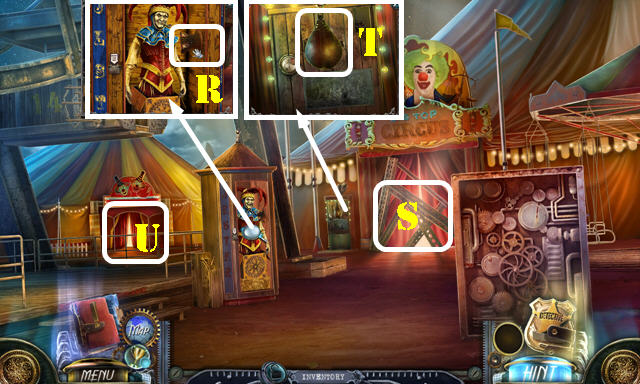
- Take the FABRIC (R).
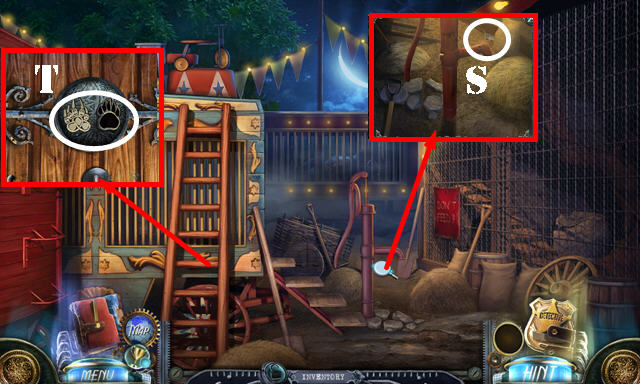
- Enter (S).

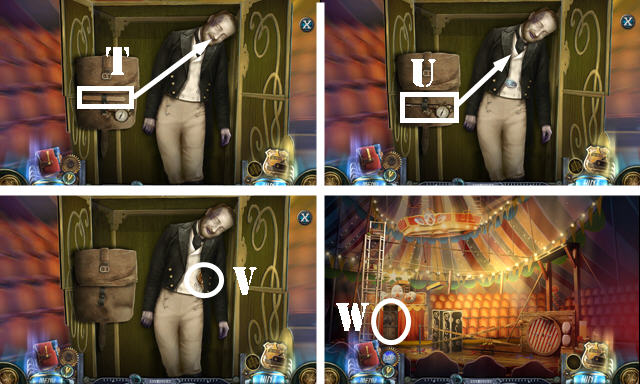
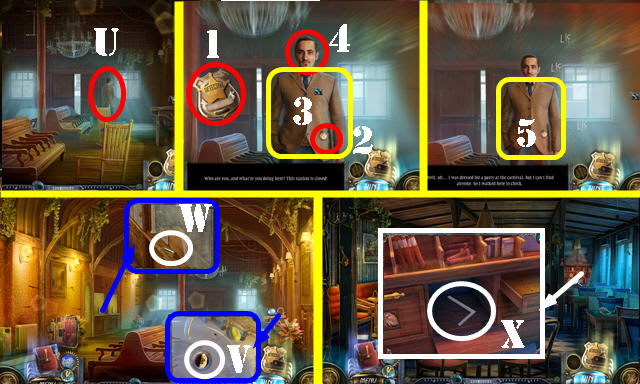
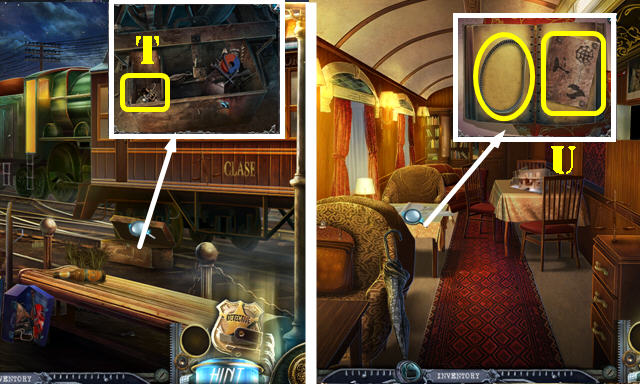
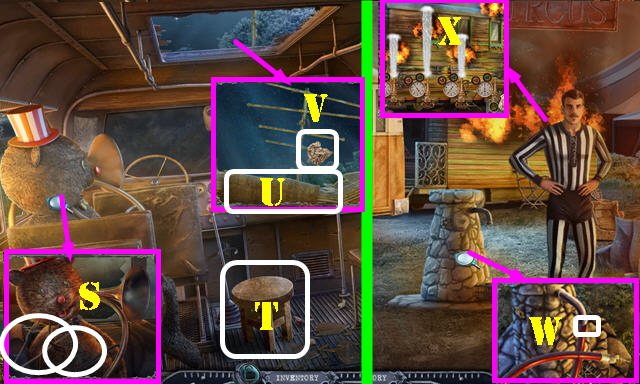
- Give the POLICE REPORT (T). Select (U-U1-U2). Open the book and touch the page (V). Select (V1).
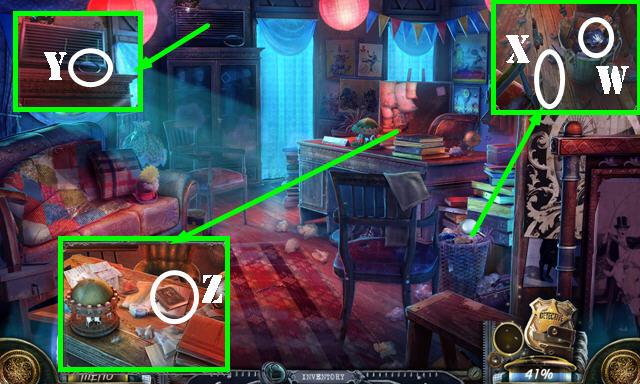
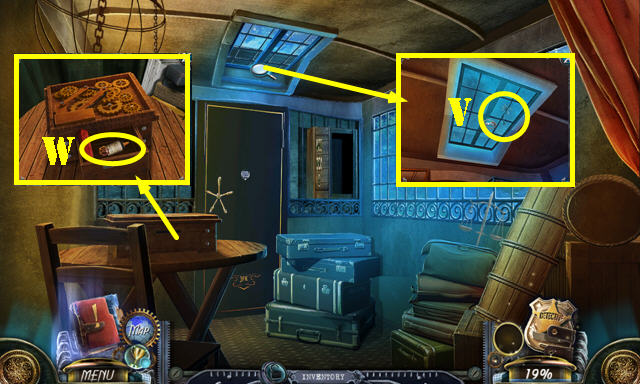
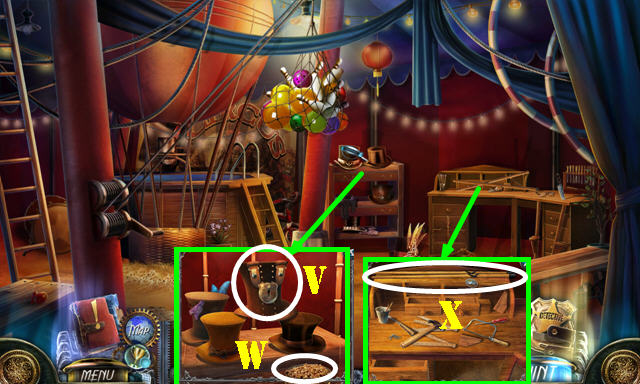
- Move the trash; take the UMBRELLA (W).
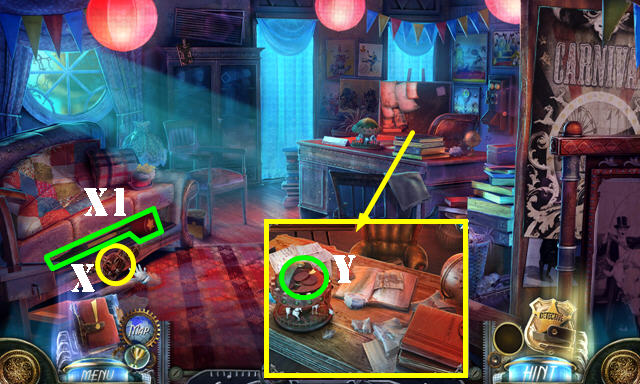
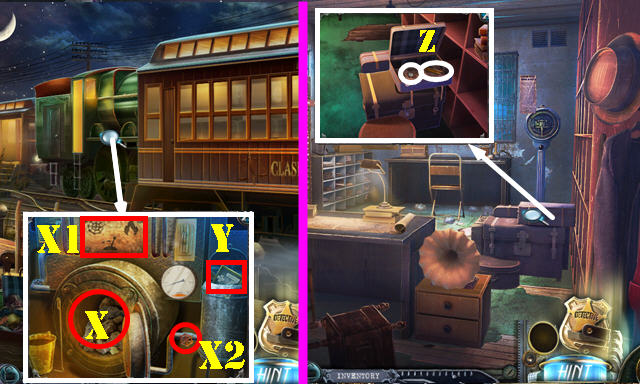
- Use the SCRAPER (X); take the WEIGHT CUTOUT and SMALL DIAL.
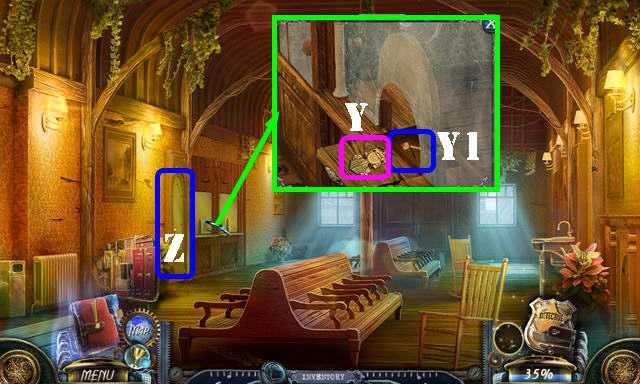
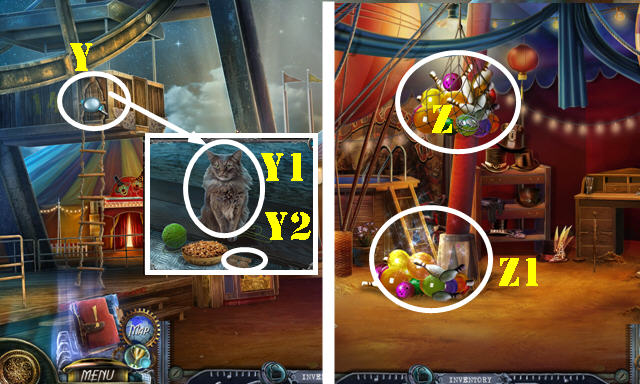
- Take the RINGS 3/3 (Y).
- Move two papers; take the EMPLOYEE RECORD (Z).
- Take the GLOBE-LOCK CODE from the EMPLOYEE RECORD; flip the pages twice (inventory).
- Walk down twice.
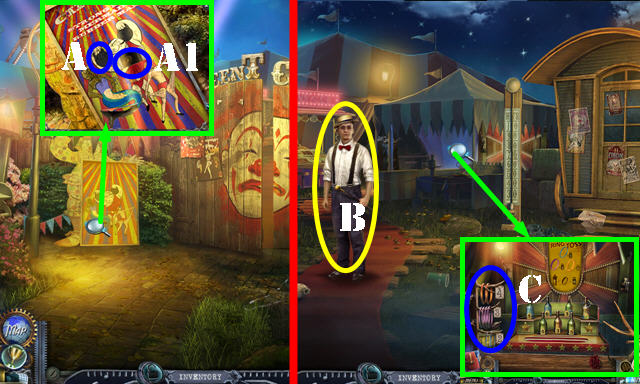
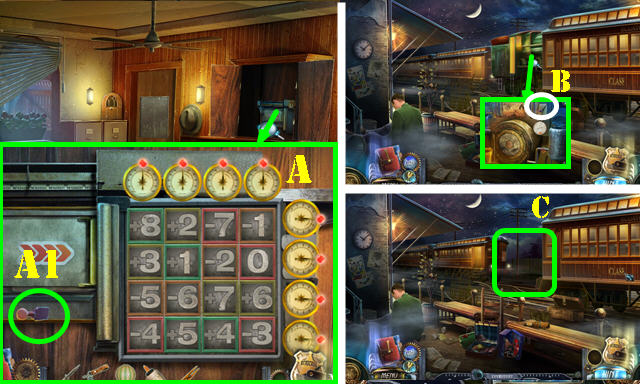
- Place the WEIGHT CUTOUT (A); take the MAGIC-BOX KEY (A1).
- Go forward.
- Talk to the man (B).
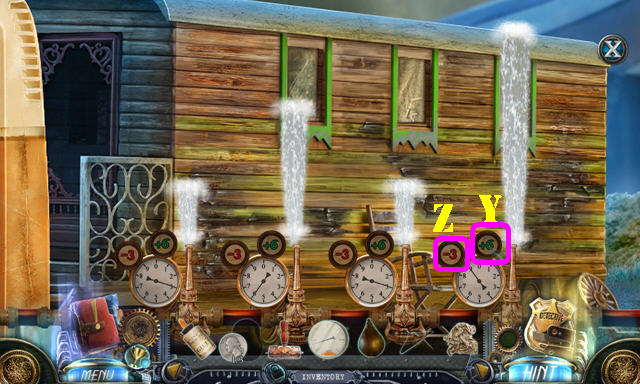
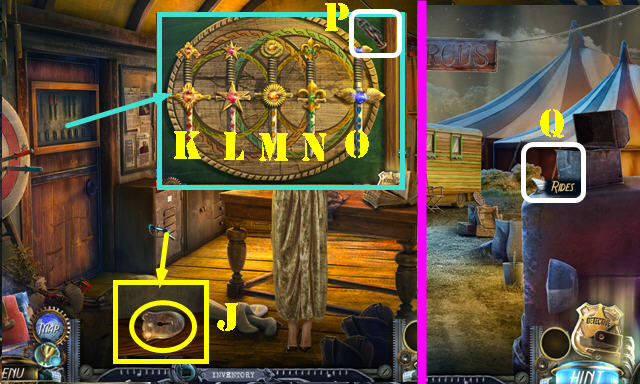
- Place the 3 RINGS for a puzzle (C).
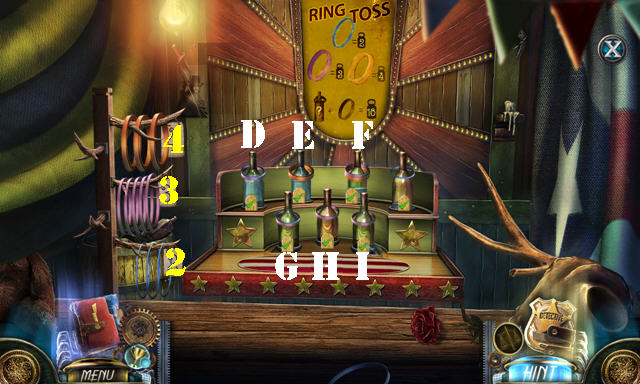
- Solution (D: 3-2)-(E: 4)-(F: 4-3)-(G: 3-2)-(H: 4-3)-(I: 3-2).
- Take the SUCTION-CUP TOY.
- Walk down.
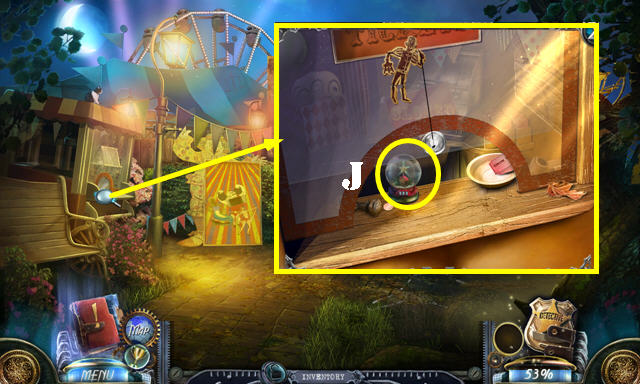
- Use the SUCTION-CUP TOY; take the SNOW GLOBE (J).
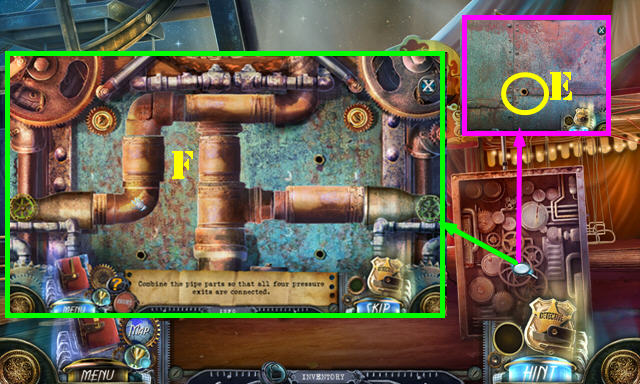
- Place the SMALL DIAL and GLOBE-LOCK CODE on the SNOW GLOBE. Change dial to 681. Touch the star and take the COPPER WIRE (inventory).
- Go to the Manager’s Office.
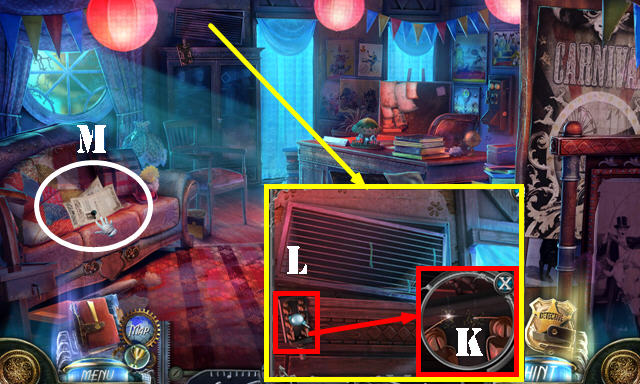
- Place the COPPER WIRES; use the GLOVES (K) and select the lever (L). Take the MISSING PAGES (M).
- Place the MISSING PAGES on the EMPLOYEE RECORD; connect the two pages to get the BIG-TOP TICKET (inventory).
- Walk down.
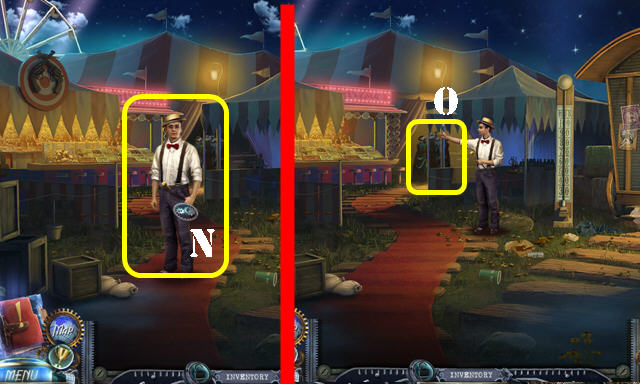
- Give the BIG-TOP TICKET (N).
- Enter (O).
- Take the STAR and LION (P).
- Use the UMBRELLA (Q); take the FLARE and CAROUSEL HANDLE (R).
- Use the MAGIC-BOX KEY (S).
- Use the tongue depressor (T) and thermometer (U). Move the jacket; take the SOFA MEDALLION and evidence (V).
- Open the curtain (W).
- Go to the Manager’s Office.
- Place the SOFA MEDALLION (X); take the LARGE HAMMER (X1).
- Place the CAROUSEL HANDLE; take the REWARD TOKENS and CARNIVAL LOGO 1/3 (Y).
- Walk down.
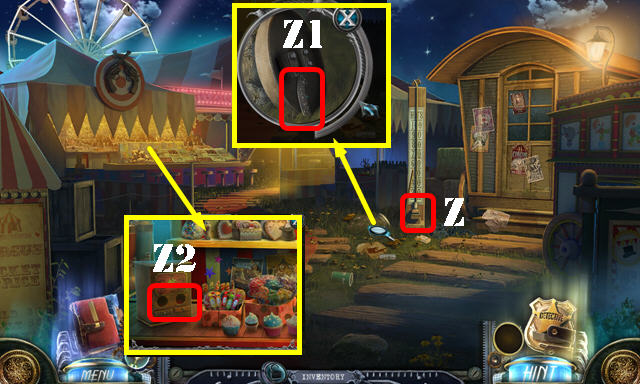
- Use the LARGE HAMMER (Z); take the CARNIVAL LOGO 2/3 (Z1).
- Place the REWARD TOKENS (Z2) for a HOP; play it to get the BULL’S-EYE.
- Go to the Big Top.
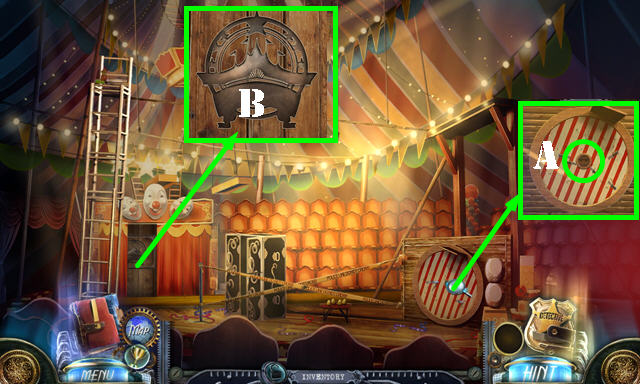
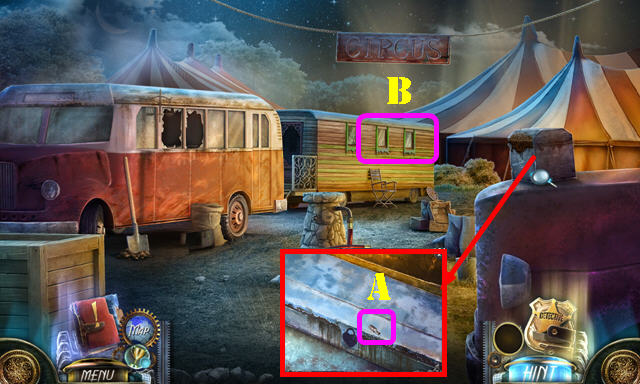
- Place the BULL’S-EYE (A); take the CARNIVAL LOGO 3/3.
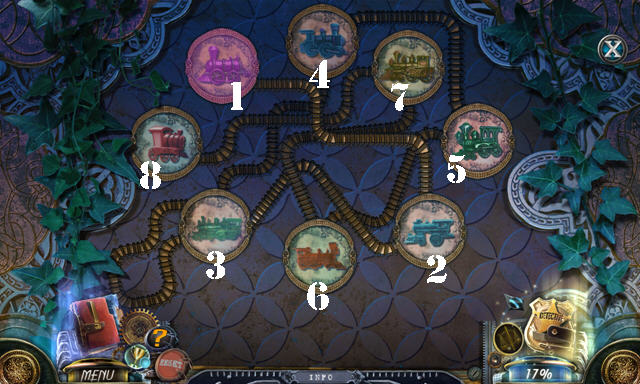
- Place the 3 CARNIVAL LOGOS (B) for a puzzle.
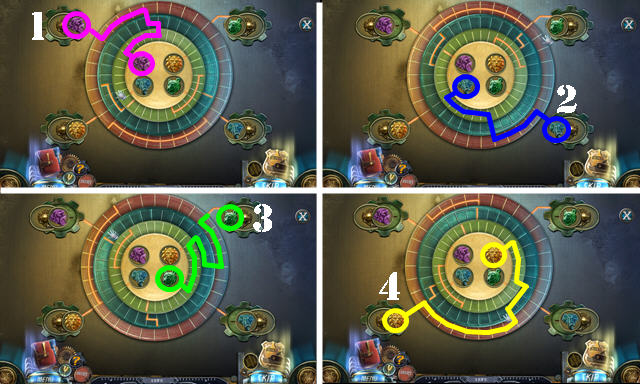
- Solution (1-4).
- Go Backstage.
Chapter 2: The Magician’s Trailer
- Take the evidence and FLINT (C).
- Take the CAGE KEY (D).
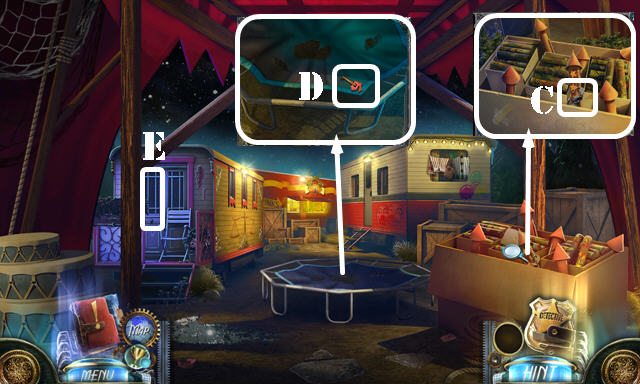
- Enter (E).
- Place the STAR for a HOP (F); play it to get the SPRINGS.
- Remove the 2 papers; take the FIREWORKS INSTRUCTIONS (G).
- Take the SEWING KIT (H).
- Remove the belts (I).
- Use the CAGE KEY; place the CARROT (J) and take the METAL POSTCARD 1/3 (K).
- Walk down.
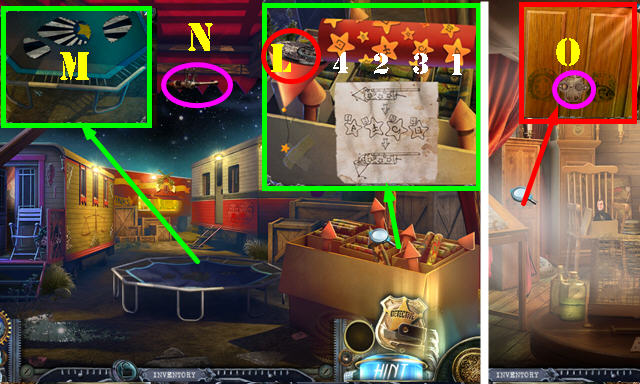
- Place the FIREWORKS INSTRUCTIONS; select 1-4 and take the NIGHT SYMBOL (L).
- Place the FABRIC and use the SEWING KIT, then place the SPRINGS (M). Jump on the trampoline and take the JUGGLING PIN (N).
- Take the ZODIAC SYMBOLS and DAY SYMBOL from the JUGGLING PIN (inventory).
- Enter the Magician’s Trailer.
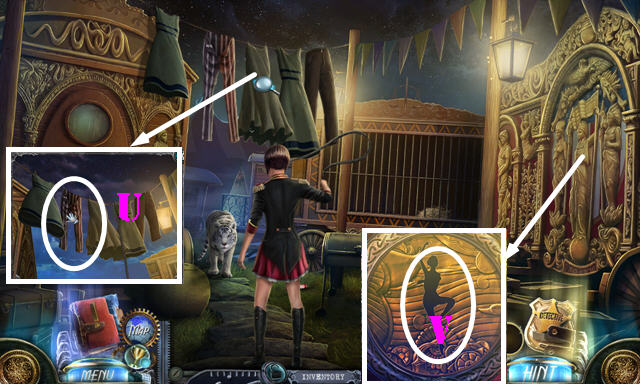
- Place the DAY SYMBOL and NIGHT SYMBOL (O). Move the curtain for a puzzle.
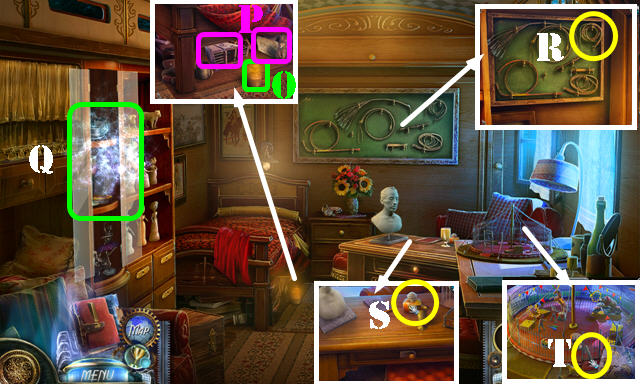
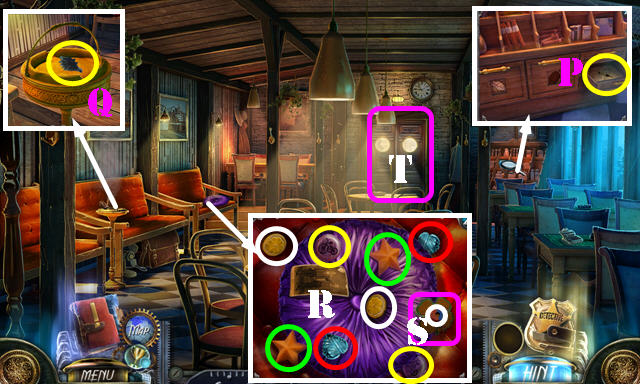
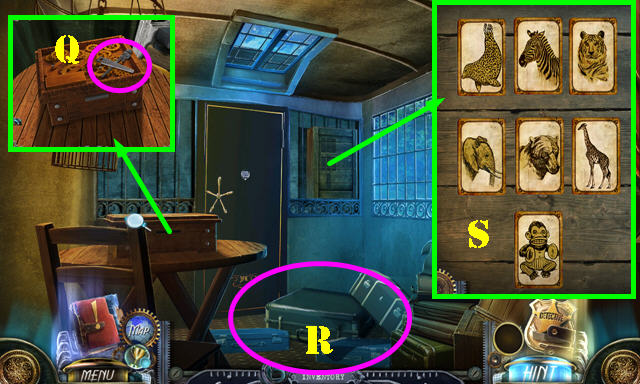
- Give the tarot cards to the fortune teller (P).
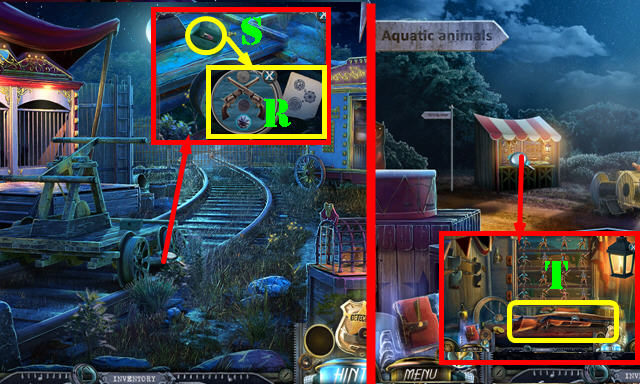
- Select the parrot, polar bear and dolphin (Q).
- Match the pairs (R). Place the target (S); select the ball (T) once it’s in the middle.
- Take the whistle (U). Select the animals in order (1-2-3). Move the box (blue) to the mantle. Select the rubber man and place it in the box (V).
- Place the box on the barbell (W). Solve the mini-game (X).
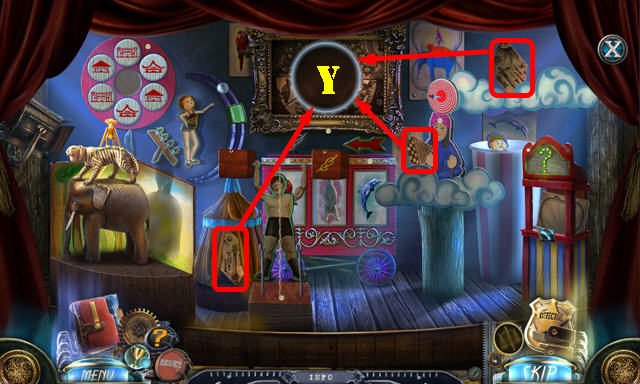
- Put all the pieces in the frame (Y).
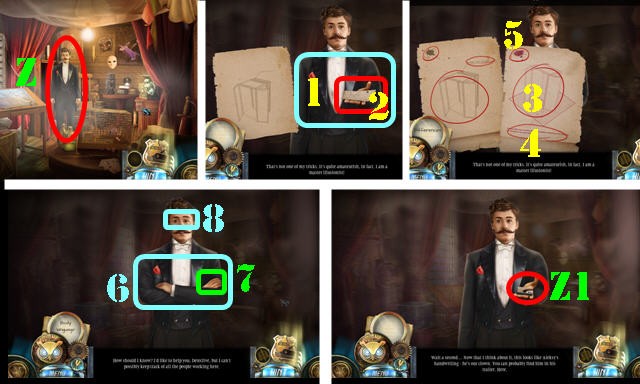
- Talk to the man (Z). Select 1-8.
- Take the TRAILER-LOCK PART (Z1).
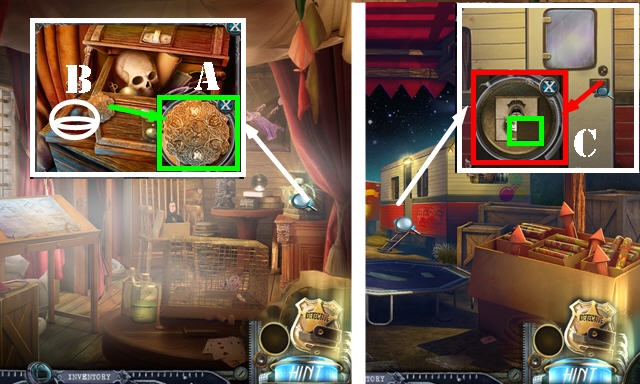
- Place the ZODIAC SYMBOLS (A); take the MAGICIAN’S WAND and CAR HORN (B).
- Walk down.
- Place the TRAILER-LOCK PART (C) and go through the door.
- Take the evidence (D).
- Move the clothes 4x; take the METAL POSTCARD 2/3 (E).
- Place the CAR HORN (F) and touch it; take the ELEPHANT TOKEN (G).
- Walk down.
- Place the ELEPHANT TOKEN; take the METAL POSTCARD 3/3 and WIG (H).
- Go to the Clown’s Trailer.
- Place the 3 METAL POSTCARDS (I); take the TORN POSTERS.
- Touch the TORN POSTERS to get the WANTED POSTERS (inventory).
- Place the WANTED POSTERS and the WIG for a HOP; play it to get the CLOWN’S FACE (J).
- Exit (K).
- Use the FLARE (L).
- Take the OIL (M).
- Enter (N).
- Lift the cover and remove the top; insert the OIL and use the FLINT (O). Take the SMALL CAGE and PAROLE DOCUMENTS 1/3 (P).
- Open the door (Q) for a HOP; play it to get the BALLERINA.
- Use the MAGICIAN’S WAND to get the WHIP (R).
- Take the HAIR OIL (S).
- Take the CHARCOAL STICK (T).
- Walk down.
- Use the WHIP; take the CLOTHES (U).
- Take the CODE from the CLOTHES (inventory).
- Place the BALLERINA (V) for a puzzle.
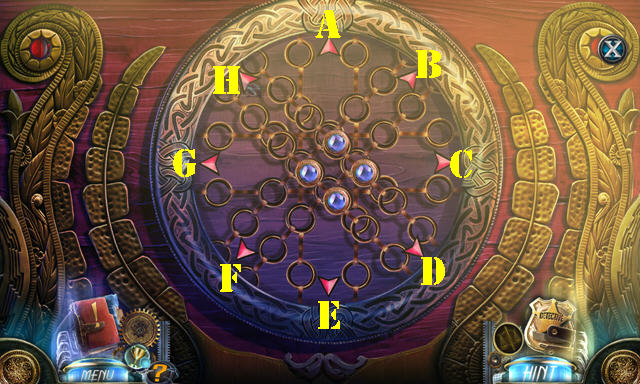
- Solution: H-A-D-Cx3-Ex3-Hx2.
- Take the ELEPHANT FIGURINE.
- Go to the Beast Tamer’s Trailer.
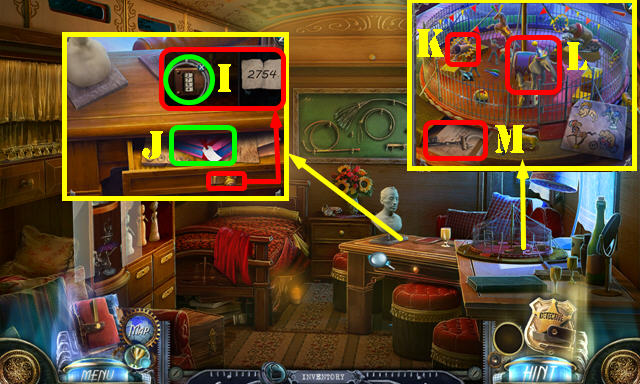
- Place the CODE; enter 2754 (I). Look at the package (J). Take the PAROLE DOCUMENTS 2/3. Move the paper; take the MIRROR.
- Place the LION (K) and the ELEPHANT FIGURINE (L); take the TIGER-DEN KEY and PAROLE DOCUMENTS 3/3 (M).
- Walk down.
- Give the TIGER-DEN KEY (N).
- Give the 3 PAROLE DOCUMENTS (O).
- Select 1-5.
- Go forward.
Chapter 3: Trailers and Cages
- Take the SANDPAPER (A) and PLIERS (B).
- Shake the pole (C); take the WIRE SPOOL (D).
- Go forward.
- Use the WIRE SPOOL; take the BUCKET (E).
- Use the PLIERS to get the NAILS 1/4 (F).
- Walk down and go left.

- Take the WOODEN CRATE (G), BANANA (H), and SHARP BOTTLENECK (I).
- Place the BUCKET (J). Use the HAIR OIL (K) and pump the handle (L). Take the WATER BUCKET.
- Use the MIRROR (M). Open and then take the NOTEBOOK (N).
- Walk down.
- Place the WOODEN CRATE; use the crank and take the CHEESE (O).
- Give the BANANA (P) for a HOP; play it to get the WHITE BEAR PAW.
- Use the SHARP BOTTLENECK (Q); open the cage and take the BLACK BEAR PAW (R).
- Return to the Beast Cages.
- Place the CHEESE in the SMALL CAGE to get the MOUSETRAP (inventory).
- Put down the MOUSETRAP (S) to get the CAGED MOUSE.
- Place the WHITE BEAR PAW and the BLACK BEAR PAW for a puzzle (T).
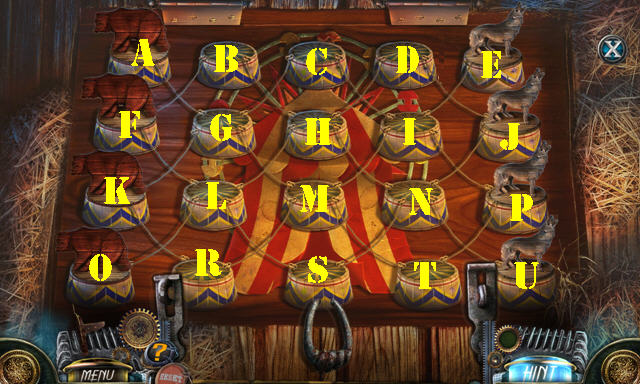
- Solution: FB-PT-KG-JN-EI-OL-LF-IP-NS-GC-BH-HD-FB-TM-MR-PT-AG-CI-IE-GC-SL-UN-NS-LO-RK-TM-MR-BH-DJ-HD-SL-CI-LF-IP-RM-MG-GA-PT-JN-DJ-TP-NU.
- Take the SHACKLES and NEWSPAPER CLIPPINGS.
- Go to the Elephant Holding Area.
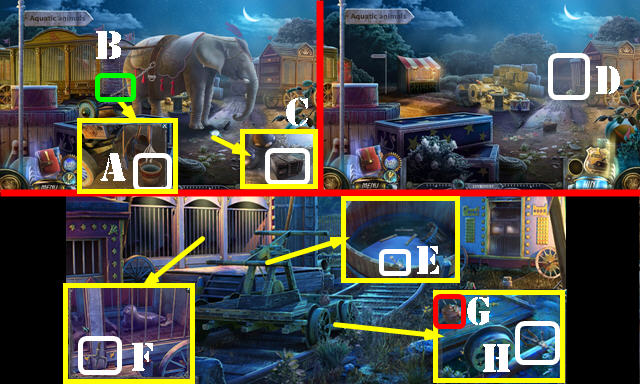
- Place the WATER BUCKET (A) and SHACKLES (B). Give the CAGED MOUSE (C).
- Go right (D).
- Take the NAILS 2/4 (E), PITCHFORK HEAD (F), FILLED KETTLE (G) and JACK (H).
- Walk down.
- Use the PITCHFORK HEAD; you receive the BROKEN PITCHFORK; take the MUSCLE ARM (I).
- Go left (J).
- Touch the cage (K) for a HOP; play it to get the GUNS TOKEN.
- Use the SANDPAPER; place the MUSCLE ARM (L); take the BROKEN LOCOMOTIVE (M). Take the evidence (N) and the NAILS 3/4 below it.
- Use the FILLED KETTLE. Place the NOTEBOOK (O). Use the CHARCOAL STICK (P); take the DRAWING.
- Take the LOCOMOTIVE WHEELS (Q).
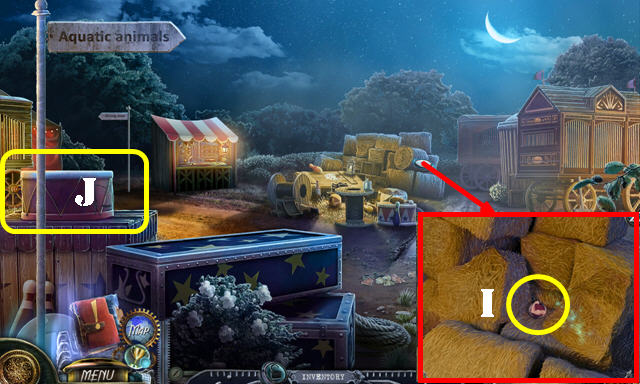
- Return to the Aquatic Animals and Reptiles.
- Place the GUNS TOKEN and DRAWING (R); take the SHELL (S).
- Walk down.
- Place the SHELL for a puzzle (T).
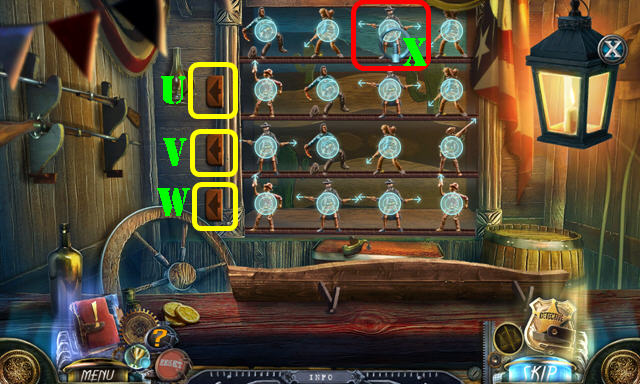
- Solution: Wx2-Vx4-Ux4-X.
- You receive the SMALL WRENCH.
- Return to Strongman’s Tent.
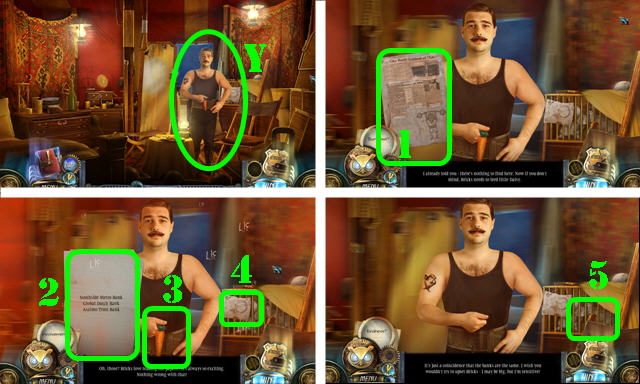
- Give the NEWSPAPER CLIPPINGS to Bricks and talk to him (Y).
- Select 1-5.

- Use the SMALL WRENCH; take the WEIGHT (Z).
- Return to the Aquatic Animals and Reptiles.
- Use the WEIGHT (Z1) and push the cart (Z2).
- Go forward.
Chapter 4: The Water Tower
- Take the CIRCUS SEAL (A), SARDINE CAN (B) and METAL BAR (C).
- Place the METAL BAR on the BROKEN PITCHFORK; take the FIXED PITCHFORK (inventory).
- Take the NAILS 4/4 (D).
- Walk down.
- Use the FIXED PITCHFORK to get the PLANKS (E).
- Place the CIRCUS SEAL (F) for a HOP; play it to get the DECORATED BOX.
- Open the DECORATED BOX; move the items aside; take the CAN OPENER (inventory).
- Use the CAN OPENER on the SARDINE CAN; take the SARDINES (inventory).
- Throw the SARDINES (G); take the HEAVY BOOT (H).
- Go forward.
- Place the PLANKS and the 4 NAILS; use the HEAVY BOOT (I).
- Take the STEEL BRUSH (J).
- Go up to the Water Tower Top.
- Pull the wire (K). Use the JACK (L) for a HOP; play it to get the TRAIN-STATION LOGO.
- Take the LOCOMOTIVE CHIMNEY (M).
- Walk down.
- Take the INCOMPLETE TOBACCO PART and CLOCK HANDS 1/3 (N).
- Place the LOCOMOTIVE WHEELS and LOCOMOTIVE CHIMNEY on the BROKEN LOCOMOTIVE to get the LOCOMOTIVE (inventory).
- Place the LOCOMOTIVE for a puzzle (O).
- Solution (1-8).
- Enter the Smoking Room.
- Open the drawer; look at the evidence and take the CLOCK HANDS 2/3 (P).
- Use the STEEL BRUSH; take the ROOSTER HEAD (Q).
- Match the pairs (R). Flip the clover; take the MAGNET (S).
- Enter (T).
- Talk to the man (U).
- Select 1-5.
- Remove the stopper; use the MAGNET to get the TOBACCO LEAF PART (V).
- Take the CHALK (W).
- Walk down.
- Place the TOBACCO LEAF PART on the INCOMPLETE TOBACCO PART to get the TOBACCO LEAF (inventory).
- Place the TOBACCO LEAF; take the RULER (X).
- Go forward.
- Use the RULER; place the TRAIN-STATION LOGO; take the CLOCK HANDS 3/3 (Y) and select the key (Y1).
- Enter (Z).
- Open the cabinet (A).
- Take the TAROT CARDS 1/2 (B) and CARTWHEEL (C).
- Place the 3 CLOCK HANDS for a puzzle (D).
- Solution: F-G-Jx3-I. Take the BATTERIES.
- Take the ASHTRAY KEY (K).
- Walk down.
- Place the CARTWHEEL (L); play the HOP to get the BROKEN FLASHLIGHT.
- Walk down.
- Use the ASHTRAY KEY; take the QUESTION MARK (M).
- Go to the Water Tower Top.
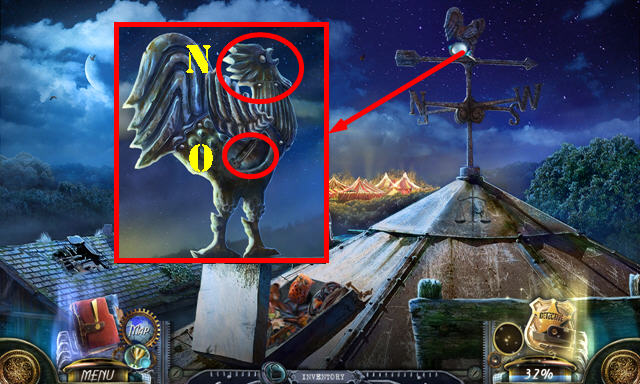
- Place the ROOSTER HEAD (N); take the BRASS KNOB (O).
- Walk down.

- Place the BRASS KNOB (P); select the screws (P1) 4x and take the LUGGAGE 1/4 (Q).
- Go to the Ticket Office.
- Place the QUESTION MARK (R); go through the door.
- Play the HOP (S) to get the UV BULB.
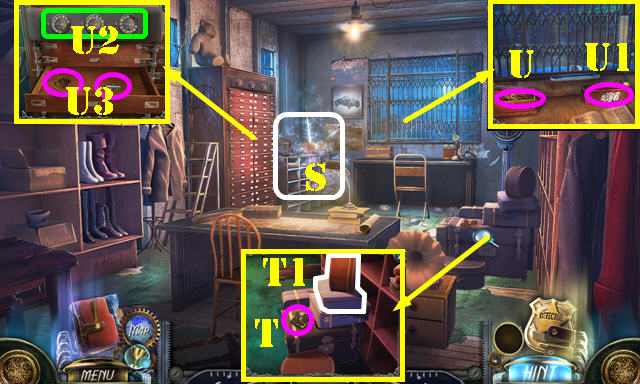
- Take the LUGGAGE 2/4 (T). Remove two pieces of luggage (T1).
- Open the box; take the BEAST CHARMER (U). Use the CHALK for a code (U1).
- Remove the cap and insert the UV BULB. Place the BATTERIES in the BROKEN FLASHLIGHT to get the UV FLASHLIGHT (inventory).
- Use the UV FLASHLIGHT and select the 3 dials (U2). Take the POUCH and TYPEWRITER KEY (U3).
- Walk down.
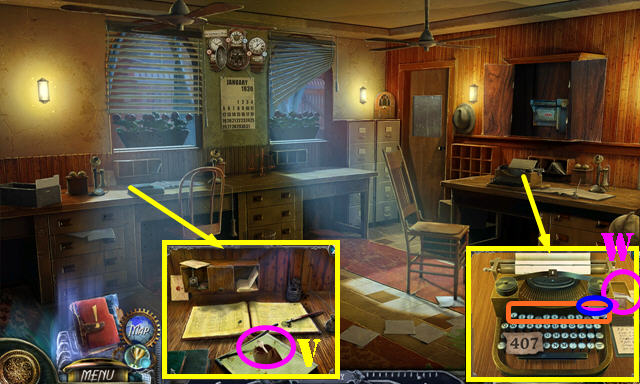
- Place the POUCH; take the LUGGAGE 3/4 (V).
- Place the TYPEWRITER KEY (blue); select 407 (orange); take the PUNCH CARD (W).
- Go to the Lost and Found Office.
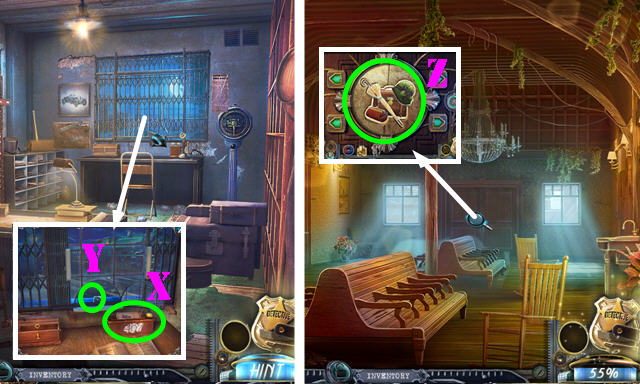
- Place the PUNCH CARD (X); open the window and take the LUGGAGE 4/4 (Y).
- Walk down twice.
- Place the 4 LUGGAGE pieces for a puzzle (Z).
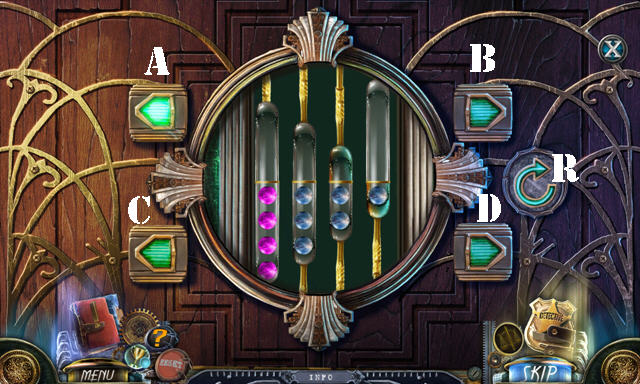
- Solution: A-R-B-R-Bx2-R-B-Cx2-B-R-A-B-R-A-C-A-B-R-Cx2-R-A.
- Enter the Boarding Platform.
Chapter 5: All Aboard!
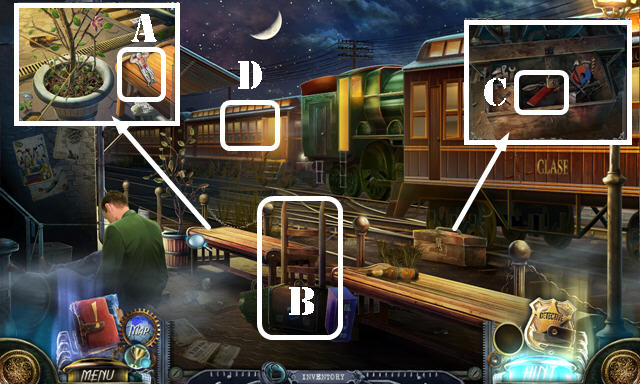
- Take the STRONGMAN (A).
- Select the handcart (B) for a HOP; play it to get the INCOMPLETE TRAVEL BADGE.
- Open the box. Use the MAGNET; take the WEDGE (C).
- Enter (D).

- Take the letter (E).
- Select the painting (F).
- Open the briefcase; read the note and take the MATCHES (G).
- Place the BEAST CHARMER and STRONGMAN for a puzzle (H).
- Solution: Look at the instructions (I), then select 1-6.
- Select the jester and take the TAROT CARDS 2/2.
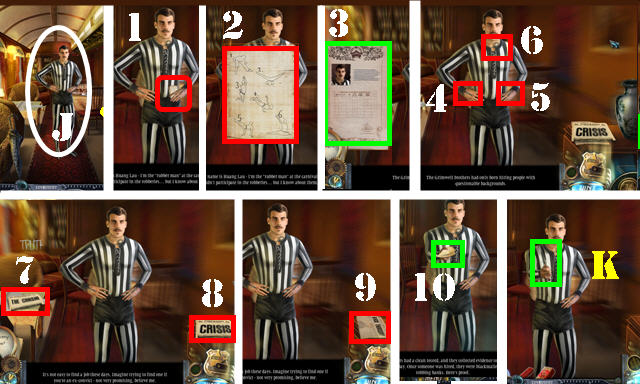
- Talk to Huang Lau (J).
- Select 1-10. Take the SWITCHBLADE (K).
- Walk down.

- Use the SWITCHBLADE to get the ROPE (L).
- Use the ROPE (M); take the BRASS KNUCKLES (N).
- Enter the Planning Car Interior.
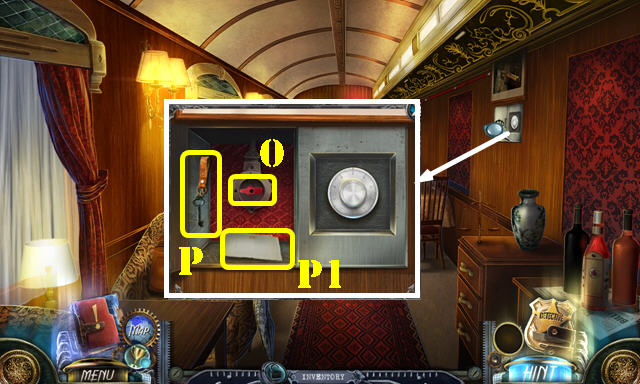
- Use the BRASS KNUCKLES; turn the valve (O) and take the BIKE KEY (P). Look at the note (P1).
- Go forward.
- Take the TOOL EMBLEM (Q).
- Select the luggage 3x (R).
- Place the 2 TAROT CARDS for a puzzle. Solution (S).
- Take the BALLOON ORNAMENT.
- Walk down twice.
- Place the TOOL EMBLEM; take the OIL DISPENSER and RAILROAD INSIGNIA (T).
- Enter the Planning Car Interior.
- Place the RAILROAD INSIGNIA; take the TRAIN INSTRUCTIONS and TRANSMISSION BELT (U).
- Go forward.
- Use the OIL DISPENSER to get the BADGE PALM (V).
- Place the BADGE PALM on the INCOMPLETE TRAVEL BADGE to get the TRAVEL BADGE (inventory).
- Use the TRANSMISSION BELT and WEDGE; take the WOOD GLUE and VALVE (W).
- Walk down twice.
- Use the MATCHES (X). Place the TRAIN INSTRUCTIONS (X1) and VALVE (X2); take the NUMBERED TILES 1/2 (Y).
- Go to the Lost and Found Office.
- Place the TRAVEL BADGE; take the NUMBERED TILES 2/2 and CLOTHESPIN (Z).
- Walk down.
- Place the 2 NUMBERED TILES for a puzzle.
- Solution (A).
- Take the LEVER (A1).
- Return to the Boarding Platform.
- Place the LEVER (B); go forward (C).
Chapter 6: Olga’s Trailer

- Take the WOODEN STOOL (D).
- Use the BIKE KEY; read the note; take the HOSE CLAMP and HALF-DOLLAR 1/3 (E).
- Use the CLOTHESPIN; take the SAW BLADE (F).
- Go forward.

- Take the WOODEN MALLET (G). Use the SWITCHBLADE; take the NUTS (H).
- Take the SCREWS (I).
- Take the ANIMAL COMB (J).
- Walk down.
- Use the WOODEN MALLET; take the HOOKED PEG (K).
- Go forward.
- Use the HOOKED PEG; take the SPIKED WHEEL TOKEN (L).
- Walk down.
- Place the SPIKED WHEEL TOKEN (M) for a HOP; play it to get the HANDLE.
- Place the HANDLE, SCREWS and NUTS on the SAW BLADE to get the RUSTED SAW (inventory).
- Go forward.
- Use the RUSTED SAW (N). Go through the fence.
- Take the PUNCHING BALL (O) and DOORMAT (P).
- Place the BALLOON ORNAMENT; take the PRESSURE DIAL (Q).
- Enter (R).
- Take the HOSE and WIRE HANGER (S).
- Place the WOODEN STOOL (T) and DOORMAT (U); take the RAG (V).
- Walk down.
- Place the HOSE and HOSE CLAMP (W). Play the puzzle (X).
- Use the ANIMAL COMB; take the STAR SCREWDRIVER (A).
- Enter (B).
- Talk to Olga (C).
- Select 1-5.
- Use the WIRE HANGER; take the ICE-PICK TIP (D).
- Return to the Tour Bus.
- Use the STAR SCREWDRIVER; take the SPRAY CLEANER (E).
- Return to Olga’s Trailer.
- Use the SPRAY CLEANER and RAG (F); take the BUS EMBLEM (G).
- Return to the Tour Bus.
- Place the BUS EMBLEM (H) for a HOP; play it to get the LOCK PIECE.
- Walk down.
- Place the LOCK PIECE; take the CODE and KNIVES (I).
- Return to Olga’s Trailer.
- Place the CODE; take the HAT ORNAMENT (J).
- Place the KNIVES for a puzzle.
- Solution: KM-KN-MO-LO-KM-MO-KM. Take the BROKEN PULLEY (P).
- Walk down and go to the Rides (Q).
- Take the TOP HAT (R).
- Use the ICE-PICK TIP on the BROKEN PULLEY; take the ROPE PULLEY (inventory).
- Use the ROPE PULLEY (S).
- Place the PUNCHING BALL (T) to get the HALF-DOLLAR 2/3.
- Enter (U).
- Place the TOP HAT and place the HAT ORNAMENT on it (V). Take the CAT FOOD (W).
- Use the WOOD GLUE; take the STILTS (X).
- Walk down.
- Use the STILTS (Y); give the CAT FOOD (Y1); take the RAZOR (Y2).
- Return to the Auxiliary Small Top.
- Use the RAZOR (Z) for a HOP (Z1); play it to get the HALF-DOLLAR 3/3.
- Walk down.
- Place the 3 HALF-DOLLARS (A); take the BROKEN HELIUM TANK (B).
- Place the PRESSURE DIAL on the BROKEN HELIUM TANK to get the HELIUM TANK (inventory).
- Return to the Auxiliary Small Top.
- Place the HELIUM TANK (C); take the WHEEL HANDLE (D).
- Walk down.
- Place the WHEEL HANDLE for a puzzle (E).
- Solution (F).
- Enter the Big Top and open the curtains.
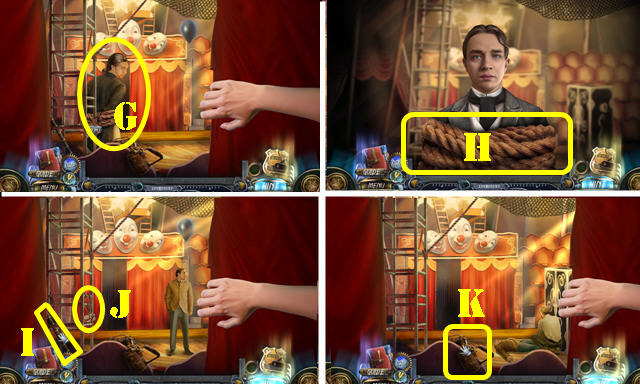
- Talk to the man (G). Remove the ropes (H).
- Open the curtain; select (I-J).
- Open the curtains; select the blowtorch. (K).
- Open the curtains. Talk to the man (L). Select 1-3.
- Congratulations, you’ve completed Dead Reckoning: The Crescent Case!


 Mystery Case Files: Fate's Carnival Walkthrough, Guide, & Tips
 PuppetShow: Mystery of Joyville ™ Walkthrough, Guide, & Tips
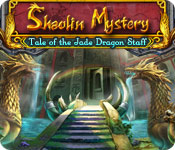 Shaolin Mystery: Tale of the Jade Dragon Staff Walkthrough, Guide, & Tips
 Dark Dimensions: City of Ash Walkthrough, Guide, & Tips
 Wanderland Tips and Tricks, Guide, & Tips