Dark Dimensions: City of Ash Walkthrough, Guide, & Tips
Dark Dimensions: City of Ash Walkthrough

Welcome to the Dark Dimensions: City of Ash Walkthrough
A dark dimension has fallen over Phoenix Hill, turning its residents into volcanic ash. Help them rise from the ashes!
Whether you use this document as a reference when things get difficult or as a road map to get you from beginning to end, we’re pretty sure you’ll find what you’re looking for here.
This document contains a complete Dark Dimensions: City of Ash game walkthrough featuring annotated screenshots from actual gameplay!
We hope you find this information useful as you play your way through the game. Use the walkthrough menu below to quickly jump to whatever stage of the game you need help with.
Remember to visit the Big Fish Games Forums if you find you need more help. Have fun!
This walkthrough was created by BrownEyedTigre, and is protected under US Copyright laws. Any unauthorized use, including re-publication in whole or in part, without permission, is strictly prohibited.
General Tips

- This is the official guide for Dark Dimensions: City of Ash.
- Select Options to adjust Effects, Music and Voice Over’s Volume. You may also adjust Full Screen, Widescreen or Custom Cursor.
- You may choose between Casual, Advanced and Hard modes.
- The Hidden-object puzzles will be referred to as HOP throughout the guide. Items labeled in yellow in the find list require an extra step to find.
- Puzzles may be skipped after a short wait.
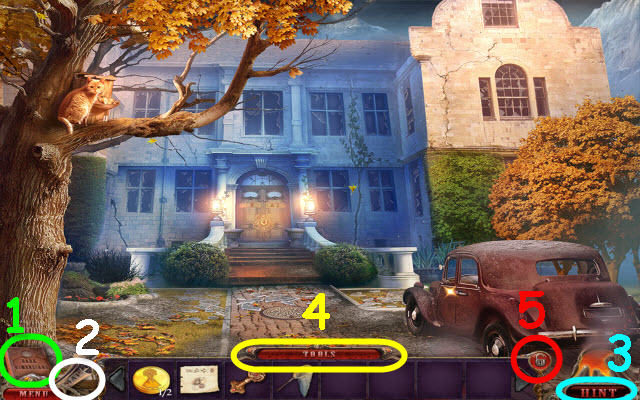
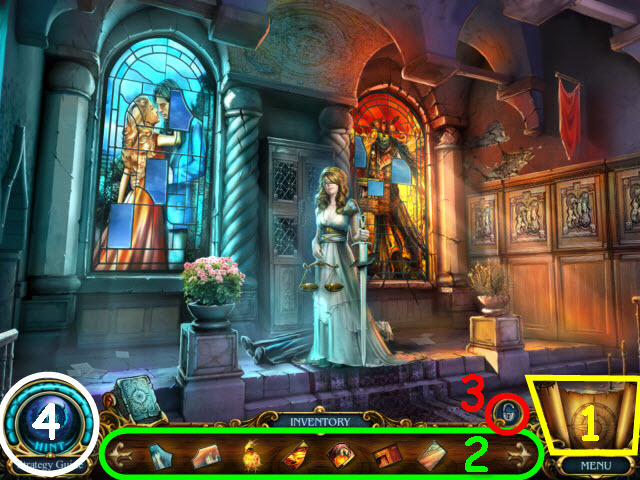
- Open your journal (1) to view your story updates and stored clues.
- Select the Map (2) to see what locations have tasks to complete. You can also fast travel to any location by selecting the desired area on the map.
- You may select the Hint button (3) for help in game play or HOP areas.
- Select the Info button on the bottom right of the puzzles to get the instructions.
- Move your cursor to the bottom of the screen to pull up the Tool Bar (4). You may lock the toolbar in the raised position by locking the padlock (5).
Chapter 1: Phoenix Hill
- Select anywhere in the scene to talk to the girl.
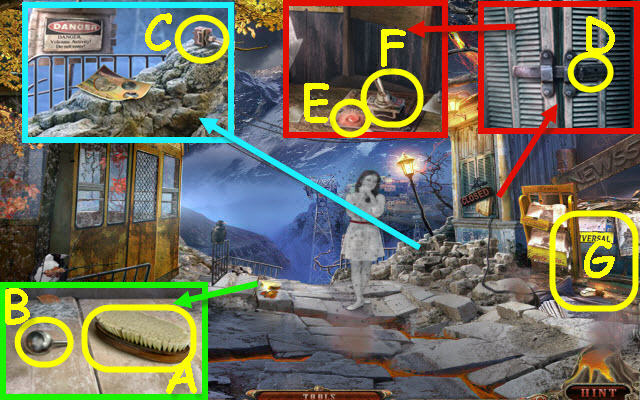
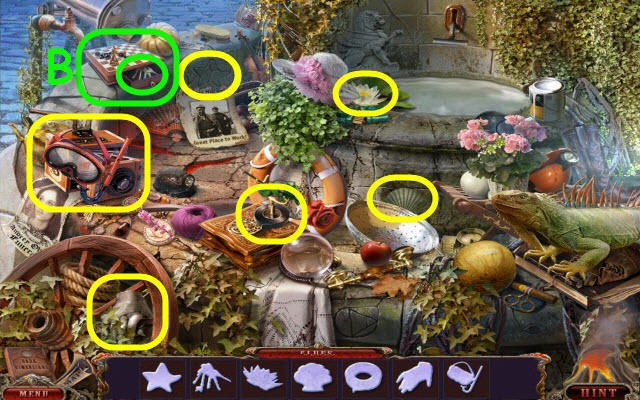
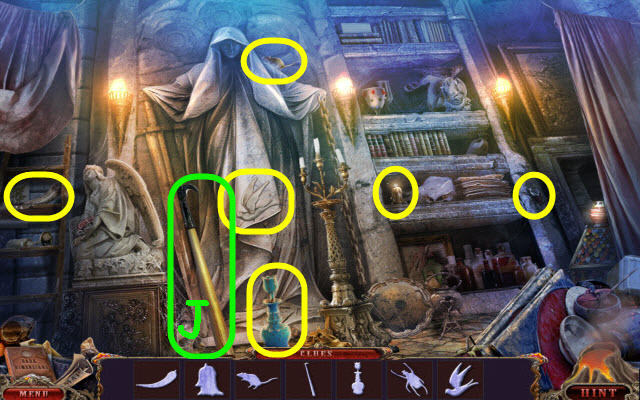
- Examine the brush and move the leaves; take the BRUSH (A) and HANDLE (B).
- Examine the danger sign; read the flyer and take the TOGGLE SWITCH (C).
- Examine the shutters; read the newspaper and remove the sign. Place the HANDLE on the latch and slide it open (D).
- Select anywhere in the close-up of the man.
- Use the BRUSH on the ash and push the light button (E).
- Reexamine the booth and place the TOGGLE SWITCH on the slot and switch it on (F).
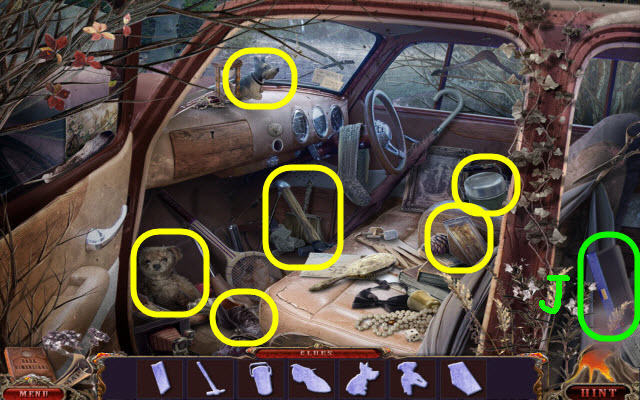
- Examine the newsstand to access a HOP (G).
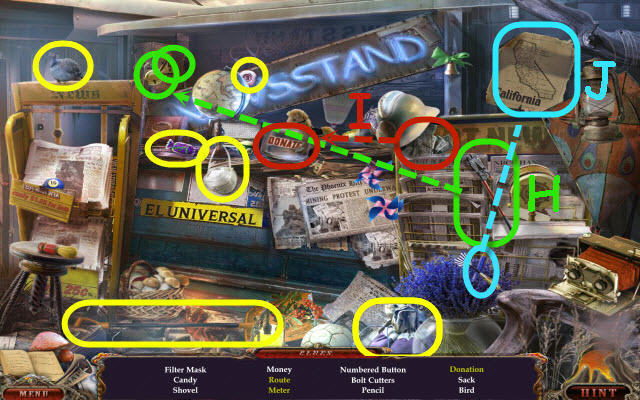
- Find the items listed.
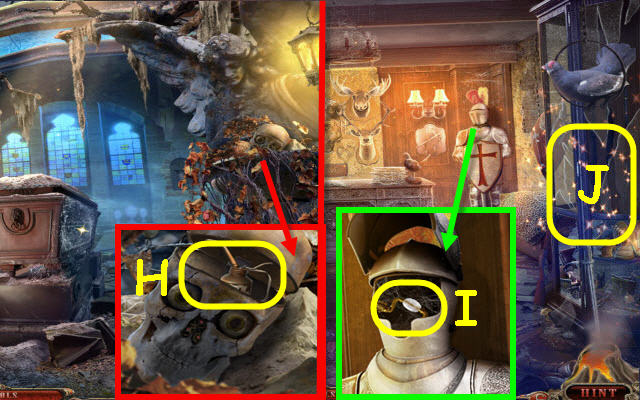
- Use the nippers on the padlock to get the meter (H).
- Place the money in the donation jar to get the donation (I).
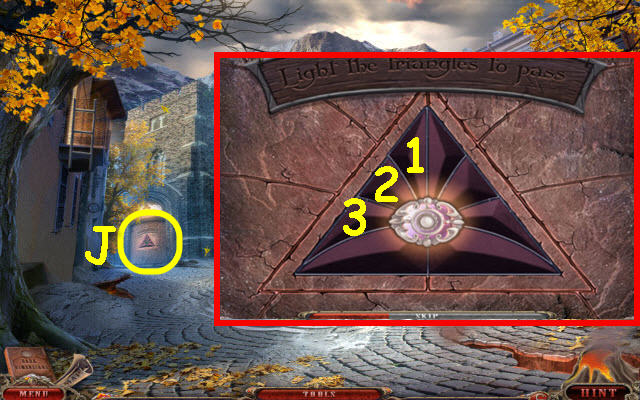
- Use the pencil on the map to get a route (J).
- You will earn a NUMBERED BUTTON.
- Enter the cable car.
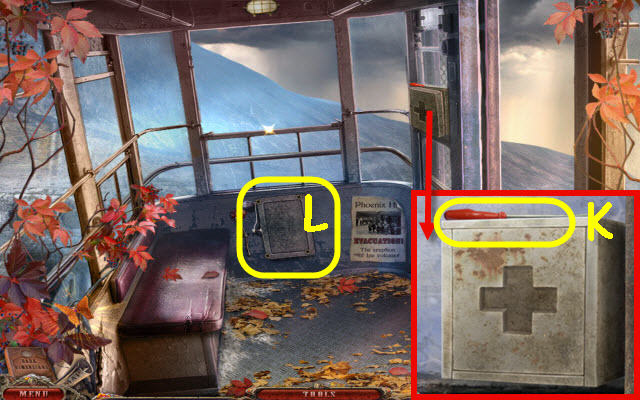
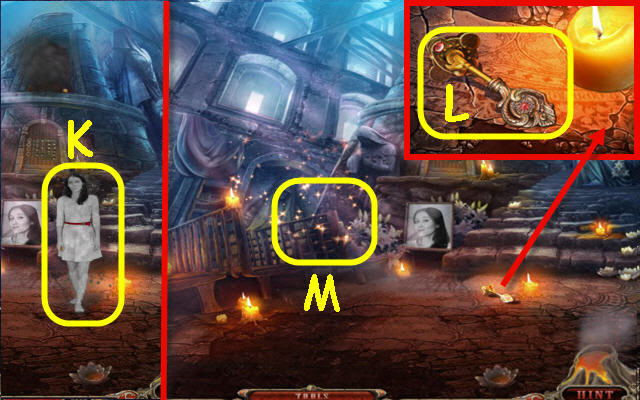
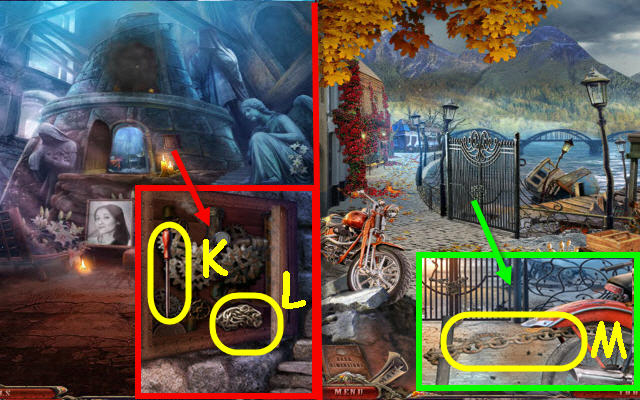
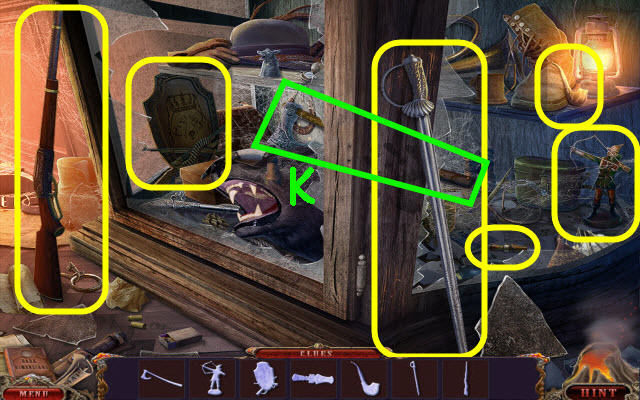
- Examine the first aid kit; take the SCREWDRIVER (K).
- Examine the panel and use the SCREWDRIVER on the four screws. Place the NUMBERED BUTTON on the panel to trigger a puzzle (L).
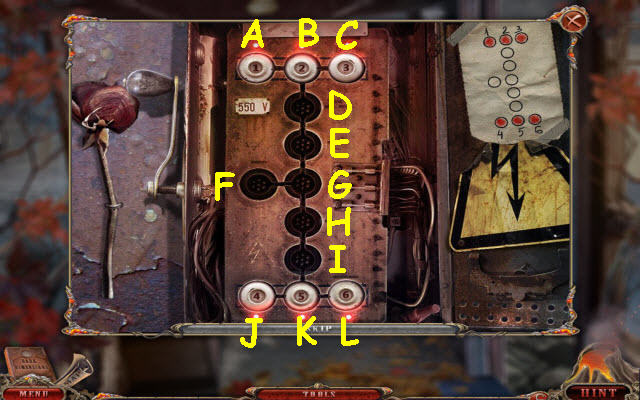
- Arrange the buttons to match the diagram.
- To solve the puzzle, select the following: E, C, G, A, H, B, L, D, J, L, F, K, D, F, B, I, C, H, A, C, F, A, H, F, I, B, K, E, F, J, E and K.
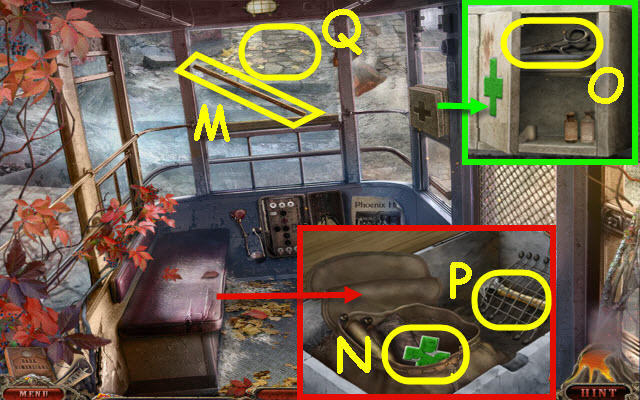
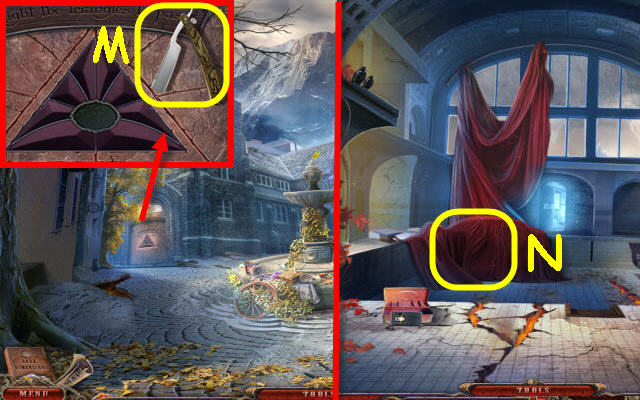
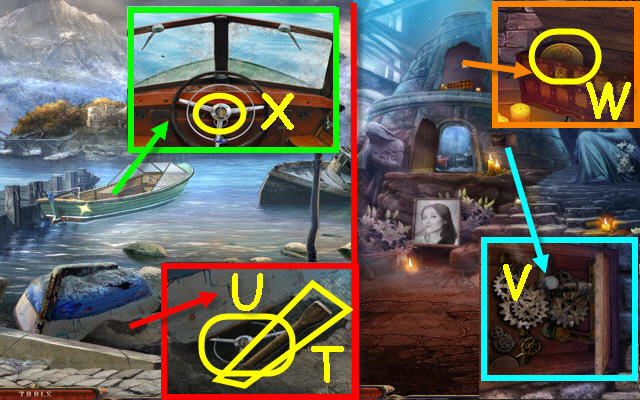
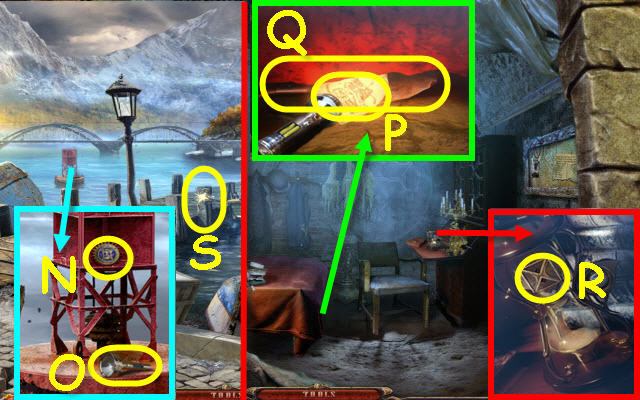
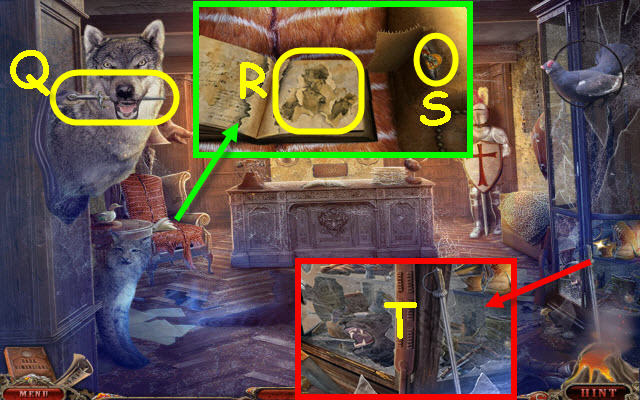
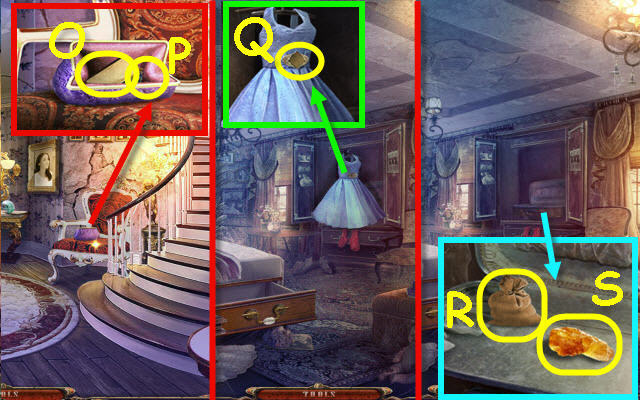
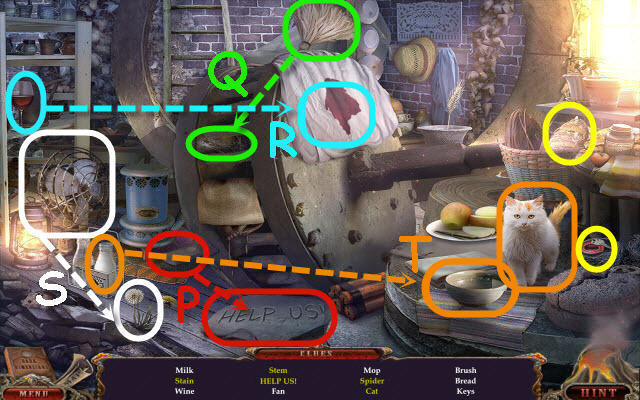
- Examine the window; take the WOODEN STICK (M).
- Examine the seat and use the WOODEN STICK to pry it up. Open the bag; take the GREEN CROSS (N).
- Examine the first aid kit and place the GREEN CROSS on it; take the SCISSORS (O).
- Examine the seat and use the SCISSORS on the net (P); take the HAMMER.
- Examine the window; use the HAMMER on the glass (Q).
- Go forward through the broken window.
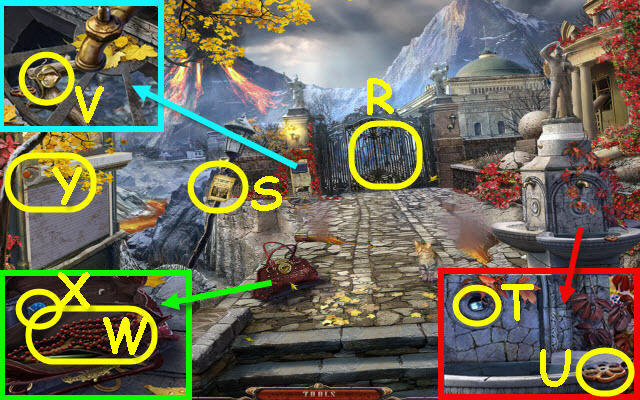
- Examine the gate (R).
- Examine the note (S); read it and take it after the cutscene.
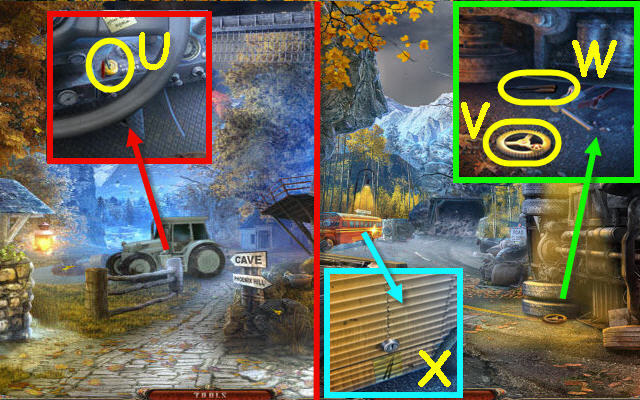
- Examine the fountain and move the branch; take the FUSE 1/2 (T) and VALVE (U).
- Examine left of the gate and place the VALVE on the spigot; take the HEART PENDANT (V).
- You will automatically receive the VALVE.
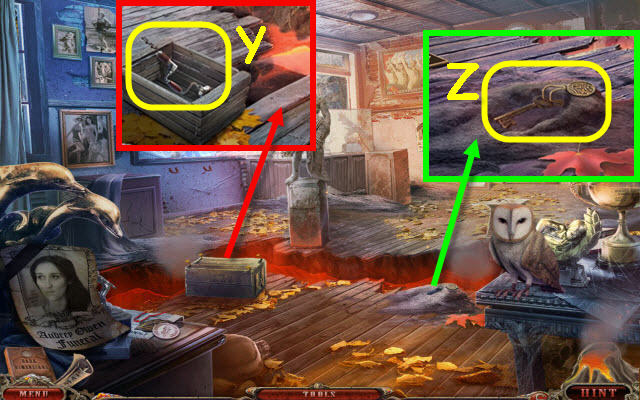
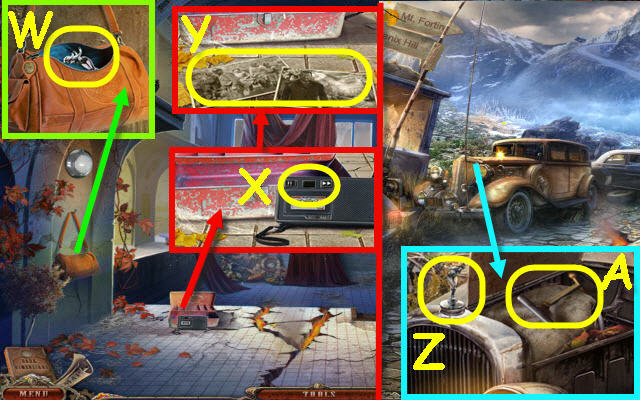
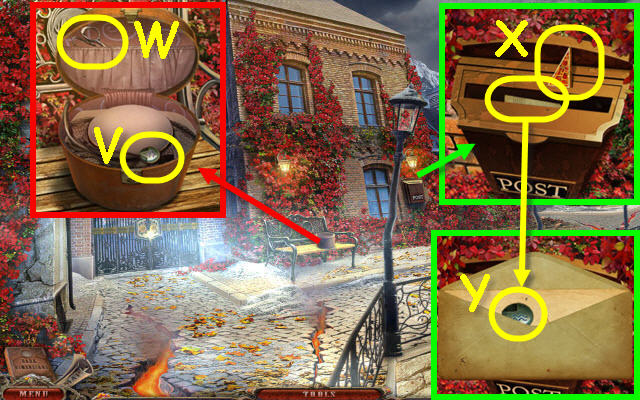
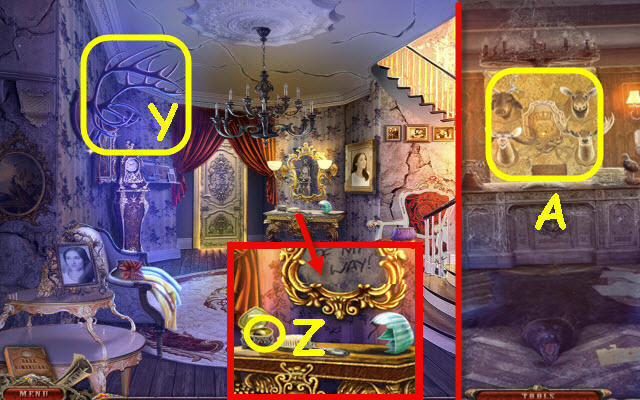
- Examine the purse and place the HEART PENDANT on the lock; examine and take the note. Take the LONG CHAIN (W) and COMBINATION DIAL (X).
- Examine the blinds and place the LONG CHAIN on it (Y).
- Examine the opened stand to access a HOP.
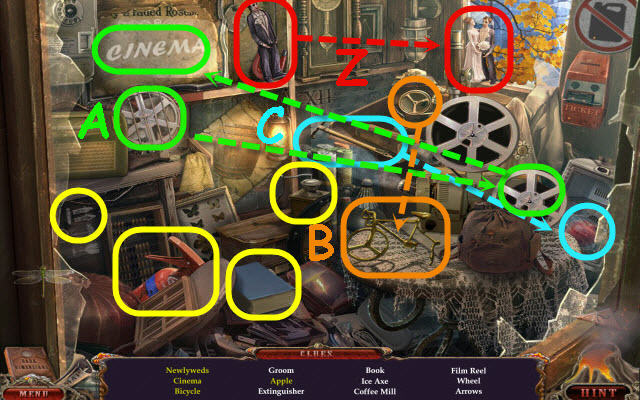
- Find the items listed.
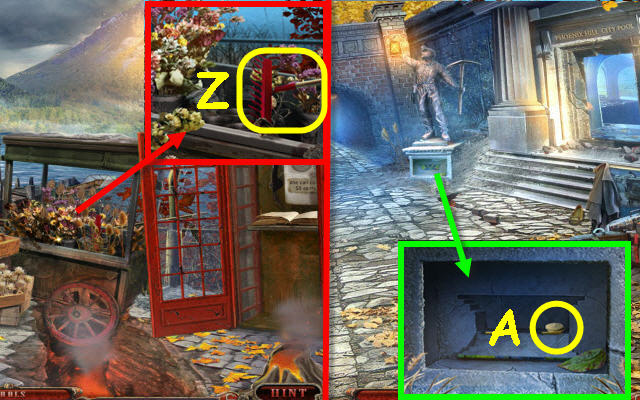
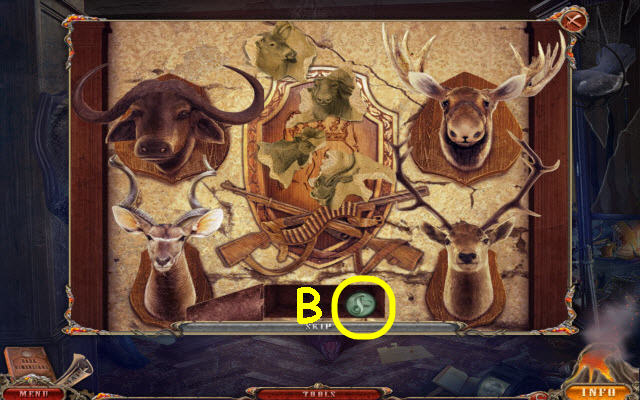
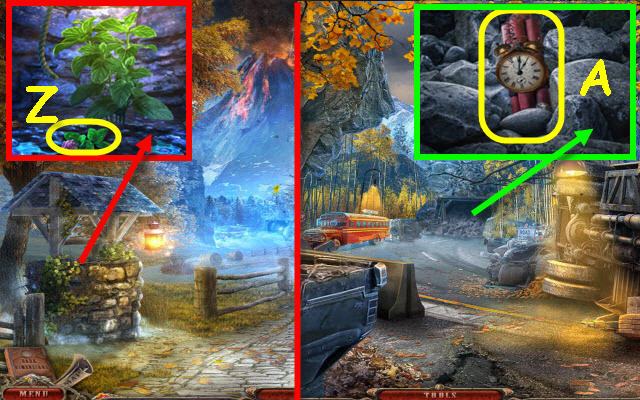
- Place the groom by the bride to get newlyweds (Z).
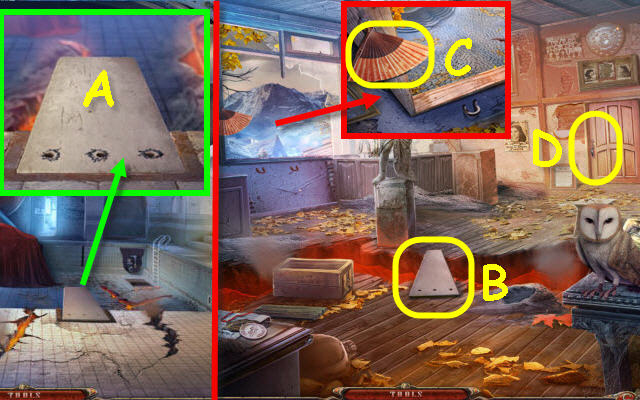
- Place the film reel on the projector to get a cinema (A).
- Place the wheel on the bicycle frame to get a bicycle (B).
- Use the ice axe on the ice to get an apple (C).
- You will earn a FIRE EXTINGUISHER.
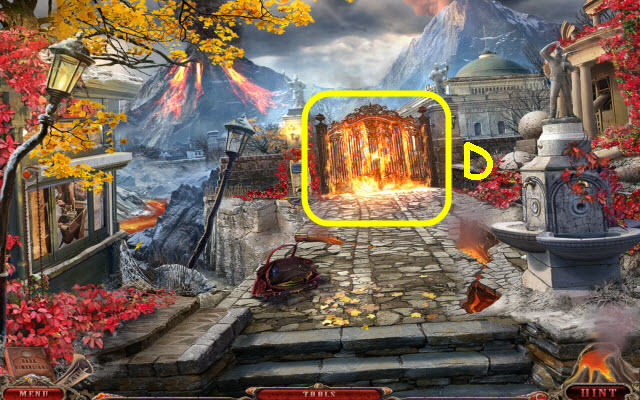
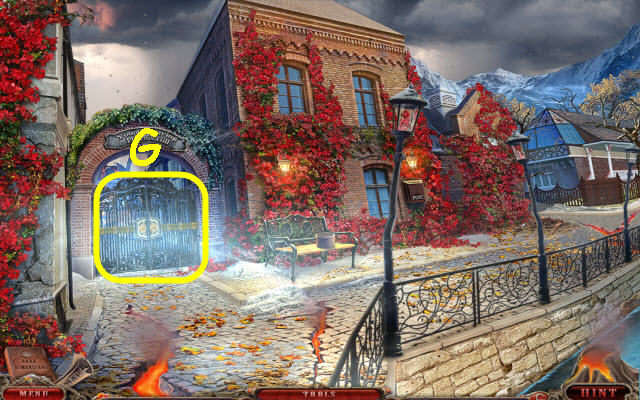
- Examine the gate and use the FIRE EXTINGUISHER on it (D).
- Go forward to the tunnel.
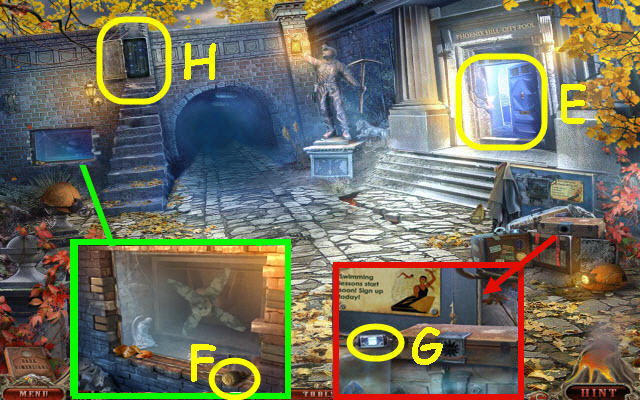
- Examine the doorway (E).
- Examine the window; take the VENT HANDLE (F).
- Examine the suitcase; take the FUSE 2/2 (G).
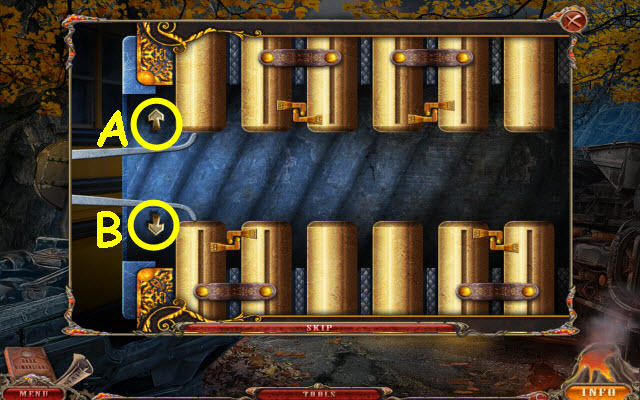
- Examine the fuse box and place the 2 FUSES on it to trigger a puzzle (H).
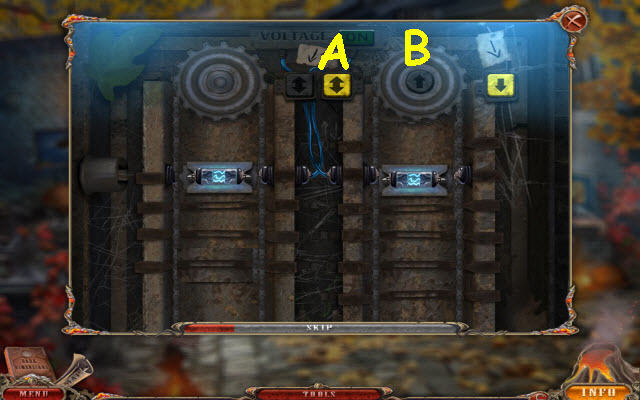
- Align the two fuses.
- To solve the puzzle, select the following buttons: A, B, A, B and A.
- Go forward.
- Examine the car interior; place the VENT HANDLE on the stem and slide it down (I). Take the COIN (J) and SUITCASE KEY (K).
- Examine the car trunk; take the DRILL BIT (L).
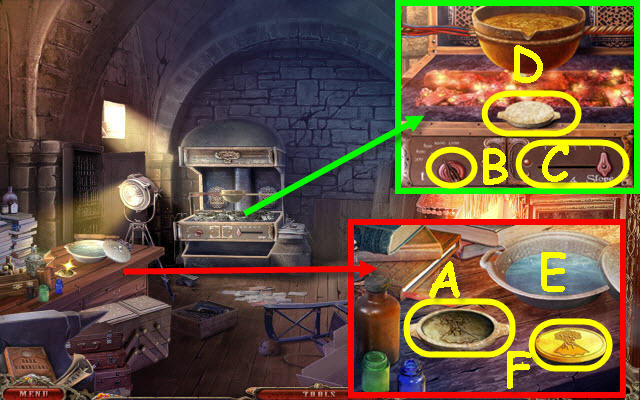
- Examine the booth to access a HOP (M).
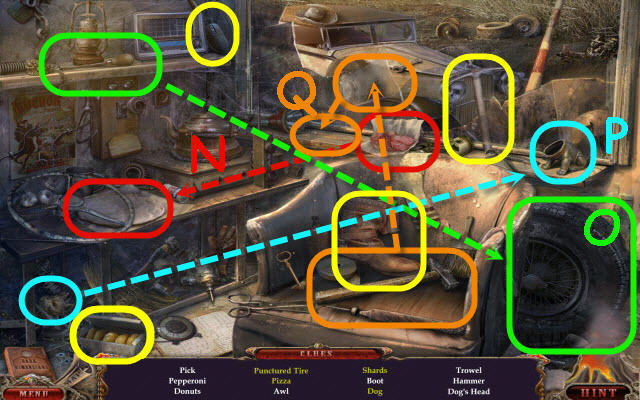
- Find the items listed.
- Place the pepperoni on the dough to get a pizza (N).
- Use the awl on the tire to get a punctured tire (O).
- Place the dog’s head on the body to get a dog (P).
- Use the hammer on the glass to get shards (Q).
- You will earn a PICK.
- Back out.
- Examine the suitcase and use the SUITCASE KEY on it; open the case and take the BLOWTORCH (R).
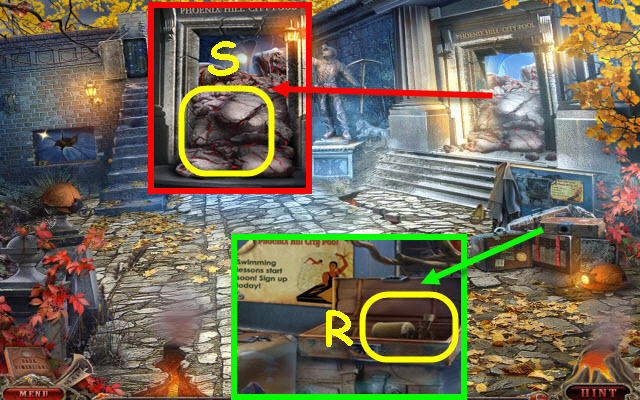
- Examine the doorway and use the PICK on the rocks three times (S).
- Go through the cleared doorway.
Chapter 2: Pool
- Examine the diving board; take the VOLCANO TILE 1/2 (T).
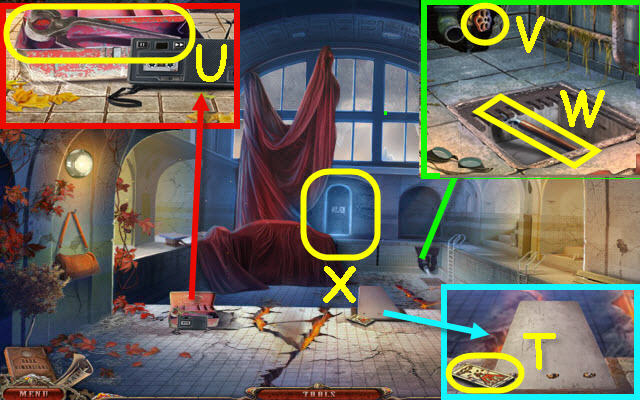
- Examine the tool chest; take the PLIERS (U).
- Examine the water pipe and use the VALVE on the stem (V).
- Use the BLOWTORCH on the grate; take the GLASS CUTTER (W).
- Examine the door and place the COIN on it to trigger a puzzle (X).
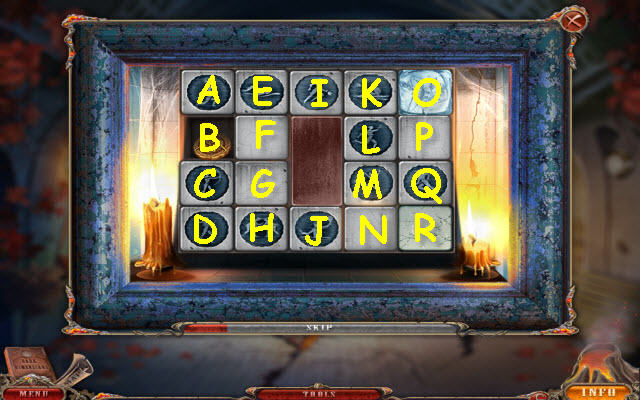
- Open all the tiles.
- To solve the puzzle, select the squares, tools or coins in the spaces in the order listed: B-H, H-M, M-H, G-Q, Q, P-E, E-C, C-E, F-D, D-K, K-R, R-A, A-J, J, N-O, O-I, I-L, L-I and I.
- Go forward through the newly-opened door.
- Examine the crate and use the PLIERS on the nails. Place the DRILL BIT on the drill; take the DRILL (Y).
- Examine the pile of ash and move the ashes three times; take the KEY (Z).
- Back out.
- Examine the diving board and use the DRILL on the 3 screws; take the DIVING BOARD (A).
- Go forward.
- Place the DIVING BOARD across the gap (B).
- Examine the window; take the FAN (C).
- Examine the door and use the KEY on the lock (D); turn the key.
- Go through the newly-opened door.
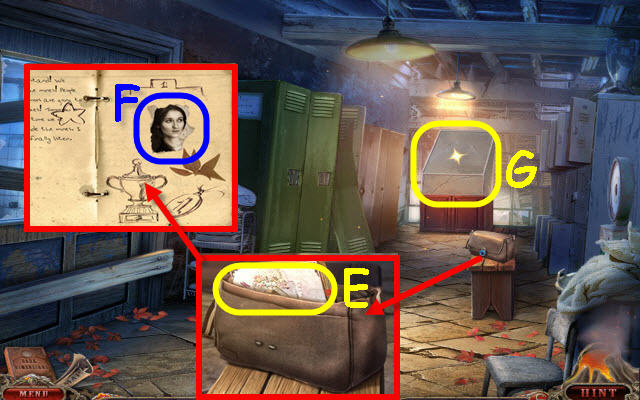
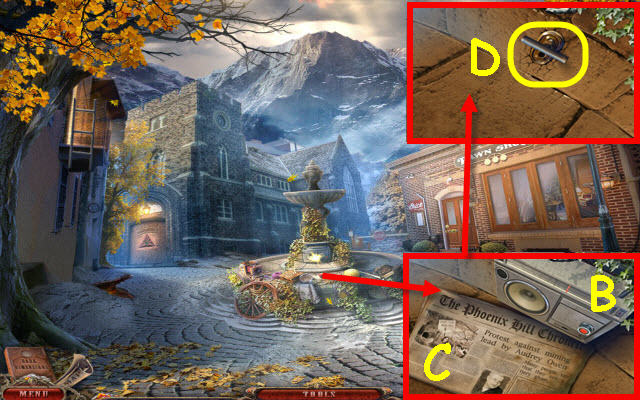
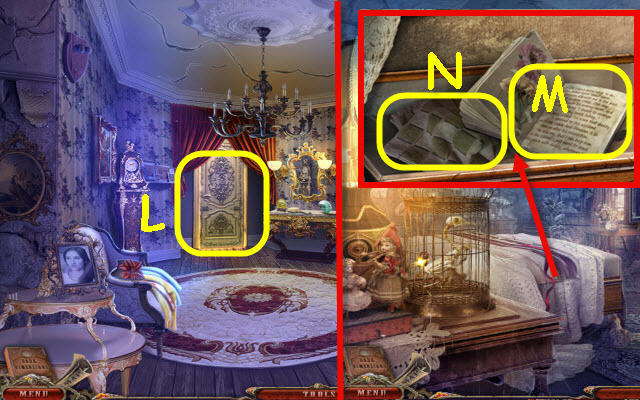
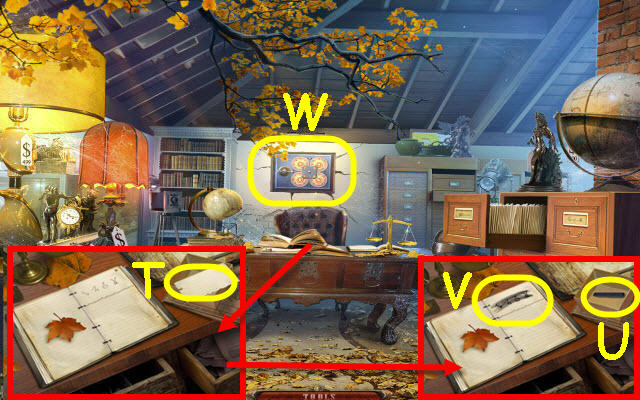
- Examine the bag and place the COMBINATION DIAL on the lock. Examine the notebook (E); take AUDREY’S PHOTO (F) and the notebook.
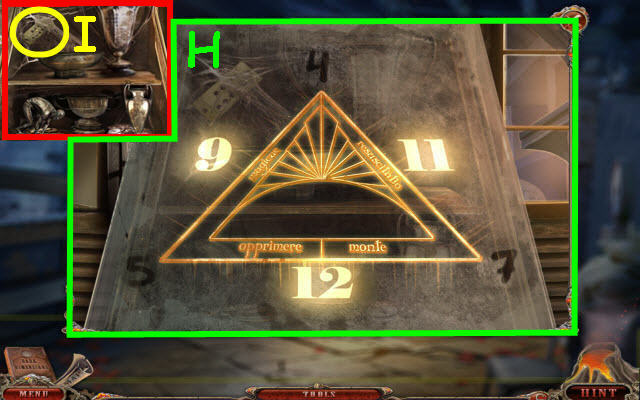
- Examine the display case and use the FAN on the dust to trigger a puzzle (G).
- Set the corner numbers so they add up to sides.
- See screenshot for solution (H).
- Take the PUNCH CARD (I).
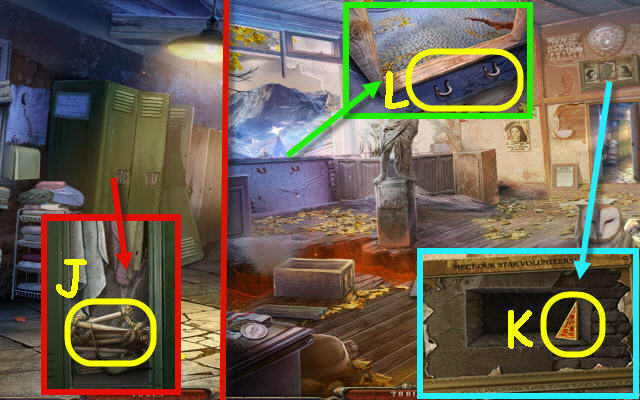
- Examine the lockers and use the PUNCH CARD on the lock. Reexamine the locker; take the ROPE LADDER (J).
- Back out.
- Examine the pictures and place AUDREY’S PHOTO in the center; take the MOSAIC TILE 1/3 (K).
- Examine the window and hook the ROPE LADDER on the hooks (L).
- Go through the window.
- Examine the door; take the RAZOR (M).
- Go to the Pool.
- Examine the cloth and use the RAZOR on it (N).
- Examine the area under the cloth to access a HOP.

- Find the items listed.
- Place the skull by the crossbones to get a Jolly Roger (O).
- Use the cup on the snake to get snake poison (P).
- Place the skate blade on the skate shoe to get an ice skate (Q).
- Place the sail on the boat to get a sailboat (R).
- You will earn an ANGEL.
- Back out.

- Examine the window and use the GLASS CUTTER on the glass; take the 2nd ANGEL (S).
- Examine the statue base and place the 2 ANGELS in the slots; take the VOLCANO TILE 2/2 (T).
- Go to the Town Square.
- Examine the note and take it: take the MOSAIC TILE 2/3 (U).
- Examine the bench and place the 2 VOLCANO TILES on it to trigger a puzzle (V).

- Arrange the volcanoes in the proper sequence.
- To solve the puzzle, select the following tiles: B, A and C x 2.
- Take the ZIPPER PULL and PLAY BUTTON.
- Go to the Pool.
- Examine the purse and place the ZIPPER PULL on it; take the HOOD ORNAMENT (W).
- Examine the tape cassette and place the PLAY BUTTON on it (X); take the photos (Y).
- Go to the Parking.
- Examine the car; place the HOOD ORNAMENT on it and turn it (Z) to open the hood. Take the LEVER (A).
- Go to Town Square.
- Examine the fountain and play the radio (B); take the newspaper (C).
- Use the LEVER in the slot and slide it down (D).
- Examine the fountain to access a HOP.
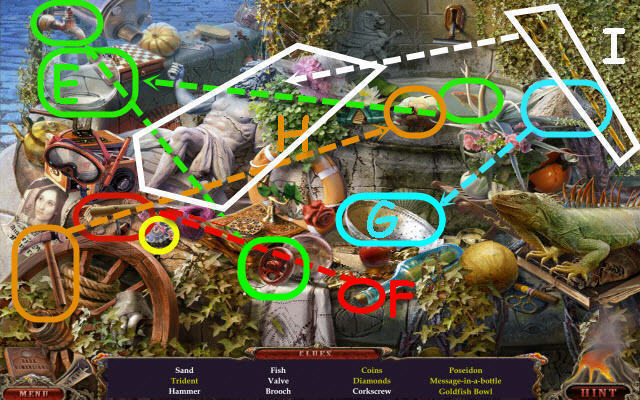
- Find the items listed.
- Place on the valve on the faucet stem and then place the fish in the bowl to get a goldfish bowl (E).
- Use the corkscrew on the bottle to get the message-in-a-bottle (F).
- Use the sand on the strainer to get diamonds (G).
- Use the hammer on the piggybank to get coins (H).
- Move the ivy to get the trident and place it on the statue to get Poseidon (I).
- You will earn a TILE.
- Examine the door and place the TILE on it to trigger a puzzle (J).
- Light up all the sections.
- To solve the puzzle, select the tiles in the order listed (1-3).
- Enter the newly-opened door.
Chapter 3: Church
- Speak to Audrey (K).
- Examine the dropped key; take the KEY (L).
- Examine the pew to access a HOP (M).

- Find the items listed.
- Give the egg to the bunny to get an Easter bunny (N).
- Place the stained glass piece in the frame to get a stained-glass (O).
- Place the eye in the triangle to get the eye of providence (P).
- Place the snakes on the wings to get a caduceus (Q).
- Use the matches on the volcano to get lava (R).
- You will earn a SWITCH.
- Go left though the wall to the Embankment.

- Open the phone booth and zoom in; open the phone book and take the note (S).
- Examine the phone; take the CLIP (T).
- Examine the flower cart; take the TWEEZERS (U).
- Go up the path on the left.
- Examine the hat box and use the CLIP on the lock; take the SYMBOL (V) and SCISSORS (W).
- Examine the mail box; take the MOSAIC TILE 3/3 (X).
- Use the TWEEZERS to get the letter; take the 2nd SYMBOL (Y) and read the letter.
- Back out.
- Examine the flower cart and use the SCISSORS on the thistles; take the RAKE (Z).
- Go to the Tunnel.
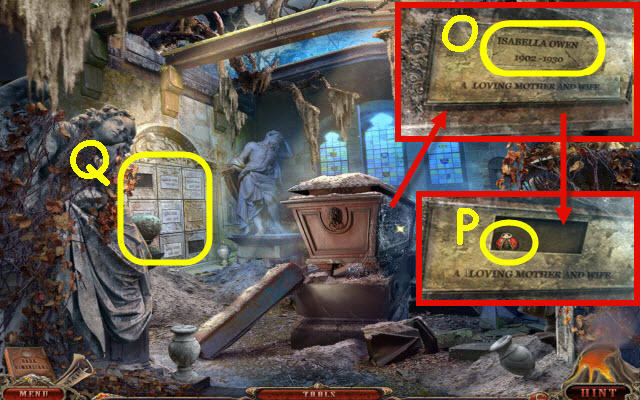
- Examine the statue base and place the 3 MOSAIC TILES on the mosaic; take the COINS (A).
- Go to the Town Square.
- Examine the fountain to access a HOP.
- Find the items matching the silhouettes.
- Open the drawer to get the keys (B).
- You will earn TAPE.
- Examine the balcony; use the RAKE on the ladder (C).
- Reexamine the balcony; take the TELEPHONE NUMBER (D) and the PHONE DISC (E).
- Go to the Embankment.
- Examine the telephone booth and zoom into the phone. Place the PHONE DISC on the center, the COINS in the slot and the TELEPHONE NUMBER on the dial to trigger a puzzle (F).
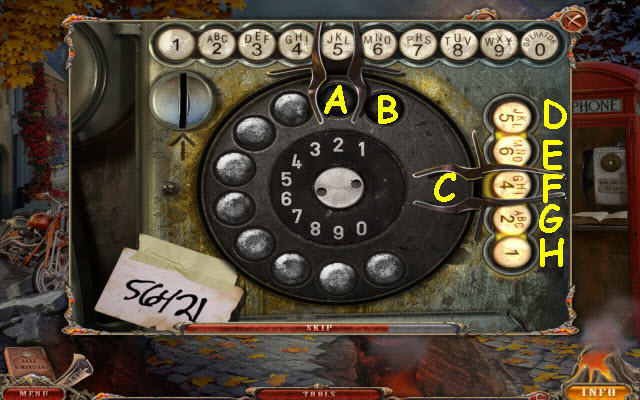
- Move the correct numbers from the top to the right.
- To solve the puzzle, move the number buttons to the spaces as follows: 5-A, rotate B to top, 6-B, rotate 5-C, 5-D, rotate 6-C, 6-E, rotate A to the top, move 4 two spaces right, 3-A.
- Rotate B to the top, 2-B, rotate 2-C, 2- F, rotate B to top, 1-B, rotate 3 to top, 3 up and left, A-C, 2-C, rotate 1 to C, 1-H, rotate 2 to C, 2-G, rotate B to top, 4-B, rotate 4 to C and 4-F.
- Take the 3rd SYMBOL.
- Go to the Church.

- Examine the door and place the 3 SYMBOLS on the lock to trigger a puzzle (@).
- Move the symbol disks to the matching symbols.
- To solve the puzzle, move the following: G-E, H-F, I-G, D-H, K-B, L-D, M-J, N-A, H-N, G-M, F-L, E-K, O-Q and P-C.
- Enter the Secret Chamber.
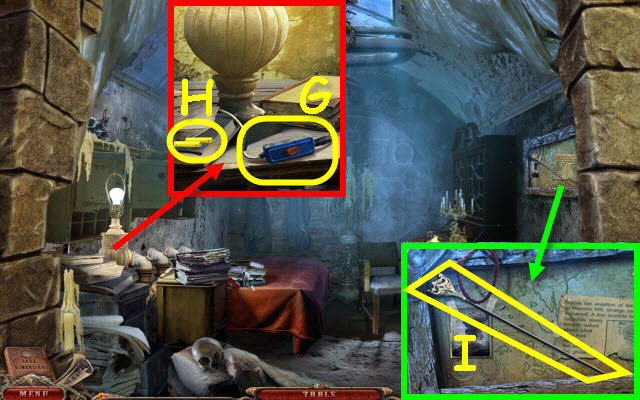
- Examine the lamp; use the SWITCH and TAPE on the broken wire; flip the switch (G).
- Take the BATTERIES (H).
- Examine the bulletin board; take the NEEDLE (I).
- Back out.
- Examine the pews to access a HOP.
- Find the items matching the silhouettes.
- You will earn a HOOK (J).
- Examine the panel and use the NEEDLE on the latch. Pull the lever (K); take the CHAIN (L).
- Go to the Embankment.
- Examine the gate; place the CHAIN on the motorcycle (M).
- Go down the pier to the Landing Stage.
- Examine the buoy and use the HOOK on it. Take the GEAR (N) and FLASHLIGHT (O).
- Go to the Secret chamber.
- Examine under the bed and place the FLASHLIGHT under it. Put the BATTERIES in the FLASHLIGHT; take the DIAGRAM (P) and SHOVEL (Q).
- Examine the desk and place the GEAR on the hourglass; take the KEY (R).
- Go to the Landing Stage.
- Examine the post and place the DIAGRAM on it to trigger a puzzle (S).
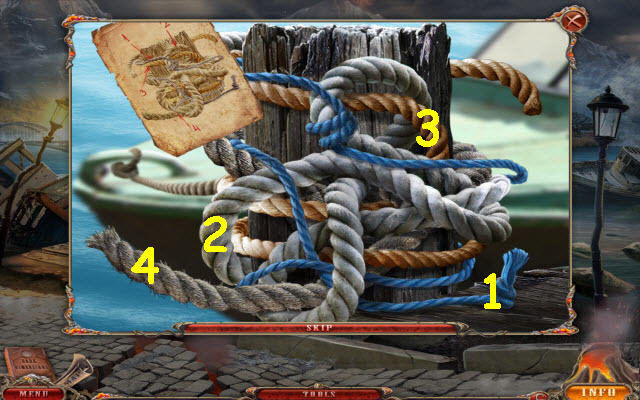
- Remove the ropes.
- See screenshot for order (1-4).
- Examine the rowboat and use the SHOVEL on the sand; take the METAL SCRAP (T) and RUDDER (U).
- Go to the Church.
- Examine the panel; use the METAL SCRAP on the gears (V).
- Examine the upper area and place the KEY on the chest; take the GOLDEN LOCK 1/2 (W).
- Go to the Landing Stage.
- Examine the boat and place the RUDDER on it; turn the key (X).
Chapter 4: Island
- Examine the net; take the NET (Y).
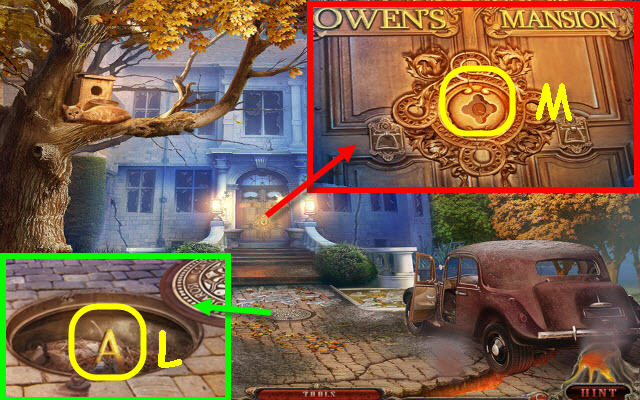
- Examine the gazebo; take the CODE (Z).
- Go forward to the Park.
- Examine the waterfall; use the NET to get the CAR HANDLE (A) and then use the net again to get the FISH (B).
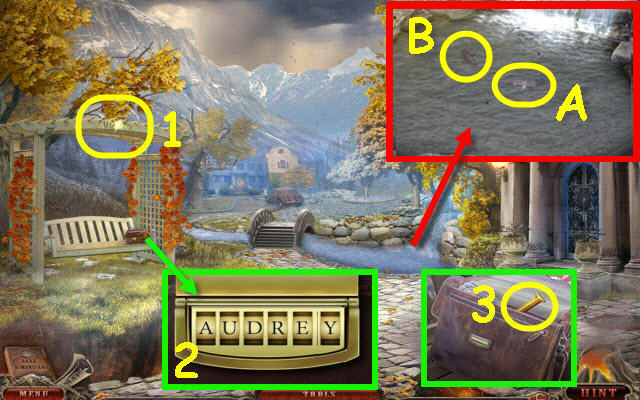
- Examine the name scrawled on the trellis (1).
- Examine the briefcase and zoom into the lock; set the lock to spell AUDREY (2).
- Take the LETTER I (3).
- Cross the bridge to Owen’s house.
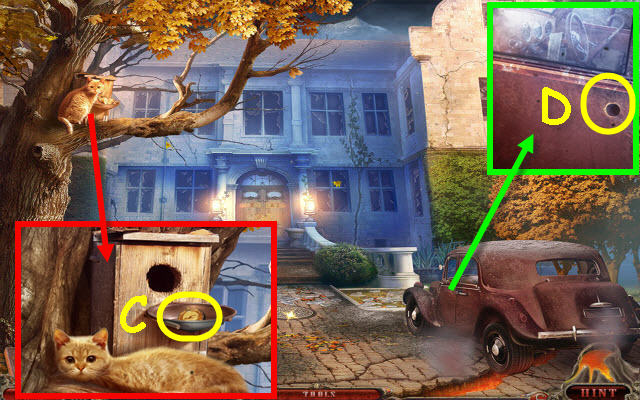
- Examine the cat and give it the FISH; move the leaves and take the MEDAL (C).
- Examine the car and place the CAR HANDLE in the slot (D); turn the handle.
- Examine the opened car to access a HOP.
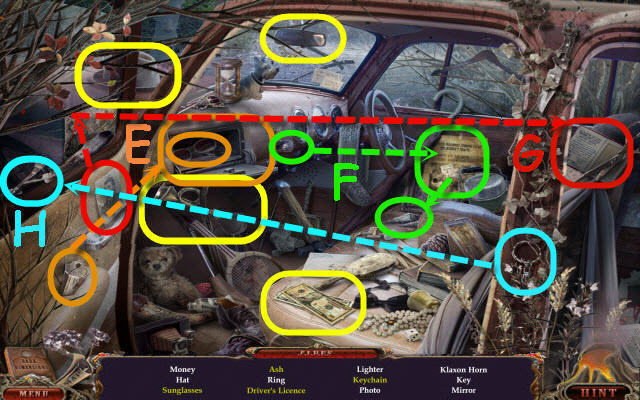
- Find the items listed.
- Use the key on the glove box to get the sunglasses (E).
- Use the lighter on the paper to get ash (F).
- Put the photo on the document to get a driver’s license (G).
- Place the ring on the Eiffel tower to get a keychain (H).
- You will earn a KLAXON HORN.
- Back out twice.

- Examine the owl and use the KLAXON HORN on it; take the LETTER E (I).
- Go to Owen’s House.
- Examine the car to access a HOP.
- Find the items matching the silhouettes.
- You will earn a BOX (J).
- Back out twice.
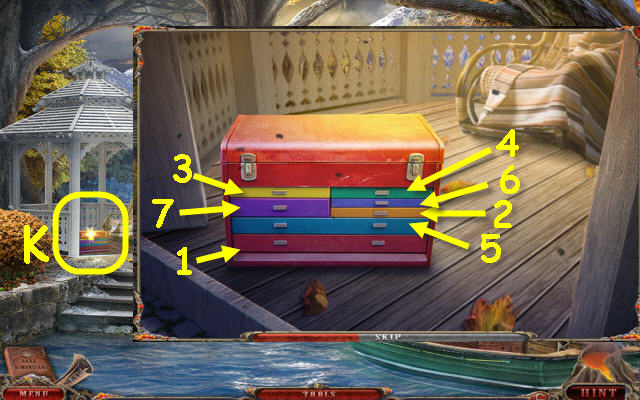
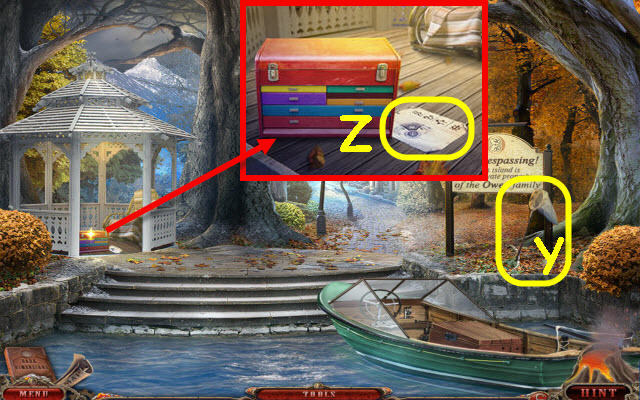
- Examine the gazebo; place the BOX in the tool chest to trigger a puzzle (K).
- Select the drawers in rainbow color order.
- To solve the puzzle, select the drawers in the order marked (1-7).
- Take the NAIL PULLER.
- Go to Owen’s House.
- Examine the drain and use the NAIL PULLER on the lid; take the LETTER A (L).
- Examine the door and place the LETTER I, LETTER E, and LETTER A on it; use the KEY in the lock (M).
- Enter the mansion to the Hall.
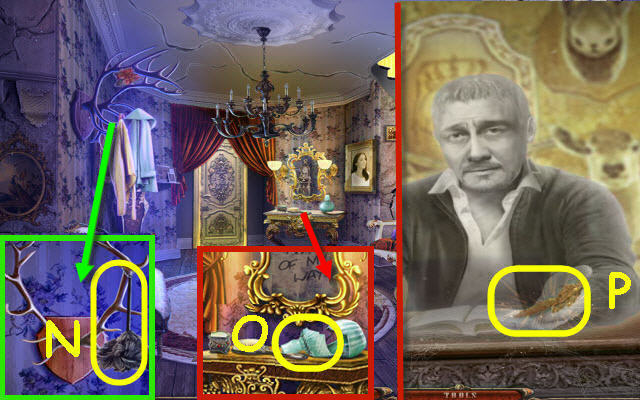
- Examine the antlers and remove the clothing; take the BROOM (N).
- Examine the table and knock over the bottle; take the SHARP GLASS (O).
- Go up the staircase.
- Take the KEY (P) after the cutscene.
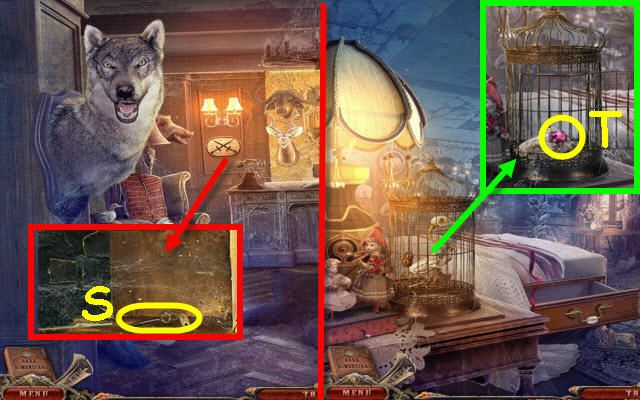
- Examine the wolf head; take the DAGGER 1/2 (Q).
- Examine the chair and use the SHARP GLASS on the patch; take the PAGES (R) and HEART (S).
- Examine the display case and use the BROOM on the cobwebs (T).
- Reexamine the display case to access a HOP.
- Find the items listed.
- Place the mace head on the handle to get a mace (U).
- Place the arrow on the crossbow to get a loaded crossbow (V).
- Use the scissors on the feathers to get plumage (W).
- Place the shotgun shells in the belt to get a loaded bandolier (X).
- You will earn a SAW.
- Back out.
- Examine the antlers and use the SAW on them to get a HORN (Y).
- Examine the table and use the HEART on the trinket box; take the EYE (Z).
- Go upstairs.
- Examine the mounted heads; place the HORN on the moose and the PAGES on the crest to trigger a puzzle (A).
- Match the horns with their correct head.
- See screenshot for solution.
- Take the SNAKE TILE (B).
- Back out three times.
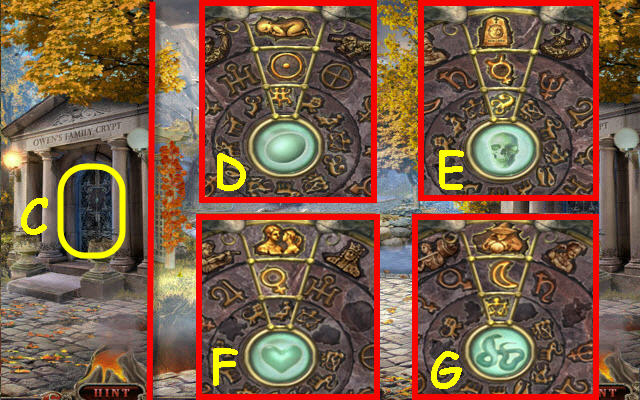
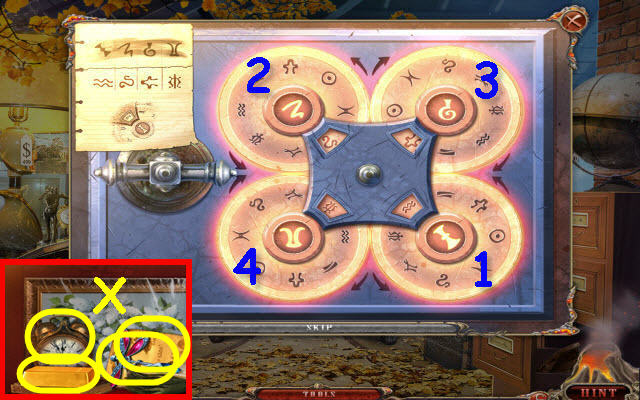
- Examine the crypt door and place the SNAKE TILE on it to trigger a puzzle (C).
- Select the three symbols that relate to the center.
- To solve the puzzle, see the screenshot for the correct sets of symbols (D-G). In order to line up the three symbols for each of the four centers you will need to first set the outer ring, then the inner ring and finally the middle ring.
- Enter into the Vault.
Chapter 5: Vault
- Examine the skull and place the EYE in the socket; take the OIL (H).
- Go to the Armory.
- Examine the armor and use the OIL on the face plate; take the HANDLE (I).
- Examine the display case to access a HOP (J).
- Find the items matching the silhouettes.
- You will earn an AXE (K).
- Back out.
- Examine the door and use the AXE on it (L).
- Go forward through the newly-opened door.
- Examine the bed and move the blanket; place the HANDLE on the drawer and pull. Open the diary; take the page (M) and the TOWEL (N).
- Go to the Vault.
- Examine the coffin and use the TOWEL on the dust three times; take the PLATE (O) and LADYBUG (P).
- Examine the vaults and place the PLATE on it to trigger a puzzle (Q).
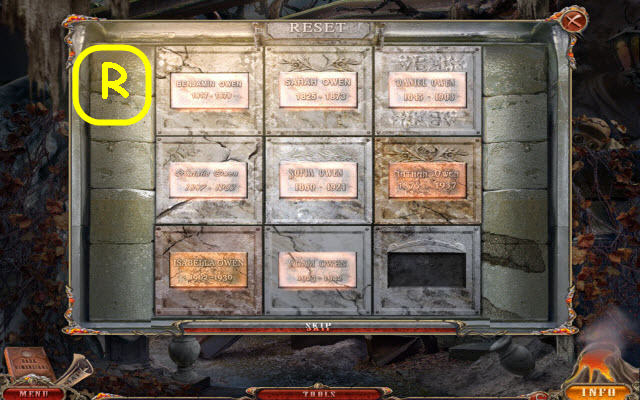
- Slide the plates so they are in birth date order.
- The original layout is random, see screenshot for solution (R).
- Take the DAGGER 2/2.
- Go to the Armory.
- Examine the plaque and place the 2 DAGGERS on it; take the KEY (S).
- Go to Audrey’s Room.
- Examine the cage and use the KEY on the lock. Touch the skeleton; take the RED CRYSTAL (T).
- Go to the Town Square.
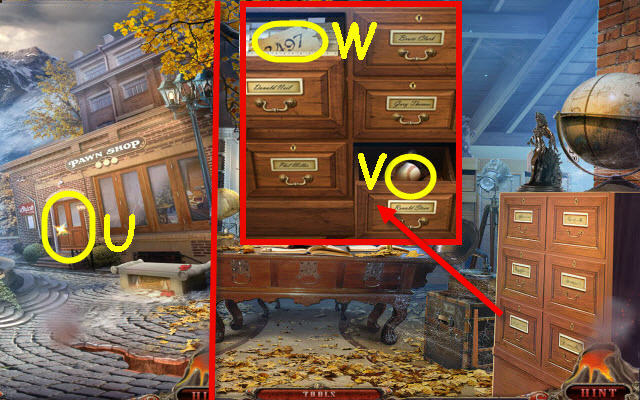
- Examine the pawn shop door and place the RED CRYSTAL on the lock (U).
- Enter the Pawn shop and go upstairs.
- Examine the file cabinet and open the bottom right drawer; take the BALL (V).
- Open the top left drawer; take the CODE (W).
- Back out.
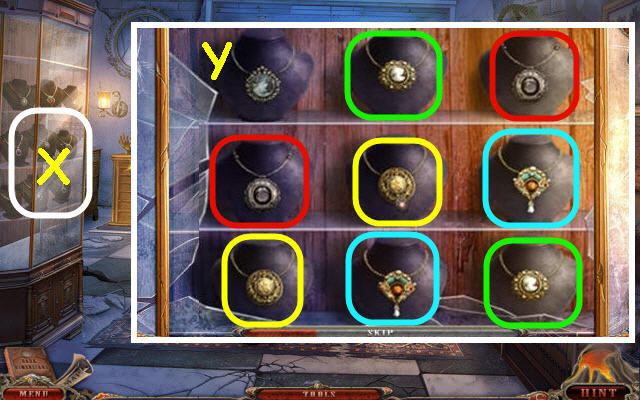
- Use the BALL on the glass case and examine it to trigger a puzzle (X).
- Find the matching necklaces.
- See screenshot for solution (Y).
- Take the PENDANT.
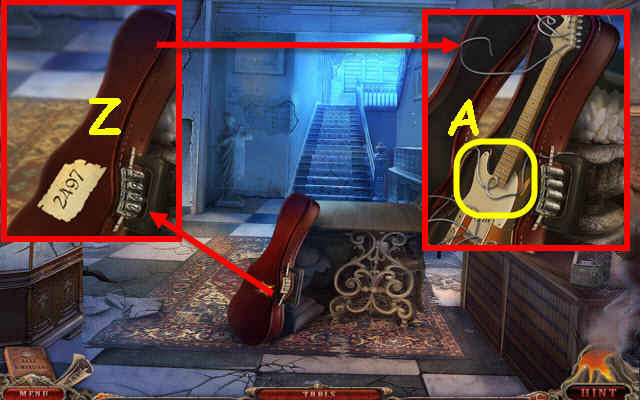
- Examine the instrument case and place the CODE on it; set the tumblers to match the code, 2497 (Z).
- Select the instrument; take the STRING (A).
- Go upstairs.
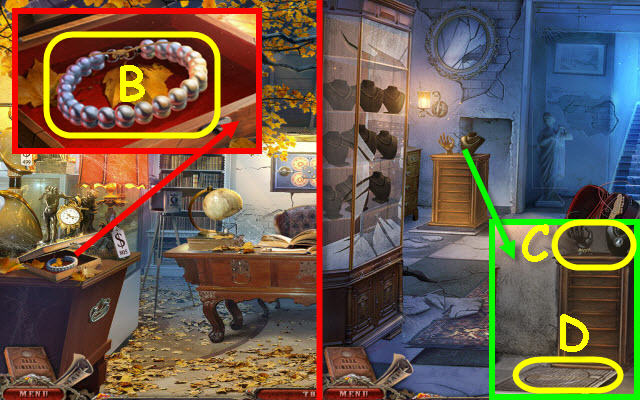
- Examine the jewelry box and use the STRING on the bracelet; take the BRACELET (B).
- Back out.
- Examine the display; place the BRACELET on the hand and the PENDANT on the bust (C).
- Open the hatch (D) and go down to the Secret Vault.
- Examine the desk by the lamps to access a HOP.
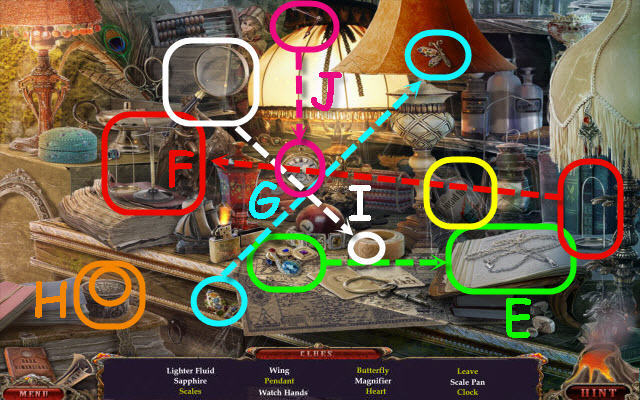
- Find the items listed.
- Place the sapphire on the chain to get a pendant (E).
- Put the scale pan on the balance to get scales (F).
- Place the wing on the butterfly half to get a butterfly (G).
- Open the container to get a leaf (H).
- Use the magnifier on the bracelet to get a heart (I). Tip: place the cursor on the heart not the magnifier.
- Place the clock hands on the watch to get a pocket watch (J).
- You will earn LIGHTER FLUID.
- Go to Audrey’s Room.
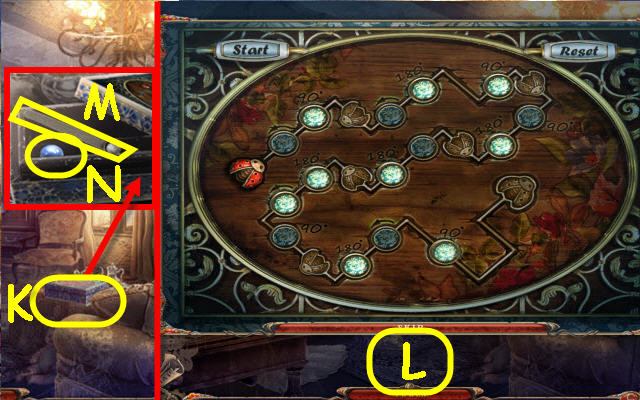
- Examine the box and place the LADYBUG on it to trigger a puzzle (K).
- Guide the ladybug through the maze by selecting the correct buttons.
- See screenshot for solution (L).
- Examine the box; take the FILE (M) and PEARL (N).
- Back out.
- Examine the bag and use the FILE on it; take the note (O) and the BROOCH (P).
- Go forward.
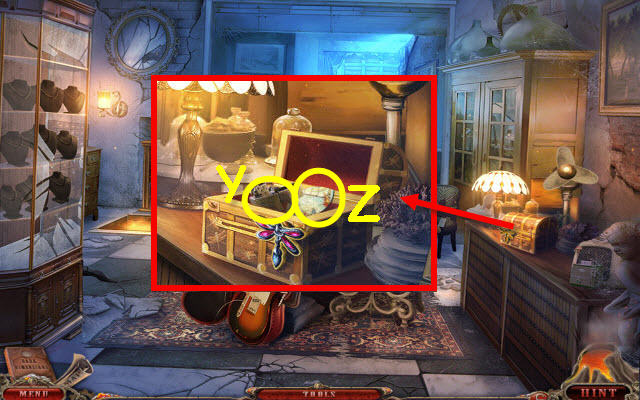
- Open the armoire and zoom into the dress; place the BROOCH on the dress (Q).
- Examine the suitcase; take the ASH (R) and INCENSE (S).
- Go to the Pawnshop Office.
- Examine the desk and move the paper (T). Use the charcoal pencil (U) on the page (V) and examine the symbols.
- You will automatically combine the PAPER WITH A CODE with the paper to get a NOTE.
- Examine the dials and place the NOTE on it to trigger a puzzle (W).
- Set the dials to the correct symbols in the correct order.
- To solve the puzzle, turn the dials to the symbols shown in the screenshot in the order marked (1-4).
- Turn the handle on the left when set.
- Take the GOLD BAR, KEY, note, and ALARM CLOCK (X).
- Back out.
- Examine the chest and place the KEY on it; slide the KEY all the way to the right to open the chest. Take the LIGHTER (Y) and TILE (Z).
- Go to the Secret Vault.
Chapter 6: Windmill
- Examine the table; take the MOLD (A).
- Examine the stove and use the LIGHTER FLUID, MOLD, GOLD BAR and LIGHTER on it; turn the dial (B).
- Slide the slope lever to the right (C); take the MOLD WITH GOLD (D).
- Examine the table; place the MOLD WITH GOLD in the bowl (E); take the GOLDEN LOCK 2/2 (F).
- Go to the Town Gates.
- Examine the gate and place the 2 GOLDEN LOCKS on the lock (G).
- Go forward through the newly-opened gates.
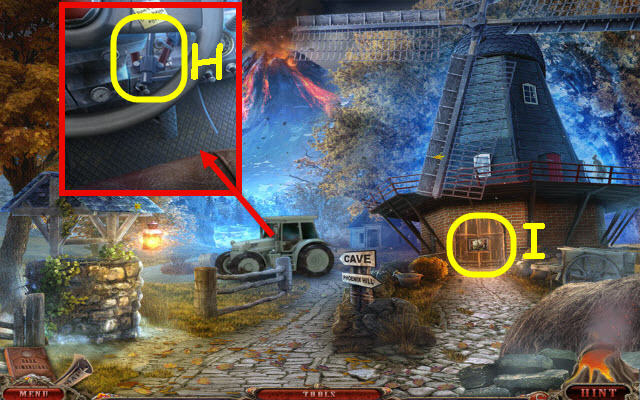
- Examine the tractor; take the JACK (H).
- Examine the mill door and place the TILE on it to trigger a puzzle (I).
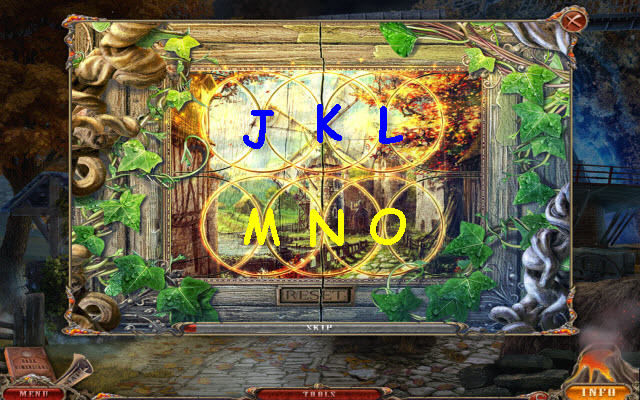
- Rotate the dials to complete the picture.
- To solve the puzzle, select the following dials: L, J, K, L, K, J, M, N, O, N, O and M.
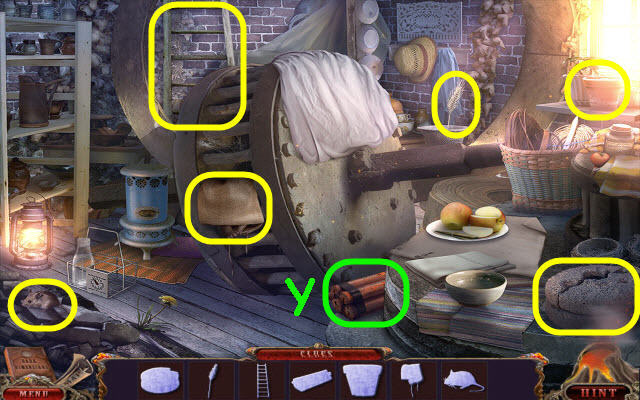
- Examine the opened mill to access a HOP.
- Find the items listed.
- Use the brush on the sand to get a HELP US! (P).
- Use the mop on the web to get the spider (Q).
- Use the wine on the sheet to get a stain (R).
- Use the fan on the dandelion to get a stem (S).
- Use the milk in the saucer to get a cat (T).
- You will earn a TRACTOR KEY.
- Examine the tractor and use the TRACTOR KEY in the ignition; turn the key (U).
- Go forward.
- Examine the overturned bus and use the JACK on it; take the WHEEL (V) and LOCK PICK (W).
- Examine the bus and use the LOCK PICK on the panel lock and then select the tumblers to trigger a puzzle (X).
- Use the lock pick to open the lock.
- To solve the puzzle, select the following arrows: B, A x 2, A, B x 2, B, A x 2, A, B x 2, B and A.
- Take the ROPE.
- Back out.
- Examine the mill house to access a HOP.
- Find the items matching the silhouettes.
- You will earn a DYNAMITE (Y).
- Examine the well and use the ROPE on it; take the MINT (Z).
- Go forward.
- Examine the cave entrance and place the DYNAMITE and ALARM CLOCK on it (A).
- Enter the cave.
- Examine the mechanism and place the WHEEL on it (B).
- Examine the floor tile to trigger a puzzle (C).
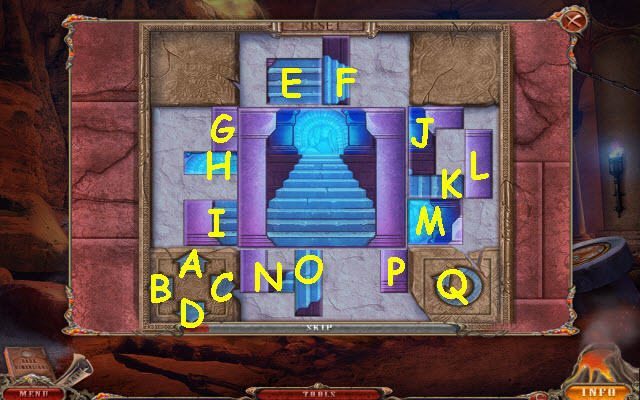
- Arrange the tiles to complete the picture.
- To solve the puzzle, select the following: F, D x 4, O, A x 4, Q, M, B x 3, E, D x 2, Q, H, C x 2, K, B x 2, Q, G, C, N, A x 4, I, C x 2, J, B x 2, L, B x 3, P and A x 2.
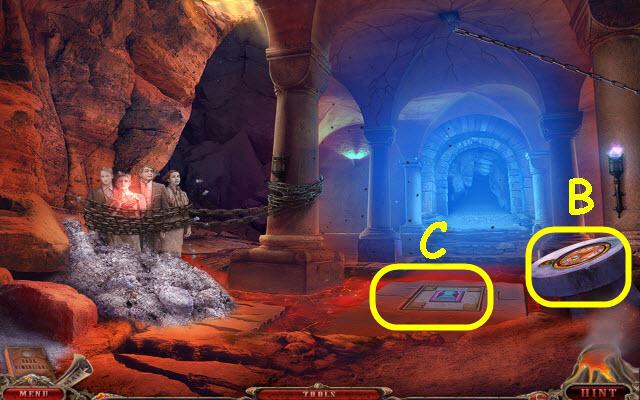
- Attempt to go forward.
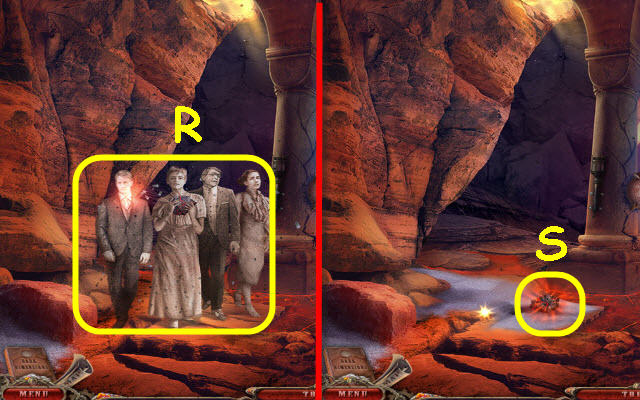
- Select the people (R).
- Examine the lava rock; take the LAVA (S).
- Go forward.
- Examine the book; take the BOOK (T).
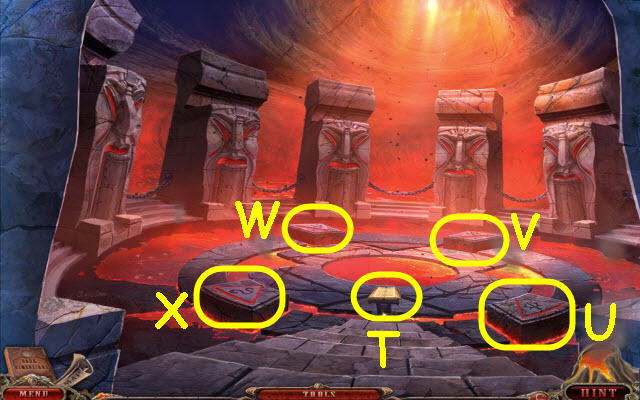
- Examine the right front pedestal; place the KEY on it (U).
- Examine the right rear pedestal; place the MINT on it (V).
- Examine the left rear pedestal; place the MEDAL on it (W).
- Examine the left front pedestal; place the LAVA on it (X).
- After the cutscene, examine each of the 4 pedestals and place the ASH on them.
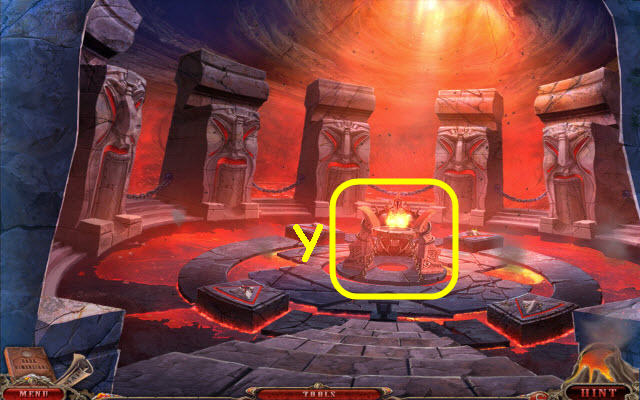
- Examine the center and add the following in this order; the BOOK, the INCENSE and then the PEARL (Y).
- Congratulations! You have successfully completed Dark Dimensions: City of Ash.


 Dark Mysteries: The Soul Keeper Walkthrough, Guide, & Tips
 Dark Parables: The Final Cinderella Walkthrough, Guide, & Tips
 Gravely Silent: House of Deadlock Walkthrough, Guide, & Tips
 House of 1000 Doors: The Palm of Zoroaster Walkthrough, Guide, & Tips
 Punished Talents: Seven Muses Walkthrough, Guide, & Tips