House of 1000 Doors: Serpent Flame Walkthrough, Guide, & Tips
House of 1000 Doors: Serpent Flame Walkthrough

Welcome to the House of 1000 Doors: Serpent Flame Walkthrough
Return to the House of 1,000 Doors to save mankind from annihilation! Giant snakes have burst out of the Earth and are wreaking destruction across every continent. Your mission: travel back in time to four different epochs to gather the elements needed to activate a machine that can destroy the ancient beasts!
Whether you use this document as a reference when things get difficult or as a road map to get you from beginning to end, we’re pretty sure you’ll find what you’re looking for here.
This document contains a complete House of 1000 Doors: Serpent Flame game walkthrough featuring annotated screenshots from actual gameplay!
We hope you find this information useful as you play your way through the game. Use the walkthrough menu below to quickly jump to whatever stage of the game you need help with.
Remember to visit the Big Fish Games Forums if you find you need more help. Have fun!
This walkthrough was created by Alawar Entertainment, and is protected under US Copyright laws. Any unauthorized use, including re-publication in whole or in part, without permission, is strictly prohibited.
The Beyond Objects can only be found in the Collector’s Edition; they are not included in the Standard Edition.
Chapter 1: The Tower

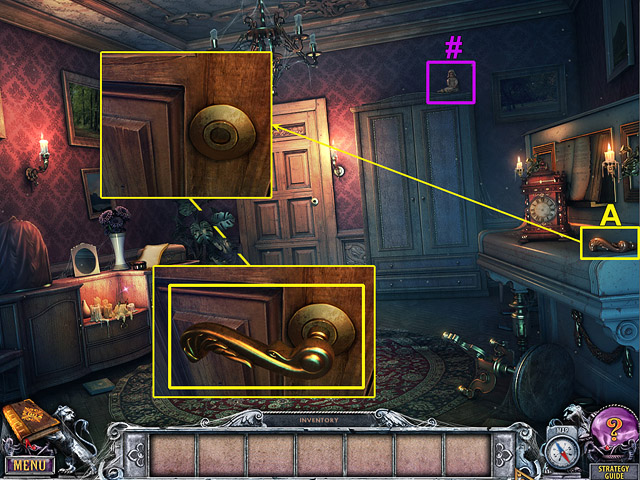
- Take the first Beyond Object(#).
- Take the DOOR HANDLE (A).
- Place the DOOR HANDLE (A) on the door. Press on the door handle.

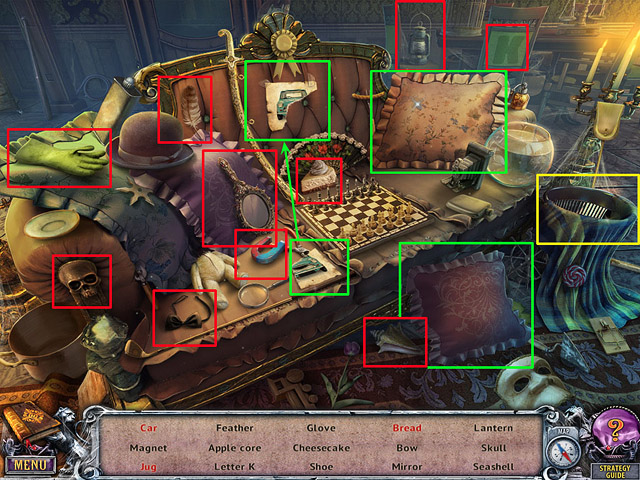
- Take the HOUR HAND (B).
- Pick up the note near the jewelry case on the makeup table. Read it.
- Take the MINUTE HAND (C).
- Take the MAKEUP POWDER (D).
- Examine the door to see the hint with the correct position of the clock hands.
- Examine the clock. Place the HOUR HAND (B) and MINUTE HAND (C) on it.

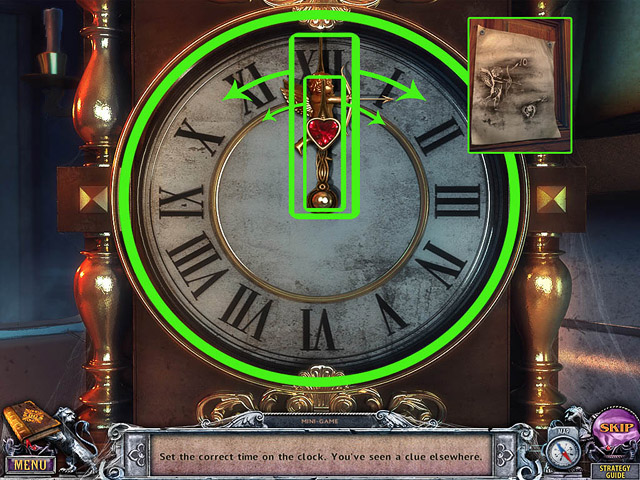

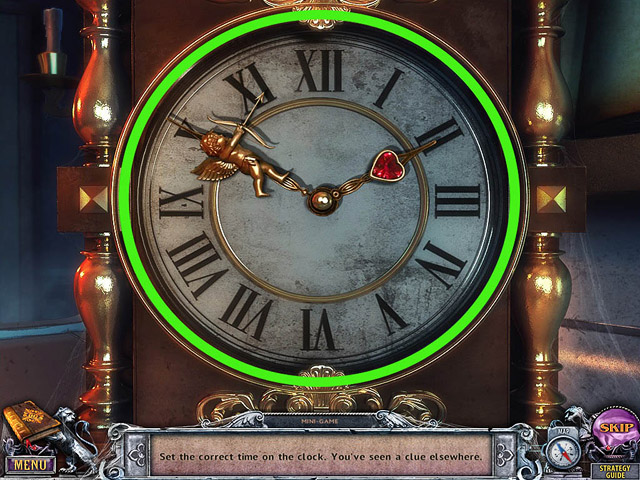
- Set the correct time on the clock.
- Go to the Main Hall.

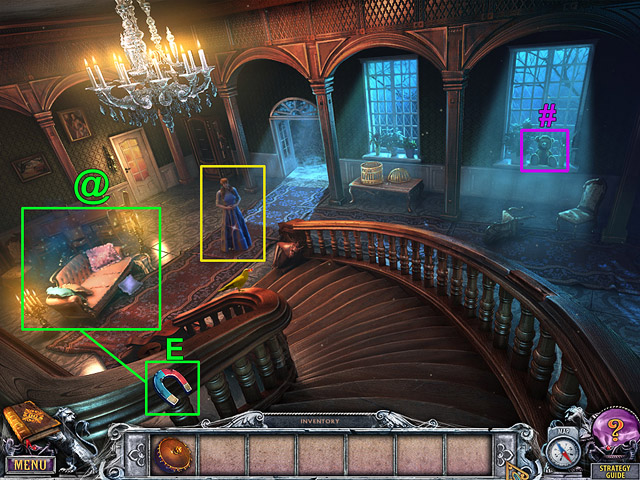
- Talk to Amanda.
- Take the second Beyond Object(#).
- Select the sparkles to open the hidden object scene(@).
- Take the MAGNET (E).


- Collect the items listed at the bottom of the screen where it belongs.

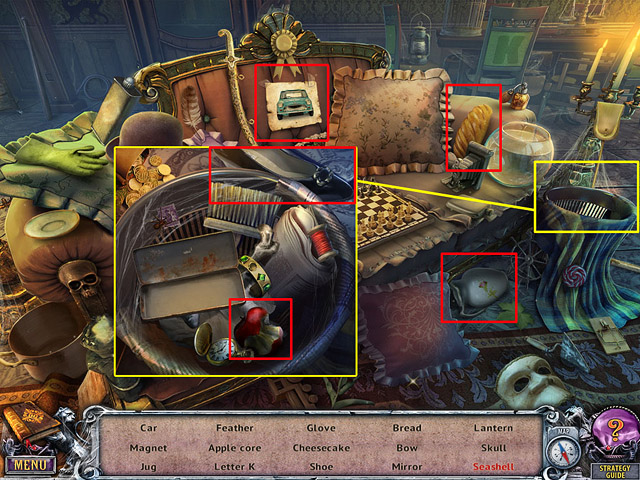
- Open the zoom-in scene to find the remaining objects.
- Go to the Garden.

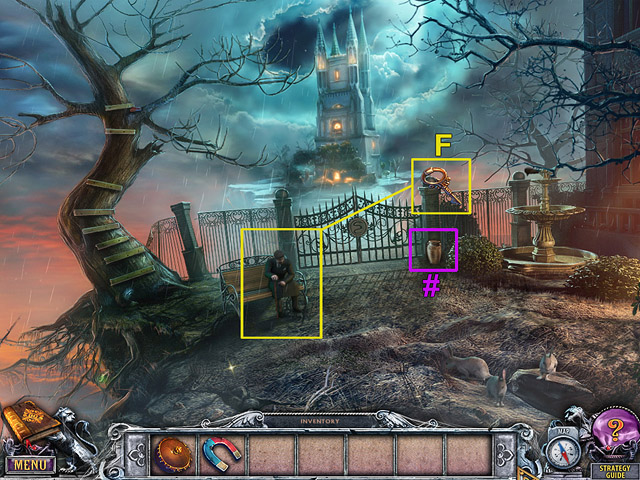
- Talk to Gabriel.
- Take the PASSAGE KEY (F).
- Take the third Beyond Object(#).
- Go to the Main Hall.

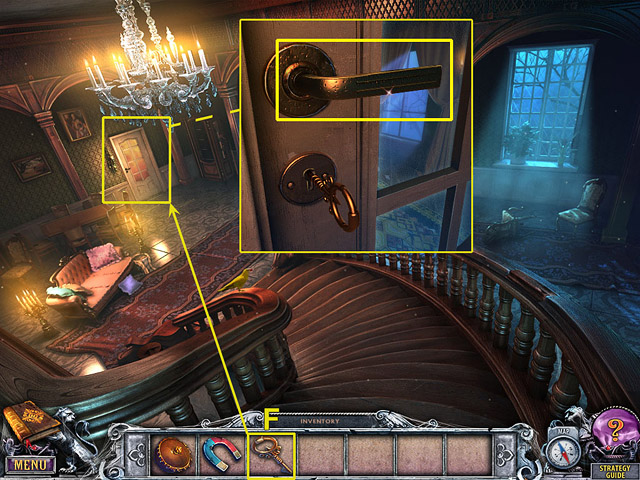
- Use the PASSAGE KEY (F) to open the door.
- Turn the door handle.
- Enter the Passage.

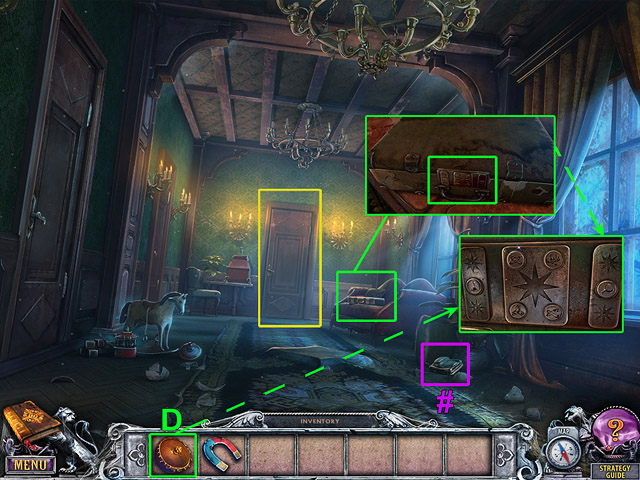
- Take the fourth Beyond Object(#).
- Open the door at the end of the passage.
- Examine the suitcase lock. Use the MAKEUP POWDER (D) to see which buttons to press.

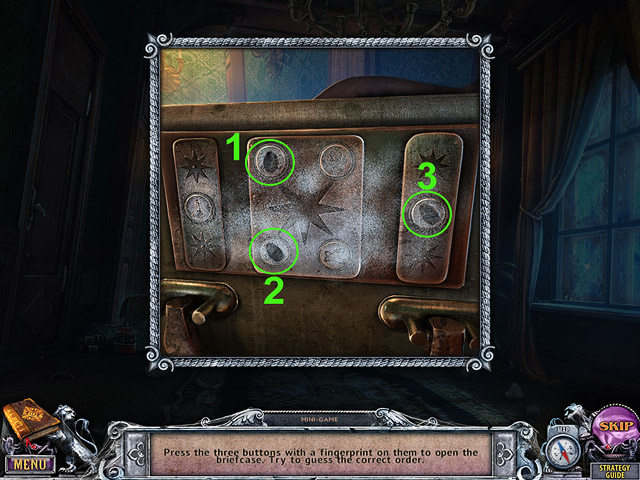
- Press on the buttons in the correct order.

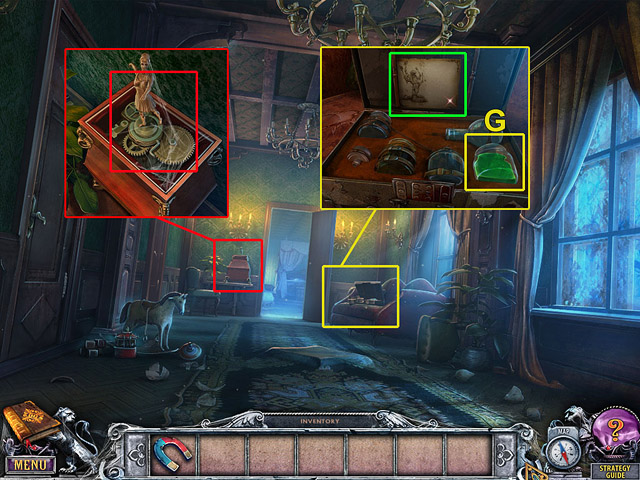
- Take ACID (G). Read the note.
- Remove the cobwebs from the music box.
- Go to Simon’s room.

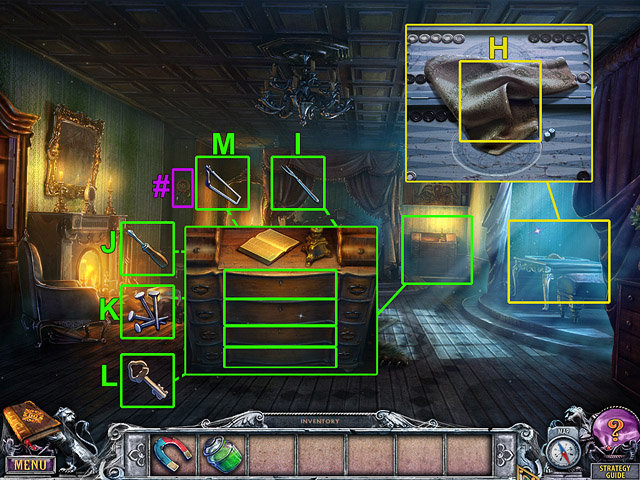
- Take the fifth Beyond Object(#).
- Take the TOWEL (H).
- Take the FORK (I).
- Take the SCREWDRIVER (J).
- Take the NAILS (K).
- Take the KEY (L).
- Take the HACKSAW (M).

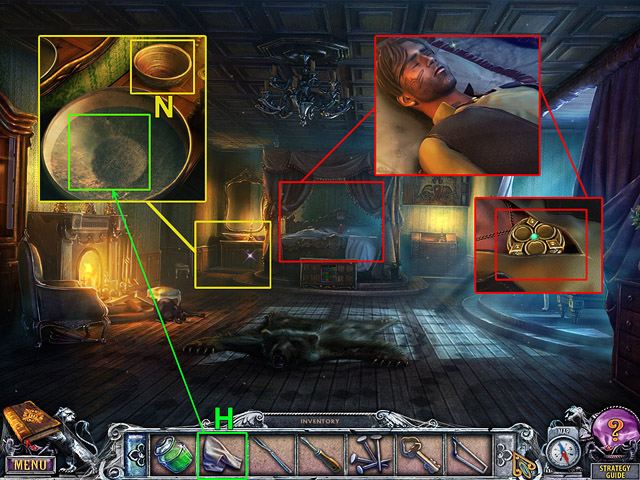
- Take the BOWL (N).
- Dip the TOWEL (H) in the bowl of water. Take the WET TOWEL (O).
- Pull the locket out from under Rafael’s shirt.
- Go to the Passage.

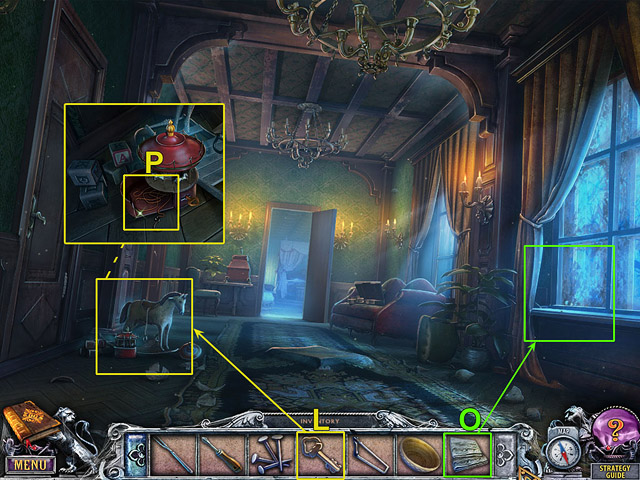
- Use the KEY (L) to wind-up the toy. Take the HOOK ON A ROPE (P).
- Use the WET TOWEL (O) to wipe the dirt off the window.
- Go to the Main Hall.

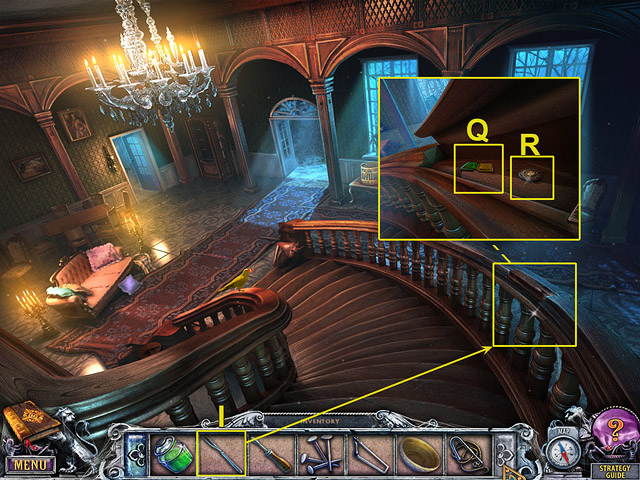
- Use the FORK (I) to open the secret compartment on the railing.
- Take the CHEST PIECE (Q) and the COIN (R).
- Go to the Garden.

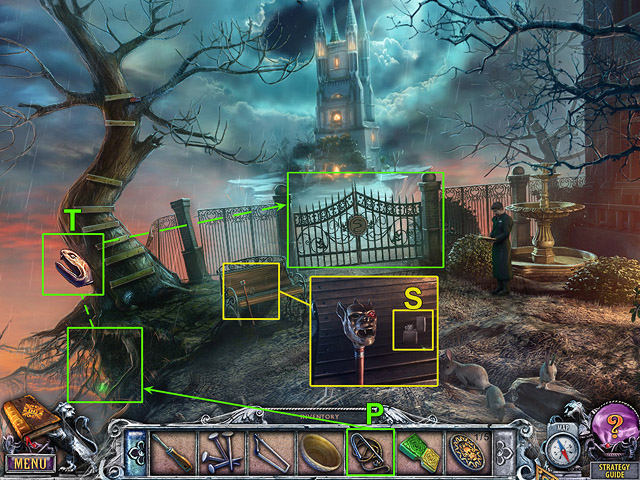
- Take the LIGHTER (S).
- Use the HOOK ON A ROPE (P) to take the SNAKE HEAD (T).
- Insert the SNAKE HEAD (T) in the seal on the gate.

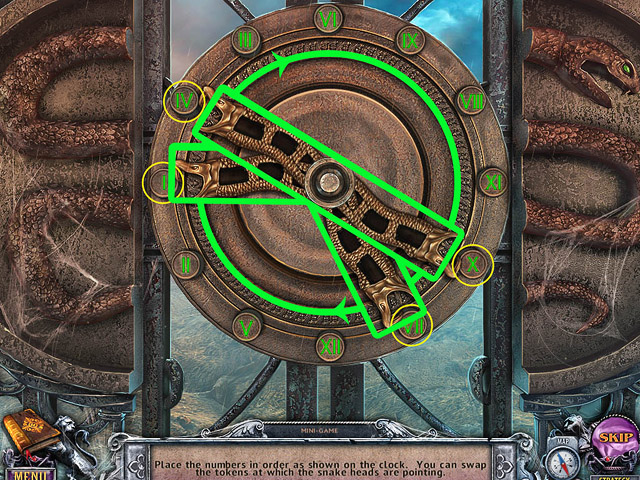
- You can swap the tokens at the opposite ends of the dials. Press and drag the snake heads to move them.

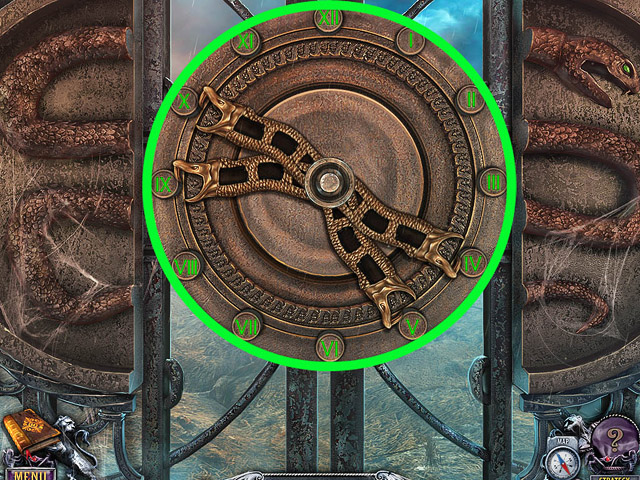
- Place the numbers on the clock in order.
- Go to Outside the Tower.

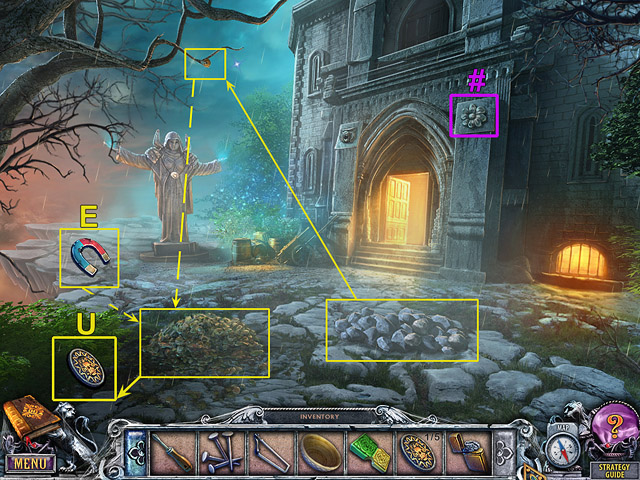
- Take the sixth Beyond Object(#).
- Use the stones to knock the coin out of the tree.

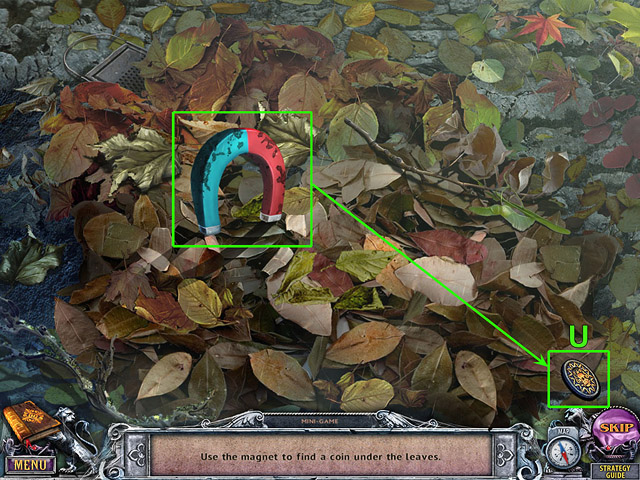
- Use the MAGNET (E) to find the COIN (U) in the leaves.

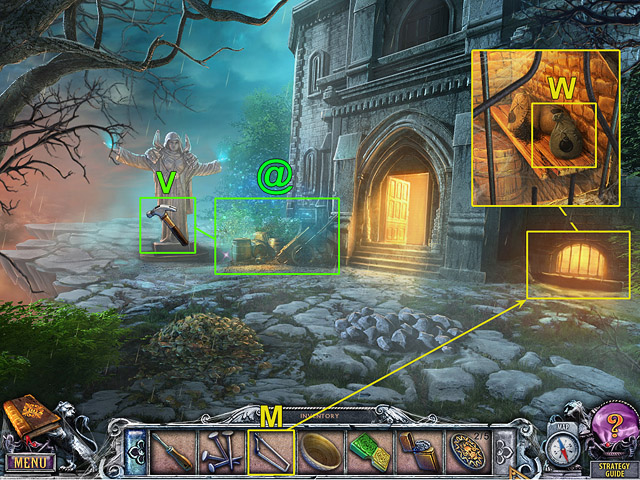
- Select the sparkles to open the hidden object scene(@).
- Take the HAMMER (V).
- Use the HACKSAW (M) to remove the cellar bars. Take the GUNPOWDER (W).

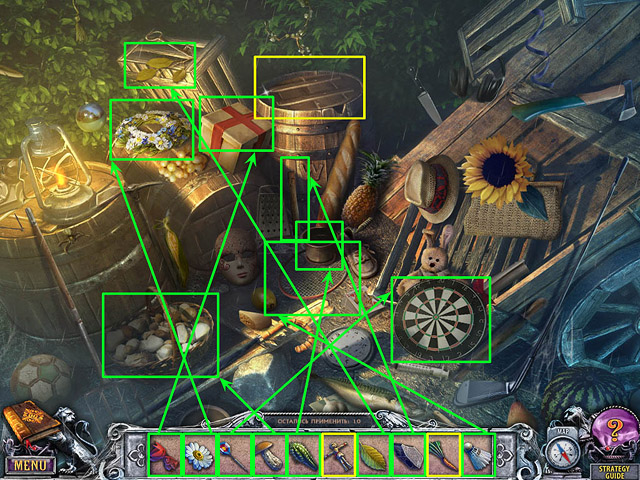
- Place each object displayed at the bottom of the screen where it belongs.

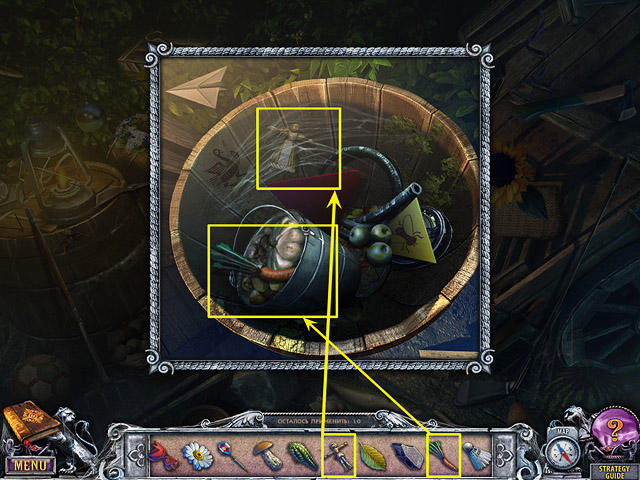
- Open the zoom-in scene to place the remaining objects where they belong.
- Enter the Tower.

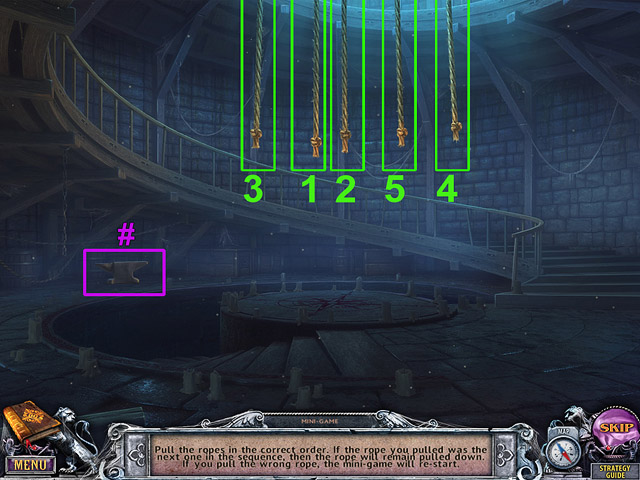
- Pull the ropes in the correct order.
- Take the seventh Beyond Object(#).
- Go to the Top of the Tower.

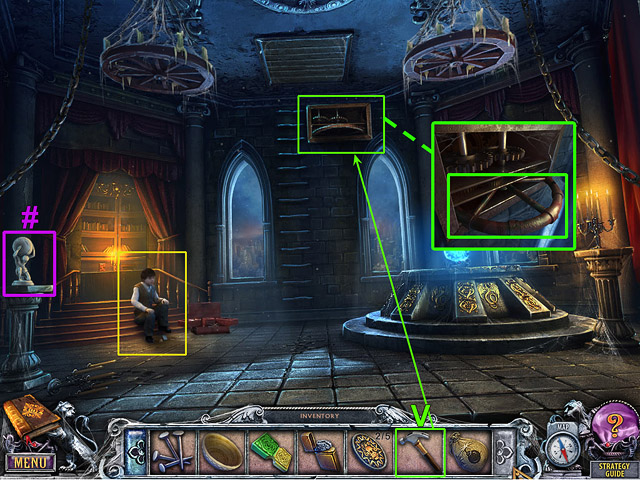
- Take the eighth Beyond Object(#).
- Talk to Sammy.
- Use the HAMMER (V) to knock out the stone stuck between the gears. Rotate the wheel.
- Climb the ladder to the Mechanism.

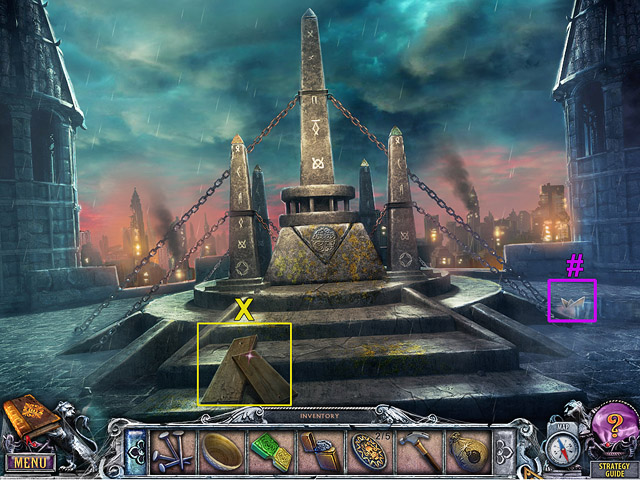
- Take the ninth Beyond Object(#).
- Take the PLANKS (X).
- Go to the Garden.

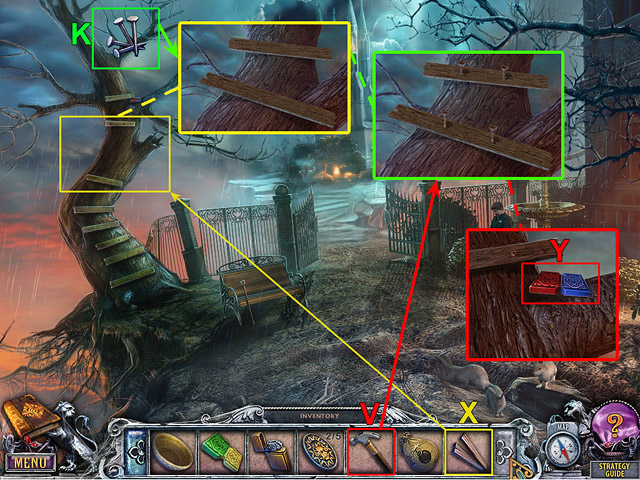
- Use the PLANKS (X), the NAILS (K) and the HAMMER (V) to fix the ladder.
- Take the CHEST PIECE (Y).
- Go to Simon’s room.

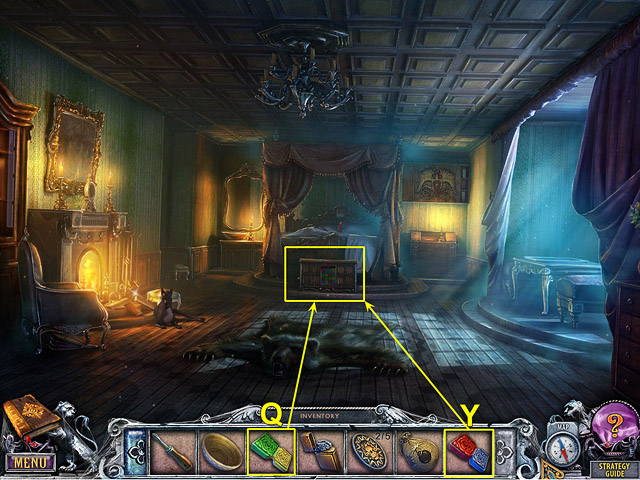
- Insert the CHEST PIECES (Y and Q) in the chest.

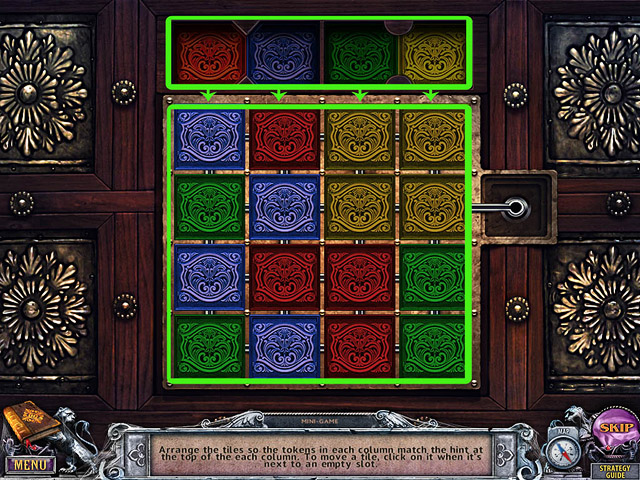
- The tiles in each column should match the tile at the top of the column.
- To move a tile, Press on it when it’s next to an empty slot.

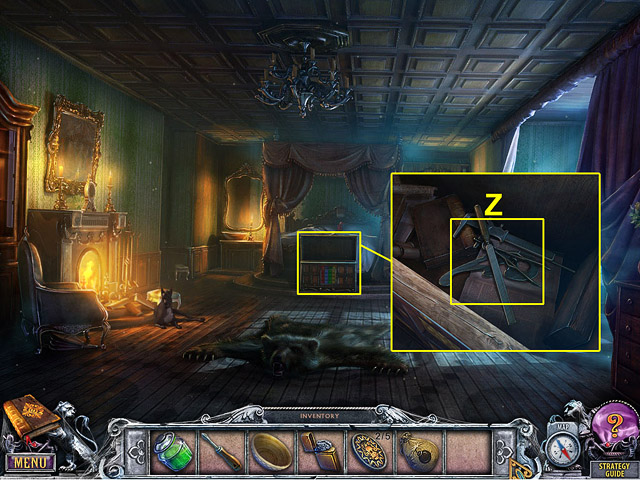
- Take the DRAWING TOOLS (Z).
- Go to the Top of the Tower.

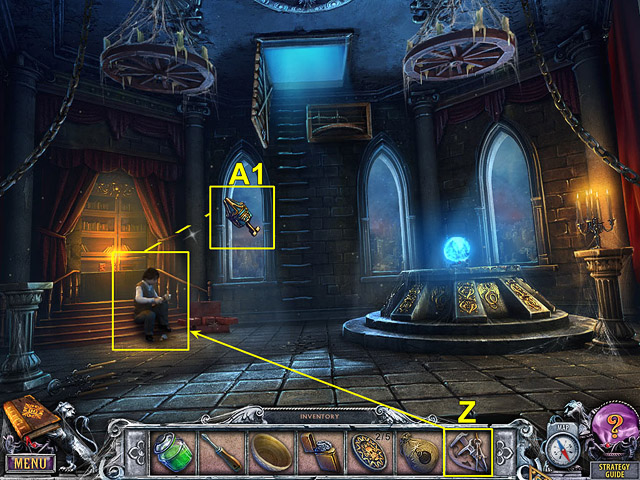
- Give the DRAWING TOOLS (Z) to Sammy. Take the KEY (A1).
- Go to the Portals.

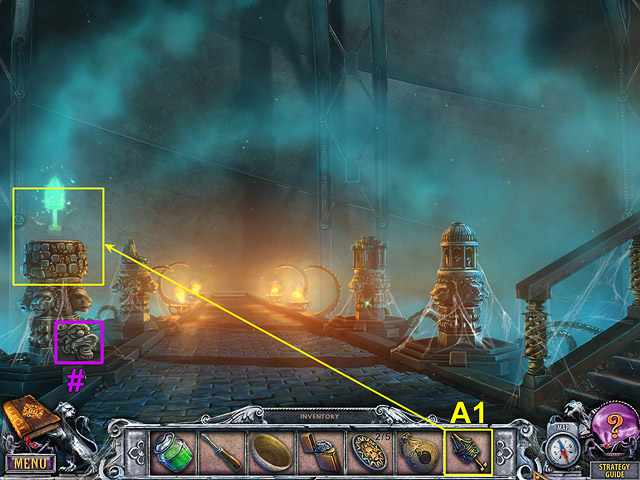
- Take the tenth Beyond Object(#).
- Use the KEY (A1) to activate the first portal.
- Step through the portal.
Chapter 2: The Air

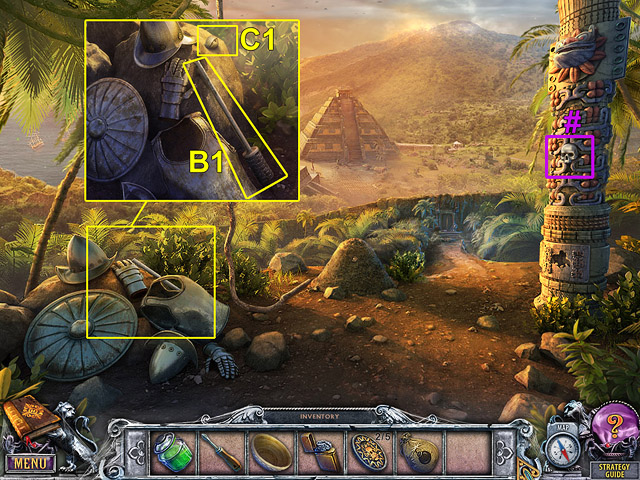
- Take the 11th Beyond Object(#).
- Take the RAMROD (B1) and the WOODEN EYE (C1).
- Go to the City Gate.

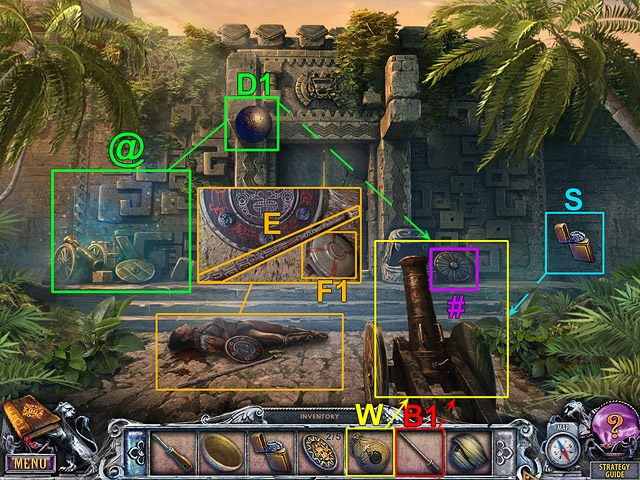
- Take the 12th Beyond Object(#).
- Select the sparkles to open the hidden object scene(@).
- Take the CANNONBALL (D1).
- Load the cannon with the GUNPOWDER (W), the CANNONBALL (D1), and the RAMROD (B1).
- Use the LIGHTER (S) to light the fuse.
- Take the SPEAR (E1) and the CANTEEN (F1).

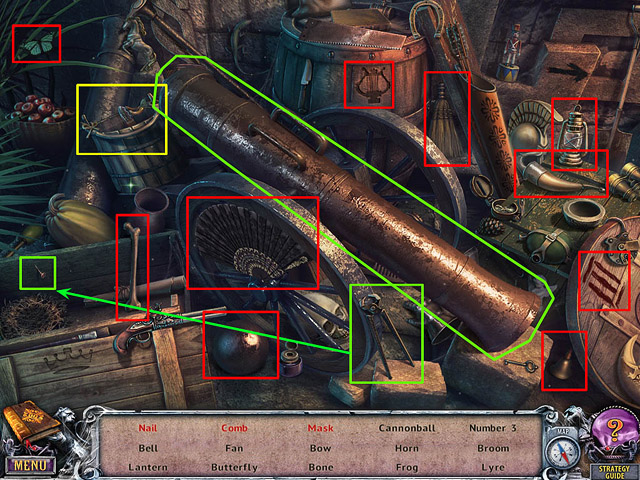
- Collect the objects listed at the bottom of the screen by selecting them.

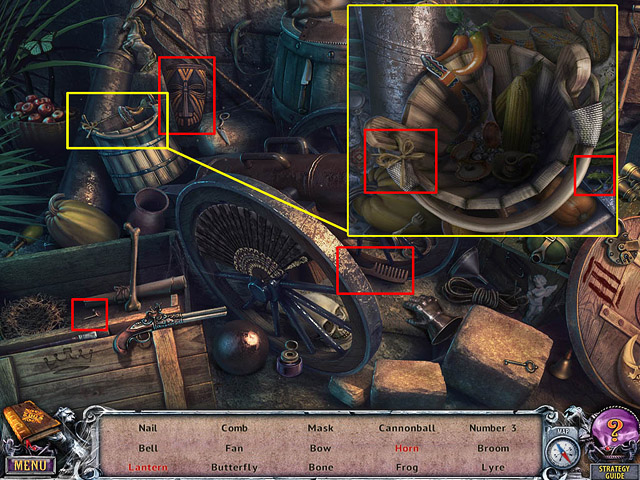
- Open the zoom-in scene to find the remaining objects.
- Enter the Village Square.

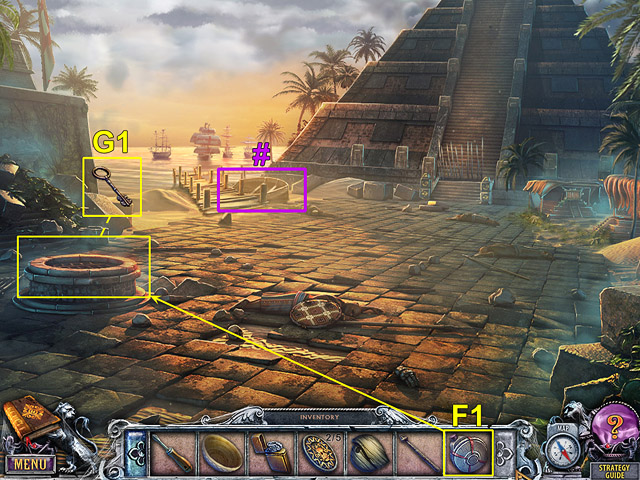
- Take the 13th Beyond Object(#).
- Give the FLASK (F1) to the prisoner. Take the KEY (G1).
- Go to the Dock.

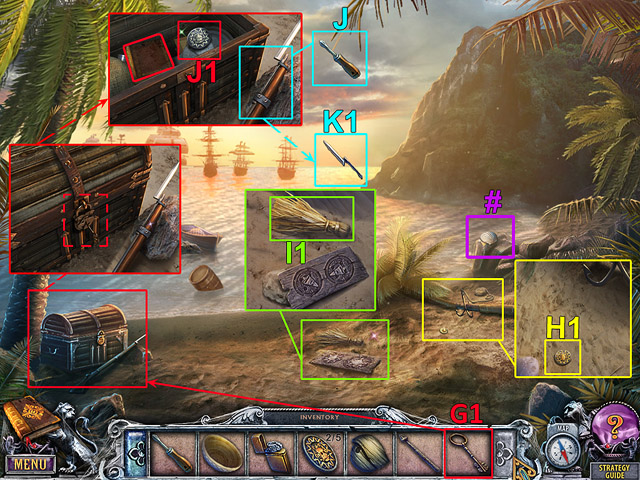
- Take the 14th Beyond Object(#).
- Take the COIN (H1).
- Take the GRASS (I1).
- Put the KEY (G1) in the lock.
- Open the chest.
- Take the COIN (J1). Read the journal.
- Use the SCREWDRIVER (J) to remove the screws holding the bayonet blade in place. Take the BAYONET (K1).
- Go to the Market.

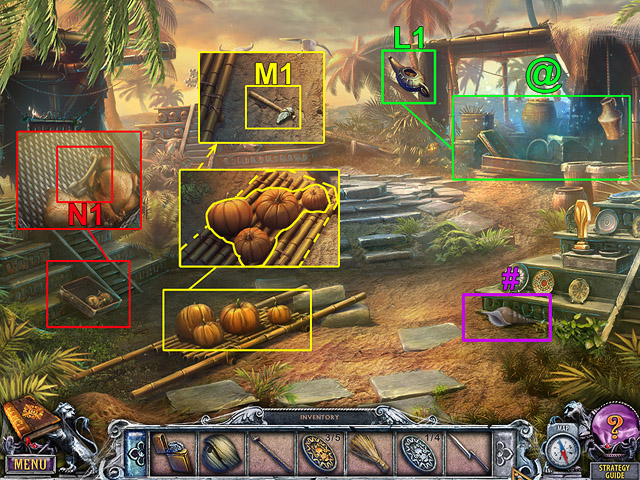
- Take the 15th Beyond Object(#).
- Select the sparkles to open the hidden object scene(@).
- Take the OILER (L1).
- Remove the pumpkins.
- Move the stretcher.
- Take the HAMMER (M1).
- Take the BONE (N1).

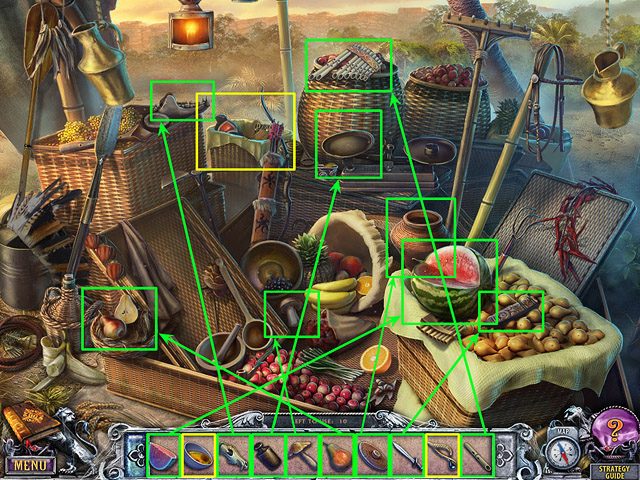
- Place each object displayed at the bottom of the screen where it belongs.

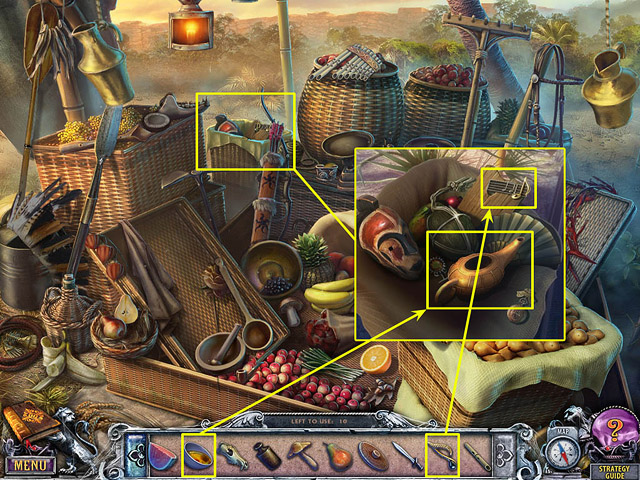
- Open the zoom-in scene to place the remaining objects where they belong.
- Go to Simon’s room.

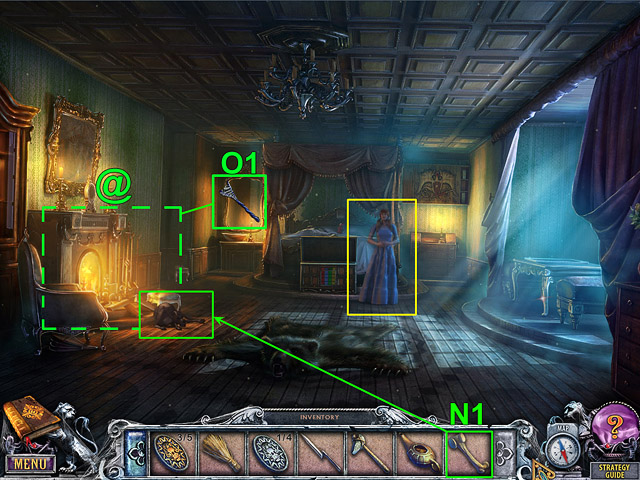
- Talk to Amanda.
- Give the BONE (N1) to the dog.
- Select the sparkles to open the hidden object scene(@).
- Take the BUTTERFLY NET (O1).

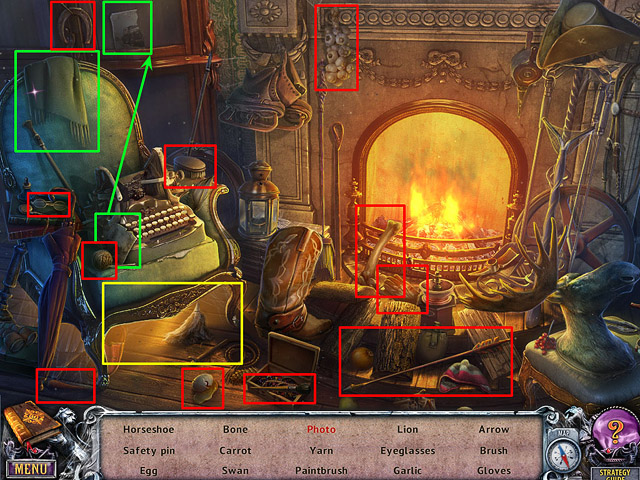
- Collect the objects listed at the bottom of the screen by selecting them.

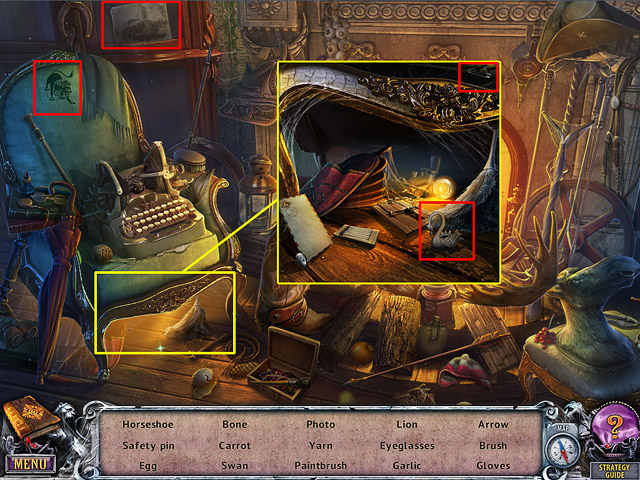
- Open the zoom-in scene to find the remaining objects.
- Go to the Passage.

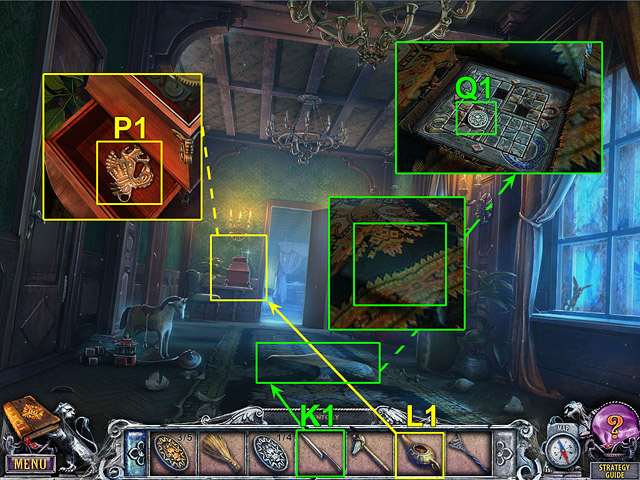
- Use the OILER (L1) to oil the case with the ballerina.
- Take the AMULET (P1).
- Use the BAYONET (K1) to cut the rug.
- Pull back the rug to reveal a secret compartment.
- Take the COIN (Q1).
- Go to the First Room.

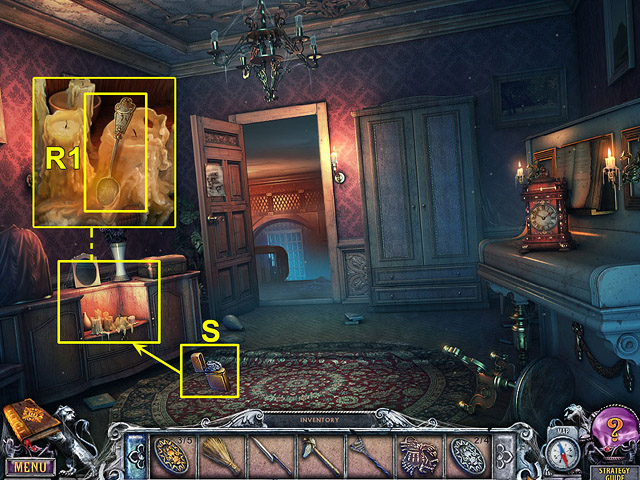
- Use the LIGHTER (S) to melt the candle wax. Take the SPOON (R1).
- Go to the Jungle.

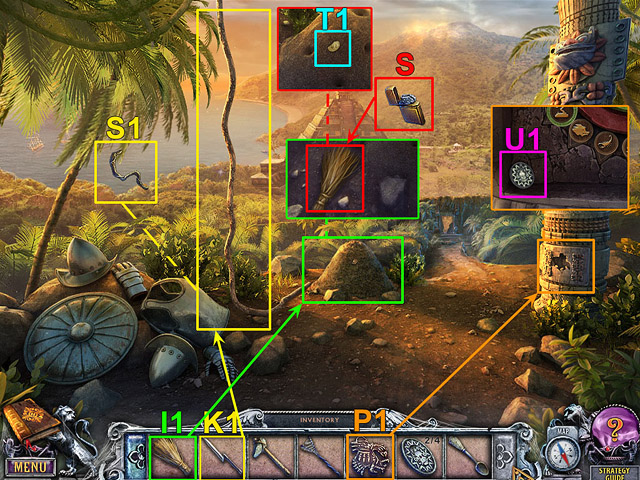
- Use the BAYONET (K1) to cut down the vine. Take the VINE (S1).
- Place the GRASS (I1) near the anthill. Use the LIGHTER (S) to ignite the grass and smoke out the ants.
- Take the COIN (T1) from the anthill.
- Place the AMULET (P1) on the column to open the cache.
- Take the COIN (U1).
- Go to the Village Square.

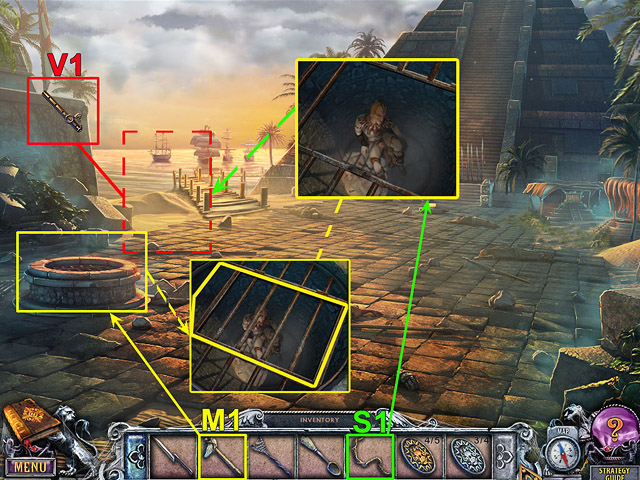
- Use the HAMMER (M1) to knock the peg out of the lock.
- Open the bars.
- Lower the VINE (S1) to the priest. He will climb out of the prison.
- Talk to the priest.
- Take the BAMBOO REED (V1).
- Go to the Market.

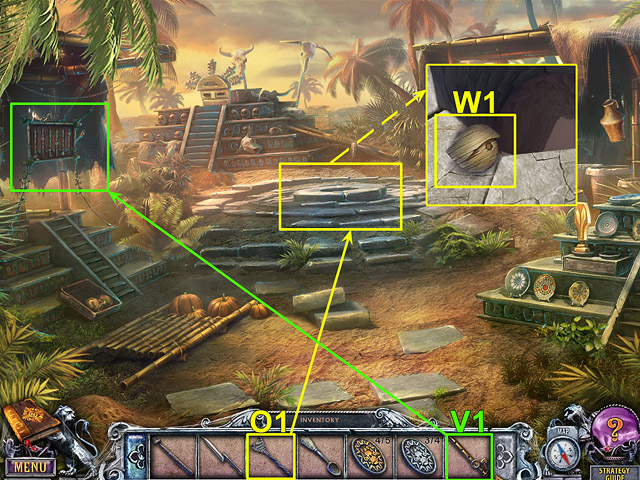
- Use the BUTTERFLY NET (O1) to scoop the WOODEN EYE (W1) out of the well.
- Place the BAMBOO REED (V1) on the musical instrument.

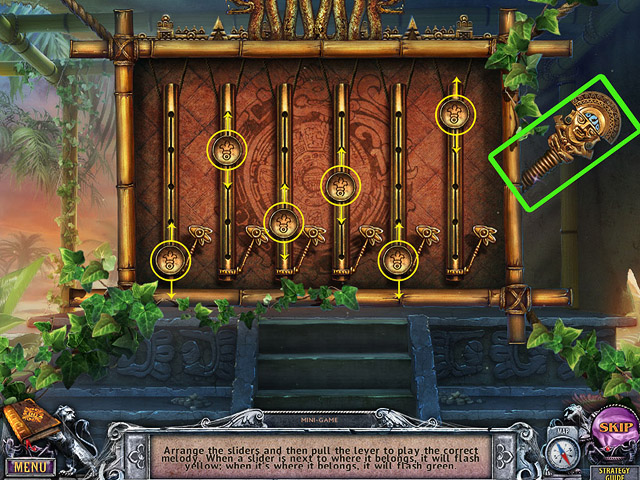
- Arrange the sliders.
- Pull the lever 4 times to play the melody.

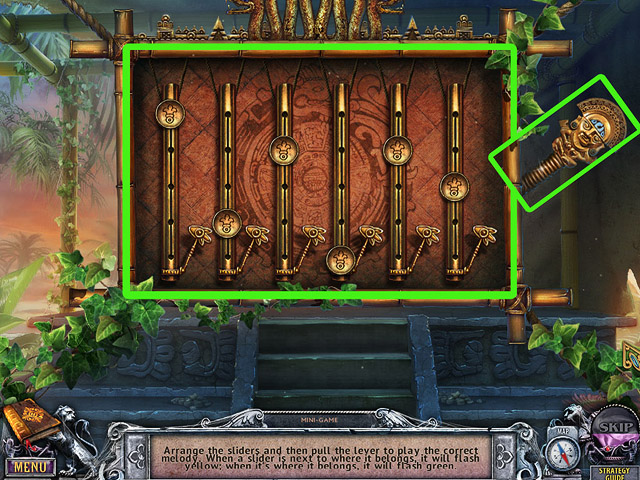
- When a slider is next to where it belongs, it will flash yellow; when it’s where it belongs, it will flash green.

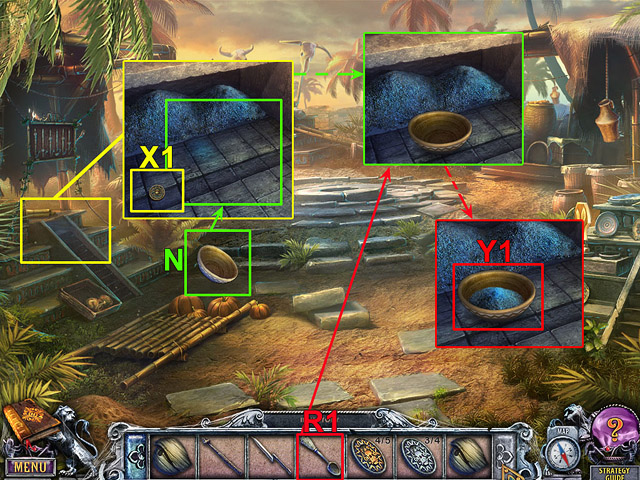
- Take the COIN (X1). Place the BOWL (N) near the sand. Use the SPOON (R1) to fill the bowl with sand.
- Take the DEAD SAND (Y1).
- Go to the Village Square.

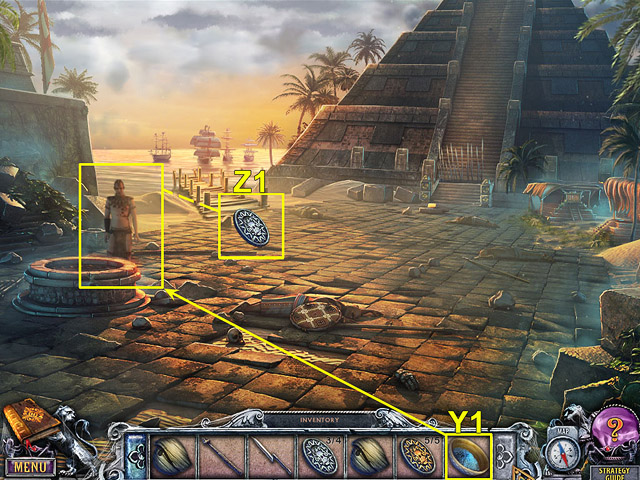
- Give the DEAD SAND (Y1) to the priest.
- Take the COIN (Z1).
- Go to the Base of the Pyramid.

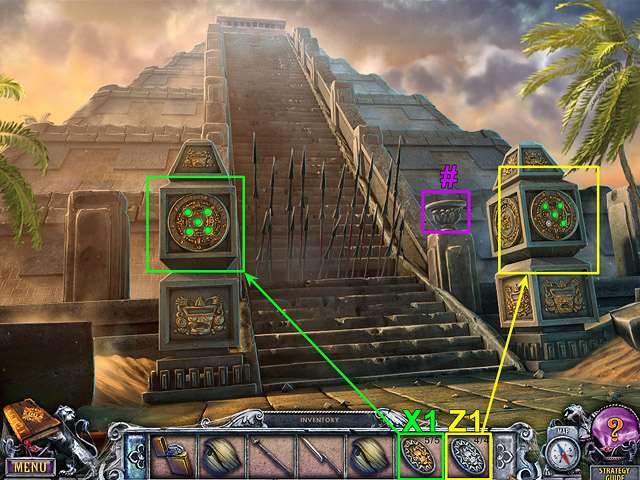
- Take the 16th Beyond Object(#).
- Activate the columns by inserting the COINS (Z1 and X1) where they belong.

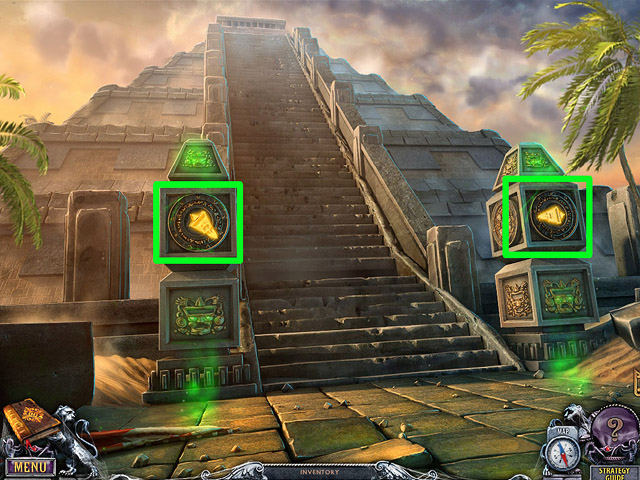
- Rotate the columns until you’ve lowered all of the spears.
- Go to the Top of the Pyramid.

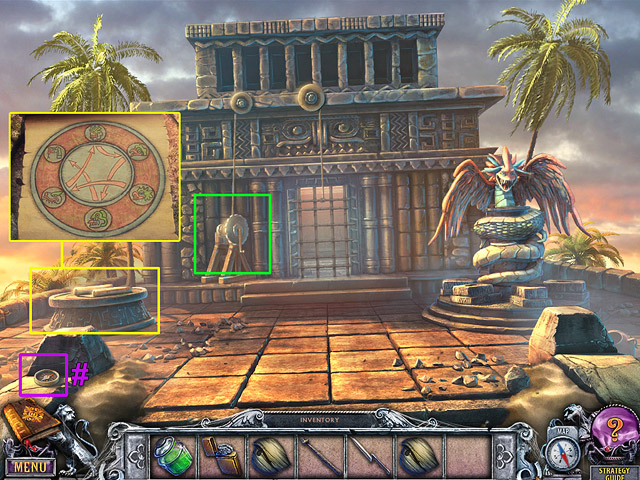
- Take the 17th Beyond Object(#).
- Read the note on the pedestal.
- Raise the prison gate.
- Enter the Prison.

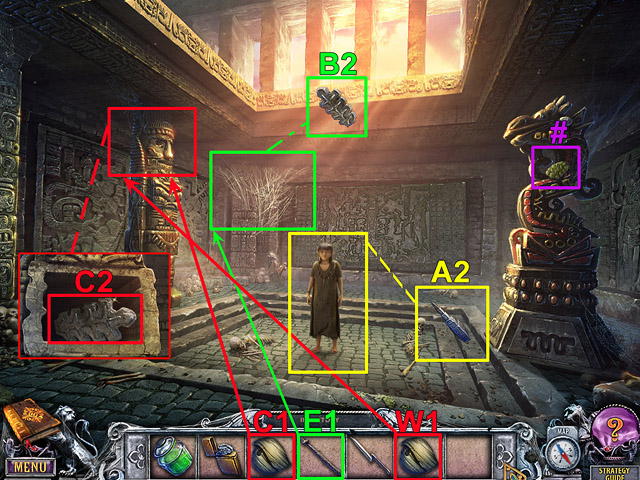
- Talk to the girl.
- Take the STONE ROD (K2).
- Take the 18th Beyond Object(#).
- Use the SPEAR (E1) to knock the object out of the cobwebs.
- Take the STONE FEATHER (B2).
- Insert the WOODEN EYES (C1 and W1) where they belong to restore the statue.
- Take the STONE FEATHER (C2) from the cache.
- Go to the City Gate.

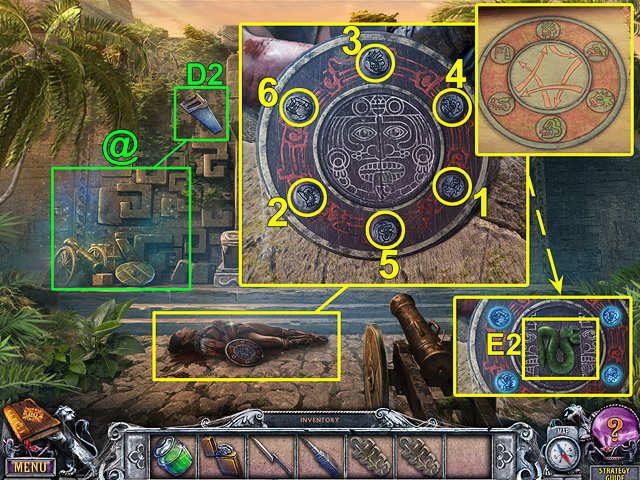
- Select the sparkles to open the hidden object scene(@).
- Take the HACKSAW (D2).
- Press the symbols on the warrior’s shield in the correct order. Take the HALF OF THE SNAKE (E2).

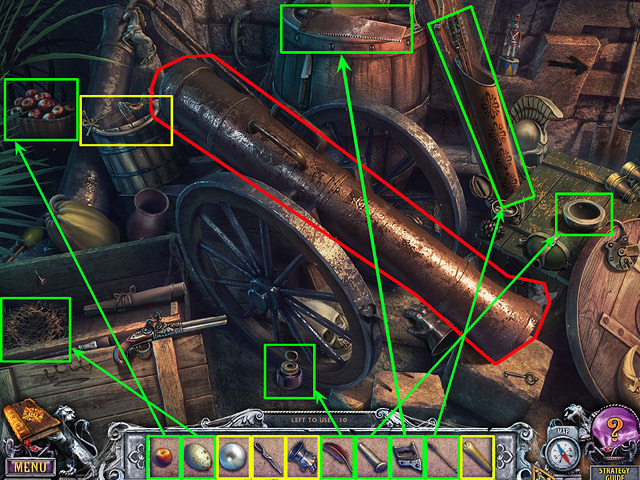
- Place each object displayed at the bottom of the screen where it belongs.

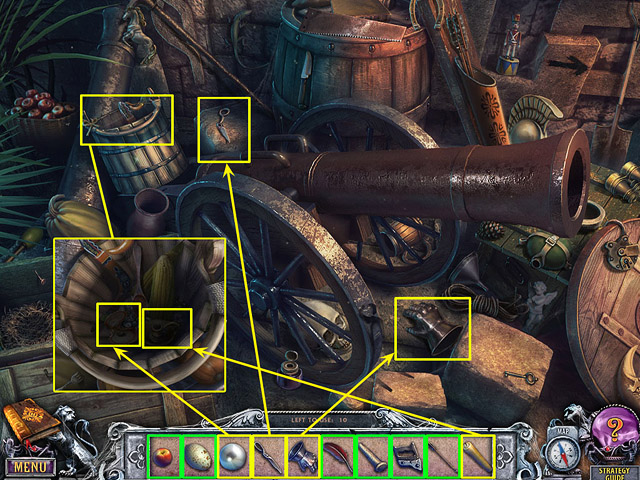
- Open the zoom-in scene to find the remaining objects.
- Go to the Dock.

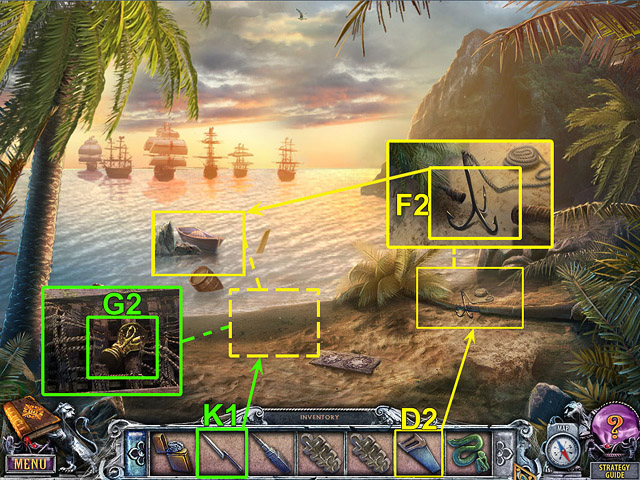
- Use the HACKSAW (D2) to saw through the fallen palm tree. Take the GRAPPLING HOOK (F2).
- Use the GRAPPLING HOOK (F2) to pull the boat to shore.
- Use the BAYONET (K1) to cut the net at the bottom of the boat.
- Take the FIGURINE (G2).
- Go to the Market.

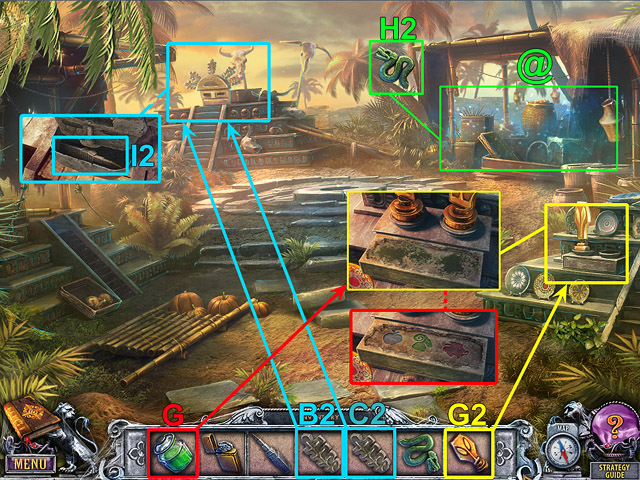
- Select the sparkles to open the hidden object scene(@).
- Take the HALF OF A SNAKE (H2).
- Place the FIGURINE (G2) where it belongs.
- Use the ACID (G) to remove the corrosion on the stone.
- Place the STONE FEATHERS (B2) and (C2) where they’re missing.
- Take the STONE ROD (I2) from the cache.

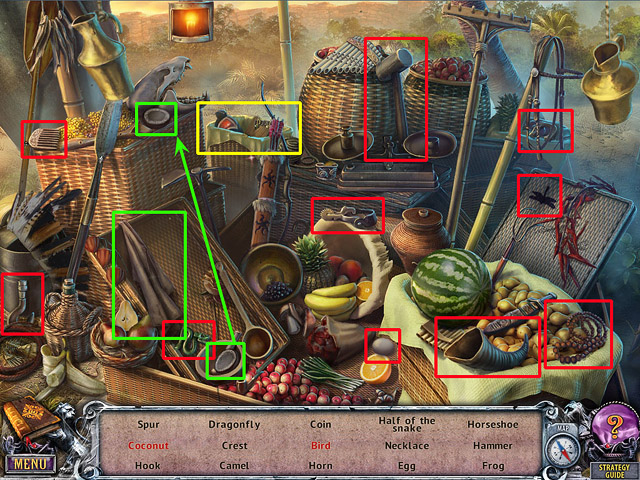
- Collect the objects listed at the bottom of the screen by selecting them.

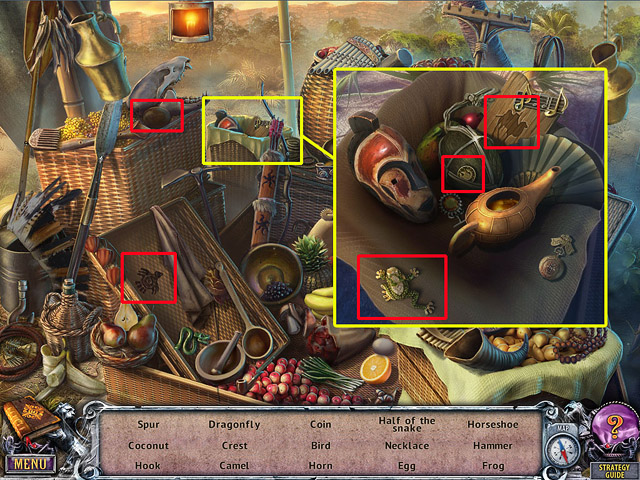
- Open the zoom-in scene to find the remaining objects.
- Go to the Jungle.

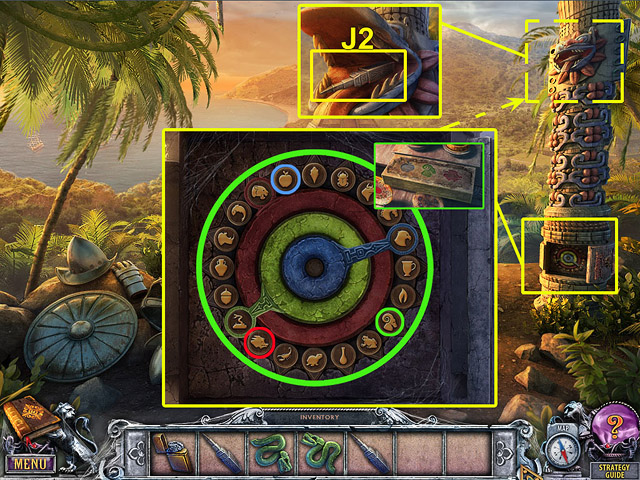
- Place each ring over its corresponding symbol.
- Take the STONE ROD (J2).
- Go to the Prison.

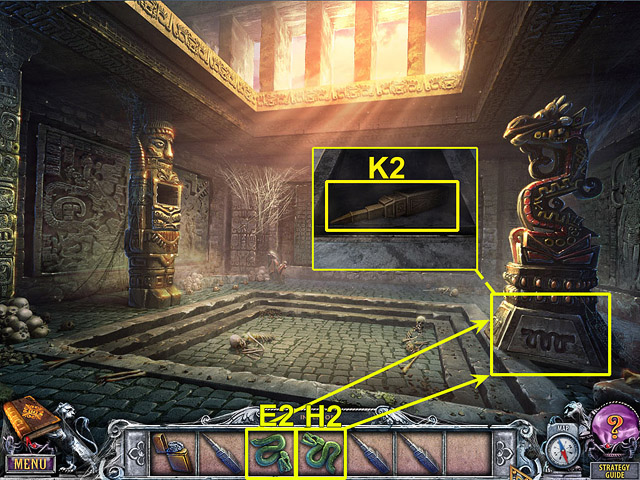
- Place the HALVES OF A SNAKE (E2 and H2) at the foot of the statue.
- Take the STONE ROD (K2).
- Go to the Top of the Pyramid.

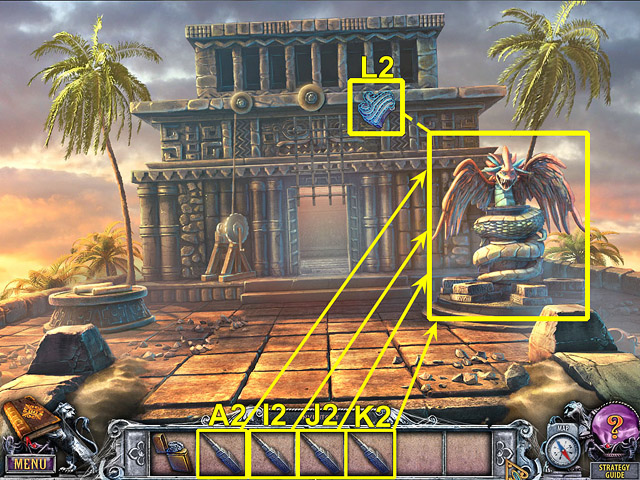
- Place STONE RODS (A2, I2, J2 and K2) around the statue of the Feathered Serpent.
- Take the AIR ELEMENT (L2).
- Go to the Top of the Tower.

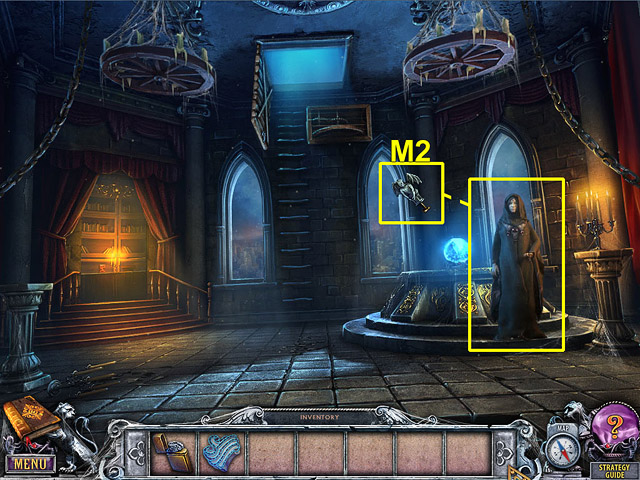
- Talk to the oracle.
- Take the KEY (M2).
- Go to the Mechanism.

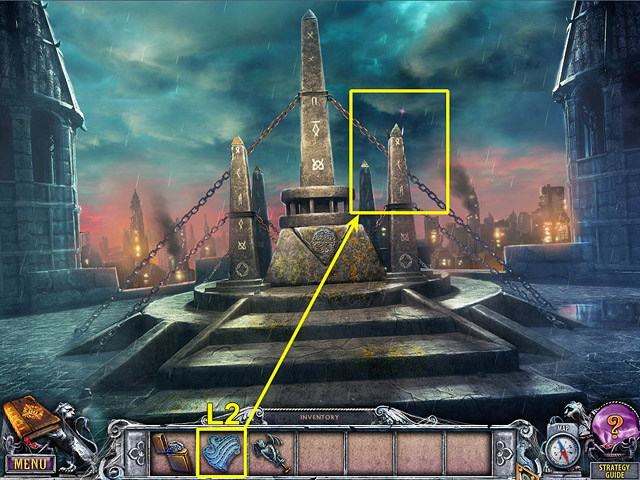
- Place the AIR ELEMENT (L2) on the machine.
- Go to the Portals.

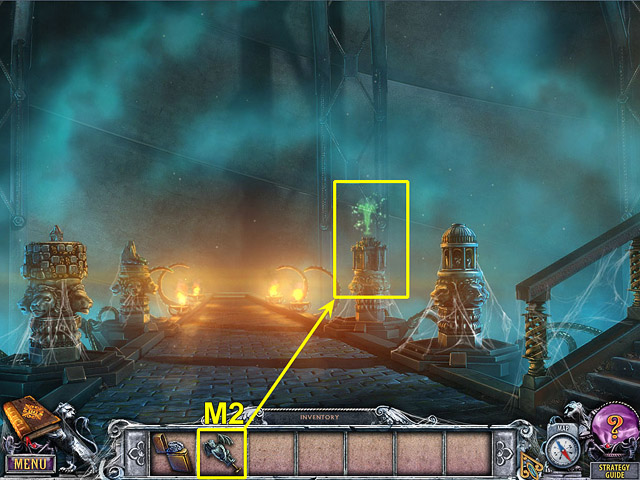
- Use the KEY (M2) to activate the second portal.
- Step through the portal.
- Go to the Town Square.
Chapter 3: The Water

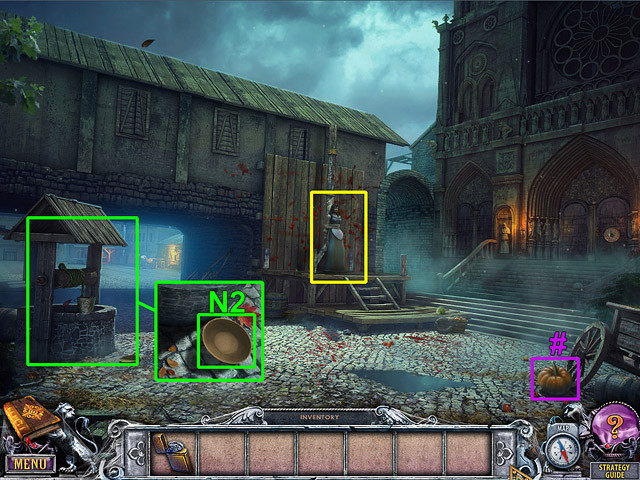
- Talk to the girl.
- Take the 19th Beyond Object(#).
- Take the BOWL (N2).
- Go to the Blacksmith’s Workshop.

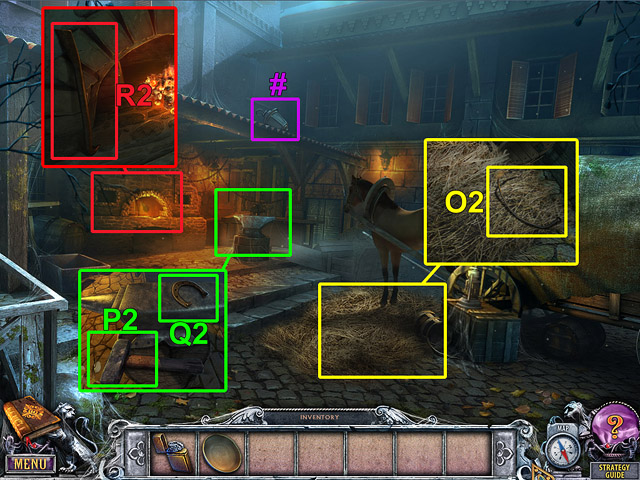
- Take the 20th Beyond Object(#).
- Take the BUCKET HANDLE (O2).
- Take the HAMMER (P2) and the HORSESHOE (Q2).
- Take the CROWBAR (R2).
- Go to the Town Square.

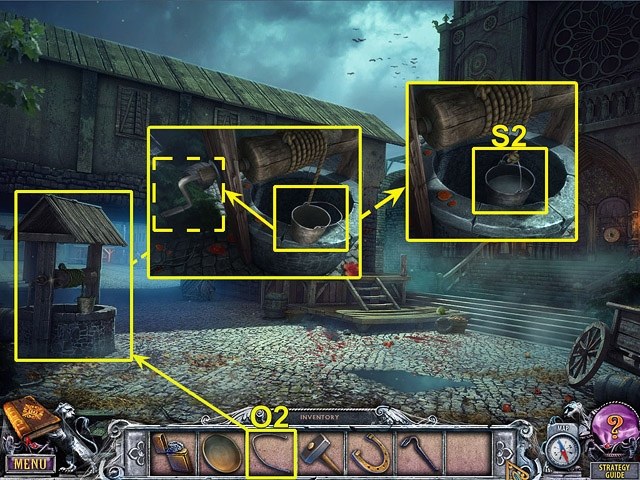
- Place the BUCKET HANDLE (O2) on the bucket.
- Tie the rope to the bucket.
- Use the handle to lower the bucket.
- Lift the bucket.
- Take the BUCKET OF WATER (S2).
- Go to the Market Street.

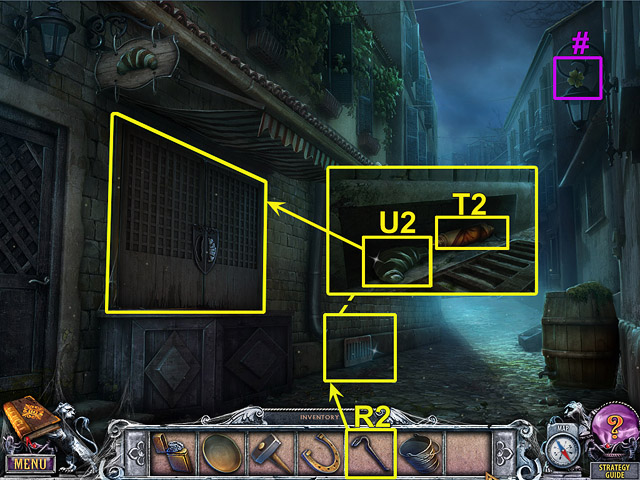
- Take the 21st Beyond Object(#).
- Use the CROWBAR (R2) to remove the grate.
- Take the SCROLL (T2) and the CROISSANT (U2).
- Open the counter by placing the CROISSANT (U2) where it belongs.

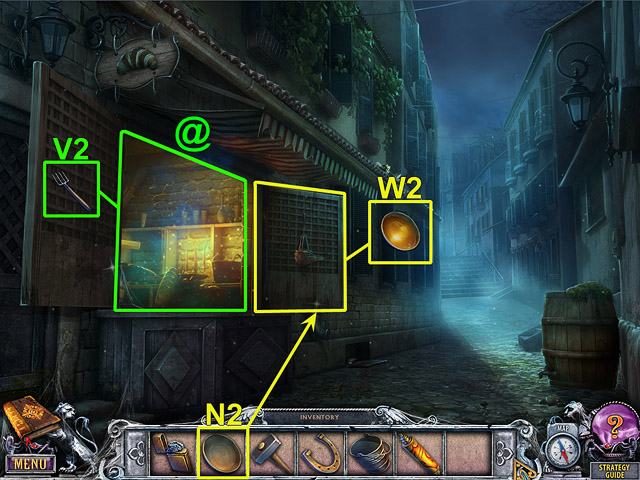
- Select the sparkles to open the hidden object scene(@).
- Take the PITCHFORK (V2).
- Fill the BOWL (N2) with oil.
- Take the BOWL OF OIL (W2).

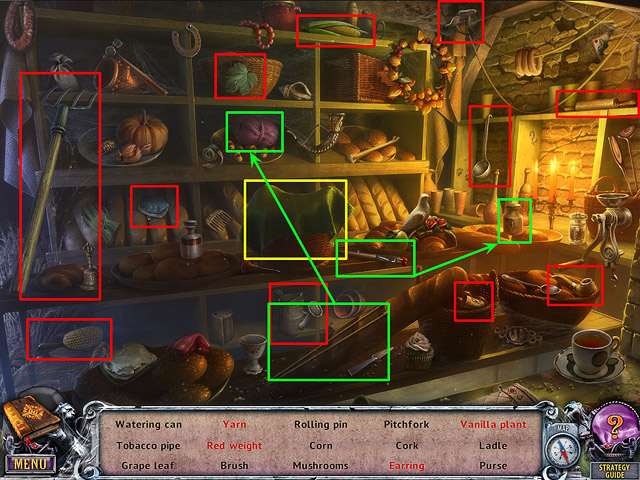
- Collect the objects listed at the bottom of the screen by selecting them.

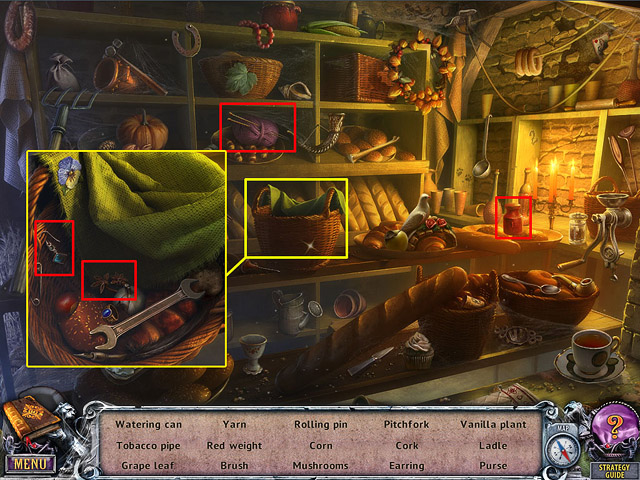
- Open the zoom-in scene to find the remaining objects.
- Go to the Blacksmith’s Workshop.

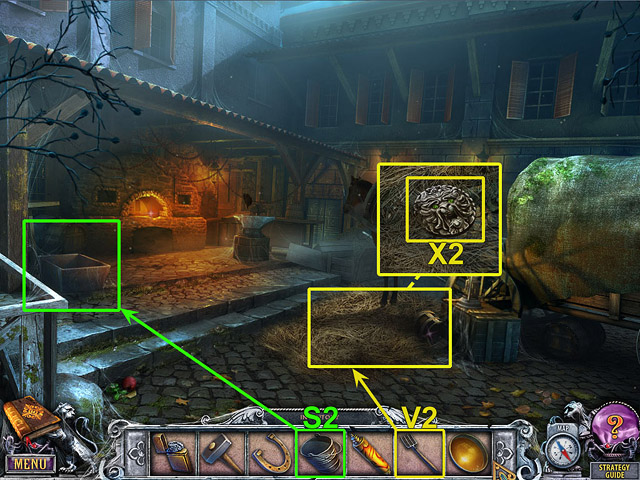
- Use the PITCHFORK (V2) to rake through the hay.
- Take the DISK (X2).
- Pour the BUCKET OF WATER (S2) into the trough.
- Go to the Cathedral Entrance.

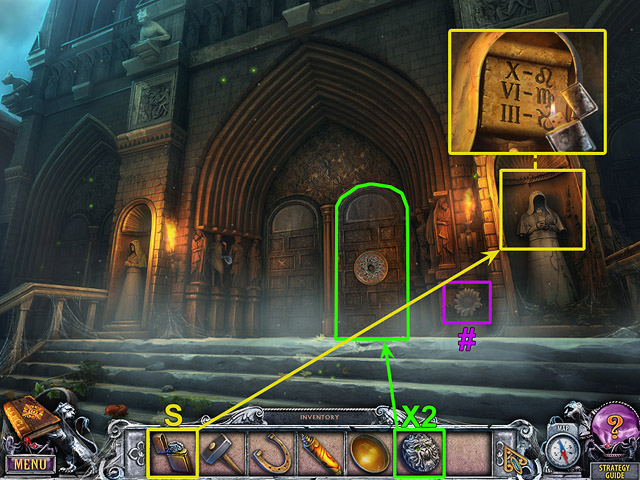
- Take the 22nd Beyond Object(#).
- Use the LIGHTER (S) to illuminate the statue’s hood.
- Insert the DISK (X2) in the door lock.

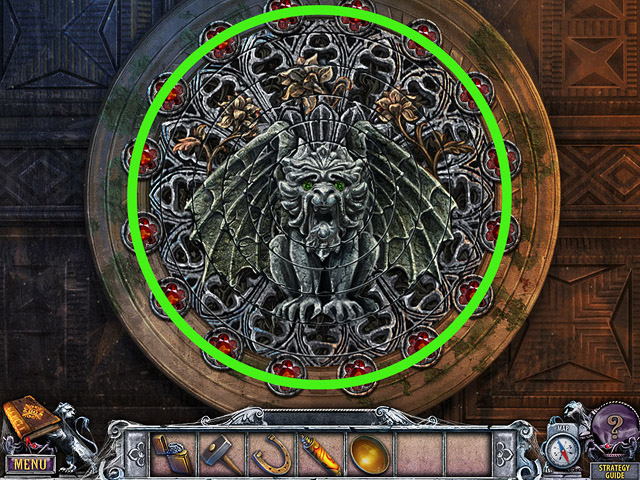
- Rotate the rings to restore the image.
- Enter the Cathedral.

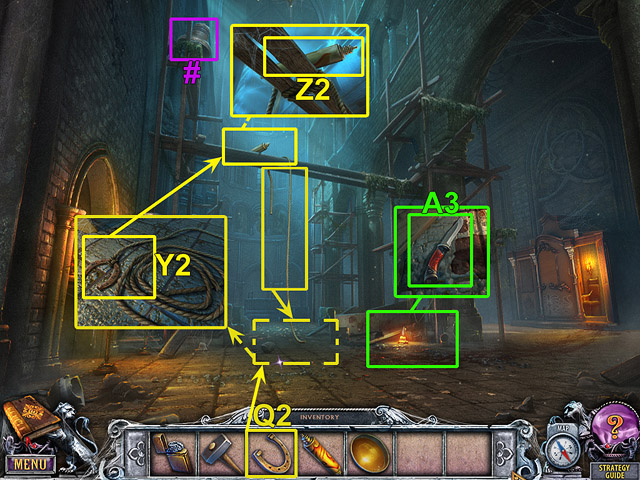
- Take the 23rd Beyond Object(#).
- Tie the HORSESHOE (Q2) to the rope.
- Take the ROPE WITH A HORSESHOE (Y2).
- Throw the ROPE WITH A HORSESHOE (Y2) over the beam.
- Take the SCROLL (Z2).
- Take the KNIFE (A3).
- Go to the Cathedral Entrance.

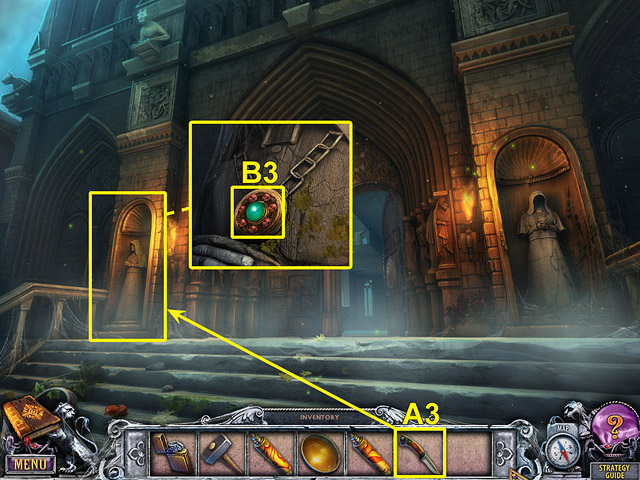
- Use the KNIFE (A3) to scrape the mud off the amulet.
- Take the LOCKET PART (B3).
- Go to the Town Square.

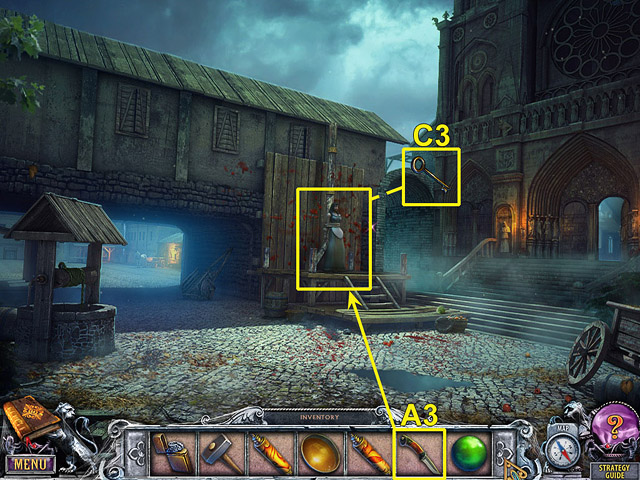
- Use the KNIFE (A3) to cut the ropes and free the girl.
- Take the KEY (C3).
- Go to the Blacksmith’s Workshop.

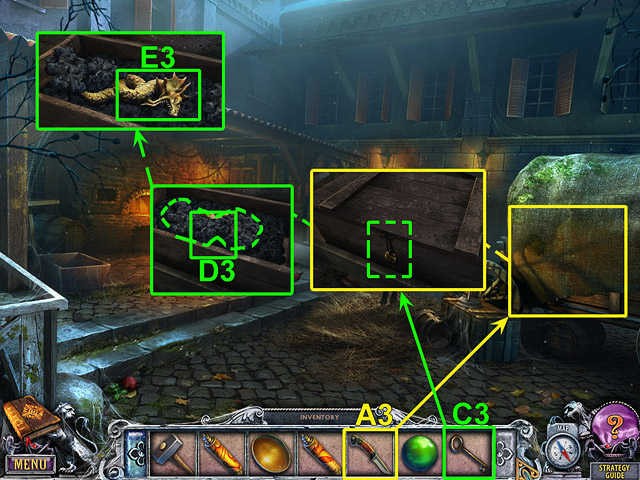
- Use the KNIFE (A3) to cut the wagon cover.
- Put the KEY (C3) in the chest.
- Turn the key.
- Open the chest.
- Take the COAL (D3).
- Rake through the coals.
- Take the SNAKE (E3).
- Go to the Cathedral.

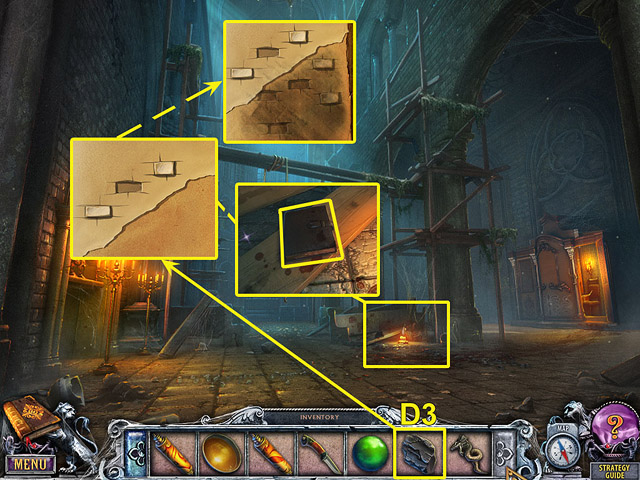
- Open the journal.
- Use the COAL (D3) to restore the image.
- Enter the Confessional.

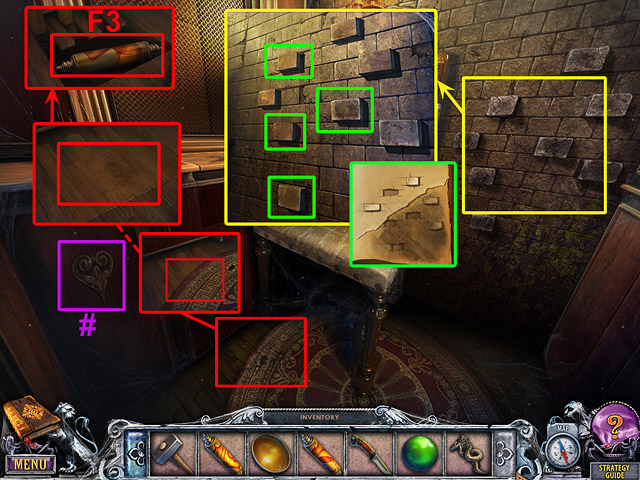
- Take the 24th Beyond Object(#).
- Press the bricks on the wall in the correct order.
- Pull back the edge of the rug.
- Open the hatch.
- Take the SCROLL (F3).

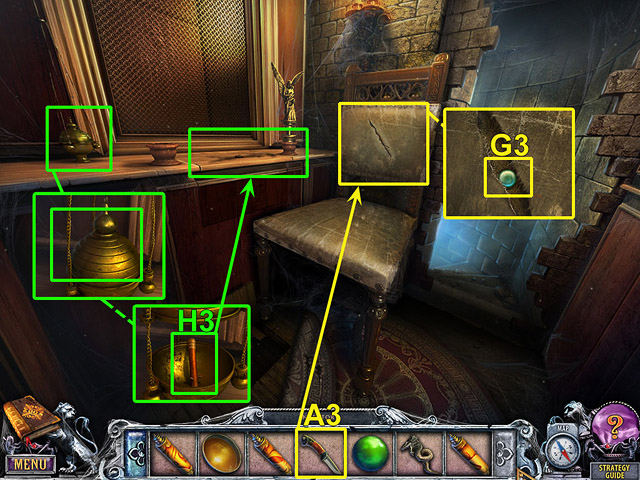
- Use the KNIFE (A3) to cut open the back of the chair.
- Take the LOCKET PART (G3).
- Open the incense burner.
- Take the LEVER (H3).
- Insert the LEVER (H3) into the slot on the table.
- Enter the Catacombs.

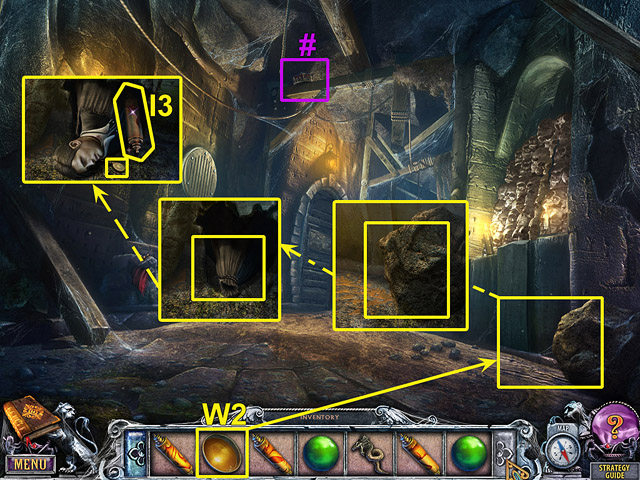
- Take the 25th Beyond Object(#).
- Pour the BOWL OF OIL (W2) on the floor next to the large rock.
- Move the rock.
- Look at Pierre’s locket.
- Take the SCROLL (I3).
- Go to the Ceremonial Hall.

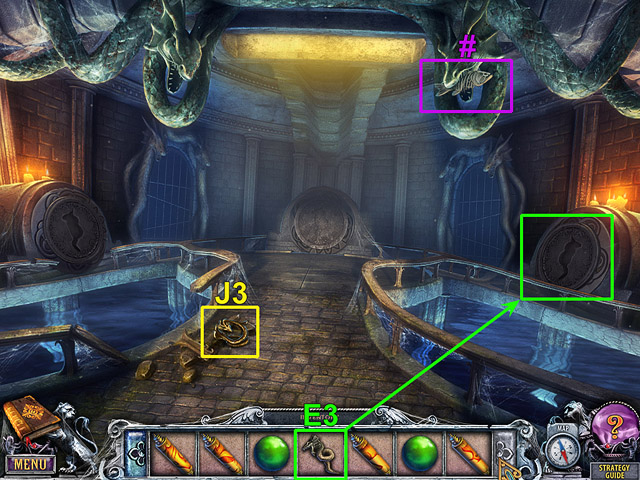
- Take the 26th Beyond Object(#).
- Take the BENT SEA SERPENT (J3).
- Insert the SNAKE (E3) in the slot on the hatch.
- Go to the Blacksmith’s Workshop.

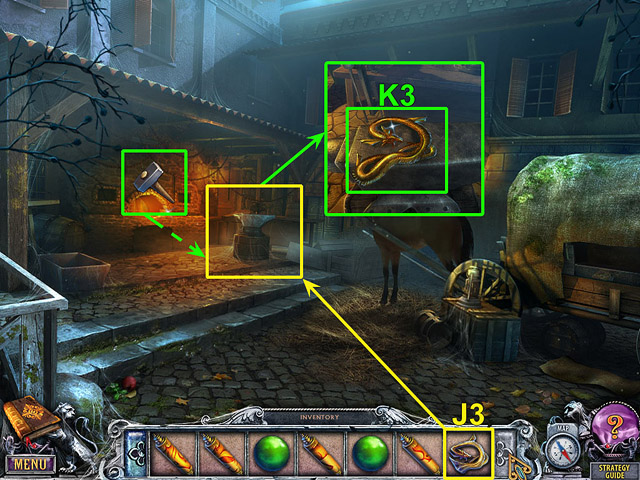
- Place the BENT SEA SERPENT (J3) on the anvil. Use the HAMMER to fix it.
- Take the SEA SERPENT (K3).
- Go to the Catacombs.

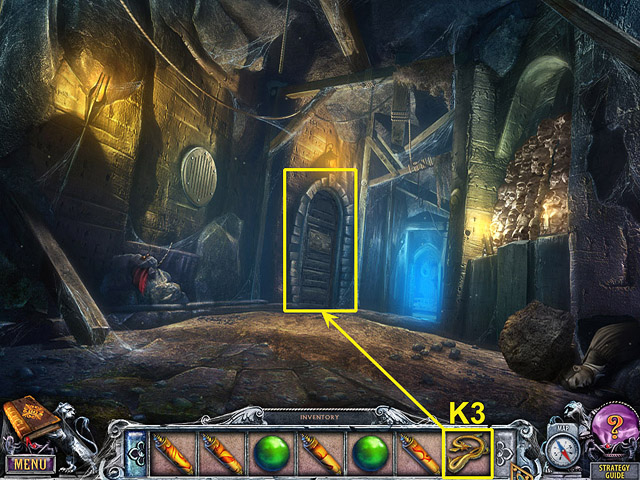
- Insert the SEA SERPENT (K3) in the slot on the door.

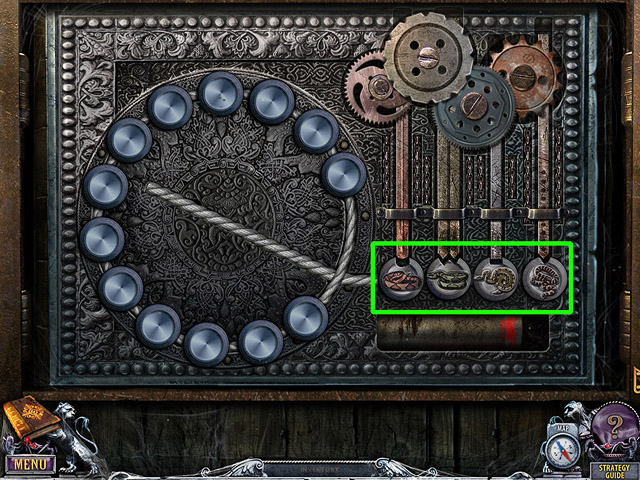
- Arrange the disks that have notches on them in the same order as the bars on the right.
- Go to the Study.

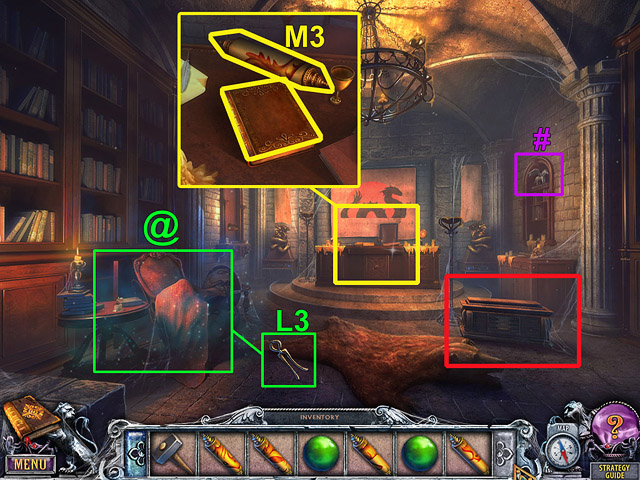
- Take the 27th Beyond Object(#).
- Select the sparkles to open the hidden object scene(@).
- Take the TONGS (L3).
- Take the SCROLL (M3).
- Read the book.
- Examine the chest.

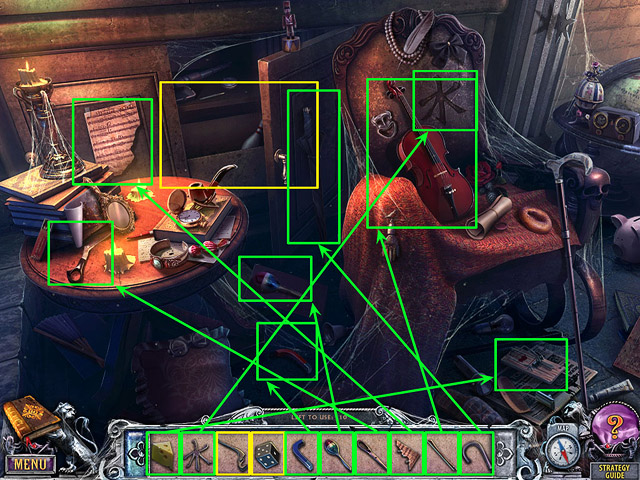
- Place each object displayed at the bottom of the screen where it belongs.

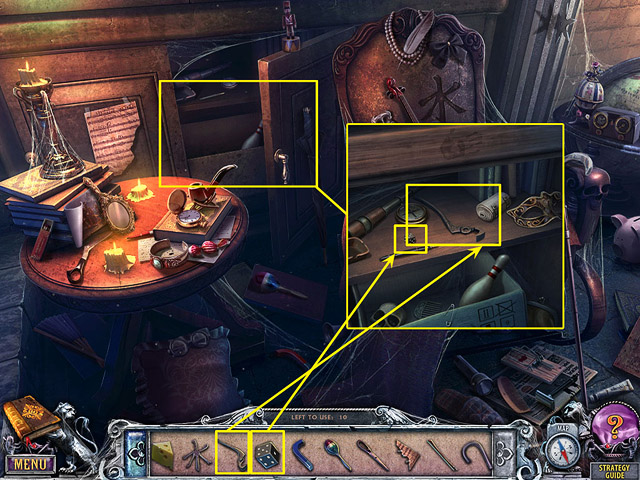
- Open the zoom-in scene to place the remaining objects where they belong.

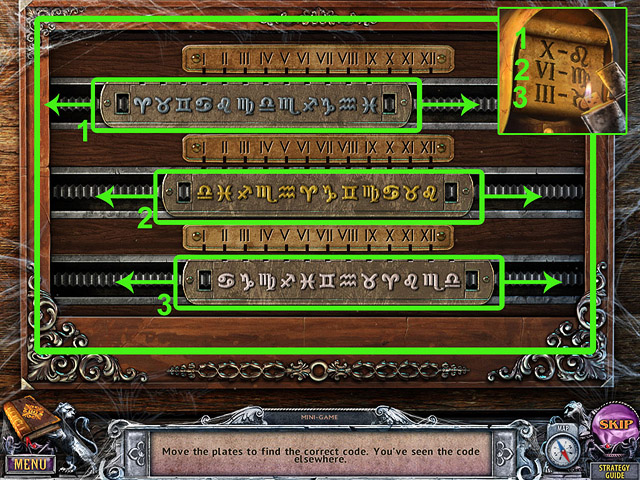
- Move the plates to find the code.

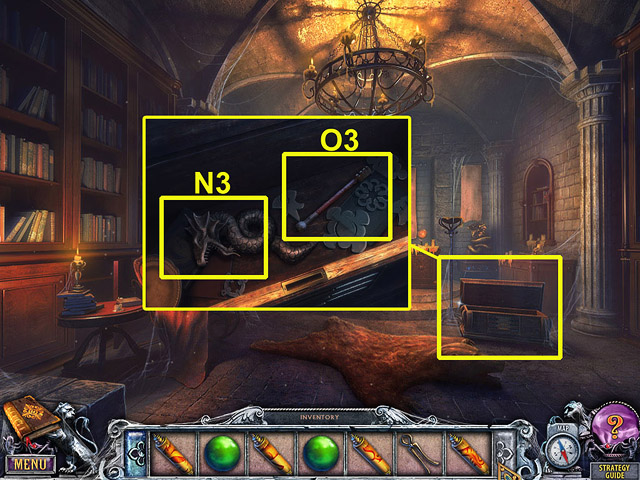
- Take the SNAKE (N3) and the GLASS CUTTER (O3) from the chest.
- Go to the Blacksmith’s Workshop.

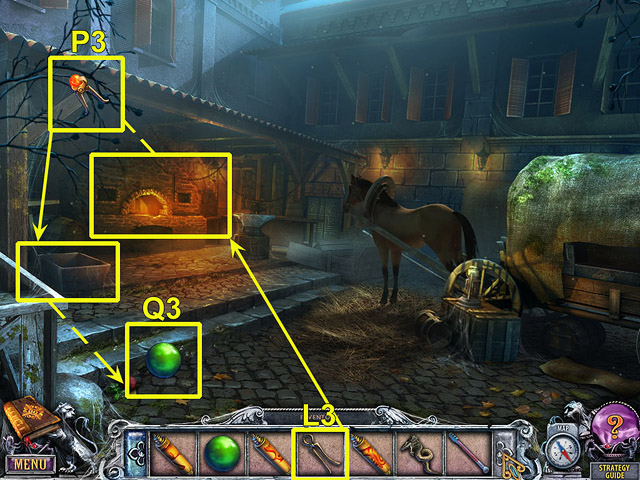
- Use the TONGS (L3) to retrieve the HOT LOCKET PART (P3).
- Cool the HOT LOCKET PART (P3) in the trough.
- Take the LOCKET PART (Q3).
- Go to the Passage.

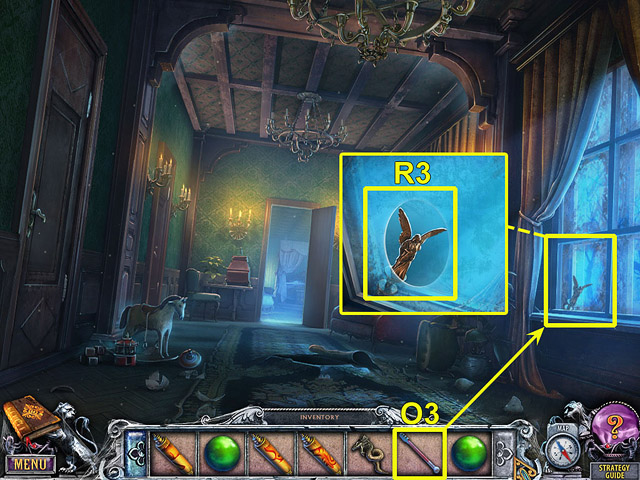
- Use the GLASS CUTTER (O3) to cut a hole in the window. Take the ANGEL (R3).
- Go to Simon’s room.

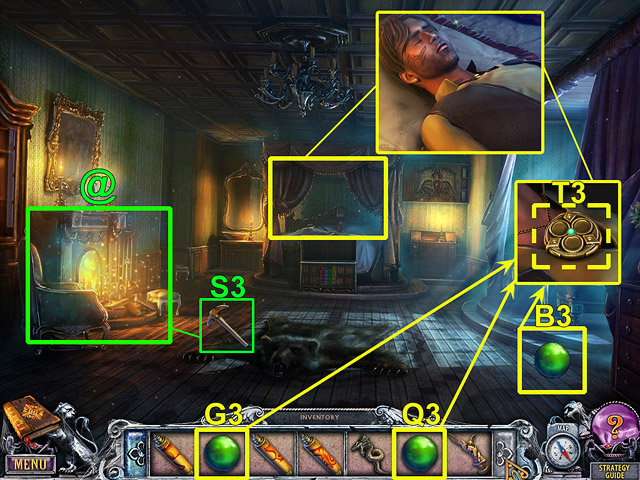
- Select the sparkles to open the hidden object scene(@).
- Take the PICKAXE (S3).
- Insert the LOCKET PARTS (B3, G3 and Q3) where they belong.
- Take Rafael’s LOCKET (T3).

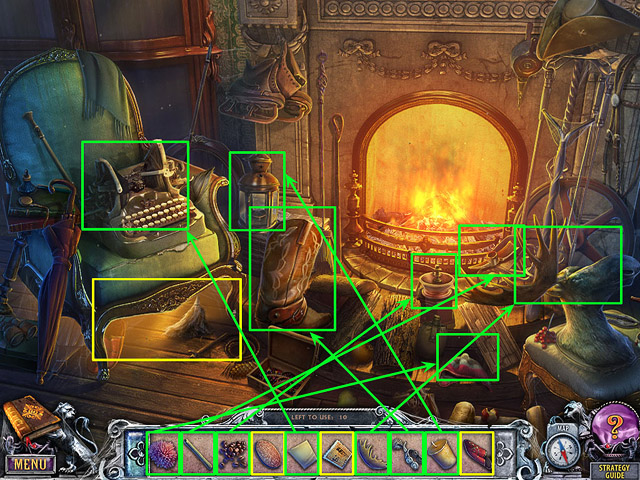
- Place each object displayed at the bottom of the screen where it belongs.

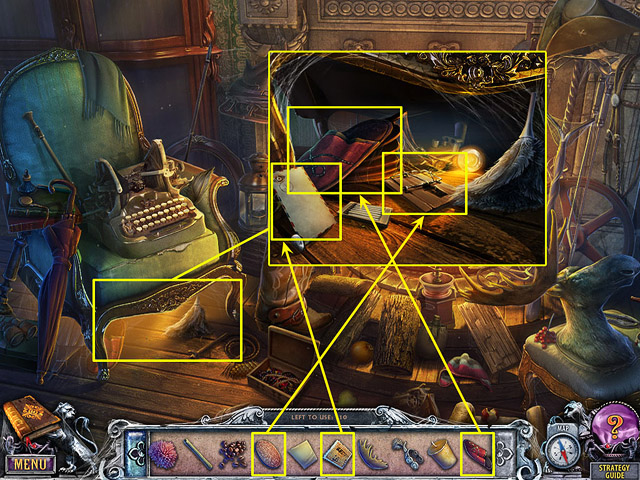
- Open the zoom-in scene to place the remaining objects where they belong.
- Go to the Confessional.

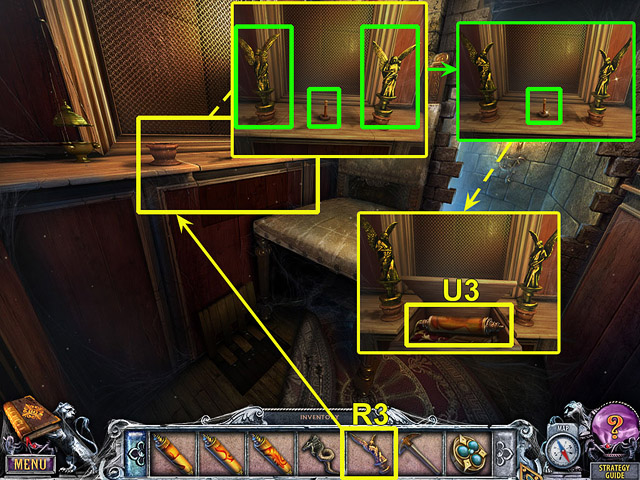
- Place the ANGEL (R3) on the base.
- Rotate the angels to face each other and pull the lever.
- Take the SCROLL (U3).
- Go to the Catacombs.

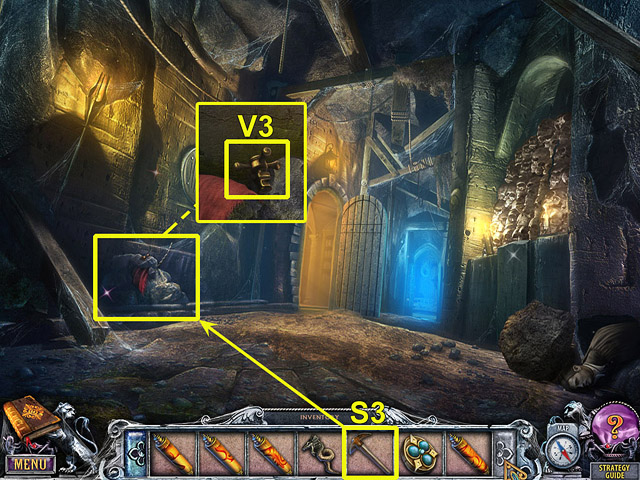
- Use the PICKAXE (S3) to break up the stones. Take the VALVE HANDLE (V3).
- Go to Market Street.

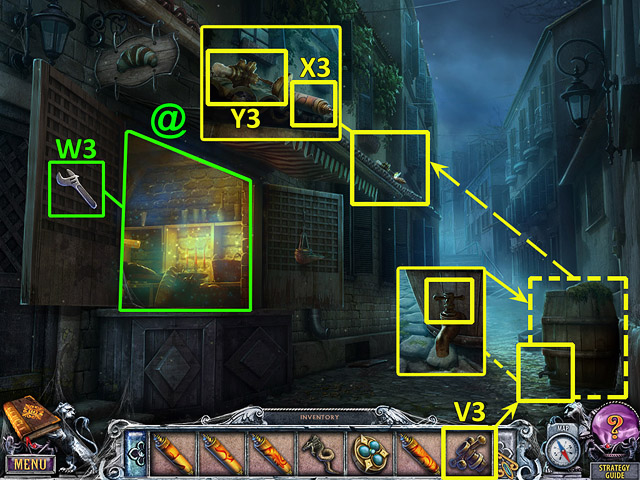
- Select the sparkles to open the hidden object scene(@).
- Take the WRENCH (W3).
- Place the VALVE HANDLE (V3) on the barrel. Drain the water.
- Move the empty barrel.
- Take the SCROLL (X3) and the CANDLE HOLDER (Y3).

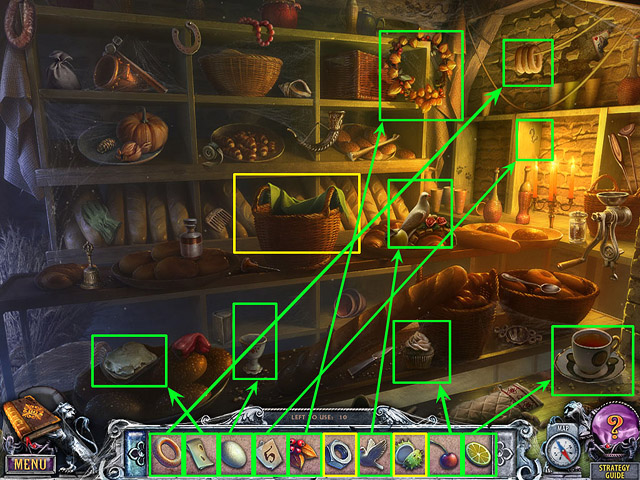
- Place each object displayed at the bottom of the screen where it belongs.

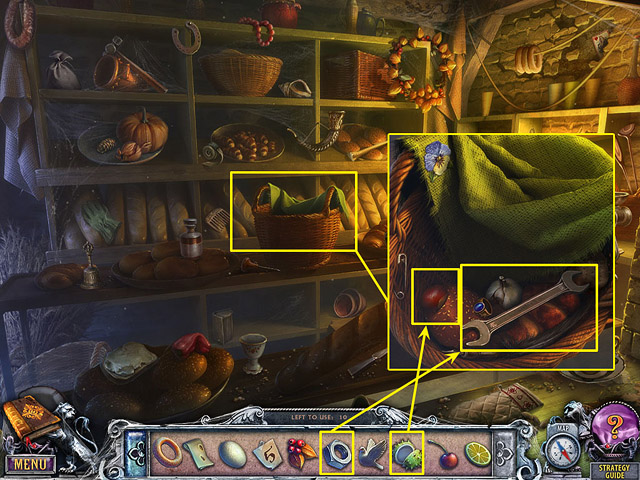
- Open the zoom-in scene to place the remaining objects where they belong.
- Go to the Cathedral.

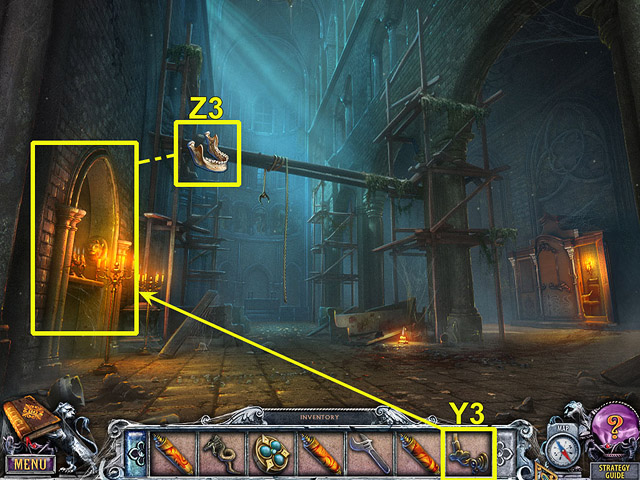
- Place the CANDLE HOLDER (Y3) where it belongs.

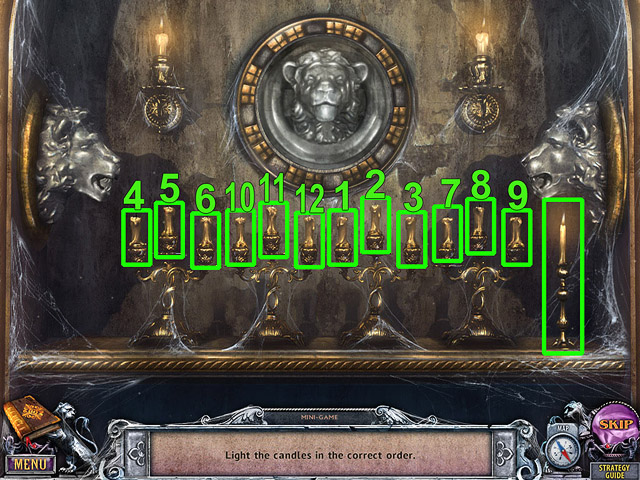
- Use the candle on the right to light the candles in the correct order.

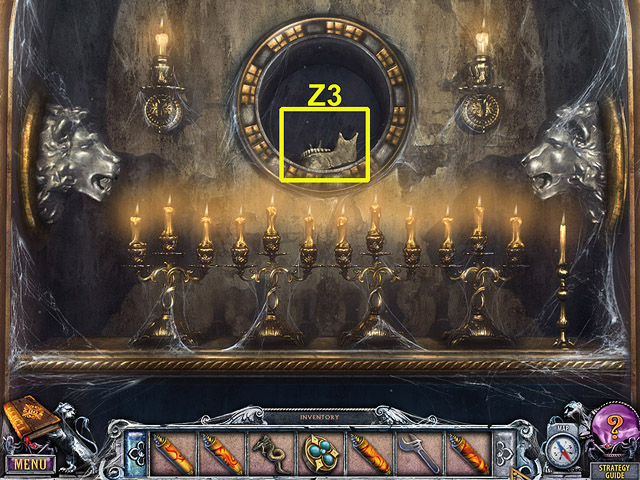
- Take the JAWBONE (Z3).
- Go to the Catacombs.

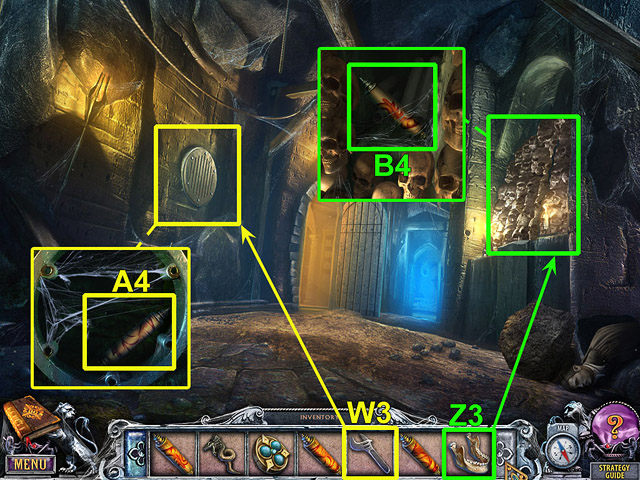
- Use the WRENCH (W3) to remove the bolts on the grate.
- Take the SCROLL (A4).
- Insert the JAWBONE (Z3) into the wall. Take the SCROLL (B4).
- Go to the Study.

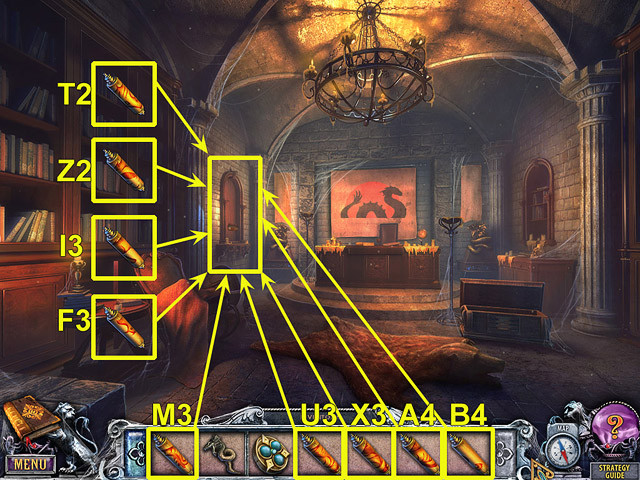
- Insert the SCROLLS (T2, Z2, F3, M3, U3, X3, A4, B4 and I3) into the slots on the wall.
- Swap the scrolls to restore the image.

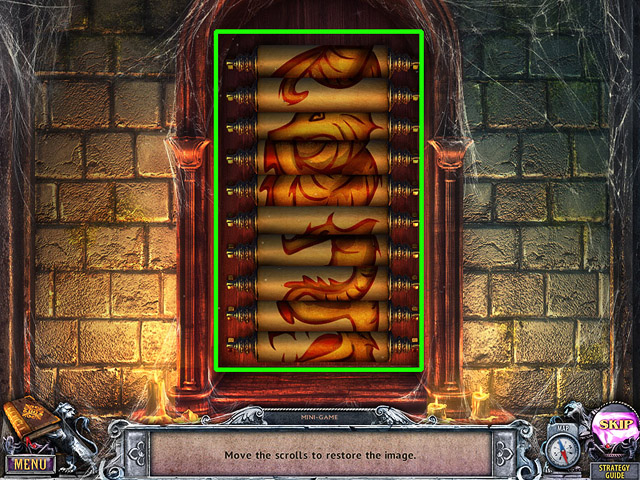
- Press on the scrolls to swap them.

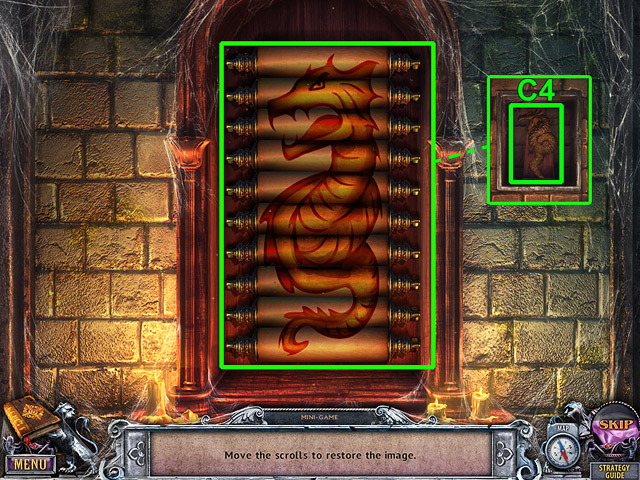
- Move the scrolls and restore the image.
- Take the SNAKE (C4).
- Go to the Ceremonial Hall.

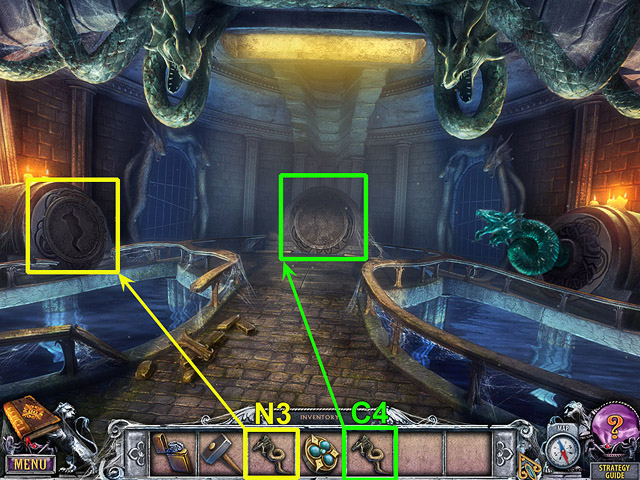
- Insert the SNAKE (N3) in the slot on the hatch.
- Insert the SNAKE (C4) in the slot on the hatch.

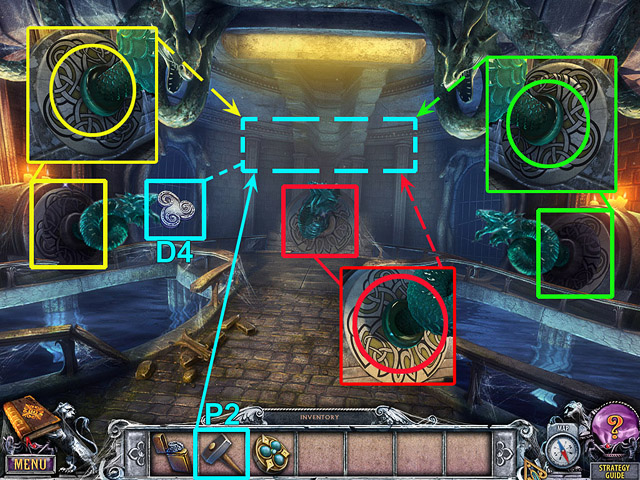
- Rotate the outer discs to restore the image under each snake.
- Use the HAMMER to break the flask with the element.
- Take the WATER ELEMENT (D4).
- Go to the Top of the Tower.

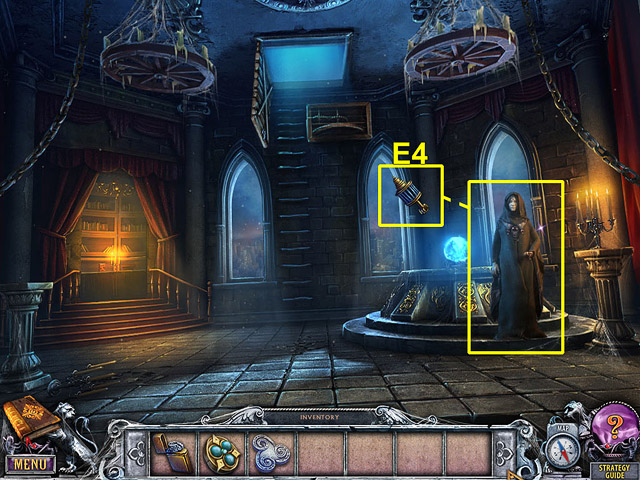
- Talk to the oracle. Take the KEY (E4).
- Go to the Mechanism.

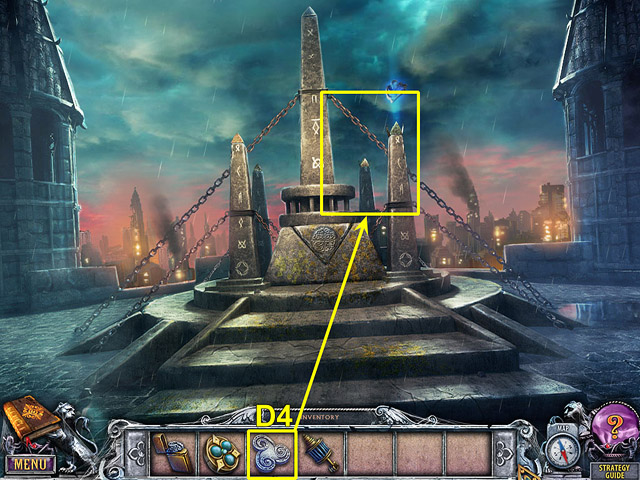
- Place the WATER ELEMENT (D4) in the machine.
- Go to the Portals.

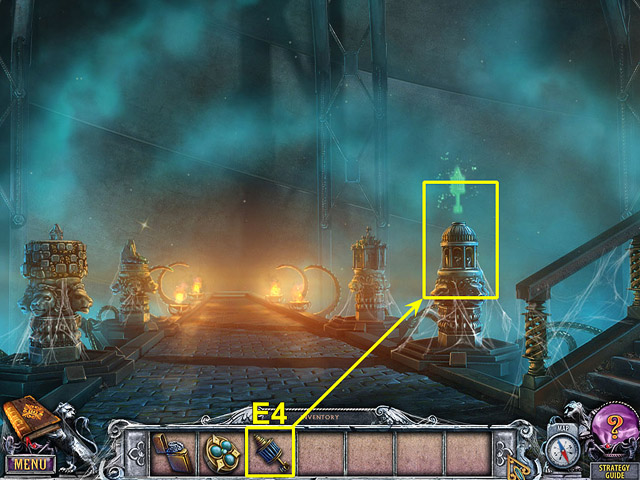
- Use the KEY (E4) to activate the third portal.
- Step through the portal.
Chapter 4: The Fire

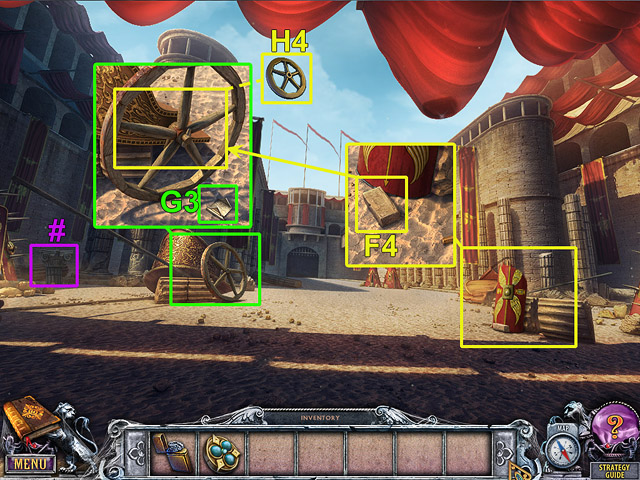
- Take the 28th Beyond Object(#).
- Pick up the BRICK (F4).
- Take the STAR FRAGMENT (G3). Use the BRICK (F4) to knock the peg out of the axle. Take the WHEEL (H4).
- Go to the Dungeon Entrance.

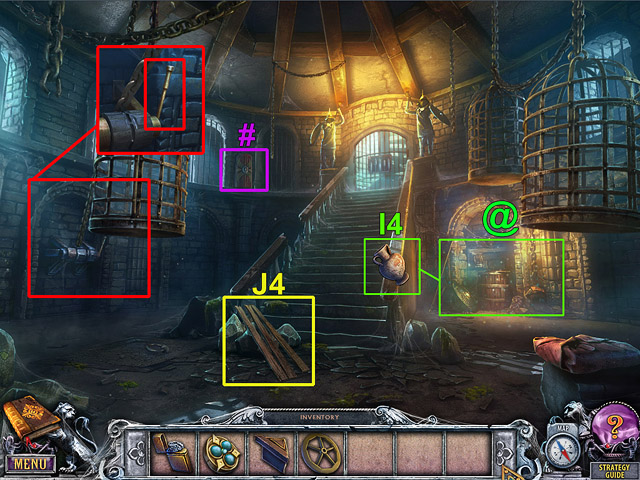
- Take the 29th Beyond Object(#).
- Select the sparkles to open the hidden object scene(@).
- Take the VASE (I4).
- Take the PLANKS (J4).
- Pull the lever to lower the cage.

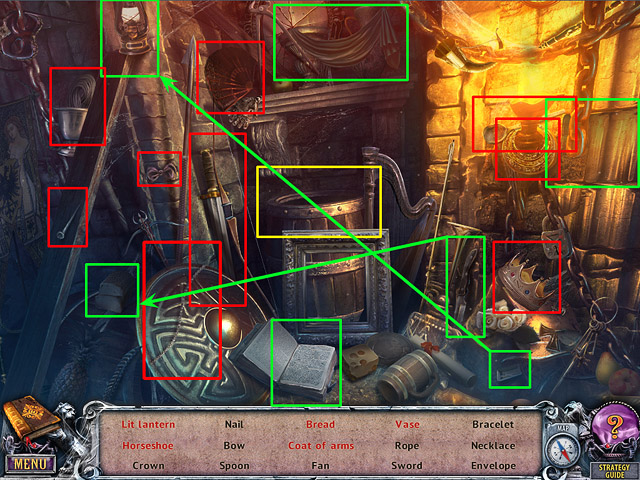
- Collect the objects listed at the bottom of the screen by selecting them.

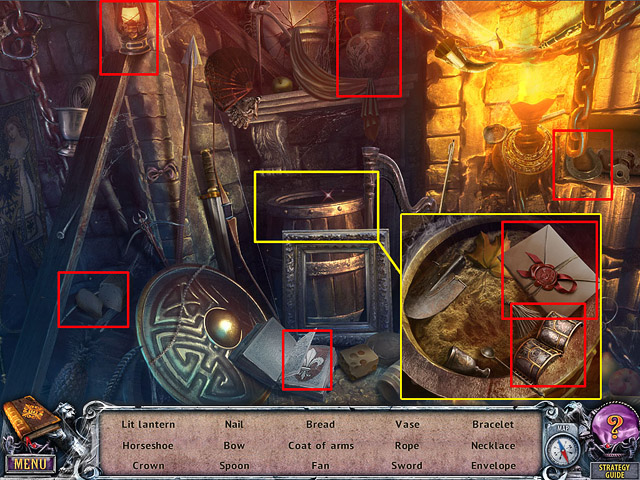
- Open the zoom-in scene to find the remaining objects.

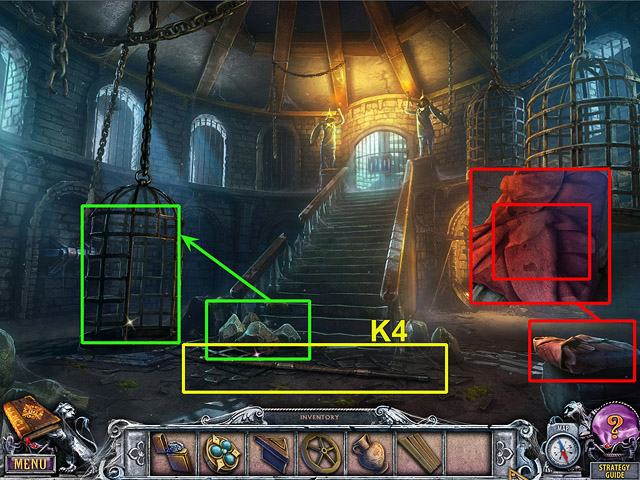
- Take the POLE (K4).
- Place the stones in the cage to make it heavier.
- Unroll the cloth.
- Go to the Arena.

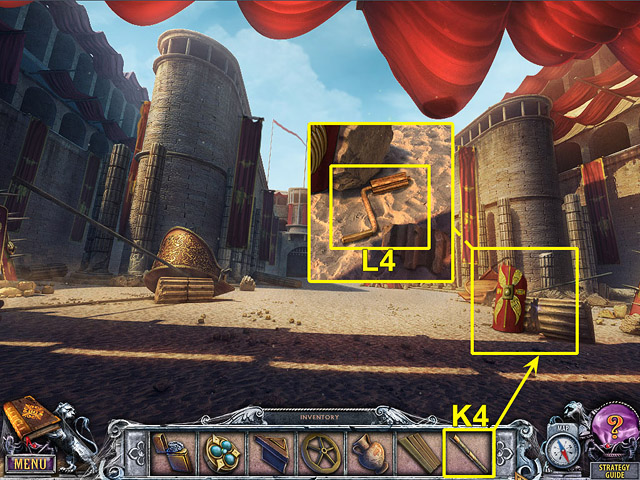
- Use the POLE (K4) to move the column fragment. Take the HANDLE (L4).
- Go to the Dungeon Entrance.

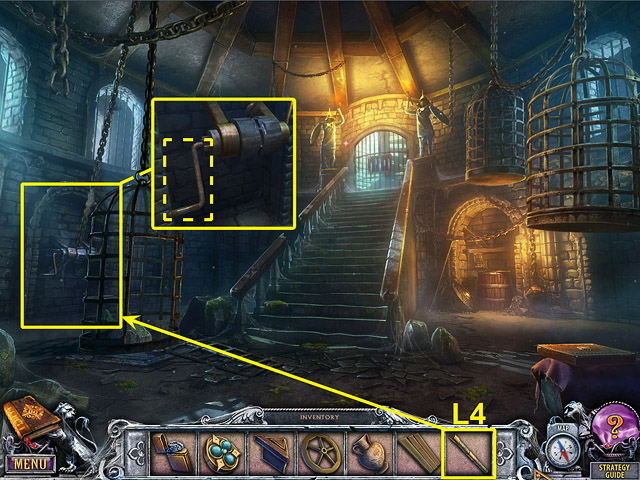
- Place the HANDLE (L4) on the winch. Raise the cage.
- Enter the Dungeon.

- Take the 30th Beyond Object(#).
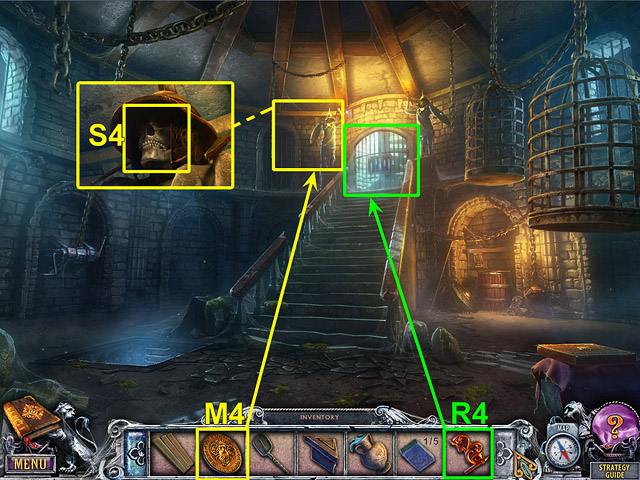
- Take the GOLD LOCKET (M4) near the Gladiator’s skeleton.
- Insert the POLE (K4) into the shovel blade. Take the SHOVEL (N4).
- Take the STAR FRAGMENT (O4). Open the furnace door.
- Open the tap. Fill the VASE (I4) with water. Take the VASE OF WATER (P4).
- Take the TILE (Q4).
- Go to the Basilisk.

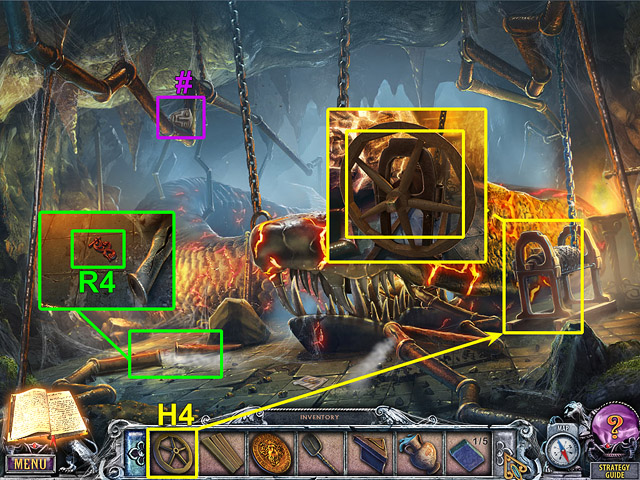
- Take the 31st Beyond Object(#).
- Place the WHEEL (H4) on the winch. Rotate it.
- Take the VALVE HANDLE (R4).
- Go to the Dungeon Entrance.


- Insert the GOLD LOCKET (M4) in the statue. Take the SKULL (S4).
- Place the VALVE HANDLE (R4) on the gate.

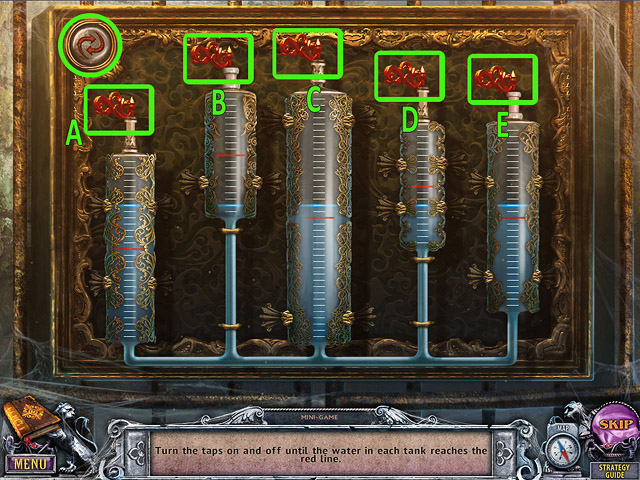
- Turn the taps (B, B, D, B, C, D, E) on and off until the water in each tank is even with the red line.
- Enter the Tribune.

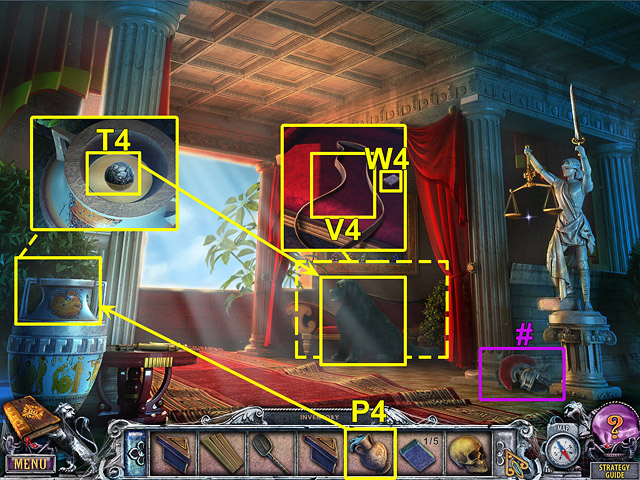
- Take the 32nd Beyond Object(#).
- Pour the VASE OF WATER into the large vase. Take the BALL (T4).
- Toss the BALL (T4) to the dog.
- Take the DRIVE BELT (V4) and the TILE (W4).

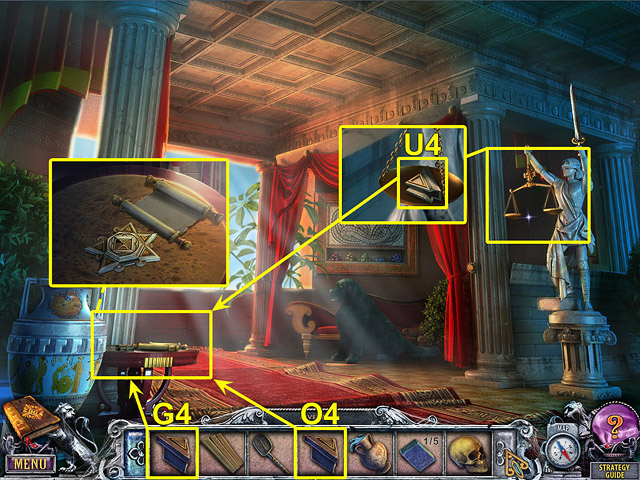
- Take the STAR FRAGMENT (U4).
- Place the STAR FRAGMENTS (G4, O4 and U4) where they belong. Read the note.
- Go to the Balcony.

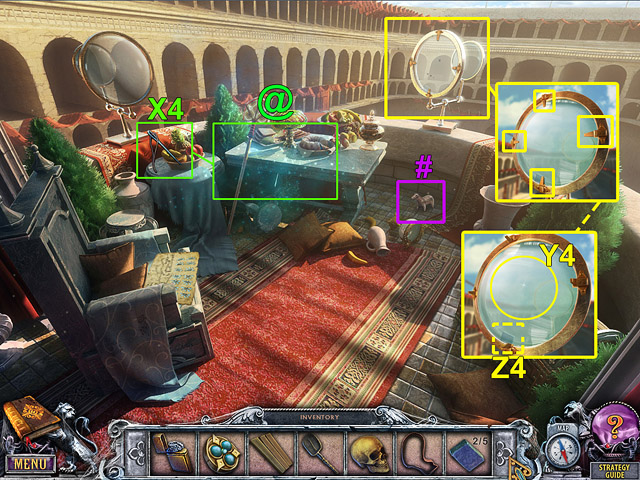
- Take the 33rd Beyond Object(#).
- Select the sparkles to open the hidden object scene(@).
- Take the NEEDLE (X4).
- Lift the clamps on the lens. Take the LENS (Y4) and the TILE (Z4).

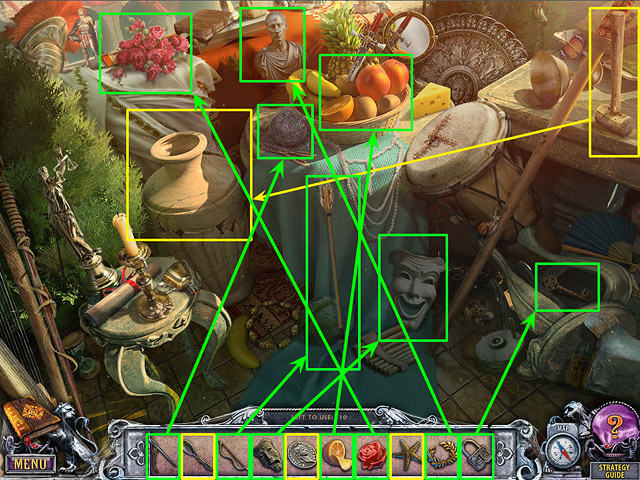
- Place each object displayed at the bottom of the screen where it belongs.

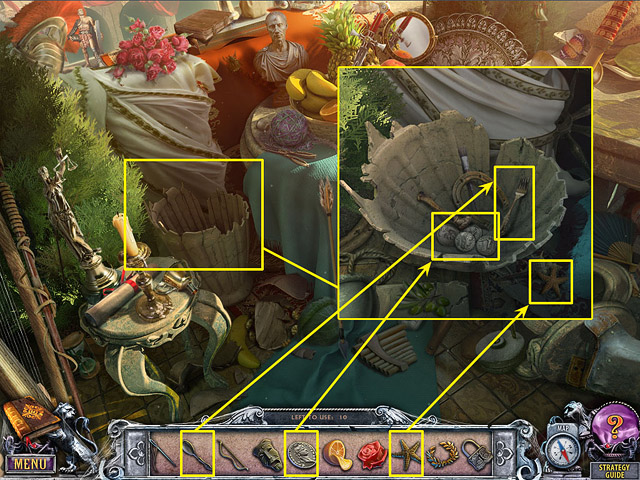
- Open the zoom-in scene to place the remaining objects where they belong.
- Go to the Dungeon.

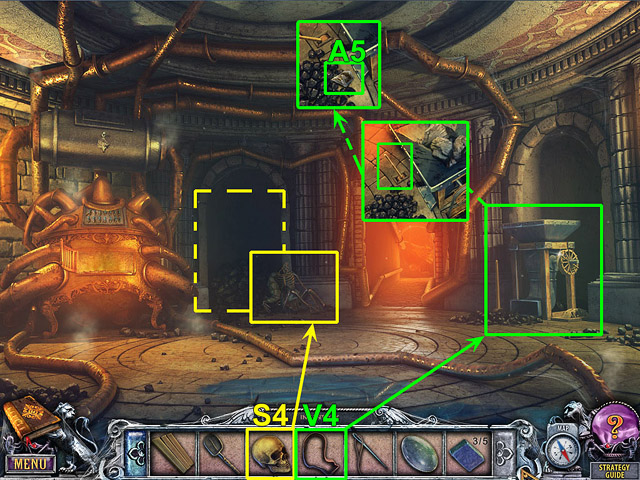
- Place the SKULL (S4) on the skeleton.
- Talk to the Gladiator.
- Install the DRIVE BELT (V4) on the mechanism. Pull the lever. Take the DIRTY IRON OBJECT (A5) the mechanism ejected.
- Go to the Basilisk.

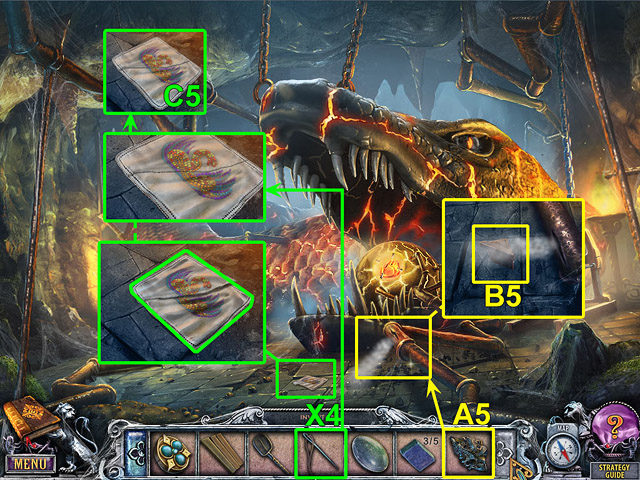
- Place the DIRTY IRON OBJECT (A5) by the steaming pipe. Take the STAR FRAGMENT (B5).
- Join the cloth pieces on the floor, then sew the pieces with the NEEDLE (X4). Take the HANDKERCHIEF (C5).
- Go to the Tribune.

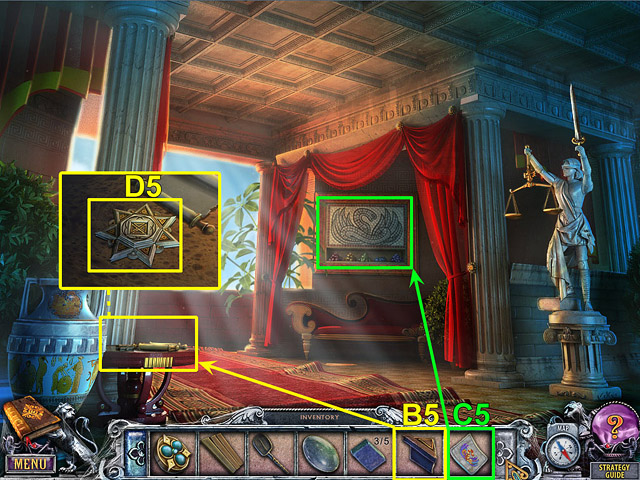
- Insert the STAR FRAGMENT (B5). Take the STAR (D5).
- Hang the HANDKERCHIEF (C5) on the puzzle.
- Go to the Balcony.

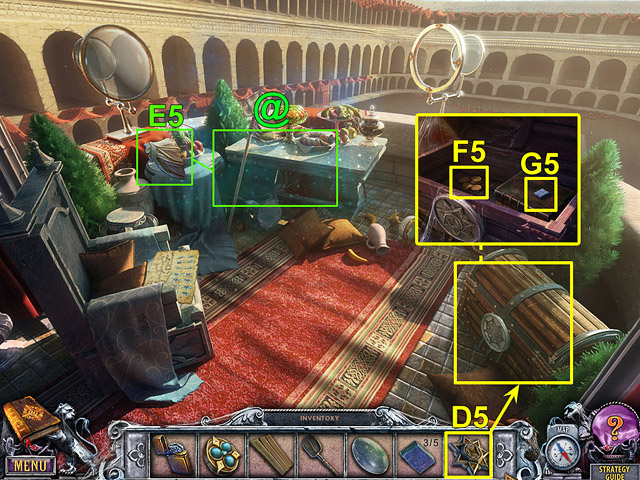
- Select the sparkles to open the hidden object scene(@).
- Take the TOGA (E5).
- Place the STAR (D5) on the chest. Take the GOLD COINS (F5) and the TILE (G5).

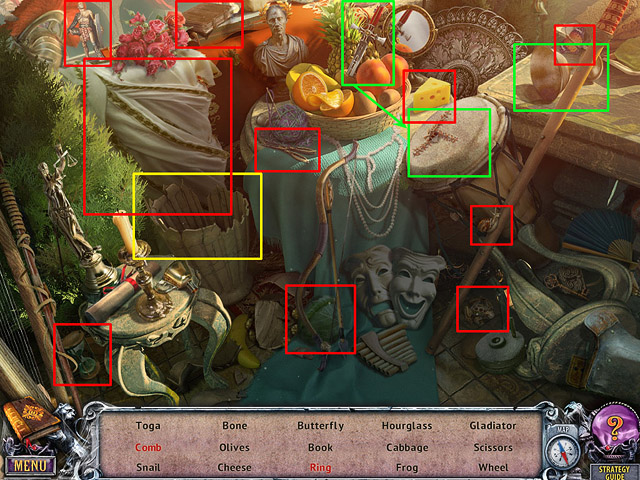
- Collect the objects listed at the bottom of the screen by selecting them.

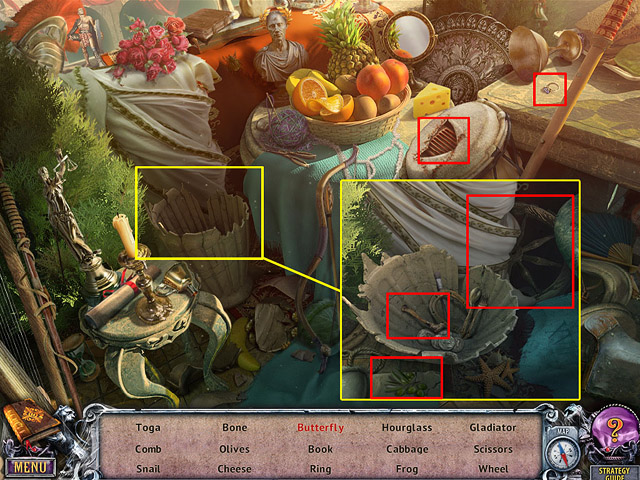
- Open the zoom-in scene to find the remaining objects.
- Go to the Basilisk.

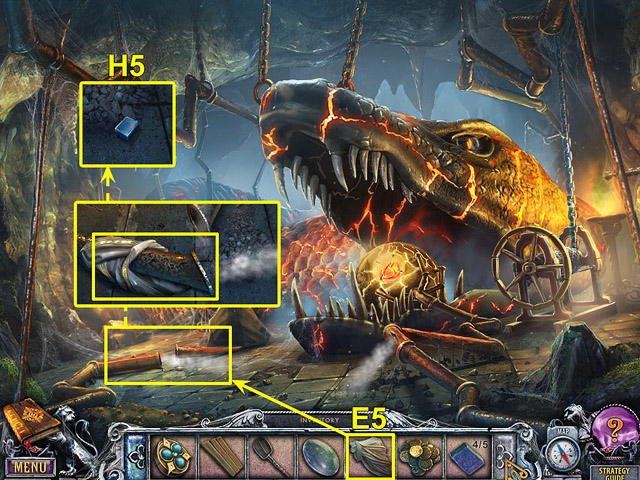
- Wrap the TOGA (E5) around the hot pipe. Join the pipes.
- Take the TILE (H5).
- Go to the Tribune.

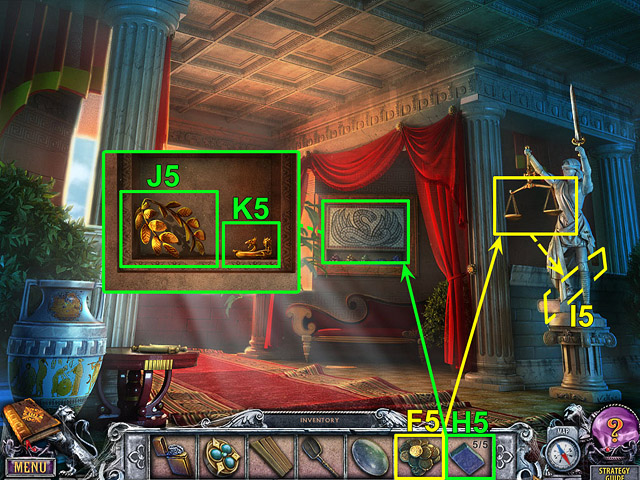
- Place GOLD COINS (F5) on the scales. Take the SWORD (I5).
- Place the TILES (H5) below the snake.
- Look at the handkerchief.

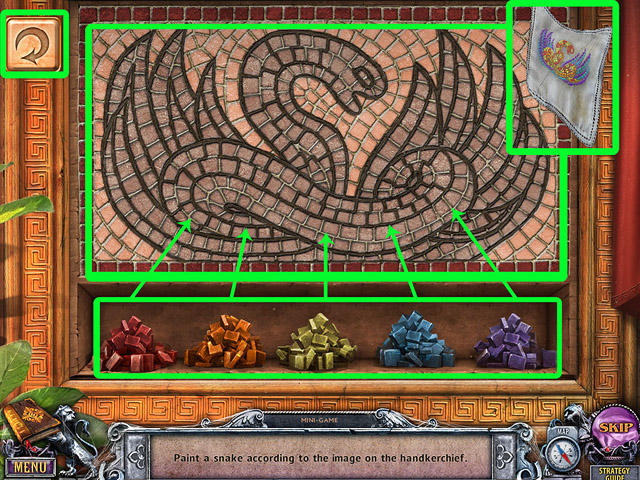
- Place the tiles on the snake as shown on the handkerchief.
- Take the LAUREL WREATH (J5) and the FIBULA (K5).
- Go to the Dungeon Entrance.

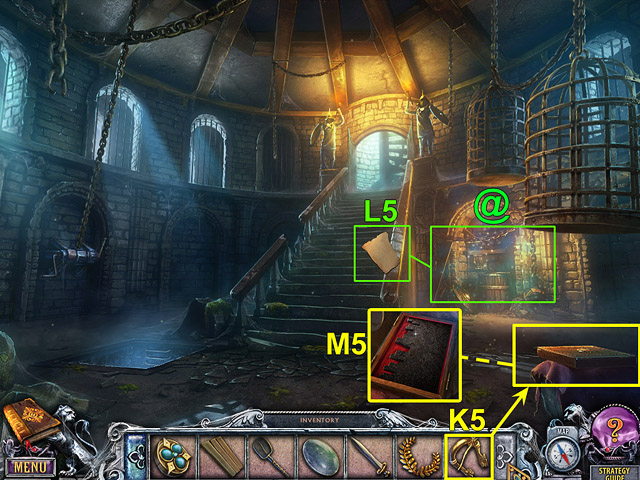
- Select the sparkles to open the hidden object scene(@).
- Take the PARCHMENT (L5).
- Place the FIBULA (K5) on the case. Take the PLATE PART (M5).

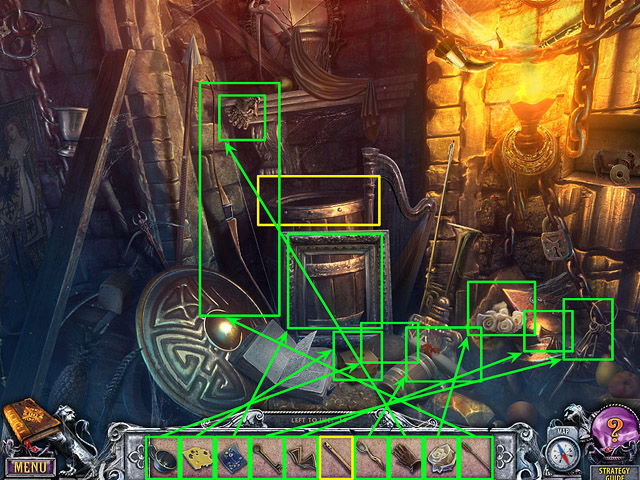
- Place each object displayed at the bottom of the screen where it belongs.

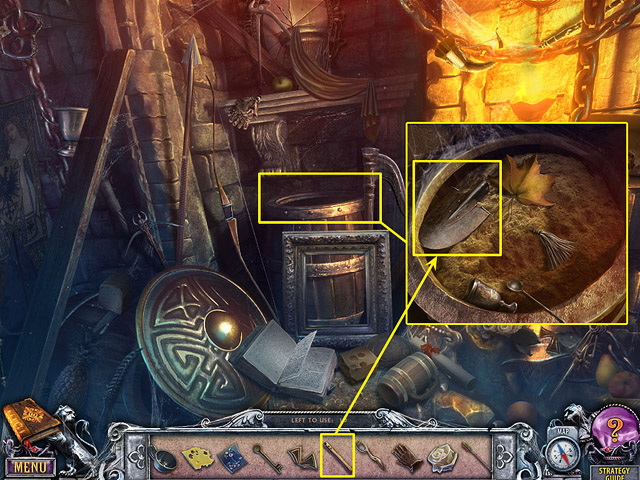
- Open the zoom-in scene to place the remaining objects where they belong.
- Go to the Dungeon.

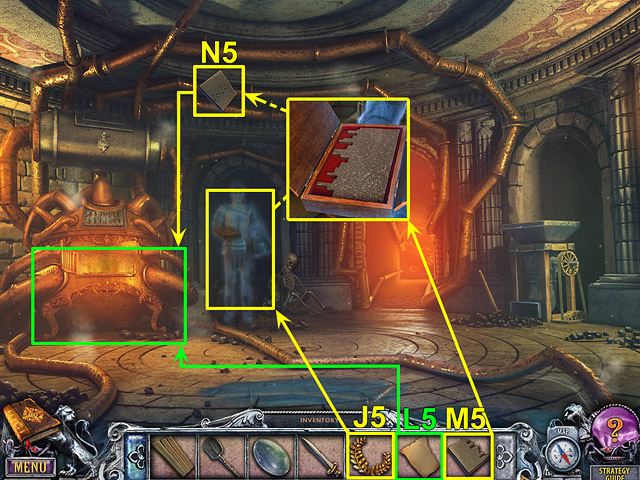
- Put the LAUREL WREATH (J5) on the box in the Gladiator’s hands. Attach the PLATE PART (M5) you are carrying to the second plate part.
- Take the PLATE (N5).
- Place the PLATE (N5) in the furnace. Place the PARCHMENT (L5) on the floor.

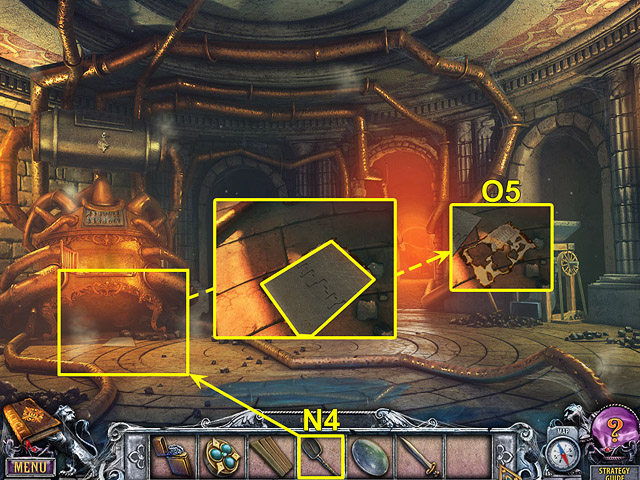
- Use the SHOVEL (N4) to remove the PLATE (N5) from the furnace. Move the cooled PLATE (N5). Take the LAYOUT FILTER (O5).
- Go to the Balcony.

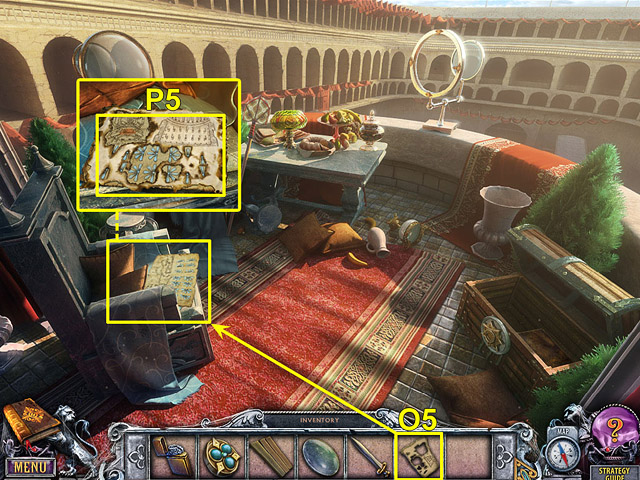
- Place the LAYOUT FILTER (O5) on the sheet of paper on the chair. Take the LAYOUT (P5).
- Go to the Dungeon.

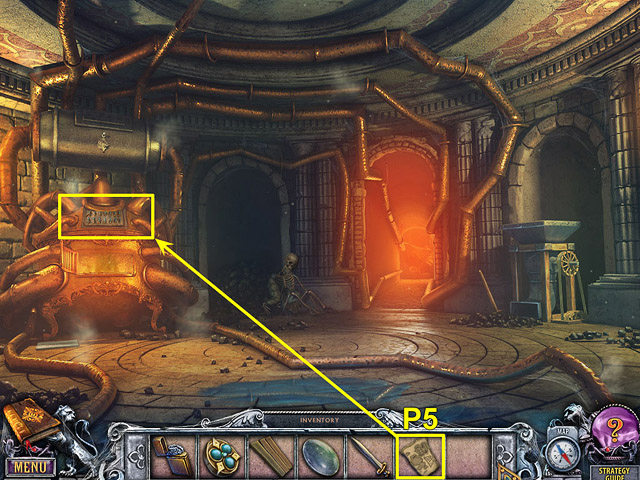
- Place the LAYOUT (P5) on the boiler.

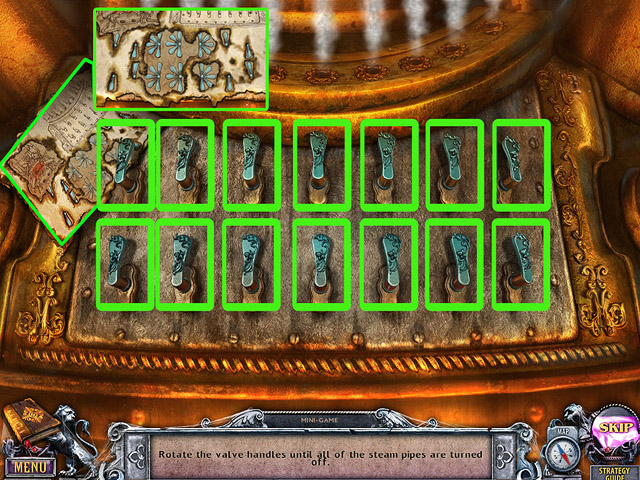

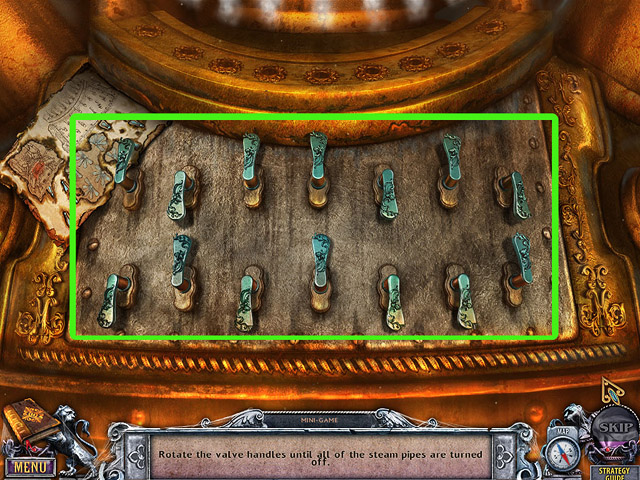
- Rotate the valve handles to turn off all the pipes.
- Go to the Arena.

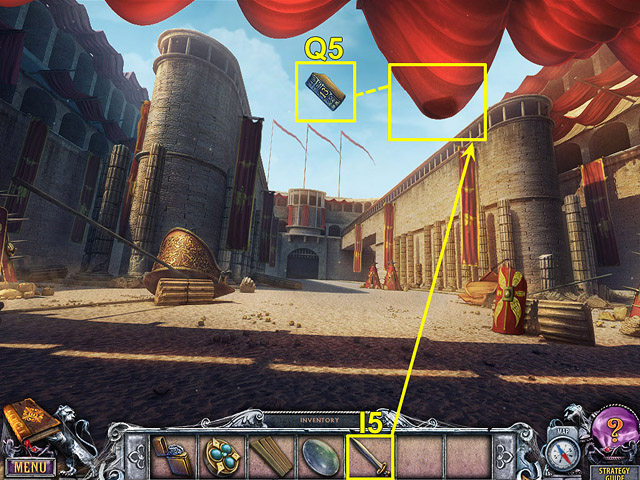
- Use the SWORD (I5) to cut the tent. Take the BOOK (Q5).
- Go to Simon’s room.

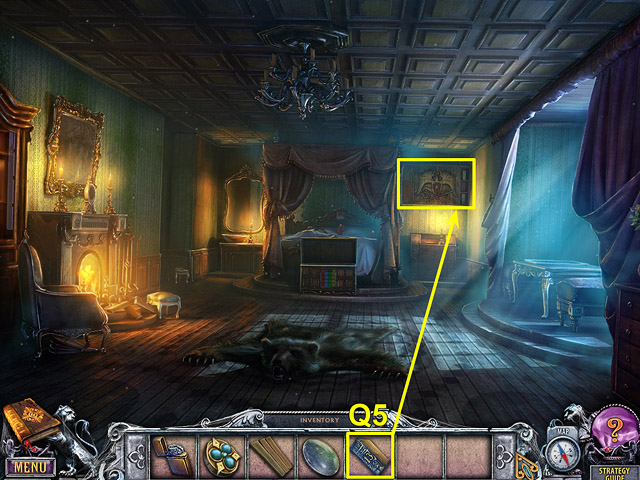
- Place the BOOK (Q5) on the shelf.

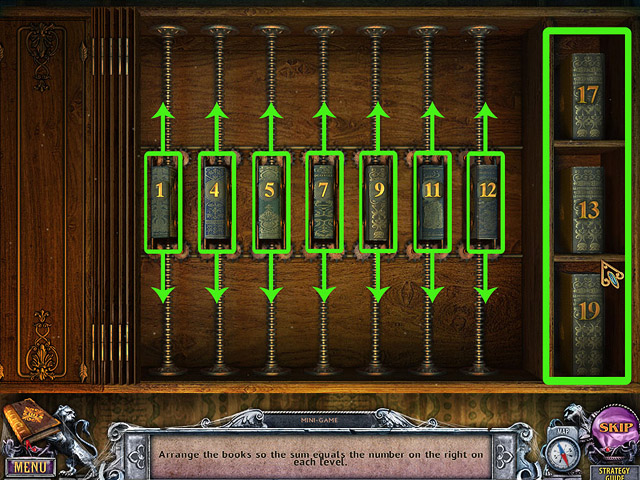
- Arrange books on the shelf so the sum on each row equals the number on the right.

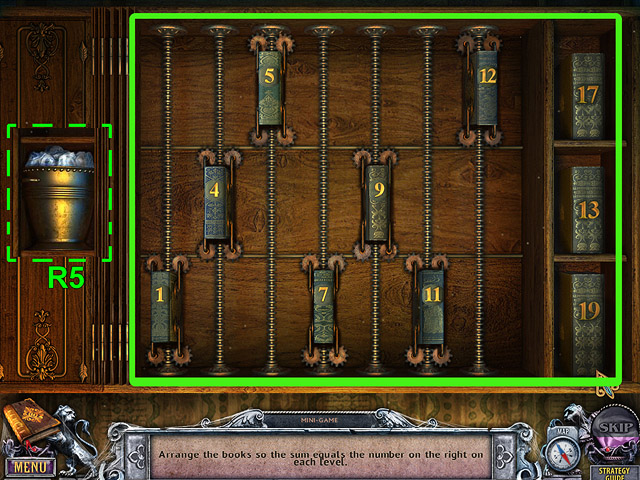
- Take the BUCKET OF ICE (R5).
- Go to the Basilisk.

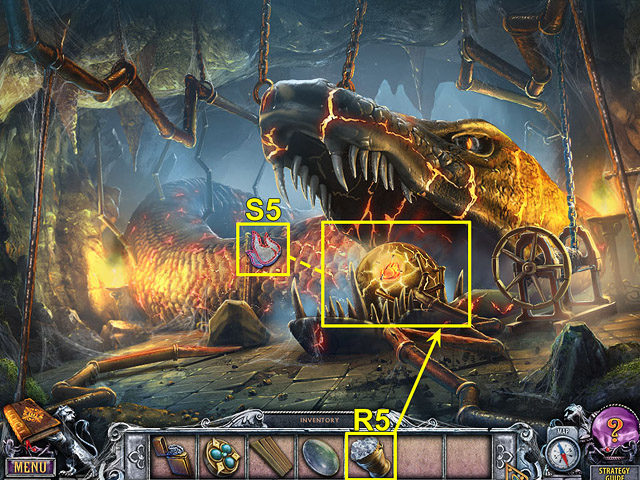
- Pour the BUCKET OF ICE (R5) into the snake’s mouth to cool the Fire Element.
- Take the FIRE ELEMENT (S5).
- Go to the Mechanism.

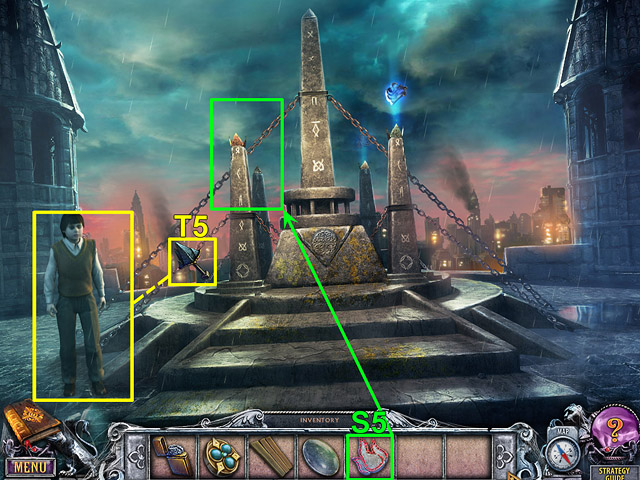
- Talk to Sammy.
- Take the KEY (T5).
- Place the FIRE ELEMENT (S5) on the mechanism.
- Go to the Portals.

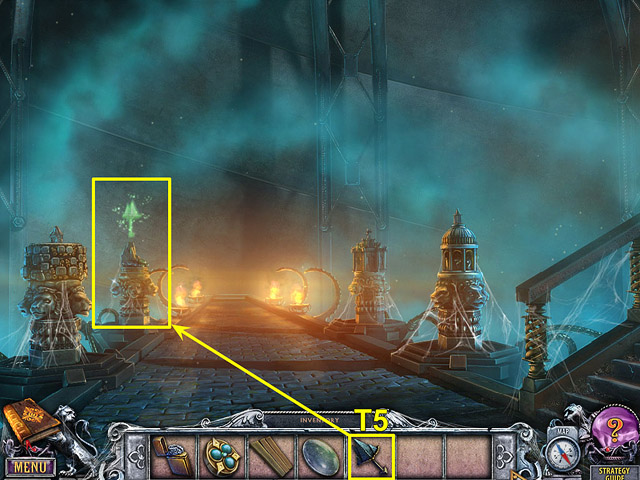
- Use the KEY (T5) to activate the fourth portal.
- Step through the portal.
Chapter 5: The Earth

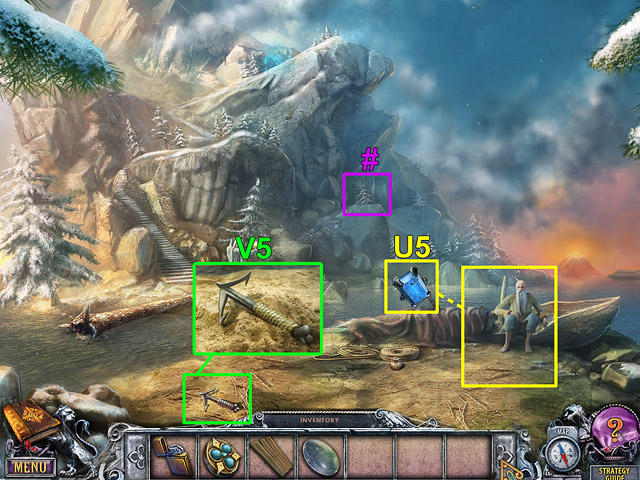
- Talk to the old man.
- Take the GEM (U5).
- Take the 34th Beyond Object(#).
- Pick up the HOOK (V5).

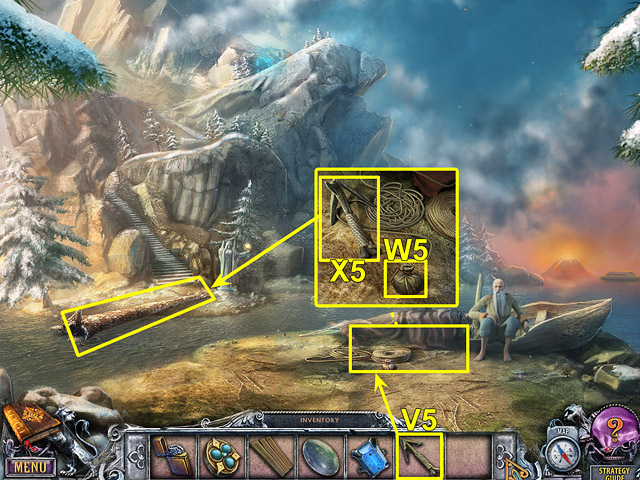
- Take the GRAIN (W5). Tie the HOOK (V5) to the rope. Take the ROPE WITH A HOOK (X5).
- Toss the ROPE WITH A HOOK (X5) at the fallen tree. Pull the tree to shore.
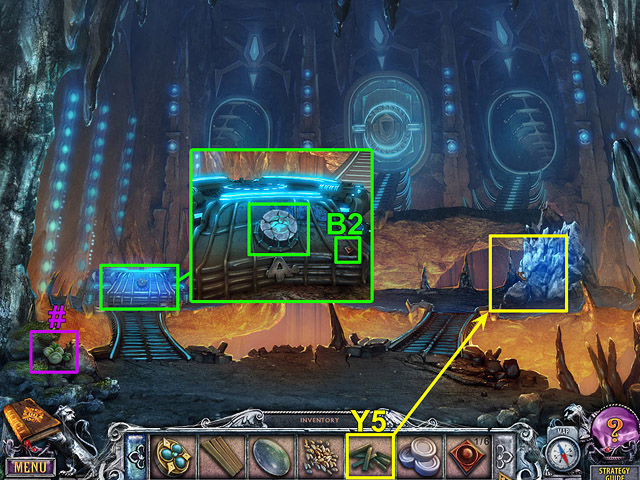
- Go to the Cave Entrance.

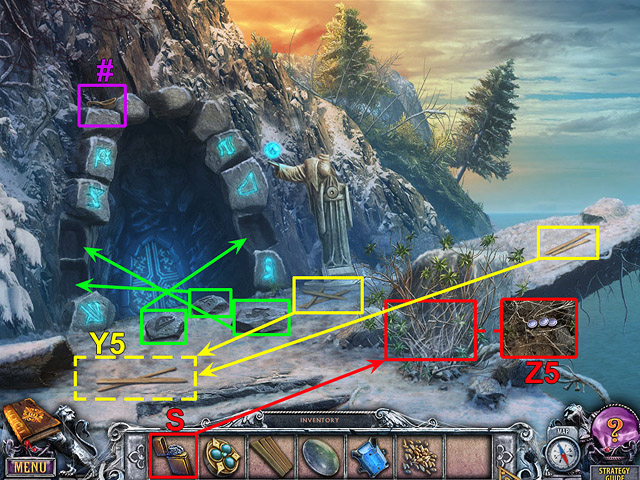
- Take the 35th Beyond Object(#).
- Gather the firewood into a single pile. Take the FIREWOOD (Y5).
- Place the stones in the slots on the arch.
- Use the LIGHTER (S) to burn the cobwebs. Take the PUZZLE PIECES (Z5).
- Enter the Cave.

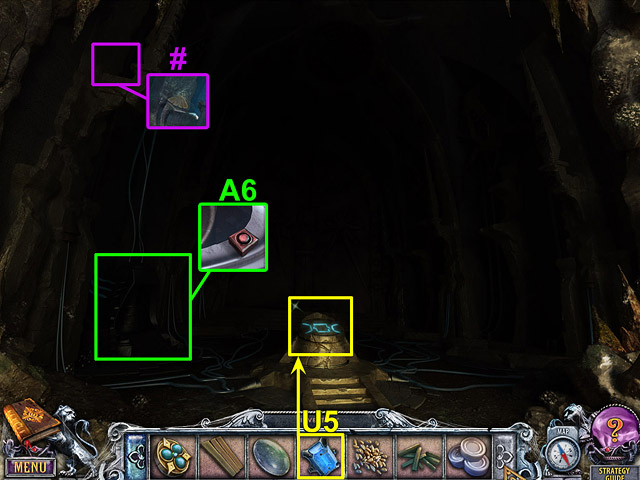
- Insert the GEM (U5) into the pedestal.
- Take the 36th Beyond Object(#). Examine the gate.
- Take the CUBE (A6).

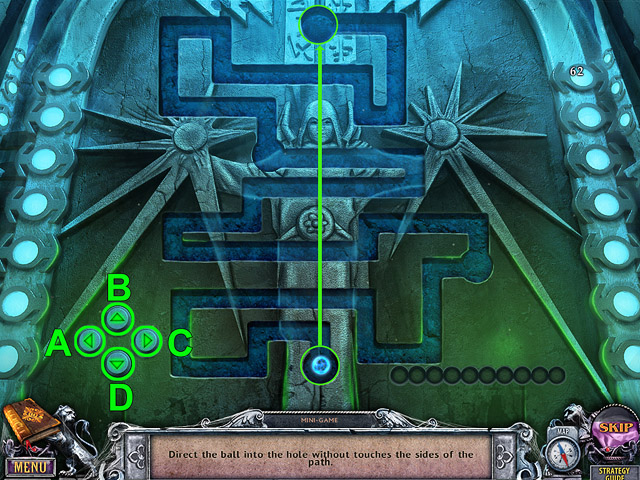
- Guide the ball into the hole without touching the sides of the path. Use the buttons to direct the bal. Once the path bar is filled, the ball will start moving (B, A, D, A, B, C, D, C, B, C, B, A, D, A, B, C, B, C, B, A, B, A, B, C, D, C, D, C, B, A).
- Enter the Inner Chamber.

- Take the 37th Beyond Object(#).
- Place the FIREWOOD (Y5) near the ice.
- Remove the debris from the memory slot. Take the CUBE (B2).
- Enter the Hall of Fame.

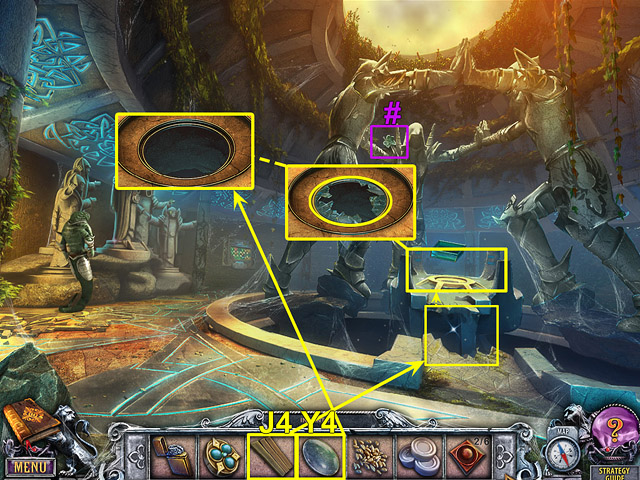
- Take the 38th Beyond Object(#).
- Use the PLANKS (J4) to make a bridge.
- Remove the pieces of broken glass. Insert the LENS (Y4).
- Go to the Incubator.

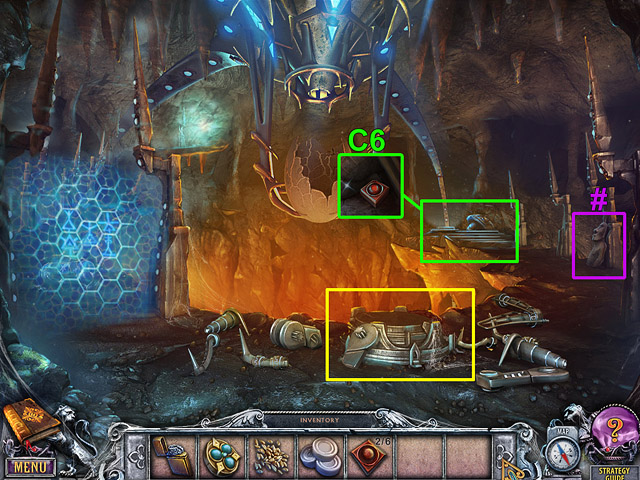
- Take the 39th Beyond Object(#).
- Grab the CUBE (C6).

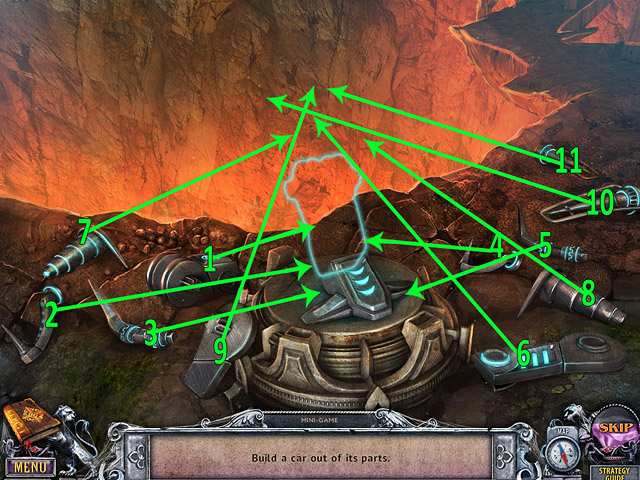
- Assemble the scattered parts into a machine.
- Go to the Main Hall.

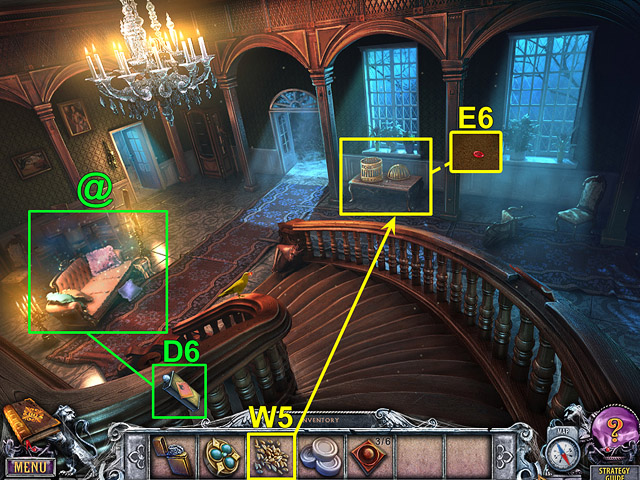
- Select the sparkles to open the hidden object scene(@).
- Take LIGHTER FLUID (D6).
- Place the GRAIN (W5) in the cage to attract the bird. Take the RUBY EYE (E6).

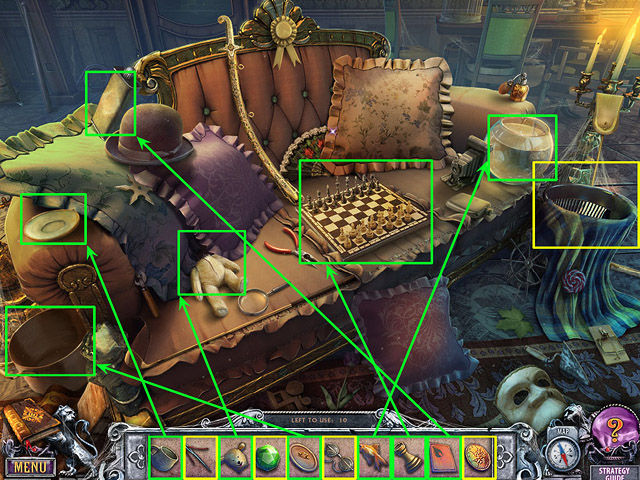
- Place each object displayed at the bottom of the screen where it belongs.

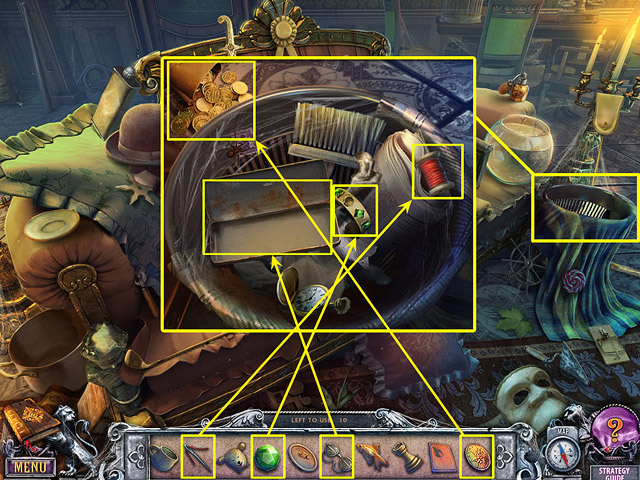
- Open the zoom-in scene to place the remaining objects where they belong.
- Go to the Garden.

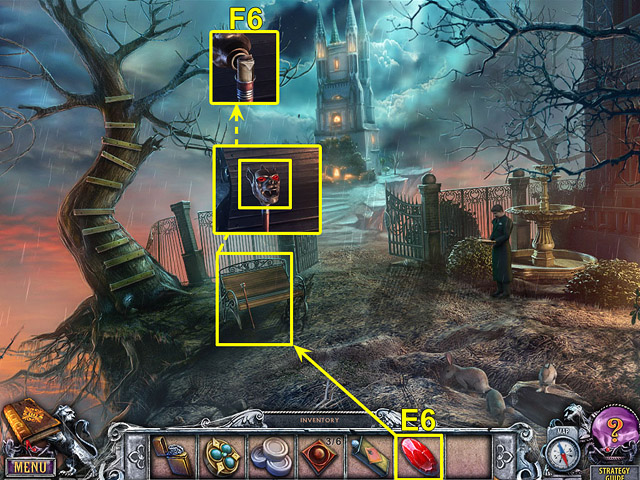
- Insert the RUBY EYE (E6) into Gabriel’s cane. Open the cane. Take the UNLOCK CODE (F6).
- Go to the Incubator.

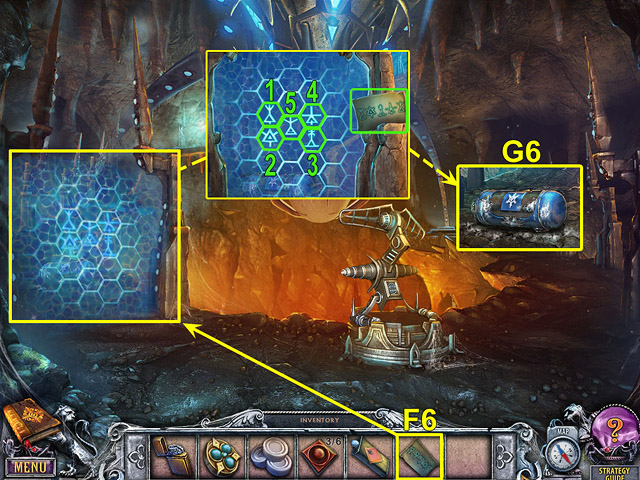
- Enter the UNLOCK CODE (F6).
- Take the LIQUID NITROGEN (G6).

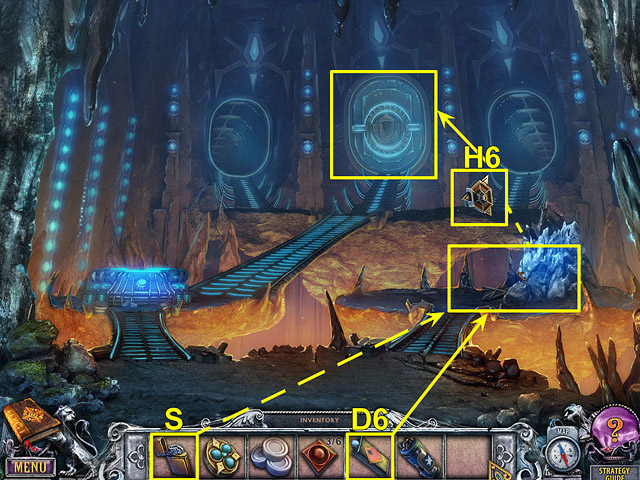
- Go to the Inner Chamber.
- Pour the LIGHTER FLUID (D6) on the firewood. Use the LIGHTER (S) to light the firewood.
- Get the SEAL KEY (H6).
- Place the SEAL KEY (H6) on the Archives door.
- Enter the Archives.

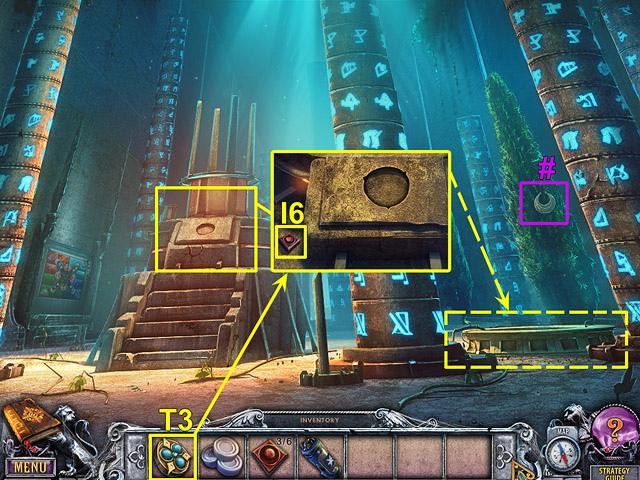
- Take the 40th Beyond Object(#).
- Take the CUBE (I6). Insert RAFAEL’S LOCKET (T3) in the slot.


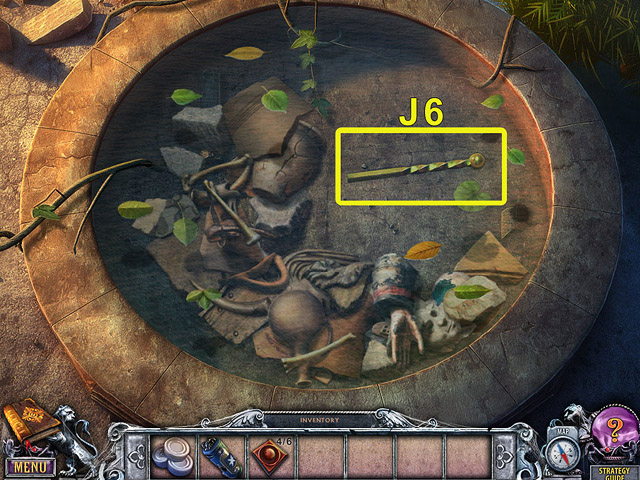
- Take the BUREAU LEVER (J6).
- Go to Simon’s room.

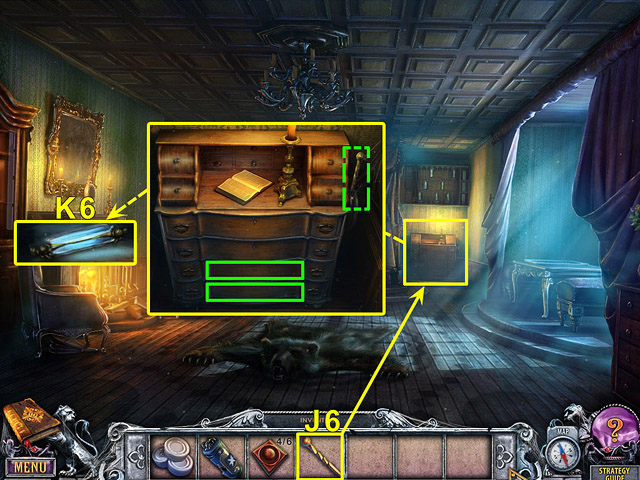
- Insert the BUREAU LEVER (J6) in the bureau.
- Open two or more drawers and then pull the lever.
- Take the GLASS TUBE (K6).
- Go to the Cave.

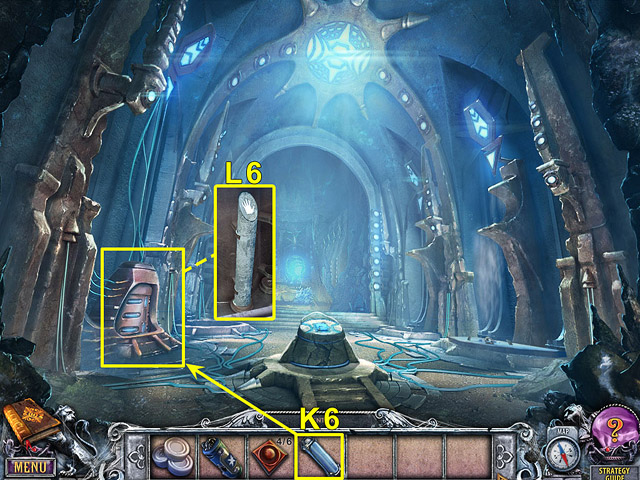
- Place the GLASS TUBE (K6) in the mechanism. Take the POLE (L6).
- Go to the Archives.

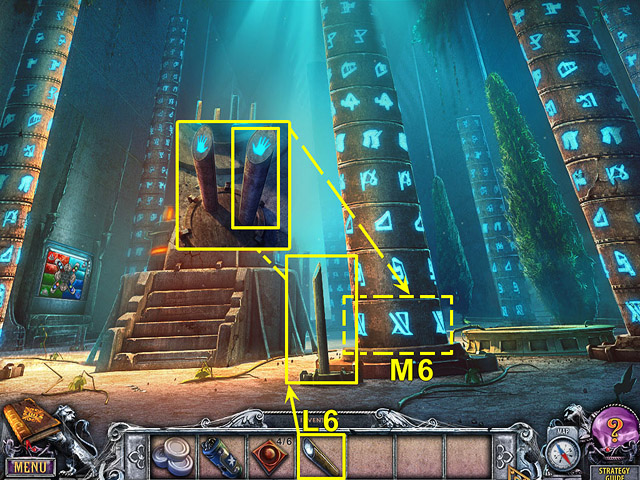
- Install the POLE (L6). Press on it.
- Take the KNOWLEDGE DISK (M6).
- Go to the Inner Chamber.

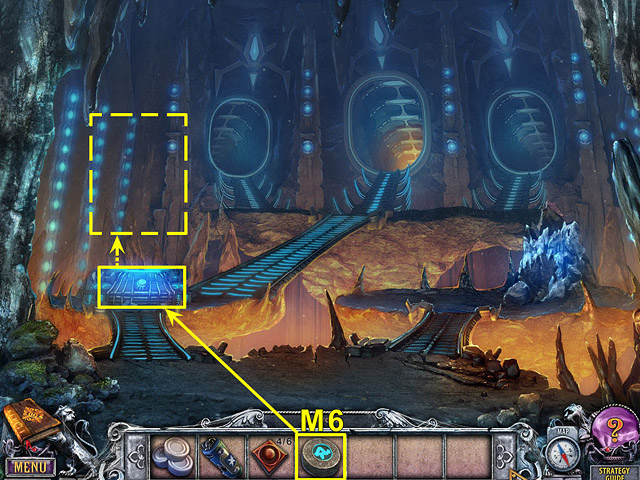
- Insert the KNOWLEDGE DISC (M6) in the slot.
- Read about snakes.
- Go to the Hall of Fame.

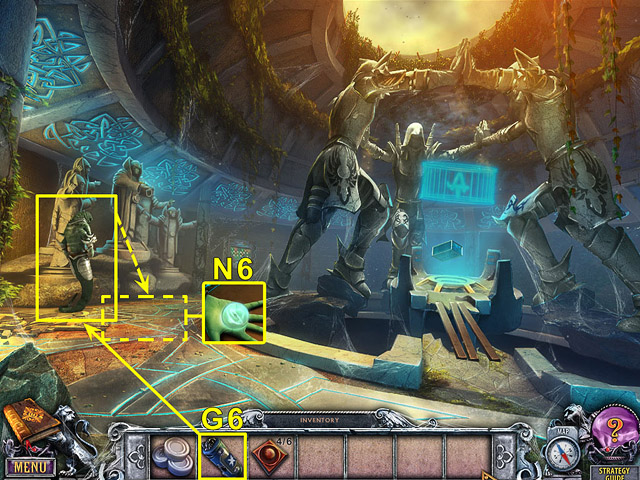
- Toss the LIQUID NITROGEN (G6) at the Naga to freeze it.
- Take the GLASS BALL (N6).
- Go to the Cave.

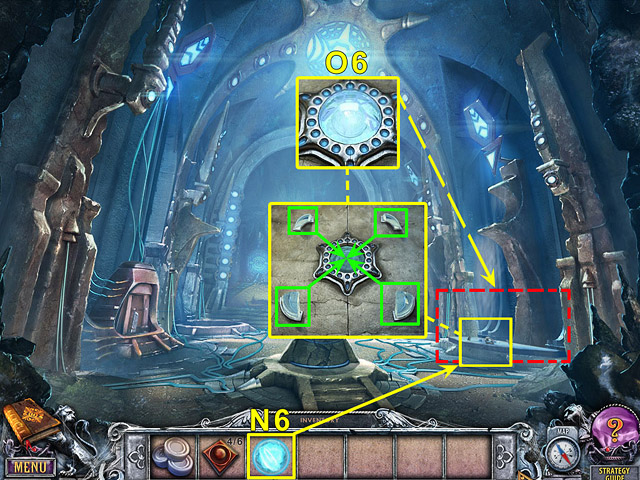
- Insert the GLASS BALL (N6) in the slot.
- Assemble the protective dome.
- Take the SPHERE (O6).

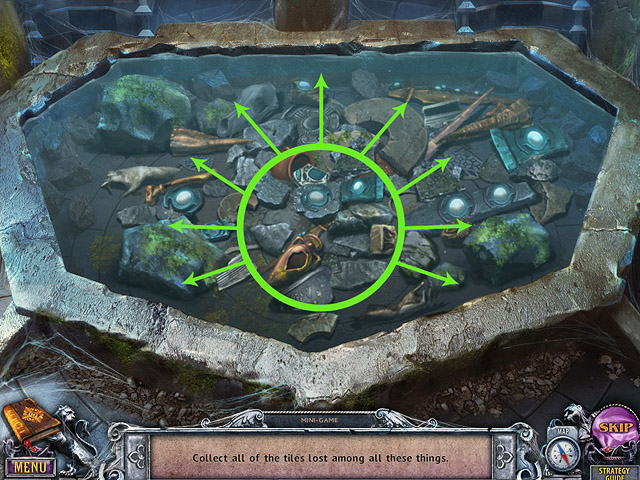
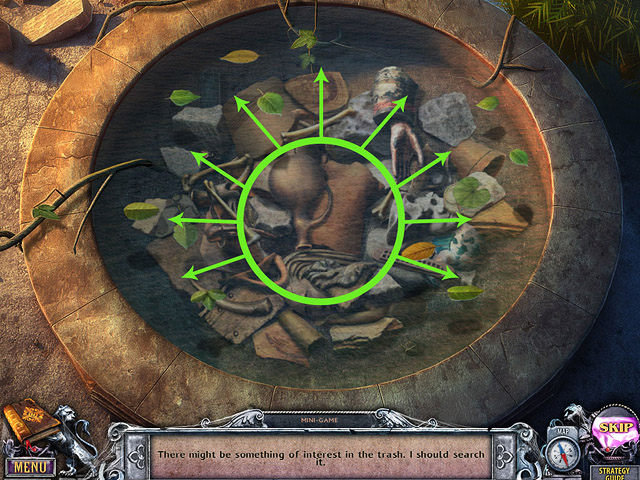
- Remove the trash from the fountain.

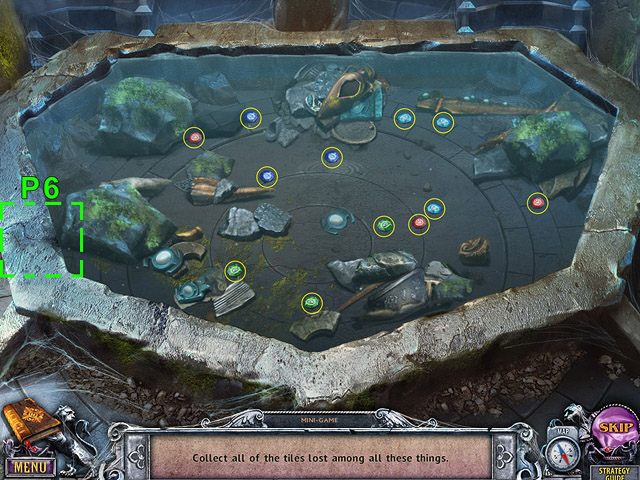
- Collect all of the tokens buried in the debris.
- Take the TOKENS (P6).

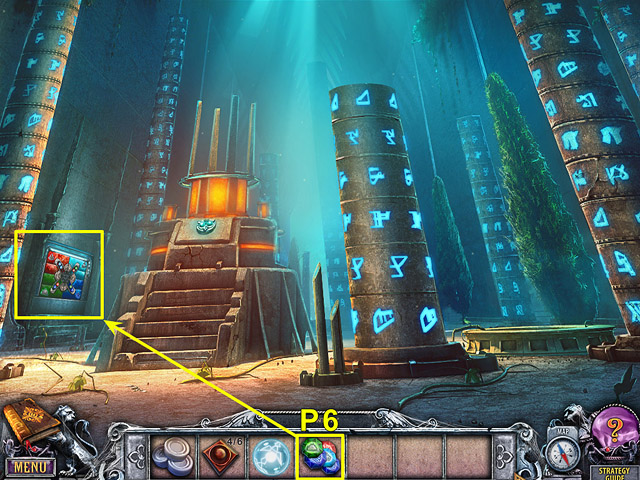
- Go to the Archives.
- Insert the TOKENS (P6) in the slot on the wall.

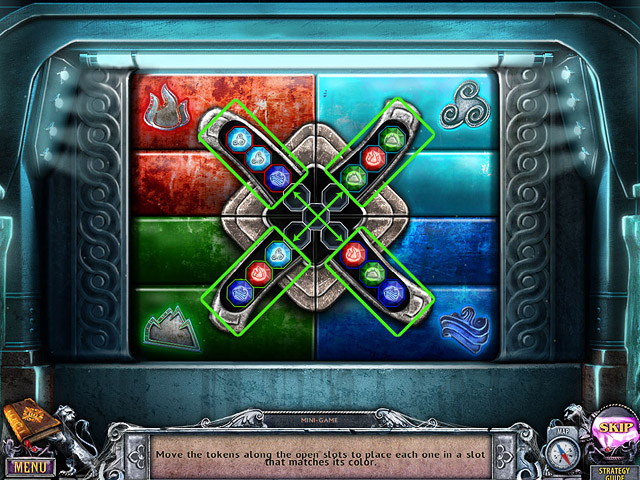
- Move the tokens along the open slots to place each one in a slot that matches its color.

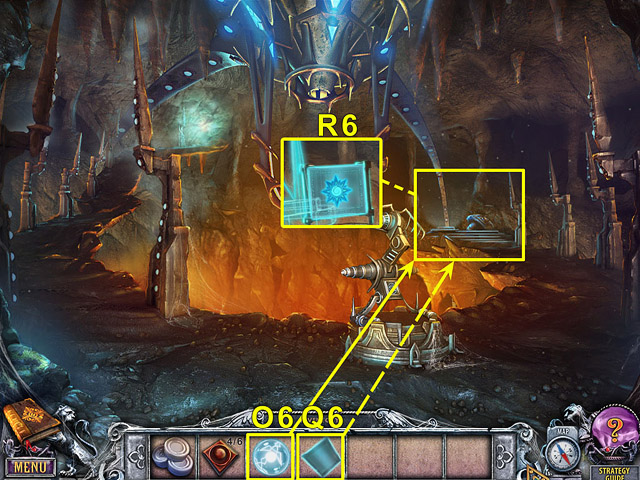
- Take the GLASS PLATE (Q6).
- Go to the Incubator.


- Place the SPHERE (O6) in the mechanism. Place the GLASS PLATE (Q6) in the mechanism. Take the FIFTH ELEMENT LAYOUT (R6).
- Go to Simon’s room.

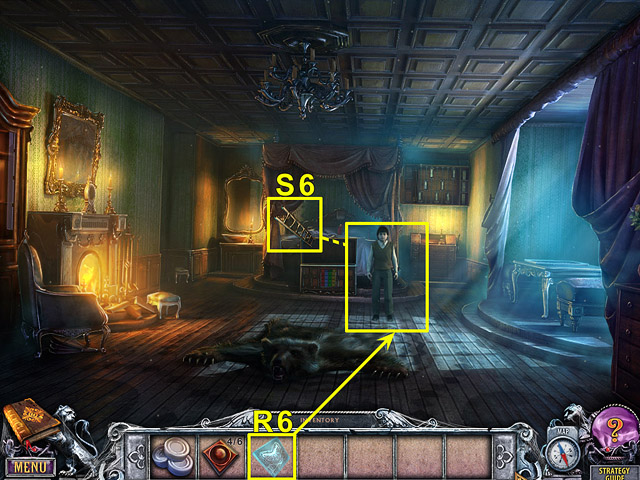
- Give the FIFTH ELEMENT LAYOUT (R6) to Sammy. Take the LADDER (S6).
- Go to the Hall of Fame.

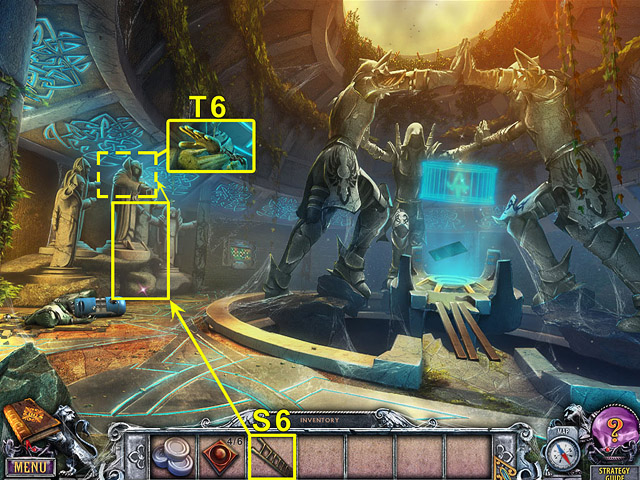
- Use the LADDER (S6) to reach the GLOVE OF THE LIGHT ONE (T6).
- Go to the Cave Entrance.

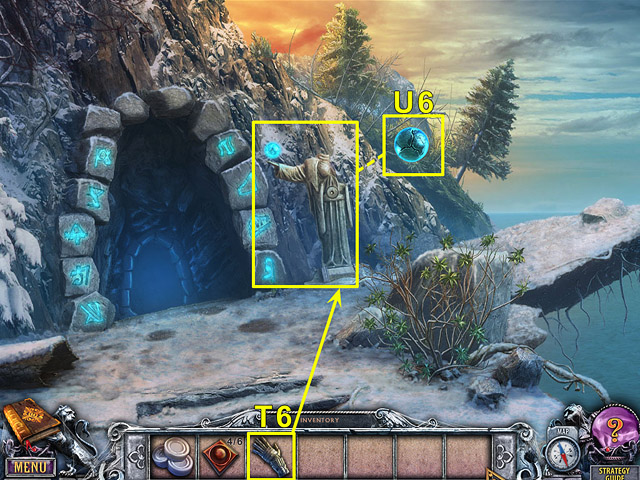
- Use the GLOVE OF THE LIGHT ONE (T6) to take the model of the EXOPLANET (U6).
- Go to the Slope.

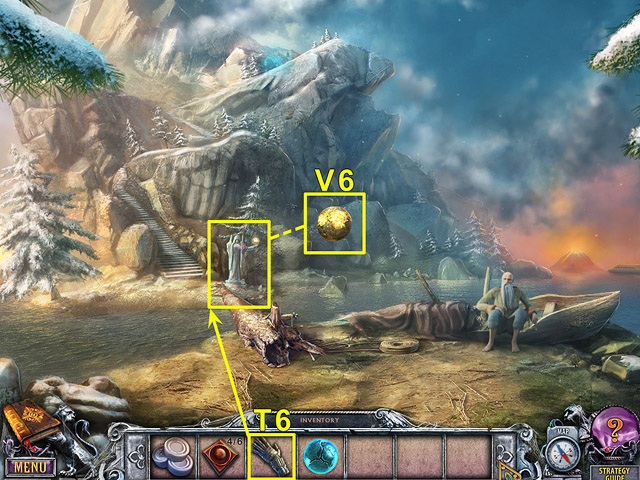
- Use the GLOVE OF THE LIGHT ONE (T6) to take the model of EARTH (V6).
- Go to Outside the Tower.

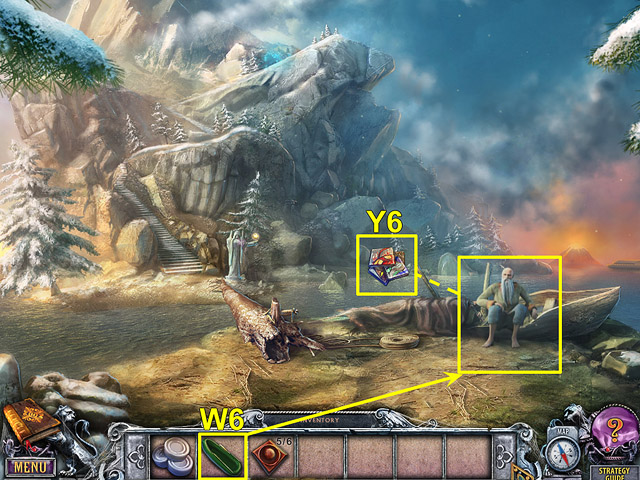
- Select the sparkles to open the hidden object scene(@).
- Get the BOAT (W6).
- Place the planets (U6 and V6) on the statue’s hands. Take the CUBE (X6).

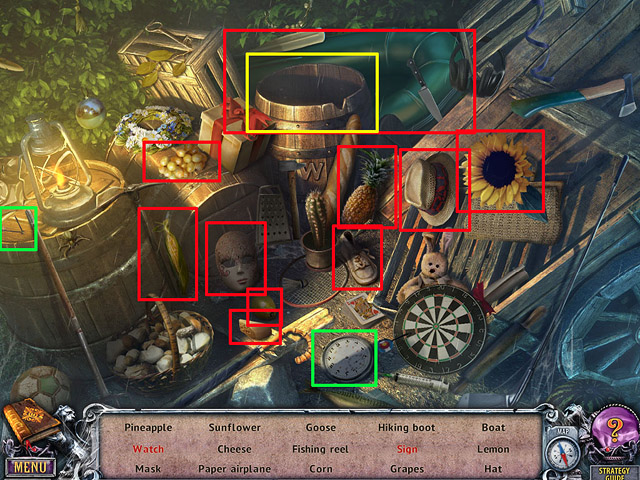
- Collect the objects listed at the bottom of the screen by selecting them.

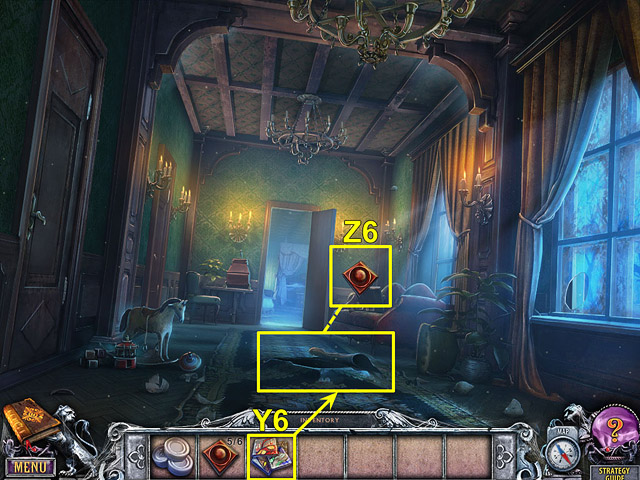
- Open the zoom-in screen to place the remaining objects where they belong.
- Go to the Slope.


- Give the BOAT (W6) to the old man. Take the PUZZLE PIECES (Y6).
- Go to the Passage.


- Insert the PUZZLE PIECES (Y6) where they belong.
- Take the CUBE (Z6).

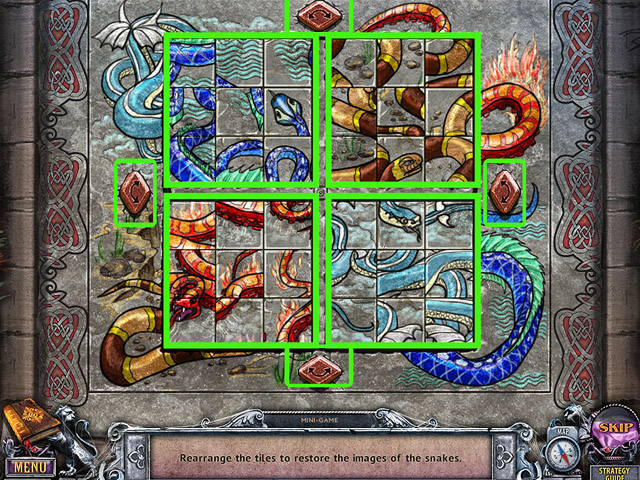
- Rearrange the puzzle pieces.

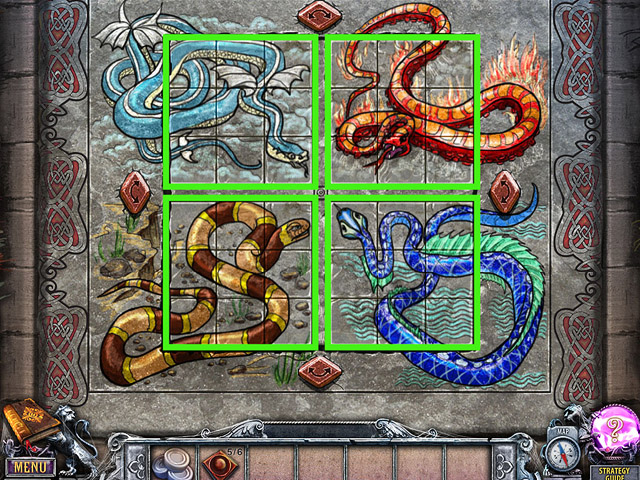
- Restore the images of the snakes.
- Go to the Hall of Fame.

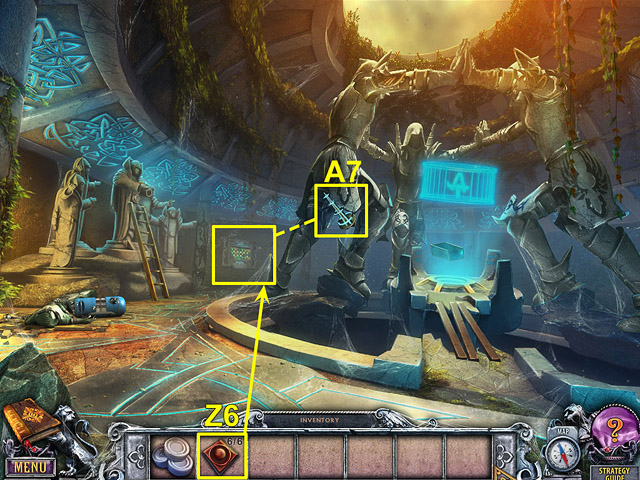
- Place the missing CUBES (Z6) where they belong.

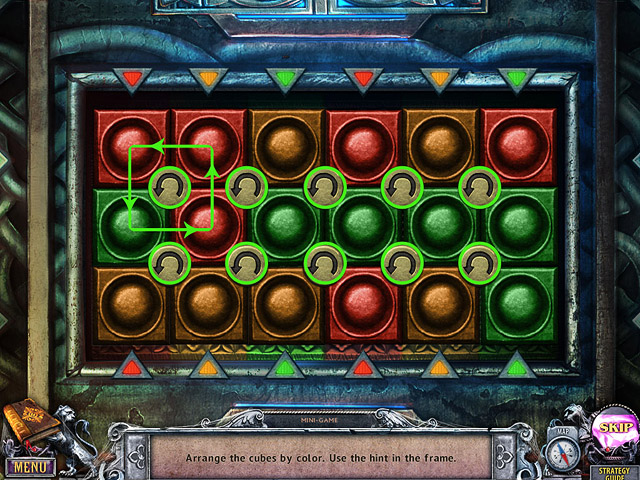
- Press the arrows to move the cubes.

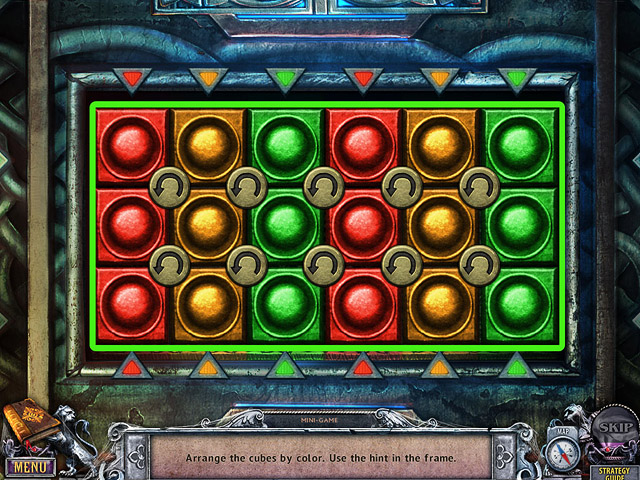
- Arrange the cubes by color. Note the hints along the frame.
- Take the MACHINE PART (A7).
- Go to the Incubator.

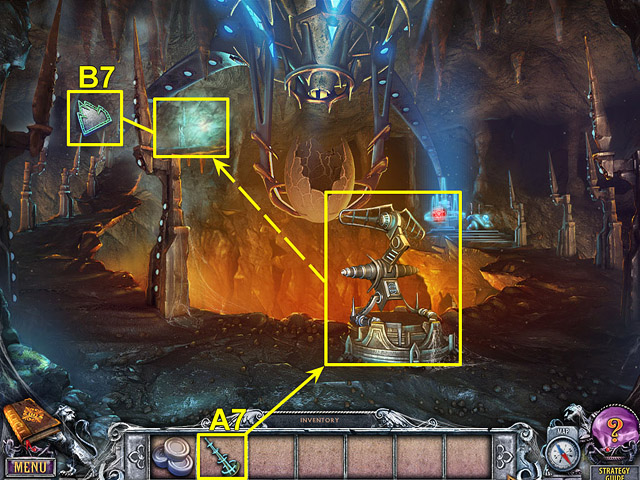
- Place the MACHINE PART (A7) on the machine you built.
- Grab the EARTH ELEMENT (B7).
- Go to the Mechanism.

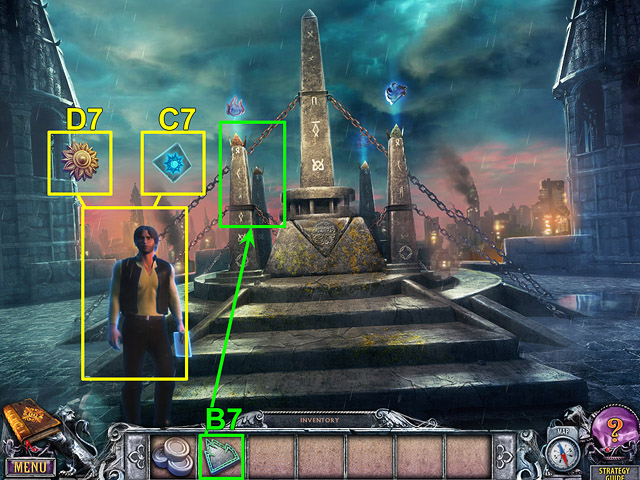
- Talk to Gabriel. Take the FIFTH ELEMENT LAYOUT (C7) and the SUN (D7).
- Place the EARTH ELEMENT (B7) in the mechanism.
- Go to the First Room.
Chapter 6: The Light

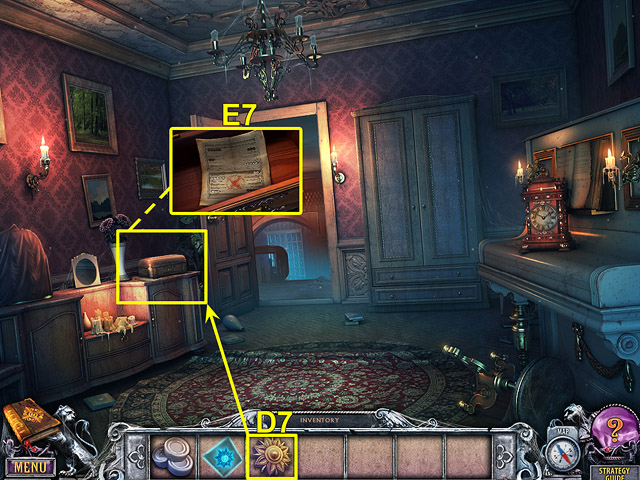
- Place the SUN (D7) on the case.
- Take the BACKGAMMON LAYOUT (E7).

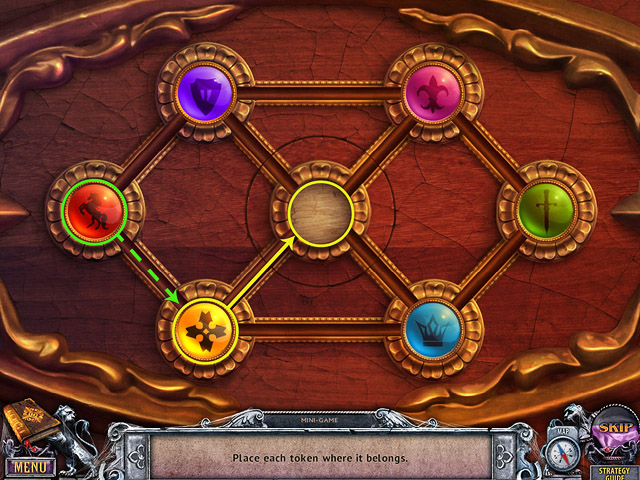
- Move each token onto its matching slot.
- Go to Simon’s room.

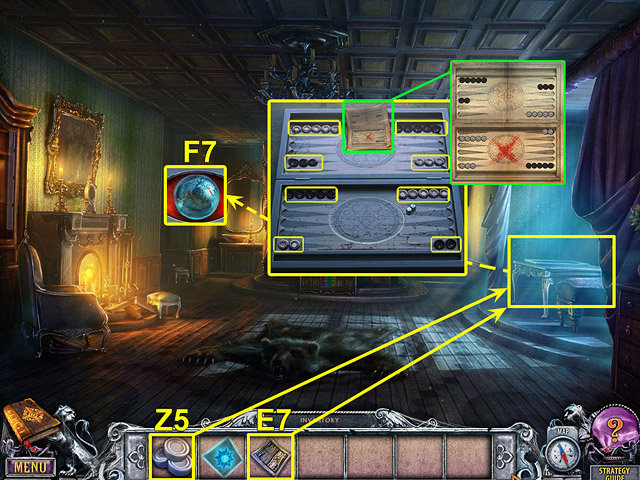
- Place the missing PUZZLE PIECES (Z5) and the BACKGAMMON LAYOUT (E7) on the Backgammon board. Read the layout.
- Arrange the backgammon pieces as shown on the layout.
- Take the EXOPLANET (F7) from the cache.
- Go to Outside the Tower.

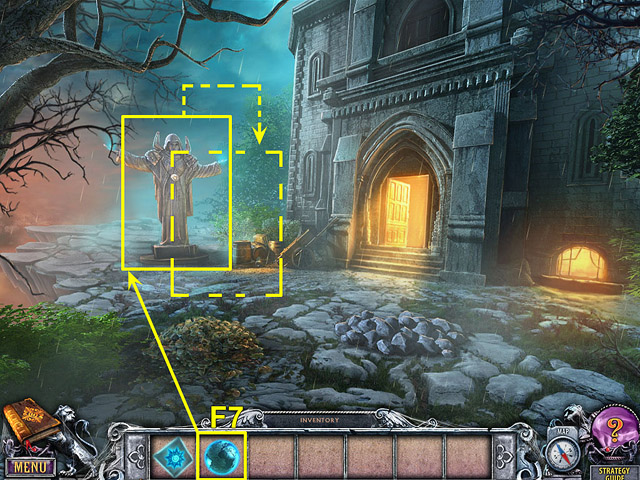
- Place the EXOPLANET (F7) in the statue’s hand.
- Step through the portal.

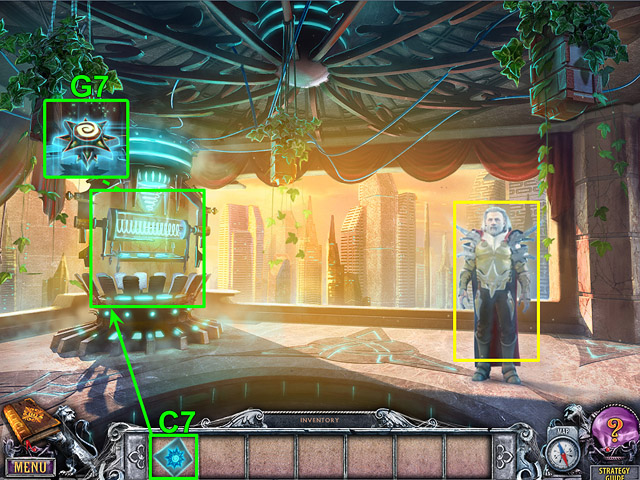
- Talk to the Nibiru citizen.
- Place the FIFTH ELEMENT LAYOUT (C7) on the mechanism. Take the LIGHT ELEMENT (G7).
- Go to the Mechanism.

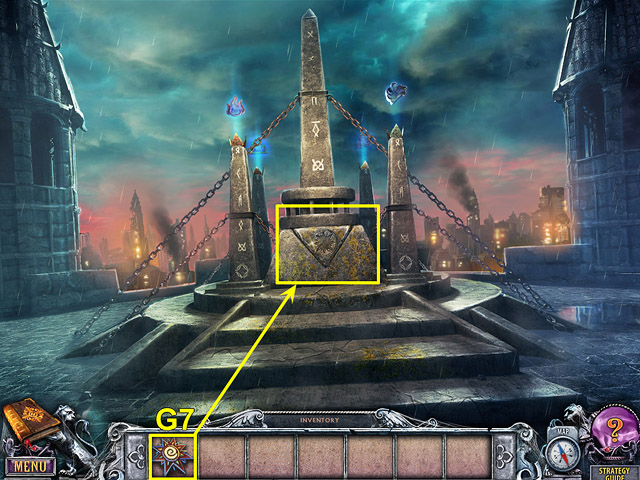
- Place the LIGHT ELEMENT (G7) on the mechanism.
- Congratulations, you have completed House of 1000 Doors: Serpent Flame!




 Greek Gems Tips and Tricks, Guide, & Tips
 Calavera: Day of the Dead Walkthrough, Guide, & Tips
 Mystery Tales: The Twilight World Walkthrough, Guide, & Tips
 Beyond: Light Advent Walkthrough, Guide, & Tips
 Criminal Minds Walkthrough, Guide, & Tips