Mystery Tales: The Twilight World Walkthrough, Guide, & Tips
Mystery Tales: The Twilight World Walkthrough

Welcome to the Mystery Tales: The Twilight World Walkthrough
A stay at a peaceful hotel turns into a nightmare when a witch from the Twilight World takes your daughter!
Whether you use this document as a reference when things get difficult or as a road map to get you from beginning to end, we’re pretty sure you’ll find what you’re looking for here.
This document contains a complete Mystery Tales: The Twilight World game walkthrough featuring annotated screenshots from actual gameplay!
We hope you find this information useful as you play your way through the game. Use the walkthrough menu below to quickly jump to whatever stage of the game you need help with.
Remember to visit the Big Fish Games Forums if you find you need more help. Have fun!
This walkthrough was created by Laurie Murphy, and is protected under US Copyright laws. Any unauthorized use, including re-publication in whole or in part, without permission, is strictly prohibited.
General Tips
- This is the official guide for Mystery Tales: The Twilight World!
- This guide does not mention each time you have to zoom into a location; the screenshots show each zoom scene.
- Hidden-object puzzles are referred to as HOPs. This guide does not show screenshots of the HOPs, however, it is mentioned when a HOP is available and the inventory item collected.
- This guide will give step-by-step solutions for all puzzles that are not random. Please read the instructions in the game for each puzzle.
- Use the map to travel quickly to a location.
Chapter 1: The Inn

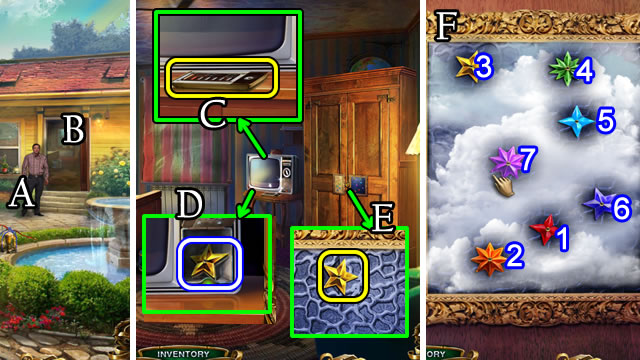
- Speak to the manager (A); enter the Hotel Room (B).
- Select the remote control (C); take the STAR (D).
- Place the STAR (E) for a puzzle.
- Solution (F). 1-7.

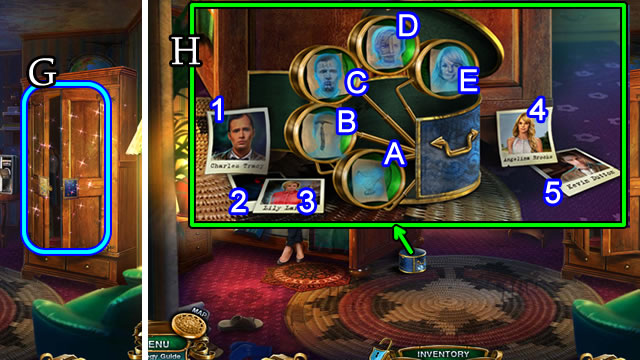
- Play the HOP (G); receive PHOTOS.
- Select the hatbox (G2); open the hatbox and read the note.
- Place the PHOTOS for a mini-game.
- Solution (H). 1-C; 2-A; 3-D; 4-E; 5-B.
- Select the box to receive the Magic Box in the user interface.

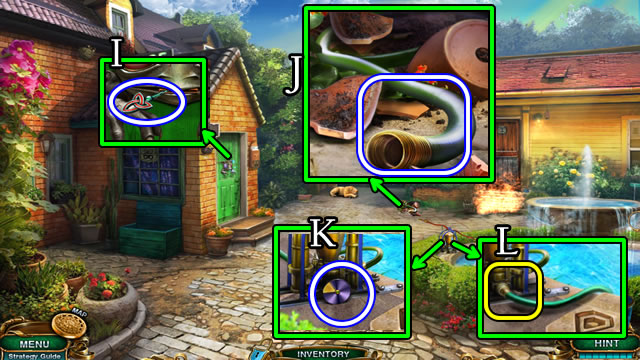
- Take the HAIR PIN (I).
- Uncover and take the HOSE (J).
- Take the CIRCLE (K); place the HOSE (L).

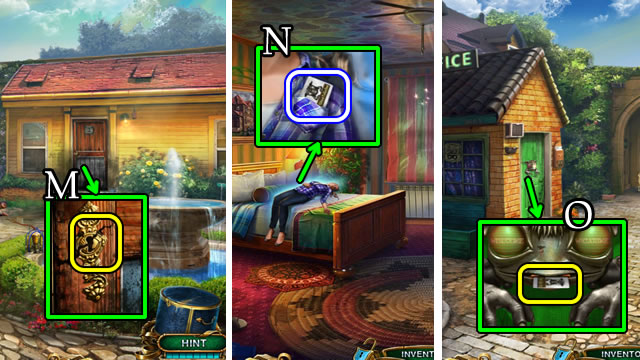
- Use the HAIR PIN (M); walk forward.
- Take the KEY CARD (N).
- Walk down.
- Use the KEY CARD (O).
- Enter the Hotel Reception. Speak to the manager.

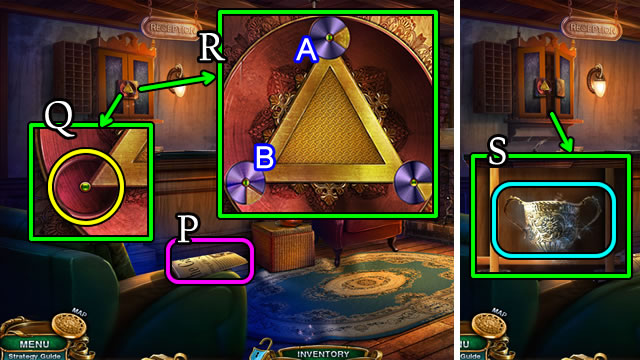
- Read the paper (P).
- Place the CIRCLE (Q) for a puzzle.
- Solution (R). Bx3-Ax2.
- Read the note; take the Magic Box Ice Bucket (S).

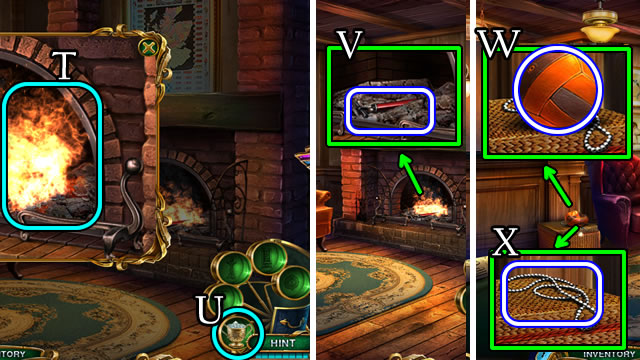
- Select the fireplace (T) to open the Magic Box.
- Select and use the Ice Bucket (U) on the flames.
- Take the PUMP (V).
- Open the vignette (V1); use the PUMP; take a BALL (W).
- Take the PULL CHAIN (X).
- Return to the Hotel Room.

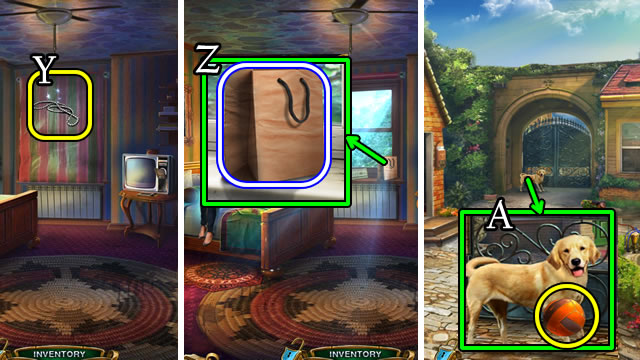
- Place the PULL CHAIN (Y).
- Take the PAPER BAG (Z).
- Go to Courtyard.
- Give the BALL (A).
- Walk to the Bridge.

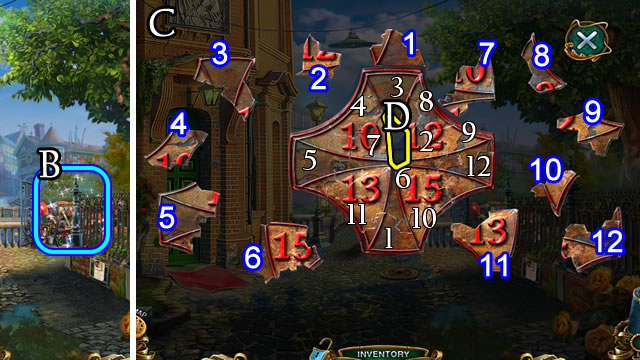
- Play the HOP (B); receive a BROKEN PART.
- Select the PAPER BAG (Inventory); place the BROKEN PART (D) for a mini-game.
- Solution (C).
- Take the NUMBERED LOCK.

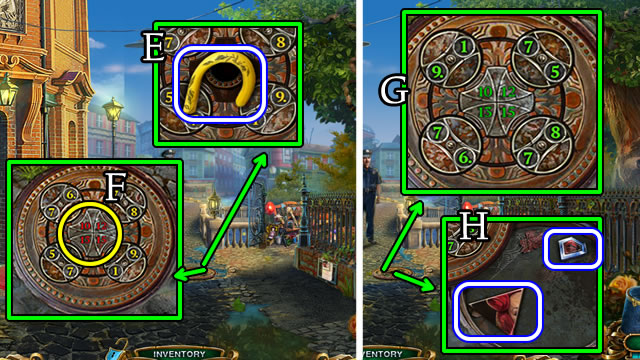
- Take the UMBRELLA HANDLE (E).
- Place the NUMBERED LOCK (F) for a puzzle.
- Solution (G).
- Take the WALL PART and DIAMOND (H).
- Walk down.

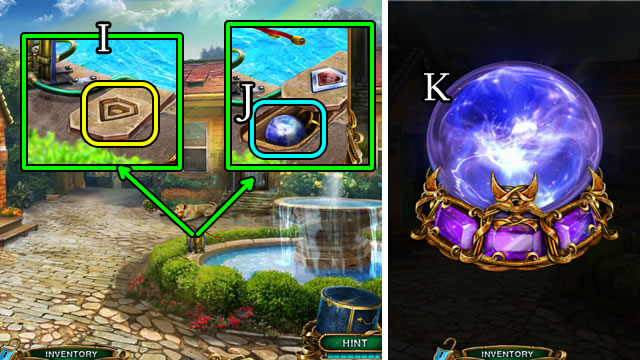
- Place the DIAMOND (I).
- Take the sphere, stand and gems (J) for a mini-game.
- Assemble the Magic Sphere (K) for the user interface.

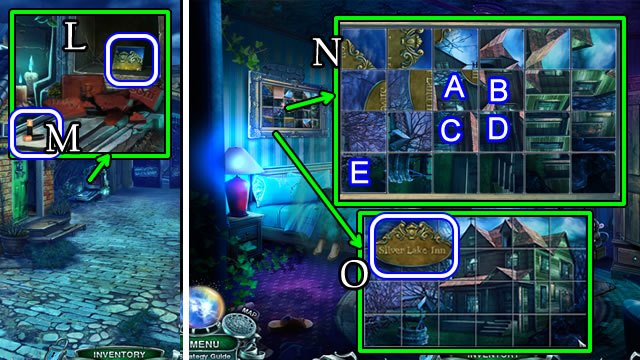
- Use the rock to find and take the PICTURE PART (L).
- Grab the BATTERIES (M).
- Enter the Hotel Room.
- Place the PICTURE PART (M1) for a puzzle.
- Solution (N). Ax3-Bx3-Cx3-Dx3-E.
- Receive a PLATE (O).

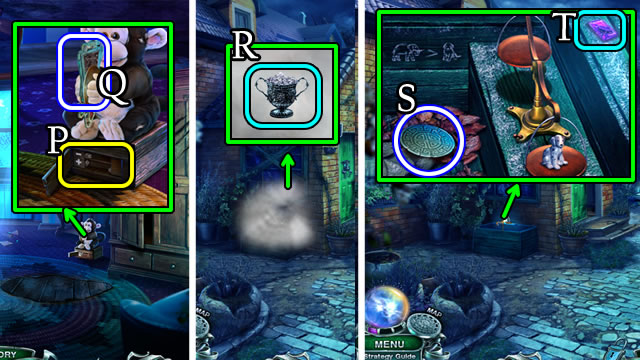
- Place the BATTERIES (P); take the WINDMILL BLADES (Q).
- Walk down.
- Select the Fog (Q1).
- Use the Ice Bucket (R).
- Take the WINDMILL GEAR (S) and Gem (T).
- Select the WINDMILL GEAR (Inventory) and place the WINDMILL BLADES for a puzzle.

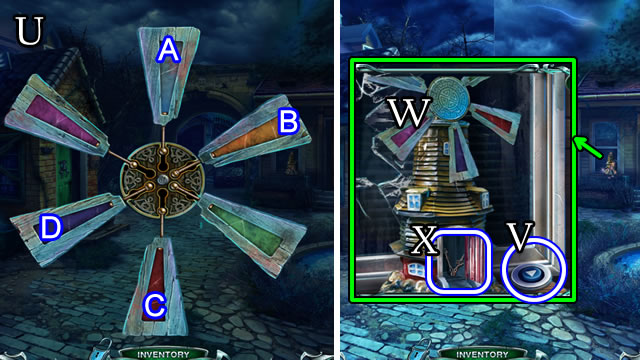
- Solution (U). A-B-C-A-D.
- Take the WINDMILL FAN.
- Take DIALS 1/2 (V).
- Place the WINDMILL FAN (W); take the CLOCK HANDS (X).
- Enter the Hotel Reception.

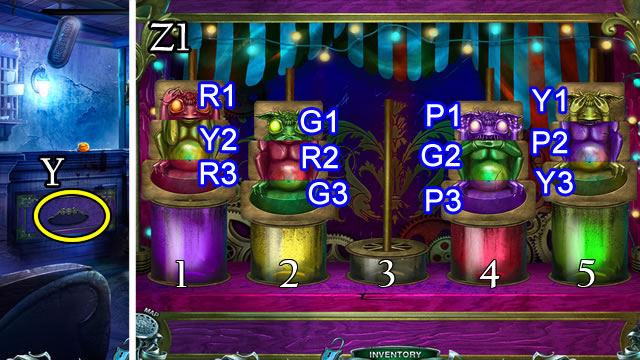
- Place the PLATE (Y) for a puzzle (Z1) where R-red, Y-yellow,P-purple. 1-head, 2-torso, 3-base. The pedestal numbers indicate piece placement.
- Solution, part one (Z1). P1-2, Y1-1, P2-4, Y3-3, P2-5, G2-3, P2-4, P1-4, G1-4, R2-3, G3-5, R2-2, G2-5, G1-5, P1-5, R2-4.

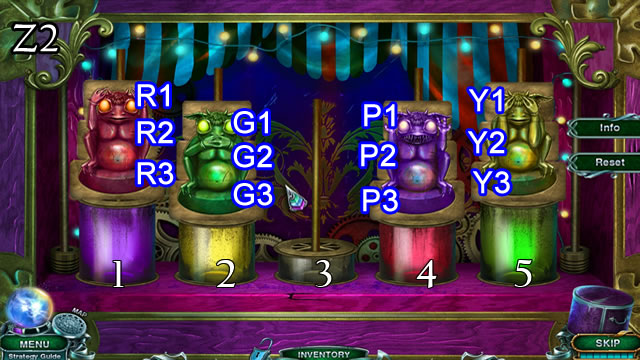
- Solution, part two (Z2). Y3-2, Y1-4, R1-3, Y2-2, Y1-2, R1-2, R3-3, R2-3, P2-3, P3-1, P2-1, R2-1, R3-4, R2-4, R1-4, P1-1.

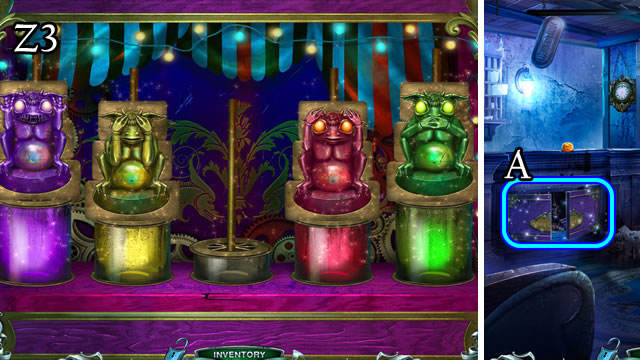
- Solution (Z3).
- Play the HOP (A); receive a CLOCK KEY.

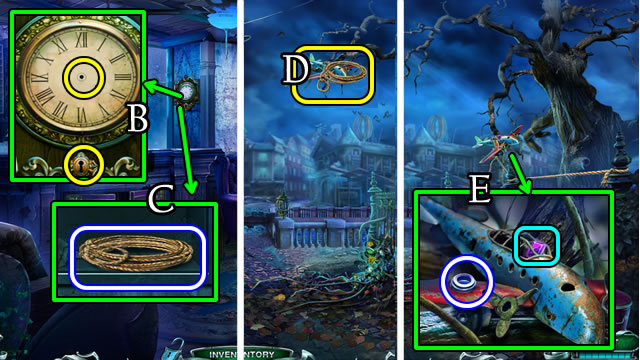
- Place the CLOCK HANDS and CLOCK KEY (B). Take the LASSO (C).
- Return to the Bridge.
- Place the LASSO (D).
- Take a Gem and DIALS 2/2 (E).
- Return to the Hotel Reception.

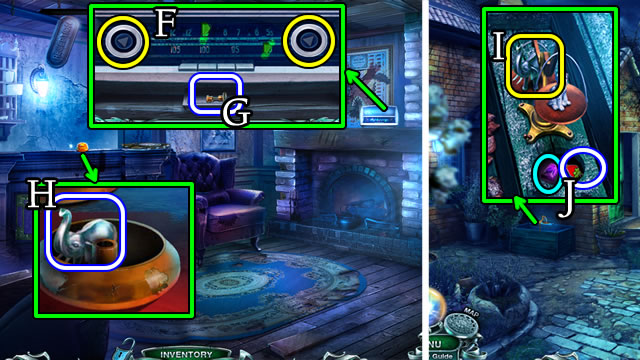
- Place DIALS 2/2 (F). Continually select the left dial to align the marks.
- Take the BELL CLAPPER (G).
- Place the BELL CLAPPER; take the ELEPHANT (H).
- Walk down.
- Place the ELEPHANT (I); take the CHEST KEY and Gem (J).

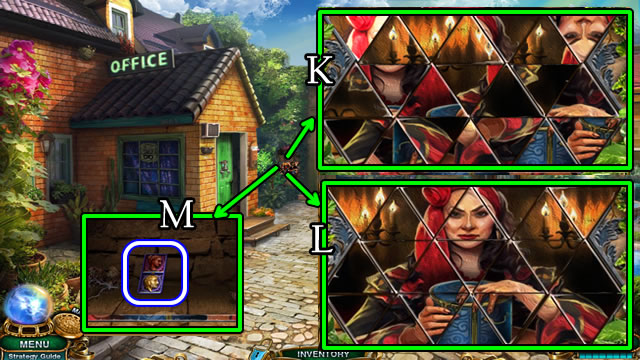
- Place the WALL PART for a puzzle (K).
- Solution (L).
- Take the DOMINO (M).
- Return to the Bridge.
Chapter 2: Kevin’s House

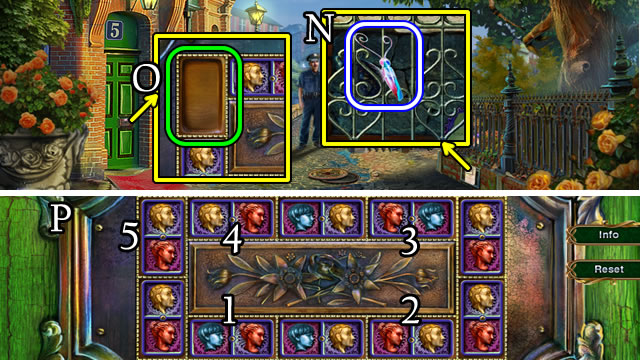
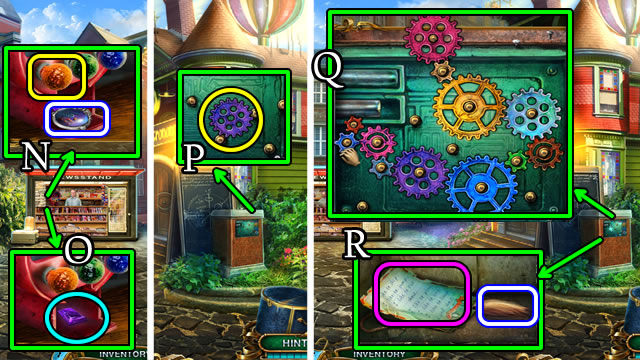
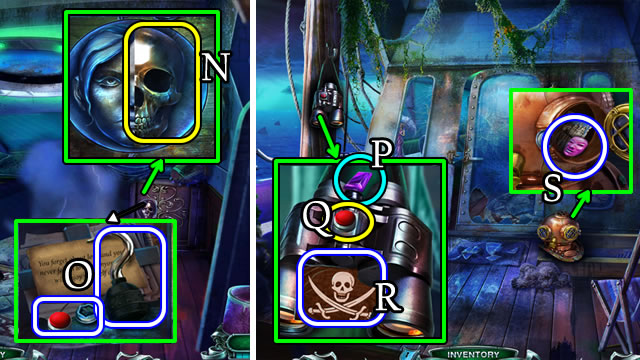
- Select the note twice; take the BROKEN BUTTERFLY (N).
- Place the DOMINO (O) for a puzzle.
- Solution (P). 1-2-3-4-5.
- Enter Kevin’s House.

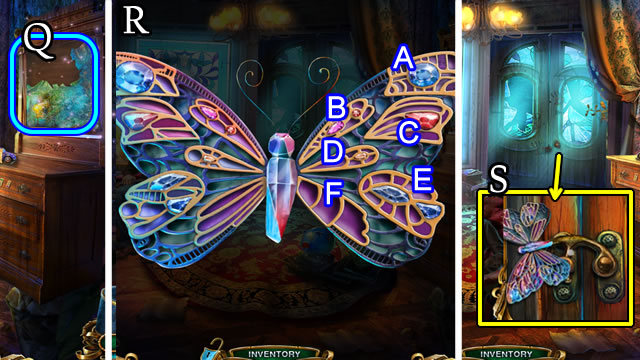
- Play the HOP (Q); receive a BUTTERFLY WING.
- Select the BROKEN BUTTERFLY (Inventory); attach the BUTTERFLY WING for a puzzle.
- Solution (R). A-Bx3-Cx4-D-Ex2-Fx4.
- Take the BUTTERFLY.
- Place the BUTTERFLY (S).
- Walk forward.

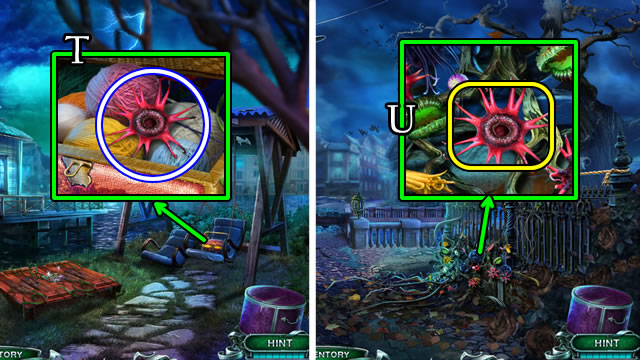
- Use the CHEST KEY; take the RED FLOWER (T).
- Walk down twice.
- Place the RED FLOWER (U) for a puzzle.

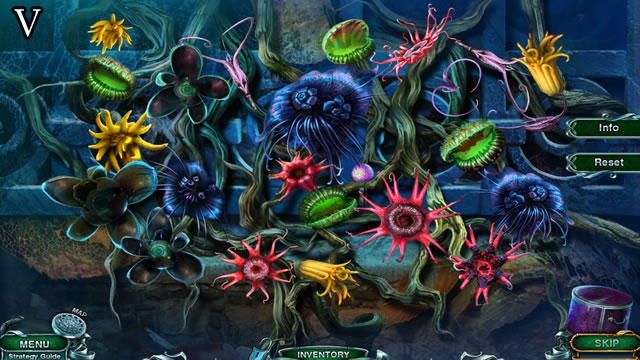
- Solution (V).
- Take the GLOBE LEVER (V1).
- Walk left.

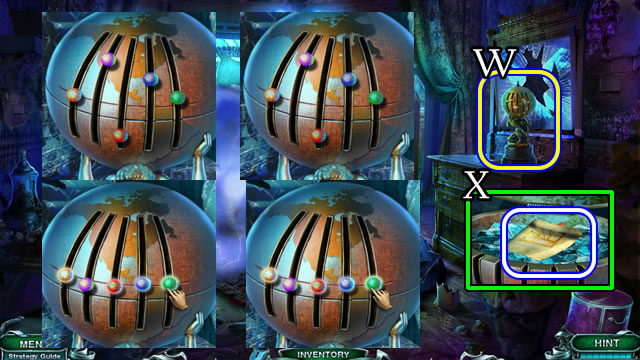
- Place the GLOBE LEVER for a puzzle (W).
- Solution (W1).
- Take the DIAGRAM (X).

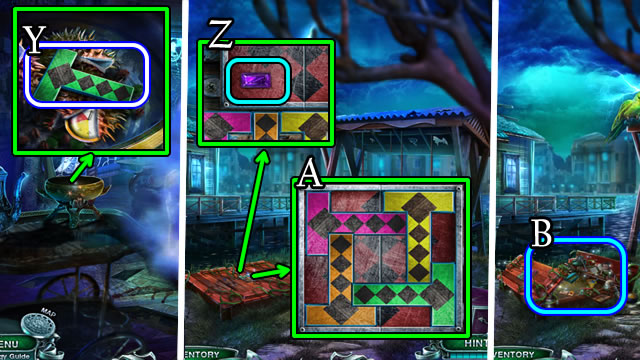
- Take the T-SYMBOL (Y).
- Walk forward.
- Take CRYSTAL 1/3 (Z).
- Place the T-SYMBOL for a puzzle.
- Solution (A).
- Play the HOP (B); receive a HORN.

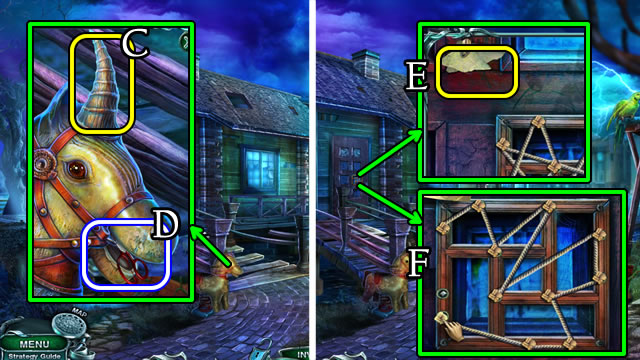
- Place the HORN (C); take SCISSORS (D).
- Place the DIAGRAM (E) for a puzzle.
- Solution (F).
- Walk forward.

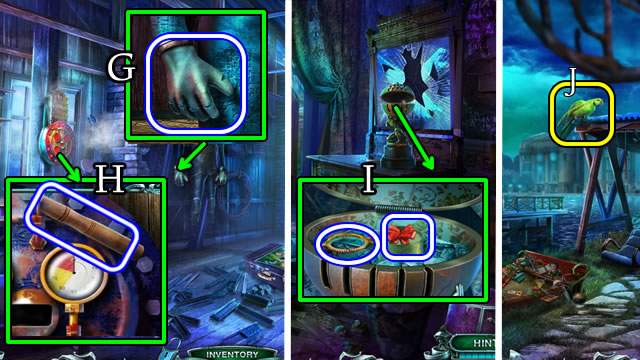
- Use the SCISSORS (G); receive a GLOVE.
- Use the Ice Bucket; take the PESTLE (H).
- Walk down twice.
- Use the GLOVE. Take the PARROT RING and BOX WITH PHOTOS (I).
- Walk forward.
- Place the PARROT RING (J); receive a PARROT.
- Walk down.

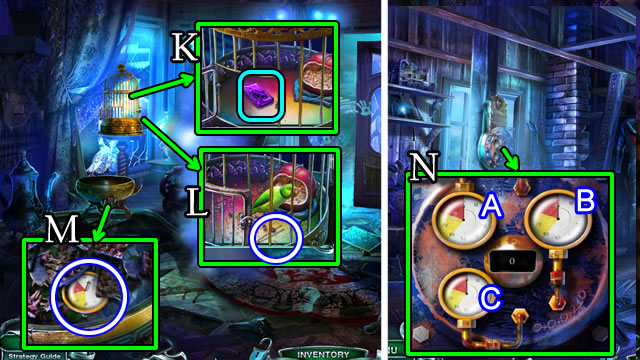
- Take CRYSTAL 2/3 (K).
- Place the PARROT; receive a PIN (L).
- Use the PESTLE. Take the DIAL (M).
- Return to the Barn.
- Place the DIAL (N) for a puzzle.
- Solution (N1). Bx3-Cx4-A.
- Receive an UNDERWATER VACUUM CLEANER.

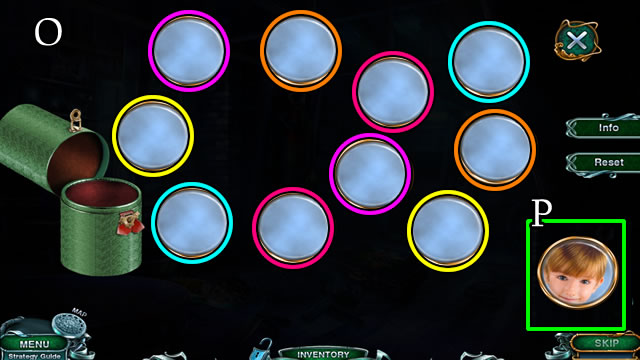
- Select the BOX WITH PHOTOS (Inventory); use the PIN; play the mini-game.
- Solution (O).
- Take the SUITCASE CHIP (P).

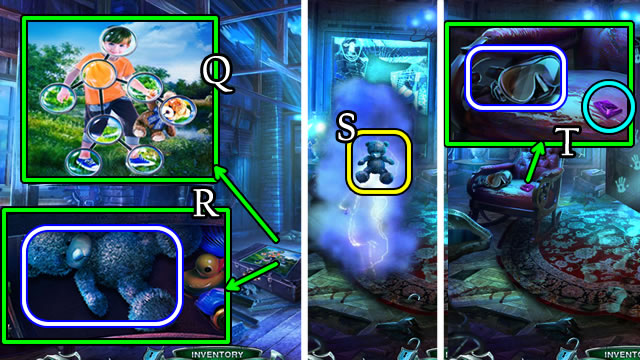
- Place the SUITCASE CHIP (Q) for a puzzle.
- Solution (Q1).
- Read the note; take PATRICK’S FAVORITE TOY (R).
- Walk down twice.
- Place PATRICK’S FAVORITE TOY (S).
- Take CRYSTAL 3/3 and the DIVING MASK (T).
- Walk forward.

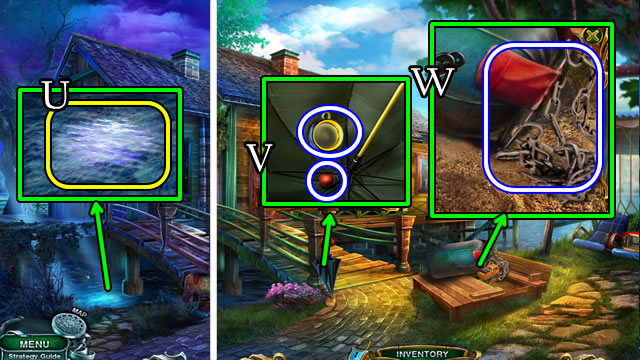
- Place the DIVING MASK and UNDERWATER VACUUM CLEANER (U).
- Place the UMBRELLA HANDLE. Select the umbrella.
- Take the PARROT’S MIRROR and CANNONBALL (V).
- Take the PUNCHING BAG (W).
- Walk forward.

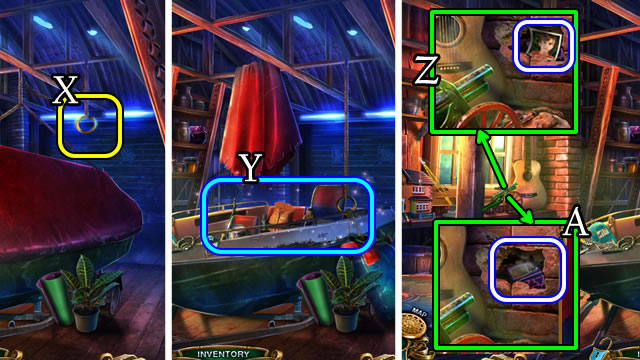
- Place the PUNCHING BAG (X).
- Play the HOP (Y); receive a LIGHTER.
- Place the CANNONBALL; use the LIGHTER. Take PHOTO OF KEVIN’S SON (Z) and CAR DOOR (A).
- Return to Kevin’s House.

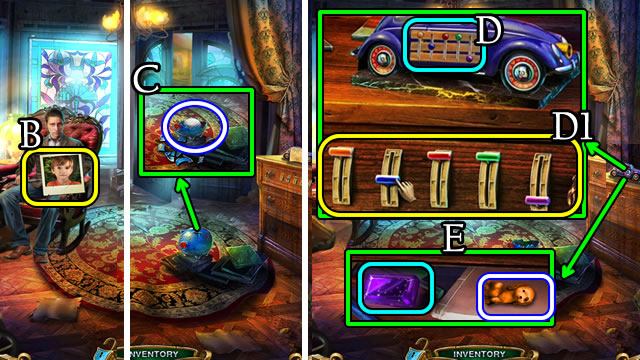
- Place the PHOTO OF KEVIN’S SON (B); receive a Hammer.
- Use the Hammer; take the WRECKING BALL (C).
- Read the note (D); place the CAR DOOR (D1) for a puzzle.
- Solution. A3-C3-E1-B2.
- Take the Gem and THEATER TOY 1/3 (E).

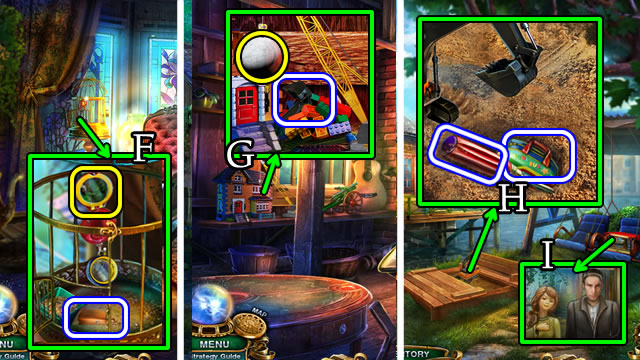
- Place the PARROT’S MIRROR; take THEATER TOY 2/3 (F).
- Return to the Barn.
- Place the WRECKING BALL; take the BUCKET (G).
- Walk down.
- Place the BUCKET. Take THEATER TOY 3/3 and a SCREWDRIVER (H).
- Place THEATER TOY 3/3 for a puzzle (I).

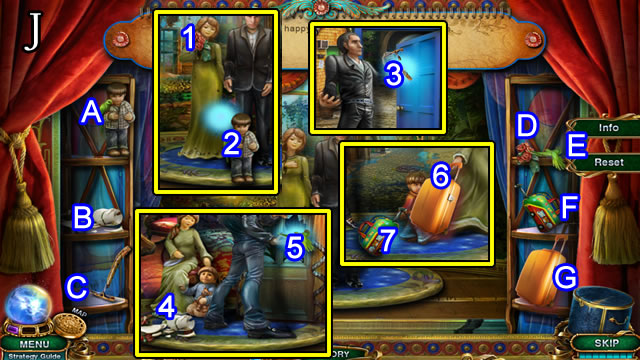
- Solution (J). 1-A, 2-E, 3-D, 4-C, 5-F, 6-G, 7-F.
- Take the BULB and PASS.
- Return to the Bridge.

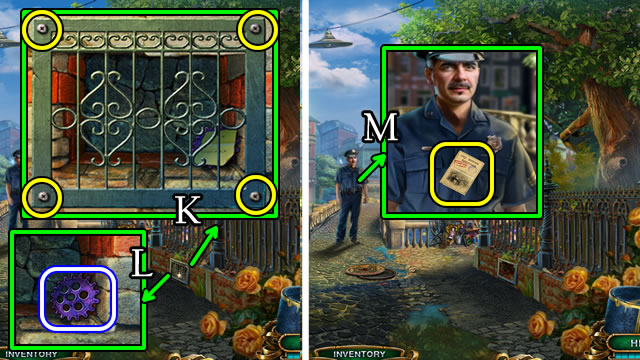
- Use the SCREWDRIVER (K).
- Read the note; take the GEAR (L).
- Give the PASS (M); walk forward.
Chapter 3: The Theater

- Speak to the newsman.
- Place the BULB; take the MEDALLION (N) and Gem (O).
- Place the GEAR (P) for a puzzle.
- Solution (Q).
- Take the TASSEL 1/2 (R).

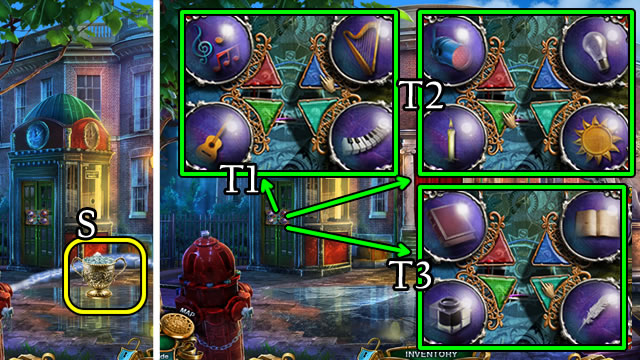
- Walk right; use the Ice Bucket (S).
- Place the MEDALLION (T) for a puzzle.
- Solution, part one (T1).
- Solution, part two (T2).
- Solution, part three (T3).
- Solution, part four (T4).

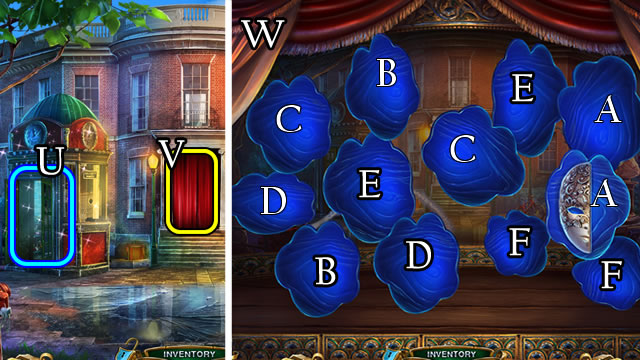
- Play the HOP (U); receive TASSEL 2/2.
- Place TASSEL 2/2 (V).
- Solution (W).
- Walk forward.

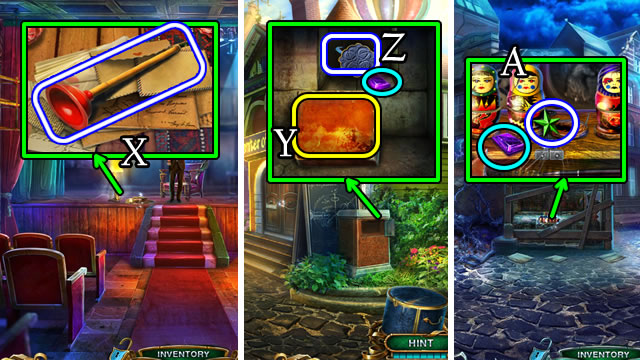
- Take the PLUNGER (X).
- Walk down twice.
- Use the PLUNGER (Y). Take the FASTENER and Gem (Z).
- Use the Hammer; take the Gem and STAR (A).

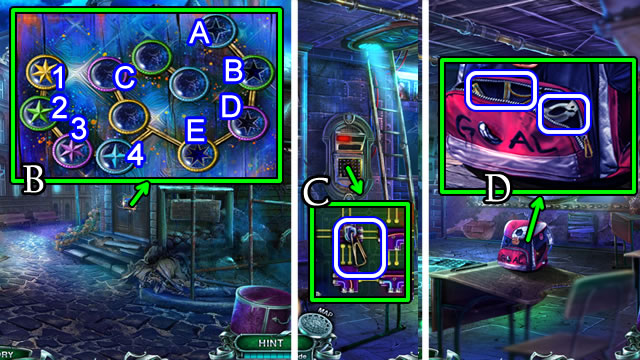
- Place the STAR (B) for a puzzle.
- Solution (B). 4-A; 3-C; 2-B; C-D; 1-E.
- Enter the School.
- Take the ZIPPER PULL (C).
- Place the ZIPPER PULL; take the OPENER and SLINGSHOT 1/2 (D).
- Return to the Theater.

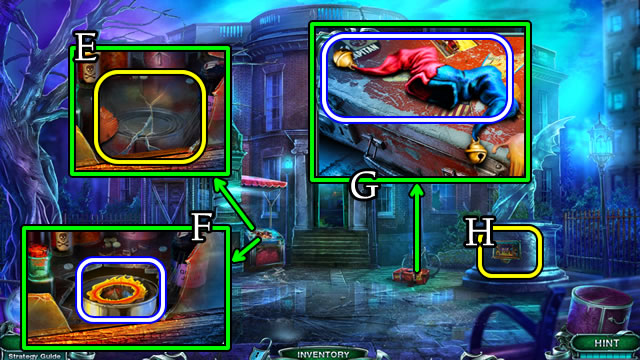
- Use the Hammer and OPENER (E).
- Take the FIRE CIRCLE (F).
- Take the FOOL’S CAP (G).
- Place the FIRE CIRCLE for a puzzle (H).

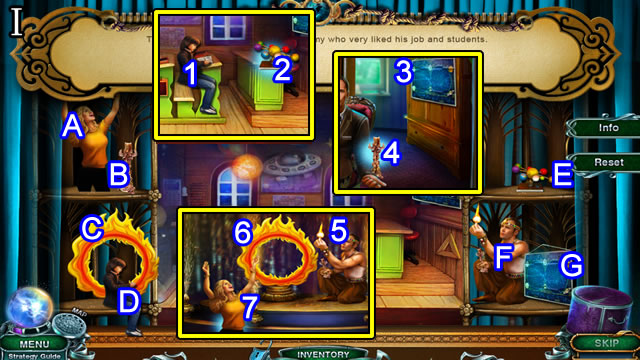
- Solution (I). 1-D; 2-E; 3-G; 4-B; 5-F; 6-C; 7-A.
- Take the ACCUMULATOR and LEVER.
- Walk forward.

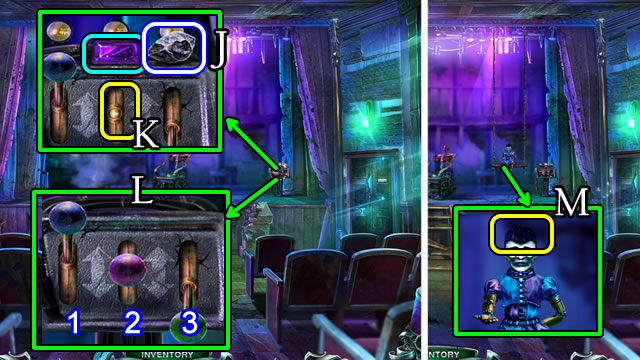
- Take the SLINGSHOT 2/2 and Gem (J).
- Place the LEVER for a puzzle (K).
- Solution (L). 2-3-1-3.
- Place the FOOL’S CAP (M); receive a MATRIOSHKA.
- Return to the Crossroads.

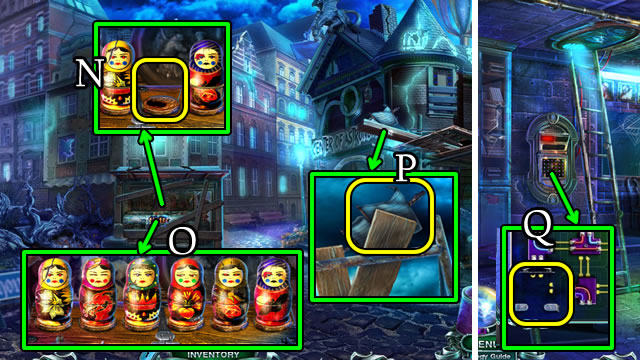
- Place the MATRIOSHKA for a puzzle (N).
- Solution (O). Take the BATTERY.
- Place the SLINGSHOT 2/2 (P); receive a MAST.
- Enter the School.
- Select the ACCUMULATOR (Inventory) and BATTERY. Insert the BATTERY, connect the leads, and close the top. Take the BATTERY.
- Place the BATTERY for a puzzle (Q).

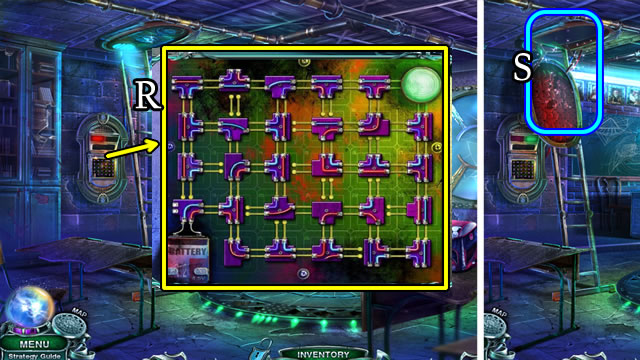
- Solution (R).
- Play the HOP (S); receive a THEATER KEY.
- Return to the Scene.

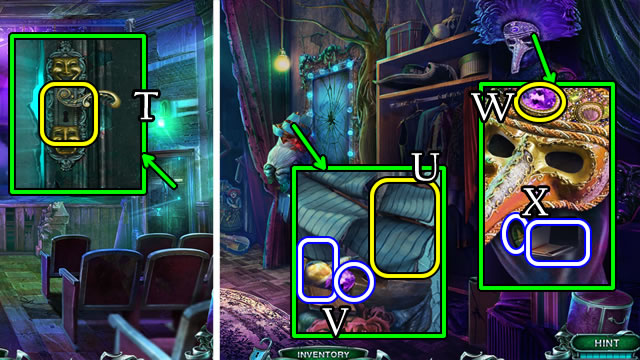
- Use the THEATER KEY (T); walk forward.
- Place the MAST (U); take the GEMSTONE and PLANETS 1/2 (V).
- Place the GEMSTONE (W); take the MATCHES and CHEST CHIP 1/2 (X).
- Walk down twice.

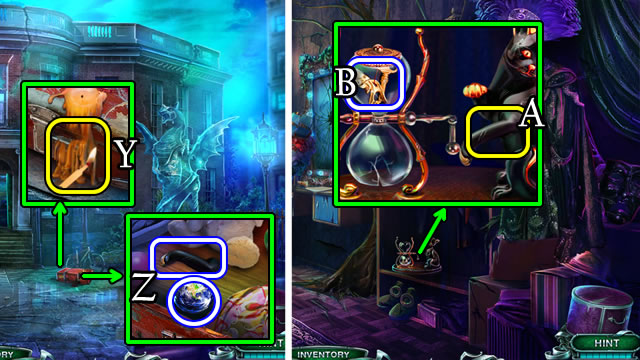
- Use the MATCHES (Y).
- Take PLANETS 2/2 and CAT PAW (Z).
- Return to the Dressing Room.
- Place the CAT PAW (A). Open and take the CASKET KEY (B).
- Return to the School.

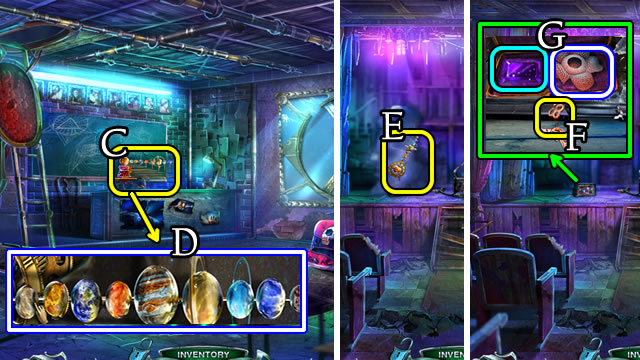
- Read the note; place PLANETS 2/2 for a puzzle (C).
- Solution (D). Ax2-Dx3-Bx5-C-Ex4-H.
- Take a SOLAR SYSTEM.
- Return to the Scene.
- Place the SOLAR SYSTEM (E).
- Use the CASKET KEY (F). Take the FLOWER and Gem (G).
- Enter the Dressing Room.

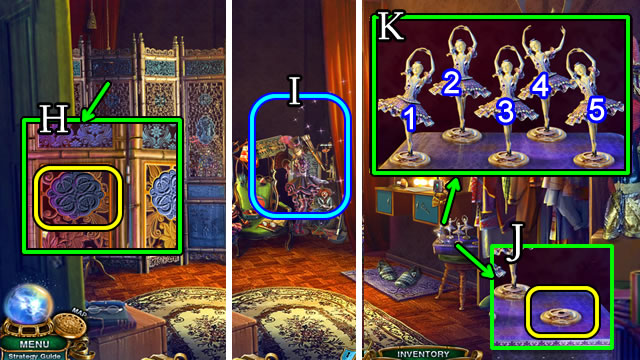
- Place the FASTENER (H) for a HOP (I); receive a BALLERINA. (Note: look in the nook at the Crossroads if the FASTENER isn’t in Inventory).
- Place the BALLERINA (J) for a puzzle.
- Solution (K). Round one. 3-4-1. Round two. 1-2-3-5. Round three 1-5-4-3-2.
- Take the Gem and WRENCH.
- Walk down twice.

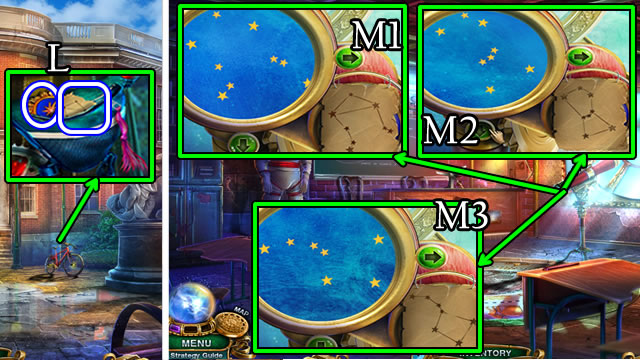
- Use the WRENCH; take the STAR MAP and STAR CHIP (L).
- Return to the School.
- Place the STAR MAP (M)for a puzzle.
- Solution, part one. M1-M2-M3.

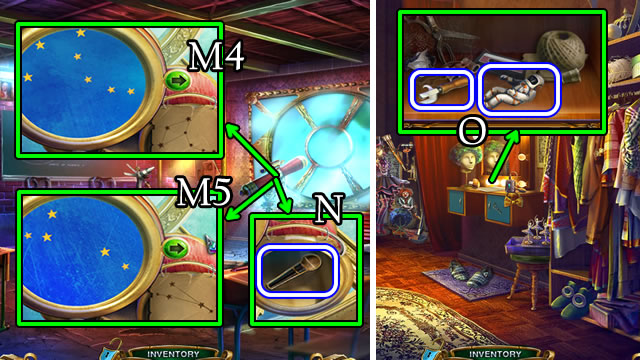
- Solution, part two. M4-M5.
- Take the MICROPHONE (N).
- Return to the Dressing Room.
- Place the MICROPHONE. Take the ASTRONAUT and OPENER (O).
- Return to the School.

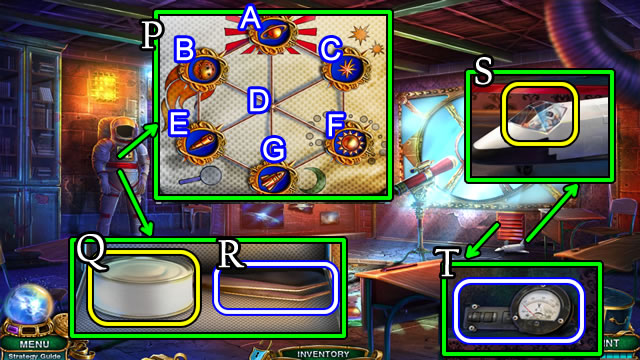
- Place the STAR CHIP for a puzzle (P).
- Solution. E-G-D-B-E-G-D-F-C-D-A-C-F-D.
- Use the OPENER (Q). Take the CANDY MACHINE COIN.
- Take the TWEEZERS (R).
- Place the ASTRONAUT (S). Take the COVER DETAILS (T).
- Return to the Scene.

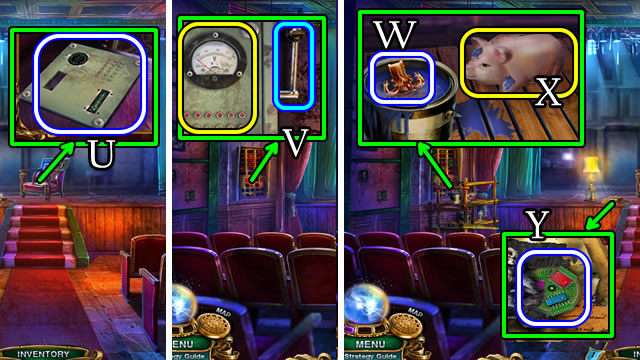
- Take the COVER (U).
- Select the COVER (Inventory) and COVER DETAILS. Place the details; receive a COVER.
- Place the COVER; pull the lever (V).
- Use the TWEEZERS (W); pick up the Candle.
- Use the Hammer (X); take the PASTRY.
- Use the Candle; take the CIRCUIT (Y).
- Go to Crossroads.
Chapter 4: The House

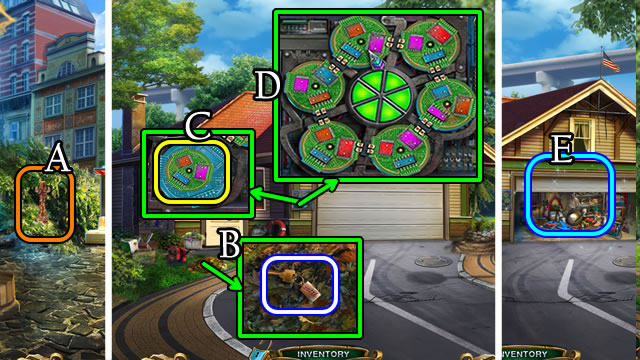
- Use the Candle (A).
- Walk forward 2x.
- Take the TRUCK KEY (B).
- Place the CIRCUIT (C) for a puzzle.
- Solution (D).
- Play the HOP (E); receive a LEVER.

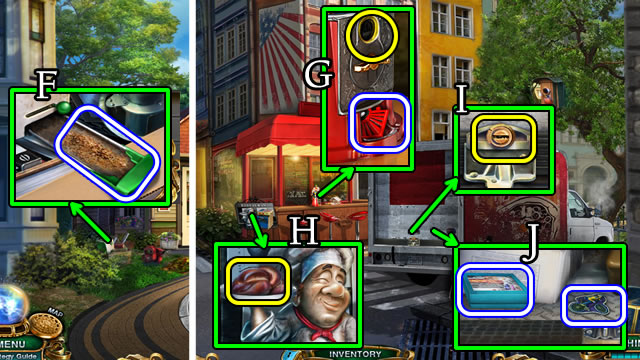
- Place and slide the LEVER; take the CRUMBS (F).
- Walk down.
- Use the CANDY MACHINE COIN; take the COW CATCHER (G).
- Place the PASTRY (H); take TRANSPORTATION CHIP 1/2.
- Use the TRUCK KEY (I). Take the TRAIN BOX and TRANSPORTION CHIP 2/2 (J).

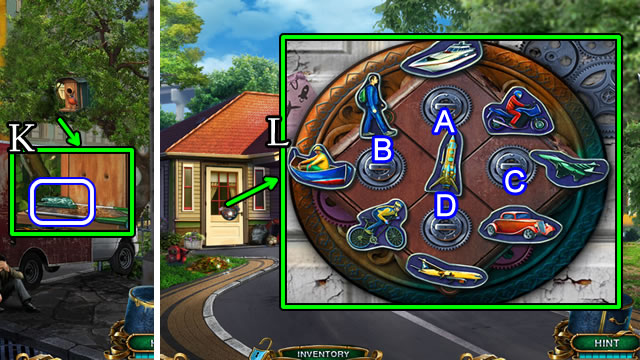
- Place the CRUMBS; take the LOCK DETAIL (K).
- Walk forward.
- Place TRANSPORTION CHIP 2/2 (L) for a puzzle.
- Solution (L). C-B-D-Bx2-D-B-Ax2-B-Ax2-Bx3.
- Walk forward.

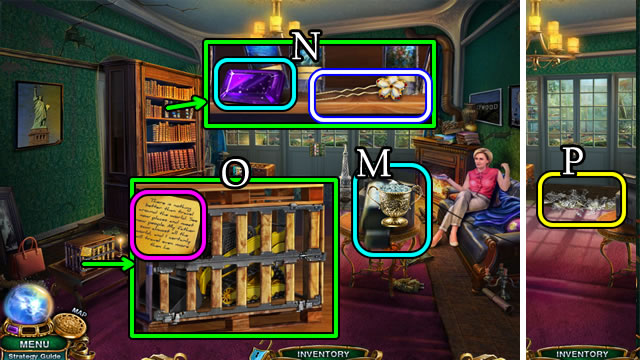
- Place the Hammer (M).
- Take the HAIRPIN and Gem (N).
- Read the note; use the Candle; take the EXCAVATOR (O).
- Place the EXCAVATOR (P).

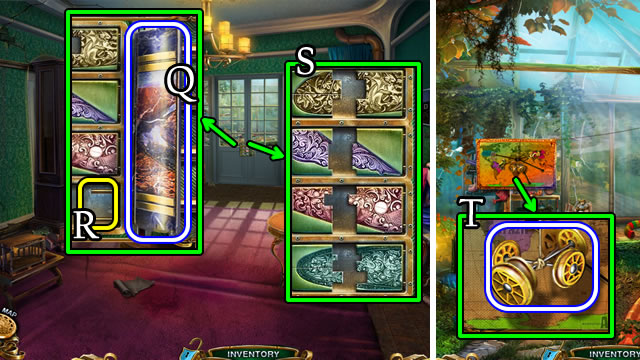
- Take SPINE 1/2 (Q).
- Place the LOCK DETAIL (R) for a puzzle.
- Solution (S).
- Walk forward.
- Take the TRAIN WHEELS (T).

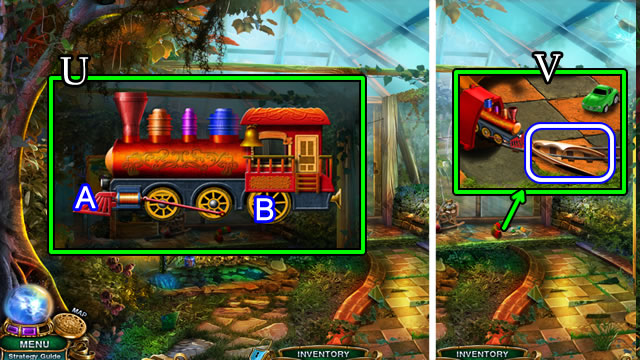
- Select the TRAIN BOX (Inventory). Place the COW CATCHER (A) and TRAIN WHEELS (B). Assemble the LOCOMOTIVE (U).
- Place the LOCOMOTIVE; take the NUTCRACKER (V).

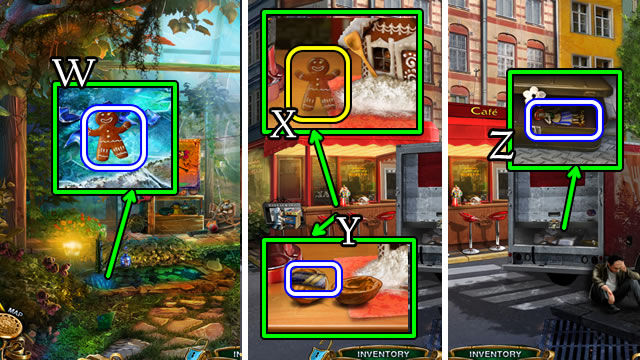
- Use the Ice Bucket and Hammer; take the GINGERBREAD MAN (W).
- Return to the Cafe.
- Place the GINGERBREAD MAN (X); receive a nut; use the NUTCRACKER; use the key on the Gumball Machine; receive a SPINE 2/2 (Y).
- Use the HAIRPIN; take the CLOCK DOLL (Z).
- Walk forward twice.

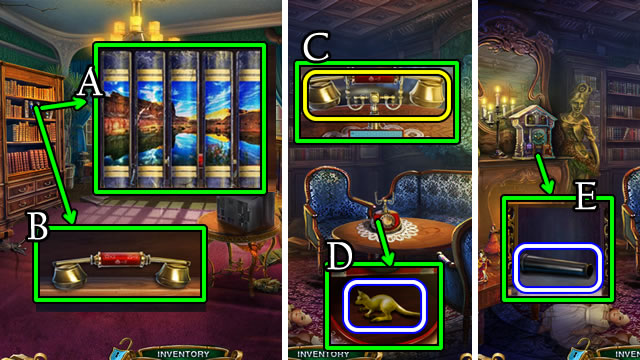
- Place SPINE 2/2 (A) for a puzzle.
- Solution (A).
- Take the HANDSET (B).
- Enter the Hidden Room.
- Place the HANDSET (C) for a puzzle.
- Solution. 5-3-5-4-2-7-9-8.
- Take ANIMAL CHIP 1/2 (D).
- Place the CLOCK DOLL; take the LEAF-BLOWER NOZZLE (E).
- Walk down twice.

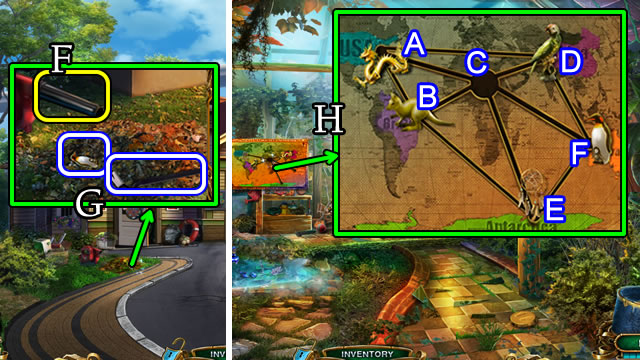
- Place the LEAF-BLOWER NOZZLE (F).
- Take ANIMAL CHIP 2/2 and a CROWBAR (G).
- Return to the Greenhouse.
- Place ANIMAL CHIP 2/2 for a puzzle (H).
- Solution. B-E-F-C-D-A-B-C.

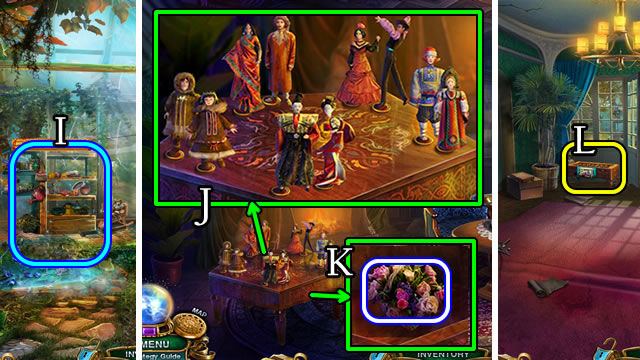
- Play the HOP (I); receive an INUIT DOLL.
- Return to the Hidden Room.
- Place the INUIT DOLL (J)for a puzzle.
- Solution (J).
- Take the MOON (K).
- Walk down.
- Place the MOON (L) for a puzzle.

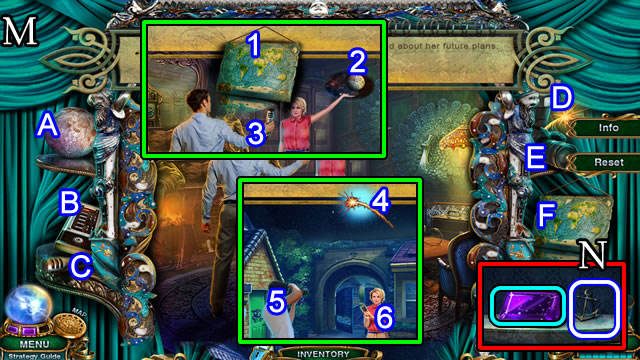
- Solution (M). 1-E, 2-C, 3-A, 4-D, 5-B.
- Take the ANCHOR and Gem (N).

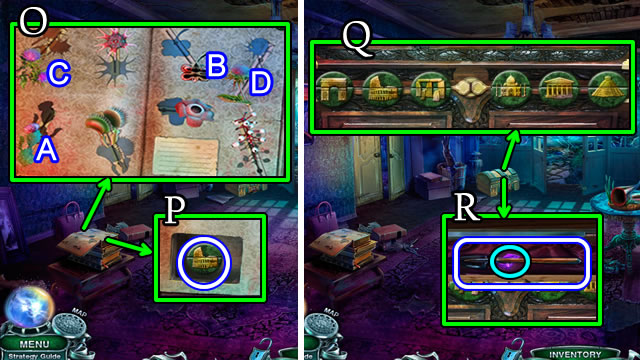
- Place the FLOWER (O)for a puzzle.
- Solution (O). E-A-B-D-F-C-H.
- Take CHEST CHIP 2/2 (P).
- Place CHEST CHIP 2/2 (Q) for a puzzle.
- Solution (Q).
- Take the SHOVEL and Gem (R).
- Enter the Greenhouse.

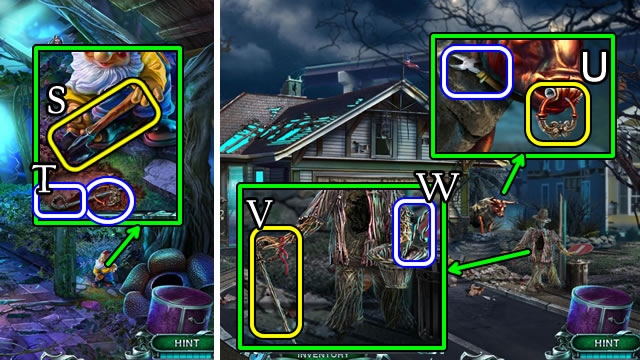
- Place the SHOVEL (S).
- Take the NOSE RING and CANE (T).
- Walk down twice.
- Place the NOSE RING (U); receive a WIRE CUTTERS.
- Place the CANE (V); take the WIRE (W).
- Walk down.

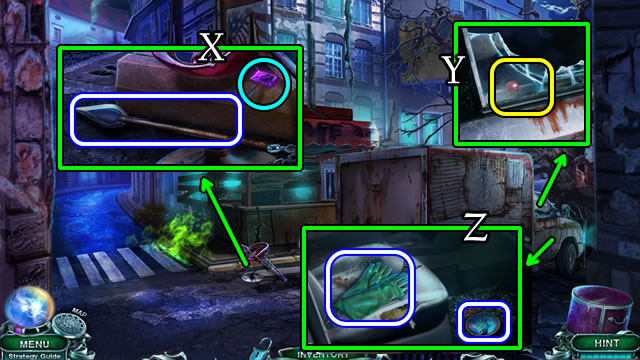
- Take the Gem; use the WIRE CUTTER; take the SPEAR (X).
- Use the WIRE (Y).
- Take TRAVEL CHIP 1/2 and GLOVES (Z).
- Return to the Greenhouse.

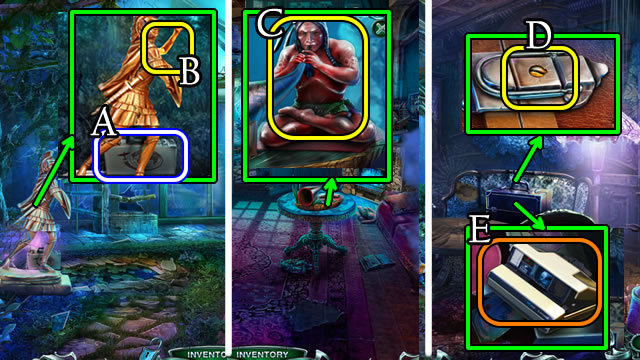
- Take the SUITCASE (A).
- Place the SPEAR (B); receive a FIGURINE.
- Walk down.
- Place the FIGURINE (C); receive a LOCKPICK.
- Enter the Hidden Room.
- Use the LOCKPICK (D); select and place the camera (E) for a HOP; receive TRAVEL CHIP 2/2.
- Walk down twice.

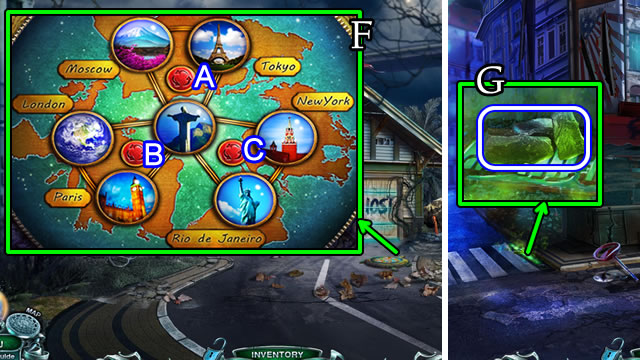
- Place TRAVEL CHIP 2/2 (F) for a puzzle.
- Solution (F). C-Ax2-Bx2.
- Receive a MASK.
- Walk down.
- Place the MASK and GLOVES; receive ALUMINUM (G).
- Return to the Hidden Room.

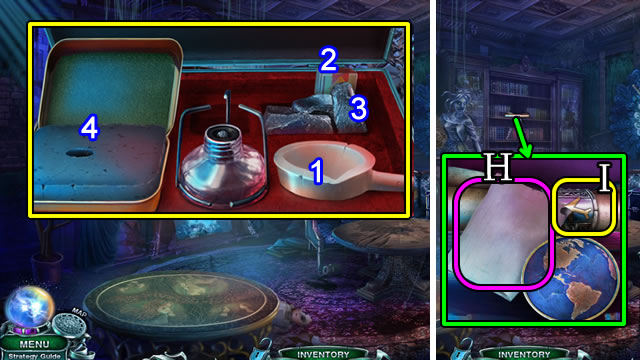
- Select the SUITCASE (Inventory); place the ALUMINUM. Select the bowl (1), use the matches (2) and add the ALUMINUM (3); pour (4); take a PLANE.
- Read the note (H); place the PLANE (I). Take the TRAVEL MAP and MASK PART.
- Walk down.

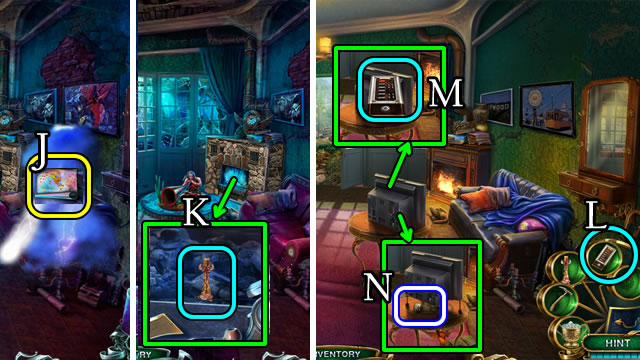
- Place the TRAVEL MAP (J).
- Place the Candle (K) for a HOP; receive a Gem.
- Receive a Remote Control (L).
- Place the Remote Control (M). Take a LAMP (N).
- Walk down twice.

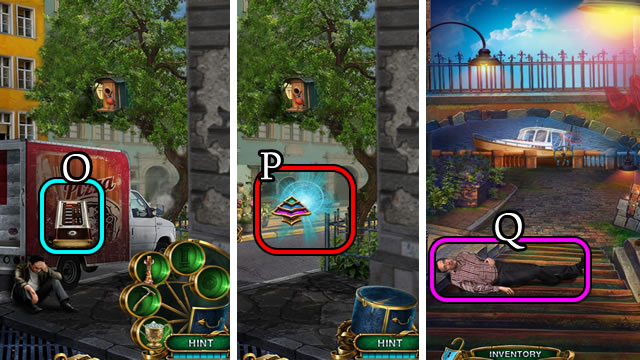
- Use the Remote Control (O).
- Follow the Footpath (P).
- Speak to the man (Q); receive a MERMAID TAIL.
Chapter 5: The Boat

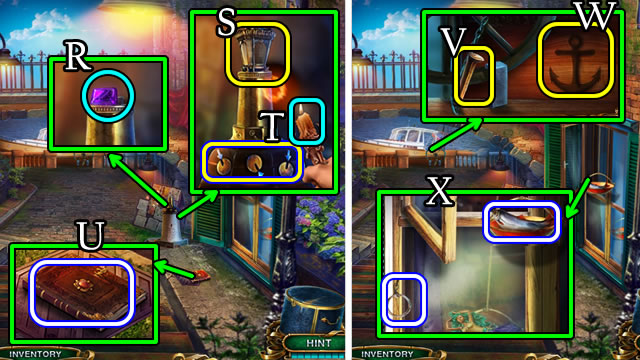
- Take the Gem (R).
- Place the LAMP (S); use the Candle and turn the knobs (T).
- Take the WITCH’S DIARY (U).
- Use the CROWBAR (V); place the ANCHOR (W).
- Take the LIFE VEST RING and FISH (X).
- Walk forward.

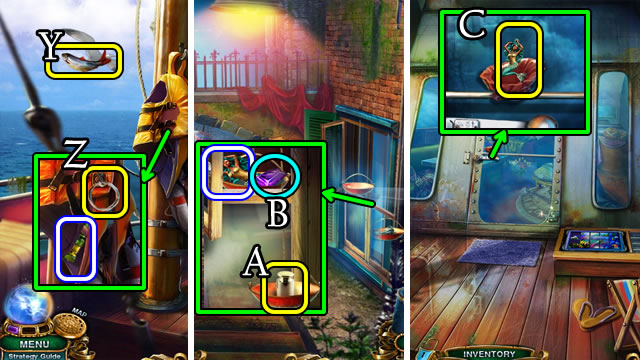
- Place the FISH (Y); receive a WEIGHT.
- Place the LIFE VEST RING (Z); receive STEERING CONTROL SPOKE 1/3.
- Walk down.
- Place the WEIGHT (A); take the Gem and MERMAID HALF (B).
- Walk forward.
- Select the MERMAID HALF (Inventory) and MERMAID TAIL. Combine for a MERMAID.
- Place the MERMAID (C).
- Enter the Cabin.

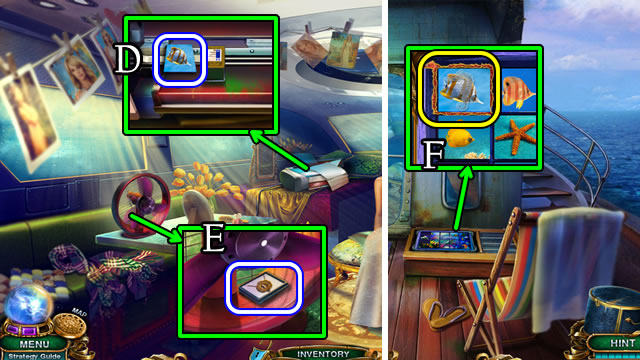
- Move the papers; use the Remote Control; take the FISH CHIP (D).
- Use the Remote Control; take the PENDANT WATCH (E).
- Walk down.
- Place the FISH CHIP for a puzzle (F).

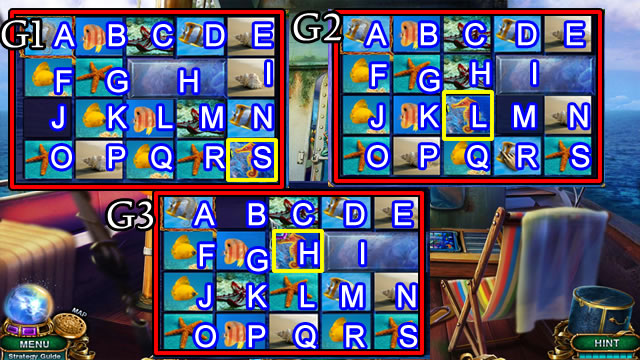
- Solution, part one (G1). K-L-M-N-S-R-M-N-I-H-L-M.
- Solution, part two (G2). R-Q-P-K-G-H-L-K-G-B.
- Solution, part three (G3). C-H-G-B-C-H-G-F-A-B.

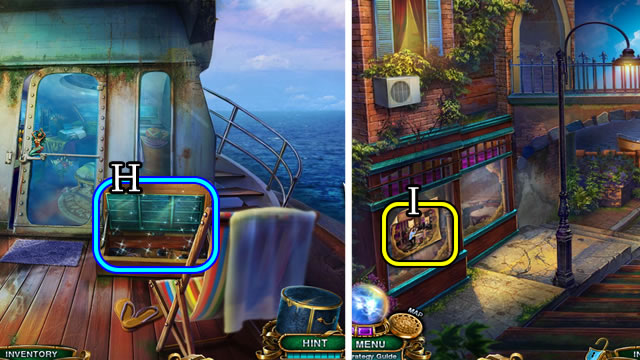
- Play the HOP (H); receive STEERING CONTROL SPOKE 2/3.
- Walk down.
- Place the PENDANT WATCH (I) for a puzzle.

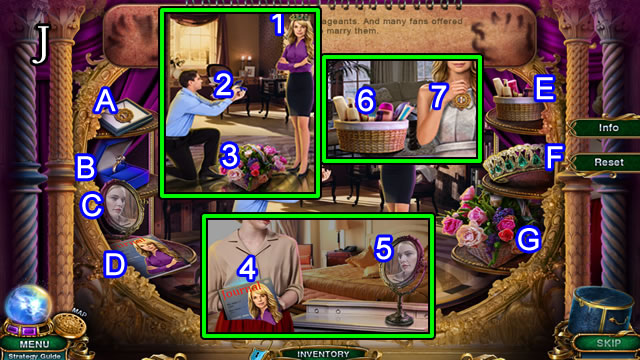
- Solution (J). 1-F, 2-B, 3-G, 4-D, 5-C, 6-E, 7-A.
- Receive STEERING CONTROL SPOKE 3/3.
- Return to the Cabin.

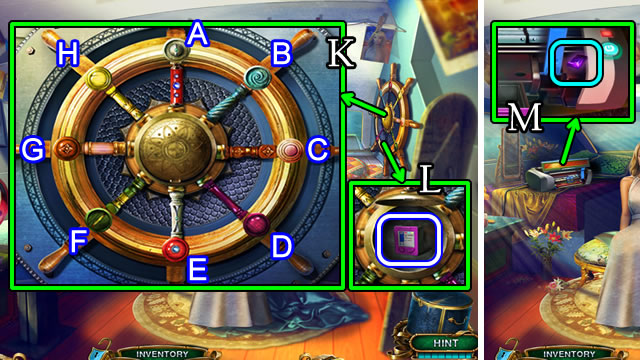
- Place the STEERING CONTROL SPOKE 3/3 for a puzzle.
- Solution (K). A-E, C-G, A-E, D-H, B-F.
- Take the CARTRIDGE (L).
- Place the CARTRIDGE; take the Gem (M).

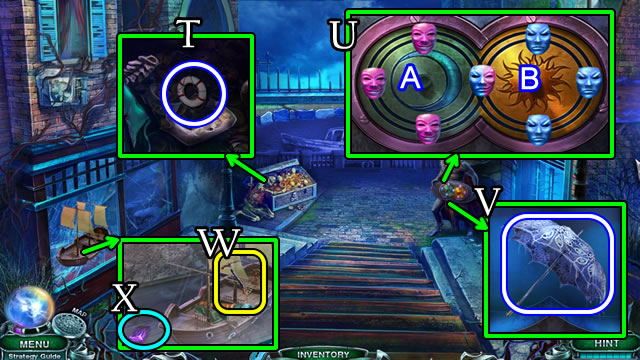
- Place the MASK PART (N).
- Take the HOOK; read the note; take the BUTTON and (O).
- Walk down.
- Take the Gem (P). Place the BUTTON (Q); receive a FLAG (R).
- Place the NUT (S); take the FACE.
- Walk down.

- Place the HOOK; take the LIFEBUOY (T).
- Place the FACE for a puzzle (U).
- Solution. A-B-A-B-A-B-A.
- Take the UMBRELLA (V).
- Use the Hammer (W); take the Gem (X); play the mini-game.

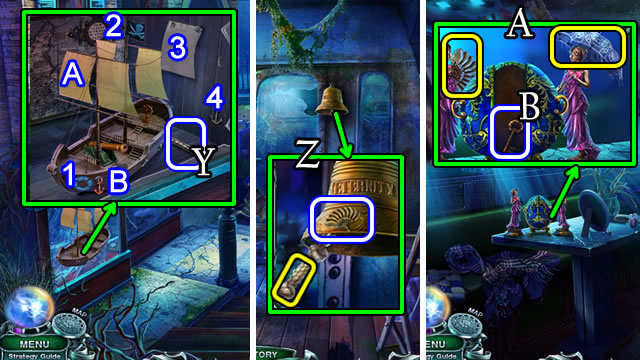
- Solution. 1-(Inventory), 2-(Inventory), 3-A, 4-B.
- Take the ROPE (Y).
- Walk forward.
- Place the ROPE; receive a FAN (Z).
- Walk forward.
- Place the FAN and UMBRELLA (A); take the LETTERS KEY (B).

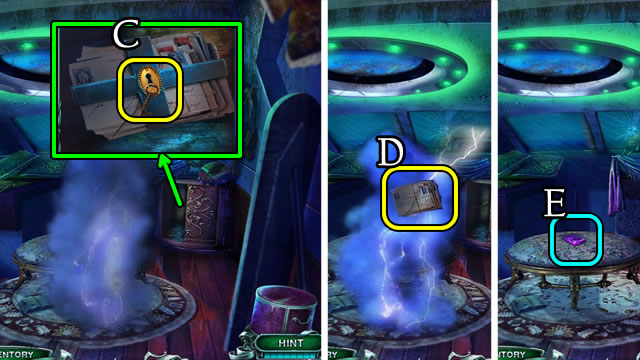
- Place the LETTERS KEY (C); take the LETTERS.
- Place the LETTERS (D). Take the Gem (E).
- Receive a Watch.

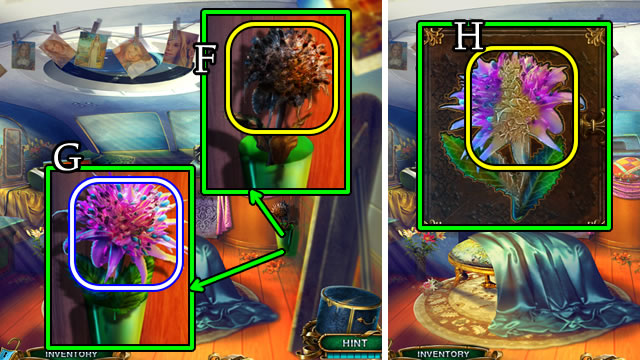
- Place the Watch (F).
- Take a FLOWER (G).
- Select the WITCH’S DIARY (Inventory); place the FLOWER. Receive CARDS.
- Return to the Hotel Room.
- Place the CARDS for a puzzle.

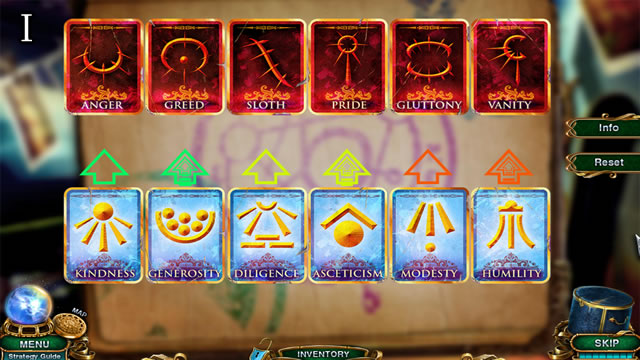
- Solution (I). Select the arrows after correctly arranging the Cards.
- Congratulations. You have completed playing Mystery Tales: The Twilight World.





 Mystery Trackers: Winterpoint Tragedy Walkthrough, Guide, & Tips
 Scarytales: All Hail King Mongo Walkthrough, Guide, & Tips
 Macabre Mysteries: Curse of the Nightingale Walkthrough, Guide, & Tips
 Hidden Mysteries: Notre Dame - Secrets of Paris, Guide, & Tips
 The Mysterious Past of Gregory Phoenix Walkthrough, Guide, & Tips