Scarytales: All Hail King Mongo Walkthrough, Guide, & Tips
Scarytales: All Hail King Mongo Walkthrough

Welcome to the Scarytales: All Hail King Mongo Walkthrough
An evil sorcerer has returned to take vengeance upon your kingdom. Will you be able to stop him?
Whether you use this document as a reference when things get difficult or as a road map to get you from beginning to end, we’re pretty sure you’ll find what you’re looking for here.
This document contains a complete Scarytales: All Hail King Mongo game walkthrough featuring annotated screenshots from actual gameplay!
We hope you find this information useful as you play your way through the game. Use the walkthrough menu below to quickly jump to whatever stage of the game you need help with.
Remember to visit the Big Fish Games Forums if you find you need more help. Have fun!
This walkthrough was created by LuckySmile, and is protected under US Copyright laws. Any unauthorized use, including re-publication in whole or in part, without permission, is strictly prohibited.
General Tips

- This is the official guide for Scarytales: All Hail King Mongo.
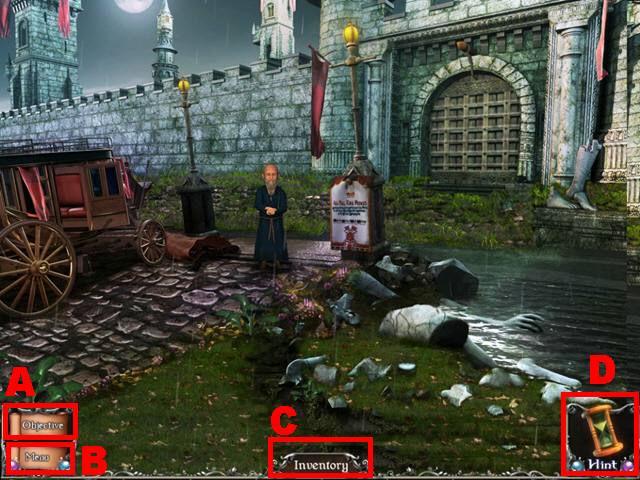
- Access the objectives (A) to review your current task.
- Enter the menu (B) to leave the game or to adjust both the volume and the display mode.
- Collected items will be stored in the inventory (C).
- Press the hint button (D) whenever you need help.
- In the beginning you can choose between two grades of difficulty: normal and hard mode.
- Hidden-object scenes will be referred to as HOPS throughout this guide.
Chapter 1: Entering the Palace
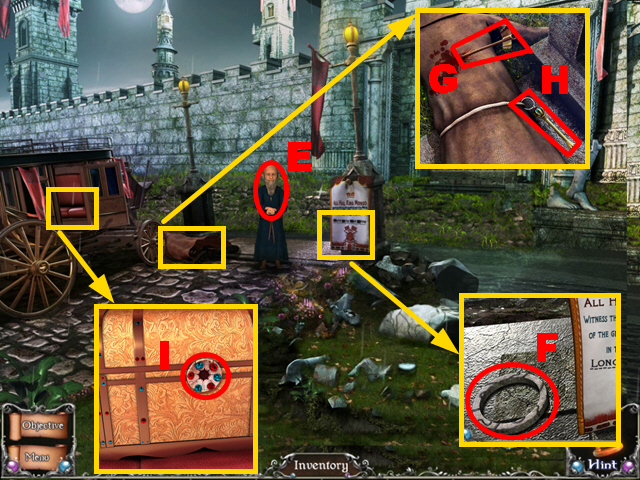
- Talk to the man (E).
- Zoom into the streetlight; take the 1/3 STONE RING (F).
- Take a closer look at the corpse; take the 1/2 LONG BOW (G) and the ROYAL KEY (H).
- Zoom into the carriage; put the ROYAL KEY into the lock (I).
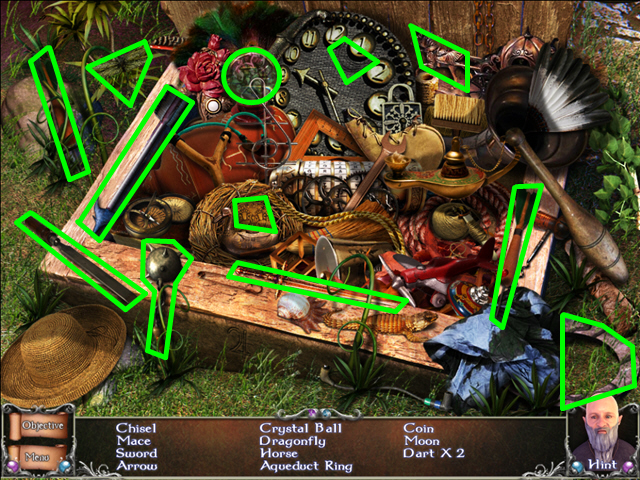
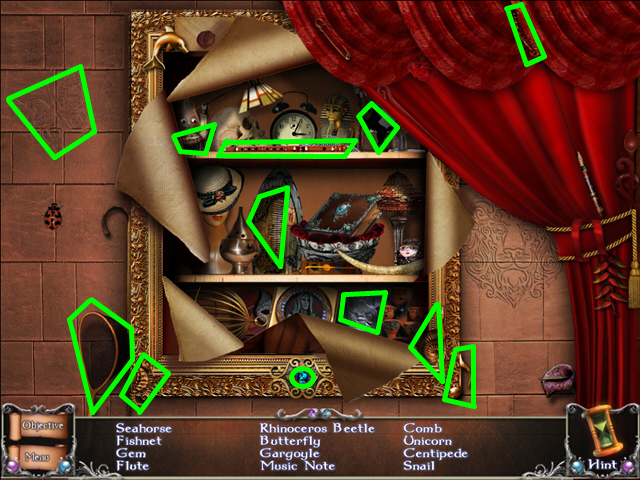
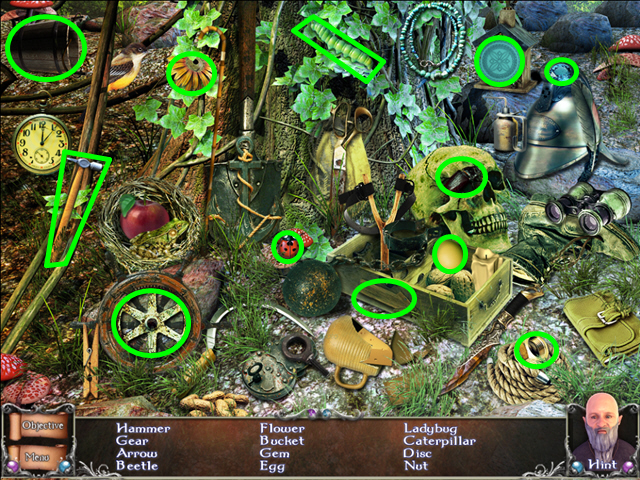
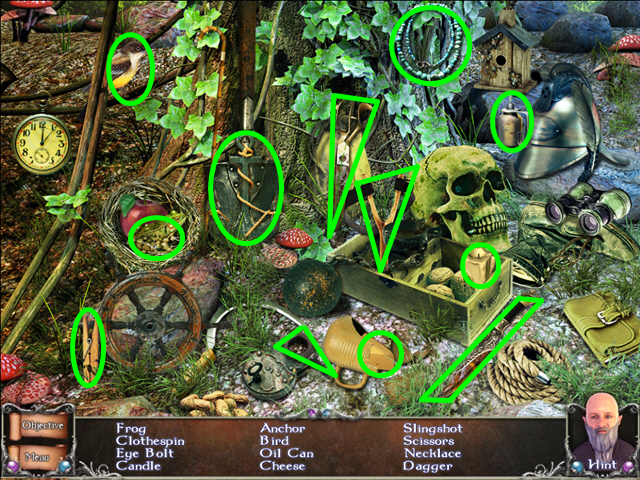
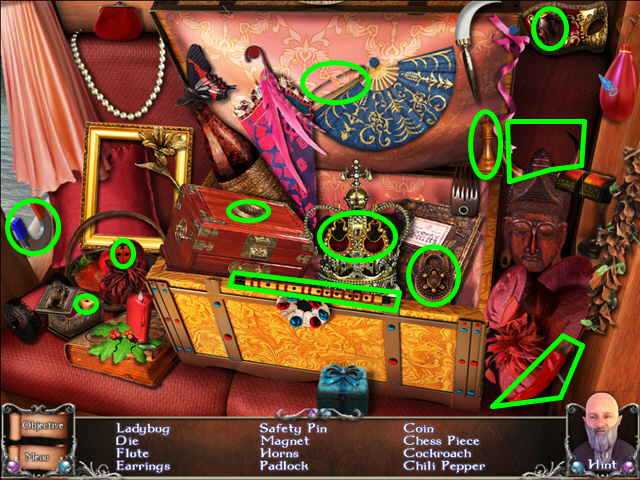
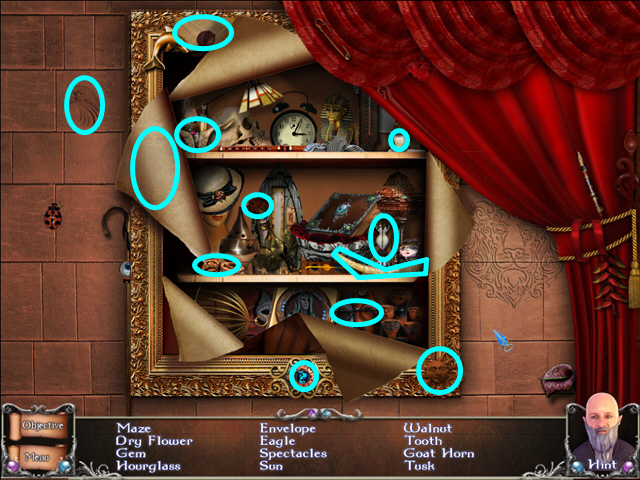
- Play the HOPS.
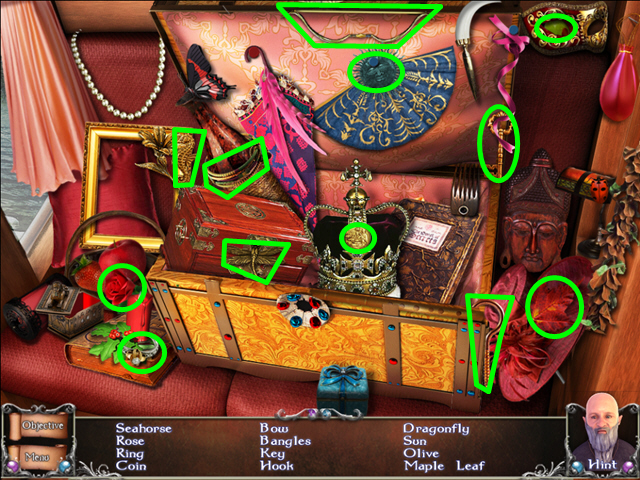
- Collect the 12 items (green).
- You will receive the 2/2 LONG BOW.
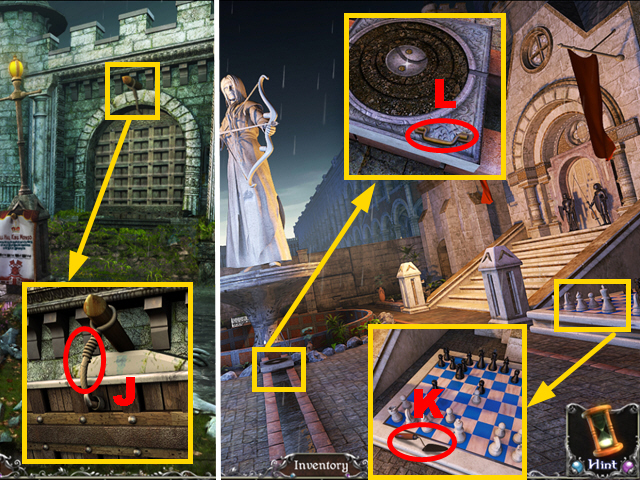
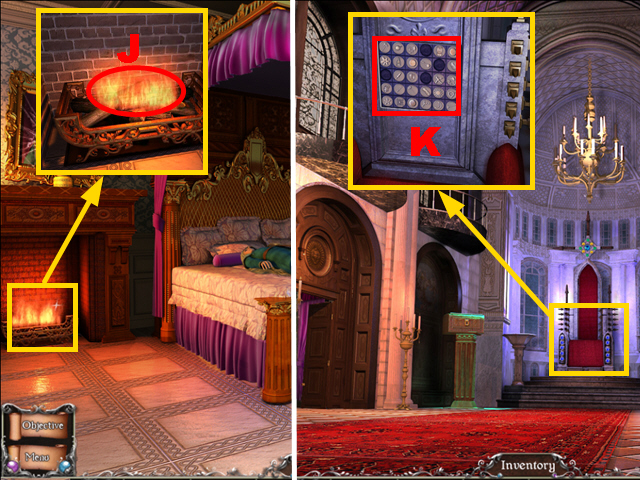
- Zoom into the gate; shoot the LONG BOW at the rope (J).
- Enter the Palace Courtyard.
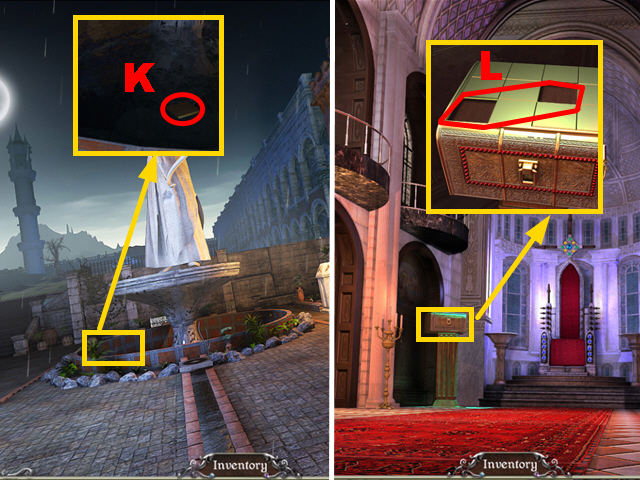
- Zoom into the chessboard; take the TROWEL (K).
- Zoom into the ground; take the HANDLE (L).
- Go to Hamoon’s Tower.
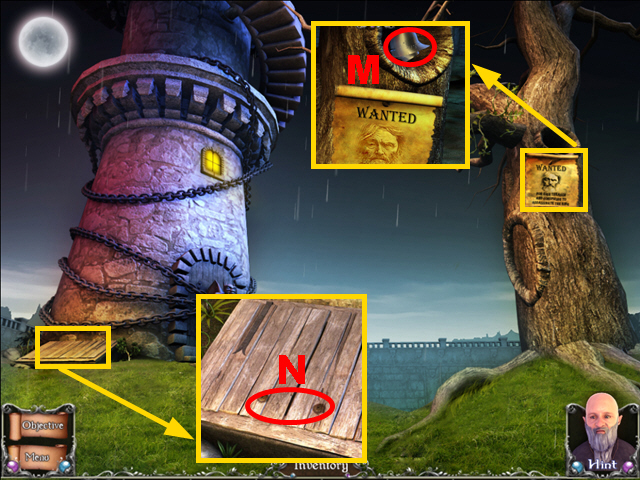
- Take a closer look at the poster; take the 1/2 ARMOR (M).
- Zoom into the trapdoor; connect the HANDLE to it (N).
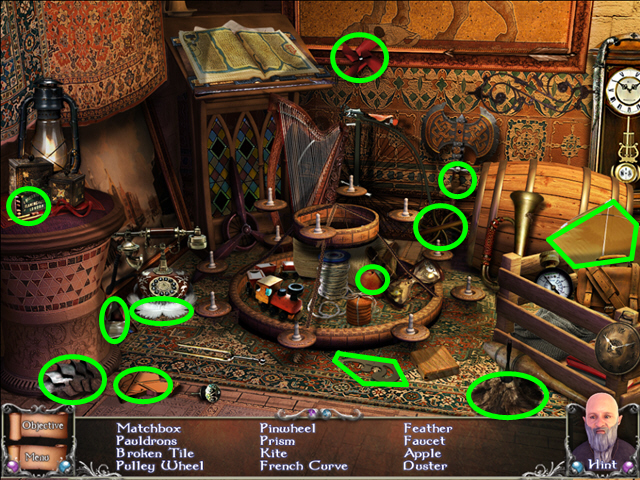
- Play the HOPS.
- Collect the 12 items (green).
- You will receive the 2/2 LONG BOW, the CHISEL, and the 2/3 STONE RING.
- Walk down.
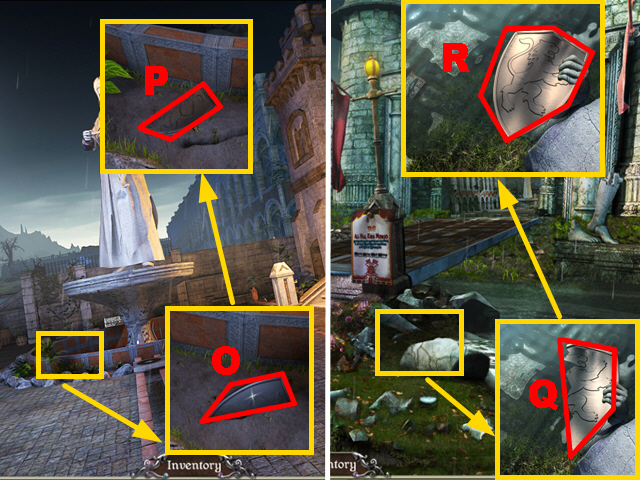
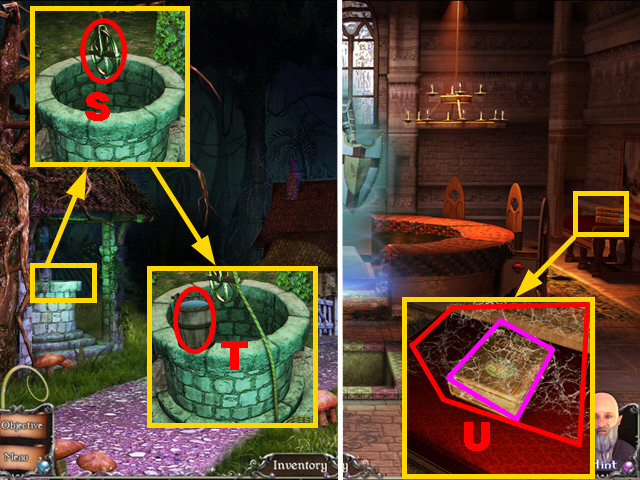
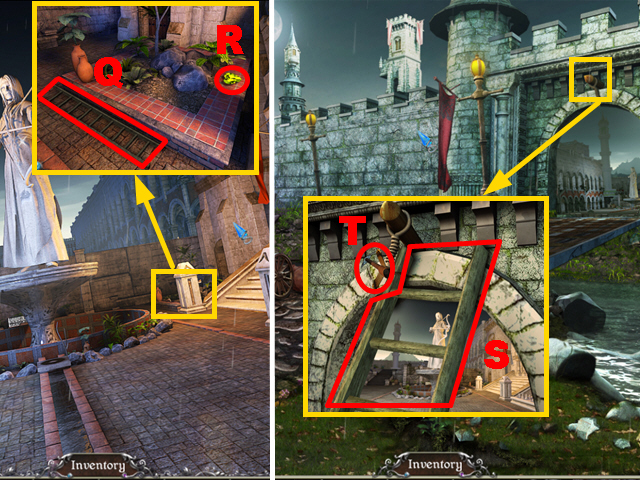
- Zoom into the well; dig out the half shield with the TROWEL (O) and take the HALF SHIELD (P).
- Walk down.
- Zoom into the broken statue; connect the HALF SHIELD to its other half (Q) and take the 2/2 ARMOR (R).
- Move forward.
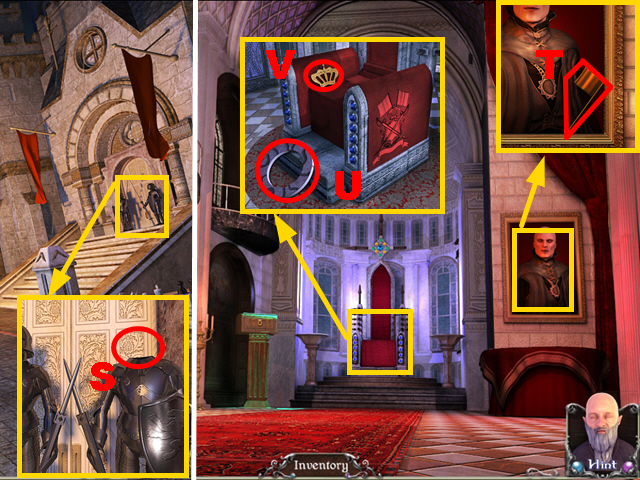
- Zoom into the entrance; put the 2 ARMORS on the knight (S).
- Enter the Palace Hall.
- Take a closer look at the portrait; take the 1/4 ROYAL SEAL (T).
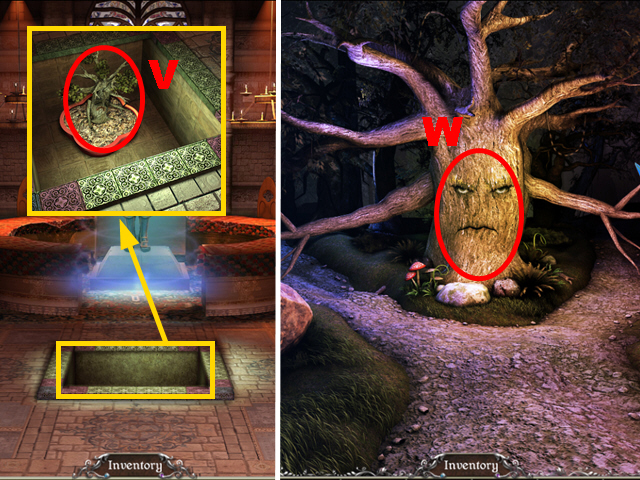
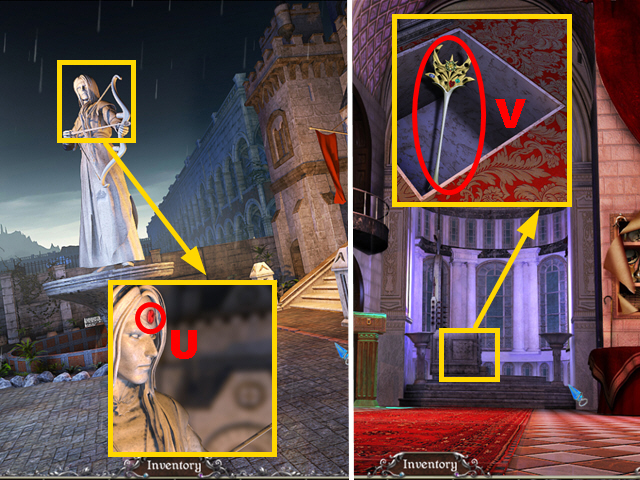
- Zoom into the throne; take the 3/3 STONE RING (U) and the 2/4 ROYAL SEAL (V).
- Go to Hamoon’s Tower.
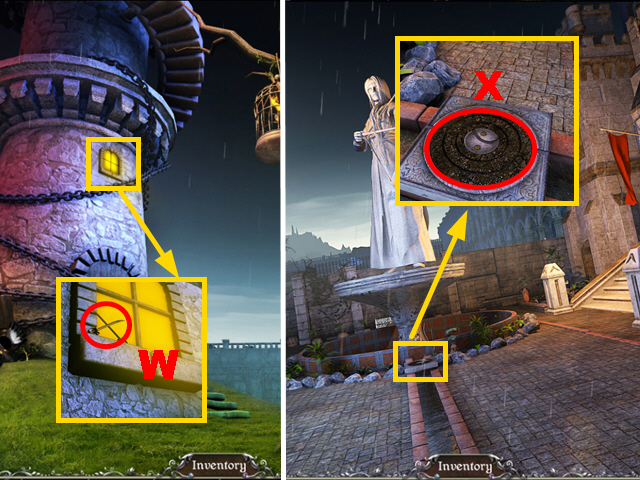
- Zoom into the window; shoot the LONG BOW at the window (W) to acquire the 3/4 ROYAL SEAL.
- Walk down.
- Zoom into the ground; insert the 3 STONE RINGS into the niche (X).
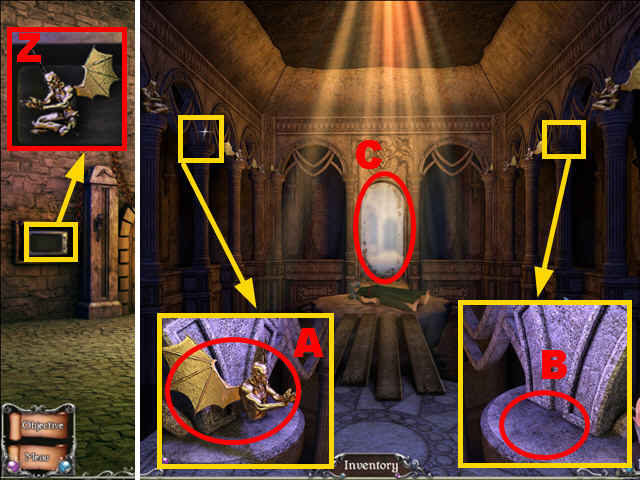
- Play the mini-game.

- To solve this puzzle (Y), rotate the rings until both ends are connected to the aqueduct.
- Take the BIRD (Z).
- Go to Hamoon’s Tower.
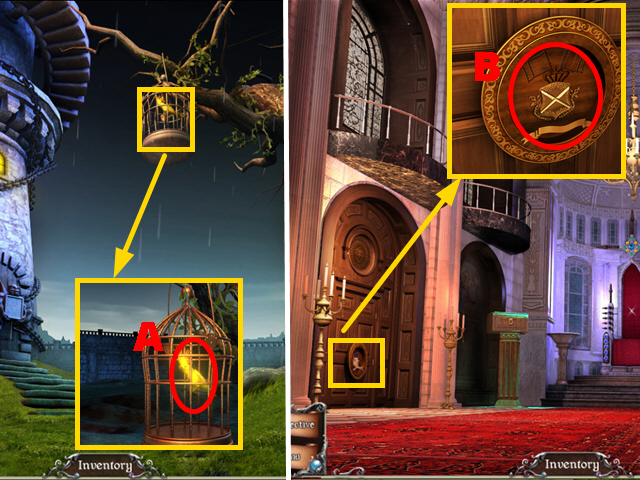
- Zoom into the cage; put the BIRD into the cage (A) to acquire the 4/4 ROYAL SEAL.
- Go to the Palace Hall.
- Zoom into the door; put the 4 ROYAL SEALS into the niche (B).
- Enter the King’s Chamber.
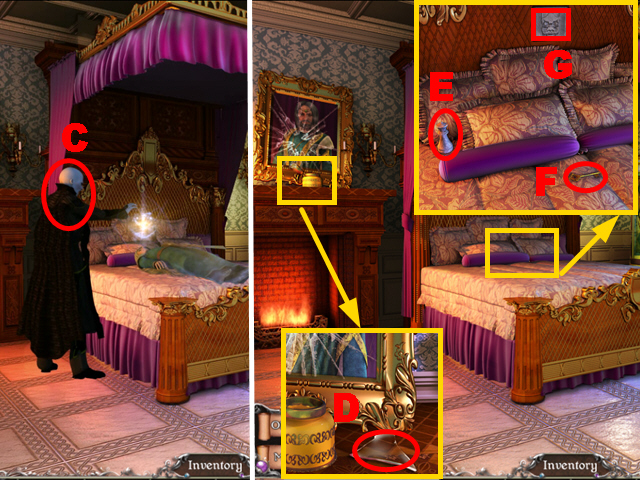
- Take a closer look at Hamoon (C).
- Zoom into the mantelpiece; take the SHARD (D).
- Zoom into the bed; take the 1/2 CHESS PIECE (E) and the CABINET KEY (F).
- Remove the gargoyle with the CHISEL (G) to acquire the 1/4 GARGOYLE.
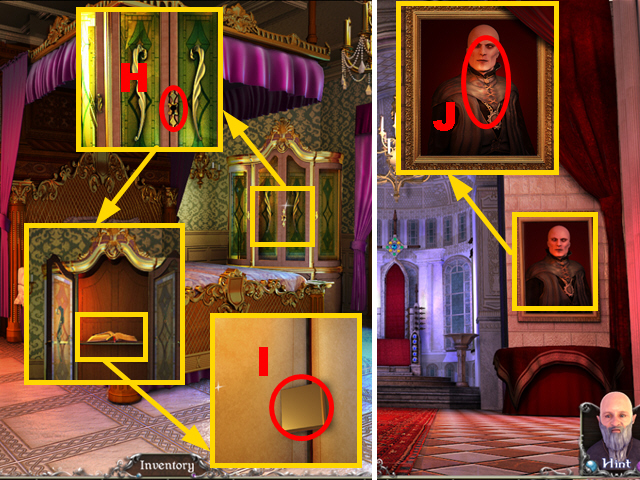
- Zoom into the cabinet; insert the CABINET KEY into the lock (H).
- Take a closer look at the book; take the 1/2 GOLDEN TILE (I).
- Walk down.
- Zoom into the portrait; cut it open with the SHARD (J).
- Play the HOPS.
- Collect the 12 items (green).
- You will receive the FISHNET and the 2/4 GARGOYLE.
- Walk down.
- Zoom into the well; put the FISHNET into the water (K) to acquire the 2/2 GOLDEN TILE.
- Enter the Palace Hall.
- Zoom into the chest; insert the 2 GOLDEN TILES into the slots (L).
- Play the mini-game.
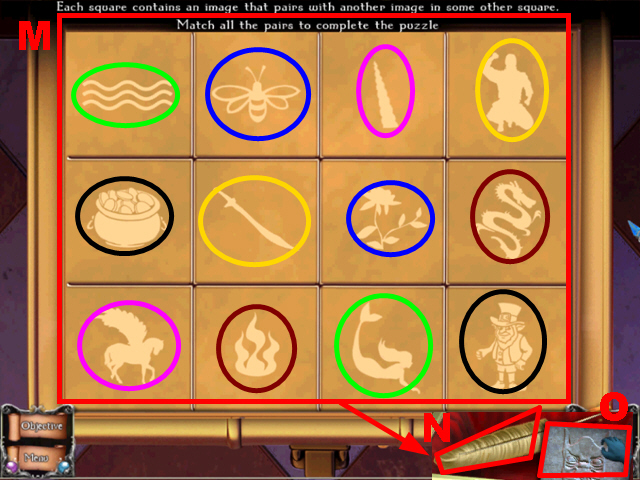
- To solve this puzzle (M), uncover and match the correct pairs.
- Pairs are framed in the same color.
- Take the ROYAL QUILL (N) and the 3/4 GARGOYLE (O).
- Enter the King’s Chamber.
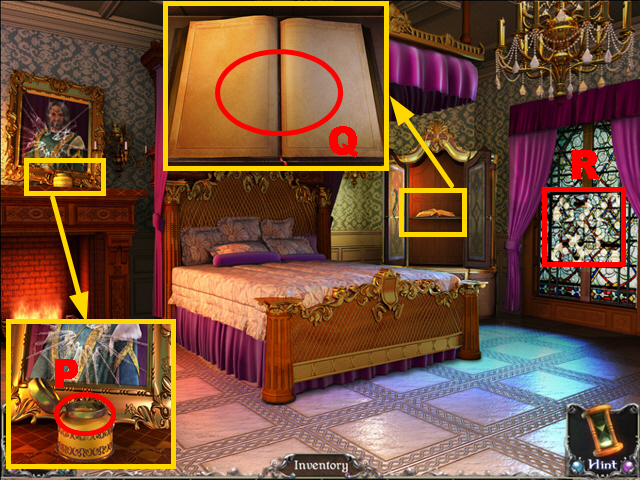
- Zoom into the mantelpiece; dip the ROYAL QUILL into the inkwell (P); the ROYAL QUILL will be acquired again.
- Zoom into the book; use the ROYAL QUILL to write on the empty pages (Q).
- Zoom into the window (R).
- Play the mini-game.
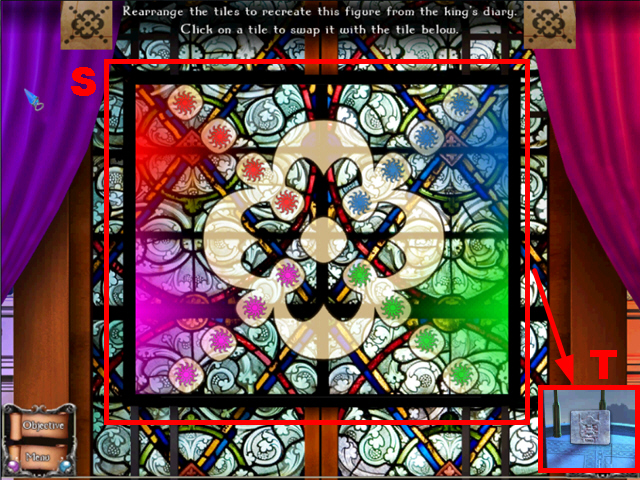
- To solve the puzzle (S), rearrange the tiles so that they recreate the figure from the king’s diary.
- Pressing any tile will move it down.
- Take the 4/4 GARGOYLE (T).
- Go to Hamoon’s Tower.
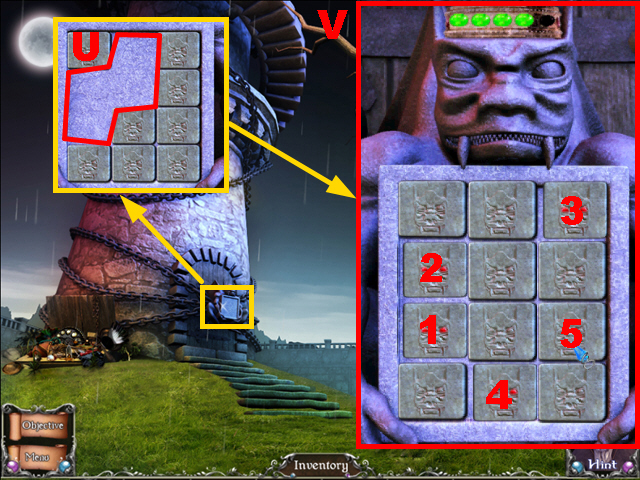
- Zoom into the gargoyle; put down the 4 GARGOYLES (U).
- Play the mini-game.
- To solve this puzzle (V), press the tiles in the sequence 1-5.
- Enter the Tower.
Chapter 2: Inside Hamoon’s Tower
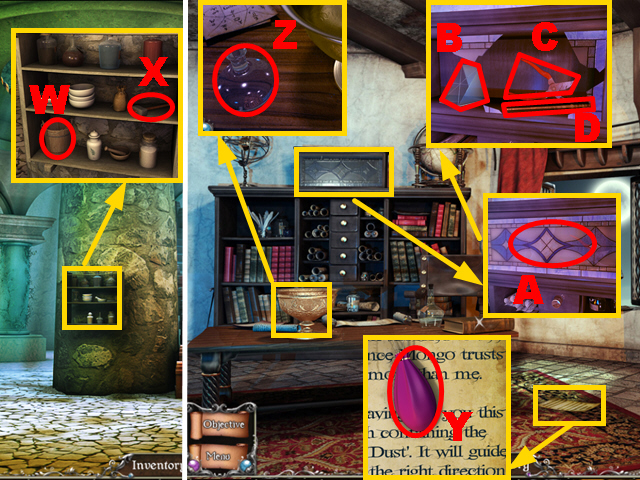
- Zoom into the shelf; take the BUCKET (W) and the HAMMER (X).
- Go into the Laboratory.
- Take a closer look at the page; take the VISION POUCH (Y).
- Zoom into the bowl; take the FLASK (Z).
- Zoom into the glass cabinet and break it with the HAMMER (A); take the 1/3 PRISM (B), the CLIPPERS (C), and the MAGIC WAND (D).
- Walk down twice.
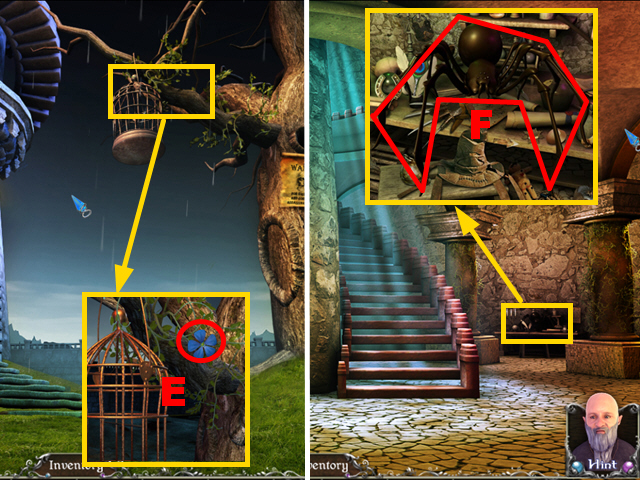
- Zoom into the cage; remove the flower with the CLIPPERS (E) to acquire the FLOWER.
- Enter the Tower.
- Zoom into the table; shrink the giant spider with the MAGIC WAND (F).
- Play the HOPS.
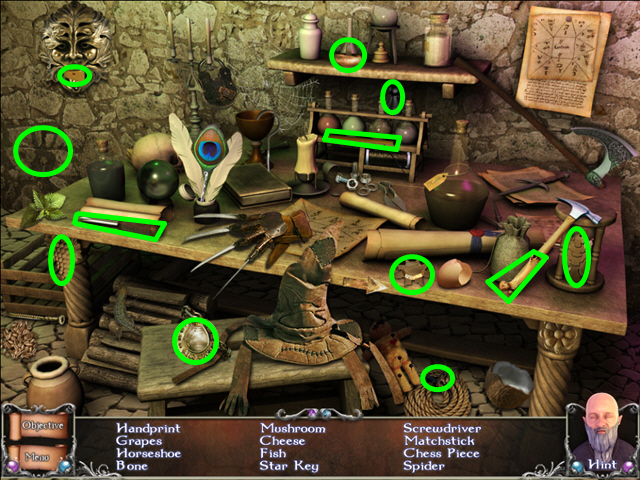
- Collect the 12 items (green).
- You will receive the 2/2 CHESS PIECE, the SCREWDRIVER, and the STAR KEY.
- Go to the Laboratory.
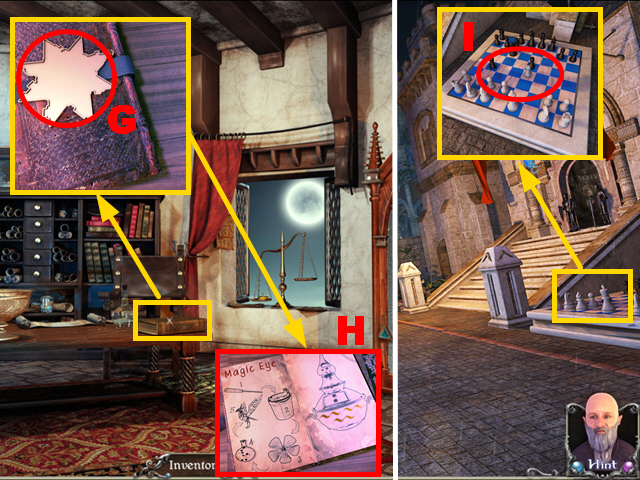
- Take a closer look at the book and insert the STAR KEY into the slot (G); read the manual (H).
- Walk down three times.
- Zoom into the chessboard; put down the 2 CHESS PIECES (I).
- Play the mini-game.
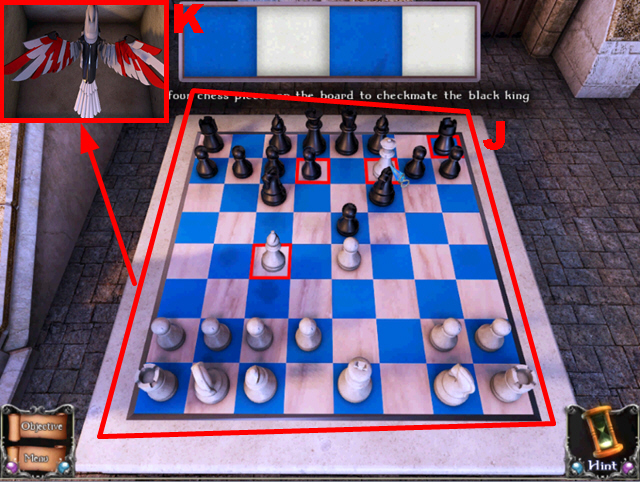
- To solve this puzzle (J), place the four chess pieces in a way to checkmate the black king.
- Take the PHOENIX (K).
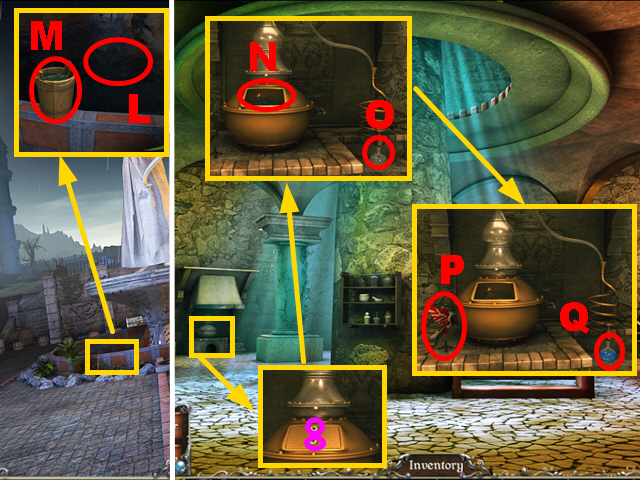
- Zoom into the well; put the BUCKET into the water (L) and take the FILLED BUCKET (M).
- Enter Hamoon’s Tower.
- Take a closer look at the device; remove the 2 screws (purple) with the SCREWDRIVER.
- Pour the FILLED BUCKET and the FLOWER into the device (N).
- Put down the FLASK (O).
- Hold the PHOENIX next to the device (P).
- Take the MAGIC POTION (Q).
- Go to the Laboratory.
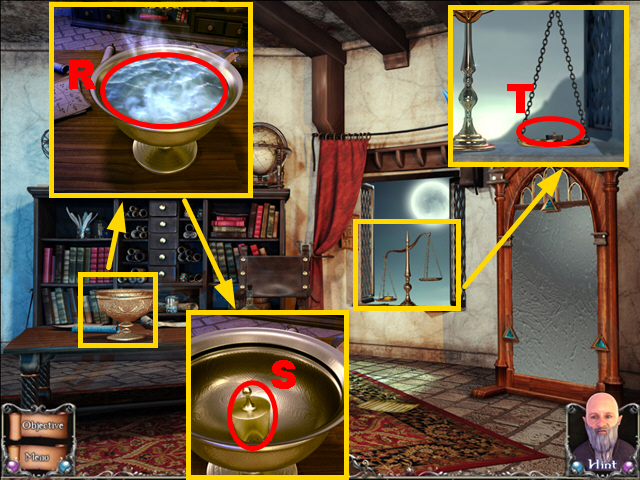
- Zoom into the bowl; pour the MAGIC POTION and the VISION POUCH into the bowl (R).
- Zoom into the bowl; take the WEIGHT (S).
- Zoom into the scale; put down the WEIGHT (T).
- Play the mini-game.
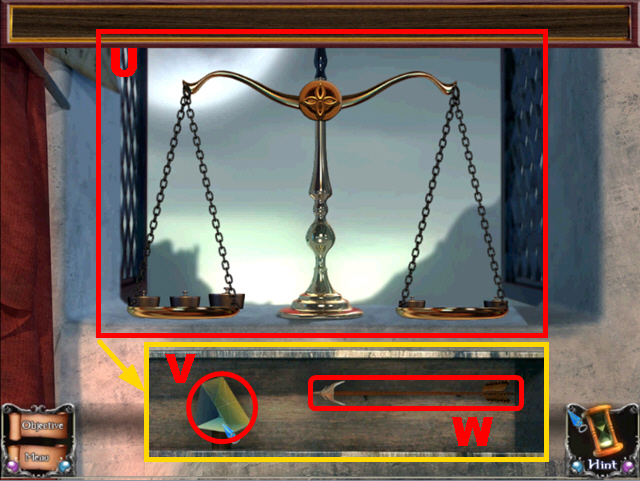
- To solve this puzzle (U), pick up the weights and arrange them in a way to keep the scale balanced.
- Take the 2/3 PRISM (V) and the 2/2 LONG BOW (W).
- Walk down.
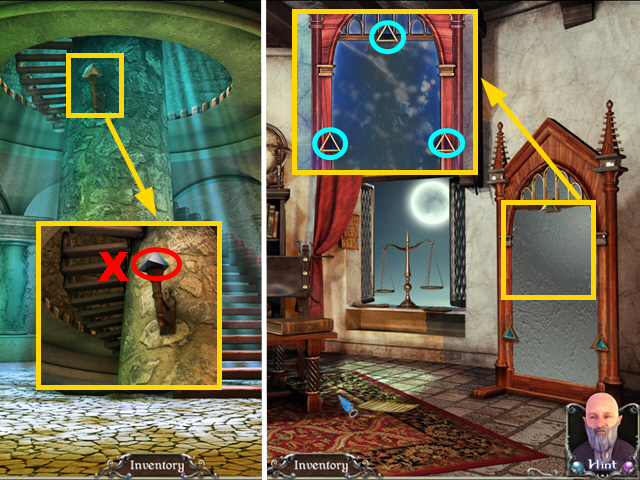
- Zoom into the torch; shoot the LONG BOW at the prism (X) to acquire the 3/3 PRISM.
- Go to the Laboratory.
- Take a closer look at the mirror; insert the 3 PRISMS into the slots marked in blue.
- Play the mini-game.
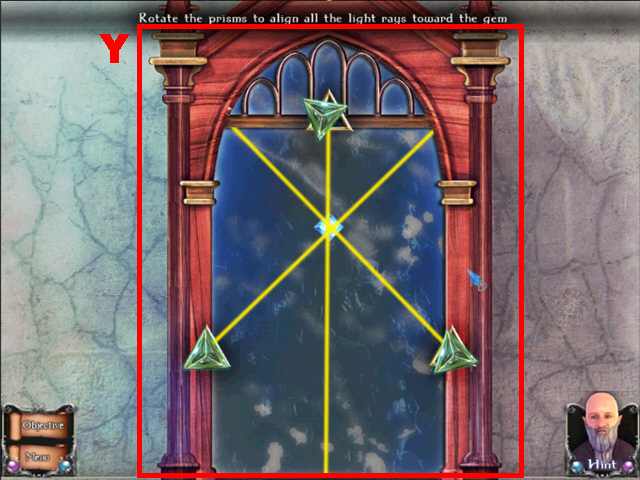
- To solve this puzzle (Y), rotate the prisms so that each light ray goes through the gem.
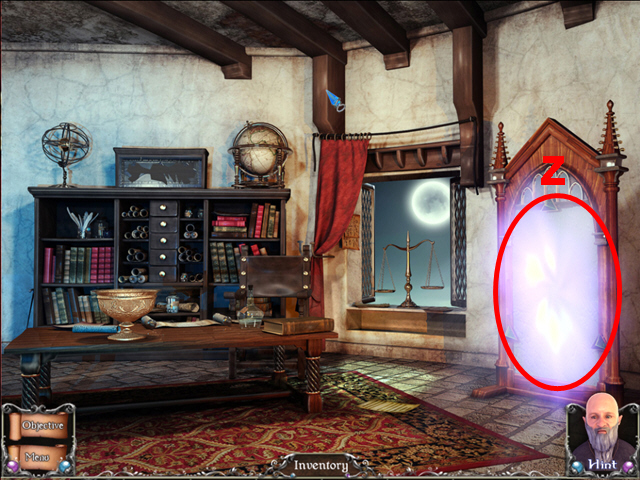
- Go through the mirror (Z) to enter the Dwarf Village.
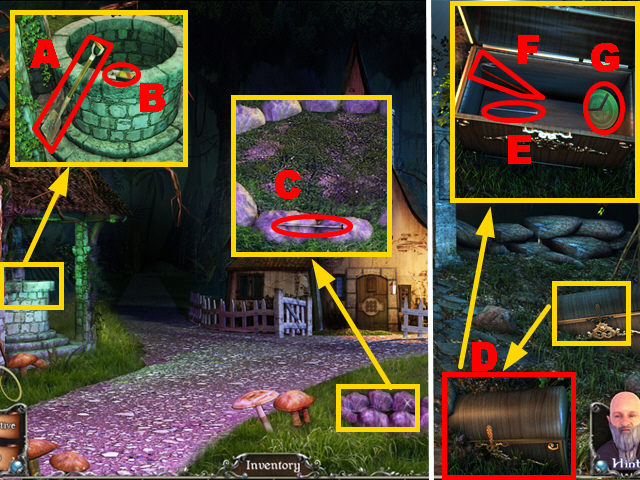
- Zoom into the well; take the SHOVEL (A) and the MATCHBOX (B).
- Zoom into the fireplace; take the 1/3 NAIL (C).
- Go to the Bridge.
- Take a closer look at the chest; dig out the chest with the SHOVEL (D).
- Take the 2/3 NAIL (E), the CROWBAR (F), and the 1/2 PUZZLE PIECE (G).
- Go to the Dark Forest.
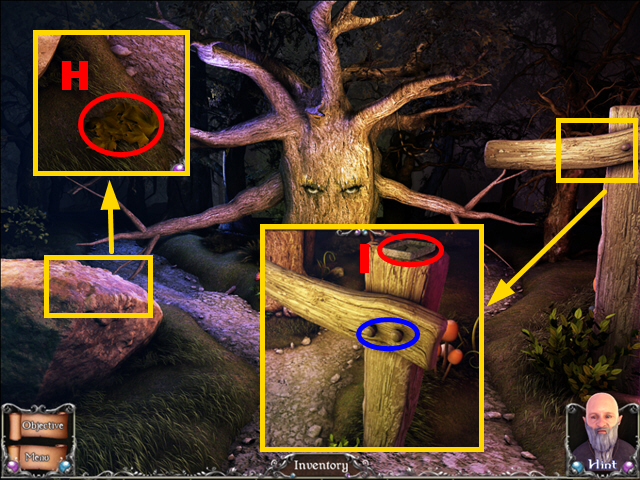
- Zoom into the rock; take the LEAVES (H).
- Zoom into the signpost; use the CROWBAR to remove the nails (blue); you will acquire the LOG.
- Take the 1/3 ANIMAL TILE (I).
- Walk down.
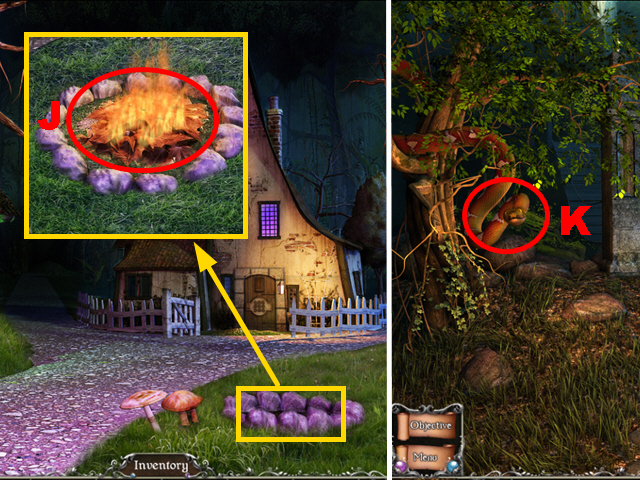
- Zoom into the fireplace; put down the LEAVES (J) and light the leaves with the MATCHBOX.
- Hold the LOG next to the fire to acquire the BURNING LOG.
- Go to the Bridge.
- Chase away the snake (K) with the BURNING LOG.
- Play the HOPS.
- Collect the 12 items (green).
- You will receive the 2/2 PUZZLE PIECE, the HAMMER, and the BUCKET.
- Walk down.
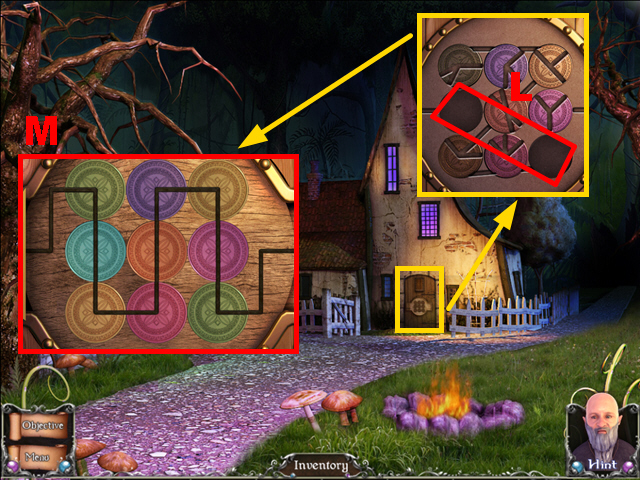
- Zoom into the door; insert the 2 PUZZLE PIECES into the slots (L).
- Play the mini-game.
- To solve this puzzle (M), rotate the discs to create a complete path from the left to the right side.
- Enter the Dwarf Council.
Chapter 3: The Dwarf Council
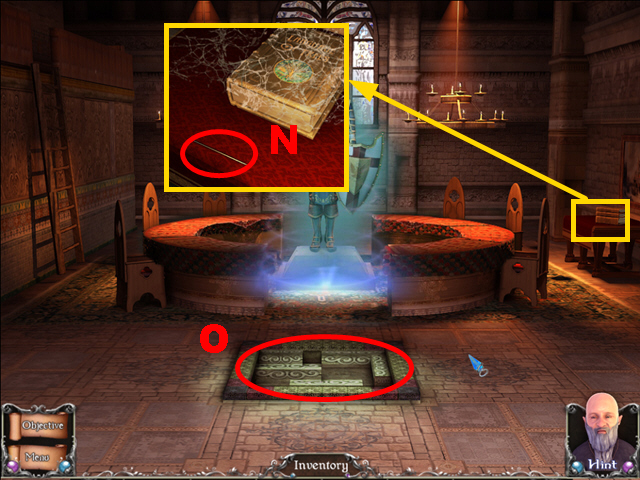
- Zoom into the book; take the 3/3 NAIL (N).
- Zoom into the floor (O).
- Play the mini-game.
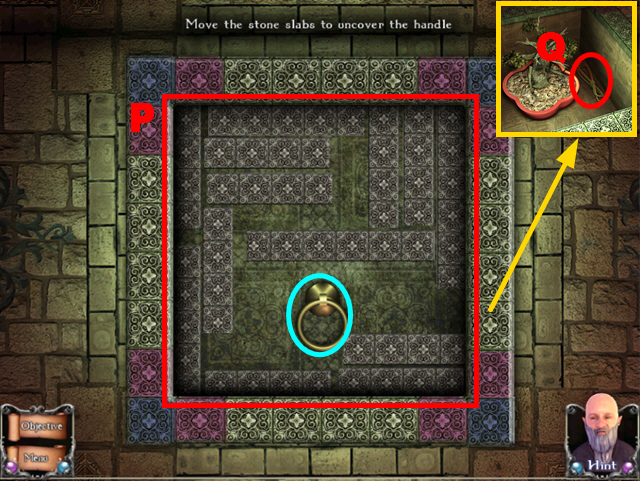
- To solve this puzzle (P), move around the stone slabs to uncover the door handle (blue).
- Take the ROPE (Q).

- Zoom into the ladder; put the 3 NAILS into the ladder (R) and fix the nails with the HAMMER.
- Play the HOPS.
- Collect the 12 items (green).
- You will receive the 1/2 SHIELD PIECE, the DUSTER, and the PULLEY WHEEL.
- Walk down.
- Zoom into the well; connect the PULLEY WHEEL, the ROPE, and the BUCKET to the hook (S).
- Take the FILLED BUCKET (T).
- Enter the Dwarf Council.
- Zoom into the book; remove the cobwebs with the DUSTER (U) and take the TREE LANGUAGE (purple).
- Zoom into the floor and pour the FILLED BUCKET over the tree (V); hold the TREE LANGUAGE next to the tree to understand it.
- Take the CHILD TREE.
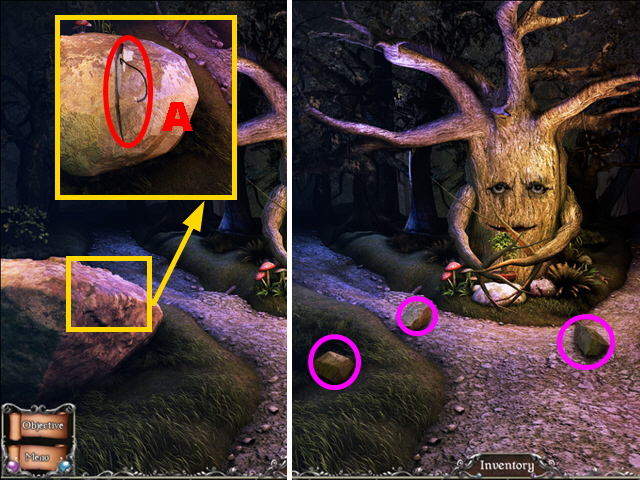
- Go to the Dark Forest.
- Give the CHILD TREE to the large tree (W).
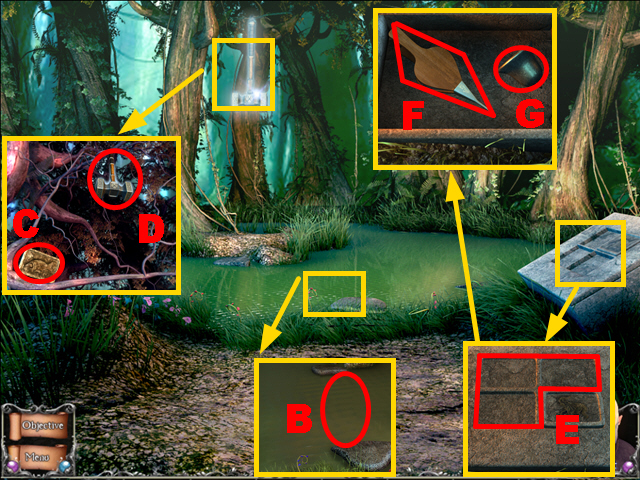
- Go to the Swamp.
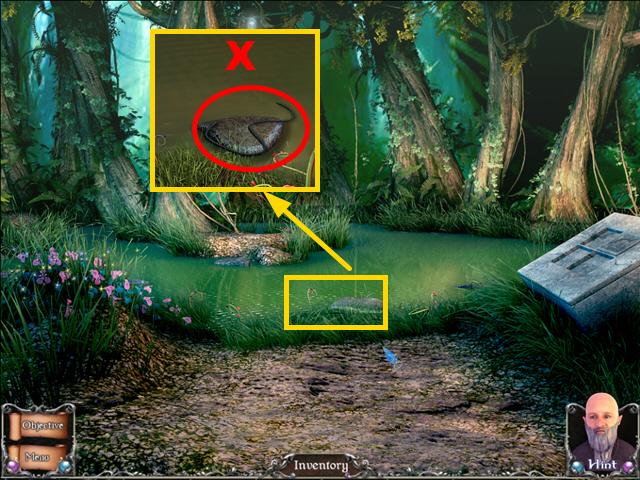
- Zoom into the swamp; take the STRING (X).
- Play the HOPS.
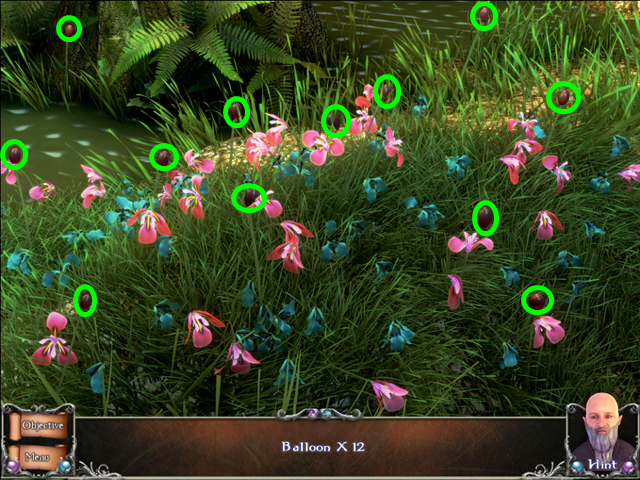
- Collect the 12 balloons (green).
- You will receive the BALLOON FLOWERS.
- Go to the Dark Temple.
- Zoom into the gargoyle; take the KNIFE.
- Zoom into the cart; cut it open with the KNIFE.
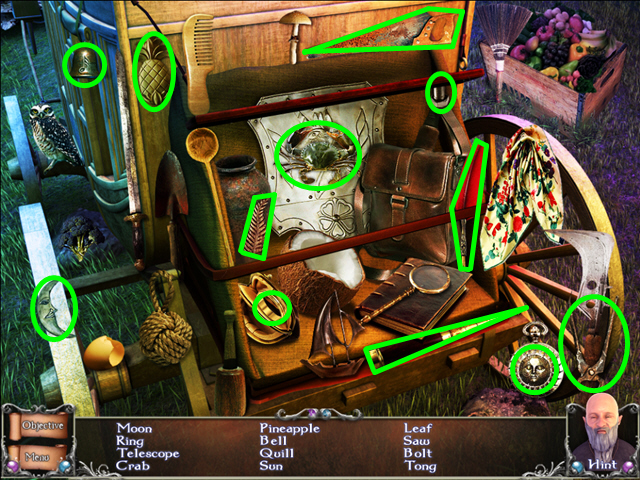
- Play the HOPS.
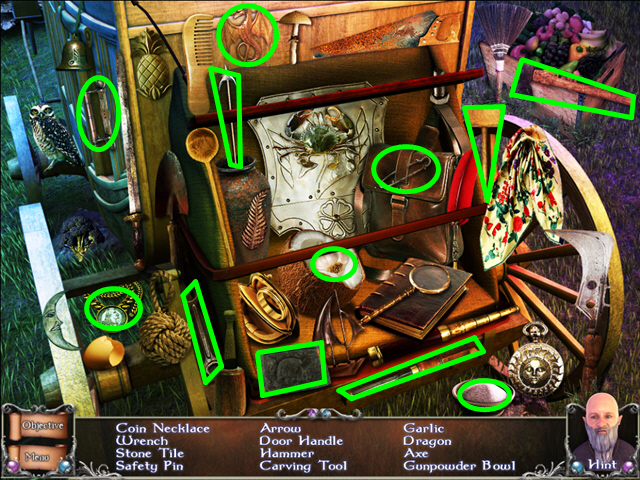
- Collect the 12 items (green).
- You will receive the 2/2 LONG BOW, the GUN POWDER, and the 2/3 ANIMAL TILE.
- Walk down.
- Zoom into the rock and pour the GUN POWDER into the crack (A).
- Put the STRING into the crack and light the string with the MATCHBOX.
- Collect the 3 STONE PIECES (purple).
- Go to the Swamp.
- Take a closer look at the swamp; put the 3 STONE PIECES into the swamp (B).
- Zoom into the hammer; take the 3/3 ANIMAL TILE (C) and the HAMMER OF LIGHT (D).
- Zoom into the stone; insert the 3 ANIMAL TILES into the niches (E).
- Take the BLOWER (F) and the 1/2 BELL (G).
- Go to the Dark Temple.

- Zoom into the gargoyle statue and connect the BALLOON FLOWERS to it (H); inflate the balloons with the BLOWER.
- Zoom into the gargoyle statue; shoot the LONG BOW at the balloons (I).
- Take the NEEDLE (J).
- Zoom into the contraption; destroy it with the HAMMER OF LIGHT (K).
- Connect the NEEDLE to the device (L).
- Play the mini-game.
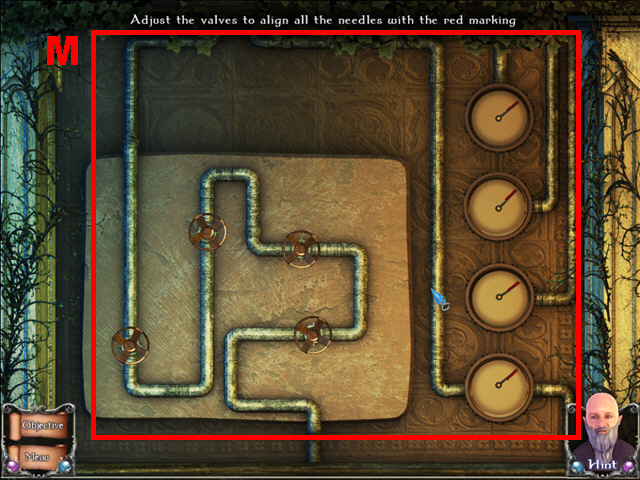
- To solve this puzzle (M), turn the valves until the four needles are aligned with the red marking.
- Play the HOPS.
- Collect the 12 items (green).
- You will receive the 2/2 BELL and the TONGS.
- Go to the Swamp.
Chapter 4: Entering the Dark Temple
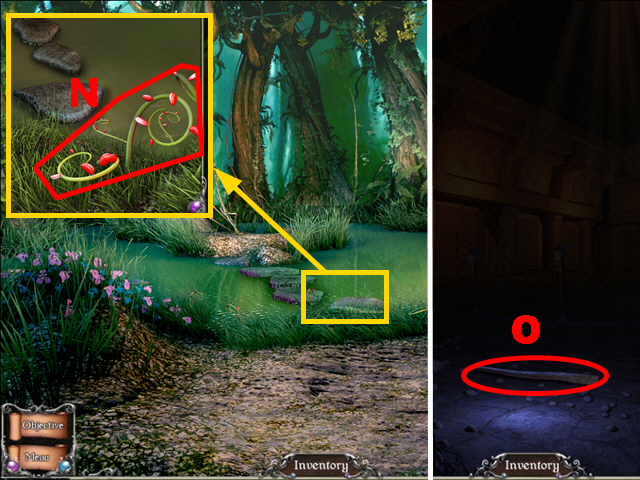
- Take a closer look at the swamp; collect the ACID BEANS with the TONGS (N).
- Enter the Dark Temple.
- Take the TORCH (O).
- Go to the Dwarf Village.
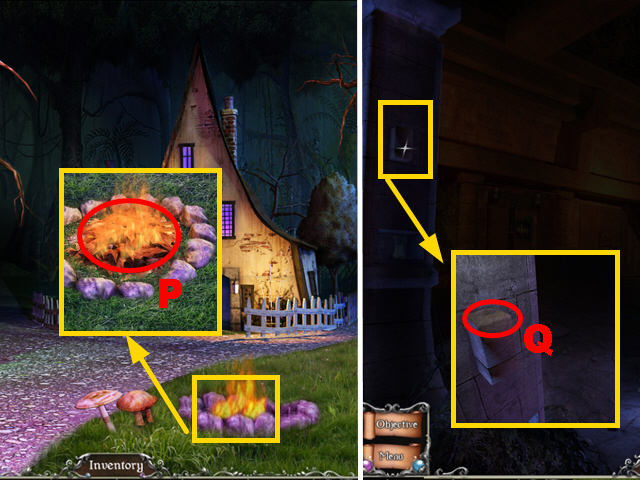
- Zoom into the fireplace; hold the TORCH into the fire (P) to acquire the BURNING TORCH.
- Enter the Dark Temple.
- Zoom into the wall; put the BURNING TORCH into the stand (Q).
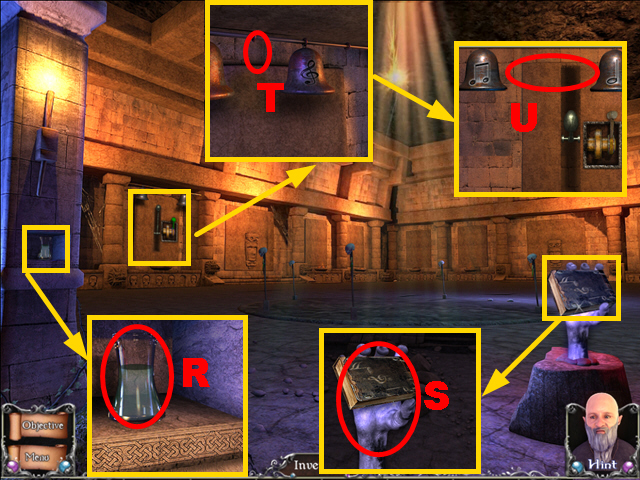
- Zoom into the compartment; put the ACID BEANS into the flask (R) to acquire the ACID.
- Zoom into the book; pour the ACID over the hand (S) to acquire the BELLS BOOK.
- Zoom into the device; connect the 2 BELLS to the device (T) and put down the BELLS BOOK (U).
- Play the mini-game.
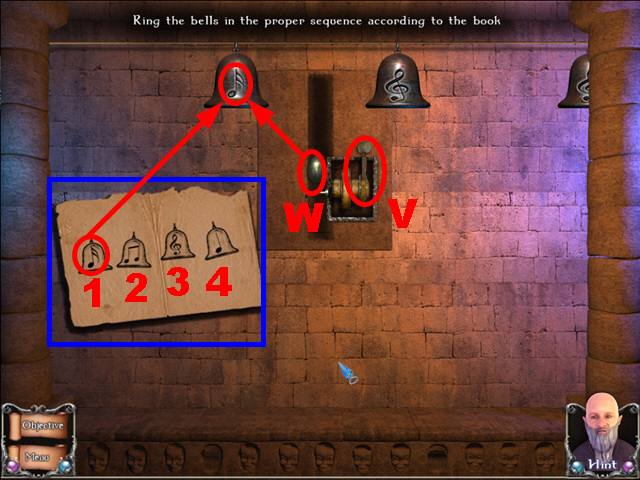
- To solve this puzzle, hit the bells in the sequence 1-4 indicated on the guide (blue).
- Pull the lever (V) as soon as the correct bell is close to the bell ringer (W).
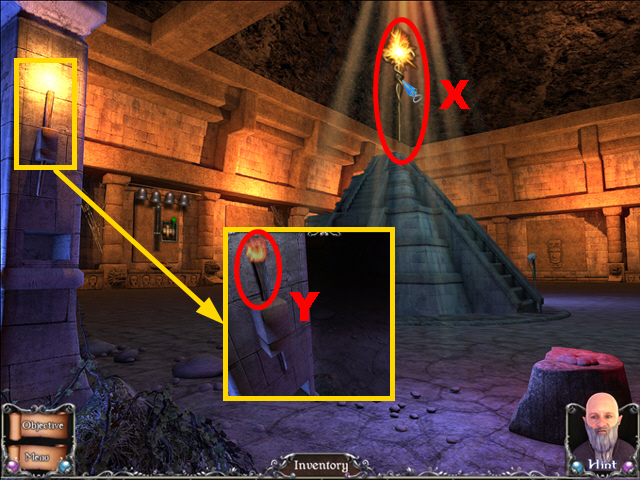
- Take the ZARRAR STAFF (X).
- Zoom into the torch; take the BURNING TORCH (Y).
- Go to the Dwarf Council.
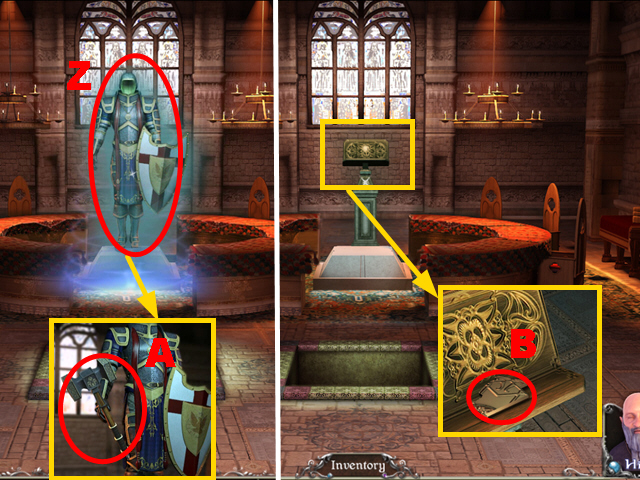
- Hold the ZARRAR STAFF next to the armor (Z).
- Zoom into the armor; connect the HAMMER OF LIGHT to it (A).
- Take the armor.
- Zoom into the pedestal; take the 2/2 SHIELD PIECE (B).
- Go to the Bridge.
- Play the HOPS.
- Collect the 12 items (green).
- You will receive the CHEESE and the OIL.
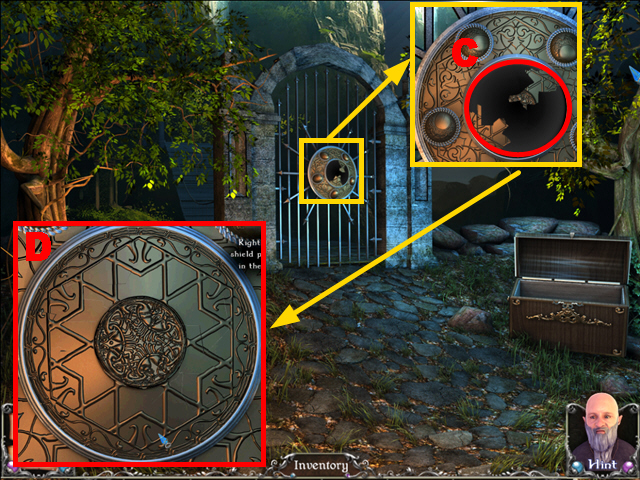
- Zoom into the gate; put down the 2 SHIELD PIECES (C).
- Play the mini-game.
- To solve this puzzle (D), rotate the shield pieces and put them into the correct position to recreate the shield.
- Correctly placed pieces will remain fixed.
- Go to the Dungeon Wall.
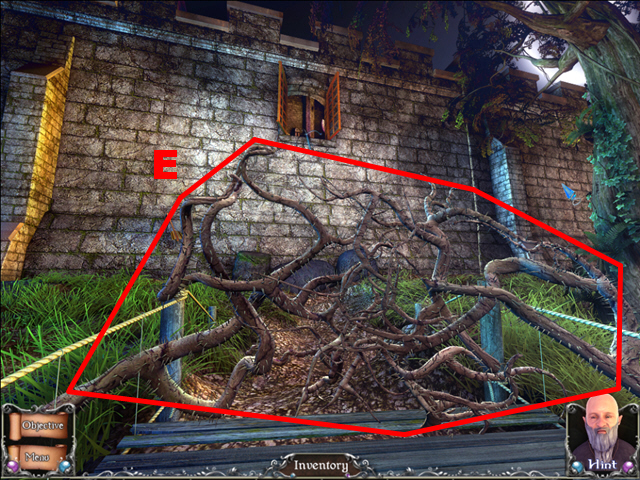
- Pour the OIL over the thorny bushes (E) and set them on fire with the BURNING TORCH.
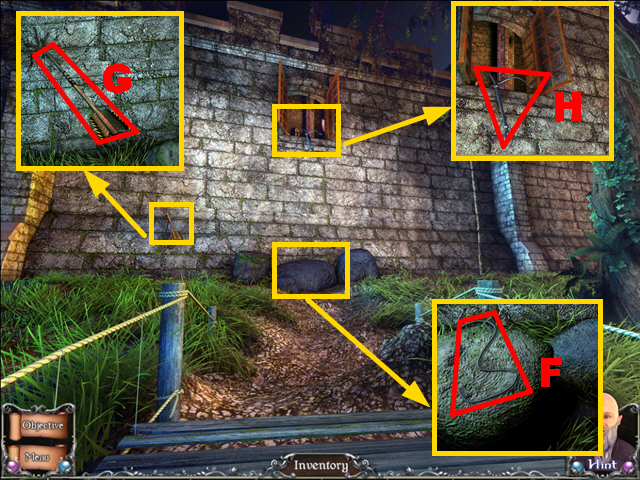
- Zoom into the stones; take the STRING (F).
- Take a closer look at the arrow; fix the arrow with the STRING and take the 2/2 LONG BOW (G).
- Zoom into the window; shoot the LONG BOW at the grappling hook (H) to acquire the 1/2 HOOK.
- Go to the Dwarf Village.

- Zoom into the well; take the rope (I) to acquire the 2/2 HOOK.
- Go to the Dungeon Wall.
- Zoom into the window; connect the HOOK to the window (J).
- Enter the Dungeon.
- Play the HOPS.
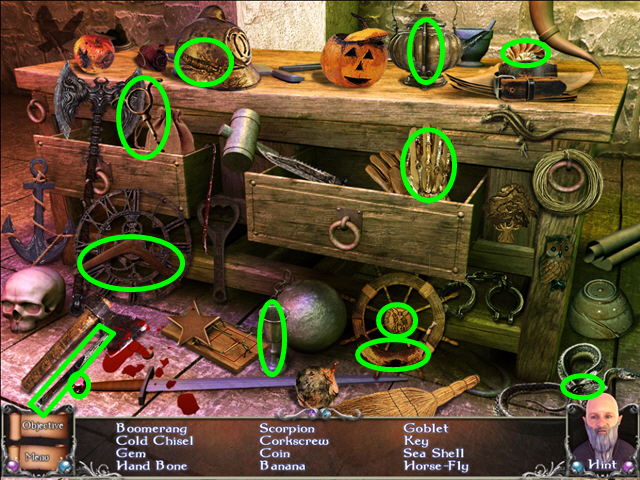
- Collect the 12 items (green).
- You will receive the WATER GOBLET and the KEY.
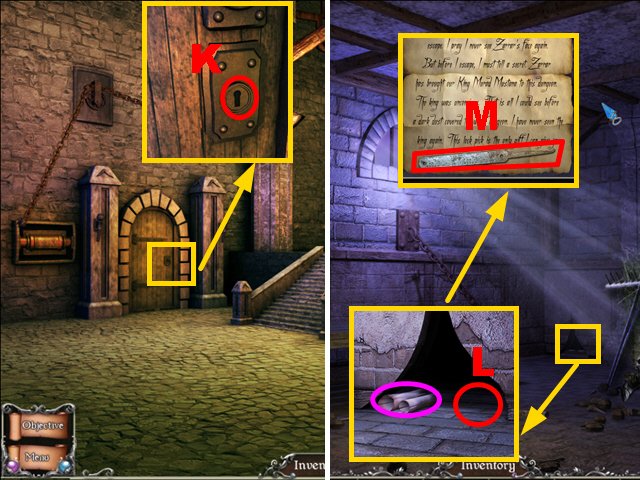
- Zoom into the door; insert the KEY into the lock (K).
- Enter the Prison Cell.
- Zoom into the hole and put down the CHEESE (L); read the note (purple).
- Take the LOCK PICK (M).
- Walk down.
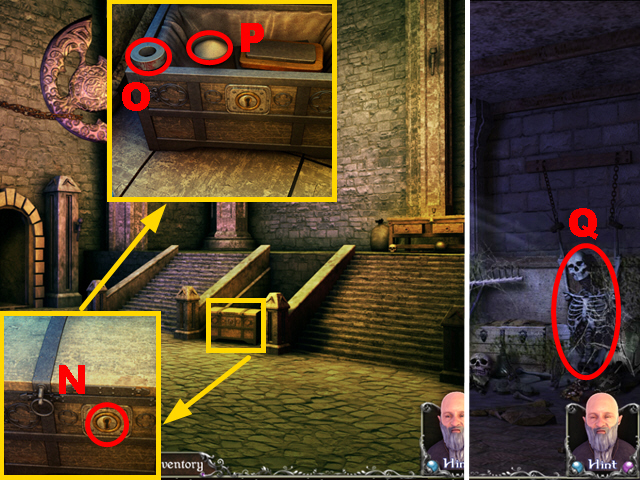
- Zoom into the chest; crack the lock (N) with the LOCK PICK.
- Take the 1/2 RING (O) and the WHITE ASH (P).
- Enter the Prison Cell.
- Pour the WHITE ASH over the skeleton (Q).
- Play the HOPS.
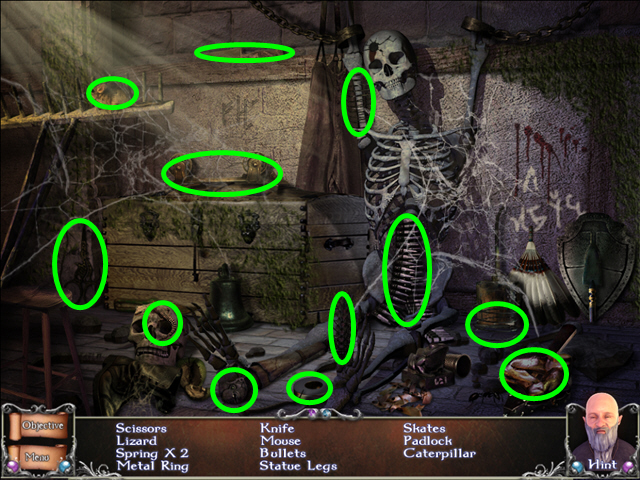
- Collect the 12 items (green).
- You will receive the BLUNT KNIFE, the GARGOYLE PIECE, and the 2/2 RING.
- Walk down.
- Zoom into the chest; hold the BLUNT KNIFE next to the sharpening stone (R) to acquire the SHARP KNIFE.
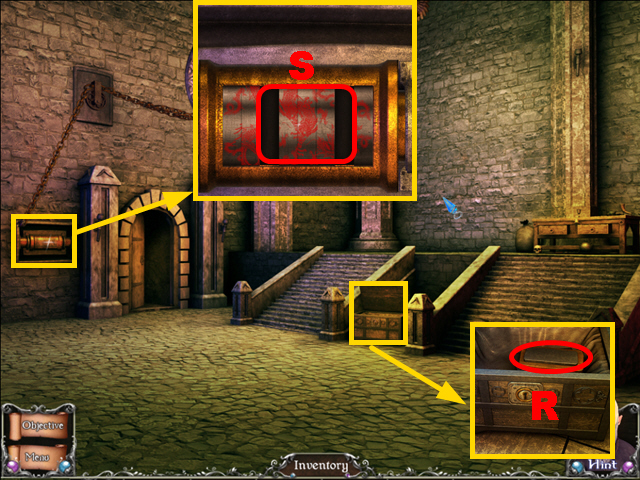
- Take a closer look at the device; insert the 2 RINGS into the device (S).
- Play the mini-game.
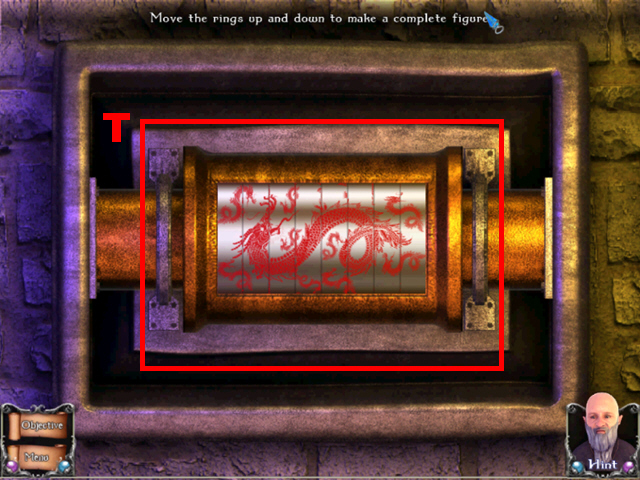
- To solve this puzzle (T), move the rings up and down until the correct picture is aligned.
- Enter the Secret Chamber.
Chapter 5: The Secret Chamber
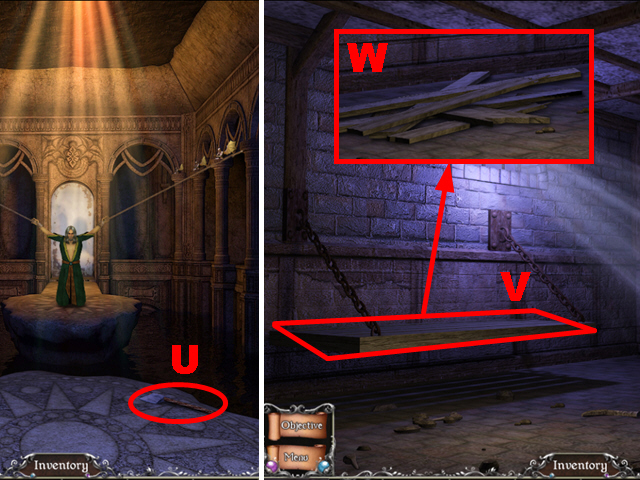
- Take the AXE (U).
- Go to the Prison Cell.
- Break the wooden bed with the AXE (V) and take the PLANKS (W).
- Go to the Secret Chamber.
- Put down the PLANKS to cross the gap (X).
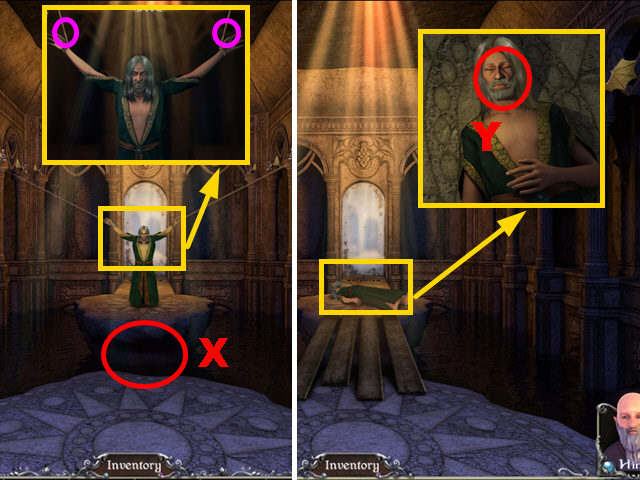
- Zoom into the king; cut the bonds (purple) with the SHARP KNIFE.
- Zoom into the unconscious king; pour the WATER GOBLET over him (Y).
- Walk down.
- Zoom into the compartment; take the GARGOYLE (Z).
- Enter the Secret Chamber.
- Zoom into the left column; put down the GARGOYLE PIECE (A).
- Zoom into the right column; put down the GARGOYLE (B).
- Go through the portal (C) to the Palace Courtyard.
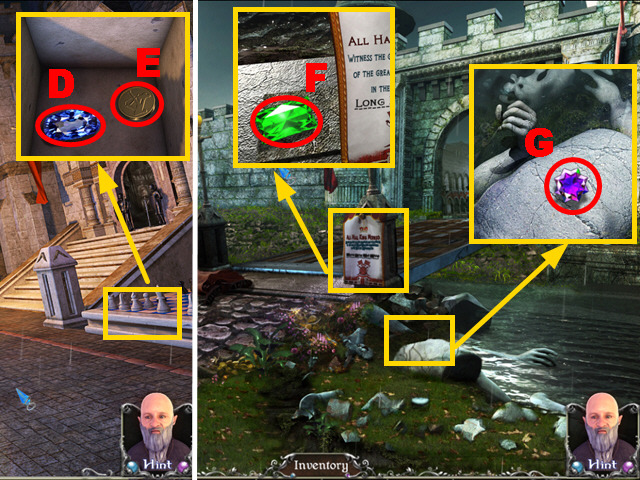
- Zoom into the chessboard; take the 1/9 GEM (D) and the 1/4 COIN (E).
- Walk down.
- Zoom into the streetlight; take the 2/9 GEM (F).
- Zoom into the broken statue; take the 3/9 GEM (G).
- Play the HOPS.
- Collect the 12 items (green).
- You will receive the 2/4 COIN and the MAGNET.
- Go to Hamoon’s Tower.
- Play the HOPS.
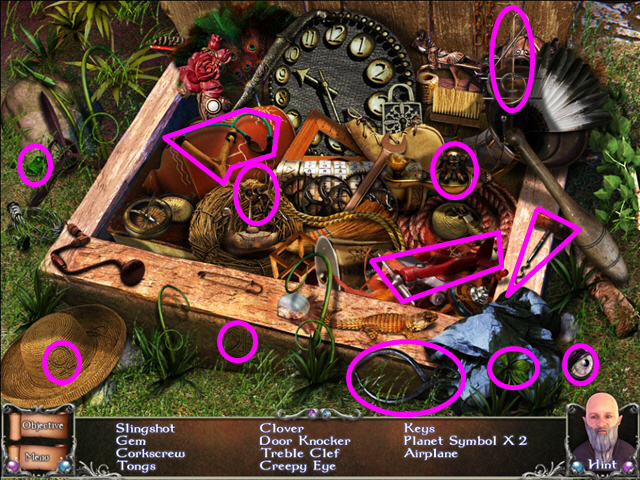
- Collect the 12 items (purple).
- You will receive the 4/9 GEM and the TONGS.
- Go to the Palace Hall.
- Play the HOPS.
- Collect the 12 items (light blue).
- You will receive the 5/9 GEM and the WALNUT.
- Go to Hamoon’s Tower.

- Zoom into the tree; give the WALNUT to the squirrel (H) to acquire the 6/9 GEM.
- Walk down.
- Zoom into the well; hold the MAGNET next to the coin (I) to acquire the 3/4 COIN.
- Go to the King’s Chamber.
- Zoom into the fireplace; hold the TONGS into the fire (J) to acquire the 4/4 COIN.
- Walk down.
- Zoom into the throne; insert the 4 COINS into the panel (K).
- Play the mini-game.
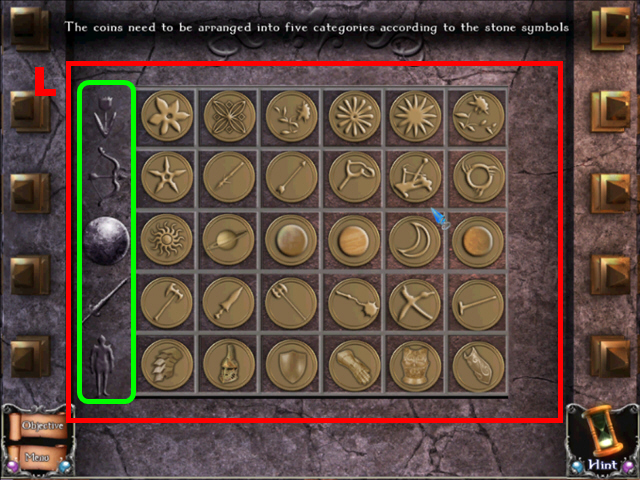
- To solve this puzzle (L), arrange the coins according to the categories (green).
- Pressing any coin will move it down one spot.
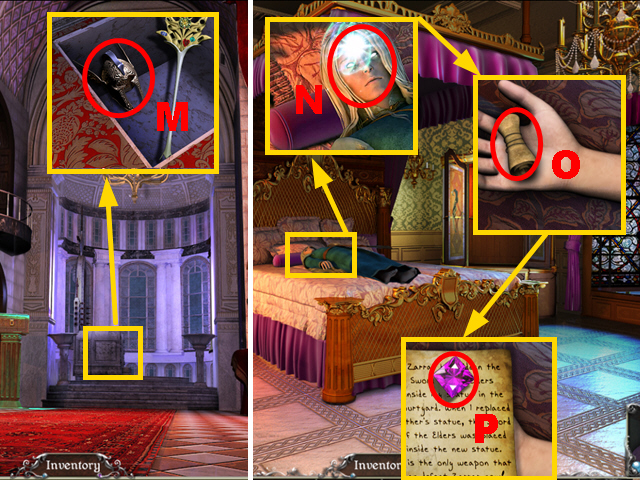
- Take the HELMET (M).
- Enter the King’s Chamber.
- Zoom into the prince; put the HELMET on his head (N).
- Read the note (O) and take the 7/9 GEM (P).
- Go to the Palace Courtyard.
- Take a closer look at the patch; take the LADDER (Q) and the 8/9 GEM (R).
- Walk down.
- Zoom into the gate and put down the LADDER (S); take the 2/2 LONG BOW (T).
- Move forward.
- Zoom into the statue; shoot the LONG BOW at the head (U) to acquire the 9/9 GEM.
- Enter the Palace Hall.
- Zoom into the throne; insert the 9 GEMS into the staff (V).
- Play the mini-game.
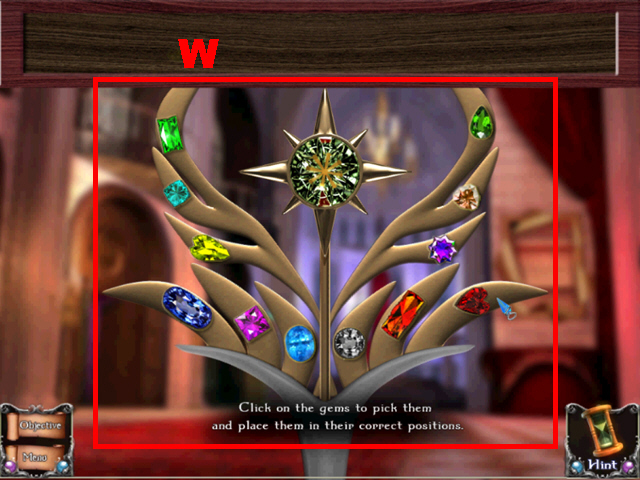
- To solve this puzzle (W), pick up the gems from the top bar and insert each gem into the fitting slot.
- You will receive the LIGHTNING ROD.
- Walk down.
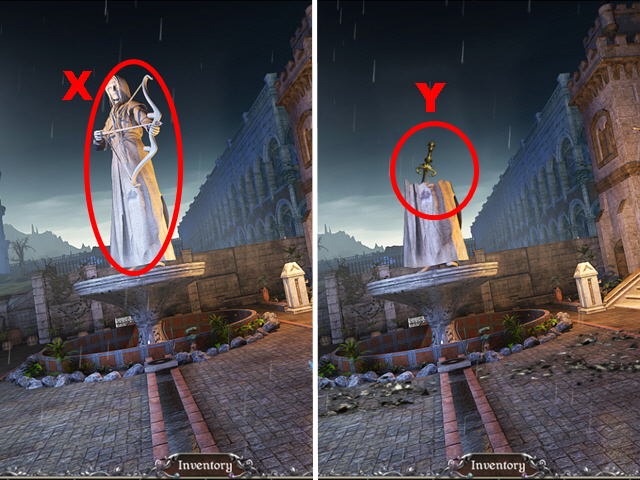
- Shoot the LIGHTNING ROD at the statue (X).
- Zoom into the broken statue (Y) and watch the final cut-scene.
- Congratulations, you have completed Scarytales: All Hail King Mongo.


 Letters from Nowhere Walkthrough, Guide, & Tips
 Youda Legend: The Golden Bird of Paradise Walkthrough, Guide, & Tips
 Flights of Fancy: Two Doves Walkthrough, Guide, & Tips
 Kaptain Brawe: A Brawe New World - Episode II Walkthrough, Guide, & Tips
 The Lost City: Chapter One Walkthrough, Guide, & Tips