Amaranthine Voyage: The Tree of Life Walkthrough, Guide, & Tips
Amaranthine Voyage: The Tree of Life Walkthrough

Welcome to the Amaranthine Voyage: The Tree of Life Walkthrough
After finding an artifact, you’re whisked away to a dying world. Can you save it from the darkness?
Whether you use this document as a reference when things get difficult or as a road map to get you from beginning to end, we’re pretty sure you’ll find what you’re looking for here.
This document contains a complete Amaranthine Voyage: The Tree of Life game walkthrough featuring annotated screenshots from actual gameplay!
We hope you find this information useful as you play your way through the game. Use the walkthrough menu below to quickly jump to whatever stage of the game you need help with.
Remember to visit the Big Fish Games Forums if you find you need more help. Have fun!
This walkthrough was created by prpldva, and is protected under US Copyright laws. Any unauthorized use, including re-publication in whole or in part, without permission, is strictly prohibited.
General Tips

- This is the official guide for Amaranthine Voyage: The Tree of Life.
- Hidden-object scenes are referred to as HOS in this guide.
- HOS and mini-games are often randomized; your solution may vary.
- HOS items listed in blue are hidden or require additional steps.
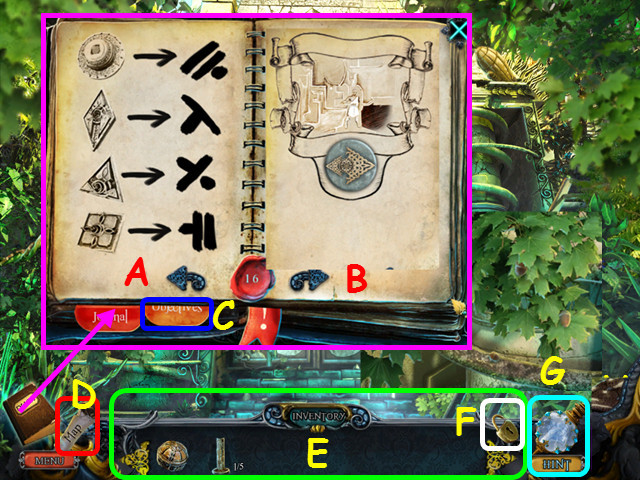
- You can look in your diary for clues (A) and revisit the stories you have collected (B).
- Select the ‘Objectives’ tab to see your current goals (C).
- Select the scroll icon to view the map (D).
- Your inventory (E) is located in the lower panel. Select an item to use it.
- The inventory auto-hides; move your mouse down to reveal the panel.
- Select the padlock to lock the panel in the up position (F).
- Hints are unlimited, but you must wait for the crystal to refill (G).
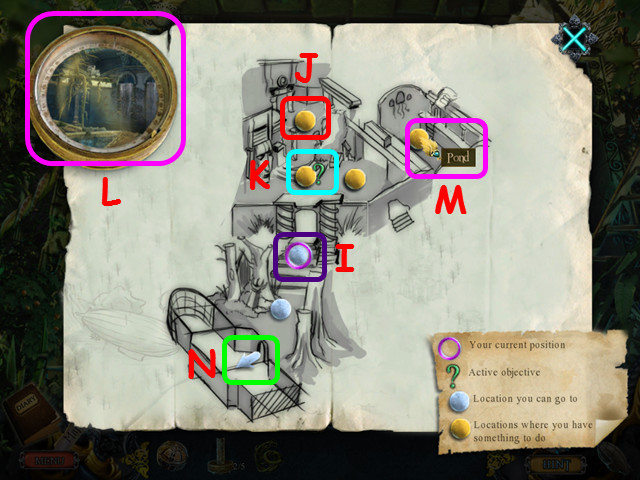
- Your current location on the map is indicated by the pink circle (I).
- Locations that have more tasks to complete will be gold (J).
- A question mark indicates an objective you need to complete (K).
- Hover your mouse over a location on the map and you will see a picture (L) from that location and the name (M).
- Select an arrow to view another section of the map (N).
Chapter 1: The Zeppelin
- You will have the option of some interactive help.
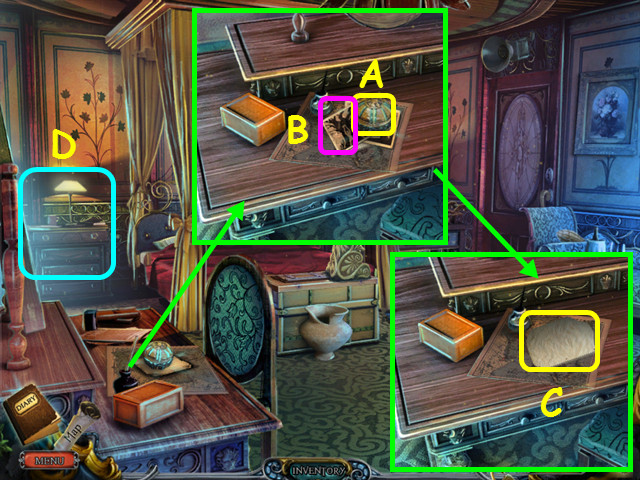
- Look at the desk and take the ARTIFACT (A); look at the photos (B), then take the BLANK SHEET OF PAPER (C).
- Select the nightstand for a HOS (D).
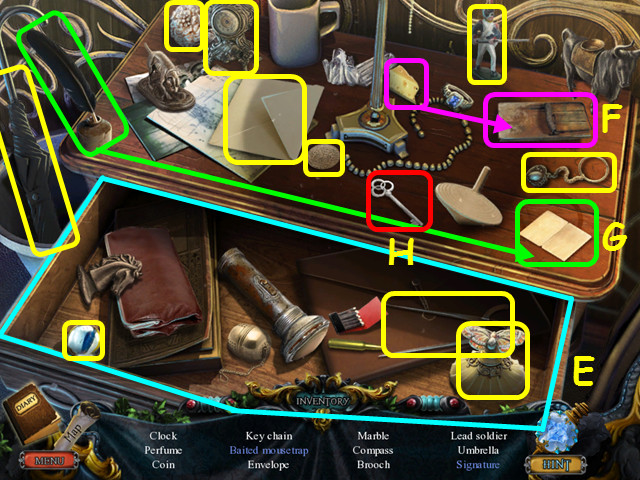
- Locate all the items on the list.
- Open the drawer (E).
- Place the cheese on the mousetrap to make the baited mousetrap (F).
- Use the quill on the card to make the signature (G).
- Take the CABIN KEY as the riddled item (H).

- Look at the door and use the CABIN KEY in the lock; turn the key, then pull the handle (I).
- Place the 4 heavy items on the cart, then push the cart 3 times (J).
- Walk right to the hall.
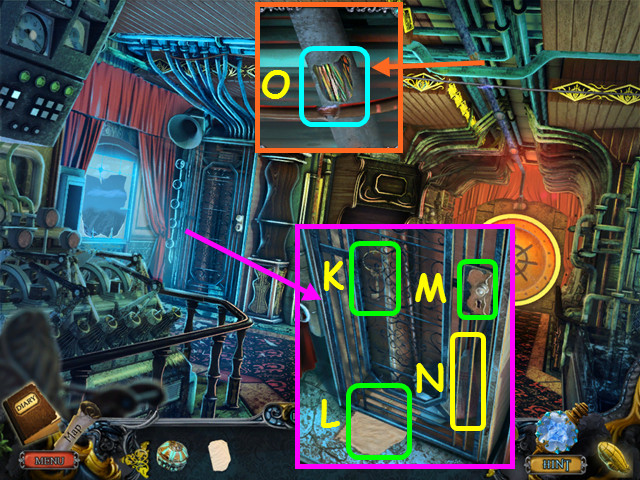
- Look at the cabinet, push the key (K), then place the BLANK SHEET OF PAPER under the door (L).
- Pull out the paper to get the JANITOR’S KEY, then use it in the lock (M).
- Take the BROOM (N).
- Look at the wires on the ceiling and use the BROOM to push them together (O).
- Walk forward to the engine room.
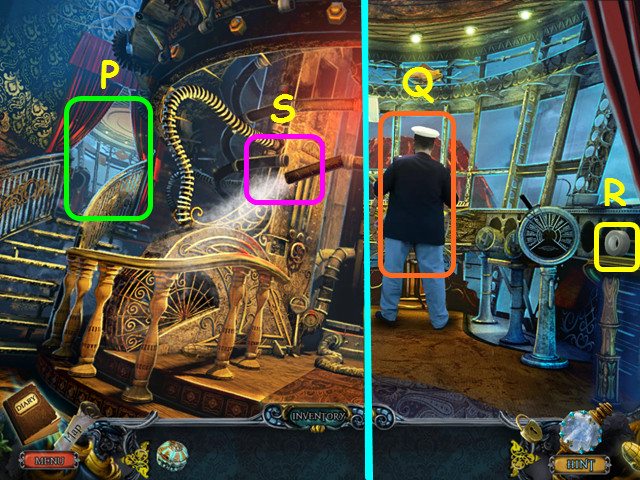
- Walk up the stairs to the flight deck (P).
- Talk to the captain (Q).
- Take the TAPE (R).
- Walk down.
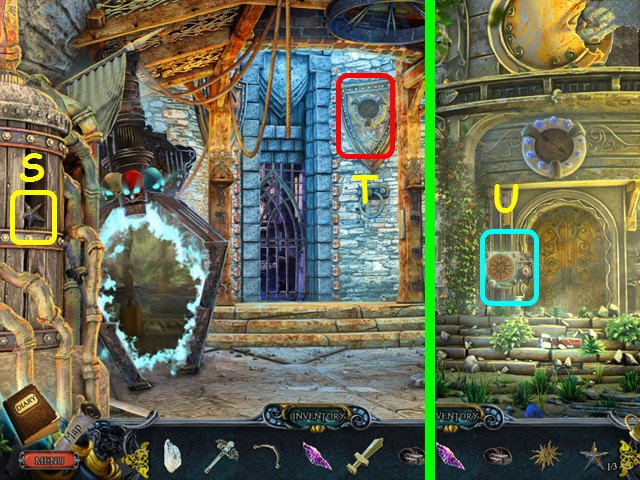
- Use the TAPE on the leaky pipe (S).
- Return to the flight deck and talk to the captain.
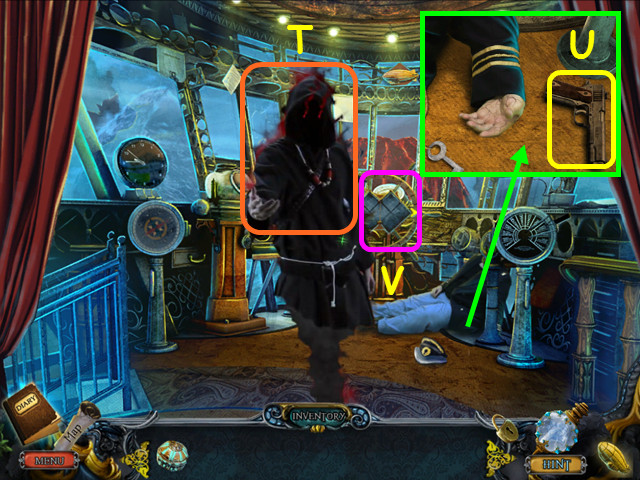
- Use the ARTIFACT on the spirit (T).
- The EMPTY ARTIFACT will return to your inventory.
- Look at the captain and take the GUN (U).
- Note the mini-game on the steering wheel (V).
- Walk down twice.
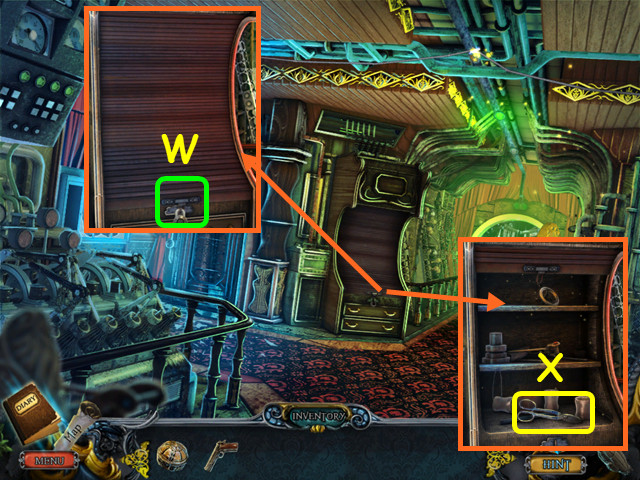
- Look at the cabinet and use the GUN to shoot off the lock (W).
- Open the cover and take the METAL SCISSORS (X).
- Walk forward, then go up the stairs to the flight deck.
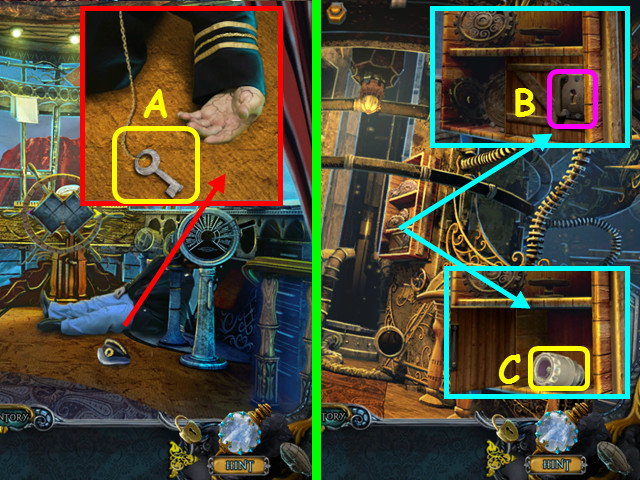
- Look at the captain and use the METAL SCISSORS to cut off the KEY ON A CHAIN (A).
- Walk down.
- Look at the cabinet and use the KEY ON A CHAIN in the lock (B).
- Open the door and take the FUSE (C).
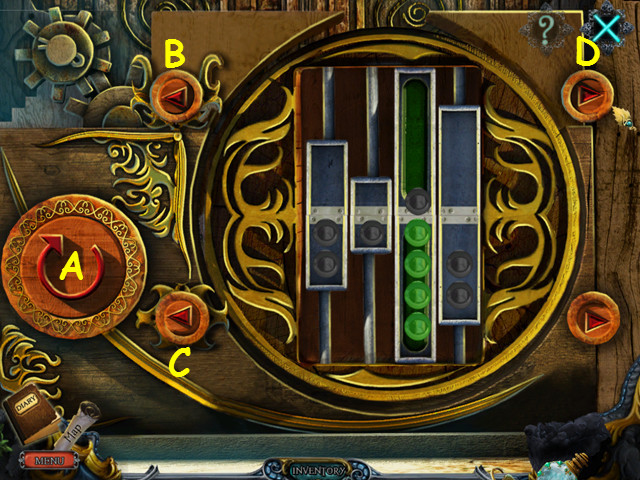
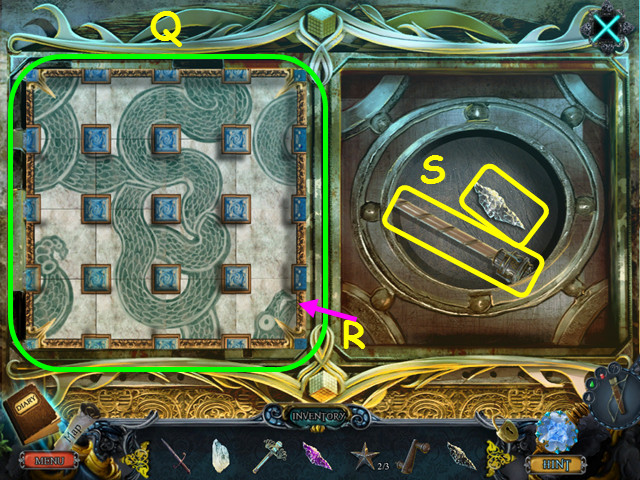
- Return to the flight deck and look at the steering wheel for a mini-game.
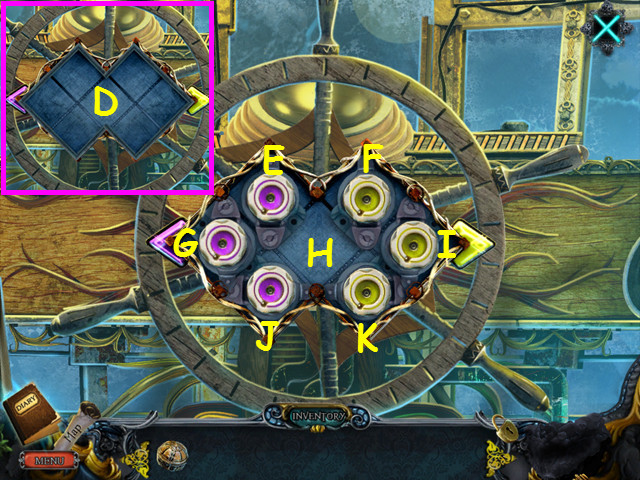
- Remove the lid in the center (D), and place the FUSE in the empty spot.
- Swap the positions on the colored fuses, by moving one space or jumping over one fuse.
- Select the fuses in these spaces to solve: E, K, H, F, J, G, E, H, K, I, F, H, K, I, F, J, and H.
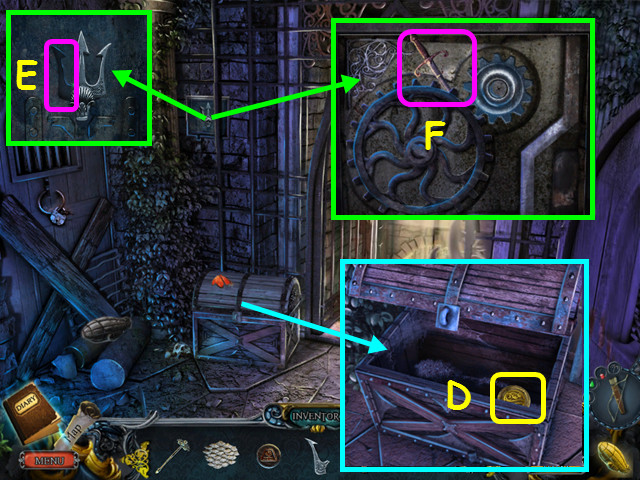
- Walk down 3 times.
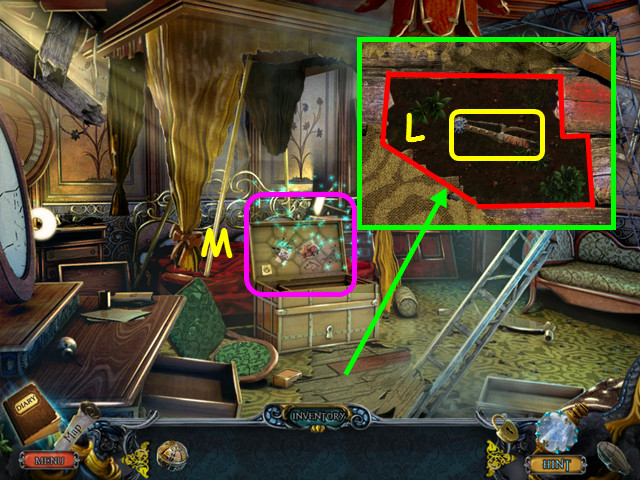
- Look at the floor and remove the 2 board pieces, then take the 1/2 LEVER (L).
- Open the chest, then look inside for a HOS (M).
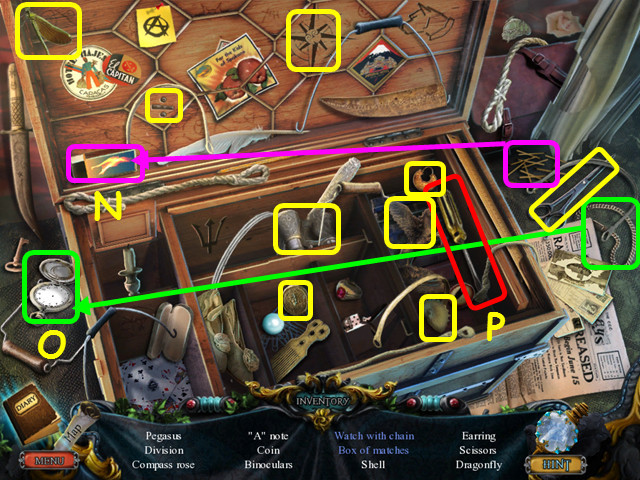
- Locate all the items on the list.
- Place the matches in the box for the matchbox (N).
- Place the chain on the watch for the watch with chain (O).
- Take the SCREWDRIVER as the riddled item (P).
- Walk forward twice, then go up the stairs to the flight deck.
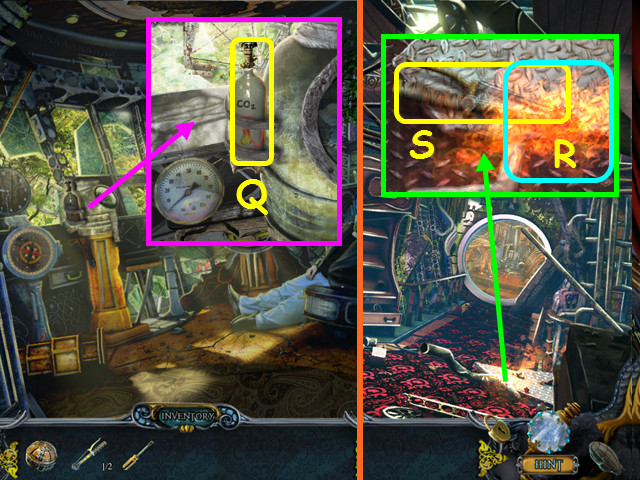
- Look at the controls, use the SCREWDRIVER on the screws, then take the CO2 CANISTER (Q).
- Walk down twice.
- Look at the floor and use the CO2 CANISTER on the flames (R).
- Take the 2/2 LEVER (S).
- Walk forward.
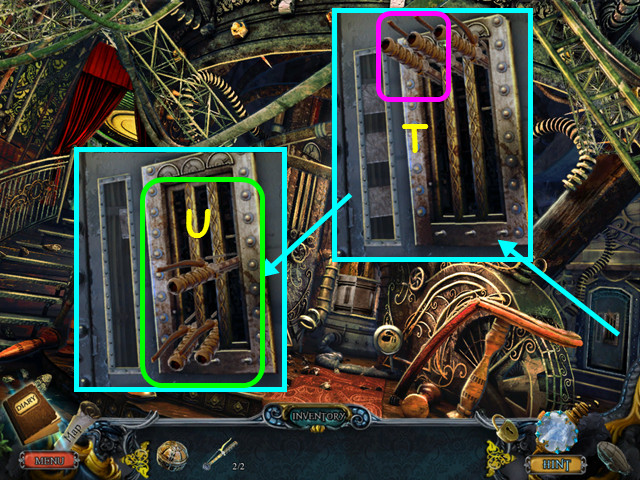
- Look at the door and place the 2 LEVERS in the slots (T).
- Pull all 3 levers down, then go out the door to the jungle (U).
Chapter 2: The Courtyard and Square
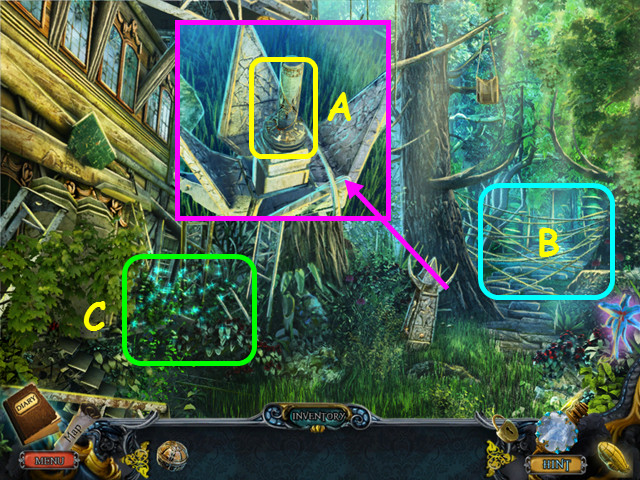
- Look at the obelisk, turn the pyramid twice, then take the 1/5 ALTAR (A).
- Note the vines blocking the way (B).
- Select the bushes for a HOS (C).
- Locate all the items on the list.
- Open the chest to find the sandwich (D).
- Use the net to capture the butterfly (E).
- Take the MACHETE as the riddled item (F).
- Use the MACHETE 3 times to remove the vines blocking the way.
- Walk forward to the gate.
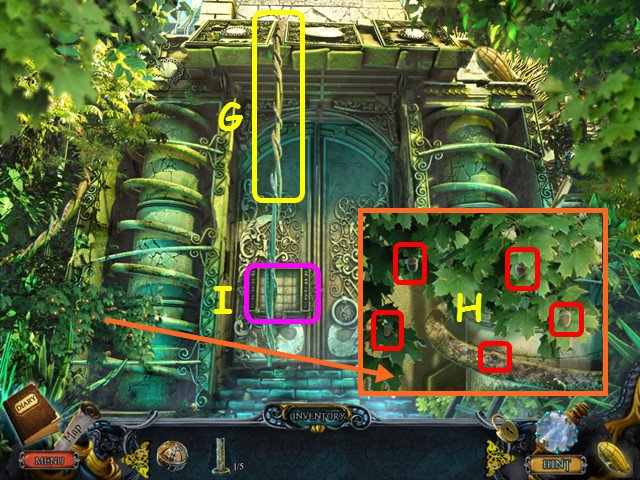
- Take the VINE (G).
- Look at the branch and take the 5 ACORNS (H).
- Note the mini-game on the door (I).
- Walk down.
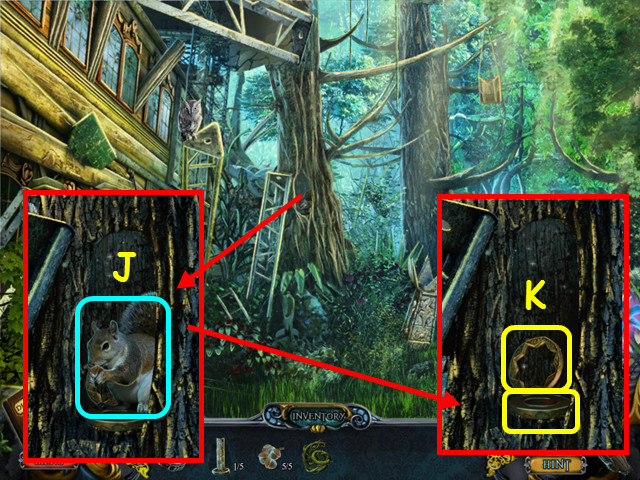
- Look in the tree hollow and give the 5 ACORNS to the squirrel (J).
- Take the 2/5 ALTAR and the MYSTERIOUS ITEM (K).
- Walk forward and look at the mini-game on the door.
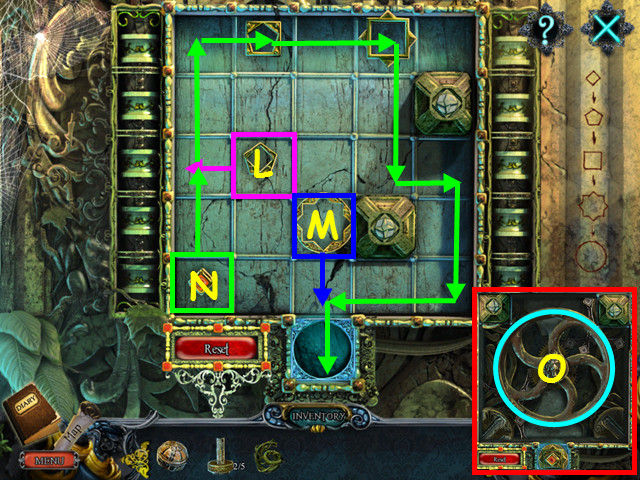
- Place the MYSTERIOUS ITEM in the grid to trigger the mini-game.
- Stack all the elements, from smallest to largest.
- Select an element, then choose an arrow to move it in that direction.
- Move L to the left, and move M down.
- Move N up x 2, right x 2, down, right, down, left, and down.
- Turn the valve (O).
- Walk forward to the square west.
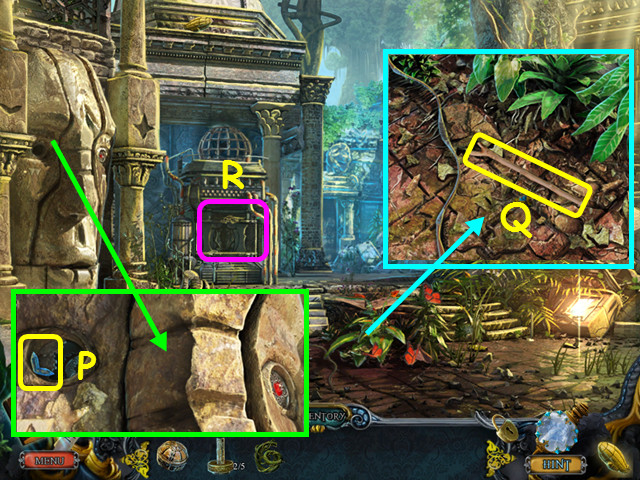
- Look at the stone head and take the CRYSTAL (P).
- Look at the bushes and take the FORKED STICK (Q).
- Note the mini-game under the cage (R).
- Walk forward to the square east.
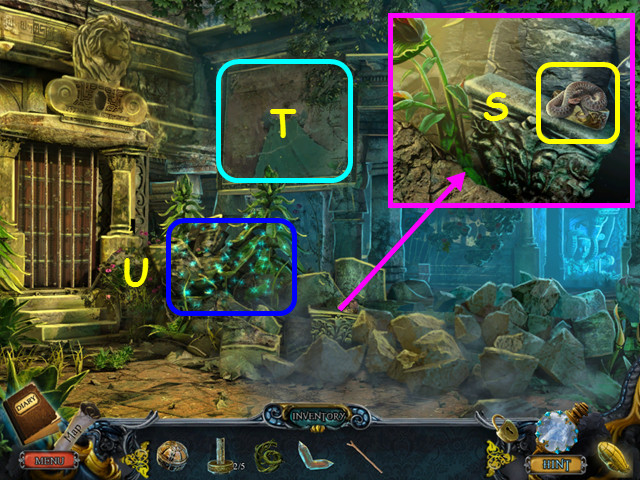
- Look at the rocks, use the FORKED STICK to move the snake, then take the 3/5 ALTAR (S).
- Look at the mural (T).
- Select the debris for a HOS (U).
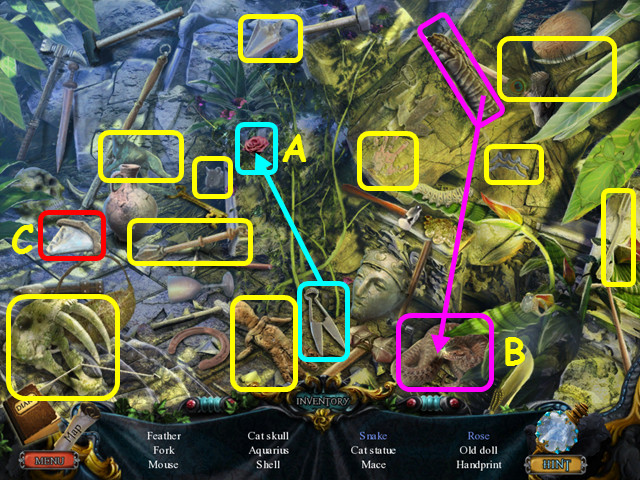
- Locate all the items on the list.
- Use the clippers to get the rose (A).
- Use the gauntlet to take the snake (B).
- Take the DIAMOND BLADE as the riddled item (C).
- Walk down, then go right to the courtyard.
- Look at the crate, move the branch aside, then use the DIAMOND BLADE to take the MIRROR (D).
- Place the CRYSTAL in the indentation (E).
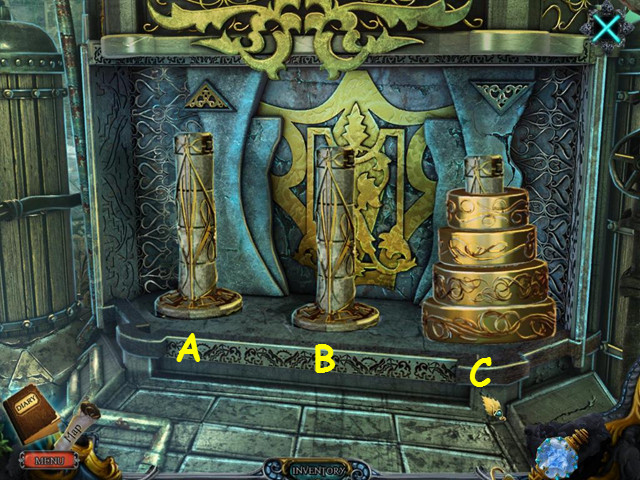
- Zoom into the roof and use the vine on the statue (F).
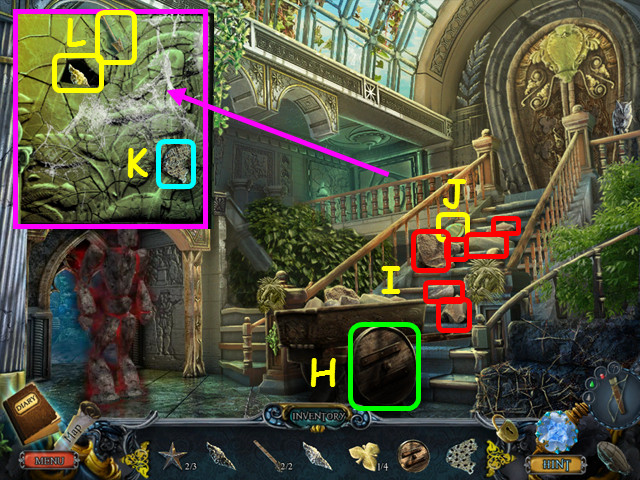
- Select the rubble for a HOS (G).
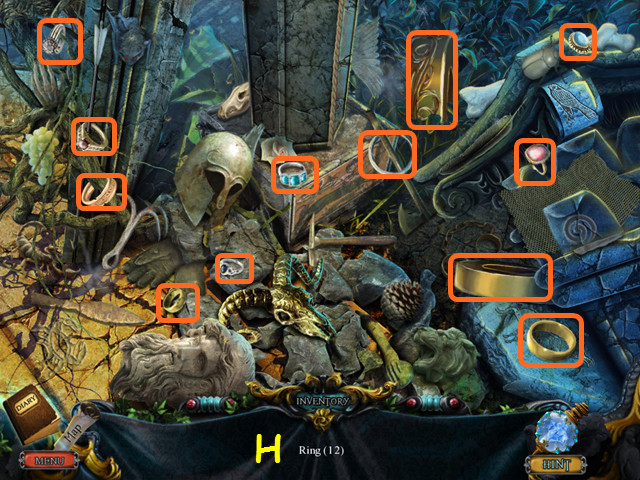
- Locate the 12 rings (H).
- You will earn the 4/5 ALTAR.
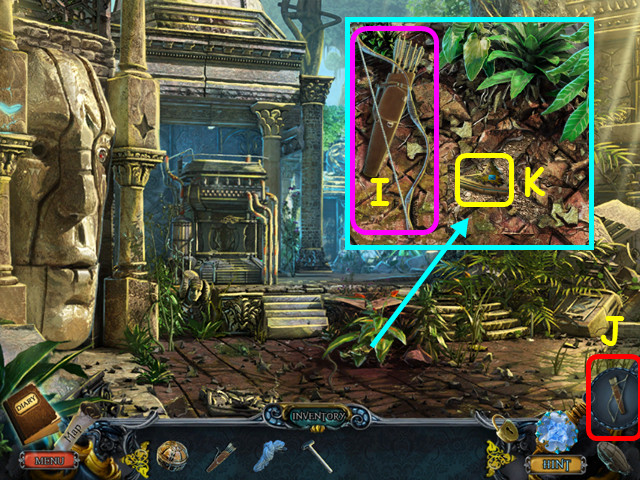
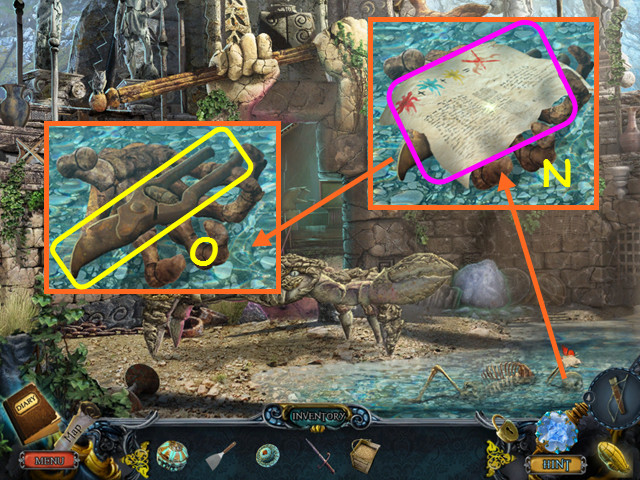
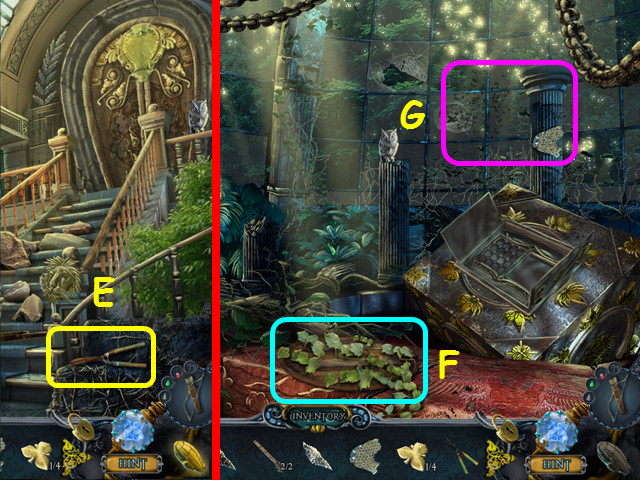
- Walk forward to the pond.
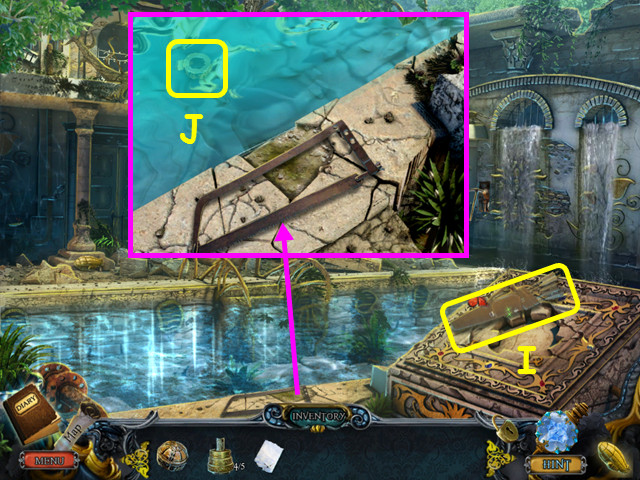
- Take the QUIVER (I).
- Look at the water and take the 5/5 ALTAR (J).
- Walk down twice and look at the mini-game under the cage.
- Place the 5/5 ALTAR on the left to trigger the mini-game.
- Move the stack of 4 rings to the right column; you cannot place a ring on a smaller one.
- Labeling the 3 platforms A, B, and C, move the top weight in the stack in the order below.
- A to B, A to C, B to C, A to B, C to A, C to B, A to B, A to C, B to C, B to A, C to A, B to C, A to B, A to C, and B to C.
- Take the BLACK DIAMOND (D).
- Walk forward to the square east.
- Look at the lion head and place the BLACK DIAMOND in the niche, then use the MIRROR on the black diamond (E).
- Walk left to enter the temple.
- Look at the floor; look at the drawing and take the STRING (F).
- Note the gate is powered by water (G).
- Walk down.
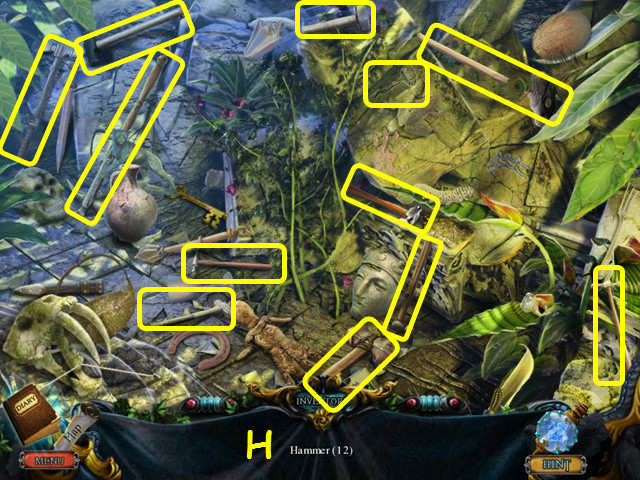
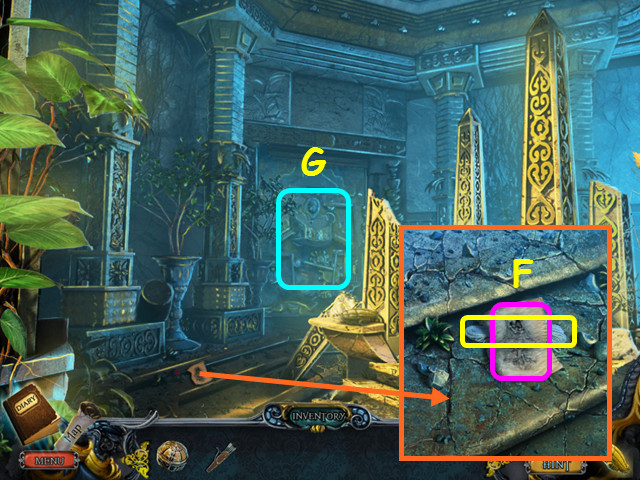
- Select the rubble for a HOS.
- Find the 12 hammers (H).
- You will earn the HAMMER.
- Walk down.
- Look at the bushes; place the QUIVER and the STRING with the bow, then take the BOW AND ARROW (I).
- The bow and arrow is now in your control panel (J).
- Use the HAMMER on the tiles, then take the 1/3 GOLD LOCK PIECE (K).
- Walk down twice.
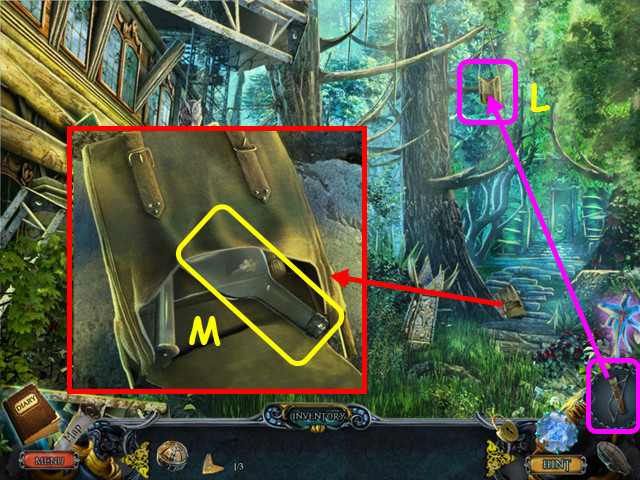
- Use the BOW AND ARROW on the hanging bag (L).
- Look at the bag and take the EMPTY WATER BOTTLE (M).
- Walk forward twice, then go right to the courtyard.
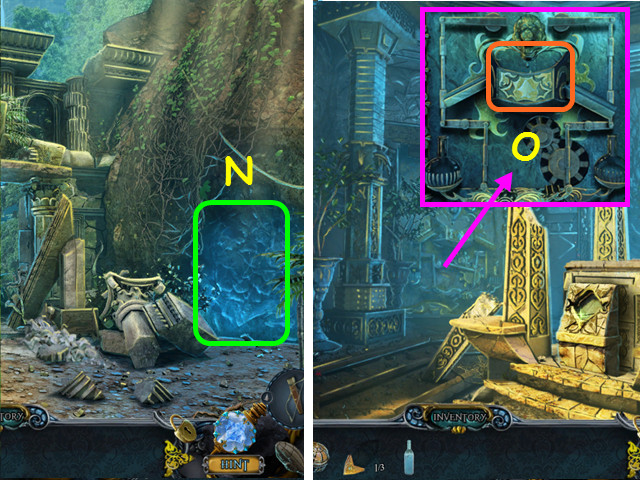
- Zoom into the crevice, then use the EMPTY WATER BOTTLE on the water to get the WATER BOTTLE (N).
- Walk down, forward, and left.
- Look at the door and use the WATER BOTTLE on the reservoir (O).
- Walk forward.
Chapter 3: The Temple
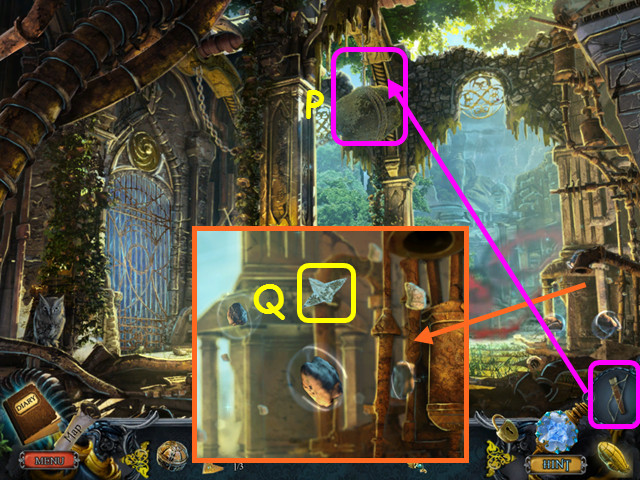
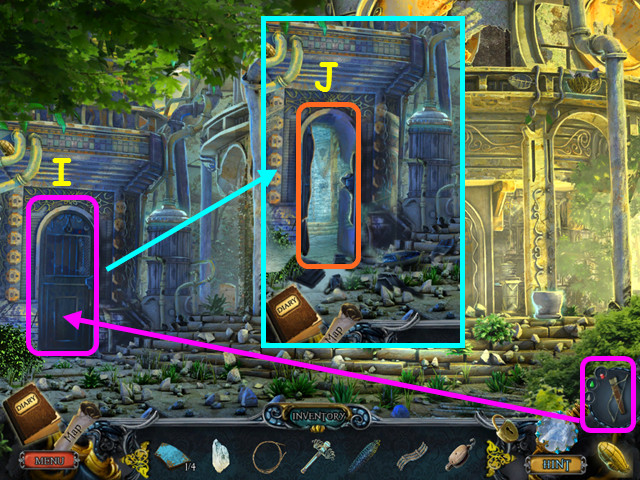
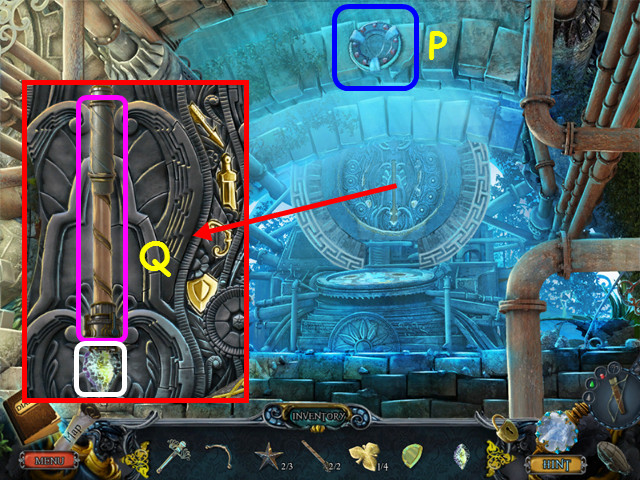
- Use the BOW AND ARROW on the hanging rock (P).
- Look at the floating rocks and take the CRYSTAL (Q).
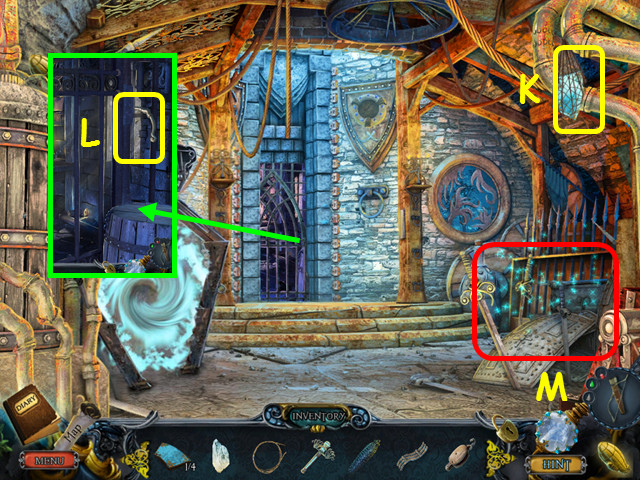
- Walk left to the temple sanctum.
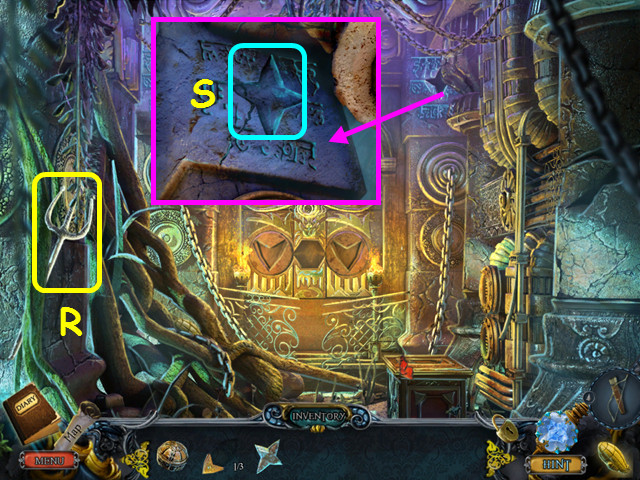
- Take the TRIDENT (R).
- Look at the carving and place the CRYSTAL in the indentation (S).
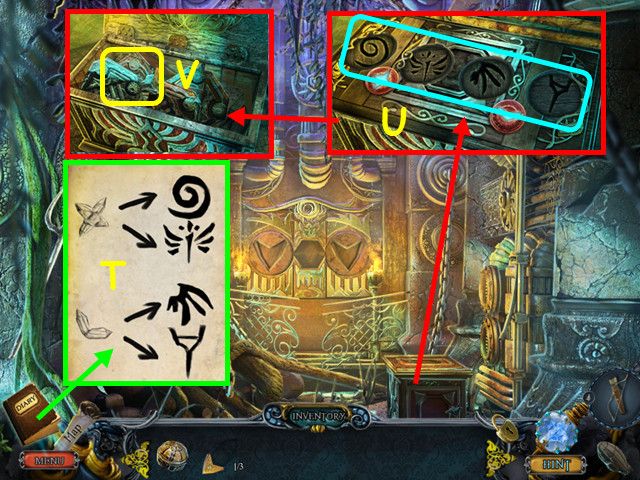
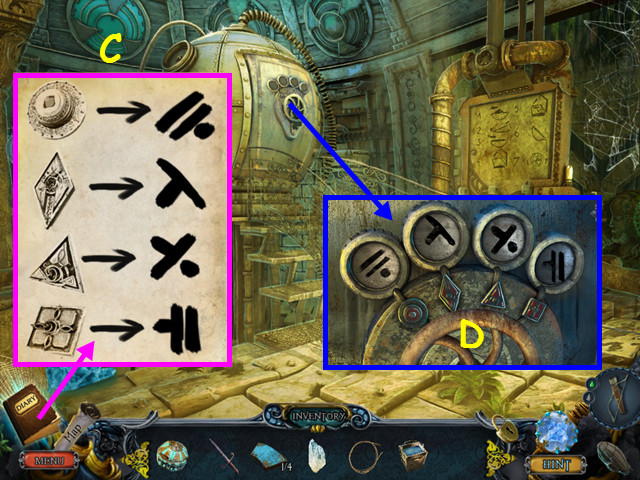
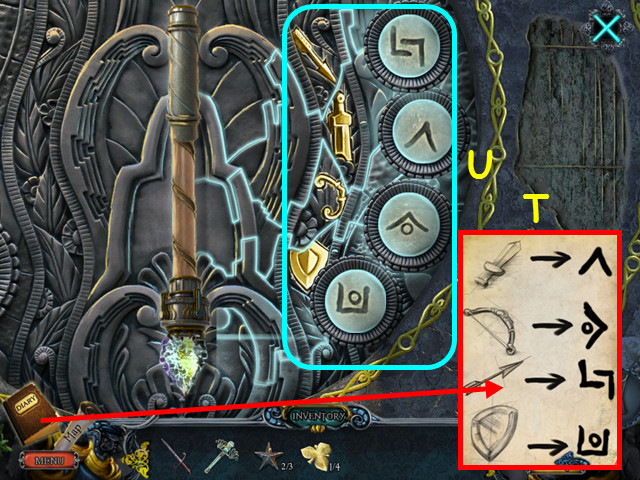
- Refer to your diary for the 4 symbol code (T).
- Look at the chest and enter the correct symbols (U).
- Take the PIECE OF THE CHEST PUZZLE (V).
- Walk down.
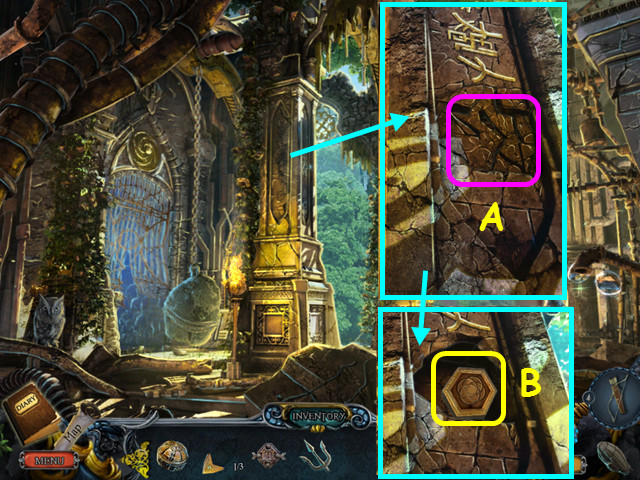
- Look at the column and use the TRIDENT on the cracked stone twice (A).
- Take the 2/3 GOLD LOCK PIECE (B).
- Walk down.
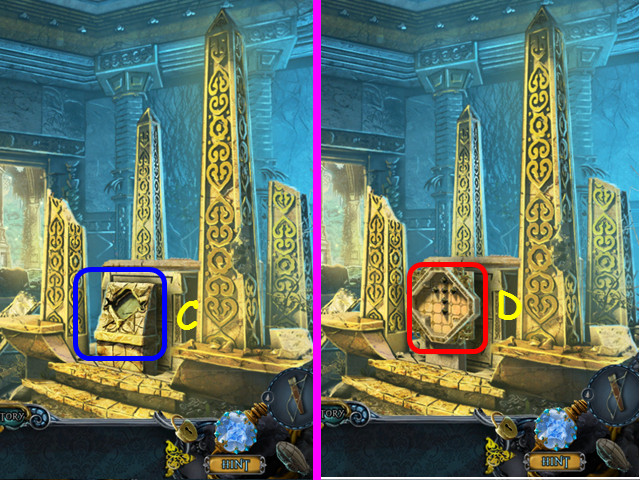
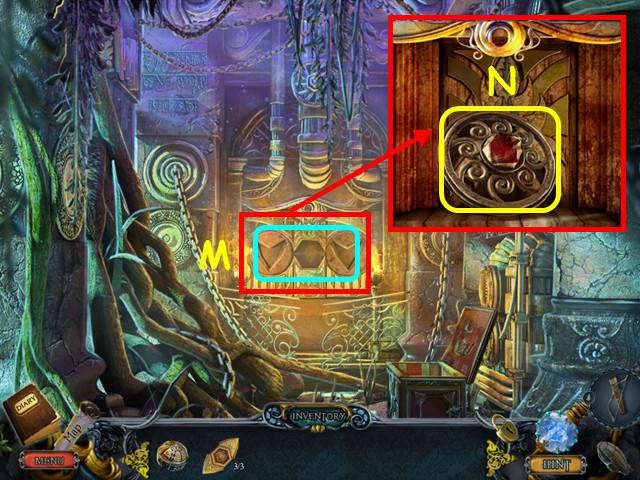
- Zoom into the altar and place the PIECE OF THE CHEST PUZZLE in the indentation (C).
- Look at the panel for a mini-game (D).
- Jump the frogs over each other until there is only one remaining.
- Move the frogs in numerical order (1-5).
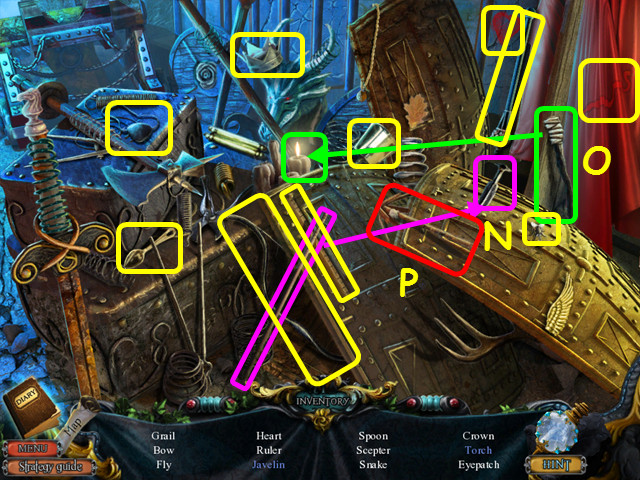
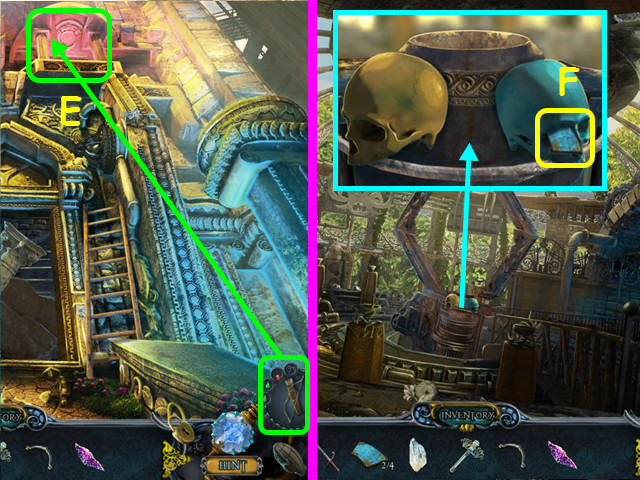
- Select the area behind the panel for a HOS.
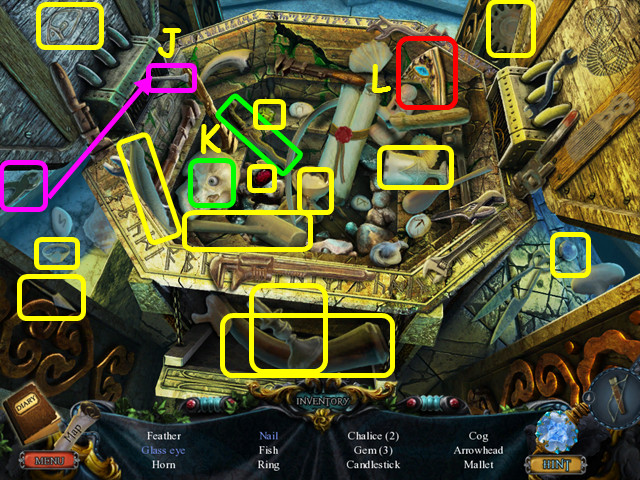
- Locate all the items on the list.
- Use the pliers to pull out the nail (J).
- Use the sword on the skull to get the glass eye (K).
- Take the 3/3 GOLD LOCK PIECE as the riddled item (L).
- Walk forward, then go left to the temple sanctum.
- Zoom into the panel and place the 3 GOLD LOCK PIECES in the device (M).
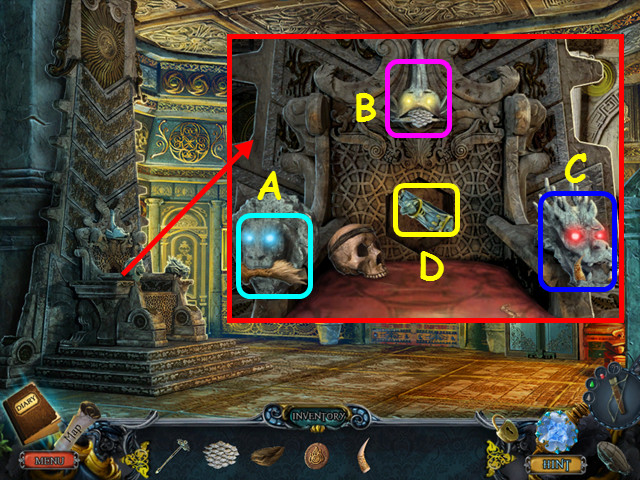
- Take the EYE (N).
- Walk down 4 times.
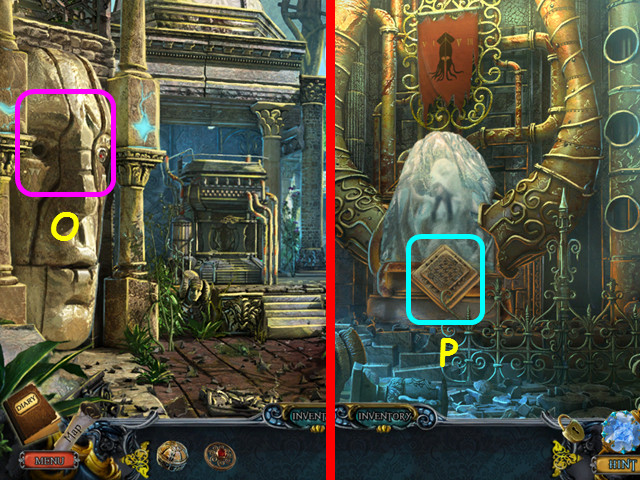
- Zoom into the head and place the EYE in the socket (O).
- Walk left into the temple engine room.
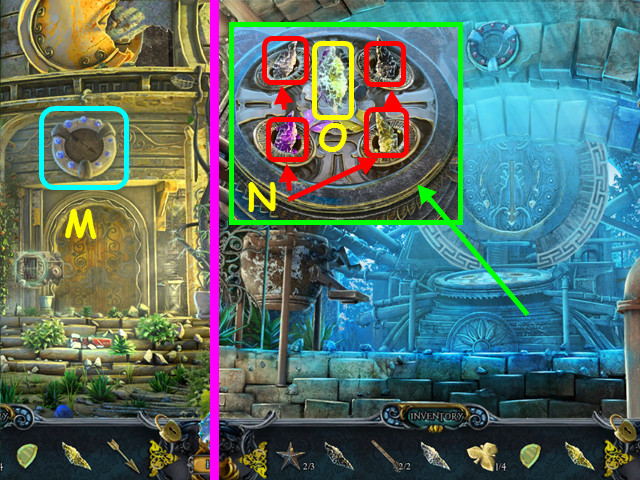
- Look at the base of the ice for a mini-game (P).
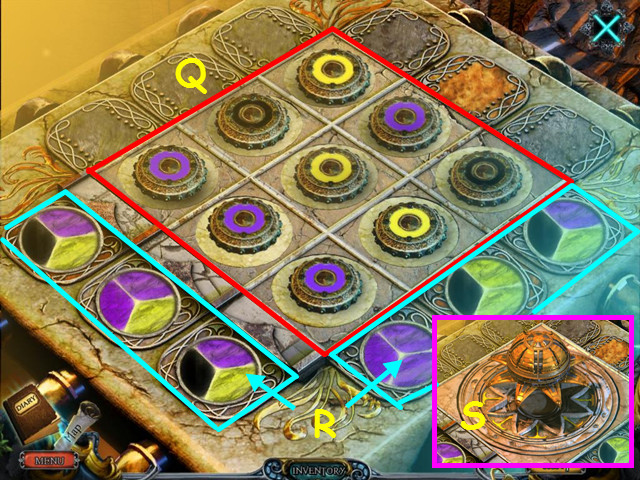
- Place the discs so the color requirements for each row and column are met (Q).
- Each row and column has a circle with 3 slices indicating the colors needed (R).
- Once the device opens, place the EMPTY ARTIFACT in the center (S).
- After the cut-scene, take the RECHARGED ARTIFACT from the dark being (T).
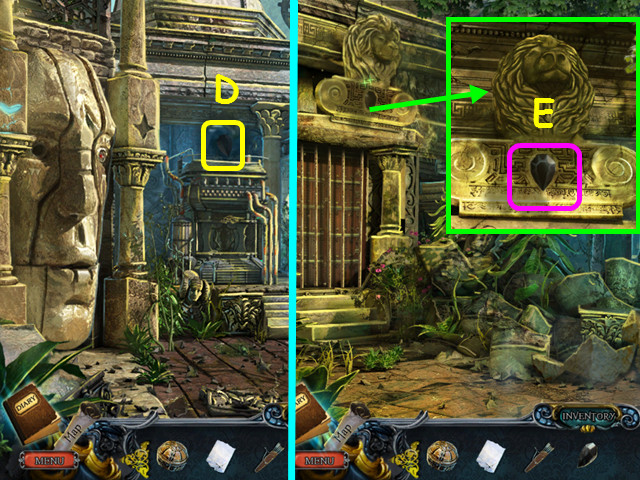
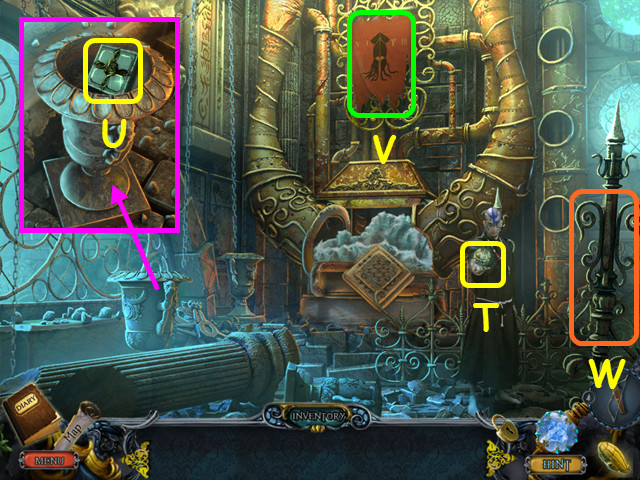
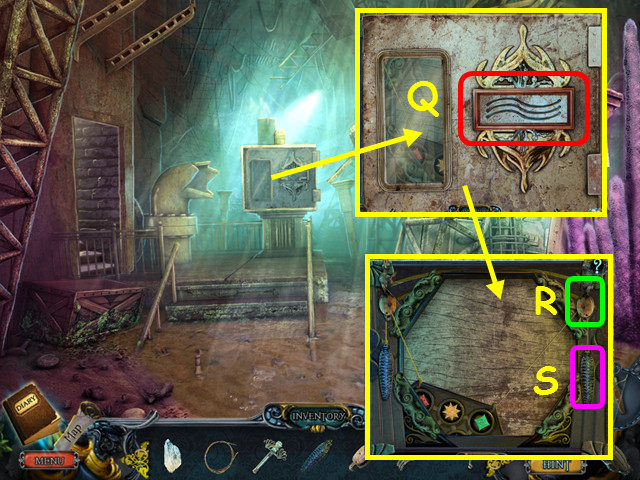
- Look in the urn and take the RECTANGLE SHAPE (U).
- Zoom into and pull off the banner (V).
- Select the ornate staff for a HOS (W).
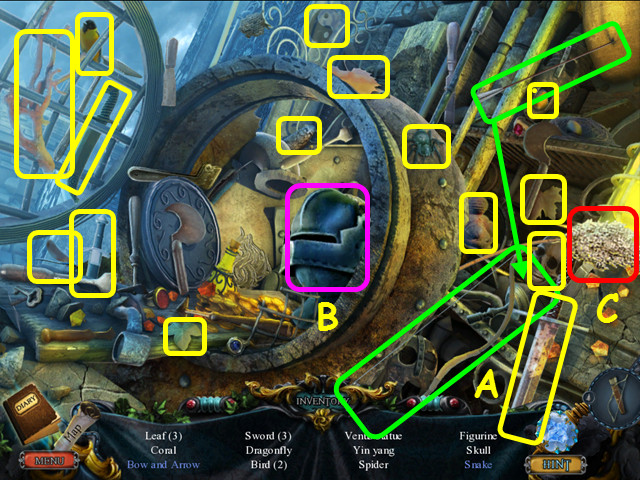
- Locate all the items on the list.
- Place the arrow with the bow to make the bow and arrow (A).
- Open the helmet to find the snake (B).
- Take the FLUFFY FLOWER as the riddled object (C).
- Walk down, forward, left, and forward.
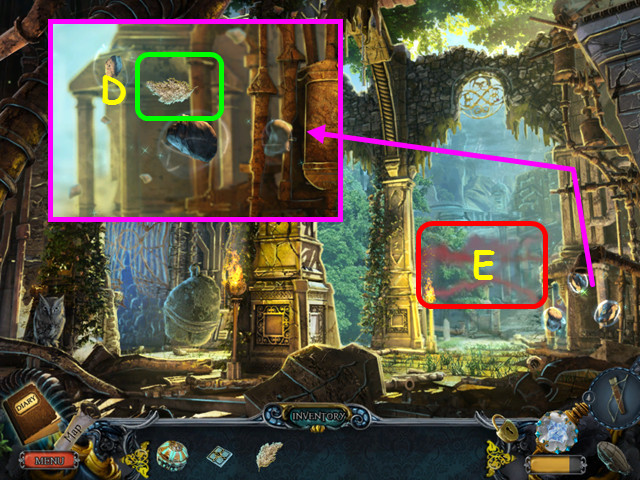
- Look at the floating rocks and use the FLUFFY FLOWER on them to get the HARVESTED LEVITATION POWDER (D).
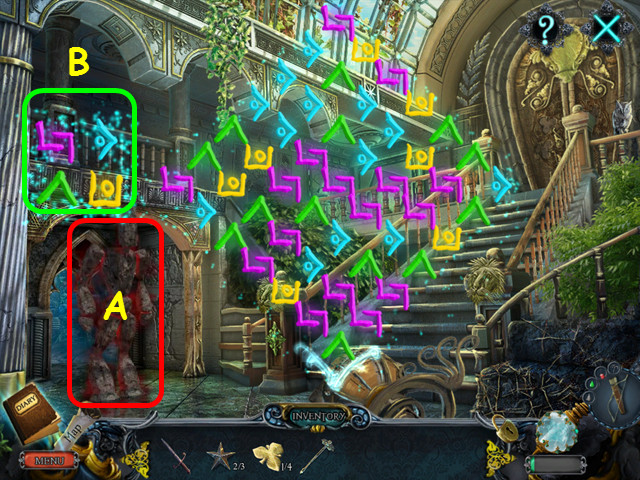
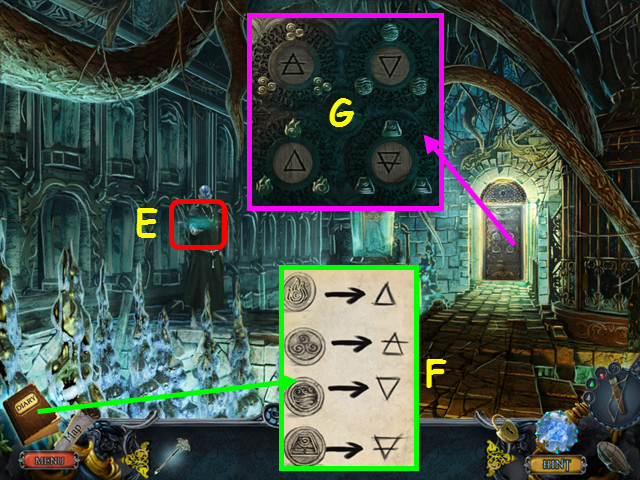
- Use the RECHARGED ARTIFACT on the red wisps for a mini-game (E).
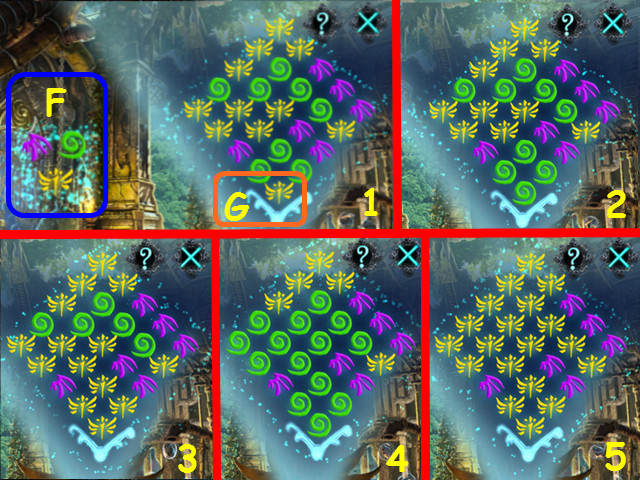
- Choose colors from the small left panel (F) to change all the glyphs to the same color.
- First select a color to change the bottommost glyph to (G) – this will also change all the touching glyphs of the same color.
- For instance, if the bottom glyph is yellow, you need to select green or purple; you should select the color that group of yellow touches the most.
- Continue in this manner until all the glyphs are the same color.
- Our solution was to select green (1), yellow (2), green (3), yellow (4), and for the last move we would choose purple (5).
- This mini-game is randomly generated; your solution may vary.
- Walk forward twice.
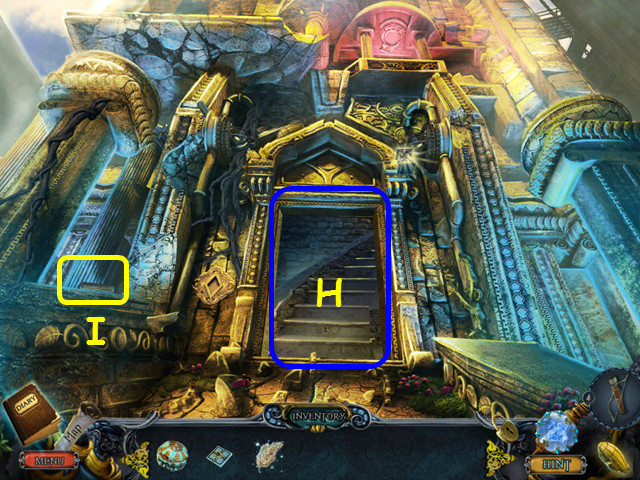
- Try to enter the observatory tower (H).
- Take the 1/3 LADDER CROSSBAR (I).
- Walk down 4 times to the square east.
Chapter 4: The Foundry
- Use the HARVESTED LEVITATION POWDER on the rocks (J).
- Walk right to the foundry hall (K).
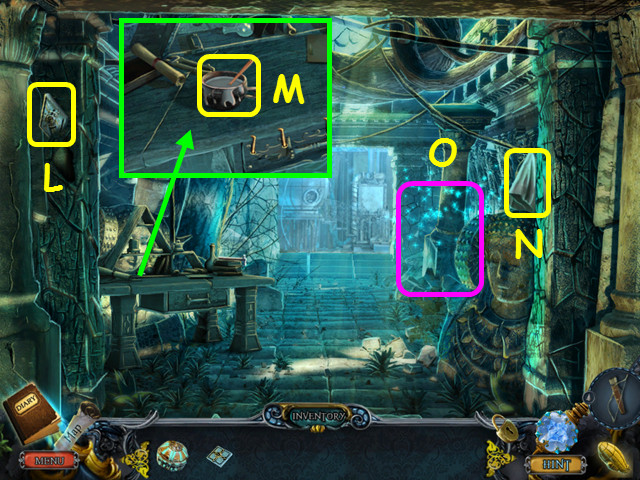
- Take the DIAMOND SHAPE (L).
- Look at the desk and take the WOOD GLUE (M).
- Take the DAMP CLOTH (N).
- Select the column for a HOS (O).
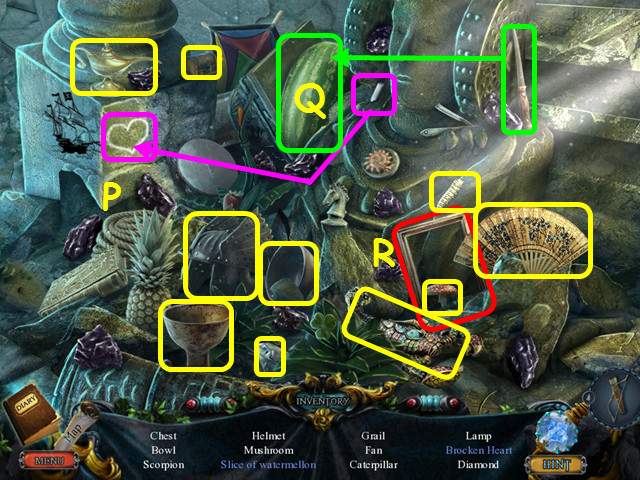
- Locate all the items on the list.
- Use the chalk on the heart to make the broken heart (P).
- Use the knife on the watermelon to get the slice of watermelon (Q).
- Take the FRAME as the riddled item (R).
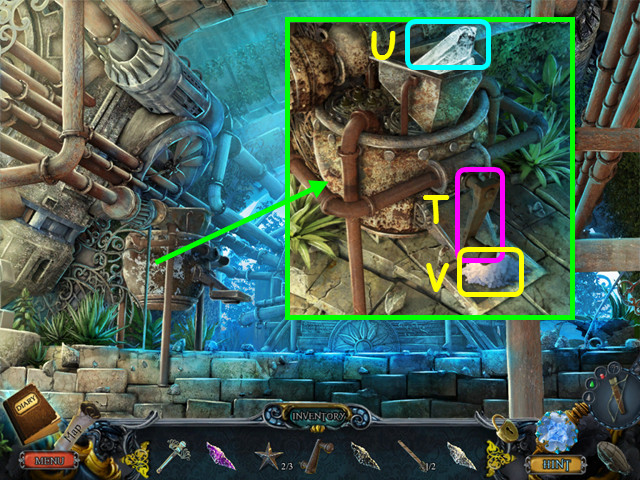
- Walk forward.
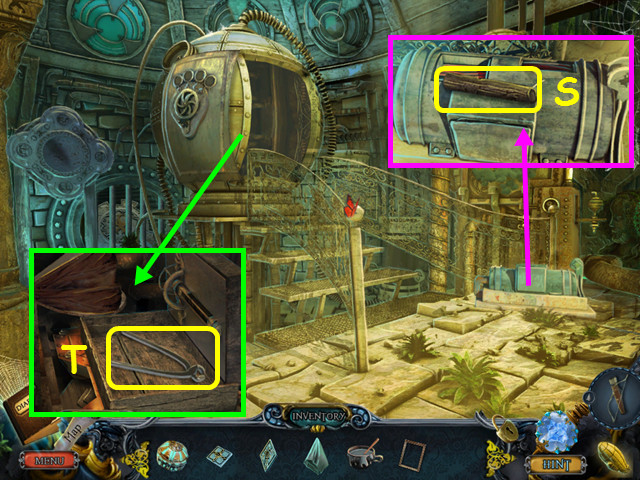
- Look at the pump and take the 2/3 LADDER CROSSBAR (S).
- Look inside the sphere and take the PAIR OF PLIERS (T).
- Exit the sphere and walk down.
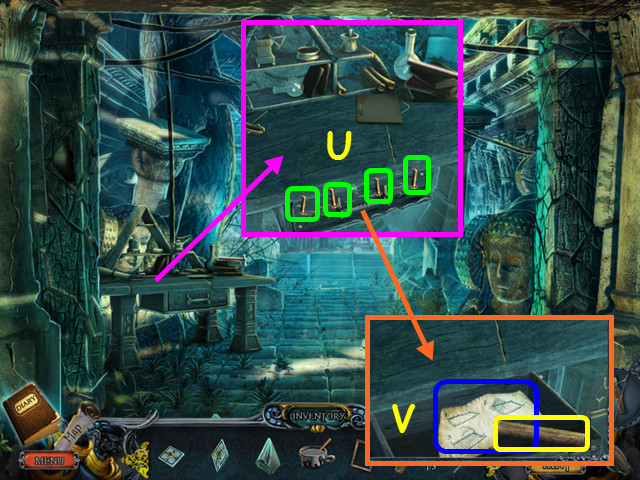
- Look at the desk and use the PAIR OF PLIERS to take the 4 NAILS (U).
- Open the drawer, read the instructions, and take the 3/3 LADDER CROSSBAR (V).
- Walk down 3 times.
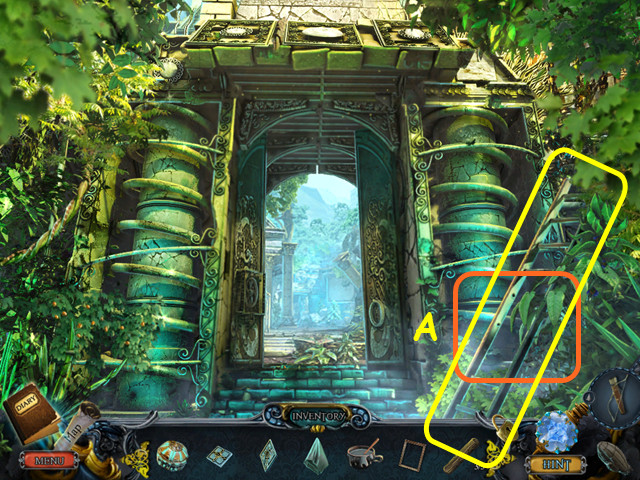
- Use the WOOD GLUE on the ladder, then add the 3 LADDER CROSSBARS (A).
- Take the LADDER.
- Walk forward twice, go left, forward, then go right and forward to the observatory entrance.
- Zoom into the inlay and place the DIAMOND SHAPE inside (B).
- Use the LADDER on the lantern (C).
- Look at the lantern, use the DAMP CLOTH to clean it, then take the LANTERN (D).
- Walk down 3 times.
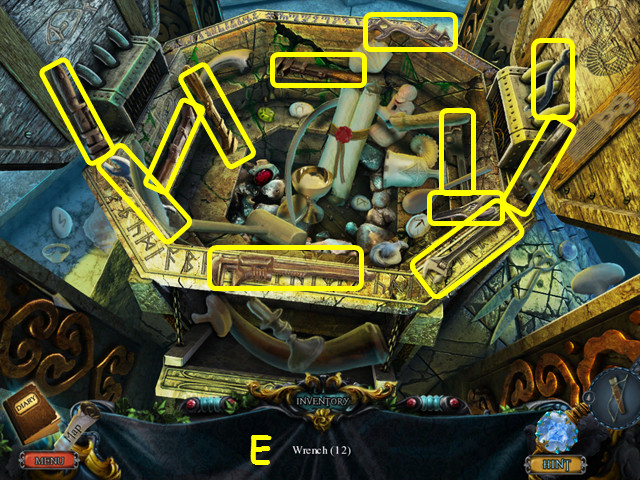
- Look at the obelisks for a HOS.
- Locate the 12 wrenches (E).
- You will earn the WRENCH.
- Walk down twice, then go left to the temple engine room.
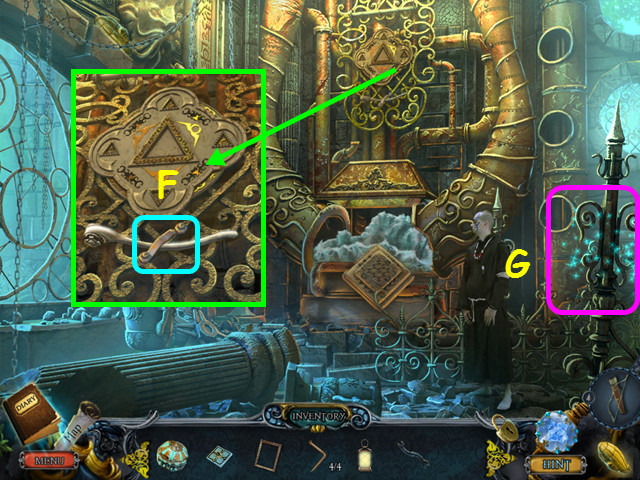
- Look at the emblem and use the WRENCH to take the PUMP PART (F).
- Select the ornate staff on the right for a HOS (G).

- Locate the 12 scrapers (H).
- You will earn a SCRAPER.
- Walk down, go forward, right, then forward again.
- Zoom into the sign; use the SCRAPER 3 times to remove the moss, then read the instructions (I).
- Look at the pump and place the PUMP PART on top (J).
- Look at the front of the pump and remove the cover for a mini-game (K).
- Place the 4 arrows into the center box (L).
- Click an arrow to rotate it into position, then drag it into the box.
- Take the PUMP.
- Walk down 3 times, then go to the right.
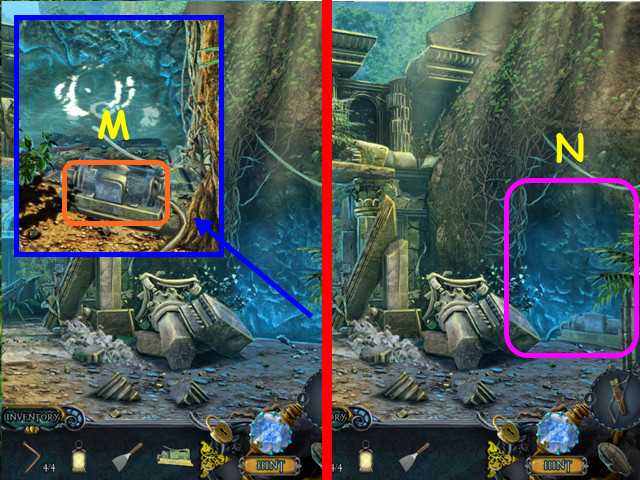
- Look at the pool of water and place the PUMP next to it (M).
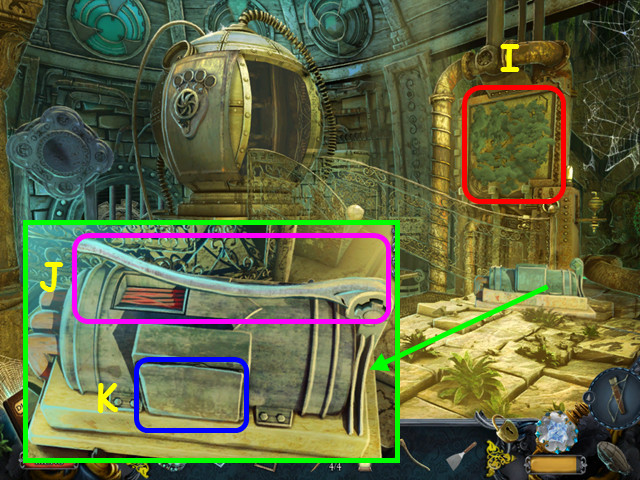
- Walk right to the underground passage (N).
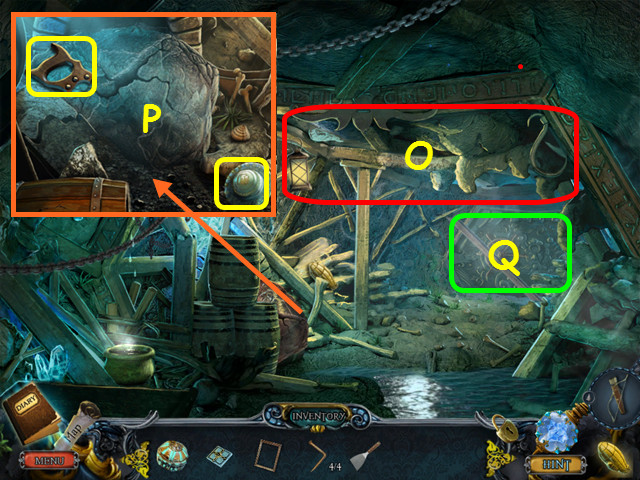
- Use the LANTERN on the darkness (O).
- Look by the barrels; take the SAW HANDLE and the CIRCULAR SHAPE (P).
- Note the mini-game on the door (Q).
- Walk down, then go forward to the pond.
- Look at the water; place the SAW HANDLE on the blade to get the HAND SAW (R).
- Walk down.
- Select the rubble for a HOS (S).

- Locate all the items on the list.
- Place the wing on the helmet to make the winged helmet (T).
- Use the hammer on the statue head to get the nose (U).
- Take the WIRE NET as the riddled item (V).
- Walk down, go forward, then go right.
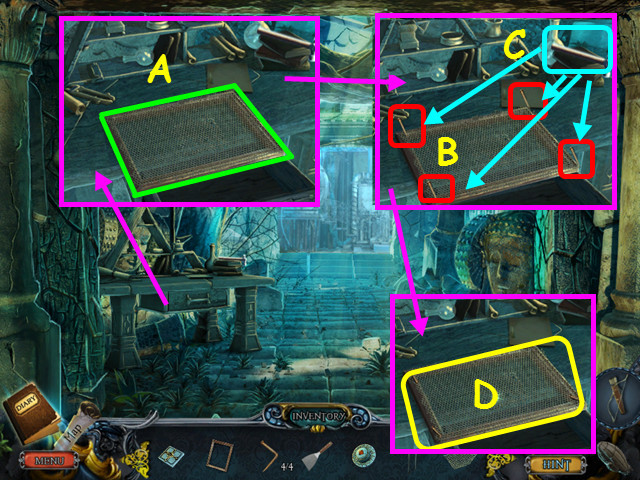
- Look at the desk; place the FRAME, then the WIRE NET on the table (A).
- Place the NAILS on the frame (B), then use the hammer (C) on each of the 4 nails.
- Take the SIFTER (D).
- Walk down twice, then go to the right twice to the underground passage.
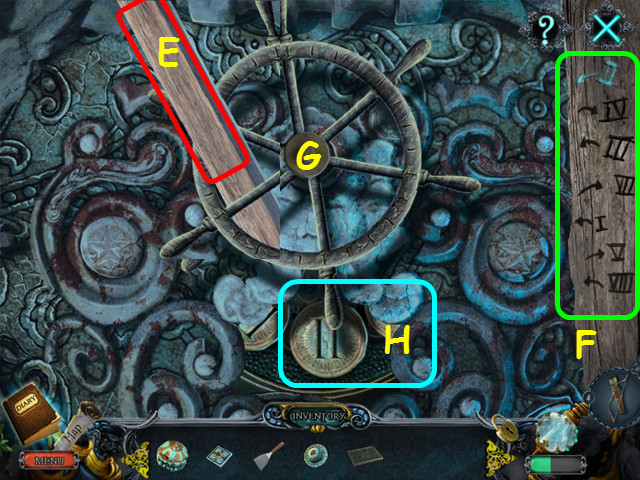
- Look at the door for a mini-game.
- Use the HAND SAW on the upper part of the beam (E).
- Use the clues carved on the right (F) to turn the wheel (G).
- Drag the wheel counterclockwise until the Roman numeral II shows in the opening (H).
- Next, drag the wheel clockwise until the IV shows in the opening.
- You will hear a bing when correct and the numeral will light up.
- Drag the wheel back and forth until all the numerals are lit on the right.
- Walk right to the beach.
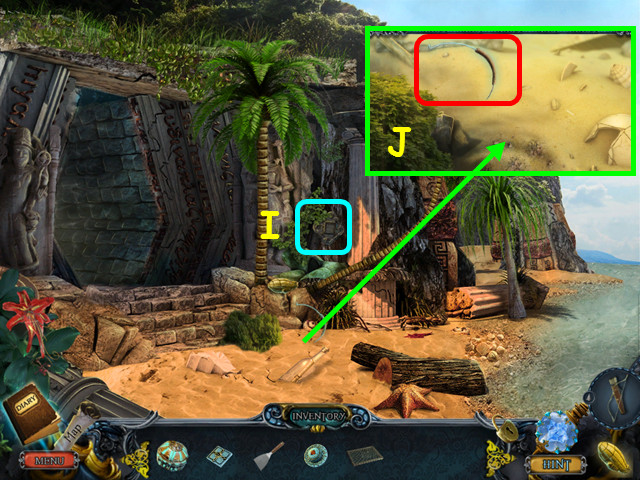
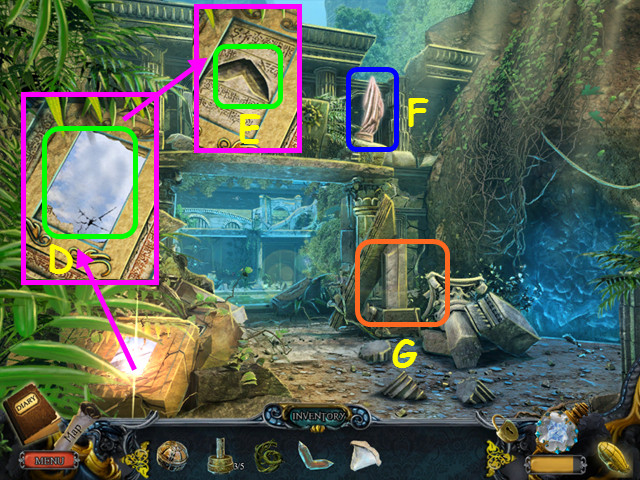
- Zoom into the frame and place the RECTANGLE SHAPE in the center (I).
- Look at the sand and take the BUCKET HANDLE (J).
- Walk down.
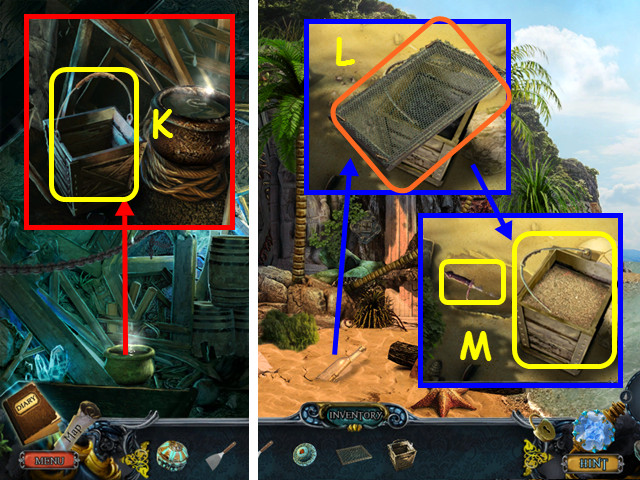
- Look at the dripping water; place the BUCKET HANDLE on the BUCKET, then take it (K).
- Walk to the beach.
- Look at the sand; place the BUCKET, then the SIFTER on the sand (L).
- Move the sifter, then take the BUCKET OF SAND and the RUSTY DAGGER (M).
- Walk forward.
- Look at the skeleton; take the recipe (N) and the PRUNING SHEARS (O).
- Walk down.
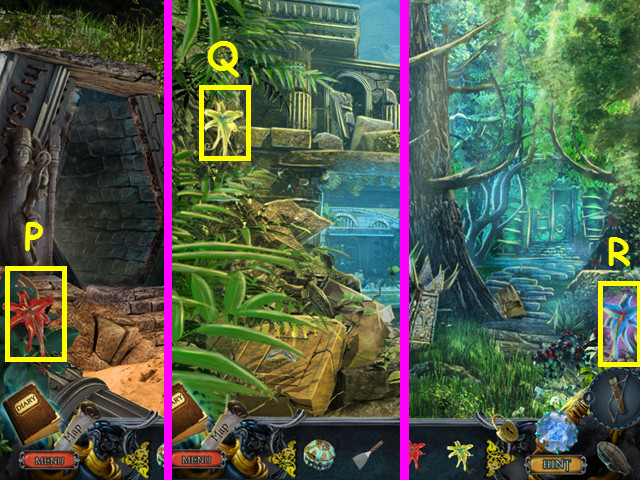
- Use the PRUNING SHEARS to take the RED FLOWER (P).
- Walk down twice.
- Use the PRUNING SHEARS to take the YELLOW FLOWER (Q).
- Walk down 3 times.
- Use the PRUNING SHEARS to take the BLUE FLOWER (R).
- Select the bushes on the left for a HOS.
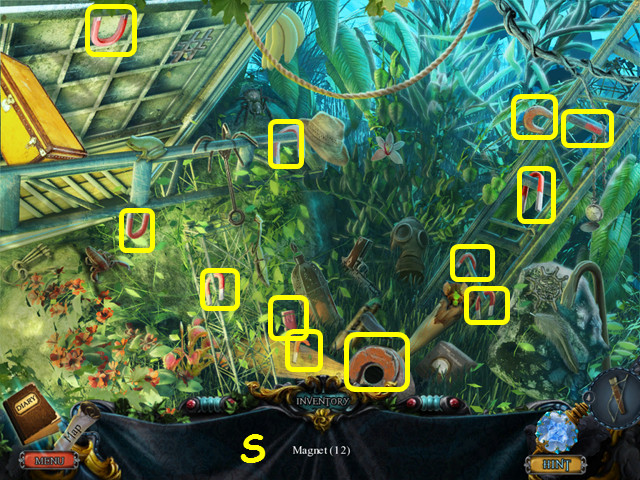
- Locate the 12 magnets (S).
- You will earn the MAGNET.
- Walk forward twice, then go right twice.
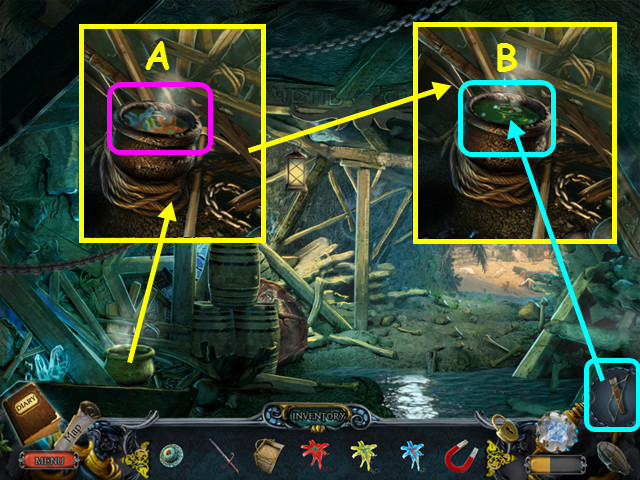
- Look at the pot; place the RED FLOWER, BLUE FLOWER, and the YELLOW FLOWER into the water (A).
- Use the BOW AND ARROW on the pot (B).
- You will now have the poison arrows.
- Walk forward twice.
- Use the BOW AND ARROW on the giant crab (C).
- Look in the corner and use the RUSTY DAGGER on the chunk of salt (D).
- Take the 1/4 OBSERVATORY WALKWAY PUZZLE PIECE and the SALT LUMP (E).
- Walk forward.
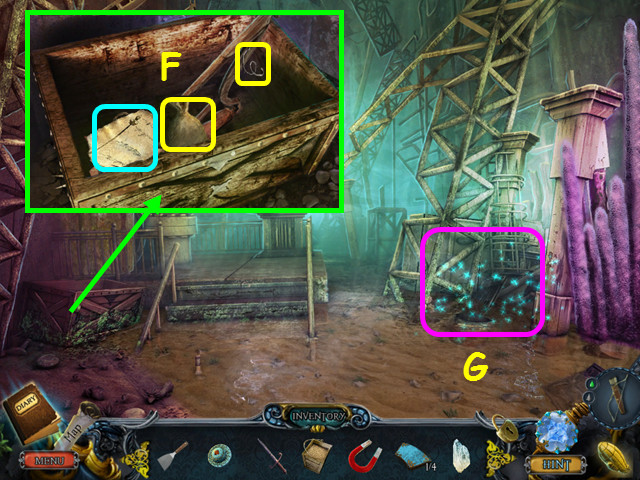
- Look in the crate; take the instructions, GUNPOWDER, and the HARP STRING (F).
- Look at the base of the column for a HOS (G).
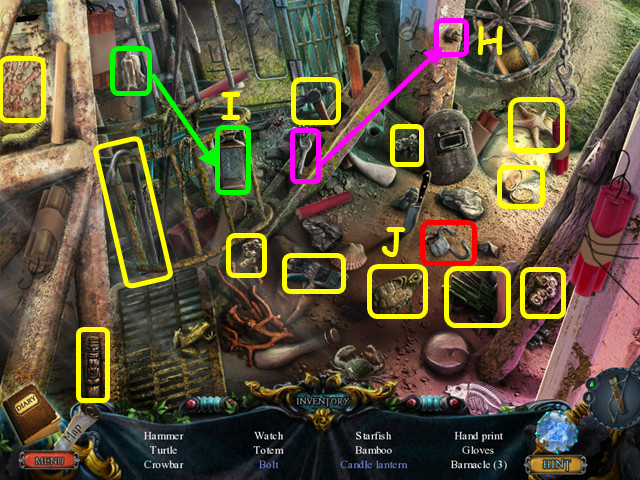
- Locate all the items on the list.
- Use the wrench to remove the bolt (H).
- Place the candle inside the lantern to make the candle lantern (I).
- Take the FLINT AND STEEL as the riddled object (J).
- Walk down 3 times.
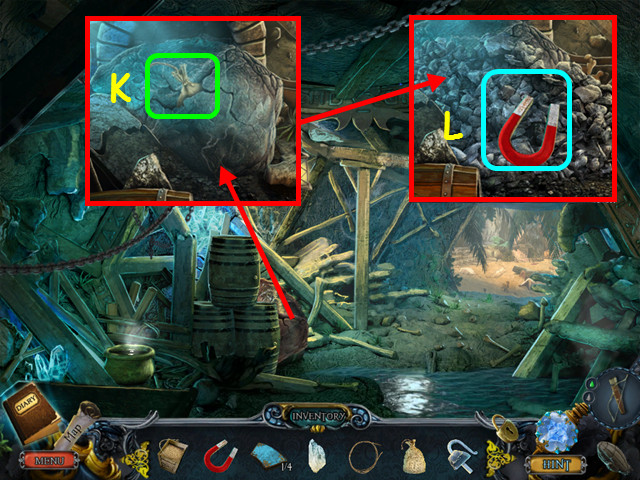
- Look behind the barrels and place the GUNPOWDER in the cracked rock. Use the FLINT AND STEEL on the pouch (K).
- Use the MAGNET on the rubble to get the ORE (L).
- Walk down twice, go forward, then walk to the right.
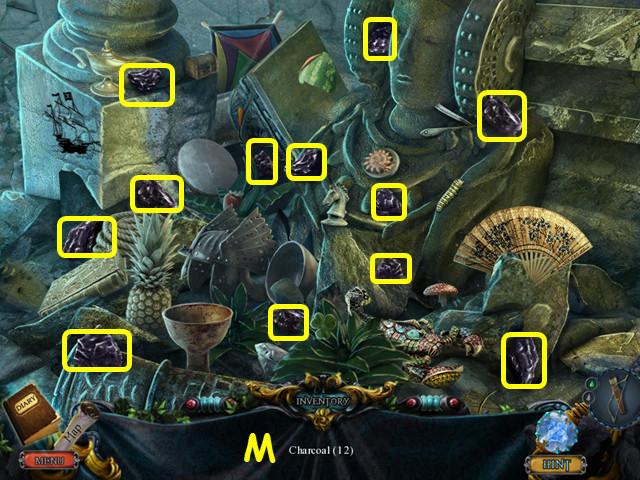
- Select the debris on the right for a HOS.
- Locate the 12 charcoal (M).
- You will earn the CHARCOAL.
- Walk forward, then enter the sphere.
- Place the BUCKET OF SAND in the crate (N).
- The EMPTY BUCKET will go back into your inventory.
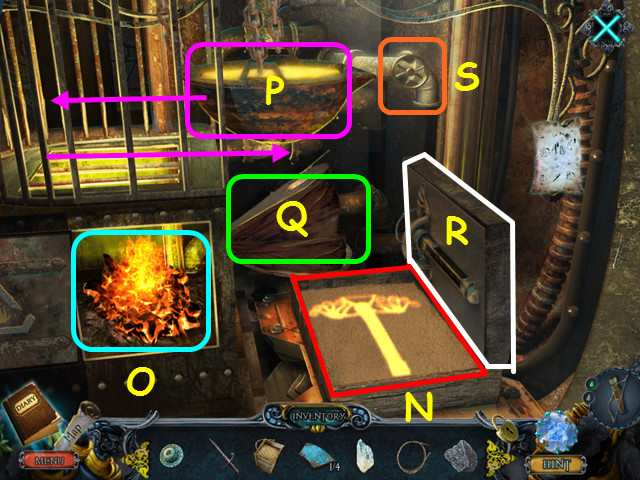
- Place the CHARCOAL in the oven (O).
- Place the ORE in the hopper, then push it to the left (P).
- Pump the bellows (Q).
- Once the ore melts, push the hopper to the right.
- Close, then open the box (R).
- Tip the hopper to pour the ore into the box.
- Turn the valve (S).
- Take the TRIANGLE SHAPE from the sphere door (T).
- Zoom into the frame and place the CIRCULAR SHAPE in the center (U).
- Walk down 3 times, then walk to the left.
- Zoom into the frame and place the TRIANGLE SHAPE in the center (A).
- Walk down, right, and forward.
- Zoom into the water and use the EMPTY BUCKET to get the BUCKET OF WATER (B).
- Walk down twice, go forward, right, then forward again.
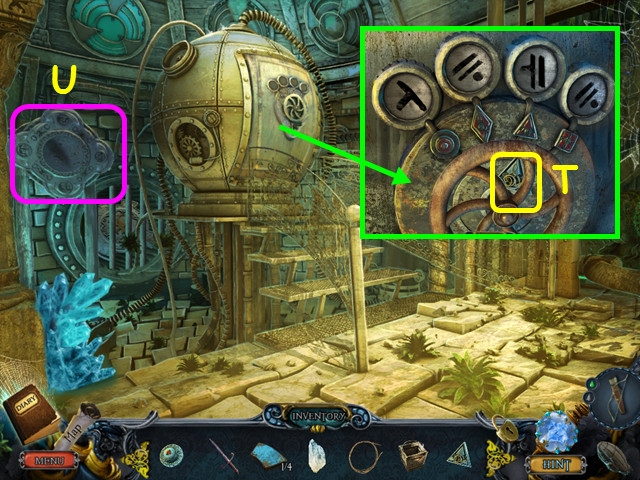
- Look at the diary for the code (C).
- Look at the sphere door and enter the code (D).
- Take the AMARANTHINE STAFF PIECE (E).
- The ARTIFACT will attach to the staff piece automatically.
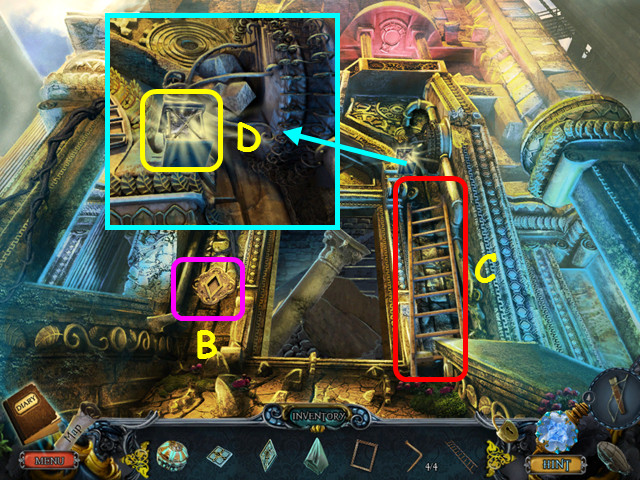
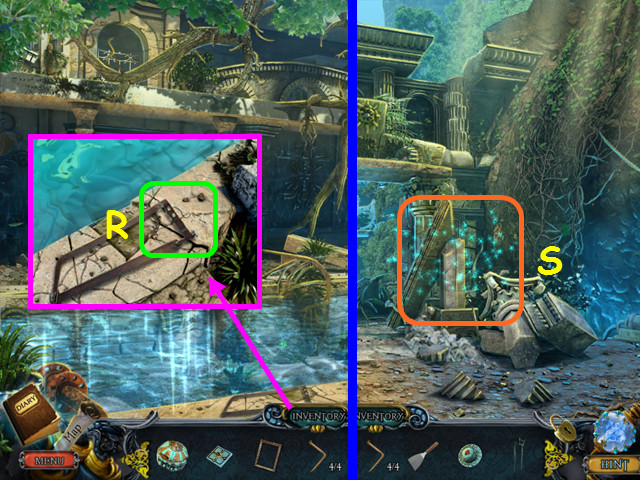
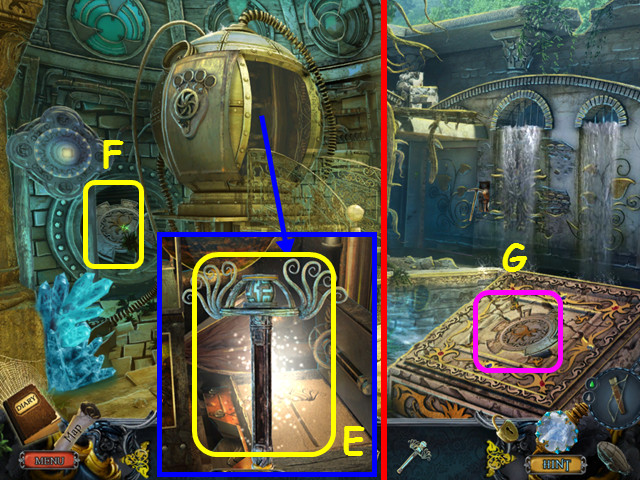
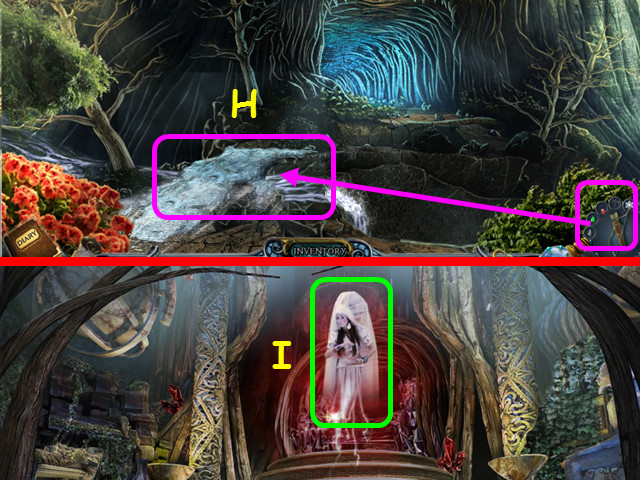
- Take the POND PUZZLE PIECE (F).
- Walk down 3 times, go to the right, then go forward to the pond.
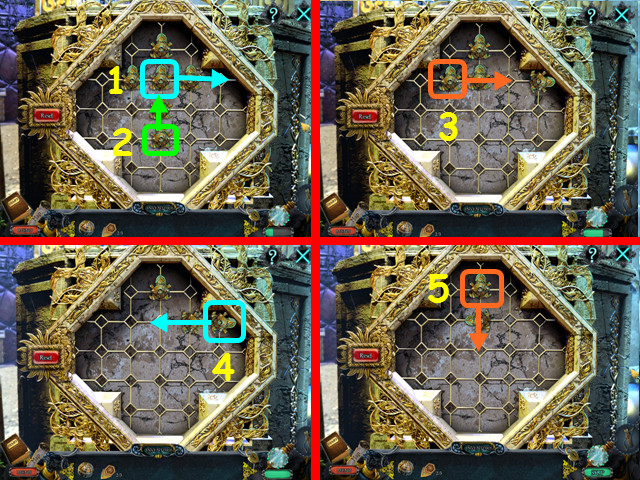
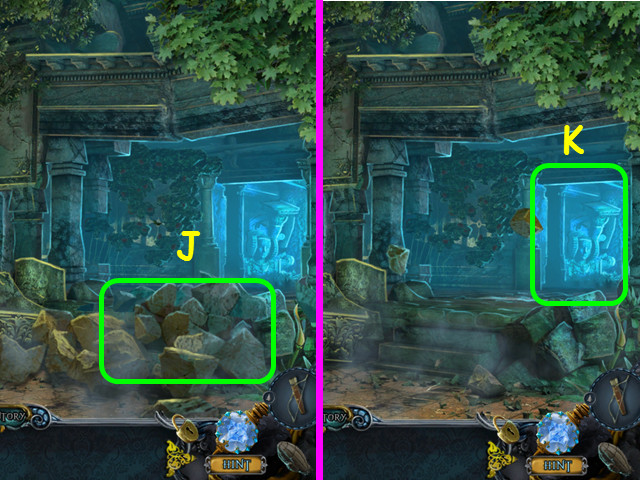
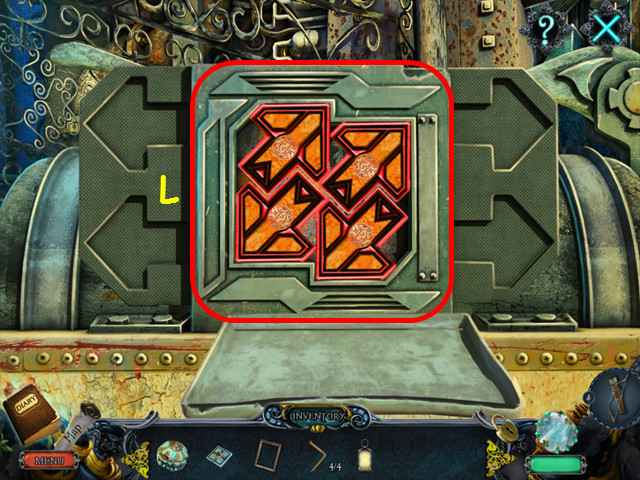
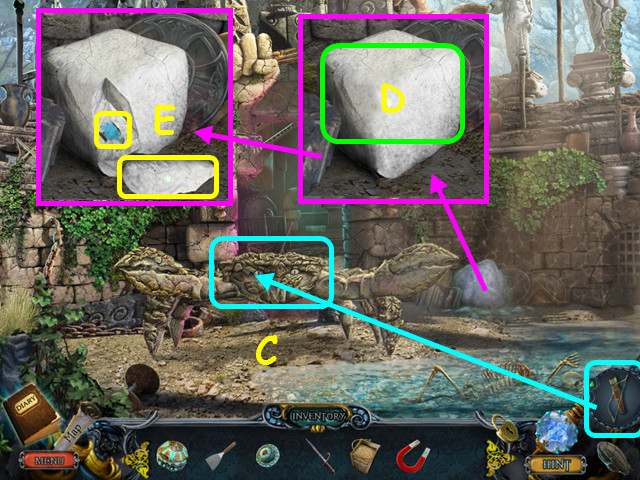
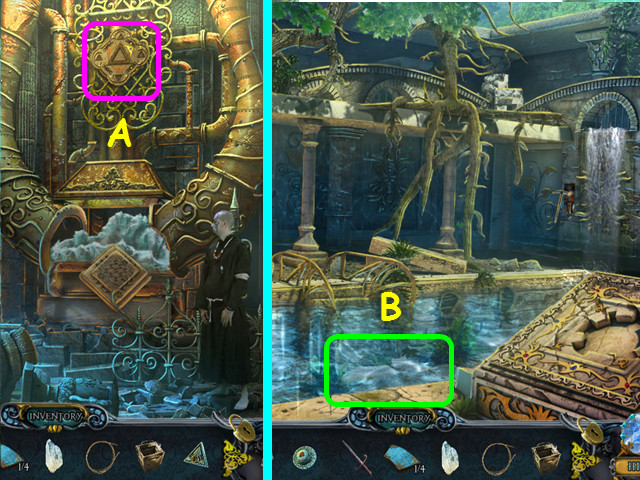
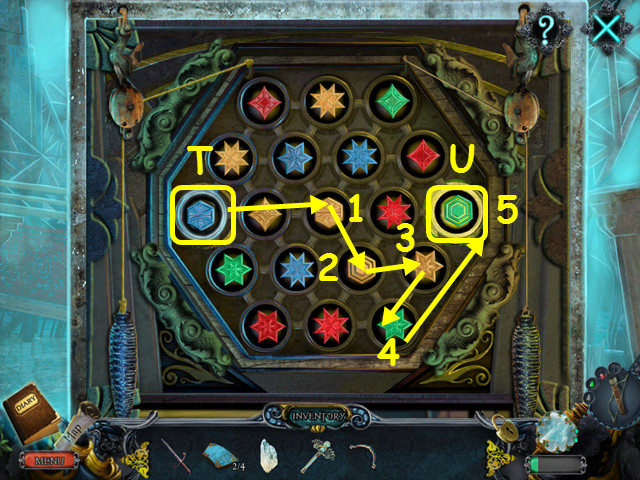
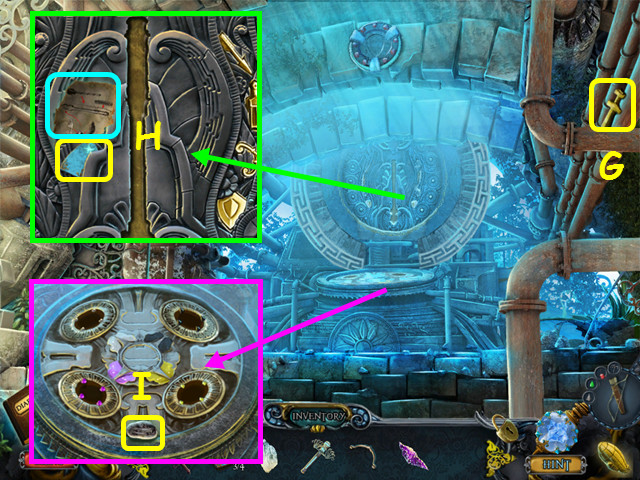
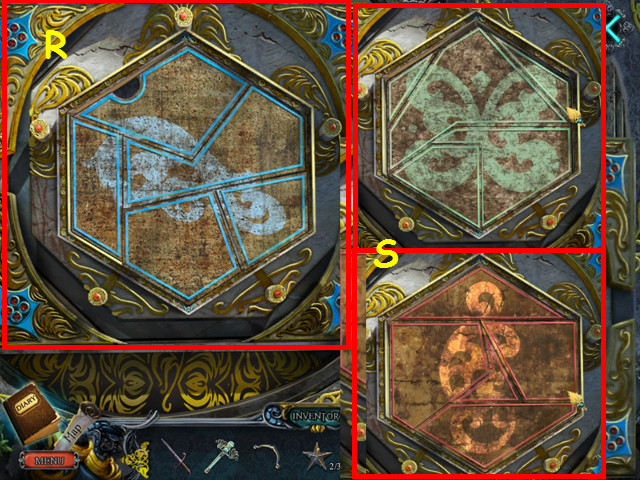
- Place the POND PUZZLE PIECE in the niche, then look at it for a mini-game (G).
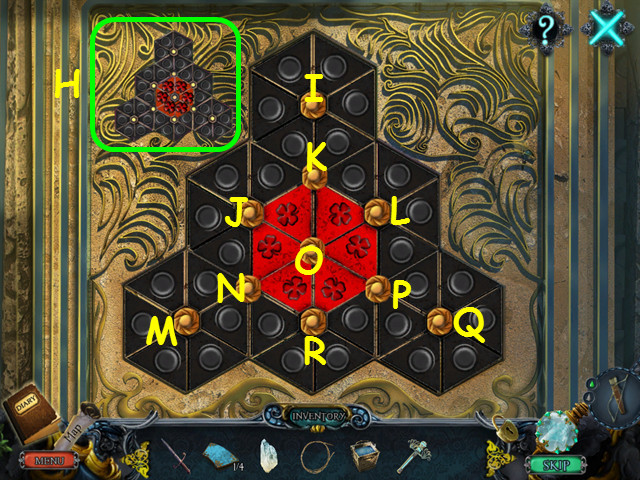
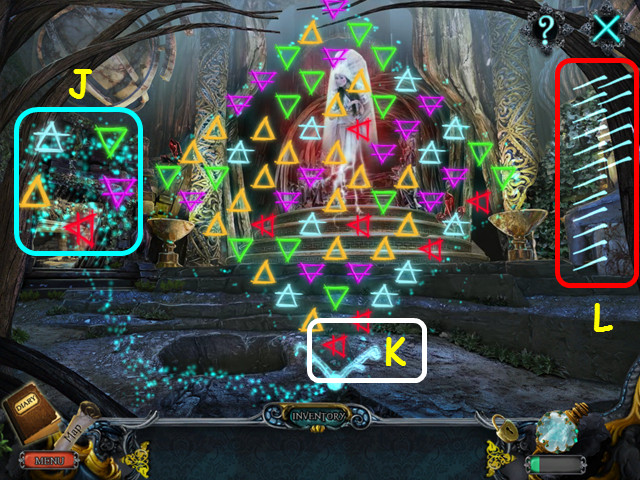
- Move all the red triangles to the center hexagon, as shown in the diagram (H).
- Our solution was: Mx2, Nx3, Ox1, Px1, Qx2, Px2, Kx1, Ix4, and Kx2.
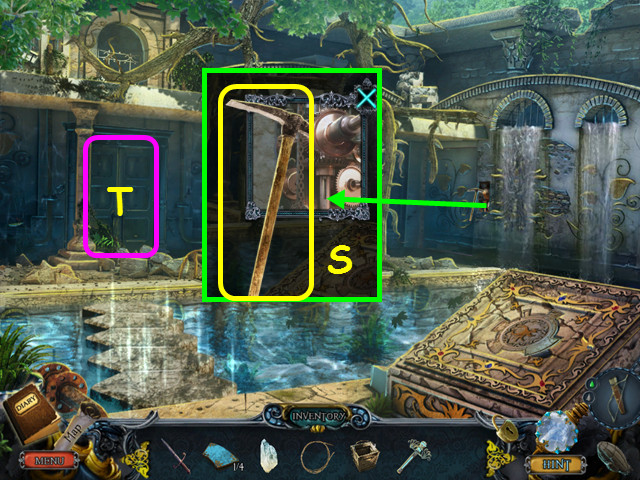
- Look at the controls and take the PICKAXE (S).
- Walk forward to the palace plaza (T).
Chapter 5: The Palace
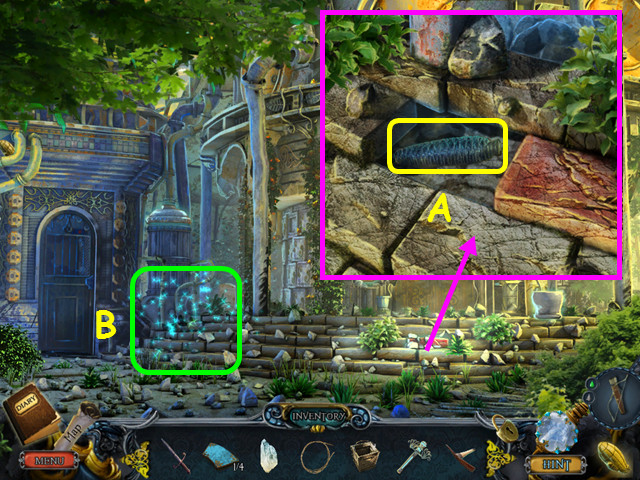
- Look at the steps, use the PICKAXE to remove a brick, then take the METAL WEIGHT (A).
- Select the boiler for a HOS (B).
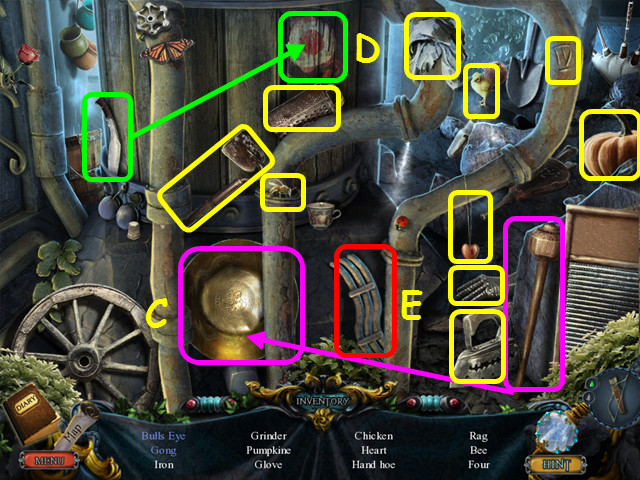
- Locate all the items on the list.
- Use the drumstick on the metal plate to make the gong (C).
- Throw the knife at the target to make the bull’s-eye (D).
- Take the WAVE SYMBOL as the riddled item (E).
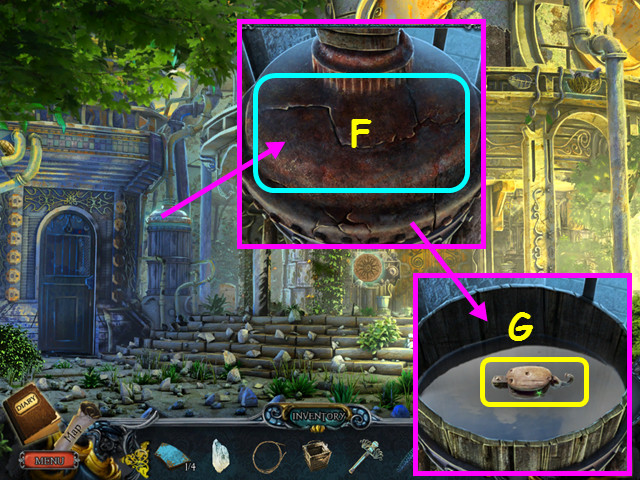
- Look at the boiler and remove the lid (F).
- Pour in the BUCKET OF WATER, then take the MINIATURE PULLEY (G).
- Walk down, then go right.
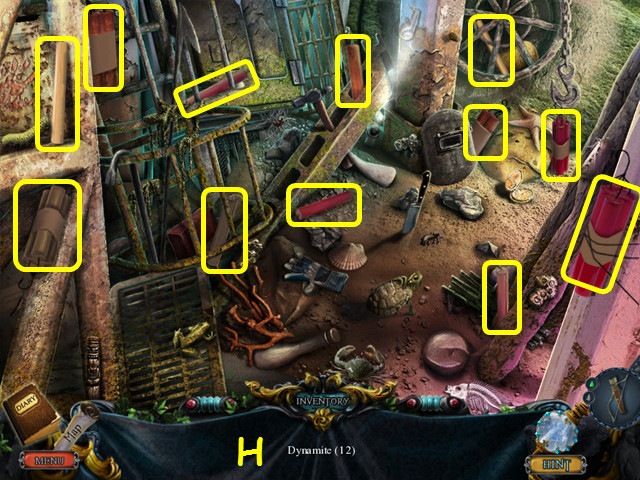
- Look at the base of the column for a HOS.
- Locate the 12 dynamite (H).
- You will now have explosive arrows.
- Walk left, then go forward.
- Use the BOW AND ARROW on the door (I).
- Walk left to the armory (J).
- Take the 2/4 OBSERVATORY WALKWAY PUZZLE PIECE (K).
- Look at the prison cell and take the GOLD BOW (L).
- Select the shield for a HOS (M).
- Locate all the items on the list.
- Place the shaft on the blade to make the javelin (N).
- Use the unlit torch on the candles to make the torch (O).
- Take the GRAPPLING HOOK as the riddled item (P).
- The GRAPPLING HOOK will combine with your BOW AND ARROW.
- Walk down twice, then go right.
- Look at the device and place the WAVE SYMBOL in the indentation (Q).
- Place the MINIATURE PULLEY on the right hook (R).
- Put the HARP STRING on the pulley, then attach the METAL WEIGHT (S).
- This will trigger a mini-game.
- Find a path from the blue symbol on the left (T) to the green symbol on the right (U).
- Select the left blue symbol, then move to any symbol in a direct line that has the same color or symbol.
- Continue until you reach the right green symbol.
- Our solution was to make the moves (1-5).
- Take the PURPLE GEMSTONE from behind the panel.
- Walk left, go down twice, walk forward, left, forward, then go to the right to the observatory walkway.
- Note the mini-game on the column (A).
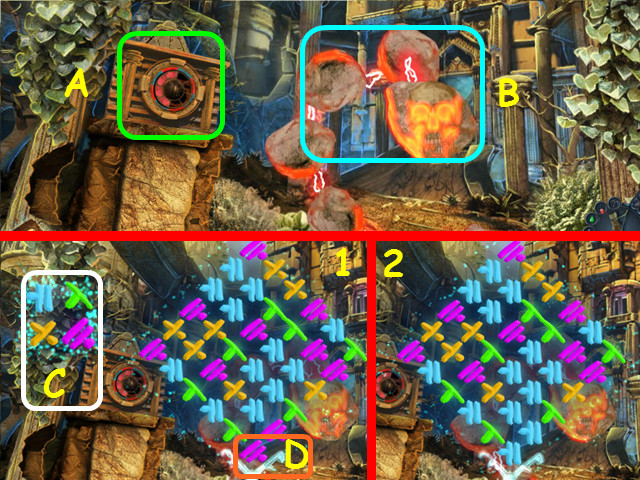
- Use the AMARANTHINE STAFF PIECE on the rock monster for a mini-game (B).
- Choose colors from the small left panel (C) to change all the glyphs to the same color.
- First select a color to change the bottommost glyph to (D) – this will also change all the touching glyphs of the same color.
- For instance, if the bottom glyph is yellow, you need to select green or purple; you should select the color that group of yellow touches the most.
- Continue in this manner until all the glyphs are the same color.
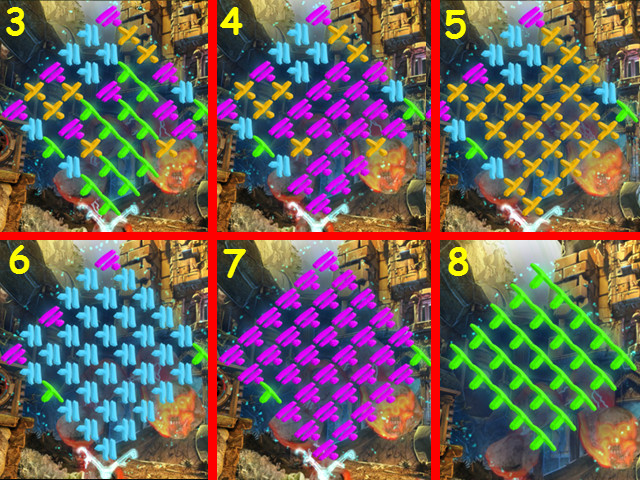
- Our solution was to select blue, green, pink, yellow, blue, pink, and green; the final grid will be all green (1-8).
- This mini-game is randomly generated; your solution may vary.
- Walk forward.
- Use the BOW AND ARROW on the window (E).
- Go up to the observatory tower.
- Look at the skulls and take the 3/4 OBSERVATORY WALKWAY PUZZLE PIECE (F).
- Walk right to the observatory reactor.
- Take the GOLD SWORD (G).
- Look at the wall device; take the instructions and the 4/4 OBSERVATORY WALKWAY PUZZLE PIECE (H).
- Look at the base device and take the BLACK PEBBLE (I).
- Walk down 3 times and select the column for a mini-game.
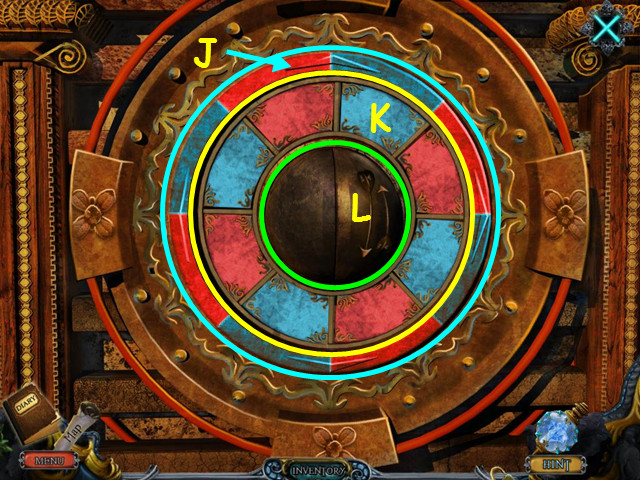
- Place the 4 OBSERVATORY WALKWAY PUZZLE PIECES into the device to trigger the mini-game.
- Move the tiles to match the outer ring (J).
- Select the ring of tiles to rotate it (K), and select the right side of the orb to change the position of tiles on the right (L).
- Our solution was: Kx1, L, Kx2, L, Kx6, L, Kx1, and L.
- Take The RED SKULL from the compartment under the mini-game.
- Go forward twice to the observatory tower.
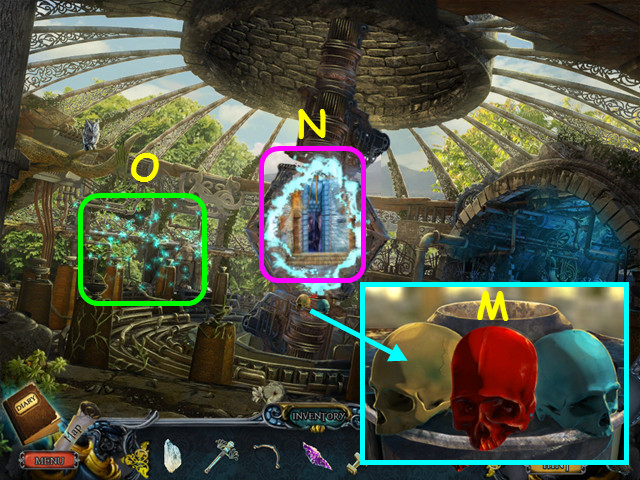
- Look at the skulls and place the RED SKULL in the center (M).
- Note the wormhole (N).
- Select the area on the left for a HOS (O).
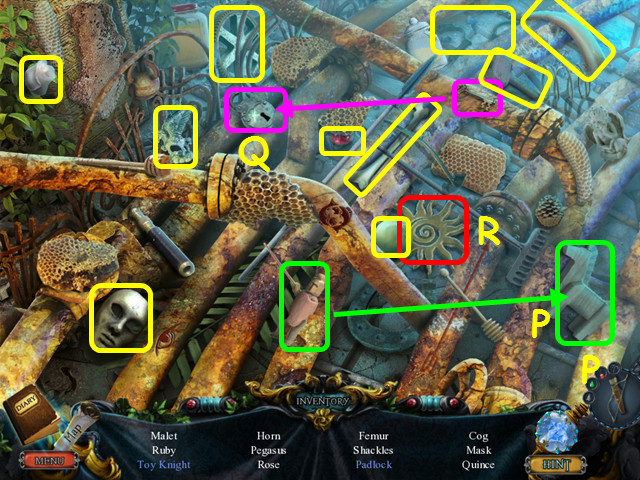
- Locate all the items on the list.
- Place the soldier on the horse to make the toy knight (P).
- Use the key to free the padlock (Q).
- Take the SUN EMBLEM as the riddled item (R).
- Enter the wormhole to travel to the armory.
- Take the 1/3 STAR SHAPE (S).
- Look at the frame and place the GOLD SWORD in the center (T).
- Walk down.
- Look at the door lock for a mini-game (U).
- Place the SUN EMBLEM in the center to open the device.
- Manipulate the buttons to get all the green marbles in one green section.
- Our solution was: D, A, D, A, B, B, A, B, B, A, C, A, D, A, B, A, B, D, and D.
- Enter the palace hall.

- Take the 2/3 STAR SHAPE (E).
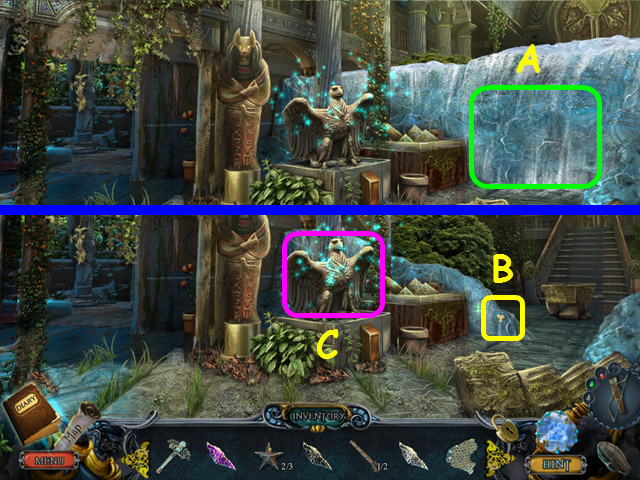
- Select the eagle for a HOS (F).
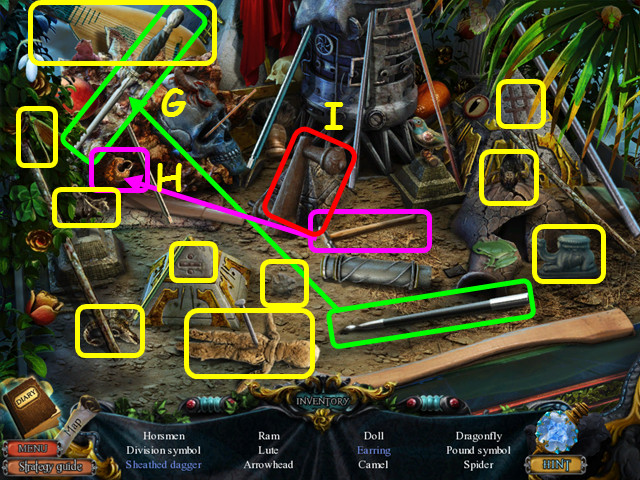
- Locate all the items on the list.
- Use the sheath on the dagger to get the sheathed dagger (G).
- Use the hammer on the rock to free the earring (H).
- Take the GRINDER HANDLE as the riddled item (I).
- Walk left to the palace garden.

- Zoom in and take the PLANT GROWTH AGENT (J).
- Zoom into the frame and place the GOLD BOW in the center (K).
- Walk down twice.
- Use the PLANT GROWTH AGENT on the pot (L).
- Look at the nest and take the GARDEN CUBE (M).
- Swap the BLACK PEBBLE for the BLACK GEMSTONE (N).
- Walk forward, then go left.
- Place the GOLDEN CUBE PIECE in the center of the giant cube (O).
- Look at the panel for a mini-game (P).
- Place the tiles in the frame to complete the mosaic (Q).
- Use the edges of the tiles as clues (R).
- Take the 1/2 SHAFT PIECE and the GRAY GEMSTONE (S).
- Walk down twice, go left, enter the wormhole, then go forward to the observatory reactor.
- Look at the grinder and place the GRINDER HANDLE on the front (T).
- Put the SALT LUMP in the grinder, then turn the handle (U).
- Take the SALT (V).
- Walk down.
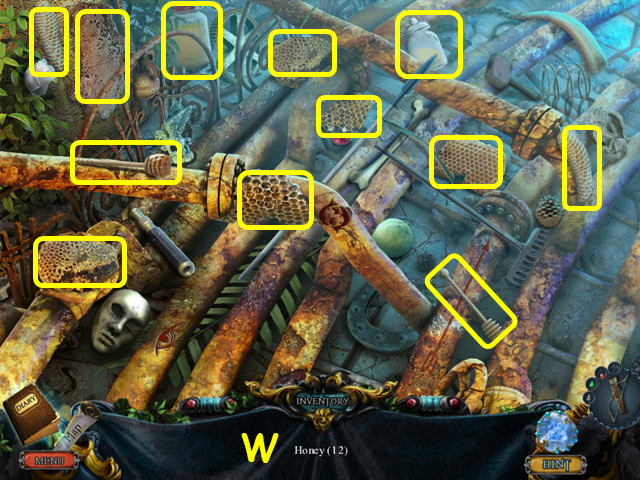
- Select the area on the left for a HOS.
- Locate the 12 pieces of honey (W).
- You will earn the FLY PAPER.
- Enter the wormhole, walk down, then enter the palace hall.
Chapter 6: The Inner Palace and Prison
- Use the SALT on the ice (A).
- Zoom into the ice and take the 1/4 GOLDEN LEAF (B).
- Select the eagle for a HOS (C).

- Locate the 12 shafts (D).
- You will earn the 2/2 SHAFT PIECE.
- Walk forward.
- Take the GARDEN SHEARS (E).
- Walk down and left.
- Zoom into the wheel; use the GARDEN SHEARS to remove the vines, then take the WHEEL (F).
- Use the FLY PAPER on the cloud of flies to get the FLIES (G).
- Walk down, then go forward.
- Place the WHEEL on the cart (H).
- Move the 6 rocks to the cart (I).
- Take the GOLD SHIELD (J).
- Push the cart.
- Look at the landing and use the FLIES to lure the spiders (K).
- Take the YELLOW GEMSTONE and the GOLD ARROW (L).
- Walk down twice.
- Zoom into the frame and place the GOLD ARROW in the center (M).
- Walk left, then enter the wormhole. Walk forward to the observatory reactor.
- Look at the base; place the GRAY GEMSTONE, PINK GEMSTONE, BLACK GEMSTONE, and the YELLOW GEMSTONE into the holders (N).
- Take the GRAND GEMSTONE from the center (O).
- Zoom into the frame and place the GOLD SHIELD in the center (P).
- Look at the wall; place the GRAND GEMSTONE and the 2 SHAFT PIECES in the indentation for a mini-game (Q).
- Place the pieces into the grid to complete the jigsaw (R).
- Drag the pieces into the frame.
- There are 2 additional jigsaws to solve (S).
- Look in your diary for the code (T).
- Set the code on the dials (U).
- The pieces will combine to form the AMARANTHINE STAFF PIECE.
- Walk down, enter the wormhole, walk down, then go forward twice.
- Use the AMARANTHINE STAFF PIECE on the rock monster on the left for a mini-game (A).
- Choose colors from the small left panel (B) to change all the glyphs to the same color.
- First select a color to change the bottommost glyph to – this will also change all the touching glyphs of the same color.
- For instance, if the bottom glyph is yellow, you need to select a different color; you should select the color that group of yellow touches the most.
- Continue in this manner until all the glyphs are the same color.
- Our solution for this one was to select: pink, green, blue, pink, blue, green, yellow, and pink.
- This mini-game is randomly generated; your solution may vary.
- Walk to the left.
- Take the 3/3 STAR SHAPE (C).
- Look at the mini-game on the gate and take the 2/4 GOLDEN LEAF (D).
- Take the FISHING NET (E).
- Walk down 3 times, then walk to the left.
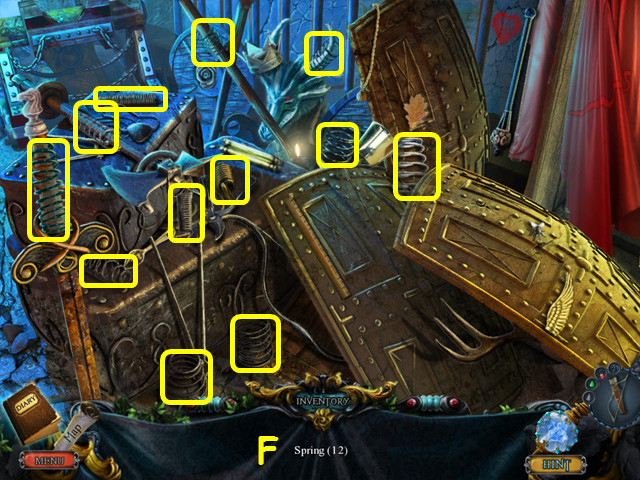
- Select the weapons on the right for a HOS.
- Locate the 12 SPRINGS (F).
- You will earn the SPRING.
- Walk forward to the prison cell.
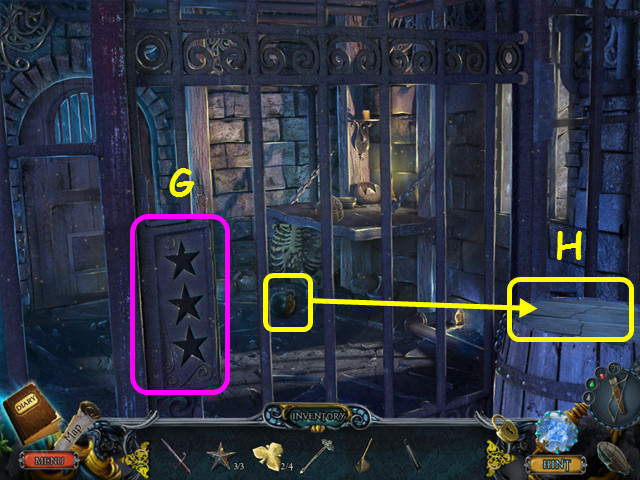
- Place the 3 STAR SHAPES in the door (G).
- Take the METAL BALL and drop it on the barrel lid (H).
- Select the barrel for a HOS.
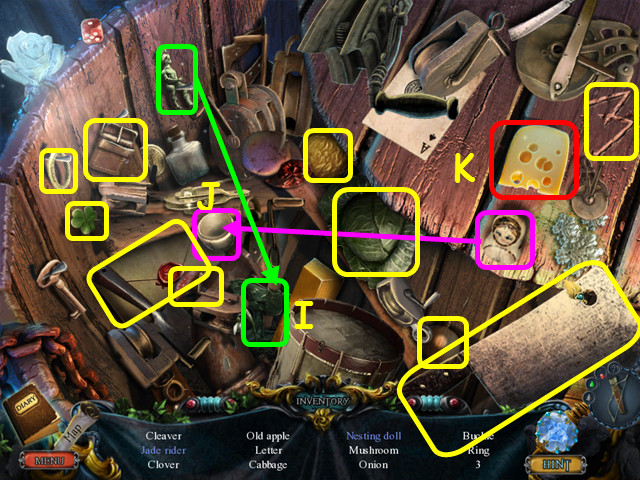
- Locate all the items on the list.
- Place the figure on the horse to make the jade rider (I).
- Place the top on the bottom to make the nesting doll (J).
- Take the CHEESE as the riddled item (K).
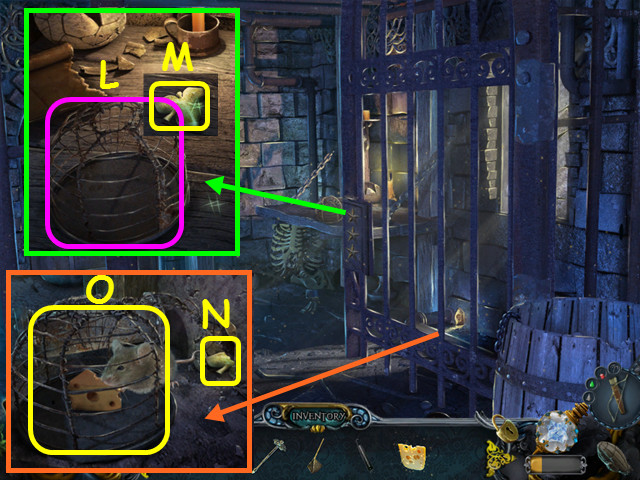
- Look at the table; place the SPRING on the dome to make the MOUSETRAP (L).
- Take the 3/4 GOLDEN LEAF (M).
- Look at the hole; place the MOUSETRAP on the floor, then place the CHEESE inside.
- Take the 4/4 GOLDEN LEAF (N) and the MOUSETRAP WITH MOUSE (O).
- Walk down twice, then go forward twice.

- Look at the door and place the 4 GOLDEN LEAVES in the door (P).
- Walk forward.
- Look at the throne; read the scroll and take the KING’S RING (Q).
- Walk forward.
- Look at the tube; place the MOUSETRAP WITH MOUSE on the top (R), then take the 1/2 GEAR (S).
- Take the 2/2 GEAR and the WIND TOKEN (T).
- Zoom into the device and place the 2 GEARS inside for a mini-game (U).
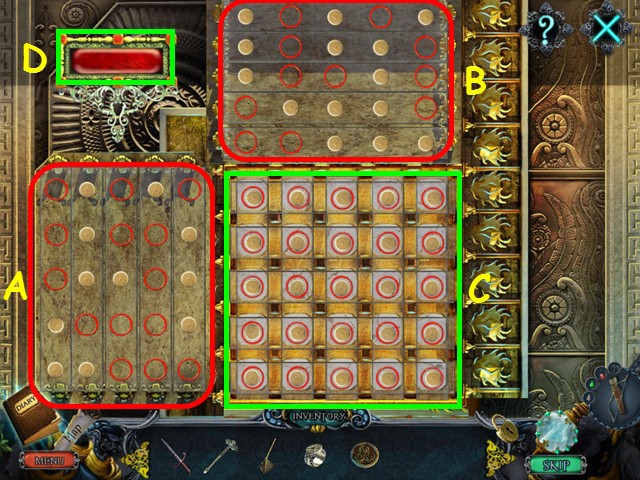
- Arrange the strips on the left (A) and top (B) so that each white square will have a red circle (C) when the button is pushed (D).
- Drag the strips into position.
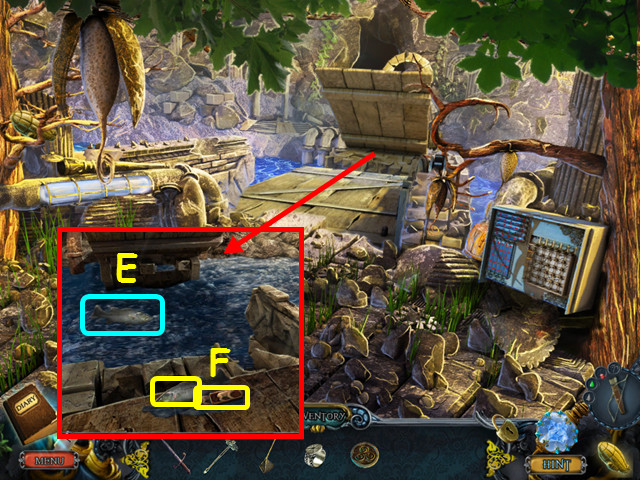
- Look under the bridge and use the FISHING NET on the fish (E).
- Take the FISH SCALES and the POLAR BEAR STATUETTE (F).
- Walk down twice, then walk to the left.
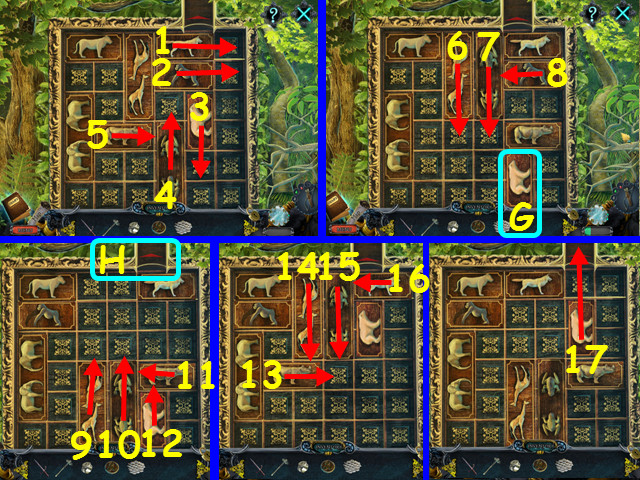
- Look at the gate for a mini-game.
- Place the POLAR BEAR STATUETTE on the board to activate the mini-game.
- Slide the pieces so you can move the polar bear (G) to the exit (H).
- Make these moves in numerical order (1-17).
- Walk forward.
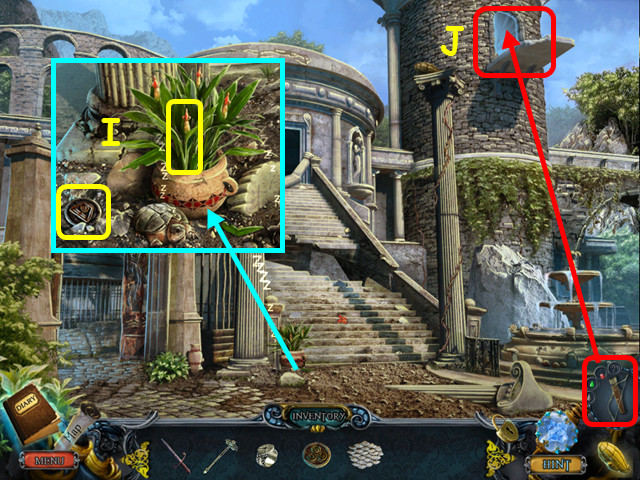
- Look at the plant; take the EARTH TOKEN and the SLEEPING HERB (I).
- Use the BOW AND ARROW on the window (J).
- Go up the rope to the palace bedroom.
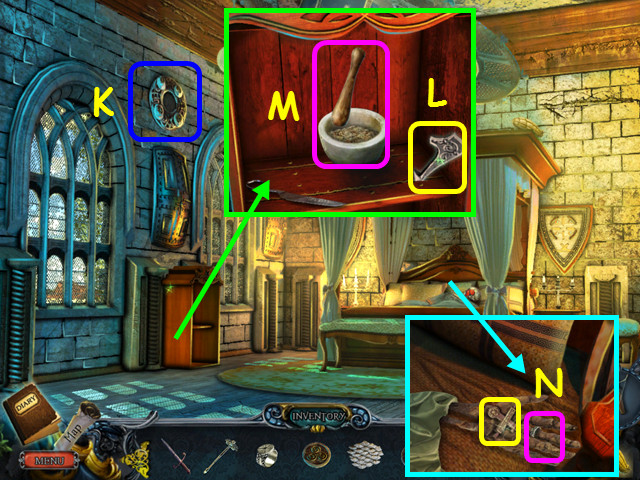
- Zoom into the frame and place the WIND TOKEN in the center (K).
- Look in the cabinet and take the TRIDENT SPIKE (L).
- Place the SLEEPING HERB in the mortar, use the pestle to grind the herb, then take the SLEEPING POWDER (M).
- Look at the skeleton and place the KING’S RING on the hand, then take the KEY TO THE DRAGON ARMOR DISPLAY CASE (N).
- Walk down.

- Look at the fountain, use the SLEEPING POWDER on the meat, then take the DRUGGED PIECE OF MEAT (O).
- Walk to the left.
- Use the DRUGGED PIECE OF MEAT on the lion (P).
- Select the debris for a HOS (Q).
- Locate all the items on the list.
- Place the plume on the helmet to make the officer’s helmet (R).
- Pull out the brick to find the diamond (S).
- Take the SCISSORS PART as the riddled item (T).
- Walk down, then go up the rope.

- Look in the cabinet and place the SCISSORS PART with the other piece to make the SCISSORS (U).
- Walk down, then left.
- Use the SCISSORS on the sleeping lion to get the LION’S MANE (V).
- Select the debris on the right for a HOS.
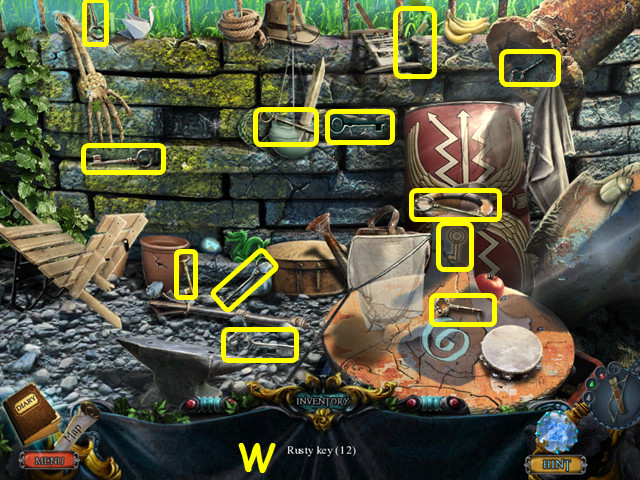
- Locate the 12 rusty keys (W).
- You will earn a RUSTY KEY.
- Walk down 5 times, go left, then forward to the prison cell.
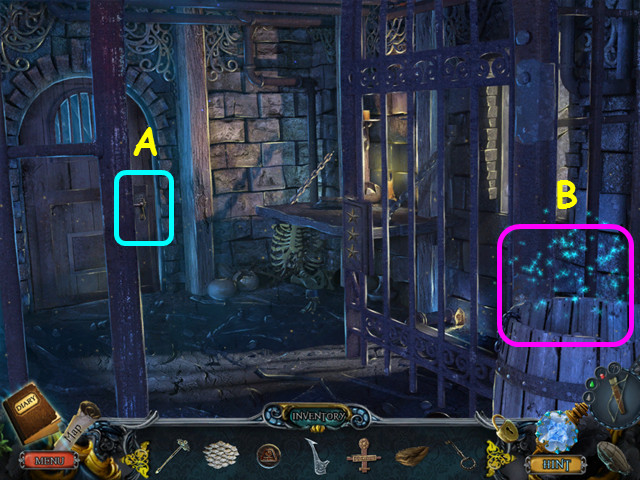
- Zoom into the lock and place the RUSTY KEY inside, then turn the key (A).
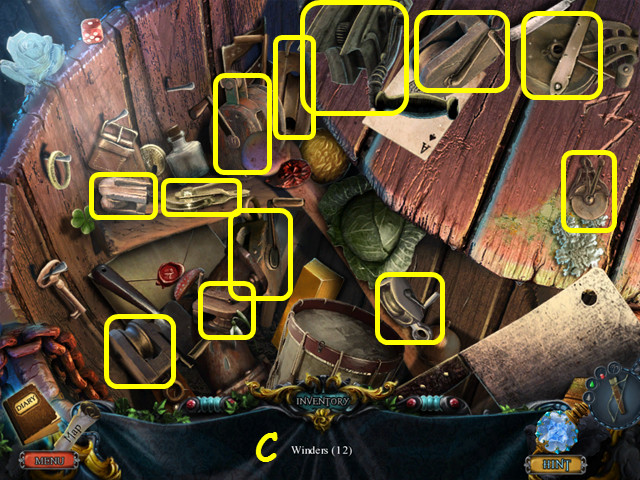
- Select the barrel for a HOS (B).
- Locate the 12 winders (C).
- You will earn the BALLISTA PART.
- Walk forward.
- Open the chest and take the WATER TOKEN (D).
- Look at the compartment and place the TRIDENT SPIKE in the indentation (E).
- Place the RUSTY DAGGER in the gears (F).
- Walk forward.

- Select the bricks in the center for a HOS.
- Locate all the items on the list.
- Use the knife on the grindstone to get the sharp knife (G).
- Use the juicer on the lemons to get the lemon juice (H).
- Take the LARGE BOLT as the riddled item (I).

- Zoom into the frame and place the WATER TOKEN in the center (J).
- Look at the ballista and place the BALLISTA PART on the bottom (K).
- Place the LARGE BOLT on the top (L), then turn the handle of the ballista to fire.
- Walk down 4 times, then go forward 5 times to the crystalline prison.
- Take the FIRE TOKEN (M).
- Zoom into the frame and place the EARTH TOKEN in the center (N).
- Note the mini-game on the door (O).
- Walk down twice.
- Zoom into the frame and place the FIRE TOKEN in the center (P).
- Look at the cabinet and use the KEY TO THE DRAGON ARMOR DISPLAY on the lock (Q).
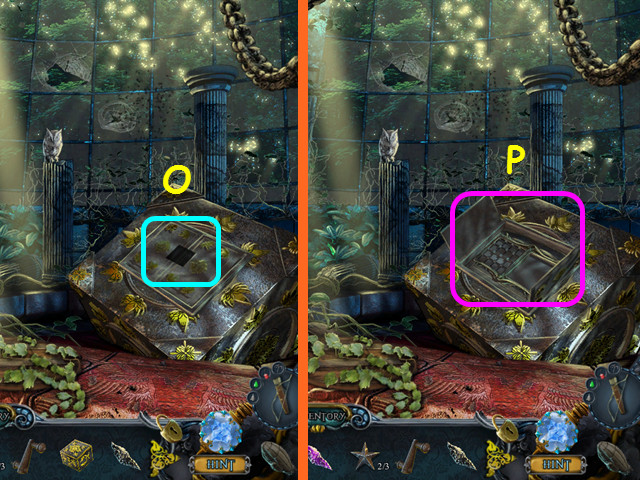
- Select the display for a mini-game (R).
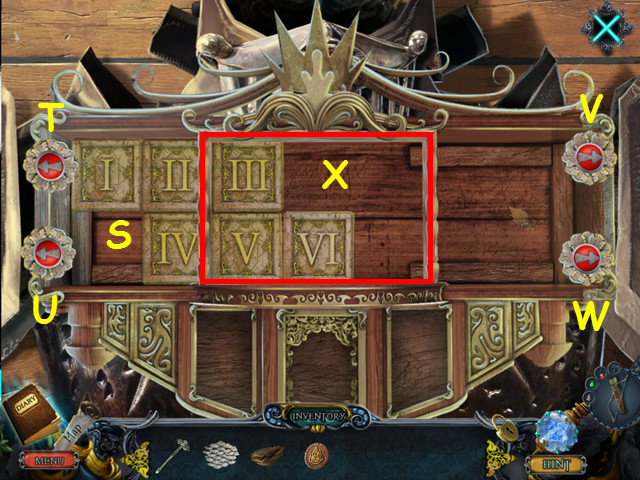
- Place the numbers in numerical order (S).
- Use the 4 red buttons to slide the rows of numerals (T-W) and click inside the rectangle to reverse the top and bottom positions of those inside (X).
- Our solution was: X, T, W, X, U, X, U, W, and X.
- Take the DRAGON TOOTH from behind the panel.
- Look at the throne and place the LION’S MANE on the lion head (A).
- Place the FISH SCALES on the fish (B), and the DRAGON TOOTH on the dragon (C).
- Take the final staff piece (D).
- Walk forward twice.
- Zoom into the prince and take the FROST ARROW, which will combine with the BOW AND ARROW (E).
- Look in the diary for the code (F).
- Look at the door and enter the code (G).
- Walk forward.
- Use the BOW AND ARROW on the stream (H).
- Walk forward.
- Use the AMARANTHINE STAFF on the queen for a mini-game (I).
- Choose colors from the small left panel (J) to change all the glyphs to the same color.
- First select a color to change the bottommost glyph to (K); this will also change all the touching glyphs of the same color.
- For instance, if the bottom glyph is yellow, you need to select a different color; you should select the color that group of yellow glyphs touches the most.
- Continue in this manner until all the glyphs are the same color.
- Use as few moves as possible or the board will reset; the hash marks on the right show the number of available moves (L).
- Our solution for this level was to select: white, yellow, pink, green, yellow, white, pink, red, yellow, white, green, yellow, blue, and pink.
- You will have three of these mini-games to solve.
- This mini-game is randomly generated; your solution may vary.
- Congratulations, you have completed Amaranthine Voyage: The Tree of Life.


 Masquerade Mystery: The Case of the Copycat Curator Walkthrough, Guide, & Tips
 Time Dreamer Walkthrough, Guide, & Tips
 Life Quest 2: Metropoville Walkthrough, Guide, & Tips
 Spirits of Mystery: The Dark Minotaur Walkthrough, Guide, & Tips
 Tales of Terror: House on the Hill Walkthrough, Guide, & Tips