Spirits of Mystery: The Dark Minotaur Walkthrough, Guide, & Tips
Spirits of Mystery: The Dark Minotaur Walkthrough

Welcome to the Spirits of Mystery: The Dark Minotaur Walkthrough
Find out who stole your magic animals, and reveal the secret of the Dark Minotaur.
Whether you use this document as a reference when things get difficult or as a road map to get you from beginning to end, we’re pretty sure you’ll find what you’re looking for here.
This document contains a complete Spirits of Mystery: The Dark Minotaur game walkthrough featuring annotated screenshots from actual gameplay!
We hope you find this information useful as you play your way through the game. Use the walkthrough menu below to quickly jump to whatever stage of the game you need help with.
Remember to visit the Big Fish Games Forums if you find you need more help. Have fun!
This walkthrough was created by Margie B, and is protected under US Copyright laws. Any unauthorized use, including re-publication in whole or in part, without permission, is strictly prohibited.
General Tips


- This is the official guide for Spirits of Mystery: Dark Minotaur.
- The ‘Options’ (A) button allows you to adjust the screen, music, cursor, and sound.
- The ‘click here to change player’ button (B) can be used to add or delete a player.
- Go to ‘More Games’ (C) to view other titles from this developer.
- In this guide, we will refer to Hidden-object scenes as ‘HOS’. Hidden-object puzzles will be referred to as ‘HOP’.
- Items written in green in HOS require an additional step.
- You can skip a puzzle once the ‘SKIP’ button fills.
- You will receive an invisibility potion at different points in the game; you will not be able to access certain areas without it.
Chapter 1: The Zoo
- Talk to the nanny.
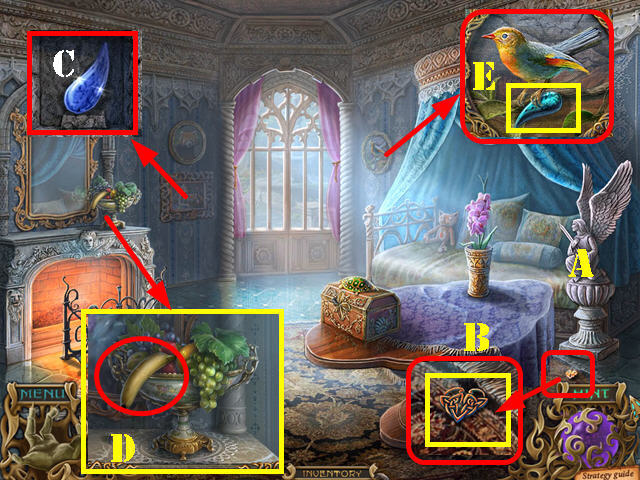
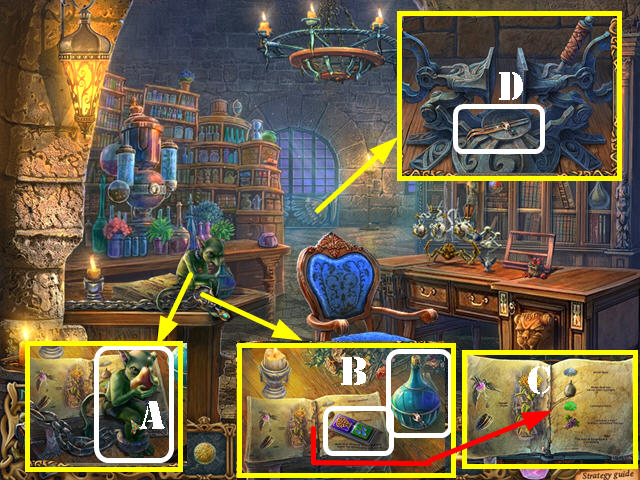
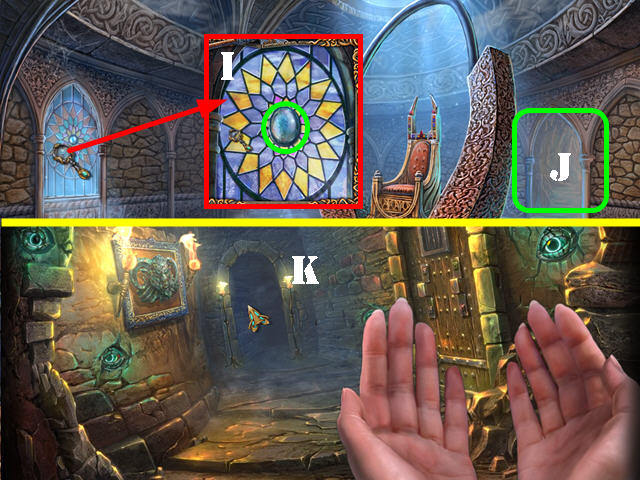
- Touch the angel statue (A). Zoom into the base of the statue; take the CREST (B).
- Take a closer look at the picture; insert the CREST into the niche. Take the BLUE DROP (C).
- Zoom into the fruit bowl; take the BANANA (D).
- Zoom into the picture frame; take the AQUAMARINE DROP (E).
- Look at the cat on the bed; take the RED DROP (F).
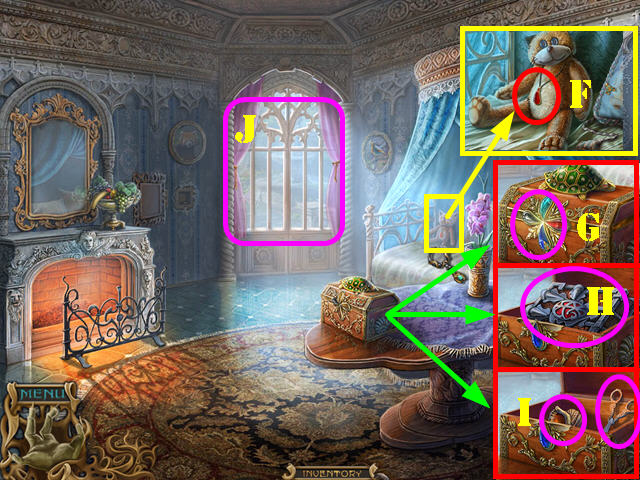
- Zoom into the chest; place the AQUAMARINE DROP, RED DROP, and the BLUE DROP into the slots (G).
- Take the Diary, open it, and then close it (H).
- Take the NAIL SCISSORS and the SHELL (I).
- Open the door and go through it (J).
- Touch the person by the table (K).
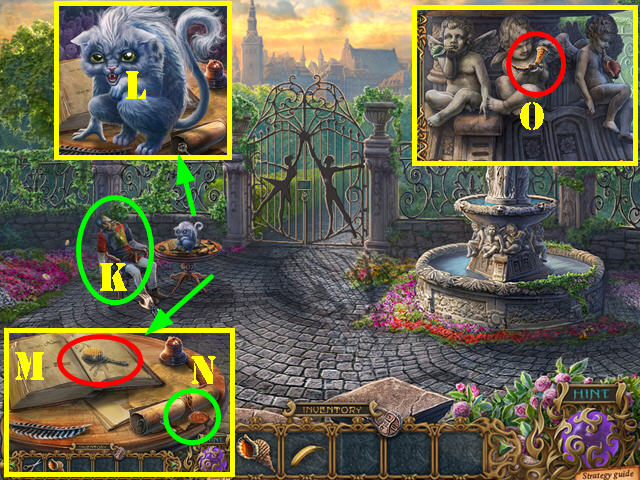
- Zoom into the table; give the BANANA to the creature (L).
- Take CHESTER’S BRUSH (M).
- Use the NAIL SCISSORS on the knot around the scroll and then take the note (N).
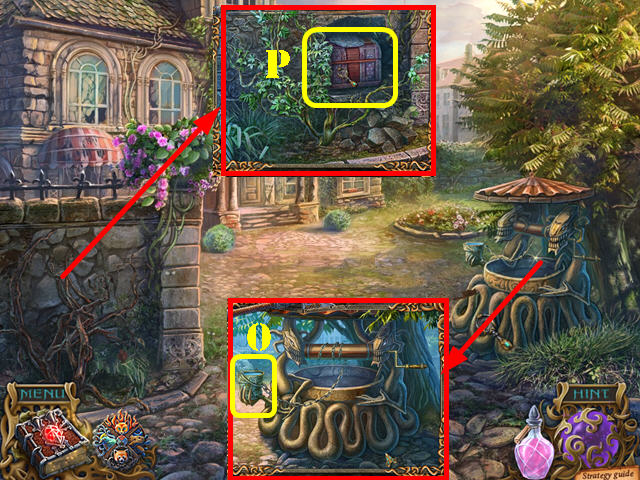
- Zoom into the fountain; take the TRUMPET from the angel and replace it with the SHELL (O).
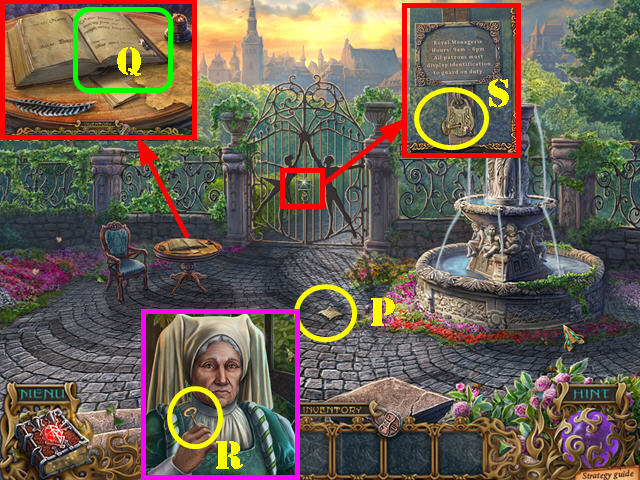
- Take the BOOK PAGE (P).
- Take a closer look at the table; put the BOOK PAGE on the book and then take the note (Q).
- Grab the KEY (R).
- Zoom into the gate; use the KEY in the lock and turn the key twice (S).
- Go through the gate and then through the archway on the right.

- Take the SCOOP NET (@).
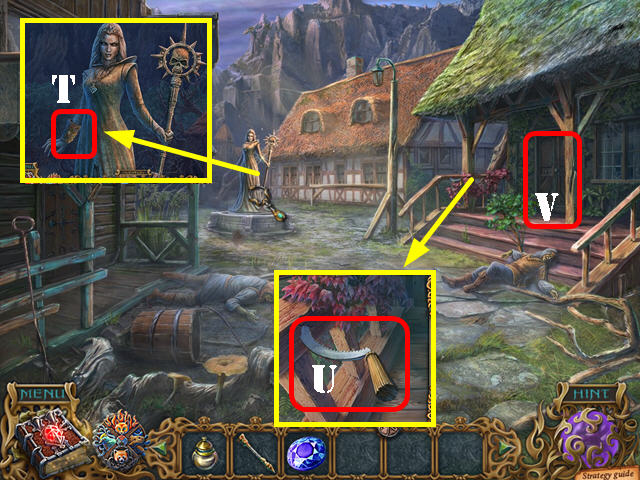
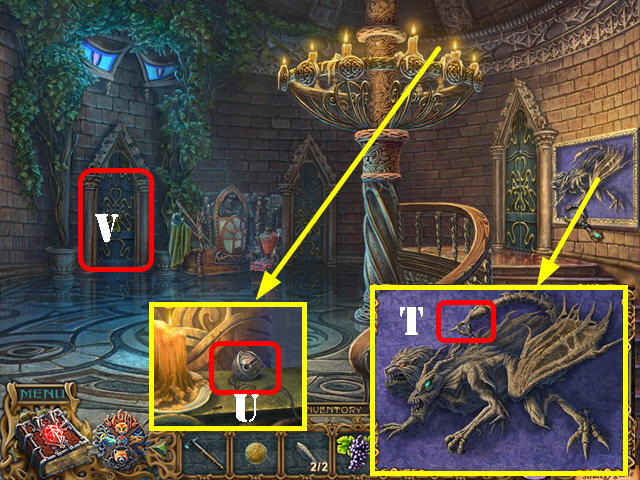
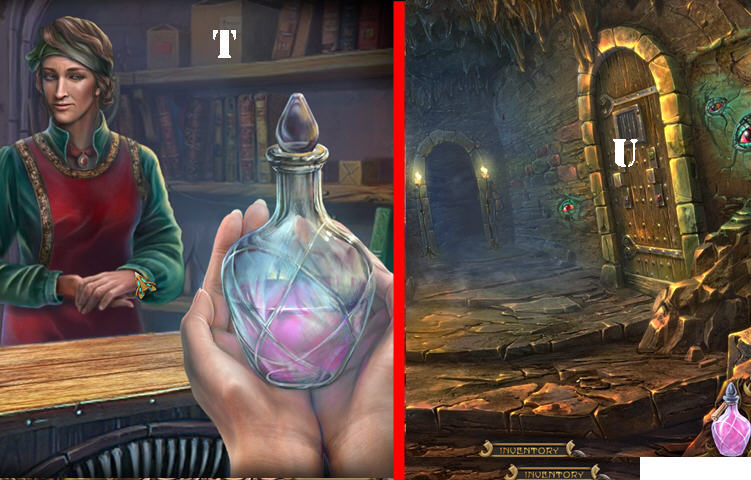
- Zoom into the ground; open the handkerchief and take the MEDALLION (T).
- Touch the medallion on the screen twice. Take the HANDKERCHIEF WITH INITIALS (U).
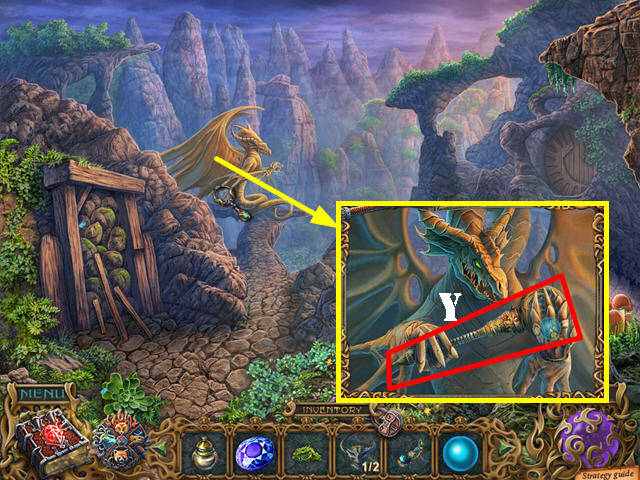
- Zoom into the small castle to activate a puzzle (V).
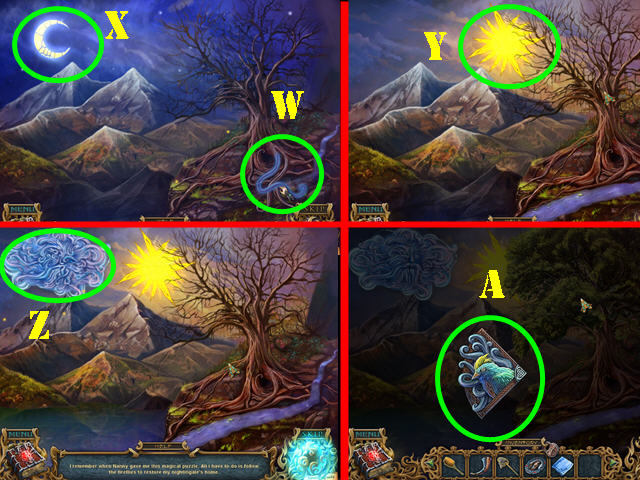
- Remove the 3 roots (W).
- Touch the moon (X).
- Touch the sun 4 times (Y).
- Touch the cloud (Z).
- Take the AIR SYMBOL (A).
- Walk down and then go left.
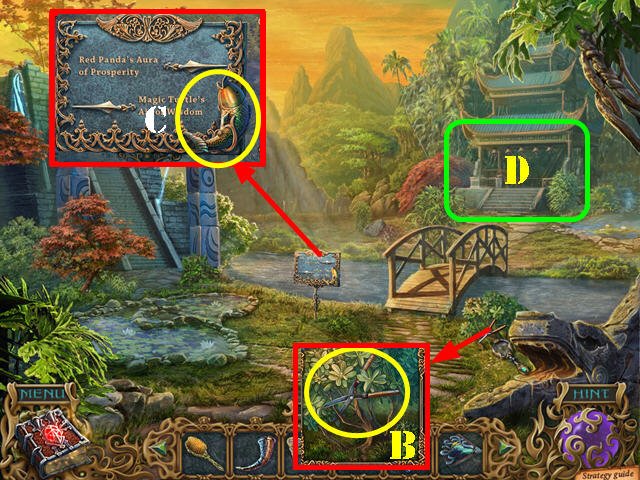
- Zoom into the PRUNERS and then take them (B).
- Take a closer look at the sign and take the 1/3 FISH (C).
- Cross the bridge (D).
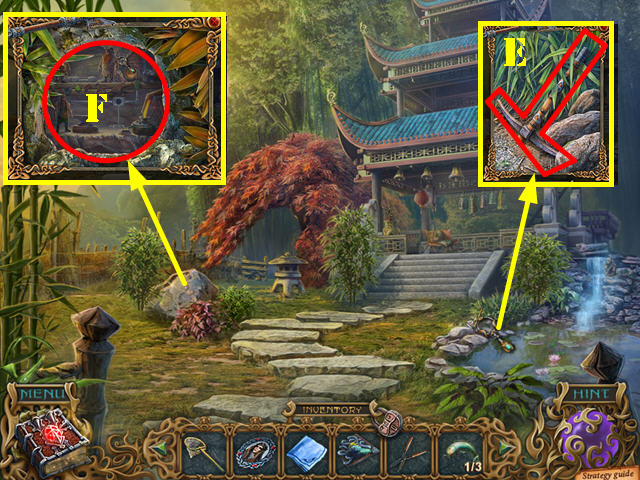
- Zoom into the rocks; take the PICKAX (E).
- Take a closer look at the glimmering rock; use the PICKAX on it. Zoom into the dwarves (F) and then use the TRUMPET on them to activate a puzzle.
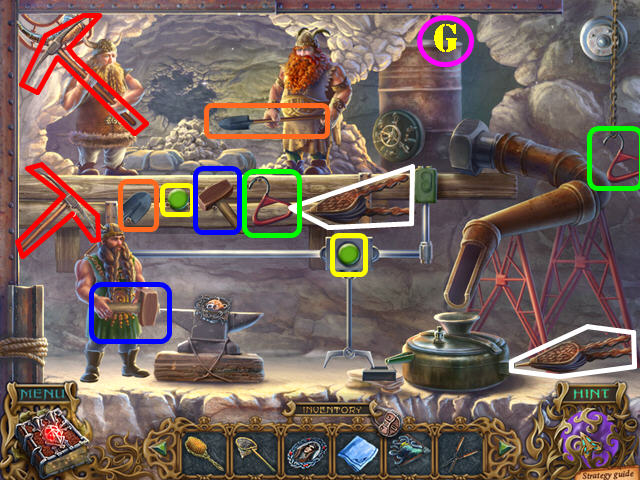
- Place the items in the right spots and give the dwarves the right tools.
- Please look at the screenshot for the solution (G).
- You will receive the EARTH SYMBOL.
- Go into the temple.
- Take the FISHING POLE (H) and the BOWL (I).
- Walk down.
- Zoom into the waterfall; use the BOWL in the water to get the BOWL OF WATER (J).
- Walk down twice.

- Zoom into the bird; use the PICKAXE on the loose stone and take a WORM (K).
- Take a closer look at the roses; use the PRUNERS on them. Take the 2/3 FISH (L) and the CRYSTAL (M).
- Go through the archway on the right.
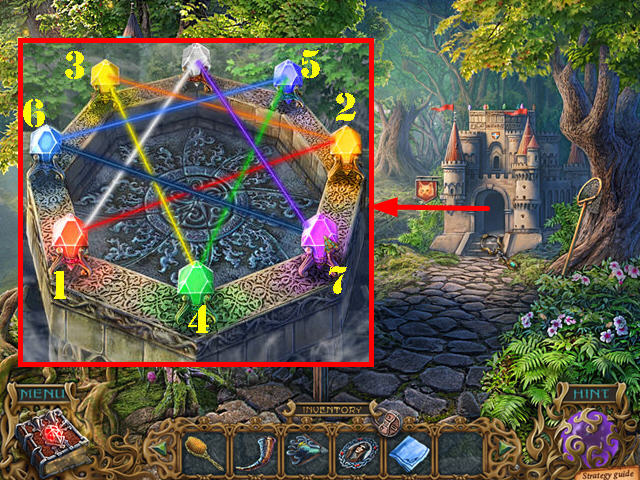
- Zoom into the large castle and insert the CRYSTAL into the stand.
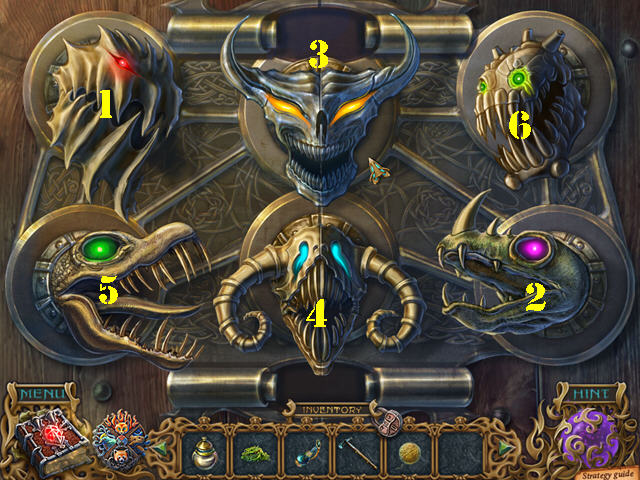
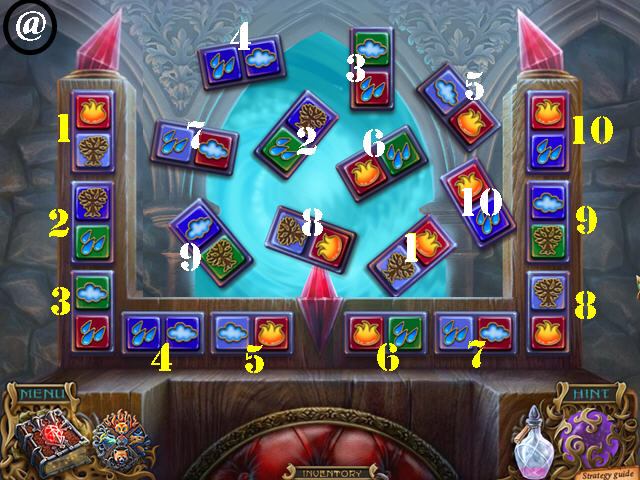
- Select the lights in the right order to activate them all.
- Please look at the screenshot for the solution (1-7).
- Take the FIRE SYMBOL.
- Walk down and go left.
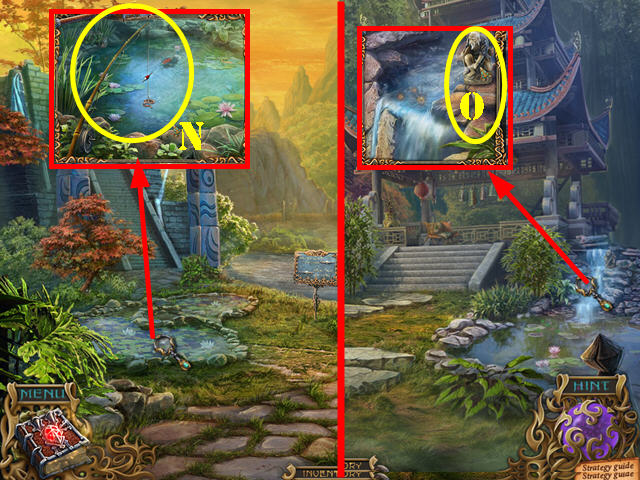
- Zoom into the pond; place the FISHING POLE on the scene and then attach the WORM to the hook. Use the SCOOP NET on the fish to get the NET (N).
- Go towards the temple.
- Zoom into the waterfall; give the NET to the statue to get the BELL HAMMER (O).
- Return to the temple.
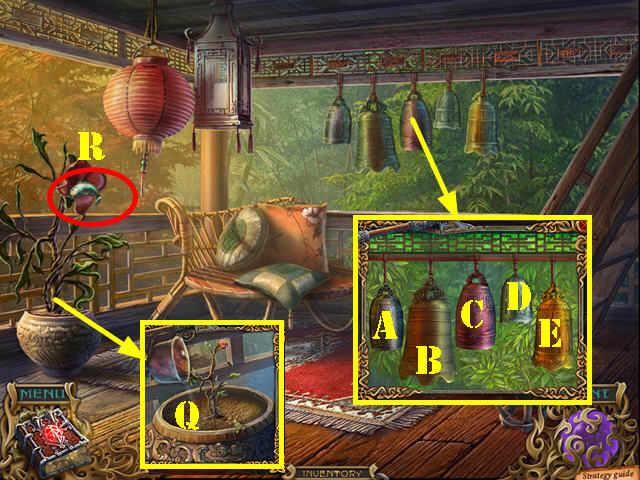
- Zoom into the potted plant; use the BOWL OF WATER in the soil (Q).
- Take a closer look at the bells; use the BELL HAMMER on them to activate a puzzle.
- Repeat the sequences played on the bell.
- First sequence: B, E, A.
- Second Sequence: B, E, A, C, D.
- Third Sequence: B, E, C, A, D, A.
- Take the 3/3 FISH from the plant (R).
- Walk down twice.
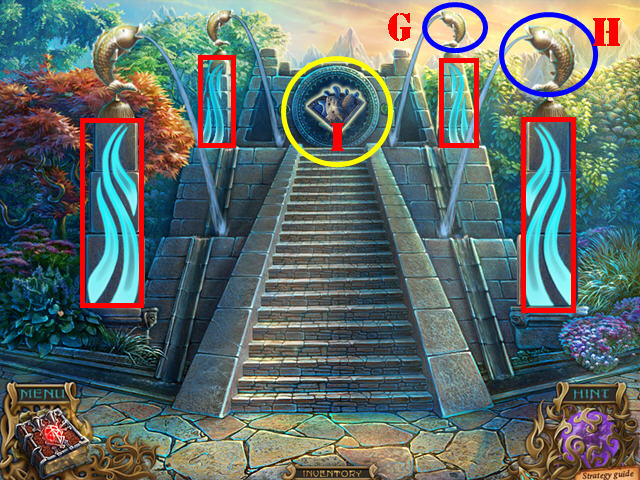
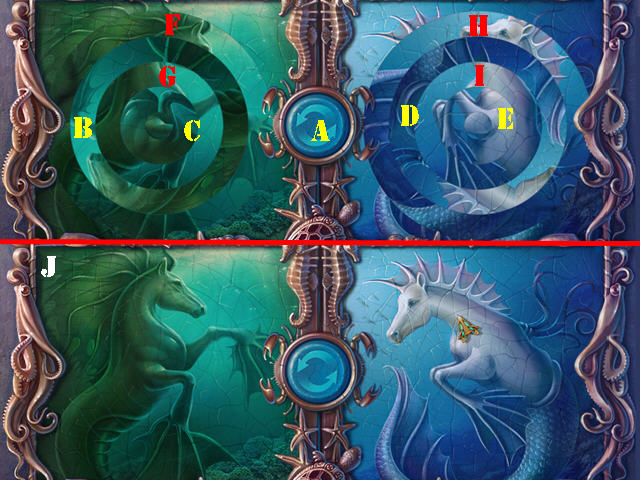
- Zoom into the steps; place the 3 FISH on the scene to activate a puzzle.
- Turn the fish in the right order until they are all facing the stairs.
- To solve the puzzle, select the fish in this order: G and H.
- Turn the columns until they resemble the images in the screenshot (red).
- Take the WATER SYMBOL (I).
- Walk down.
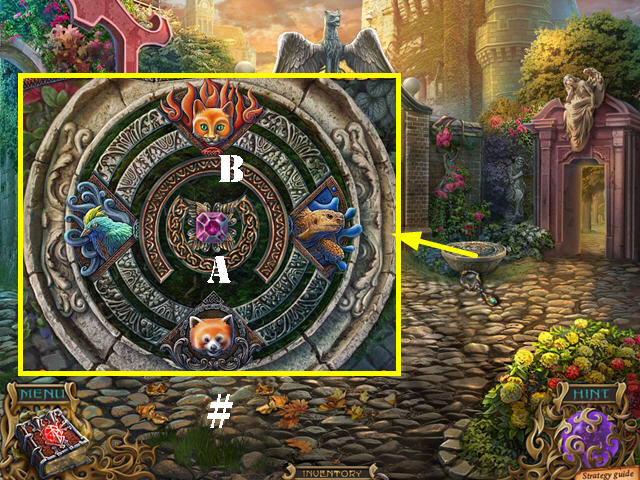
- Zoom into the bowl (J); place the AIR SYMBOL, EARTH SYMBOL, FIRE SYMBOL, and the WATER Symbol into the niches to activate a puzzle.
- Rotate the rings in the right order: A, B, A, Bx2, A, Bx2, A, and B (#).
- Take the amulet.
- Give the HANDKERCHIEF WITH INITIALS and then the MEDALLION, to the nanny.
- Go through the gate.
Chapter 2: The Village
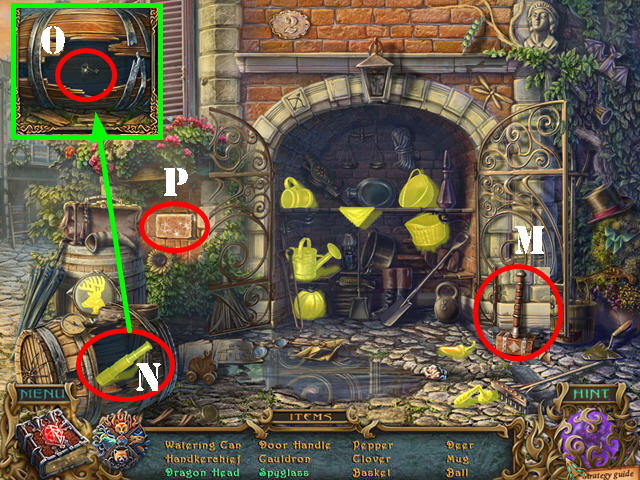
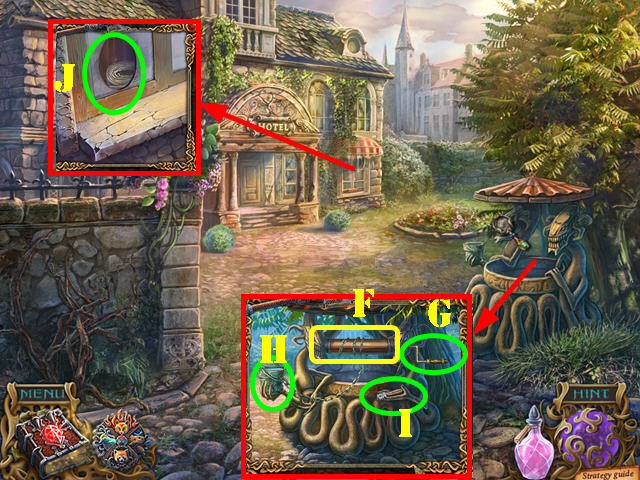
- Zoom into the sparkles to activate a HOS.
- Use the HAMMER on the barrel (M); take the spyglass (N).
- Look inside the barrel and take the key (O); use the key on the gate lock.
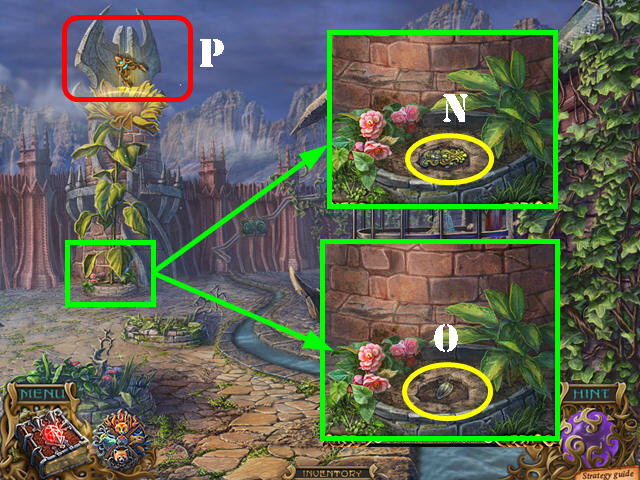
- Remove the block (P) and take the dragon head.
- You will receive the DRAGON HEAD.
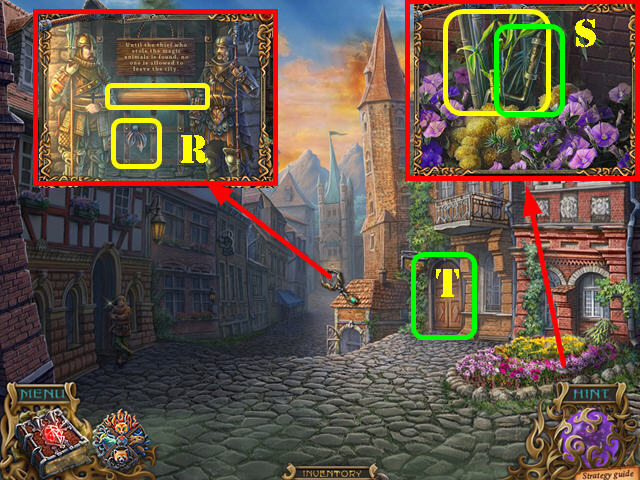
- Zoom into the gate; take the SHAFT and the SCARF (R).
- Look at the plants; take the BAMBOO and the WELL CRANK (S).
- Enter the shop on the right (T).
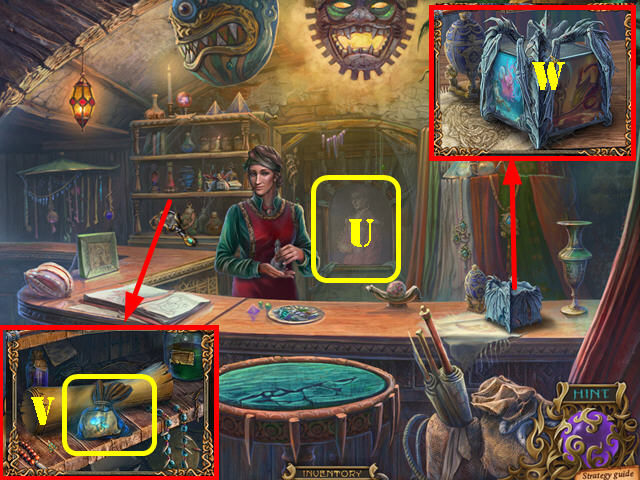
- Talk to Hanna. Touch the picture (U).
- Zoom into the shelf; take the BAG OF LUMINOUS FUNGI SPORES (V).
- Take a closer look at the box; place the DRAGON HEAD on it to activate a HOP (W).
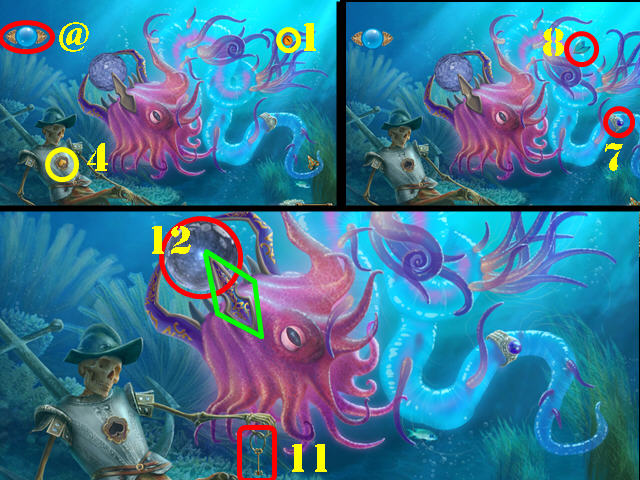
- Touch the sphere (@) in the upper left to go back and forth between the two scenes.
- Open the tentacles and take the eye of the dragon (1)..
- Touch the sphere. Place the eye of the dragon on the dragon’s eye socket (2) and take the dagger (3).
- Touch the sphere. Use the dagger on the spade (4); take the spade.
- Touch the sphere. Place the spade on the lock (5) and take the pearl (6).
- Touch the sphere. Put the pearl in the ring (7) and take the dragon scale (8).
- Touch the sphere. Place the scale on the dragon (9) and take the water dragon tooth (10).
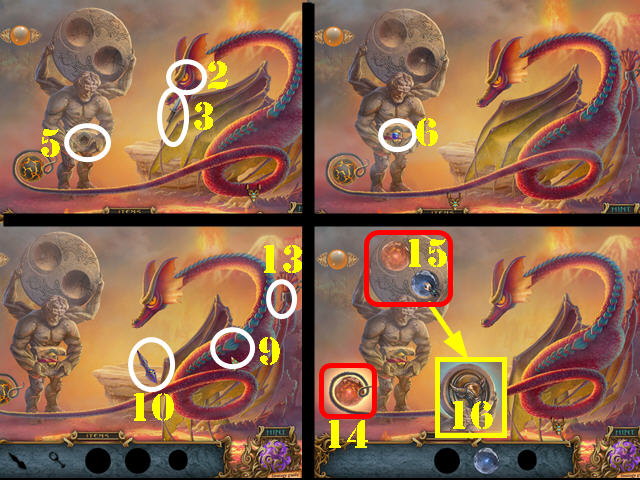
- Touch the sphere. Put the water dragon tooth on the water dragon (green). Take the key (11) and the water sphere (12).
- Touch the sphere. Use the key in the shackles (13) and take the fire sphere (14).
- Place the fire sphere and the water sphere in the slots (15).
- Take the SEAL (16).
- Zoom into the shelf; place the SEAL on the scroll. Open the scroll (A).
- Take the invisibility potion (B). The potion will keep you invisible as long as the bottle has some potion left in it.
- Walk down.
- Zoom into the man by the gate and go forward (@). Note: you will only be able to pass if you’ve collected the potion bottle.
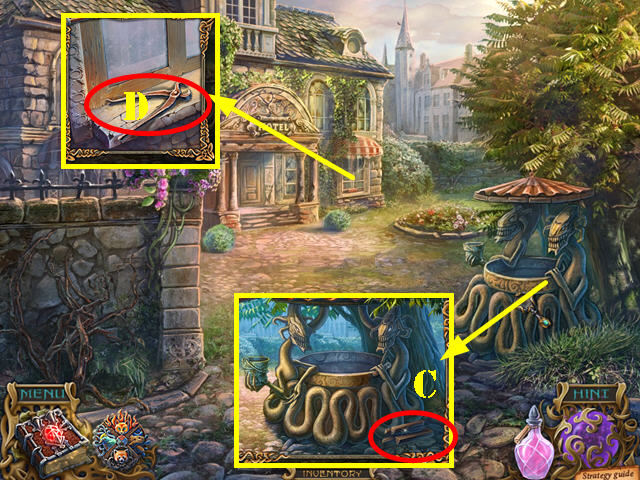
- Zoom into the well; take the FIREWOOD (C).
- Take a closer look at the window sill and take the PLIERS (D).
- Walk down.
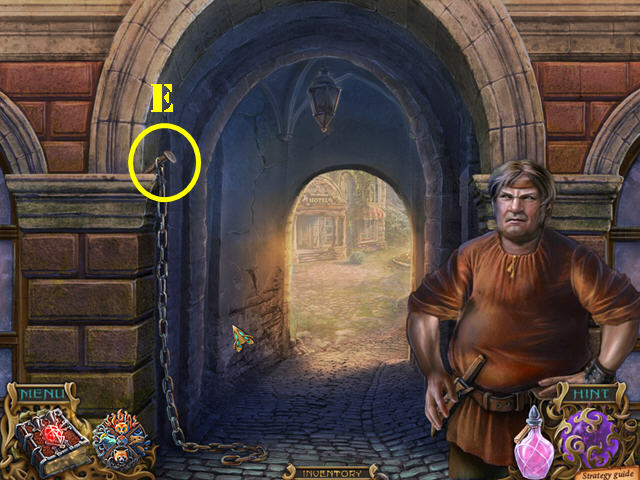
- Remove the NAIL with the PLIERS to acquire the CHAIN (E).
- Go forward.
- Zoom into the well; place the SHAFT on it (F) and put the WELL CRANK on the shaft (G).
- Place the CHAIN on the crank and touch the bucket (H).
- Use the crank to pull up the bucket. Take the GLASS CUTTER (I).
- Zoom into the window; clean the glass with the SCARF and then use the GLASS CUTTER on the glass. Take the TAPE and the YELLOW BUTTON below it (J).
- Walk down twice.
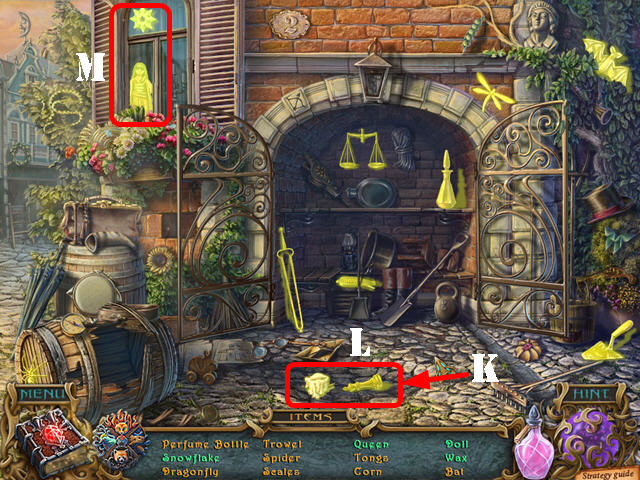
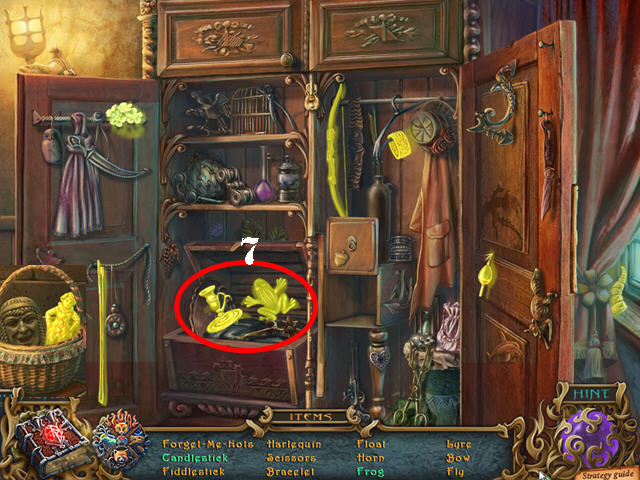
- Play the HOS.
- You can open and close the gates to look for hidden items.
- Touch the stone (K); take the queen and the wax (L).
- Open the shutters; take the doll and the snowflake (M).
- You will receive the 1/3 CANDLE WAX.
- Go into the shop on the right.
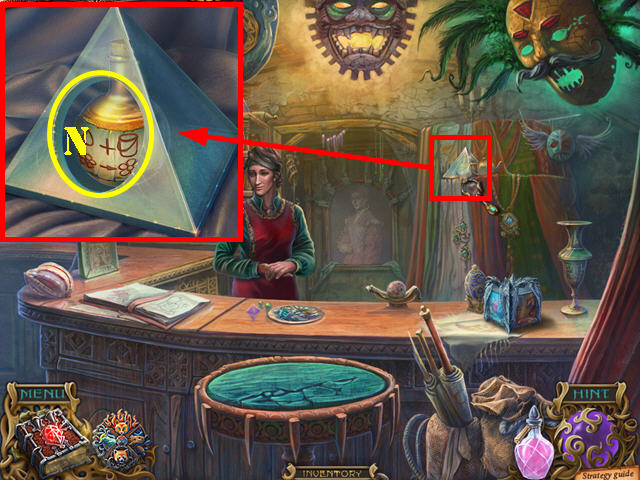
- Take a closer look at the pyramid; cut the glass with the GLASS CUTTER and then take the MAGIC FERTILIZER (N).
- Return to the well outside of the hotel.
- Zoom into the well; use the MAGIC FERTILIZER on the bucket and take the BUCKET WITH FERTILIZER (O).
- Take a closer look at the wall; use the BUCKET WITH FERTILIZER on the ivy (P).
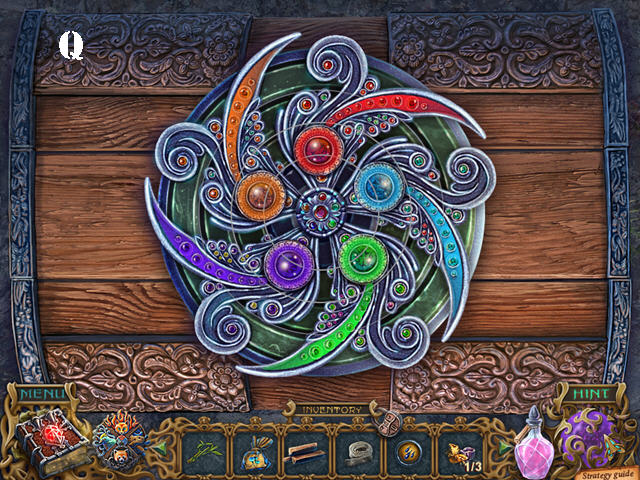
- Zoom into the chest to activate a puzzle.
- Rotate the rings in the right order until the image is complete. Rotating a ring may affect others.
- Please look at the screenshot for the final image (Q).
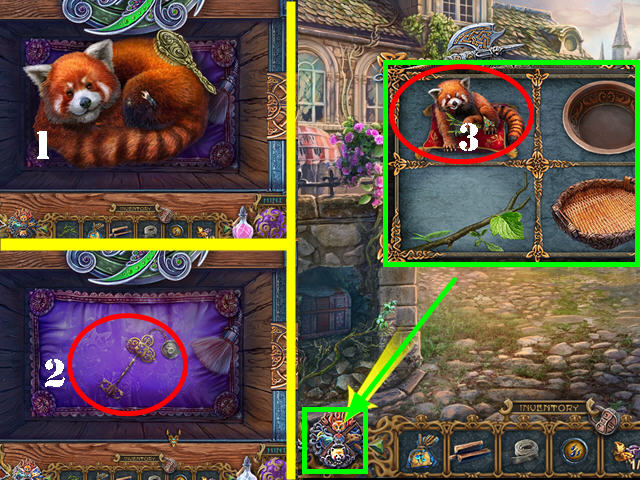
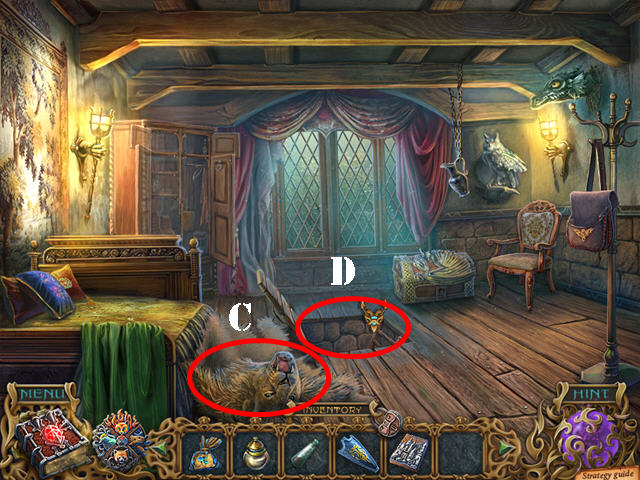
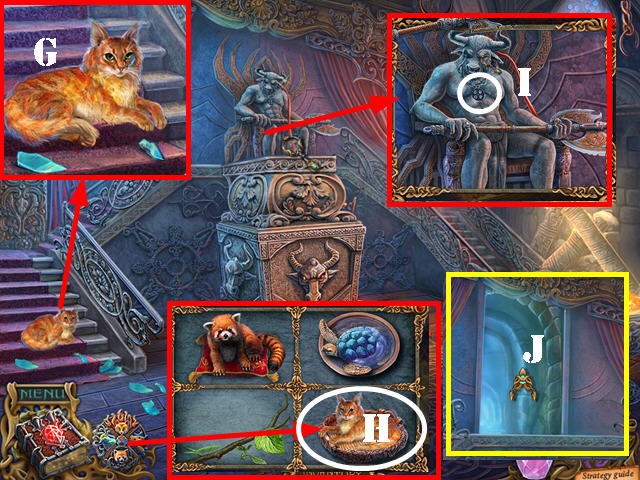
- Use CHESTER’S BRUSH on Chester (1); take Chester to add him to the mini-menageri.
- Grab the KEY TO ROOM NUMBER 8 (2).
- Select the amulet to open the mini-menagerie; give the BAMBOO to Chester to receive the GREEN BUTTON (3).
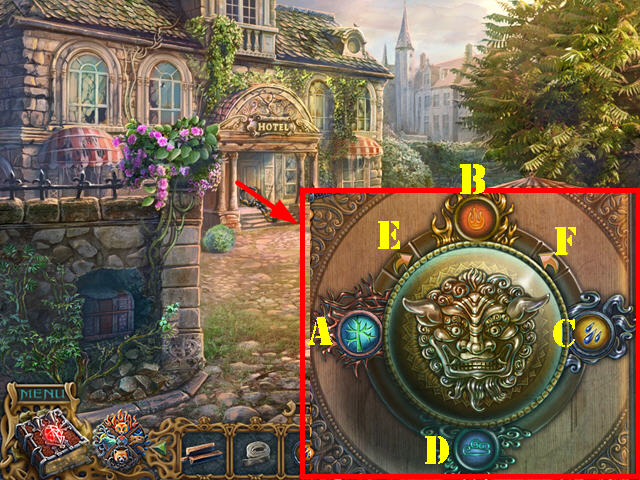
- Zoom into the door; place the YELLOW BUTTON and the GREEN BUTTON into the slots to activate a puzzle.
- Enter the code etched on the right side of the lock.
- To solve the puzzle, select the buttons in this order: A, E, D, E, C, F, B. and E.
- Enter the hotel.
Chapter 3: The Hotel
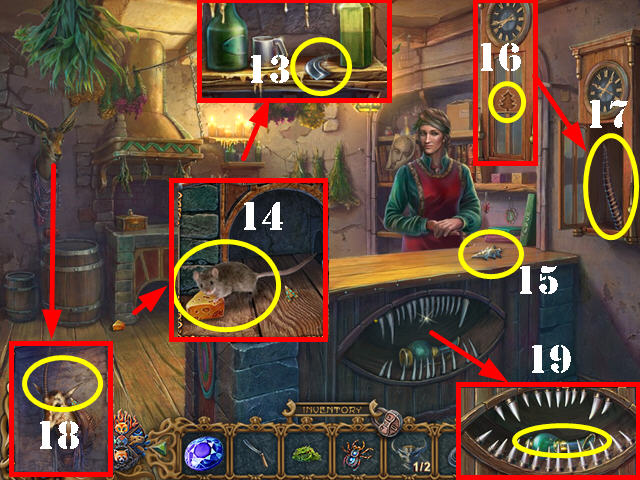
- Look at the cabinet; take the 2/3 CANDLE WAX (G).
- Take a closer look at the table; take the POT OF MILK (green).
- Take the PAGE (red).
- Go through the door.
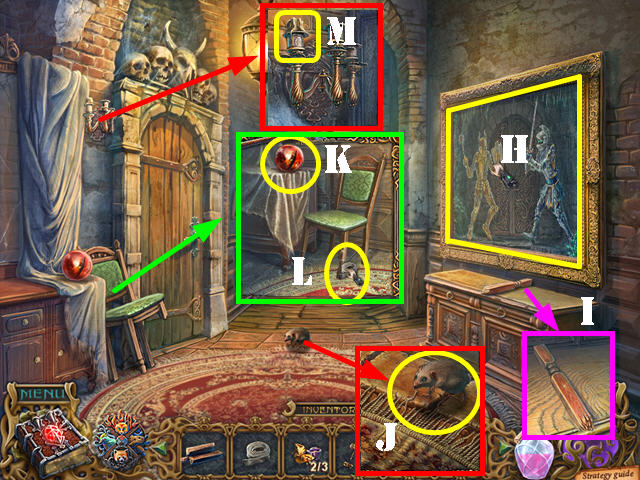
- Touch the picture twice (H).
- Zoom into the cabinet; take the CHAIR LEG (I).
- Look at the carpet; touch the mouse and then take the PIECE OF YARN (J).
- Take a closer look at the chair; take the SNAKE EYE (K).
- Put the CHAIR LEG on the chair and then use the TAPE on it (L).
- Zoom into the candleholder; take the 3/3 CANDLE WAX (M).
- Walk down and zoom into the snake.
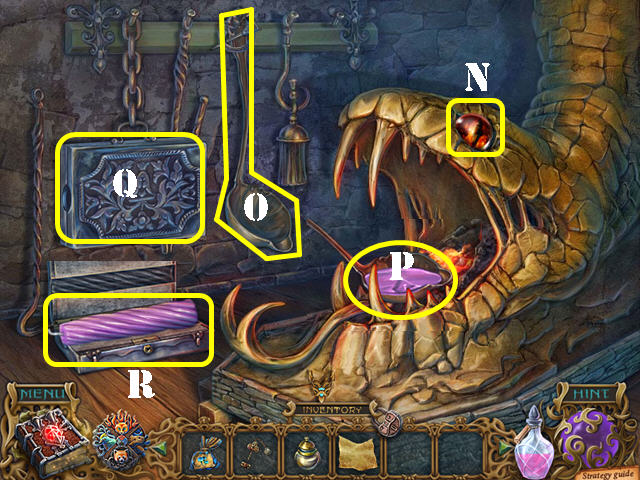
- Place the FIREWOOD over the coals inside the snake’s mouth.
- Place the SNAKE EYE in the socket (N).
- Touch the ladle (O) and place the 3 CANDLE WAXES in the ladle (P).
- Touch the box (Q); put the PIECE OF YARN in the box and then touch the box twice.
- Touch the ladle with the hot wax and then open the box. Take the CANDLE (R).
- Place the CANDLE in the fire to get the LIT CANDLE.
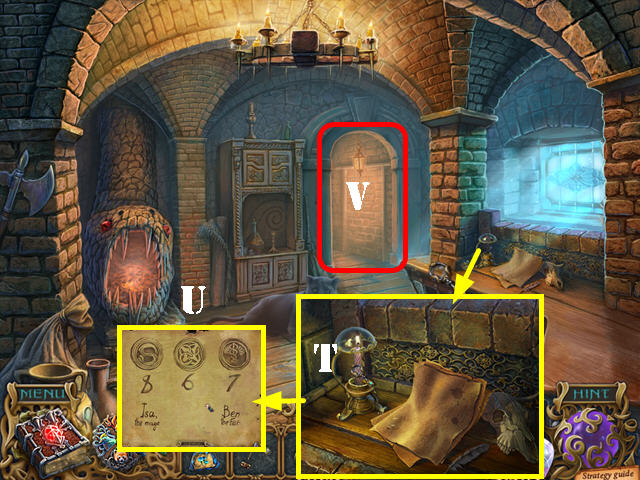
- Zoom into the table; place the LIT CANDLE in the lamp (T).
- Place the BOOK PAGE over the flame to view a code (U).
- Go through the door (V).
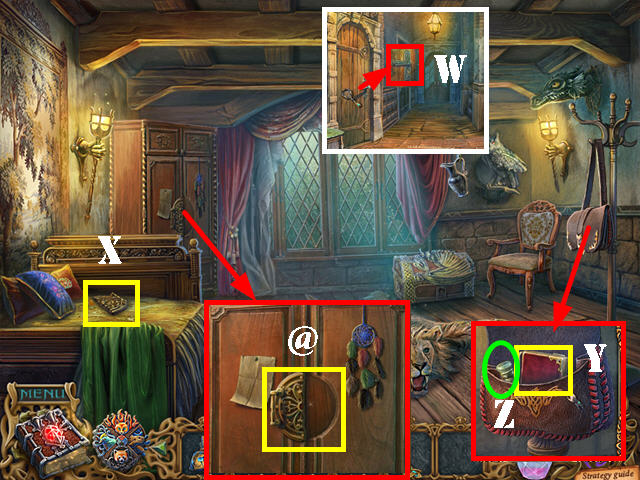
- Zoom into the left door; use the KEY TO ROOM 8 in the lock (W). Go through the door.
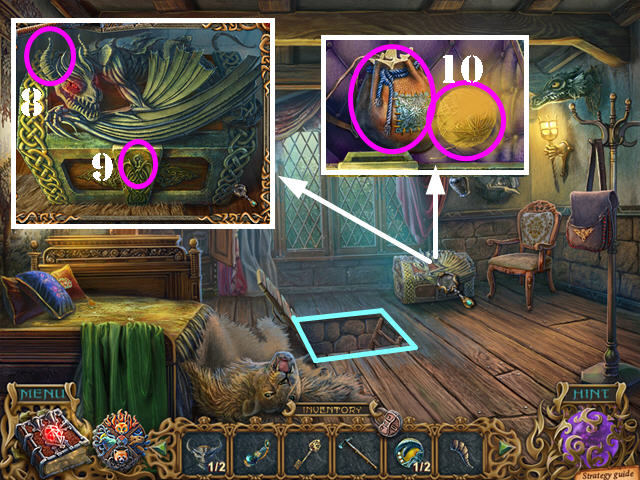
- Move the pillow and take the LOCK PART (X).
- Zoom into the satchel and open it; open the book (Y), turn the page and take the note.
- Take the VOLCANIC ASHES (Z).
- Take a closer look at the cabinet; use the LOCK PART on the lock to activate a HOS (@).
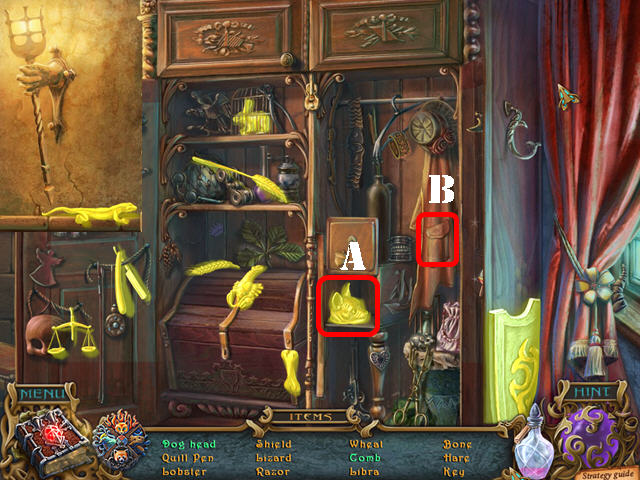
- Open and close the doors to find hidden items.
- Open the compartment and take the dog head (A).
- Open the pocket and take the comb (B).
- You will receive the SHIELD.
- At this point, you’ve run out of potion; you are no longer invisible. You will receive the PUZZLE PART from Isa.
- Move the lion rug (C), open the hatch and go through it (D).

- Look in the basket; put the BAG OF LUMINOUS FUNGI SPORES in it, followed by the VOLCANIC ASHES (E).
- Take the SWORD (F).
- Play the HOS.
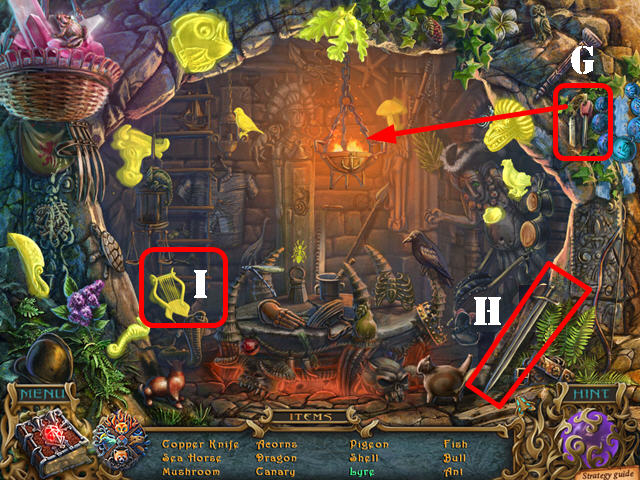
- Use the lighter (G) in the lantern to light up the room.
- Break the vase with the sword (H) and take the lyre (I).
- You will receive the COPPER KNIFE.
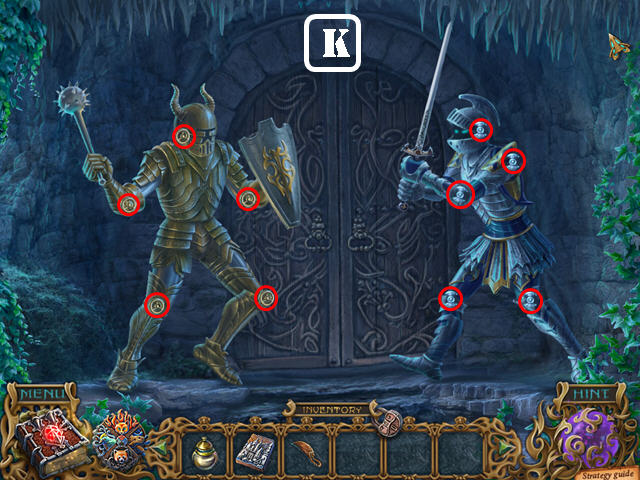
- Zoom into the back door; place the SHIELD and the SWORD on the knight to activate a puzzle.
- Position the knights correctly by moving the joints (red) for each one.
- Please look at the screenshot for the solution (K).
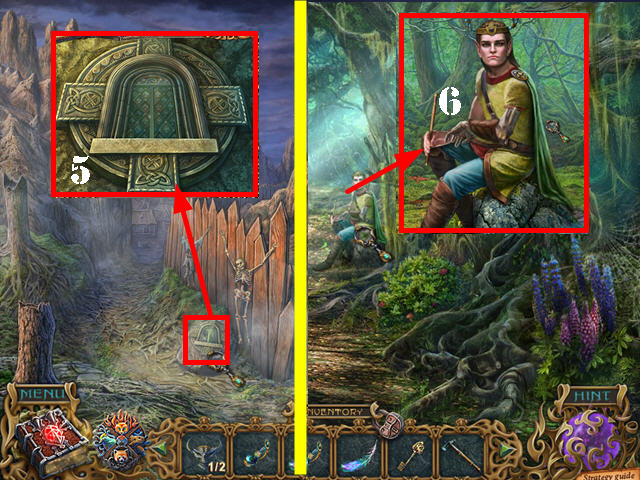
- Go through the door.
Chapter 4: The Forest Prince
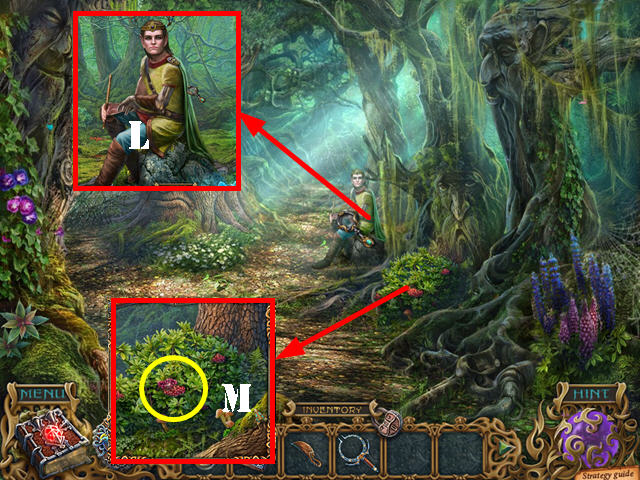
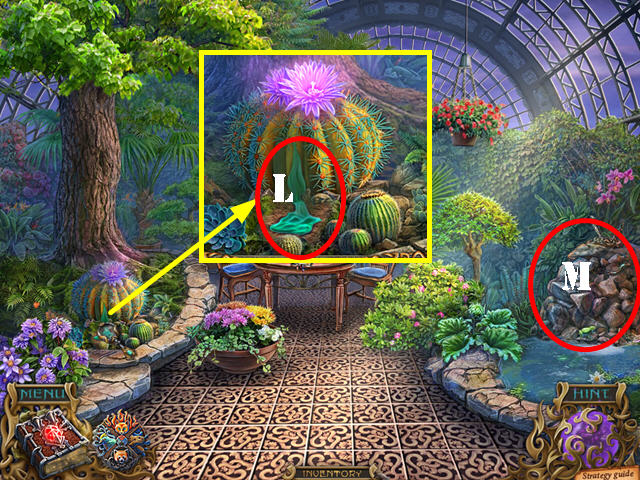
- Talk to the forest prince to receive the MIRROR (L).
- Zoom into the BERRIES and take them (M).
- Go forward.
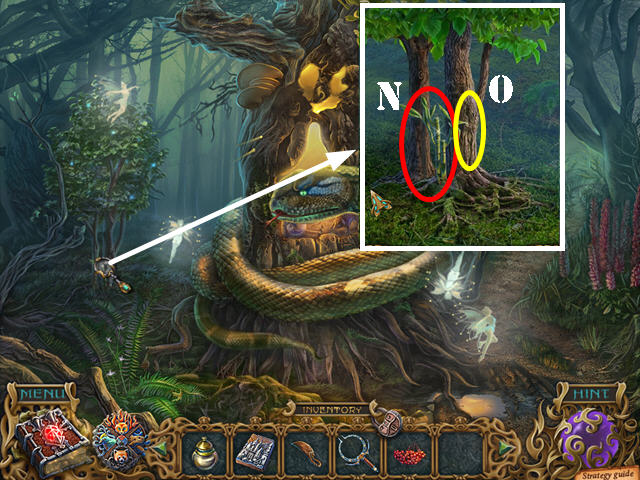
- Look at the tree; take the BAMBOO (N).
- Use the COPPER KNIFE on the tree to get the CINNAMON (O).
- Head right.
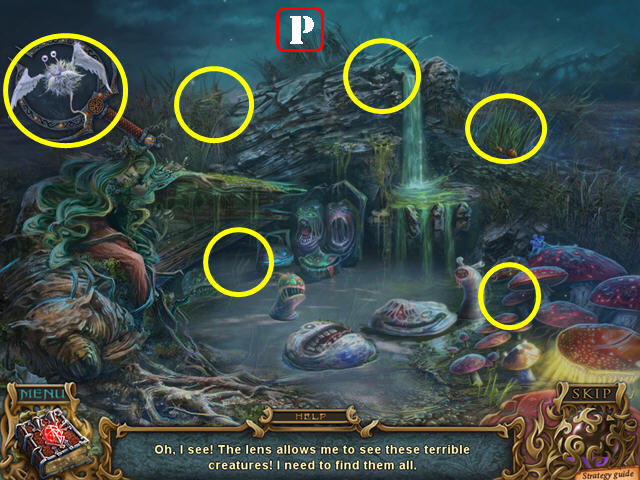
- Use the MIRROR on the nymph to activate a puzzle.
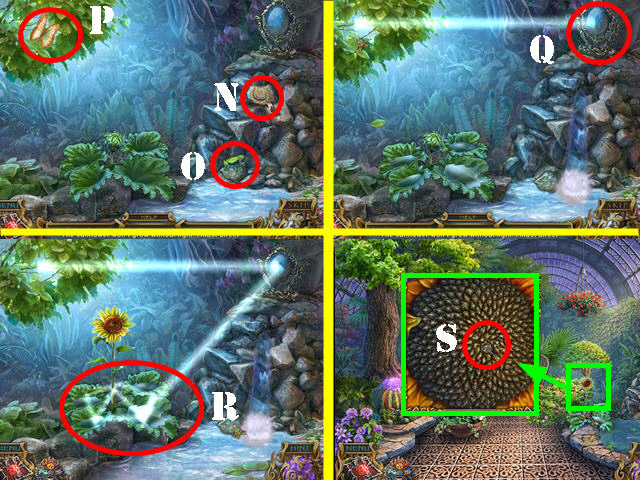
- Find the monsters by moving the mirror around the scene; select the monsters once you find them (P).
- Take the RECIPE from the nymph (Q).
- Take the WINE GLASS from the nymph (R).
- Look at the field and take an ONION (S).
- Open the amulet; give the BAMBOO to Chester to get the PESTLE (T).
- Select the waterfall for a mini-game (U).
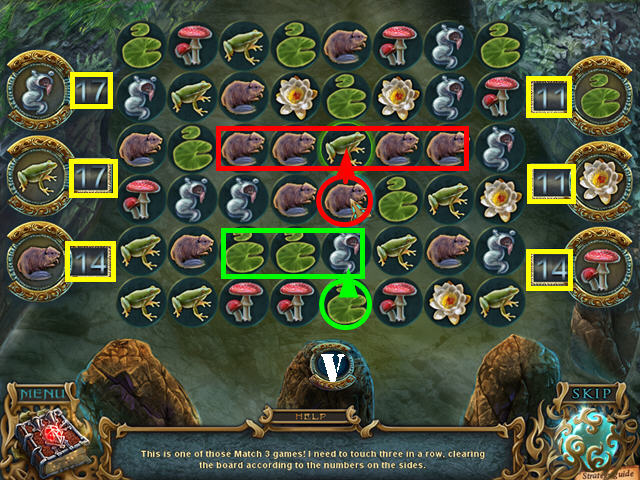
- Make matches of three or more of the same items (red, green). For each match that you make, you will see the numbers in the box (yellow) decrease by the number of items you matched.
- Some matches will be made automatically as the pieces fall through the board.
- Use the reset button at the bottom, if you run out of moves (V).
- The solution for this puzzle is random.
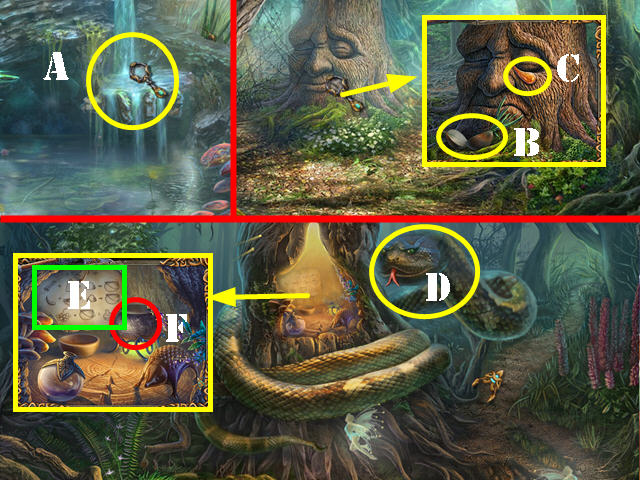
- Use the WINEGLASS on the waterfall to receive the WINE GLASS WITH WATER (A).
- Walk down twice.
- Zoom into the tree face; place the ONION in front of it and then cut the onion with the COPPER KNIFE (B).
- Take the TEAR (C).
- Go forward.
- Give the WINE GLASS WITH WATER to the snake (D).
- Zoom into the inside of the tree. Place the RECIPE on the scene (E).
- Take the CAULDRON (F). Exit this scene and go right.
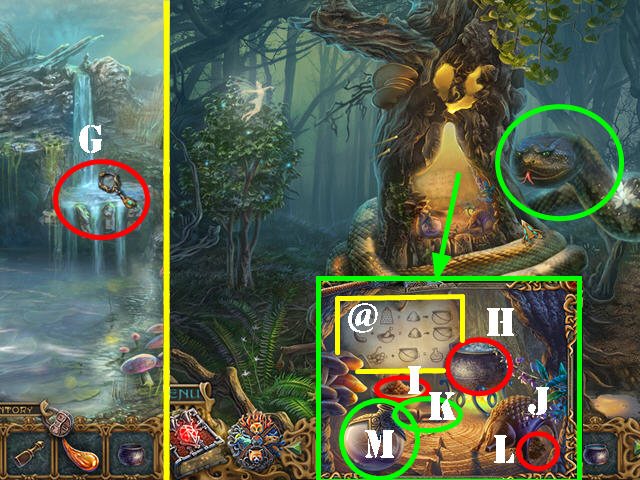
- Use the CAULDRON in the waterfall to get the FULL CAULDRON (G).
- Walk down.
- Zoom into the tree; place the FULL CAULDRON on the stand (H).
- Read the recipe (@).
- Use the CINNAMON on the grater (J).
- Put the TEAR in the bowl (I). Place the PESTLE on the scene. Touch the pestle to crush the tear (K).
- Place the BERRIES, the crushed tear, and the cinnamon gratings (L) into the cauldron.
- Pour the cauldron’s contents into the bottle; take the ELIXIR (M).
- Walk down.
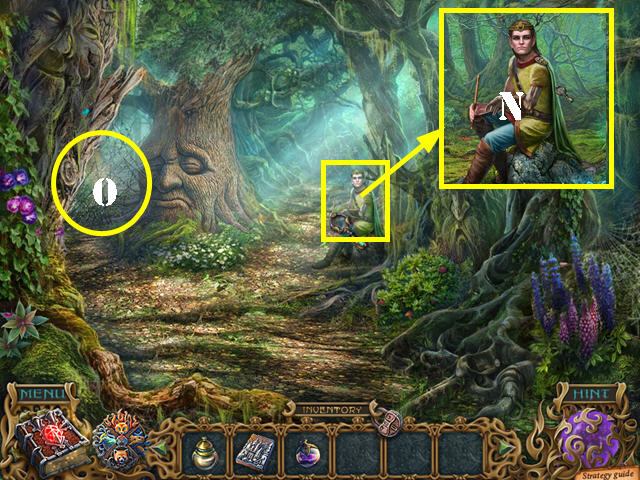
- Zoom into the prince and give him the ELIXIR to receive the PART OF THE ELF WAND (N).
- Go left (O).
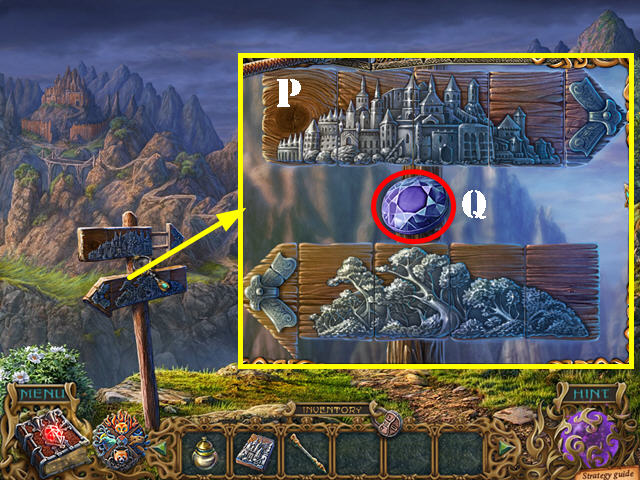
- Take a closer look at the sign; put the PUZZLE PART on it to activate a puzzle.
- Assemble the puzzle correctly.
- Select two pieces in the same row to swap their positions.
- Please look at the screenshot for the solution (P).
- Take the DIAMOND (Q).
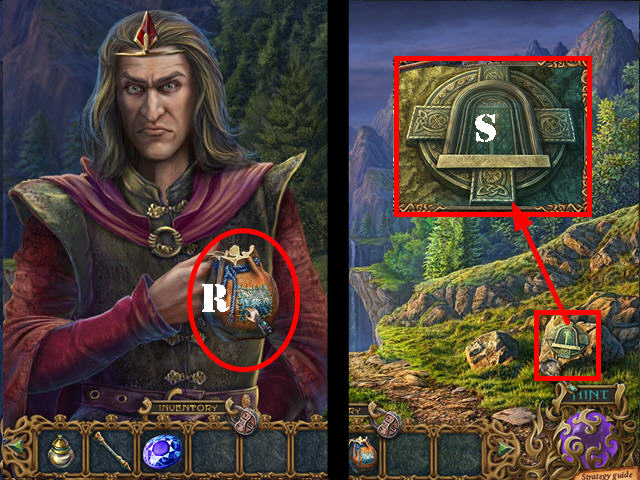
- Take the MAGIC POWDER from Isa (R).
- Take a closer look at the door; use the MAGIC POWDER on it (S).
- Go left once you reach the new location.
- Take a closer look at the statue and then take the BRACELET (T).
- Take a closer look at the railing and take the SICKLE WITH HANDLE (U).
- Go through the right door (V).
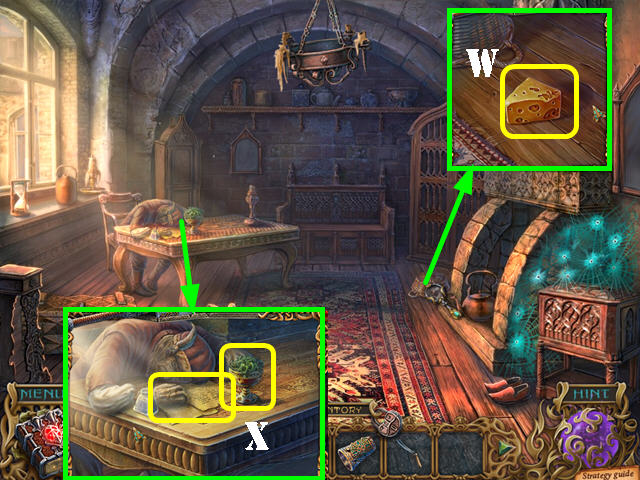
- Zoom into the basket; lift it and take the CHEESE (W).
- Zoom into the table; take the SEAWEED and the note (X).
- Walk down twice and go right.
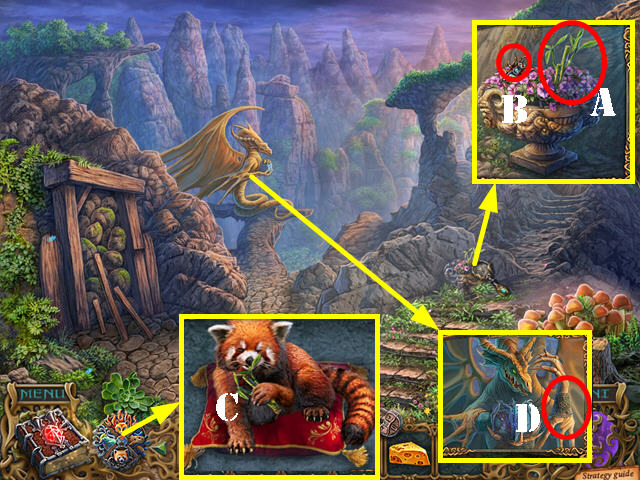
- Take a closer look at the plant; take the BAMBOO (A) and the SPIDER (B).
- Open the amulet.
- Give the BAMBOO to Chester to receive the 1/2 MONSTER HEAD (C).
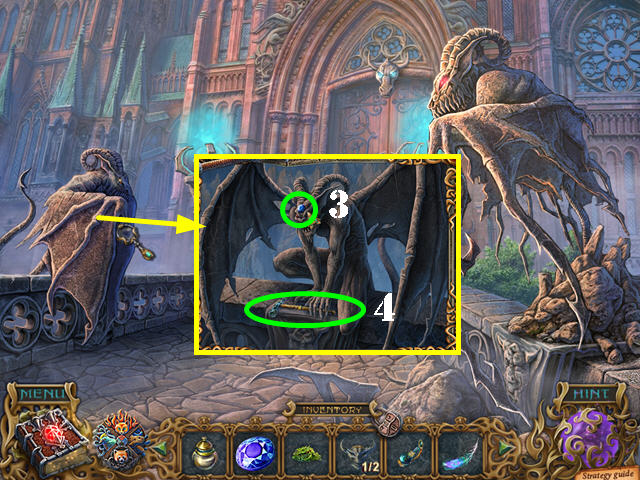
- Take a closer look at the dragon; place the BRACELET on it (D). Zoom into its box for a HOP.
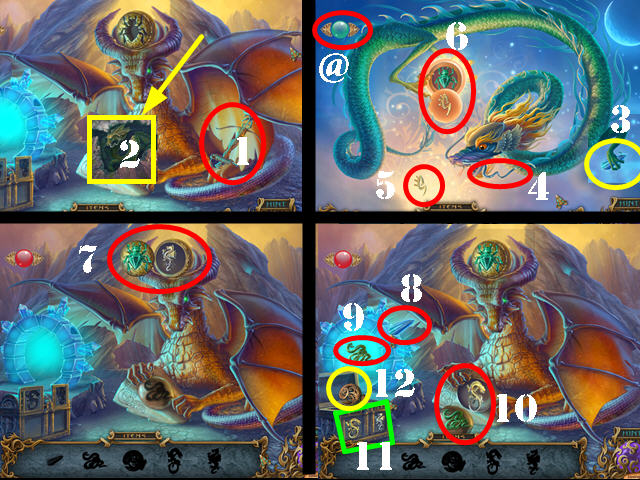
- Touch the sphere (@) in the upper left to go back and forth between the two scenes.
- Touch the right wing and take the crossbow (1).
- Zoom into the niche and use the crossbow on the baby dragon to get the dragon mustache (2).
- Touch the sphere. Touch the leg and take the crystal (3). Place the dragon mustache on the dragon (4) and then take the rune (5). Place the rune in the slot and take the spider (6).
- Touch the sphere. Place the spider in the niche and take the lock part (7). Place the crystal in the arch (8) and take the snake (9)..
- Place the snake in the slot; take the second lock part (10).
- Place the 2 lock parts in the locks (11) and take the TOP OF THE ELF WAND (12).
- Go through the door.
Chapter 5: Hanna’s House
- Talk to Hanna.
- Zoom into the mantle; take the SICKLE (13.
- Take a closer look at the mouse hole; put the CHEESE down (14).
- Take the FIR TREE (15). Place the FIR TREE in the niche (16) and take the HORN (17).
- Zoom into the deer head; place the HORN on its head (18) and then touch the horn to open the teeth below the counter.
- Zoom into the niche and take the JUG (19).
- Walk down twice; go left and then through the right door.
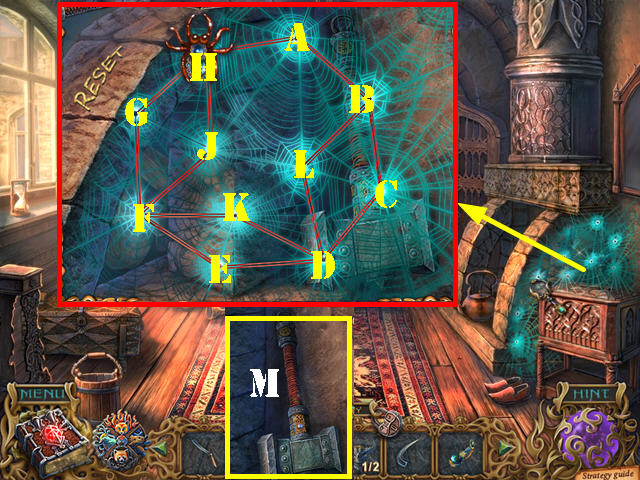
- Zoom into the web and place the SPIDER on it to activate a mini-game.
- Move the spider to all available spots just once. Select a spot and the spider will move to it.
- Please follow these steps, to solve the puzzle: A, B, C, D, E, F, G, H, J, F, K, D, L, and B.
- Take the HAMMER (M).
- Walk down and go through the left door.
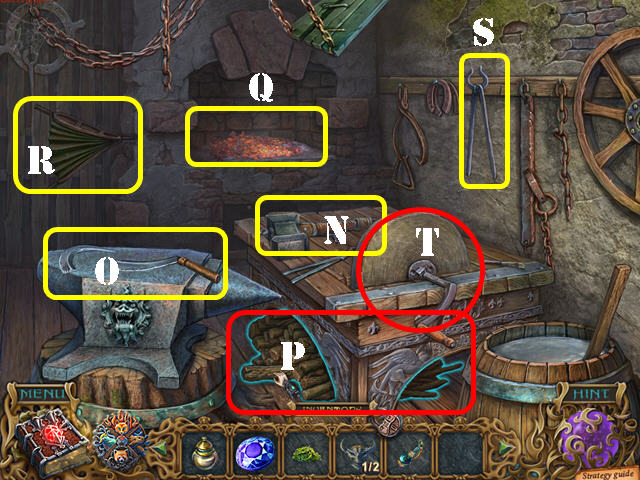
- Place the HAMMER on the table (N).
- Place the SICKLE WITH HANDLE and the SICKLE on the anvil (O).
- Grab the firewood (P) and place it in the furnace (Q). Squeeze the bellows (R).
- Place the sickle with handle and the sickle into the furnace. Use the tongs (S) to retrieve both pieces from the furnace.
- Use the hammer on the 2 hot sickle pieces.
- Place the tongs on the hot sickle to automatically place it in the barrel of water.
- Use the dull sickle on the grindstone (T) and take the EDGED SICKLE.
- Walk down twice.
- Use the EDGED SICKLE on the plant on the right fence to activate a HOS.
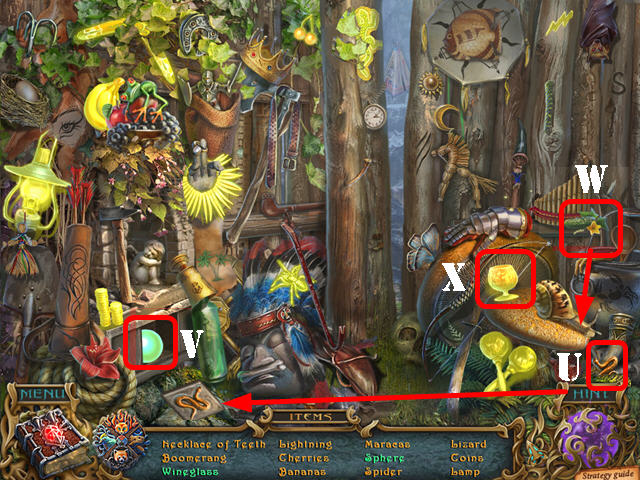
- Play the HOS.
- Place the snake (U) in the niche and take the sphere (V).
- Place the plant (W) in front of the snail and then take the wine glass (X).
- You will receive the ELF WAND SPHERE.
- Head right.
- Zoom into the dragon.
- Place the PART OF THE ELF WAND in its hand. Place the TOP OF THE ELF WAND on the wand.
- Place the ELF WAND SPHERE in the top.
- Take the ELF WAND (Y).
- Walk down.
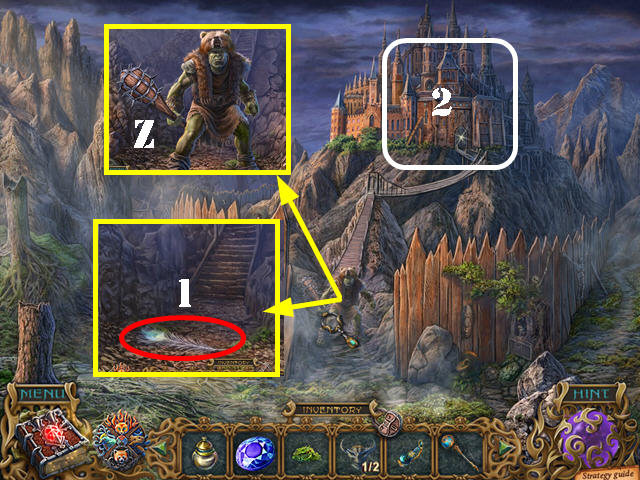
- Zoom into the guard; use the ELF WAND on him (Z).
- Take the FEATHER (1).
- Go towards the castle (2).
- You will receive the MAGIC POWDER and the KEY from Isa.
- Zoom into the gargoyle; place the DIAMOND in its head (3).
- Take the HAMMER (4).
- Walk down.
- Zoom into the portal door; use the MAGIC POWDER on the door (5).
- Walk down.
- Zoom into Arton and give him the FEATHER to receive the 1/2 MEDAL (6).
- Exit this scene; walk down and go up the ladder.
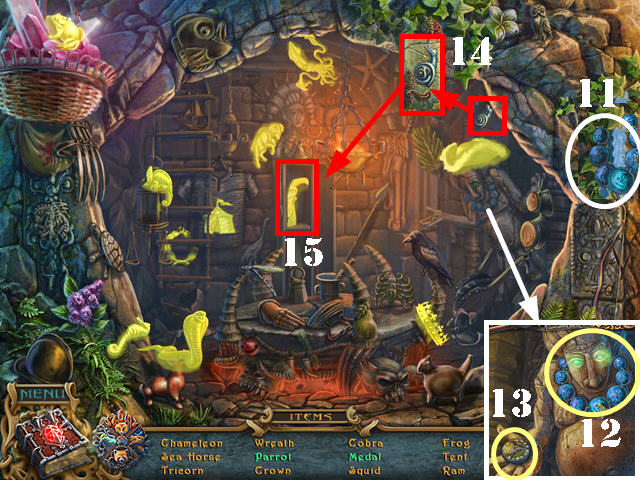
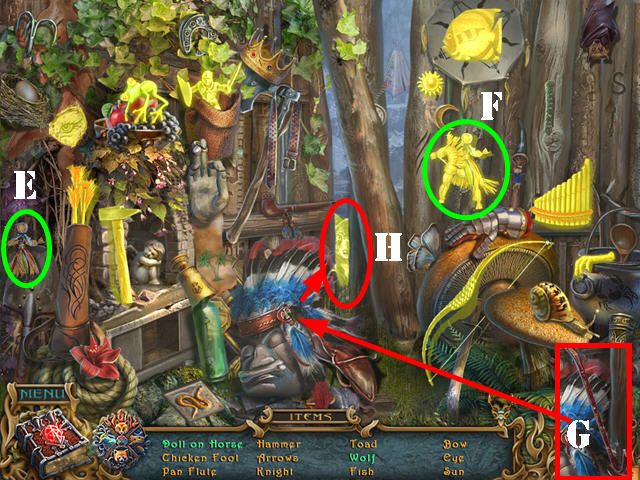
- Play the HOS.
- Open the chest; take the candlestick and the frog (7).
- You will receive the HORN.
- Take a closer look at the dragon chest; place the HORN on the dragon (8) and use the KEY in the lock (9).
- Take ISA’S YARN BALL and the MAGIC POWDER (10).
- Go back down the hatch.
- Play the HOS..
- Take the necklace (11) and zoom into the statue; place the necklace on it (12) and take the medal (13).
- Pick up the snail (14); zoom into the niche and place the snail in the slot. Take the parrot (15).
- You will receive the 2/2 MEDAL.
- Go forward and then go left.
- Zoom into the portal door; place the 2 MEDALS on it to activate a puzzle.
- Use the buttons in the center to rotate the puzzle parts. A piece will light up as soon as it is in the right spot.
- To solve the puzzle, select the buttons in this order: C, B, A, B, and C.
- Zoom into the portal and use the MAGIC POWDER on it to activate a HOS (D).
- Place the doll (E) on the horse; take the doll on horse (F).
- Use the crowbar (G) on the wood; move it aside and take the wolf (H).
- You will receive the 2/2 MONSTER HEAD.
- Go towards the castle.
- Zoom into the door; place the 2 MONSTER HEADS on the door to activate a puzzle.
- Find the right order to select the heads.
- To solve the puzzle, select the heads in numerical order (1-6).
- Go through the door.
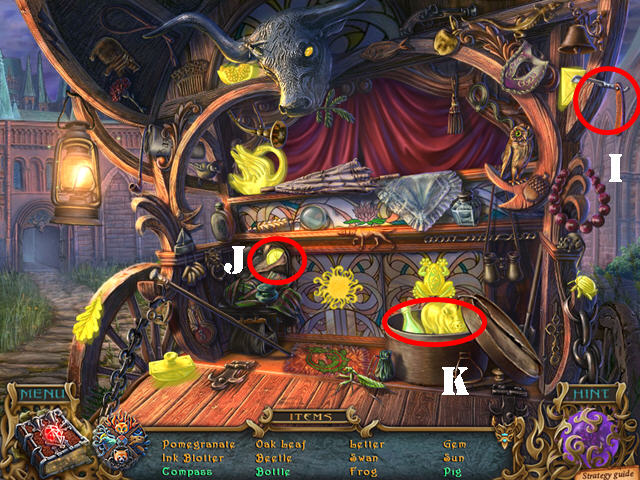
- Play the HOS.
- Open the door to view all available items.
- Cut the cloth with the knife (I) and take the compass (J).
- Open the box; take the pig and the bottle (K).
- You will receive the 1/2 STONE FEATHER.
- Go right.
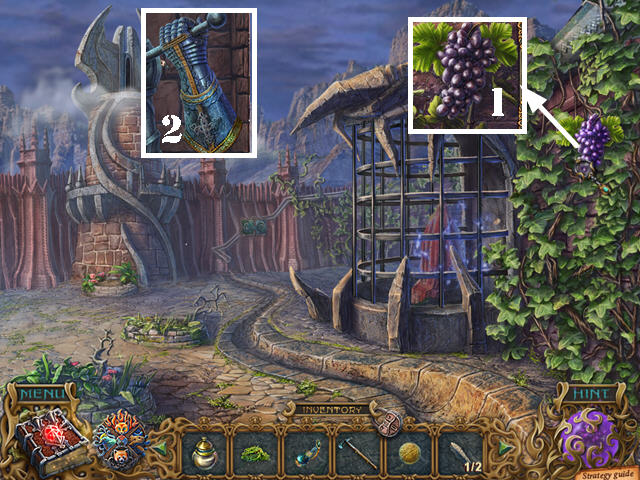
- Zoom into the GRAPES and take them (1).
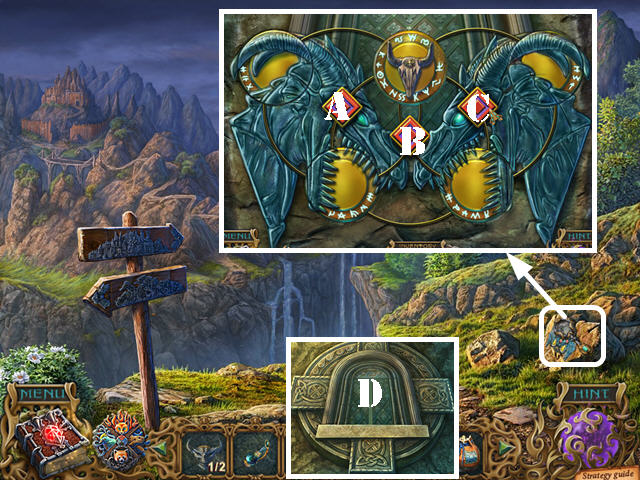
- Examine the back door for a puzzle.
- This puzzle contains two parts. In the first section you must swap rings of the same size by using the button (A) in the center.
- Once the rings are in the right place, you must drag the rings into place.
- To solve the first part of the puzzle, swap the rings in this order: B, D, A, and C, E, A.
- To solve the second part of the puzzle, rotate the rings in this order: C, B, G, C, F, G for the left and H, D, I, E, H, and I. Note: when lining up the pieces make sure you look at the final image to view how the pieces should line up (J).
- Take the GLOVE (2).

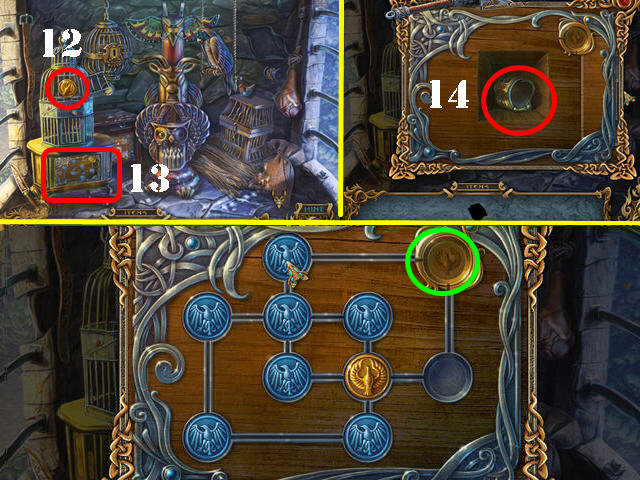
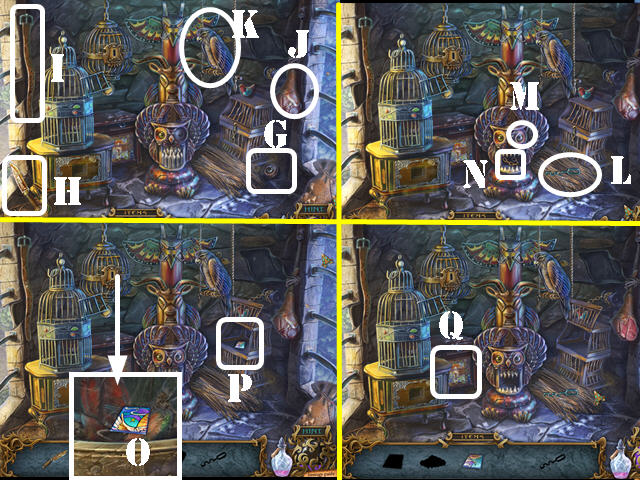
- Play the HOP.
- Remove the cover on the birdcage (3) and open the cage.
- Touch the straw and take the horn (4).
- Remove the feathers and take the flamingo (5). Place the flamingo in the niche (6) and take the bird with fire breath (7).
- Place the horn on the head (8).
- Use the bird with fire breath on the steel bar (9). Use the steel bar on the stone and take the first chip (10).
- Take the hawk’s cap (#); place it on the hawk (11). The bird will fly out of the cage.
- Take the chip from inside the cage (12).
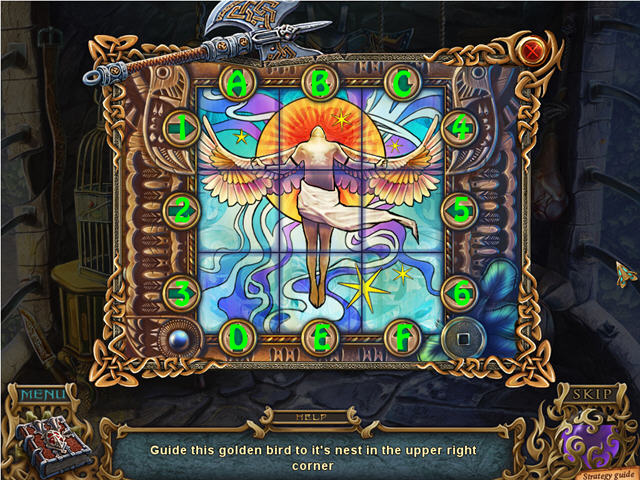
- Take a closer look at the cabinet (13); place the 2 chips in the slots to activate a mini-game.
- Guide the golden bird into the nest in the upper right corner (green). Select a chip to light and then select an empty spot to move it there.
- The starting point in this puzzle is random.
- Take the PIN (14).
- Place the JUG in the water stream to get the JUG WITH WATER (K).
- Walk down.
- Zoom into the chest (L); use the JUG WITH WATER on the straps.
- Break the glass with the HAMMER and take the Turtle (M)..
- Open the amulet. Give the SEAWEED to the turtle to get the 2/2 STONE FEATHER (N).
- Zoom into the flowers; use the GLOVE to get the MAGIC FLOWER (O).
- Walk down twice; go right and through the door.
Chapter: 6 The Castle
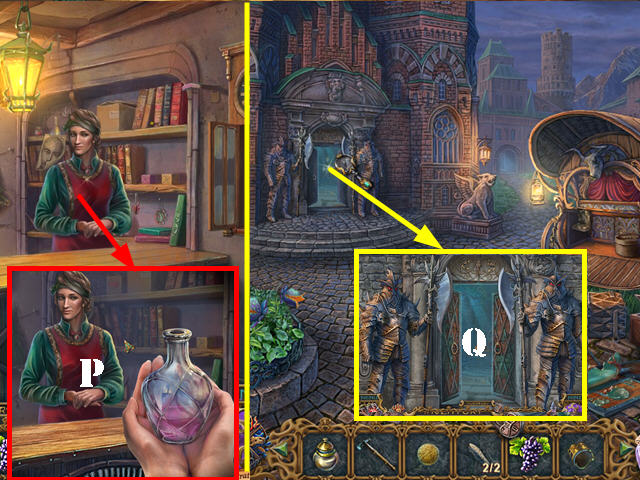
- Give the MAGIC FLOWER to Hanna and then take the invisibility potion.
- Walk down twice and go forward towards the castle. Go through the door.
- Zoom into the guarded door and go forward (Q). Note: you can only go forward if you have the invisibility potion in your inventory.
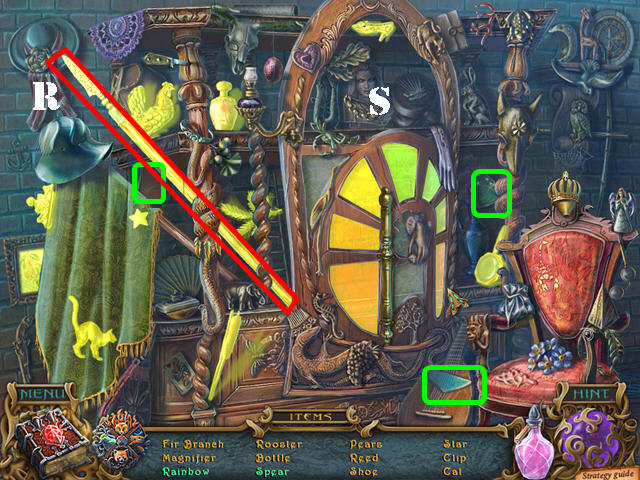
- Play the HOS.
- Remove the cloth and take the spear (R).
- Place the 3 stained glass pieces marked in green on the window and then take the rainbow (S).
- You will receive the SPEAR.
- Zoom into the creature; break the claw with the HAMMER and take the OBSIDIAN CLAW (T).
- Take a closer look at the chandelier; use the PIN on the bell and take the BELL (U).
- Go through the left door (V).
- Zoom into the table; open the book and flip through the pages (W).
- Take the picture (X).
- Zoom into the cactus; use the SPEAR on the head to get the FRUIT PICKER (Y).
- Use the FRUIT PICKER on the pear to receive the MAGIC GROWTH PEAR (Z).
- Walk down and go through the center door.
- Take a closer look at the goblin; give him the MAGIC GROWTH PEAR (A).
- Take the DOMINO and the BOTTLE (B).
- Take a closer look at the book; view the list of ingredients (C).
- Zoom into the wings by the door; place the 2 STONE FEATHERS on it. Take the TWEEZERS (D).
- Walk down and go through the right door.
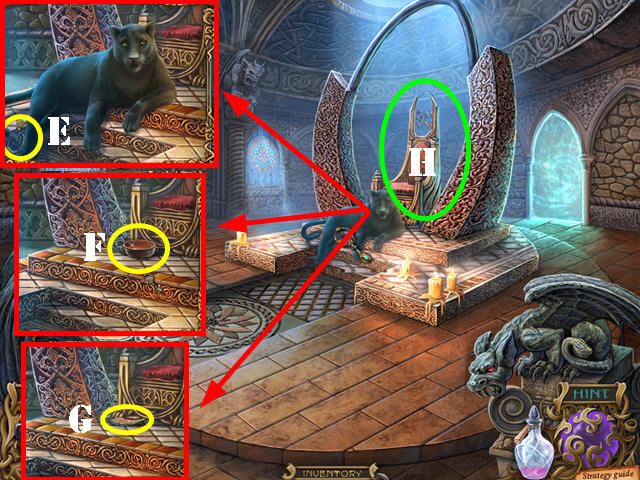
- Zoom into the panther; place the BELL on its tail (E).
- Place the POT OF MILK into the bowl to receive the CUP WITH MILK (F).
- Take the HORN (G).
- Zoom into the throne (H); place the DOMINO on it to activate a puzzle.
- Assemble all the parts so adjacent pieces have something in common or have the same background color.
- Drag the pieces into place.
- Please look at the screenshot for the solution (@).
- Zoom into the stained-glass window; use the OBSIDIAN CLAW to get the LENS (I).
- Go through the archway (J). Try to go forward and you will not be able to; you need the invisibility potion (K).
- Walk down twice and go through the left door.
- Zoom into the cactus; cut it with the OBSIDIAN CLAW. Use the BOTTLE to collect the ACID (L).
- Take a closer look at the stones (M); place the LENS in the frame to activate a puzzle.
- Touch the stone (N).
- Touch the frog (O).
- Touch the butterfly (P) and then the mirror (Q).
- Position the leaves as shown in the screenshot (R).
- Zoom into the plant; use the TWEEZERS to take the SEED (S).
- Walk down 4 times, go right and then through the door.
- Take the invisibility potion (T). You will also receive the BOOK.
- Return to the throne room in the castle; take the back door and then go through the right door (U). Note: you can only get past this point if you have the invisibility potion.
Chapter 7: The Finale
- Examine the table; take the PLIERS (V).
- Zoom into the sphere; use the PLIERS on it (W).
- Take the RING (X).
- Play the HOP.
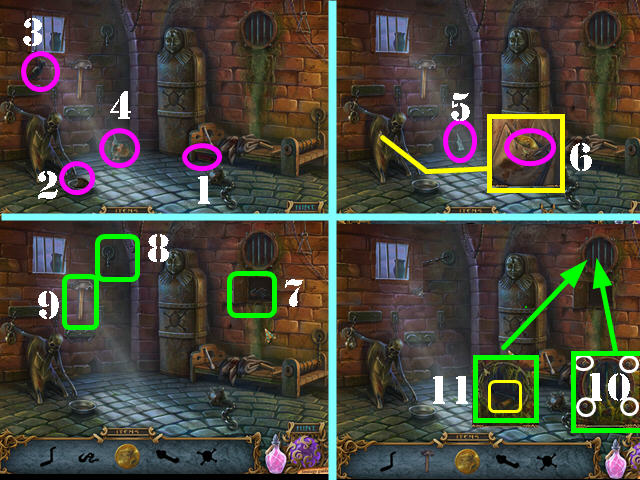
- Take the brush (1), the bread (2) and the parrot (3).
- Give the bread to the rat (4) and take the glass (5).
- Zoom into the skeleton’s pocket and cut it with the glass. Take the coin (6).
- Use the brush on the overgrowth and put the parrot in the niche. Take the hook on chain (7).
- Place the hook on chain on the broken chain (8); take the hammer (9).
- Zoom into the hole; use the coin to remove the screws (10). Take the handle (11).
- Place the handle on the winch (12); take the chisel (13).
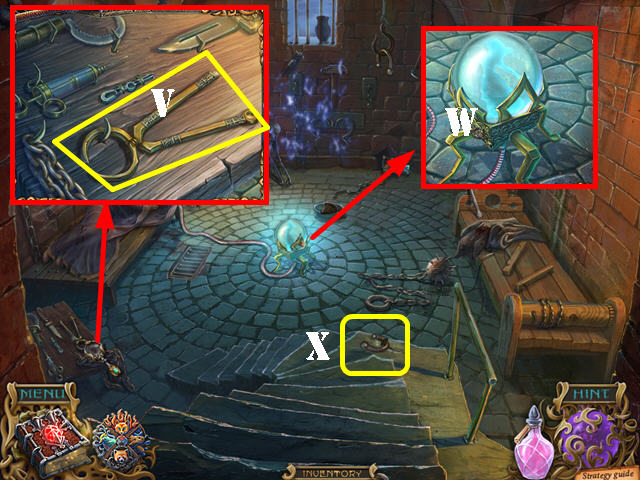
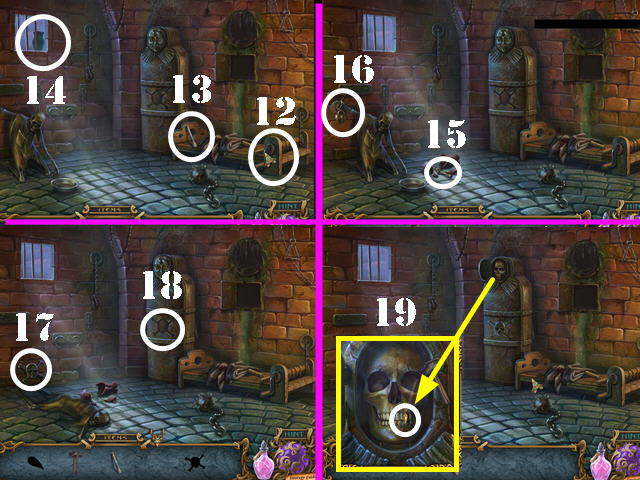
- Touch the jug (14) and take the key (15).
- Use the key in the shackle (16) and take the skull (17).
- Place the skull in the niche (18).
- Zoom into the skull. Use the chisel and hammer to retrieve the TOOTH (19).
- Walk down.
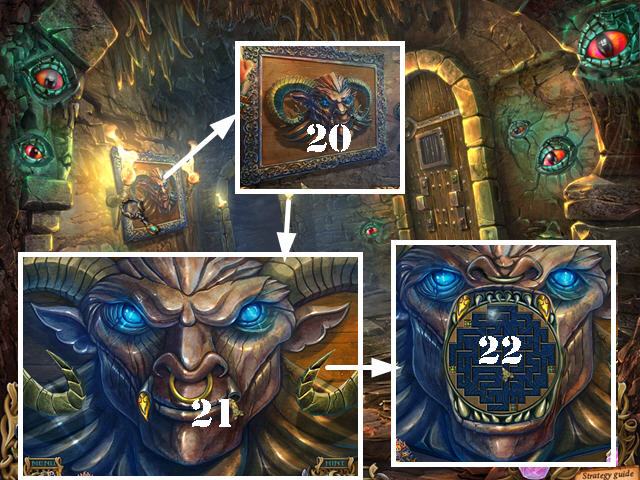
- Zoom into the frame; use the ACID on it (20). Zoom into the face; place the HORN, RING, and TOOTH on the face (21).
- Place ISA’S YARN BALL on the maze to activate a puzzle (22).
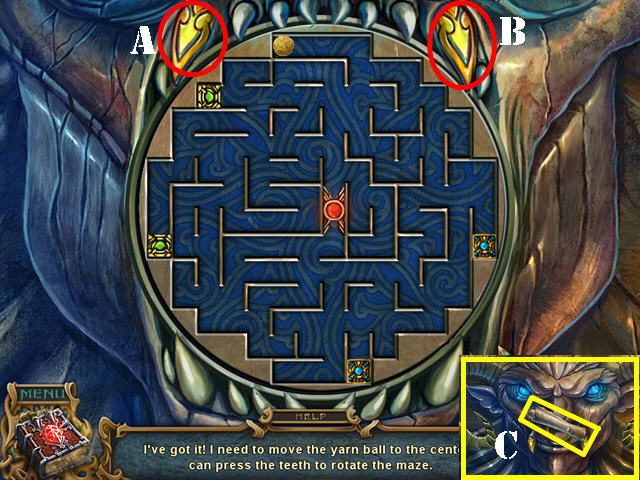
- Use the teeth to guide the ball into the center.
- To solve the puzzle, select the teeth in this order: B, A, B, A, Bx2, Ax2, B, A, B x2, A, Bx2, A, Bx2, Ax2, and B.
- Take the clue (C).
- Go forward.
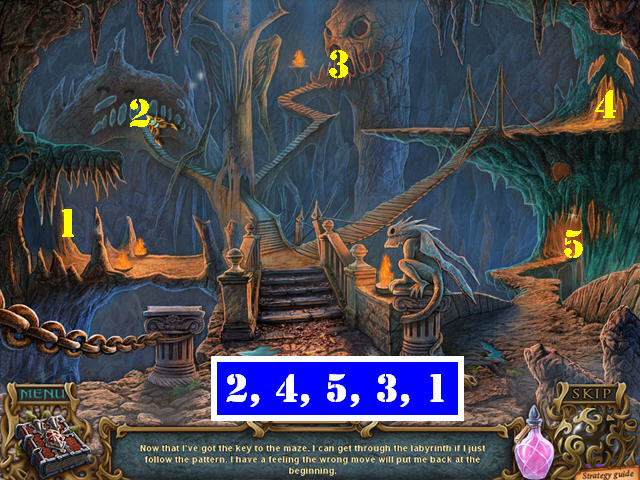
- Use the clue in your journal to travel through the maze. If you make an incorrect step, you will be taken back to the beginning.
- The caves are labeled 1-5, select the caves in this order: 2, 4, 5, 3, 1.
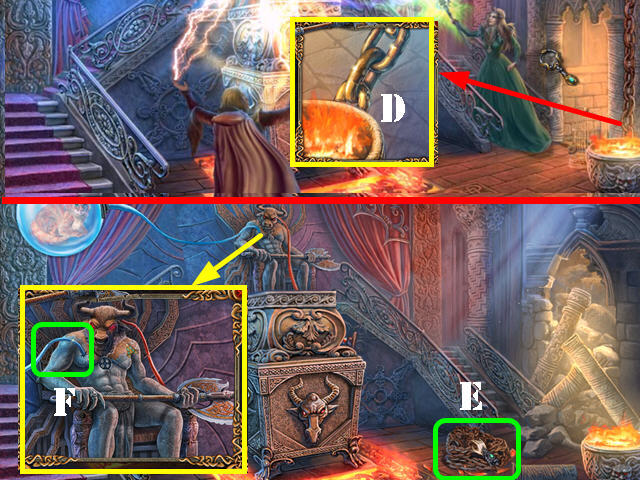
- Zoom into the chain; use the ACID on it (D).
- Take the CHAIN (E).
- Zoom into the Minotaur; use the PLIERS on the glass tube (F).
- Zoom into the cat and take it (G).
- Open the amulet; give the CUP WITH MILK to the cat to receive the FIRE MEDALLION (H).
- Zoom into the Minotaur and place the FIRE MEDALLION on his chain (I).
- Go through the door (J).
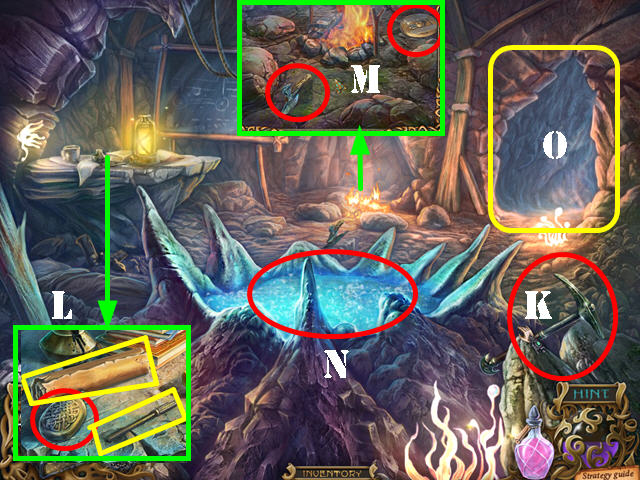
- Take the PICK (K).
- Zoom into the table; take the FILE, the CLAY FLASK and the scroll (L).
- Examine the fire pit; take the WHEEL and the AXE (M).
- Use the CLAY FLASK in the water to get the CLAY FLASK WITH WATER (N).
- Go through the cave (O).
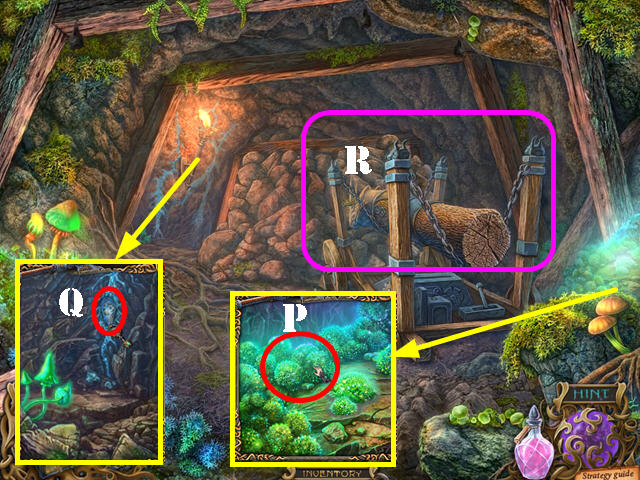
- Zoom into the moss; take the LUMINOUS MOSS (P).
- Examine the wall; use the PICK to collect the SILVER NUGGET (Q).
- Zoom into the contraption (R).
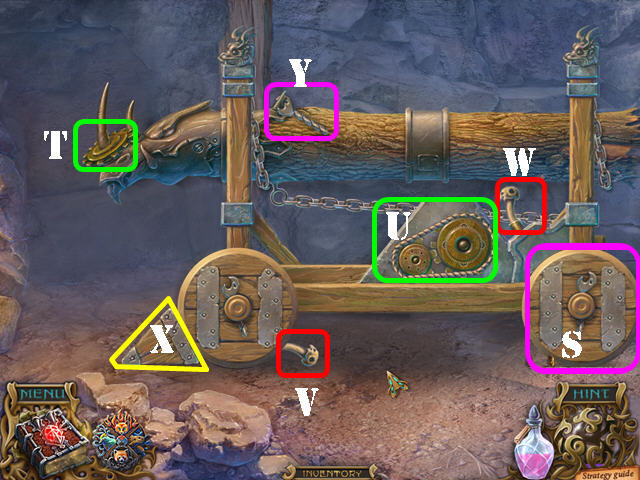
- Place the items into the right spots.
- Put the WHEEL on it (S).
- Drag the gear (T) into place (U). Place the CHAIN on the gears (U).
- Put the lever (V) in place (W).
- Use the AXE on the kick stopper (X).
- Place the wrench (Y) on the wheel (S).
- Pull the lever (W).
- Go forward and then return to the inside of the castle.
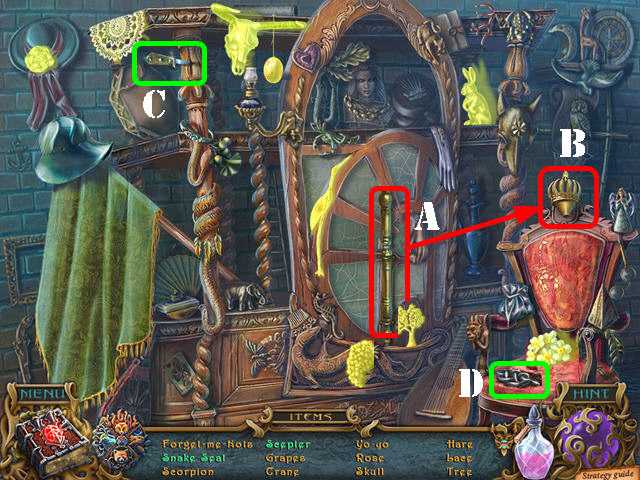
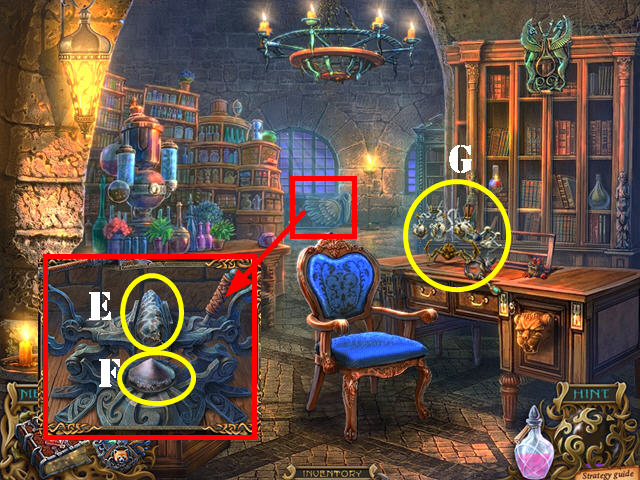
- Play the HOS.
- Place the handle (A) on the head (B) and take the scepter.
- Use the knife (C) on the seat cushion and take the snake seal (D).
- You will receive the SEAL.
- Go through the center door.
- Take a closer look at the mechanism; place the SILVER NUGGET in it (E).
- Use the FILE on the silver nugget and take the SILVER (F).
- Zoom into the table (G).
- Put down the BOOK (H). Place the SEAL on the book cover to open it to open it.
- Use the CLAY FLASK WITH WATER on the flask (J).
- Place the LUMINOUS MOSS in the filter (K).
- Place the GRAPES in the container (L).
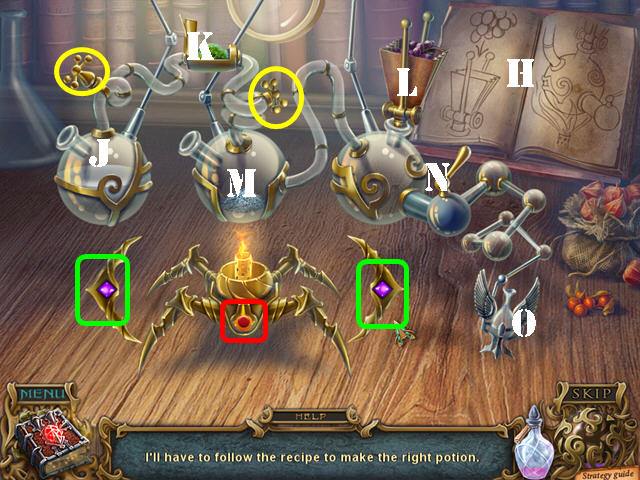
- Place the SILVER in the flask to activate the puzzle (M).
- Follow the recipe shown in the book; flip the book pages to view all steps.
- Use the arrows to move the burner left and right (green). Touch the burner button (red) to light it.
- Move to the left. Close the filter lid (K). Select the burner button.
- Turn both valves (yellow).
- Move right; select the burner button.
- Move right again and select the burner button once more.
- Touch the container (L) and then pull the handle (N).
- Take the GROWTH POTION (O).
- Walk down twice.
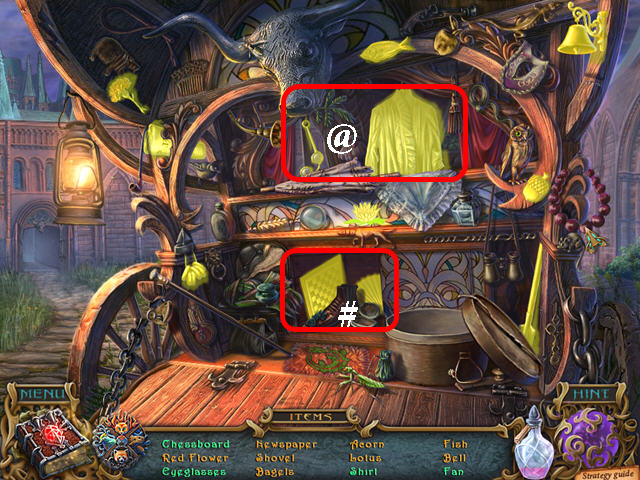
- Play the HOS.
- Open the curtains; take the shirt and the eyeglasses (@).
- Open the stained-glass door; take the chessboard and the fan (#).
- You will receive the SHOVEL.
- Go forward.
- Play the HOP.
- Move the bag and take the totem’s eye (G).
- Grab the dull knife (H).Use the dull knife on the belt (I) to get the sharp knife.
- Use the sharp knife to cut the meat (J); take the raw meat.
- Give the raw meat to the bird (K); take the key (L).
- Place the totem’s eye on the owl (M) and take the chain (N).
- Use the key in the lock; zoom into the cage and take the chip (O).
- Place the chain on the cage and take the chip (P).
- Zoom into the tiles and place the 2 chips on it (Q).
- Use the arrows to move the tiles in place.
- To solve the puzzle, select the arrows in this order: 3, A, 6, D, C, C, 3, F, F, E, 3, and B.
- Take the GRAIN.
- Zoom into the flowerbed; use the SHOVEL in the soil; take the LOCK KEY and the 1/2 PUZZLE PART below it (N).
- Place the SEED in the soil and add the GROWTH POTION to it (O).
- The invisibility potion has worn off; go up the tower (P).
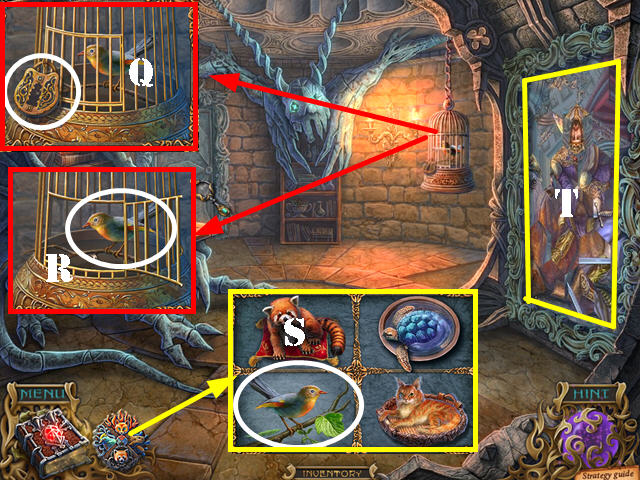
- Zoom into cage; use the LOCK KEY in the lock (Q) and take the bird (R).
- Open the amulet; give the GRAIN to the bird to receive the 2/2 PUZZLE PART (S).
- Examine the picture (T); place the 2 PUZZLE PARTS on it to activate a puzzle.
- Select a piece to rotate it; rotate all the parts until the right image is shown.
- Please look at the screenshot for the solution (U).
- Go through the right door and watch the cut scene.
- Congratulations, you have completed Spirits of Mystery: Dark Minotaur.


 Drawn: The Painted Tower ™ Walkthrough, Guide, & Tips
 Final Cut: The True Escapade Walkthrough, Guide, & Tips
 Grim Facade: Sinister Obsession Walkthrough, Guide, & Tips
 The Clumsys 2: The Butterfly Effect Walkthrough, Guide, & Tips
 Nevertales: Smoke and Mirrors Walkthrough, Guide, & Tips