The Mirror Mysteries 2: Forgotten Kingdoms Walkthrough, Guide, & Tips
The Mirror Mysteries 2: Forgotten Kingdoms Walkthrough
Welcome to the The Mirror Mysteries: Forgotten Kingdoms Walkthrough
The highly anticipated follow-up to the smash hit Mirror Mysteries is finally here! The mirror is back—can you extinguish his power for good?
Whether you use this document as a reference when things get difficult or as a road map to get you from beginning to end, we’re pretty sure you’ll find what you’re looking for here.
This document contains a complete The Mirror Mysteries: Forgotten Kingdoms game walkthrough featuring annotated screenshots from actual gameplay!
We hope you find this information useful as you play your way through the game. Use the walkthrough menu below to quickly jump to whatever stage of the game you need help with.
Remember to visit the Big Fish Games Forums if you find you need more help. Have fun!
This walkthrough was created by Rebekah, and is protected under US Copyright laws. Any unauthorized use, including re-publication in whole or in part, without permission, is strictly prohibited.
General Tips

- This is the official guide for The Mirror Mysteries 2: Forgotten Kingdoms.
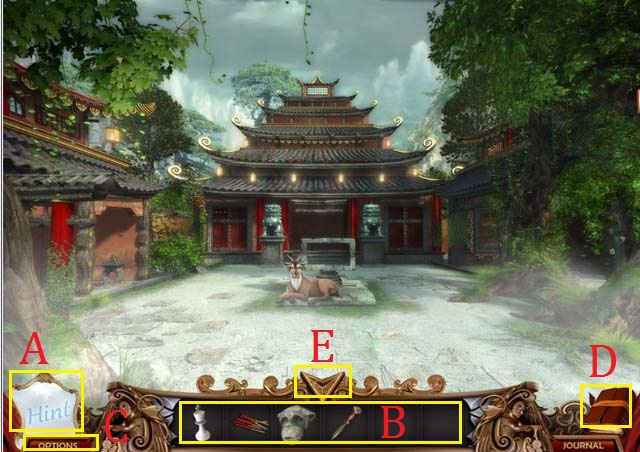
- Use the Hint Button (A) if you need additional help.
- Your Inventory Bar (B) will hold items until they are needed.
- Click on the Options button (C) to exit, pause, or resume the game. You can also use this button to adjust your options (sound, music, and screen size).
- Use your Journal (D) for additional help with puzzles and tasks.
- Use the Arrow Key (E), when available, to back up one scene.
- Zoom into sparkling scenes to play Hidden Object Scenes. Hidden Object Scenes will be referred to as HOS in the remainder of this guide.
- All items in the HOS are marked in green unless otherwise noted.
Chapter 1: The First Mirror
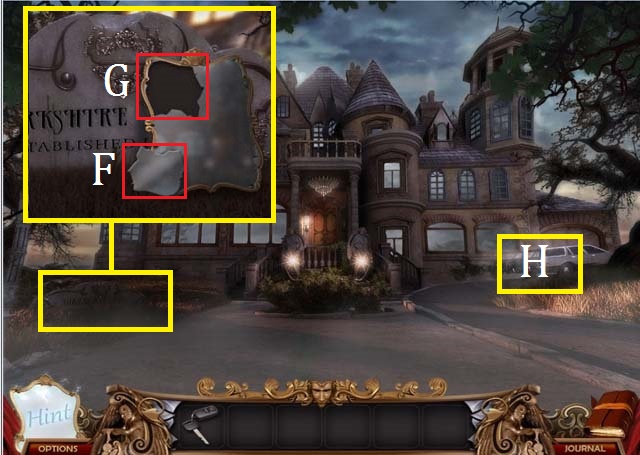
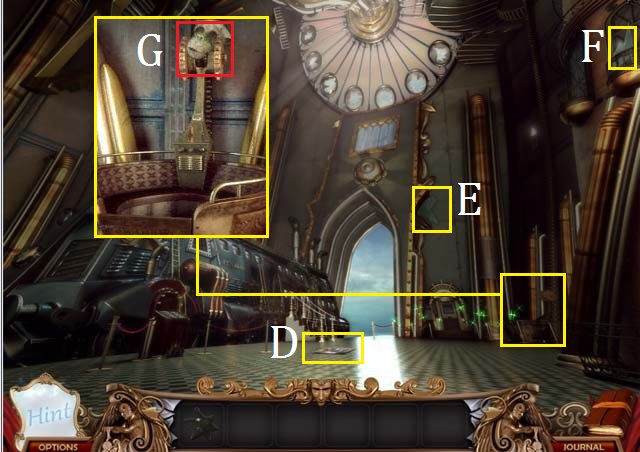
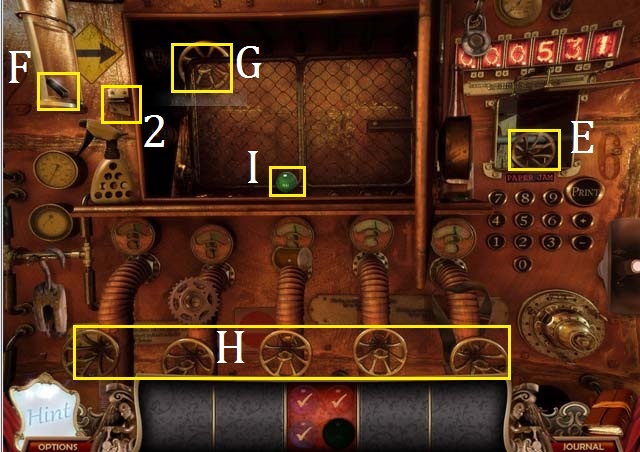
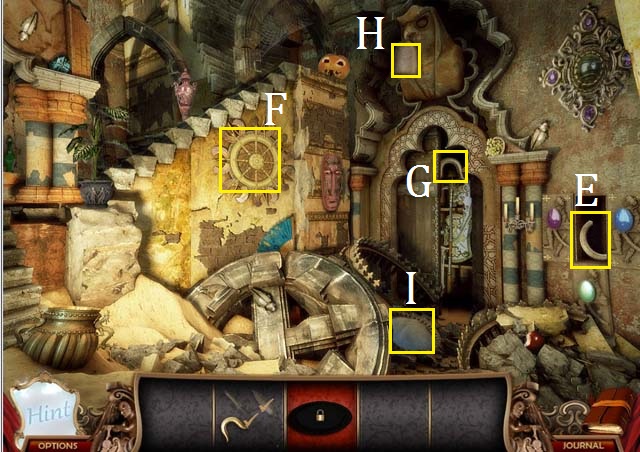
- Zoom into the sign; place the MISSING MIRROR SHARD (F) in the mirror (G).
- Examine the car (H).
- Move forward to the Front Door.
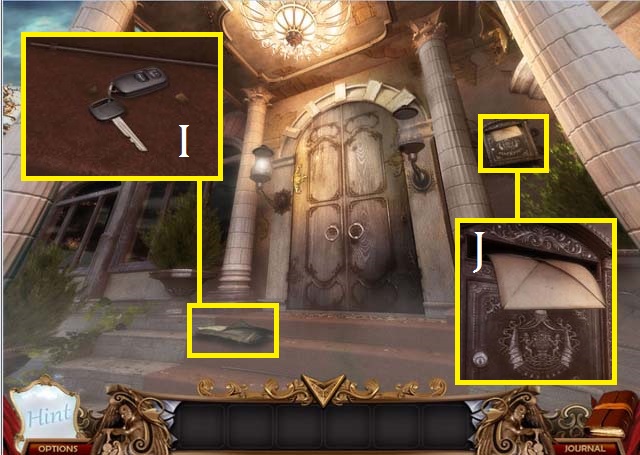
- Zoom into the paper; collect the paper and then collect the CAR KEYS (I).
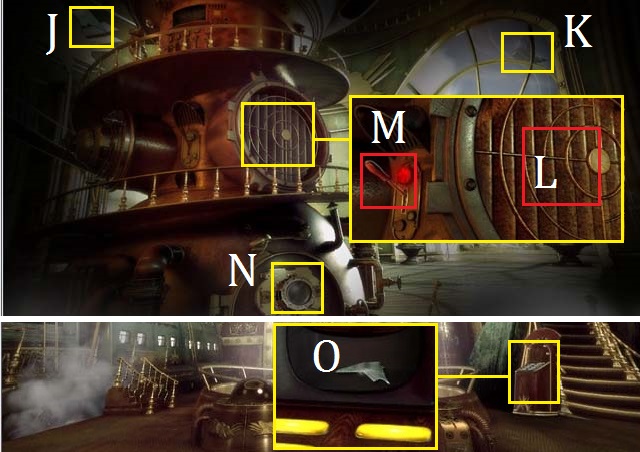
- Zoom into the mailbox; collect the note (J).
- Exit back one scene.
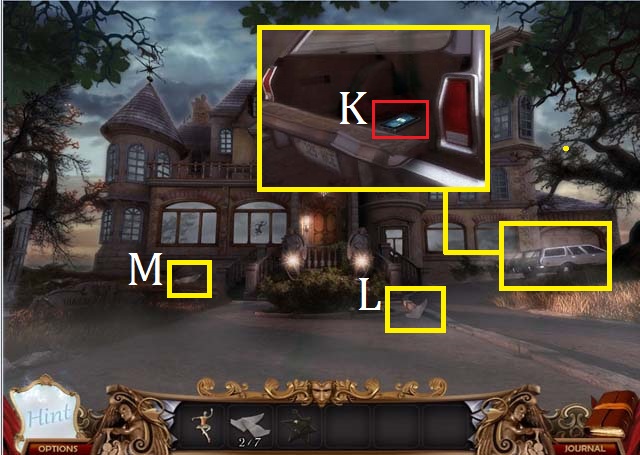
- Zoom into the car; unlock the hatchback with the CAR KEYS and then collect the phone (K).
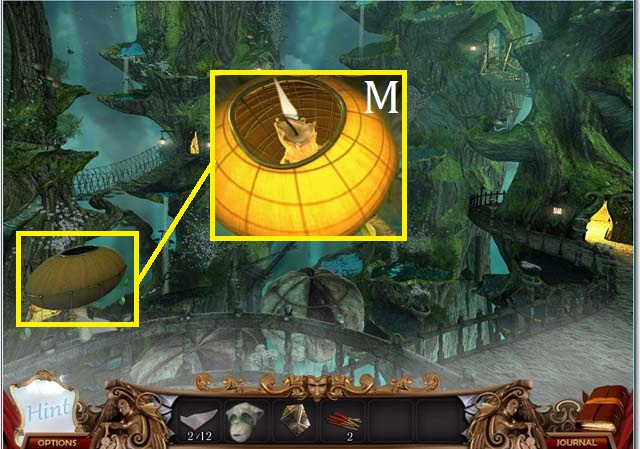
- Collect the first two MIRROR SHARDS (L, M).
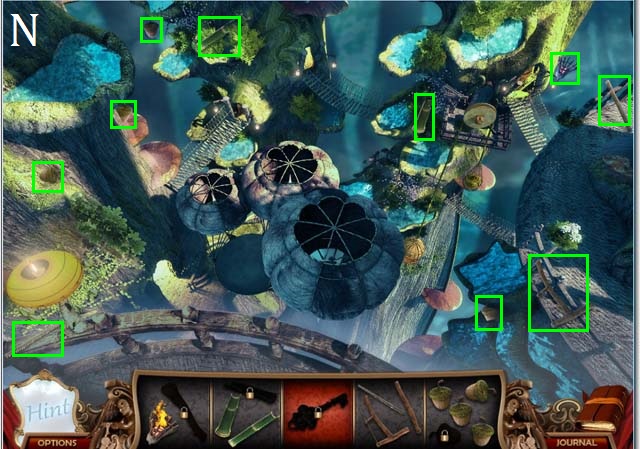
- Zoom into the sparkles to play a HOS.
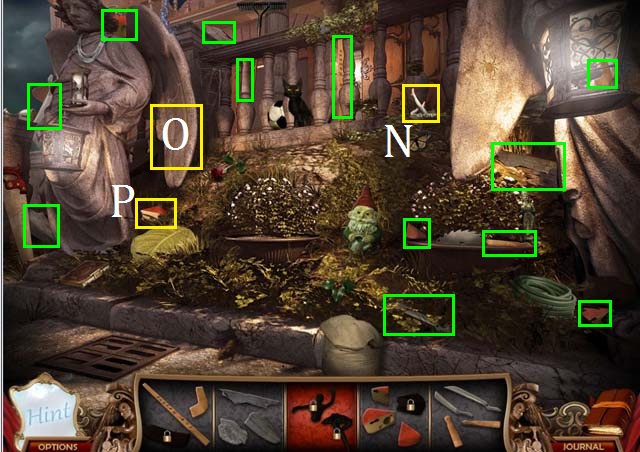
- Collect all the pieces marked in green.
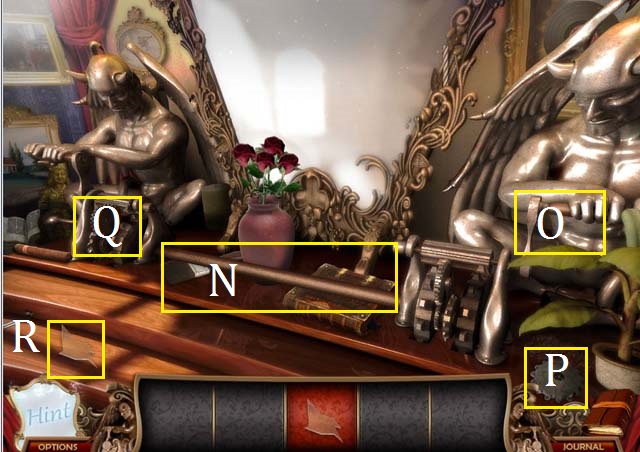
- Use the Hedge Clippers to clear the bush and then collect the ballerina legs (N).
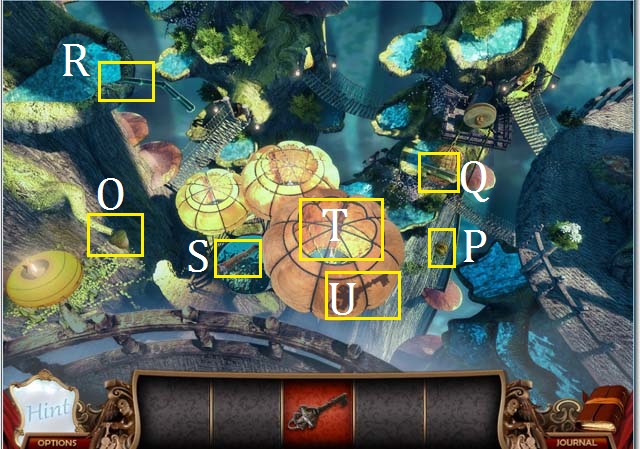
- Place the Wing on the statue (O) and then collect the last cheese piece (P).

- Place the Cheese in front of the mouse (Q) and collect the last piece of the hockey stick (R).
- Use the Hockey Stick to remove the grate and then collect the ballerina top (S) to receive the BALLERINA.
- Move to the Front Porch.
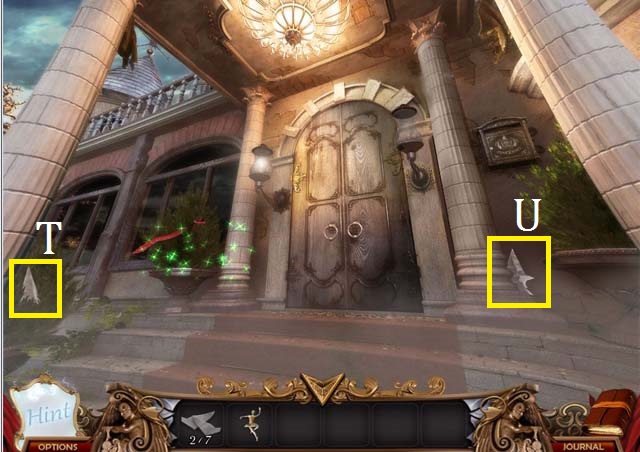
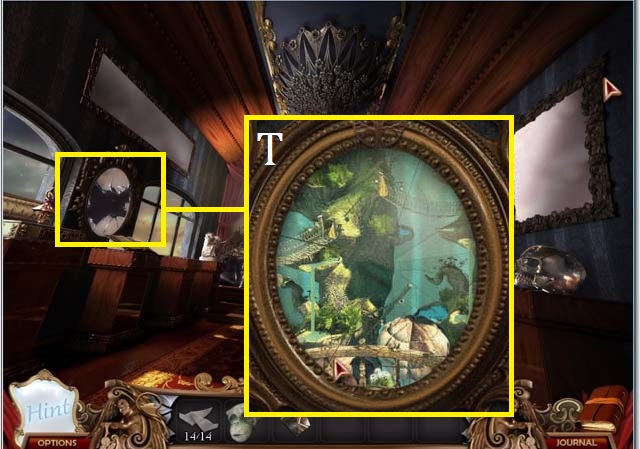
- Collect the third and fourth MIRROR SHARDS (T, U).
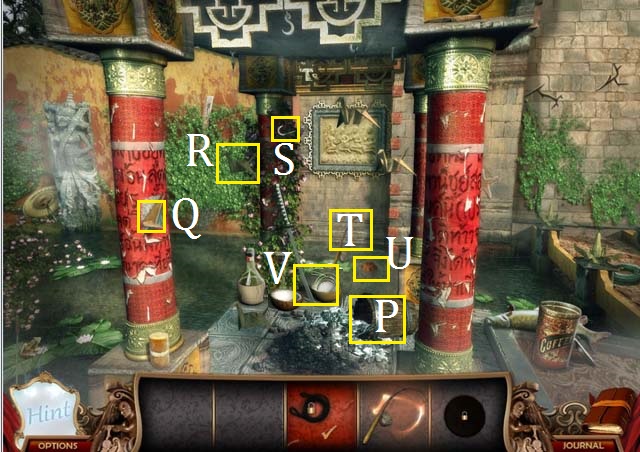
- Zoom into the sparkles to play a HOS.
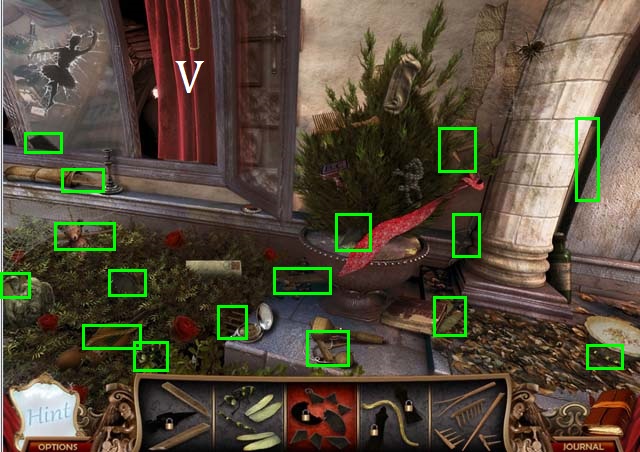
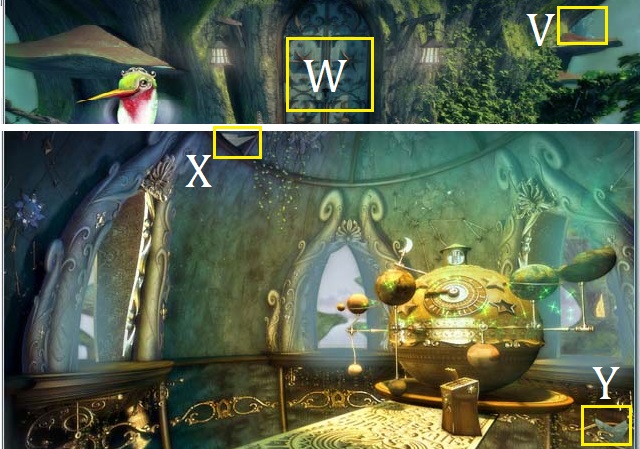
- Collect all of the available pieces (V).
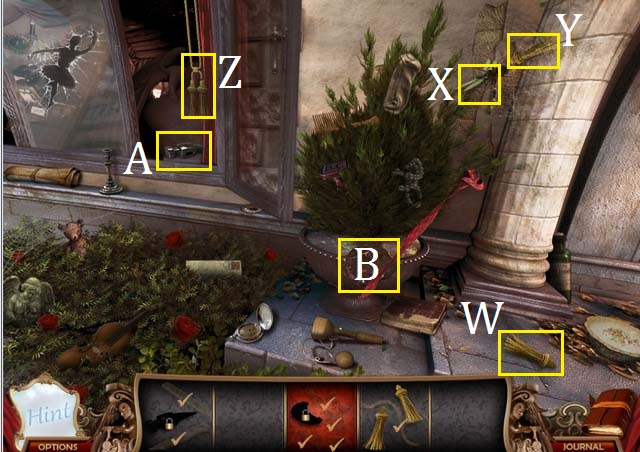
- Use the Rake to clear the leaves and then collect the tassel (W).
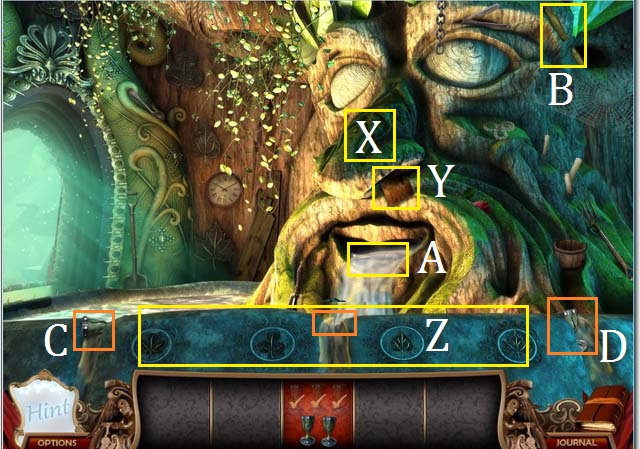
- Place the Dragonfly in the spider web (X) and then collect the tassel (Y).
- Use the Tassel to tie back the curtain (Z) and then collect the hammer head (A).
- Bust the urn open with the Hammer and then collect the last piece of the SUN WEIGHT (B).
- Enter the Hall of Mirrors.
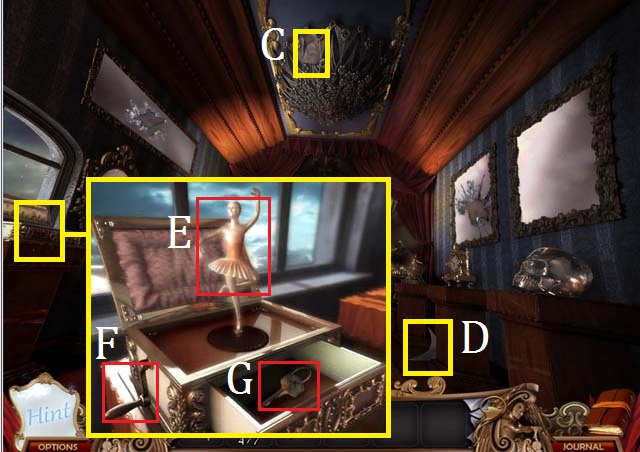
- Collect the fifth and sixth MIRROR SHARDS (C, D).
- Zoom into the music box; place the BALLERINA in the box (E) and then spin the handle (F). Collect the MAILBOX KEY (G).
- Exit the Hall of Mirrors.
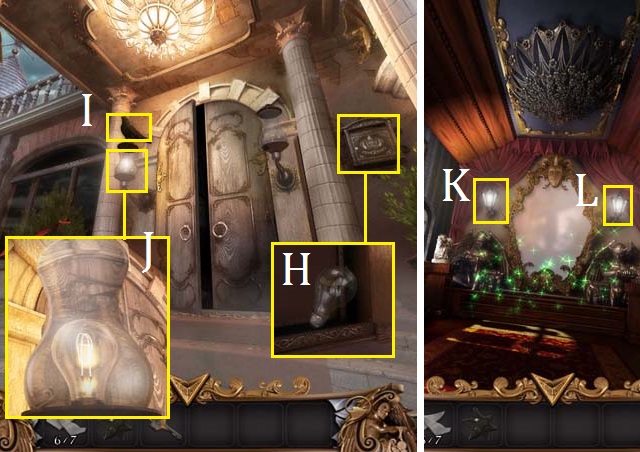
- Zoom into the mailbox; open the box with the MAILBOX KEY and then collect the first LIGHT BULB (H).
- Scare the crow (I) away.
- Zoom into the light; collect the second LIGHT BULB (J).
- Enter the Hall of Mirrors.
- Place a LIGHT BULB in each of the lamps (K, L).
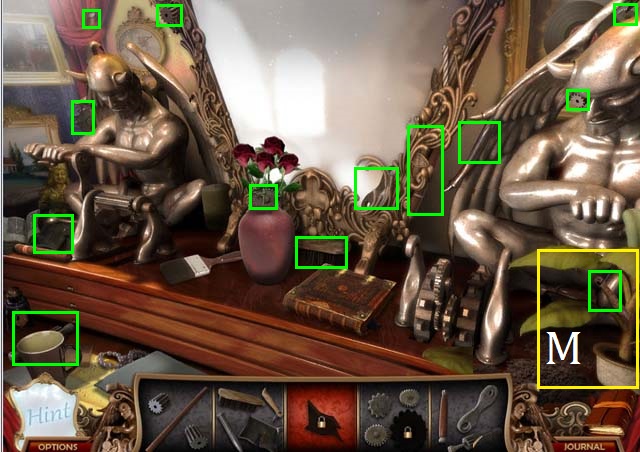
- Zoom into the sparkles to play a HOS.
- Turn the plant (M) upright.
- Collect all of the available pieces.
- Place the Axel on the crank (N) and the Handle in the statue’s hand (O).
- Use the Broom and Dust Pan on the dirt and then collect the last cog piece (P).
- Place the Gears in the statue’s base (Q).
- Collect the seventh MIRROR SHARD (R).
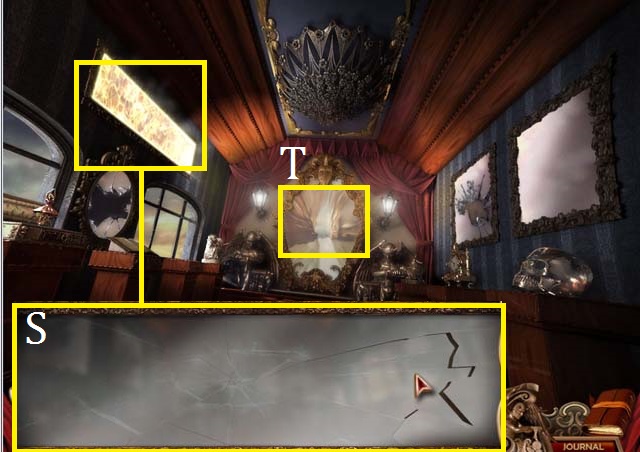
- Zoom into the broken mirror; Place the 7 MIRROR SHARDS in the frame and then assemble the mirror (S).
- Take the open portal (T).
Chapter 2: The Second Mirror
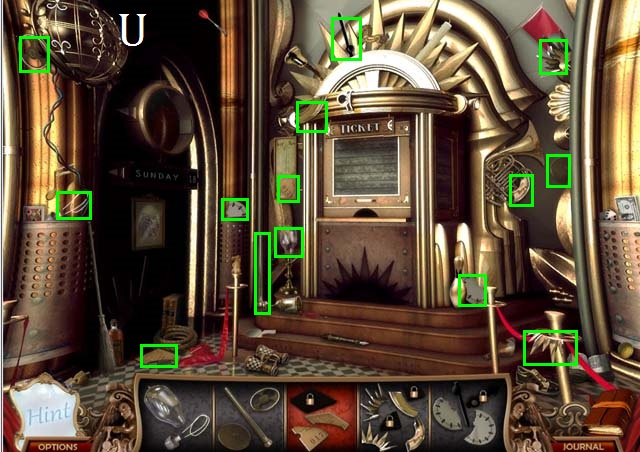
- Zoom into the sparkles to play a HOS.
- Collect all of the available pieces (U).
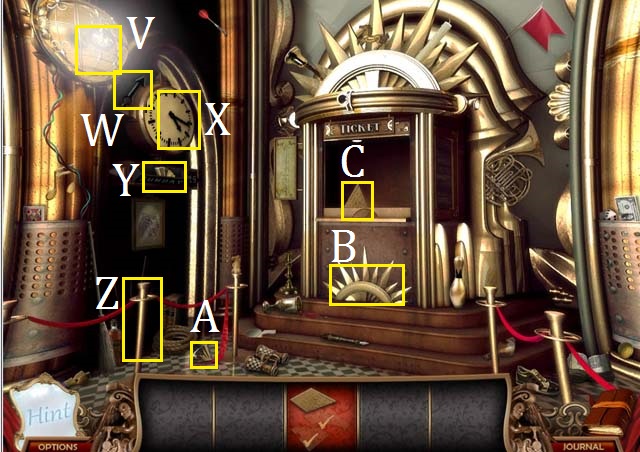
- Place the Bulb in the lamp (V) and then collect the last clock face piece (W).
- Place the Clock Face in the clock (X) and then collect the medallion piece (Y).
- Set the Rope Stand on the ground (Z) and then collect the last medallion piece (A).
- Place the Medallion Piece in the slot (B) and then collect the last piece of the TICKET (C).
- Zoom into and collect the paper (D) on the ground.
- Collect the first two MIRROR SHARDS (E, F) of this chapter.
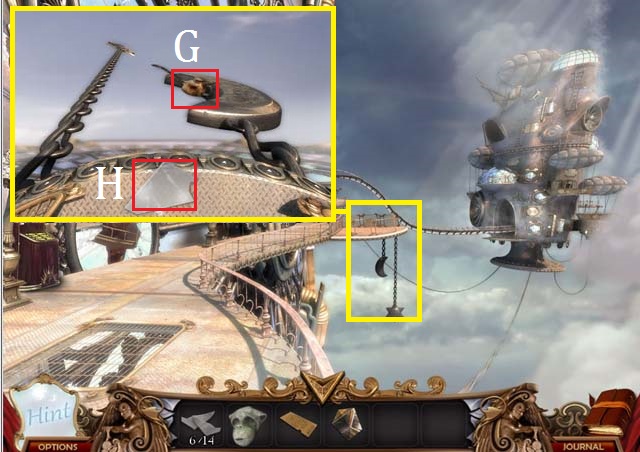
- Zoom into the lift; collect the STONE MONKEY HEAD (G).
- Take the lift upstairs to the Bridge.
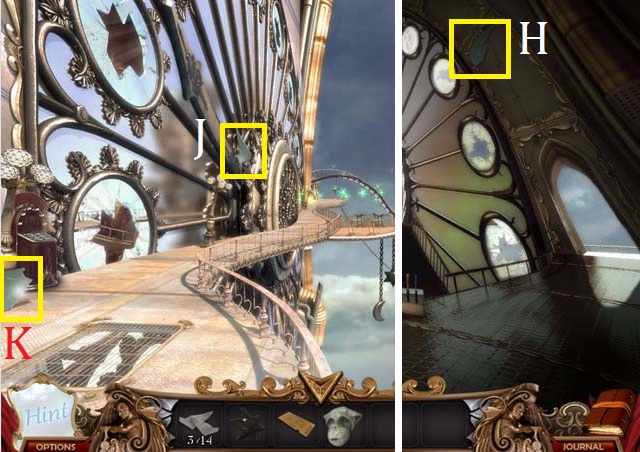
- Collect the third MIRROR SHARD (H).
- Exit the Bridge to the Sky Walk.
- Collect the fourth and fifth MIRROR SHARDS (J, K).
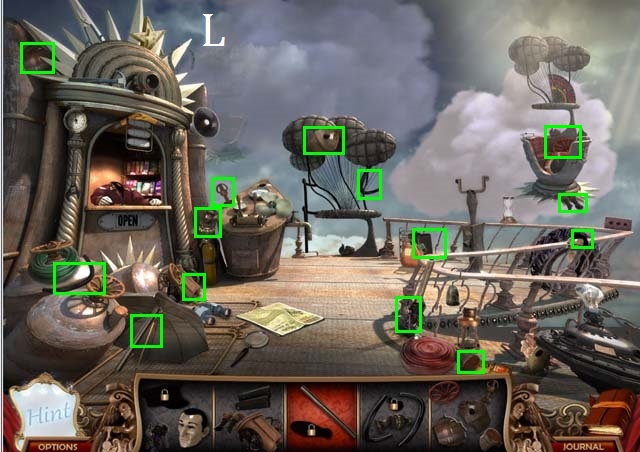
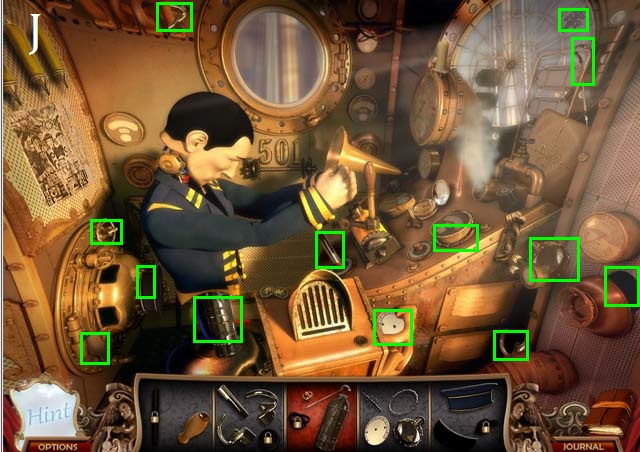
- Zoom into the sparkles to play a HOS.
- Collect all of the available pieces (L).
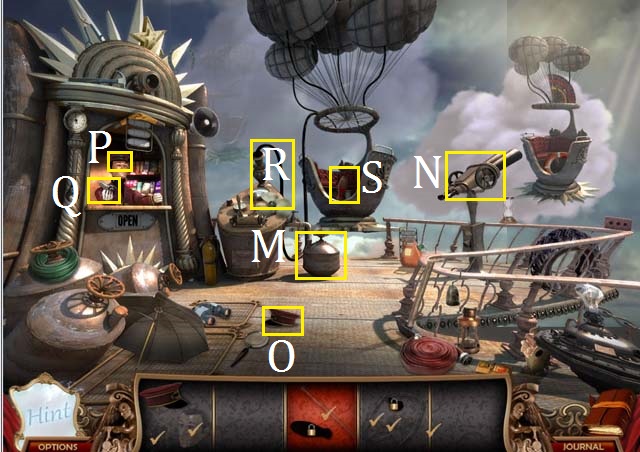
- Place the Tank next to the control panel (M).
- Place the Scope on the stand (N) and then collect the cap (O) to complete the Robot Head.
- Place the Robot Head on the robot (P) and then collect the last piece of the hose (Q).
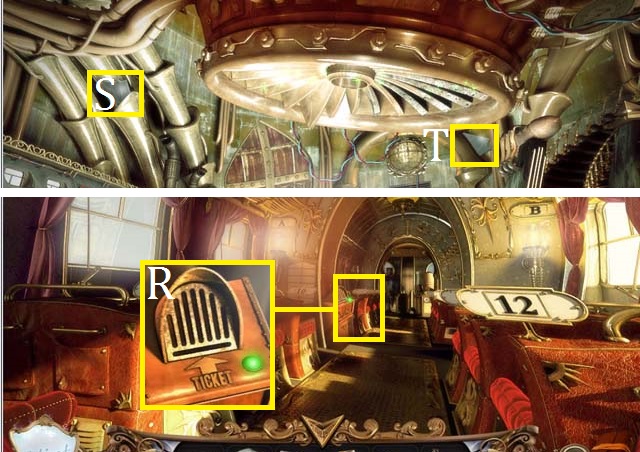
- Connect the Tank and control panel with the Hose (R).
- Collect the last piece of the LEVER (S).
- Return to the Bridge.
- Zoom into the panel; place the LEVER in the panel and then pull the blue lever (T) followed by the red lever (U) to properly lower the bridge.
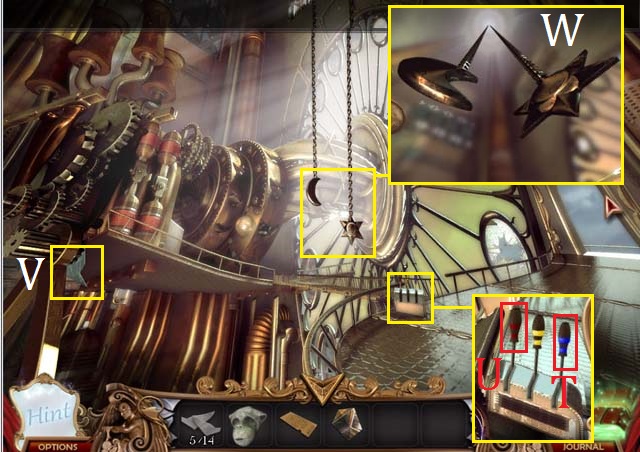
- Collect the sixth MIRROR SHARD (V).
- Zoom into the chains; place the STAR WEIGHT on the chain (W).
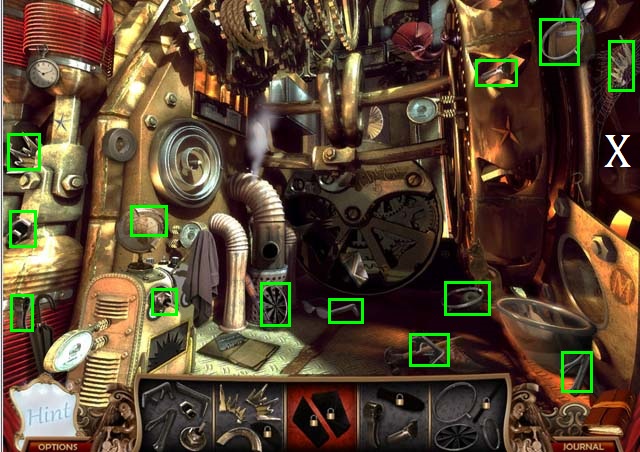
- Zoom into to the sparkles to play a HOS.
- Collect all of the available pieces (X).
- Place the Valve on the spindle (Y) and then collect the last handle piece (Z) and the emblem piece (1).
- Place the Handle on the crank (A) and then collect the last gyro piece (B).
- Place the Gyro in the slot (C) and then collect the last emblem piece (D).
- Place the Emblem in the slot (E) and then collect the last piece of the PRISM (F).
- Exit back out to the Sky Walk.
- Zoom into the ledge; collect the OIL CAN (G) and the seventh MIRROR SHARD (H).
- Return to the Main Station, (the first scene of this chapter).
- Enter the train.
- Zoom into the sparkles to play a HOS.
- Collect all of the available pieces (J).
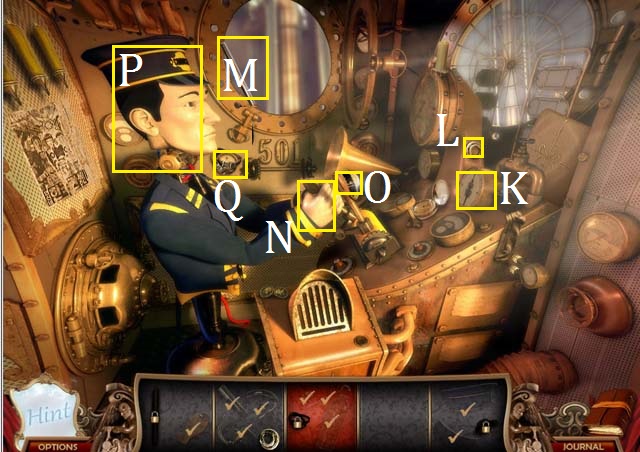
- Place the Dial on the dashboard (K) and then collect the last window peg piece (L).
- Use the Window Peg to open the window and then collect the last lever piece (M).
- Place the lever in the dashboard (N) and then collect the last hat piece (O).
- Place the Hat on the robot (P) and then collect the last piece of the FIRE EXTINGUISHER (Q).
- Zoom into the panel; place the TICKET in the slot (R).
- Once you are in the Exhaust Room, collect the eighth and ninth MIRROR SHARDS (S, T).

- Zoom into the sparkles to play a HOS.
- Collect all of the available pieces (U).
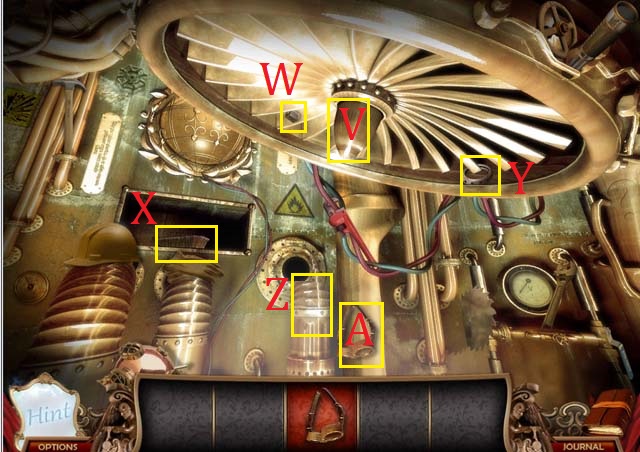
- Place the Fan Nose on the fan (V) and then collect the last piece of the screwdriver (W).
- Open the panel with the Screwdriver and then collect the last piece of the broom (X).
- Use the Broom to sweep away the dust and then collect the last piece of the pipe (Y).
- Place the Pipe over the open hole (Z) and then collect the GOGGLES (A).
- Take the stairs to the Furnace room.
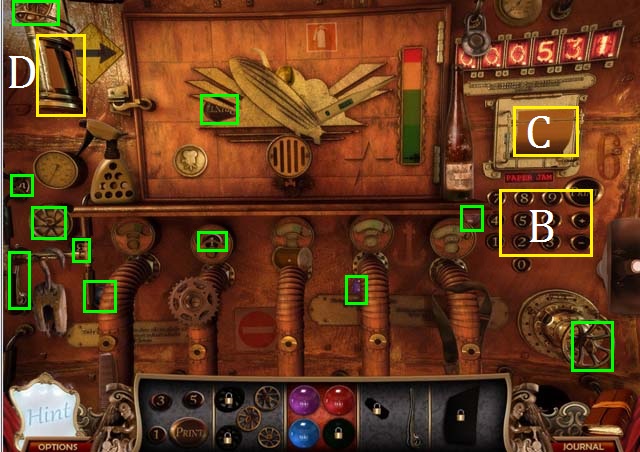
- Zoom into the sparkles to play a HOS.
- Collect all of the available pieces.
- Place the Number Keys on the panel (B) and then collect the Paper (C).
- Place the Paper in the tube (D).
- Collect the valve (E).
- Collect the last piece of the handle (F).
- Place the Handle on the latch (2).
- Collect the last valve (G).
- Place the Valves on the tubes (H).
- Collect the last marble (I) to receive the MARBLES.
- Return to the Exhaust Room.

- Zoom into the spinner; place the MARBLES into the spinner. In order to align all of the marbles, press the buttons 1-4.
- Return to the Furnace Room.
- Collect the tenth and eleventh MIRROR SHARDS (J, K).
- Zoom into the vent; use the OIL CAN to clean the vent (L) and then pull the lever (M).
- Spray the FIRE EXTINGUISHER into the furnace (N).
- Return downstairs.
- Zoom into the information panel; press any button and then collect the twelfth MIRROR SHARD (O).
- Return to the Main Station.
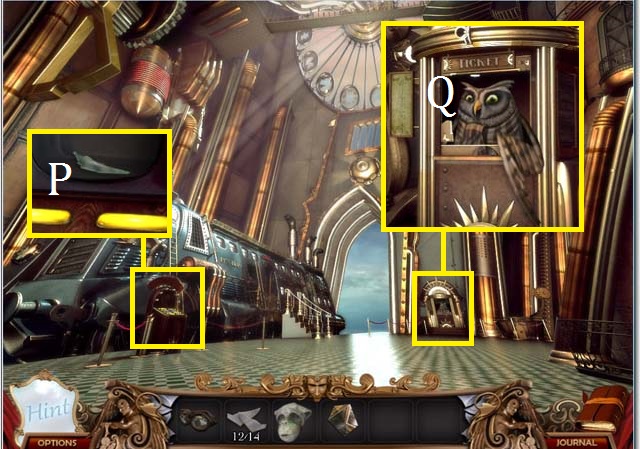
- Zoom into the information panel; press any button and then collect the thirteenth MIRROR SHARD (P).
- Zoom into the ticket booth; give the owl (Q) his GOGGLES and then receive the MAGICAL FRAME.
- Return to the Sky Walk.
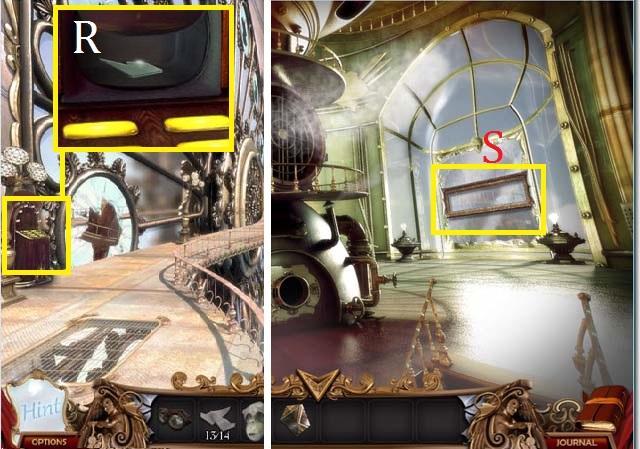
- Zoom into the information panel; press any button and then collect the fourteenth MIRROR SHARD (R).
- Return to the Furnace Room.
- Hang the MAGICAL FRAME on the window (S) and then take it back to the Hall Of Mirrors.
- Zoom into the second broken mirror; place all of the MIRROR SHARDS in the frame and then assemble the mirror (T).
- Take the open portal.
Chapter 3: The Third Mirror

- Collect the first and second MIRROR SHARDS (U, V) for this chapter.
- Take the path to the Fountain Room.
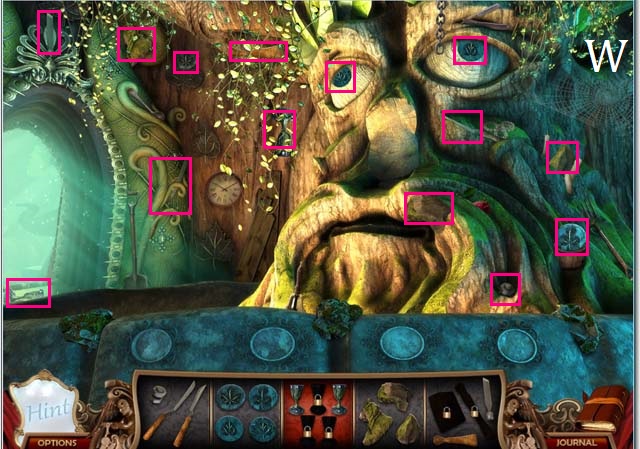
- Zoom into the sparkles to play a HOS.
- Collect all of the available pieces marked in pink (W).
- Place the Nose on the face (X) and then collect the chisel and hammer piece (Y).
- Place the Emblems on the wall (Z) and then collect the goblet (A).
- Use the Hedge Clippers to clear the leaves and then collect the last piece of the chisel and hammer (B).
- Use the Chisel and Hammer to remove the three stones (orange).
- Collect the last two GOBLETS (C, D).
- Collect the third MIRROR SHARD (E).
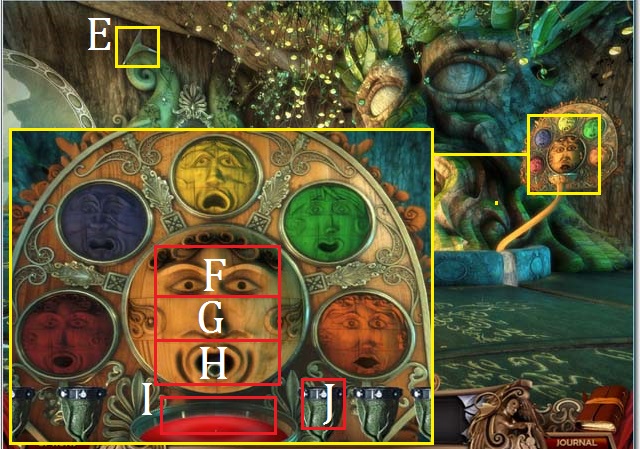
- Zoom into the faces; set the three dials (F, G, H) to match the different colored faces. When the water (I) changes color grab an empty goblet (J) and fill it with the different colors.
- If you start by just changing the nose (G) until the water turns red then you may proceed by just rotating each dial once to get all five colors.
- Receive the BLUE GOBLET, YELLOW GOBLET, RED GOBLET, GREEN GOBLET, and the ORANGE GOBLET.

- Zoom into the tiered baskets; pour the BLUE GOBLET into the basket (1), the ORANGE GOBLET into (2), the YELLOW GOBLET into (3), the GREEN GOBLET into (4), and the RED GOBLET into basket (5).
- Collect the two sets of MATCHES (L).
- Return to the first scene.
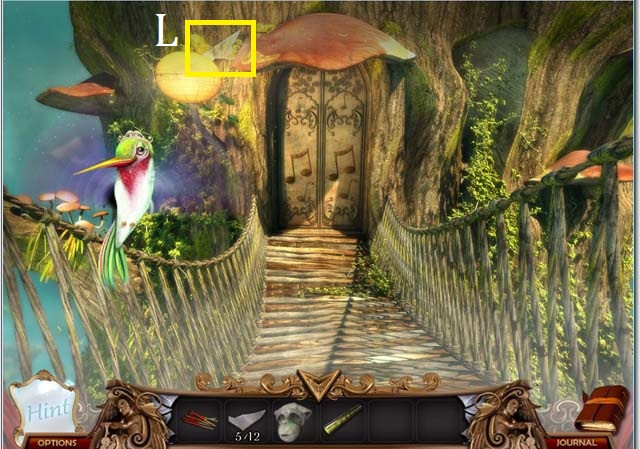
- Zoom into the paper lamp; light the candle (M) with one set of the MATCHES.
- Zoom into the sparkles to play a HOS.
- Collect all of the available pieces (N).
- Use the Saw to remove the limb and then collect the last acorn (O).
- Place the Acorns in the basket (P) and then collect the last reed piece (Q).
- Place the Reed in the water (R) and then collect the last torch piece (S).
- Light the paper lantern (T) with the Torch and then collect the STAR KEY (U).
- Return to the Fountain Room and take the door to the Star Bridge.
- Collect the fourth MIRROR SHARD (V).
- Use the STAR KEY to open the door (W).
- Enter the Astronomy Room.
- Collect the fifth and sixth MIRROR SHARDS (X, Y).

- Zoom into the sparkles to play a HOS.
- Collect all of the available pieces (Z).
- Place the Levers in the gear box (A).
- Collect the last star (C).
- Place the Planet piece on the planet (D) and then place the Stars on the sun (E).
- Collect the last two dial pieces (F, G).
- Place the dial in the center of the sun (H) and then collect the FLUTE (I).
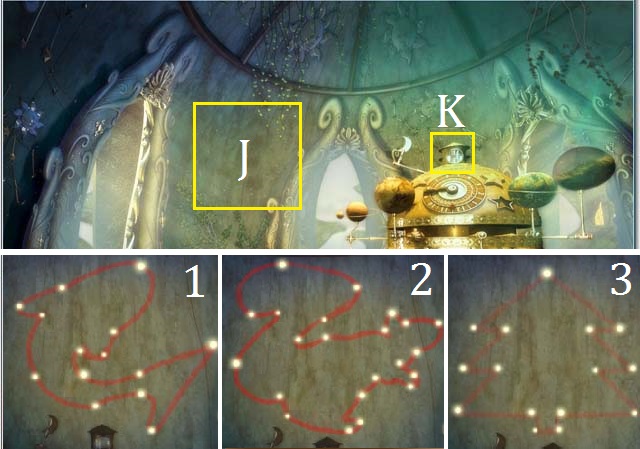
- Zoom into the back wall (J); place the PRISM in the projector (K).
- Arrange the stars as they are shown in the screenshot (1). Complete the rest of the constellations (2-3). Hint: grab a star and trace the symbol until you find the correct location.
- Take the door to the Music Bridge.
- Collect the seventh MIRROR SHARD (L).
- Enter the Music Room.
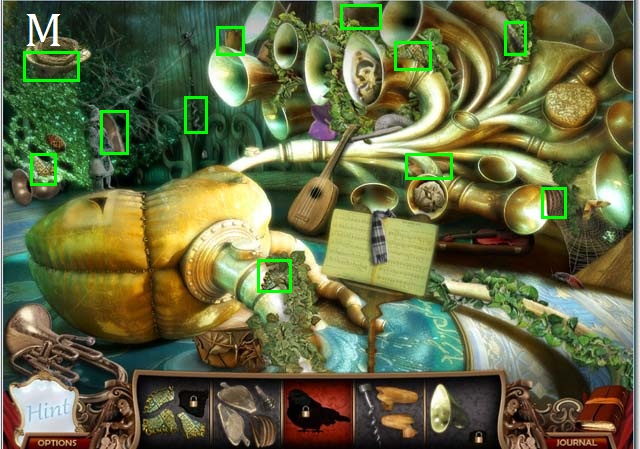
- Zoom into the sparkles to play a HOS.
- Collect all of the available pieces (M).
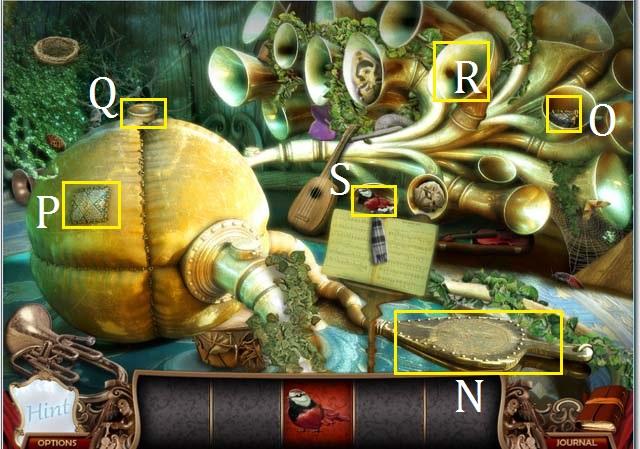
- Place the Bellows on the hose (N).
- Use the corkscrew on the pipe and then collect the last patch piece (O).
- Place the patch over the hole (P) and then collect the last horn piece (Q).
- Place the Horn on the instrument (R) and then collect the BIRD (S).
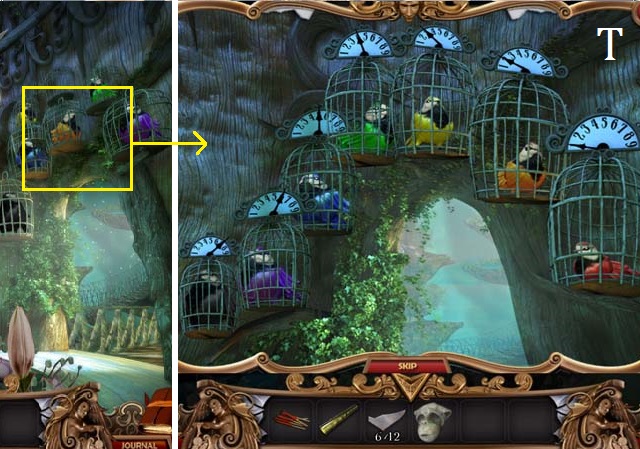
- Zoom into the birdcages; place the BIRD in a cage. Rearrange the birds as they are placed in the screenshot (T).
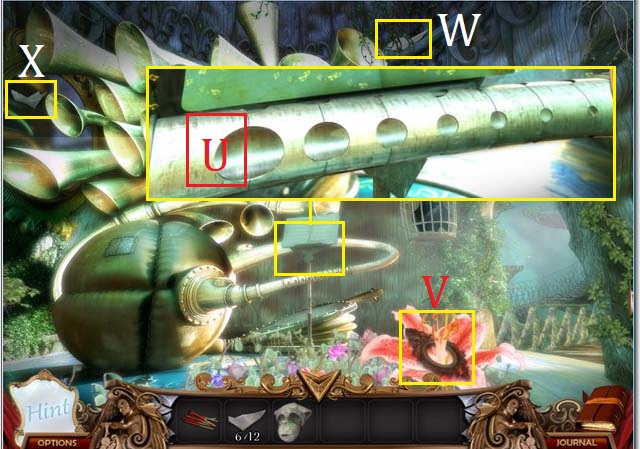
- Zoom into the music stand; place the FLUTE under the sheet music. Start with the left side and rotate the flute section (U) to the largest hole. Rotate the second section until it matches the first. Continue all the way to the right. You may use the screenshot for the correct alignments.
- Collect the MAGIC FRAME (V).
- Collect the eighth and ninth MIRROR SHARDS (W, X).
- Exit the room to the Gyro Bridge.
- Collect the tenth MIRROR SHARD (Y).
- Enter the Gyro Room.
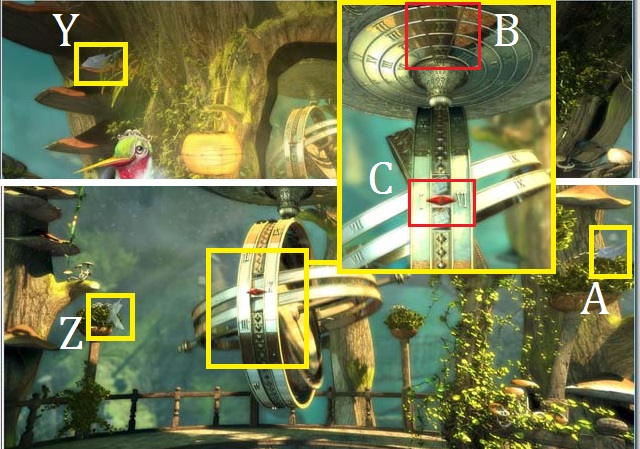
- Collect the eleventh and twelfth MIRROR SHARDS (Z, A).
- Zoom into the Gyro; set the dials (B) to 2, 2, 1, 4 as shown in the screenshot.
- Set the middle rings (C) to 3 and 6 as shown in the screenshot to receive the WHITE KING.
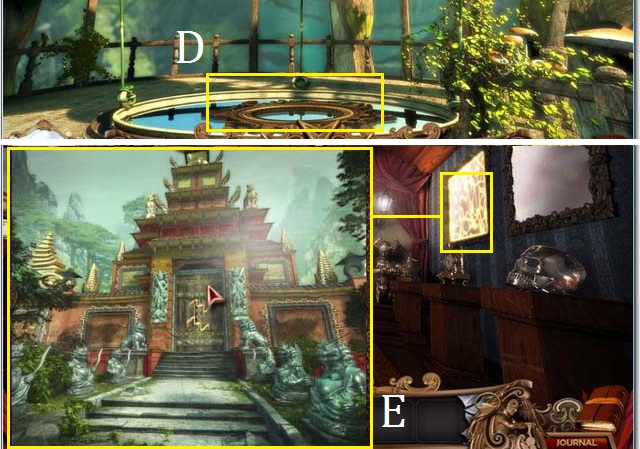
- Place the MAGIC FRAME in the liquid (D) and then take the portal back to the Hall Of Mirrors.
- Zoom into the third frame; place the 12 MIRROR SHARDS in the frame and arrange the pieces to complete the picture (E).
- Take the open portal.
Chapter 4: Three Monkeys
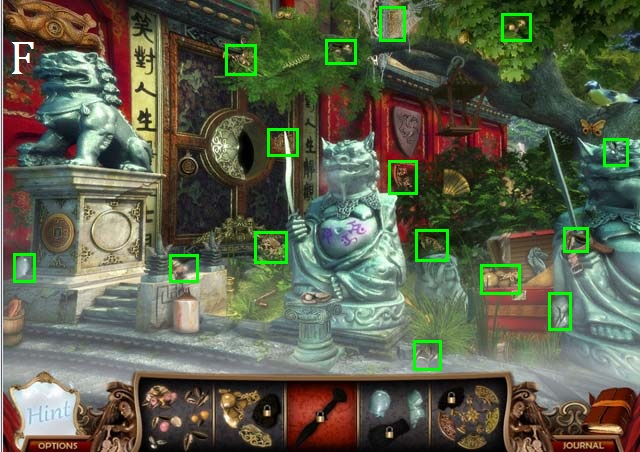
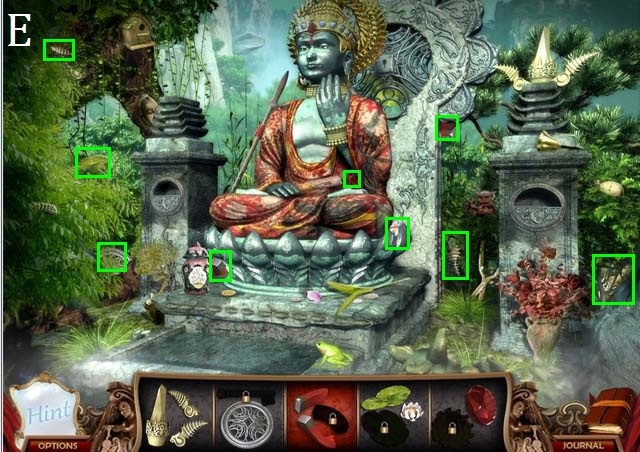
- Zoom into the sparkles to play a HOS.
- Collect all of the available pieces (F).
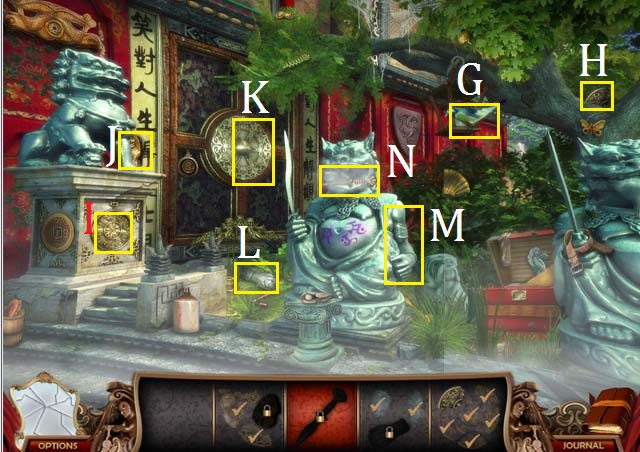
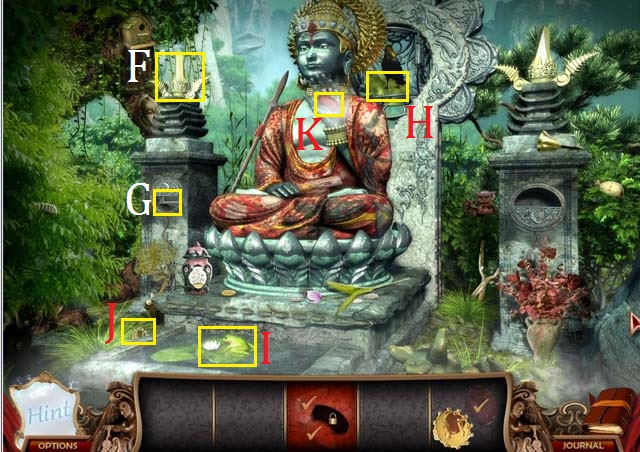
- Place the Bird Food in the feeder (G) and then collect the last emblem piece (H).
- Place the Emblem on the pillar (I) and then collect the last half emblem piece (J).
- Place the Half Emblem piece in the panel (K) and then collect the hand (L).
- Place the completed Arm on the statue (M).
- Collect the DAGGER (N).
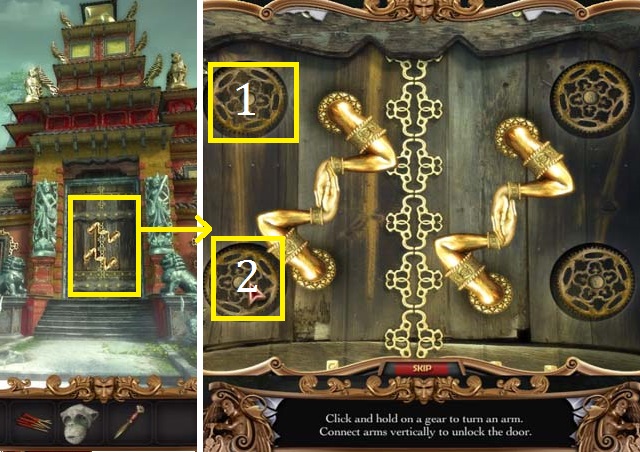
- Zoom into the door; to get the arms to align properly hold the first gear (1) down until the top left arm has spun as far as it goes. Quickly spin the lower left arm using the (2) gear and release it as the top arm is spinning back. Repeat this for the right side.
- Move through the open gate to the Courtyard.
- Go left to the Second Gate.
- Zoom into the sparkles to play a HOS.
- Collect all of the available pieces (O).
- Place the bucket next to the burning coals (P) and then collect the last crane piece (Q).
- Hang the Crane on the string (R) and then collect the hook (S).
- Cast the Fishing rod into the water (T) and then collect the coconut (U).
- Cut the Coconut open with the sword and then collect the last piece of the LONG BOW (V).
- Zoom into the fountain; use the DAGGER to release the QUIVER (W).
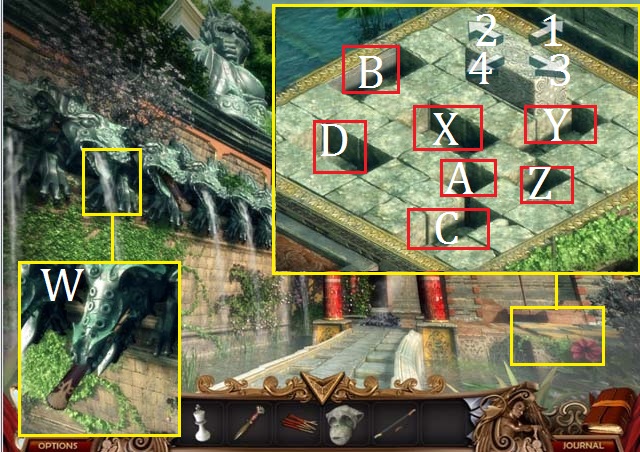
- Zoom into the stones; place a brick in the first slot (X) by pressing the arrows in the following order: 4, 4, 4.
- Place another brick in the (Y) slot by pressing the arrows 3, 4.
- Continue on for slot (Z) with 3, 4, 3, 4. (A) = 4, 3, 4, 4. (B) = 4, 3, 4, 2, 2, 2, 2. (C) = 4, 2, 4, 4, 3, 3, 1, 3, 4, 4. (D) = 4, 4, 3, 4, 2, 4, 2.
- Take the open gate to the Chess Courtyard.
- Zoom into the sparkles to play a HOS.
- Collect all available pieces (E).
- Place the Adornment atop the pillar (F) and then collect the last key piece (G).
- Use the Key in the lock and then collect the last lily pad piece (H).
- Place the Lily Pad in the water (I) and then collect the last ring piece (J).
- Place the ring on the statue’s hand and then collect the last MAGNET (K) piece.
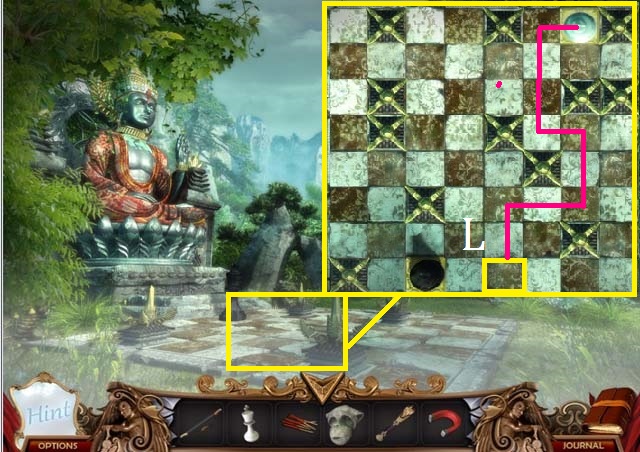
- Zoom into the chessboard; place the WHITE KING on the board (L). Moving only the WHITE KING, follow the path (pink) marked in the screenshot.
- Receive the first MONKEY STATUE.
- Return to the Courtyard.
- Zoom into the panel; place the MONKEY STATUE in the panel (N).
- Enter the Bell Courtyard.
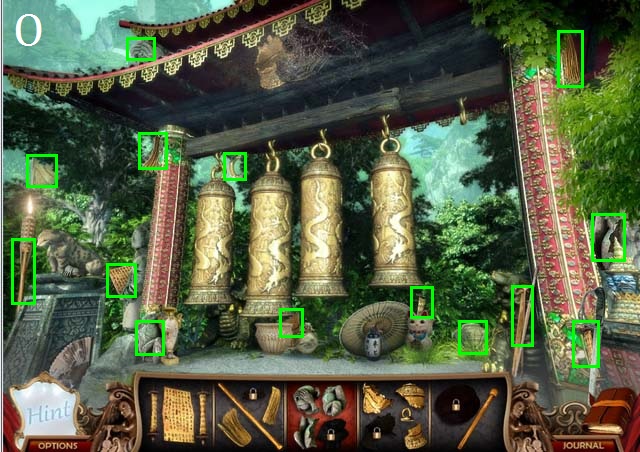
- Zoom into the sparkles to play a HOS.
- Collect all of the available pieces (O).
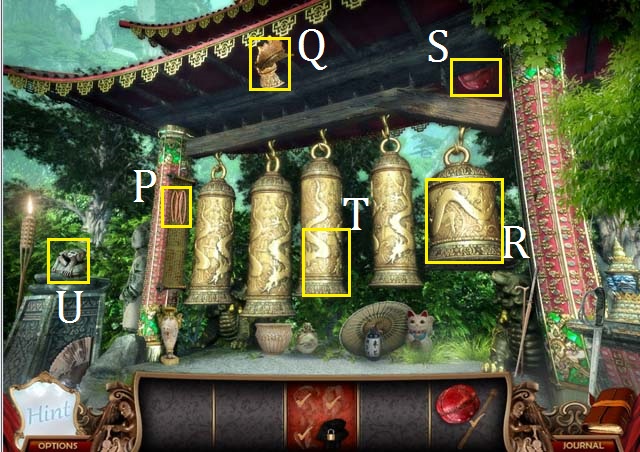
- Hang the Scroll on the pillar and then collect the piece of the broom (P).
- Use the Broom to sweep away the cobwebs and then collect the last piece of the bell (Q).
- Hang the bell on the rafter (R) and then collect the last piece of the mallet (S).
- Ring the bell (T) with the Mallet.
- Collect the second MONKEY STATUE (U).
- Return to the Courtyard.
- Zoom into the panel (V); place the MONKEY STATUE in the panel.
- Enter the Idol Room.
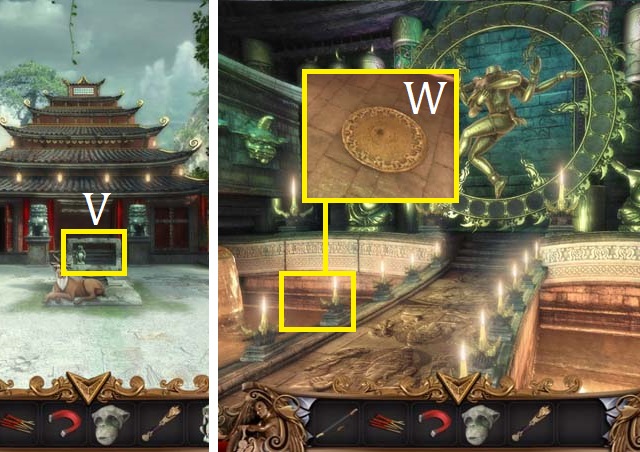
- Zoom into the water; use the MAGNET to collect the CIRCULAR PLATE (W).
- Return to the Bell Courtyard.
- Zoom into the ground; place the CURCULAR PLATE in the center (X) and then swap the discs as they are shown in the screenshot.
- Receive the IDOL HEAD.
- Return to the Idol Room.

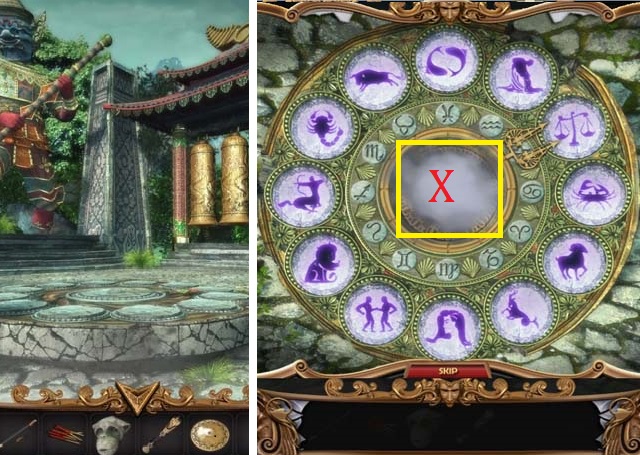
- Zoom into the Idol; place the IDOL HEAD on the statue (Y). You may use the screenshot as a key to solve this memory puzzle.
- Receive the third MONKEY STATUE.
- Return to the Courtyard.
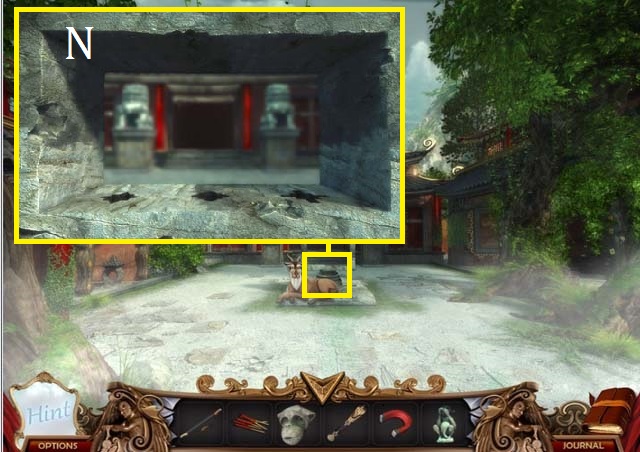
- Zoom into the panel; place the MONKEY STATUE in the panel followed by the STONE MONKEY HEAD.
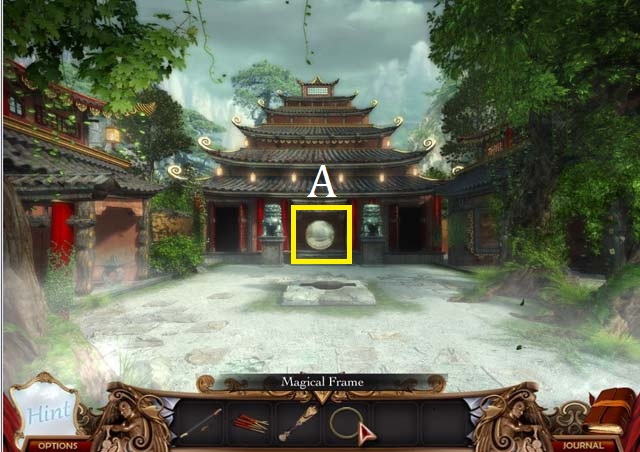
- Receive the MAGICAL FRAME from the deer.
- Place the MAGICAL FRAME on the mirror (A) and then enter the portal.
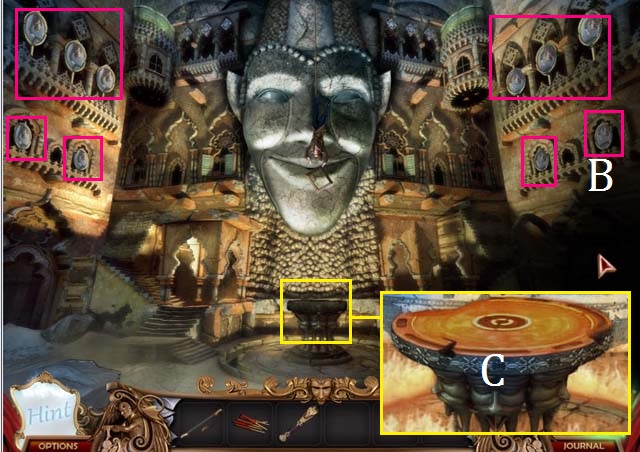
- Drop the LONG BOW over one of the mirrors (B). Shoot all of the mirrors (pink) with the LONG BOW.
- Zoom into the altar; light the oil (C) with the MATCHES.
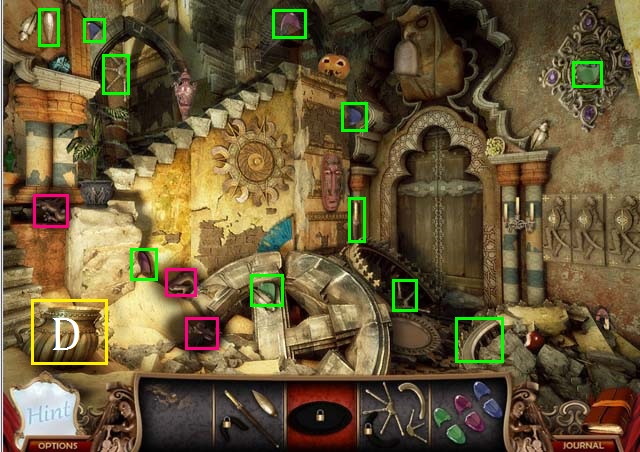
- Zoom into the sparkles to play a HOS.
- Collect the three dragon pieces (pink).
- Place the Dragon on the urn (D).
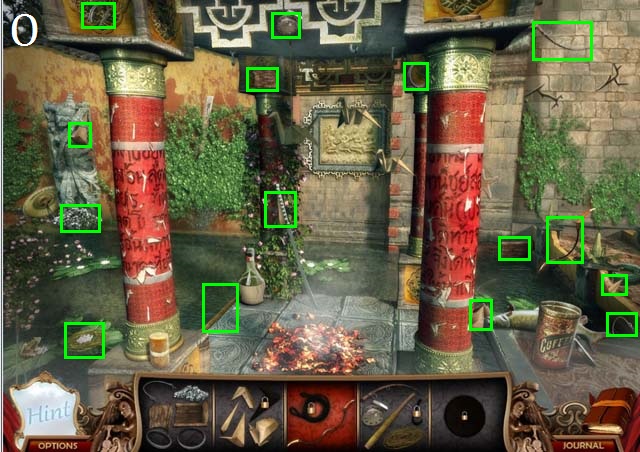
- Collect all available pieces (green).
- Place the three Shields on the panel and then collect the last wheel piece (E).
- Hang the Wheel on the wall (F).
- Collect the last spear piece (G).
- Cut the bag (H) open with the Spear.
- Collect the PURE QUARTZ SAND (I).

- Zoom into the altar; place the PURE QUARTZ SAND on the altar (J).
- Congratulations! You have completed The Mirror Mysteries 2: The Forgotten Kingdoms!


 Mystery Murders: The Sleeping Palace Walkthrough, Guide, & Tips
 Love Chronicles: The Spell Walkthrough, Guide, & Tips
 3 Days: Amulet Secret Walkthrough, Guide, & Tips
 Dark Canvas: A Brush with Death Walkthrough, Guide, & Tips
 Nancy Drew Dossier: Resorting to Danger Walkthrough, Guide, & Tips