Dark Canvas: A Brush with Death Walkthrough, Guide, & Tips
Dark Canvas: A Brush with Death Walkthrough

Welcome to the Dark Canvas: A Brush with Death Walkthrough
Uncover the mystery behind an artist’s deadly talent.
Whether you use this document as a reference when things get difficult or as a road map to get you from beginning to end, we’re pretty sure you’ll find what you’re looking for here.
This document contains a complete Dark Canvas: A Brush with Death game walkthrough featuring annotated screenshots from actual gameplay!
We hope you find this information useful as you play your way through the game. Use the walkthrough menu below to quickly jump to whatever stage of the game you need help with.
Remember to visit the Big Fish Games Forums if you find you need more help. Have fun!
This walkthrough was created by Rebekah, and is protected under US Copyright laws. Any unauthorized use, including re-publication in whole or in part, without permission, is strictly prohibited.
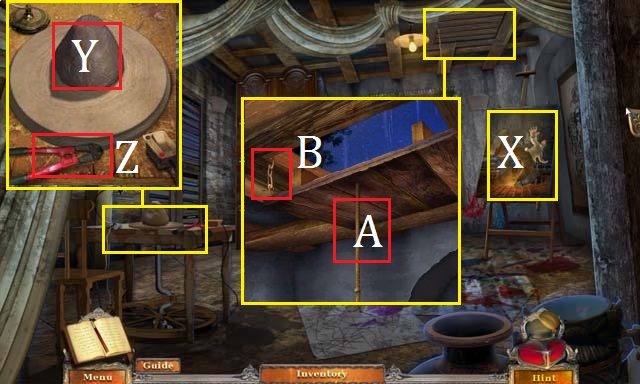
General Tips

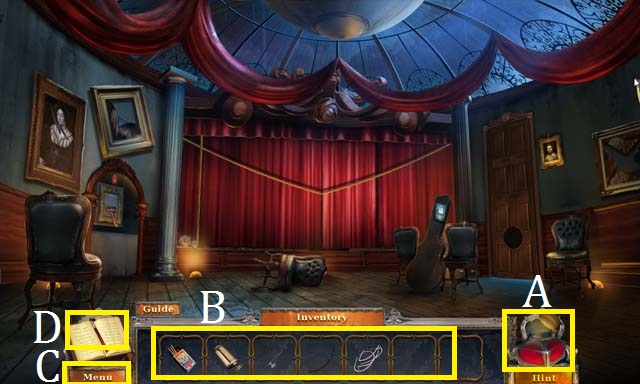
- This is the official guide for Dark Canvas: A Brush with Death.
- Use the Hint Button (A) if you need additional help.
- Your Inventory Bar (B) will hold items until they are needed.
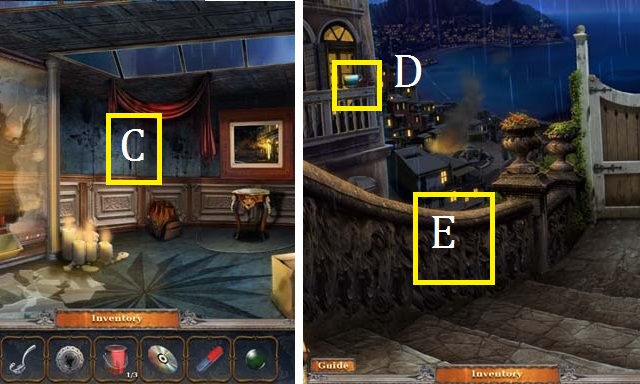
- Click on the Menu (C) button to exit, pause, or resume the game. You can also use this button to adjust your options (sound, music, and screen size).
- Use your Journal (D) for additional help with puzzles and tasks.
- Zoom into sparkling scenes to play Hidden-object scenes. Hidden-object scenes will be referred to as HOS in the remainder of this guide.
- All items in the HOS are marked in green unless otherwise noted. Items in the HOS may be random
Chapter 1: The Dock
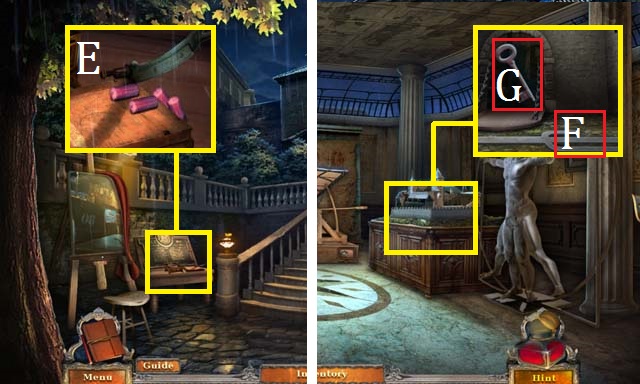
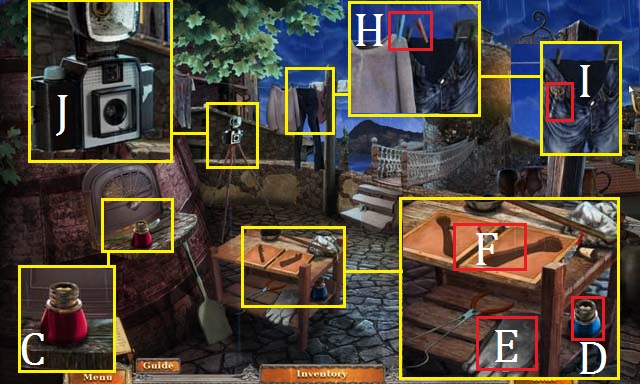
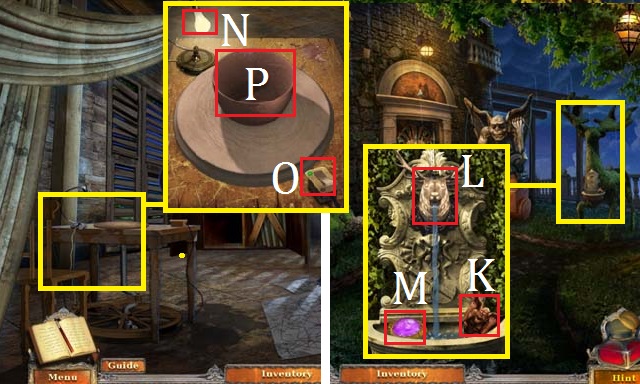
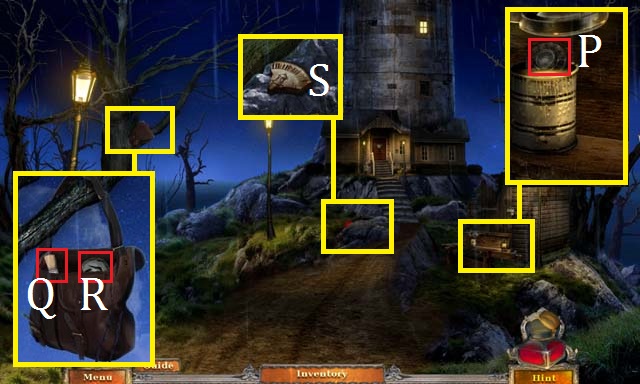
- Zoom into the message board; collect the JEWEL (E), MATCHES (F), and the two clues (pink).
- Zoom into the carriage wheel; collect the BRUSH TOKEN (G).
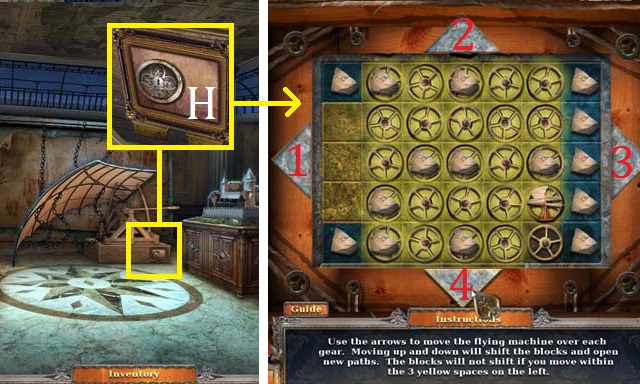
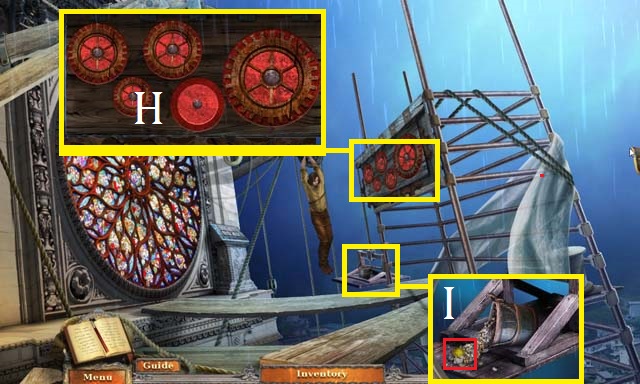
- Zoom into the carriage; place the JEWEL in the lock (H).
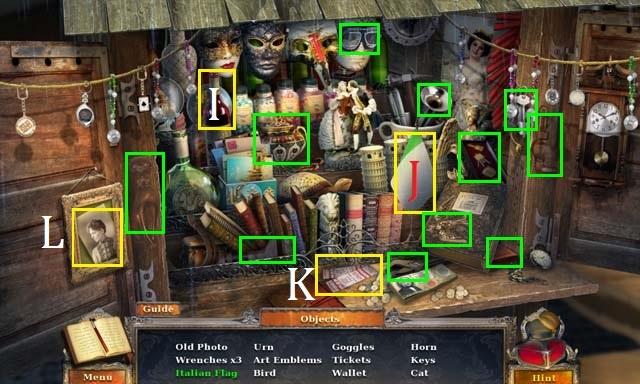
- Zoom into the sparkles to play a HOS.
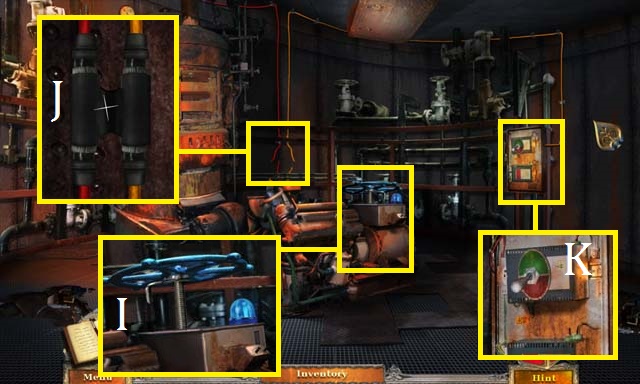
- Pour the wine (I) on the flag (J) to make the Italian Flag.
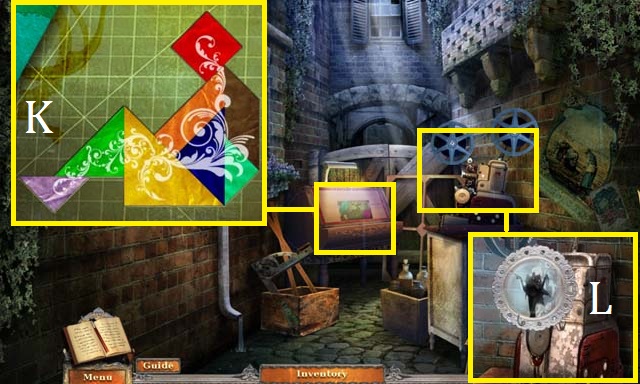
- Move the book to reveal the Tickets (K).
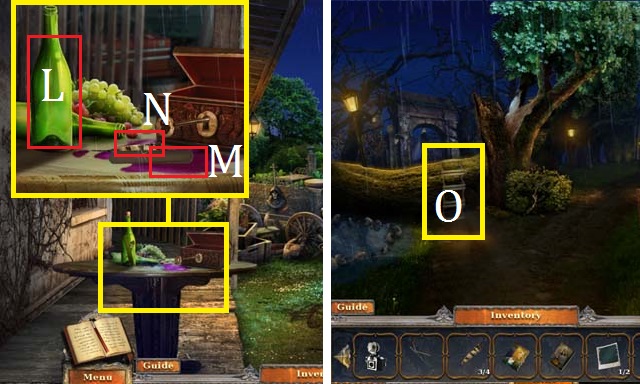
- Remove the painting from its frame to reveal the Old Photo (L).
- Collect the remaining items (all are marked in green) to receive the ART EMBLEMS.

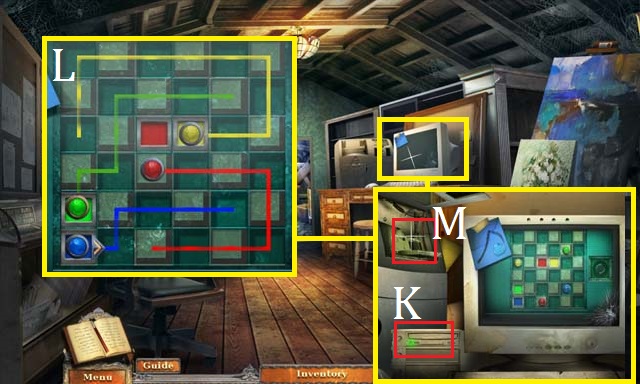
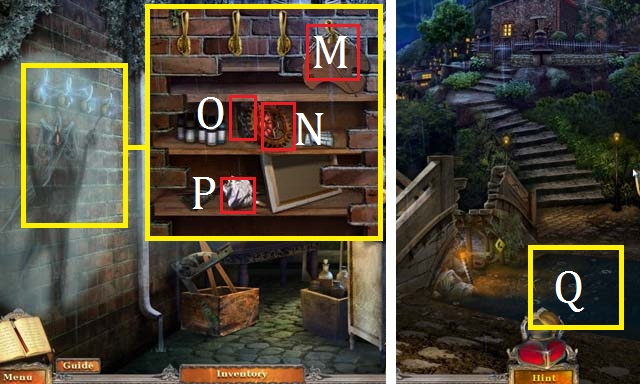
- Zoom into the gate and then zoom again into the lock; place the ART EMBLEMS in the puzzle.
- Place the emblems on the board so that no symbol or color repeats in the same line, horizontally or diagonally. Use the screenshot (M) as a key to this puzzle.
- Move forward to the Art Gallery Entrance.
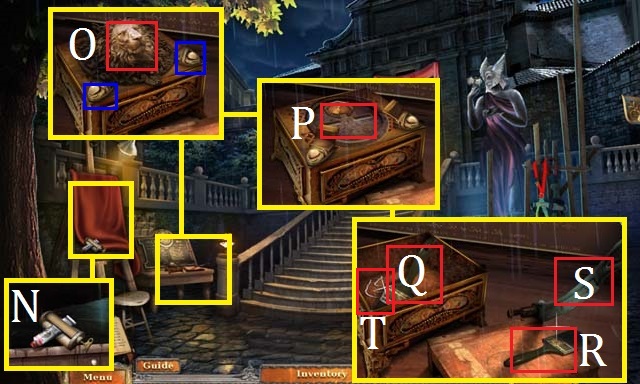
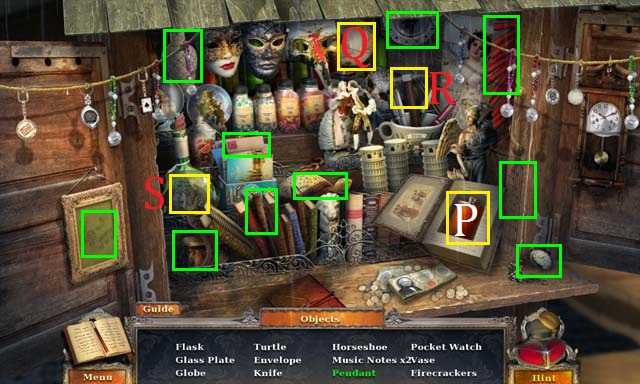
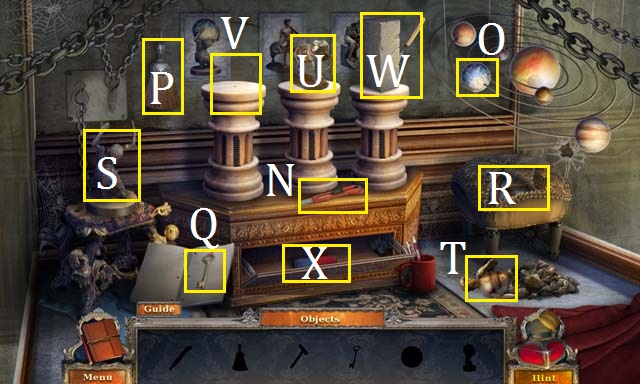
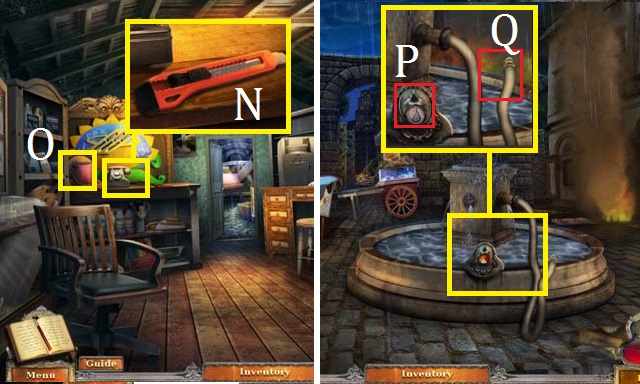
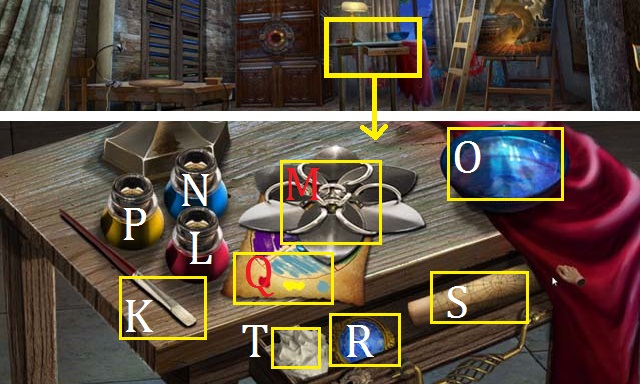
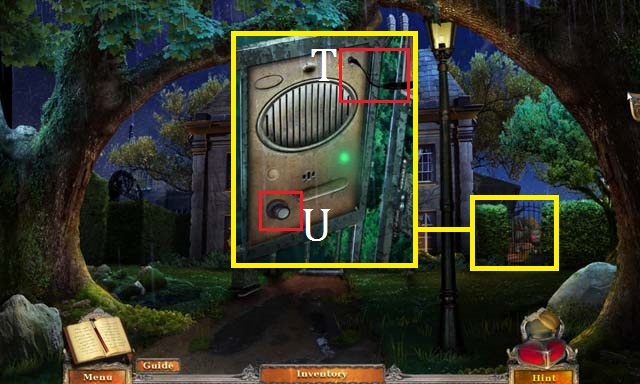
- Zoom into the painting; remove the drape and collect the TUBE SQUEEZER (N).
- Zoom into the small stand; open the latches (blue) and then collect the LION EMBLEM (O).
- Place the BRUSH TOKEN in the slot (P) and turn the token. Collect the WIDE PAINTBRUSH (Q) and the CANDLEWICKS (T).
- Place the WIDE PAINTBRUSH on the cutting board (R) and then lower the handle (S).
- Collect the WIDE HANDLE.
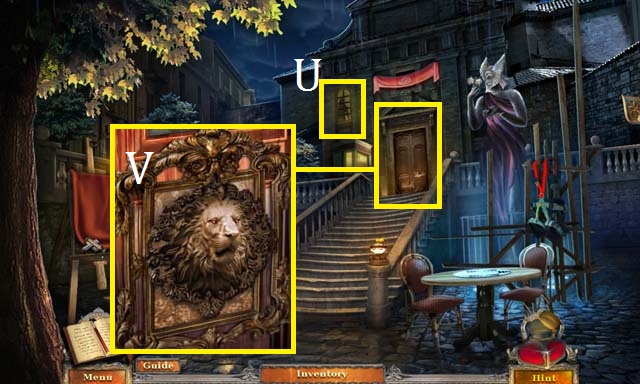
- Examine the window (U).
- Zoom into the ticket booth; place the LION EMBLEM in the slot (V).
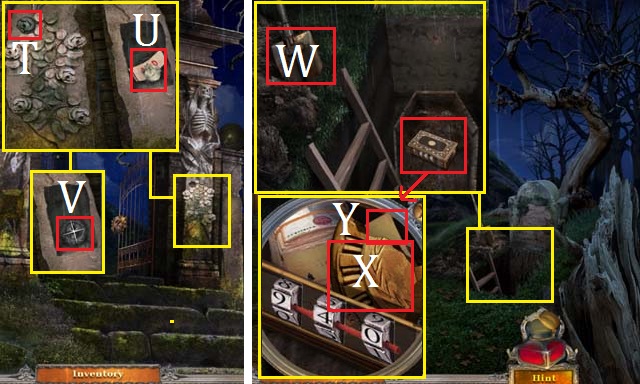
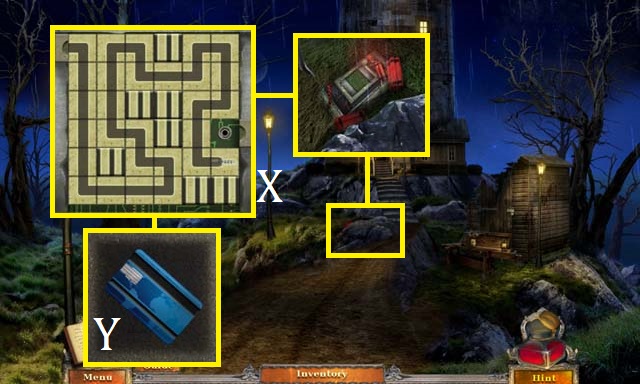
- Return to the Dock.
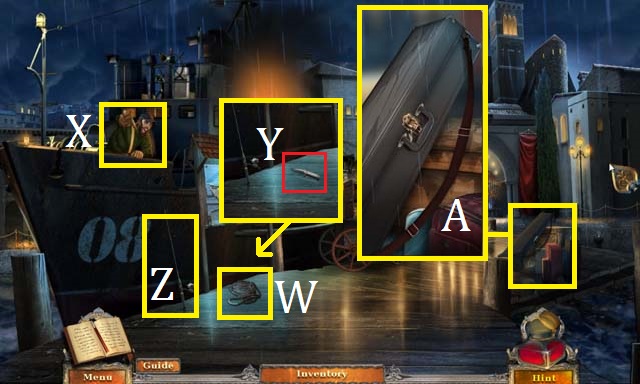
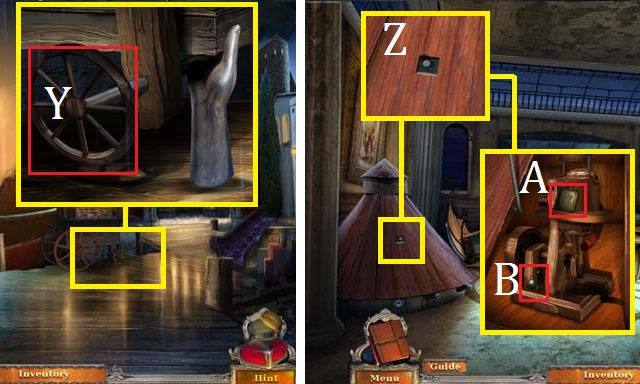
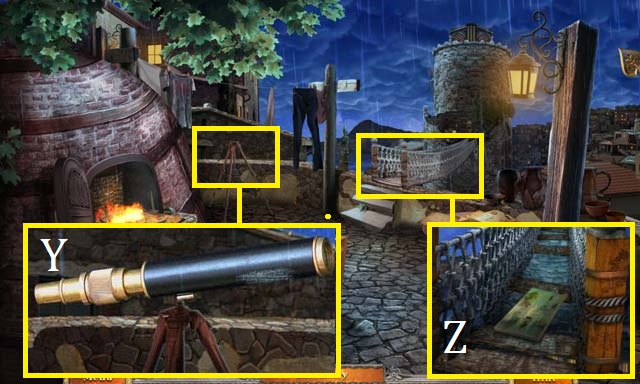
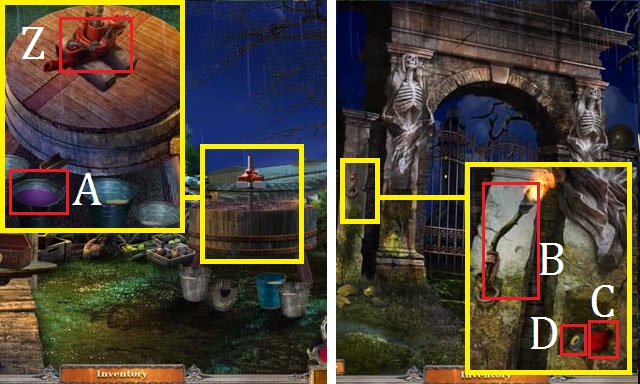
- Throw the ROPE (W) to the Captain (X).
- Collect the KNIFE (Y) and the FISHING POLE (Z).
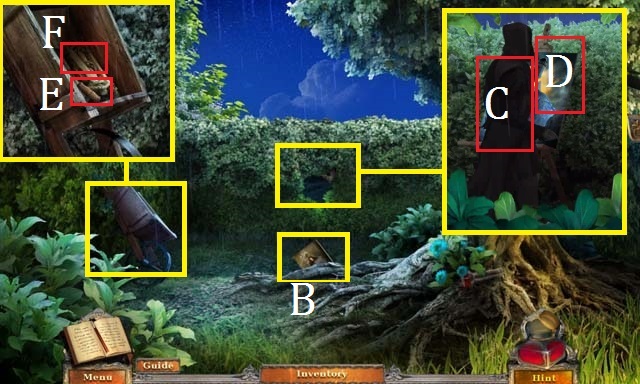
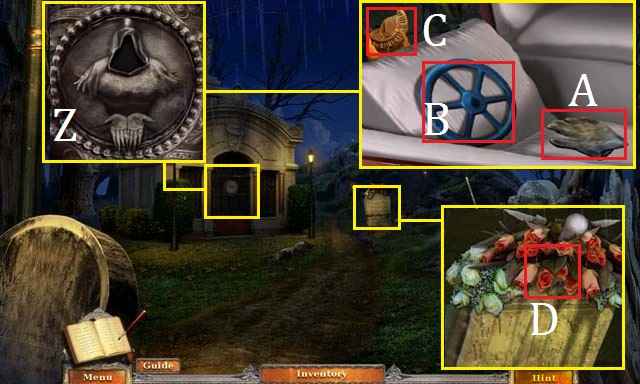
- Zoom into the luggage; cut the BELT (A) free with the KNIFE.
- Return to the Art Gallery Entrance.
- Use the KNIFE to cut down the HARNESS (B).
- Return to the Dock.
- Give the Captain the HARNESS.
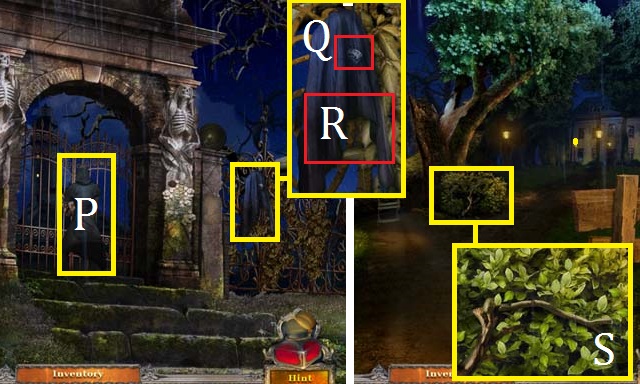
- Speak with the Captain. Collect the GALLERY TICKET (C).
- Move forward.
- Zoom into the ticket booth (D); place the GALLERY TICKET in the lion’s mouth.
Chapter 2: The Art Gallery
- Enter the Art Gallery.
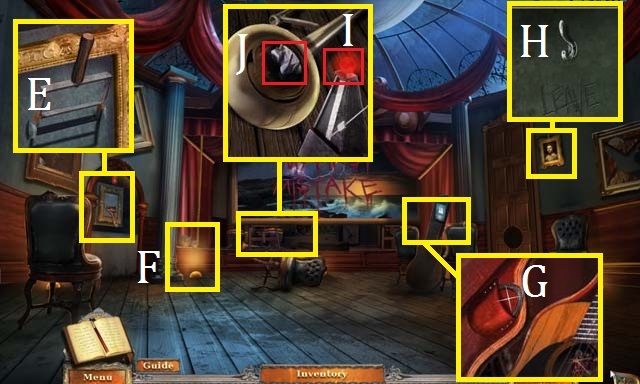
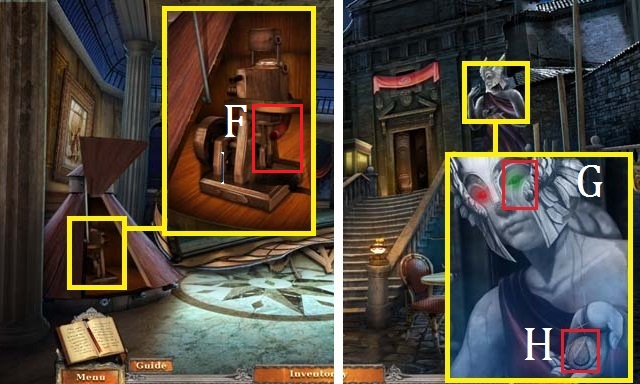
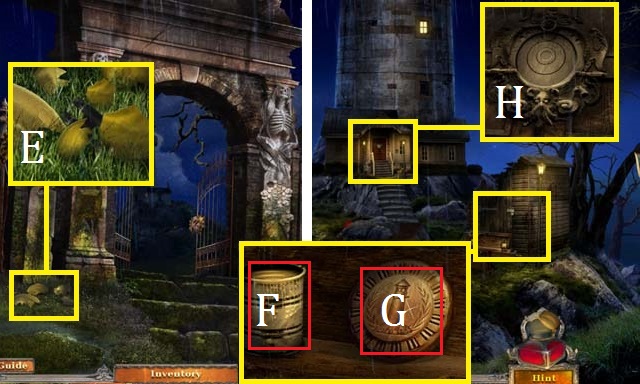
- Zoom into the switch panel; flip the switch (E). Use the WIDE HANDLE to replace the broken switch. Flip the switch to turn on the power.
- Zoom into the crank (F); place the BELT on the gears.
- Zoom into the guitar case; collect the hint and then open the case. Collect the GUITAR STRING (G).
- Zoom into the painting; remove the portrait and collect the HOOK (H).
- Zoom into the stage; move the frame. Stop the metronome and then collect the SMALL RED LIGHTBULB (I). Attempt to remove the paper (J) from the trombone.
- Exit the Art Gallery.
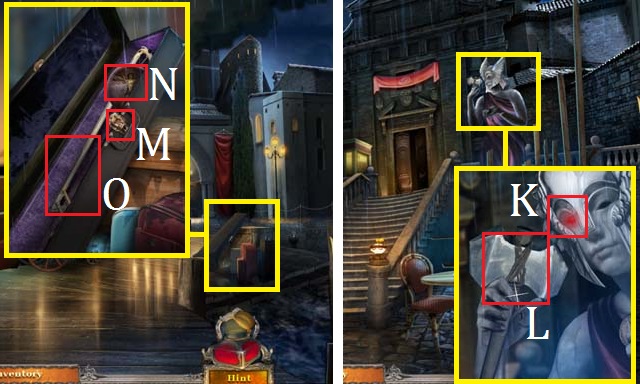
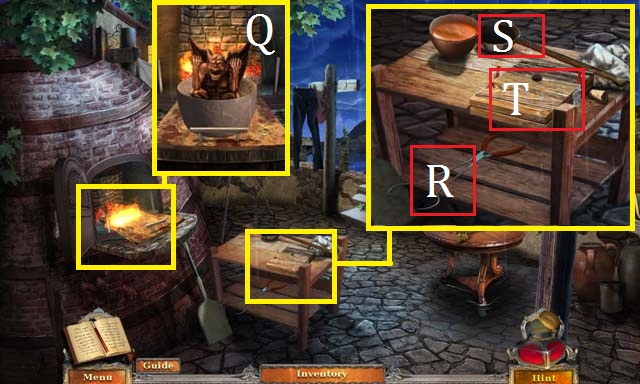
- Zoom into the statue; place the SMALL RED LIGHTBULB in the statue’s eye (K). Collect the STONE HAMMER (L).
- Return to the Dock.
- Zoom into the luggage; use the STONE HAMMER to open the trombone case’s lock (M).
- Collect the VITRUVIAN DISC (N) and the TROMBONE SLIDE (O).
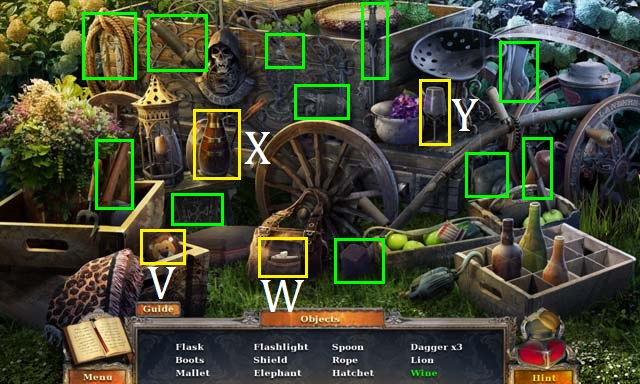
- Zoom into the sparkles to play a HOS.
- Open the book to reveal the Flask (P).
- Move the mask to uncover the Globe (Q).
- Use the hammer (R) to break the bottle and free the Pendant (S).
- Collect the remaining items to receive the DECORATIVE GLASS PLATE.
- Return to the Art Gallery.
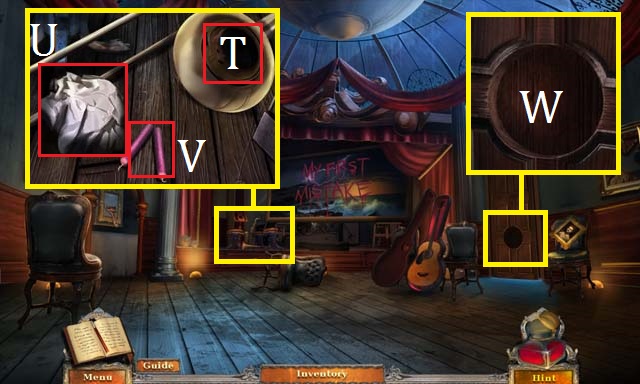
- Zoom into the stage; place the TROMBONE SLIDE on the trombone (T). Collect the clue (U) and the TRICK CANDLES (V).
- Zoom into the door; place the VITRUVIAN DISC in the slot (W).
- Enter the Vitruvian Room.
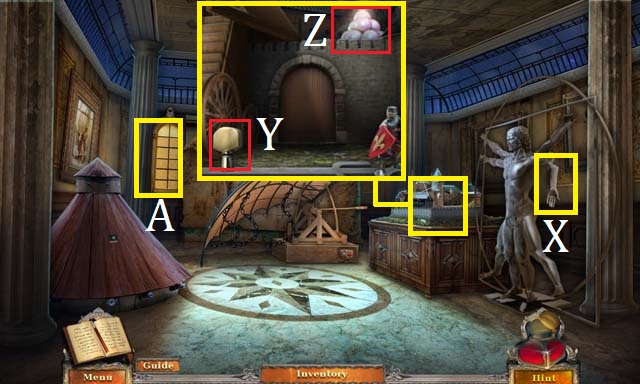
- Collect the Vitruvian Man’s MANNEQUIN ARM (X).
- Zoom into the castle; collect the GUITAR PEG (Y) and the MINIATURE CANNONBALLS (Z).
- Look out the window (A).
- Back up one scene.
- Zoom into the guitar; place the GUITAR PEG on the headstock (B). Turn the peg until the strings break. Collect the first TOY ARCHER (C).
- Return to the Art Gallery Entrance.
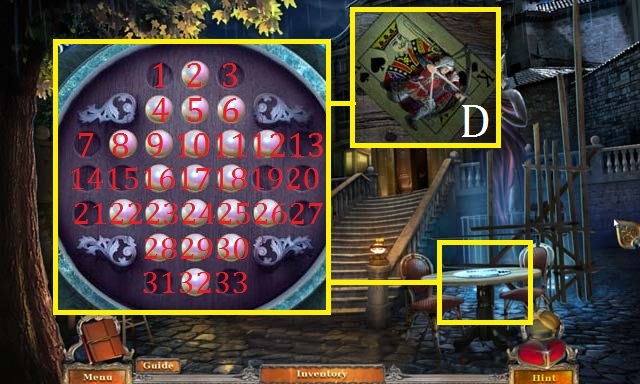
- Zoom into the table; place the MINIATURE CANNONBALLS in the puzzle.
- Jump the cannonballs in the following sequence to clear the board: move 9 to 1, 1 to 3, 11 to 9, 3 to 11, 12 to 10, 25 to 33, 33 to 31, 23 to 25, 26 to 24, 17 to 15, 5 to 17, 18 to 16, 31 to 23, 29 to 17, 22 to 24, 17 to 29, 15 to 17, 8 to 10, 10 to 24, 29 to 17.
- Collect the second TOY ARCHER (D).
- Zoom into the cutting board; place the TRICK CANDLES on the board and slice them by pulling the handle. Collect the SMALL TRICK CANDLES (E).
- Return to the Vitruvian Man Room.
- Zoom into the castle; place the two TOY ARCHERS on the board (F) and collect the PANEL KEY (G).
- Zoom into the Wing’s base; collect the clue and insert the PANEL KEY in the keyhole (H).
- Zoom back into the Wing’s base; press the buttons in the following sequence to clear this puzzle: 2, 3, 4, 4, 4, 3, 2, 2, 2, 2, 3, 4, 4, 4, 4, 2, 3, 4, 2, 2, 2, 2, 4, 3, 2, 3, 3, 3, 3.
- Enter the back room.

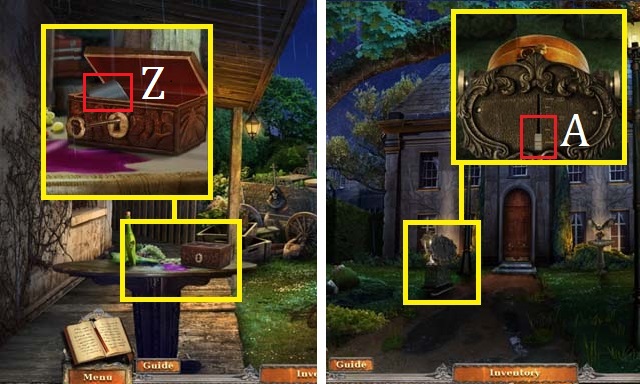
- Collect the first PAINT CANS (I).
- Zoom into the bag; open the top and then collect the COMPUTER DISK (J) and the clue.
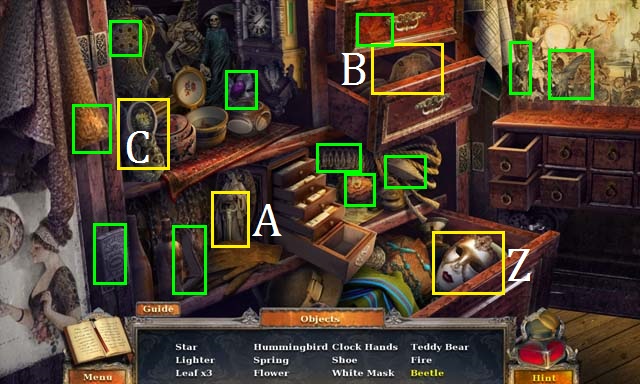
- Zoom into the dresser; place the SMALL TRICK CANDLES on the dresser top (K). Place the CANDLEWICKS in the candles and then light them with the MATCHES.
- Zoom into the table after the wall turns; collect the SCRUBBING BRUSH (L).
- Light the candles (M), on the floor, with the MATCHES.
- Zoom into the sparkles to play a HOS.
- Collect the Retractable Knife (N), Globe (O), and Brush (P).
- Turn the page of the notebook and then collect the Key (Q).
- Cut the ottoman open with the Retractable Knife and then collect the Hammer (R).
- Zoom into the Atlas; remove the handcuffs with the Key. Place the Globe in the statue’s hands and then collect the Atlas (S).
- Use the Brush to clean up the rubble and then collect the Statue Torso (T).
- Place the Statue Torso on the horse body (U) and the Atlas on the empty pillar (V).
- Zoom into the stone block (W); use the Hammer on the block.
- Collect the MAGNET (X).
- Return to the Dock.
- Zoom into the cart’s wheel; place the MANNEQUIN ARM under the cart so that you may collect the WHEEL (Y).
- Return to the Vitruvian Room.
- Zoom into the cone; Use the WHEEL on the latch (Z) to open the panel. Collect the TURPENTINE BOTTLE (A) and the SMALL GREEN LIGHTBULB (B).
- Enter the back room.
- Pour the TURPENTINE BOTTLE on the wall (C). Use the SCRUBBING BRUSH to remove the paint from the wall.
- Open the door and then exit to the Gate.
- Try to drop the FISHING POLE over the EMPTY CREAMER (D) and it will land on the railing (E). Place the GUITAR STRING on the pole and then attach the HOOK.
- The EMPTY CREAMER will be added to your inventory.
- Return to the Vitruvian Room.
- Zoom into the cone; place the EMPTY CREAMER under the tube (F). Use the TUBE SQUEEZER to fill the CREAMER WITH OIL. Collect the CREAMER WITH OIL.
- Exit back to the Art Gallery Entrance.
- Zoom into the statue; place the SMALL GREEN LIGHT BULB in the statue’s eye (G) and then collect the TOKEN (H).
Chapter 3: The Bakery
- Return to the Gate.
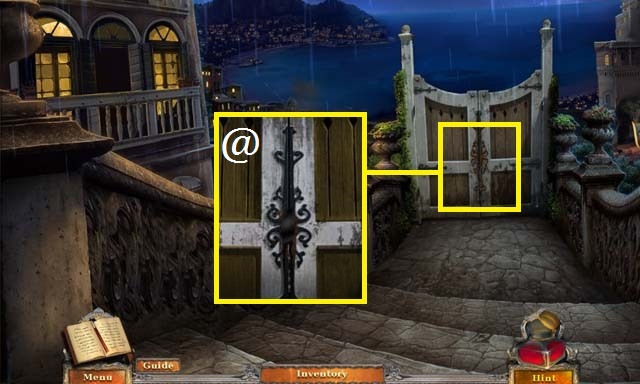
- Zoom into the Gate; pour the CREAMER WITH OIL on the rusty hinge (@).
- Move forward to the Fountain.
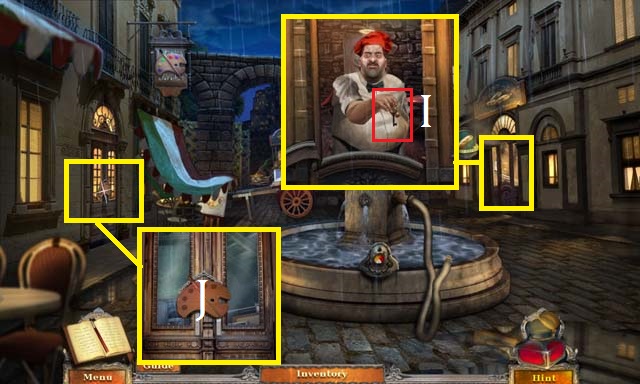
- Zoom into the Bakery door. Collect the ART STORE KEY (I) from the Baker.
- Zoom into the Art Store door; collect the HANGING ORNAMENT (J). Zoom into the lock and then use the ART STORE KEY to open the door.
- Enter the Art Store.
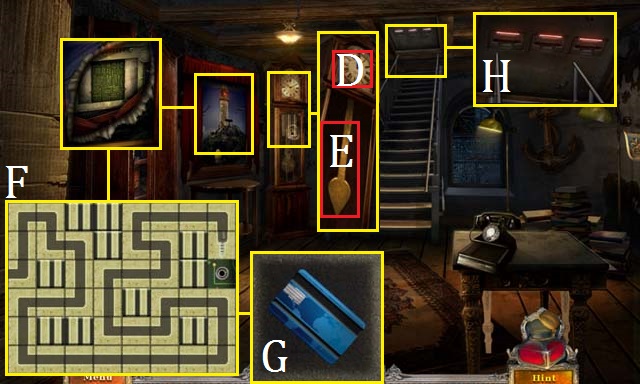
- Zoom into the computer; place the COMPUTER DISK in the drive (K).
- Zoom into the computer screen; move the disks along the paths shown in the screenshot (L) for the wining paths.
- Collect the SCYTHE REPLICA (M).
- Zoom into the shelf; collect the PAPER CUTTER (N).
- Collect the second PAINT CAN (O).
- Exit the Art Store.
- Zoom into the fountain; place the TOKEN in the slot (P). Pick up the hose (Q) to put out the fire.
- Enter the Bakery.
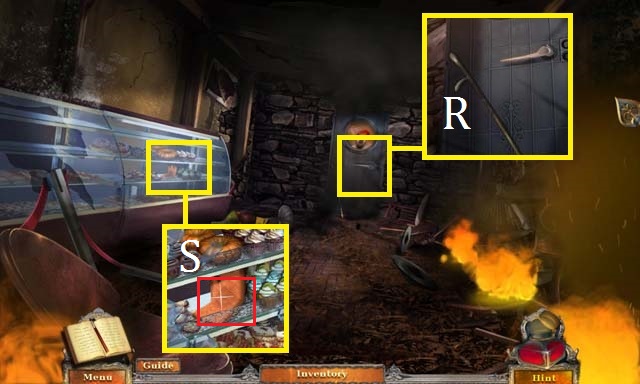
- Zoom into the freezer door; collect the FIREPLACE IRON (R).
- Zoom into the pastry case; use the FIRE IRON to break the glass and collect the OVEN MITT (S).
- Use the OVEN MITT to open the freezer door.
- Once back outside, take the open path to the Bridge.
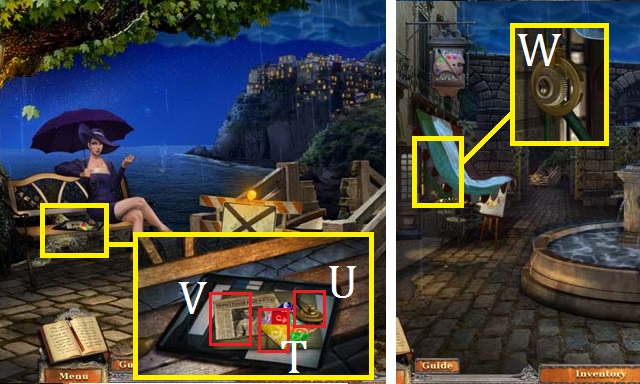
- Speak with Rosaria.
- Zoom into the bench; collect the CRAFT PAPER (T), TURNNING HANDLE (U), and the clue (V).
- Return to the Fountain.
- Zoom into the awning; place the TURNNING HANDLE on the crank (W). Spin the handle.

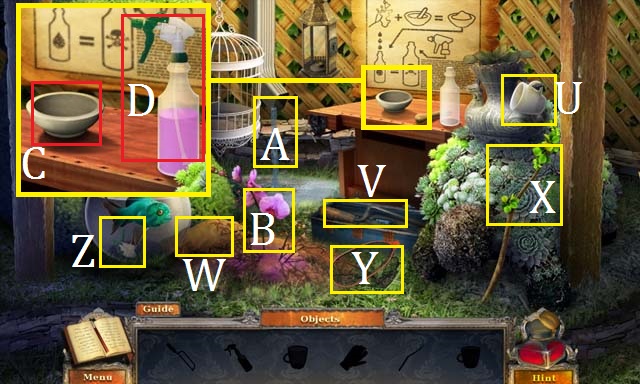
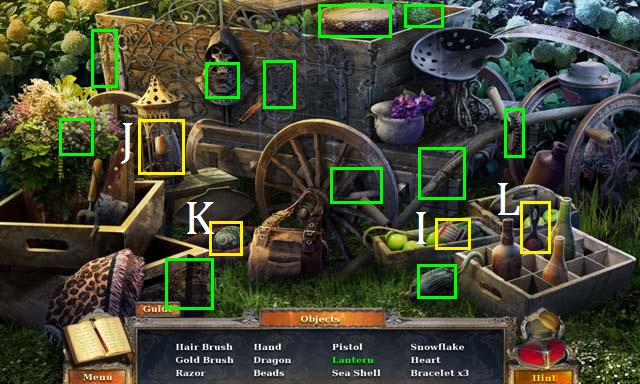
- Zoom into the sparkles to play a HOS.
- Collect the Knife (X), Paintbrush (Y), and the Napkin (Z).
- Flip the page on the easel (A).
- Open the honey jar (B). Dip the Paintbrush in the honey and paint the roses on the easel.
- Collect the Number Four Button (C).
- Slice the Cheese (D) with the Knife.
- Give a small Piece of the Cheese to the mouse and collect the Quill (E).
- Dip the Quill in the ink (F).
- Zoom into the fruit basket; use the Napkin to clean off and collect the Number Eight Button (G).
- Place the Number Four Button and Number Eight Button in the box (H).
- Zoom into the box; key in the number 4682. Collect the CAMERA LENS (I).
- Enter the Art Store and then take the door to the Back Alley.
- Zoom into the easel; place the CRAFT PAPER and PAPER CUTTER on the board.
- Rotate and place the scraps in the puzzle as they are shown in the screenshot (K).
- Collect the GATE EMBLEM.
- Zoom into the projector; place the CAMERA LENS on the projector (L) followed by the DECORATIVE GLASS PLATE.
- Zoom into the wall; collect the hint and then hang the HANNGING ORNAMENT on the far right hook (M).
- Collect the WOODEN GEAR (N), the third PAINT CAN (O), and the clue (P).
- Return to the Bridge.
- Zoom into the water (Q); place the three PAINT CANS in the water.
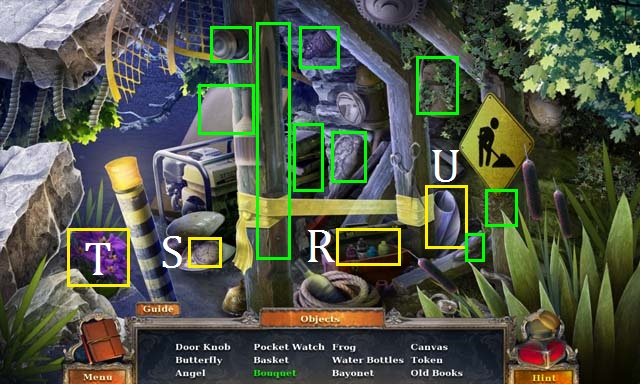
- Zoom into the sparkles to play a HOS.
- Open the toolbox to reveal the Water Bottles (R).
- Open the shell to locate the Pocket Watch (S).
- Place the flowers (T) in the paper (U) to make the Bouquet.
- Collect the remaining items to receive the first CANVAS.
Chapter 4: The Art Studio
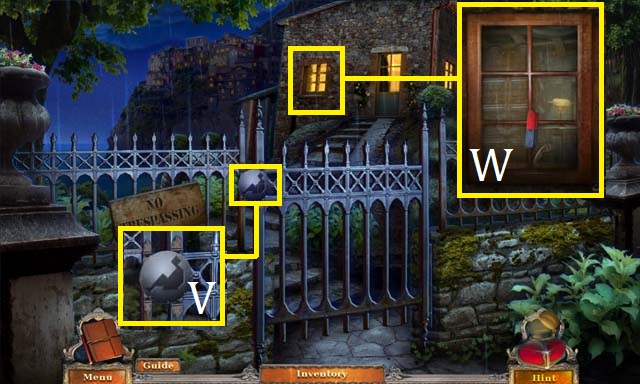
- Climb the long steps.
- Zoom into the gate; place the GATE EMBLEM in the slot (V).
- Zoom into the window; use the MAGNET to open the latch (W).
- Enter the Art Studio.
- Examine the painting (X).
- Zoom into the pottery wheel; collect the DRY CLAY (Y) and the BOLT CUTTERS (Z).
- Zoom into the hatch door; pull the string (A). Cut the chain (B) with the BOLT CUTTERS.
- Climb the ladder to the Roof Top.
- Zoom into the oven; collect the RED PAINT (C) and then open the oven door.
- Zoom into the shelf; collect the BLUE PAINT (D) and the HEAT-RESISTANT GLOVES (E). Shut the form’s lid (F).
- Zoom into the clothesline; collect the CLOTHESPINS (H) and then VIRGIL’S DESK KEY (I).
- Zoom into the tripod; collect the CAMERA (J).
- Return to the Art Studio.
- Zoom into the table; place the RED PAINT and the BLUE PAINT on the table.
- Dip the brush (K) in the red paint (L) and then paint the emblem (M). Dip the brush in the blue paint (N) and then paint the emblem. Rinse the brush in the water (O).
- Paint the emblem blue and then add yellow (P) to paint the emblem green. Paint the emblem yellow and then add red to paint the emblem orange.
- Receive the STRANGE EMBLEM and then collect the paper (Q).
- Use VIRGIL’S DESK KEY to open the drawer and then collect the BLUE BEAD (R), the STAR CHART (S), and the clue (T).
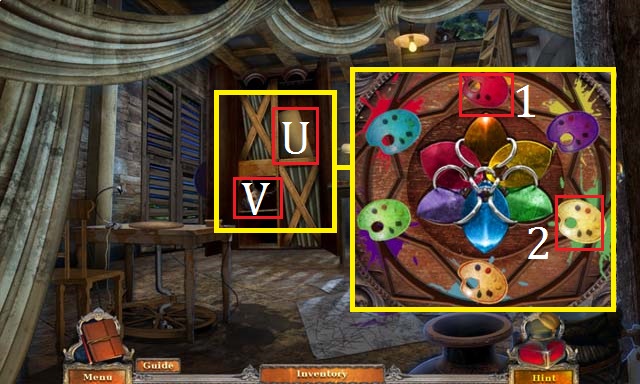
- Zoom into the cabinet; place the STRANGE EMBLEM in the lock.
- Use the following sequence to solve this puzzle: move the red palette (1) and then the yellow palette (2). Rotate the board until all the palettes are in line with their color on the emblem.
- Collect the second CANVAS (U) and the ELK-SHAPED SPOUT (V).
- Return to the Roof Top.
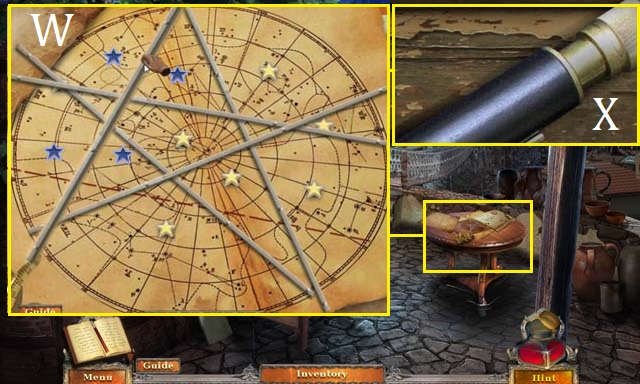
- Zoom into the table; place the STAR CHART on the board.
- You may use the screenshot (W) to see how to arrange the lines. Collect the TELESCOPE (X).
- Zoom into the tripod; place the TELESCOPE on the tripod (Y).
- Zoom into the bridge; place the two CANVASES on the bridge (Z) and cross it to the Tower Entrance.
- Zoom into the sparkles to play a HOS.
- Collect the Spade (A) and the Crowbar (B).
- Use the Spade to dig up the dirt in the pot and then collect the Latch (C).
- Zoom into the case; place the Latch on the case and then open all three latches (D). Collect the Shears (E).
- Use the Crowbar to remove the brick and then collect the Bird Emblem (F).
- Place the Bird Emblem on the cage and then collect the Seeds (G).
- Plant the Seeds in the pot and then use the Shears to collect the Rose (H).
- Place the Rose in the vase and then collect the Key (I).
- Zoom into the lantern; use the Key to open the door and then collect the DRYING BULB (J).
- Zoom into the elk shrub; collect the COPPER FIGURE (K). Place the ELK-SHAPED SPOUT on the fountain (L). Collect the VIOLET BEAD (M).
- Dip the DRY CLAY in the fountain to receive the WET CLAY.
- Return to the Art Studio.
- Zoom into the pottery wheel; place the DRYING BULB in the lamp (N). Put the WET CLAY on the wheel and flip the switch (O). Spin the clay and then collect the EMPTY BOWL (P).
- Return to the Roof Top.
- Zoom into the oven; place the EMPTY BOWL on the tray (Q) and then drop the COPPER STATUE in the bowl. Push the tray into the oven. Use the HEAT-RESISTANT GLOVES to remove the BOWL OF MELTED COPPER from the oven.
- Zoom into the shelf; place the BOWL OF MELTED COPPER on the shelf.
- Use the tongs (R) to pour the melted copper into the cup (S). Pour the cup into the mold (T) and then collect the HOT MOLD.
- Return to the Tower Entrance.
- Zoom into the sparkles to play a HOS.
- Collect the Empty Cup (U), Handsaw (V), and the Gloves (W).
- Use the Handsaw to cut the Branch (X).
- Place the Branch on the Net (Y).
- Use the Net to fish out the Spray Bottle Lid (Z).
- Fill the Empty Cup with water from the gutter (A).
- Use the Gardening Glove to collect the Poison Plant (B).
- Zoom into the table; place the Poison Plant in the mortar (C) to receive the Poison Powder.
- Pour the Cup of Water in the bottle (D) followed by the Poison Powder. Place the Spray Bottle Lid in the bottle and then collect the HERBICIDE.
- Zoom into the elk shrub; place the HOT MOLD into the fountain to receive the COPPER ARM.
- Zoom into the statue (E); place the COPPER ARM on the statue.
- Use the HERBICIDE on the elevator door (F).
- Enter the Elevator.
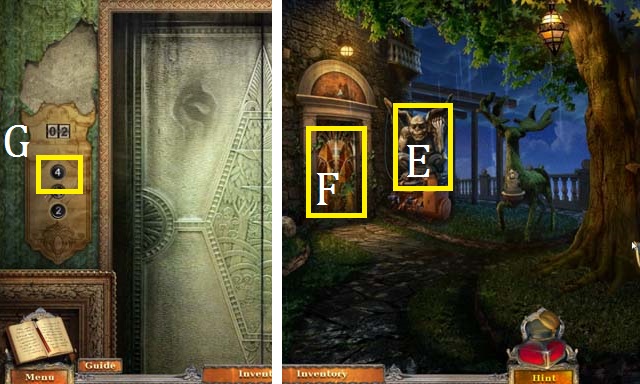
- Press the 4 button (G).
- Exit the Elevator to the Tower Top.
- Zoom into the gears; place the WOODEN GEAR in the slot (H).
- Zoom into the lift; dump the pail over and collect the YELLOW BEAD (I).
- Zoom into the panel; place the YELLOW BEAD, VIOLET BEAD, and the BLUE BEAD in the puzzle.
- You may move the beads to their correct positions using the following sequences to complete this puzzle: 5, 4, 6, 3, 1, 2, 6, 3, 1, 2, 6. 10, 11, 8, 7, 12, 11, 8, 9, 7, 12, 13, 14, 16, 15, 17, 18. 20, 23, 19, 22, 21, 24.
- Turn the handle (J).
Chapter 5: The Church
- Once inside the Church, collect the MECHANICAL ARM (K).
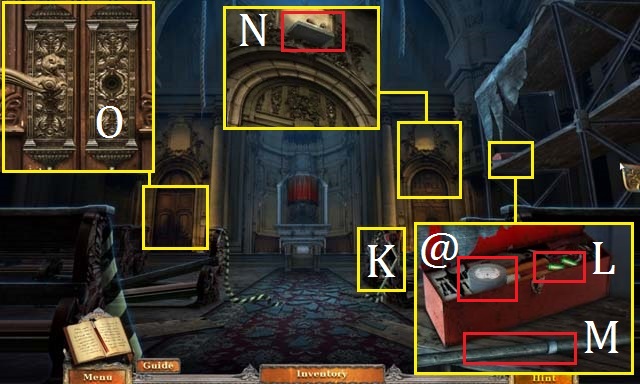
- Zoom into the scaffolding; open the toolbox and then collect the BATTERIES (L).
- Place the MECHANICAL ARM on the pole (M) and then tape (@) them together to receive the REACHING TOOL.
- Zoom into the right door; use the REACHING TOOL to grab the DOOR HANDLE (N).
- Zoom into the left door; place the DOOR HANDLE on the door (O) and then turn the handle.
- Exit the Church to the Path.
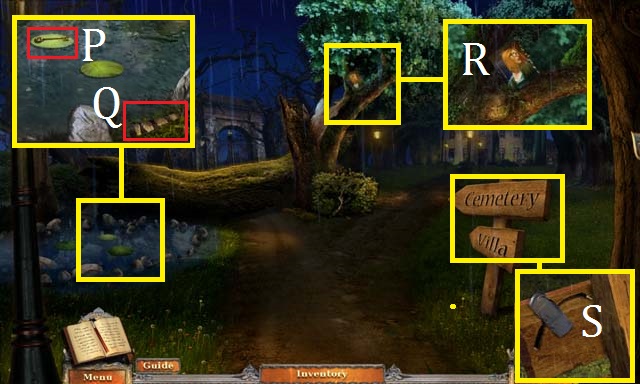
- Zoom into the pond; use the REACHING TOOL to grab the LOCKBOX KEY (P). Collect the first STONE FEATHER (Q).
- Zoom into the tree; use the REACHING TOOL to collect the LEFT HALF OF PORTRAIT (R).
- Zoom into the sign; spin the sign and collect the INTERCOM CABLE (S).
- Move forward to the Front of the House.
- Zoom into the gate; place the INTERCOM CABLE on the speaker (T) and then press the button (U).
- Enter the Back Yard.
- Speak with Rosaria.
- Zoom into the sparkles to play a HOS.
- Move the rug to locate the Lion (V).
- Open the satchel to find the Flask (W).
- Pour the bottle (X) into the glass (Y) for the Wine.
- Collect the remaining items to receive the HATCHET.
- Zoom into the table; use the LOCKBOX KEY to open the box and collect the DIMMER SWITCH (Z).
- Exit the Back Yard.
- Zoom into the spotlight; place the DIMMER SWITCH in the groove (A) and slide it up.
- Enter the Side Yard.
- Collect the RIGHT HALF OF PORTRAIT (B).
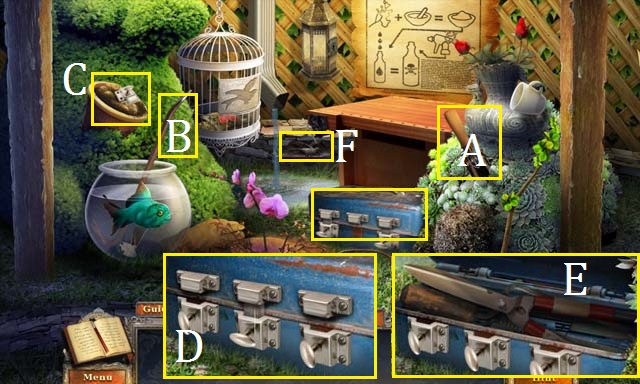
- Zoom into the bushes; use the CAMERA to take a picture of the Shadow (C) to receive the first UNDERDEVELOPED PHOTO. Examine the painting (D).
- Zoom into the wheelbarrow; use the HATCHET to break open the lid. Collect the CORKSCREW (E) and the ROPE LADDER (F).
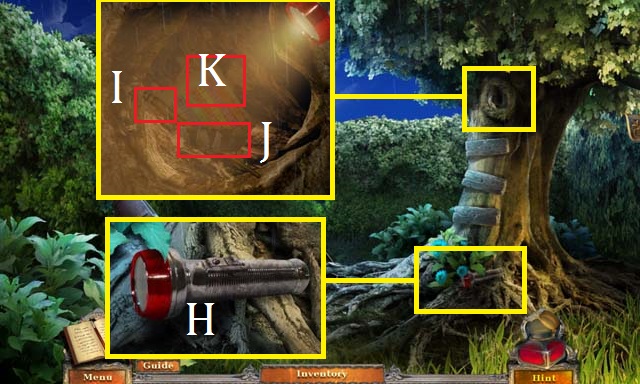
- Zoom into the tree base; place the BATTERIES in the FLASHLIGHT (H). Collect the FLASHLIGHT.
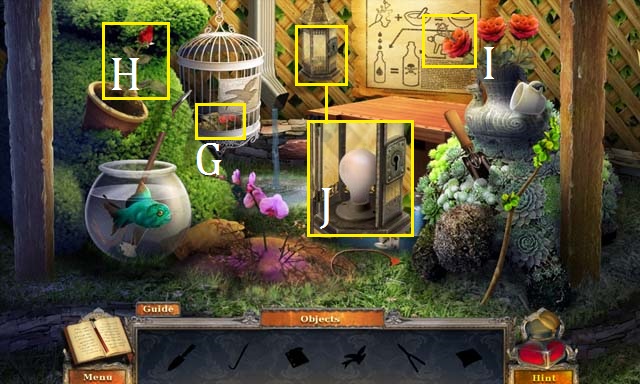
- Zoom into the tree nook; shine the FLASHLIGHT in the hole and then collect the GOLDEN PEN (I), the second STONE FEATHER (J), and the clue (K).
- Return to the Back Yard.
- Zoom into the table; use the CORKSCREW to open the bottle (L). Collect the clue (M) and the third STONE FEATHER (N).
- Return to the Path.
- Hang the ROPE LADDER over the fallen tree (O).
- Take the path to the Cemetery Gate.
- Take a photo of the Shadow (P) with the CAMERA to receive the second UNDERDEVELOPED PHOTO.
- Zoom into the torn cloak; collect the CAMERA CREST (Q) and the RIPPED CLOTH (R).
- Return to the Path.
- Zoom into the tree base; use the HATCHET to chop the branch (S). Place the RIPPED CLOTH on the branch and then collect the DRY TORCH.
- Enter the Church.
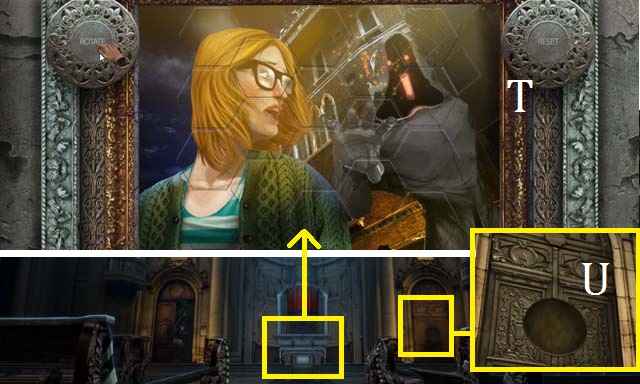
- Zoom into the panel; place the LEFT HALF OF PORTRAIT and the RIGHT HALF OF PORTRAIT in the frame. You may use the screenshot (T) for the final arrangement.
- Zoom into the right door; place the CAMERA CREST in the slot (U).
- Enter the Dark Room.
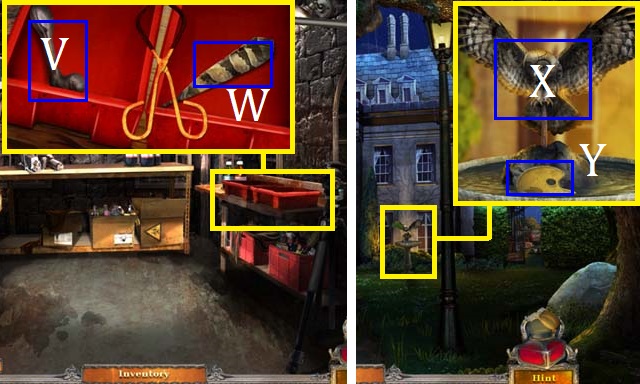
- Zoom into the developer trays; collect the GRAPE PRESS CRANK (V) and the fourth STONE FEATHER (W).
- Return to the Front of the House.
- Zoom into the fountain; place the four STONE FEATHERS on the owl (X) and collect the GOLDEN PALETTE (Y).
- Return to the Back Yard.
- Zoom into the grape press; place the GRAPE PRESS CRANK on the spindle (Z). Dip the DRY TORCH in the wine (A) to receive the FLAMMABLE TORCH.
- Return to the Cemetery Gate.
- Zoom into the left side of the gate; hang the FLAMMABLE TORCH in the pillar (B) and then light it with the MATCHES. Collect the RED LIGHT BULB (C) and ELECTRICAL TAPE (D).
- Return to the Dark Room.

- Zoom into the bulb (E); replace the bulb with the RED LIGHT BULB.
- Zoom into the developer trays; pour the developer (F) in the trays. Place the two UNDERDEVELOPED PHOTOS in the developer. Use the tongs (G) to collect the WET PHOTOS.
- Zoom into the line; hang the CLOTHESPINS followed by the WET PHOTOS and then collect the PHOTOS OF VIRGIL (H).
- Return to the Back Yard.
- Give the PHOTOS OF VIRGIL to Rosaria to receive the RADIO.
- Zoom into the sparkles to play a HOS.
- Use the Matches (I) to light the Lantern (J).
- Open the box to reveal the Sea Shell (K).
- Move the wine bottle to find the Hair Brush (L).
- Collect the remaining items to receive the GOLD BRUSH.
- Return to the Church.
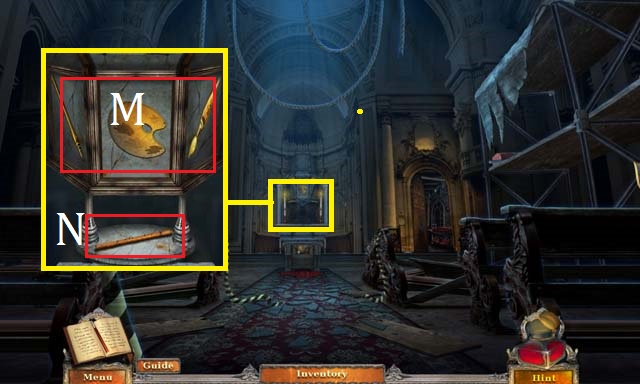
- Zoom into the panel; place the GOLDEN PALETTE, the GOLDEN PEN, and the GOLD BRUSH in the slots (M). Collect the FLUTE (N).
- Return to the Cemetery Gate.
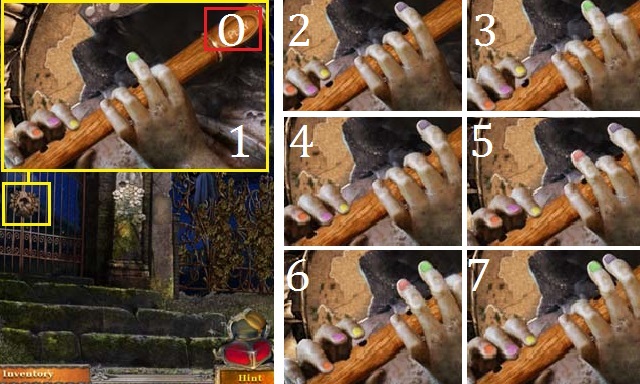
- Zoom into the gate; place the FLUTE in the statue’s hand. Position the fingers as they are shown in the screenshot (1) and then press the play button (O). Continue with sections 2 thru 7 to open the gate.
- Enter the Cemetery.
- Move forward to the Lighthouse Exterior.
- Zoom into the bench; collect the ROTARY WHEEL (P).
- Zoom into the tree; use the REACHING TOOL to lower the bag. Open the bag and then collect the THIN BRUSH (Q) and the STONE ROSE (R).
- Zoom into the stone; collect the first LIGHTHOUSE EMBLEM SHARD (S).
- Return to the Cemetery Gate.
- Zoom into the right side of the gate; place the STONE ROSE on the pillar (T). Collect the clue, code (U), and the SILHOUETTE STONE (V).
- Return to the Cemetery.
- Zoom into the open grave; use the shovel (W) to completely uncover the box.
- Zoom into the box and set the code to 940. Collect the clue, the second LIGHTHOUSE EMBLEM SHARD (X) and the invoice (Y).
- Zoom into the mausoleum door; place the SILHOUETTE STONE in the slot (Z) followed by the SCYTHE REPLICA.
- Open the casket. Collect the WORK GLOVES (A) and the VALVE (B).
- Light the candle with the MATCHES and then collect the third LIGHTHOUSE EMBLEM SHARD (C).
- Zoom into the gravestone; use the WORK GLOVES to pick up the LEVER (D).
- Exit back to the Cemetery Gate.
- Zoom into the broken shards; use the WORK GLOVES to collect the CONDUCTOR (E).
- Return to the Lighthouse Exterior.
- Zoom into the bench; place the three LIGHTHOUSE EMBLEM SHARDS on the bench.
- Use the THIN BRUSH to apply the glue (F) to the shards and then collect the LIGHTHOUSE EMBLEM (G).
- Zoom into the Lighthouse door; place the LIGHTHOUSE EMBLEM in the slot (H).
Chapter 6: The Lighthouse
- Enter the Lighthouse.
- Zoom into the generator; place the VALVE on the spindle (I). Spin the valve to turn off the power.
- Zoom into the cut wires; use the CONDUCTOR to fix the wires (J). Apply the ELECTRICAL TAPE to the conductor.
- Zoom back into the generator and turn the power back on.
- Zoom into the panel; place the LEVER on the switch (K). Flip the lever to lower the stairs.
- Climb the stairs to the Lighthouse Loft.
- Open the curtain (L) and examine the painting.
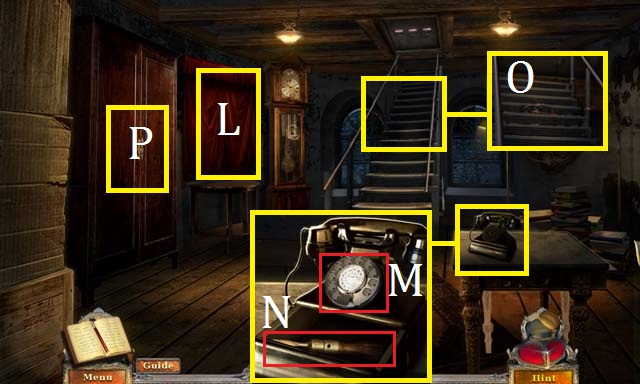
- Zoom into the phone; place the ROTARY WHEEL on the phone (M) and then collect the SCREWDRIVER (N).
- Zoom into the stairs; collect the WARDROBE HANDLE (O).
- Place the WARDROBE HANDLE on the wardrobe (P).
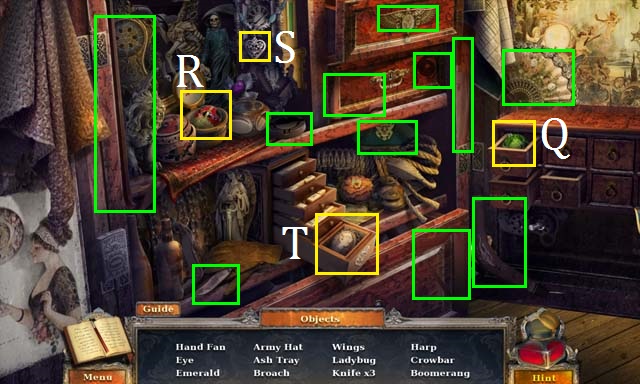
- Zoom into the sparkles to play a HOS.
- Open the drawer to reveal the Emerald (Q).
- Open the lid to find the Ladybug (R).
- Use the heart (S) to open the box to find the Brooch (T).
- Collect the remaining items to receive the CROWBAR.
- Go back down stairs.
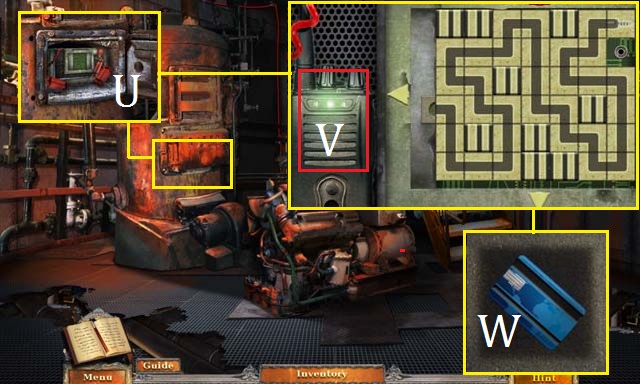
- Zoom into the furnace; use the SCREWDRIVER to open the panel.
- Zoom into the bomb (U); place the RADIO next to the puzzle (V). Using the arrows, move along the path shown in the screenshot to solve the puzzle.
- Collect the first BOMB KEYCARD (W). The RADIO will be returned to your inventory.
- Exit the Lighthouse.
- Zoom into the stone; move the stone with the CROWBAR.
- Zoom into the bomb; place the RADIO in the puzzle and use the path shown in the screenshot (X). Collect the second BOMB KEYCARD (Y).
- Return to the Lighthouse Loft.
- Zoom into the sparkles to play a HOS.
- Open the drawer to reveal the White Mask (Z).
- Use the key (A) to unlock the drawer and reveal the Teddy Bear (B).
- Open the lion head to reveal the Beetle (C).
- Collect the remaining items to receive the CLOCK HANDS.
- Zoom into the clock; place the CLOCK HANDS on the clock face (D). Collect the SHARP PENDULUM (E).
- Zoom into the painting; use the SHARP PENDULUM to slice open the painting and reveal the bomb.
- Zoom into the bomb; place the RADIO and follow the path shown in the screenshot (F). Collect the third BOMB KEY CARD (G).
- Zoom into the stairs; place the three BOMB KEY CARDS in the slots (H).
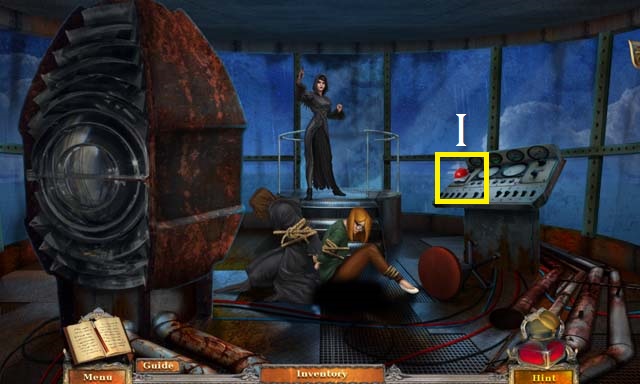
- Once Rosaria stops talking, throw the RADIO at the red button (I).
- Untie the captives.
Congratulations! You have completed Dark Canvas: A Brush with Death.


 Blood Oath Walkthrough, Guide, & Tips
 Grave Mania: Pandemic Pandemonium Walkthrough, Guide, & Tips
 Spirits of Mystery: Amber Maiden Walkthrough, Guide, & Tips
 Cursed Fates: The Headless Horseman Walkthrough, Guide, & Tips
 Echoes of the Past: The Revenge of the Witch Walkthrough, Guide, & Tips