Death Pages: Ghost Library Walkthrough, Guide, & Tips
Death Pages: Ghost Library Walkthrough

Welcome to the Death Pages: Ghost Library Walkthrough
Rescue teenagers from the tragic fate of Romeo and Juliet!
Whether you use this document as a reference when things get difficult or as a road map to get you from beginning to end, we’re pretty sure you’ll find what you’re looking for here.
This document contains a complete Death Pages: Ghost Library game walkthrough featuring annotated screenshots from actual gameplay!
We hope you find this information useful as you play your way through the game. Use the walkthrough menu below to quickly jump to whatever stage of the game you need help with.
Remember to visit the Big Fish Games Forums if you find you need more help. Have fun!
This walkthrough was created by BrownEyedTigre, and is protected under US Copyright laws. Any unauthorized use, including re-publication in whole or in part, without permission, is strictly prohibited.
General Tips

- This is the official guide for Death Pages: Ghost Library.
- Select Options to adjust the Music, Effects, Environment, and Voice Volume. You can also adjust Special Effects and Gamma.
- You may select between Casual, Advanced and Hardcore Mode. You may change the mode of play anytime in Options.
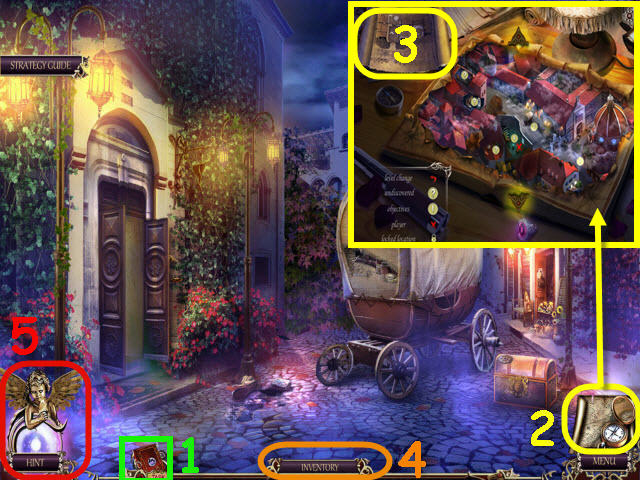
- You can review tasks in the book (1) located on the left of the inventory bar.
- You may access the Map (2) on the lower right to travel quickly to other areas and to see where you have unfinished quests.
- To travel to locations within the library, select the Library Map (3) in the upper left of the map area.
- Hidden-object scenes are referred to as HOS throughout the guide.
- Select the Info Button on the left of the puzzles to access the game instructions.
- Move your cursor down to the bottom of the screen to raise the Inventory bar (4).
- Select the Hint button (5) on the bottom left to get a hint in HOS and in the main quest.
- Inventory items will be marked in all CAPS in the strategy guide.
Chapter 1 – Save Mercutio
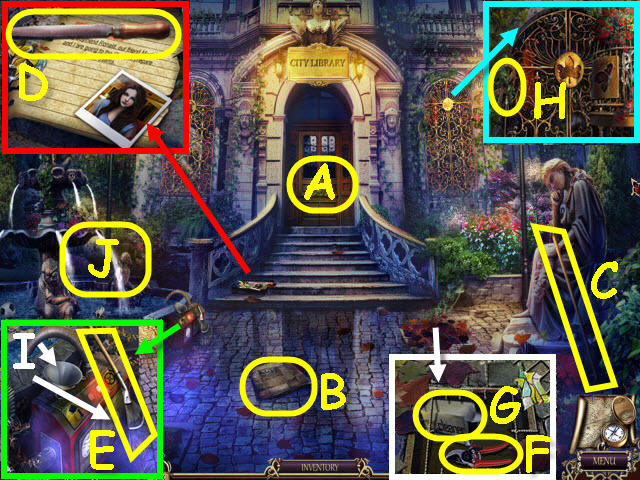
- Select anywhere in the scene.
- Examine the library door (A).
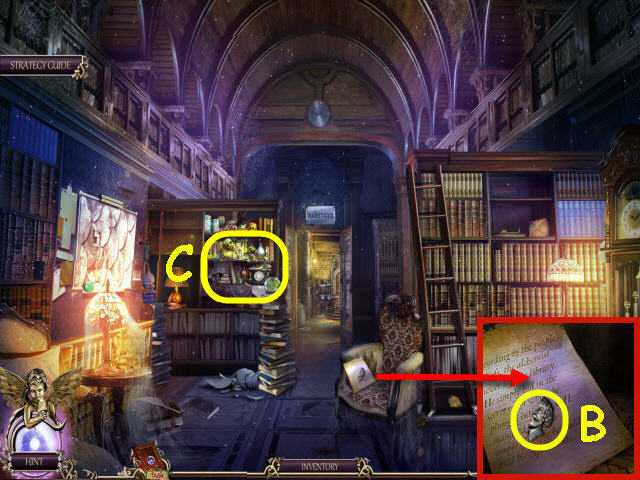
- Examine the newspaper (B).
- Take the RAKE HANDLE(C).
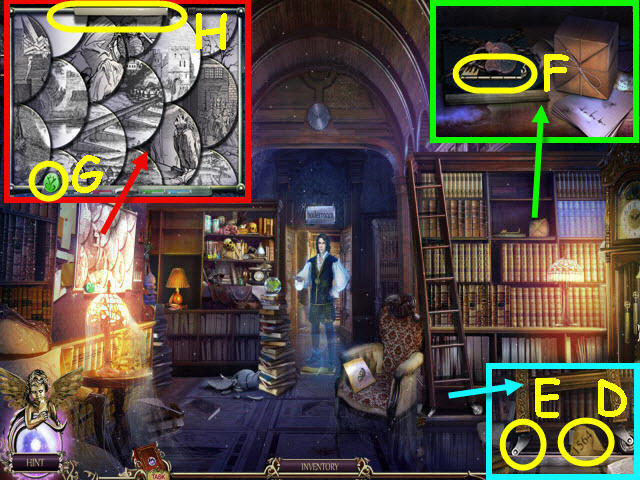
- Examine the note; take the FILE (D).
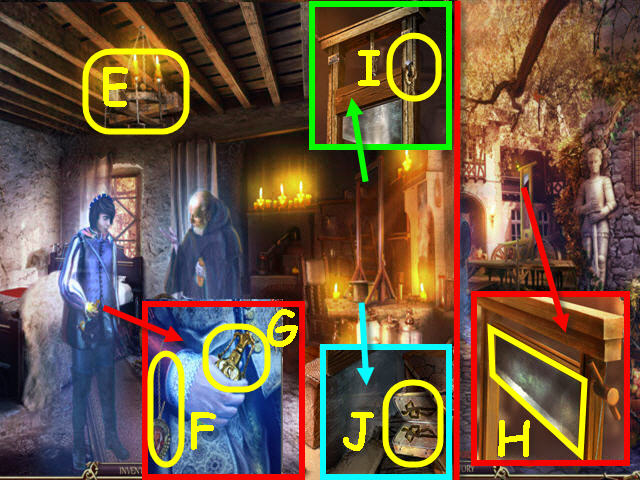
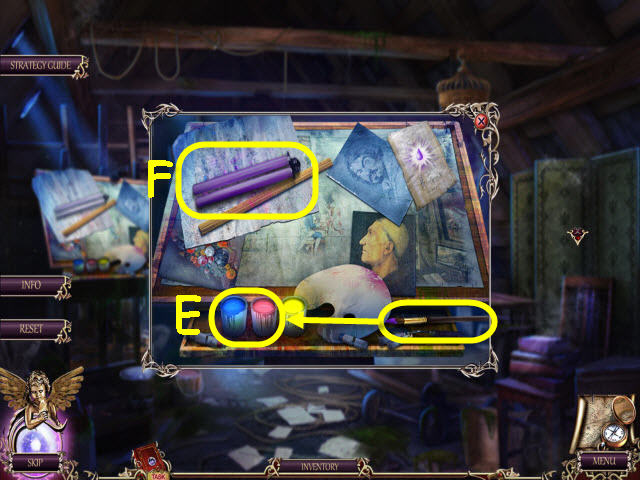
- Examine the fountain; place the RAKE HANDLE on the rake head and take the RAKE (E).
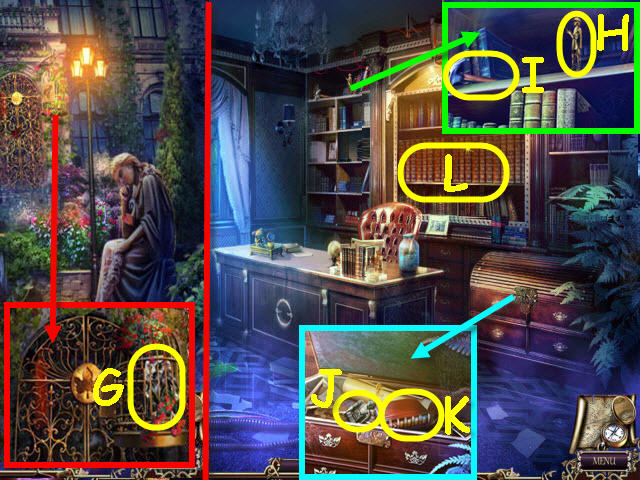
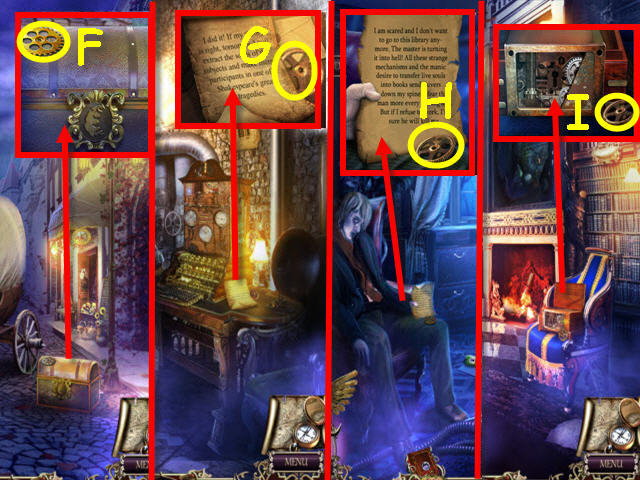
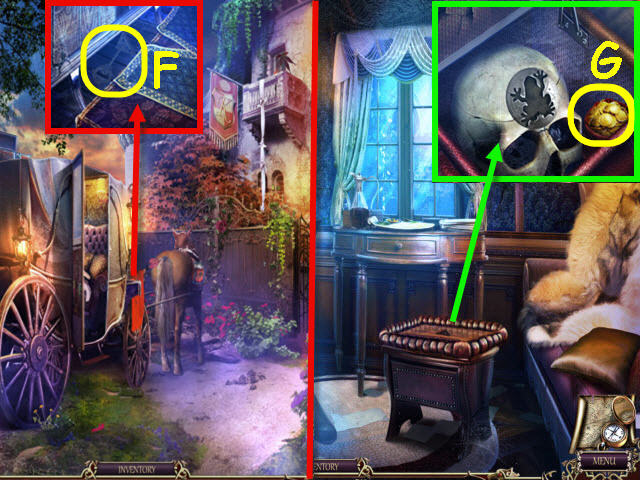
- Examine the grate and use the RAKE and FILE on it; take the PRUNER (F) and POWDER (G).
- Examine the ivy and use the PRUNER on it to get a VALVE (H).
- Examine the fountain; place the CLEANER in the funnel and the VALVE on the front and turn it (I).
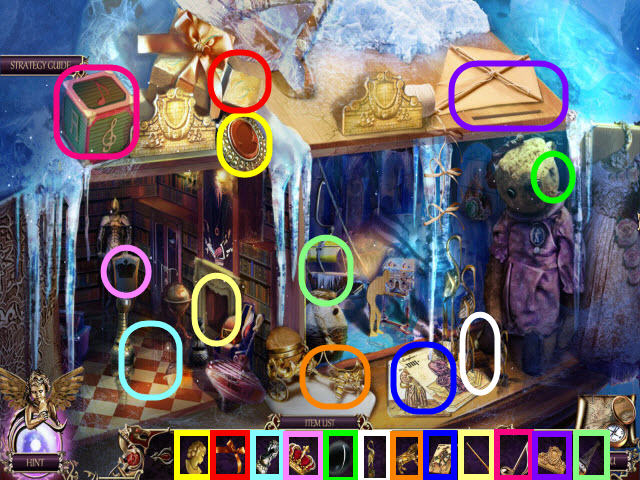
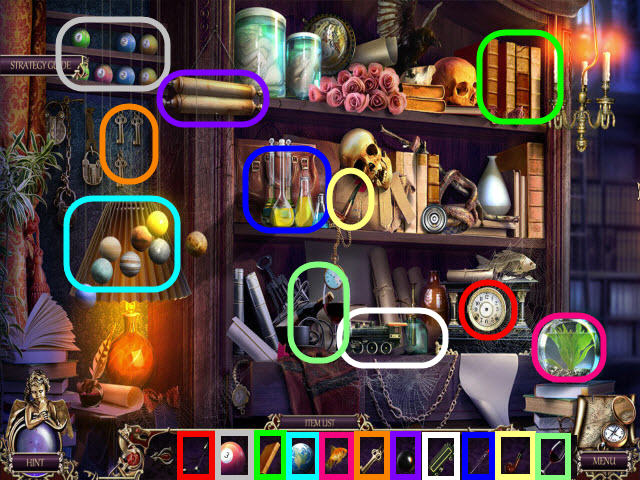
- Examine the fountain to access a HOS (J).
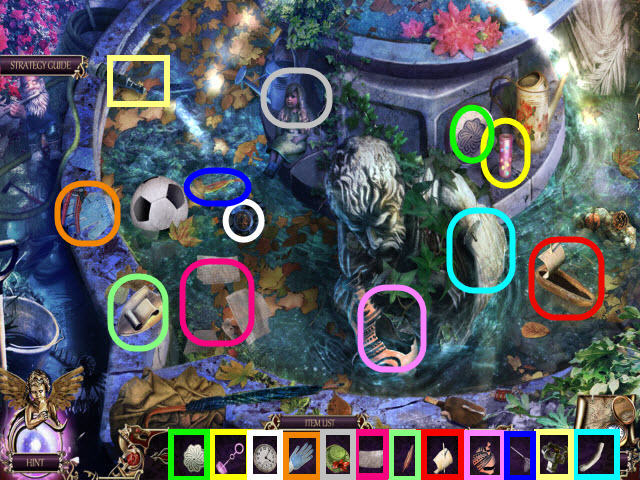
- Place the items in their correct spots in the scene.
- See screenshot for solution (J).
- You will earn a LIBRARIAN’S BADGE.
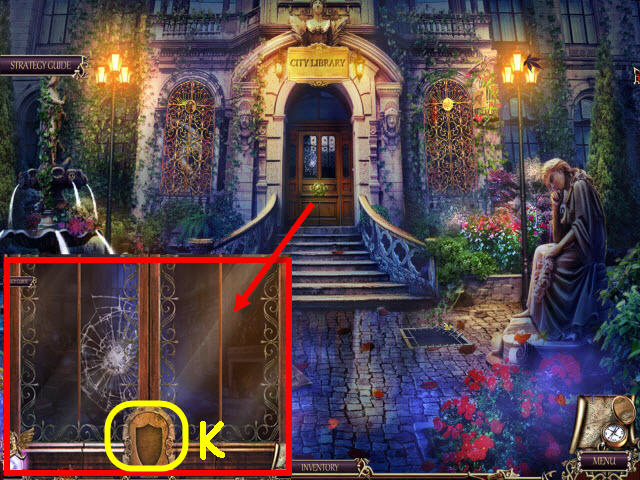
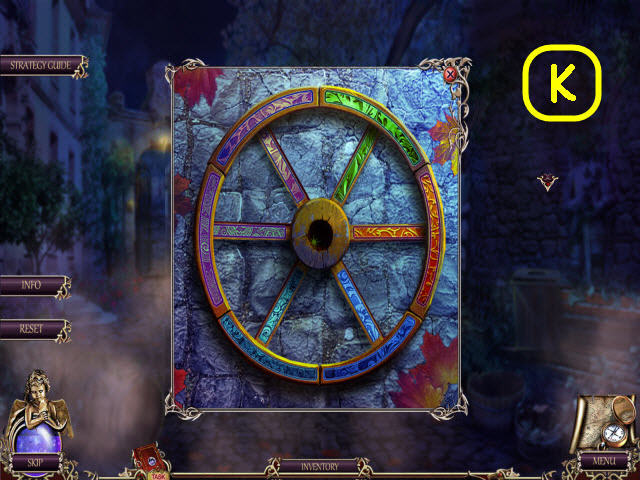
- Examine the library door; place the LIBRARIAN’S BADGE on the lock (K).
- Go forward into the main hall.
- Select anywhere in the scene.
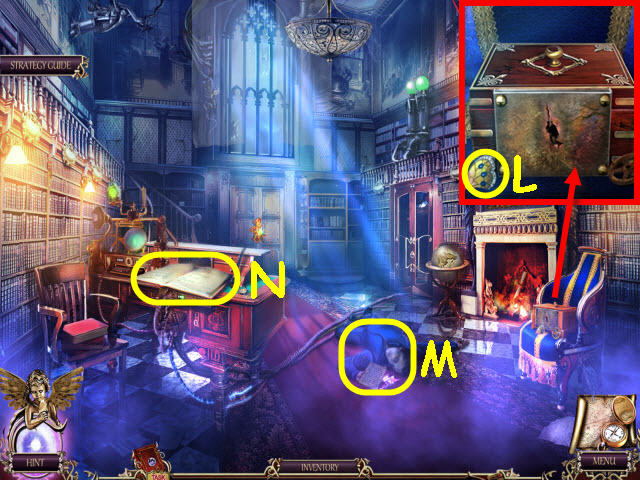
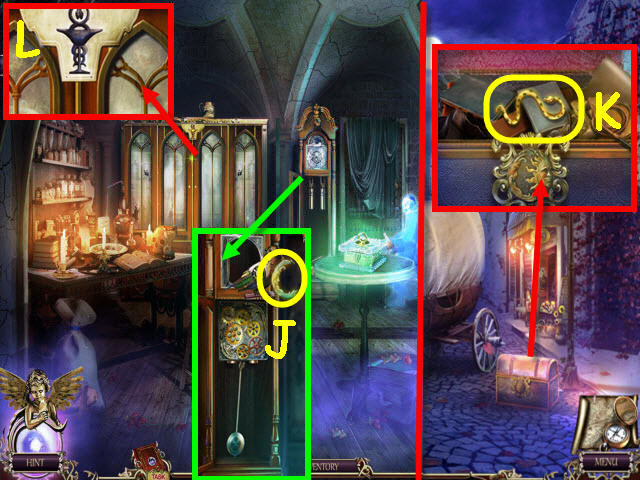
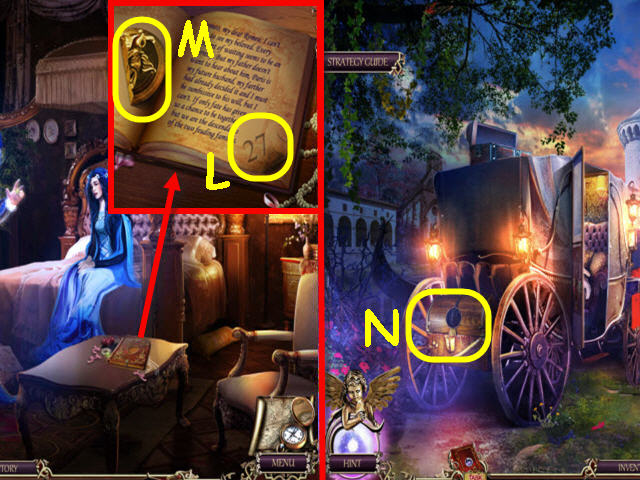
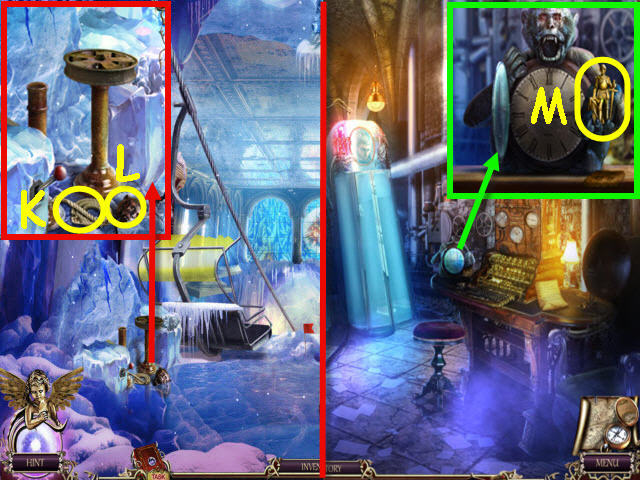
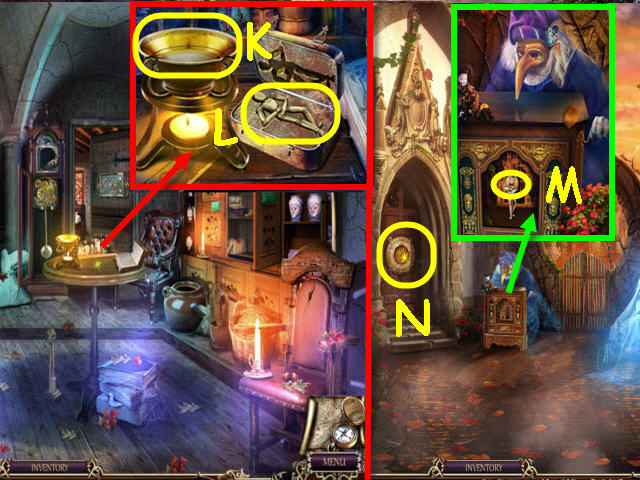
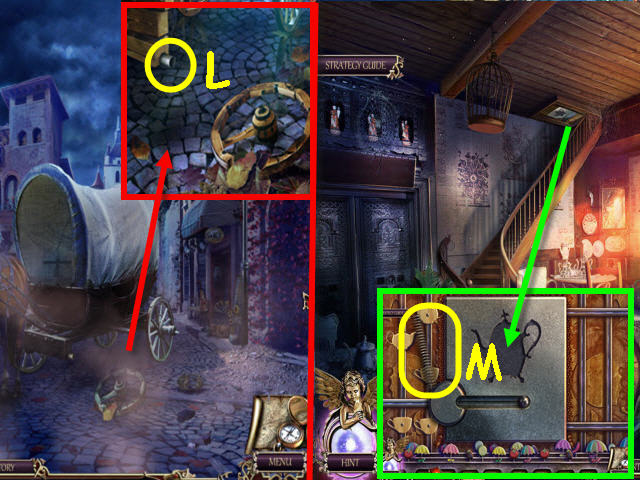
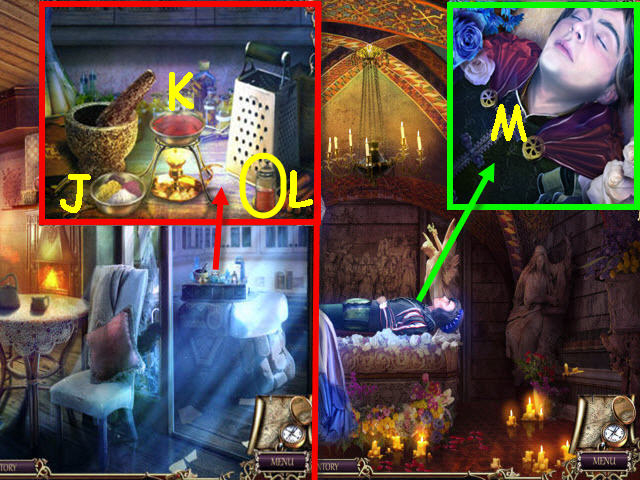
- Examine the chest; take the CHARM PIECE (L).
- Examine the mechanic’s body (M) and read the note.
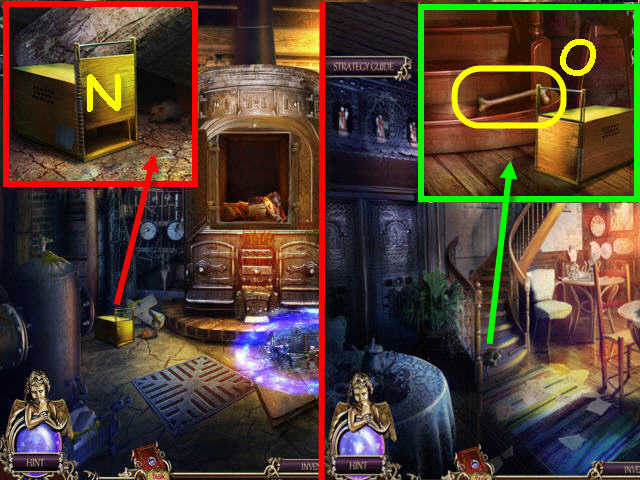
- Examine the book to enter a portal (N).
- Select anywhere in the scene.
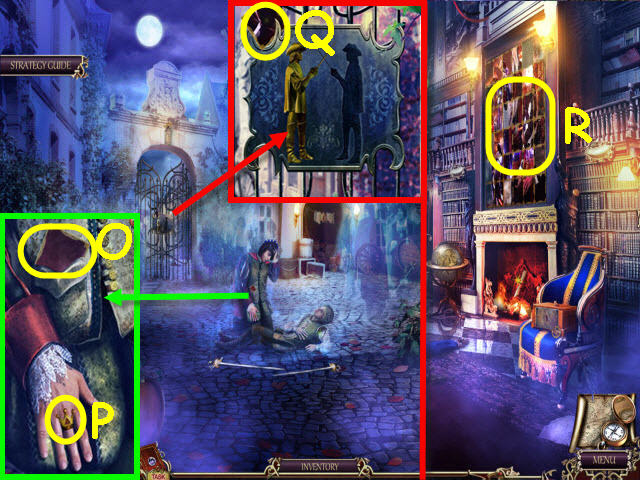
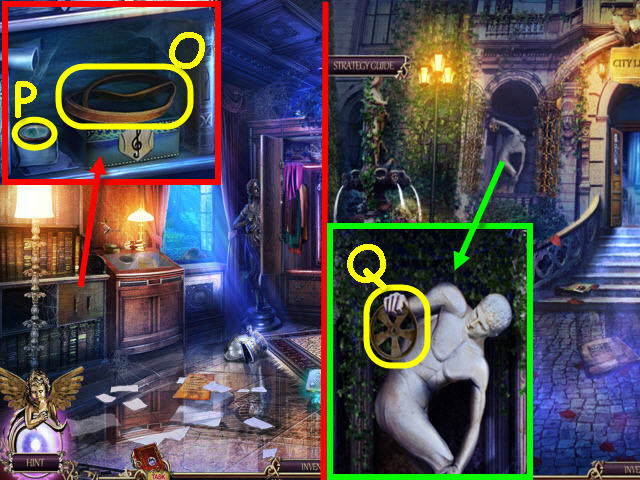
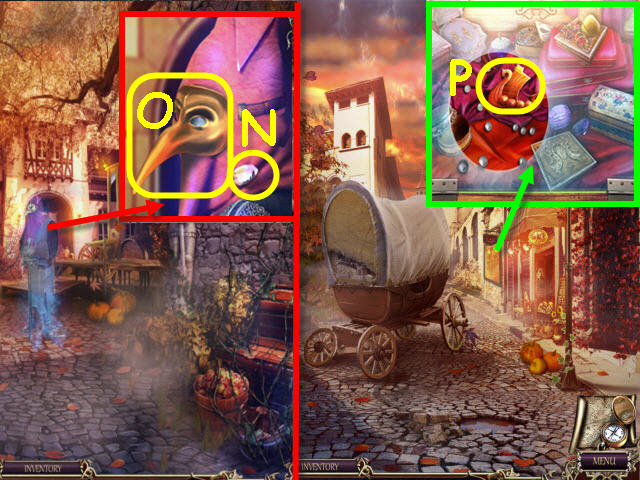
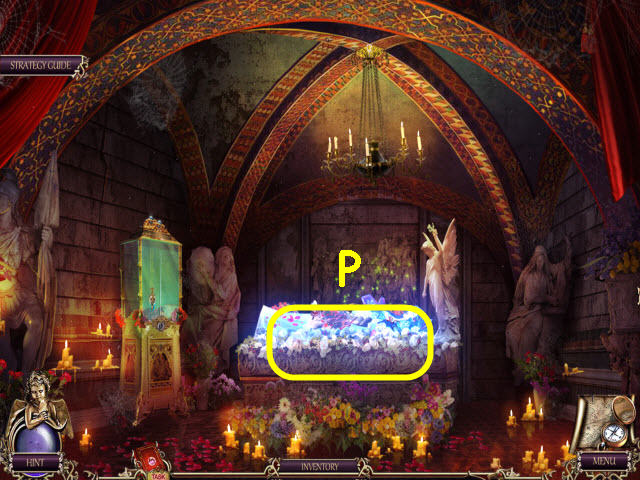
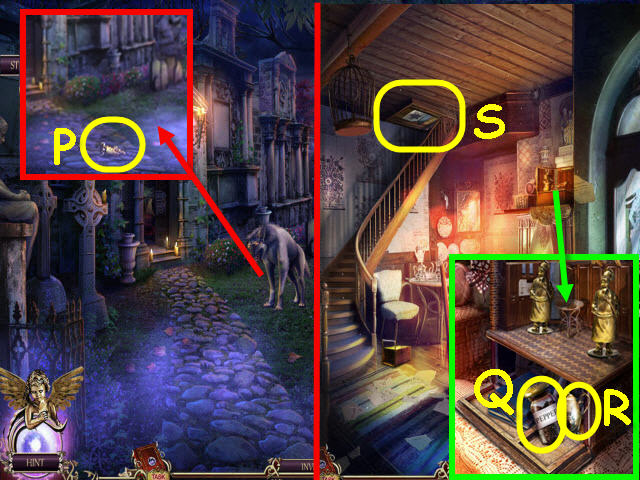
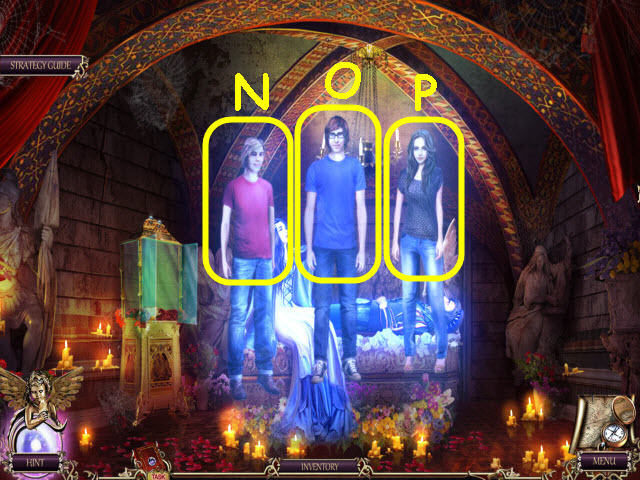
- Examine Romeo; take the PICTURE PIECE (O), and the CROWN RING (P).
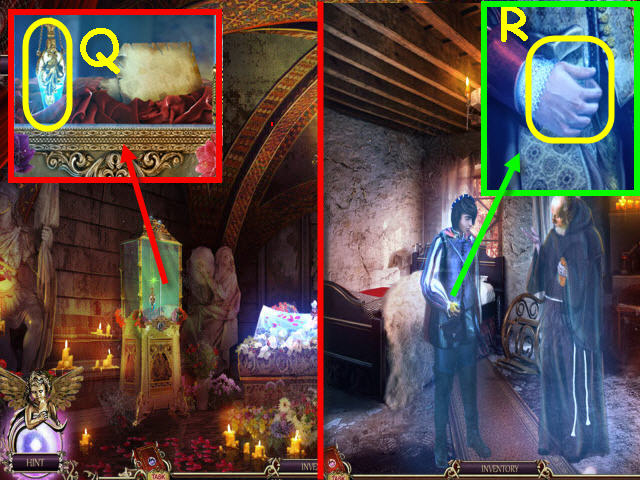
- Examine the grate; take the 2nd PICTURE PIECE (Q).
- Back out twice.
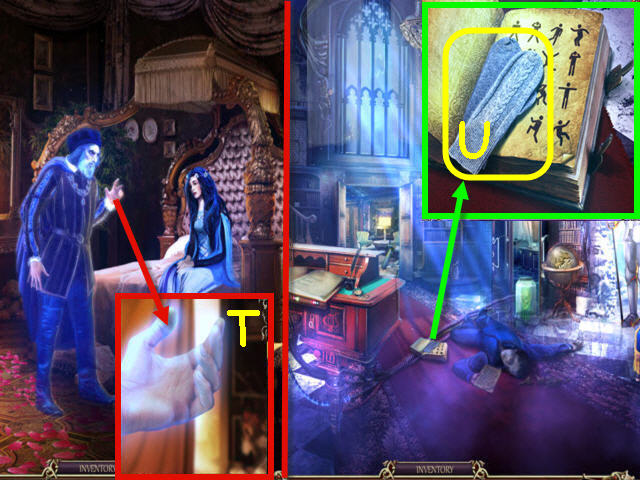
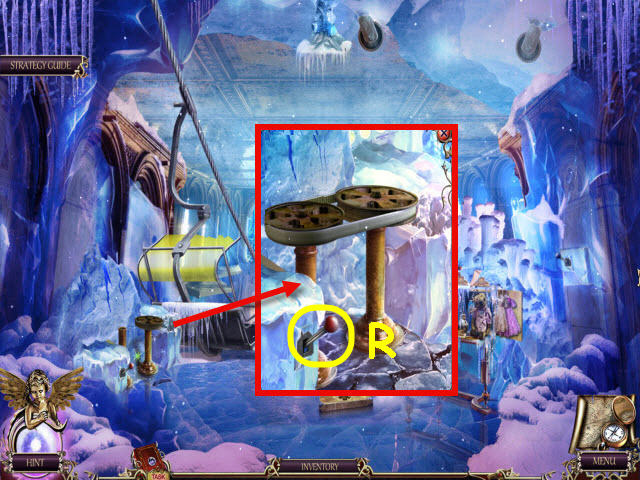
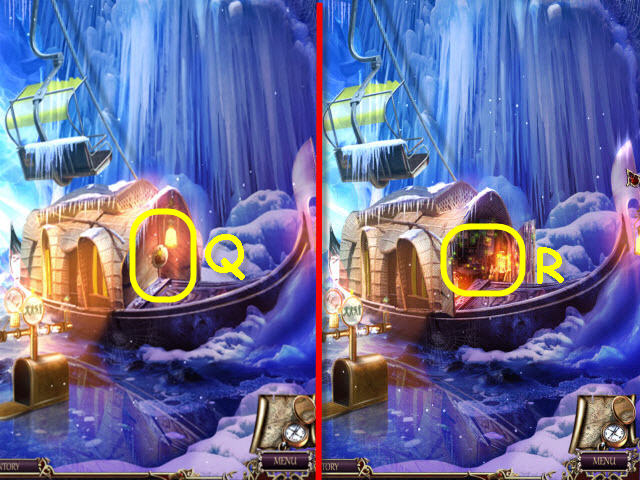
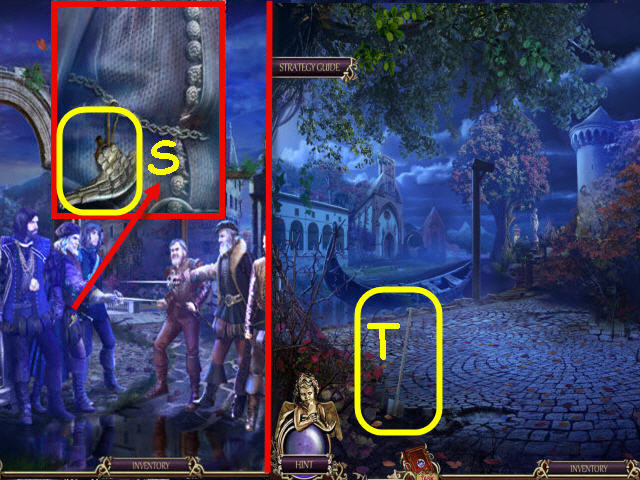
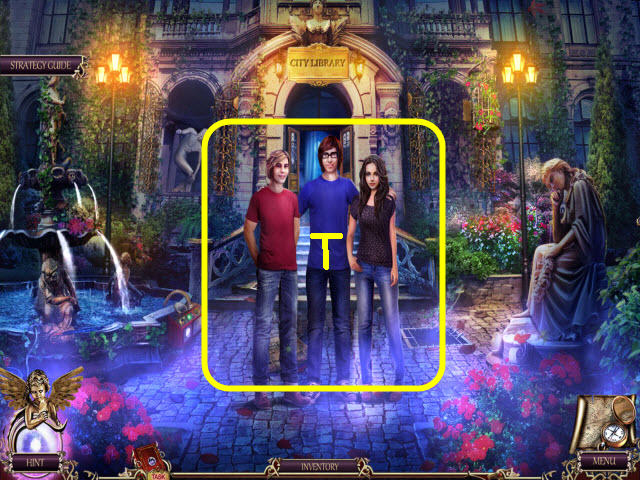
- Examine the portrait and place the two PICTURE PIECES on it to trigger a puzzle (R).
- Swap any two adjoining pictures until the picture is complete.
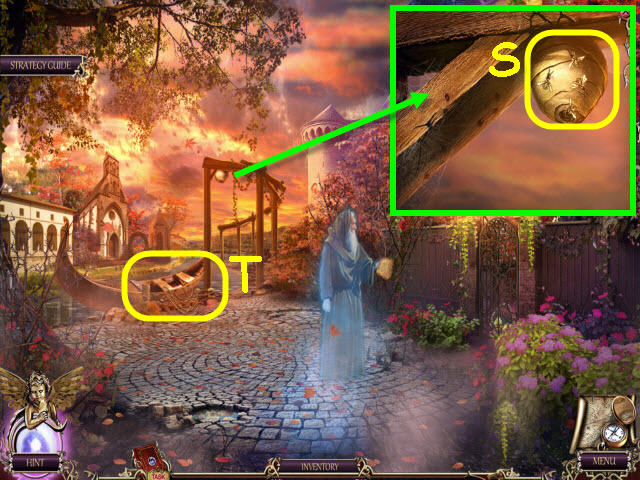
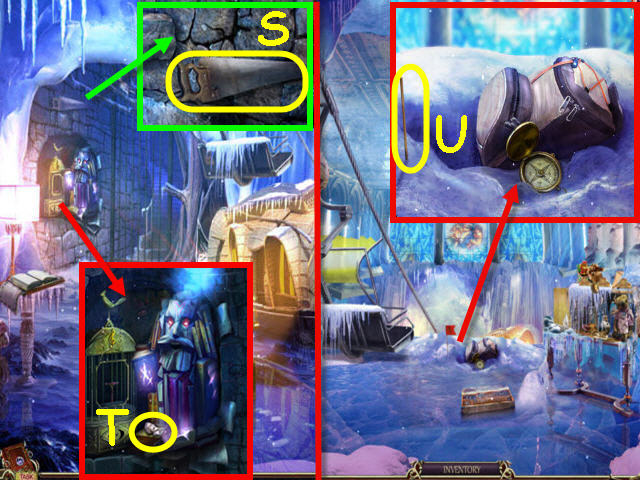
- See screenshot for solution (S).
- Take the GLOVE (T).
- Back out to the entrance.
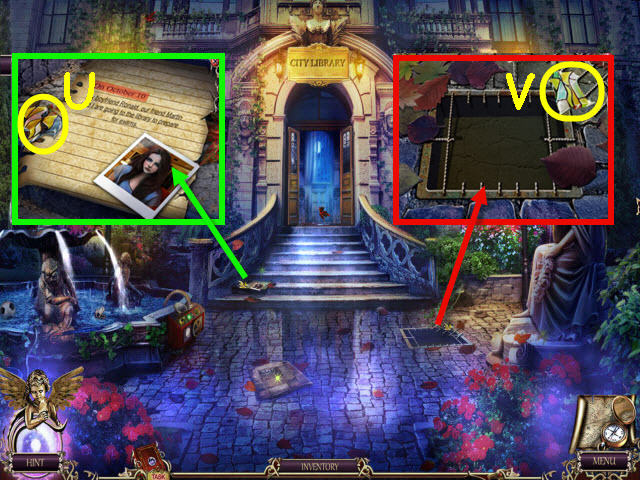
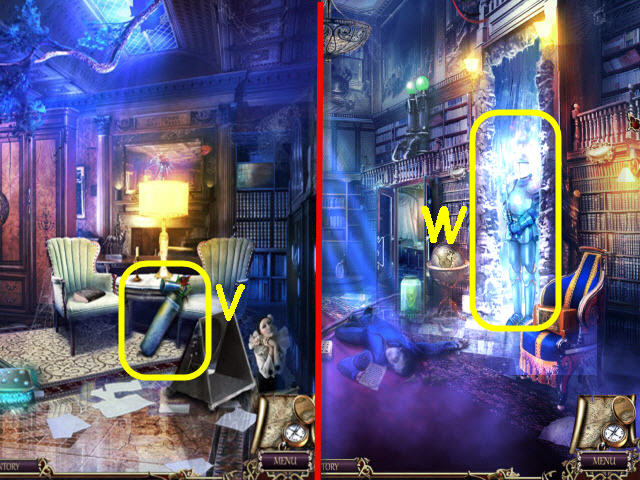
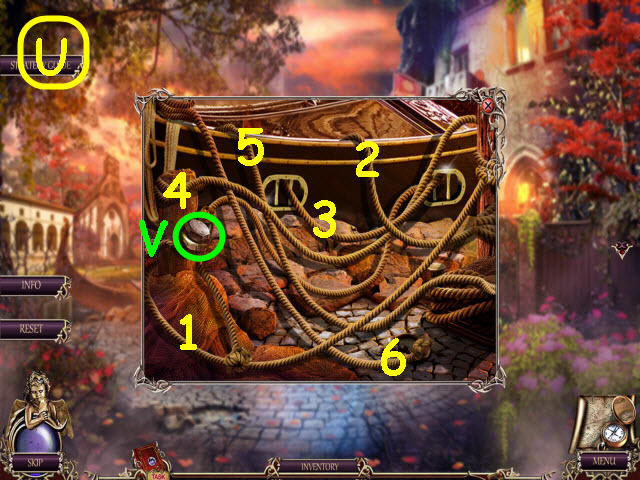
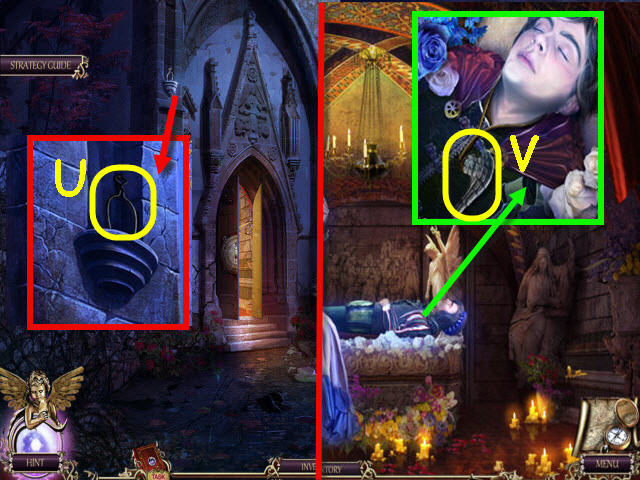
- Examine the note; use the GLOVE to get the STAINED GLASS 1/3 (U).
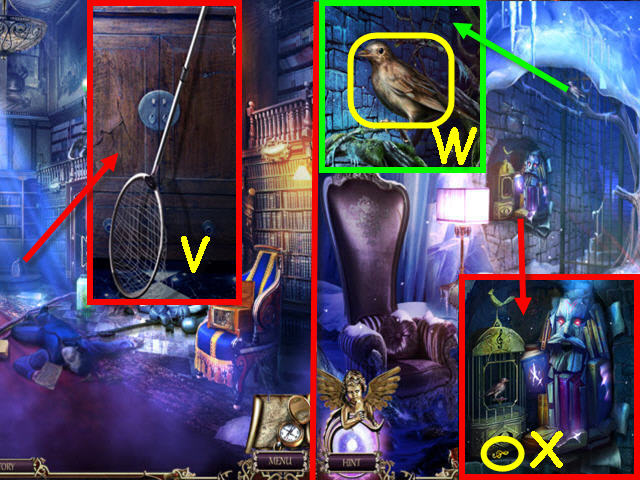
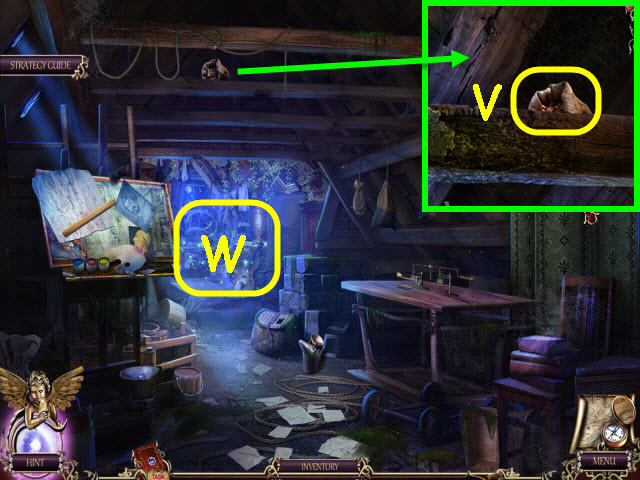
- Examine the grate; use the GLOVE to get the STAINED GLASS 2/3 (V).
- Go forward.
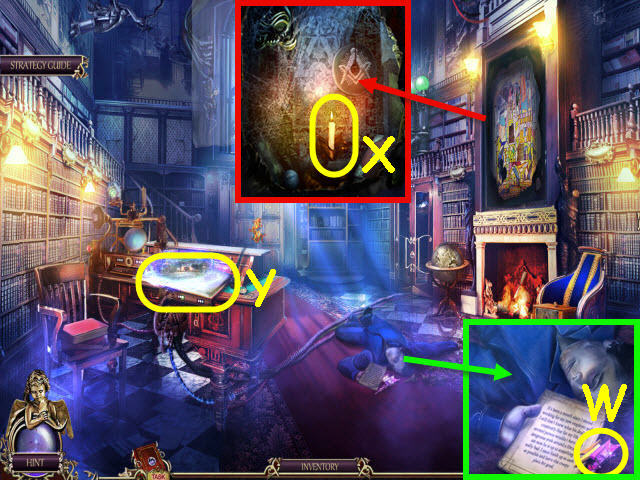
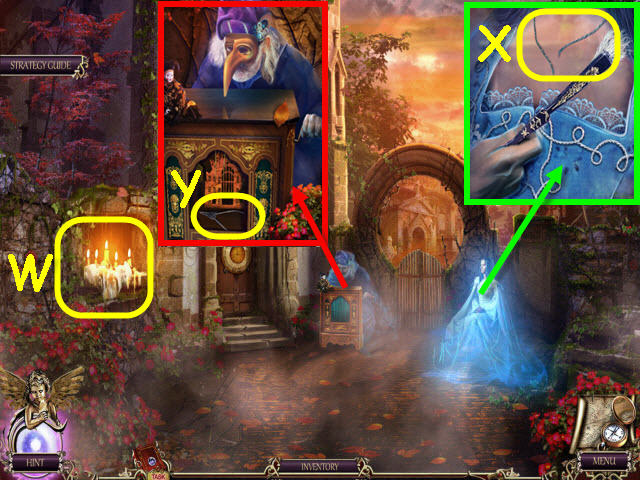
- Examine the mechanic; use the GLOVE to get the STAINED GLASS 3/3 (W).
- Examine the stained glass portrait and place the 3 STAINED GLASS pieces on it; take the CANDLE (X).
- Go through the portal on the book table (Y).
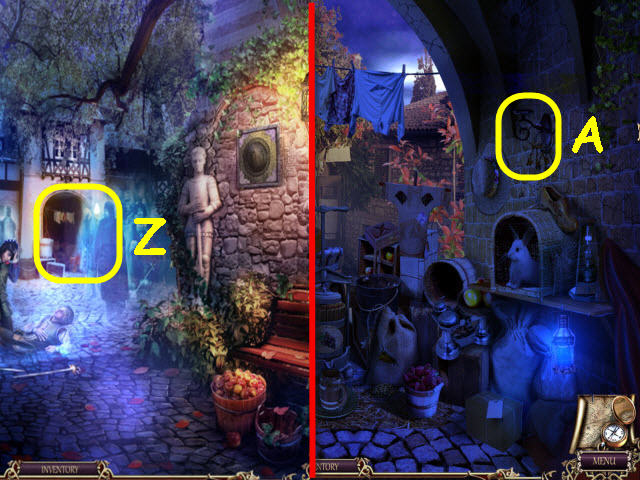
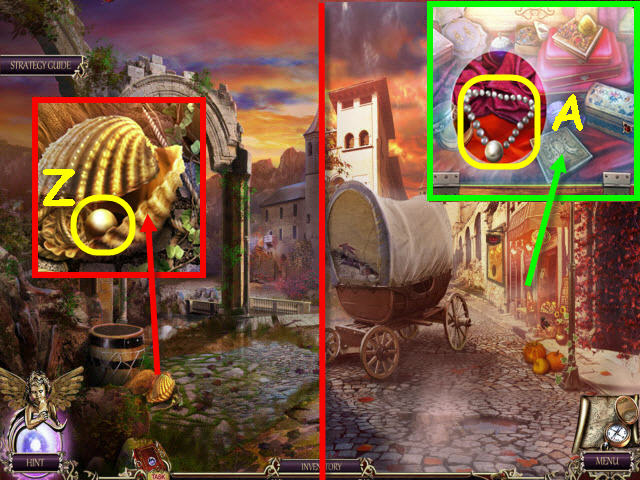
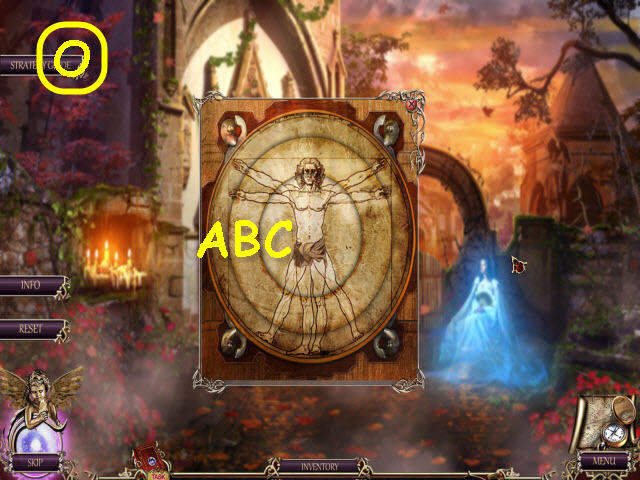
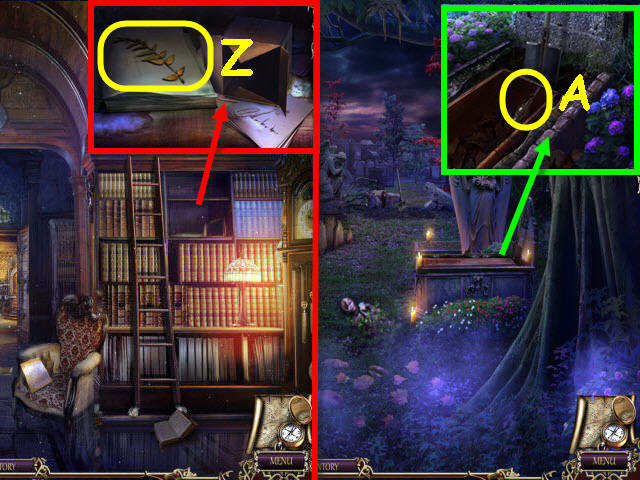
- Examine the archway (Z).
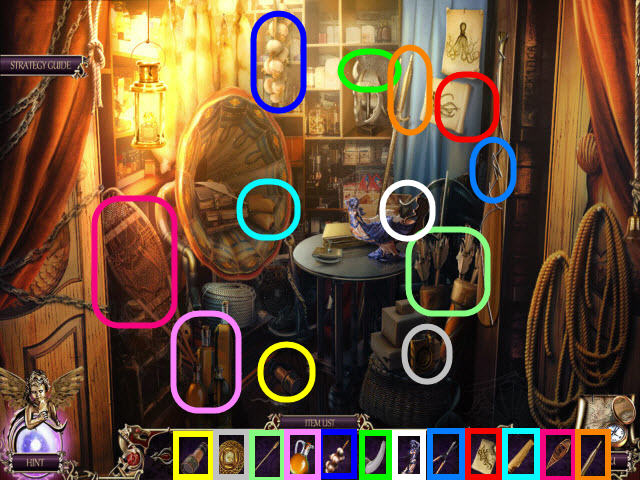
- Use the CANDLE on the holder to trigger a HOS (A).
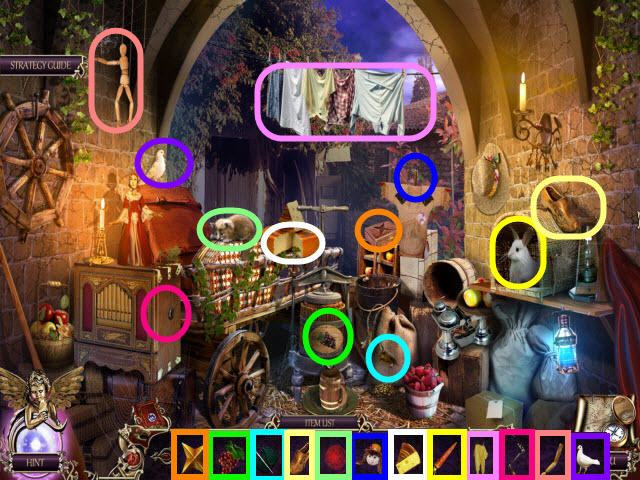
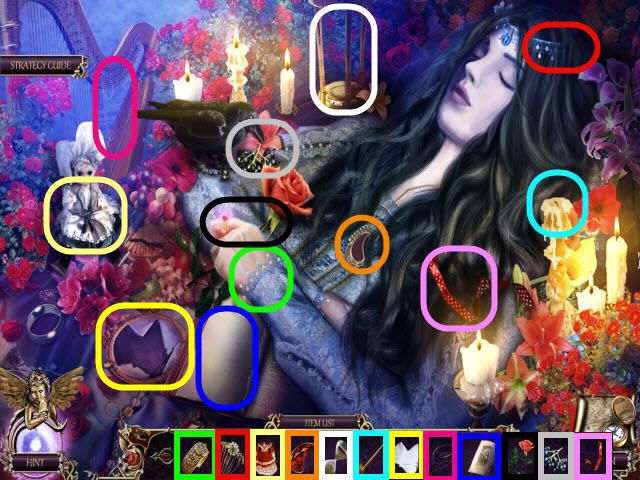
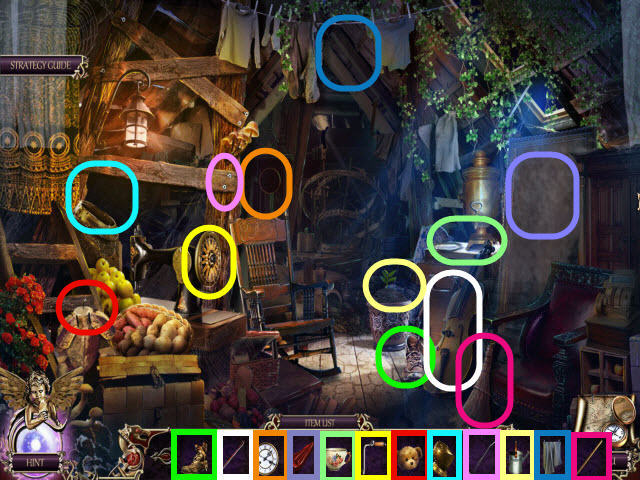
- Place the items where they belong in the scene.
- You will earn a KEY.
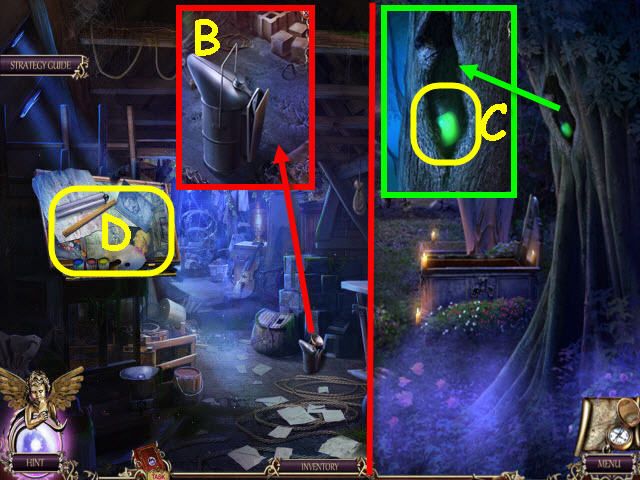
- Back out to the main hall.
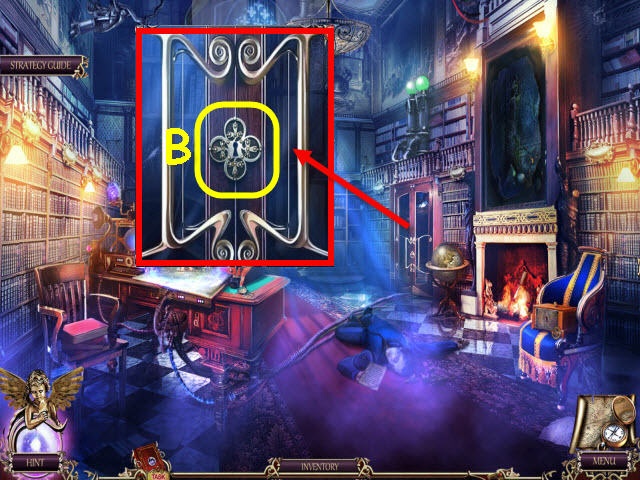
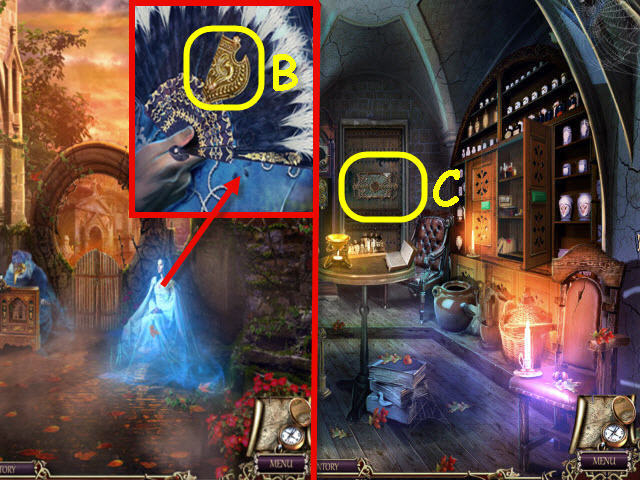
- Examine the office door (B).
- Use the KEY on the lock and enter through the newly-opened door.
- Examine the chest; take the 2nd CHARM PIECE (C).
- Examine the Librarian’s table; take the GOLDEN SNAKE (D).
- Examine the cabinet; take the 3rd CHARM PIECE (E), and the SCREWDRIVER (F).
- Back out twice.
- Examine the ivy and place the 3 CHARM PIECES on the cage lock; take the OWLET (G).
- Go forward and right into the office.
- Examine the cupboard; use the OWLET on the shelf. You will acquire a SOLDIER (H), and HAMMER (I).
- Examine the chest and use the HAMMER on the lock; take the STONE FIGURE (J), and BOOK (K).
- Examine the bookshelf and place the BOOK on it to trigger a puzzle (L).
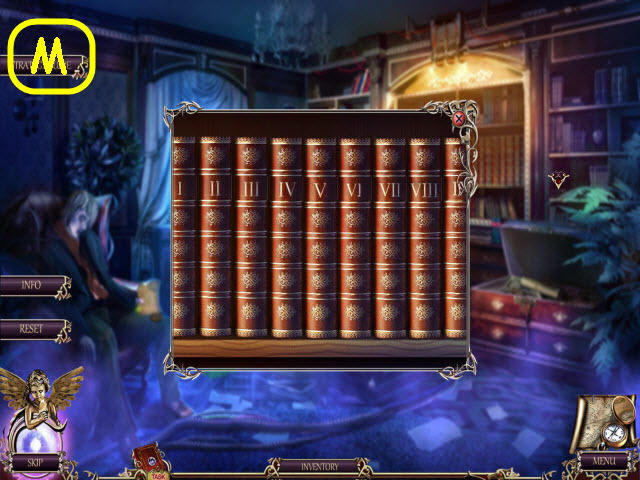
- Arrange the books in numerical order.
- See screenshot for solution (M).
- Go through the newly-opened doorway to the laboratory.
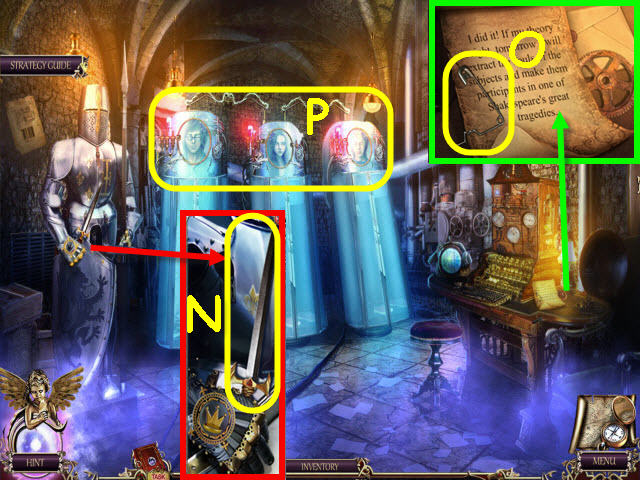
- Examine the knight and place the CROWN RING on the gauntlet; take the SWORD (N).
- Examine the letter; take the LOCK PICK (O).
- Examine the three faces and select each of them (P).
- Back out twice.
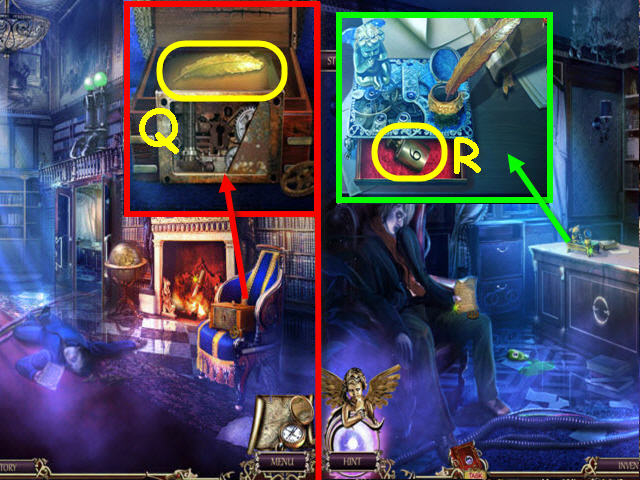
- Examine the chest; use the SCREWDRIVER to remove the panel. Use the LOCK PICK on the lock; take the GOLDEN QUILL (Q).
- Go into the office.
- Examine the librarian’s table; place the GOLDEN QUILL in the inkwell and take the WEIGHT (R).
- Back out and go through the portal in the book on the desk.
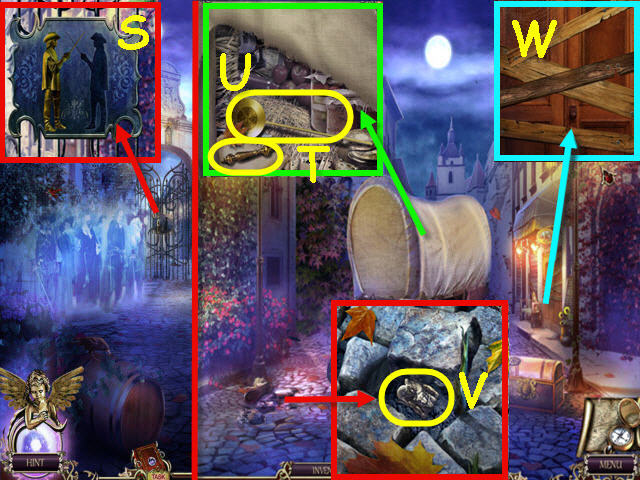
- Examine the grate and place the SOLDIER in the recess (S).
- Go forward to trade lane.
- Examine the wagon and use the SWORD on the covering; take the CABINET HANDLE (T), and PENDULUM (U).
- Examine the cobblestones and use the SWORD on it; take the 2nd STONE FIGURE (V).
- Examine the store and use the HAMMER on the boards (W).
- Examine the store to access a HOS.
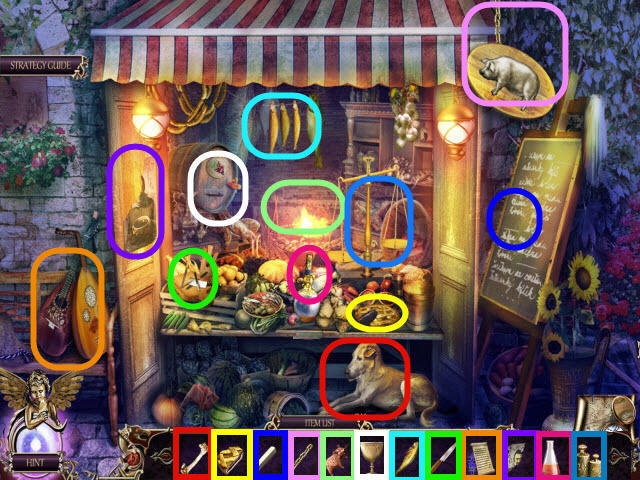
- Place the items where they belong in the scene.
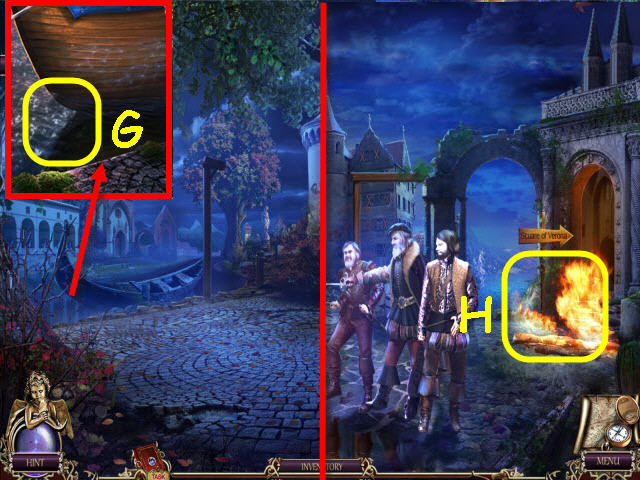
- You will earn a 2nd WEIGHT. Back out to a Square in Verona.
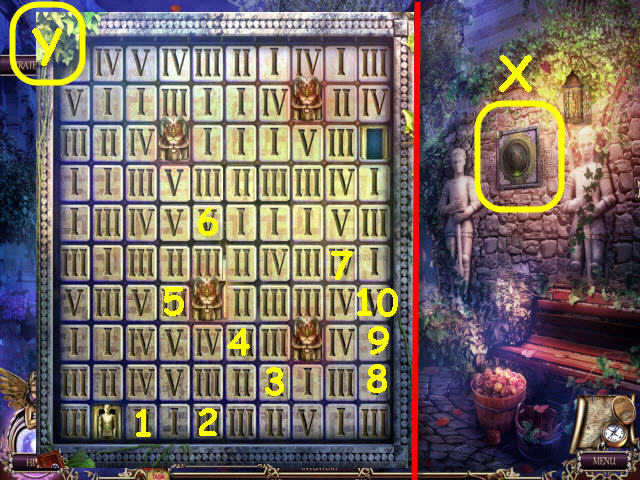
- Examine the wall; place the 2 STONE FIGURES in the recesses to trigger a puzzle (X).
- Direct the man to the exit.
- See screenshot for squares to select (Y).
- Take the 3rd WEIGHT.
- Go forward to trade lane.
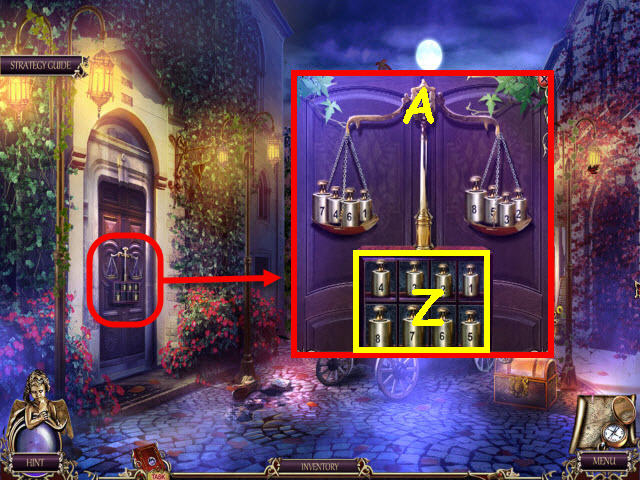
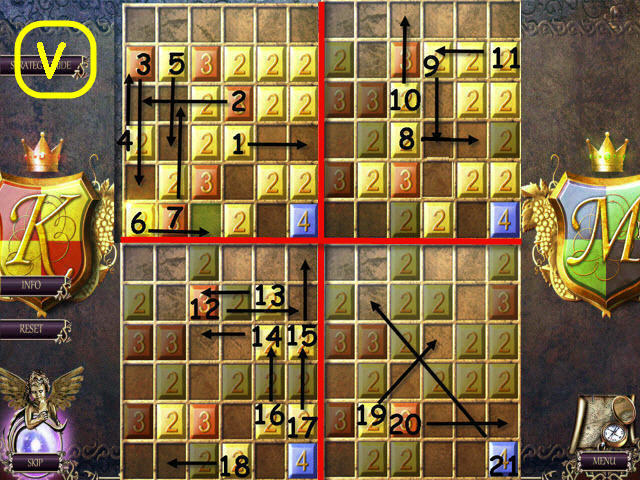
- Examine the pharmacy door and place the 3 WEIGHTS on the bottom to trigger a puzzle (Z).
- Place the weights on the scales to equally balance them.
- To solve the puzzle, place the following weights on the scales: Left – 7,4,6,1, and right – 8, 2, 3, and 5 (A).
- Enter the pharmacy.
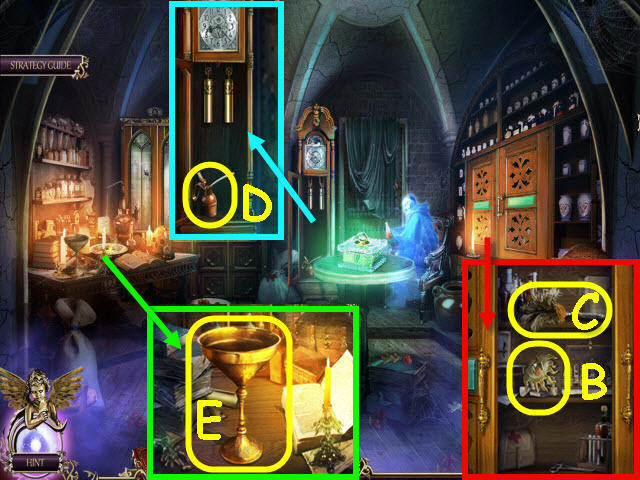
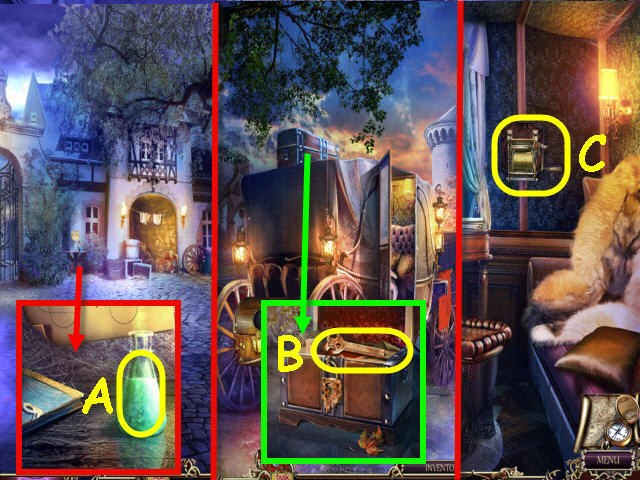
- Examine the cupboard and place the CABINET HANDLE on it; take the SUN (B) and DUSTER (C).
- Examine the clock; take the OIL CAN (D).
- Examine the pharmacy table and use the DUSTER on the cobwebs; take the GOLDEN CUP (E).
- Back out.
- Examine the case and use the OIL CAN on the gear; take the GEAR 1/4 (F).
- Go to the laboratory.
- Examine the letter and use the OIL CAN on the gear; take the GEAR 2/4 (G).
- Back out.
- Examine the chair and use the OIL CAN on the gear; take the GEAR 3/4 (H).
- Back out.
- Examine the chest and use the OIL CAN on the gear; take the GEAR 4/4 (I).
- Go to the pharmacy.
- Examine the clock; place the PENDULUM in the center and the 4 GEARS on the mechanism. Take the MOON (J).
- Back out.
- Examine the case and place the SUN and the MOON on the lock; take the 2nd GOLDEN SNAKE (K).
- Go left into the pharmacy.
- Examine the medicine cabinet and place the GOLDEN CUP and 2 GOLDEN SNAKES on the lock to trigger a puzzle (L).
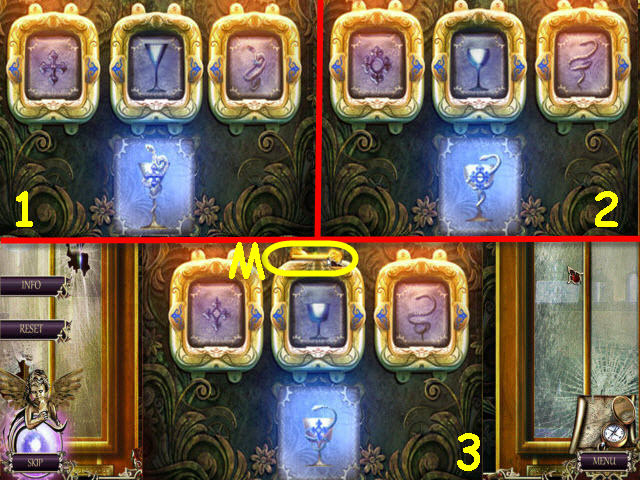
- Choose the correct parts to make up the cups below.
- See screenshot for solution (1-3).
- Take the GOLD KEY (M).
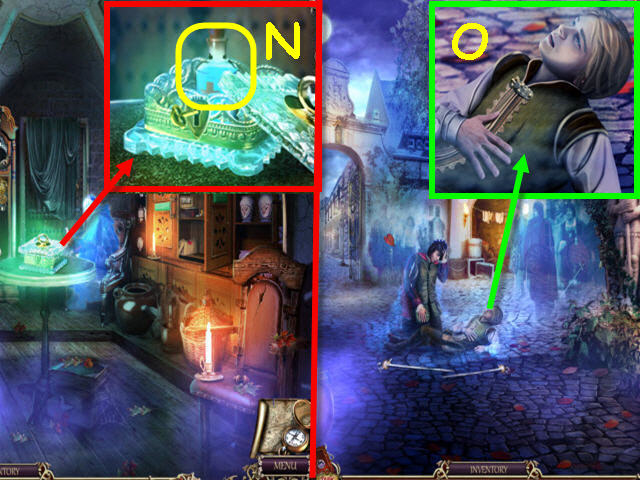
- Examine the box and use the GOLD KEY on the lock; take the ELIXIR (N).
- Back out twice.
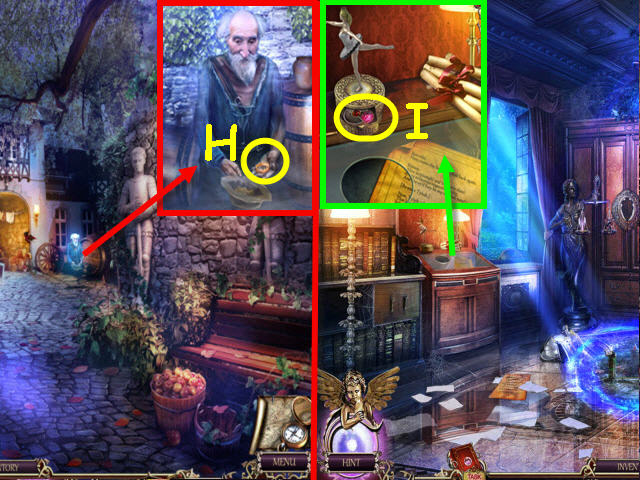
- Examine Mercutio and give him the ELIXIR (O); automatically speak to Julie and receive a LEAF.
- Back out twice and select anywhere in the scene.
- Back out to the library entrance.
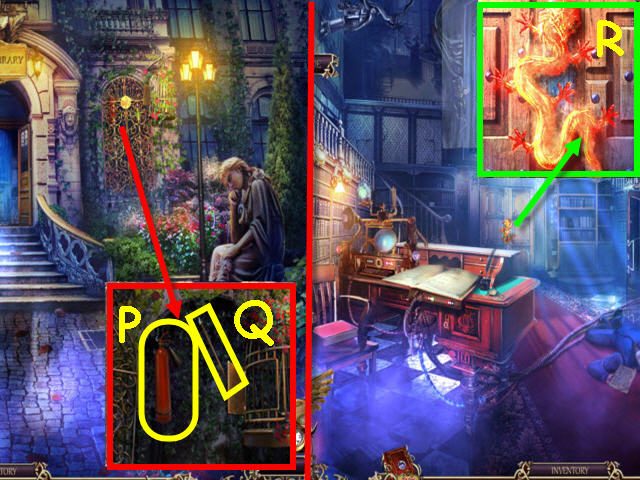
- Examine the ivy and place the LEAF in the recess; take the EXTINGUISHER (P) and ARROW (Q).
- Go forward.
- Examine the dragon knob and use the EXTINGUISHER on it to trigger a puzzle (R).
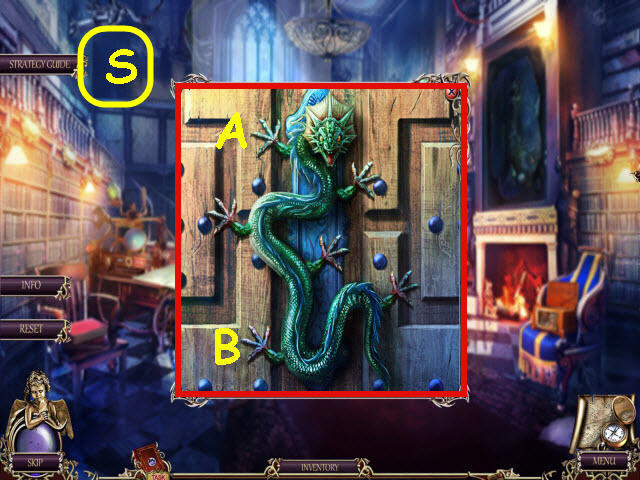
- Make all the claws go in.
- To solve the puzzle; select the following claws: A and B (S).
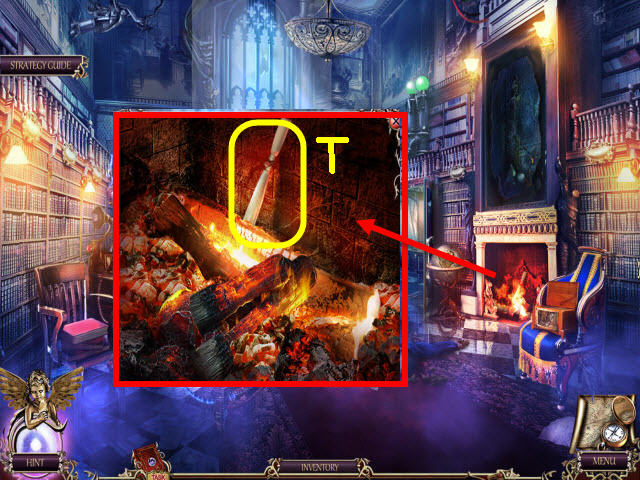
- Examine the fireplace and use the EXTINGUISHER on the fire; take the BLADES (T).
- Go forward to the reading room.
Chapter 2 – Save Juliet
- Select anywhere in the room for a cutscene.
- Select the goblin book (U) and get a BANKCARD.
- Select anywhere in the room.
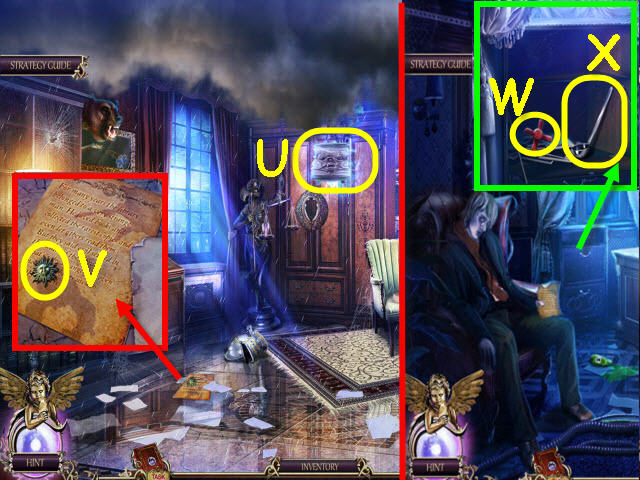
- Examine the note; take the AMULET SUN (V).
- Back out and go right into the office.
- Examine the cabinet and use the BANKCARD on it; take the AMULET FAN (W), and SPOON (X).
- Back out and go forward.
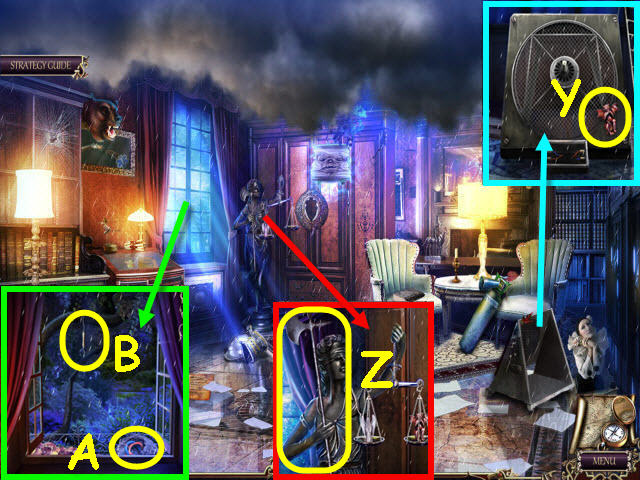
- Examine the fan and place the AMULET FAN on it; take the IMP (Y).
- Examine Lady Justice and place the IMP on the right scale; take the HALBERD (Z).
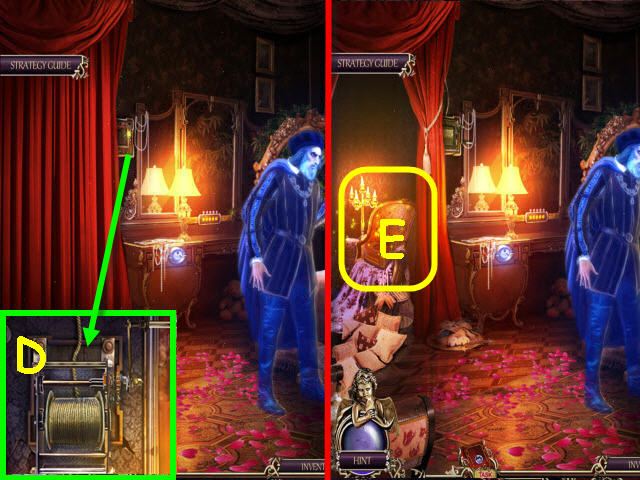
- Examine the window and use the HALBERD on it. Take the CABLE (A), and use OWLET to get the OPENER (B).
- Reexamine the fan and place the BLADES and CABLE on it to knock the goblin book down.
- Back out and go right.
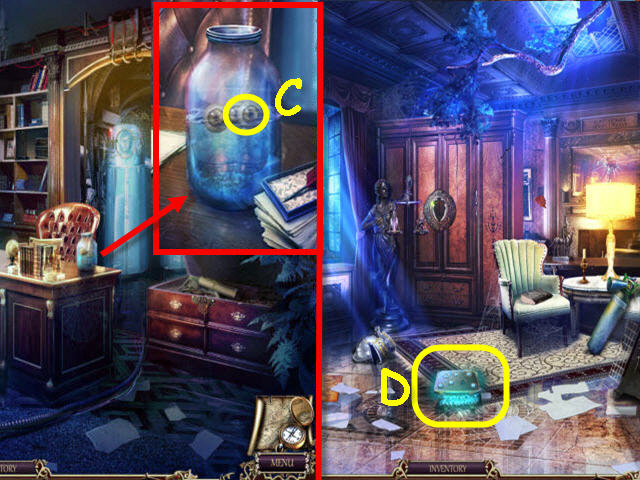
- Examine the jar of eyeballs and use the OPENER and SPOON it to get an EYE (C).
- Back out and go forward.
- Examine the teeth book and place the EYE on it to trigger a puzzle (D).
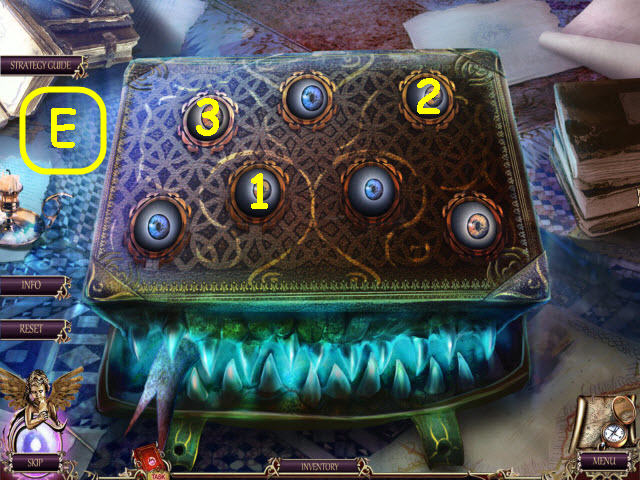
- Close all the eyes.
- To solve the puzzle, select the following eyes: 1,2,3 (E).
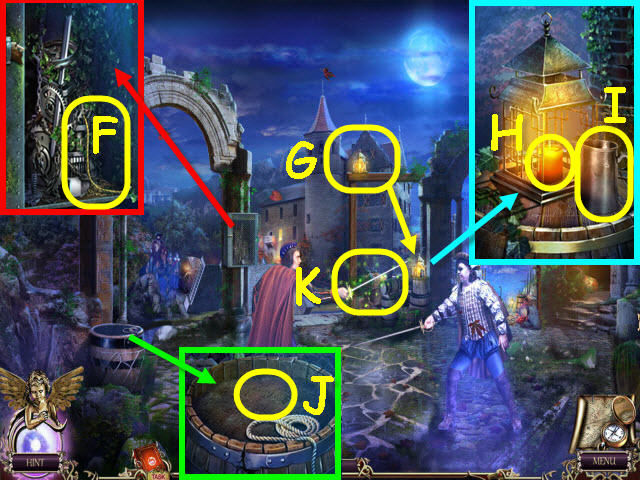
- Examine the mechanism and use the HALBERD on it; take the WICK (F).
- Examine the candle lantern and use OWLET on it (G).
- Examine the lantern and use the AMULET SUN on it; take the CANDLE (H), and MUG (I).
- Examine the gunpowder keg; use the MUG on it to get GUNPOWDER (J).
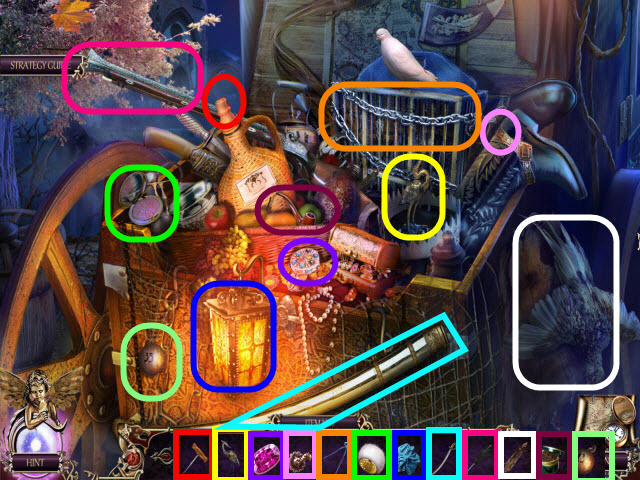
- Examine the wharf to access a HOS (K).

- Place the items where they belong in the scene.
- You will earn an OIL CAN.
- Go right to the square.
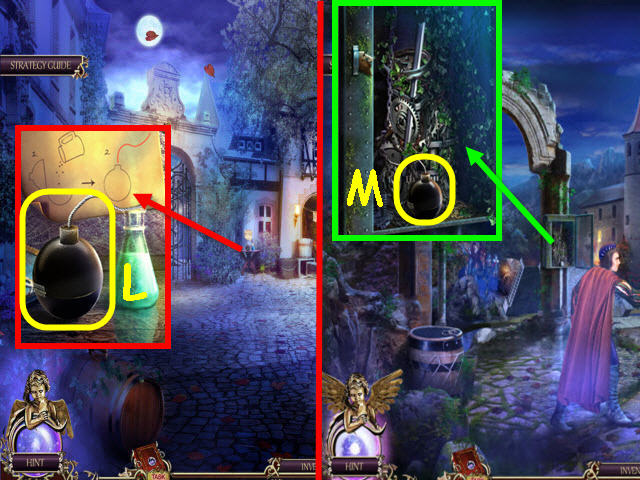
- Examine the alchemy; place the GUNPOWDER and WICK on the bomb shell. Take the BOMB (L).
- Back out.
- Examine the mechanism and place the BOMB inside; light the BOMB with the CANDLE (M).
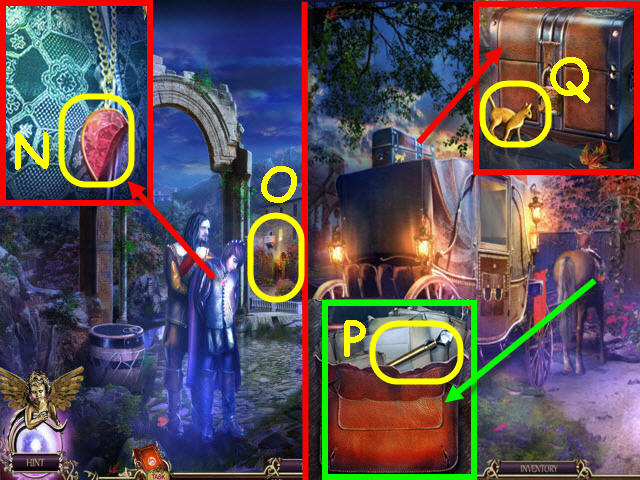
- Examine Romeo’s chest; take the HEART PIECE (N).
- Go forward to Juliet’s house (O).
- Examine the pouch and use the OIL CAN on it; take the GLASS CUTTER (P).
- Examine the chest; take the CAT CHARM (Q).
- Back out.
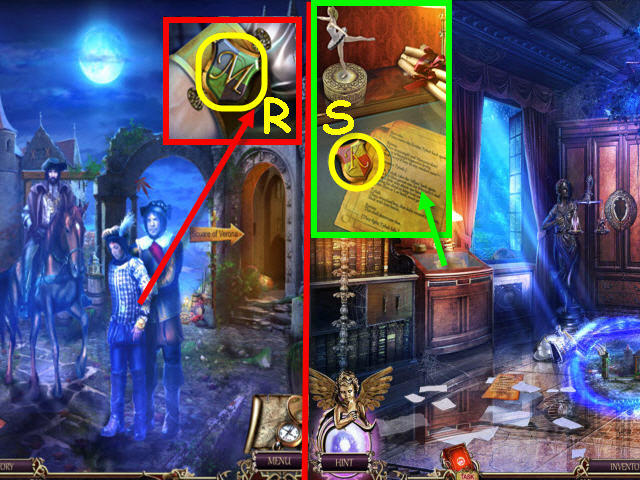
- Examine Tybalt’s bracelet and place the CAT CHARM on it; take the MONTAGUE CREST (R).
- Back out twice.
- Examine the glass case and use the GLASS CUTTER on it; take the CAPULET CREST (S).
- Go to Juliet’s house.
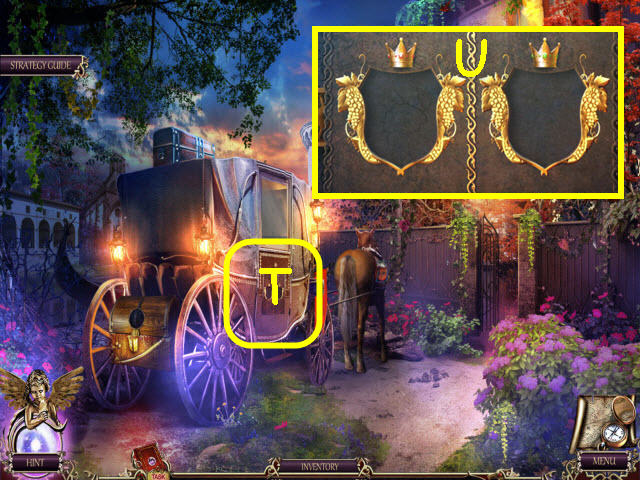
- Examine the carriage door (T).
- Place the MONTAGUE CREST and the CAPULET CREST on it to trigger a puzzle (U).
- Slide each tile and move them the number of spaces on each.
- See screenshot for solution (V).
- Enter the newly-opened carriage.

- Select anywhere in the scene.
- Examine Paris; take the LOCKET FACE (W).
- Examine the dish; take the FISH (X).
- Back out.
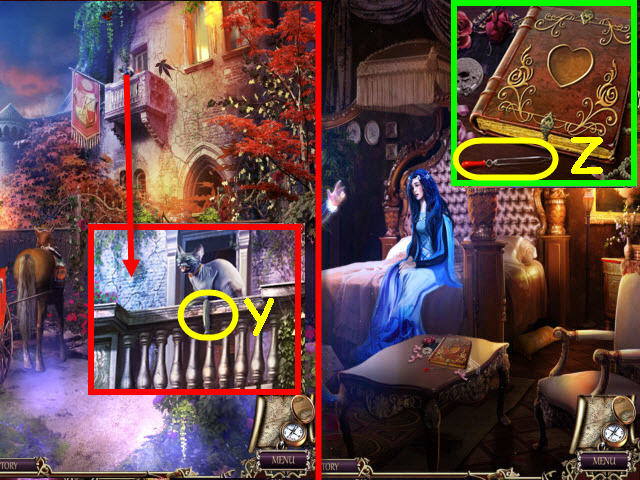
- Examine the balcony and give the FISH to the cat; send OWLET to pull the rope (Y).
- Go up to Juliet’s room via the balcony.
- Select anywhere in the scene.
- Examine the diary; take the PIPET (Z).
- Back out twice and go right.
- Examine the alchemy; use the PIPET on the beaker to get ACID (A).
- Back out and go forward to Juliet’s house.
- Examine the chest; use the ACID on the lock and take the WRENCH (B).
- Enter the carriage.
- Examine the window pulley and use the WRENCH on it; take the HOIST (C).
- Back out and up to Juliet’s room.
- Examine the frame and place the HOIST on it; use the WRENCH to tighten and pull the handle (D).
- Examine the dressing room to access a HOS (E).
- Place the items where they belong in the scene.
- You will earn a CROCHET HOOK.
- Back out.
- Examine the coachman’s seat and use the CROCHET HOOK to get the TRIANGLE KEY (F).
- Enter the carriage.
- Examine the ottoman and use the TRIANGLE KEY on the lid; take the GOLD (G).
- Back out twice and go right to the square.
- Examine the beggar and put the GOLD in the hat; take the CROWN (H).
- Back out to the reading room.
- Examine the glass case; place the CROWN on the ballerina. Take the FLOWER KEY and automatically get the 2nd HEART PIECE (I).
- Back out twice.
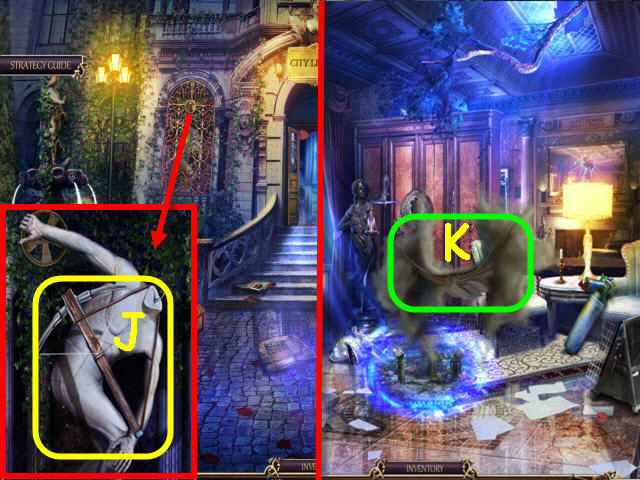
- Examine the left statue and place the FLOWER KEY on the lock; take the ARBALEST (J) which will automatically combine with the ARROW.
- Go forward twice.
- Use the ARBALEST on the gargoyle book (K).
- Go to Juliet’s room.
- Examine the diary and place the 2 HEART PIECES on the cover; take the CODE PIECE (L) and the 2nd LOCKET FACE (M).
- Back out.
- Examine the carriage trunk and place the 2 LOCKET FACES on it (N).
- Examine the opened trunk to access a HOS.
- Place the items where they belong in the scene.
- You will earn POWDER.
- Go up to Juliet’s room.
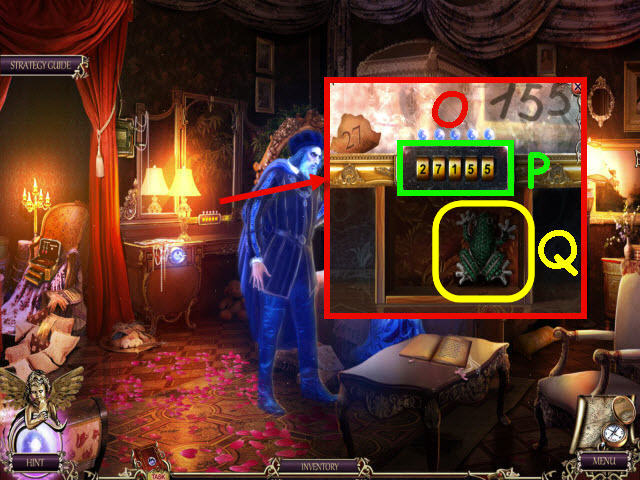
- Examine the code mirror and place the CODE PIECE on it; use the POWDER on the mirror to get the rest of the code (O).
- You will trigger a puzzle.
- Change the tumblers to the code on the mirror; 2-7-1-5-5 (P).
- Take the FROG (Q).
- Back out and go into the carriage.
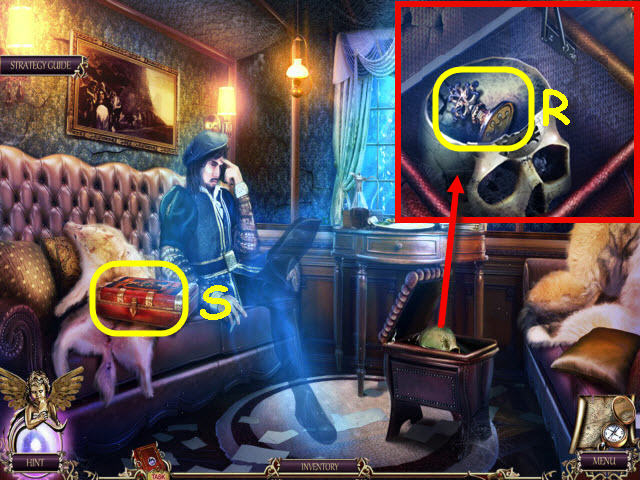
- Examine the ottoman and place the FROG in the slot; take the STAMP (R).
- Examine the box of documents and use the STAMP on the lock to trigger a puzzle (S).
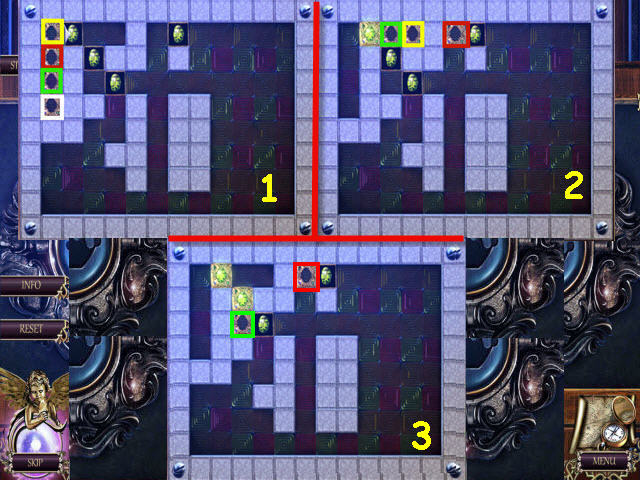
- Move the boxes so that each one rests over a gem.
- To solve the puzzle, move the following spaces: Yellow – right, red – up, right, down, right, up, left, green – up, right, white – up, and right (1).
- Green – down, yellow – left, and down (2).
- Green – right, up, left, red – down, left, up, right, up, right, and up (3).
- Take the LETTER.
- Go to Juliet’s room.
- Examine father’s hand and place the LETTER in it (T).
- Back out to the main hall.
- Examine the book; take the MITTENS (U).
- Go forward.
- Examine the nitrogen; use the MITTENS to take the NITROGEN (V).
- Back out.
- Examine the fire knight and use the NITROGEN on him (W).
- Select anywhere in the scene.
- Take the KNIGHT AMULET (X) and the SHOVEL (Y).
- Go forward.
- Examine the lock and place the KNIGHT AMULET on it. Move the coats on the left and right a few times; take the FUR COAT (Z).
- Back out.
- Use the FUR COAT on the icy hall entrance (A).
Chapter 3 – Save Romeo
- Examine the wheel and use OWLET on it (B).
- Take the STATUE HEAD (C).
- Examine the medicine chest; take the LENS (D).
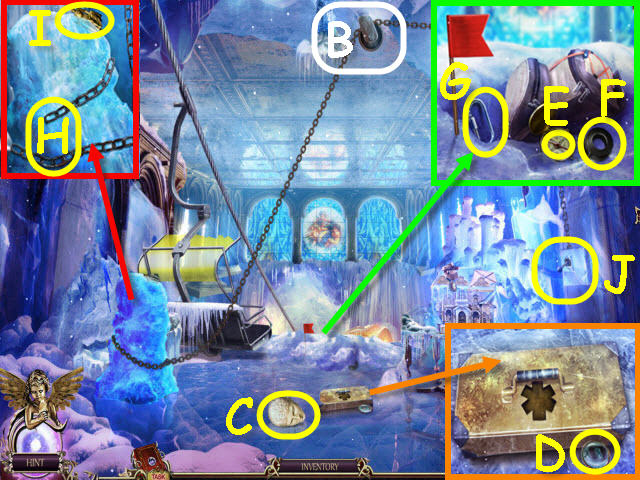
- Examine the snow pile and use the SHOVEL on it; take the CLOCK HANDS (E), ELECTRIC TAPE (F), and CARABINER (G).
- Examine the ice block; take the FIGURE (I).
- Select the chain to wrap it around and use the CARABINER on it (H).
- Pull the LEVER (J).
- Examine the elevator; take the ROPE (K).
- Use the SWORD on the HEAD (L) and take it.
- Back out and go right through the office to the laboratory.
- Examine the clock and place the HEAD and CLOCK HANDS on it. Turn the dial to 12:15 and take the 2nd FIGURE (M).
- Go back to the ice hall.

- Examine the dollhouse; place the 2 FIGURES on the pedestals (N).
- Examine the opened dollhouse to access a HOS.
- Place the items where they belong in the scene.
- You will earn a SHIP IN A BOTTLE.
- Back out and go forward.
- Examine the shelf and place the SHIP IN A BOTTLE on it; take the BELT (O) and 2nd LENS (P).
- Back out twice.
- Examine the niche and place the STATUE HEAD on the statue; take the WHEEL (Q).
- Go to the ice hall.
- Examine the elevator and place the WHEEL, and BELT on it; use the WRENCH to tighten the belt. Pull the lever (R).
- Go forward to the basement.
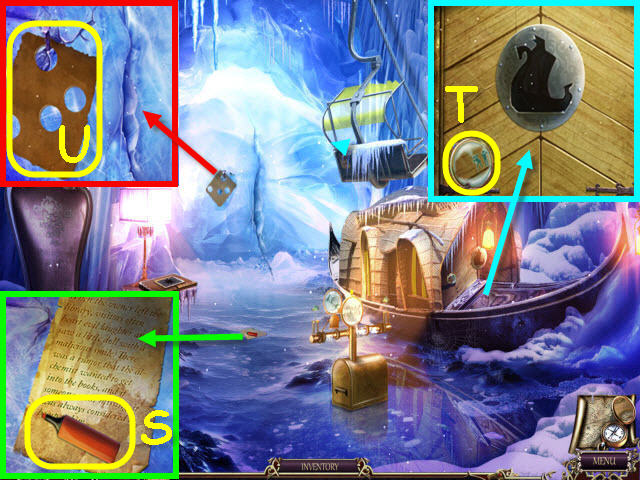
- Examine the note; take the marker (S).
- Examine the frozen boat; take the 3rd LENS (T).
- Examine the ice wall; take the STENCIL (U).
- Back out twice.
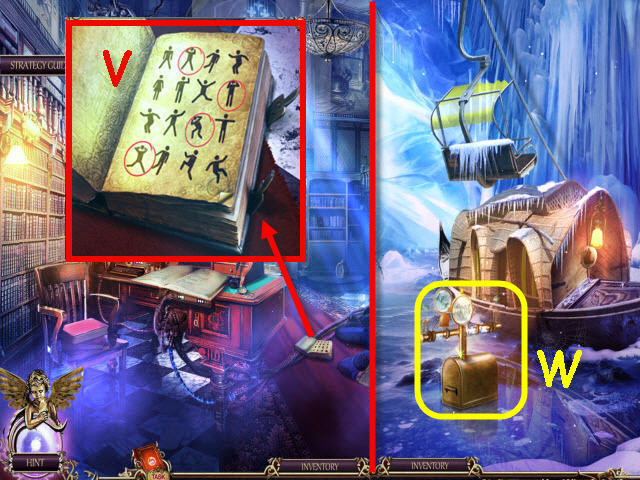
- Examine the book and use the STENCIL and MARKER on it; take the CODE (V).
- Go to the basement.
- Examine the kaleidoscope and place the 3 LENSES and CODE on it to trigger a puzzle (W).
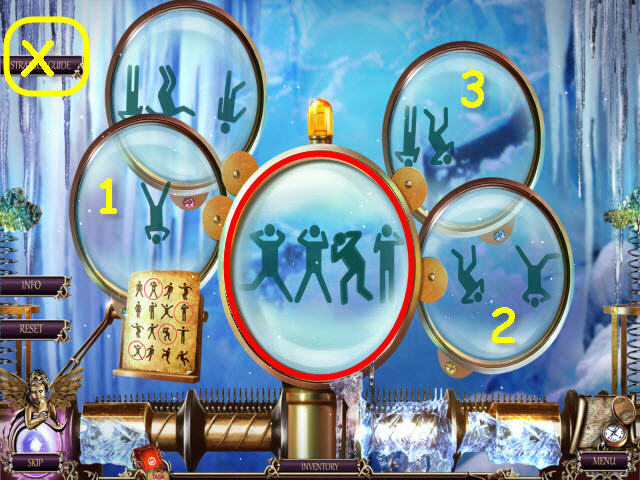
- Use the correct lenses to duplicate the code.
- To solve the puzzle, select the lenses marked in the screenshot (X).
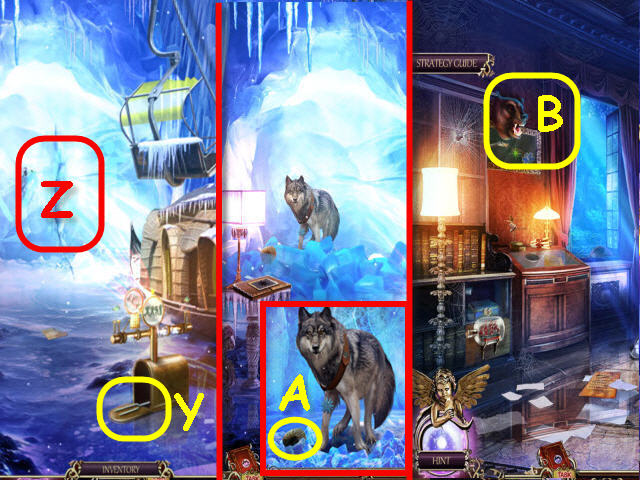
- Take the TUNING FORK (Y).
- Examine the ice wall and place the TUNING FORK in the crack (Z).
- Examine the wolf; take the EAR (A).
- Back out twice and go forward.
- Examine the gun glass case; place the ear on the head to trigger a puzzle (B).
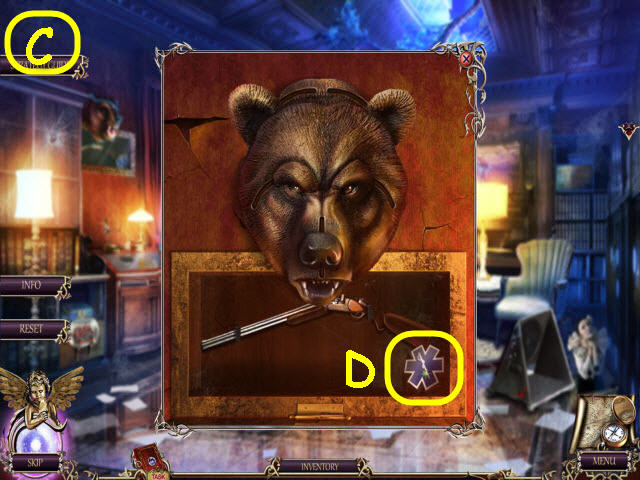
- Adjust the nose, eyebrows and ears to complete the bear face.
- To solve the puzzle, select the following: Move both ears all the way down, both eyebrows all the way up, and move the nose up and then down one (C).
- Take the FIRST AID KIT KEY (D).
- Go to the ice hall.
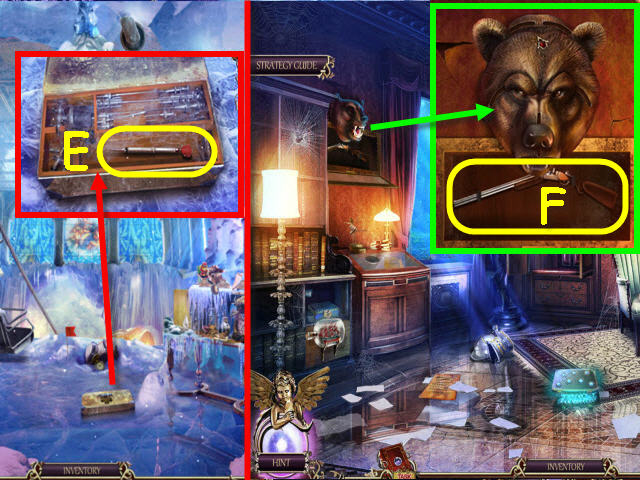
- Examine the medicine chest and place the FIRST AID KIT KEY on it; take the TRANQUILIZER DART (E).
- Back out and go forward.
- Examine the gun glass case and place the TRANQUILIZER DART in the gun; get a SHOTGUN (F).
- Go to the basement of the ice hall.
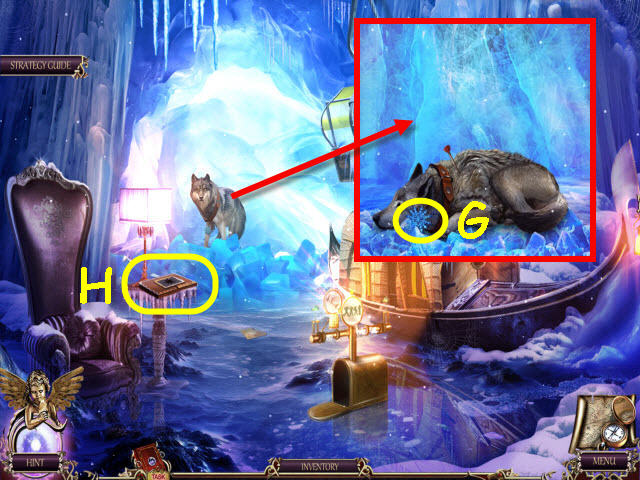
- Examine the wolf and use the SHOTGUN on it; take the SNOWFLAKE (G).
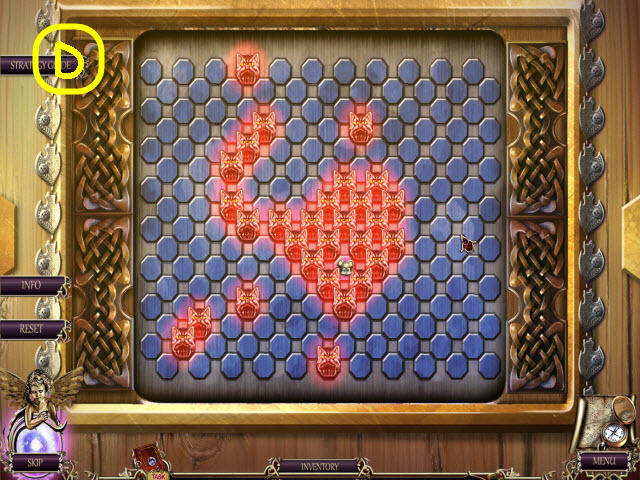
- Examine the BOOK; place the SNOWFLAKE on the center to trigger a puzzle (H).
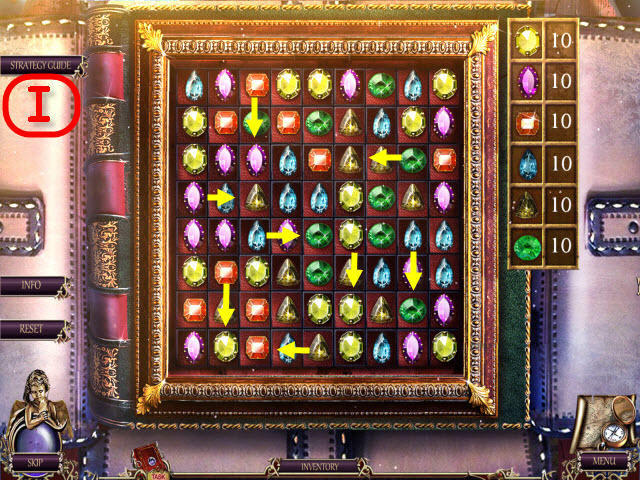
- Collect ten sets of each gem by matching 3 or more.
- See screenshot for examples (I).

- Examine the hook and use the ROPE on it; take the HOOK (J).
- Go forward to Juliet’s house.
- Examine the gate and use the HOOK on the package; take the HAM (K).
- Examine the letter; take the PIN (L).
- Back out.
- Give the HAM to the dog (M).
- Go right to the square.
- Examine the executioner and use the pin on the mask clasp. Take the DIAMOND (N) and the MASK (O).
- Go forward to trade lane.
- Examine the glass case and use the DIAMOND on it; take the SHIP (P).
- Back out four times to the ice hall basement.
- Examine the frozen boat and place the SHIP on it (Q).
- Examine the boat to access a HOS (R).
- Place the items where they belong in the scene.
- You will earn an OAR.
- Go to Juliet’s house.
- Examine the beehive and use the OAR on it (S).
- Examine the gondola to trigger a puzzle (T).
- Remove the ropes from the top to the bottom.
- See screenshot for solution (U).
- Use the WRENCH on the bolt (V).
- Go forward via the gondola.
- Examine the candles and use the SWORD on them to get WAX (W).
- Examine the lady; take the THREAD (X).
- Examine the organ grinder and place the MASK on him; take the PLIERS (Y).
- Back out twice.
- Examine the fishing nets and use the PLIERS on the shell; take the PEARL (Z).
- Go right and forward to trade lane.
- Examine the glass case and use the THREAD and PEARL on the pearls; take the NECKLACE (A).
- Go to the chapel.
- Examine the lady and place the NECKLACE around her neck; take the LADY’S AMULET (B).
- Go to trade lane and go left into the pharmacy.
- Examine the apothecary and place the LADY’S AMULET in the center to trigger a puzzle (C).
- Surround the mouse by selecting the spaces around it.
- See screenshot for a winning board (D).
- Go forward to the apothecary’s office.
- Examine the chandelier; use OWLET on it to retrieve a VALVE (E).
- Examine Romeo’s hand; take the HEART PIECE (F), and remove the potion from his hand (G).
- Back out three times.
- Examine the guillotine and place the VALVE on it; turn the VALVE and take the BLADE (H).
- Go back to the apothecary’s office.
- Examine the guillotine and place the BLADE on it; untie the rope (I).
- Examine the operating table; take the MOLD (J).
- Back out.
- Examine the burner and place the WAX in it (K).
- Place the MOLD on the table and select the melted wax to fill it; take the WAX FIGURINE (L).
- Go to the chapel.
- Examine the organ grinder and place the WAX FIGURINE in the theatre box; take the DISK (M).
- Examine the chapel door and place the DISK on the lock to trigger a puzzle (N).
- Rotate the disks to complete the picture.
- To solve the puzzle, select the following rings: C x 3, A x 4, C x 2, and B x 4 (O).
- Enter into the newly-opened vault.
- Examine Juliet (P).
- You will access a HOS.
- Place the items where they belong in the scene.
- You will earn a 2nd HEART PIECE.
- Examine the altar and place the 2 HEART PIECES on the lock; read the note and take the SLEEPING POTION (Q).
- Go to the apothecary’s office.
- Examine Romeo’s hand and place the SLEEPING POTION in it (R).
Chapter 4 – Hamlet
- Examine the ledge and use OWLET to retrieve the SAW (S).
- Examine the reader; take the SHAKESPEARE FACE (T).
- Back out.
- Examine the snow pile and use the SAW on the flag; take the STICK (U).
- Back out.
- Examine the scoop net and place the STICK on it; take the HAND SCOOP (V).
- Go to the basement of the ice hall.
- Examine the NIGHTINGALE (W) and catch it with the HAND SCOOP.
- Examine the reader and place the NIGHTINGALE in the cage; take the TREBLE CLEF (X).
- Back out twice and go forward.

- Examine the ship and place the TREBLE CLEF on the box; take the WIND-UP KEY (Y), and the BUTTON (Z).
- Go back to the ice hall basement.
- Examine the reader and use the WIND-UP KEY on the cage (A).
- Go up the staircase to the repository of forgotten books.
- Select anywhere in the scene twice.
- Examine the note; take the 2nd SHAKESPEARE FACE (B).
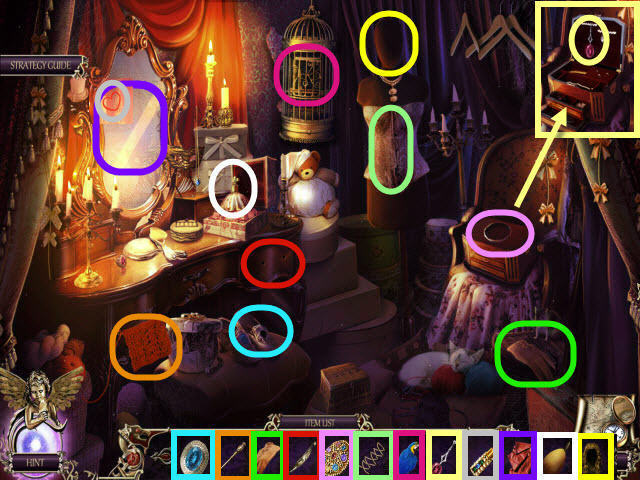
- Examine the shelves to access a HOS (C).
- Place the items where they belong in the scene.
- You will earn a WHEEL.
- Examine the rails; take the DATA (D) and place the WHEEL on the ladder (E).
- Examine the book; take BROKEN KEY (F).
- Examine the board; take the 2nd BUTTON (G), and LAMP (H).
- Back out to the main hall.
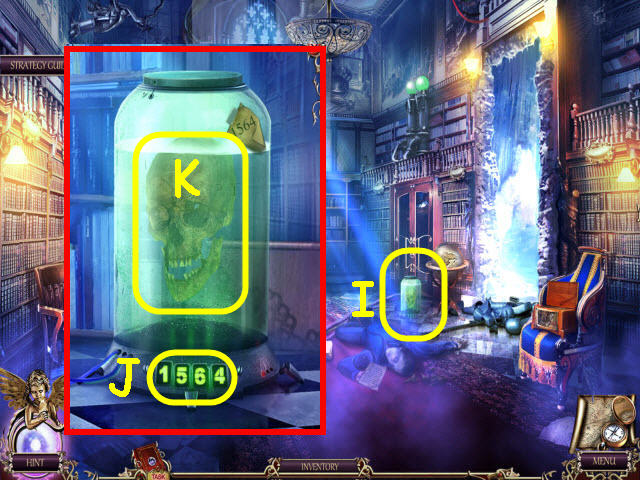
- Examine the jar with a skull and place the 2 SHAKESPEARE FACES and DATA on it to trigger a puzzle (I).
- To solve the puzzle, enter the following code: 1564 (J).
- Take the SKULL (K).
- Go back to the repository of forgotten books.
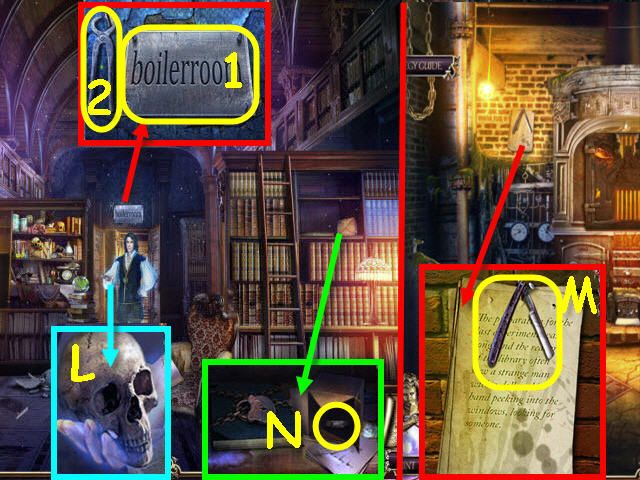
- Examine Hamlet and place the SKULL in his hand (L).
- Examine the plate and use the WRENCH to get the PLATE (1), and TONGS (2).
- Go forward to the boiler room.
- Select anywhere in the room.
- Examine the note; take the RAZOR (M).
- Back out.
- Examine the book and use the RAZOR on the box; take the FUSE (N).
- Go forward.
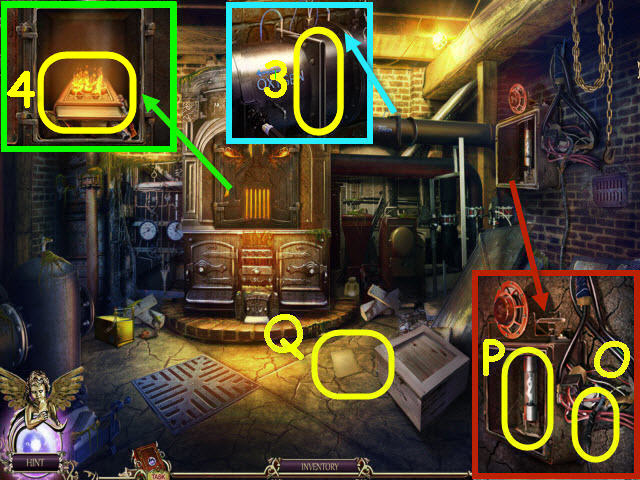
- Examine the fire alarm; use the ELECTRIC TAPE on the broken wires (O).
- Place the FUSE in the slot (P).
- Examine the pipe and place the PLATE in the slot (3).
- Examine the furnace and use the WRENCH on the door; use the TONGS to get the firebook (4).
- Examine the firebook and place the 2 BUTTONS on it to trigger a puzzle (Q).
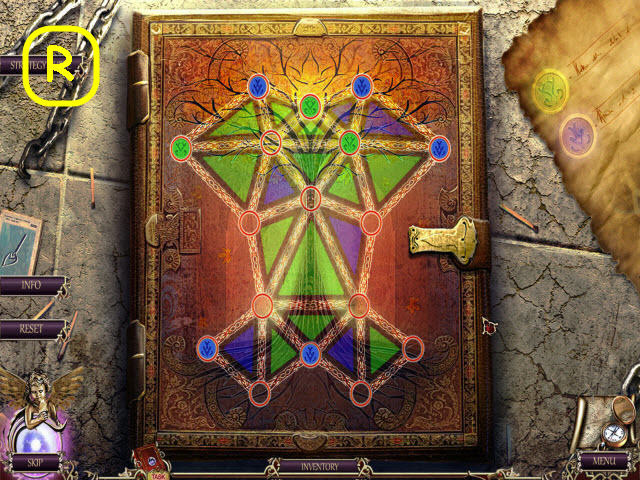
- Color in all the triangles by moving the tokens.
- The paths are random. See screenshot for a completed board (R).
- Examine Romeo’s father; use the RAZOR to get the WING (S).
- Go forward to Juliet’s house.
- Take the SHOVEL (T).
- Go forward via the gondola to the chapel.
- Examine the ledge and send OWLET to get the NIPPERS (U).
- Enter the vault.
- Examine Romeo; use the RAZOR on the rope and take the 2nd WING (V).
- Back out.
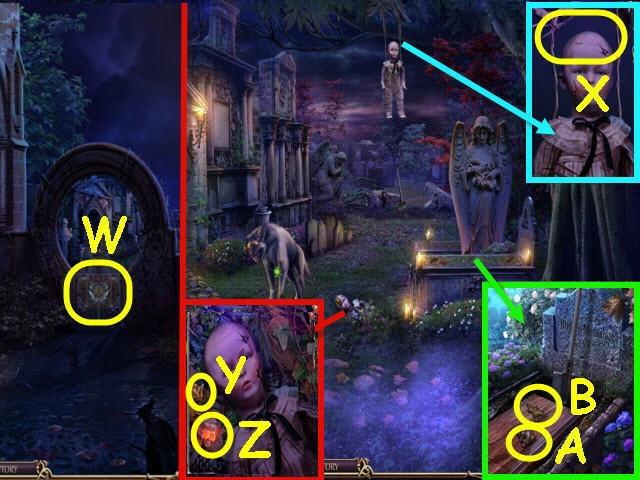
- Examine the gates; place the 2 WINGS on the lock to open the gate (W).
- Go forward through the newly opened gates.
- Examine the branch; use the NIPPERS on the wires (X).
- Examine the doll; take the STONE FLOWER (Y), and PUZZLE PIECE (Z).
- Examine Romeo’s grave; use the SHOVEL on the dirt and take the 2nd PUZZLE PIECE (A), and the GINGER (B).
- Back out twice and go up the balcony to Juliet’s room.
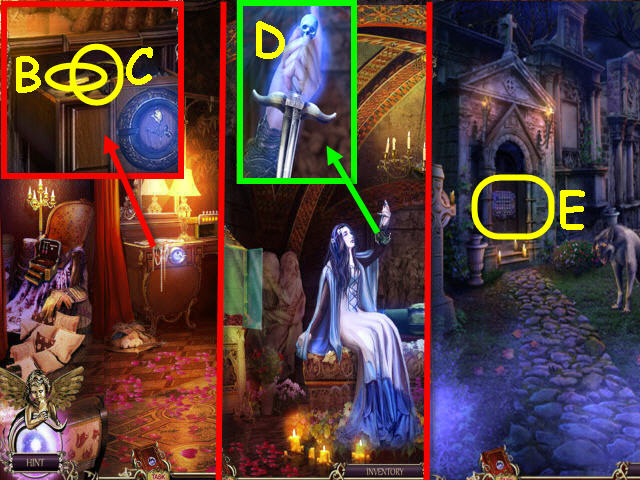
- Examine the drawer and place the STONE FLOWER in the recess; take the BRUSH (B), and SCYTHE KEY (C).
- Go to the vault.
- Examine Juliet; use the SCYTHE KEY on the lock and take the DAGGER (D).
- Back out and go forward to the cemetery.
- Examine the door and use the DAGGER on the skull. Place the 2 PUZZLE PIECES on the lock to trigger a puzzle (E).
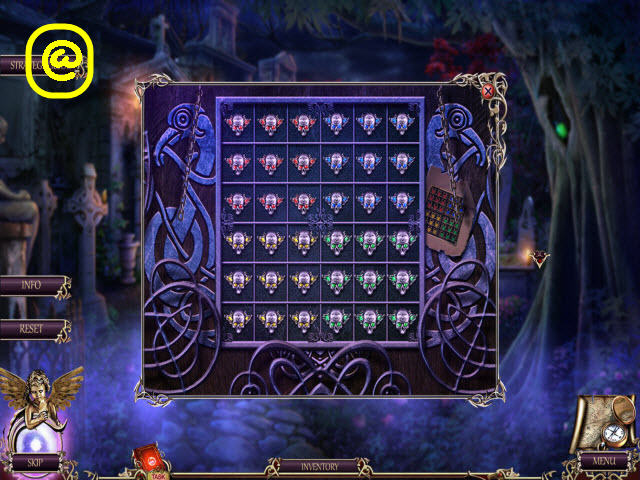
- Arrange the colored faces to match the code on the right.
- The starting board is random, see screenshot for solution (@).
- Examine the newly-opened tomb to access a HOS.
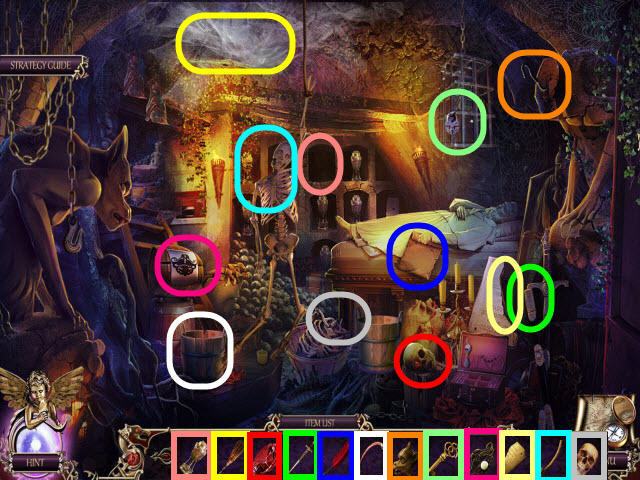
- Place the items where they belong in the scene.
- You will earn a BUCKET.
- Back out twice.
- Examine the water and use the BUCKET on it to get WATER (G).
- Back out.
- Use the WATER on the flames (H).
- Go right to the square and then forward to trade lane.
- Examine the wagon; take the SPOKES (I).
- Back out.
- Examine the wheel and place the SPOKES on it to trigger a puzzle (J).
- Swap any two spokes to place them by matching rims.
- See screenshot for solution (K).
- Take the WHEEL.
- Go forward.
- Examine the wagon and place the WHEEL on the axle (L).
- Go forward into the café.
- Examine the attic; take the SPRING (M).
- Back out all the way to the boiler room.
- Examine the mousetrap and select it to break the spring; place the SPRING on it and take the MOUSETRAP (N).
- Go to the café.
- Examine the rat and place the MOUSETRAP by it; take the BONE (O).
- Go to the cemetery.
- Examine the dog and give him the BONE; take the FIGURE (P).
- Go to the café.
- Examine the cook figures and place the FIGURE on the pedestal. Take the PEPPER (Q), and the TEAPOT (R).
- Examine the attic and place the TEAPOT in the center to trigger a puzzle (S).
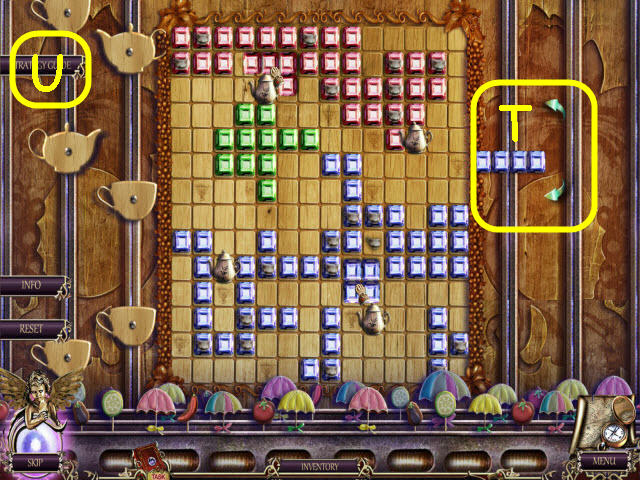
- Place the colored bars over the teacups and connect any two teapots with the same colored gems to remove them.
- Clear the board of teacups.
- You can rotate an available colored bar by using the arrows (T).
- See screenshot for examples (U).
- Go up the newly-opened attic hatch.
- Examine the beam and send OWLET to get the COCOA (V).
- Examine the attic to access a HOS (W).
- Place the items where they belong in the scene.
- You will earn a CROWBAR.
- Back out all the way to the boiler room.

- Examine the crate and use the CROWBAR on it; take the CIRCULAR SAW BLADE (X).
- Return to the attic.
- Examine the workbench and place the BROKEN KEY and CIRCULAR SAW BLADE on it; take the KEY (Y).
- Back out seven times to the repository of forgotten books.
- Examine the book and use the KEY on the lock; take the VALERIAN LEAF (Z).
- Go to the cemetery.
- Examine Romeo’s grave and use the CROWBAR on it; take the POISON (A).
- Go to the café and up to the attic.
- Examine the smoker and place the POISON in it; take the SMOKER (B).
- Go back to the cemetery.
- Examine the hollow tree and use the SMOKER on the bugs; take the PHOSPHORUS (C).
- Go back to the attic.
- Examine the painting collection and place the BRUSH, LAMP, and PHOSPHORUS on it to trigger a puzzle (D).
- Combine the colors to make an ultraviolet lamp.
- Solution: Dip the paintbrush on the blue and pink paint pots and then paint the lamp (E).
- Take the ULTRAVIOLET LAMP (F).
- Back out all the way to the repository of forgotten books.

- Examine the board and place the ULTRAVIOLET LAMP on it to trigger a puzzle (G).
- Select the scales to turn them to complete the picture. Use the switch to check your progress or when complete (H).
- See screenshot for solution (I).
- Take the BURNER.
- Go to the café.
- Examine the kitchen table and place the BURNER, COCOA, GINGER, PEPPER, and VALERIAN LEAF on the table. Select the bowl (J) to move it to the burner (K), select the bowl on the burner to move it to the bottle; take the AWAKEN POTION (L).
- Go into the vault at the chapel.
- Examine Romeo and give him the AWAKEN POTION (M).
- Take MARTIN’S SOUL (N), RONALD’S SOUL (O), and JULIE’S SOUL (P).
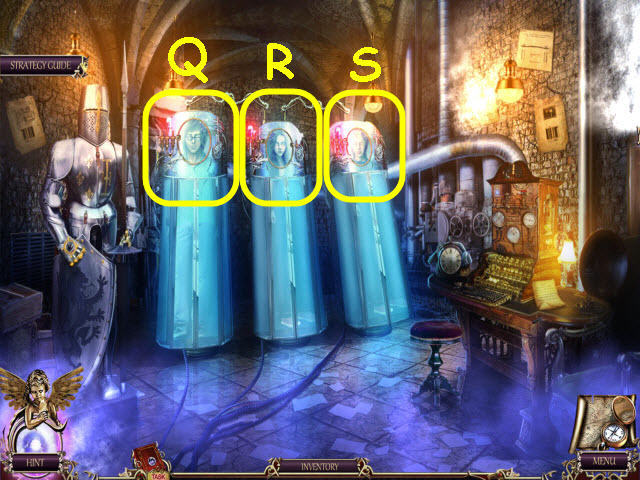
- Examine the left chamber and place RONALD’S SOUL on it (Q).
- Examine the middle chamber and place JULIE’S SOUL on it (R).
- Examine the right chamber and place MARTIN’S SOUL on it (S).
- Select the kids and watch the cutscene (T).
- Congratulations! You have successfully completed Death Pages: Ghost Library.


 Revived Legends: Titan's Revenge Walkthrough, Guide, & Tips
 The Secret Order: Masked Intent Walkthrough, Guide, & Tips
 Tiger Eye - Part I: Curse of the Riddle Box Walkthrough, Guide, & Tips
 Nick Chase and the Deadly Diamond Walkthrough, Guide, & Tips
 Botanica: Earthbound Walkthrough, Guide, & Tips