Botanica: Earthbound Walkthrough, Guide, & Tips
Botanica: Earthbound Walkthrough

Welcome to the Botanica: Earthbound Walkthrough
Play as both Ellie and Ian, two scientists stranded on Botanica. Can you save your friends and find your way home?
Whether you use this document as a reference when things get difficult or as a road map to get you from beginning to end, we’re pretty sure you’ll find what you’re looking for here.
This document contains a complete Botanica: Earthbound game walkthrough featuring annotated screenshots from actual gameplay!
We hope you find this information useful as you play your way through the game. Use the walkthrough menu below to quickly jump to whatever stage of the game you need help with.
Remember to visit the Big Fish Games Forums if you find you need more help. Have fun!
This walkthrough was created by BrownEyedTigre, and is protected under US Copyright laws. Any unauthorized use, including re-publication in whole or in part, without permission, is strictly prohibited.
General Tips

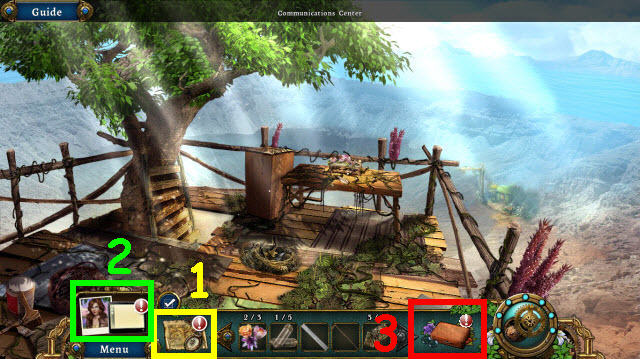
- This is the official guide for Botanica: Earthbound.
- This guide will not mention each time you have to zoom into a location; the screenshots will show each zoom scene.
- We will use the acronym HOP for Hidden-object puzzles. Interactive items will be color-coded and some will be numbered; please follow the numbers in sequence.
- The HOP lists may be random; our lists may vary from yours.
- Most Puzzles are random. Where possible, there will be step-by-step solutions.
- Use the map (1) to check locations and objective areas.
- Select the journal (2) for clues and story updates.
- The kits will get an exclamation point by them when complete. You may then select them and solve the puzzle (3).
Chapter 1: Shipwreck

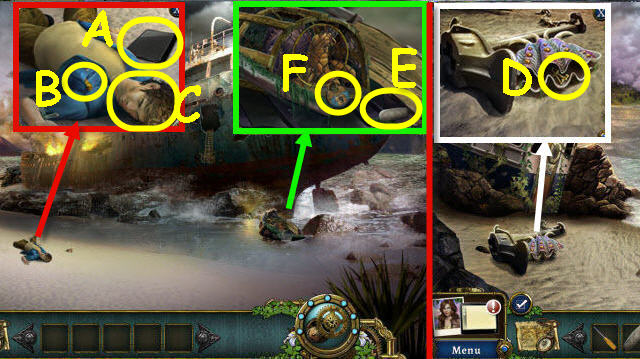
- Take the Journal (A) which will be added to your toolbar.
- Open the pocket; take the SCREWDRIVER (B).
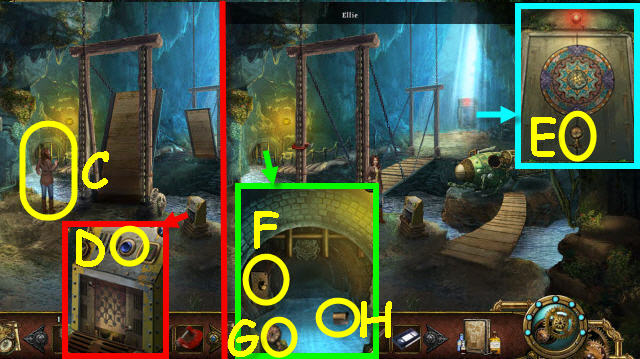
- Speak to Ian (C).
- Go forward.
- Use the SCREWDRIVER on the clam; take the KEY (D).
- Back out.
- Take the STONE (E).
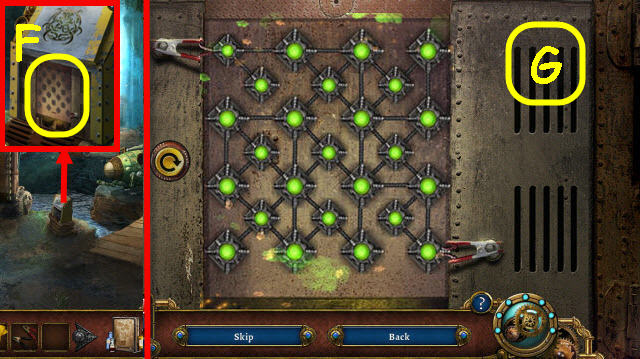
- Use the KEY on the lock to trigger a puzzle (F).

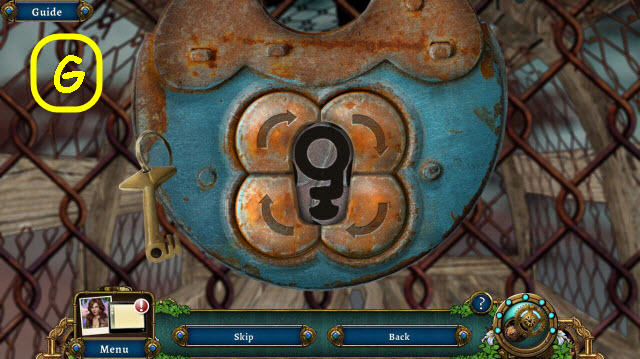
- Select the arrows to complete the keyhole.
- See screenshot for solution (G).
- Take the CLAWCRAB.
- Go forward.

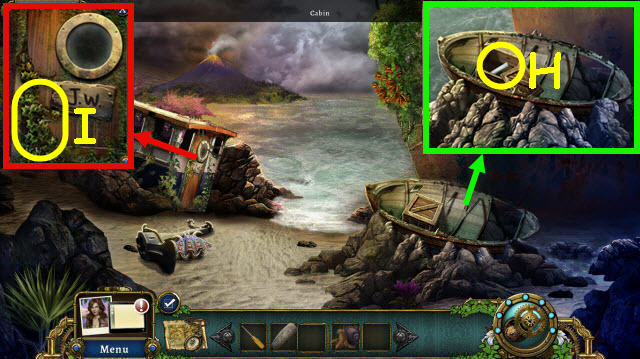
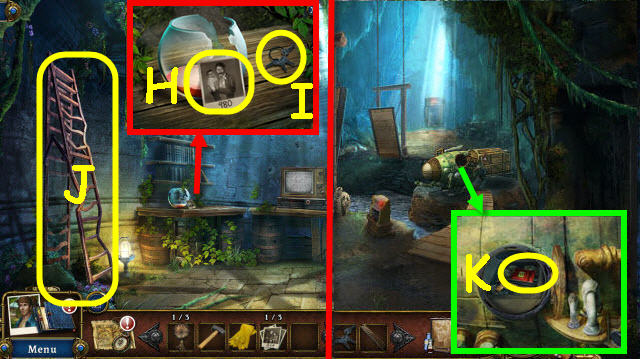
- Open the crate; take the CANDLE (H).
- Use the CLAWCRAB on the vines (I).
- Turn the door handle to trigger a HOP.

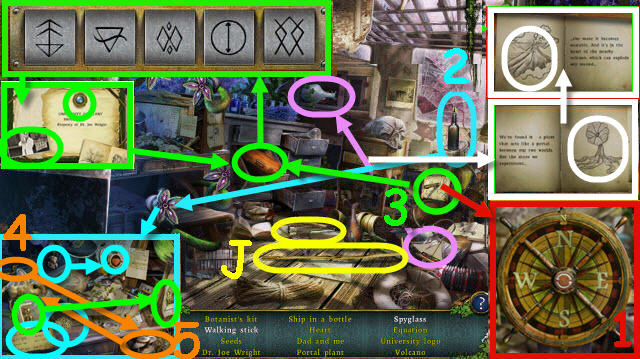
- Play the HOP.
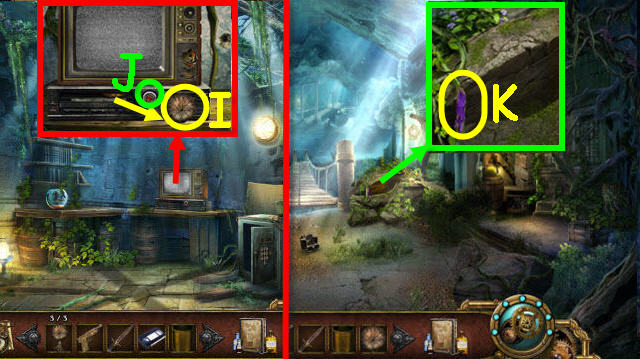
- You receive a WALKING STICK (J).
- You receive a BOTANIST’S KIT which is added to your toolbar.

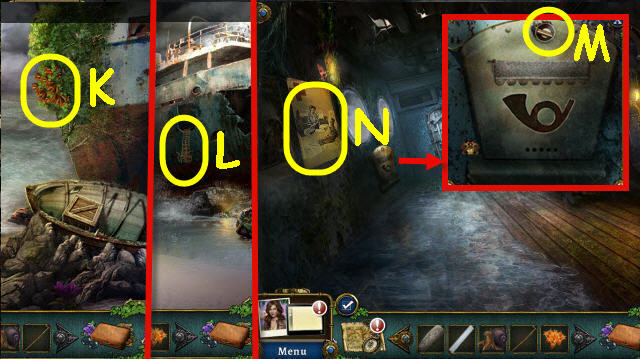
- Use the WALKING STICK to get TRUMPET FLOWERS (K).
- Back out.
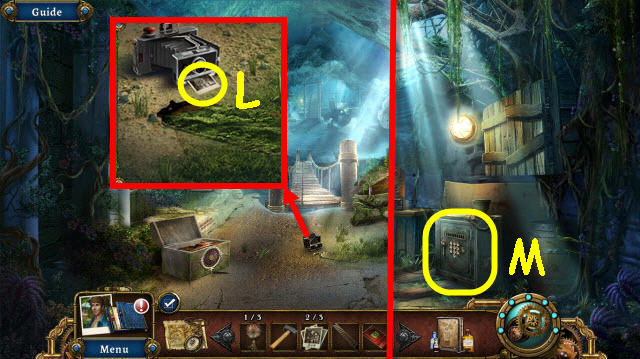
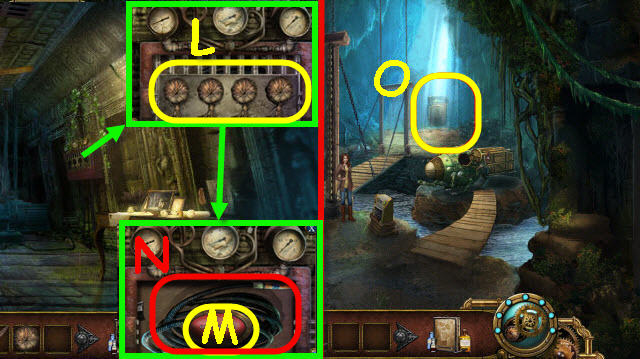
- Use the WALKING STICK on the ladder (L).
- Go up the ladder.
- Take the WOODEN KNOB (M).
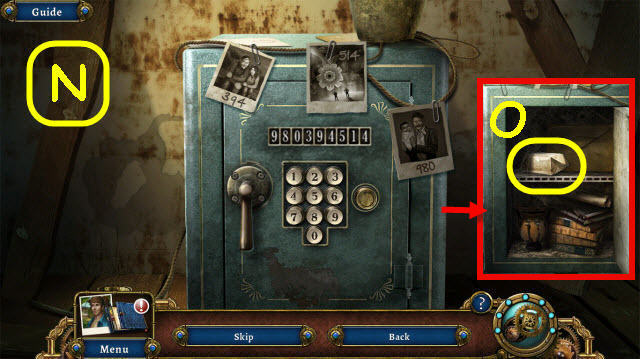
- Select the poster twice to get a recipe (N) added to your Botanist’s kit.
- Go right.

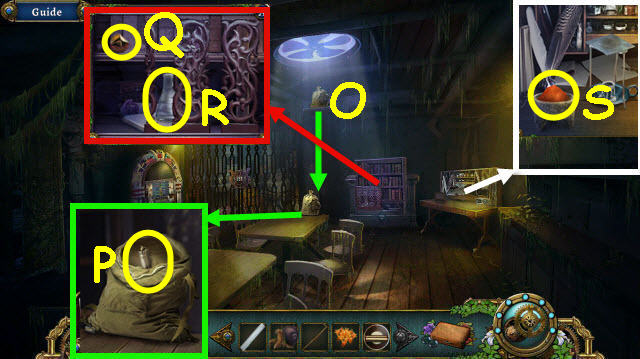
- Use the WALKING STICK on the bag (O).
- Use the CLAWCRAB on the bag; take the LIGHTER (P).
- Move the panels; take the CIRCLE PATCH (Q) and EMPTY FLASK (R).
- Use the TRUMPET FLOWERS and the STONE on the mortar; select the mortar. Take the ground trumpet flowers (S) which will be added to your Botanist’s kit.
- Go to Back of Ship.

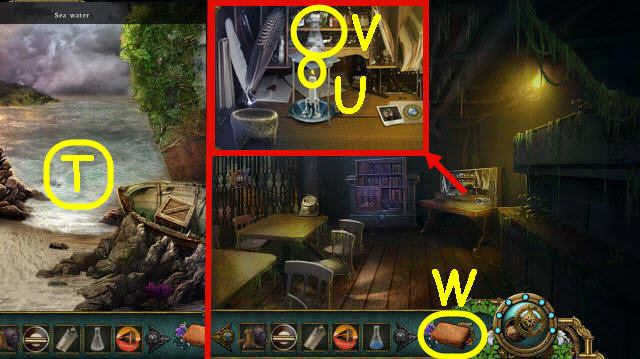
- Use the EMPTY FLASK on the water; receive SALT WATER (T).
- Go to Wardroom.
- Place the CANDLE in the holder; use the LIGHTER on the wick (U).
- Place the SALT WATER on the burner; take the salt (V).
- Examine the Botanist’s Kit to trigger a puzzle (W).

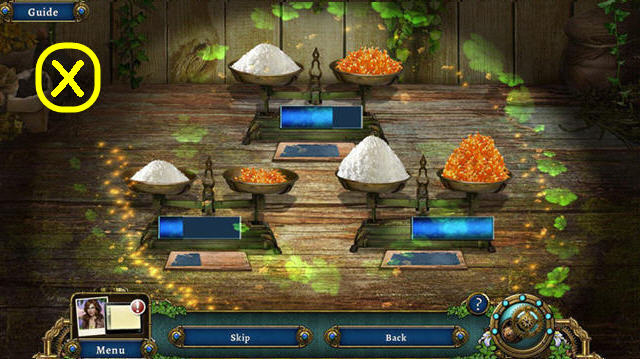
- Place the ingredients per the clues.
- See screenshot for solution (X).

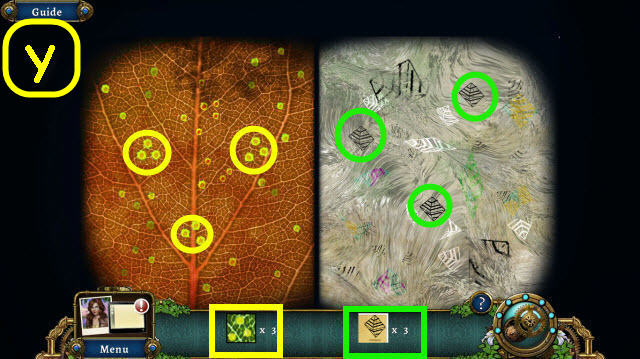

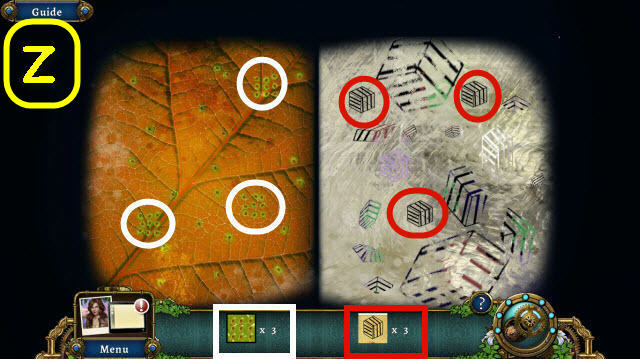

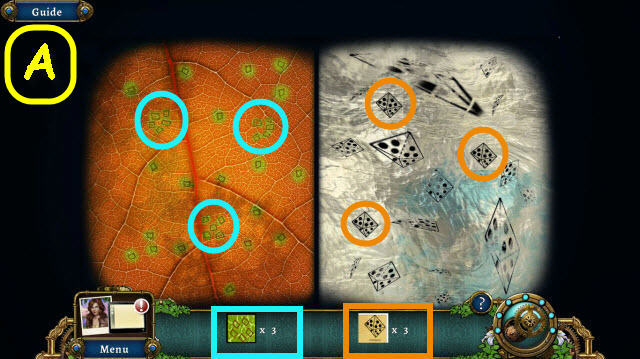
- Find the patterns.
- Part 1 solution (Y).
- Part 2 solution (Z).
- Part 3 solution (A).

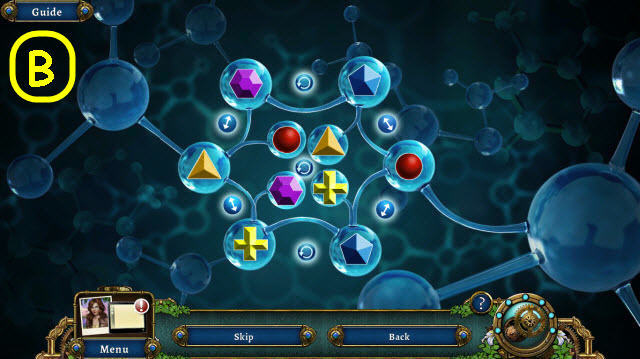
- Place the symbol on their matching platforms.
- See screenshot for solution (B).
- You receive SMELLING SALTS.
- Back out twice.

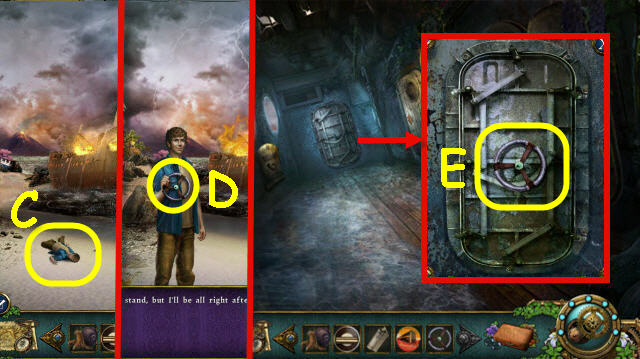
- Use the SMELLING SALTS on Ian (C).
- Take the WHEEL (D).
- Enter the ship.
- Place the WHEEL on the door; turn the wheel (E).
- Go forward.

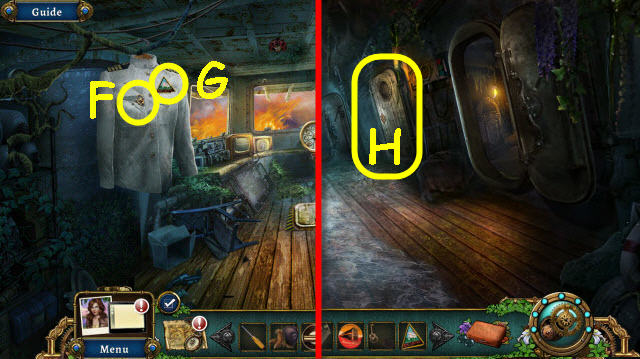
- Open the pocket; take the CABIN KEY (F).
- Take the TRIANGLE PATCH (G).
- Back out.
- Use the CABIN KEY on the lock; enter the Captain’s Cabin (H).

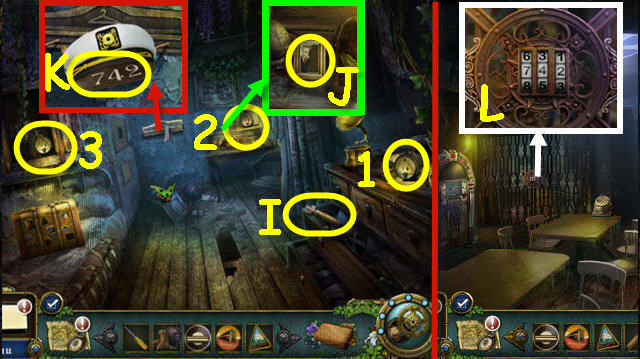
- Use the LIGHTER on the lanterns (1-3).
- Take the CAN OPENER (I).
- Examine and take the PHOTOGRAPH (J).
- Lift the cap to get a code (K).
- Go to Wardroom.
- Use the code from the cap on the lock: 742 (L).
- You will trigger a HOP.

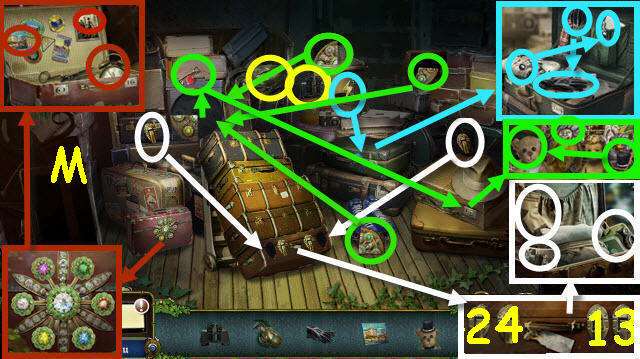
- Play the HOP.
- You receive a SQUARE PATCH (M).
- Go to Comm room.

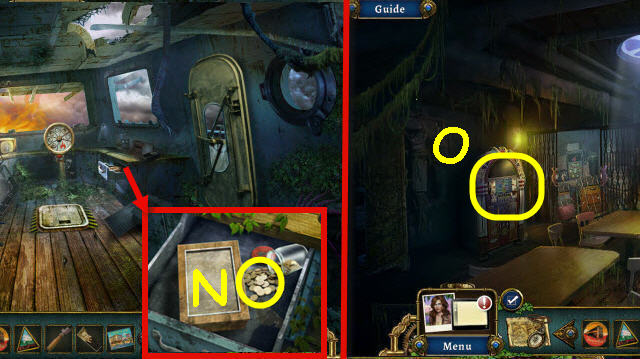
- Use the CAN OPENER on the jar; take a COIN (N).
- Go to Wardroom.
- Use the COIN on the jukebox to trigger a puzzle (O).

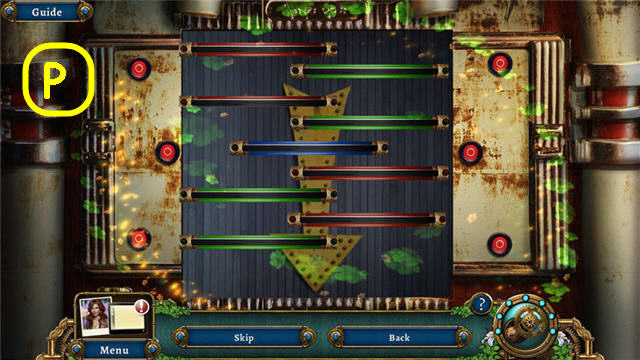
- Move the bars so only the blue is in the center.
- See screenshot for random solution (P).
- You receive a RECORD.
- Go to Captain’s cabin.

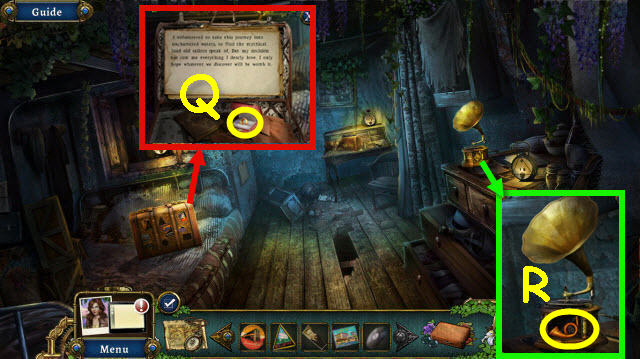
- Place the SQUARE PATCH, TRIANGLE PATCH and CIRCLE PATCH on the suitcase. Open the box; take the WEDDING RING 1/2 (Q).
- Place the RECORD on the phonograph; take the HORN ORNAMENT (R).
- Back out.

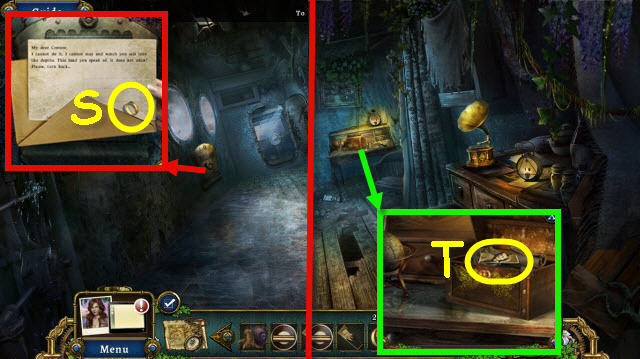
- Place the HORN ORNAMENT on the letter box; open the letter and take the WEDDING RING 2/2 (S).
- Go to Captain’s cabin.
- Place the 2 WEDDING RINGS on the chest; take the 2nd PHOTOGRAPH (T).
- Go to Comm room.

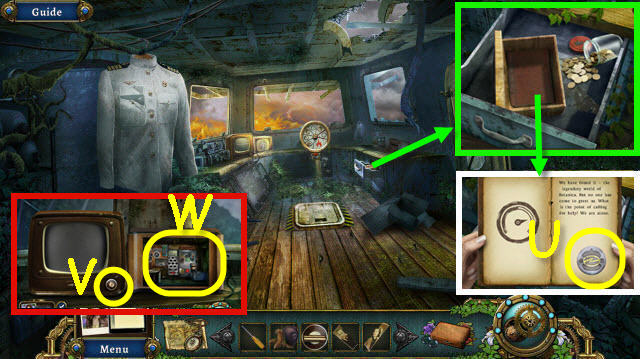
- Place the 2 PHOTOGRAPHS on the box; open the book and take the MICROPHONE (U).
- Place the WOODEN KNOB on the monitor (V) and the MICROPHONE on the radio. Select the radio to trigger a puzzle (W).

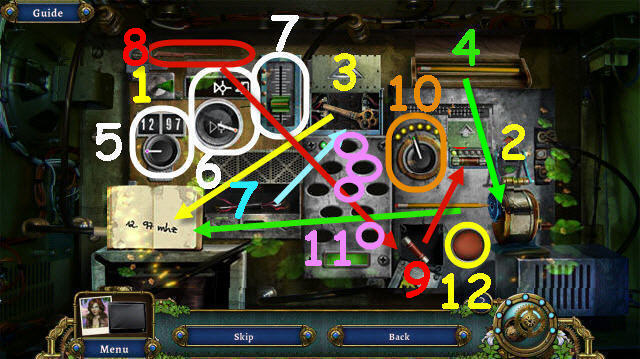
- Set the controls to their proper settings.
- See screenshot for order (1-12).

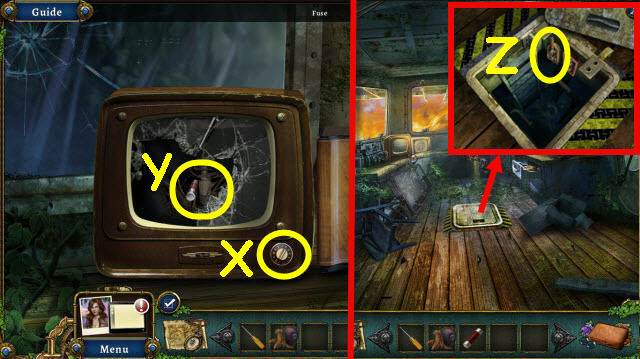
- Select the monitor knob (X) and the screen.
- Take the FUSE (Y).
- Use the SCREWDRIVER on the hatch; place the FUSE in the socket and pull the lever (Z).
- Select the bottom of the hatch to access a HOP.

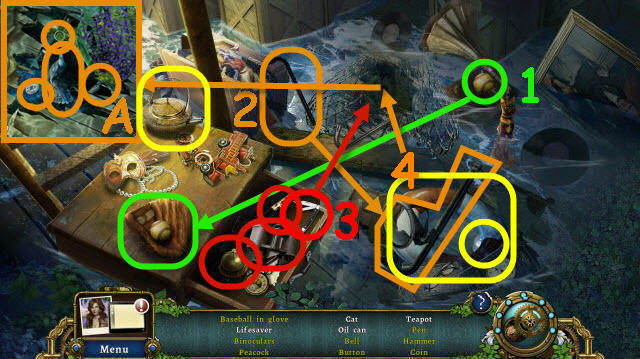
- Play the HOP.
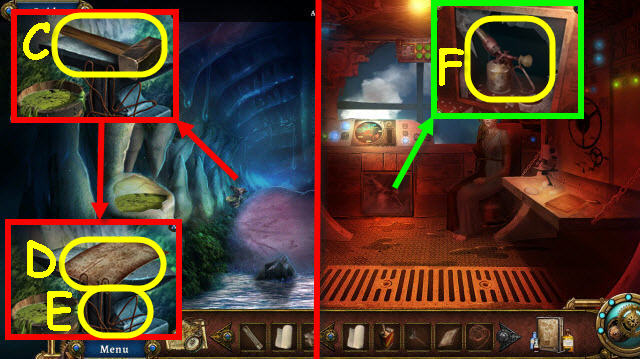
- You receive a HAMMER (A).

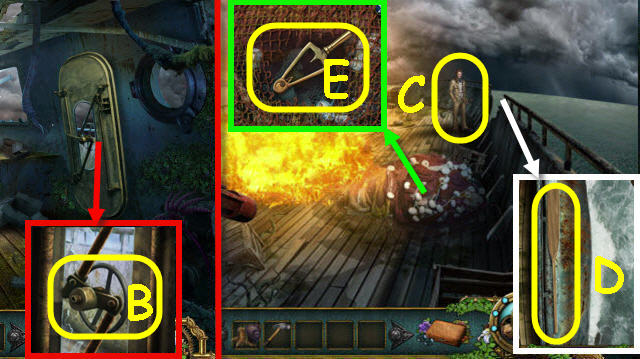
- Use the HAMMER on the glass; turn the wheel (B).
- Go right.
- Select Gustav (C).
- Look over the edge; take the PADDLE 1/2 (D).
- Use CLAWCRAB on the net 3x; take the LEVER (E).
- Back out.

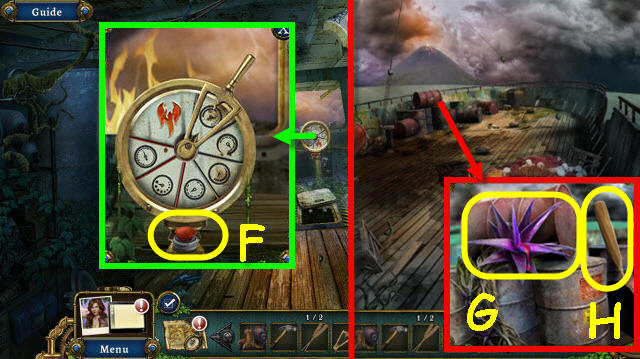
- Place the LEVER on the mechanism turn to the correct symbol; select the button (F).
- Go right.
- Use CLAWCRAB to get WATERPROOF RESIN (G).
- Take PADDLE 2/2 (H).
- Go to Captain’s cabin.

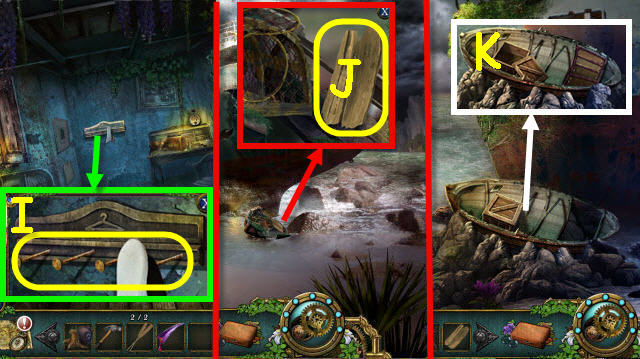
- Use the HAMMER to get the NAILS (I).
- Back out twice.
- Use the HAMMER on the boat; take the WOODEN PLANKS (J).
- Go forward.
- Use the WOODEN PLANKS, NAIL, HAMMER, WATERPROOF RESIN and 2 PADDLES on the boat (K).
Chapter 2: Temple

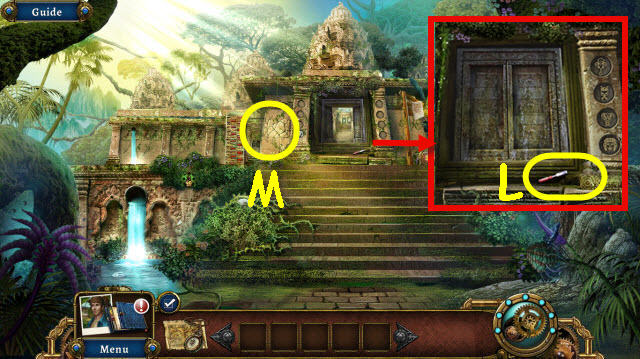
- Select the door twice; take the CHISEL (L).
- Use CHISEL on cracks 4x to trigger a puzzle (M).

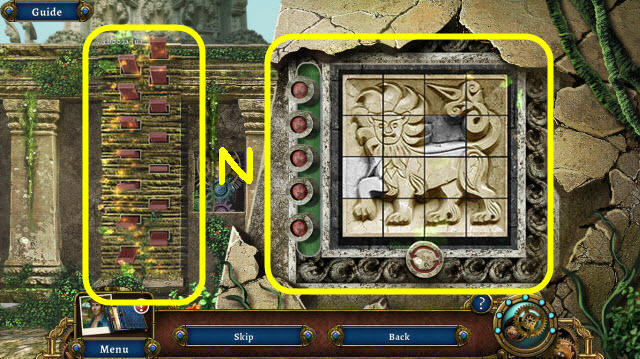
- Use the buttons and arrows to pull out all the bricks and complete the image.
- See screenshot for solution (N).

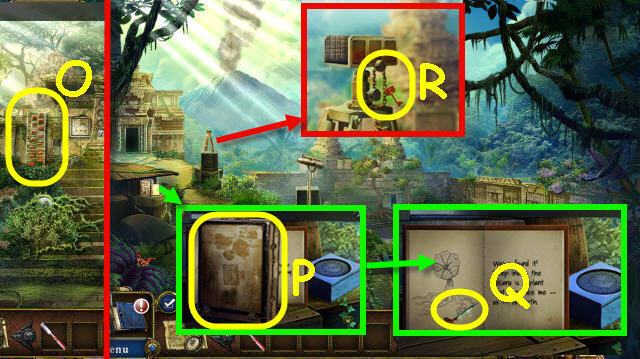
- Go up to the ledge (O).
- Take the Chemist’s KIT which will be added to your toolbar (P).
- Turn the pages; take the EMPTY DARTS 1/2 (Q).
- Take the KEY (R).
- Go forward.

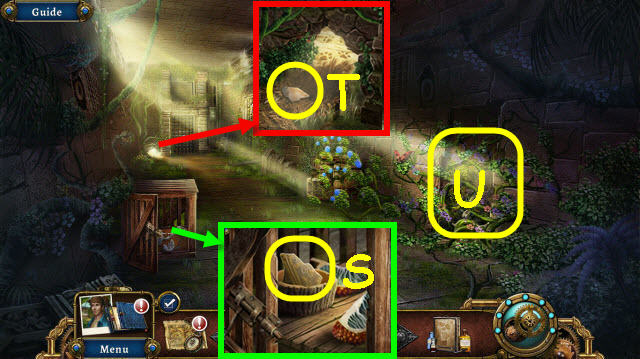
- Take the JAR SHARDS 1/3 (S).
- Take the JAR SHARDS 2/3 (T).
- Examine the vines to trigger a puzzle (U).

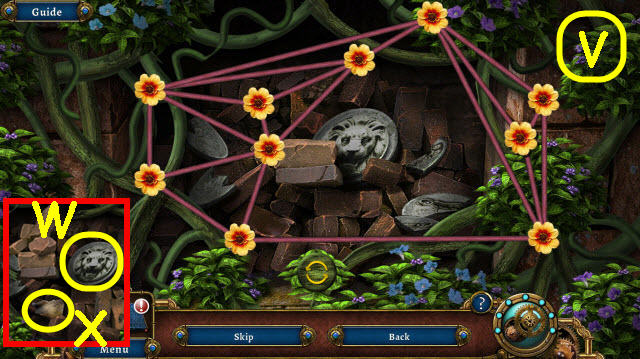
- Untangle the ropes.
- See screenshot for solution (V).
- Move the bricks; take the TOKEN (W) and JAR SHARDS 3/3 (X).

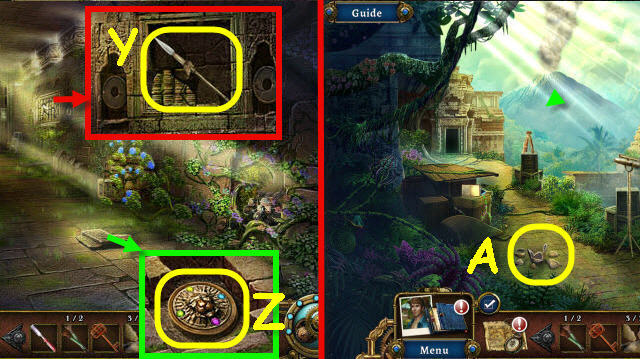
- Use the CHISEL on the wall 4x; take the SPEAR (Y).
- Use the SPEAR on the stones; take the CENTERPIECE (Z).
- Back out.
- Place the 3 JAR SHARDS on the jar to trigger a puzzle (A).

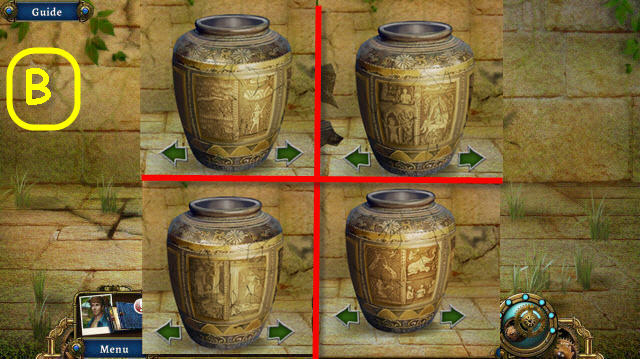
- Assemble the jug.
- See screenshot for solution (B).
- You receive an EMPTY JUG.
- Back out.

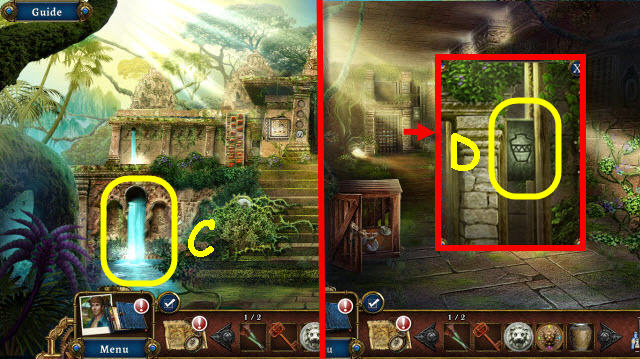
- Use the EMPTY JUG on the waterfall; receive a FILLED JUG (C).
- Go to Temple hall.
- Place the FILLED JUG on the pulley (D).
- Go forward.

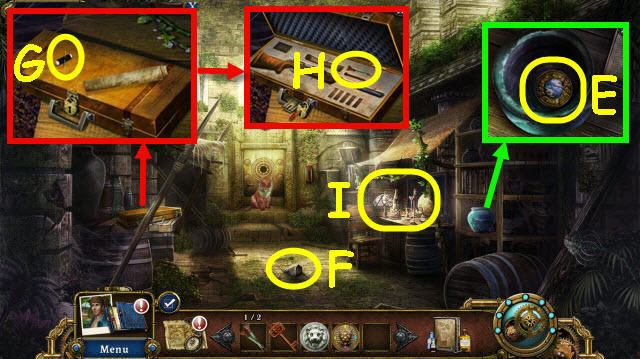
- Take the UNIVERSITY LOGO (E).
- Take the ROCK (F).
- Take the recipe and NEEDLE AND THREAD (G).
- Use the KEY on the lock; take the EMPTY DART 2/2 (H) which will go into your Chemist’s kit.
- Examine the desk to access a HOP (I).

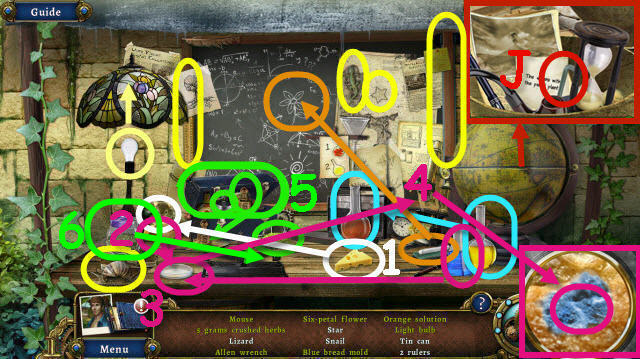
- Play the HOP.
- You receive an ALLEN WRENCH (J).
- Back out twice.

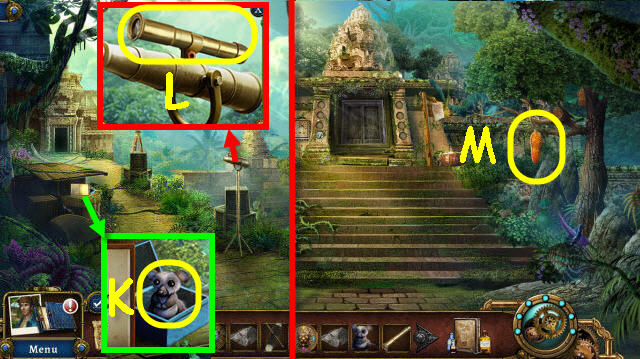
- Place the UNIVERSITY LOGO on the box; use the NEEDLE AND THREAD on the toy. Take the PLUSH TOY (K).
- Use the ALLEN WRENCH on the screw; receive a SCOPE (L).
- Back out.
- Use the ROCK to get the THORNFRUIT (M).
- Go to Abandoned camp.

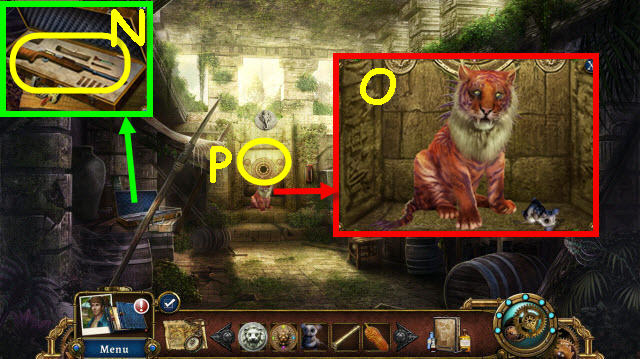
- Place the SCOPE on the rifle (N); get a rifle in the Chemist’s kit.
- Give the PLUSH TOY and THORNFRUIT to the tiger; get a SPIKE TIGER (O).
- Place the CENTERPIECE on the door to trigger a puzzle (P).

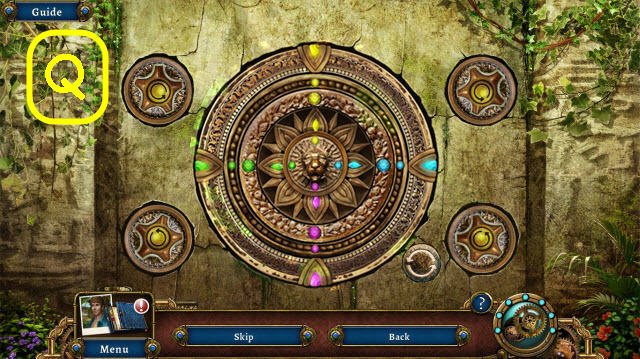
- Rotate the rings to complete the image.
- See screenshot for solution (Q).

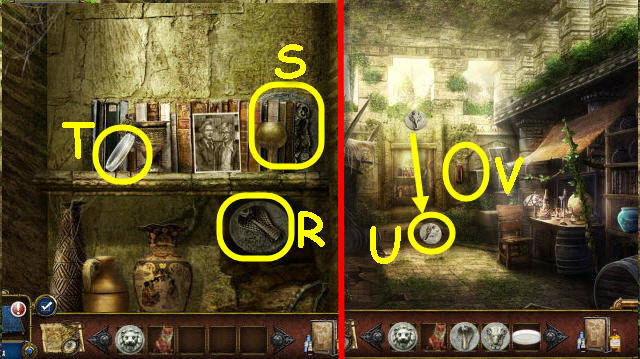
- Use the SPIKED TIGER on the vines; take the 2nd TOKEN (R), 3rd TOKEN (S), PETRI DISH (T) and photo.
- Use the SPIKED TIGER on the token; take the 4th TOKEN (U).
- Pull the lever (V).
- Back out.

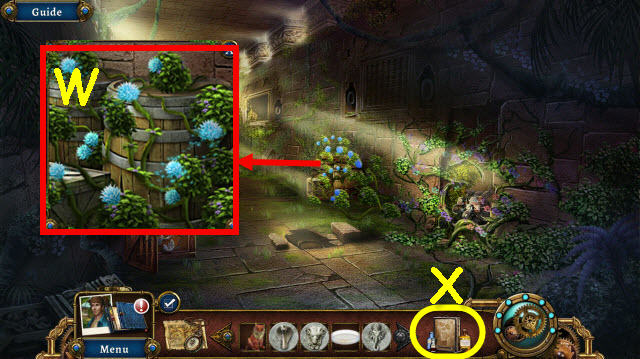
- Use the PETRI DISH on the flowers (W). It will be added to your Chemist’s kit.
- Open the Chemist’s kit to trigger a puzzle (X).

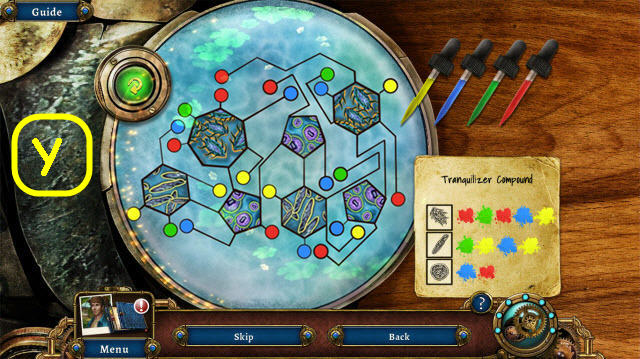
- Create the right combination of colors.
- See screenshot for solution (Y).
- You receive a TRANQUILIZER RIFLE.
- Back out.

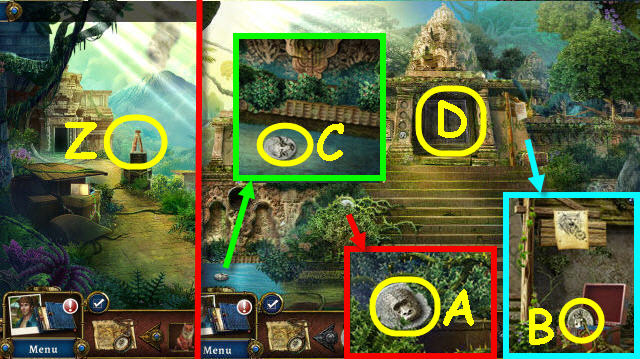
- Place the TRANQUILIZER RIFLE on the tripod (Z).
- Back out.
- Use the SPIKED TIGER on the vines; take the 5th TOKEN (A).
- Use the SPIKED TIGER on the vines; take the 6th TOKEN (B) and the poster.
- Take the 7th TOKEN (C).
- Examine the doorway (D).

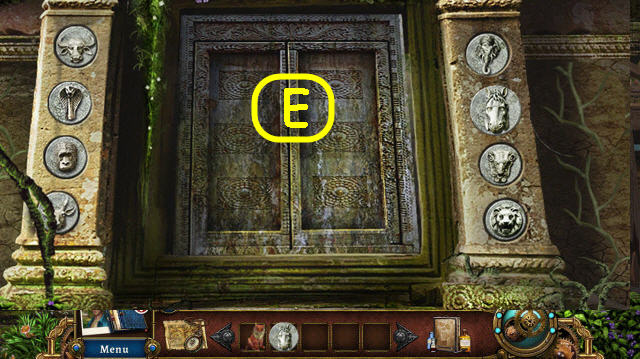
- Place the 7 TOKENS in their matching slots.
- See screenshot for solution (E).
- Go forward; go forward again after cutscene.

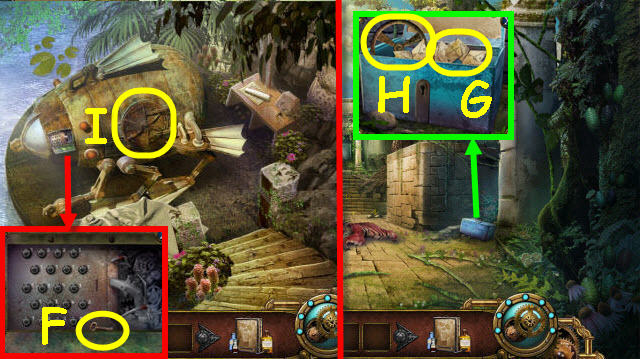
- Remove the cover; zoom in and take the METAL KEY (F).
- Back out.
- Use the METAL KEY on the box; take the SCHEMATIC PIECES 1/3 (G) and VALVE (H).
- Go forward.
- Place the VALVE on the door; turn it (I).
- Enter the submarine.

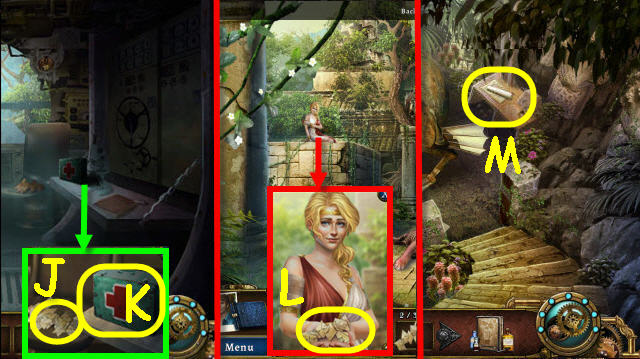
- Take the SCHEMATIC PIECES 2/3 (J) and FIRST AID KIT (K).
- Go to Temple courtyard.
- Use FIRST AID KIT on Kassandra; take the SCHEMATIC PIECES 3/3 (L).
- Go forward.
- Take the note; place the 3 SCHEMATIC PIECES on the schematic to trigger a puzzle (M).

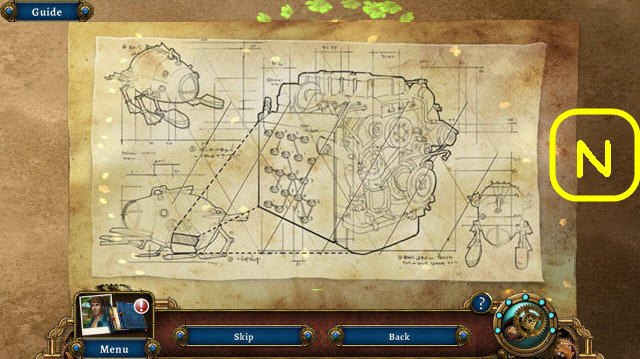
- Complete the schematic.
- See screenshot for solution (N).
- You receive a SUBMARINE SCHEMATIC.

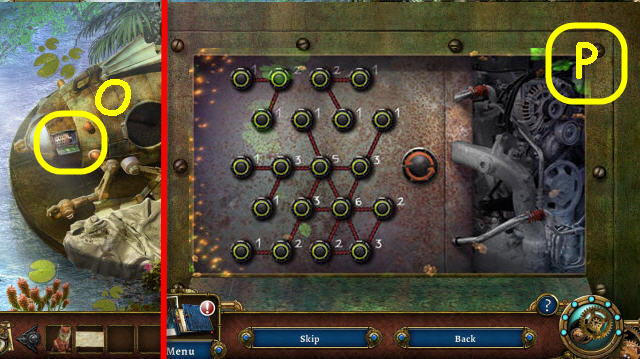
- Place the SUBMARINE SCHEMATIC on the panel to trigger a puzzle (O).
- Connect the nodes with the correct number of wires.
- See screenshot for solution (P).
Chapter 3: Old Capital

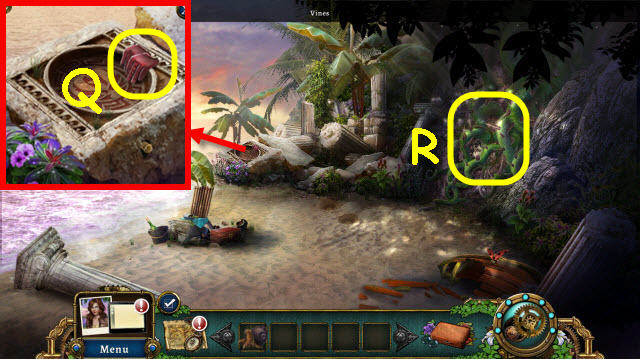
- Take the GLOVES (Q).
- Use CLAWCRAB and GLOVES on the vines (R).
- Go forward and left over the bridge.

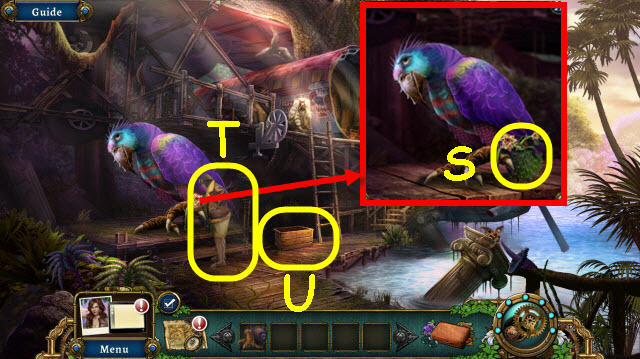
- Take the FLOWERTHORN SAMPLE (S).
- Speak to Sullivan (T).
- Examine the crate to access a HOP (U).

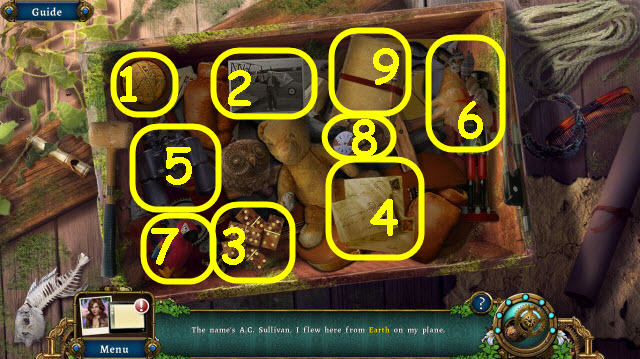
- Play the HOP.
- You receive SULLIVAN’S JOURNAL (9).
- Give SULLIVAN’S JOURNAL to Sullivan.
- Back out; go forward.

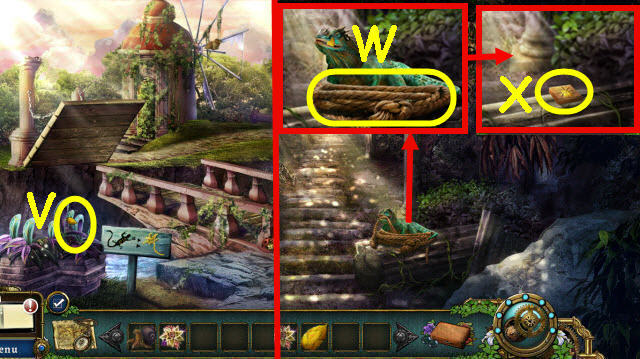
- Use CRABCLAW on the flower; get PETALS (V).
- Go to Mediterranean vista.
- Give the PETALS to the lizard; take the ROPE (W) and WOODEN TILE (X).
- Go to Plane house 1F.

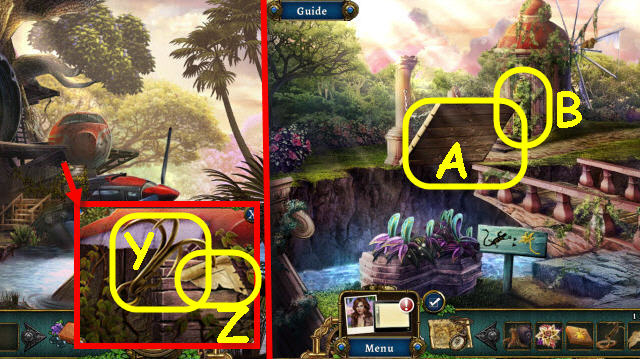
- Place the ROPE on the hook; receive a HOOK (Y).
- Take the MAP PIECES 1/6 (Z).
- Go to Forest drawbridge.
- Use the HOOK on the drawbridge (A).
- Use CLAWCRAB and the WOODEN TILE on the door to trigger a puzzle (B).

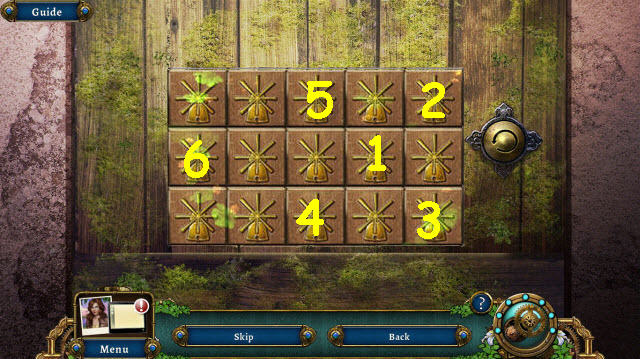
- Turn over all the tiles.
- See screenshot for solution (1-6).

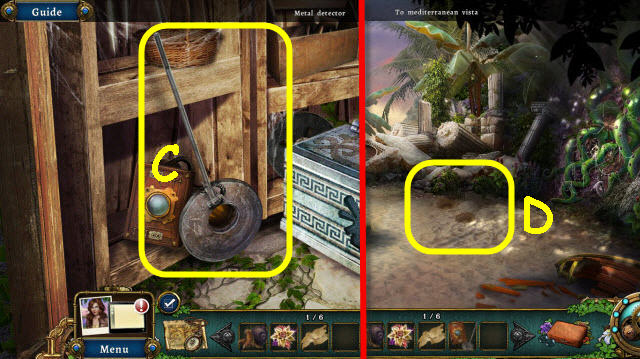
- Take the METAL DETECTOR (C).
- Go to Mountain shore.
- Use the METAL DETECTOR on the sand to trigger a HOP (D).

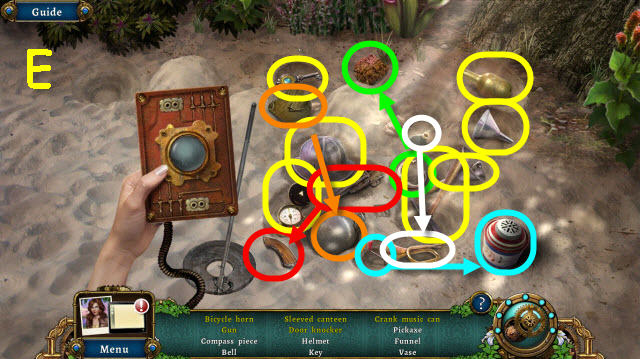
- Play the HOP.
- You receive a KEY and TROWEL (E).
- Go up the vines.

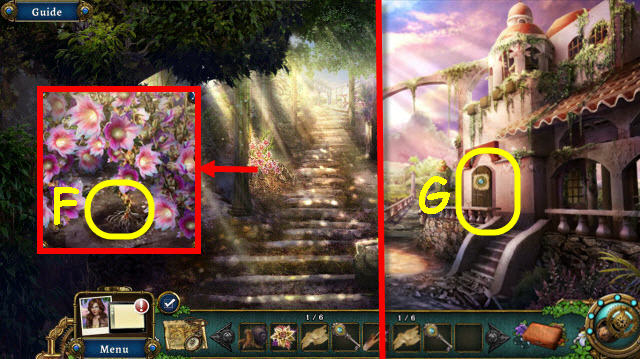
- Use the TROWEL on the dirt; use CLAWCRAB to get a marshmallow root (F) added to your Botanist’s kit.
- Go forward.
- Use the KEY on the lock; enter Joe’s outpost (G).

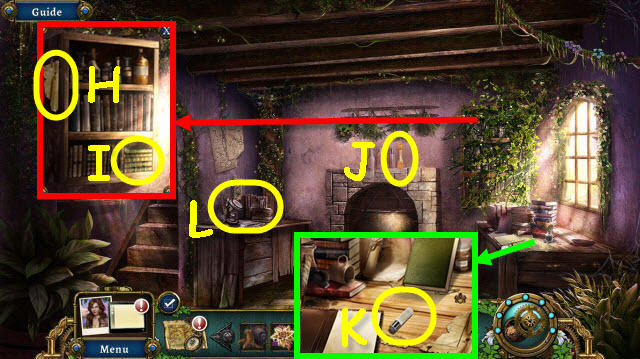
- Use CLAWCRAB on the vines; take MAP PIECES 2/6 (H) and BOTANY BOOKS (I).
- Take the PEPPER SHAKER (J).
- Take the VIAL (K).
- Place the FLOWERTHORN SAMPLE and the BOTANY BOOKS on the table to trigger a puzzle (L).

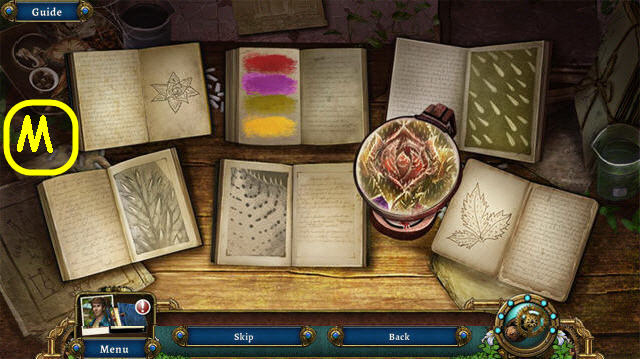
- Find the correct pages to match the flower.
- See screenshot for solution (M).
- Take the recipe which will be added to your Botanist’s kit.
- Go to Forest drawbridge. Go up the right to Forest edge.

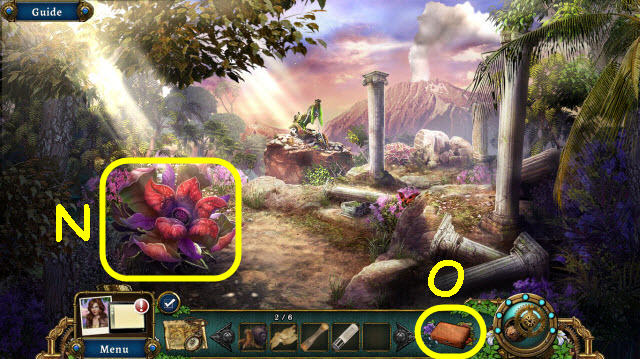
- Use PEPPER SHAKER and VIAL on the flower (N); nectar is added to your Botanist kit.
- Select the Botanist kit to access a puzzle (O).

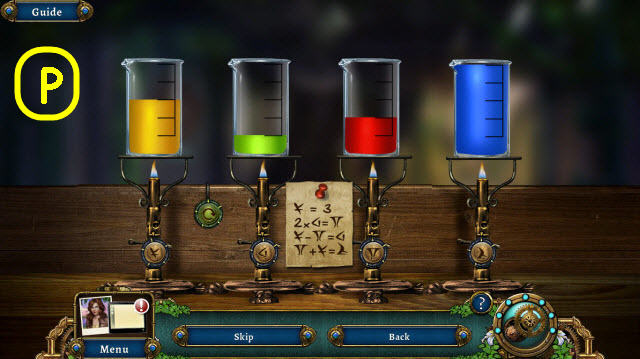
- Adjust the vial levels per the clue.
- See screenshot for solution (P).
- You receive FLOWERTHORN MEDICINE.
- Go to Plane house 1F.

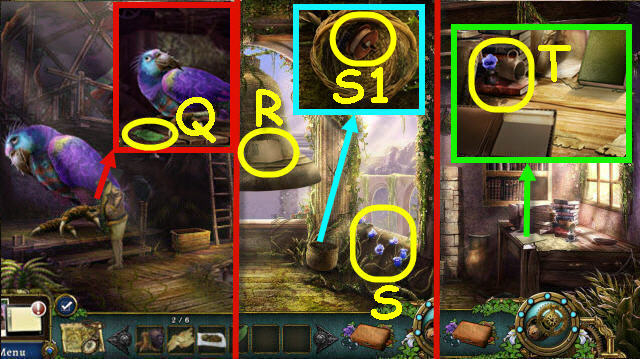
- Use the FLOWERTHORN MEDICINE on the bird; take the FEATHER (Q).
- Go to Joe’s outpost and up the stairs to the Bell tower.
- Read the note (R).
- Use CLAWCRAB on the flower; receive BELLFLOWER INK (S).
- Take the FISHING REEL (S1).
- Back out.
- Place the BELLFLOWER INK on the inkwell; dip the FEATHER in it (T).
- Receive a LETTER FOR IAN.
- Go to Bell tower.

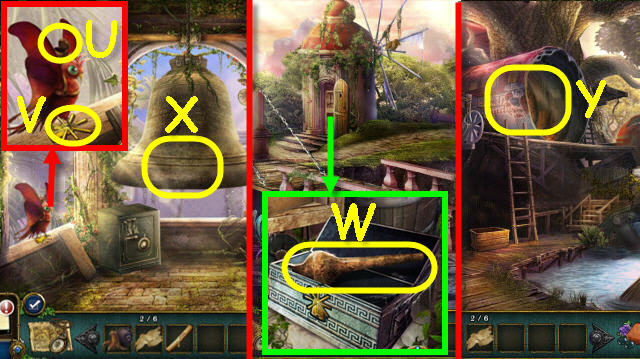
- Place the LETTER FOR IAN in the carrier (U).
- Take the WINDMILL EMBLEM (V).
- Go to Forest drawbridge.
- Place the WINDMILL EMBLEM on the chest; take the BELL CLAPPER (W).
- Return to Bell tower.
- Hang the BELL CLAPPER on the bell; ring it (X).
- Go to Plane house 1F.
- Examine the top of the ladder to trigger a HOP (Y).

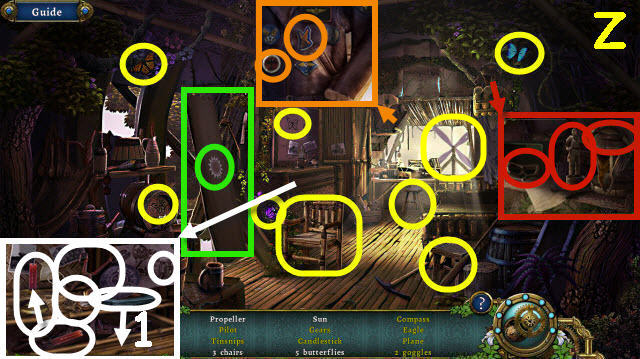
- Play the HOP.
- You receive TINSNIPS (Z).
- Go to Mountain shore.

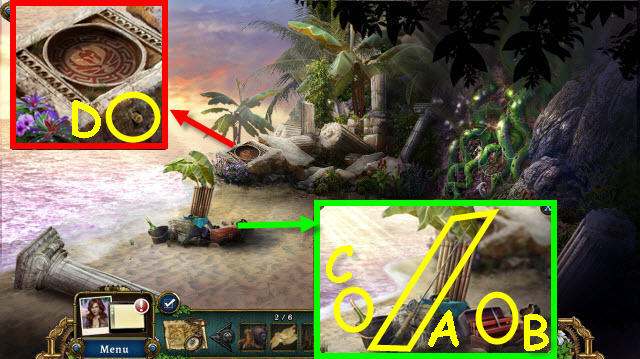
- Place the FISHING REEL on the rod; take the FISHING POLE (A).
- Use the TINSNIPS on the tackle box; take the TWEEZERS (B).
- Take the MAP PIECES 3/6 (C).
- Use the TWEEZERS to get MAP PIECES 4/6 (D).
- Go to Forest edge.

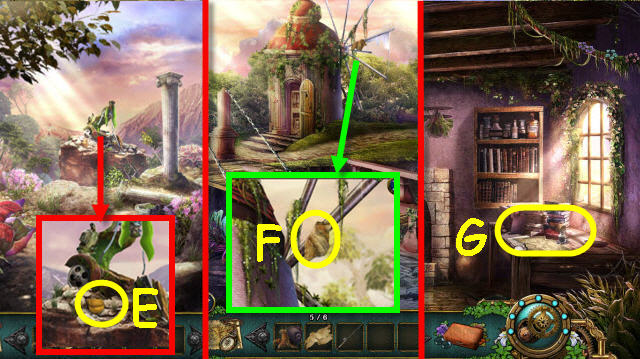
- Use the FISHING POLE to get the pouch; open and take the MAP PIECES 5/6 (E).
- Back out.
- Use the FISHING POLE to get the MAP PIECES 6/6 (F).
- Go to Joe’s outpost.
- Place the 6 MAP PIECES on the desk to trigger a HOP (G).

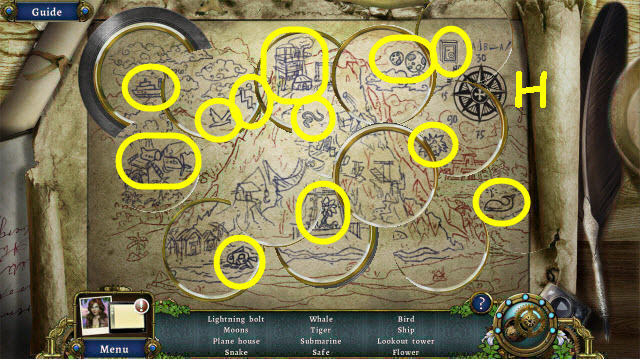
- Play the HOP.
- You receive a SAFE CODE (H).
- Go upstairs.

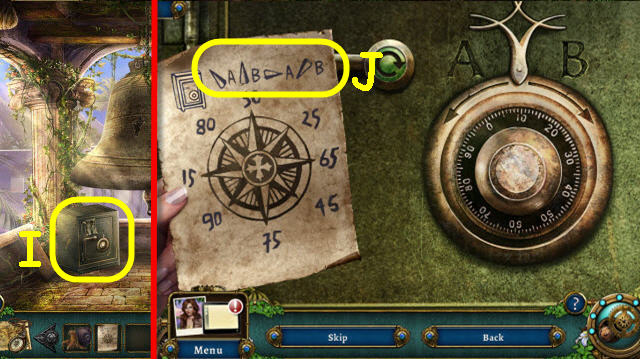
- Place the SAFE CODE on the safe to trigger a puzzle (I).
- Turn the dial per the safe code.
- Solution: Left 80, right 30, left 65, right 90 (J).
- Take the SADDLE and read the journal.

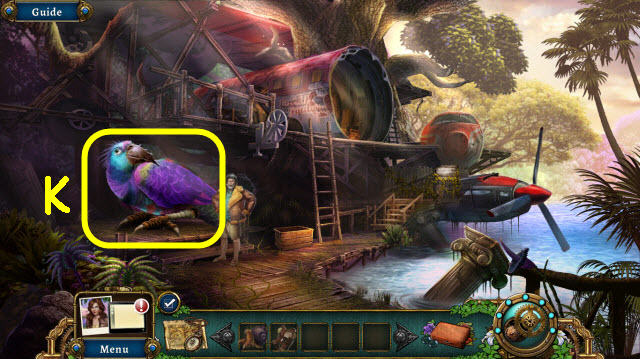
- Go to Plane house 1F.
- Place the SADDLE on the bird (K).
Chapter 4: The Whale

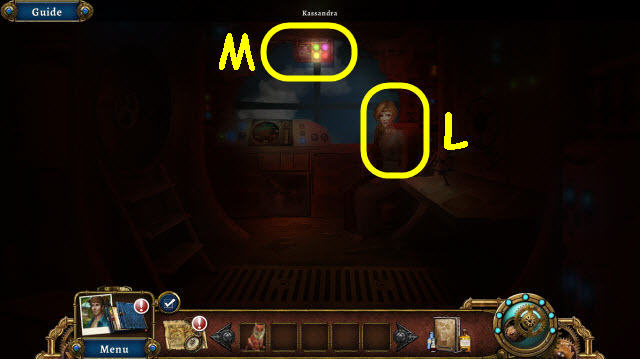
- Speak to Kassandra (L).
- Examine the panel to trigger a puzzle (M).

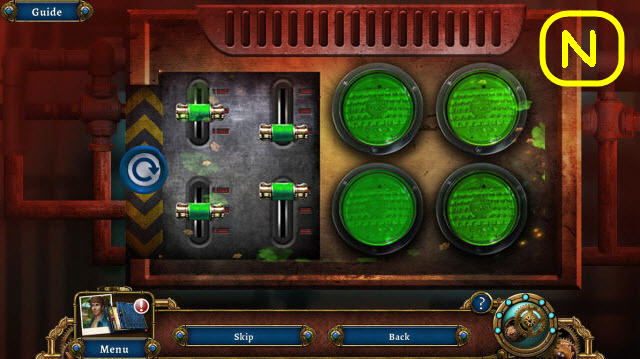
- Turn all the lights green.
- See screenshot for solution (N).

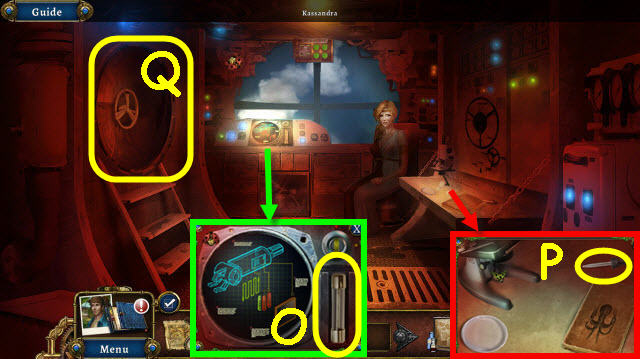
- Take the FUSE (O).
- Take the DROPPER (P).
- Open the portal; go left (Q).

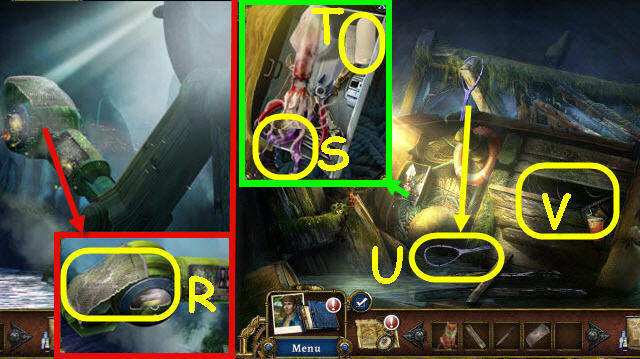
- Take the ROPE NET (R).
- Go forward.
- Select the quid; then use the DROPPER on the squid to acquire INK SAMPLE (S).
- Take the BANDAGES (T).
- Use the SPIKED TIGER on the net frame; place the ROPE NET on it to receive a FISHING NET (U).
- Select the compartment to access a HOP (V).

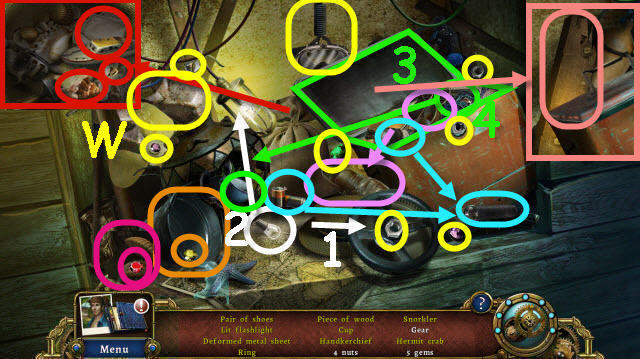
- Play the HOP.
- You receive a DEFORMED METAL SHEET (W).
- Back out twice.

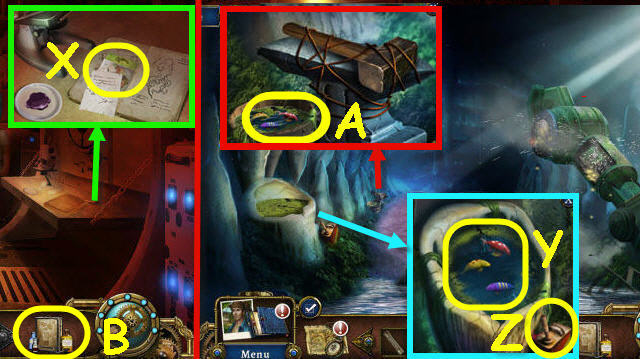
- Place the INK SAMPLE in the dish; read the recipe and take the FISH FLAKES (X).
- Go left.
- Use the FISH FLAKES and FISHING NET on the tooth to get PATTERNED FISH 1/2 (Y).
- Take the GAS CAN (Z).
- Use the FISH FLAKES and FISHING NET on the barrel to get PATTERNED FISH 2/2 (A).
- Select the Chemist’s Kit to access a puzzle (B).

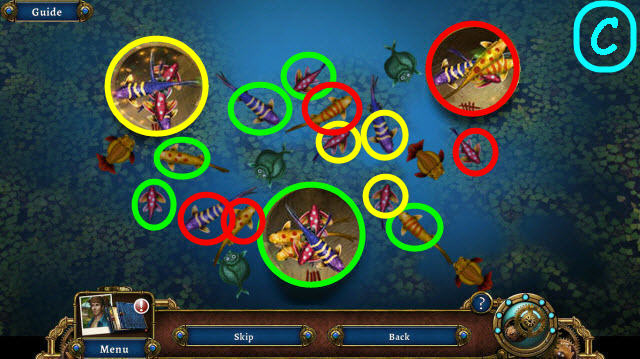
- Place the fish with the equal number strips or dots in their matching numbered bowls.
- See screenshot for solution (C).
- You receive PATTERNED FISH CHUNKS.
- Go forward.

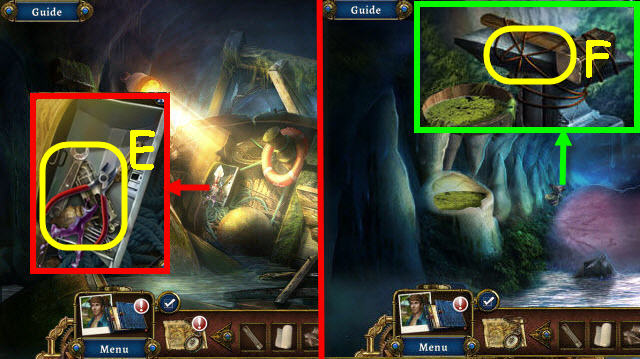
- Give the PATTERNED FISH CHUNKS to the squid; take the WIRE CUTTER (E).
- Back out.
- Select the wires to trigger a puzzle (F).

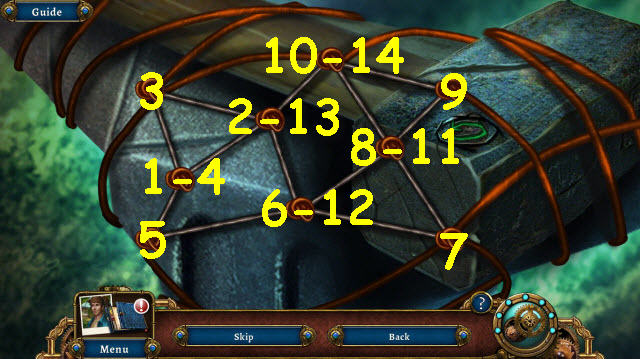
- Pass through each wire one time.
- See screenshot for order (1-14).

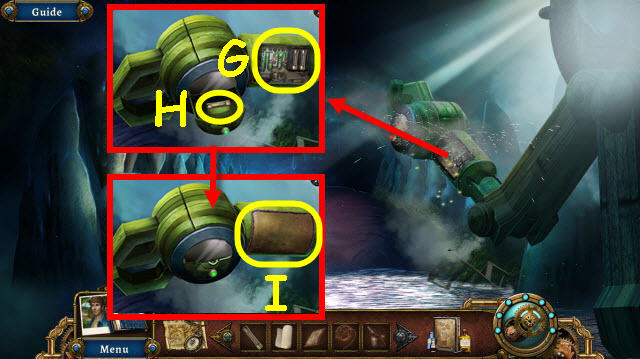
- Take the MALLET (C).
- Place the DEFORMED METAL SHEET on the anvil and use the MALLET on it 3x; take the METAL SHEET (D).
- Use the WIRE CUTTERS on the wire; receive COPPER WIRE (E).
- Back out.
- Use the MALLET on the glass. Use the GAS CAN on the torch; receive a BLOWTORCH (F).
- Go left.

- Place the COPPER WIRE in the panel (G).
- Open the compartment; take the 2nd FUSE (H) and place the 2 FUSES in the panel (G).
- Place the METAL SHEET on the panel; use the BLOWTORCH on it (I).
- Back out.

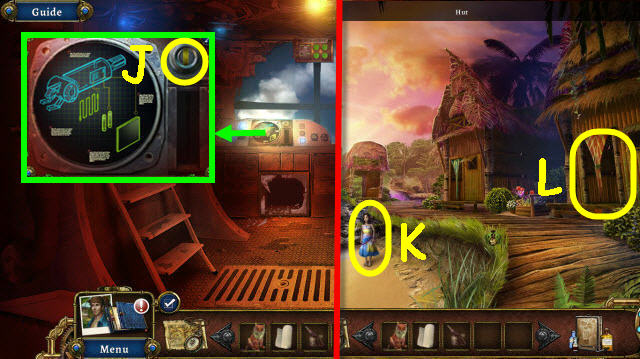
- Flip the switch (J).
- Speak to the girl (K).
- Examine the hut to trigger a HOP (L).

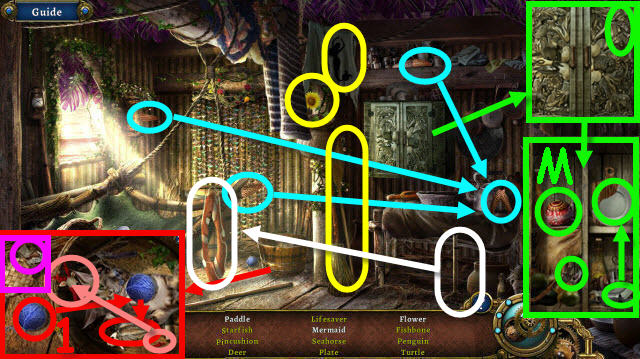
- Play the HOP.
- You receive a PINCUSHION (M).
- Go forward into Lois’s hut.
- Select the beaded alcove to access a HOP.

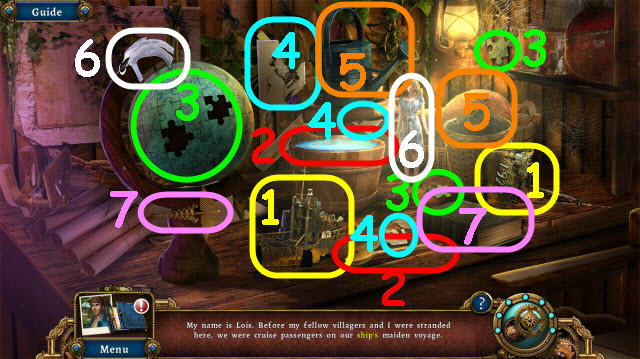
- Play the HOP.
- You receive a MEDICINE JOURNAL (7).

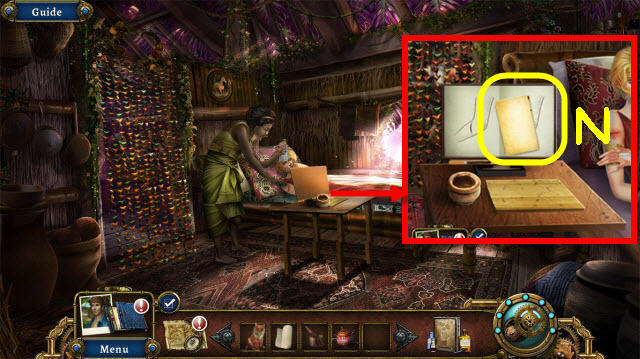
- Place the MEDICINE JOURNAL on the stand; take the recipe (N) which is added to your Chemist’s kit.
- Exit the hut and go forward to the Diving outpost.

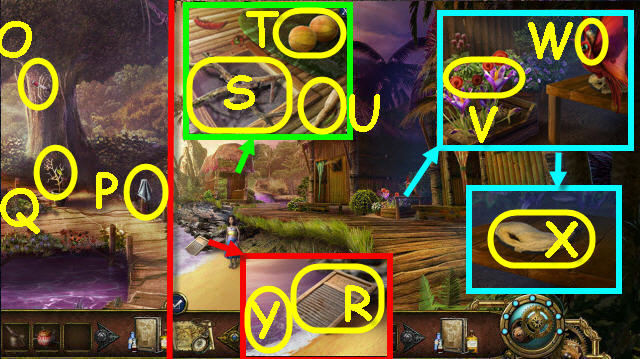
- Use the SPIKED TIGER to get the HUNTING KNIFE (O).
- Take the WASHCLOTH (P).
- Use the HUNTING KNIFE on the plant; receive DRY STICKS (Q).
- Back out.
- Use the WASHCLOTH on the washboard; get a CLEAN CLOTH (R).
- Place the DRY STICKS in the pit; use the BLOWTORCH on it (S).
- Take the HONEYNUTS (T) and PESTLE (U).
- Use the HUNTING KNIFE on the flowers; receive SAFFRON DANDELIONS (V).
- Take the note (W).
- Use the PINCUSHION on the hole; receive a WATERSKIN (X).
- Use the WATERSKIN on the water to get salt water in your Chemist’s Kit (Y).
- Enter Lois’s hut.

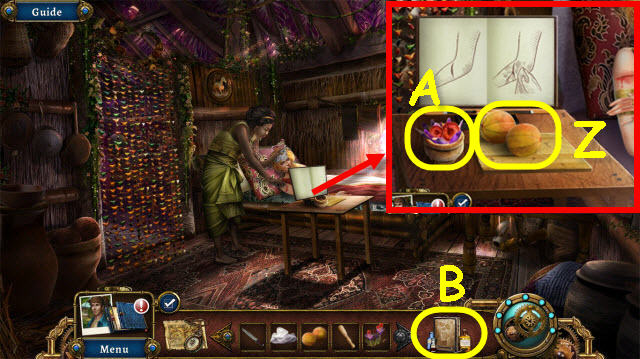
- Place the HONEYNUTS on the table; use the HUNTING KNIFE on them (Z).
- Place the SAFFRON DANDELIONS in the mortar; use the PESTLE on them (A).
- Both ingredients will be added to your Chemists Kit; select it to trigger a puzzle (B).

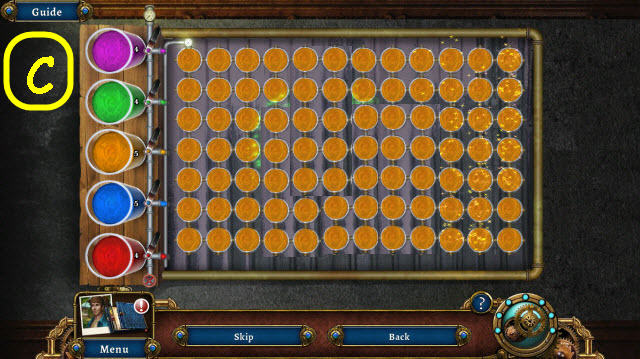
- Turn all circles orange.
- See screenshot for solution (C).
- You receive HEALING GEL.

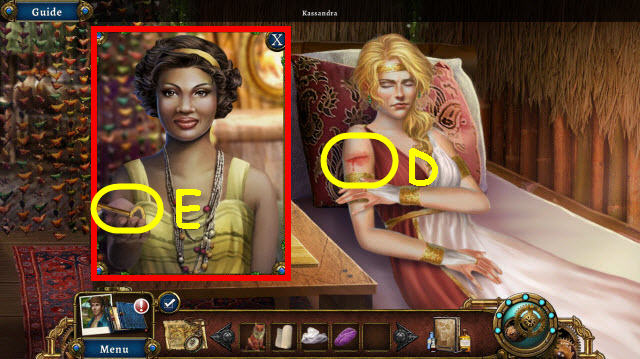
- Use the CLEAN CLOTH, HEALING GEL and BANDAGES on the wound (D).
- Take the KEY (E).
- Go to Diving outpost.

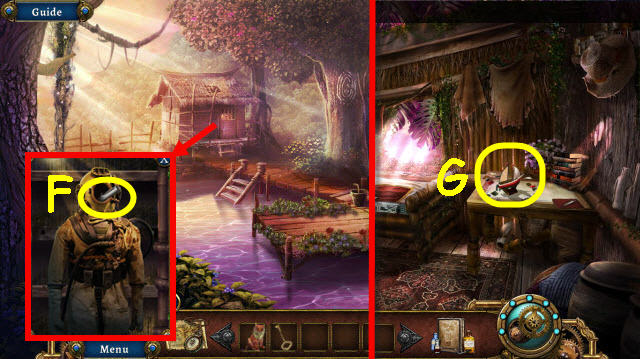
- Use the KEY on the lock; take the INSTRUCTIONS (F).
- Go to Lois’s hut.
- Place the INSTRUCTIONS on the sailboat to trigger a puzzle (G).

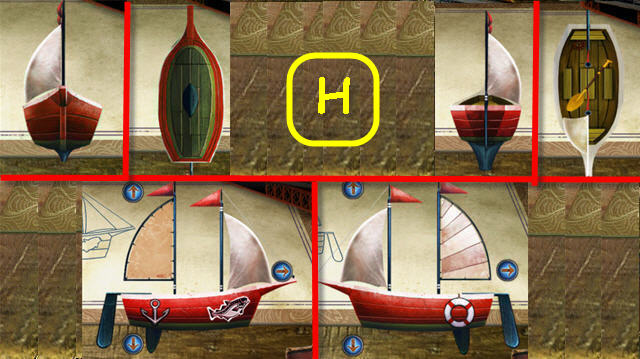
- Complete the sailboat.
- See screenshot for solution (H).
- You receive a TOY SAILBOAT.
- Back out.

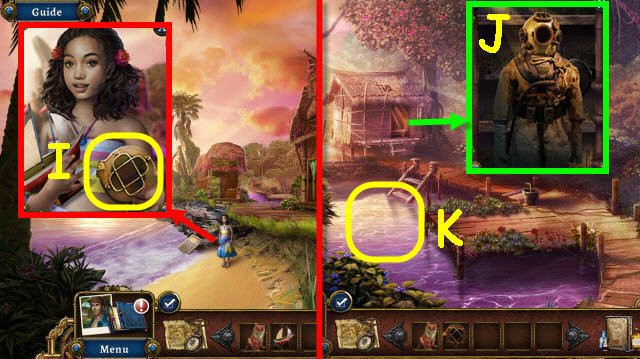
- Give the TOY SAILBOAT to the girl; take the FACE PLATE (I).
- Go to Diving post.
- Place the FACE PLATE on the suit; receive a DIVING SUIT (J).
- Use the DIVING SUIT on the water (K).

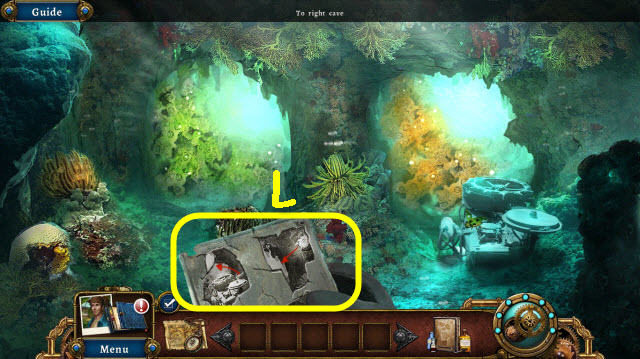
- Check your map (L).
- Go through the right cave, left cave and then right cave.
Chapter 5: Volcano Outpost

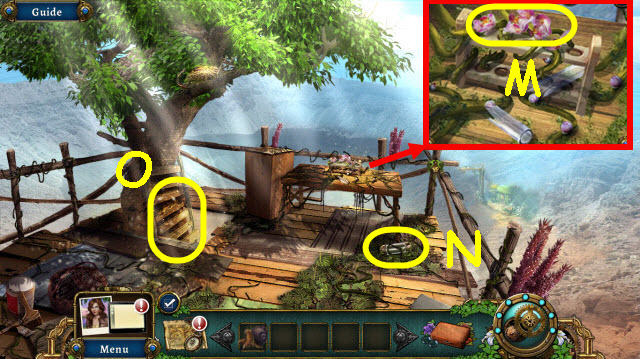
- Use CLAWCRAB to get the EDIBLE FLOWERS 1/3 (M).
- Take the CYLINDER 1/5 (N).
- Go down the ladder (O).

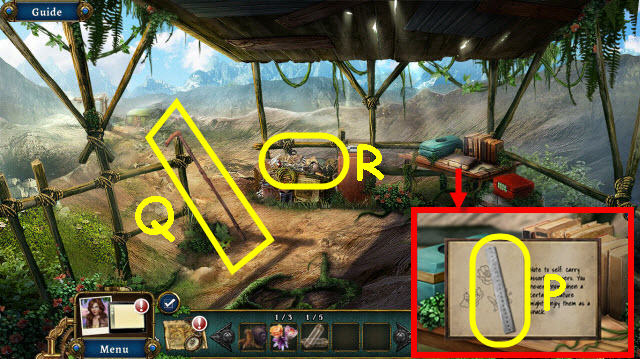
- Open the book; flip the pages and take the METAL RULER (P).
- Take the WALKING STICK (Q).
- Examine the bin to access a HOP (R).

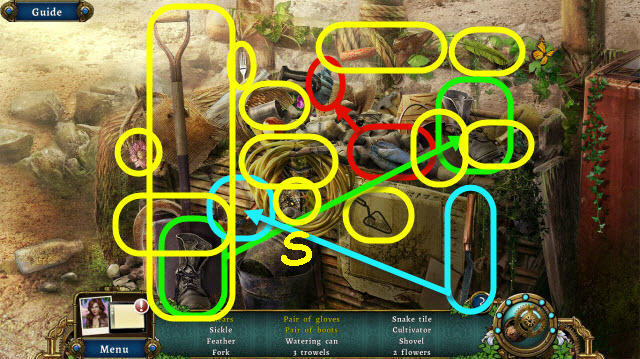
- Play the HOP.
- You receive a SNAKE TILE 1/4 (S).
- Go up the path.

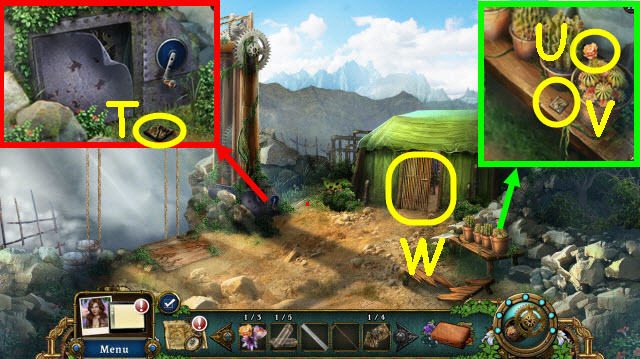
- Take the SNAKE TILE 2/4 (T).
- Use CLAWCRAB to get EDIBLE FLOWERS 2/3 (U).
- Take the SNAKE TILE 3/4 (V).
- Try and enter the hut (W).
- Back out twice.

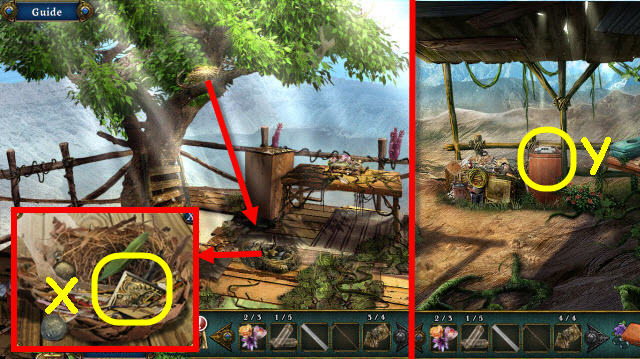
- Use the WALKING STICK on the nest; take the SNAKE TILE 4/4 (X).
- Go down the ladder.
- Place the 4 SNAKE TILES on the pedestal to trigger a puzzle (Y).

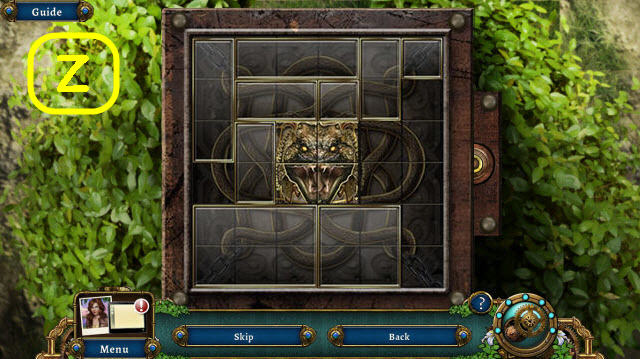
- Move the corner pieces to the center to complete the image.
- See screenshot for solution (Z).
- Take the FIRE EXTINGUISHER.
- Go up the path.

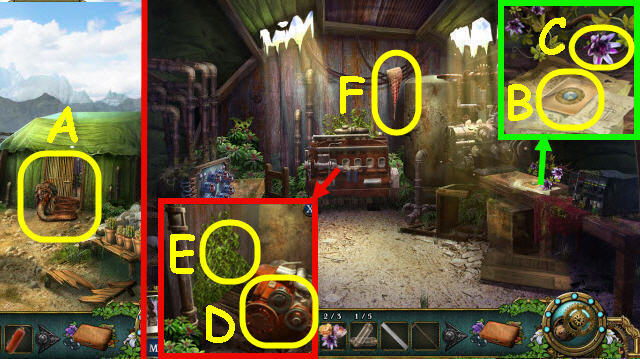
- Use the FIRE EXTINGUISHER on the creature (A).
- Go forward.
- Take the recipe (B) which will be added to your Botanist’s kit.
- Use CLAWCRAB to get the EDIBLE FLOWERS 3/3 (C).
- Use the WALKING STICK on the machine (D).
- Use the METAL RULER on the moss 3x (E) to get moss in the Botanist’s kit.
- Take the snake skin (F) for your Botanist kit.
- Go to Lookout post 2F.

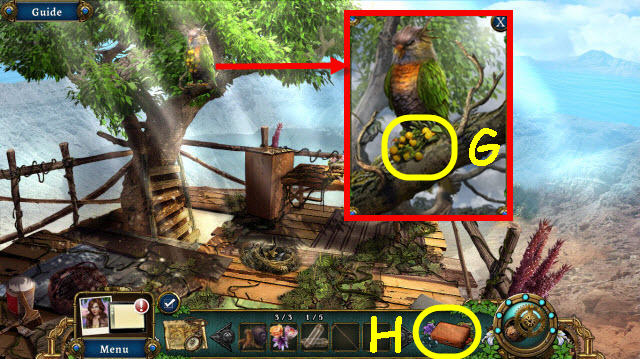
- Give the 3 EDIBLE FLOWERS to the Horned Lorikeet; use the WALKING STICK to get the tiny citrus bunch (G) in your Botanist’s kit.
- Select the Botanist kit to trigger a puzzle (H).

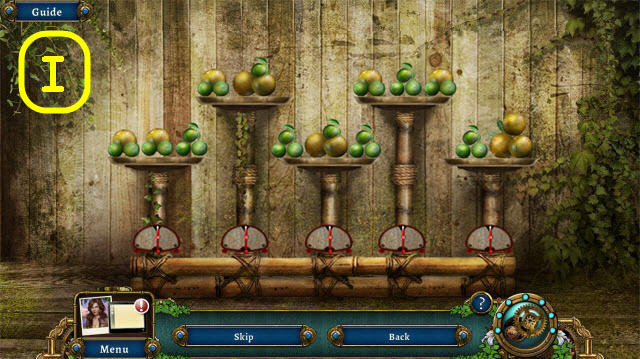
- Swap the fruit to balance the scales.
- See screenshot for solution (I).
- You receive a RUST REMOVER.
- Go to Inside comm center.

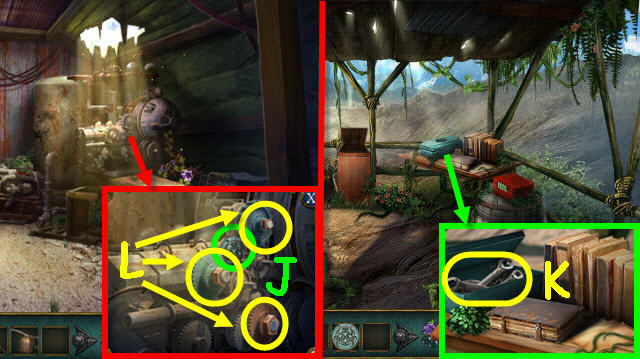
- Use the RUST REMOVER on the engine; take the AQUEUX LOGO (J).
- Back out twice.
- Place the AQUEUX LOGO on the toolbox; open the lid and take the WRENCH SET (K).
- Return to Inside comm center.
- Use the WRENCH SET on all three nuts; take the GEARS 1-3/3 (L).
- Back out.

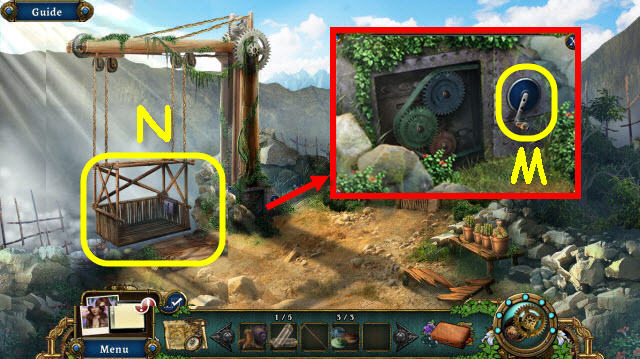
- Remove the cover and place the 3 GEARS on the mechanism; turn the handle (M).
- Go down the lift (N) and then down to Campsite.

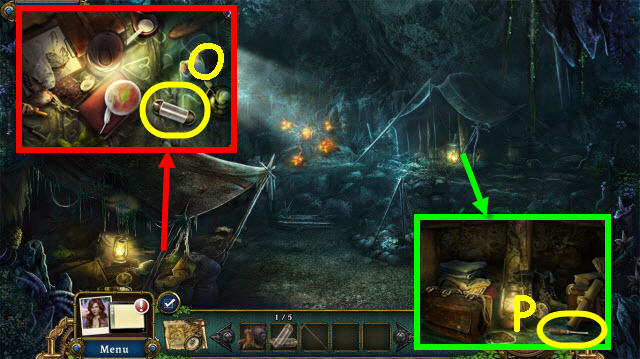
- Move the blanket; take the CYLINDER 2/5 (O).
- Take the SCREWDRIVER (P).
- Back out; go forward twice.

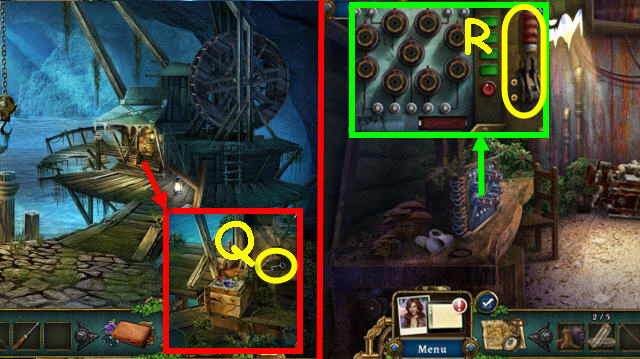
- Take the KEY (Q).
- Go to Inside comm center.
- Use the SCREWDRIVER on both screws; take the LEVER (R).
- Go to Cavern.

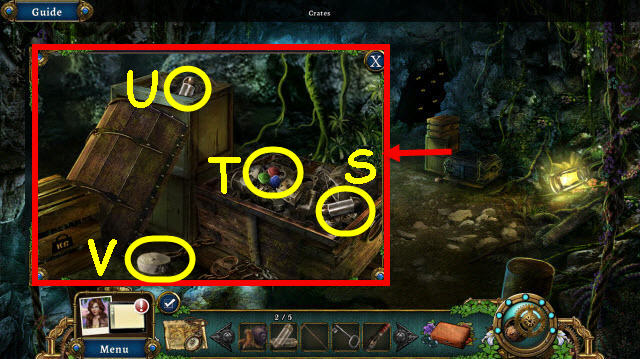
- Use the KEY on the padlock; open the lid and take the CYLINDER 3/5 (S) and CONTROL PANEL BUTTONS (T).
- Knock off the crate; take the CYLINDER 4/5 (U).
- Take the DIAL (V).
- Go to Cliff.

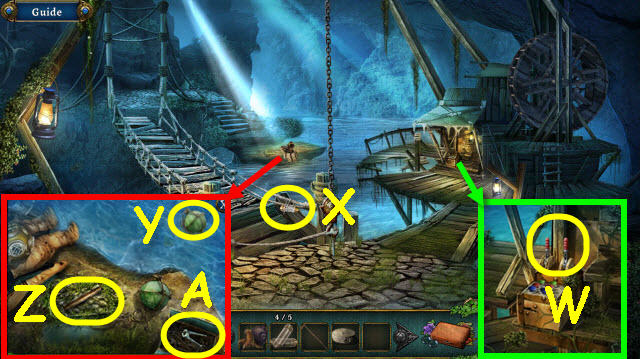
- Place the CONTROL PANEL BUTTONS and LEVER on the mechanism; pull the right lever (W).
- Take the CYLINDER 5/5 (X).
- Use the WALKING STICK on the buoy (Y).
- Use CLAWCRAB on the moss; take the PIPE (Z) and PLIERS (A).
- Back out.

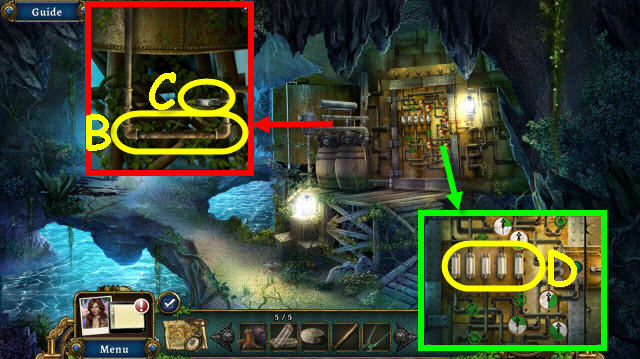
- Place the PIPE on the pipes (B); take the 2nd DIAL (C).
- Select the broken cylinders and place the 5 CYLINDERS on them (D); turn any valve to trigger a puzzle.

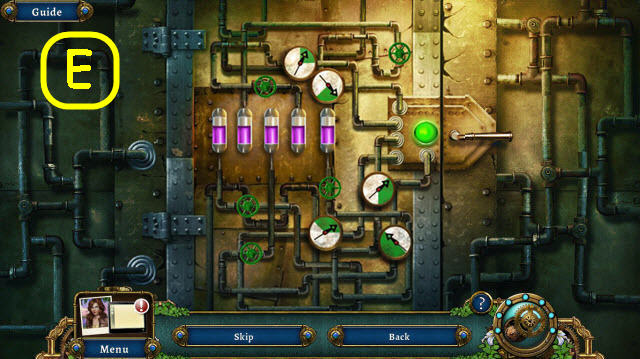
- Turn the valves to fill the vials and set the dials to green.
- See screenshot for solution (E).

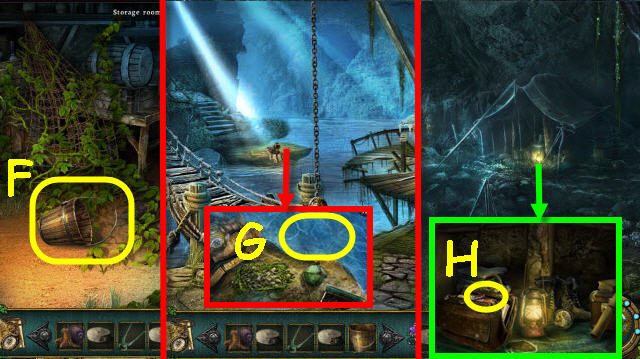
- Take the BUCKET (F).
- Go to Cliff.
- Use the BUCKET on the water; receive a FILLED BUCKET (G).
- Go to Campsite.
- Use PLIERS on bag and open it; take the DEAD BATTERY (H).
- Go to Supply Cave and zoom into Storage room.

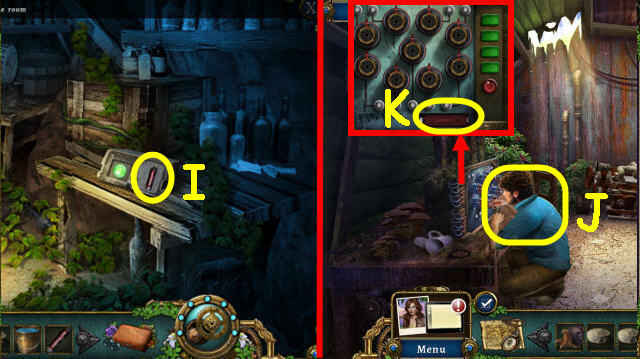
- Place the DEAD BATTERY on the charger; take the CHARGED BATTERY (I).
- Go to Inside comm center.
- Speak to Ian (J).
- Place the CHARGED BATTERY in the slot to trigger a puzzle (K).

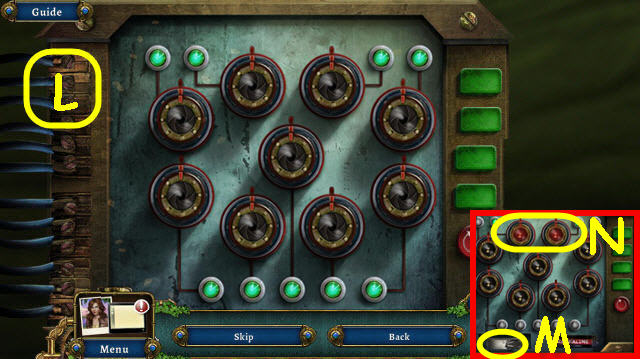
- Rotate the dials so they all point up.
- See screenshot for random solution (L).
- Take the 3rd DIAL (M).
- Select the two red cameras (N).
- Go to Lookout post 1F.

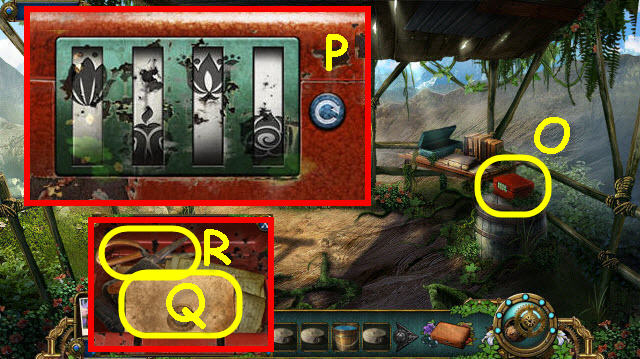
- Place the 3 DIALS on the box to trigger a puzzle (O).
- Rotate the dials to complete the images.
- See screenshot for solution (P).
- Take the recipe (Q) which will go to your Botanist’s kit and the SHEARS (R).
- Go to Supply cave and examine Storage room.

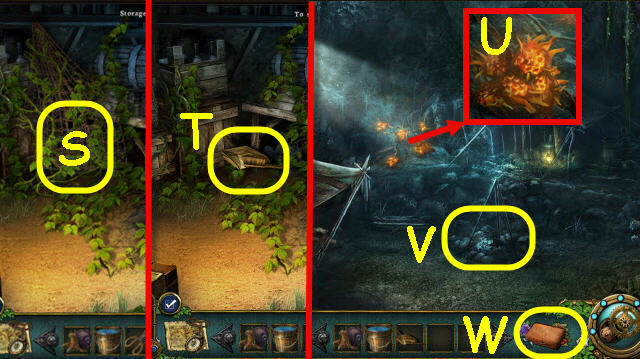
- Use the CLAWCRAB and SHEARS on the net to get wick (S) added to Botanist’s kit.
- Take the BRUSH AND DUSTPAN (T).
- Go to Campsite.
- Use the FILLED BUCKET and CLAWCRAB on the lava fruit to get lava fruit (U) added to Botanist’s kit.
- Use the BRUSH AND DUSTPAN on the ashes (V) to get ashes added to Botanist’s kit.
- Select the Botanist’s kit to access a puzzle (W).

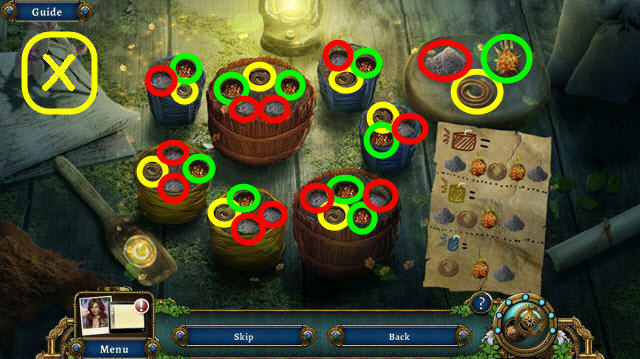
- Place the proper ingredients in the containers.
- See screenshot for solution (X).
- You receive PLANT BOMBS.
- Back out.

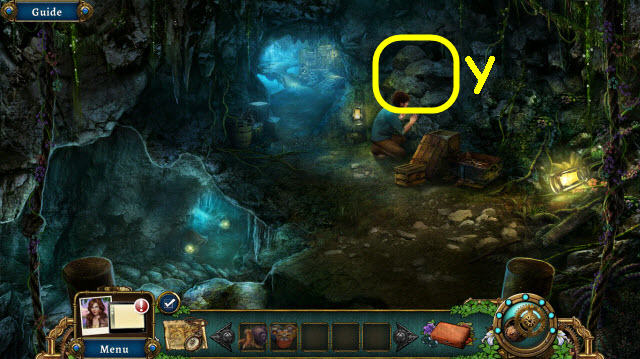
- Place the PLANT BOMBS on the rock wall (Y).
- You will trigger a puzzle.

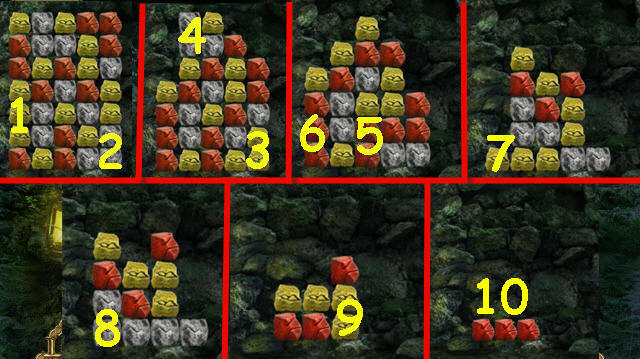

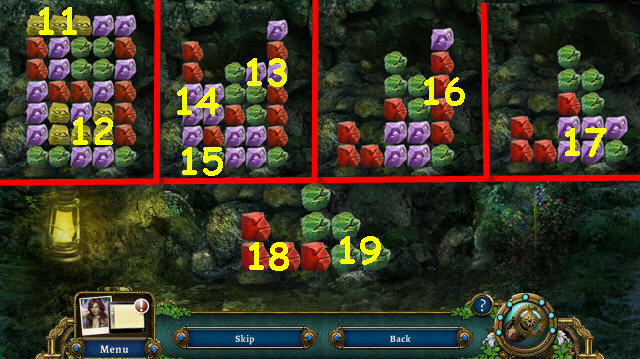

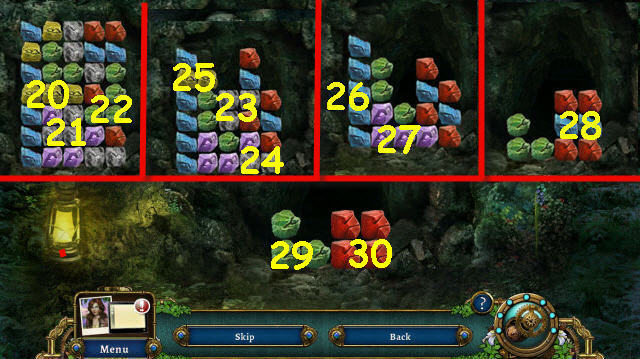
- Clear the rocks by selecting groups of 2 or more.
- See screenshot for first set order (1-10).
- Second set order (11-19).
- Third set order (20-30).
Chapter 6: Portal

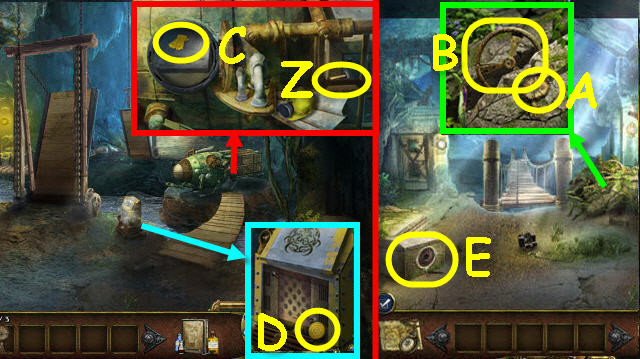
- Go forward.
- Speak to Ellie.
- Take the MALLET (Z).
- Back out to Path to bridge.
- Take the STONE FIGURINE 1/3 (A).
- Use the MALLET on the stone twice; take the WHEEL (B).
- Go forward.
- Place WHEEL on door and turn it; take the YELLOW SAFETY GLOVES (C).
- Use the YELLOW SAFETY GLOVES on the panel; take the STONE MEDALLION (D).
- Back out.
- Place the STONE MEDALLION on the chest to trigger a HOP (E).

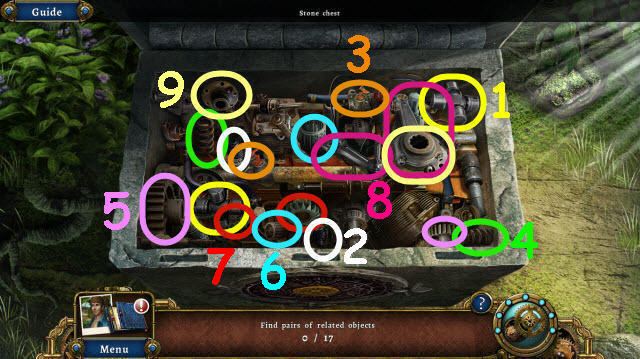

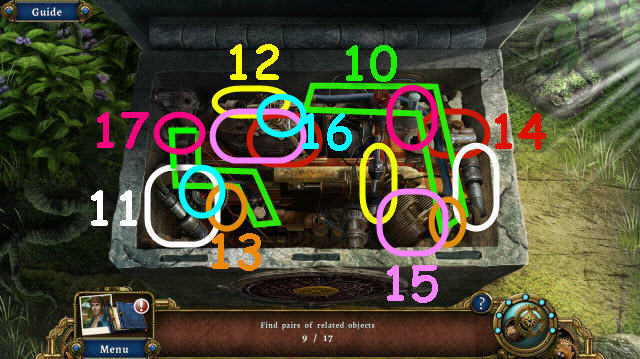
- Find the matching pairs (1-9).
- Additional pairs (10-17).
- You receive WIRE CONNECTORS.
- Go forward.

- Place the WIRE CONNECTORS on the panel to trigger a puzzle (F).
- Connect the nodes.
- See screenshot for solution (G).
- Take the PHOTO 1/3 and METAL BAR.
- Go left into Joe’s Lab.

- Take the PHOTO 2/3 (H).
- Use the YELLOW SAFETY GLOVES to remove 4 glass shards; take the KEYS (I).
- Use the MALLET on bent ladder rungs 3x; take the LADDER (J).
- Back out.
- Use KEYS on the compartment; take the INSTANT FILM (K).
- Go to Path to bridge.

- Place the INSTANT FILM in the camera and press the button; take the PHOTO 3/3 (L).
- Go to Joe’s lab.
- Place the 3 PHOTOS on the safe to trigger a puzzle (M).

- Punch in the correct code on the safe.
- See screenshot for solution (N).
- Unwrap the box; take the BULLETS (O).
- Back out.

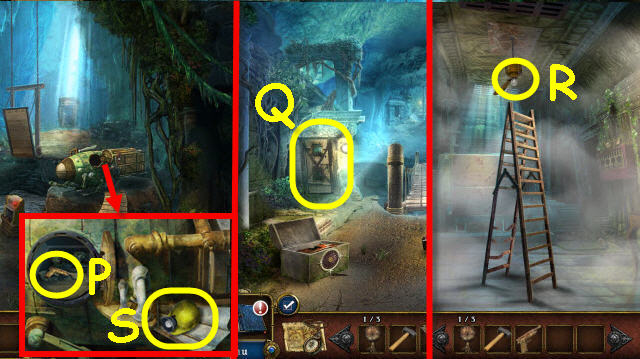
- Place the BULLETS in the gun; take the GUN (P).
- Go to Path to bridge.
- Use the GUN on the padlock; enter the generator room (Q).
- Place the LADDER under the fan; take the BULB (R).
- Go to Drawbridge.
- Place the BULB in the hat; take the HARD HAT (S).
- Back out.

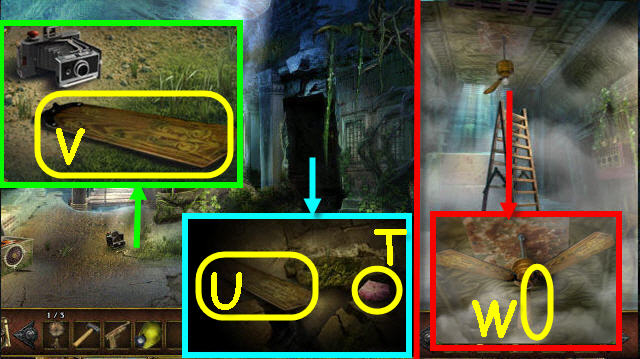
- Use the HARD HAT on the nook; use the MALLET on the two rocks. Take the PUMICE (T) and FAN BLADE 1/2 (U).
- Use PUMICE on the moss 3x; take the FAN BLADE 2/2 (V).
- Go to Generator room.
- Place the 2 FAN BLADES on the fan; pull the chain (W).

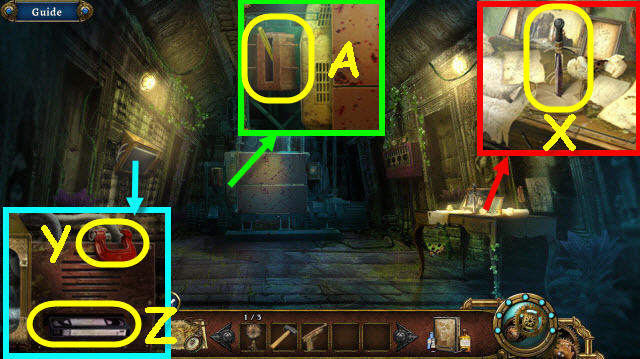
- Take the DAGGER (X) and read the note.
- Use the DAGGER to get the CLAMP (Y).
- Push the arrow; take the UNWATCHED TAPE (Z).
- Place the METAL BAR in the slot; pull the bar to trigger a puzzle (A).

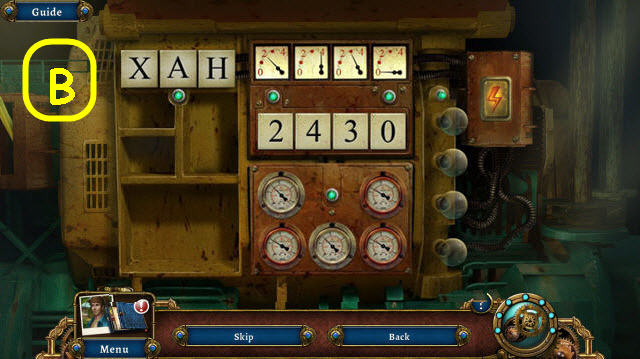
- Put the items where they belong and set the dials and buttons to turn all the lights green.
- See screenshot for solution (B).
- Go to Drawbridge.

- Give the CLAMP to Ellie (C).
- Press the button (D).
- Take the STONE FIGURINE 2/3 (E).
- Use the MALLET on the rocks twice; use the GUN on lever (F).
- Take the STONE FIGURINE (G) and EMPTY CAN (H).
- Go left.

- Open the tape drive and use the DAGGER on the piece; take the STATUE PIECE (I).
- Place the UNWATCHED TAPE in the drive; push it in and press the arrow (J).
- Back out twice.
- Use the DAGGER and EMPTY CAN on the vine to get an oil sample (K) in your Chemist’s kit.
- Go to Generator room.

- Place the 3 STONE FIGURINES and STATUE PIECE in the slots; push one (L).
- Push the button (M); take the HOSE (N).
- Go to drawbridge.
- Examine the portal door to trigger a puzzle (O).

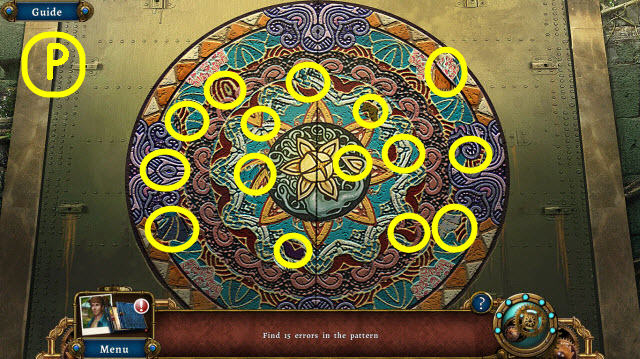
- Find the differences.
- See screenshot for solution (P).
- Go forward.

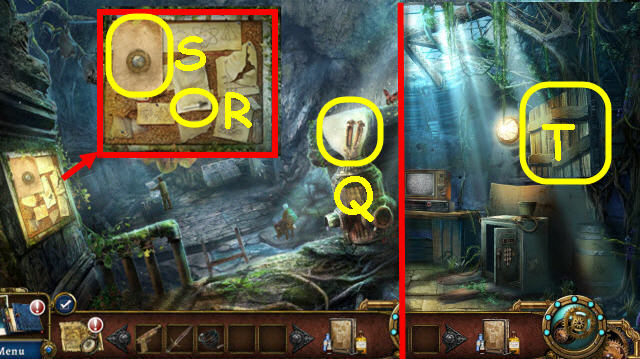
- Take the HANDLE (Q).
- Take the DROPPER (R) and recipe (S) which is added to your Chemist’s kit.
- Go to Joe’s lab.
- Use the HANDLE on the cabinet and open it to trigger a puzzle (T).

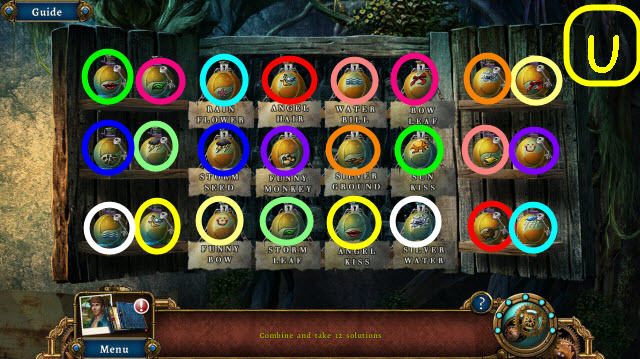
- Combine the correct solutions.
- See screenshot for solution (U).
- Take the 12 solution samples when complete to be added to your Chemist’s kit.

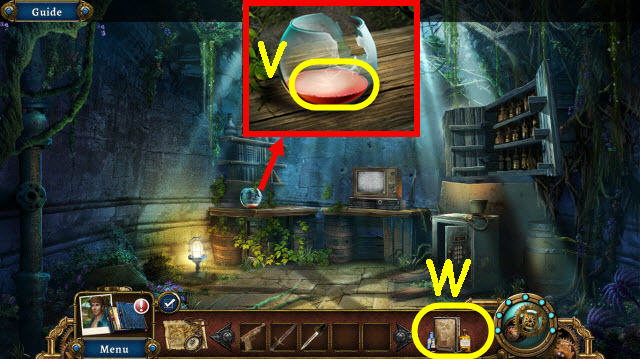
- Use the DROPPER on the bowl to get bat bait drops (V) added to your Chemist’s kit.
- Examine the Chemist’s kit to trigger a puzzle (W).

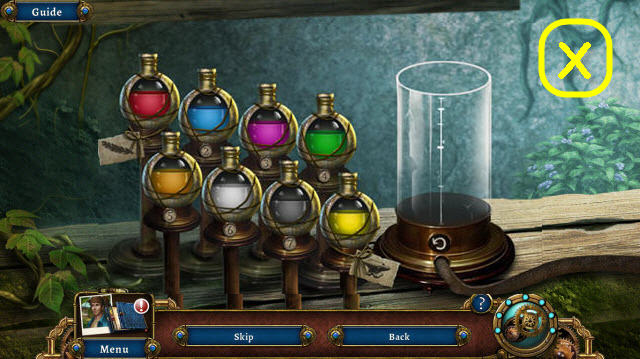
- Drag and drop the bottles according to weight.
- See screenshot for solution (X).
- You receive BAT BAIT.
- Go to Portal room.

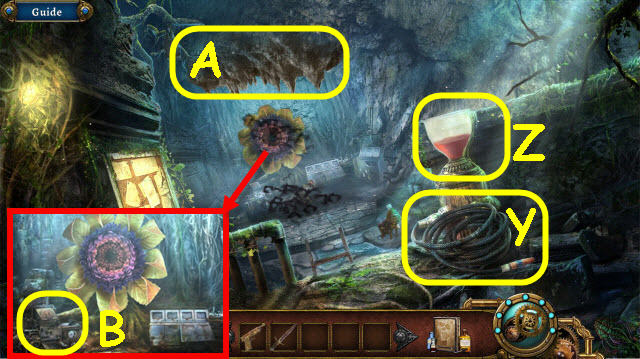
- Place the HOSE on the hydrant (Y) and the BAT BAIT in the container (Z); select the container.
- Use the Gun on the rocks (A).
- Examine the control panel to trigger a puzzle (B).

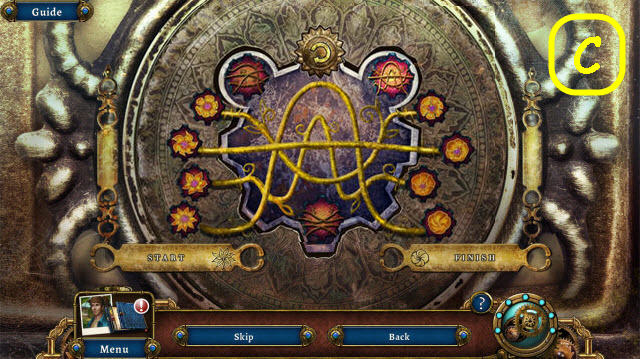
- Arrange the flowers from open to closed.
- See screenshot for solution (C).
- Back out of close-up.

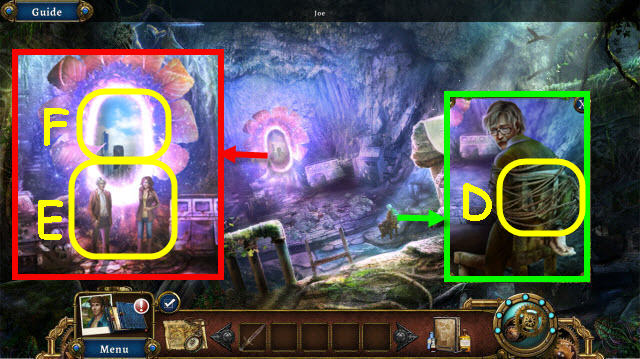
- Use the DAGGER on the ropes (D).
- Speak to both Ellie and Joe (E).
- Go through portal (F).
- Congratulations! You have successfully completed Botanica: Earthbound.


 My Beautiful Vacation Walkthrough, Guide, & Tips
 Mystery Tales: The Lost Hope Walkthrough, Guide, & Tips
 Fearful Tales: Hansel and Gretel Walkthrough, Guide, & Tips
 Haunted Hotel: Death Sentence Walkthrough, Guide, & Tips
 Redemption Cemetery: Clock of Fate Walkthrough, Guide, & Tips