Spirits of Mystery: The Silver Arrow Walkthrough, Guide, & Tips
Spirits of Mystery: The Silver Arrow Walkthrough

Welcome to the Spirits of Mystery: The SIlver Arrow Walkthrough
The mystical Silver Arrow has been stolen from you on the eve of your wedding. Without it, you can’t marry your beloved Prince Philip! Can you track down the arrow in time?
Whether you use this document as a reference when things get difficult or as a road map to get you from beginning to end, we’re pretty sure you’ll find what you’re looking for here.
This document contains a complete Spirits of Mystery: The SIlver Arrow game walkthrough featuring annotated screenshots from actual gameplay!
We hope you find this information useful as you play your way through the game. Use the walkthrough menu below to quickly jump to whatever stage of the game you need help with.
Remember to visit the Big Fish Games Forums if you find you need more help. Have fun!
This walkthrough was created by David Becker, and is protected under US Copyright laws. Any unauthorized use, including re-publication in whole or in part, without permission, is strictly prohibited.
General Tips
- This is the official guide for Spirits of Mystery: The Silver Arrow.
- This guide will not mention each time you have to zoom into a location; the screenshots will show each zoom scene.
- We will use the acronym HOP for Hidden-object puzzles. Interactive items will be color-coded and some will be numbered; please follow the numbers in sequence.
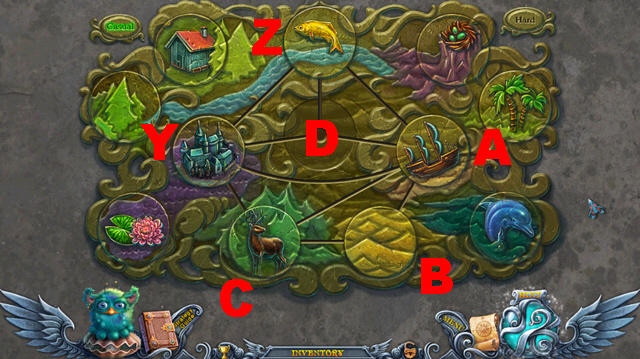
- Use the map to travel to a location.
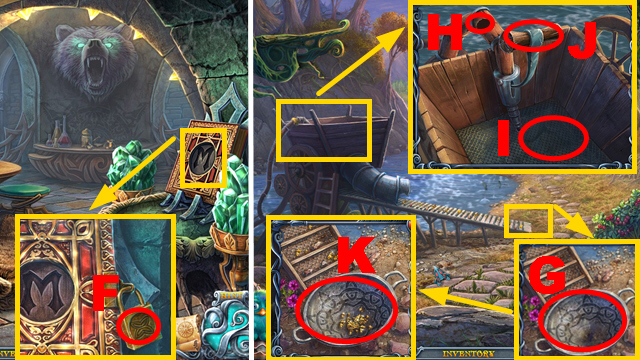
Chapter 1: The Castle

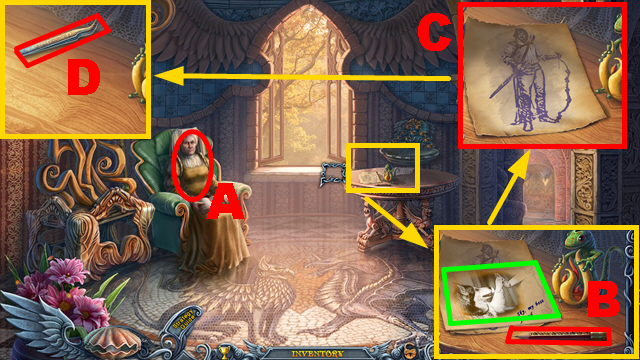
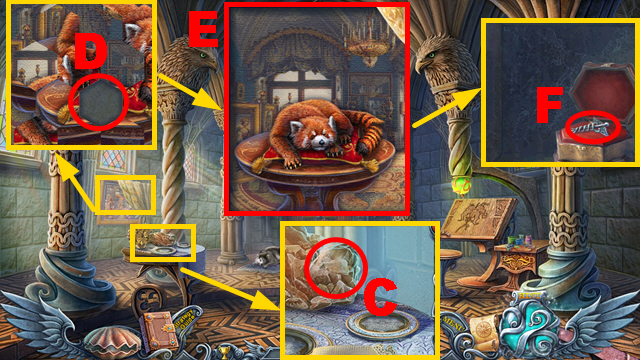
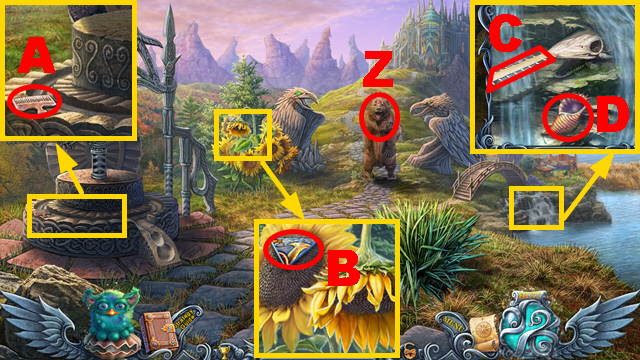
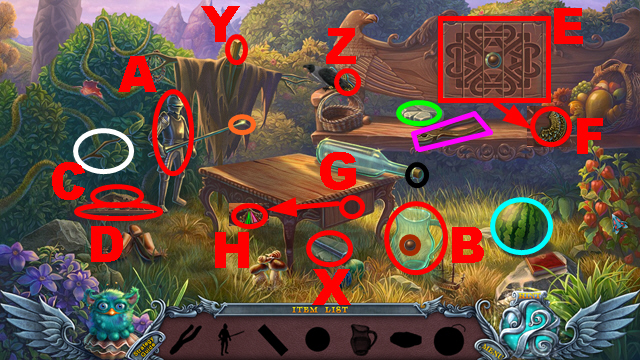
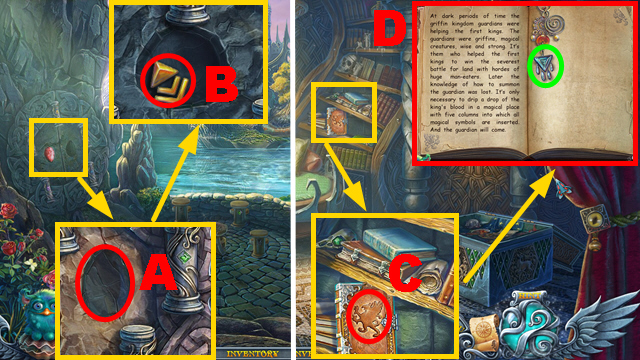
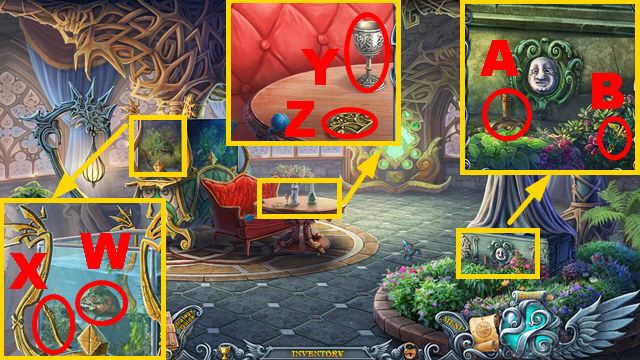
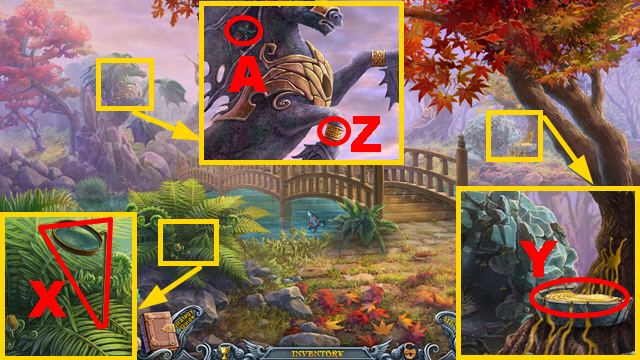
- Talk to the woman (A).
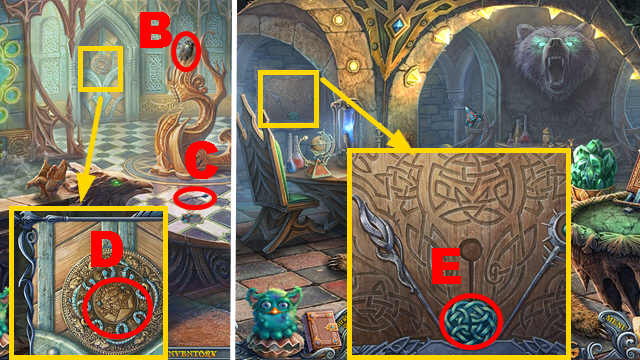
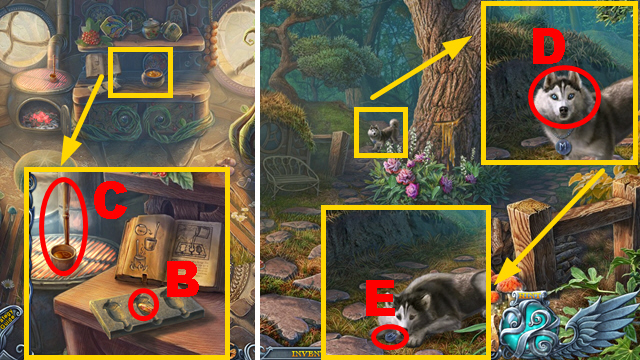
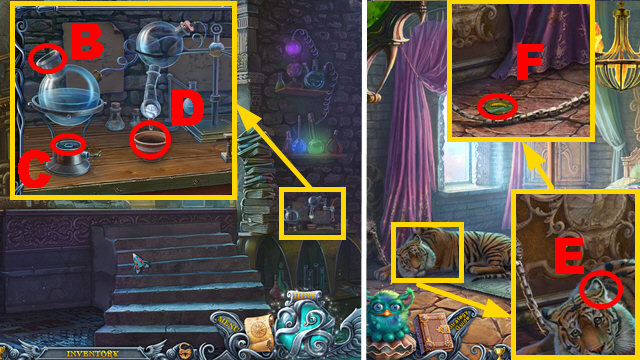
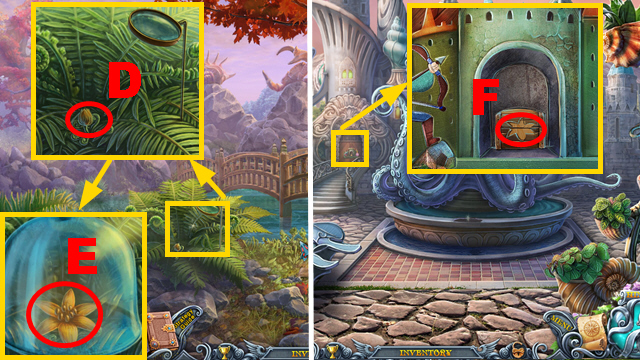
- Take the PENCIL (B) and note (green); use the PENCIL to complete the drawing (C), take the drawing and TWEEZERS (D).
- Turn right.
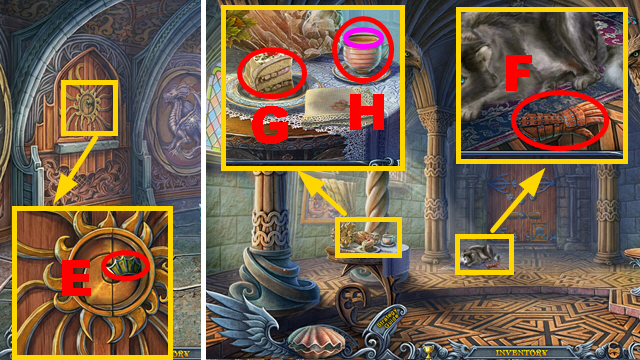
- Collect the SALAMANDER CREST with the TWEEZERS (E).
- Turn right.
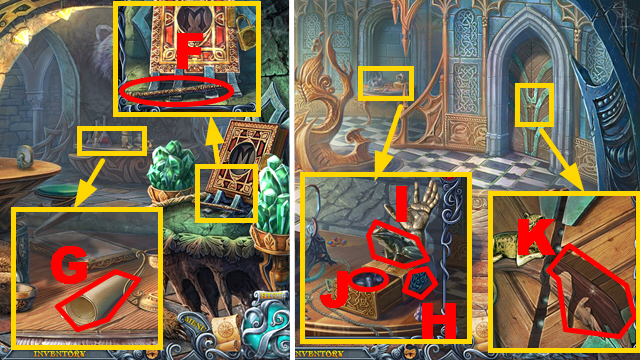
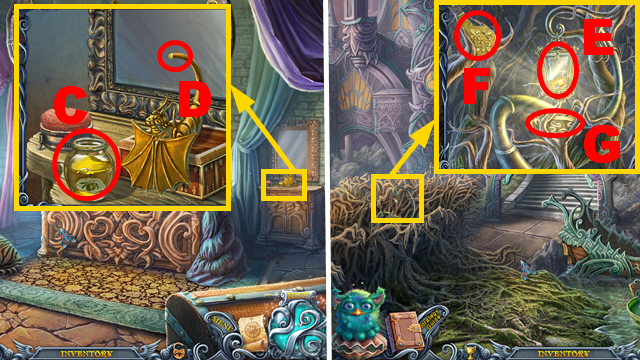
- Take the GLOVE (F).
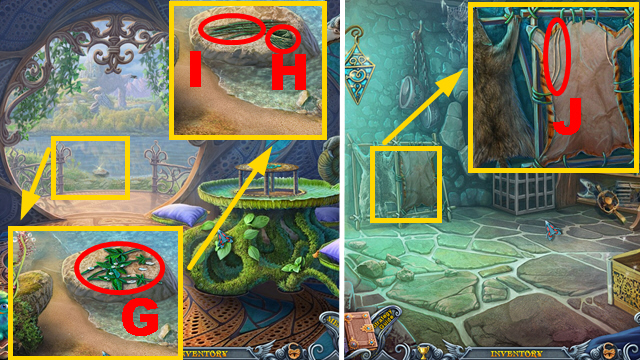
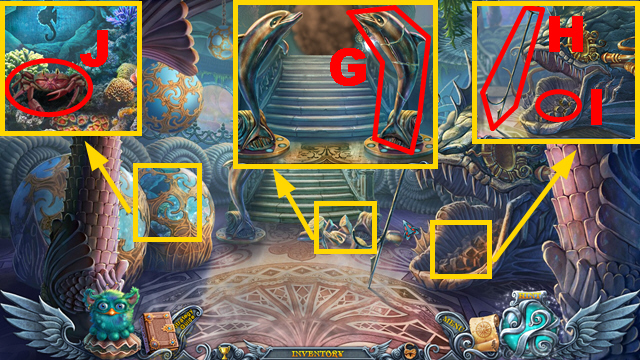
- Eat the cake (G), drink the tea (purple); take the EMPTY CUP (H).
- Walk down twice.
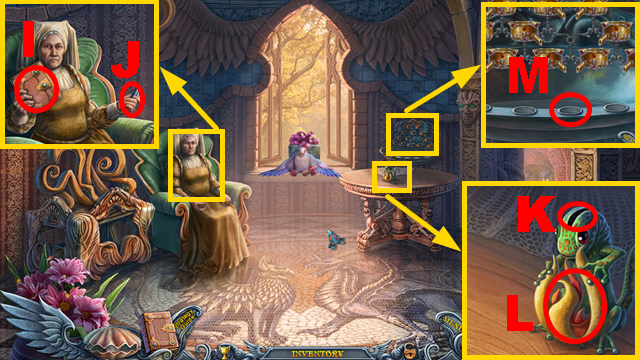
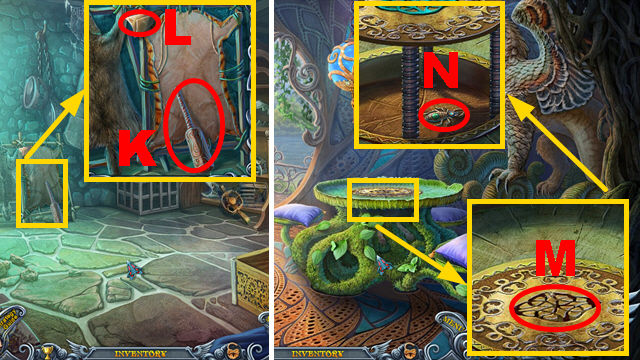
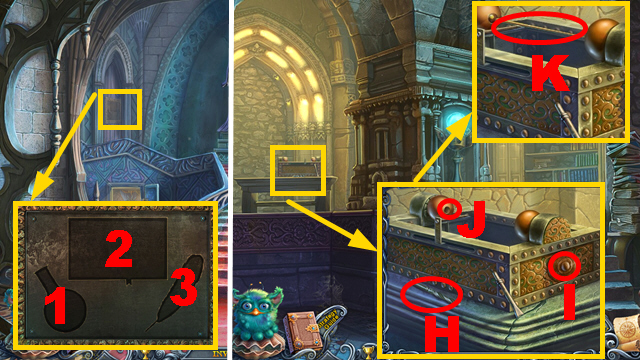
- Take the book (I) and DRAGON HORN (J).
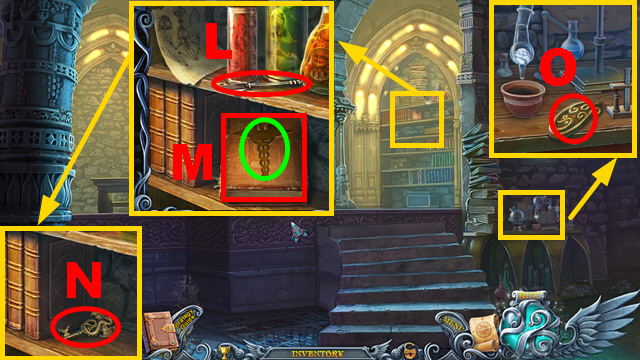
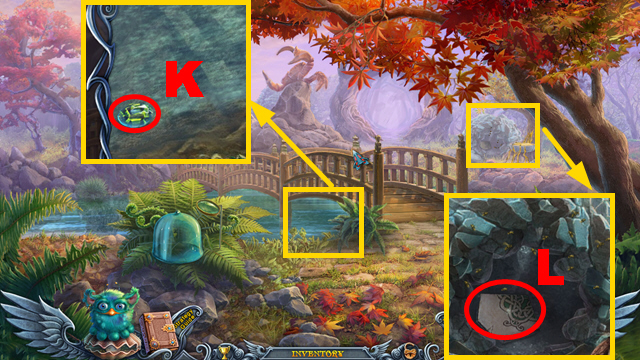
- Connect the SALAMANDER CREST (K); take the FLAME FIGURINE (L).
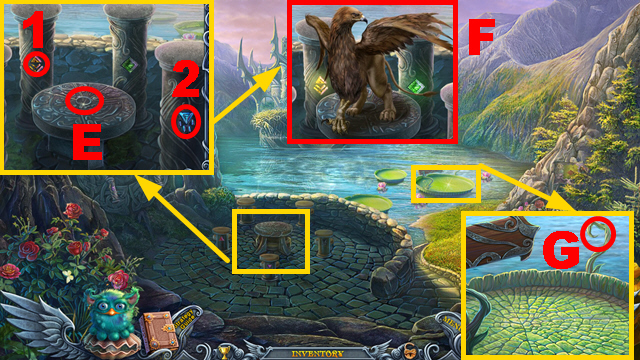
- Put down the EMPTY CUP (M).
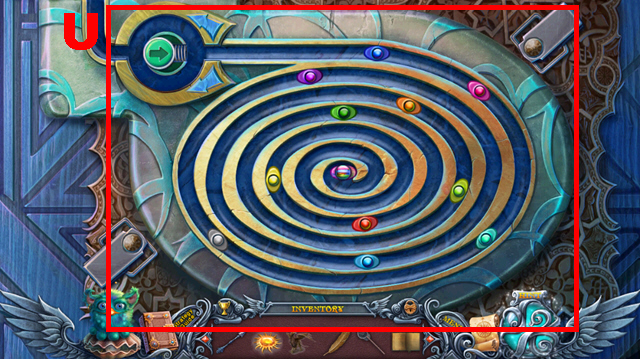
- Play the mini-game.

- Solution: 1, 2, 3, 2, 1, 2.
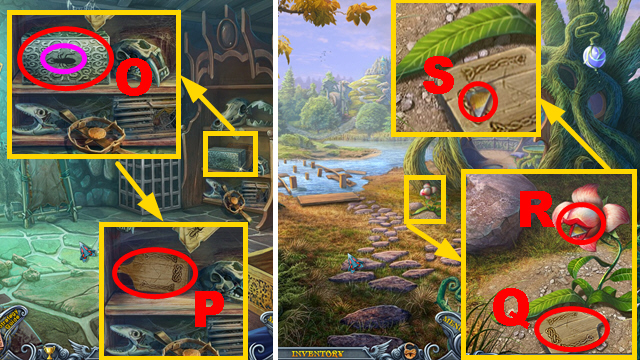
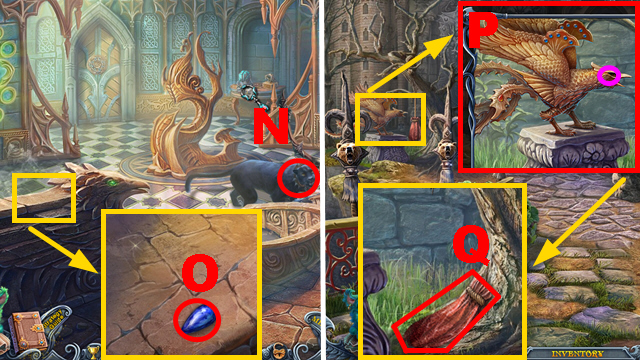
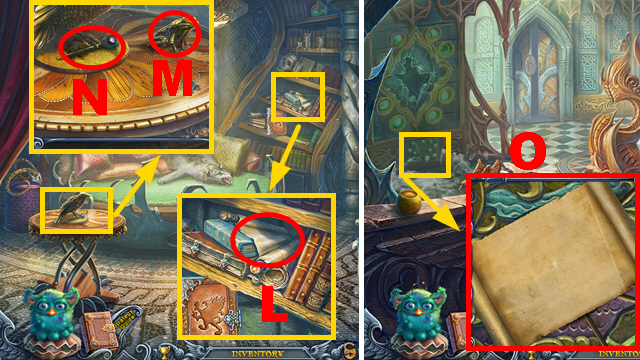
- Take the CUP OF WATER (N).
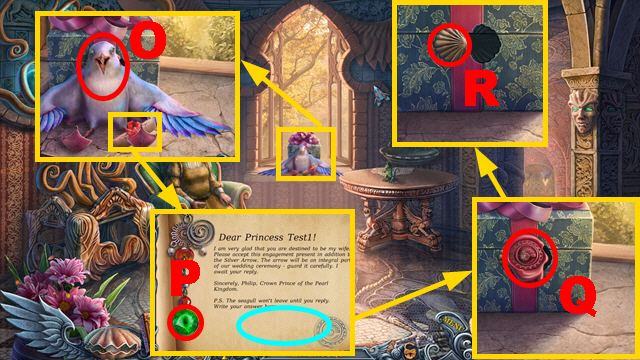
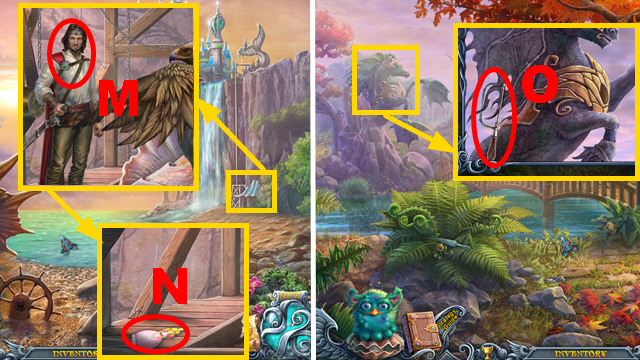
- Give the CUP OF WATER to the bird (O); take the GRIFFIN EYE (P); write the reply with the PENCIL (blue).
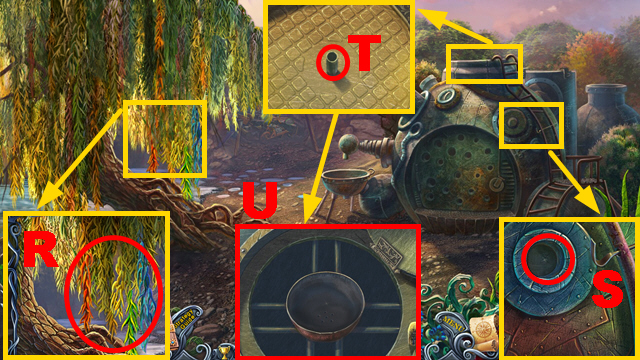
- Take the WAX SEAL (Q) and SHELL (R).
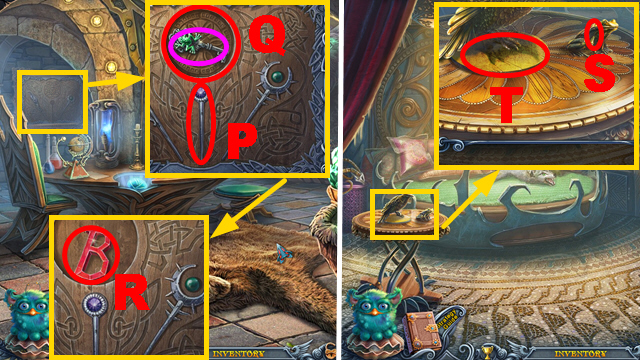
- Turn right.
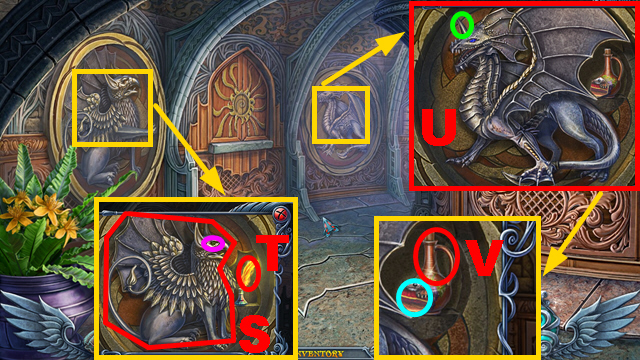
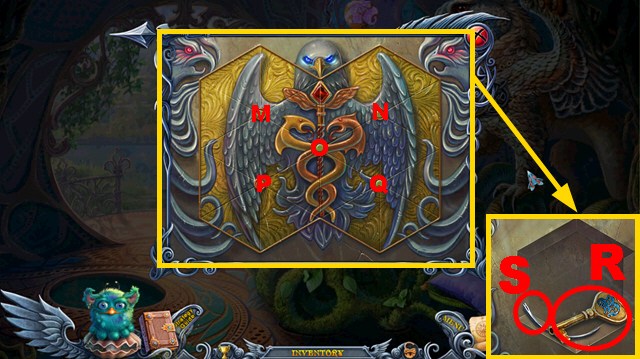
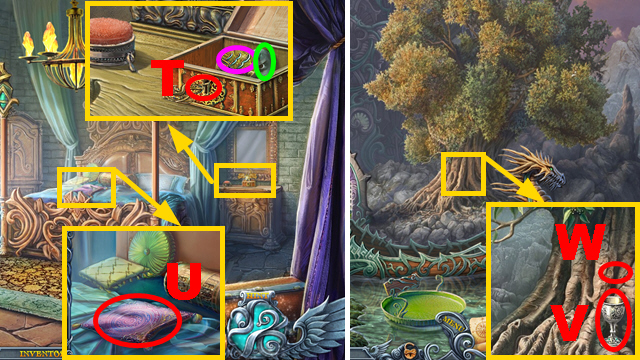
- Insert the GRIFFIN EYE (purple); position the figurine as shown (S). Collect the BURNING FEATHER with the GLOVE (T).
- Insert the DRAGON HORN (green); position the figurine as shown (U). Take the PAINTING FRAGMENT (blue) and OLD WINE (V).
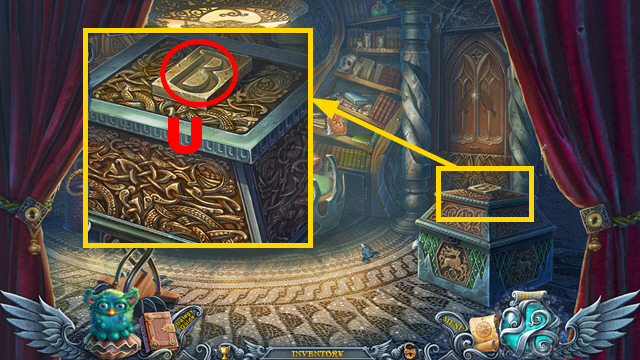
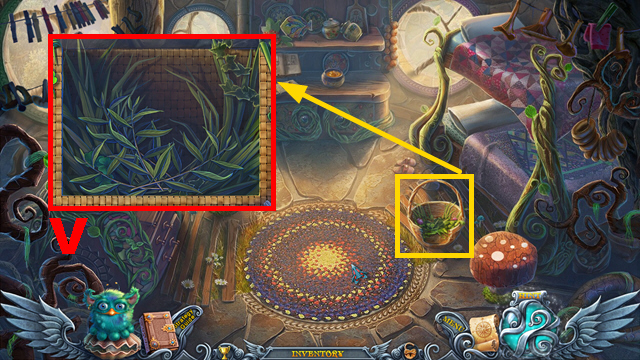
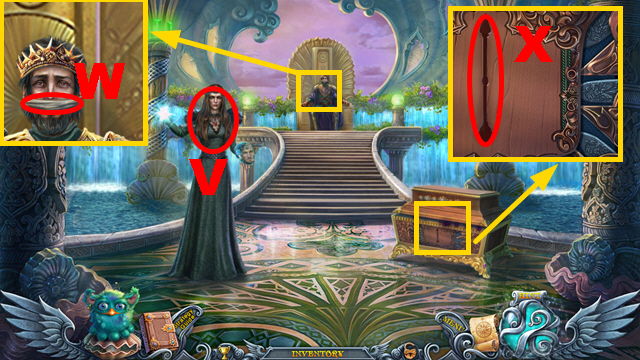
- Go through the right door.
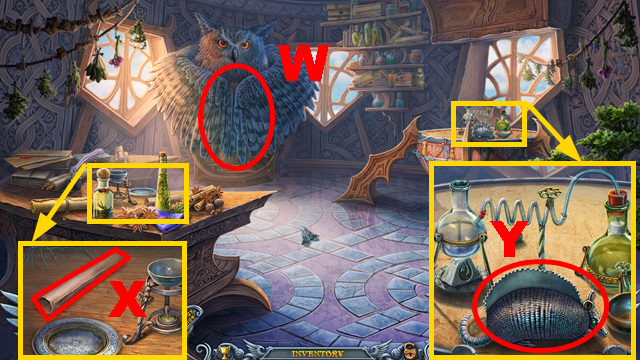
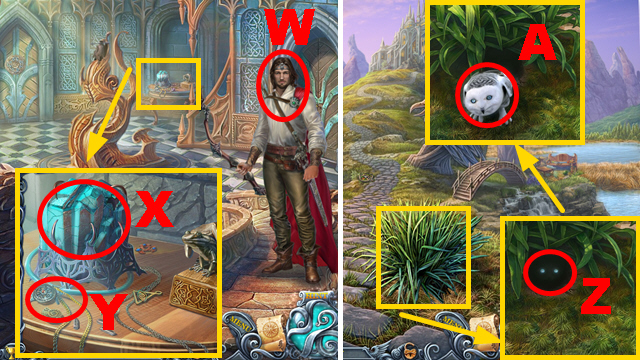
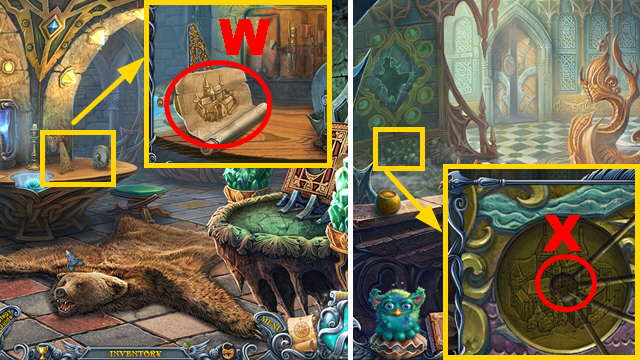
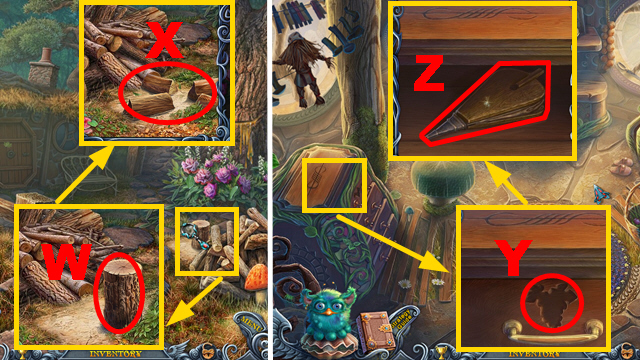
- Open the wings (W).
- Unfold the recipe (X).
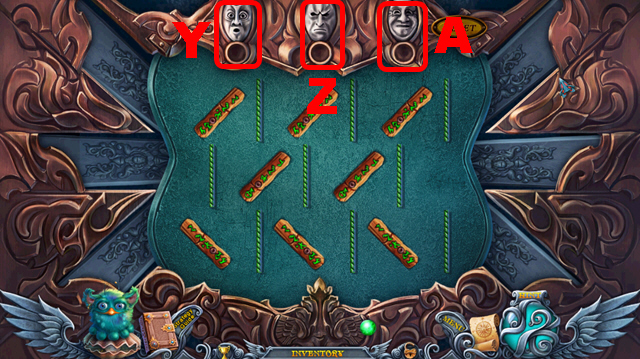
- Take the SAW (Y).
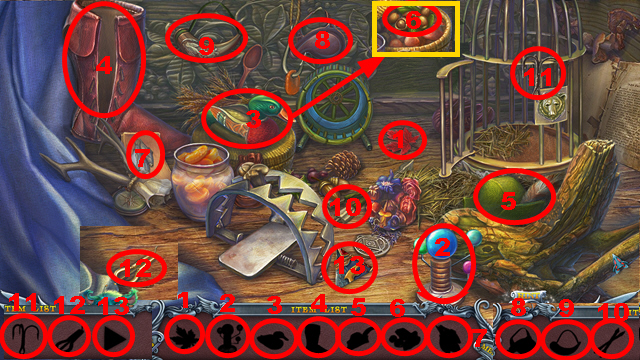
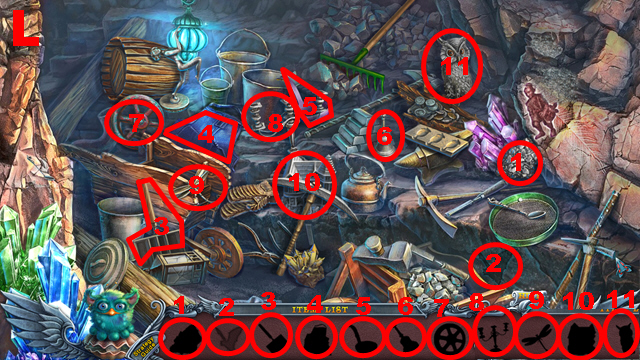
- Play the HOP.
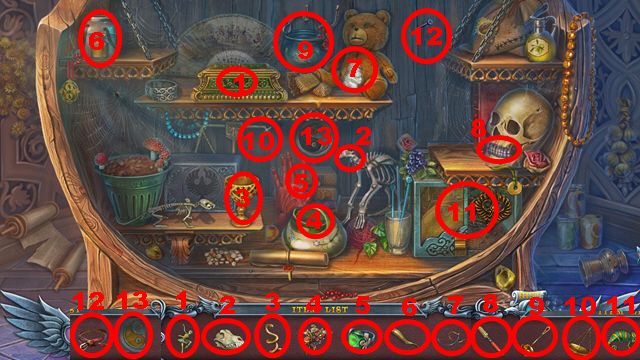
- Solution: 1-13.
- You receive the BELT.
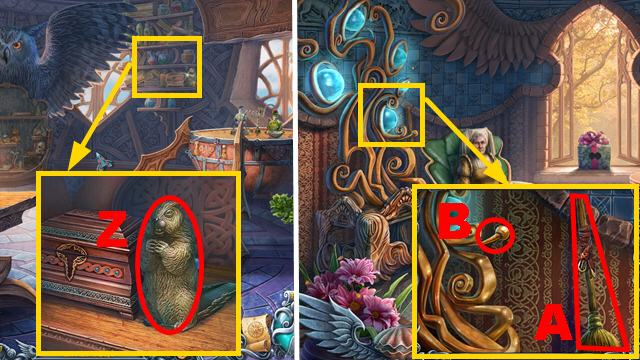
- Take the CHISEL (Z).
- Walk down twice.
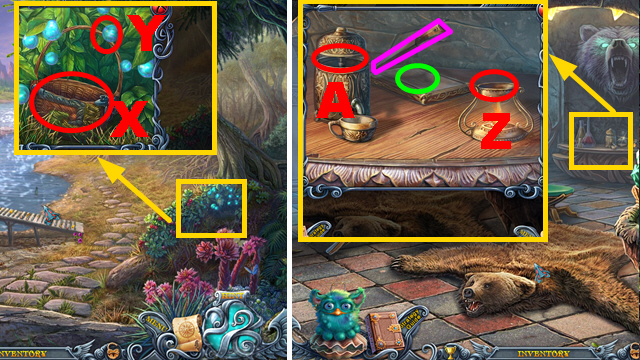
- Try to take the broom; straighten it, put the BELT on it and take the BROOM (A). Cut the pestle with the SAW (B) to acquire the PESTLE.
- Turn right, move forward.
- Cut the gypsum with the SAW; take the GYPSUM (C).
- Insert the PAINTING FRAGMENT into the slot (D).
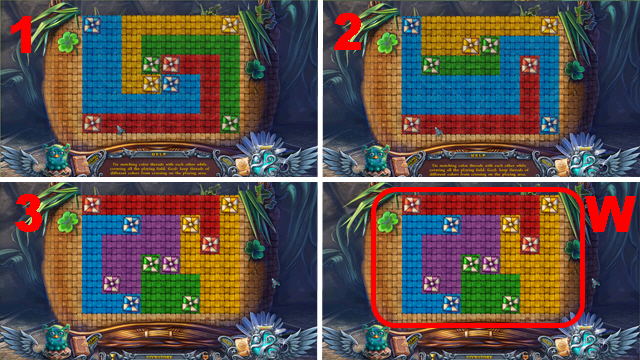
- Play the mini-game.
- Assemble the correct picture (E); take the SYMBOL OF HEALING (F).
- Walk down, turn right.

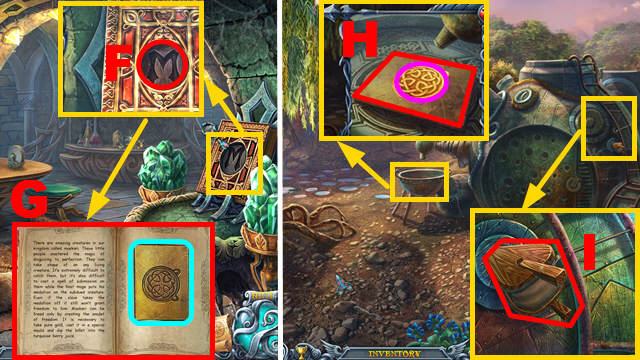
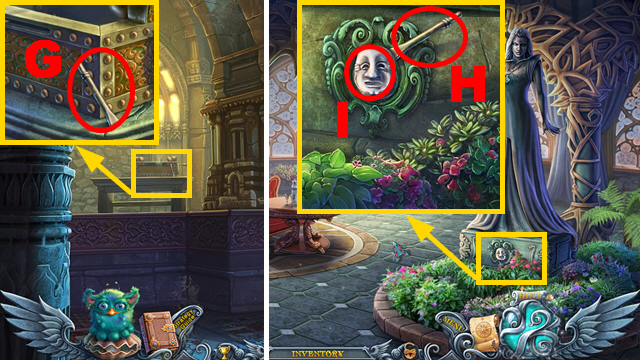
- Insert the SYMBOL OF HEALING into the niche (G); take the recipe (H), PAINTING FRAGMENT (I), and BERRIES (J).
- Walk down, move forward.
- Insert the PAINTING FRAGMENT into the slot (K).
- Play the mini-game.
- Assemble the picture correctly (L).
- Take the STARRY SKY (M).
- Walk down.
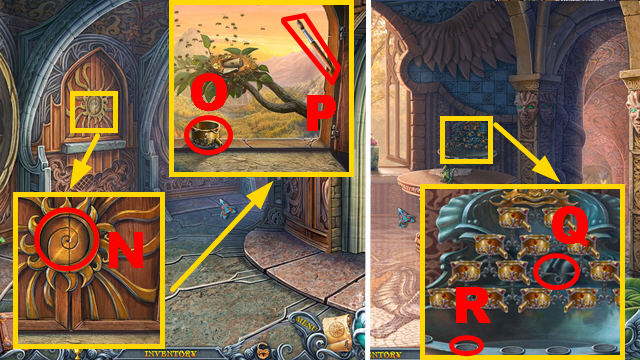
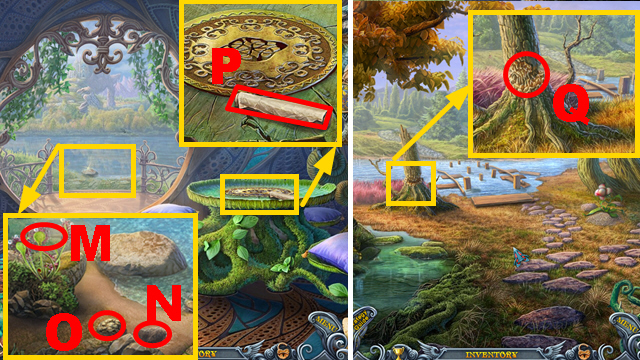
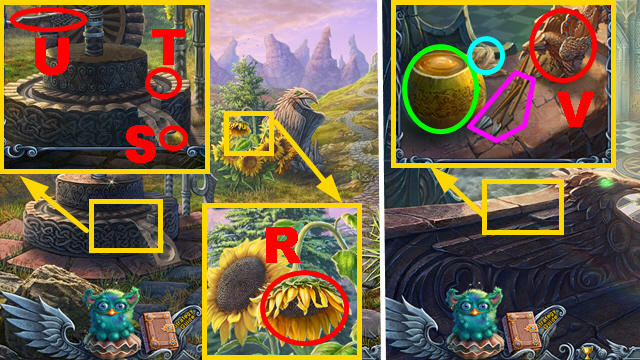
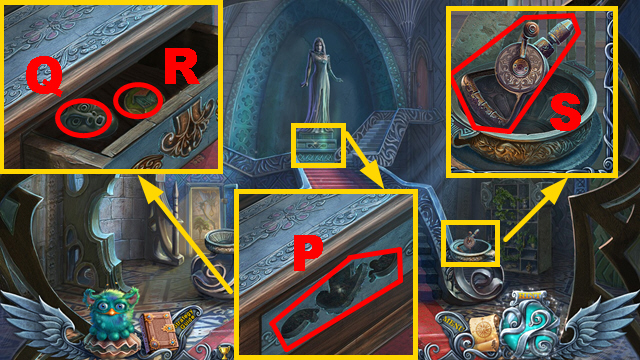
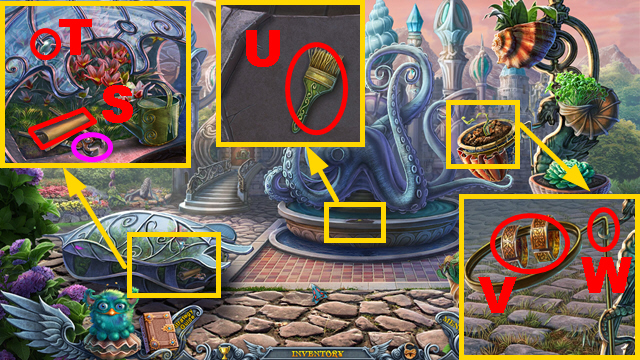
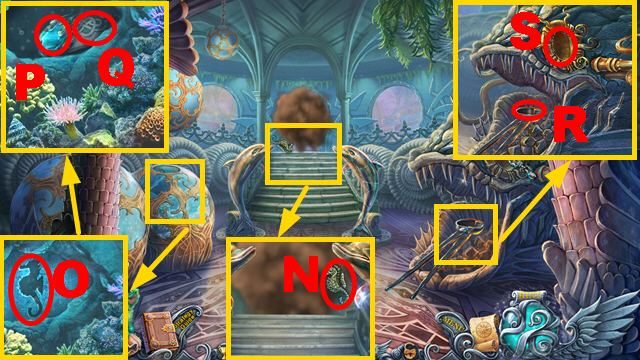
- Insert the STARRY SKY into the niche (N); take the FOUNTAIN PART (O) and BRUSH (P).
- Walk down.
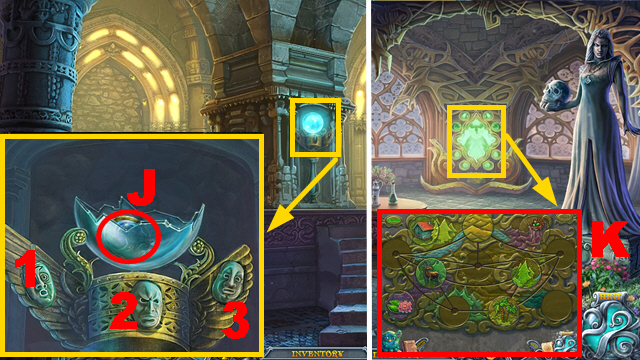
- Connect the FOUNTAIN PART to the fountain (Q); put down the EMPTY CUP (R).
- Play the mini-game.
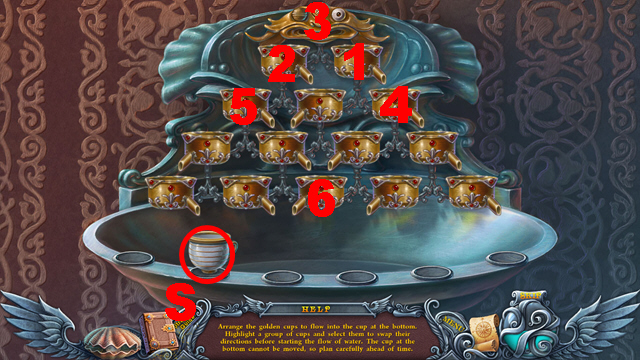
- Solution: 1, 2, 3, 2, 4, 5, 1, 3, 6, 3.
- Take the CUP OF WATER (S).
- Turn right.
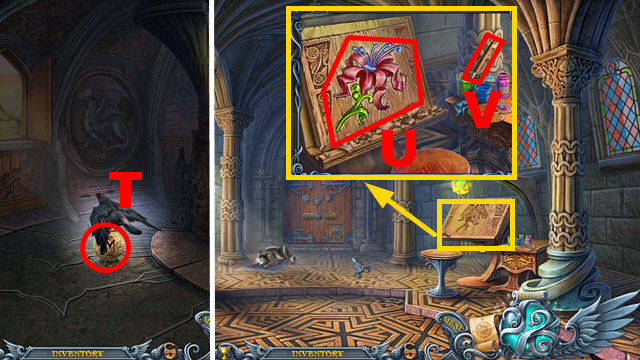
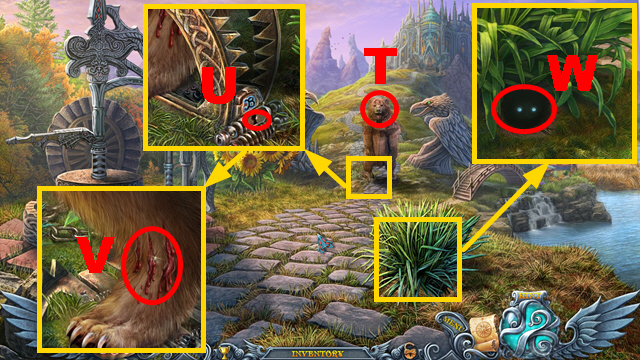
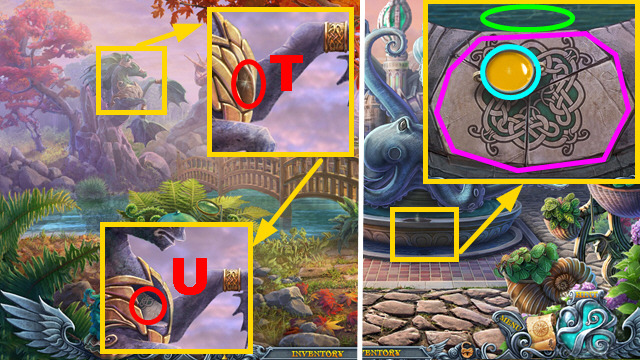
- Try to take the golden sphere (T); open it.
- Move forward.
- Carve the lily with the CHISEL (U). Put down the BRUSH (V) and paint the lily with the brush, take the LILY.
- Walk down, turn right.
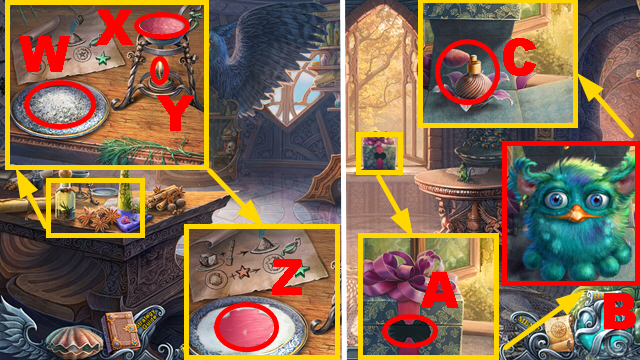
- Put down the GYPSUM (W); use the PESTLE on it. Put the WAX SEAL in the bowl (X); light the burner with the BURNING FEATHER (Y).
- Pour the CUP OF WATER over the gypsum; put the SHELL in it and take the SHELL. Pour the bowl into the mold; take the WAX SHELL (Z).
- Walk down twice.
- Insert the SHELL and the WAX SHELL into the niches (A); take Romas (B) and the PERFUME (C).
- Turn right.
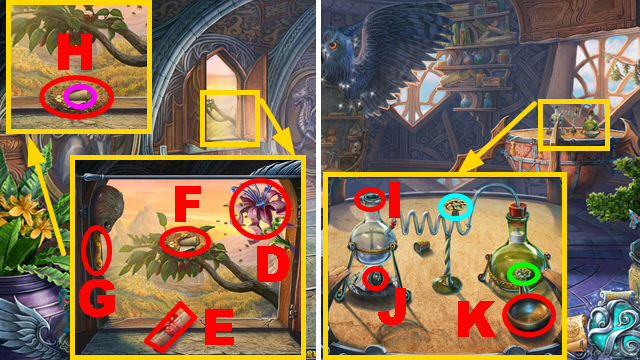
- Put down the LILY (D), spray the PERFUME on it; take the note (E) and BEE GLUE (G).
- Pull the nest with the BROOM (F); take the BANDAGE (purple) and NEST (H).
- Turn right.
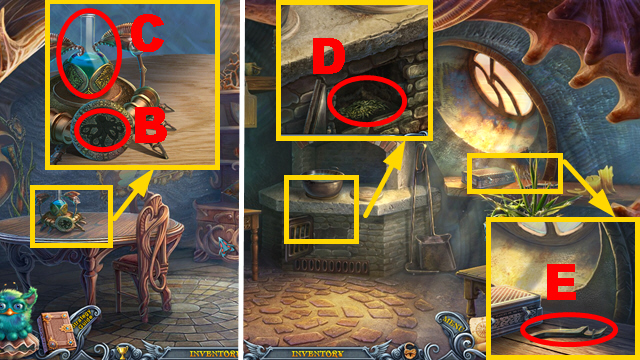
- Pour the OLD WINE, BERRIES, and BEE GLUE into the flask (I). Insert the FLAME FIGURINE (J), turn the valves (blue, green), , and take the PAIN-KILLER (K).
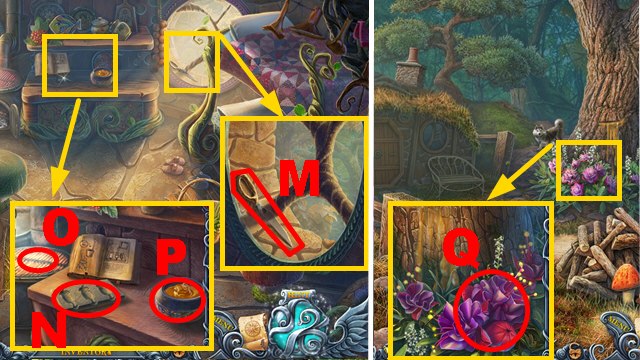
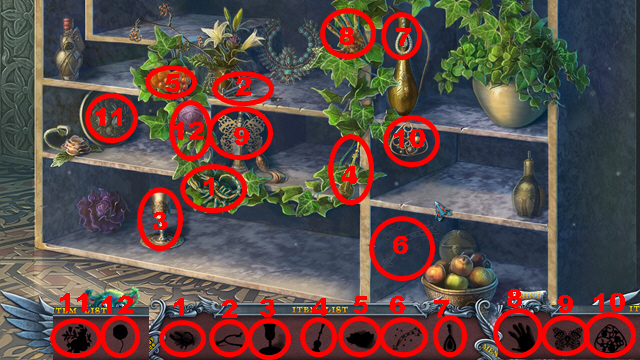
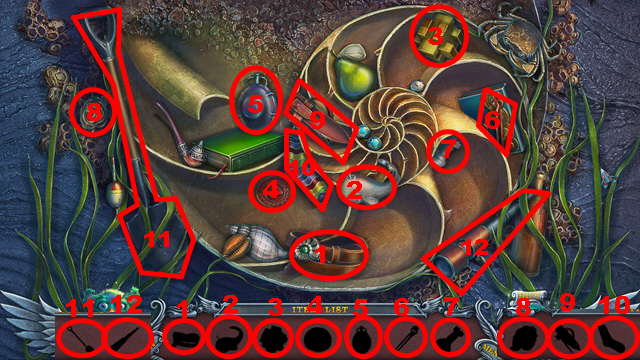
- Play the HOP.
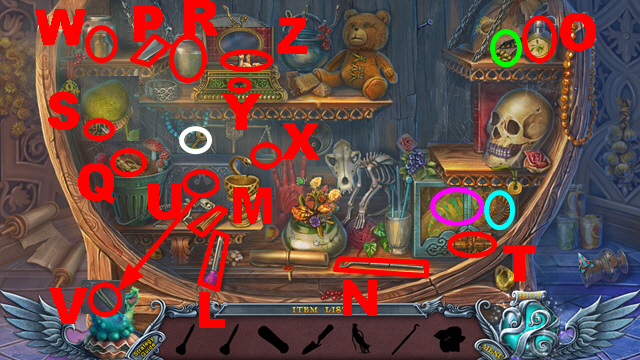
- Take the dental hook (N).
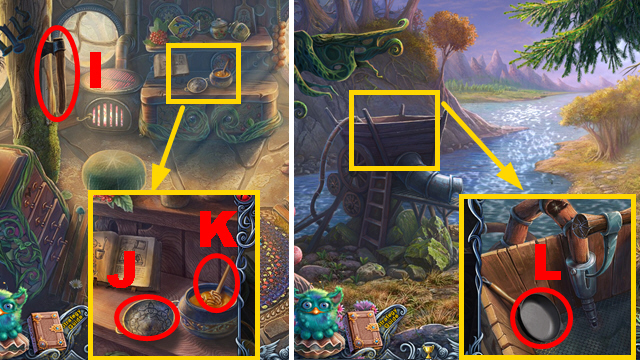
- Put the pipette (L) into the oil (O).
- Connect the trowel handle (M) to its head (P).
- Cut the sack with the dental hook; take the seeds (green).
- Use the trowel on the soil; take the root (Q) and insert the seeds into the soil.
- Put the root into the glass (R); take the growth potion. Pour the growth potion over the soil; take the fly (S).
- Pour the pipette with oil over the lock (T); give the fly to the chameleon (purple).
- Insert the symbol (blue) into the niche (U).
- Collect the weight (W) with the tweezers (V). Put the weight on the scales (X). Insert the key (white) into the lock (Y); take the LION (Z).
- Walk down, move forward.
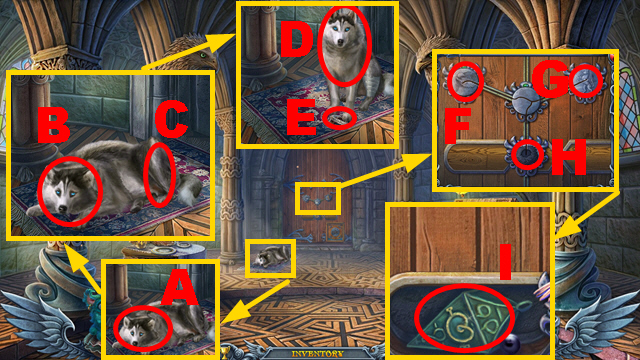
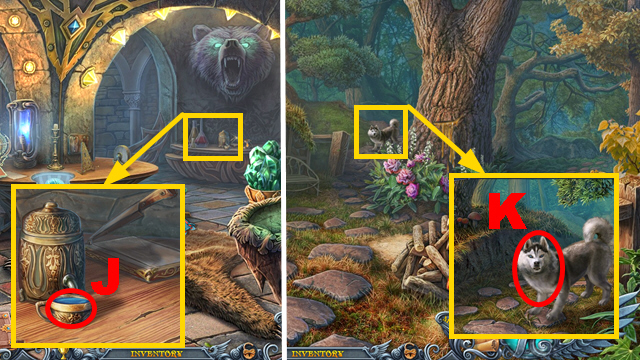
- Let Romas talk (A); give the PAIN-KILLER to the dog (B), let Romas talk, fix the dog’s leg (C), apply the BANDAGE to the leg, and let Romas talk.
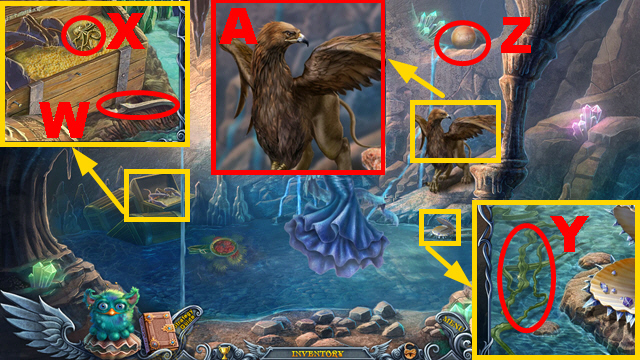
- Let Romas talk; take SKY (D) and the EAGLE (E).
- Connect the EAGLE (F), LION (G), and NEST (H) to the door; take the LANTERN (I).
- Open the door.
- Move forward.
Chapter 2: The River
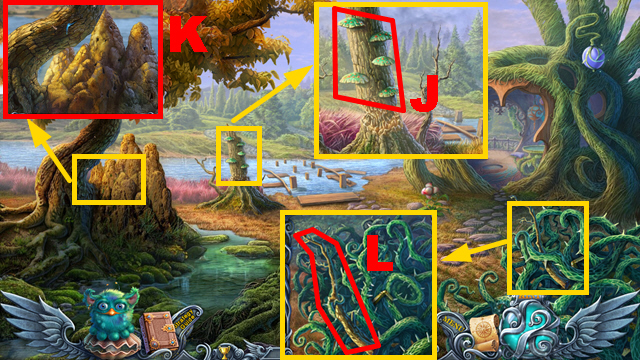
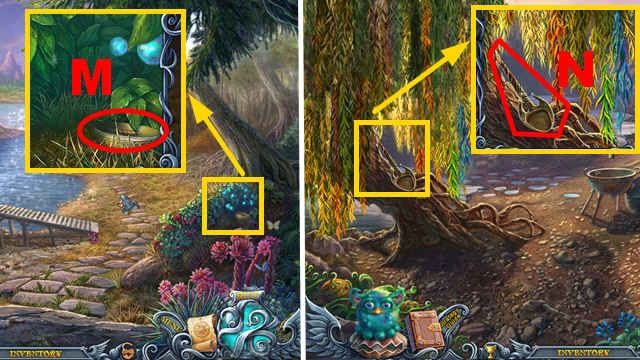
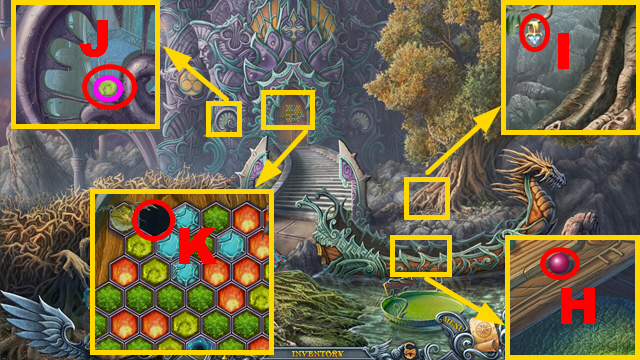
- Take the GLOWING MUSHROOMS (J).
- Let Romas talk (K).
- Take the BRANCH (L).
- Turn right.
- Use the BRANCH (M) to acquire the BRANCH WITH GLUE; let SKY dig through the soil (N), let Romas talk, and take the CLAY (O).
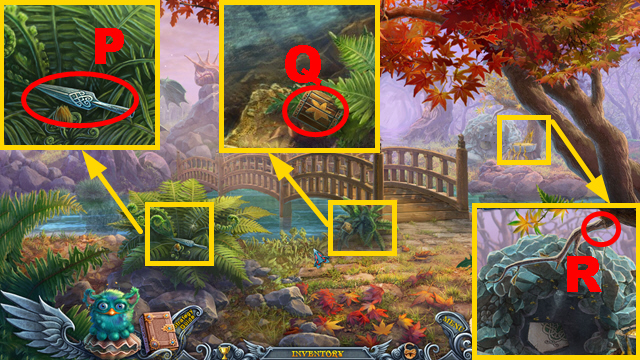
- Take the note (P).
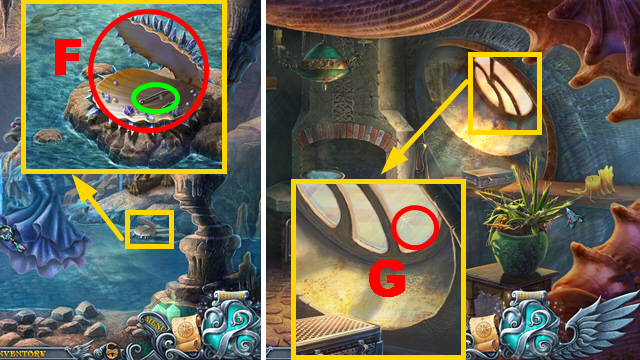
- Walk down.
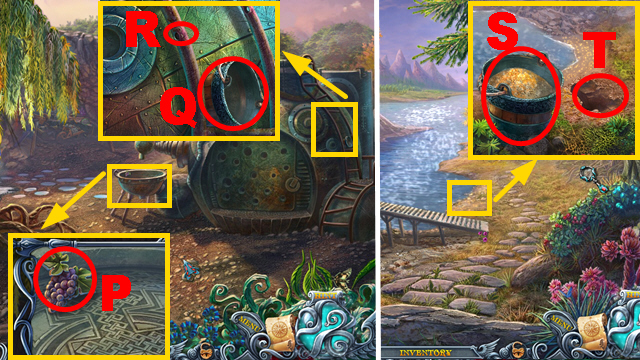
- Apply the CLAY to the tree (Q).
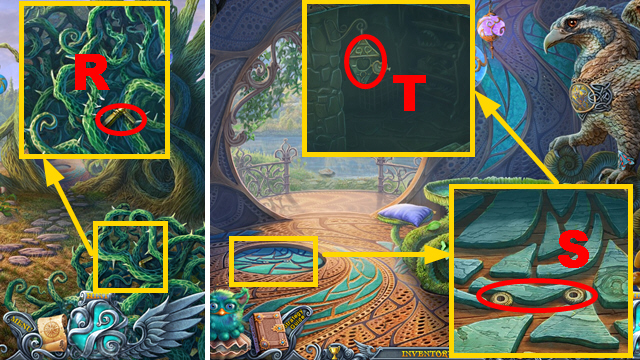
- Collect the HATCH HANDLE with the BRANCH WITH GLUE (R).
- Turn right.
- Insert the HATCH HANDLE (S) and pull it. Connect the LANTERN to the hook (T) and insert the GLOWING MUSHROOMS into it.
- Go downstairs.
- Play the HOP.
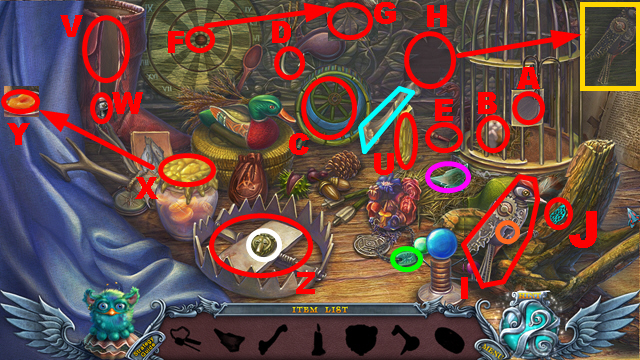
- Light the candle (U) with the flint (green); take the lit candle.
- Cut the boot (V) with the glass shard (purple).
- Melt the wax with the lit candle (X); take the dried apricot (Y).
- Put the bone (blue) into the trap (Z). Insert the bear medallion (white) into the slot (A).
- Put the hamster (B) into the wheel (C); connect the dried apricot to the hook (D).
- Throw the dart (E) at the dartboard (F).
- Insert the chestnut key (G) into the slot (H); take the woodpecker (yellow).
- Put down the woodpecker (I); insert the woodpecker key (W) into the lock (orange).
- Take the TABLE ORNAMENT (J).
- Take the CLUB (K) and note (L).
- Walk down.
- Insert the TABLE ORNAMENT into the niche (M); take the TERMITE KEY (N).
- Go downstairs.
- Insert the TERMITE KEY (purple); take the TERMITE TRAP (O) and CUTTING BOARD (P).
- Walk down twice.
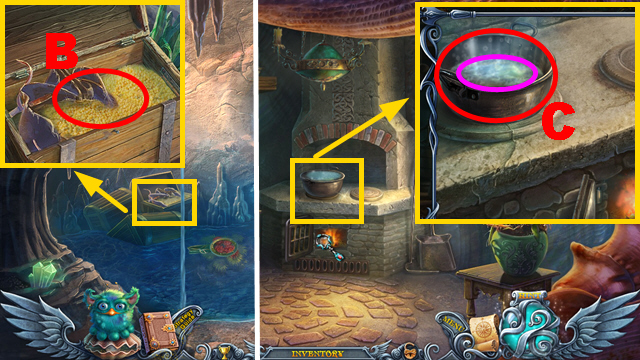
- Put down the CUTTING BOARD (Q); touch the flower (R) and take the BREASTPLATE PIECE 1/3 (S).
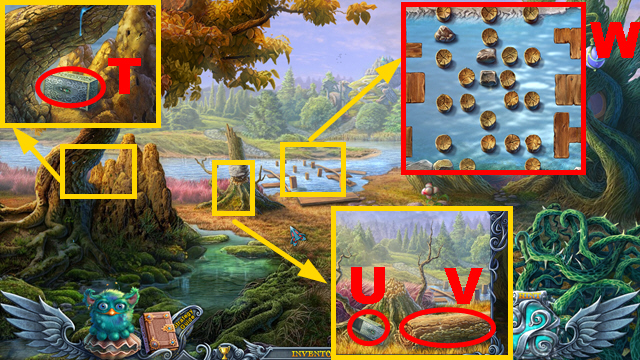
- Put down the TERMITE TRAP (T), open it; take the TERMITES.
- Free the TERMITES (U); take the LOG (V).
- Put down the LOG (W).
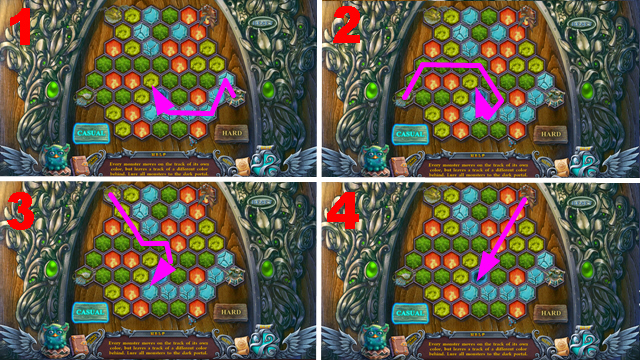
- Play the mini-game.

- Solution: (X).
- Move forward.
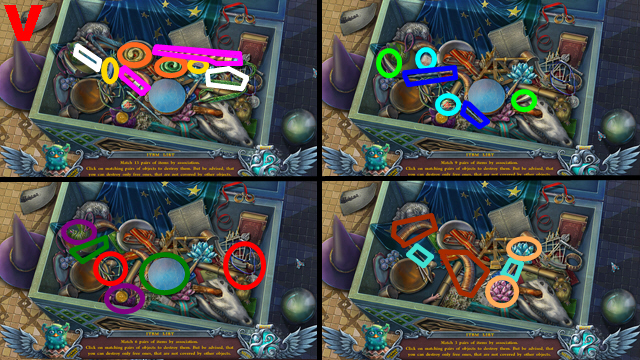
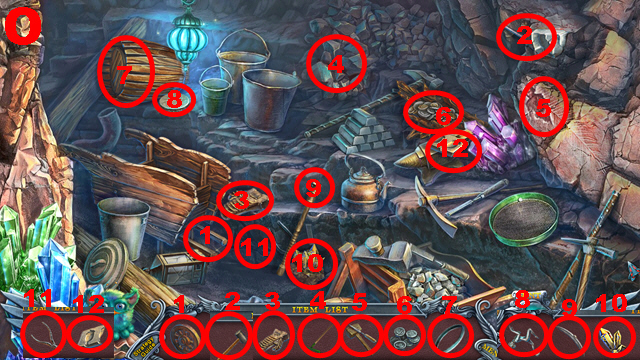
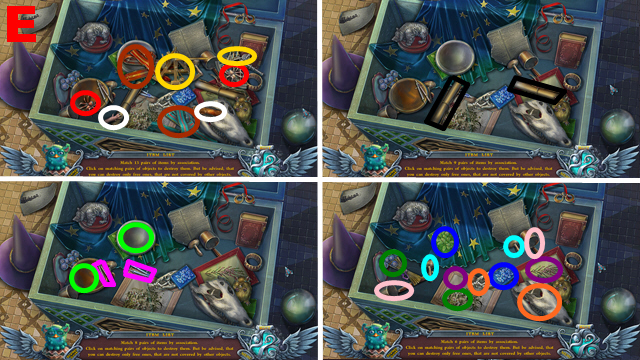
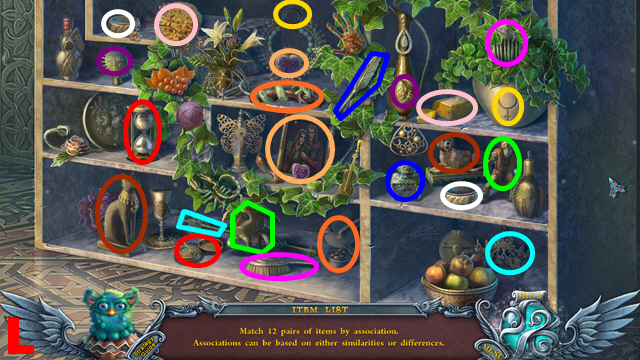
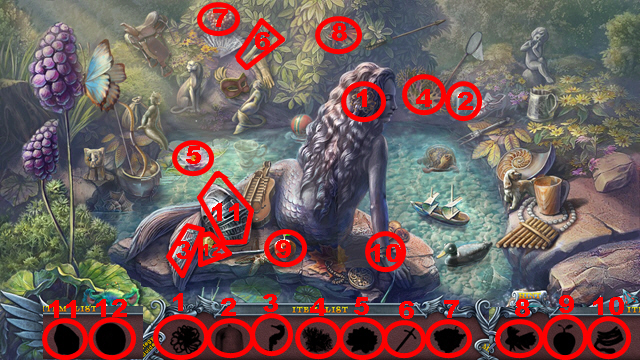
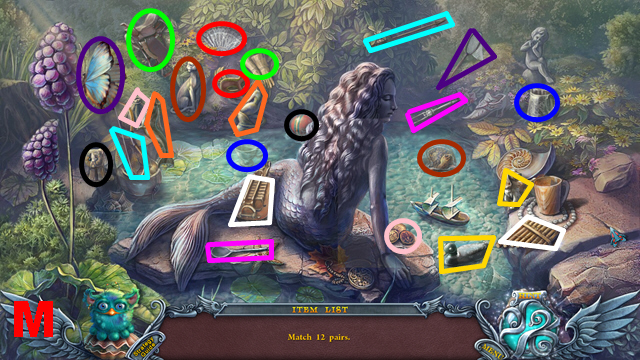
- Play the HOP.
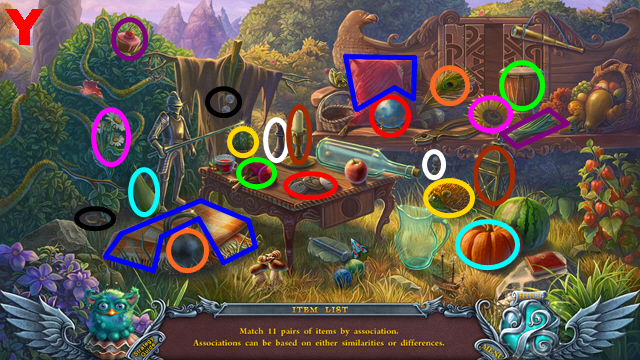
- Collect 11 pairs (color-coded).
- You receive the MAGNIFIER (Y).
- Let Romas talk (Z).
- Take the COMB (A).
- Take the BREASTPLATE PIECE 2/3 (B).
- Break the saw with the CLUB (C); take the SAW and SHELL (D).

- Take three STALKS (E).
- Walk down.
- Collect the HEALING SAP with the SHELL (F).
- Turn right.
- Put the STALKS on the stone (G); dry them with the MAGNIFIER, hit them with the CLUB, use the COMB on them; take the FIBER (H) and ROPE (I).
- Go downstairs.
- Collect the THREAD with the SAW (J).
- Play the HOP.
- Solution: 1-13.
- You receive the BREASTPLATE PIECE 3/3.
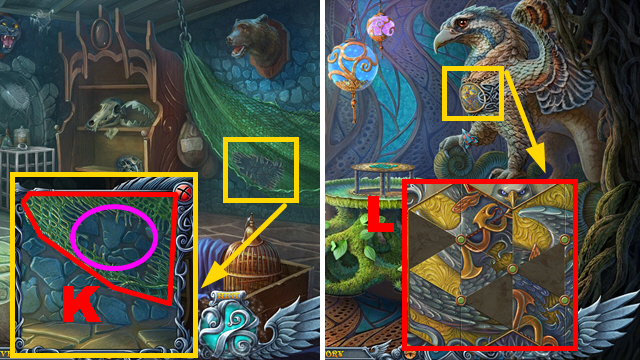
- Repair the net with the ROPE (purple); take the NET (K).
- Walk down.
- Insert the 3 BREASTPLATE PIECES into the slots (L).
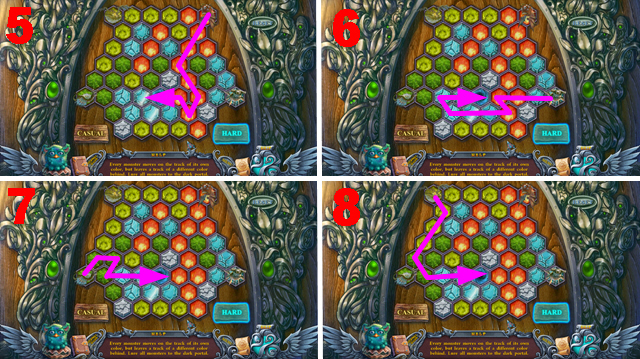
- Play the mini-game.
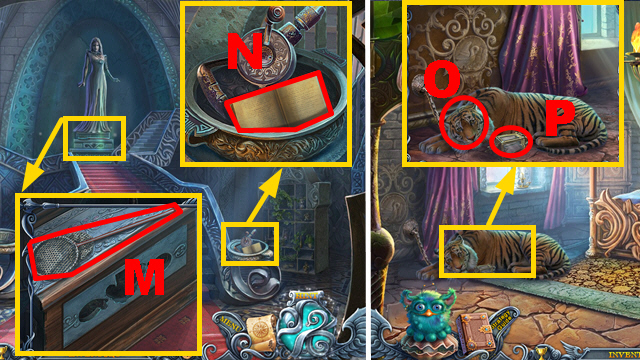
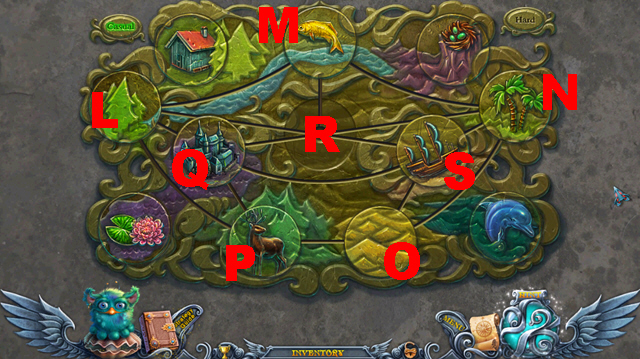
- Casual solution: M, P, N, Q.
- Hard solution: N, M, O, P, Q, O, M, N.
- Take the MONOGRAMMED KEY (R); connect the THREAD to the needle (S), take the NEEDLE AND THREAD.
- Walk down, move forward.
- Throw the NET at the bear (T).
- Insert the MONOGRAMMED KEY into the lock (U); use the NEEDLE AND THREAD and the HEALING SAP on the wound (V).
- Remove the net; let Romas talk to the bear.
- Let Romas talk (W).
- Play the HOP.
- Take the pliers (purple).
- Move the branch aside (white).
- Hit the nail (X) with the stone (green); take the handmade knife.
- Put the watermelon (blue) on the stick (Y); use the handmade knife on it.
- Use the pliers (purple) on the metal beam (orange).
- Remove the cork (black) with the corkscrew-knight (A); take the wooden bead (brown).
- Pour the jar of water (B) over the dirt (C); take the plank (D).
- Insert the plank (D) and the wooden bead into the board; arrange the board correctly (E).
- Put the 2 medallion pieces (Z) and (F) into the slot (G); take the GEM TRIANGLE (H).
- Move forward.

- Take the note (I) and MACE (J).
- Cut the gourd with the SAW; take the GOURD BOWL (K).
- Insert the GEM TRIANGLE into the slot (L).
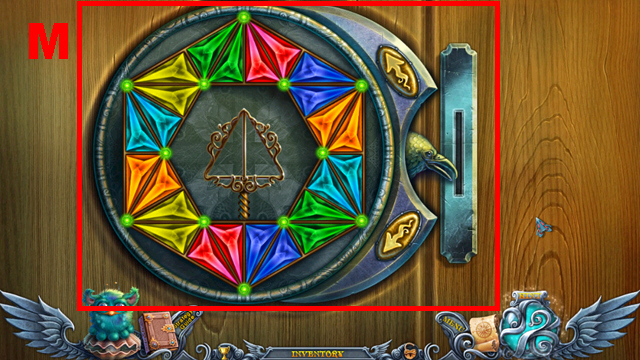
- Play the mini-game.
- Solution (M).
- Move forward.
Chapter 3: Basil’s Castle
- Look at the panther (N) to receive the ARROWS.
- Take the PHOENIX EYE (O).
- Walk down.
- Insert the PHOENIX EYE into the slot (purple). Activate the phoenix; take the PHOENIX LIGHTER (P) and BAG (Q).
- Walk down.
- Connect the BAG to the sunflower (R); touch it and take the SEEDS.
- Put down the GOURD BOWL (S), insert the SEEDS into the device (T); push the handle (U), take the BOWL OF OIL.
- Move forward twice.
- Put down the ARROWS (purple), BOWL OF OIL (green), FIBER (blue), and PHOENIX LIGHTER (V).
- Put the fiber around the arrows, place them in the oil, activate the phoenix lighter, take the BURNING ARROWS.
- Give the BURNING ARROWS to Philip (W).
- Hit the stone with the MACE (X); take the CRACKED STONE and MOUSE AMULET (Y).
- Walk down twice.
- Give the CRACKED STONE to the animal (Z) and let Romas talk; take the OWL (A).
- Move forward twice.
- Send the OWL away (B).
- Take the SILVER ARROW (C).
- Connect the SILVER ARROW to the lock (D), turn it; take the SILVER ARROW.
- Move forward.
- Take the ORNAMENT (E).
- Take the PENCIL (F).
- Take the note (G).
- Walk down.
- Insert the ORNAMENT into the slot (H); take the METAL FROG (I) and PANTHER FIGURINE (J).
- Insert the PANTHER FIGURINE into the niche (K).
- Turn right.
- Take the PARCHMENT (L).
- Put down the METAL FROG (M); take the HAIRPIN (N).
- Walk down.
- Put down the PARCHMENT (O), use the PENCIL on it; take the PARCHMENT.
- Move forward.
- Insert the HAIRPIN into the slot (P); take the FROG KEY (purple).
- Insert the MOUSE AMULET into the niche (Q); take the MONOGRAM (R).
- Walk down, turn right.
- Insert the FROG KEY into the lock (S); take the METAL DISK (T).
- Insert the MONOGRAM into the slot (U).
- Play the HOP.
- Collect the color-coded pairs.
- You receive the ENGRAVING TOOLS (V).
- Walk down, move forward.
- Put down the METAL DISK (W) and PARCHMENT. Use the ENGRAVING TOOLS on the PARCHMENT to acquire the PORTAL STONE.
- Walk down.
- Insert the PORTAL STONE into the niche (X).
- Play the mini-game.
- Casual solution: Y, Z, D, Y, C, B, A, Z, Y, C, B, A, D, Y, A, B, C, Y, D.
- Hard solution: Y, A, B, A, D, Y, A, B, C, B, A, Z, Y, C, B, A, Z, Y, C, B, A, D, Y, A, B, C, Y, D, A, B, C, Y, D, A, Y, C, B, A, D, Y, A, B, C, Y, D.
- Go through the portal.
Chapter 4: The Wood

- Take the POKER (E), RAVEN 1/2 (F), and ROPE WITH HOOK (G).
- Let Romas talk (H).
- Enter the house.
- Take the RUSTED AXE (I).
- Take the BOWL (J) and HONEY STICK (K).
- Walk down, turn right.
- Take the PAN (L).
- Take the SAP BOWL (M).
- Move forward.
- Take the SHOVEL (N).
- Play the HOP.
- Solution: 1-12.
- You receive the CANDY MOLD (O).
- Take the LOCK PART (P).
- Take the BUCKET (Q); insert the POKER into the ladder (R).
- Walk down.
- Put down the BUCKET (S); fill the BUCKET with the SHOVEL (T), take the GOLD SAND.
- Walk down.

- Collect the SAP with the SAP BOWL (U).
- Walk down, go through the central door.
- Sharpen the RUSTED AXE on the grindstone (V) to acquire the SHARP AXE.
- Walk down, turn left.
- Hit the wood with the SHARP AXE (W); take the FIREWOOD (X).
- Turn left.
- Insert the LOCK PART into the niche (Y); take the BELLOWS (Z).

- Open the oven; take the RAVEN 2/2 (green). Collect the EMBERS with the PAN (A).
- Walk down twice, turn right.
- Insert 2 RAVENS into the slots (B); take the SCISSORS HALF (C) and LOCK SEAL (D).
- Play the HOP.
- Collect the color-coded pairs.
- You receive the PAN (E).
- Walk down, go through the central door.
- Insert the LOCK SEAL into the lock (F).
- Walk down, turn left, turn right.
- Put down the BOWL (G).
- Apply the SAP to the hole (H); pour the GOLD SAND into the crate (I), turn the handle (J).
- Take the GOLD NUGGETS (K).
- Move forward.
- Play the HOP.
- Solution: 1-11.
- You receive the VALVE (L).
- Walk down twice, turn left.
- Put down the SCISSORS HALF (M); take the SCISSORS.
- Put down the CANDY MOLD (N) and PAN (O); pour the honey (P) into the pan.
- Walk down.
- Collect the SLEEPING FLOWERS with the SCISSORS (Q).
- Turn right, move forward.
- Collect the TWIGS with the SCISSORS (R).
- Insert the BELLOWS into the niche (S).
- Put the VALVE into the slot (T), turn it; put down the FIREWOOD, EMBERS, and GOLD NUGGETS (U), close the door.
- Walk down twice, turn left.
- Put down the TWIGS (V).
- Play the mini-game.
- Solution: 1-3.
- Take the BASKET (W).
- Walk down, turn right.
- Put down the BASKET (X), collect the berries (Y); take the BERRIES.
- Walk down twice, go through the central door.
- Place the SLEEPING FLOWERS into the burner (Z), put them on the slat (green), cut them with the knife (purple); pour the HONEY STICK over them to acquire the PILLS.
- Insert the BERRIES into the device (A); push the cover.
- Walk down, turn left twice.
- Put the PILLS into the mold (B), pour the pan’s content (C) over them; take the SWEETENED PILL.
- Walk down.
- Give the SWEETENED PILL to Sky (D); take the COLLAR (E).
- Walk down, go through the central door.
- Insert the COLLAR into the niche (F); take the AMULET MOLD (blue) and book (G).
- Walk down, turn left, turn right, and move forward.
- Put down the AMULET MOLD (H).
- Blow the bellows (I).
- Take the GOLD AMULET (purple) and book.
- Walk down three times, go through the central door.
- Put down the GOLD AMULET (J) to acquire the ENCHANTED AMULET.
- Walk down, turn left.
- Give the ENCHANTED AMULET to Sky (K); you receive the GRIFFIN MEDALLION.
- Move forward.
Chapter 5: The Lake
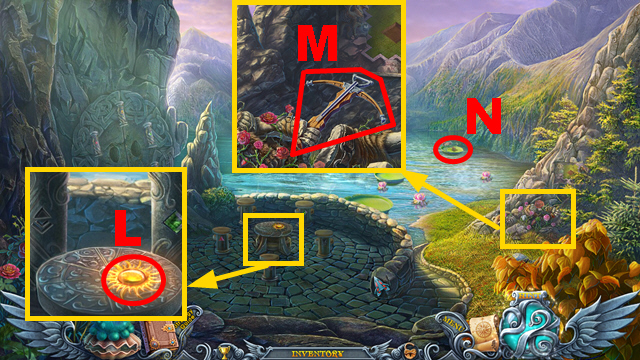
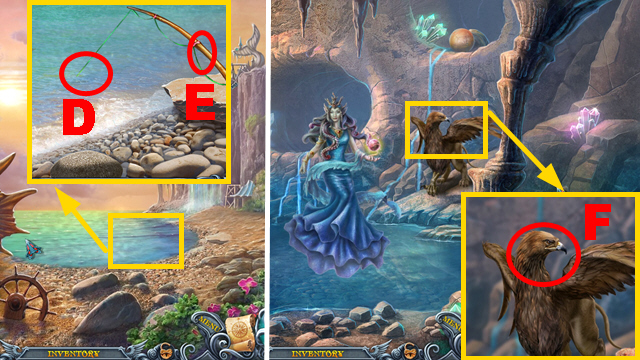
- Take the SUN STONE (L).
- Insert the ROPE WITH HOOK into the crossbow (M); take the CROSSBOW.
- Shoot the CROSSBOW (N).
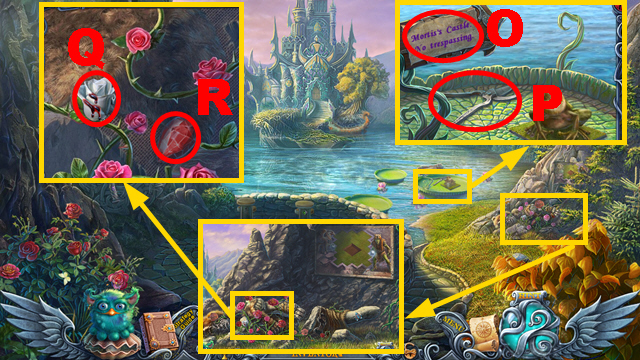
- Take the SCROLL (O) and PRUNING SCISSORS (P).
- Remove the roses with the PRUNING SCISSORS; take the ROYAL BLOOD (Q) and RUBY (R).
- Walk down twice.
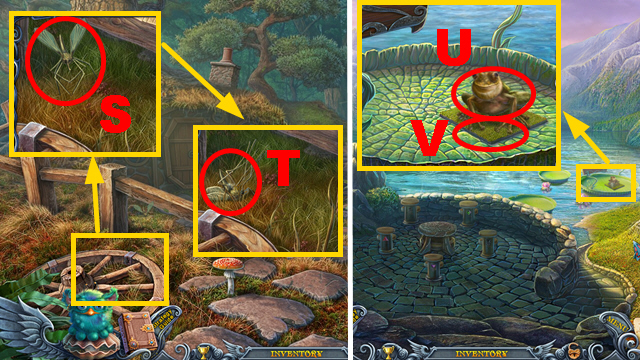
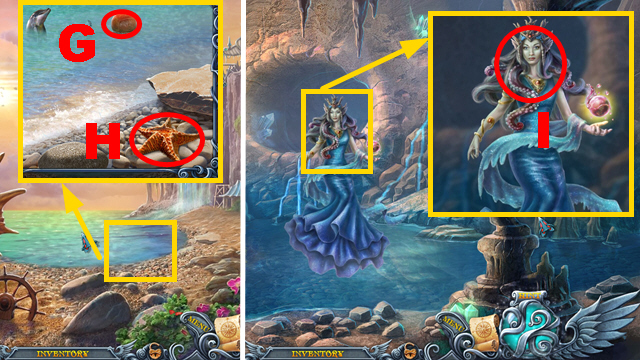
- Hit the mosquito with the SCROLL (S); take the MOSQUITO (T).
- Move forward.
- Give the MOSQUITO to the frog (U); take the PUZZLE SQUARE (V).
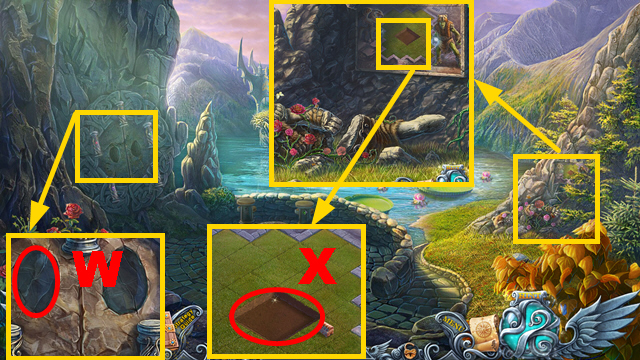
- Insert the RUBY into the slot (W).
- Put the PUZZLE SQUARE into the niche (X).
- Play the mini-game.
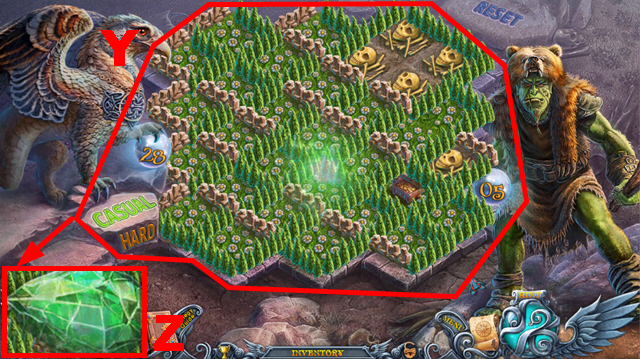
- Solution: (Y).
- The movements of your opponent are random; capture as many fields as possible. Gain fields by closing them with the last fence.
- Take the EMERALD (Z).
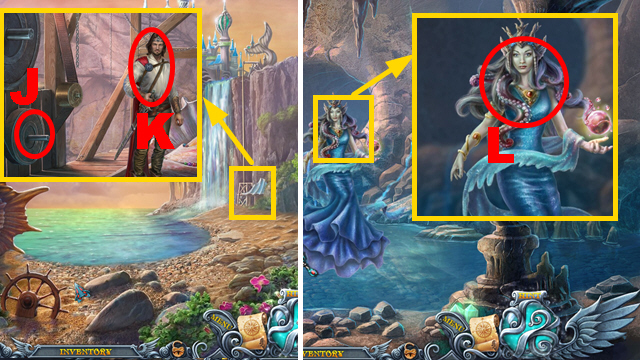
- Insert the SAPPHIRE into the niche (A); take the SYMBOL (B).
- Walk down twice, turn right.
- Insert the GRIFFIN MEDALLION into the niche (C); take the SYMBOL (green) and book (D).
- Walk down, turn left, move forward.
- Insert 2 SYMBOLS into the slots (1) and (2), put the ROYAL BLOOD on the altar (E); let Romas talk, take MIRTSELLA (F).
- Put down MIRTSELLA (G).
- Take the COLORED SPHERE 1/2 (H).
- Take the DIAMOND RING (I).
- Cut the window with the DIAMOND RING (J); take the DOOR-PUZZLE PART (purple).
- Insert the DOOR-PUZZLE PART into the niche (K).
- Play the mini-game.
- Casual solution: 1-4.
- Hard solution: 5-8.
- Move forward.
- Play the HOP.
- Collect the color-coded pairs.
- You receive the METAL FEATHER (L).
- Take the NET (M).
- Take the METAL BOOK (N).
- Turn right.
- Let Romas talk (O); take the LANTERN (P).
- Take the BURNING CANDLE (Q).
- Flip the pillow; take the note (R) and COLORED SPHERE 2/2 (S).
- Walk down.
- Insert 2 COLORED SPHERES into the device (T).
- Play the mini-game.
- Solution: (U).
- Turn left.
- Put the NET into the water (W) to acquire the WOODEN ROD, scare away the fish with MIRTSELLA; take MIRTSELLA and DRAGON TAIL (X).
- Take the SILVER CUP (Y) and DRAWER KEY 1/3 (Y).
- Take the MACHINE HANDLE (A) and CADUCEUS (B).
- Walk down, turn right.
- Take the OLIVE OIL (C); connect the DRAGON TAIL to the statue (D).
- Walk down twice.
- Connect the LANTERN to the hook (E), put the SUN STONE in it; take the METAL SYMBOL (F) and DRAWER KEY 2/3 (G).
- Move forward.
- Insert the METAL SYMBOL (1), METAL BOOK (2), and METAL FEATHER (3) into the slots.
- Go through the left door upstairs.
- Take the DRILL BIT (H); connect the MACHINE HANDLE to the machine (I), put the WOODEN ROD in it (J), take the KNITTING NEEDLE (K).
- Take the SCALPEL (L), insert the CADUCEUS into the niche (green); take the book (M) and DRAGON KEY (N).
- Take the DRAWER KEY 3/3 (O).
- Walk down.
- Play the HOP.
- Solution: 1-12.
- You receive the YARN.
- Insert 3 DRAWER KEYS into the slots (P); take the FEAR FACE (Q) and PORTAL PART 1/4 (R).
- Connect the DRILL BIT to the drill (S); take the DRILL.
- Turn right.
- Insert the DRAGON KEY into the lock (T); take PORTAL PART 2/4 (purple) and WRATH FACE (green).
- Collect the CLOTH with the SCALPEL (U).
- Walk down twice.
- Put down the SILVER CUP (V); use the DRILL on the trunk (W), take the CAMPHOR SAP.

- Cut the sack with the SCALPEL; take the COTTON (X) and HAMMER (Y).
- Move forward; go through the downstairs left door.
- Use the KNITTING NEEDLE and YARN on the scarf (Z); take the SCARF (A).
- Walk down; go through the upper left door.
- Pour the OLIVE OIL and the CAMPHOR SAP into the flask (B), light the burner with the BURNING CANDLE (C); dip the COTTON into the bowl (D) to acquire the CAMPHOR COTTON.
- Walk down, turn right.
- Put the CAMPHOR COTTON on the ear (E), fix it with the CLOTH and the SCARF; let Romas talk. Take PORTAL PART 3/4 (F).
- Walk down; go through the upper left door.
- Collect the CHISEL with the HAMMER (G).
- Walk down, go through the left door downstairs.
- Insert the CHISEL into the crack (H); hit it with the HAMMER, take the GREED FACE (I).
- Walk down, go through the upper left door.
- Insert the FEAR (1), WRATH (2), and GREED FACE (3) into the slots; let Romas talk, take PORTAL PART 4/4 (J).
- Walk down; go through the lower left door.
- Insert 4 PORTAL PARTS into the slots (K).
- Play the mini-game.
- Casual solution: L, P, Q, S, N, M, L, Q, S, R, M, L, Q, R, M, L, R, S, O, N, S, R.
- Hard solution: Q, L, M, N, S, O, P, Q, L, M, N, S, R, M, L, Q, R, M, L, Q, P, O.
- S, N, M, R, S, N, M, R, Q, P, O, S, N, M, R, S, N, M, R, S, N, M, R, S, N, M, L.
- Q, R, S, N, M, R, Q, L, M, R, S, N, M, R, S, Q, R, M, L, Q, S, R, M, R, S, N, M.
- R, S, O, P, Q, R, M, L, Q, R, S, N, M, R, Q, S, N, M, R, S, N, M, L, Q, R, M, L, Q, P, O, S, and R.
- Move forward.
Chapter 6: The Beach
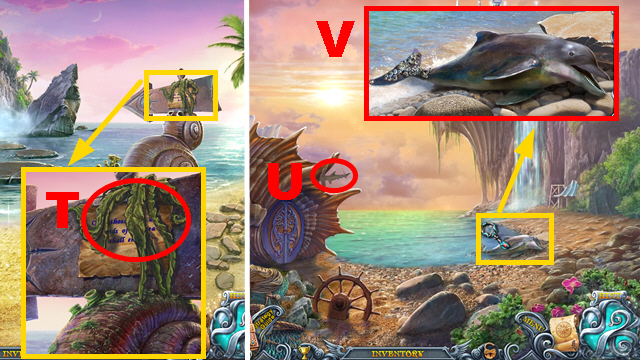
- Take the DRY SEAWEED (T).
- Turn right.
- Take the HAMMER FISH (U).
- Let Romas talk (V).
- Enter the small house.
- Play the HOP.
- Collect the color-coded pairs.
- You receive the VINEGAR (W).
- Take the OIL LAMP (X).
- Turn right.
- Break the moneybox with the HAMMER FISH (Y); take PICTURE PART 1/2 (green).
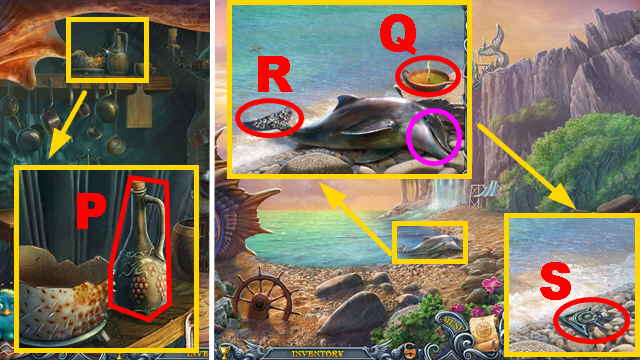
- Open the door; take the HORN (Z) and KETTLE OF WATER (A).
- Walk down twice.
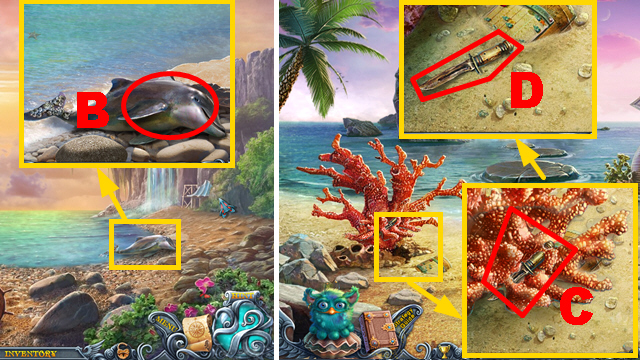
- Pour the KETTLE OF WATER over the dolphin (B); let Romas talk to receive the DOLPHIN.
- Walk down.
- Pour the VINEGAR over the corals (C); take the RUSTY KNIFE (D).
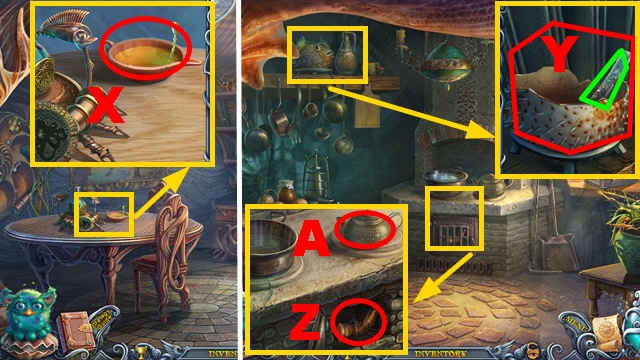
- Turn right, enter the house.
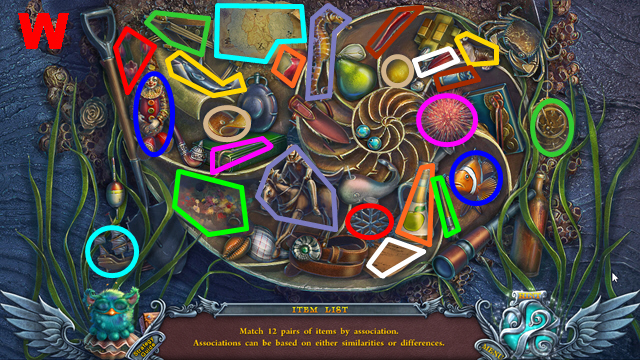
- Play the HOP.
- Solution: 1-12.
- You receive the SHOVEL.
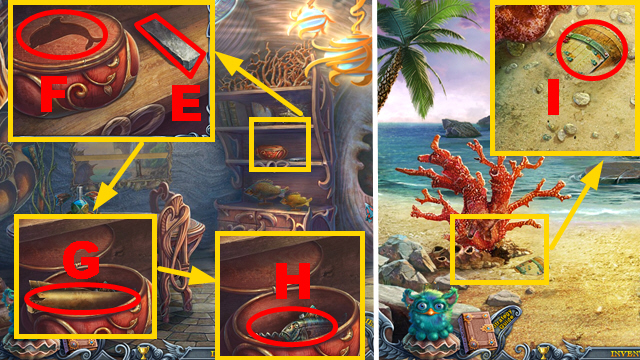
- Sharpen the RUSTY KNIFE on the sharpener (E) to acquire the SHARP KNIFE. Insert the DOLPHIN into the slot (F); take the recipe (G) and CORKSCREW FISH (H).
- Walk down twice.
- Dig out the chest with the SHOVEL (I).
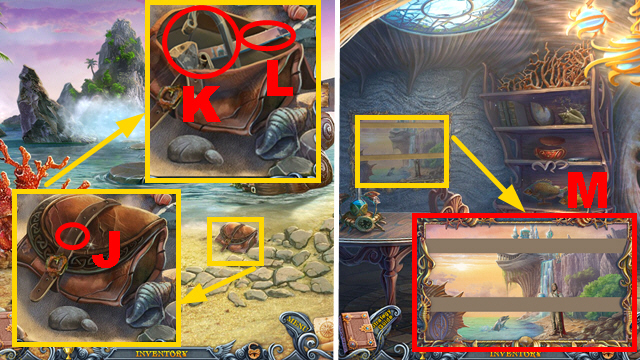
- Cut the belt with the SHARP KNIFE (J), open it; take the FLINT (K) and PICTURE PART 2/2 (L).
- Turn right, enter the house.
- Put down 2 PICTURE PARTS (M).
- Play the mini-game.
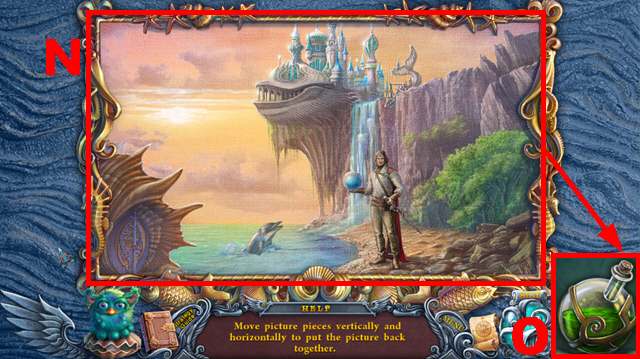
- Solution: (N).
- Take the PAIN-KILLER (O).
- Turn right.
- Open the bottle with the CORKSCREW FISH (P); take the BOTTLE OF WINE.
- Walk down twice.
- Put the OIL LAMP on the stone (Q), light it with the FLINT. Give the PAIN-KILLER to the dolphin (purple).
- Hold the SHARP KNIFE next to the oil lamp; pour the BOTTLE OF WINE over the fin (R), let Romas talk, take the SIGN PART (S).
- Walk down.

- Insert the SIGN PART into the niche (T).
- Move forward.
- Talk to the woman (U); touch the sphere (V) to receive a recipe.
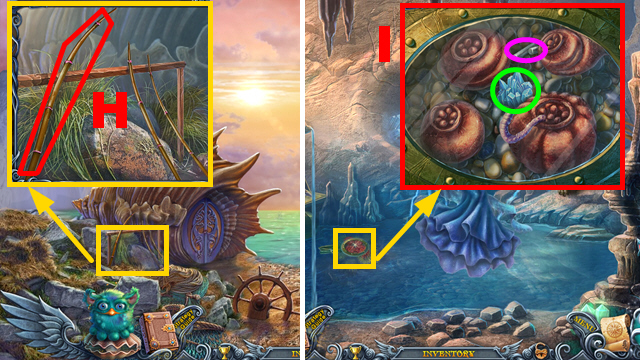
- Take the PLIERS PART (W), open the bag; take the OCTOPUS (X).
- Fold the plant; take the FISHING LINE (Y).
- Put down MIRTSELLA (Z); let Romas talk (A).
- Walk down, turn right, and enter the house.
- Insert the OCTOPUS into the slot (B); take the ALGAE EXTRACT (C).
- Turn right.
- Put down the PLIERS PART (E); take the PLIERS.
- Put down the DRY SEAWEED (D); light it with the FLINT.
- Walk down three times, move forward.
- Collect the HOOK with the PLIERS (green); close the shell, take the DIAMOND SHELL (F).
- Walk down, turn right, enter the house, turn right.
- Collect the LENS with the DIAMOND SHELL (G).
- Walk down twice.
- Connect the FISHING LINE and HOOK to the rod (H).
- Walk down, move forward.
- Put down the LENS and the HORN (I); take the PUZZLE PIECE (green) and SCREWS (purple).
- Walk down, turn right, enter the house, turn right.
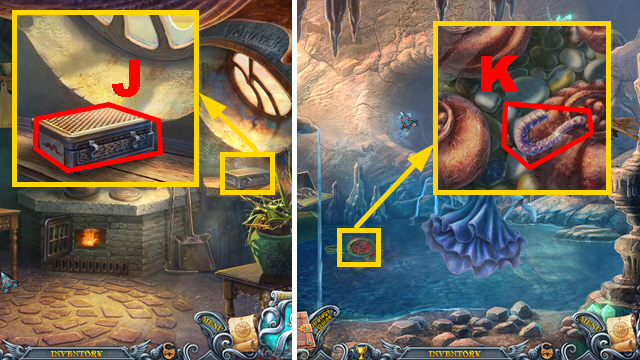
- Insert the SCREWS into the box (J); take the BAIT BOX.
- Walk down three times, move forward.
- Use the BAIT BOX (K) to acquire the BOX WITH WORM.
- Walk down, turn right.
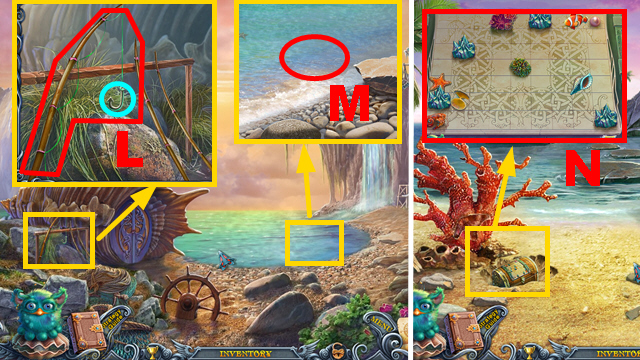
- Connect the BOX WITH WORM to the hook (blue); take the FISHING ROD WITH WORM (L).
- Put the FISHING ROD WITH WORM into the water (M).
- Walk down.
- Put down the PUZZLE PIECE (N).
- Play the mini-game.
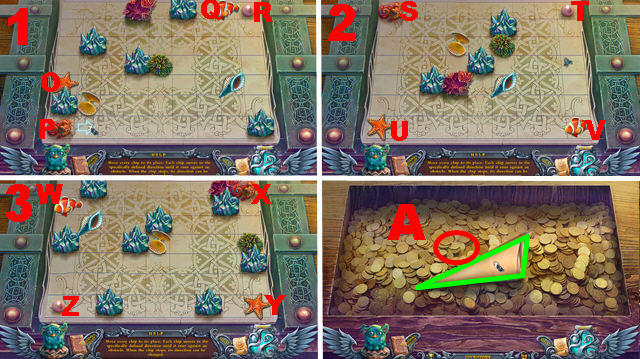
- Solution round 1: O up, O right, P right, P up, R down, R left, Q down, Q left.
- Solution round 2: U up, T down, S right, S down, T left, T up, U right, U up, U right, U down, V left, T up, V up, V, right, U up, U left, T down, T right, T up, T left, T up, U down, V up, T right, U up, U right, U down, V down, V right, S left, T down, U right, U down.
- Solution round 3: Y left, Y up, Y left, Y up, X down, X left, Z right, Z up, Z right, W right, X right, Z down, Z right, Z down, Z left, Z up, W down, W right, W down, W left, W up, Z left, Z up, X left, X down, X left, Z down, Z left, X up, X left, X down, X right, X up, W right, Z up, Y right.
- Take the PARCHMENT CONE (green) and GOLD COINS (A).
- Move forward.
- Collect the WHEAT with the PARCHMENT CONE (B).
- Walk down, turn right, enter the house, turn right.
- Pour the WHEAT into the pot (purple); take the PORRIDGE (C).
- Walk down twice.
- Pour the PORRIDGE into the water (D); pull the fishing rod (E) to acquire the FISH.
- Walk down, move forward.
- Give the FISH to Mirtsella (F) to acquire the SMALL BALL, ELEVATOR PART, and MIRTSELLA.
- Walk down, turn right.
- Throw the SMALL BALL into the water (G); take the STARFISH (H).
- Walk down, move forward.
- Give the ALGAE EXTRACT and STARFISH to the woman (I); you receive the PROTECTION POTION.
- Walk down, turn right.
- Put down the ELEVATOR PART (J).
- Attack the guy with MIRTSELLA (K); you receive the MEDALLION.
- Walk down twice, move forward.
- Give the MEDALLION and GOLD COINS to the woman (L); you receive the AMULET OF FREEDOM.
- Walk down, turn right.
Chapter 7: The Mountains
- Give the AMULET OF FREEDOM to the guy (M) to receive MIRTSELLA; take the PRINCESS FIGURINE (N).
- Move forward.
- Take the SAW (O).
- Take the SPEARHEAD (P).
- Take the GATE FIGURINE (Q).
- Collect the STICK with the SAW (R).
- Move forward.
- Play the HOP.
- Solution: 1-12.
- You receive the GLASS CASE.
- Take the recipe (S) and the FIRE TONGS (purple); loosen the glass with the SPEARHEAD (T), take the ROUND GLASS.
- Take the BRUSH (U).
- Remove the pot, take the CUFFS (V); collect the STAND with the SAW (W).
- Walk down.
- Put down the STAND; insert the ROUND GLASS into it (X).
- Dip the BRUSH into the glue (Y) to acquire the BRUSH WITH GLUE.
- Insert the CUFFS into the niche (Z); take the PRINCE FIGURINE (A).
- Move forward.

- Insert the PRINCE (1), PRINCESS (2), and GATE FIGURINE (3) into the slots.
- Apply the BRUSH WITH GLUE on the watering can (blue); take the EMPTY WATERING CAN (B).
- Walk down.
- Use the EMPTY WATERING CAN into the water (C) to acquire the FULL WATERING CAN.
- Pour the FULL WATERING CAN over the flower, put the GLASS CASE on it (D); take the FERN FLOWER (E).
- Move forward.
- Insert the FERN FLOWER into the niche (F).
- Move forward.
- Assemble the dolphin correctly (G).
- Take the HOOK (H); put down the FIRE TONGS (I).
- Collect the CRAB ON A STICK with the STICK (J).
- Walk down twice.
- Collect the FIREPLACE PART with the HOOK (K).
- Collect FOUNTAIN PART 1/3 with the CRAB ON A HOOK (L).
- Move forward.
- Play the HOP.
- Collect the color-coded pairs.
- You receive the BUTTERFLY NET (M).
- Move forward.
- Collect the SEA-HORSE FIGURINE with the BUTTERFLY NET (N).
- Insert the SEA-HORSE FIGURINE into the slot (O); take the ENCASED GEM (P) and FOUNTAIN PART 2/3 (Q).
- Put the ENCASED GEM into the fire tongs (R), insert the FIREPLACE PART into the niche (S); take the GEM.
- Walk down twice.
- Insert the GEM into the slot (T); take FOUNTAIN PART 3/3 (U).
- Move forward.
- Put 3 FOUNTAIN PARTS into the niche (purple); put the PROTECTION POTION into the water (green), drink from it three times (blue).
- Move forward twice.
- Attack the woman with MIRTSELLA (V).
- Cut the gag with the SPEARHEAD (W).
- Insert the SILVER ARROW into the niche (X).
- Play the mini-game.
- Solution: A, Z, A, Z x2, Y, Z x4, A, Y x3, Z, Y, Z, A x2.
- Congratulations, you have completed Spirits of Mystery: The Silver Arrow.


 Dracula: Love Kills Walkthrough, Guide, & Tips
 Echoes of the Past: The Citadels of Time Walkthrough, Guide, & Tips
 League of Light: Wicked Harvest Walkthrough, Guide, & Tips
 Time Builders: Pyramid Rising 2 Walkthrough, Guide, & Tips
 Campgrounds: The Endorus Expedition Walkthrough, Guide, & Tips