Haunted Hotel: Death Sentence Walkthrough, Guide, & Tips
Haunted Hotel: Death Sentence Walkthrough

Welcome to the Haunted Hotel: Death Sentence Walkthrough
Your wedding day gets interrupted when your fiancée is kidnapped!
Whether you use this document as a reference when things get difficult or as a road map to get you from beginning to end, we’re pretty sure you’ll find what you’re looking for here.
This document contains a complete Haunted Hotel: Death Sentence game walkthrough featuring annotated screenshots from actual gameplay!
We hope you find this information useful as you play your way through the game. Use the walkthrough menu below to quickly jump to whatever stage of the game you need help with.
Remember to visit the Big Fish Games Forums if you find you need more help. Have fun!
This walkthrough was created by Laurie Murphy, and is protected under US Copyright laws. Any unauthorized use, including re-publication in whole or in part, without permission, is strictly prohibited.
General Tips
- This is the official guide for Haunted Hotel: Death Sentence!
- This guide does not mention each time you have to zoom into a location; the screenshots show each zoom scene.
- Hidden-object puzzles are referred to as HOPs. This guide does not show screenshots of the HOPs, however, it is mentioned when a HOP is available and the inventory item collected.
- This guide will give step-by-step solutions for all puzzles that are not random. Please read the instructions in the game for each puzzle.
- Use the map to travel quickly to a location.
Chapter 1: Isaac

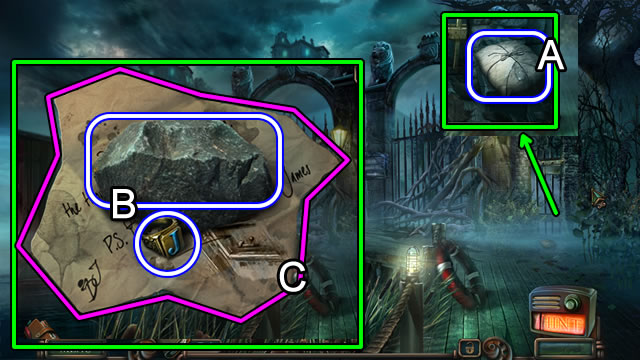
- Remove the debris; take the NOTE (A).
- Select, untie and unwrap the NOTE (Inventory).
- Take the STONE and JAMES’S RING (B); read the note (C).

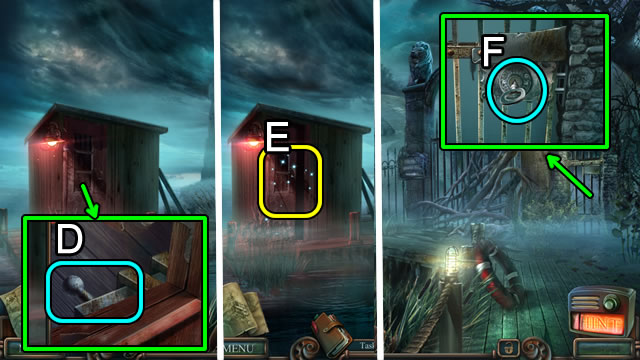
- Use the STONE twice; slide the latch; open the door (D).
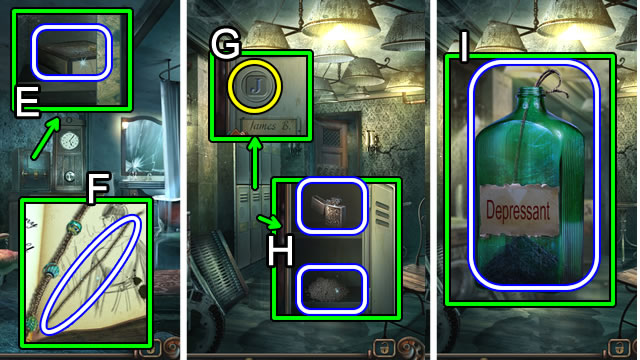
- Play the HOP (E). Receive a TRIANGULAR KEY.
- Lift the cover; place and turn the TRIANGULAR KEY (F).
- Walk forward.

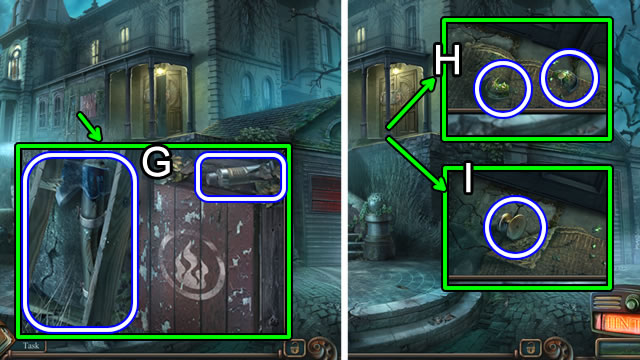
- Take the LADDER; uncover and take the GLUE (G).
- Attempt to enter the house.
- Take the BROKEN DOOR HANDLE 1/3, 2/3 (H).
- Lift the mat. Take BROKEN DOOR HANDLE 3/3 (I).

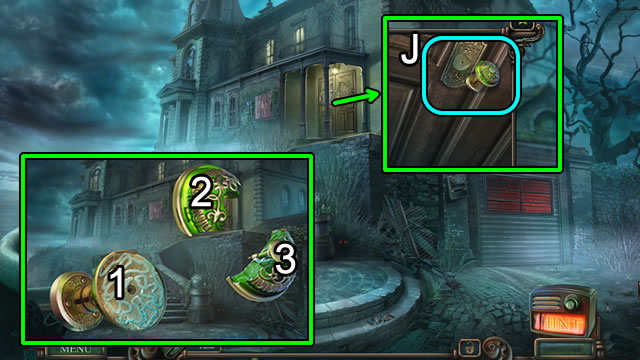
- Select the BROKEN DOOR HANDLE 3/3 (Inventory).
- Use the GLUE (1) and (3). Affix fragments (2) and (3) to (1). Take the DOOR HANDLE.
- Place the DOOR HANDLE (J).
- Slide the plate for a puzzle.

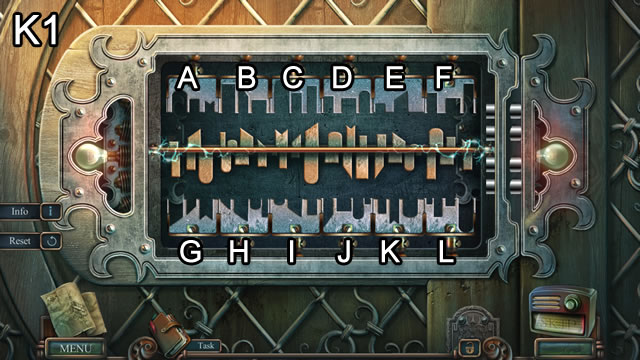

- Solution part 1 (K1). B-C, C-D, A-B, A-G, B-C, A-B, G-H, A-G, G-H, D-E, C-D, B-C, A-B.
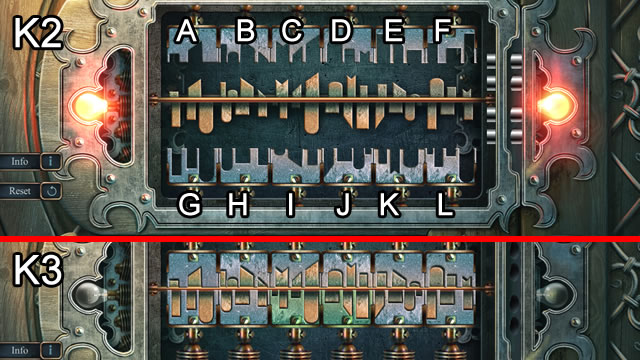
- Solution part 2 (K2). K-L, J-K, I-J, J-K, F-L, E-F, K-L, F-L, D-E, E-F, K-L, J-K.
- Solved (K3).
- Walk forward.

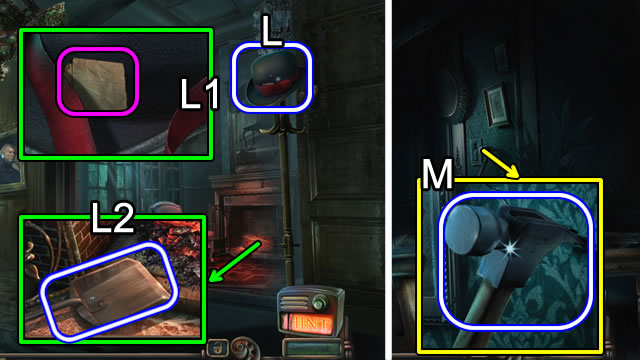
- Take JAMES’S HAT (L).
- Select JAMES’S HAT (Inventory). Untie the ribbon; read the note (L1); take JAMES’S HAT.
- Take the SHOVEL (L2).
- Attempt and then walk upstairs.
- Loosen and take the HAMMER (M).
- Walk down.

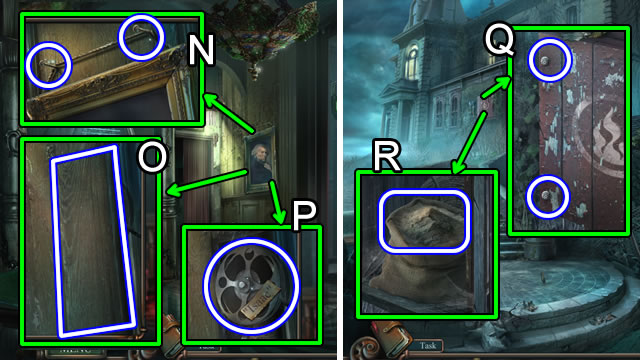
- Use the HAMMER for NAILS 1/6, 2/6 (N).
- Take the PLANK 1/3 (O).
- Take ISAAC’S REEL (P).
- Walk down.
- Use the HAMMER to loosen then take NAILS 3/6, 4/6 (Q).
- Open the cabinet; untie and open the sack.
- Use the SHOVEL; receive a SCOOP OF SAND (R).
- Walk down.

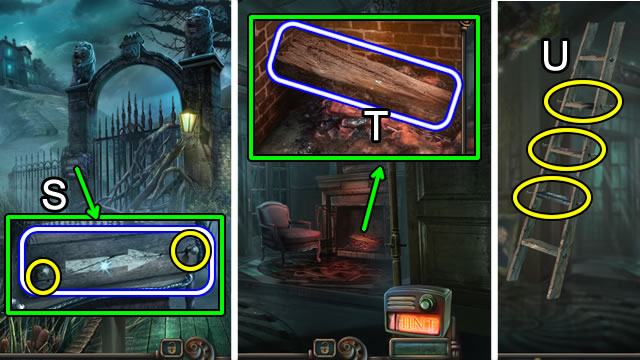
- Use the HAMMER for NAILS 5/6, 6/6; take PLANK 2/3 (S).
- Walk forward twice.
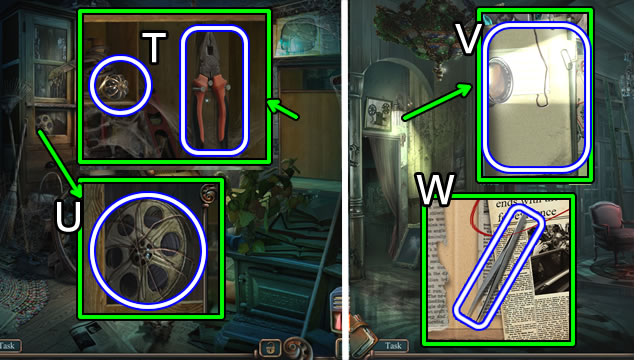
- Place the SCOOP OF SAND (T); take PLANK 3/3.
- Select the LADDER (Inventory). Place PLANKS 3/3 and NAILS 6/6 (U).
- Use the HAMMER 3x; take the LADDER (Inventory).

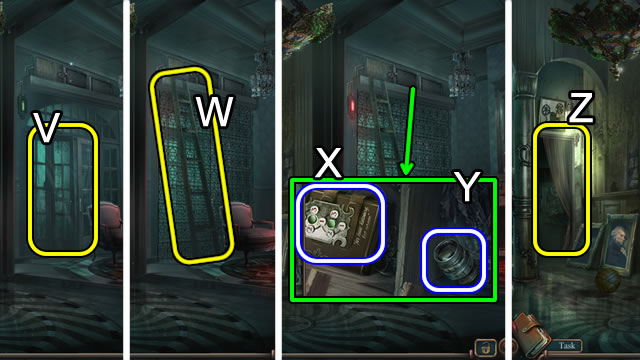
- Attempt to enter (V).
- Place the LADDER (W).
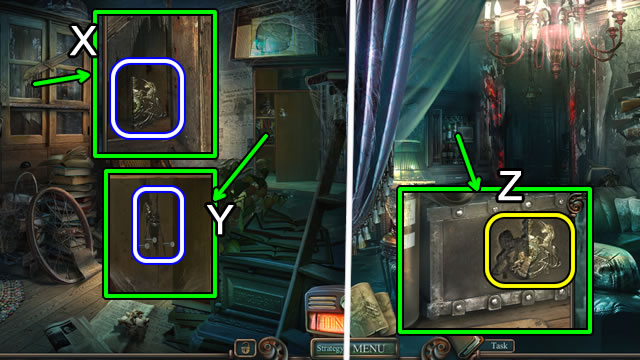
- Open the cabinet doors; take ISAAC’S DIARY (X) and the LENS (Y).
- Move the drape (Z); select for a puzzle.

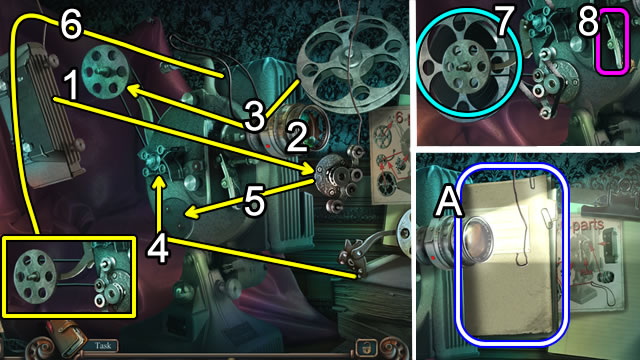
- Solution. Place (1); replace (2) with the LENS. Place 3-6.
- Place ISAAC’S REEL (7); press the switch (8); take ISAAC’S DOSSIER (A).

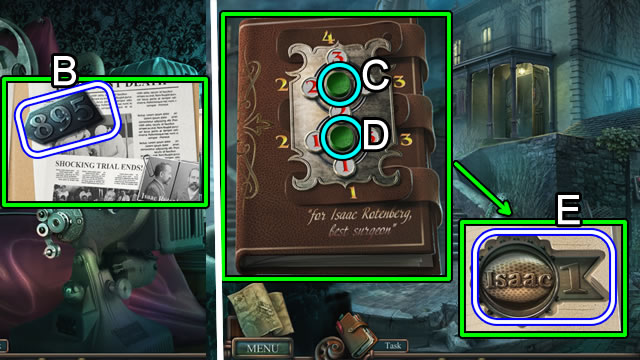
- Select ISAAC’S DOSSIER (Inventory); take ISAAC’S CODE (B).
- Walk down twice.
- Select ISAAC’S DIARY (Inventory) for a puzzle.
- Solution. C-Dx4-Cx2-Dx3-C-D-C-D-Cx2-Dx3-Cx2-Dx2.
- Read the diary; take ISAAC’S MEDALLION (E).

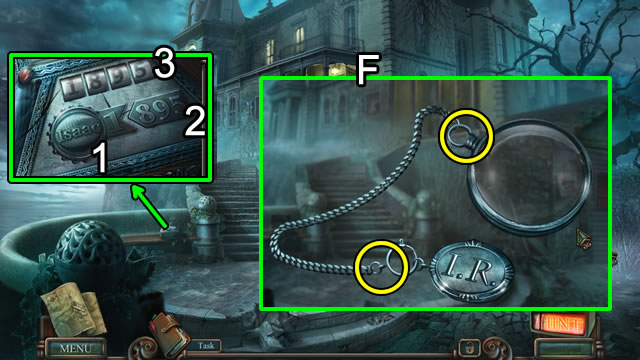
- Place ISAAC’S MEDALLION (1) and ISAAC’S CODE (2). Set the dials (3) to 1-8-9-5.
- Take the POUCH.
- Select and open the POUCH (Inventory). Take the chain; detach the magnifier and tag (F); receive a CHAIN.
- Walk forward.

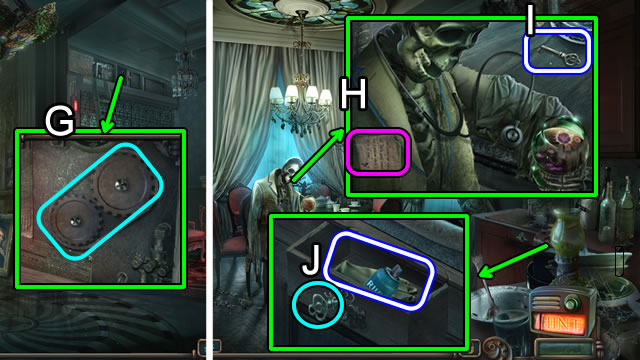
- Replace the broken chain with the CHAIN (G).
- Enter the dining room.
- Open the pocket (H); read the note.
- Take the SMALL KEY (I).
- Place and select the SMALL KEY; take the RUST-AWAY and RUBBER GLOVE (J).
- Walk down twice.
Chapter 2: Norton

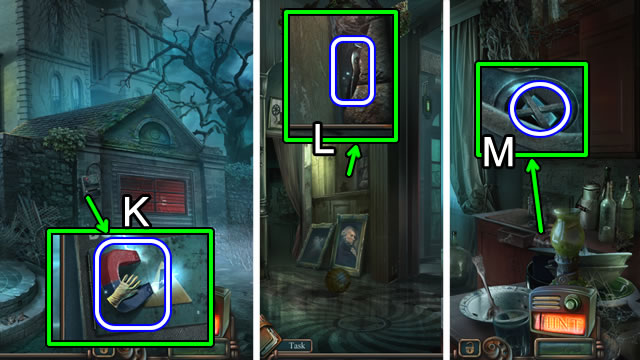
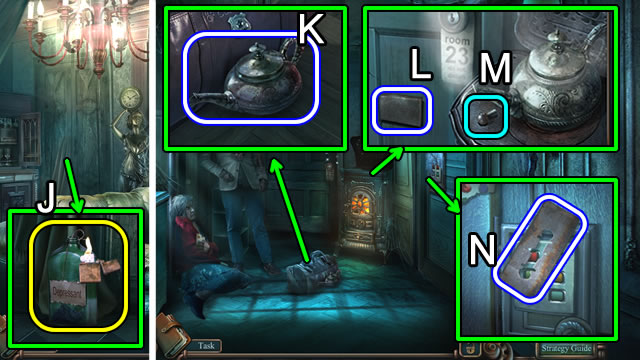
- Use the RUBBER GLOVE; receive a MAGNET (K).
- Return to the front hall.
- Use the MAGNET; receive BROKEN CUTTERS 1/2 (L).
- Enter the dining room.
- Use the MAGNET; receive a TOGGLE SWITCH (M).
- Return to the second floor corridor.

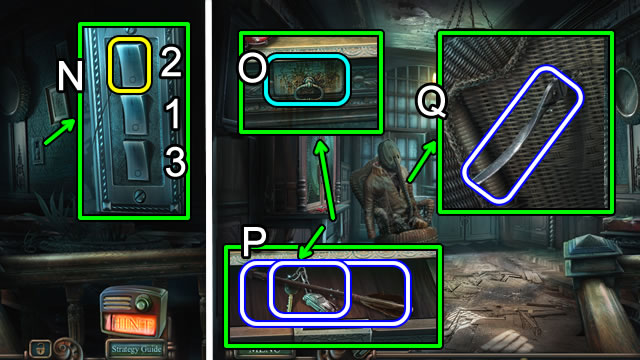
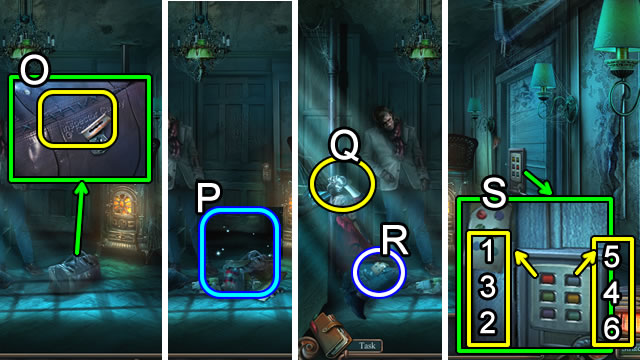
- Place the TOGGLE SWITCH (N); select the switches 1-2-3.
- Use the RUST-AWAY (O); open the drawer; read the note.
- Take the ARROW and CAR KEY (P).
- Loosen and take the BROKEN CUTTERS 2/2 (Q).

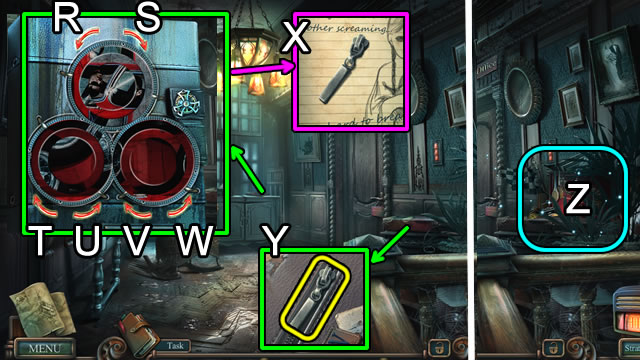
- Take NORTON’S DIARY; select NORTON’S DIARY (Inventory) for a puzzle.
- Solution. Rx3-Sx2-Tx2-U-Vx2-Wx3.
- Read the diary; take the ZIPPER PULL (X).
- Place and select the ZIPPER PULL (Y).
- Play the HOP (Z); receive a DRAGON.
- Return to the dining room.

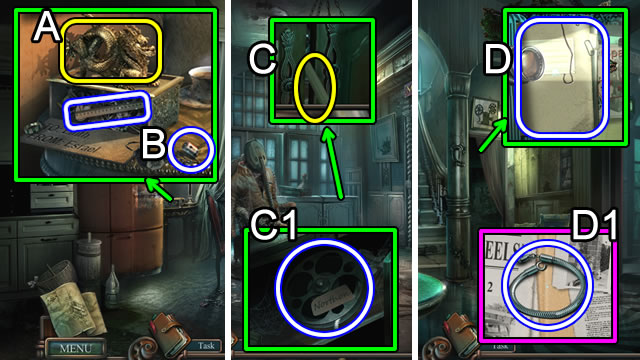
- Place and select the DRAGON (A).
- Uncover the RULER; loosen and take the BATTERY (B).
- Return to the second floor corridor.
- Use the RULER (C); open and take NORTON’S REEL (C1).
- Walk down.
- Place NORTON’S REEL on the projector; select the switch.
- Take NORTON’S DOSSIER (D).
- Select NORTON’S DOSSIER (Inventory). Take NORTON’S BRACELET (D1).
- Walk down twice.

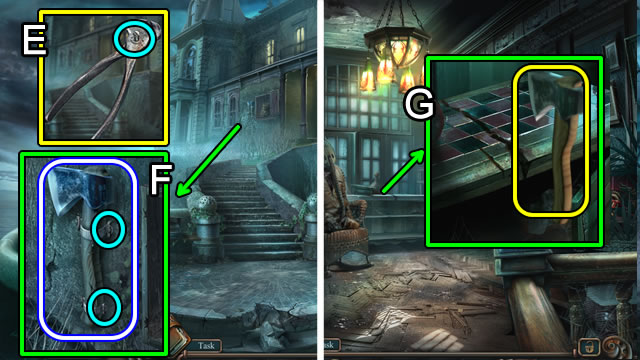
- Select the BROKEN CUTTERS 2/2 (Inventory).
- Place the three pieces; turn the screw; take the CUTTERS (E).
- Use the CUTTERS (F); take the FIRE AXE.
- Return to the second floor corridor.
- Use the FIRE AXE (G).
- Walk forward.

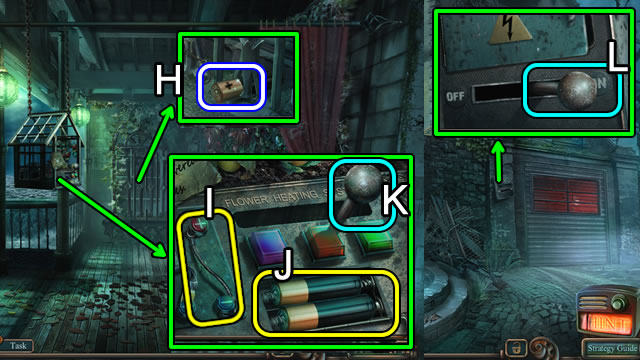
- Loosen and take the BATTERY (H).
- Remove and replace the wire with NORTON’S BRACELET (I).
- Remove the cover; place two BATTERIES (J).
- Slide the lever (K); receive a LEVER.
- Walk down three times.
- Place and slide the LEVER (L); remove the plate for a puzzle.

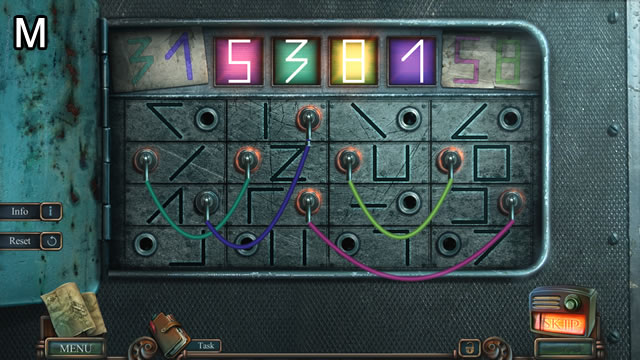
- Solution (M).
- Enter the garage.

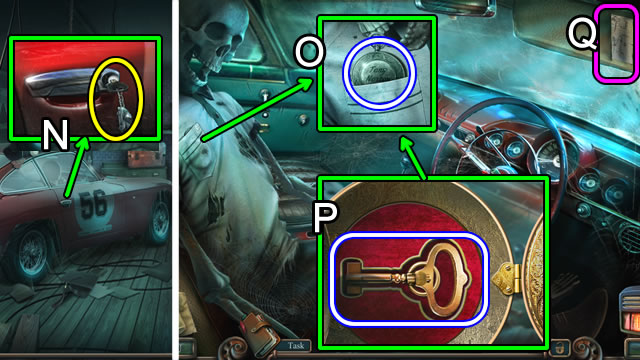
- Place and select the CAR KEY (N); enter the car.
- Take NORTON’S WATCH (O).
- Select NORTON’S WATCH (Inventory). Open and touch the face; take a WIND-UP KEY (P).
- Lower the visor; read the note (Q).
- Return to the second floor corridor.

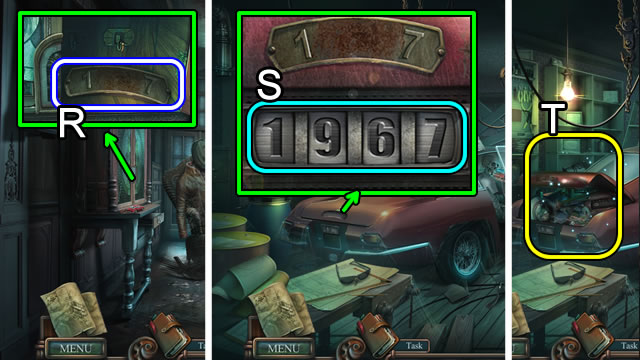
- Place and select the WIND-UP KEY. Take the TRUNK PLATE (R).
- Return to the garage.
- Place the TRUNK PLATE for a puzzle.
- Solution (S).
- Play the HOP (T); receive a HEX KEY.

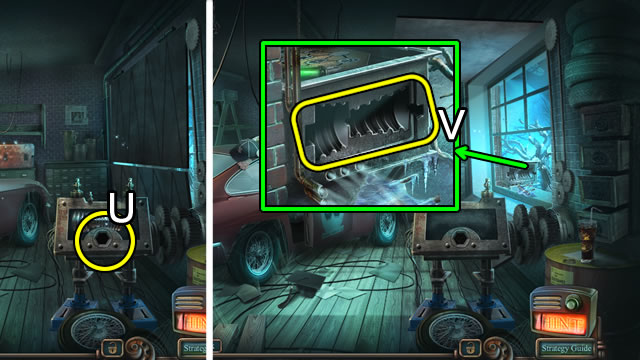
- Place the HEX KEY (U); receive a TURBINE.
- Place the TURBINE (V) for a puzzle.

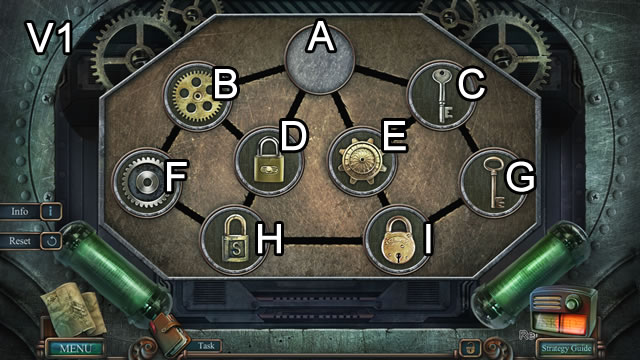

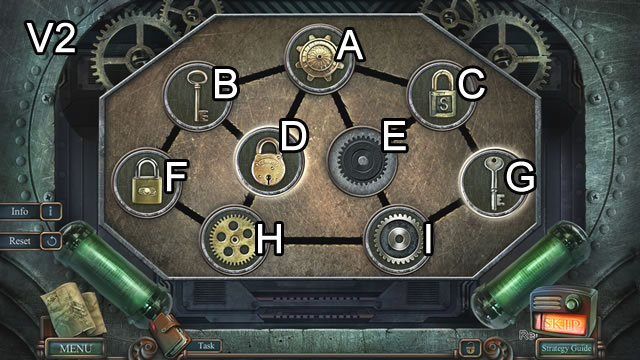

- Solution part one (V1). E-I-G-C-A-E-I-H-F-B-D-A-E-I-H-F-B-A-C-E.
- Solution part two (V2). I-H-F-B-A-C-G-I-E-C-G-I-E-A-C-G-I-E-C-A.
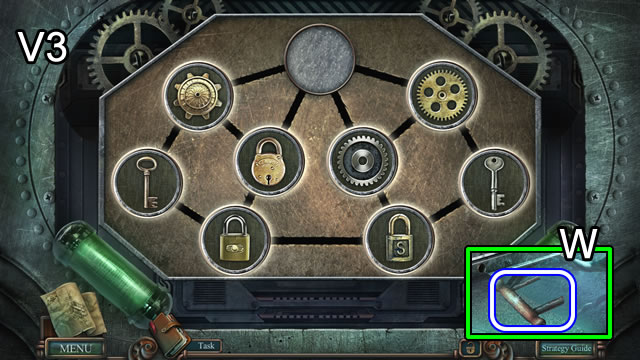
- Solved (V3).
- Take the DRAWER HANDLE (W).

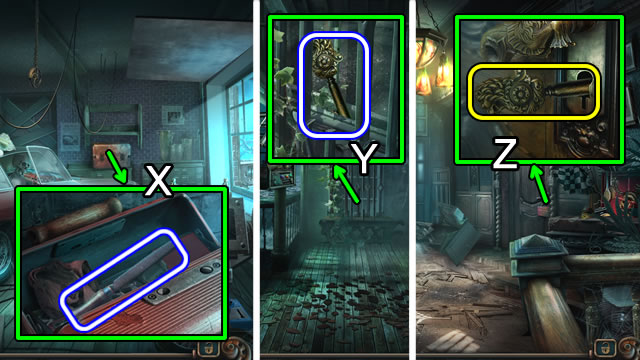
- Place and select the DRAWER HANDLE; take the FILE (X).
- Return to the balcony.
- Use the FILE; take ESRAEL’S KEY (Y).
- Walk down.
- Remove and select the sign; read the note.
- Place and select ESRAEL’S KEY (Z).
- Enter Esrael’s office.

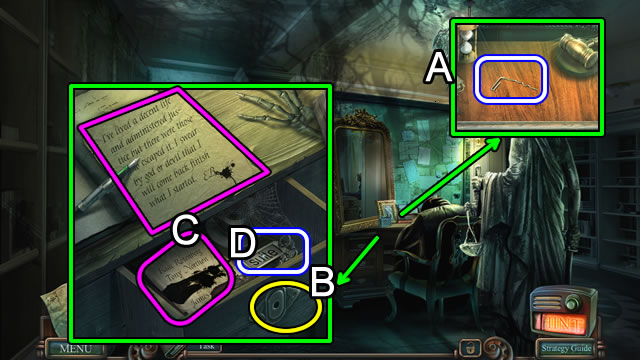
- Uncover and take a CLIP (A).
- Place and select the CLIP (B). Open the drawer.
- Read the notes (C); take the SUITE KEY (D).
Chapter 3: Marshall

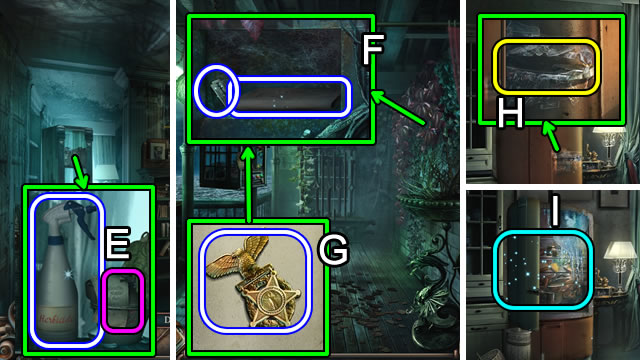
- Move the books; read the note, take the HERBICIDE (E).
- Return to the balcony.
- Use the HERBICIDE; uncover a BLADE and MARSHALL’S DIARY (F).
- Select and read MARSHALL’S DIARY (Inventory); take the MARSHALL’S MEDAL (G).
- Return to the dining room.
- Use the BLADE (H); remove the tape; open the door.
- Play the HOP (I); receive a CHROME HANDLE.
- Return to Esrael’s car.

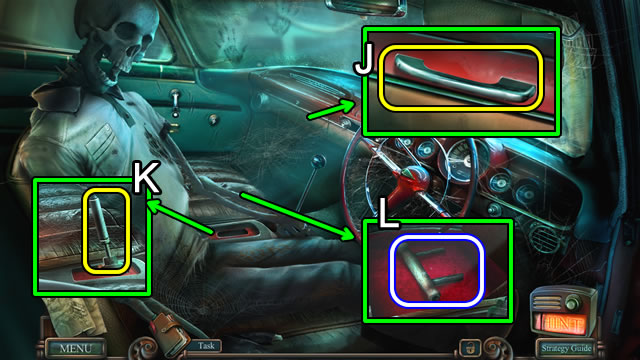
- Place and select the CHROME HANDLE (J); take the SEAT LEVER.
- Place and pull the SEAT LEVER (K).
- Read the note; take the DRAWER HANDLE (L).
- Exit the car.

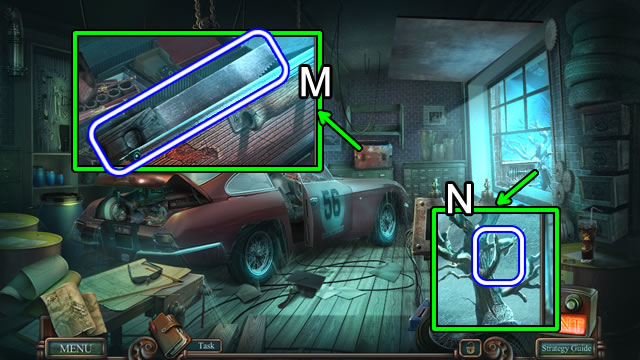
- Place and select the DRAWER HANDLE; take the HANDSAW (M).
- Use the HANDSAW; receive a BRANCH (N).
- Walk forward.

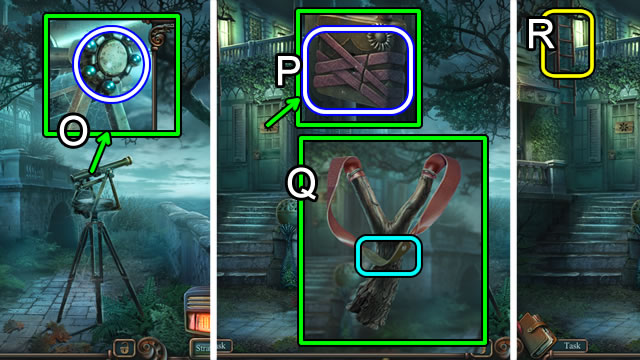
- Take the STEEL BALLS (O).
- Use the BLADE; take the CUT RUBBER BAND (P).
- Select the BRANCH (Inventory).
- Place and attach the CUT RUBBER BAND; add the STEEL BALLS; take the SLINGSHOT (Q).
- Place the SLINGSHOT (R) for a puzzle.

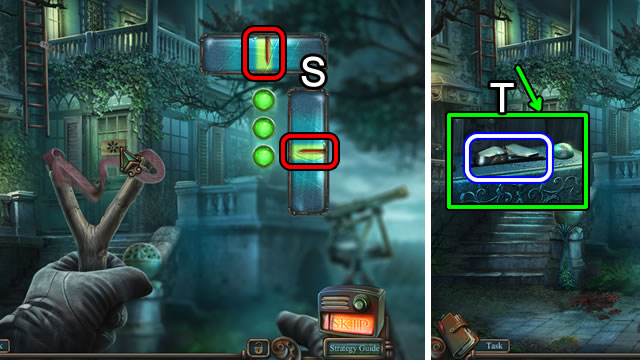
- Solution (S).
- Uncover and take the CHROME SLIDER (T).
- Return to Esrael’s car.

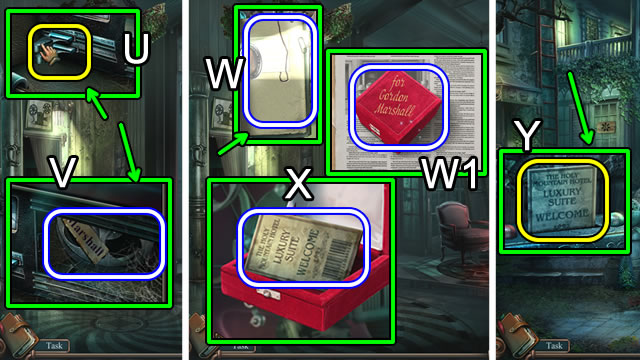
- Place and select the CHROME SLIDER (U).
- Take MARSHALL’S REEL (V).
- Return to the front hall.
- Place MARSHALL’S REEL; select the switch; take MARSHALL’S DOSSIER (W).
- Select MARSHALL’S DOSSIER (Inventory); take the VELVET BOX (W1).
- Select and open the VELVET BOX (Inventory); take the PERMIT (X).
- Return to the terrace.
- Place the PERMIT (Y).
- Look again for a puzzle.

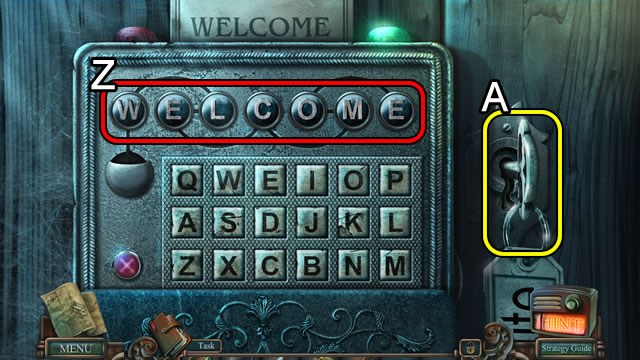
- Solution (Z). E-O-M-C-E-L-W.
- Place and select the SUITE KEY (A).
- Walk forward.

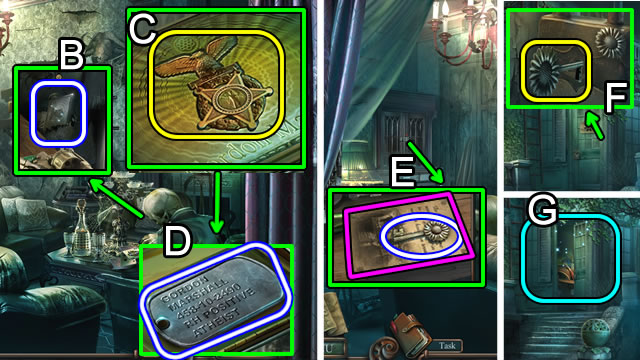
- Move the curtain. Slide out and take MARSHALL’S CIGAR CASE (B).
- Select MARSHALL’S CIGAR CASE (Inventory).
- Place MARSHALL’S MEDAL (C); open; lift holder; take the DOG TAG (D).
- Place the DOG TAG; open and take the SUNFLOWER KEY; read the note (E).
- Walk down.
- Place and select the SUNFLOWER KEY (F); open the door.
- Play the HOP (G); receive an ENVELOPE.
Chapter 4: Redmond

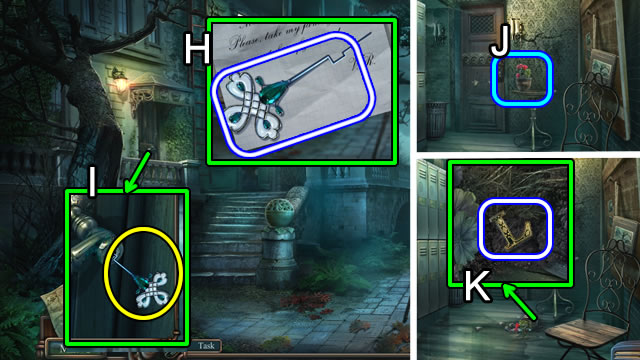
- Select and open the ENVELOPE (Inventory).
- Read the note; select the pin; take the HAIRPIN (H).
- Remove the WIRE; place and select the HAIRPIN (I); open the door.
- Enter the back hallway.
- Knock over the plant (J).
- Use the HERBICIDE; take the L MEDALLION (K).

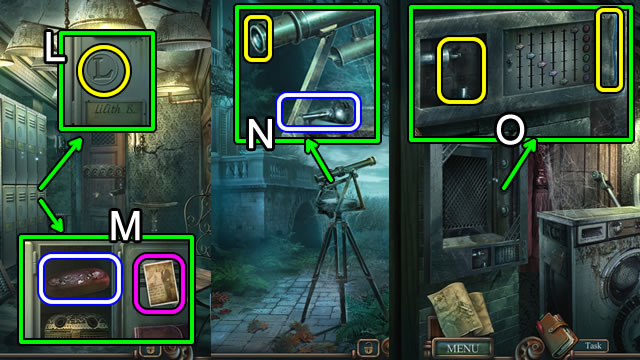
- Place the L MEDALLION (L).
- Select the picture; take the GLASSES CASE (M).
- Select the GLASSES CASE (Inventory); open the case; select the glasses; receive a LENS.
- Walk down.
- Remove the broken lens; place the LENS; take the HINGE JOINT (N).
- Return to the back hallway.
- Place the HINGE JOINT and replace the WIRE (O) for a puzzle.

- Solution (P). D-6, B-5, C-1, A-1, E-4, C-1.
- Flip the switch (Q).
- Enter the laundry room.

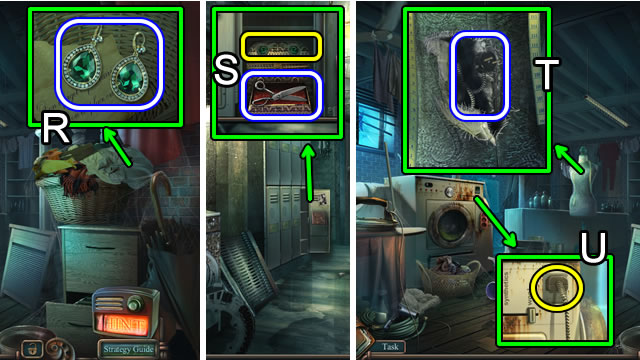
- Remove the clothes; take the EARRINGS (R).
- Walk down.
- Place the EARRINGS; open; take the SCISSORS (S).
- Return to the laundry room.
- Use the SCISSORS; uncover and take the CONNECTOR CORD (T).
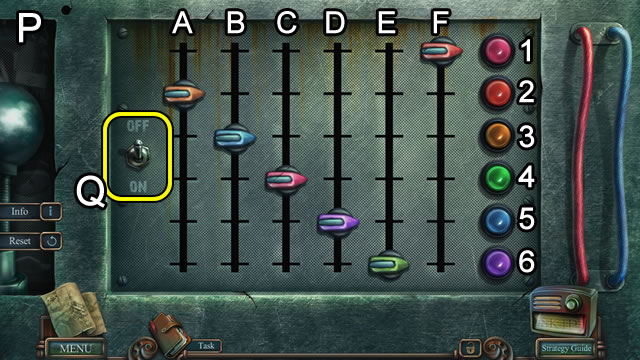
- Place the CONNECTOR CORD (U) for a puzzle.

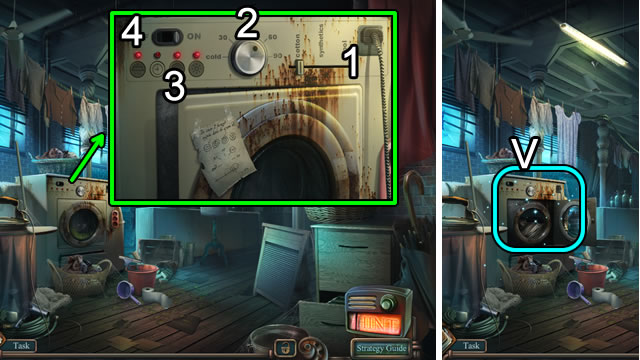
- Slide to ‘cotton’ (1); set to ’60′ (2), press the first and third buttons (3); slide to ‘on’ (4).
- Play the HOP (V); receive the REDMOND’S REEL.
- Return to the front hall.

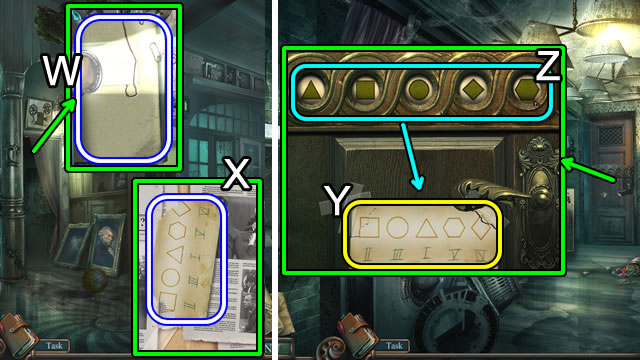
- Place REDMOND’S REEL; press the switch; take VERONICA’S DOSSIER (W).
- Select VERONICA’S DOSSIER (Inventory); take the CODE (X).
- Return to the back hallway.
- Place the CODE (Y).
- Solution (Z).
- Enter the economy room.

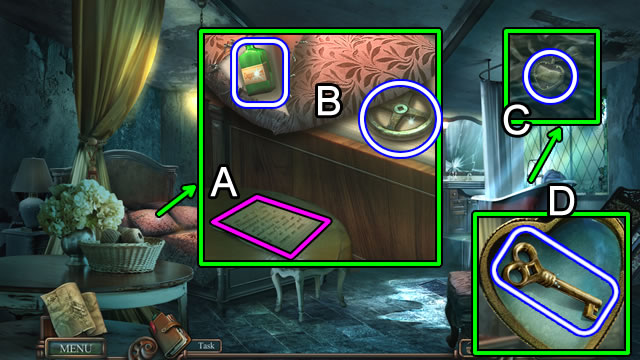
- Read the note (A); use the SCISSORS on the pillowcase; lift the covers. Take the EMPTY FLASK and VALVE (B).
- Uncover and take VERONICA’S LOCKET (C).
- Select VERONICA’S LOCKET (Inventory). Open, remove the glass and picture; take the TINY KEY (D).

- Place the VALVE; turn. Take VERONICA’S DIARY (E).
- Select VERONICA’S DIARY (Inventory); place the TINY KEY; read the diary; select the bookmark; take the WICK (F).
- Walk down.
- Place JAMES’S RING (G).
- Read the note; take the LIGHTER and GUNPOWDER (H).
- Select the EMPTY FLASK (Inventory). Add the GUNPOWDER and WICK (I). Take the EXPLOSIVE.
- Return to the deluxe suite.

- Place the EXPLOSIVE; use the LIGHTER (J).
- Walk forward.
- Take the KETTLE OF WATER (K).
- Take the GRINDSTONE (L).
- Place the KETTLE OF WATER; turn the knob; take the BOILING WATER (M).
- Pour the BOILING WATER; take the RUSTY BLADE (N).
- Select the RUSTY BLADE (Inventory) and the GRINDSTONE. Take a RAZOR BLADE.

- Use the RAZOR BLADE (O).
- Play the HOP (P); receive HANDCUFFS.
- Place the HANDCUFFS (Q); take LILITH’S CODE (R).
- Place the LILITH’S CODE.
- Solution (S).
- Open the door; enter the storage room.
Chapter 5: O’Connor

- Open the door; take the WIRE CUTTERS and DRAWER PULL (T).
- Move and take the WRAPPED FILM (U).
- Select the WRAPPED FILM (inventory); use the WIRE CUTTERS; remove the wire; take O’CONNOR’S REEL.
- Return to the front hall.
- Place O’CONNOR’S REEL; press the switch; take O’CONNOR’S DOSSIER (V).
- Select O’CONNOR’S DOSSIER (Inventory); open; take the TWEEZERS (W).
- Return to the storage room.

- Uncover and take the CREST PART (X).
- Use the TWEEZERS to take a second CREST PART (Y).
- Return to the deluxe suite.
- Place the CREST PARTS (Z) for a puzzle.

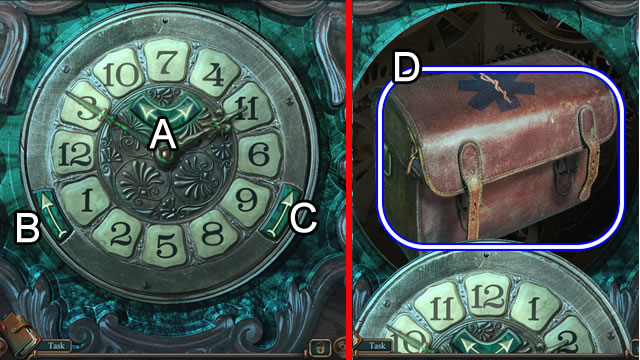
- Solution. Bx3-A-B-A-C-A-Cx3-A-Cx2-A-Cx2-A-B-A-Cx2-A-Bx2-A-Bx2-A-Bx6.
- Take the FIRST AID KIT (D).
- Walk forward.

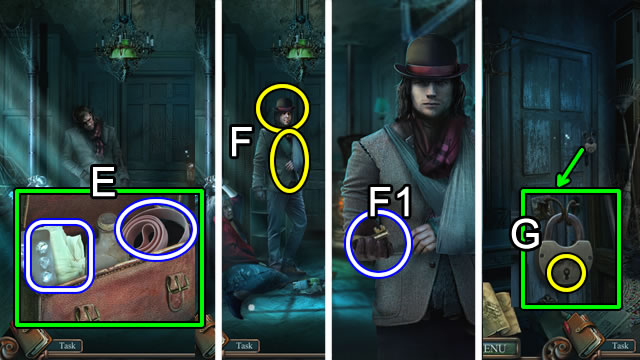
- Select the FIRST AID KIT (Inventory). Open, uncover and take the BANDAGE and TOURNIQUET (E).
- Place the TOURNIQUET and BANDAGE. Place JAMES’S HAT (F).
- Speak with James; take the PADLOCK KEY (F1).
- Walk right.
- Place and select the PADLOCK KEY twice (G).
- Walk forward.

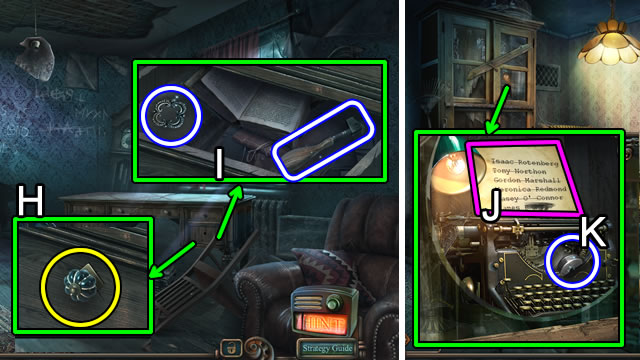
- Remove and replace the knob with the DRAWER PULL (H).
- Open the drawer; take the SILVER DECORATION and GLASS CUTTER (I).
- Walk down.
- Use the GLASS CUTTER. Press the keys; read the note (J); take the SILVER HANDLE (K).
- Walk forward.

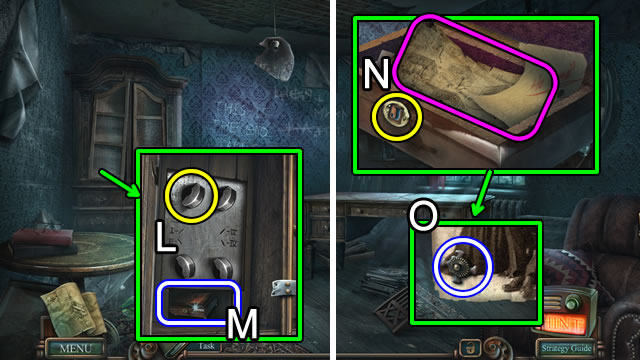
- Open the door; place the SILVER HANDLE; set the switches (L).
- Take JAMES’S NOTES (M).
- Select JAMES’S NOTES (inventory); place JAMES’S RING; open the box; flip through the notes (N).
- Take the HANDLE (O).

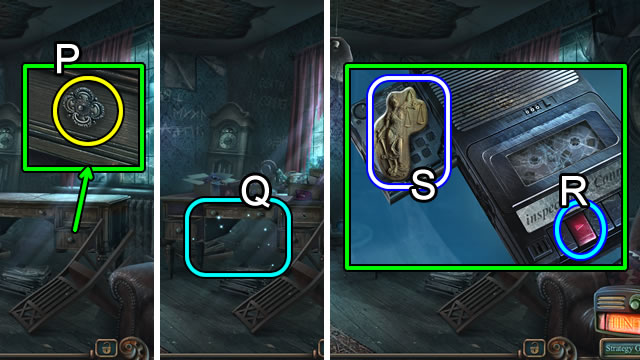
- Place SILVER DECORATION and HANDLE (P); open the drawer.
- Play the HOP (Q); receive the O’CONNOR’S RECORDER.
- Select the O’CONNOR’S RECORDER (Inventory). Press (R); take the BAS-RELIEF FIGURE (S).

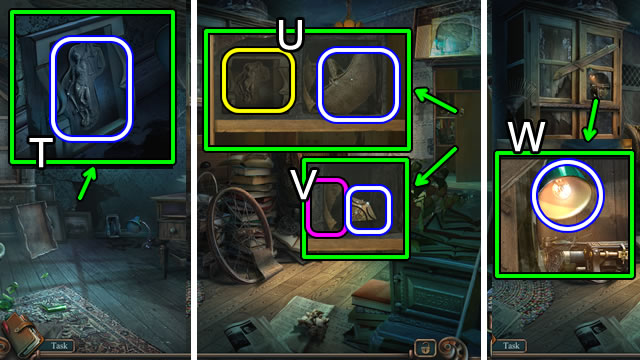
- Place the BAS-RELIEF FIGURE; select and take the BAS-RELIEF (T).
- Walk down.
- Place the BAS-RELIEF; press; take the OVEN MITT (U). Read the note; receive the MEDALLION PART (V).
- Use the OVEN MITT; take the BULB (W).
- Walk forward.

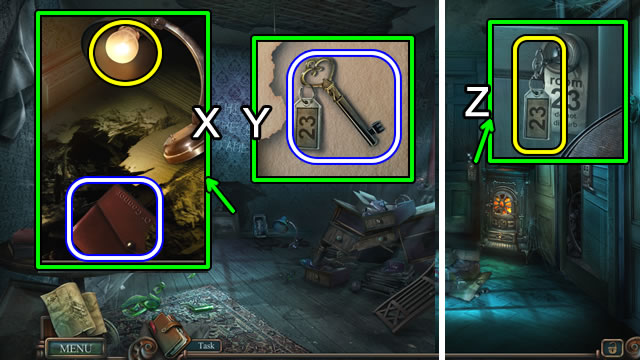
- Place the BULB; take O’CONNOR’S DIARY (X).
- Select and open O’CONNOR’S DIARY (Inventory). Read the diary; take the KEY TO ROOM 23 (Y).
- Walk down twice.
- Place and select twice the KEY TO ROOM 23 (Z).
- Walk forward.
Chapter 6: Room 23

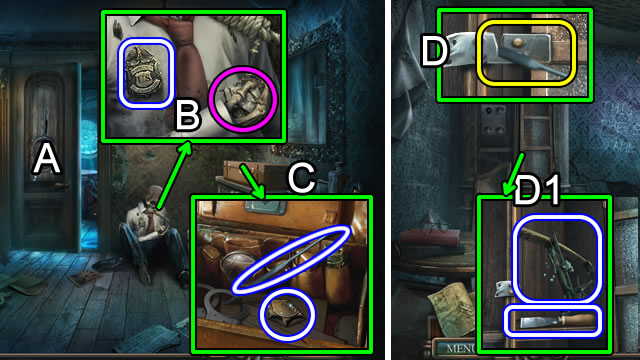
- Attempt to enter the next room (A).
- Take the note and O’CONNOR’S BADGE (B).
- Place O’CONNOR’S BADGE; unlatch and open the case; take the NAIL FILE and second MEDALLION PART (C).
- Walk down, right and forward.
- Use the NAIL FILE (D); open the door; take the CROSSBOW FRAME and CHISEL (D1).
- Return to room 23.

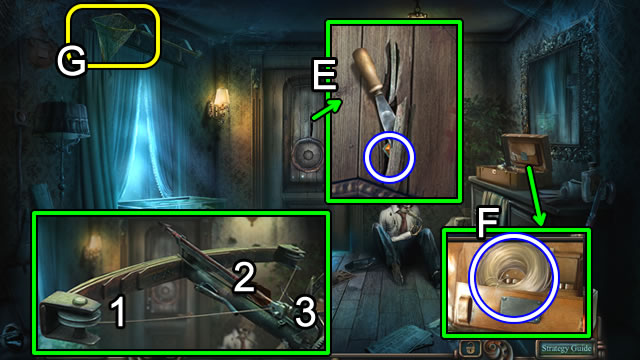
- Place and select the CHISEL; take the DIAMOND BUTTON (E).
- Place the DIAMOND BUTTON; press and take the FISHING LINE (F).
- Select the CROSSBOW FRAME (Inventory); place and attach the FISHING LINE (1), place and select to add the ARROW (2), pull the cocking mechanism (3). Take the CROSSBOW.
- Select and place the CROSSBOW on the net (G).

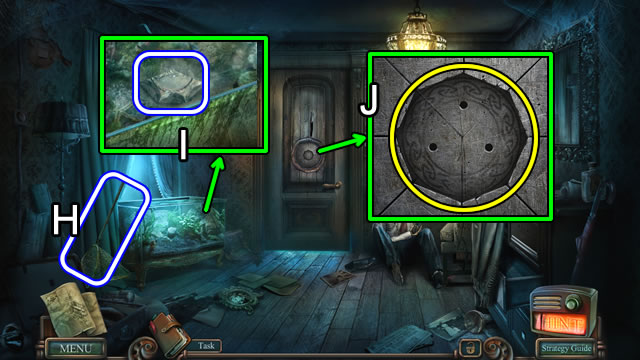
- Take the NET (H).
- Use the NET; receive the third MEDALLION PART (I).
- Place each MEDALLION PART (J).

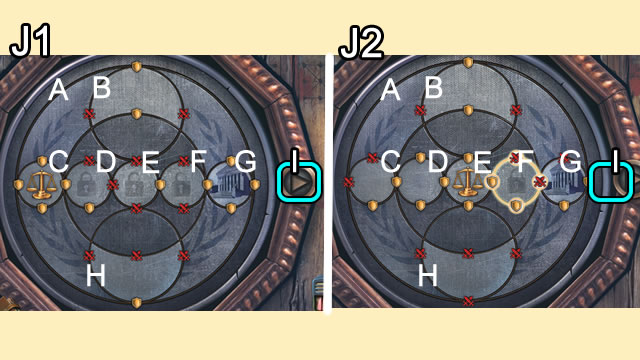
- Solution (J1). B-Ix2-H-Ix2-E-I-D-I-E-I-F-I-G-I-F-I-G-I-A-I-C-I-A-I-E-I-F-I.
- Solution (J2). G-I-C-I-A-I-C-I-F-I-G-I-A-I-G-I-A-I.
- Walk forward.

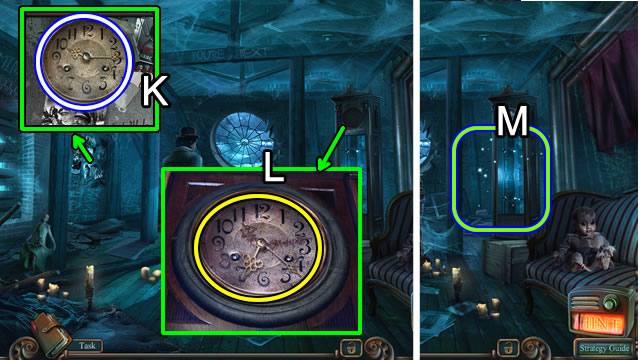
- Speak to James; take the CLOCKFACE (K).
- Place and select the CLOCKFACE twice(L).
- Play the HOP (M); receive the JAMES’S REEL.
- Return to the front hall.

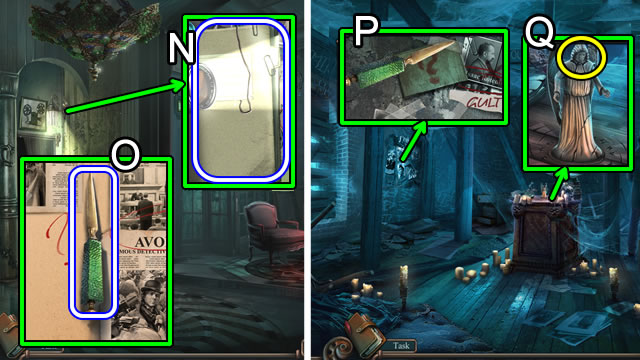
- Place JAMES’S REEL; press the switch; take JAMES’S DOSSIER (N).
- Select JAMES’S DOSSIER (Inventory); open; take the GREEN SPLINTER (O).
- Return to the altar.
- Use the GREEN SPLINTER (P); take the STATUETTE HEAD.
- Place and select the STATUETTE HEAD (Q) for a puzzle.

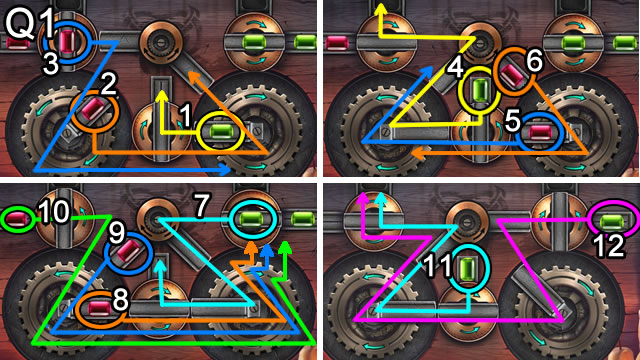

- Receive LILITH’S DIARY (R).
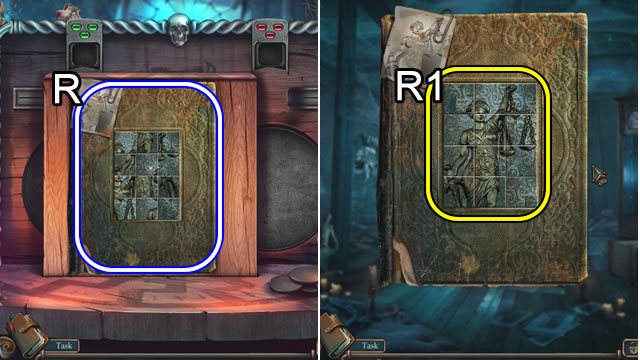
- Select LILITH’S DIARY (Inventory) for a puzzle.
- Solution (R1).
- Read then give LILITH’S DIARY to James.

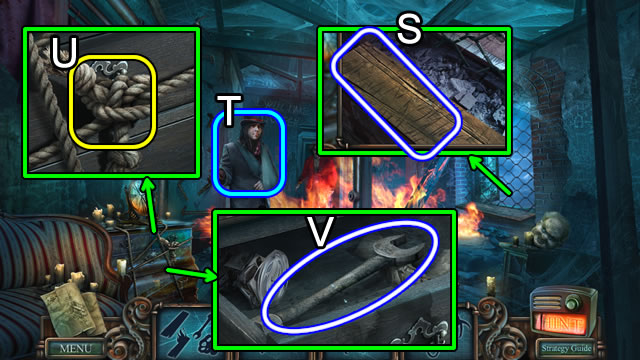
- Select, loosen and take the WOOD (S).
- Give the WOOD (T); take a TORCH.
- Place the TORCH (U); receive a ROPE.
- Open the drawer; take the WRENCH (V).

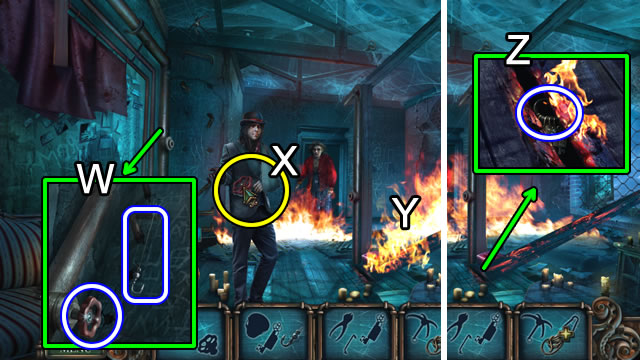
- Use the WRENCH; receive a VALVE. Take the HOOK (W).
- Give the VALVE (X); take a BUCKET OF WATER.
- Place the BUCKET OF WATER (Y).
- Use the HOOK; take the KEY RING (Z).

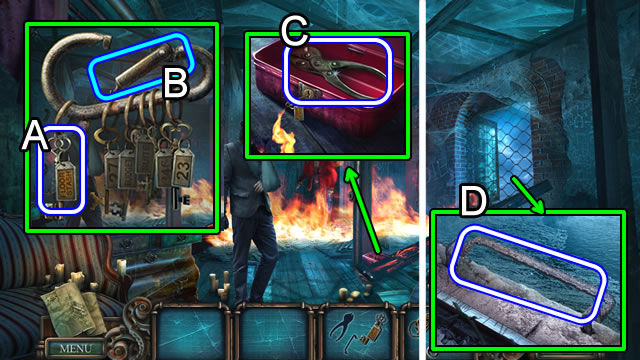
- Select the KEY RING (Inventory); remove the last FIRE KEY (A).
- Select the clip (B) to receive a CARABINER (B).
- Place and select the FIRE KEY twice; take the CUTTERS (C).
- Use the CUTTERS; take the METAL RUNG (D).

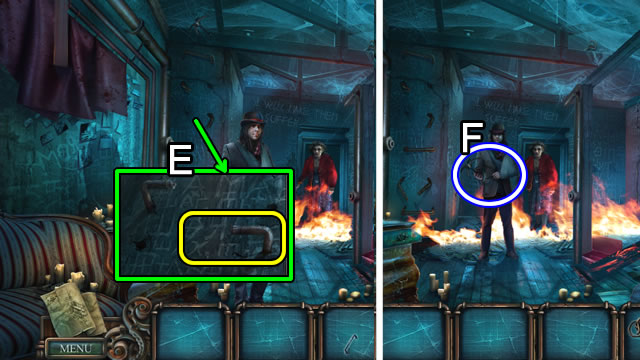
- Place the METAL RUNG (E).
- Take the GRAPPLING HOOK (F).

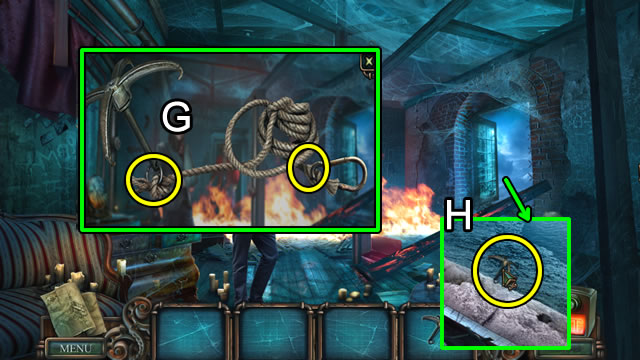
- Select the ROPE (Inventory). Select, place and attach the GRAPPLING HOOK and CARABINER (G).
- Take the ROPE SWING.
- Place the ROPE SWING (H).
- Congratulations. You have completed playing Haunted Hotel: Death Sentence .


 Mystery Tales: The Lost Hope Walkthrough, Guide, & Tips
 Pachinko Pop Tips and Tricks, Guide, & Tips
 Relic Rescue Tips and Tricks, Guide, & Tips
 Dark Tales: ™ Edgar Allan Poe's Murders in the Rue Morgue Collector's Edition Walkthrough, Guide, & Tips
 Crossworlds: The Flying City Walkthrough, Guide, & Tips