Hidden Expedition: Smithsonian Castle Walkthrough, Guide, & Tips
Hidden Expedition: Smithsonian Castle Walkthrough
Welcome to the Hidden Expedition: Smithsonian Castle Walkthrough
The Smithsonian Castle’s secrets lie in a Civil War past.
Whether you use this document as a reference when things get difficult or as a road map to get you from beginning to end, we’re pretty sure you’ll find what you’re looking for here.
This document contains a complete Hidden Expedition: Smithsonian Castle game walkthrough featuring annotated screenshots from actual gameplay!
We hope you find this information useful as you play your way through the game. Use the walkthrough menu below to quickly jump to whatever stage of the game you need help with.
Remember to visit the Big Fish Games Forums if you find you need more help. Have fun!
This walkthrough was created by David Becker, and is protected under US Copyright laws. Any unauthorized use, including re-publication in whole or in part, without permission, is strictly prohibited.
General Tips
- This is the official guide for Hidden Expedition: Smithsonian Castle.
- Hidden-object puzzles are referred to as HOPs. This guide will not show screenshots of the HOPs, however, it will mention when an HOP is available and the inventory item you’ll collect from it.
- This guide will not mention each time you have to zoom into a location; the screenshots will show each zoom scene.
Chapter 1: The Smithsonian Castle

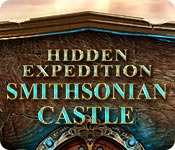
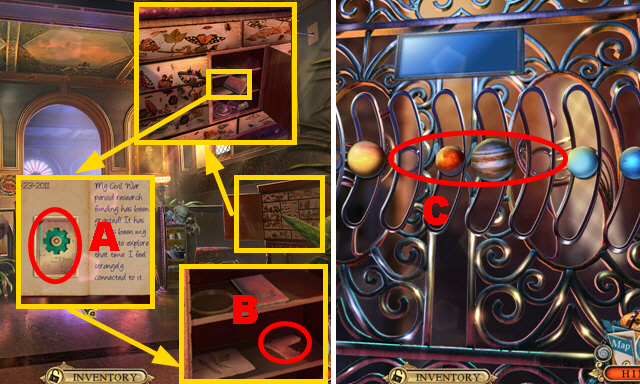
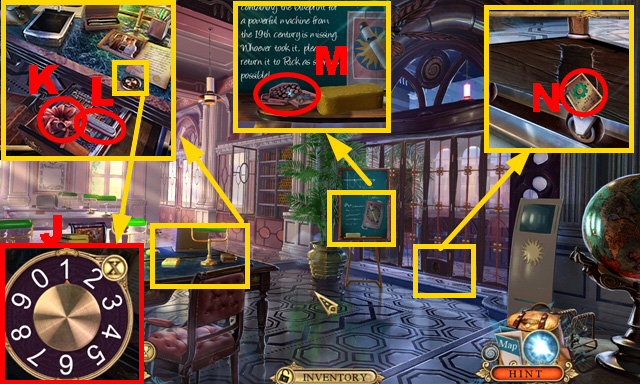
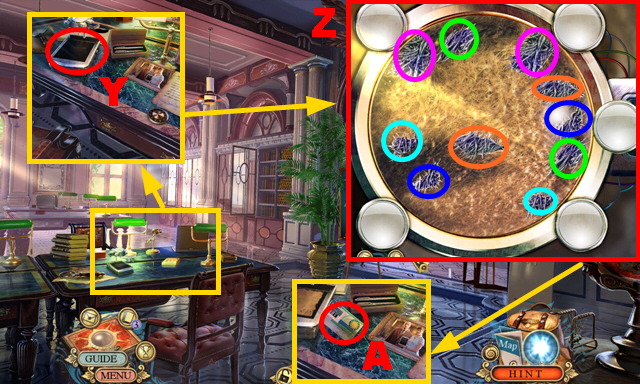
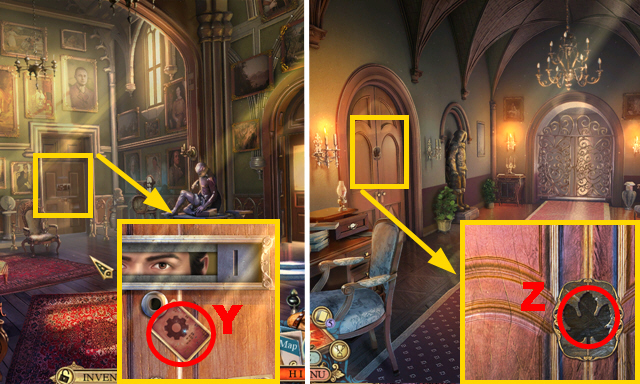
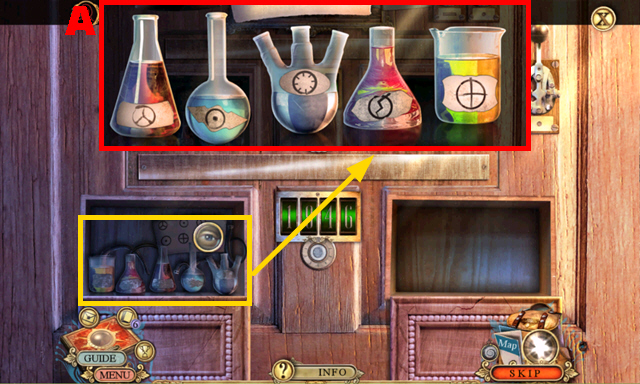
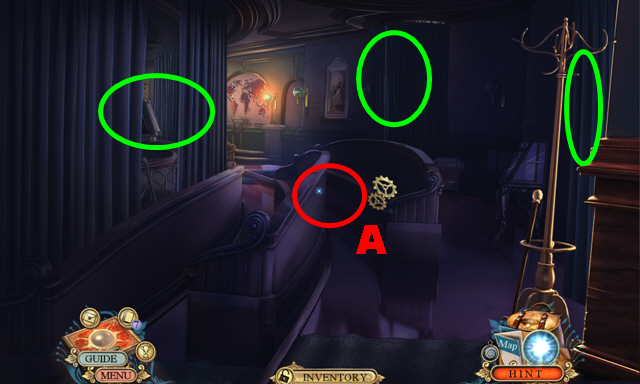
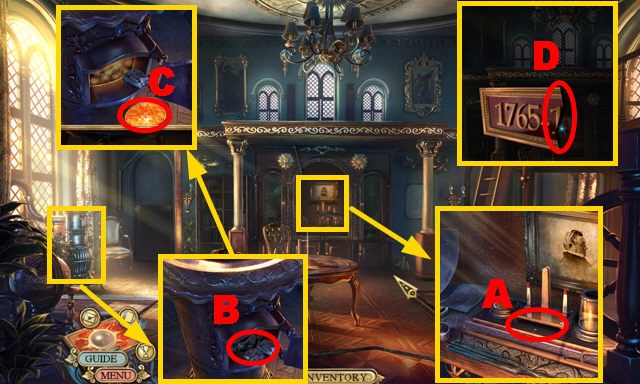
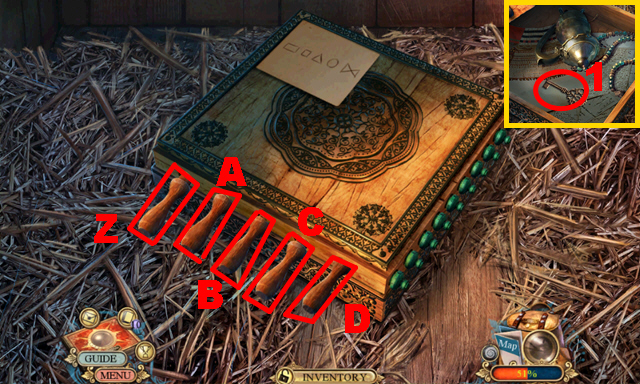
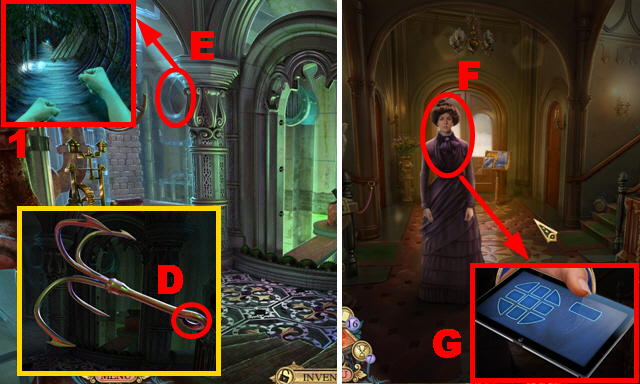
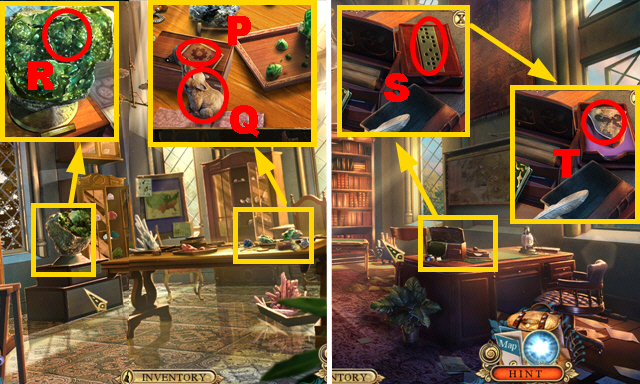
- Take the SMITHSONIAN SUN EMBLEM (A).
- Move 2 items; take the COCKTAIL STIRRER (B).
- Place the SMITHSONIAN SUN EMBLEM (C).
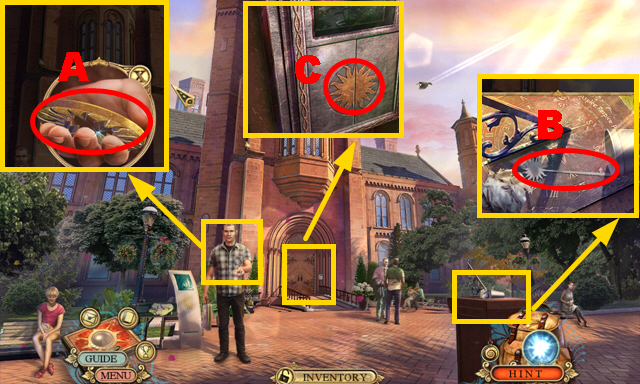
- Play the mini-game.
- Solution: (D).
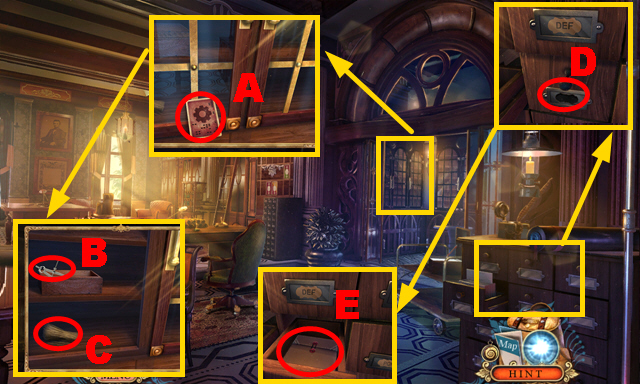
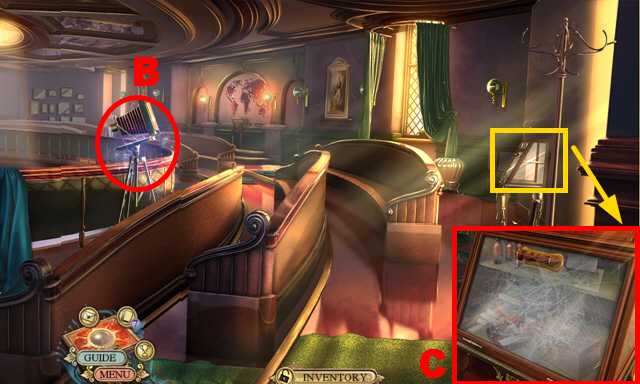
- Move forward twice.

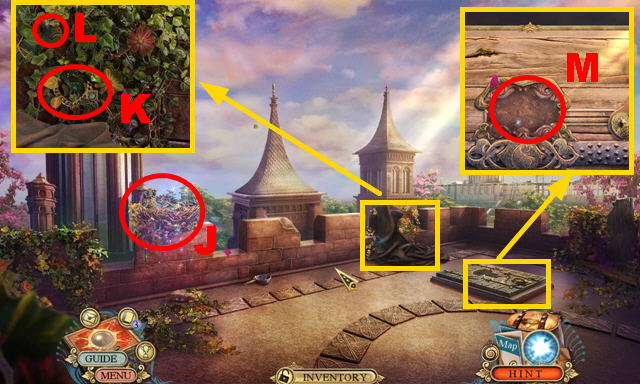
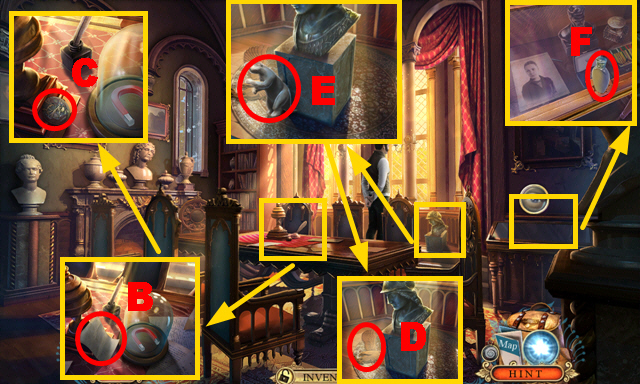
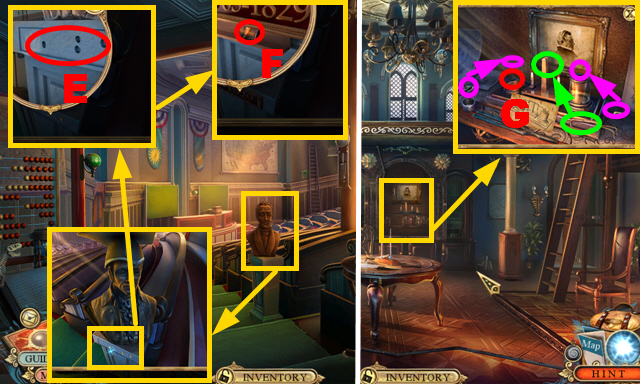
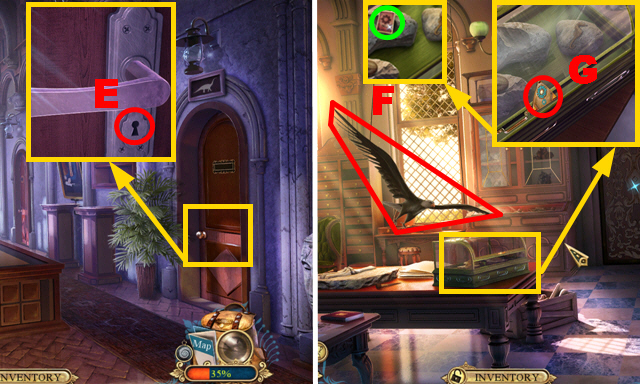
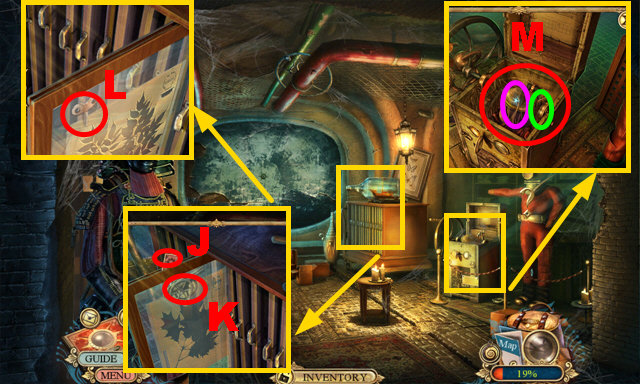
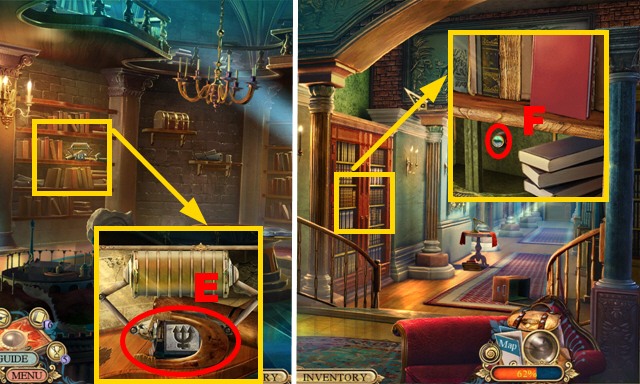
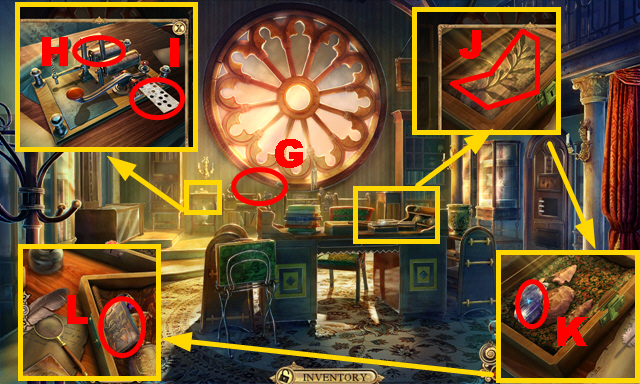
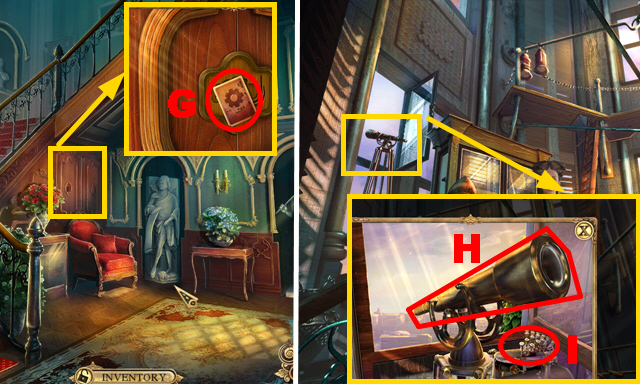
- Take the PORTABLE VAULT (E).
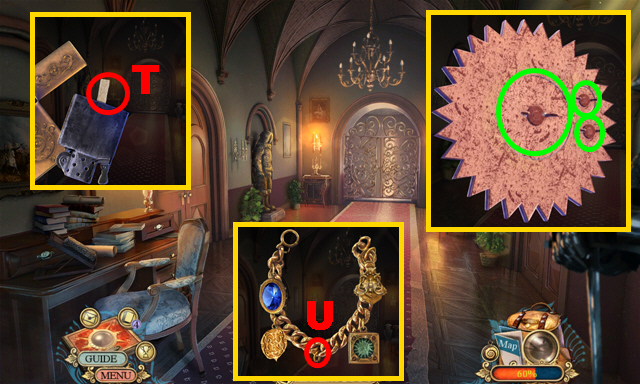
- Pan down and remove the pillows; take the EMPTY LIGHTER (F) and DIMMER KNOB (G).
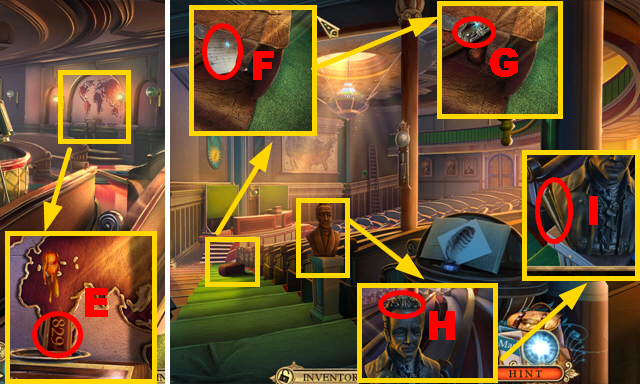
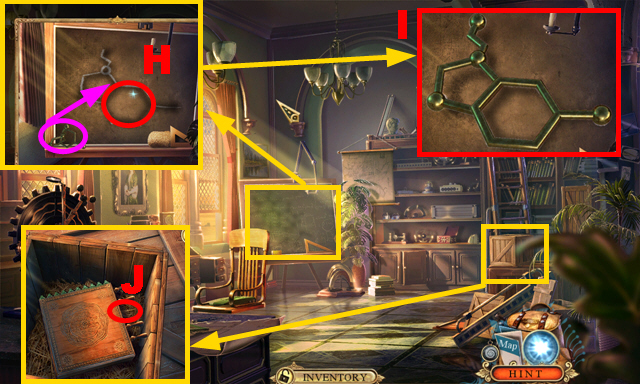
- Use the COCKTAIL STIRRER (H).
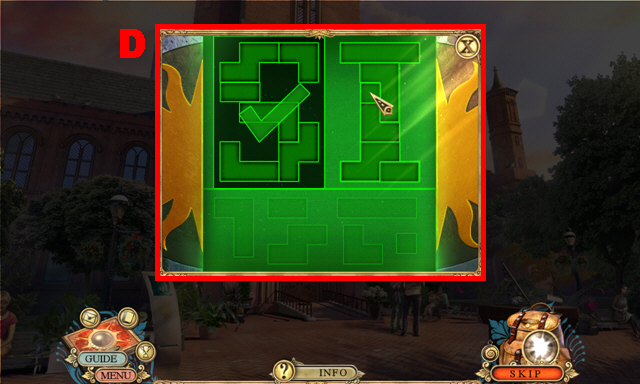
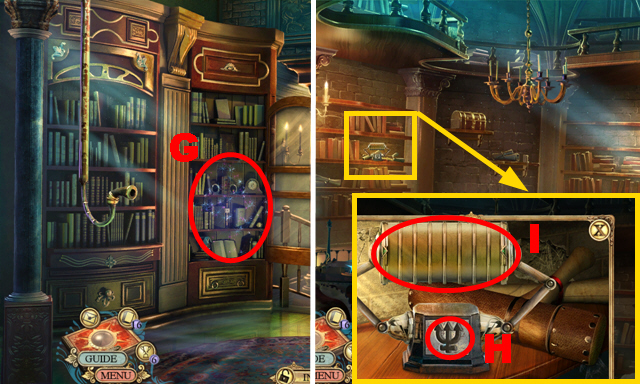
- Take the fact card (I) and 2 BUTTERFLY WINGS (green).
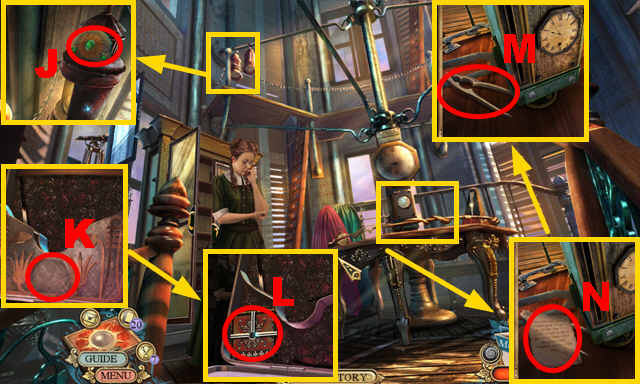
- Move the books (J); take BUTTERFLY WING 3/3 (K).
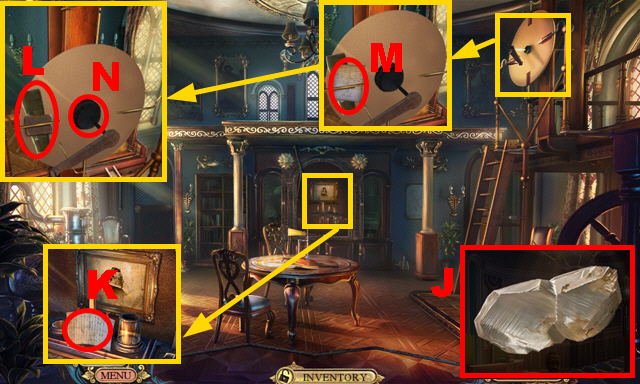
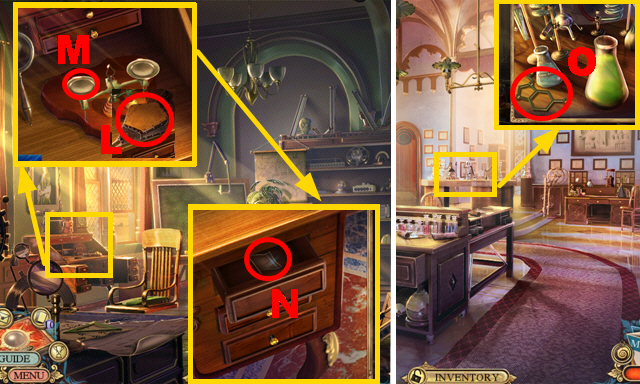
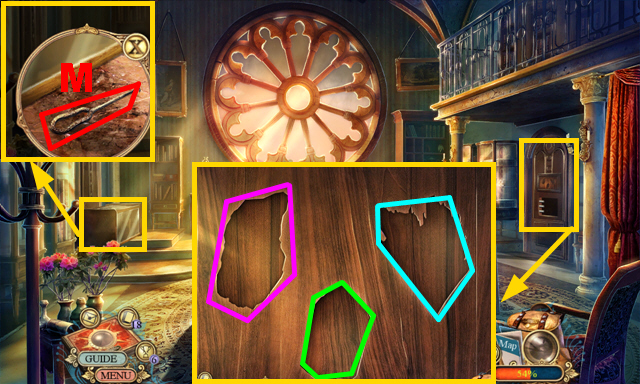
- Open the PORTABLE VAULT (L); take the USB ENCRYPTION KEY (M).
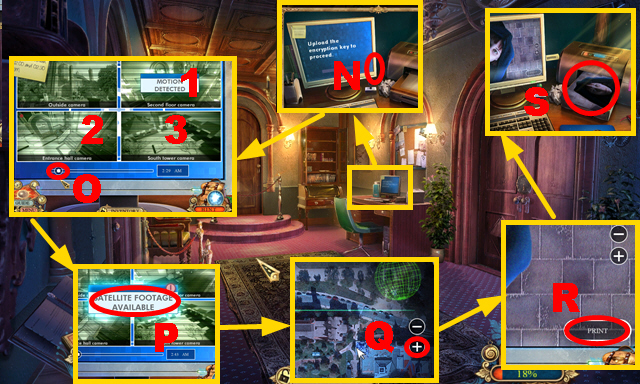
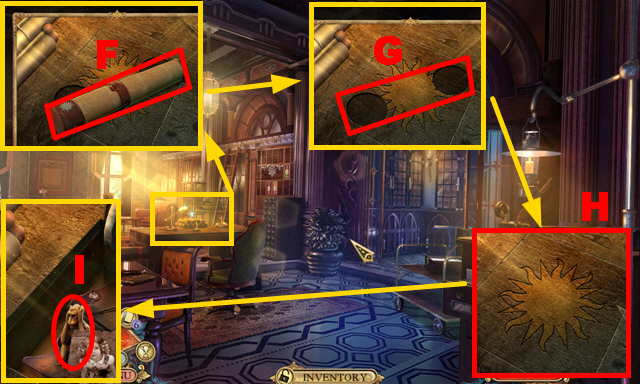
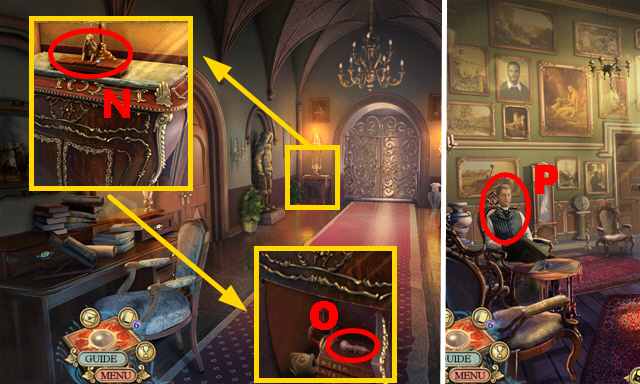
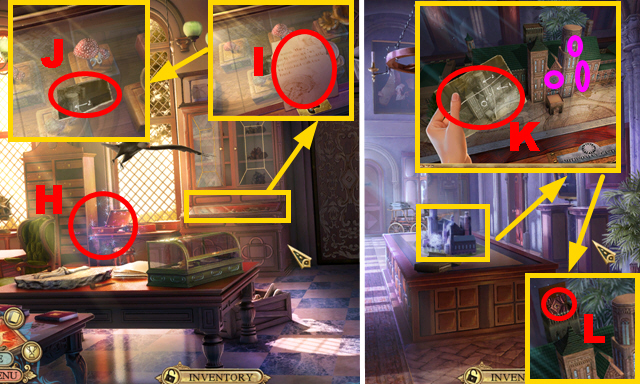
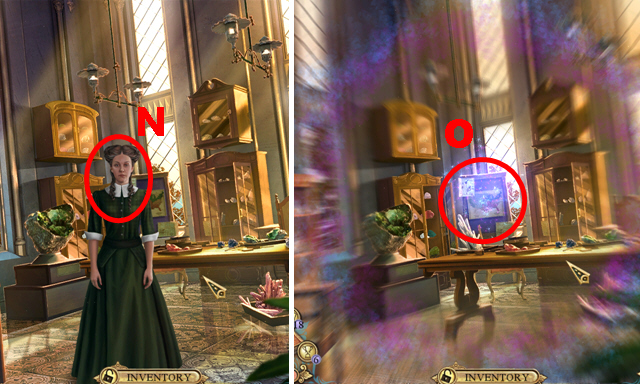
- Place the USB ENCRYPTION KEY (N); inspect the monitor.
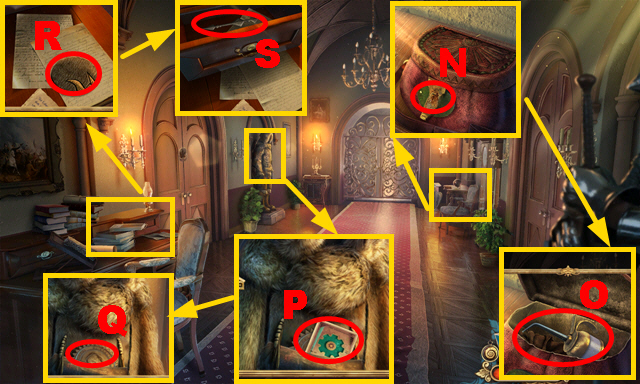
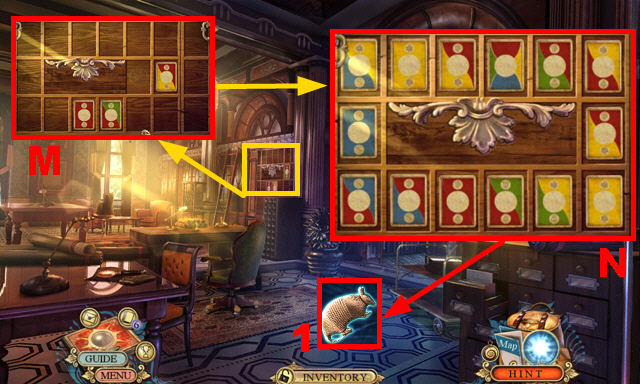
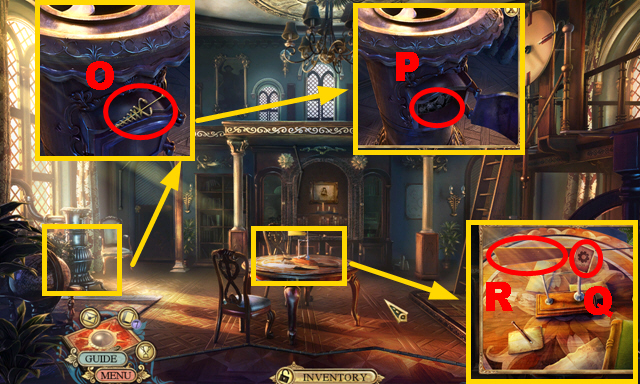
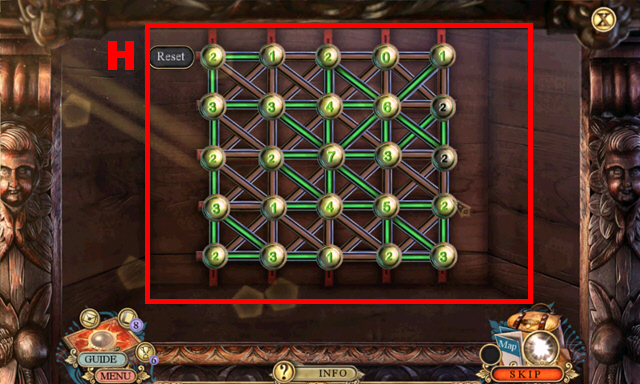
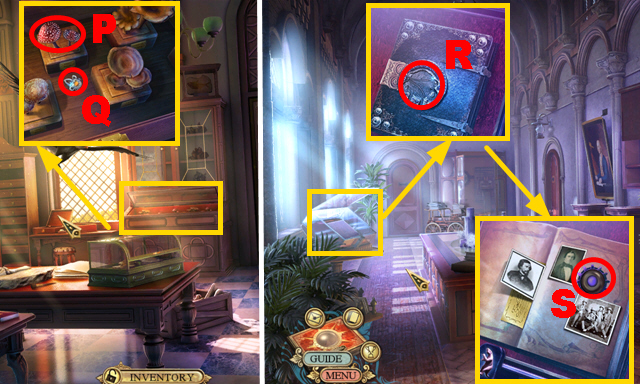
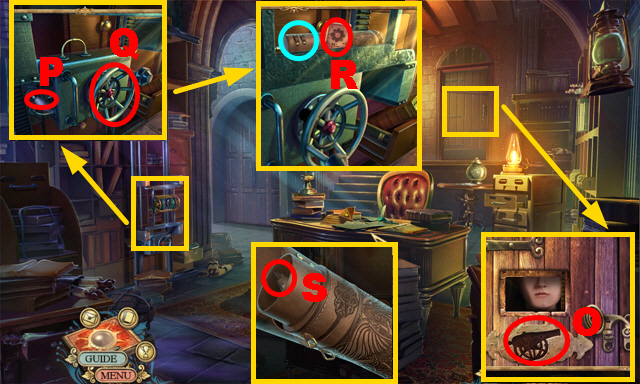
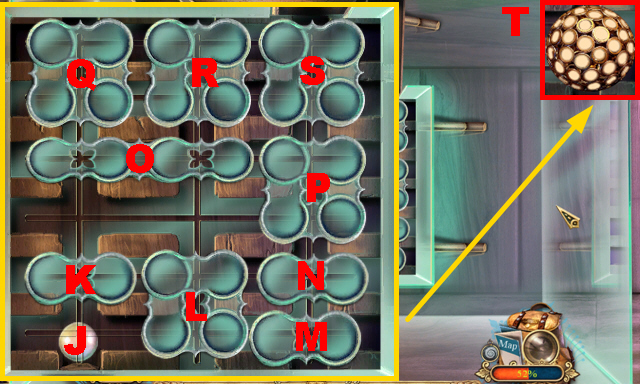
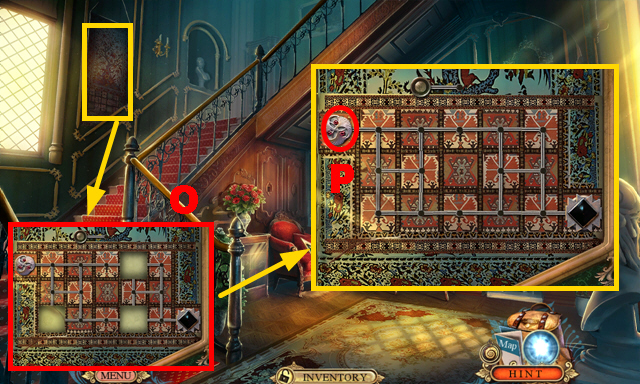
- Move the slider into the correct position (O); activate panels 1-3.
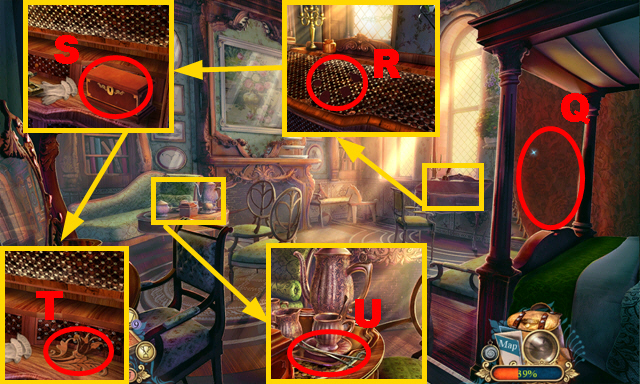
- Select the footage (P); push the button five times (Q).
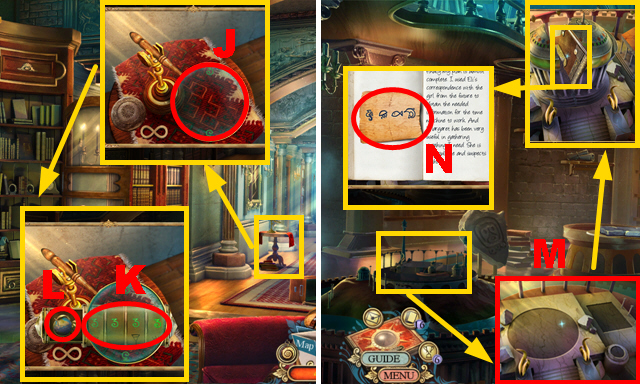
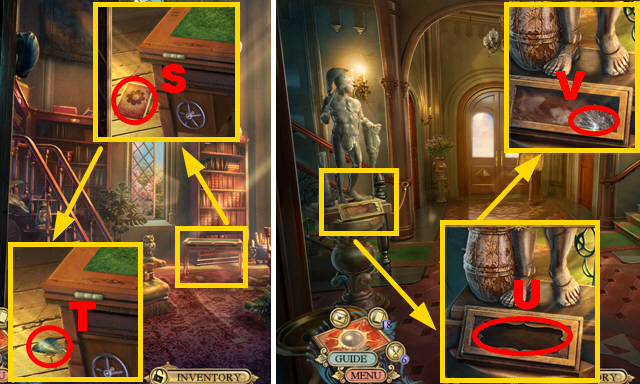
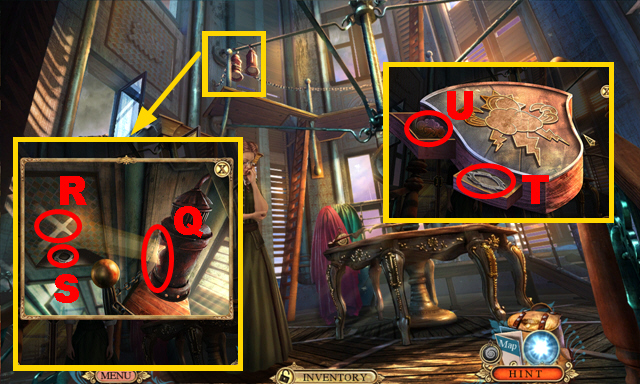
- Activate the button (R); take the SUSPECT PHOTO (S).
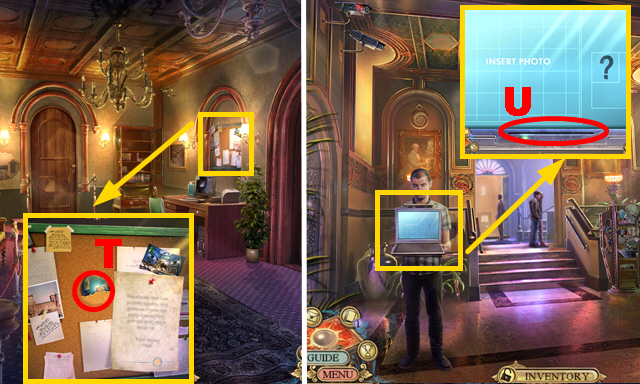
- Move the note; take PLANET 1/2 (T).
- Walk down.
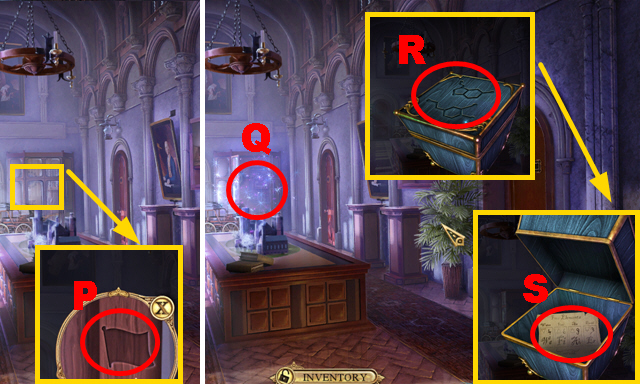
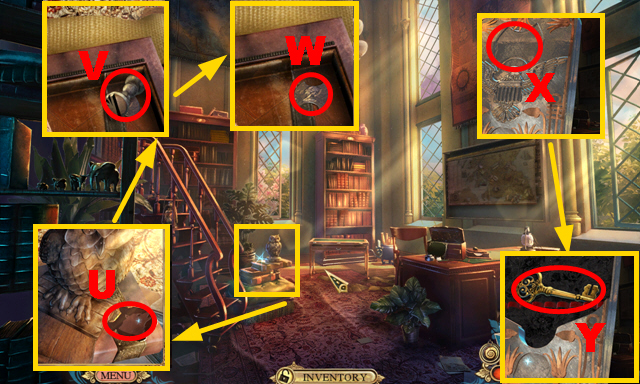
- Insert the SUSPECT PHOTO (U).
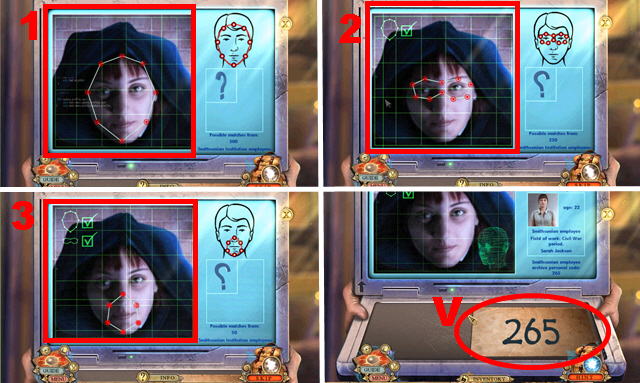
- Play the mini-game.
- Solution: 1-3.
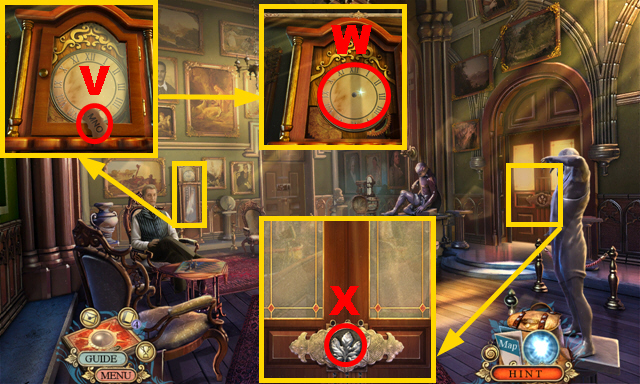
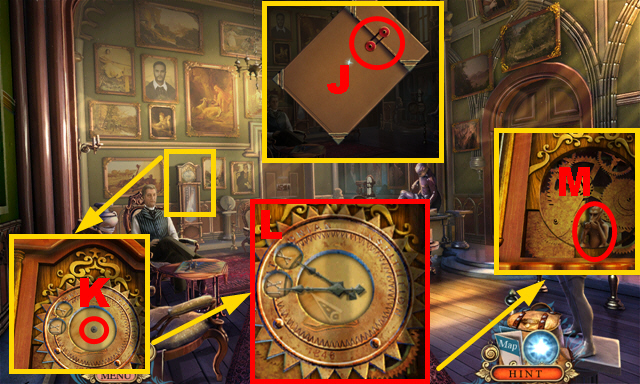
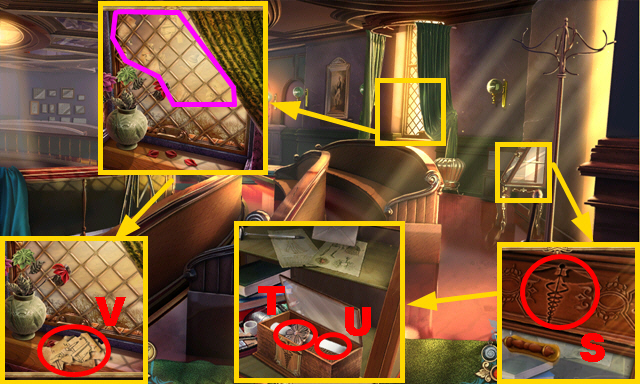
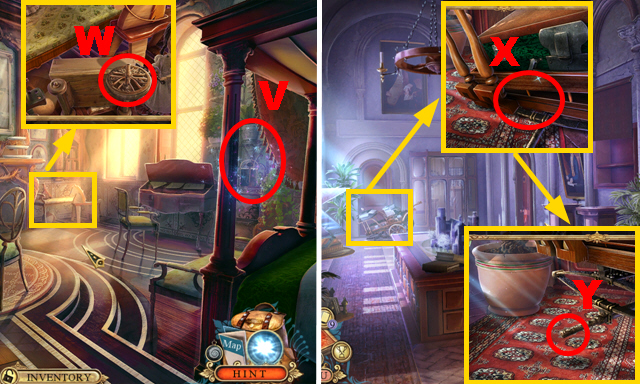
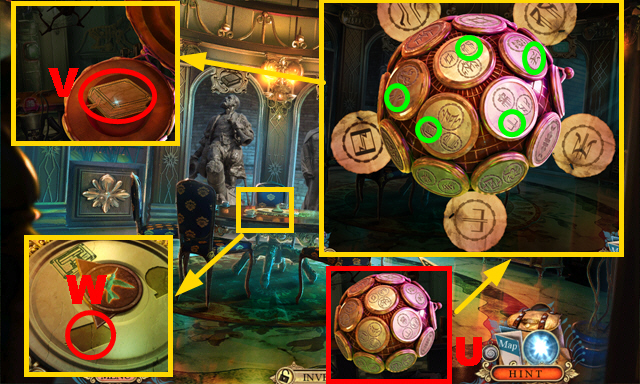
- Take the PERSONAL CODE (V).
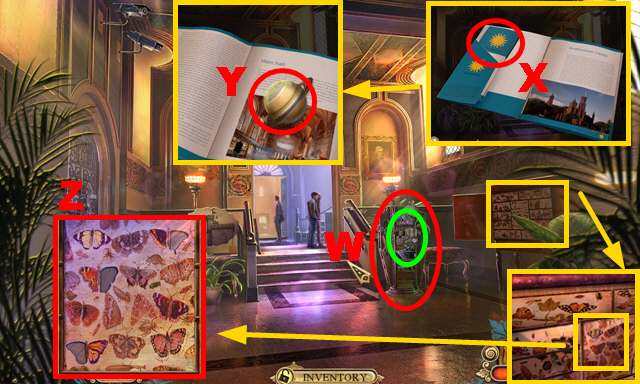
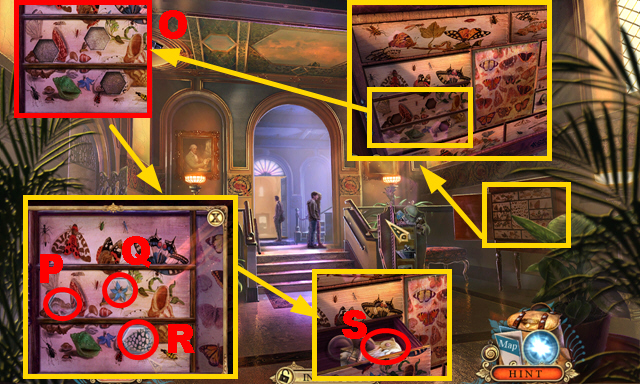
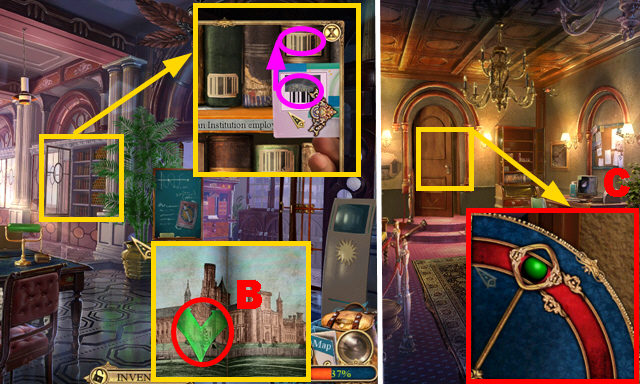
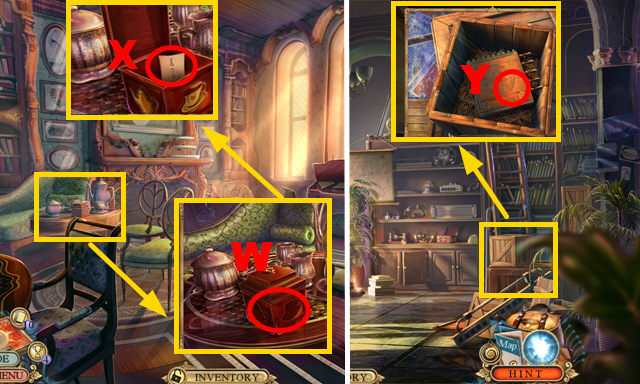
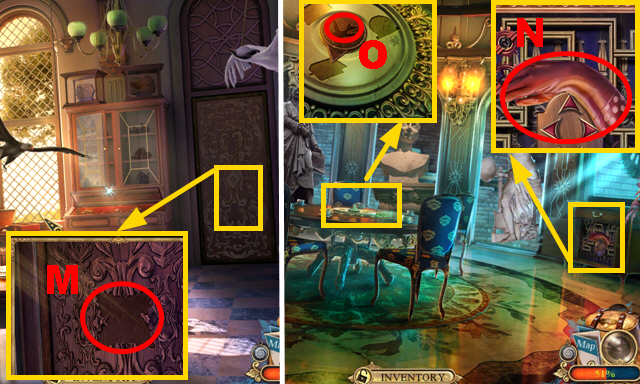
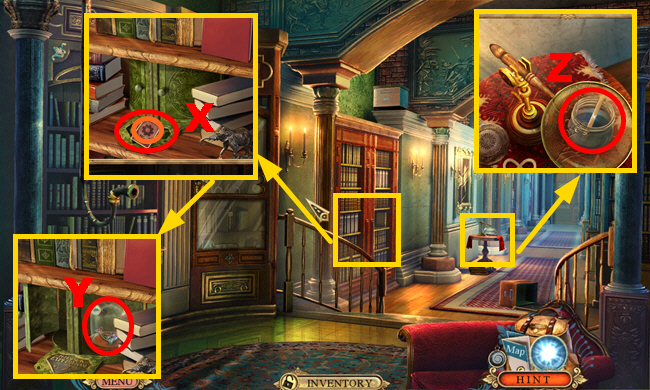
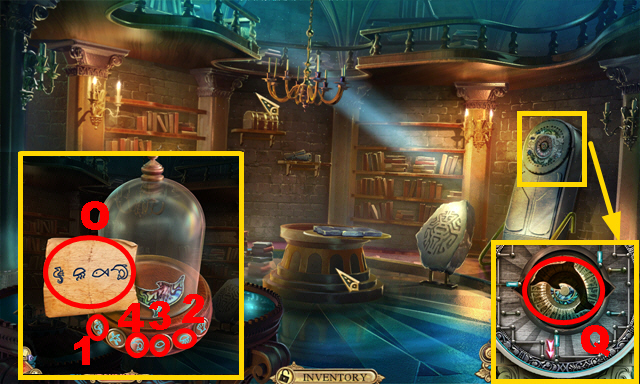
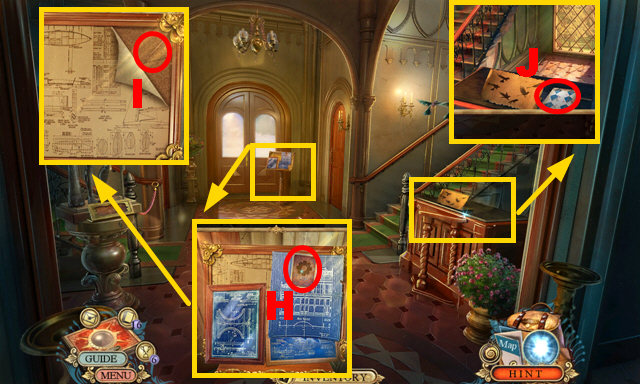
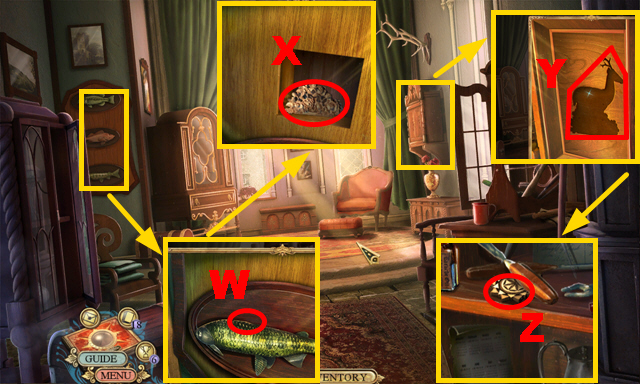
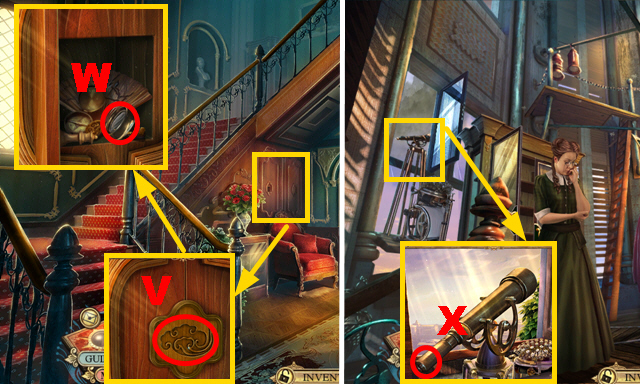
- Turn the shelf (W); play the HOP (green) to acquire the SMITHSONIAN BOOKLET.
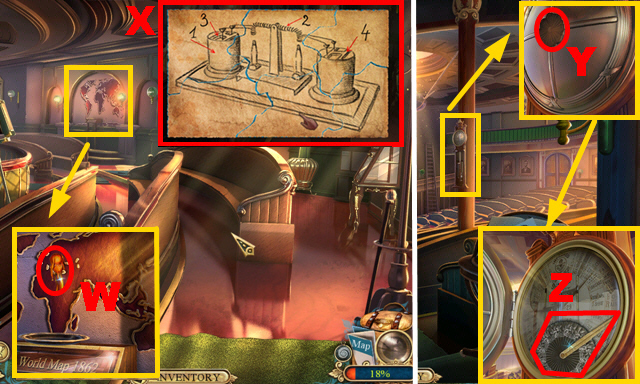
- Open the SMITHSONIAN BOOKLET; take the map (X).
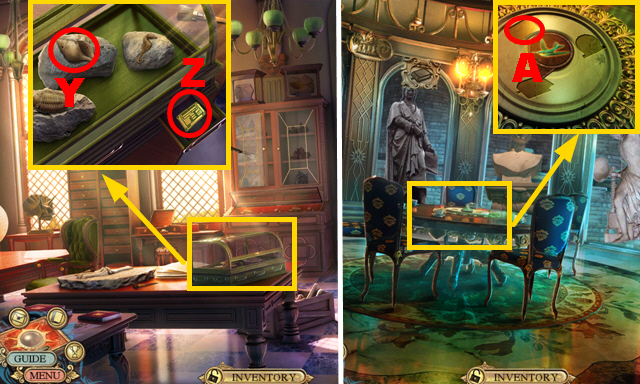
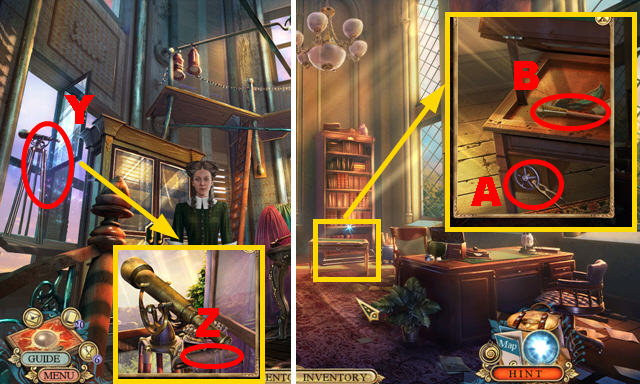
- Turn a page; take PLANET 2/2 (Y).
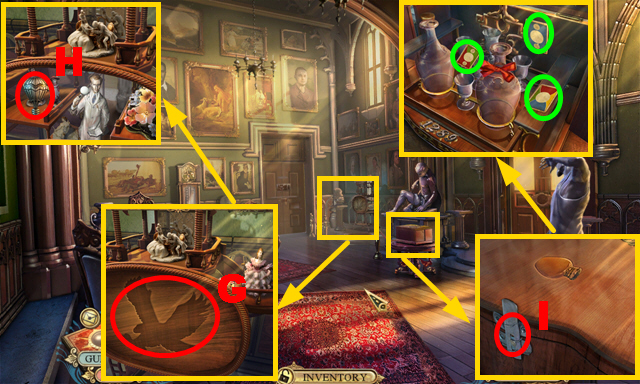
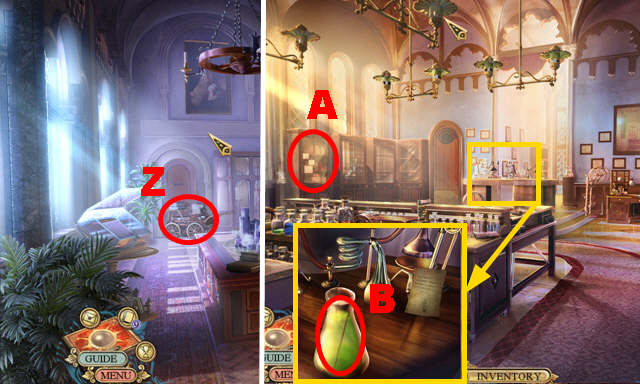
- Place 3 BUTTERFLY WINGS (Z).
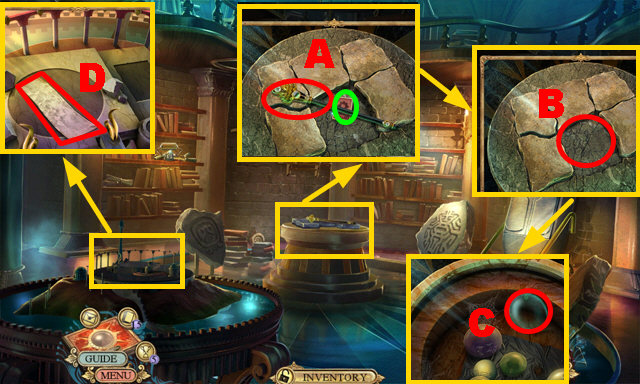
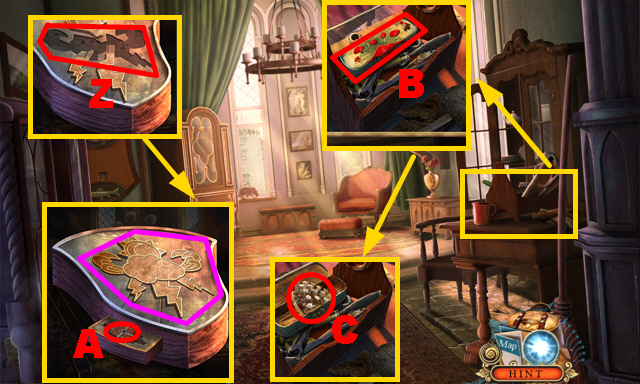
- Take the fact card (A) and GLASS SHARD 1/4 (B).
- Turn left.
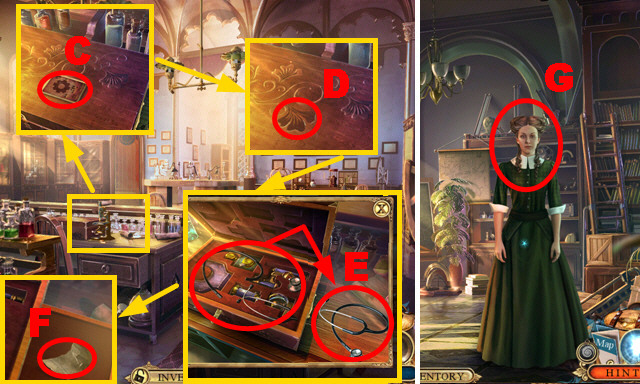
- Place 2 PLANETS (C).
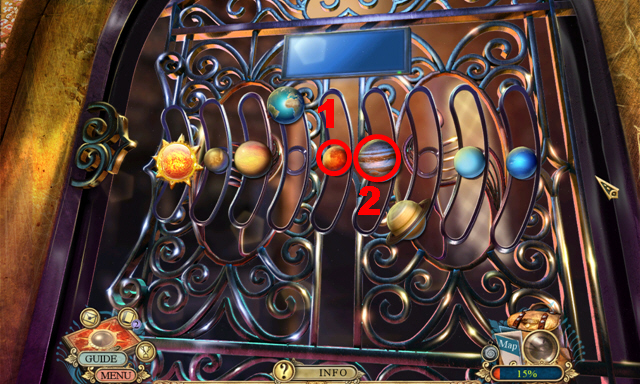
- Play the mini-game.
- Solution: 1-2.
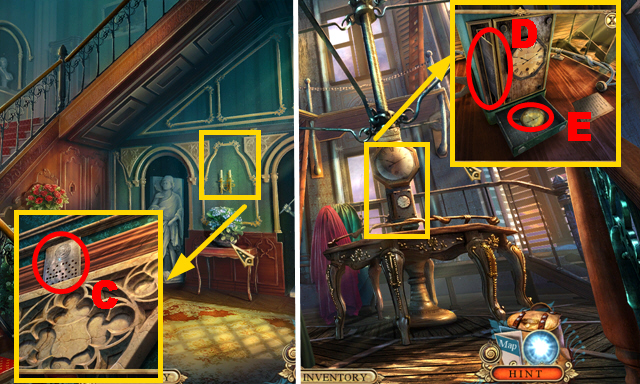
- Place the DIMMER KNOB (D); turn it.
- Play the HOP (E) to receive GLASS SHARD 2/4.
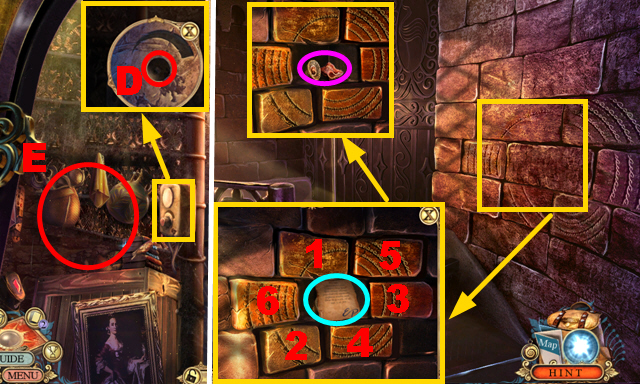
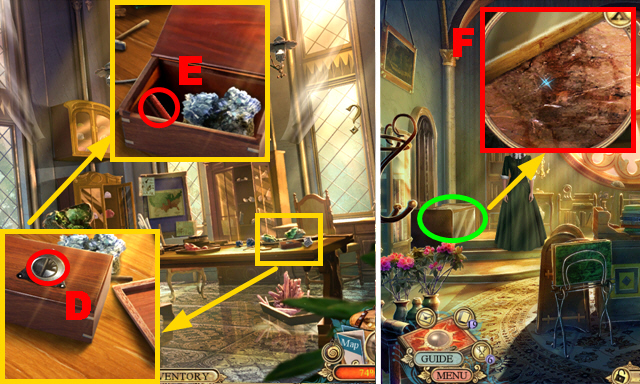
- Go upstairs.
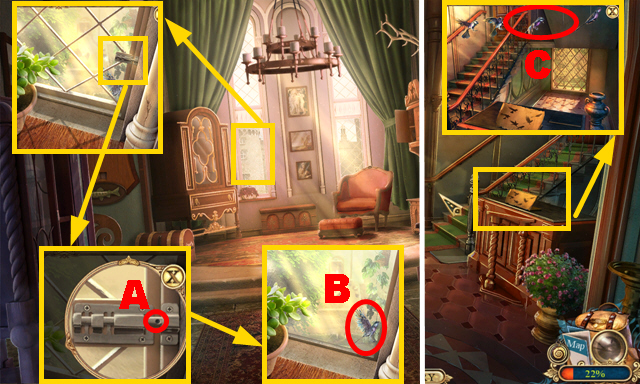
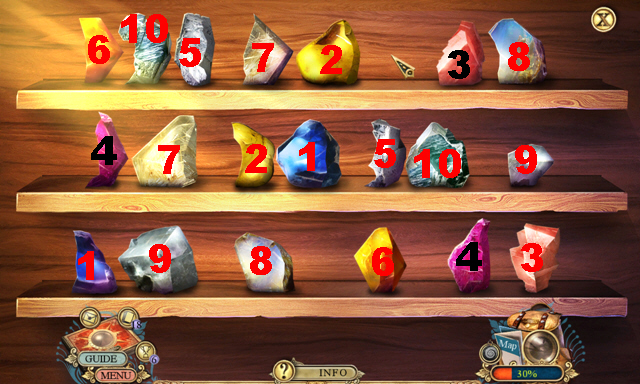
- Push stones 1-6; take the note (blue) and SHELLS (purple).
- Walk down twice.
- Place the SHELLS (F).
- Assemble the symbols correctly (G).
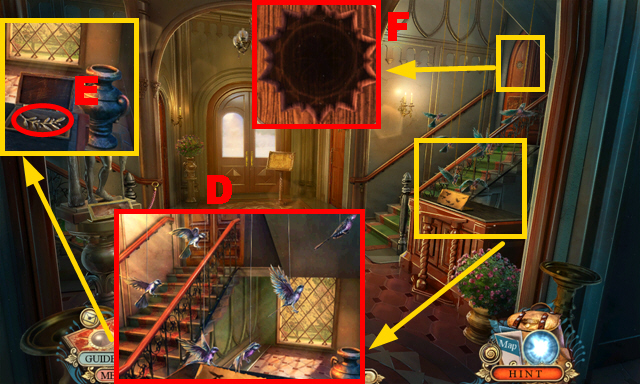
- Take the ARROW (H).
- Move forward.
- Place the ARROW (I).
- Turn right.
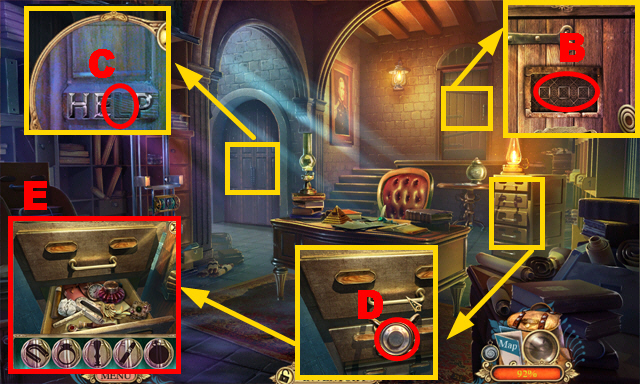
- Move the photo and note; place the PERSONAL CODE (J).
- Enter the code 265; take the HAIR BAND (K) and NAIL FILE (L).
- Move the sponge; take the TILES (M).
- Take the fact card (N).
- Walk down twice.
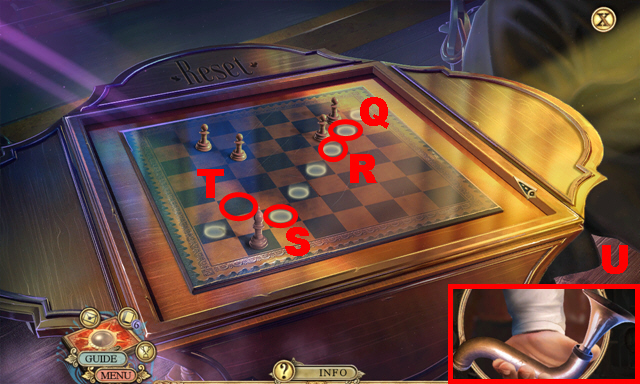
- Place the TILES (O).
- Play the mini-game.
- Solution: Px4-Qx5-Rx2.
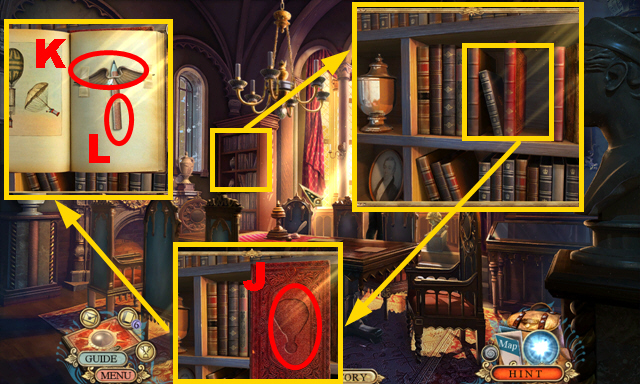
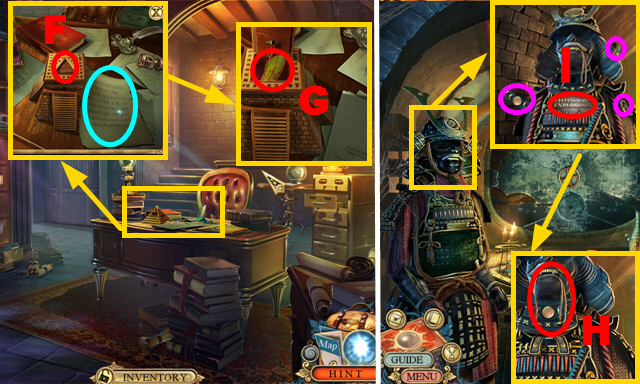
- Move the item; take the OWL SYMBOL (S).
- Go to the Archive.
- Place the OWL SYMBOL (T).
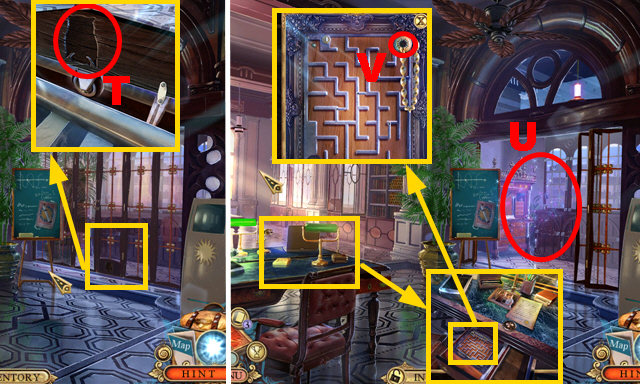
- Play the HOP (U) to receive the SMITHSONIAN SIGNET RING.
- Use the SMITHSONIAN SIGNET RING (V).
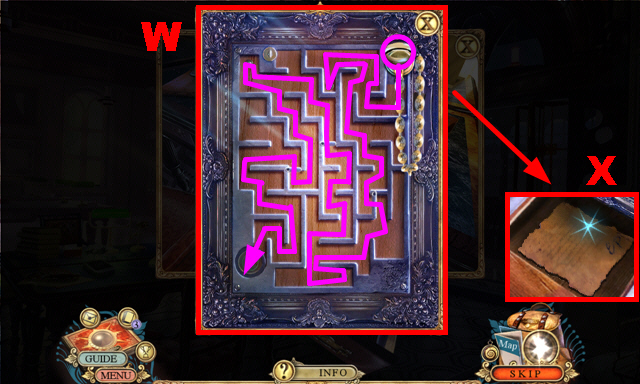
- Play the mini-game.
- Solution: (W).
- Take the OLD LETTER (X).
- Place the OLD LETTER (Y).
- Play the mini-game.
- Solution: (Z).
- Take the BOOK CARD (A).
- Pan right; use the BOOK CARD (purple) to acquire the EMPLOYEE YEARBOOK.
- Open the EMPLOYEE YEARBOOK; turn two pages.
- Take GLASS SHARD 3/4 (B).
- Walk down.
- Open the door at the correct moment (C).
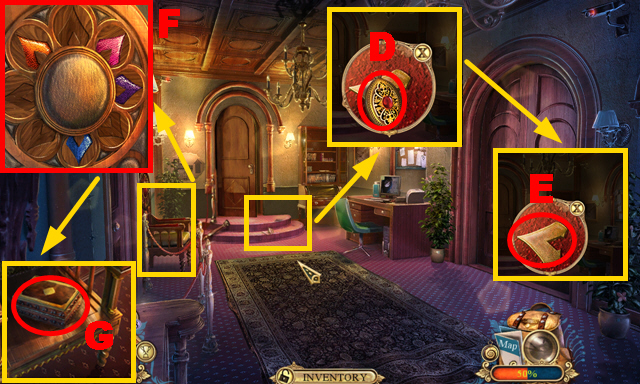
- Take the PENDANT (D) and GLASS SHARD 4/4 (E).
- Pan up and place 4 GLASS SHARDS (F); pan down.
- Take the ORNATE BOX (G).
- Open the ORNATE BOX; arrange the tower correctly (H).
- Take the SOUTH TOWER ORNAMENT.
- Go to the Tower Entrance.
- Place the SOUTH TOWER ORNAMENT (I); push it.
- Move forward.
Chapter 2: The Tower
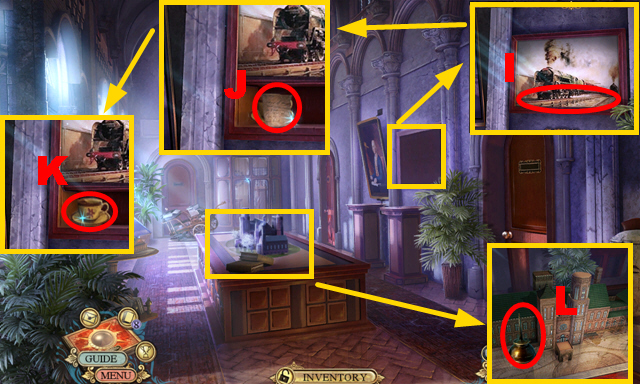
- Play the HOP (J) to receive the TRAPDOOR DECORATION.
- Remove the cloak; take the BROKEN BRACELET (K) and WOODEN TILE 1/2 (L).
- Place the TRAPDOOR DECORATION (M); open the trapdoor.
- Go down.
- Use the NAIL FILE (N); open the bag.
- Take the CAN OF LIGHTER FLUID (O).
- Take the fact card (P) and SMITHSONIAN SEAL (Q).
- Remove a page; take WOODEN TILE 2/2 (R).
- Open the drawer; take CLOCK HAND 1/2 (S).
- Open the EMPTY LIGHTER; pour the CAN OF LIGHTER FLUID into it and light it up (T) to acquire the LIGHTER.
- Connect the PENDANT to the BROKEN BRACELET (U) to acquire SARAH’S BRACELET.
- Turn around the SMITHSONIAN SEAL; remove three pieces (green) to acquire the CLOCK FACE.
- Turn right.
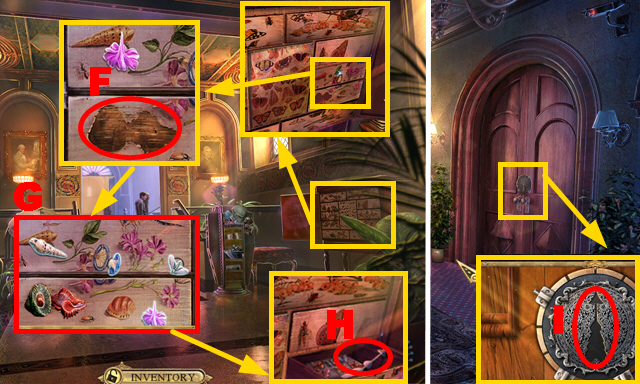
- Take the LABEL (V); open the door.
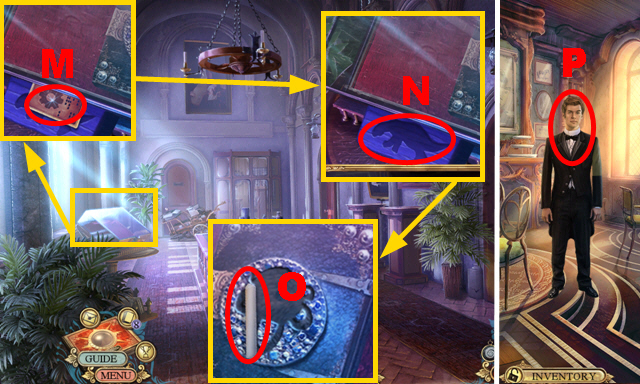
- Place the CLOCK FACE (W).
- Take the SILVER LEAF (X).
- Take the fact card (Y).
- Walk down.
- Place the SILVER LEAF (Z).
- Open the door.
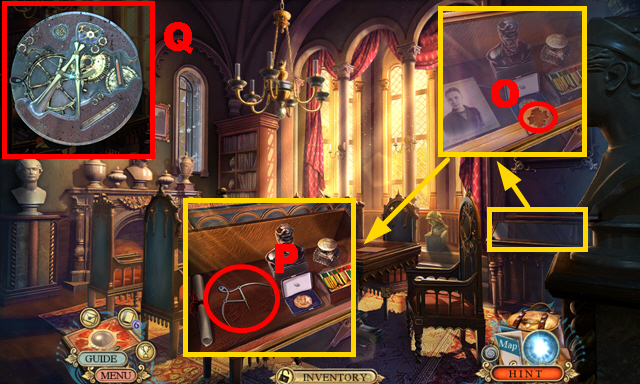
- Take the fact card (A); open the cupboard and box.
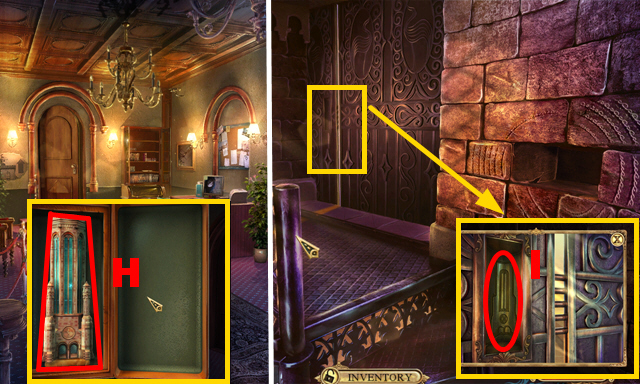
- Take the MECHANICAL DIVIDER (B); place the HAIR BAND (C) to receive the BRUSH.
- Place the LABEL (D); take the FILE ENVELOPE (E).
- Take the scroll case (F); place 2 WOODEN TILES (G).
- Arrange the tiles correctly (H).
- Move the photo; take MONKEY FIGURINE 1/2 (I).
- Walk down, turn right.
- Open the FILE ENVELOPE (J); turn it around to acquire CLOCK HAND 2/2.
- Place 2 CLOCK HANDS (K); enter the correct time (L).
- Take MONKEY FIGURINE 2/2 (M).
- Walk down.
- Place 2 MONKEY FIGURINES (N); take the BISHOP CHESS PIECE (O).
- Turn right.
- Give the BISHOP CHESS PIECE to the man (P).
- Play the mini-game.
- Solution: Q-R-Q-S-T-S.
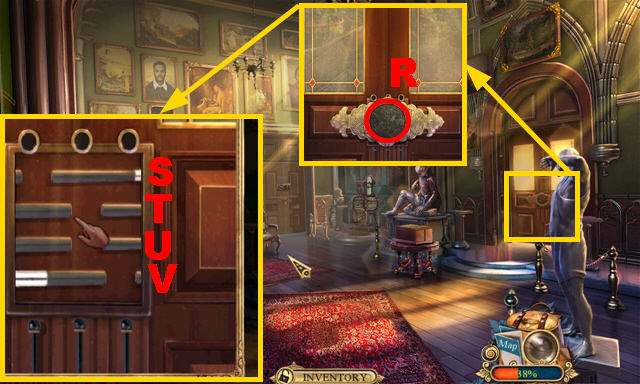
- Take the SPEAKING TUBE (U).

- Place the SPEAKING TUBE (V).
- Play the mini-game.
- Solution part 1: X-Wx3-Xx3.
- Play the mini-game.
- Solution part 2: (Y).
- Play the mini-game.
- Solution part 3: (Z).
- Play the mini-game.
- Solution part 4: (A).
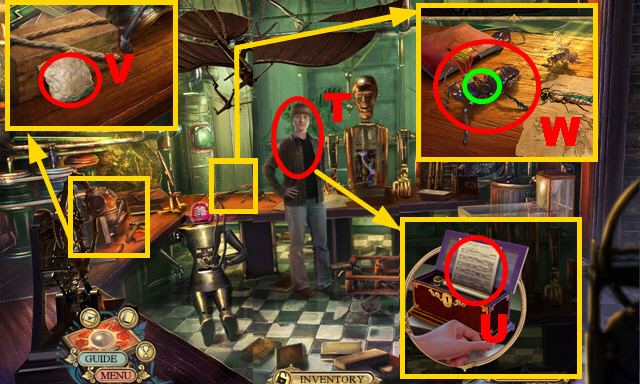
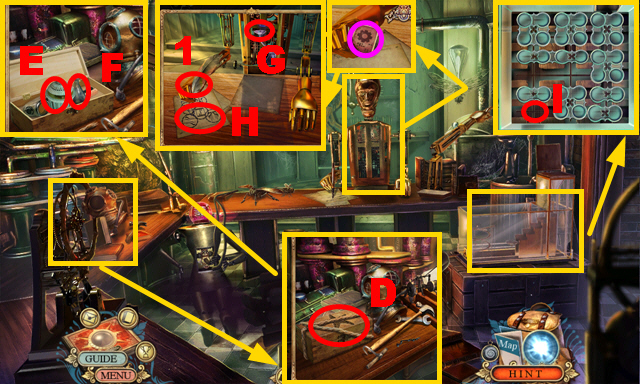
- Read the note (B); take the MECHANICAL ACTIVATOR (C).
- Take the MEGATHERIUM BADGE (E), EAGLE SIGN (D), and BOTTLE DECOR (F).
- Walk down.
- Place the EAGLE SIGN (G); take the HOT AIR BALLOON SIGN (H).
- Place the BOTTLE DECOR (I).
- Remove 2 bottles; collect 3 CATALOG CARDS (green).
- Move forward.
- Move 2 books; place the HOT AIR BALLOON SIGN (J).
- Take CADUCEUS 1/2 (K) and the MINIATURE PENCIL (L).
- Go to the Archive.
- Place 3 CATALOG CARDS (M).
- Play the mini-game.
- Solution: (N).
- Take the ANIMAL MOTIF (1).
- Go to the Regent’s Room.
- Place the ANIMAL MOTIF (O).
- Remove the photo; take the MECHANICAL CALIPERS (P).
- Place the MECHANICAL DIVIDER, MINIATURE PENCIL, and MECHANICAL CALIPERS on the MECHANICAL ACTIVATOR (Q) to acquire the ACTIVATOR.
- Walk down.
- Place the ACTIVATOR (R).
- Play the mini-game.
- Solution: V-left, U-left, T-left, S-left, T-left, V-left, S-left, T-left, V-centre, U-centre, T-centre, S-centre, T-centre, U-centre, S-right, T-right, V-right, S-right, T-right.
- Turn right.
Chapter 3: The Lecture Hall
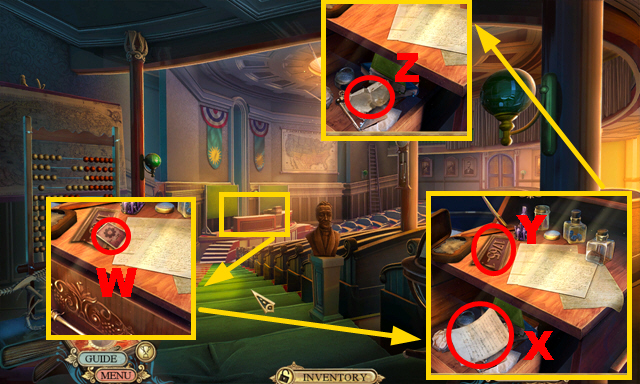
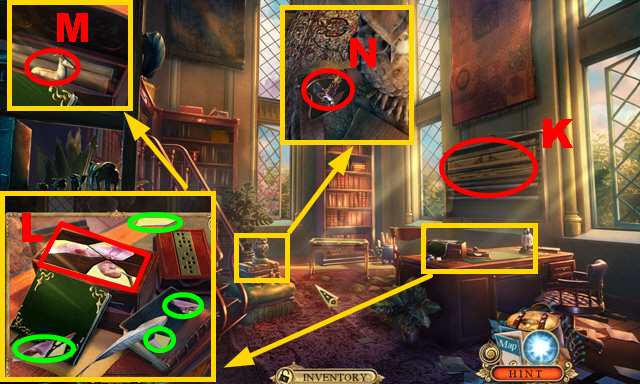
- Take the fact card (W); open the drawer.
- Take the note (X), BROKEN PLAQUE PIECE (Y), and QUARTZITE FLINT (Z).
- Turn right.
- Use the LIGHTER (A).
- Open 3 curtains (green).
- Play the HOP (B) to acquire the MORTARBOARD.
- Use the BRUSH (C).
- Take the PLAQUE HALF (E).
- Walk down.
- Open the bag; take the note (F) and STEEL COMB (G).
- Place the MORTARBOARD (H); take the GLASS ROD (I).
- Turn left.
- Apply the STEEL COMB to the QUARTZITE FLINT (J) to acquire the FLINT AND STEEL.
- Take 2 notes (K) and (M) and the OLD PHOTOGRAPH 1/3 (L).
- Place the GLASS ROD (N) to acquire the ELECTRIFIED ROD.
- Take CADUCEUS 2/2 (O).
- Open the compartment; place the FLINT AND STEEL (P).
- Take the fact card (Q) and WEATHERVANE TOP (R).
- Go to the Gallery.
- Place the CADUCEUS (S); open the box.
- Take the BRASS FLOWER (T) and CANVAS (U).
- Use the ELECTRIFIED ROD (purple); take the PAPER PIECES (V).
- Collect the RESIN IN PLATE with the WEATHERVANE TOP (W).
- Assemble the PAPER PIECES correctly (X) to acquire the OSCILLATOR PLANS.
- Walk down.
- Place the BRASS FLOWER (Y); take the LADIES’ FAN (Z).
- Turn left.
- Place the OSCILLATOR PLANS (A).
- Use the LADIES’ FAN and RESIN IN PLATE (B); take the LIQUID RESIN (C).
- Apply the LIQUID RESIN and PLAQUE HALF to the BROKEN PLAQUE PIECE (D) to acquire the PLAQUE.
- Walk down.
- Place the PLAQUE (E); take the COPPER CYLINDER (F).
- Turn left.
- Place the COPPER CYLINDER (G), spring (green), and 2 parts (purple).
- Play the mini-game.
- Solution: (H).
- Turn left.
- Use the CANVAS (I); take the note (J) and WOODEN TEA SET 1/2 (K).
- Take the OIL CAN (L).
- Take the fact card (M); place the MEGATHERIUM BADGE (N).
- Take the CHALK (O).
- Turn right.
- Talk to the man (P).
- Move the curtain (Q).
- Remove the note; place SARAH’S BRACELET (R).
- Take the MUSIC BOX (S), WOODEN BOX DECORATION (T), and FORCEPS (U).
- Play the HOP (V) to acquire the ATLAS FIGURINE.
- Use the OIL CAN (W); take the WOODEN WHEEL.
- Walk down.
- Place the ATLAS FIGURINE (X) and WOODEN WHEEL (Y).
- Move the cart (Z).
- Enter the Chemistry Laboratory.
- Play the HOP (A) to acquire the SMALL WEIGHT.
- Move the note; collect the ROLLER HANDLE with the FORCEPS (B).
Chapter 4: Helen’s Laboratory
- Take the fact card (C); place the WOODEN BOX DECORATION (D).
- Assemble the stethoscope; take the STETHOSCOPE (E).
- Take OLD PHOTOGRAPH 2/2 (F).
- Move forward.
- Talk to Helen (G).
- Use the CHALK (H); move the model to the board (purple) and adjust it twice.
- Take MOLECULAR MODEL 1/2 (I).
- Place the ROLLER HANDLE (J).
- Take the BELLOWS (L).
- Place the SMALL WEIGHT (M); take the SHOWCASE INLAY (N).
- Walk down.
- Take MOLECULAR MODEL 2/2 (O).
- Walk down.
- Place the SHOWCASE INLAY (P).
- Play the HOP (Q) to acquire the DECORATED CHEST.
- Place 2 MOLECULAR MODELS on the DECORATED CHEST (R); take the ELEMENTS LIST (S).
- Move forward.

- Place the ELEMENTS LIST (T).
- Play the mini-game.
- Solution: (U).
- Take WOODEN TEA SET 2/2 (V).
- Go to Helen’s Residence.
- Place 2 WOODEN TEA SETS (W); take the LOCKBOX DRAWING (X).
- Go to Helen’s Laboratory.
- Place the LOCKBOX DRAWING (Y).
- Play the mini-game.
- Solution: B-C-B-D-B-Z-B-A.
- Take the NATURAL HISTORY KEY (1).
- Go to the Cloister.
- Insert the NATURAL HISTORY KEY (E).
- Enter the Natural History Laboratory.
- Push the bird figure (F).
- Take the TRIANGLE (G); open the compartment.
- Take the fact card (green).
- Play the HOP (H) to acquire the HUMMINGBIRD.
- Take the note (I) and OLD PHOTOGRAPH 3/3 (J); open the compartment.
- Walk down.
- Place the OLD PHOTOGRAPH (K); activate 3 windows (purple).
- Take the WOODEN DECOR (L).
- Enter the Natural History Laboratory.
- Place the WOODEN DECOR (M).
- Move forward.
- Open the shelf; take the MUSHROOM GLOVE (N).
- Place the HUMMINGBIRD (O).
- Walk down.
- Use the MUSHROOM GLOVE (P); take the BOOK PATTERN (Q).
- Walk down.
- Place the BOOK PATTERN (R); take the COG (S).
- Go to the Meeting Room.

- Place the COG (T).
- Play the mini-game.
- Solution: U-V-U-X-U-V-U-X-Wx2-V-Wx3-V-U-X-U-X-W-V-U-V-W-V-U-Xx2-Ux2-Vx2-U-X-W-X-W-V.
- Take the LETTER L (green) and SHELL FOSSIL (purple).
- Walk down.
- Place the SHELL FOSSIL (Y).
- Move 3 items; take the REGISTRY PLATE (Z).
- Move forward.
- Place the REGISTRY PLATE (A).
- Enter the Registry.
- Move the panel (B).
- Place the LETTER L (C).
- Place the STETHOSCOPE (D); turn it four times.
- Play the HOP (E) to acquire the MAGNET.
- Take the note (blue); place the TRIANGLE (F).
- Take the MECHANICAL WING (G).
- Move forward.
- Take the H.E.L.P. CREST (I); move 3 parts (purple).
- Take the LEATHER STRING (H).
- Pull the compartment; take the fact card (J).
- Use the MAGNET (K) to acquire the SMALL CANNON.
- Pan right; pull the compartment.
- Use the MAGNET (L) to acquire the WIND-UP KEY.
- Use the BELLOWS (M); take ATLANTIS PART 1/3 (purple) and the HOSE (green).
- Walk down.
- Place the SMALL CANNON (O).
- Place the HOSE and LEATHER STRING (P); turn the valve (Q).
- Take the fact card (R) and LEATHER TUBE (blue).
- Open the LEATHER TUBE; take the QUILL (S).
- Enter the Inventions Room.
- Use the MUSIC BOX (T); take SARAH’S SONG (U).
- Take the STONE SLAB (V).
- Place the WIND-UP KEY and MECHANICAL WING (green); take the INSECT (W).
- Go to the Repository.

- Use the INSECT (X) to acquire the VALVE (Y).
- Place the VALVE (Z); turn it.
- Play the HOP (A) to acquire the SHELL.
- Open the SHELL.

- Play the mini-game.
- Solution: (B).
- You receive the PEARL and SHARP SHELL.
- Go to the Inventions Room.
- Use the SHARP SHELL (D) and open the box; take ATLANTIS PART 2/3 (E) and the INK BOTTLE (F).
- Take the fact card (purple); use the QUILL (1).
- Pan up; use the INK BOTTLE (G).
- Take the SYMBOLS (H).
- Place the PEARL (I).
- Play the mini-game.
- Solution: K-up, K-right, J-up, L-left, N-left, M-left, P-down, O-right, J-up, K-left, O-down, J-right, K-up, K-right, Q-down, R-left, S-left, J-up.
- Take the SPHERE (T).
- Go to the Meeting Room.
- Place the SYMBOLS on the SPHERE (U); choose 5 symbols (green).
- Take the BOOK SYMBOL (V).
- Place the BOOK SYMBOL (W).
- Enter the Library.
Chapter 5: The Library
- Move the books; take the fact card (orange).
- Place the H.E.L.P. CREST (X).
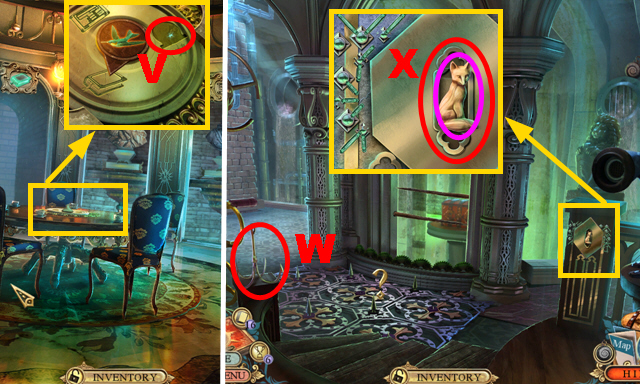
- Take the GLASS ADORNMENT (Y) and GLUE (Z).
- Move forward.
- Take the SCEPTER (A) and fact card (green); place the STONE SLAB (B).
- Take the COLORED LENS (C) and TICKER TAPE (D).
- Take the WEDGE (E).
- Walk down.
- Place the SCEPTER (F).
- Play the HOP (G) to receive NEPTUNE’S SYMBOL.
- Move forward.
- Place NEPTUNE’S SYMBOL (H); take the CODED CYLINDER (I).
- Walk down.
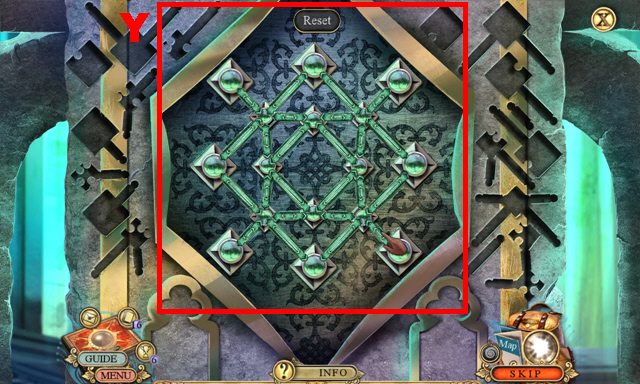
- Place the COLORED LENS and CODED CYLINDER (J).
- Enter the correct symbols (K); take ATLANTIS PART 3/3 (L).
- Move forward.
- Place 3 ATLANTIS PARTS (M); take the INSTRUCTIONS (N).
- You acquire THOMAS’ LEDGER.
- Place the INSTRUCTIONS on the GLASS ADORNMENT (O); push symbols 1-4.
- You receive the DOLPHIN.
- Place the DOLPHIN (Q).
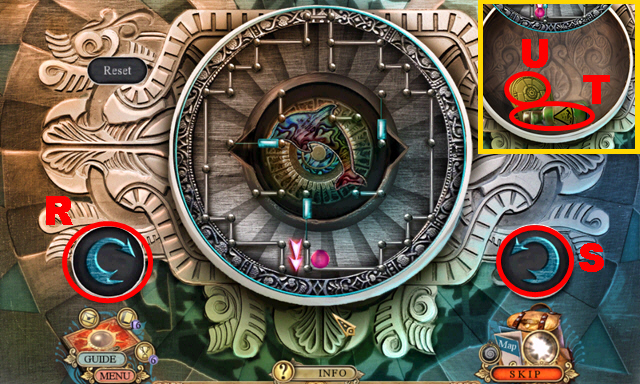
- Play the mini-game.
- Solution: Rx2-S-Rx2-S-Rx6-S-R..
- Take the ACID (T) and VAULT SYMBOL (U).
- Go to the Meeting Room.
- Place the VAULT SYMBOL (V).
- Enter the Vault.
- Take the HOOK (W) and FOX FIGURINE (purple).
- Use the ACID (X).
- Play the mini-game.
- Solution: (Y).
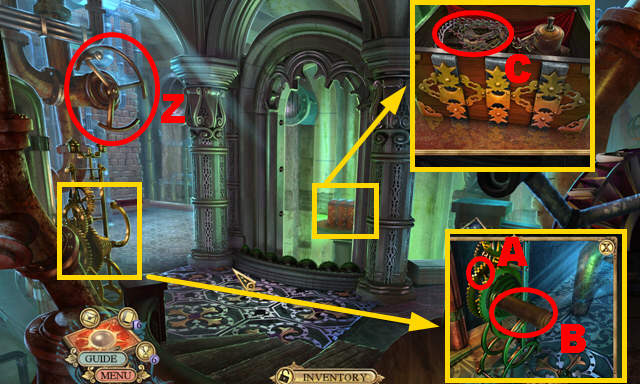
- Turn the valve (Z).
- Place the WEDGE (A); turn the valve (B).
- Open the chest; take the CHAIN (C).
- Place the CHAIN on the HOOK (D) to acquire the GRAPPLING HOOK.
- Throw the GRAPPLING HOOK (E); remove 5 obstacles to move forward (1).
- Give THOMAS’ LEDGER to the woman (F); take the TABLET (G).
- Take the fact card (H).
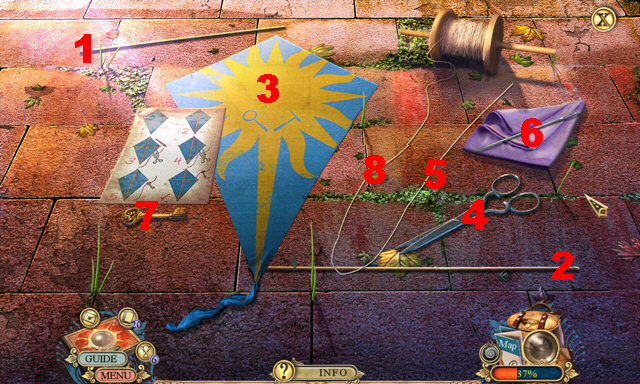
- Move four papers; take the IVORY PIN (I).
- Take the KITE PLANS (J).
- Turn left.
- Pull the paper (K).
- Use the GLUE (L); collect 4 pieces (green).
- Take DEER 1/2 (M) and BIRD 1/2 (N).
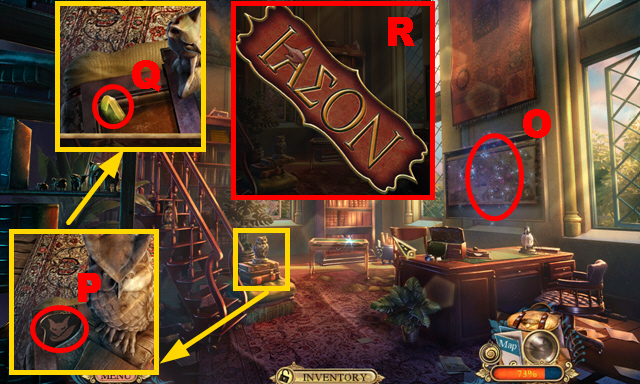
- Play the HOP (O) to acquire the JUMBLED NAMEPLATE.
- Place the FOX FIGURINE (P); take the ELBAITE MINERAL (Q).
- Assemble the JUMBLED NAMEPLATE correctly (R); you acquire the NAMEPLATE.
- Take the fact card (S) and FISH FIN (T).
- Walk down.
- Place the NAMEPLATE (U); take the KYANITE MINERAL (V).
- Enter the Janitor’s Quarters.
- Place the FISH FIN (W); take DEER 2/2 (X).
- Place the DEER (Y).
- Remove 2 items; take the DOOR INLAY (Z).
- Use the IVORY PIN (A); take BIRD 2/2 (B).
- Walk down.
- Place 2 BIRDS (C).
- Arrange the birds correctly (D); take the OLIVE BRANCH (E).
- Place the DOOR INLAY (F).
- Enter the Circular Office.
Chapter 6: The Circular Office
- Play the HOP (G) to receive the TURPENTINE.
- Place the TICKER TAPE (H); take the LIBRARY CODE (I).
- Place the OLIVE BRANCH (J); take the AZURITE MINERAL (K).
- Pan right and open the box; take the MATCH CASE (L).
- Take the STEEL BUTTON HOOK (M).
- Place the AZURITE MINERAL (purple), ELBAITE MINERAL (green), and KYANITE MINERAL (blue).
- Play the mini-game.
- Match pairs of crystals: 1-10.
- Turn right.
- Give SARAH’S SONG to the woman (N).
- Play the HOP (O) to acquire the CREST STAMP.
- Take the fact card (P) and WOLF FIGURINE (Q).
- Use the STEEL BUTTON HOOK (R) to acquire STAINED GLASS PIECE 1/3.
- Go to the Librarian’s Study.
- Place the LIBRARY CODE (S); take the METEOROLOGY CREST (T).
- Pan right and place the WOLF FIGURINE (U); take SEAL STAMP (V) and COPPER SEAL (W).
- Place the COPPER SEAL on the MATCH CASE (X); take the IRON KEY (Y).
- Go to the Janitor’s Quarters.
- Place the CREST STAMP on the METEOROLOGY CREST (Z).
- Assemble the symbols correctly (purple); take STAINED GLASS PIECE 2/3 (A).
- Use the TURPENTINE (B); take the TYPEWRITER KEYS (C).
- Go to the Mineralogy Storage.
- Place the SEAL STAMP (D); take the CANDLE WAX (E).
- Walk down.
- Clean the chest with the CANDLE WAX (F).
- Move the chest (green).
- Turn left.
- Take the fact card (G).
- Go upstairs.
- Turn the telescope (H); place the TYPEWRITER KEYS (I).
- Take the JEWELED SUN (J).
- Place the JEWELED SUN on the MATCH CASE (K); take STAINED GLASS PIECE 3/3 (L).
- Take the note (N) and NUTCRACKER (M).
- Walk down.
- Place 3 STAINED GLASS PIECES (O).
- Play the mini-game.
- Move the token (P): Right-right-right-left-down-down-right-right-right-right.
- You acquire the LANTERN COVER.
- Go upstairs.
- Place the LANTERN COVER (Q).
- Push the compartment (R); take the CREST PART (S).
- Place the CREST PART on the METEOROLOGY CREST (T); take the METEOROLOGY EMBLEM (U).
- Walk down.
- Place the METEOROLOGY EMBLEM (V); take the TELESCOPE EYEPIECE (W).
- Go upstairs.
- Place the TELESCOPE EYEPIECE (X).
- Play the HOP (Y).
- Take the WIND VELOCITY RESULTS (Z).
- Go to the Librarian’s Study.
- Place the NUTCRACKER (A); turn the valve three times.
- Take the GENTLEMAN’S CANE (B).
- Go to the Flag Tower Entrance.
- Collect the PUNCH CARD with the GENTLEMAN’S CANE (C).
- Go upstairs.
- Place the PUNCH CARD (D); take the PRESSURE GAUGE (E).
- Move forward.
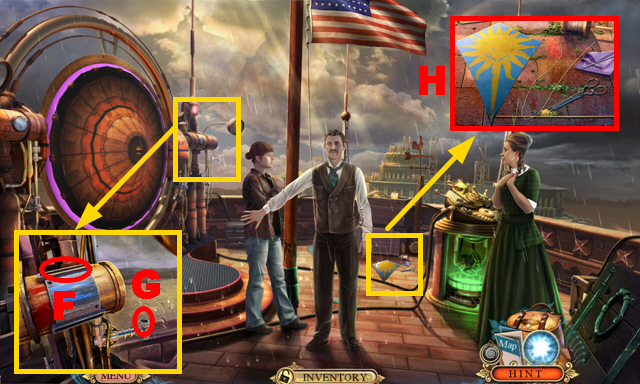
- Place the WIND VELOCITY RESULTS (F) and PRESSURE GAUGE (G).
- Place the IRON KEY and KITE PLANS (H).
- Play the mini-game.
- Solution: 1-3-2-3-4-5-6-3-4-5-3-7-8.
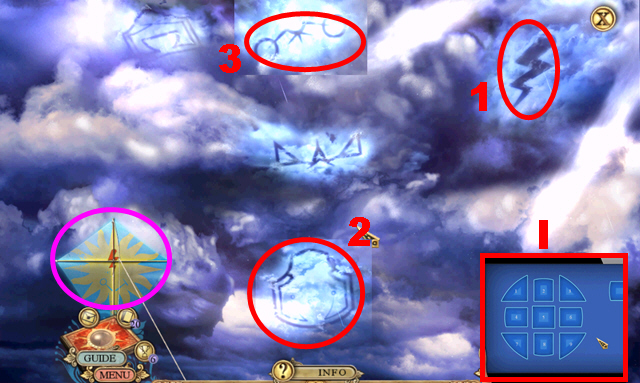
- Play the mini-game.
- Move the kite (purple) to symbols 1-3.
- Enter a four-digit password (I).
- Give the TABLET to the man (J).
- Congratulations, you have completed Hidden Expedition: Smithsonian Castle.


 Nevertales: Smoke and Mirrors Walkthrough, Guide, & Tips
 Witch Hunters: Full Moon Ceremony Walkthrough, Guide, & Tips
 Empress of the Deep: The Darkest Secret Walkthrough, Guide, & Tips
 Shadow Wolf Mysteries: Cursed Wedding Walkthrough, Guide, & Tips
 Riddles of Fate: Wild Hunt Walkthrough, Guide, & Tips