Revived Legends: Titan's Revenge Walkthrough, Guide, & Tips
Revived Legends: Titan’s Revenge Walkthrough
Welcome to the Revived Legends: Titan’s Revenge Walkthrough
Stop a vengeful Titan from destroying Athens – and the world!
Whether you use this document as a reference when things get difficult or as a road map to get you from beginning to end, we’re pretty sure you’ll find what you’re looking for here.
This document contains a complete Revived Legends: Titan’s Revenge game walkthrough featuring annotated screenshots from actual gameplay!
We hope you find this information useful as you play your way through the game. Use the walkthrough menu below to quickly jump to whatever stage of the game you need help with.
Remember to visit the Big Fish Games Forums if you find you need more help. Have fun!
This walkthrough was created by Erin Bell, and is protected under US Copyright laws. Any unauthorized use, including re-publication in whole or in part, without permission, is strictly prohibited.
General Tips
- This is the official guide for Revived Legends: Titan’s Revenge!
- This guide will not mention each time you have to zoom into a location; the screenshots will show each zoom scene.
- Hidden-object puzzles are referred to as HOPS. This guide will not show screenshots of the HOPS, however, it will mention when an HOP is available and the inventory item you’ll collect from it.
- This guide will give step-by-step solutions for all puzzles which are not random. Please read the instructions in the game for each puzzle.
Chapter 1: The Parthenon

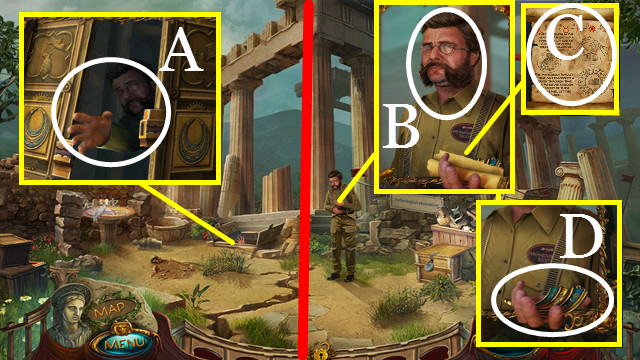
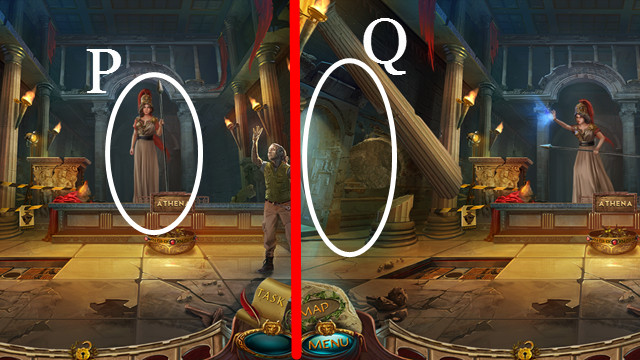
- Rescue (A).
- Talk (B).
- Take the SCROLL (C) and NECKLACE PART (D).

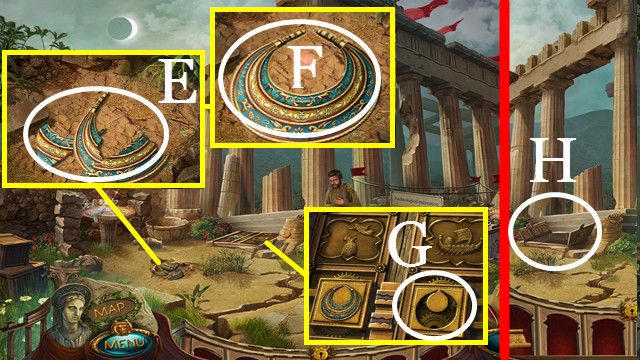
- Use the NECKLACE PART (E); assemble.
- Take the NECKLACE (F).
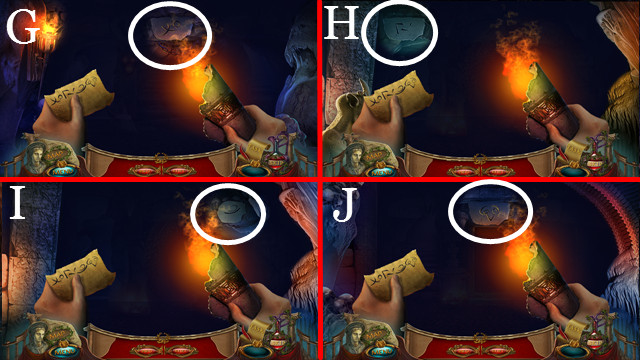
- Use the NECKLACE (G).
- Enter (H).

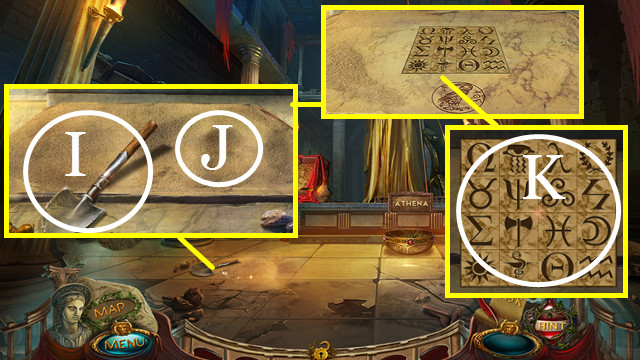
- Take the SHOVEL (I).
- Touch (J) three times.
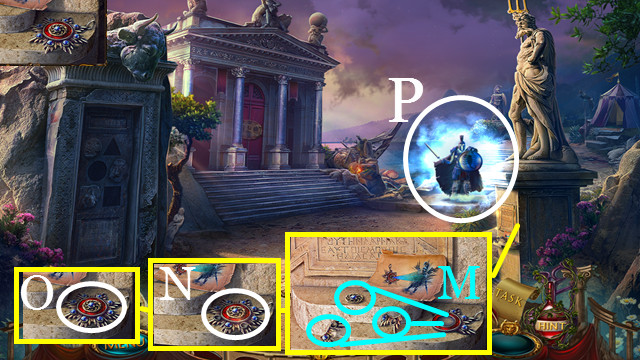
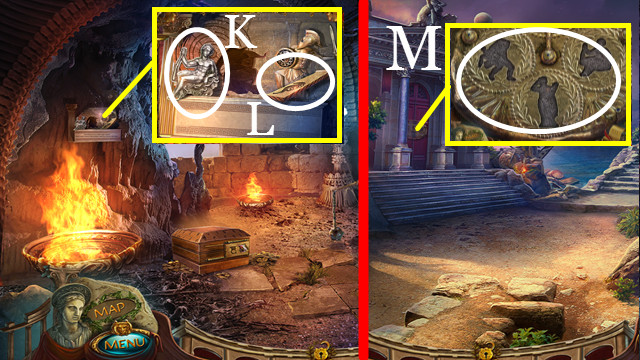
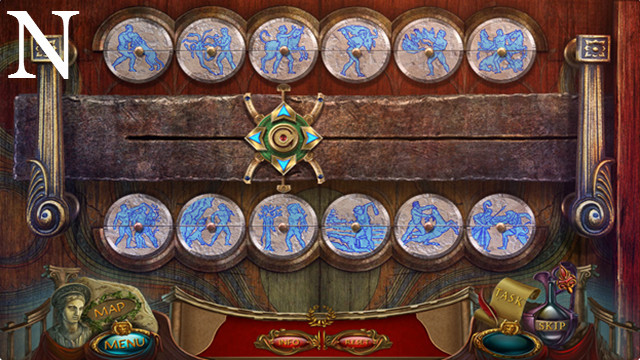
- Use the SCROLL (K) to trigger a puzzle.

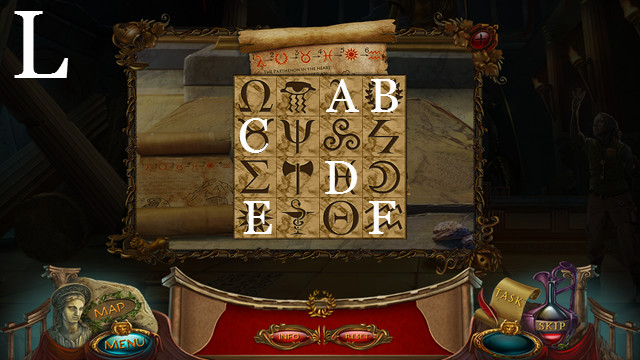
- Solution (L): A-B-C-D-E-F.

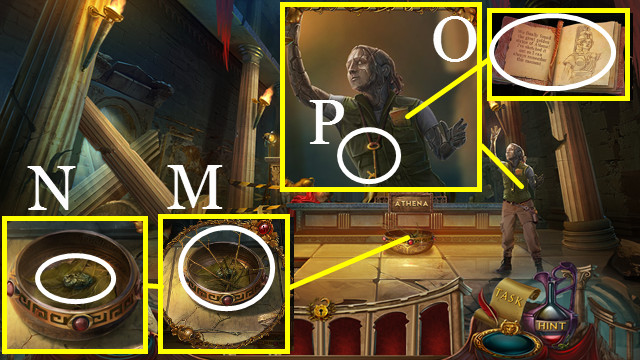
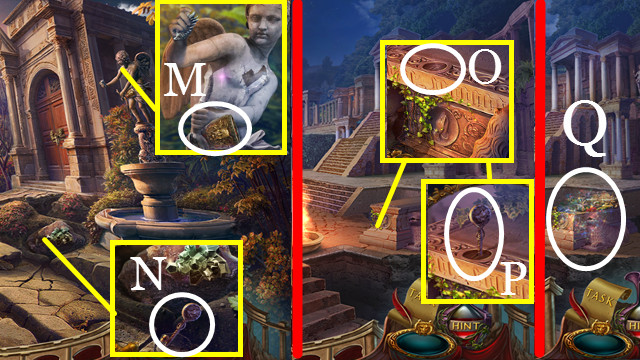
- Remove (M).
- Take the OLIVE SEED (N).
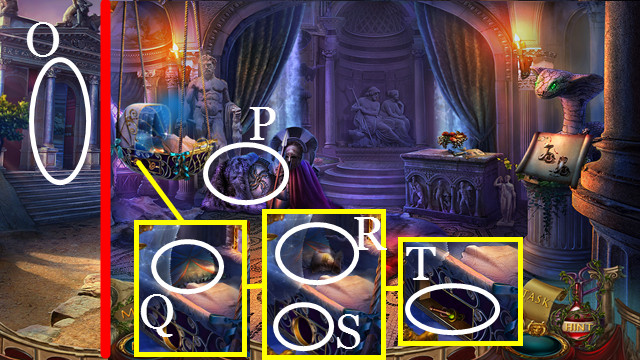
- Take the DRAWING OF ATHENA (O) and CRATE KEY (P).
- Walk down.

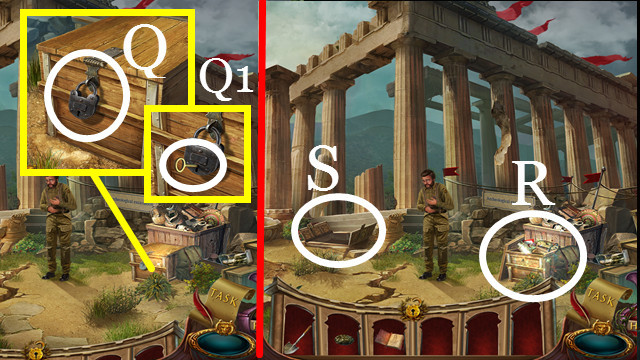
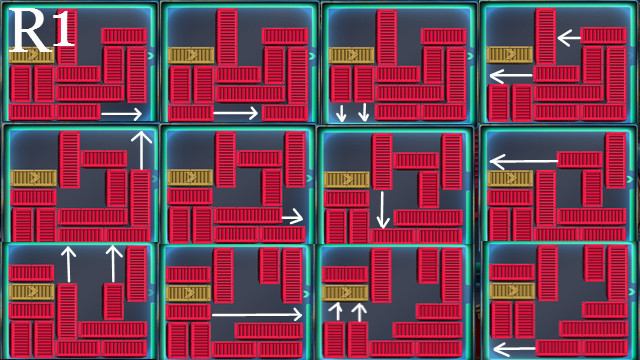
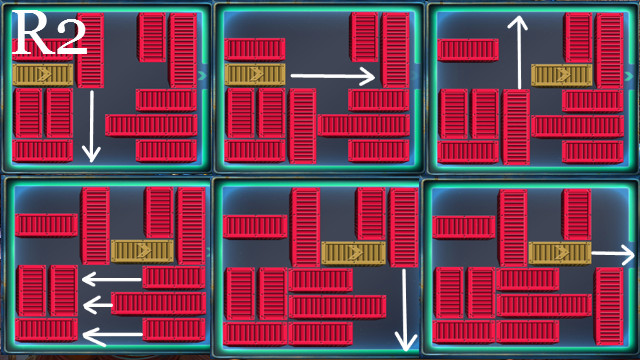
- Use the CRATE KEY (Q); touch (Q1) to trigger a HOP.
- Play the HOP (R); receive the ZEUS STATUE.
- Enter (S).

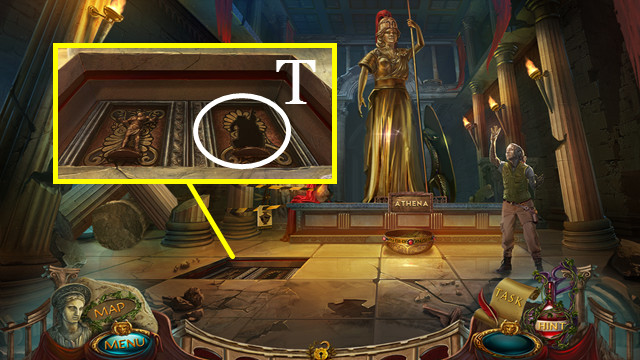
- Use the ZEUS STATUE (T) to trigger a puzzle.



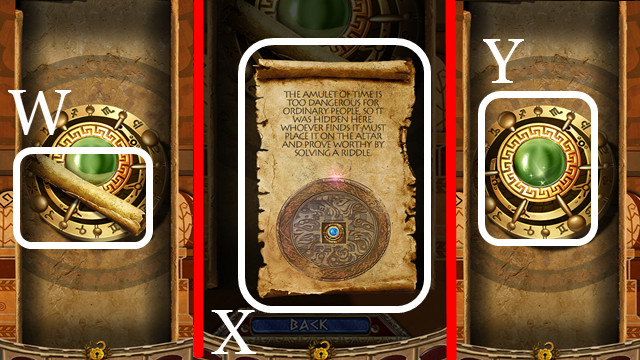
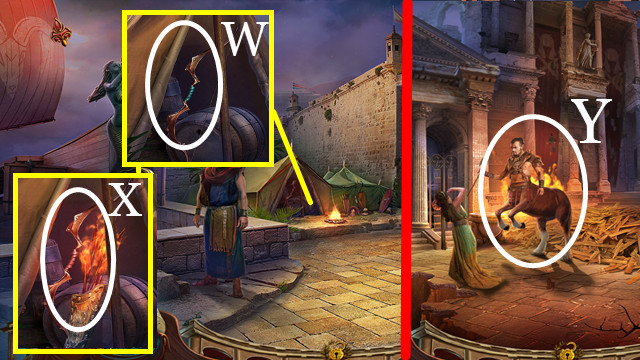
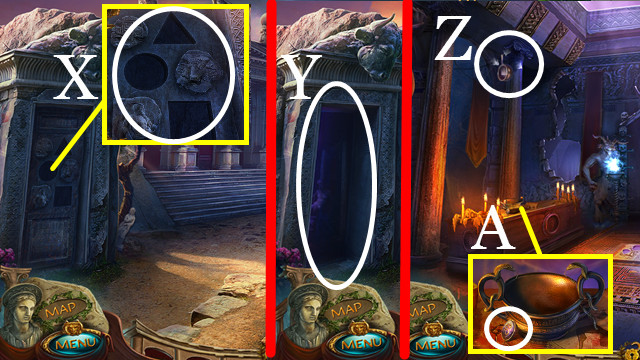
- Touch (W-X).
- Take the DRAINED AMULET (Y).
- Walk down.

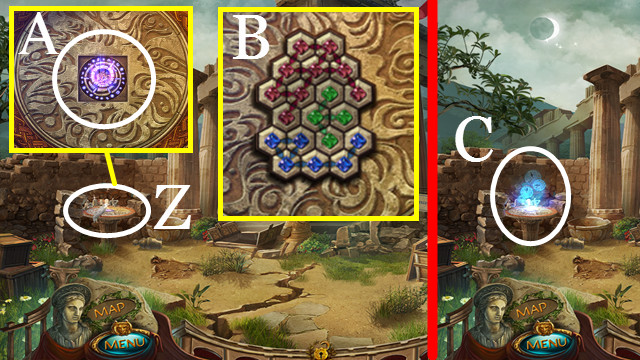
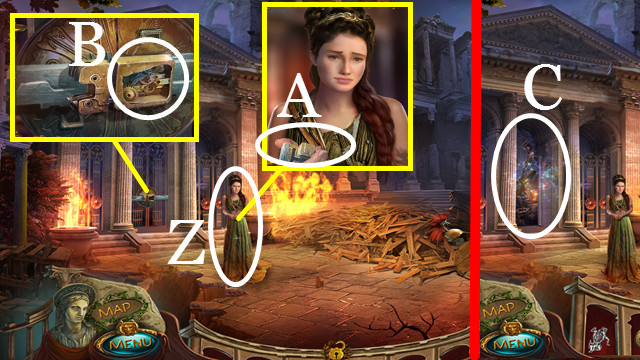
- Touch (Z); use the DRAINED AMULET (A) to trigger a mini-game.
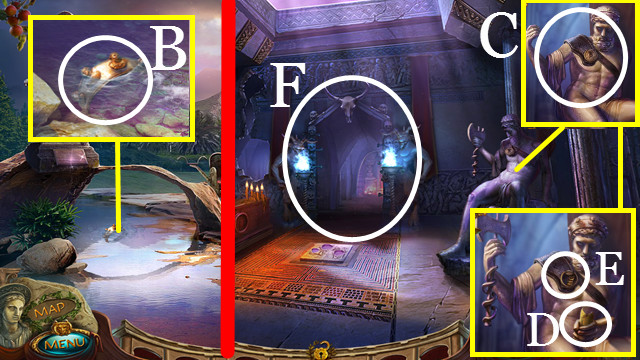
- Solution (B).
- Receive the AMULET.
- Touch (C) to time-travel.

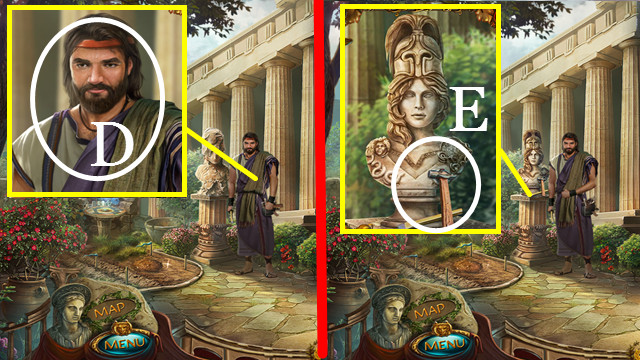
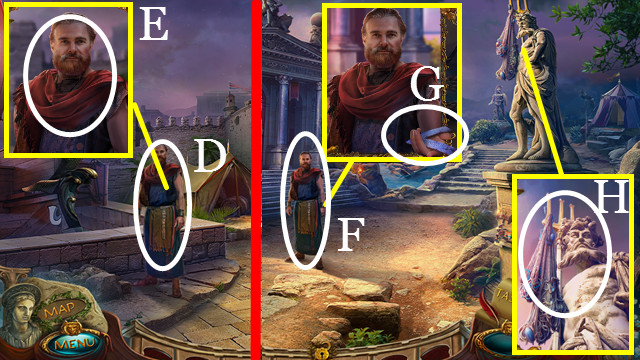
- Talk (D); give the DRAWING OF ATHENA (D).
- Take the HAMMER AND CHISEL (E).
- Time-travel to the present; return to Parthenon – Hall.

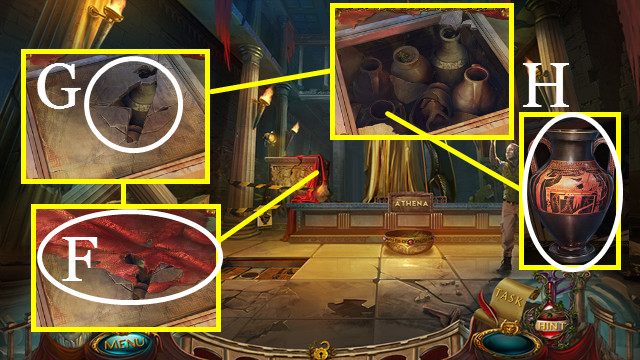
- Touch (F); Use the HAMMER AND CHISEL (G).
- Take the AMPHORA (H).
- Walk down; time-travel to the past.

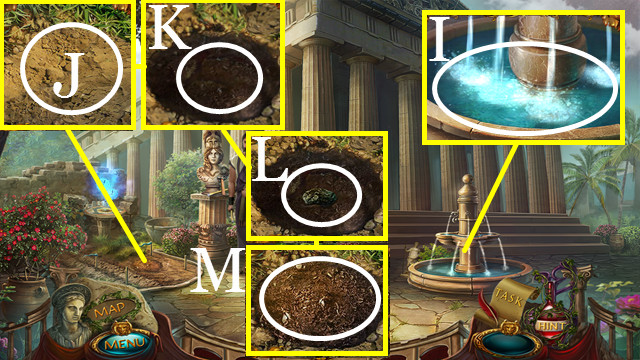
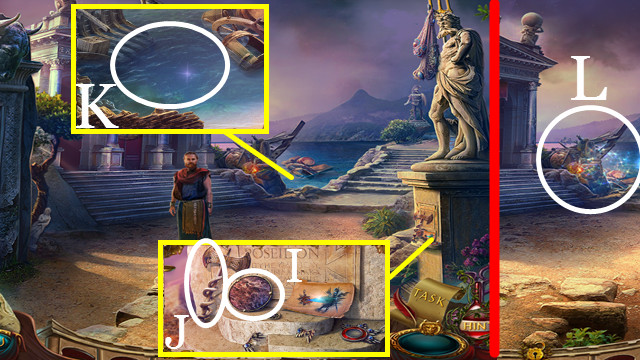
- Use the AMPHORA (I); receive the AMPHORA WITH WATER.
- Use the SHOVEL (J).
- Place the OLIVE SEED (K); touch.
- Use the AMPHORA WITH WATER (L).
- Time-travel to the present.

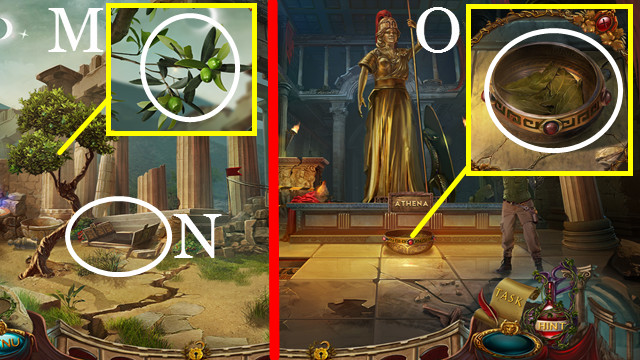
- Take the OLIVE BRANCH (M).
- Enter (N).
- Place the OLIVE BRANCH (O).

Chapter 2: The Marketplace

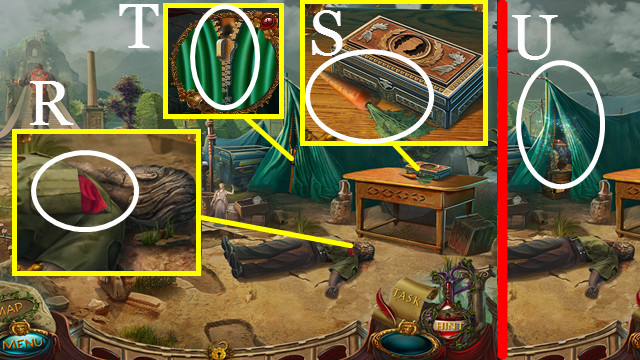
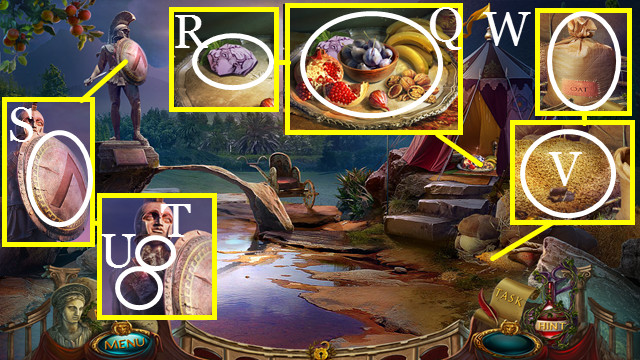
- Take the HANDKERCHIEF (R) and CARROT (S).
- Touch (T) to trigger a HOP.
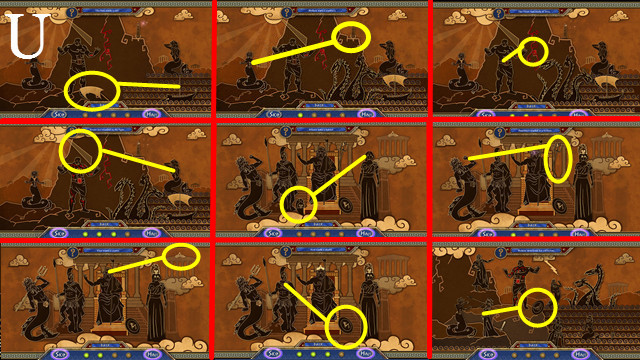
- Play the HOP (U); receive the BAG OF GLASS.
- Walk up.

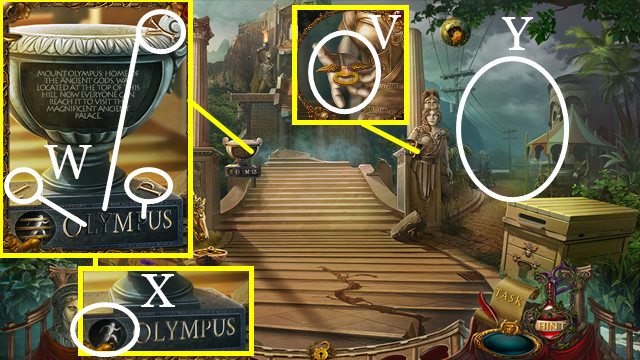
- Take the WINGED GATE KEY (V).
- Place the letters (W).
- Take the RUNNER 1/2 (X).
- Walk right (Y).

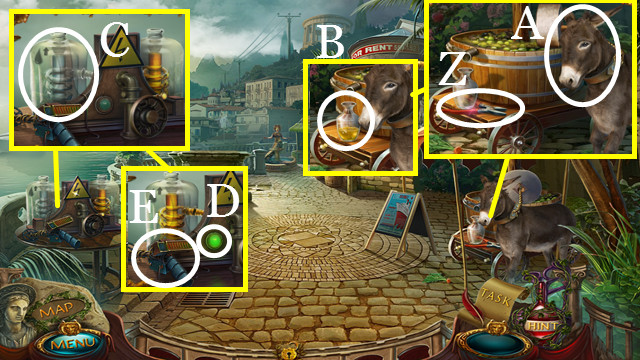
- Take the PLIERS (Z); use the CARROT (A).
- Take the OLIVE OIL (B).
- Use the OLIVE OIL (C); press (D).
- Take the METAL DETECTOR (E).
- Walk up.

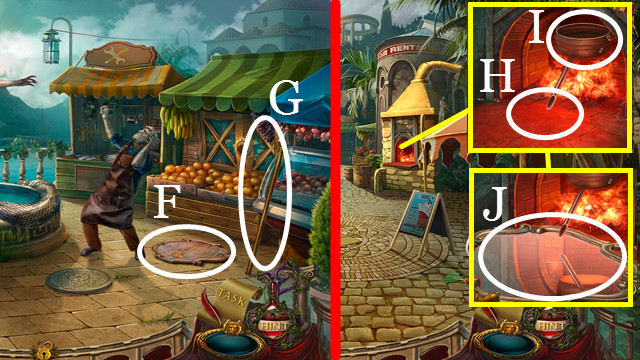
- Take the MIRROR FRAME (F) and SPEAR (G).
- Walk down.
- Use the MIRROR FRAME (H) and BAG OF GLASS (I); take the MIRROR (J).
- Walk up.

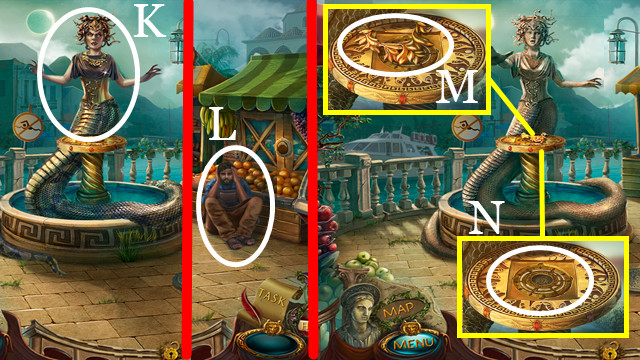
- Use the MIRROR (K).
- Talk (L).
- Take the GOLD NECKLACE (M); use the AMULET (N); receive the AMULET.

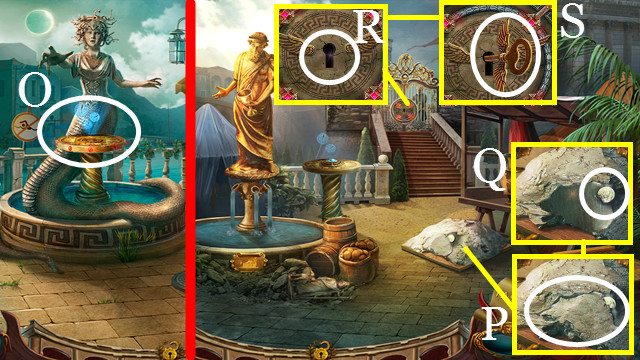
- Time-travel (O).
- Take the CLAY and SILVER COIN 1/3 (P).
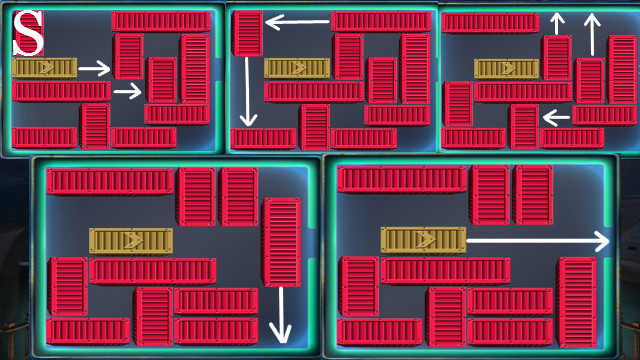
- Use the WINGED GATE KEY (Q); touch (R) to trigger a mini-game.

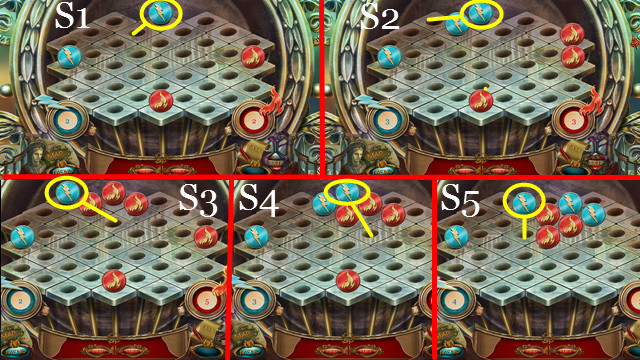
- Solution (S1-S2-S3-S4-S5).
- Walk up.

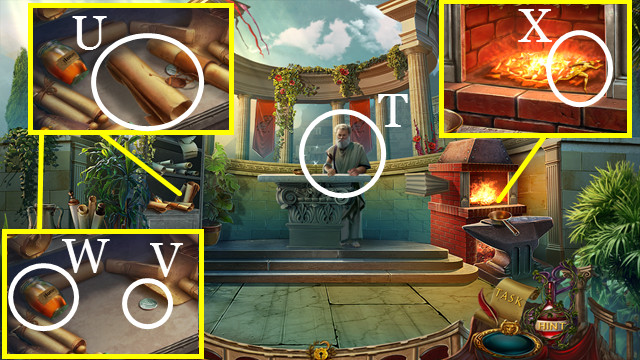
- Talk (T).
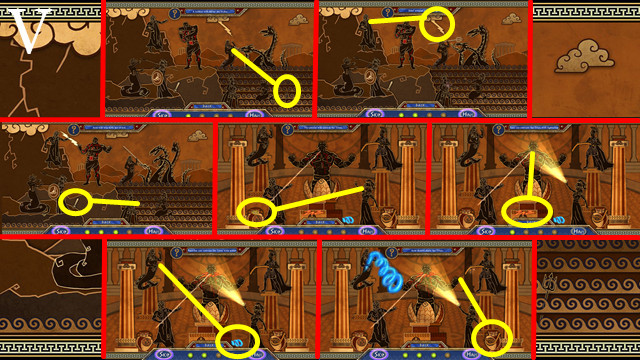
- Move (U); take the SILVER COIN 2/3 (V) and HONEY (W).
- Use the PLIERS (X); receive the HOT RUNNER.
- Walk down.

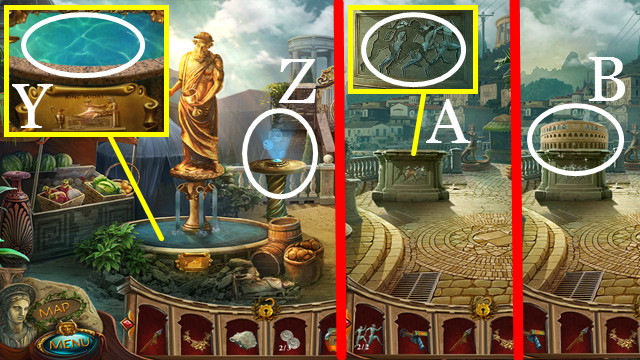
- Use the HOT RUNNER (Y); receive the RUNNER 2/2.
- Time-travel (Z); walk down.
- Use the RUNNER (A).
- Touch (B) to trigger a mini-game.

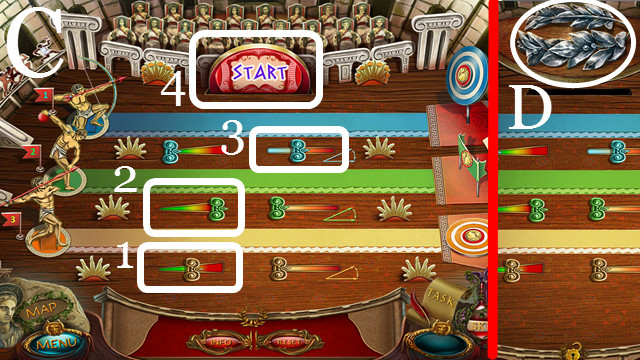
- Solution (C): 1-2-3-4.
- Take the LAUREL WREATH (D).
- Walk down.

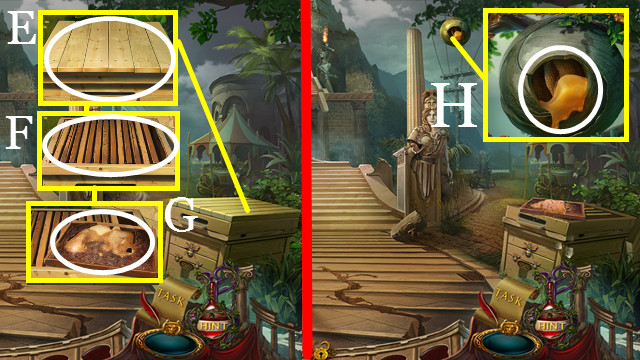
- Touch (E-F).
- Use the HONEY (G).
- Take the WAX (H).
- Walk down.

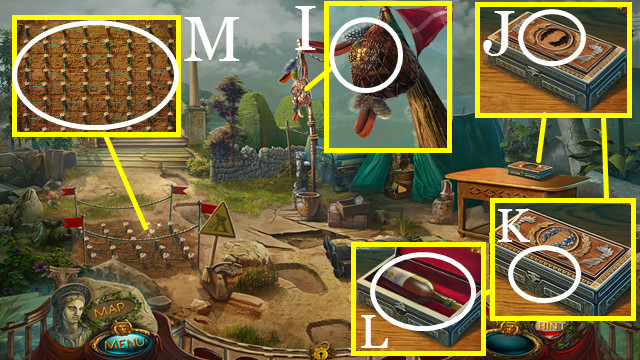
- Use the SPEAR (I); receive the FRUIT SYMBOL.
- Use the LAUREL WREATH (J); open (K); take the WINE (L).
- Use the METAL DETECTOR (M) to trigger a mini-game.

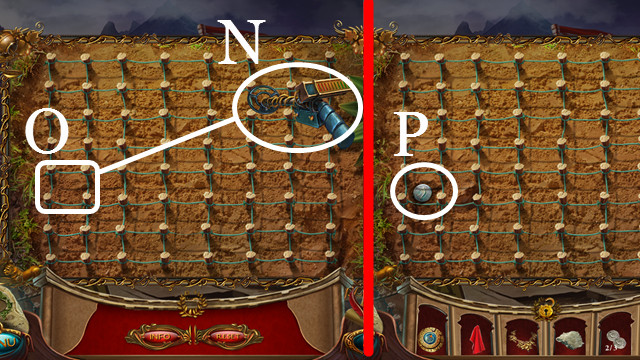
- Solution: Use (N) on (O).
- Take the SILVER COIN 3/3 (P).
- Return to the Market – Present.

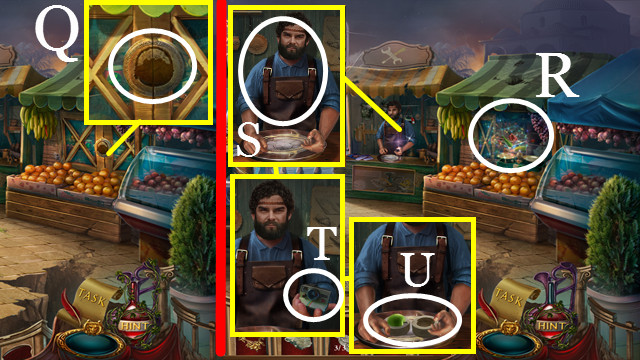
- Use the FRUIT SYMBOL (Q) to trigger a HOP.
- Play the HOP (R); receive the APPLE.
- Talk (S) and give the SILVER COIN; take the CAMERA (T).
- Give the CLAY and APPLE (S); take the APPLE and APPLE FORM (U).
- Time-travel.

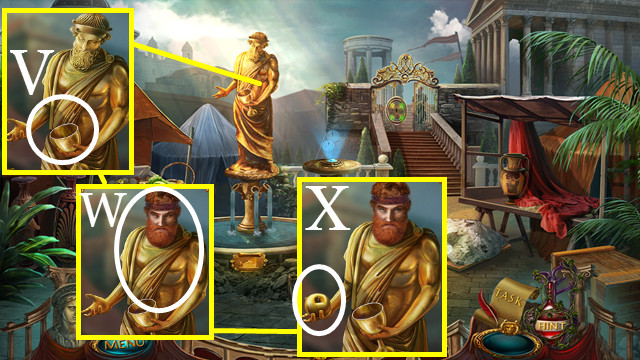
- Use the WINE (V).
- Give the APPLE (W); take the GOLDEN APPLE 1/2 (X).
- Walk up.

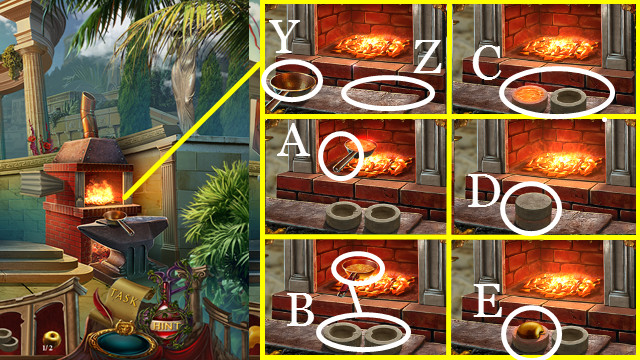
- Place the GOLD NECKLACE (Y) and APPLE FORM (Z).
- Use the HANDKERCHIEF (A); pour (B).
- Touch (C); touch (D); take the GOLDEN APPLE 2/2 (E).
- Return to Olympus – Base.

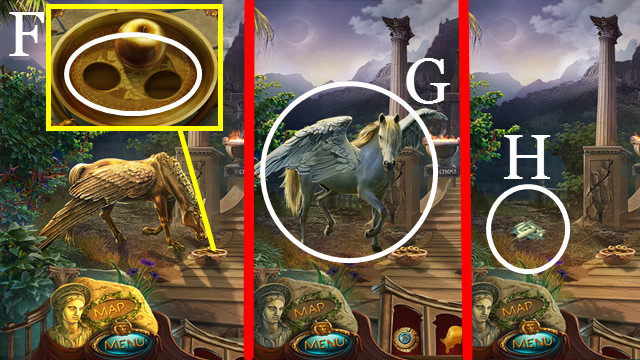
- Place the GOLDEN APPLE (F).
- Use the CAMERA (G); receive the IMAGE OF PEGASUS.
- Take the PEGASUS FEATHERS (H).
- Return to the Workshop.

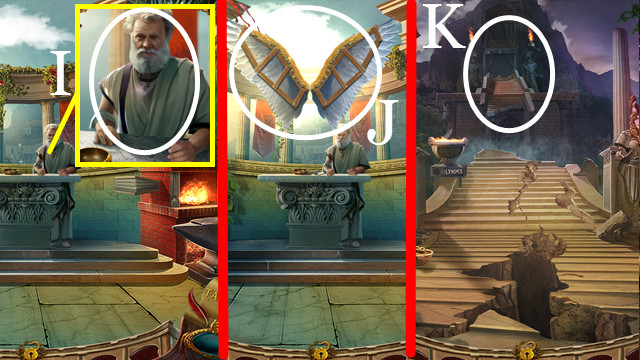
- Give the WAX, IMAGE OF PEGASUS and PEGASUS FEATHERS (I).
- Take the WINGS (J).
- Return to Olympus – Base.
- Use the WINGS (K) to trigger a mini-game.

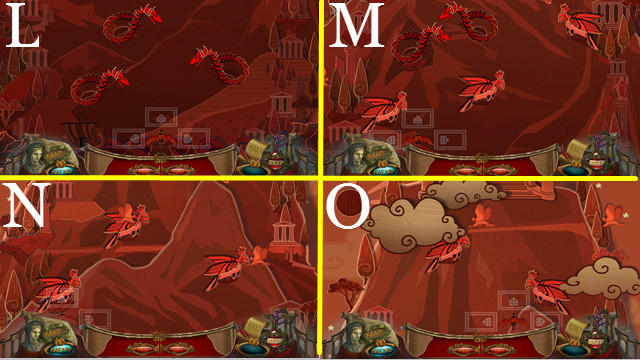
- Solution: (L) Up-Up-Up-Up-Left-Left-Left-Up-Right-Up.
- Fail once to reset position to center.
- (M) Right-Up-Left-Left-Up-Up-Left-Left-Up-Up-Up.
- (N) Right-Right-Up-Right-Up-Up-Right-Up-Up-Up.
- Fail once to reset position to center.
- (O) Up-Left-Left-Up-Left-Up-Up-Right-Left-Right-Up-Right-Up.
Chapter 3: The Underworld

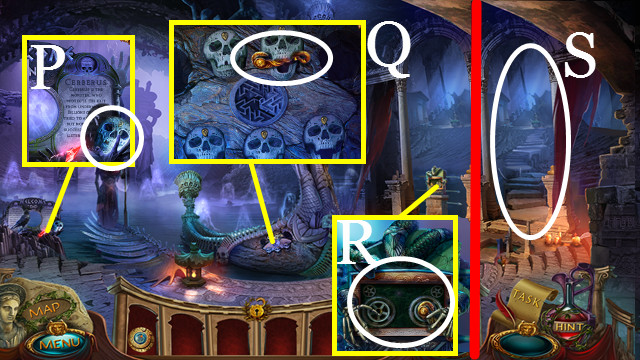
- Take the SKULL 1/2 (P) and DEATH’S KEY (Q).
- Use the DEATH’S KEY (R).
- Walk up (S).

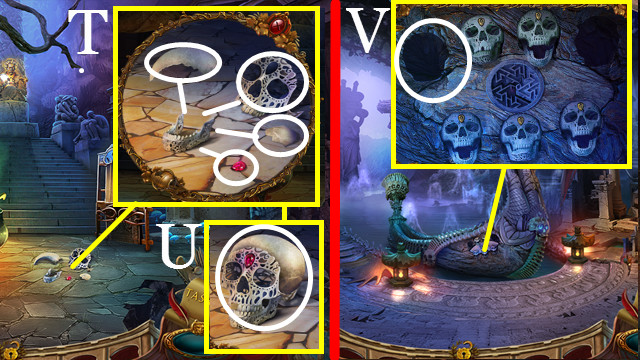
- Assemble (T); take the SKULL 2/2 (U).
- Walk down.
- Use the SKULL (V) to trigger a mini-game.

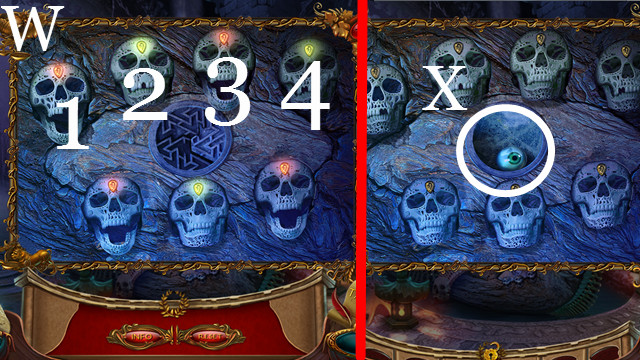
- Solution (W): 3-1-4.
- Take the GRAEAE’S EYE (X).
- Walk up.

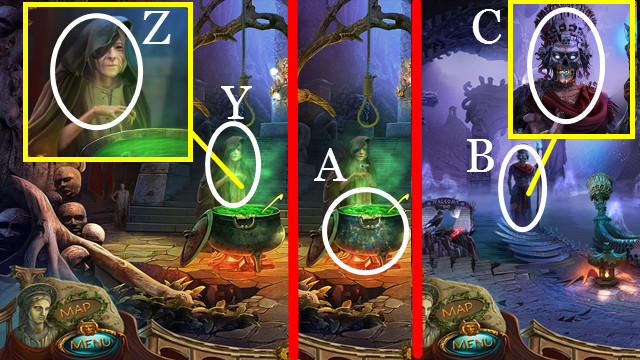
- Talk (Y); give the GRAEAE’S EYE (Z) to trigger a HOP.
- Play the HOP (A); receive the COIN.
- Walk down.
- Talk (B); use the COIN (C).

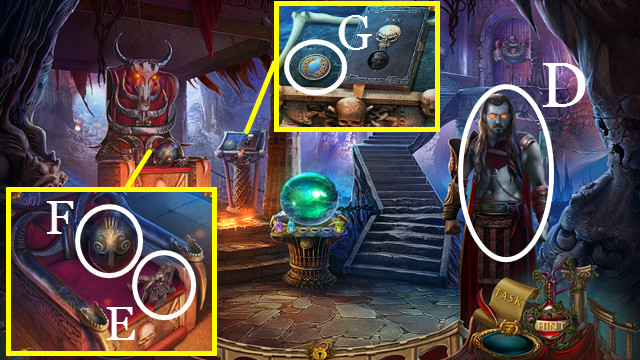
- Talk (D).
- Take the HERACLES FIGURINE 1/3 (E), AJAX’S HELMET (F) and BRONZE SEAL (G).
- Walk up.

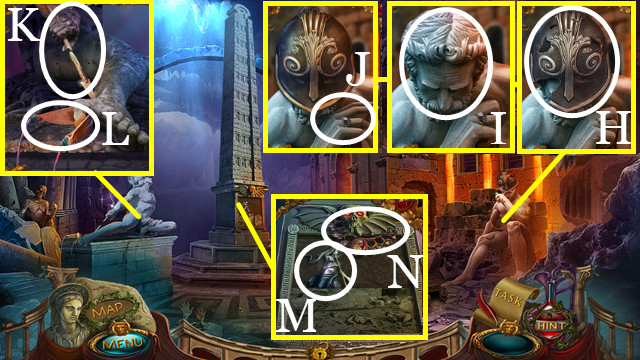
- Remove (H); place the AJAX’S HELMET (I); take the HADES’ SIGNET (J).
- Remove (K); take the SLING (L).
- Take the TITAN FIGURINE (M) and HELEN’S NECKLACE (N).
- Walk down.

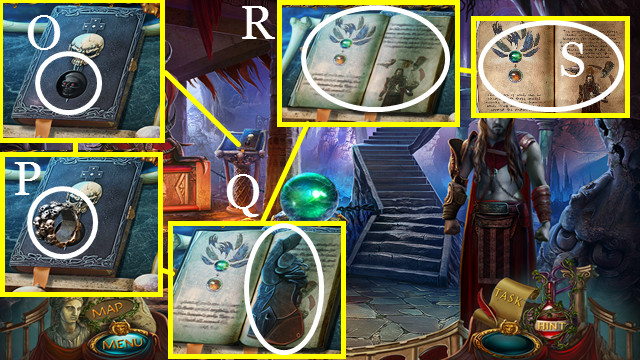
- Use the HADES’ SIGNET (O); touch (P); take the HADES’ GLOVE (Q).
- Touch (R-S).
- Walk down.

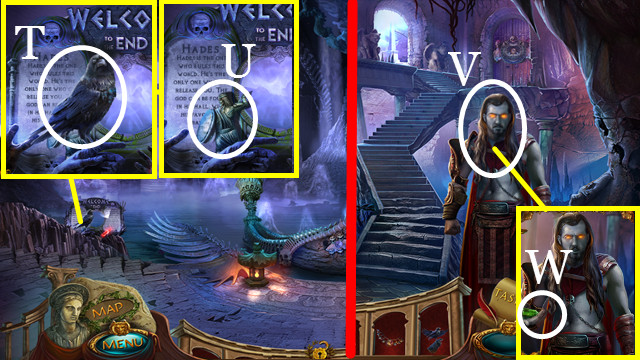
- Use the HADES’ GLOVE (T); receive the GLOVE WITH RAVEN.
- Take the TITAN FIGURINE 2/2 (U).
- Walk up to Hades Kingdom.
- Give the GLOVE WITH RAVEN (V); take the GREEN CRYSTAL (W).
- Return to Souls Valley.

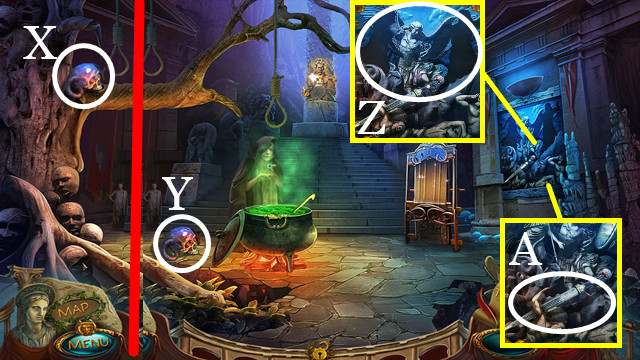
- Use the SLING (X); take the HORN 1/2 (Y).
- Use the TITAN FIGURINE (Z); take the TITAN’S DAGGER (A).
- Walk down.

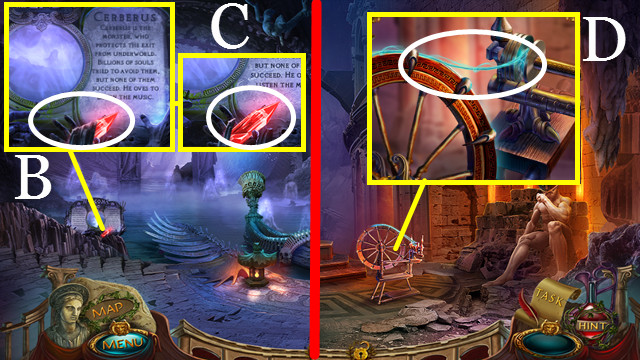
- Use the TITAN’S DAGGER (B); take the RED CRYSTAL (C).
- Return to the Great Dead Hall.
- Use the TITAN’S DAGGER (D); receive the FATE’S THREAD.
- Return to Souls Valley.

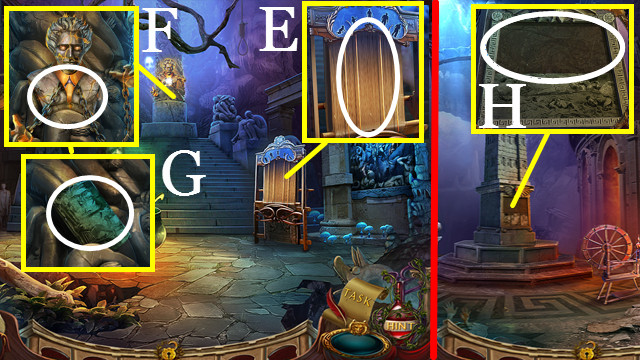
- Use the FATE’S THREAD (E); receive the HADES’ KEY.
- Use the HADES’ KEY (F); take the STELE PLAQUE (G).
- Return to Great Dead Hall.
- Place the STELE PLAQUE (H) to trigger a mini-game.

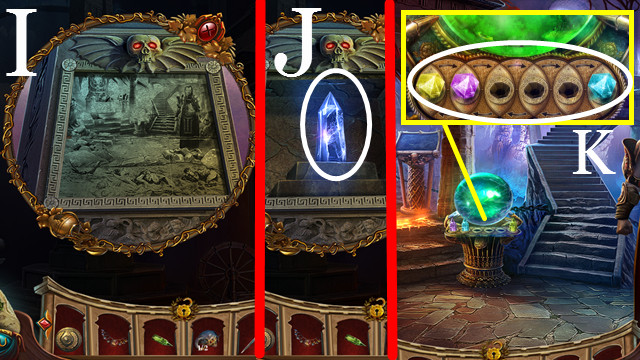
- Solution (I).
- Take the BLUE CRYSTAL (J).
- Walk down.
- Place the GREEN CRYSTAL, RED CRYSTAL and BLUE CRYSTAL (K) to trigger a mini-game.

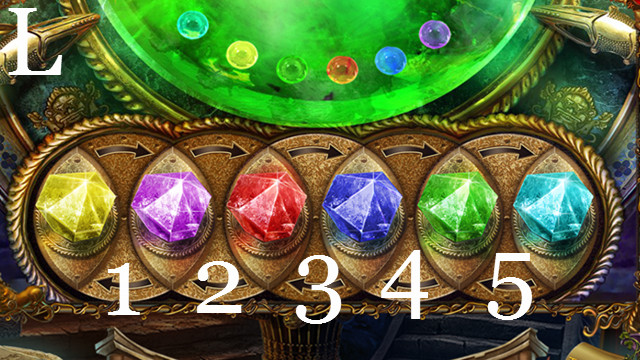
- Solution (L): 5-4-3-2-1-5-4-3-4-5.

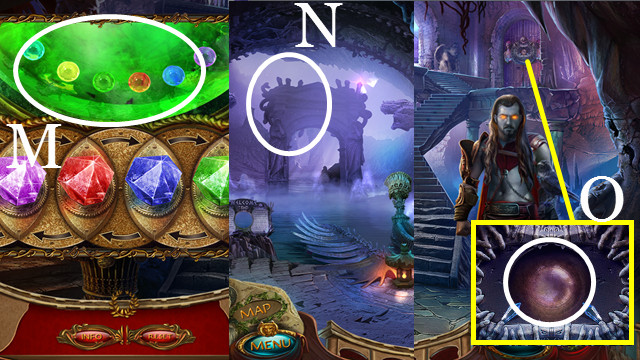
- Take the SPHERE OF SOULS (M).
- Walk down.
- Use the SPHERE OF SOULS (N) to trigger a HOP.
- Play the HOP; receive the CHARGED SOUL SPHERE.
- Return to Hades Kingdom.
- Place the CHARGED SOUL SPHERE (O) to trigger a mini-game.

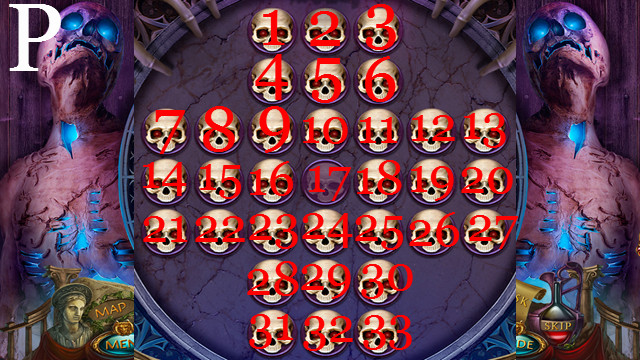
- Solution (P): 19-17, 30-18, 27-25, 18-30, 13-27, 11-13, 3-11, 10-12,
- 13-11, 33-25, 24-26, 27-25, 22-24, 25-23, 8-10, 11-9, 32-24, 24-22, 2-10,
- 10-8, 1-9, 31-23, 16-4, 22-24, 24-10, 7-9, 21-7, 10-8, 7-9, 4-16, 15-17.
- Walk to the upper right.

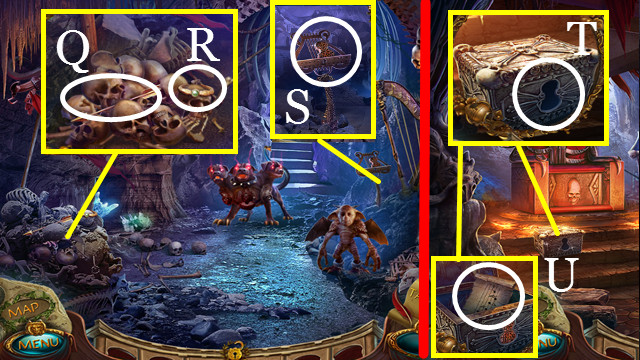
- Take the ARROW (Q), GOLDEN BRACELET (R) and MUSIC MEDALLION (S).
- Walk down.
- Use the MUSIC MEDALLION (T); take the MUSIC SHEET (U).
- Walk to the upper left.

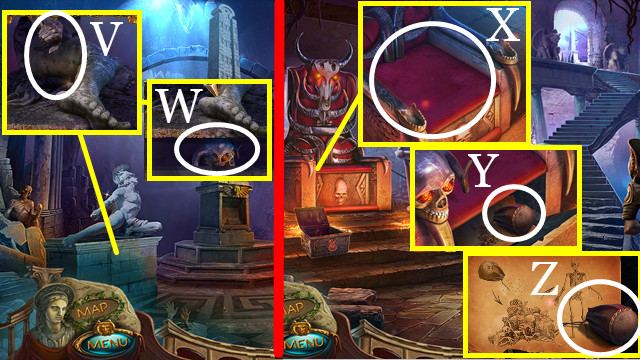
- Place the ARROW (V); take the HORN 2/2 (W).
- Walk down.
- Use the HORN (X); touch (Y); take the LIFE DUST (Z).
- Walk to the upper right.

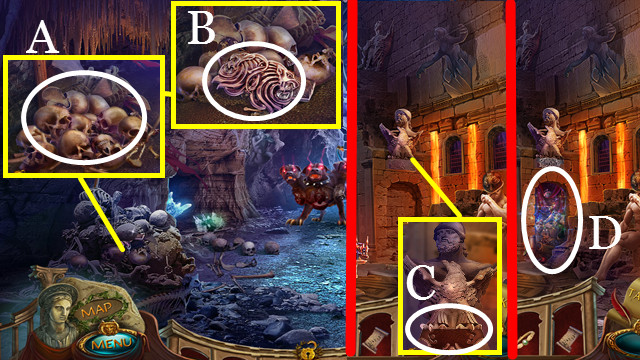
- Use the LIFE DUST (A).
- Take the HECTOR’S BELT (B).
- Return to Great Dead Hall.
- Place the HECTOR’S BELT (C) to trigger a HOP.
- Play the HOP (D); receive the FREEDOM AMULET.
- Return to Underworld Exit.

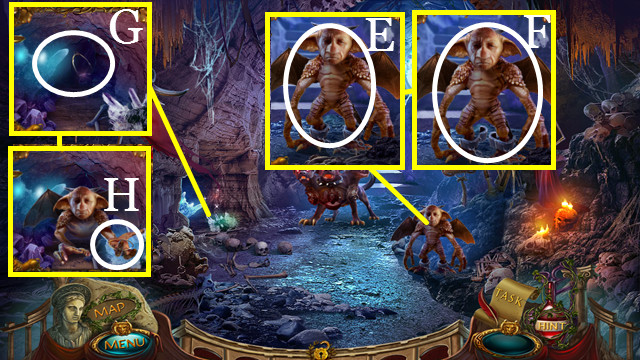
- Use the FREEDOM AMULET (E); take the IMP (F).
- Use the IMP (G); take the STRING (H); receive the IMP.

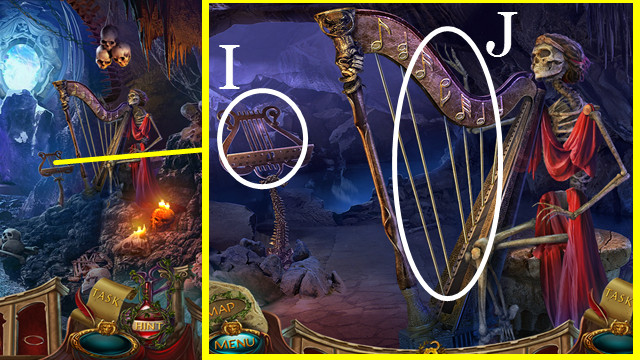
- Place the STRING (I) and MUSIC SHEET (J) to trigger a mini-game.

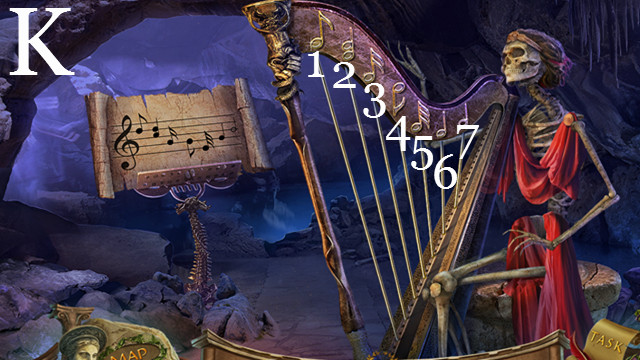
- Solution (K): 6-3-1; 7-2-5-3-6; 3-1-7-4-2-6.
- Walk up.
Chapter 4: The Harbor

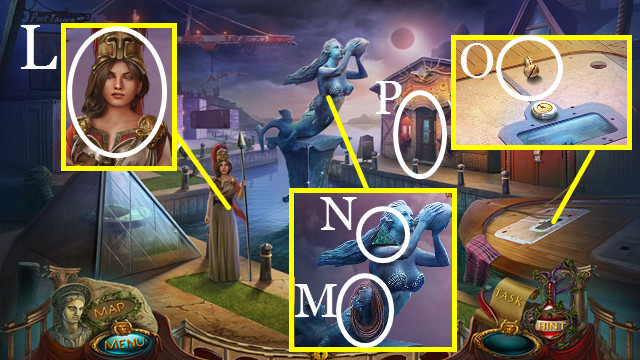
- Talk (L).
- Take the ROPE (M), TRIANGULAR PLATE (N) and BOLT (O).
- Enter (P).

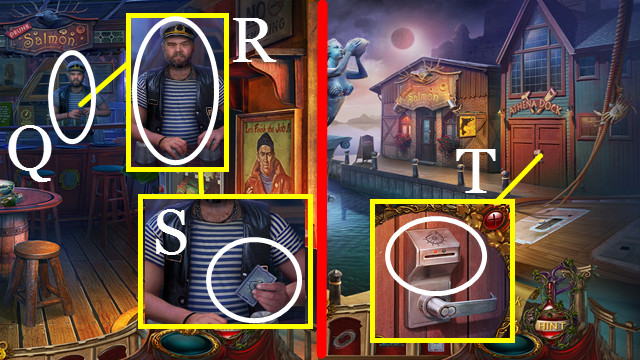
- Talk (Q); give the GOLDEN BRACELET (R) to trigger a mini-game.
- Solution: Left-Center-Left.
- Take the KEY CARD (S).
- Walk down.
- Use the KEY CARD (T); enter.

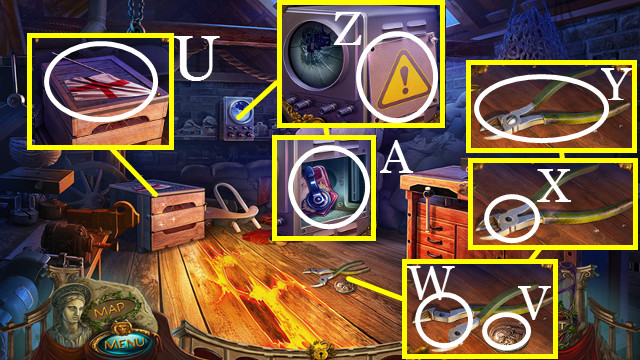
- Take the ST. GEORGE’S CROSS (U) and AGEMEMNON SEAL (V).
- Touch (W); use the BOLT (X); take the PLIERS (Y).
- Touch (Z) twice; take the JOYSTICK (A).
- Return to the Port Tavern.

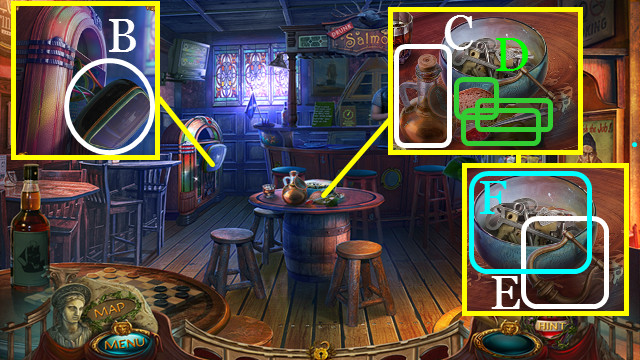
- Use the PLIERS (B); receive the MONITOR.
- Take the VINEGAR (C); move (D).
- Take the SHIP’S HOLD HANDLE (E).
- Touch (F) to trigger a mini-game.

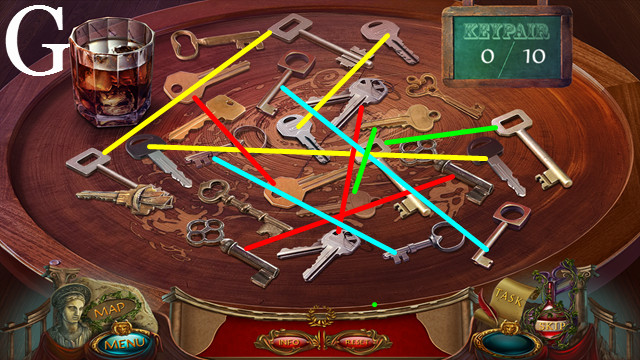

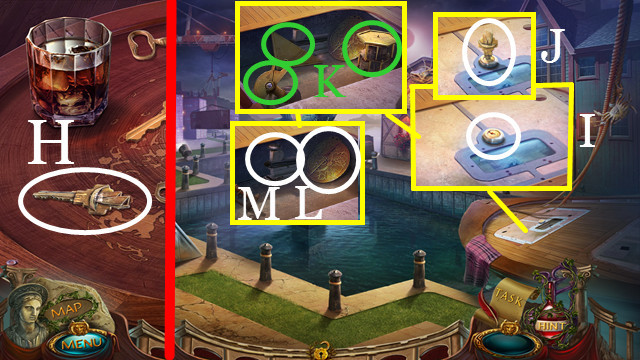
- Take the YACHT KEY (H).
- Walk down.
- Use the YACHT KEY (I); touch (J); move (K); take the COMPASS (L) and INDUSTRIAL STAPLER (M).

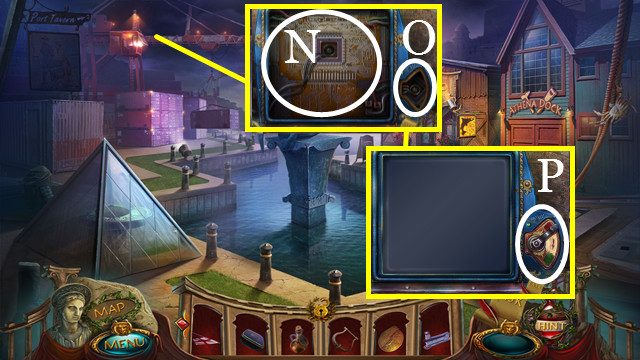
- Place the MONITOR (N) and JOYSTICK (O).
- Touch (P) to trigger a mini-game.

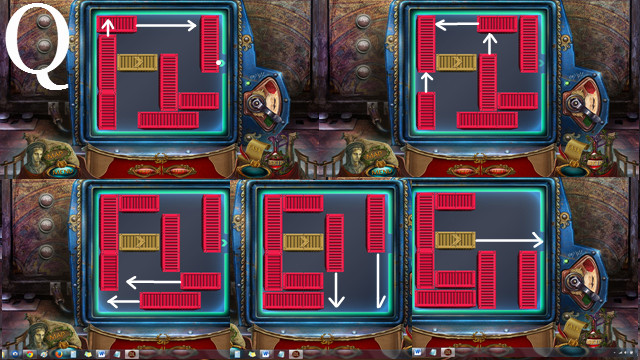



- Solve (S) to trigger a HOP.

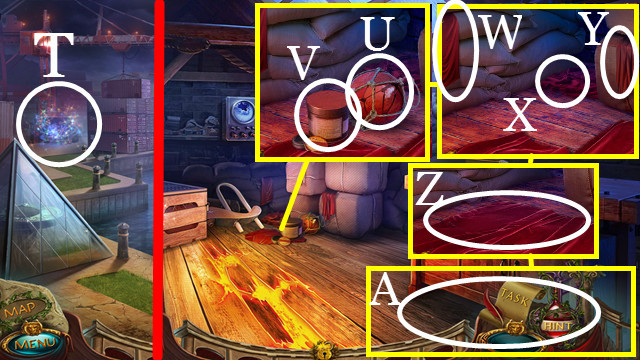
- Play the HOP (T); receive the CROWBAR.
- Enter the Ship Repair.
- Touch (U-V-W-X-Y).
- Use the INDUSTRIAL STAPLER (Z); take the SAIL (A).

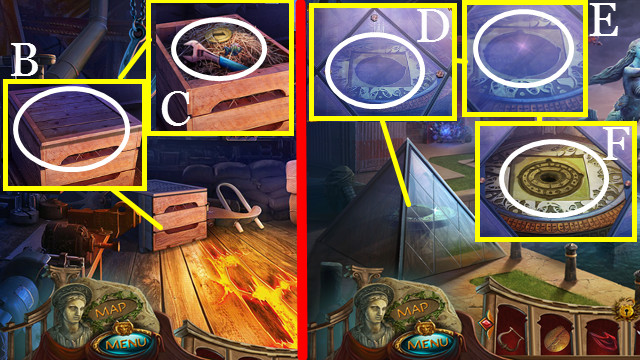
- Use the CROWBAR (B); take the WRENCH, TOKEN and FISH 1/3 (C).
- Walk down.
- Use the WRENCH (D); touch (E); use the AMULET (F).

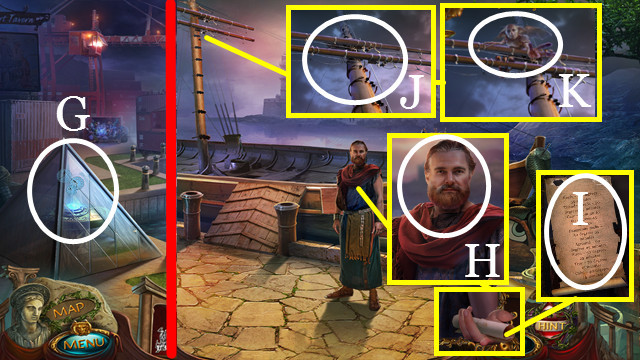
- Time-travel (G).
- Talk (H).
- Take the STRABON MAP (I).
- Use the IMP (J); give the SAIL and ROPE (K); receive the IMP.


- Take the FISH 2/3 (L) and GRECIAN FLAG (M).
- Use the COMPASS (N).
- Use the SHIP’S HOLD HANDLE (O); touch (P) to trigger a HOP.
- Play the HOP (Q); receive the RESIN.
- Return to the Port Tavern.

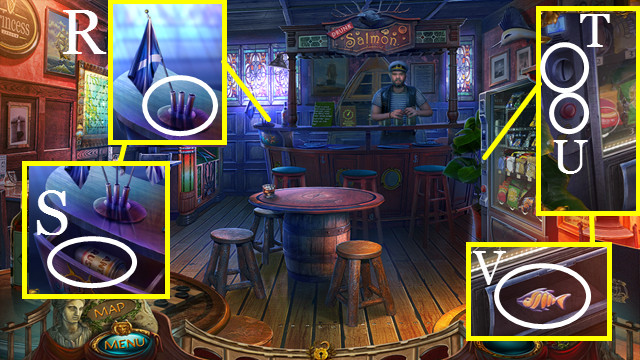
- Place the ST. GEORGE’S CROSS and GRECIAN FLAG (R).
- Take the ANTICORROSIAN SOLUTION (S).
- Use the TOKEN (T); press (U); take the FISH 3/3 (V).
- Walk down.

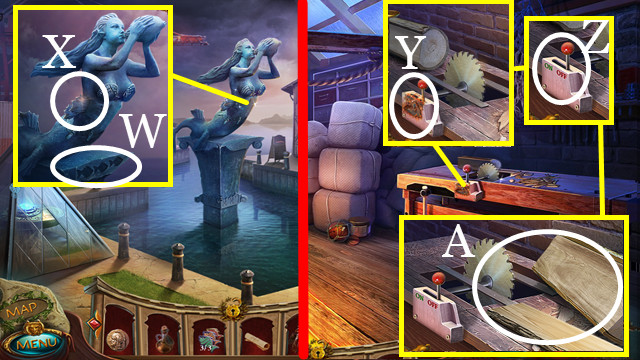
- Use the FISH (W); touch twice (X); receive the MERMAID.
- Return to Ship Repair.
- Use the ANTICORROSIAN SOLUTION (Y).
- Touch (Z); take the BOARDS (A).
- Return to the Port Tavern.

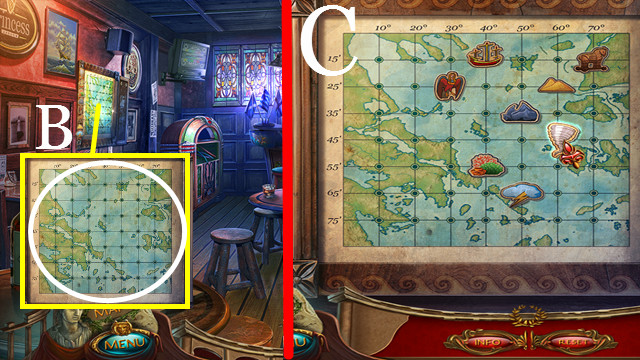
- Use the STRABON MAP (B) to trigger a mini-game.
- Solution (C).
- Receive the SEA MAP.
- Return to the Harbor – Past.

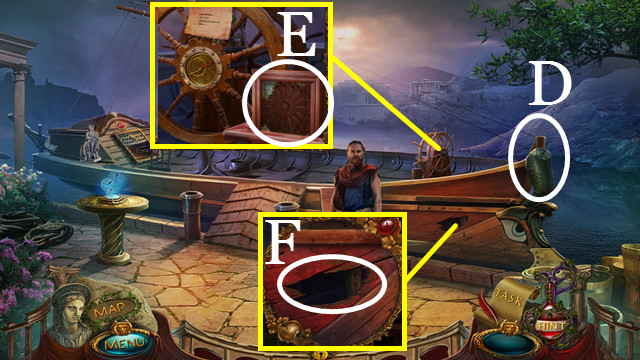
- Place the MERMAID (D) and the SEA MAP (E).
- Place the BOARDS and use the RESIN (F).
Chapter 5: Odysseus

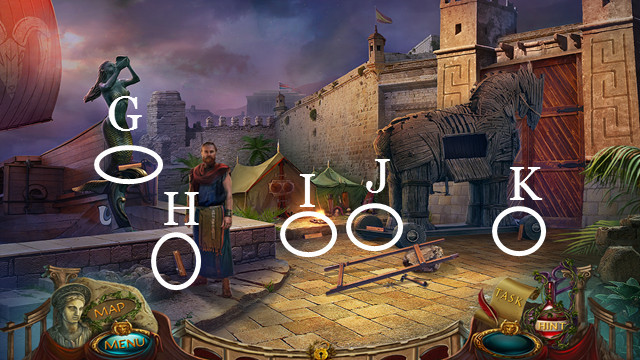
- Take the BOARDS (G-H-I-J-K).

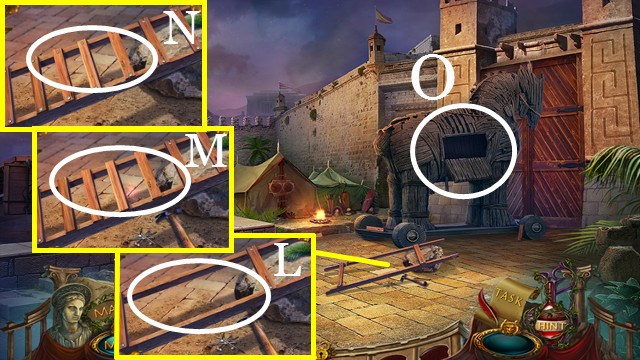
- Place the BOARDS (L); touch (M) twice.
- Take the LADDER (N).
- Use the LADDER (O).

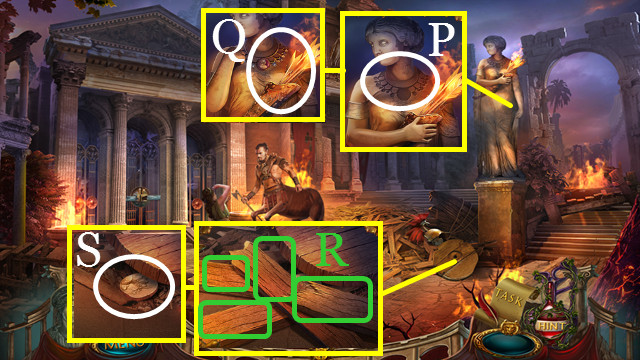
- Use the HELEN’S NECKLACE (P); take the QUIVER (Q).
- Move (R); take the MENELAUS’ SEAL (S).
- Walk down.

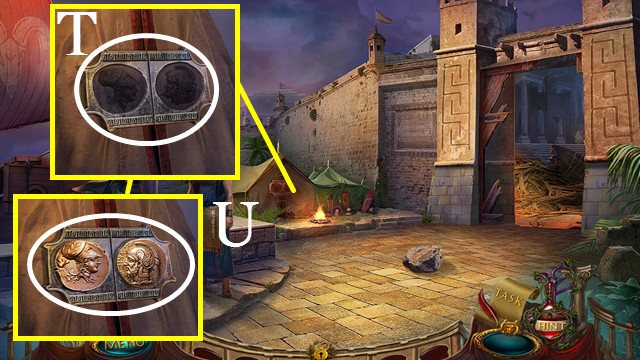
- Use the MENELAUS’ SEAL and AGAMEMNON SEAL (T).
- Touch (U) to trigger a mini-game.

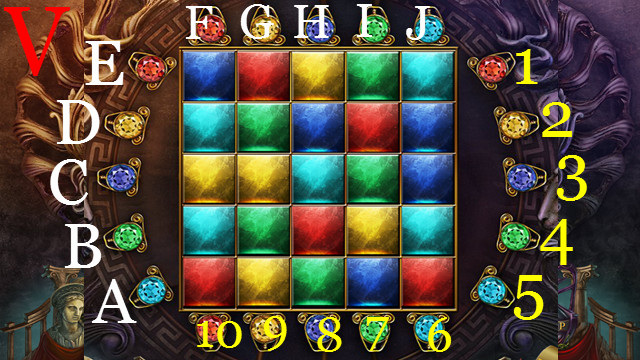
- Solution (V): E-D-D-D-B-B-10-10-9-9-9-5-8-5-5.
- 6-6-A-A-8-5-5-6-A-A-8-J-5-5-6-A-A.
- 8-5-5-6-A-A-7-5-6-6-A-7-7-7-5-6-6-A.

- Use the QUIVER (W); take the MAGIC BOW (X).
- Walk right.
- Use the MAGIC BOW (Y).

- Talk (Z); take the TROY’S COAT-OF-ARMS (A).
- Use the TROY’S COAT-OF-ARMS (B) to trigger a HOP.
- Play the HOP (C); receive the ARIADNE’S THREAD.
- Walk down.

- Talk (D); give the ARIADNE’S THREAD (E).
- Talk (F); take the EMBLEM (G).
- Use the IMP (H); receive the SEINE.

- Take the CIRCLE PLATE (I) and SCEPTER (J).
- Use the SEINE (K) to trigger a HOP.
- Play the HOP (L); receive the AEGEAN PEARLS.
- Try to walk up.

- Assemble (M); use the AEGEAN PEARLS (N).
- Take the LIGHT AMULET (O).
- Use the LIGHT AMULET (P).
- Walk up.

- Move (Q); take the FRESCO PART 1/3 (R).
- Place the EMBLEM (S); take the HERACLES FIGURINE 2/3 (T) and SQUARE PLATE (U).
- Touch (V) four times; take the BAG OF OATS (W).
- Walk down.

- Place the TRIANGULAR PLATE, SQUARE PLATE and CIRCLE PLATE (X).
- Enter (Y).
- Use the IMP (Z); receive the SCOOP.
- Take the SNAKE SYMBOL (A).
- Return to Thermopylae Gorge.

- Use the SCOOP (B); receive the CROWN.
- Return to the Labyrinth Entrance.
- Place the SCEPTER and CROWN (C).
- Take the LABYRINTH MAP (D) and PATTERN PART (E).
- Use the LABYRINTH MAP (F) to trigger a mini-game.


- Take the HERACLES FIGURINE 3/3 (K) and HASP (L).
- Return to Crete.
- Place the HERACLES FIGURINE (M) to trigger a mini-game.


- Enter (O).
- Touch (P).
- Move (Q); take the BAG OF WHEAT (R).
- Place the SNAKE SYMBOL (S); take the SNAKE POISON (T).

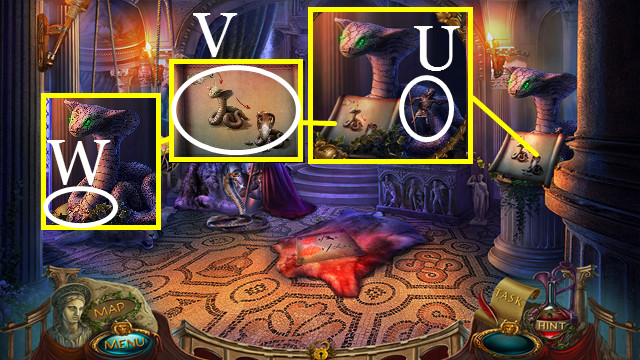
- Take the HELOT STATUE (U).
- Touch (V); take the FRESCO PART 2/3 (W).

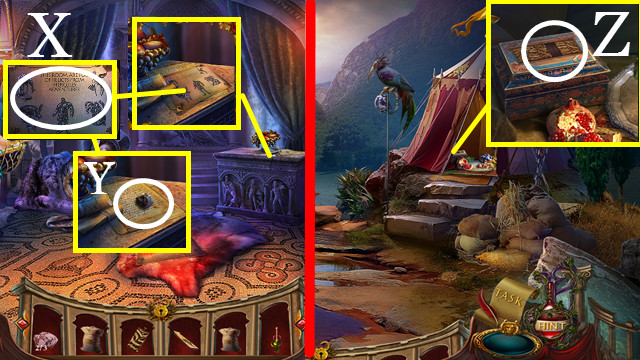
- Touch (X); take the MINOTAUR’S RING (Y).
- Return to Thermopylae Gorge.
- Use the PATTERN PART (Z); touch to trigger a mini-game.

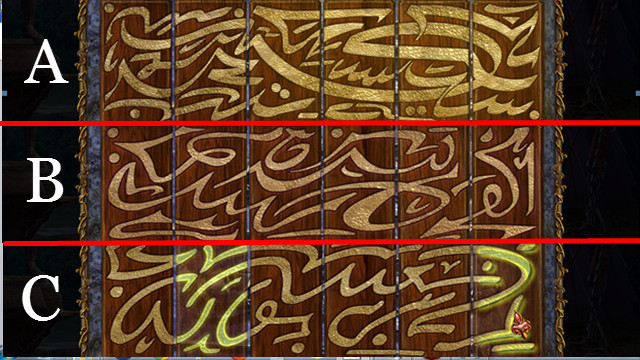

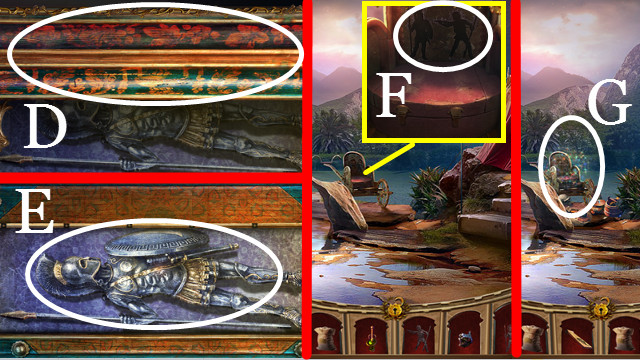
- Touch (D); take the SPARTAN STATUE (E).
- Place the SPARTAN STATUE and HELOT STATUE (F) to trigger a HOP.
- Play the HOP (G); receive the CAGE KEY.
- Return to the Minotaur Room.

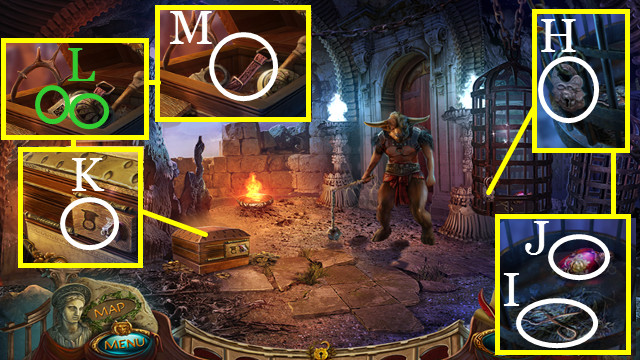
- Use the CAGE KEY (H); take the TONGS (I) and VIAL OF BLOOD (J).
- Use the MINOTAUR’S RING (K); move (L); take the BELT (M).
- Return to the Heracles Temple.

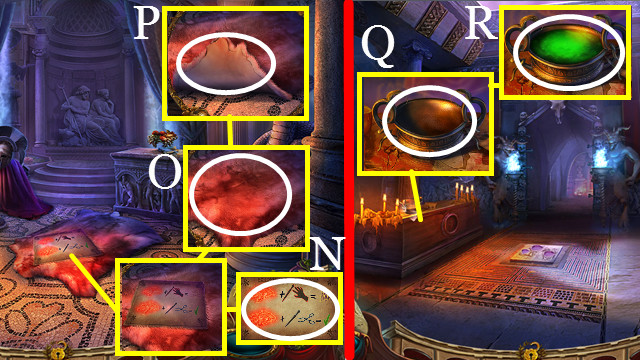
- Take (N). Use the TONGS (O) and TITAN’S DAGGER (P); receive the POISONED SNAKESKIN.
- Return to the Labyrinth Entrance.
- Use the VIAL OF BLOOD, POISONED SNAKESKIN, VINEGAR, and SNAKE POISON (Q).
- Take the DISSOLVING POTION (R).
- Return to the Hercules Temple.

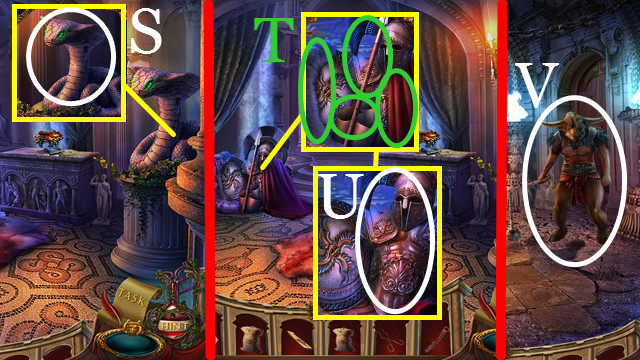
- Use the DISSOLVING POTION (S).
- Move (T); take HERACLES’ ARMOR (U).
- Return to the Minotaur Room.
- Use HERACLES’ ARMOR (V).

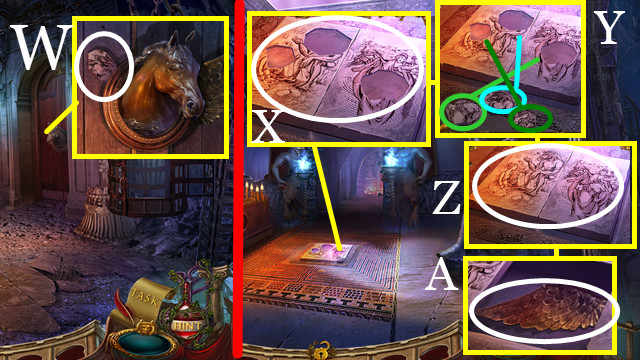
- Take the FRESCO PART 3/3 (W).
- Walk down.
- Place the FRESCO PART (X).
- Place (Y); touch (Z); take the WING (A).
- Walk up.

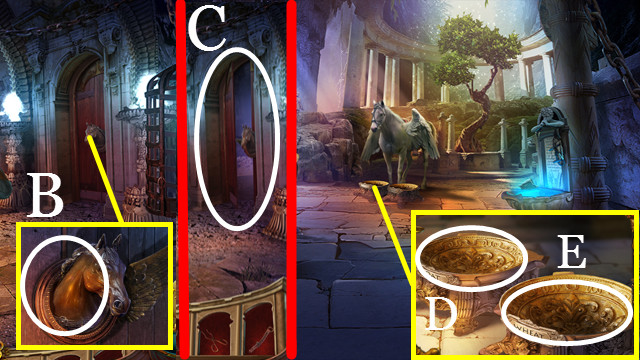
- Use the WING (B); enter (C).
- Use the BAG OF OATS (D) and BAG OF WHEAT (E).

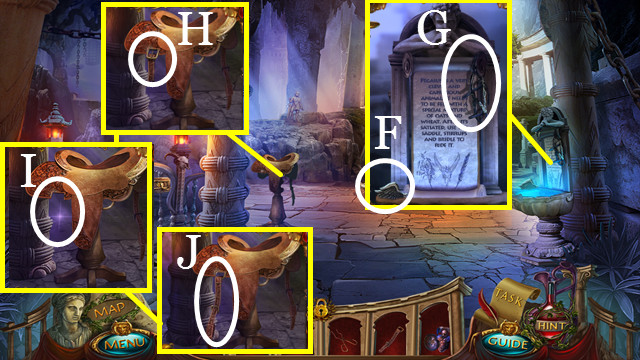
- Take the LEVITATION STAFF 1/4 (F) and BRIDLE (G).
- Touch (H); use the BELT (I); take the SADDLE (J).

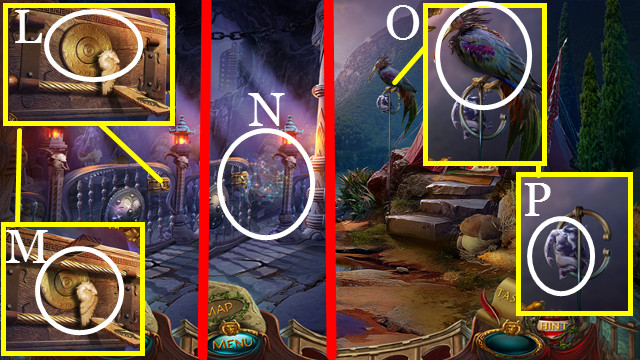
- Place the HASP (L); touch (M) to trigger a HOP.
- Play the HOP (N); receive the RATCHET.
- Return to Thermopylae Gorge.
- Use the RATCHET (O); take the MINOTAUR FIGURE (P).
- Return to the Minotaur Room.

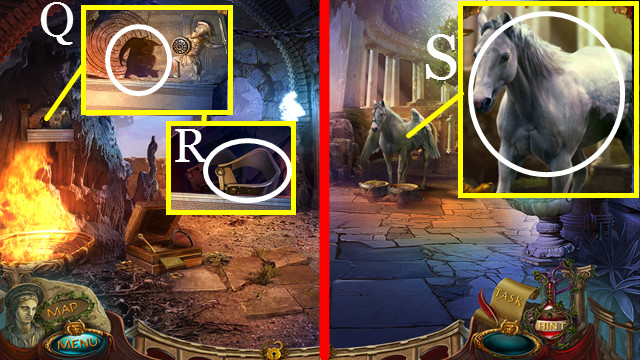
- Place the MINOTAUR FIGURE (Q); take the STIRRUPS (R).
- Enter Pegasus’ Stable.
- Use the SADDLE, BRIDLE and STIRRUPS (S).
Chapter 6: Olympus

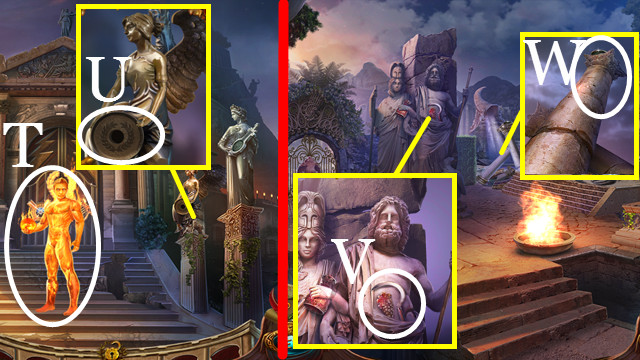
- Use HERACLES’ ARMOR (T) and the BRONZE SEAL (U).
- Walk forward.
- Take the SICKLE and GOLDEN GRAPES 1/2 (V).
- Use the IMP (W); receive the SILVER SEAL.
- Walk down.

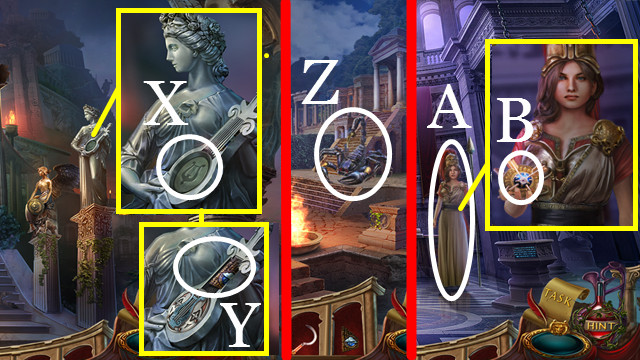
- Use the SILVER SEAL (X); take the RAIN FLUTE (Y).
- Walk up.
- Use the RAIN FLUTE (Z).
- Climb the stairs.
- Talk (A); take the GOLDEN SEAL (B).

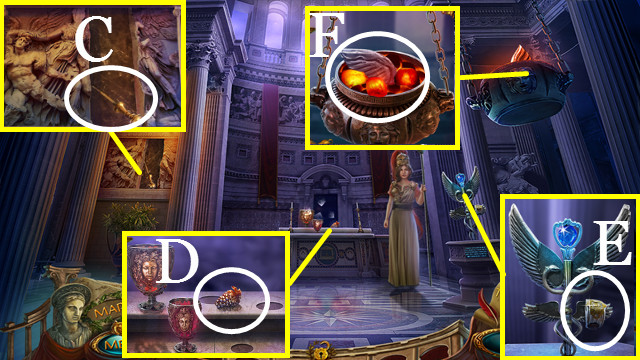
- Take the LEVER (C), GOLDEN GRAPES 2/2 (D) and BRACELET (E).
- Use the TONGS (F); receive the LEVITATION STAFF 2/4.
- Return to the Olympus Gates.

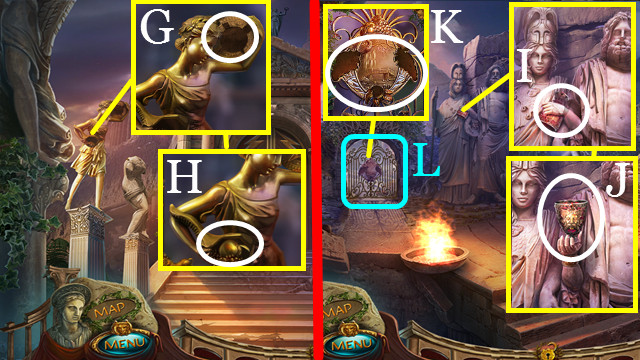
- Use the GOLDEN SEAL (G); take the GOLDEN PEACH (H).
- Walk up.
- Use the BRACELET (I); take the ARES’ GOBLET (J).
- Use the GOLDEN GRAPES and GOLDEN PEACH (K); enter (L).

- Take the HEPHAESTUS’ GOBLET (M) and KEY (N).
- Walk down.
- Use the KEY (O); touch (P) to trigger a HOP.
- Play the HOP (Q); receive the EROS’ HEART.
- Return to the Olympus Garden.

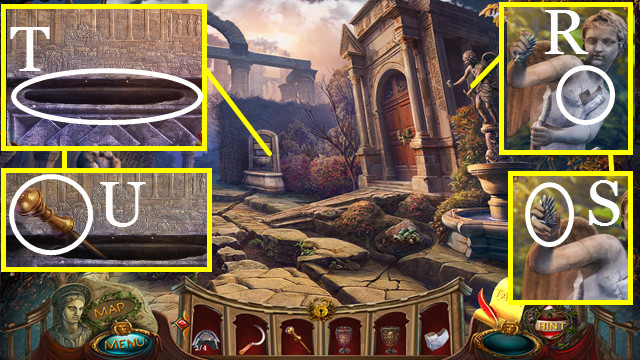
- Use the EROS’ HEART (R); take the LEVITATION STAFF 3/4 (S).
- Use the LEVER (T); touch (U) to trigger a mini-game.

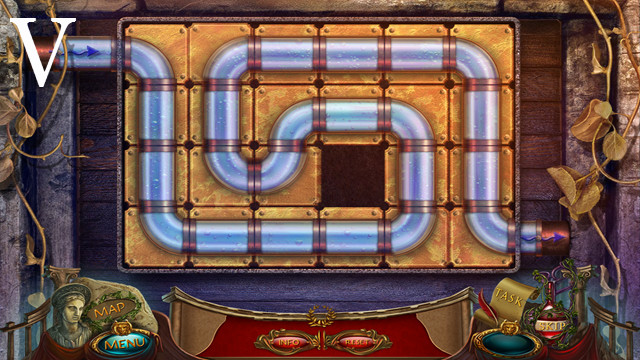

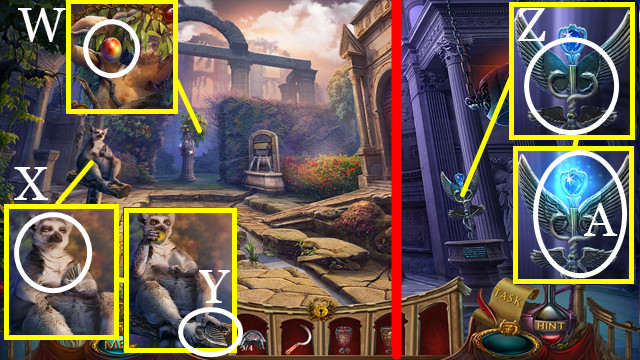
- Use the SICKLE (W); receive the MANGO.
- Give the MANGO (X); take the LEVITATION STAFF 4/4 (Y).
- Return to Gods’ Temple.
- Place the LEVITATION STAFF (Z); take the LEVITATION STAFF (A).
- Walk down.

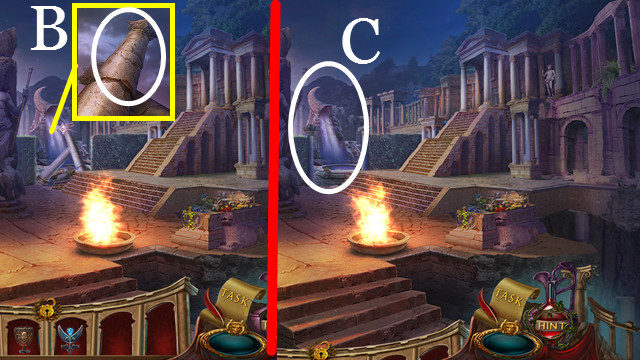
- Use the LEVITATION STAFF (B).
- Walk up (C).

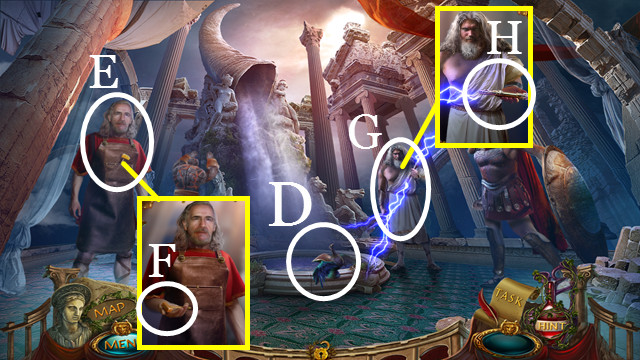
- Take the MAGIC BOWL (D).
- Talk (E); take the TINY HAMMER (F).
- Talk (G); take the THUNDERBOLT (H).
- Return to Olympus Garden.

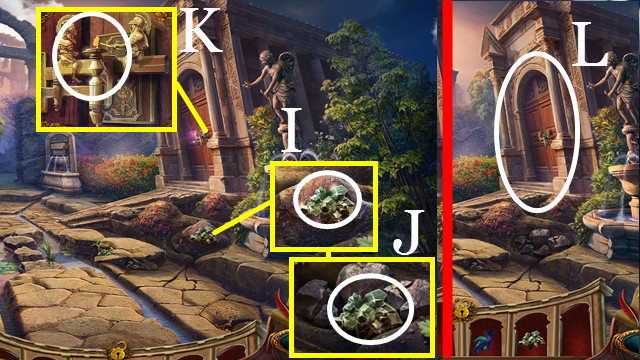
- Use the THUNDERBOLT (I); take the METEORITE IRON (J).
- Use the TINY HAMMER (K).
- Enter (L).

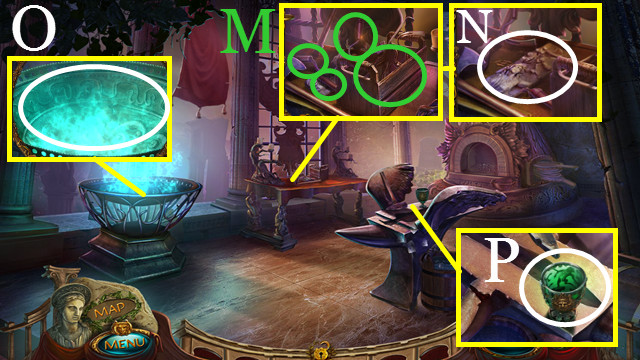
- Move (M); take the BAS RELIEF PANEL (N).
- Use the MAGIC BOWL (O); receive the ETERNAL FIRE.
- Take the ZEUS’ GOBLET (P).
- Return to God’s Temple.

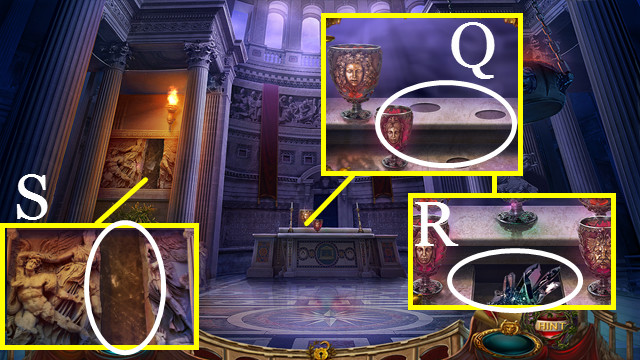
- Place the ARES’ GOBLET, HEPHAESTUS’ GOBLET and ZEUS’ GOBLET (Q).
- Take the ADAMANTINE BAR (R).
- Place the BAS RELIEF PANEL (S) to trigger a mini-game.

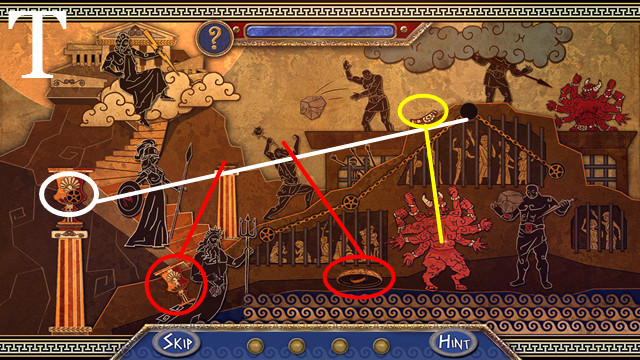

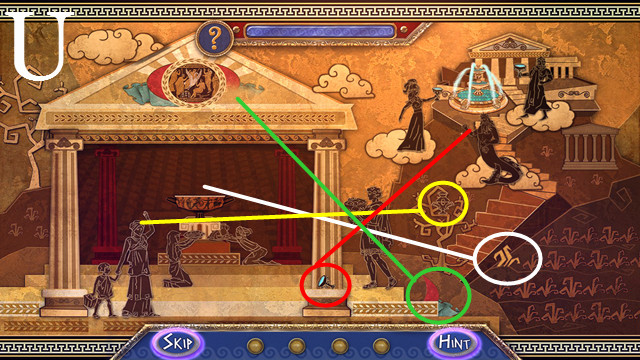

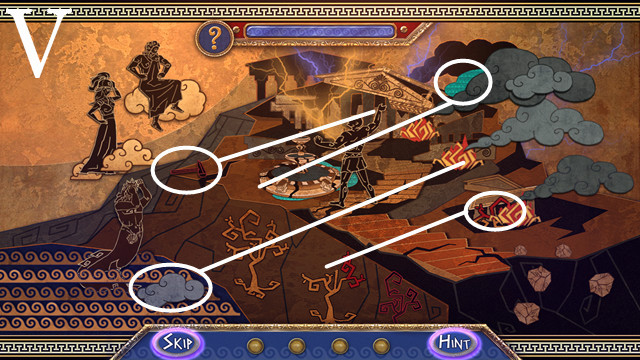

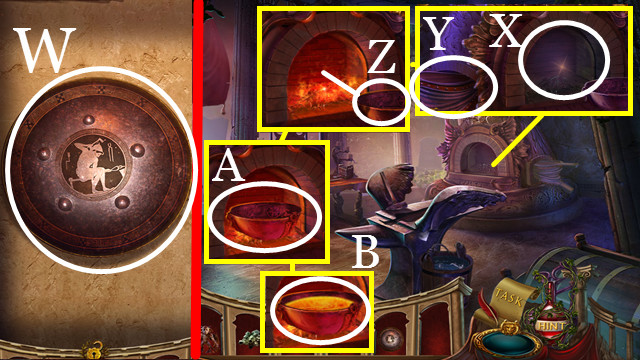
- Take HEPHAESTUS’ SHIELD (W).
- Return to the Hephestus Smithy.
- Use the ETERNAL FIRE (X); touch the bellows (Y).
- Move the bowl (Z); place the METEORITE IRON and ADAMANTINE BAR (A).
- Take the ALLOY (B).

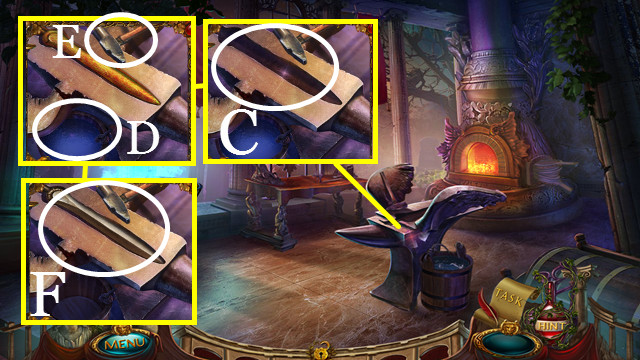
- Use the ALLOY (C).
- Touch (D-E).
- Take the ARES’ SWORD (F).
- Return to the Ambrosia Source.

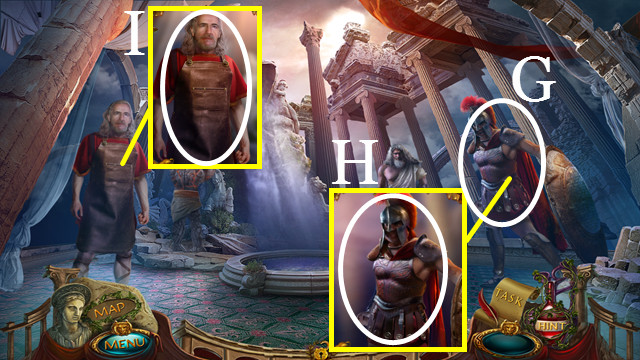
- Talk (G); give the ARES’ SWORD (H).
- Give the HEPHAESTUS’ SHIELD (I).
- Congratulations, you have completed Revived Legends: Titans Revenge!





 Grim Tales: The Wishes Walkthrough, Guide, & Tips
 Dark Tales: ™ Edgar Allan Poe's The Black Cat Walkthrough, Guide, & Tips
 Mystery Trackers: Raincliff Walkthrough, Guide, & Tips
 Whispered Secrets: Into the Beyond Walkthrough, Guide, & Tips
 The Jolly Gang's Spooky Adventure Walkthrough, Guide, & Tips