Dark Tales: ™ Edgar Allan Poe's The Black Cat Walkthrough, Guide, & Tips
Dark Tales: ™ Edgar Allan Poe’s The Black Cat Walkthrough

Welcome to the Dark Tales: ™ Edgar Allan Poe’s The Black Cat Walkthrough!
Follow a mysterious black cat, who seems to be purposely helping you, and discover helpful clues in Dark Tales: ™ Edgar Allen Poe’s The Black Cat.
Whether you use this document as a reference when things get difficult or as a road map to get you from beginning to end, we’re pretty sure you’ll find what you’re looking for here.
This document contains a complete Dark Tales: ™ Edgar Allan Poe’s The Black Cat Walkthrough game walkthrough featuring annotated screenshots from actual gameplay!
We hope you find this information useful as you play your way through the game. Use the walkthrough menu below to quickly jump to whatever stage of the game you need help with.
Remember to visit the Big Fish Games Forums if you find you need more help. Have fun!
This walkthrough was created by Margie B, and is protected under US Copyright laws. Any unauthorized use, including re-publication in whole or in part, without permission, is strictly prohibited.
General Tips

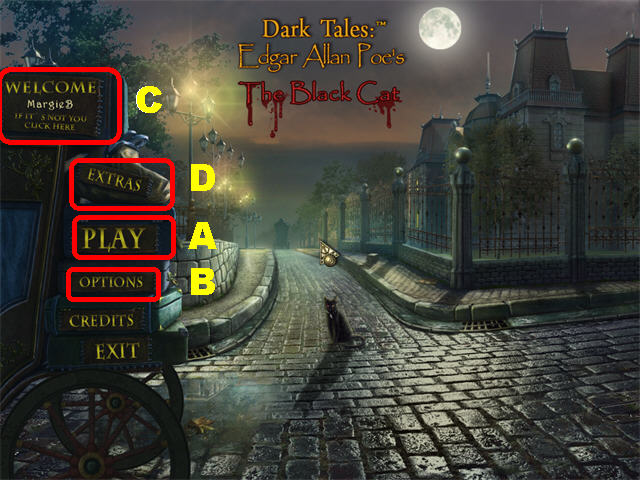
- This is the Official Guide for Dark Tales: Edgar Allan Poe’s The Black Cat, a chilling Hidden Object Puzzle Adventure!
- Click on PLAY (A) to access the main chapters in the game. The OPTIONS (B) Button allows you to adjust the screen, music, cursor, and sound.
- The WELCOME Button (C) can be used to manage your profiles in the game.
- The EXTRAS (D) Button has a link for the collector’s edition version of this game.
- A single sparkle indicates an interactive area in the game. A cluster of sparkles indicates a Hidden Object Scene which will grant an inventory item upon completion.
- Certain Hidden Object Scenes will require you to uncover hidden areas within the scene.
- Click on the Eye Icon, when it appears, to take a closer look at a section, or to read valuable information regarding the game.
- The Hand Icon allows you to pick up inventory items or explore certain areas.

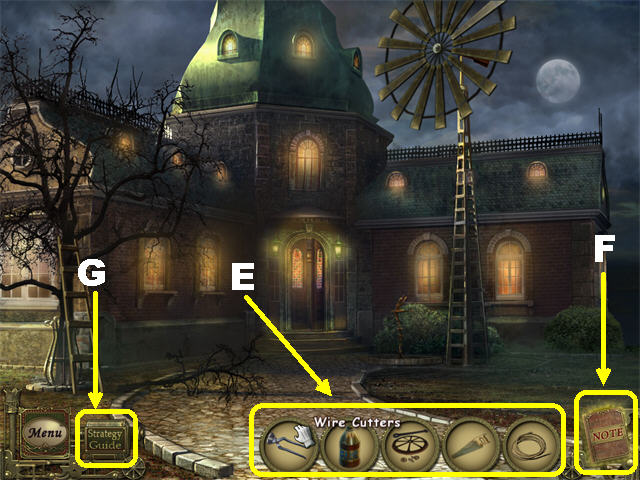
- You will find an inventory item in each Hidden Object Scene, investigation site, or after you solve a puzzle.
- Inventory Items can be used more than once and will remain in your inventory until they are no longer of use.
- Inventory items will appear at the bottom of the scene (E). Use the arrows in your inventory tray to scroll through all the items you’ve collected.
- Open your Journal (F), in the lower right, to find clues and read part of the story.
- The Strategy Guide (G) button can only be activated if you upgrade to the collector’s edition.
- To use an inventory item, select the one you want to use, drag it to the desired location, and click it into the spot in which you want it used.
- You can skip a mini-game once the Skip Button fills. The Skip Button only appears in mini-game sections; it is located in the lower right corner.
- You have unlimited hints in the game but you must wait for them to recharge between uses.
Chapter 1

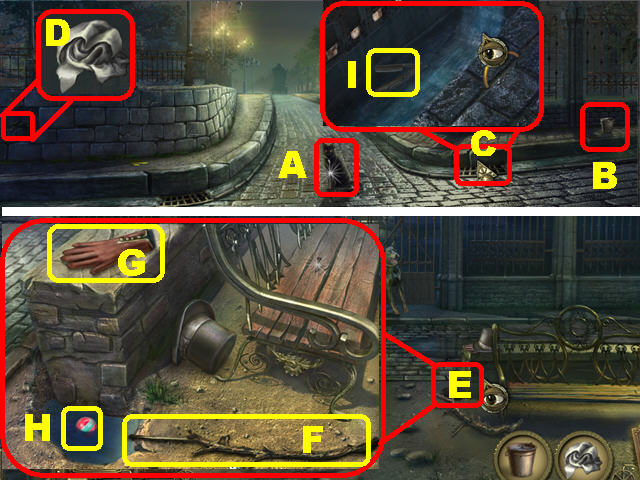
- Click on the BLACK CAT (A).
- Take the BUCKET (B) in the lower right.
- Zoom into the grid (C) in the lower right; click it to open it.
- Place the BUCKET in the water to create the FILLED BUCKET.
- Collect the RAG (D) in the lower left.
- Go forward.
- Zoom into the hotspot next to the right bench (E); take the BRANCH (F).
- In the same hotspot, click on the hat to remove it; take the GLOVE (G).
- Place the FILLED BUCKET in the hole; grab the BALL (H) that floats to the surface.
- Click down.
- Zoom into the grid in the lower right (C).
- Collect the RAZOR (I) with the GLOVE.
- Go forward.

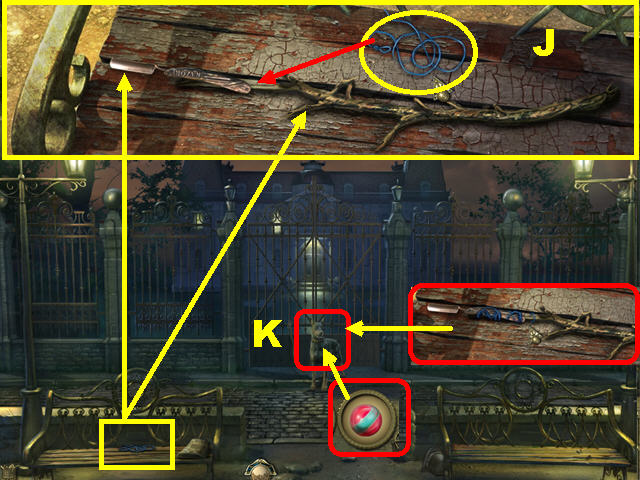
- Zoom into the left bench.
- Place the RAZOR and the BRANCH on the bench.
- Click on the RAZOR to open it.
- Drag the opened RAZOR to the end of the branch, as shown in the screenshot (J).
- Drag the STRING from the bench to the handle of the razor to obtain the RAZOR TOOL.
- Give the BALL to the dog (K).
- Cut the dog’s leash using the RAZOR TOOL.
- Go through the gate.

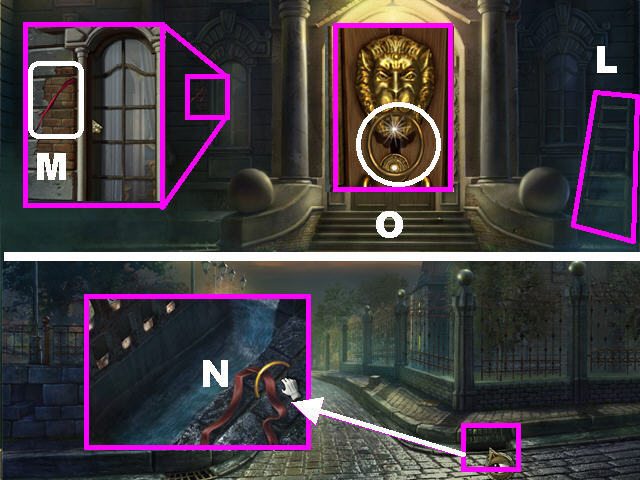
- Take the LADDER (L) on the right side of the house.
- Zoom into the left window, closest to the door.
- Click on the window and Madame Davies will appear.
- Take the RIBBON (M) on the left side of the wall.
- Exit the pop-up window and click down twice.
- Zoom into the hotspot in the lower right.
- Use the RIBBON to take the RING (N).
- Return to the front of the Estate.
- Zoom into the front door.
- Place the RING (O) on the doorknocker.
- Click on the ring to unlock the door.
- Go through the door.

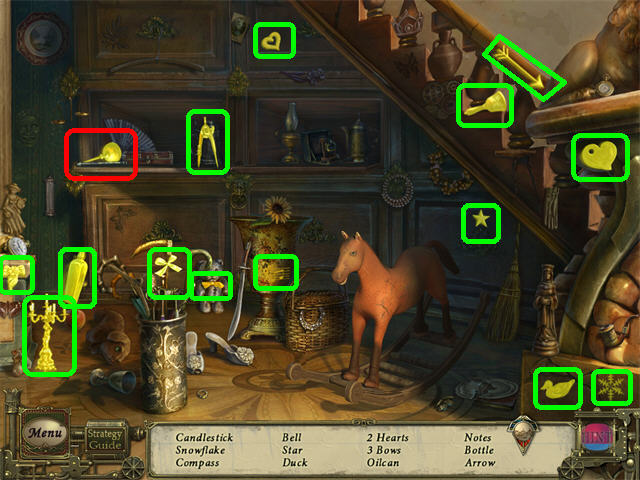
- Play the Hidden Object Scene.
- Open the two middle drawers.
- Look for the items on your list.
- The OILCAN will be added to inventory.

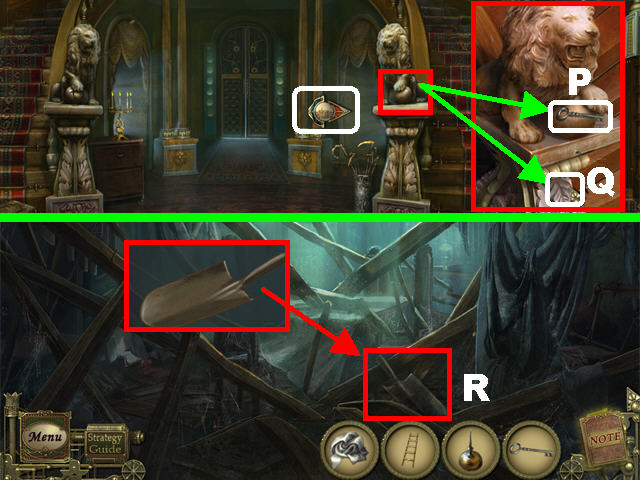
- Zoom into the right lion.
- Click on the lever (Q) at the base of the statue and then take the GARDEN KEY (P).
- Go into the entryway in the lower right and then take the SPADE HEAD (R).
- Exit that scene.
- Go in to the entryway in the lower left.

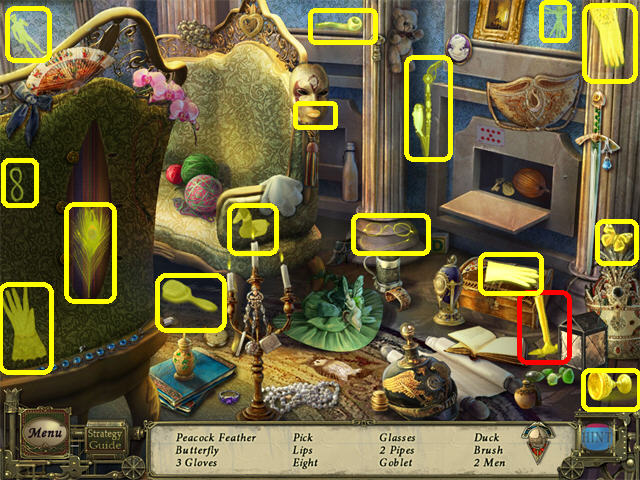
- Play the Hidden Object Scene by the chair.
- Click on the three buttons in the back of the chair (take the peacock feather if it’s on your list).
- Open the compartment on the right.
- Take any items on your list.
- The HAND PICK will be added to your inventory.

- Zoom into the mirror.
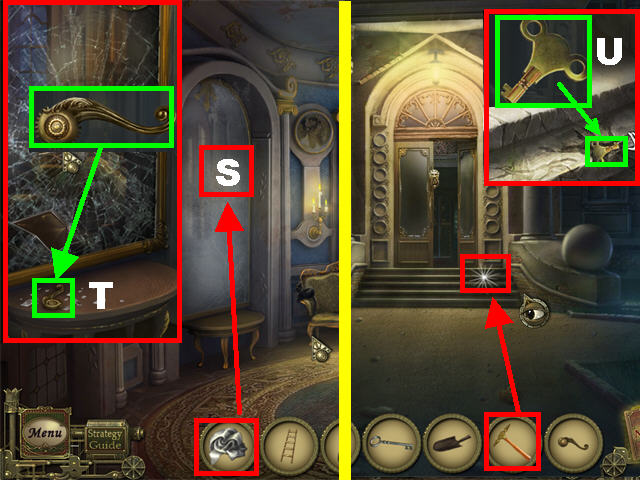
- Wipe the mirror with the RAG until it shatters (S).
- Take the WINDOW HANDLE (T) that falls on the table.
- Go outside.
- Zoom into the steps.
- Use the HAND PICK on the steps and take the CLOCK KEY (U).
- Go inside the Estate.
- Go into the lower left entryway.

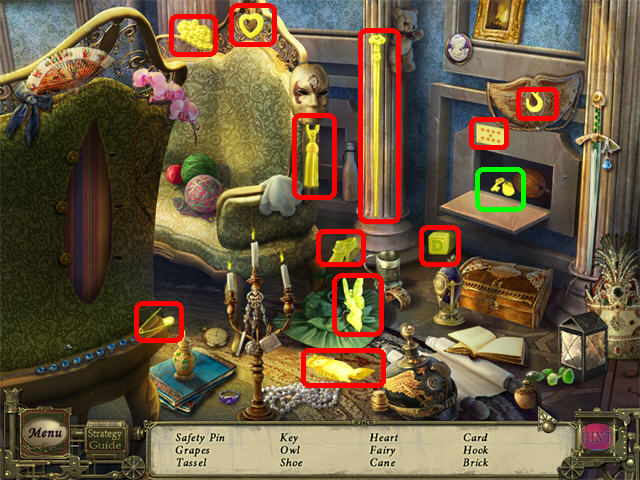
- Play the Hidden Object Scene by the chair to obtain the CAGE KEY.
- Zoom into the right door.
- Place the OILCAN on the rusty hinges.
- Go through the door to access the Entertainment Room.

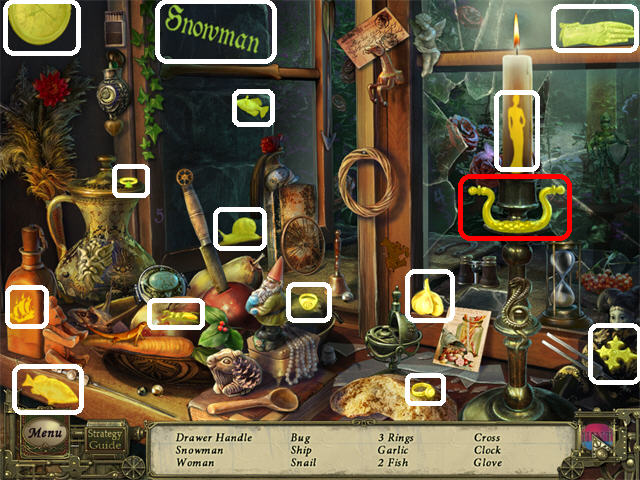
- Play the Hidden Object Scene on the left to obtain the DRAWER HANDLE.
- Return to the Lobby.

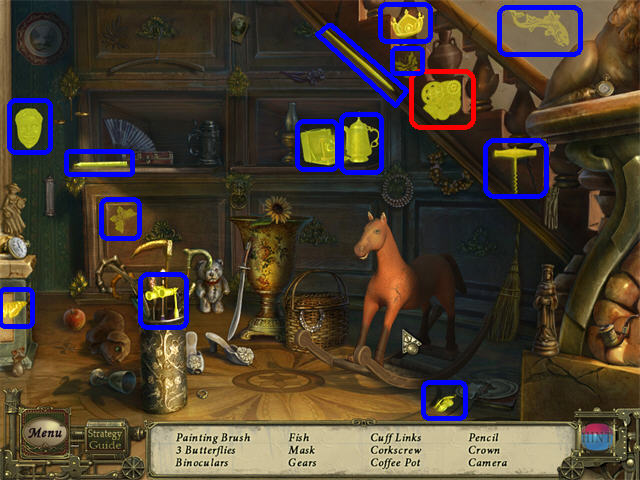
- Play the Hidden Object Scene on the right to obtain the GEARS.

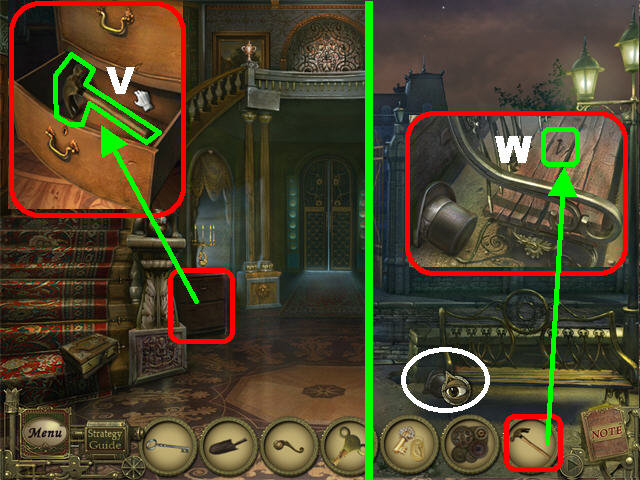
- Zoom into the dresser on the left.
- Place the DRAWER HANDLE on the bottom drawer.
- Open the drawer and take the HAMMER (V).
- Go outside the gate.
- Zoom into the hotspot by the right bench.
- Remove the NAIL from the bench with the HAMMER (W).
- Return to the Entertainment Room.

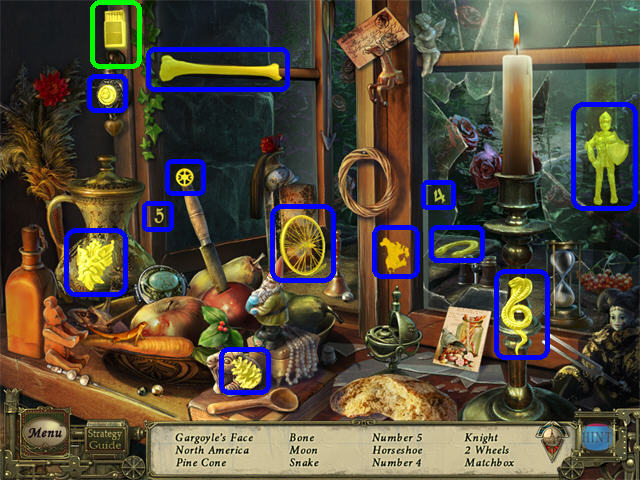
- Play the Hidden Object Scene on the left to obtain the MATCHBOX.

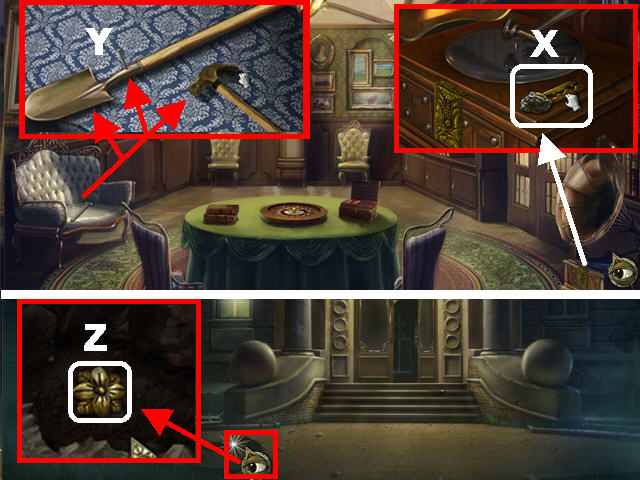
- Zoom into the gramophone; pick up the LION KEY (X).
- Zoom into the couch on the left.
- Place the HAMMER, NAIL, and the SPADE HEAD on the couch.
- Place the SPADE HEAD and NAIL on the stick, as shown in the screenshot.
- Place the HAMMER on the NAIL to complete the SPADE (Y).
- Go outside.
- Take a closer look at the hole in the ground.
- Use the SPADE on the dirt two times and take the FLOWER (Z).

- Return to the Entertainment Room.
- Zoom into the right door.
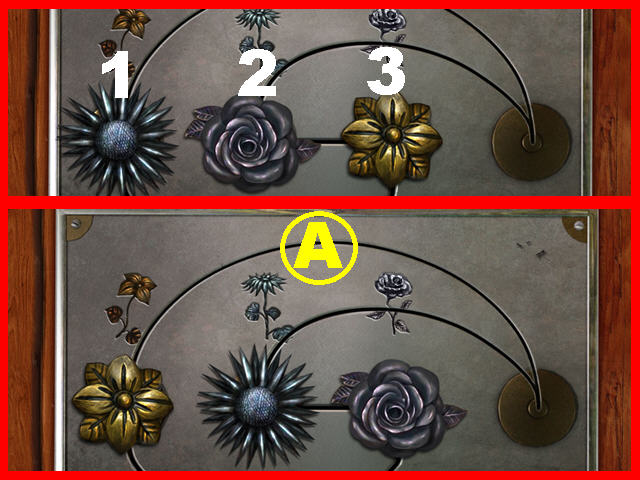
- Place the FLOWER on the door to trigger a puzzle.
- Slide the flowers on the board until each one is below its matching flower.
- Using the screenshot numbers (A), click on the flowers in the following order to solve the puzzle: 1, 3, 2, 1.
- Go through the door after the puzzle has been solved.

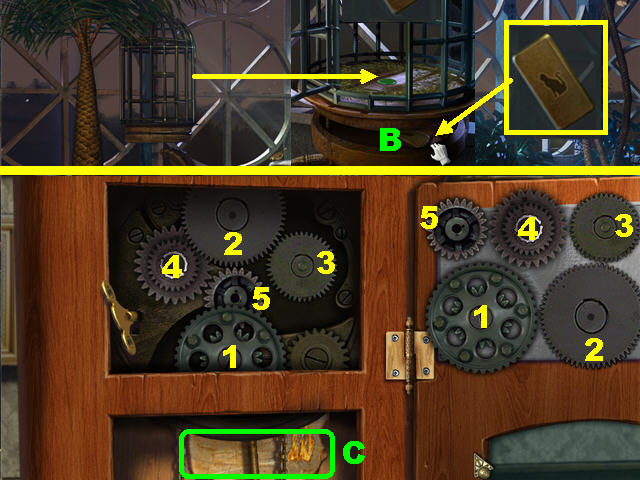
- Zoom into the birdcage; open it with the CAGE KEY.
- Click on the bottom of the cage three times to open the compartment below the cage.
- Take the TILE (B).
- Click down.
- Zoom into the grandfather clock.
- Place the CLOCK KEY in the keyhole.
- Arrange the GEARS on the board, as in the screenshot.
- Click on the CLOCK KEY to start the mechanism.
- Take the MYSTERIOUS PAPER (C) below the gears.

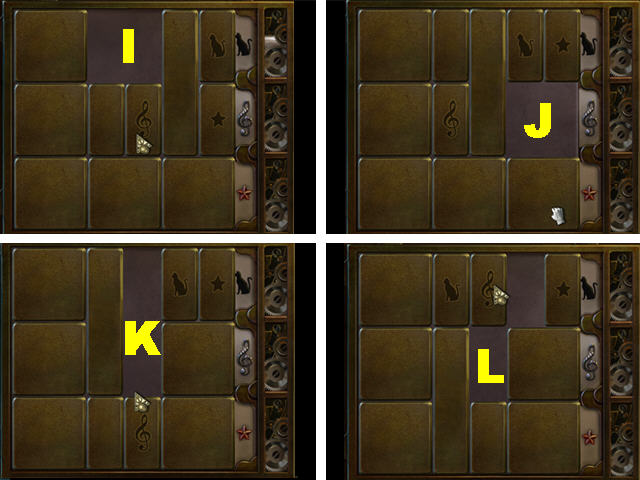

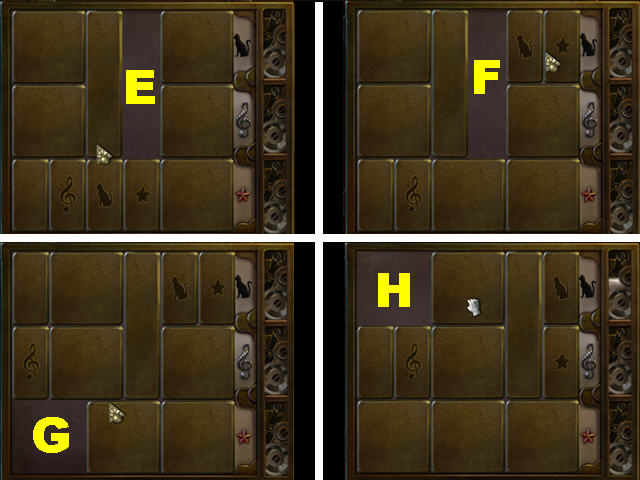


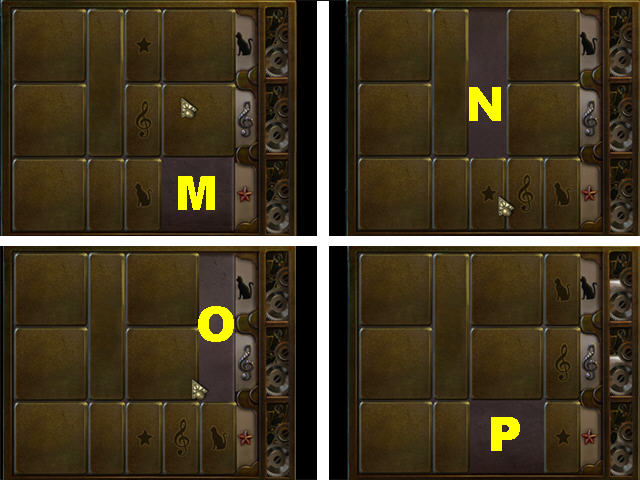
- Click down and then zoom into the left door.
- Place the TILE on the lock to trigger a puzzle.
- Slide the tiles around the board until they are next to their matching symbols on the right.
- You can reset the puzzle by clicking the right lever.
- You can only move tiles to empty spaces.
- Please look at the screenshots for step-by-step solutions.
- Slide the tiles around the board until they are next to their matching symbols on the right (D).
- You can only move a tile to an empty space.
- Check out of video solution.
- Go through the door after the puzzle has been solved.

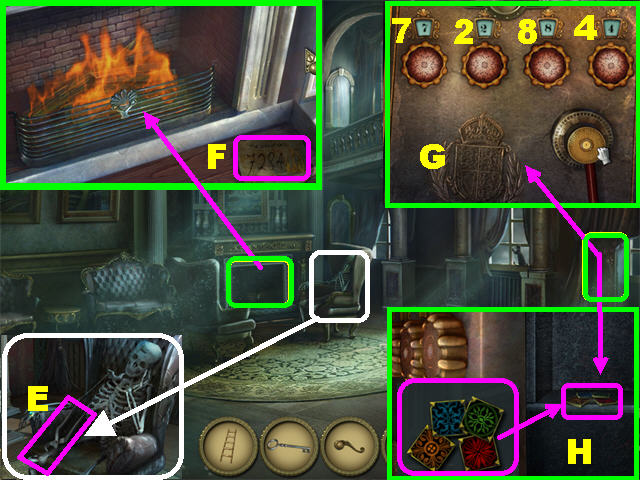
- Zoom into the right chair; take the BOLT CUTTERS (E).
- Zoom into the fireplace; light it up with the MATCHBOX.
- Place the MYSTERIOUS PAPER in the fireplace to reveal the code for the safe “7284” (F).
- Exit the pop-up window and then zoom into the safe in the lower right.
- Turn the dials from left to right to 7, 2, 8, and 4 (G).
- Click on the handle to open the safe.
- Take the COLORED TILES (H) from inside the safe.

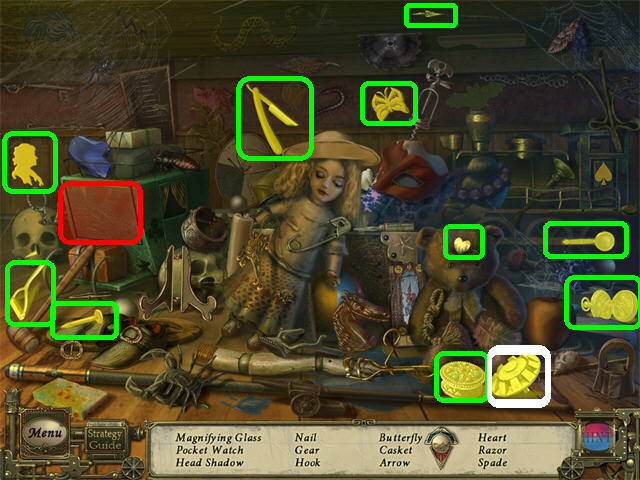
- Return to the Atrium.
- Zoom into the board on the table; place the COLORED TILES on the table to trigger a puzzle.
- Slide the tiles around until the positions of the colors mirror those in the diagram on the right side of the screen.
- Click on a tile to move the surrounding tiles in a clockwise fashion.
- Take the WINDOW HANDLE (I) after the puzzle has been solved.

- Return to the Fireplace Room.
- Zoom into the window in the lower right.
- Place the WINDOW HANDLES on the window.
- Click on the WINDOW HANDLES and then the window to open it.
- Take the TWEEZERS from the window sill (J).
- Return to the Lobby and zoom into the back door.
- Remove the blockage from the keyhole with the TWEEZERS (K).
- Unlock the door with the GARDEN KEY. Go through the door.
Chapter 2


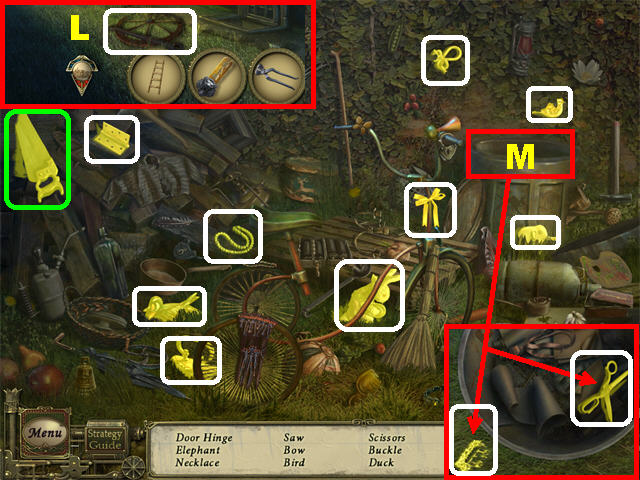
- Take the SPARE BOILER PARTS (L) in the lower right side of the ground.
- Play the Hidden Object Scene.
- Open the lid on the right and zoom into it; take any items on your list (M).
- The SAW will be added to inventory.

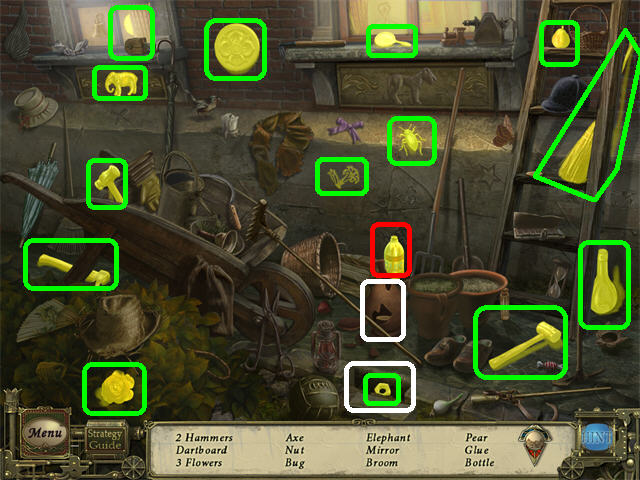
- Click down and then go left.
- Play the Hidden Object Scene.
- Click on the vase and the brick, marked in white; take any items on your list.
- The GLUE will be added to inventory.

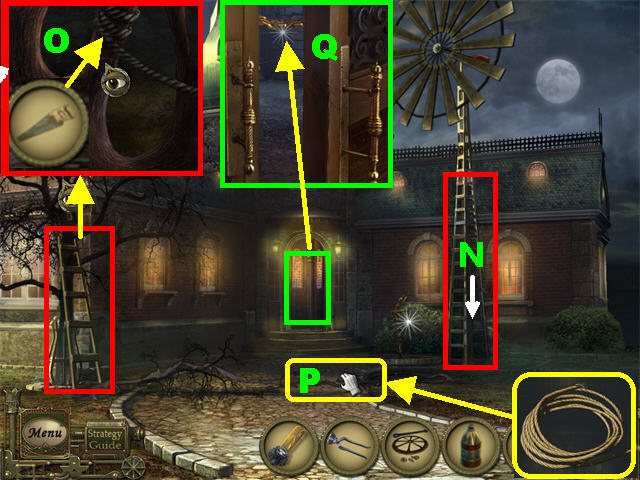
- Click on the rope on the windmill to remove it (N).
- Place the LADDER on the left tree.
- Zoom into the top of the tree.
- Cut the branch with the SAW (O).
- Take the ROPE (P) from the ground.
- Zoom into the door; cut the chains with the BOLT CUTTERS (Q).
- Go through the door on the left.


- Go through the right door to reach the Pool Room.
- Play the Hidden Object Scene.
- Click on the bear’s head.
- Open the cover on the left, marked in red; take any items on your list.
- The GEAR will be added to inventory.

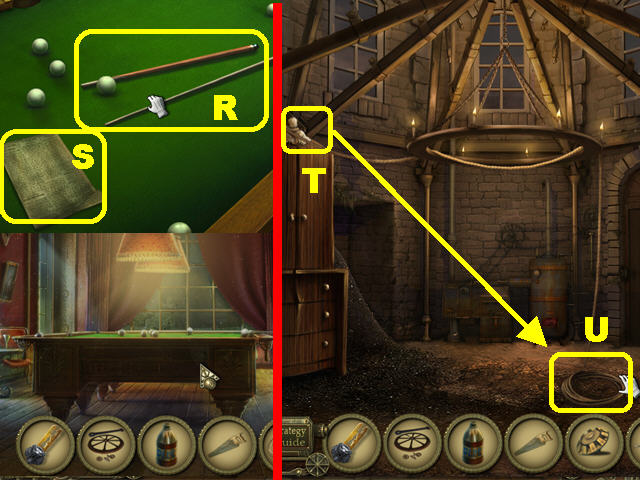
- Zoom into the pool table; take the BROKEN BILLIARD CUE (R) and the NEWSPAPER (S).
- Click down.
- Place the ROPE on the ornament above the cupboard (T).
- Click on the excess ROPE (U) on the ground to send some of it outside.

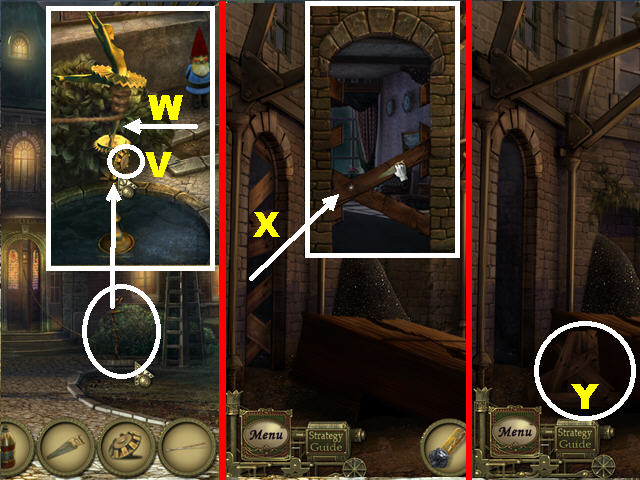
- Go outside and then zoom into the fountain on the right.
- Place the GEAR at the base of the ballerina (V).
- Drag the ROPE on the left to the ballerina’s leg (W), she will start spinning and pulling the rope.
- Go back; the cupboard will be on the ground.
- Zoom into the wooden boards on the left (X).
- Remove the boards with the SAW by cutting them several times.
- Take the FIREWOOD (Y) from the ground.
- Go through the door.

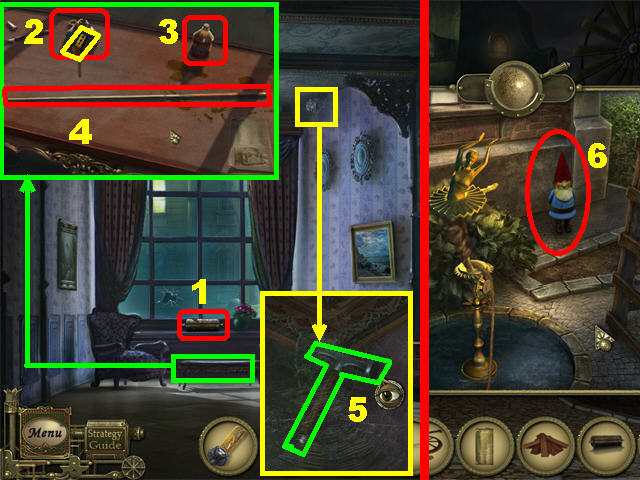
- Take the ROLLER ORGAN PART (1) on the window sill after Sarah disappears.
- Zoom into the coffee table by the window.
- Take the OWL KEY (2).
- Place the GLUE (3) and BROKEN BILLIARD CUE (4) on the table.
- Place the long pole on the short pole; fix them together with the glue.
- The BILLIARD CUE will be added to inventory.
- Zoom into the cobweb in the ceiling.
- Remove the cobweb with the BILLIARD CUE to obtain the ICE PICK and view a dwarf sketch (5).
- Return to the fountain outside.
- Break the Garden Dwarf with the ICE PICK to obtain the CODE SCRAP (6).
- Return to the Pool Room.

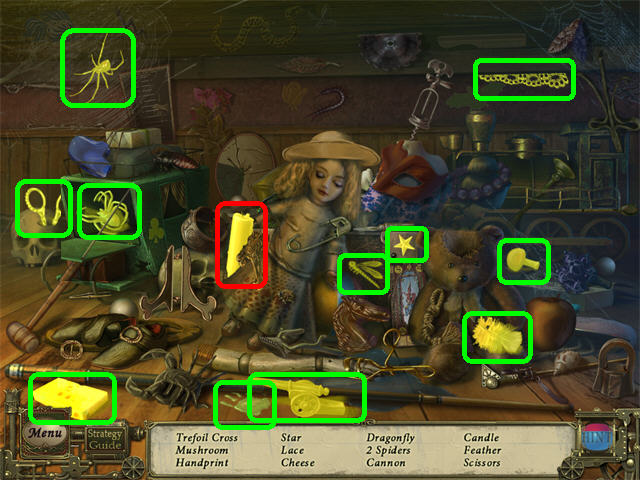
- Play the Hidden Object Scene.
- Open the panel on the left; take any items in your inventory.
- The CANDLE will be added to inventory.

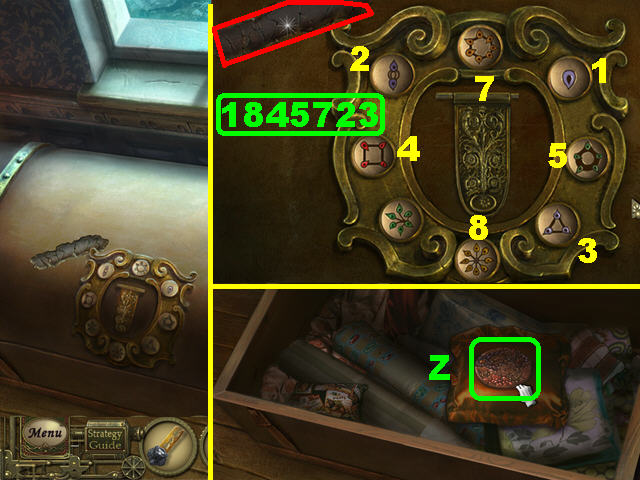
- Zoom into the chest in the lower right.
- Place the CODE SCRAP on the chest.
- Click on the chest to trigger a puzzle.
- Use the code on the scrap (1845723) to solve the puzzle. Each number represents the number of drops each button has.
- Click on the items in the order shown in the screenshot to solve the puzzle.
- Take the LOCK PIECE (Z) from the chest, after it is unlocked.
- Click down and then go through the left door.

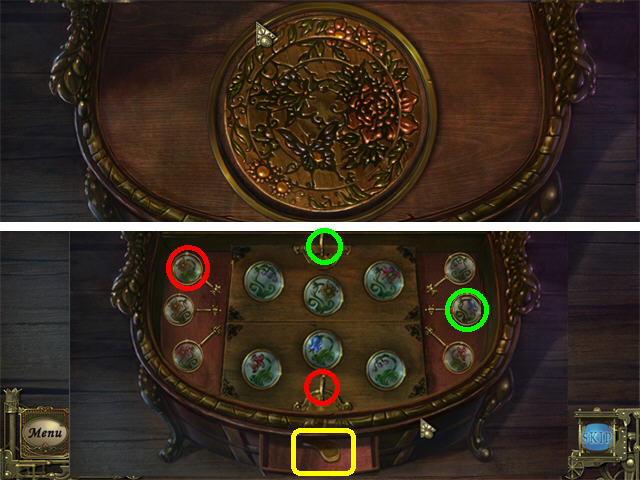
- Zoom into the table on the right.
- Place the LOCK PIECE on the table to trigger a mini-game.
- Rotate the pieces to mirror the image in the screenshot. Correct pieces will lock in place.
- The top will open after the pieces are in place, revealing a second puzzle.
- Place the keys into their respective holes, as in the screenshot, and then click each key to unlock a secret compartment below.
- Take the PAWL from the secret compartment.
- Click down.

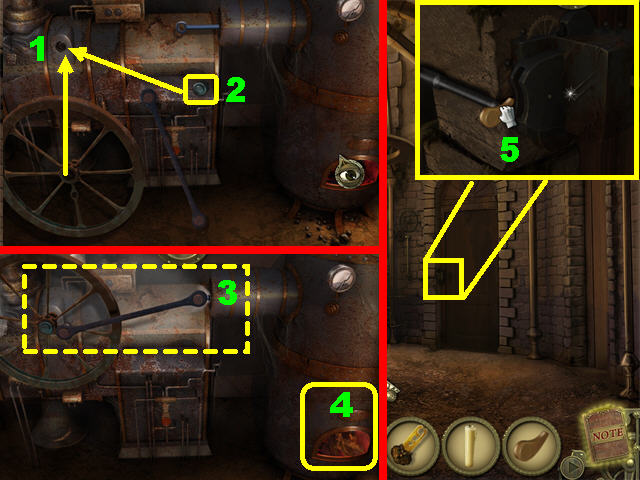
- Light the CANDLE on the candles in the chandelier.
- Zoom into the boiler.
- Place the SPARE BOILER PARTS on the boiler.
- Move the WHEEL (1) to the slot in the upper left.
- Drag the BOLT (2) in the center of the boiler to the center of the wheel.
- Place the BAR (3) as shown in the screenshot.
- Add the FIREWOOD and the LIT CANDLE in the lower right (4).
- Once the mechanism starts; zoom out of the pop-up window.
- Zoom into the door to the right of the boiler.
- Place the PAWL in the lock.
- Go through the door to access the Gazebo (5).
Chapter 3

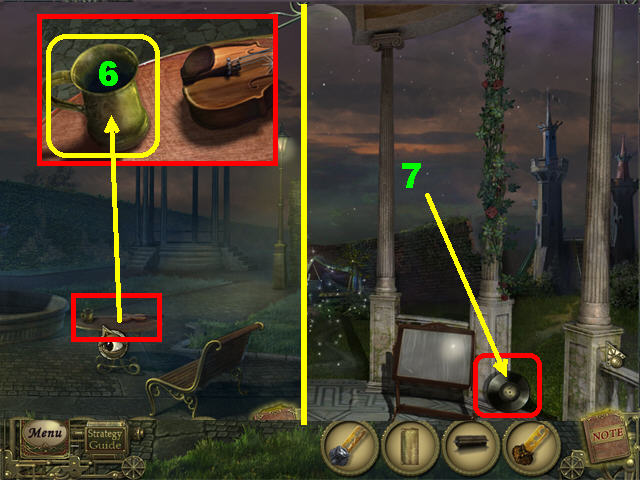
- Zoom into the small table; pick up the CUP (6).
- Click down to back away from the table and then head right.
- Pick up the RECORD (7) in the lower right.

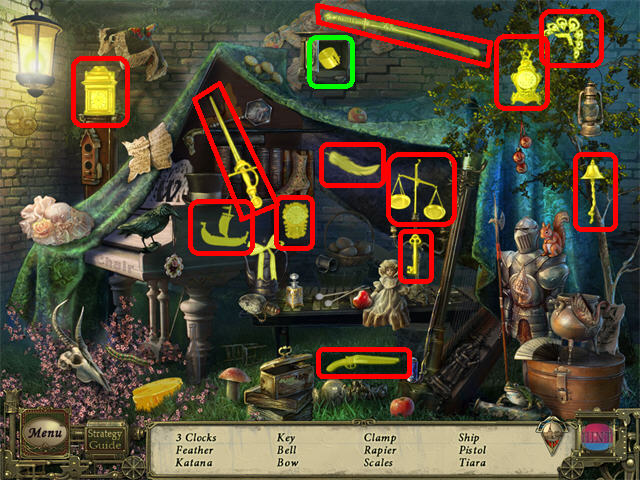
- Play the Hidden Object Scene.
- Open the cabinet in the upper center; pick up items on your list.
- The CLAMP will be added to inventory.

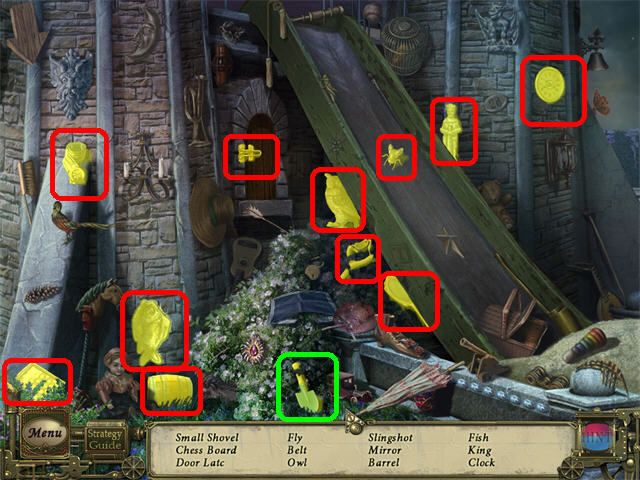
- Head right.
- Play the Hidden Object Scene.
- The SMALL SHOVEL will be added to inventory.

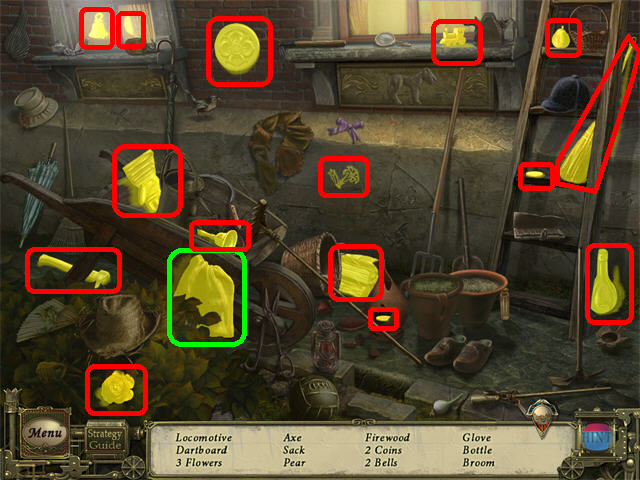
- Return to the fountain area outside the Boiler Room.
- Play the Hidden Object Scene.
- The SACK will be added to inventory.

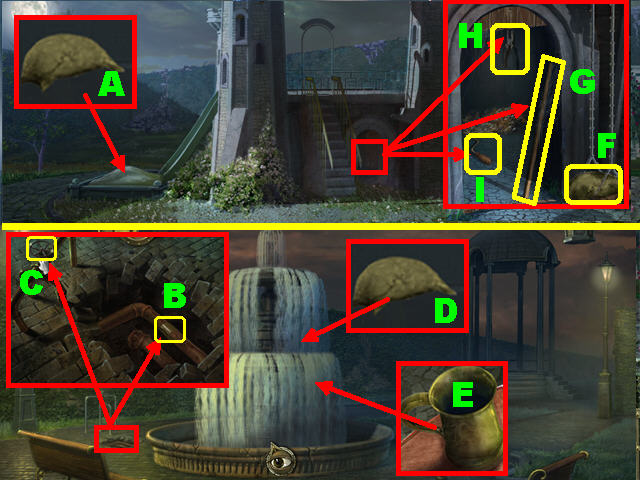
- Return to the Playground.
- Place the SACK on the SAND to create the SACK OF SAND (A).
- Return to the fountain by the gazebo.
- Zoom into the patch of dirt next to the fountain.
- Use the SMALL SHOVEL twice on the patch of dirt.
- Place the CLAMP on the broken pipe (B).
- Turn the valve to fill the fountain with water (C).
- Place the SACK WITH SAND in the water to create the WET SAND SACK (D).
- Once the water starts flowing, place the CUP on the water to obtain the CUP WITH WATER (E).
- Return to the Playground.
- Zoom into the right door.
- Place the WET HEAVY SACK WITH SAND on the swing to open the door (F).
- Take the STICK (G), PLIERS, (H) and BARREL ORGAN HANDLE (I).

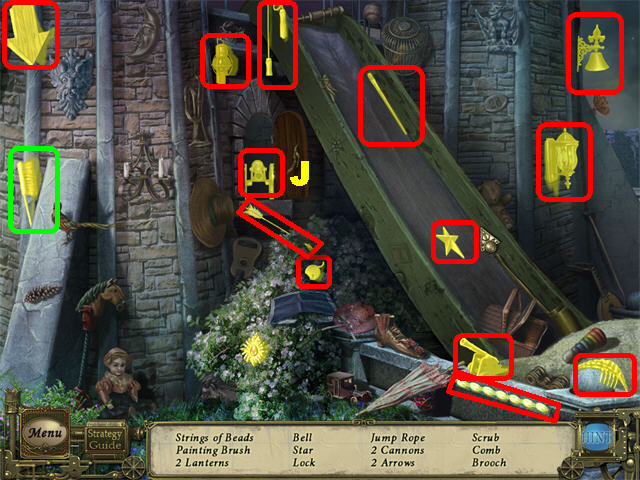
- Play the Hidden Object Scene to obtain the SCRUB BRUSH.
- Open the small door (J); pick up the items on your list.
- The SCRUB BRUSH will be added to inventory.

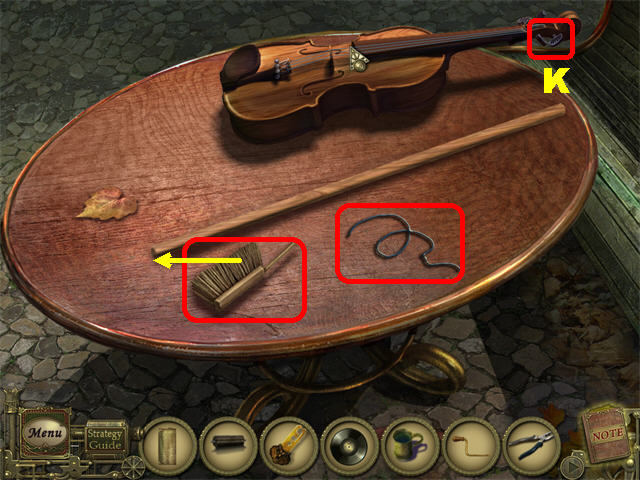
- Return to the fountain by the Gazebo Area.
- Zoom into the small table; place the STICK and the SCRUB BRUSH on the table.
- Turn the violin’s peg (K) to release a string.
- Click on the loose string and it will land on the table.
- Place the SCRUB BRUSH at the end of the stick.
- Drag the STRING to the end of the SCRUB BRUSH, attaching it to the stick and creating the LONG BRUSH.
- Go to the Gazebo.

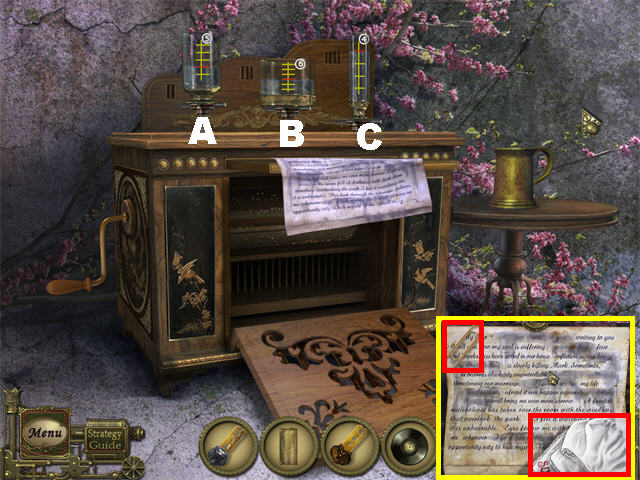
- Zoom into the roller organ; place the ROLLER ORGAN HANDLE on the side of the roller organ.
- Place the CUP WITH WATER on the small table to activate a puzzle.
- Fill each cylinder to the red line using the cup of water.
- Remove water from the cylinders by placing them back into the cup.
- Fill cylinder A with CUP OF WATER and pour it into cylinder C.
- Place the remainder of cylinder A into cylinder B.
- Empty cylinder C.
- Repeat those steps twice to completely fill cylinder B.
- Fill cylinder A with CUP OF WATER.
- Pour cylinder A into cylinder C.
- Empty cylinder C test.
- Place the rest of cylinder A into cylinder C.
- Fill cylinder A and pour it into cylinder C to complete the puzzle.
- Place the ROLLER ORGAN PART into the compartment below after the puzzle has been solved.
- Turn the handle; pick up the PAPER CLIP and HANDKERCHIEF on the letter.
- Exit the pop-up window.

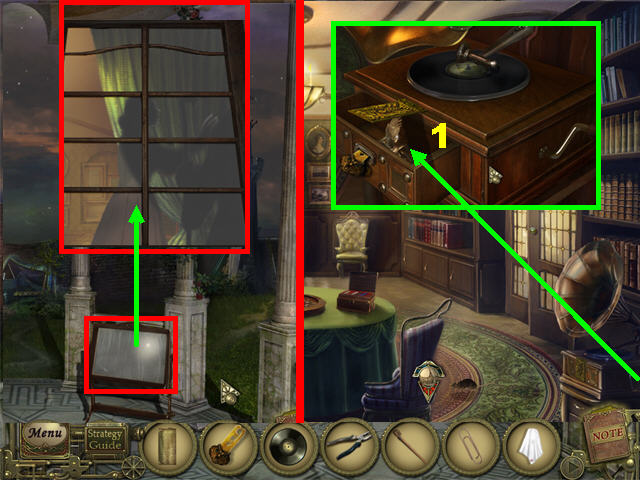
- Clean the mirror with the HANDKERCHIEF three times to view someone in the upstairs window.
- Return to the Entertainment Room.
- Place the RECORD on the gramophone and then turn the handle.
- Place the OWL KEY in the slot and then pick up the OWL STATUETTE (1).

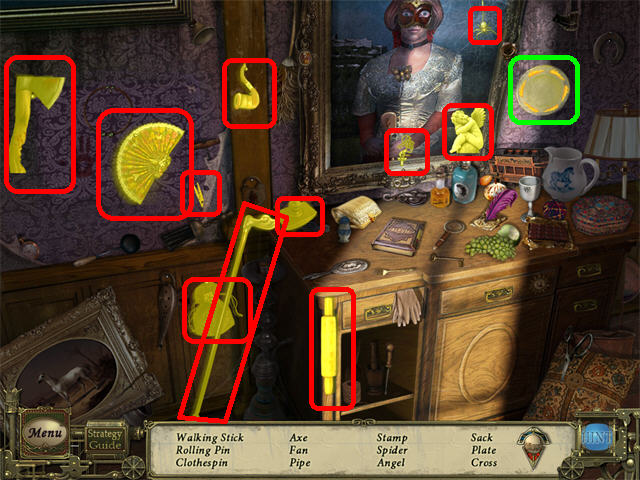
- Go into the upper left door inside the Estate Lobby.
- Play the Hidden Object Scene.
- Remove the left painting by clicking on it (take the fan if it’s on your list).
- The PLATE will be added into inventory.

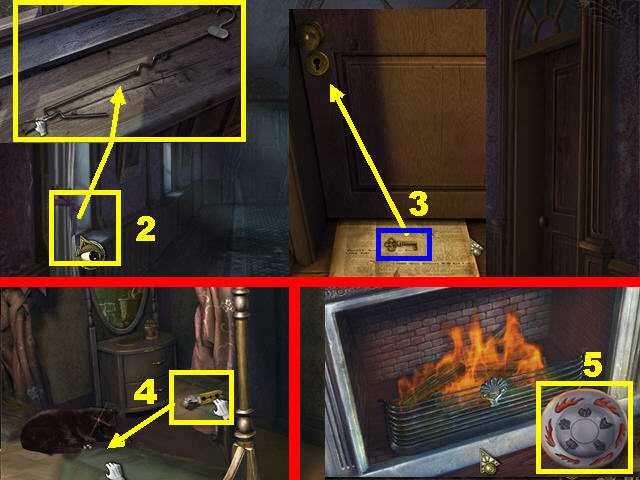
- Move the curtains and then zoom into the window sill.
- Place the PLIERS on the loose end of the hanger three times to straighten it; the CLOTHES HANGER (2) will be added to inventory.
- Take a closer look at the right door.
- Put the NEWSPAPER below the door and push it in.
- Place the PAPER CLIP in the keyhole to push the key onto the newspaper.
- Pull the newspaper out and then pick up the KEY.
- Place the KEY in the keyhole.
- Turn the KEY and enter the bedroom (3).
- Click on the cat and then pick up the EAGLE KEY below it (4).
- Return to the Fireplace Room.
- Zoom into the fireplace; place the PLATE in the fire to view the code on it (5).

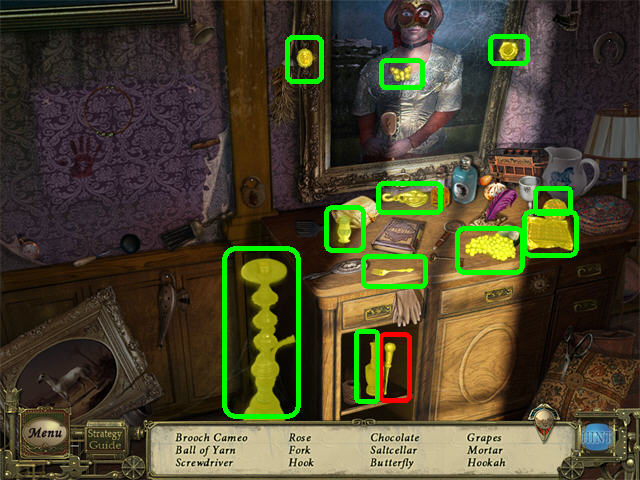
- Go to the second floor hallway.
- Play the Hidden Object Scene to obtain the SCREWDRIVER.

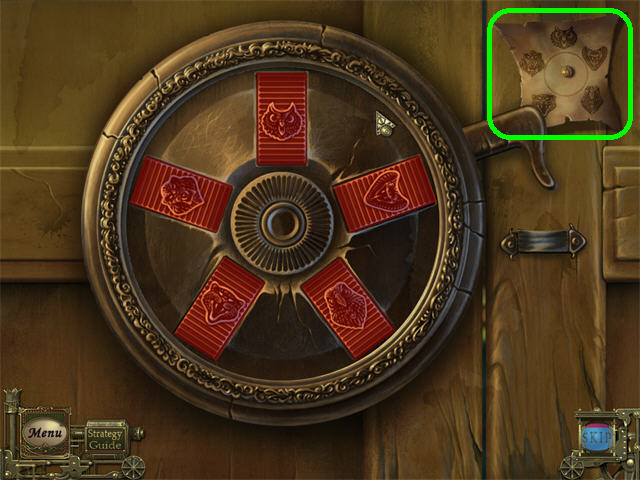
- Zoom into the back door.
- Reproduce the images shown on the plate code in the upper right.
- Click on the images to change them.
- The solution is, clock-wise from the top: owl, snake, eagle, tiger, lion.
- Go into the door to access the Library.

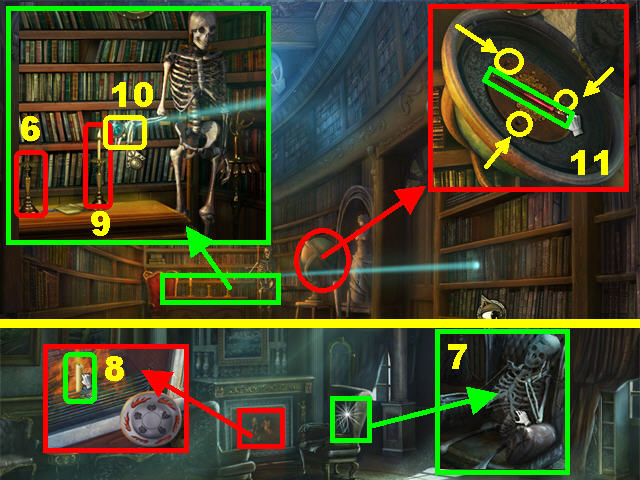
- Zoom into the back desk; pick up the left CANDLE (6).
- Return to the Fireplace Room.
- Zoom into the chair; take the SKELETON (7).
- Light the CANDLE in the fireplace (8).
- Return to the Library.
- Zoom into the back desk; light the candle in the candleholder with the LIT CANDLE (9).
- Place the SKELETON on the coat rack.
- Click on its hand to shine a light on the right bookcase (10).
- Zoom into the globe.
- Open the globe with the SCREWDRIVER; take the PEN (11).
- Remove the rest of the screws (11) on the panel with the SCREWDRIVER to reveal the snake keyhole (you will not acquire this key until much later in the game).

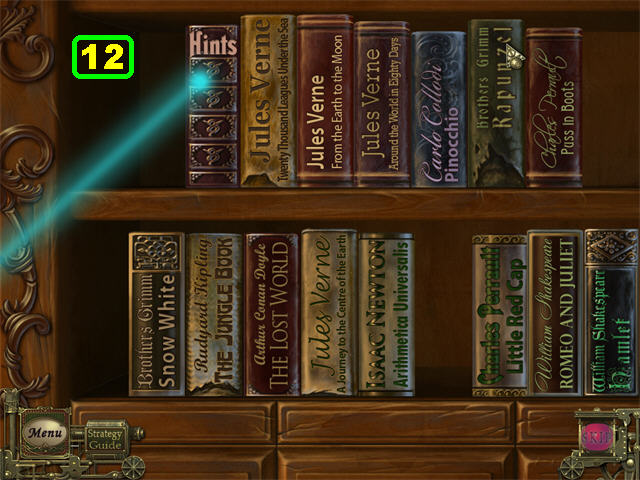
- Take a closer look at the right bookcase and then click on the book marked “HINTS.”
- Arrange the books following the book’s instructions. Pay attention to the red words (12).
- A correct solution is shown in the screenshot.
- Pull the lever with the CLOTHES HANGER to unlock the door; go into the Office.
Chapter 4

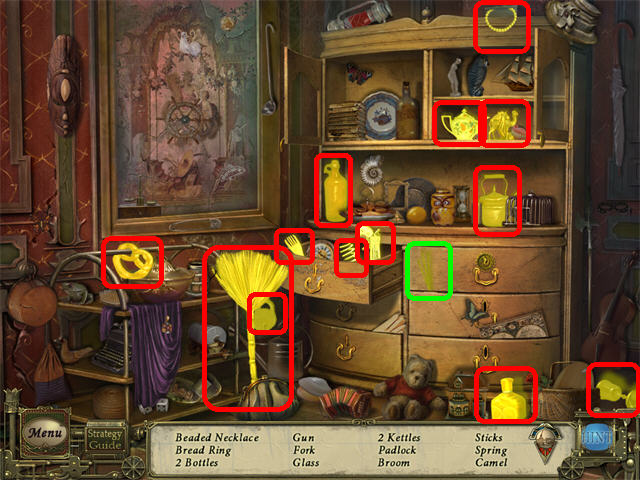
- Play the Hidden Object Scene.
- Open the cabinets and drawers; find the items on your list.
- The INCENSE STICKS will be added to inventory.

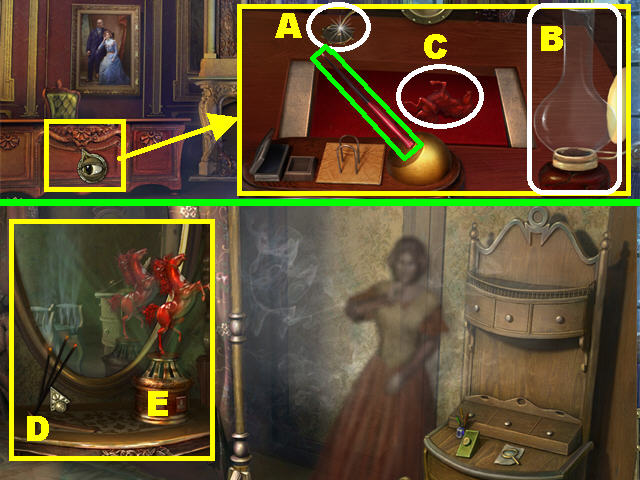
- Zoom into the desk; take the BENT GEAR (A) and the LAMP (B).
- Place the PEN in the penholder.
- Pick up the HORSE that appears on the desk (C).
- Go into the bedroom by the hallway and zoom into the dresser.
- Place the INCENSE STICKS (D) on the incense holder.
- Light the INCENSE STICKS with the LIT CANDLE.
- Place the HORSE on the stand and a ghost will appear (E).

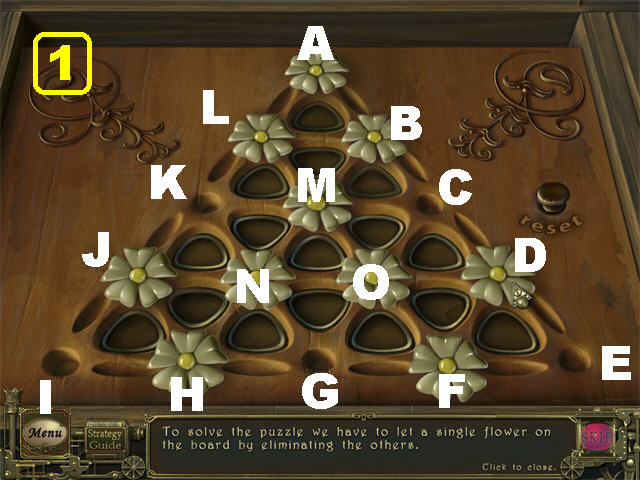
- Click on the box by the bedside table; click it again to trigger a puzzle.
- Eliminate all flowers but one to solve the puzzle.
- Flowers can only jump into empty pegs (F).
- Flowers can only jump into empty pegs (1).
- Move the Flower from Spot A to Spot C.
- Move the Flower from Spot C to Spot E.
- Move the Flower from Spot E to Spot G.
- Move the Flower from Spot G to Spot I.
- Move the Flower from Spot I to Spot K.
- Move the Flower from Spot K to Spot A.
- Move the Flower from Spot N to Spot B.
- Move the Flower from Spot A to Spot C.
- Move the Flower from Spot C to Spot G.
- The TELESCOPE LENS will be added to inventory.

- Go into the Office.
- Zoom into the fireplace.
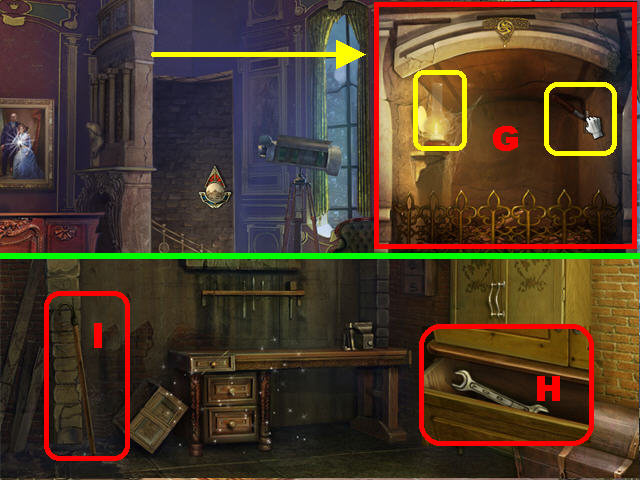
- Put the LAMP in the fireplace and then click on the lever to unlock a secret passage (G).
- Go into the hidden area.
- Click on the far right door twice and go into the door.
- Open the bottom drawer of the wardrobe; pick up the WRENCH (H).
- Take the POLE HOOK on the left (I).

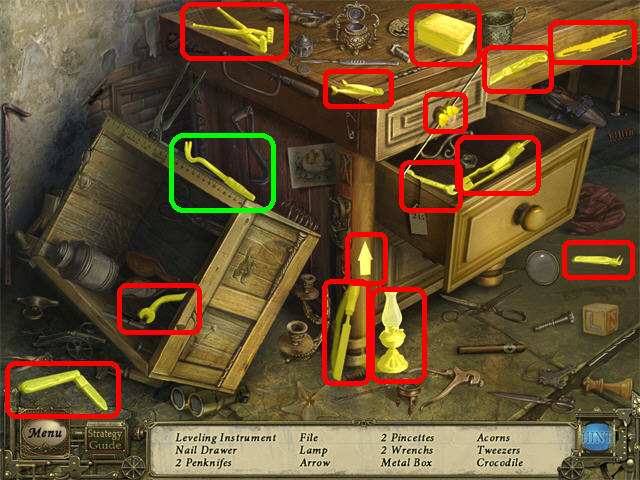
- Play the Hidden Object Scene.
- Open the middle drawer; look for items on your list.
- The CROWBAR will be added to inventory.

- Exit this scene.
- Zoom into the right door; remove the hinges with the CROWBAR.
- Go into the room.
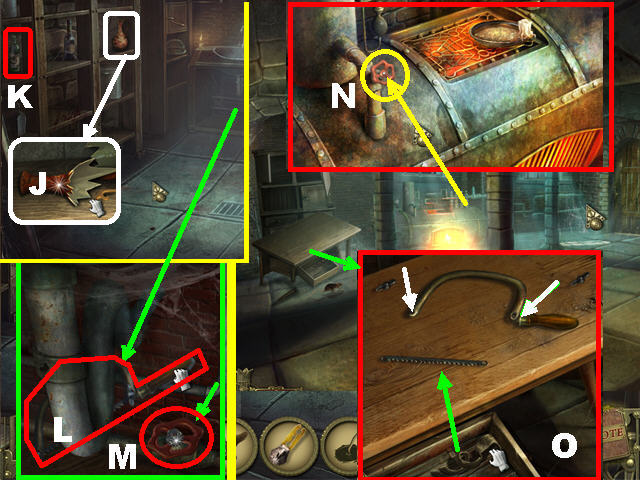
- Zoom into the vase on the left shelf; break it with the WRENCH and take the VASE SHARD (J).
- Pick up the VINEGAR BOTTLE on the left (K).
- Take a closer look below the sink; take the FRETSAW (L).
- Remove the nut from the VALVE with the WRENCH; pick up the VALVE (M).
- Exit this scene; zoom into the oven.
- Place the VALVE on the vent.
- Twist the VALVE to eliminate the steam from the room (N).
- Zoom into the left table; place the FRETSAW on it.
- Remove the screws marked with white arrows in the screenshot.
- Grab the cloth from below the table and then attach it to the blade to create the SAW BLADE (O).
- Zoom into the leftmost door; cut the crossbar using the SAW BLADE twice.
- Go into the door.

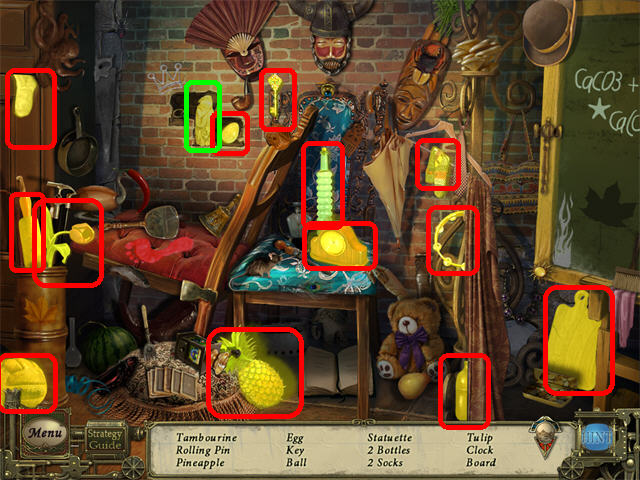
- Play the Hidden Object Scene.
- Pull the sheet on the right; look for any items on your list.
- The WAX STATUETTE will be added to inventory.
- Exit this scene.

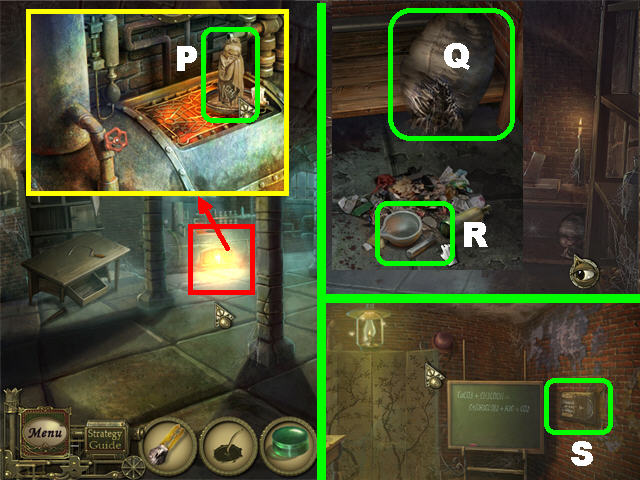
- Zoom into the oven.
- Place the WAX STATUETTE on top of the oven; pick up the CHEMISTRY PLATE (P).
- Go into the right door.
- Zoom into the right table; place the POLE HOOK on the bag to move it closer.
- Open the bag with the VASE SHARD (Q).
- Take the MORTAR AND PESTLE (R).
- Return to the lab; zoom into the device on the right wall (S).

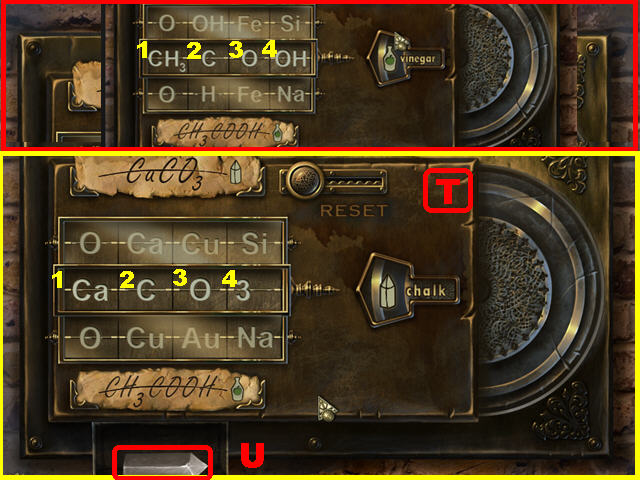
- Place the CHEMISTRY PLATE into the empty slot.
- Click on the plates in the correct order until you obtain the formula at the bottom of the puzzle.
- For the VINEGAR BOTTLE combination (CH3, C, O, OH) click the center buttons in this order: 3, 4, 2, 1 (T).
- For the chalk combination (Ca, C, O, 3) click on the center buttons in this order: 2, 3 (T).
- Take the CHALK (U).

- Zoom into the table.
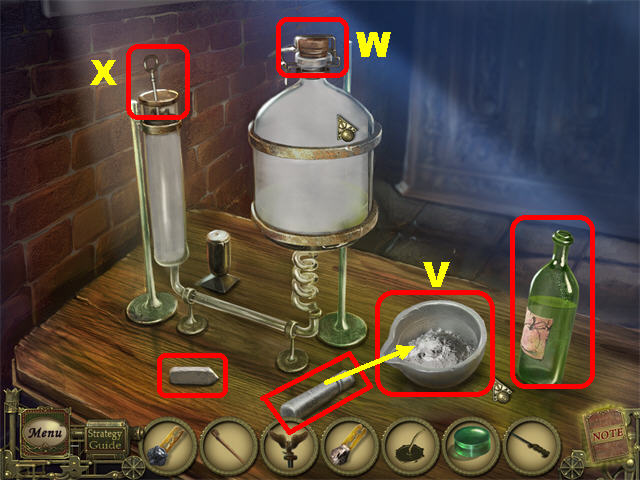
- Place the VINEGAR BOTTLE, CHALK, and MORTAR AND PESTLE on the table.
- Place the CHALK into the mortar and then pulverize it with the PESTLE (V).
- Open the lid (W); place the PULVERIZED CHALK and the VINEGAR BOTTLE into the bottle.
- Close the lid; pick up the KEY (X) from the test tube.

- Go into the Chest Room.
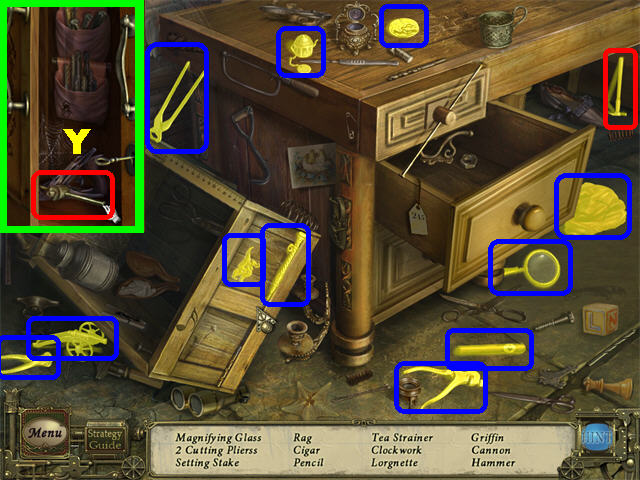
- Zoom into the wardrobe; open it with the KEY and take the VISE HANDLE (Y).
- Play the Hidden Object Scene to obtain the HAMMER.

- Zoom into the vise on the right.
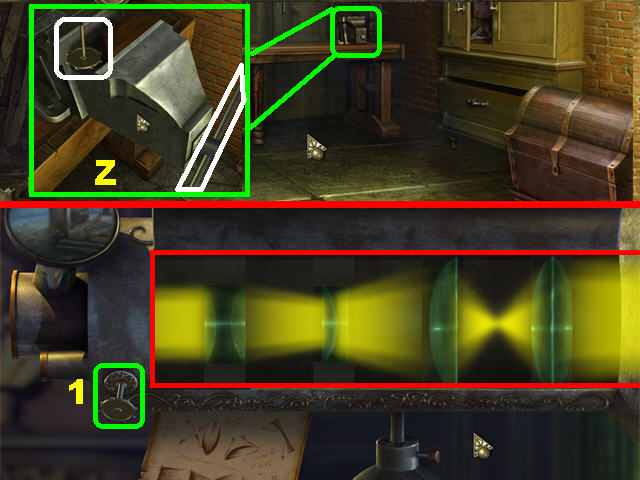
- Place the VISE HANDLE and the BENT GEAR on the vise; turn the handle to secure the gear (Z).
- Straighten out the gear using the HAMMER; take the GEAR.
- Go to the Office.
- Place the TELESCOPE LENS and the GEAR (1) on the telescope.
- Place the LENSES in the correct order by swapping the pieces. Once the lenses are set correctly, you will see a vision of someone at the arbor.

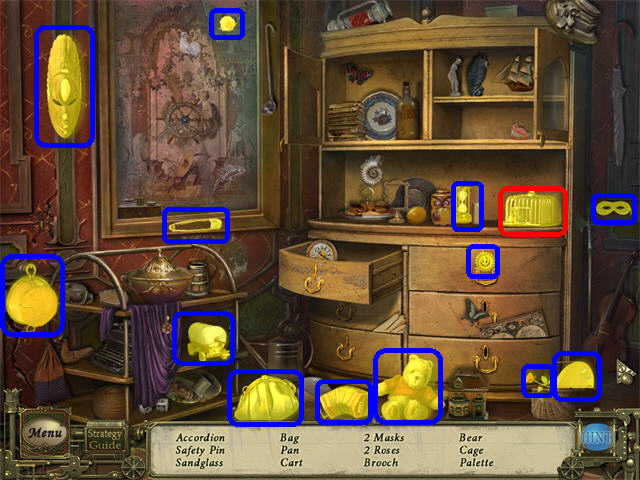
- Play the Hidden Object Scene by the window to obtain the CAGE WITH MOUSE.

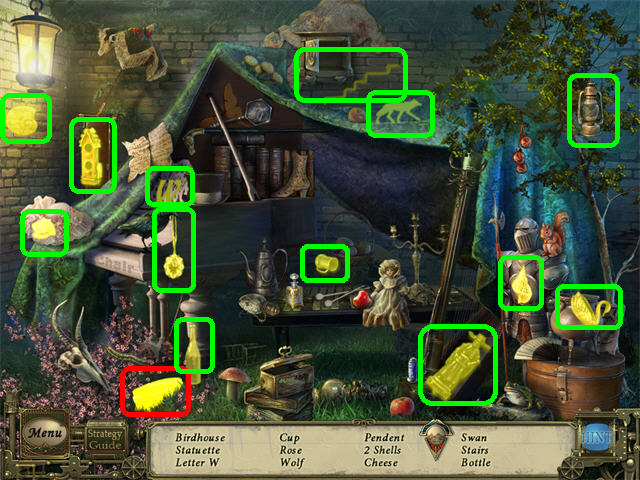
- Return to the Gazebo.
- Play the Hidden Object Scene to obtain the CHEESE.

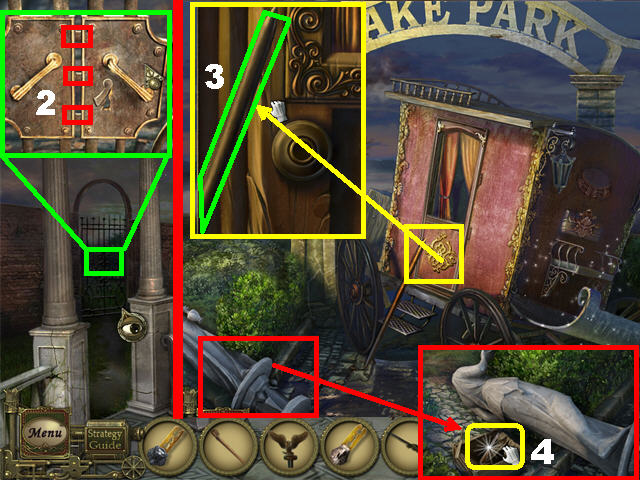
- Zoom into the left gate; cut the three bars with the SAW BLADE (2).
- Go through the gate to access the Lake Park Area.
- Zoom into the stagecoach door; take the STEEL BAR (3).
- Zoom into the statue on the ground; move it using the STEEL BAR and take the NAIL PULLER (4).

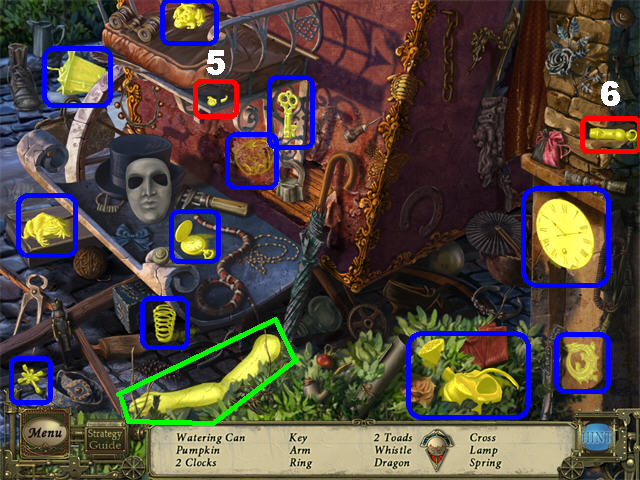
- Play the Hidden Object Scene.
- Click on the edge of the cushion; take any items on your list (5).
- Remove the brick on right (take the whistle if it’s on your list) (6).
- The STATUE ARM will be added to inventory.

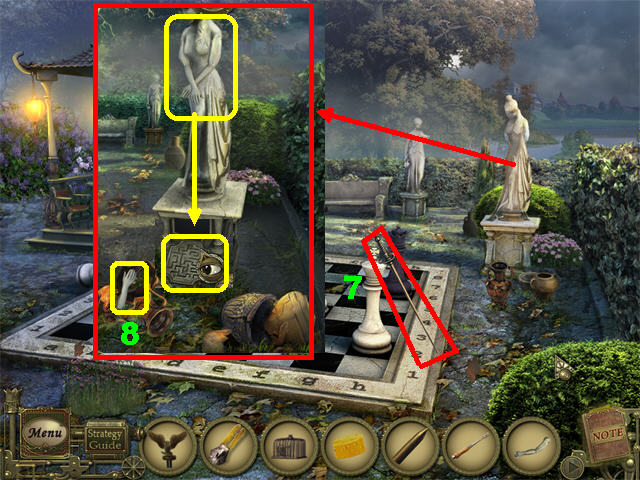
- Head right to reach the Chess Area.
- Take the RAPIER next to the chessboard (7).
- Zoom into the right statue.
- Take the STATUE ARM on the ground (8).
- Place the STATUE ARM and the STATUE ARM on the statue to unlock the secret compartment on the base.

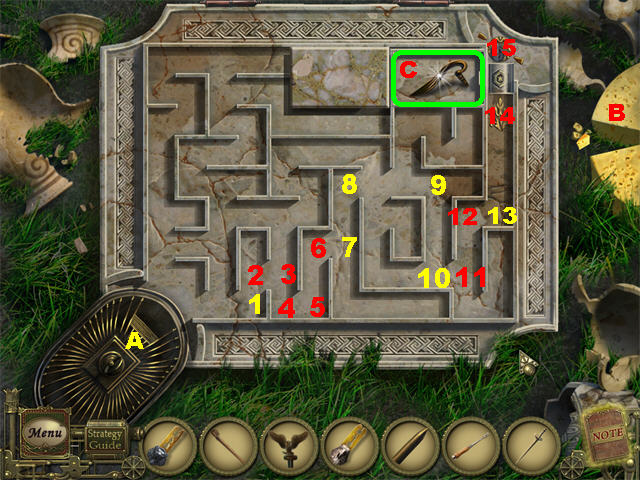
- Take a closer look at the maze on the base.
- Place the CAGE WITH MOUSE in the lower left end of the maze (A).
- Place the CHEESE on the upper right side of the maze (B).
- Place the cheese pieces on the maze so the mouse can see them, otherwise the mouse will not move forward.
- Keep placing the cheese pieces around the maze until you reach the upper right side.
- Take the HANDLE (C) after the maze has been completed.

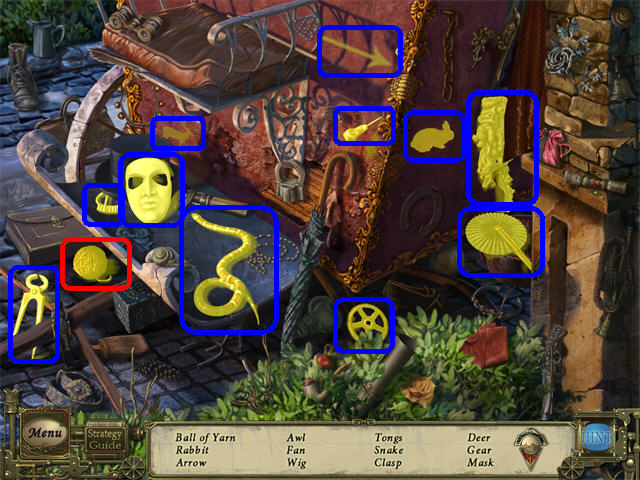
- Return to the Stagecoach Area.
- Play the Hidden Object Scene to obtain the BALL OF YARN.

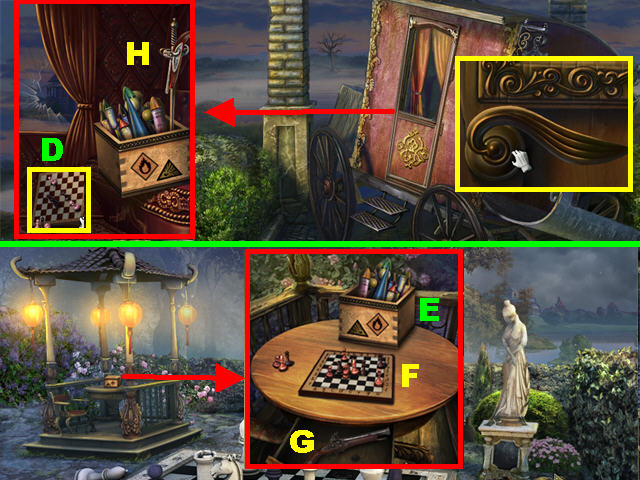
- Zoom into the stagecoach door.
- Place the HANDLE on the door and then turn it to go inside.
- Grab the CHESSBOARD (D).
- Return to the Chess Area. Zoom into the veranda.
- Remove the nails from the box with the NAIL PULLER; take the FIREWORKS (E).
- Place the CHESSBOARD on the table; chess pieces will appear on the table (F).
- Place the CHESS PIECES on the CHESSBOARD to unlock the drawer below; take the PISTOL (G).
- Go to the Stagecoach Area.
- Place the FIREWORKS on the seat.
- Place the RAPIER in the fireworks box.
- Put the PISTOL on the RAPIER (H).
- Place the BALL OF YARN on the PISTOL to pull the trigger from a distance.
- Re-enter the coach and then go through the hole in the other side.
Chapter 5

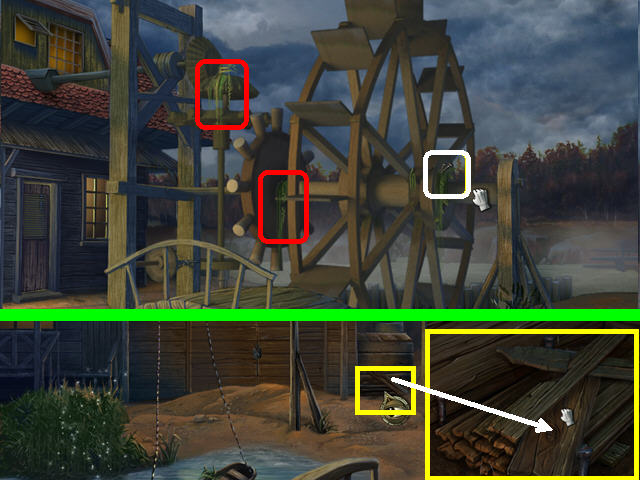
- Head towards the watermill on the right.
- Take the NAILS marked in white.
- Click on the areas marked in red to eliminate all rubbish from the pinions, activating the watermill.
- Cross the bridge.
- Zoom into the area marked in yellow; take the BOARD.

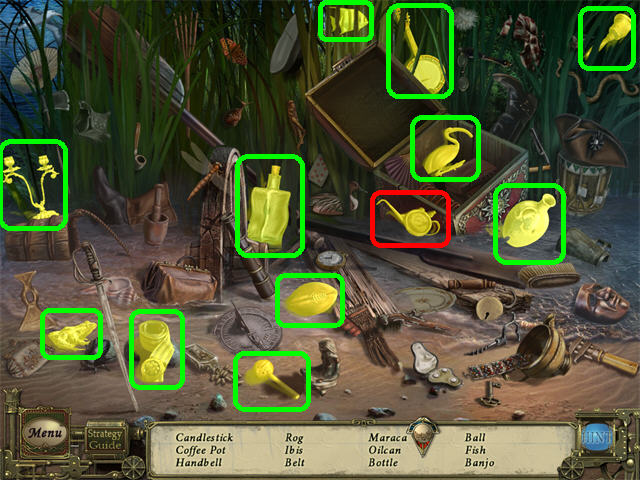
- Play the Hidden Object Scene.
- Open the treasure chest; look for items on your list.
- The OILCAN will be added to inventory.

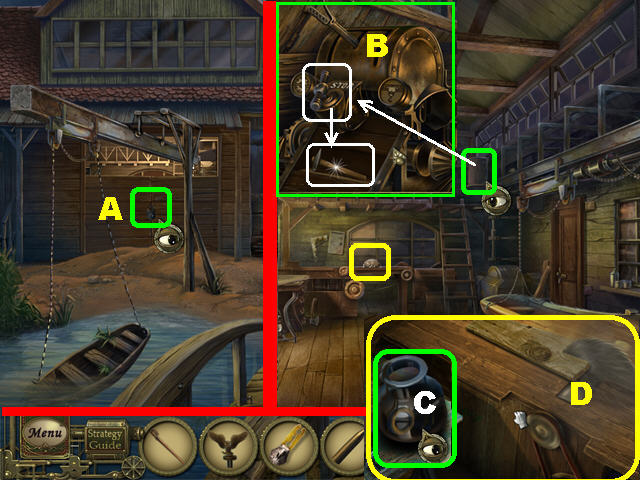
- Zoom into the lock on the back door; place the STEEL BAR on the rusted lock.
- Enter the boathouse (A).
- Zoom into the windlass drum above the steps; turn the valve and take the HAMMER that appears below (B).
- Take a closer look at the back table; fill the OILCAN by placing it in the oil jar (C).
- The FULL OILCAN will be added to inventory.
- Break the oil jar with the HAMMER and take the BOAT HOOK (C).
- Zoom into the lever on the windlass drum.
- Click on the LEVER to start the buzz saw.
- Place the BOARD on the buzz saw to cut it; take the BOARD (D).
- Click down.

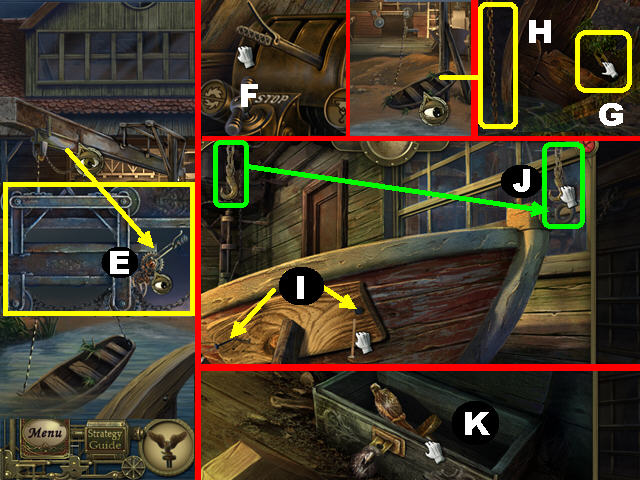
- Zoom into the lever above the boat.
- Place the FULL OILCAN on the lever (E) and then click the lever to lift the boat out of the water.
- Go inside; zoom into the windlass drum.
- Move the lever to the last slot so the outside boat can move onto the ground (F).
- Go outside.
- Zoom into the boat on the ground; take the TIGER KEY (G).
- Pull the CHAIN so it detaches itself from the boat (H).
- Go into the boathouse. Zoom into the boat.
- Place the BOARD on the side of the boat.
- Place the NAILS (I) on the board.
- Place the HAMMER on both nails.
- Place the BOAT HOOK in the slot.
- Drag the HOOK onto the BOAT HOOK to lift the boat and place it in the water outside (J).
- Go inside.
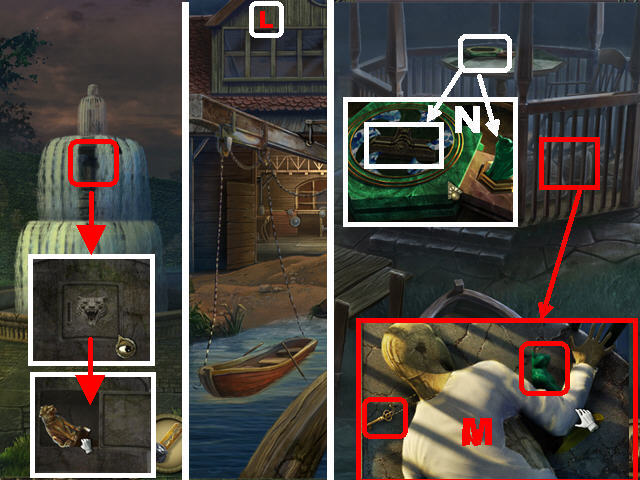
- Zoom into the small box in the lower right; place the EAGLE KEY in the slot and take the EAGLE STATUETTE (K).

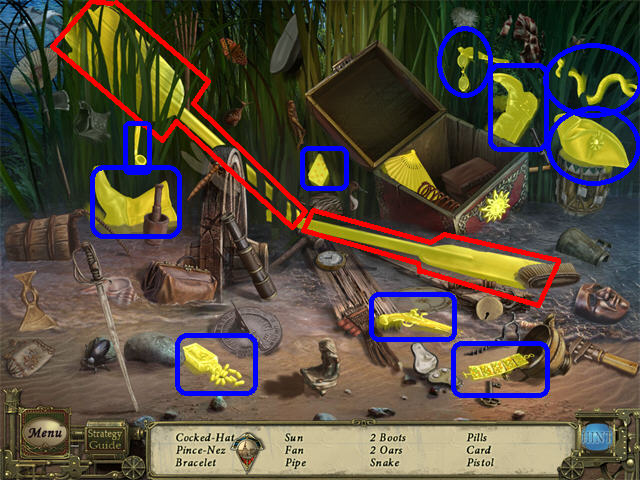
- Go outside.
- Play the Hidden Object Scene to obtain the PAIR OF OARS.

- Return to the fountain area near the gazebo.
- Zoom into the top of the fountain; place the LONG BRUSH on the moss.
- Put the TIGER KEY in the slot; take the TIGER STATUETTE.
- Return to the dock; place the PAIR OF OARS in the boat to reach the Island (L).
- Zoom into the dummy on the ground; take the CAT STATUETTE and the KEY (M).
- Zoom into the table.
- Place the CAT STATUETTE in the empty slot; take the LOCK PART (N).

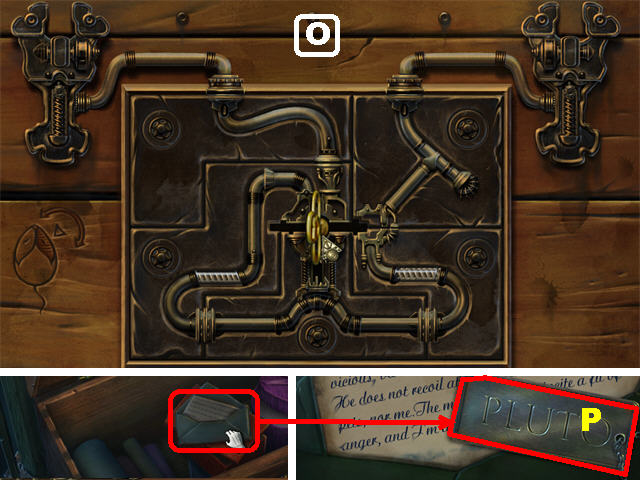
- Zoom into the chest; place the LOCK PART on the device.
- Assemble the lock mechanism by dragging the pieces into the correct spots.
- Right-click on a piece to rotate it; left-click it to release it.
- Correctly placed pieces will lock.
- Place the KEY in the center; click on it to unlock the chest (O).
- Click on the letter.
- Take the NAME TAG inside the chest (P).
Chapter 6

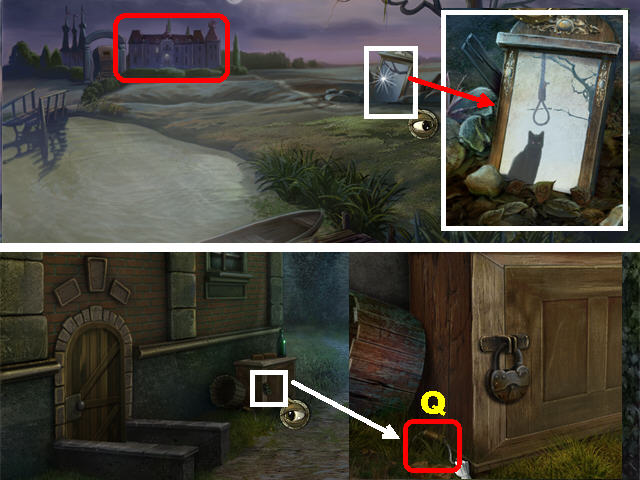
- Head towards the black cat on the far bank of the river.
- Zoom into the mirror on the right; place the NAME TAG on the mirror after the cutscene.
- Head towards the estate.
- Zoom into the box; take the BUCKET HANDLE (Q).

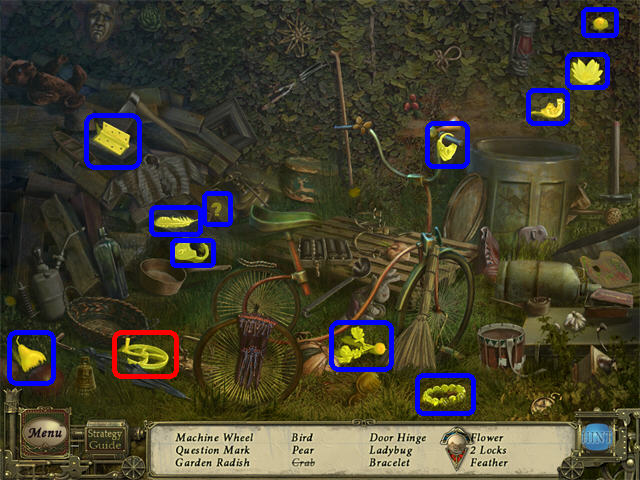
- Play the Hidden Object Scene to obtain the TURNWHEEL.

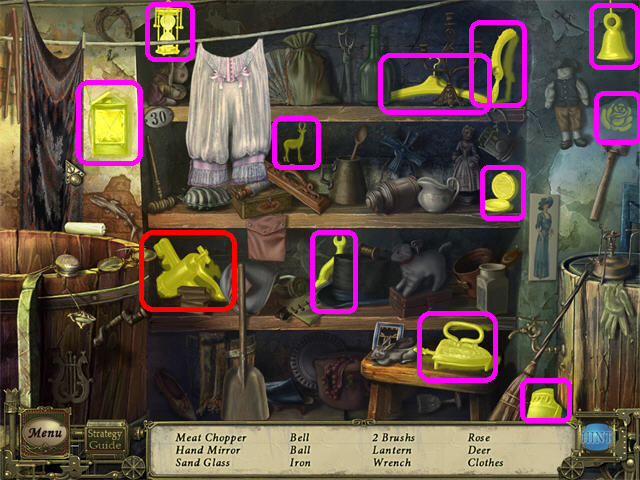
- Click on the door; go through it and the next door on the left.
- Play the Hidden Object Scene.
- Move aside both items hanging on the clothesline; pick up any items on your list.
- The MEAT GRINDER will be added to inventory.

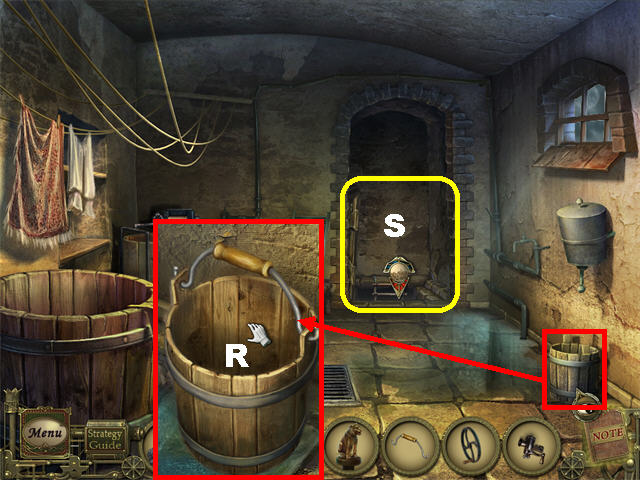
- Zoom into the bucket in the lower right; place the BUCKET HANDLE on it.
- Grab the BUCKET (R).
- Open the trapdoor by the entryway; go downstairs to the lab (S).

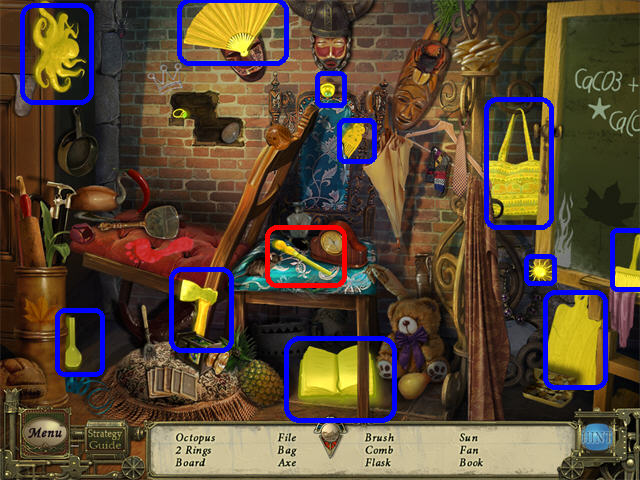
- Play the Hidden Object Scene to obtain the FILE.

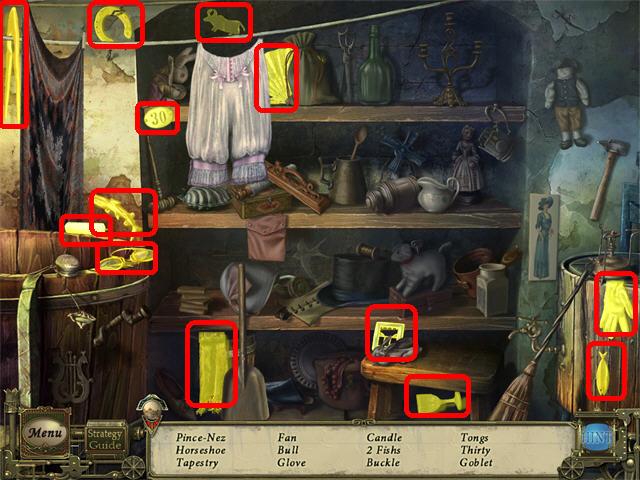
- Return to the cellar via the rope ladder.
- Play the Hidden Object Scene by the washing machine to obtain the DIRTY TAPESTRY.

- Click down twice.
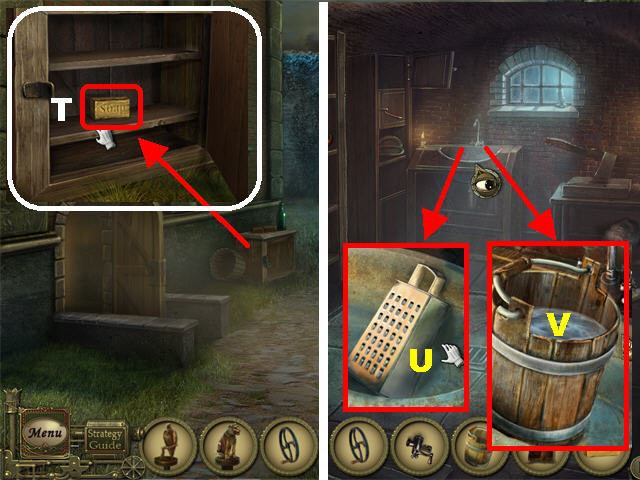
- Zoom into the box; open the lock with the FILE and take the SOAP (T).
- Return to the lab.
- Click down and then go to the room on the right.
- Zoom into the sink; take the GRATER (U).
- Place the BUCKET in the sink; turn the faucet to fill the bucket.
- Grab the BUCKET WITH WATER (V).

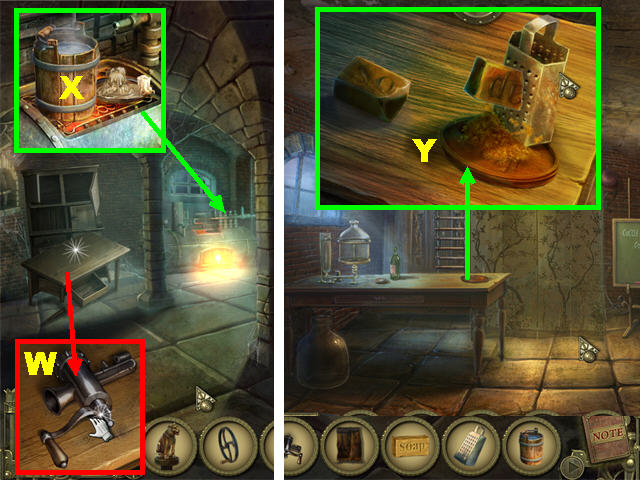
- Exit this scene and zoom into the left table; place the MEAT GRINDER on the table.
- Twist the handle twice to add the MEAT GRINDER LEVER to inventory (W).
- Zoom onto the oven; place the BUCKET WITH WATER on the oven and take the BUCKET WITH WARM WATER (X).
- Go into the lab; zoom into the table.
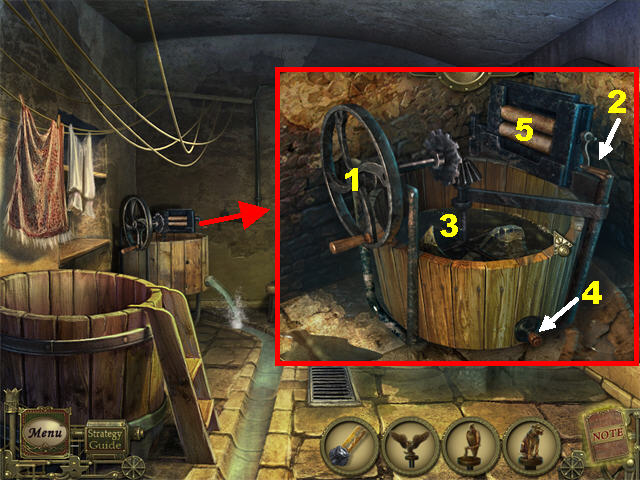
- Place the GRATER on the table.
- Place the SOAP on the table.
- Move the SOAP onto the GRATER and pick up the SOAP SHAVINGS (Y).

- Go up the rope ladder.
- Zoom into the old-fashioned washing machine; place the WASHING MACHINE TURNWHEEL in the slot (1).
- Place the MEAT GRINDER LEVER by the rollers (2).
- Place the BUCKET WITH WARM WATER and the SOAP SHAVINGS into the machine (3).
- Place the DIRTY TAPESTRY into the water.
- Turn the washing machine wheel to activate the machine (1).
- Click on the plug (4) to drain the water.
- Take the WET TAPESTRY and place it in the rollers to dry it (5).
- Take the TAPESTRY PIECE.

- Click down and then zoom into the wall close to the chair.
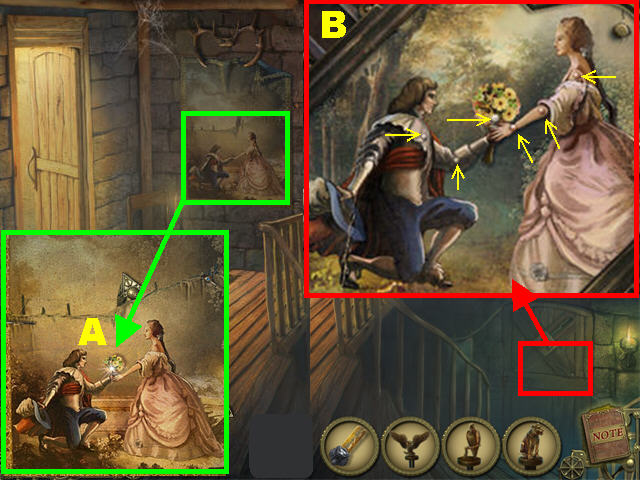
- Place the TAPESTRY PIECE on the wall and take the BOUQUET OF FLOWERS from the tapestry (A).
- Zoom into the door at the bottom of the steps.
- Place the BOUQUET OF FLOWERS in the man’s left hand.
- Position the hands of the man and the woman as in the tapestry by clicking the small buttons attached to each character (B).
- Go through the door after the puzzle has been solved.

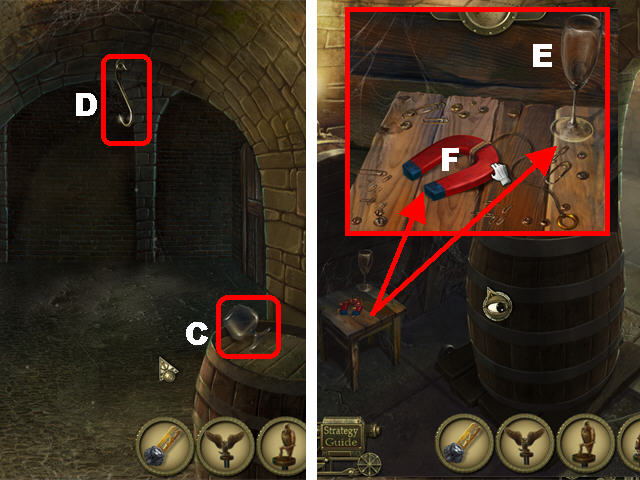
- Grab the WINEGLASS on the right (C).
- Grab the HOOK in the upper center (D).
- Go through the left entryway.
- Zoom into the small table; pick up another WINEGLASS (E).
- Click on the MAGNET twice to remove the debris; take the MAGNET (F).
- Go through the entryway.

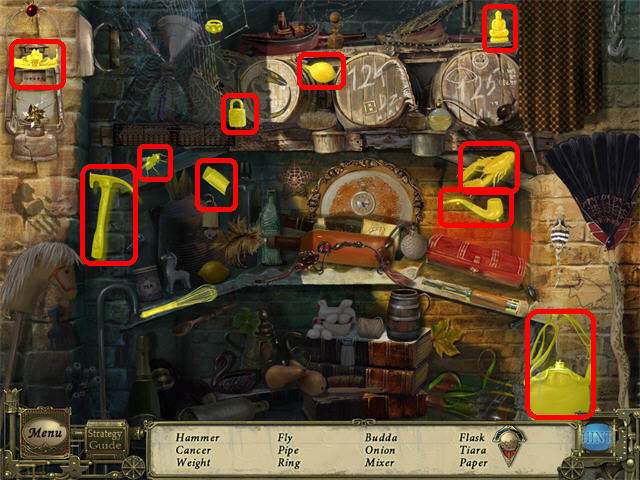
- Play the Hidden Object Scene.
- Move the curtain; take any items on your list.
- The WEIGHT will be added to inventory.

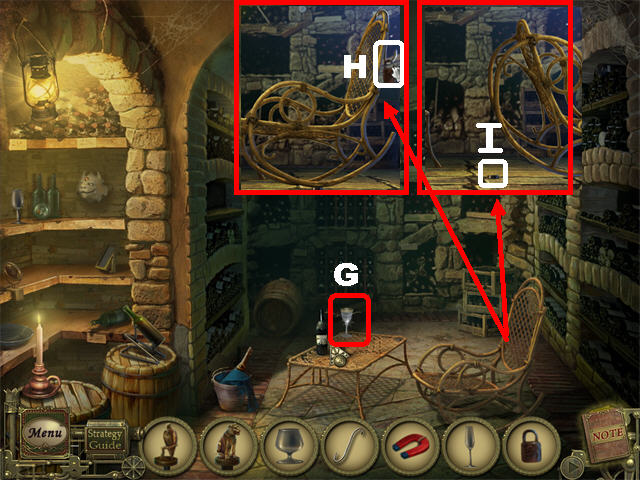
- Pick up another WINEGLASS on the table (G).
- Take a closer look at the rocking chair.
- Place the HOOK on the upper right side of the chair (H).
- Hang the WEIGHT on the hook (H).
- Take the WHEEL (I) on the ground after the chair is moved.

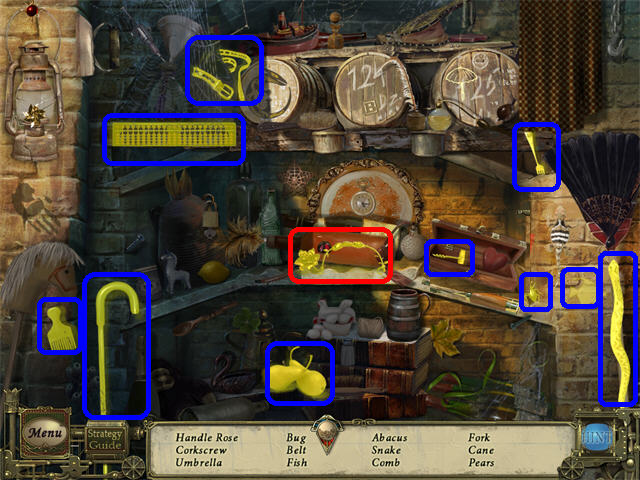
- Play the Hidden Object Scene to obtain the ROSE HANDLE.
- Open the small chest; take any items on your list.
- Click down.

- Place the WHEEL on the barrel cart (J).
- Click on the barrel to move it out of the way; zoom into that area on the floor.
- Take the HANDLE on the floor (K).
- Place the ROSE HANDLE on the slab (L).
- Click on the slab and grab the chain for a box to appear (M).
- Place the LION KEY in the slot (N) and take the LION STATUETTE (O).


- Go through the entryway.
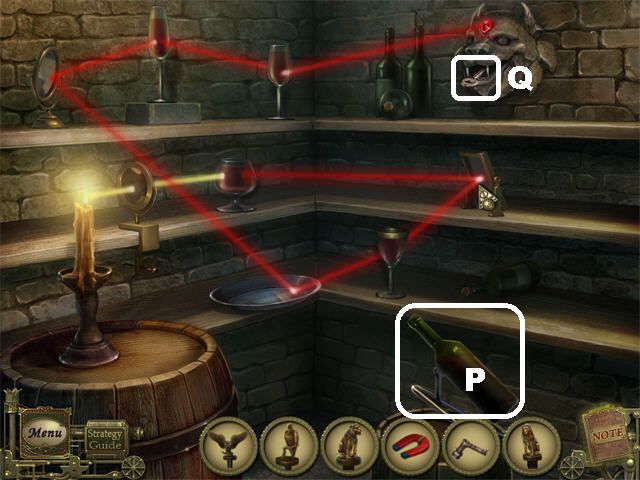
- Zoom into the left shelf; place the WINEGLASSES on the shelf to trigger a puzzle.
- Using the bottle in the lower right (P), pour wine into each of the WINEGLASSES.
- Position the mirrors so the light from the candle shines through all the glasses and hits the lion head.
- Take the KEY (Q) from the lion’s mouth after the puzzle has been solved.

- Click down twice.
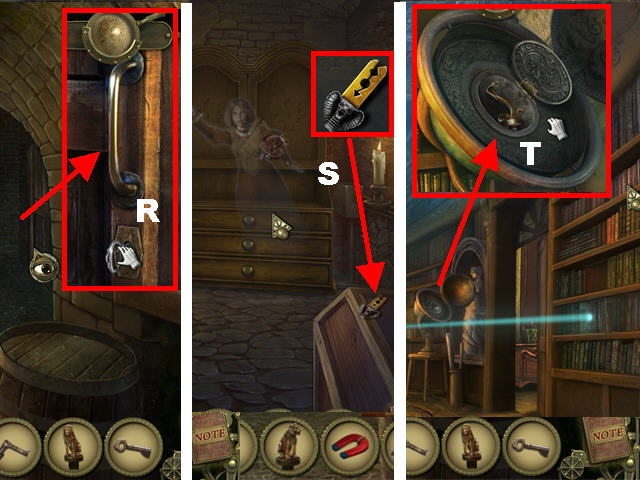
- Zoom into the right door.
- Place the KEY into the lock; turn it and then go through the door (R).
- Pick up the SNAKE KEY in the lower right (S).
- Click downwards until you reach the Estate. You will have to take the boat twice.
- Go to the Library on the second floor.
- Zoom into the globe; place the SNAKE KEY into the slot and take the SNAKE STATUETTE (T).
- Return to the cellar. Go through the stagecoach door, take the boat and return to the same cellar location in which you picked up the SNAKE KEY.

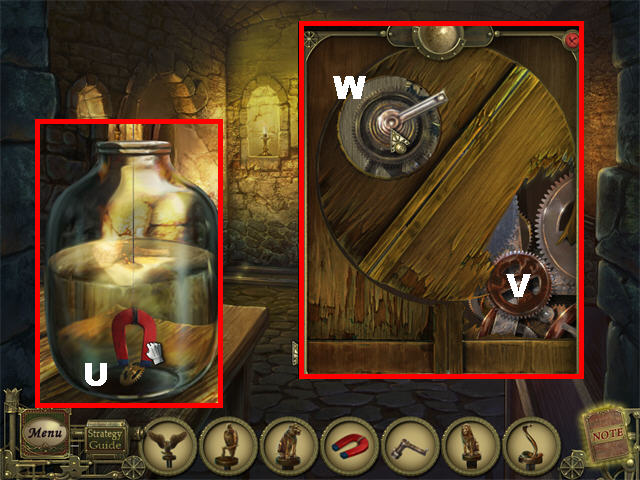
- Zoom into the large glass jar.
- Place the MAGNET on top of the jar and then drag it to the GEAR to pick it up (U).
- Zoom into the cabinet on the right.
- Place the GEAR in the lower right side of the mechanism (V).
- Place the HANDLE in the upper side of the mechanism to activate it (W).

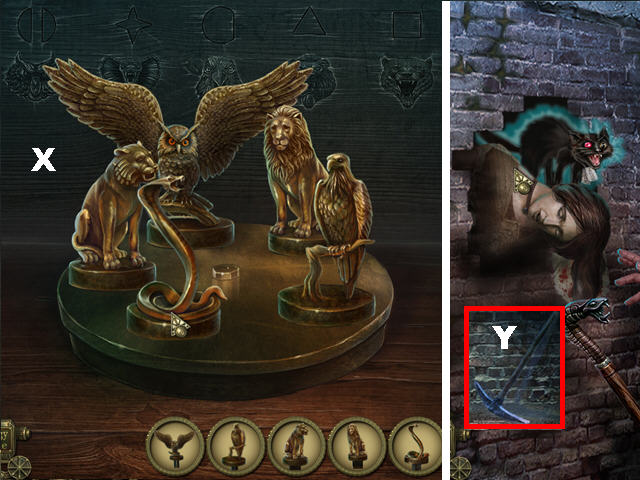
- Zoom into the cabinet; place the SNAKE STATUETTE, EAGLE STATUETTE, LION STATUETTE, TIGER STATUETTE, and OWL STATUETTE into the correct slots.
- Use the symbols on the wall, and the ones on the base, to figure out the proper placement (X).
- Correctly placed pieces will lock.
- Go through the secret compartment after the puzzle has been solved.
- Take the PICK (Y).
- Break the left side of the wall following the cutscene; a cat and dead woman will come out of the wall!
- You now have access to the Bonus Adventure! Click on the EXTRAS button in the main menu and then click on PLAY to begin.
- Congratulations! You’ve completed Dark Tales: Edgar Allan Poe’s Black Cat!



 Labyrinths of the World: Shattered Soul Walkthrough, Guide, & Tips
 Fear for Sale: Mystery of McInroy Manor Walkthrough, Guide, & Tips
 The Cross Formula Walkthrough, Guide, & Tips
 Spirits of Mystery: The Silver Arrow Walkthrough, Guide, & Tips
 Abandoned: Chestnut Lodge Asylum Walkthrough, Guide, & Tips