Mystery Trackers: Raincliff Walkthrough, Guide, & Tips
Mystery Trackers: Raincliff Walkthrough

Welcome to the Mystery Trackers: Raincliff Walkthrough!
After a group of young students go missing, the Mystery Trackers are called in to search the city of Raincliff!
Whether you use this document as a reference when things get difficult or as a road map to get you from beginning to end, we’re pretty sure you’ll find what you’re looking for here.
This document contains a complete Mystery Trackers: Raincliff game walkthrough featuring annotated screenshots from actual gameplay!
We hope you find this information useful as you play your way through the game. Use the walkthrough menu below to quickly jump to whatever stage of the game you need help with.
Remember to visit the Big Fish Games Forums if you find you need more help. Have fun!
This walkthrough was created by prpldva, and is protected under US Copyright laws. Any unauthorized use, including re-publication in whole or in part, without permission, is strictly prohibited.
General Tips

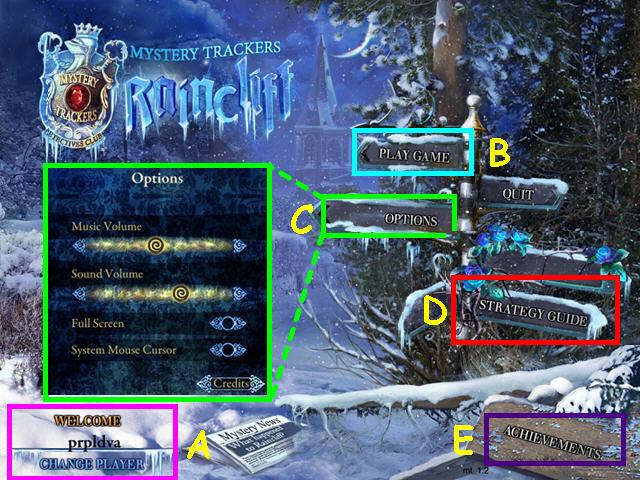
- Click on ‘Change Player’ on the main screen to add or delete player profiles (A).
- Select ‘Play Game’ to begin or continue your game (B).
- You may play this game in full screen or windowed mode by changing the settings in the Options menu (C).
- You may adjust the volume of effects and music in the Options menu.
- You may also revert to the system cursor from the Options menu.
- The Options menu is accessible from both the main screen and the in-game menu.
- Select the ‘Strategy Guide’ button to link to the guide purchase page (D).
- Click on ‘Achievements’ to view the masks you have earned during the game (E).

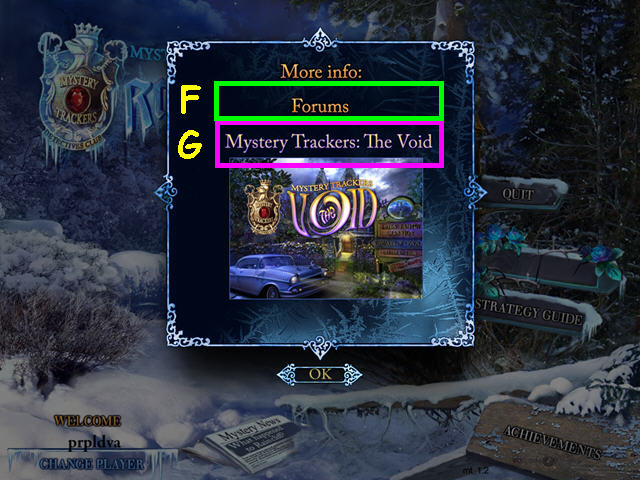
- Inside the ‘More Info’ menu are more features.
- Select the ‘Forums’ button to discuss the game with other players (F).
- There is a link to the first game in the series- Mystery Trackers: The Void (G).

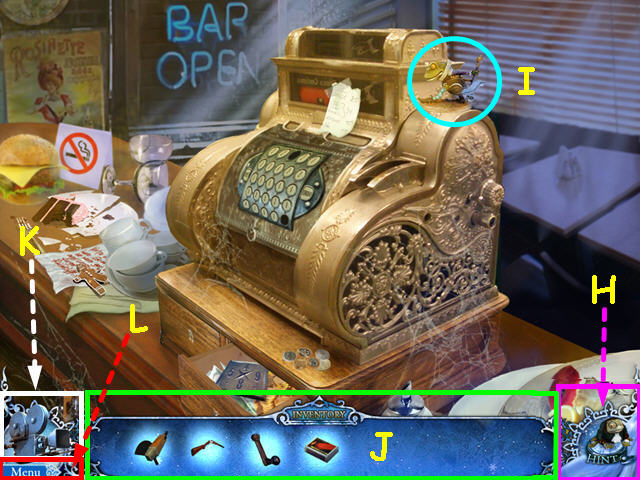
- Hints are unlimited, but you must wait for the frog to return (H).
- A hint will show an item in a Hidden Object scene, and will point you in the general direction of where you need to go outside the Hidden Object Scenes.
- This is an example of one of the secret frogs- there are many different types (I).
- Your inventory is in the bottom panel and will auto-hide when not in use (J).
- Select the camera in the lower left to replay videos you have seen in the game (K).
- Click the menu button to access the settings menu or return to the main menu (L).
Chapter 1: The Deserted City

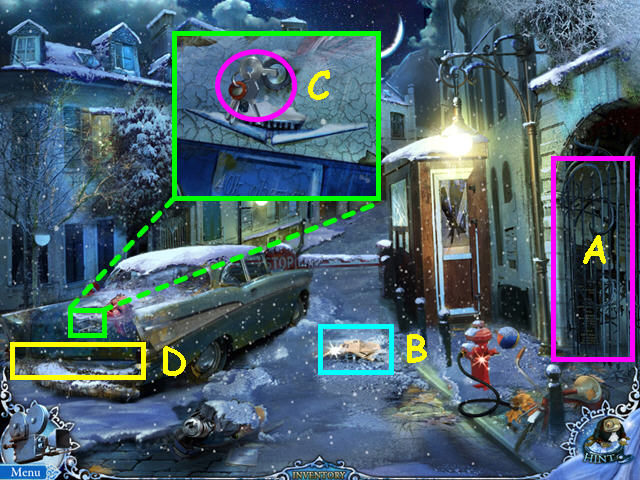
- You will have the option of a brief tutorial when you first start the game.
- Note the gate on the right (A).
- Read the newspaper clipping (B).
- Look at the trunk of the car and click on the keys to open the trunk (C).
- Select the trunk for a Hidden Object Area (D).

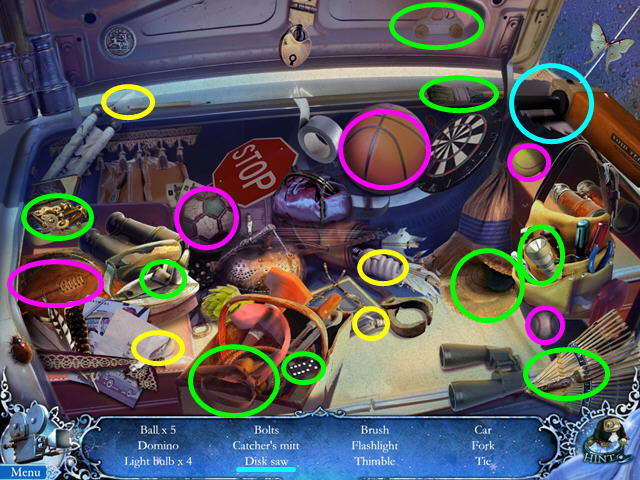
- Locate all the items on the list.
- You will earn the DISK SAW.

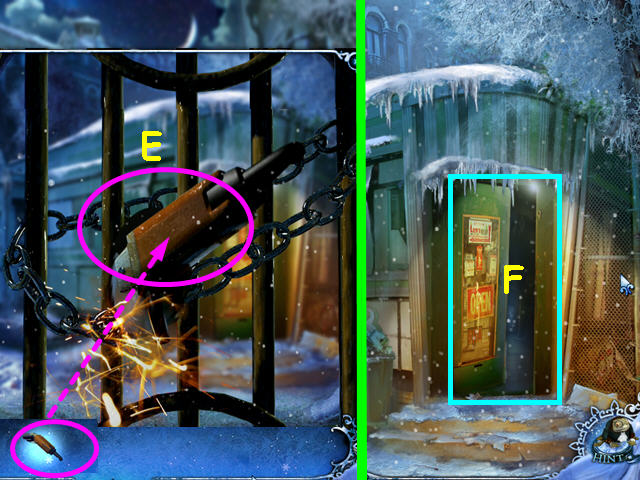
- Look at the close-up of the right gate.
- Use the DISK SAW on the chain (E).
- You will lose the saw blade here.
- Walk right to the abandoned cafe.
- Enter the cafe (F).

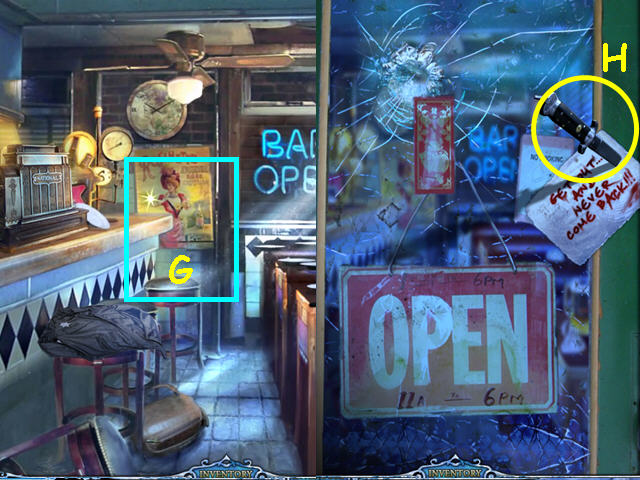
- Try to walk to the back towards the pinball machine (G).
- Take the BROKEN KNIFE (H).
- Walk down twice to return to the city entrance.
- Walk forward to the minor square.

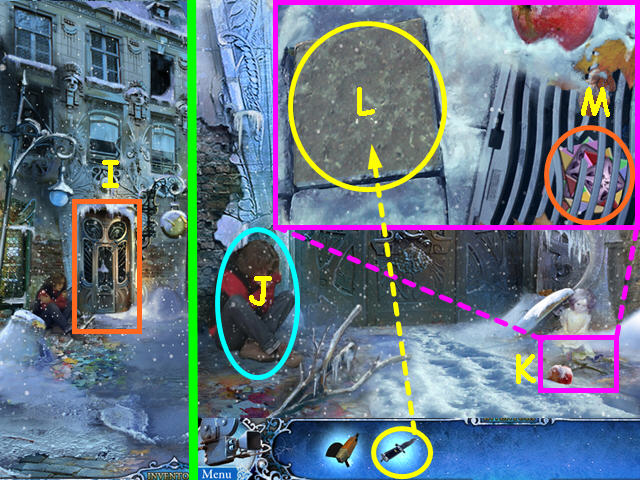
- Walk to the watchmaker’s door (I).
- Try to talk to the boy (J).
- Look at the close-up of the ground (K).
- Use the BROKEN KNIFE to take the stone (L).
- Note the item under the grate (M).
- Exit the close-up and walk down twice to return to the city entrance.

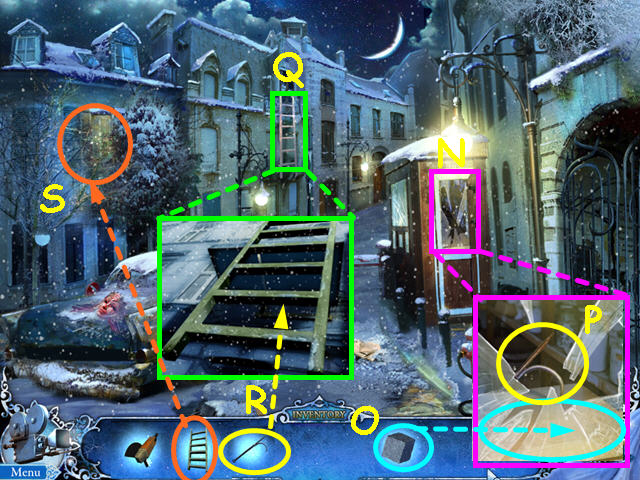
- Look at the turnpike booth (N).
- Use the STONE to break the glass out of the window (O).
- Take the GAFF (P).
- Look at the close-up of the fire escape ladder (Q).
- Use the GAFF to take the LADDER (R).
- Use the gaff on the sheriff’s window (S).
- Look at the window, click to open the window, then walk inside.

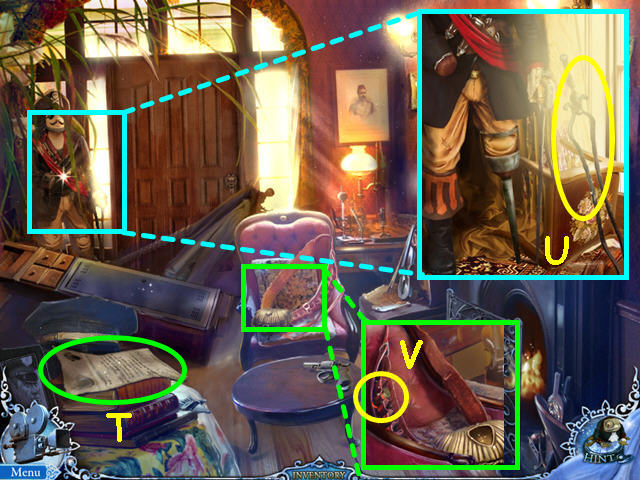
- Read the report (T).
- Look at the pirate and take the TONGS (U).
- Look at the chair and take the CARTRIDGE (V).
- Walk down, then go forward twice to the watchmaker’s door.

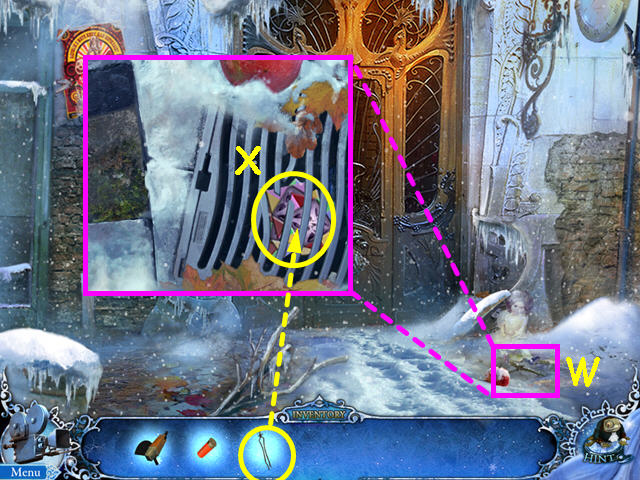
- Look at the close-up of the grate (W).
- Use the TONGS to get the MOSAIC (X).
- Walk down twice then go up the ladder to the sheriff’s room.

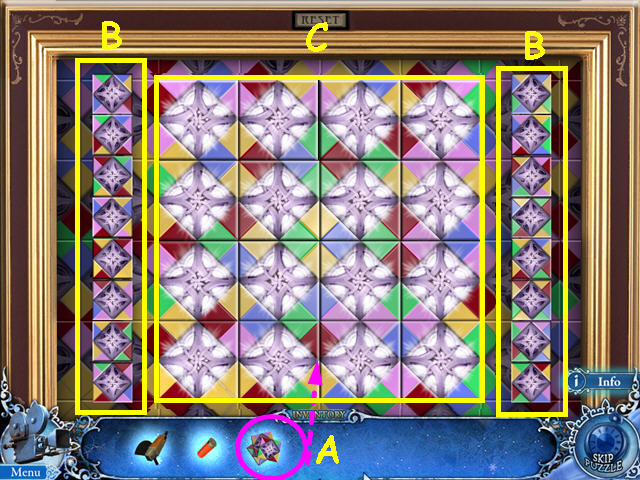
- Select the frame over the fireplace.
- Use the MOSAIC on the grid to activate a mini-game (A).
- Move all the pieces (B) into the grid so that all the colors match on all sides (C).
- Left-click and drag a mosaic piece into the grid, then right-click to rotate the piece in place.
- Pieces in the correct position will light and lock into place.
- Note- you will not be able to rotate the last piece you place into the grid.

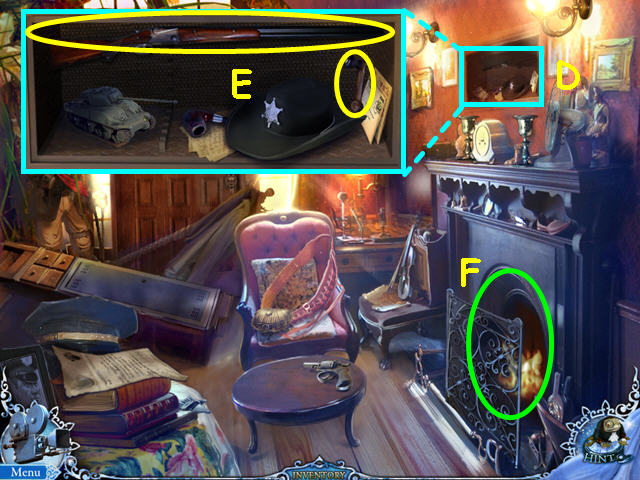
- Look at the niche that was hidden behind the frame (D).
- Take the CASH REGISTER LEVER and the SHOTGUN (E).
- The SHOTGUN will automatically combine with the CARTRIDGE to make the LOADED SHOTGUN.
- Note that something is in the fireplace, but you need to put out the flames (F).
- Walk down to exit the room.
- Walk right through the gate.

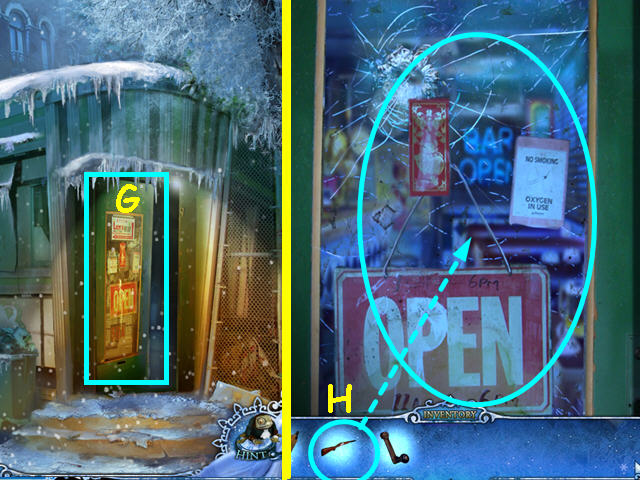
- Look at the cafe door (G).
- Use the LOADED SHOTGUN on the cafe door (H).

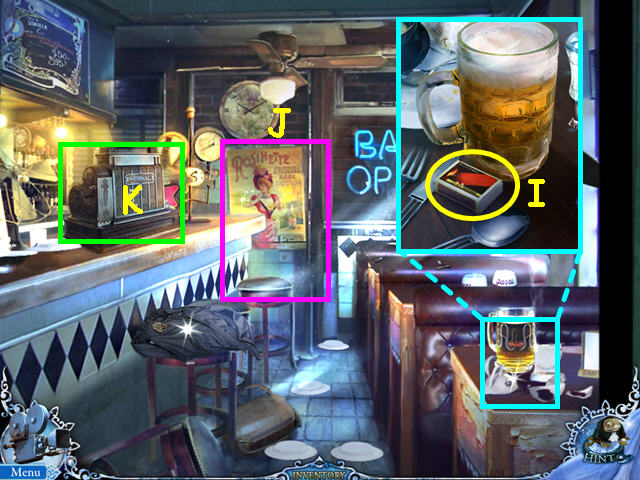
- Look at the close-up of the beer glass and take the MATCHES (I).
- Note the path to the pinball machine (J).
- Look at the cash register (K).

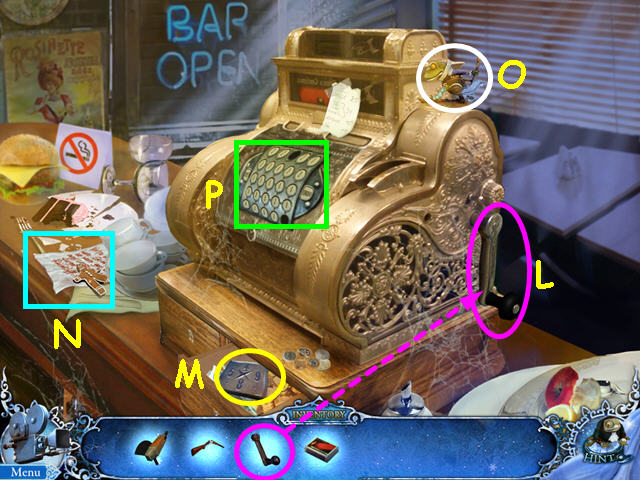
- Use the CASH REGISTER LEVER on the side of the register (L).
- Take the DIGIT BUTTON from the drawer (M).
- Read the warning (N).
- Take the 1 of 60 SECRET FROG (O).
- Note the mini-game on the register that is missing pieces (P).
- Exit the close-up of the register.
- Walk left to the pinball machine.

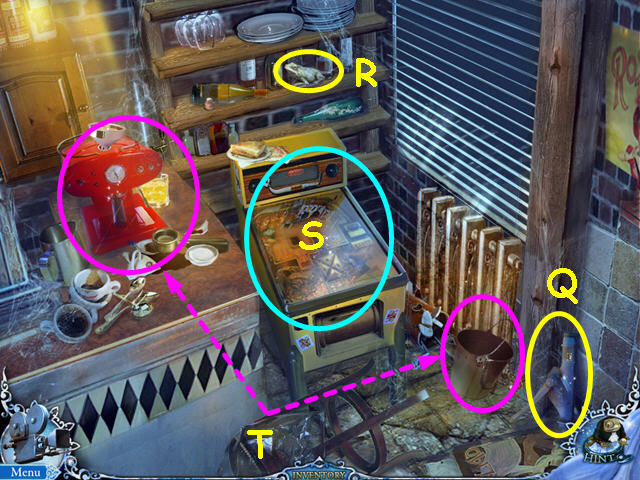
- Take the JACKSCREW (Q).
- Take the 2 of 60 SECRET FROG (R).
- Note that the pinball machine is missing a piece (S).
- Note that to use the coffee machine or get the bucket will require additional items (T).
- Walk down 3 times to return to the city entrance.
- Walk forward to the minor square.

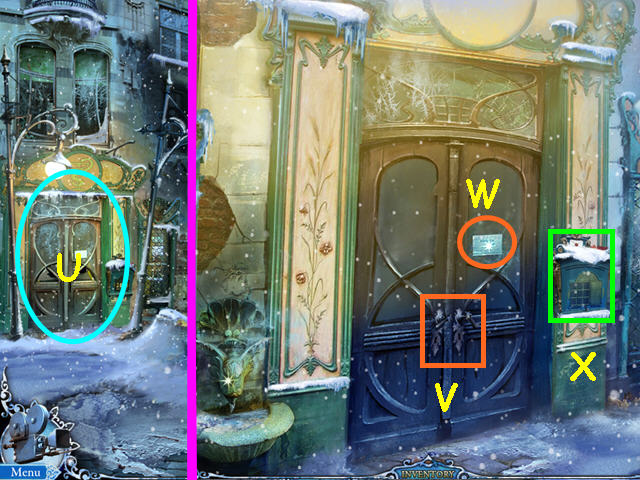
- Select the pharmacy door on the left (U).
- Note that the door lock will require a pick (V).
- Read the missing person’s notice (W).
- Select the mailbox for a mini-game (X).

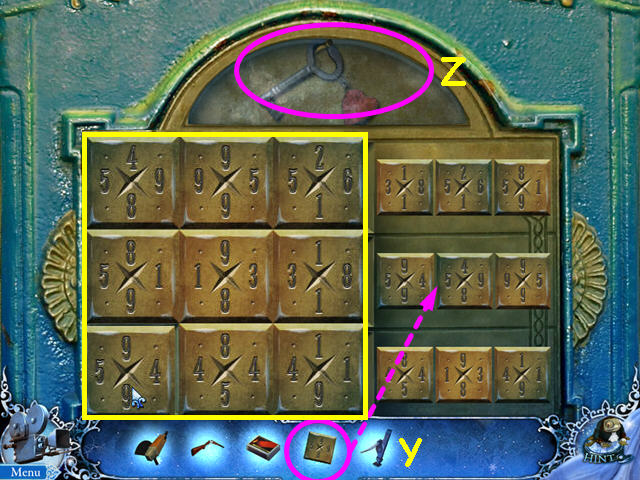
- Place the DIGIT BUTTON with the other buttons (Y).
- Place the buttons so that all the numbers match on all sides.
- Take the RED KEY (Z).
- Walk down, then go to the watchmakers door.
- Look at the lock on the door.

- Use the RED KEY on the top lock (A).
- Take the RUBY (B).
- Walk down 3 times to return to the city entrance, then go up the ladder to the sheriff’s room.

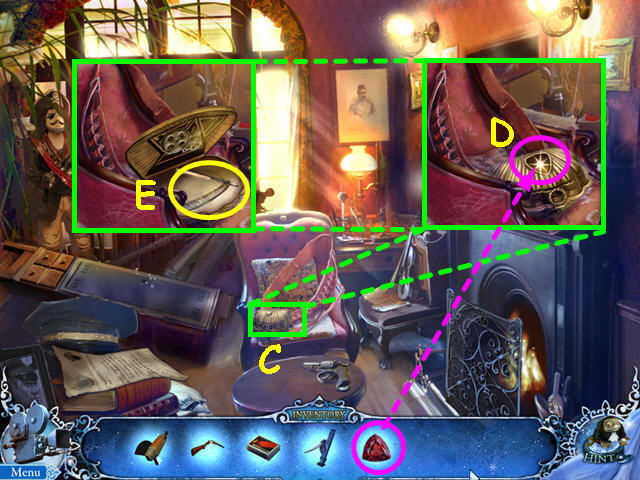
- Look at the close-up of the chair (C).
- Use the RUBY on the niche on the gold box (D).
- Take the RAZOR (E).
- Walk down to exit the room.
- Walk right through the gate, then enter the cafe.

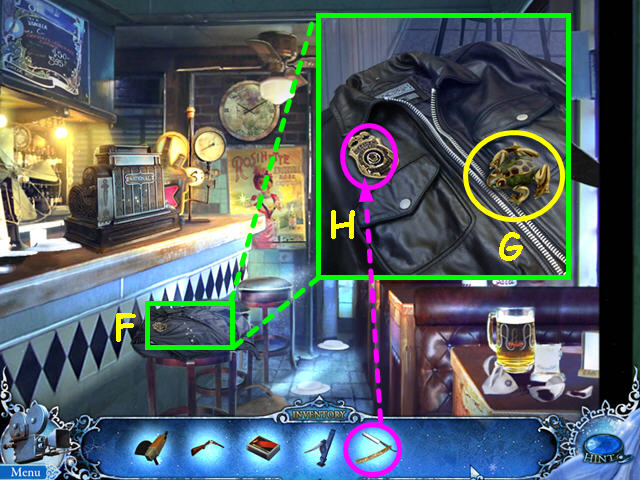
- Look at the close-up of the jacket on the stool (F).
- Take the 3 of 60 SECRET FROG (G).
- Use the RAZOR to to take the POLICE BADGE (H).
- Walk down twice to the city entrance.
- Climb the ladder and enter the sheriff’s room.


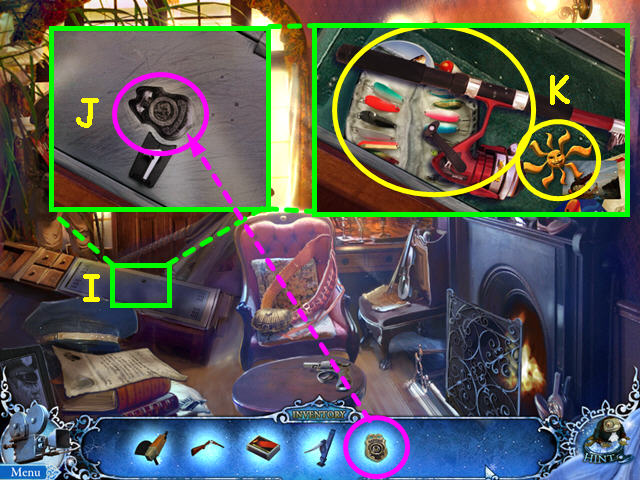
- Look at the close-up of the locker (I).
- Use the POLICE BADGE on the badge-shaped lock (J).
- Take the FISHING ROD and the SUN TRINKET (K).
- Exit the sheriff’s room.
Chapter 2: Footprints in the Snow

- Walk forward to the minor square.
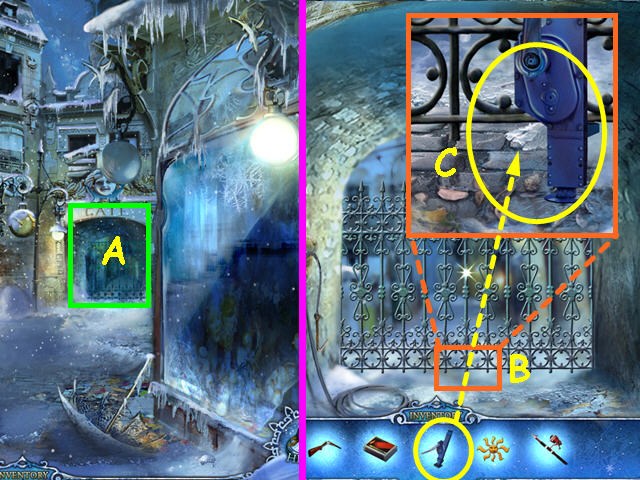
- Walk to the gate (A).
- Look at the base of the gate (B).
- Use the JACKSCREW to raise the gate (C).
- Walk forward to the crossroads.

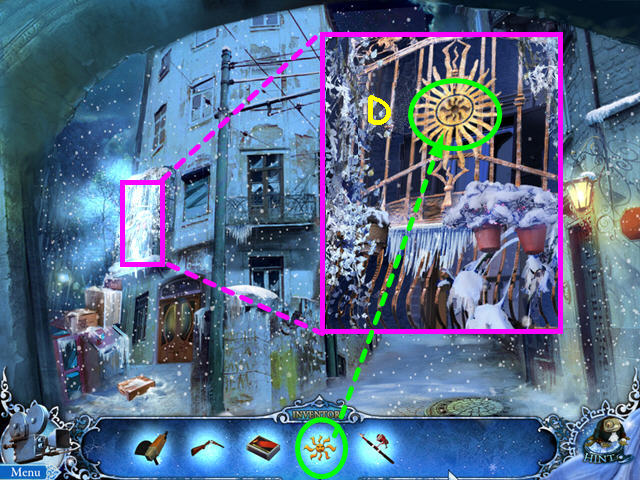
- Look at the close-up of the balcony and use the SUN TRINKET on the balcony gate (D).
- Select the balcony again for a Hidden Object Scene.

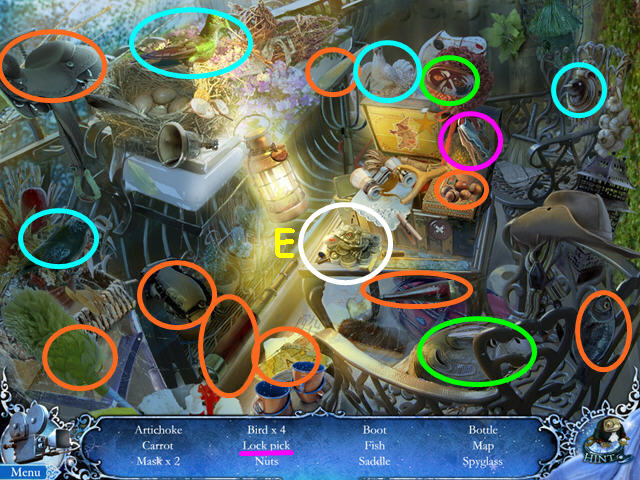
- Locate all the items on the list.
- Take the 4 of 60 SECRET FROG (E).
- You will earn the LOCK PICK.
- Walk down twice to the minor square.
- Look at the pharmacy door on the left.

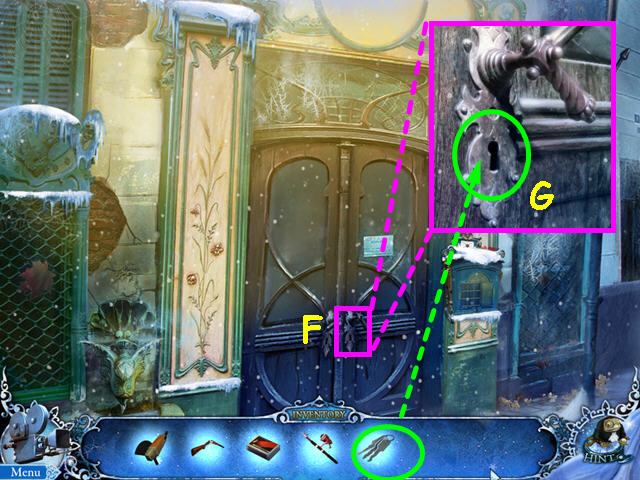
- Look at the close-up of the lock (F).
- Use the LOCK PICK on the lock (G).
- Enter the pharmacy.

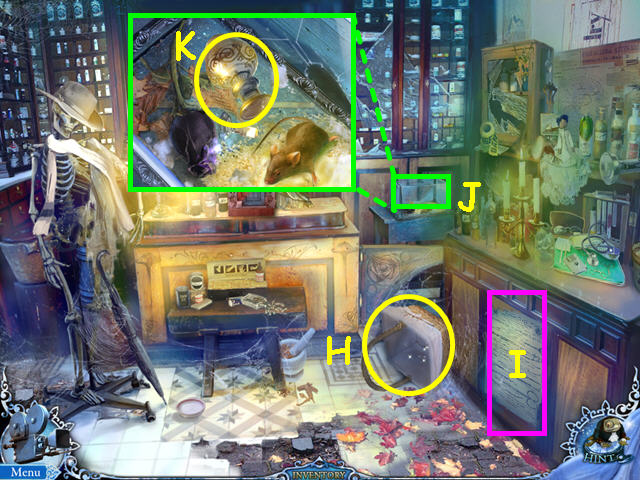
- Take the BASKET for the CAT (H).
- Read the notes on the rose (I).
- Look at the mouse cage (J).
- Take the VIAL (K).
- Walk down 3 times to the city entrance.
- Walk right through the gate.

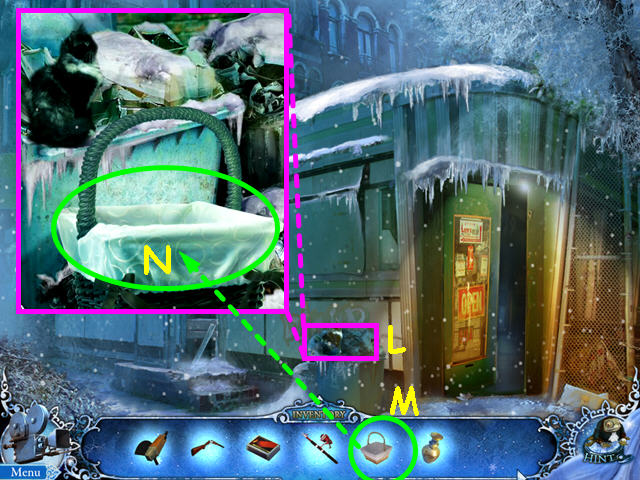
- Look at the close-up of the garbage (L).
- Place the BASKET for the CAT on the ground (M).
- Once the cat jumps into the basket, take the BASKET with CAT (N).
- Walk down to the city entrance, then go up to the minor square.
- Enter the pharmacy door on the left.

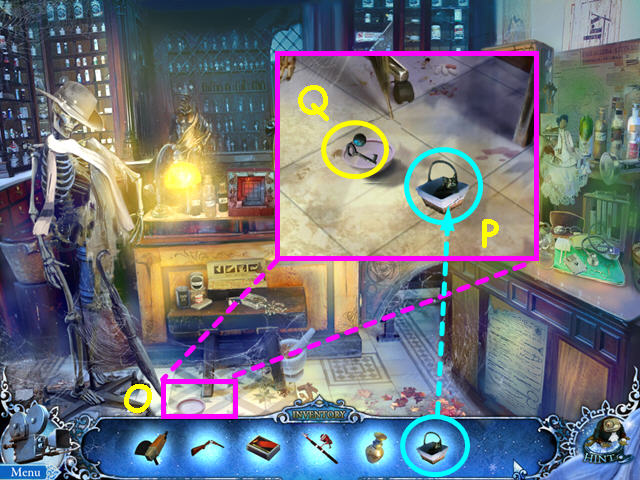
- Look at the close-up of the milk bowl on the floor (O).
- Place the BASKET with CAT on the floor (P).
- Once the cat finishes the milk, take the BLUE KEY (Q).
- Walk down twice to the minor square then walk forward twice towards the watchmaker’s door.
- Look at the close-up of the lock.

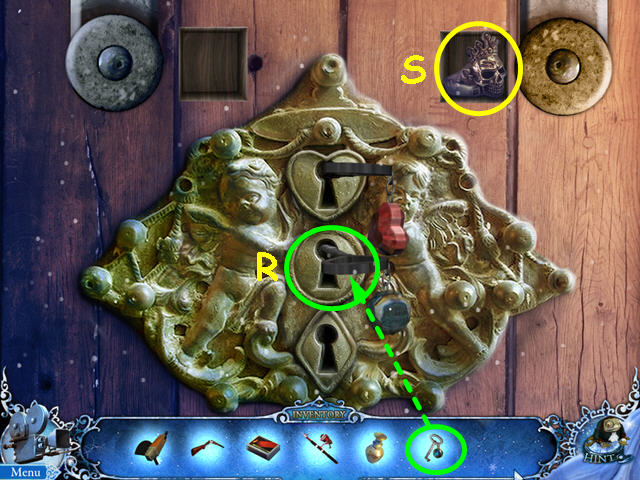
- Use the BLUE KEY on the middle lock (R).
- Take the SIGNET RING (S).
- Walk down 3 times to return to the city entrance.
- Look inside the cab of the rusty car.

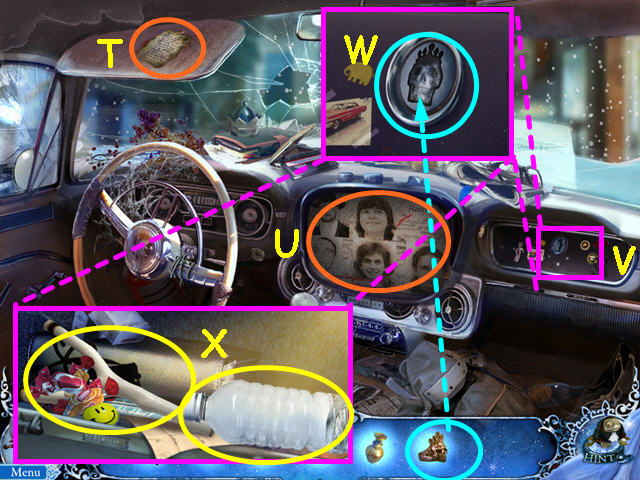
- Read the note on the visor (T).
- Look at the video screen (U).
- Look at the glove box (V).
- Use the SIGNET RING on the skull indentation to open the glove box (W).
- Take the EMPTY BOTTLE and the SLINGSHOT (X).
- Walk down to exit the car.
- Walk forward twice to the gate area.

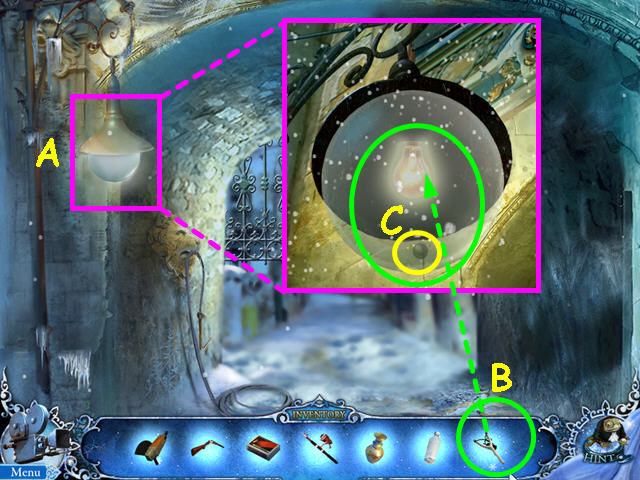
- Look at the street light (A).
- Use the SLINGSHOT to break the light (B).
- The BRASS BALL will go automatically into your inventory (C).
- Walk down twice, then go to the right and into the cafe.
- Walk to the pinball area and look at the pinball machine.

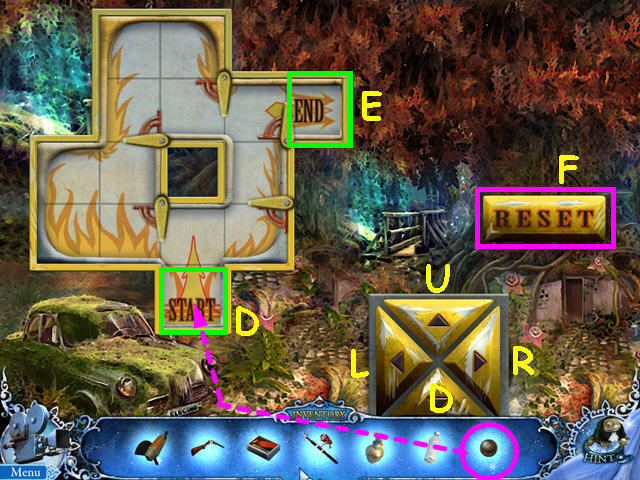
- Place the BRASS BALL at the start position (D).
- The object of this mini-game is to move the ball to the end (E) using the yellow buttons (U,R,D,L).
- You will have to make the bumpers move by either pushing or pulling them with the ball.
- Should you get stuck, press the reset button (F).
- Our solution is: U-L-L-U-R-U-U-R-D-L-U-R-D-U-L-D-R-R-D-D-L-L-L-U-R-U-U-R-D-L-U-R-D-U-L-D-R-R-R.

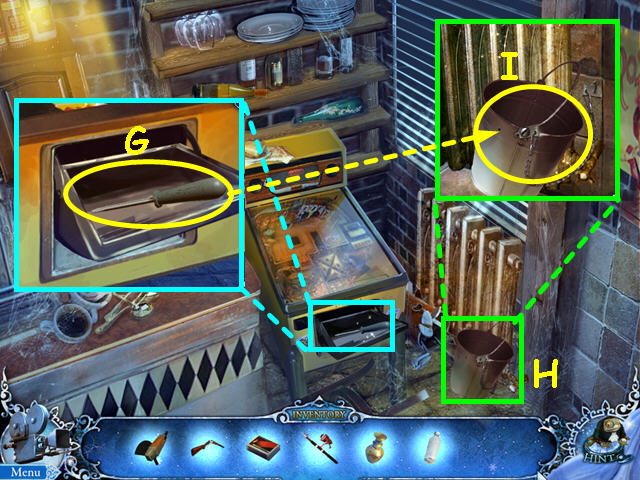
- Take the SCREWDRIVER from the pinball machine (G).
- Look at the radiator (H).
- Use the SCREWDRIVER to remove the BUCKET (I).
- Walk down 3 times to the city entrance.
- Walk forward 4 times through the gate to the lane.

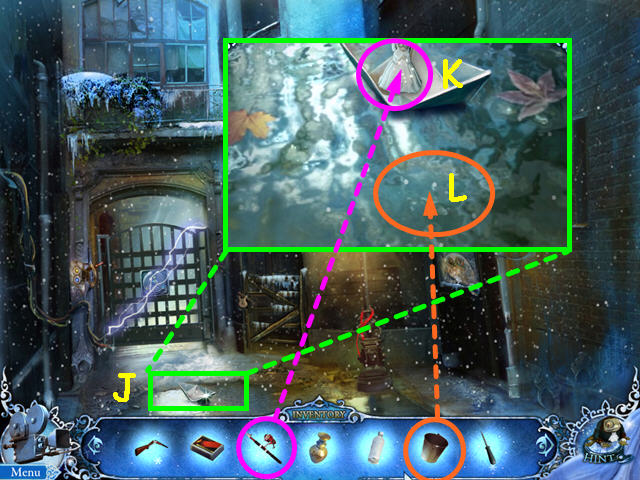
- Look at the paper boat in the puddle (J).
- Use the FISHING ROD to get the ANGEL (K).
- Use the BUCKET on the puddle to get a BUCKET of WATER (L).
- Walk down 4 times to return to the city entrance.
- Climb the ladder and enter the sheriff’s room.

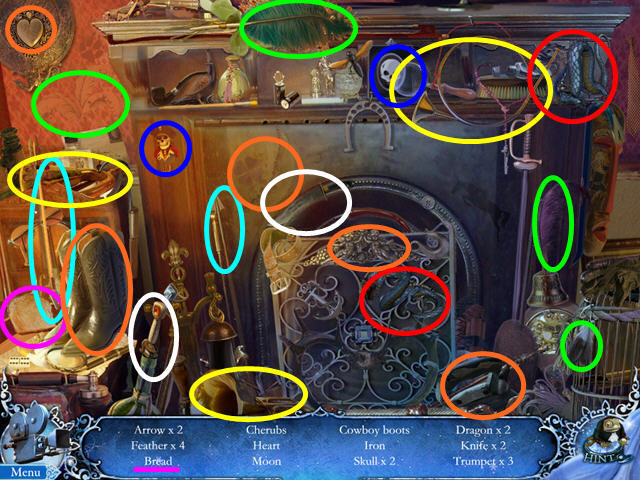
- Use the BUCKET of WATER on the fireplace.
- Select the fireplace for a Hidden Object Scene.
- Locate all the items on the list.
- You will earn the BREAD.
- Walk down to exit the room.
- Walk right, through the gate.

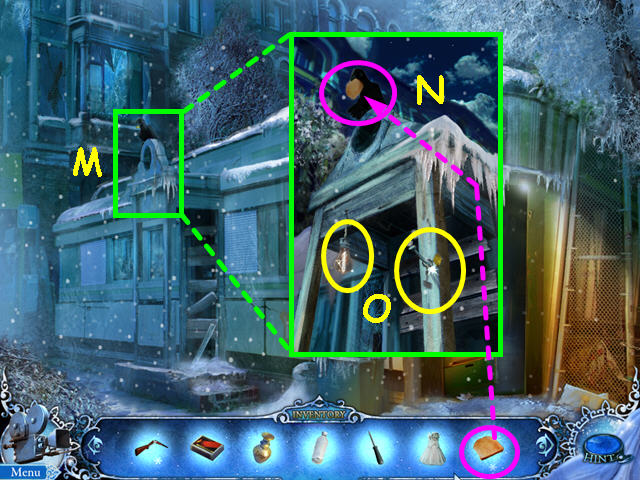
- Look at the raven atop the cafe (M).
- Use the BREAD on the raven (N).
- Take the FRIDGE BULB and the YELLOW KEY (O).
- Walk down, then up to the minor square.

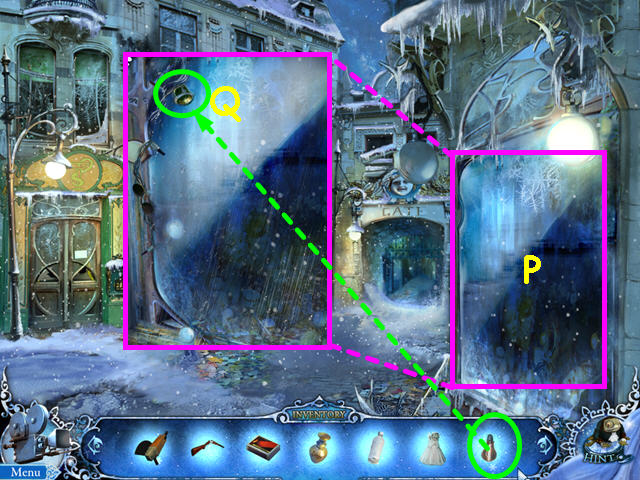
- Look at the glass window on the right (P).
- Use the FRIDGE BULB in the socket (Q).
- Select the window again for a Hidden Object Scene.

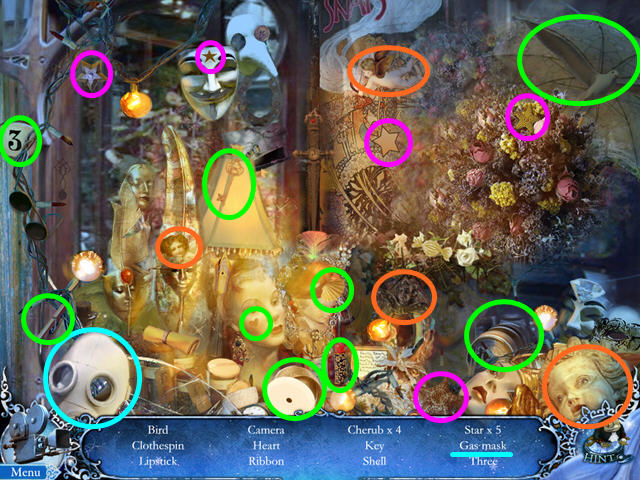
- Locate all the items on the list.
- You will earn the GAS MASK.
- Walk forward to the pharmacy door on the right and go inside.

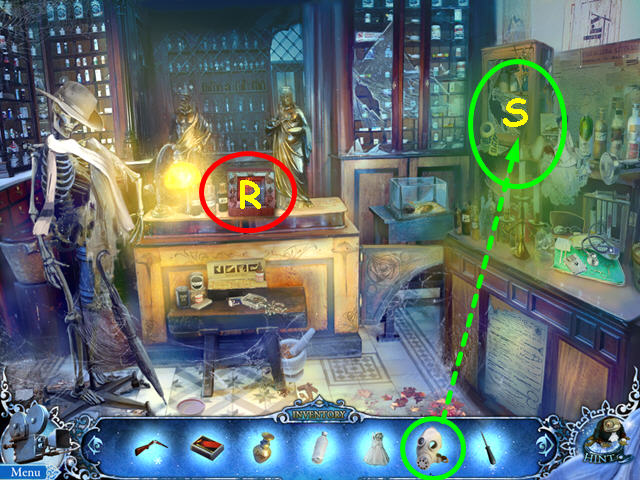
- Note the mini-game on the counter is missing a piece (R).
- Use the GAS MASK on the cloudy shelf on the right (S).
- Select the shelves for a Hidden Object Scene.

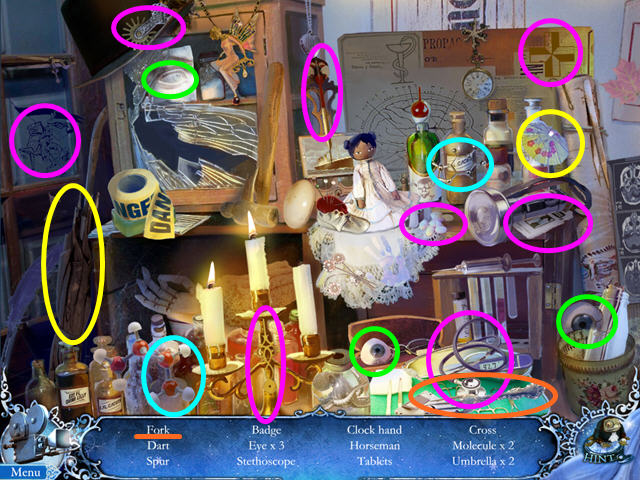
- Locate all the items on the list.
- You will earn the FORK.
- Walk down twice, then go forward to the watchmaker’s door and look at the lock.
- Use the YELLOW KEY on the bottom keyhole.
- Enter the Watchmaker’s shop.

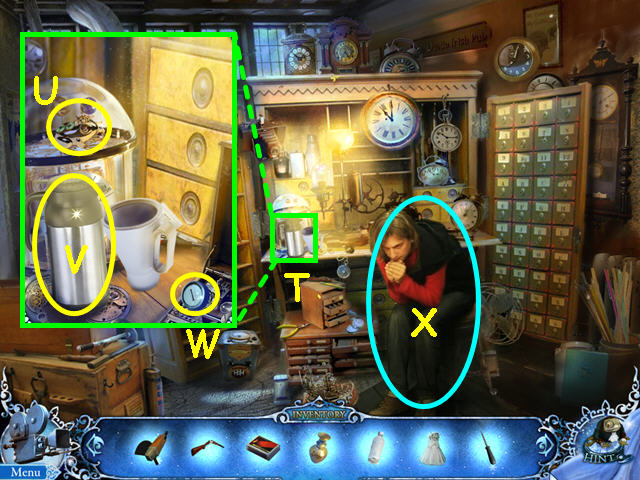
- Look at the cup on the desk (T).
- Take the 5 of 60 SECRET FROG (U).
- Take the CONTAINER (V).
- Take the 1 CASH REGISTER BUTTON (W).
- Try to talk to the boy to learn he is in shock (X).
- Walk down twice to the minor square, then walk forward through the gate 3 times.

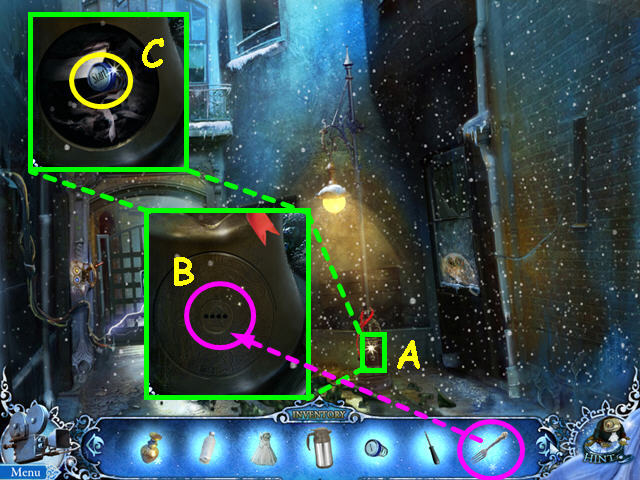
- Look at the base of the lamppost (A).
- Use the FORK on the holes (B).
- Take the START CASH REGISTER BUTTON (C).
- Walk down 4 times to the city entrance.
- Walk right through the gate and enter the cafe.
- Look at the cash register.

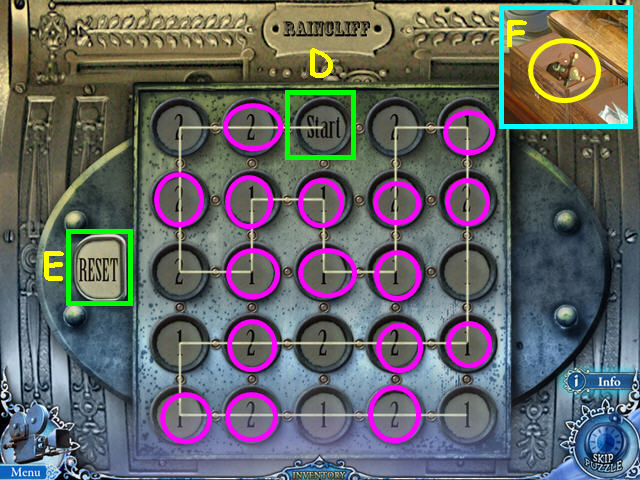
- Look at the keys of the register and add the START CASH REGISTER BUTTON and the 1 CASH REGISTER BUTTON to trigger a mini-game.
- The object of this mini-game is to press all the buttons down.
- The number on each button determines how far the line will travel.
- You must make sure not to cross lines.
- Starting at the ‘Start’ button (D), press the circled buttons as you come to them on the line to solve.
- Should you get stuck, press the ‘Reset’ button to start over (E).
- Take the FAUCET HANDLE from the register drawer (F).
- Walk down 3 times, then go up to the minor square.

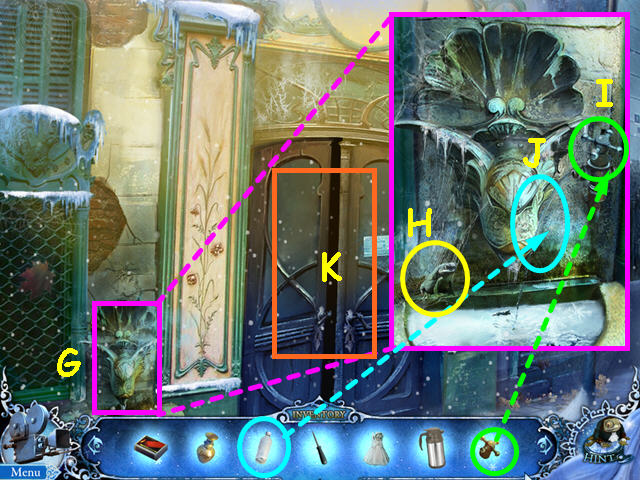
- Walk to the pharmacist’s door and look at the fountain (G).
- Take the 6 of 60 SECRET FROGS (H).
- Place the FAUCET HANDLE on the tap (I).
- Place the EMPTY BOTTLE into the water stream to get the BOTTLE with WATER (J).
- Exit the close-up and enter the pharmacy (K).

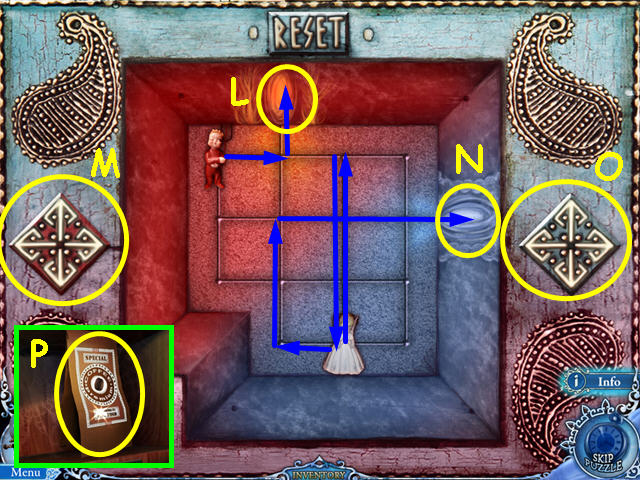
- Look at the mini-game on the counter and add the ANGEL to activate the mini-game.
- The object of this mini-game is to move the Angel and the Imp to their gates using the arrow buttons on the left and right.
- The Imp’s gate is at the top (L) and his arrow button is on the left (M).
- The Angel’s gate is on the right (N) and so is her arrow button (O).
- Make the following moves: Angel-up, Imp-right, Angel-down, Angel-left, Angel- up, Angel-right, and Imp-up.
- After the mini-game opens, take the COFFEE (P).
- Walk down 3 times to the city entrance.
- Walk to the right, then enter the cafe.

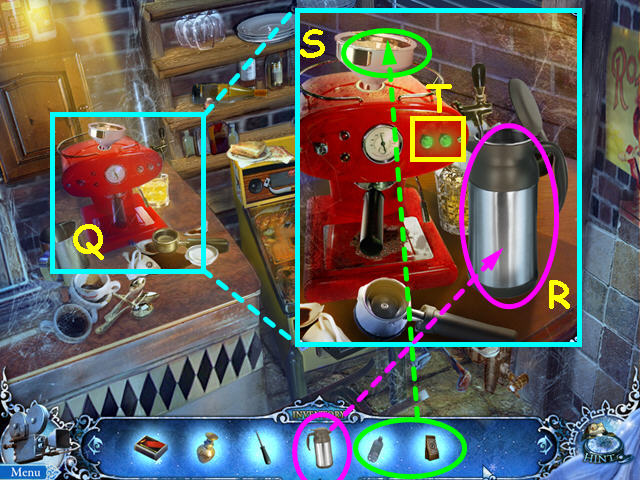
- Walk to the pinball area and look at the coffee maker (Q).
- Place the CONTAINER under the dispenser (R).
- Place the COFFEE and then the BOTTLE with WATER into the top of the coffee maker (S).
- Once the indicator lights turn green (T), take the CONTAINER with COFFEE.
- Walk down 3 times, then go forward 3 times into the watchmaker’s shop.

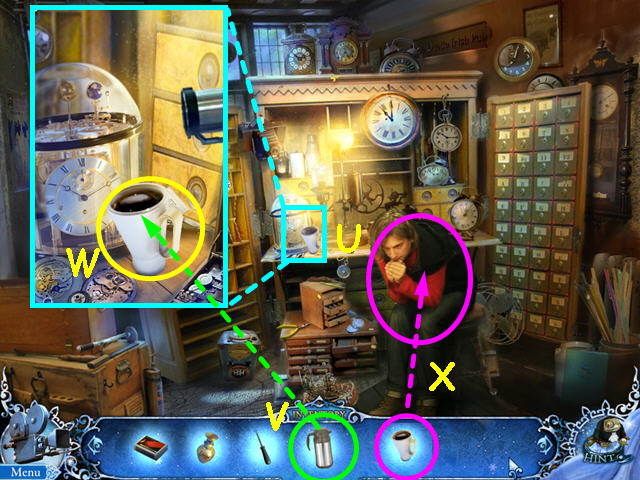
- Look at the cup on the desk (U).
- Use the CONTAINER with COFFEE on the cup (V).
- Take the COFFEE CUP (W).
- Give the COFFEE CUP to the boy (X).
- After the cut-scene, walk down and re-enter the watchmaker’s shop.

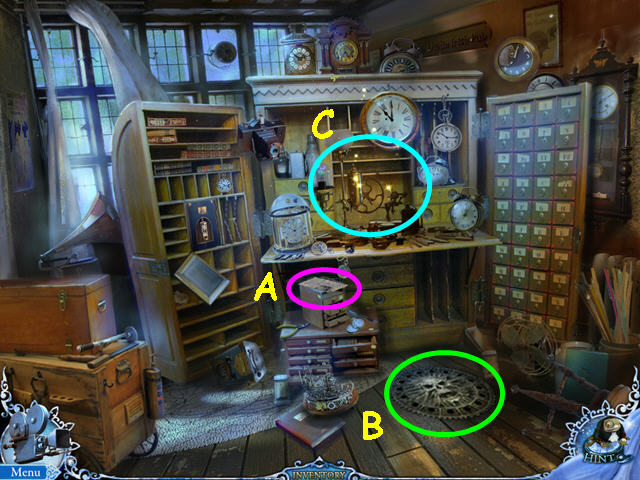
- Read the notes (A).
- Note the hatch (B).
- Select the desk area for a Hidden Object Scene (C).

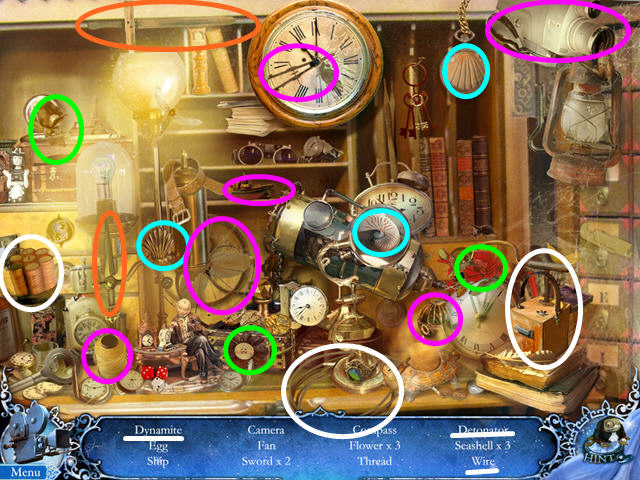
- Locate all the items on the list.
- You will earn the DYNAMITE.
- Walk down twice, then go forward to the gate.

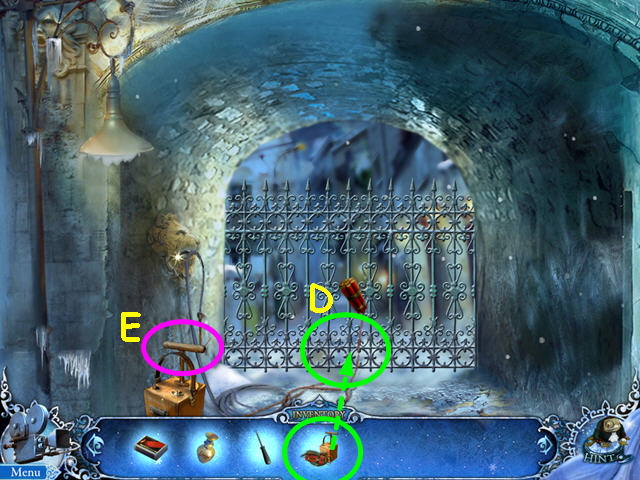
- Place the DYNAMITE on the gate (D).
- Press the plunger (E).
- Walk forward through the gate.
Chapter 3: Taken

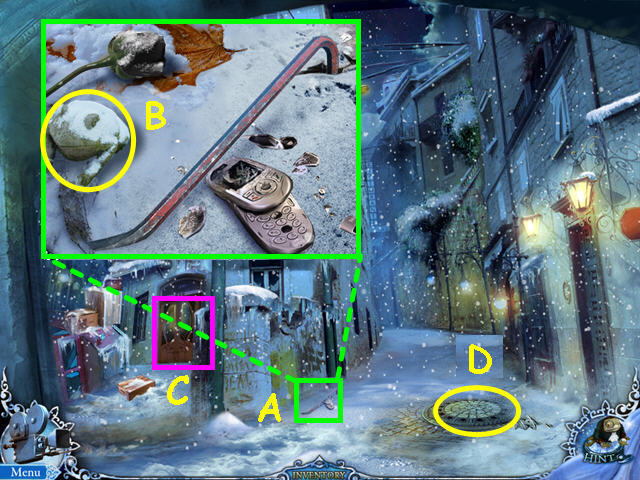
- Look at the close-up of the crowbar (A).
- Take the 7 of 60 SECRET FROGS (B).
- Note the double doors (C).
- Select the manhole cover for a mini-game (D).

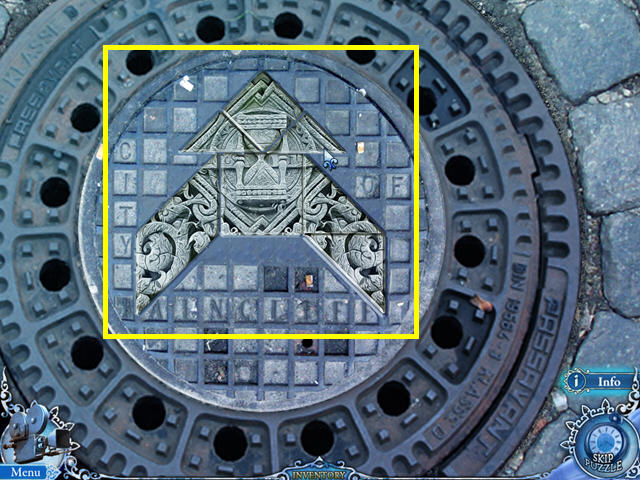
- The object of this mini-game is to place all the pieces into the grid to restore the image.
- Right-click to rotate a piece and left-click-hold to drag a piece into position.
- Enter the passageway.

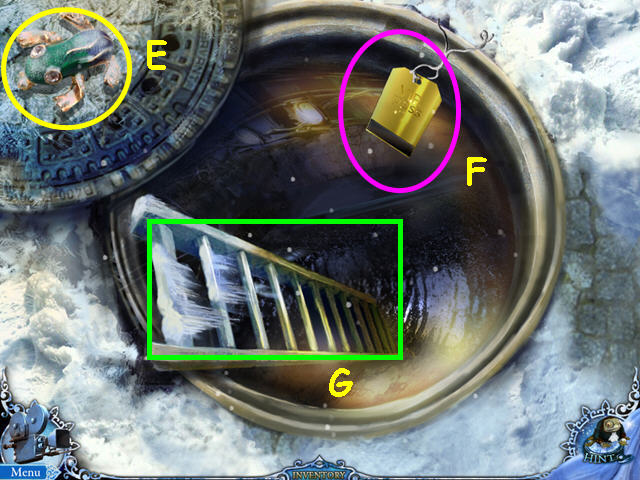
- Take the 8 of 60 SECRET FROG (E).
- Take the KEY CARD (F).
- Note the ladder down (G).
- Exit the close-up.

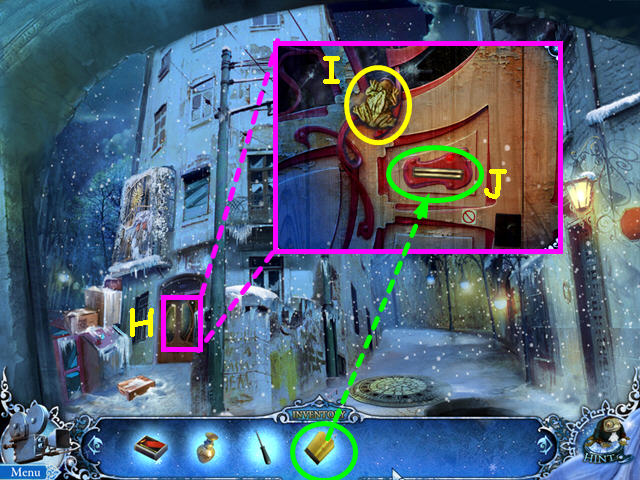
- Select the double doors (H).
- Take the 9 of 60 SECRET FROGS (I).
- Use the KEY CARD on the slot (J).
- Enter the stairwell.

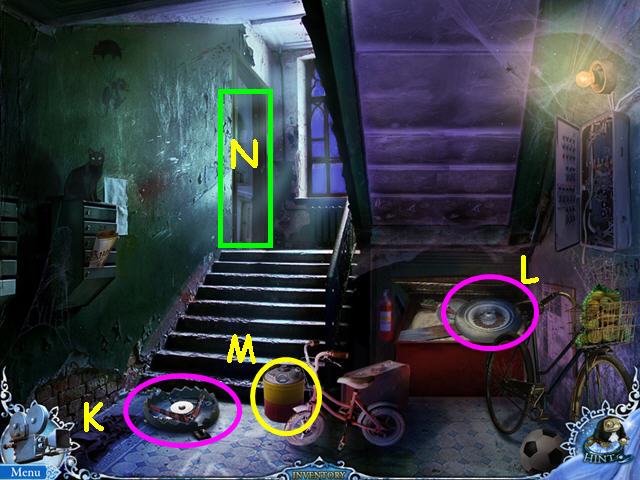
- Note the trap (K).
- Note the tire (L).
- Take the GASOLINE TANK (M).
- Walk to the left into the kitchen (N).

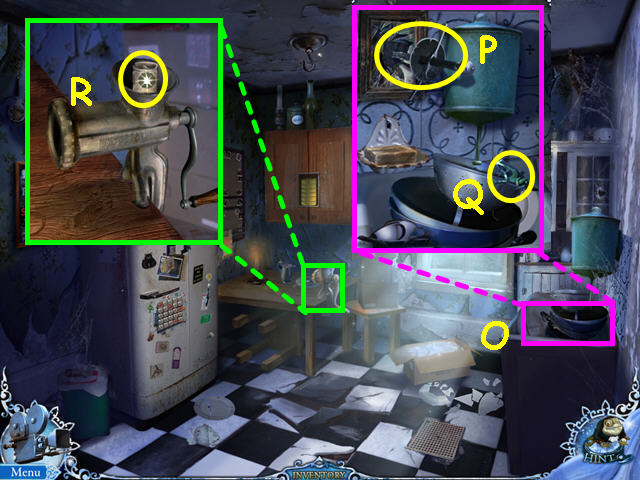
- Look at the sink (O).
- Take the SWORD HILT (P).
- Take the 10 of 60 SECRET FROG (Q).
- Look at the meat grinder and take the 1 DOLLAR (R).
- Walk down twice to exit the building.

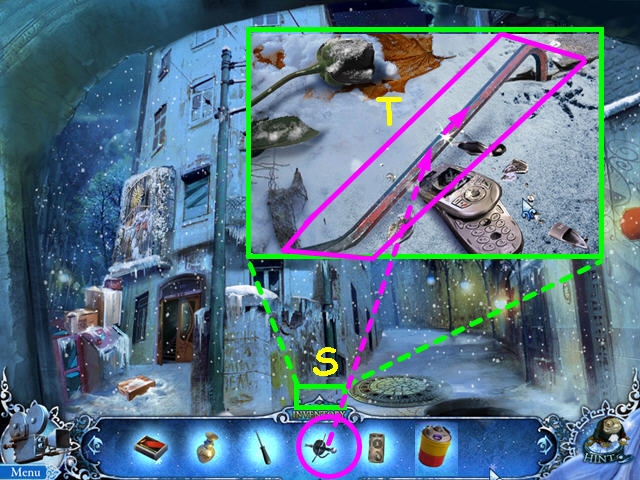
- Look at the close-up of the crowbar (S).
- Use the SWORD HILT to get the CROWBAR (T).
- Exit the close-up and walk down twice to the minor square.
- Walk forward to the watchmaker’s door.

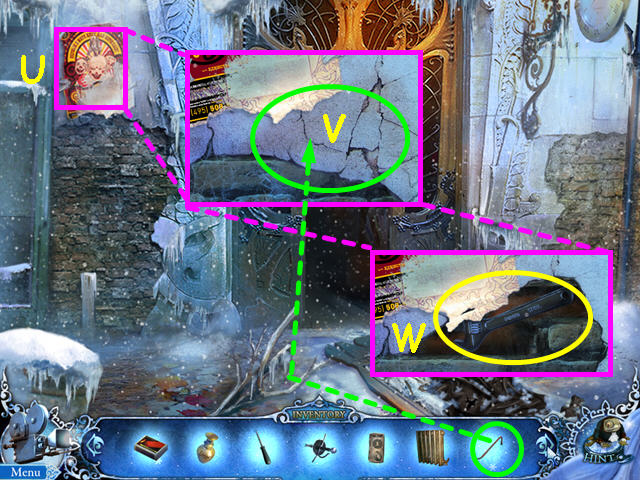
- Look at the close-up of the plaster (U).
- Use the CROWBAR on the plaster (V).
- Take the WRENCH (W).
- Walk down twice to the city entrance.
- Walk to the right, then enter the cafe.
- Walk to the pinball area.

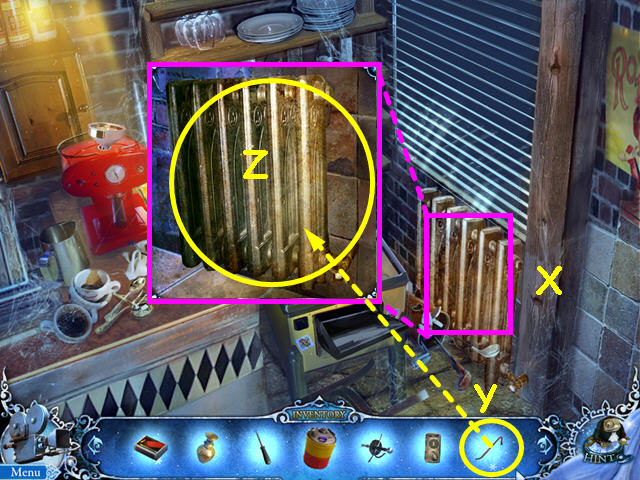
- Look at the close-up of the radiator (X).
- Use the CROWBAR to remove the radiator from the wall (Y).
- Take the RADIATOR (Z).
- Walk down to exit.
- After the cut-scene, walk down once more.

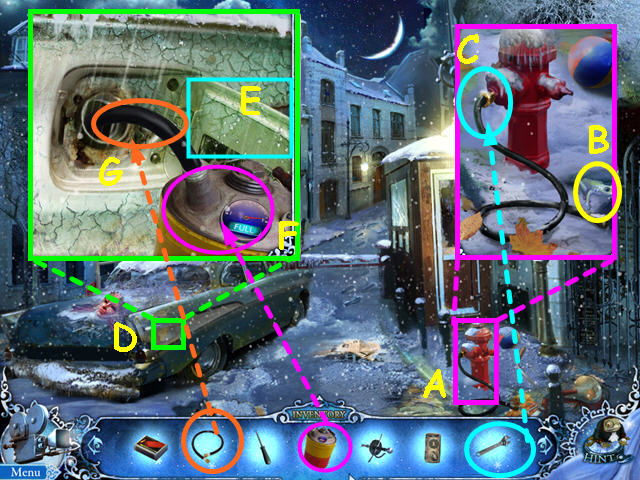
- Look at the close-up of the hydrant (A).
- Take the 11 of 60 SECRET FROG (B).
- Use the WRENCH to remove the HOSE (C).
- Look at the close-up of the car’s fuel tank (D).
- Click on the lid to open the tank (E).
- Place the GASOLINE TANK near the fuel tank (F).
- Place the HOSE on the tank (G).
- The FULL GASOLINE TANK will go automatically into your inventory.
- Walk forward twice to the pharmacy door.

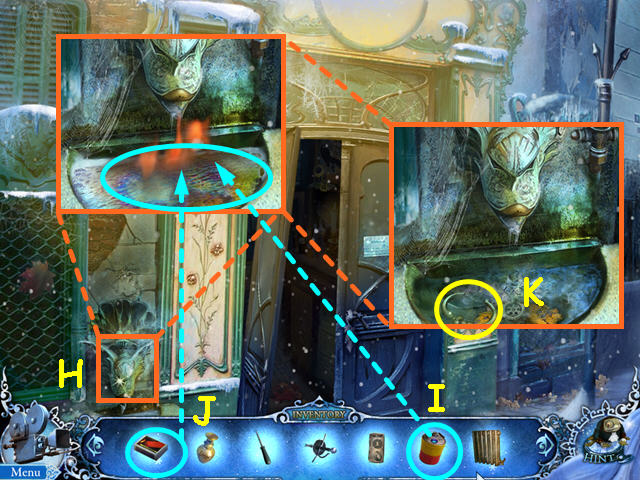
- Look at the close-up of the fountain (H).
- Use the FULL GASOLINE TANK on the frozen water (I).
- Use the MATCHES to light the gasoline (J).
- Take the LION RING (K).
- Walk down, then go up to the gate area.

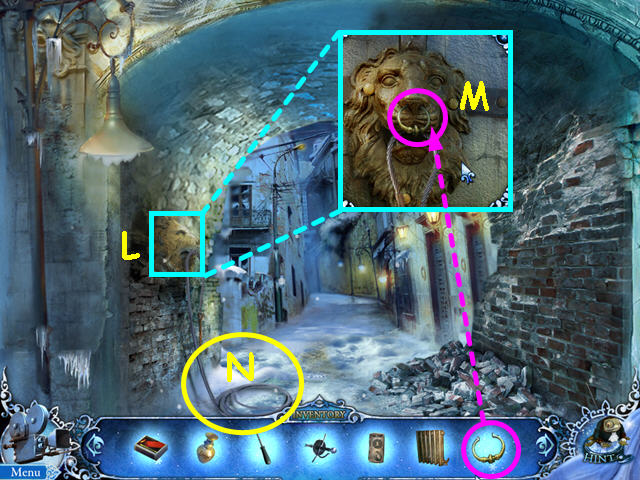
- Look at the close-up of the lion head (L).
- Use the LION RING on the lion head (M).
- Take the METAL CABLE (N).
- Walk forward once, then enter the building on the left.
- Walk up the stairs to the old kitchen.

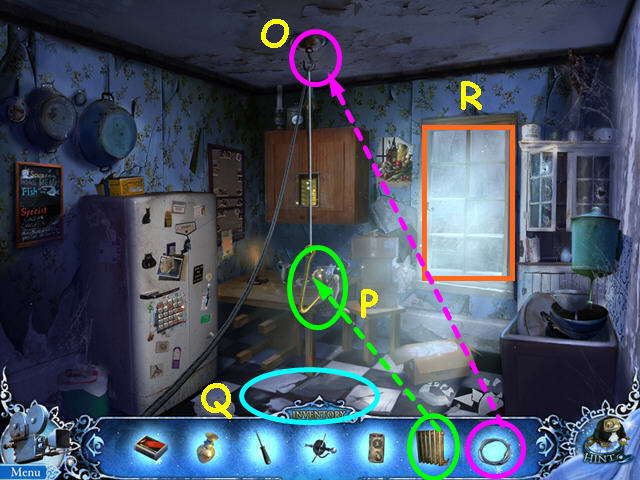
- Use the METAL CABLE on the hook in the ceiling (O).
- Place the RADIATOR on the hanging hook (P).
- Try to go down through the hole in the floor (Q).
- Follow the masked man out the window (R).

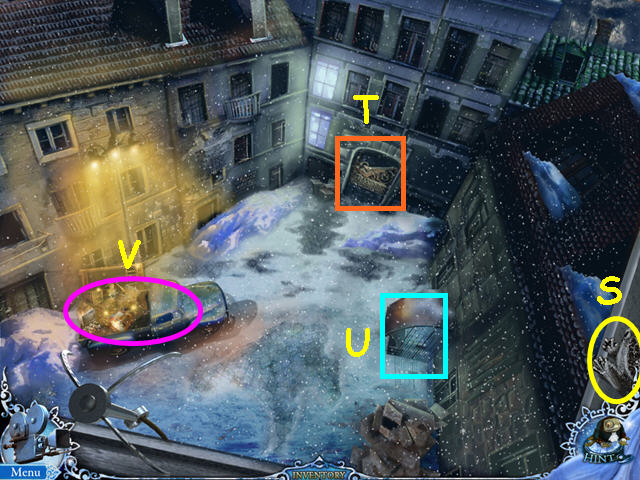
- Take the 12 of 60 SECRET FROGS (S).
- Note the Dragon gate (T).
- Note the basement entrance (U).
- Select the truck for a Hidden Object Scene (V).

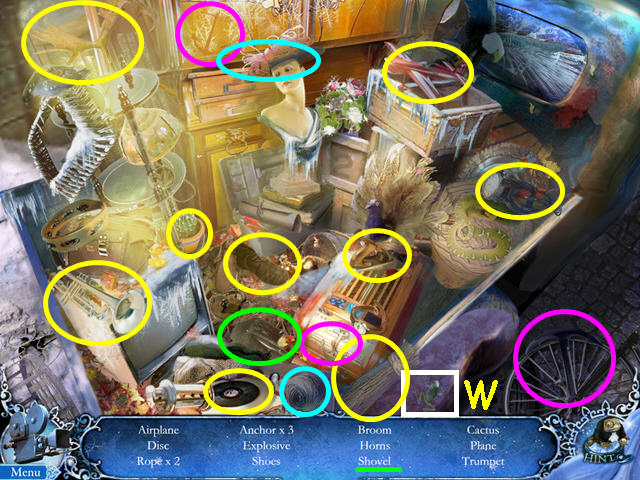
- Locate all the items on the list.
- Take the 13 of 60 SECRET FROGS (W).
- You will earn the SHOVEL.
- Walk down 3 times to the crossroads.
- Enter the manhole and go down the ladder.

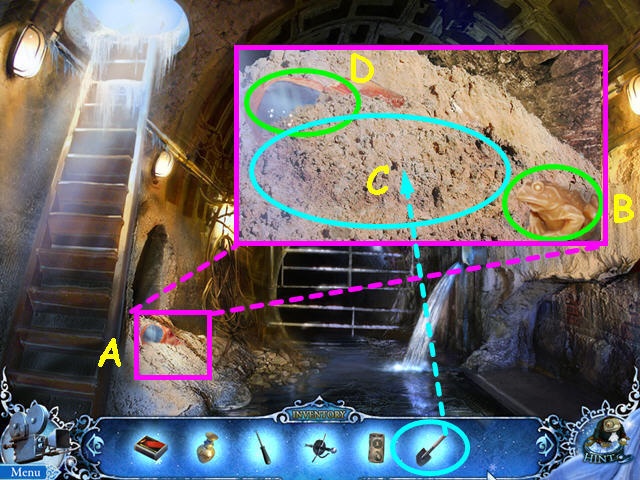
- Look at the pile of dirt (A).
- Take the 14 of 60 SECRET FROG (B).
- Use the SHOVEL to remove the dirt (C).
- Take the PROTECTION SUIT (D).
- Climb up the ladder and exit the manhole.
- Enter the building and return to the kitchen.
- Climb down through the hole in the floor.

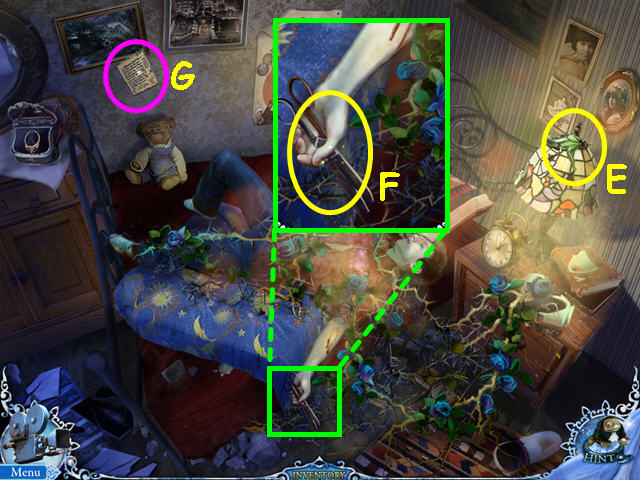
- Use the PROTECTION SUIT anywhere in the scene.
- Take the 15 of 60 SECRET FROG (E).
- Look at the student’s hand and take the SCISSORS (F).
- Read the notes (G).
- Exit the room then go out the window.
- Select the basement entrance on the right.

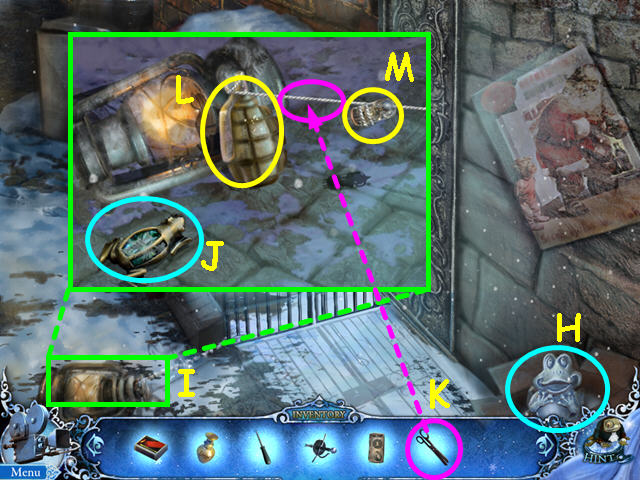
- Take the 16 of 60 SECRET FROG (H).
- Look at the close-up of the lantern (I).
- Take the 17 of 60 SECRET FROG (J).
- Use the SCISSORS to cut the string (K).
- Take the GRENADE (L).
- Take the LAMP (M).
- Walk down twice to return to the kitchen.

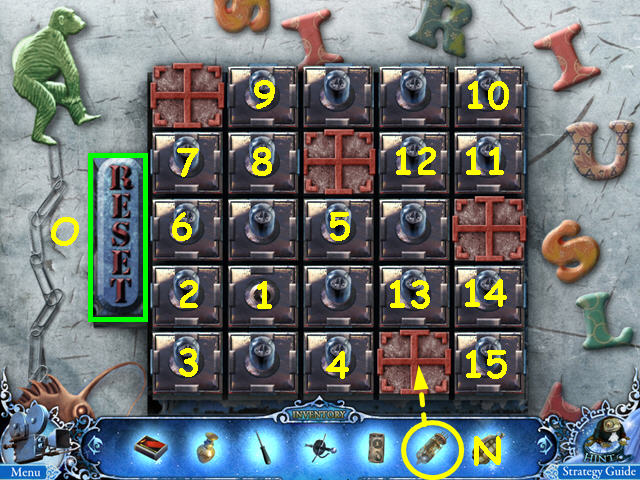
- Look at the mini-game on the refrigerator.
- Place the LAMP into the grid to activate the mini-game (N).
- The object is to switch on all the lights.
- Click on a lamp to turn it on- the others in the same row or column will half-light.
- Your next move must be one of the half-lit lamps.
- Weave a path through the grid so all lamps are lit.
- Press the RESET button if you make a mistake (O).
- Press the lamps in numerical order for the solution (1-15).

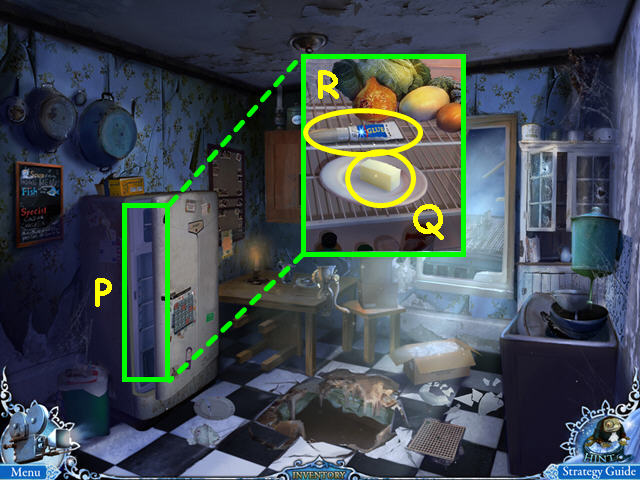
- Look inside the refrigerator (P).
- Take the BUTTER (Q).
- Take the GLUE (R).
- Walk down twice to the crossroads, then go forward to the lane.

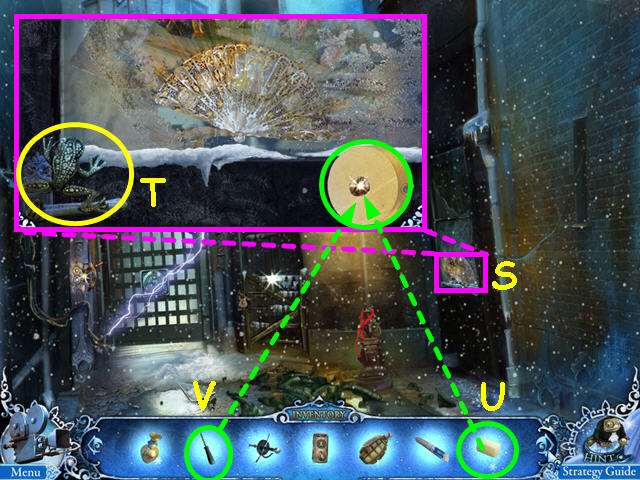
- Look at the close-up of the window on the right (S).
- Take the 18 of 60 SECRET FROG (T).
- Use the BUTTER on the screw (U).
- Use the SCREWDRIVER to remove the screw (V).
- The DISC will go automatically into your inventory.
- Exit the close-up and walk down.
- Enter the building on the left and go up to the kitchen.

- Look at the close-up of the cabinet (W).
- Use the DISC on the stack of discs to trigger a mini-game (X).

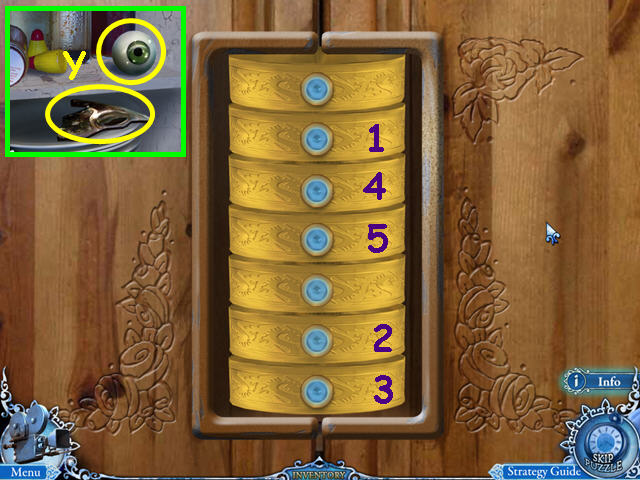
- The object of this mini-game is to rotate the discs so that all the lights are showing.
- Click on a disc to rotate it and 2 others.
- Hover your mouse over a disc to see what other discs will be affected.
- Click on the discs in numerical order (1-5).
- Look in the cabinet and take the EYE and the PUZZLE PIECE (Y).
- Walk down twice to return to the crossroads.


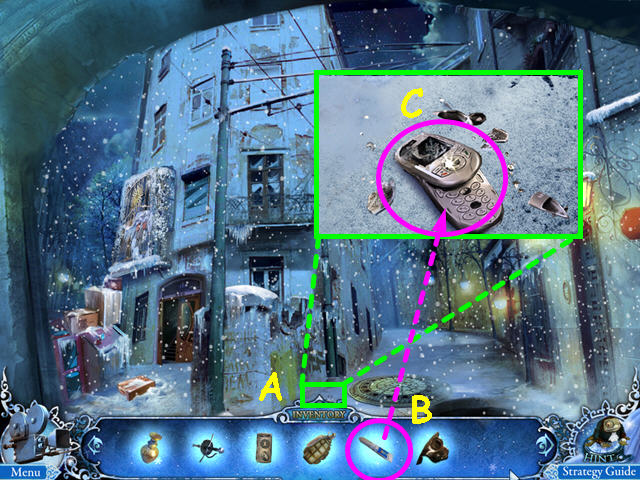
- Look at the close-up of the broken cell phone (A).
- Use the GLUE on the phone (B).
- Take the CELL PHONE (C).
- Enter the building on the left and walk up to the kitchen.
- Climb down the hole in the floor.

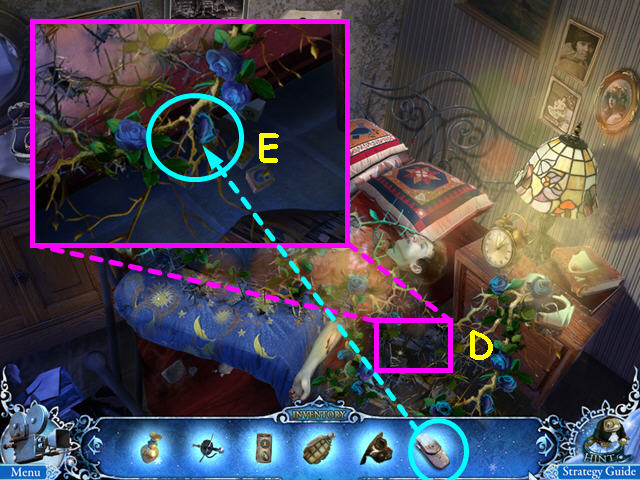
- Look under the bed (D).
- Use the CELL PHONE to light under the bed (E).
- Select under the bed for a Hidden Object Scene.

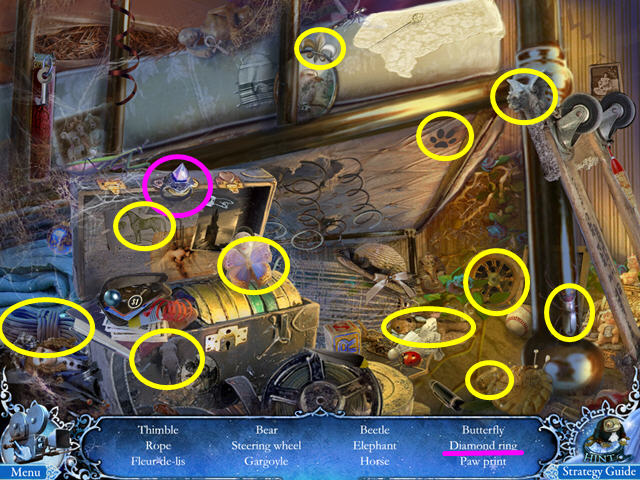
- Locate all the items on the list.
- You will earn the DIAMOND RING.
- Walk down 3 times, then go forward to the lane.

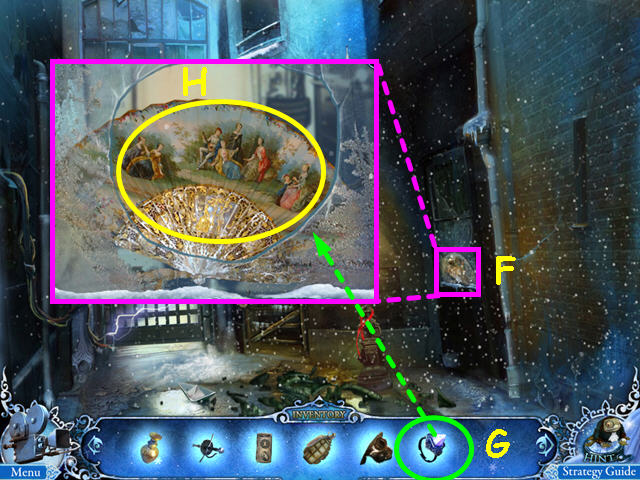
- Look at the window on the right (F).
- Use the DIAMOND RING to cut a hole in the glass (G).
- Take the FAN (H).
Chapter 4: Masked Gunman

- Walk down, then enter the building on the left.
- Walk up the stairs and go out the window.
- Walk to the Dragon Gate.
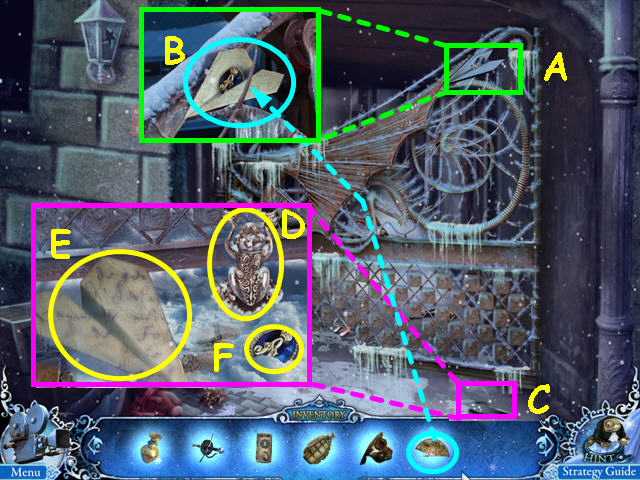
- Look at the paper airplane stuck in the gate (A).
- Use the FAN on the airplane (B).
- Look at the paper airplane on the ground (C).
- Take the 19 of 60 SECRET FROG (D).
- Take the PAPER AIRPLANE (E).
- Take the BROOCH (F).
- Walk down twice to return to the kitchen.
- Climb down the hole in the wall.

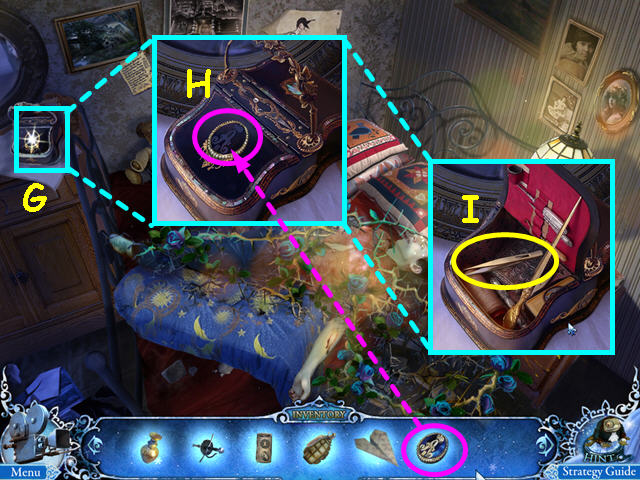
- Look at the sewing box on the left (G).
- Use the BROOCH on the box (H).
- Take the TWEEZERS (I).
- Walk down 5 times to return to the minor square.
- Walk forward and enter the pharmacy.

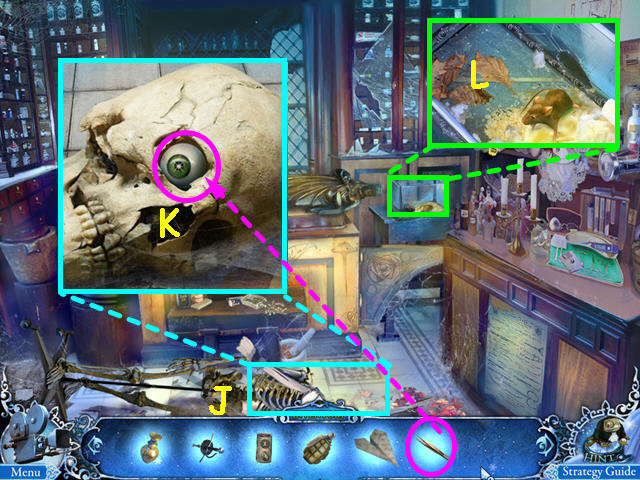
- Look at the close-up of the skeleton’s skull (J).
- Use the TWEEZERS to get the EYE (K).
- Note the rose is missing from the mouse cage (L).
- Walk down twice, then go forward twice to enter the watchmaker’s shop.

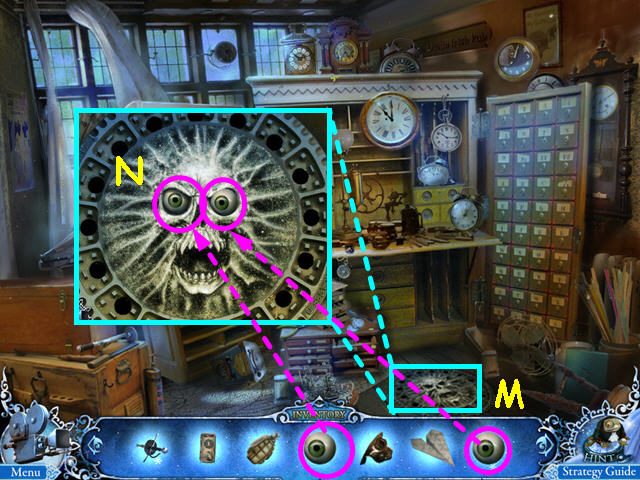
- Look at the hatch on the floor (M).
- Place the 2 EYES into the sockets (N).
- Opening the hatch will trigger a mini-game.

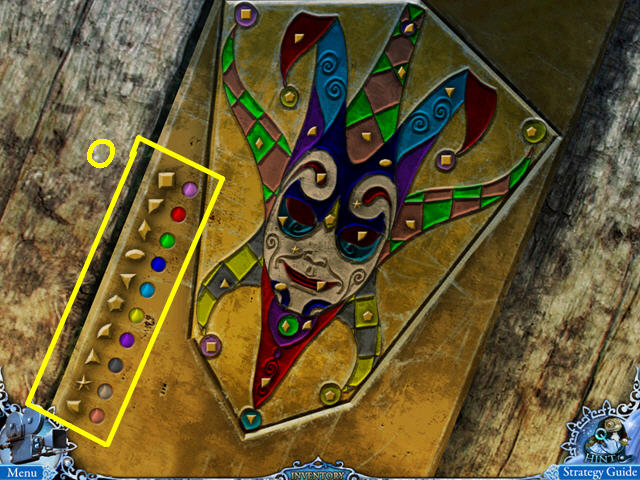
- The object of this mini-game is to color the mask.
- Click on the color paint next to a shape (O), then click on the same shape in the mask.
- Color the whole mask to reveal a Hidden Object Scene under the hatch.

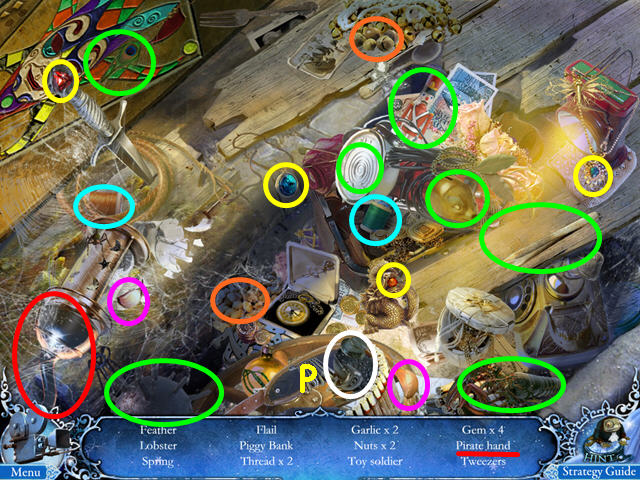
- Locate all the items on the list.
- Take the 20 of 60 SECRET FROG (P).
- You will earn the PIRATE HAND.
- Walk down 3 times to the city entrance, then climb the ladder and enter the sheriff’s room.

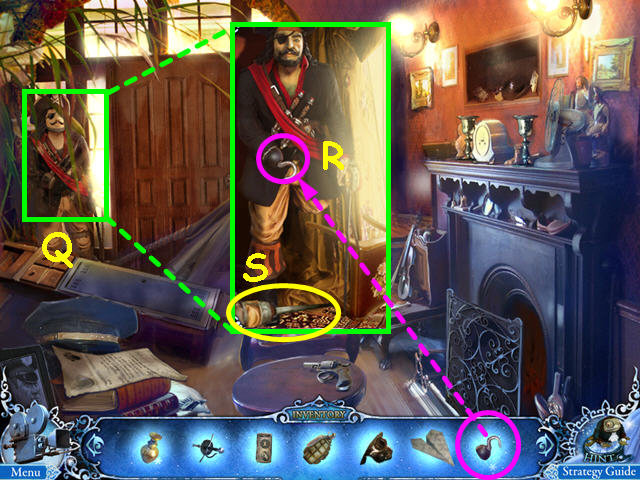
- Look at the close-up of the pirate (Q).
- Place the PIRATE HAND on the pirate (R).
- Take the PEG LEG once it falls (S).
- Walk down, then go forward 3 times through the gate to the crossroads.
- Enter the building on the left.

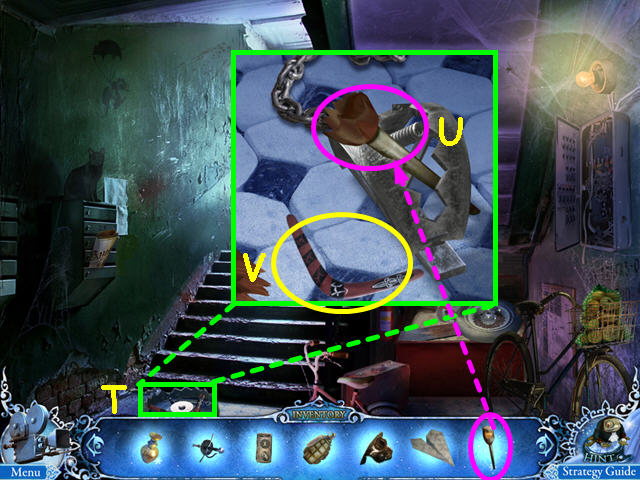
- Look at the close-up of the trap (T).
- Use the PEG LEG in the trap (U).
- Take the BOOMERANG (V).
- Walk down to exit the building, then enter the manhole and climb down the ladder.

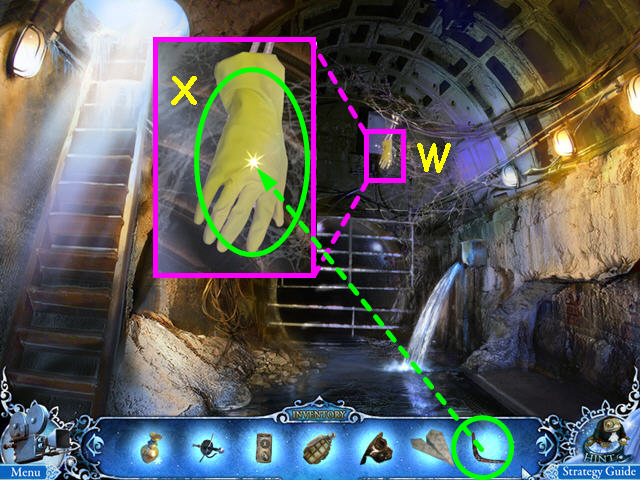
- Look at the glove hanging from the ceiling (W).
- Use the BOOMERANG on the glove (X).
- The GLOVE will go automatically into your inventory.
- Climb up the ladder and exit the manhole.
- Walk forward to the lane.

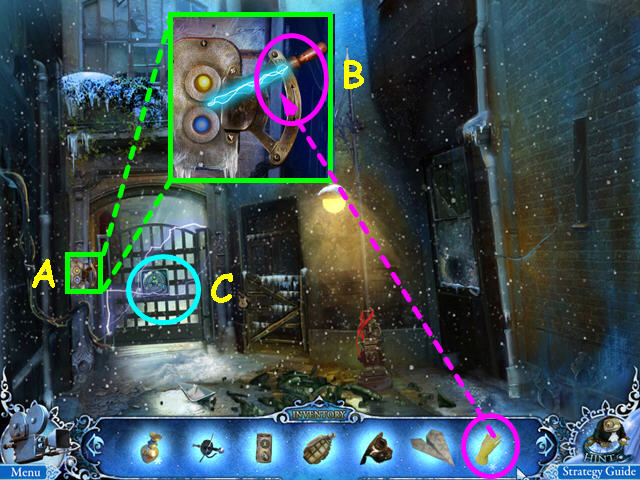
- Look at the electrical switch (A).
- Use the GLOVE on the switch (B).
- Look at the gate for a mini-game (C).

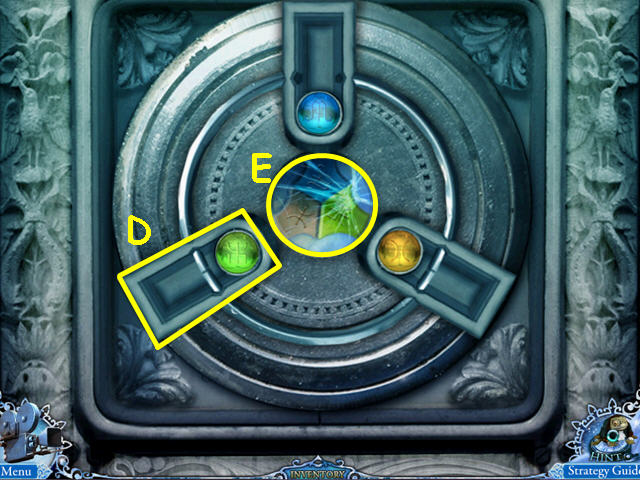
- The object of this mini-game is to move the colored balls to the inner slot of each arm.
- Click on the outer arms (D) to move them and click on the inner piece (E) to rotate it as well.
- Rotate the following sections: outer-inner-outer-inner-outer.
- Walk forward through the gate.

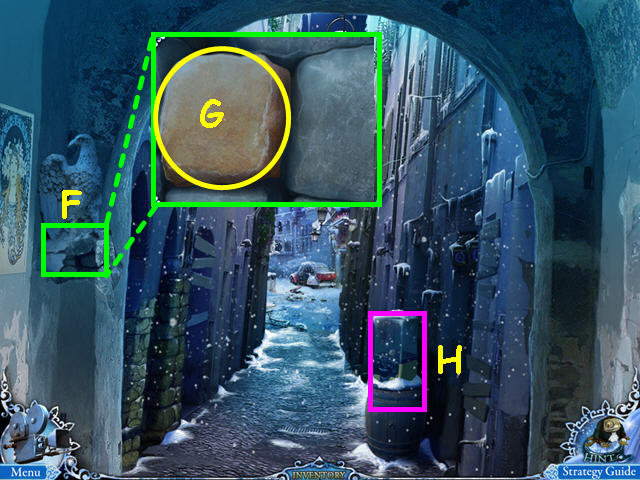
- Look at the eagle on the left (F).
- Take the SANDSTONE (G).
- Note the vending machine on the right (H).
- Walk forward.

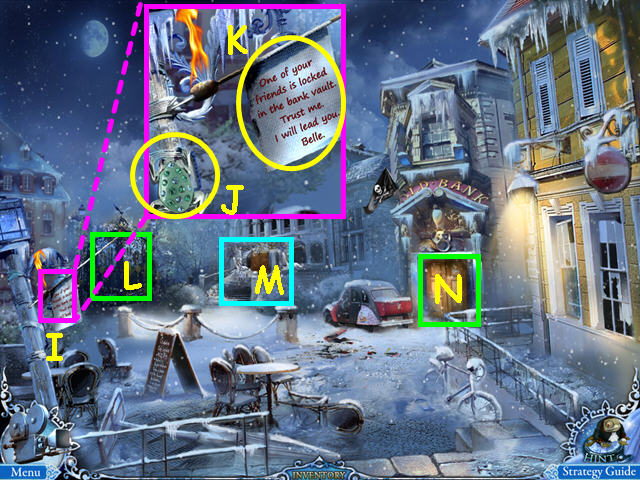
- Click anywhere on the screen.
- Look at the flaming arrow (I).
- Take the 21 of 60 SECRET FROG (J).
- Read the note (K).
- Note the Oak Alley Gate (L).
- Note the Palace entrance (M).
- Walk to the bank (N).

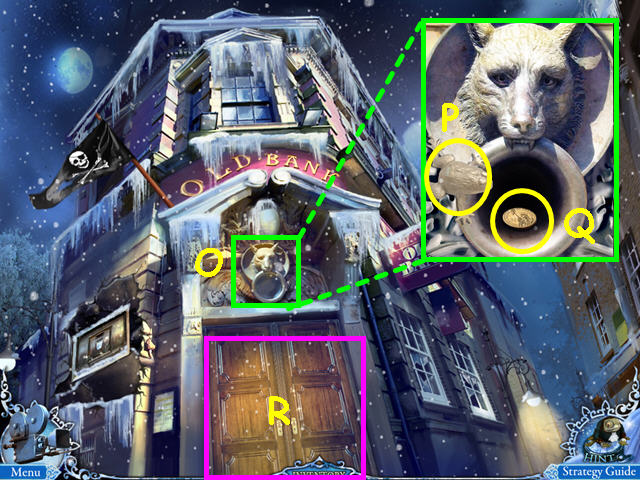
- Look at the wolf head over the door (O).
- Take the 22 of 60 SECRET FROG (P).
- Take the golden 1 DOLLAR (Q).
- Open the door and walk inside (R).

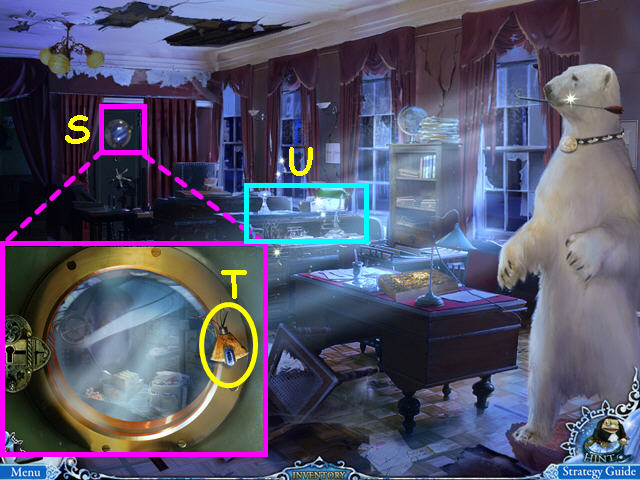
- Look at the bank vault to learn you need a key (S).
- Take the BLUE RADIO TUBE (T).
- Exit the close-up and select the desk for a Hidden Object Scene (U).

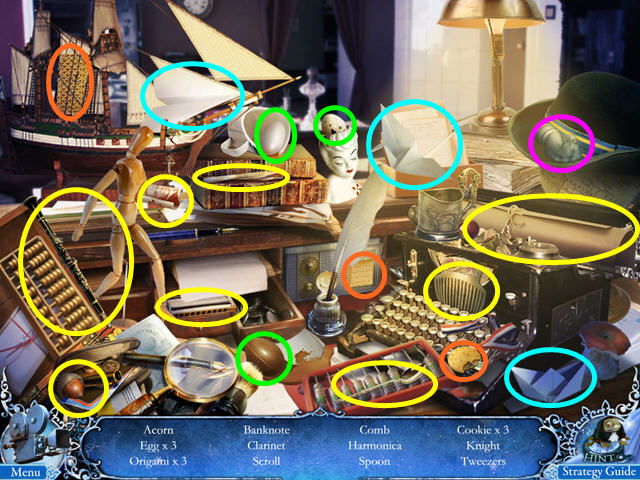
- Locate all the items on the list.
- You will earn the KNIGHT.
- Walk down 5 times to return to the crossroads.
- Enter the building on the left and go to the kitchen.

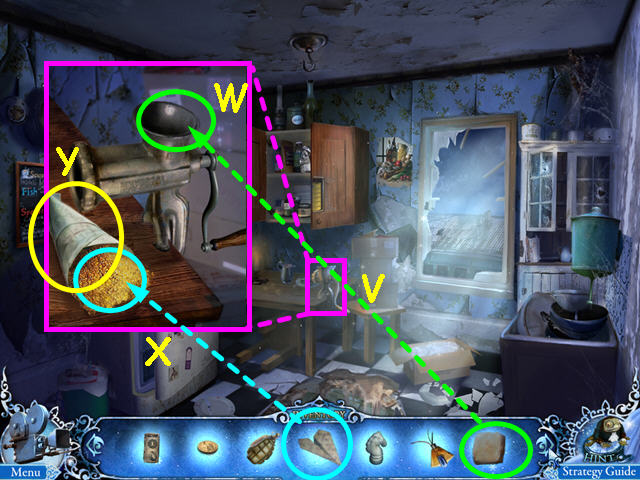
- Look at the close-up of the meat grinder (V).
- Place the SANDSTONE in the grinder (W).
- Use the PAPER PLANE on the sand (X).
- Take the CONE with SAND (Y).
- Walk down 4 times to the minor square, then enter the watchmaker’s shop.

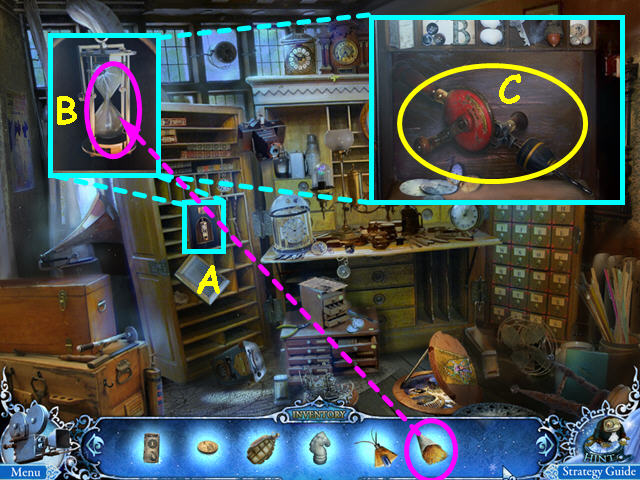
- Look at the close-up of the hourglass (A).
- Use the CONE with SAND on the hourglass (B).
- Take the DRILL (C).
- Walk down twice, then go froward through the gate 3 times.

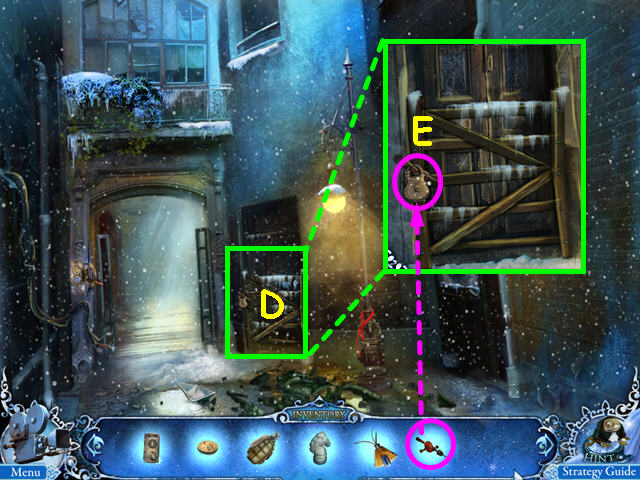
- Look at the boarded up door on the right (D).
- Use the DRILL on the lock (E).
- Enter the studio.

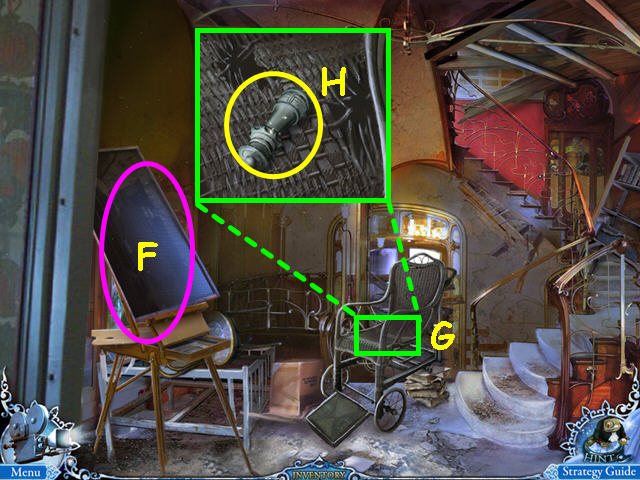
- Look at the easel to learn you need black and white paint (F).
- Look at the close-up of the wheelchair (G).
- Take the QUEEN (H).
- Exit the studio, then walk down to the crossroads.
- Enter the building on the left, then go up to the kitchen.
- Climb out the window and go to the basement entrance.

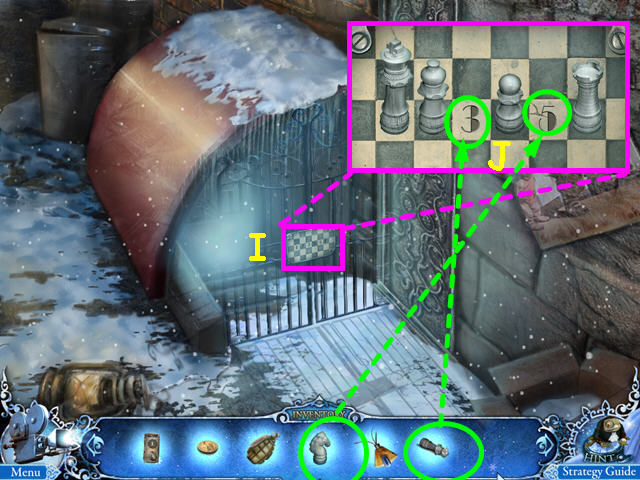
- Look at the close-up of the lock on the gate (I).
- Place the QUEEN and the KNIGHT onto the grid to trigger a mini-game (J).

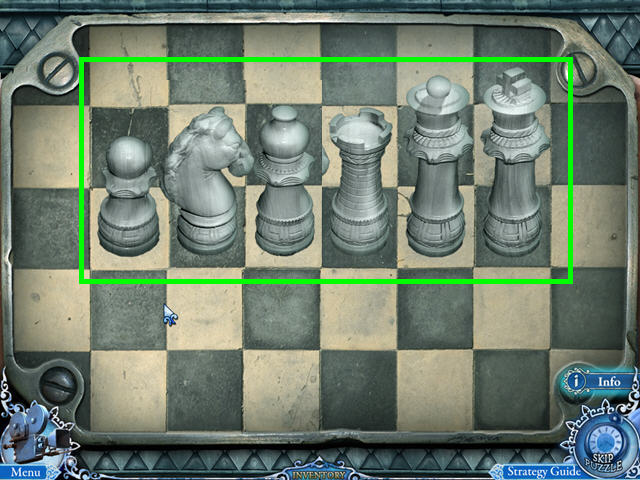
- The object of this mini-game is to place the pieces in order of importance with the lowest on the left.
- Click on two adjacent pieces to swap positions.
- The order from left to right is : pawn, knight, bishop, rook, queen, and king.

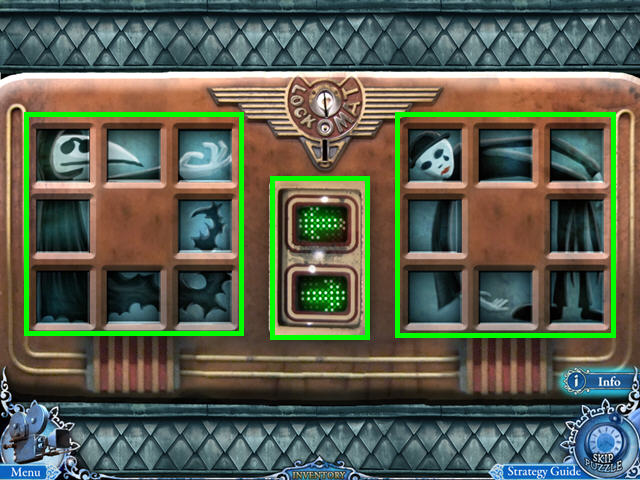
- The object of this mini-game is to swap tile to form a picture on each side.
- Click on 2 adjacent tiles to swap positions.
- Once a side is correct a green arrow will show in the center.
- Enter the garage, then the bus.

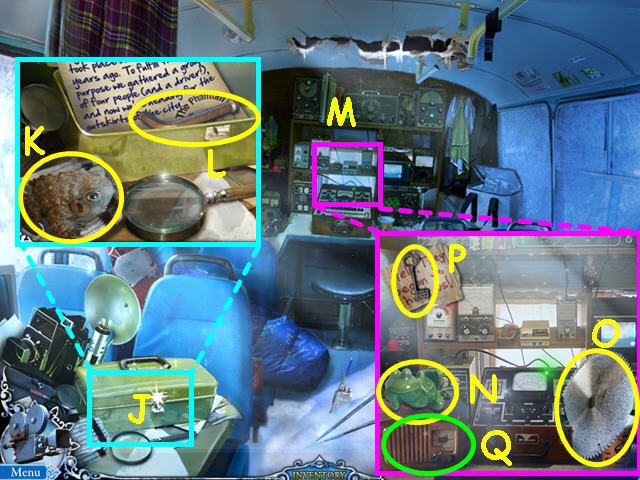
- Look at and open the green tackle box (J).
- Take the 23 of 60 SECRET FROG (K).
- Take the ALLEN WRENCH (L).
- Look at the electronics (M).
- Take the 24 of 60 SECRET FROG (N).
- Take the blade- this will automatically combine with the SAW to make the DISK SAW (O).
- Take the SAFE KEY (P).
- Note the radio (Q).
- Walk down 5 times to the stairwell.

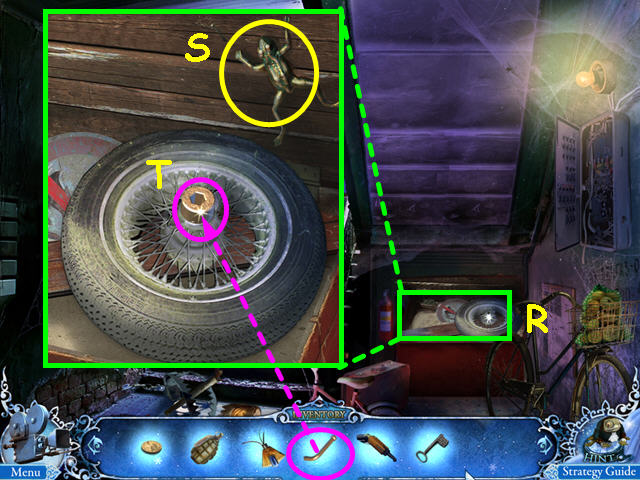
- Look at the bin under the stairs (R).
- Take the 25 of 60 SECRET FROG (S).
- Use the ALLEN WRENCH to take the WHEEL (T).
- Walk down, then go forward 3 times, then enter the bank.
- Look at the safe and use the SAFE KEY to unlock the door.

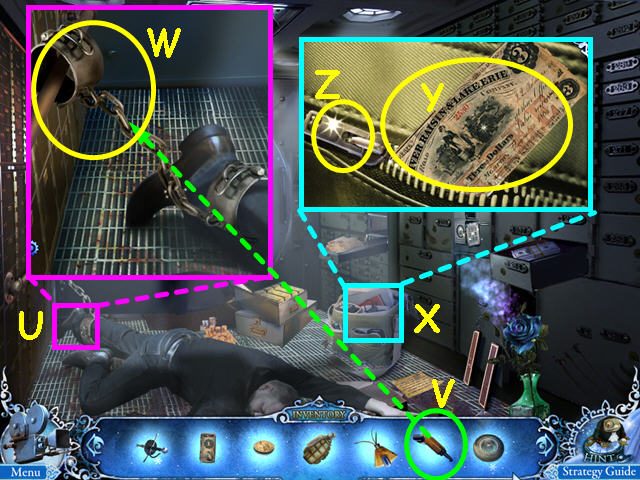
- Look at the driver’s feet (U).
- Use the DISK SAW on the shackles (V).
- Take the SHACKLES (W).
- Look at the bag (X).
- Take the 3 DOLLAR (Y).
- Take the SLIDER (Z).
- Walk down 4 times to the narrow street.

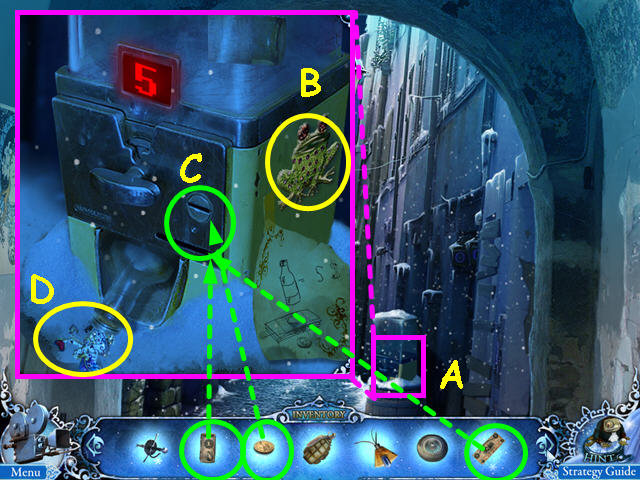
- Look at the vending machine (A).
- Take the 26 of 60 SECRET FROG (B).
- Use the 1 DOLLAR, golden 1 DOLLAR and the 3 DOLLAR on the machine (C).
- Take the ANGEL CORK (D).
- Walk down twice and enter the building on the left.
- Walk up the stairs and out the window.
- Climb to the basement entrance on the right and enter the garage, then the bus.

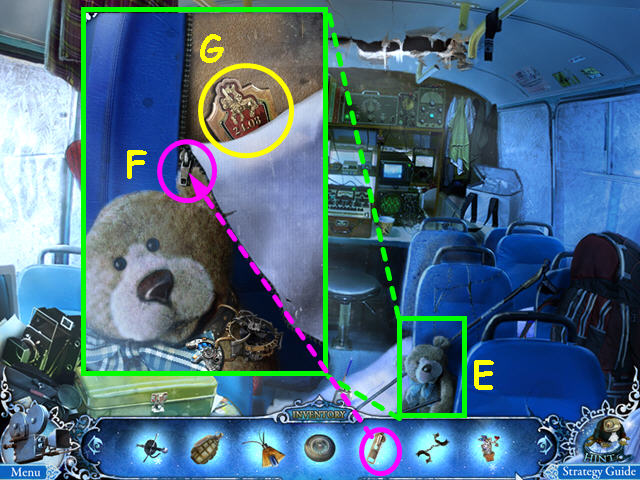
- Look at the close-up of the bear (E).
- Use the SLIDER on the zipper (F).
- Take the PANEL with DATE (G).
- Walk down 6 times, then go forward 4 times to the bank.

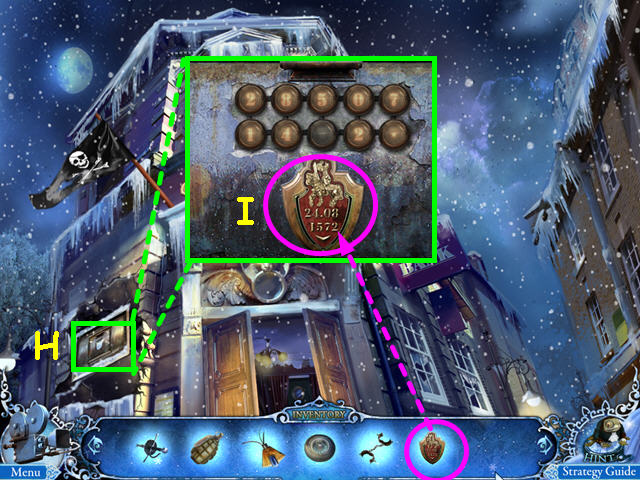
- Look at the night depository (H).
- Place the PANEL with DATE into the indentation to trigger a mini-game (I).

- The object of this mini-game is to move the numbers (J) so they match the lower panel (K).
- Click on adjacent circles to move the numbers, space, and period into position.
- Take the BIRD CORK and the WHITE EAGLE MEDAL (L).
- Walk down to the square, then go forward to the palace.


- Look at the broken bottle on the steps (M).
- Take the 27 of 60 SECRET FROG (N).
- Take the MOON CORK (O).
- Walk down 4 times to the crossroads, then enter the building on the left.
- Walk up to the kitchen and climb out the window.
- Climb to the basement entrance and enter the garage.


- Look at the machine on the left for a mini-game.
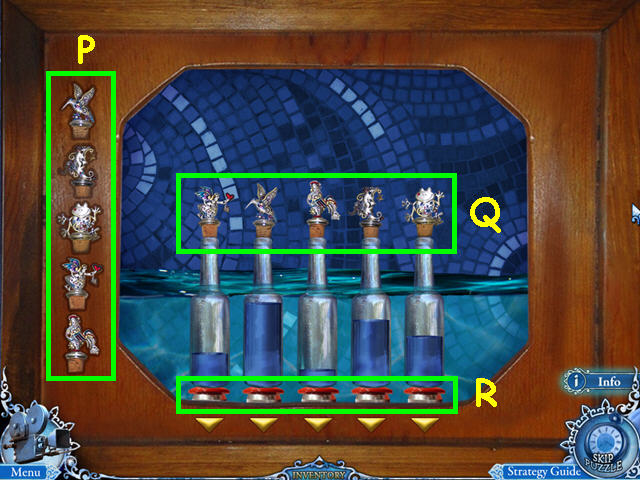
- Place the ANGEL CORK, BIRD CORK, and MOON CORK into the slots to trigger the mini-game (P).
- The object is to make the bottles push the red buttons (Q).
- Each cork has a different weight.
- Place the corks on the bottles from left to right: Angel, Bird, Mermaid, Moon, Frog (R).
- Select the machine again for a Hidden Object Scene.

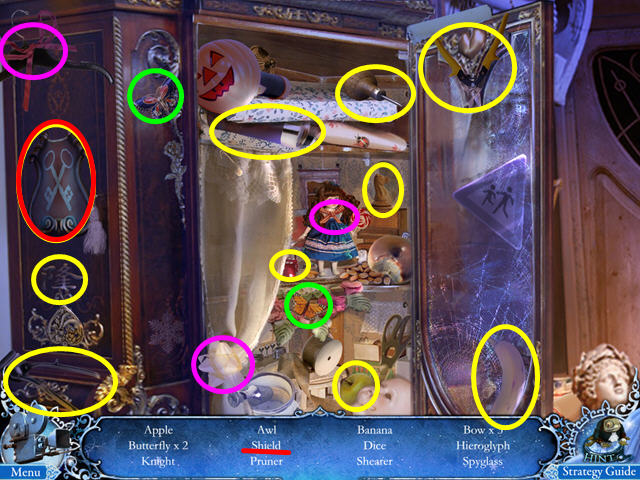
- Locate all the items on the list.
- You will earn the SHIELD.
- Walk down 5 times, then go forward 4 times to the Oak alley gate.
Chapter 5: Oak Alley

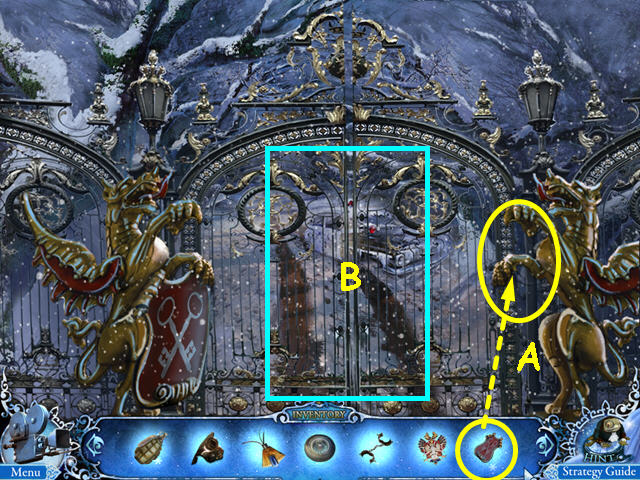
- Place the SHIELD into the right griffin’s paws (A).
- Enter the gate (B).

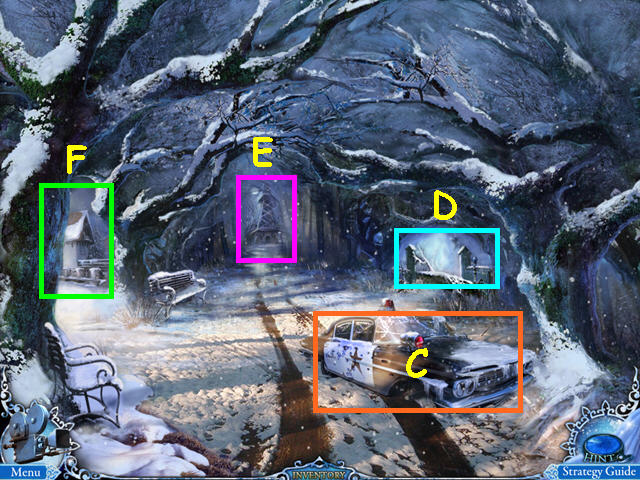
- Note the sheriff’s abandoned car (C).
- Note the path to the church (D).
- Not the way to the radio tower (E).
- Walk left to the mill (F).

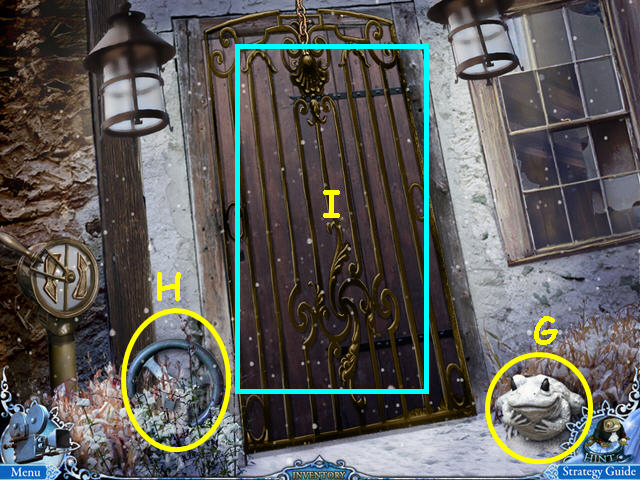
- Continue forward across the ice to the mill entrance.
- Take the 28 of 60 SECRET FROG (G).
- Take the VALVE (H).
- Note the door will only open if the mill is running (I).
- Walk down 4 times to the square, then go forward 3 times into the bank.
- Look at the back of the bank vault and use the VALVE to trigger a mini-game.

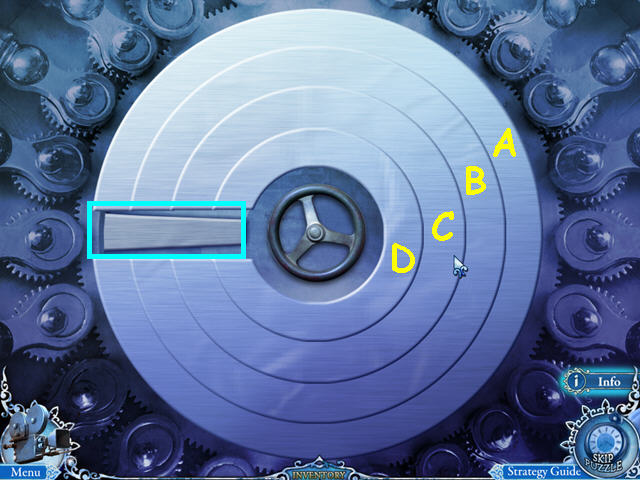
- The object of this mini-game is to rotate all the discs so that the slots are on the left and the lock bolt can exit.
- Click on disc to rotate it, 2 neighboring discs will also rotate.
- Lettering the discs A-D, make the following moves: B x6, C x6, A x2, and D x4.

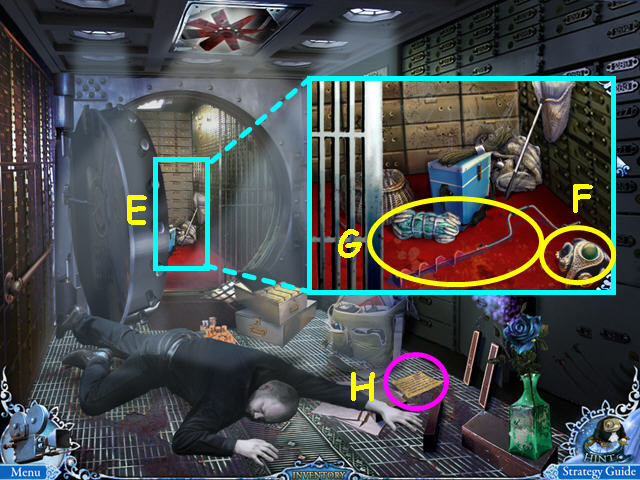
- Look inside the vault (E).
- Take the 29 of 60 SECRET FROG (F).
- Take the FISHING AUGER (G).
- Read the note (H).
- Walk down 3 times to the square, then go forward twice to Oak alley.
- Walk left to the Mill.

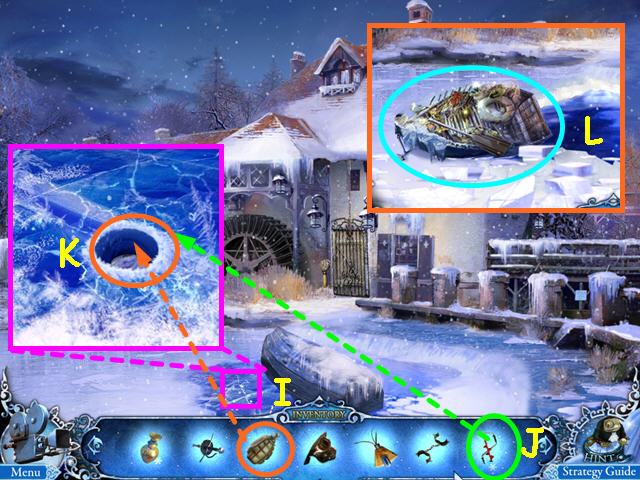
- Look at the close-up of the ice (I).
- Use the FISHING AUGER on the ice (J).
- Place the GRENADE into the hole (K).
- Select the boat for a hidden object scene (L).

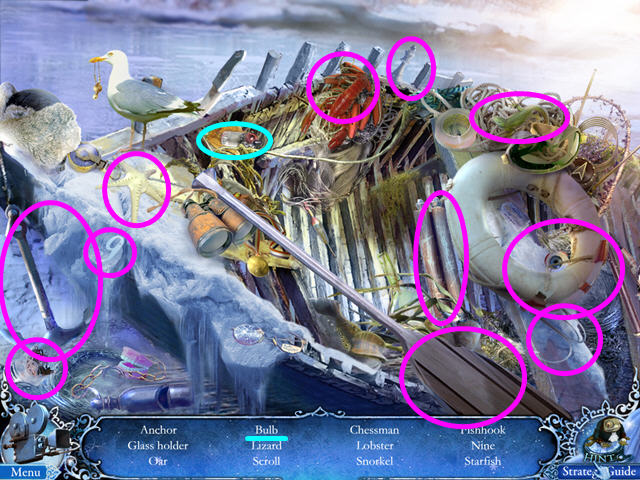
- Locate all the items on the list.
- You will earn the RED RADIO TUBE.
- Walk forward to the mill door and pull the lever on the left.
- Click on the door to open it and go inside.

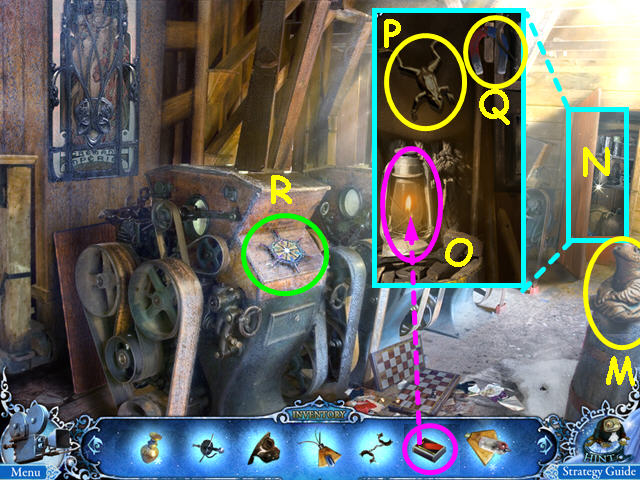
- Take the 30 of 60 SECRET FROG (M).
- Open the closet door (N).
- Use the MATCHES on the lamp (O).
- Take the 31 of 60 SECRET FROG (P).
- Take the MAGNET (Q).
- Look at the mini-game (R).

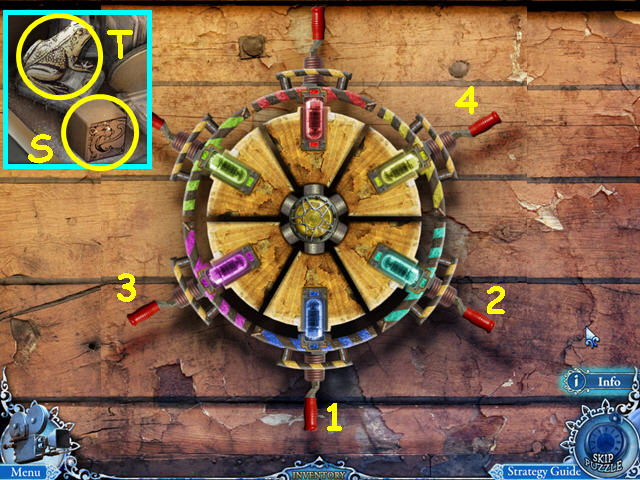
- Place the BLUE RADIO TUBE and the RED RADIO TUBE into the circle to trigger the mini-game.
- Click on the levers over the lamps to swap positions of either the lamps or the outer rings until each lamp matches the color of the outer ring.
- Some levers swap lamps, some swap outer rings, some swap both.
- Click on the levers in numerical order (1-4).
- Look inside the drawer below the mini-game.
- Take the BLOCK (S).
- Take the 32 of 60 SECRET FROG (T).
- Walk down 3 times to Oak alley, the walk forward to the radio tower.

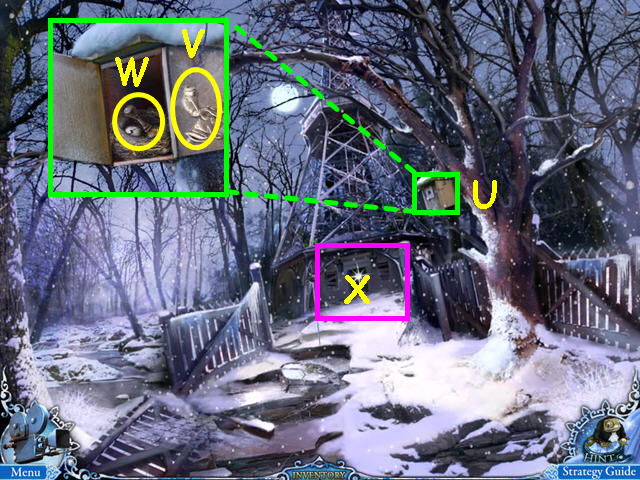
- Look at the birdhouse and click on the door (U).
- Take the 33 of 60 SECRET FROG (V).
- Take the SHIELD STAMP (W).
- Try to walk forward to the tower, but you need a weapon.
- Walk down 6 times to the crossroads and enter the building on the left.
- Walk up to the kitchen and go out the window.
- Climb down to the dragon gate.

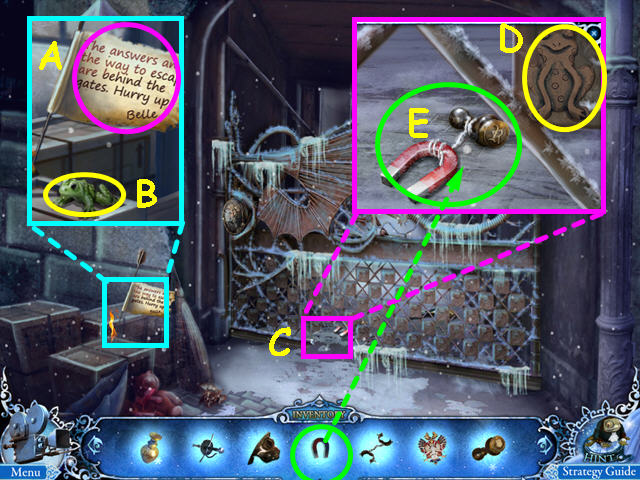
- Read the note on the arrow (A).
- Take the 34 of 60 SECRET FROG (B).
- Look at the base of the gate (C).
- Take the 35 of 60 SECRET FROG (D).
- Use the MAGNET to get the LETTER STAMP (E).
- Walk down 4 times to the crossroads, then go forward 3 times to the square.
- Walk forward to the palace and look at the front door for a mini-game.

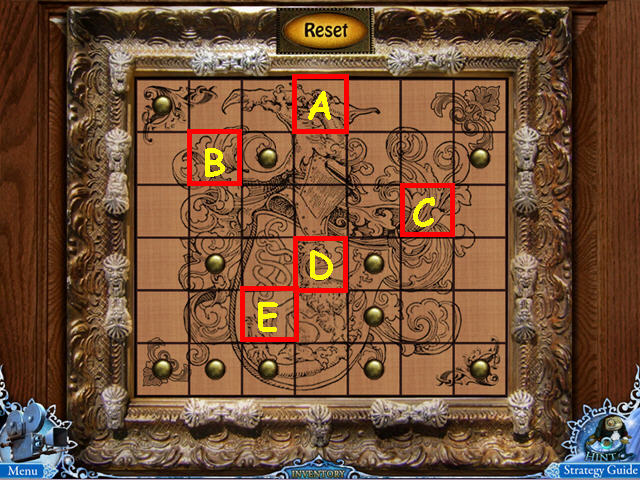
- Place the BLOCK in the center to trigger the mini-game.
- The object of this mini-game is to restore the picture.
- Click on the squares to rotate them, squares with nails are not movable.
- Each block may effect other blocks.
- Click on the following: A x3, B x3, C x3, D x3, and E x3.
- Enter the Palace.

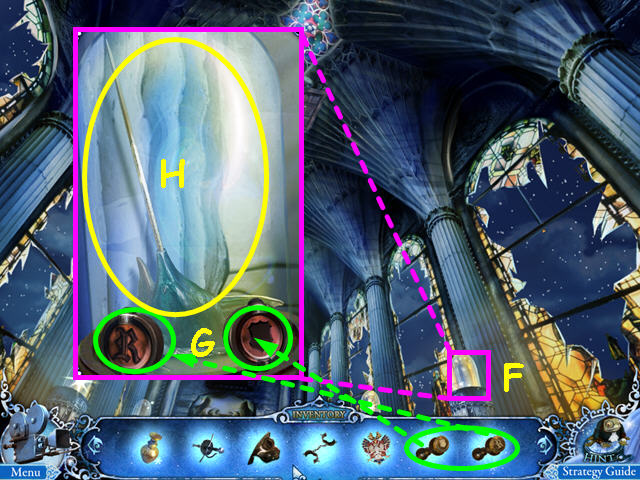
- Look at the right-hand dome (F).
- Use the LETTER STAMP and the SHIELD STAMP on the matching niches (G).
- Take the fish head (H) and it will automatically combine with the SWORD HILT to make the ASSEMBLED SWORD.
- Walk down twice, then go forward through the Oak alley gate 3 times towards the radio tower.

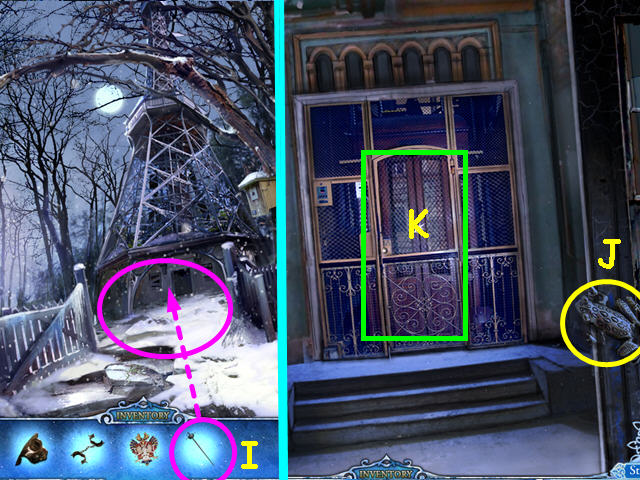
- Use the ASSEMBLED SWORD on the path by the bird house (I).
- Walk forward.
- Take the 36 of 60 SECRET FROG (J).
- Open the screen door and enter the lift (K).

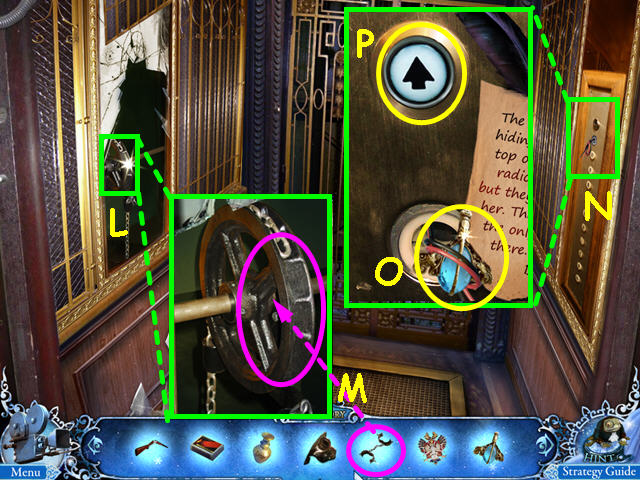
- Look at the pulley on the left (L).
- Use the SHACKLES to repair the chain (M).
- Look at the elevator control panel (N).
- Take the PIECE of DRAGONFLY BROOCH (O).
- Press the UP button (P).
- Walk forward to the radio room.

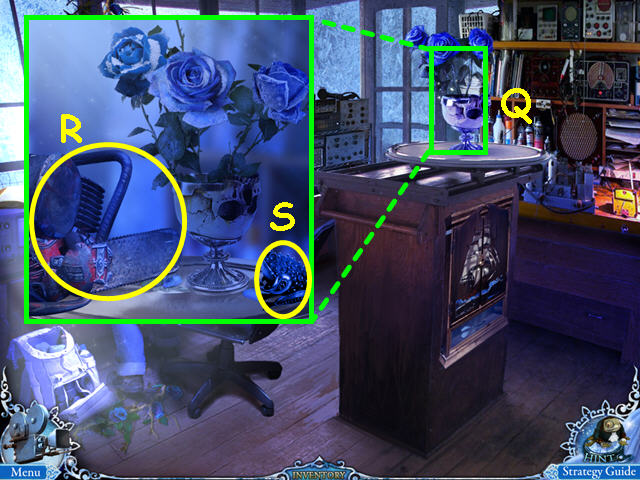
- Look at the roses (Q).
- Take the CHAINSAW (R).
- Take the 37 of 60 SECRET FROG (S).
- Exit the close-up and walk down to the elevator.
- Look at the panel and press the down button.
- Walk down 5 times to the square, then go forward to the bank entrance.

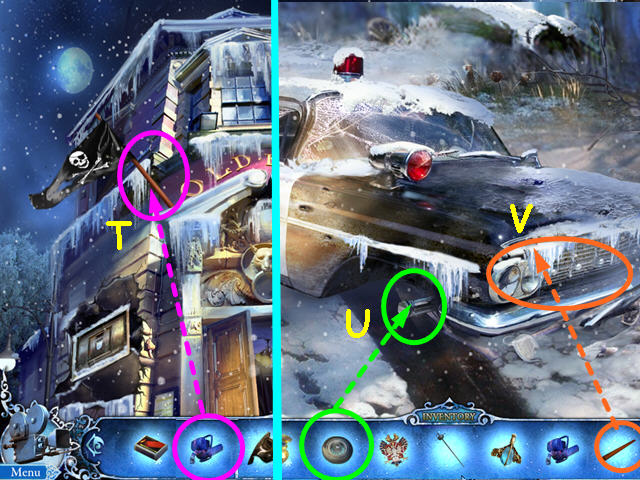
- Look at the close-up of the flagpole and use the CHAINSAW to cut down the FLAGPOLE (T).
- Walk down, then go forward twice through the Oak alley gate.
- Look at the sheriff’s patrol car.
- Place the WHEEL on the car (U).
- Use the FLAGPOLE on the car (V).

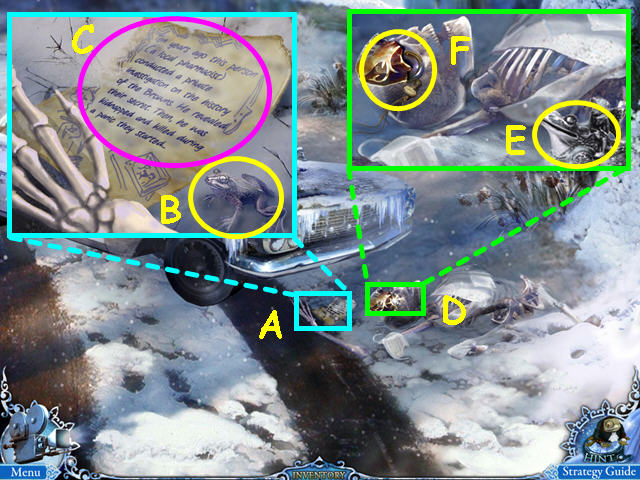
- Look at the close-up of the hand (A).
- Take the 38 of 60 SECRET FROG (B).
- Read the notes (C).
- Look at the close-up of the skull (D).
- Take the 39 of 60 SECRET FROG (E).
- Take the PUZZLE PIECE (F).
- Walk down, then go right to the church.

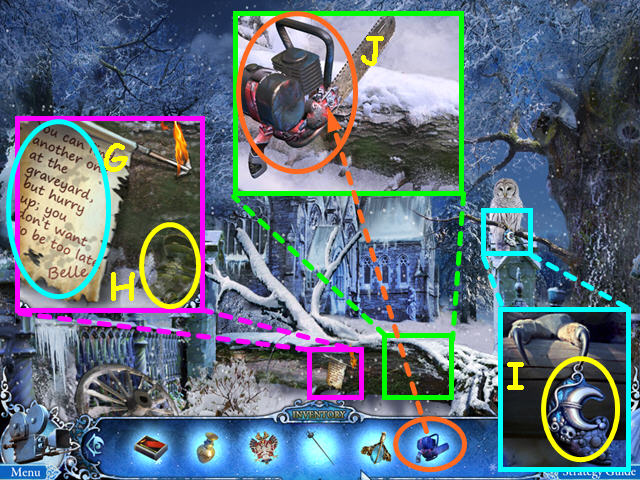
- Click anywhere on the screen.
- Read the note on the flaming arrow (G).
- Take the 40 of 60 SECRET FROG (H).
- Look at the owl and take the PART of TRINKET (I).
- Look at the log and use the CHAINSAW to cut the wood (J).
- Walk forward.

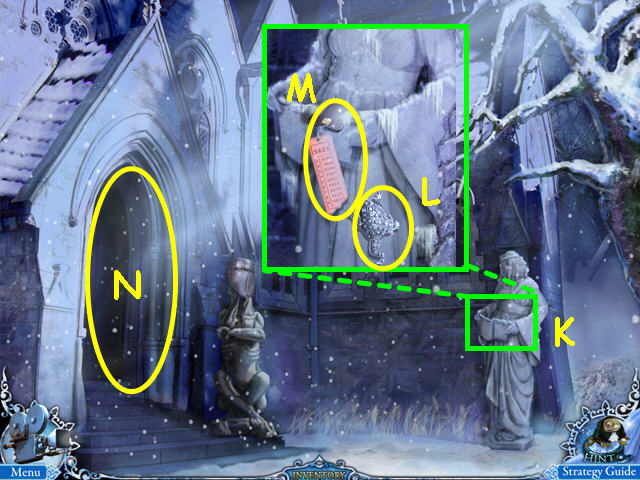
- Look at the right statue (K).
- Take the 41 of 60 SECRET FROG (L).
- Take the KEY CARD (M).
- Enter the church (N).
- Walk down the steps in the floor to the basement.

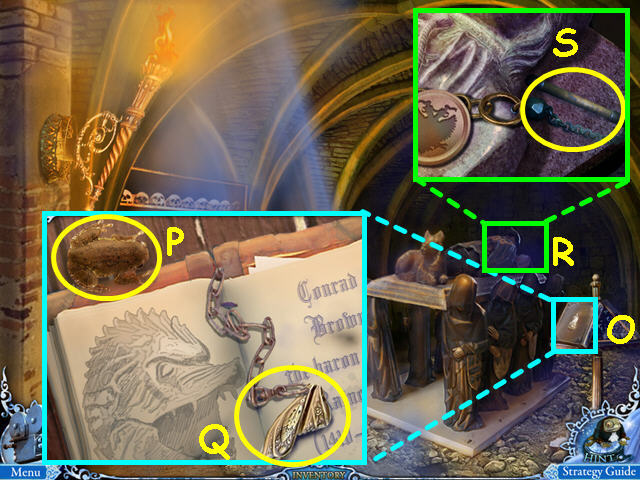
- Look at the close-up of the book on the right (O).
- Take the 42 of 60 SECRET FROG (P).
- Take the PIECE of DRAGONFLY BROOCH (Q).
- Look at the figure on the crypt (R).
- Take the MILITARY FLAIL (S).
- Walk down twice to exit the church.

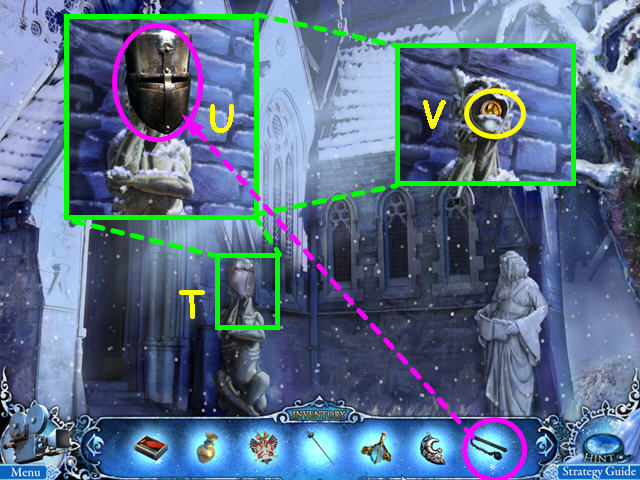
- Look at the statue on the left (T).
- Use the MILITARY FLAIL on the helmet (U).
- Take the AMBER BUTTON (V).
- Walk down 4 times to the square, then go forward into the bank twice.

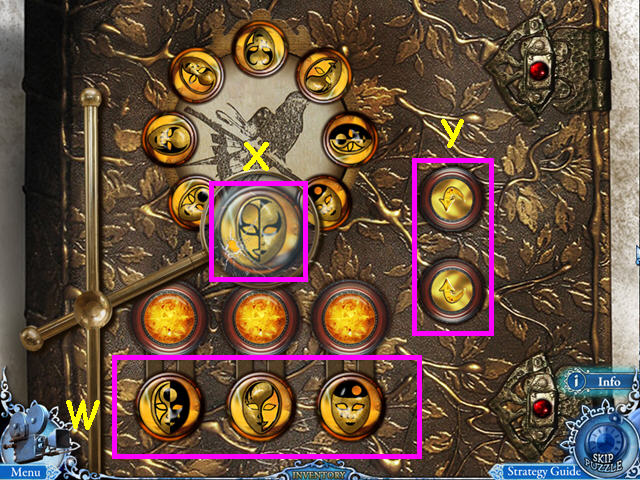
- Select the book on the desk and use the AMBER BUTTON to activate a mini-game.
- The object of this mini-game is to remove the 3 masks on the bottom (W).
- You can only remove a mask from the bottom when the button in the magnifier matches (X).
- Rotate the wheel using the arrows on the side (Y).
- The lower arrow turns the dial 4 clockwise, while the upper arrow turns it 3 counterclockwise.
- Press the upper arrow, lower arrow, then the button over the right mask.
- Press the upper arrow, lower arrow, then the button over the left mask.
- Press the upper arrow, lower arrow, then the button over the center mask.

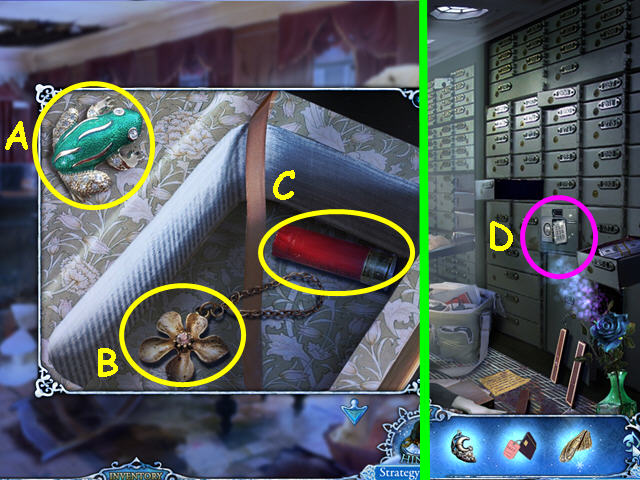
- Take the 43 of 50 SECRET FROG (A).
- Take the BRONZE FLOWER (B).
- Take the CARTRIDGE (C).
- The CARTRIDGE and the SHOTGUN will automatically combine to make the LOADED SHOTGUN.
- Enter the vault and look at the keypad on the right safety deposit boxes for a mini-game (D).

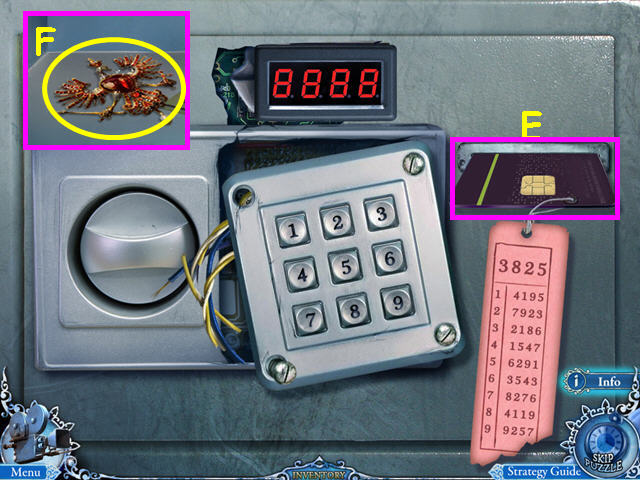
- Use the KEY CARD on the slot to activate the mini-game (E).
- The object is to enter the code using the buttons.
- Use the guide hanging from the key card to tell you how many times you need to push a button in a certain position.
- Enter: 1-1-1-8-6-7-3-1 to solve.
- Take the RUBY EAGLE MEDAL from the open box (F).
- Walk down 3 times, then go forward twice to enter the palace.

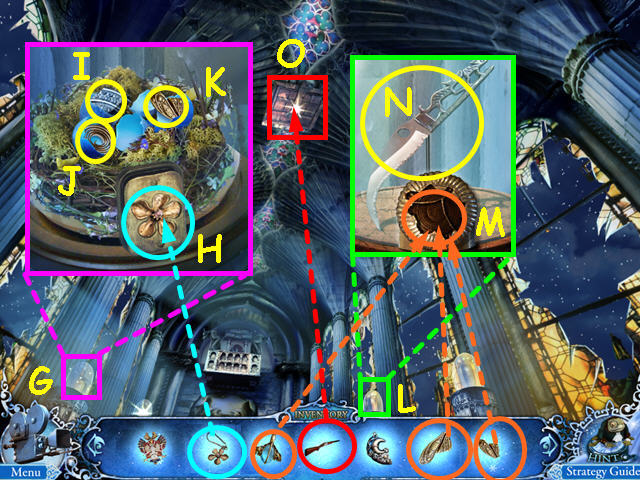
- Look at the close-up of the left glass dome (G).
- Place the METAL FLOWER into the indentation (H).
- Click on each of the 3 eggs to crack them open.
- Take the WOODEN FRAGMENT (I).
- Take the SPRING (J).
- Take the PIECE of DRAGONFLY BROOCH (K).
- Look at the close-up of the 2nd dome from the right (L).
- Place the 3 PIECES of DRAGONFLY BROOCH into the indentations (M).
- Take the HOOK KNIFE (N).
- Look at the close-up of the hatch on the ceiling and use the SHOTGUN to open it (O).
- Climb up the rope ladder.
Chapter 6: Belle

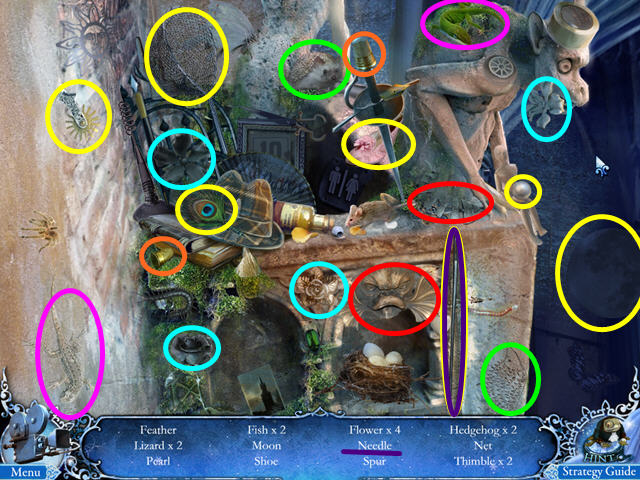
- Take the BOW (A).
- Look at the chimney (B).
- Take the 44 of 50 SECRET FROG (C).
- Note the clogged chimney (D).
- Exit the close-up and walk down 6 times.
- Enter the building on the left and walk to the kitchen.
- Climb out the window and go to the basement entrance.
- Enter the garage and walk onto the bus.

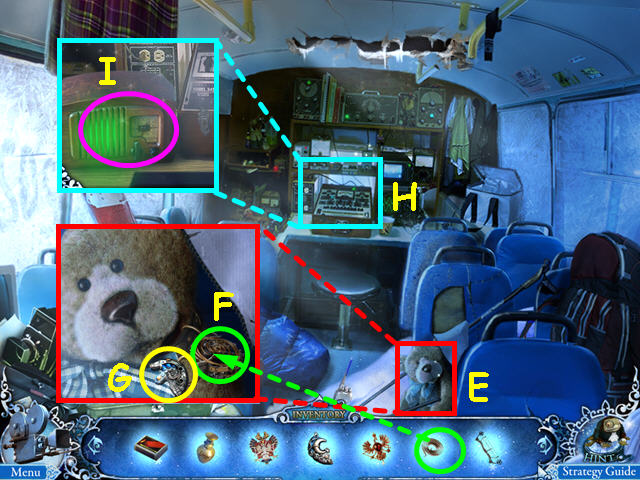
- Look at the close-up of the bear (E).
- Use the SPRING on the device (F).
- Take the PART of TRINKET (G).
- Look at the electronics in the back (H).
- Note the radio has stopped sending Morse code (I).
- Walk down 6 times to the crossroads, then go forward 5 times into the bank.
- Look at the stuffed polar bear.

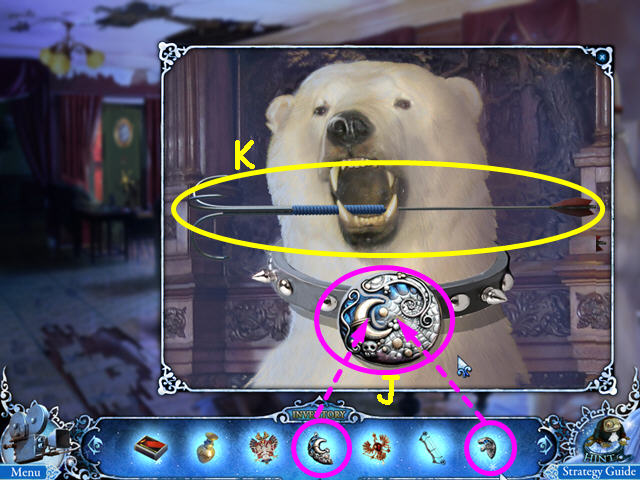
- Place the 2 PARTS of TRINKET into the collar piece (J).
- Take the ARROW (K).
- The ARROW will automatically combine with the BOW to make the BOW and ARROW.
- Walk down twice to exit the bank, then enter the palace.
- Go forward twice to the balcony area.

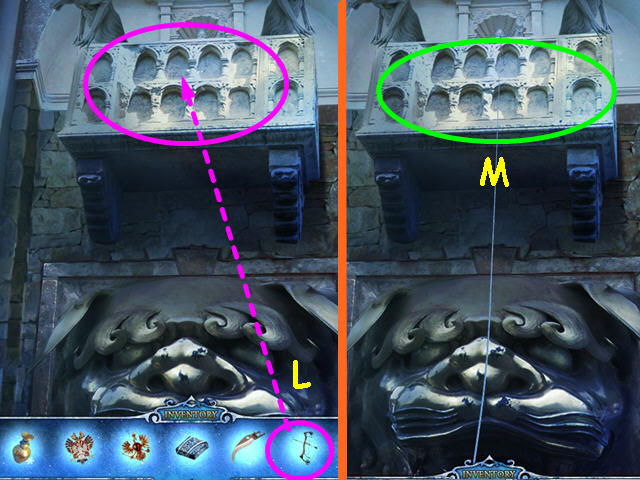
- Use the BOW and ARROW on the balcony (L).
- Select the balcony for a Hidden Object Scene (M).


- Locate all the items on the list.
- You will earn the NEEDLE.
- Walk down 3 times to the square.
- Walk forward through the Oak alley gate 5 times to the radio tower elevator.
- Look at the control panel and press the up button.
- Walk forward and look at the girl on the right.

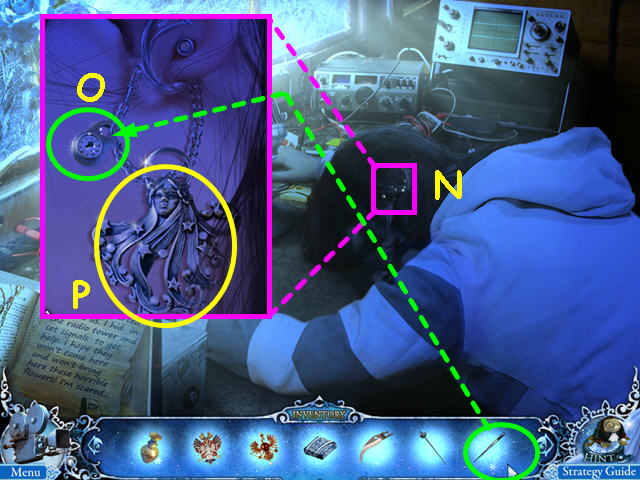
- Look at the close-up of her ear (N).
- Use the NEEDLE to pick the tiny lock (O).
- Take the EARRING (P).
- Walk down twice to the elevator, then look at the control and push the down button.
- Walk down 3 times to the sheriff’s car, then go right to the church.
- Walk forward twice to enter the church, then go to the basement using the hatch on the right.

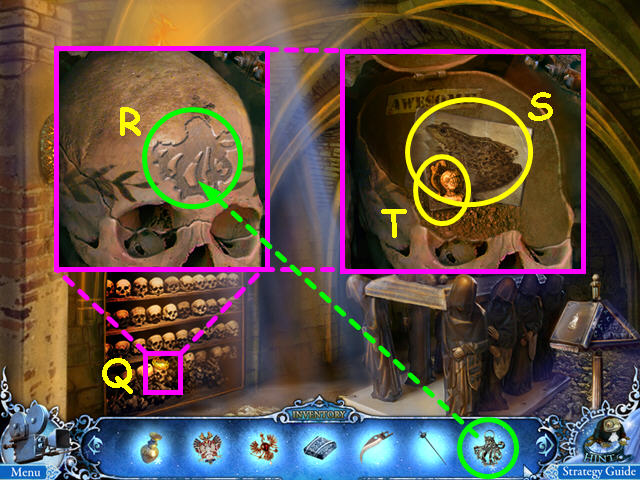
- Look at the close-up of the bottom shelf (Q).
- Place the EARRING into the indentation on the skull (R).
- Take the 45 of 60 SECRET FROG (S).
- Take the CHIP with the KNIGHT (T).
- Exit the basement, then walk left to the garden.

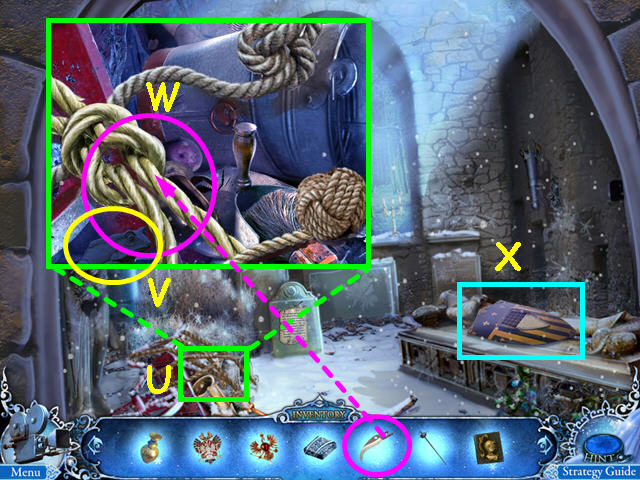
- Look at the close-up of the refuse pile (U).
- Take the 46 of 60 SECRET FROG (V).
- Use the HOOK KNIFE on the ropes (W).
- Note the knight’s shield (X).
- Select the refuse pile for a Hidden Object Scene.

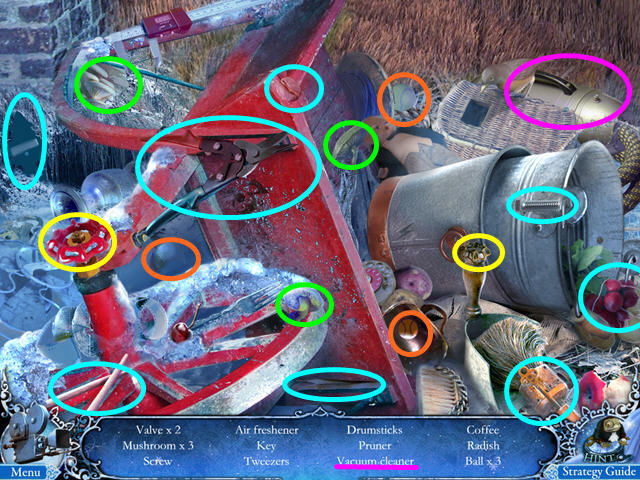
- Locate all the items on the list.
- You will earn the VACUUM CLEANER.

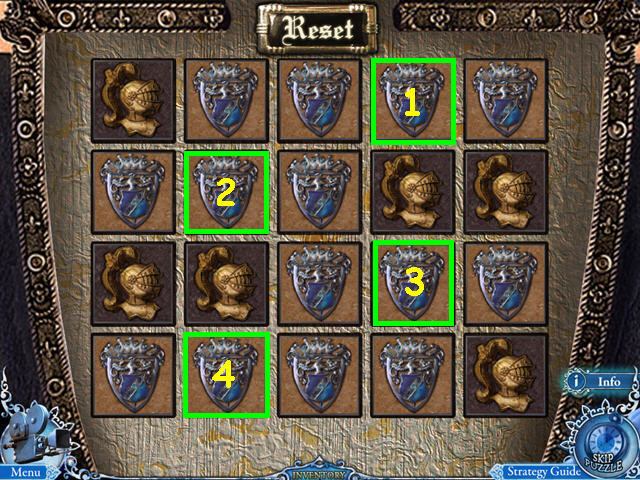
- Select the knight’s shield for a mini-game.
- Place the CHIP with the KNIGHT into the empty slot to activate the mini-game.
- The object of this mini-game is to flip the tiles so that only the helmets show.
- Clicking on a tile affects the tiles on all 4 sides.
- Click on the tiles in numerical order (1-4).

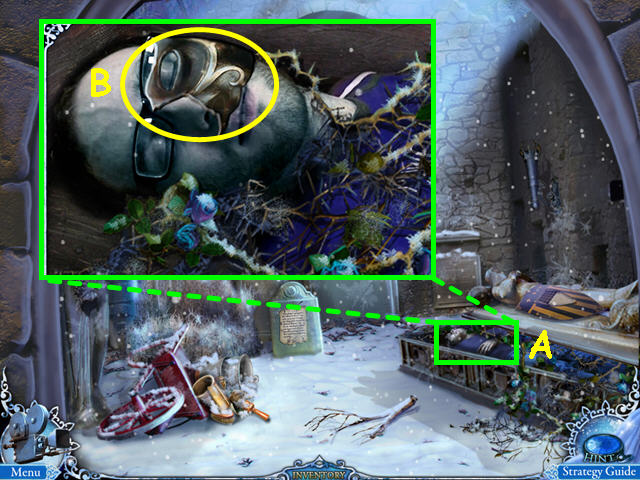
- Look inside the knight’s sarcophagus (A).
- Take the PUZZLE PIECE (B).
- Exit the close-up and walk down 6 times.
- Walk forward to the palace and climb up the rope ladder.

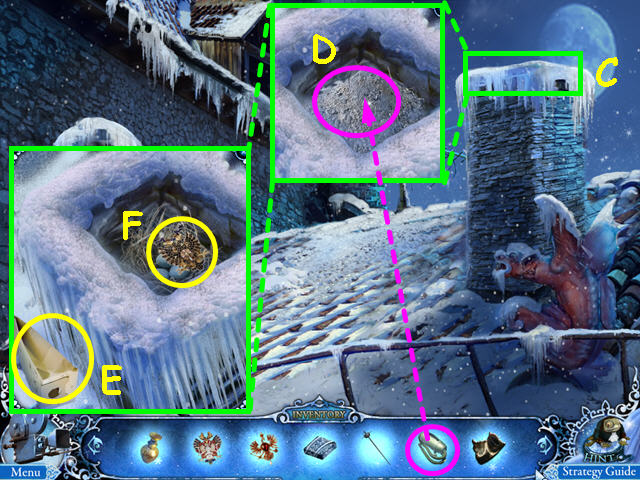
- Look at the close-up of the chimney (C).
- Use the VACUUM CLEANER on the ashes (D).
- Take the DUST BAG (E).
- Take the BLACK EAGLE MEDAL (F).
- Walk down 3 times to return to the square.
- Walk forward twice through the Oak alley gate to the sheriff’s car.
- Take the right path, then go forward twice to enter the church.
- Walk down to the basement.

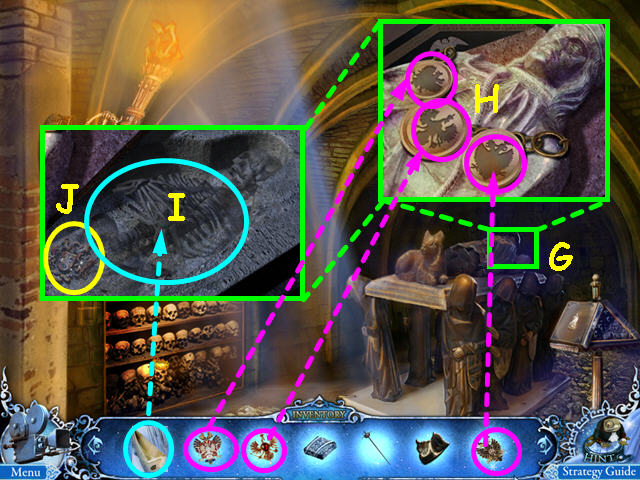
- Look at the figure on the table (G).
- Place the WHITE EAGLE MEDAL, the RUBY EAGLE MEDAL, and the BLACK EAGLE MEDAL into the necklace (H).
- Use the DUST BAG on the sarcophagus (I).
- Take the COAT OF ARMS (J).
- Walk down 6 times to the square, then go forward twice to enter the palace.

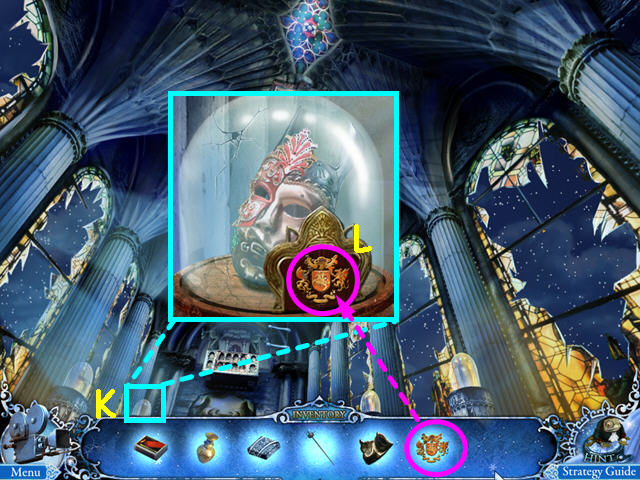
- Look at the 2nd glass dome from the left (K).
- Use the COAT OF ARMS on the indentation to trigger a mini-game (L).

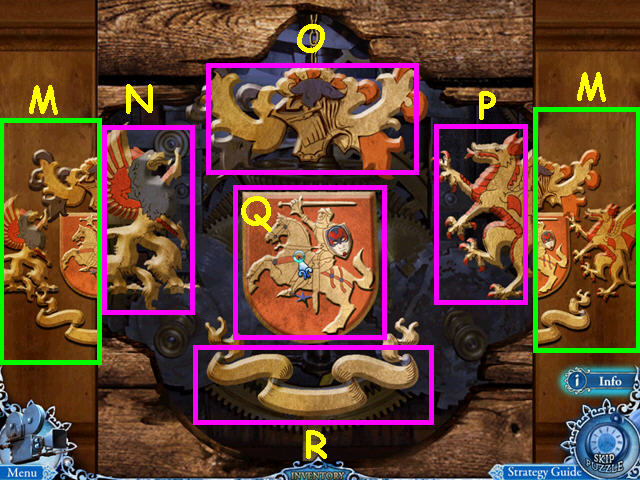
- The object of this mini-game is to re-create the coat of arms.
- Click on the pieces to change them to match the coat of arms that was placed on the dome.
- Use the left and right panels as guides (M).
- Clicking on a piece effects other pieces.
- Click on the following pieces: Q x2, P x4, R x2, N x5, R x6, Nx5, Qx1.
- Take the PUZZLE PIECE from the mask.
- Walk down 5 times to the crossroads, then enter the building on the left.
- Walk up to the kitchen, then climb out the window.
- Climb down to the dragon gate.

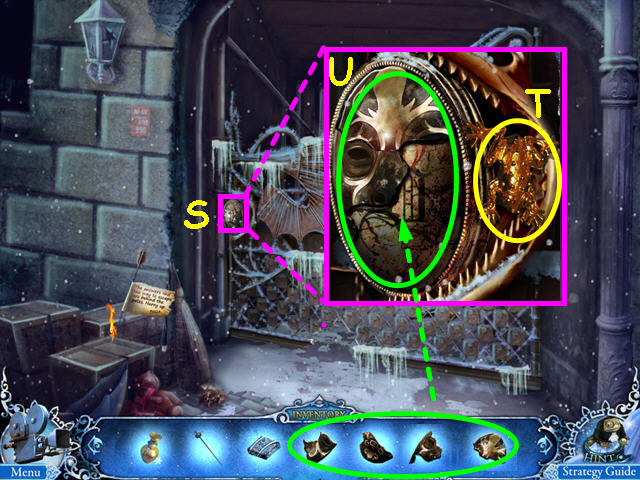
- Look at the close-up of the lock (S).
- Take the 47 of 60 SECRET FROG (T).
- Place the 4 PUZZLE PIECES onto the lock (U).
Chapter 7: Through the Dragon Gate

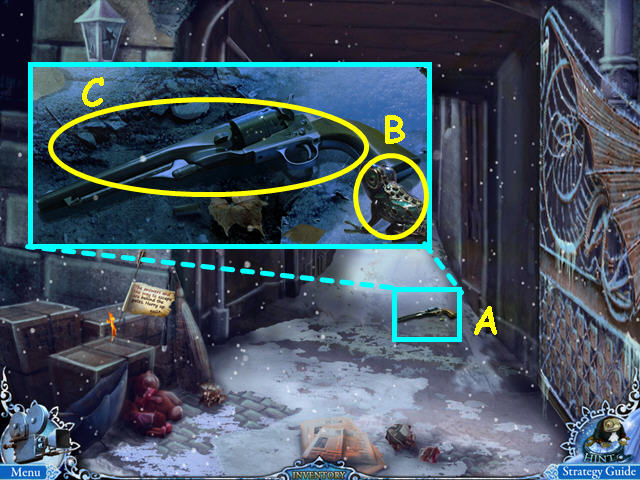
- Look at the close-up of the gun (A).
- Take the 48 of 60 SECRET FROG (B).
- Take the gun (C).
- Walk forward.

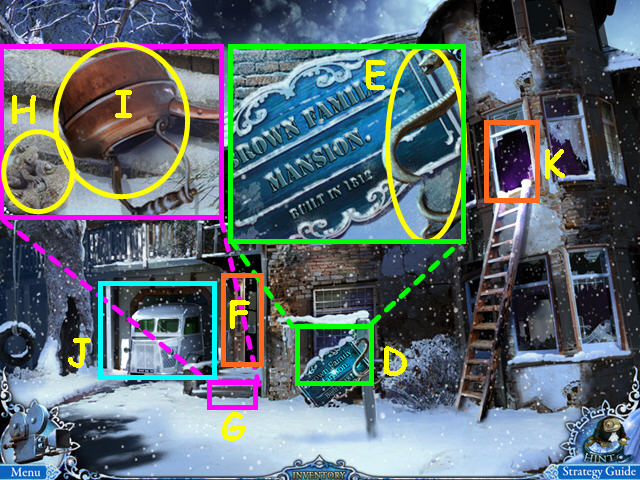
- Look at the close-up of the sign (D).
- Take the BRONZE SNAKE (E).
- Try to enter the front door (F).
- Look at the front steps (G).
- Take the 49 of 60 SECRET FROG (H).
- Take the EMPTY KETTLE (I).
- Note the garage entrance (J).
- Climb the ladder and enter the 2nd floor (K).

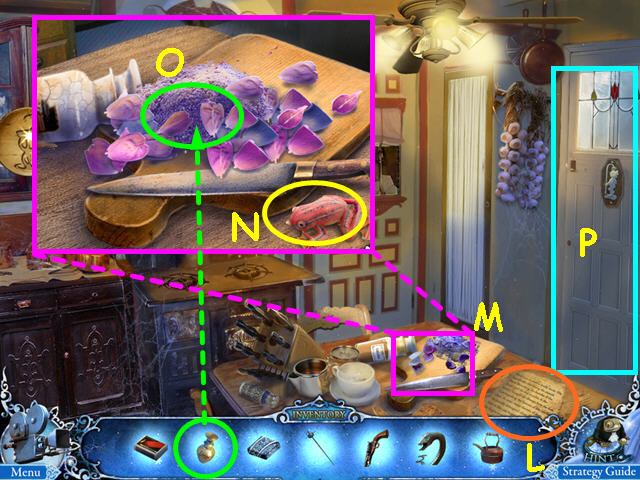
- Read the family history (L).
- Look at the close-up of the rose petals (M).
- Take the 50 of 60 SECRET FROG (N).
- Note- you only need 50 SECRET FROGS to earn the achievement.
- Use the VIAL on the powder (O).
- Exit the close-up and enter the bathroom (P).

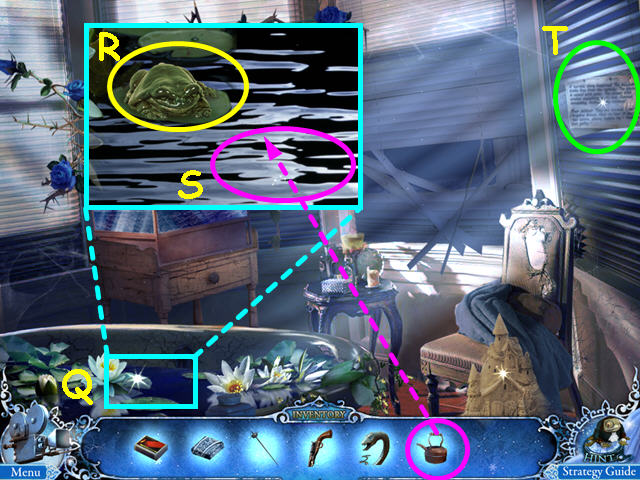
- Look at the close-up of the bathtub (Q).
- Take the 51 of 60 SECRET FROG (R).
- Use the EMPTY KETTLE on the water to get the KETTLE with WATER (S).
- Read the note on the blind (T).
- Walk down to return to the kitchen.

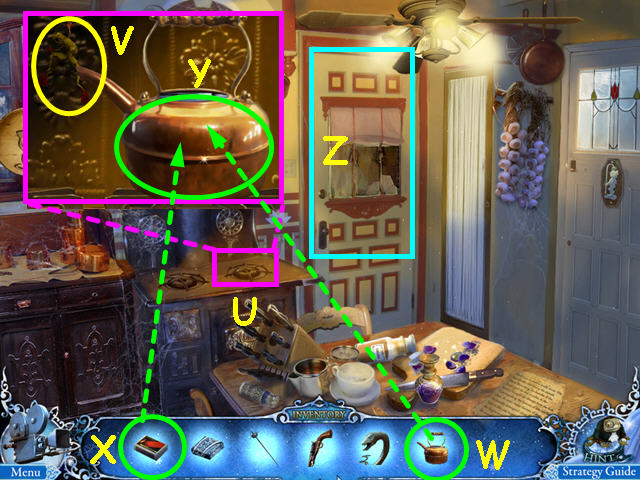
- Look at the close-up of the stove (U).
- Take the 52 of 60 SECRET FROG (V).
- Place the KETTLE with WATER on the stove (W).
- Use the MATCHES on the kettle (X).
- Take the BOILED KETTLE (Y).
- Walk forward to the hall (Z).

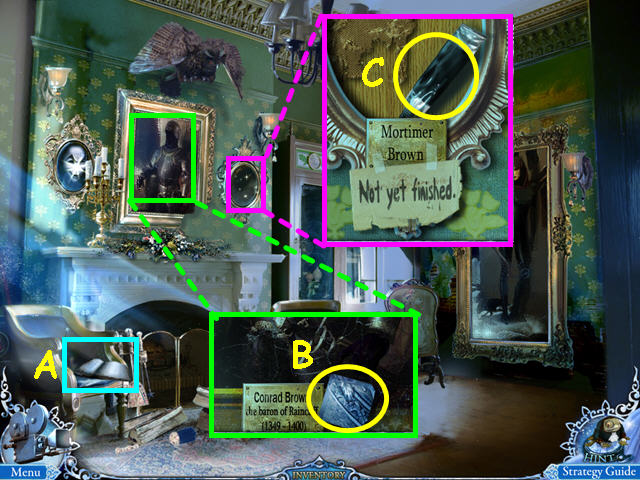
- Read the family history (A).
- Look at the center portrait and take the WOODEN FRAGMENT (B).
- Look at the right portrait and take the BLACK PAINT (C).

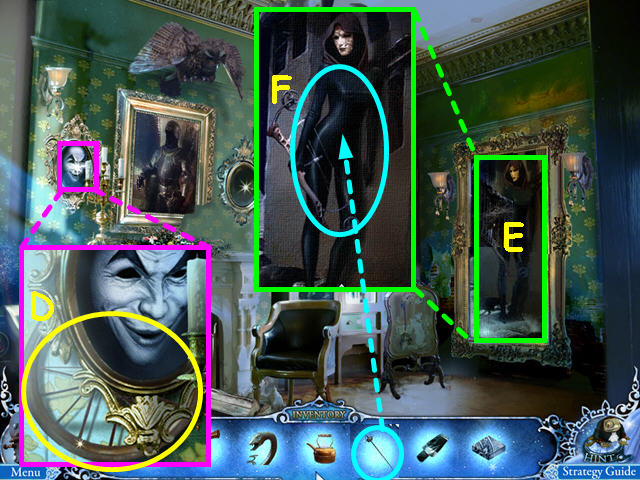
- Look at the portrait on the left and take the WOODEN WHEEL (D).
- Look at Belle’s portrait (E).
- Use the ASSEMBLED SWORD to cut open the portrait (F).
- Look at the door hidden behind Belle’s portrait to learn you need pieces for the mini-game.
- Walk down 3 times to the front of the house, then walk to the garage.

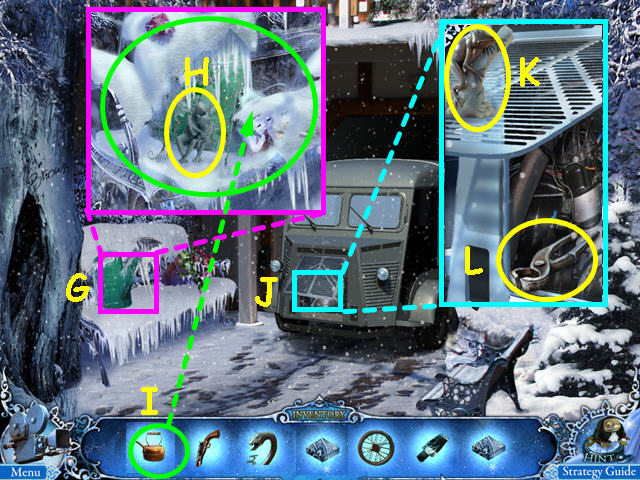
- Look at the frozen bench (G).
- Take the 53 of 60 SECRET FROG (H).
- Use the BOILED KETTLE on the bench (I).
- Look in the engine compartment (J).
- Take the 54 of 60 SECRET FROG (K).
- Take the WIRE CUTTERS (L).
- Exit the close-up and select the bench for a Hidden Object Scene.

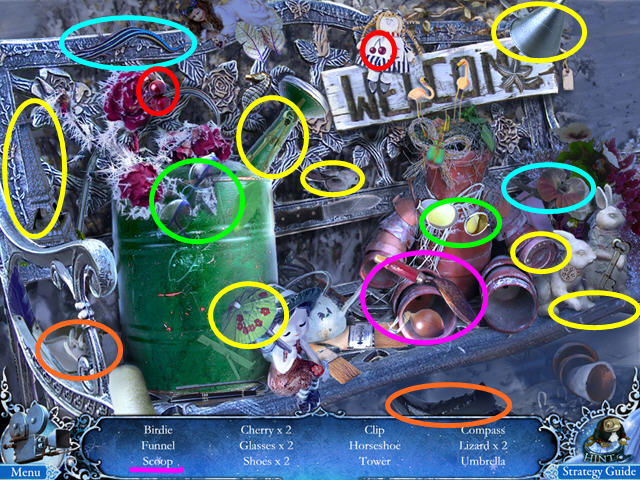
- Locate all the items on the list.
- You will earn the SCOOP.
- Walk down to exit the garage, then climb the ladder to the kitchen.
- Walk right to the bathroom.

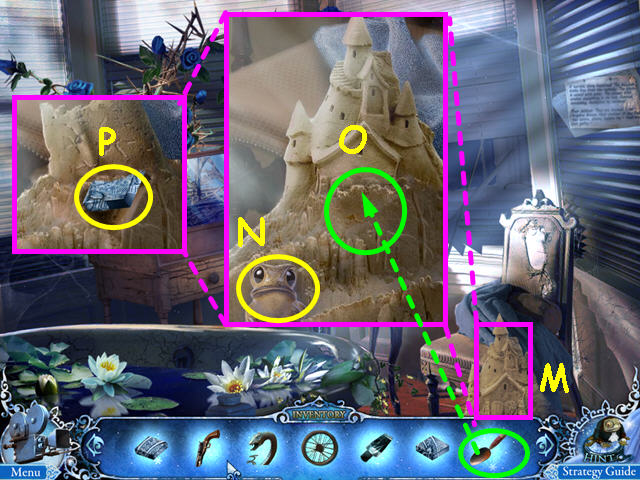
- Look at the sand castle (M).
- Take the 55 of 60 SECRET FROG (N).
- Use the SCOOP on the sand castle (O).
- Take the WOODEN FRAGMENT (P).
- Exit the bathroom, then go forward to the hall.
- Look at the mini-game on the door behind Belle’s portrait.

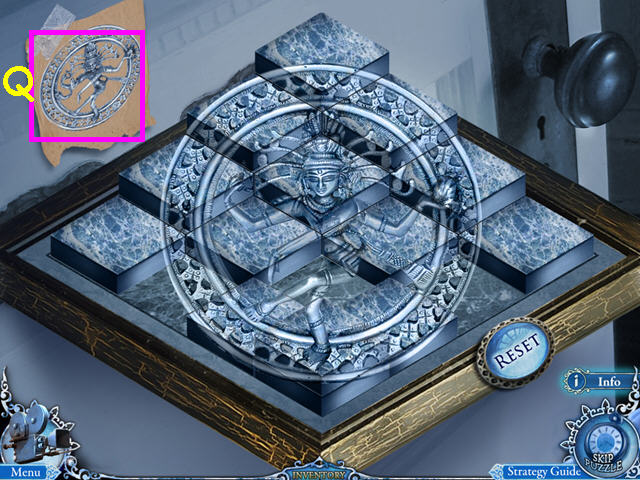
- Place the 3 WOODEN FRAGMENTS onto the board to trigger a mini-game.
- The object is to re-create the diagram on the wall (Q).
- Right-click to take or place a tile.
- Walk upstairs to the bedroom.

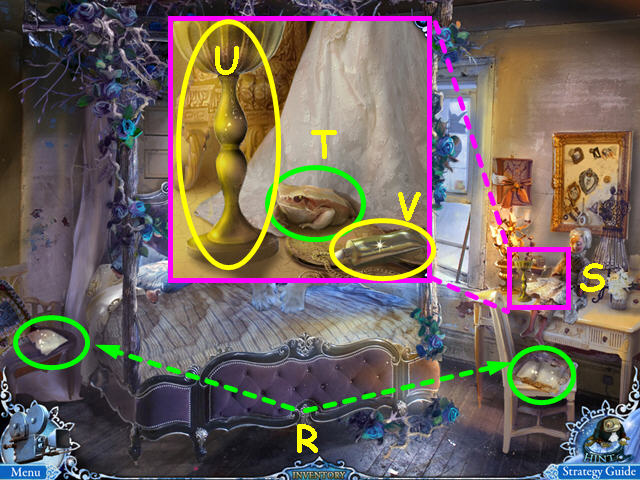
- Read the 2 diary pages (R).
- Look at the close-up of the vanity (S).
- Take the 56 of 60 SECRET FROG (T).
- Take the BRONZE CUP (U).
- Take the WHITE PAINT (V).
- Walk down 3 times to return to the kitchen.

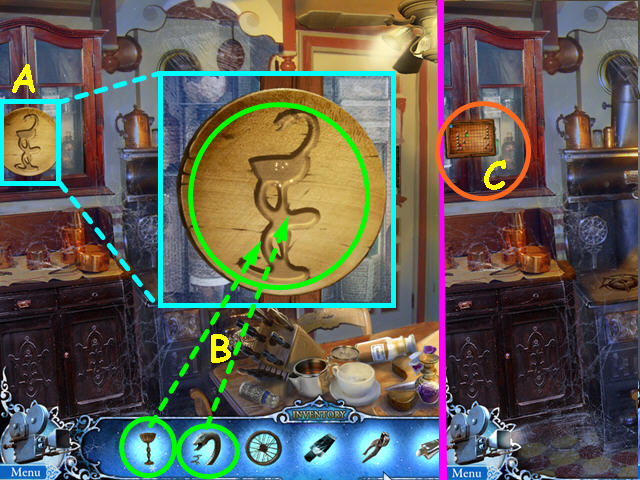
- Look at the symbol on the cabinet (A).
- Place the BRONZE CUP and the SNAKE into the indentations (B).
- Select the mini-game that was under the symbol (C).

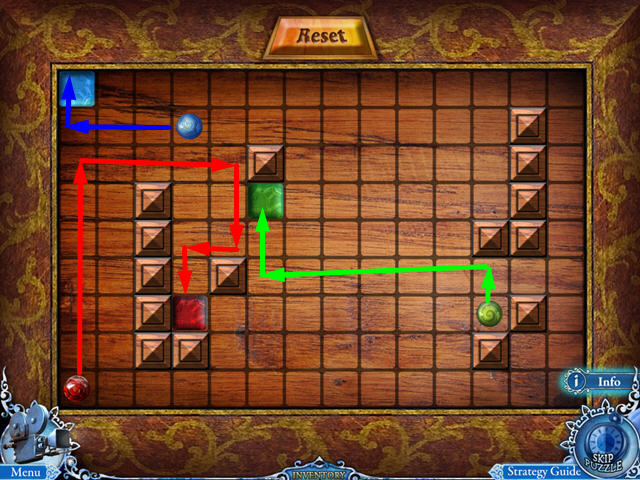
- The object of this mini-game is to move the colored balls to the matching squares.
- Click on a ball to see the directions it can move, the click on the arrow.
- Make the following moves: blue- left and wait, red- up, right, down, left, down, blue- up, green- up, left, and up.

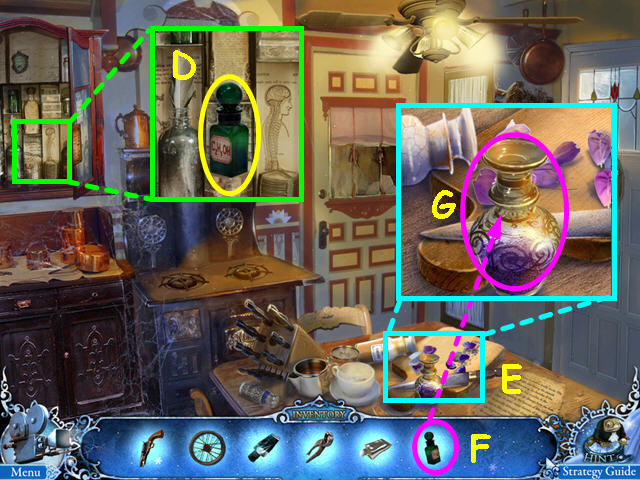
- Look in the cabinet and take the C2H5OH BOTTLE (D).
- Look at the table (E).
- Pour the C2H5OH BOTTLE into the VIAL (F).
- Take the VIAL WITH HYPNOTIC FLUID (G).
- Walk forward to the hall and into Belle’s portrait to her room.

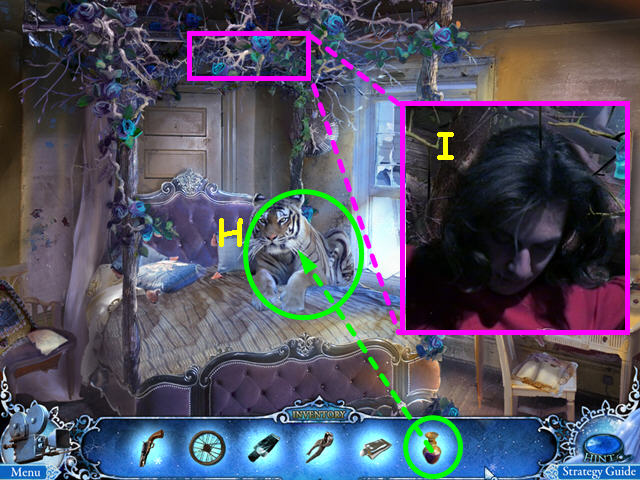
- Use the VIAL WITH HYPNOTIC FLUID on the tiger (H).
- Look at the canopy over the bed to find the boy from the watchmaker’s shop (I).
- Walk down 13 times to return to the city entrance.
- Enter the cab of the rusty car.

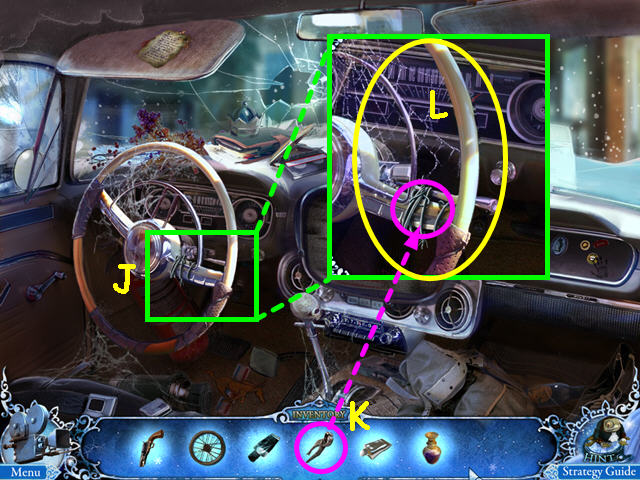
- Look at the close-up of the steering wheel (J).
- Use the WIRE CUTTERS to cut the wire (K).
- Take the STEERING WHEEL (L).
- Exit the car and walk forward 4 times to the lane.
- Enter the studio on the right.

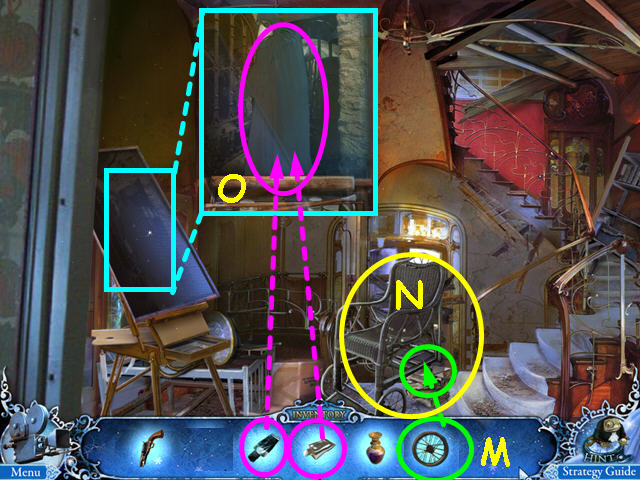
- Place the WOODEN WHEEL on the wheelchair (M).
- Take the WHEELCHAIR (N).
- Look at the easel and place the BLACK PAINT and the WHITE PAINT on the portrait (O).
- Look at the easel again for a mini-game.

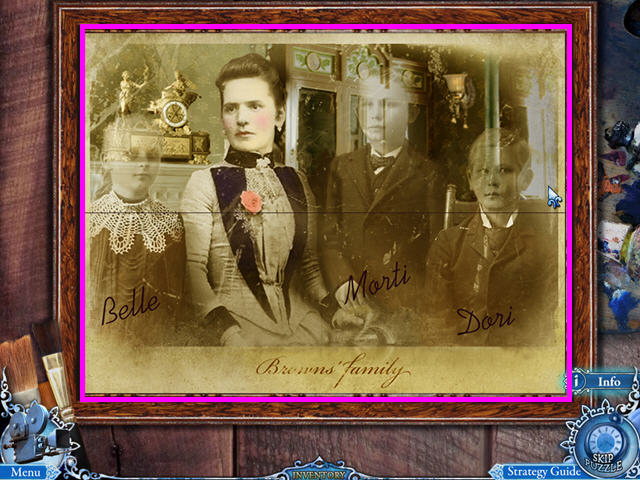
- The object of this mini-game is to restore the photograph.
- Move the strips vertically and horizontally.
- Left-click, hold and drag the strips into position.
- Take the SCYTHE hidden in the mini-game.
- Walk down twice to the crossroads, then enter the building on the left.
- Walk up to the kitchen, then go out the window.
- Continue forward through the dragon gate twice, then go up the ladder to the kitchen.
- Enter the bathroom on the right.

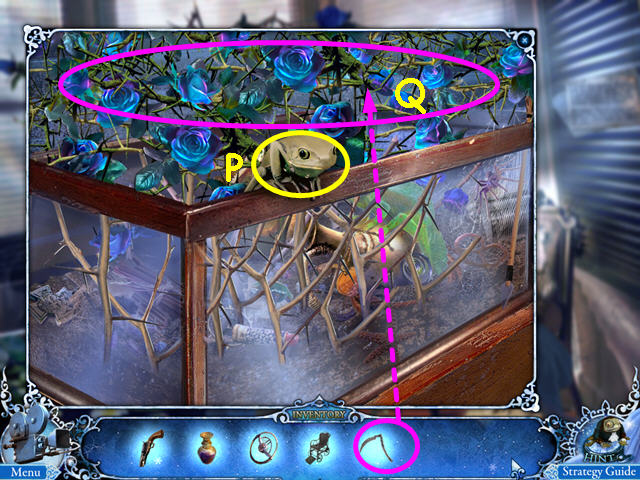
- Look at the black roses.
- Take the 57 of 60 SECRET FROG (P).
- Use the SCYTHE on the roses (Q).
- Select the rose planter for a Hidden Object Scene.

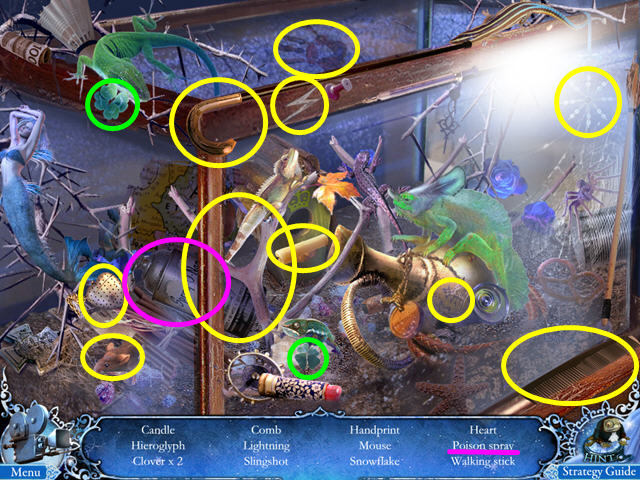
- Locate all the item on the list.
- You will earn the FLOWER ANTIDOTE.
- Exit the bathroom, go to the hall, through Belle’s portrait to her room.
- Look at the canopy over the bed.

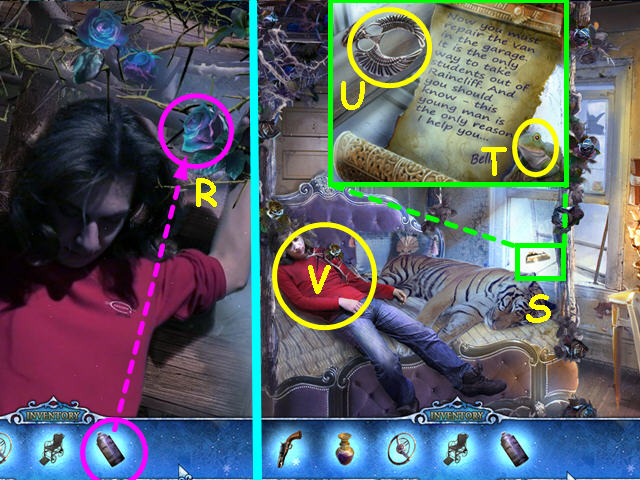
- Use the FLOWER ANTIDOTE on the roses (R).
- Look at the window sill (S).
- Take the 58 of 60 SECRET FROG (T).
- Take the HOOD ORNAMENT (U).
- Take the boy, INGVAR VASA (V).
- Walk down 9 times to the crossroads, then go forward 3 times to the square.
- Walk through the Oak alley gate and go forward twice to the sheriff’s car.

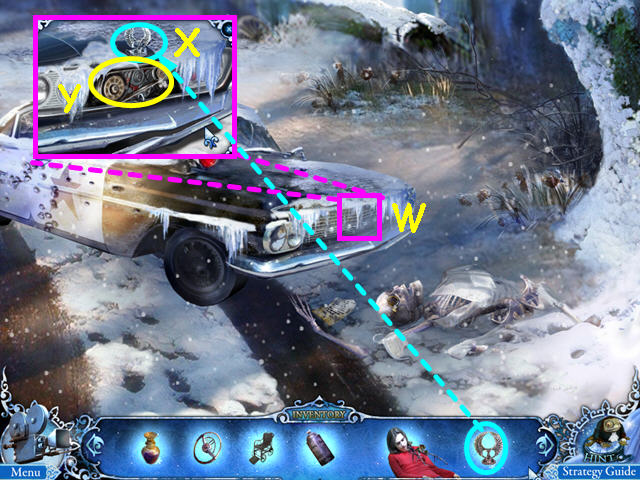
- Look at the front of the car (W).
- Place the HOOD ORNAMENT on the car (X).
- Take the TRANSMISSION BELT (Y).
- Walk down 6 times to the crossroads, then enter the left building.
- Walk up to the kitchen, then go out the window.
- Walk forward through the dragon gate twice, then go to the garage.
Chapter 8: Escape

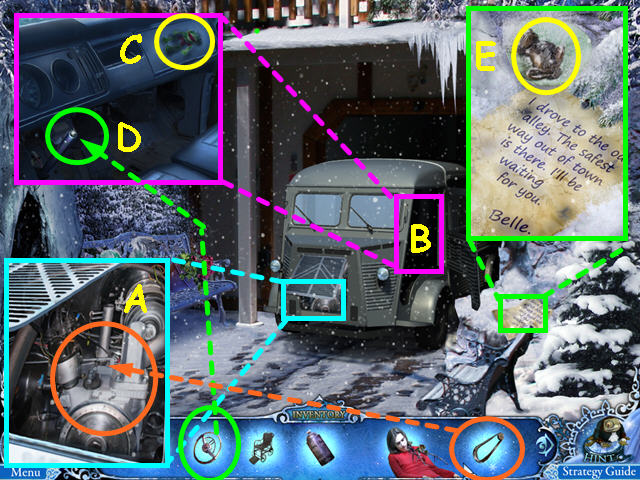
- Look under the grill and place the TRANSMISSION BELT on the engine (A).
- Look inside the vehicle (B).
- Take the 59 of 60 SECRET FROG (C).
- Place the STEERING WHEEL on the column (D).
- After Bell drives away, read her note and take the 60 of 60 SECRET FROG (E).
- Walk down 6 times to the crossroads, then go forward 3 times to the square.
- Walk through the Oak alley gate twice.
- Look at the trailer and open the door.

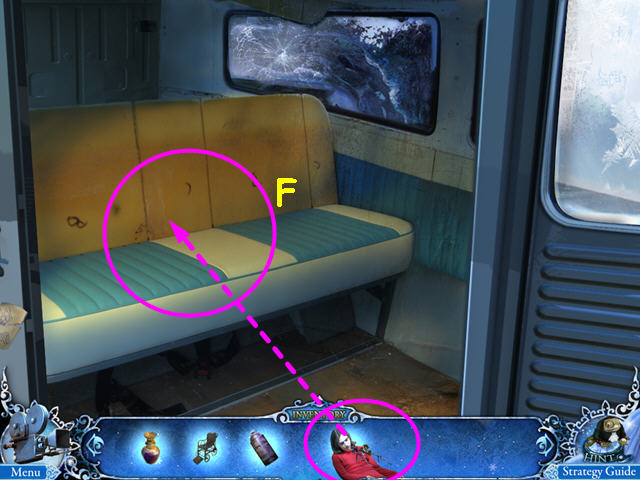
- Place INVAR VASA on the seat (F).
- Exit the van, then go forward 3 time to the radio tower.
- Push the elevator up button, then walk forward.

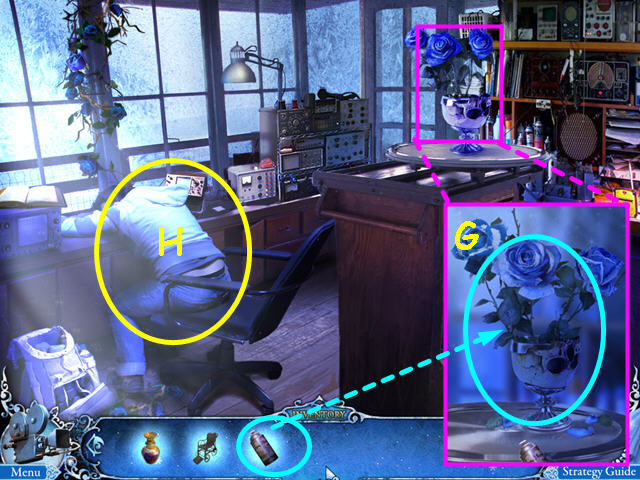
- Look at the roses and use the FLOWER ANTIDOTE (G).
- Take the girl, LISA THOMPSON (H).
- Exit the room and take the elevator down.
- Walk down twice and see the brothers.

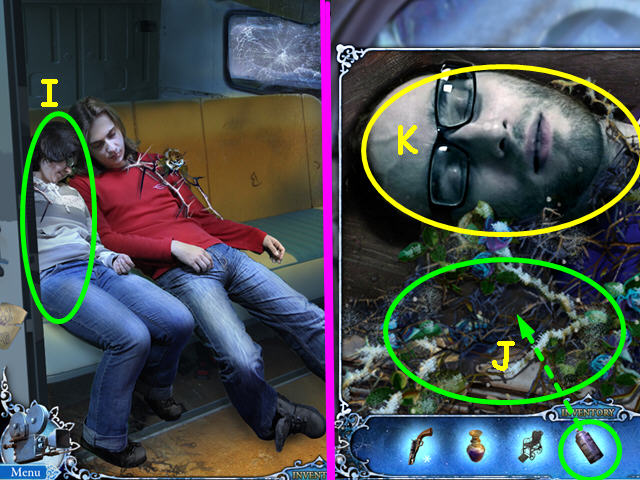
- Walk down once more to the trailer and place LISA THOMPSON on the seat (I).
- Exit the trailer and walk right to the church.
- Walk forward 3 times to the garden and look at the boy in the sarcophagus.
- Use the FLOWER ANTIDOTE on the roses (J).
- Take the boy, ANJEY SLOTSKY (K).
- Walk down 4 times to return to the trailer.

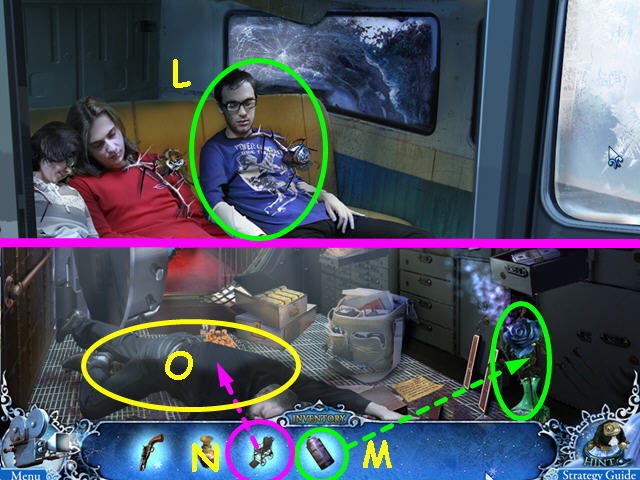
- Look inside and place ANJEY SLOTSKY on the seat (L).
- Exit the trailer and walk down twice to the square.
- Walk forward 3 times to the bank vault.
- Use the FLOWER ANTIDOTE on the rose (M).
- Use the WHEELCHAIR on the driver (N).
- Take the driver, FRITZ LAYBER (O).
- Walk down 3 times to the square, then go forward through the Oak alley gate twice.

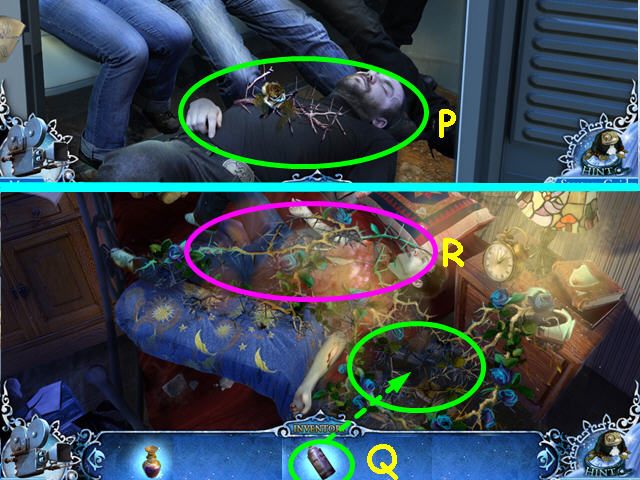
- Look inside and place FRITZ LAYBER on the floor (P).
- Exit the trailer and walk down 5 times to the crossroads.
- Enter the building on the left and walk to the kitchen.
- Climb down the hole in the floor.
- Use the FLOWER ANTIDOTE on the roses (Q).
- Take the boy, BOB CROWD (R).
- Walk down 3 times, then go forward 3 times to the square.
- Walk forward through the Oak alley gate twice.

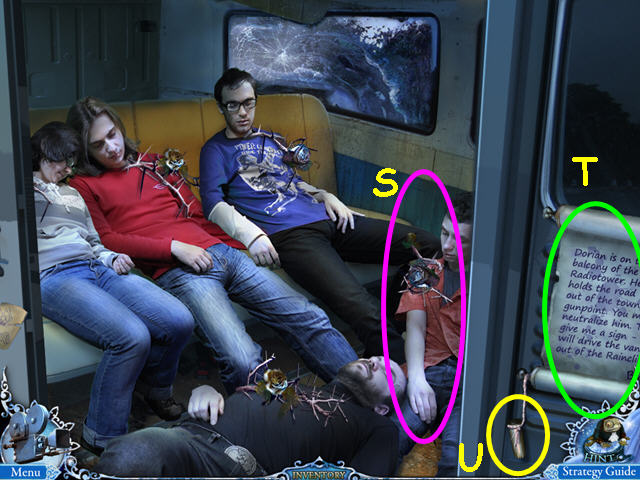
- Look inside the trailer and place BOB CROWD on the floor (S).
- Read the note Belle leaves (T).
- Take the BULLET (U).
- The BULLET will automatically combine with the GUN to get the LOADED GUN.
- Exit the trailer and walk forward towards the radio tower.

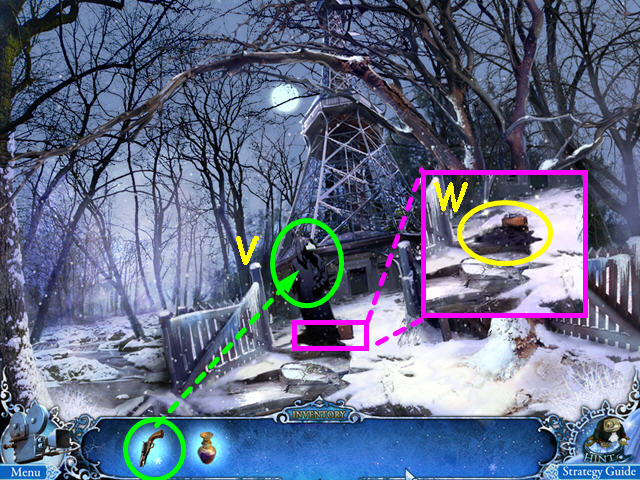
- Use the LOADED GUN on Mortimer (V).
- Look at the dropped cloak for a Hidden Object Scene (W).

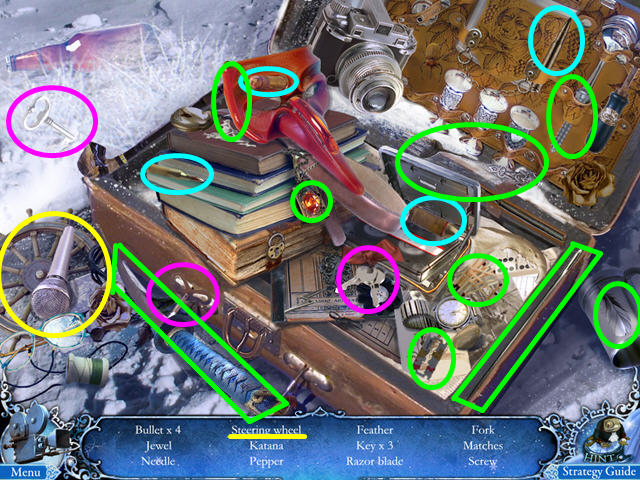
- Locate all the items on the list.
- You will earn the SHIP WHEEL.
- Walk forward twice to the elevator and push the up button.
- Enter the radio room.

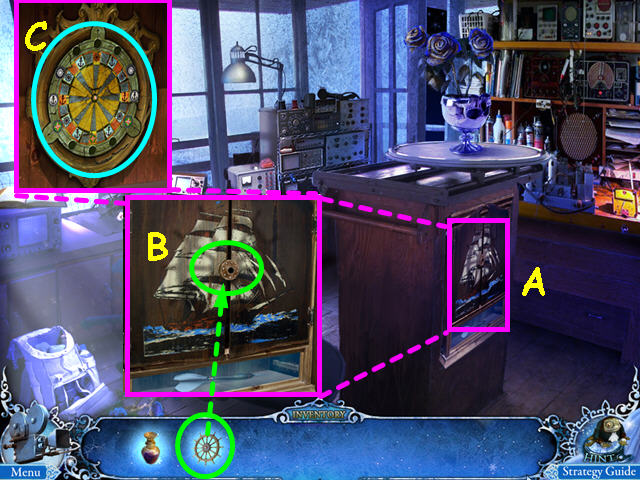
- Look at the cabinet below the roses (A).
- Use the SHIP WHEEL on the center (B).
- Select the dartboard inside the cabinet for a mini-game (C).

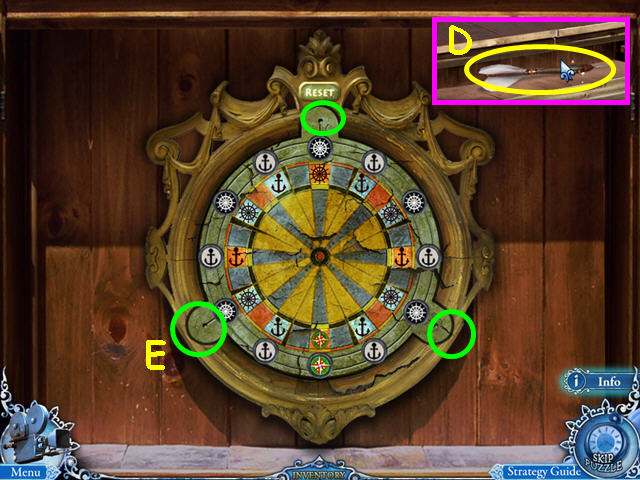
- The object of this mini-game is to move all the discs next the matching symbols.
- Place your cursor over a disc to see movement arrows.
- Click on the arrow to move in that direction.
- Move discs to the 3 outer slots to move them out of the way (D).
- Take the DART from beneath the dartboard (E).
- The DART will combine with the VIAL to make a POISONED DART.
- Walk forward to the balcony.

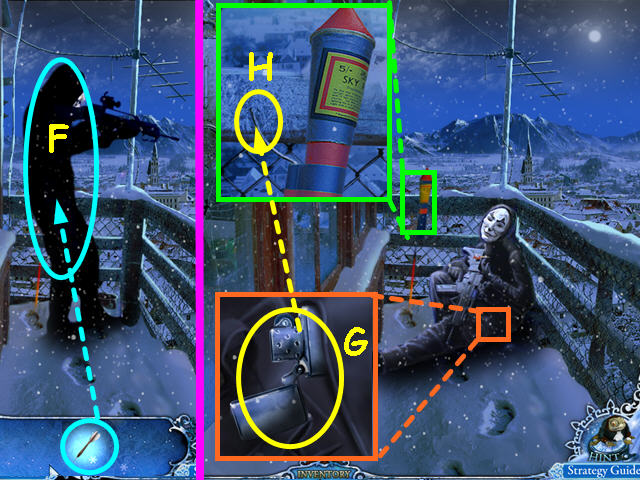
- Use the POISONED DART on Dorian (F).
- Look at Dorian’s pocket and take the LIGHTER (G).
- Look at the flare and use the LIGHTER on the fuse (H).
- Congratulations! You have completed Mystery Trackers: Raincliff!



 Zodiac Prophecies: The Serpent Bearer Walkthrough, Guide, & Tips
 Shadow Wolf Mysteries: Tracks of Terror Walkthrough, Guide, & Tips
 Voodoo Chronicles: The First Sign Walkthrough, Guide, & Tips
 Dark Alleys: Penumbra Motel Walkthrough, Guide, & Tips
 Beyond the Unknown: A Matter of Time Walkthrough, Guide, & Tips