9: The Dark Side of Notre Dame Walkthrough, Guide, & Tips
9: The Dark Side of Notre Dame Walkthrough

Welcome to the 9: The Dark Side of Notre Dame Walkthrough
Find the festivalgoer abducted by the gargoyles of Notre Dame and uncover the cathedral’s dark past in this reimagining of the Victor Hugo’s classic tale.
Whether you use this document as a reference when things get difficult or as a road map to get you from beginning to end, we’re pretty sure you’ll find what you’re looking for here.
This document contains a complete 9: The Dark Side of Notre Dame game walkthrough featuring annotated screenshots from actual gameplay!
We hope you find this information useful as you play your way through the game. Use the walkthrough menu below to quickly jump to whatever stage of the game you need help with.
Remember to visit the Big Fish Games Forums if you find you need more help. Have fun!
This walkthrough was created by BrownEyedTigre, and is protected under US Copyright laws. Any unauthorized use, including re-publication in whole or in part, without permission, is strictly prohibited.
General Tips

- This is the official guide to 9: The Dark Side of Notre Dame.
- Select Options to adjust the Music, Effects, and Voice Volume. You can also adjust Full Screen and Software Cursor.
- You may select between Casual, Advanced and Hardcore Mode.
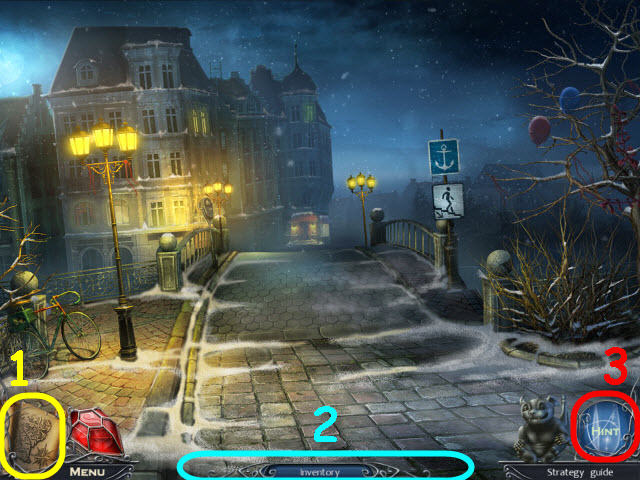
- You will acquire a Map during gameplay which will appear on the lower left of your toolbar (1). You may use it to travel quickly to other areas and to see where you have unfinished quests.
- Hidden object scenes are referred to as HOS throughout the guide.
- Puzzles may be skipped and most can be reset.
- Move your cursor down to the bottom of the screen to raise the Inventory bar (2). You may lock it in the up position by closing the padlock.
- Select the Hint button on the bottom right to get a hint in HOS and in the main quest (3).
- Inventory items will be marked in all CAPS in the strategy guide.
Chapter 1 – Paris
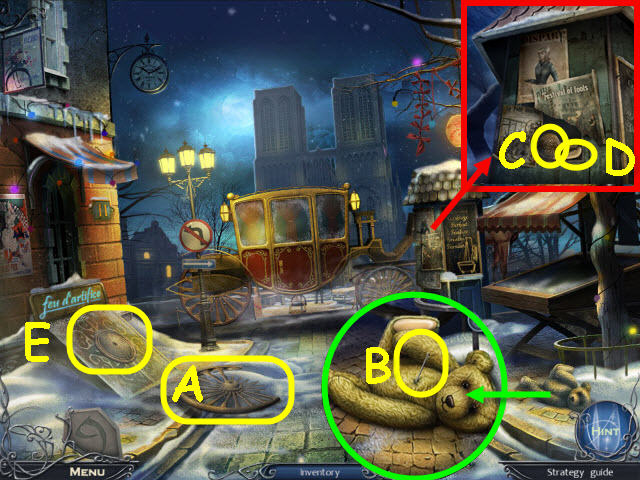
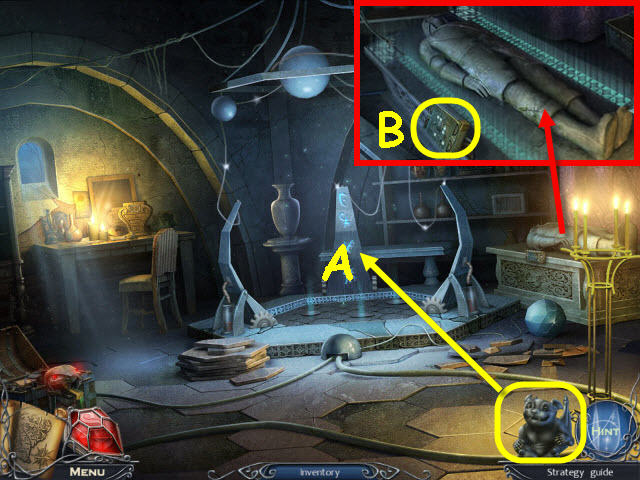
- Take the WHEEL (A).
- Examine the teddy bear; take the NEEDLE (B).
- Examine the bulletin board and move the flyer; take the DIAL (C) and read the note (D).
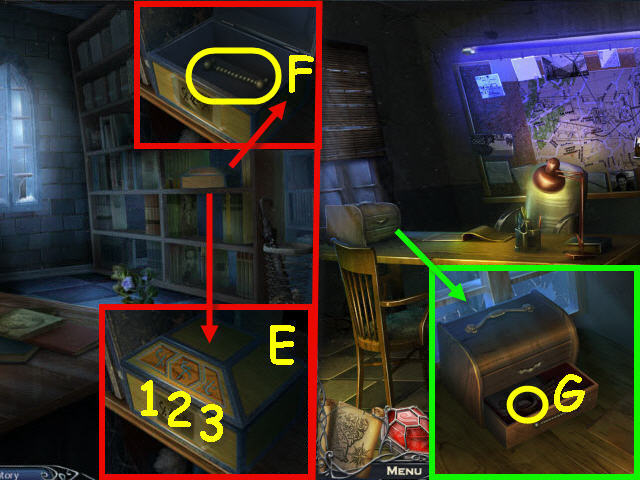
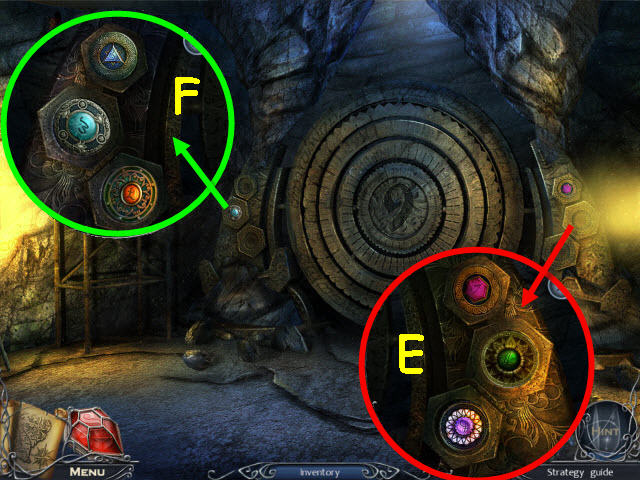
- Examine the cellar door and place the DIAL on it to trigger a puzzle (E).
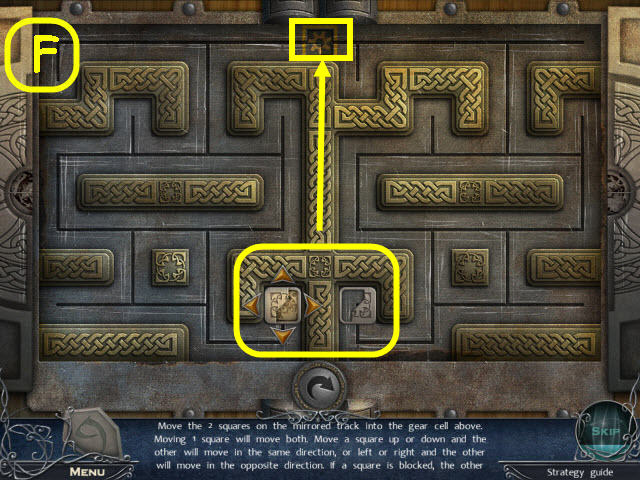
- Move the two squares to the gear cell on the top.
- The arrow movements are: Down equals D, Up equals U, Right equals R, and Left equals L.
- To solve the puzzle, select the following arrows using the arrows on left square: D-Lx2-Ux3-Rx2-Ux2-Lx4-Ux2-D-Rx2-Ux3-Lx4, and Rx7 (F).
- Go down into the newly-opened souvenir shop.

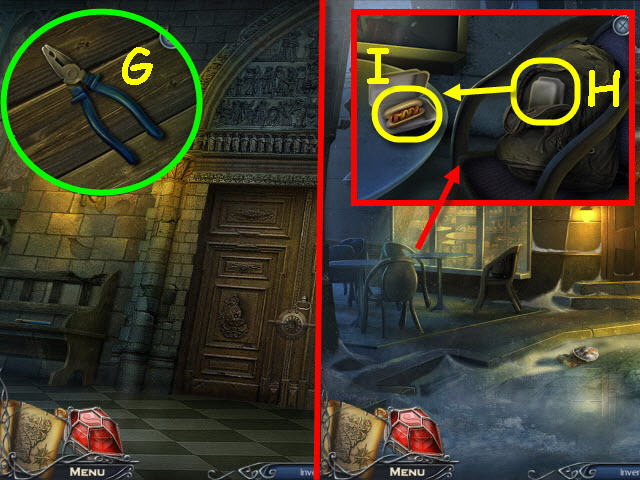
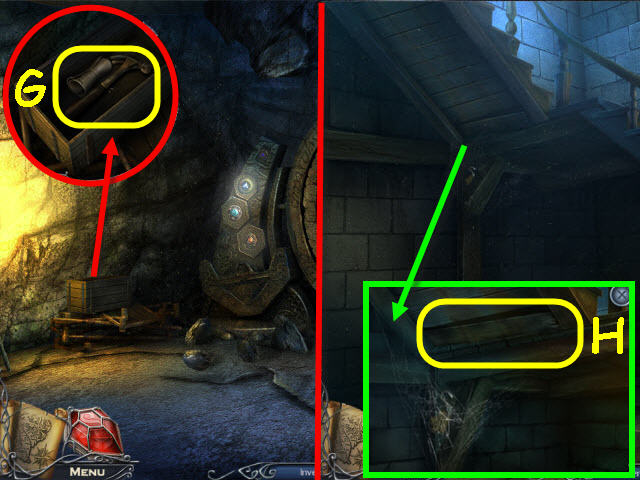
- Examine the cash register and take the map (G) which will be added to your task bar; take the SCISSORS (H) and read the open book.
- Examine the left cupboard to access a HOS (I).
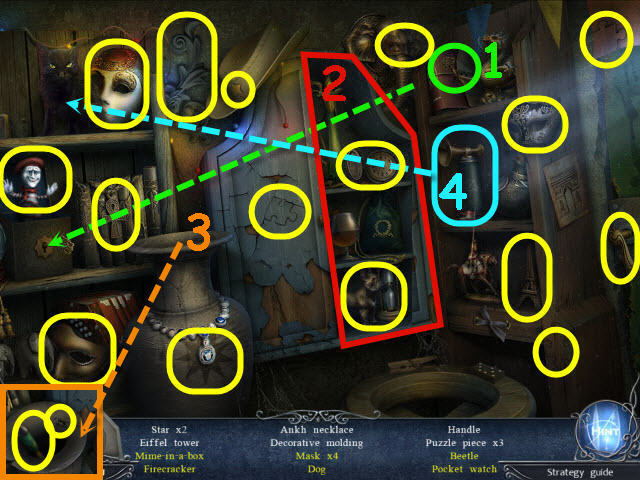
- Find the items listed.
- Use the key on the box to get a mime-in-a-box (1).
- Open the cabinet to get the dog and pocket watch (2).
- Examine the vase to get the firecracker and beetle (3).
- Close the cabinet door if open and use the air horn on the cat to get a mask (4).
- You will earn a CARRIAGE HANDLE.
- Back out.
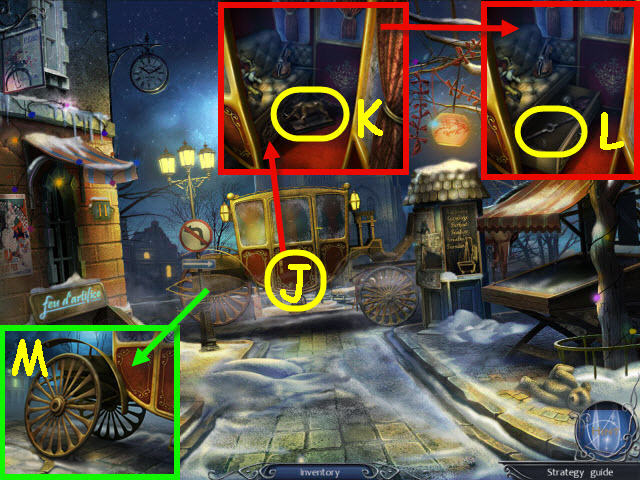
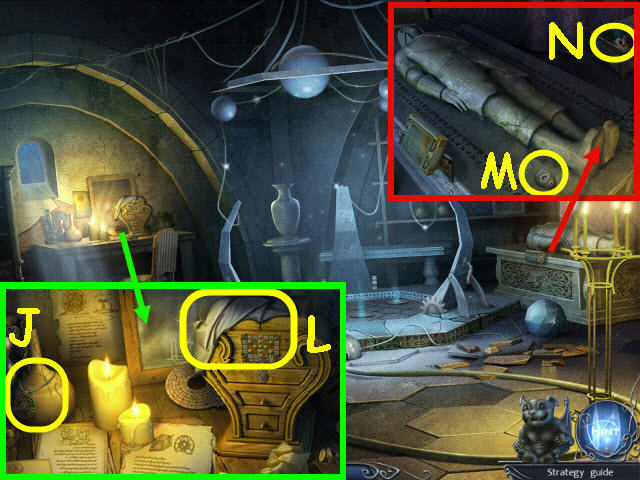
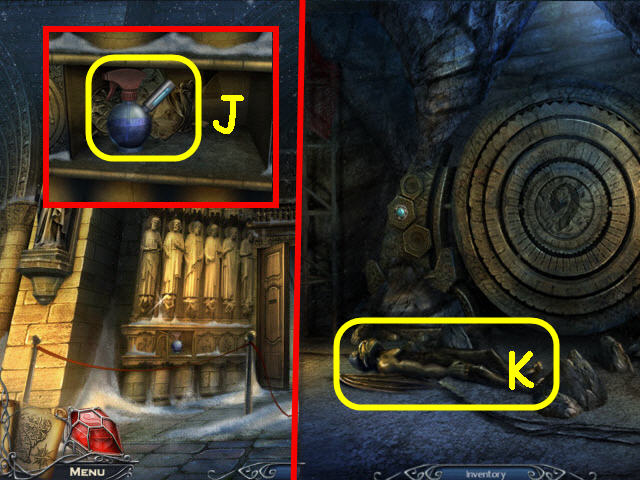
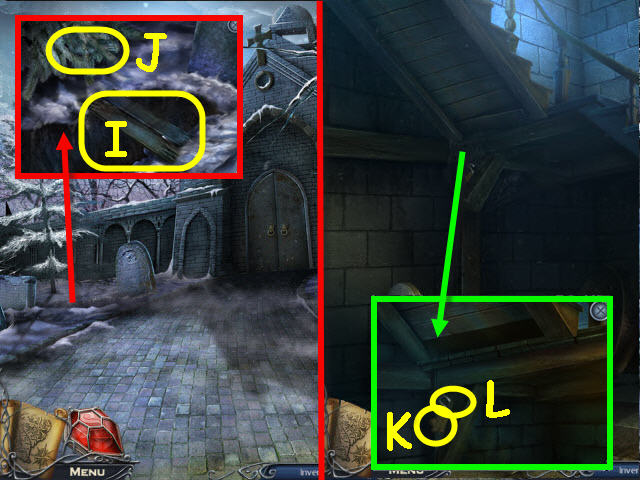
- Examine the carriage door and place the CARRIAGE HANDLE on it (J).
- Examine the open carriage; take the HEAVY BRONZE STATUE (K).
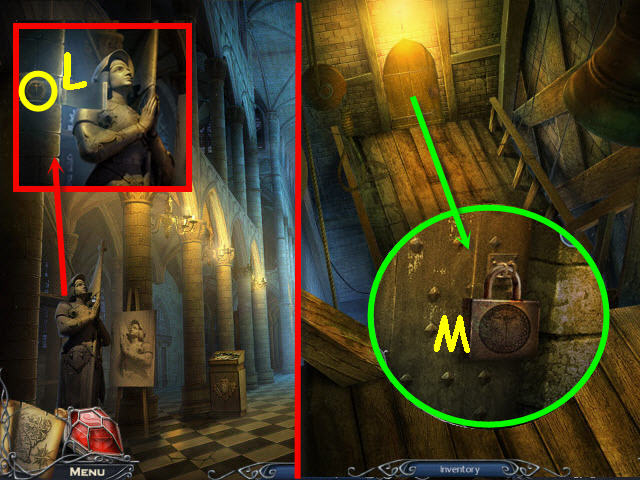
- Open the drawer; take the WHEEL WRENCH (L).
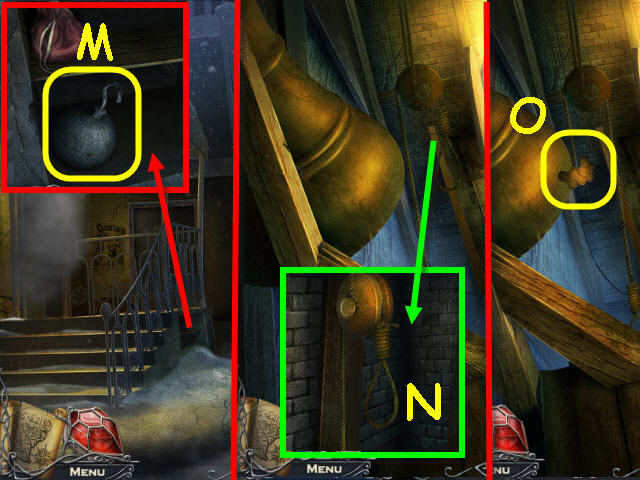
- Examine the rear of the carriage and place the WHEEL on the axle; use the WHEEL WRENCH on the WHEEL (M).
- Go forward.
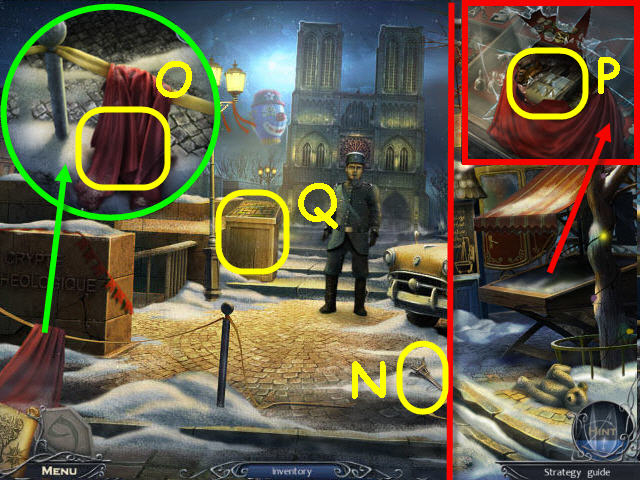
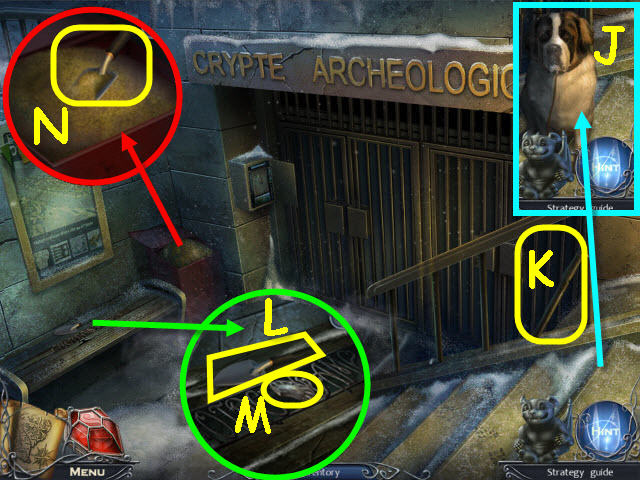
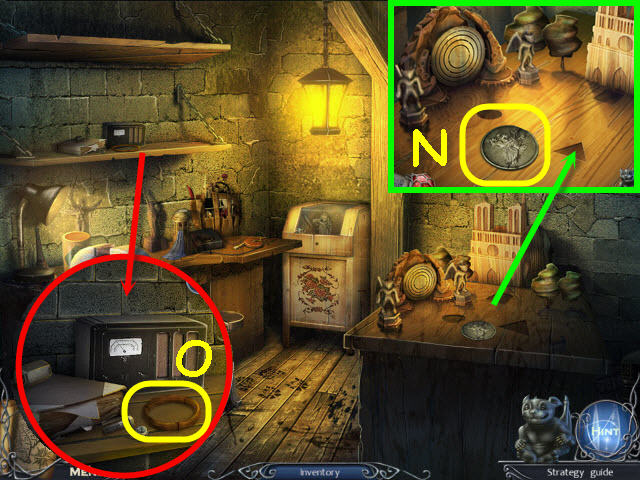
- Examine the EIFFEL TOWER MINIATURE (N) and take it.
- Examine the cloth and use the SCISSORS on it; get a RAG (O).
- Back out.
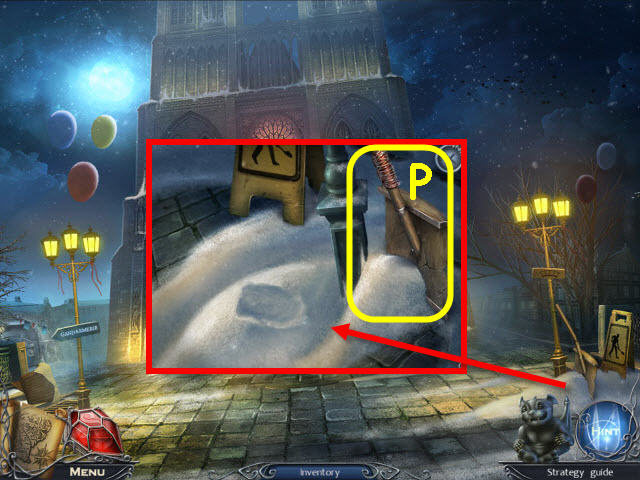
- Examine the stand and use the HEAVY BRONZE STATUE and RAG on the glass; take the NOTRE DAME MINIATURE (P).
- Go forward.
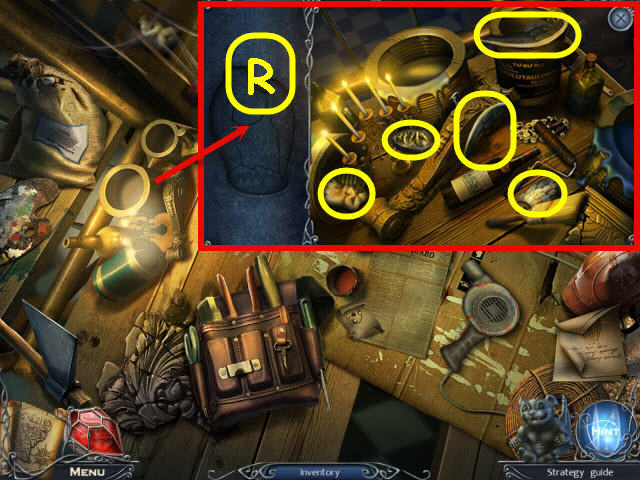
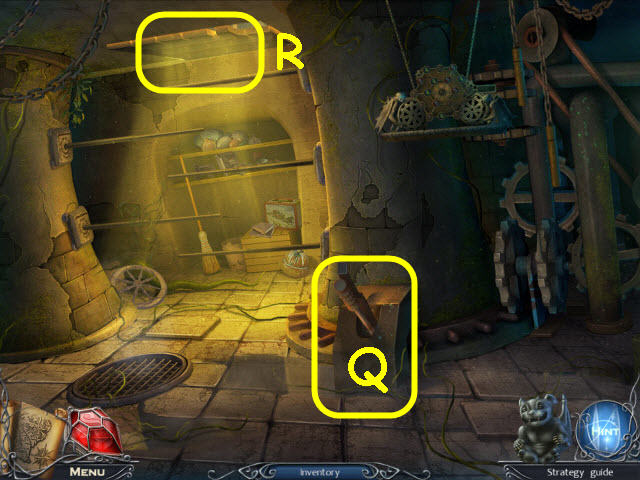
- Examine the tourist center board and place the NOTRE DAME MINIATURE and EIFFEL TOWER MINIATURE on it to trigger a puzzle (Q).
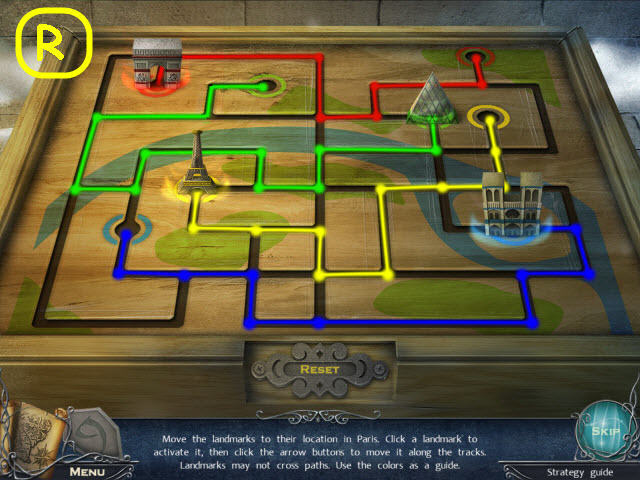
- Move the landmarks to their proper locations.
- See screenshot for solution (R).
- Take the CAR KEYS and read the note.
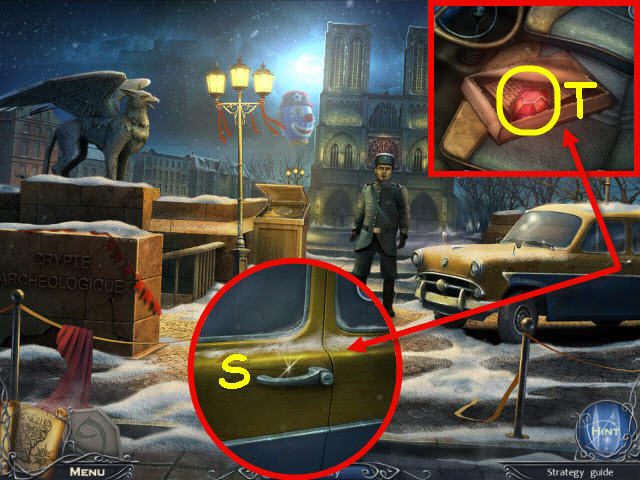
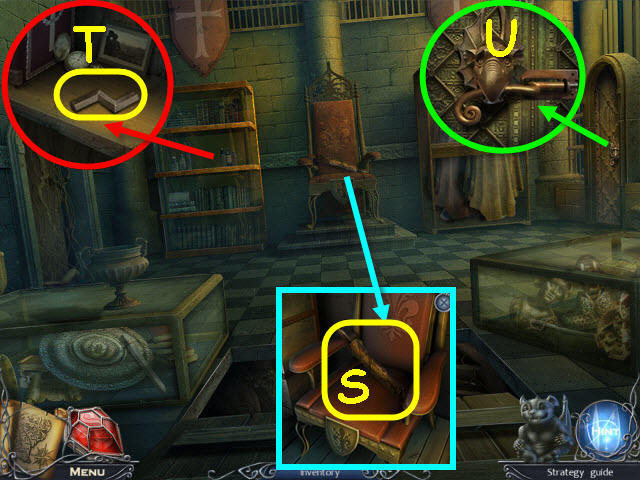
- Examine the car door and use the CAR KEYS on the lock (S).
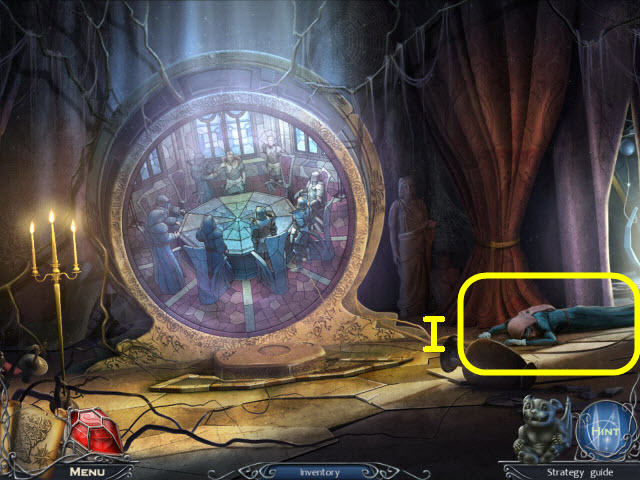
- Examine the opened car and open the portfolio; read the note. After the cut scene, take the GUARDIAN AMULET (T) which will be added to your taskbar.
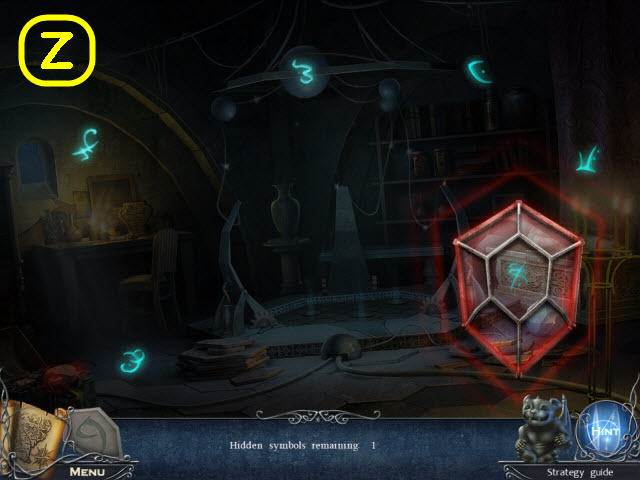
- You may now use the GUARDIAN AMULET to find hidden symbols.
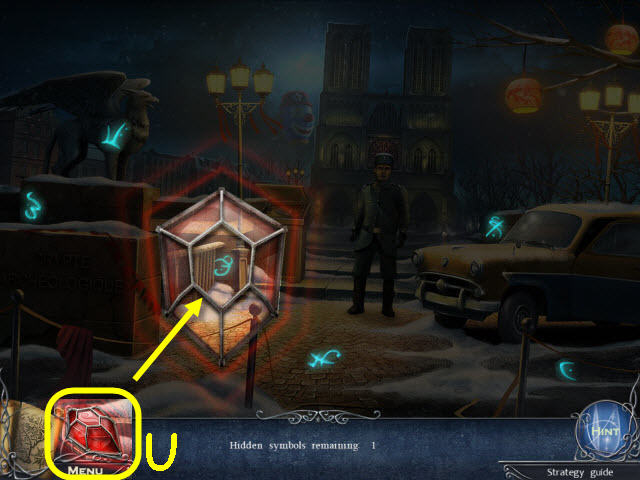
- Find the hidden symbols using the GUARDIAN AMULET (U).
- See screenshot for solution.
- Go forward to the plaza.

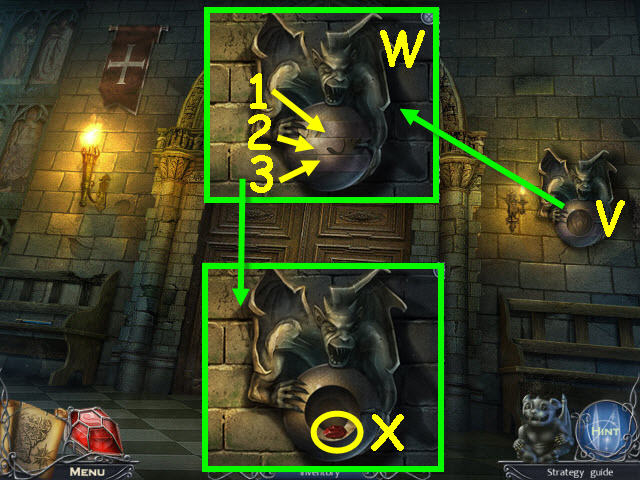
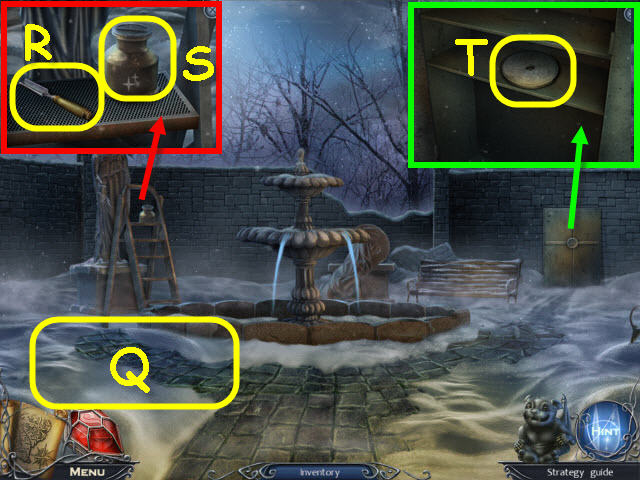
- Examine the snow pile; take the GARGOYLE WING (V).
- Examine the drain; take the REGISTER HANDLE (W).
- Go forward.
- Examine the ground left of the door; take the 2nd GARGOYLE WING (X).
- Back out three times and enter the cellar souvenir stand.
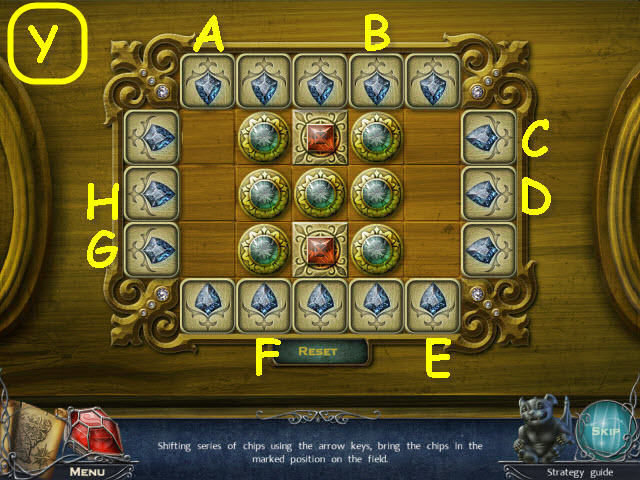
- Examine the cash register and place the REGISTER HANDLE on it; select the buttons to trigger a puzzle (Y).
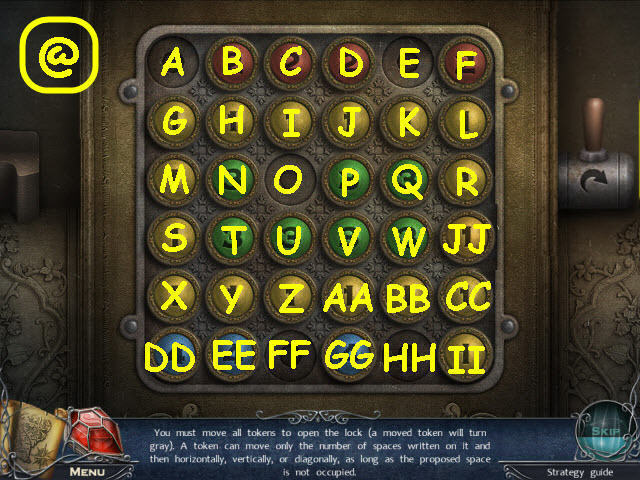
- Move each button the number of spaces written on them.
- Select the handle to reset.
- To solve the puzzle, move the following buttons: Q-HH, N-Q, H-A, EE-H, W-E, B-N, T-B, C-O, U-C, Z-FF, Y-EE, X-Y, M-T, G-M, DD-G, S-X, V-S, P-DD, D-P, AA-Z, BB-AA, CC-BB, JJ-W, II-CC, R-JJ, F-R, I-D, J-I, GG-J, L-F, and K-L (@).
- Take the RAZOR BLADE.
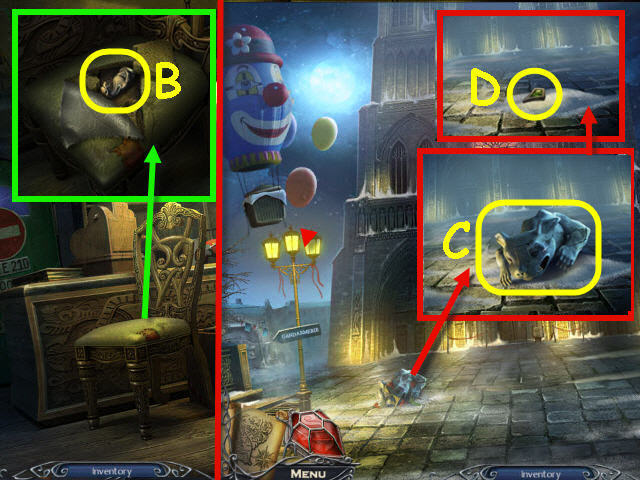
- Examine the chair and use the RAZOR BLADE on the seat; move the cloth and springs and take the STONE STATUETTE (B).
- Go to Notre Dame Plaza.
- Examine the entangled gargoyle and use the RAZOR BLADE on the banners to get the THIN TWINE; take the SMALL STONE GARGOYLE (C).
- Select the gem (D) and watch the cut scene.
- Back out twice and go into the cellar souvenir stand.
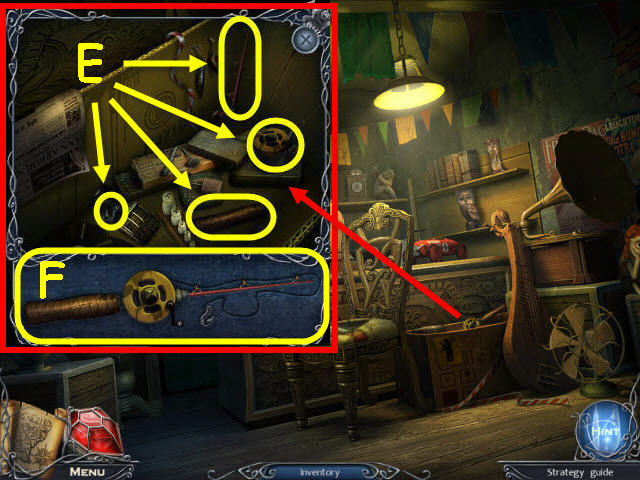
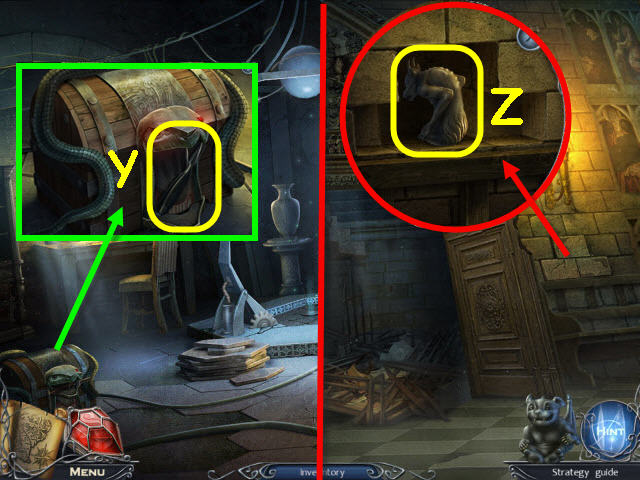
- Examine the box and select the items needed to assemble the fishing rod (E).
- Place the THIN TWINE on the rod and get a FISHING ROD (F).
- Back out and go forward twice.
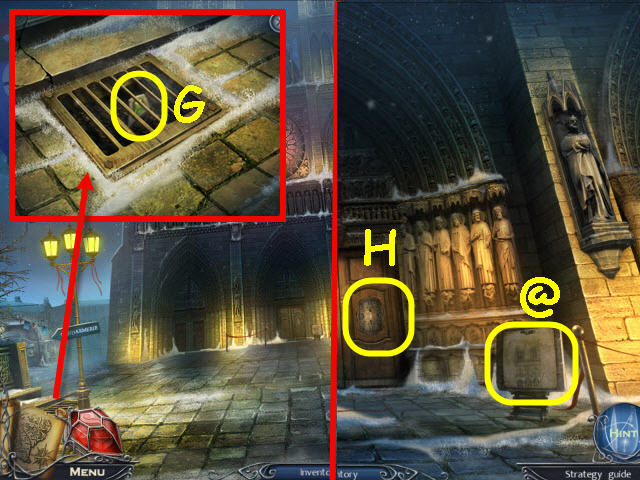
- Examine the drain and use the FISHING ROD on it to get the GREEN JEWEL KEY (G).
- Go forward.
- Read the sign (@).
- Examine the door and place the GREEN JEWEL KEY on it to trigger a puzzle (H).
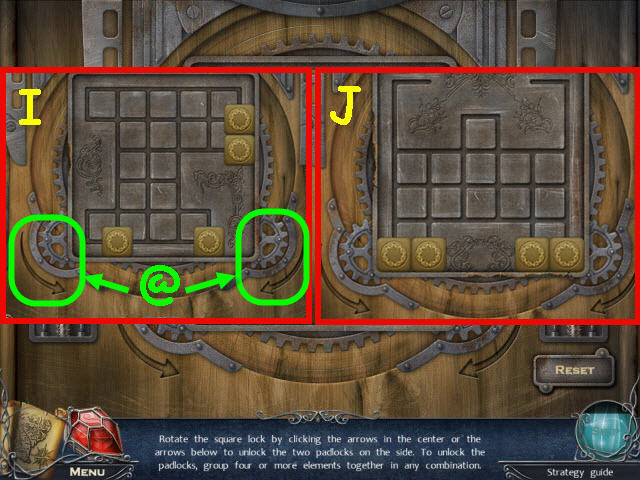
- Rotate the square to join four or more elements.
- Use the arrows to rotate the board; L = arrow on the left, R = arrow on the right (@).
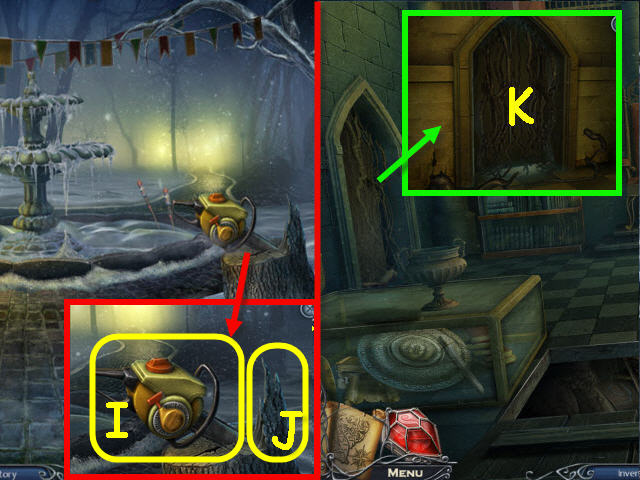
- To solve the puzzle, select the following arrows: First set – L, Rx2, Lx2, and R (I).
- Second set: R x10, and L (J).
- Go forward into Notre Dame and go right.
Chapter 2 – Notre Dame
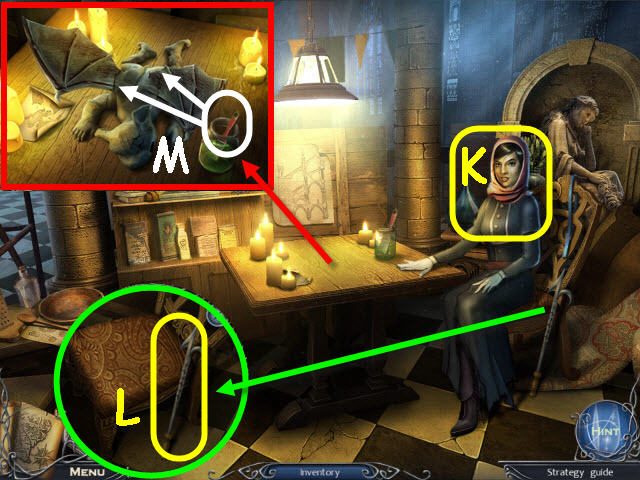
- Speak to Esme (K).
- Examine the chair; take the FIRE IRON (L).
- Examine the table and place the SMALL STONE GARGOYLE and 2 GARGOYLE WINGS on it; use the brush with glue on each the wing (M).
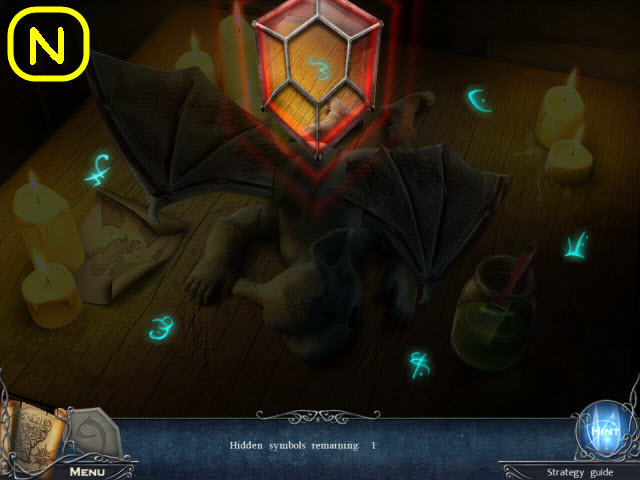
- Use your GUARDIAN AMULET to locate the hidden symbols in the scene (N).
- Take the repaired gargoyle, GLADRIEL, and she will be added to your toolbar. You can use her to get things out of your reach.
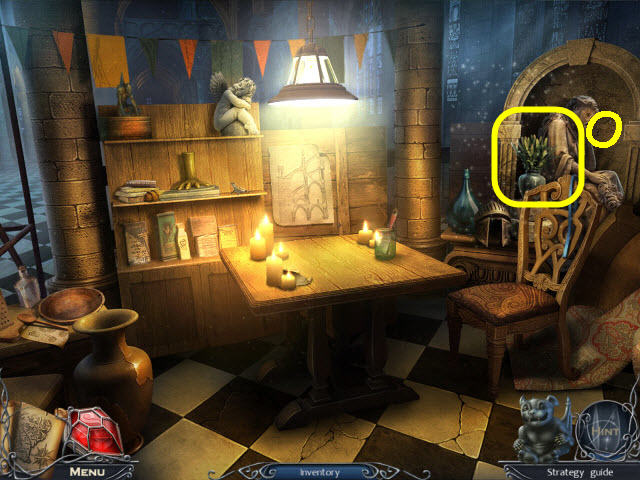
- Examine the area on the right (O).
- You will access a HOS.
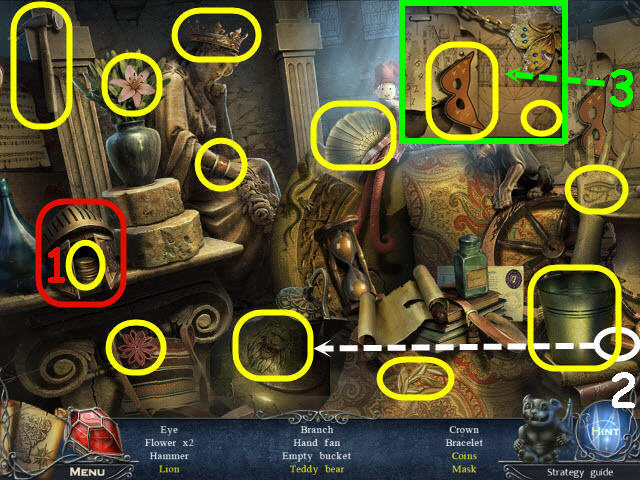
- Find the items listed.
- Open the helmet cheek plates to get the coins (1).
- Use the brush on the bell to get the lion (2).
- Examine the drawings to get the mask and teddy bear (3).
- You will earn an EMPTY BUCKET.
- Back out three times.

- Use GLADRIEL on the balloon (P).
- Examine the snow pile and use the EMPTY BUCKET on it; take the BUCKET WITH SNOW (Q).
- Examine the fallen basket to access a HOS (R).
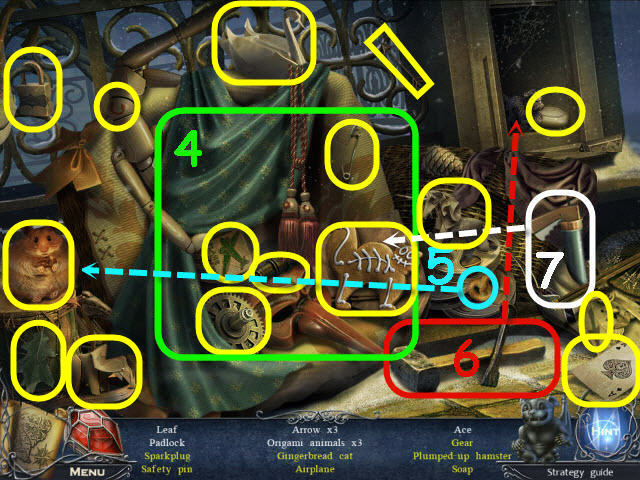
- Find the items listed.
- Move the cloth to get the sparkplug, airplane, safety pin, gear, and the cookie for gingerbread cat (4).
- Give the pretzel to the hamster to get a plumped-up hamster (5).
- Use the hammer and chisel on the cover; remove the panel and examine the opened niche to get the soap (6).
- Use the cookie decorator on the cookie to get a gingerbread cat (7).
- You will earn SOAP.
- Go left to the police station entrance.
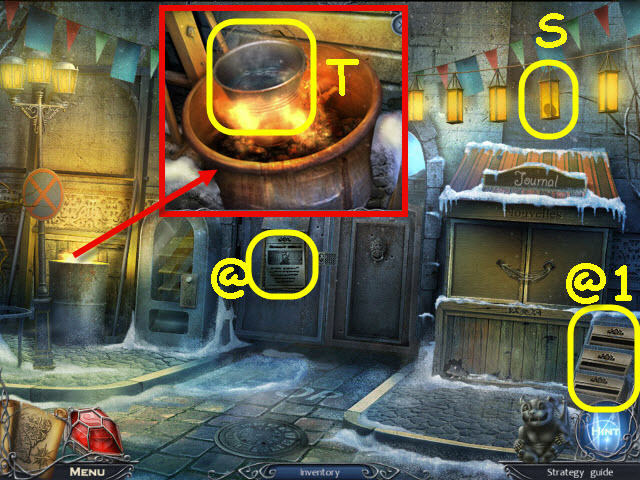
- Examine the lantern and use GLADRIEL on it to get a JUKEBOX TOKEN (S).
- Examine the barrel and place the BUCKET WITH SNOW on it; use the FIRE IRON to take the BUCKET WITH WATER (T).
- Read the notices (@-@1).
- Back out; go forward twice and then right.
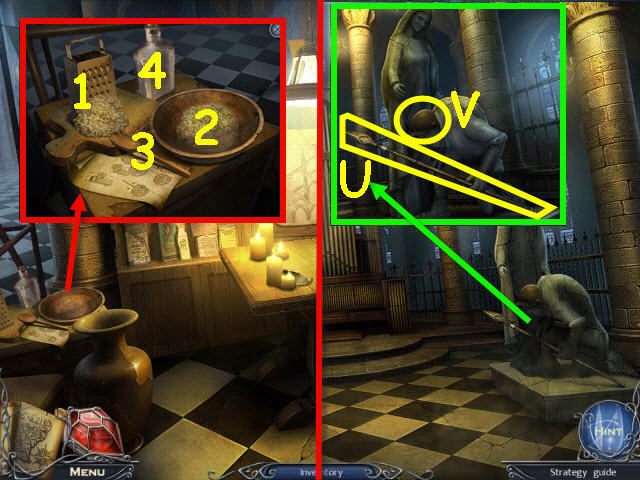
- Examine the bowl and use the SOAP on the grater (1); place the soap shavings in the bowl (2).
- Use the BUCKET WITH WATER on the bowl; stir with the spoon (3).
- Use the bottle on the bowl; take the LUBRICANT (4).
- Back out and go forward twice.
- Examine the statue; take the SPEAR (U).
- Use the LUBRICANT on the helmet; take the HELMET (V).
- Back out twice.
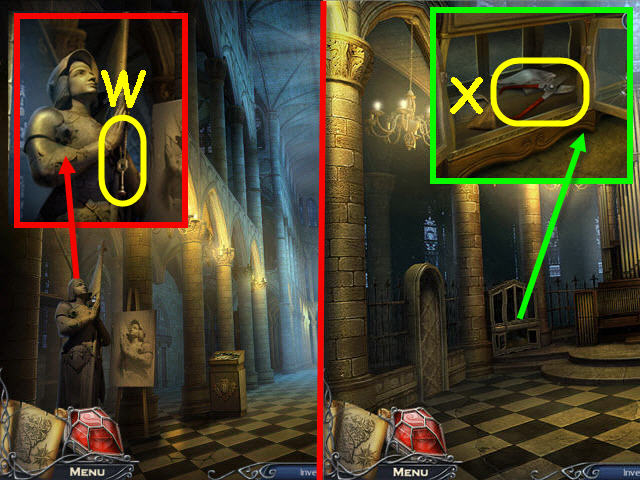
- Examine the statue and place the HELMET on it; take the FLEUR-DE-LYS KEY (W).
- Go forward twice.
- Examine the cabinet and use the FLEUR-DE-LYS KEY on the lock. Re-examine the cabinet; take the WIRE CUTTERS (X).
- Go to the police station entrance in Paris.
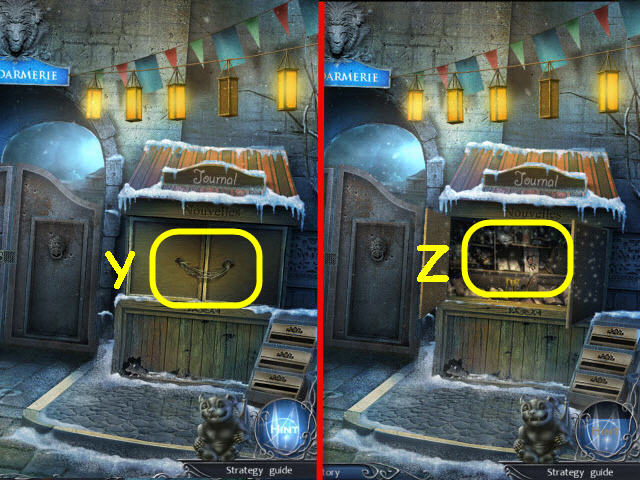
- Examine the kiosk; use the WIRE CUTTERS on the wire (Y).
- Examine the opened kiosk to access a HOS (Z).
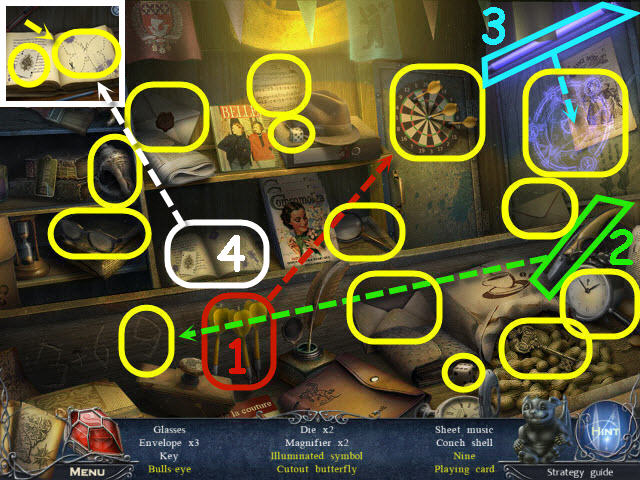
- Find the items listed.
- Use all three darts on the dart board to get a bulls-eye (1).
- Use the knife on the equation to get a nine (2).
- Turn on the light to get an illuminated symbol (3).
- Examine the book to get the playing card. Use the utility knife on the butterfly to get a cutout butterfly (4).
- You will earn SHEET MUSIC.
- Back out and go forward twice.
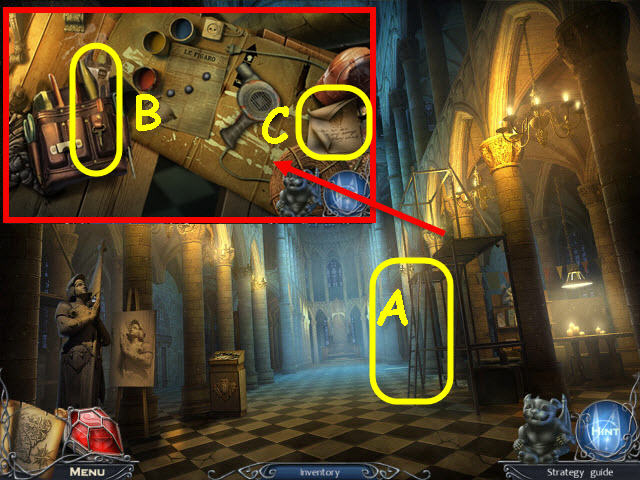
- Examine the scaffolding and use the SPEAR on it to pull down the ladder (A).
- Go up the scaffolding; take the WRENCH (B) and read the note (C).
- Back out, go forward and left.
- Examine the door and use the WRENCH on the lock (D).
- Examine the opened doorway; move the debris and open the satchel. Take the ORGAN KEYS (E) and read the note (F).
- Back out and go forward.
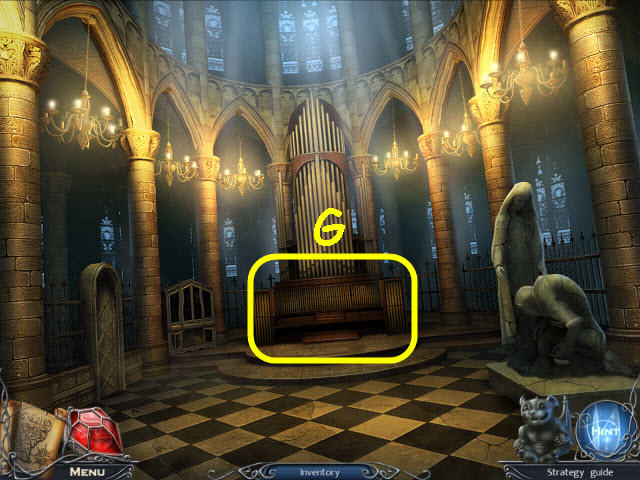
- Examine the organ and place the SHEET MUSIC and ORGAN KEYS to trigger a puzzle (G).
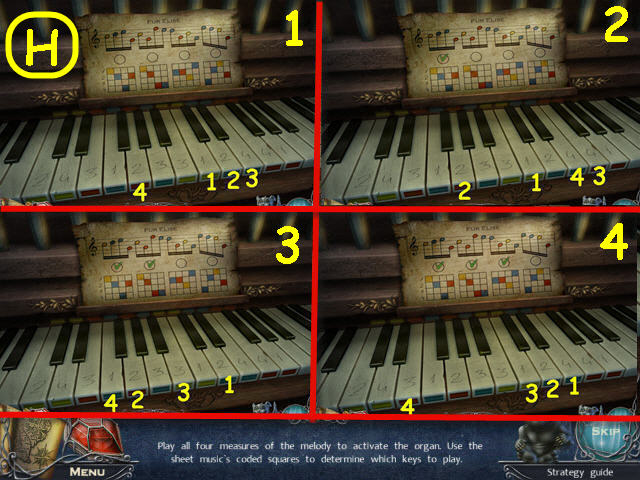
- Play all 4 tunes.
- See screenshot for solution (H).
- Go down in front of the organ into the stained glass window secret room.
Chapter 3 – Secret Room
- Attempt to go right.
- Examine Esme (I).
- Go right.
- Examine the table; read all the notes and take ESME’S MEDALLION (J).
- Take the THICK CLOTH (L).
- Examine the slab; take the POLICE BADGE (M).
- Examine the chest; take the BAKING POWDER (N).
- Go to the north tower entrance.
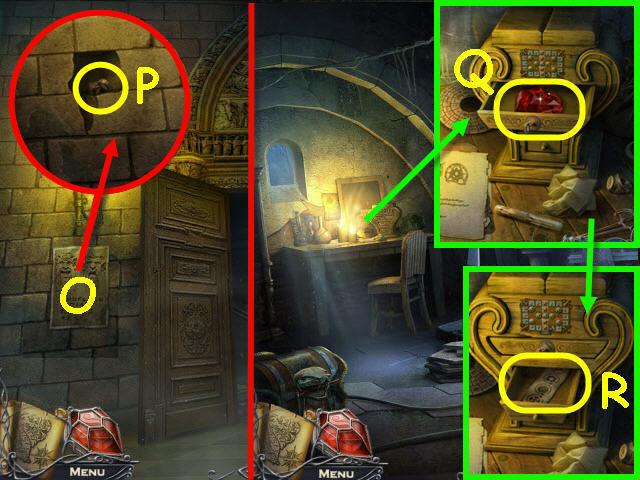
- Examine the notice and remove it (O).
- Place ESME’S MEDALLION in the slot; take the QUATREFOIL KEY (P).
- Go back to Esme’s underground lab.
- Examine the desk and zoom into the lock; place the QUATREFOIL KEY in the lock and take the HEART (Q).
- Open the second drawer; take the PAPER WITH CODE (R).
- Go to the atrium.
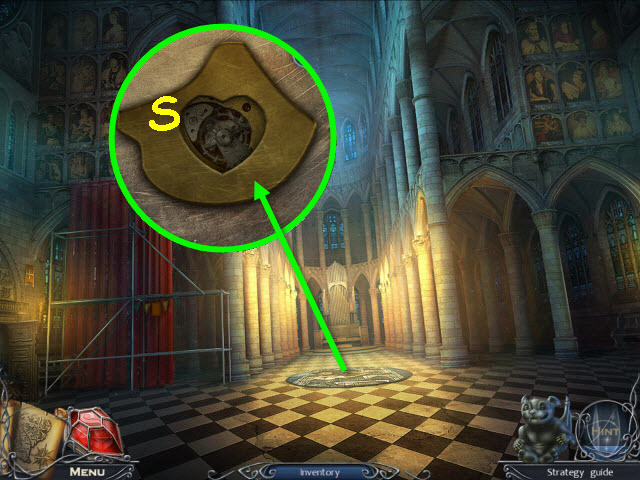
- Examine the center floor and select the lock (S).
- Place the HEART in the center to trigger a puzzle.
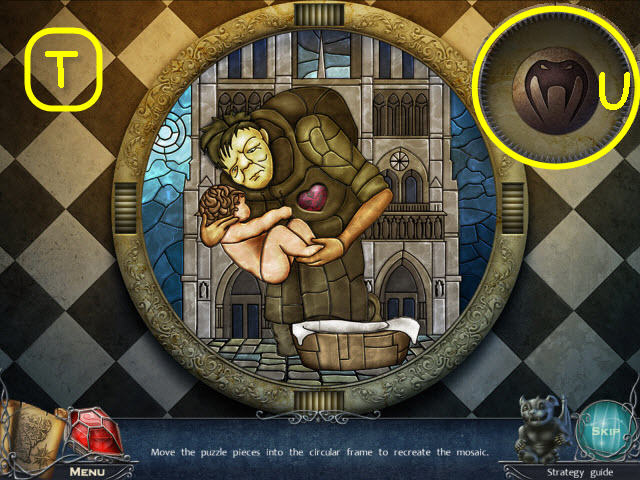
- Assemble the pieces to complete the picture.
- See screenshot for solution (T).
- Take the SNAKE SYMBOL (U).
- Go right.
- Examine the gargoyle and place the SNAKE SYMBOL in the center (V).
- To solve the puzzle, select disk 3 (W).
- Take the RUBY STONE (X).
- Go to Esme’s underground lab.
- Examine the chest and place the RUBY STONE in the eye socket; take the CHISEL (Y).
- Go to the north tower entrance.
- Examine the loose bricks and use the CHISEL on them; take the 2nd STONE STATUETTE (Z).
- Back out twice and go right.
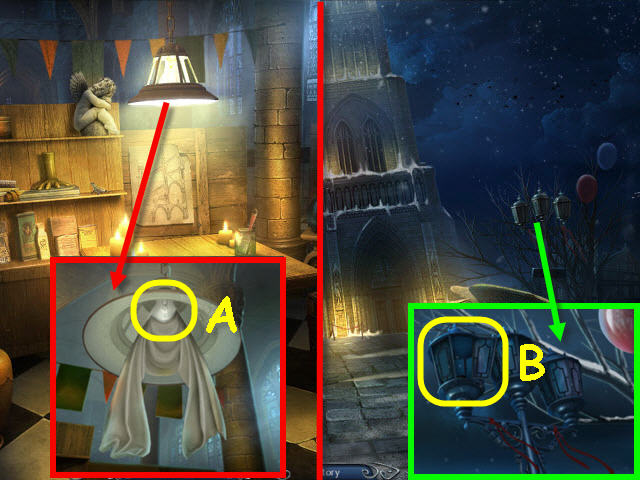
- Examine the lamp and use the THICK CLOTH on it; take the LIGHT BULB (A).
- Back out three times.
- Examine the lamp and open the panel; place the LIGHT BULB in the lamp (B).
- Go right and then forward to the cafe.
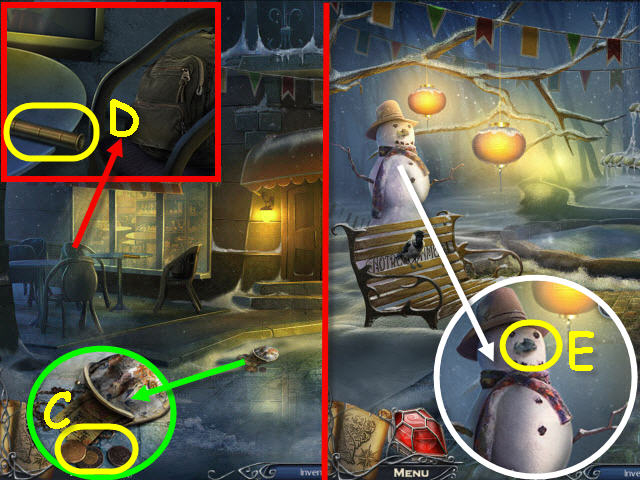
- Examine the coin purse; take the COINS (C).
- Examine the table; take the VACUUM TUBE (D).
- Go right.
- Examine the snowman; take the FROZEN LOCK PIECE (E).
- Go to the police station entrance.
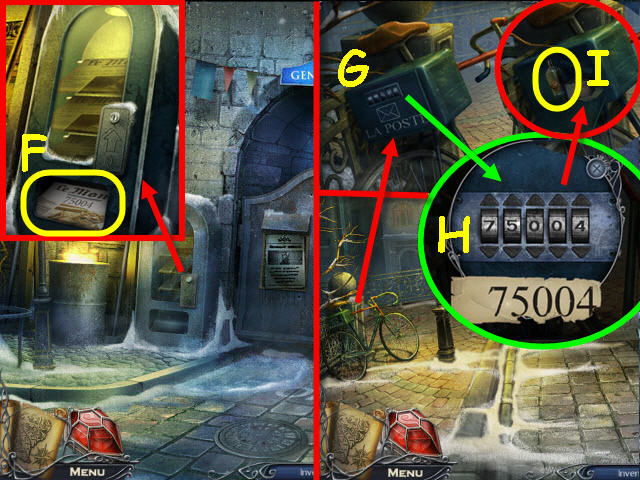
- Examine the newspaper dispenser and place the COINS in the slot; take the LUGGAGE BOX CODE (F).
- Back out and go right.
- Examine the bicycle; zoom into the postal box and place the LUGGAGE BOX CODE on it (G).
- Select the code 7-5-0-0-4 (H).
- Take the ACETONE (I).
- Go right.
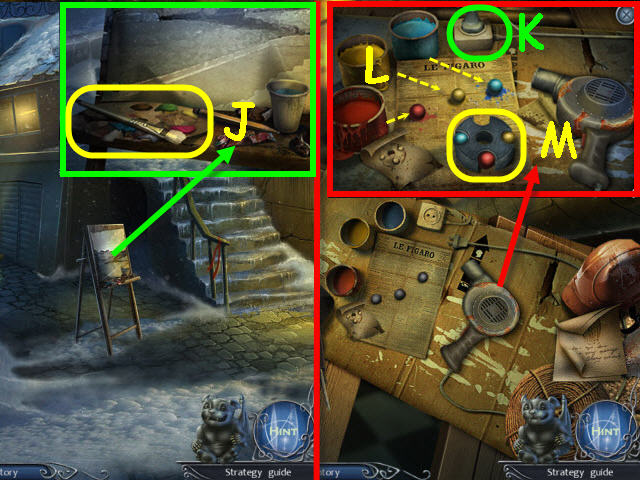
- Examine the easel and use the ACETONE on the brush; take the BRUSH (J).
- Go up the scaffolding in Notre Dame.
- Examine the hairdryer and place the FROZEN LOCK PIECE on the table; plug in the hairdryer (K).
- Select the hairdryer twice to dry the lock piece.
- Use the BRUSH on the red paint pot and paint a ball, repeat this action for the yellow and blue paints (L). Tip: Use the hand cursor and not the tip of the brush.
- Place the three balls on the lock; take the PART OF A LOCK (M).
- Go to the police station entrance in Paris.
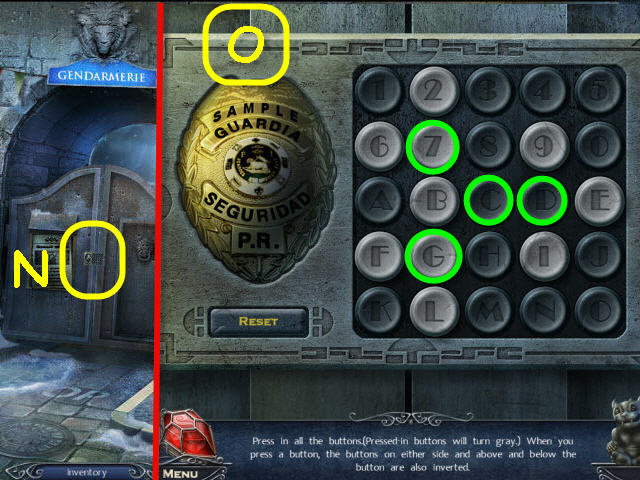
- Examine the gate; place the POLICE BADGE on it to trigger a puzzle (N).
- Push all the buttons in.
- To solve the puzzle, select the following buttons: G, 7, C and D (O).
- Go forward into the police precinct.
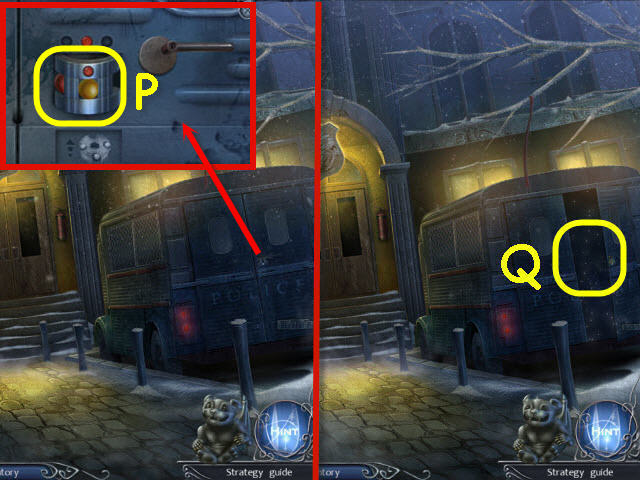
- Examine the police van and place the PART OF A LOCK on the lock (P).
- Examine the opened van to access a HOS (Q).
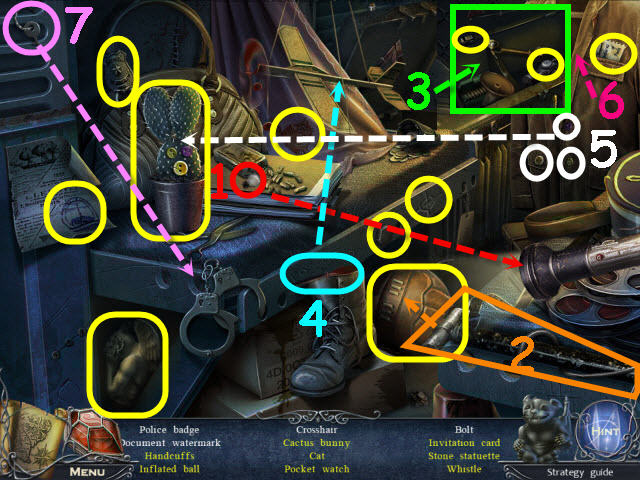
- Find the items listed.
- Place the bulb in the flashlight to get the stone statuette (1).
- Use the pump on the ball to get an inflated ball (2).
- Open the case and zoom in, to get the pocket watch and whistle (3).
- Place the propeller on the plane to get a cat (4).
- Place the three buttons on the cactus to get a cactus bunny (5).
- Move the lapel to get the invitation card (6).
- Use the key to get the handcuffs (7).
- You will earn a 3rd STONE STATUETTE.
- Go to the scaffolding in Notre Dame.
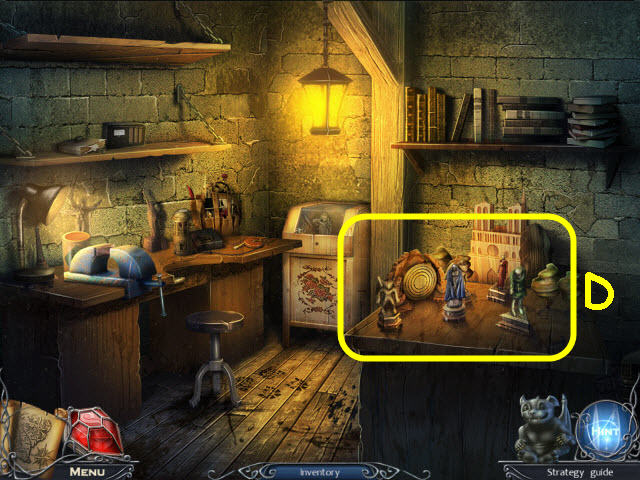
- Examine the left side of the table; assemble the pieces to get a 4th STONE STATUETTE (R).
- Go to the stonemason’s work area.
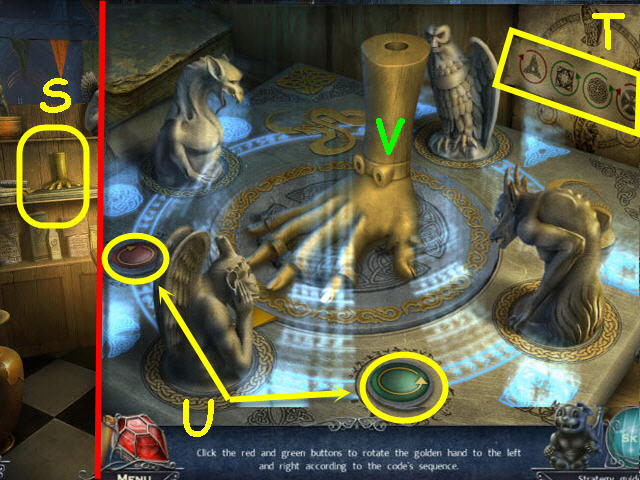
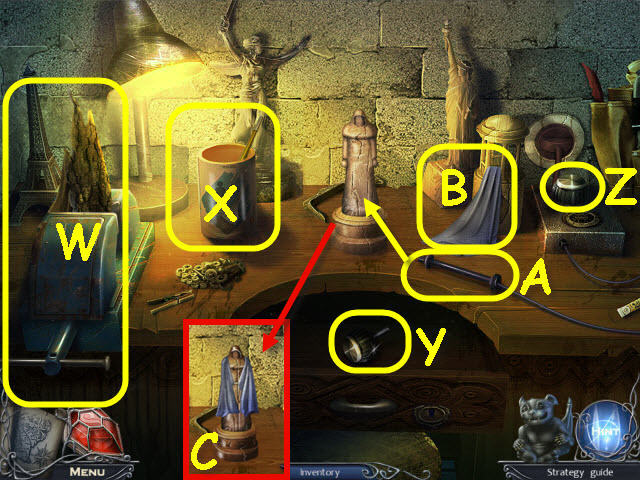
- Examine the shelf; place the 4 STONE STATUTES and the PAPER WITH CODE by the hand to trigger a puzzle (S).
- Move the hand according to the code (T).
- To solve the puzzle, select the following buttons: Red x2, green x3, green x2, and red x3 (U).
- Take the GOLDEN HAND (V).
- Go to the Esme’s underground lab.
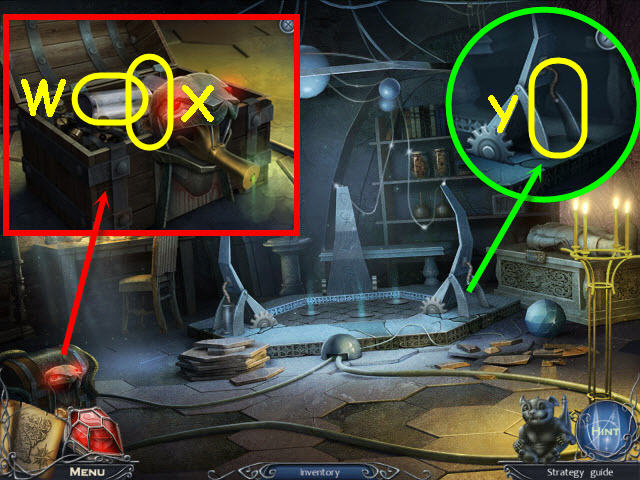
- Examine the chest and place the GOLDEN HAND in the lock. Take the PUMP (W), and STAINED GLASS FRAME PIECE (X).
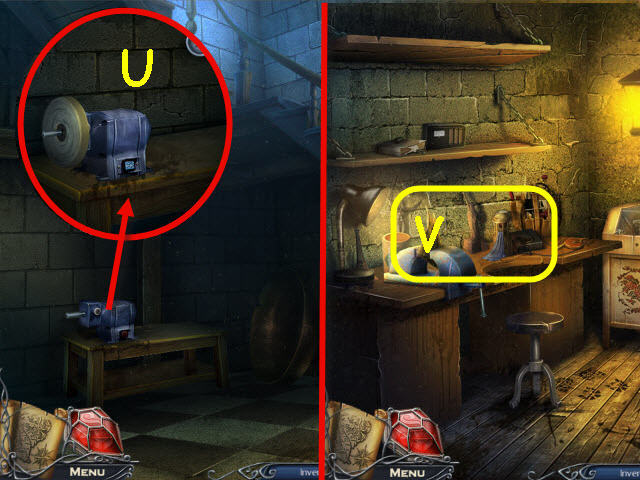
- Examine the right animator base and place the PUMP on it (Y).
- Use the GUARDIAN AMULET to find the hidden symbols.
- See screenshot for solution (Z).
Chapter 4 – The Animator
- Place GLADRIEL in the animator (A) to get an upgraded GLADRIEL.
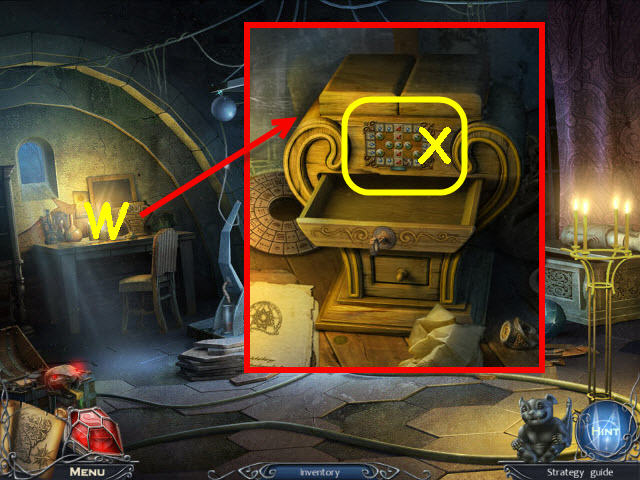
- Examine the coffin and zoom into the panel to trigger a puzzle (B).

- Construct a line connecting all open cells.
- See screenshot for solution; use the yellow square for your starting point (C).
- Examine the opened coffin to access a HOS.

- Find the items listed.
- Place the gems on the box to get a dragon (1).
- Place the pins in the doll to get a voodoo doll (2).
- You will earn an INSPIRED TOKEN.
- Go to the Notre Dame facade.

- Use the upgraded GLADRIEL to turn the right statue; take the SMALL SHIELD (D).
- Go to the Paris police precinct.
- Examine under the stairs and place the SMALL SHIELD in the recess; take the PLIERS HALF (E), and 2nd INSPIRED TOKEN (F).
- Go to the south tower entrance in Notre Dame.
- Examine the left bench and place the PLIERS HALF on the pliers half; take the PLIERS (G).
- Go to the cafe in Paris.
- Examine the table; use the PLIERS on the backpack and remove the container (H).
- Open the container; take the HOT DOG (I).
- Back out three times and go left.
- Give the HOT DOG to the dog (J).
- Take the SHARP CROSSBEAM (K).
- Examine the bench; take the SCOOP (L), and RIGHT SUN PART (M).
- Examine the bin and use the SCOOP on it; take the SCOOP OF SAND (N).
- Go to the Seine riverbank.
- Use the SCOOP OF SAND on the icy steps (O).
- Enter the boathouse (P).
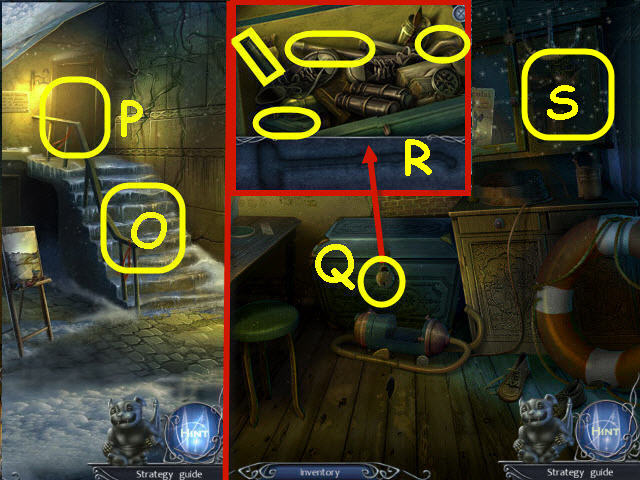
- Examine the chest and use the SHARP CROSSBEAM on the padlock (Q).
- Assemble the BRUSH ATTACHMENT (R).
- Examine the cabinet to access a HOS (S).
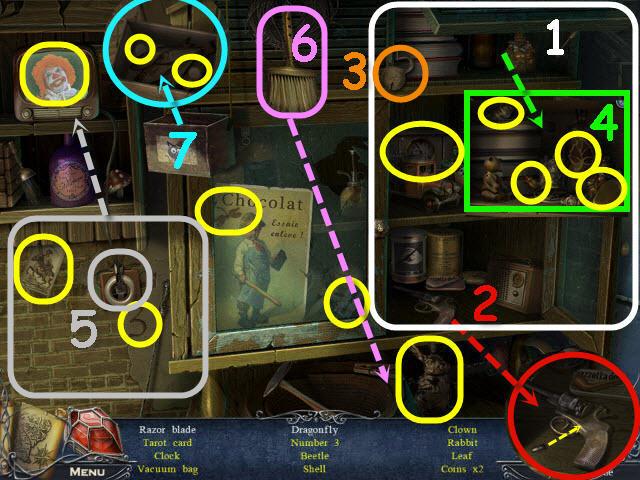
- Find the items listed.
- Move the anchor on the upper right and open the right cabinet door to get the clock (1).
- Examine the bottom shelf and place the bullet in the gun (2).
- Use the loaded gun on the padlock and open the upper right cabinet (3).
- Zoom into the cabinet to get the leaf, vacuum bag and shell. Move the mask to get the beetle (4).
- Remove the picture to get the tarot card, number 3 and expose the plug. Plug in the TV to get the clown (5).
- Use the brush on the cobwebs to get the rabbit (6).
- Examine the hanging box to get the 2 coins (7).
- You will earn a VACUUM BAG.
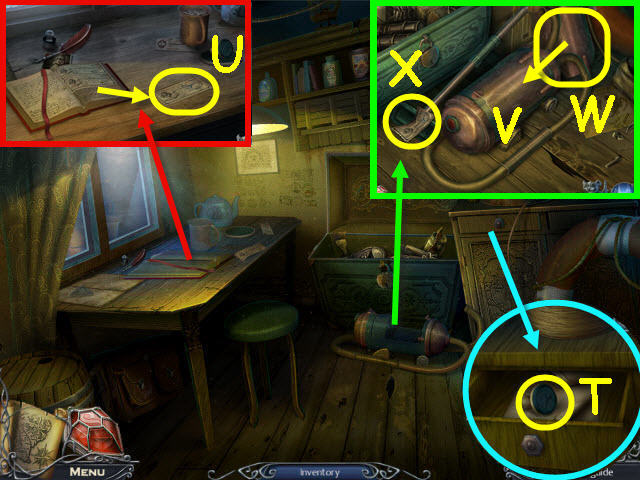
- Examine the drawer and use the CHISEL on it; take the STAMP (T).
- Examine the table; take a ticket and use the STAMP on it; attempt to take the ticket (U).
- Examine the vacuum; place the BRUSH ATTACHMENT, VACUUM BAG, and VACUUM TUBE on it (V).
- Place the lid (W) on the vacuum and push the red button; take the TICKET (X).
- Back out.
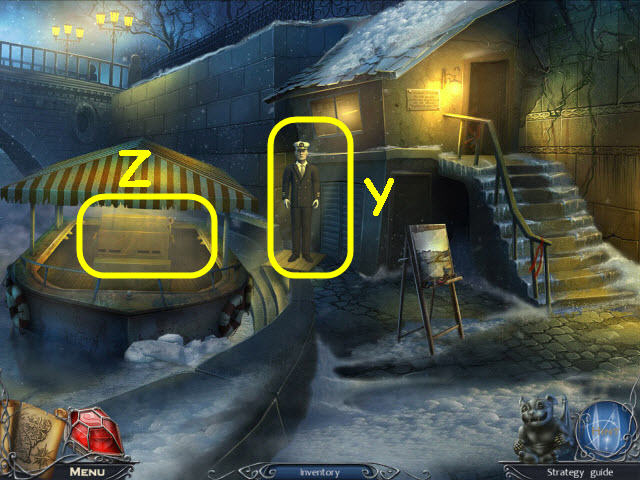
- Give the TICKET to the captain (Y).
- Enter the boat (Z).
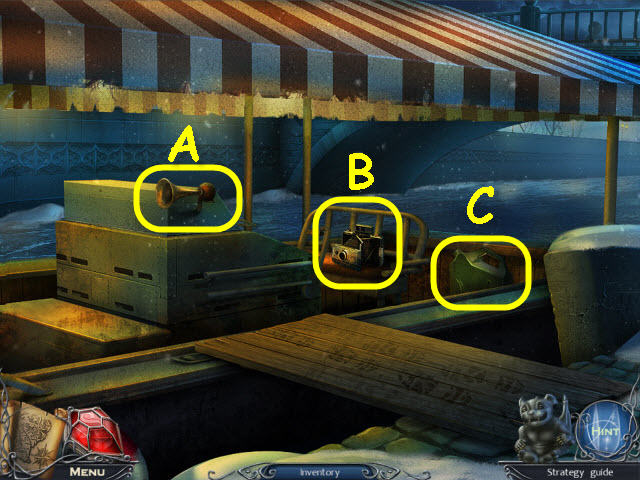
- Take the HORN (A), CAMERA (B), and the FUEL CAN (C).
- Go to the Fontaine Saint Michel.
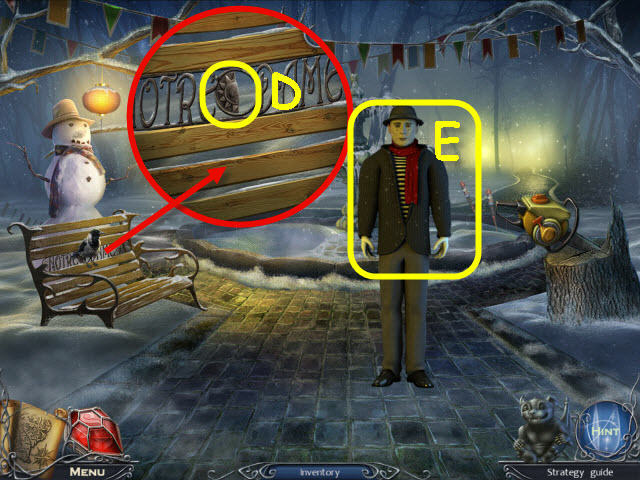
- Examine the bird and use the HORN to scare him away; take the LEFT SUN PART (D).
- Use the CAMERA on the mime to get PHOTO OF ZODIACAL POSE (E).
- Go to the south tower entrance in Notre Dame.
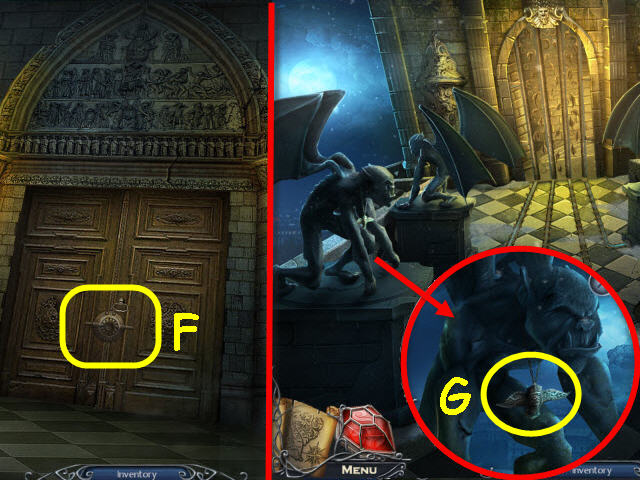
- Examine the door and place the LEFT SUN PART and RIGHT SUN PART in the lock (F).
- Go forward and up the stairs.
- Examine the front left gargoyle; take the WINGED EMBLEM (G).
- Back out.
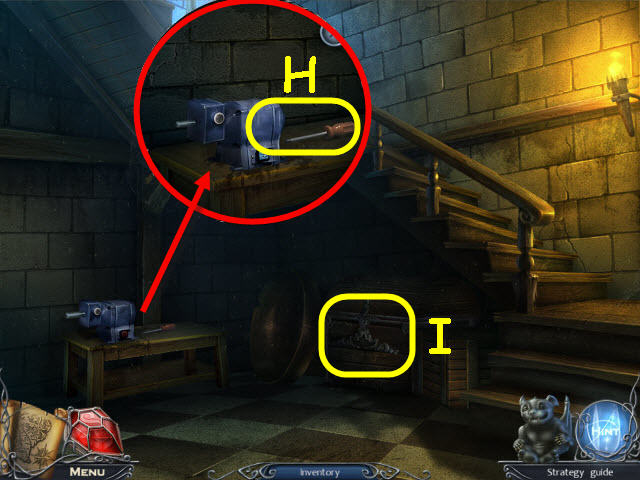
- Examine the grindstone; take the SCREWDRIVER (H).
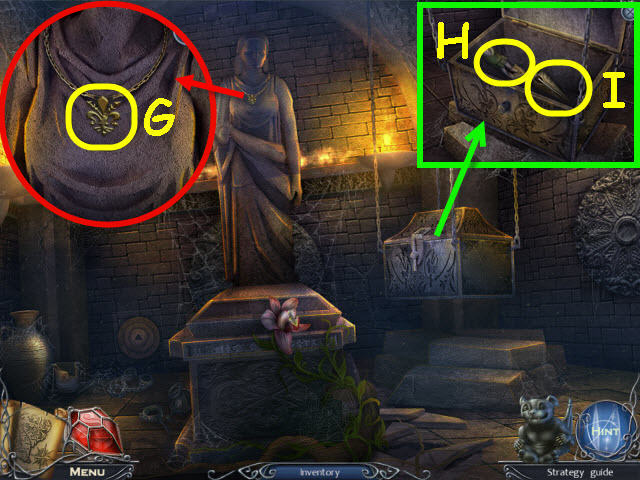
- Examine the chest and place the WINGED EMBLEM in the lock (I).
- Examine the opened chest to access a HOS.
- Find the items listed.
- Use the hammer on the bottle to get a scroll (1).
- You will earn a BIG GEAR.
- Go up the stairs.
- Examine the gear and place the BIG GEAR by it (J).
- Turn the front left and right gargoyles to face outward (K).
- Go forward and awaken in the dungeon.
Chapter 5 – The Dungeon
- Examine the pillar base; take the PLUNGER (L) and DECORATIVE TILE (M).
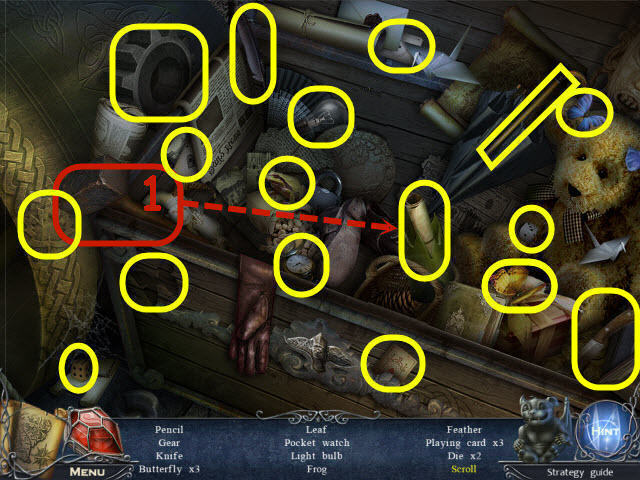
- Examine the shelves to access a HOS (N).

- Find the items listed.
- Zoom into the bucket to get the ring and violets; use the hole punch on the bucket to get the dentures (1).
- Use the pruners on the vines and zoom into the ball to get the lizard; pull the handle to get the glass sphere (2).
- Use the ball of yarn on the pinned board to get a number 9 (3).
- You will earn a CODED HEXAGON.
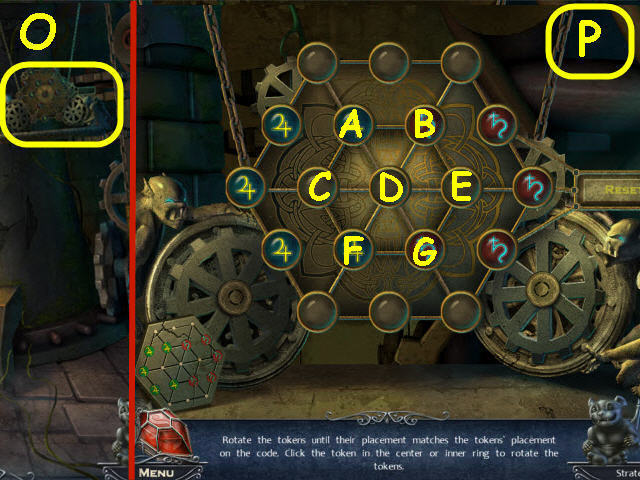
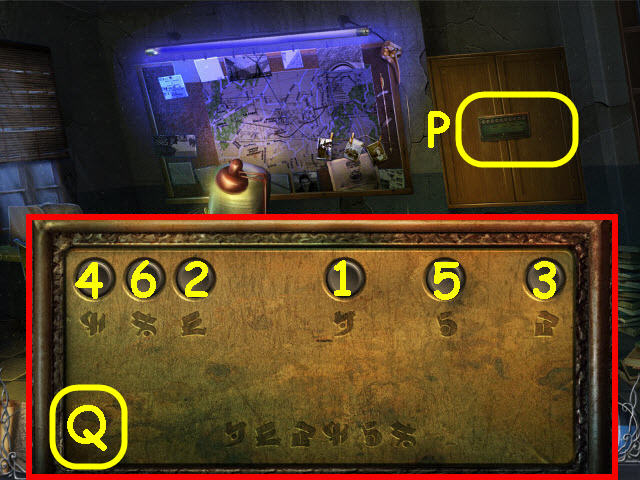
- Examine the mechanism and place the CODED HEXAGON on it to trigger a puzzle (O).
- Rotate the tokens to duplicate the code.
- To solve the puzzle; rotate the following rings: Cx3, Dx5, Ax4, D, Gx2, A, Bx2, E, Bx2, Dx4, Gx2, Fx2, Cx5, Fx3, Cx5, E, B, E, and Bx5 (P).
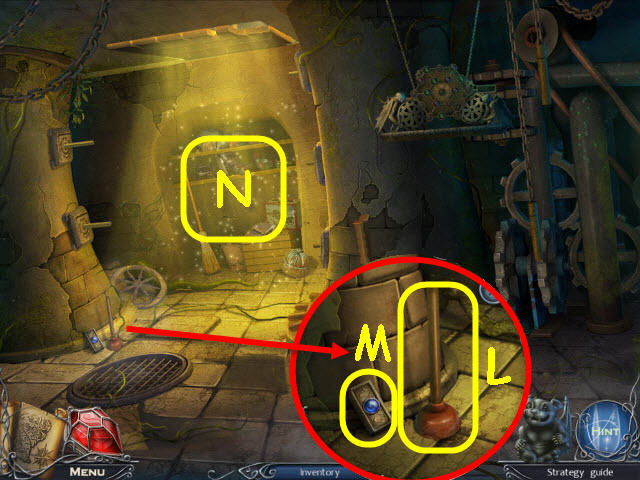
- Pull the lever (Q).
- Use GLADRIEL on the upper grate (R).
- Go up the newly-opened grate.
- Examine the throne; take the DIRTY ROLLING PIN (S).
- Examine the shelves; take the ALLEN KEY (T).
- Examine the door on the right and slide the bolt (U).
- Go right to exit and then go to the cellar souvenir stand in Paris.
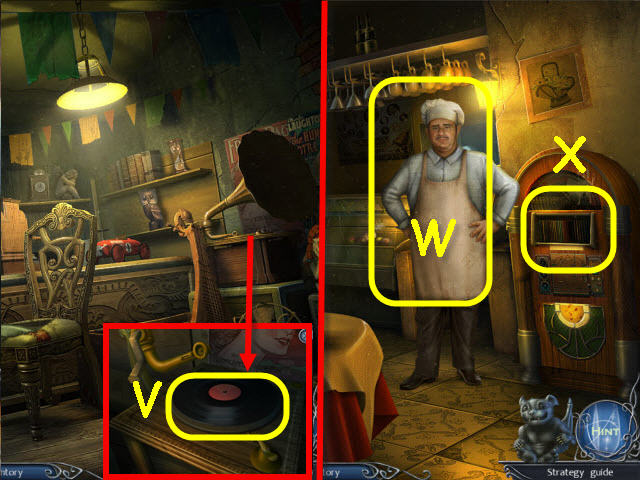
- Examine the gramophone and use the ALLEN KEY on the arm; take the RECORD (V).
- Go to the cafe and forward to the cafe interior.
- Give the RECORD to the chef (W).
- Examine the jukebox and place the JUKEBOX TOKEN on it to trigger a puzzle (X).

- Move the token to the coin slot.
- To solve the puzzle, move the token the following directions: Right, up, left, down, right, down, left, up, right, up, left, down, right, up, and right (Y).
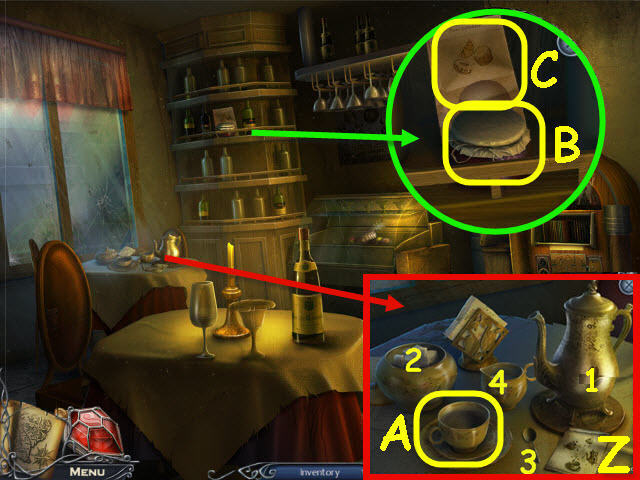
- Examine the table; lift the lid off the sugar bowl and make coffee per the directions (Z).
- Pour the coffee (1), place the sugar (2) in the cup, stir with the spoon (3) and then place the cream (4) in the cup.
- Take the CUP OF COFFEE (A).
- Examine the shelves; take the JAM (B), and EMPTY PAPER BAG (C).
- Go through the back doorway into the cafe kitchen.
- Examine the sink and place the DIRTY ROLLING PIN in it; turn on the tap (D).
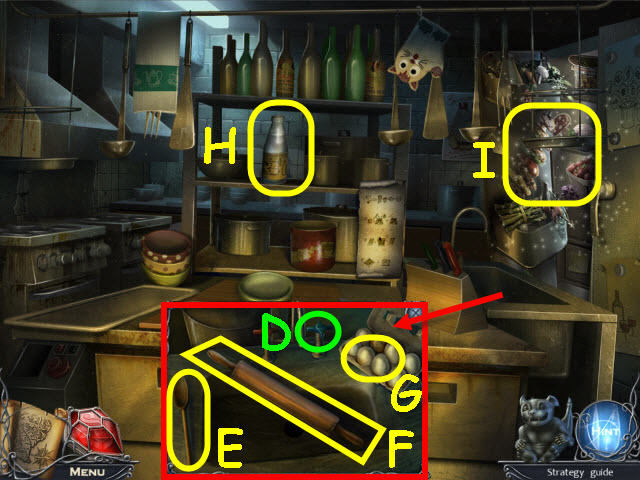
- Take the WOODEN SPOON (E), CLEAN ROLLING PIN (F), and EGGS (G).
- Take the MILK (H).
- Examine the refrigerator to access a HOS (I).
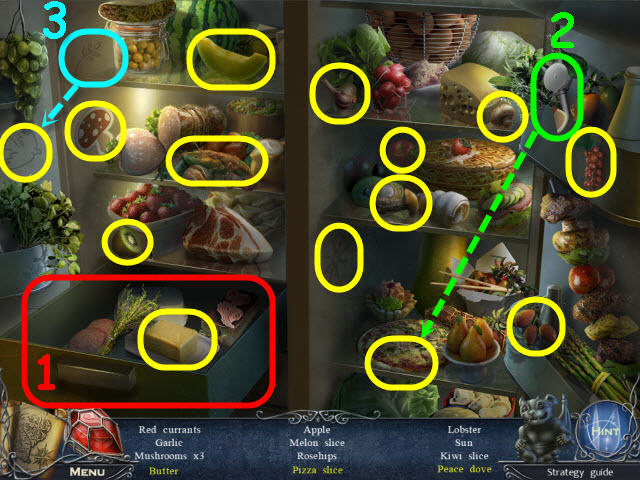
- Find the items listed.
- Open the drawer to get the butter (1).
- Use the pizza cutter on the pizza to get a pizza slice (2).
- Use the sprig on the bird to get a peace dove (3).
- You will earn BUTTER.
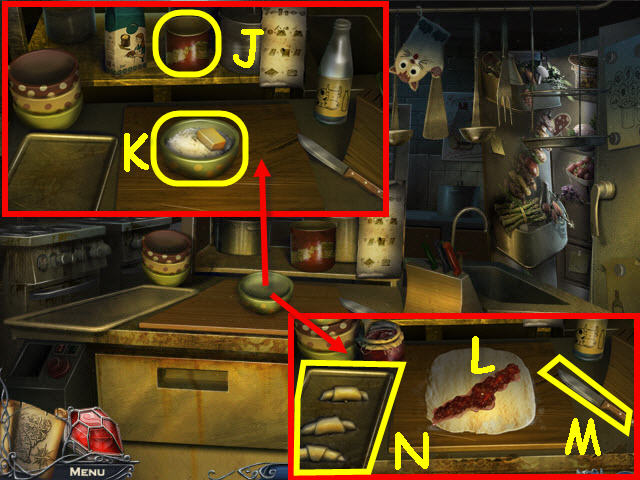
- Examine the counter and use the items on the bowl (K) in the following order: MILK, EGGS, BAKING POWDER, sugar (J), and BUTTER.
- Use the WOODEN SPOON on the bowl; use the CLEAN ROLLING PIN on the dough and place the JAM on the rolled out dough (L).
- Roll the dough with jam and use the knife (M) to make the rolls.
- Take the RAW CROISSANTS (N).
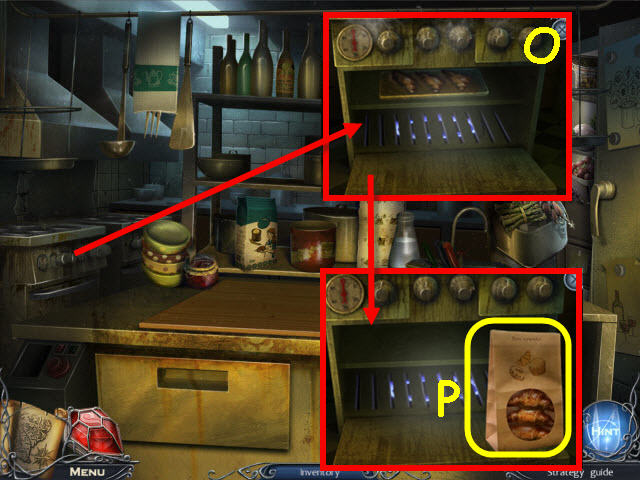
- Examine the stove, open the oven and place the RAW CROISSANTS in it (O).
- Select the oven knobs and open the oven. Place the EMPTY PAPER BAG on the door; take the PAPER BAG WITH CROISSANTS (P).
- Go to the bell tower entrance in Notre Dame; go forward to the bell tower.
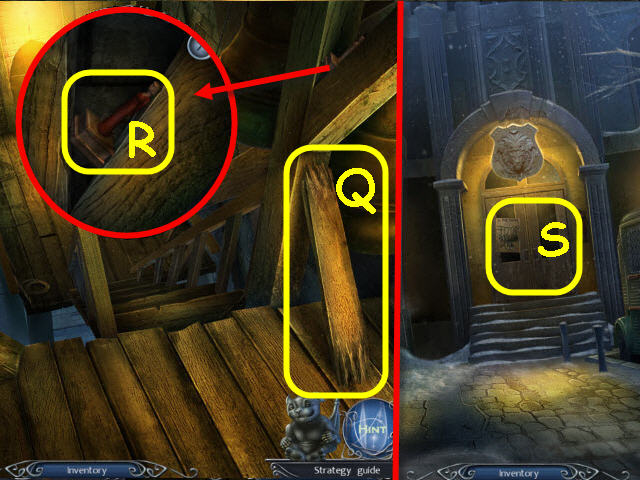
- Take the PLANK (Q).
- Examine the beam; take the ESME FIGURE (R).
- Go to the Paris police precinct.
- Examine the door and place the DECORATIVE TILE on it to trigger a puzzle (S).
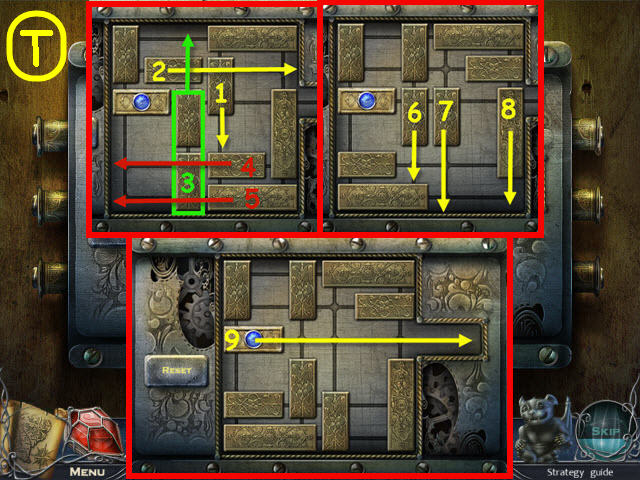
- Clear a path for the decorative tile to slide out.
- See screenshot for solution (T).
- Go forward into the police hall.
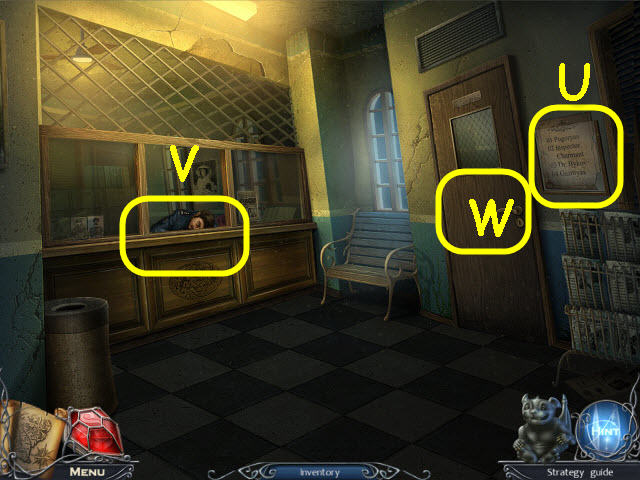
- Examine the numbers and take the PHONE NUMBERS (U).
- Examine the police officer (V) and give him a CUP OF COFFEE, the PAPER BAG WITH CROISSANTS, and the PHONE NUMBERS.
- Go right through the newly-opened door into Inspector Charmant’s office (W).
- After a cut scene you will acquire the ARCHIVES KEY.
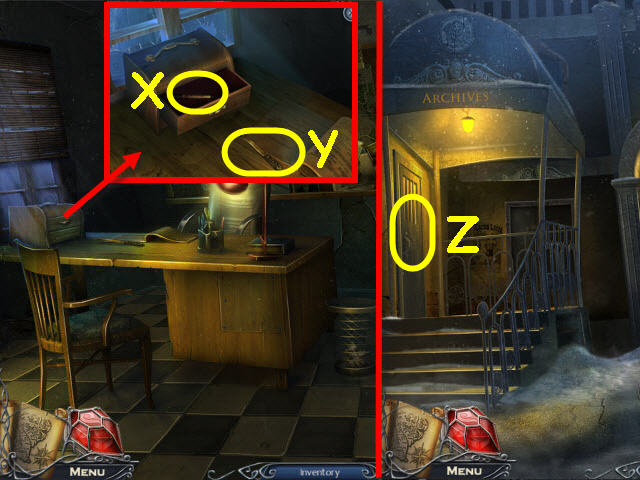
- Examine the desk; open the drawer and take the HIGHLIGHTER (X) and the LETTER OPENER (Y). Close the drawer.
- Back out twice.
- Examine the archive door and use the ARCHIVES KEY on it (Z).
- Enter the police archives.
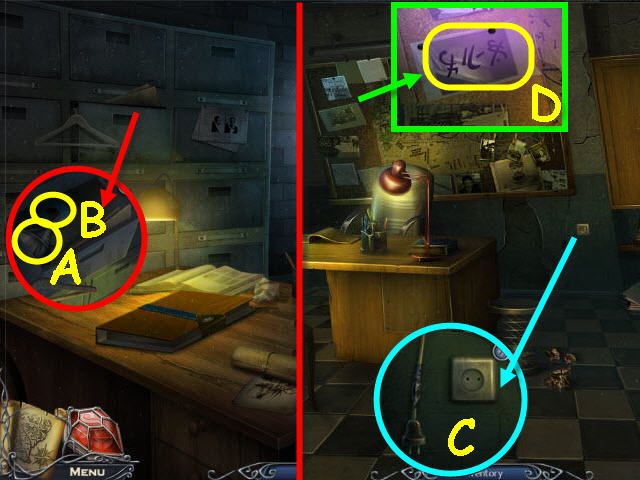
- Examine the cabinets; take the FUNNEL (A) and INSULATING TAPE (B).
- Go to the Inspector Charmant’s Office.
- Inspect the outlet and repair the plug with the INSULATING TAPE; plug in the repaired plug (C).
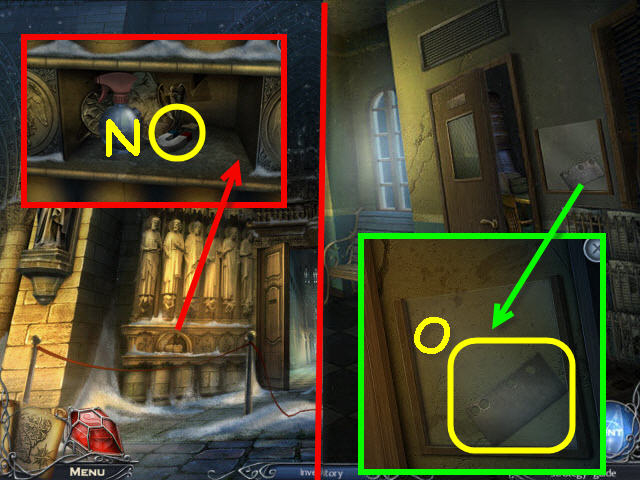
- Examine the bulletin board; use the HIGHLIGHTER on the photo and take the PHOTO WITH CODE (D).
- Go to the police archives.
- Examine the box and place the PHOTO WITH CODE on it; press the symbols in the order of the code. Solution: 1-3-2 (E).
- Take the DRAWER HANDLE (F).
- Go to Inspector Charmant’s office.
- Examine the desk and place the DRAWER HANDLE on the bottom drawer; open the drawer and take the SIGNET RING (G).
- Go back to the police archives.
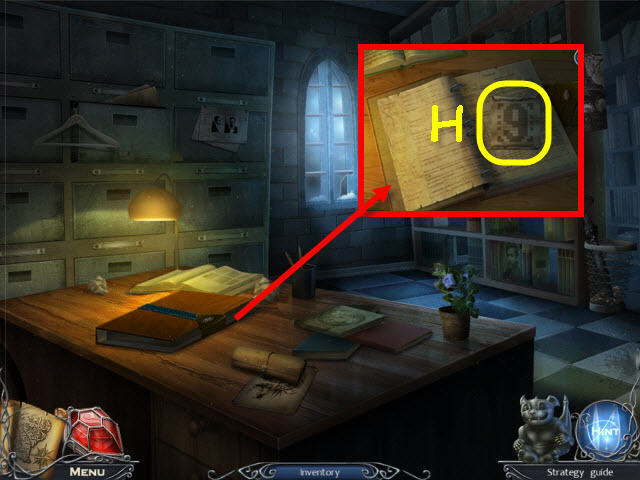
- Examine the desk and use the SIGNET RING on the book; turn the page and take the PATTERN WITH 9 (H).
- Go to Fontaine Saint Michel.
Chapter 6 – Number 9
- Examine the chainsaw and remove the gas cap; use the FUNNEL and FUEL CAN on it (I).
- Pull the cord to get the CHAINSAW; take the SPLINTER (J).
- Go to the sacristy in Notre Dame.
- Examine the left door and use the CHAINSAW on the roots (K).
- Go left through the newly-opened doorway.
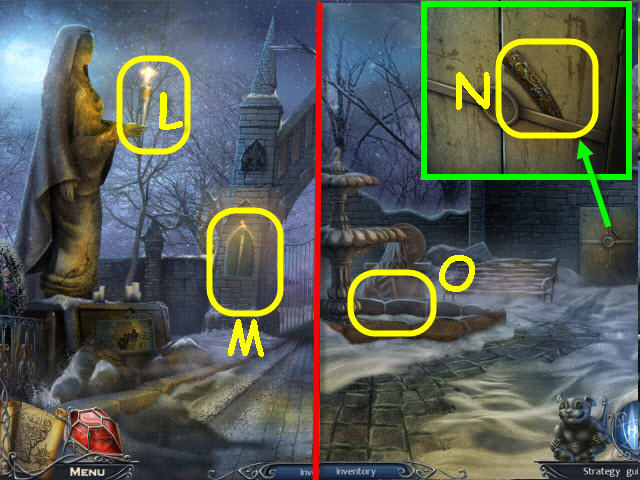
- Use GLADRIEL to get the TORCH (L).
- Examine the alcove and place the TORCH in it (M).
- Go right.
- Examine the cabinet; take the 2nd STAINED GLASS FRAME PIECE (N).
- Examine the fountain and place the PHOTO OF ZODIACAL POSE on it to trigger a puzzle (O).
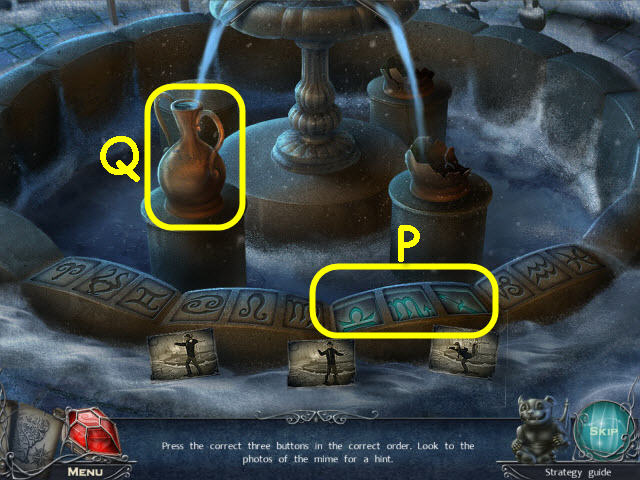
- Press the correct three buttons as depicted in the mime poses.
- See screenshot for solution (P).
- Take the PITCHER OF WATER (Q).
- Back out to the cemetery entrance.
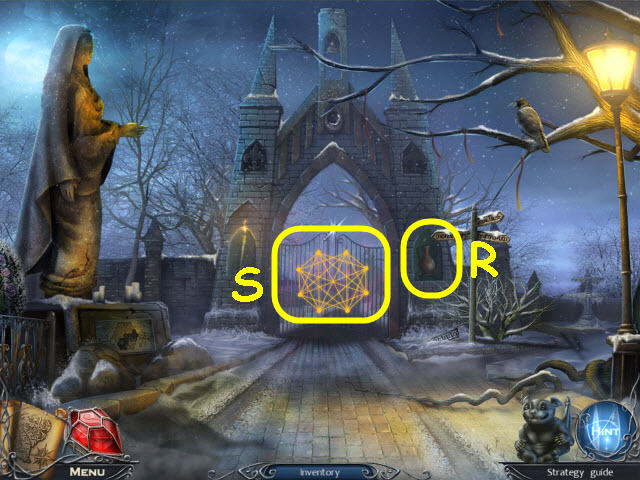
- Examine the right alcove and place the PITCHER OF WATER on it (R).
- Select the gates to trigger a puzzle (S).
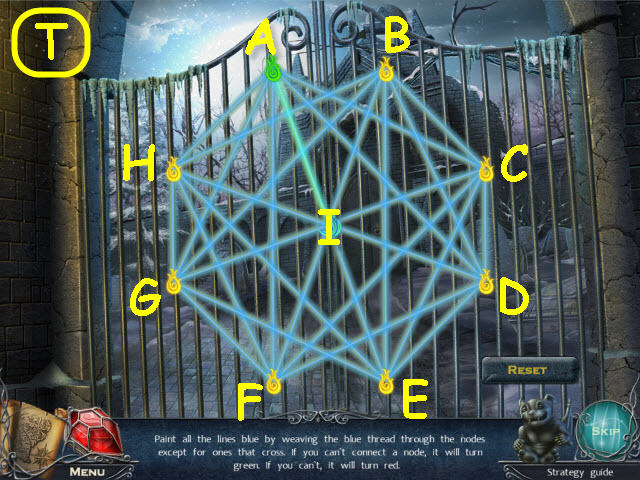
- Paint all the lines blue.
- To solve the puzzle, select the following points: A-H-G-A-C-B-H-F-C-D-E-B-G-F-A-D-B-I-H-E-C-I-D-F-I-G-E-I-A (T).
- Go forward to the burial ground.
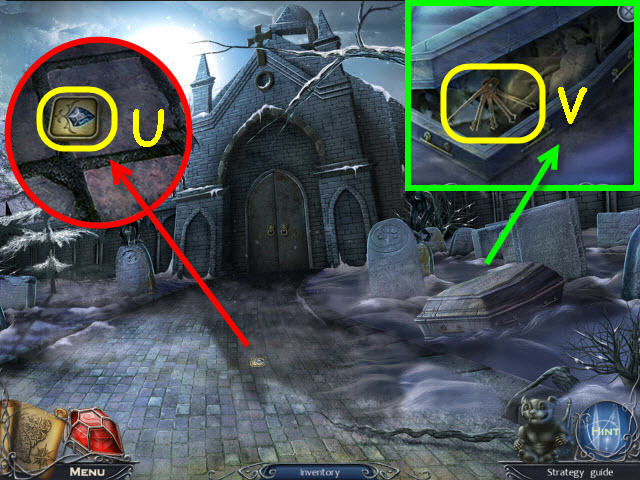
- Examine the walkway; take the JEWELRY-BOX ARROW (U).
- Examine the coffin and open it; take the LOCK PICK (V).
- Go to Esme’s underground lab in Notre Dame.
- Examine the table (W).
- Zoom into the panel (X), and place the JEWELRY-BOX ARROW on the board to trigger a puzzle.
- Place the green gems on the green marked circles.
- To solve the puzzle, select the following arrows: F-C-D-G-Bx2-Ex2-C-A and H (Y).

- Examine the opened jewelry box; take the MATCHES (Z), and GOLDEN THREAD (A).
- Go to the sacristy.
- Examine the glass case and use the LETTER OPENER on it (B).
- Move the robes and zoom into the blue robe and place the NEEDLE, PATTERN WITH 9, and GOLDEN THREAD on it to trigger a puzzle (C).

- Stitch the pattern of the 9.
- See screenshot for solution (D).
- You will earn ARKIVUS CLOAK.
- Go to the burial ground in Paris.

- Use ARKIVUS CLOAK on the door (E).
- Examine the font and use the MATCHES on the oil (F).
- Examine the statue; take the FLEUR-DE-LIS AMULET (G).
- Examine the chest and use the SCREWDRIVER on the lock; remove the lock and get a HANDLE GRIP. Take the QUASIMODO FIGURINE (H), and DAGGER BLADE (I).
- Go to the main hall of Notre Dame.
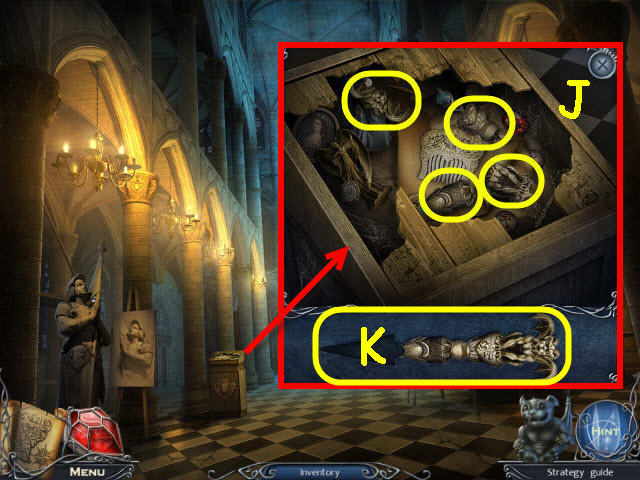
- Examine the pedestal; choose the items to assemble the dagger (J).
- Place the DAGGER BLADE on the parts and get an ANCIENT DAGGER (K).
- Go back to the vault in Paris.

- Examine the slot and place the ANCIENT DAGGER in it; take the 3rd INSPIRED TOKEN (L).
- Go to the sacristy in Notre Dame.
- Examine the chair and place the FLEUR-DE-LIS AMULET in the crest; take the ANGEL WING (M).
- Go to the Notre Dame façade in Paris.
- Examine the relief and place the ANGEL WING in the slot; take the MAGNET (N).
- Go to the police hall.
- Examine the metal plate and use the MAGNET on it; get a METAL PLATE WITH HOLES (O).
- Go forward through the door.
- Examine the cabinet and place the METAL PLATE WITH HOLES on it to trigger a puzzle (P).
- Press the buttons in the correct sequence.
- See screenshot for solution (Q).
- Examine the opened cabinet for a HOS.
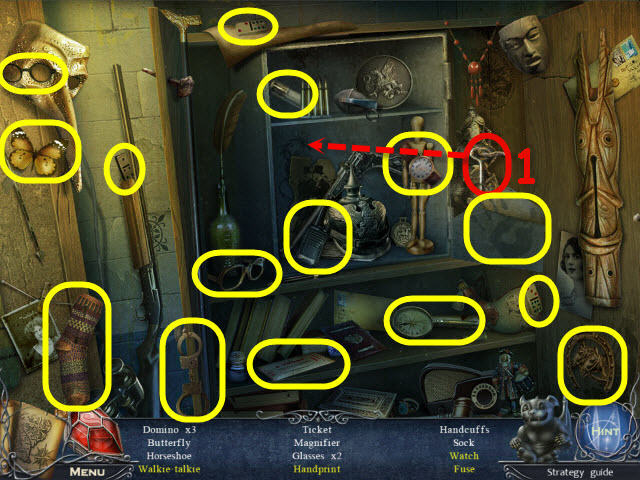
- Find the items listed.
- Use the key on the cabinet lock to get walkie-talkie, handprint, watch, and fuse (1).
- You will earn a FUSE.
- Go to the Crypte Archeologique.
Chapter 7 – Crypte Archeologique
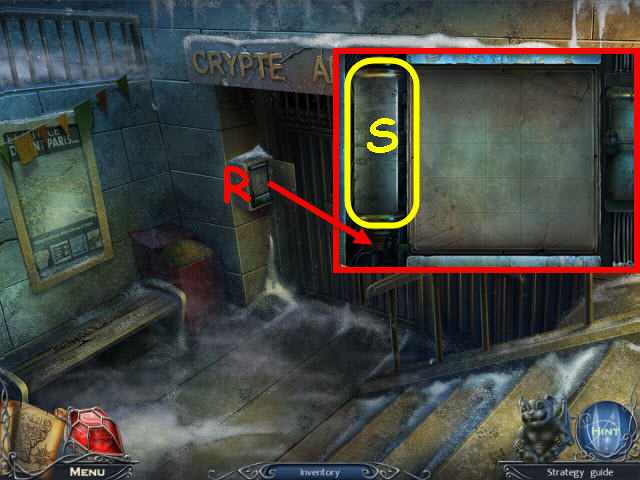
- Examine the panel (R).
- Place the FUSE in the slot to trigger a puzzle (S).
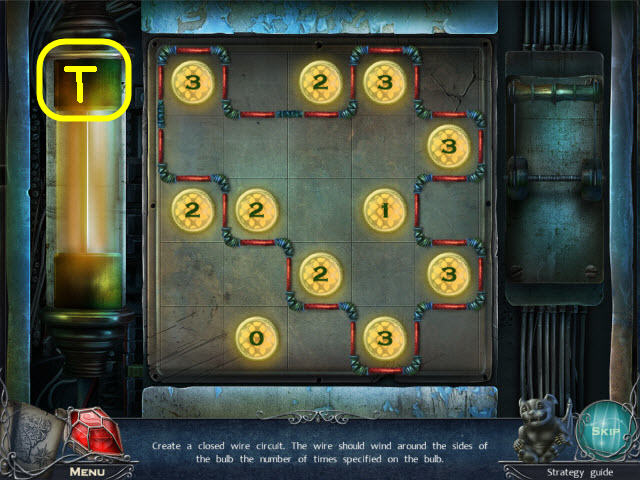
- Create a completed circuit.
- See screenshot for solution (T).
- Enter the newly-opened Crypte Archeologique.
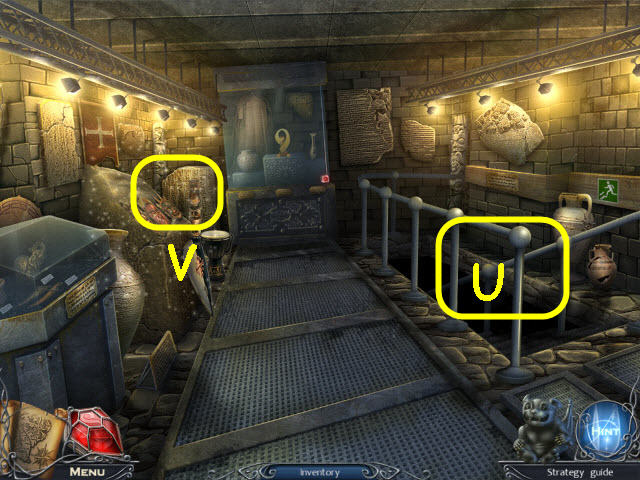
- Attempt to go downstairs to trigger a cut scene (U).
- Examine the left corner of the room to access a HOS (V).
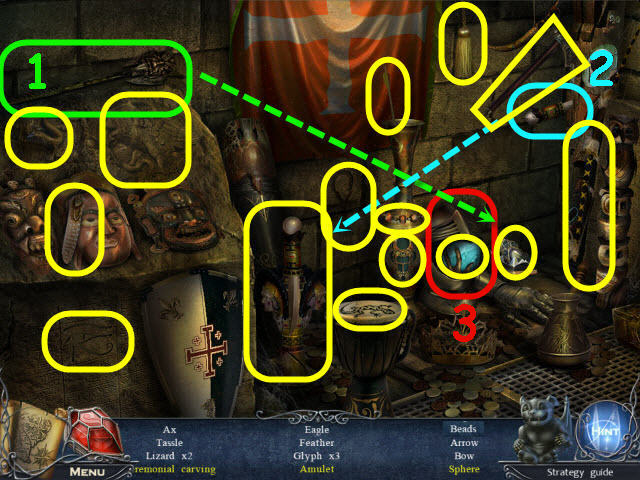
- Find the items listed.
- Use the staff on the vase to get an amulet (1).
- Use the knife on carving to get a ceremonial carving (2).
- Open the face covering on the helmet to get a sphere (3).
- You will earn a MAGIC SPHERE.
- Go down the right stairwell.
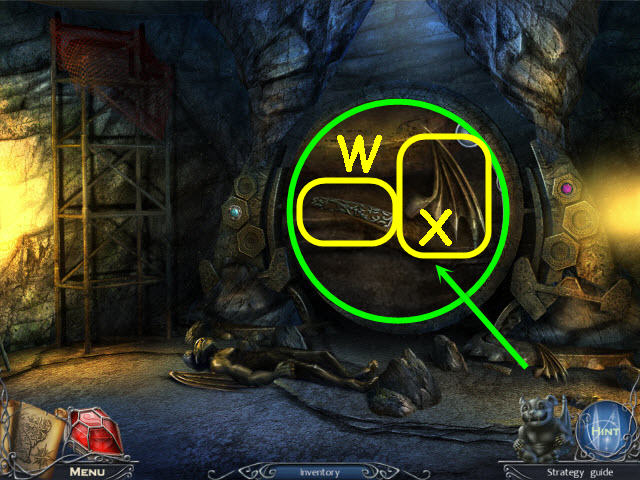
- Examine the ground on the right; take the 3rd STAINED GLASS FRAME PIECE (W), and MINI-GARGOYLE WING (X).
- Go to the stained-glass window in Notre Dame.
- Examine the stained glass and place the 3 STAINED GLASS FRAME PIECES on the frame (Y).
- Examine the base and place the MAGIC SPHERE on it (Z).
- Select the gems to trigger a puzzle (A).
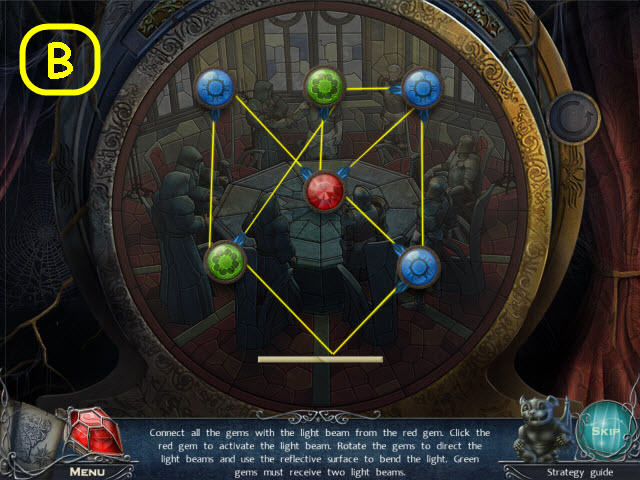
- Connect the beams.
- See screenshot for solution (B).
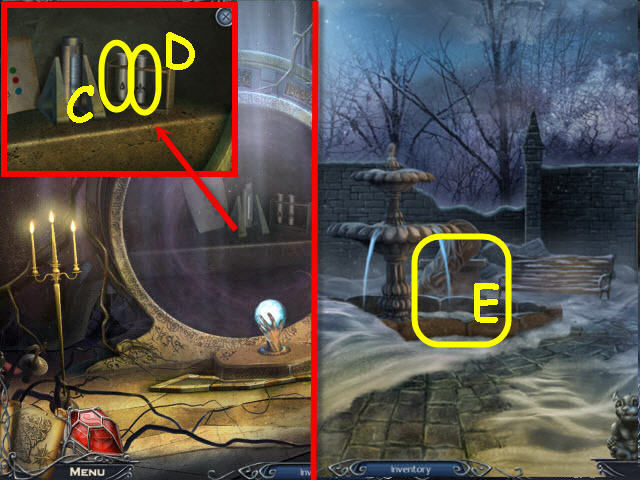
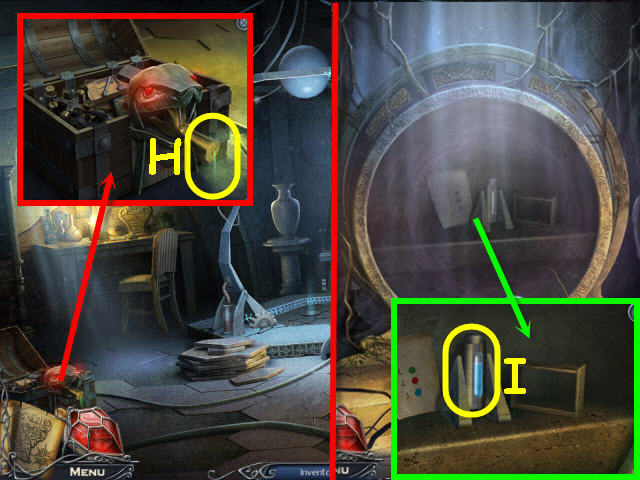
- Examine the sphere; take the TUBE FOR WATER (C) and TUBE FOR NECTAR (D).
- Go to the Cathedral garden fountain in Paris.
- Examine the fountain and use the TUBE FOR WATER on it (E); get a TUBE OF WATER.
- Go to the vault.
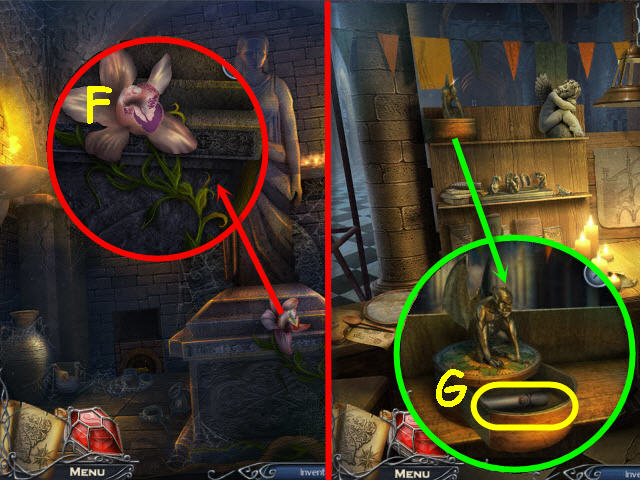
- Examine the flower and use the TUBE FOR NECTAR on it (F); get a TUBE OF NECTAR.
- Go to the stonemason’s work area in Notre Dame.
- Examine the gargoyle and place the MINI-GARGOYLE WING on it; take the TUBE FOR POISON (G).
- Go to Esme’s underground lab.
- Examine the chest and use the TUBE FOR POISON on the snake venom to get a TUBE OF POISON (H).
- Back out.
- Examine the sphere and place the TUBE OF POISON, TUBE OF NECTAR, and the TUBE OF WATER in the vial. Spin the vial and take the FLASK OF POISON (I).
- Back out four times to the façade.
- Examine the niche and use the FLASK OF POISON on the spray bottle; take the REVITALIZING WATER (J).
- Go to the window of inspiration.
- Use the REVITALIZING WATER on Fleur (K); get a J EMBLEM.
- Go to the main hall of Notre Dame.
Chapter 8 – Fleur
- Examine the statue and place the J EMBLEM on the pillar; take the HAMMER KEY (L).
- Go to the bell tower.
- Examine the door and place the HAMMER KEY on the lock (M).
- Go forward through the newly-opened door to Quasimodo’s workshop.
- Examine the table on the right; take the DRAGON EMBLEM (N).
- Examine the shelf; take the WIRE (O).
- Go to the Notre Dame plaza in Paris.
- Examine the snow pile and use the WIRE on the broken shovel; take the SHOVEL (P).
- Go to the cathedral garden fountain.
- Use the SHOVEL on the snow to create a path (Q).
- Examine the ladder; take the DULL CHISEL (R), and VARNISH (S).
- Examine the cabinet and use the DRAGON EMBLEM on the lock; take the GRINDSTONE (T).
- Go to the bell tower stairwell in Notre Dame.
- Examine the grinder and place the GRINDSTONE on it (U).
- Use the DULL CHISEL on the grindstone to get a SHARP CHISEL.
- Go to Quasimodo’s workshop.
- Examine the workbench (V).
- Place the HANDLE GRIP and SPLINTER on the vise (W).
- Place the VARNISH in the pot (X).
- Examine the drawer and use the LOCK PICK on the lock; take the knob (Y) and place it on the burner (Z).
- Turn the knob.
- Use the SHARP CHISEL on the SPLINTER in the vise.
- Use the wood burner (A) on the carving and then coat with varnish (X).
- Place the cloak (B) on the carving; take the ARKIVUS FIGURINE (C).
- Back out of the close-up.
- Examine the table and place the ESME FIGURINE, QUASIMODO FIGURINE and ARKIVUS FUGURINE on it (D).
- After the cut scene, you will automatically receive a 4th INSPIRED TOKEN.
- Go to the window of inspiration in Paris.
- Examine the right recesses and place the correct 2 INSPIRED TOKENS in the slots (E).
- Examine the left recesses and place the correct 2 INSPIRED TOKENS in the slot (F).
- Examine the crate; take the HAMMER (G) and read the note.
- Go to the bell tower stairwell in Notre Dame.
- Examine the beam and use the HAMMER on to get the 2nd PLANK (H).
- Go to the burial ground in Paris.
- Examine the open grave and place the 2 PLANKS across the grave (I); take the BRANCH BROOM (J).
- Go to the bell tower stairwell.
- Examine the beam and use the BRANCH BROOM on the cobwebs; take the HONEYCOMB PLATE (K) and HOOK (L).
- Go to the Paris police precinct.
- Examine under the stairs and place the HOOK on the weight; take the HOOKED WEIGHT (M).
- Go to the bell tower in Notre Dame.
- Examine the pulley; hang the HOOKED WEIGHT on the noose (N).
- Take the 2nd HONEYCOMB PLATE (O).
- Go to the cemetery entrance in Paris.
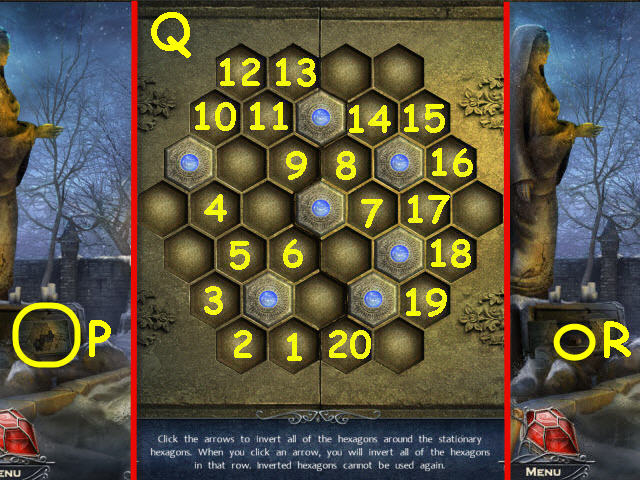
- Examine the statue base; place the 2 HONEYCOMB PLATES on it to trigger a puzzle (P).
- Select the arrows to push in all hexagons.
- See screenshot for solution (Q).
- Examine the statue base; take the CASE HANDLE (R).
- Go to Quasimodo’s workshop in Notre Dame.
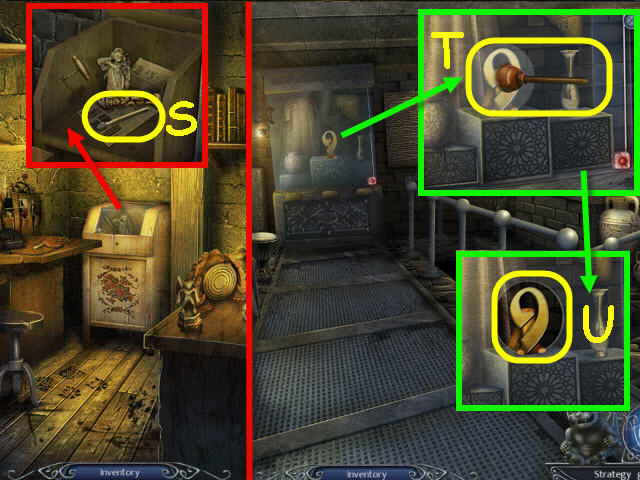
- Examine the case and use the CASE HANDLE on the lid; take the GLASS CUTTER (S).
- Go to the Crypte in Paris.
- Examine the display case and use the GLASS CUTTER and PLUNGER on it (T).
- Pull the PLUNGER; take the INSPIRED TOKEN NINE (U).
- Go down to the window of inspiration.
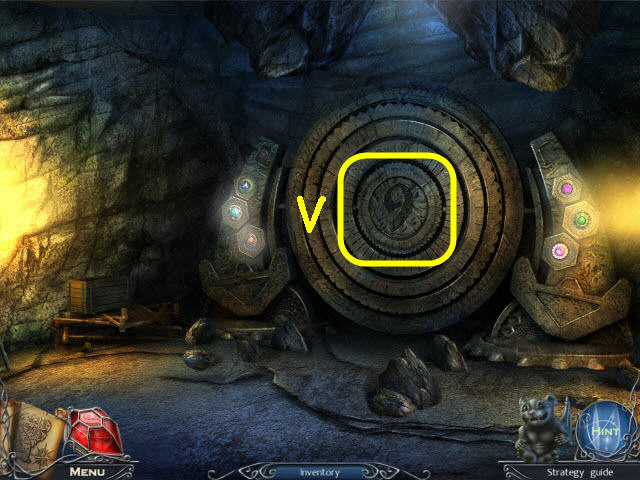
Place the INSPIRED TOKEN NINE in the center of the wheel (V).
Congratulations! You have successfully completed 9: The Dark Side of Notre Dame.


 Love Story: The Beach Cottage Walkthrough, Guide, & Tips
 Anka Walkthrough, Guide, & Tips
 Dream Chronicles: The Book of Air Collector's Edition Walkthrough, Guide, & Tips
 Awakening: The Redleaf Forest Walkthrough, Guide, & Tips
 Age of Oracles: Tara's Journey Walkthrough, Guide, & Tips