Awakening: The Redleaf Forest Walkthrough, Guide, & Tips
Awakening: The Redleaf Forest Walkthrough

Welcome to the Awakening: The Redleaf Forest Walkthrough
After a long journey, Queen Sophia faces her enemy for the last time – but will she succeed in saving her parents?
Whether you use this document as a reference when things get difficult or as a road map to get you from beginning to end, we’re pretty sure you’ll find what you’re looking for here.
This document contains a complete Awakening: The Redleaf Forest game walkthrough featuring annotated screenshots from actual gameplay!
We hope you find this information useful as you play your way through the game. Use the walkthrough menu below to quickly jump to whatever stage of the game you need help with.
Remember to visit the Big Fish Games Forums if you find you need more help. Have fun!
This walkthrough was created by David Becker, and is protected under US Copyright laws. Any unauthorized use, including re-publication in whole or in part, without permission, is strictly prohibited.
General Tips
- This is the official guide for Awakening: The Redleaf Forest.
- This guide will not mention each time you have to zoom into a location; the screenshots will show each zoom scene.
- We will use the acronym HOP for Hidden-object puzzles. Interactive items will be color-coded.
- Use the map to travel to a location.
Chapter 1: The Centaur Forest


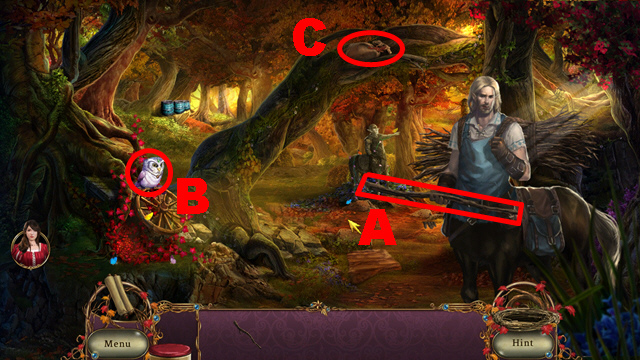
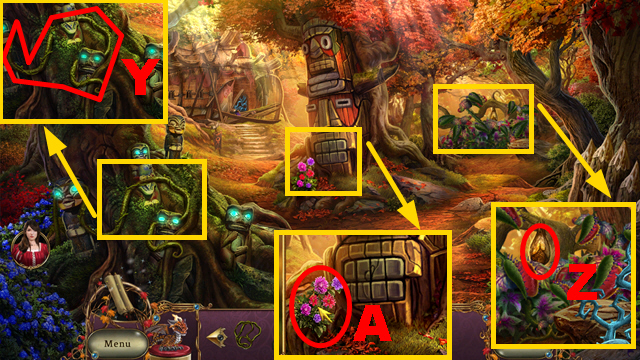
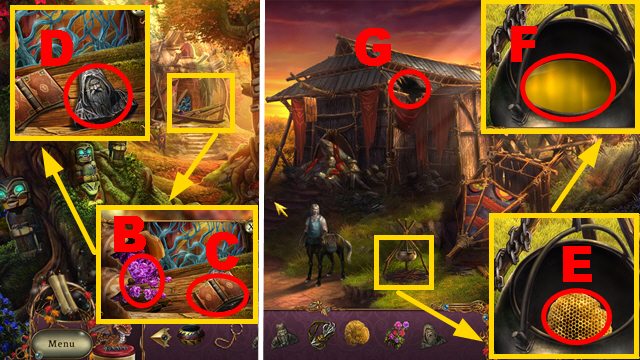
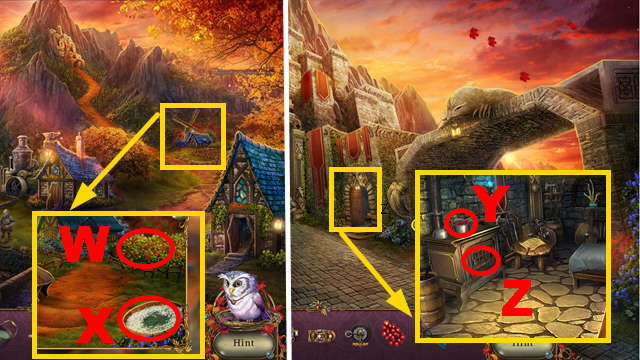
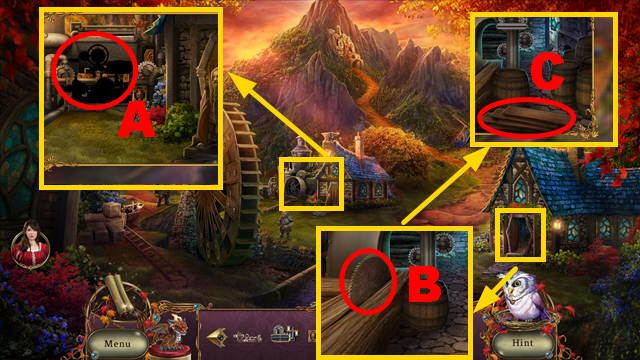
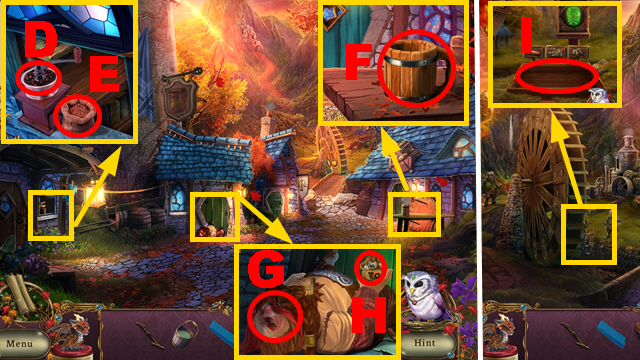
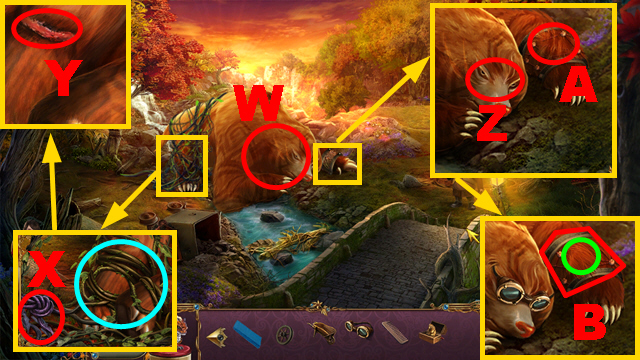
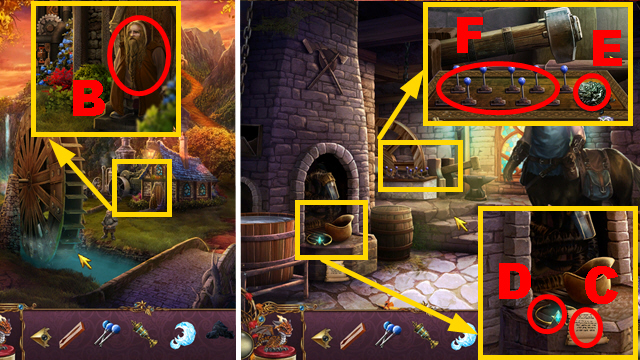
- Talk to the man; take the LONG STICK (A).
- Take the owl (B).
- Use the LONG STICK (C).


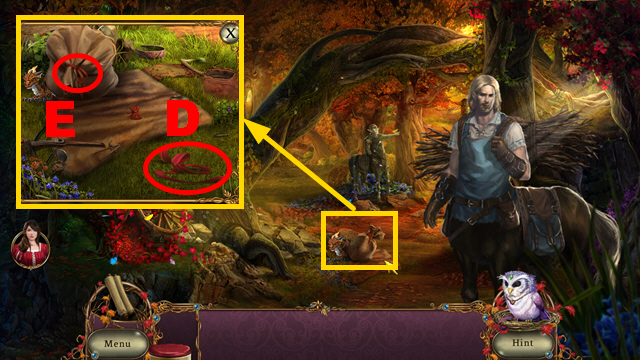
- Take the RIBBON (D).
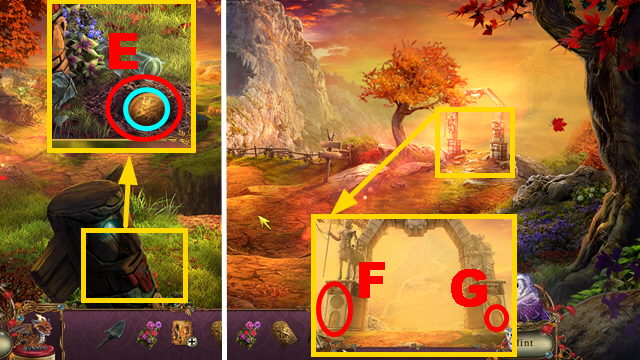
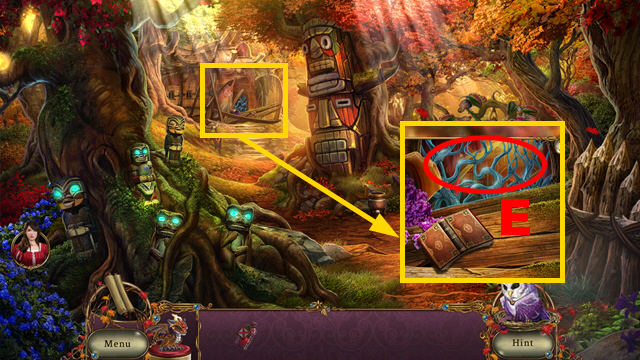
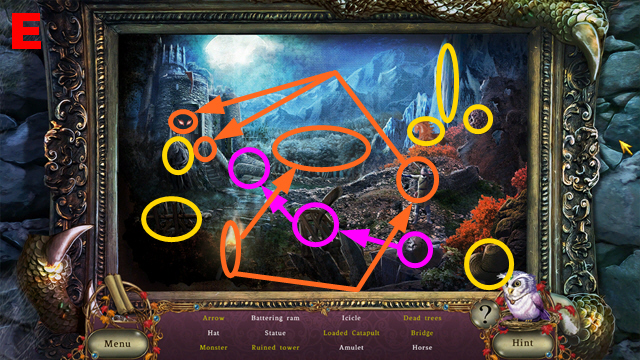
- Open the sack (E).


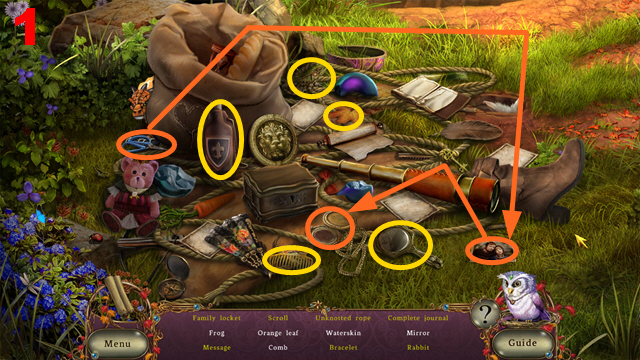
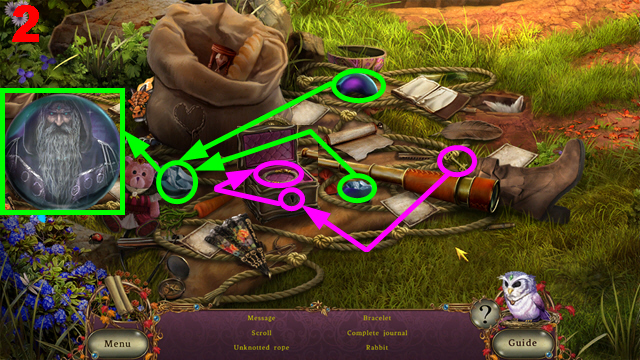
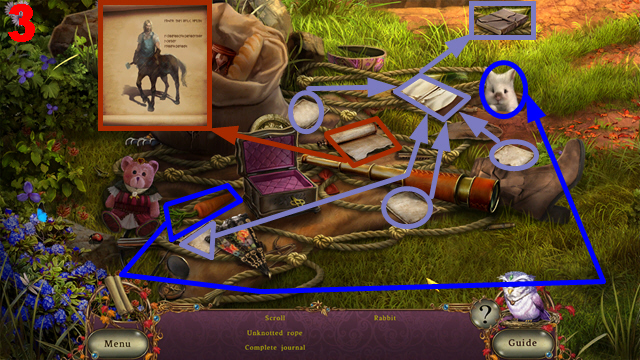
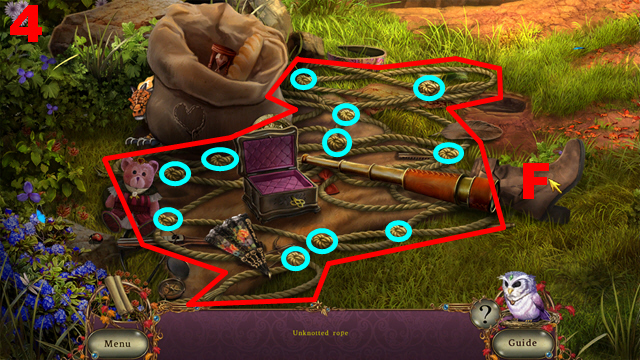
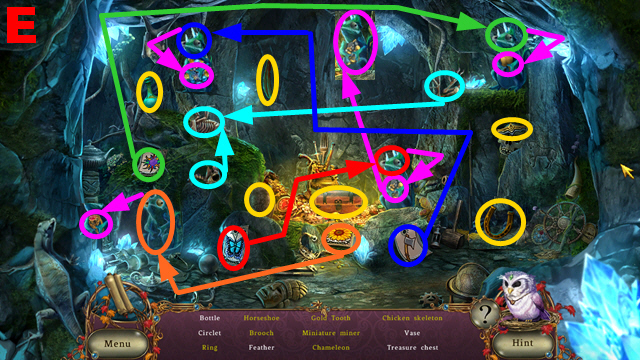
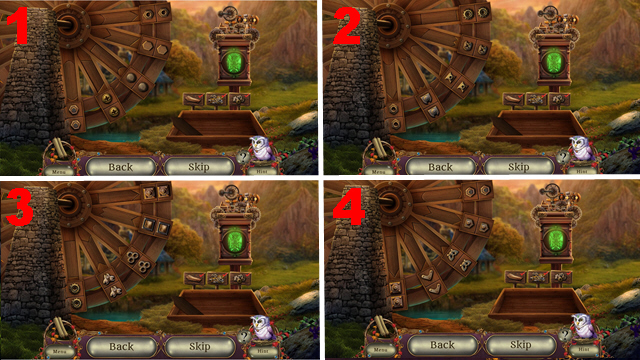
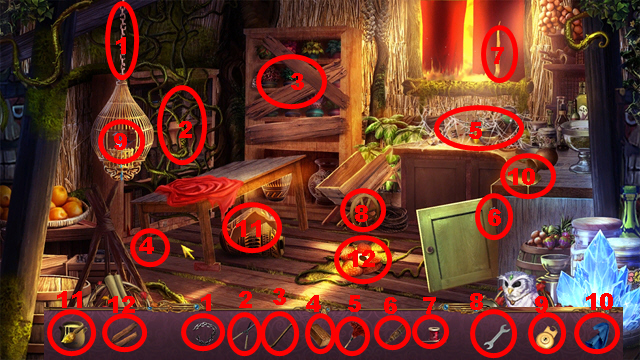
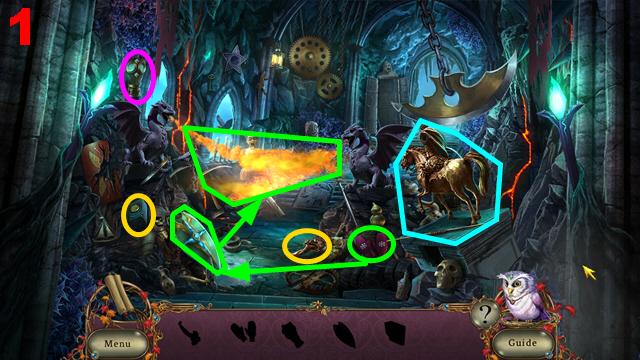
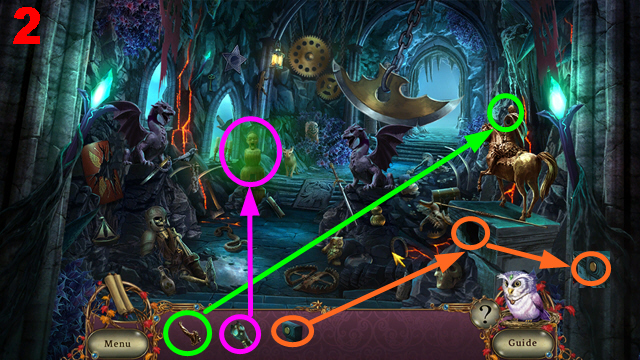
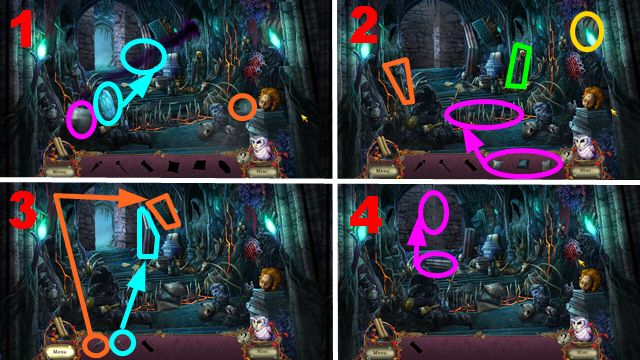
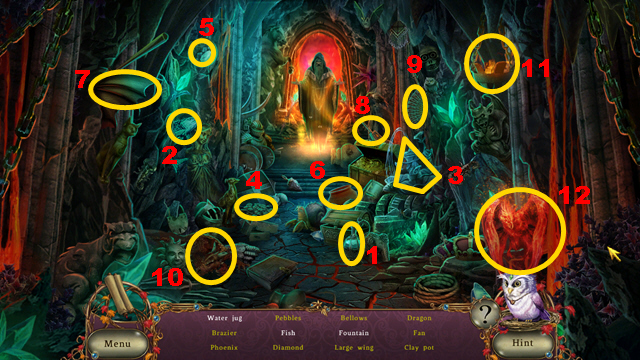
- Play the HOP.
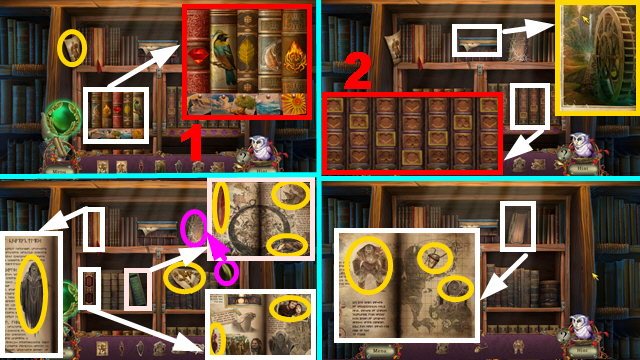
- Solution: 1-4
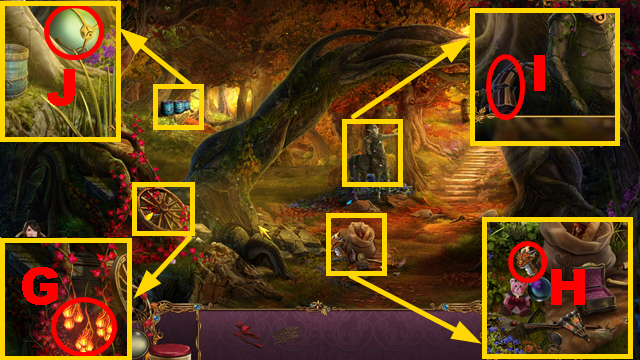
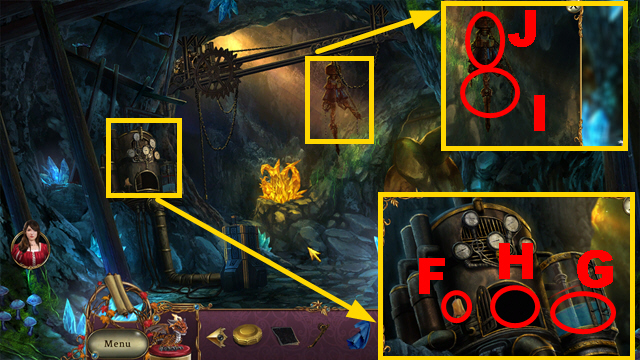
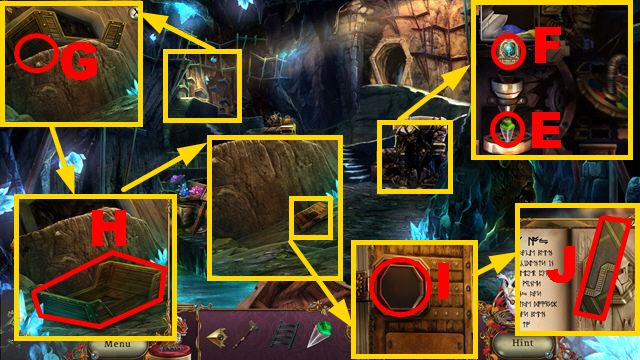
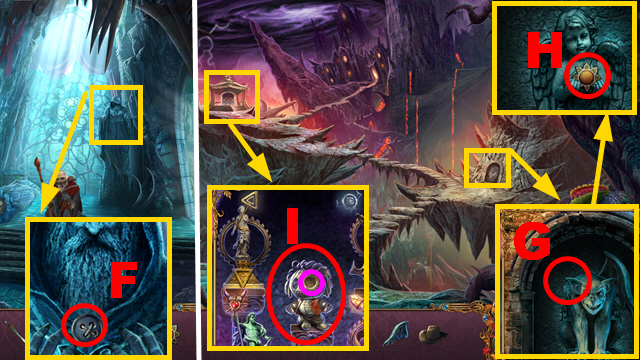
- You receive the ROPE (F).


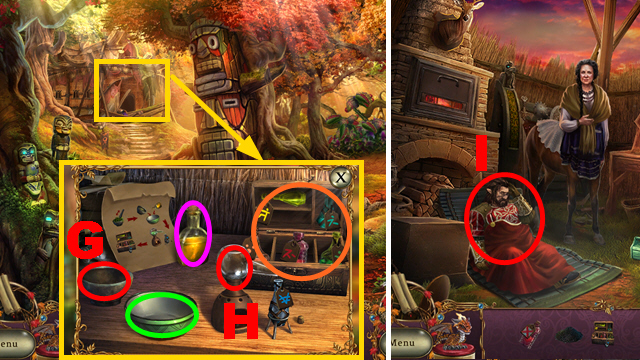
- Take the FIRE BERRIES (G).
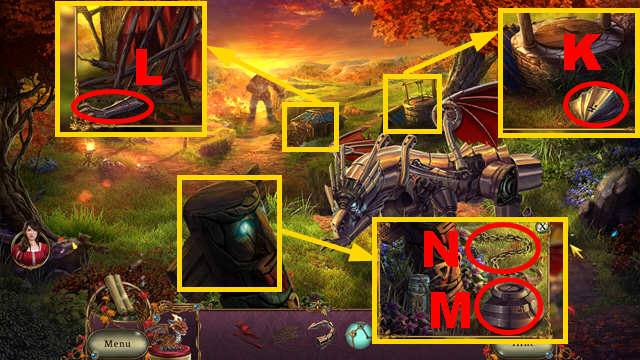
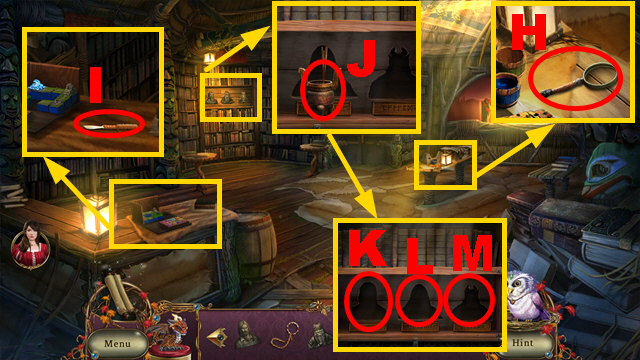
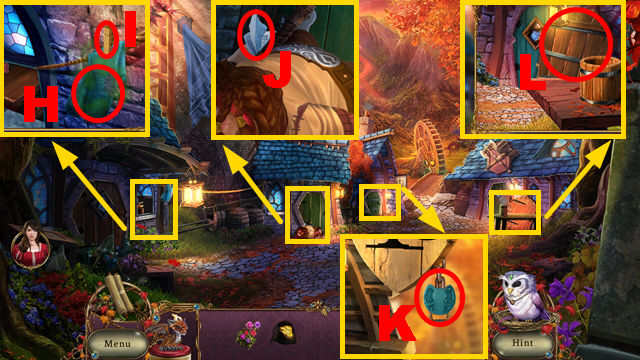
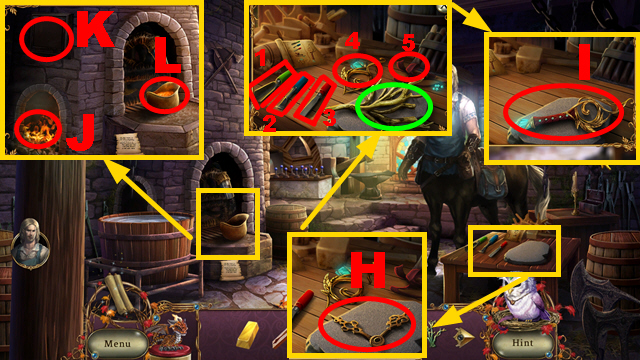
- Give the FIRE BERRIES to the dragon (H); take the dragon.
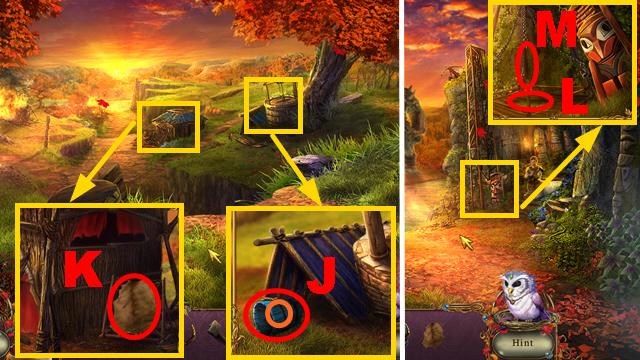
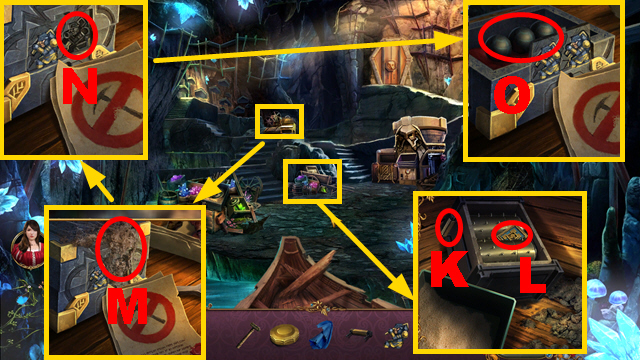
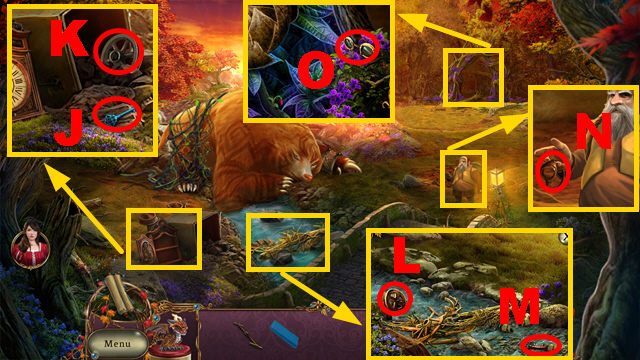
- Take 2 CLOCKWORK DRAGON PIECES (I) and (J).
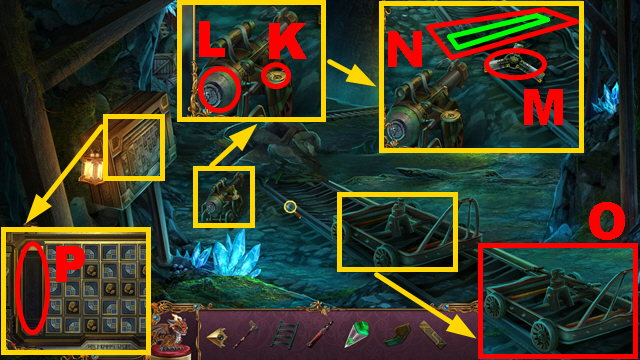
- Turn right.


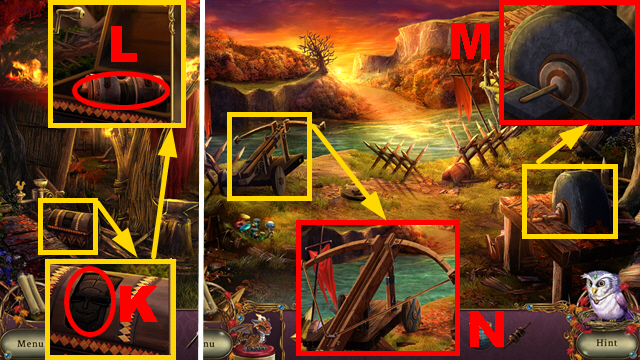
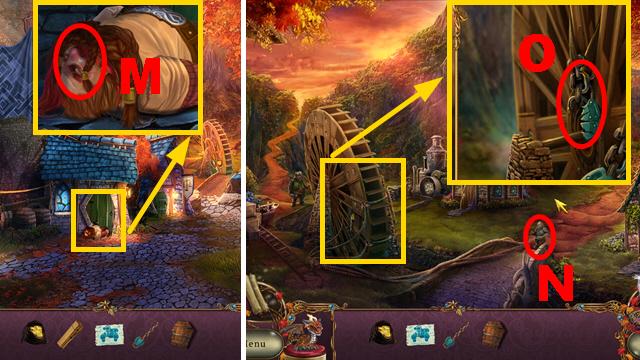
- Take 3 CLOCKWORK DRAGON PIECES (K), (L), and (M).
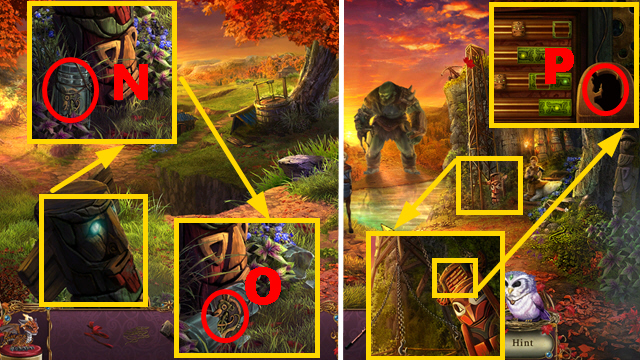
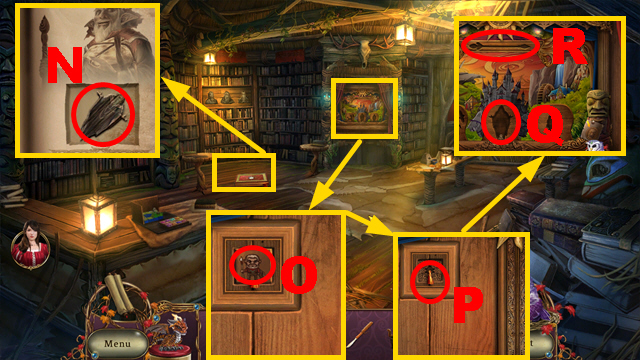
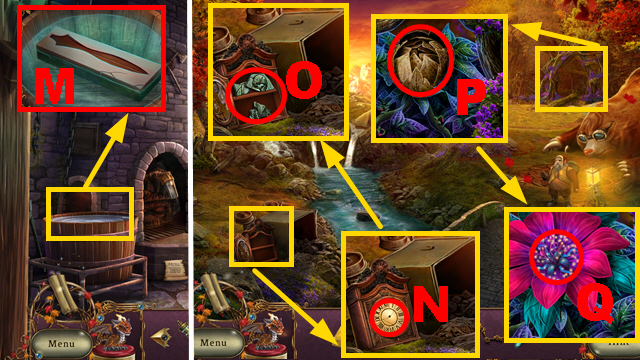
- Take the CHAINED HOOK (N).


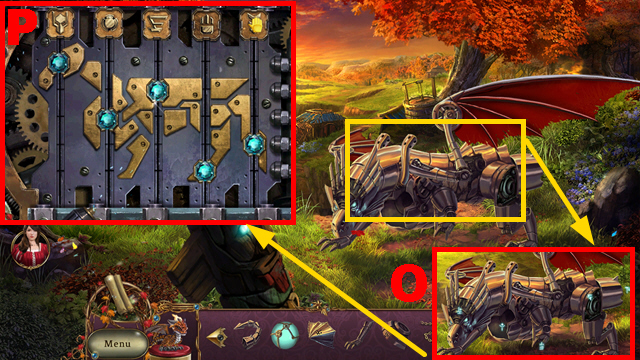
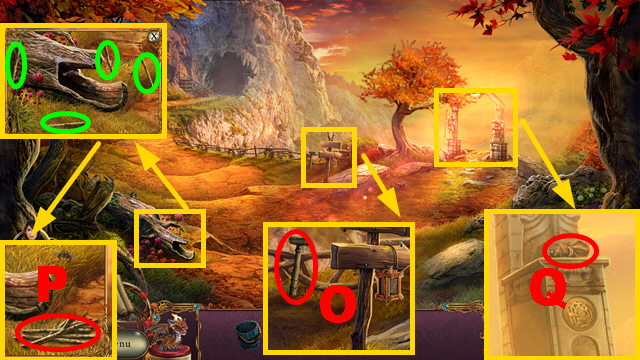
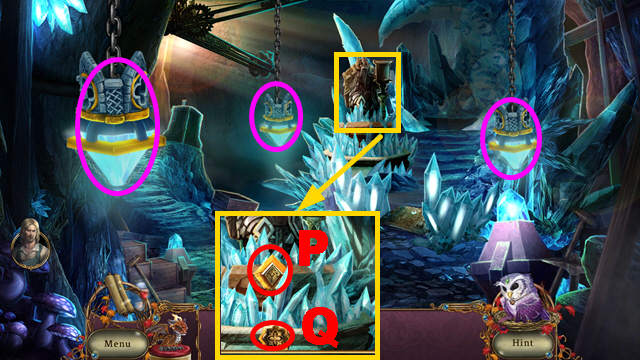
- Place 5 CLOCKWORK DRAGON PIECES (O).
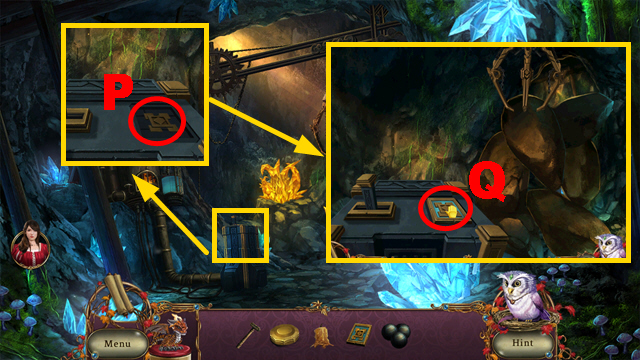
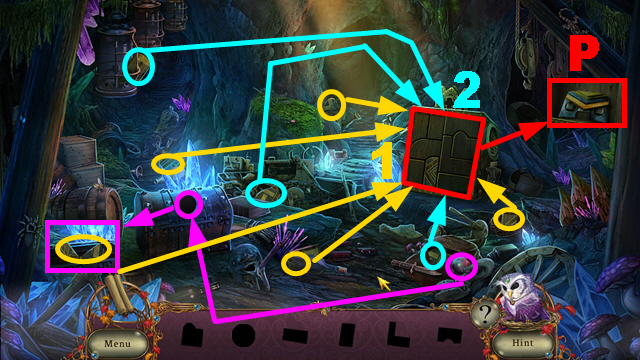
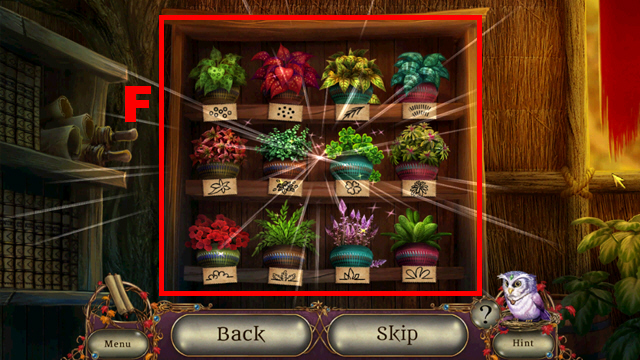
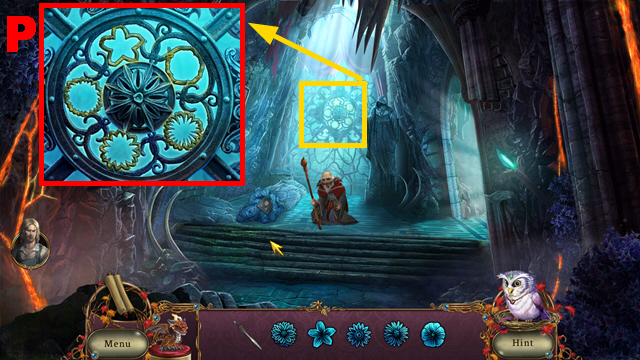
- Play the mini-game.
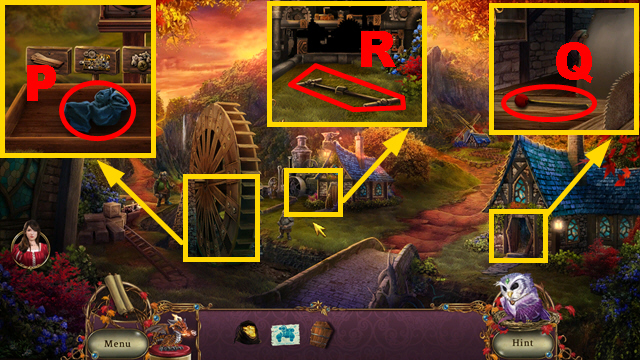
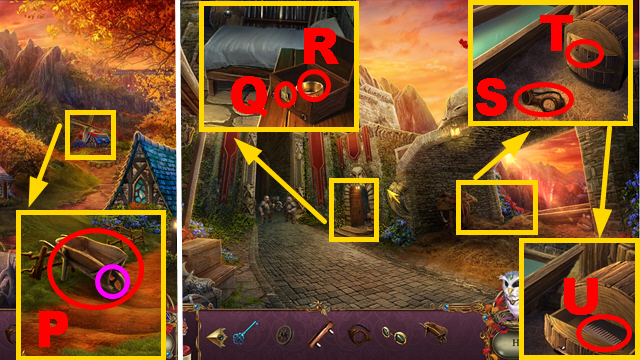
- Solution: (P).
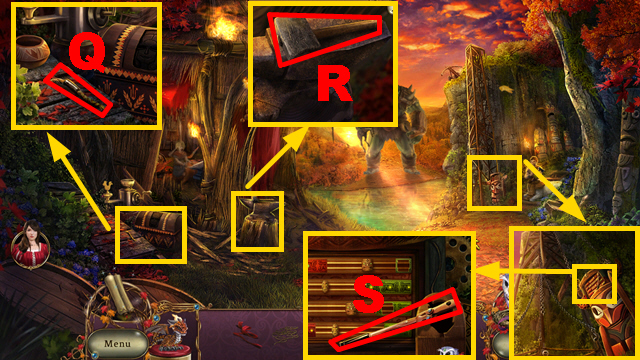
- Move forward.


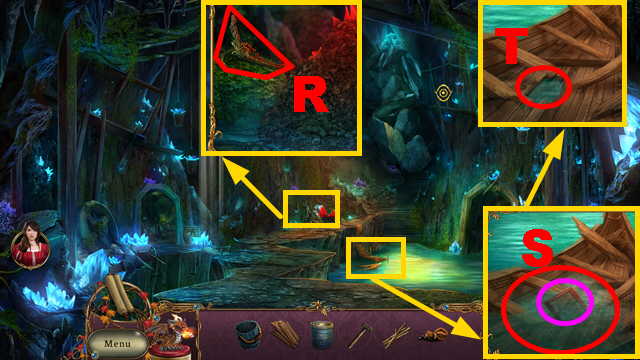
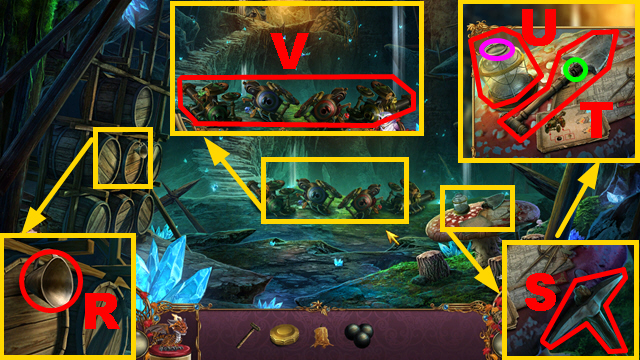
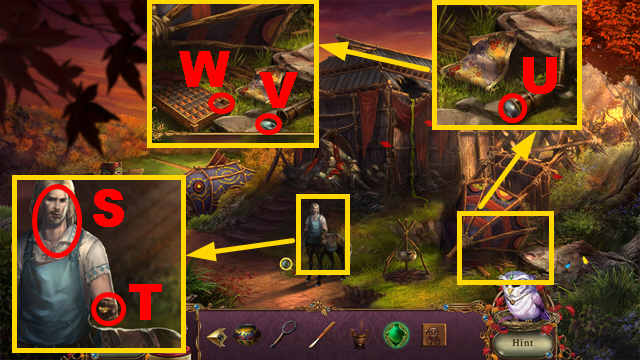
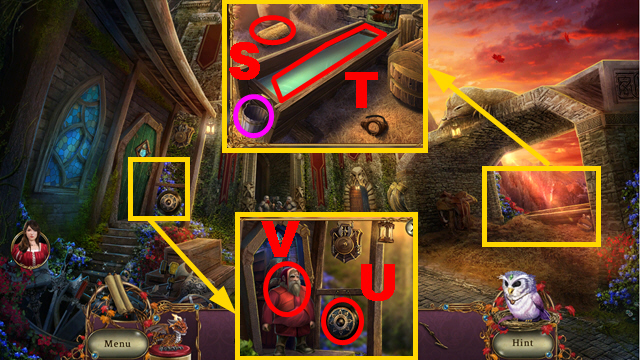
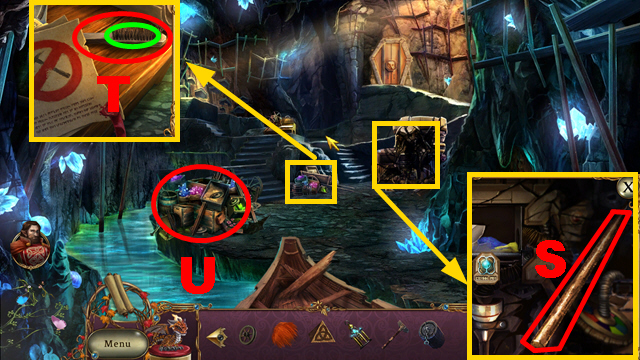
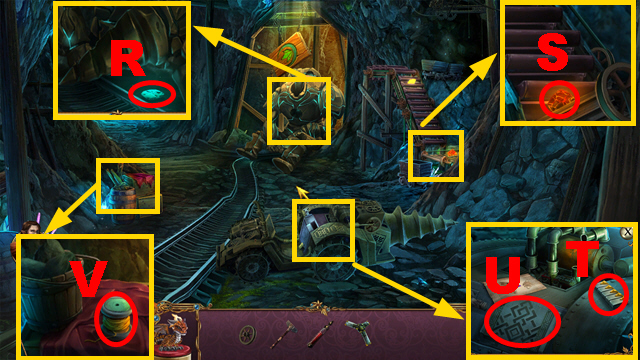
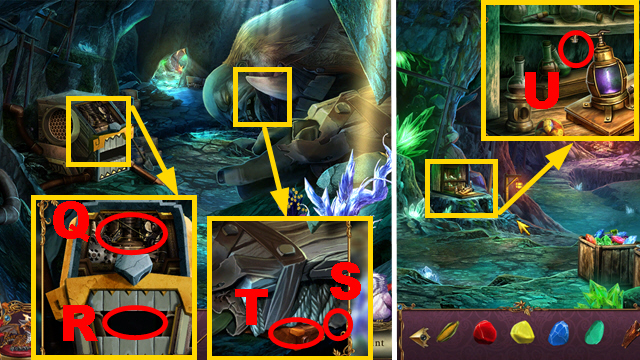
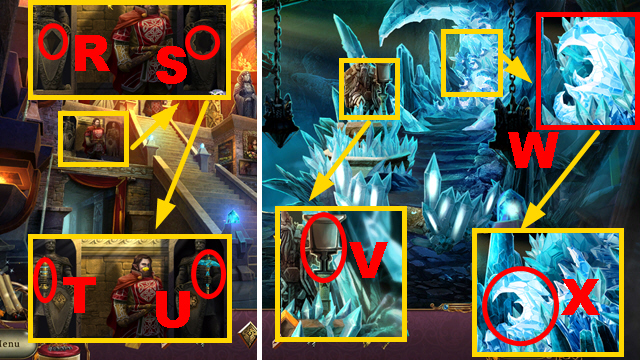
- Take the PAIL HANDLE (Q), HAMMER (R), and BOLT CUTTER HALF (S).
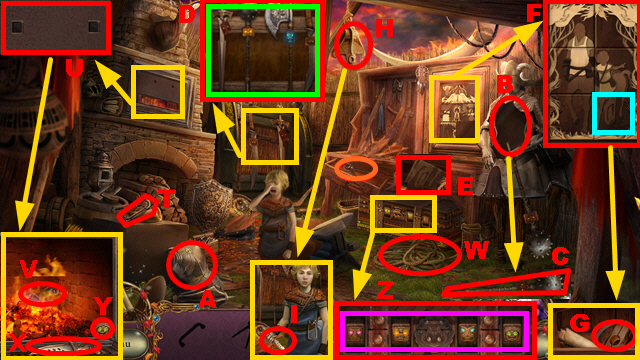
- Turn left.


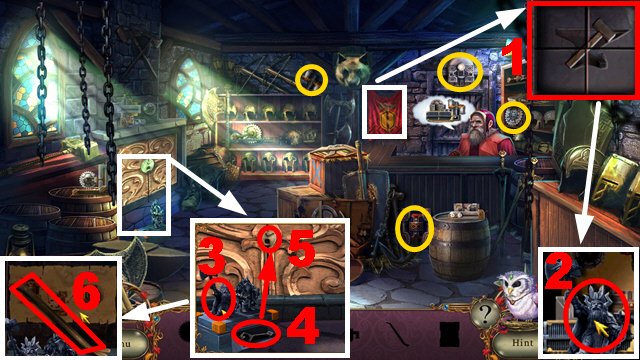
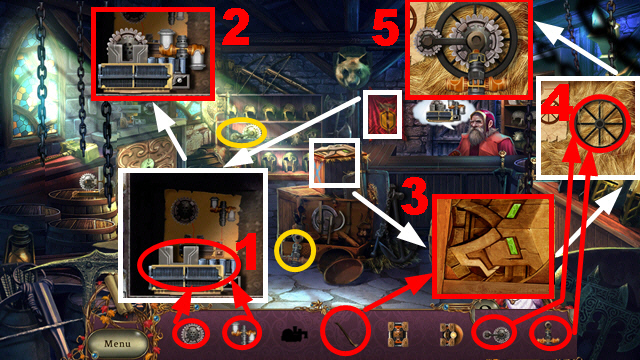
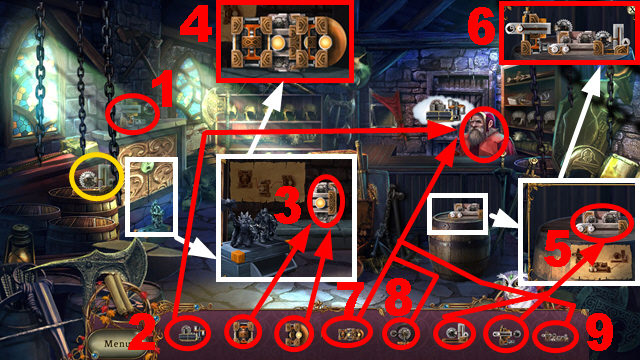
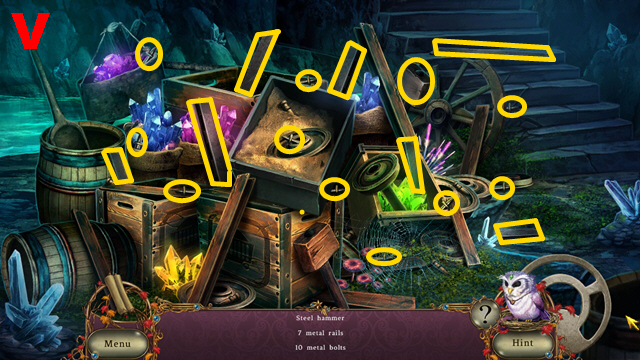
- Play the HOP.
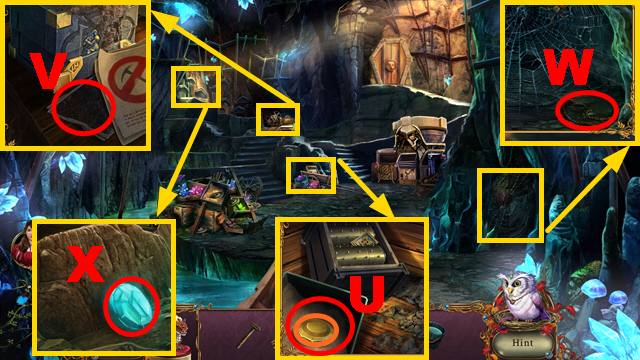
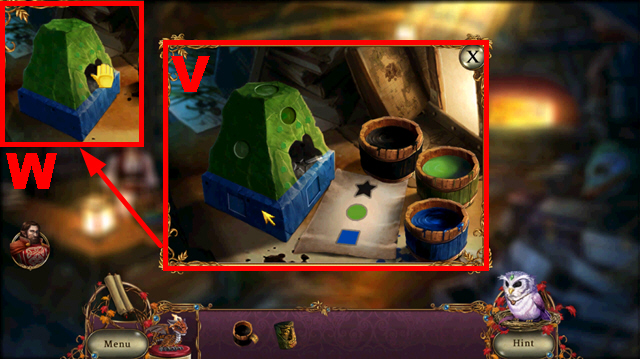
- Place the handle (T) on the oven (U).
- Use the tongs (orange) on the fire (V).
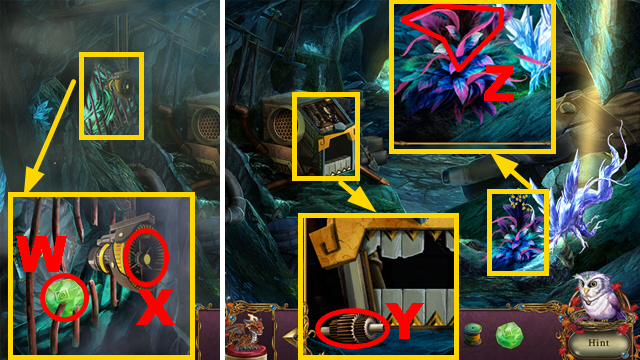
- Cut the rope (W) with the dagger (X); take the rope.
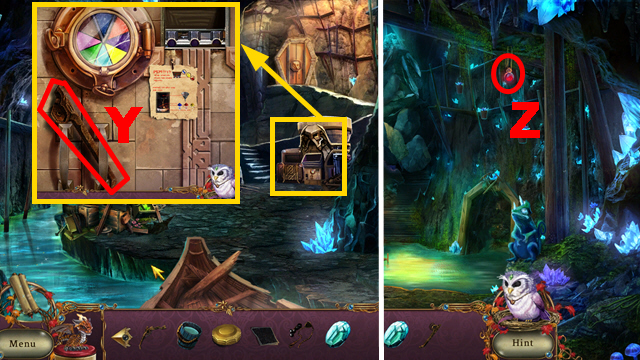
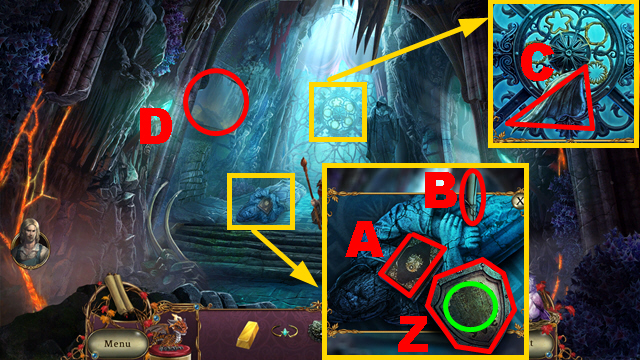
- Put the lock dial (Y) on the chest (Z).
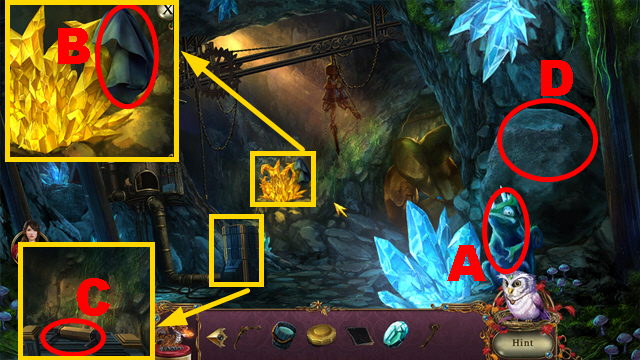
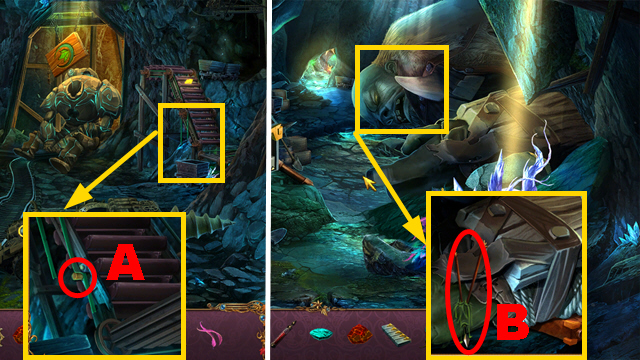
- Place the chest plate (A) on the armor (B).
- Put the mace (C) on the stand (D).
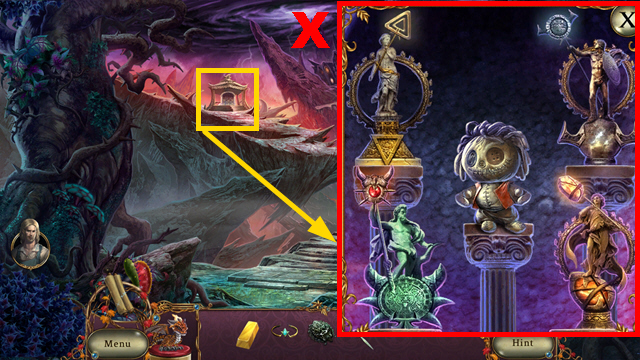
- Arrange the weapons correctly (green).
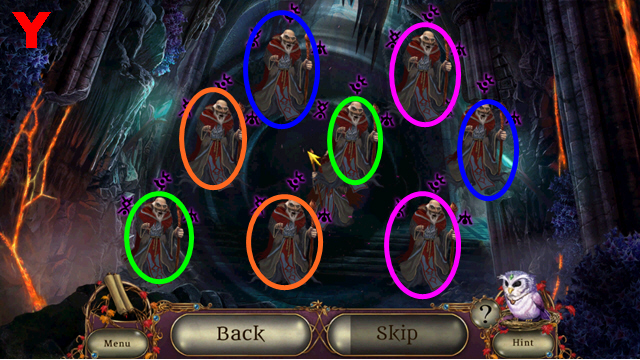
- Enter the correct code (purple).
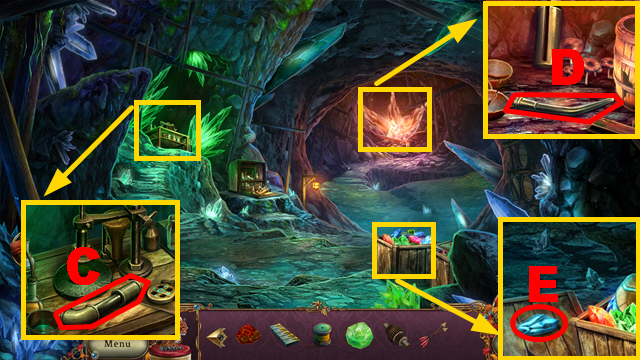
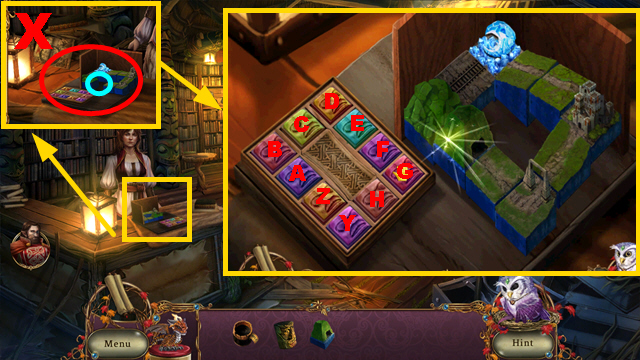
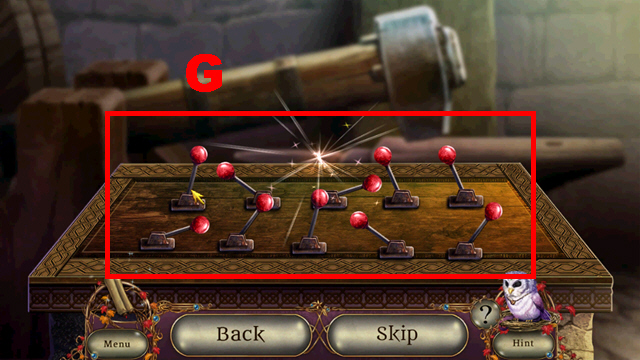
- Place the tile (E) on the panel (blue).
- Arrange the tiles correctly (F); take the wheel (G).
- Place the wheel and rope (H).
- Take the DAGGER (I).
- Walk down.


- Place the PAIL HANDLE (orange); take the PAIL (J).
- Collect the LEATHER (K) with the DAGGER.
- Move forward.
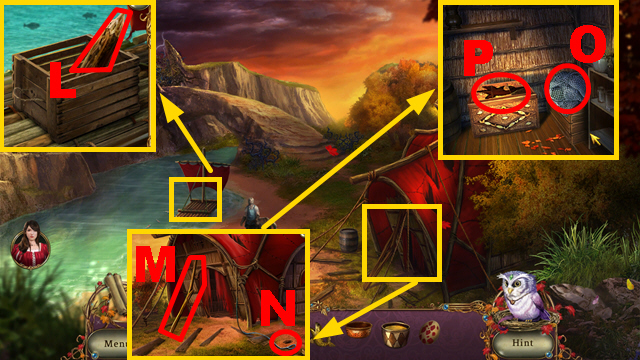
- Place the LEATHER (L) and CHAINED HOOK (M).
- Walk down.


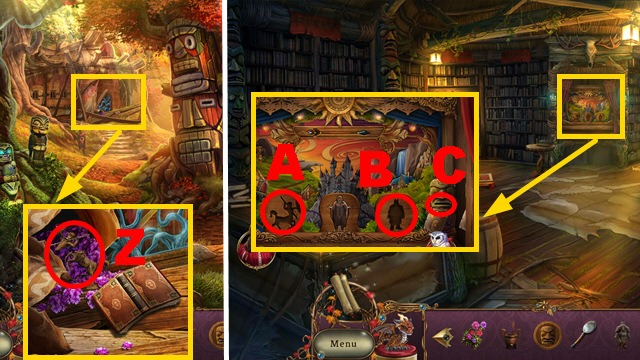
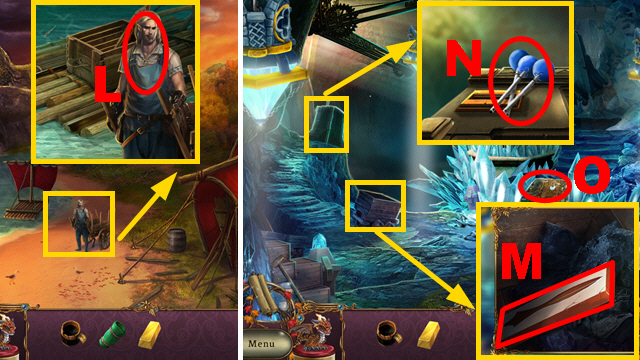
- Use the HAMMER (N); take the WOODEN HORSE (O).
- Move forward.
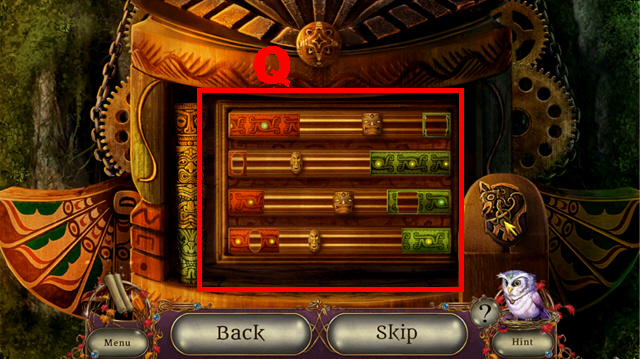
- Place the WOODEN HORSE (P).


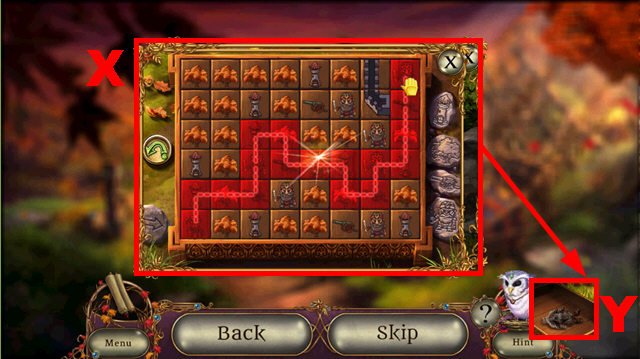
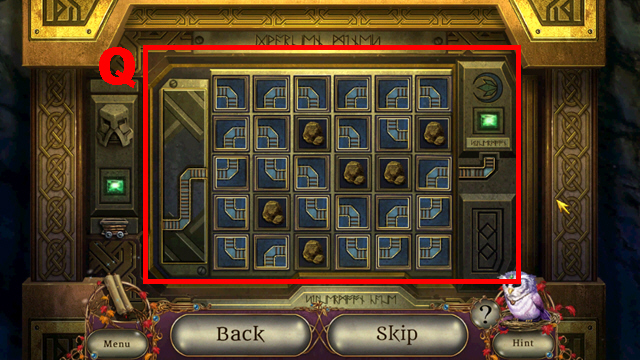
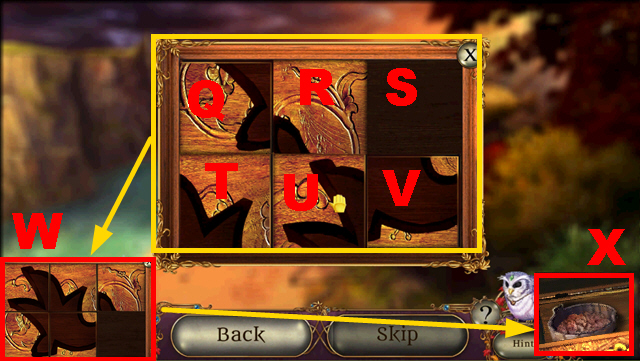
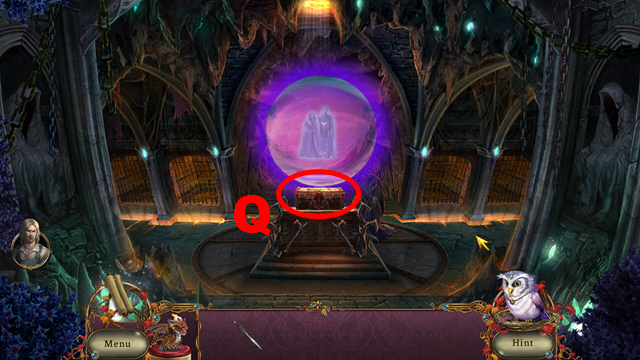
- Play the mini-game.
- Solution: (Q).
- Go upwards.


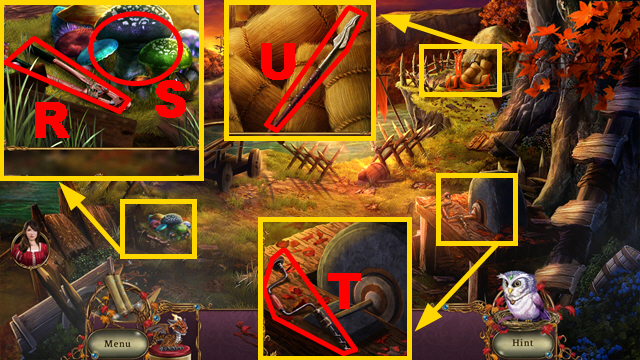
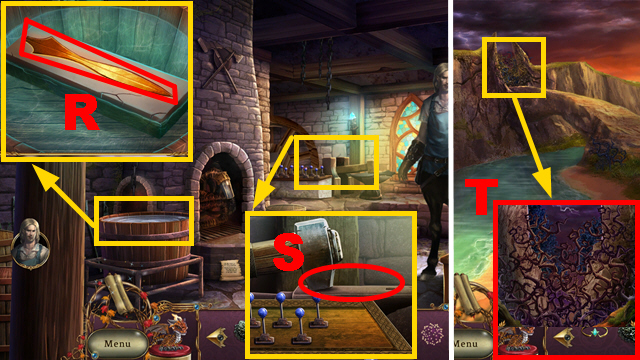
- Place the BOLT CUTTER HALF; take the BOLT CUTTER (R) and MEDICINAL MUSHROOMS (S).
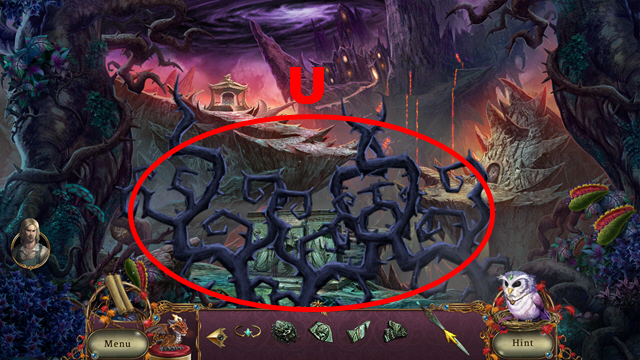
- Take the HAND DRILL (T).
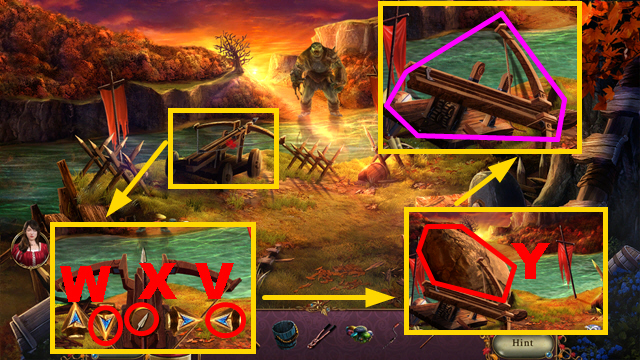
- Remove the hay; take the DENTED BALLISTA BOLT (U).


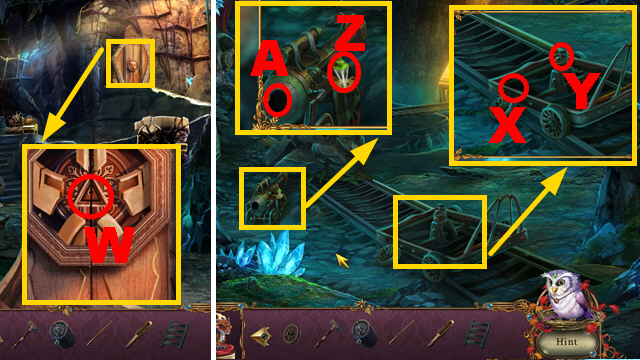
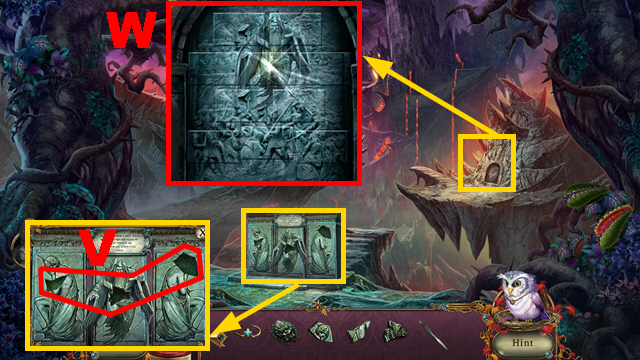
- Push buttons (V) and (W).
- Shoot the arrow (X).
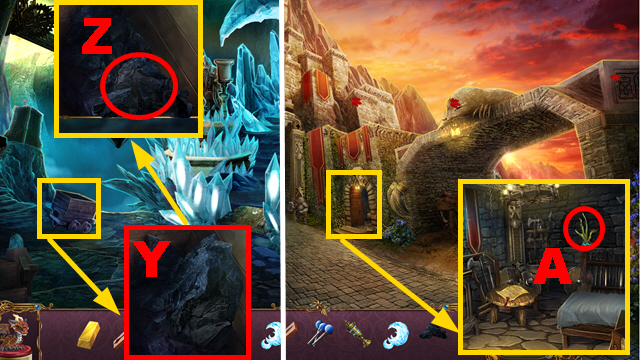
- Use the DENTED BALLISTA BOLT (Y).
- Put up the ballista (purple).
- Walk down.


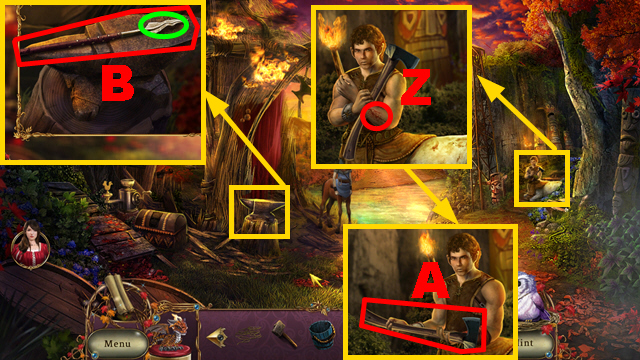
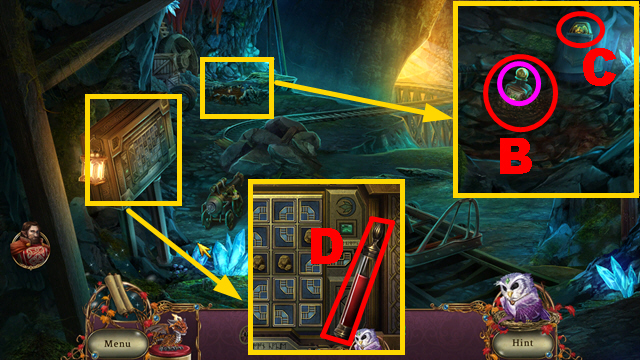
- Use the MEDICINAL MUSHROOMS and RIBBON (Z).
- Take the AXE (A).
- Place the DENTED BALLISTA BOLT (B).
- Use the dragon and HAMMER (green); take the DULL BALLISTA BOLT.
- Walk down.


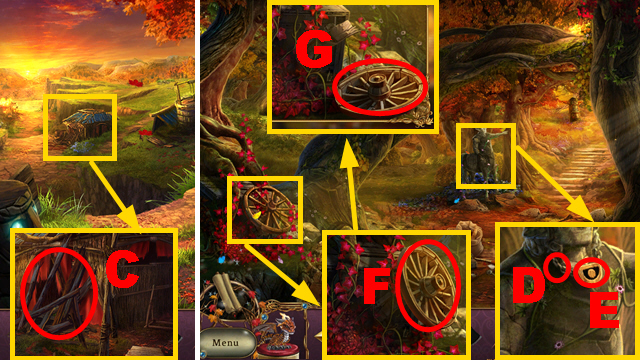
- Use the AXE twice (C) to acquire the WOODEN BOARDS.
- Walk down.
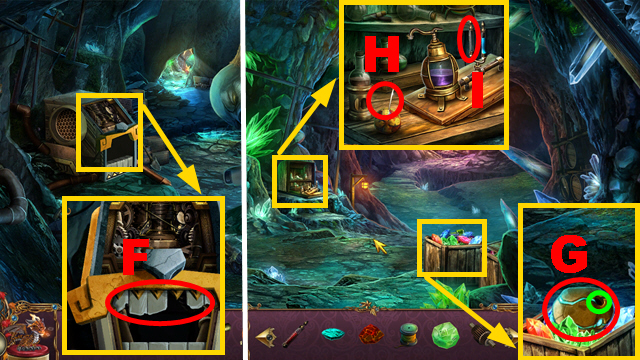
- Use the BOLT CUTTER (D); take the WOODEN EYE (E).
- Use the AXE (F); take the WHEEL (G).


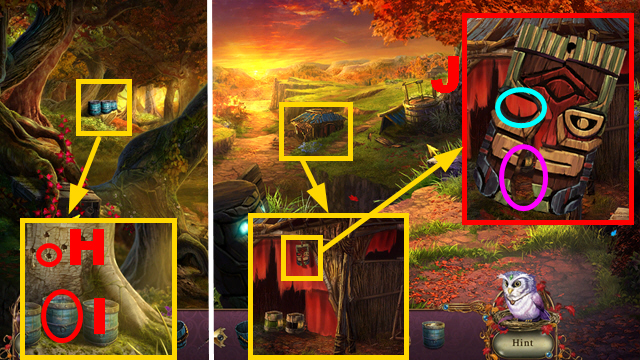
- Use the HAND DRILL (H); take the STICKY SAP (I).
- Move forward.
- Use the STICKY SAP (purple) and WOODEN EYE (blue); take the WOODEN MASK (J).
- Move forward.


- Place the WOODEN MASK (K); take the SPINNER (L).
- Turn right.
- Place the DULL BALLISTA BOLT (M) to acquire the SHARP BALLISTA BOLT.
- Place the SHARP BALLISTA BOLT, ROPE, WHEEL, and SPINNER (N).
Chapter 2: The Forest Fork


- Take the SHOVEL HANDLE (O).
- Assemble 4 sticks (green); take the FIREWOOD (P).
- Take the STONE BULLETS (Q).
- Move forward.
- Attempt to move forward.


- Take the CLAW PART (R) and SIFTER (purple).
- Use the PAIL to acquire the WATER (S); use the WOODEN BOARDS and STICKY SAP (T).
- Turn right.


- Use the SIFTER (U); take the LID (orange).
- Take the SANDPAPER (V).
- Place the STONE BULLETS (W) to acquire the SLINGSHOT.
- Take the SHINY GEM (X).


- Take the CLAW PART (Y).
- Walk down.
- Use the SLINGSHOT (Z).
- Turn left.


- Give the SHINY GEM to the animal (A).
- Take the RAG (B) and LEVER (C).
- Examine the cave (D).


- Play the HOP.
- You receive the MINIATURE MINER (E).


- Take the CANDLE (F); use the WATER (G).
- Use the FIREWOOD and dragon (H).
- Place 2 CLAW PARTS (I); use the SANDPAPER (J).
- Walk down, turn right.


- Place the LEVER (K); pull it.
- Take the BUTTON (L).
- Use the RAG (M); place the MINIATURE MINER (N).
- Open the box; take the CANNON BALLS (O).
- Walk down, turn left.


- Place the BUTTON (P).
- Play the mini-game.
- To solve this puzzle, push the button (Q) when the claw is directly above the rocks.
- Move forward.


- Take the FUNNEL (R) and PICKAXE (S).
- Place the SHOVEL HANDLE (green); take the SHOVEL (T).
- Place the LID (purple); take the JAR (U).
- Erect the four cannons (V); you receive the BLUE VIAL, RED VIAL, and YELLOW VIAL.
- Walk down.


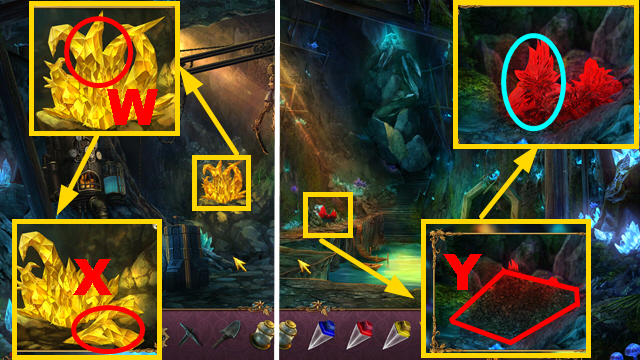
- Use the PICKAXE (W); take the YELLOW ORE (X).
- Walk down.
- Use the SHOVEL three times (Y).
- Use the PICKAXE; take the RED ORE (blue).
- Walk down.


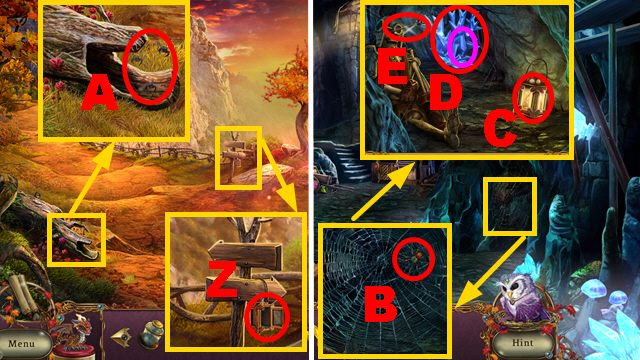
- Open the lantern; use the CANDLE and dragon (Z).
- Take the LANTERN.
- Collect the FLIES with the JAR (A).
- Move forward, turn right.
- Use the FLIES (B); remove the cobweb.
- Place the LANTERN (C); use the PICKAXE (D).
- Take the BLUE ORE (purple) and ARROW (E).


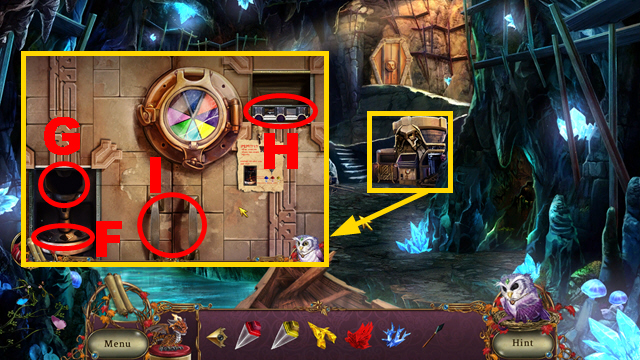
- Place the RED VIAL, BLUE VIAL, and YELLOW VIAL (F).
- Use the FUNNEL (G).
- Place the RED ORE, YELLOW ORE, and BLUE ORE (H).
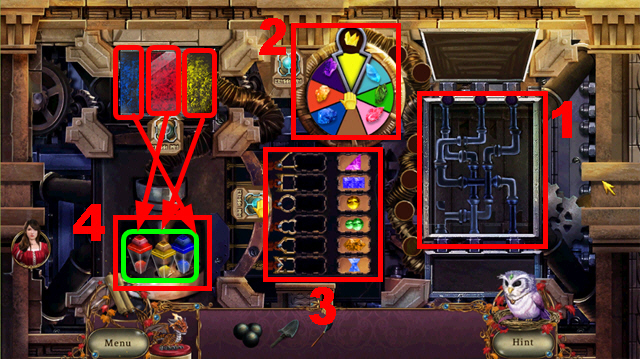
- Pull the handles (I).


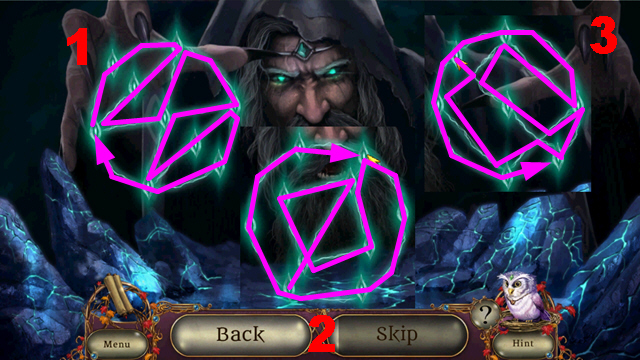
- Play the mini-game.
- Solution: 1-4.
- Take the RED CRYSTAL DUST, YELLOW CRYSTAL DUST, and BLUE CRYSTAL DUST (green).
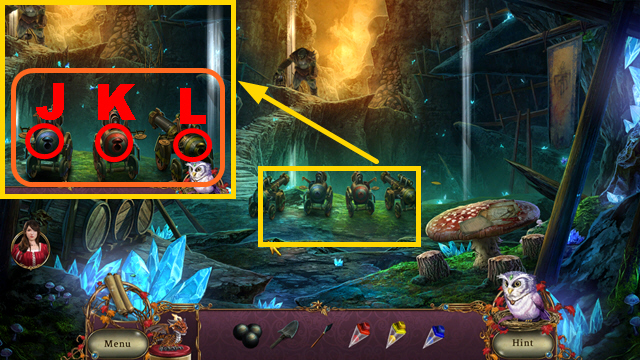
- Go to the Ogre’s Lair.


- Place the CANNON BALLS (orange).
- Place the BLUE CRYSTAL DUST (J), RED CRYSTAL DUST (K), and YELLOW CRYSTAL DUST (L).


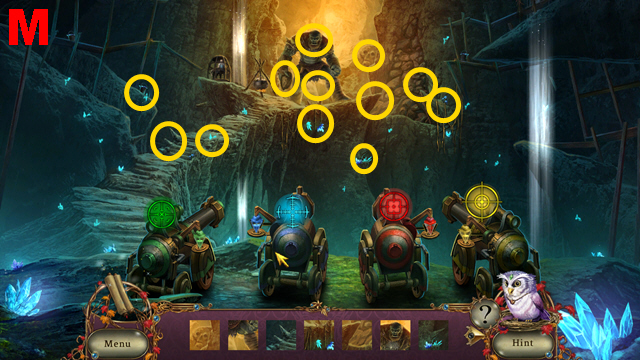
- Play the HOP.
- Find 12 spots (M).


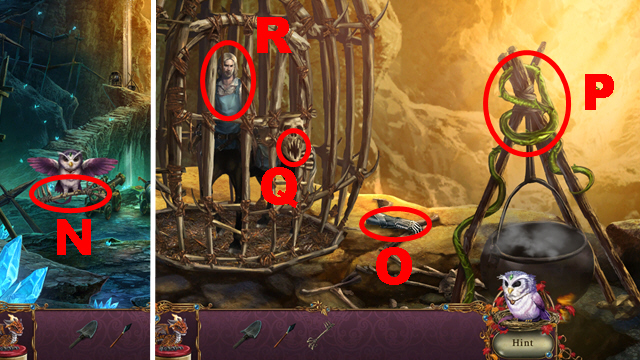
- Take the BONE KEY (N).
- Move forward.
- Take the GAUNTLETS (O) and VINES (P).
- Use the BONE KEY (Q); talk to the blacksmith (R).
- Walk down six times.


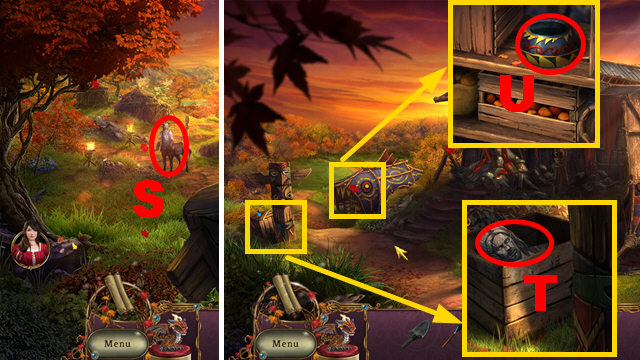
- Talk to the blacksmith (S).
- Turn left.
- Open the crate; take the BLACKSMITH BUST (T).
- Take the EMPTY WAX POT (U).


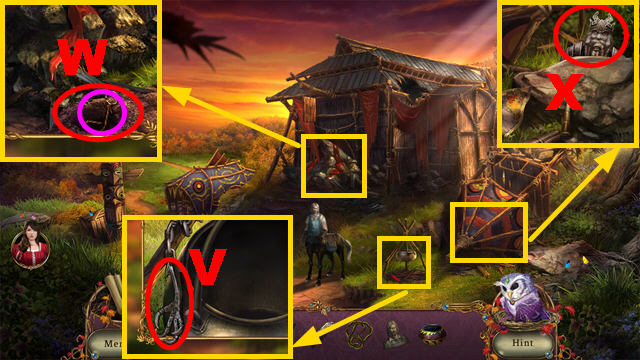
- Take the LARGE CLAW (V).
- Use the SHOVEL (W); take the PULLSTRING (purple).
- Take the DWARF BUST (X).
- Move forward.
Chapter 3: The Forest Patch


- Place the VINES and LARGE CLAW (Y) to acquire the GRAPPLING HOOK.
- Collect the HONEYCOMB with the GAUNTLETS (Z).
- Take the SCENTED FLOWERS (A).


- Remove the flowers (B); read the book (C).
- Take the DREADMYRE BUST (D).
- Walk down.
- Use the HONEYCOMB and dragon (E).
- Place the EMPTY WAX POT (F) to acquire the BEES WAX.
- Throw the GRAPPLING HOOK (G).
- Enter the Library Interior.


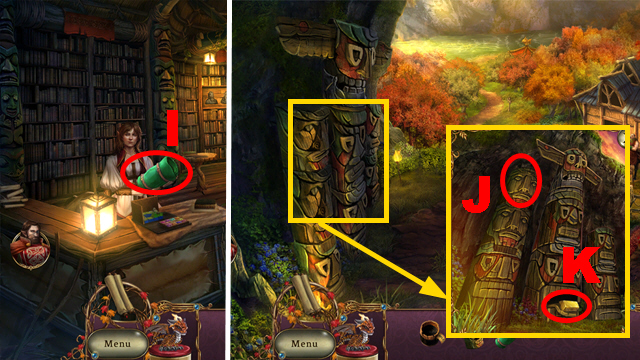
- Remove the leaves; take the LENSLESS MAGNIFIER (H).
- Take the CARVING SCALPEL (I).
- Take the INCENSE STICK (J); place the BLACKSMITH BUST (K), DREADMYRE BUST (L), and DWARF BUST (M).


- Play the HOP.
- Solution: 1-2.
- You receive the KNOWLEDGE SPHERE.


- Turn three pages; take the SHADOW FIGURINE (N).
- Take the WOODEN SQUARE (O).
- Place the PULLSTRING (P); pull it.
- Place the SHADOW FIGURINE (Q) and ARROW (R).
- Walk down.


- Give the KNOWLEDGE SPHERE to the blacksmith (S).
- Take the CENTAUR COIN (T).
- Use the CARVING SCALPEL (U); place the LENSLESS MAGNIFIER (V) to acquire the MAGNIFYING LENS.
- Place the WOODEN SQUARE (W).


- Play the mini-game.
- Solution: (X).
- Take the DWARF FIGURINE (Y).
- Turn left.


- Use the BEES WAX (Z); take the CENTAUR FIGURINE.
- Walk down, turn right.
- Place the CENTAUR FIGURINE (A), DWARF FIGURINE (B), and CENTAUR COIN (C).


- Play the mini-game.
- Push the buttons D-T until the images are assembled correctly.
- The first two parts of this mini-game are randomized.
- Solution: V, W, U, Y, V, U, A, B, C, 1.
- Use the MAGNIFYING LENS (2); take the TREASURE MAP (3).
- Walk down.


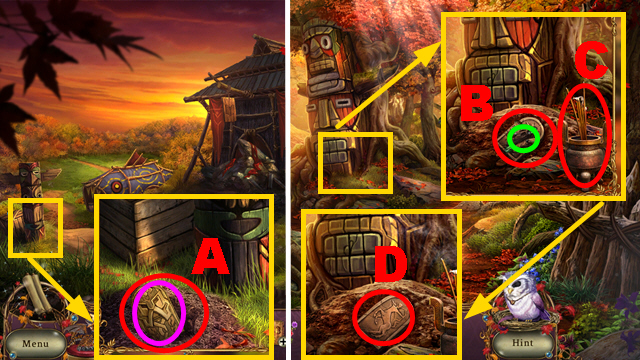
- Use the SHOVEL (A); take the DWARF PLAQUE (purple).
- Turn left.
- Use the SHOVEL (B); place the INCENSE STICK (C).
- Light the incense with the dragon; take the DWARF CURRENCY (green) and CENTAUR PLAQUE (D).
- Walk down twice.


- Use the SHOVEL (E); take the CENTAUR EMBLEM (blue).
- Go to the Forest Fork.
- Place the CENTAUR EMBLEM and CENTAUR PLAQUE (F); place the DWARF PLAQUE (G).
- Turn right.


- Use the SCENTED FLOWERS (H); take the CLOTHESPIN (I).
- Take the WATERWHEEL BLUEPRINTS (J), FASTENER (K), and BROKEN DOOR (L).


- Use the CLOTHESPIN (M).
- Move forward.
- Talk to the dwarf (N).
- Use the FASTENER (O).
- Talk to the dwarf once more.


- Take the DIRTY NAPKIN (P), GONG MALLET (Q), and HANDCART HANDLE (R).
- Move forward.
Chapter 4: The Castle Entrance


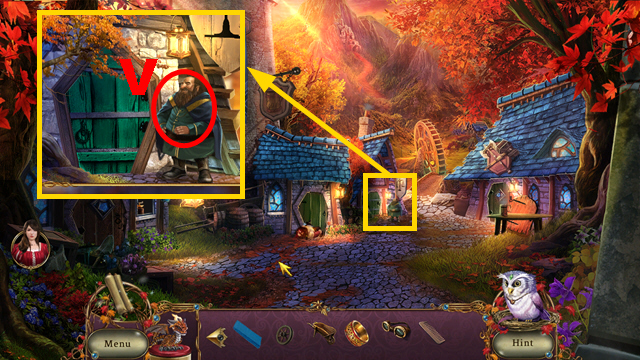
- Take the SCRUB (S); put the bucket (purple) into the water (T) to acquire the BUCKET OF WATER.
- Use the GONG MALLET (U).
- Give the WATERWHEEL BLUEPRINTS and DWARF CURRENCY to the dwarf (V).
- Go through the door.


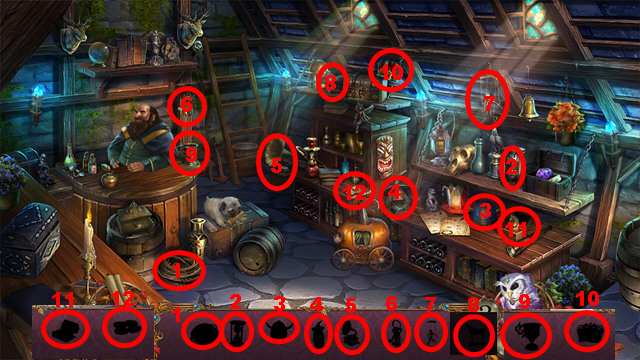
- Play the HOP.
- Solution: 1-6.


- Continue the HOP.
- Solution: 1-5.


- Continue the HOP.
- Solution: 2, 1, 3-9.
- You receive 4 WATERWHEEL-FORGE CONNECTOR PARTS.
- Walk down.


- Take the COFFEE BERRIES (W); put the DIRTY NAPKIN into the water (X) to acquire the BANDAGE.
- Move forward.
- Use the COFFEE BERRIES (Y) and dragon (Z); take the ROASTED BEANS.
- Walk down.


- Place 4 WATERWHEEL-FORGE CONNECTOR PARTS (A).
- Use the SCRUB and BROKEN DOOR (B); take the WOODEN BOARDS (C).
- Walk down.


- Place the ROASTED BEANS (D); take the GROUND COFFEE (E).
- Use the BUCKET OF WATER, GROUND COFFEE, and dragon (F); take the COFFEE MUG.
- Give the COFFEE MUG to the dwarf (G); take the BAG OF BOLTS (H).
- Move forward.
- Place the WOODEN BOARDS and BAG OF BOLTS (I).


- Play the mini-game.
- Solution: 1-4.
- Turn left.


- Take the STRONGBOX KEY (J), BELT WHEEL (K), CART WHEEL (L), and CABINET HANDLE (M).
- Take the GOGGLE HALF (N) and GOGGLE LENS (O).
- Walk down.


- Place the CART WHEEL (purple); take the WHEELBARROW (P).
- Move forward.
- Use the STRONGBOX KEY (Q); take the COLLECTOR’S BANGLE (R).
- Place the GOGGLE HALF and GOGGLE LENS (S); take the GOGGLES.
- Place the CABINET HANDLE (T); take the COMB (U).
- Walk down twice.


- Give the COLLECTOR’S BANGLE to the dwarf (V).
- Go through the door.


- Play the HOP.
- Solution: 1-12.
- You receive the MUSIC BOX.
- Move forward, turn left.


- Play the MUSIC BOX (W).
- Use the dragon (X); remove the vines (blue).
- Apply the BANDAGE (Y).
- Place the GOGGLES (Z); use the COMB (A).
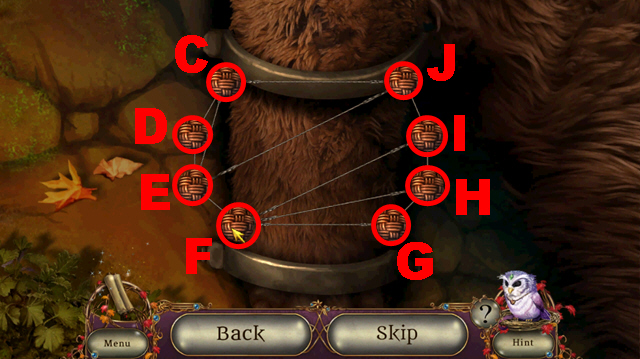
- Take the STIFF MOLE BRISTLES (green); examine the maze (B).


- Play the mini-game.
- Solution: E-F, G-C, E-I, E-H, D-H, G-I, D-H, E-I, E-C, E-D, D-J, G-E, F-J, F-I, F-G.


- Place the WHEELBARROW (K); put the debris (purple) into the wheelbarrow three times.
- Remove the wheelbarrow.
- Take the PALACE PASS (L).
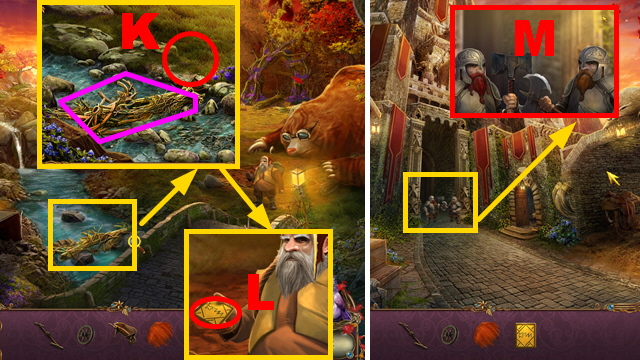
- Walk down, move forward.
- Give the PALACE PASS to the dwarfs (M).
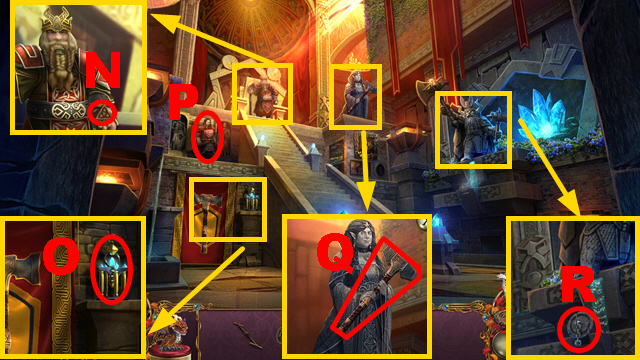
- Move forward.


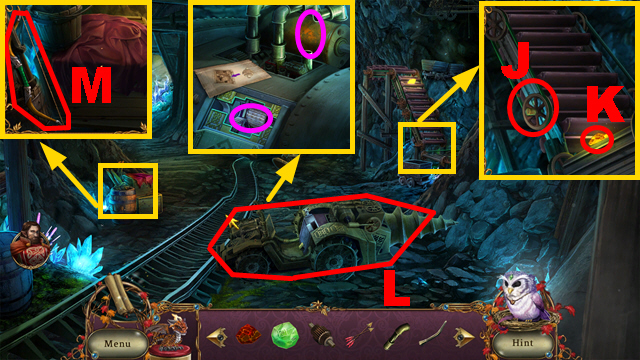
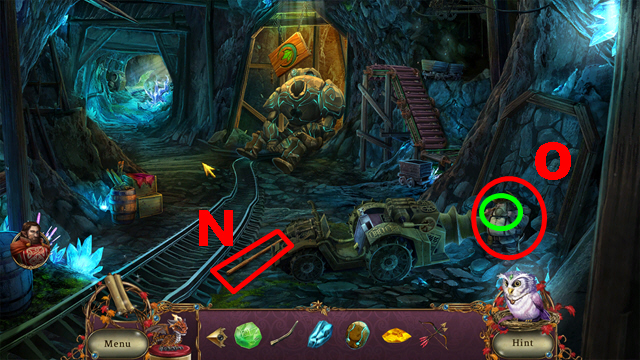
- Take the KEY TO THE MINES (N) and METAL DETECTOR (O).
- Talk to the man (P).
- Take the SLEDGEHAMMER (Q) and LARGE PLUG (R).
- Go to the Miner’s Base.


- Take the AXLE (S).
- Place the STIFF MOLE BRISTLES (green); take the BRUSH (T).
- Use the METAL DETECTOR (U).


- Play the HOP.
- You receive the RAILS (V).


- Remove the lid; use the KEY TO THE MINES (W).
- Move forward.
- Place the AXLE (X) and HANDCART HANDLE (Y).
- Take the EMPTY VIAL (Z); place the LARGE PLUG (A).


- Use the BRUSH (B); take the LUBRICANT (purple) and DWARF BADGE (C).
- Take the RED SOLUTION (D).
- Walk down.


- Place the EMPTY VIAL (E).
- Push the button (F); take the GREEN VIAL.
- Use the LUBRICANT (G); take the MINECART (H).
- Place the DWARF BADGE (I); open the book.
- Take the PANEL (J).
- Move forward.


- Place the GREEN VIAL (K); shoot the cannon (L).
- Take the PROPELLER (M); place the RAILS (N).
- Use the dragon and SLEDGEHAMMER (green).
- Place the MINECART (O) and PANEL (P).


- Play the mini-game.
- Solution: (Q).
- Move forward.
Chapter 5: The Golem Room


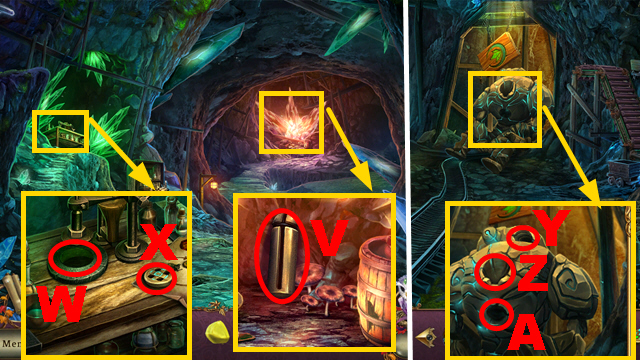
- Take the GOLEM EYE (R), ROUGH FIRESTONE (S), and TEETH (T).
- Remove the lid (U).
- Take the THREAD (V).
- Move forward.


- Take the ROUGH AIRSTONE (W).
- Place the PROPELLER (X); activate it.
- Take the DRILL PART (Y) and FEATHER (Z).
- Walk down.


- Place the BELT WHEEL (A).
- Move forward.
- Place the FEATHER (B) to acquire the ARROWS.
- Move forward.


- Take the DRILL PART (C), STRAW (D), and ROUGH WATERSTONE (E).
- Walk down.


- Place the TEETH (F).
- Move forward.
- Place the GOLEM EYE (green); take the GOLEM HEAD (G).
- Place the THREAD (H) to acquire the SEWING KIT.
- Place the RED SOLUTION (I).
- Walk down twice.


- Use the SEWING KIT (J); take the ROUGH EARTHSTONE (K).
- Place 2 DRILL PARTS (purple); activate the machine (L).
- Place the ARROWS (M) to acquire the BOW AND ARROW.


- Take the WOODEN ROD (N).
- Talk to the dwarf (green); you acquire the CORN.
- Examine the cave (O).


- Play the HOP.
- Take the CRUSHER PARTS (P).
- Move forward.


- Place the CRUSHER PARTS (Q).
- Insert the ROUGH AIRSTONE, ROUGH WATERSTONE, ROUGH FIRESTONE, and ROUGH EARTHSTONE (R).
- Take the SMOOTH AIRSTONE, SMOOTH WATERSTONE, SMOOTH FIRESTONE, and SMOOTH EARTHSTONE.
- Use the WOODEN ROD (S); place the STRAW (T) to acquire the EMPTY FUEL CONTAINER.
- Move forward.
- Place the EMPTY FUEL CONTAINER (U) to acquire the GOLEM FUEL.


- Use the GOLEM FUEL (V); take the TANK.
- Place the SMOOTH FIRESTONE, SMOOTH WATERSTONE, SMOOTH AIRSTONE, and SMOOTH EARTHSTONE (W).
- Take the GOLEM CORE (X).
- Walk down twice.
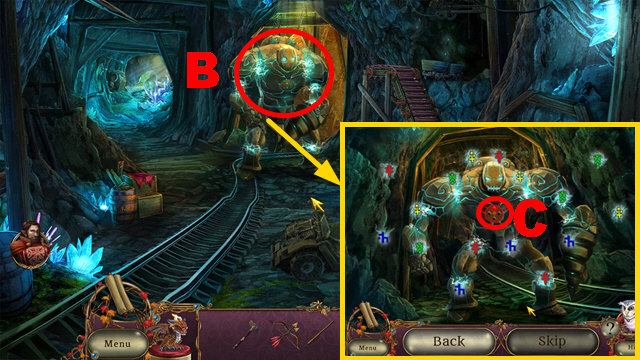
- Place the TANK (Y), GOLEM HEAD (Z), and GOLEM CORE (A).


- Use the BOW AND ARROW (B).
- Play the mini-game.
- To solve this puzzle, select the body parts that share the core’s color (C) four times.


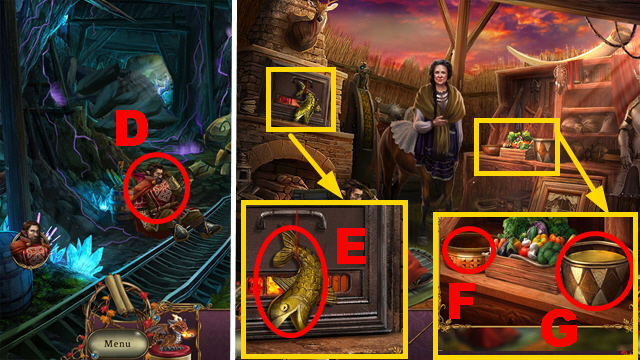
- Talk to the dwarf (D).
- Go to the Blacksmith’s Hut.
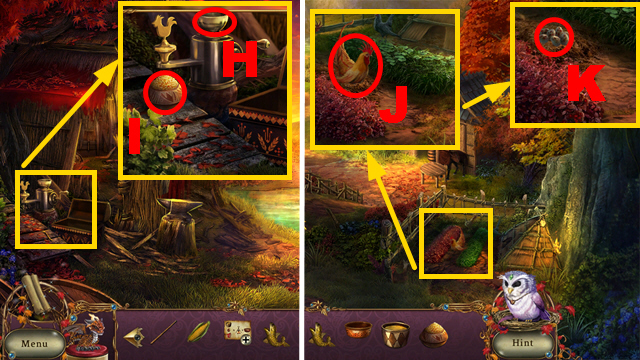
- You acquire the RECIPE.
- Take the WOODEN FISH (E), SOUP BOWL (F), and CHICKEN STOCK (G).
- Walk down.


- Use the CORN (H); take the CHICKEN FEED (I).
- Go to the Cliffside.
- Use the CHICKEN FEED (J); take the EGG (K).
- Move forward.


- Take the STAKE (L).
- Place the WOODEN ROD (M) and STAKE (N); hit the stake with the SLEDGEHAMMER.
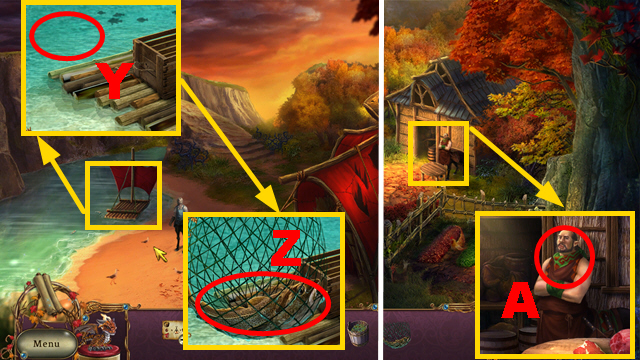
- Take the FISHING NET (O).
- Examine the box (P).


- Play the mini-game.
- Solution: R-S, U-R, T-U, Q-T, R-Q, U-R, V-U.
- Place the WOODEN FISH (W); take the FISHING CHUM (X).


- Use the FISHING CHUM and FISHING NET (Y); take the FISH (Z).
- Walk down.
- Give the FISH to the man (A); you acquire the MEAT.
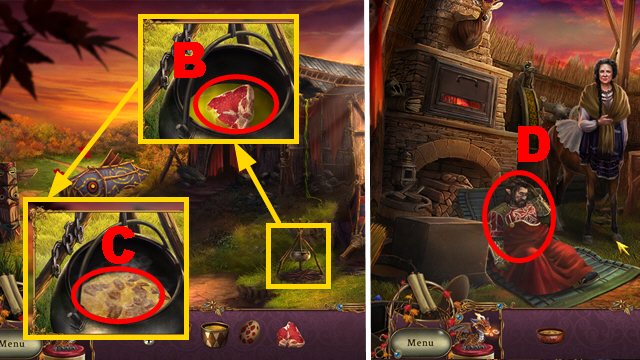
- Go to the Centaur Village Center.


- Use the CHICKEN STOCK, EGG, MEAT, and dragon (B).
- Place the SOUP BOWL (C) to acquire the SOUP.
- Go to the Blacksmith’s Hut.
- Give the SOUP to the dwarf (D); you acquire the LOCKWEED POTION.
- Go to the Forest Patch.


- Use the LOCKWEED POTION (E).
- You acquire the BLACK POWDER.


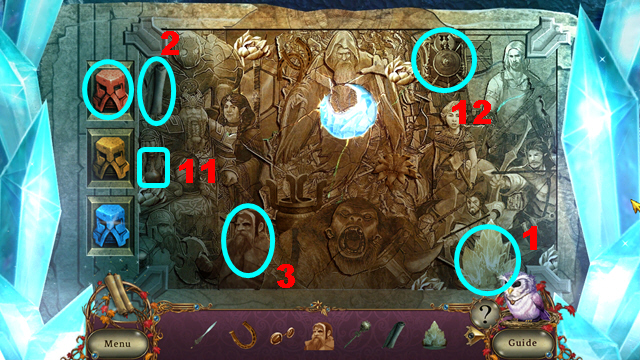
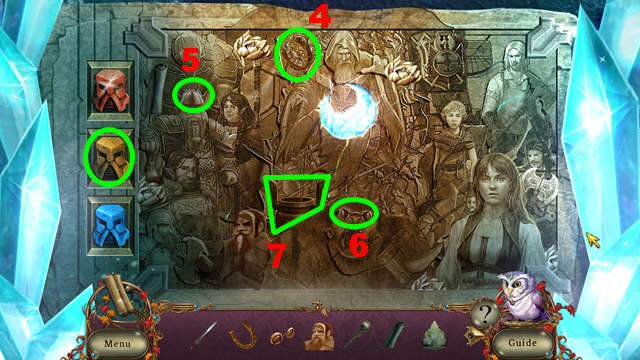
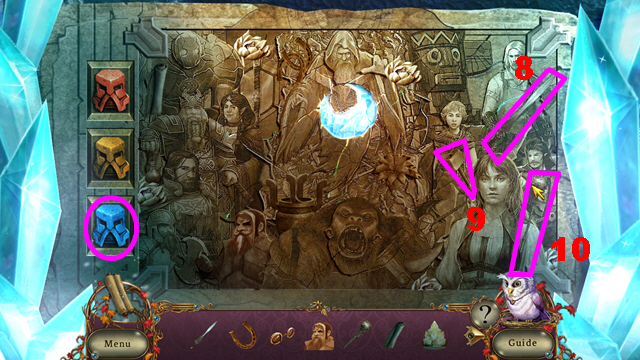
- Play the HOP.
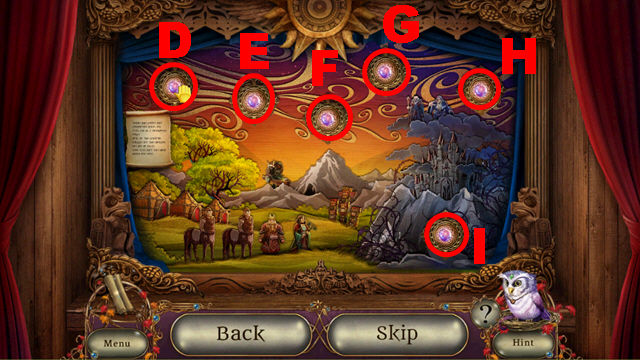
- Solution: 1-12.


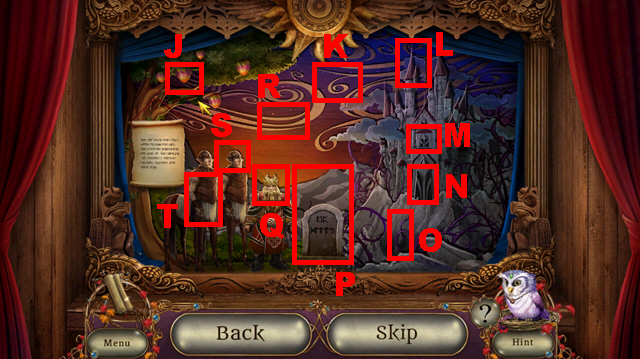
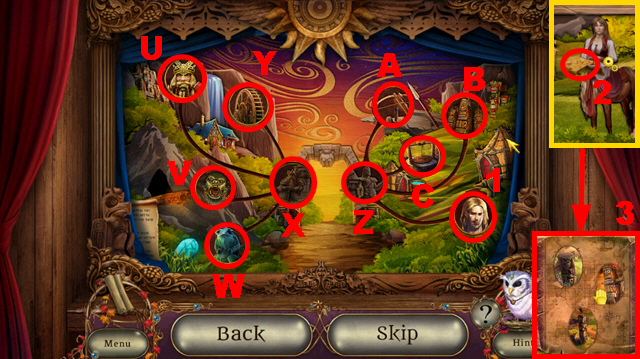
- Play the mini-game.
- Solution: (F).
- You receive the HERBS.
Chapter 6: The Cure


- Place the HERBS (G); pound them.
- Pour the herbs and potion (purple) into the bowl (green).
- Use the bowl and dragon (H); take the CURE (orange).
- Go to the Blacksmith’s Hut.
- Use the CURE (I).


- Play the mini-game.
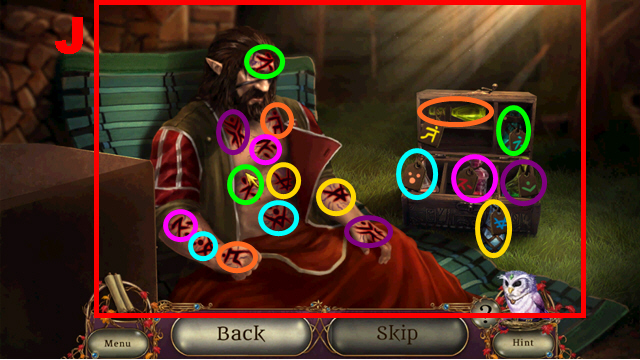
- To solve this puzzle (J), apply potions to wounds framed in the same color.


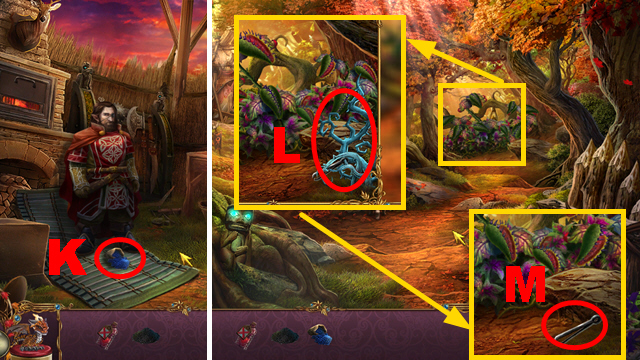
- Take the BLUE POWDER (K).
- Go to the Forest Patch.
- Use the LOCKWEED POTION (L); take the TWEEZERS (M).
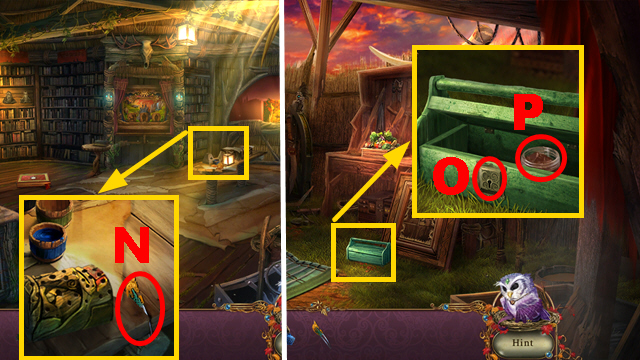
- Go to the Library.


- Collect the PIN with the TWEEZERS (N).
- Go to the Blacksmith’s Hut.
- Use the PIN (O); take the WOOD PUTTY (P).
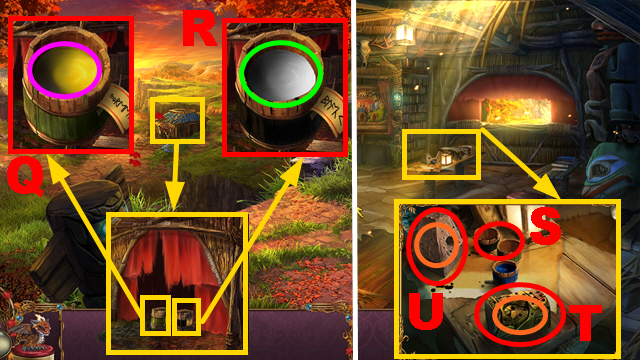
- Go to the Centaur Village Entrance.


- Use the BLUE POWDER (purple); take the GREEN PAINT (Q).
- Use the BLACK POWDER (green); take the BLACK PAINT (R).
- Go to the Library.
- Place the BLACK PAINT and GREEN PAINT (S); use the WOOD PUTTY (orange).
- Take the TOTEM (T).
- Examine the structure (U).


- Play the mini-game.
- Solution: (V).
- Take the MODEL PART (W).


- Place the MODEL PART (blue); examine the model (X).
- Play the mini-game.
- Solution: Yx3, Zx2, Ax3, Bx3, Cx3, D, Ex2, F, Gx2, H.


- Take the CARGO TARP (I).
- Go to the Cliffside.
- Place the TOTEM (J); take the TRADER’S GOLD (K).
- Move forward.


- Give the CARGO TARP to the man (L).
- Go to the Dwarf Palace.
- Move forward.
- Take the SWORD MOLD (M) and CONTROL LEVERS (N).
- Examine the panel (O).


- Play the HOP.
- Solution: 1-12.


- Use the BLACK PAINT (purple).
- Take the DIAMOND MOTIF (P) and FLOWER MOTIF (Q).
- Walk down.


- Place the DIAMOND MOTIF (R) and FLOWER MOTIF (S).
- Take the CRYSTAL CHALICE (T) and CRYSTAL PICKAXE (U).
- Move forward.
- Place the CRYSTAL CHALICE (V); take the MOON WATER.
- Use the CRYSTAL PICKAXE (W); take the MOONSILVER ORE (X).


- Use the CRYSTAL PICKAXE (Y); take the COAL (Z).
- Walk down twice.
- Use the MOON WATER (A); take the PALEWOOD BRANCH.
- Walk down.


- Use the MOONSILVER ORE (B).
- Read the note (C); take the QUEEN’S CROWN (D).
- Take the SHIELD EMBLEM (E); place the CONTROL LEVERS (F).


- Play the mini-game.
- To solve this puzzle, activate the levers (G) in the correct sequence.
- This puzzle is randomized.


- Take the CLOCKHANDS (H); place the PALEWOOD BRANCH (green).
- Solution: 1-5.
- Take the PALEWOOD HILT (I).
- Use the COAL and dragon (J); place the MOONSILVER ORE (K).
- Take the SMELTED MOONSILVER (L).


- Place the SWORD MOLD (M); pour the SMELTED MOONSILVER into it.
- Go to the Mountain Spring.
- Place the CLOCKHANDS (N); take 3 COLORED STONES (O).
- Use the MOON WATER (P); take the FROST POLLEN (Q).
- Go to the Forge Room.


- Use the FROST POLLEN (R); take the MOONSILVER BLADE.
- Place the MOONSILVER BLADE and PALEWOOD HILT (S).
- You receive the BLADE OF COURAGE.
- Use the BLADE OF COURAGE (T).
Chapter 7: The Stairs Room


- Use the BLADE OF COURAGE three times (U).


- Place 3 COLORED STONES (V).
- Arrange the tiles correctly (W).


- Arrange the staff heads correctly (X).
- Move forward.


- Play the mini-game.
- Match 4 pairs framed in the same color to solve this puzzle (Y).
- This puzzle is randomized.


- Place the SHIELD EMBLEM (green); take the SHIELD (Z).
- Read the book (A); take the LOVE LETTERS (B).
- Take the GARGOYLE WING (C).
- Examine the painting (D).


- Play the HOP.
- You receive the FARMER’S HAT (E).


- Take the BUTTON (F).
- Walk down.
- Place the GARGOYLE WING (G); take the SUN MOTIF (H).
- Place the BUTTON (purple); take the DOLL (I).
- Move forward twice.


- Take the TESSERACT MODEL (J).
- Walk down.
- Place the TESSERACT MODEL (K); take the FROST MOTIF (L).
- Go right.
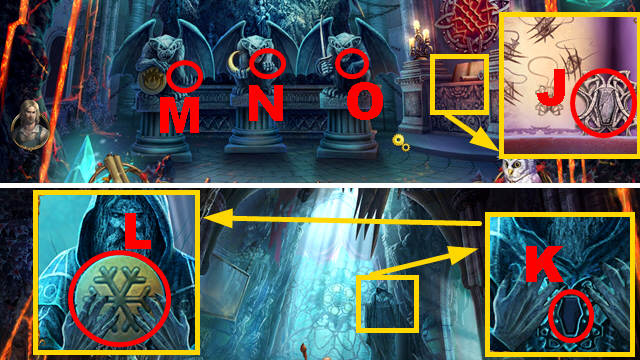
- Place the FROST MOTIF (M), SUN MOTIF (N), and SHIELD (O).


- Place the FARMER’S HAT (1), LOVE LETTERS (2), DOLL (3), QUEEN’S CROWN (4), and TRADER’S GOLD (5).
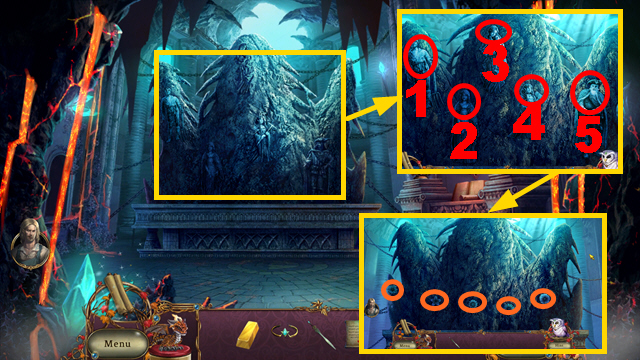
- Talk to the figurines.
- Take 5 PETRIFIED FLOWERS (orange).
- Walk down.


- Place 5 PETRIFIED FLOWERS (P).
- Move forward.


- Play the HOP.
- Solution: 1-2.
- Move forward.


- Play the HOP.
- Solution: 1-4.


- Play the HOP.
- Solution: 1-12.


- Use the BLADE OF COURAGE (Q).
- Play the mini-game.


- Solution: 1-3.
- Congratulations, you have completed Awakening: The Red Leaf Forest.


