Haunted Hotel: Ancient Bane Walkthrough, Guide, & Tips
Haunted Hotel: Ancient Bane Walkthrough

Welcome to the Haunted Hotel: Ancient Bane Walkthrough
Guests keep disappearing from a gimmicky haunted hotel. Is there someone pulling the strings, or are these ghosts actually real?
Whether you use this document as a reference when things get difficult or as a road map to get you from beginning to end, we’re pretty sure you’ll find what you’re looking for here.
This document contains a complete Haunted Hotel: Ancient Bane game walkthrough featuring annotated screenshots from actual gameplay!
We hope you find this information useful as you play your way through the game. Use the walkthrough menu below to quickly jump to whatever stage of the game you need help with.
Remember to visit the Big Fish Games Forums if you find you need more help. Have fun!
This walkthrough was created by Dan L. Peach, and is protected under US Copyright laws. Any unauthorized use, including re-publication in whole or in part, without permission, is strictly prohibited.
General Tips

- This is the official guide for Haunted Hotel: Ancient Bane.
- This guide will not mention each time you have to zoom into a location; the screenshots will show each zoom scene.
- We will use the acronym HOP for Hidden-object puzzles. Interactive items will be color-coded and some will be numbered; please follow the numbers in sequence when appropriate.
- The HOP lists may be random; our lists may vary from yours.
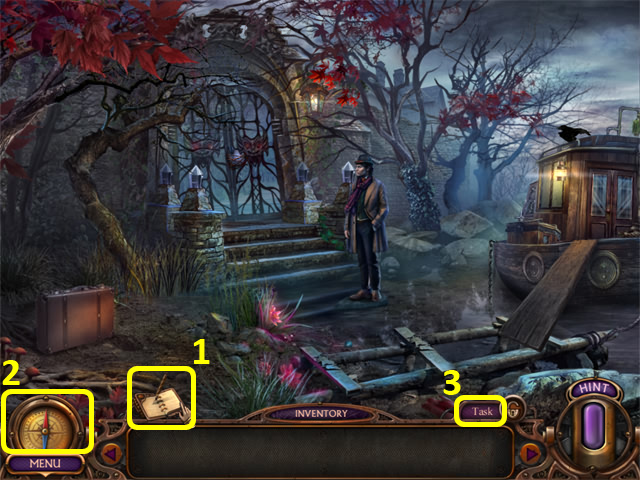
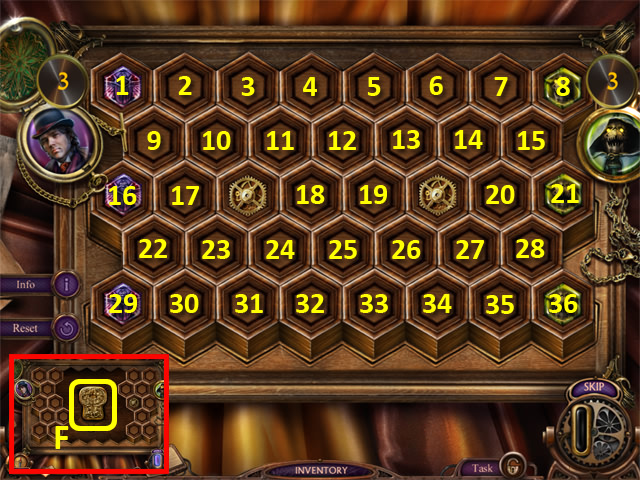
- Select the diary (1) for story updates.
- Select the compass (2) for a map.
- Select the button (3) for current objective.
Chapter 1: Entrance and Reception
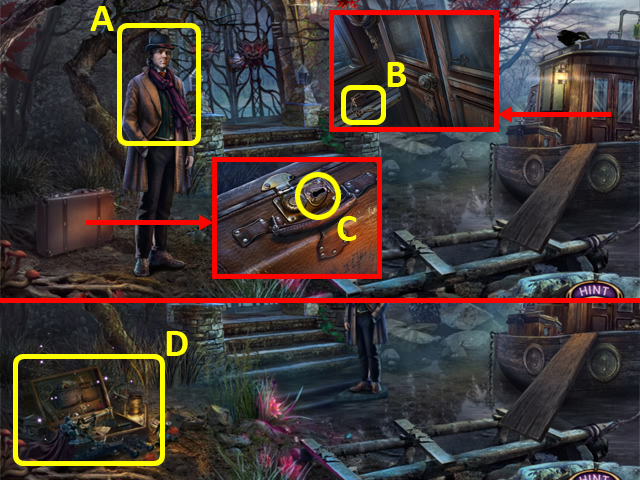
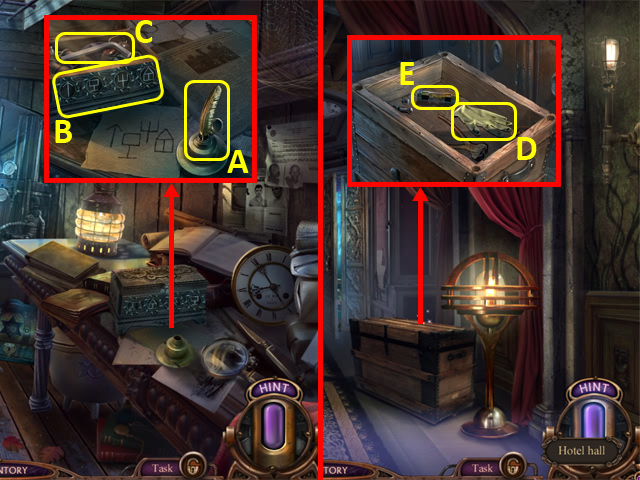
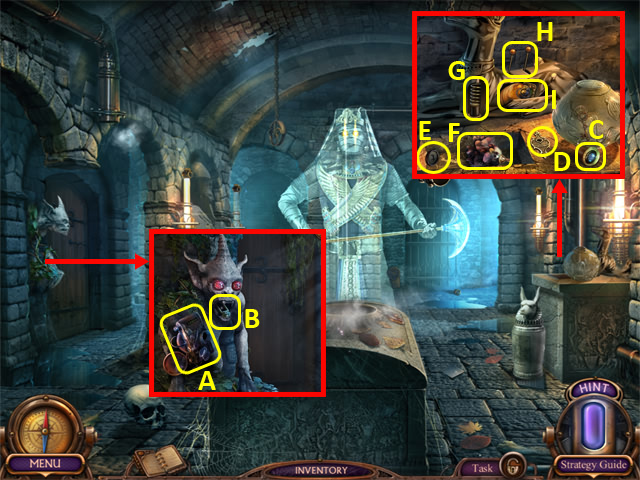
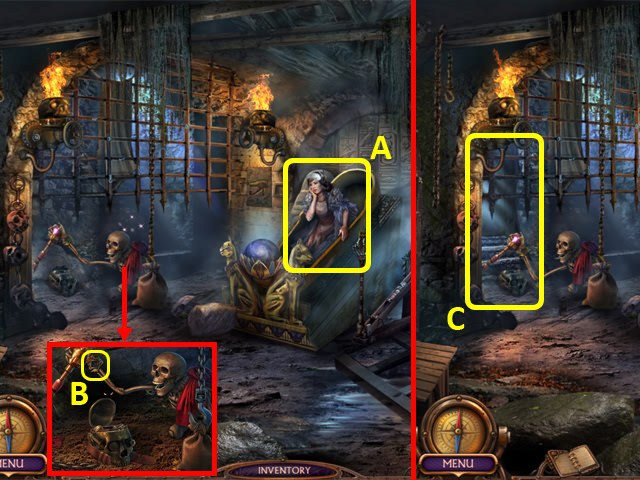
- Talk to James (A).
- Grab the SUITCASE KEY (B).
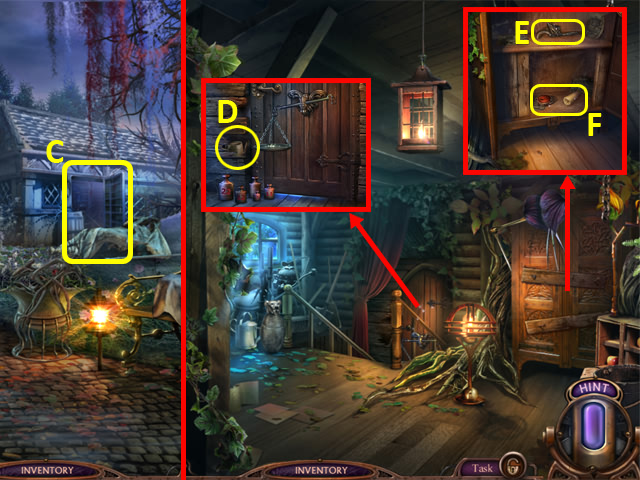
- Use the SUITCASE KEY (C).
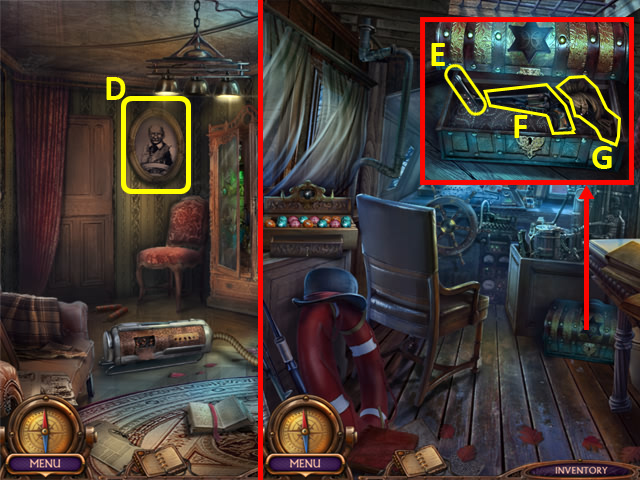
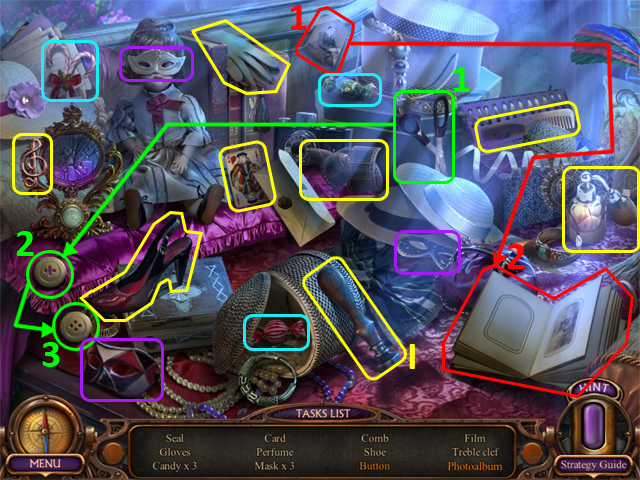
- Examine the suitcase to access a HOP (D).
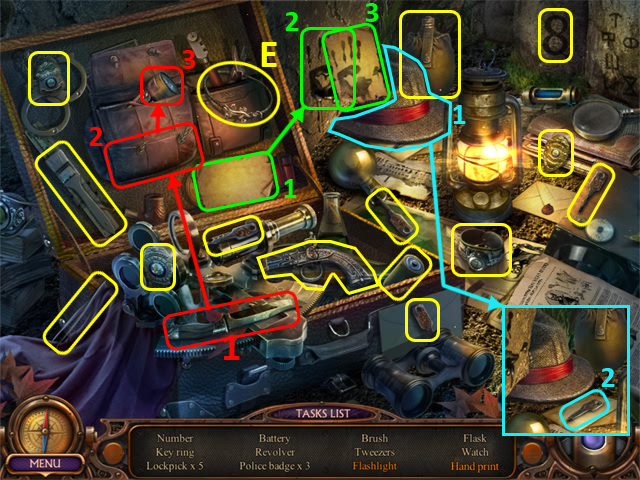
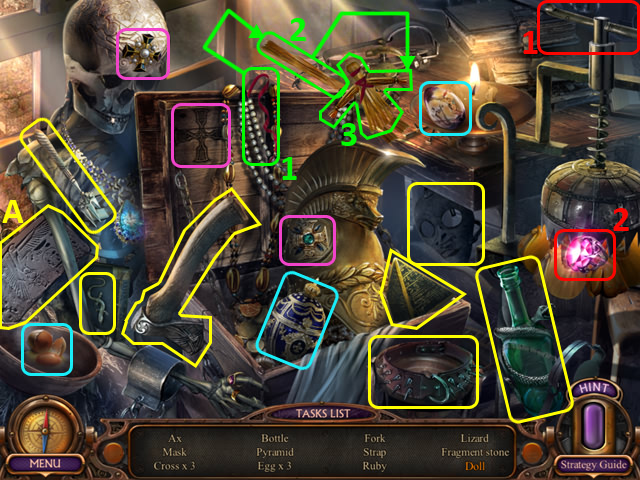
- Play the HOP.
- You receive a KEY RING (E).
- You receive a LOCK PICK PART from James.
- Select the LOCK PICK PART in your Inventory.
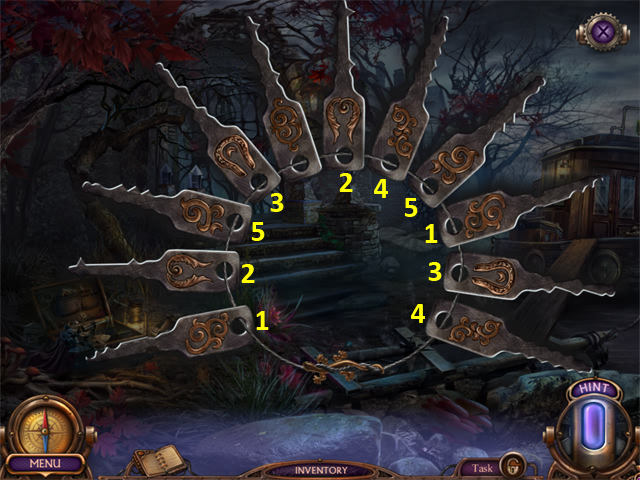
- Match pairs of lock picks.
- Take the LOCK PICK.
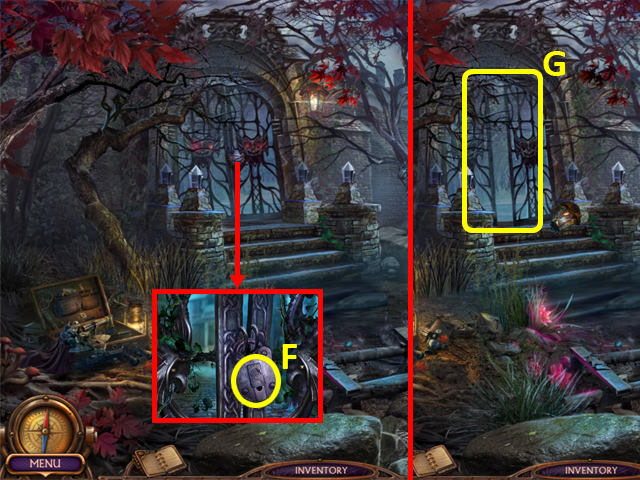
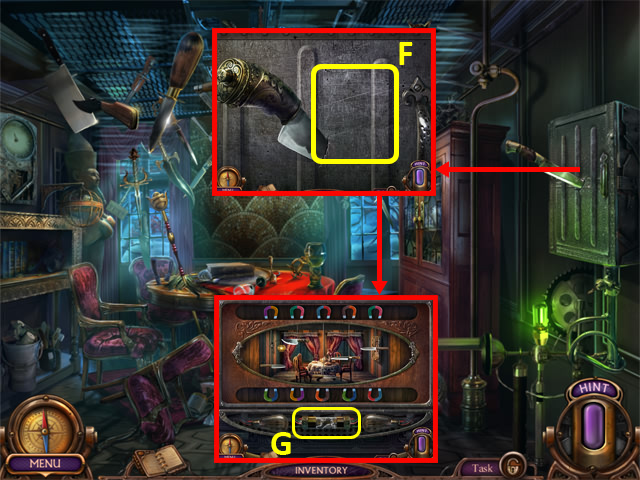
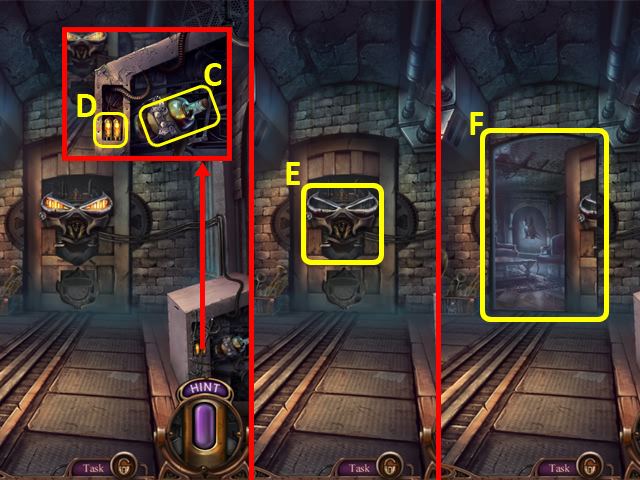
- Remove the wire; use the LOCK PICK (F).
- Enter the Hotel Porch (G).
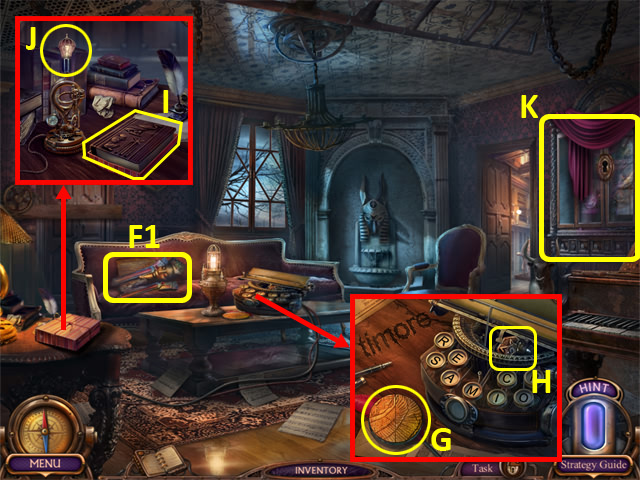
- Select the scene.
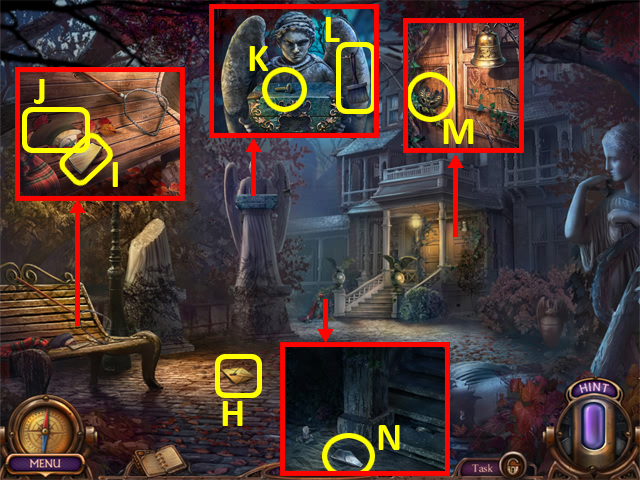
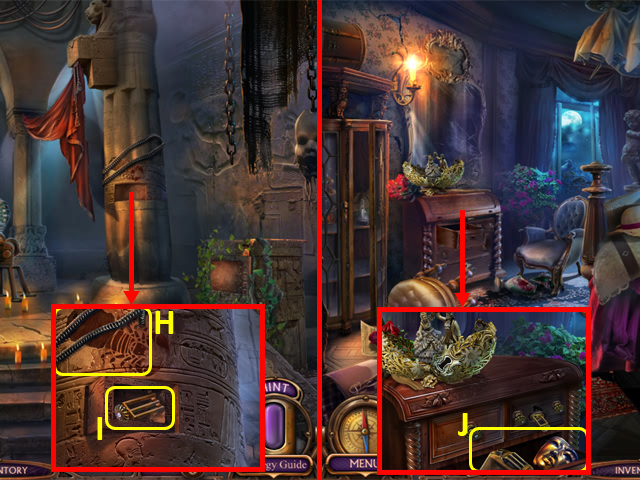
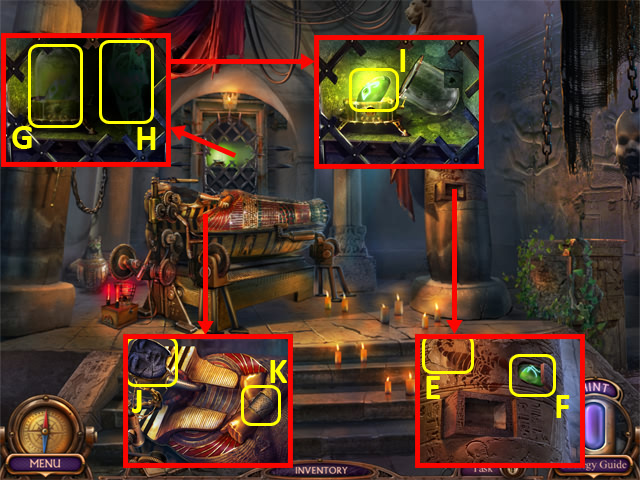
- Read the note (H).
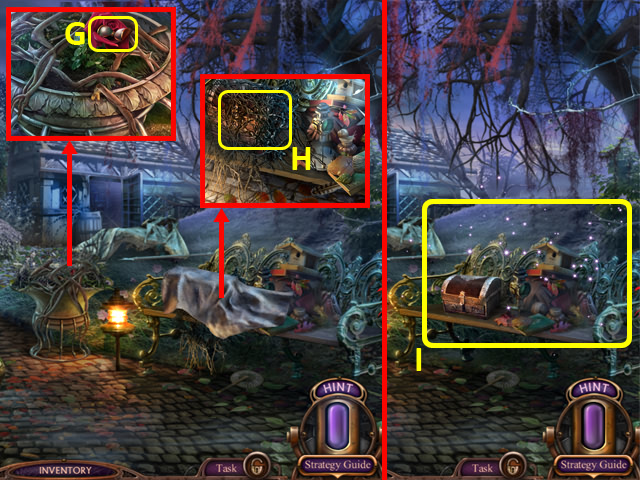
- Grab the GLASS LEAF 1/3 (I), RECORD PIECE 1/4 (J), SCREW (K), FEATHER DUSTER (L) and DECORATION (M).
- Move the sand; take the GLASS LEAF 2/3 (N).
- Back out.
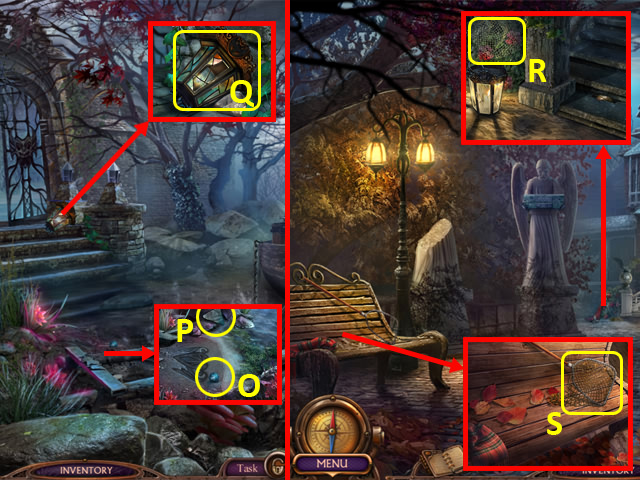
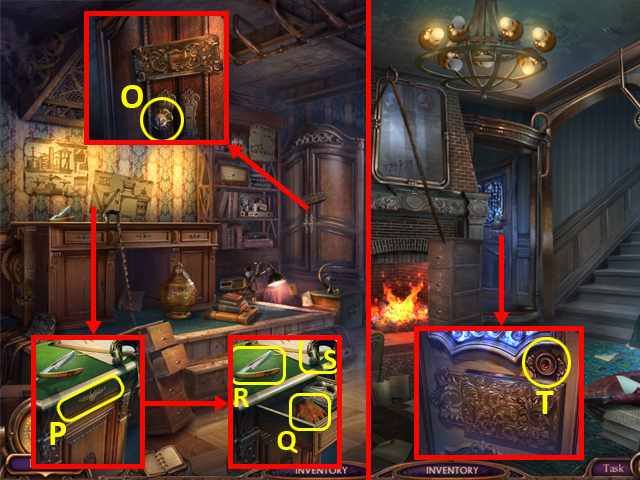
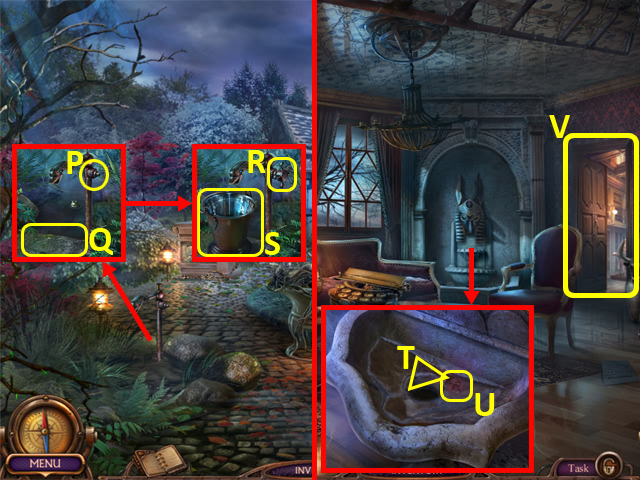
- Grab the MARBLE (O) and GLASS LEAF 3/3 (P).
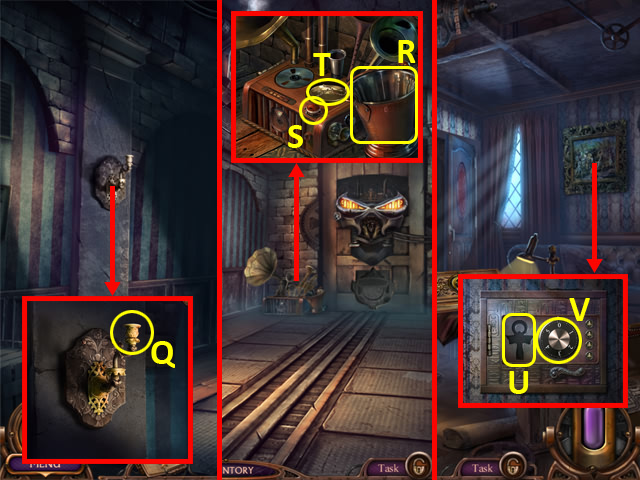
- Add the GLASS LEAF and DECORATION to the lantern (Q); take it.
- Walk forward.
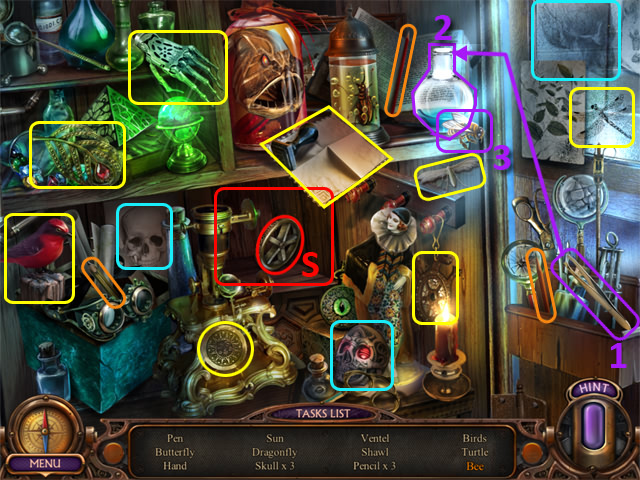
- Place the LANTERN on the candle; take the TORN NET (R).
- Place the TORN NET and select it 3 times; take the NET (S).
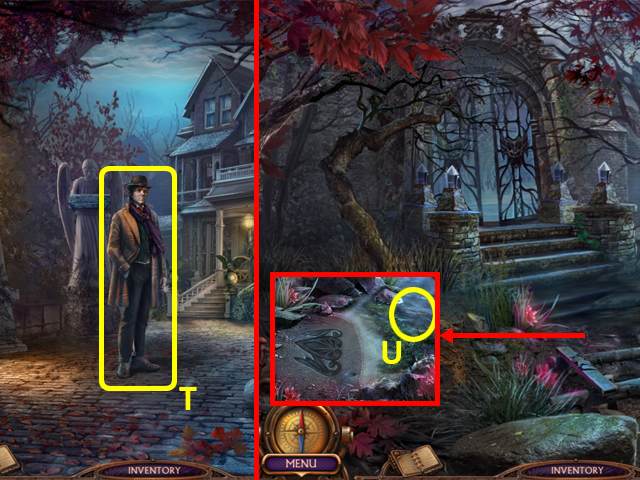
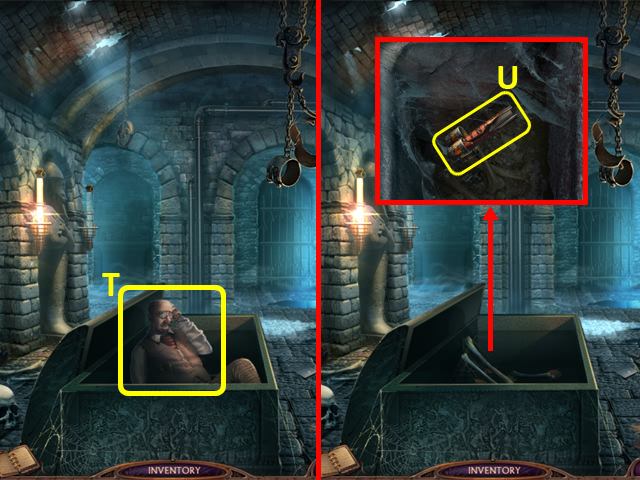
- Talk to James (T); you receive a LIGHT AMULET.
- Back out.
- Use the NET to get the BELL CLAPPER (U).
- Walk forward.
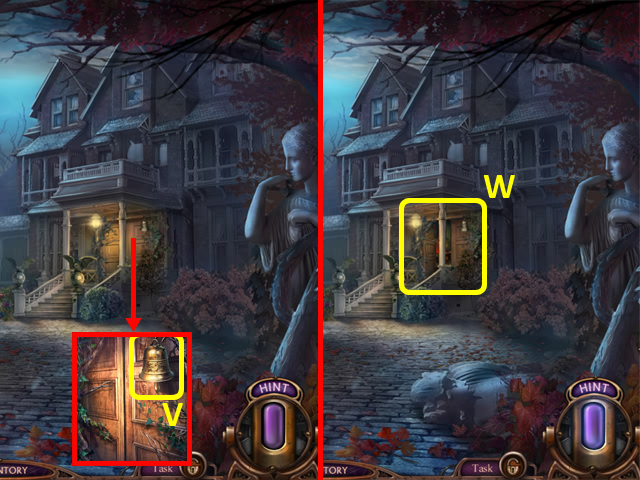
- Place the BELL CLAPPER (V); ring the bell.
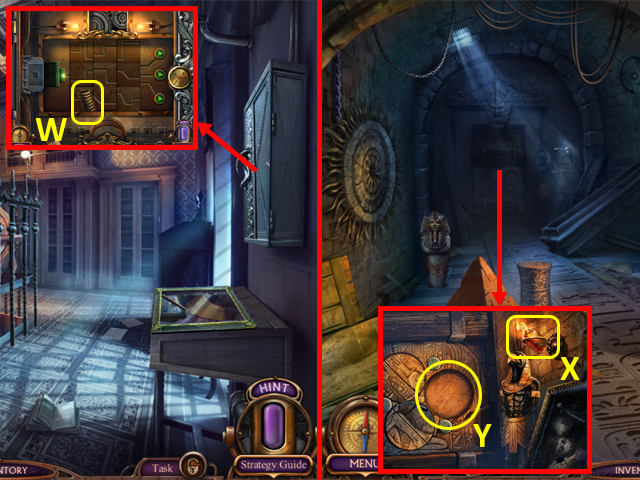
- Enter the Hotel Hall (W).
- Talk to James twice.
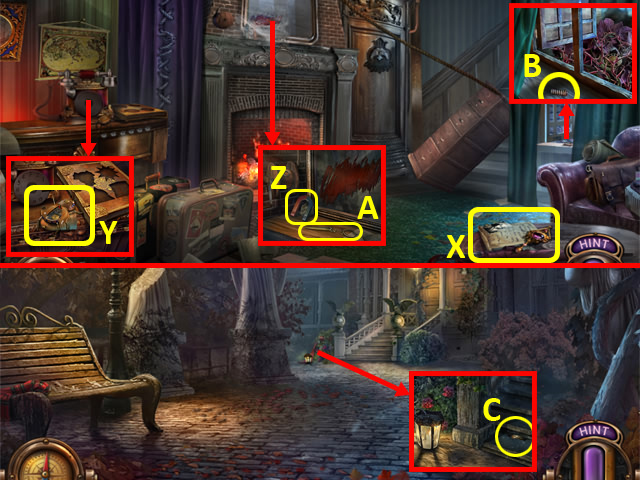
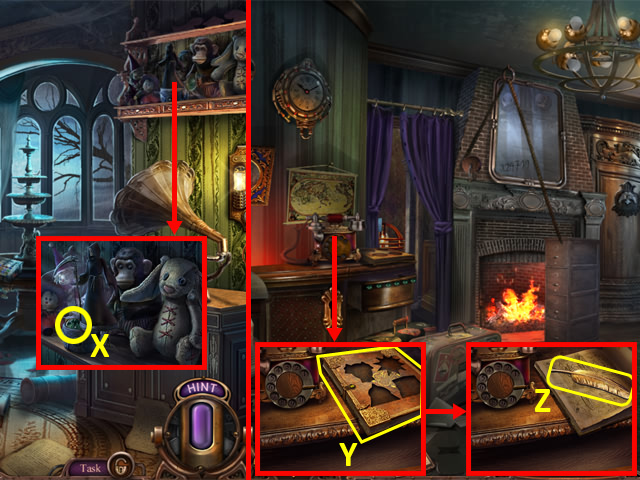
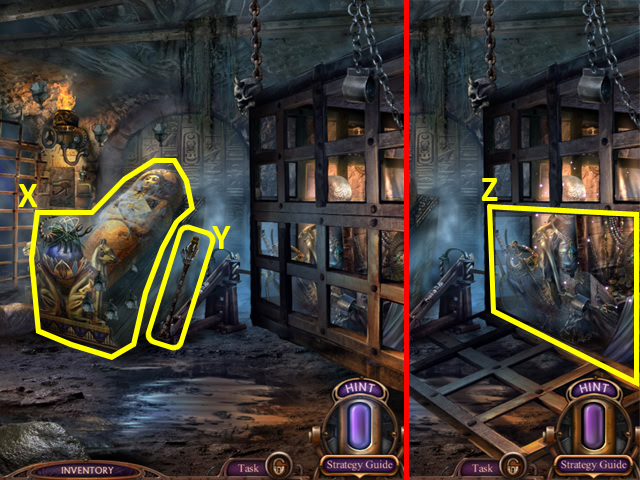
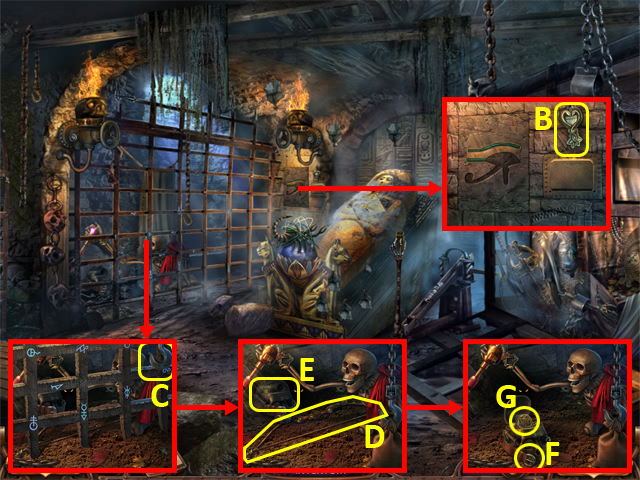
- Read the note (X).
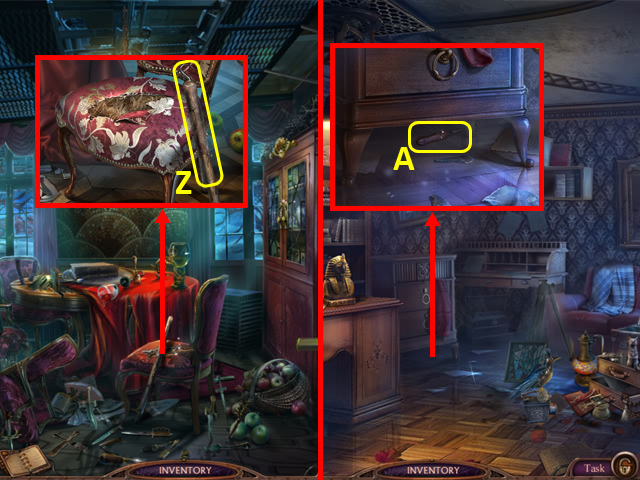
- Take the BROKEN SCARAB (Y); read the note underneath.
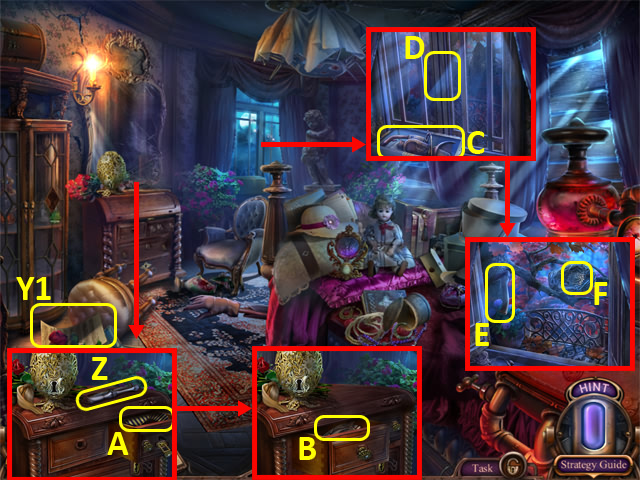
- Remove the cobwebs with the FEATHER DUSTER; grab the MAGNET (Z) and HALF OF SCISSOR (A).
- Take the SPRING (B).
- Back out.
- Use the MAGNET to get the METALLIC WING (C).
- Select the BROKEN SCARAB in your Inventory.
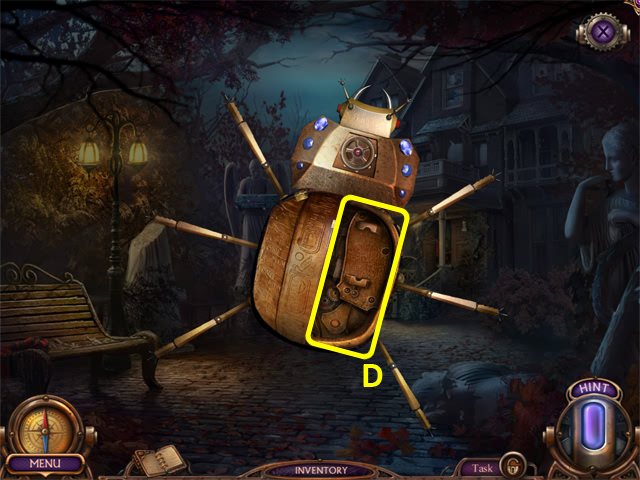
- Remove the broken wing and broken spring. Attach the SPRING and METALLIC WING (D); take the SCARAB.
- Back out.
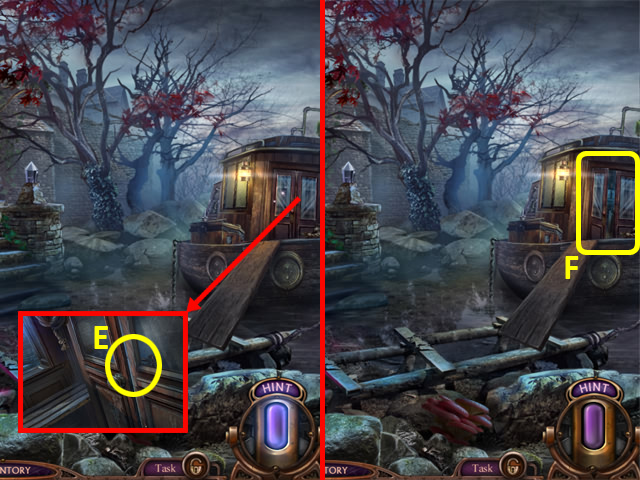
- Use the SCARAB (E).
- Enter James’ Boat (F).

- Grab the HALF OF SCISSOR (G), RAG (H), and PLASTER (I).
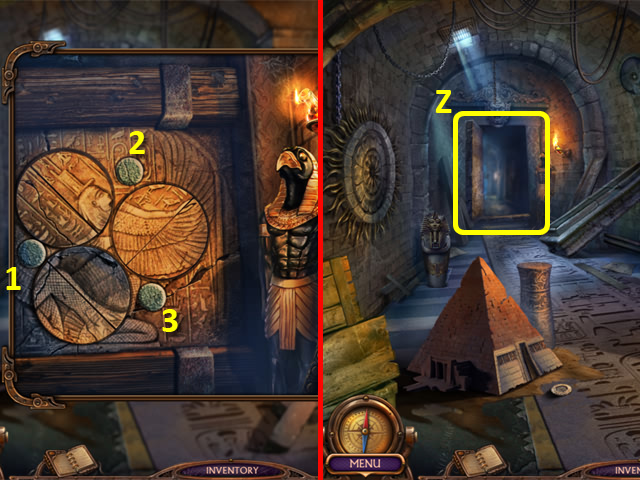
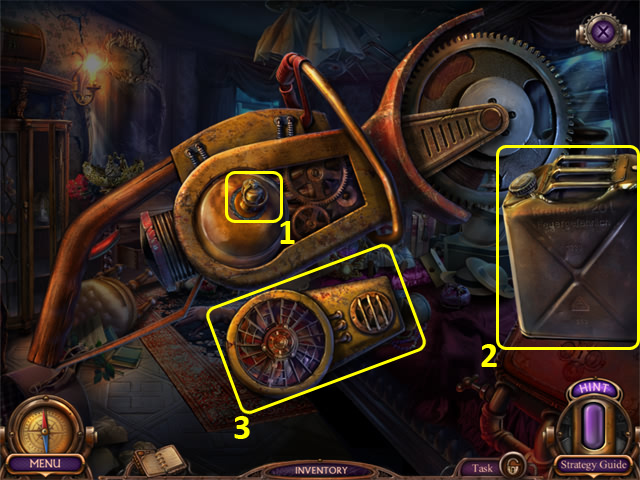
- Select the SCISSOR PART in your Inventory.
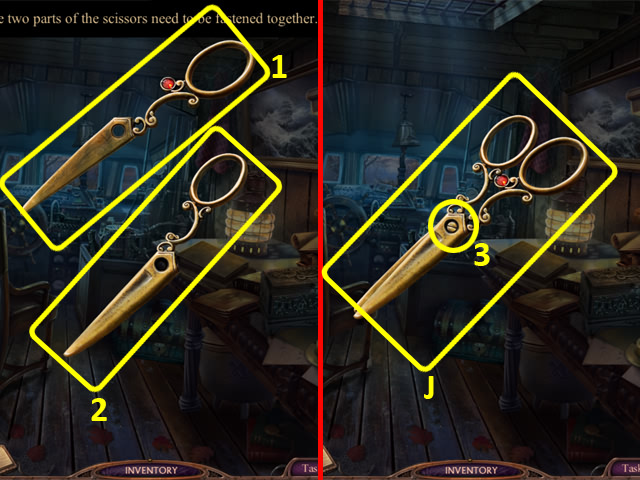
- Grab the HALF OF SCISSOR (1); add it to the HALF OF SCISSOR (2).
- Insert and then select the SCREW (3); take the VINTAGE SCISSORS (J).
- Back out.
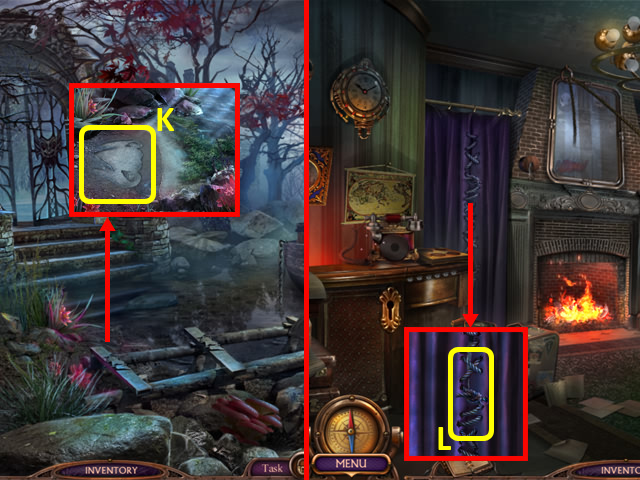
- Place the PLASTER in the impression; take the BAS-RELIEF (K).
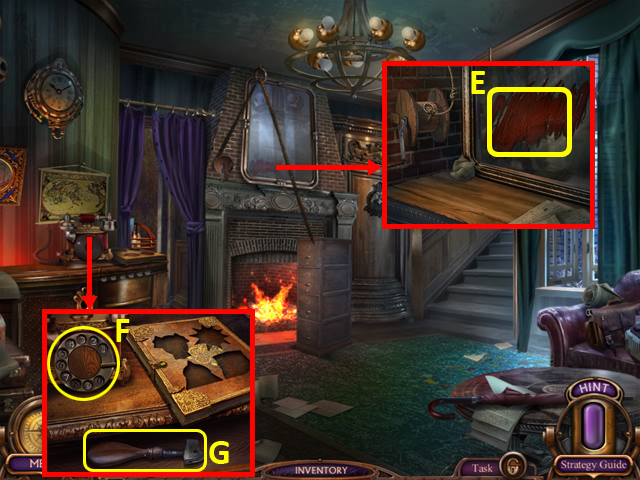
- Return to the Hotel Hall.
- Cut the knot (L) with the VINTAGE SCISSORS and receive some ROPE; open the curtains.
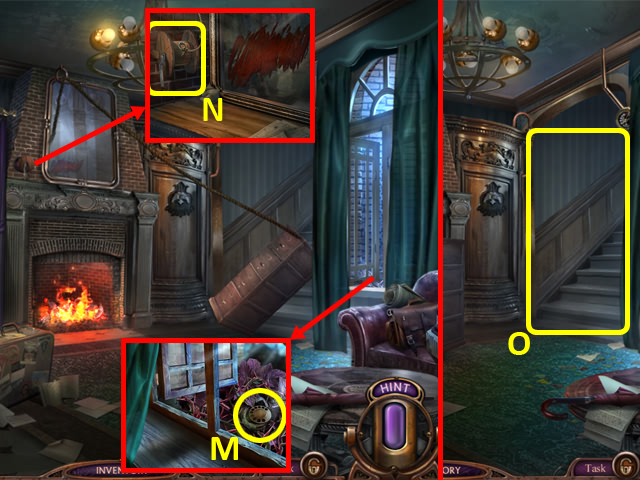
- Cut the branches with the VINTAGE SCISSORS; take the TELEPHONE DIAL (M).
- Attach the ROPE and crank the handle (N).
- Walk up to the Second Floor (O).
Chapter 2: Second Floor and Beyond
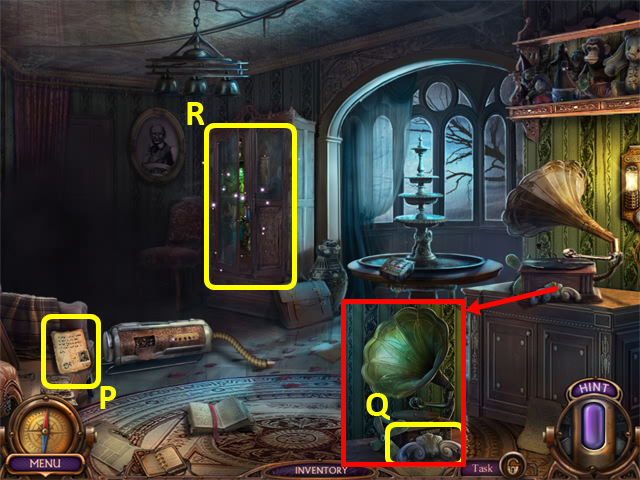
- Read the note (P).
- Grab the BAS-RELIEF (Q).
- Open the wardrobe; examine inside to access a HOP (R).
- Play the HOP.
- You receive a FAUCET HANDLE (S).
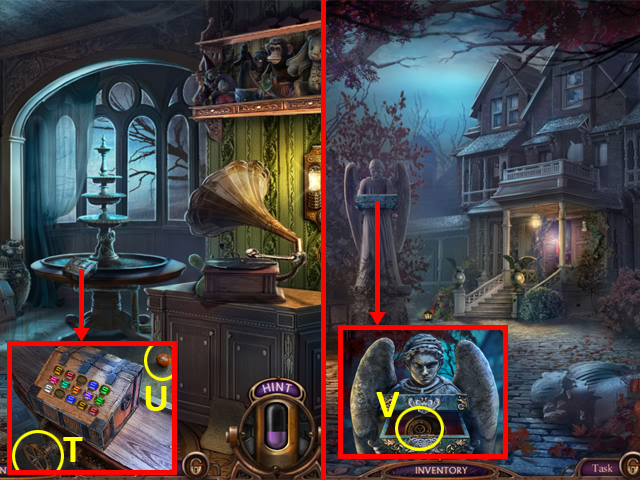
- Place the FAUCET HANDLE (T) and turn it; take the MARBLE (U).
- Return to the Hotel Porch.
- Place the BAS-RELIEFS into the chest; grab the MECHANISM PART (V).
- Return to James’ Boat.
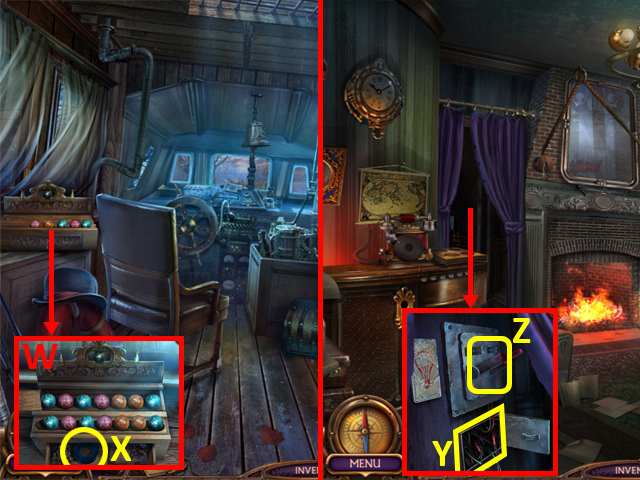
- Place the MARBLES in the front row and arrange as shown (W); take the INSULATING TAPE (X).
- Return to the Hotel Hall.
- Use the INSULATING TAPE (Y); flip the switch (Z).
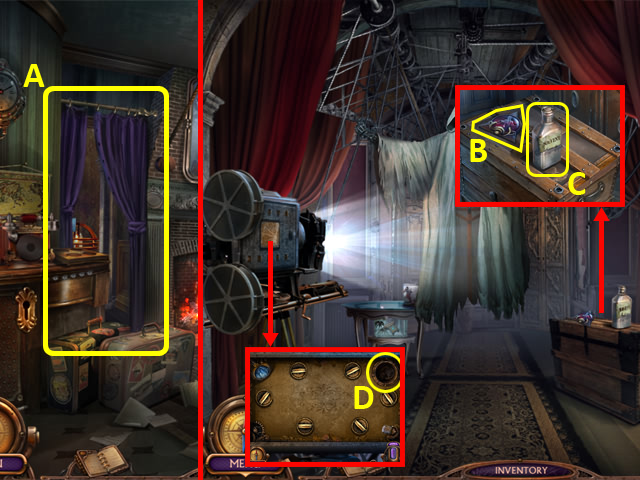
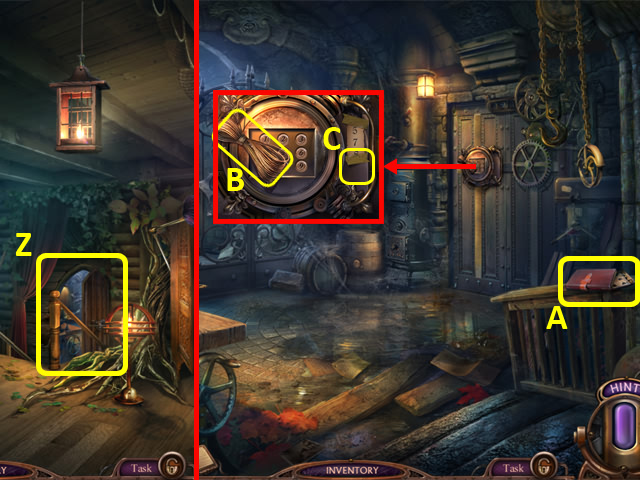
- Enter the Scary Corridor (A).
- Grab the AMULET (B) and SOLVENT (C).
- Open the camera cover; place the MECHANISM PART (D) to trigger a puzzle.
- Use the SOLVENT and RAG on the mirror (E).
- Place the TELEPHONE DIAL (F); dial: 324719.
- Grab the GLASS CUTTER (G).
- Walk forward.
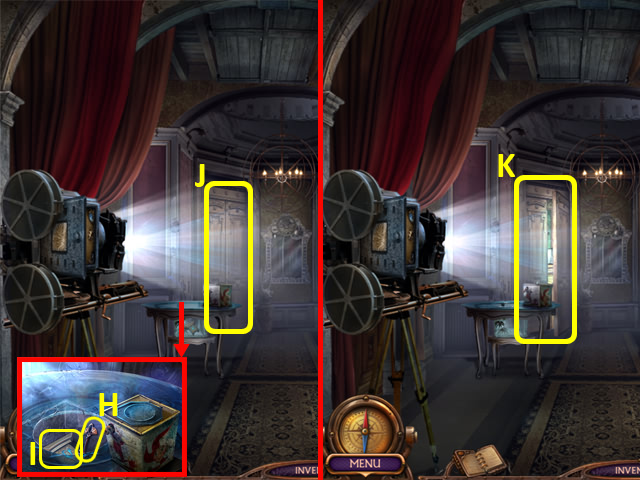
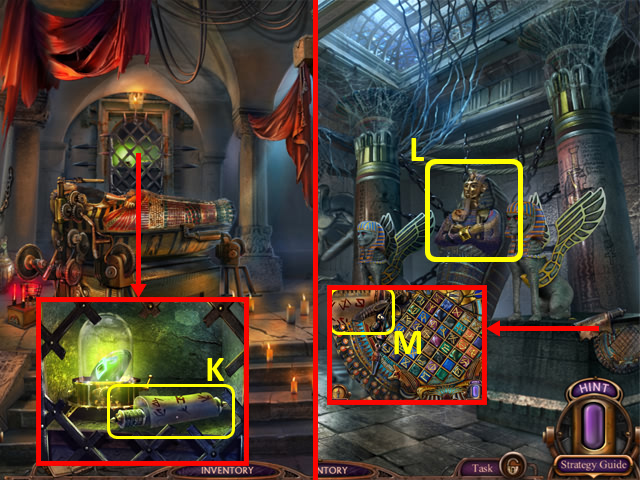
- Use the GLASS CUTTER on the table; take the ROOM KEY (H) and LIGHT AMULET PIECE (I).
- Unlock the door (J) with the ROOM KEY.
- Enter the Victim’s Room (K).
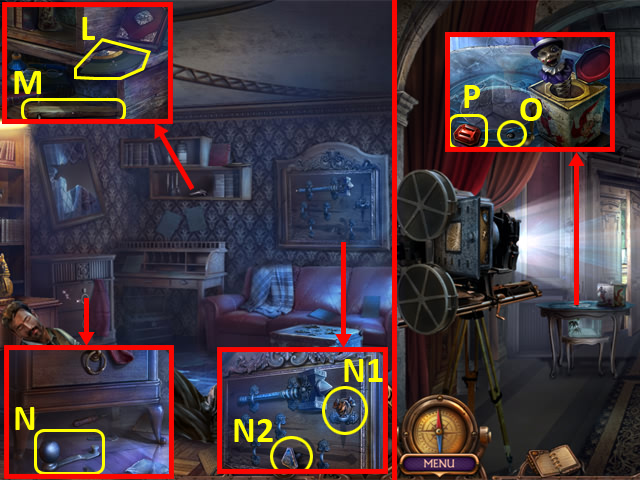
- Grab the RECORD PIECE 2/4 (L), WEDGE (M), HANDLE (N), AMULET (N1), and BUTTON (N2).
- Back out.
- Place the HANDLE in the box and turn it; grab the BUTTON (O) and GEM (P).
- Return to the Second Floor.
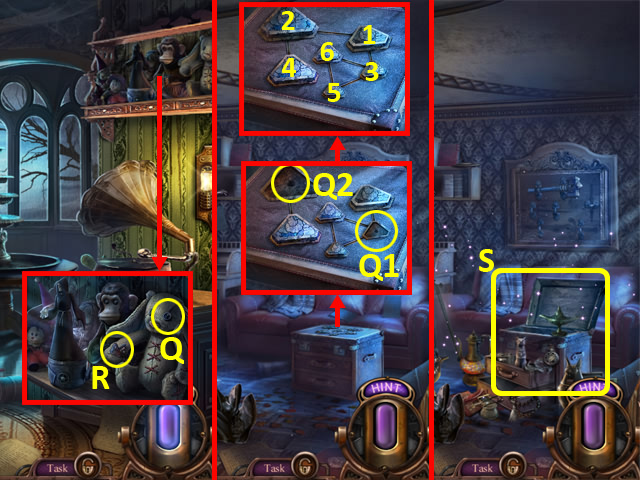
- Place the BUTTON (round/black) (Q); take the CHEST BUTTON (R).
- Return to the Victim’s Room.
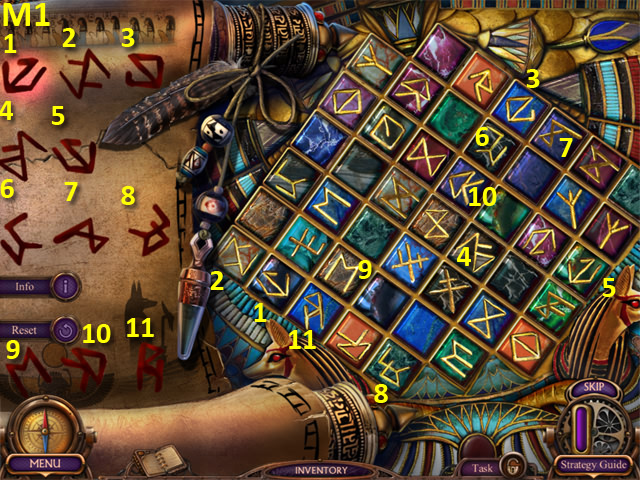
- Place the CHEST BUTTON (Q1) and BUTTON (Q2); press the buttons in the order shown (1-6).
- Examine the chest to access a HOP (S).
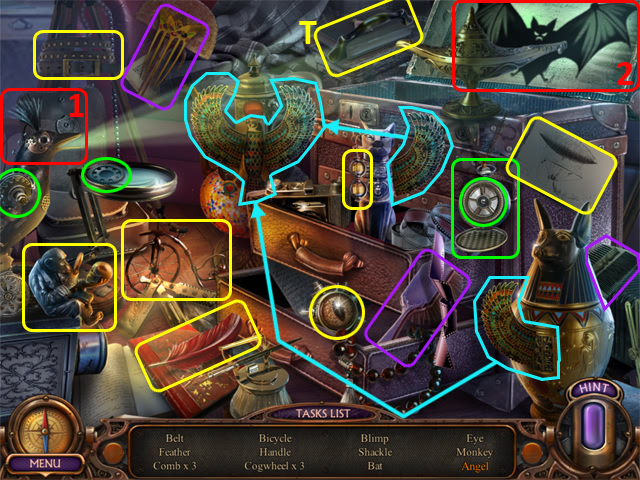
- Play the HOP.
- You receive a HANDLE (T).
- Talk to James; you receive an AMULET.
- Back out.
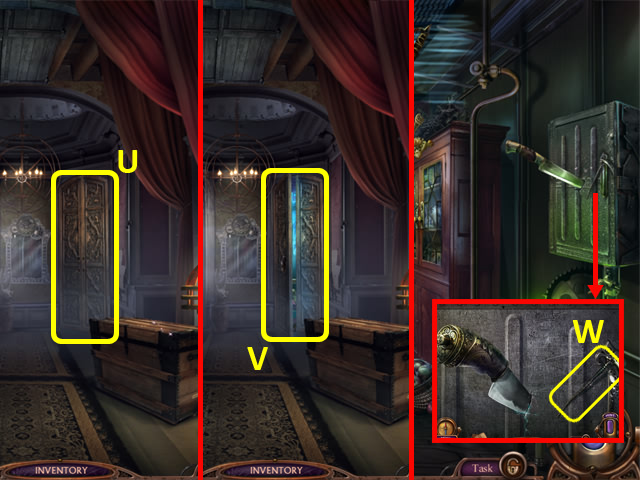
- Select the door (U); attach the HANDLE and open the door.
- Enter the Dining Room (V).
- Grab the SCYTHE (W).
- Return to the Second Floor.
- Place the SCYTHE on the Grim Reaper; grab the AMULET (X).
- Back out.
- Place the four AMULETS (Y); open the book and take the GOLDEN FEATHER (Z).
- Return to James’ Boat.
- Place the GOLDEN FEATHER in the inkwell (A) and then select it.
- Arrange the buttons as shown (B); open the box and take the HEX KEY (C).
- Return to the Scary Corridor.
- Use the HEX KEY on the box; grab the RUBBER GLOVE (D) and FUSE (E).
- Enter the Dining Room.
- Use the RUBBER GLOVE to open the cover (F).
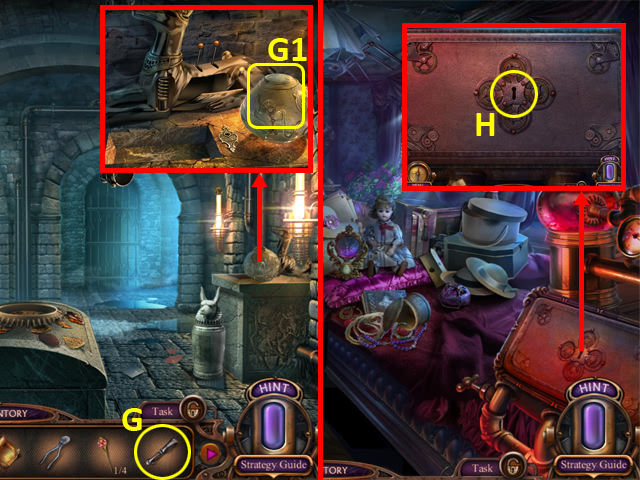
- Replace the broken fuse with the FUSE (G) to trigger a puzzle.
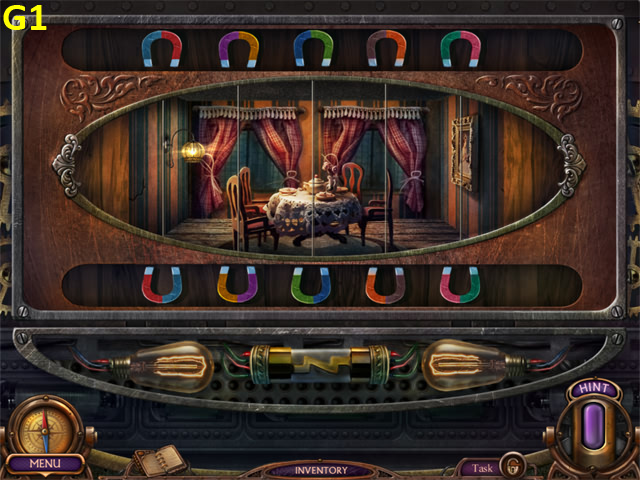
- Swap the magnets.
- Solution (G1).
- Talk to James; you receive some GLUE.
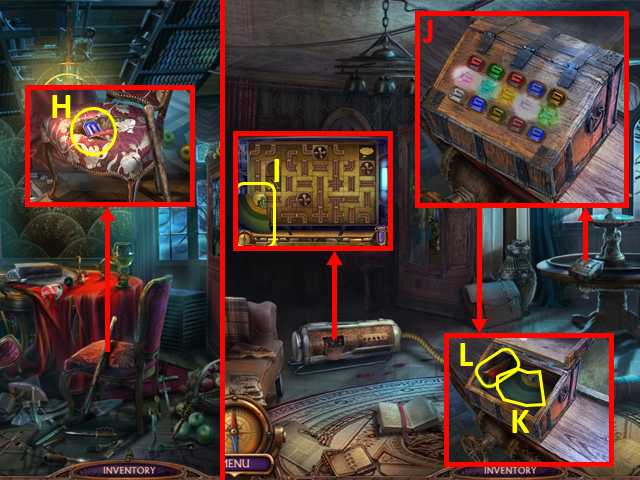
- Use the VINTAGE SCISSORS on the chair; take the GEM (H).
- Return to the Second Floor.
- Grab the RECORD PIECE 3/4 (I).
- Place the GEMS in the box and arrange as shown (J).
- Take the RECORD PIECE 4/4 (K) and LIGHT AMULET PIECE (L).
- Select the RECORD PIECES in your Inventory.
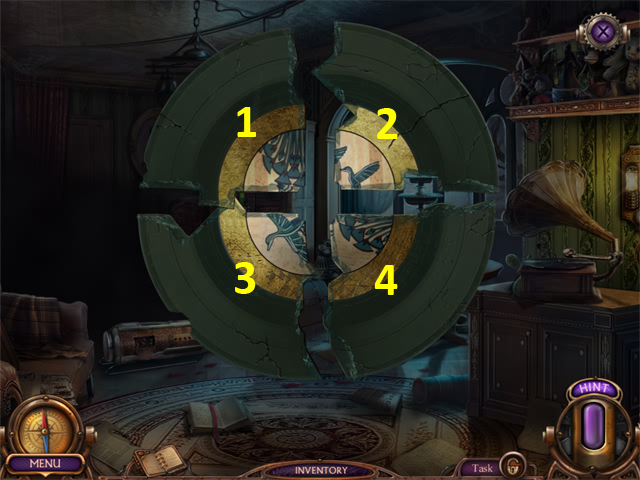
- Use the GLUE on the record parts.
- Swap parts: 1/3, 3/4.
- Take the CRACKED RECORD.
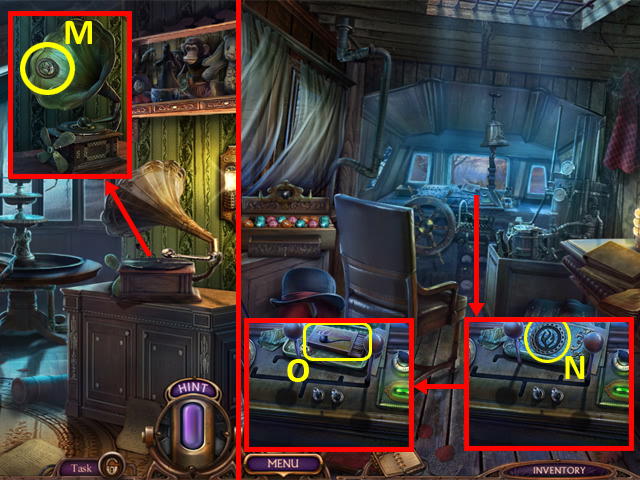
- Place the CRACKED RECORD on the record player; take the CIGARETTE CASE (M).
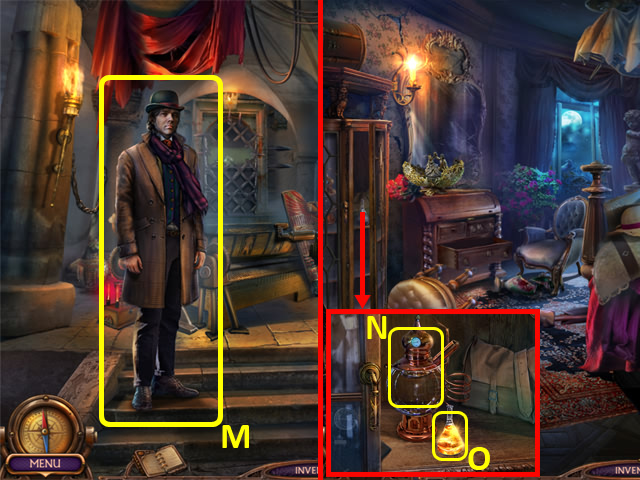
- Return to James’ Boat.
- Place the CIGARETTE CASE (N); open the case and grab the MATCHES (O).
- Return to the Dining Room.

- Light the candle (P) with the MATCHES; take the UTILITY KNIFE (Q).
- Back out.
- Use the UTILITY KNIFE on the metal snips (R); you receive some METAL SNIPS.
- Walk forward to the Victim’s Room.
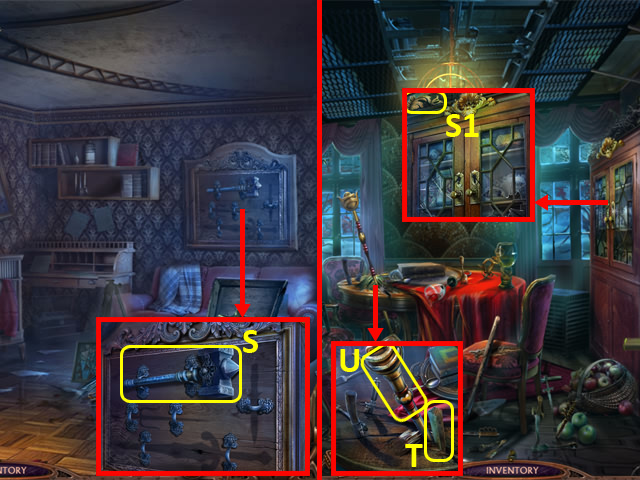
- Use the METAL SNIPS on the HAMMER (S); take it.
- Return to the Dining Room.
- Grab the WOODEN BAS-RELIEF (S1).
- Place the WEDGE into the crack; use the HAMMER on the wedge (T) and grab the SCEPTER (U).
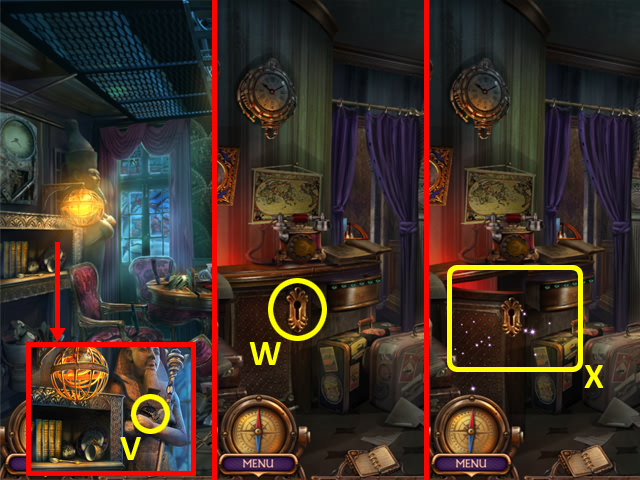
- Place the SCEPTER on the statue; grab the COUNTER KEY (V).
- Return to the Hotel Hall.
- Use the COUNTER KEY (W).
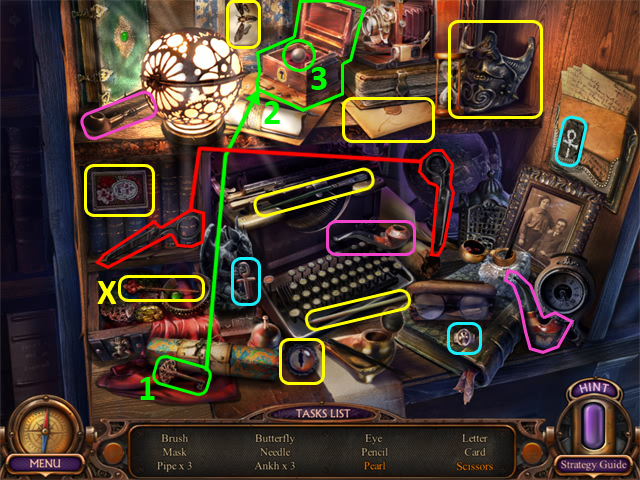
- Examine the counter to access a HOP (X).
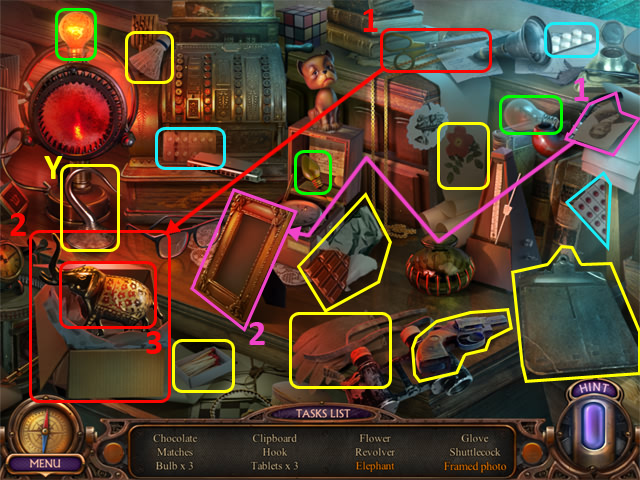
- Play the HOP.
- You receive a HOOK (Y).
- Return to the Dining Room.
- Place the HOOK on the wooden stick; take the GAFF (Z).
- Return to the Victim’s Room.
- Use the GAFF to get the SCREWDRIVER (A).
- Return to the Second Floor.
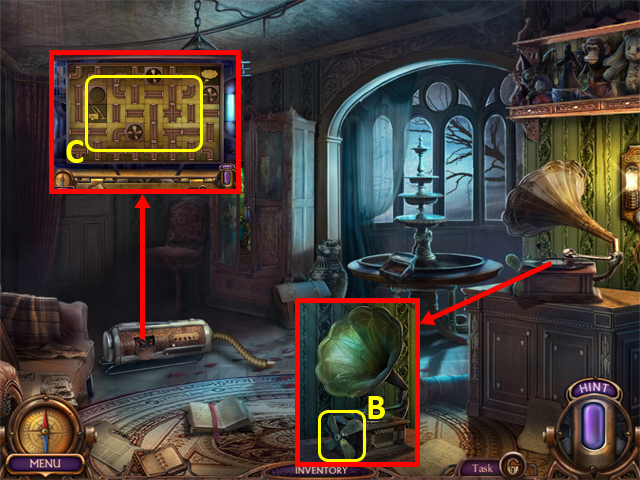
- Unscrew the FAN (B) with the SCREWDRIVER; take it.
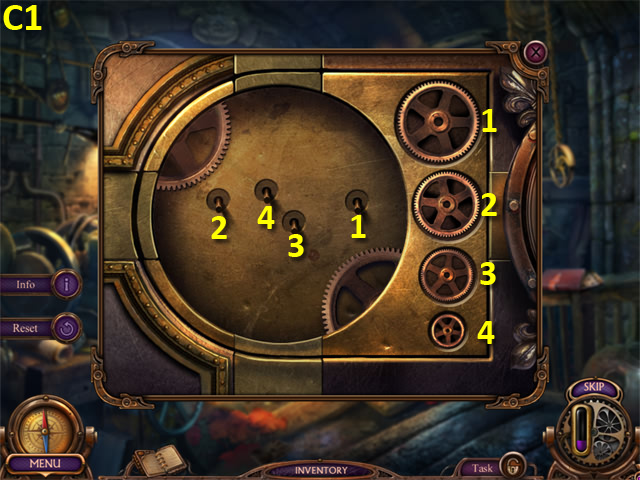
- Place the FAN (C) to trigger a puzzle.
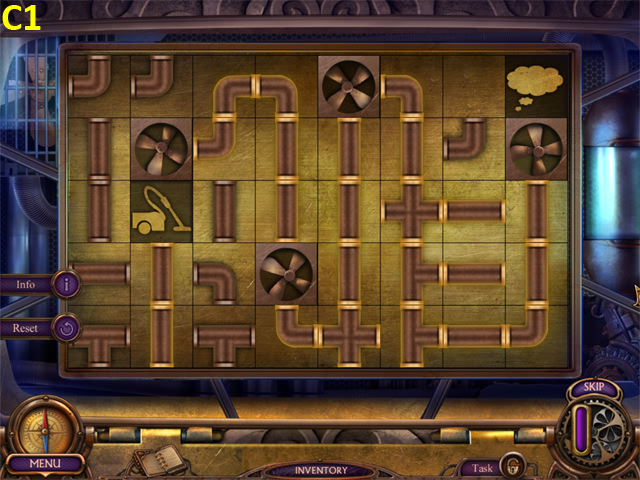
- Create a path from the vacuum cleaner to the smoke, passing through the fans.
- Solution (C1).
- Select the painting (D).
- Talk to James; receive a BULLET and DETECTIVE’S KEY.
- Return to James’ Boat.
- Unlock the chest with the DETECTIVE’S KEY; open it and take the KNITTING NEEDLE (E), REVOLVER (F) and WOODEN BAS-RELIEF (G).
- Return to the Hotel Hall.

- Place the two WOODEN BAS-RELIEFS (H).
- Grab the GUN POWDER (I).
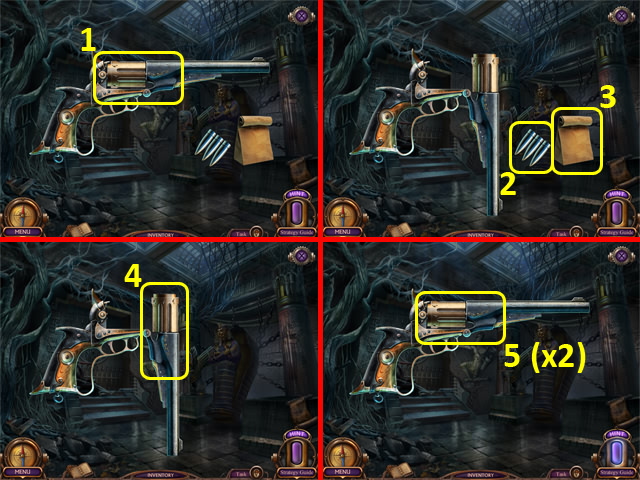
- Select the REVOLVER in your Inventory.
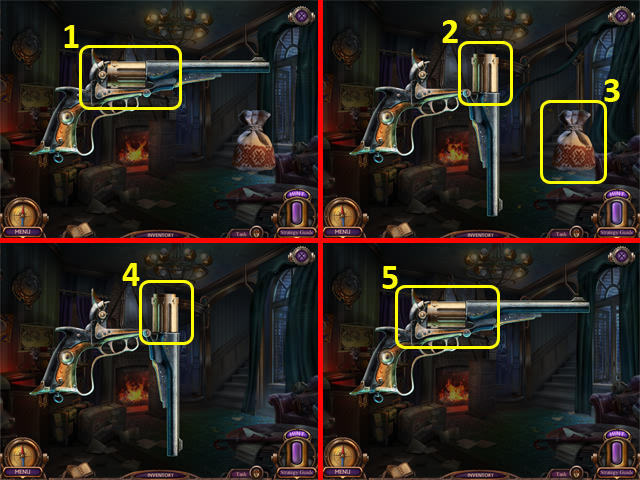
- Select the gun (1).
- Add the BULLET (2).
- Select the gunpowder (3).
- Select the gun (4).
- Select the gun (5) twice.
- You receive a CHARGED REVOLVER.
- Walk up.
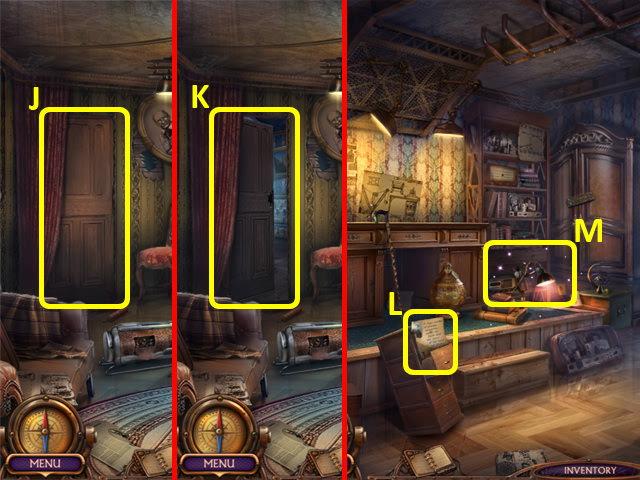
- Shoot the door (J) with the CHARGED REVOLVER; open it.
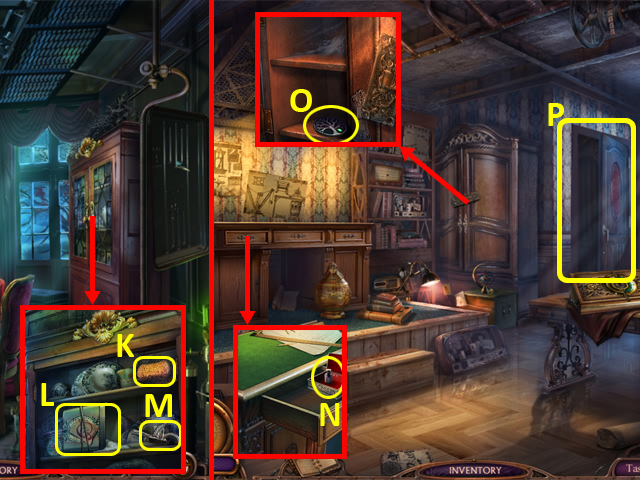
- Enter Abraham’s Room (K).
- Read the note (L).
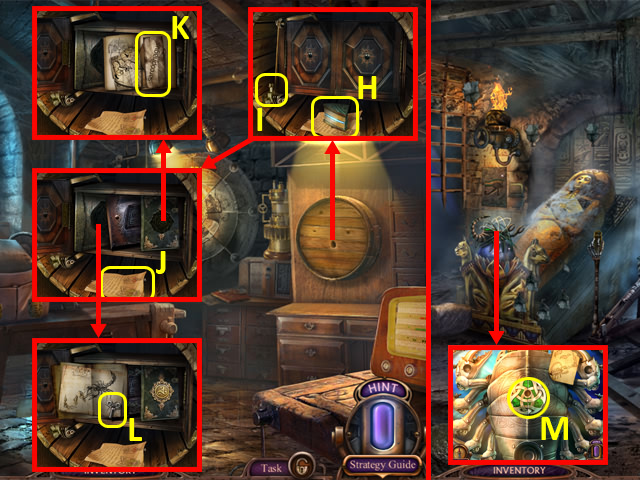
- Open the cupboard, and examine inside to access a HOP (M).
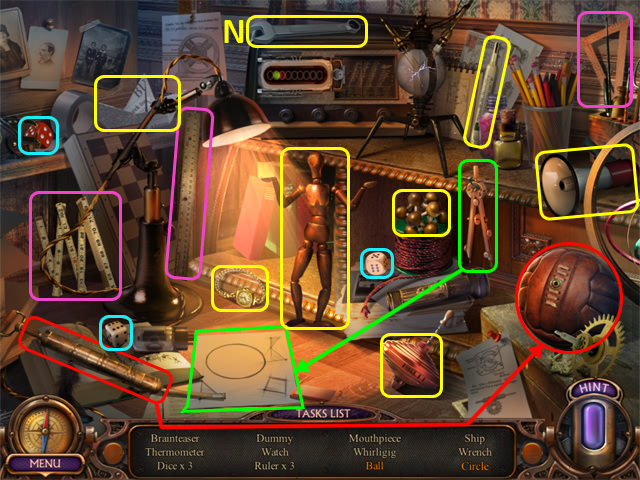
- Play the HOP.
- You receive a WRENCH (N).
- Grab the SUN-SHAPED HANDLE (O).
- Use the KNITTING NEEDLE (P); open the drawer and take the LEATHER GLOVE (Q), RAZOR (R) and CANE (S).
- Return to the Hotel Hall.
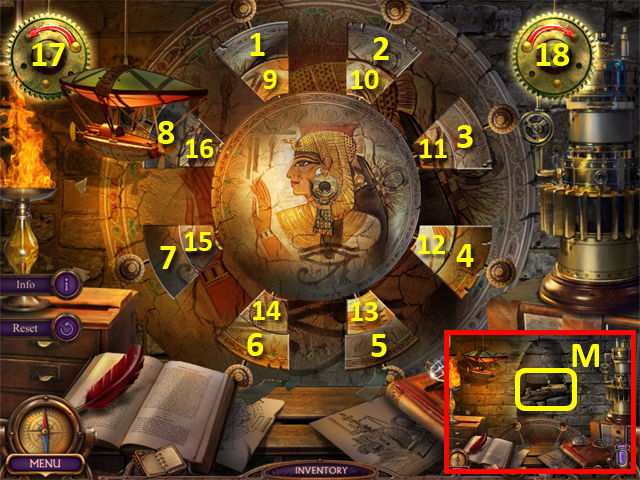
- Place the SUN-SHAPED HANDLE to trigger a puzzle (T).
- Move the tumblers up and down to release the locks.
- Solution: 1U, 3D, 4D, 3D, 4Ux2, 3Ux2.
Chapter 3: Garden and Basement
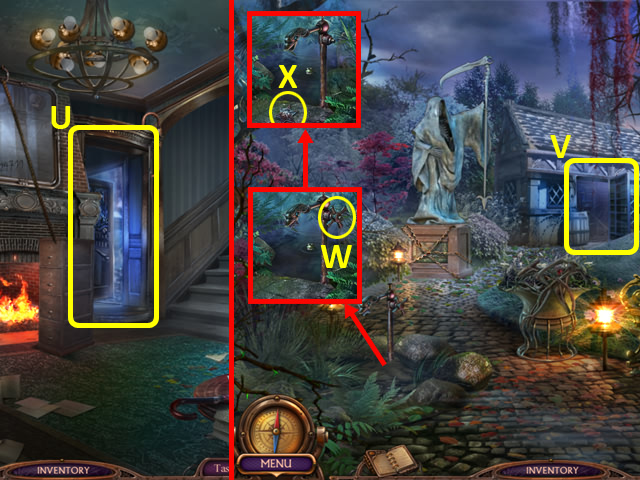
- Enter the Garden (U).
- Select the bungalow door (V).
- Use the WRENCH (W); turn the tap and grab the DETECTIVE’S BADGE (X).
- Return to James’ Boat.

- Place the DETECTIVE’S BADGE (Y); grab the HACKSAW (Z).
- Return to the Garden.
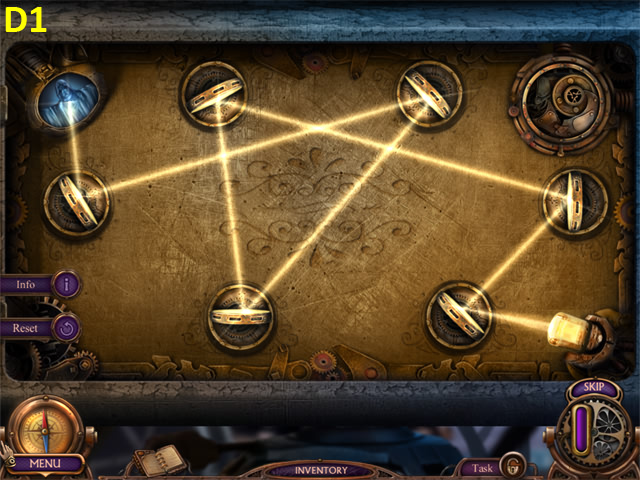
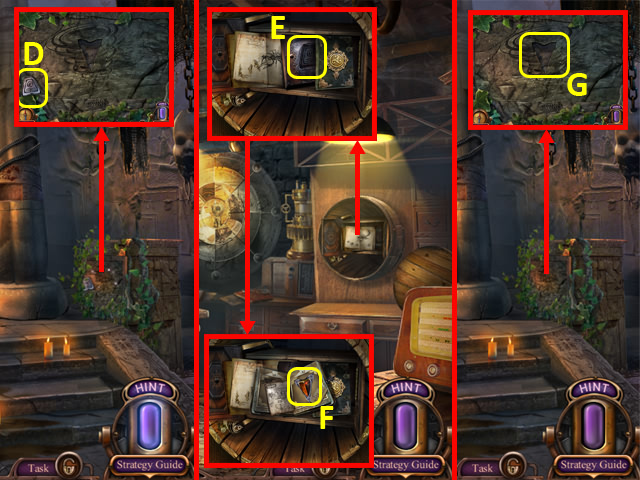
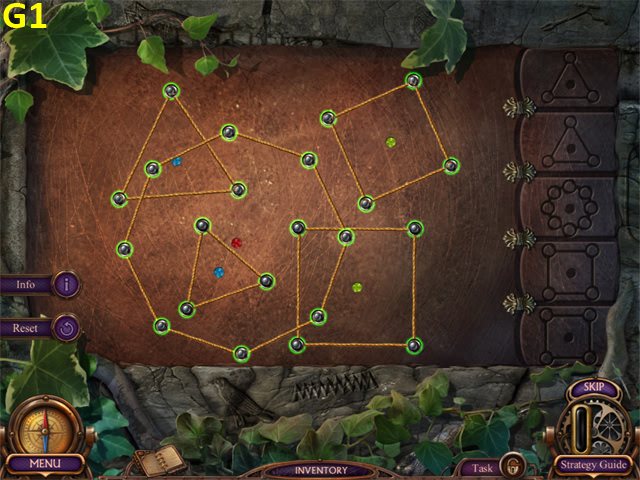
- Use the HACKSAW (A); remove the coverings (B) to trigger a puzzle.
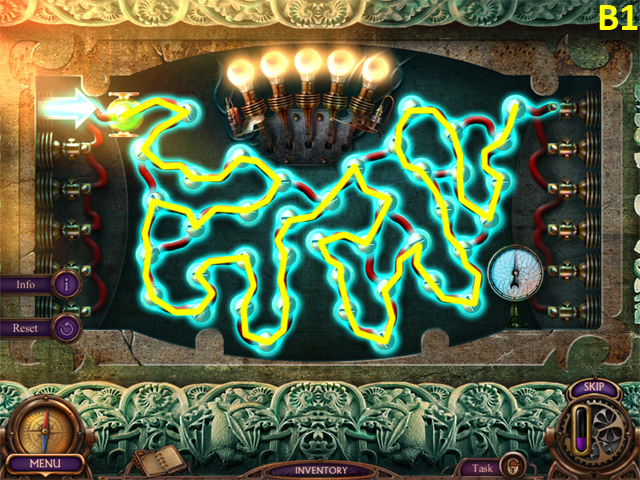
- Move through all the points just once.
- Solution (B1).
- Enter the Gardener’s Bungalow (C).
- Talk to James; you receive a LIGHTER.
- Use the SCARAB (D); you receive some FERTILIZER.
- Remove the planks from the cupboard and open the door; take the ANKH KEY (E).
- Use the SCREWDRIVER to remove the panel; grab the BUTTON and CANDLE (F).
- Back out.
- Use the RAZOR on the roots; pour the FERTILIZER and grab the HOURGLASS AMULET (G).
- Remove the cover with the CANE; use the LIGHTER to burn the dry vines (H), and then open the chest.
- Examine the bench to access a HOP (I).
- Play the HOP.
- You receive a STETHOSCOPE (J).
- Return to the Dining Room.
- Use the LEATHER GLOVE on the cabinet; open it and take the SPONGE (K).
- Use the KNITTING NEEDLE (L); grab the ANKH KEY (M).
- Return to Abraham’s Room.
- Place the HOURGLASS AMULET in the box; open it and take the WEIGHT (N).
- Use the SCREWDRIVER on the plaque and open the wardrobe; use the SPONGE on the cobwebs and take the GARDENER’S AMULET (O).
- Enter the Mysterious Corridor (P).
- Place the CANDLE (Q); light it with the LIGHTER.
- Take the BUCKET (R) and place the BUTTON (S); press it and grab the PART OF SCALES (T).
- Back out.
- Use the RAZOR on the painting and remove the frame; place the ANKH KEYS (U) and STETHOSCOPE (V) to trigger a puzzle.
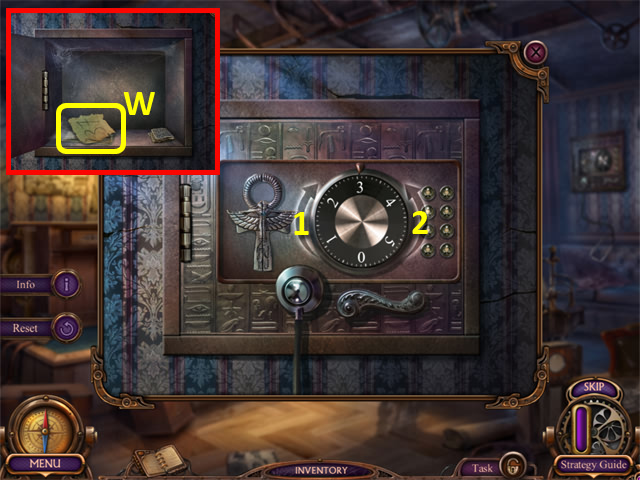
- Open the safe; solution: 2,1,1, 2, 1, 2, 2, 1.
- Grab the PIECE OF CODE (W).
- Return to the Gardener’s Bungalow.
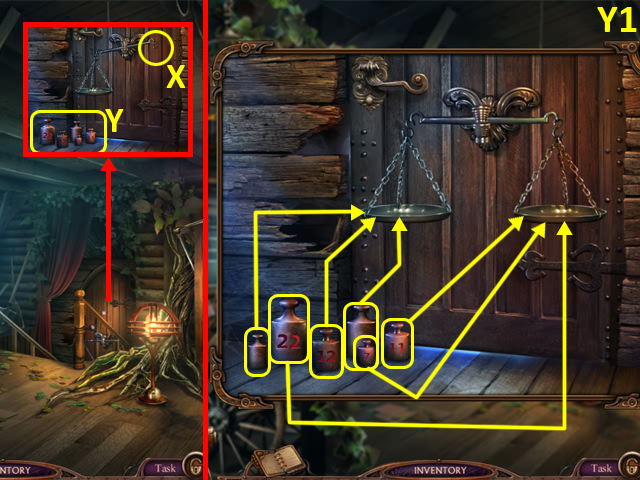
- Place the PART OF SCALES (X) and WEIGHT (Y) to trigger a puzzle.
- Balance the scales; solution (Y1).
- Enter the Basement (Z).
- Read the note (A).
- Grab the FUSE (B).
- Place the PIECE OF CODE (C); enter code: 57824 to trigger a puzzle.
- Insert the gears in the correct places.
- Solution (C1).
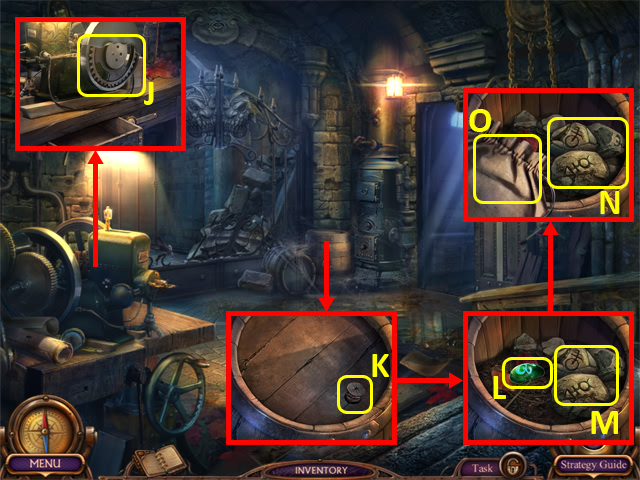
- Enter the Workshop (D).
- Talk to James; you receive a LEVER.
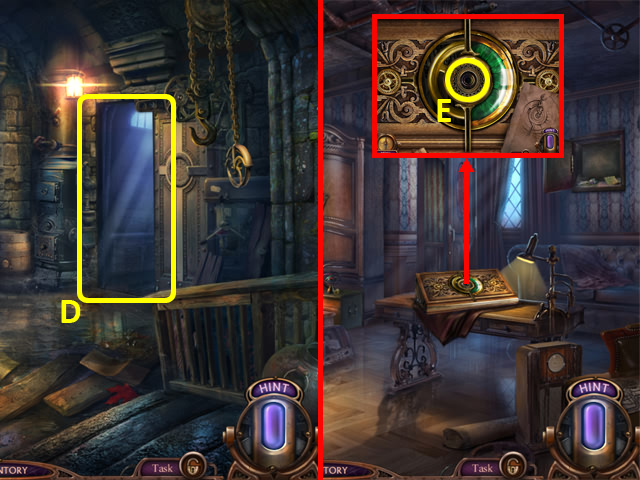
- Return to Abraham’s Room.
- Place the LEVER to trigger a puzzle (E).
- Play the game.
- Solution: 1-2, 2-9, 9-10, 10-17, 17-22, 16-10, 29-30, 2-9, 30-31, 10-11, 11-12, 11-18, 24-25, 19-26, 19-14, 13-19, 13-20, 20-27, 34-35.
- Take the ENGRAVED LOCK (F).
- Return to the Workshop.
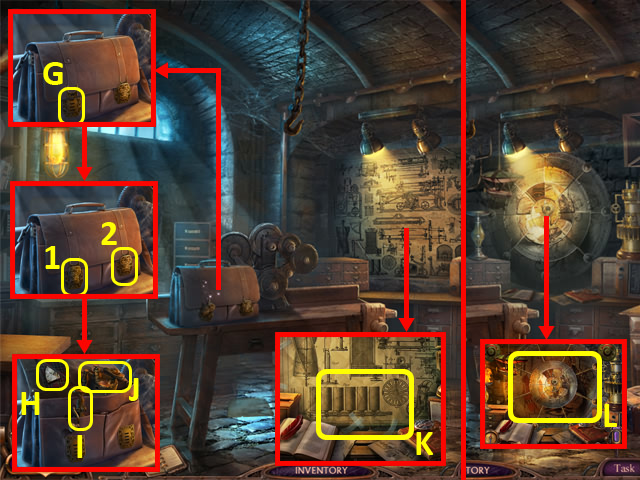
- Remove the broken lock; place the ENGRAVED LOCK (G) to trigger a puzzle.
- Unlock the briefcase; solution: 1, 1, 2, 2, 1, 2, 2, 1.
- Cut the lining with the RAZOR; take the PIECE OF MURAL (H).
- Grab the CORKSCREW (I) and GAS CAN (J).
- Cut the picture with the RAZOR (K).
- Place the PIECE OF MURAL to trigger a puzzle (L).
- Move the pieces to make a complete picture.
- Solution: 12, 18×2, 13, 17×3, 9, 18×3, 11, 17×3, 15, 18×2, 16, 17, 14, 17×3, 10, 17×2, 2, 17×2, 1, 17×2, 8, 17×2, 7, 17×4, 4, 18, 6, 17×2, 5, 17×3, 3, 17.
- Grab the BURNER TUBE (M).
- Back out.
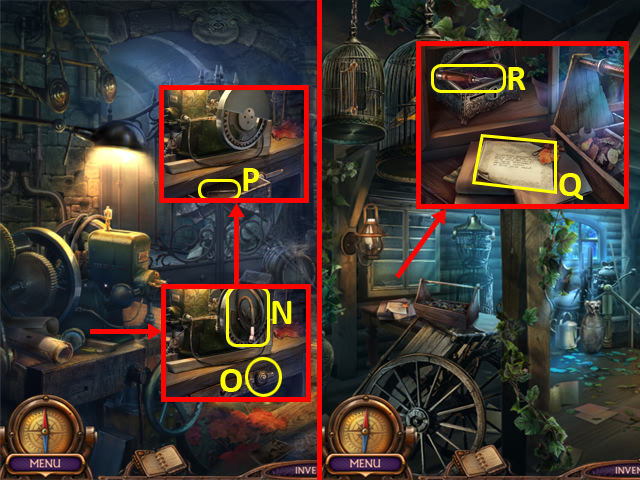
- Grab the HOSE (N).
- Use the WRENCH (O); open the drawer and take the PROBE (P).
- Back out.
- Read the note (Q).
- Use the PROBE to open the cabinet. Use the GARDENER’S AMULET in the box; open it and take the CHISEL (R).
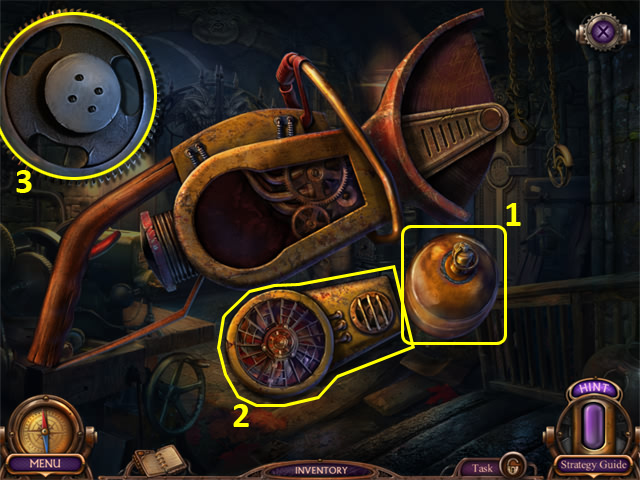
- Click the GAS CAN in your inventory.
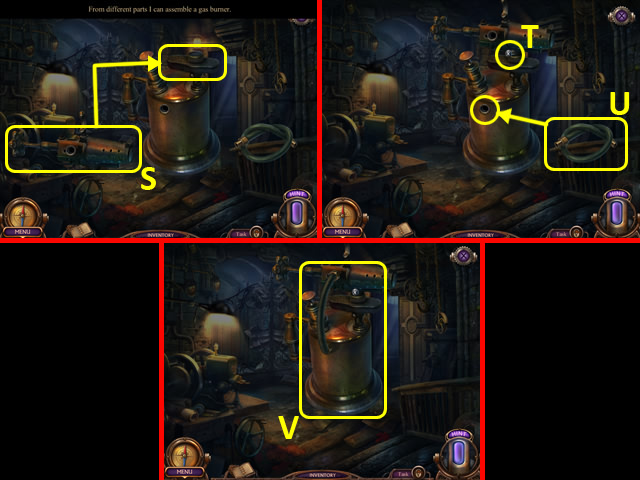
- Place the BURNER TUBE (S).
- Use the SCREWDRIVER (T).
- Select the HOSE (U); place it.
- Take the TORCH (V).
- Walk down.

- Use the TORCH (W).
- Enter the Catacombs (X).
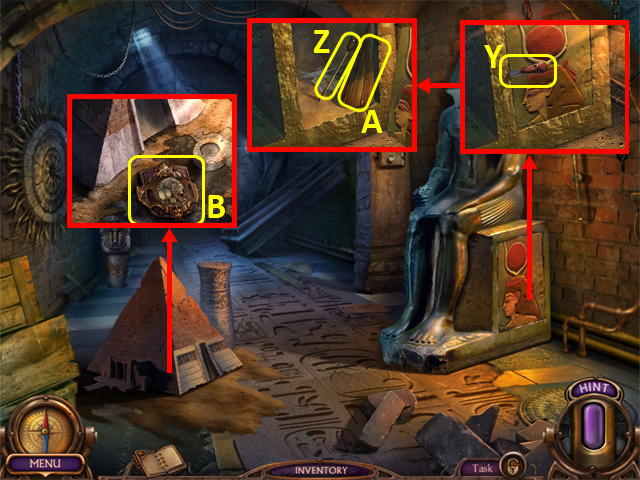
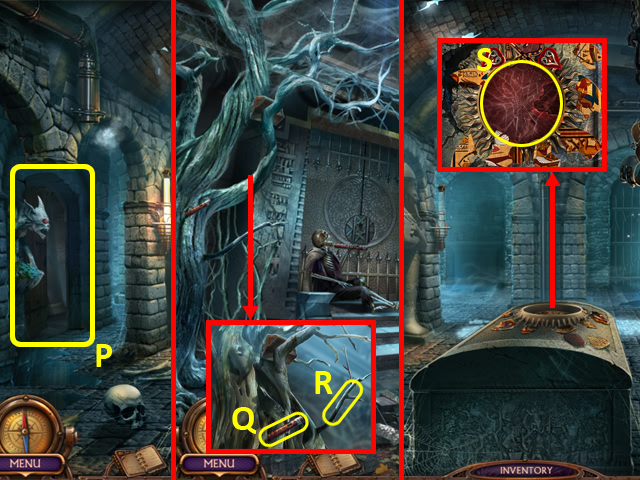
- Insert the CHISEL (Y) and select twice; grab the CABINET LEVER (Z) and BROOM (A).
- Use the BROOM to clear the sand; take the PICTURE OF EMBLEM (B).
- Return to the Mysterious Corridor.
- Use the WRENCH on the BOTTLE OF OIL (C); take it.
- Move the barbed wire with the LEATHER GLOVE; select the two lights (D).
- Place the PICTURE OF EMBLEM (E).
- Enter the Living Room (F).
Chapter 4: Tomb
- Read the note (F1).
- Grab the STONE DISK (G).
- Use the SCARAB to get the HEXAHEDRON AMULET (H).
- Use the RAZOR on the package; remove the wrapping and take the BOOK (I).
- Select the lamp twice; use the LEATHER GLOVE to grab the LIGHTBULB (J).
- Open the cupboard (K); examine it to access a HOP.
- Play the HOP.
- You receive a VALVE (L).
- Select the BOTTLE OF OIL in your Inventory.
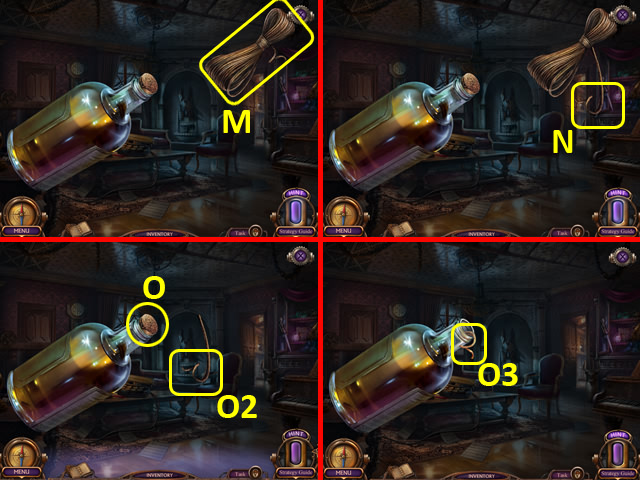
- Select the FUSE (M).
- Cut the fuse (N) with the RAZOR.
- Use the CORKSCREW (O).
- Select the FUSE (O2).
- Light the FUSE (O3) with the lighter.
- You receive a TORCH.
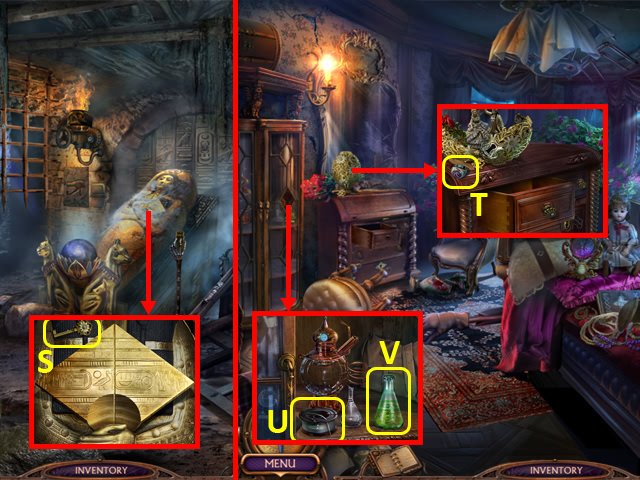
- Return to the Garden.
- Place the VALVE (P) and BUCKET (Q).
- Turn the valve (R); take the FULL BUCKET (S).
- Return to the Living Room.
- Pour the FULL BUCKET into the sink; grab the TRIANGULER AMULET (T) and GLOWING GEMS (U).
- Enter the Library (V).
- Select the scene.
- Open the cabinet; grab the SPRING (W).
- Return to the CATACOMBS.
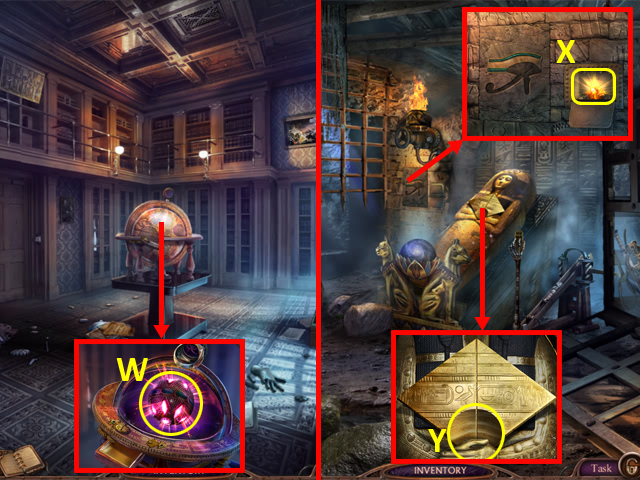
- Place the TORCH (X).
- Place the STONE DISK to trigger a puzzle (Y).
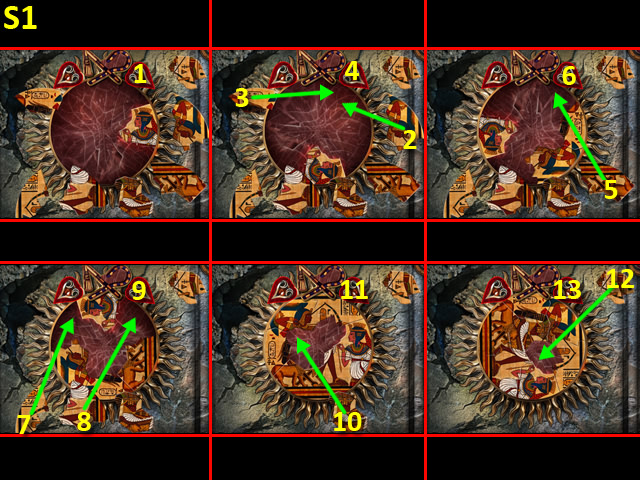
- Rotate the discs to make a complete picture; solution: 1, 2×7, 3×5.
- Enter the Tomb (Z).
- Select the scene twice.
- Use the RAZOR on the vines; grab the CAMERA (A).
- Place the GLOWING GEMS in the statue’s eye sockets; take the DOUBLE KEY (B).
- Grab the CAMERA LENS (C).
- Use the KNITTING NEEDLE (D); take the TYPEWRITER KEY (E) and DUSTER PART (F).
- Place the SPRING (G); move the levers (H) and grab the CANISTER OF GASOLINE and COMPUTER CHIP (I).
- Select the CAMERA in your Inventory.
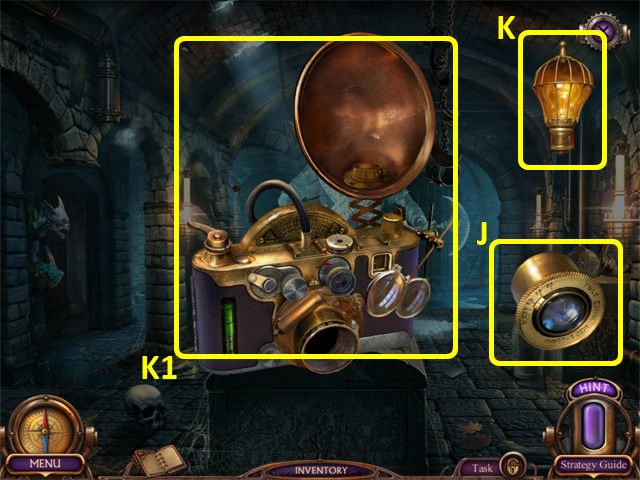
- Select the camera lens (J) and light bulb (K).
- Take the CAMERA WITH FLASH (K1).
- Use the CAMERA WITH FLASH (L).
- Grab the CUTOFF SAW WITHOUT GASOLINE (M).
- Return to the Library.
- Place the COMPUTER CHIP to trigger a puzzle (N).

- Select the columns to connect the lights left to right.
- Solution: 1, 2×4, 3, 1, 2×4, 3, 2, 3×3.
- Grab the DUSTER PART (O).
- Place the TRIANGULAR AMULET in the slot; take the PIECE OF MURAL (P).
- Use the SCARAB with the glass (Q) to get the PARCHMENT.
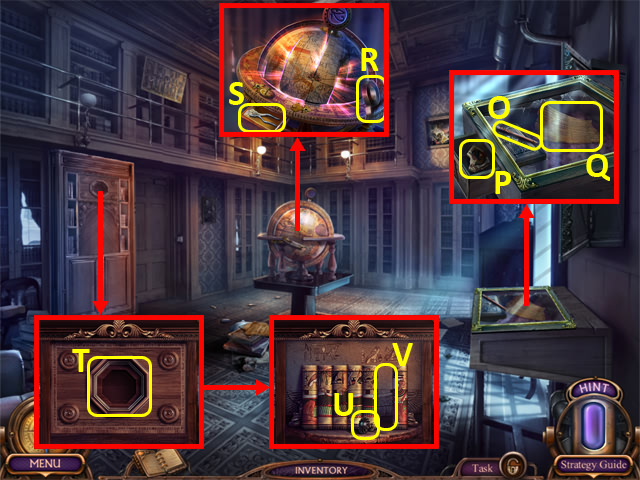
- Grab the TAPE (R).
- Select the globe, use the SCREWDRIVER on the screws, and select the drawer; take the TONGS (S).
- Place the HEXAHEDRON AMULET (T); open the panel and grab the DRAWER HANDLE (U).
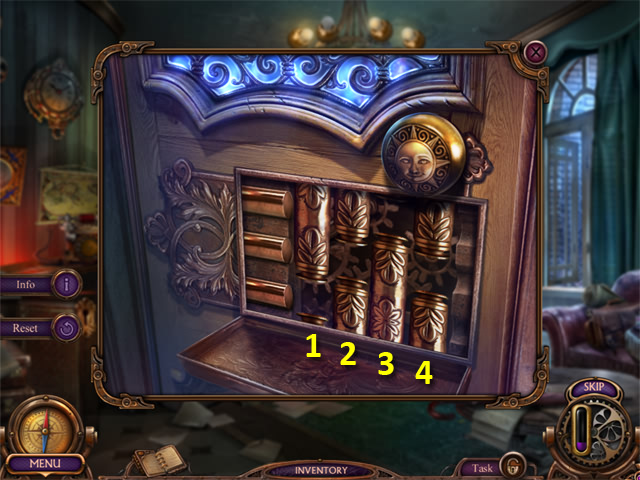
- Place the BOOK to trigger a puzzle (V).
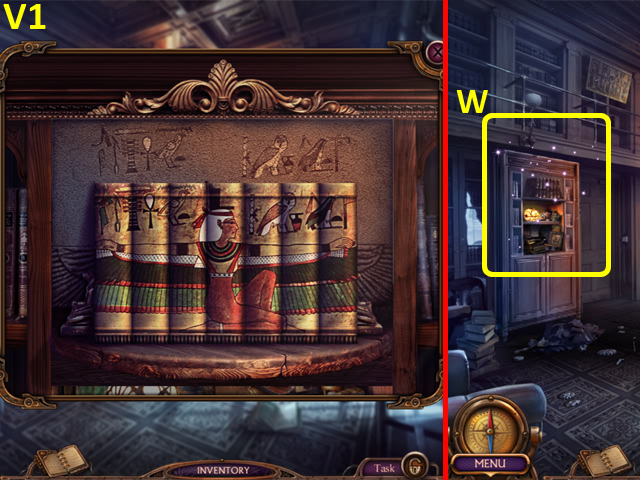
- Re-arrange the books; solution (V1).
- Examine the bookcase to access a HOP (W).
- Play the HOP.
- You receive a NEEDLE 1/4 (X).
- Back out.
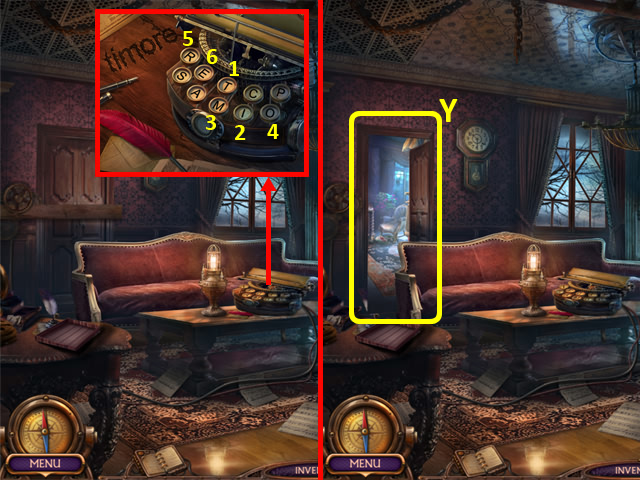
- Place the TYPEWRITER KEY into the typewriter to trigger a puzzle; select the keys in the order shown (1-6).
- Enter Room 13 (Y).
Chapter 5: Room 13
- Read the note (Y1).
- Grab the TONGS (Z).
- Unlock the drawer with the DOUBLE KEY; open it and take the THREAD (A).
- Attach the DRAWER HANDLE to the drawer; open it and take the EMPTY SACK (B).
- Cut the box with the RAZOR; take the CUTOFF SAW (C).
- Use the CHISEL (D).
- Grab the SMALL AXE (E).
- Use the CAMERA WITH FLASH; grab the TRISKELION AMULET (F).
- Return to the Tomb.
- Use the TONGS (G) to get the KEY WITH GEARS (G1).
- Return to Room 13.
- Insert the KEY WITH GEARS (H) and turn it to trigger a puzzle.

- Rotate the arrows to connect the colours left to right.
- Solution (H1).
- Examine the bed to access a HOP.
- Play the HOP.
- You receive a SEAL STAMP (I).
- Return to the basement.
- Use the TONGS; take the SAW BLADE (J).
- Use the CORKSCREW with the CORK (K); pull it twice to take it.
- Open the barrel; move the cover and grab the LIGHT AMULET PIECE (L).
- Use the EMPTY SACK (M).
- Put the three rocks (N) in the sack; take the SACK OF ROCKS (O).
- Select the CUTOFF SAW in your Inventory.
- Select the parts in the order shown (1-3).
- You receive a CUT-OFF SAW.
- Return to the Tomb.
- Enter the Underground Hall (P); select the scene.
- Grab the STICK OF DYNAMITE (Q).
- Use the SMALL AXE (R); you receive a DRY BRANCH and HARPOON.
- Back out.
- Place the PIECE OF MURAL to trigger a puzzle (S).
- Place the mural pieces to make a complete picture.
- Solution (S1).
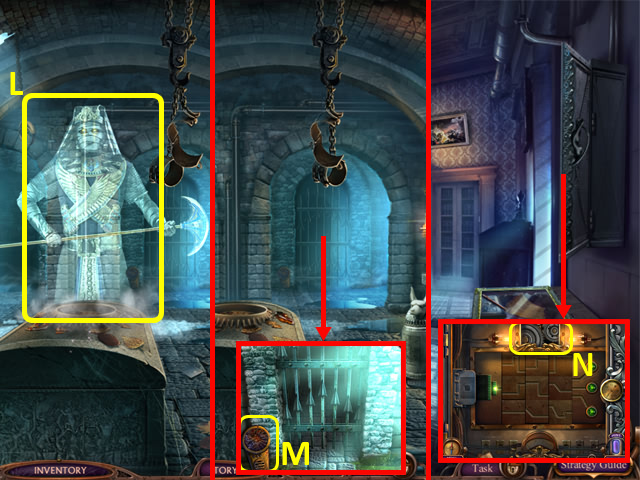
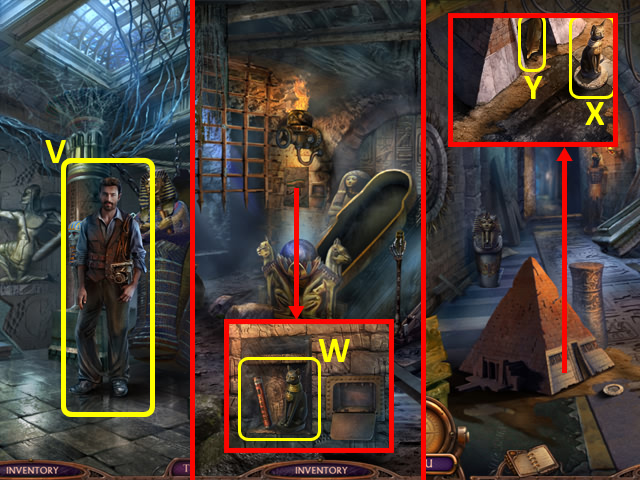
- Talk to Abraham Shadowy (T).
- Grab the DYNAMITE BASE (U).

- Use the CUT-OFF SAW on the bars (V); you receive CUT-OFF SAW WITHOUT GASOLINE.
- Enter the Dungeon (W).
- Select the scene.
- Select the sarcophagus (X).
- Pull the lever (Y).
- Examine the cage (Z) to access a HOP.
- Play the HOP.
- You receive a STONE FRAGMENT (A).
- Grab the BOWL AMULET (B).
- Place the SACK OF ROCKS (C).
- Grab the BOW (D).
- Use the DRY BRANCH (E).
- Select the belt buckle; take the BELT BUCKLE (F).
- Use the SEAL STAMP in the skull; grab the AMULET OF INFINITY (G).
- Return to the Workshop.
- Use the CORK in the barrel and open it; remove the wrapping and take the LIGHT AMULET PIECE (H).
- Place the CABINET LEVER (I) and pull it.
- Select the note (J).
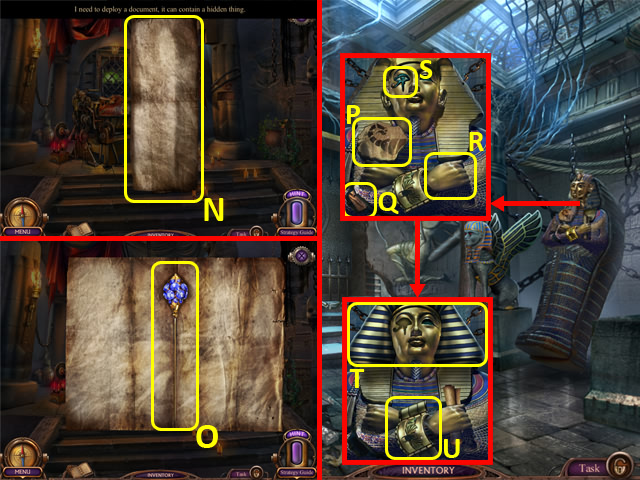
- Place the TRISKELLION AMULET; take the DELIVERY DOCUMENT (K).
- Place the AMULET OF INFINITY; take the WINDUP KEY (L).
- Return to the Dungeon.
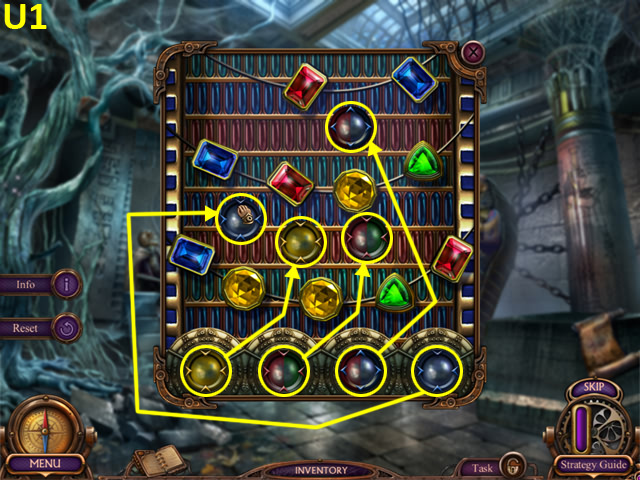
- Remove the bindings four times; place the WINDUP KEY (M) to trigger a puzzle.

- Match the tiles to the centre board.
- Solution (M1).
- Select the DUSTER PART in your Inventory.

- Select the tape (N).
- Use the RAZOR on the tape (O).
- Attach the tape (P) to the handle (Q).
- Take the DUSTER (R).
- Use the DUSTER on the cobwebs; grab the ENGRAVED KEY (S).
- Return to Room 13.
- Open the egg with the ENGRAVED KEY; take the SIGNET RING (T).
- Place the BOWL AMULET in the door; open it and grab the FISHING LINE (U) and ACID (V).
- Return to the Library.
- Place the SIGNET RING in the top of the globe; take the ANCIENT SPHERE (W).
- Return to the Dungeon.
- Open the slot and pour the ACID on the bars; grab the AMBER STONE (X).
- Place the ANCIENT SPHERE (Z) to trigger a puzzle.
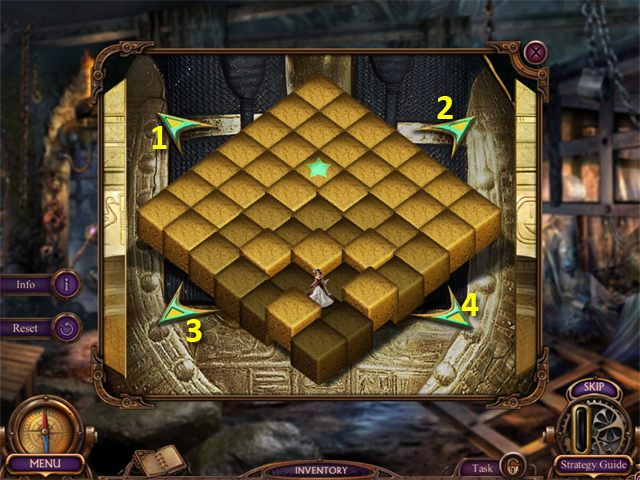
- Guide the figurine to the star.
- Solution: 1, 3, 1, 1, 2, 2, 4, 2, 4, 2, 2, 1, 2, 1, 1, 1, 3, 3, 4, 4.
- You receive an ANCIENT COIN.
- Talk to the girl (A); you receive a NEEDLE 2/4.
- Place the AMBER STONE (B).
- Enter the Shrine (C).
Chapter 6: Shrine
- Grab the EARTH AMULET (D).
- Return to the Workshop.
- Place the EARTH AMULET (E).
- Take the GLOWING CONE (F).
- Return to the Shrine.
- Place the GLOWING CONE to trigger a puzzle (G).
- Place the pieces.
- Solution (G1).
- Grab the ELECTRIC WIRE (H).
- Place the STONE FRAGMENT in the pillar; take the TRIPLE KEY (I).
- Return to Room 13.
- Use the TRIPLE KEY with the bottom drawer; open it and take the GASOLINE CAN and MASK (J).
- Select the CUT-OFF SAW WITHOUT GASOLINE in your Inventory.
- Select the items in the order shown (1-3).
- You receive a CUT-OFF SAW.
- Return to the Shrine.
- Use the CUT-OFF SAW on the grating; grab the SCROLL WITH SYMBOLS (K).
- Return to the Underground Hall.
- Select the sarcophagus (L).
- Attach the SCROLL WITH SYMBOLS to trigger a puzzle (M).
- Select symbols that are mirror images of the symbols on the parchment.
- Solution (M1).
- Select the DELIEVERY DOCUMENT in your Inventory.
- Select the document (N) three times; take the NEEDLE 3/4 (O).
- Select the sarcophagus; grab the SCORPION FRAGMENT (P).
- Use the SCARAB to get the GUNPOWDER (Q).
- Place the PARCHMENT (R); take the EYE AMULET (S).
- Place the THREAD (T); take the ANUBIS BRACELET (U) to trigger a puzzle.
- Move the pieces into position.
- Solution (U1).
- Talk to the Historian (V); you receive the HISTORIAN’S DIARY.
- Return to the Dungeon.
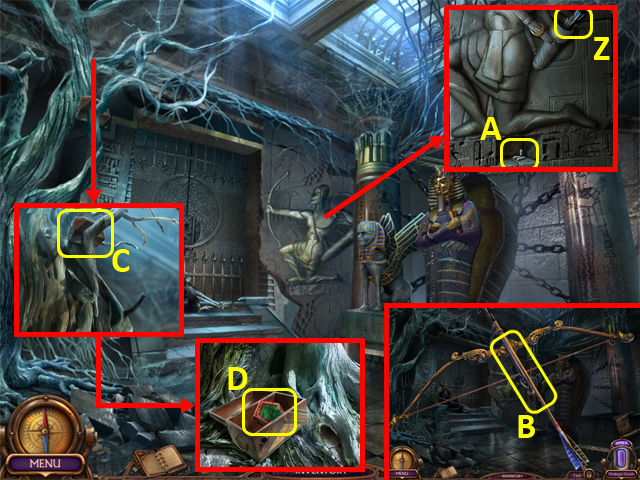
- Place the EYE AMULET into the rock; take the STICK OF DYNAMITE and CAT FIGURINE (W).
- Return to the Catacomb.
- Place the CAT FIGURINE (X); grab the GOLDEN FEATHER (Y).
- Return to the Underground Hall.
- Place the BELT BUCKLE on the quiver; take the ARROW (Z).
- Place the GOLDEN FEATHER in the stone; grab the BULLETS (A).
- Select the BOW in your Inventory; select the arrow (B) twice and take the BOW.
- Use the BOW with the chest (C); open it and take the LIGHT AMULET PIECE (D).
- Select the REVOLVER in your INVENTORY.
- Select the items in the order shown (1-5); you receive a CHARGED REVOLVER.
- Return to the Shrine.
- Place the SCORPION FRAGMENT (E); take the LIGHT AMULET PIECE (F).
- Select the container (G); use the CHARGED REVOLVER on the ghost (H).
- Place the ANCIENT COIN in the container; grab the LIGHT AMULET PIECE (I).
- Place the MASK (J) and ANUBIS BRACELET (K) to trigger a puzzle.
- Grab the JAR (L).
- Slide the pieces to make a complete picture; solution: 4, 1, 3, 5, 2, 4, 1, 3, 5, 8, 6, 4, 1.
- Talk to James (M); you receive a WATCH.
- Return to Room 13.
- Use the JAR (N); take the LIGHT AMULET LIQUID (O).
- Select the LIGHT AMULET in your Inventory.
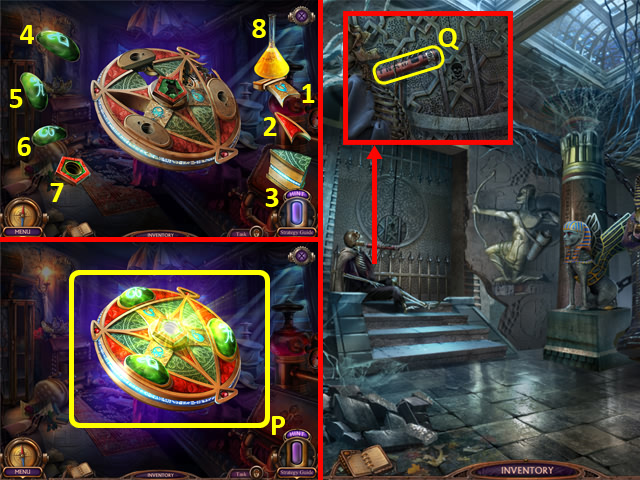
- Unwrap the package three times and read and take the note; select the items in the order shown (1-8) and take the LIGHT AMULET (P).
- Return to the Underground Hall.
- Use the LIGHT AMULET on the skeleton; grab the STICK OF DYNAMITE (Q).
- Select the DYNAMITE BASE in your Inventory.
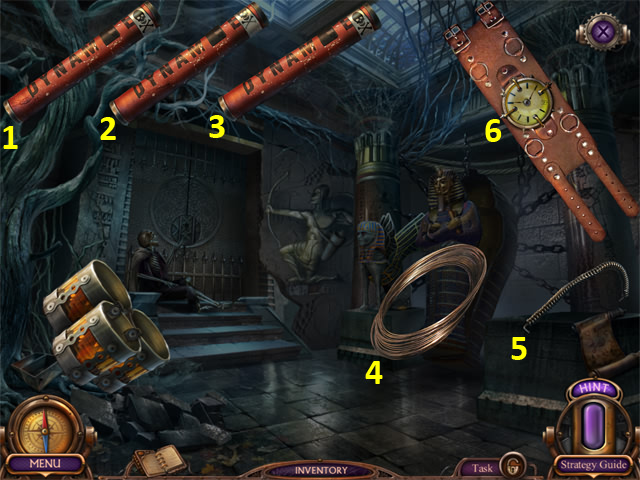
- Select the items in the order shown (1-6); you receive some DYNAMITE.
- Select the HISTORIAN’S DIARY in your Inventory.
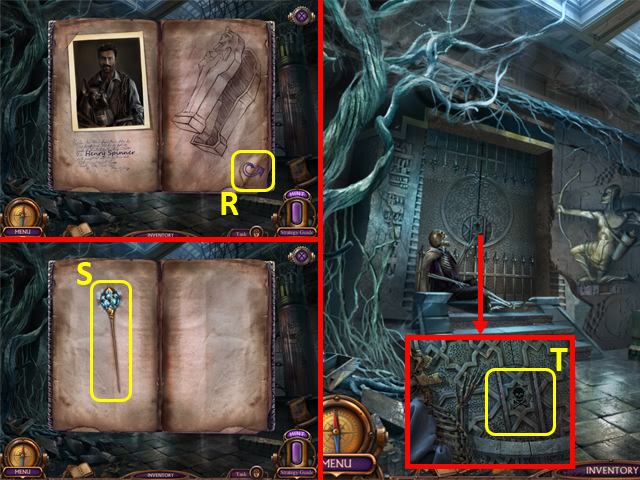
- Select the arrow (R) twice; take the NEEDLE 4/4 (S).
- Place the DYNAMITE to trigger a puzzle (T).
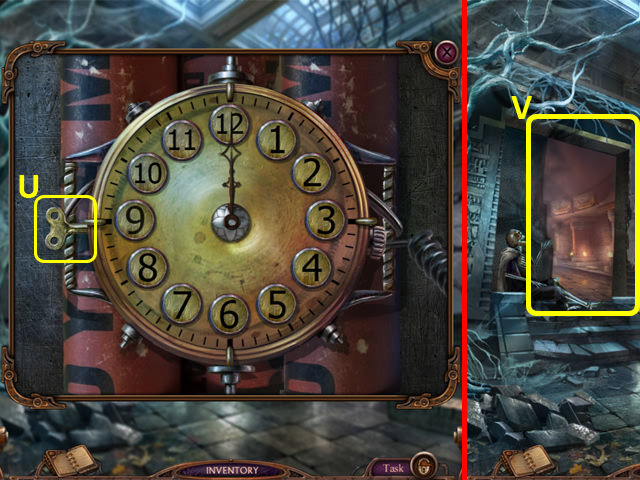
- Wind the watch (U).
- Solution: 3, 6, 9, 12, then 1, 5, 7, 10, then 2, 4, 8, 11.
- Enter the Altar to trigger a puzzle (V).
Chapter 7: Altar
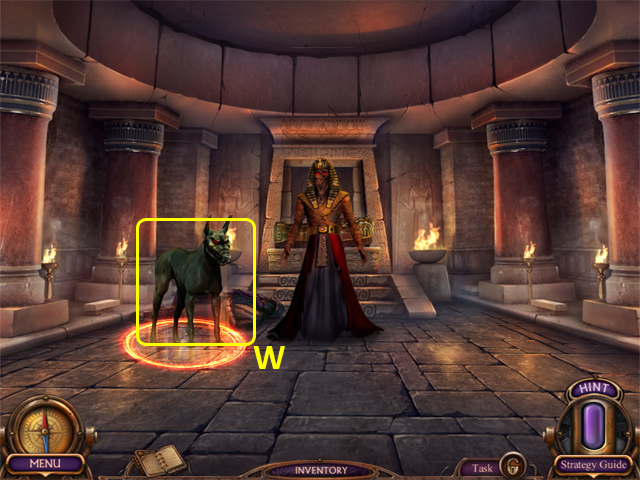
- Select the dogs in the correct order.
- Use the LIGHT AMULET (W) to trigger a puzzle.
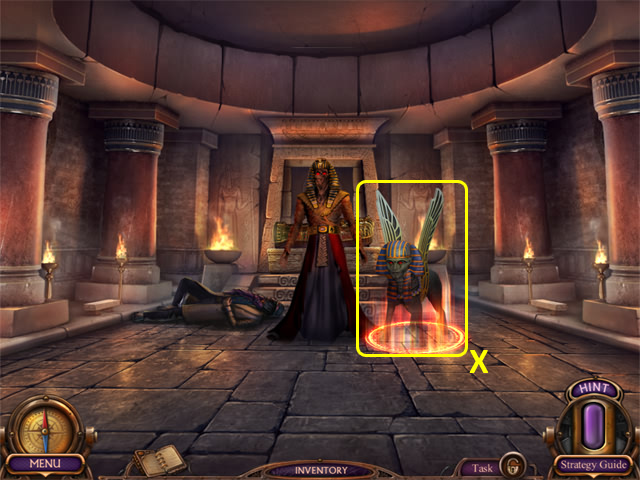
- Select the Sphinxes in the correct order.
- Use the LIGHT AMULET (X) to trigger a puzzle.
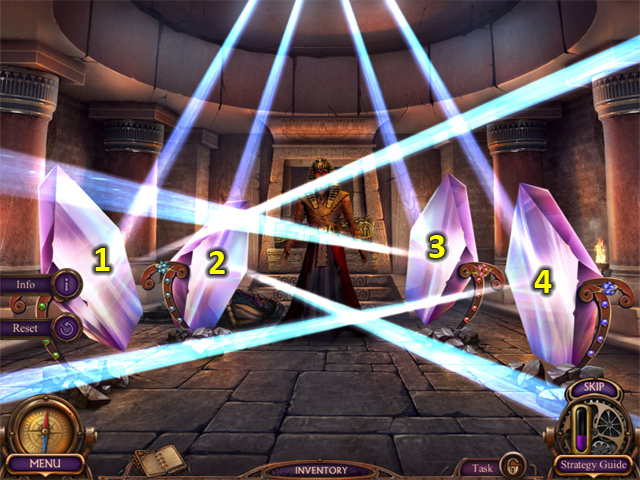
- Place the NEEDLE WITH EMERALD (1), NEEDLE WITH SAPPHIRE (2), NEEDLE WITH RUBY (3), and NEEDLE WITH TOPAZ (4).
- Solution: 4up, 1down, 3down, 3down.
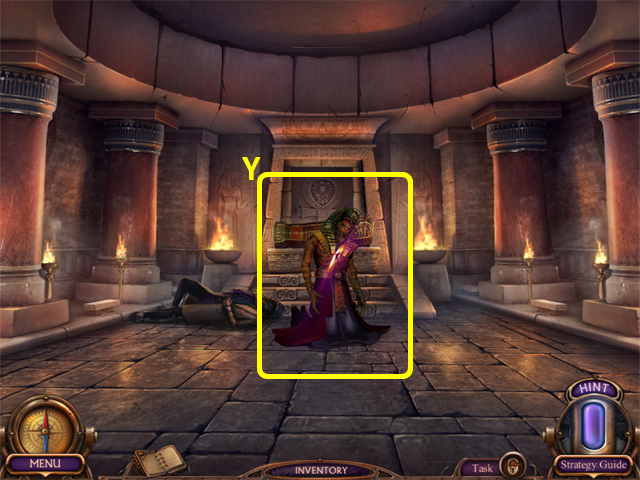
- Use the LIGHT AMULET (Y).
- Congratulations, you’ve completed Haunted Hotel: Ancient Bane.


 Escape the Museum 2 Walkthrough, Guide, & Tips
 Dark Romance: Heart of the Beast Walkthrough, Guide, & Tips
 Nightmare Realm Walkthrough, Guide, & Tips
 Secrets of the Dark: The Flower of Shadow Walkthrough, Guide, & Tips
 Grim Facade: A Wealth of Betrayal Walkthrough, Guide, & Tips