Dark Romance: Heart of the Beast Walkthrough, Guide, & Tips
Dark Romance: Heart of the Beast Walkthrough

Welcome to the Dark Romance: Heart of the Beast Walkthrough
A simple job protecting a bumbling professor becomes a nightmare when a masked figure threatens to kill him!
Whether you use this document as a reference when things get difficult or as a road map to get you from beginning to end, we’re pretty sure you’ll find what you’re looking for here.
This document contains a complete Dark Romance: Heart of the Beast game walkthrough featuring annotated screenshots from actual gameplay!
We hope you find this information useful as you play your way through the game. Use the walkthrough menu below to quickly jump to whatever stage of the game you need help with.
Remember to visit the Big Fish Games Forums if you find you need more help. Have fun!
This walkthrough was created by Amanda Barrera, and is protected under US Copyright laws. Any unauthorized use, including re-publication in whole or in part, without permission, is strictly prohibited.
General Tips
- This is the official guide for Dark Romance: Heart of the Beast.
- This guide will not show when you have to zoom into a location; the screenshots will show each zoom scene.
- Hidden-object puzzles are referred to as HOPs. This guide will not show screenshots of the HOPs, however, it will mention when an HOP is available and the inventory item you’ll collect from it.
- Use the Map to fast travel to a location.
Chapter 1: The Rose of Life

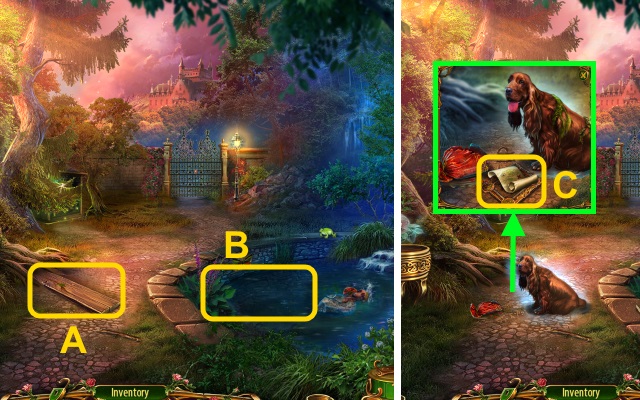
- Take the BOARD (A).
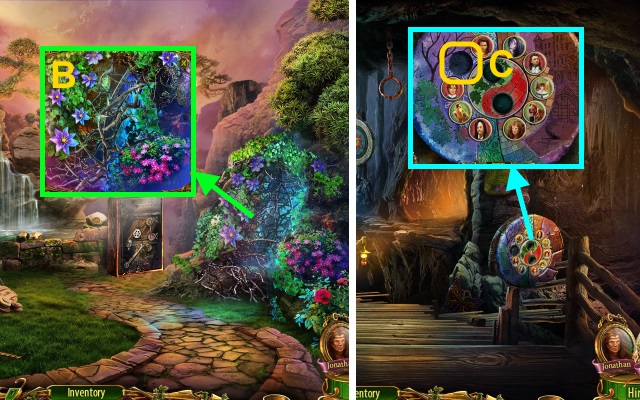
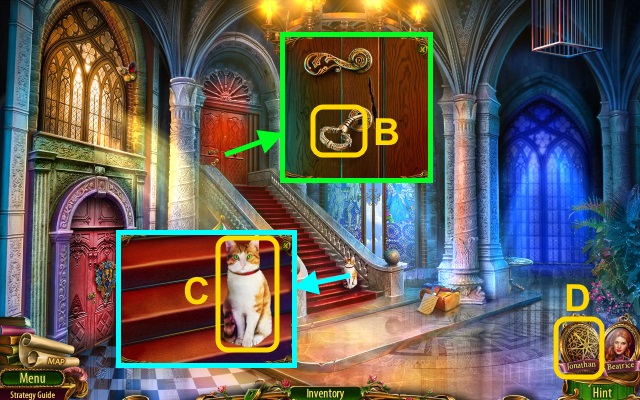
- Place the BOARD (B).
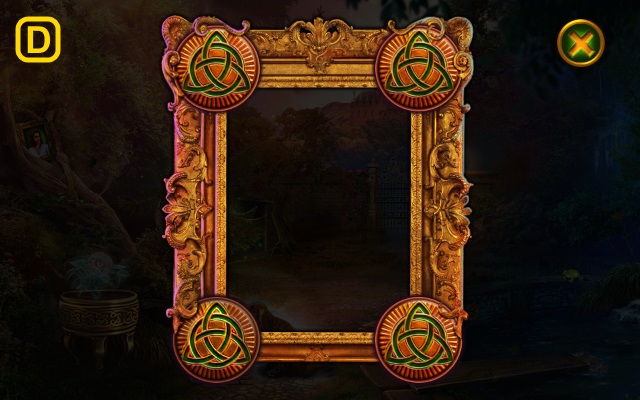
- Take the Map and ENCHANTED FRAME for a mini-game (C).
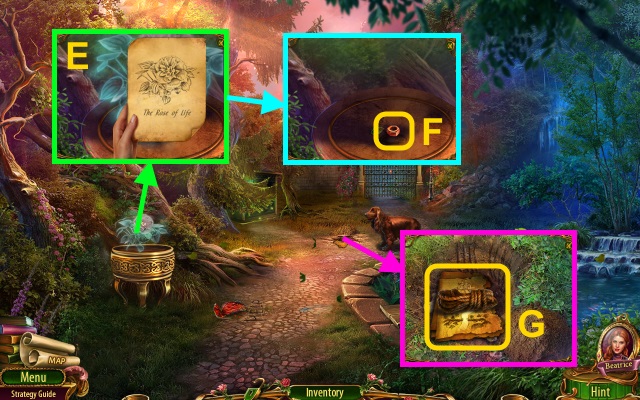
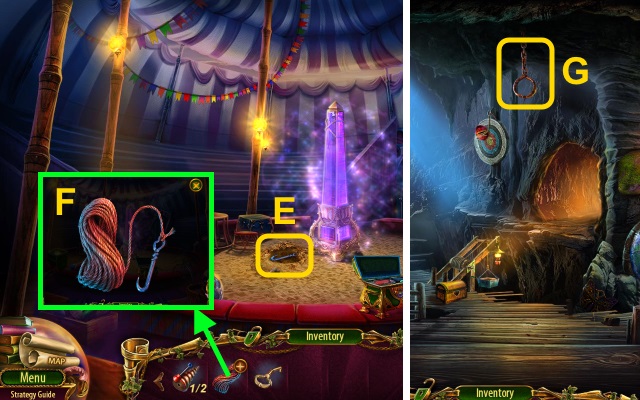
- Take the note (E); try to take the flower.
- Take the NUT (F).
- Take the ROPE and SCROLL WITH SPELLS (G).
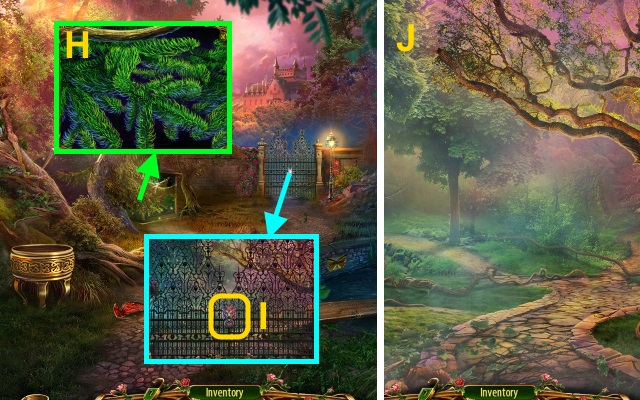
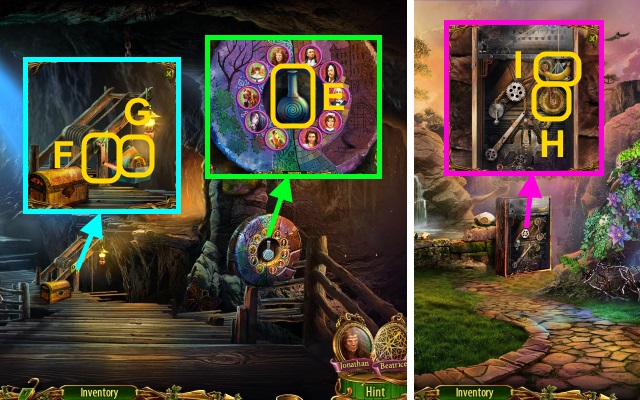
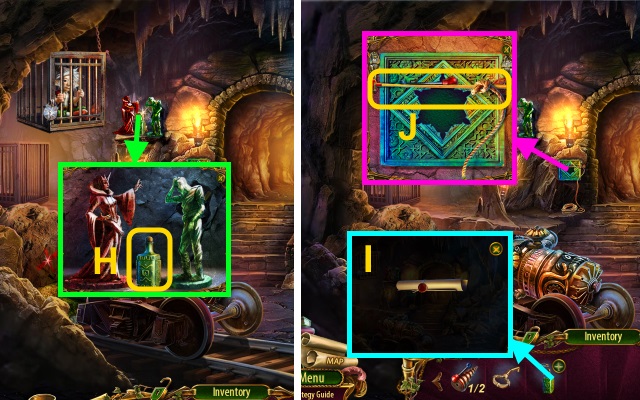
- Use the rope (H); play the HOP to receive the GATE KEY.
- Use the GATE KEY (I).
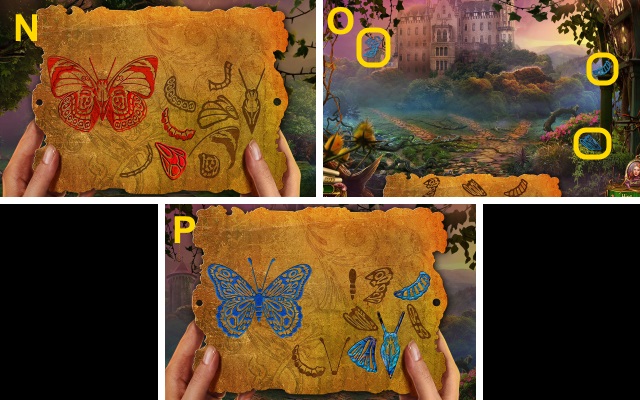
- Use the SCROLL WITH SPELLS for a mini-game (J).
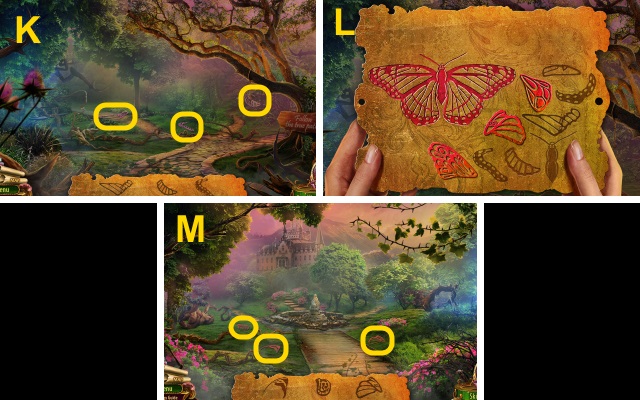
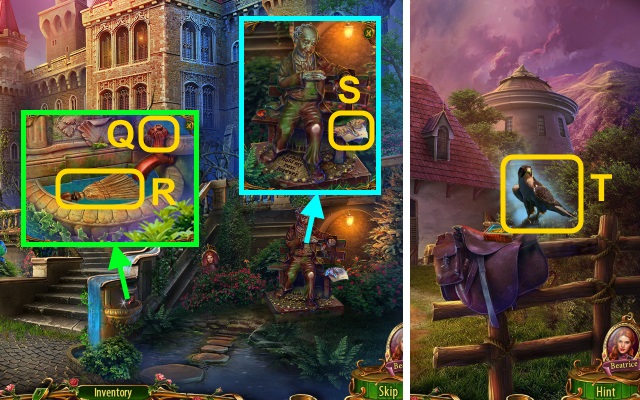
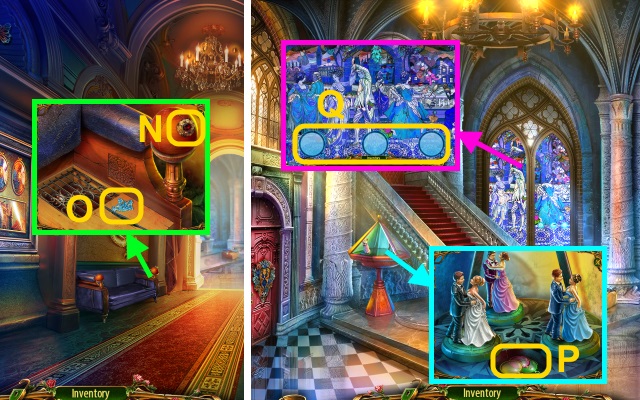
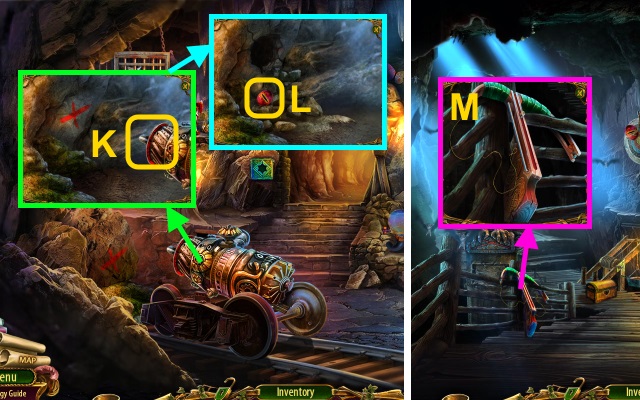
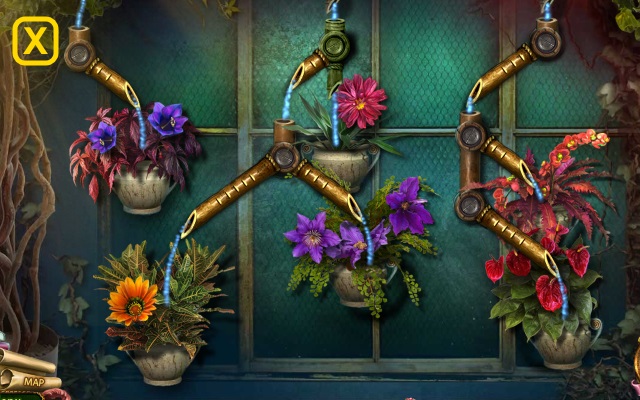
- Move the tap; place the NUT (Q).
- Take the BROOM (R).
- Take the BROKEN STEM and note (S).
- Walk left.
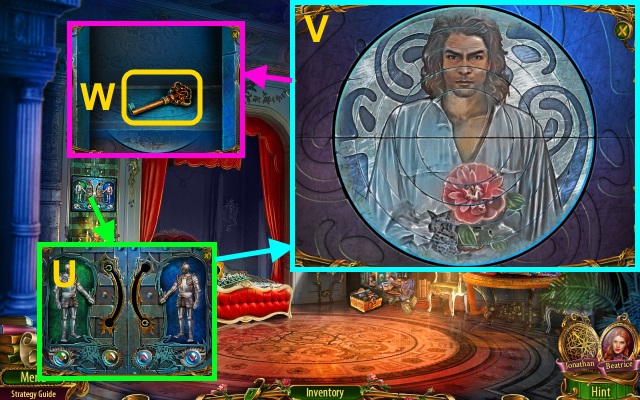
- Use the ENCHANTED FRAME (T).
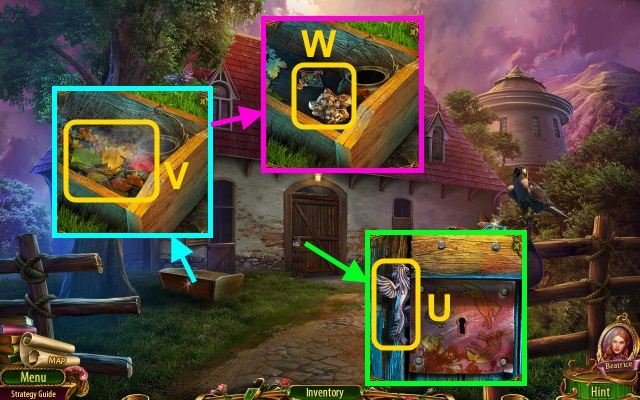
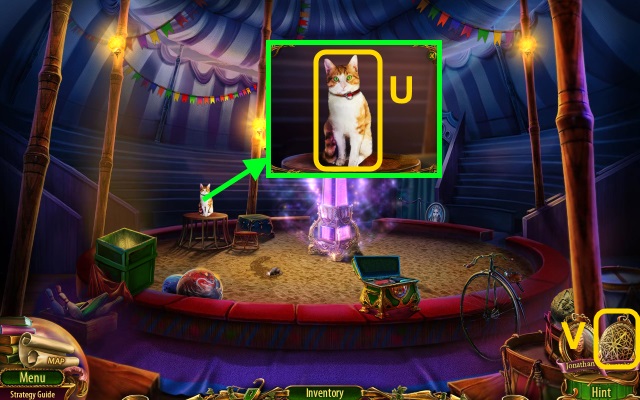
- Take the GRIFFIN (U).
- Use the BROOM (V); take the INCOMPLETE ROSE and KEY PART (W).
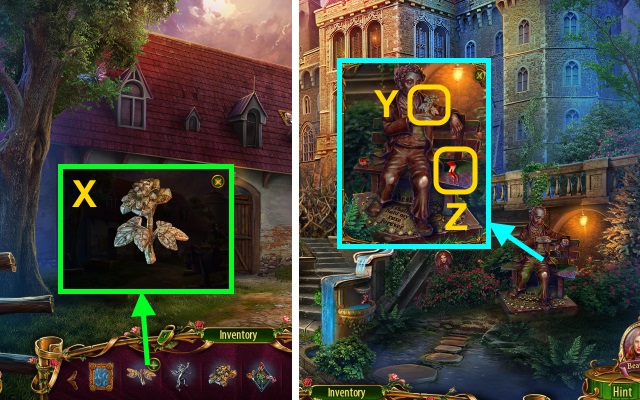
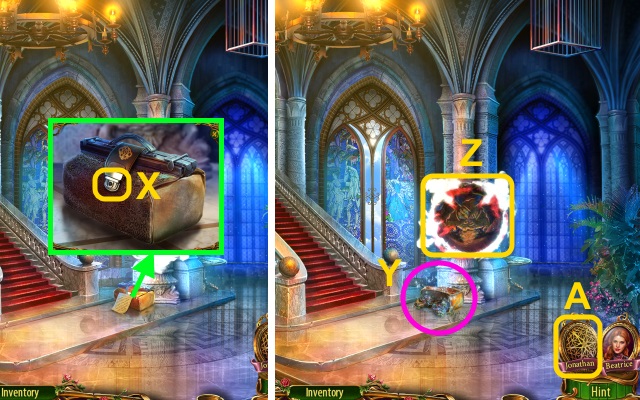
- Place the INCOMPLETE ROSE on the BROKEN STEM; take the STONE ROSE (X).
- Walk down.
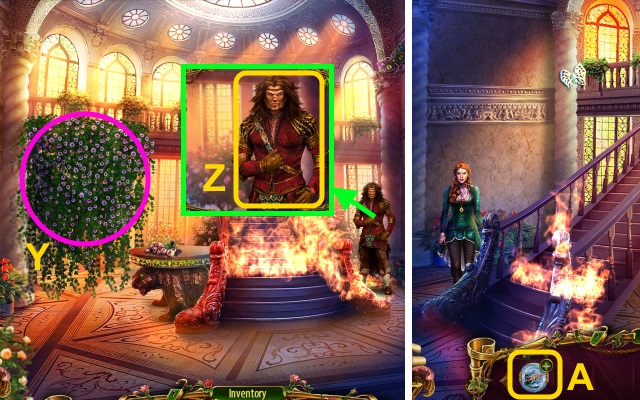
- Place the STONE ROSE (Y); take the FLAG (Z).
- Walk left.

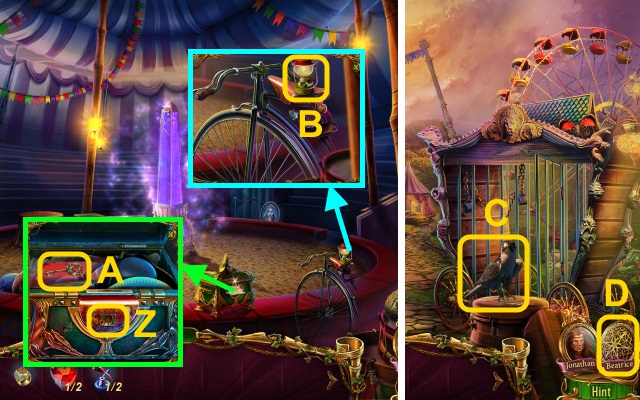
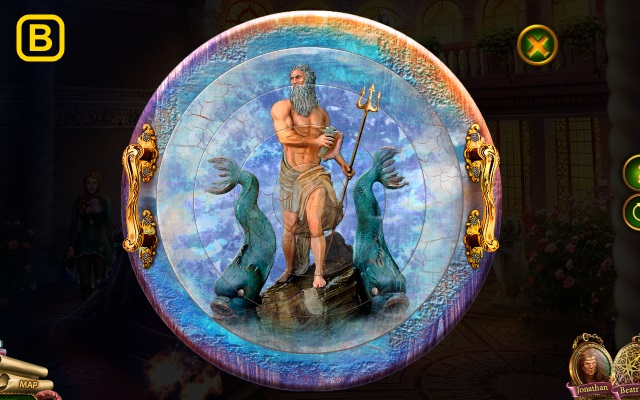
- Place the FLAG (A); take the Locket (B).
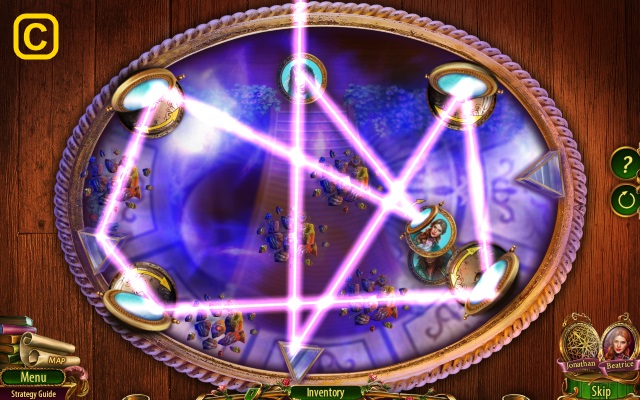
- Select the Locket to switch characters (C).
Chapter 2: The Circus
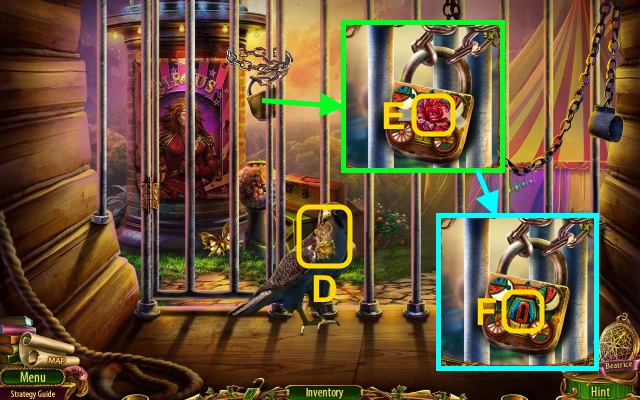
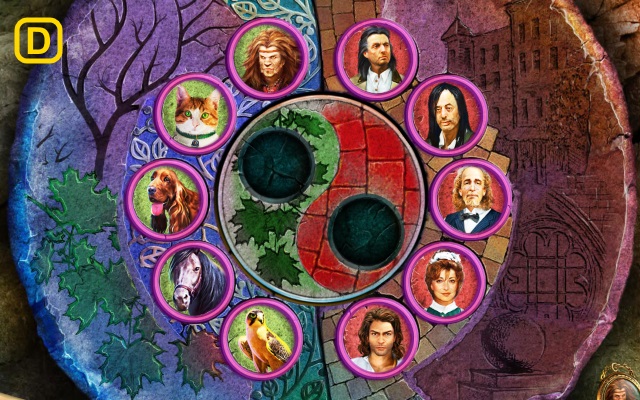
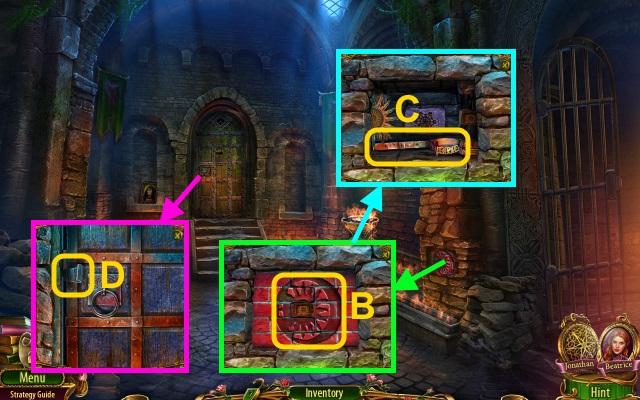
- Take the KEY (D).
- Turn the lock; take the FLOWER TOKEN (E).
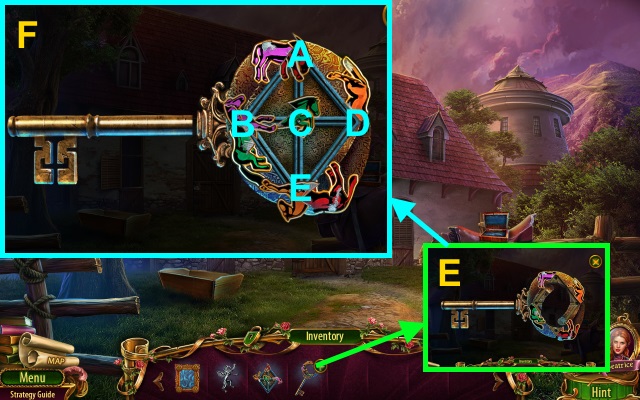
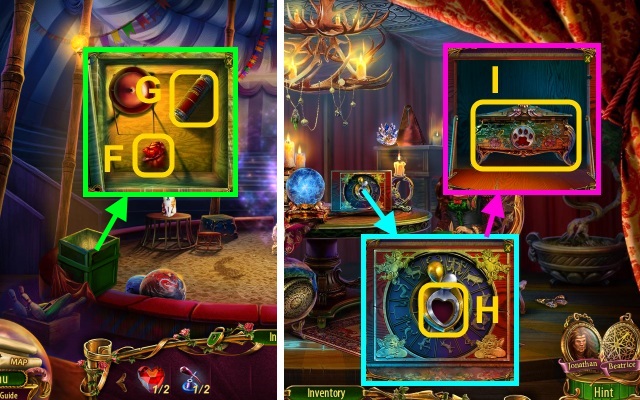
- Use the KEY for a mini-game (F).
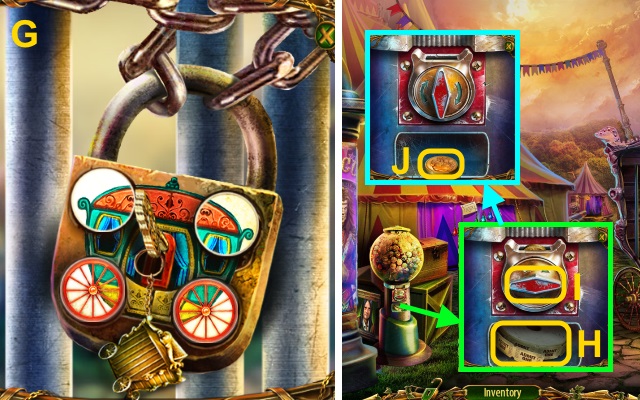
- Solution (G).
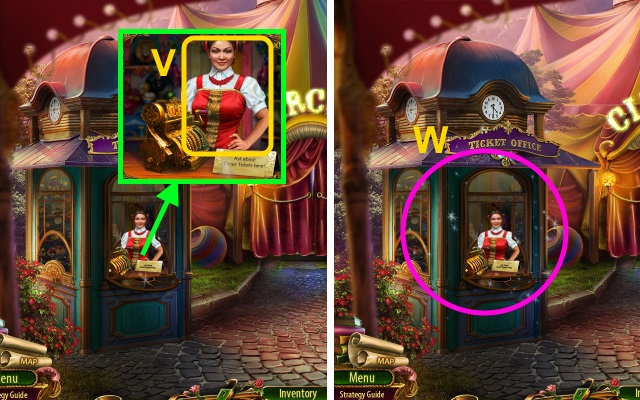
- Take the ROLL OF TICKETS (H).
- Turn the slot (I); take the COIN (J).
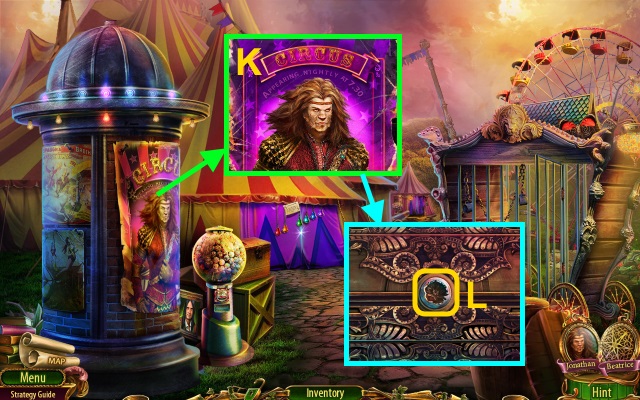
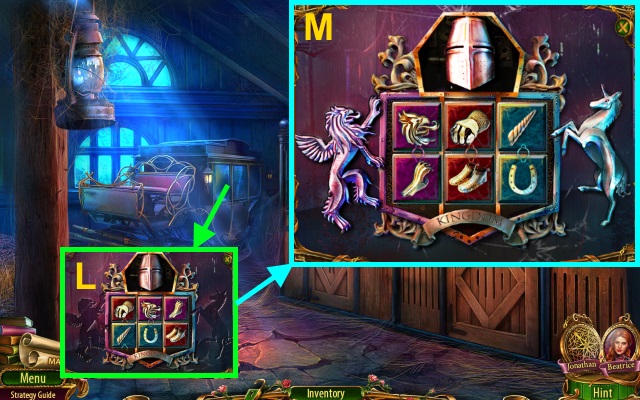
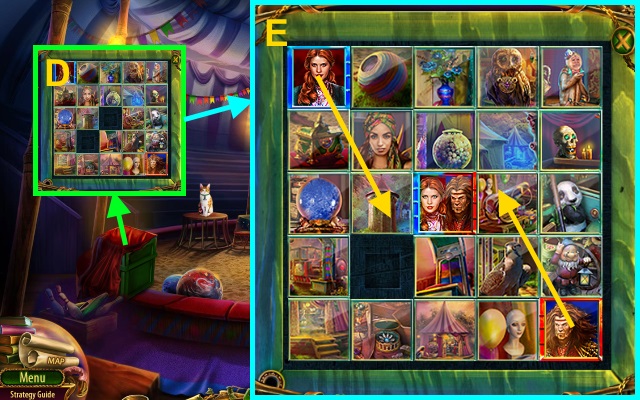
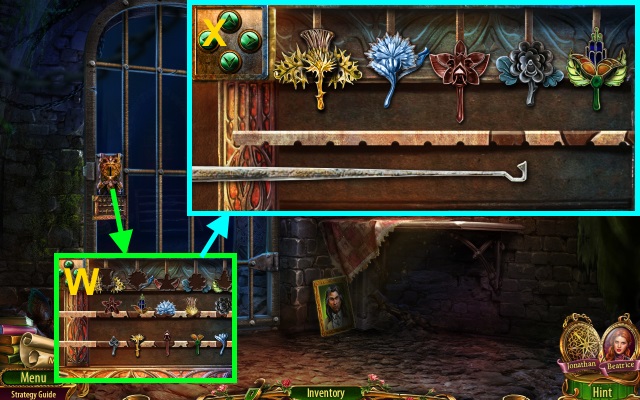
- Move the poster (K); place the FLOWER TOKEN for a mini-game (L).
- Solution (M): Ax2, B, Cx2, Dx2, Ex2, Fx2, Gx2, H, I, Jx2, K, L, Mx2.
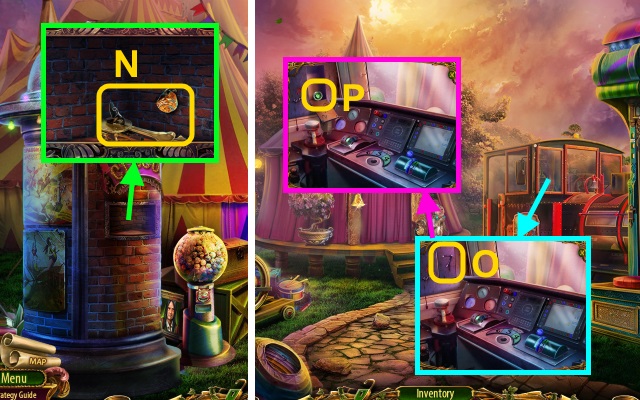
- Take the RING and FIRE STARTER (N).
- Walk right.
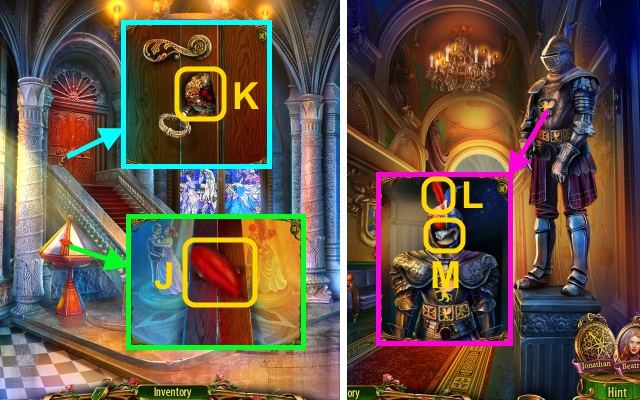
- Place the ROLL OF TICKETS (O); take the JEWEL EYE (P).
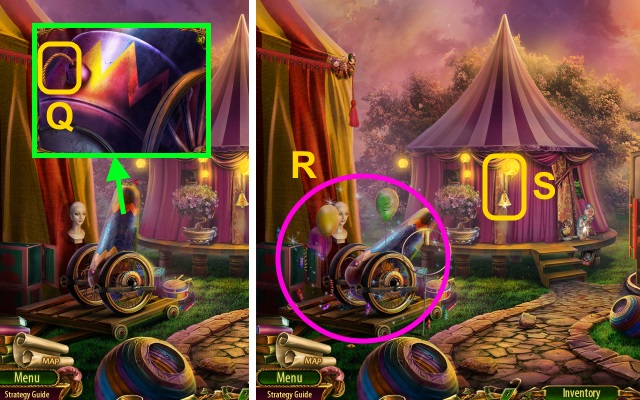
- Use the FIRE STARTER (Q).
- Play the HOP to receive the CLAPPER WITH CORD (R).
- Place the CLAPPER WITH CORD (S).
- Walk forward.

- Give the COIN (T); you receive the BELL.
- Take the RUBY HEART (1/2) (U).
- Place the JEWEL EYE (V); take the LEVER (1/2) (W).
- Walk down twice.
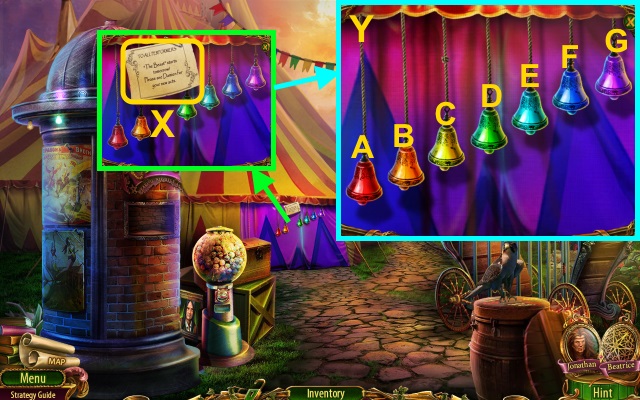
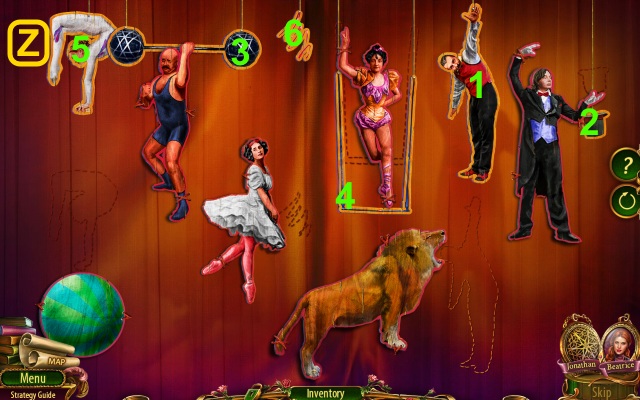
- Take the note (X); place the BELL for a mini-game.
- Solution (Y): B, D, F, A, C, G, E, C, D, G, F, B.
- Walk forward.
- Take the note; use the RING (Z).
- Take the STABLE KEY (A).
- Take the LANTERN (B).
- Walk down.
- Give the STABLE KEY (C).
- Select the Locket (D).
- You receive the STABLE KEY.
- Place the KEY PART on the STABLE KEY for a mini-game (E).
- Solution (F): A, B, C, E, D, C.
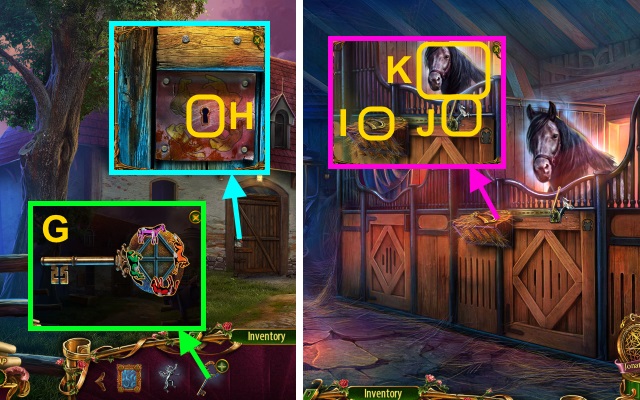
- Take the STABLE KEY (G).
- Use the STABLE KEY (H).
- Walk forward.
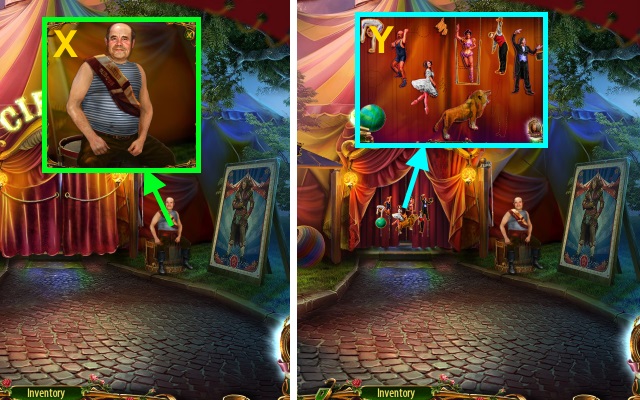
- Take the INCOMPLETE HORSESHOE (I) and UNICORN (J); use the ENCHANTED FRAME (K).
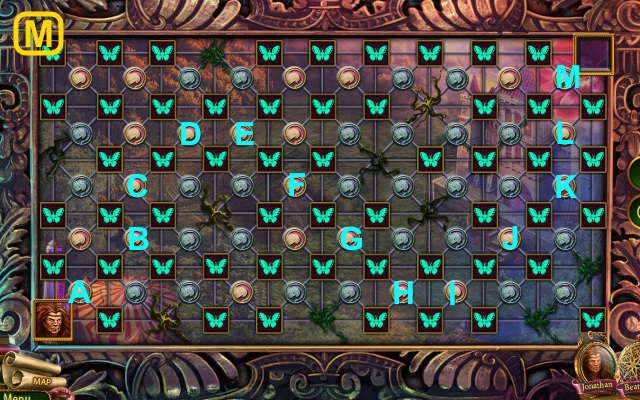
- Place the GRIFFIN and UNICORN for a mini-game (L).
- Solution (M).
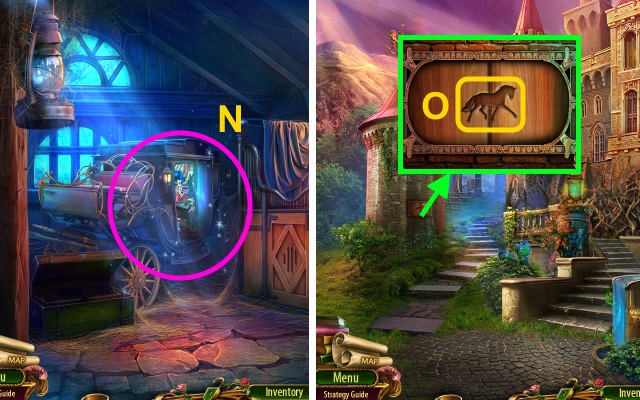
- Play the HOP to receive the HORSE SYMBOL (N).
- Walk down twice.
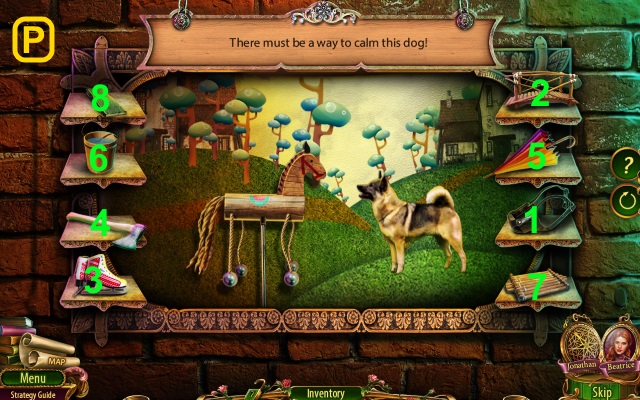
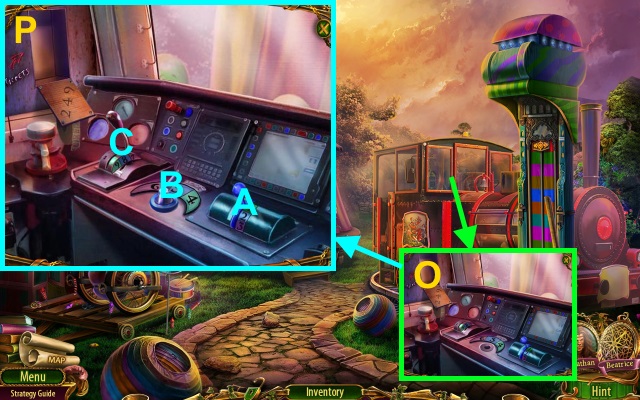
- Place the HORSE SYMBOL for a mini-game (O).
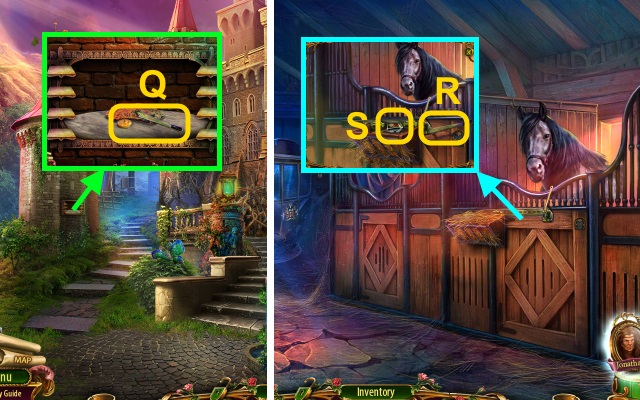
- Take the COIN and LEVER (Q).
- Walk left, then forward.
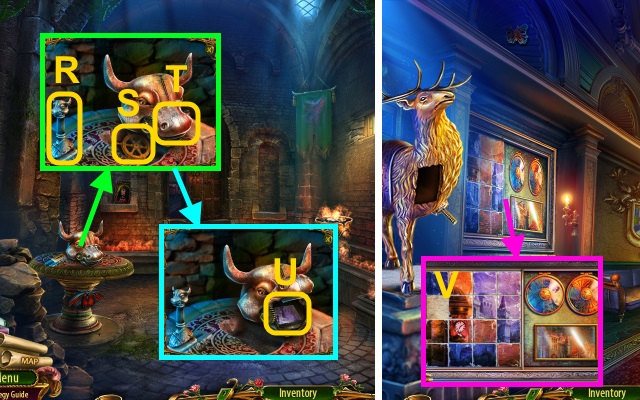
- Place the LEVER (R); take the MATCHES and HORSE SYMBOL (S).
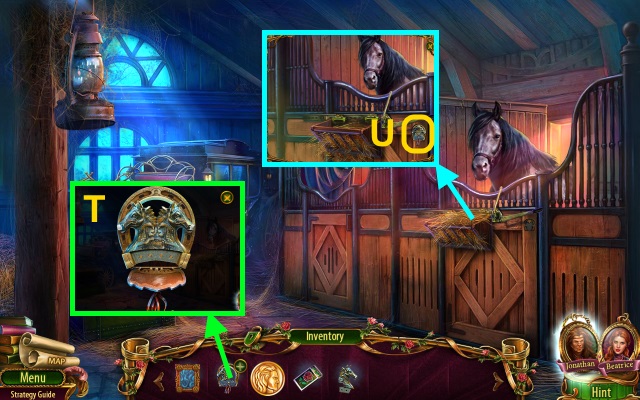
- Open the INCOMPLETE HORSESHOE; place the HORSE SYMBOL (T).
- Close the latch; take the HORSESHOE.
- Place the HORSESHOE (U).
- Give the COIN (V); you receive the BARBELL CHARM.
- Play the HOP to receive the CIRCUS TICKET (W).
- Give the CIRCUS TICKET (X); you receive the HAMMER.
- Place the BARBELL CHARM for a mini-game (Y).
- Solution (Z).
- Walk forward.
- Use the HAMMER (A).
- Use the ENCHANTED FRAME (B).
- Select the Locket (C).
Chapter 3: Escaping the Prison
- You receive the BOX TILE.
- Move the cloth; place the BOX TILE for a mini-game (D).
- Solution (E).
- Place the LANTERN; take the RUBY HEART (2/2) (F) and BROKEN KALEIDOSCOPE (G).
- Go to the Fortune-teller’s Tent.
- Place the RUBY HEART (2/2) (H); take the CASKET (I).
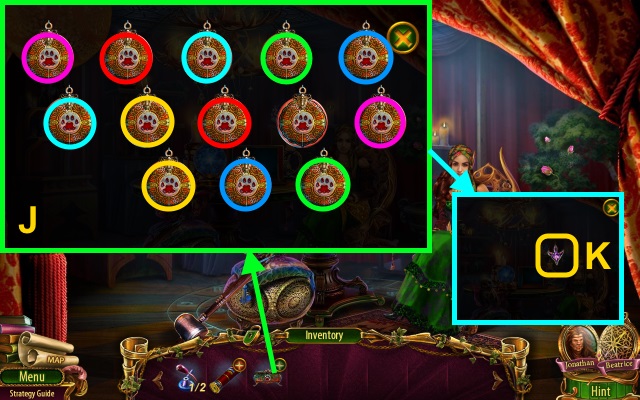
- Examine the CASKET for a mini-game.
- Solution (J).
- Take the OWL’S FOOT (K).
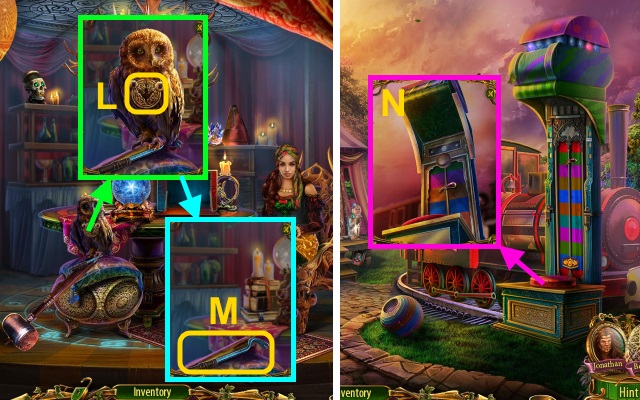
- Place the OWL’S FOOT (L); take the NAIL PULLER and HAMMER (M).
- Walk down.
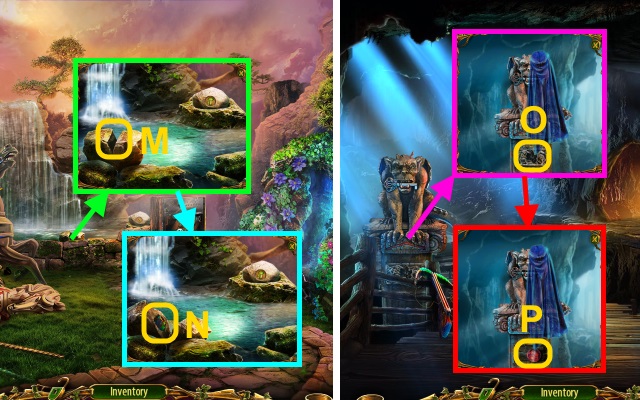
- Use the HAMMER (N); you receive the LEVER (2/2).
- Place the LEVER (2/2) for a mini-game (O).
- Solution (P): A, Bx2, Cx2.
- Walk right.
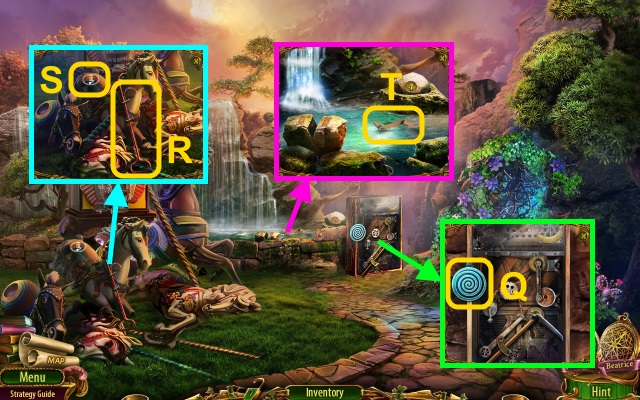
- Take the SPIRAL (Q).
- Use the NAIL PULLER (R); take the GAFF and STONE DISK (S).
- Use the GAFF to take the LEVER (T).
- Walk down, then forward.
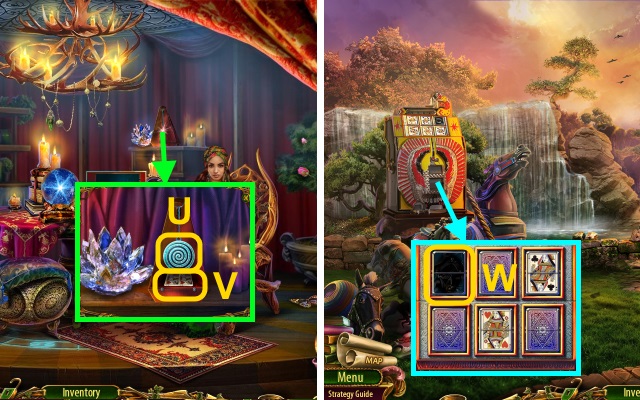
- Place the SPIRAL (U); take the PLAYING CARD (V).
- Walk down, then right.
- Place the PLAYING CARD for a mini-game (W).
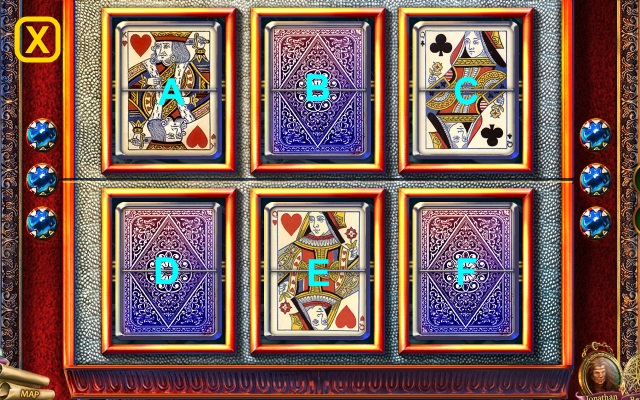
- Solution (X): D, A, F, C, B, E.

- Take the DRILLING RIG PARTS (1/2) (Y).
- Play the HOP to receive the CHAIN (Z).
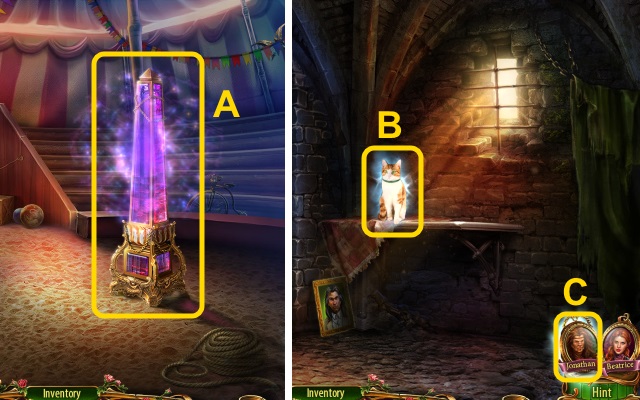
- Place the CHAIN to receive the SCYTHE (A).
- Use the SCYTHE (B).
- Walk right.
- Place the STONE DISK for a mini-game (C).
- Take the MAGIC LIQUID (E).
- Place the LEVER (F); take the GEAR and note (G).
- Walk down.
- Place the GEAR (H); take the BANANA (I).
- Walk down.

- Give the BANANA (J); you receive the GOLD TOOTH.
- Walk forward.
- Place the GOLD TOOTH; take the WRENCH (K).
- Use the MAGIC LIQUID; take the WEDGE (L).
- Walk down, then right.
- Place the WEDGE (M); take the STONE LEAF (N).
- Walk right.
- Place the STONE LEAF (O); take the KALEIDOSCOPE GLASS (1/2) (P).
- Go to the Main Stage.

- Use the WRENCH (Q); take the MONKEY KEY and ROPE (R).
- Walk down, then right.
- Use the MONKEY KEY (S); you receive the KALEIDOSCOPE GLASS (2/2).
- Place the KALEIDOSCOPE GLASS (2/2) on the BROKEN KALEIDOSCOPE (T); play the HOP to receive the MASTER KEY.
- Walk down, then forward.
- Give the MASTER KEY (U).
- Select the Locket (V).
- You receive the MASTER KEY.
- Use the MASTER KEY for a mini-game (W).
- Solution (X).
- Walk left.

- Use the MATCHES (Y).
- Take the CHISEL (Z).
- Take the SUN DISK (A).
- Place the SUN DISK (B); take the BELT and METAL PLATE (C).
- Use the METAL PLATE (D).
- Walk forward.

- Take the HORN (E).
- Place the BELT (F); take the GLASS SWORD (G).
- Place the HORN (H); take the FIGURINES (1/2) (I).
- Walk forward.
- Take the RED FEATHER (J); open the case.
- Use the CHISEL to take the HERALDIC DECORATION (K).
- Walk down.
- Place the RED FEATHER (L); take the FIGURINES (2/2) (M).
- Place the HERALDIC DECORATION (N); take the SNOWFLAKE (1/2) (O).
- Walk forward.
- Place the FIGURINES (2/2); take the COLORED GLASS (P).
- Place the COLORED GLASS (Q); play the HOP to receive the NOSE RING.
- Walk down twice.
- Place the GLASS SWORD (R); take the STEERING WHEEL (S).
- Place the NOSE RING (T); take the FRESCO PIECE (U).
- Walk forward.
- Place the FRESCO PIECE for a mini-game (V).
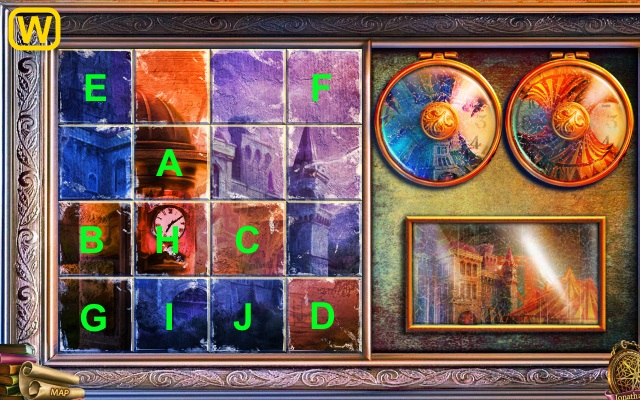
- Solution (W): A, B, C, D, E, F, G, D, H, C, I, J, G, D.
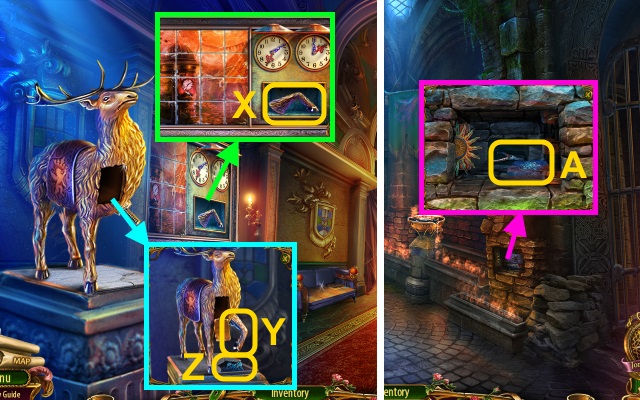
- Take the DEER LEG (X).
- Place the DEER LEG (Y); take the SNOWFLAKE (2/2) (Z).
- Walk down.
- Place the SNOWFLAKE (2/2); take the PLIERS (A).
- Walk forward twice.
- Use the PLIERS to take the BENT KEY (B).
- Give the BENT KEY (C).
- Select the Locket (D).
Chapter 4: Damien’s Hideout
- You receive the BENT KEY.
- Take the HOOK (E).
- Place the HOOK on the ROPE (F); take the ROPE.
- Go to the Cave.
- Use the ROPE (G).
- Take the SEALED BOTTLE (H).
- Open the SEALED BOTTLE; take the MAGIC SCROLL (I).
- Take the DRILLING RIG PARTS (2/2) and ARROW (J).
- Place the DRILLING RIG PARTS (2/2) (K).
- Take the DRAGON’S EYE (1/2) (L).
- Walk down.
- Place the ARROW to receive the CROSSBOW (M).
- Use the CROSSBOW to take the DRAGON’S EYE (2/2) (N).
- Walk right, then forward.
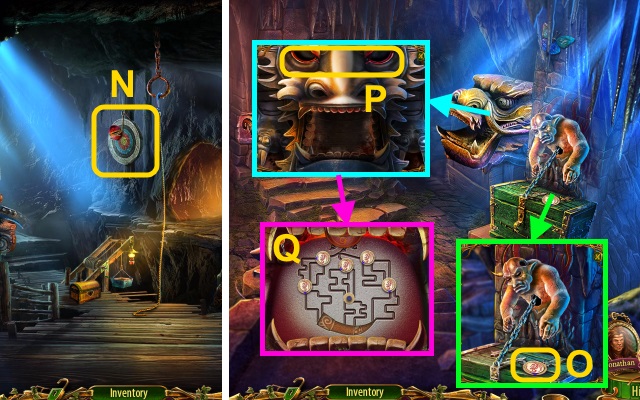
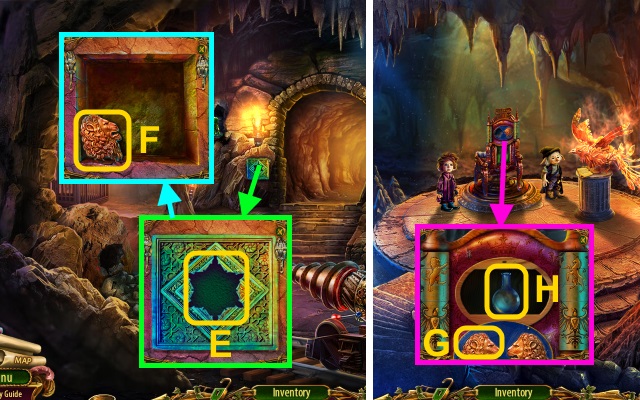
- Take the FORGE DISK (O).
- Place the DRAGON’S EYE (2/2) (P).
- Place the FORGE DISK for a mini-game (Q).
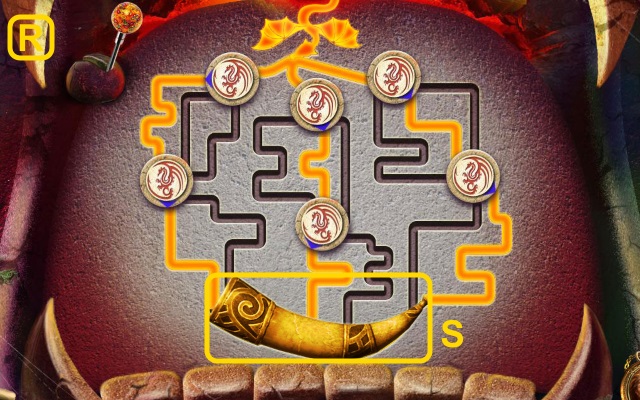
- Solution (R).
- Take the HORN (S).
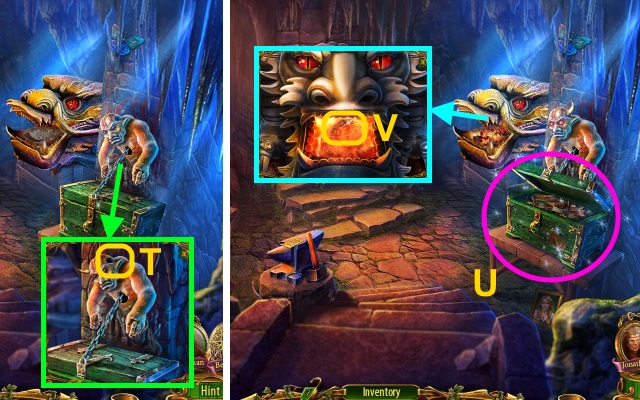
- Place the HORN (T).
- Play the HOP to receive the TONGS (U).
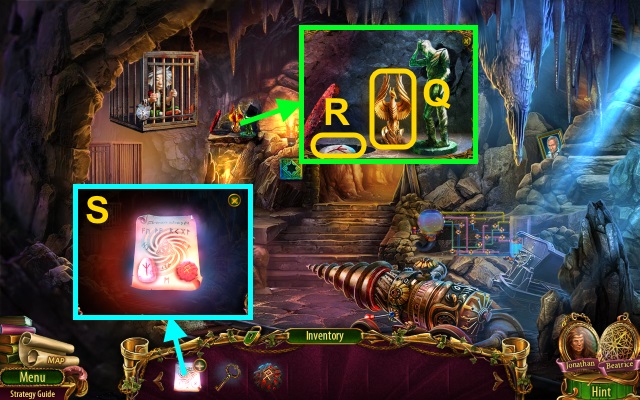
- Use the TONGS to take the CHEST AMULET (V).

- Place the BENT KEY (W); use the TONGS to take the WHITE-HOT KEY.
- Take the note (X); place the WHITE-HOT KEY.
- Take the MAGIC RUNE and PRINCE’S ROOM KEY (Y).
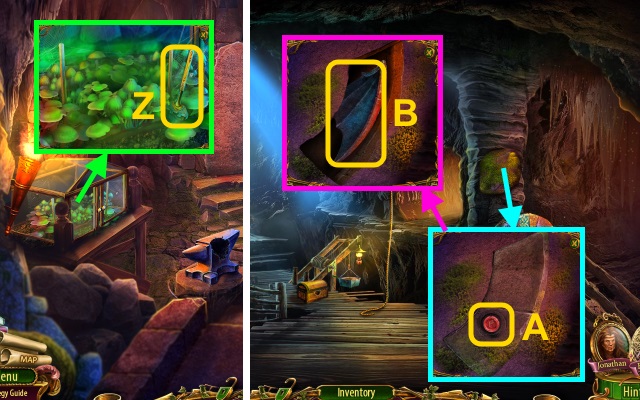
- Open the case; take the SCRAPER (Z).
- Walk down twice.
- Use the SCRAPER; press the button (A).
- Take the GARGOYLE WING (1/2) (B).
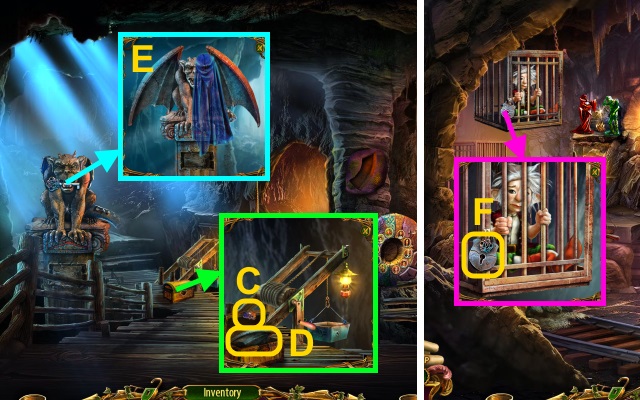
- Place the CHEST AMULET (C); take the GARGOYLE WING (2/2) (D).
- Place the GARGOYLE WING (2/2) to receive the CAGE KEY (E).
- Walk right.
- Talk to the gnome; use the CAGE KEY (F).
- You receive the MAGIC DISK.
- Walk down twice.
- Place the MAGIC DISK (G); take the POISON (H).
- Go to the Blacksmith.
- Use the POISON; take the MAGIC BOOK (I).
- Walk down.
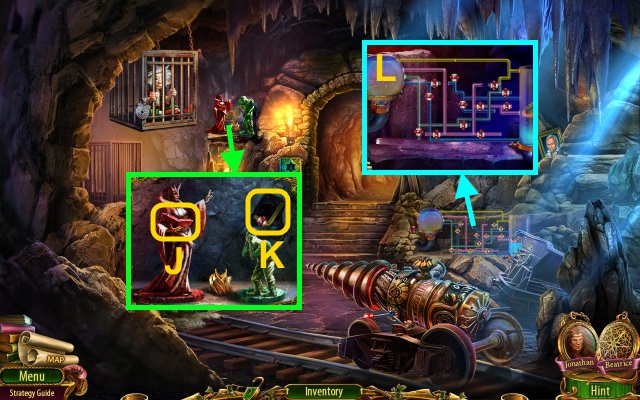
- Place the MAGIC BOOK (J); take the LEVER (K).
- Place the LEVER for a mini-game (L).
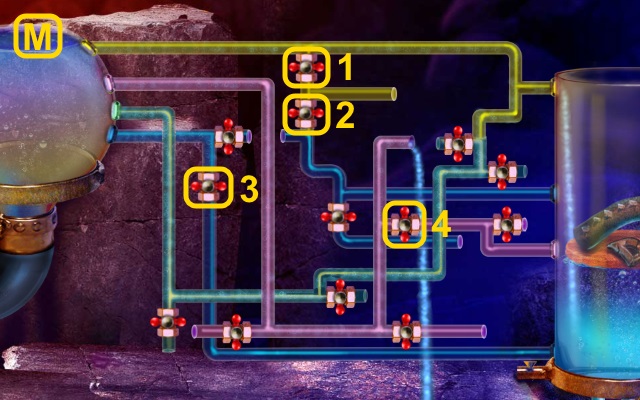
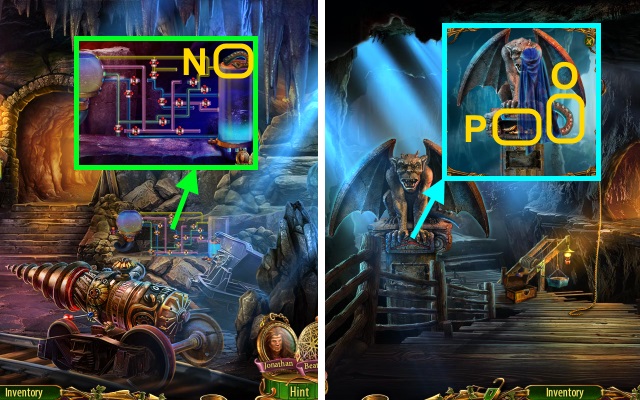
- Take the GARGOYLE TAIL (N).
- Walk down.
- Place the GARGOYLE TAIL (O); take the PHOENIX STATUE (P).
- Walk right.
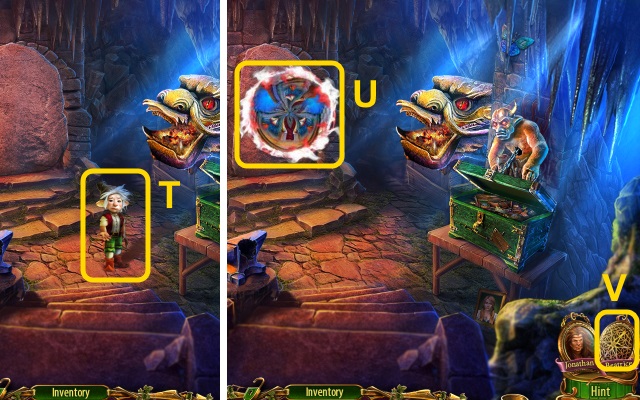
- Place the PHOENIX STATUE (Q); take the MAGIC RUNE (R).
- Place the MAGIC RUNES on the MAGIC SCROLL; take the MAGIC SCROLL (S).
- Walk forward.
- Give the MAGIC SCROLL (T).
- Place the PRINCE’S ROOM KEY (U).
- Select the Locket (V).
- You receive the PRINCE’S ROOM KEY.
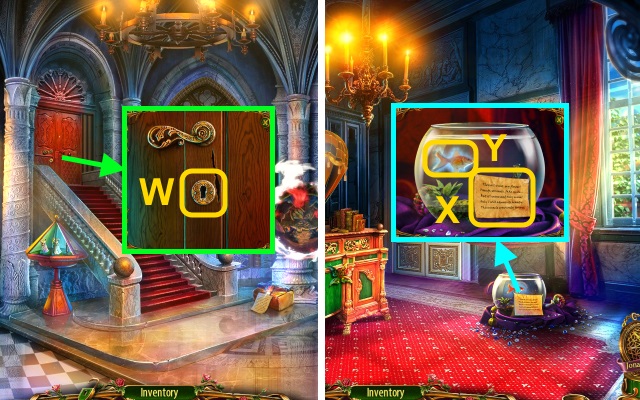
- Use the PRINCE’S ROOM KEY (W).
- Walk forward.
- Take the note (X); use the ENCHANTED FRAME (Y).
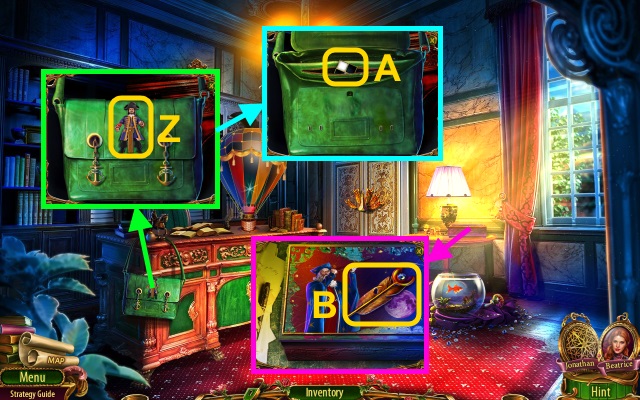
- Place the STEERING WHEEL (Z); take the PHOTO FRAME DETAIL (A).
- Take the PEACOCK FEATHER (B).
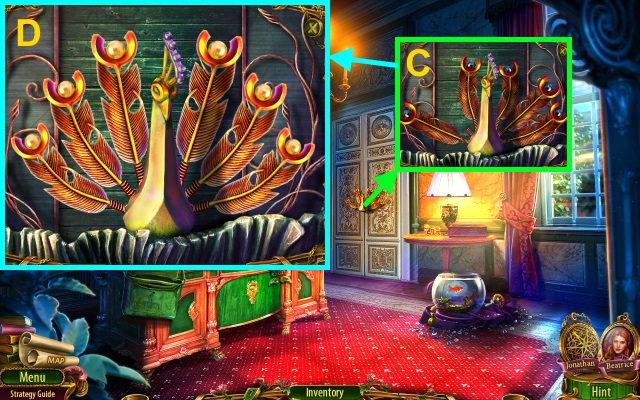
- Place the PEACOCK FEATHER for a mini-game (C).
- Solution (D).
- Walk forward.
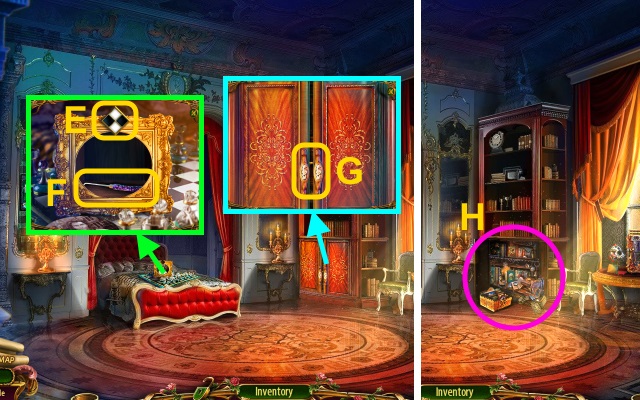
- Place the PHOTO FRAME DETAIL (E); take the CROCHET HOOK (F).
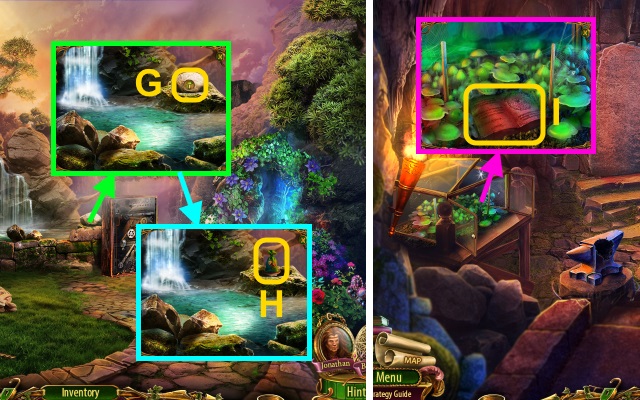
- Use the CROCHET HOOK (G).
- Play the HOP to receive the BLUE BOOK (H).
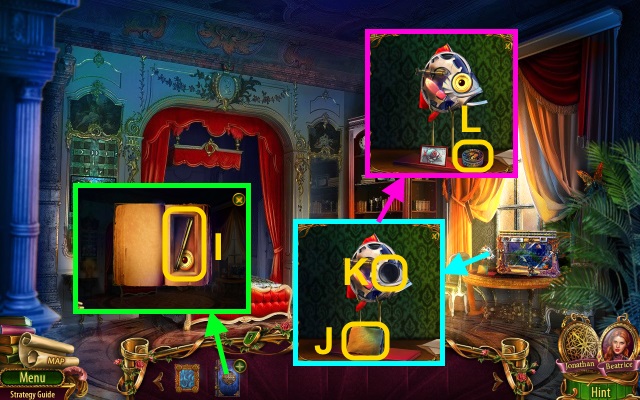
- Open the BLUE BOOK; take the SPYGLASS and FISH EYE (I).
- Take the note (J); place the FISH EYE (K).
- Take the FISH FOOD (L).
- Walk down.
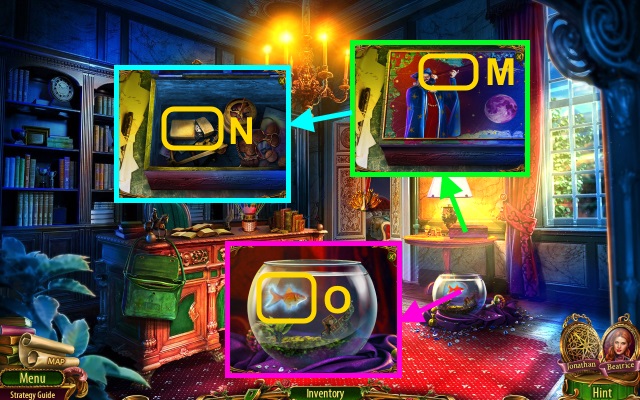
- Place the SPYGLASS (M); take the LIGHTER (N).
- Give the FISH FOOD (O); you receive the FISH TAIL.
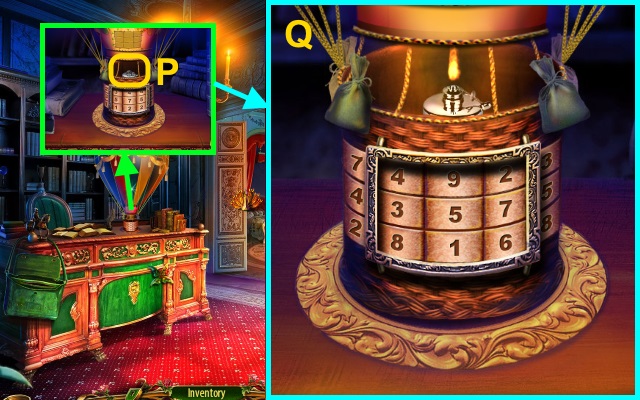
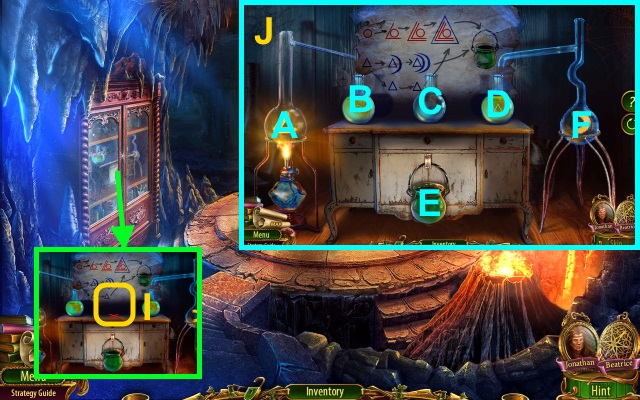
- Use the LIGHTER for a mini-game (P).
- Solution (Q).
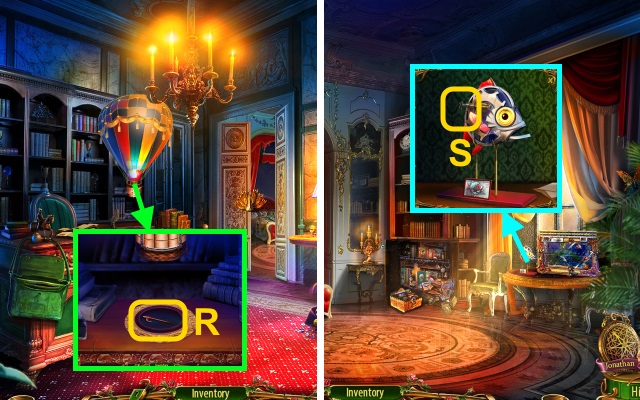
- Take the SPEARS (1/2) (R).
- Walk forward.
- Place the FISH TAIL for a mini-game (S).
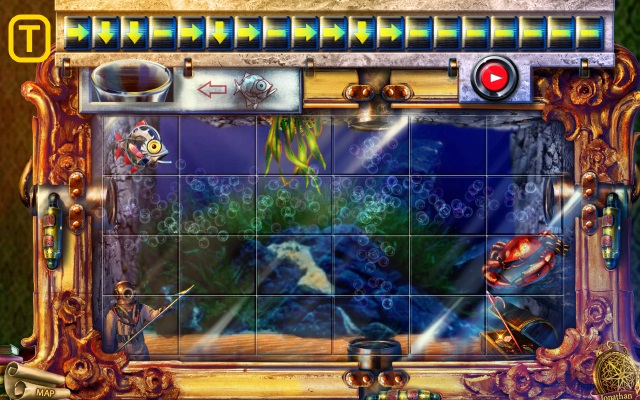
- Solution (T).
- You receive the SPEARS (2/2).
- Place the SPEARS (2/2) for a mini-game (U).
- Solution (V).
- Take the SUITCASE KEY (W).
- Walk down twice.
- Take the note; use the SUITCASE KEY (X).
- Play the HOP to receive the RAM’S HEAD (Y).
- Place the RAM’S HEAD (Z).
- Select the Locket (A).
Chapter 5: The Palace

- You receive the RAM’S HEAD.
- Place the RAM’S HEAD (B).
- Walk forward.
- Take the MOON (C).
- Take the SNOWFLAKE AMULET (D).
- Walk down twice.
- Place the SNOWFLAKE AMULET (E).
- Take the LION’S HEAD (F).
- Walk forward twice.
- Place the LION’S HEAD (G); take the FLASK (H).
- You receive the PHOENIX ASHES.
- Open the cupboard; place the FLASK for a mini-game (I).
- Solution (J): B-A, B-A, D-C, D-F, D-F, C-B, B-E, D-E.
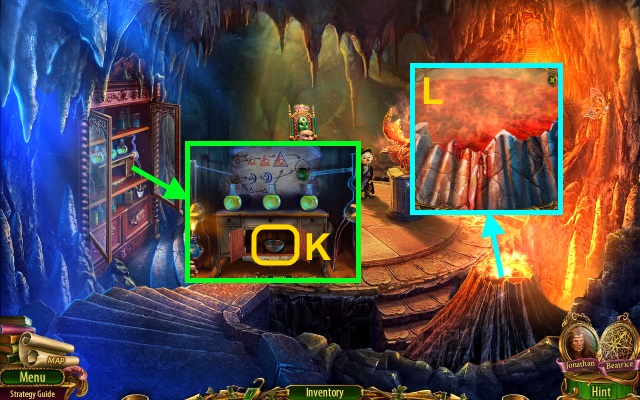
- Take the BOWL (K).
- Use the BOWL to take the LAVA (L).
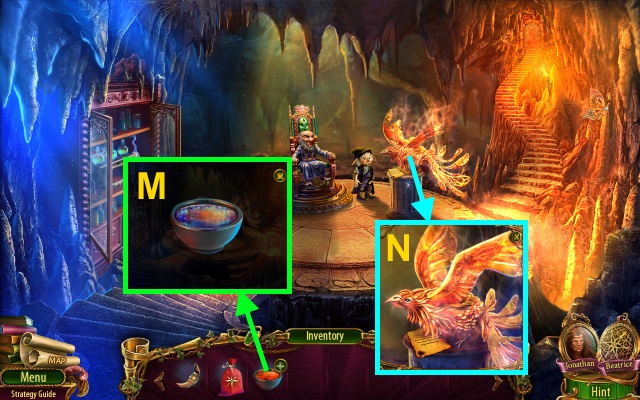
- Place the PHOENIX ASHES in the LAVA; take the PHOENIX BLOOD (M).
- Use the PHOENIX BLOOD (N).

- Take the note and BRANCH (O).
- Place the BRANCH (P).
- Play the HOP to receive the KEYS (Q).
- Use the KEYS (R); take the WIRE BRUSH (S).
- Use the WIRE BRUSH; press the tile (T).
- Take the note and SICKLE (U).
- Use the SICKLE (V).
- Walk forward.
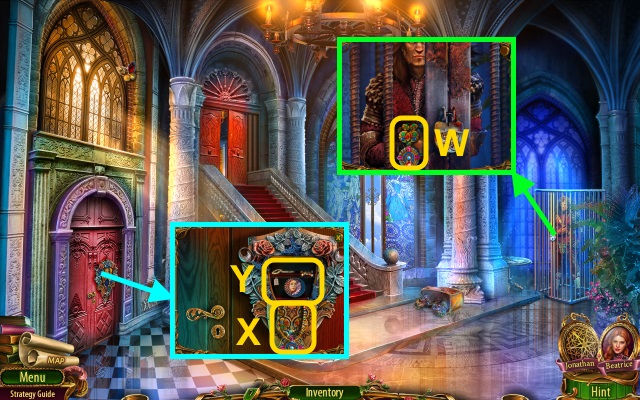
- Talk to Jonathan to receive the DOOR AMULET (W).
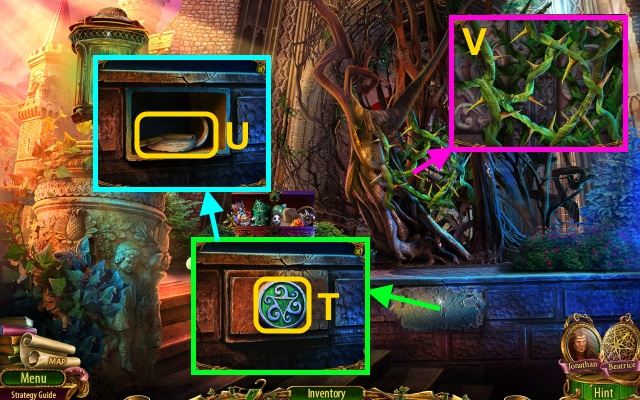
- Place the DOOR AMULET (X); take the PLANET MEDALLION, HANDLE, and KEY (Y).
- Walk down.
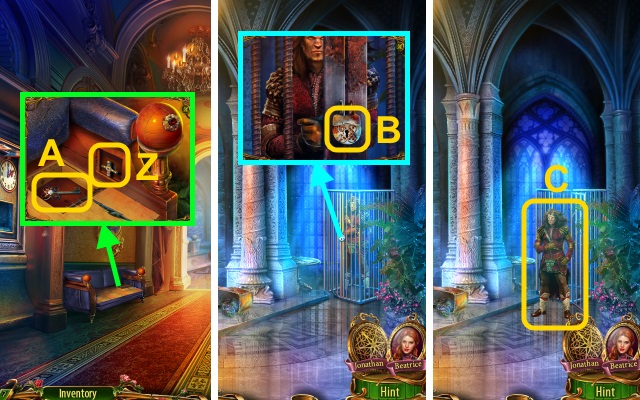
- Move the panel; place the HANDLE (Z).
- Take the CAGE KEY (A).
- Walk forward.
- Use the CAGE KEY (B).
- Give the PLANET MEDALLION (C).
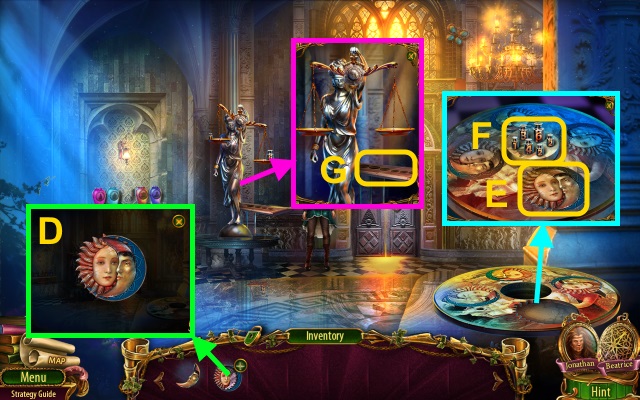
- You receive the PLANET MEDALLION.
- Place the MOON on the PLANET MEDALLION; take the PLANET AMULET (D).
- Place the PLANET AMULET (E); take the WEIGHTS (F).
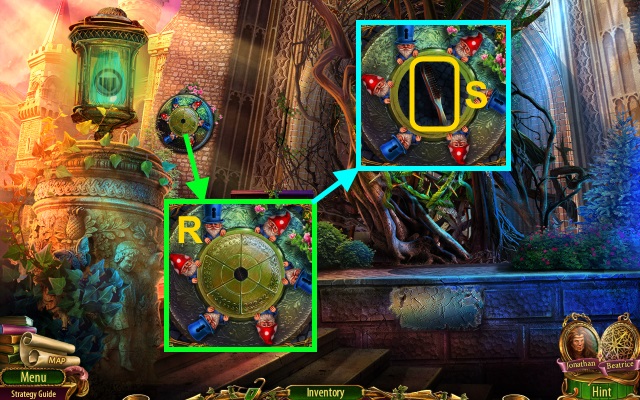
- Place the WEIGHTS for a mini-game (G).
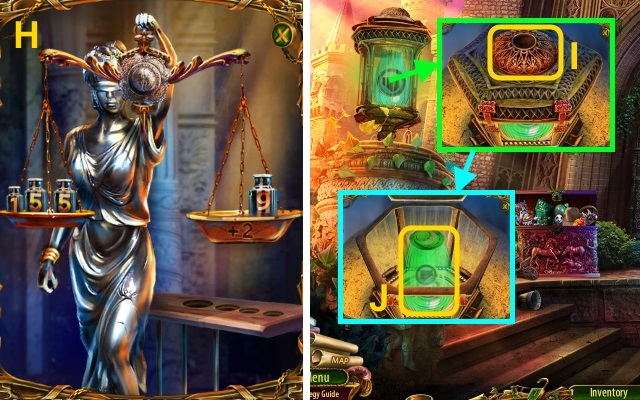
- Solution (H).
- You receive the LAMP COVER.
- Walk down.
- Place the LAMP COVER (I).
- Take the VASE (J).
- Walk forward.
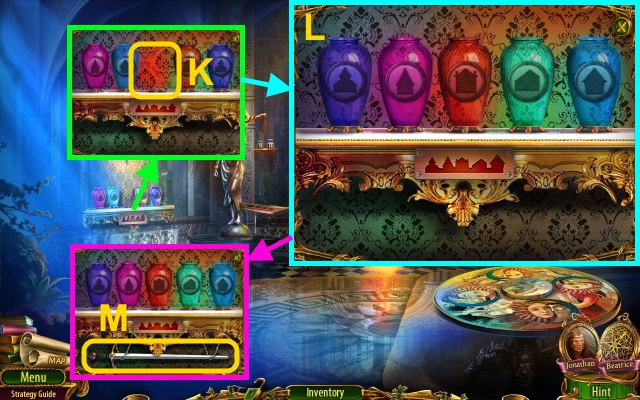
- Place the VASE for a mini-game (K).
- Solution (L).
- Take the SWORD (M).
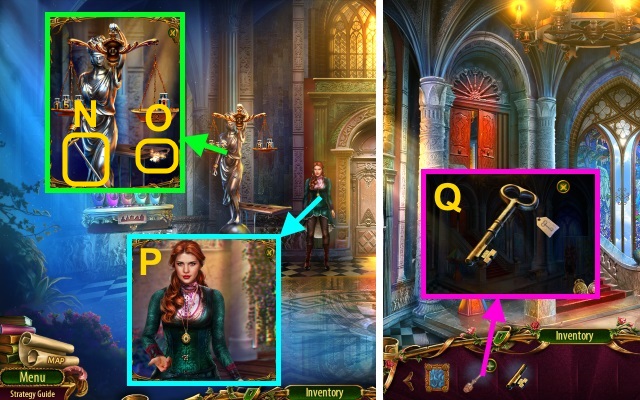
- Give the SWORD (N); take the KEY PART (O).
- Give the KEY PART (P).
- You receive the KEY PART.
- Place the KEY PART on the KEY; take the KEY (Q).
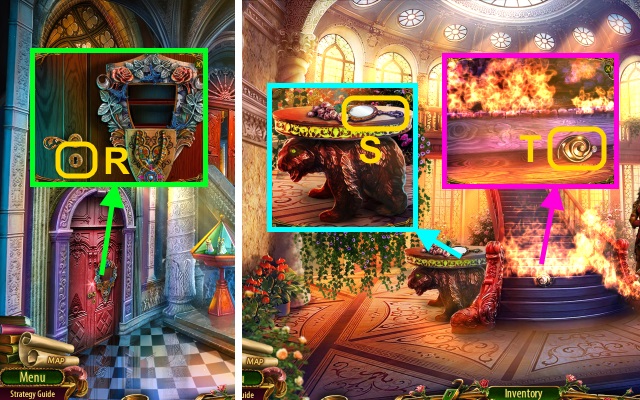
- Use the KEY (R).
- Walk left.
- Take the MIRROR (S).
- Take the SPIRAL (T).
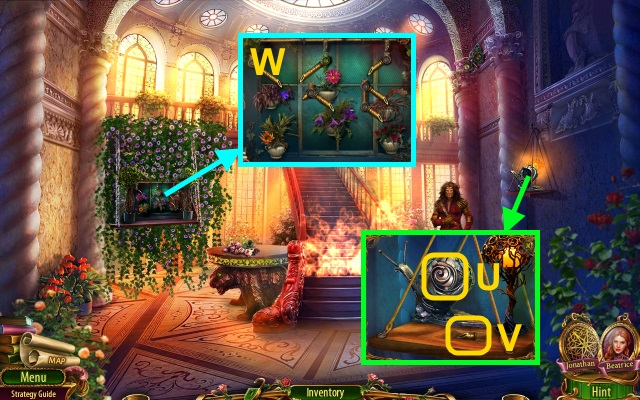
- Place the SPIRAL (U); take the TUBE (V).
- Place the TUBE for a mini-game (W).
- Play the HOP to receive the WATER AMULET (Y).
- Give the WATER AMULET (Z).
- You receive the WATER AMULET.
- Examine the WATER AMULET for a mini-game (A).
- Solution (B, C).
- Congratulations! You have completed Dark Romance: Heart of the Beast.


 Elementals: The Magic Key Walkthrough, Guide, & Tips
 Witches Legacy: The Dark Throne Walkthrough, Guide, & Tips
 Nancy Drew: Treasure in the Royal Tower Walkthrough, Guide, & Tips
 The Crop Circles Mystery Walkthrough, Guide, & Tips
 Maze: Subject 360 Walkthrough, Guide, & Tips