Witches Legacy: The Dark Throne Walkthrough, Guide, & Tips
Witches Legacy: The Dark Throne Walkthrough

Welcome to the Witches’ Legacy: The Dark Throne Walkthrough
The witches’ dark legacy continues as Lynn becomes possessed!
Whether you use this document as a reference when things get difficult or as a road map to get you from beginning to end, we’re pretty sure you’ll find what you’re looking for here.
This document contains a complete Witches’ Legacy: The Dark Throne game walkthrough featuring annotated screenshots from actual gameplay!
We hope you find this information useful as you play your way through the game. Use the walkthrough menu below to quickly jump to whatever stage of the game you need help with.
Remember to visit the Big Fish Games Forums if you find you need more help. Have fun!
This walkthrough was created by Chrysanne Westin, and is protected under US Copyright laws. Any unauthorized use, including re-publication in whole or in part, without permission, is strictly prohibited.
General Tips
- This is the official guide for Witches Legacy: The Dark Throne.
- This guide will not mention each time you have to zoom into a location; the screenshots will show each zoom scene.
- Hidden-object puzzles are referred to as HOPs. This guide will not show HOP solutions. It will identify the location of the HOP and the inventory item acquired.
- This guide will show solutions for non-random puzzles. Please read the in-game instructions for each puzzle.
Chapter 1: The Showroom

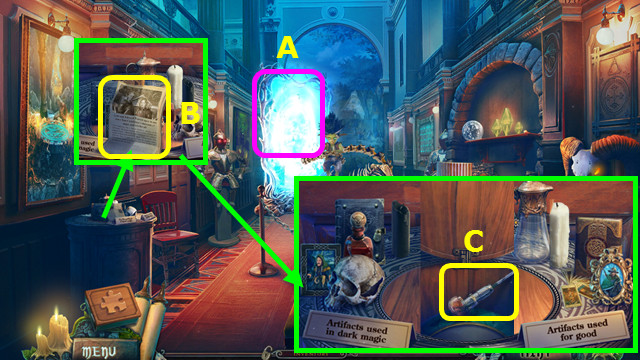
- Touch the mirror (A).
- Take the NEWSPAPER (B).
- Move the items as shown; take the ANCIENT KNIFE (C).

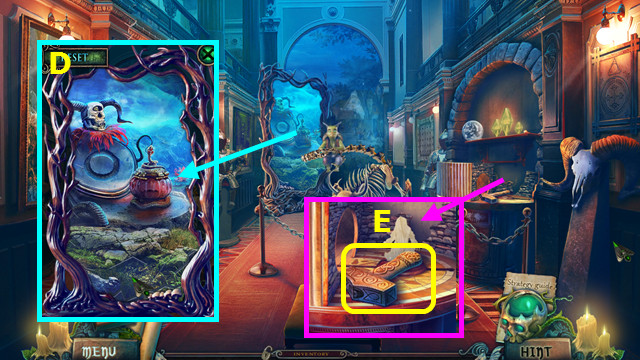
- Touch, and then restore the mirror (D).
- Take the RITUAL HAMMER (E).

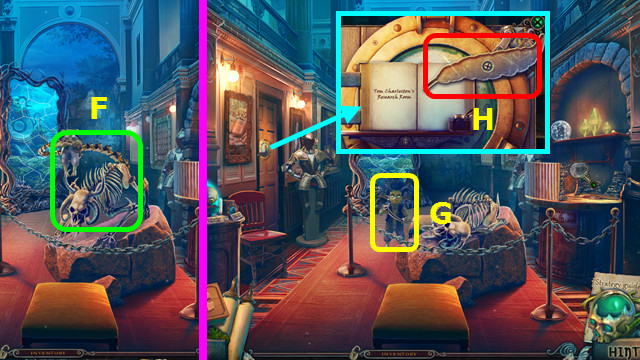
- Use the RITUAL HAMMER (F).
- Take the TUSK and IMP (G).
- Combine the TUSK and ANCIENT KNIFE to make the BONE PEN (inventory).
- Place the BONE PEN (H).
- Walk left.

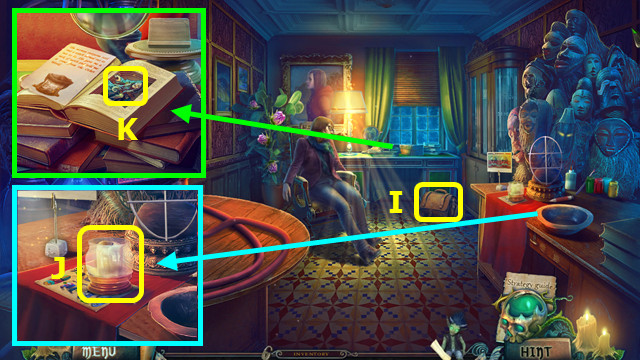
- Take CARRIE’S BAG (I).
- Open CARRIE’S BAG, place the photos into the frame, and take the SUNGLASSES (inventory).
- Take the CANDLE (J).
- Open Tom’s Diary; read the note and take the WITCH FIGURINE (K).
- Walk down.

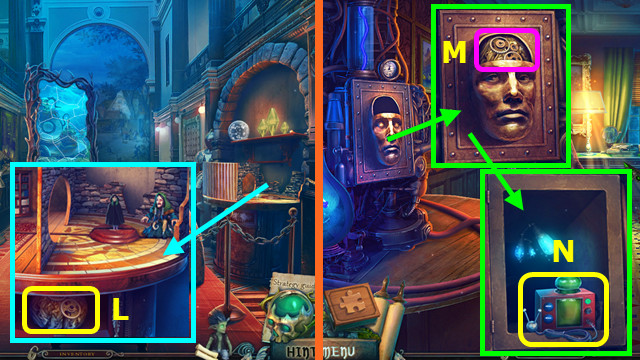
- Place the WITCH FIGURINE; take the MECHANICAL BRAIN (L).
- Walk left.
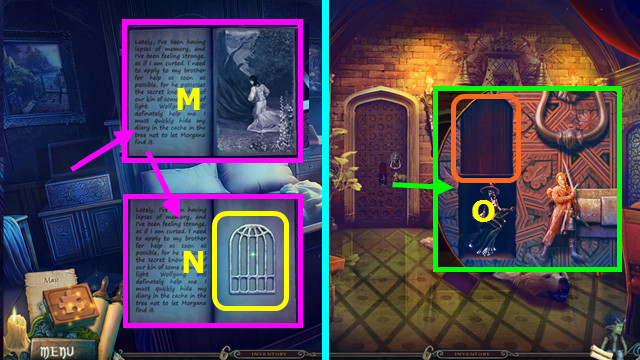
- Place the MECHANICAL BRAIN (M).
- Take the LIGHTNING CATCHER (N).

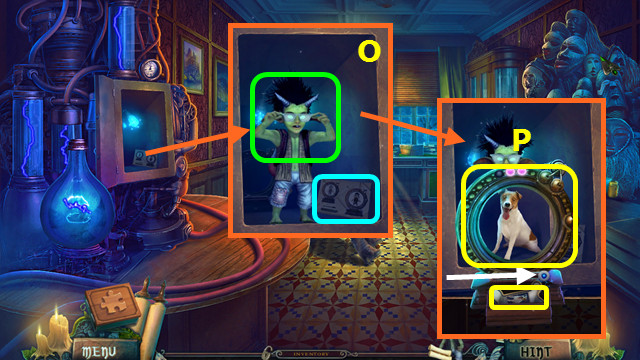
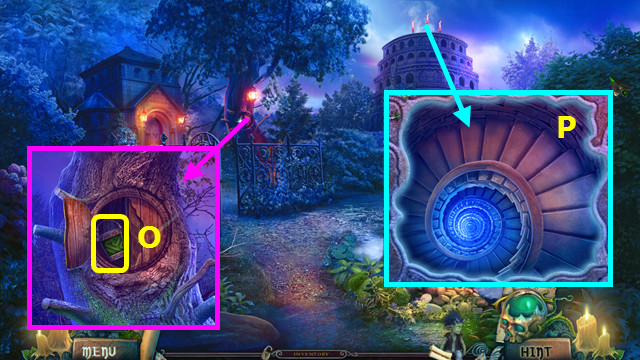
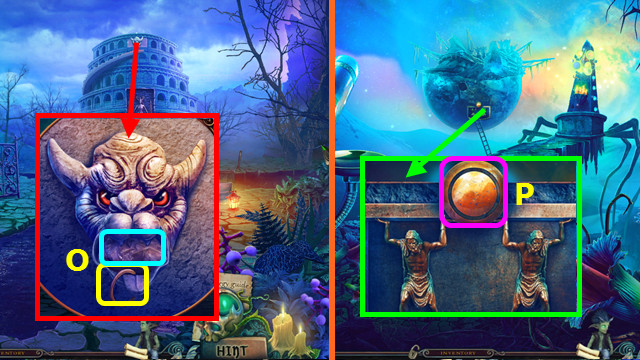
- Read the note; use the IMP and SUNGLASSES (O).
- Slide the button; take the PHOTO OF PUPPY and GLASS OF TRUTH (P).

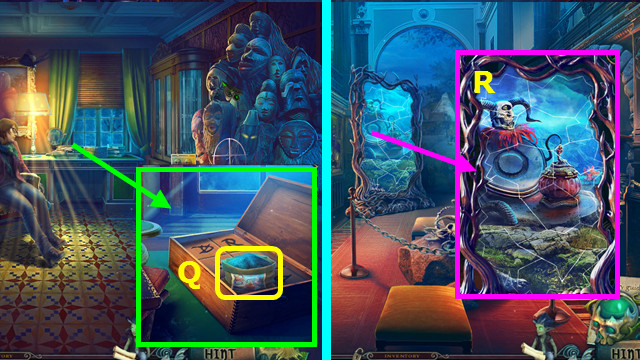
- Place the PHOTO OF PUPPY; take the OTHER WORLD SOIL (Q).
- Walk down.
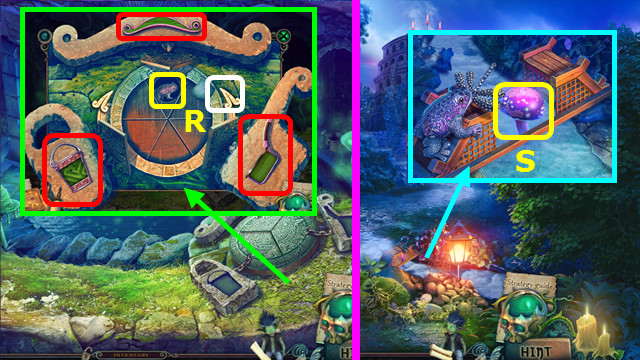
- Use the OTHER WORLD SOIL (R).
- Walk forward.

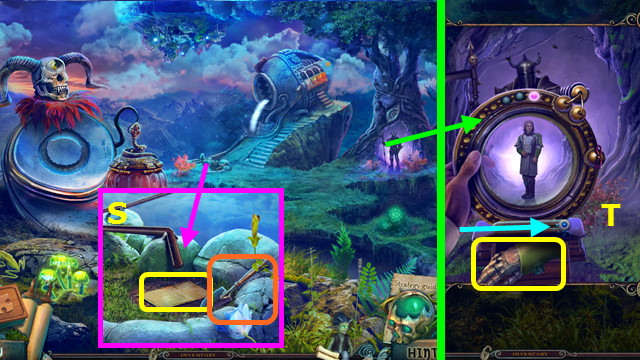
- Take the MAP and select the shovel (S).
- Use the GLASS OF TRUTH; slide the button right and take the GATEKEEPER’S GLOVE (T).
- Walk down.

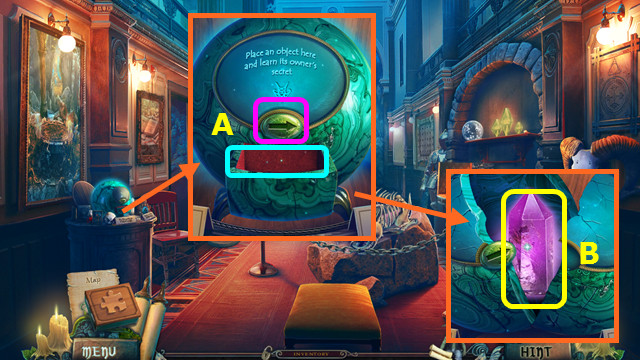
- Place the GATEKEEPER’S GLOVE; press the button 5x (A).
- Take the CRYSTAL ENERGY (B).
- Walk forward.

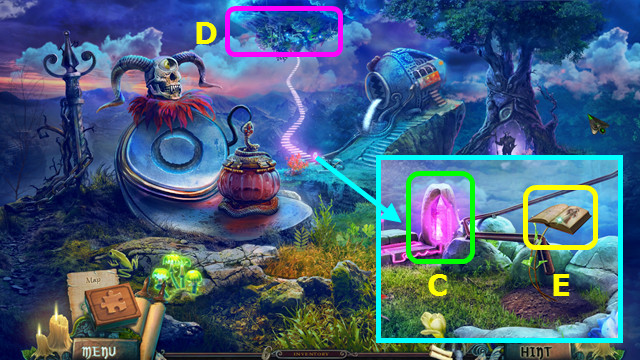
- Place the CRYSTAL ENERGY (C).
- Play the HOP; earn the SEEDS (D).
- Place the SEEDS; take the SACRED BOOK (E).
- Walk down and left.

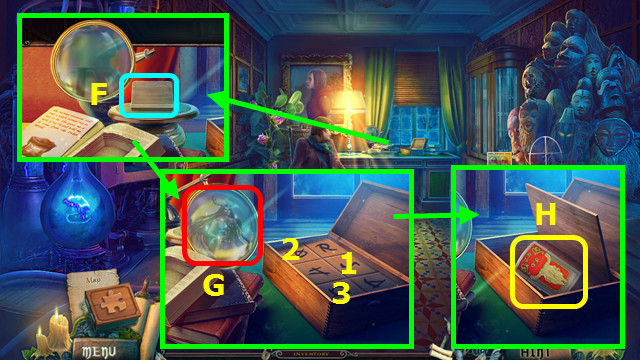
- Place the SACRED BOOK (F).
- Play the HOP (G).
- Press 1-3.
- Take the LIGHTER (H).
- Combine the CANDLE and LIGHTER to make the MOLTEN WAX (inventory).
- Walk down and forward.

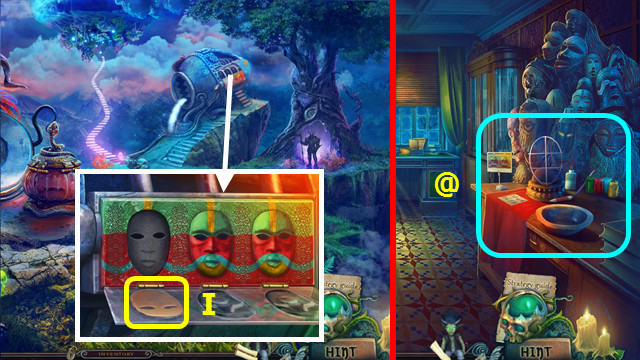
- Open the panel; use the MOLTEN WAX and take the MASK CASTING (I).
- Walk down and left.
- Select (@).

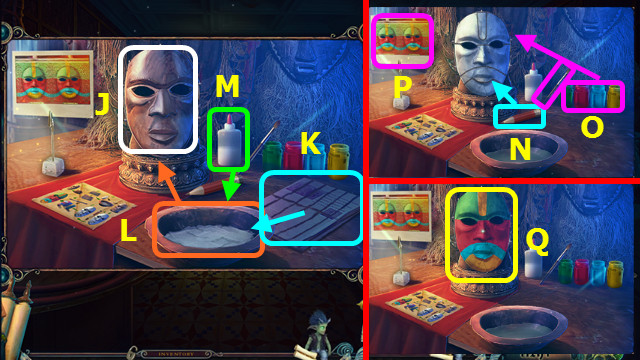
- Place the MASK CASTING (J) and NEWSPAPER (K).
- Select (K) 4x; move to (L).
- Use (M) on (L).
- Move (L) to (J) 2x.
- Use (N) on the mask casting.
- Select the paintbrush (O) and use the paints to finish the mask as shown (P).
- Take the RITUAL MASK (Q).
- Walk down and forward.

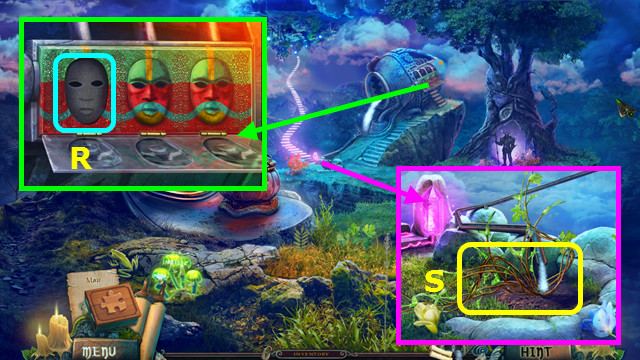
- Place the RITUAL MASK (R).
- Take the VINES (S).

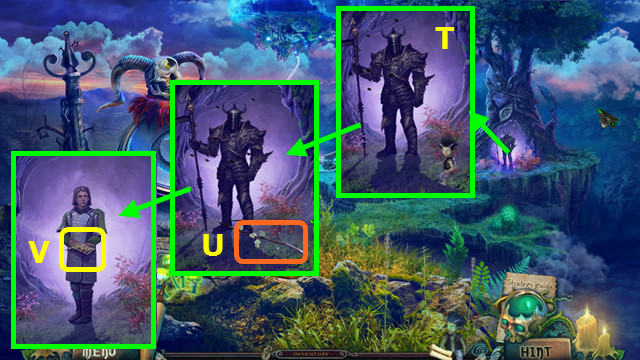
- Use the IMP and VINES (T).
- Pull the vine (U).
- Take the CASTLE EMBLEM (V).
- Walk right.
Chapter 2: The Bewitched Wood

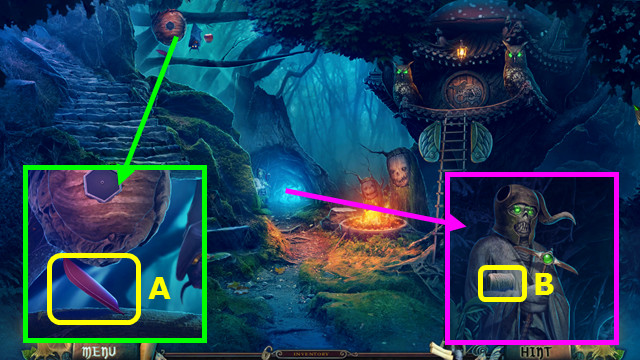
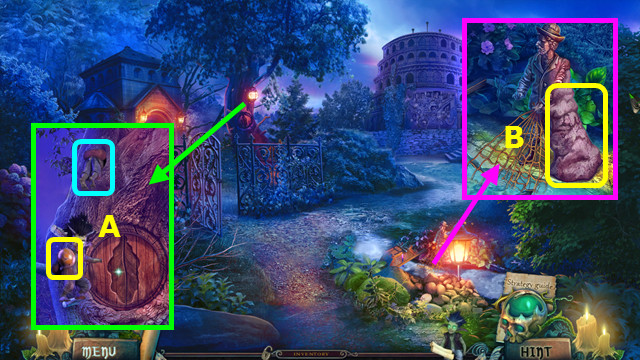
- Take the RED FEATHER (A).
- Take the TWINE (B).
- Walk left.

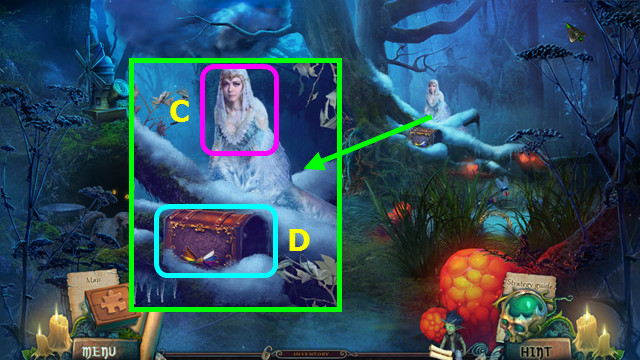
- Talk to Vesta (C).
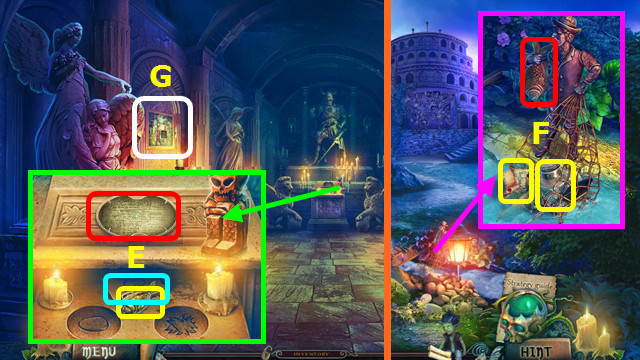
- Select the chest (D).

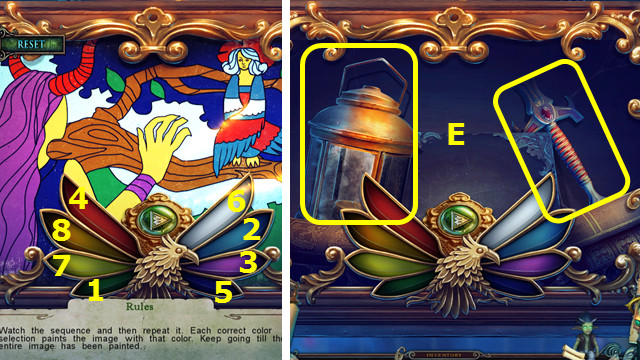
- Place the RED FEATHER and push the arrow button.
- Select 1-8.
- Take the LANTERN and SWORD HILT (E).
- Walk down.

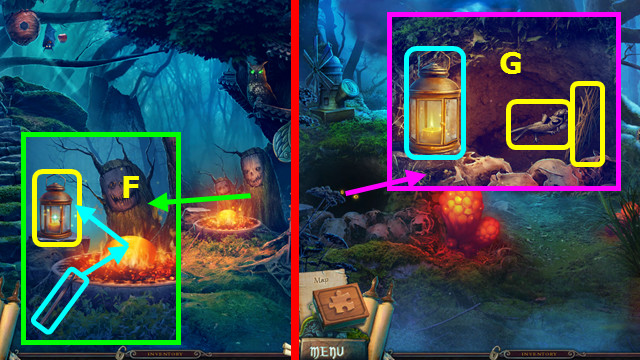
- Place the LANTERN, use the stick on the fire, and then the lantern; take the LIT LANTERN (F).
- Walk left.
- Use the LIT LANTERN; take the BROKEN BIRD and BRUSHWOOD (G).
- Restore the BROKEN BIRD to make the MECHANICAL BIRD (inventory).
- Walk down.

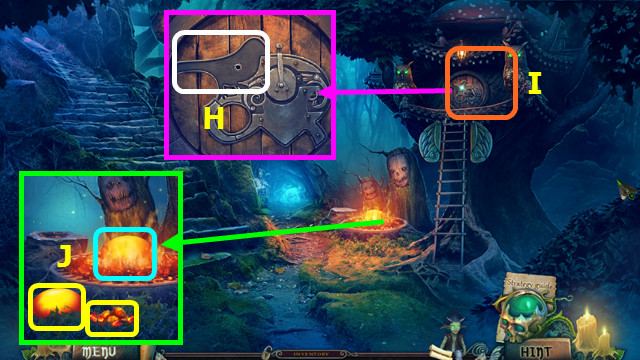
- Place the MECHANICAL BIRD (H).
- Play the HOP; earn the POT HOOK (I).
- Use the POT HOOK; take the FIRE SALAMANDER EGG and EMBERS (J).
- Walk left.

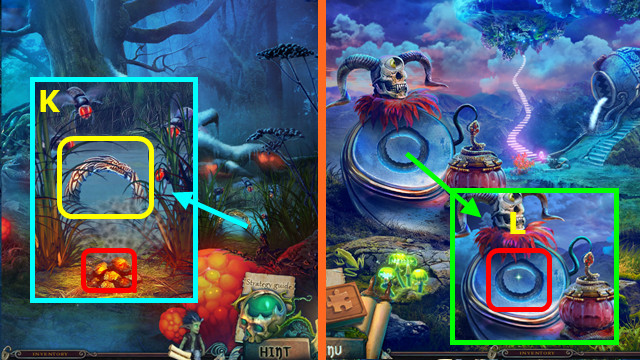
- Use the EMBERS; take the OUROBOROS (K).
- Walk down 2x.
- Place the OUROBOROS (L).

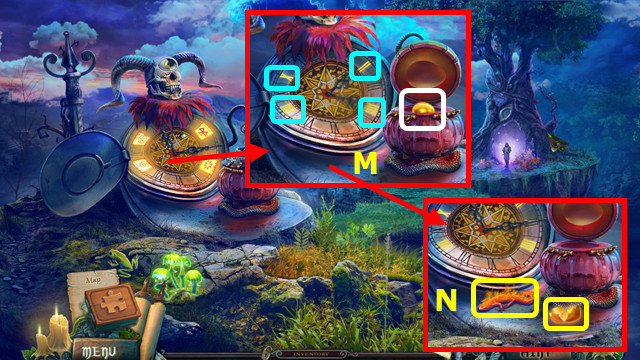
- Change the symbols as shown; place the FIRE SALAMANDER EGG (M).
- Take the FIRE SALAMANDER SHELL and FIRE SALAMANDER (N).
- Walk right and left.

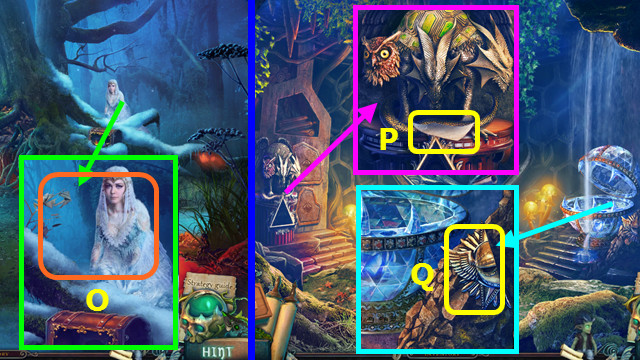
- Use the FIRE SALAMANDER (O).
- Walk forward.
- Take the TISSUE PAPER (P).
- Arrange the BRUSHWOOD; add the TISSUE PAPER and TWINE to make the KITE (inventory).
- Take the 1st FALLEN WARRIOR EMBLEM FRAGMENT (Q).
- Walk down.

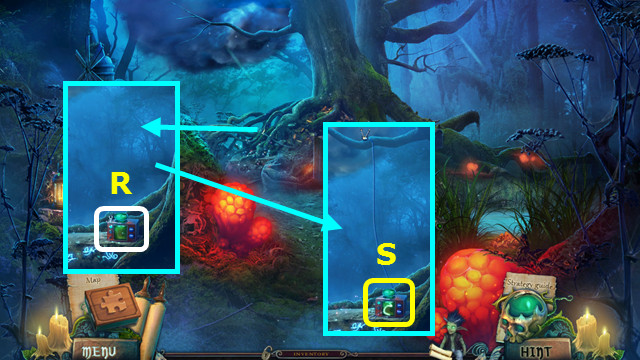
- Place the LIGHTNING CATCHER (R).
- Use the IMP and KITE; take the LIGHTNING (S).
- Walk forward.

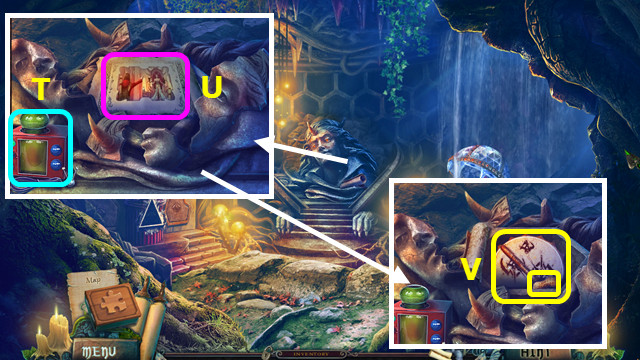
- Place the LIGHTNING (T).
- Play the HOP (U).
- Take the PEANUT and TAMBOURINE (V).
- Walk down 2x.

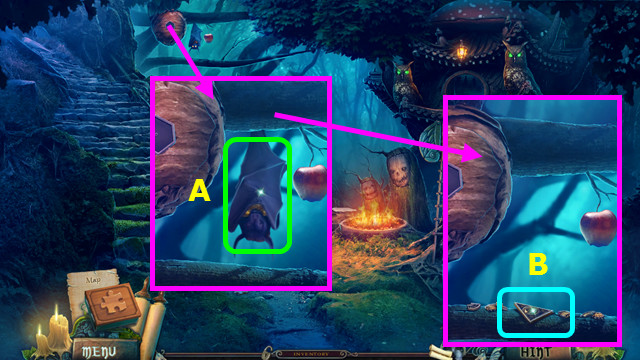
- Use the TAMBOURINE (A).
- Play the HOP; earn the ALL-SEEING EYE (B).
- Walk left and forward.

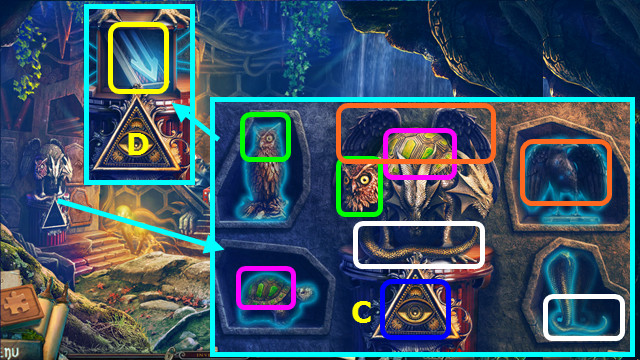
- Place the ALL-SEEING EYE (C).
- Restore the 4 animals (color-coded).
- Take the WIND RUNE (D).
- Walk down.

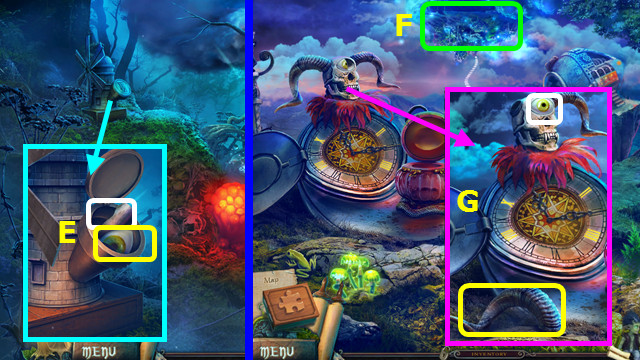
- Place the WIND RUNE; take the EYE PIECE and read the note (E).
- Walk down 2x.
- Play the HOP; earn the AIR PLANT (F).
- Place the EYE PIECE; take the HORN (G).
- Walk right.

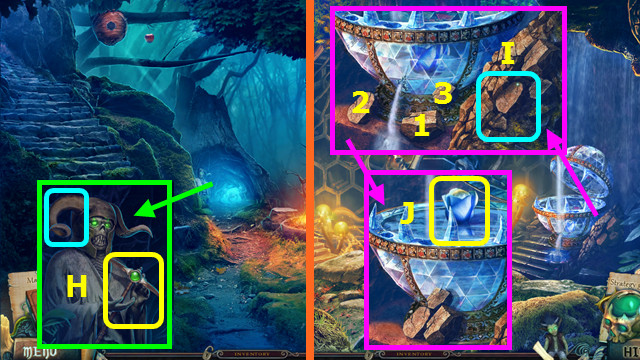
- Place the HORN; take the PICKAX (H).
- Walk left and forward.
- Use the PICKAX (I); select 1-3.
- Take the WATER LILY BUD (J).
- Walk down.

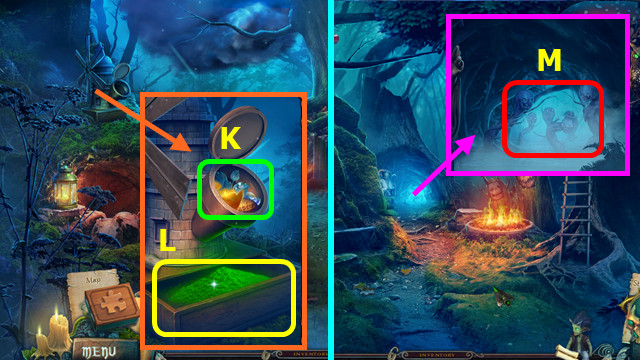
- Place the PEANUT, FIRE SALAMANDER SHELL, WATER LILY BUD, and AIR PLANT (K).
- Take the MAGIC POWDER (L).
- Walk down.
- Use the MAGIC POWDER (M).
- Walk forward.
Chapter 3: The Locks

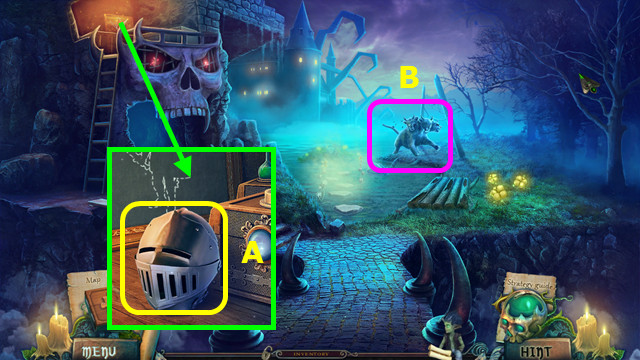
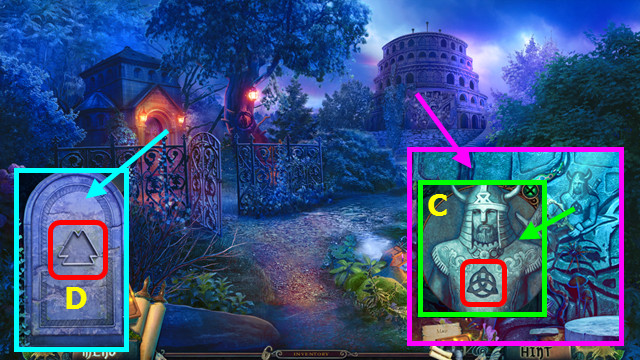
- Take the HELMET (A).
- Select (B).

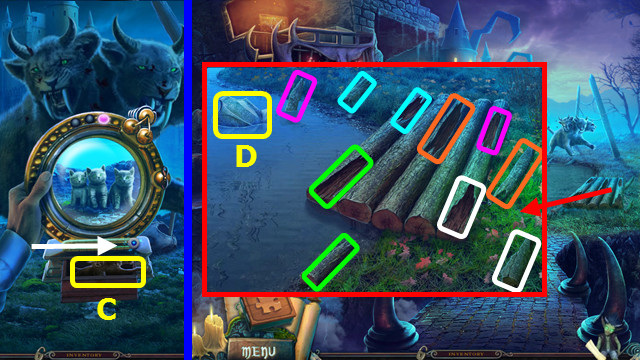
- Use the GLASS OF TRUTH, slide the button, and take the MONSTER EMBLEM (C).
- Walk down.
- Restore the logs (color-coded).
- Take the CHEST ARMOR (D).
- Walk left.

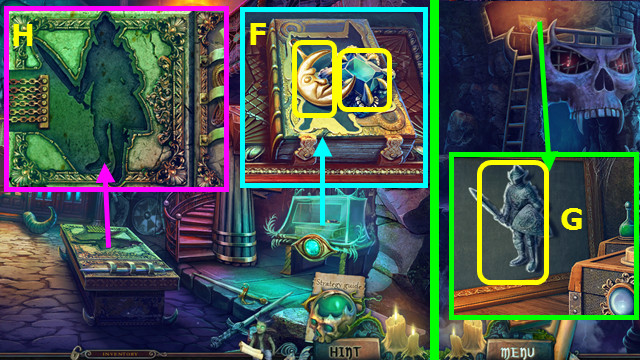
- Take the MOON and SAPPHIRE; place the CASTLE EMBLEM and MONSTER EMBLEM (F).
- Play the HOP; earn the IMAGE OF KNIGHT and MAGIC CHALK.
- Walk down.
- Use the MAGIC CHALK; take the KNIGHT FIGURINE (G).
- Walk left.
- Place the KNIGHT FIGURINE (H).

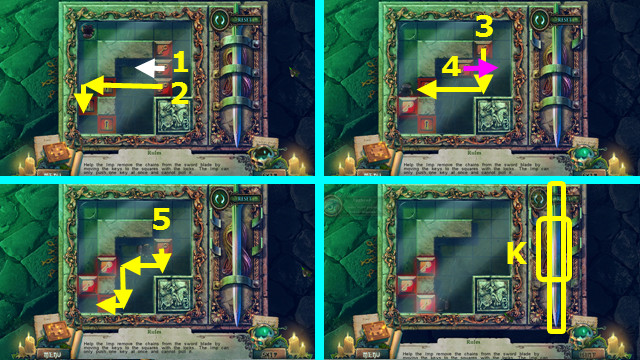
- Move the keys along the paths (1-5).
- Take the SWORD BLADE and ROPE (K).
- Walk down.

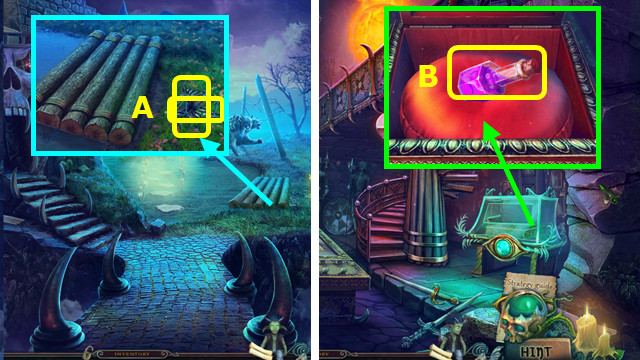
- Use the ROPE; take the SCALES and 2nd FALLEN WARRIOR EMBLEM FRAGMENT (A).
- Walk left.
- Place the 2 FALLEN WARRIOR EMBLEM FRAGMENTS; take the ELIXIR (B).
- Walk down.

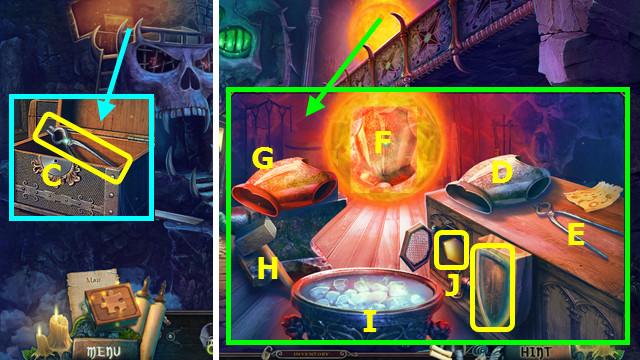
- Place the ELIXIR; take the TONGS (C).
- Walk left.
- Place the CHEST ARMOR (D) and TONGS (E).
- Move D to F; use E on F and G.
- Use H on G 3x.
- Use E on G and I.
- Take the HONEYCOMB and SHIELD (J).
- Walk down 2x.

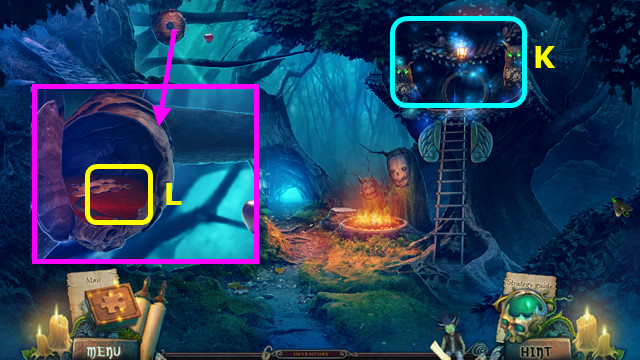
- Play the HOP; earn the STRENGTH POTION (K).
- Combine the SWORD BLADE, SWORD HILT, and STRENGTH POTION to make the MAGIC SWORD (inventory).
- Place the HONEYCOMB; move the spores and take the CLOTH (L).
- Open the HELMET; add the CLOTH and EMBERS to make the RESPIRATOR MASK (inventory).
- Walk forward.

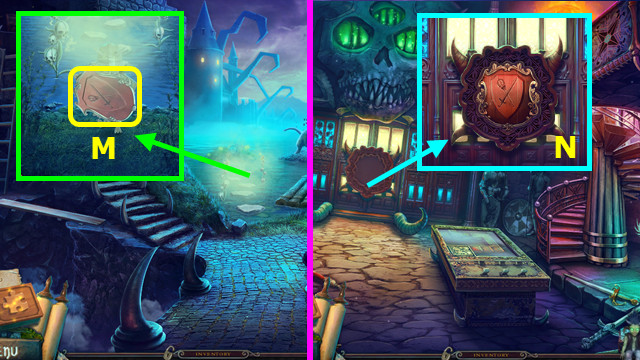
- Use the IMP and RESPIRATOR MASK; take the KNIGHT’S COAT OF ARMS (M).
- Walk left.
- Place the KNIGHT’S COAT OF ARMS (N).

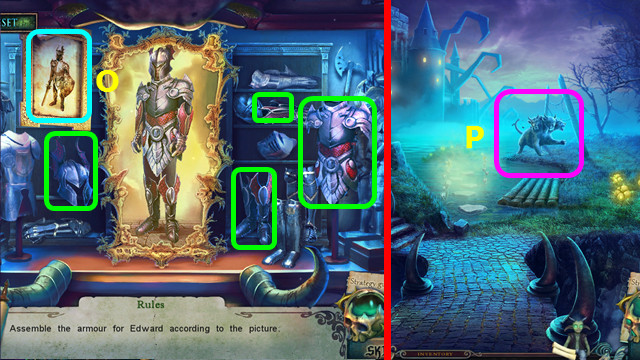
- Place the IMAGE OF KNIGHT (O).
- Select the armor (green).
- Walk down.
- Select (P).

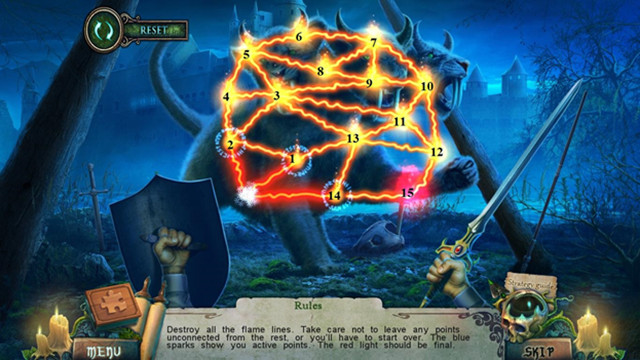
- Use the SHIELD and MAGIC SWORD.
- Select 1-15.
- Walk forward.

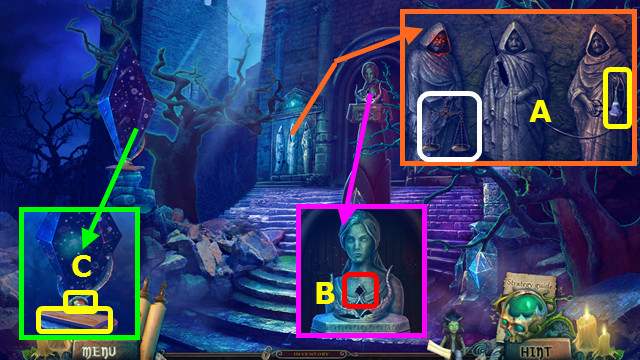
- Place the SCALES and take the SILVER BELL (A).
- Place the SAPPHIRE; play the HOP (B).
- Take the TABLET and SERPENT HEART (C).
- Walk forward.

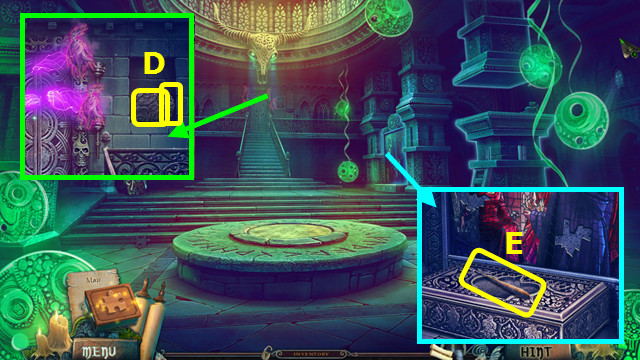
- Select the painting 3x; take the BLACK TABLET and KEY OF LIFE (D).
- Take MOIRA’S SPINDLE (E).
- Walk down.

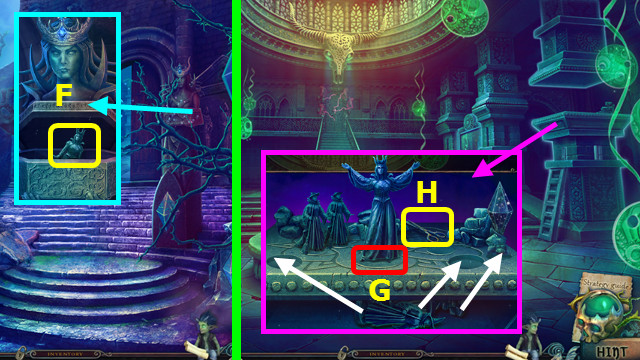
- Place the BLACK TABLET; take the MARBLE WITCH (F).
- Walk forward.
- Place the MARBLE WITCH; move the 3 figures to the tableau (G).
- Take MOIRA’S SCISSORS (H).
- Walk down.

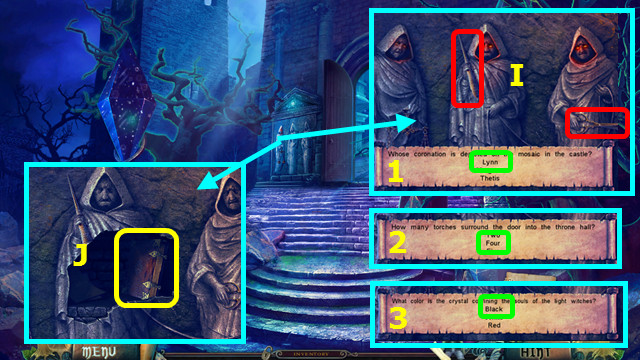
- Place MOIRA’S SPINDLE and MOIRA’S SCISSORS (I).
- Answer the questions (1-3).
- Take the BOOK OF LIFE (J).
- Combine the BOOK OF LIFE and KEY OF LIFE; restore the picture and take the DRAGON CLAW (inventory).

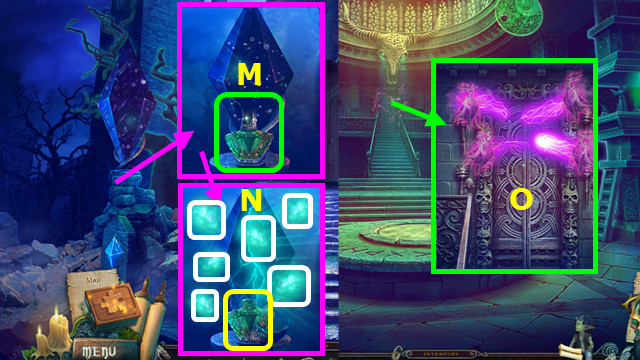
- Place and select the DRAGON CLAW (M).
- Select the 6 souls; take the BRIGHT SOULS (N).
- Walk forward.
- Use the BRIGHT SOULS (O).
- Walk forward.
Chapter 4: Prison

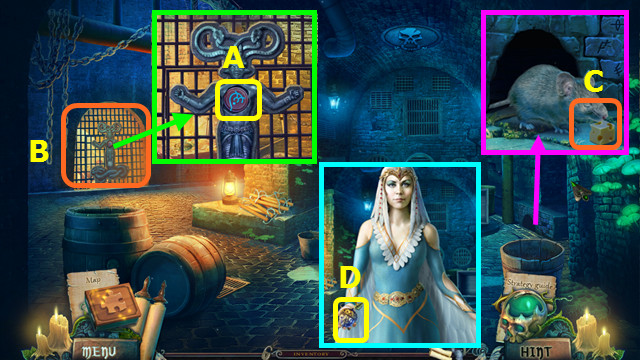
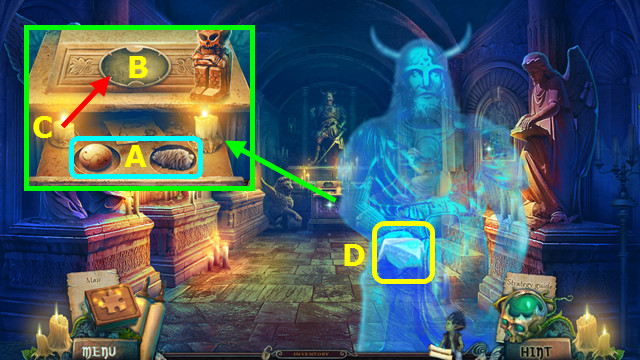
- Take the RUNE CHIP; place the SERPENT HEART (A).
- Play the HOP; earn the MONEY POUCH (B).
- Open the MONEY POUCH; move items and take the CHEESE and EMPTY FLASK (inventory).
- Select the hole; place the CHEESE (C).
- Take the DIAMOND NUT (D).

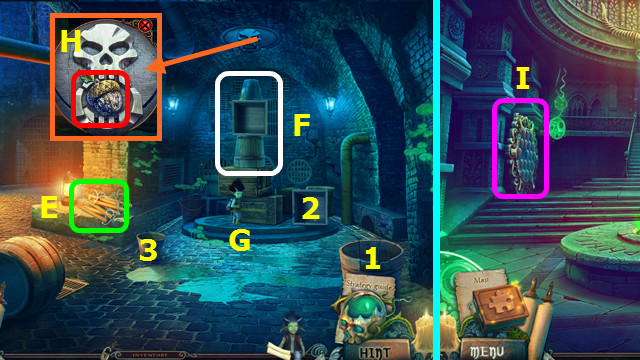
- Play the HOP; earn the ROPE LADDER (E).
- Place the 3 items (1-3) on the stack (F).
- Give the IMP the ROPE LADDER (G).
- Place the DIAMOND NUT (H).
- Go up the ladder.
- Select (I).

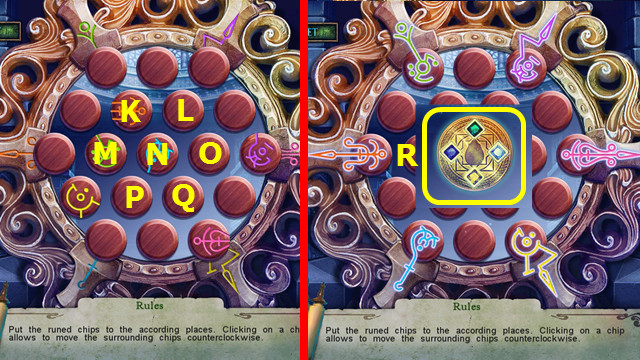
- Place the RUNE CHIP.
- Solution: Kx4-O-L-Mx3-N-Px4-Q-O-Qx5.
- Take the HARPY’S AMULET (R).
- Walk forward.

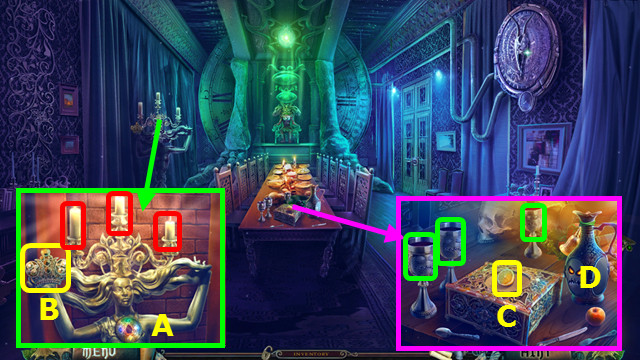
- Select the 3 candles (red); place the HARPY’S AMULET (A).
- Take the CROWN (B).
- Take the LEMON (C).
- Pour the 3 goblets (green) into the pitcher (D).
- Walk down.

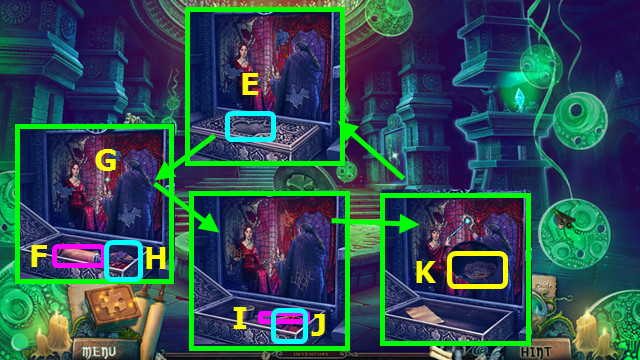
- Place the CROWN (E).
- Use the glue (F) on the mosaic (G).
- Place the pieces (H) on the mosaic.
- Select the palette knife (I); use the cloth (J) on the mosaic.
- Read the note; take the MAGIC BOWL (K).
- Walk forward.

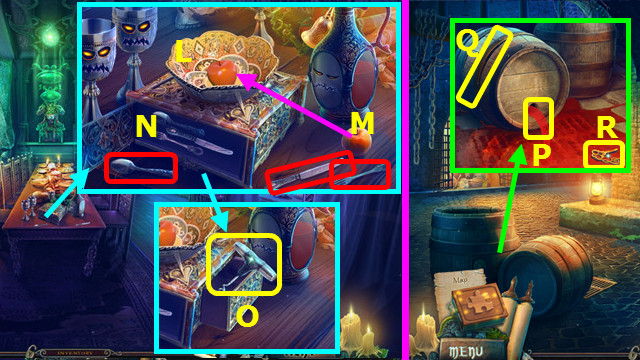
- Place the MAGIC BOWL (L); move (M) to (L).
- Restore the silverware (red) to the case (N).
- Take the CORKSCREW (O).
- Return to the Prison.
- Use the CORKSCREW; use the EMPTY FLASK to take the FLASK OF WINE (P).
- Take the BARREL HOOP (Q) and CLOCKWORK KEY (R).
- Go up and forward.

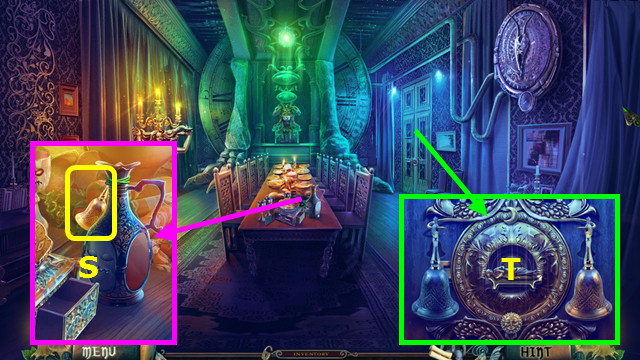
- Use the FLASK OF WINE; take the GOLDEN BELL (S).
- Place the SILVER BELL and GOLDEN BELL (T).
- Walk right.

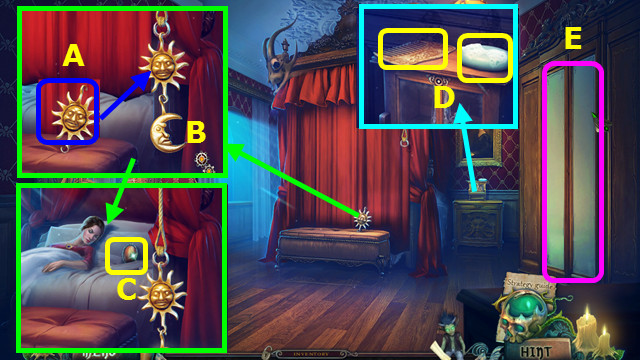
- Hang the sun (A) and add the MOON (B).
- Take the GOLD AGATE (C).
- Take the COMB and SOAP (D).
- Open the closet; play the hop to earn the HAT (E).
- Walk down.

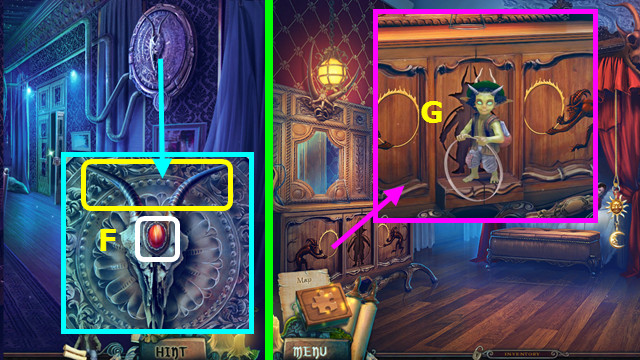
- Place the GOLD AGATE; take the HORNS (F).
- Combine the HAT and HORNS to make the HAT WITH HORNS (inventory).
- Walk right.
- Give the BARREL HOOP and HAT WITH HORNS to the imp (G).

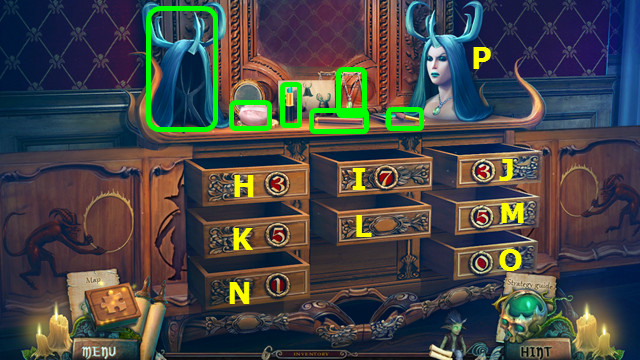
- Select O-N-L-J-L-H-L-K-L-M-L-I.
- Use the 6 items (green) on the bust (P) to make MORGANA’S HEAD.
- Walk down.

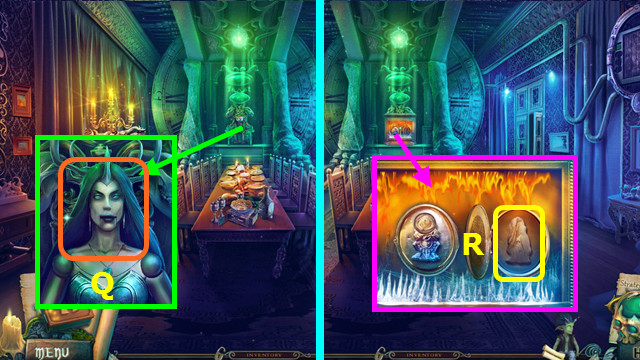
- Place MORGANA’S HEAD (Q).
- Close the door; take the DEMON (R).
- Walk right.

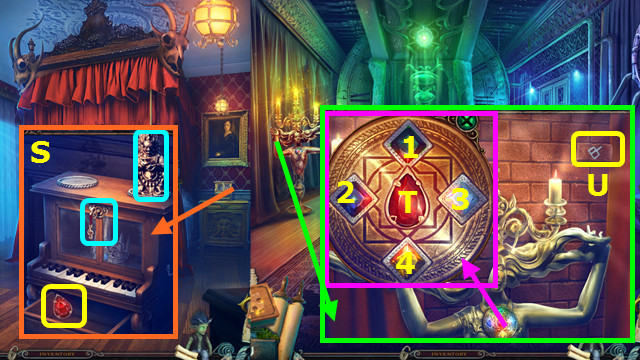
- Place the CLOCKWORK KEY and DEMON; take the RUBY TEARDROP (S).
- Walk down.
- Place the RUBY TEARDROP (T); touch 1-4.
- Take the RUNE STONE (U).
- Go to the Prison.

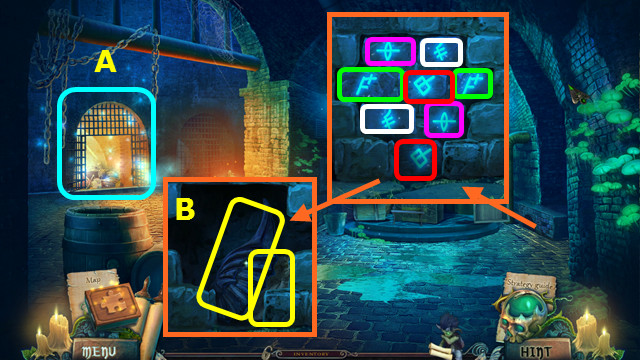
- Play the HOP; earn the BANSHEE SIGNET (A).
- Place the RUNE STONE; select pairs (color-coded).
- Take the DRAGON WING and CLAY (B).
- Go up and forward.

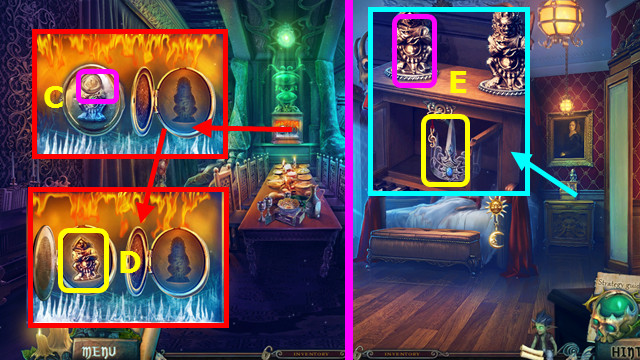
- Use the BANSHEE SIGNET (C).
- Place the CLAY; take the BANSHEE (D).
- Walk right.
- Place the BANSHEE; take the WITCHES CROWN (E).

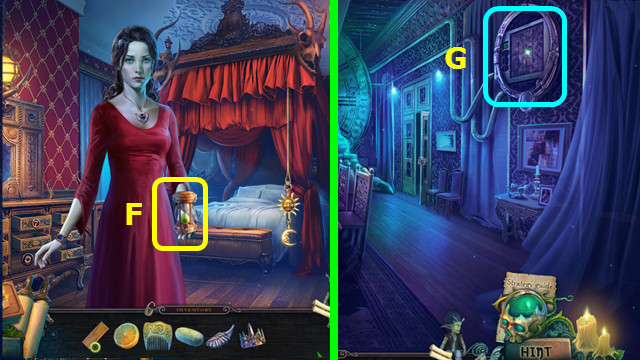
- Take the RULER OF TIME (F).
- Walk down.
- Select (G).

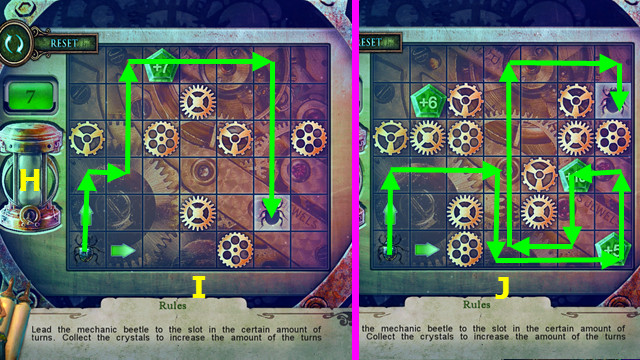
- Place the RULER OF TIME (H).
- Solution, part 1 (I).
- Solution, part 2 (J).
Chapter 5: Castle Courtyard

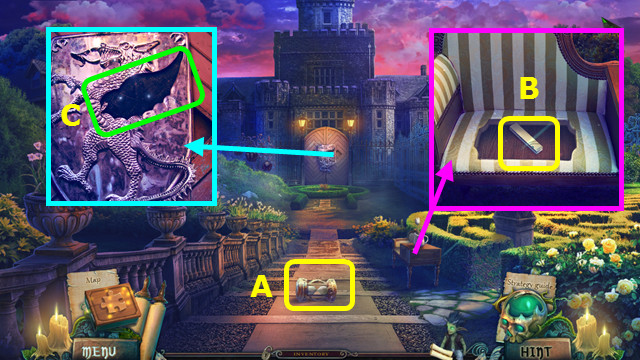
- Take the RULER OF TIME (A).
- Take the PIANO KEY (B).
- Remove the sign; place the DRAGON WING (C).
- Walk forward.

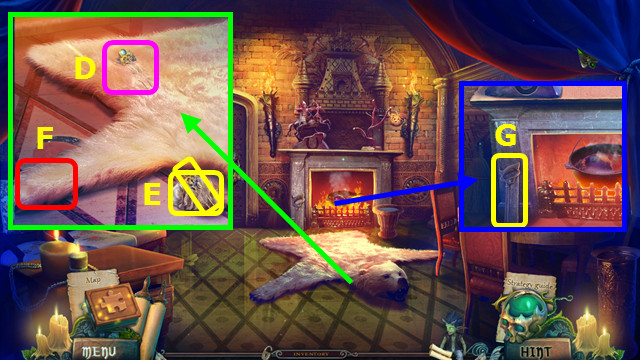
- Use the COMB (D).
- Take the PIN and BEAR FUR (E).
- Move the paw (F).
- Take the SAW (G).
- Walk down.

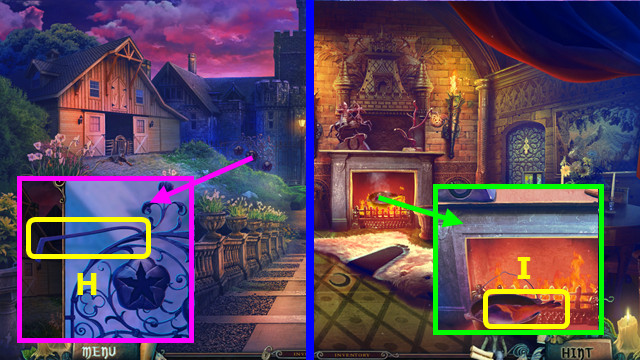
- Use the SAW; take the FIRE IRON (H).
- Walk forward.
- Use the FIRE IRON; take the HAM (I).
- Walk down.

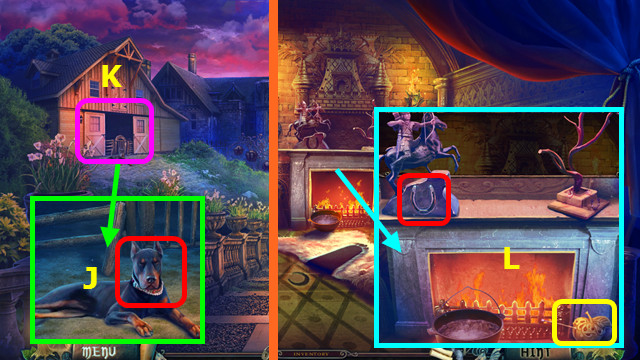
- Use the HAM (J).
- Play the HOP; earn the HORSESHOE (K).
- Walk forward.
- Place the HORSESHOE; take the WOODEN APPLE (L).
- Walk down.

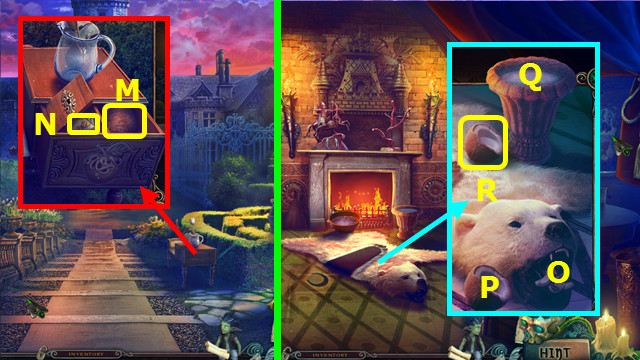
- Place the WOODEN APPLE; take the CRACKED COCONUT (M).
- Use the PIN; take the TORN CARD (N).
- Walk forward.
- Place the COCONUT (O).
- Use (P) on (Q); take the COCONUT WATER (R).
- Walk down.

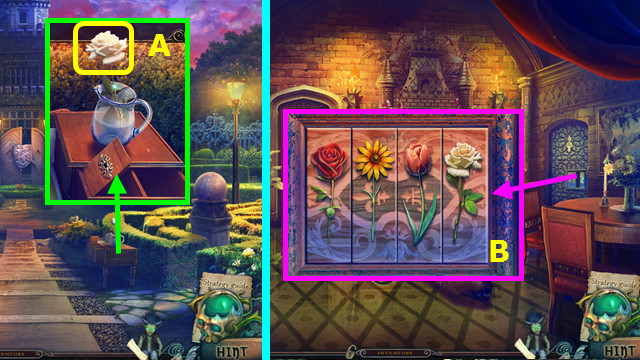
- Use the COCONUT WATER; take the ROSE (A).
- Combine the TABLET and TORN CARD; add the ROSE to make the FLOWER PANEL (inventory).
- Walk forward.
- Place the FLOWER PANEL; swap the flowers as shown (B).
- Walk right.

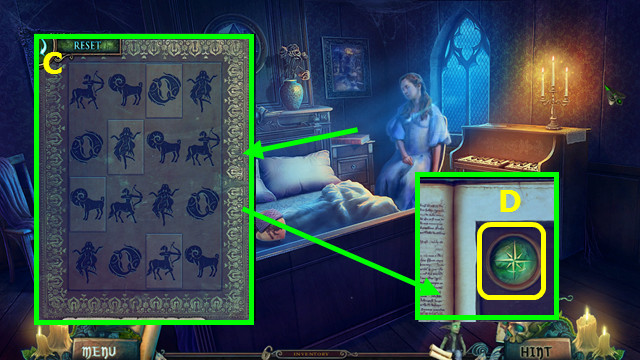
- Change the 4 tiles (C).
- Take the WIND ROSE (D).

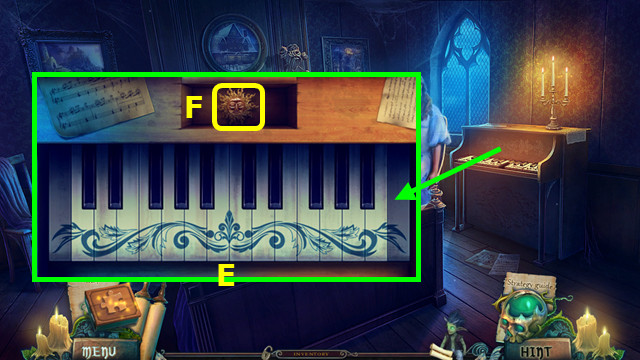
- Place the PIANO KEY; restore the keyboard (E).
- Take the SUN (F).
- Walk down.

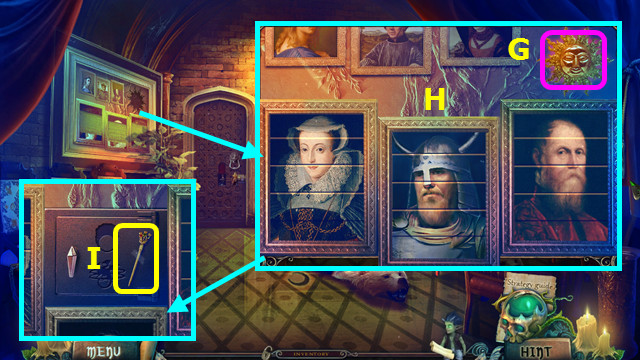
- Place the SUN (G).
- Restore the 3 portraits (H).
- Take the PIN (I).
- Walk right.

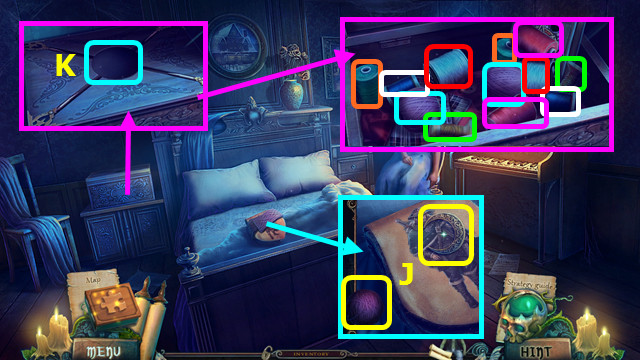
- Use the PIN; take the BALL OF YARN and HALF-MOON (J).
- Place the BALL OF YARN (K).
- Select pairs (color-coded).
- Walk down.

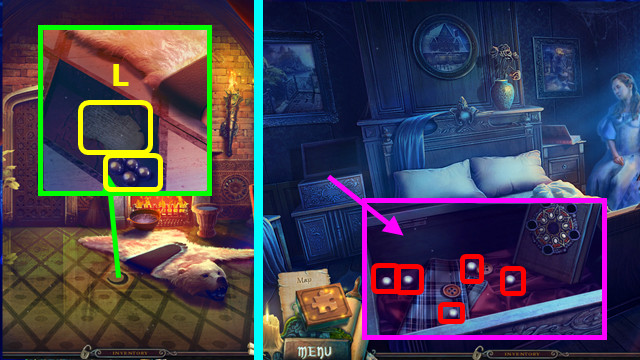
- Place the HALF-MOON; take the CALL SPELL and BEADS (L).
- Walk right.
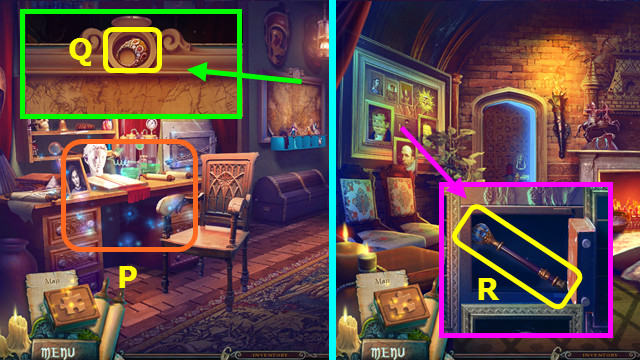
- Place the BEADS; select each bead (red).

- Restore and select the picture (M).
- Take the SILVER CAGE (N).
- Walk down.
- Place the SILVER CAGE (O).
- Walk forward.

- Play the HOP; earn the DRAGON MEDALLION (P).
- Place the WIND ROSE; take the DRAGON RING (Q).
- Walk down.
- Place the DRAGON MEDALLION and DRAGON RING; take the MAGIC WAND (R).
- Walk forward.

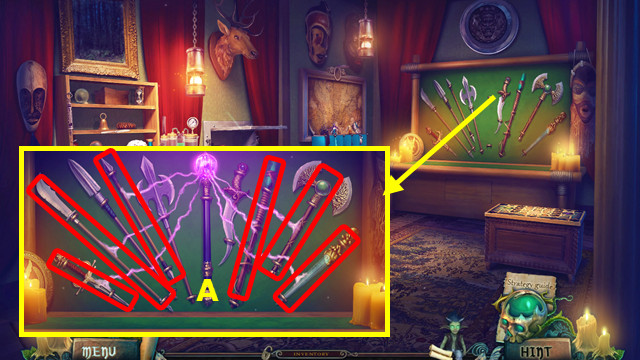
- Place the MAGIC WAND (A).
- Select the 6 weapons (red).

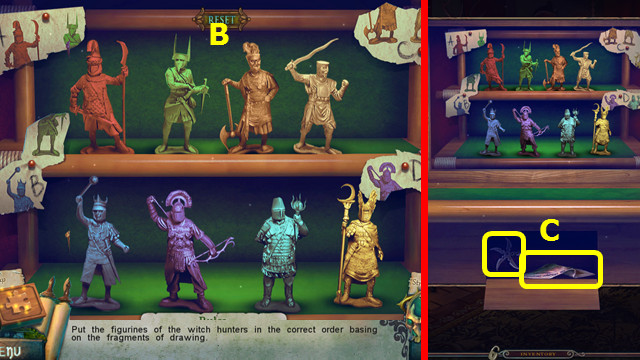
- Solution (B).
- Take the PENNANT and NINJA STAR (C).
- Walk down and right.

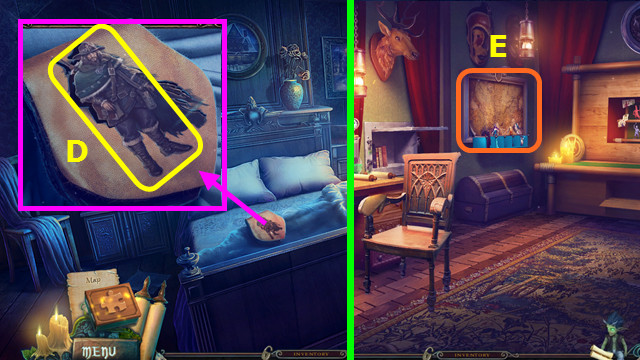
- Use the NINJA STAR; take the WOLFGANG APPLIQUE (D).
- Walk down and forward.
- Select (E).

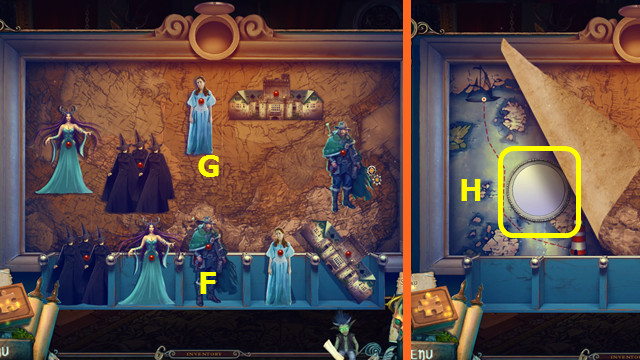
- Place the WOLFGANG APPLIQUE (F).
- Place the cutouts on the map (G).
- Take the MIRROR (H).
- Return to Elizabeth’s Room.

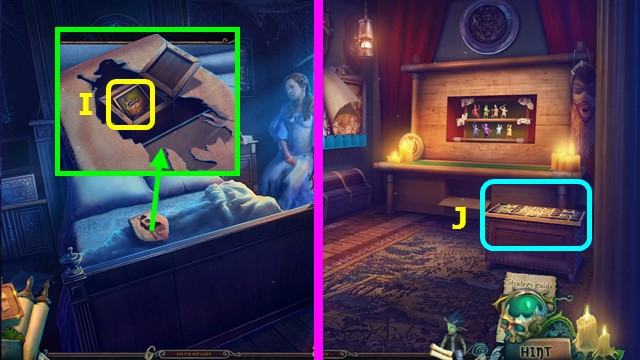
- Place the MIRROR; take the FIGURE (I).
- Walk down and forward.
- Select (J).

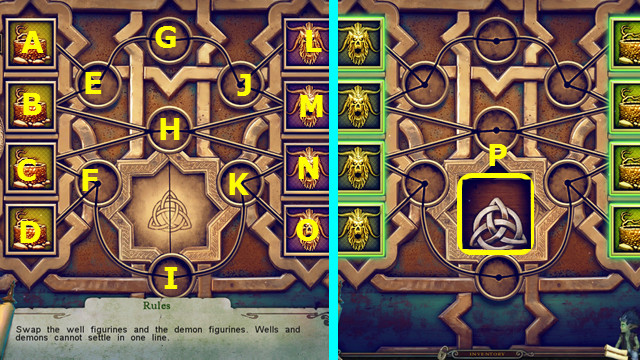
- Place the FIGURE.
- Select N-I-M-G-C-M-I-N-D-C-N-I-C-H-I-D-O-F-H-O-B-K-M-N-G-J-A-H-J-A-L-E-H-L-N-M-K-N-E-B-F-C.
- Read the note; take the IRISH TRINITY KNOT (P).
- Walk down. After the cut-scene, walk right.
Chapter 6: Near the Well

- Use the IMP and SOAP; take the EGG (A).
- Take the CLAY (B).

- Place the IRISH TRINITY KNOT (C); play the HOP to earn the FALLEN WARRIOR EMBLEM.
- Place the FALLEN WARRIOR EMBLEM (D); play the HOP.
- Walk left.

- Place the CALL SPELL; read the instructions and take the BRONZE FISH (E).
- Walk down.
- Place the BRONZE FISH; take the INKWELL and TAPESTRY PIECE (F).
- Walk left.
- Select (G).

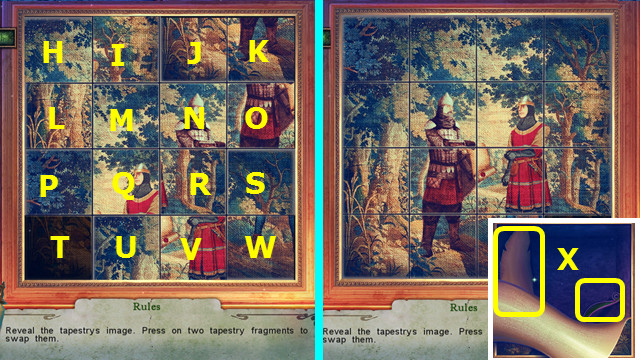
- Place the TAPESTRY PIECE.
- Select U-Q-M-L-P-T-U-V-R-S-O-N-R-S-O-K-J-I-M-Q-R-S-O.
- K-J-I-M-Q-R-S-O-K-J-N-O-K-J-I-H-L-P-T-U-V-W-S-O-N-M-Q.
- P-T-U-V-R-Q-U-V-W-S-O-N-R-Q-P-L-M-N-O-S-R-N-M-L-P-T-U.
- V-W-S-R-Q-P-T-U-V-W-S-R-Q-P-T-U-Q-P-T-U-V-W-S-R-V-W-S.
- R-V-U-Q-R-S-W-V-R-Q-P-T-U-V-W-S-R-Q-U-T-P-Q-R-V-U-T-P.
- Q-U-T-P-Q-U-V-R-Q-P-T-U-Q-R-S-W.
- Take the PARCHMENT and YOKE TALISMAN (X).
- Combine the INKWELL, LEMON, and PARCHMENT to make the INVISIBLE SPELL (inventory).

- Place the EGG and BEAR FUR (A).
- Place the INVISIBLE SPELL (B).
- Use the candle on the spell (C).
- Take the GHOST STOLE (D).
- Walk down.

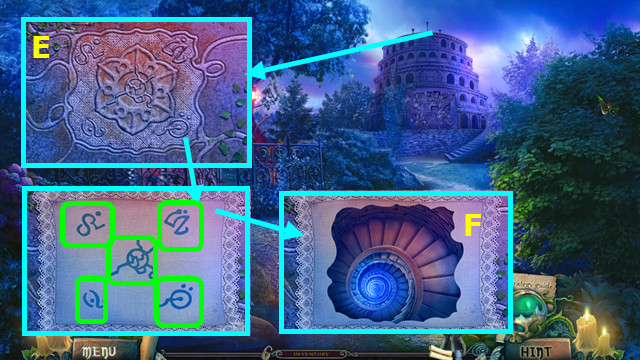
- Use the GHOST STOLE (E).
- Select the 5 symbols (green).
- Go down the stairs (F).

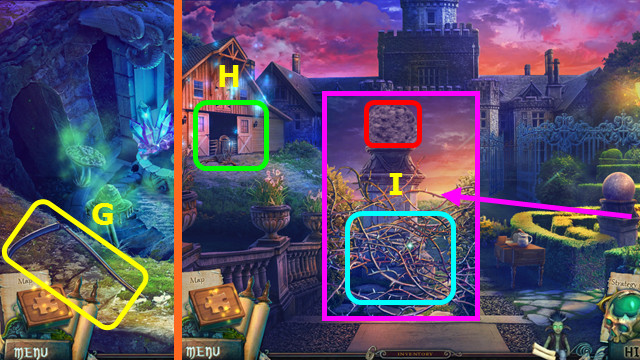
- Take the SCYTHE (G).
- Walk down 2x.
- Play the HOP; earn the SCOOP TALISMAN (H).
- Use the SCYTHE; touch the sphere (I).

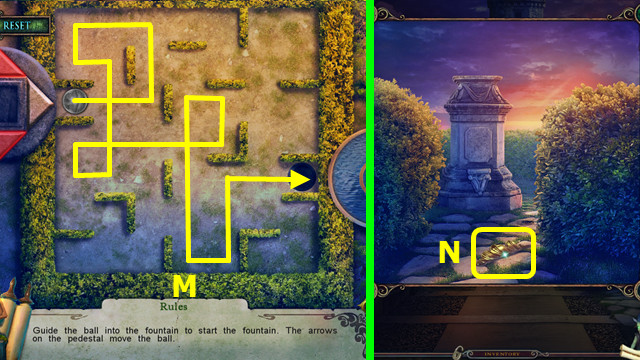
- Solution (M).
- Take the GOLD LEAF (N).
- Walk right.

- Place the GOLD LEAF; take the BUCKET TALISMAN (O).
- Go down the stairs (P).

- Place the YOKE TALISMAN, BUCKET TALISMAN, and SCOOP TALISMAN (red).
- Press the button 3x; take the note and CRYSTAL FROG (R).
- Walk down.
- Place the CRYSTAL FROG; take the HEALING MUSHROOM (S).
- Return to the Inside the Well.

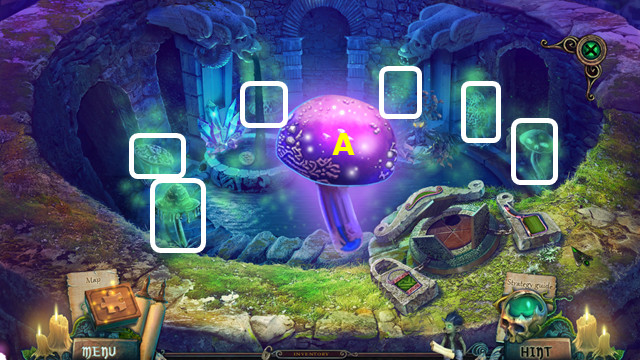
- Place the HEALING MUSHROOM (A).
- Select the 6 mushrooms (white).

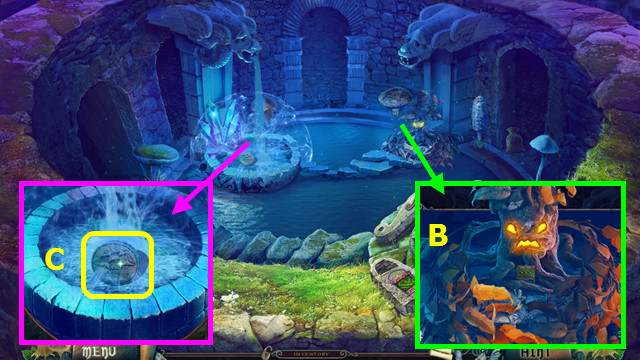
- Talk to the Keeper (B).
- Take the DRAGON SIGNET (C).
- Walk down and left.

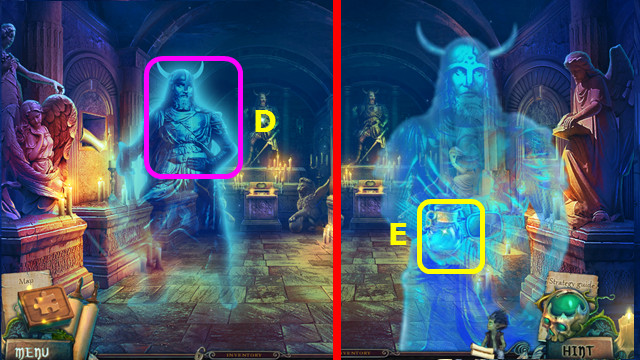
- Use the DRAGON SIGNET (D).
- Take the LIFE-GIVING WATER (E).
- Return to Inside the Well.

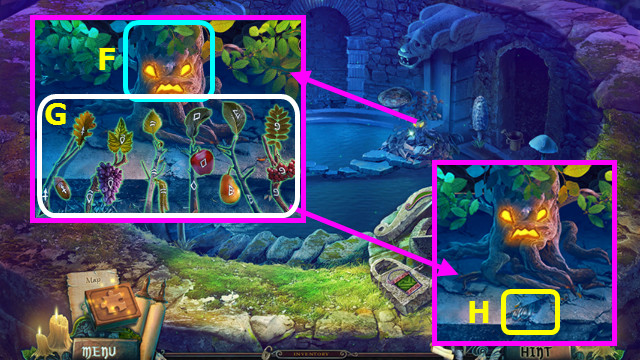
- Use the LIFE-GIVING WATER (F).
- Swap the leaves and fruit as shown (G).
- Take the SILVER LEAF (H).
- Walk down.

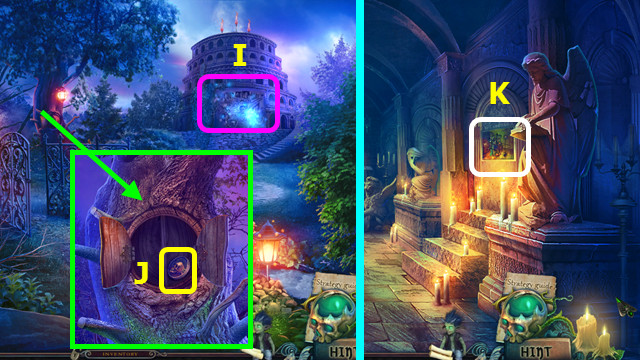
- Play the HOP; earn the SKULL (I).
- Place the SILVER LEAF; take the SKULL DISK (J).
- Walk left.
- Select (K).

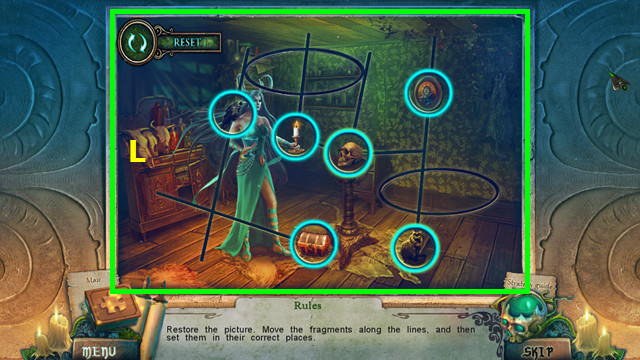
- Place the SKULL DISK; move the chips as shown (L).
- Walk right.
Chapter 7: Morgana’s Hideaway

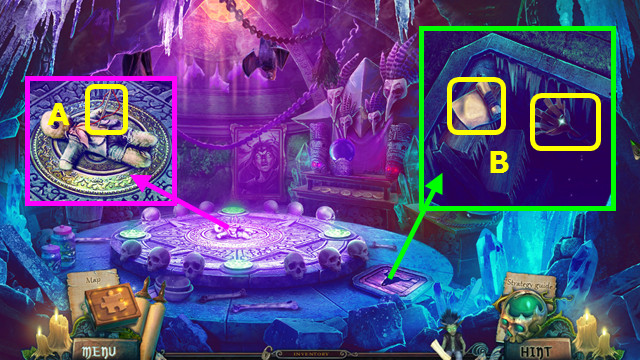
- Take the NEEDLE (A).
- Place the SKULL; take the GRANITE ROLL and TORCH (B).
- Walk down.

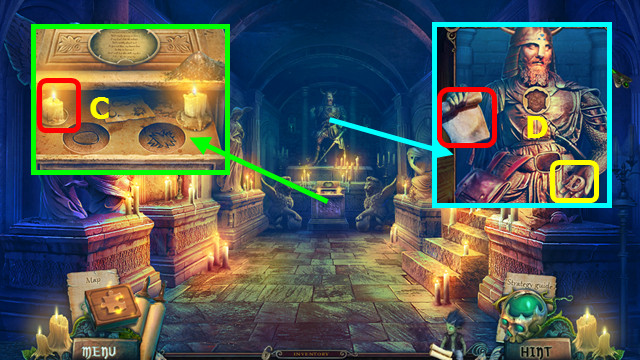
- Use the TORCH; take the LIGHTED TORCH (C).
- Place the GRANITE ROLL; take the LETTER D (D).
- Walk down 2x.

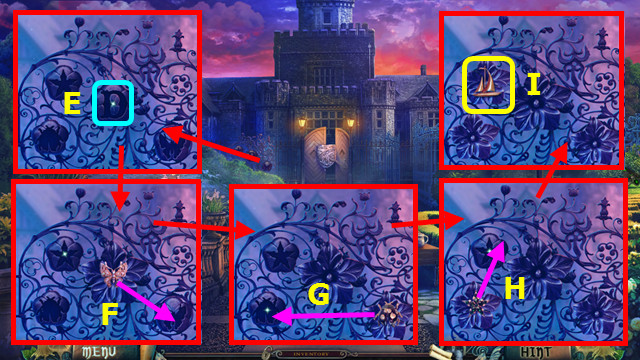
- Place the LETTER D (E).
- Move the butterfly (F).
- Move the bug (G).
- Move the star (H).
- Take the SHIP (I).
- Walk forward 2x.

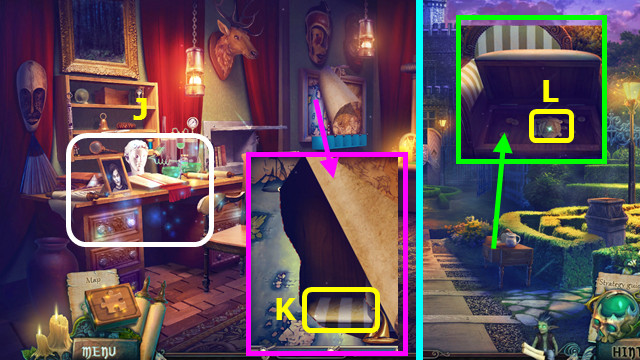
- Play the HOP; earn the MITTEN (J).
- Place the SHIP; take the SOFA CUSHION (K).
- Walk down 2x.
- Place the SOFA CUSHION; take the GUARDIAN MEDALLION (L).
- Walk right and left.

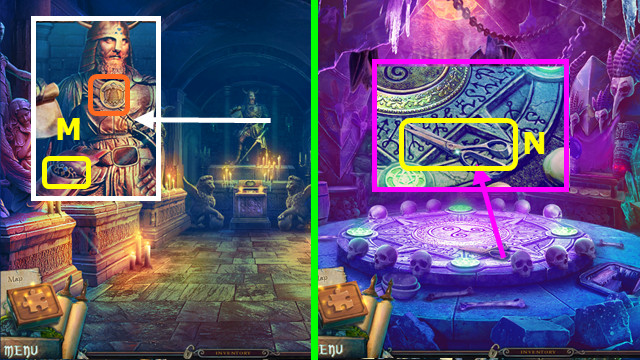
- Place the GUARDIAN MEDALLION; take the 1st PIECE OF RIM (M).
- Walk right.
- Take the SCISSORS (N).
- Combine the MITTEN, SCISSORS, and NEEDLE to make the SMALL COAT (inventory).

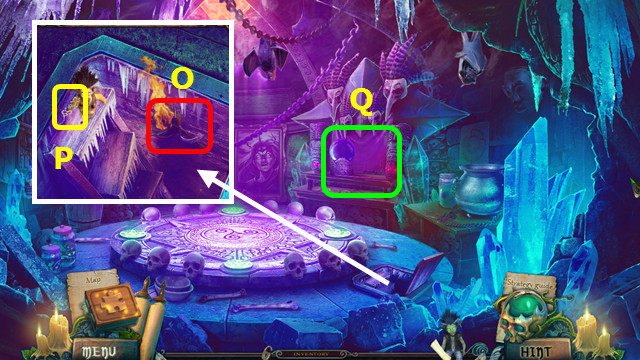
- Place the LIGHTED TORCH (O).
- Give the IMP the SMALL COAT; take the 2nd PIECE OF RIM (P).
- Select (Q).

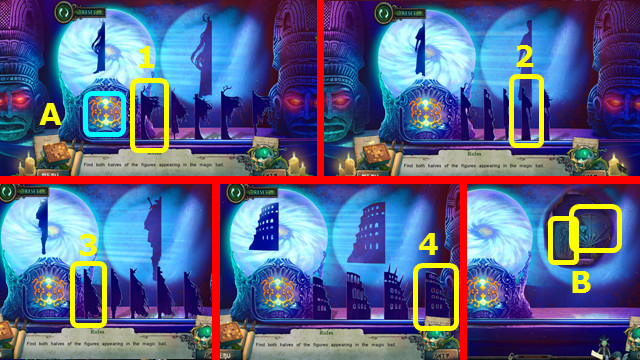
- Place the 2 PIECES OF RIM (A).
- Select 1-4; the position of your silhouettes may differ.
- Take the GOLD BUCKLE and MAGIC FAN (B).
- Walk down.

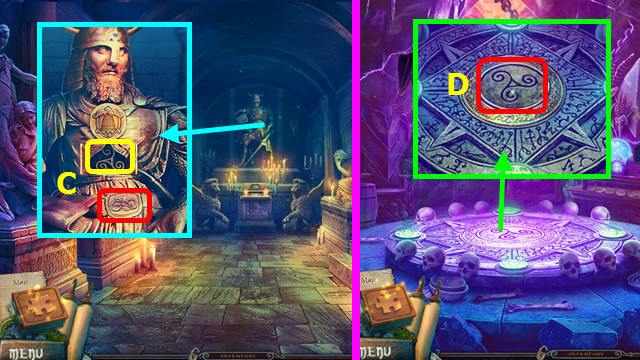
- Place the GOLD BUCKLE; take the TRISKELION (C).
- Walk right.
- Place the TRISKELION (D).

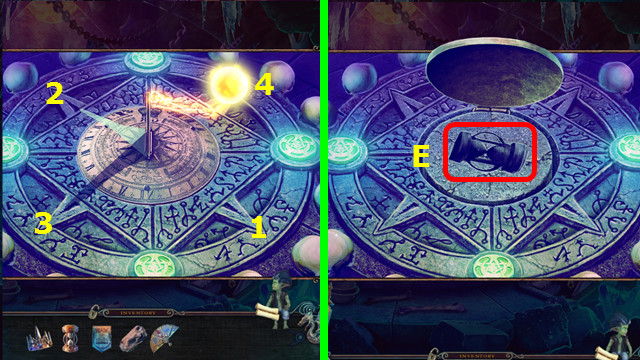
- Move the orb 1-4.
- Place the RULER OF TIME (E).
- Walk right.

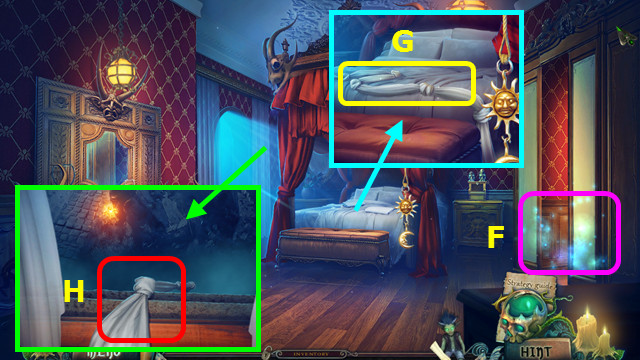
- Play the HOP; earn the WITCH’S COIN (F).
- Select the 2 sheets; take the BEDSHEET ROPE (G).
- Use the BEDSHEET ROPE; go forward (H).

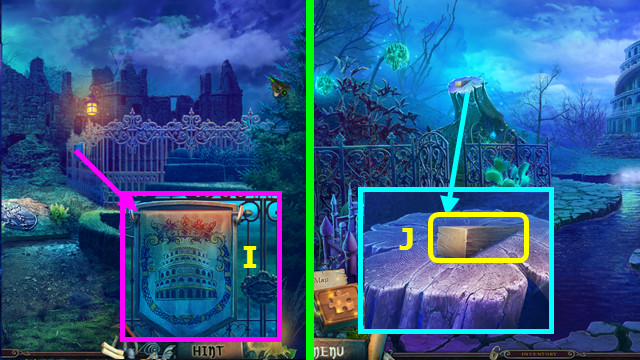
- Place the PENNANT (I); play the HOP.
- Walk right.
- Take the WEDGE (J).
- Walk down.

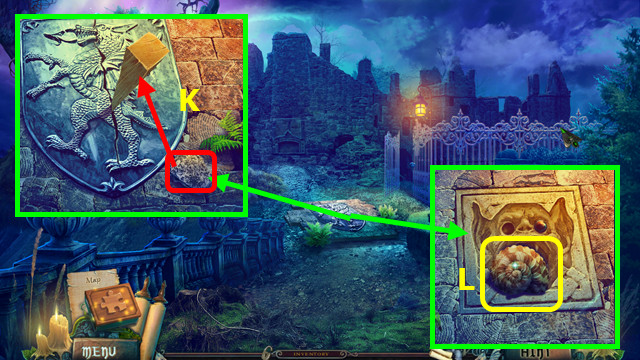
- Place the WEDGE and use the rock (K).
- Take the SHELL (L).
- Walk right.

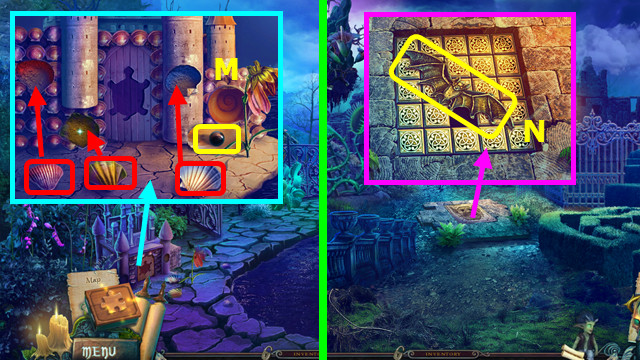
- Restore the 3 shells (red); place the SHELL and take the PEARL (M).
- Walk down.
- Place the PEARL; take the BAT (N).
- Walk right.

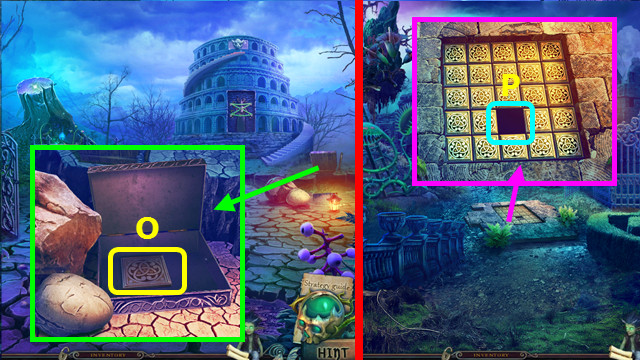
- Remove the mud 2x, place the BAT, and take the CELTIC TILE (O).
- Walk down.
- Place the CELTIC TILE (P).

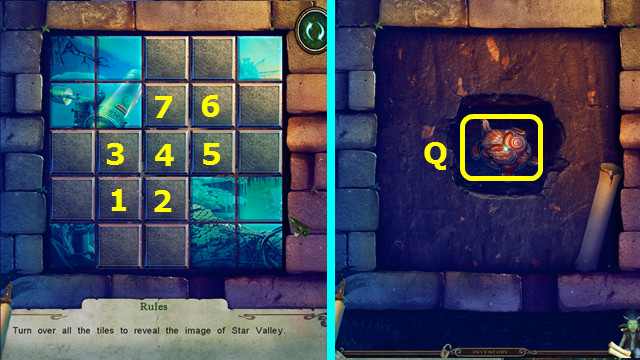
- Press 1-7.
- Read the note; take the TURTLE (Q).
- Walk right.

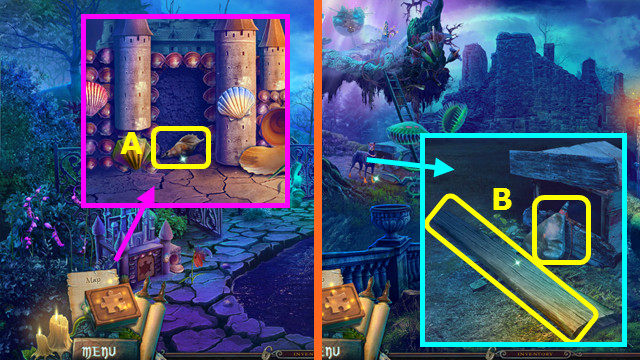
- Place the TURTLE; take the MAGIC WHISTLE (A).
- Walk down.
- Use the MAGIC WHISTLE; take the WINESKIN and BOARD (B).
- Walk right.

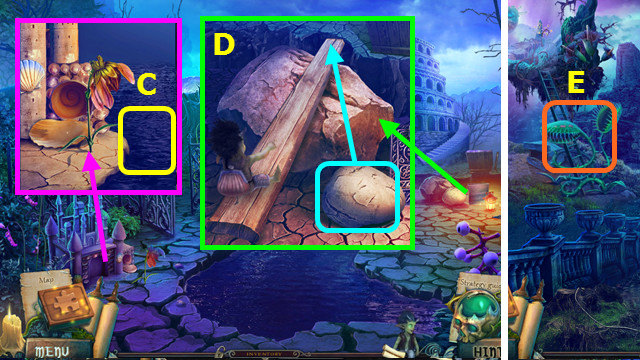
- Use the WINESKIN to take the BLACK WATER (C).
- Use the IMP and BOARD; drop the rock on the board (D).
- Walk down.
- Use the BLACK WATER (E).
- Walk left.
Chapter 8: Star Valley

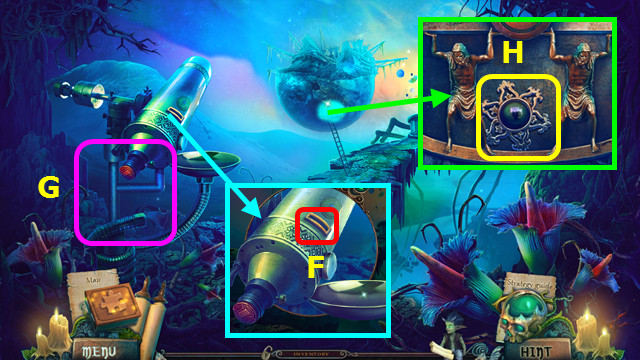
- Use the WITCH’S COIN (F).
- Play the HOP; earn the HYDRA CONSTELLATION (G).
- Use the MAGIC FAN; take the STAR (H).
- Walk down and right.

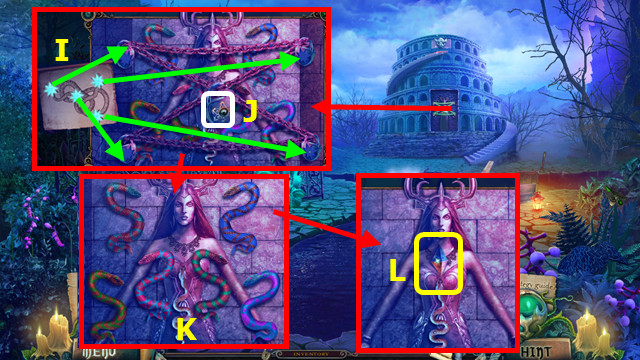
- Place the HYDRA CONSTELLATION (I) and STAR (J).
- Move the 4 stars to the locks (green).
- Restore the snakes (K).
- Take the MAGNETIC CRYSTAL (L).
- Walk down and left.

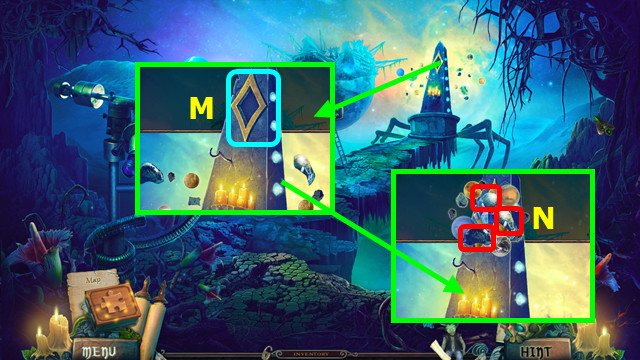
- Place the MAGNETIC CRYSTAL (M).
- Select 3 pieces; take the STONE MOUTH (N).
- Walk down and right.

- Place the STONE MOUTH; place the CLAY and take the TITAN’S RING (O).
- Walk down and left.
- Place the TITAN’S RING (P).

- Place the items 1-2.
- Take the BRAVERY STAFF, read the note, and take the DRYAD POTION (Q).
- Walk down and right.


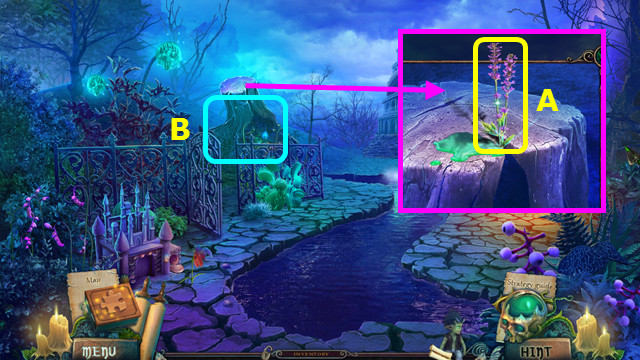
- Use the DRYAD POTION; take the LAVENDER (A).
- Play the HOP; earn the OIL BURNER (B).
- Combine the OIL BURNER and LAVENDER to make the AROMATIC OILS (inventory).
- Walk down and left.

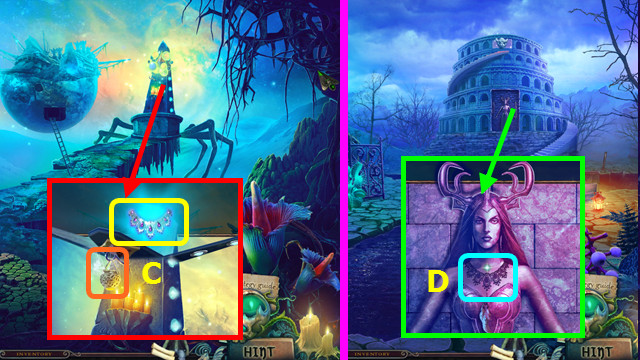
- Place the AROMATIC OILS; take MORGANA’S NECKLACE (C).
- Walk down and right.
- Place MORGANA’S NECKLACE (D).

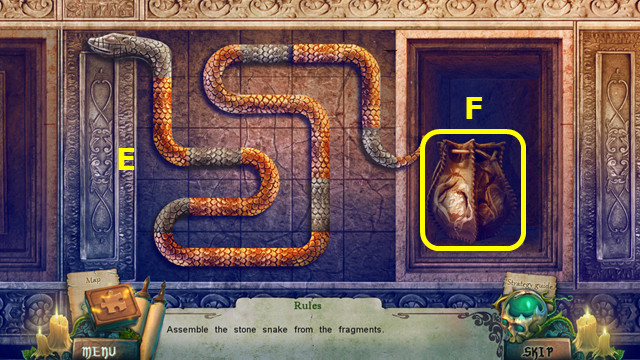
- Solution (E).
- Take the MAGIC POUCH (F).
- Walk down and left.

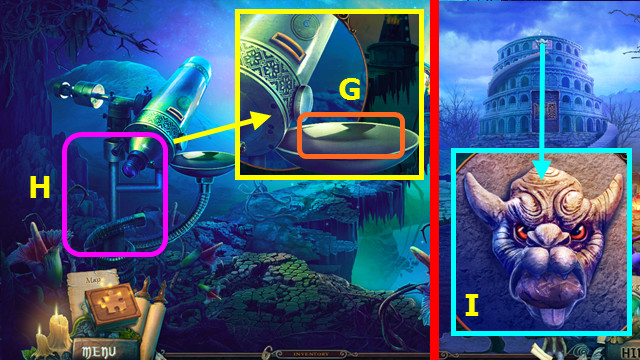
- Place the MAGIC POUCH (G).
- Play the HOP; earn the STARDUST (H).
- Walk down and right.
- Use the STARDUST (I).
- Go forward.

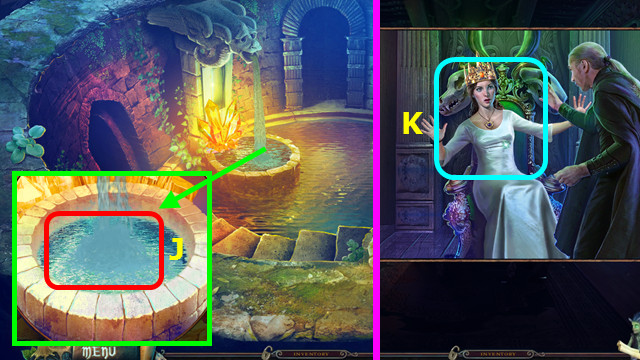
- Use the WITCH’S CROWN (J).
- Play the HOP.
- Use the BRAVERY STAFF (K).

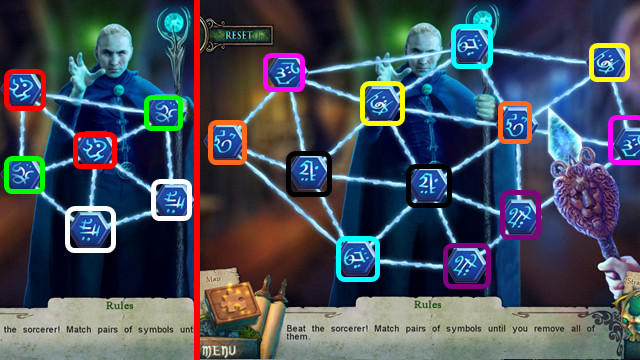
- Select pairs (color-coded). Rune placement may vary.
- Congratulations! You have completed Witches Legacy: The Dark Throne!





 Life Quest™ Walkthrough, Guide, & Tips
 Antique Road Trip: American Dreamin' Tips and Tricks, Guide, & Tips
 Mystery Trackers: Nightsville Horror Walkthrough, Guide, & Tips
 Elementals: The Magic Key Walkthrough, Guide, & Tips
 Kaptain Brawe: A Brawe New World (Episode 1) Walkthrough, Guide, & Tips